

Page 1
EF400mm f/4 DO IS II USM
COPY
ENG
Instructions
Page 2

Thank you for purchasing a Canon product.
COPY
Canon’s EF400mm f/4 DO IS II USM is a highperformance super telephoto lens, for use with EOS
cameras, which includes a newly-developed DO lens
(Gapless Dual-Layer Diffractive Optical Element) and
is designed to be compact and lightweight.
“DO” stands for Diffractive Optics.
“IS” stands for Image Stabilizer.
“USM” stands for Ultrasonic Motor.
Features
1. An optimal combination of DO elements
providing good compensation of chromatic
aberration and an aspherical element
providing good compensation of aberrations,
giving superior definition as well as achieving
compactness.
2. The Image Stabilizer gives the equivalent effect
of a shutter speed 4 stops* faster (when using
an EOS-1D X).
Also, a third Image Stabilizer mode effective for
shooting irregularly moving subjects.
3. SWC (Subwavelength Structure Coating)
reduces flare and ghosting.
4. Using a fluorine coating on the foremost and
rearmost lens surfaces allows adhered dirt to be
removed more easily than before.
5. Ultrasonic motor (USM) for fast, quiet autofocus.
6. Manual focusing is available after the subject
comes into focus in autofocus mode (ONE SHOT
AF).
7. An AF stop button to pause autofocus whenever
desired.
8. A power focus mode enables smooth focus
change.
9. A focus preset function for advance storage
of focusing positions in memory to allow
instantaneous focusing.
10. Can be used with EF1.4× III/EF2× III extenders.
11. Attachment slot provided for wire-type security
lock, located under the cover for the orientation
locking knob.
12. Tight seal structure provides excellent dustproof
and drip-proof performance. However, it is unable
to provide complete protection from dust and
moisture.
13. Designed for lighter weight with parts made of
magnesium alloy.
* Based on CIPA (Camera & Imaging Products
Association) standards.
ENG-1
Page 3

Safety Precautions
COPY
Handling Cautions
If the lens is taken from a cold environment into a
warm one, condensation may develop on the lens
surface and internal parts. To prevent condensation
in this case, first put the lens into an airtight plastic bag
before taking it from a cold to warm environment. Then
take out the lens after it has warmed gradually. Do the
same when taking the lens from a warm environment
into a cold one.
Do not leave the lens in excessive heat such as in a car
in direct sunlight. High temperatures can cause the
lens to malfunction.
Conventions used in this instruction
Warning to prevent lens or camera malfunction
or damage.
Supplementary notes on using the lens and
taking pictures.
Safety Precautions
Do not look at the sun or a bright light source
through the lens or camera. Doing so could result in
loss of vision. Looking at the sun directly through the
lens is especially hazardous.
Do not point the lens or camera at the sun or
photograph it. This is because the lens concentrates
the sun’s rays even when the sun is outside the image
area or when shooting with backlight, which could cause
malfunction or fire.
Whether it is attached to the camera or not, do not
leave the lens under the sun without the lens cap
attached. This is to prevent the lens from concentrating
the sun’s rays, which could cause a fire.
When the lens is mounted on a camera, be sure to also
hold the camera by the lens, including when mounting
on a tripod. Only holding by the camera could result in
scratches on the camera body or the lens itself. The lens
may also detach from its mount and fall, causing injury.
Do not use a strap attached to the camera. The mount
may break, resulting in the lens falling off and causing
injury or in scratches on the camera. Be sure to use the
camera with a dedicated strap attached correctly to the
strap mount on the lens. (Refer to “Attaching the strap”.)
Do not stand on top of the lens case. You may fall and
injure yourself.
Do not pile lens cases on top of one another as they
may fall and cause injury.
ENG-2
Page 4
Usage Precautions
COPY
When using this lens, please check the Canon website
for the latest camera firmware. If the camera’s firmware
is not the latest version, be sure to update to the latest
firmware.
For details on updating firmware, please check the
Canon website.
Shooting Precautions
As a characteristic of the diffractive optics with this lens,
colored flare may occasionally appear around the light
source depending on shooting conditions.
For scenes where a light source is inside the screen,
colored flare may occasionally appear as a halo of light
around the light source or appear fanning out from the
light source.
For scenes where a light source is outside the screen,
colored flare may occasionally appear partially inside
the screen. You can reduce or prevent these issues
with the following steps according to the scene you are
shooting.
• Attach a lens hood.
• Use your hand or paneling, an umbrella, etc. to block
the light source and placed so that they do not appear
in the screen.
ENG-3
Page 5

Safety Precautions
COPY
This device complies with Part 15 of the FCC Rules.
Operation is subject to the following two conditions: (1) This
device may not cause harmful interference, and (2) this
device must accept any interference received, including
interference that may cause undesired operation.
Do not make any changes or modifications to the equipment
unless otherwise specified in the instructions. If such changes
or modifications should be made, you could be required to
stop operation of the equipment.
This equipment has been tested and found to comply with
the limits for a class B digital device, pursuant to part 15
of the FCC Rules. These limits are designed to provide
reasonable protection against harmful interference in a
residential installation. This equipment generates, uses and
can radiate radio frequency energy and, if not installed and
used in accordance with the instructions, may cause harmful
interference to radio communications.
However, there is no guarantee that interference will not
occur in a particular installation. If this equipment does cause
harmful interference to radio or television reception, which
can be determined by turning the equipment off and on, the
user is encouraged to try to correct the interference by one or
more of the following measures:
• Reorient or relocate the receiving antenna.
• Increase the separation between the equipment and
receiver.
• Connect the equipment into an outlet on a circuit different
from that to which the receiver is connected.
• Consult the dealer or an experienced radio/TV technician
for help.
CAN ICES-3(B)/NMB-3(B)
ENG-4
Page 6
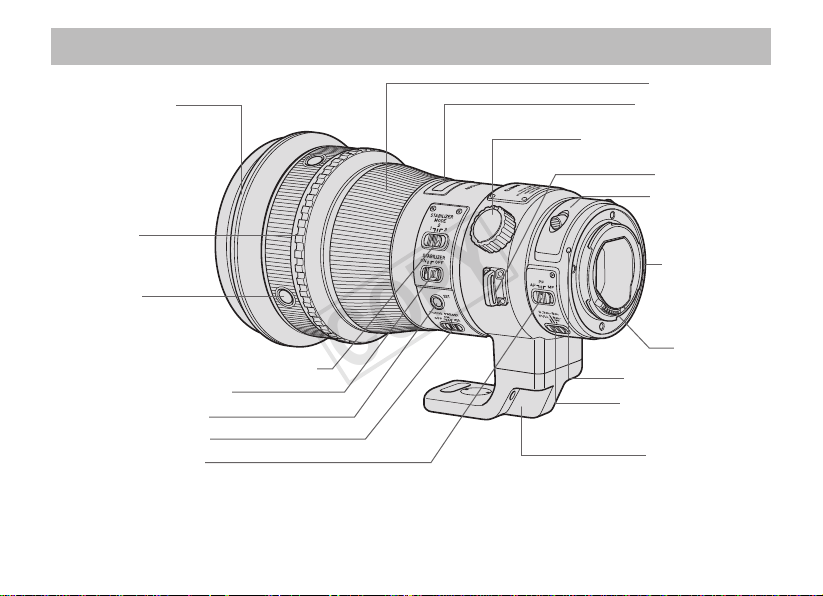
Nomenclature
COPY
Hood mount (→ 15)
Orientation locking knob (→ 18)
Security slot (covered) (→ 18)
Playback ring
(→ 10)
AF stop button
(→ 8)
Image stabilizer mode selector switch (→ 12)
Image stabilizer switch (→ 12)
Focus preset button (→ 9)
Focus preset switch (→ 9)
Focus mode switch (→ 7)
For detailed information, reference page numbers are provided in parentheses (→ **).
Focusing distance range
Focusing ring (→ 7)
Distance scale (→ 15)
Strap mount (→ 6)
Drop-in filter (→ 19)
Rubber ring (→ 6)
Contacts (→ 6)
Lens mount index (→ 6)
selector switch (→ 7)
Tripod mount (→ 18)
ENG-5
Page 7
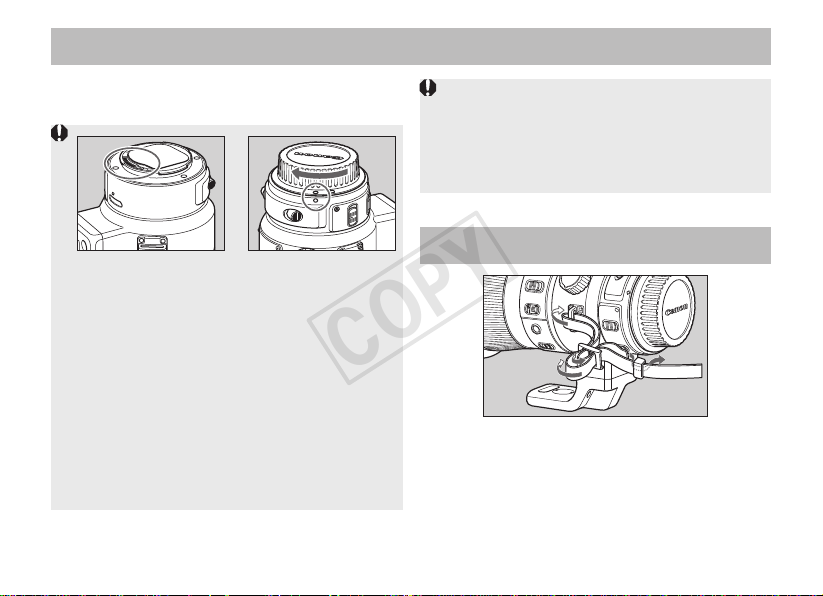
1. Mounting and Detaching the Lens
COPY
See your camera’s instructions for details on
mounting and detaching the lens.
After detaching the lens, place the lens with
the rear end up to prevent the lens surface and
contacts from getting scratched.
If the contacts get soiled, scratched, or have
fingerprints on them, corrosion or faulty
connections can result. The camera and lens
may not operate properly.
If the contacts get soiled or have fingerprints on
them, clean them with a soft cloth.
If you remove the lens, cover it with the dust cap.
To attach it properly, align the lens mount index
and the index of the dust cap as shown in
the diagram, and turn clockwise. To remove it,
reverse the order.
The lens mount has a rubber ring for enhanced
dust- and water-resistance. The rubber ring may
cause slight abrasions around the camera’s lens
mount, but this will not cause any problems. If the
rubber ring becomes worn, it is replaceable by a
Canon Service Center at cost.
Attaching the strap
Thread the end of the strap through the strap
mount on the lens and then back through the
clasp on the strap. Pull the strap tight and check
that there is no slack in the clasp.
ENG-6
Page 8
2.
COPY
Setting the Focus Mode
To shoot in autofocus (AF) mode, set the focus
mode switch to AF.
To shoot in manual focus (MF) mode, set the
focus mode switch to MF, and focus by turning
the focusing ring. The focusing ring always
works, regardless of the focus mode.
To shoot in power focus (PF) mode, set the
focus mode switch to PF when the focus
preset switch (p. 9) is at OFF. For detailed
information, see “6. Power Focus (PF) Mode”
(p. 11).
After autofocusing in ONE SHOT AF mode, focus
manually by pressing the shutter button halfway
and turning the focusing ring. (Full-time manual
focus)
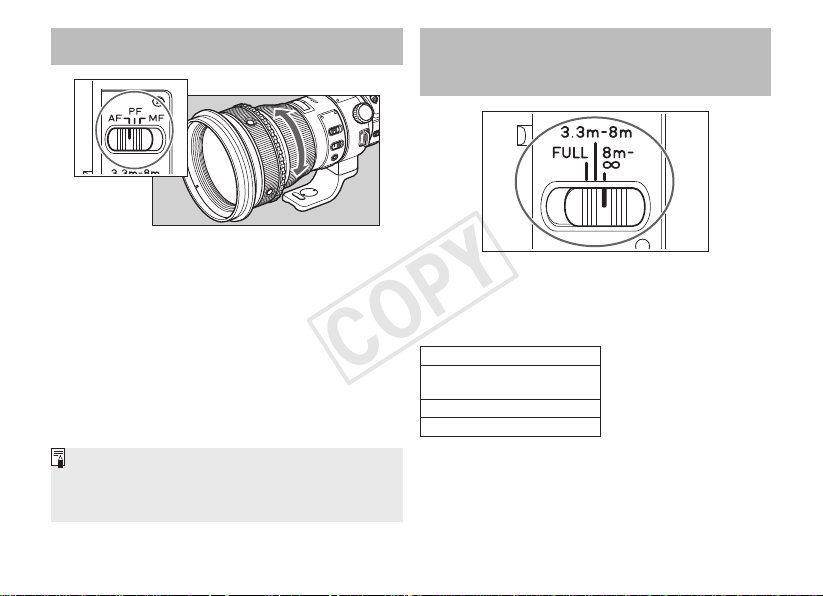
3.
Switching the Focusing
Distance Range
You can set the focusing distance range with a
switch. By setting a suitable focusing distance
range, the actual autofocusing time will be
shorter.
Ranges
FULL
(3.3 m/10.83 ft. - ∞)
3.3 m/10.83 ft. – 8 m/26.25 ft.
8 m/26.25 ft. - ∞
ENG-7
Page 9

4. AF Stop Button
COPY
During autofocus operation, you can press the
AF stop button to temporarily pause autofocus.
If the shutter button is still pressed halfway when
the AF stop button is released, autofocusing will
continue as before.
The AF stop function also works in AI Servo AF
mode.
Angle positioning of the AF stop button is
adjustable by a Canon Service Center at cost.
With the EOS 630/600, RT, A2/A2E/5, or 10S/10
set to the AI Servo AF mode and continuous
shooting, AF will not resume even after you
let go of the AF stop button. Press the shutter
release button halfway to resume AF.
With the EOS A2/A2E/5 and 10S/10 set to the
Sports mode, AF will not resume even after you
let go of the AF stop button. Press the shutter
release button halfway to resume AF.
You can change the functions of the AF stop
button using the camera’s Custom Function. For
details, please refer to the camera’s instructions.
ENG-8
Page 10

5. Focus Preset
COPY
By presetting any focusing distance, you can instantly focus at that point even while you are
shooting a different subject. This function operates in any of the AF, PF, and MF modes.
< How to Set >
Set the focus preset switch
to ON or
.
Press the shutter button
halfway or turn the focusing
ring to focus the distance
you want to preset.
Press the focus preset
button.
The focused distance will be
preset.
If the focus preset switch was
set to
sound once.
, the beeper will
ENG-9
Page 11

Focus Preset
COPY
< How to Focus at the Preset Distance >
By turning the playback ring to the left or right,
the focus shifts as far as the preset distance.
Focus will shift freely released of AF focusing
while the playback ring is still turned.
If the focus preset switch was set to , the beeper
will sound twice.
Setting the focus mode switch to power focus
(PF) when using the lens with the following
cameras enables focus change to a preset
focusing distance at a slow speed during movie
shooting. Also, you can make a 2-step change
in focus shift speed depending on the angle that
the playback ring is rotated to.
EOS-1D X, EOS 5D Mark III, EOS 6D, EOS
70D, EOS REBEL T5i/700D, SL1/100D,
T4i/650D, T5/1200D
EOS M2* and EOS M when used together with
Mount Adapter EF-EOS M
When turning the playback ring, keep your finger
away from the shutter button. In One-Shot AF
mode, the exposure will be locked when you
press the shutter button halfway and focus is
achieved. So if you press the shutter button
halfway while turning the playback ring, the
exposure may not be correct.
When not using the focus preset, set the switch
to OFF.
The focus preset function will work while a Live
View image is displayed on the camera or when
shooting movies for the following cameras:
EOS-1D X, EOS 5D Mark III, EOS 6D, EOS 70D,
EOS REBEL T5i/700D, SL1/100D, T4i/650D ,
T5/1200D
EOS M2* and EOS M when used together with
Mount Adapter EF-EOS M
* Not available in certain countries and regions.
ENG-10
Page 12

6. Power Focus (PF) Mode
COPY
Using the playback ring enables smooth focus change.
This is a useful feature for changing focus when shooting movies.*
With the focus preset switch set to OFF, set the focus mode
switch to PF.
When the playback ring is rotated in a certain direction, focus changes in the same direction as when
the focusing ring is rotated.
You can make a 2-step change in focus shift speed depending on the angle that the playback ring is
rotated to.
1
*
Power focus (PF) will work while a Live View image is displayed on the camera or when shooting movies for the
following cameras:
EOS-1D X, EOS 5D Mark III, EOS 6D, EOS 70D, EOS REBEL T5i/700D, SL1/100D, T4i/650D, T5/1200D
EOS M2*
2
and EOS M when used together with Mount Adapter EF-EOS M
*2 Not available in certain countries and regions.
1
Rotate the playback ring to
change the focus.
ENG-11
Page 13

7. Image Stabilizer
COPY
You can use the image stabilizer in AF, PF, or MF mode.
Set the STABILIZER switch
to ON.
If you are not going to use the
image stabilizer function, set
the switch to OFF.
Select the stabilizer mode.
MODE 1: Corrects vibrations in
all directions. It is mainly effective
for shooting still subjects.
MODE 2: Corrects vertical
camera shake during
following shots in a horizontal
direction, and corrects
horizontal camera shake
during following shots in a
vertical direction.
MODE 3: Corrects vibration only
during exposure. During panning
shots, corrects vibration during
exposure only in one direction
the same as MODE 2.
First press the shutter
button down halfway, then
press down all the way to
take the picture.
MODE 1, 2: Press the
shutter button down halfway
to stabilize the image in
the viewfinder and enable
stabilization.
MODE 3: Press the shutter
down halfway to initiate
computation of stabilization,
then press down all the way
to enable stabilization.
ENG-12
Page 14

8. Tips on Using the Image Stabilizer
COPY
The image stabilizer for this lens is effective for hand-held shots in the following conditions.
MODE 1 MODE 2
ON
OFF
In semi-darkened areas such as indoors or
outdoors at night.
In locations where flash photography is
prohibited, such as art museums and theater
stages.
In situations where your footing is uncertain.
In situations where fast shutter settings
cannot be used.
ON
OFF
When panning subjects in motion.
MODE 3
Since camera shake is stabilized only during
exposure, following a subject is easier such as
when shooting a fast and irregularly moving
player during sports photography.
ENG-13
Page 15

Tips on Using the Image Stabilizer
COPY
The Image Stabilizer cannot compensate for a
blurred shot caused by a subject that moved.
Set the STABILIZER switch to OFF when you
are taking pictures using the Bulb setting (long
exposures). If the STABILIZER switch is set to ON,
the image stabilizer function may introduce errors.
The Image Stabilizer might not be fully effective in
the following cases:
• You shoot from a violently moving vehicle.
• You move the camera dramatically for a panning
shot in Mode 1.
The Image Stabilizer consumes more power than
normal shooting, resulting in fewer shots and a
shorter movie shooting time.
The image stabilizer operates for about two seconds
even when your finger is off the shutter button.
Do not remove the lens while the stabilizer is in
operation. This will cause a malfunction.
With Extender EF2× II attached to the lens, the
Image Stabilizer will work with the following cameras:
EOS-1D X, EOS-1Ds Mark III, EOS-1Ds Mark II,
EOS-1Ds, EOS-1D Mark IV, EOS-1D Mark III,
EOS-1D Mark II N, EOS-1D Mark II, EOS-1D,
EOS 5D Mark III, 5D Mark II, 5D, 6D, 7D, 70D, 60D,
50D, 40D, 30D, 20D, 20Da, 10D, REBEL T5i/700D,
SL1/100D, T4i/650D, T3i/600D, REBEL T2i/550D ,
REBEL T1i/500D, DIGITAL REBEL XSi/450D,
REBEL T5/1200D, REBEL T3/1100D, DIGITAL
REBEL XS/1000D, DIGITAL REBEL XTi/400D
DIGITAL, DIGITAL REBEL XT/350D DIGITAL,
DIGITAL REBEL/300D DIGITAL, D60, D30,
EOS DCS1, DCS3, D2000, D6000, EOS-1V/HS,
EOS-1N/DP/HS/RS, 3, ELAN 7E/ELAN 7/30/33,
ELAN 7NE/ELAN 7N/30V/33V, ELAN II/ELAN
IIE/50/50E, REBEL X/REBEL XS/500, REBEL
G/500N, REBEL 2000/300, REBEL Ti/300V, REBEL
T2/300X, REBEL K2/3000V, IX, IX Lite/IX7, 3000/88,
5000/888
With the EOS-1V/HS, 3, ELAN 7E/ELAN 7/30/33,
ELAN 7NE/ELAN 7N/30V/33V, ELAN II/ELAN II
E/50/50E, REBEL 2000/300, IX, IX Lite/IX7, and
D30, the Image Stabilizer will not work during selftimer operation.
Using a tripod also stabilizes the image.
However, depending on the kind of tripod and
shooting conditions, sometimes it may be better to
turn off the Image Stabilizer function.
The stabilizer is equally effective for hand-held
photography and photography with a monopod. The
Image Stabilizer effect may be reduced, however,
depending on the shooting environment.
The Image Stabilizer also operates when the lens is
used with extension tube EF12 II or EF25 II or the
extender EF1.4× III or EF2× III.
Depending on the camera there may be image
shake, such as after releasing the shutter. However,
this does not affect shooting.
If you set the camera’s Custom Function to change
the assigned button to operate the AF, the Image
Stabilizer will operate when you press the newly
assigned AF button.
ENG-14
Page 16

9.
COPY
Infinity Compensation
Mark
Infinity compensation mark
10. Hood
Distance index
To compensate for shifting of the infinity focus
point that results from changes in temperature.
The infinity position at normal temperature is the
point at which the vertical line of the distance
scale L mark is aligned with the distance index.
For accurate manual focusing of subjects at infinity,
look through the viewfinder or look at the magnified
image* on the LCD screen while rotating the
focusing ring.
* For cameras with Live View shooting capability.
The special hood that comes with the lens cuts
out unwanted light and protects the front of the
lens from rain, snow, and dust.
To attach the hood, loosen the hood lock knob
by turning it counterclockwise. Fit the hood onto
the lens’s hood mount, and tighten the lock knob
to fix it in place. Use the same procedure, in
reverse, to remove the hood.
ENG-15
Page 17

11. Fitting the Lens Cap
COPY
Reverse the lens hood, slip
it over the lens, and tighten
the lock knob to fix it in
place.
Lift the hook and loop
fastener, and fit the cap so
that the lock knob rides up
the slot in the cap.
With the lock knob at the
opening in the cap, close
the fastener to fix the cap in
place as shown.
Can also be attached to the
front of the hood when using
the lens.
ENG-16
Page 18

12. Case
COPY
Slot Lid
Hinge
Strap
Keyhole
Lever
Put the lens away as follows.
Reverse the lens hood, slip it over the lens,
and attach the lens cap.
Position the tripod mount towards you as
shown and place it in the case.
Place so that the hood’s lock knob rests in
the slot near you.
Fold the strap and fit it into the space near
the case hinges.
Fasten the lens securely with the strap.
Close the lid, and then push the lever while
holding the lid from above to lock.
Do not sit on top of the lens case.
Place the lens in the position intended for it.
ENG-17
Page 19

13. Using the Tripod
COPY
Mount
A tripod or monopod attaches to the tripod
mount on the lens.
Adjusting the Tripod Mount
By loosening the orientation locking knob on the
tripod mount you can rotate the camera to set
the image for any vertical or horizontal position.
14. Security Slot
An attachment slot is provided for a wire-type
security lock. The slot is located under the cover
for the orientation locking knob.
A wire-type security lock can be purchased
separately.
ENG-18
Page 20

15. Drop-In Filters
COPY
A 52(WII)-series drop-in gelatin filter holder with
a glass filter is included with the lens. The dropin filter holder can be used fitted with a gelatin
filter (sold separately).
<Installing and Removing>
To remove the drop-in filter, press in the left
and right lock buttons and pull the filter holder
straight up out of the slot.
To install the drop-in filter, push the filter holder
straight down into the slot until it clicks into place.
The filter holder can be installed facing either
forwards or backwards.
Because the lens optics are designed to include a
glass filter, you must always install the filter holder,
even if no gelatin filter is fitted.
<Using a Gelatin Filter>
14mm
14mm
47mm
47mm
Lift up the holder’s retaining plate.
Cut the gelatin filter as shown and mount it in
the holder.
Return the retaining plate to its closed
position.
The Drop-In Screw-Type Filter Holder 52(WII) and
Drop-In Circular Polarizing Filter PL-C52(WII) are
also available (sold separately).
ENG-19
Page 21

16. Extenders (Sold Separately)
COPY
Lens specifications when using extender EF1.4× II/III or EF2× II/III are as follows.
Focal length (mm) 560 800
Aperture f/5.6 – 45 f/8 – 64
Angle of view
Maximum magnification (×) 0.18 0.26
Attach the extender to the lens, and then attach the lens to the camera. To remove it, reverse the order.
Errors may occur if you attach the extender to the camera first.
With Extender EF2× II/III attached to the lens, only manual focus is possible. However, with the EOS-1D
X*, EOS-1Ds Mark III, EOS-1Ds Mark II, EOS-1Ds, EOS-1D Mark IV, EOS-1D Mark III, EOS-1D Mark II
N, EOS-1D Mark II, EOS-1D, EOS 5D Mark III*, EOS-1V/HS, EOS-3 camera, autofocusing with the center
focusing point is possible.
When shooting with EOS A2/A2E/5, use –0.5 step exposure compensation when using extender EF1.4× II,
and use –1 step exposure when using extender EF2× II.
Extenders cannot be used more than one at a time.
Autofocusing is still enabled with extender EF1.4× II/III attached.
When an extender is attached, the AF speed will become slower to retain proper control.
* AF can be used by updating your camera’s firmware. Please check the Canon website for information about
firmware updates.
Diagonal 4° 25’ 3° 5’
Vertical 2° 25’ 1° 40’
Horizontal 3° 40’ 2° 35’
EF1.4× II/III EF2× II/III
ENG-20
Page 22

17. Extension Tubes
COPY
(Sold Separately)
You can attach extension tube EF12 II or EF25
II for magnified shots. The shooting distance and
magnification are shown below.
Focusing Distance Range (mm)
Close distance
EF12 II 2753 13407 0.17 0.03
EF25 II 2362 6638 0.22 0.07
MF mode is recommended for accurate focusing.
Long distance
Magnification (×)
Close distance
Long distance
ENG-21
Page 23

Specifications
COPY
Focal Length/Aperture 400mm f/4
Lens Construction 12 groups, 18 elements
Minimum Aperture f/32
Angle of View
Min. Focusing Distance 3.3 m/10.83 ft.
Max. Magnification 0.13×
Field of View
Filter Any 52(WII)-series drop-in filter
Max. Diameter and Length Approx. 128 × 232.7 mm/5.04 × 9.16 inch
Weight Approx. 2100 g/74.1 oz
Hood ET-120(WII)
Lens Cap E-145C
Case Lens case 400D
The lens length is measured from the mount surface to the front end of the lens. Add 26.5 mm
when including the lens cap and dust cap.
The size and weight listed are for the lens only, except as indicated.
The Close-up Lenses 250D and 500D cannot be attached.
Aperture settings are specified on the camera.
All data listed is measured according to Canon standards.
Product specifications and appearance are subject to change without notice.
Diagonal: 6° 10’
Vertical: 3° 30’
Horizontal: 5° 10’
Approx. 185 × 278 mm/
7.28 × 10.94 inch (at 3.3 m/10.83 ft.)
ENG-22
Page 24

COPY
CT1-8590-000 1406SZ © CANON INC. 2014
 Loading...