

Page 1
PUB. DIM-594
DV Network Software Version 2
Instruction Manual (Installation and Preparation)
Mode d’emploi (Installation et préparation)
Manual de Instrucciones (Instalación y preparativos)
This manual covers the installation and the connection procedures only.
For more operating instructions, refer to the PDF format manual provided
on the DIGITAL VIDEO SOLUTION DISK For Windows.
Ce manuel traite uniquement des procédures d’installation et de connexion.
Pour les instructions d’utilisation, reportez-vous au manuel au format PDF
fourni sur le disque DIGITAL VIDEO SOLUTION DISK For Windows.
Este manual solamente cubre los procedimientos de instalación y conexión.
Para más instrucciones de operación, consulte el manual en formato PDF
contenido en el disco DIGITAL VIDEO SOLUTION DISK For Windows.
E
F
Es
This software is for use with Windows® XP only.
Ce logiciel ne peut être employé que sous Windows® XP.
Este software solamente es compatible con Windows® XP.
Page 2
Read Carefully Before Using
CANON SOFTWARE LICENCE AGREEMENT
IMPORTANT: READ THIS AGREEMENT CAREFULLY BEFORE CLICKING “YES” AT THE BOTTOM OF THE
SCREEN AND INSTALLING THE SOFTWARE.
This agreement (“Agreement”) is a legal contract between you, either an individual or entity, and
Canon Inc. (“Canon”) governing your use of this software program and “online” or electronic
documentation, if any (collectively, the “SOFTWARE”).
BY CLICKING “YES” BELOW, YOU AGREE TO BE BOUND BY THE TERMS OF THIS AGREEMENT. IF YOU
DO NOT AGREE TO THE TERMS OF THIS AGREEMENT, YOU MAY NOT INSTALL OR OTHERWISE USE
THE SOFTWARE. IN SUCH CASE, CLICK “NO” BELOW, CLOSE THIS SET UP PROGRAM AND EXIT THIS
SCREEN.
In consideration of the right to use the SOFTWARE, you agree to abide by the terms and conditions of this
Agreement.
1. GRANT OF LICENSE
Canon grants you the personal, non-exclusive, non-transferable license to use (“use” shall mean
storing, loading, installing, executing or displaying) the SOFTWARE on a single computer solely for
use with Canon’s digital video camcorder products. You may physically transfer the SOFTWARE
from one computer to another, provided that the SOFTWARE is used on only one computer at a
time. You shall not install or use the SOFTWARE on a network, multiple CPU, multiple site
arrangement, or any other hardware configuration where the SOFTWARE is accessible to more than
one CPU or to more than one user.
You may make one copy of the SOFTWARE solely for backup purposes, or copy the SOFTWARE
onto the permanent storage device (e.g. hard disk) of your computer and retain the original for
back-up purposes, provided that you shall reproduce on such backup copy the same copyright
notice and other ownership legends exactly as and where they appear on the SOFTWARE as
delivered. Any other copying of the SOFTWARE is a violation of this Agreement.
2. RESTRICTIONS
You shall not, or allow any third party to, assign, sublicense, sell, rent, lease, loan, convey or
otherwise use, transfer, copy, translate, convert to another programming language, alter, modify,
decompile or disassemble the SOFTWARE, in whole or in part, except as expressly provided for or
granted herein. You shall not remove, obliterate or cancel any copyright notice appearing on the
SOFTWARE or on a medium, if any, on which the SOFTWARE is delivered.
3. OWNERSHIP
All rights, including but not limited to copyrights and trade secret rights, to the SOFTWARE belong
to Canon, its affiliated corporations and third party licensors. Your use of the SOFTWARE is subject
to the laws of the United States, and Canada, and other applicable copyright and trademark laws,
and nothing in this Agreement constitutes a waiver of the rights of Canon, its affiliated corpora-
tions and third party licensors under such laws. You only own the CD-ROM media in which the
SOFTWARE is stored. Except as expressly provided herein, no license or right, express or implied, is
hereby conveyed or granted by Canon to you for any intellectual property of Canon.
4. EXPORT RESTRICTIONS
You agree to comply with all export laws and restrictions and regulations of the country involved,
and not to export or re-export, directly or indirectly, the SOFTWARE in violation of any such laws
and restrictions and regulations, or without all necessary approvals.
2
Page 3
5. SUPPORT AND UPDATE
Neither Canon, nor its subsidiaries, dealers or distributors will be responsible for providing
maintenance or support for use of the SOFTWARE. No updates, fixes or support will be made
available for the SOFTWARE.
6. LIMITED WARRANTY AND DISCLAIMER OF LIABILITY
It is your responsibility to choose, maintain and match the hardware and software components of
your computer system. Thus, Canon does not guarantee uninterrupted service or correction of
errors or that the functions or performance of the SOFTWARE will meet your requirements. TO THE
MAXIMUM EXTENT PERMITTED BY APPLICABLE LAW, CANON AND ITS SUPPLIER PROVIDE THE
SOFTWARE “AS IS” WITHOUT WARRANTY OR CONDITION OF ANY KIND, EITHER EXPRESS,
IMPLIED OR STATUTORY. The CD ROM storing the SOFTWARE, if any, is warranted only against
defective material under normal use for a period of ninety (90) days after purchase from an
authorized Canon dealer as evidenced by your sales receipt. Your sole remedy for a defective CD-
ROM shall be replacement of the same without charge when returned by you at your expense to
your point of purchase and proven to be defective upon inspection. The Replacement CD-ROM will
be warranted for the remainder of the original ninety-day (90) warranty period of the defective CD-
ROM. This limited warranty does not apply if the failure of the CD-ROM resulted from accident,
abuse, or misapplication of the SOFTWARE and shall not extend to anyone other than the original
user of the SOFTWARE.
EXCEPT AS SPECIFICALLY SET FORTH HEREINABOVE, CANON, CANON’S SUBSIDIARIES,
DISTRIBUTORS AND DEALERS DISCLAIM ALL WARRANTIES, OR CONDITIONS, EXPRESS, IMPLIED
OR STATUTORY, INCLUDING BUT NOT LIMITED TO, WARRANTIES OR CONDITIONS AS TO
DESIGN, QUALITY, MERCHANTABILITY, FITNESS FOR A PARTICULAR PURPOSE, OR SYSTEM
INTEGRATION.
TO THE MAXIMUM EXTENT PERMITTED BY APPLICABLE LAW, IN NO EVENT SHALL CANON,
CANON’S SUBSIDIARIES AND AFFILIATES, THEIR DISTRIBUTORS AND DEALERS BE LIABLE FOR
ANY LOSS OR DAMAGES WHATSOEVER (WHETHER KNOWN, FORESEEABLE OR OTHERWISE),
INCLUDING WITHOUT LIMITATION, ANY CONSEQUENTIAL, INCIDENTAL, DIRECT, INDIRECT,
SPECIAL, PUNITIVE, OR OTHER DAMAGES WHATSOEVER (INCLUDING, DAMAGES FOR LOSS OF
PROFITS, BUSINESS INTERRUPTION, LOSS OF CONFIDENTIAL OR OTHER BUSINESS INFORMATION,
LOSS OF PRIVACY, ARISING OUT OF OR IN ANY WAY RELATED TO THE USE OF OR INABILITY TO
USE THE SOFTWARE, THE PROVISION OF OR FAILURE TO PROVIDE SUPPORT SERVICES, OR
OTHERWISE UNDER OR IN CONNECTION WITH ANY PROVISION OF THIS AGREEMENT, EVEN IN
THE EVENT OF FAULT, TORT (INCLUDING NEGLIGENCE), STRICT LIABILITY, BREACH OF
CONTRACT OR BREACH OF WARRANTY OF CANON OR ANY SUPPLIER, OR OTHERWISE EVEN IF
CANON, CANON’S SUBSIDIARIES OR AFFILIATES, THEIR DISTRIBUTORS OR DEALERS HAVE BEEN
ADVISED OF THE POSSIBILITY OF SUCH DAMAGES.
E
DV Messenger
NEITHER CANON, NOR ANY OF CANON’S SUBSIDIARIES, DISTRIBUTORS OR DEALERS SHALL
HAVE ANY OBLIGATION TO INDEMNIFY YOU AGAINST ANY CLAIM OR SUIT BROUGHT BY A
THIRD PARTY ALLEGING THAT THE SOFTWARE OR USE THEREOF INFRINGES ANY INTELLECTUAL
PROPERTY OF SUCH THIRD PARTY. TO THE FULL EXTENT PERMITTED BY APPLICABLE LAW, YOU
HEREBY RELEASE CANON, ITS SUPPLIER, CANON’S SUBSIDIARIES AND AFFILIATES, THEIR
DISTRIBUTORS OR DEALERS FROM ANY AND ALL LIABILITY ARISING FROM OR RELATED TO ALL
CLAIMS CONCERNING THE SOFTWARE OR ITS USE.
SOME STATES, PROVINCES OR LEGAL JURISDICTIONS DO NOT ALLOW THE EXCLUSION OF
IMPLIED WARRANTIES, OR THE LIMITATION OR EXCLUSION OF LIABILITY FOR INCIDENTAL OR
CONSEQUENTIAL DAMAGES, OR PERSONAL INJURY OR DEATH RESULTING FROM NEGLIGENCE
ON THE PART OF THE SELLER, SO THE ABOVE DISCLAIMERS AND EXCLUSIONS MAY NOT APPLY
TO YOU.
3
Page 4
Read Carefully Before Using
7. TERM
This Agreement is effective upon your acceptance hereof by clicking “YES” below and remains in
effect until expiration of all copyright interests in the SOFTWARE unless earlier terminated. You
may terminate this Agreement by destroying the SOFTWARE including any and all copies thereof.
This Agreement shall also terminate without notice to you if you fail to comply with any of the
terms of this Agreement. In the event that this Agreement terminates for your failure to comply,
you must promptly destroy the SOFTWARE including any and all copies thereof. In addition,
Canon may enforce its other legal rights.
8. U.S. GOVERNMENT RESTRICTED RIGHTS NOTICE
The SOFTWARE is a “commercial item,” as that term is defined at 48 C.F.R. 2.101 (Oct 1995),
consisting of “commercial computer software” and “commercial computer software
documentation,” as such terms are used in 48 C.F.R. 12.212 (Sept 1995). Consistent with 48
C.F.R. 12.212 and 48 C.F.R. 227.7202-1 through 227.7202-4 (June 1995), all U.S. Government
end users shall acquire the SOFTWARE with only those rights set forth herein. Manufacturer is
Canon Inc./30-2, Shimomaruko 3-chome, Ohta-ku, Tokyo 146-8501, Japan.
9. SEVERABILITY
In the event that any provision of this Agreement is declared or found to be illegal by any court or
tribunal of competent jurisdiction, such provision shall be null and void with respect to the
jurisdiction of that court or tribunal and all the remaining provisions of this Agreement shall
remain in full force and effect.
10. CONTROLLING LAW
The terms of this Agreement as it relates to purchases of the SOFTWARE in the United States of
America shall be governed and construed in all respects in accordance with the laws and
regulations of the State of New York, without reference to choice of law principles. The terms of
this Agreement as it relates to purchases of the SOFTWARE in Canada shall be governed by the
laws of the Province of Ontario.
11. ACKNOWLEDGMENT
CLICKING “YES” BELOW AND SUBSEQUENTLY USING THE SOFTWARE, YOU AGREE THAT YOU
HAVE READ THIS AGREEMENT, UNDERSTOOD IT AND AGREE THAT THIS AGREEMENT IS THE
COMPLETE AND EXCLUSIVE STATEMENT OF AGREEMENT BETWEEN YOU AND CANON
CONCERNING THE SUBJECT MATTER HEREOF AND SUPERSEDES ALL PROPOSALS OR PRIOR
AGREEMENTS, ORAL OR WRITTEN, AND ANY OTHER COMMUNICATIONS BETWEEN YOU AND
CANON RELATING TO THE SUBJECT MATTER HEREOF. NO AMENDMENT TO THIS AGREEMENT
SHALL BE EFFECTIVE UNLESS SIGNED BY A DULY AUTHORIZED OFFICER OF CANON.
4
Page 5
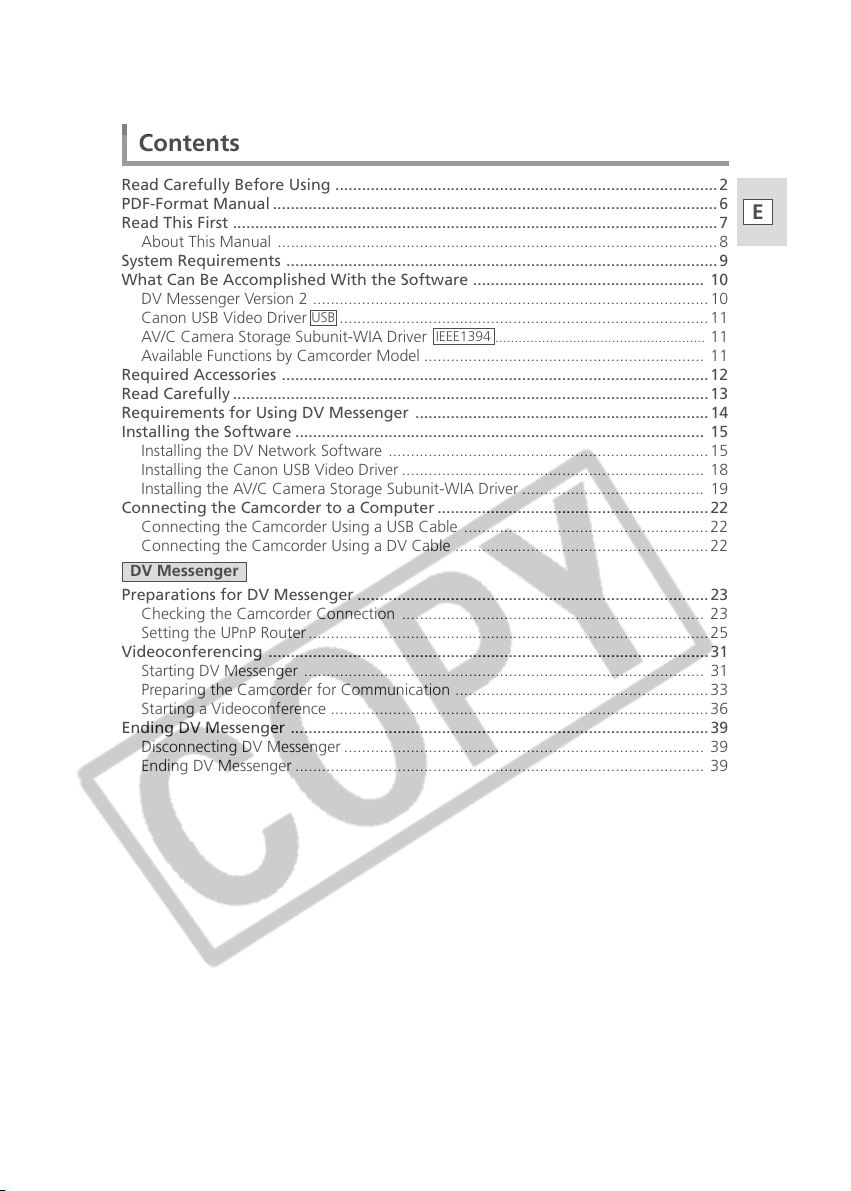
Contents
Read Carefully Before Using ......................................................................................2
PDF-Format Manual .................................................................................................... 6
Read This First .............................................................................................................7
About This Manual ...................................................................................................8
System Requirements ................................................................................................. 9
What Can Be Accomplished With the Software .................................................... 10
DV Messenger Version 2 .........................................................................................10
Canon USB Video Driver
AV/C Camera Storage Subunit-WIA Driver
Available Functions by Camcorder Model ............................................................... 11
Required Accessories ................................................................................................ 12
Read Carefully ........................................................................................................... 13
Requirements for Using DV Messenger .................................................................. 14
Installing the Software ............................................................................................ 15
Installing the DV Network Software ........................................................................15
Installing the Canon USB Video Driver .................................................................... 18
Installing the AV/C Camera Storage Subunit-WIA Driver ......................................... 19
Connecting the Camcorder to a Computer ............................................................. 22
Connecting the Camcorder Using a USB Cable .......................................................22
Connecting the Camcorder Using a DV Cable .........................................................22
DV Messenger
Preparations for DV Messenger ...............................................................................23
Checking the Camcorder Connection .................................................................... 23
Setting the UPnP Router .......................................................................................... 25
Videoconferencing ................................................................................................... 31
Starting DV Messenger .......................................................................................... 31
Preparing the Camcorder for Communication .........................................................33
Starting a Videoconference .....................................................................................36
Ending DV Messenger .............................................................................................. 39
Disconnecting DV Messenger ................................................................................. 39
Ending DV Messenger ............................................................................................ 39
USB
...................................................................................11
IEEE1394
......................................................
11
E
DV Messenger
5
Page 6
PDF-Format Manual
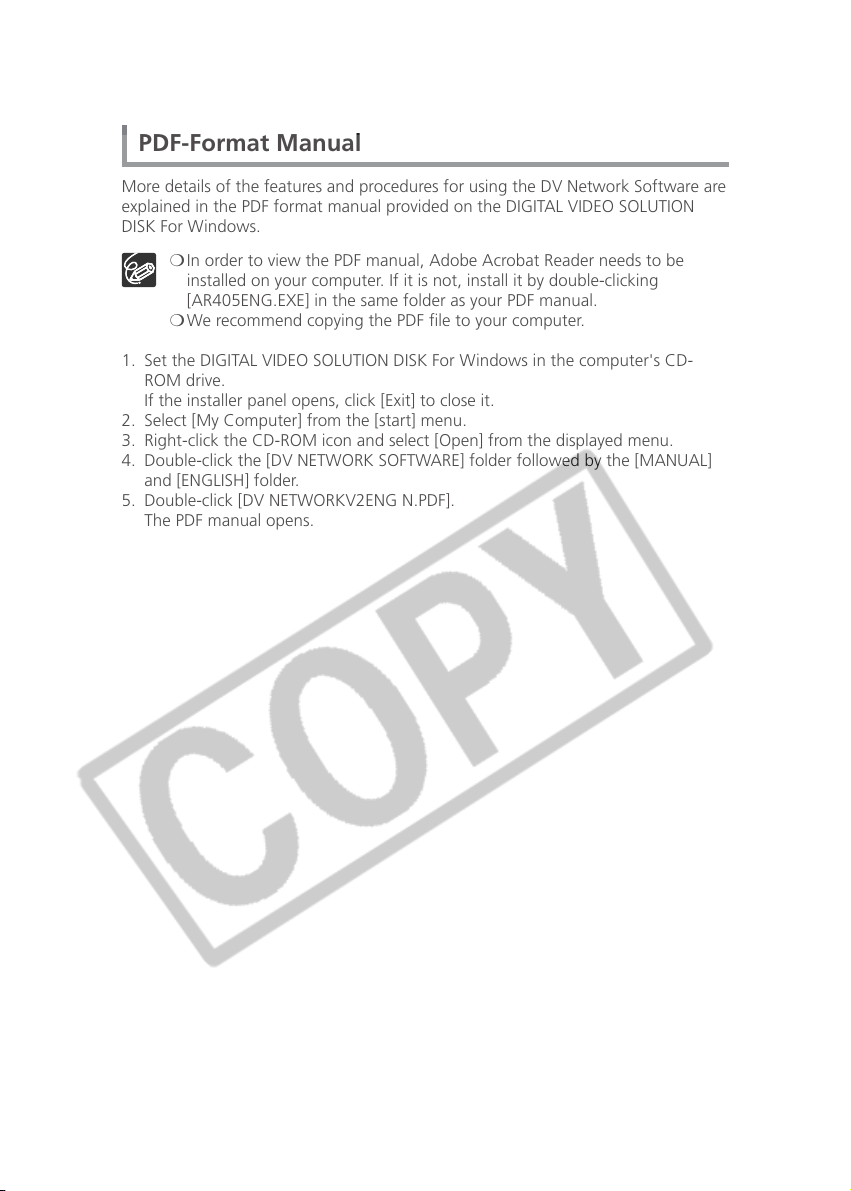
More details of the features and procedures for using the DV Network Software are
explained in the PDF format manual provided on the DIGITAL VIDEO SOLUTION
DISK For Windows.
❍ In order to view the PDF manual, Adobe Acrobat Reader needs to be
installed on your computer. If it is not, install it by double-clicking
[AR405ENG.EXE] in the same folder as your PDF manual.
❍ We recommend copying the PDF file to your computer.
1. Set the DIGITAL VIDEO SOLUTION DISK For Windows in the computer's CD-
ROM drive.
If the installer panel opens, click [Exit] to close it.
2. Select [My Computer] from the [start] menu.
3. Right-click the CD-ROM icon and select [Open] from the displayed menu.
4. Double-click the [DV NETWORK SOFTWARE] folder followed by the [MANUAL]
and [ENGLISH] folder.
5. Double-click [DV NETWORKV2ENG N.PDF].
The PDF manual opens.
6
Page 7
Read This First
Disclaimer
¡ While every effort has been made to ensure that the information contained in
this guide is accurate and complete, no liability can be accepted for any errors or
omissions. Canon reserves the right to change the specifications of the hardware
and software described herein at any time without prior notice.
¡ No part of this guide may be reproduced, transmitted, transcribed, stored in a
retrieval system, or translated into any other language in any form, by any
means, without the prior written permission of Canon.
¡ Canon makes no warranties for damages resulting from corrupted or lost data
due to mistaken operation or malfunction of the camcorder, the software,
memory cards (MultiMediaCards or SD Memory Cards), personal computers, or
peripheral devices, or due to use of a memory card not formatted by a Canon
camcorder.
E
¡ Canon is a registered trademark of Canon Inc.
¡ Microsoft
Microsoft Corporation in the United Stated and/or other countries.
¡ Adobe and Acrobat are trademarks of Adobe Systems Incorporated.
¡ Other names and products not mentioned above may be registered trademarks
or trademarks of their respective companies.
¡ AV/C Camera Storage Subunit is a standard for downloading and uploading files
using an AV device equipped with the IEEE1394. The driver complies with the
“AV/C Camera Storage Subunit Version 1.0” by the IEEE1394 Trade Association.
¡ WIA stands for Windows Image Acquisition. WIA is a driver software for
downloading images from digital devices onto a computer. WIA is preinstalled
on Windows XP.
Copyright © Canon Inc. 2003 All rights reserved.
Safety Precautions
Do not play the supplied CD-ROM(s) in any CD player that does not support data
CD-ROM(s). Playing the CD-ROM(s) in an audio CD player (music player) could
damage the speakers. It is also possible to suffer from hearing loss from listening
with headphones to the loud sound of a CD-ROM played on a music CD player.
®
and Windows® are either registered trademarks or trademarks of
DV Messenger
7
Page 8
Read This First
About This Manual
¡ In this manual, DV Messenger Version 2 is abbreviated as "DV Messenger".
¡ In this manual, the operating modes of camcorders are described as following:
– CAMERA mode: Mode for recording video and sound to tape.
– PLAY (VCR) mode: Mode for playing back video and sound recorded on a
tape.
– CARD PLAY (VCR) mode: Mode for playing back images recorded on a
memory card.
– NETWORK mode: Mode for connecting to the computer for using DV
Messenger.
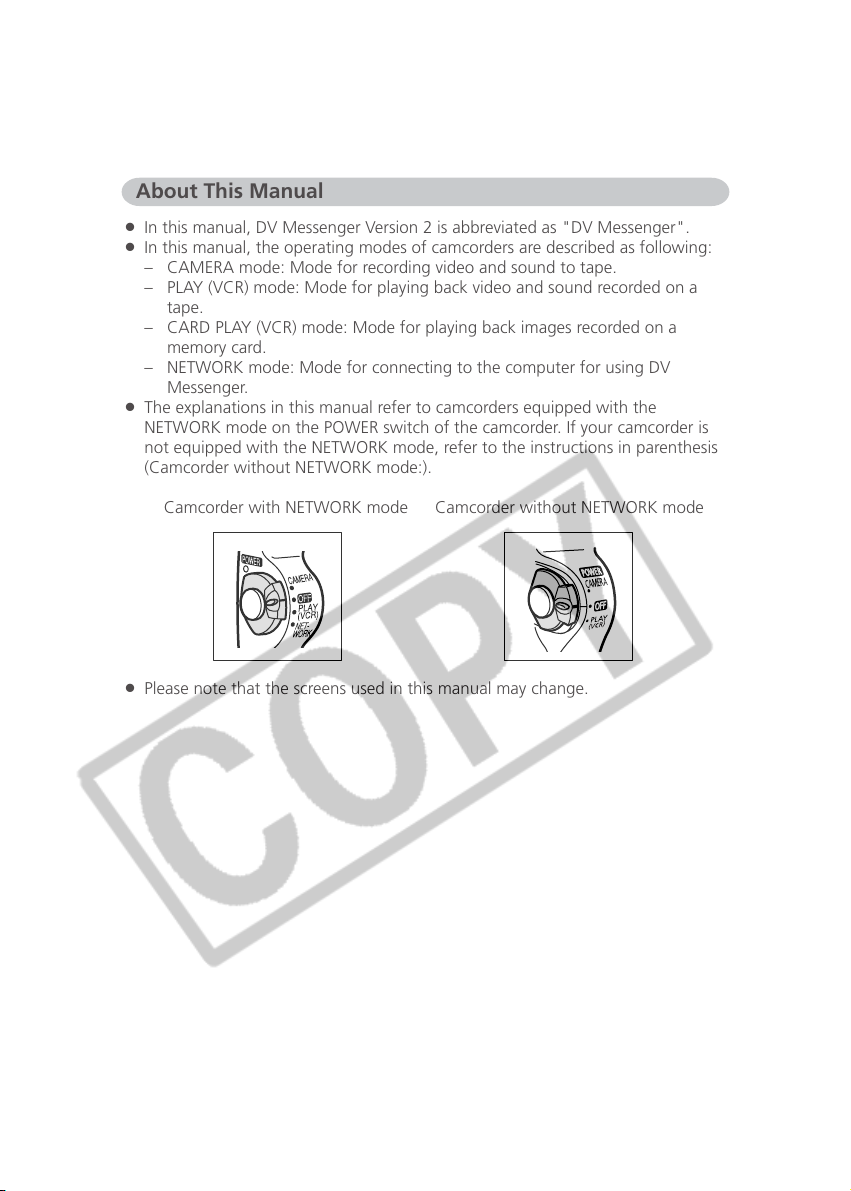
¡ The explanations in this manual refer to camcorders equipped with the
NETWORK mode on the POWER switch of the camcorder. If your camcorder is
not equipped with the NETWORK mode, refer to the instructions in parenthesis
(Camcorder without NETWORK mode:).
Camcorder with NETWORK mode Camcorder without NETWORK mode
¡ Please note that the screens used in this manual may change.
8
Page 9

System Requirements
OS: Microsoft Windows XP Home Edition or Professional
(Installation of Service Pack 1 recommended)
Proper operation is not guaranteed on Windows XP
that has been upgraded from a previous version.
CPU: Pentium 500 MHz or better (800 MHz or better
recommended)
RAM: 128 MB or more (256 MB or more recommended)
Interface: USB (1.1/2.0) or IEEE1394 (OHCI compliant)
Free Hard Disk Space: • DV Messenger: 100 MB or more
• Canon USB Video Driver: 1 MB or more
• AV/C Camera Storage Subunit-WIA Driver: 1 MB or
more
Display: 800 × 600 pixels/High Color (16 bit) or better
Others: Windows Messenger Version 4.5, 4.6 or 4.7, sound
function, Internet connection*
* Using a standard dial-up connection is possible, but
we recommend using a broadband connection to the
Internet.
❍ Proper operation is not guaranteed on a dual CPU PC or on a user-built
PC.
❍ Proper operation is not guaranteed on any particular system, even if it
meets the requirements outlined above.
❍ Do not connect two or more camcorders to the computer at the same
time. The connection may not work correctly.
❍ A CD-ROM drive is required to install the software.
USB connection:
❍ Connect the USB cable directly to one of the computer’s main USB ports.
The interface may not function correctly if the camcorder is connected via
a USB hub.
❍ The connection may not operate correctly if you are using other USB
devices, excluding USB mice or keyboards, at the same time. If this occurs,
disconnect the other devices from the computer and try reconnecting the
camcorder.
❍ Not all operations performed with a connection to a USB 2.0 compatible
board can be guaranteed.
DV (IEEE1394) connection:
❍ Connect the camcorder directly to the computer using a DV (IEEE1394)
cable. The connection may not operate correctly if the camcorder is
connected via a repeater or other IEEE1394 devices, or if more than one
IEEE1394 device is connected to the computer.
❍ Do not connect another IEEE1394 device while the AV/C Camera Storage
Subunit-WIA Driver is operating. The connection may not operate
correctly.
E
DV Messenger
9
Page 10
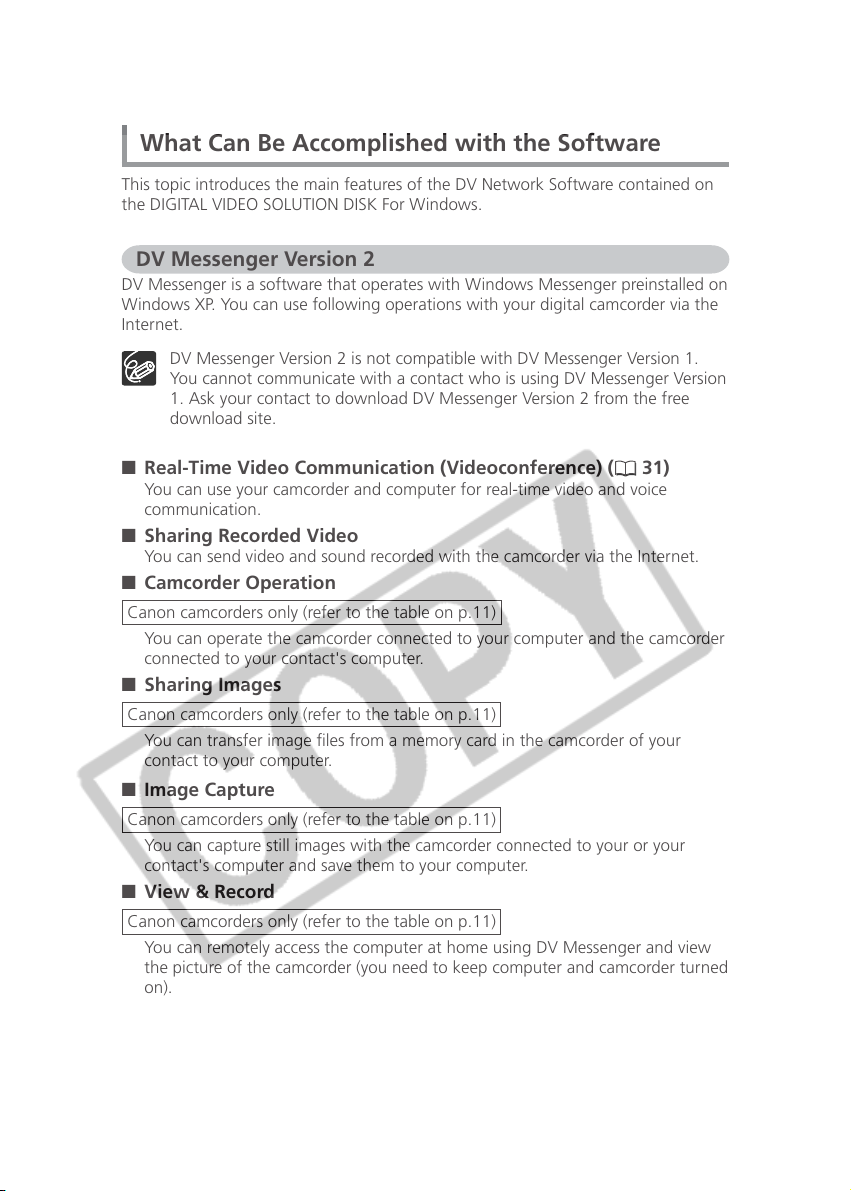
What Can Be Accomplished with the Software
This topic introduces the main features of the DV Network Software contained on
the DIGITAL VIDEO SOLUTION DISK For Windows.
DV Messenger Version 2
DV Messenger is a software that operates with Windows Messenger preinstalled on
Windows XP. You can use following operations with your digital camcorder via the
Internet.
DV Messenger Version 2 is not compatible with DV Messenger Version 1.
You cannot communicate with a contact who is using DV Messenger Version
1. Ask your contact to download DV Messenger Version 2 from the free
download site.
■ Real-Time Video Communication (Videoconference) ( 31)
You can use your camcorder and computer for real-time video and voice
communication.
■ Sharing Recorded Video
You can send video and sound recorded with the camcorder via the Internet.
■ Camcorder Operation
Canon camcorders only (refer to the table on p.11)
You can operate the camcorder connected to your computer and the camcorder
connected to your contact's computer.
■ Sharing Images
Canon camcorders only (refer to the table on p.11)
You can transfer image files from a memory card in the camcorder of your
contact to your computer.
■ Image Capture
Canon camcorders only (refer to the table on p.11)
You can capture still images with the camcorder connected to your or your
contact's computer and save them to your computer.
■ View & Record
Canon camcorders only (refer to the table on p.11)
You can remotely access the computer at home using DV Messenger and view
the picture of the camcorder (you need to keep computer and camcorder turned
on).
10
Page 11
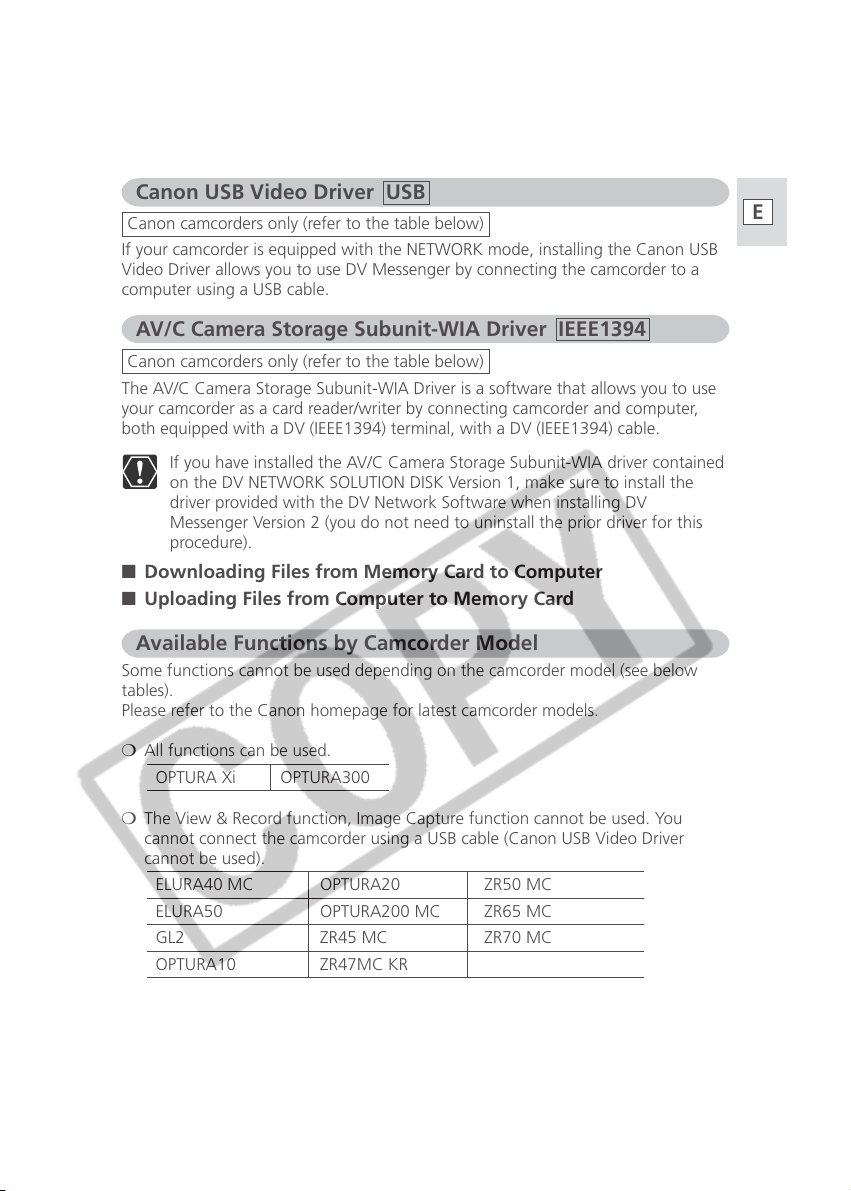
Canon USB Video Driver USB
Canon camcorders only (refer to the table below)
If your camcorder is equipped with the NETWORK mode, installing the Canon USB
Video Driver allows you to use DV Messenger by connecting the camcorder to a
computer using a USB cable.
AV/C Camera Storage Subunit-WIA Driver IEEE1394
Canon camcorders only (refer to the table below)
The AV/C Camera Storage Subunit-WIA Driver is a software that allows you to use
your camcorder as a card reader/writer by connecting camcorder and computer,
both equipped with a DV (IEEE1394) terminal, with a DV (IEEE1394) cable.
If you have installed the AV/C Camera Storage Subunit-WIA driver contained
on the DV NETWORK SOLUTION DISK Version 1, make sure to install the
driver provided with the DV Network Software when installing DV
Messenger Version 2 (you do not need to uninstall the prior driver for this
procedure).
■ Downloading Files from Memory Card to Computer
■ Uploading Files from Computer to Memory Card
Available Functions by Camcorder Model
Some functions cannot be used depending on the camcorder model (see below
tables).
Please refer to the Canon homepage for latest camcorder models.
❍ All functions can be used.
OPTURA Xi OPTURA300
E
❍ The View & Record function, Image Capture function cannot be used. You
cannot connect the camcorder using a USB cable (Canon USB Video Driver
cannot be used).
ELURA40 MC OPTURA20 ZR50 MC
ELURA50 OPTURA200 MC ZR65 MC
GL2 ZR45 MC ZR70 MC
OPTURA10 ZR47MC KR
11
Page 12
What Can Be Accomplished with the Software
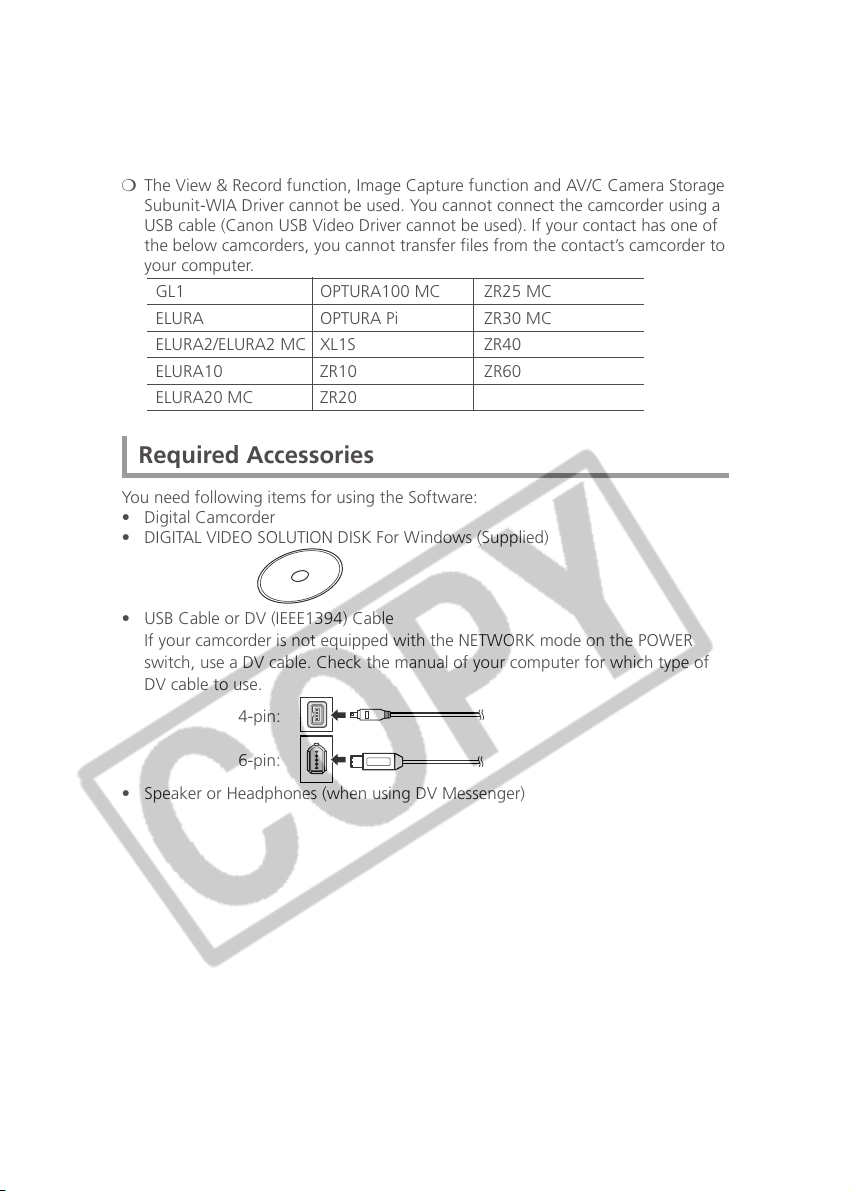
❍ The View & Record function, Image Capture function and AV/C Camera Storage
Subunit-WIA Driver cannot be used. You cannot connect the camcorder using a
USB cable (Canon USB Video Driver cannot be used). If your contact has one of
the below camcorders, you cannot transfer files from the contact’s camcorder to
your computer.
GL1 OPTURA100 MC ZR25 MC
ELURA OPTURA Pi ZR30 MC
ELURA2/ELURA2 MC XL1S ZR40
ELURA10 ZR10 ZR60
ELURA20 MC ZR20
Required Accessories
You need following items for using the Software:
• Digital Camcorder
• DIGITAL VIDEO SOLUTION DISK For Windows (Supplied)
• USB Cable or DV (IEEE1394) Cable
If your camcorder is not equipped with the NETWORK mode on the POWER
switch, use a DV cable. Check the manual of your computer for which type of
DV cable to use.
4-pin:
6-pin:
• Speaker or Headphones (when using DV Messenger)
12
Page 13
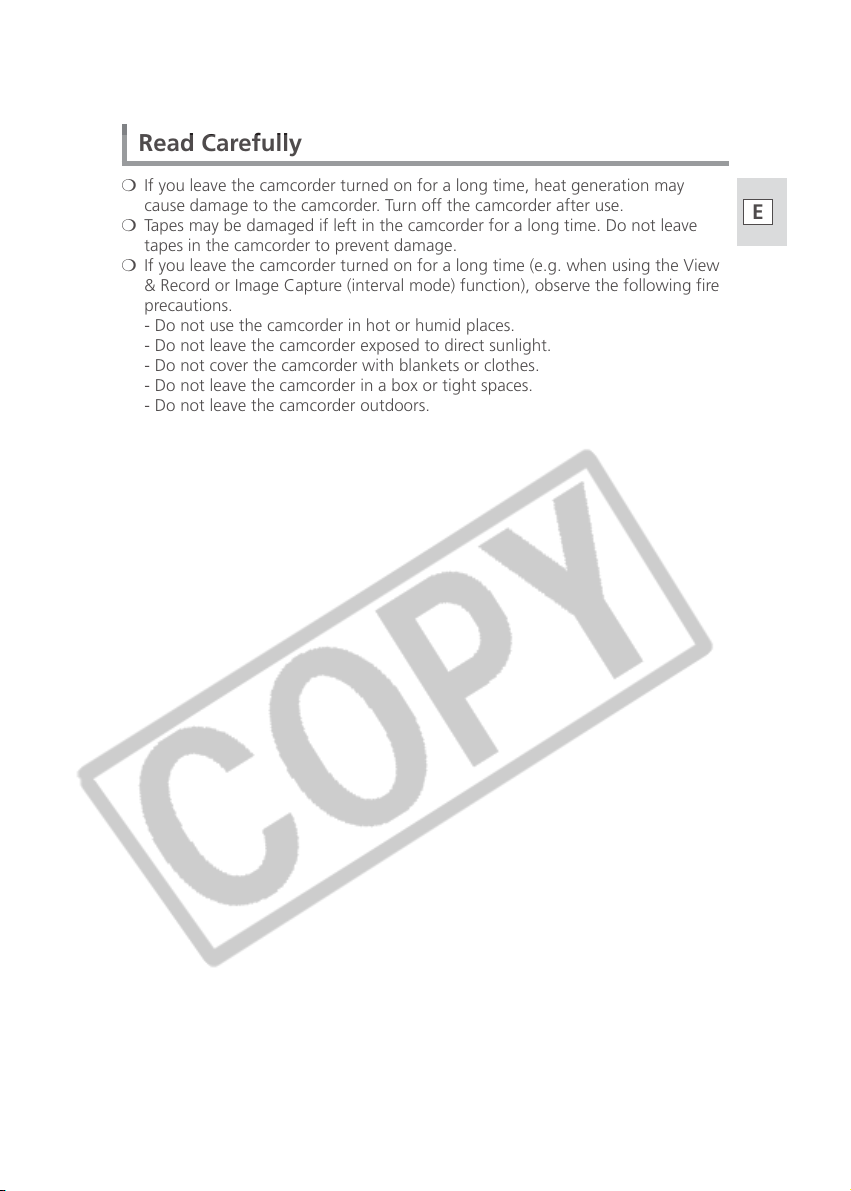
Read Carefully
❍ If you leave the camcorder turned on for a long time, heat generation may
cause damage to the camcorder. Turn off the camcorder after use.
❍ Tapes may be damaged if left in the camcorder for a long time. Do not leave
tapes in the camcorder to prevent damage.
❍ If you leave the camcorder turned on for a long time (e.g. when using the View
& Record or Image Capture (interval mode) function), observe the following fire
precautions.
- Do not use the camcorder in hot or humid places.
- Do not leave the camcorder exposed to direct sunlight.
- Do not cover the camcorder with blankets or clothes.
- Do not leave the camcorder in a box or tight spaces.
- Do not leave the camcorder outdoors.
E
DV Messenger
13
Page 14
Requirements for Using DV Messenger
To use DV Messenger, it is required that Windows XP is installed and Windows
Messenger 4.5, 4.6 or 4.7 operates correctly.
Make sure to confirm the following before installing DV Messenger.
1. Windows XP and Windows Messenger 4.5, 4.6 or 4.7 are installed*.
2. Windows Messenger operates and its voice or video conversation can be used*.
3. If you are using a router for Internet connection: your router is UPnP (Universal
Plug and Play) compatible.**
(Some modems are equipped with a router function. For details, refer to the
manual of the modem.)
* This software is compatible with Windows XP only. It cannot be used with other
Operating Systems. Furthermore, Windows Messenger 4.5, 4.6 or 4.7 is
required. Establish an environment that allows the use of this software. Please
consult Microsoft for details.
** If you use a router to connect to the Internet, the router must be UPnP
(Universal Plug and Play) compatible and it must be recognized as “Internet
Gateway Device” (
telephone carrier or router manufacturer, or refer to the manual of the router.
Be aware that your contact can access the contents of the tape or memory
card in your camcorder when using DV Messenger.
Free Download
If your contact does not have DV Messenger or is using DV Messenger
Version 1, DV Messenger Version 2 can be downloaded from the following
homepage:
http://www.canondv.com/
25). For details, consult your Internet service provider,
14
Page 15
Installing the Software
Installing the DV Network Software
With this procedure, the DV Messenger will be installed and the driver files for the
AV/C Camera Storage Subunit-WIA Driver and Canon USB Video Driver will be
copied to your computer. The drivers will be installed when you connect the
camcorder to the computer. For the installation procedure of the Canon USB Video
Driver, see p. 18. For the installation procedure of the AV/C Camera Storage
Subunit-WIA Driver, see p. 19.
❍ Do not connect the camcorder to the computer when installing the
DV Network Software.
❍ DV Messenger can only be installed with Windows Messenger 4.5, 4.6 or
4.7. Download Windows Messenger 4.7 from the Microsoft homepage
and update your Windows Messenger if necessary. Please consult
Microsoft for details.
❍ Users of Windows XP Professional must first log in as an Administrator to
install programs.
•••••••••••••••••••••••••••••••••••••••••••••••••••••••••••••••••••••••••••••••••••••••••••••
Close any programs that are running.
1.
•••••••••••••••••••••••••••••••••••••••••••••••••••••••••••••••••••••••••••••••••••••••••••••
Set the DIGITAL VIDEO SOLUTION DISK For Windows in the
2.
computer’s CD-ROM drive.
• The installer panel opens automatically.
• If the installer panel does not appear automatically, use the following
procedures to display it.
1. Select [My Computer] from the [Start] menu.
2. Right-click the CD-ROM icon and select [Open] from the displayed menu.
3. Double-click the [Setup.exe] icon.
Depending on the setting of your computer, the file extension “.exe” may
not appear.
•••••••••••••••••••••••••••••••••••••••••••••••••••••••••••••••••••••••••••••••••••••••••••••
Select your language.
3.
E
DV Messenger
15
Page 16
Installing the Software
•••••••••••••••••••••••••••••••••••••••••••••••••••••••••••••••••••••••••••••••••••••••••••••
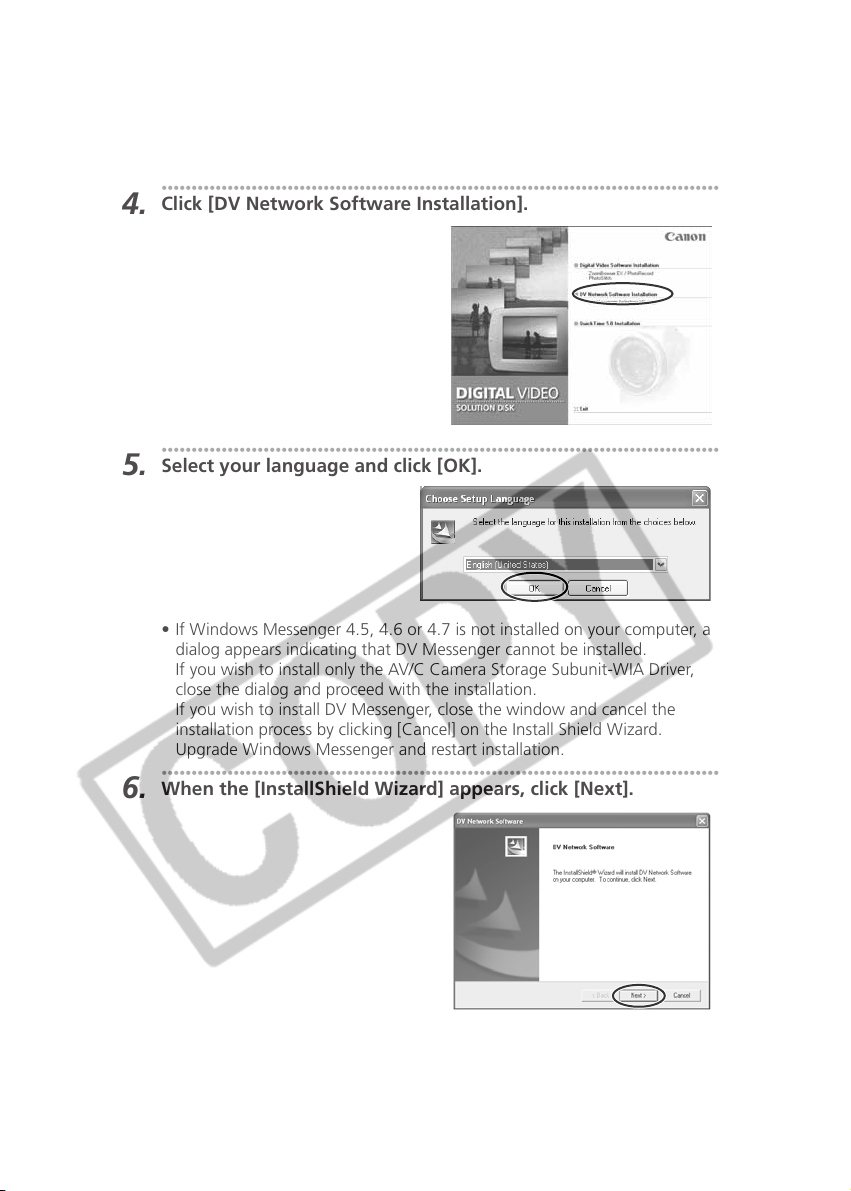
Click [DV Network Software Installation].
4.
•••••••••••••••••••••••••••••••••••••••••••••••••••••••••••••••••••••••••••••••••••••••••••••
Select your language and click [OK].
5.
• If Windows Messenger 4.5, 4.6 or 4.7 is not installed on your computer, a
dialog appears indicating that DV Messenger cannot be installed.
If you wish to install only the AV/C Camera Storage Subunit-WIA Driver,
close the dialog and proceed with the installation.
If you wish to install DV Messenger, close the window and cancel the
installation process by clicking [Cancel] on the Install Shield Wizard.
Upgrade Windows Messenger and restart installation.
•••••••••••••••••••••••••••••••••••••••••••••••••••••••••••••••••••••••••••••••••••••••••••••
When the [InstallShield Wizard] appears, click [Next].
6.
16
Page 17
•••••••••••••••••••••••••••••••••••••••••••••••••••••••••••••••••••••••••••••••••••••••••••••
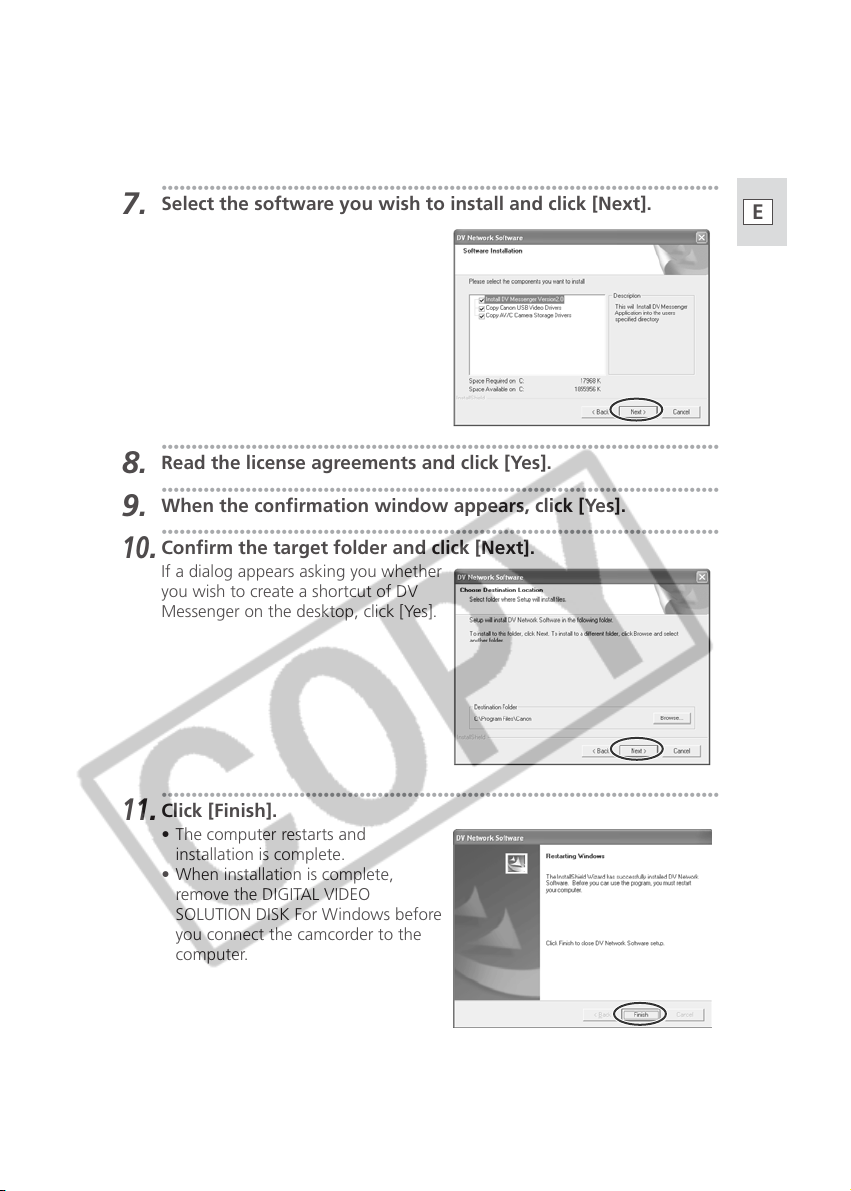
Select the software you wish to install and click [Next].
7.
•••••••••••••••••••••••••••••••••••••••••••••••••••••••••••••••••••••••••••••••••••••••••••••
Read the license agreements and click [Yes].
8.
•••••••••••••••••••••••••••••••••••••••••••••••••••••••••••••••••••••••••••••••••••••••••••••
When the confirmation window appears, click [Yes].
9.
•••••••••••••••••••••••••••••••••••••••••••••••••••••••••••••••••••••••••••••••••••••••••••••
Confirm the target folder and click [Next].
10
.
If a dialog appears asking you whether
you wish to create a shortcut of DV
Messenger on the desktop, click [Yes].
E
•••••••••••••••••••••••••••••••••••••••••••••••••••••••••••••••••••••••••••••••••••••••••••••
Click [Finish].
11
.
• The computer restarts and
installation is complete.
• When installation is complete,
remove the DIGITAL VIDEO
SOLUTION DISK For Windows before
you connect the camcorder to the
computer.
17
Page 18
Installing the Software
Installing the Canon USB Video Driver
Installing the Canon USB Video Driver allows you to use DV Messenger by
connecting the camcorder to a computer using a USB cable.
❍ The Canon USB Video Driver can only be used with camcorders equipped
with the NETWORK mode.
❍ Before installing the driver following the procedure below, install the DV
Network Software first to copy the driver files to the computer.
❍ Close any programs that are running before installing the driver.
❍ Do not turn off the camcorder until the driver installation is complete. And
do not interrupt the installation.
❍ Users of Windows XP Professional must first log in as an Administrator to
install programs.
•••••••••••••••••••••••••••••••••••••••••••••••••••••••••••••••••••••••••••••••••••••••••••••
Connect the power adapter to the camcorder.
1.
•••••••••••••••••••••••••••••••••••••••••••••••••••••••••••••••••••••••••••••••••••••••••••••
Set the camcorder to NETWORK mode.
2.
•••••••••••••••••••••••••••••••••••••••••••••••••••••••••••••••••••••••••••••••••••••••••••••
Connect the camcorder to the computer using the USB cable
3.
(
22).
• The driver installation starts automatically.
• A window appears allowing you to select an application program to start.
Click [Cancel] to close the window.
•••••••••••••••••••••••••••••••••••••••••••••••••••••••••••••••••••••••••••••••••••••••••••••
Restart the computer.
4.
•••••••••••••••••••••••••••••••••••••••••••••••••••••••••••••••••••••••••••••••••••••••••••••
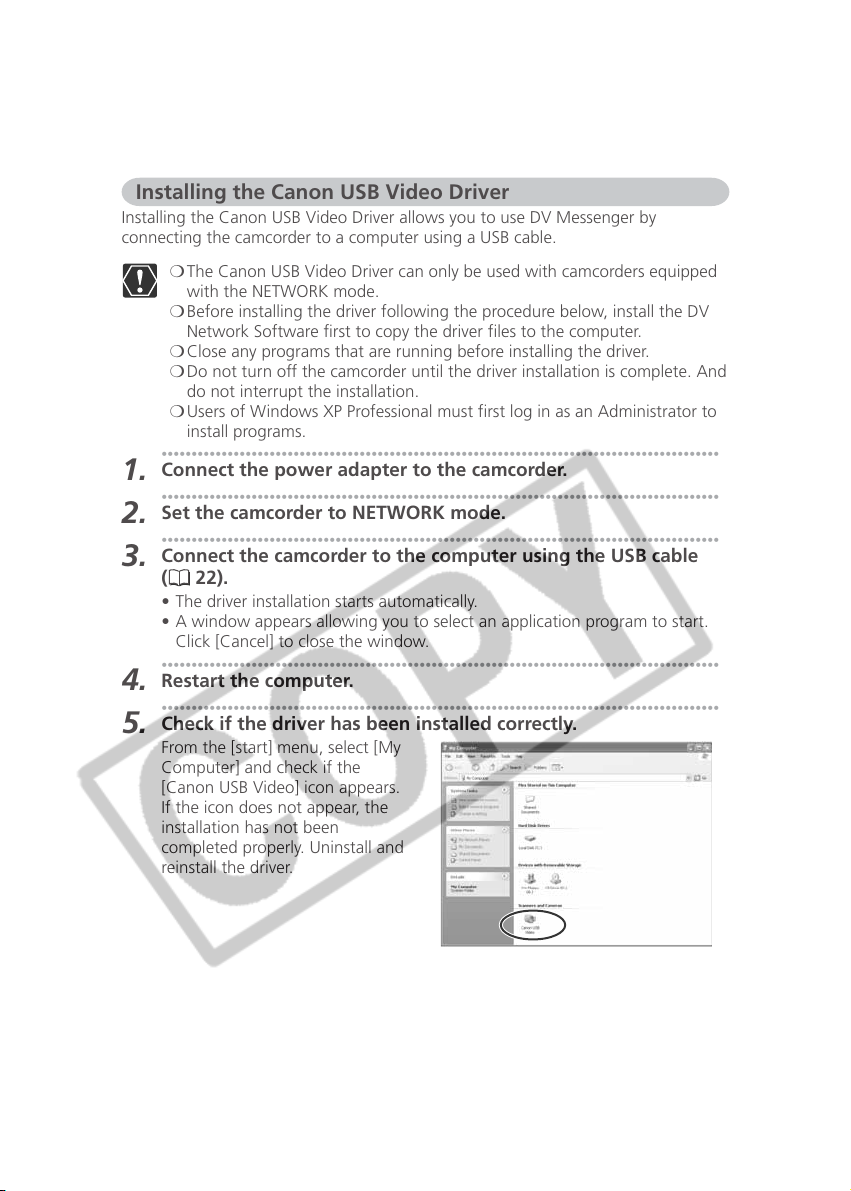
Check if the driver has been installed correctly.
5.
From the [start] menu, select [My
Computer] and check if the
[Canon USB Video] icon appears.
If the icon does not appear, the
installation has not been
completed properly. Uninstall and
reinstall the driver.
18
Page 19
Installing the AV/C Camera Storage Subunit-WIA Driver
❍ Before installing the driver following the procedure below, install the DV
Network Software first to copy the driver files to the computer.
❍ Close any programs that are running before installing the driver.
❍ Do not turn off the camcorder until the driver installation is complete. And
do not interrupt the installation.
❍ Users of Windows XP Professional must first log in as an Administrator to
install programs.
•••••••••••••••••••••••••••••••••••••••••••••••••••••••••••••••••••••••••••••••••••••••••••••
Connect the power adapter to the camcorder.
1.
•••••••••••••••••••••••••••••••••••••••••••••••••••••••••••••••••••••••••••••••••••••••••••••
Set the camcorder to NETWORK or CARD PLAY (VCR) mode.
2.
(Camcorder without NETWORK mode: Set the camcorder to
CARD PLAY (VCR) mode.)
•••••••••••••••••••••••••••••••••••••••••••••••••••••••••••••••••••••••••••••••••••••••••••••
Connect the camcorder to the computer using the DV cable
3.
(
22).
• The driver installation starts automatically.
• Depending on the setting of your computer, a video editing program may
start. In such case, close this program.
• If the installation is complete, the Scanner and Camera Wizard or a dialog
for selecting an application appears. Click [Cancel] to close the dialog.
•••••••••••••••••••••••••••••••••••••••••••••••••••••••••••••••••••••••••••••••••••••••••••••
Restart the computer.
4.
•••••••••••••••••••••••••••••••••••••••••••••••••••••••••••••••••••••••••••••••••••••••••••••
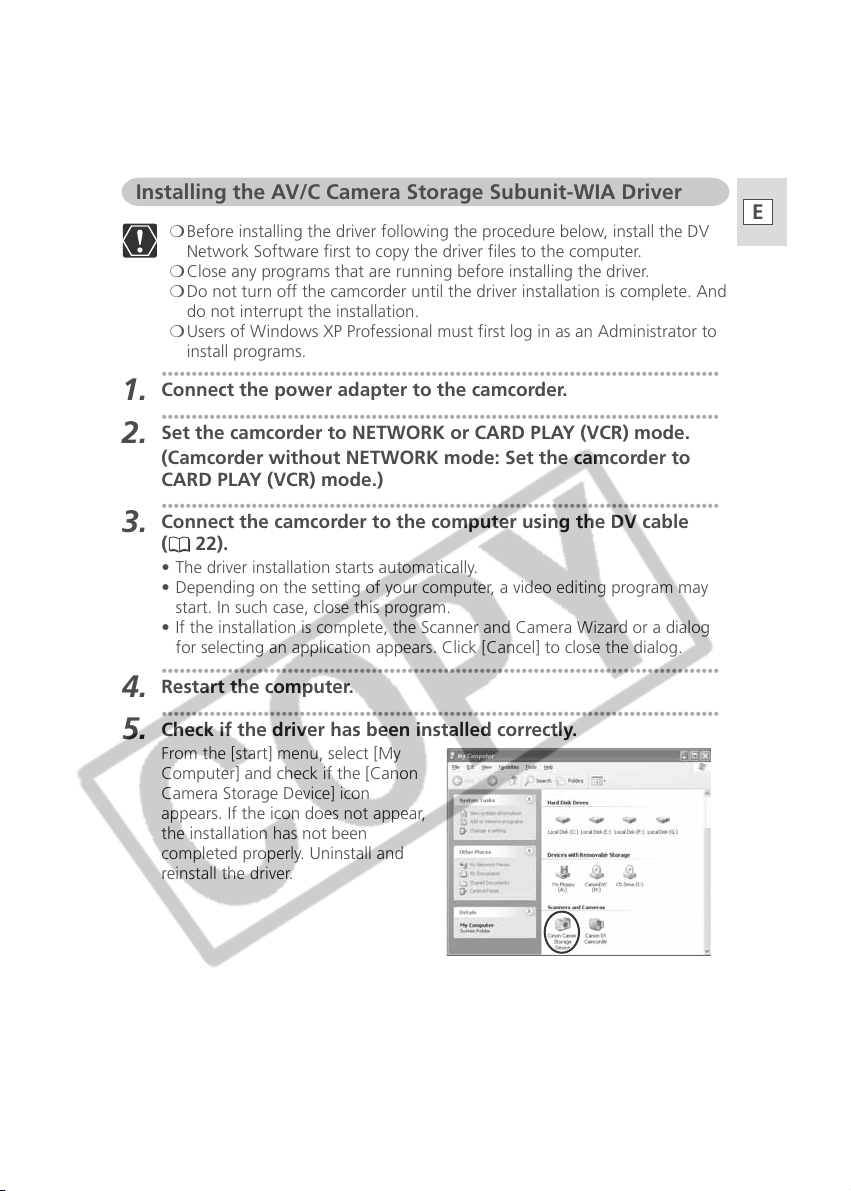
Check if the driver has been installed correctly.
5.
From the [start] menu, select [My
Computer] and check if the [Canon
Camera Storage Device] icon
appears. If the icon does not appear,
the installation has not been
completed properly. Uninstall and
reinstall the driver.
E
19
Page 20
Installing the Software
■ Changing the Automatic Start Setting
When you install the driver, a window appears allowing you to select an application
program to start each time you connect the camcorder to the computer. When
using DV Messenger, we recommend setting the computer not to start any
application.
•••••••••••••••••••••••••••••••••••••••••••••••••••••••••••••••••••••••••••••••••••••••••••••
Connect the power adapter to the camcorder.
1.
•••••••••••••••••••••••••••••••••••••••••••••••••••••••••••••••••••••••••••••••••••••••••••••
Set the camcorder to NETWORK or CARD PLAY (VCR) mode.
2.
•••••••••••••••••••••••••••••••••••••••••••••••••••••••••••••••••••••••••••••••••••••••••••••
Connect the camcorder to the computer using the DV cable
3.
4.
5.
22).
(
•••••••••••••••••••••••••••••••••••••••••••••••••••••••••••••••••••••••••••••••••••••••••••••
From the [start] menu, select [My Computer].
•••••••••••••••••••••••••••••••••••••••••••••••••••••••••••••••••••••••••••••••••••••••••••••
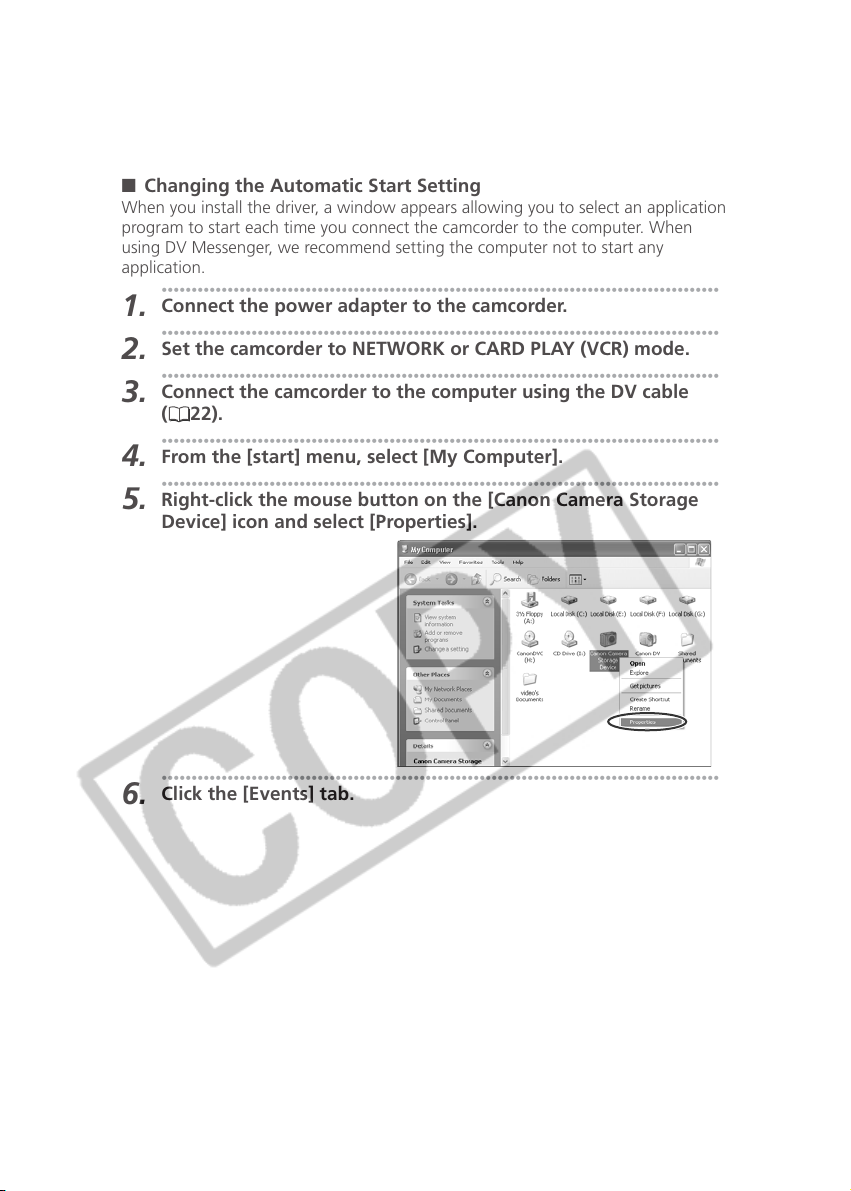
Right-click the mouse button on the [Canon Camera Storage
Device] icon and select [Properties].
•••••••••••••••••••••••••••••••••••••••••••••••••••••••••••••••••••••••••••••••••••••••••••••
Click the [Events] tab.
6.
20
Page 21
•••••••••••••••••••••••••••••••••••••••••••••••••••••••••••••••••••••••••••••••••••••••••••••
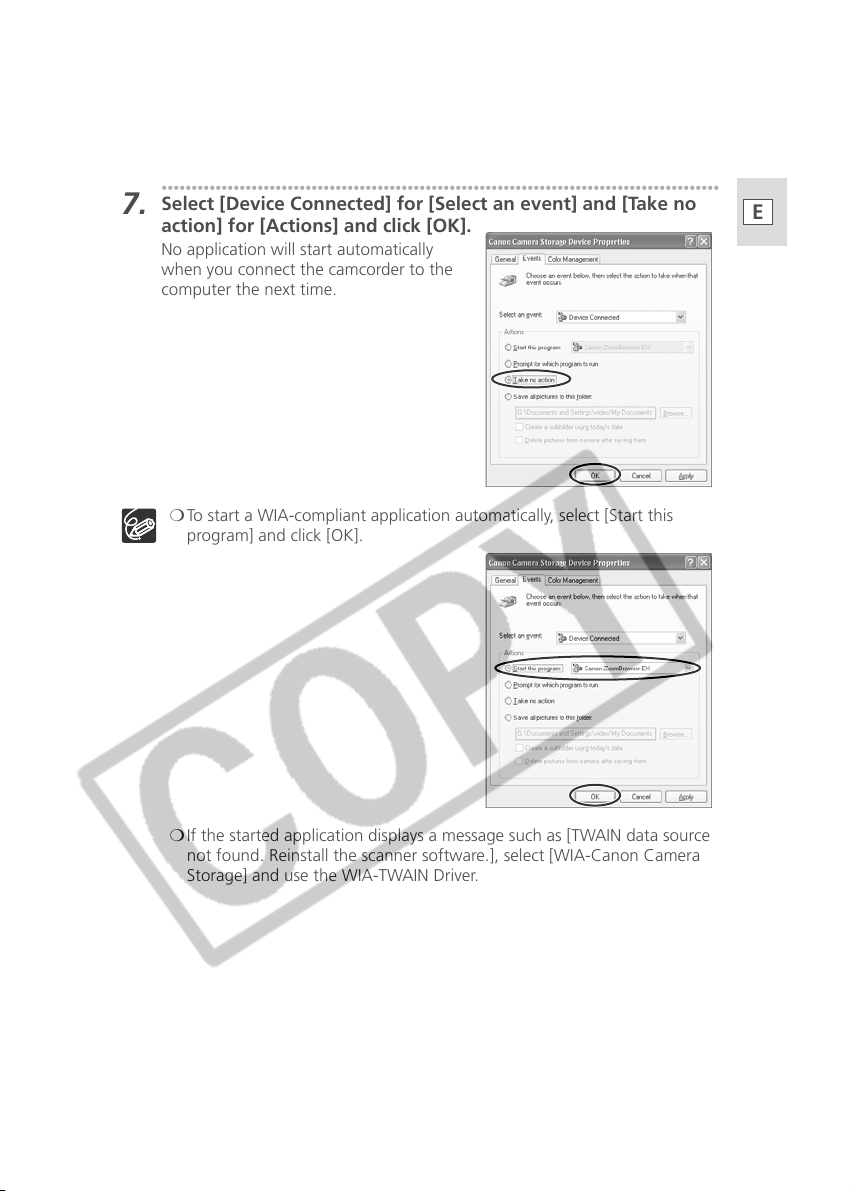
Select [Device Connected] for [Select an event] and [Take no
7.
action] for [Actions] and click [OK].
No application will start automatically
when you connect the camcorder to the
computer the next time.
❍ To start a WIA-compliant application automatically, select [Start this
program] and click [OK].
E
❍ If the started application displays a message such as [TWAIN data source
not found. Reinstall the scanner software.], select [WIA-Canon Camera
Storage] and use the WIA-TWAIN Driver.
21
Page 22
Connecting the Camcorder to a Computer
If your camcorder is equipped with the NETWORK mode, you can use a DV cable or
a USB cable to connect your camcorder to the computer. If your computer is not
equipped with the NETWORK mode, use the DV cable.
Connecting the Camcorder Using a USB Cable
❍ Make sure to install the DV Network Software before connecting the
camcorder to the computer.
❍ Make sure the camcorder is being powered by the compact power adapter
before connecting it to a computer.
❍ Do not connect any devices to the camcorder‘s DV terminal when
connecting the camcorder to the computer using the USB terminal.
••••••••••••••••••••••••••••••••••••••••••••••••••••••••••••••••••••••••••••••••••••••••••••••••••••
Attach the supplied USB cable to the computer’s USB port and the
camcorder’s USB Terminal.
• Refer to your computer manual for the location of the computer’s USB ports.
• See your camcorder instruction manual for connecting instructions.
Connecting the Camcorder Using a DV Cable
❍ Make sure to install the DV Network Software before connecting the
camcorder to the computer.
❍ Make sure the camcorder is being powered by the compact power adapter
before connecting it to a computer.
❍ Do not connect any devices to the camcorder‘s USB terminal when
connecting the camcorder to the computer using the DV terminal.
••••••••••••••••••••••••••••••••••••••••••••••••••••••••••••••••••••••••••••••••••••••••••••••••••••
Attach the DV cable to the computer’s IEEE1394 terminal and the
camcorder’s DV terminal.
• Refer to your computer manual for the location of the computer’s IEEE1394
terminal.
• See your camcorder’s instruction manual for connecting instructions.
22
Page 23
Preparations for DV Messenger
Before you use DV Messenger, check whether the camcorder is correctly connected
to the computer.
Checking the Camcorder Connection
•••••••••••••••••••••••••••••••••••••••••••••••••••••••••••••••••••••••••••••••••••••••••••••
Connect the power adapter to the camcorder.
1.
•••••••••••••••••••••••••••••••••••••••••••••••••••••••••••••••••••••••••••••••••••••••••••••
Set the camcorder to NETWORK mode.
2.
(Camcorder without NETWORK mode: Set the camcorder to
CAMERA mode.)
•••••••••••••••••••••••••••••••••••••••••••••••••••••••••••••••••••••••••••••••••••••••••••••
Connect the camcorder to the computer using the USB cable or
3.
DV cable (
(Camcorder without NETWORK mode: Connect the camcorder
to the computer using the DV cable (
•••••••••••••••••••••••••••••••••••••••••••••••••••••••••••••••••••••••••••••••••••••••••••••
From the [start] menu, select [All Programs] and [Windows
4.
Messenger].
• [Windows Messenger] appears.
• If the [.NET Passport Wizard] appears, click [Cancel].
•••••••••••••••••••••••••••••••••••••••••••••••••••••••••••••••••••••••••••••••••••••••••••••
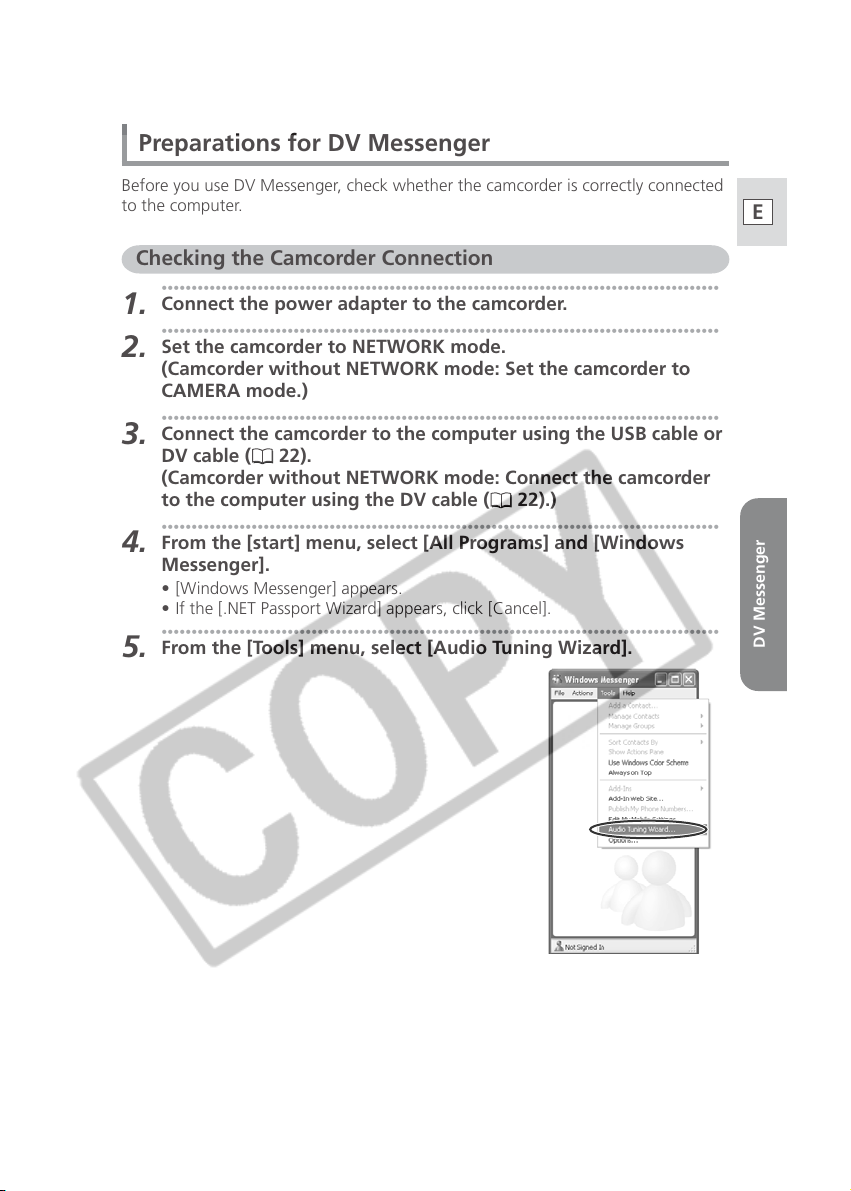
From the [Tools] menu, select [Audio Tuning Wizard].
5.
22).
22).)
E
DV Messenger
23
Page 24
Preparations for DV Messenger
•••••••••••••••••••••••••••••••••••••••••••••••••••••••••••••••••••••••••••••••••••••••••••••
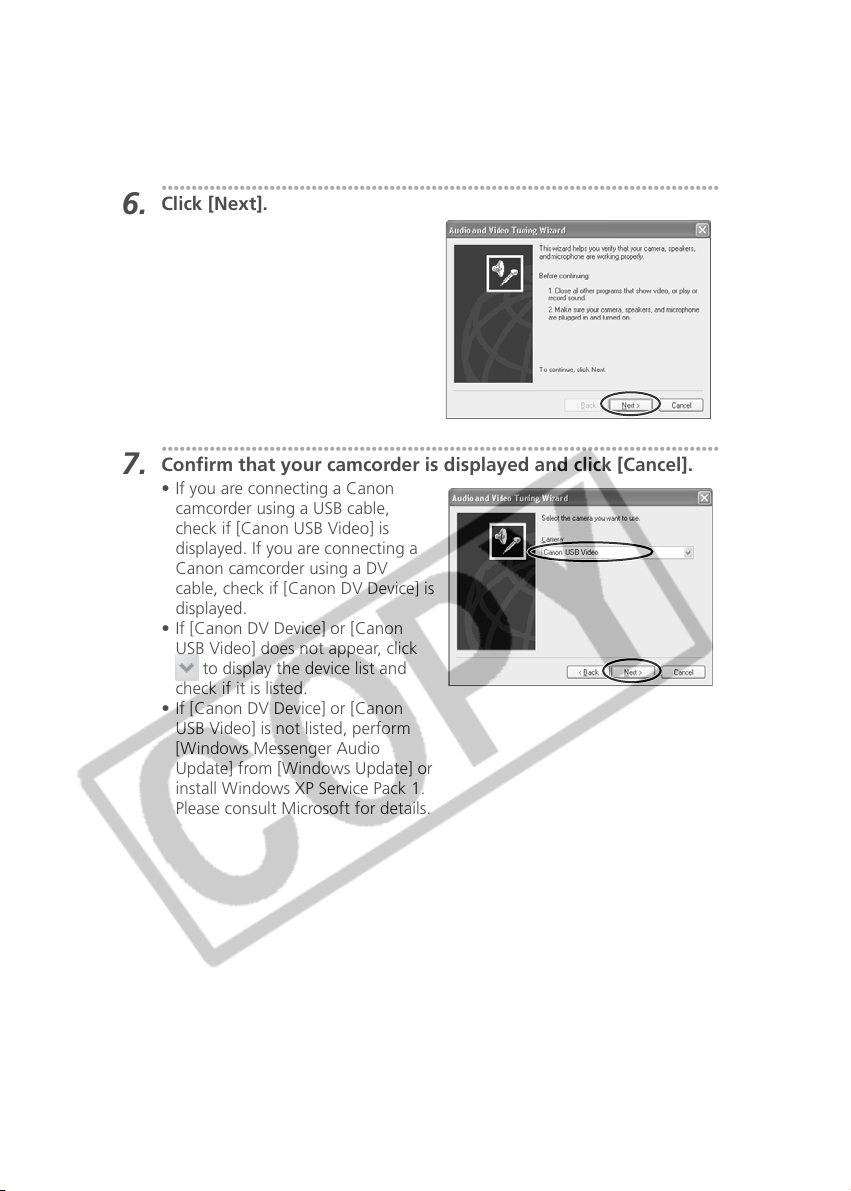
Click [Next].
6.
•••••••••••••••••••••••••••••••••••••••••••••••••••••••••••••••••••••••••••••••••••••••••••••
Confirm that your camcorder is displayed and click [Cancel].
7.
• If you are connecting a Canon
camcorder using a USB cable,
check if [Canon USB Video] is
displayed. If you are connecting a
Canon camcorder using a DV
cable, check if [Canon DV Device] is
displayed.
• If [Canon DV Device] or [Canon
USB Video] does not appear, click
to display the device list and
check if it is listed.
• If [Canon DV Device] or [Canon
USB Video] is not listed, perform
[Windows Messenger Audio
Update] from [Windows Update] or
install Windows XP Service Pack 1.
Please consult Microsoft for details.
24
Page 25
Setting the UPnP Router
If you are using an UPnP-compliant router to connect to the Internet, you need to
install UPnP and disable the firewall of Windows XP to use DV Messenger.
■ Installing UPnP
•••••••••••••••••••••••••••••••••••••••••••••••••••••••••••••••••••••••••••••••••••••••••••••
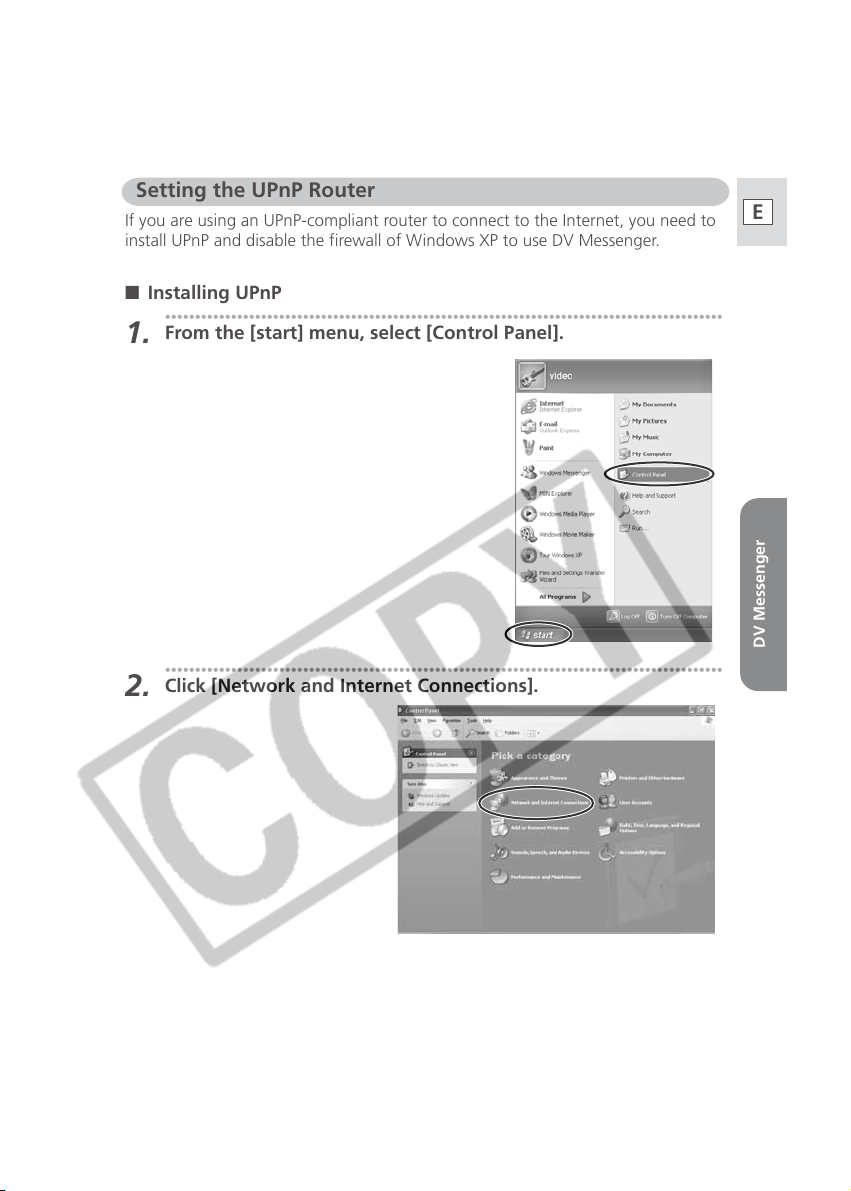
From the [start] menu, select [Control Panel].
1.
•••••••••••••••••••••••••••••••••••••••••••••••••••••••••••••••••••••••••••••••••••••••••••••
Click [Network and Internet Connections].
2.
E
DV Messenger
25
Page 26
Preparations for DV Messenger
•••••••••••••••••••••••••••••••••••••••••••••••••••••••••••••••••••••••••••••••••••••••••••••
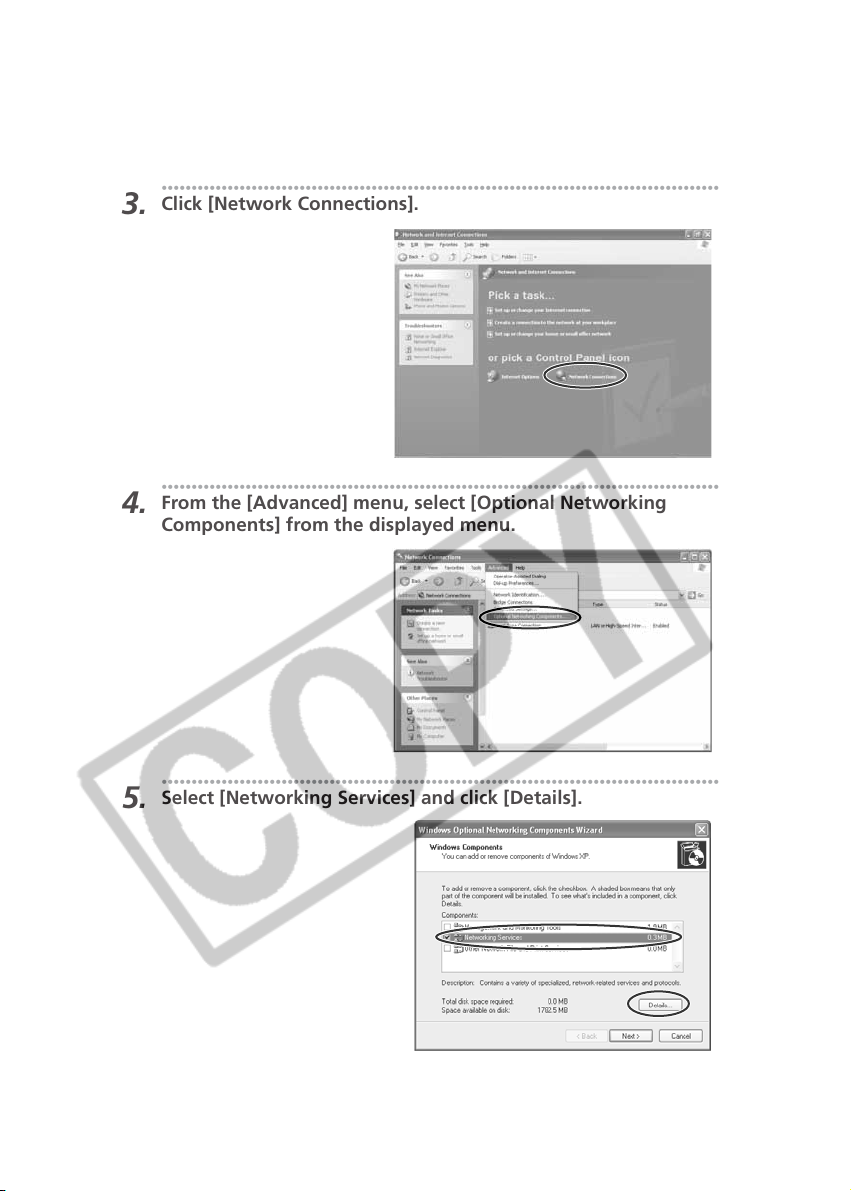
Click [Network Connections].
3.
•••••••••••••••••••••••••••••••••••••••••••••••••••••••••••••••••••••••••••••••••••••••••••••
From the [Advanced] menu, select [Optional Networking
4.
Components] from the displayed menu.
•••••••••••••••••••••••••••••••••••••••••••••••••••••••••••••••••••••••••••••••••••••••••••••
Select [Networking Services] and click [Details].
5.
26
Page 27
•••••••••••••••••••••••••••••••••••••••••••••••••••••••••••••••••••••••••••••••••••••••••••••
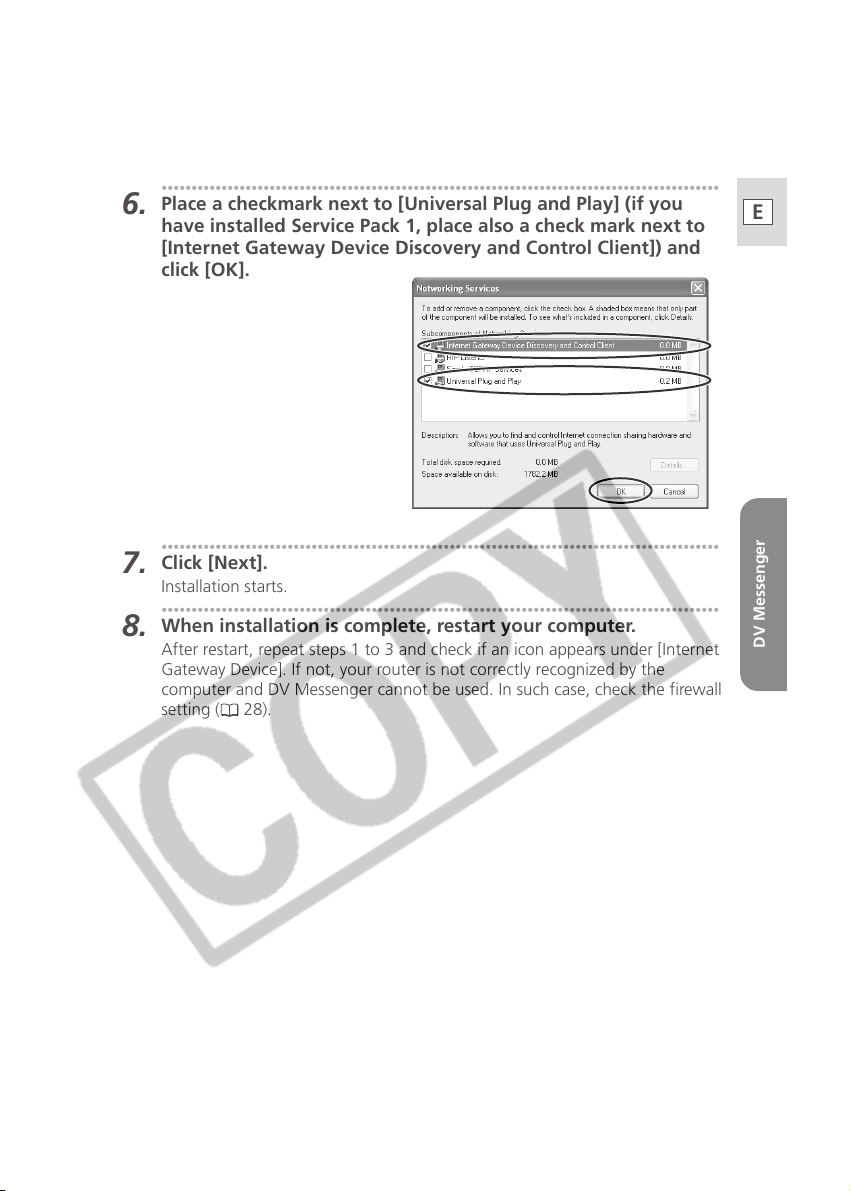
Place a checkmark next to [Universal Plug and Play] (if you
6.
have installed Service Pack 1, place also a check mark next to
[Internet Gateway Device Discovery and Control Client]) and
click [OK].
•••••••••••••••••••••••••••••••••••••••••••••••••••••••••••••••••••••••••••••••••••••••••••••
Click [Next].
7.
Installation starts.
•••••••••••••••••••••••••••••••••••••••••••••••••••••••••••••••••••••••••••••••••••••••••••••
When installation is complete, restart your computer.
8.
After restart, repeat steps 1 to 3 and check if an icon appears under [Internet
Gateway Device]. If not, your router is not correctly recognized by the
computer and DV Messenger cannot be used. In such case, check the firewall
setting (
28).
E
DV Messenger
27
Page 28
Preparations for DV Messenger
■ Disabling the Firewall
About the Firewall
The firewall is an important security system that protects your computer by
limiting or preventing access by other computers on the Internet. If you
disable the function, other computers may be able to access the files on your
computer, or write files onto your hard disk. Disable the firewall before using
DV Messenger, and make sure to re-enable the firewall after use.
•••••••••••••••••••••••••••••••••••••••••••••••••••••••••••••••••••••••••••••••••••••••••••••
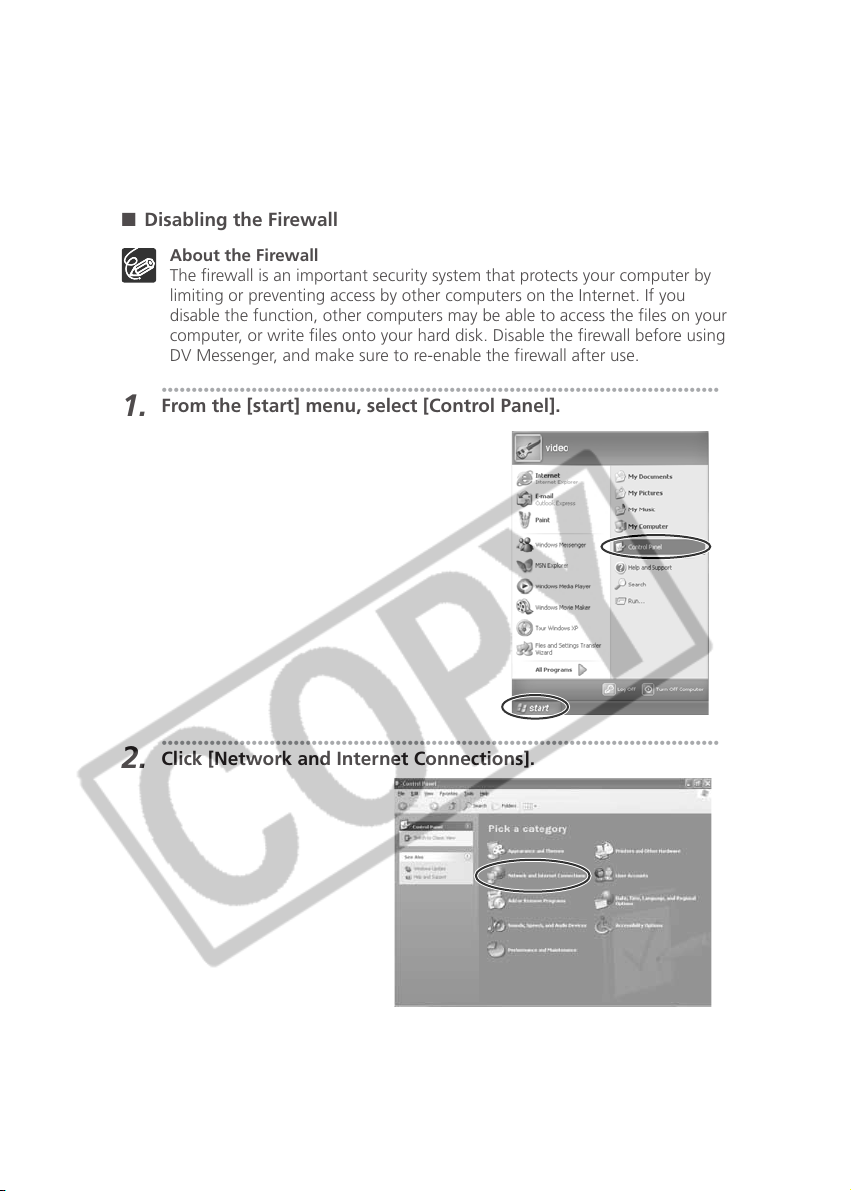
From the [start] menu, select [Control Panel].
1.
•••••••••••••••••••••••••••••••••••••••••••••••••••••••••••••••••••••••••••••••••••••••••••••
Click [Network and Internet Connections].
2.
28
Page 29
•••••••••••••••••••••••••••••••••••••••••••••••••••••••••••••••••••••••••••••••••••••••••••••
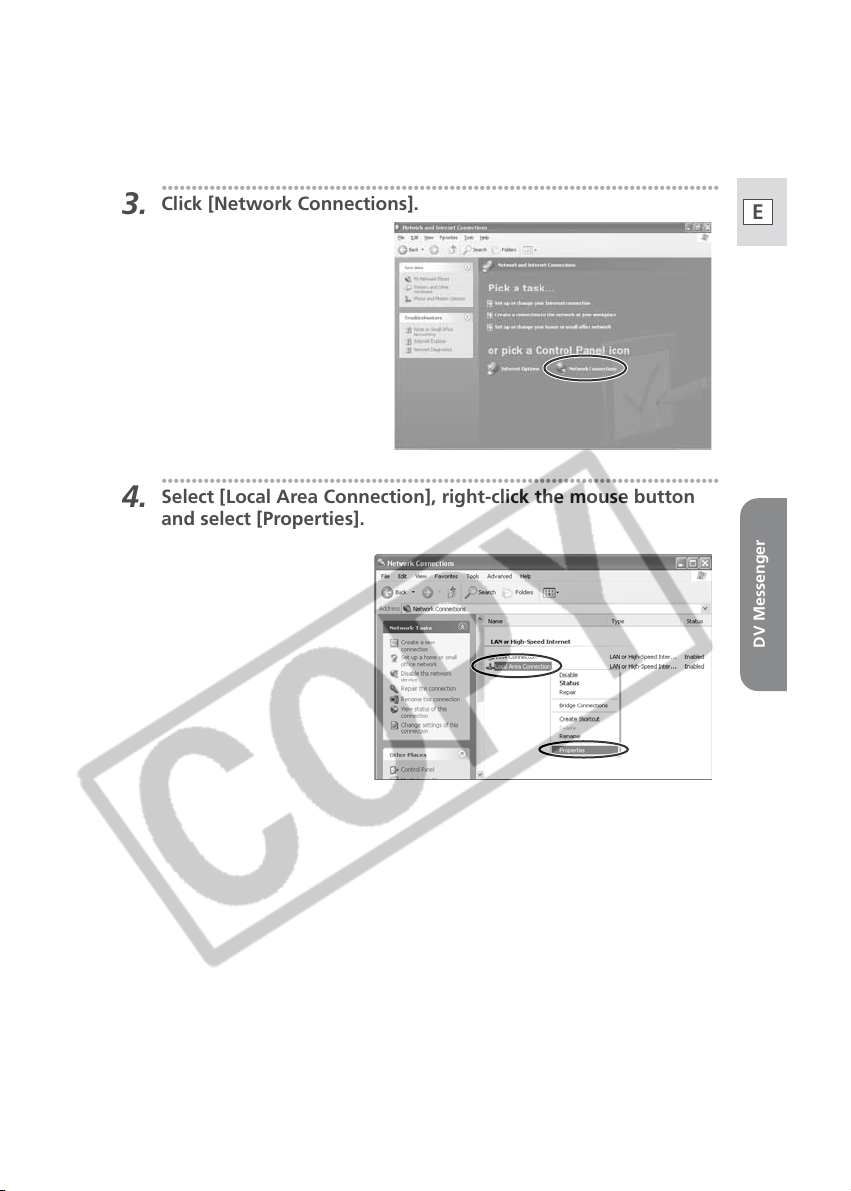
Click [Network Connections].
3.
•••••••••••••••••••••••••••••••••••••••••••••••••••••••••••••••••••••••••••••••••••••••••••••
Select [Local Area Connection], right-click the mouse button
4.
and select [Properties].
E
DV Messenger
29
Page 30
Preparations for DV Messenger
•••••••••••••••••••••••••••••••••••••••••••••••••••••••••••••••••••••••••••••••••••••••••••••
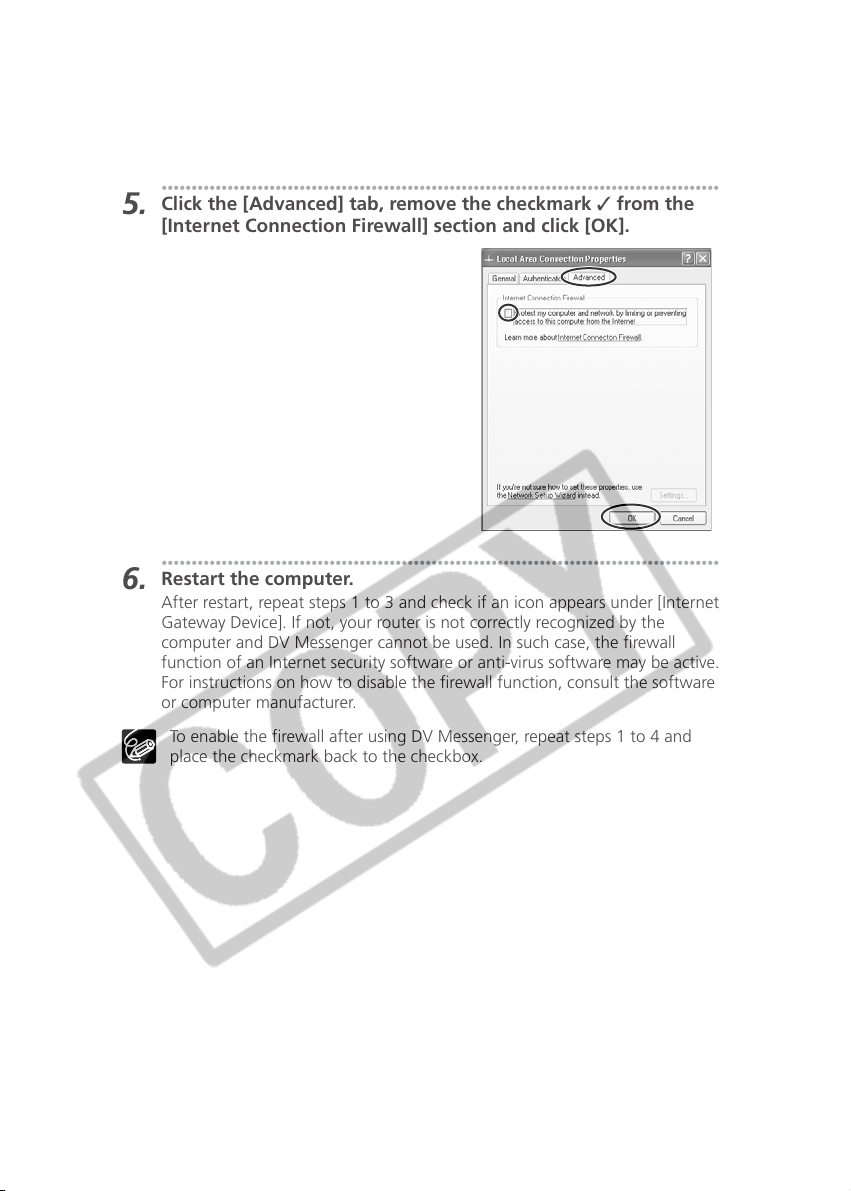
Click the [Advanced] tab, remove the checkmark ✓ from the
5.
[Internet Connection Firewall] section and click [OK].
•••••••••••••••••••••••••••••••••••••••••••••••••••••••••••••••••••••••••••••••••••••••••••••
Restart the computer.
6.
After restart, repeat steps 1 to 3 and check if an icon appears under [Internet
Gateway Device]. If not, your router is not correctly recognized by the
computer and DV Messenger cannot be used. In such case, the firewall
function of an Internet security software or anti-virus software may be active.
For instructions on how to disable the firewall function, consult the software
or computer manufacturer.
To enable the firewall after using DV Messenger, repeat steps 1 to 4 and
place the checkmark back to the checkbox.
30
Page 31
Videoconferencing
Starting DV Messenger
❍ DV Messenger will not start when you have signed in to Windows
Messenger. In such case, sign out of Windows Messenger first and start
DV Messenger.
❍ Do not access the memory card using programs such as Windows Explorer
while DV Messenger is started.
❍ Do not update Windows Messenger while DV Messenger is started.
❍ Do not connect two or more digital camcorders to the computer.
❍ Do not disconnect the interface cable while DV Messenger is started.
❍ If an anti-virus software is installed on your computer, the firewall of the
software may be active. In such case, you need to deactivate its firewall
function. For further details, consult your software or computer
manufacturer.
❍ If you are using an UPnP-compliant router, you need to install UPnP and
disable Windows XP's firewall (
•••••••••••••••••••••••••••••••••••••••••••••••••••••••••••••••••••••••••••••••••••••••••••••
Set the camcorder to NETWORK mode.
1.
(Camcorder without NETWORK mode: Set the camcorder to
CAMERA mode.)
•••••••••••••••••••••••••••••••••••••••••••••••••••••••••••••••••••••••••••••••••••••••••••••
Connect the camcorder to the computer ( 22).
2.
•••••••••••••••••••••••••••••••••••••••••••••••••••••••••••••••••••••••••••••••••••••••••••••
Connect to the Internet.
3.
•••••••••••••••••••••••••••••••••••••••••••••••••••••••••••••••••••••••••••••••••••••••••••••
Double-click the [DV Messenger] icon on the desktop, or select
4.
[DV Messenger] from the [start] menu.
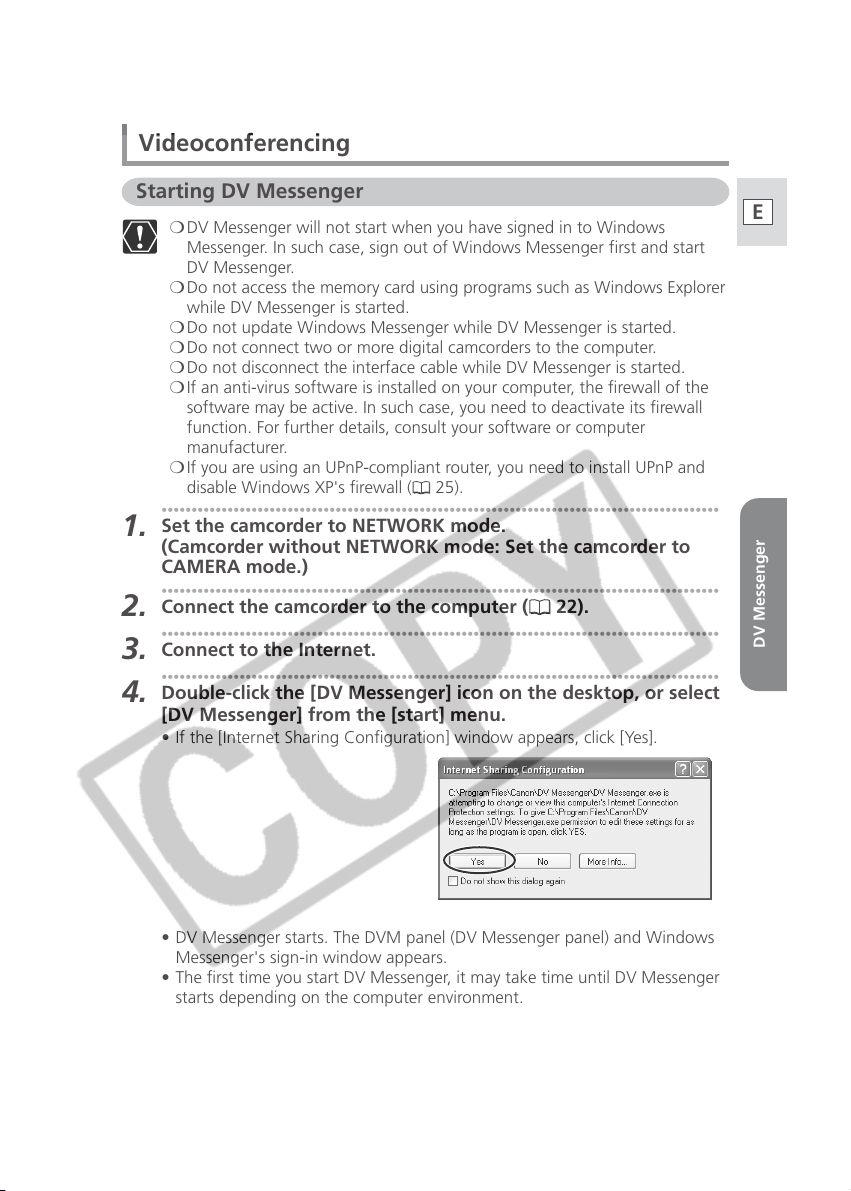
• If the [Internet Sharing Configuration] window appears, click [Yes].
25).
E
DV Messenger
• DV Messenger starts. The DVM panel (DV Messenger panel) and Windows
Messenger's sign-in window appears.
• The first time you start DV Messenger, it may take time until DV Messenger
starts depending on the computer environment.
31
Page 32
Videoconferencing
•••••••••••••••••••••••••••••••••••••••••••••••••••••••••••••••••••••••••••••••••••••••••••••
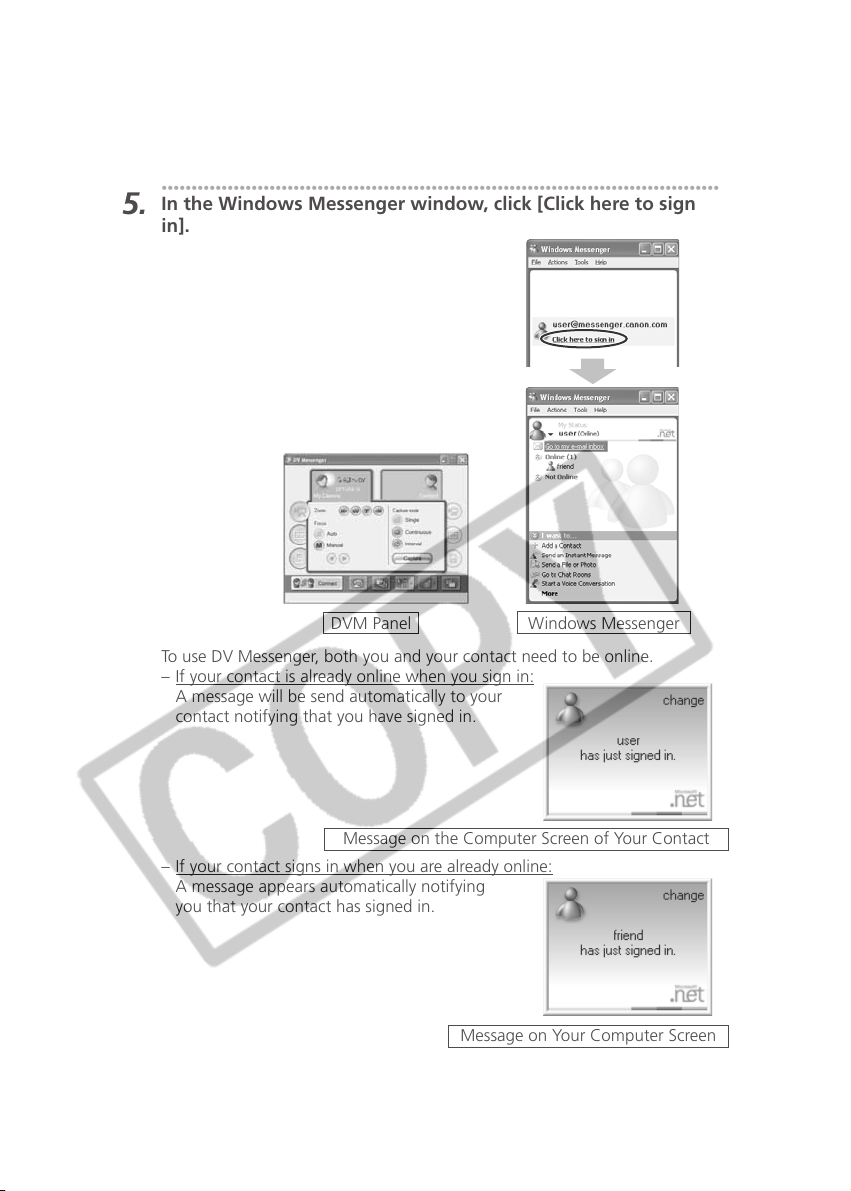
In the Windows Messenger window, click [Click here to sign
5.
in].
DVM Panel
To use DV Messenger, both you and your contact need to be online.
–
If your contact is already online when you sign in:
A message will be send automatically to your
contact notifying that you have signed in.
Message on the Computer Screen of Your Contact
– If your contact signs in when you are already online:
A message appears automatically notifying
you that your contact has signed in.
Message on Your Computer Screen
Windows Messenger
32
Page 33
Preparing the Camcorder for Communication
When you have signed in, set the camcorder and adjust the volume of the speaker
and microphone.
❍ Connect speaker or headphones as necessary.
❍ As microphone, use the microphone of the camcorder.
•••••••••••••••••••••••••••••••••••••••••••••••••••••••••••••••••••••••••••••••••••••••••••••
Set the camcorder to NETWORK mode.
1.
(Camcorder without NETWORK mode: Set the camcorder to
CAMERA or PLAY (VCR) mode.)
When you have set the camcorder to PLAY (VCR) mode, play back the tape.
•••••••••••••••••••••••••••••••••••••••••••••••••••••••••••••••••••••••••••••••••••••••••••••
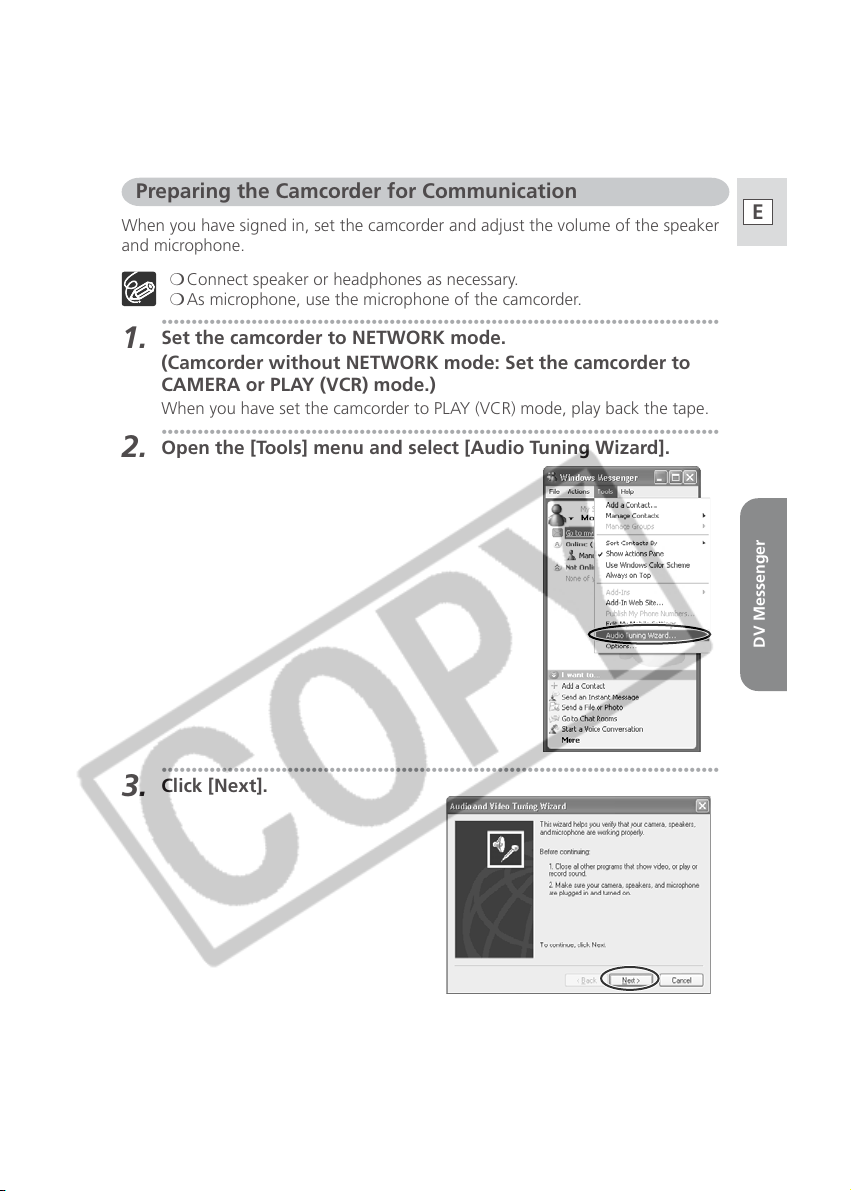
Open the [Tools] menu and select [Audio Tuning Wizard].
2.
•••••••••••••••••••••••••••••••••••••••••••••••••••••••••••••••••••••••••••••••••••••••••••••
Click [Next].
3.
E
DV Messenger
33
Page 34
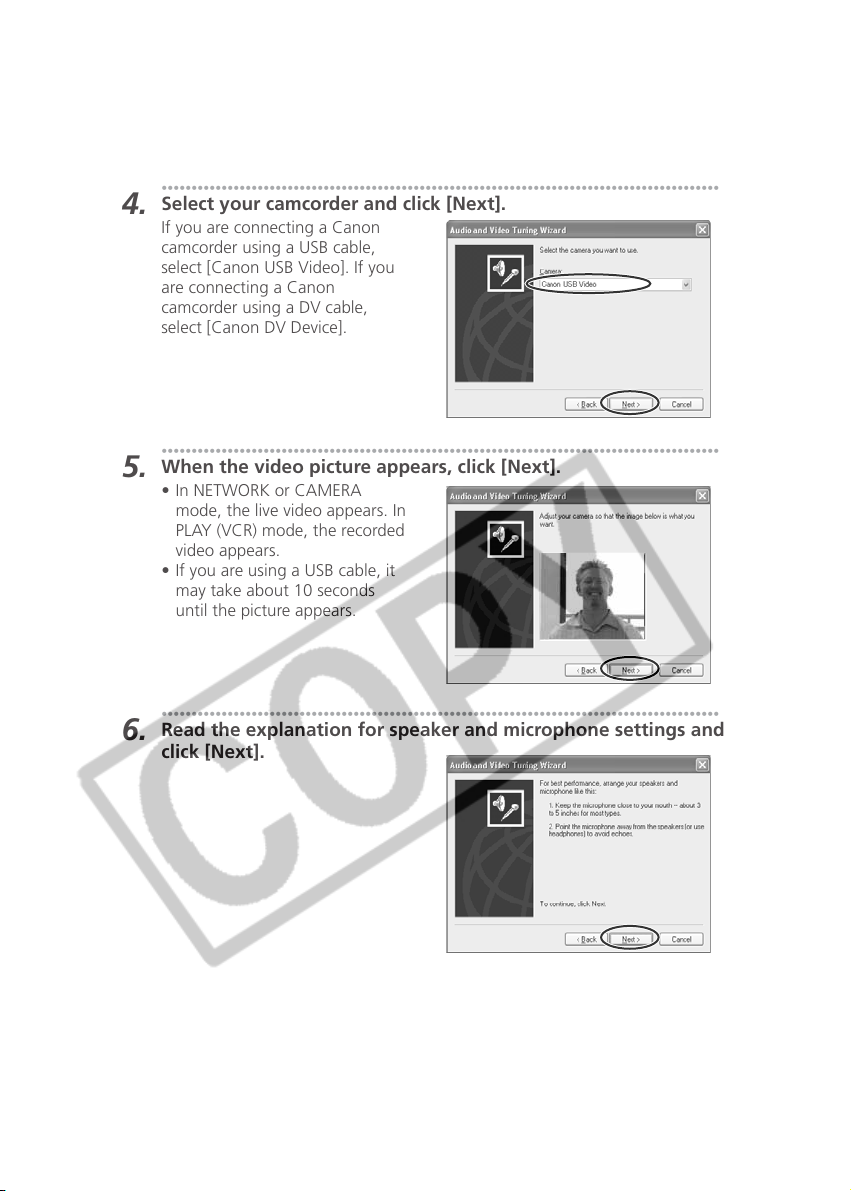
Videoconferencing
•••••••••••••••••••••••••••••••••••••••••••••••••••••••••••••••••••••••••••••••••••••••••••••
Select your camcorder and click [Next].
4.
If you are connecting a Canon
camcorder using a USB cable,
select [Canon USB Video]. If you
are connecting a Canon
camcorder using a DV cable,
select [Canon DV Device].
•••••••••••••••••••••••••••••••••••••••••••••••••••••••••••••••••••••••••••••••••••••••••••••
When the video picture appears, click [Next].
5.
• In NETWORK or CAMERA
mode, the live video appears. In
PLAY (VCR) mode, the recorded
video appears.
• If you are using a USB cable, it
may take about 10 seconds
until the picture appears.
•••••••••••••••••••••••••••••••••••••••••••••••••••••••••••••••••••••••••••••••••••••••••••••
Read the explanation for speaker and microphone settings and
6.
click [Next].
34
Page 35
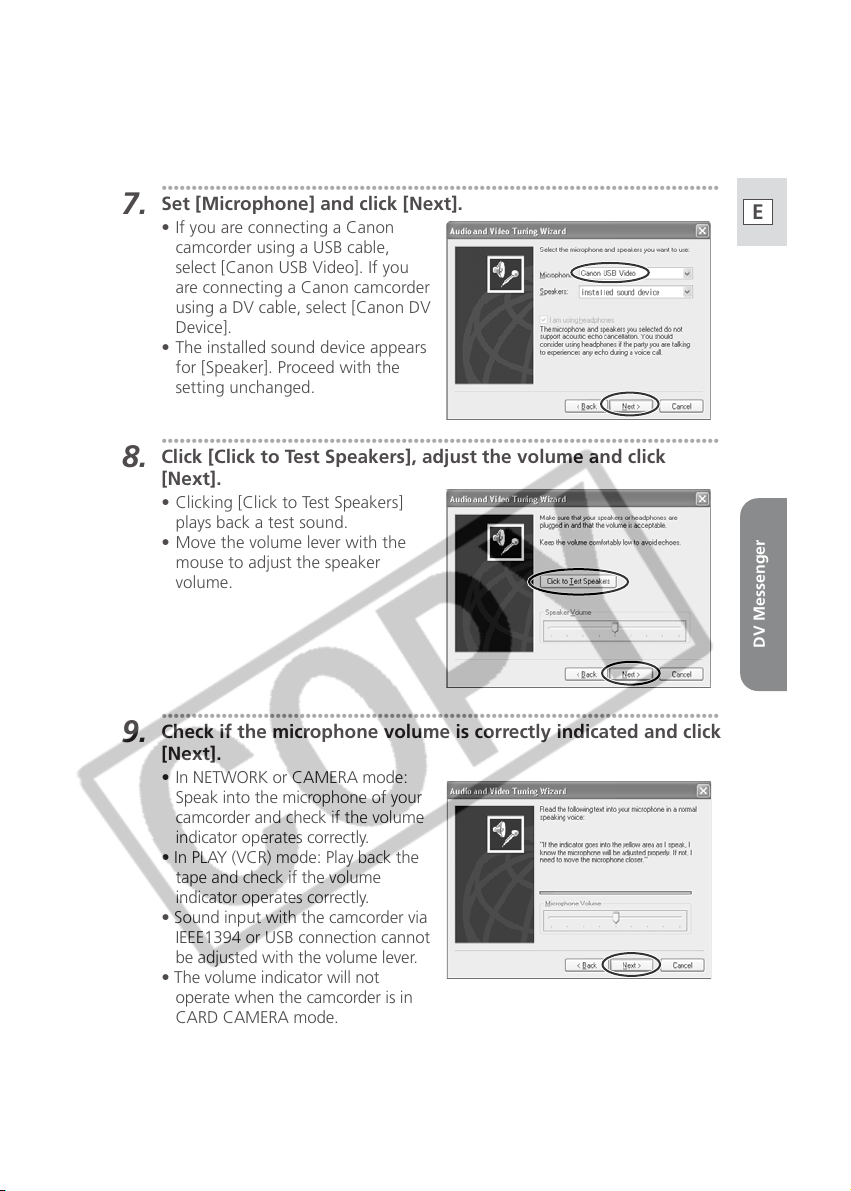
•••••••••••••••••••••••••••••••••••••••••••••••••••••••••••••••••••••••••••••••••••••••••••••
Set [Microphone] and click [Next].
7.
• If you are connecting a Canon
camcorder using a USB cable,
select [Canon USB Video]. If you
are connecting a Canon camcorder
using a DV cable, select [Canon DV
Device].
• The installed sound device appears
for [Speaker]. Proceed with the
setting unchanged.
•••••••••••••••••••••••••••••••••••••••••••••••••••••••••••••••••••••••••••••••••••••••••••••
Click [Click to Test Speakers], adjust the volume and click
8.
[Next].
• Clicking [Click to Test Speakers]
plays back a test sound.
• Move the volume lever with the
mouse to adjust the speaker
volume.
•••••••••••••••••••••••••••••••••••••••••••••••••••••••••••••••••••••••••••••••••••••••••••••
Check if the microphone volume is correctly indicated and click
9.
[Next].
• In NETWORK or CAMERA mode:
Speak into the microphone of your
camcorder and check if the volume
indicator operates correctly.
• In PLAY (VCR) mode: Play back the
tape and check if the volume
indicator operates correctly.
• Sound input with the camcorder via
IEEE1394 or USB connection cannot
be adjusted with the volume lever.
• The volume indicator will not
operate when the camcorder is in
CARD CAMERA mode.
E
DV Messenger
35
Page 36
Videoconferencing
•••••••••••••••••••••••••••••••••••••••••••••••••••••••••••••••••••••••••••••••••••••••••••••
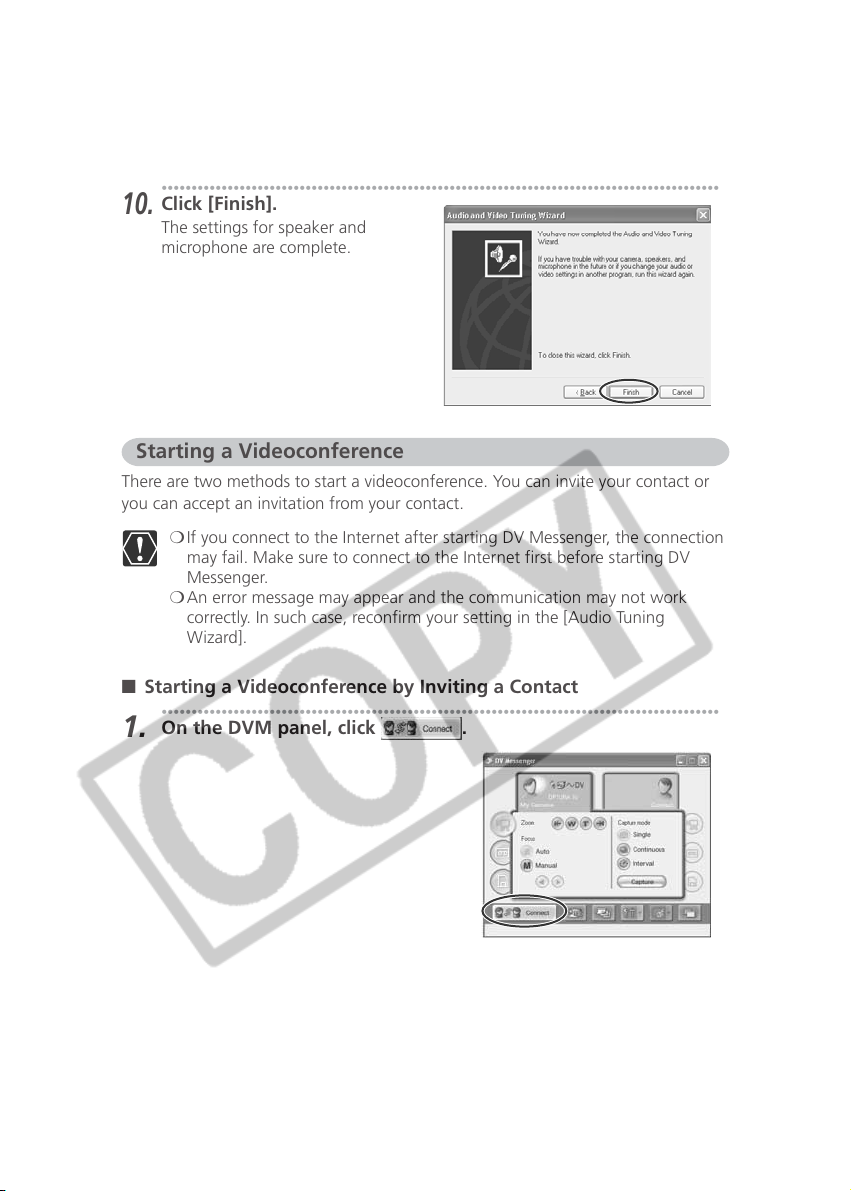
Click [Finish].
10.
The settings for speaker and
microphone are complete.
Starting a Videoconference
There are two methods to start a videoconference. You can invite your contact or
you can accept an invitation from your contact.
❍ If you connect to the Internet after starting DV Messenger, the connection
may fail. Make sure to connect to the Internet first before starting DV
Messenger.
❍ An error message may appear and the communication may not work
correctly. In such case, reconfirm your setting in the [Audio Tuning
Wizard].
■ Starting a Videoconference by Inviting a Contact
•••••••••••••••••••••••••••••••••••••••••••••••••••••••••••••••••••••••••••••••••••••••••••••
On the DVM panel, click .
1.
36
Page 37
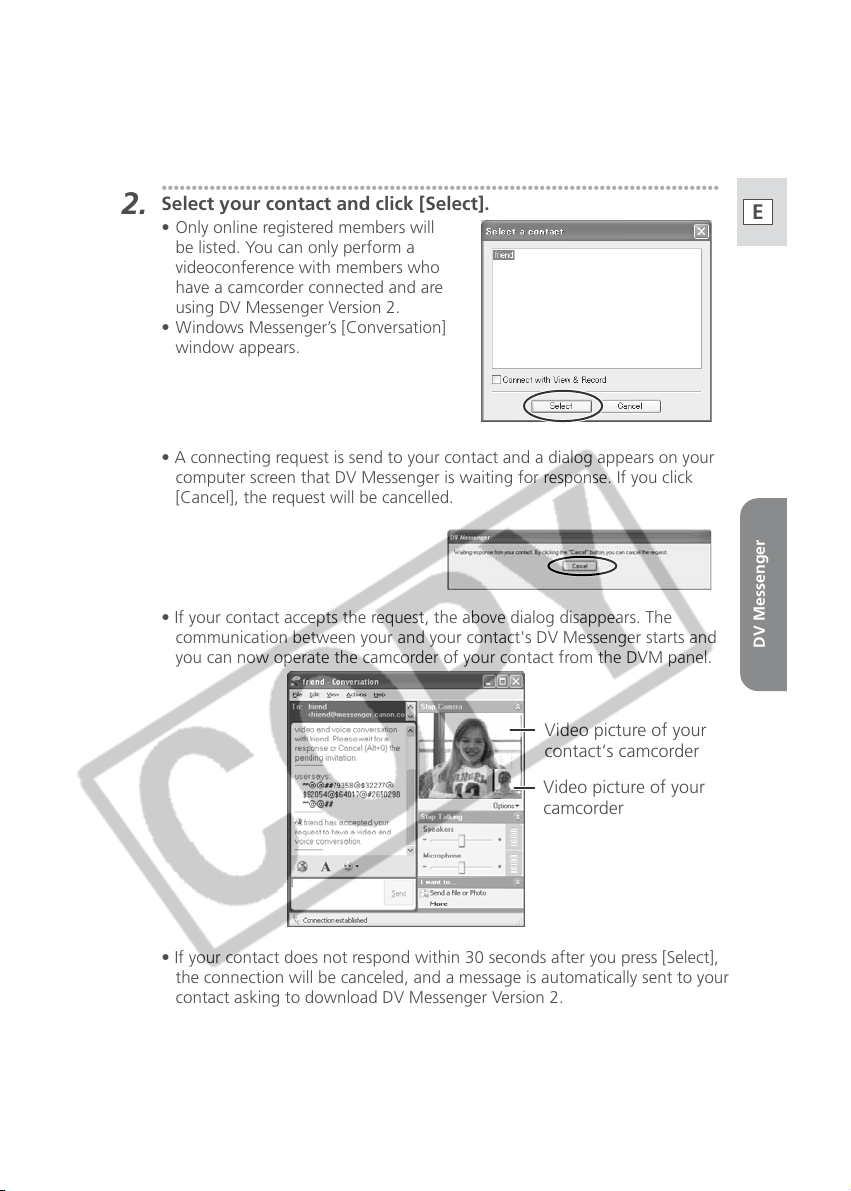
•••••••••••••••••••••••••••••••••••••••••••••••••••••••••••••••••••••••••••••••••••••••••••••
Select your contact and click [Select].
2.
• Only online registered members will
be listed. You can only perform a
videoconference with members who
have a camcorder connected and are
using DV Messenger Version 2.
• Windows Messenger’s [Conversation]
window appears.
• A connecting request is send to your contact and a dialog appears on your
computer screen that DV Messenger is waiting for response. If you click
[Cancel], the request will be cancelled.
• If your contact accepts the request, the above dialog disappears. The
communication between your and your contact's DV Messenger starts and
you can now operate the camcorder of your contact from the DVM panel.
Video picture of your
contact‘s camcorder
E
DV Messenger
Video picture of your
camcorder
• If your contact does not respond within 30 seconds after you press [Select],
the connection will be canceled, and a message is automatically sent to your
contact asking to download DV Messenger Version 2.
37
Page 38
Videoconferencing
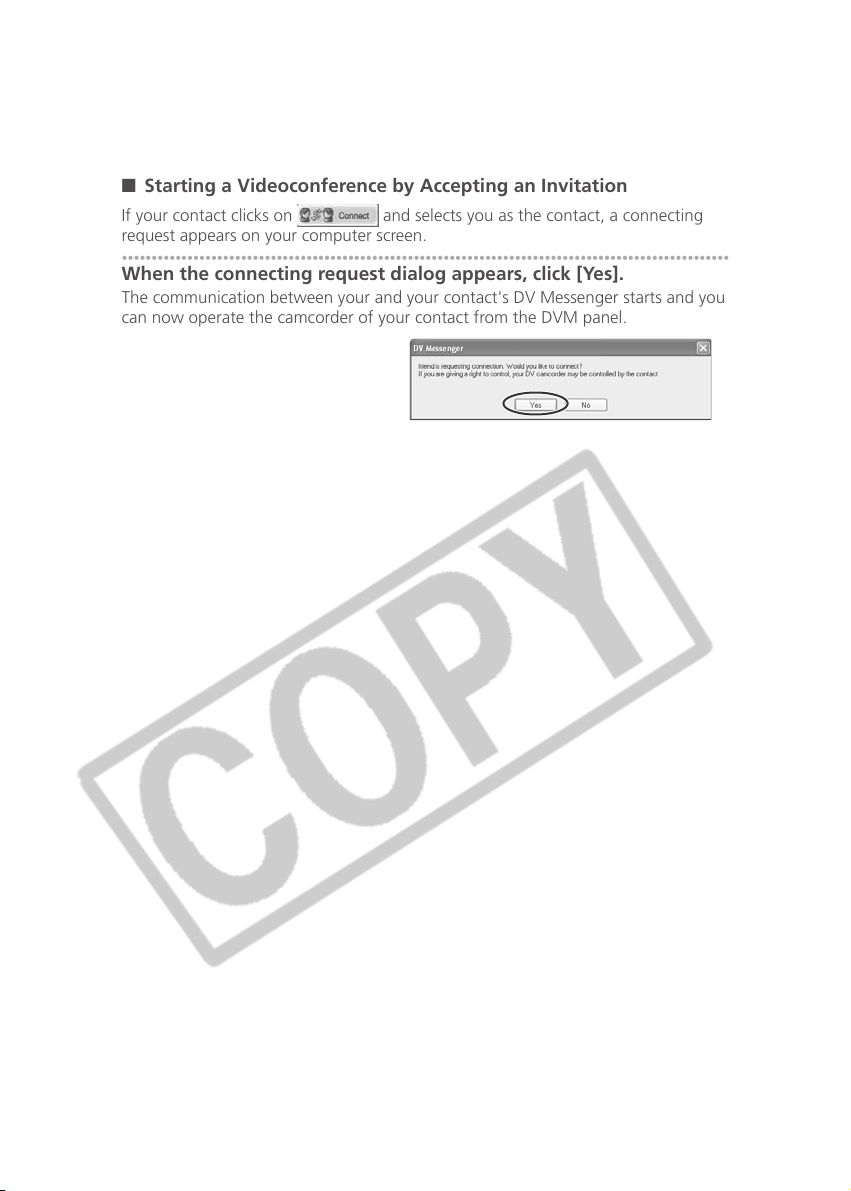
■ Starting a Videoconference by Accepting an Invitation
If your contact clicks on and selects you as the contact, a connecting
request appears on your computer screen.
••••••••••••••••••••••••••••••••••••••••••••••••••••••••••••••••••••••••••••••••••••••••••••••••••••••
When the connecting request dialog appears, click [Yes].
The communication between your and your contact's DV Messenger starts and you
can now operate the camcorder of your contact from the DVM panel.
38
Page 39
Ending DV Messenger
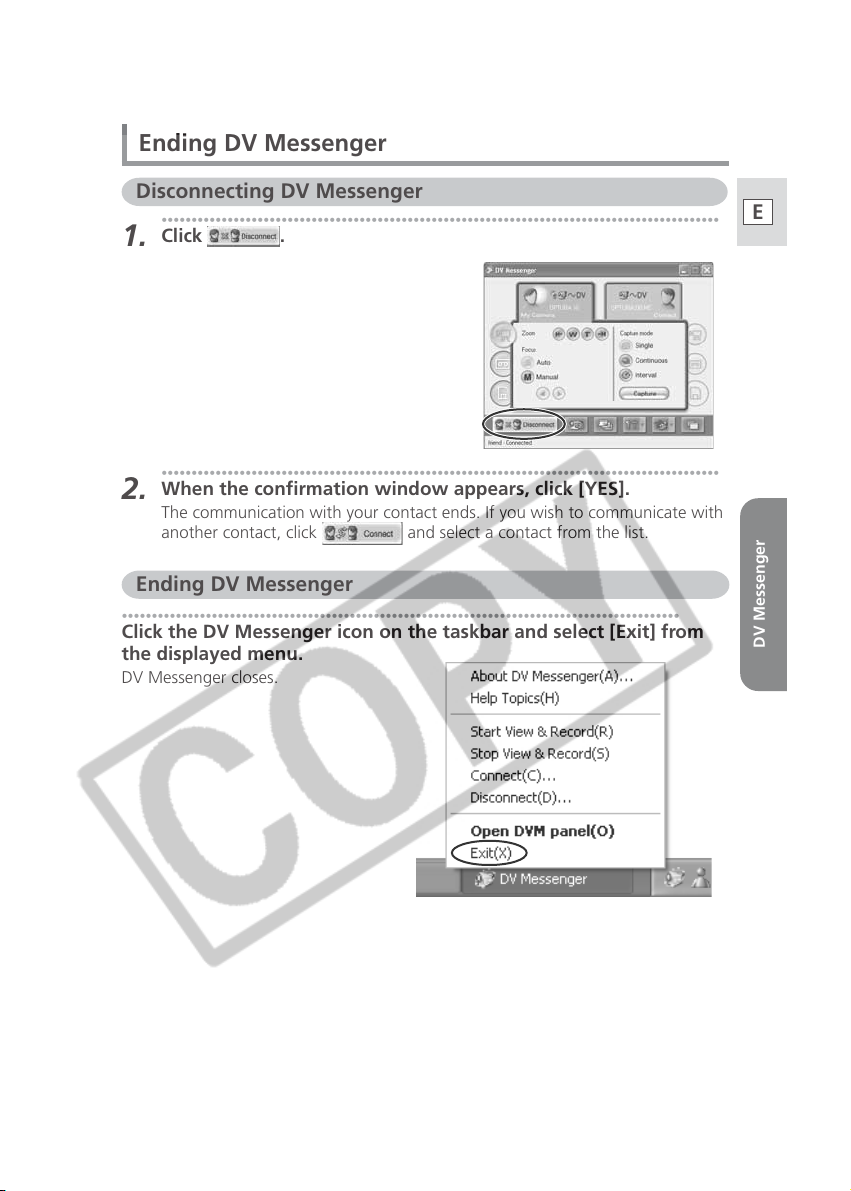
Disconnecting DV Messenger
•••••••••••••••••••••••••••••••••••••••••••••••••••••••••••••••••••••••••••••••••••••••••••••
Click .
1.
•••••••••••••••••••••••••••••••••••••••••••••••••••••••••••••••••••••••••••••••••••••••••••••
When the confirmation window appears, click [YES].
2.
The communication with your contact ends. If you wish to communicate with
another contact, click
Ending DV Messenger
•••••••••••••••••••••••••••••••••••••••••••••••••••••••••••••••••••••••••••••••••••••••••••••
Click the DV Messenger icon on the taskbar and select [Exit] from
the displayed menu.
DV Messenger closes.
and select a contact from the list.
E
DV Messenger
39
Page 40
CANON INC.
U.S.A. Canon U.S.A., Inc.
CANADA Canon Canada Inc.
ASIA Canon Hongkong Co., Ltd.
Canon Customer Care Center
Tel (US): 1-800-828-4040
(Mon.-Fri., 9 AM to 8 PM Eastern Time)
Tel (Canada): 1-800-OK-CANON (1-800-652-2666)
19/F., The Metropolis Tower, 10 Metropolis Drive,
Hunghom, Kowloon, Hong Kong
Phone: 852-2170-2828
Fax: 852-2723-9684
Document réalisé avec du papier recyclé à 100%.
Printed on 100% reused paper.
El papel aqui utilizado es 100% reciclado.
PRINTED IN JAPAN
PUB. DIM-594 © CANON INC. 2003 IMPRIME AU JAPON
0403A/AB6.0 DY8-9120-397-000 IMPRESO EN JAPÓN
 Loading...