

Canon Color ImageRUNNER C2058 Operator's Manual
Copier Operator's Manual/
Basic Operations
Please read this manual before operating this equipment.
After you finish reading this manual, store it in a safe place for future reference.
ENGLISH

• Operations Described in These Manuals •
Safety Considerations
Reference
Manual
Copier Operator’s
Manual/Basic
Operations
(This Manual)
Setting Additional Functions
Clearing Paper Jams
Loading Paper/Replacing Toner Cartridges
Basic Operations
Setting Various Functions
Enlarging/
Reducing
Copier Operator’s
Manual/Advanced
Operations
Layouts
Color Balance and Color Creation
• Color Balance
• Single Color Copies
Changing the Original Image on Copies
What is Color
Custom Copy
Settings
Making Copies of
Various Kinds of Originals
You can make
these kinds
of copies.
ii

■ The Canon Color imageRUNNER C2058 provides the following functions.
Copier Operator’s Manual/Basic Operations
For function in the Copier Operator’s Manual/Advanced Operations, see the rear side of this sheet.
Enlargement/Reduction Two-sided
Preset Copy Ratios: See p. 3-20
Enlarge/reduce standard-size originals to different
standard sizes.
LTR-R Copied on 11" x 17"
Copied on STMT-R
Auto Zoom: See p. 3-22
Enlarge/reduce originals depending on the paper
size.
Zoom: See p. 3-25
Enlarge/reduce originals by any copy ratio, in 1%
increments.
Zoom Program: See p. 3-29
Enter the original size and paper size in inches.
XY Zoom: See p. 3-33
Make copies using different copy ratios in the
horizontal and vertical directions.
Image Combination: See p. 4-32
Make copies by reducing several sheets of
originals to fit on one side or both sides of the
selected paper size.
Image Separation: See p. 4-42
Make copies in enlarged form on separate sheets
of paper by dividing originals into equal sections.
1 → 2-sided: See p. 3-45
Make 1 two-sided copy from 2 one-sided originals.
2 → 2-sided: See p. 3-50
Make two-sided copies from two-sided originals.
2 → 1-sided: See p. 3-52
Make one-sided copies on separate sheets of
paper from two-sided originals.
Transparency Interleaving
Transparency Interleaving: See p. 4-4
Make copies with sheets of paper interleaved
between transparencies.
Interleaves
without images
REPORT
Interleaves
with images
Interleaf
sheets
Interleaf
sheets
REPORT
REPORT
REPORT
Transparencies
Transparencies
Shift
Shift: See p. 4-7
Make copies by shifting the original image.
Frame Erase
Original Frame Erase: See p. 4-21
Make copies without the dark border and frame
that appear on the copy.
Original Frame Erase
not selected
Original Frame Erase
selected
Sheet Frame Erase: See p. 4-24
Make copies by creating a blank border on the
copy.
Book Frame Erase: See p. 4-26
Make copies without the dark border as well as
center and contour lines that appear on the copy.
Book Frame Erase
not selected
Entire Image: See p. 3-27
Slightly reduce originals to prevent trimming of
the original’s edges.
Multi-page Enlargement: See p. 3-38
Make copies on multiple pages to provide an
enlarged copy size.
Page Separation
Two-page Separation: See p. 4-2
Make copies of facing pages in a book on two
separate sheets of paper in one step.
Book → 2-sided: See p. 3-54
Make two-sided copies from facing pages in a
bound original, such as a book.
Margin: See p. 4-18
Make copies by shifting the entire original image
slightly to create a margin.
Book Frame Erase
selected
Binding Erase: See p. 4-29
Make copies without the shadows that appear on
the copy due to binding holes in originals.
Binding Erase
not selected
Binding Erase
selected

Copier Operator’s Manual/Advanced Operations
For function in the Copier Operator’s Manual/Basic Operations, see the rear side of this sheet.
Color Balance: See p. 1-2
Make copies by adjusting color tones.
One Touch Color: See p. 1-12
Make copies by adjusting color tones with one touch of a key.
Vivid Colors
Tranquil Colors
Highlight
Reproduction
Single Color: See p. 1-15
Make copies in one specific color.
Color Creation
Background Color Adjustment: See p. 1-18
Make copies eliminating or adjusting the background color.
Framing/BlankingColor Balance
Framing: See p. 2-2
Make copies only of a designated area on the original.
Blanking: See p. 2-14
Make copies excluding a designated area on the original.
Sharpness
Sharpness: See p. 2-46
Make copies by varying the sharpness or softness of original
images.
Image Creation
Nega/Posi: See p. 2-26
Make copies reversing the hues and gradations of original
images.
Image Repeat: See p. 2-28
Make copies repeating an original image on a single sheet of
paper.
Lighten Image
Darken Image
Old-fashioned
Photo Image
2nd Side Elimination: See p. 1-22
Make copies eliminating the image shadow from the rear
side of two-sided originals printed on lightweight paper.
Normal settings
Image on
front side
Image on
rear side
Settings with
2nd side elimination
Set the
sharpness high
Set the
sharpness low
Mirror Image: See p. 2-34
Make mirror image copies reversing an original image across
the horizontal axis.
Slanted Image: See p. 2-40
Make copies of an original image at a designated angle
(slant).
PREFACE
Thank you for purchasing the Canon Color imageRUNNER C2058. This
Copier Operator’s Manual describes the iR C2058, its functions, and its
method of use. It also describes various precautions to be observed in
order to ensure safe operation. Please read this manual thoroughly before operating the iR C2058 in order to familiarize yourself with its capabilities, and to make the most of its many functions. After reading this
manual, store it in a safe place for future reference.
CAUTION
In this manual, CAUTION MESSAGES with this symbol indicate that
neglecting the suggested procedure or practice could result in personal injury.
NOTICE:
Considerable effort has been made to ensure that this manual is free
of inaccuracies and omissions.
However, as we are constantly improving our products, some of the
data contained herein may not exactly reflect the current model of the
particular product with which this manual has been included. If you
have a need for an exact specification, please contact Canon for the
current specification.
Do not make any changes or modifications to the equipment unless otherwise specified in the manual. If such changes or modifications should
be made, you could be required to stop operation of the equipment.
The information necessary for using the iR C2058 safely is included in
the Reference Manual. Be sure to read the Reference Manual before
operating the iR C2058.
Some copy image examples used in this manual are for reference purposes only.
This machine is equipped with an anti-counterfeiting function.
i

Table of Contents Copier Operator’s Manual/Basic Operations
Table of Contents
Operations Described in These Manuals
The Canon Color imageRUNNER C2058 provides the following functions.
PREFACE ...............................................................................................................................................................i
Table of Contents .................................................................................................................................................. ii
How to Use This Manual ...................................................................................................................................... iv
Illustrated Function Summary ............................................................................................................................... v
Chapter 1
Introduction
■ Parts and Their Functions ...........................................................................................................................1-2
Control Panel Parts and Functions 1-2
Touch Panel Display Operations 1-4
■ Legal Limitation on Usage of Your Product and the Use of Images ........................................................1-8
■ Preserving Color Copies .............................................................................................................................1-9
Fading due to exposure to light 1-9
Use of clear covers 1-9
Use of adhesives 1-9
Inserting copies between printed pages 1-9
Folding of copies 1-9
Effect of high temperatures 1-9
Chapter 2
Basic Copying
■ Flow of Copy Operations ............................................................................................................................. 2-2
■ Original Placement .......................................................................................................................................2-5
Placing the Original on the Platen Glass 2-5
Placing Originals in the Feeder (optional accessory) 2-7
■ Entering the Copy Quantity ......................................................................................................................... 2-9
■ Interrupt Mode (Interrupting the Current Job to Make Priority Copies) ................................................2-10
■ Auto Start .................................................................................................................................................... 2-14
■ Automatic Functions/Energy Saver Functions/Guide Function ............................................................ 2-16
Auto Drawer Switching 2-16
Auto Clear Function 2-16
Energy Saver Mode 2-16
Low Power Mode 2-17
Sleep Function/Auto Sleep Function 2-17
Guide Function 2-18
■ Entering the Dept. ID and Password ......................................................................................................... 2-19
■ Switching between the Full Color Mode and Black Monochrome Mode (including ACS) ..................2-21
■ Confirming, Canceling, or Changing the Mode Settings ........................................................................ 2-22
Chapter 3
Making Copies Using the Basic Features
■ Selecting the Paper Size .............................................................................................................................. 3-2
Automatic Paper Selection 3-2
Manual Paper Selection 3-4
Using the Stack Bypass 3-5
■ Adjusting Copy Exposure ......................................................................................................................... 3-15
Automatic Exposure Adjustment 3-15
Manual Exposure Adjustment 3-16
■ Selecting the Original Type .......................................................................................................................3-17
■ Enlarging/Reducing Originals to the Desired Size .................................................................................. 3-20
Preset Copy Ratios (Enlarging/Reducing Originals from One Standard Paper Size to Another) 3-20
Auto Zoom (Automatically Setting the Copy Ratio Based on the Original and Paper Size) 3-22
Zoom (Freely Enlarging/Reducing, in 1% Increments) 3-25
Entire Image (Slightly Reducing Images to Prevent Trimming of the Original Edges) 3-27
Zoom Program (Calculating the Copy Ratio Based on the Original and Paper Size) 3-29
ii

Copier Operator’s Manual/Basic Operations Table of Contents
XY Zoom (Making Copies with Different Horizontal and Vertical Copy Ratios) 3-33
Multi-page Enlargement (Making Copies on Multiple Pages to Provide an Enlarged Copy Size) 3-38
■ Two-sided Mode ......................................................................................................................................... 3-45
1 → 2-sided (Making Two-sided Copies from One-sided Originals) 3-45
2 → 2-sided (Making Two-sided Copies from Two-sided Originals) 3-50
2 → 1-sided (Making One-sided Copies from Two-sided Originals) 3-52
Book → 2-sided (Making Two-sided Copies from Facing Pages in a Book in One Step) 3-54
■ Sorting Copies (Sorter) .............................................................................................................................. 3-56
Chapter 4
Making Various Types of Copies
■
Two-page Separation (Making Copies of Facing Pages in a Book on Two Separate Sheets in One Step) ..............
■
Transparency Interleaving (Making Copies with Sheets of Paper Interleaved between Transparencies) ..........
■ Shift (Making Copies with the Original Images Shifted) ...........................................................................4-7
Making Copies with the Original Images Shifted to the Center or Corner 4-7
Making Copies with the Original Images Shifted Using the Number Keys 4-10
Making Copies with the Original Images Shifted Using the Edit Pen 4-14
■ Margin (Making Copies with Margins) ...................................................................................................... 4-18
■ Frame Erase (Erasing Shadows from Copies) ........................................................................................ 4-21
Original Frame Erase (Erasing Shadows Around the Original Image on Copies) 4-21
Sheet Frame Erase (Erasing Shadows from the Edge of Copies) 4-24
Book Frame Erase (Erasing Shadows from the Center Line/Edge of Copies) 4-26
Binding Erase (Erasing Binding Holes on Copies) 4-29
■ Image Combination (Reducing Several Originals to Fit on a Single Sheet) ......................................... 4-32
■
Image Separation (Dividing the Original into Equal Sections and Copying Each Section on a Separate Sheet) ............
4-2
4-4
4-42
Chapter 5
Storing/Recalling Copy Settings
■ Mode Memory (Storing and Recalling Copy Settings) .............................................................................. 5-2
Storing Copy Settings as a Copy Job 5-2
Assigning a Name to a Copy Job 5-5
Erasing a Copy Job 5-8
Recalling a Copy Job 5-11
■ Recall (Recalling Previously Used Copy Jobs) ....................................................................................... 5-13
Chapter 6
Custom Copy Settings
■ What are “Custom Copy Settings”? ........................................................................................................... 6-2
■ Custom Copy Settings ................................................................................................................................. 6-3
■ Standard Key Settings ................................................................................................................................. 6-4
■ Auto Sort ....................................................................................................................................................... 6-6
■ Changing Standard Settings ....................................................................................................................... 6-7
■ Initialize Custom Copy Settings ................................................................................................................ 6-10
Chapter 7
Troubleshooting
■ Service-call Messages ................................................................................................................................. 7-2
■ Self-diagnostic (Error) Messages ...............................................................................................................7-3
Appendix
■ Main Specifications ..................................................................................................................................... A-2
Index
■ Index ............................................................................................................................................................... I-2
iii

How to Use This Manual Copier Operator’s Manual/Basic Operations
How to Use This Manual
Notes
Notes and restrictions
regarding the use of a function.
1
Operational and
2
Supplementary Instructions
Numbered steps describing how to
select and operate various functions.
Supplementary instructions and
reference pages are provided.
3
Symbols Used in This Copier Operator’s Manual
WARNING
Indicates a warning concerning operations that may lead to death or injury
to persons if not performed correctly. In order to use the machine safely,
always pay attention to these warnings.
CAUTION
Indicates a caution concerning operations that may lead to injury to persons or damage to property if not performed correctly. In order to use the
machine safely, always pay attention to these cautions.
REQUEST
Indicates important information or prohibited actions that should always
be followed when operating the machine. These should always be read to
avoid damage to the machine or injury to persons.
NOTICE:
Indicates operational warnings. Be certain to read these items so that you
operate the machine correctly.
MEMO:
Indicates notes for operation or additional explanations. Reading these is
recommended.
Indicates supplementary instructions and reference pages at the end of
the section. Reading these is recommended when further information is
required.
The following symbols for keys are used in this manual.
■ Keys on the control panel
Start
key,
Reset
key
■ Keys on the touch panel display
[DONE] key, [OK] key
Screen shots of the touch panel display used in this manual illustrate the situation when the
feeder (optional accessory) is attached.
iv
Copier Operator’s Manual/Basic Operations Illustrated Function Summary
Illustrated Function Summary
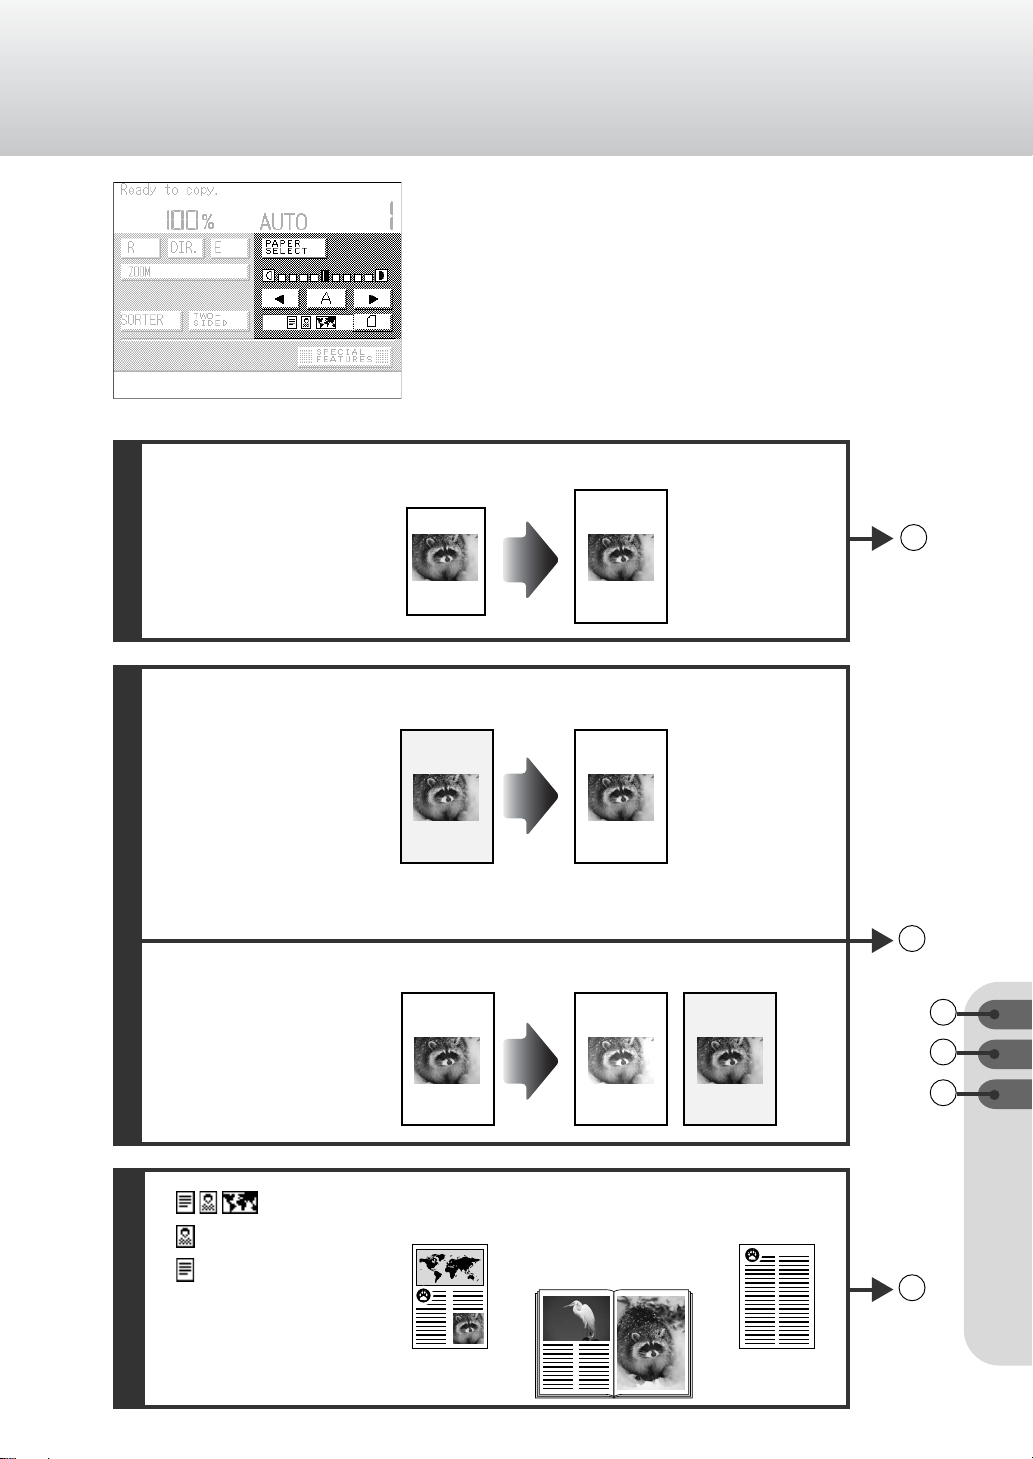
[PAPER SELECT]
(See p. 3-2.)
Select the size of the paper to be
copied to.
The paper size can also be
automatically selected.
[A] (Auto)
(See p.3-15.)
The machine automatically adjusts
the copy exposure to the most
appropriate level to match the
original.
When making copies in the Full
Color mode, copies can be made
with the color around the image
erased to produce a white
background.
▼
[ ] (Light)
[ ] (Dark)
▼
(See p. 3-16.)
Adjusts the copy exposure to
match the contrast of the original.
STMT-size original
Original Copy
Original Light Dark
Copy on LTR-size paper
Example:
If you want to make a LTR
copy of a STMT original,
designate the size manually.
1
2
1
2
3
[ ] (TEXT/PHOTO/MAP)
[ ] (PRINTED IMAGE)
TEXT/PHOTO/MAP
[ ] (BLACK TEXT)
(See p. 3-17.)
Adjusts the image quality and make
copies to match the type of original.
BLACK TEXT
PRINTED IMAGE
3
v

Illustrated Function Summary Copier Operator’s Manual/Basic Operations
[R] (Reduce)
(See p. 3-20.)
Makes reduced size copies of
standard-size originals onto
standard-size paper.
LTR-R-size original
Copy on STMT-R-size paper
[DIR.]
(See p. 3-20.)
Makes copies the same size as
the original.
[E] (Enlarge)
(See p. 3-20.)
Makes enlarged size copies of
standard-size originals onto
standard-size paper.
LTR-R-size original
LTR-R-size original
LTR-R-size paper
4
Copy on 11" x 17"-size paper
vi
Copier Operator’s Manual/Basic Operations Illustrated Function Summary
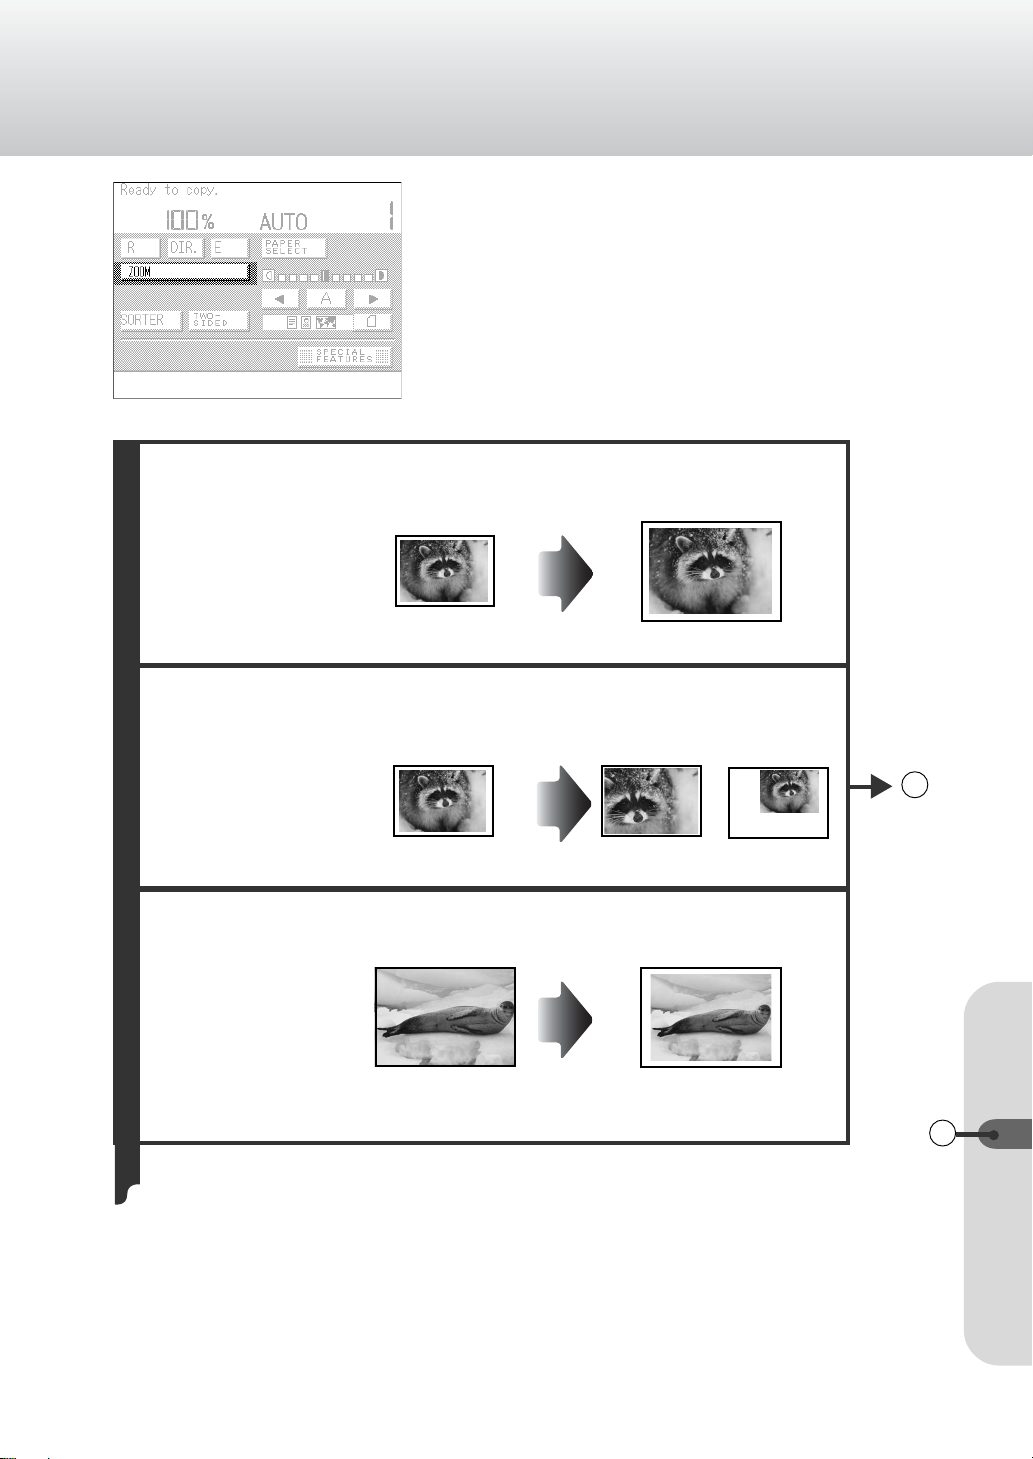
[ZOOM]
[AUTO]
(See P. 3-22.)
Enlarges/reduces originals to
match to the selected paper size.
LTR-R-size original Copy on 11" x 17"-size paper
[-] (Zoom)
[+]
(See p. 3-25.)
Enlarges/reduces originals by any
copy ratio in 1% increments.
[ENTIRE IMAGE]
(See p. 3-27.)
When copying an original where
the image fills the page, the edges
of the original may be cut off on
copies. Using the Entire Image
mode, the image is slightly
reduced before copying so that
the entire original is copied
without trimming of the edges.
11" x 17"-size selected
Original Copy (150%)
Original that extends to the edge
of the sheet
Copy (50%)
4
Set the ratio
Copied without trimming
of the edges
Slightly reduced
4
vii

Illustrated Function Summary Copier Operator’s Manual/Basic Operations
[ZOOM PROGRAM]
(See p. 3-29.)
You can designate the original size
(size of original image or original)
and copy size (size of copied
image or paper) in inch when
making copies.
Enter the original’s vertical (Y)
size as 4" (100 mm)
[XY ZOOM]
(See p. 3-33.)
You can designate different copy
ratios (%) for each of the X and Y
axes when making copies.
Enter the original’s size of
5 7/8" (150 mm)
5 7/8" (150 mm)
4"
(100 mm)
Enter the copy size of 7 7/8"
(200 mm) for the Y axis
Original
Set the LTR-R-size original
The copy is enlarged with the same ratio
Enter the copy size of 7 7/8"
(200 mm)
The copy is enlarged only vertically
The copy’s vertical and horizontal axes
Set the ratios to
Vertical 130%
Horizontal 80%
XY Zoom
The copy ratio is automatically set
horizontally and vertically
7 7/8" (200 mm)
7 7/8"
(200 mm)
have different ratios
Y = 130%
4
X = 80%
viii
[MULTI-PG ENLARGE]
(See p. 3-38.)
You can make copies of originals
on several sheets of paper when
requiring copies larger than 11" x
17"-size by cutting and pasting the
output sheets together.
Select LTR-size paper
AUTO XY Zoom
Original Copies cut and pasted together
Copies
Copier Operator’s Manual/Basic Operations Illustrated Function Summary
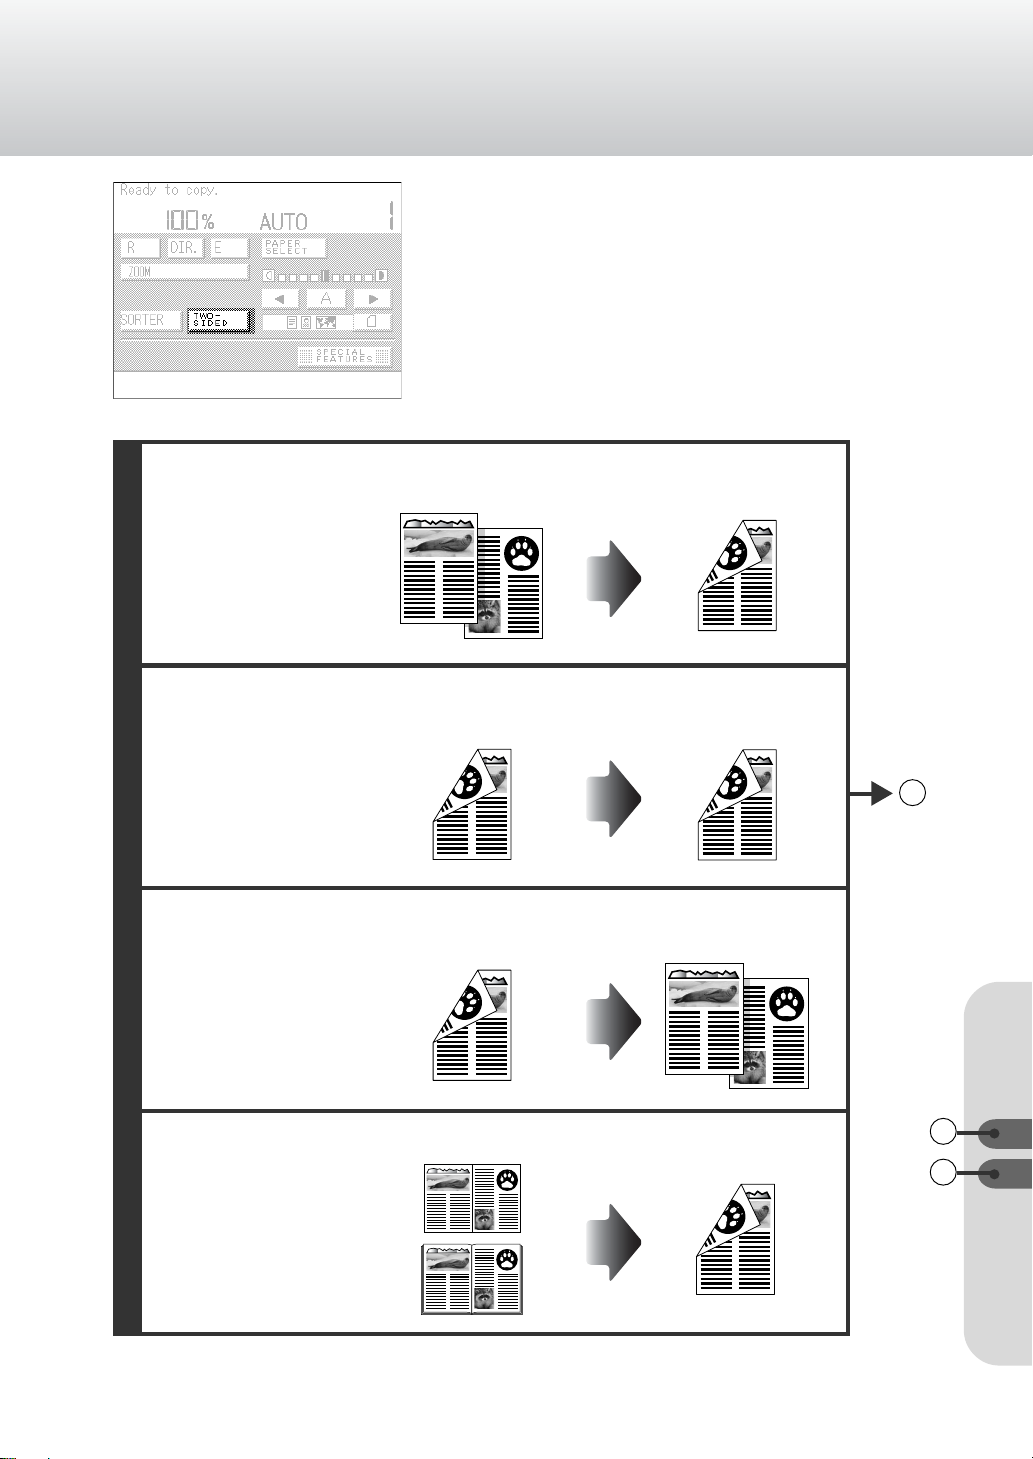
[TWO-SIDED]
[1 2-SIDED]
▼
(See p. 3-45)
Makes a two-sided copy from onesided originals.
2 one-sided originals A two-sided copy
[2 2-SIDED]
▼
(see p. 3-50.)
Makes two-sided copy from twosided originals.
[2 1-SIDED]
▼
(See p. 3-52.)
Makes 2 one-sided copies from a
two-sided original.
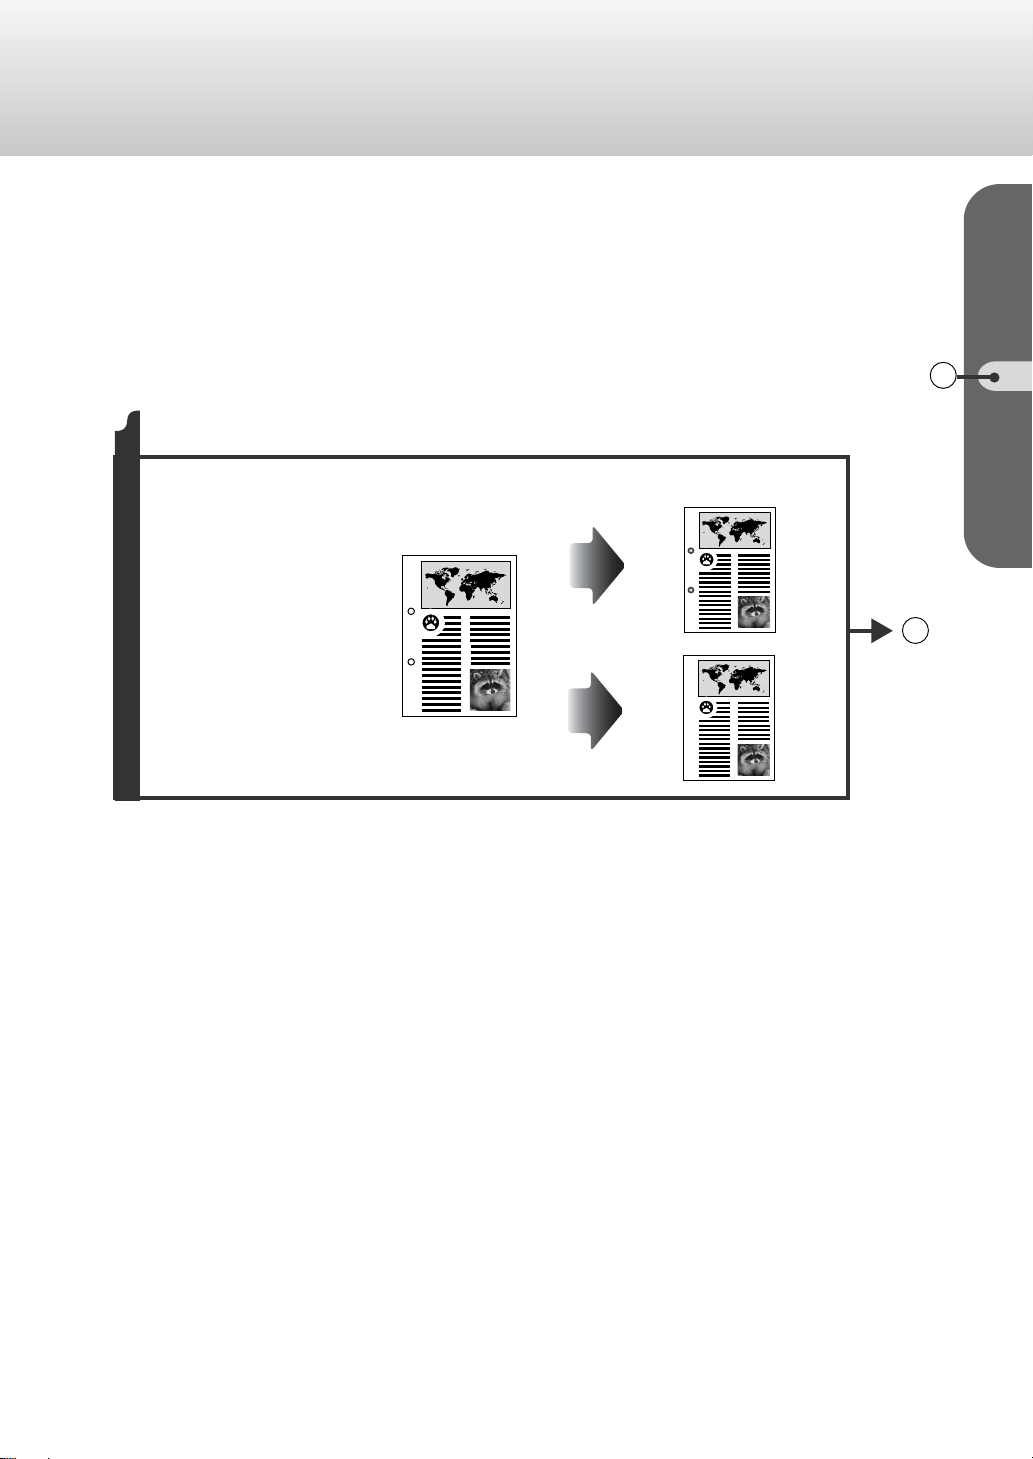
[BOOK 2-SIDED]
(See p. 3-54.)
Makes two-sided copies from
facing pages in a book.
▼
A two-sided original A two-sided copy
A two-sided original 2 one-sided copies
Originals such as books
A two-sided copy
5
4
5
ix

Illustrated Function Summary Copier Operator’s Manual/Basic Operations
[SORTER]
[SORT]
(See p.3-56.)
Sorts copies into sets arranged in
page order, and outputs them to
the bins.
[GROUP]
(See p.3-56.)
Groups all copies of the same
original page together, and
outputs them to the bins.
[STAPLE]
(See p.3-56.)
Sorts copies into sets arranged in
page order, outputs them to the
bins, and automatically staples
them.
Originals Sorted copies
11
22
33
Four sets of copies
44
specified
Originals Grouped copies
11
22
Four sets of copies
33
44
specified
Originals
11
22
33
44
Four sets of copies
specified
Sorted and stapled copies
11
11
11
11
11
11
11
11
11
11
11
11
22
22
22
22
11
11
11
11
11
11
11
11
11
11
11
11
11
11
11
6
33
33
33
33
44
44
44
44
11
11
11
11
11
11
11
11
11
x

Copier Operator’s Manual/Basic Operations Illustrated Function Summary
7
8
[TWO-PAGE SEPARATION]
(See p.4-2.)
This mode enables you to make
copies of facing pages in a book
or a magazine on separate
sheets of paper in one step.
[TRANSP.
INTERLVING]
(See p.4-4.)
Use this mode when copying
onto transparencies. The
machine automatically
interleaves a sheet of paper
between each transparency.
Originals such as books Copied onto separate pages
7
Interleaves without images
Transparencies
Originals
Interleaf sheets
8
Interleaves with images
Transparencies
Interleaf sheets
6
xi

Illustrated Function Summary Copier Operator’s Manual/Basic Operations
Enter these positions
with the editor
Start position
Final position
[SHIFT]
[CENTER/
CORNER SHIFT]
(See p.4-7.)
Makes copies with the entire
image shifted to a designated
direction.
[NO. KEY ENTRY]
(See p.4-10.)
Makes copies with the entire
original shifted to a designated
position.
[PEN ENTRY]
(See p.4-14.)
Makes copies with the entire
original shifted to a position
designated by the edit pen.
Original Copy in the center Copy in the corner
Indicate the position
9
Original Copy
Enter these values
Indicate the position
with the number keys
Original Copy
Indicate the start and final
positions with the edit pen
xii

Copier Operator’s Manual/Basic Operations Illustrated Function Summary
[MARGIN]
(See p.4-18.)
Makes copies with the entire
original shifted slightly to the
left, right, top or bottom to
create a margin on copy
sheets.
Original Left margin Right margin Top margin Bottom margin
10
9
10
xiii

Illustrated Function Summary Copier Operator’s Manual/Basic Operations
[FRAME ERASE]
[ORIGINAL FRAME
ERASE]
(See p. 4-21.)
Erases the dark border and
frame that appear when the
original is smaller than the
selected paper size.
[SHEET FRAME
ERASE]
(See p. 4-24.)
Creates a blank border around
the edge of the paper to erase
shadows and lines that appear
when making copies.
[BOOK FRAME
ERASE]
(See p. 4-26.)
Erase the dark border as well
as center and contour lines
(between pages) that appear
when making copies of facing
pages in a bound original,
such as a book or a magazine,
on a single sheet of paper.
STMT-size original
Original that extends to the edge of
the sheet
Original such as a book
Original Frame Erase
not selected
Original Frame Erase
selected
Create a blank border
Book Frame Erase
not selected
Book Frame Erase
selected
Copy on LTR-size paper
Copy
11
xiv
Copier Operator’s Manual/Basic Operations Illustrated Function Summary
11
[BINDING ERASE]
(See p. 4-29.)
Erase the shadows that can
appear in copies due to
binding holes in the original.
Copy
Binding Erase not selected
An original with binding holes
11
Binding Erase selected
xv

Illustrated Function Summary Copier Operator’s Manual/Basic Operations
[IMAGE COMB.]
[2 ON 1]
(See p. 4-32.)
Makes copies of 2 originals or a
two-sided original reduced onto
a one-sided copy.
[4 ON 1]
(See p. 4-32.)
Makes copies of 4 originals or 2
two-sided originals reduced onto
a one-sided copy.
[2 ON 1]
[2-SIDED COPY]
(See p. 4-32.)
Makes copies of 4 originals or 2
two-sided originals reduced onto
a two-sided copy.
2 originals or a two-sided original
4 originals or 2 two-sided originals
4 originals or 2 two-sided originals
Onto a one-sided copy
When reduced
Onto a one-sided copy
12
When reduced
Onto a two-sided copy
When reduced
xvi
[4 ON 1]
[2-SIDED COPY]
(See p. 4-32.)
Makes copies of 8 originals or 4
two-sided originals reduced onto
a two-sided copy.
8 originals or 4 two-sided originals
Onto a two-sided copy
When reduced

Copier Operator’s Manual/Basic Operations Illustrated Function Summary
[IMAGE SEPERATION]
[1 TO 2]
(See p. 4-42.)
Make copies of an original
divided into equal sections and
enlarged onto 2 one-sided
copies or a one-sided copy.
[1 TO 4]
(See p. 4-42.)
Make copies of an original
divided into equal sections and
enlarged onto 4 one-sided
copies or 2 two-sided copies.
[TWO-SIDED/1 TO 2]
(See p. 4-42.)
Make copies of a two-sided
original divided into equal
sections and enlarged onto 4
one-sided copies or 2 two-sided
copies.
An original
An original
A two-sided original
12
13
2 one-sided copies
Separated into 2 sheets
and enlarged to form
4 one-sided copies
Separated into 4 sheets and
enlarged to form
13
4 one-sided copies
Separated into 4 sheets and
enlarged to form
[TWO-SIDED/1 TO 4]
(See p. 4-42.)
Make copies of a two-sided
original divided into equal
sections and enlarged onto 8
one-sided copies or 4 two-sided
copies.
A two-sided original
8 one-sided copies
Separated into 8 sheets
and enlarged to form
xvii
Illustrated Function Summary Copier Operator’s Manual/Basic Operations
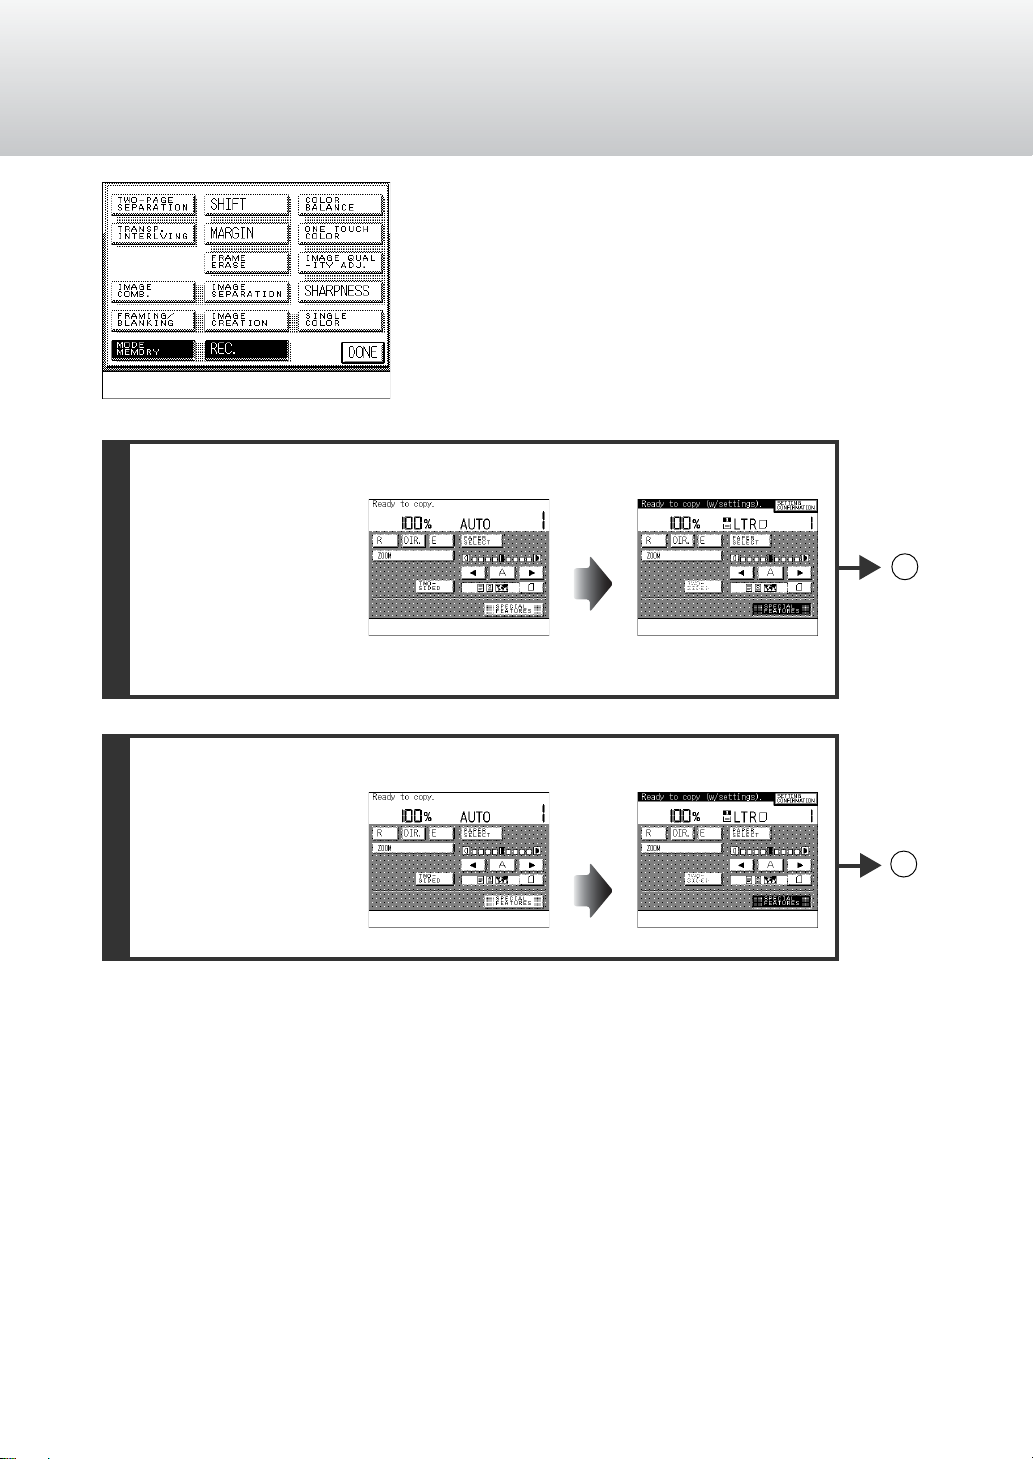
[MODE MEMORY]
(See p. 5-2.)
Enables you to store the copy
settings (e.g. copy quantity, copy
exposure, and copy ratio) for
often-run copy jobs in the
memory for later use. This
function eliminates the need to
program copy settings each time
you run a routine copy job.
[REC.]
(See p. 5-13.)
Recalls (up to the last three)
previously set copy jobs and
makes copies using the settings
of that copy job.
Recall stored copy settings from memory.
[M1] - [M9]
Recall previously stored copy settings from memory.
[1BEFORE]
[2BEFORE]
[3BEFORE]
14
15
xviii

Copier Operator’s Manual/Basic Operations Illustrated Function Summary
14
15
xix

Copier Operator’s Manual/Basic Operations
Chapter 1
Introduction
This chapter describes the operation of the parts and functions of the control
panel and the touch panel, and information that you need to get started.
Parts and Their Functions .............................................................. 1 - 2
Legal Limitation on Usage of Your Product
and the Use of Images ..................................................................... 1 - 8
Preserving Color Copies ................................................................ 1 - 9
Display
Contrast
Copying
Guide
?
Additional Functions
Interrupt
ErrorError Data
OPTIONSCOPY
1
4
7
ID
Energy Saver
ON/OFF
ACSReset
Full Color
2
3
5
6
8
9
Clear
0
C
Black
Stop
Start
Power

Chapter 1 Introduction Copier Operator’s Manual/Basic Operations
Parts and Their Functions
Control Panel Parts and Functions
Status Display lamps
Display Contrast
dial
Turn to adjust the
contrast of the touch
panel display.
Touch panel display
Displays the setting
screens for each
function.
Parts and Their Functions
Display
Contrast
Reset key
Press to return the copy settings
to the standard settings. The copy
setting automatically returns to
the standard settings if no key
operation is performed within a
fixed period of time. (See Auto
Clear Function p. 2-16.)
Guide key
Press to display the guide
messages in the touch panel
display that provide explanations of
the copy operations and functions
available. (See Guide Function p.
2-18.)
Additional Functions key
Press to select or cancel additional
functions.
(See Reference Manual, Setting
Additional Functions Chapter 3.)
(See Custom Copy Settings
Chapter 6.)
Interrupt key
Press to interrupt a copy/print job
in progress when you need to
make priority copies. (See
Interrupt Mode p. 2-10.)
1-2
Displays the status of the
machine.
(See the table, ’Status
Display lamps’ p. 1-3.)
Copy key
Press to switch the copier
functions screen from the
printer functions screen
(while the Options key
lights). When switched to the
copier functions screen, the
Copy key lights.
Options key
Press to switch to the
printer functions
from the copier functions
screen (
key lights). When
switched to the printer
functions
Options key lights.
Copying
screen
while the Copy
screen
, the
OPTIONSCOPY
1
Guide
?
4
Additional Functions
7
Interrupt
ID
ErrorError Data
2
5
8
0
Number keys
Press to enter the desired
copy quantity and other
numerical values when
setting a mode. When
using the number keys, the
sign appears in the
touch panel display.
ID key
Used only when an ID
number is assigned. Press
this key after entering the ID
number to proceed making
copies in the usual way.
When the key is pressed
after copying, the display
returns to the ID number
entry screen. An ID number
can be assigned in the
Additional Functions setting.
(See Entering the Dept. ID
and Password p. 2-19.)
ACS key
Press to automatically
select between the
black and white and full
color modes when
making copies.
Full Color key
Press to select the Full
Color mode (the mode
in which copies are
made in four colors:
yellow, magenta, cyan
and black) when making
copies.
Black key
Press to select the
Black Monochrome
mode when making
copies.
Energy Saver
ON/OFF
Full Color
Black
ACSReset
3
6
9
Clear
C
Stop
Start
Power
Clear key
Press to reset the copy
quantity to one, or to clear
an incorrect value entered
when setting a mode.
Control panel
power switch
Press to turn the power ON
and OFF. (See the
Reference Manual, Turning
the Power ON and OFF
p. 2-2.)
When set to OFF, the
machine enters the Sleep
mode. (See Sleep
Function/Auto Sleep
Function p. 2-17.)
Energy Saver key
Press to activate the
Energy Saver mode.
Press it again to cancel
the Energy Saver mode.
The amount of the
energy saved can be
adjusted in the Additional
Functions. (See Energy
Saver Mode p. 2-16.)
Stop key
Press to stop the machine
before a copying is complete.
Start key
Press to begin making copies.
Pilot lamp
This lamp lights while the main
power switch is turned ON.

Copier Operator’s Manual/Basic Operations Chapter 1 Introduction
Status Display lamps
Copy
Copying
Error
Flashing green: while copying
Flashing orange:
no paper in the selected drawer or paper
deck (during a continuous copying job),
paper jams, or no toner left
Continuous orange: out of order
Options
Data
Error
Continuous green: while outputting data
Flashing orange:
printer error, no paper in the selected
or paper deck
, paper jams, or no toner left
Continuous orange: out of order
All error lamps
Flashing orange: cannot make copies (paper jams, no
toner left, open cover on the main unit,
sorter or finisher, or options are not
securely attached to the main unit, etc.)
Continuous orange: contact your service representative
REQUEST
❍ Before using the touch panel, peel off the protective film from the display.
drawer
Parts and Their Functions
1-3

Chapter 1 Introduction Copier Operator’s Manual/Basic Operations
Touch Panel Display Operations
■ Basic Features screen
This machine enables you to program the copy settings or set various types of modes in the
touch panel display. Messages due to paper jams or operational errors also appear on this
screen.
Message display
Displays guide messages
for operational
instructions and the
status of the machine.
Copy ratio display
Displays the current
copy ratio setting.
Reduce, Direct,
Enlarge
Press to enlarge or
reduce by a preset copy
ratio, or to reset the copy
ratio to 100%. (See
Enlarging/Reducing
Originals to the Desired
Parts and Their Functions
Size p. 3-20.)
Zoom
Press to specify the copy ratios, in
1% increments, or to freely
enlarge or reduce images in either
the vertical direction or the
horizontal direction by a copy ratio
of your choice. Enables automatic/
manual settings for your specific
needs. (See Enlarging/Reducing
Originals to the Desired Size p. 3-
20.)
Remaining paper
quantity indicator
Displays the remaining quantity
of paper in the selected drawer.
(See Remaining Paper Quantity
Indicator Explanation p. 1-5.)
Two-sided
Press to make two-sided copies
from one-sided originals or facing
pages in a bound original, such as
a book, etc. (See Two-sided Mode
p. 3-45.)
Paper size display
Displays the selected drawer.
Setting confirmation
Press to confirm the selected
mode settings. Enables the
more detailed screen for the
selected mode to appear in
the touch panel display.
Copy quantity
indicator
Displays the setting for the
number of copies to be made.
Paper select
Press to select Auto Paper
Selection, a drawer, or the
stack bypass.
(See Selecting the Paper Size
p. 3-2.)
Original Type
Press to select the setting
most suitable for the type of
original to be copied. (See
Selecting the Original Type p.
3-17.)
Special features
Press to select the Special
Features screen. You can select
or cancel the desired special
feature mode in addition to in the
Basic Features screen. Enables
the desired layout settings to be
selected. (See Special Features
screen p. 1-6.)
Sorter
Press to sort copies made into
sets arranged in page order. This
mode can be selected only when
the sorter (optional accessory) is
attached. (See Sorting Copies
(Sorter) p. 3-56.)
Light, Auto, Dark
Press the [ ] key or the [ ] key to manually adjust
the copy exposure to the desired level. Press the [A]
key to select Automatic Exposure Control. The
machine automatically adjusts the copy exposure to
the most appropriate level for the original. (See
Adjusting Copy Exposure p. 3-15.)
▲
* This screen shot appears when the sorter (optional accessory) is attached.
1-4
▲
Copier Operator’s Manual/Basic Operations Chapter 1 Introduction
Explanations of keys displayed in the touch panel display
Keys
[C]
Explanation of Functions
Press to cancel settings that are in the process of being selected
and return to the last operational step.
[OK]
Press to finalize settings that have been selected and proceed to
the next operational step.
[DONE]
Press to return to the previous screen after making the copy mode
settings, or to return after confirming settings without changing them.
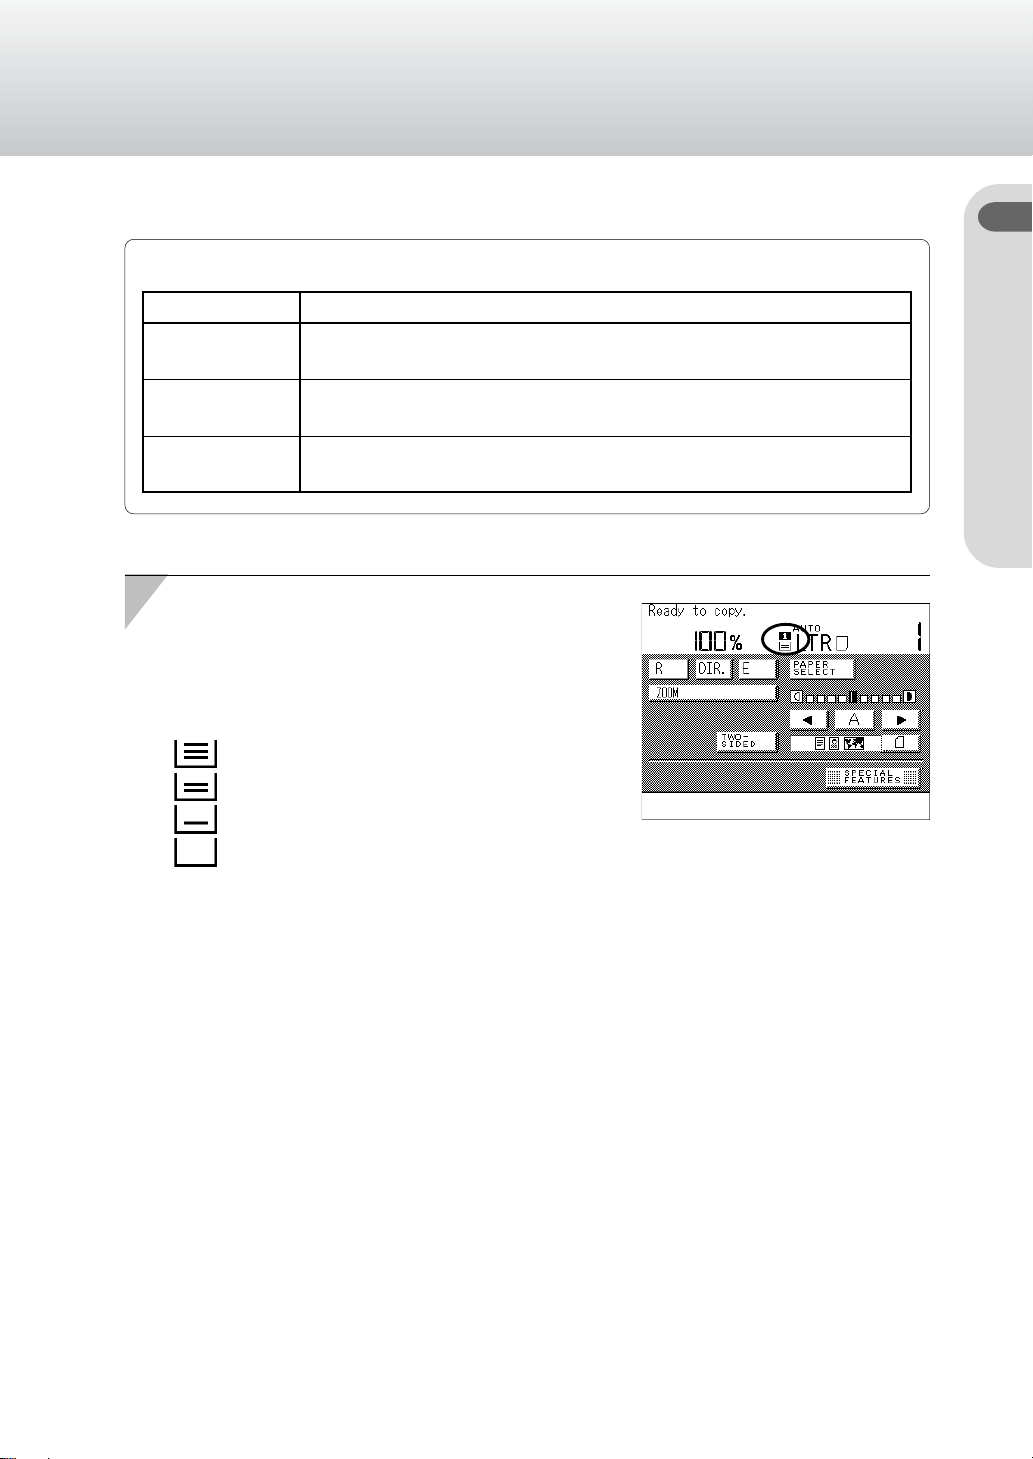
■ Remaining Paper Quantity Indicator Explanation
Remaining Paper Quantity Indicator
Displays the remaining quantity of paper in the selected
drawer. Four indications are available:
Display Indicator Remaining quantity
Approx. 100 to 40%
Approx. 40 to 10%
Approx. 10% or less
No paper
Parts and Their Functions
1-5

Chapter 1 Introduction Copier Operator’s Manual/Basic Operations
■ Special Features screen
When the [SPECIAL FEATURES] key is pressed in the Basic Features screen, the Special
Features screen appears in the touch panel display.
Two-page Separation
Press to select or cancel the Two-page
Separation function. This function
enables you to copy bound originals
such as books in one step. (See Twopage Separation p. 4-2.)
Transparency Interleaving
Press to select or cancel the
Transparency Interleaving function.
This function enables you to insert
a sheet between transparencies.
You can also make copies of the
same original image on both the
transparencies and interleaf
sheets. (See Transparency
Interleaving p. 4-4.)
Frame Erase
Press to select or cancel
the Frame Erase function.
Parts and Their Functions
This function enables you to
erase shadows and lines
that appear when copying
various types of originals.
(See Frame Erase p. 4-21.)
Image Combination
Press to select or cancel the
Image Combination function.
This function enables you to
combine several original images
for output in reduced form onto a
single sheet. (See Image
Combination p. 4-32.)
Shift
Press to select or cancel the Shift function. This function enables you
to shift the position of the original image on the sheet. Two modes
are available: shifting the original image to a fixed position or shifting
the original image to a designated position. (See Shift p. 4-7.)
Margin
Press to select or cancel the
Margin function. This function
enables you to create a blank
margin on the edge of copies.
(See Margin p. 4-18.)
Recall
Press to recall the previously
set copying job. This function
enables you to recall up to
three copy jobs that have
been previously processed.
(See Recall p. 5-13.)
Image Separation
Press to select or cancel the Image
Separation function. This function enables
you to automatically divide an original image
into several equal sections and output each
section in enlarged form onto separate
sheets of paper.
(See Image Separation p. 4-42.)
1-6
Mode Memory
Press to store or recall copying jobs. You can store up to
nine frequently used copy modes in mode memory. (See
Mode Memory p. 5-2.)

Copier Operator’s Manual/Basic Operations Chapter 1 Introduction
One Touch Color
Press to select or cancel
the One Touch Color
function. This function
enables you to adjust the
copy image quality so that it
corresponds to the original
with just one touch of a key.
Six image qualities are
available, including Vivid
Colors, Lighten Image,
Highlight Reproduction, etc.
(See the Copier Operator’s
Manual/Advanced
Operations, One Touch
Color p.1-12.)
Color Balance
Press to select or cancel the Color Balance function. This function
enables you to adjust color tones by varying the relative strengths of
yellow, magenta, cyan and black. It is also possible to store and
recall the adjusted color tones. (See the Copier Operator’s Manual/
Advanced Operations, Color Balance p.1-2.)
Image Quality Adjustment
Press to select or cancel the Image
Quality Adjustment function or set
the Automatic Exposure Adjustment. This function enables you to
make copies eliminating background color or eliminating image
shadow from the rear side of a twosided original. (See the Copier
Operator’s Manual/Advanced
Operations, Background Color
Adjustment p.1-18.) (See the
Copier Operator’s Manual/
Advanced Operations, 2nd Side
Elimination p. 1-22.)
Sharpness
Press to select or cancel the
Sharpness function. This function
enables you to enhance the edges
or to soften the contrast of the
images when making copies. (See
the Copier Operator’s Manual/
Advanced Operations, Sharpness
p. 2-46.)
Parts and Their Functions
Framing/Blanking
Press to select or cancel the Framing or
Blanking function. This function enables you
to make copies only of designated areas on
the original, or to make copies excluding a
designated area on the original. (See the
Copier Operator’s Manual/Advanced
Operations, Framing p. 2-2.) (See the Copier
Operator’s Manual/Advanced Operations,
Blanking p. 2-14.)
Image Creation
Press to select or cancel the Image Creation function. This function enables you to
make copies by processing the original image. Four types are available: Nega/Posi,
Image Repeat, Mirror Image and Slanted Image.
(See the Copier Operators Manual/Advanced Operations, Nega/Posi p. 2-26
Single Color
Press to select or cancel the
Single Color function. This
function enables you to make
copies in one specific color
(monochrome copies). You can
select one color from the seven
color types: red, magenta, yellow,
green, cyan, blue and black. (See
the Copier Operator’s Manual/
Advanced Operations, Single
Color p. 1-15.)
Image Repeat p. 2-28
Mirror Image p. 2-34
Slanted Image p. 2-40.)
1-7
 Loading...