

Page 1
Unpack the MultiPASS C545
1
1
Carefully remove all items from
the box.
Remove these items from the documentation package:
this Quick Start Guide, the MultiPASS C545 Installer CD
packet, MultiPASS C545 User's Manual, Registration card,
and Warranty card.
Remove these hardware items from the top tray:
TELEPHONE
LINE
SENDING DOCUMENT
SUPPORT
USB-TO-PARALLEL
CABLE
Ink
Cartridge
BCl-21
Black
Made in
Japan
BC-21e COLOR
BJ CARTRIDGE
EXTRA BCI-21
BLACK BJ TANK
Lift out the MultiPASS unit from the bottom.
POWER
CORD
SB-21 BJ CARTRIDGE
STORAGE BOX
3
Open the document tray.
Remove the protective sheet covering the
operation panel.
4
Open the operation panel.
Use both hands to grip the operation panel, and
gently pull it toward you until it opens partially.
Remove the soft styrofoam sheet from the unit's
Automatic Document Feeder (ADF).
Set Up the MultiPASS
2
Place the main unit of the MultiPASS on a level surface with plenty of room to work.
1
Attach the sending document support.
Fit the tabs on the sending
document support into the
slots above the ADF.
Make sure the
support curves
toward the back
of the unit.
2
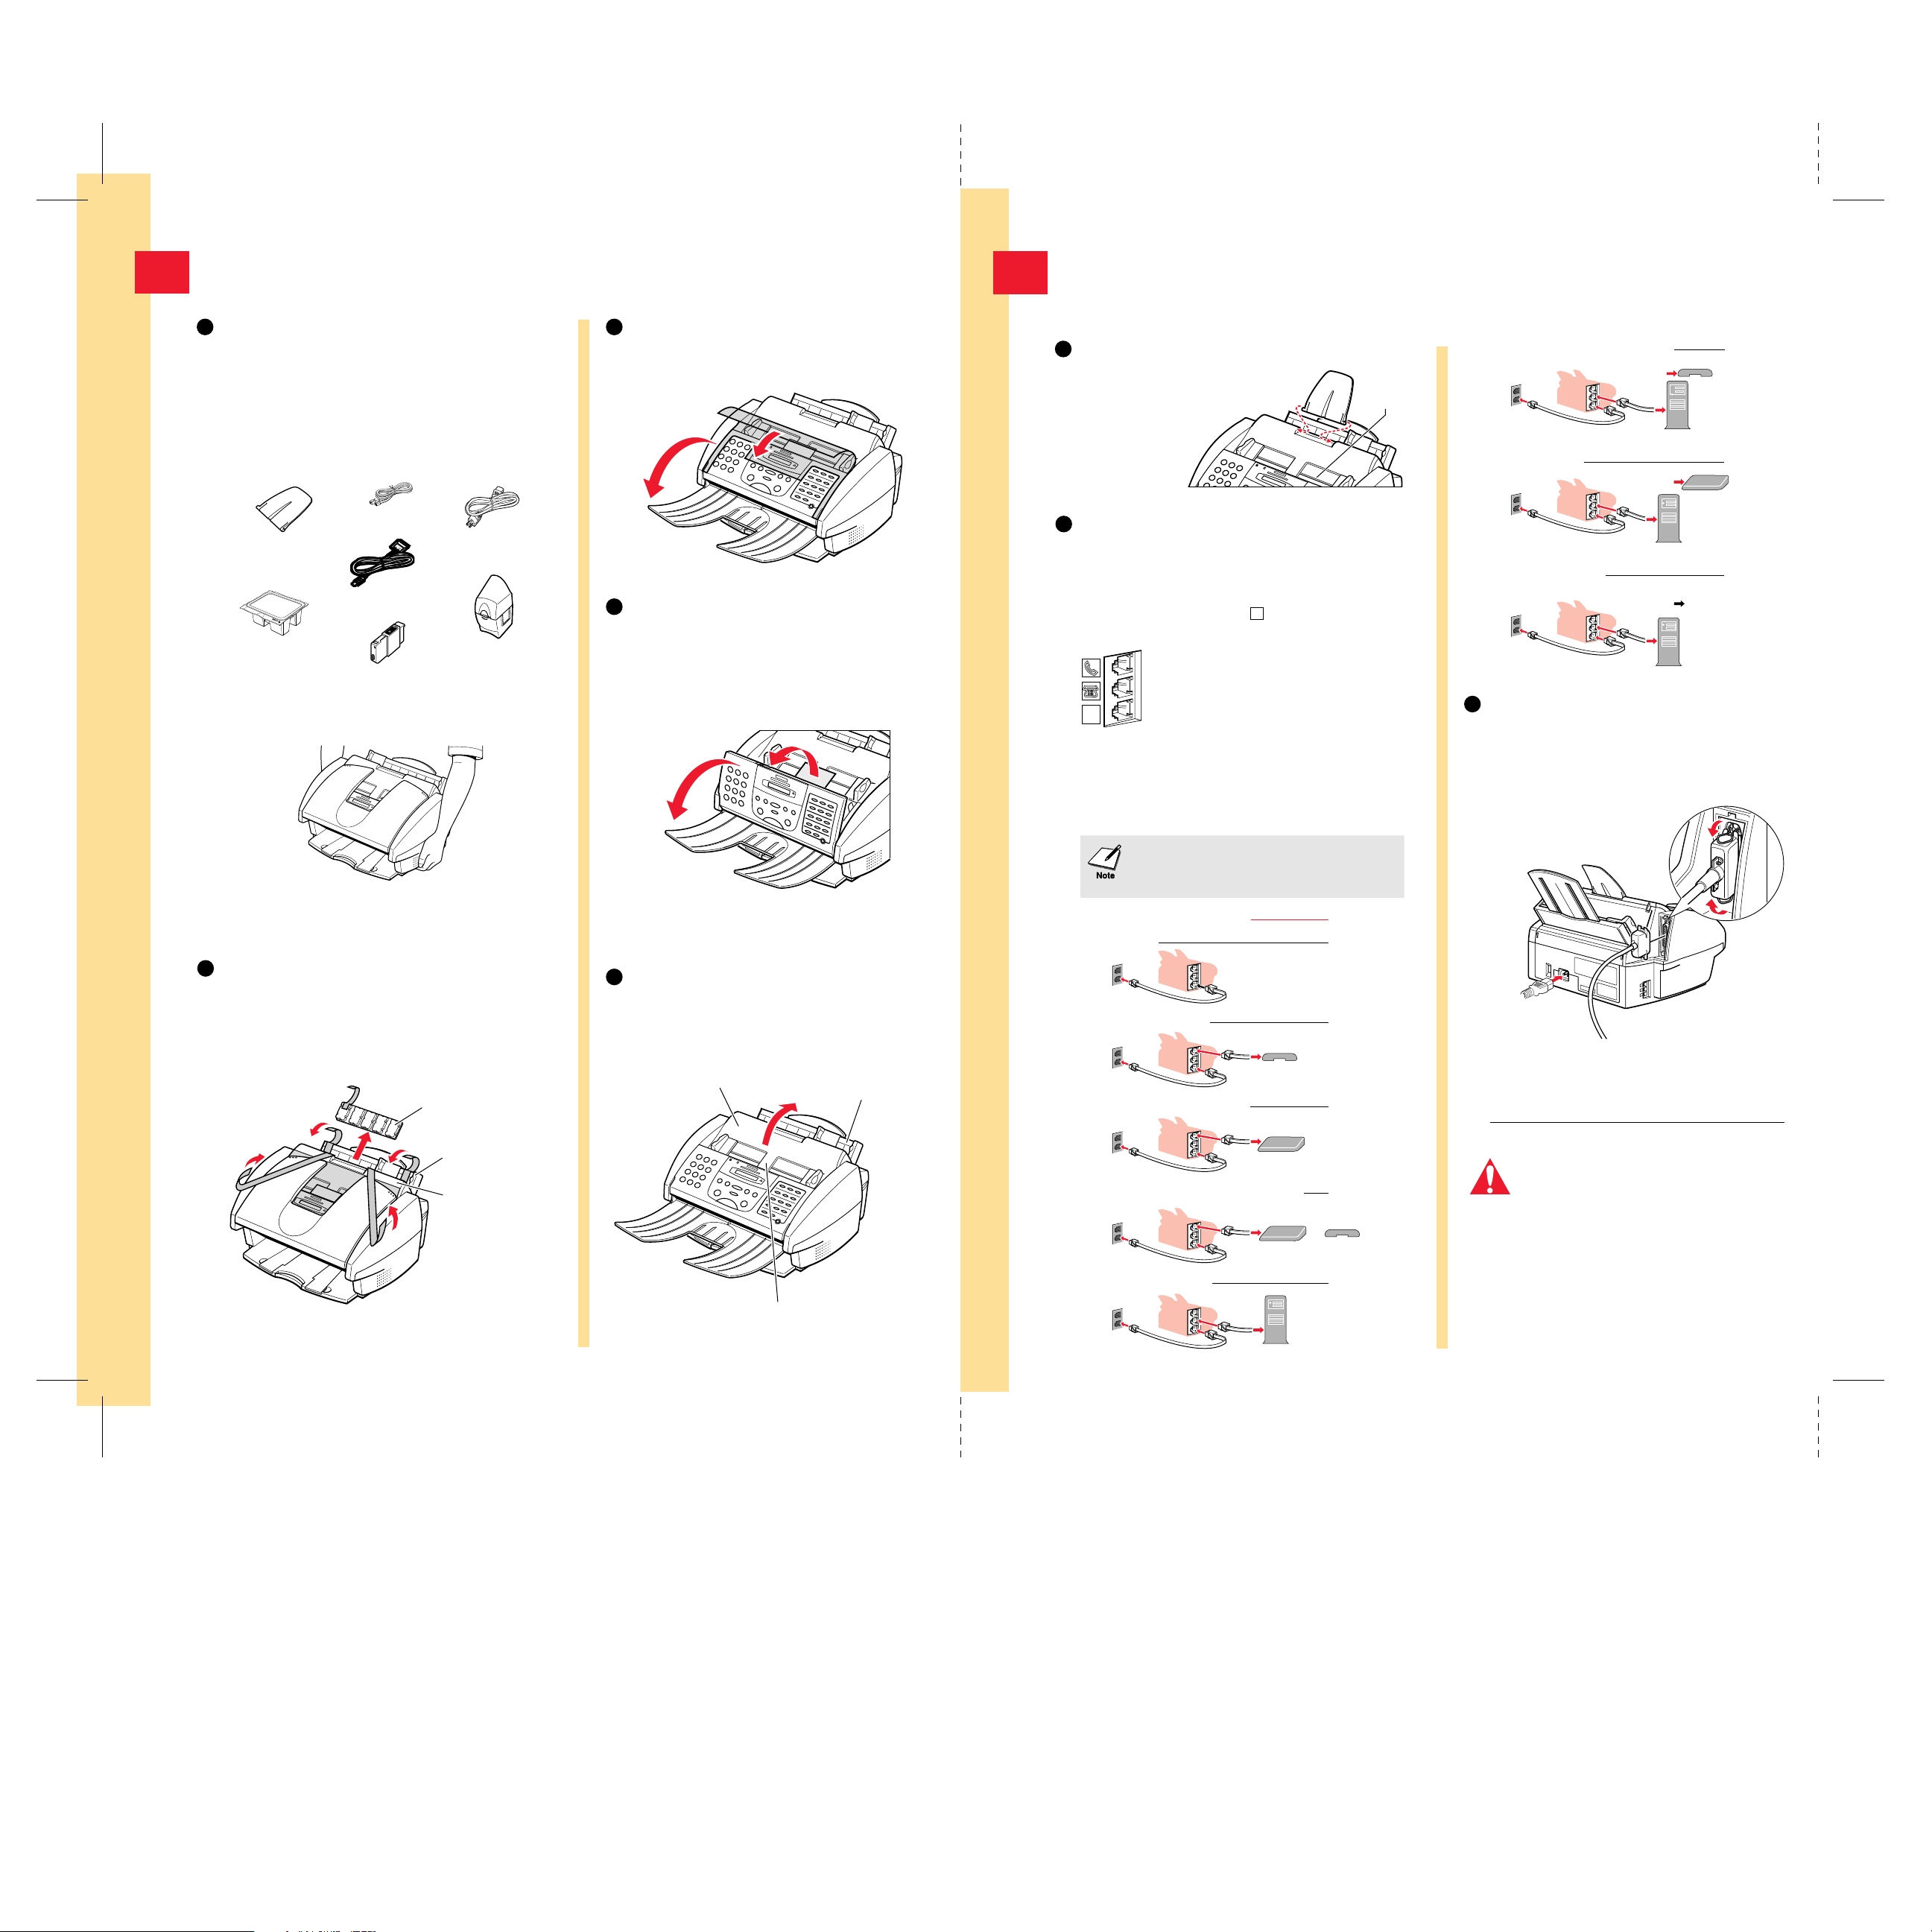
Connect the phone line.
The MultiPASS unit has three telephone jacks (located
on the left side of the unit) that will accept standard
line connections.
L
Jacks on
MultiPASS
Use the bottom jack to connect the wall
jack to the MultiPASS with the supplied
line cord (unless connected with Caller ID).
The other two jacks are pass-through ports
to connect other devices to the MultiPASS
and your telephone service. Select from the
L
options in the diagram below to configure
your telephone device to work in
conjunction with your MultiPASS.
If you have only one telephone line and plan to use the
MultiPASS for receiving both faxes and voice calls, you
must attach a telephone and/or answering machine to
the unit.
ADF
MultiPASS, PC Modem and Telephone
Wall Jack
MultiPASS, PC Modem and
Answering Machine
Wall Jack
MultiPASS, PC Modem, Answering
Machine and Telephone
Wall Jack
3
Connect the USB—to—Parallel cable
Telephone
PC
PC
Telephone
PC
Answering
Machine
and power cord.
Make sure the computer is turned off.
Connect the USB—to—Parallel cable to the
MultiPASS and to your
computer.
Important!Save the box and shipping materials.
You may need them later if you have to transport
the MultiPASS.
2
Remove all pieces of shipping tape.
Remove all pieces of shipping tape from the outside of
the printer. Be sure to remove the tape from the back of
the printer also.
Remove the protective plastic piece from the sheet feeder.
PROTECTIVE
PLASTIC
MULTI-PURPOSE TRAY
( FEEDER)
AUTOMATIC
DOCUMENT
FEEDER
(ADF)
Note that tape may not be in the exact locations shown.
Press the operation panel closed until it clicks
into place.
5
Open the printer cover.
Check for any tape or shipping material inside
the unit and remove it.
MULTI-PURPOSE TRAY
PRINTER
COVER
AUTOMATIC DOCUMENT FEEDER (ADF) –
holds documents to be
faxed, copied or scanned
(SHEET FEEDER) –
holds paper for
printing or receiving faxes
If you use Caller ID with any of these
configurations, place the Caller ID device
between the MultiPASS and the wall jack.
Recommended Device Connections Receive Modes
MultiPASS Only
Wall Jack
MultiPASS and Telephone Fax/Tel, DRPD,
Telephone
Wall Jack
MultiPASS and Answering Machine Ans.Machine
Wall Jack
MultiPASS, Answering Machine and Telephone
Wall Jack
MultiPASS and PC Modem Fax Only
Wall Jack
Answering
Machine
Answering
Machine
PC
Fax Only
or DRPD
or Manual
Ans.Machine
Telephone
or DRPD
Power Cord
(to outlet)
USB—to—Parallel Cable
(to computer)
Connect the power cord to the MultiPASS and to
a wall outlet. The MultiPASS has no power switch.
The power is on as long as the system is plugged in.
The MultiPASS is equipped with a 3-prong,
grounding-type plug. This plug will only fit
into a grounding-type outlet. This is a safety
Caution
feature. Do not defeat the safety purpose of
this plug. Make sure the socket-outlet is
located near the MultiPASS and is easily
accessible.
PAGE 2 (BACKS COVER/1) PAGE 3 (BACKS 6)
CANON/MPC545 Q.S.G: Pages 2 & 3 - File: 545QS2-3.eps
Wendi Swanlund Correx> August 19 '99
Page 2

Install the Canon BJ® Cartridge
BC-21e
Ink
Cartridge
BCl-21
Color
Made in
Japan
Ink
Cartridge
BCl-21
Black
Made in
Japan
3
Spilled ink can stain any surface.
Open BJ cartridges and ink tanks very
carefully. See your User's Manual for
Caution
complete details on BJ cartridge and
ink tank maintenance.
2
Remove the cap and tape from the
BC-21e Color BJ Cartridge.
Peel the clear plastic from the
BJ cartridge's protective packaging
and remove the cartridge.
Install the MultiPASS C545 Software
4
Your MultiPASS C545 comes with a Setup program that makes installing the MultiPASS software easy and fast.
You install the MultiPASS C545 software from the MultiPASS C545 Installer CD.
Important! The MultiPASS must be plugged in and connected to your Macintosh. If you have a previous version of
the MultiPASS Desktop Manager software installed, you must remove it. See your online MultiPASS Desktop Manager
Software Guide for details.
Make sure the MultiPASS is plugged in.
The LCD reads:
1
Open the ADF.
Grasp both the document guides and lift up.
Cartridge
Button
When you plug in the MultiPASS for the
first time, the cartridge holder moves to
the center of the unit so you can install the
BJ cartridge. If the cartridge holder is not
in the center, press the cartridge button
inside the unit.
Do not touch the ribbon cable, the small
circuit board, the guide rail, or the round
shaft. Touching these parts may adversely
Caution
affect operation of the unit and/or cause
print quality deterioration.
Circuit
Board
Ribbon Cable
Round Shaft
Document
Guide
Guide Rail
Hold the BJ cartridge on the sides only. Do not touch
the silver plate on the bottom of the cartridge, or the
silver metal or circuit area on the side.
Make sure the BJ cartridge's print head is facing away
from you. Carefully remove the orange cap and then
pull the orange tape from the print head.
Ink Tanks
BJ Cartridge
Print Head
do not touch
Color BJ
Cartridge
Cap
Cartridge
Ink
BCl-21
Color
Made in
Japan
Cartridge
Ink
BCl-21
Black
Made in
Japan
Made in Japan
BC-
2
1e
Discard the cap and tape immediately. Never attempt
to re-attach the cap or tape to the print head; this may
adversely affect the ink flow or quality of the ink color.
3
Insert the BJ cartridge.
Raise the blue lock lever (on the right side of the
cartridge holder) to the up position.
Lock Lever
Make sure the cartridge label
faces you and the print head
is down.
Carefully set the
BJ cartridge straight
down into the
cartridge holder.
4
Lower the lock lever and press the
cartridge button .
Make sure the cartridge is aligned against the back of
the holder, then press the blue lock lever down
completely.
The BJ cartridge locks
into position.
Press the button
(see step for location)
1
to move the cartridge
to its home position
on the right and close
the ADF. The MultiPASS cleans the print head,
which takes about one minute.
Ink
Cartridge
BCl-21
Color
Made in
Japan
Cartridge
Ink
BCl-21
Black
Made in
Japan
Tape
Standalone Fax Users: If you plan to use the MultiPASS C545 as a standalone fax machine, you do not
need to install the MultiPASS Desktop Manager software. However, you do need to program your name
and fax number into the unit so that this information prints on faxes you send. You can also select a
Receive Mode for faxes you receive.
Start up your system in this order:
1. Make sure your computer is turned off.
2. Be sure the MultiPASS is plugged in
and connected to the computer.
3. Now turn on the computer.
When you see the Macintosh desktop, follow
these steps.
1. Insert the MultiPASS Canon Creative
CD into your CD drive. (This CD contains
all the device software for your MultiPASS.)
2. The MultiPASS Canon Creative screen
should appear automatically. (If not, double click the MultiPASS C545 icon that appears
in the CD window on your desktop. This will
launch the MultiPASS Canon Creative screen.)
3. Click the Install/Uninstall button on the
MultiPASS Canon Creative screen.
4. On the new screen that appears, click the
Install MultiPASS Software button. This will
install the MultiPASS Desktop Manager
software package. Follow the instructions on
screen. (You must accept the license
agreement in order for installation to proceed.)
5. When installation is complete, you will be
prompted to restart your computer.
6. After you restart, the Fax Setup Utility will
launch automatically. You will be prompted
to enter important information, which is
outlined in steps 7 and 8.
7. On the Send Fax tab of the Fax Setup Utility,
fill in your name in the Fax Heading/Unit
Name box. Fill in your fax number in the
Fax Number box.
8. On the Receive Fax tab, select one of four
Receive Modes to determine how faxes are
received. For more information about these
Receive Modes, see Chapter 3, Using the Fax
Setup Utility in your Desktop Manager Software
Guide (click the Manuals/Supplies/Help button
on the Canon Creative screen, or double-click
the Desktop Software Guide icon in the
Desktop Manager folder on your hard drive).
9. Installation and setup of the MultiPASS
Desktop Manager software is now complete.
To install Canon Photo and TextBridge Pro:
1. Make sure the MultiPASS Canon Creative CD is
inserted into your CD drive. (Double-click the
MultiPASS C545 icon if the MultiPASS Canon
Creative screen does not appear automatically.)
2. Click the Install/Uninstall button on the
MultiPASS Canon Creative screen.
3. Click the Install Canon Photo button. Follow
the instructions that appear on the screen.
4. When installation is complete, click the Install
TextBridge Pro button.
5. After you finish installing Canon Photo and
TextBridge Pro, click the Plug-In Setup button.
6. Installation and setup of Canon Photo and
TextBridge Pro is now complete.
If you have Microsoft Office installed, you may
wish to install OfficeReady CC. You can do so at any
time by returning to the MultiPASS Canon Creative
CD, clicking the Install/Uninstall button, then clicking
the OfficeReady CC button.
To register your MultiPASS:
1. Return to the Canon Creative CD. Double-click
the MultiPASS C545 icon if the Canon Creative screen
does not appear automatically.
2. Click the Product Registration button to register
your MultiPASS C545. Follow the instructions.
PAGE 4 (BACKS 7) PAGE 5 (BACKS 6)
CANON/MPC530/560 Q.S.G: Pages 4 & 5 - File: 560QS4-5.eps
Wendi Swanlund P.R. Correx> January 5, 2000
Page 3

MultiPASS Software
Load a Stack of Paper
5
The MultiPASS comes with the following software: MultiPASS Toolbar, MultiPASS Printer Driver,
ScanTastic™ for MultiPASS, and Canon Creative for MultiPASS.
Your Canon Creative for MultiPASS software includes:
OfficeReady™ CC
Now you can enhance your image and boost your performance with professionally designed Microsoft® Office
templates –for business and personal use.
250 templates integrated for Word®, Excel®, and PowerPoint®
Perfect for business and personal applications
Customized templates create professional documents in seconds
Integrated tools simplify advanced office-document functions
You must have Microsoft Office installed on your system to use OfficeReady CC.
Canon Photo
With Canon Photo, you can digitally enhance and retouch your photographs, share them with friends over the Internet,
explore special effects and create wonderful photo projects:
Organize and enhance your digital pictures easily
Add pictures, movies, and sound to your e-mail
Create photo projects from over 250 ready-made templates
Canon Photo is backed by Canon's photographic expertise and leadership
TextBridge® Pro
For printing or receiving faxes, the MultiPASS uses paper from the sheet feeder.
The sheet feeder is
the larger capacity
tray behind
the ADF.
1
Pull the paper rest up until it stops.
Move the paper guide to
the left to match the size
of your paper.
ADF
(holds documents
to be faxed, copied,
or scanned)
Sheet Feeder
(holds blank paper
for printing or
receiving faxes)
Sheet Feeder
2
Insert the stack of paper.
Make sure the print-side of the paper is face-up.
Align the right edge of the stack with the right side
of the sheet feeder.
Adjust the paper guide snugly against the side of the
stack of paper.
Do not fill the sheet feeder above the
limit mark ( ). The sheet feeder holds
up to 100 sheets of plain paper (20 lb
or 75 g/m2).
The powerful, easy way to scan documents into your personal computer for editing as text:
Turn paper into PC documents without retyping. TextBridge Pro is a full-featured, highly accurate and easy-to-use
document recognition package.
TextBridge Pro offers increased accuracy and improved duplication of page layout including pictures and tables.
Edit scanned documents with a word processor, spreadsheet, or HTML editor
Fan a stack of paper. Fan the edge that will feed into
the MultiPASS first; then tap the stack on a flat
surface to even its edges.
What's Next?
After using this Quick Start Guide to unpack and set up your new MultiPASS unit, you'll want to look at the rest of
your documentation. All the online manuals in Adobe Acrobat format are located on the MultiPASS Installer CD
and in the MultiPASS Desktop Manager folder on your hard drive.
MultiPASS C545 User's Manual (in Adobe® Acrobat® PDF format)
This manual describes how to use the MultiPASS as a monochromatic or color printer and covers the basics on
how to send and receive faxes. It also includes maintenance, troubleshooting, and specifications.
MultiPASS Desktop Manager Software Guide (in Adobe® Acrobat® PDF format)
Use the online Software Guide to find out how to use the MultiPASS C545 Printer Driver,
ScanTastic scanning software, MultiPASS Fax Setup Utility and the MultiPASS Toolbar.
Standalone Fax Manual (in Adobe® Acrobat® PDF format)
PAGE 6 (BACKS 5)
PAGE 7 (BACKS 4)
If you are NOT going to connect the MultiPASS to your computer, use this manual to find out how you use the
operation panel on the MultiPASS to control all your faxing and receiving functions.
CANON/MPC530\560 Q.S.G: Pages 6 & 7 - File: 560QS6-7.eps
Wendi Swanlund UPDATE4/FINAL> December 26, 1999
Page 4

Quick Start Guide
MultiPASS
™
C545
Color Bubble Jet
™
Printer • Fax
Copier • Scanner
A Universe of Creative Projects
www.canonprintplanet.com
IMPORTANT
Follow the steps
in this Quick Start
Guide to unpack
and set up your new
MultiPASS C545
multifunction printer.
IMPORTANT
Follow the steps
in this Quick Start
Guide to unpack
and set up your new
MultiPASS C545
multifunction printer.
Printing an Image or Document
To print an image or a document, make sure you have paper loaded in the multi-purpose tray. Start the application
that you used to create the image or document. Make sure the Canon MultiPASS C545 printer is selected as your default
printer in the Chooser. In the application, choose Print or Page Setup from the File menu. Specify any special printing
options, then click Print to start the print job. See your online MultiPASS Desktop Manager Software Guide for details.
Faxing or Scanning an Image or Document
For faxing, you load the document face-down in the Automatic Document Feeder (ADF), dial the number you are
faxing to, and then press the Start/Scan button on the MultiPASS.
To scan, load the image or document in the Automatic Document Feeder (ADF). Scan the document in the following ways.
MultiPASS
C545
™
Scanning With the MultiPASS Toolbar
Use the MultiPASS Toolbar to scan a document
directly into an application.
If you installed Canon Photo and TextBridge
Pro, or if PictureViewer and SimpleText are
on your system, just click any of the application
buttons to scan directly into that application.
To customize the default settings associated
with a Toolbar button, click and hold the
button. To add an application to the Toolbar,
drag the application icon onto the Toolbar.
The Toolbar appears automatically. If you quit
the Toolbar, relaunch it by selecting MultiPASS
Toolbar from the Apple menu.
Scanning With ScanTastic or Other Applications
To set more detailed scan options, click the ScanTastic Central
button on the Toolbar, or select ScanTastic Central from the Apple
menu. You can also use ScanTastic as a plug-in, to scan directly
to applications that support the Adobe Photoshop plug-in standard.
Scanning With the Start/Scan Button
You can insert a document into the ADF and press the Start/Scan
button on the operator panel on the front of the MultiPASS. The
factory default setting for this button is to scan into Canon Photo,
if you have it installed. To customize the scan settings and scan
destination, click and hold the Start/Scan button on the Toolbar.
See your online MultiPASS Desktop Manager Software Guide for
complete details on using the Toolbar and ScanTastic.
Copying an Image or Document
The MultiPASS Toolbar must be
running to a scan with the
Start/Scan button on the operator
panel of the MultiPASS.
To copy an image or a document, make sure you have paper loaded in the sheet feeder. Next, place the image or
document you want to copy face-down in the ADF. On the operation panel, press the Copy button and then press the
Start/Scan button. (To make multiple copies, press Copy, enter the number of copies with the numeric buttons, and
then press Start/Scan. To make one color copy, press Color so the light comes on, press Copy, and then press Start/Scan.
See your online MultiPASS C545 User's Manual for details.)
Numeric Buttons
ENERGY STAR
©2000 Canon Computer Systems, Inc. BCI, BJ, Bubble Jet and MultiPASS are trademarks of Canon Inc.
Print Planet is a service mark of Canon Computer Systems, Inc. Mac and the Mac logo are trademarks of
Apple Computer, Inc., registered in the U.S. and other countries. All other products and brand names are
trademarks of their respective owners.
®
Compliant
Printed in U.S.A.
CST-5257-000
30-32236-0100
 Loading...