

Canon C530 Software Guide

C
OLOR BUBBLE JET™ PRINTER
F
AX • SCANNER • COPIER
Desktop Manager
Software Guide
M
ULTI
PASS
C530/C560
™

Copyright
Disclaimer
This manual is copyrighted by Canon Computer Systems, Inc. (CCSI) with all rights reserved.
Under the copyright laws, this manual may not be reproduced in any form, in whole or part,
without prior written consent of CCSI.
©1999 Canon Computer Systems, Inc.
Canon Computer Systems, Inc. has reviewed this manual thoroughly in order to make it an easy
to use guide for your Canon MultiPASS C530/C560 Desktop Manager system. All statements,
technical information, and recommendations in this guide and in any guides or related
documents are believed reliable, but the accuracy and completeness thereof are not guaranteed
or warranted, and they are not intended to be, nor should they be understood to be,
representations or warranties concerning the products described.
Your MultiPASS and the software media included with your system have been sold to you
subject to the limited warranties set forth in the warranty and license agreement enclosed with
the respective products. All software is licensed AS IS, as described in the license agreement
enclosed with the software media. Further, CCSI reserves the right to make changes in the
specifications of the products described in this guide at any time without notice and without
obligation to notify any person of such changes.
Preface ii

Trademarks
Canon, BCI, BJ, Bubble Jet, MultiPASS, ScanGear, and UHQ are trademarks and SelectExchange
is a service mark of Canon Inc.
All other product and brand names are registered trademarks, trademarks or service marks of
their respective owners.
ENERGY STAR® COMPLIANT
As an ENERGY STAR ® Partner, Canon U.S.A., Inc. has determined that this product meets the
ENERGY STAR ® guidelines for energy efficiency.
Preface iii

Contents
Chapter 1 Introduction .............................................................................................................................. 1-1
Desktop Manager Features: an Overview ................................................................................... 1-2
The MultiPASS Settings ............................................................................................................... 1-4
Desktop Manager Software Package ........................................................................................... 1-5
Using Your Documentation ........................................................................................................ 1-7
About This Guide ................................................................................................................. 1-8
Conventions Used in This Guide ........................................................................................ 1-8
Other User Assistance .......................................................................................................... 1-9
Using the MultiPASS Toolbar .................................................................................................... 1-10
Changing the Options for the Scan Buttons on the Toolbar ........................................... 1-14
Changing Toolbar Settings ................................................................................................ 1-19
Performing Other Toolbar Tasks ....................................................................................... 1-22
Chapter 2 Using the Desktop Manager ..................................................................................................... 2-1
Desktop Manager: an Overview.................................................................................................. 2-2
Features of the Desktop Manager Window ........................................................................ 2-4
Understanding Desktop Manager Folders .......................................................................... 2-8
System-Defined Folders ....................................................................................................... 2-9
User-Defined Folders ......................................................................................................... 2-11
Viewing Documents in the Desktop Manager.................................................................. 2-11
Table of Contents iv

Chapter 3 PC Faxing ...................................................................................................................................3-1
Faxing With Your Computer ....................................................................................................... 3-3
Sending a Fax From Your Computer (PC Faxing) ............................................................. 3-4
Specifying a Fax Recipient ................................................................................................... 3-8
Defining Send Fax Options ............................................................................................... 3-12
Processing the Fax .............................................................................................................. 3-15
Creating a Fax Memo......................................................................................................... 3-18
Receiving a Fax ................................................................................................................... 3-20
Using the Fax Log............................................................................................................... 3-22
Working With Jobs in the Send Fax Manager................................................................... 3-25
Setting Up the Address Book .................................................................................................... 3-32
Working With Address Book Entries ................................................................................ 3-33
Printing the Address Book ................................................................................................. 3-40
Importing the Address Book ............................................................................................. 3-40
Exporting the Address Book .............................................................................................. 3-44
Designing a Fax Cover Page ...................................................................................................... 3-46
Using the Cover Page Designer.......................................................................................... 3-47
Creating a New Cover Page................................................................................................ 3-50
Making Image Adjustments ............................................................................................... 3-71
Adding Annotations to Your Cover Page .......................................................................... 3-88
Opening and Modifying a Fax Cover Page ....................................................................... 3-91
Reverting to the Last Saved Version .................................................................................. 3-93
Printing a Cover Page......................................................................................................... 3-93
Renaming a Cover Page ..................................................................................................... 3-94
Deleting a Cover Page ........................................................................................................ 3-95
Table of Contents v

Faxing With Your E-Mail Application ...................................................................................... 3-96
Setting Up MultiPASS Fax in Your E-mail Application.................................................... 3-97
Sending an E-mail Message as a Fax ................................................................................. 3-98
Receiving a Fax ................................................................................................................... 3-99
Chapter 4 Scanning..................................................................................................................................... 4-1
Scanning Overview ...................................................................................................................... 4-3
Features of the ScanGear Window ...................................................................................... 4-4
Scanning With the Desktop Manager ......................................................................................... 4-6
Scanning From a Windows Application ..................................................................................... 4-8
Setting the Preview Scan Options ............................................................................................... 4-9
Setting the Scan Mode ....................................................................................................... 4-10
Setting the Scan Resolution ............................................................................................... 4-12
Setting Preferences ............................................................................................................. 4-16
Setting Paper Size ............................................................................................................... 4-18
Setting Black and White Options ...................................................................................... 4-20
Adjusting the Preview Image for Final Scan............................................................................. 4-21
Clearing the Preview Area.................................................................................................. 4-22
Adjusting the Preview Image View .................................................................................... 4-22
Adjusting the Selection Size ............................................................................................... 4-23
Moving an Image ............................................................................................................... 4-25
Reversing the Image Tone .................................................................................................. 4-25
Mirroring an Image............................................................................................................ 4-26
Rotating an Image .............................................................................................................. 4-26
Scaling the Image Output Size........................................................................................... 4-26
Table of Contents vi

Adjusting the Tone of the Preview Image................................................................................. 4-27
Features of the Tone Tab .................................................................................................... 4-28
Correcting the Image Tone Automatically ........................................................................ 4-30
Adjusting Contrast and Brightness ................................................................................... 4-31
Changing Gamma Curve Values ....................................................................................... 4-32
Adjusting Histogram Tone Levels ..................................................................................... 4-34
Using Tone Curves ............................................................................................................. 4-37
Adjusting Contrast/Brightness for Black and White Scan Mode..................................... 4-38
Increasing the Speed of the Scan Process.......................................................................... 4-40
Chapter 5 Working With Documents........................................................................................................ 5-1
Managing Your Documents in the Desktop Manager ............................................................... 5-3
Selecting Documents in the Desktop Manager .................................................................. 5-3
Printing a Document in the Desktop Manager .................................................................. 5-4
Creating a Folder .................................................................................................................. 5-6
Moving a Document ............................................................................................................ 5-7
Copying a Document ........................................................................................................... 5-8
Renaming a Document or Folder........................................................................................ 5-8
Deleting a Document or Folder......................................................................................... 5-10
Restoring a Deleted Folder or Document ......................................................................... 5-11
Emptying the Trash Folder ................................................................................................ 5-12
Importing a Document ...................................................................................................... 5-13
Exporting a Document ...................................................................................................... 5-14
Attaching a Document to Electronic Mail (E-mail) ......................................................... 5-15
Manipulating a Document in Document View ................................................................ 5-16
Arranging Documents in Document View....................................................................... 5-16
Table of Contents vii

Scrolling Through a Multi-Page Document ..................................................................... 5-17
Removing a Page from a Document ................................................................................. 5-18
Splitting a Document ......................................................................................................... 5-18
Merging a Document ......................................................................................................... 5-19
Indexing and Searching for Documents ........................................................................... 5-20
Setting Up the Search Index .............................................................................................. 5-21
Assigning Index Criteria to Documents ........................................................................... 5-27
Searching Your Documents ............................................................................................... 5-33
Redisplaying the Result of Your Last Search ..................................................................... 5-40
Modifying a Document ............................................................................................................. 5-40
Features of the MultiPASS Viewer Window ...................................................................... 5-43
Adjusting the Document Image ........................................................................................ 5-46
Making Image Adjustments ............................................................................................... 5-54
Adding Annotations to Your Document ........................................................................... 5-70
Revising Your Annotations ................................................................................................ 5-81
Reverting to the Last Saved Version .................................................................................. 5-83
Printing the Document ...................................................................................................... 5-84
Adjusting the MultiPASS Viewer Default Options ........................................................... 5-87
Chapter 6 Utilities....................................................................................................................................... 6-1
Setting Up Fax Options in the Desktop Manager ...................................................................... 6-3
Setting Up Fax Preferences .................................................................................................. 6-5
Setting Up Send Fax Options .............................................................................................. 6-7
Setting Up Advanced Send Fax Options ............................................................................. 6-9
Setting Up Receive Fax Options ........................................................................................ 6-11
Setting Up Advanced Receive Fax Options ....................................................................... 6-15
Setting Up Speed Dial Assignments .................................................................................. 6-19
Table of Contents viii

Setting Up System Options ....................................................................................................... 6-23
Using the Launcher.................................................................................................................... 6-25
Adding Applications to the Launcher ................................................................................ 6-26
Modifying the Launcher Setup .......................................................................................... 6-28
Making a Phone Call From the Desktop Manager .................................................................. 6-29
Using the MultiPASS Status Monitor ....................................................................................... 6-31
Using the Minimized Status Monitor ............................................................................... 6-32
Using the Status Monitor Window.................................................................................... 6-34
Status Messages .................................................................................................................. 6-35
Disconnecting the MultiPASS ................................................................................................... 6-37
Restarting the MultiPASS Connection .............................................................................. 6-38
Removing the Desktop Manager .............................................................................................. 6-39
Chapter 7 Frequently Asked Questions ..................................................................................................... 7-1
MultiPASS Cannot Be Initialized ................................................................................................ 7-2
MultiPASS Service Cannot Be Restarted (Windows NT only).................................................. 7-3
Faxes Are Not Being Sent Correctly ............................................................................................ 7-4
Faxes Are Not Being Received Correctly..................................................................................... 7-6
Images Are Not Scanning Properly............................................................................................. 7-8
Documents Are Not Being Copied ............................................................................................. 7-9
Documents Are Not Printing Correctly ................................................................................... 7-10
Paper Is Not Loading Correctly ................................................................................................ 7-13
The Print Quality Is Not Satisfactory ....................................................................................... 7-14
Appendix A Fax/Phone Characters .............................................................................................................. A-1
Glossary ............................................................................................................................................................ G-1
Table of Contents ix

Chapter 1
Introduction
With your MultiPASS C530/C560, the Desktop Manager software package enables you to
perform a variety of tasks, meeting all your printing, faxing, and scanning needs.
❑ Desktop Manager Features: An Overview ..........................................................................1-2
❑ The MultiPASS Settings .......................................................................................................1-4
❑ Desktop Manager Software Package ...................................................................................1-5
❑ Using Your Documentation ................................................................................................ 1-7
● About This Guide.........................................................................................................1-8
● Conventions Used in This Guide ................................................................................1-8
● Other User Assistance ..................................................................................................1-9
❑ Using the MultiPASS Toolbar ............................................................................................1-10
● Changing the Options for the Scan Buttons on the Toolbar ...................................1-14
● Changing Toolbar Settings ........................................................................................1-19
● Performing Other Toolbar Tasks ...............................................................................1-22
Chapter 1 Introduction 1-1

Desktop Manager Features: An Overview
This section reviews some of the features of the Desktop Manager. For detailed information and
instructions, refer to later chapters in this guide.
■ Print a Document
The MultiPASS can be configured as the Windows® default printer, allowing you to print a
document in any Windows application. You can also define and customize print options
that affect the output of your printed documents. For information on printing with the
MultiPASS, see your online User’s Manual.
■ Fax a Document
You can fax a black and white document from your computer, from within a Windows
application, or from the Desktop Manager. You can attach a fax cover page and even
schedule the transmission time that the fax should be sent. Predefined fax cover pages are
available for you to use, or you can design your own.
For associates to whom you repeatedly send faxes or e-mail, you can set up an Address
Book, containing predefined fax and e-mail information for each recipient (such as the fax
number or e-mail address). When you send a fax or an e-mail message from your
computer, the recipient information is then readily available in the Address Book.
You can also receive color and black and white faxes from your business and personal
contacts directly into your PC.
Chapter 1 Introduction 1-2

■ Scan an Image
The TWAIN-compliant scan driver enables you to use the MultiPASS to scan black and white,
and color documents, photographs, and other images directly into the Desktop Manager or into
another Windows application.
■ Import or Export a Document
You can import, export, store, and manage documents and images in a variety of formats
directly in the Desktop Manager, such as .BMP and .TIF.
■ Manipulate or Annotate a Document
You can manipulate or annotate any document placed in the Desktop Manager — which occurs
by sending or receiving a fax, scanning an image, or importing a file. You manipulate a
document by scrolling through and viewing its contents; removing a page; splitting or merging
it with another document; editing it by cropping, rotating or flipping; adjusting the document
brightness, contrast, size, or image type; or by printing the document. You annotate a document
by adding a text annotation, graphic or text stamp, sticky note, highlighting, or by creating a
simple drawn graphic.
■ Set MultiPASS Options
Options that affect certain operations of your MultiPASS can be set manually on the MultiPASS
itself or in the Desktop Manager. These options include parameters that affect sending and
receiving faxes, and the assignment of speed dial numbers. Option settings defined in the
Desktop Manager override any corresponding option setting you previously set up on the
MultiPASS itself.
Chapter 1 Introduction 1-3

The MultiPASS Settings
To customize the MultiPASS to your particular needs, you can adjust the general operation,
sending, receiving, printing, system settings, and speed dialing settings. There are two methods
of adjusting these settings:
Method 1: Using the MultiPASS Desktop Manager
You can adjust settings using the MultiPASS Desktop Manager software included with your
MultiPASS. For detailed instructions refer to Chapter 6, Utilities, in this guide.
Method 2: Using the MultiPASS operation panel
You can also adjust settings directly via the operation panel of the MultiPASS. Detailed
instructions are described in the Stand-alone Fax Manual. Adjusting settings through the
operation panel is convenient when you do not have your MultiPASS connected to a PC.
Before adjusting any settings, decide whether you prefer to make changes from the MultiPASS
Desktop Manager or from the operation panel. Using both — the MultiPASS Desktop Manager
and the operation panel — may cause confusion. Changes made in the MultiPASS Desktop
Manager will override any corresponding settings made through the operation panel, and
changes made to settings through the operation panel will not be displayed in the MultiPASS
Desktop Manager.
If your MultiPASS is connected to a PC, we recommend using the MultiPASS Desktop Manager
n
to adjust any settings. If you are not using the MultiPASS Desktop Manager, you can ignore the
information in this manual.
Chapter 1 Introduction 1-4

Desktop Manager Software Package
The Desktop Manager software package includes drivers and a set of utility programs which are
automatically installed on your system when you install the software package. The drivers allow
the MultiPASS to communicate with the software on your computer.
The following drivers and application programs are installed:
■ MultiPASS Desktop Manager for Windows
The MultiPASS Desktop Manager for Windows coordinates sending faxes directly from
your computer (PC faxes), receiving faxes into your computer, and scanning images. The
Desktop Manager enables you to store and manage the resulting documents.
■ MultiPASS Printer Driver
The MultiPASS printer driver enables you to use the MultiPASS as the default printer in
any Windows application that supports printing.
■ MultiPASS Fax Driver
The MultiPASS fax driver enables you to send a PC fax from any Windows application that
allows faxing.
■ Scan Driver (ScanGear™ for MultiPASS)
The scan driver enables you to scan an image into the Desktop Manager or most Windows
applications that support TWAIN-compliant scanning.
Chapter 1 Introduction 1-5

■ MultiPASS Service (Windows NT only)
The MultiPASS Service (MPService) enables and controls all the communication between
your computer and the MultiPASS. MPService must be running for jobs to be processed
with the Desktop Manager and the MultiPASS (such as receiving faxes in the Desktop
Manager, scheduling faxes, scanning, and printing).
MPService starts automatically when you start your computer, even if you have not yet
logged into Windows. If you log off Windows and leave the computer on, MPService
continues to run, to receive and send any faxes to and from the Desktop Manager.
■ MultiPASS Status Monitor
The MultiPASS Status Monitor controls and tracks the activity occurring through the bidirectional parallel port to which the MultiPASS is connected. The Status Monitor must be
running to enable the MultiPASS system to function successfully. The Status Monitor
displays status messages about the current activity with your MultiPASS system. With the
installation of the software, the Status Monitor is set up to automatically start when you
start Windows.
■ Send Fax Manager
The Send Fax Manager displays an ordered queue of fax jobs and their status.
■ MultiPASS Toolbar
The MultiPASS Toolbar enables you to scan an image from the Windows desktop without
opening an imaging application (such as Photoshop®) or the Desktop Manager. The
scanned image is delivered directly to a destination, such as a fax or to the desired
application (such as your e-mail application or a graphic application).
Chapter 1 Introduction 1-6

Using Your Documentation
Your MultiPASS includes the following documentation to help you learn how to use your unit
quickly and easily:
■ Quick Start Guide
This foldout sheet describes how to unpack and set up your new MultiPASS unit. It
includes instructions on how to install the software that comes with the MultiPASS,
including the MultiPASS Desktop Manager for Windows, ScanGear for MultiPASS, and
the MultiPASS Printer Driver. This software enables you to use all the features of the
MultiPASS — color printing, color copying, color faxing, PC faxing, and color scanning.
■ MultiPASS C530/C560 User’s Manual
This online manual offers detailed information on how to operate your new MultiPASS. It
describes how to use the MultiPASS as a monochrome or color printer and covers the
basics on how to send and receive faxes. It also includes maintenance, troubleshooting, and
specifications.
■ MultiPASS Desktop Manager Software Guide
This online manual describes how you use the MultiPASS Desktop Manager, which is a
software application that provides all the PC faxing and scanning capabilities of your
MultiPASS. If you plan to use the PC faxing and scanning features of the MultiPASS, you
must install the MultiPASS Desktop Manager software. You can then use the Desktop
Manager to define and control all of the features of the MultiPASS.
Chapter 1 Introduction 1-7

■ Stand-alone Fax Manual
This online manual describes how you use the operation panel on the MultiPASS to control
all your faxing and receiving functions. If you decide not to install the MultiPASS Desktop
Manager, you can still use many of the features of the MultiPASS. In this case, you will
define and control the features of the MultiPASS through the operation panel.
About This Guide
This guide assumes you have a basic understanding of Windows. This includes how to start
your system and navigate within the Windows environment. You should be familiar with
common Windows terms such as window, dialog box, button, icon, menu, application, select,
open, close, click, double-click, drag, and list box.
For assistance in familiarizing yourself with Windows, refer to your Microsoft® Windows user
documentation.
Conventions Used in This Guide
The following types of formatting identify specific types of information provided in this guide.
Chapter 1 Introduction 1-8

Italicized text Used to stress the importance of a word or phrase, or to refer to
Text in quotation marks Used to refer to the title of a section within the guide. For
Click, double-click Use of the word click or double-click provides instructions for
Monospaced text Used for commands you might type when installing the
Other User Assistance
In addition to this guide, the MultiPASS Desktop Manager includes online help. The online help
includes context-sensitive help about a window or dialog box and step-by-step instructions for
performing Desktop Manager tasks.
the title of another guide. For example:
You cannot access the dialog box ....
—or—
...the Microsoft Windows User’s Guide....
example:
...the “Installing the Software” section....
selecting or choosing a command or option, generally with a
mouse.
software, or system messages that may display on your screen.
For example: A:\SETUP
Chapter 1 Introduction 1-9

Using the MultiPASS Toolbar
The MultiPASS Toolbar displays as an icon on the Windows desktop. When you click the icon
(or press Start/Scan on the MultiPASS), the MultiPASS Toolbar (hereafter referred to as the
Toolbar) displays on the Windows desktop and enables you to scan a document or image,
without opening a graphics application or the Desktop Manager.
When you scan a document, the system uses defined settings that determine the characteristics
of your scanned image (such as the image type and resolution). The settings are predefined,
enabling you to begin scanning with the Toolbar immediately. However, you can change these
settings as needed.
The following illustration includes each of the buttons that may display on the Toolbar. The
button icons may vary somewhat based on your Toolbar settings. You can also adjust the
Toolbar settings to display only those buttons that are convenient for you.
Fax
Mail
Scan Text
Scan Photo
Custom
Desktop Manager
Toolbar Settings
Help
Chapter 1 Introduction 1-10

The Fax, Mail, Scan Text, Scan Photo, and Custom buttons enable you to scan a document
or image to a particular destination. For example, you may want to scan a document, and
immediately send it as a fax or attach it to an e-mail message.
When the Toolbar is running, a minimized icon appears on the Windows taskbar.
Toolbar Icon
To scan with the Toolbar:
1. Place your document or image facedown in the Automatic Document Feeder (ADF) of
your MultiPASS.
2. On the Windows desktop, on the MultiPASS Toolbar:
Click Fax to scan your document and automatically send it as a fax in the Desktop
Manager.
Click Mail to scan your document and automatically attach it to a message in your
e-mail application.
Click Scan Text to scan your document and automatically have it display in a text
editor application (such as TextBridge™).
Chapter 1 Introduction 1-11

Click Scan Photo to scan your document and automatically have it display in a graphic
application (such as Adobe PhotoDeluxe®).
Click Custom to scan your document and automatically have it display in an
application you assigned in the Toolbar settings (such as Microsoft Paint™).
3. If the ScanGear window appears, set your scan options as desired and scan your document.
These settings override any scan settings defined in the Toolbar. For details on defining
scan options in the ScanGear window, see Chapter 4, Scanning.
If the ScanGear window does not appear, skip to Step 4.
4. When the MultiPASS begins to scan the document, the MultiPASS Toolbar dialog box
displays the progress of the scan activity.
Based on your Toolbar settings, a preview of the scanned image may appear in the Toolbar
dialog box. When the scan is complete, click OK to accept the image and continue to the
destination for your scanned image. If you are dissatisfied with the image, click Cancel.
If a preview image does not appear, the image is immediately sent to its destination.
Chapter 1 Introduction 1-12
n
5. When the scan is complete and, if necessary, the image is accepted, do one of the following:
If you clicked Fax in Step 2:
In the Send Fax dialog box, enter the appropriate information and send the fax. For
details, see Chapter 3, PC Faxing.
If you clicked Mail in Step 2:
In the e-mail message window, enter the appropriate information and send the e-mail
message.
If you clicked Scan Text in Step 2:
The image automatically appears in the associated text editor application.
If you clicked Scan Photo in Step 2:
The image automatically appears in the associated graphic application.
If you clicked Custom in Step 2:
The image automatically appears in the software application set up as the custom
application in your Toolbar settings.
For complete details on scanning, see Chapter 4, Scanning.
Chapter 1 Introduction 1-13

Changing the Options for the Scan Buttons on the Toolbar
In the Toolbar settings, you can define certain features associated with the scan buttons on the
Toolbar. These features include scan settings that the Toolbar uses automatically to produce the
scanned image. These settings are defined independently for each scan destination available, such
as scan to fax or scan to mail. Although these settings are predefined so you can begin scanning
with the Toolbar immediately after installing the MultiPASS software, you can change these
settings as needed.
To change the scan button options:
1. On the Windows Desktop, right-click on the MultiPASS Toolbar icon, and then click Toolbar
Settings.
Chapter 1 Introduction 1-14
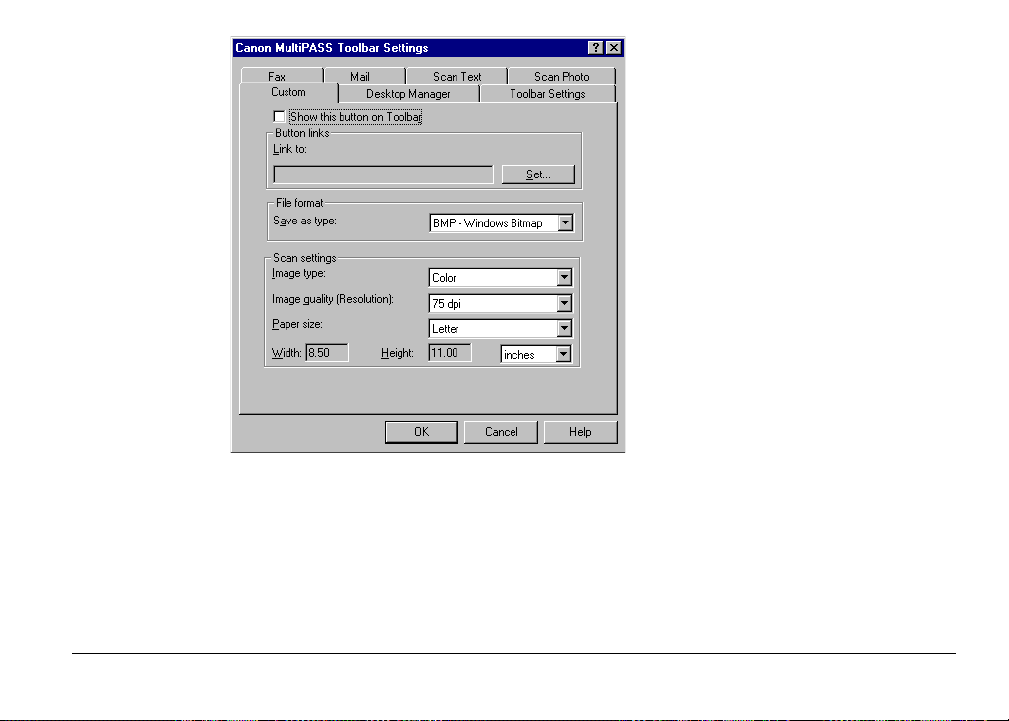
2. In the Toolbar Settings dialog box, select the appropriate tab for the scan button whose
settings you want to change: Fax, Mail, Scan Text, Scan Photo, and Custom.
3. On the appropriate tab, make your preferred changes.
4. Click OK to save the changes.
Click Cancel to close the Toolbar Settings dialog box without saving the changes.
Chapter 1 Introduction 1-15

Defining the Scan Button Options
On the applicable tab in the Toolbar Settings dialog box, you can change the following options:
■ Show This Button on Toolbar
Select this option to display the button associated with this scan destination on the Toolbar.
If this option is cleared, the button does not appear on the Toolbar.
■ Link To
On the Fax tab, this option displays the MultiPASS fax driver that is used to send your
scanned document as a fax.
On the Scan Text, Scan Photo, and Custom tabs, this option displays the path and executable
file for the application associated with the scan destination. The Scan Text and Scan Photo
buttons may be factory-defined with an application bundled with your MultiPASS software.
For example, the Scan Text button may be linked to the TextBridge application. The Custom
tab enables you to associate your preferred application with the Custom button.
■ Set
On the Fax tab, click to change the fax options used when faxing the scanned document with
the Fax button. In the Fax Properties dialog box, specify your changes (such as paper size)
and click OK.
On the Scan Text, Scan Photo and Custom tabs, click to select the application you want
associated with this scan destination. For details, see “Linking an Application for a Toolbar
Scan Button” later in this section.
Chapter 1 Introduction 1-16

■ Save as Type
If available on the tab, click the file format in which you want your scanned image saved,
such as BMP or TIF. This option is available only for those scan destinations where saving
the image file is appropriate.
■ Image Type
Select the type of image you are scanning, such as Black and White.
■ Image Quality (Resolution)
Select the resolution (in dots per inch, dpi) for the image you are scanning. A higher
resolution results in a better image quality, but may take longer to scan. A lower resolution
generally scans faster, but may generate a lesser quality image.
■ Paper Size
Select the physical size of the image being scanned, such as letter or business card size. You
can also define a custom paper size. For details, see “Defining a Custom Paper Size” later in
this section.
■ Weight and Size
Based on the paper size you selected, the corresponding width and height display. If you
selected the custom paper size, you can define the width and height. You can also select the
unit of measure by which you want to display or define the width and height.
Chapter 1 Introduction 1-17
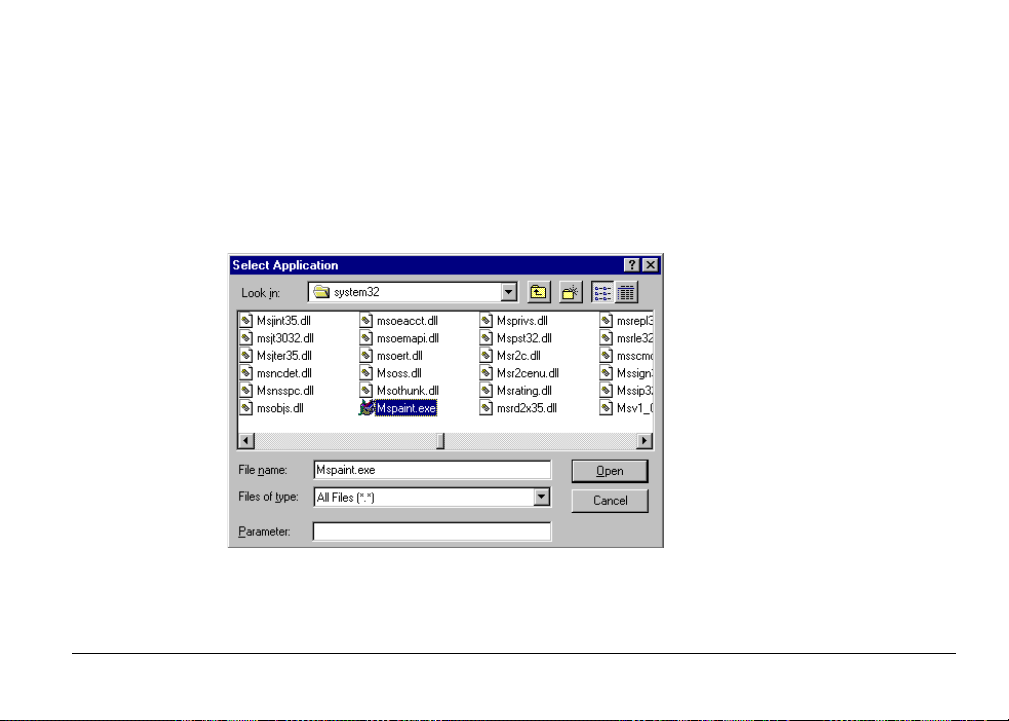
Linking an Application for a Toolbar Scan Button
When linking an application to a button, you need to know the program or executable (.EXE)
file associated with the application and where this file is located on your system. For example, to
link Microsoft Paint to the Custom button, you would need to know the path and the
executable file name for Paint (PBRUSH.EXE).
To link an application:
1. On the Scan Text, Scan Photo, or Custom tab, click Set.
2. In the Select Application dialog box, select the path and file name for the application
executable file. Then click Open.
Your selection displays in the Link To box.
Chapter 1 Introduction 1-18

Defining a Custom Paper Size
1. On the applicable tab, in the Paper Size box, click Custom.
2. Select the unit of measure by which you want to define your custom paper size.
3. In the Width and Height boxes, enter the dimensions of your custom paper size.
Changing Toolbar Settings
You can change certain characteristics about the Toolbar, such as its appearance and
performance.
To change Toolbar settings:
1. On the Windows Desktop, right-click on the MultiPASS Toolbar icon, and then click
Toolbar Settings.
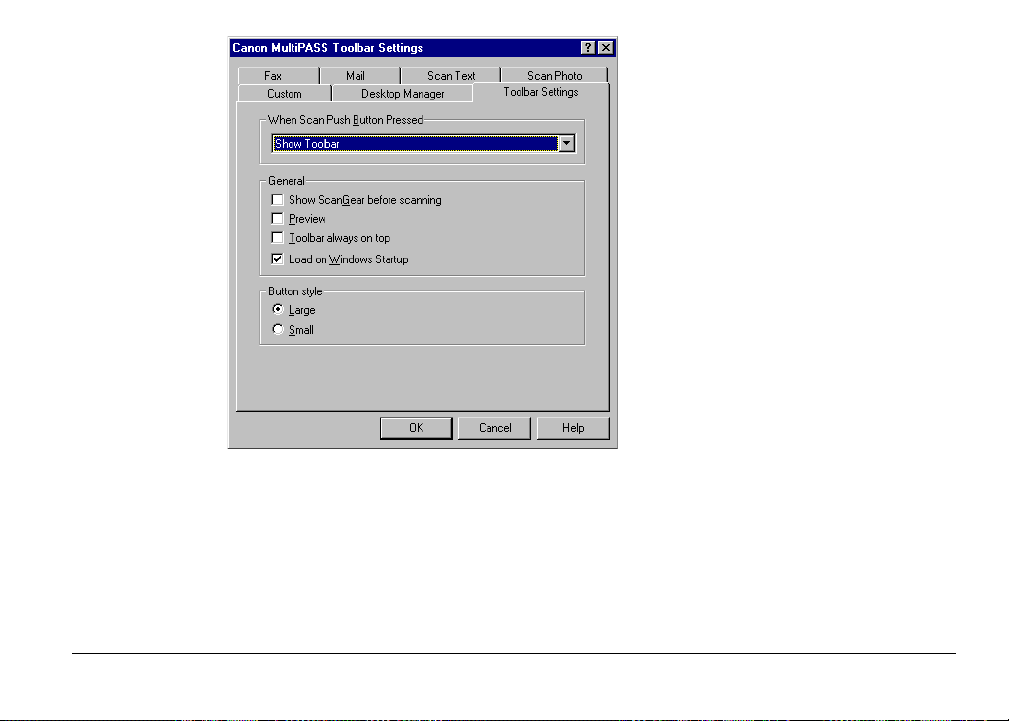
2. In the Toolbar Settings dialog box, select the Toolbar Settings tab.
Chapter 1 Introduction 1-19
3. Specify your changes.
4. Click OK to save the changes.
Click Cancel to close the Toolbar Settings dialog box without saving the changes.
Chapter 1 Introduction 1-20

Defining the Toolbar Settings
You can define the following options on the Toolbar Settings tab.
■ When Scan Push Button Pressed
You define the desired action that occurs when you push the scan button on your
MultiPASS. In the When Scan Push Button Pressed box, select the desired action. For
example, you can set the button to display the Toolbar, or to send the scanned document to
a particular destination, such as fax.
■ Show ScanGear Before Scanning
Click to display the ScanGear window when you scan a document in the Toolbar. When the
ScanGear window is displayed, you can set and adjust scan options, and then rescan the
document, before accepting the final scanned image. The options you set override the scan
options set in the Toolbar.
If this option is cleared, the image is scanned based on the scan settings defined in the
Toolbar.
■ Preview
Click to display a preview image during the scanning of a document in the Toolbar
progress dialog box. This option enables you to preview the image before accepting or
canceling the image.
If this option is cleared, the image is immediately sent to its destination.
Chapter 1 Introduction 1-21
 Loading...