

Canon C530 Owner's Manual
Stand-alone Fax
Manual
C530/C560
C
OLOR BUBBLE JET
™
PRINTER
FAX • SCANNER • COPIER

Preface ii
Copyright
This manual is copyrighted by Canon Computer Systems, Inc. (CCSI) with all rights reserved.
Under the copyright laws, this manual may not be reproduced in any form, in whole or part,
without prior written consent of CCSI.
©1999 Canon Computer Systems, Inc.
Disclaimer
Canon Computer Systems, Inc. has reviewed this manual thoroughly in order to make it an easy
to use guide for your Canon MultiPASS system. All statements, technical information, and
recommendations in this guide and in any guides or related documents are believed reliable, but
the accuracy and completeness thereof are not guaranteed or warranted, and they are not intended
to be, nor should they be understood to be, representations or warranties concerning the products
described.
Your MultiPASS and the software media included with your system have been sold to you subject
to the limited warranties set forth in the warranty and license agreement enclosed with the
respective products. All software is licensed AS IS, as described in the license agreement enclosed
with the software media. Further, CCSI reserves the right to make changes in the specifications of
the products described in this guide at any time without notice and without obligation to notify
any person of such changes.

Trademarks
Canon, BCI, BJ, Bubble Jet, MultiPASS, ScanGear, and UHQ are trademarks and SelectExchange is
a service mark of Canon Inc.
All other product and brand names are trademarks or service marks of their respective owners.
E
NERGYSTAR
®
C
OMPLIANT
As an ENERGY
STAR
®
Partner, Canon U.S.A., Inc. has determined that this product meets the
ENERGY
STAR
®
guidelines for energy efficiency.
Preface iii

Contents
Chapter 1: Introduction
The MultiPASS Settings ......................................................................................................................1-2
Using Your Documentation ...............................................................................................................1-3
Type Conventions Used in This Manual ...........................................................................................1-4
Chapter 2: Registering Information
Guidelines for Entering Information Via the Operation Panel .......................................................2-2
Using the One-Touch Speed Dialing/Special Function Buttons................................................2-3
Understanding and Accessing the Menus....................................................................................2-4
Entering Numbers, Letters, and Symbols....................................................................................2-8
Registering Required Sender Information ......................................................................................2-13
Registering Sender Information.................................................................................................2-15
Printing a List to Check the Sender Information .....................................................................2-19
Setting the Telephone Line Type......................................................................................................2-21
Chapter 3: Speed Dialing
What Is Speed Dialing?.......................................................................................................................3-3
Speed Dialing Methods.................................................................................................................3-3
One-Touch Speed Dialing ..................................................................................................................3-4
Registering Numbers for One-Touch Speed Dialing..................................................................3-4
Changing/Deleting a One-Touch Speed Dialing Entry ..............................................................3-9
Using One-Touch Speed Dialing................................................................................................3-14
Contents iv

Coded Speed Dialing ........................................................................................................................3-16
Registering Numbers for Coded Speed Dialing........................................................................3-16
Changing/Deleting a Coded Speed Dialing Entry ....................................................................3-21
Using Coded Speed Dialing........................................................................................................3-26
Group Dialing ...................................................................................................................................3-28
Creating Groups..........................................................................................................................3-28
Changing/Deleting a Group Dialing Entry ...............................................................................3-34
Using Group Dialing...................................................................................................................3-36
Speed Dialing Lists............................................................................................................................3-38
Printing the One-Touch or Coded Speed Dial List ..................................................................3-38
Printing the Group Dial List ......................................................................................................3-42
Chapter 4: Sending Faxes
Preparing to Send a Fax......................................................................................................................4-3
Adjusting the Quality of Your Faxes ............................................................................................4-3
Dialing Methods..........................................................................................................................4-10
Sending Methods ..............................................................................................................................4-11
Memory Sending.........................................................................................................................4-11
Manual Sending ..........................................................................................................................4-14
Canceling Sending ............................................................................................................................4-17
Removing the Document From the Automatic Document Feeder (ADF) .............................4-18
Redialing When the Line Is Busy .....................................................................................................4-21
Manual Redialing........................................................................................................................4-21
Automatic Redialing ...................................................................................................................4-21
Contents v

Sequential Broadcasting ...................................................................................................................4-28
Sending a Document to More Than One Destination.............................................................4-28
Delayed Sending................................................................................................................................4-32
Sending Other Documents While the MultiPASS Is Set for Delayed Sending........................4-32
Documents Stored in Memory ........................................................................................................4-33
Printing a List of Documents in Memory.................................................................................4-33
Printing a Document in Memory ..............................................................................................4-34
Deleting a Document From Memory........................................................................................4-39
Special Dialing ..................................................................................................................................4-41
Dialing Through a Switchboard.................................................................................................4-41
Dialing an International Number..............................................................................................4-42
Switching Temporarily to Tone Dialing...........................................................................................4-44
Chapter 5: Receiving Faxes
Different Ways to Receive a Fax .........................................................................................................5-2
Receiving Both Faxes and Telephone Calls Automatically: Fax/Tel Mode ................................5-3
Receiving Faxes Manually: MANUAL MODE ..........................................................................5-13
Receiving Faxes Automatically: FAX ONLY MODE .................................................................5-16
Receiving With an Answering Machine: ANS.MACHINE MODE..........................................5-19
Receiving Using the Distinctive Ring Pattern Detection Feature: DRPD................................5-20
Receiving in Color ............................................................................................................................5-34
Setting Color Reception..............................................................................................................5-35
Contents vi

Receiving While Registering, Copying, or Printing ........................................................................5-37
Receiving Faxes in Memory When a Problem Occurs....................................................................5-37
Canceling Receiving..........................................................................................................................5-41
Chapter 6: Reports and Lists
Summary of Lists and Reports...........................................................................................................6-2
Abbreviations Used in Transaction Reports......................................................................................6-4
Activity Report....................................................................................................................................6-5
Transmission (TX) Reports................................................................................................................6-7
Error TX Report............................................................................................................................6-7
TX Report......................................................................................................................................6-8
TX Report With First Page ...........................................................................................................6-9
Multi-Transaction (TX/RX) Report.................................................................................................6-10
Reception (RX) Reports ...................................................................................................................6-11
Error RX Report..........................................................................................................................6-11
RX Report....................................................................................................................................6-12
Memory Clear Report.......................................................................................................................6-13
Chapter 7: Summary of Settings
Understanding the Menu System.......................................................................................................7-3
Summary of Menus ......................................................................................................................7-3
Contents vii

User Settings........................................................................................................................................7-5
Accessing the User Settings Menu................................................................................................7-5
User Settings Menu.......................................................................................................................7-7
Report Settings....................................................................................................................................7-8
Accessing the Report Settings Menu............................................................................................7-8
Report Settings Menu.................................................................................................................7-10
TX (Transmission) Settings..............................................................................................................7-11
Accessing the TX Settings Menu................................................................................................7-11
TX Settings Menu .......................................................................................................................7-13
RX (Reception) Settings ...................................................................................................................7-14
Accessing the RX Settings Menu................................................................................................7-14
RX Settings Menu .......................................................................................................................7-16
Printer Settings..................................................................................................................................7-17
Accessing the Printer Settings Menu..........................................................................................7-17
Printer Settings Menu.................................................................................................................7-19
System Settings..................................................................................................................................7-20
Accessing the System Settings Menu..........................................................................................7-20
System Settings Menu.................................................................................................................7-22
Contents viii

Chapter 1 Introduction 1-1
Chapter 1
Introduction
This manual describes how you use the operation panel to control your MultiPASS.
For paper handling, printing, document handling, maintenance, troubleshooting, specifications,
and other information regarding the MultiPASS, see the MultiPASS C530/C560 User’s Manual.
❏ The MultiPASS Settings ...............................................................................................................1-2
❏ Using Your Documentation.........................................................................................................1-3
❏ Type Conventions Used in This Manual ....................................................................................1-4

The MultiPASS Settings
To customize the MultiPASS to your particular needs, you can adjust the general operation,
sending, receiving, printing, system settings, and speed dialing settings. There are two methods
of adjusting these settings:
Method 1: Using the MultiPASS operation panel
You can adjust settings directly via the operation panel of the MultiPASS. Detailed instructions are
described in this manual. Adjusting settings through the operation panel is convenient when you
do not have your MultiPASS connected to a PC.
Method 2: Using the MultiPASS Desktop Manager
You can adjust settings using the MultiPASS Desktop Manager software included with your
MultiPASS. For detailed instructions refer to the online MultiPASS Desktop Manager Software
Guide (in Adobe® Acrobat® format).
Before adjusting any settings, decide whether you prefer to make changes from the operation
panel or from the MultiPASS Desktop Manager. Using both — the operation panel and the
MultiPASS Desktop Manager — may cause confusion. Changes made to settings through the
operation panel will not be displayed in the MultiPASS Desktop Manager, and changes made in
the MultiPASS Desktop Manager will override any corresponding settings made through the
operation panel.
n
If your MultiPASS is connected to a PC, we recommend using the MultiPASS Desktop Manager to
adjust any settings.
If you are using the MultiPASS Desktop Manager, you can ignore the information in this manual.
Chapter 1 Introduction 1-2

Using Your Documentation
Your MultiPASS includes the following documentation to help you learn how to use your unit
quickly and easily:
■ Quick Start Guide — This foldout sheet describes how to unpack and set up your new
MultiPASS unit. It includes instructions on how to install the software that comes with the
MultiPASS, including the MultiPASS Desktop Manager for Windows®, ScanGear™ for
MultiPASS, and the MultiPASS Printer Driver. This software enables you to use all the
features of the MultiPASS — color printing, color copying, color faxing, PC faxing, and
color scanning.
■ MultiPASS C530/C560 User's Manual — This online manual offers detailed information on
how to operate your new MultiPASS. It describes how to use the MultiPASS as a monochrome
or color printer and covers the basics on how to send and receive faxes. It also includes
maintenance, troubleshooting, and specifications.
■ MultiPASS Desktop Manager Software Guide — This online manual describes how you use
the MultiPASS Desktop Manager, which is a software application that provides all the PC
faxing and scanning capabilities of your MultiPASS. If you plan to use the PC faxing and
scanning features of the MultiPASS, you must install the MultiPASS Desktop Manager
software. You can then use the Desktop Manager to define and control all of the features of
the MultiPASS.
Chapter 1 Introduction 1-3

■ MultiPASS C530/C560 Stand-alone Fax Manual — This online manual describes how you
use the operation panel on the MultiPASS to control all your faxing and receiving functions.
If you decide not to install the MultiPASS Desktop Manager, you can still use many of the
features of the MultiPASS. In this case, you will define and control the features of the
MultiPASS through the operation panel.
Type Conventions Used in This Manual
Please read the list below of symbols, terms, and abbreviations used in this manual, and make sure
you know what they mean.
c
Cautions tell you how to avoid actions that could injure you or damage your MultiPASS.
In order to use your unit safely, always pay attention to these cautions.
n
Notes provide advice on using the MultiPASS more effectively, describe operating restrictions, and
tell you how to avoid minor difficulties. Reading these is recommended to make the most of your
unit and its functions.
default A setting that remains in effect unless you change it.
document or A document or fax is the original sheet(s) of
fax paper you send or receive on the unit.
Chapter 1 Introduction 1-4

menu A menu is a list of settings or features from which you select an item to set
up or change. A menu has a title which appears in the LCD display.
d and u buttons The d and u buttons are used to select an item in a menu. Press d to
select the next item, and press u to select the previous item.
transaction number When you send or receive a document, your unit automatically assigns
the document a unique transaction number. A transaction number is a
four-digit number that will help you keep track of documents you
send and receive.
TX/RX NO. On the LCD display, TX/RX NO. is the abbreviation used for
transaction number.
RX Denotes receiving.
TX Denotes sending.
In addition, this manual uses distinctive typefaces to identify the buttons you press, the lights on
the operation panel, and any commands you enter at your computer.
■ The buttons you press and the names of lights you see appear in this typeface:
Start/Scan.
■ What you see in the LCD display appears in this typeface: REGISTRATION.
n
For a complete glossary of terms, see the MultiPASS C530/C560 User’s Manual.
Chapter 1 Introduction 1-5

Chapter 2 Registering Information 2-1
Chapter 2
Registering Information
This chapter describes how to enter information in the MultiPASS using the operation panel. It
briefly explains how to browse through the menus and find items you want. You will also find
instructions for entering your sender information, which is required before using your unit.
n
If you are using the MultiPASS Desktop Manager, you will not need this information. This
information is provided for those using the MultiPASS as a stand-alone fax machine.
❏ Guidelines for Entering Information Via the Operation Panel ................................................2-2
● Using the One-Touch Speed Dialing/Special Function Buttons..........................................2-3
● Understanding and Accessing the Menus..............................................................................2-4
● Entering Numbers, Letters, and Symbols ..............................................................................2-8
❏ Registering Required Sender Information ...............................................................................2-13
● Registering Sender Information...........................................................................................2-15
● Printing a List to Check the Sender Information ...............................................................2-19
❏ Setting the Telephone Line Type...............................................................................................2-21

Guidelines for Entering Information Via the Operation Panel
The following section provides a brief overview of how to use the buttons on the operation panel
to access menus, make selections, and register your entries. You will also find information on
entering numbers, letters, and symbols to register fax/telephone numbers and names.
When entering information, always keep the following in mind:
■ If you pause while entering information and do not make an entry for more than 60 seconds,
the MultiPASS returns automatically to standby mode and loses all information you had
entered up to that point. You will have to start again.
■ If the MultiPASS is set for manual receiving and the unit rings while you are entering
information, press the
Stop button and lift the telephone. The MultiPASS will automatically
save all the information entered up to the last time you pressed the Set button.
● If you hear nothing or a slow beep, someone is trying to send a fax: press the Start/Scan
button.
● If you hear a voice, you are receiving a normal telephone call.
● If your MultiPASS is set to receive faxes automatically, you do not have to press the Stop
button. The MultiPASS will automatically receive the fax.
Chapter 2 Registering Information 2-2
Using the One-Touch Speed Dialing/Special Function Buttons
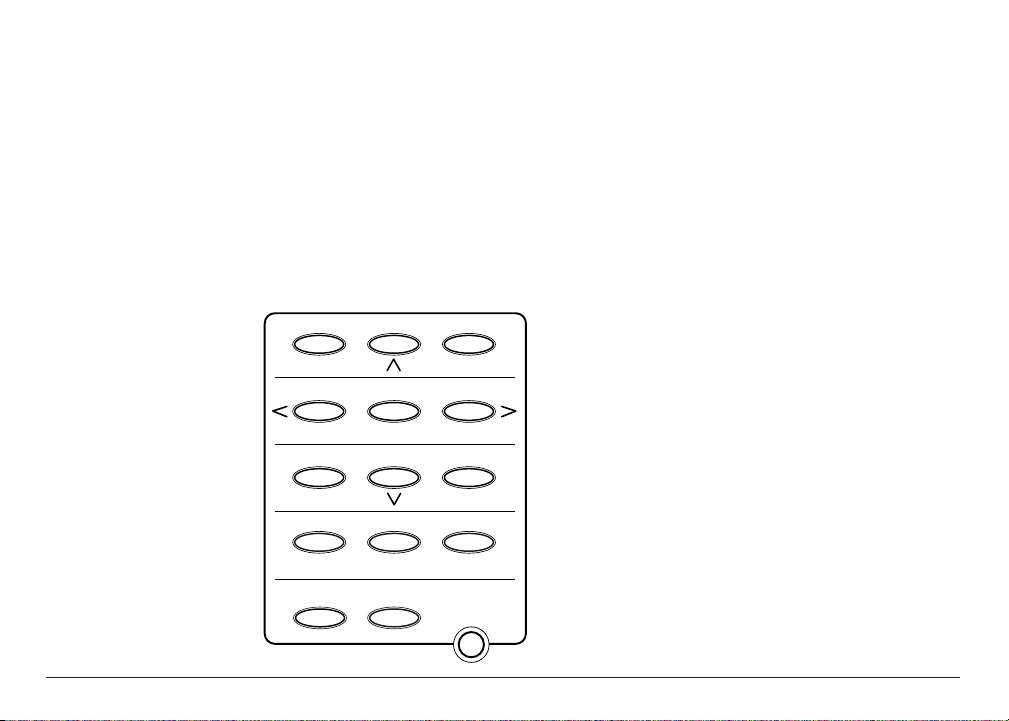
The buttons located on the right of the operation panel have two functions.
■ One-Touch Speed Dialing Buttons
Use the buttons marked 01 to 12 to dial fax/telephone numbers registered under these
buttons.
■ Special Function Buttons
To access the special functions (marked under or to the sides of the buttons), press the
Function button to turn on its light and then press the button you wish to access.
Resume
01 02 03
04 05 06
07
08
09
10 11 12
Function
Memory Reference
Data Registration
Space
+
Cleaning
Set
Clear
Report
Chapter 2 Registering Information 2-3
Understanding and Accessing the Menus
The menu system, under the Data Registration button, contains settings that allow you to register
important information and set up different features of your MultiPASS. This section describes the
general procedure for displaying and accessing the menus. The content of each menu is described
in detail in Chapter 7, Summary of Settings.
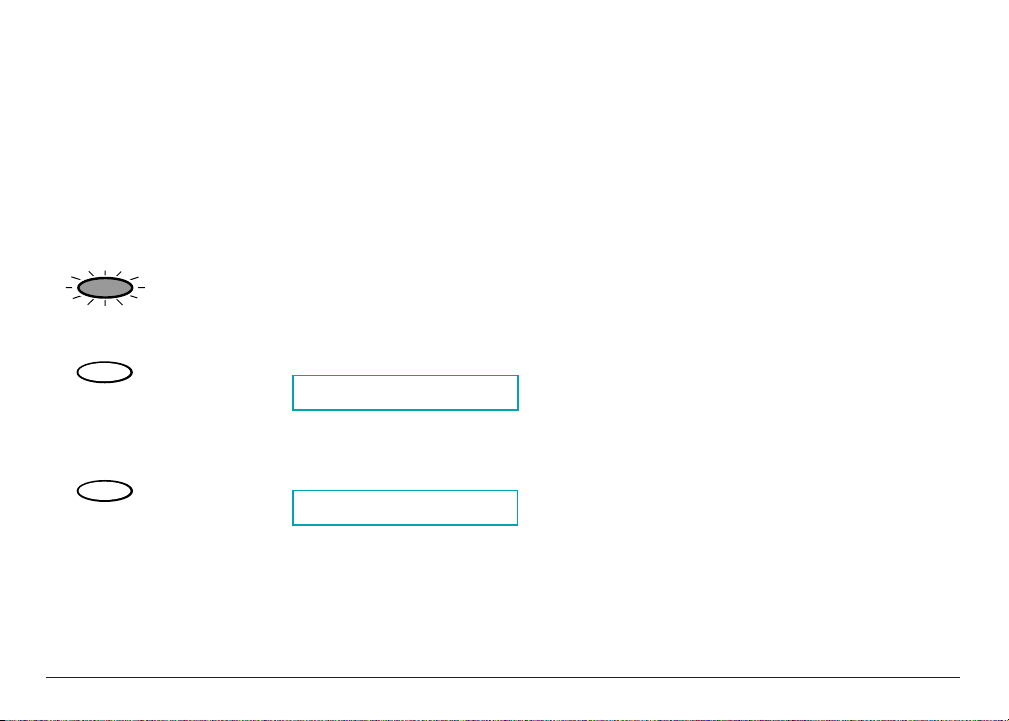
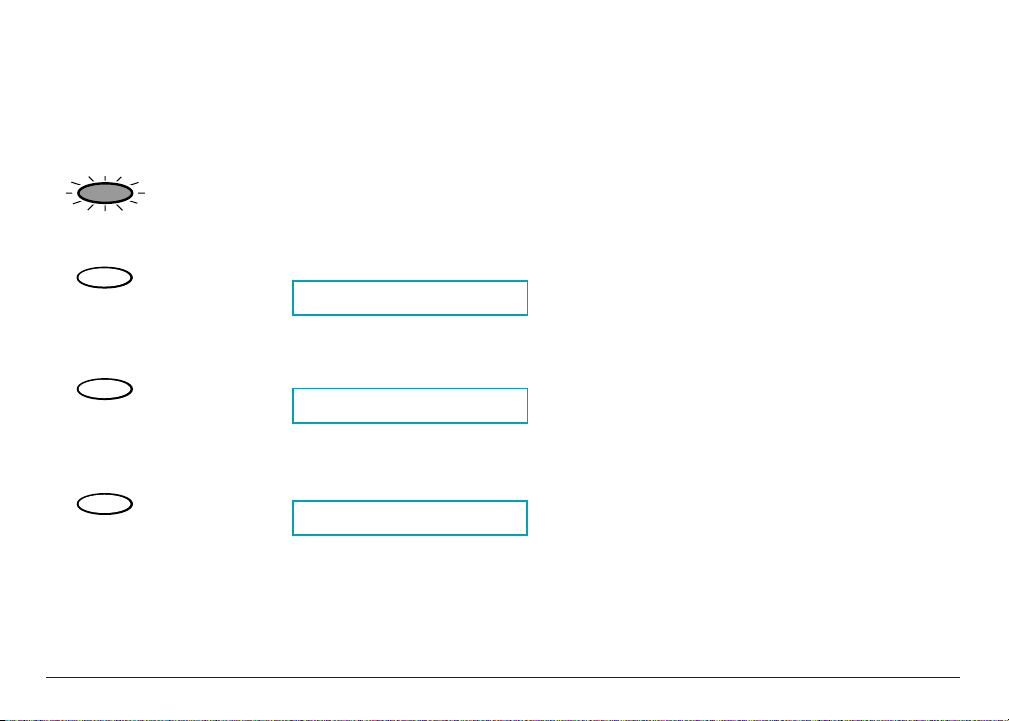
To access the menus, follow this general procedure:
1. Press
Function.
2. Press
Data Registration.
3. Press
Set.
USER SETTINGS
Set
DATA REGSTRATION
01
Data Registration
Function
Chapter 2 Registering Information 2-4

4. Use d or u to select the menu you want.
Ex:
■ Press d to select the next menu in the list. The list will wrap from the last menu in the
list to the first.
■ Press
u to select the previous menu in the list. The list will wrap from the first menu in
the list to the last.
■ You can select from the following menus:
● USER SETTINGS menu
Contains important settings such as date and time setup, and registration of the
sender information that should be entered when you set up your unit. (See page 7-5.)
● REPORT SETTINGS menu
The settings under this menu allow you to select different options for printing
transaction reports. (See page 7-8.)
● TX (Transmission) SETTINGS menu
Use these settings to customize how the unit sends documents. (See page 7-11.)
● RX (Reception) SETTINGS menu
Use these settings to customize how the unit receives documents. (See page 7-14.)
● PRINTER SETTINGS menu
Use these settings to customize how the unit prints. (See page 7-17.)
RX SETTINGS
02
08
Chapter 2 Registering Information 2-5

● SYSTEM SETTINGS menu
Use these settings to set up system defaults such as the date format, the language for
the LCD display, and the transaction speeds. (See page 7-20.)
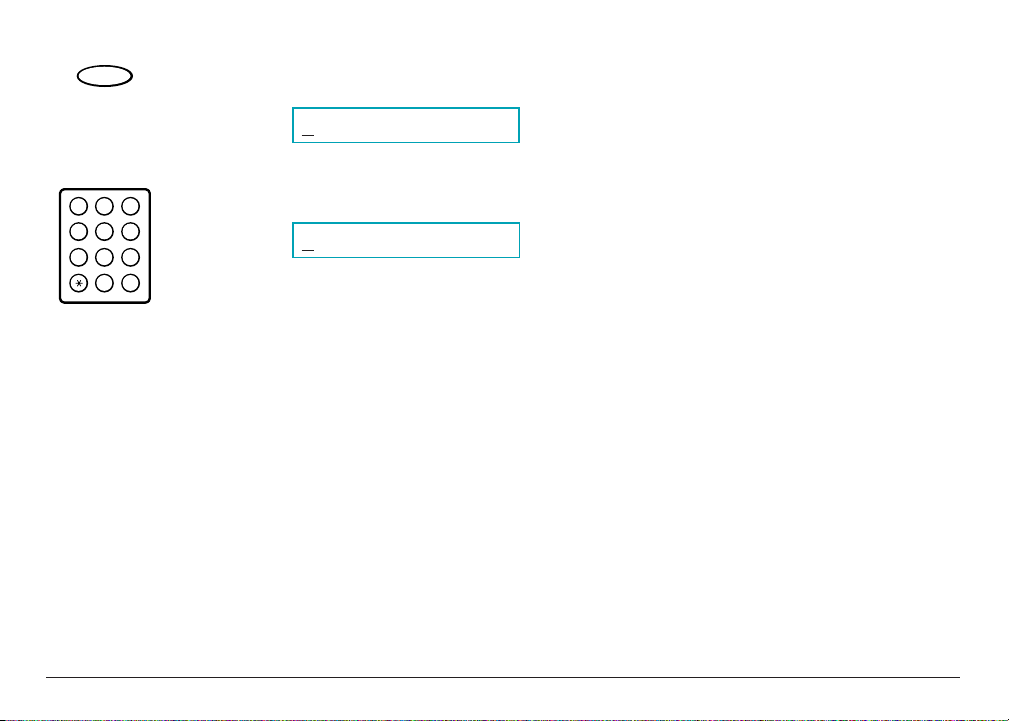
5. Press
Set to access the settings under the menu you selected.
Ex:
6. Use d or u to select the setting you want.
Ex:
7. Press Set to display the sub-setting under the setting you selected.
Ex:
8. Again, use d or u to select the sub-setting you want.
-or-
If required, use the numeric buttons to enter information.
GHI JKL MNO
ABC DEF
TUV WXY
OPER
Tone
SYMBOLS
PRS
1
0#
7
8
9
45
6
2
3
02
08
OFF
Set
INCOMING RING
02
08
ECM RX
Set
Chapter 2 Registering Information 2-6

9. Press Set to register the setting or entry.
■ If you access additional settings, repeat the above procedure from step 6.
10. When you have finished changing settings, press
Stop to return to standby mode.
Ex:
Returning to a Previous Level
To return to a previous level so you can continue browsing, press Data Registration. Each time you
press Data Registration, you will return to the previous level until the unit is back in standby
mode.
Returning Directly to Standby Mode
If at any time you wish to return directly to standby mode, press Stop.
n
If you do not press a button for 60 seconds, the unit will automatically return to standby mode.
12/27 FaxTel
Stop
Set
Chapter 2 Registering Information 2-7
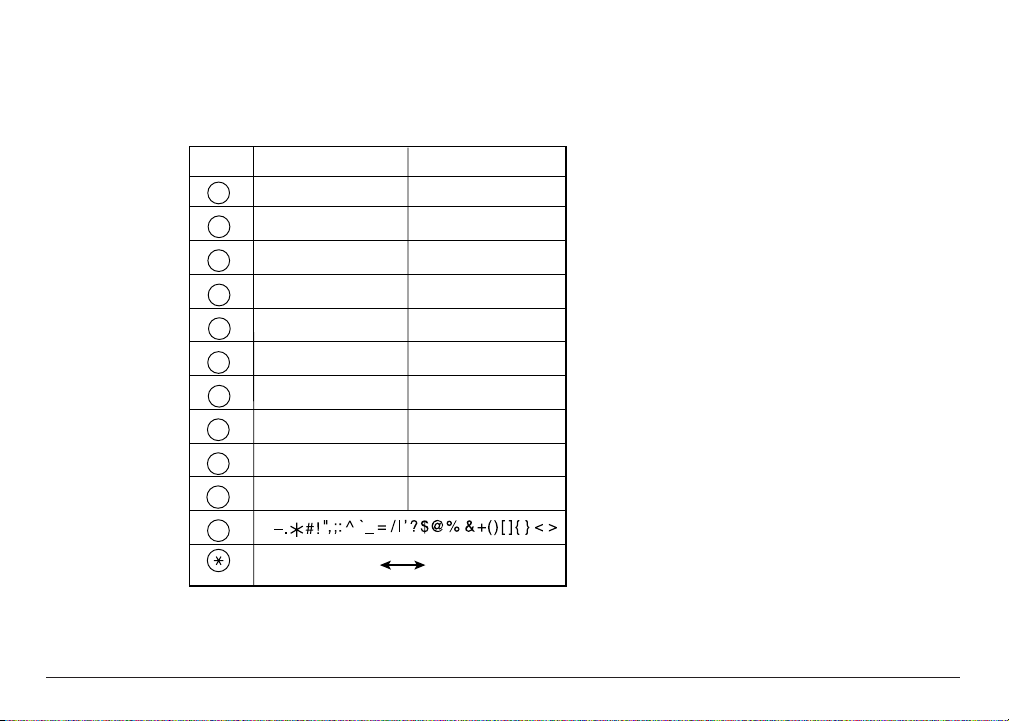
Entering Numbers, Letters, and Symbols
Each numeric button has a number and a group of uppercase and lowercase letters assigned to it.
Use the chart below to determine which numeric button to press for each character.
When you come to a step that requires you to enter a name or number, follow the procedures on
the following pages.
Button Letters (:A) Numbers (:1)
WXYZwxyz 9
TUVtuv 8
PQRSpqrs 7
0
MNOmno 6
JKLjkl 5
GHIghi 4
DEFdef 3
ABCabc 2
1
1
SYMBOLS
#
PRS
7
TUV
8
WXY
9
GHI
4
JKL
5
MNO
6
ABC
2
DEF
3
Tone
OPER
0
Letter input (:A) Number input (:1)
Chapter 2 Registering Information 2-8
Changing Between Number Mode and Letter Mode
Use the T button to change between number mode and letter mode.
When you are in number mode,“1” appears on the right of the LCD display.
When you are in letter mode,“A” appears on the right of the LCD display.
Entering Letters
1. Press T to switch to letter mode (:A).
_:A
Tone
_:A
_:1
Tone
Chapter 2 Registering Information 2-9
2. Press the appropriate numeric button to enter the letter.
■ Keep pressing the button until the letter you want appears. If you go past the letter you
want, you will have to keep on pressing the button until it reappears.
Ex:
■ Refer to the table on the previous page if you are unsure which button to press for the
letter you want.
3. Use the numeric buttons to enter other letters.
If the next letter you want to enter is under a different button, simply press that button until
the letter appears.
-or-
If the next letter you want to enter is under the same button you just pressed, press
r to
move the cursor to the right. Then press the button you want and continue pressing it until
the letter you want appears.
■ To enter a space, press Space.
GHI JKL MNO
ABC DEF
TUV WXY
OPER
Tone
SYMBOLS
PRS
1
0#
7
8
9
45
6
2
3
C :A
GHI JKL MNO
ABC DEF
TUV WXY
OPER
Tone
SYMBOLS
PRS
1
0#
7
8
9
45
6
2
3
Chapter 2 Registering Information 2-10
Entering Numbers
1. Press T to switch to number mode (:1).
Ex:
2. Press the appropriate numeric button to enter the number.
■ To enter a space, press Space.
Ex:
3. Use the numeric buttons to enter other numbers.
Ex:
Entering Symbols
1. Press # repeatedly until the symbol you want appears.
SYMBOLS
#
CANON 10_ :1
GHI JKL MNO
ABC DEF
TUV WXY
OPER
Tone
SYMBOLS
PRS
1
0#
7
8
9
45
6
2
3
CANON 1_ :1
GHI JKL MNO
ABC DEF
TUV WXY
OPER
Tone
SYMBOLS
PRS
1
0#
7
8
9
45
6
2
3
CANON_ :1
Tone
Chapter 2 Registering Information 2-11
2. If you want to enter another symbol, press r to move the cursor to the right, then press #
repeatedly until the symbol you want appears.
Correcting a Mistake
1. Use l or r to move the cursor under the incorrect character.
Ex:
2. Use the numeric buttons to enter the correct character over the incorrect character.
Ex:
3. When you have finished making corrections, press Set to register your new entry.
n
Alternatively, you can press the Clear button to delete the whole entry.
Set
CANON:A
GHI JKL MNO
ABC DEF
TUV WXY
OPER
Tone
SYMBOLS
PRS
1
0#
7
8
9
45
6
2
3
CANE
N:A
04 06
Memory Reference
+
SYMBOLS
#
06
+
Chapter 2 Registering Information 2-12

Registering Required Sender Information
Recent amendments to the FCC rules governing the use of facsimile equipment in the
United States state that the following sender information must be printed on every facsimile
transmission:
■ Your fax number
■ Your personal name or company name
■ The time and date of transmission
Your MultiPASS has been designed to print this information at the top of every fax you send. You
must, therefore, register your unit’s telephone/fax number, your personal name or company name,
and the current date and time before using your unit. This section gives details on registering the
sender information.
Chapter 2 Registering Information 2-13
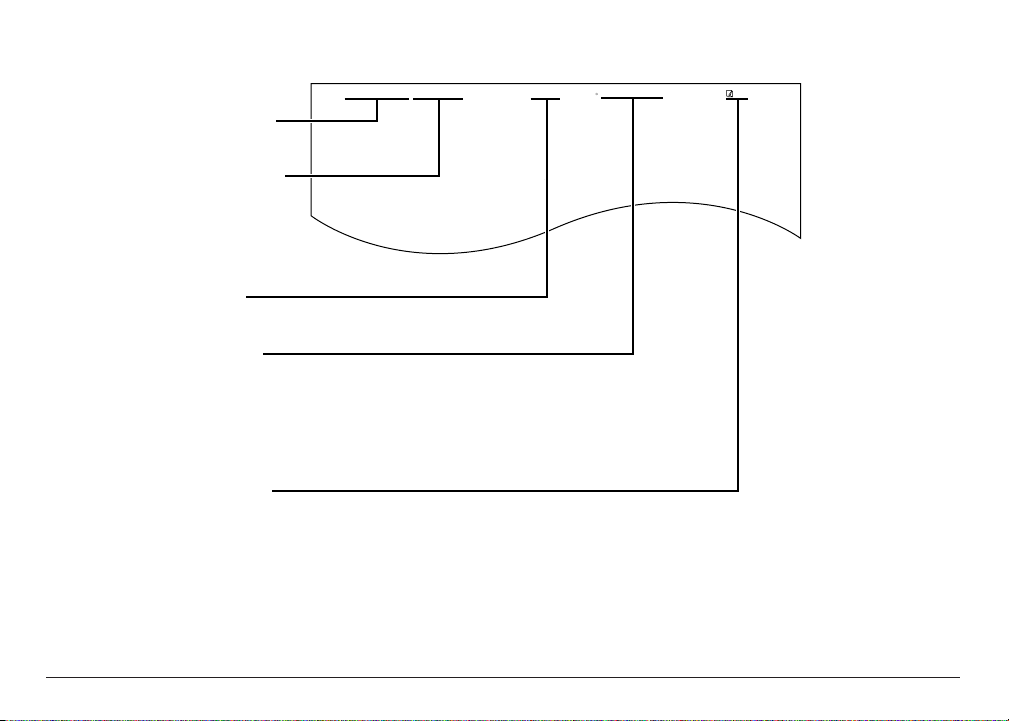
The following is an example of the sender information printed on a received fax.
The following pages explain how to enter this information via the MultiPASS operation panel.
Chapter 2 Registering Information 2-14
12/27/2000 10:12 FAX 123 4567 CANON CANON CANADA 001
DATE AND TIME
Date and time of
transmission.
FAX/TELEPHONE
THE SLEREXE COMPANY LIMITED
SAPORS LANE•BOOLE•DORSET•BH25 8ER
TELEPHONE BOOLE (945 13) 51617 – FAX 123456
NUMBER
Your fax/telephone
number. You can
select FAX or TEL to
Our Ref. 350/PJC/EAC
be displayed in front
of the number.
UNIT NAME
Your name or
company name.
DESTINATION
If you used memory
sending and dialed
the fax number using
one-touch or coded
speed dialing, the
other party’s name
appears here.
PAGE NUMBER
The page number of
the fax.
Registering Sender Information
Follow these steps to set the current date and time, register the fax/telephone number of your
MultiPASS, and register your name or company name.
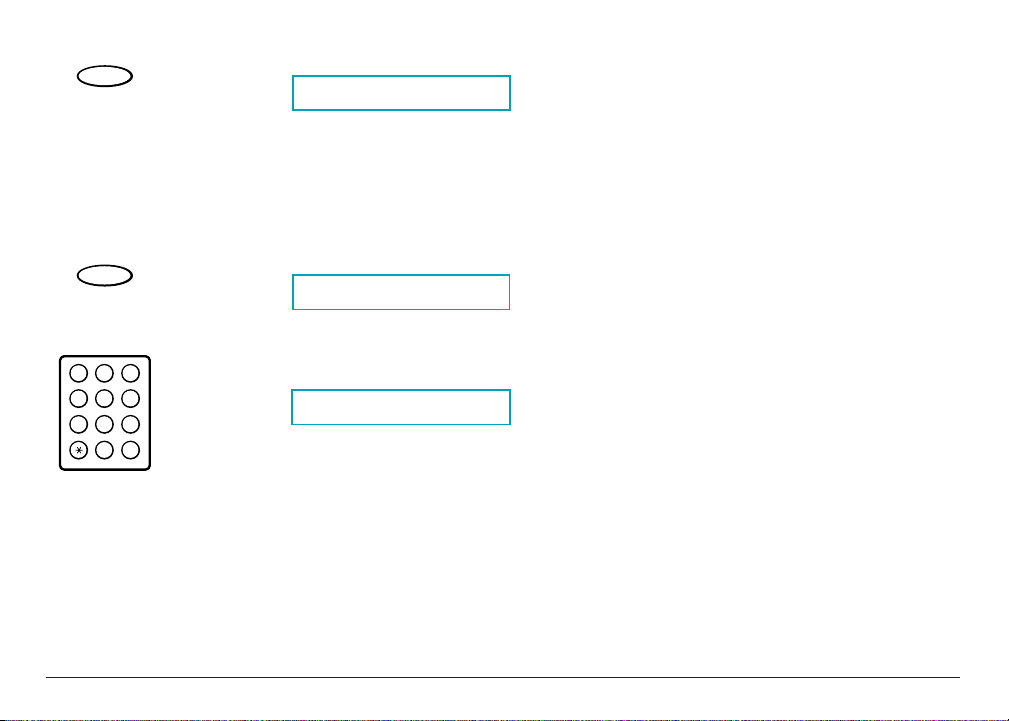
1. Press
Function.
2. Press
Data Registration.
3. Press
Set.
4. Press
Set.
DATE & TIME
Set
USER SETTINGS
Set
DATA REGSTRATION
01
Data Registration
Function
Chapter 2 Registering Information 2-15
5. Press Set.
■ The date and time currently set for the unit are displayed.
Ex:
6. Use the numeric buttons to enter the correct month, day, year, and time.
Ex:
■ Enter the new date and time over the previous date and time.
■ Use the month/day/year format for the date and use the 24-hour format for the time
(for example, 1:00 p.m. as 13:00).
■ The default format for the date is MM/DD/YYYY. However, if you prefer, you can change
this format to DD/MM YYYY,or YYYY MM/DD.(See page 7-20.)
■ If you make a mistake, press
Clear and enter the date and time again. You can also use
l or r to move the cursor under the digit you want to correct, and enter the correct
digit.
1
2/27/2000 15:00
GHI JKL MNO
ABC DEF
TUV WXY
OPER
Tone
SYMBOLS
PRS
1
0#
7
8
9
45
6
2
3
12/20/2000 13:30
Set
Chapter 2 Registering Information 2-16
7. When you have entered the correct date and time, press Set to register your entry.
■ If you only need to adjust the date and time, press
Stop after this step to return to
standby mode. To register your fax/telephone number and name, continue with the steps
that follow.
8. Press
Set again.
9. Use the numeric buttons to enter your fax/telephone number.
Ex:
■ Your fax/telephone number can be up to 20 digits long (including spaces).
■ To enter a space, press
Space. Spaces are optional and are useful to make the number
easier to read.
■ To enter a plus sign (+) before the number, press +.
■ If you make a mistake, press
Clear and start again. Alternatively, you can use l to delete
digits from the rightmost digit.
TEL= 123 4567
GHI JKL MNO
ABC DEF
TUV WXY
OPER
Tone
SYMBOLS
PRS
1
0#
7
8
9
45
6
2
3
TEL=
Set
UNIT TELEPHONE #
Set
Chapter 2 Registering Information 2-17
 Loading...