

Page 1
PS/PCL/UFR Printer Guide
PS/PCL/UFR Printer Guide
Please read this guide before operating this equipment.
After you finish reading this guide, store it in a safe place for future reference.
ENG
Page 2

Page 3

0
Ot¯
imageRUNNER C3100N
PS/PCL/UFR Printer
Guide
Page 4
Manuals for the Machine
The manuals for this machine are divided as follows. Please refer to them for detailed information.
The manuals supplied with optional equipment are included in the list below. Depending on the system
configuration and product purchased, some manuals may not be needed.
Guides with this symbol are printed manuals. Guides with this symbol are PDF manuals included on the
Basic Operations
•
Troubleshooting
•
•
Copying Instructions
Mail Box Instructions
•
Sending and Fax Instructions
•
accompanying CD-ROM. (See footnote on the next page.)
CD-ROM
Reference Guide
Copying Guide
Mail Box Guide
Sending and Facsimile
Guide
•
Setting Up the Network Connection and
Installing the CD-ROM Software
•
Remote User Interface Instructions
•
Network Connectivity and Setup Instructions
•
Color Network ScanGear Installation and
Instructions
•
PS/PCL/UFR Printer Instructions
For the imageRUNNER C3100N only.
•
UFR Printer Instructions
For the imageRUNNER C3100 only.
•
PCL Printer Driver Installation and
Instructions
•
PS Printer Driver Installation and
Instructions
Mac OS X PS Printer Driver
•
Installation and Instructions
Network Quick Start Guide
Remote UI Guide
Network Guide
Color Network ScanGear
User's Guide
PS/PCL/UFR Printer Guide
(This Document)
UFR Printer Guide
PCL Driver Guide
PS Driver Guide
Mac PS Driver Guide
CD-ROM
CD-ROM
CD-ROM
CD-ROM
CD-ROM
CD-ROM
CD-ROM
CD-ROM
Page 5
•
UFR Printer Driver Installation and
Instructions
Fax Driver Installation and Instructions
•
UFR Driver Guide
Fax Driver Guide
CD-ROM
CD-ROM
To view the manual in PDF format, Adobe Reader/Acrobat Reader/Acrobat is required. If Adobe Reader/Acrobat Reader/Acrobat is not installed on
•
your system, please download it from the Adobe Systems Incorporated website (http://www.adobe.com).
•
The machine illustration on the cover may differ slightly from your machine.
Page 6

How This Manual Is Organized
Chapter 1 Before You Start Using This Machine
Chapter 2 Printer Settings Menu
Chapter 3 Report Settings Menu
Chapter 4 Troubleshooting
Chapter 5 Appendix
Includes the available font lists, configuration page sample, specifications, and
index.
Considerable effort has been made to ensure that this manual is free of inaccuracies and omissions. However, as we are constantly improving our
products, if you need an exact specification, please contact Canon.
Page 7

Contents
Preface . . . . . . . . . . . . . . . . . . . . . . . . . . . . . . . . . . . . . . . . . . . . . . . . . . . . . . . . . . x
How to Use This Manual . . . . . . . . . . . . . . . . . . . . . . . . . . . . . . . . . . . . . . . . . . . . x
Symbols Used in This Manual . . . . . . . . . . . . . . . . . . . . . . . . . . . . . . . . . . . . . . .x
Keys Used in This Manual . . . . . . . . . . . . . . . . . . . . . . . . . . . . . . . . . . . . . . . . . .x
Displays Used in This Manual . . . . . . . . . . . . . . . . . . . . . . . . . . . . . . . . . . . . . . xi
Illustrations Used in This Manual. . . . . . . . . . . . . . . . . . . . . . . . . . . . . . . . . . . . xi
Abbreviations Used in This Manual . . . . . . . . . . . . . . . . . . . . . . . . . . . . . . . . . . xi
Legal Notices . . . . . . . . . . . . . . . . . . . . . . . . . . . . . . . . . . . . . . . . . . . . . . . . . . . . xii
License Notice . . . . . . . . . . . . . . . . . . . . . . . . . . . . . . . . . . . . . . . . . . . . . . . . . . xii
Trademarks . . . . . . . . . . . . . . . . . . . . . . . . . . . . . . . . . . . . . . . . . . . . . . . . . . . . xii
Copyright . . . . . . . . . . . . . . . . . . . . . . . . . . . . . . . . . . . . . . . . . . . . . . . . . . . . . xiii
Disclaimers . . . . . . . . . . . . . . . . . . . . . . . . . . . . . . . . . . . . . . . . . . . . . . . . . . . xiii
Chapter 1 Before You Start Using This Machine
Menu Functions. . . . . . . . . . . . . . . . . . . . . . . . . . . . . . . . . . . . . . . . . . . . . . . . . . 1-2
What Are Menu Functions? . . . . . . . . . . . . . . . . . . . . . . . . . . . . . . . . . . . . . . . 1-2
Additional Functions Screen . . . . . . . . . . . . . . . . . . . . . . . . . . . . . . . . . . . . . . 1-3
Accessing the Menus. . . . . . . . . . . . . . . . . . . . . . . . . . . . . . . . . . . . . . . . . . . . 1-4
Using the Printer Settings Menu . . . . . . . . . . . . . . . . . . . . . . . . . . . . . . . . . . . . 1-6
Using the Report Settings Menu . . . . . . . . . . . . . . . . . . . . . . . . . . . . . . . . . . . 1-10
Chapter 2 Printer Settings Menu
An Overview of Printer Settings. . . . . . . . . . . . . . . . . . . . . . . . . . . . . . . . . . . . . 2-2
Settings Menu . . . . . . . . . . . . . . . . . . . . . . . . . . . . . . . . . . . . . . . . . . . . . . . . . . . 2-6
Copies . . . . . . . . . . . . . . . . . . . . . . . . . . . . . . . . . . . . . . . . . . . . . . . . . . . . . . . 2-6
2-Sided Printing . . . . . . . . . . . . . . . . . . . . . . . . . . . . . . . . . . . . . . . . . . . . . . . . 2-6
Paper Feed . . . . . . . . . . . . . . . . . . . . . . . . . . . . . . . . . . . . . . . . . . . . . . . . . . . 2-7
Default Paper Size . . . . . . . . . . . . . . . . . . . . . . . . . . . . . . . . . . . . . . . . . . . 2-7
Default Paper Type . . . . . . . . . . . . . . . . . . . . . . . . . . . . . . . . . . . . . . . . . . 2-8
Paper Size Override. . . . . . . . . . . . . . . . . . . . . . . . . . . . . . . . . . . . . . . . . . 2-9
Print Quality . . . . . . . . . . . . . . . . . . . . . . . . . . . . . . . . . . . . . . . . . . . . . . . . . . . 2-9
Image Refinement . . . . . . . . . . . . . . . . . . . . . . . . . . . . . . . . . . . . . . . . . . . 2-9
Density . . . . . . . . . . . . . . . . . . . . . . . . . . . . . . . . . . . . . . . . . . . . . . . . . . . 2-10
Toner Save . . . . . . . . . . . . . . . . . . . . . . . . . . . . . . . . . . . . . . . . . . . . . . . . 2-10
Layout . . . . . . . . . . . . . . . . . . . . . . . . . . . . . . . . . . . . . . . . . . . . . . . . . . . . . . 2-11
v
Page 8

vi
Binding . . . . . . . . . . . . . . . . . . . . . . . . . . . . . . . . . . . . . . . . . . . . . . . . . . .2-11
Margin . . . . . . . . . . . . . . . . . . . . . . . . . . . . . . . . . . . . . . . . . . . . . . . . . . .2-12
Offset X/Offset Y . . . . . . . . . . . . . . . . . . . . . . . . . . . . . . . . . . . . . . . . . . . .2-14
Job Securing Time . . . . . . . . . . . . . . . . . . . . . . . . . . . . . . . . . . . . . . . . . . . . .2-15
Timeout . . . . . . . . . . . . . . . . . . . . . . . . . . . . . . . . . . . . . . . . . . . . . . . . . . . . .2-15
Print After Completing RIP . . . . . . . . . . . . . . . . . . . . . . . . . . . . . . . . . . . . . . . 2-16
Finisher . . . . . . . . . . . . . . . . . . . . . . . . . . . . . . . . . . . . . . . . . . . . . . . . . . . . .2-17
Punch . . . . . . . . . . . . . . . . . . . . . . . . . . . . . . . . . . . . . . . . . . . . . . . . . . . . . . . 2-21
Transparency Interleaving . . . . . . . . . . . . . . . . . . . . . . . . . . . . . . . . . . . . . . .2-21
Personality . . . . . . . . . . . . . . . . . . . . . . . . . . . . . . . . . . . . . . . . . . . . . . . . . . .2-22
Mode Priority . . . . . . . . . . . . . . . . . . . . . . . . . . . . . . . . . . . . . . . . . . . . . . . . . 2-22
Color Mode. . . . . . . . . . . . . . . . . . . . . . . . . . . . . . . . . . . . . . . . . . . . . . . . . . .2-23
Gradation Settings . . . . . . . . . . . . . . . . . . . . . . . . . . . . . . . . . . . . . . . . . . . . .2-24
Halftones . . . . . . . . . . . . . . . . . . . . . . . . . . . . . . . . . . . . . . . . . . . . . . . . . . . . 2-25
Compressed Image Output . . . . . . . . . . . . . . . . . . . . . . . . . . . . . . . . . . . . . . 2-26
Initialize . . . . . . . . . . . . . . . . . . . . . . . . . . . . . . . . . . . . . . . . . . . . . . . . . . . . .2-26
PCL/PS Settings. . . . . . . . . . . . . . . . . . . . . . . . . . . . . . . . . . . . . . . . . . . . . . . . . 2-27
PCL . . . . . . . . . . . . . . . . . . . . . . . . . . . . . . . . . . . . . . . . . . . . . . . . . . . . . . . .2-27
Orientation . . . . . . . . . . . . . . . . . . . . . . . . . . . . . . . . . . . . . . . . . . . . . . . .2-27
Font Number. . . . . . . . . . . . . . . . . . . . . . . . . . . . . . . . . . . . . . . . . . . . . . .2-27
Point Size . . . . . . . . . . . . . . . . . . . . . . . . . . . . . . . . . . . . . . . . . . . . . . . . . 2-28
Pitch . . . . . . . . . . . . . . . . . . . . . . . . . . . . . . . . . . . . . . . . . . . . . . . . . . . . .2-28
Form Lines . . . . . . . . . . . . . . . . . . . . . . . . . . . . . . . . . . . . . . . . . . . . . . . . 2-28
Symbol Set . . . . . . . . . . . . . . . . . . . . . . . . . . . . . . . . . . . . . . . . . . . . . . . .2-28
Custom Paper. . . . . . . . . . . . . . . . . . . . . . . . . . . . . . . . . . . . . . . . . . . . . .2-28
Unit of Measure . . . . . . . . . . . . . . . . . . . . . . . . . . . . . . . . . . . . . . . . . . . .2-29
X Dimension . . . . . . . . . . . . . . . . . . . . . . . . . . . . . . . . . . . . . . . . . . . . . . .2-29
Y Dimension . . . . . . . . . . . . . . . . . . . . . . . . . . . . . . . . . . . . . . . . . . . . . . .2-29
Append CR to LF . . . . . . . . . . . . . . . . . . . . . . . . . . . . . . . . . . . . . . . . . . .2-30
Gray Compensation . . . . . . . . . . . . . . . . . . . . . . . . . . . . . . . . . . . . . . . . .2-31
PS . . . . . . . . . . . . . . . . . . . . . . . . . . . . . . . . . . . . . . . . . . . . . . . . . . . . . . . . .2-32
Job Timeout . . . . . . . . . . . . . . . . . . . . . . . . . . . . . . . . . . . . . . . . . . . . . . . 2-32
Wait Timeout. . . . . . . . . . . . . . . . . . . . . . . . . . . . . . . . . . . . . . . . . . . . . . . 2-32
Print PS Errors . . . . . . . . . . . . . . . . . . . . . . . . . . . . . . . . . . . . . . . . . . . . .2-32
RGB Source Profile. . . . . . . . . . . . . . . . . . . . . . . . . . . . . . . . . . . . . . . . . .2-32
CMYK Simulation Profile. . . . . . . . . . . . . . . . . . . . . . . . . . . . . . . . . . . . . . 2-33
Use Grayscale Profile. . . . . . . . . . . . . . . . . . . . . . . . . . . . . . . . . . . . . . . . 2-35
Output Profile . . . . . . . . . . . . . . . . . . . . . . . . . . . . . . . . . . . . . . . . . . . . . .2-35
Matching Method . . . . . . . . . . . . . . . . . . . . . . . . . . . . . . . . . . . . . . . . . . .2-36
Page 9

RGB Pure Black Process . . . . . . . . . . . . . . . . . . . . . . . . . . . . . . . . . . . . . 2-37
CMYK Pure Black Process. . . . . . . . . . . . . . . . . . . . . . . . . . . . . . . . . . . . 2-37
Pure Black Text . . . . . . . . . . . . . . . . . . . . . . . . . . . . . . . . . . . . . . . . . . . . 2-38
Black Overprint . . . . . . . . . . . . . . . . . . . . . . . . . . . . . . . . . . . . . . . . . . . . 2-39
Brightness . . . . . . . . . . . . . . . . . . . . . . . . . . . . . . . . . . . . . . . . . . . . . . . . 2-39
Utility Menu . . . . . . . . . . . . . . . . . . . . . . . . . . . . . . . . . . . . . . . . . . . . . . . . . . . . 2-40
Initialize PCL Hard Disk . . . . . . . . . . . . . . . . . . . . . . . . . . . . . . . . . . . . . . . . . 2-40
Initialize PS Hard Disk . . . . . . . . . . . . . . . . . . . . . . . . . . . . . . . . . . . . . . . . . .2-40
Reset Printer . . . . . . . . . . . . . . . . . . . . . . . . . . . . . . . . . . . . . . . . . . . . . . . . . 2-41
Chapter 3 Report Settings Menu
An Overview of Report Settings . . . . . . . . . . . . . . . . . . . . . . . . . . . . . . . . . . . . 3-2
PCL Menu. . . . . . . . . . . . . . . . . . . . . . . . . . . . . . . . . . . . . . . . . . . . . . . . . . . . . . . 3-3
Configuration Page . . . . . . . . . . . . . . . . . . . . . . . . . . . . . . . . . . . . . . . . . . . . . 3-3
Font List . . . . . . . . . . . . . . . . . . . . . . . . . . . . . . . . . . . . . . . . . . . . . . . . . . . . . . 3-3
PS Menu . . . . . . . . . . . . . . . . . . . . . . . . . . . . . . . . . . . . . . . . . . . . . . . . . . . . . . . . 3-4
Configuration Page . . . . . . . . . . . . . . . . . . . . . . . . . . . . . . . . . . . . . . . . . . . . . 3-4
Font List . . . . . . . . . . . . . . . . . . . . . . . . . . . . . . . . . . . . . . . . . . . . . . . . . . . . . . 3-4
Chapter 4 Troubleshooting
Responding to Error Messages . . . . . . . . . . . . . . . . . . . . . . . . . . . . . . . . . . . . . 4-2
Resetting the Machine After a Service Call Message . . . . . . . . . . . . . . . . . . . 4-2
When a Message Is Displayed . . . . . . . . . . . . . . . . . . . . . . . . . . . . . . . . . . . . . . 4-3
Printing Problems . . . . . . . . . . . . . . . . . . . . . . . . . . . . . . . . . . . . . . . . . . . . . . . . 4-6
Printer Trouble . . . . . . . . . . . . . . . . . . . . . . . . . . . . . . . . . . . . . . . . . . . . . . . . . 4-6
Printing Problems . . . . . . . . . . . . . . . . . . . . . . . . . . . . . . . . . . . . . . . . . . . . . . 4-7
Print Quality Problems . . . . . . . . . . . . . . . . . . . . . . . . . . . . . . . . . . . . . . . . . . . 4-9
If Trouble Occurs When Downloading Fonts, Macros, or Profiles from a
Personal Computer . . . . . . . . . . . . . . . . . . . . . . . . . . . . . . . . . . . . . . . . . . . . . . 4-15
Chapter 5 Appendix
Some Basic Facts about Fonts . . . . . . . . . . . . . . . . . . . . . . . . . . . . . . . . . . . . . 5-2
What Is a Font? . . . . . . . . . . . . . . . . . . . . . . . . . . . . . . . . . . . . . . . . . . . . . . . . 5-2
Attributes of Fonts . . . . . . . . . . . . . . . . . . . . . . . . . . . . . . . . . . . . . . . . . . . . . . 5-2
Typeface . . . . . . . . . . . . . . . . . . . . . . . . . . . . . . . . . . . . . . . . . . . . . . . . . . 5-3
Stroke Weight. . . . . . . . . . . . . . . . . . . . . . . . . . . . . . . . . . . . . . . . . . . . . . . 5-3
Style . . . . . . . . . . . . . . . . . . . . . . . . . . . . . . . . . . . . . . . . . . . . . . . . . . . . . . 5-3
Point Size . . . . . . . . . . . . . . . . . . . . . . . . . . . . . . . . . . . . . . . . . . . . . . . . . . 5-4
Pitch (cpi). . . . . . . . . . . . . . . . . . . . . . . . . . . . . . . . . . . . . . . . . . . . . . . . . . 5-4
vii
Page 10

Character Width (Fixed and PS). . . . . . . . . . . . . . . . . . . . . . . . . . . . . . . . .5-5
Orientation . . . . . . . . . . . . . . . . . . . . . . . . . . . . . . . . . . . . . . . . . . . . . . . . .5-5
Symbol Set . . . . . . . . . . . . . . . . . . . . . . . . . . . . . . . . . . . . . . . . . . . . . . . . .5-6
Fonts and Scalable Fonts. . . . . . . . . . . . . . . . . . . . . . . . . . . . . . . . . . . . . . . . . 5-6
Bitmapped Fonts . . . . . . . . . . . . . . . . . . . . . . . . . . . . . . . . . . . . . . . . . . . .5-6
Scalable Fonts . . . . . . . . . . . . . . . . . . . . . . . . . . . . . . . . . . . . . . . . . . . . . . 5-7
Standard Scalable Fonts (PCL) . . . . . . . . . . . . . . . . . . . . . . . . . . . . . . . . . 5-8
OCR Sets Fonts (PCL) . . . . . . . . . . . . . . . . . . . . . . . . . . . . . . . . . . . . . . . . 5-9
Bar Code Fonts (PCL) . . . . . . . . . . . . . . . . . . . . . . . . . . . . . . . . . . . . . . . .5-9
Symbol Sets (For Scalable Typefaces Only) . . . . . . . . . . . . . . . . . . . . . . . 5-9
PS Fonts . . . . . . . . . . . . . . . . . . . . . . . . . . . . . . . . . . . . . . . . . . . . . . . . . .5-10
Checking the Font Lists for Available Fonts . . . . . . . . . . . . . . . . . . . . . . . . . . 5-13
Typeface Samples . . . . . . . . . . . . . . . . . . . . . . . . . . . . . . . . . . . . . . . . . . . . . 5-15
Standard Scalable Fonts (PCL) . . . . . . . . . . . . . . . . . . . . . . . . . . . . . . . . 5-15
Bar Code Scalable Fonts (PCL) . . . . . . . . . . . . . . . . . . . . . . . . . . . . . . . .5-18
OCR Code Scalable Fonts (PCL) . . . . . . . . . . . . . . . . . . . . . . . . . . . . . . .5-19
Bitmapped Fonts (PCL) . . . . . . . . . . . . . . . . . . . . . . . . . . . . . . . . . . . . . . 5-19
PS Fonts . . . . . . . . . . . . . . . . . . . . . . . . . . . . . . . . . . . . . . . . . . . . . . . . . .5-20
Symbol Sets . . . . . . . . . . . . . . . . . . . . . . . . . . . . . . . . . . . . . . . . . . . . . . . . . . 5-29
ASCII . . . . . . . . . . . . . . . . . . . . . . . . . . . . . . . . . . . . . . . . . . . . . . . . . . . .5-29
DeskTop . . . . . . . . . . . . . . . . . . . . . . . . . . . . . . . . . . . . . . . . . . . . . . . . . . 5-29
ISO 8859-1 Latin 1 . . . . . . . . . . . . . . . . . . . . . . . . . . . . . . . . . . . . . . . . . .5-30
ISO 8859-10 Latin 6 . . . . . . . . . . . . . . . . . . . . . . . . . . . . . . . . . . . . . . . . .5-30
ISO 8859-2 Latin 2 . . . . . . . . . . . . . . . . . . . . . . . . . . . . . . . . . . . . . . . . . .5-31
ISO 8859-9 Latin 5 . . . . . . . . . . . . . . . . . . . . . . . . . . . . . . . . . . . . . . . . . .5-31
ISO French . . . . . . . . . . . . . . . . . . . . . . . . . . . . . . . . . . . . . . . . . . . . . . . .5-32
ISO German . . . . . . . . . . . . . . . . . . . . . . . . . . . . . . . . . . . . . . . . . . . . . . .5-32
ISO Italian. . . . . . . . . . . . . . . . . . . . . . . . . . . . . . . . . . . . . . . . . . . . . . . . .5-33
ISO Norwegian . . . . . . . . . . . . . . . . . . . . . . . . . . . . . . . . . . . . . . . . . . . . .5-33
ISO Spanish . . . . . . . . . . . . . . . . . . . . . . . . . . . . . . . . . . . . . . . . . . . . . . .5-34
ISO Swedish . . . . . . . . . . . . . . . . . . . . . . . . . . . . . . . . . . . . . . . . . . . . . . .5-34
ISO United Kingdom . . . . . . . . . . . . . . . . . . . . . . . . . . . . . . . . . . . . . . . .5-35
Legal. . . . . . . . . . . . . . . . . . . . . . . . . . . . . . . . . . . . . . . . . . . . . . . . . . . . .5-35
Math-8 . . . . . . . . . . . . . . . . . . . . . . . . . . . . . . . . . . . . . . . . . . . . . . . . . . .5-36
MC Text. . . . . . . . . . . . . . . . . . . . . . . . . . . . . . . . . . . . . . . . . . . . . . . . . . . 5-36
Microsoft Publishing . . . . . . . . . . . . . . . . . . . . . . . . . . . . . . . . . . . . . . . . .5-37
PC-1004 . . . . . . . . . . . . . . . . . . . . . . . . . . . . . . . . . . . . . . . . . . . . . . . . . .5-37
PC-775 . . . . . . . . . . . . . . . . . . . . . . . . . . . . . . . . . . . . . . . . . . . . . . . . . . .5-38
PC-8 . . . . . . . . . . . . . . . . . . . . . . . . . . . . . . . . . . . . . . . . . . . . . . . . . . . . .5-38
viii
Page 11

ix
PC-8 D/N . . . . . . . . . . . . . . . . . . . . . . . . . . . . . . . . . . . . . . . . . . . . . . . . . 5-39
PC-850 . . . . . . . . . . . . . . . . . . . . . . . . . . . . . . . . . . . . . . . . . . . . . . . . . . . 5-39
PC-852 . . . . . . . . . . . . . . . . . . . . . . . . . . . . . . . . . . . . . . . . . . . . . . . . . . . 5-40
PC-Turkish . . . . . . . . . . . . . . . . . . . . . . . . . . . . . . . . . . . . . . . . . . . . . . . . 5-40
Pi Font . . . . . . . . . . . . . . . . . . . . . . . . . . . . . . . . . . . . . . . . . . . . . . . . . . . 5-41
PS Math . . . . . . . . . . . . . . . . . . . . . . . . . . . . . . . . . . . . . . . . . . . . . . . . . . 5-41
PS Text . . . . . . . . . . . . . . . . . . . . . . . . . . . . . . . . . . . . . . . . . . . . . . . . . . . 5-42
Roman-8. . . . . . . . . . . . . . . . . . . . . . . . . . . . . . . . . . . . . . . . . . . . . . . . . . 5-42
Symbol . . . . . . . . . . . . . . . . . . . . . . . . . . . . . . . . . . . . . . . . . . . . . . . . . . . 5-43
Ventura International . . . . . . . . . . . . . . . . . . . . . . . . . . . . . . . . . . . . . . . . 5-43
Ventura Math . . . . . . . . . . . . . . . . . . . . . . . . . . . . . . . . . . . . . . . . . . . . . . 5-44
Ventura US . . . . . . . . . . . . . . . . . . . . . . . . . . . . . . . . . . . . . . . . . . . . . . . . 5-44
Windows 3.0 Latin 1. . . . . . . . . . . . . . . . . . . . . . . . . . . . . . . . . . . . . . . . . 5-45
Windows 3.1 Latin 1. . . . . . . . . . . . . . . . . . . . . . . . . . . . . . . . . . . . . . . . . 5-45
Windows 3.1 Latin 2. . . . . . . . . . . . . . . . . . . . . . . . . . . . . . . . . . . . . . . . . 5-46
Windows 3.1 Latin 5. . . . . . . . . . . . . . . . . . . . . . . . . . . . . . . . . . . . . . . . . 5-46
Windows Baltic. . . . . . . . . . . . . . . . . . . . . . . . . . . . . . . . . . . . . . . . . . . . . 5-47
Wingdings . . . . . . . . . . . . . . . . . . . . . . . . . . . . . . . . . . . . . . . . . . . . . . . . 5-47
3 of 9 Barcode . . . . . . . . . . . . . . . . . . . . . . . . . . . . . . . . . . . . . . . . . . . . . 5-48
Code 128 . . . . . . . . . . . . . . . . . . . . . . . . . . . . . . . . . . . . . . . . . . . . . . . . . 5-48
CODABAR . . . . . . . . . . . . . . . . . . . . . . . . . . . . . . . . . . . . . . . . . . . . . . . . 5-49
Interleaved 2 of 5 . . . . . . . . . . . . . . . . . . . . . . . . . . . . . . . . . . . . . . . . . . . 5-49
MSI / Plessey . . . . . . . . . . . . . . . . . . . . . . . . . . . . . . . . . . . . . . . . . . . . . . 5-50
PostNet. . . . . . . . . . . . . . . . . . . . . . . . . . . . . . . . . . . . . . . . . . . . . . . . . . . 5-50
UPC / EAN barcode . . . . . . . . . . . . . . . . . . . . . . . . . . . . . . . . . . . . . . . . . 5-51
OCR-A . . . . . . . . . . . . . . . . . . . . . . . . . . . . . . . . . . . . . . . . . . . . . . . . . . . 5-51
OCR-B . . . . . . . . . . . . . . . . . . . . . . . . . . . . . . . . . . . . . . . . . . . . . . . . . . . 5-52
Dingbats. . . . . . . . . . . . . . . . . . . . . . . . . . . . . . . . . . . . . . . . . . . . . . . . . . 5-52
ISO Latin 9 . . . . . . . . . . . . . . . . . . . . . . . . . . . . . . . . . . . . . . . . . . . . . . . . 5-53
PC-8 Greek CP437. . . . . . . . . . . . . . . . . . . . . . . . . . . . . . . . . . . . . . . . . . 5-53
PC-858 . . . . . . . . . . . . . . . . . . . . . . . . . . . . . . . . . . . . . . . . . . . . . . . . . . . 5-54
PC-860 . . . . . . . . . . . . . . . . . . . . . . . . . . . . . . . . . . . . . . . . . . . . . . . . . . . 5-54
PC-865 . . . . . . . . . . . . . . . . . . . . . . . . . . . . . . . . . . . . . . . . . . . . . . . . . . . 5-55
Roman 9. . . . . . . . . . . . . . . . . . . . . . . . . . . . . . . . . . . . . . . . . . . . . . . . . . 5-55
Configuration Page Sample . . . . . . . . . . . . . . . . . . . . . . . . . . . . . . . . . . . . . . . 5-56
Specifications . . . . . . . . . . . . . . . . . . . . . . . . . . . . . . . . . . . . . . . . . . . . . . . . . . 5-58
Software Specifications . . . . . . . . . . . . . . . . . . . . . . . . . . . . . . . . . . . . . . . . . 5-58
Index . . . . . . . . . . . . . . . . . . . . . . . . . . . . . . . . . . . . . . . . . . . . . . . . . . . . . . . . . . 5-59
Page 12
Preface
Thank you for purchasing this Canon product. Please read this manual thoroughly before
operating the machine in order to familiarize yourself with its capabilities, and to make the
most of its many functions. After reading this manual, store it in a safe place for future
reference.
How to Use This Manual
Symbols Used in This Manual
The following symbols are used in this manual to explain procedures, restrictions,
handling precautions, and instructions that should be observed for safety.
.
IMPORTANT
NOTE
Indicates operational requirements and restrictions. Be sure to read
these items carefully in order to operate the machine correctly, and to
avoid damage to the machine.
.
Indicates a clarification of an operation, or contains additional
explanations for a procedure. Reading these notes is highly
recommended.
Keys Used in This Manual
The following symbols and key names are a few examples of how keys to be
pressed are expressed in this manual:
•
Touch Panel display Keys: [Key Name]
Examples: [Cancel]
•
Control Panel Keys: <Key icon> + (Key Name)
Examples:
x
[Done]
(Start)
(Stop)
Page 13
Displays Used in This Manual
Screen shots of the touch panel display used in this manual may differ from the
ones you actually see, depending on the options that come with your machine.
Note that functions that cannot be used depending on the model or options, are not
displayed on the touch panel display.
The keys which you should press are marked with a , as shown below.
When multiple keys can be pressed on the touch panel display, all keys are marked.
Select the keys which suit your needs.
Press [Printer Settings].
Press this key for operation.
Illustrations Used in This Manual
Illustrations of the machine used in this manual may not represent exact
appearance and configuration of the actual machine.
Abbreviations Used in This Manual
In this manual, product names and model names are abbreviated as follows:
Microsoft
PostScript
®
Windows
®
3 emulation is referred to as PS.
®
operating system is referred to as Windows.
xi
Page 14

Legal Notices
License Notice
This product contains the Universal Font Scaling Technology or UFST under
license from Agfa Corporation.
Copyright © 1997-2001 Agfa Monotype Corporation.
Trademarks
Canon, the Canon logo, and imageRUNNER are trademarks of Canon Inc.
Adobe, PostScript, PostScript 3, and Illustrator are trademarks of Adobe Systems
Incorporated.
Apple, Macintosh, and TrueType are trademarks of Apple Computer, Inc.
PCL and PCL5c are trademarks of Hewlett-Packard Company.
Microsoft, MS-DOS, and Windows are registered trademarks of Microsoft
Corporation in the United States and other countries.
UNIX is a registered trademark of The Open Group in the United States and other
countries.
Concerning typeface credit, the actual names on a FONT LIST for this machine
may differ from those listed below.
CG, Intellifont, and UFST are trademarks of Agfa Monotype Corporation or its
affiliated companies and may be registered in some jurisdictions.
Marigold and Oxford are trademarks of AlphaOmega Typography, Inc.
Apple, Apple Chancery, Chicago, Geneva, Hoefler Text, Monaco, and New York are
trademarks of Apple Computer, Inc.
ITC AvantGarde Gothic, ITC Bookman, ITC Lubalin Graph, ITC Mona Lisa, ITC
Symbol, ITC Zapf Chancery, and ITC Zapf Dingbats are registered trademarks of
International Typeface Corporation.
Clarendon, Helvetica, New Century Schoolbook, Optima, Palatino, Stempel
Garamond, and Times are trademarks of Linotype-Hell AG and its subsidiaries.
Univers is a trademark of Linotype-Hell AG and its subsidiaries and may be
registered in some jurisdictions.
xii
Page 15

Coronet is a registered trademark of Ludlow Type Foundry.
Wingdings is a trademark of Microsoft Corporation.
Albertus, Arial, Book Antiqua, Bookman Oldstyle, Century Gothic, GillSans,
Joanna, and Times New Roman are trademarks of the Monotype Corporation plc.,
and may be registered in some jurisdictions.
CG Omega is a product of Agfa Corporation and CG Times, based on Times New
Roman under license from the Monotype Corporation plc, is a product of Agfa
Corporation.
Eurostile is a trademark of Nebiolo.
Other products and company names herein may be the trademarks of their
respective owners.
Copyright
Copyright 2004 by Canon Inc. All rights reserved.
No part of this publication may be reproduced or transmitted in any form or by any
means, electronic or mechanical, including photocopying and recording, or by any
information storage or retrieval system without the prior written permission of
Canon Inc.
Disclaimers
The information in this document is subject to change without notice.
CANON INC. MAKES NO WARRANTY OF ANY KIND WITH REGARD TO THIS
MATERIAL, EITHER EXPRESS OR IMPLIED, EXCEPT AS PROVIDED HEREIN,
INCLUDING WITHOUT LIMITATION, THEREOF, WARRANTIES AS TO
MARKETABILITY, MERCHANTABILITY, FITNESS FOR A PARTICULAR
PURPOSE OF USE OR AGAINST INFRINGEMENT OF ANY PATENT. CANON
INC. SHALL NOT BE LIABLE FOR ANY DIRECT, INCIDENTAL, OR
CONSEQUENTIAL DAMAGES OF ANY NATURE, OR LOSSES OR EXPENSES
RESULTING FROM THE USE OF THIS MATERIAL.
xiii
Page 16

xiv
Page 17

Before You Start Using This Machine
This chapter describes how to set up the printing environment from the touch panel display.
Menu Functions . . . . . . . . . . . . . . . . . . . . . . . . . . . . . . . . . . . . . . . . . . . . . . . . . . . . . . . . 1-2
What Are Menu Functions? . . . . . . . . . . . . . . . . . . . . . . . . . . . . . . . . . . . . . . . . . . . . . . . . . . . . .1-2
Additional Functions Screen . . . . . . . . . . . . . . . . . . . . . . . . . . . . . . . . . . . . . . . . . . . . . . . . . . . .1-3
Accessing the Menus. . . . . . . . . . . . . . . . . . . . . . . . . . . . . . . . . . . . . . . . . . . . . . . . . . . . . . . . . .1-4
Using the Printer Settings Menu. . . . . . . . . . . . . . . . . . . . . . . . . . . . . . . . . . . . . . . . . . . . 1-6
Using the Report Settings Menu. . . . . . . . . . . . . . . . . . . . . . . . . . . . . . . . . . . . . . . . . . . 1-10
1
CHAPTER
1-1
Page 18
Menu Functions
1
What Are Menu Functions?
Before You Start Using This Machine
This section describes the menu functions and how to access them with the touch
panel display.
The machine lets you specify settings, such as the number of copies and the paper
size, to use when it receives a print job. These types of settings can be specified by
the application sending the print job, or by the printer driver.
You can specify many settings which affect the printer function of the machine.
These include some settings that cannot be specified remotely from an application
or from the printer driver. These settings are referred to as "Menu Functions."
The menu functions are set using the keys on the touch panel display and are
grouped together according to the type of settings, which makes them easy to set.
When the same menu function setting can be specified by using the keys on the
machine or by specifying the setting in an application or the printer driver, the
setting from the application or printer driver has priority. These settings will override
the settings made on the machine.
Setting priority
High
Low
1-2
Application
Printer driver
Touch panel display
The printer driver is included on the CD-ROM provided with the machine. For
instructions on installing the printer driver, see Chapter 2, "Installing Software," in
the Network Quick Start Guide.
NOTE
The contents of the Printer Settings are stored in the nonvolatile memory of the machine.
This means that the settings are stored even if the power to the machine is switched OFF,
and therefore the settings will still be available when the power is switched ON again.
Menu Functions
Page 19
1
Before You Start Using This Machine
Additional Functions Screen
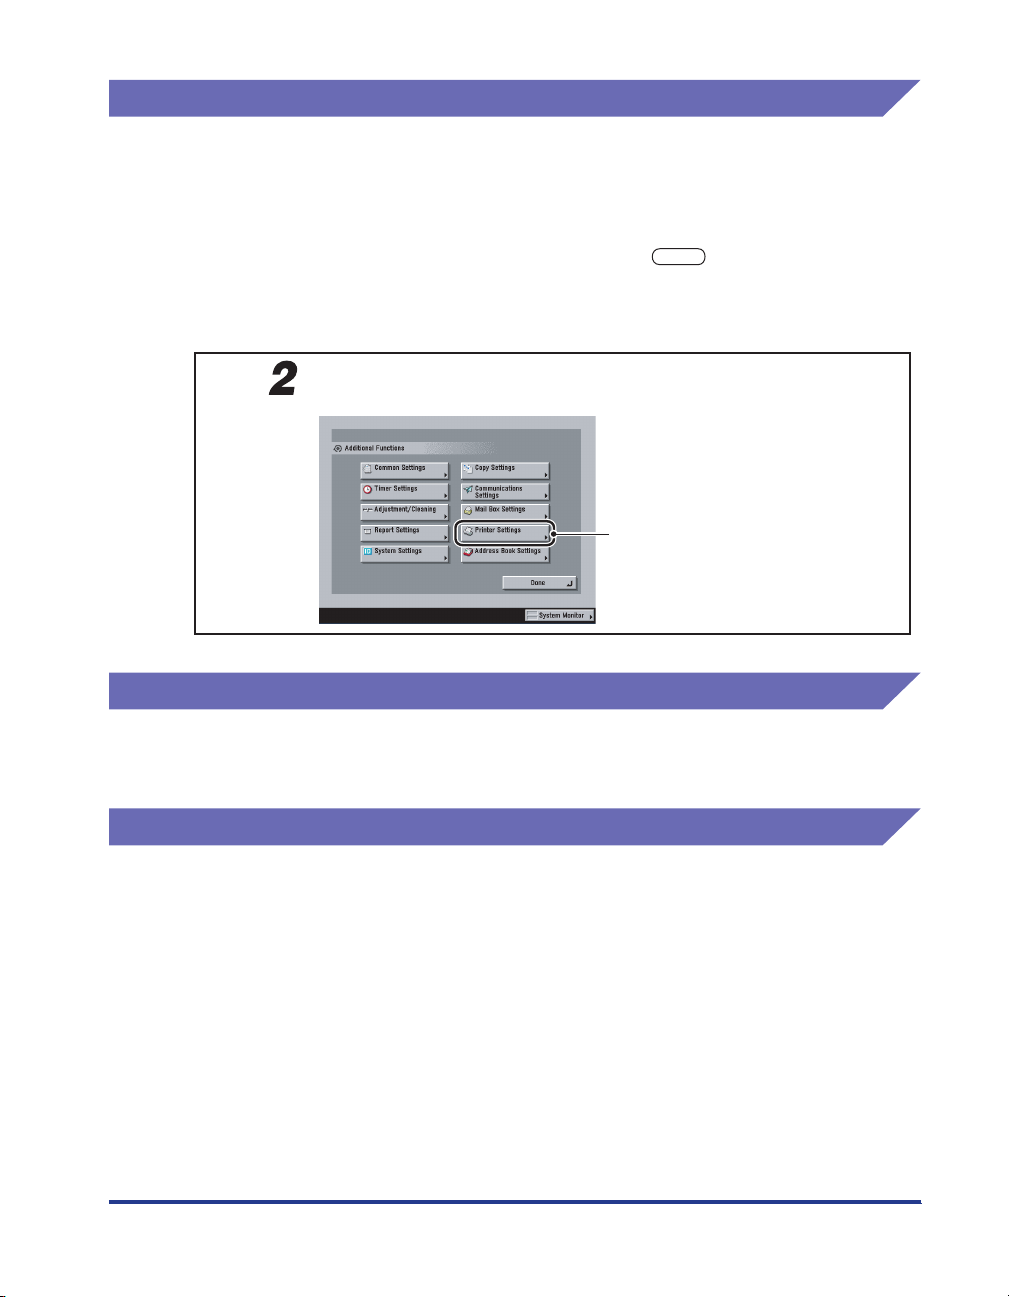
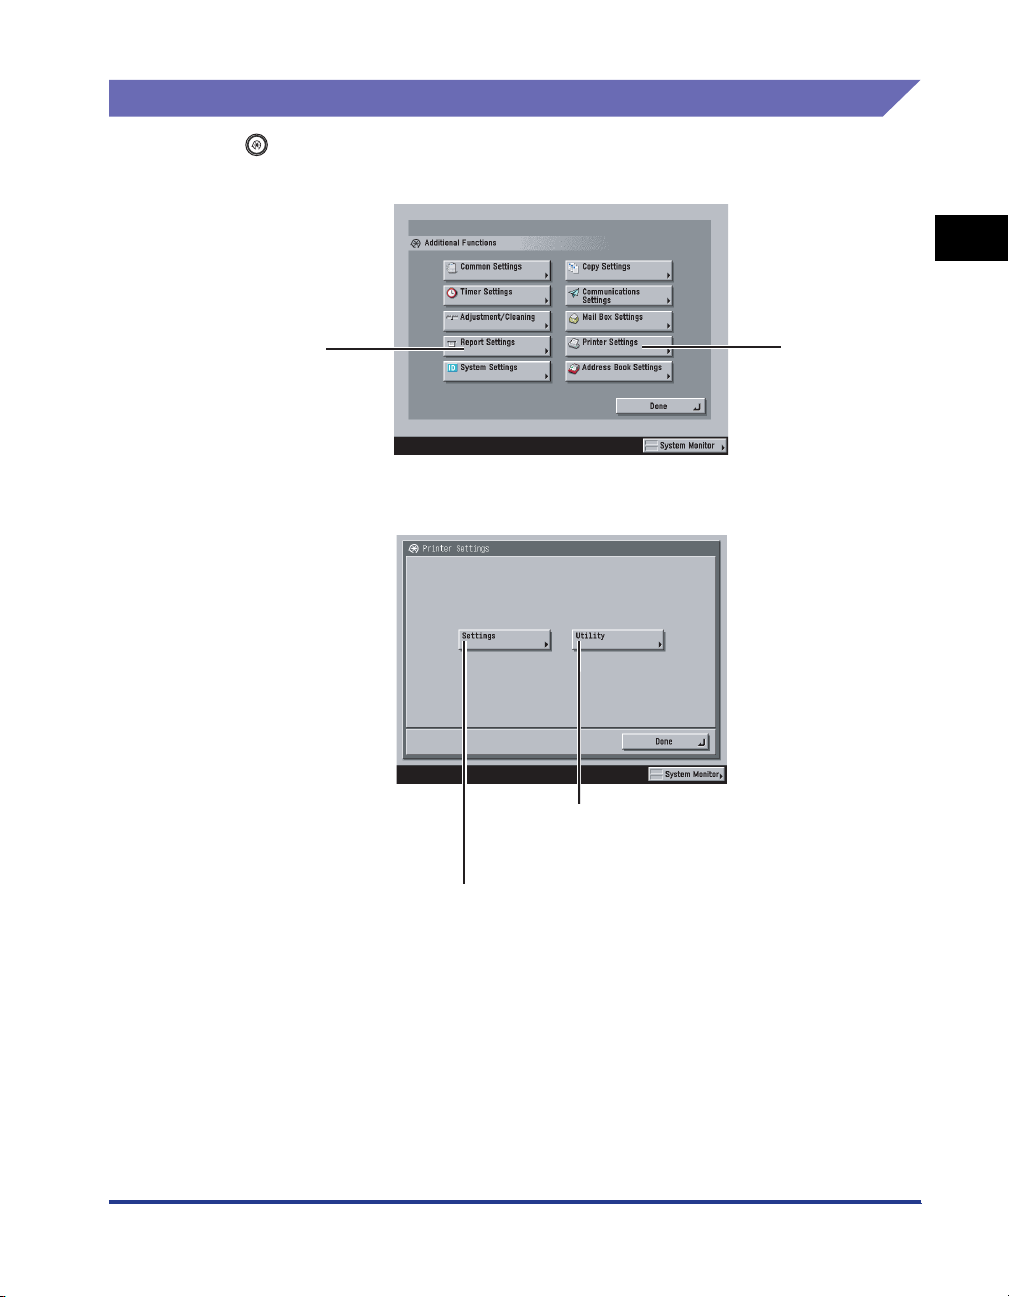
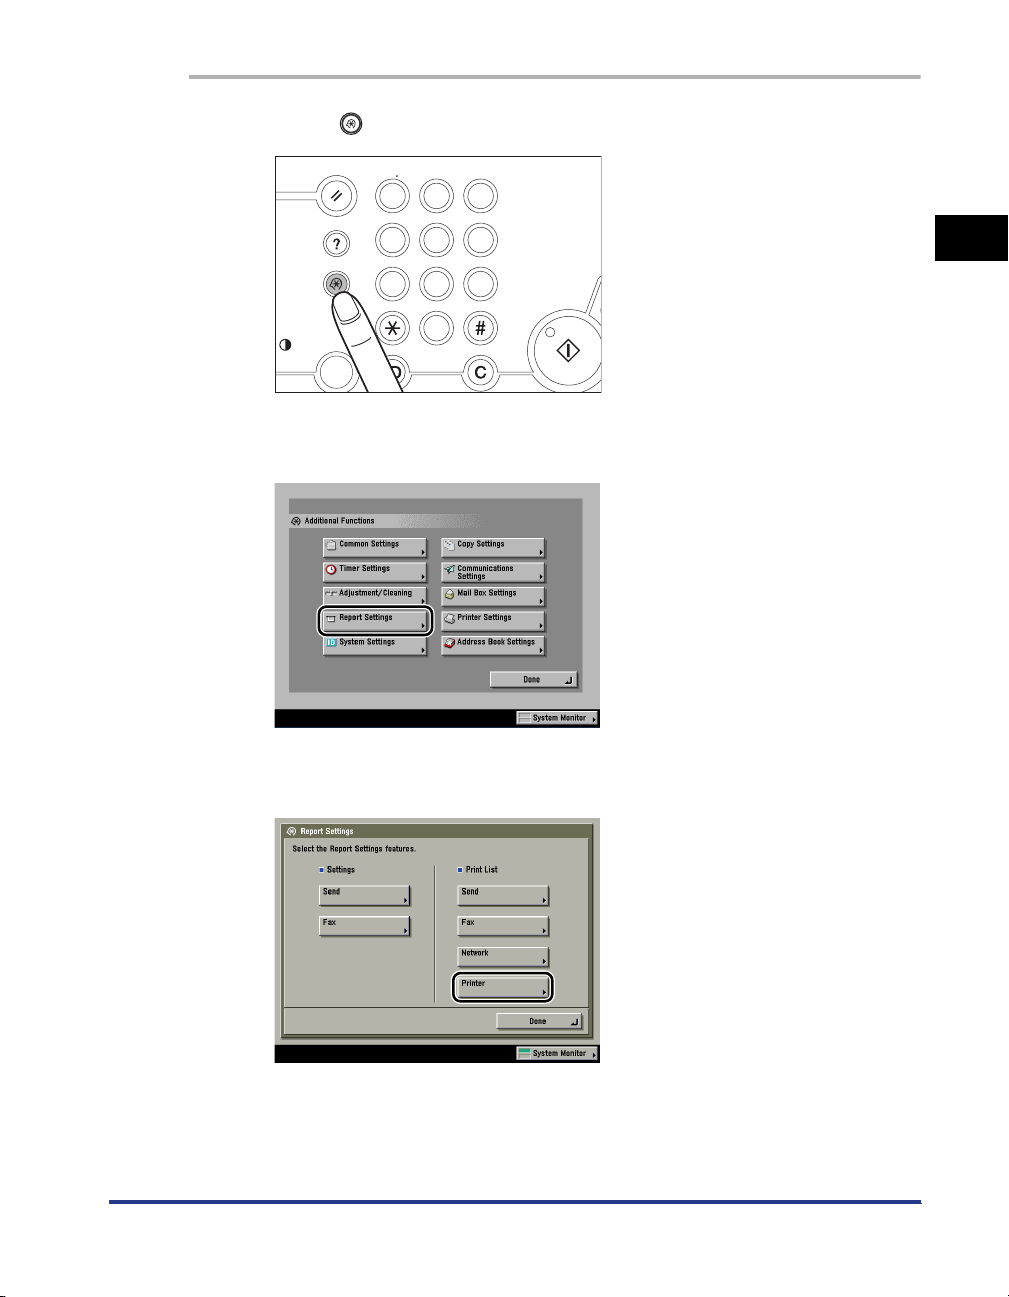
Press (Additional Functions) to open the Additional Functions screen. The
Printer Settings or the Report Settings can be accessed from this screen.
Report Settings
Printer Settings
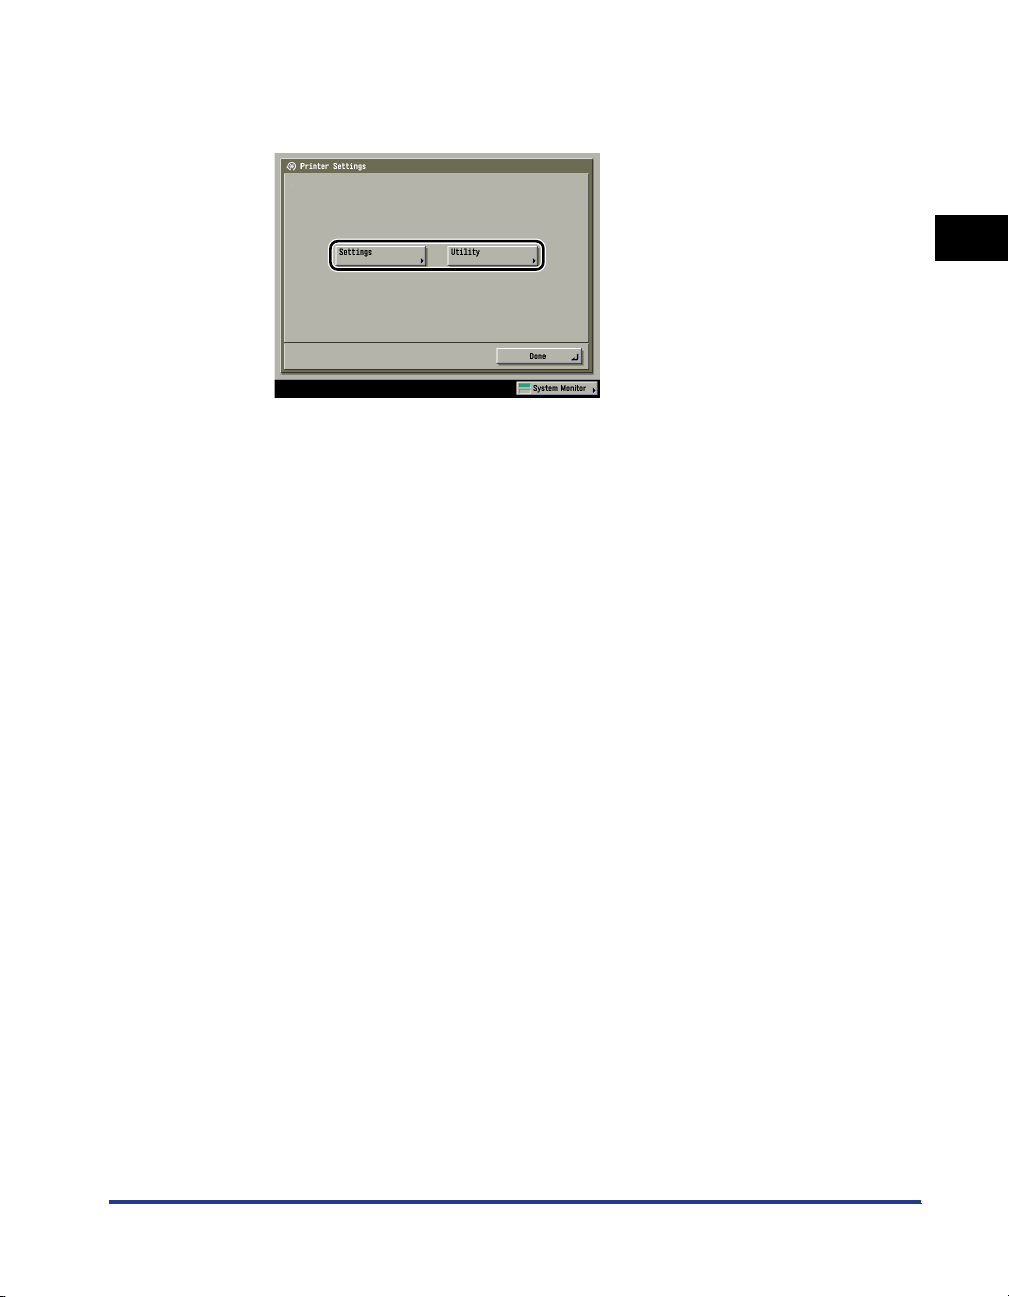
In the Additional Functions screen, press [Printer Settings] to open the Custom
Printing Settings menu.
Utility
Press this key to open the
Utility menu, for initializing the
Settings
Press this key to open the Settings menu.
printer.
Menu Functions
1-3
Page 20
Accessing the Menus
To access the printer-related menu functions, display the Printer Settings screen on
the touch panel display and use the keys on the display to specify the settings.
1
IMPORTANT
You can access menus and modify settings while print jobs are waiting in the queue.
However, any new settings will only affect print jobs sent to the queue after the
modifications were made.
1
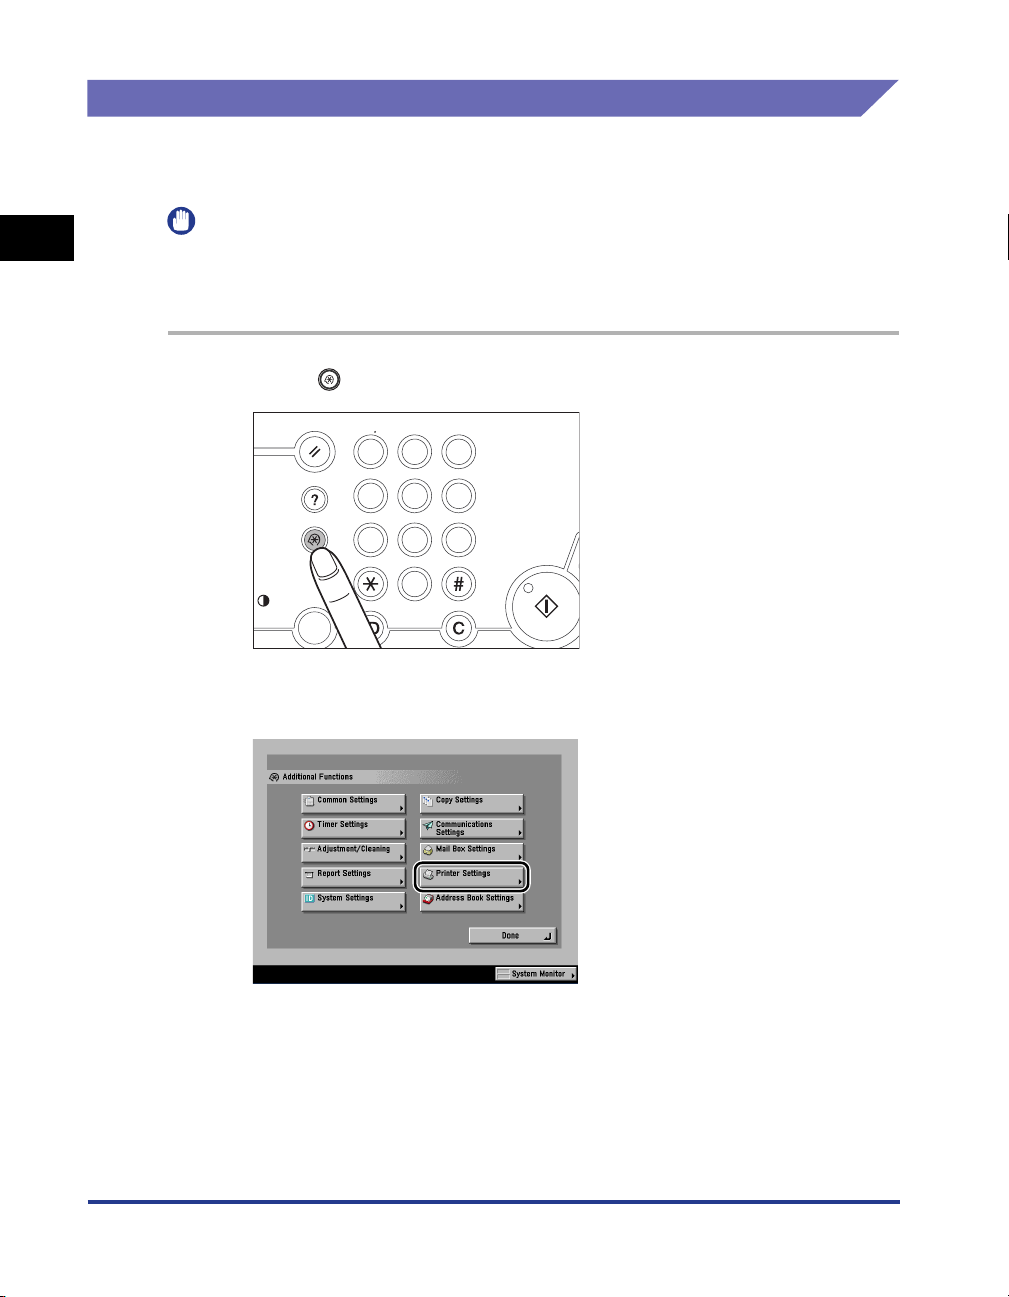
Press (Additional Functions).
Before You Start Using This Machine
Reset
@
1
Help
GHI
4
Additional Functions
PRS
7
Display Contrast
2
Press [Printer Settings].
ABC
DEF
2
3
MNO
L
JK
5
6
WXY
TUV
89
OPER
SYMBOLS
0
Clear
Stop
Start
1-4
Menu Functions
Page 21
1
Before You Start Using This Machine
3
Select [Settings] or [Utility] to access the corresponding
menu.
The Settings menu provides access to common settings, such as number of
copies, error handling, and toner density.
The Utility menu provides access to the reset printer function.
Menu Functions
1-5
Page 22
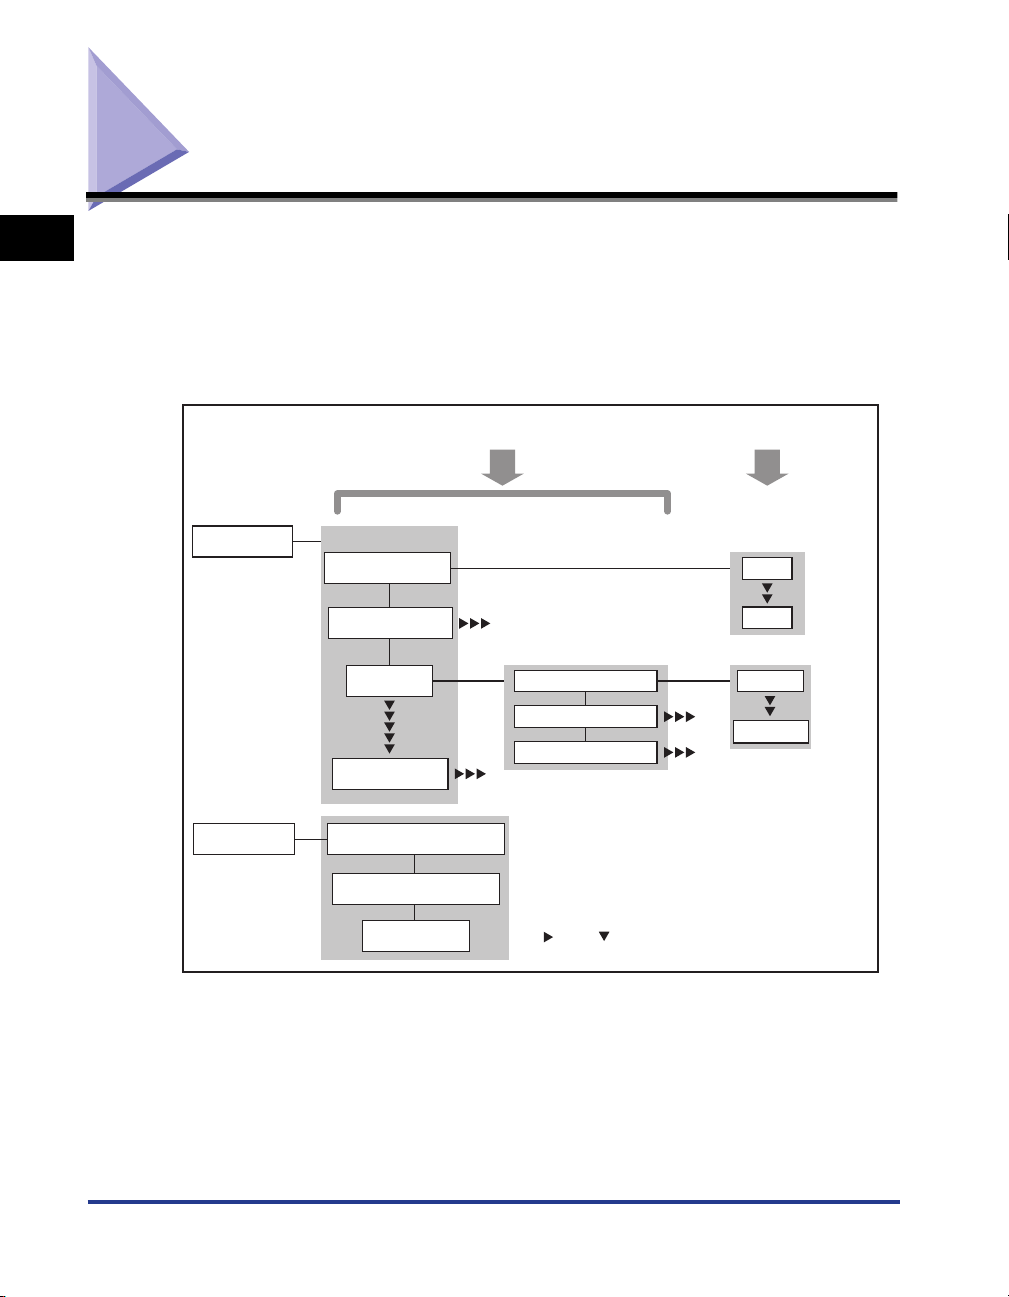
Using the Printer Settings Menu
1
Before You Start Using This Machine
The Printer Settings menu enables you to access common features. Below is an
abbreviated outline of the Printer Settings menu structure. For a detailed
description of all Printer Settings menu options, see Chapter 2, "Printer Settings
Menu."
As an example, the sequence of steps for setting the default number of copies is
shown on the following pages.
Settings Setting Value
Settings
Common Menu
Copies
2-Sided Printing
Paper Feed
PCL/PS*
Default Paper Size
Default Paper Type
Paper Size Override
1
2000
Letter
Statement
1-6
Utility
Using the Printer Settings Menu
Initialize PCL Hard Disk*
Initialize PS Hard Disk*
Reset Printer
" " and " " indicate that settings or levels are omitted.
*Settings are not applicable for UFR mode.
Page 23
1
Before You Start Using This Machine
1
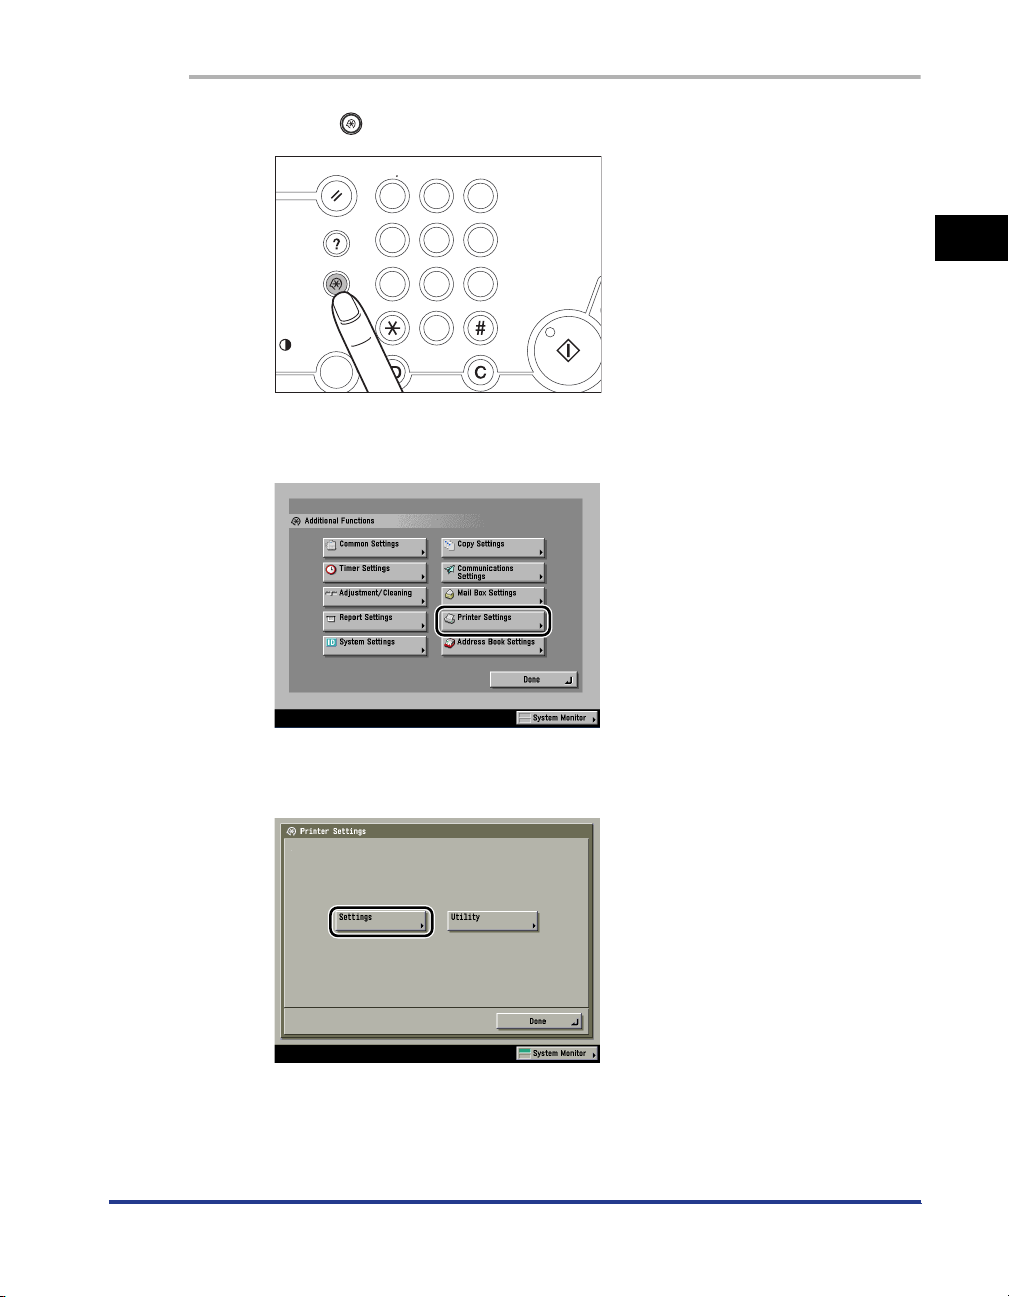
Press (Additional Functions).
Reset
@
1
Help
GHI
4
Additional Functions
PRS
7
OPER
Display Contrast
2
Press [Printer Settings].
ABC
DEF
2
3
MNO
L
JK
5
6
WXY
TUV
89
SYMBOLS
0
Clear
Stop
Start
3
Press [Settings].
Using the Printer Settings Menu
1-7
Page 24

1
Before You Start Using This Machine
4
Press [Copies].
5
Press [-] or [+] to enter the number of copies.
1-8
You can also use - (numeric keys) to enter the value, and (Clear) to
clear your entry.
You can change the value by pressing [-] or [+], even if you have entered the
value using - (numeric keys).
If you enter a value outside the setting range, a message prompting you to enter
an appropriate value appears on the screen.
Using the Printer Settings Menu
Page 25
1
Before You Start Using This Machine
6
Confirm the setting ➞ press [OK].
Using the Printer Settings Menu
1-9
Page 26
Using the Report Settings Menu
1
Before You Start Using This Machine
The Report Settings menu enables you to access report print features, such as
checking the configuration. Below is an abbreviated outline of the Report Settings
menu structure. For a detailed description of Report Settings menu options, see
Chapter 3, "Report Settings Menu."
As an example, the sequence of steps for printing a Configuration Page is shown
on the following pages.
NOTE
The Report Settings menu is not applicable for UFR mode.
Settings
■ Print List
Printer
PCL
PS
Configuration
Page
Font List
Configuration
Page
1-10
Font List
Using the Report Settings Menu
Page 27
1
Before You Start Using This Machine
1
Press (Additional Functions).
Reset
@
1
Help
GHI
4
Additional Functions
PRS
7
OPER
Display Contrast
2
Press [Report Settings].
ABC
DEF
2
3
MNO
L
JK
5
6
WXY
TUV
89
SYMBOLS
0
Clear
Stop
Start
3
Press [Printer] under <Print List>.
Using the Report Settings Menu
1-11
Page 28
1
Before You Start Using This Machine
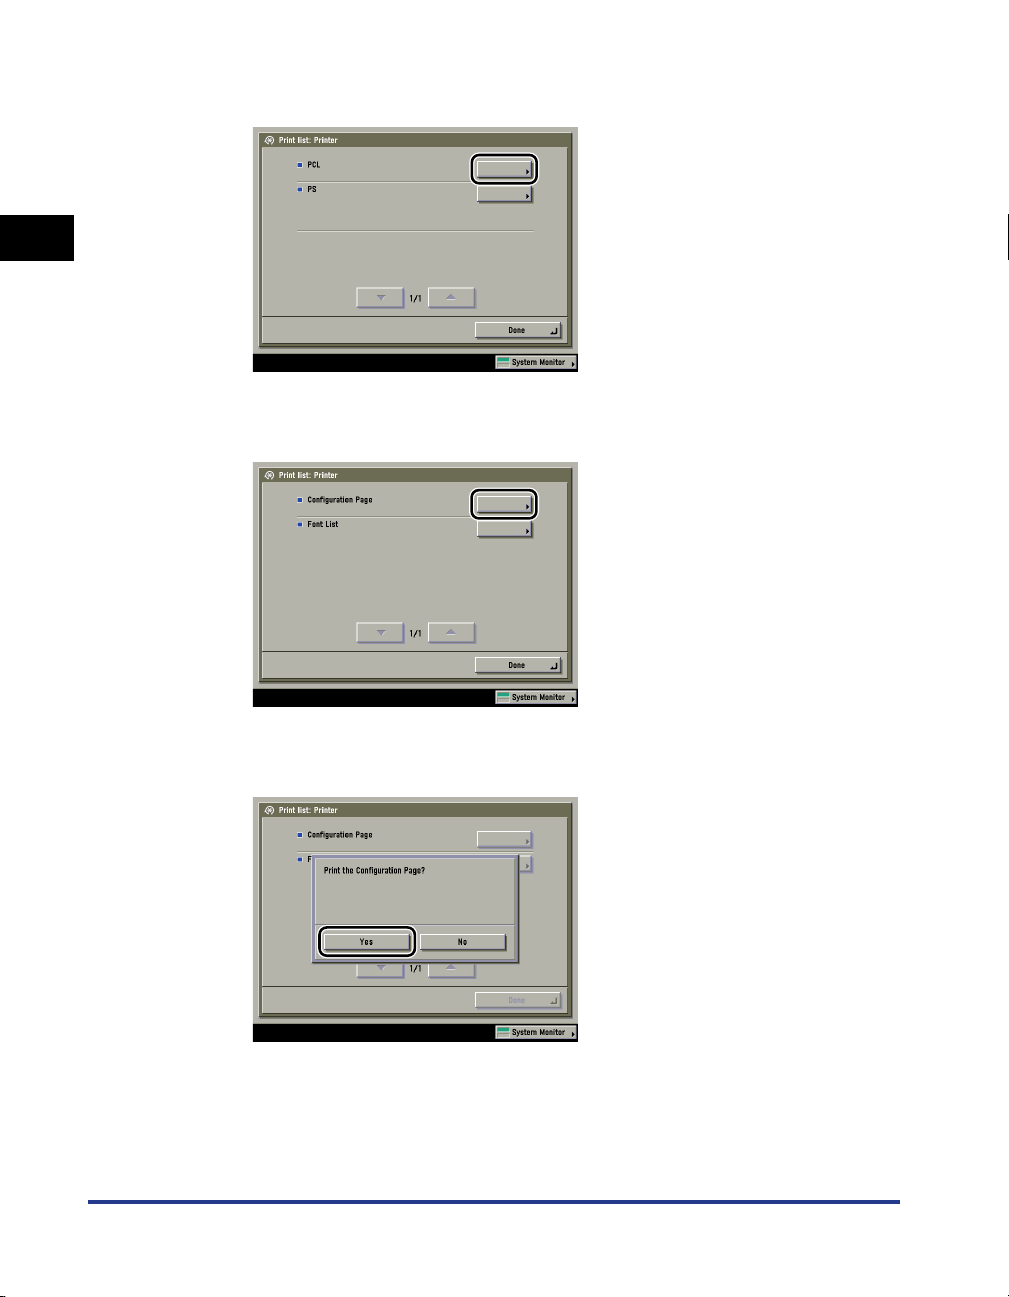
4
Press [PCL].
5
Press [Configuration Page].
1-12
6
Press [Yes] to print the page.
If you do not want to print the configuration page, press [No].
Using the Report Settings Menu
Page 29
1
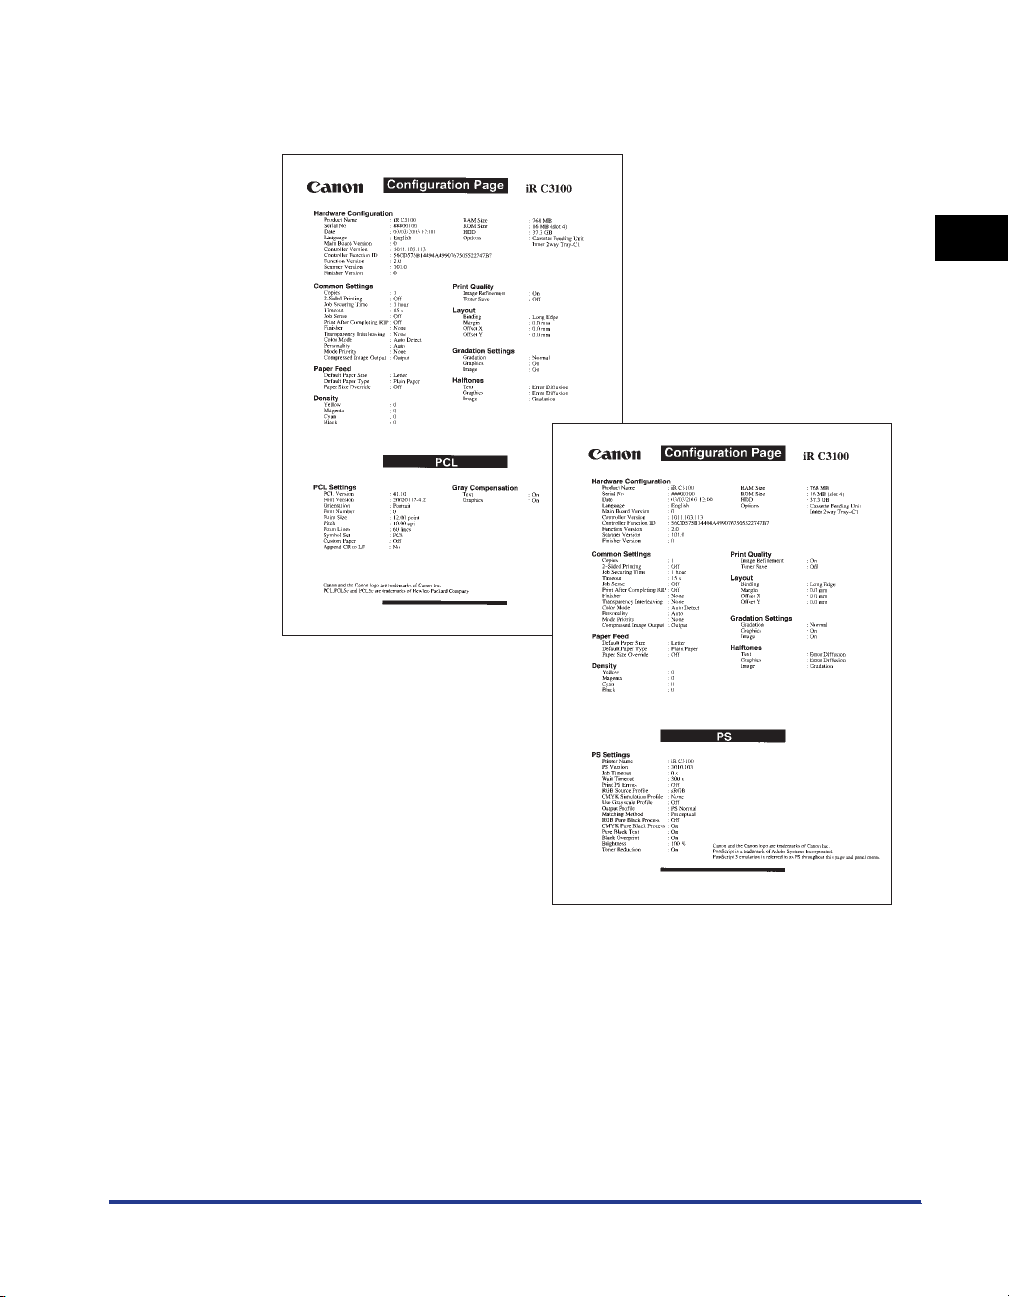
Before You Start Using This Machine
If the printer function is working correctly, the Configuration Page will be similar to
the sample below.
PCL Configuration Page
PS Configuration Page
Using the Report Settings Menu
1-13
Page 30

1
Before You Start Using This Machine
1-14
Using the Report Settings Menu
Page 31

Printer Settings Menu
This chapter describes how to use the Printer Settings menu and its submenus.
An Overview of Printer Settings . . . . . . . . . . . . . . . . . . . . . . . . . . . . . . . . . . . . . . . . . . . . 2-2
Settings Menu. . . . . . . . . . . . . . . . . . . . . . . . . . . . . . . . . . . . . . . . . . . . . . . . . . . . . . . . . . 2-6
Copies . . . . . . . . . . . . . . . . . . . . . . . . . . . . . . . . . . . . . . . . . . . . . . . . . . . . . . . . . . . . . . . . . . . . .2-6
2-Sided Printing . . . . . . . . . . . . . . . . . . . . . . . . . . . . . . . . . . . . . . . . . . . . . . . . . . . . . . . . . . . . . .2-6
Paper Feed. . . . . . . . . . . . . . . . . . . . . . . . . . . . . . . . . . . . . . . . . . . . . . . . . . . . . . . . . . . . . . . . . .2-7
Print Quality . . . . . . . . . . . . . . . . . . . . . . . . . . . . . . . . . . . . . . . . . . . . . . . . . . . . . . . . . . . . . . . . .2-9
Layout. . . . . . . . . . . . . . . . . . . . . . . . . . . . . . . . . . . . . . . . . . . . . . . . . . . . . . . . . . . . . . . . . . . . .2-11
Job Securing Time . . . . . . . . . . . . . . . . . . . . . . . . . . . . . . . . . . . . . . . . . . . . . . . . . . . . . . . . . . .2-15
Timeout. . . . . . . . . . . . . . . . . . . . . . . . . . . . . . . . . . . . . . . . . . . . . . . . . . . . . . . . . . . . . . . . . . . .2-15
Print After Completing RIP . . . . . . . . . . . . . . . . . . . . . . . . . . . . . . . . . . . . . . . . . . . . . . . . . . . . .2-16
Finisher . . . . . . . . . . . . . . . . . . . . . . . . . . . . . . . . . . . . . . . . . . . . . . . . . . . . . . . . . . . . . . . . . . . .2-17
Punch . . . . . . . . . . . . . . . . . . . . . . . . . . . . . . . . . . . . . . . . . . . . . . . . . . . . . . . . . . . . . . . . . . . . .2-21
Transparency Interleaving . . . . . . . . . . . . . . . . . . . . . . . . . . . . . . . . . . . . . . . . . . . . . . . . . . . . .2-21
Personality . . . . . . . . . . . . . . . . . . . . . . . . . . . . . . . . . . . . . . . . . . . . . . . . . . . . . . . . . . . . . . . . .2-22
Mode Priority . . . . . . . . . . . . . . . . . . . . . . . . . . . . . . . . . . . . . . . . . . . . . . . . . . . . . . . . . . . . . . .2-22
Color Mode. . . . . . . . . . . . . . . . . . . . . . . . . . . . . . . . . . . . . . . . . . . . . . . . . . . . . . . . . . . . . . . . .2-23
Gradation Settings . . . . . . . . . . . . . . . . . . . . . . . . . . . . . . . . . . . . . . . . . . . . . . . . . . . . . . . . . . .2-24
Halftones . . . . . . . . . . . . . . . . . . . . . . . . . . . . . . . . . . . . . . . . . . . . . . . . . . . . . . . . . . . . . . . . . .2-25
Compressed Image Output . . . . . . . . . . . . . . . . . . . . . . . . . . . . . . . . . . . . . . . . . . . . . . . . . . . .2-26
Initialize. . . . . . . . . . . . . . . . . . . . . . . . . . . . . . . . . . . . . . . . . . . . . . . . . . . . . . . . . . . . . . . . . . . .2-26
PCL/PS Settings. . . . . . . . . . . . . . . . . . . . . . . . . . . . . . . . . . . . . . . . . . . . . . . . . . . . . . . 2-27
PCL. . . . . . . . . . . . . . . . . . . . . . . . . . . . . . . . . . . . . . . . . . . . . . . . . . . . . . . . . . . . . . . . . . . . . . .2-27
PS . . . . . . . . . . . . . . . . . . . . . . . . . . . . . . . . . . . . . . . . . . . . . . . . . . . . . . . . . . . . . . . . . . . . . . . .2-32
Utility Menu. . . . . . . . . . . . . . . . . . . . . . . . . . . . . . . . . . . . . . . . . . . . . . . . . . . . . . . . . . . 2-40
Initialize PCL Hard Disk . . . . . . . . . . . . . . . . . . . . . . . . . . . . . . . . . . . . . . . . . . . . . . . . . . . . . . .2-40
Initialize PS Hard Disk . . . . . . . . . . . . . . . . . . . . . . . . . . . . . . . . . . . . . . . . . . . . . . . . . . . . . . . .2-40
Reset Printer . . . . . . . . . . . . . . . . . . . . . . . . . . . . . . . . . . . . . . . . . . . . . . . . . . . . . . . . . . . . . . . .2-41
2
CHAPTER
2-1
Page 32

An Overview of Printer Settings
The following table lists all settings of the Printer Settings menu.
2
■ Settings Menu
Item Settings
Copies
2-Sided Printing
1 to 2000; 1
*
On, Off
Applicable
Page
*
p. 2-6
p. 2-6
Paper Feed
*
, Legal, A4, A3, A5, 11 x 17,
Printer Settings Menu
Default Paper Size
Letter
Executive, Statement, Envelope Monarch,
Envelope COM10, Envelope ISO-B5,
p. 2-7
Envelope ISO-C5, Envelope DL, Envelope
Y4, 12_5/8 x 17_11/16, 12 x 18
*
, Transparency, Heavy Paper,
p. 2-8
Default Paper Type
Plain Paper
Recycled Paper, Color Paper, Ltrhead
(plain), Ltrhead (heavy), Tracing Paper,
Labels, Pre-punched, Envelope
Paper Size Override
On, Off
*
p. 2-9
Print Quality
Image Refinement
Density
*1
•Yellow
•Magenta
•Cyan
•Black
Toner Save
*
On
, Off
-8 to +8; 0
-8 to +8; 0
-8 to +8; 0
-8 to +8; 0
*
On, Off
p. 2-9
*
*
*
*
p. 2-10
p. 2-10
Layout
Binding
Margin
Offset X
Offset Y
Job Securing Time
Long Edge
-1.20 to +1.20 inch; 0.0
-2.00 to +2.00 inch; 0.0
-2.00 to +2.00 inch; 0.0
1 hour
24 hours
*
, Short Edge
*
inch
*
inch
*
inch
*
, 2 hours, 3 hours, 6 hours, 12 hours,
p. 2-11
p. 2-12
p. 2-14
p. 2-14
p. 2-15
2-2
An Overview of Printer Settings
Page 33

2
Printer Settings Menu
Item Settings
Timeout
Print After Completing
RIP
Timeout (5 to 300 seconds), Off; 15* seconds
*
On, Off
*
None
, Collating, Rotate Collating, Rotate
Applicable
Page
p. 2-15
p. 2-16
Grouping, Offset Collating, Offset Grouping,
Staple Sort
Finisher
Staple position: Corner (Upper-L)
*
, Double
p. 2-17
(Top), Corner (Upper-R), Double (Right),
Corner (Lower-R), Double (Bottom), Corner
(Lower-L), Double (Left)
Punch None*, Top, Bottom, Left, Right p. 2-21
Transparency Interleaving
Personality
Mode Priority
*2
*2
Color Mode
*
None
, Blank, Printed
Auto*, PS, PCL
None*, PS, PCL
Auto Detect
*
, Full Color, Black and White
p. 2-21
p. 2-22
p. 2-22
p. 2-23
Gradation Settings
Gradation
Graphics
*3
Image
*3
Normal
On*, Off
On*, Off
*
, Smooth 1, Smooth 2
p. 2-24
p. 2-24
p. 2-24
Halftones
Text
Graphics
Image
Compressed Image
Output
Resolution, Gradation, Error Diffusion
Resolution, Gradation
Resolution, Gradation
*
Output
, Display Error
*
, Error Diffusion
*
, Error Diffusion
*
p. 2-25
p. 2-25
p. 2-25
p. 2-26
Initialize - p. 2-26
An asterisk (*) indicates the default setting.
*1
The menu will not be displayed when Toner Save is set to 'On'.
*2
Settings are not applicable when printing in UFR mode.
*3
The menus will not be displayed when Gradation is set to 'Normal'.
■ PCL/PS Settings
*1
Item Settings
PCL
Applicable
An Overview of Printer Settings
Page
2-3
Page 34

Item Settings
Orientation
Font Number
Point Size
Pitch
Form Lines
2
Portrait*, Landscape
0 to 120; 0
4.00 to 999.75 point; 12.00
0.44 to 99.99 cpi; 10.00
5 to 128 lines; 60
*
*
point
*
cpi
*
lines
DESKTOP, ISO4, ISO6, ISO11, ISO15,
Applicable
Page
p. 2-27
p. 2-27
p. 2-28
p. 2-28
p. 2-28
ISO17, ISO21, ISO60, ISO69, ISOL1,
ISOL2, ISOL5, ISOL6, LEGAL, MATH8,
Symbol Set
MCTEXT, MSPUBL, PC775, PC8
PC852, PC8DN, PC8TK, PC1004, PIFONT,
*
, PC850,
p. 2-28
PSMATH, PSTEXT, ROMAN8, VNINTL,
VNMATH, VNUS, WIN30, WINBALT, WINL1,
WINL2, WINL5
Printer Settings Menu
Custom Paper
Unit of Measure
X Dimension
Y Dimension
*2
*2
*2
Append CR to LF
*
On, Off
Millimeters, Inches
*
5.51 to 17.99 inches; 17.99* inches
3.90 to 12.13 inches; 12.13* inches
Yes, No
*
p. 2-28
p. 2-29
p. 2-29
p. 2-29
p. 2-30
Gray Compensation
Text
Graphics
On
On
*
, Off
*
, Off
p. 2-31
p. 2-31
PS
Job Timeout
Wait Timeout
Print PS Errors
RGB Source Profile
CMYK Simulation Profile
Use Grayscale Profile
Output Profile
Matching Method
RGB Pure Black Process
0 to 3600 seconds; 0
0 to 3600 seconds; 300
*
On, Off
*
sRGB
, Gamma 1.5, Gamma 1.8, Gamma
2.4, None, Download Profile
JapanColor(Canon), US Web Ctd(Canon),
Euro Standard, None
*
On, Off
PS Normal, PS Photo, PS TR Normal
TR Photo, Download Profile
, Off
*
, Saturation, Colorimetric
Perceptual
*
On
*
seconds
*
seconds
*
, Download Profile
*
, PS
p. 2-32
p. 2-32
p. 2-32
p. 2-32
p. 2-33
p. 2-35
p. 2-35
p. 2-36
p. 2-37
2-4
An Overview of Printer Settings
Page 35

2
Printer Settings Menu
Item Settings
CMYK Pure Black Process
Pure Black Text
Black Overprint
Brightness
An asterisk (*) indicates the default setting.
*1
Settings are not applicable for UFR mode.
*2
The menus will not be displayed when Custom Paper is set to 'Off'.
*3
The menu will not be displayed when Toner Save is set to 'On'.
*3
On*, Off
*
On
, Off
*
On
, Off
85 to 115%; 100%
*
Applicable
Page
p. 2-37
p. 2-38
p. 2-39
p. 2-39
■ Utility Menu
Item Settings
Initialize PCL Hard Disk
Initialize PS Hard Disk
*1
*1
- p. 2-40
- p. 2-40
Applicable
Page
Reset Printer - p. 2-41
*1
Settings are not applicable for UFR mode.
An Overview of Printer Settings
2-5
Page 36

Settings Menu
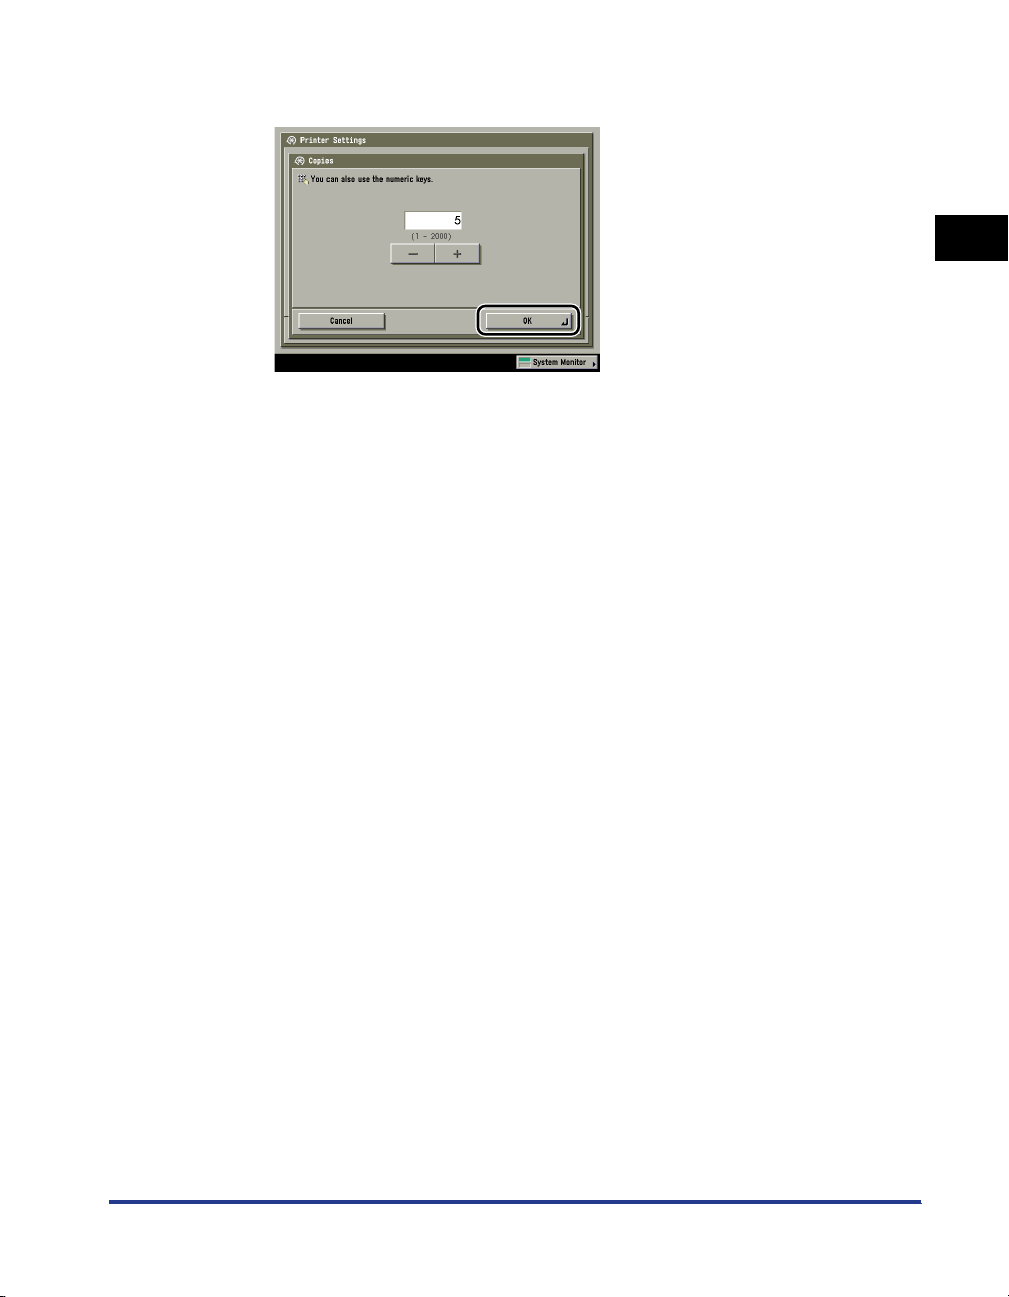
Copies
2
1 to 2000; 1
This setting enables you to specify the number of copies printed. The default
setting is '1', but you can specify up to 2000 copies.
*
2-Sided Printing
*
On, Off
Printer Settings Menu
This parameter selects one-sided or two-sided printing. When 2-Sided Printing is
specified, the document is printed on both sides of the paper.
NOTE
•
Two-sided printing can use either the paper drawer or the stack bypass in sizes of
12" x 18", 11" x 17", 12_5/8" x 17_11/16", LGL, LTR, LTRR, STMT, STMTR, EXEC,
A3, JIS-B4, A4, A4R, JIS-B5, JIS-B5R, A5, and A5R.
•
Two-sided printing can use paper within the following range.
- 17 lb bond to 28 lb bond (64 to 105 g/m
•
When printing on letterhead paper, or paper with a logo (such as a cover sheet),
please note the following points:
- If the paper is fed from an internal paper drawer, the print surface of the first page
should be face down.
- If the paper is fed from the stack bypass or the optional paper deck, the print
surface of the first page should be face up.
2
)
2-6
Settings Menu
Page 37

2
Printer Settings Menu
Paper Feed
■ Default Paper Size
Letter*, Legal, A4, A3, A5, 11" x 17", Executive, Statement, Envelope Monarch,
Envelope COM10, Envelope ISO-B5, Envelope ISO-C5, Envelope DL, Envelope
Y4, 12_5/8" x 17_11/16", and 12" x 18"
This parameter defines the default paper size used when the paper size cannot be
set within the application software, when no paper source is specified.
IMPORTANT
If you are printing from an OS that does not have a printer driver for the machine
(MS-DOS, UNIX, etc.), make sure that the paper loaded in the paper drawer
matches the paper size specified in this setting. If the paper size specified in this
setting is not available, an error message is displayed when the machine tries to
print the job and the machine stops. In addition, if a paper source has not been
selected through the application, the machine automatically selects the default
print settings for the paper size and type. See Chapter 4, "Customizing Settings," in
the Reference Guide.
Settings Menu
2-7
Page 38

■ Default Paper Type
Plain Paper*, Transparency, Heavy Paper, Recycled Paper, Color Paper, Ltrhead
(plain), Ltrhead (heavy), Tracing Paper, Labels, Pre-punched, and Envelope
This parameter sets the default paper type to be used for print jobs. This machine
has internally defined optimal print modes for each specified paper type.
IMPORTANT
2
Printer Settings Menu
If you are printing from an OS that does not have a printer driver for the machine
(MS-DOS, UNIX, etc.), make sure that the paper loaded in the paper drawer
matches the paper type specified in this setting. If the paper type specified in this
setting is not available, an error message is displayed when the machine tries to
print the job, and the machine stops. In addition, if a paper source has not been
selected through the application, the machine automatically selects the default
print settings for the paper type and size. See Chapter 4, "Customizing Settings," in
the Reference Guide.
NOTE
•
Use the following figures as a guideline to decide whether paper should be
specified as Plain Paper or Heavy Paper.
2
- Plain Paper: 17 to 28 lb bond (64 to 105 g/m
- Heavy Paper: 28 lb bond to 90 lb index (106 to 163 g/m
•
Canon transparency film is recommended for printing on transparencies.
•
Canon label paper is recommended for printing on labels.
•
Heavy Paper, Transparency, Ltrhead (heavy), Tracing Paper, Labels, and Envelope
)
2
)
cannot be printed using two-sided printing.
2-8
Settings Menu
Page 39

2
Printer Settings Menu
■ Paper Size Override
*
On, Off
If paper of the size that is set in the printer driver has not been loaded in the paper
drawer, the paper that is printed is changed to the following sizes.
Printer Driver Setting Paper
Letter A4
A4 Letter
11" x 17" A3
A3 11" x 17"
If [On] is selected, the paper size is changed.
If [Off] is selected, the paper supply message is displayed and the paper size is
not changed.
NOTE
The paper size does not change if there is no paper in the cassette of the size that
is set in the printer driver, even if Paper Size Override is set to 'On'.
Print Quality
■ Image Refinement
On*, Off
This setting smooths the jagged outlines of characters and graphics.
If [On] is selected, smoothing is performed before printing.
If [Off] is selected, jobs are printed without being smoothed.
NOTE
The results of image refinement may be different depending on the types of
characters and graphics you want to print.
Settings Menu
2-9
Page 40

■ Density
Yellow: -8 to 8; 0
Magenta: -8 to 8; 0
Cyan: -8 to 8; 0
Black: -8 to 8; 0
*
*
*
*
This setting adjusts the print density of the respective colors.
Pressing [Dark] makes the print image darker, pressing [Light] makes the image
2
lighter. This setting has 17 levels you can adjust, with level '0' (middle level) being
the default setting.
NOTE
This function is not available if the Toner Save option is set to 'On'.
■ Toner Save
*
Printer Settings Menu
On, Off
This setting determines whether Toner Save is enabled. Toner Save uses less
toner to print documents and may result in longer toner life.
NOTE
If [On] is selected for Toner Save, very light or finely detailed images may not be
printed clearly.
2-10
Settings Menu
Page 41

2
Printer Settings Menu
Layout
■ Binding
Long Edge*, Short Edge
This parameter determines whether the binding position is along the long edge or
the short edge of the paper. When binding for two-sided printing, the image
orientation is automatically adjusted for correct layout.
When the binding position is on the long edge of the paper:
Two-sided printing
in portrait orientation
Front Back Front Back
Binding Position
ABC
Binding Position
DEF
Two-sided printing
in landscape orientation
Binding Position
ABC
DEF
Binding Position
When the binding position is on the short edge of the paper:
Two-sided printing
in portrait orientation
Front Back Front Back
Binding Position
DEF
ABC
Binding Position
Two-sided printing
in landscape orientation
Binding Position
ABC
DEF
Binding Position
NOTE
•
You cannot create a binding margin with this setting alone. Use this setting in
combination with the Margin setting to create a binding margin.
•
For two-sided printing, the orientation of the back image may be changed by this
setting.
Settings Menu
2-11
Page 42

■ Margin
-1.20 to +1.20 inch (in increments of 0.01 inch); 0.0* inch
This setting sets the page margin in inches. The settings can be set between
-1.20" (-30.0 mm) and +1.20" (+30.0 mm) in increments of 0.01" (0.5 mm).
Use [ ] to increase the width of the inside margin.
Use [ ] to increase the width of the outside margin.
2
[0 inch]
[ + ]
[ - ]
Center Center Center
Left Margin
Right Margin
Printer Settings Menu
You can specify the edge along which the margin will be created in the Binding
setting (previous setting). To create a margin along one of the edges of the paper,
use this setting in combination with the Binding setting.
IMPORTANT
If this setting moves the image outside the printable area, part of the image may be
cut off.
NOTE
•
If this setting is used in combination with the Offset X/Offset Y setting, the values of
the two settings are added together.
•
Pressing [ ] increases the setting value by 0.01" (0.5 mm) each time the key is
pressed. Pressing [ ] decreases the value by 0.01" (0.5 mm) each time. Holding
down either [ ] or [ ] continuously speeds up the value alteration.
2-12
Settings Menu
Page 43

2
Printer Settings Menu
Binding and Margin Settings
Refer to the figures below to set binding and margins.
Portrait printing
with margin
Front Back
(Two-sided printing)
ABC
DEF
Binding : Long edge
Margin : [+]
ABC
ABC
ABC
DEF
DEF
Binding : Long edge
DEF
Margin : [-]
Binding : Short edge
Margin : [+]
Binding : Short edge
Margin : [-]
Landscape printing
with margin
Front
ABCDE
ABCDE
ABCDEABCDE
Back
(Two-sided printing)
FGHIJK
FGHIJK
FGHIJKFGHIJK
Set the paper orientation in the application you are using.
Settings Menu
2-13
Page 44

■ Offset X/Offset Y
-2.00 to +2.00 inch (in increments of 0.01 inch); 0.0* inch
This setting sets the offset position in inches. The settings can be set between
-2.00" (-50.0 mm) and +2.00" (+50.0 mm) in increments of 0.01" (0.5 mm).
The print position is adjusted in the vertical or horizontal direction to the value
specified in the setting value.
You can increase or decrease the setting in increments of 0.01" (0.5 mm) to adjust
2
Printer Settings Menu
the print position, as described below.
Offset X: Increasing the setting value moves the image in the rightward X
direction on the paper. Decreasing the setting value moves the image in the
leftward X direction on the paper.
Offset Y: Increasing the setting value moves the image in the downward Y
direction on the paper. Decreasing the setting value moves the image in the
upward Y direction on the paper.
Area adjusted using
X-Adjustment
[+]
XX
DEFABC
Adjust using
X/Y-Adjustment
YY
ABC
[+]
Y-Adjustment
Area adjusted using
DEF
Part of the
original margin
Front Back Front Back
IMPORTANT
Please note that if the print position is adjusted to place print data outside the valid
print area, the portion outside the valid print area is not printed.
NOTE
•
If this setting is used in combination with the Margin setting, the values of the two
settings are added together.
•
Pressing [ ] increases the setting value by 0.01" (0.5 mm) each time the key is
pressed. Pressing [ ] decreases the value by 0.01" (0.5 mm) each time. Holding
down either [ ] or [ ] continuously speeds up the value alteration.
2-14
Settings Menu
Page 45

2
Printer Settings Menu
Job Securing Time
1 hour*, 2 hours, 3 hours, 6 hours, 12 hours, and 24 hours
When a secured print job is sent to the machine, it is stored on the machine's hard
disk, and a password must be entered before the job can be printed. This setting
specifies how long the job will be stored before it is automatically canceled.
NOTE
•
Even if the time period specified with this setting has not elapsed, the print job data
is deleted if the main power to the machine is switched OFF.
•
The password is set from the printer driver.
Timeout
Timeout (5 to 300 seconds), Off; 15* seconds
and starts printing in the appropriate mode. After all the data has been received
and the end of the data is detected, the print mode stops. This processing of print
data is called a job.
If the data for a job does not end, the machine does not start the next job even if it
receives other print commands. In cases like this, use the Timeout setting to force
jobs to finish if no data is received during the set period of time.
If Timeout is 'On', jobs can finish automatically. For example, if print data still
remains in the machine because a form feed command cannot be processed, the
paper can be fed automatically.
If Timeout is 'Off', jobs will not end automatically.
When the Personality is set to 'Auto', the machine detects the control commands
IMPORTANT
•
If this function is set so that a job will timeout, the machine may end a print job
before all the data has been received if it takes a long time for the PC to send the
data. If this occurs, adjust the length of the Timeout setting.
•
If [Off] is selected, you will not be able to make copies until print jobs that use the
staple sort and punch settings have been completed.
•
If you send data from a printer driver not compatible with the machine, and the end
of job command is not received within the time set in this setting, the machine
cancels the job, which may cause the data to be printed incorrectly.
NOTE
When a job is being processed, the Processing/Data Indicator on the control panel
flashes.
Settings Menu
2-15
Page 46

Print After Completing RIP
*
On, Off
Sets whether to use the Print After Completing RIP function.
RIP is Raster Image Processor, used for advanced graphical representation.
If Print After Completing RIP is enabled, the first page is printed after all the pages
in the job have been processed.
2
Although it may take longer to print the first page, the remaining pages in the job
will be printed more quickly. This is useful when several people are using the
machine or when using another function, such as the Copy function, because the
printing time for a print job is reduced.
IMPORTANT
Please note that the memory of the machine can store up to 3,700 pages. When
you send a secured document to be stored in the memory to be printed at a later
Printer Settings Menu
time, and the memory is full (already reached its maximum capacity), your
document will not be stored. The memory may be full because the machine is
being used for other functions (such as storing a document in an inbox or storing a
form) or other jobs, which use memory space.
2-16
Settings Menu
Page 47

2
Printer Settings Menu
Finisher
None*, Collating, Rotate Collating, Rotate Grouping, Offset Collating, Offset
Grouping, and Staple Sort
Staple Position:
Corner (Upper-Left)
(Lower-Right), Double (Bottom), Corner (Lower-Left), and Double (Left)
Some of the above options require specific delivery trays and may not be available
unless appropriate delivery trays are installed:
✓: Available
✗: Unavailable
*
, Double (Top), Corner (Upper-Right), Double (Right), Corner
Inner 2Way
No Options
Collating ✓✓ ✓✓
Rotate Collating ✓✓ ✗ ✗
Rotate Grouping ✓✓ ✗ ✗
Offset Collating ✗✗✓✓
Offset Grouping ✗✗✓✓
Staple Sort ✗✗✓✓
You can choose from several features when collating printed matter.
None
This setting prints all copies of the same page before printing the next page.
Collating
This setting prints all pages of each copy before printing the next copy.
Rotate Collating
This setting prints all pages of each copy (collating), and rotates every other
complete copy 90 degrees to indicate where each copy starts.
Tray-C1,
Copy Tray
Unit-J1
Finisher-P1
Finisher-Q1,
Saddle
Finisher-Q2
Rotate Grouping
This setting prints all copies of the same page before printing the next page. It
rotates every other complete set of pages to indicate where each new set starts.
Settings Menu
2-17
Page 48

Offset Collating
This setting prints all pages of each copy (collating), and offsets every other
complete copy to indicate where each copy starts.
Offset Grouping
This setting prints all copies of the same page before printing the next page. It
offsets every other complete set of pages to indicate where each new set starts.
2
Staple Sort
This setting prints all pages of each copy (collating) and prepares them for
stapling according to the option selected for Staple Sort.
Examples of each Finisher option when printing three copies of a three page
document:
None
Printer Settings Menu
Rotate Collating
Offset Collating
1
1
1
2
2
2
3
3
3
Rotate Grouping
1
1
2
2
3
3
1
2
3
Offset Grouping
1
2
3
1
2
3
1
2
3
Collating
1
2
3
1
2
3
1
2
3
1
2
1
2
1
2
3
3
3
1
1
1
2
2
2
3
3
3
2-18
Staple Sort
1
1
1
Settings Menu
Page 49

2
Printer Settings Menu
IMPORTANT
Please note that the memory of the machine can store up to 3,700 pages. When
you send a secured document to be stored in the memory to be printed at a later
time, and the memory is full (already reached its maximum capacity), your
document will not be stored. The memory may be full because the machine is
being used for other functions (such as storing a document in an inbox or storing a
form) or other jobs, which use memory space.
NOTE
•
Rotate Collating and Rotate Grouping are available for selection if the paper size is
A4, A4R, JIS-B5, JIS-B5R, LTR, or LTRR.
•
If [Rotate Collating] or [Rotate Grouping] is selected, part of the print image may be
cut off when the image is rotated. You need to load the same size paper as the
original in the paper cassettes in both landscape and portrait positions. If you do
not, all the sheets will be printed in the orientation that the loaded paper is in.
•
Offset Grouping and Offset Collating are available for selection in combination with
the following optional units and paper sizes.
- If the Finisher-P1 is attached : 11" x 17", LGL, LTR, LTRR, STMT, EXEC, A3, B4,
A4, A4R, or JIS-B5.
- If the Finisher-Q1 or Saddle Finisher-Q2 is attached : 11" x 17", LGL, LTR, LTRR,
STMT, EXEC, A3, B4, A4, A4R, JIS-B5, or A5.
•
When you select Staple Sort, you can select the stapling position.
Corner
(Upper-Left)
ABC
ABC
Corner
(Lower-Right)
ABC
ABC
•
When you are stapling paper in landscape orientation, the image orientation and
Double
(Top)
ABC
ABC
Double
(Bottom)
ABC
ABC
Corner
(Upper-Right)
ABC
ABC
Corner
(Lower-Left)
ABC
ABC
Double
(Right)
ABC
ABC
Double
(Left)
ABC
ABC
the staple position may not match.
Settings Menu
2-19
Page 50

•
Staple Sort is available for selection if the paper size is 11" x 17", LGL, LTR, LTRR,
EXEC, A3, B4, A4, A4R, or JIS-B5. Available staple locations depend on paper size
and image orientation, as shown.
✓ : Available
Finisher-P1/Finisher-Q1/Saddle Finisher-Q2
Staple
Position
Paper Size
11" × 17"
2
LGL
Double
Corner
(Top)
(Upper-
Left)
✓✓
✓
✗
LTR ✓✓✓✗✗✓✓✓
LTRR ✓✓✓* ✗✗✓* ✗✗
Double
Corner
(Upper-
Right)
✓✗
(Right)
✗
Corner
Double
(Lower-
(Bottom)
Right)
✓✓
✓
✗ : Unavailable
Corner
Double
(Lower-
(Left)
Left)
✓
✗✓✗✗✓
Capacity
(Sheets)
30
30
50
50
EXEC ✓✓✓✗✗✓✓✓ 50
A3
B4
A4 ✓✓✓✓ ✗✗✓✓
Printer Settings Menu
A4R ✓✓✓* ✗✗✓* ✗✗
JIS-B5 ✓✓✓✓ ✗✗✓✓
✓
✓
✓
✓
✓
✓
✓
✓
✓
✓✗
✗✗
✓
30
30
✗
✓
50
50
50
* Will be stapled parallel to the edge of the paper.
•
Make sure to select compatible settings when using Staple Sort and Punch
simultaneously. If conflicting settings are selected, such as the staple setting for the
right side of the paper and the punch setting for the left, the printer will use neither
Staple Sort nor Punch.
•
The maximum number of sheets that can be stapled is 30 for A3, B4, LGL, and 11"
x 17", 50 for A4, A4R, JIS-B5, LTR, LTRR, and EXEC. If the number of sheets is
greater than the limit, they will not be stapled.
2-20
Settings Menu
Page 51

2
Printer Settings Menu
Punch
None*, Top, Bottom, Left, Right
This setting enables you to specify the desired paper position for holes to be
punched for binding (two or three holes).
NOTE
•
This function can only be selected if the Finisher-Q1 or Saddle Finisher-Q2 is
attached to the Puncher Unit-M1.
•
Acceptable paper sizes for this option are 11" x 17", LGL, LTR, LTRR, A3, B4, A4,
A4R, B5, and B5R.
•
Make sure to select compatible settings when using Staple Sort and Punch
simultaneously. If conflicting settings are selected, such as the staple setting for the
right side of the paper and the punch setting for the left, the printer will use neither
Staple Sort nor Punch.
•
The machine automatically detects the size of the paper and punches two or three
holes accordingly. (A3, A4, 11" x 17", and Letter papers are punched with three
holes.)
•
Holes cannot be punched in Transparency, Pre-punched, Tracing paper, Envelope,
and Labels.
Transparency Interleaving
None*, Blank, and Printed
If you are printing on transparencies, you can use this setting to output a sheet of
paper after each transparency. The paper can be blank, or it can be a paper copy
of the transparency.
If [None] is selected, no sheets are interleaved with the transparencies.
If [Blank] is selected, a blank sheet of paper is inserted between each
transparency.
If [Printed] is selected, a printed paper from the print job is inserted between each
transparency.
NOTE
If [Printed] is selected, the paper printouts are included in the Prints count.
However, if [Blank] is selected, they are not included in the Prints count.
Settings Menu
2-21
Page 52

Personality
Auto*, PS, and PCL
This setting enables the machine to process data received from the host computer
in the specified data format. Setting the Personality to 'Auto' makes the machine
determine the type of data received from the host on a job-by-job basis. If you are
printing from applications on a computer, we recommend that you use the 'Auto'
setting.
2
NOTE
•
If you find that the machine does not correctly switch to the appropriate personality
when Personality is set to 'Auto', change the setting manually to match the data you
are sending from the host computer.
•
This function is not available when printing in UFR mode.
Mode Priority
Printer Settings Menu
None*, PS, and PCL
This setting determines which printer command language should be used if a job
is received without a specified command language. Mode Priority is used when
the Personality setting is set to 'Auto'.
None
This does not specify a preferred personality. If a job is received without a
specified command language, the current personality is used. The default setting
is 'None'.
PS
This assigns priority to the PS personality.
PCL
This assigns priority to the PCL personality.
NOTE
This function is not available when printing in UFR mode.
2-22
Settings Menu
Page 53

2
Printer Settings Menu
Color Mode
Auto Detect*, Full Color, and Black and White
This setting enables you to set the color mode you want to specify when printing.
If [Auto Detect] or [Full Color] is selected, the machine automatically detects
whether the page is reproduced using black (K) only or all 4 colors: cyan (C),
magenta (M), yellow (Y), and black (K).
is in color.
NOTE
If [Black and White] is selected, data is printed in black (K) only, even if the original
•
If different color data is overlaid, the machine may not distinguish color from
monochrome, even if [Auto Detect] or [Full Color] is selected. For example,
although the printout looks monochrome, if different color data is overlaid, it is
printed in full color mode, thereby using the color toner cartridges to print, not the
black toner cartridge. Furthermore, if the data is created as color data in the
application you are using, it is printed in full color mode, even though the data looks
monochrome.
•
If [None] is selected for the RGB Source Profile, and the machine receives a
device-dependent color space definition that is color-processed by the host
computer, gray data with the equivalent ratio of R to G to B is printed using black
(K) only.
Settings Menu
2-23
Page 54

Gradation Settings
Gradation: Normal*, Smooth 1, and Smooth 2
Graphics: On
*
, Off
Image: On*, Off
Set this function when the gradation of graphics (illustrations made by software
applications) or images (bitmap images) does not print smoothly (the color
changes stand out).
2
Smooth 2 performs a smoother gradation than Smooth 1. If [Smooth 1] is selected
and the gradation is still not printed smoothly, select [Smooth 2]. You can select
whether to apply smoothing to graphics or image data.
Printer Settings Menu
'Normal'
*The above gradation patterns are examples.
'Smooth 2'
NOTE
•
This setting does not apply to text data.
•
If [Smooth 1] or [Smooth 2] is selected, and gradation is applied to halftones,
graphics and images may appear grainy.
•
Graphics and Image are only displayed when [Smooth 1] or [Smooth 2] is selected.
2-24
Settings Menu
Page 55

2
Printer Settings Menu
Halftones
Text: Resolution, Gradation, and Error Diffusion
*
Graphics: Resolution, Gradation*, and Error Diffusion
Image: Resolution, Gradation*, and Error Diffusion
This setting specifies how you print halftones.
Halftoning is used to print each process color at a different intensity, allowing
millions of different color to be reproduced using only the four process colors.
Depending on the required intensity of a given color, toner is placed on paper in
dots of different sizes. The grid of dots used for each toner color is called a screen.
Halftone screens are aligned to unique angles designed to eliminate interference
patterns called moiré (a shimmering, wavy effect) that can arise with halftoning.
If [Resolution] is selected, a dither pattern that gives priority to the resolution of
the images is used. This helps eliminate the appearance of jagged or uneven lines
along the edges of objects and is best for printing standard text and graphics.
If [Gradation] is selected, a dither pattern that gives priority to the appearance of
smooth changes in tone is used. This is best for reproducing images with delicate
gradations or changes of tone.
If [Error Diffusion] is selected, an error diffusion method that gives priority to
printing fine lines or text is used. This is best for printing images with small text or
very fine lines.
GradationResolution Error Diffusion
*The above dithering patterns are examples.
NOTE
A dither pattern creates the illusion of varying shades of gray or additional colors by
treating areas of an image as groups of dots that are colored in different patterns.
Settings Menu
2-25
Page 56

Compressed Image Output
Output*, Display Error
This setting enables you to specify how the data should be treated if the data size
of the print job is too large to be stored in the machine's internal memory.
If [Output] is selected, the data is highly compressed (so it is able to stored in the
internal memory), and then the job is printed. However, the print quality may
diminish.
2
If [Display Error] is selected, the job is canceled when the data size is too large.
NOTE
•
Even if [Output] is selected and the data is highly compressed, the data may still be
too large to be stored in the machine's internal memory. In this case, the job is
canceled and an error is logged in the Print Log. (See Chapter 5, "Checking Job
and Device Status," in the Reference Guide.)
Printer Settings Menu
Initialize
-
The menu settings can be reset to the factory defaults by initializing the printer
settings.
If you select Initialize, the confirmation message <Is it OK to initialize the
settings?> is displayed. If you select [Yes], the settings are initialized. If you select
[No], the settings are not initialized.
IMPORTANT
Do not turn OFF the machine while the settings are being initialized, as this may
damage the machine's memory.
2-26
Settings Menu
Page 57

2
Printer Settings Menu
PCL/PS Settings
NOTE
These settings are not applicable when printing in UFR mode.
PCL
■ Orientation
Portrait*, Landscape
This setting enables you to set the paper orientation.
If [Portrait] is selected, the print image is printed in portrait orientation regardless
of the orientation of the paper in the paper drawers.
A B C D E
Portrait
If [Landscape] is selected, the print image is printed in landscape orientation
regardless of the orientation of the paper in the paper drawers.
A B C D E
Landscape
■ Font Number
0 to 120; 0
You can set the default font typeface for this printer function using the
corresponding font numbers. Valid font numbers are from 0 to 120.
*
PCL/PS Settings
2-27
Page 58

■ Point Size
4.00 to 999.75 point (in increments of 0.25 points); 12.00* point
If the number selected in Font Number is that of a proportionally spaced scalable
font, this option appears in the PCL menu. It enables you to specify a point size for
the default font. The point size can be adjusted in increments of 0.25 pts.
■ Pitch
2
0.44 to 99.99 cpi (in increments of 0.01 cpi); 10.00* cpi
If the number selected in Font Number is that of a fixed pitch scalable font, Pitch
appears in the PCL menu. It enables you to specify the pitch for the default font.
The pitch can be adjusted in increments of 0.01 cpi (characters per inch).
■ Form Lines
Printer Settings Menu
5 to 128 lines; 60* lines
This setting enables you to specify the number of lines to be printed on a page.
You can specify from 5 to 128 lines.
■ Symbol Set
DESKTOP, ISO4, ISO6, ISO11, ISO15, ISO17, ISO21, ISO60, ISO69, ISOL1,
ISOL2, ISOL5, ISOL6, LEGAL, MATH8, MCTEXT, MSPUBL, PC775, PC8
PC850, PC852, PC8DN, PC8TK, PC1004, PIFONT, PSMATH, PSTEXT,
ROMAN8, VNINTL, VNMATH, VNUS, WIN30, WINBALT, WINL1, WINL2, and
WINL5
This setting enables you to select the symbol set most suited to the needs of the
host computer.
*
,
■ Custom Paper
*
On, Off
2-28
This setting enables you to specify a custom paper size. If [On] is selected, you
can enter a custom size.
NOTE
You can only select the custom paper size entered with settings from the printer
driver.
PCL/PS Settings
Page 59

2
Printer Settings Menu
■ Unit of Measure
Millimeters, Inches
*
This setting enables you to specify the unit of measurement you would like to use
to specify your custom paper size.
NOTE
This function is not available if the Custom Paper option is set to 'Off'.
■ X Dimension
5.51 to 17.99 inches; 17.99* inches
This setting enables you to specify the X dimension of the custom paper. The X
dimension can be adjusted between 5.51" (140 mm) and 17.99" (457 mm) in
increments of 0.01" (1 mm).
This function can be very useful when part of the printed image is cut off.
Increasing this dimension may allow some of the missing text to be correctly
printed. Make sure you do not increase the X dimension beyond the actual size of
the paper you are using for printing.
NOTE
This function is not available if the Custom Paper option is set to 'Off'.
■ Y Dimension
3.90 to 12.13 inches; 12.13* inches
This setting enables you to specify the Y dimension of the custom paper. The Y
dimension can be adjusted between 3.90" (99 mm) and 12.13" (308 mm) in
increments of 0.01" (1 mm).
This function can be very useful when part of the printed image is cut off.
Increasing this dimension may allow some of the missing text to be correctly
printed. Make sure you do not increase the Y dimension beyond the actual size of
the paper you are using for printing.
NOTE
This function is not available if the Custom Paper option is set to 'Off'.
PCL/PS Settings
2-29
Page 60

■ Append CR to LF
ABCDE
FGHIJ
*
ABCDE ↓ FGHIJ
LF code ( ↓ ) only
ABCDE
FGHIJ
Append CR to LF 'No'
Yes, No
This setting enables you to specify whether to append a carriage return (CR)
when line feed code (LF) is received.
If [Yes] is selected, the print head moves to the beginning of the next line when
line feed code is received.
If [No] is selected, the print head moves down to the next line when line feed code
2
Printer Settings Menu
is received, and the margin does not change (such as to the beginning of the next
line).
Append CR to LF 'Yes'
2-30
PCL/PS Settings
Page 61

2
Printer Settings Menu
■ Gray Compensation
Text: On*, Off
Graphics: On*, Off
This setting determines whether only black (K) toner is used when the ratio of R
(red) to G (green) to B (blue) is the same.
Gray compensation can be set for Text and Graphics data.
If [On] is selected, black and gray data for the equivalent levels of RGB is printed
using the black (K) toner only, thereby lessening toner bleeding.
If [Off] is selected, black and gray data for the equivalent levels of RGB is printed
using all 4 (CMYK) toners. However, there is a possibility that the toner may bleed.
Test
Test
Gray Compensation 'On'
NOTE
If a problem occurs to the Graphics data with the default values set, switch
Graphics On and Off to fix the problem.
RGB (R = G = B)
Test
TestTest
Test
Gray Compensation 'Off'
PCL/PS Settings
2-31
Page 62

PS
■ Job Timeout
0 to 3600 seconds; 0* seconds
This setting enables you to specify the amount of time before a job times out. If a
job has not finished within the set time limit, the job automatically cancels.
2
■ Wait Timeout
0 to 3600 seconds; 300* seconds
This setting enables you to specify the amount of time the machine will wait for
data sent from the host computer before it times out. If data is not received within
the set time limit, the job automatically cancels.
■ Print PS Errors
Printer Settings Menu
■ RGB Source Profile
*
On, Off
This setting determines whether an error page is printed when an error is
encountered.
sRGB*, Gamma 1.5, Gamma 1.8, Gamma 2.4, None, and Download Profile
This setting allows you to define the characteristics of the RGB profile (color data
represented using the RGB (Red Green Blue) color model) that is appropriate for
your monitor, used when printing color images or graphics in a document. This
ensures that the machine uses the most appropriate color conversion when
printing color documents using the CMYK (Cyan Magenta Yellow blacK) color
model.
2-32
sRGB
This setting specifies the industry standard definition for generic Windows (PC)
monitors. If you are using an sRGB compatible monitor, you can print out colors
close to how they appear on your monitor.
Gamma 1.5, Gamma 1.8, and Gamma 2.4
These settings enable you to select the gamma correct level of the RGB data. The
higher the value, the darker the printout.
None
When this setting is selected, device-dependent RGB data is converted into
CMYK without the machine applying the RGB color model.
PCL/PS Settings
Page 63

2
Printer Settings Menu
Download Profile
This setting specifies the profiles you have downloaded from the host computer to
this machine using NetSpot Resource Downloader. You can store up to 100
profiles.
IMPORTANT
•
You may not be able to use all the profiles that are downloadable. If color data is
printed in gray using a downloaded profile, check the downloaded profile for
compatibility.
•
If the machine receives data with a device-independent (CIE-based) color space
definition, it is color-processed with the specified settings. Therefore RGB Source
Profiles are not applied by the machine.
•
When a setting other than 'None' is selected, and the machine receives a
device-dependent color space definition that is color-processed by the host
computer, RGB Source Profiles are also applied by the machine.
NOTE
•
Device-independent colors are not dependent on any particular device, such as a
monitor, and are meant to be true representations of colors as perceived by the
human eye. These color representations, called device-independent color spaces,
result from work carried out by the Commission Internationale d'Eclairage (CIE)
and for that reason are also called CIE-based color spaces.
•
For more information on obtaining the NetSpot Resource Downloader, consult your
local authorized Canon dealer.
•
If a profile with the name of "None" is downloaded to the machine, the profile is not
applied and the [None] setting on the menu is applied.
■ CMYK Simulation Profile
JapanColor(Canon), US Web Ctd(Canon), Euro Standard, None*, and Download
Profile
This setting allows you to change the simulation target for the current job. When
the machine processes the job, the simulation target selected in the CMYK
Simulation Profile is applied before the job is printed, using the Canon-built CMYK
(Cyan Magenta Yellow blacK) color model profile.
JapanColor(Canon)
This setting uses the JapanColor profile. This is the specification for proofing and
printing in Japan.
US Web Ctd(Canon)
This setting uses the U.S. Web Coated profile. This is the specification for proofing
and printing on a web offset press in the USA.
PCL/PS Settings
2-33
Page 64

Euro Standard
This setting uses the Euro Standard profile. This is the specification for proofing
and printing in Europe.
None
When this setting is selected, device-dependent CMYK data is printed as is
without the machine applying the CMYK color model.
2
Download Profile
This setting uses custom simulation target that you have downloaded from the
host computer to this machine using NetSpot Resource Downloader. You can
store up to 100 profiles.
IMPORTANT
•
You may not be able to use all the profiles that are downloadable. If color data is
printed in gray using a downloaded profile, check the downloaded profile for
Printer Settings Menu
compatibility.
•
If the machine receives data with a device-independent (CIE-based) color space
definition, it is color-processed with the specified settings. Therefore CMYK
Simulation Profiles are not applied by the machine.
•
When a setting other than 'None' is selected, and the machine receives a
device-dependent color space definition that is color-processed by the host
computer, CMYK Simulation Profiles are also applied by the machine.
NOTE
•
For more information on obtaining the NetSpot Resource Downloader, consult your
local authorized Canon dealer.
•
When [None] is selected, areas of dark color may be blotchy depending on the
data.
•
If a profile with the name of "None" is downloaded to the machine, the profile is not
applied and the [None] setting on the menu is applied.
2-34
PCL/PS Settings
Page 65

2
Printer Settings Menu
■ Use Grayscale Profile
*
On, Off
This setting allows you to define how device-dependent gray data is processed.
If [On] is selected, device-dependent gray data is converted into CMYK data using
the Grayscale Profile of the machine. The data may be reproduced using only the
black (K) toner, depending upon the Pure Black Text process or Output Profile.
If [Off] is selected, device-dependent gray data is reproduced using black (K) toner
only.
■ Output Profile
PS Normal, PS Photo, PS TR Normal*, PS TR Photo, and Download Profile
This setting allows you to define the profile that is appropriate for the data you are
going to print. It is applied to all data in the print job, so make sure the selected
profile is right for your job.
PS Normal
This setting prints the colors closely matching the ones displayed on your monitor.
PS Photo
This setting prints at photograph quality.
PS TR Normal
This setting prints the colors closely matching the ones displayed on your monitor,
and also minimizes toner bleeding of text and fine lines.
PS TR Photo
This setting prints at photograph quality, and also minimizes toner bleeding of text
and fine lines.
Download Profile
This setting uses a custom profile that you have downloaded from the host
computer to this machine using NetSpot Resource Downloader. You can store up
to 100 profiles.
NOTE
•
For more information on obtaining the NetSpot Resource Downloader, consult your
local authorized Canon dealer.
•
If [None] is selected for the RGB Source Profile or CMYK Simulation Profile, or if
[Off] is selected for Use Grayscale Profile, this setting is not applied to
device-dependent color data.
PCL/PS Settings
2-35
Page 66

■ Matching Method
Perceptual*, Saturation, and Colorimetric
This setting allows you to specify a method of printing when the RGB Source
Profile is applied. This machine includes a color management system that
provides the following color rendering styles.
Perceptual
2
Printer Settings Menu
This setting optimizes the range of colors on the machine to produce the best
results for photographic or bitmapped images.
Saturation
This setting optimizes the output of pure, saturated colors, such as those used in
business presentations.
Colorimetric
This setting provides a close match to the CMYK device being simulated.
NOTE
•
When [PS Normal] or [PS TR Normal] is selected in the Output Profile, the
[Perceptual] function is automatically set to Monitor Color Matched mode.
•
When [PS Photo] or [PS TR Photo] is selected in the Output Profile, the
[Perceptual] function is automatically set to Photographic mode.
•
If [None] is selected for the RGB Source Profile, and the machine receives a
device-dependent color space definition that is color-processed by the host
computer, this setting is not applied.
2-36
PCL/PS Settings
Page 67

2
Printer Settings Menu
■ RGB Pure Black Process
On*, Off
This setting enables you to specify how black and gray data with the equivalent
ratio of R to G to B should be processed when device-dependent RGB data is
converted into device-dependent CMYK data using the RGB Source Profile of the
machine.
If [On] is selected, black and gray data with the equivalent ratio of R to G to B is
printed using the black (K) toner only, regardless of the selected Output Profile
setting.
If [Off] is selected, black and gray data with the equivalent ratio of R to G to B is
printed using CMYK toners appropriate for the selected Output Profile setting.
NOTE
•
In combination with certain settings, black and gray data with the equivalent ratio of
R to G to B may be printed using the black (K) toner only, even if [Off] is selected.
The following are examples.
- When [On] is selected for Pure Black Text
- When [None] is selected for RGB Source Profile
- When [PS TR Normal] or [PS TR Photo] is selected for Output Profile
- When 'Prioritize Printing of Lines and Text' in the printer driver is selected
•
If [None] is selected for RGB Source Profile, this setting is not applied.
■ CMYK Pure Black Process
On*, Off
This setting enables you to specify how monochrome data (C=M=Y=0) should be
printed when the device-dependent CMYK data is processed using the CMYK
Simulation Profile of the machine.
If [On] is selected, monochrome data (C=M=Y=0) is printed using the black (K)
toner only, regardless of the selected Output Profile setting.
If [Off] is selected, monochrome data (C=M=Y=0) is printed using CMYK toners
appropriate for the selected Output Profile setting.
NOTE
•
In combination with certain settings, monochrome data (C=M=Y=0) may be printed
using the black (K) toner only, even if [Off] is selected. The following are examples.
- When [On] is selected for Pure Black Text
- When [None] is selected for CMYK Simulation Profile
- When [PS TR Normal] or [PS TR Photo] is selected for Output Profile
- When 'Prioritize Printing of Lines and Text' in the printer driver is selected
•
If [None] is selected for CMYK Simulation Profile, this setting is not applied.
PCL/PS Settings
2-37
Page 68

■ Pure Black Text
On*, Off
This setting affects the printout for black text on a page. Under most
circumstances it is preferable to leave this option set to 'On'.
If [On] is selected, black colors generated by applications are printed using only
100% black toner. This means that black text will not exhibit halftone patterns
(such as moiré patterns), and the color toner will not be misaligned since only one
2
toner color (black) is used. It also eliminates color bleed (the unintended
overlaying or blending of two adjacent colors when text is printed).
Test
Pure Black Text 'On'
If [Off] is selected, you can print black text as four color black (using Cyan,
Printer Settings Menu
Magenta, Yellow, and Black toner) and using normal PostScript rendering. For
some jobs, it is preferable to turn this option 'Off' (for example, if the page includes
gradient fills that use black).
Test
TestTest
Test
Pure Black Text 'Off'
2-38
PCL/PS Settings
Page 69

2
Printer Settings Menu
■ Black Overprint
On*, Off
When printing black text in combination with a color background or graphics, the
text can be printed as part of the color background, or separately. This setting
allows you to choose a specific way to print black text for such a job.
If [On] is selected, you can overprint black text. When this setting is used in
combination with the Pure Black Text option, the machine first prints the full color
background, then lays the black text on the top of the color background as 100% K
(black) toner. The result is a darker and glossier appearance for the black text.
Overprinting also minimizes the misalignment of colors and the halo effect that
can appear around the edge of objects in the printed image.
Test
Black Overprint 'On'
If [Off] is selected, black text is printed with knockouts. The machine first prints the
color background with the black text areas "knocked out" (no color is printed in the
text areas). The black text is then printed in the knocked out area, filling in the
areas not printed in color. The result is a flatter appearance for the black text.
Test
Test
Black Overprint 'Off'
NOTE
This function is not available if Pure Black Text is set to 'Off'.
■ Brightness
85 to 115%; 100%
This setting adjusts the brightness of the overall image. The settings can be set
between 85% and 115% in increments of 5%.
Selecting [85%] makes the image brighter, and selecting [115%] makes it darker.
NOTE
This function is not available if the Toner Save option is set to 'On'.
*
PCL/PS Settings
2-39
Page 70

Utility Menu
Initialize PCL Hard Disk
2
-
If trouble occurs when fonts, macros, or profiles are downloaded from a personal
computer to this machine using the download utility, initialize the PCL hard disk
partition.
For details, see "If Trouble Occurs When Downloading Fonts, Macros, or Profiles
from a Personal Computer," on p. 4-15.
Printer Settings Menu
IMPORTANT
•
This function can only be selected if the System Management Mode is set.
•
Never initialize the PCL hard disk when the machine is operating normally. Before
initializing, be sure to read "If Trouble Occurs When Downloading Fonts, Macros, or
Profiles from a Personal Computer," on p. 4-15.
NOTE
This function is not available for UFR mode.
Initialize PS Hard Disk
-
If trouble occurs when fonts, macros, or profiles are downloaded from a personal
computer to the machine using the download utility, initialize the PS hard disk
partition.
2-40
Utility Menu
For details, see "If Trouble Occurs When Downloading Fonts, Macros, or Profiles
from a Personal Computer," on p. 4-15.
IMPORTANT
•
This function can only be selected if the System Management Mode is set.
•
Never initialize the PS hard disk when the machine is operating normally. Before
initializing, be sure to read "If Trouble Occurs When Downloading Fonts, Macros, or
Profiles from a Personal Computer," on p. 4-15.
NOTE
This function is not available for UFR mode.
Page 71

2
Printer Settings Menu
Reset Printer
-
If you want to clear all print jobs in progress as well as data that has been received
in memory, you must reset the printer function. Resetting the printer deletes print
jobs in the machine's memory and the print data that has been received by all
interfaces.
NOTE
•
If the machine is being used on a network, please note that resetting the printer
function may affect data being received from other users.
•
If you reset the printer function, data may be deleted for print jobs that have already
been received, or received while the printer function is being reset. However, in
some cases, the data is not deleted from the machine's memory, and the print job
may not print correctly. Canon recommends that you reset the printer to delete the
data and print the job again.
•
If you have downloaded fonts to the machine from a Macintosh computer, you need
to restart the machine or reset the printer function from this menu, in order to
enable the downloaded fonts when spool printing.
Utility Menu
2-41
Page 72

2
Printer Settings Menu
2-42
Utility Menu
Page 73

Report Settings Menu
This chapter describes how to use the Report Settings menu to check the configuration of the
print function or print a font list. This menu is not applicable for UFR mode.
An Overview of Report Settings . . . . . . . . . . . . . . . . . . . . . . . . . . . . . . . . . . . . . . . . . . . . 3-2
PCL Menu. . . . . . . . . . . . . . . . . . . . . . . . . . . . . . . . . . . . . . . . . . . . . . . . . . . . . . . . . . . . . 3-3
Configuration Page. . . . . . . . . . . . . . . . . . . . . . . . . . . . . . . . . . . . . . . . . . . . . . . . . . . . . . . . . . . .3-3
Font List . . . . . . . . . . . . . . . . . . . . . . . . . . . . . . . . . . . . . . . . . . . . . . . . . . . . . . . . . . . . . . . . . . . .3-3
PS Menu. . . . . . . . . . . . . . . . . . . . . . . . . . . . . . . . . . . . . . . . . . . . . . . . . . . . . . . . . . . . . . 3-4
Configuration Page. . . . . . . . . . . . . . . . . . . . . . . . . . . . . . . . . . . . . . . . . . . . . . . . . . . . . . . . . . . .3-4
Font List . . . . . . . . . . . . . . . . . . . . . . . . . . . . . . . . . . . . . . . . . . . . . . . . . . . . . . . . . . . . . . . . . . . .3-4
CHAPTER
3
3-1
Page 74

An Overview of Report Settings
The following table lists all settings of the Report Settings menu.
■ Printer Menu
Item Settings
3
Report Settings Menu
PCL
Configuration Page - p. 3-3
Font List - p. 3-3
PS
Configuration Page - p. 3-4
Font List - p. 3-4
Applicable
Page
3-2
An Overview of Report Settings
Page 75

3
Report Settings Menu
PCL Menu
Configuration Page
-
Details of RAM capacity, settings in the printer's menus, etc., are printed.
If you select Configuration Page, the confirmation message <Print the
configuration page?> is displayed. If you select [Yes], the configuration page is
printed, and if you select [No], it is not printed.
Font List
-
ID numbers, names, and samples of fonts held by the printer are printed.
If you select Font List, the confirmation message <Print the font list?> is displayed.
If you select [Yes], the font list is printed, and if you select [No], it is not printed.
PCL Menu
3-3
Page 76

PS Menu
Configuration Page
-
Details of RAM capacity, settings in the printer's menus, etc., are printed.
3
If you select Configuration Page, the confirmation message <Print the
configuration page?> is displayed. If you select [Yes], the configuration page is
printed, and if you select [No], it is not printed.
Font List
-
Report Settings Menu
Names and samples of fonts held by the printer are printed.
If you select Font List, the confirmation message <Print the font list?> is displayed.
If you select [Yes], the font list is printed, and if you select [No], it is not printed.
3-4
PS Menu
Page 77

Troubleshooting
This chapter explains how to solve printing problems and the remedial steps to take if printing
fails.
Responding to Error Messages . . . . . . . . . . . . . . . . . . . . . . . . . . . . . . . . . . . . . . . . . . . . 4-2
Resetting the Machine After a Service Call Message . . . . . . . . . . . . . . . . . . . . . . . . . . . . . . . . .4-2
When a Message Is Displayed . . . . . . . . . . . . . . . . . . . . . . . . . . . . . . . . . . . . . . . . . . . . . 4-3
Printing Problems . . . . . . . . . . . . . . . . . . . . . . . . . . . . . . . . . . . . . . . . . . . . . . . . . . . . . . . 4-6
Printer Trouble . . . . . . . . . . . . . . . . . . . . . . . . . . . . . . . . . . . . . . . . . . . . . . . . . . . . . . . . . . . . . . .4-6
Printing Problems . . . . . . . . . . . . . . . . . . . . . . . . . . . . . . . . . . . . . . . . . . . . . . . . . . . . . . . . . . . . .4-7
Print Quality Problems . . . . . . . . . . . . . . . . . . . . . . . . . . . . . . . . . . . . . . . . . . . . . . . . . . . . . . . . .4-9
If Trouble Occurs When Downloading Fonts, Macros, or Profiles from a Personal
Computer. . . . . . . . . . . . . . . . . . . . . . . . . . . . . . . . . . . . . . . . . . . . . . . . . . . . . . . . . . . . 4-15
CHAPTER
4
4-1
Page 78

Responding to Error Messages
When the Error Indicator is orange, printing is not possible. If this happens during
printing, the print operation stops. Read the displayed error message to determine
the appropriate actions necessary to correct the problem.
This section describes how to handle error messages that appear on the touch
panel display. The two types of error messages are:
• Service Call Messages
4
Troubleshooting
• Error Messages
NOTE
Other messages that may appear indicate the current condition of the machine.
Resetting the Machine After a Service Call Message
If a Service Call message occurs (Exxx-xxxx, where x represents a number), use
the following procedure to clear the message.
1
Press (Additional Functions).
4-2
2
Press [Printer Settings].
When a Service Call error occurs, the normal Printer Settings screen does not
appear and only the Reset Printer screen appears.
3
Press [Reset Printer].
IMPORTANT
If the Service Call error message still appears after you have performed this
procedure, make a note of the number of the message and contact your local
authorized Canon dealer with the number of the message and the conditions when
the error occurred.
Responding to Error Messages
Page 79

4
Troubleshooting
When a Message Is Displayed
If the printer is unable to print for some reason, the Error Indicator lights up and a
message indicating the cause of the problem is displayed on the touch panel
display. When these messages are displayed, take the appropriate action to solve
the problem.
NOTE
•
If a message indicating another problem occurs at the same time as the first error
message, a warning message will not be displayed.
•
If the message is shown with the "Error Skip" mark, you can bypass the error and
continue printing by pressing [Error skip]. However, if you do this, print data may be lost
or the data may not be printed correctly. If you want to cancel the procedure, cancel the
print job to remove the cause of the problem, and print the data again.
•
To perform an error skip, press [Print] on the System Monitor screen ➞ select the job
containing the error ➞ press [Details] ➞ [Error Skip].
•
To cancel a print job, press [Print] on the System Monitor screen ➞ select the job
containing the error ➞ press [Cancel]. (See Chapter 5, "Checking Job and Device
Status," in the Reference Guide.)
E730-1001 PDL Initialize Error Service Call
Cause An error occurred during the initialization of the printer function.
Remedy Perform a printer reset to try to initialize the function again. If this error persists,
contact your local authorized Canon dealer.
E730-100A PDL Service Call Service Call
Cause An internal error has occurred.
Remedy Perform a printer reset to try to initialize the function again. If this error persists,
contact your local authorized Canon dealer.
E730-100B PDL Font Error Service Call
Cause A master font error has occurred.
Remedy Perform a printer reset to try to initialize the function again. If this error persists,
contact your local authorized Canon dealer.
When a Message Is Displayed
4-3
Page 80

4
Troubleshooting
PDL Memory Full Error Skip
Cause The machine's memory is full and printing cannot proceed.
Remedy Change the mode setting in the printer driver and try printing again, or reduce
the complexity of the print job by reducing the number of fonts, macros, images,
or patterns that need to be downloaded to the machine.
PDL Font Memory Full Error Skip
Cause The machine's memory space allocated for fonts is full and printing cannot
proceed.
Remedy Change the font setting in the printer driver and try printing again. Alternatively
reduce the complexity of the print job by reducing the number of fonts that need
to be downloaded to the machine.
PDL Macro Memory Full Error Skip
Cause The machine's memory space allocated for macros is full and printing cannot
proceed.
Remedy Change the macro setting in the printer driver and try printing again.
Alternatively reduce the complexity of the print job by reducing the number of
macros that need to be downloaded to the machine.
4-4
PDL Image Memory Full Error Skip
Cause The machine's memory space allocated for images is full and printing cannot
proceed.
Remedy Change the image setting in the printer driver and try printing again.
Alternatively reduce the complexity of the print job by reducing the number of
images that need to be downloaded to the machine.
PDL Pattern Memory Full Error Skip
Cause The machine's memory space allocated for patterns is full and printing cannot
proceed.
Remedy Change the pattern setting in the printer driver and try printing again.
Alternatively reduce the complexity of the print job by reducing the number of
patterns that need to be downloaded to the machine.
When a Message Is Displayed
Page 81

4
Troubleshooting
PDL HD Error Error Skip
Cause The printer has reported a hard disk error.
Remedy Perform a reset and try printing again. If the problem persists, contact your local
authorized Canon dealer. You must perform an Error Skip manually to skip this
error.
PDL Invalid Version Error Skip
Cause The Printer Name selected in the UFR printer driver is not correct.
Remedy Choose the correct Printer Name in the UFR printer driver.
PDL Invalid Sequence
Cause The Printer Name selected in the UFR printer driver is not correct.
Remedy Choose the correct Printer Name in the UFR printer driver.
PDL Warning
Cause An internal error has occurred for the printer function.
Remedy Perform a printer reset to try to initialize the function again. If this error persists,
contact your local authorized Canon dealer.
When a Message Is Displayed
4-5
Page 82

Printing Problems
If you have trouble printing, we recommend resolving the problems with the
following remedies.
NOTE
Please contact your local authorized Canon dealer if a problem persists, or if you
encounter problems not listed below.
4
Troubleshooting
Printer Trouble
The printer does not work
Cause 1 There is data remaining in the printer's memory. (The Processing/Data Indicator
is flashing or lit.)
Remedy Print out the data. (See Chapter 5, "Checking Job and Device Status," in the
Reference Guide.)
Cause 2 There is a problem with the printer or the software.
Remedy Look at the message on the display and act accordingly. (See "When a
Printing stops before the job is complete
Cause There is data remaining in the printer's memory. (The Processing/Data Indicator
Remedy Print out the data. (See Chapter 5, "Checking Job and Device Status," in the
You cannot print a job or store a job
Cause The total number of pages in all jobs (maximum capacity is 3,700 pages) or size
Remedy 1 Delete other processes, documents, or forms stored in the box, cancel other
Remedy 2 Divide the job, then print again.
Message Is Displayed," on p. 4-3.)
is flashing or lit.)
Reference Guide.)
of the data in the hard disk has exceeded the limit which can be processed.
jobs being processed, or wait until those jobs are finished, then print again.
4-6
Printing Problems
Page 83

4
Troubleshooting
You cannot store a secured print job
Cause The number of secured jobs stored in the machine has exceeded the maximum
capacity of 50 jobs, or the total number of pages that are stored or are in jobs
has exceeded the limit (3,700 pages).
Remedy Delete other secured jobs, or wait until those jobs have finished printing, then
print again.
Printing Problems
Meaningless characters are being printed
Cause 1 You have printed from Windows without installing the printer driver for Windows
that was included with the machine.
Remedy Install the printer driver for Windows that was included with the machine and
print the data again. (See Chapter 2, "Getting Started," in the PCL Driver Guide,
the PS Driver Guide, or the UFR Driver Guide.)
Cause 2 MS-DOS application software printer settings are incompatible.
Remedy Reset the MS-DOS application software printer settings on a printer that is
compatible with the machine. (See the application software manual.)
A font that is different from the one specified is printed
Cause The 'Substituting Printer Fonts' setting has been set on the printer driver for
Windows.
Remedy Set the 'Substituting Printer Fonts' setting to the correct setting and print the
data again. (See the Help function on the printer driver.)
You cannot print the last page
Cause The command that identifies the end of the data has not been sent from the PC.
(The Processing/Data Indicator is flashing or lit.)
Remedy Clear the print data. (If you print from application software that does not have a
print function and the last page of data is not a full page, the data will remain in
the machine's memory.) (See Chapter 5, "Checking Job and Device Status," in
the Reference Guide.)
Printing Problems
4-7
Page 84

4
Troubleshooting
A print job that you have specified as two-sided printing is printed on one side of the paper
Cause 1 The paper size you have specified is not supported by two-sided printing.
Remedy Change the print job settings and print the data again.
Cause 2 The settings for the front and back sides of the paper are different.
Remedy Change the print job settings and print the data again.
The data does not fit on the page properly
Cause 1 The paper is not in the correct position.
Remedy Make sure the machine is set correctly and try printing again. (See Chapter 7,
"Routine Maintenance," in the Reference Guide.)
Cause 2 The data is outside the printable area.
Remedy 1 Insert margins around the data and print the data again. (See the Help function
on the printer driver or the application software manual.)
Remedy 2 Change the 'Scaling' settings on the printer driver and print the data again. (See
Chapter 3, "Basic Print Options" in the PCL Driver Guide, the PS Driver Guide,
or the UFR Driver Guide.)
The printing location has slipped
Cause 1 Margin, Offset X, or Offset Y in the printer settings menu have been changed.
Remedy Set Margin, Offset X, and Offset Y to '0.0' and print the data again. (See
"Margin," on p. 2-12, and "Offset X/Offset Y," on p. 2-14.)
Cause 2 The application software's top margin and paper location settings are not
correct.
Remedy Set the correct settings for the top margin and the paper location and print the
data again. (See the application software manual.)
4-8
Printing Problems
Page 85

4
Troubleshooting
Data that should be printed on the same page is printed on two separate pages
Cause 1 The application software's "Line spacing" and "Number of lines on a page"
settings are not correct.
Remedy Change the settings so that the data fits on one page and print the data again.
(See the application software manual.)
Cause 2 The Timeout setting is too short, when the Personality setting is set to 'Auto'.
Remedy Change the Personality setting to a setting other than 'Auto', or increase the
Timeout setting. (See "Personality," on p. 2-22, and "Timeout," on p. 2-15.)
Print Quality Problems
The printout is too light or too dark
Cause 1 The toner density settings are not correct.
Remedy Adjust the toner density and print the data again. (See "Density," on p. 2-10.)
Cause 2 Toner Save is set to 'On'.
Remedy Set Toner Save to 'Off' and print the data again. (See "Toner Save," on p. 2-10.)
Cause 3 The machine's density settings are not adjusted correctly.
Remedy Perform an Automatic Gradation Adjustment. (See Chapter 4, "Customizing
Settings," in the Reference Guide.)
Toner does not fix properly
Cause Toner may not fix well on some types of paper.
Remedy Enable Gray Compensation in the printer driver and print the data again. (See
the Help function on the printer driver.)
NOTE
You can also perform the same procedure from the touch panel display. (See "Gray
Compensation," on p. 2-31.)
Printing Problems
4-9
Page 86

The color does not match the other imageRUNNER C3100/C3100N that you are using at the
same time
Cause 1 There is a slight unevenness in the Y (Yellow), M (Magenta), C (Cyan), or K
(blacK) toner density.
Remedy Slightly adjust the toner density of the Y (Yellow), M (Magenta), C (Cyan), or K
(blacK) toners. (See "Toner Save," on p. 2-10.)
Cause 2 The machine's density settings are not adjusted correctly.
Remedy Perform an Automatic Gradation Adjustment. (See Chapter 4, "Customizing
Settings," in the Reference Guide.)
4
Troubleshooting
The specified color of thin lines or filled-in patterns do not print or disappear
Cause 1 The combination of the color or pattern cannot be reproduced correctly.
Remedy 1 Adjust the color in the software application you are using and print the data
again.
Remedy 2 Change the pattern in the software application you are using and print the data
again.
Cause 2 The color looks different due to the halftone pattern.
Remedy 1 Change the density of the color and print the data again.
Remedy 2 Change the direction of the paper and print the data again.
Remedy 3 Set Halftones in the printer driver to 'Error Diffusion' and print the data again.
(See the Help function on the printer driver.)
NOTE
You can also perform the same procedure from the touch panel display. (See "Halftones,"
on p. 2-25.)
4-10
Printing Problems
Page 87

4
Troubleshooting
The halftone pattern does not print in the correct (specified) color
Cause The machine's dither pattern is interfering with the halftone pattern in the print
data.
Remedy 1 Remove the halftone pattern in the software application you are using and print
the data again.
Remedy 2 Set Halftones in the printer driver to 'Error Diffusion' and print the data again.
(See the Help function on the printer driver.)
NOTE
You can also perform the same procedure from the touch panel display. (See "Halftones,"
on p. 2-25.)
The color of the photograph-like printout is different to the color on the display
Cause Due to the difference of the color adjustment method between the display
(RGB) and the machine (CMYK), the display colors cannot be faithfully printed.
Remedy 1 Set Matching Method in the printer driver to 'Perceptual[Monitor Color Matched]'
and print the data again. (See the Help function on the printer driver.)
NOTE
You can also perform the same procedure from the touch panel display. (See "Matching
Method," on p. 2-36.)
Remedy 2 Set RGB Source Profile to 'Gamma 1.5', 'Gamma 1.8', or 'Gamma 2.4' and print
the data again. (See "RGB Source Profile," on p. 2-32.)
A diagram containing gradation is printed with a streak in the gradation area
Cause Gray Compensation is taking effect on the gray part of the streak on the
diagram.
Remedy Disable Gray Compensation in the printer driver and print the data again. (See
the Help function on the printer driver.)
NOTE
You can also perform the same procedure from the touch panel display. (See "Gray
Compensation," on p. 2-31.)
Printing Problems
4-11
Page 88

4
Troubleshooting
Characters are blurred
Cause Thick font is used for characters.
Remedy 1 Use thinner font and print the data again.
Remedy 2 Disable Gray Compensation in the printer driver and print the data again. (See
the Help function on the printer driver.)
NOTE
You can also perform the same procedure from the touch panel display. (See "Gray
Compensation," on p. 2-31.)
Thin lines and fine characters bleed
Cause The specified thin lines and fine characters cannot be processed properly.
Remedy 1 Adjust the color in the software application you are using and print the data
again.
Remedy 2 Use thicker lines or fonts and print the data again.
Remedy 3 Set Halftones in the printer driver to 'Error Diffusion' or 'Resolution' and print the
data again. (See the Help function on the printer driver.)
NOTE
You can also perform the same procedure from the touch panel display. (See "Halftones,"
on p. 2-25.)
Remedy 4 If you are using Illustrator 8.0 or higher, set Bitmap Print to 'Off' (uncheck the
check box) and print the data again. (Windows only)
4-12
Printing Problems
Page 89

4
Troubleshooting
The frame of the image that you inserted, which is not visible on your monitor, is printed in a
color different to that of the color surrounding the frame.
Cause Depending on the application software and OS that you are using, the method
in which halftones and colors are processed may be different.
Remedy 1 Disable Gray Compensation in the printer driver and print the data again. (See
the Help function on the printer driver.)
Remedy 2 Set Halftones in the printer driver to 'Error Diffusion', 'Resolution', or 'Gradation',
and print the data again. (See the Help function on the printer driver.)
NOTE
You can also perform the same procedure from the touch panel display. (See "Halftones,"
on p. 2-25.)
Remedy 3 Set Matching Method in the PCL printer driver or the UFR printer driver to
'Perceptual [Monitor Color Matched]', 'Saturation', or 'Colorimetric', and print the
data again. (See the Help function on the printer driver.)
Gradation in the black or gray parts of the image does not appear smooth (the color changes
stand out).
Cause RGB Pure Black Process is affecting the black or gray part of the gradation.
Remedy Disable RGB Pure Black Process in the Windows PS printer driver or Mac PS
printer driver and print the data again. (See the Help function on the printer
driver.)
NOTE
•
You can also perform the same procedure from the touch panel display. (See "RGB Pure
Black Process," on p. 2-37.)
•
If you change the above settings, gray or black data is printed using CMYK toners.
Therefore, the data may be printed in color, even if all pages are monochrome.
Printing Problems
4-13
Page 90

4
Troubleshooting
The gray data appears grainy.
Cause The RGB Pure Black Process setting, in combination with the Prioritize Printing
of Line and Text setting in the printer driver or Output Profile setting on the
control panel, is affecting the gray part of the data.
Remedy 1 Disable RGB Pure Black Process and Prioritize Printing of Line and Text in the
Windows PS printer driver or Mac PS printer driver and print the data again.
(See the Help function on the printer driver.)
Remedy 2 Set RGB Pure Black Process to 'Off' and Output Profile to 'PS Normal' on the
PS menu from the touch panel display and print the data again. (See "RGB
Pure Black Process," on p. 2-37, and "Output Profile," on p. 2-35.)
NOTE
If you change the above settings, gray or black data is printed using CMYK toners.
Therefore, the data may be printed in color, even if all pages are monochrome.
4-14
Printing Problems
Page 91

4
Troubleshooting
If Trouble Occurs When Downloading Fonts, Macros,
or Profiles from a Personal Computer
If trouble occurs when fonts, macros, or profiles are downloaded from a personal
computer to this machine and the problem cannot be resolved by reinstalling, follow
the steps explained in this section to initialize the hard disk partition.
IMPORTANT
•
Only the system administrator for the machine can initialize the hard disk. Contact the
system administrator to execute this procedure.
•
The font, macros, or profile information downloaded to the hard disk is deleted by
initializing the hard disk.
•
Do not turn OFF the power when the hard disk is initializing. This may damage the
machine.
NOTE
•
The hard disk cannot be initialized in the following conditions:
- When print data is being received or printed. (It is recommended that you remove the
cable connecting the machine to the hub, so it does not receive print data.)
- When fonts are being installed or uninstalled.
•
The steps explained below are for initializing the PCL Hard Disk partition.
•
To initialize the PS Hard Disk partition, follow the same steps, except that for step 5,
select [Initialize PS Hard Disk].
1
Set System Management Mode.
NOTE
Before setting System Management Mode, a system manager ID and system
password must be set. For details on settings, see Chapter 6, "System Manager
Settings," in the Reference Guide.
If Trouble Occurs When Downloading Fonts, Macros, or Profiles from a Personal
Computer
4-15
Page 92

2
Press (Additional Functions).
4
Troubleshooting
Reset
@
1
Help
GHI
4
Additional Functions
PRS
7
Display Contrast
3
Press [Printer Settings].
ABC
DEF
2
3
MNO
L
JK
5
6
WXY
TUV
89
OPER
SYMBOLS
0
Clear
Stop
Start
4-16
4
Press [Utility].
If Trouble Occurs When Downloading Fonts, Macros, or Profiles from a Personal
Computer
Page 93

4
Troubleshooting
5
Press [Initialize PCL Hard Disk].
A confirmation message appears.
NOTE
If you cannot press [Initialize PCL Hard Disk], the hard disk cannot be initialized.
Check whether System Management Mode is set or if the machine is processing a
job, and start with Step 1 again.
6
Press [Yes].
If you do not wish to initialize the hard disk, press [No].
If Trouble Occurs When Downloading Fonts, Macros, or Profiles from a Personal
Computer
4-17
Page 94

4
Troubleshooting
The following screen is displayed and the hard disk is initialized. During
initialization, the Processing/Data Indicator flashes.
When the initialization of the hard disk is completed, the Processing/Data
Indicator goes out.
The duration of the hard disk initialization process depends on the number of
fonts, macros and profiles on the hard disk.
IMPORTANT
•
Do not turn OFF the power until the Processing/Data Indicator goes out. This may
damage the machine.
•
If the following screen is displayed after pressing [Yes], the hard disk has not been
initialized. Check whether print data is received and retry.
4-18
If Trouble Occurs When Downloading Fonts, Macros, or Profiles from a Personal
Computer
Page 95

Appendix
This chapter shows print samples for different fonts, describes font information, including
sources and font lists, and lists a summary of the specifications for the machine.
Some Basic Facts about Fonts . . . . . . . . . . . . . . . . . . . . . . . . . . . . . . . . . . . . . . . . . . . . . 5-2
What Is a Font?. . . . . . . . . . . . . . . . . . . . . . . . . . . . . . . . . . . . . . . . . . . . . . . . . . . . . . . . . . . . . . .5-2
Attributes of Fonts . . . . . . . . . . . . . . . . . . . . . . . . . . . . . . . . . . . . . . . . . . . . . . . . . . . . . . . . . . . .5-2
Fonts and Scalable Fonts. . . . . . . . . . . . . . . . . . . . . . . . . . . . . . . . . . . . . . . . . . . . . . . . . . . . . . .5-6
Checking the Font Lists for Available Fonts . . . . . . . . . . . . . . . . . . . . . . . . . . . . . . . . . . 5-13
Typeface Samples . . . . . . . . . . . . . . . . . . . . . . . . . . . . . . . . . . . . . . . . . . . . . . . . . . . . . . . . . . .5-15
Symbol Sets . . . . . . . . . . . . . . . . . . . . . . . . . . . . . . . . . . . . . . . . . . . . . . . . . . . . . . . . . . . . . . . .5-29
Configuration Page Sample . . . . . . . . . . . . . . . . . . . . . . . . . . . . . . . . . . . . . . . . . . . . . . 5-56
Specifications . . . . . . . . . . . . . . . . . . . . . . . . . . . . . . . . . . . . . . . . . . . . . . . . . . . . . . . . . 5-58
Software Specifications . . . . . . . . . . . . . . . . . . . . . . . . . . . . . . . . . . . . . . . . . . . . . . . . . . . . . . .5-58
Index. . . . . . . . . . . . . . . . . . . . . . . . . . . . . . . . . . . . . . . . . . . . . . . . . . . . . . . . . . . . . . . . 5-59
5
CHAPTER
5-1
Page 96

Some Basic Facts about Fonts
This section summarizes some of the basic facts you should know about fonts.
What Is a Font?
A font is a collection of letters and symbols used when printing a document. In
general, a group of letters and symbols sharing a common design is referred to as
a font. A font consists of the letters A to Z in both upper and lowercase, digits, and
symbols.
The design that distinguishes one font from another is referred to as a "typeface."
5
Appendix
Each font has a typeface name, such as Courier, CG Times, Letter Gothic, etc.
Attributes of Fonts
All fonts share some common characteristics, which are called "attributes." The
typeface is one such attribute. The letters and symbols that are actually printed are
determined by the values of a collection of these attributes.
5-2
Typeface
Stroke Weight
Style
Point Size Height of the letters (e.g. 10 point or 5 point).
Pitch (cpi)
Character Width
(Fixed/PS)
Orientation Orientation of the characters on a page ("Portrait" or "Landscape").
Symbol Set
Some Basic Facts about Fonts
The design of the letters (for example, Courier, CG Times, Letter, or
Gothic).
The thickness of the lines with which the letters are drawn (e.g. bold,
medium, or light).
Whether the letters are drawn straight or at an angle (e.g. upright or
italic).
Number of characters that are printed in one inch (e.g. 10 cpi, 12 cpi, or
Scale).
Indicates whether the character width is set to "Fixed" or "Proportional."
The rule that defines the correspondence between the character codes
coming from the host computer, and the letter forms that appear on the
page (for example, Roman-8).
Page 97

5
Appendix
Typeface
Typeface refers to the design of the characters and symbols. The following figure
shows an example of some typefaces.
Stroke Weight
Stroke weight refers to the thickness of the print. There are light, medium, and bold
stroke weights. The printer function has medium and bold fonts available. The figure
below shows an example of medium and bold printing.
Style
Style refers to the shape of the characters. The printer function can print in two
styles: upright and italic.
With some fonts, like Letter Gothic, the term "Oblique" is used in the same manner
as italics.
Some Basic Facts about Fonts
5-3
Page 98

Point Size
Point size refers to the height of the character. Character size is measured in points.
One inch is divided into 72 points and 1 point is 1/72 of an inch (about 0.35 mm).
The printer function has bitmapped fonts and scalable fonts available. The
bitmapped fonts are fixed in size, but the scalable fonts are not fixed in size.
Scalable fonts are freely scalable to any size you wish in 0.1 point increments. The
following figure shows an example of various point sizes.
5
Appendix
NOTE
See "Fonts and Scalable Fonts," on p. 5-6, for more information on bitmapped fonts and
scalable fonts.
Pitch (cpi)
Pitch refers to the number of characters that are printed in one inch. The unit is cpi
(characters per inch). As the number of characters per inch increases, the space
between characters decreases; as the cpi decreases, the space between
characters increases.
5-4
Some Basic Facts about Fonts
Page 99

5
Appendix
Character Width (Fixed and PS)
Each character has a different width from all the other characters in a font at a given
point size. For example, "W" is a wider letter than "I." There are two ways to print
letters of different widths: you can print all letters with the same spacing, regardless
of their actual width; or you can change the spacing between letters to
accommodate these different widths. Printing all letters with the same spacing is
called "Fixed spacing," while changing the spacing to accommodate different letter
widths is called "Proportional spacing."
Because the Fixed spacing method prints all letters with the same spacing, the
number of characters which will fit into a given length is a fixed quantity which can
be specified.
If the characters are printed with Proportional spacing, then the number of
characters that will fit into an inch varies depending on the letters printed.
Orientation
Orientation refers to the direction of printing. The printer function can print using
two different paper orientations: portrait and landscape. With portrait orientation,
text is printed across the width of the paper (short edge), and with landscape
orientation, text is printed across the length of the paper (long edge).
Some Basic Facts about Fonts
5-5
Page 100

5
Appendix
Symbol Set
When you print the letter "A," the host computer sends a code corresponding to "A"
(hexadecimal 41 is an example of this) to the machine. This code is referred to as
the character code. The machine stores an internal representation of each
character, and selects from among these character patterns the pattern
corresponding to the received code. In this case, the machine searches for the
pattern for "A," and prints it.
■ The process by which letters are printed
Computer Machine Character
The machine uses a fixed rule to decide which letter or symbol corresponds to the
character code sent from the host computer. For example, the letter "A" is printed for the
hexadecimal code "41." The rule which determines the correspondence between
character codes and printed letters is called the "symbol set."
Fonts and Scalable Fonts
There are two types of fonts available, and these fonts are distinguished by the type
of data from which they are formed.
• Bitmapped fonts
• Scalable fonts
Bitmapped Fonts
Each character of bitmapped fonts are composed of a grid of small dots and stored
in the machine's memory in dot matrix format.
5-6
Some Basic Facts about Fonts
Patterns
 Loading...