

Page 1
Network Guide
Network Guide
Please read this guide before operating this product.
After you finish reading this guide, store it in a safe place for future reference.
ENG
Page 2

Page 3

Ot¯
0
Color imageRUNNER
C3480/C3480i
C3080/C3080i
C2550
Network Guide
Page 4
Manuals for the Machine
The manuals for this machine are divided as follows. Please refer to them for detailed information.
The manuals supplied with optional equipment are included in the list below. Depending on the system
configuration and product purchased, some manuals may not be needed.
Guides with this symbol are printed manuals.
Guides with this symbol are included on the accompanying
CD-ROM
CD-ROM. (See footnote on the next page.)
• Quick Reference for Basic Operations
• Learn How to Use Your Machine
The Tutorial CD is a teaching aid, designed to help you learn the various
functions of the machine.
• Precautions for Using Your Machine
• Troubleshooting
• Specifications
• Basic Operations
• Copying and Mail Box Instructions
• Sending and Fax Instructions
• Setting Up the Network Connection and
Installing the CD-ROM Software
• Remote User Interface Instructions
• Network Connectivity and Setup Instructions
Easy Operation Guide
Tutorial CD
Support Guide
Reference Guide
Copying and Mail Box
Guide
Sending and Facsimile
Guide
Network Quick Start Guide
Remote UI Guide
Network Guide
(This Document)
CD-ROM
CD-ROM
CD-ROM
CD-ROM
CD-ROM
CD-ROM
• Color Network ScanGear Installation and
Instructions
• PS/PCL/UFR II Printer and Direct Printing
Instructions
• PCL Printer Driver Installation and
Instructions
Color Network ScanGear
User's Guide
PS/PCL/UFR II Printer
Guide
PCL Driver Guide
CD-ROM
CD-ROM
CD-ROM
Page 5
• PS Printer Driver Installation and
Instructions
PS Driver Guide
CD-ROM
• UFR II Printer Driver Installation and
Instructions
• Mac OS X PS Printer Driver Installation and
Instructions
• Mac OS X UFR II Printer Driver Installation
and Instructions
• Fax Driver Installation and Instructions
• Installing MEAP Applications and Using the
Login Service
UFR II Driver Guide
Mac PS Driver Guide
Mac UFR II Driver Guide
Fax Driver Guide
MEAP SMS Administrator
Guide
CD-ROM
CD-ROM
CD-ROM
CD-ROM
CD-ROM
• To view the manual in PDF format, Adobe Reader/Acrobat Reader/Acrobat is required. If Adobe Reader/Acro bat Reader/Acrobat is not installed on
your system, please download it from the Adobe Systems Incorporated website (http://www.adobe.com).
• The machine illustration on the cover may differ slightly from your machine.
Page 6

How This Manual Is Organized
Chapter 1 Before You Start
Chapter 2 Settings Common to the Network Protocols
Chapter 3
Chapter 4 Using a NetWare Network (Windows)
Chapter 5 Using a NetBIOS Network
Chapter 6 Using an AppleTalk Network (Macintosh)
Chapter 7 Troubleshooting
Chapter 8 Appendix
Using a TCP/IP Network
Includes the network settings, specifications, glossary, and index.
Considerable effort has been made to ensure that this manual is free of inaccuracies and omissions. However, as we are constantly improving our
products, if you need an exact specification, please contact Canon.
Page 7

Contents
Preface . . . . . . . . . . . . . . . . . . . . . . . . . . . . . . . . . . . . . . . . . . . . . . . . . . . . . . . . . . ix
How To Use This Manual. . . . . . . . . . . . . . . . . . . . . . . . . . . . . . . . . . . . . . . . . . . . ix
Symbols Used in This Manual . . . . . . . . . . . . . . . . . . . . . . . . . . . . . . . . . . . . . . ix
Keys and Buttons Used in This Manual . . . . . . . . . . . . . . . . . . . . . . . . . . . . . . . x
Displays Used in This Manual . . . . . . . . . . . . . . . . . . . . . . . . . . . . . . . . . . . . . . x
Abbreviations Used in This Manual . . . . . . . . . . . . . . . . . . . . . . . . . . . . . . . . . . xi
Trademarks . . . . . . . . . . . . . . . . . . . . . . . . . . . . . . . . . . . . . . . . . . . . . . . . . . . . xi
Legal Notices . . . . . . . . . . . . . . . . . . . . . . . . . . . . . . . . . . . . . . . . . . . . . . . . . . . . xii
Copyright . . . . . . . . . . . . . . . . . . . . . . . . . . . . . . . . . . . . . . . . . . . . . . . . . . . . . .xii
Disclaimers . . . . . . . . . . . . . . . . . . . . . . . . . . . . . . . . . . . . . . . . . . . . . . . . . . . .xii
Chapter 1 Before You Start
Optional Equipment and System Requirements . . . . . . . . . . . . . . . . . . . . . . .1-2
Printing or Sending a Fax from a Computer . . . . . . . . . . . . . . . . . . . . . . . . . .1-2
Optional Equipment Requirements . . . . . . . . . . . . . . . . . . . . . . . . . . . . . .1-2
System Requirements . . . . . . . . . . . . . . . . . . . . . . . . . . . . . . . . . . . . . . . .1-3
Using E-Mail/I-Fax . . . . . . . . . . . . . . . . . . . . . . . . . . . . . . . . . . . . . . . . . . . . . .1-6
Optional Equipment Requirements . . . . . . . . . . . . . . . . . . . . . . . . . . . . . .1-6
System Requirements . . . . . . . . . . . . . . . . . . . . . . . . . . . . . . . . . . . . . . . .1-6
Sending Data . . . . . . . . . . . . . . . . . . . . . . . . . . . . . . . . . . . . . . . . . . . . . . . . . .1-7
Optional Equipment Requirements . . . . . . . . . . . . . . . . . . . . . . . . . . . . . .1-7
System Requirements . . . . . . . . . . . . . . . . . . . . . . . . . . . . . . . . . . . . . . . .1-7
Checking Your Network Environment . . . . . . . . . . . . . . . . . . . . . . . . . . . . . . .1-10
Sample Windows Network. . . . . . . . . . . . . . . . . . . . . . . . . . . . . . . . . . . . . . . 1-10
Sample Macintosh Network . . . . . . . . . . . . . . . . . . . . . . . . . . . . . . . . . . . . . .1-11
Sample UNIX Network. . . . . . . . . . . . . . . . . . . . . . . . . . . . . . . . . . . . . . . . . . 1-11
Using a Network with Various Types of Computers . . . . . . . . . . . . . . . . . . . .1-12
Chapter 2 Settings Common to the Network Protocols
Network Environment Setup Procedures . . . . . . . . . . . . . . . . . . . . . . . . . . . . .2-2
Connecting the Machine to a Computer or Network . . . . . . . . . . . . . . . . . . . . 2-3
Connecting to a Network . . . . . . . . . . . . . . . . . . . . . . . . . . . . . . . . . . . . . . . . .2-3
Connecting to a USB Interface . . . . . . . . . . . . . . . . . . . . . . . . . . . . . . . . . . . .2-5
Touch Panel Display Transition . . . . . . . . . . . . . . . . . . . . . . . . . . . . . . . . . . . . .2-7
Interface Settings . . . . . . . . . . . . . . . . . . . . . . . . . . . . . . . . . . . . . . . . . . . . . . . .2-9
v
Page 8

Communication Environment Setup . . . . . . . . . . . . . . . . . . . . . . . . . . . . . . . .2-11
Chapter 3 Using a TCP/IP Network
TCP/IP Network Setup Procedures . . . . . . . . . . . . . . . . . . . . . . . . . . . . . . . . . .3-2
Protocol Settings . . . . . . . . . . . . . . . . . . . . . . . . . . . . . . . . . . . . . . . . . . . . . . . . .3-3
TCP/IP Settings (IPv4) . . . . . . . . . . . . . . . . . . . . . . . . . . . . . . . . . . . . . . . . . . .3-3
Confirming TCP/IP Settings (IPv4). . . . . . . . . . . . . . . . . . . . . . . . . . . . . . . . .3-17
TCP/IP Settings (IPv6) . . . . . . . . . . . . . . . . . . . . . . . . . . . . . . . . . . . . . . . . . .3-18
Confirming TCP/IP Settings (IPv6). . . . . . . . . . . . . . . . . . . . . . . . . . . . . . . . .3-26
Key Pair and Server Certificate Settings for Encrypted SSL
Communication . . . . . . . . . . . . . . . . . . . . . . . . . . . . . . . . . . . . . . . . . . . . . . .3-27
Generating a Key Pair and Server Certificate . . . . . . . . . . . . . . . . . . . . .3-27
Registering a Key Pair File and Server Certificate File Installed from
a Computer. . . . . . . . . . . . . . . . . . . . . . . . . . . . . . . . . . . . . . . . . . . . . . . .3-30
Editing Key Pairs and Server Certificates . . . . . . . . . . . . . . . . . . . . . . . .3-31
Registering a CA Certificate File Installed from a Computer . . . . . . . . . .3-33
Editing a CA Certificate . . . . . . . . . . . . . . . . . . . . . . . . . . . . . . . . . . . . . .3-34
Generating and Confirming a Key Pair and Device Signature Certificate
and User Certificate for Adding Digital Signatures to PDF Files . . . . . . . . . .3-35
Setting a Key Pair and Device Certificate . . . . . . . . . . . . . . . . . . . . . . . .3-35
Confirming a Key Pair and Device Certificate . . . . . . . . . . . . . . . . . . . . .3-37
Confirming a Key Pair and User Certificate . . . . . . . . . . . . . . . . . . . . . . .3-38
E-Mail/I-Fax Settings . . . . . . . . . . . . . . . . . . . . . . . . . . . . . . . . . . . . . . . . . . .3-39
Startup Time Settings. . . . . . . . . . . . . . . . . . . . . . . . . . . . . . . . . . . . . . . . . . .3-42
Setting Up a Computer for Printing/Sending a Fax . . . . . . . . . . . . . . . . . . . .3-43
Printer Connection Method (LPD/Raw) . . . . . . . . . . . . . . . . . . . . . . . . . . . . .3-44
Windows 2000/XP/Server 2003/Vista . . . . . . . . . . . . . . . . . . . . . . . . . . . .3-44
Mac OS X . . . . . . . . . . . . . . . . . . . . . . . . . . . . . . . . . . . . . . . . . . . . . . . . .3-48
UNIX . . . . . . . . . . . . . . . . . . . . . . . . . . . . . . . . . . . . . . . . . . . . . . . . . . . . .3-48
Printer Connection Method (IPP/IPPS) . . . . . . . . . . . . . . . . . . . . . . . . . . . . .3-50
Windows 2000/XP/Server 2003/Vista . . . . . . . . . . . . . . . . . . . . . . . . . . . .3-50
Mac OS X 10.3 or later . . . . . . . . . . . . . . . . . . . . . . . . . . . . . . . . . . . . . . .3-51
Printer Connection Method (FTP) . . . . . . . . . . . . . . . . . . . . . . . . . . . . . . . . .3-52
Printer Connection Method (WSD). . . . . . . . . . . . . . . . . . . . . . . . . . . . . . . . .3-53
Setting Up a Computer as a File Server. . . . . . . . . . . . . . . . . . . . . . . . . . . . . .3-54
FTP Server Settings. . . . . . . . . . . . . . . . . . . . . . . . . . . . . . . . . . . . . . . . . . . .3-55
Windows 2000/XP/Server 2003/Vista . . . . . . . . . . . . . . . . . . . . . . . . . . . .3-55
UNIX/Linux . . . . . . . . . . . . . . . . . . . . . . . . . . . . . . . . . . . . . . . . . . . . . . . .3-59
Mac OS X . . . . . . . . . . . . . . . . . . . . . . . . . . . . . . . . . . . . . . . . . . . . . . . . .3-60
vi
Page 9

FTP Server for imageWARE Gateway. . . . . . . . . . . . . . . . . . . . . . . . . . . .3-62
WebDAV Server Settings . . . . . . . . . . . . . . . . . . . . . . . . . . . . . . . . . . . . . . . .3-63
IIS for Windows 2000/2000 Server/XP/Server 2003. . . . . . . . . . . . . . . . .3-63
Apache for Windows 2000/2000 Server/XP/Server
2003/UNIX/Linux/Mac OS X. . . . . . . . . . . . . . . . . . . . . . . . . . . . . . . . . . .3-66
Chapter 4 Using a NetWare Network (Windows)
NetWare Network Setup Procedures . . . . . . . . . . . . . . . . . . . . . . . . . . . . . . . . .4-2
NetWare Print Service Settings . . . . . . . . . . . . . . . . . . . . . . . . . . . . . . . . . . . . .4-3
Types of Print Service . . . . . . . . . . . . . . . . . . . . . . . . . . . . . . . . . . . . . . . . . . . 4-3
Setup Using NetWare Administrator or PCONSOLE. . . . . . . . . . . . . . . . . . . .4-4
Using NetWare Administrator in the NDS Queue Server Mode or the
Remote Printer Mode (NetWare 4.x or Later). . . . . . . . . . . . . . . . . . . . . . .4-4
Using PCONSOLE in the Queue Server Mode or Remote Printer
Mode in the Bindery Mode (NetWare 3.2) . . . . . . . . . . . . . . . . . . . . . . . . .4-5
Protocol Settings. . . . . . . . . . . . . . . . . . . . . . . . . . . . . . . . . . . . . . . . . . . . . . . . .4-8
Setting Up a Computer for Printing/Sending a Fax . . . . . . . . . . . . . . . . . . . . 4-12
Connecting to a NetWare Network . . . . . . . . . . . . . . . . . . . . . . . . . . . . . . . .4-12
Printer Connection Method . . . . . . . . . . . . . . . . . . . . . . . . . . . . . . . . . . . . . . 4-12
Setting Up a Computer as a File Server . . . . . . . . . . . . . . . . . . . . . . . . . . . . .4-13
Chapter 5 Using a NetBIOS Network
NetBIOS Network Setup Procedures . . . . . . . . . . . . . . . . . . . . . . . . . . . . . . . . .5-2
Protocol Settings. . . . . . . . . . . . . . . . . . . . . . . . . . . . . . . . . . . . . . . . . . . . . . . . .5-3
TCP/IP Settings (IPv4). . . . . . . . . . . . . . . . . . . . . . . . . . . . . . . . . . . . . . . . . . . 5-3
SMB and WINS Settings . . . . . . . . . . . . . . . . . . . . . . . . . . . . . . . . . . . . . . . . . 5-3
Setting Up a Computer for Printing/Sending a Fax . . . . . . . . . . . . . . . . . . . . . 5-6
Connecting to a TCP/IP Network. . . . . . . . . . . . . . . . . . . . . . . . . . . . . . . . . . .5-6
Connecting to a NetBIOS Network . . . . . . . . . . . . . . . . . . . . . . . . . . . . . . . . .5-6
Windows 98/Me . . . . . . . . . . . . . . . . . . . . . . . . . . . . . . . . . . . . . . . . . . . . .5-7
Windows 2000/XP/Server 2003/Vista. . . . . . . . . . . . . . . . . . . . . . . . . . . . .5-8
Printer Connection Method . . . . . . . . . . . . . . . . . . . . . . . . . . . . . . . . . . . . . . .5-9
Windows 2000/XP/Server 2003/Vista. . . . . . . . . . . . . . . . . . . . . . . . . . . . .5-9
Mac OS X 10.3 or later. . . . . . . . . . . . . . . . . . . . . . . . . . . . . . . . . . . . . . . 5-10
Setting Up a Computer as a File Server . . . . . . . . . . . . . . . . . . . . . . . . . . . . .5-11
Connecting to a TCP/IP Network. . . . . . . . . . . . . . . . . . . . . . . . . . . . . . . . . .5-11
Connecting to a NetBIOS Network and Configuring a Shared Folder . . . . . .5-12
Windows 98/Me . . . . . . . . . . . . . . . . . . . . . . . . . . . . . . . . . . . . . . . . . . . .5-12
Windows 2000/XP/Server 2003/Vista. . . . . . . . . . . . . . . . . . . . . . . . . . . . 5-16
vii
Page 10

Samba (UNIX/Linux). . . . . . . . . . . . . . . . . . . . . . . . . . . . . . . . . . . . . . . . .5-22
Chapter 6 Using an AppleTalk Network (Macintosh)
AppleTalk Network Setup Procedures . . . . . . . . . . . . . . . . . . . . . . . . . . . . . . . .6-2
Protocol Settings . . . . . . . . . . . . . . . . . . . . . . . . . . . . . . . . . . . . . . . . . . . . . . . . .6-3
Setting Up a Computer for Printing . . . . . . . . . . . . . . . . . . . . . . . . . . . . . . . . . .6-4
Chapter 7 Troubleshooting
Network Connection Problems and Remedies . . . . . . . . . . . . . . . . . . . . . . . . .7-2
Printing Problems and Remedies. . . . . . . . . . . . . . . . . . . . . . . . . . . . . . . . . . . .7-4
Data Sending/File Sharing Problems and Remedies . . . . . . . . . . . . . . . . . . .7-10
Encrypted SSL Data Communication Problems and Remedies . . . . . . . . . .7-16
Chapter 8 Appendix
Network Setting Items . . . . . . . . . . . . . . . . . . . . . . . . . . . . . . . . . . . . . . . . . . . . .8-2
Confirming Settings. . . . . . . . . . . . . . . . . . . . . . . . . . . . . . . . . . . . . . . . . . . . . .8-21
Viewing the Network Access Log. . . . . . . . . . . . . . . . . . . . . . . . . . . . . . . . . . .8-24
Obtaining the Public Key of the Machine to Use SSL with Windows
Vista . . . . . . . . . . . . . . . . . . . . . . . . . . . . . . . . . . . . . . . . . . . . . . . . . . . . . . . . . .8-25
Specifications. . . . . . . . . . . . . . . . . . . . . . . . . . . . . . . . . . . . . . . . . . . . . . . . . . .8-27
Hardware Specifications. . . . . . . . . . . . . . . . . . . . . . . . . . . . . . . . . . . . . . . . .8-27
Software Specifications . . . . . . . . . . . . . . . . . . . . . . . . . . . . . . . . . . . . . . . . .8-27
Glossary . . . . . . . . . . . . . . . . . . . . . . . . . . . . . . . . . . . . . . . . . . . . . . . . . . . . . . .8-28
Index . . . . . . . . . . . . . . . . . . . . . . . . . . . . . . . . . . . . . . . . . . . . . . . . . . . . . . . . . .8-49
viii
Page 11

Preface
Thank you for purchasing the Canon Color imageRUNNER C3480/C3480i/C3080/C3080i/
C2550. Please read this manual thoroughly before operating the product to familiarize
yourself with its capabilities, and to make the most of its many functions. After reading this
manual, store it in a safe place for future reference.
How To Use This Manual
Symbols Used in This Manual
The following symbols are used in this manual to explain procedures, restrictions,
handling precautions, and instructions that should be observed for safety.
.
WARNING
IMPORTANT
NOTE
Indicates a warning concerning operations that may lead to death or
injury to persons if not performed correctly. To use the machine safely,
always pay attention to these warnings.
.
Indicates operational requirements and restrictions. Be sure to read
these items carefully to operate the product correctly, and avoid damage
to the machine.
.
Indicates a clarification of an operation, or contains additional
explanations for a procedure. Reading these notes is highly
recommended.
ix
Page 12
Keys and Buttons Used in This Manual
The following symbols and key/button names are a few examples of how keys and
buttons to be clicked or pressed are expressed in this manual:
• Control Panel Keys: Key Icon (Key Name)
Examples:
• Touch Panel Display Keys: [Key Name]
Examples: [Cancel]
• Buttons on Computer Operation Screens: [Button Name]
Examples: [OK]
Displays Used in This Manual
Screen shots of the touch panel display used in this manual have been taken from
the Color imageRUNNER C3480i.
The keys or buttons which you should click or press are marked with a , as
shown below.
When multiple buttons or keys can be clicked or pressed, they will be highlighted
and mentioned in the order in which they should be clicked or pressed.
(Start)
(Stop)
[Done]
[Add]
1
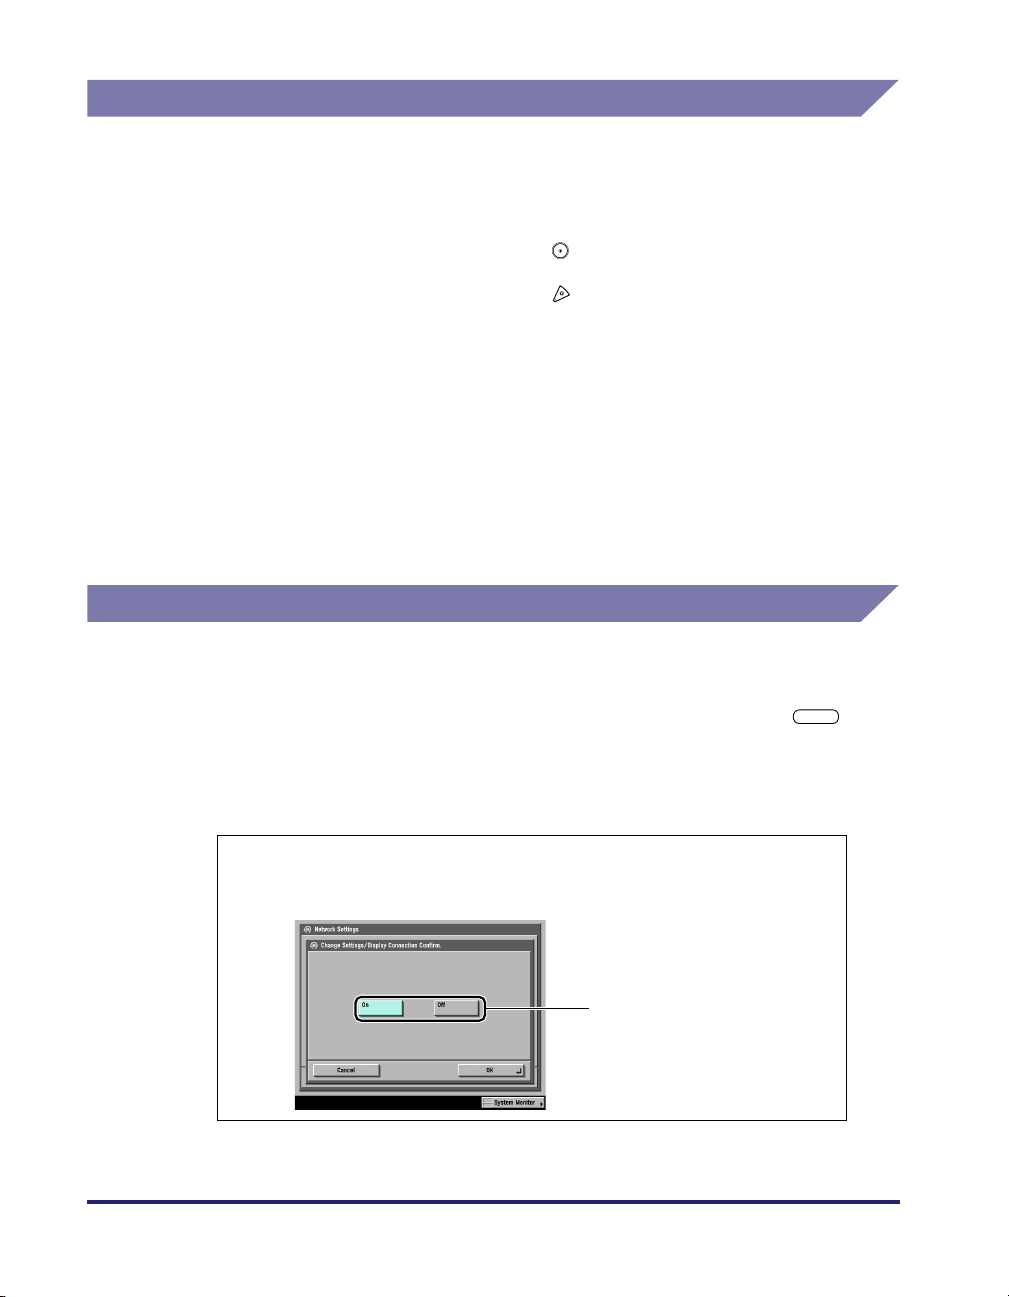
On the Network Settings screen, press [Change Settings/
Display Connection Confirm.]
x
➞ specify the following.
Press this key for operation.
Page 13

Abbreviations Used in This Manual
In this manual, product names and model names are abbreviated as follows:
Microsoft Windows 98 operating system: Windows 98
Microsoft Windows Millennium Edition operating system: Windows Me
Microsoft Windows 2000 operating system: Windows 2000
Microsoft Windows XP operating system: Windows XP
Microsoft Windows Server 2003 operating system: Windows Server
Microsoft Windows Vista operating system: Windows Vista
Microsoft Windows operating system: Windows
PostScript3 emulation: PS
Novell NetWare: NetWare
Apple Macintosh: Mac
2003
Trademarks
MEAP is a trademark of Canon Inc.
Apple, AppleTalk, EtherTalk, LocalTalk, Macintosh, and Mac OS are trademarks of
Apple Inc., registered in the U.S. and other countries.
Microsoft, Windows, and Windows Vista are trademarks or registered trademarks
of Microsoft Corporation in the U.S. and/or other countries.
Other product and company names herein may be the trademarks of their
respective owners.
xi
Page 14

Legal Notices
Copyright
Copyright 2007 by Canon Inc. All rights reserved.
No part of this publication may be reproduced or transmitted in any form or by any
means, electronic or mechanical, including photocopying and recording, or by any
information storage or retrieval system without the prior written permission of
Canon Inc.
Disclaimers
The information in this document is subject to change without notice.
CANON INC. MAKES NO WARRANTY OF ANY KIND WITH REGARD TO THIS
MATERIAL, EITHER EXPRESS OR IMPLIED, EXCEPT AS PROVIDED HEREIN,
INCLUDING WITHOUT LIMITATION, THEREOF, WARRANTIES AS TO
MARKETABILITY, MERCHANTABILITY, FITNESS FOR A PARTICULAR
PURPOSE OF USE OR AGAINST INFRINGEMENT OF ANY PATENT. CANON
INC. SHALL NOT BE LIABLE FOR ANY DIRECT, INCIDENTAL, OR
CONSEQUENTIAL DAMAGES OF ANY NATURE, OR LOSSES OR EXPENSES
RESULTING FROM THE USE OF THIS MATERIAL.
xii
Page 15

Before You Start
This chapter describes what you need to know before you start using the machine, including
the network environments with which the machine is compatible, and how to check the network
environment you are using.
Optional Equipment and System Requirements. . . . . . . . . . . . . . . . . . . . . . . . . . . . . . . . 1-2
Printing or Sending a Fax from a Computer . . . . . . . . . . . . . . . . . . . . . . . . . . . . . . . . . . . . . . . . .1-2
Using E-Mail/I-Fax . . . . . . . . . . . . . . . . . . . . . . . . . . . . . . . . . . . . . . . . . . . . . . . . . . . . . . . . . . . .1-6
Sending Data . . . . . . . . . . . . . . . . . . . . . . . . . . . . . . . . . . . . . . . . . . . . . . . . . . . . . . . . . . . . . . . .1-7
Checking Your Network Environment . . . . . . . . . . . . . . . . . . . . . . . . . . . . . . . . . . . . . . .1-10
Sample Windows Network . . . . . . . . . . . . . . . . . . . . . . . . . . . . . . . . . . . . . . . . . . . . . . . . . . . . .1-10
Sample Macintosh Network . . . . . . . . . . . . . . . . . . . . . . . . . . . . . . . . . . . . . . . . . . . . . . . . . . . .1-11
Sample UNIX Network . . . . . . . . . . . . . . . . . . . . . . . . . . . . . . . . . . . . . . . . . . . . . . . . . . . . . . . . 1-11
Using a Network with Various Types of Computers . . . . . . . . . . . . . . . . . . . . . . . . . . . . . . . . . . 1-12
CHAPTER
1
1-1
Page 16

Optional Equipment and System Requirements
1
This section describes the optional equipment and system environments with which
the machine is compatible.
NOTE
By connecting the machine to the network, its settings and operations can be performed
on computers using the Remote UI and other utilities, without the need for any optional
Before You Start
equipment. For more information on the Remote UI, see the Remote UI Guide. For more
information on utilities, see the Reference Guide.
Printing or Sending a Fax from a Computer
Optional Equipment Requirements
The following optional equipment is required for printing or sending a fax from a
computer:
IMPORTANT
•
The optional Expansion RAM is necessary if you want to use the optional Color PS
Printer Kit.
•
For more information on the equipment needed, consult your local authorized Canon
dealer.
■ Printing
• If you want to use the UFR II printer driver
- Optional equipment is unnecessary
• If you want to use the PCL printer driver
- Optional equipment is unnecessary (for the Color imageRUNNER C3480i/C3080i)
- Color PCL Printer Kit (for the Color imageRUNNER C3480/C3080/C2550)
• If you want to use the PS printer driver (one of the following)
- Color PS Printer Kit
- imagePASS (for the Color imageRUNNER C3480/C3480i/C3080/C3080i)
1-2
Optional Equipment and System Requirements
Page 17

IMPORTANT
•
The printing function is not available with Windows 98/Me.
•
To print with Mac OS 9, you need to use a PS printer driver provided by Apple Inc. with
the Mac OS, via an AppleTalk network.
•
The PS printer driver can be used only in a Mac OS X 10.3.9 or later environment. Also,
you cannot print documents via an AppleTalk network.
•
The optional Color PS Printer Kit cannot be used if the optional imagePASS is attached.
If you are using the optional imagePASS, see the manual provided with the optional
imagePASS.
■ Sending a Fax (for a TCP/IP, NetBIOS, or NetWare network)
• Super G3 FAX Board
• Super G3 Multi-Line Fax Board
IMPORTANT
You cannot use the Super G3 FAX Board and Super G3 Multi-Line Fax Board
simultaneously. For more information on fax boards, see the Sending and Facsimile
Guide.
System Requirements
The following network and system environments are compatible when printing or
sending a fax from a computer:
IMPORTANT
•
If you are using the optional imagePASS, see the manual provided with the optional
imagePASS for details on the system requirements.
•
If you are using Windows 2000, you need to install Service Pack 2 or later.
1
Before You Start
Optional Equipment and System Requirements
1-3
Page 18

■ With a TCP/IP Network:
• Compatible OS
- Microsoft Windows 98
- Microsoft Windows Me
- Microsoft Windows 2000 Server
- Microsoft Windows 2000 Professional
1
Before You Start
- Microsoft Windows XP Professional
- Microsoft Windows XP Home Edition
- Microsoft Windows Server 2003
- Microsoft Windows Vista Ultimate
- Microsoft Windows Vista Business
- Microsoft Windows Vista Home Premium
- Microsoft Windows Vista Home Basic
- Microsoft Windows Vista Enterprise
- Solaris Version 1.1x (SunOS Version 4.1x) or later
- Solaris Version 2.5x (SunOS Version 5.5x) or later
-Mac OS X
• Compatible Computers
- Windows: IBM PC/compatibles
- Macintosh: Mac computers (operating OS X)
IMPORTANT
If you are using Mac OS X, compatible operating systems differ depending on the type of
printer driver. For details, see the Mac PS Driver Guide, the Mac UFR II Driver Guide, or
the Network Quick Start Guide.
1-4
■ With a NetBIOS Network:
• Compatible OS
- Microsoft Windows 98
- Microsoft Windows Me
- Microsoft Windows 2000 Server
- Microsoft Windows 2000 Professional
- Microsoft Windows XP Professional
- Microsoft Windows XP Home Edition
- Microsoft Windows Server 2003
- Microsoft Windows Vista Ultimate
- Microsoft Windows Vista Business
- Microsoft Windows Vista Home Premium
- Microsoft Windows Vista Home Basic
- Microsoft Windows Vista Enterprise
- Mac OS X 10.3 or later
• Compatible Protocol
- NetBIOS over TCP/IP (NetBT)
Optional Equipment and System Requirements
Page 19

• Compatible Computers
- Windows: IBM PC/compatibles
- Macintosh: Mac OS X 10.3 or later operating computers/memory
IMPORTANT
When you are using Mac OS X 10.3 or later, you can only print via a NetBIOS network if
you are using a PS printer driver provided by Apple Inc. with the Mac OS.
■ With a NetWare Network:
• Compatible Servers
- Novell NetWare Version 3.2/4.1/4.11/4.2/5/5.1/6/6.5
• Compatible Clients
- Microsoft Windows 98
- Microsoft Windows Me
- Microsoft Windows 2000 Server
- Microsoft Windows 2000 Professional
- Microsoft Windows XP Professional
- Microsoft Windows XP Home Edition
- Microsoft Windows Server 2003
- Microsoft Windows Vista Ultimate
- Microsoft Windows Vista Business
- Microsoft Windows Vista Home Premium
- Microsoft Windows Vista Home Basic
- Microsoft Windows Vista Enterprise
• Compatible Computers
- IBM PC/compatibles
1
Before You Start
■ With an AppleTalk Network:
• Compatible AppleTalk
- EtherTalk Phase 2
• See the Mac UFR II Driver Guide or the Network Quick Start Guide for compatible
operating systems and computers.
IMPORTANT
The machine does not support Macintosh LocalTalk networks.
■ With a Server-Based Computing Environment:
• Compatible Windows Terminal Server (Services)
- Microsoft Windows 2000 Server
- Microsoft Windows Server 2003
• Compatible Software
- Citrix MetaFrame 1.8
- Citrix MetaFrame XP
Optional Equipment and System Requirements
1-5
Page 20

Using E-Mail/I-Fax
Optional Equipment Requirements
Optional equipment is not required for using the e-mail/I-fax functions.
1
System Requirements
The following system environments are confirmed for using the e-mail/I-fax
functions:
• Compatible mail forwarding server software
Before You Start
- Sendmail 8.93 or later (UNIX)
- Microsoft Exchange Server (Windows)
(Microsoft Exchange Server 5.5 + Service Pack 1 or later)
- Lotus Domino R4.6 or later (Windows)
• Compatible mail receiving server software
- Qpopper 2.53 or later (UNIX)
- Microsoft Exchange Server (Windows)
(Microsoft Exchange Server 5.5 + Service Pack 1 or later)
- Lotus Domino R4.6 or later (Windows)
IMPORTANT
If you are using Windows 2000, you need to install Service Pack 2 or later.
NOTE
•
The machine sends e-mail or I-fax messages to mail servers using SMTP.
The machine can receive incoming messages from a mail server using the POP3
protocol or directly using the machine's own SMTP receiving function.
If the latter method is used, it is not necessary for the mail server to support the POP3
protocol.
•
The machine can receive I-fax images and error e-mail messages sent when errors
occur during communication, but not any other type of e-mail.
1-6
Optional Equipment and System Requirements
Page 21

Sending Data
Optional Equipment Requirements
Optional equipment is not required for sending data.
System Requirements
The following network and system environments are compatible when sending data
from the machine to a file server, depending on the type of network used:
IMPORTANT
•
If you are using the optional imagePASS, see the manual provided with the optional
imagePASS for details on the system requirements.
•
If you are using Windows 2000, you need to install Service Pack 2 or later.
■ With a TCP/IPv4 Network (Using FTP):
• Compatible servers
- Microsoft Windows 2000 Server and Internet Information Services (IIS) 5.0
- Microsoft Windows XP Professional and IIS 5.1
- Microsoft Windows Server 2003 and IIS 6.0
- Microsoft Windows Vista Ultimate and IIS 7.0
- Microsoft Windows Vista Business and IIS 7.0
- Microsoft Windows Vista Home Premium and IIS 7.0
- Microsoft Windows Vista Home Basic and IIS 7.0
- Microsoft Windows Vista Enterprise and IIS 7.0
- Solaris Version 2.6 or later
- Red Hat Linux 7.2 or later
-Mac OS X
- FTP server for imageWARE Gateway
• Compatible protocol
-TCP/IPv4
1
Before You Start
■ With a TCP/IPv6 Network (Using FTP):
• Compatible servers
- Solaris Version 9 or later
- Red Hat Enterprise Linux AS/ES/WS 4.0 or later
- Mac OS X 10.3 or later
• Compatible protocol
-TCP/IPv6
Optional Equipment and System Requirements
1-7
Page 22

■ With a TCP/IPv4 Network (Using WebDAV):
• Compatible servers
- Microsoft Windows 2000 Server and IIS 5.0
- Microsoft Windows 2000 Professional and IIS 5.0
- Microsoft Windows XP Professional and IIS 5.1
- Microsoft Windows Server 2003 and IIS 6.0
1
- Microsoft Windows 2000 Server and Apache 2.0 for Win 32
- Microsoft Windows XP Professional and Apache 2.0 for Win 32
- Microsoft Windows Server 2003 and Apache 2.0 for Win 32
- Solaris Version 2.6 or later, and Apache 2.0 or later
- Red Hat Enterprise Linux AS/ES/WS 4.0 or later, and Apache 2.0 or later
-Mac OS X
Before You Start
• Compatible protocol for the WebDAV server
-TCP/IPv4
■ With a TCP/IPv6 Network (Using WebDAV):
• Compatible servers
- Microsoft Windows Server 2003 and IIS 6.0
- Solaris Version 9 or later, and Apache 2.0 or later
• Compatible protocol for the WebDAV server
-TCP/IPv6
IMPORTANT
If you connect to the internet via a proxy, the proxy server must support IPv6.
1-8
■ With a NetBIOS Network:
• Compatible servers
- Microsoft Windows 98
- Microsoft Windows Me
- Microsoft Windows 2000 Server
- Microsoft Windows 2000 Professional
- Microsoft Windows XP Professional
- Microsoft Windows XP Home Edition
- Microsoft Windows Server 2003
- Microsoft Windows Vista Ultimate
- Microsoft Windows Vista Business
- Microsoft Windows Vista Home Premium
- Microsoft Windows Vista Home Basic
- Microsoft Windows Vista Enterprise
• Compatible server software for sending data
- Samba 2.2.8a or later (UNIX/Linux)
• Compatible protocol
- NetBIOS over TCP/IP (NetBT)
Optional Equipment and System Requirements
Page 23

■ With a NetWare Network:
• Compatible server
- Novell NetWare Version 3.2/4.11/4.2/5/5.1/6/6.5
• Compatible protocol
-IPX
1
Before You Start
Optional Equipment and System Requirements
1-9
Page 24

Checking Your Network Environment
1
Refer to the following examples to confirm the network environment that is
connected to the machine, and then perform the necessary operations for that
environment.
IMPORTANT
If you are using the optional imagePASS, see the manual provided with the optional
Before You Start
imagePASS.
Sample Windows Network
In a Windows network environment, the TCP/IP or NetBIOS (NetBIOS over TCP/
IP) protocol can be used. Multiple protocols can be used at the same time.
In addition to IPv4 (Internet Protocol Version 4), the machine also supports IPv6
(Internet Protocol Version 6), and has a dual stack configuration that enables it to
communicate with both IPv4 networks and IPv6 networks. The functions of IPv4 are
always enabled, and you can select whether to use the functions of IPv6.
To use the e-mail/I-fax function, the TCP/IP protocol is required.
After configuring the settings in accordance with Chapter 2, "Settings Common to
the Network Protocols," see the following, depending on the protocol:
• Chapter 3, "Using a TCP/IP Network"
• Chapter 5, "Using a NetBIOS Network"
IMPORTANT
•
The machine does not support NetBEUI.
•
The IPv6 network of the machine does not support encryption using IPsec (Security
Architecture for Internet Protocol).
•
If you are using the optional imagePASS, you cannot use the functions of IPv6.
1-10
Checking Your Network Environment
Page 25

Sample Macintosh Network
In Mac OS 8/9, the AppleTalk (EtherTalk) protocol is used. In Mac OS X, either the
AppleTalk (EtherTalk), TCP/IP, or NetBIOS (NetBIOS over TCP/IP) protocol can be
used.
To use the e-mail/I-fax function or to send data, the TCP/IP protocol is required.
After configuring the settings in accordance with Chapter 2, "Settings Common to
the Network Protocols," see the following, depending on the protocol:
• Chapter 6, "Using an AppleTalk Network (Macintosh)"
• Chapter 3, "Using a TCP/IP Network"
• Chapter 5, "Using a NetBIOS Network"
IMPORTANT
The protocol you can use differs depending on the version of Mac OS or type of printer
driver. For details, see the Mac PS Driver Guide, the Mac UFR II Driver Guide, or the
Network Quick Start Guide.
Sample UNIX Network
With UNIX computers, the TCP/IP protocol is used.
After configuring the settings in accordance with Chapter 2, "Settings Common to
the Network Protocols," see the following:
• Chapter 3, "Using a TCP/IP Network"
1
Before You Start
Checking Your Network Environment
1-11
Page 26

Using a Network with Various Types of Computers
If there are various types of computers on the network, the network operations you
are required to perform depend on the type of computers being used.
For example, if you are using Windows XP and Macintosh computers, you will need
to specify the settings described in both "Sample Windows Network" and "Sample
1
Before You Start
Macintosh Network".
To use the e-mail/I-fax function, the TCP/IP protocol is required.
To use the data sending function, either the TCP/IP, NetWare, or NetBIOS protocol
is required.
After configuring the settings in accordance with Chapter 2, "Settings Common to
the Network Protocols," see the following, depending on the protocol:
• Chapter 3, "Using a TCP/IP Network"
• Chapter 4, "Using a NetWare Network (Windows)"
• Chapter 5, "Using a NetBIOS Network"
• Chapter 6, "Using an AppleTalk Network (Macintosh)"
1-12
Checking Your Network Environment
Page 27

Settings Common to the Network Protocols
This chapter describes setting items common to the network protocols, which are required for
using the machine in a network environment. Before specifying the settings of the desired
protocol (Chapters 3 to 6), be sure to set the items explained in this chapter. (If you are using
the optional imagePASS, see the manual provided with the optional imagePASS.)
Network Environment Setup Procedures . . . . . . . . . . . . . . . . . . . . . . . . . . . . . . . . . . . . . 2-2
Connecting the Machine to a Computer or Network. . . . . . . . . . . . . . . . . . . . . . . . . . . . . 2-3
Connecting to a Network . . . . . . . . . . . . . . . . . . . . . . . . . . . . . . . . . . . . . . . . . . . . . . . . . . . . . . .2-3
Connecting to a USB Interface . . . . . . . . . . . . . . . . . . . . . . . . . . . . . . . . . . . . . . . . . . . . . . . . . . .2-5
Touch Panel Display Transition . . . . . . . . . . . . . . . . . . . . . . . . . . . . . . . . . . . . . . . . . . . . .2-7
Interface Settings . . . . . . . . . . . . . . . . . . . . . . . . . . . . . . . . . . . . . . . . . . . . . . . . . . . . . . .2-9
Communication Environment Setup . . . . . . . . . . . . . . . . . . . . . . . . . . . . . . . . . . . . . . . . 2-11
CHAPTER
2
2-1
Page 28

Network Environment Setup Procedures
Before using the machine in a network environment, it is necessary to perform the
following setup procedures.
2
1
Network Cable Connection (See "Connecting the Machine to a Computer or Network," on p.
2-3.)
Connect the machine to the network using the network cables.
2
Interface Settings (See "Interface Settings," on p. 2-9.)
Specify the interface settings for communication between the machine and computers on your network. To
specify the settings, use:
• The machine's control panel
• The Remote UI (via a web browser)
3
Communication Environment Setup (See "Communication Environment Setup," on p. 2-11.)
Set up the environment for communication between the machine and computers on your network.
Settings Common to the Network Protocols
2-2
Network Environment Setup Procedures
Page 29
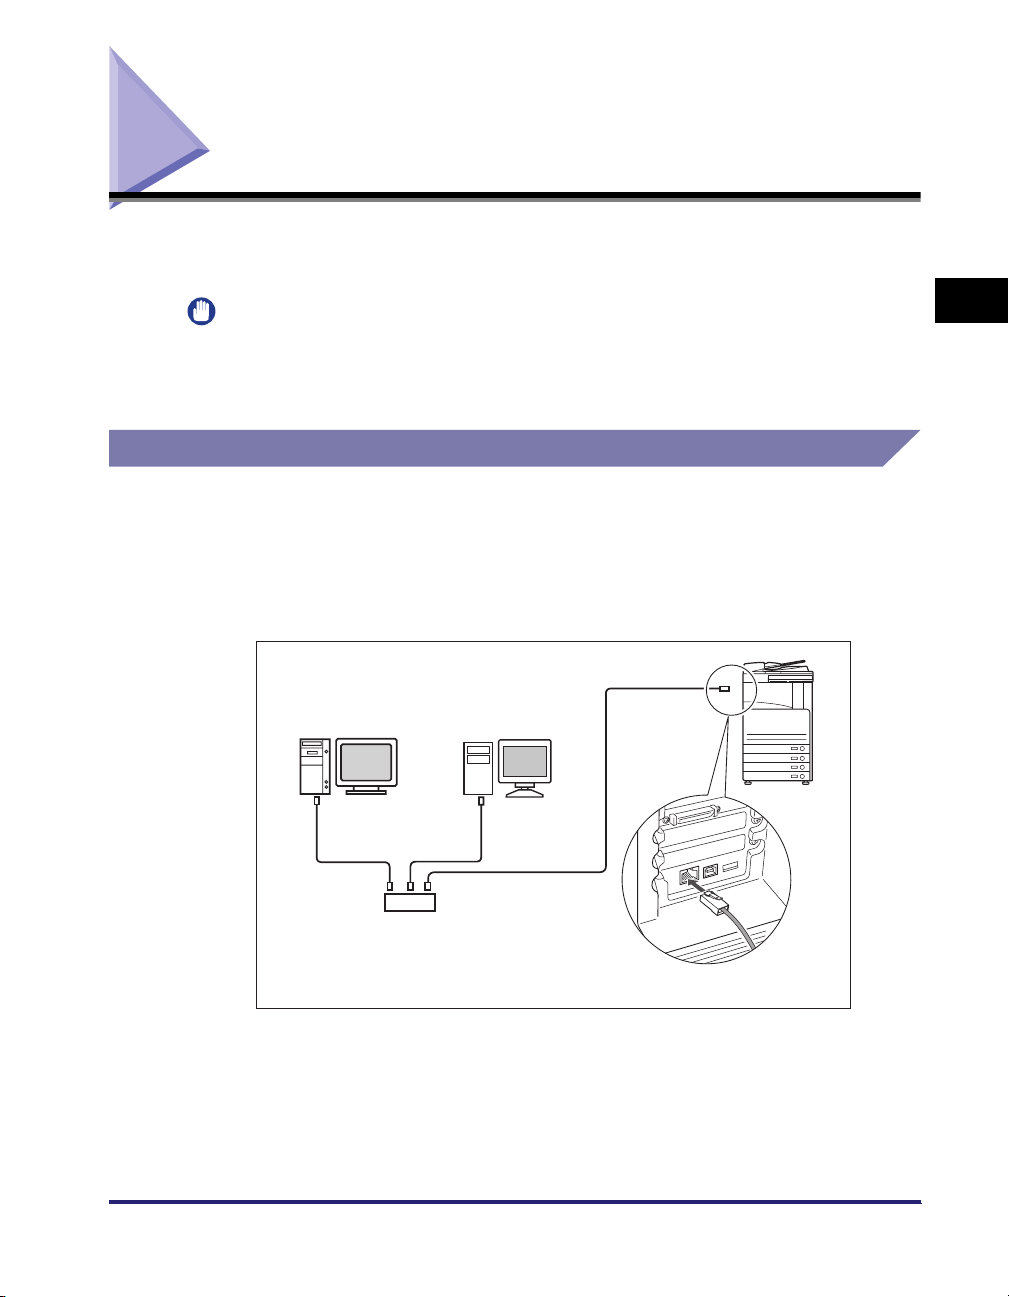
Connecting the Machine to a Computer or Network
The machine can be connected to a computer or network with a USB cable or
10Base-T/100Base-TX Ethernet cable.
IMPORTANT
•
External USB devices (e.g., memory, keyboard, mouse, etc.) are not supported.
•
A USB cable or network cable are not included in this package. Please obtain a suitable
cable for your computer or network.
Connecting to a Network
The machine supports TCP/IP, AppleTalk, and NetWare, which enables it to be
used by Windows, Macintosh, UNIX, and Linux computers. It also has a 10Base-T/
100Base-TX connector that can be used on most LANs.
Connect the machine's RJ-45 connector to a hub port using a Category 5 twisted
pair LAN cable.
2
Settings Common to the Network Protocols
PC with
100Base-TX Connector
Hub
PC with
10Base-T Connector
Ethernet Cable
Connecting the Machine to a Computer or Network
2-3
Page 30

2
Settings Common to the Network Protocols
WARNING
When connecting the interface cable or network cable, be sure to observe the
following precautions to avoid electrical shock.
- Turn OFF the machine's main power switch before disconnecting the power
cord from the power outlet. (See Chapter 1, "Before You Start Using This
Machine," in the Reference Guide.)
- Turn OFF the computer and disconnect the power cord from the power outlet.
IMPORTANT
•
You cannot use the machine as a repeater, bridge, or gateway.
•
If two or more machines are on an AppleTalk network, they should be switched 'ON' 10
seconds or more apart.
NOTE
•
The machine can automatically detect the type of Ethernet (10Base-T or 100Base-TX).
•
If you are using a mixed 10 Base-T/100 Base-TX environment, devices on the network
(hubs, routers, etc.) must support the mixed environment. For more information, consult
your local authorized Canon dealer.
•
After connecting the network cable, perform the following operations. (For more
information, see the relevant descriptions.)
- Set the date and time, and System Manager settings. (See Chapter 6, "System
Manager Settings," in the Reference Guide.)
- Set the network settings.
- Install a driver if necessary. (See the PCL Driver Guide, the PS Driver Guide, the UFR II
Driver Guide, the Fax Driver Guide, the Mac PS Driver Guide, the Mac UFR II Driver
Guide, or the Network Quick Start Guide.)
2-4
Connecting the Machine to a Computer or Network
Page 31

Connecting to a USB Interface
You can connect the machine to a computer with a USB port via a USB cable. The
machine is USB 2.0 Hi-Speed compatible. The drivers, and utility that matches the
operating system on your computer will be installed. For more information on
installing the driver through a USB connection, see Chapter 2, "Getting Started," in
the PCL Driver Guide, the PS Driver Guide, the UFR II Driver Guide, the Fax Driver
Guide, the Mac PS Driver Guide, or the Mac UFR II Driver Guide.
Driver Software
2
USB Cable
USB Port
USB Connector
WARNING
If you connect or disconnect the USB cable while the machine's main power
switch is ON, do not touch the metal parts around the connector, as this may
result in electrical shock.
IMPORTANT
•
Do not connect or disconnect the USB cable in the following situations, as it may cause
your computer or the machine to operate poorly:
- When installing the driver
- When the computer is booting up
- When printing
•
If you disconnect the USB cable with the computer or machine's main power switch ON,
always wait at least five seconds before reconnecting the cable. Immediately
reconnecting the cable may cause your computer or machine to operate poorly.
•
When the machine is connected to a personal computer via the USB cable, you will not
be able to use some of the utilities. (See the Network Quick Start Guide.)
•
If you connect the machine to a personal computer via a USB cable, confirm that [Use
USB Device] (in the System Settings screen) is set to 'On'. (See the Reference Guide.)
Settings Common to the Network Protocols
Connecting the Machine to a Computer or Network
2-5
Page 32

NOTE
•
If you connect the machine to a Macintosh via a USB cable, the Macintosh, if shut down,
may start up when the machine starts up or returns from the Sleep mode. If this happens,
disconnect the USB cable (the use of a USB hub between the machine and the
Macintosh may solve this problem).
•
If the machine is connected to a computer with a USB cable, you can print a document
from your computer using the printer driver, or send a fax from your computer using the
fax driver.
•
You cannot specify a computer connected to the machine through a USB connection as a
2
destination for Send jobs or forwarded jobs. Also, with that computer, you cannot use the
Remote UI and the Network Scan function.
•
The appropriate USB interface differs depending on the operating system of the
connected computer as follows. For more information, consult your local authorized
Canon dealer.
- Windows 98/Me: USB Full-Speed (USB 1.1 equivalent)
- Windows 2000/XP/Server 2003/Vista: USB 2.0 Hi-Speed/USB Full-Speed (USB 1.1
equivalent)
- Mac OS 8/9/X (10.3.2 or earlier): USB Full-Speed (USB 1.1 equivalent)
- Mac OS X (10.3.3 or later): USB 2.0 Hi-Speed/USB Full-Speed (USB 1.1 equivalent)
Settings Common to the Network Protocols
2-6
Connecting the Machine to a Computer or Network
Page 33

Touch Panel Display Transition
The following is a flow diagram of the touch panel display used in this manual.
Specify the network settings from the Additional Functions screen displayed by
pressing (Additional Functions). See this diagram to specify the various network
settings, in accordance with the procedures in Chapters 3 to 6.
Additional Functions screen
2
System Settings screen
Network Settings screen
TCP/IP Settings screen
Touch Panel Display Transition
Settings Common to the Network Protocols
2-7
Page 34

IMPORTANT
Settings specified from the control panel become effective after the machine is restarted,
after the procedure. Turn OFF the machine, wait at least 10 seconds, and then turn it ON.
NOTE
If the System Manager ID and password are set, enter them. (See Chapter 6, "System
Manager Settings," in the Reference Guide.)
2
Settings Common to the Network Protocols
2-8
Touch Panel Display Transition
Page 35

Interface Settings
This section describes how to specify the interface settings from the control panel.
If you are configuring the settings for the first time, use the control panel of the
machine.
After configuring the settings, you can change them using software other than the
control panel of the machine. For details, see "Network Setting Items," on p. 8-2.
1
On the Network Settings screen, press [Change Settings/
Display Connection Confirm.] ➞ specify the following.
[On]: If errors related to network connections occur, an error message is
displayed on the touch panel display of the machine. If you want to use the
machine in a network environment, select [On].
[Off]: Messages related to network connections are no longer displayed. If you
want to use the machine without connecting to a network, select [Off].
IMPORTANT
Even if you switch the [Change Settings/Display Connection Confirm.] setting from
'On' to 'Off', if the network connections are correctly set they will not be
disconnected. The settings in the Network Settings screen will not be changed.
2
Settings Common to the Network Protocols
Interface Settings
2-9
Page 36

2
Settings Common to the Network Protocols
2
On the Network Settings screen, press [Ethernet Driver
Settings] ➞ specify the following.
● If you want the machine to automatically determine the
communication mode and Ethernet type:
<Auto Detect>: [On]
❑
If you reconnect the network cable (for example, reconnect the cable to a
different Ethernet hub) with the machine's main power switch ON, the Auto
Detect function will not work even if you set <Auto Detect> to [On]. Turn OFF
the machine, wait at least 10 seconds, and then turn it ON. (Connect the cable
with the machine's main power switch OFF.)
IMPORTANT
The machine automatically determines the Ethernet type. Press [On] unless you
want to specify a particular Ethernet setting.
2-10
● If you want to manually set the communication mode and Ethernet
type for specifying a particular Ethernet type setting:
❑
Interface Settings
<Auto Detect>: [Off].
Select the appropriate items for <Communication Mode> and <Ethernet
Type>, according to the network environment you are using.
Page 37

Communication Environment Setup
This section describes how to set up the environment for communication between
the machine and computers on your network. If you are configuring the settings for
the first time, use the control panel of the machine.
After configuring the settings, you can change them using software other than the
control panel of the machine. For details, see "Network Setting Items," on p. 8-2.
1
On the Network Settings screen, press [SNMP Settings] ➞
specify the settings for SNMP v. 1.
[On] for <Use SNMP v. 1>: Specify the settings for <MIB Access Permission>
according to your network environment. You can also change the community
name in [Community Name] to a name other than 'public'.
2
Settings Common to the Network Protocols
Communication Environment Setup
2-11
Page 38

2
Settings Common to the Network Protocols
IMPORTANT
•
The machine supports the SNMP v. 1 and SNMP v. 3 management functions. You
can use them simultaneously. The [Read Only]/[Read/Write] functions of SNMP v.
1 and the security functions of SNMP v. 3, such as an encrypted communication
path, enable you to manage devices more securely.
The available combinations of SNMP v. 1 and SNMP v. 3 functions you can use are
shown below:
SNMP v. 1 SNMP v. 3
Use
SNMP v. 1
MIB Access
Permission
Use
SNMP v. 3
Description
You can set or browse each item of the
machine with a utility that uses SNMP
v. 1 to obtain information.
On Read/Write On/Off
As the write access with SNMP v. 1 is
enabled, the security functions of
SNMP v. 3 are not available,
regardless of the settings for <Use
SNMP v. 3>.
You can only browse each item of the
machine with a utility that uses SNMP
v. 1 to obtain information.
On Read Only On
Only users who have been assigned
access rights can set each item of the
machine with a utility that uses SNMP
v. 3.
You can only browse each item of the
On Read Only Off
machine with a utility that uses SNMP
v. 1 to obtain information.
Only users who have been assigned
Off - On
access rights can set or browse each
item of the machine with a utility that
uses SNMP v. 3.
Off - Off
You cannot set or browse each item of
the machine with a utility.
2-12
•
If you want to use a Canon printer driver or utility, press [On] for both <Use SNMP
v. 1> and [Enable Dedicated Port] (for IPv4 only).
•
You can restrict the IP addresses of computers on which items can be set or
browsed. If you restrict the IP addresses, it is not possible to set or browse detailed
information concerning the machine on computers other than those whose IP
addresses are allowed, even if <Use SNMP v. 1>, <Use SNMP v. 3>, and [Enable
Dedicated Port] (for IPv4 only) are 'On'. For details, see "TCP/IP Settings (IPv4),"
on p. 3-3 or "TCP/IP Settings (IPv6)," on p. 3-18.
Communication Environment Setup
Page 39

2
Specify the settings for SNMP v. 3.
[On] for <Use SNMP v. 3>: Specify the user and context according to the
following procedures.
NOTE
An SNMP v. 3 user with the following settings is registered by default. Delete or
change these settings as necessary.
- User: initial
- MIB Access Permission: Read/Write
- Security Settings: Auth Yes/Encrypt Yes
- Authent. Algorithm: MD5
- Authent. Password: initial
- Encryption Password: initial
● If you want to add an SNMP v. 3 user:
Press [User Settings] ➞ [Register] ➞ specify the user name, MIB permissions,
❑
and security settings.
If you select [Auth Yes/Encrypt Yes] from the Security Settings drop-down list,
select the authentication algorithm ➞ enter the passwords for authentication
and encryption. If you select [Auth. Yes/Encrypt. No] from the Security
Settings drop-down list, select the authentication algorithm ➞ enter the
password for authentication.
2
Settings Common to the Network Protocols
● If you want to confirm or change the SNMP v. 3 user settings:
Press [User Settings] to select the user whose settings you want to confirm or
❑
change ➞ press [Details/Edit].
Confirm the displayed information ➞ change the settings if necessary.
● If you want to erase an SNMP v. 3 user:
Press [User Settings] to select the user whose settings you want to erase ➞
❑
press [Erase].
Communication Environment Setup
2-13
Page 40

2
Settings Common to the Network Protocols
● If you want to change the status of an SNMP v. 3 user:
Press [User Settings] ➞ select the user whose status you want to change ➞
❑
press [User On/Off].
● If you want to edit the context:
Press [Context Settings] ➞ edit the context.
❑
If you want to add a context, press [Register] to add a new context. If you want
to change a context, select the context you want to change ➞ press [Edit] to
change the context. If you want to erase a context, select the context you want
to erase ➞ press [Erase].
NOTE
A context named 'NULL' is registered by default. The 'NULL' context cannot be
deleted, and is not displayed on the Context Settings screen.
2-14
3
Set monitoring for the printer management information.
[On] for <Get Printer Mgmt Info from Host>: If you are using Windows Vista and
set [Standard TCP/IP port] for the printer driver port, the SNMP port monitoring
function will be enabled automatically to obtain printer management information
such as information on print applications and printer ports.
Communication Environment Setup
Page 41

4
On the Network Settings screen, press [Enable Dedicated
Port] ➞ specify the following.
[On]: You can set or browse detailed information on the machine with a Canon
printer driver or utility (UFR II/PCL/PS printer drivers, NetSpot Device Installer,
etc.).
IMPORTANT
•
If you want to use a Canon printer driver or utility, press [On] for both <Use SNMP
v. 1> and [Enable Dedicated Port].
•
You can restrict the IP addresses of computers on which items can be set or
browsed. If you restrict the IP addresses, it is not possible to set or browse detailed
information concerning the machine on computers other than those whose IP
addresses are allowed, even if <Use SNMP v. 1>, <Use SNMP v. 3>, and [Enable
Dedicated Port] are 'On'. For details, see "TCP/IP Settings (IPv4)," on p. 3-3 or
"TCP/IP Settings (IPv6)," on p. 3-18.
•
IPv6 is not supported.
2
Settings Common to the Network Protocols
5
On the Network Settings screen, press [Use Spooler] ➞
specify the following.
[On]: You can spool print jobs transmitted to this machine on the machine's hard
disk.
Communication Environment Setup
2-15
Page 42

IMPORTANT
If the optional Color PS Printer Kit is activated, take note of the following:
- If the print job is sent from a Macintosh computer to a PS printer, you cannot
specify whether to spool under this option. Spooling is determined by the name of
the printer selected in the Macintosh screen. For more information, see "Setting
Up a Computer for Printing," on p. 6-4.
- If you print a file in PDF or PS format by specifying its URL on the Remote UI, the
print job will always be spooled, regardless of the settings made under this option.
2
NOTE
When you spool a print job on the machine's hard disk, the time required to release
a computer outputting a print job is shortened.
Settings Common to the Network Protocols
2-16
Communication Environment Setup
Page 43

Using a TCP/IP Network
This chapter describes the settings and procedures necessary to connect and use the
machine with a TCP/IP network.
TCP/IP Network Setup Procedures . . . . . . . . . . . . . . . . . . . . . . . . . . . . . . . . . . . . . . . . . 3-2
Protocol Settings. . . . . . . . . . . . . . . . . . . . . . . . . . . . . . . . . . . . . . . . . . . . . . . . . . . . . . . .3-3
TCP/IP Settings (IPv4) . . . . . . . . . . . . . . . . . . . . . . . . . . . . . . . . . . . . . . . . . . . . . . . . . . . . . . . . .3-3
Confirming TCP/IP Settings (IPv4) . . . . . . . . . . . . . . . . . . . . . . . . . . . . . . . . . . . . . . . . . . . . . . .3-17
TCP/IP Settings (IPv6) . . . . . . . . . . . . . . . . . . . . . . . . . . . . . . . . . . . . . . . . . . . . . . . . . . . . . . . .3-18
Confirming TCP/IP Settings (IPv6) . . . . . . . . . . . . . . . . . . . . . . . . . . . . . . . . . . . . . . . . . . . . . . .3-26
Key Pair and Server Certificate Settings for Encrypted SSL Communication . . . . . . . . . . . . . .3-27
Generating and Confirming a Key Pair and Device Signature Certificate and User
Certificate for Adding Digital Signatures to PDF Files . . . . . . . . . . . . . . . . . . . . . . . . . . . . . . . .3-35
E-Mail/I-Fax Settings . . . . . . . . . . . . . . . . . . . . . . . . . . . . . . . . . . . . . . . . . . . . . . . . . . . . . . . . .3-39
Startup Time Settings . . . . . . . . . . . . . . . . . . . . . . . . . . . . . . . . . . . . . . . . . . . . . . . . . . . . . . . . . 3-42
Setting Up a Computer for Printing/Sending a Fax. . . . . . . . . . . . . . . . . . . . . . . . . . . . . 3-43
Printer Connection Method (LPD/Raw) . . . . . . . . . . . . . . . . . . . . . . . . . . . . . . . . . . . . . . . . . . .3-44
Printer Connection Method (IPP/IPPS) . . . . . . . . . . . . . . . . . . . . . . . . . . . . . . . . . . . . . . . . . . .3-50
Printer Connection Method (FTP) . . . . . . . . . . . . . . . . . . . . . . . . . . . . . . . . . . . . . . . . . . . . . . . 3-52
Printer Connection Method (WSD) . . . . . . . . . . . . . . . . . . . . . . . . . . . . . . . . . . . . . . . . . . . . . . . 3-53
Setting Up a Computer as a File Server. . . . . . . . . . . . . . . . . . . . . . . . . . . . . . . . . . . . . 3-54
FTP Server Settings . . . . . . . . . . . . . . . . . . . . . . . . . . . . . . . . . . . . . . . . . . . . . . . . . . . . . . . . . .3-55
WebDAV Server Settings . . . . . . . . . . . . . . . . . . . . . . . . . . . . . . . . . . . . . . . . . . . . . . . . . . . . . . 3-63
3
CHAPTER
3-1
Page 44

TCP/IP Network Setup Procedures
To use a TCP/IP network, it is necessary to perform the following procedures.
1
Protocol Settings (See "Protocol Settings," on p. 3-3.)
Specify the protocol settings. To specify the settings, use:
3
Using a TCP/IP Network
• The machine's control panel
• The Remote UI (via a web browser)
• Canon utilities (NetSpot Device Installer, etc.)
2
Computer Settings for Printing/Sending a Fax (See "Setting Up a Computer for Printing/
Sending a Fax," on p. 3-43.)
Specify the settings for each computer you use for printing or sending a fax. (Optional equipment is required
to print or send a fax from a computer. For the equipment needed, see "Optional Equipment and System
Requirements," on p. 1-2.)
3
Computer Settings for a File Server (See "Setting Up a Computer as a File Server," on p. 3-54.)
Specify the settings of the computer receiving data sent from the machine.
IMPORTANT
•
If you are using the optional imagePASS, for step 2, see the manual provided with the
optional imagePASS, not this guide.
•
It is recommended that steps 1 and 3 above be performed by the network administrator.
•
The machine or optional printing equipment does not come with printer driver software
that can be used on a UNIX platform. (Use LPD to set up a printer in UNIX.)
•
As the fax option does not come with fax driver software for the UNIX platform, it is not
possible to send a fax from a UNIX platform.
3-2
TCP/IP Network Setup Procedures
Page 45

Protocol Settings
This section describes how to specify the protocol settings for the machine using
the control panel. If you are configuring the settings for the first time, use the control
panel of the machine.
After configuring the settings, you can change the content by using software other
than the control panel of the machine. For details, see "Network Setting Items," on
p. 8-2.
IMPORTANT
•
When using functions to access external servers on the internet, you may not be able to
access them due to the settings of firewalls, etc. In this case, consult your network
administrator.
•
If you are using the optional imagePASS, see the manual provided with the optional
imagePASS for more information on the settings (other than for e-mail/I-fax settings).
TCP/IP Settings (IPv4)
The following are the procedures for specifying the TCP/IPv4 settings from the
control panel. After configuring the TCP/IPv4 settings, confirm that the network
connections are properly set. (See "Confirming TCP/IP Settings (IPv4)," on p.
3-17.)
3
Using a TCP/IP Network
If you want to use IPv6 communications, follow the procedure in "TCP/IP Settings
(IPv6)," on p. 3-18 to specify the required settings, and the procedure in
"Confirming TCP/IP Settings (IPv6)," on p. 3-26 to confirm the settings.
1
On the TCP/IP Settings screen, press [IPv4 Settings] ➞ [IP
Address Settings].
Protocol Settings
3-3
Page 46

2
In [IP Address Settings], specify the following.
3
● Using a fixed IP address:
[DHCP], [RARP], and [BOOTP]: [Off]
❑
Enter the appropriate values in [IP Address], [Subnet Mask], and [Gateway
Address].
NOTE
It takes about two minutes to check whether the DHCP, BOOTP, or RARP settings
Using a TCP/IP Network
can be used. If you do not plan to use one of these settings, it is recommended that
you turn them off.
● Obtaining automatically an IP address:
[DHCP], [RARP], or [BOOTP]: [On]
❑
If this information cannot be obtained via DHCP, RARP, or BOOTP after you
restart the machine, enter the IP address, subnet mask, and gateway address
to use the settings entered in this step.
NOTE
•
If the machine is restarted after DHCP, BOOTP, or RARP settings are specified, the
TCP/IP Settings screen displays the IP address setting values obtained from the
DHCP, BOOTP, or RARP server. (If the IP address, host name, and domain name
have been previously set, these will be overwritten by the setting values obtained
from DHCP, BOOTP, or RARP.)
•
If you use DHCP without the DNS dynamic update function, it is recommended that
an identical IP address be assigned to the machine at all times. (If the IP address is
not identical, the host name for the machine will not correspond to the IP address.)
3-4
Protocol Settings
Page 47

3
On the TCP/IP Settings screen, press [DNS Settings] ➞ [DNS
Server Address Settings].
4
In <IPv4>, specify the following.
3
Using a TCP/IP Network
If you want to use dynamic DNS updating, enter the IPv4 address of the DNS
server in [Primary DNS Server].
If you do not want to set up a secondary DNS server, enter <0.0.0.0>.
IMPORTANT
If you set [BOOTP] or [DHCP] to 'On' in step 2, the IP address of a DNS server you
set manually will be overwritten.
Protocol Settings
3-5
Page 48

5
On the DNS Settings screen, press [DNS Host Name/Domain
Name Settings] ➞ in <IPv4>, specify the following.
3
Enter the name of the machine as [Host Name], and the network domain name of
the machine as [Domain Name].
If you want to use dynamic DNS updating, it is necessary to set a host name and
domain name.
IMPORTANT
If you set [BOOTP] or [DHCP] to 'On' in step 2, the host name and domain name
Using a TCP/IP Network
you set manually will be overwritten.
6
On the DNS Settings screen, press [DNS Dynamic Update
Settings] ➞ in <IPv4>, specify the following.
3-6
[On] for <DNS Dynamic Update>: If your environment includes a dynamic DNS
server, you can automatically register the IPv4 address, host name, and domain
name set for the machine in the DNS server using dynamic DNS updating.
Protocol Settings
Page 49

NOTE
•
If you have a DHCP server running Windows 2000 Server that uses the DHCP
service and want to register the machine's DNS record, configure the following
settings in the DHCP server:
➞
- In the DHCP server, right-click the [Scope] icon
click [Properties]. In the [DNS]
sheet of the displayed dialog box, select [Automatically update DHCP client
information in DNS] ➞ [Update DNS only if DHCP client requests].
•
If you have a DHCP server running Windows 2003 Server that uses the DHCP
service and want to register the machine's DNS record, configure the following
settings in the DHCP server:
➞
- In the DHCP server, right-click the [Scope] icon
click [Properties]. In the [DNS]
sheet of the displayed dialog box, select [Enable DNS dynamic updates
➞
according to the settings below]
[Dynamically update DNS A and PTR (Pointer
Record) records only if requested by the DHCP clients].
- In the Active Directory environment, right-click the icon of the DHCP server you
➞
are using
select [Properties]. In the [Advanced] sheet of the displayed dialog
box, click [Credentials]. In the [DNS dynamic update credentials] dialog box, enter
the user name, domain, and password for the Active Directory.
7
On the TCP/IP Settings screen, press [LPD Print Settings] ➞
specify the following.
3
Using a TCP/IP Network
[On]: You can use LPD as the print application.
NOTE
•
You can only output a banner page if you are using the Color imageRUNNER
C3480i/C3080i, or the Color imageRUNNER C3480/C3080/C2550 with the
optional Color PCL Printer Kit or the optional Color PS Printer Kit.
•
Output of a banner page is set on a print-job basis. Even if [On] is selected for
<LPD Banner Page>, a banner page cannot be output for a print job unless it is set.
Protocol Settings
3-7
Page 50

8
On the TCP/IP Settings screen, press [RAW Print Settings] ➞
specify the following.
3
[On]: You can use Raw as the print application.
If you want to establish bidirectional communication using Port 9100, press [On]
for <Bidirectional Communication>.
9
On the TCP/IP Settings screen, press [SNTP Settings] ➞
specify the following.
Using a TCP/IP Network
3-8
[On] for <Use SNTP>: You can perform time synchronization using SNTP.
Select the interval for performing time synchronization in <Polling Interval>.
In [NTP Server Address], enter the NTP server IPv4 address or host name.
IMPORTANT
In order to perform time synchronization through SNTP, it is necessary to set the
time zone of the region in which you are using the machine in advance. For
instructions on how to set the time zone, see Chapter 6, "System Manager
Settings," in the Reference Guide.
Protocol Settings
Page 51

10
On the TCP/IP Settings screen, press [FTP Print Settings] ➞
specify the following.
[On] for <Use FTP printing>: You can use FTP as the print application.
In [User], enter the login user name for access to the FTP server.
In [Password], enter the login password for access to the FTP server.
IMPORTANT
•
If you do not specify [User] and [Password], all user names and passwords will be
valid.
•
The password will appear in the job list as a user name if you enter "anonymous"
as a login user name for access to an FTP server without specifying [User] and
[Password], or if you enter "anonymous" in [User]. (To display the job list, press
➞
[System Monitor]
•
The port number is 21 and cannot be changed.
[Print] ➞ [Log] on the touch panel display.)
3
Using a TCP/IP Network
11
On the TCP/IP Settings screen, press [WSD Print Settings] ➞
specify the following.
Specify the WSD print settings if you are using Windows Vista.
[On] for <Use WSD>: You can use WSD (Web Services for Devices) as the print
application.
<Use WSD Browsing> is automatically set to 'On' if you set <Use WSD> to 'On',
and enables device information to be obtained using WSD.
Protocol Settings
3-9
Page 52

If you want to respond to multicast discovery requests, set <Use Multicast
Discovery> to 'On'.
IMPORTANT
IPv6 is not supported.
12
On the TCP/IP Settings screen, press [Use PASV Mode for
FTP] ➞ specify the following.
3
IMPORTANT
Using a TCP/IP Network
Whether you use the PASV mode for FTP depends on the network environment
you are using and the settings of the file server you are sending to. Before
specifying the PASV mode for FTP, consult your network administrator.
3-10
13
On the TCP/IP Settings screen, press [IPP Print Settings] ➞
specify the following.
[On]: You can use IPP as the print application. Pressing [On] for [IPP Print
Settings] automatically sets [Use HTTP] to 'On'.
To use SSL to encrypt the IPP data, press [On] for <Use SSL>.
If you are using IPP authentication, press [On] for <Use Authentication> ➞ enter
the user name to use for IPP authentication in [User], and the password to use for
IPP authentication in [Password].
Protocol Settings
Page 53

IMPORTANT
•
IPv6 is not supported.
•
In order to select [On] for <Use SSL> to allow SSL communication, a key pair is
necessary. You can use the preinstalled default key pair, or generate an original key
pair with the machine, to use as the default key pair. For information on the default
key pair, and instructions on how to generate an original key pair, see "Generating
a Key Pair and Server Certificate," on p. 3-27.
14
On the TCP/IP Settings screen, press [Multicast Discovery] ➞
specify the following.
[On] for <Response>: You can use device information from other devices, such
as an Address Book or Department ID Management settings, or respond to a
multicast discovery from utilities.
Optionally, press [Scope Name] and enter the scope name for a multicast
discovery.
IMPORTANT
IPv6 is not supported.
NOTE
For instructions on how to deliver and share device information, such as the
Address Book and Department ID Management settings with multiple devices, see
Chapter 6, "System Manager Settings," in the Reference Guide.
3
Using a TCP/IP Network
Protocol Settings
3-11
Page 54

15
On the TCP/IP Settings screen, press [Use HTTP] ➞ specify
the following.
3
[On]: You can use the Remote UI or IPP.
Pressing [Off] for [Use HTTP] automatically sets [Remote UI] (in the System
Settings screen) and [IPP Print Settings] to 'Off'.
16
On the TCP/IP Settings screen, press [Proxy Settings] ➞
specify the following.
Using a TCP/IP Network
3-12
In the following cases, specify the proxy settings, according to the network
environment you are using:
• If you are using the optional Color PS Printer Kit
• If you are using the optional Web Access Software (The Web Access Software
is optional software for viewing web pages on the touch panel display of the
machine. For details, see the
• If you connect the WebDAV client to the Internet via a proxy, when using a
WebDAV server
In [Server Address], enter a proxy server IP address or FQDN (for example,
starfish.company.com).
In [Port Number], enter the port number of a proxy server using - (numeric
keys).
If you want to use a proxy in the same domain, press [On] for <Use Proxy within
the Same Domain>.
Protocol Settings
Web Access Software User's Guide
.)
Page 55

If you want to use proxy authentication, press [Authentication Settings] ➞ [On] for
<Use Proxy Authentication> ➞ enter the user name to use for proxy
authentication in [User], and the password to use for proxy authentication in
[Password].
IMPORTANT
If the optional Color PS Printer Kit is activated, you can print a file in the PDF or PS
format by specifying its URL using the Remote UI. To print a file by specifying its
URL using the Remote UI, you need to specify the proxy settings suitable for your
environment. (Set in this step.)
17
On the IPv4 Settings screen, press [IP Address Range
Settings] ➞ specify the following.
IMPORTANT
You can maintain security by setting the range of IPv4 addresses for computers
that can obtain access to the machine.
- Once you set the range of IPv4 addresses of computers on which items for the
machine can be set or browsed, it is not possible to use the Remote UI on
computers whose IPv4 addresses are not allowed; a utility on the computers
cannot be used to set or browse detailed information concerning the machine.
- Once you set the range of IPv4 addresses of computers from which data (print/
fax/I-fax job) can be sent to the machine, the machine rejects data sent from
computers whose IPv4 addresses are not allowed. (Optional equipment is
required to print or send a fax from a computer. For the equipment needed, see
"Optional Equipment and System Requirements," on p. 1-2.)
3
Using a TCP/IP Network
● If you do not want to restrict the IPv4 addresses of computers from
which data (print/fax/I-fax job) can be sent to the machine:
<Apply Settings> of [Permit IPv4 Address] for <RX/Print Range>: [Off]
❑
❑ <Apply Settings> of [Reject IPv4 Address] for <RX/Print Range>: [Off]
Protocol Settings
3-13
Page 56

● If you want to restrict the IPv4 addresses of computers from which
data (print/fax/I-fax job) can be sent to the machine:
❑
<Apply Settings> of [Permit IPv4 Address] for <RX/Print Range>: [On]
Press [Register] ➞ store only one IPv4 address or a range of IPv4 addresses
that are to be permitted.
3
❑ <Apply Settings> of [Reject IPv4 Address] for <RX/Print Range>: [On]
Press [Register] ➞ store only one IPv4 address or a range of IPv4 addresses
that are to be rejected.
Using a TCP/IP Network
which the machine setting items can be set or browsed (using the
Remote UI or utility):
● If you do not want to restrict the IPv4 addresses of computers on
❑
<Apply Settings> of [Permit IPv4 Address] for <Setting/Browsing Range>: [Off]
❑ <Apply Settings> of [Reject IPv4 Address] for <Setting/Browsing Range>: [Off]:
● If you want to restrict the IPv4 addresses of computers on which the
machine setting items can be set or browsed (using the Remote UI
or utility):
❑
<Apply Settings> of [Permit IPv4 Address] for <Setting/Browsing Range>: [On]
Press [Register]➞ store only one IPv4 address or a range of IPv4 addresses
that are to be permitted.
❑ <Apply Settings> of [Reject IPv4 Address] for <Setting/Browsing Range>: [On]
Press [Register] ➞ store only one IPv4 address or a range of IPv4 addresses
that are to be rejected.
3-14
Protocol Settings
Page 57

IMPORTANT
•
You can register up to eight IPv4 addresses or IPv4 address ranges.
•
The IPv4 address '0.0.0.0' cannot be specified.
•
The value of [First Address] for [Multiple Addresses] should be smaller than or
equal to that of [Last Address].
•
If <Apply Settings> is set to 'Off' for both [Permit IPv4 Address] and [Reject IPv4
Address], all IPv4 addresses are permitted.
•
If <Apply Settings> is set to 'Off' for [Permit IPv4 Address] and <Apply Settings> is
set to 'On' for [Reject IPv4 Address], IPv4 addresses that are beyond the specified
range of [Reject IPv4 Address] are permitted.
•
If <Apply Settings> is set to 'On' for [Permit IPv4 Address] and <Apply Settings> is
set to 'Off' for [Reject IPv4 Address], IPv4 addresses that are beyond the specified
range of [Permit IPv4 Address] are not permitted.
•
If <Apply Settings> for both [Permit IPv4 Address] and [Reject IPv4 Address] is set
to 'On', IPv4 addresses that are beyond the ranges of both [Permit IPv4 Address]
and [Reject IPv4 Address] are not permitted.
•
If <Apply Settings> for both [Permit IPv4 Address] and [Reject IPv4 Address] is set
to 'On', IPv4 addresses that are within the ranges of both [Permit IPv4 Address]
and [Reject IPv4 Address] are not permitted.
•
If the usage of a protocol or print application is not permitted on your device, it
cannot be used even after its IPv4 address is permitted on the machine; on your
device, configure the settings to permit the protocol or print application.
NOTE
This machine logs attempts to gain access from IPv4 addresses that it has been
set to reject. For instructions on how to refer to the access log, see "Viewing the
Network Access Log," on p. 8-24.
3
Using a TCP/IP Network
18
On the TCP/IP Settings screen, press [Permitted Receiving
MAC Address Settings] ➞ specify the following.
[On] for <Apply Settings>: You can enable a MAC address filter. Press [Register]
➞ specify the MAC addresses to allow access to.
Protocol Settings
3-15
Page 58

IMPORTANT
•
Up to 100 MAC addresses can be specified.
•
If you select [On] for <Apply Settings>, you will become unable to access from
MAC addresses which have not been specified. Check the MAC addresses
carefully before specifying them. If the corresponding MAC address does not exist,
you will become unable to access the network.
19
On the TCP/IP Settings screen, press [Dept. ID Management
Password Confirmation] ➞ specify the following.
3
Using a TCP/IP Network
[On]: You can confirm the Department ID and password when printing using a
driver that supports Windows Vista.
IMPORTANT
•
A key pair to use for encrypted SSL communication is required to confirm
Department IDs and passwords. Even if you set [Dept. ID Management Password
Confirmation] to 'On', Department IDs and passwords cannot be confirmed if the
key pair is corrupted or invalid. In this case, erase the key pair and follow the
procedure in "Generating a Key Pair and Server Certificate," on p. 3-27 or
"Registering a Key Pair File and Server Certificate File Installed from a Computer,"
on p. 3-30 to register a new key pair.
•
If there is no key pair, you cannot set <Dept. ID Management Password
Confirmation> to 'On'. You can use the preinstalled default key pair, or generate an
original key pair with the machine, to use as the default key pair. For information on
the default key pair, and instructions on how to generate an original key pair, see
"Generating a Key Pair and Server Certificate," on p. 3-27.
3-16
Protocol Settings
Page 59

Confirming TCP/IP Settings (IPv4)
The following is the procedure for confirming that the network connections are
properly set.
1
On the TCP/IP Settings screen, press [IPv4 Settings] ➞ [PING
Command].
3
2
In [PING Command], check the following.
Pressing [Start] after entering the desired IP address existing on the network
displays the result of the PING command on the touch panel display.
If this result is inappropriate, check the settings described in "Interface Settings,"
on p. 2-9, and "TCP/IP Settings (IPv4)," on p. 3-3.
Using a TCP/IP Network
Protocol Settings
3-17
Page 60

IMPORTANT
•
If you set the startup time of the machine's network function by following the
procedure in "Startup Time Settings," on p. 3-42, execute the PING command only
after the time set as the startup time passes.
•
If you connect the machine to a switching hub, the machine may not be able to
connect to a network even though your network settings are appropriate. This
problem may be resolved by delaying the startup of network communications for
the machine. See "Startup Time Settings," on p. 3-42 for information on how to set
up the startup time.
3
3
Using a TCP/IP Network
On the TCP/IP Settings screen, press [SNTP Settings] ➞ check
the following.
After pressing [NTP Server Check], if <OK> is displayed, time synchronization is
working correctly via SNTP.
If <Error> is displayed, check the settings for [NTP Server Address] set in step 9
of "TCP/IP Settings (IPv4)," on p. 3-3.
Even if you perform [NTP Server Check], time settings are not updated. Check
that communications are possible between the machine and the NTP server.
TCP/IP Settings (IPv6)
The following explains the procedure for specifying TCP/IPv6 settings with the
control panel. After specifying the TCP/IPv6 settings, perform the procedure in
"Confirming TCP/IP Settings (IPv6)," on p. 3-26 to confirm that the network settings
are correct.
The machine can use up to seven of the following IPv6 addresses. With IPv6
communication, multiple IPv6 addresses can be used at the same time.
IMPORTANT
You cannot use the functions of IPv6 without using the functions of IPv4.
3-18
■ Link local address (1)
An address that is only valid within the same link. A link local address is automatically set
using a specific prefix (fe80::) and an interface identifier generated from the MAC address
of the machine. When the machine is using the functions of IPv6, one link local address is
always registered.
■ Manual address (0 or 1)
A fixed address that is set from the control panel.
Protocol Settings
Page 61

■ Stateless address (0 to 6)
A stateless address is automatically set using the machine's MAC address and the prefix
(information indicating the network belonged to) included in the RA (Router
Advertisement) notified by the router when the machine is started.
■ Stateful address (0 or 1)
A stateful address can be obtained from a DHCP server using DHCPv6.
1
On the TCP/IP Settings screen, press [IPv6 Settings] ➞ [Use
IPv6].
2
In [Use IPv6], specify the following.
3
Using a TCP/IP Network
[On] for <Use IPv6>: You can use an IPv6 network. A link local address is
automatically set.
Protocol Settings
3-19
Page 62

3
On the IPv6 Settings screen, press [Stateless Address
Settings] ➞ specify the following.
3
[On] for <Use Stateless Address>: A stateless address is automatically set when
the machine is started.
NOTE
The stateless address is discarded when the machine is restarted (with the
machine's main power switch ON).
Using a TCP/IP Network
4
On the IPv6 Settings screen, press [Manual Address Settings]
➞ specify the following.
[On] for <Use Manual Address>: You can set the IPv6 address manually.
Enter the IPv6 address value in [Manual Address] and the IPv6 address prefix
length in [Prefix Length].
Enter the default router address value in [Default Router Addr.]. If you do not
want to specify the default router address, leave [Default Router Addr.] blank.
IMPORTANT
•
You cannot set a multicast address, an address composed entirely of zeros, or an
address that starts with 'fe80' other than 'fe80:0' or 'fe80:1' in [Manual Address].
You also cannot use a manual address if you leave [Manual Address] blank.
•
You cannot enter a multicast address or an address composed entirely of zeros in
[Default Router Addr.].
3-20
Protocol Settings
Page 63

5
On the IPv6 Settings screen, press [Use DHCPv6] ➞ specify
the following.
[On] for <Use DHCPv6>: You can use DHCPv6 to obtain a stateful address from
a DHCP server.
6
On the IPv6 Settings screen, press [IP Address Range
Settings] ➞ specify the following.
IMPORTANT
You can maintain security by setting the range of IPv6 addresses for computers
that can obtain access to the machine.
- Once you set the range of IPv6 addresses of computers on which items for the
machine can be set or browsed, it is not possible to use the Remote UI on
computers whose IPv6 addresses are not allowed; a utility on the computers
cannot be used to set or browse detailed information concerning the machine.
- Once you set the range of IPv6 addresses of computers from which data (print/
fax/I-fax job) can be sent to the machine, the machine rejects data sent from
computers whose IPv6 addresses are not allowed. (Optional equipment is
required to print or send a fax from a computer. For the equipment needed, see
"Optional Equipment and System Requirements," on p. 1-2.)
3
Using a TCP/IP Network
Protocol Settings
3-21
Page 64

● If you do not want to restrict the IPv6 addresses of computers from
which data (print/fax/I-fax job) can be sent to the machine:
❑
<Apply Settings> of [Permit IPv6 Address] for <RX/Print Range>: [Off]
3
❑ <Apply Settings> of [Reject IPv6 Address] for <RX/Print Range>: [Off]
● If you want to restrict the IPv6 addresses of computers from which
data (print/fax/I-fax job) can be sent to the machine:
<Apply Settings> of [Permit IPv6 Address] for <RX/Print Range>: [On]
❑
Press [Register] ➞ store only one IPv6 address or a range of IPv6 addresses
Using a TCP/IP Network
that are to be permitted. Also specify the prefix and prefix length for the IPv6
address.
3-22
❑ <Apply Settings> of [Reject IPv6 Address] for <RX/Print Range>: [On]
● If you do not want to restrict the IPv6 addresses of computers on
which the machine setting items can be set or browsed (using the
Remote UI or a utility):
❑
❑ <Apply Settings> of [Reject IPv6 Address] for <Setting/Browsing Range>: [Off]
Protocol Settings
Press [Register] ➞ store only one IPv6 address or a range of IPv6 addresses
that are to be rejected. Also specify the prefix and prefix length for the IPv6
address.
<Apply Settings> of [Permit IPv6 Address] for <Setting/Browsing Range>: [Off]
Page 65

● If you want to restrict the IPv6 addresses of computers on which the
machine setting items can be set or browsed (using the Remote UI
or a utility):
<Apply Settings> of [Permit IPv6 Address] for <Setting/Browsing Range>: [On]
❑
Press [Register] ➞ store only one IPv6 address or a range of IPv6 addresses
that are to be permitted. Also specify the prefix and prefix length for the IPv6
address.
❑ <Apply Settings> of [Reject IPv6 Address] for <Setting/Browsing Range>: [On]
Press [Register] ➞ store only one IPv6 address or a range of IPv6 addresses
that are to be rejected. Also specify the prefix and prefix length for the IPv6
address.
IMPORTANT
•
A total of eight (groups) of IPv6 addresses, ranges of IPv6 addresses, or IPv6
address prefixes can be set.
•
You cannot specify a multicast address or an address composed entirely of zeros
for an IPv6 address.
•
If you enter '0' in [Prefix Length], all IPv6 addresses are not permitted.
•
If you enter '128' in [Prefix Length], the IPv6 addresses of the machine are not
permitted.
•
If you want to enter a range of addresses, make sure that the number entered in
[First Address] is less than the number entered in [Last Address].
•
If <Apply Settings> is set to 'Off' for both [Permit IPv6 Address] and [Reject IPv6
Address], all IPv6 addresses are permitted.
•
If <Apply Settings> is set to 'Off' for [Permit IPv6 Address] and <Apply Settings> is
set to 'On' for [Reject IPv6 Address], IPv6 addresses that are beyond the range
specified in [Reject IPv6 Address] are permitted.
•
If <Apply Settings> is set to 'On' for [Permit IPv6 Address] and <Apply Settings> is
set to 'Off' for [Reject IPv6 Address], IPv6 addresses that are beyond the range
specified in [Permit IPv6 Address] are not permitted.
•
If <Apply Settings> for both [Permit IPv6 Address] and [Reject IPv6 Address] is set
to 'On', IPv6 addresses that are beyond the ranges specified in both [Permit IPv6
Address] and [Reject IPv6 Address] are not permitted.
•
If <Apply Settings> for both [Permit IPv6 Address] and [Reject IPv6 Address] is set
to 'On', IPv6 addresses that are within the ranges specified in both [Permit IPv6
Address] and [Reject IPv6 Address] are not permitted.
•
If the usage of a protocol or print application is not permitted on your device, it
cannot be used even if its IPv6 address is permitted on the machine. Configure the
settings of the device to permit the protocol or print application.
NOTE
This machine logs attempts to gain access from IPv6 addresses that it has been
set to reject. For instructions on how to refer to the access log, see "Viewing the
Network Access Log," on p. 8-24.
3
Using a TCP/IP Network
Protocol Settings
3-23
Page 66

7
On the TCP/IP Settings screen, press [DNS Settings] ➞ [DNS
Server Address Settings].
3
8
In <IPv6>, specify the following.
Using a TCP/IP Network
3-24
If you want to use dynamic DNS updating, enter the IPv6 address of the DNS
server in [Primary DNS Server].
If you do not want to specify a secondary DNS server, leave [Secondary DNS
Server] blank.
IMPORTANT
•
You cannot enter a multicast address or address composed entirely of zeros in
[Primary DNS Server] or [Secondary DNS Server].
•
If you set <Use DHCPv6> to 'On' in step 5, the IPv6 address of a DNS server you
set manually will be overwritten.
Protocol Settings
Page 67

9
On the DNS Settings screen, press [DNS Host Name/Domain
Name Settings] ➞ in <IPv6>, specify the following.
[On] for <Use Same Host Name/Domain Name as IPv4>: You can set the same
host name or domain name used with IPv4 communication for IPv6
communication. If you set <Use Same Host Name/Domain Name as IPv4> to
'Off', enter the name of the machine in [Host Name] and the name of the domain
the machine belongs to in [Domain Name]. It is necessary to set a host name
and domain name if you want to use dynamic DNS updating.
IMPORTANT
If you set <Use DHCPv6> to 'On' in step 5, the domain name you set manually will
be overwritten.
10
On the DNS Settings screen, press [DNS Dynamic Update
Settings] ➞ in <IPv6>, specify the following.
3
Using a TCP/IP Network
[On] for <DNS Dynamic Update>: If your environment includes a dynamic DNS
server, you can automatically register the IPv6 address, host name, and domain
name set for the machine in the DNS server using dynamic DNS updating.
[On] for <Register Stateless Address>: You can automatically register a stateless
address in the DNS server using dynamic DNS updating.
[On] for <Register Manual Address>: You can automatically register a manual
address in the DNS server using dynamic DNS updating.
Protocol Settings
3-25
Page 68

[On] for <Register Stateful Address>: You can automatically register a stateful
address in the DNS server using dynamic DNS updating.
IMPORTANT
Windows 2000 Server and Windows Server 2003 do not support DHCPv6 servers.
Confirming TCP/IP Settings (IPv6)
The following is the procedure for confirming that the TCP/IPv6 network
connections are properly set.
3
1
On the TCP/IP Settings screen, press [IPv6 Settings] ➞ [PING
Command].
Using a TCP/IP Network
3-26
2
In [PING Command], check the following.
Pressing [Start] after entering an IPv6 address existing on the network in [IPv6
Address] displays the result of the PING command on the touch panel display.
Pressing [Start] after entering the machine's host name in [Host Name] displays
the result of the PING command on the touch panel display.
If this result is inappropriate, check the settings described in "Interface Settings,"
on p. 2-9, and "TCP/IP Settings (IPv6)," on p. 3-18.
Protocol Settings
Page 69

IMPORTANT
•
If you set the startup time of the machine's network functions by following the
procedure in "Startup Time Settings," on p. 3-42, execute the PING command only
after the time set as the startup time passes.
•
If you connect the machine to a switching hub, the machine may not be able to
connect to a network even though your network settings are appropriate. This
problem may be resolved by delaying the startup of network communications for
the machine. See "Startup Time Settings," on p. 3-42 for information on how to set
up the startup time.
Key Pair and Server Certificate Settings for Encrypted SSL Communication
The key pair and server certificate are required for performing SSL encrypted
communication, for use with the following items. This section describes how to
specify the key pair and server certificate settings from the control panel of the
machine.
• [IPP Print Settings] (See step 13 of "TCP/IP Settings (IPv4)," on p. 3-3.)
• [E-Mail/I-Fax] (See "E-Mail/I-Fax Settings," on p. 3-39.)
• [Remote UI] (See the Remote UI Guide.)
• MEAP functions via a web browser (See the MEAP SMS Administrator Guide.)
• [Device Information Delivery Settings] (See the Reference Guide.)
• Department IDs/Passwords Confirmation (See step 19 of "TCP/IP Settings
(IPv4)," on p. 3-3.)
3
Using a TCP/IP Network
Generating a Key Pair and Server Certificate
It is necessary to generate and register a key pair in order to use encrypted SSL
communication for IPP printing, e-mail and I-faxes, the Remote UI, MEAP functions
via a web browser, and device information delivery, or confirm Department IDs and
passwords.
A key pair and server certificate are preinstalled in the machine. You can also use
this key pair and server certificate to enable encrypted SSL communication.
The procedure for generating and registering a key pair and self-signed server
certificate using the control panel of the machine is as follows:
IMPORTANT
Up to two key pairs can be registered.
Protocol Settings
3-27
Page 70

1
On the TCP/IP Settings screen, press [Certificate Settings] ➞
[Generate Key].
3
2
Press [Generate SSL Key] ➞ specify the following.
Using a TCP/IP Network
3-28
In [Key Name], enter a name for the key pair ➞ select a key length.
IMPORTANT
•
Up to 24 alphanumeric characters can be entered for [Key Name].
•
You cannot generate a key pair with a key length other than 512 or 1024 bit.
NOTE
You cannot specify 'Device Signature Key' (used for key pairs for adding digital
signatures to PDFs) or 'AMS' (used for key pairs for access restrictions) as the
name for the key pair.
Protocol Settings
Page 71

3
Press [Next] ➞ set the self-signed server certificate.
You cannot set an end date which is earlier than the start date.
Set at least one of the following items ➞ press [Start Key Generatn] to generate a
key. You cannot issue a server certificate if all the items are left blank. When
using IPPS printing with Windows Vista, make sure to enter the IP address of the
machine in [Common Name].
Items you can set:
[Country/Region]: Select the country/region name from the 25 countries/
regions in the list, or enter an Internet country code (2
characters maximum).
[State]: Set the state name (24 characters maximum).
[City]: Set the city name (24 characters maximum).
[Organization]: Set the organization name (24 characters maximum).
[Orgnztion Unit]: Set the organization unit, such as the department name (24
characters maximum).
[Common Name]: Set the IP address or FQDN (for example,
starfish.company.com) of the machine (24 characters
maximum).
IMPORTANT
•
A DNS server is necessary to use the FQDN of the machine in [Common Name].
Use the IP address of the machine if you do not have a DNS server.
•
The key pair you have registered cannot be used for encrypting communications
with SSL until it has been set as the default key pair. For instructions on how to set
the default key pair, see "Editing Key Pairs and Server Certificates," on p. 3-31.
NOTE
•
To confirm the key pair and server certificate you have registered, see "Editing Key
Pairs and Server Certificates," on p. 3-31.
•
After pressing [Start Key Generatn], you cannot use any of the keys until a key pair
has been generated and registered.
3
Using a TCP/IP Network
Protocol Settings
3-29
Page 72

Registering a Key Pair File and Server Certificate File Installed from
a Computer
You can install a key pair from a computer in order to use encrypted SSL
communication for IPP printing, e-mail and I-faxes, the Remote UI, MEAP functions
via a web browser, and device information delivery, or confirm Department IDs and
passwords.
A key pair file and server certificate file created on a computer can be installed in
the machine using a web browser (Remote UI).
The procedure for registering installed files in the machine using the control panel
is as follows:
3
Using a TCP/IP Network
IMPORTANT
Up to two key pairs can be registered.
NOTE
For instructions on how to install a key pair file and server certificate file, see the Remote
UI Guide.
1
On the TCP/IP Settings screen, press [Certificate Settings] ➞
[Register Key and Certificate] ➞ specify the following.
3-30
Select the file to register ➞ press [Register] ➞ enter the name of the private key in
[Key Name], and the password for the private key in [Password].
To erase an unnecessary file, select the file ➞ press [Erase].
IMPORTANT
You can register only key pair files which use the RSA algorithm.
NOTE
For instructions on how to confirm a registered key pair and server certificate, see
"Editing Key Pairs and Server Certificates," on p. 3-31.
Protocol Settings
Page 73

Editing Key Pairs and Server Certificates
You can confirm the settings of registered key pairs and server certificates. You can
also erase unnecessary key pairs and server certificates, and set the default key
pair. The key pair set as the default key pair is used for SSL communication.
1
On the TCP/IP Settings screen, press [Certificate Settings] ➞
[Key and Certificate List] ➞ [Key and Certificate List for this
Machine] ➞ specify the following.
If (invalid) is displayed to the left of a key pair, it is corrupted or invalid. After
erasing the corrupted or invalid key pair, register a key pair (see "Generating a
Key Pair and Server Certificate," on p. 3-27 or "Registering a Key Pair File and
Server Certificate File Installed from a Computer," on p. 3-30).
NOTE
The Device Signature Key is a key pair required for a device signature. For more
information, see "Confirming a Key Pair and Device Certificate," on p. 3-37.
● If you want to confirm a server certificate:
Select the key pair for the server certificate you want to confirm ➞ press
❑
[Certificate Details] ➞ [Certificate Verification].
3
Using a TCP/IP Network
If [Certificate Verification] is grayed out or <The key is corrupted or invalid.> is
displayed, you cannot use the key pair. After erasing the corrupted or invalid
key pair, register a key pair (see "Generating a Key Pair and Server
Certificate," on p. 3-27 or "Registering a Key Pair File and Server Certificate
File Installed from a Computer," on p. 3-30).
Protocol Settings
3-31
Page 74

● If you want to erase a registered key pair:
Select the key pair to erase ➞ press [Erase].
❑
3
IMPORTANT
The key pair with (default) displayed to the left of it is set as the default key pair.
If SSL is set to 'On' for any of the following items, that key pair cannot be erased.
The key pair can be erased when all of the settings are set to 'Off'.
- [Remote UI] (See the Remote UI Guide.)
- [Use HTTP] in [MEAP Settings] (See the MEAP SMS Administrator Guide.)
- [IPP Print Settings] (See step 13 of "TCP/IP Settings (IPv4)," on p. 3-3.)
Using a TCP/IP Network
- <SMTP Receipt> in [E-Mail/I-Fax] (See step 2 of "E-Mail/I-Fax Settings," on p.
3-39.)
- [Receive Restriction for Each Function] in [Device Information Delivery Settings]
(See the Reference Guide.)
- [Dept. ID Management Password Confirmation] (See step 19 of "TCP/IP Settings
(IPv4)," on p. 3-3.)
● If you want to set the default key pair:
❑
Select the key pair to set as the default key pair ➞ press [Default Key Settings].
3-32
Protocol Settings
Page 75

NOTE
•
The key pair with (default) displayed to the left of it is set as the default key pair.
To change the default key pair, select a key pair which does not have (default)
displayed to the left of it.
•
If you try to set the key pair with (invalid) displayed to the left of it as a default
key, <Cannot set as the Default Key because this key is corrupted or invalid.> is
displayed. After erasing the corrupted or invalid key pair, register a key pair (see
"Generating a Key Pair and Server Certificate," on p. 3-27 or "Registering a Key
Pair File and Server Certificate File Installed from a Computer," on p. 3-30).
Registering a CA Certificate File Installed from a Computer
Apart from the X.509 (DER) format CA certificate preinstalled in the machine, you
can also register a CA certificate file which has been installed using a web browser
(Remote UI).
The procedure for registering installed files in the machine using the control panel
is as follows:
IMPORTANT
For instructions on how to install a CA certificate file, see the Remote UI Guide.
NOTE
Up to 50 CA certificate files can be registered.
3
Using a TCP/IP Network
1
On the TCP/IP Settings screen, press [Certificate Settings] ➞
[Register CA Certificate] ➞ specify the following.
Select the file to register ➞ press [Register].
To erase an unnecessary file, select the file ➞ press [Erase]. When the
confirmation message is displayed, press [Yes].
To confirm the CA certificate you have registered, see "Editing a CA Certificate,"
on p. 3-34.
Protocol Settings
3-33
Page 76

Editing a CA Certificate
You can confirm the settings of registered CA certificates. You can also erase
unnecessary CA certificates.
1
On the TCP/IP Settings screen, press [Certificate Settings] ➞
[CA Certificate List] ➞ specify the following.
● If you want to confirm a CA certificate:
Select the key pair for the CA certificate you want to confirm ➞ press
❑
3
Using a TCP/IP Network
[Certificate Details] ➞ [Certificate Verification].
● If you want to erase a registered CA certificate:
3-34
❑
Protocol Settings
Select the CA certificate to erase ➞ press [Erase].
Page 77

Generating and Confirming a Key Pair and Device Signature Certificate and User Certificate for Adding Digital Signatures to PDF Files
The machine can add the following two types of digital signatures to PDF files.
This section describes the procedures for specifying and confirming the settings
necessary for adding digital signatures to PDF files using the control panel of the
machine.
For instructions on how to add digital signatures to PDF files, see the Sending and
Facsimile Guide or the Remote UI Guide.
■ Device Signature
Enables the recipient to identify the device that scanned the document. This type of
signature requires the optional Universal Send PDF Security Feature Set. To add a device
signature to a PDF, set a key pair and device certificate. (See "Setting a Key Pair and
Device Certificate," on p. 3-35.)
IMPORTANT
The Universal Send PDF Security Feature Set is optional if you are using the Color
imageRUNNER C3480/C3080/C2550.
■ User Signature
Enables the recipient to identify the user who signed the document. This type of signature
requires the optional Digital User Signature PDF Kit. To add a user signature to a PDF, it is
necessary to install a key pair and user certificate in the machine from a computer. (See
the Remote UI Guide.) You can confirm the installed key pair and user certificate using the
control panel of the machine. (See "Confirming a Key Pair and User Certificate," on p.
3-38.)
3
Using a TCP/IP Network
Setting a Key Pair and Device Certificate
The following procedures describe how to generate and update the key pair and
device certificate necessary for adding a device signature to a PDF.
NOTE
The optional Universal Send PDF Security Feature Set is necessary to add a device
signature to PDF files. For more information on the equipment needed, see the Sending
and Facsimile Guide. The Universal Send PDF Security Feature Set is optional if you are
using the Color imageRUNNER C3480/C3080/C2550.
Protocol Settings
3-35
Page 78

1
On the TCP/IP Settings screen, press [Certificate Settings] ➞
[Generate Key].
3
2
Press [Generate/Update Device Signature Key] ➞ [Yes].
Using a TCP/IP Network
3-36
IMPORTANT
You can register only one key pair.
NOTE
The name of the generated/updated key pair is set to 'Device Signature Key'.
To confirm a key pair and device certificate, see "Confirming a Key Pair and Device
Certificate," on p. 3-37.
Protocol Settings
Page 79

Confirming a Key Pair and Device Certificate
The following procedure describes how to confirm a key pair and device certificate
generated/updated in "Setting a Key Pair and Device Certificate," on p. 3-35.
1
On the TCP/IP Settings screen, press [Certificate Settings] ➞
[Key and Certificate List] ➞ [Key and Certificate List for this
Machine].
If (invalid) is displayed to the left of a key pair, the key pair is corrupted or
invalid. Follow the procedure in "Setting a Key Pair and Device Certificate," on p.
3-35 to generate/update a key pair.
NOTE
You cannot delete or edit a key pair necessary for a device signature on the Key
and Certificate List for this Machine screen.
2
Select 'Device Signature Key' ➞ press [Certificate Details] ➞
[Certificate Verification].
3
Using a TCP/IP Network
If <Certificate Verification> is grayed out or <The key is corrupted or invalid.> is
displayed, you cannot use the key pair. Follow the procedure in "Setting a Key
Pair and Device Certificate," on p. 3-35 to generate/update a new key pair.
NOTE
•
<Certificate Thumbprint> contains sender information used to validate the reliability
of a PDF with a device signature, by matching it with the MD5 or SHA-1 message
digest number.
•
The expiration date for the device signature is set to 5 years after its key pair was
generated/updated.
Protocol Settings
3-37
Page 80

Confirming a Key Pair and User Certificate
The following procedure describes how the system manager can confirm the key
pairs and user certificates for all users.
Install the key pair and user certificate used for adding a user signature to PDF files
from a computer. (See the Remote UI Guide.)
NOTE
•
To add a user signature to a PDF, it is necessary to log in to the machine using the SDL
or SSO login service, and the optional Digital User Signature PDF Kit must be activated
by registering a license key. For more information on the SDL and SSO login services,
see the MEAP SMS Administrator Guide. For more information on the Digital User
3
Using a TCP/IP Network
Signature PDF Kit, see the Sending and Facsimile Guide.
•
You can also use the Remote UI to confirm the key pairs and user certificates for all
users. For more information, see the Remote UI Guide.
•
End users can display the Key and Certificate List for Users screen in [Communications
Settings] ➞ [TX Settings] under <Common Settings> ➞ [Check User Signature
Certificate] (from the Additional Functions screen). However, in this case, only the key
pair and user certificate for the user who is currently logged in are displayed. Key pairs
and user certificates for other users cannot be displayed. The user's key pair also cannot
be deleted from this screen. An end user must use the Remote UI to delete their key pair.
(See the Remote UI Guide).
1
On the TCP/IP Settings screen, press [Certificate Settings] ➞
[Key and Certificate List] ➞ [Key and Certificate List for Users]
➞ specify the following.
User key pairs with (invalid) displayed to the left of them are corrupted or
invalid key pairs. After erasing the key pair, install a key pair and user certificate
in the machine from a computer. (See the
Remote UI Guide
.)
3-38
● If you want to confirm a user certificate:
❑
Protocol Settings
Select the key pair for the certificate you want to confirm ➞ press [Certificate
Details] ➞ [Certificate Verification].
Page 81

If [Certificate Verification] is grayed out or <The key is corrupted or invalid.> is
displayed, you cannot use the key pair. After erasing the corrupted or invalid
key pair, install a new key pair and user certificate from a computer. (See the
Remote UI Guide
● If you want to erase a registered key pair:
Select the key pair to erase ➞ press [Erase].
❑
E-Mail/I-Fax Settings
1
On the Network Settings screen, press [E-mail/I-Fax].
.)
3
Using a TCP/IP Network
2
Specify the mail server for receiving e-mail/I-faxes.
The machine supports both the SMTP and POP3 functions.
The machine can receive I-fax images and communication error notices only.
Protocol Settings
3-39
Page 82

● If you want to receive e-mail/I-faxes using the machine's own SMTP
receiving function:
❑
Register the host name of the machine with the DNS server ➞ specify the
following.
Press [On] for <SMTP Receipt> ➞ press [Off] for <POP>.
In [E-mail Address], enter the e-mail address your machine will use. You can
specify any user name (the part of the address located in front of the @
symbol). Enter the host name after the "@" symbol in the e-mail address.
If you select [SSL] for <Allow SSL (SMTP Receive)>, reception of only data
encrypted using SSL is allowed and communications from the host not using
SSL are rejected.
3
Using a TCP/IP Network
If you select [On] for <Allow SSL (SMTP Receive)>, depending on the request
from the host, reception of data encrypted using SSL is allowed only when
there is a request from the host.
IMPORTANT
•
Even if you select [On] for <Allow SSL (SMTP Receive)>, the data will not be
encrypted if the SMTP host does not support encryption.
•
In order to select [SSL] or [On] for <Allow SSL (SMTP Receive)> to allow SSL
transmission, it is necessary to generate a key pair in advance. For instructions on
how to generate a key pair, see "Generating a Key Pair and Server Certificate," on
p. 3-27.
● If you want to receive e-mail/I-faxes using a POP server:
3-40
❑
Protocol Settings
Press [On] for <POP> ➞ press [Off] for <SMTP Receipt>.
In [E-mail Address], enter the e-mail address your machine will use.
In [POP Server], enter the IP address or name of the POP server using the
keyboard on the touch panel display.
In [POP Address], enter the login name for access to the POP server.
In [POP Password], enter the password for access to the POP server.
Set <POP Interval> to the interval you want the POP server to check for
incoming e-mail. If the interval is set to '0', the POP server is not checked
automatically. For instructions on how to manually check the POP server, see
Chapter 8, "Checking/Changing the Send/Receive Status," in the
Facsimile Guide
Select the authentication method supported by the POP server from
[Standard], [APOP], or [POP AUTH] for <POP AUTH Method>.
If you want to send encrypted data, press [On] for <Allow SSL (POP)>.
.
Sending and
Page 83

IMPORTANT
•
If the POP server does not support SSL encryption, data is not encrypted when
[On] is selected for <Allow SSL (POP)>.
•
In order to select [On] for <Allow SSL (POP)> to allow SSL transmission, it is
necessary to generate a key pair in advance. For instructions on how to generate a
key pair, see "Generating a Key Pair and Server Certificate," on p. 3-27.
3
Specify the mail server for sending e-mail/I-faxes.
3
● If you are using an SMTP server that requires POP before SMTP
(method for authenticating users who have logged in the POP server
before sending e-mail):
In [SMTP Server], enter the IP address or name of the SMTP server using the
❑
keyboard on the touch panel display.
Press [On] for <POP Authentication before Sending> ➞ press [Off] for <SMTP
Authentication (SMTP AUTH)>.
● If you are using an SMTP server that requires SMTP Authentication
(method for authenticating users who have logged in the SMTP
server before sending e-mail):
❑
In [SMTP Server], enter the IP address or name of the SMTP server using the
keyboard on the touch panel display.
Press [On] for <SMTP Authentication (SMTP AUTH)> ➞ press [Off] for <POP
Authentication before Sending>.
In [User], enter the user name used for logging in to the SMTP server. If you
are using a Microsoft SMTP server, enter the user name in [User] using the
following format: user name@domain name.
In [Password], enter the password used for logging in to the SMTP server.
To encrypt data to be sent using SSL, select [On] for <Allow SSL (SMTP
Send)>.
Using a TCP/IP Network
Protocol Settings
3-41
Page 84

IMPORTANT
If the SMTP host does not support encryption, data is not encrypted when [On] is
selected for <Allow SSL (SMTP Send)>.
● If you are using an SMTP server that does not require authentication
for sending e-mail:
In [SMTP Server], enter the SMTP server IP address or name using the
❑
keyboard on the touch panel display.
Press [Off] both for <SMTP Authentication (SMTP AUTH)> and <POP
Authentication before Sending>.
3
Startup Time Settings
If you connect the machine to a switching hub, it may not be able to connect to a
network even though your network settings are set correctly.
This occurs because the spanning tree process performed between switching hubs
prevents them from communicating with each other immediately after the machine
connects to a switching hub.
Using a TCP/IP Network
In this case, use the following procedure to delay the start of communication.
1
On the Network Settings screen, press [Startup Time Settings]
➞ specify the following.
Press [-] or [+] to set the time period to delay the startup of network
communications for the machine.
3-42
Protocol Settings
Page 85

Setting Up a Computer for Printing/Sending a Fax
After you have completed the protocol settings for printing and sending a fax with
the machine, you are ready to set up each of the computers for printing or sending
a fax.
■ Connecting to a TCP/IP Network
All computers that use the printer must have TCP/IP client software installed and must be
enabled for TCP/IP network use. For details, see the manuals provided with the operating
system.
■ Installing the Driver and Specifying the Port Setting
To print or send a fax from a computer, you must install a driver and specify a port setting.
The port setting differs depending on the print application used for printing or sending a
fax. Use the following information as a guide to determine the print application you are
using, and then perform the necessary operations.
3
• LPD
This is the print application generally used with TCP/IP.
See "Printer Connection Method (LPD/Raw)," on p. 3-44.
• Raw
This is a print application used with Windows. It can send a job to the machine at higher
speeds than LPD.
See "Printer Connection Method (LPD/Raw)," on p. 3-44.
• IPP/IPPS
This is a print application that can be used with TCP/IP. IPP enables you to use the
HTTP protocol to send data to a machine on an intranet/the internet. IPPS is a print
application which performs encrypted SSL communication when using IPP.
See "Printer Connection Method (IPP/IPPS)," on p. 3-50.
• FTP
This is a print application that prints files by copying them to the printer using FTP client
software.
See "Printer Connection Method (FTP)," on p. 3-52.
• WSD
This is a print application that can be used with Windows Vista.
See "Printer Connection Method (WSD)," on p. 3-53.
• SMB
This is a print application that can be used with a NetBIOS network.
See Chapter 5, "Using a NetBIOS Network."
Using a TCP/IP Network
Setting Up a Computer for Printing/Sending a Fax
3-43
Page 86

IMPORTANT
•
Optional equipment is required to print or send a fax from a computer. For the equipment
needed, see "Optional Equipment and System Requirements," on p. 1-2.
•
If the settings for <RX/Print Range> in [IP Address Range Settings] on the IPv4 or IPv6
Settings screen do not permit the IP address of a computer in which a driver is installed,
you cannot print from the computer. (See step 17 in "TCP/IP Settings (IPv4)," on p. 3-3 or
step 6 in "TCP/IP Settings (IPv6)," on p. 3-18.)
•
If you print with IPP, the [Pause Printing] and [Cancel All Documents] settings on the
[Printer] menu in the Windows print queue cannot be used. (To view the print queue, click
➞
the [Start] menu
point to [Settings] ➞ click [Printers] ➞ double-click the icon of the
machine.)
3
NOTE
It is recommended that you install Canon LPR2 when using Raw or IPP in Windows
2000/XP/Server 2003. Canon LPR2 enables you to set ports easily. For more
information, see the Canon LPR2 User's Guide (PDF manual). For instructions on how to
display the Canon LPR2 User's Guide, see the Network Quick Start Guide.
Printer Connection Method (LPD/Raw)
Using a TCP/IP Network
Windows 2000/XP/Server 2003/Vista
In the following procedures, items displayed on the screens for Windows 2000 are
used. The items displayed may differ according to your operating system.
NOTE
If you are using Windows Vista, a dialog box may be displayed while you are performing
the procedure. In this case, enter a user name and password. For more information, see
the manuals provided with the operating system.
3-44
Setting Up a Computer for Printing/Sending a Fax
Page 87

■ Installing a New Driver
1
Check the settings for <RX/Print Range> in [IP Address Range
Settings] on the IPv4 or IPv6 Settings screen to see whether
the IP address of the computer in which a driver is to be
installed is permitted. For details, see step 17 in "TCP/IP
Settings (IPv4)," on p. 3-3 or step 6 in "TCP/IP Settings (IPv6),"
on p. 3-18.
IMPORTANT
•
If the settings for <RX/Print Range> in [IP Address Range Settings] on the IPv4 or
IPv6 Settings screen do not permit the IP address, you cannot install a driver.
•
If the IP address of the computer is beyond the range of the permitted addresses
set for <RX/Print Range> after installing a driver, you cannot print or send a fax
from the computer.
2
Install the driver.
Install the driver according to the following procedures indicated in the manual
for each driver:
• If you want to use the PCL printer driver
See the procedure for dynamic installation in Chapter 2, "Getting Started," in the
PCL Driver Guide
• If you want to use the PS printer driver
See the procedure for dynamic installation in Chapter 2, "Getting Started," in the
PS Driver Guide
• If you want to use the UFR II printer driver
See the procedure for dynamic installation in Chapter 2, "Getting Started," in the
UFR II Driver Guide
• If you want to use the fax driver
See the procedure for dynamic installation in Chapter 2, "Getting Started," in the
Fax Driver Guide
NOTE
•
The print application will be LPD and the print queue will be set to <LP> if the driver
has been installed according to the above procedures.
•
This machine enables you to specify print queues other than <LP>. You can also
use Raw as the print application. For instructions on how to change the settings,
see "Changing the Port after Installing the Driver," on p. 3-46.
.
.
.
3
Using a TCP/IP Network
.
Setting Up a Computer for Printing/Sending a Fax
3-45
Page 88

■ Changing the Port after Installing the Driver
1
Install Canon LPR2, and change the port settings.
If you are using Windows Vista or you do not want to use Canon LPR2, proceed
to step 2.
For instructions on how to install Canon LPR2 and set ports, see the
User's Guide
User's Guide
IMPORTANT
3
Using a TCP/IP Network
If you use LPD, enter one of the following in [LPR Queue Name] in the [Add Port]
dialog box of Canon LPR2:
-LP
The machine prints according to its spool settings. Normally enter <LP> as a print
queue.
- SPOOL
The machine prints only after spooling a print job on the hard disk, regardless of
its spool settings.
-DIRECT
The machine prints without spooling a print job on the hard disk, regardless of its
spool settings.
2
In the printer properties dialog box of the printer you installed,
(PDF manual). For instructions on how to display the
, see the
Network Quick Start Guide
.
Canon LPR2
Canon LPR2
select the [Ports] sheet ➞ click [Add Port].
3-46
Setting Up a Computer for Printing/Sending a Fax
Page 89

3
In the [Printer Ports] dialog box, from [Available ports types],
select [Standard TCP/IP Port] ➞ click [New Port].
4
According to the instructions on the Add Standard TCP/IP
Printer Port Wizard, in [Printer Name or IP Address], enter the
printer IP address or printer host name ➞ exit the Wizard.
If the dialog box displays <Additional Port Information Required>, follow the
instructions on the screen to search again, or click [Standard] ➞ click [Canon
Network Printing Device with P9100] under [Device type].
5
In the printer properties dialog box, click [Configure Port] ➞
select [LPR] or [Raw].
3
Using a TCP/IP Network
If you use LPD, you can specify one of the following print queues in [Queue
Name].
• LP
The machine prints according to its spool settings. Normally, <LP> is entered
as a print queue.
• SPOOL
The machine prints only after spooling a print job on the hard disk, regardless of
its spool settings.
• DIRECT
The machine prints without spooling a print job on the hard disk, regardless of
its spool settings.
Setting Up a Computer for Printing/Sending a Fax
3-47
Page 90

Mac OS X
1
Check the settings for <RX/Print Range> in [IP Address Range
Settings] on the IPv4 or IPv6 Settings screen to see whether
the IP address of the computer in which a driver is to be
installed is permitted. For details, see step 17 in "TCP/IP
Settings (IPv4)," on p. 3-3 or step 6 in "TCP/IP Settings (IPv6),"
on p. 3-18.
IMPORTANT
•
3
Using a TCP/IP Network
If the settings for <RX/Print Range> in [IP Address Range Settings] on the IPv4 or
IPv6 Settings screen do not permit the IP address, you cannot install a driver.
•
If the IP address of the computer is beyond the range of the permitted addresses
set for <RX/Print Range> after installing a driver, you cannot print or send a fax
from the computer.
2
Install the driver.
Install the driver according to the instructions in the manual for each driver.
• If you want to use the UFR II printer driver
See the
• If you want to use the PS printer driver
See the
• If you want to use a PS printer driver provided by Apple Inc.
For instructions on how to install the corresponding PPD file from Canon, see
the
documentation provided with your Macintosh.
IMPORTANT
•
If you are using the optional imagePASS, for details, see the manual provided with
the optional imagePASS.
•
The PS printer driver can be used only in a Mac OS X 10.3.9 or later environment.
Mac UFR II Driver Guide
Mac PS Driver Guide
Network Quick Start Guide
.
.
. For details about the PS printer driver, see the
3-48
UNIX
The machine supports the LPD print application for printing over TCP/IP networks.
The following procedures are only examples. The setup procedures for your
environment may differ.
IMPORTANT
If the settings for <RX/Print Range> in [IP Address Range Settings] on the IPv4 or IPv6
Settings screen do not permit the IP address, you cannot specify the spooling system.
Setting Up a Computer for Printing/Sending a Fax
Page 91

1
Log in to a workstation as a superuser ➞ set up the spooling
system.
● Example using Solaris 1.x:
❑
Add the following to the /etc/printcap file:
<Print queue name>|<comment>:\
:lp=<device special file>:\
:sd=<spool directory>:\
:rm=<printer IP address or host name>:
● Example using Solaris 2.x:
Start the admintool utility ➞ click [Browse] ➞ [Printers] ➞ [Edit] ➞ [Add] ➞
❑
[Access to Printer] ➞ in [Printer Name], enter the desired print queue name ➞
in [Print Server], enter the IP address or printer host name.
NOTE
•
The admintool utility is included with the operating system. For specific operating
instructions, see the operating system manual.
•
You can specify one of the following print queues.
-LP
The machine prints according to its spool settings. Normally, <LP> is entered as a
print queue.
- SPOOL
The machine prints only after spooling a print job on the hard disk, regardless of
its spool settings.
-DIRECT
The machine prints without spooling a print job on the hard disk, regardless of its
spool settings.
•
When the job log appears on the touch panel display of the machine, <unknown>
may be displayed as the document name and user name of print data transmitted
to the machine over a UNIX network.
➞
(To display the job log, press [System Monitor]
display.)
[Print] ➞ [Log] on the touch panel
3
Using a TCP/IP Network
Setting Up a Computer for Printing/Sending a Fax
3-49
Page 92

Printer Connection Method (IPP/IPPS)
Windows 2000/XP/Server 2003/Vista
If you are using Windows 2000/XP/Server 2003, you can also set IPP by installing
Canon LPR2. Canon LPR2 enables you to set ports easily. For more information,
see the Canon LPR2 User's Guide (PDF manual). For instructions on how to
display the Canon LPR2 User's Guide, see the Network Quick Start Guide.
In the following procedures, items displayed on the screens for Windows 2000 are
used. The items displayed may differ according to your operating system.
3
Using a TCP/IP Network
IMPORTANT
When using IPPS printing with Windows Vista, it is necessary to obtain the public key of
the machine and install it in Windows Vista. For information on obtaining the public key,
see "Obtaining the Public Key of the Machine to Use SSL with Windows Vista," on p.
8-25.
NOTE
If you are using Windows Vista, a dialog box may be displayed while you are performing
the procedure. In this case, enter a user name and password. For more information, see
the manuals provided with the operating system.
3-50
1
Check the settings for <RX/Print Range> in [IP Address Range
Settings] on the IPv4 or IPv6 Settings screen to see whether
the IP address of the computer in which a driver is to be
installed is permitted. For details, see step 17 in "TCP/IP
Settings (IPv4)," on p. 3-3 or step 6 in "TCP/IP Settings (IPv6),"
on p. 3-18.
IMPORTANT
•
If the settings for <RX/Print Range> in [IP Address Range Settings] on the IPv4 or
IPv6 Settings screen do not permit the IP address, you cannot install a driver.
•
If the IP address of the computer is beyond the range of the permitted addresses
set for <RX/Print Range> after installing a driver, you cannot print or send a fax
from the computer.
2
Start the Add Printer Wizard ➞ select a network printer.
Setting Up a Computer for Printing/Sending a Fax
Page 93

3
Select the option for locating the printer on the Internet or on
your intranet ➞ enter the URL of your printer.
If you want to use regular IPP printing, enter the following URL in [URL].
http://<the IP address or host name of the machine>/ipp
If you want to use encrypted communication and perform IPPS printing, enter the
following URL in [URL].
https://<the IP address or host name of the machine>/ipp
3
Using a TCP/IP Network
4
Follow the instructions on the screen to complete the
installation.
Mac OS X 10.3 or later
If you are using the optional Color PS Printer Kit, and a PS printer driver provided
by Apple Inc. with the Mac OS, you can use IPP as the print application. After
installing the PPD file according to the Network Quick Start Guide, specify the print
settings according to the instructions in the documentation provided with your
Macintosh.
Setting Up a Computer for Printing/Sending a Fax
3-51
Page 94

Printer Connection Method (FTP)
The following procedure describes how to perform printing by using FTP.
1
Go to the MS-DOS prompt or the command prompt ➞ log in to
the machine's FTP server.
For details on user names and passwords, see step 10 in "TCP/IP Settings
(IPv4)," on p. 3-3.
3
Using a TCP/IP Network
Command to be executed
1. ftp> bin *Change the file type to IMAGE (BINARY)
Change the file type to IMAGE (BINARY) even if you are printing text files.
2. ftp> put <file name to be printed> *Upload the file to be printed
3. ftp> bye *Cut off server connection
The following is a UNIX command example.
1. U:> ftp 172.24.176.244 *Connect to server
Connected to 172.24.176.244.
220 Connection established.
2. Name (172.24.176.244:none): user_name *User login
331 Password required to login.
3. Password: *Enter password
230 User user_name logged in.
4. ftp> bin *Set file type
200 Type set to IMAGE (binary).
5. ftp> put print.txt *Upload print file
200 PORT command successful.
150 Opened BINARY data connection for file transfer.
226 Transfer complete.
6. ftp> bye *Cut off server connection
221 Server closing down connection.
IMPORTANT
•
Up to three clients can be logged in simultaneously to its FTP server.
•
You cannot perform manipulation of files (changing file names, deleting, etc.) on
the FTP server by using FTP commands.
3-52
Setting Up a Computer for Printing/Sending a Fax
Page 95

Printer Connection Method (WSD)
The following procedure describes how to perform printing with WSD when using
Windows Vista.
If a dialog box is displayed while you are performing this procedure, enter a user
name and password. For more information, see the documentation provided with
Windows Vista.
IMPORTANT
IPv6 is not supported.
1
Check the settings for <RX/Print Range> in [IP Address Range
Settings] on the IPv4 Settings screen to see whether the IPv4
address of the computer in which a driver is to be installed is
permitted. For details, see step 17 in "TCP/IP Settings (IPv4),"
on p. 3-3.
IMPORTANT
•
If the settings for <RX/Print Range> in [IP Address Range Settings] on the IPv4
Settings screen do not permit the IPv4 address, you cannot install a driver.
•
If the IPv4 address of the computer is beyond the range of the permitted IPv4
addresses set for <RX/Print Range> after installing a driver, you cannot print or
send a fax from the computer.
3
Using a TCP/IP Network
2
Install the driver.
● Using Windows Explorer
With Windows Explorer, right-click the printer icon you want to use ➞ select
❑
[Install].
● Using the Add Printer Wizard
Start the Add Printer Wizard ➞ select a network printer.
❑
Setting Up a Computer for Printing/Sending a Fax
3-53
Page 96

Setting Up a Computer as a File Server
To send data from the machine to a computer on your network, you need to specify
the settings of the computer for receiving data.
You can send data over a TCP/IP network to any of the following:
• FTP server (Windows 2000/XP/Server 2003/Vista, UNIX, Linux, Mac OS X,
3
Using a TCP/IP Network
imageWARE Gateway series)
• WebDAV server (Windows 2000 Server/2000 Professional/XP/Server 2003, UNIX,
Linux, Mac OS X)
• Windows shared folder (Windows 98/Me/2000/XP/Server 2003)
• Samba shared folder (UNIX/Linux)
This section describes how to set up a computer as an FTP/WebDAV server.
For instructions on how to configure a Windows and Samba shared folder, see
"Setting Up a Computer as a File Server," on p. 5-11.
IMPORTANT
•
Samba 2.2.8a or later is supported.
•
This section describes only the procedures for setting up a computer to receive data sent
from the machine. To send data from the machine to a server on the network, you must
enter an address setting from the control panel.
For instructions on how to specify recipient address settings, see Chapter 2, "Basic
Sending Methods," in the Sending and Facsimile Guide.
•
The following procedure explains a sample FTP/WebDAV server setup. Depending on
your environment, the actual setup procedure may differ.
3-54
Setting Up a Computer as a File Server
Page 97

FTP Server Settings
Windows 2000/XP/Server 2003/Vista
This section describes the procedures for using the default home directory under
[Default FTP Site]. To use other settings, enter the FTP site and home directory by
referring to the IIS documentation.
It is recommended that the FTP server be configured by the network administrator.
In the following procedures, items displayed on the screens for Windows 2000 are
used. The items displayed may differ according to your operating system.
IMPORTANT
•
The use of Windows 2000 Server/XP Professional/Server 2003/Vista as an FTP server
requires the installation of IIS. If IIS is not installed in the computer you are using, you will
need to install the version of IIS for the operating system you are using before entering
these settings. (See "System Requirements" in "Sending Data," on p. 1-7.) For
installation procedures, see the manuals provided with your operating system.
•
User authentication for access to FTP servers is performed using the local account
database of Windows 2000 Server/XP Professional/Server 2003/Vista used as the FTP
server. Therefore, it is not possible to use the account of a domain user registered in
Windows 2000 Server/XP Professional/Server 2003/Vista to send data directly from the
machine to FTP servers in other domains.
•
IPv6 is not supported.
NOTE
If you are using Windows Vista, a dialog box may be displayed while you are performing
the procedure. In this case, enter a user name and password. For more information, see
the manuals provided with the operating system.
3
Using a TCP/IP Network
1
Log on to Windows as a member of the group with access
rights to the directory to be designated as the FTP site
directory ➞ start IIS.
Depending on your environment, the access rights settings for a drive or
directory may differ. For details, see the Windows manual.
2
In the [Default FTP Site Properties] dialog box, on the
[Security Accounts] sheet, deselect the option which allows
only anonymous connection.
Setting Up a Computer as a File Server
3-55
Page 98

3
In the [Default FTP Site Properties] dialog box, on the [Home
Directory] sheet, select both [Read] and [Write].
3
4
Right-click [My Computer] ➞ click [Properties] to open the
Using a TCP/IP Network
[System Properties] dialog box ➞ confirm [Full computer
name].
3-56
Setting Up a Computer as a File Server
Page 99

5
Right-click [My Computer] ➞ click [Manage] to open the
[Computer Management] window ➞ under [System Tools], in
[Local Users and Groups], right-click the [Users] folder ➞ click
[New User].
6
In the [New User] dialog box, enter the user name in [User
name] ➞ enter the password in [Password] ➞ re-enter the
password in [Confirm Password] ➞ click [Create].
3
Using a TCP/IP Network
Enter a user name and a password not longer than 24 alphanumeric characters.
If [User must change password at next logon] is selected, any new users added
must change their passwords in order to send data from the machine. (You
cannot change the password from the control panel.)
NOTE
In the Active Directory environment, the procedures for setting up users differ from
the above. For details, see the Windows manual.
Setting Up a Computer as a File Server
3-57
Page 100

7
Set a recipient address using the control panel.
Sample recipient setting:
• Server side settings:
[Full Computer Name]: starfish.organization.company.com
Create a directory named "share" in the specified FTP server's home directory
"\lnetpub\ftproot", and then set "share" as the data destination.
• The machine's recipient settings:
<Protocol>: FTP
3
Using a TCP/IP Network
[Host Name]: starfish.organization.company.com
[Folder Path]: share
[User]: User name entered in step 5
[Password]: Password for the above user
IMPORTANT
•
To use [Full computer name], which was confirmed in step 4, as the host name for
[Host Name] as shown in the above example, it is necessary to use a DNS server.
(This applies even if the machine and the FTP server are in the same subnet.) If no
DNS server is available, the host name setting should be specified using the IP
address of the FTP server.
•
Up to 128 alphanumeric characters can be entered for [Host Name] on the control
panel. Also, up to 255 alphanumeric characters can be entered for [Folder Path].
•
If you switch the language of the touch panel display, [Host Name] and [Folder
Path] may not be displayed correctly.
•
If you want to send to an IPv4 host using an FTP port other than port 21, set [Host
Name] using the following format:
<IPv4 address of FTP server>:<Port number>
Example: 192.168.1.21:21000
•
To send to an IPv6 host, set [Host Name] using the following format:
<IPv6 address>:<Port number>
Example: [5aed:90a0:bc05:01d2:568a:2fc0:0001:12ee]:21000
3-58
Setting Up a Computer as a File Server
 Loading...