

Page 1

ENG
Setup Guide
After you finish reading this guide, store it in a safe place for future reference.
ENG
Setup Guide
After you finish reading this guide, store it in a safe place for future reference.
Page 2

2
How This Manual Is Organized
Chapter 1
Operations Required to Use the Machine
Describes the flow of operations required first, such as logging in to the machine, and connecting to a network.
Chapter 2
Setting Up the Machine for the First Time
Uses general examples to describe the setup required for starting to use the functions of the machine.
Chapter 3
Using the System Options/MEAP Applications
Describes the procedure for installing system options and MEAP applications using the Register/Update
Software function, and the procedure for using system options and MEAP applications.
As we are constantly improving our products, if you need an exact specification, please contact Canon.
•
Screen shots used in this manual may differ from the ones you actually see.
•
Page 3
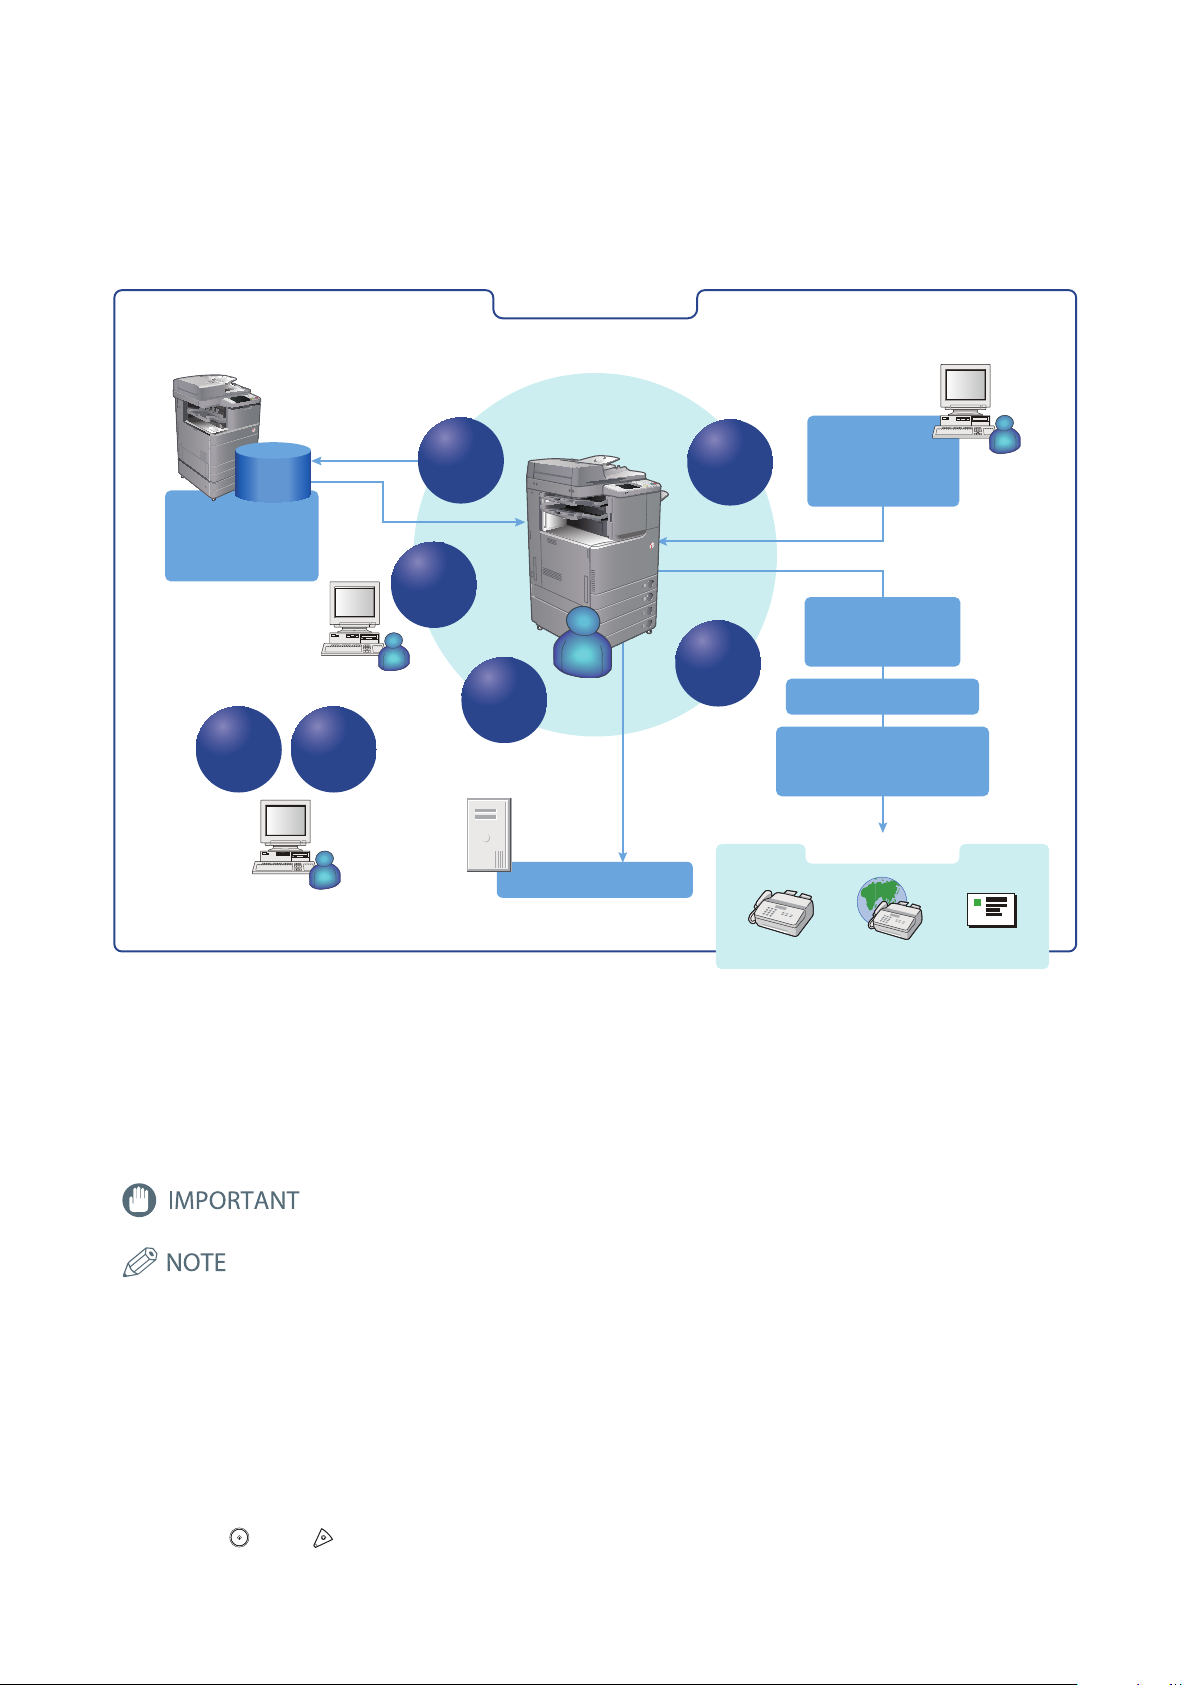
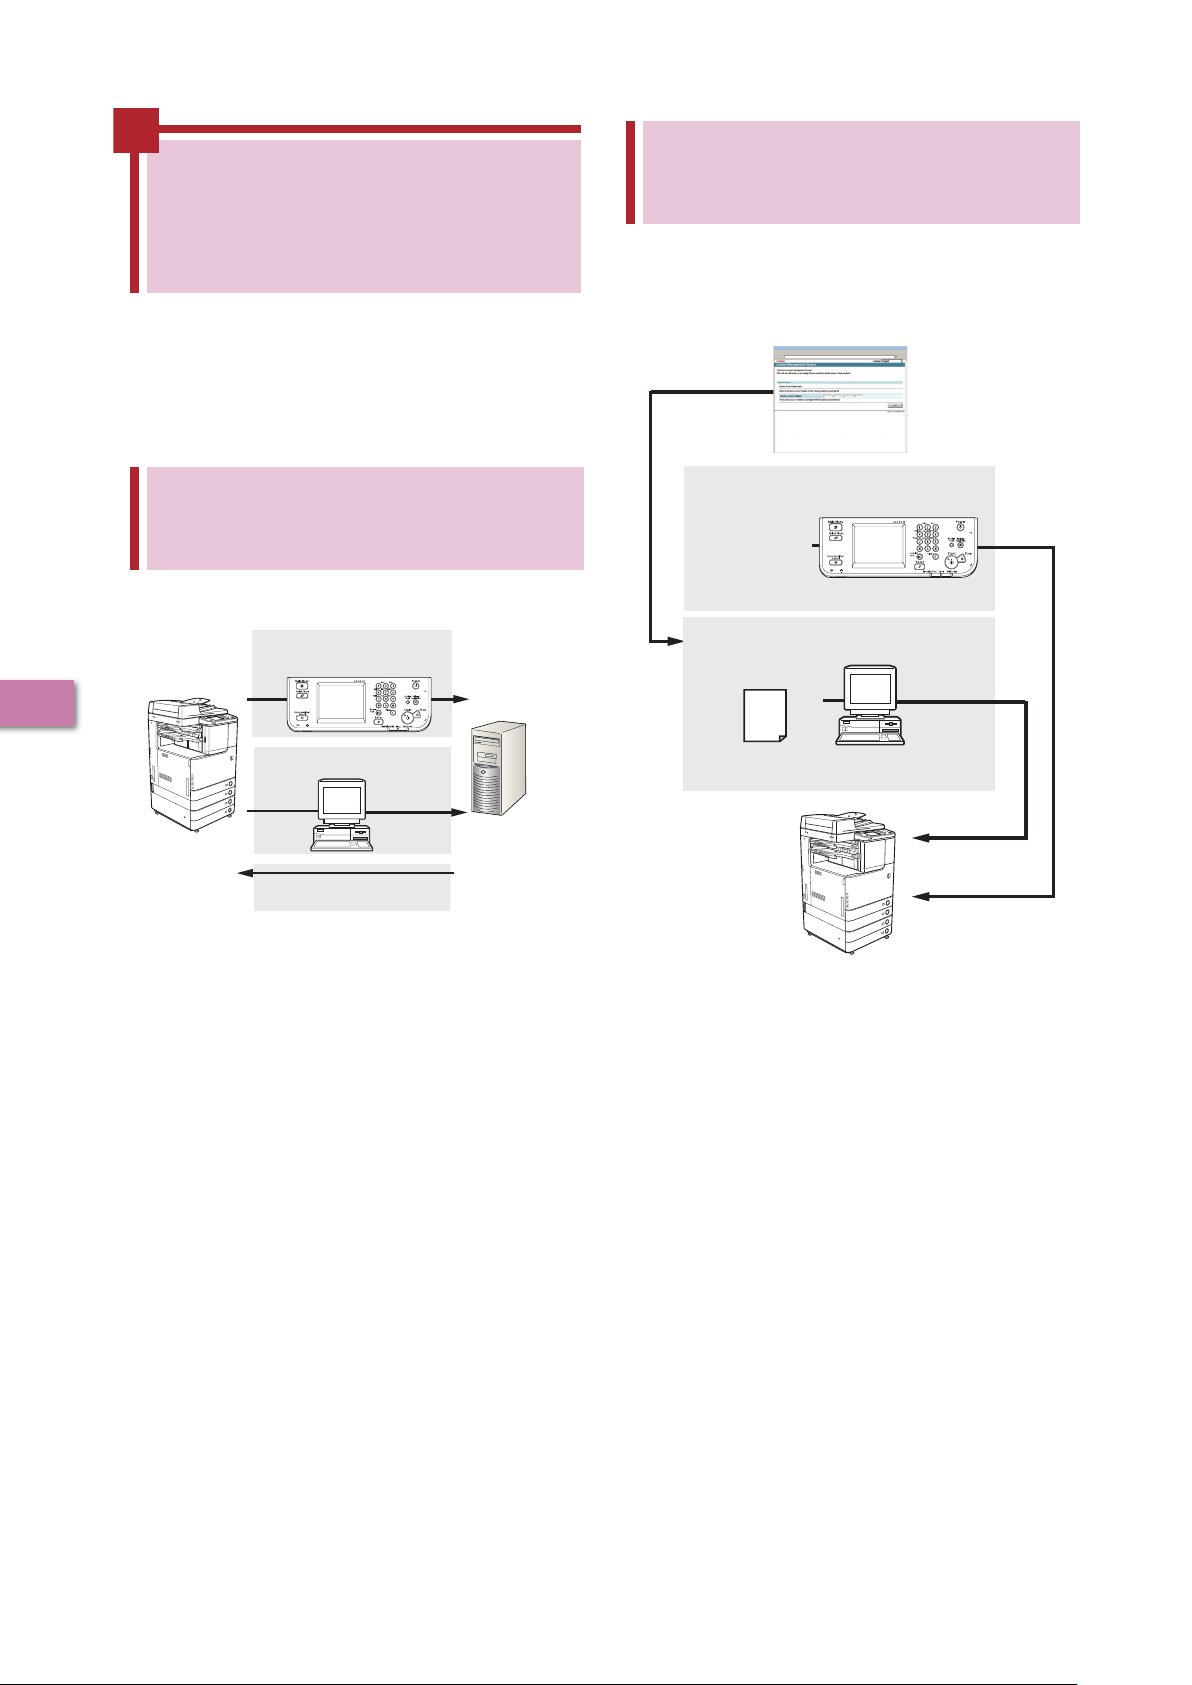
Preface
Storing in
an Advanced Box
on the Network
Local network
Print
Remote
UI
MEAP
Sending Faxes
from a Computer
via the Machine
Sending to a File Server
External network
Fax I-Fax E-Mail
File Server
imageRUNNER ADVANCE
Advanced
Box
Sending Documents
via the Remote Fax Server
Sending Faxes
from the Machine
Sending by E-Mail/I-Fax
Scan and
Send
Scan and
Store
Copy
Fax
This Machine
It is necessary to specify settings in advance to use some functions of the machine. Refer to “Flow of Settings for Using
the Desired Functions” on p. 2 in this manual to check the flow of the required operations.
Symbols Used in This Manual
The following symbols are used in this manual to explain procedures, restrictions, handling precautions, and instructions
that should be observed for safety.
Keys and Buttons Used in This Manual
The following symbols and key/button names are a few examples of how keys and buttons to be clicked or pressed are
expressed in this manual:
- Touch Panel Display Keys: [Key Name] - Buttons on Computer Operation Screens: [Button Name]
Example: [Cancel]/[Close] Example: [OK]/[Add]
- Control Panel Keys: Key Icon (Key Name)
Example:
Indicates operational requirements and restrictions. Be sure to read these items carefully to
operate the machine correctly, and avoid damage to the machine or property.
Indicates a clarification of an operation, or contains additional explanations for a procedure.
Reading these notes is highly recommended.
(Start) / (Key Name)
1
Page 4
2
These functions
can be used by default
(no settings are required).
Copy
●
The optional FAX Board is required.
●
An Optional product(s) and/or license registration may be required, depending on the print function.
●
The optional Fax Board is required.
●
The optional Remote Fax Kit and license registration are required.
Scan and Store*1 /
Access Stored Files
*1*2
(Memory Media)
Register/Update
Software
*3
Fax
(Receive on the Machine)
Fax
(Sending/Receiving)
Scanner
Scan and Send
*4
Scan and Store /
Access Stored
Files
(Network)
Remote UI
MEAP
Sending and Receiving Documents
via the Remote Fax Server
Sending Faxes from a Computer
via the Machine
*4
Using an Advanced Box
on the Network
*1
Sending Faxes from the Machine
*4
Sending to a File Server
Sending by E-Mail/ I-Fax
●
Connecting to a Network
●
Connecting via a USB
See e-Manual.
●
Using TCP/IP
●
Using SMB/CIFS
●
Using AppleTalk
●
Using Netware
●
Using TCP/IP
●
Using TCP/IP
●
Using SMB/CIFS
Print
*4
●
Connecting to a Network
●
Network Settings
*1 To print PDF files stored in memory media or the Advanced Space of another machine on the network, the PS Printer Kit or Direct Print Kit (for PDF) is required. (Both the PS
Printer Kit and Direct Print Kit (for PDF) require license registration.)
*2 The default setting for displaying memory media is 'Off'. To use the memory media, press [Display Settings] in [Preferences] (Settings/Registration)
Display Settings]
*3 To access a distribution server to register/update software, it is necessary to perform the "Connecting to a Network" and "Network Settings" operations indicated in this flowchart.
To register/update software using the Remote UI, it is necessary to perform the "Connecting to a Network," "Network Settings," and "Remote UI Settings" operations.
*4 For information on the system requirements, see e-Manual > Optional Products and Software.
*5 The file servers you can use depend on your network. For details on the file servers you can use, see e-Manual > Network.
●
The optional FAX Board is
required.
●
If you ar e us ing th e im ageRUN NER AD VANC E
C2 020 , de pen din g on th e r egio n, the Col or
Universal Send Kit and license registration may be
required.
●
If you are using the imageRUNNER ADVANCE
C2020, depending on the region, the the Color
Universal Send Kit or 2.5inch/80GB HDD and
license registration may be required.
●
If you ar e us ing th e im ageRUN NER AD VANC E
C2 020 , de pen din g on th e r egio n, the Col or
Universal Send Kit and license registration may be
required.
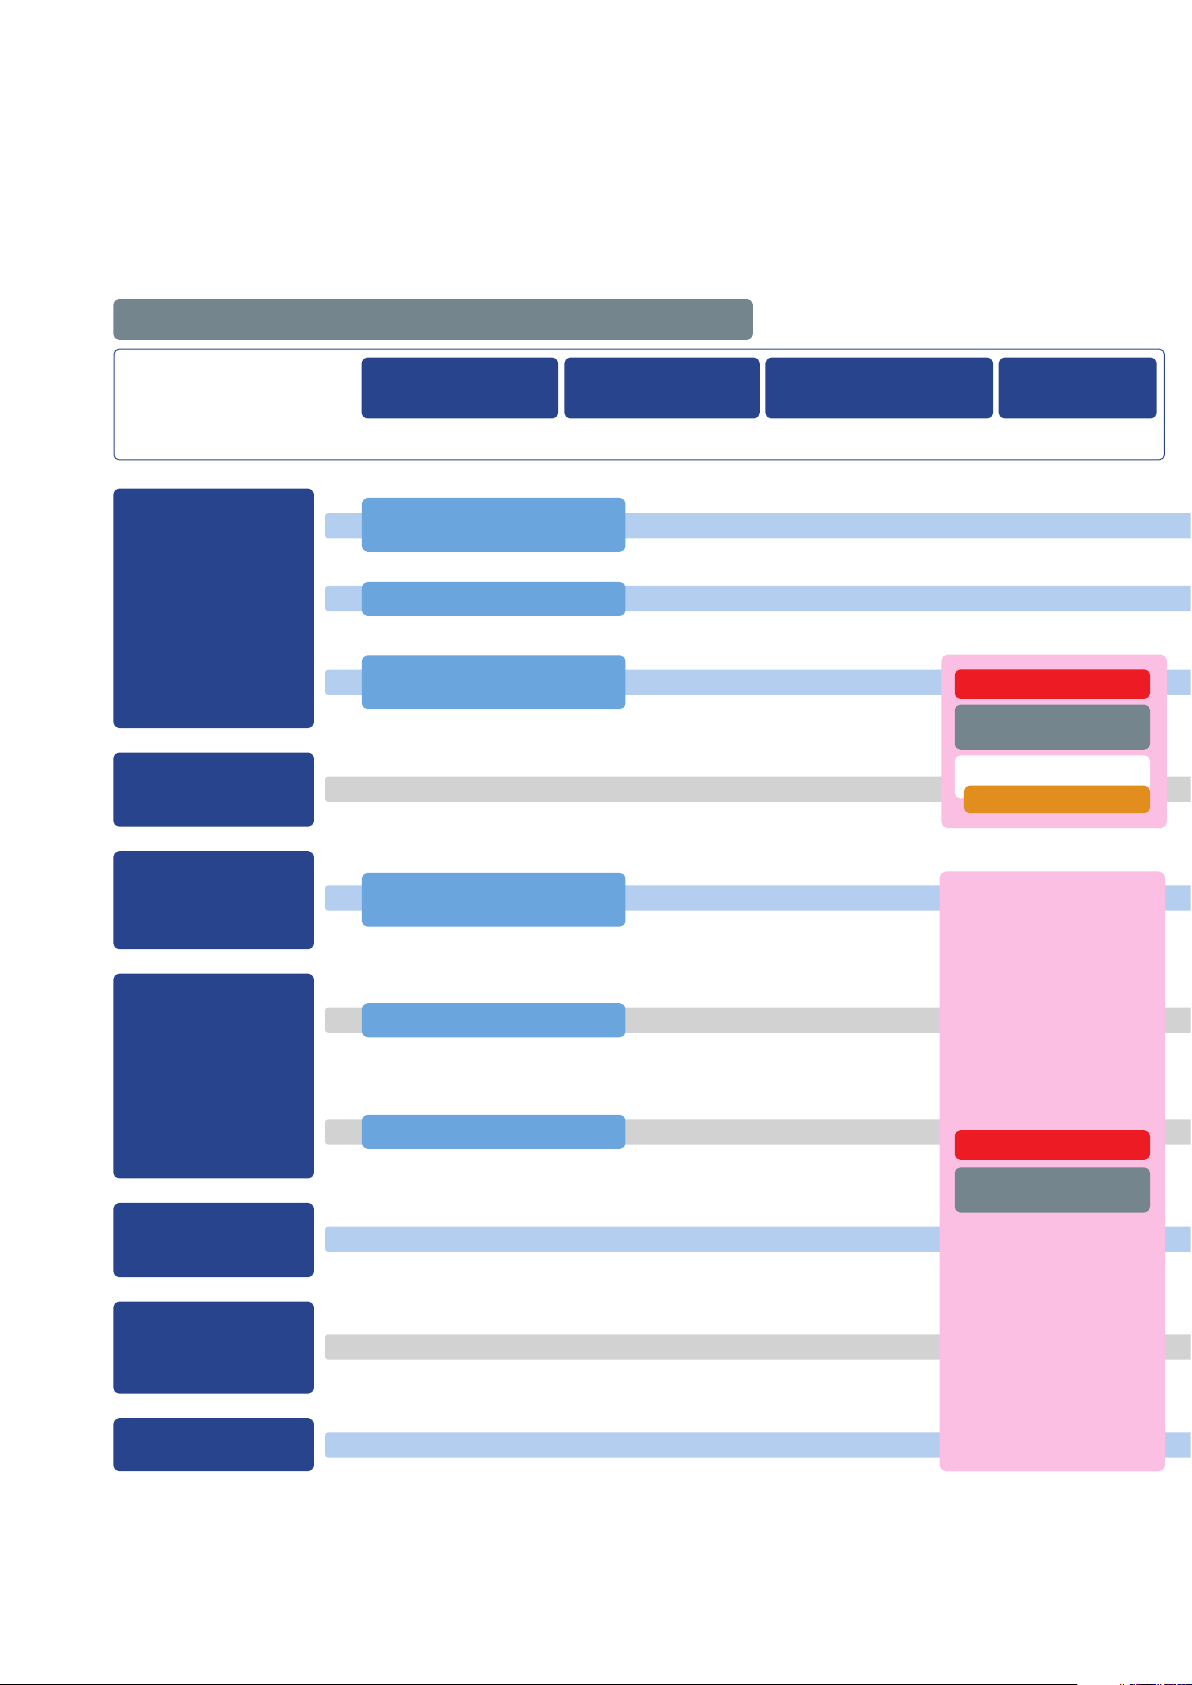
Flow of Settings for Using the Desired Functions
This flowchart indicates the flow of settings required for using each function of the machine. After checking the flow of settings
required, refer to the detailed page in this manual or the e-Manual to perform the actual setting procedure.
First, refer to “Logging In to the Machine as an Administrator,” on p. 8.
See “Connecting the Machine
to a Network,” on p. 9.
See “Connecting the Machine
to a Network,” on p. 9.
Page 5

* These settings are only required when connecting to a network.
They are not required when connecting via USB.
●
Remote Scan Settings
●
Settings for Printing from a Computer
●
MEAP Service Management Service
(
SMS) Settings
●
Remote UI Settings
●
Using an Advanced Box on the Network
●
Fax Settings
●
Settings for Fax from a Computer
●
Remote Fax Settings
●
E-Mail/I-Fax Settings
See e-Manual.
●
Using TCP/IP
:
●
Using SMB/CIFS
:
●
Setting Up a Computer as a File Server
*5
See e-Manual.
●
Using TCP/IP
:
●
Using SMB/CIFS
:
●
Using AppleTalk
:
●
Using Netware
:
●
Using TCP/IP
:
See e-Manual.
●
Using TCP/IP
:
●
Using SMB/CIFS
:
●
Network Settings
*1 To print PDF files stored in memory media or the Advanced Space of another machine on the network, the PS Printer Kit or Direct Print Kit (for PDF) is required. (Both the PS
Printer Kit and Direct Print Kit (for PDF) require license registration.)
*2 The default setting for displaying memory media is 'Off'. To use the memory media, press [Display Settings] in [Preferences] (Settings/Registration) → press [Store Location
Display Settings] → [Memory Media] → [On].
*3 To access a distribution server to register/update software, it is necessary to perform the "Connecting to a Network" and "Network Settings" operations indicated in this flowchart.
To register/update software using the Remote UI, it is necessary to perform the "Connecting to a Network," "Network Settings," and "Remote UI Settings" operations.
*4 For information on the system requirements, see e-Manual > Optional Products and Software.
*5 The file servers you can use depend on your network. For details on the file servers you can use, see e-Manual > Network.
See “Sending/Receiving Faxes via the
Remote Fax Server,” on p. 35.
See “Sending Faxes,” on p. 29.
See “Sending Faxes from a Computer Using
See “Setting a Network on the Machine,” on p. 12.
the Machine,” on p. 37.
See “Printing a Document from a Computer,”
on p. 39.
See “Using an Advanced Box on the
Network,” on p. 45.
See “Setting a Network on the Machine,” on p. 12.
See “Sending Scanned Data to a File Server,”
on p. 24.
See “Setting a Network on the Machine,” on p. 12.
See “Using E-Mail/I-Fax,” on p. 20.
See “Settings Required to Use the Remote
UI,” on p. 15.
See “Settings Required to Use SMS,” on p. 16.
See “Scanning an Original,” on p. 42.
3
Page 6

4
Contents
Preface. . . . . . . . . . . . . . . . . . . . . . . . . . . . . . . . . . . . . . . . . . . . . . . . . . . . . . . . . . . .1
Symbols Used in This Manual . . . . . . . . . . . . . . . . . . . . . . . . . . . . . . . . . . . . . . . . . . . . . . . . . . . . . . . . . . . . . . . 1
Keys and Buttons Used in This Manual . . . . . . . . . . . . . . . . . . . . . . . . . . . . . . . . . . . . . . . . . . . . . . . . . . . . . . 1
Flow of Settings for Using the Desired Functions . . . . . . . . . . . . . . . . . . . . . . . . . . . . . . . . . . . . . . . . . . . . 2
Chapter 1 Operations Required to Use the Machine . . . . . . . . . . . . . 7
Logging In to the Machine as an Administrator . . . . . . . . . . . . . . . . . . . . . . . . . . . . . . . . . . . . . 8
Logging In from the Touch Panel Display . . . . . . . . . . . . . . . . . . . . . . . . . . . . . . . . . . . . . . . . . . . . . . . . . . . . . . . . . . . . . . . . . . .8
Logging In Using the Remote UI . . . . . . . . . . . . . . . . . . . . . . . . . . . . . . . . . . . . . . . . . . . . . . . . . . . . . . . . . . . . . . . . . . . . . . . . . . . .8
Connecting the Machine to a Network . . . . . . . . . . . . . . . . . . . . . . . . . . . . . . . . . . . . . . . . . . . . . 9
Setting a Network on the Machine . . . . . . . . . . . . . . . . . . . . . . . . . . . . . . . . . . . . . . . . . . . . . . . . 12
Managing the Machine from a Computer . . . . . . . . . . . . . . . . . . . . . . . . . . . . . . . . . . . . . . . . . . 15
Settings Required to Use the Remote UI . . . . . . . . . . . . . . . . . . . . . . . . . . . . . . . . . . . . . . . . . . . . . . . . . . . . . . . . . . . . . . . . . . 15
Managing the Machine Using the Remote UI . . . . . . . . . . . . . . . . . . . . . . . . . . . . . . . . . . . . . . . . . . . . . . . . . . . . . . . . . . . . . 16
Settings Required to Use SMS . . . . . . . . . . . . . . . . . . . . . . . . . . . . . . . . . . . . . . . . . . . . . . . . . . . . . . . . . . . . . . . . . . . . . . . . . . . . 16
Managing the Machine Using SMS . . . . . . . . . . . . . . . . . . . . . . . . . . . . . . . . . . . . . . . . . . . . . . . . . . . . . . . . . . . . . . . . . . . . . . . 17
Chapter 2 Setting Up the Machine for the First Time . . . . . . . . . . . 19
Using E-Mail/I-Fax . . . . . . . . . . . . . . . . . . . . . . . . . . . . . . . . . . . . . . . . . . . . . . . . . . . . . . . . . . . . . . . 20
Settings Required to Send E-Mail/I-Faxes . . . . . . . . . . . . . . . . . . . . . . . . . . . . . . . . . . . . . . . . . . . . . . . . . . . . . . . . . . . . . . . . . 20
Specifying E-Mail/I-Fax Settings . . . . . . . . . . . . . . . . . . . . . . . . . . . . . . . . . . . . . . . . . . . . . . . . . . . . . . . . . . . . . . . . . . . . . . . 20
Sending E-Mail/I-Faxes . . . . . . . . . . . . . . . . . . . . . . . . . . . . . . . . . . . . . . . . . . . . . . . . . . . . . . . . . . . . . . . . . . . . . . . . . . . . . . . . . . . 21
Storing New Destinations . . . . . . . . . . . . . . . . . . . . . . . . . . . . . . . . . . . . . . . . . . . . . . . . . . . . . . . . . . . . . . . . . . . . . . . . . . . . 21
Sending an E-Mail Message . . . . . . . . . . . . . . . . . . . . . . . . . . . . . . . . . . . . . . . . . . . . . . . . . . . . . . . . . . . . . . . . . . . . . . . . . . . 23
Sending Scanned Data to a File Server . . . . . . . . . . . . . . . . . . . . . . . . . . . . . . . . . . . . . . . . . . . . 24
Settings Required to Send Data to a Computer . . . . . . . . . . . . . . . . . . . . . . . . . . . . . . . . . . . . . . . . . . . . . . . . . . . . . . . . . . . . 24
Setting a Computer . . . . . . . . . . . . . . . . . . . . . . . . . . . . . . . . . . . . . . . . . . . . . . . . . . . . . . . . . . . . . . . . . . . . . . . . . . . . . . . . . . 24
Scanning and Sending an Original to the Shared Folder of a Computer . . . . . . . . . . . . . . . . . . . . . . . . . . . . . . . . . . . . 27
Storing New Destinations . . . . . . . . . . . . . . . . . . . . . . . . . . . . . . . . . . . . . . . . . . . . . . . . . . . . . . . . . . . . . . . . . . . . . . . . . . . . 27
Sending Scanned Data to a Shared Folder . . . . . . . . . . . . . . . . . . . . . . . . . . . . . . . . . . . . . . . . . . . . . . . . . . . . . . . . . . . . . 28
Sending Faxes . . . . . . . . . . . . . . . . . . . . . . . . . . . . . . . . . . . . . . . . . . . . . . . . . . . . . . . . . . . . . . . . . . . 29
Settings Required to Send Faxes . . . . . . . . . . . . . . . . . . . . . . . . . . . . . . . . . . . . . . . . . . . . . . . . . . . . . . . . . . . . . . . . . . . . . . . . . . 29
Registering the Fax Number, Unit Name, and Line Type . . . . . . . . . . . . . . . . . . . . . . . . . . . . . . . . . . . . . . . . . . . . . . . . 30
Attaching the Sender's Name to Sent Documents . . . . . . . . . . . . . . . . . . . . . . . . . . . . . . . . . . . . . . . . . . . . . . . . . . . . . 32
Sending Faxes . . . . . . . . . . . . . . . . . . . . . . . . . . . . . . . . . . . . . . . . . . . . . . . . . . . . . . . . . . . . . . . . . . . . . . . . . . . . . . . . . . . . . . . . . . . 33
Storing New Destinations . . . . . . . . . . . . . . . . . . . . . . . . . . . . . . . . . . . . . . . . . . . . . . . . . . . . . . . . . . . . . . . . . . . . . . . . . . . . 33
Sending a Fax . . . . . . . . . . . . . . . . . . . . . . . . . . . . . . . . . . . . . . . . . . . . . . . . . . . . . . . . . . . . . . . . . . . . . . . . . . . . . . . . . . . . . . . . 34
Page 7

Sending/Receiving Faxes via the Remote Fax Server . . . . . . . . . . . . . . . . . . . . . . . . . . . . . . . 35
Settings Required to Send Faxes via the Remote Fax Server . . . . . . . . . . . . . . . . . . . . . . . . . . . . . . . . . . . . . . . . . . . . . . . . 35
Setting the Server . . . . . . . . . . . . . . . . . . . . . . . . . . . . . . . . . . . . . . . . . . . . . . . . . . . . . . . . . . . . . . . . . . . . . . . . . . . . . . . . . . . . 35
Setting the Client . . . . . . . . . . . . . . . . . . . . . . . . . . . . . . . . . . . . . . . . . . . . . . . . . . . . . . . . . . . . . . . . . . . . . . . . . . . . . . . . . . . . 35
Sending Faxes Using the Remote Fax Server . . . . . . . . . . . . . . . . . . . . . . . . . . . . . . . . . . . . . . . . . . . . . . . . . . . . . . . . . . . . . . 36
Settings Required to Receive a Fax via the Remote Fax Server . . . . . . . . . . . . . . . . . . . . . . . . . . . . . . . . . . . . . . . . . . . . . 37
Setting the Server . . . . . . . . . . . . . . . . . . . . . . . . . . . . . . . . . . . . . . . . . . . . . . . . . . . . . . . . . . . . . . . . . . . . . . . . . . . . . . . . . . . . 37
Setting the Client . . . . . . . . . . . . . . . . . . . . . . . . . . . . . . . . . . . . . . . . . . . . . . . . . . . . . . . . . . . . . . . . . . . . . . . . . . . . . . . . . . . . 37
Sending Faxes from a Computer Using the Machine . . . . . . . . . . . . . . . . . . . . . . . . . . . . . . . . 37
Settings Required to Send Faxes from a Computer . . . . . . . . . . . . . . . . . . . . . . . . . . . . . . . . . . . . . . . . . . . . . . . . . . . . . . . . 37
Installing the Fax Driver . . . . . . . . . . . . . . . . . . . . . . . . . . . . . . . . . . . . . . . . . . . . . . . . . . . . . . . . . . . . . . . . . . . . . . . . . . . . . . 37
Sending Faxes from a Computer . . . . . . . . . . . . . . . . . . . . . . . . . . . . . . . . . . . . . . . . . . . . . . . . . . . . . . . . . . . . . . . . . . . . . . . . . . 38
Printing a Document from a Computer . . . . . . . . . . . . . . . . . . . . . . . . . . . . . . . . . . . . . . . . . . . . 39
Settings Required to Print from a Computer . . . . . . . . . . . . . . . . . . . . . . . . . . . . . . . . . . . . . . . . . . . . . . . . . . . . . . . . . . . . . . 39
Installing the Printer Driver . . . . . . . . . . . . . . . . . . . . . . . . . . . . . . . . . . . . . . . . . . . . . . . . . . . . . . . . . . . . . . . . . . . . . . . . . . . 39
Printing from a Computer . . . . . . . . . . . . . . . . . . . . . . . . . . . . . . . . . . . . . . . . . . . . . . . . . . . . . . . . . . . . . . . . . . . . . . . . . . . . . . . . 40
Scanning an Original . . . . . . . . . . . . . . . . . . . . . . . . . . . . . . . . . . . . . . . . . . . . . . . . . . . . . . . . . . . . 42
Settings Required to Perform Scanning . . . . . . . . . . . . . . . . . . . . . . . . . . . . . . . . . . . . . . . . . . . . . . . . . . . . . . . . . . . . . . . . . . . 42
Installing the Scanner Driver . . . . . . . . . . . . . . . . . . . . . . . . . . . . . . . . . . . . . . . . . . . . . . . . . . . . . . . . . . . . . . . . . . . . . . . . . . 42
Setting Remote Scanning Online . . . . . . . . . . . . . . . . . . . . . . . . . . . . . . . . . . . . . . . . . . . . . . . . . . . . . . . . . . . . . . . . . . . . . 42
Scanning an Original . . . . . . . . . . . . . . . . . . . . . . . . . . . . . . . . . . . . . . . . . . . . . . . . . . . . . . . . . . . . . . . . . . . . . . . . . . . . . . . . . . . . . 44
Using an Advanced Box on the Network . . . . . . . . . . . . . . . . . . . . . . . . . . . . . . . . . . . . . . . . . . . 45
Settings Required to Use an Advanced Box on the Network . . . . . . . . . . . . . . . . . . . . . . . . . . . . . . . . . . . . . . . . . . . . . . . 45
Making an Advanced Box Accessible on the Network . . . . . . . . . . . . . . . . . . . . . . . . . . . . . . . . . . . . . . . . . . . . . . . . . . 46
Accessing an Advanced Box on the Network . . . . . . . . . . . . . . . . . . . . . . . . . . . . . . . . . . . . . . . . . . . . . . . . . . . . . . . . . . 46
Storing Data in an Advanced Box on the Network . . . . . . . . . . . . . . . . . . . . . . . . . . . . . . . . . . . . . . . . . . . . . . . . . . . . . . . . . 48
Chapter 3 Using the System Options/MEAP Applications . . . . . . . 51
Installing the System Options/MEAP Applications . . . . . . . . . . . . . . . . . . . . . . . . . . . . . . . . . 52
Installing by Connecting This Machine to an Outside Network . . . . . . . . . . . . . . . . . . . . . . . . . . . . . . . . . . . . . . . . . . . . . 52
Installing by Not Connecting This Machine to an Outside Network . . . . . . . . . . . . . . . . . . . . . . . . . . . . . . . . . . . . . . . . . 52
License Registration . . . . . . . . . . . . . . . . . . . . . . . . . . . . . . . . . . . . . . . . . . . . . . . . . . . . . . . . . . . . . 53
System Options/MEAP Applications . . . . . . . . . . . . . . . . . . . . . . . . . . . . . . . . . . . . . . . . . . . . . . . . . . . . . . . . . . . . . . . . . . . . . . 53
Installing the System Options/MEAP Applications . . . . . . . . . . . . . . . . . . . . . . . . . . . . . . . . . . . . . . . . . . . . . . . . . . . . . . . . . 53
Installing by Connecting this Machine to an Outside Network . . . . . . . . . . . . . . . . . . . . . . . . . . . . . . . . . . . . . . . . . 53
Installing by Not Connecting this Machine to an Outside Network . . . . . . . . . . . . . . . . . . . . . . . . . . . . . . . . . . . . . 54
Installing by Connecting This Machine to an Outside Network . . . . . . . . . . . . . . . . . . . . . . 54
Using the Touch Panel Display to Install (Delivery) . . . . . . . . . . . . . . . . . . . . . . . . . . . . . . . . . . . . . . . . . . . . . . . . . . . . . . . . . 54
Using the Remote UI to Install (Delivery) . . . . . . . . . . . . . . . . . . . . . . . . . . . . . . . . . . . . . . . . . . . . . . . . . . . . . . . . . . . . . . . . . . 56
Installing by Not Connecting This Machine to an Outside Network . . . . . . . . . . . . . . . . . . 57
Obtaining the License Key/License File . . . . . . . . . . . . . . . . . . . . . . . . . . . . . . . . . . . . . . . . . . . . . . . . . . . . . . . . . . . . . . . . . . . 57
Installing the System Options Using the Touch Panel Display . . . . . . . . . . . . . . . . . . . . . . . . . . . . . . . . . . . . . . . . . . . . . . 57
Installing the System Options Using the Remote UI (Manual) . . . . . . . . . . . . . . . . . . . . . . . . . . . . . . . . . . . . . . . . . . . . . . 58
Installing the MEAP Applications Using the Remote UI (Manual) . . . . . . . . . . . . . . . . . . . . . . . . . . . . . . . . . . . . . . . . . . . 58
Starting the MEAP Applications . . . . . . . . . . . . . . . . . . . . . . . . . . . . . . . . . . . . . . . . . . . . . . . . . . . . . . . . . . . . . . . . . . . . . . . . . . 59
5
Page 8

6
Downloading the Manuals and Related Software . . . . . . . . . . . . . . . . . . . . . . . . . . . . . . . . . . 60
Managing by Using the Touch Panel Display . . . . . . . . . . . . . . . . . . . . . . . . . . . . . . . . . . . . . . . 60
Displaying the Installation Log Using the Touch Panel Display . . . . . . . . . . . . . . . . . . . . . . . . . . . . . . . . . . . . . . . . . . . . . 60
Testing Communication Using the Touch Panel Display . . . . . . . . . . . . . . . . . . . . . . . . . . . . . . . . . . . . . . . . . . . . . . . . . . . 61
Managing by Using the Remote UI . . . . . . . . . . . . . . . . . . . . . . . . . . . . . . . . . . . . . . . . . . . . . . . . 62
Displaying the Installation Log Using the Remote UI . . . . . . . . . . . . . . . . . . . . . . . . . . . . . . . . . . . . . . . . . . . . . . . . . . . . . . 62
Testing Communication Using the Remote UI . . . . . . . . . . . . . . . . . . . . . . . . . . . . . . . . . . . . . . . . . . . . . . . . . . . . . . . . . . . . . 62
Updating the Firmware . . . . . . . . . . . . . . . . . . . . . . . . . . . . . . . . . . . . . . . . . . . . . . . . . . . . . . . . . . 63
Updating Firmware . . . . . . . . . . . . . . . . . . . . . . . . . . . . . . . . . . . . . . . . . . . . . . . . . . . . . . . . . . . . . . . . . . . . . . . . . . . . . . . . . . . . . . 63
Updating Using the Remote UI (Manual) . . . . . . . . . . . . . . . . . . . . . . . . . . . . . . . . . . . . . . . . . . . . . . . . . . . . . . . . . . . . . . . . . . 63
Page 9

Operations Required to Use the
Machine
Logging In to the Machine as an Administrator . . . . . . . . . . . . . . . . . . . . . . . . .8
Logging In from the Touch Panel Display . . . . . . . . . . . . . . . . . . . . . . . . . . . . . . . . . . . . . . . . . . . . . . . . . . . . . . . . . . . . . . 8
Logging In Using the Remote UI . . . . . . . . . . . . . . . . . . . . . . . . . . . . . . . . . . . . . . . . . . . . . . . . . . . . . . . . . . . . . . . . . . . . . . 8
Connecting the Machine to a Network . . . . . . . . . . . . . . . . . . . . . . . . . . . . . . . . .9
Setting a Network on the Machine . . . . . . . . . . . . . . . . . . . . . . . . . . . . . . . . . . . .12
Managing the Machine from a Computer . . . . . . . . . . . . . . . . . . . . . . . . . . . . .15
Settings Required to Use the Remote UI . . . . . . . . . . . . . . . . . . . . . . . . . . . . . . . . . . . . . . . . . . . . . . . . . . . . . . . . . . . . . . 15
Managing the Machine Using the Remote UI . . . . . . . . . . . . . . . . . . . . . . . . . . . . . . . . . . . . . . . . . . . . . . . . . . . . . . . . . 16
Settings Required to Use SMS . . . . . . . . . . . . . . . . . . . . . . . . . . . . . . . . . . . . . . . . . . . . . . . . . . . . . . . . . . . . . . . . . . . . . . . . 16
Managing the Machine Using SMS . . . . . . . . . . . . . . . . . . . . . . . . . . . . . . . . . . . . . . . . . . . . . . . . . . . . . . . . . . . . . . . . . . . 17
1
7
Page 10
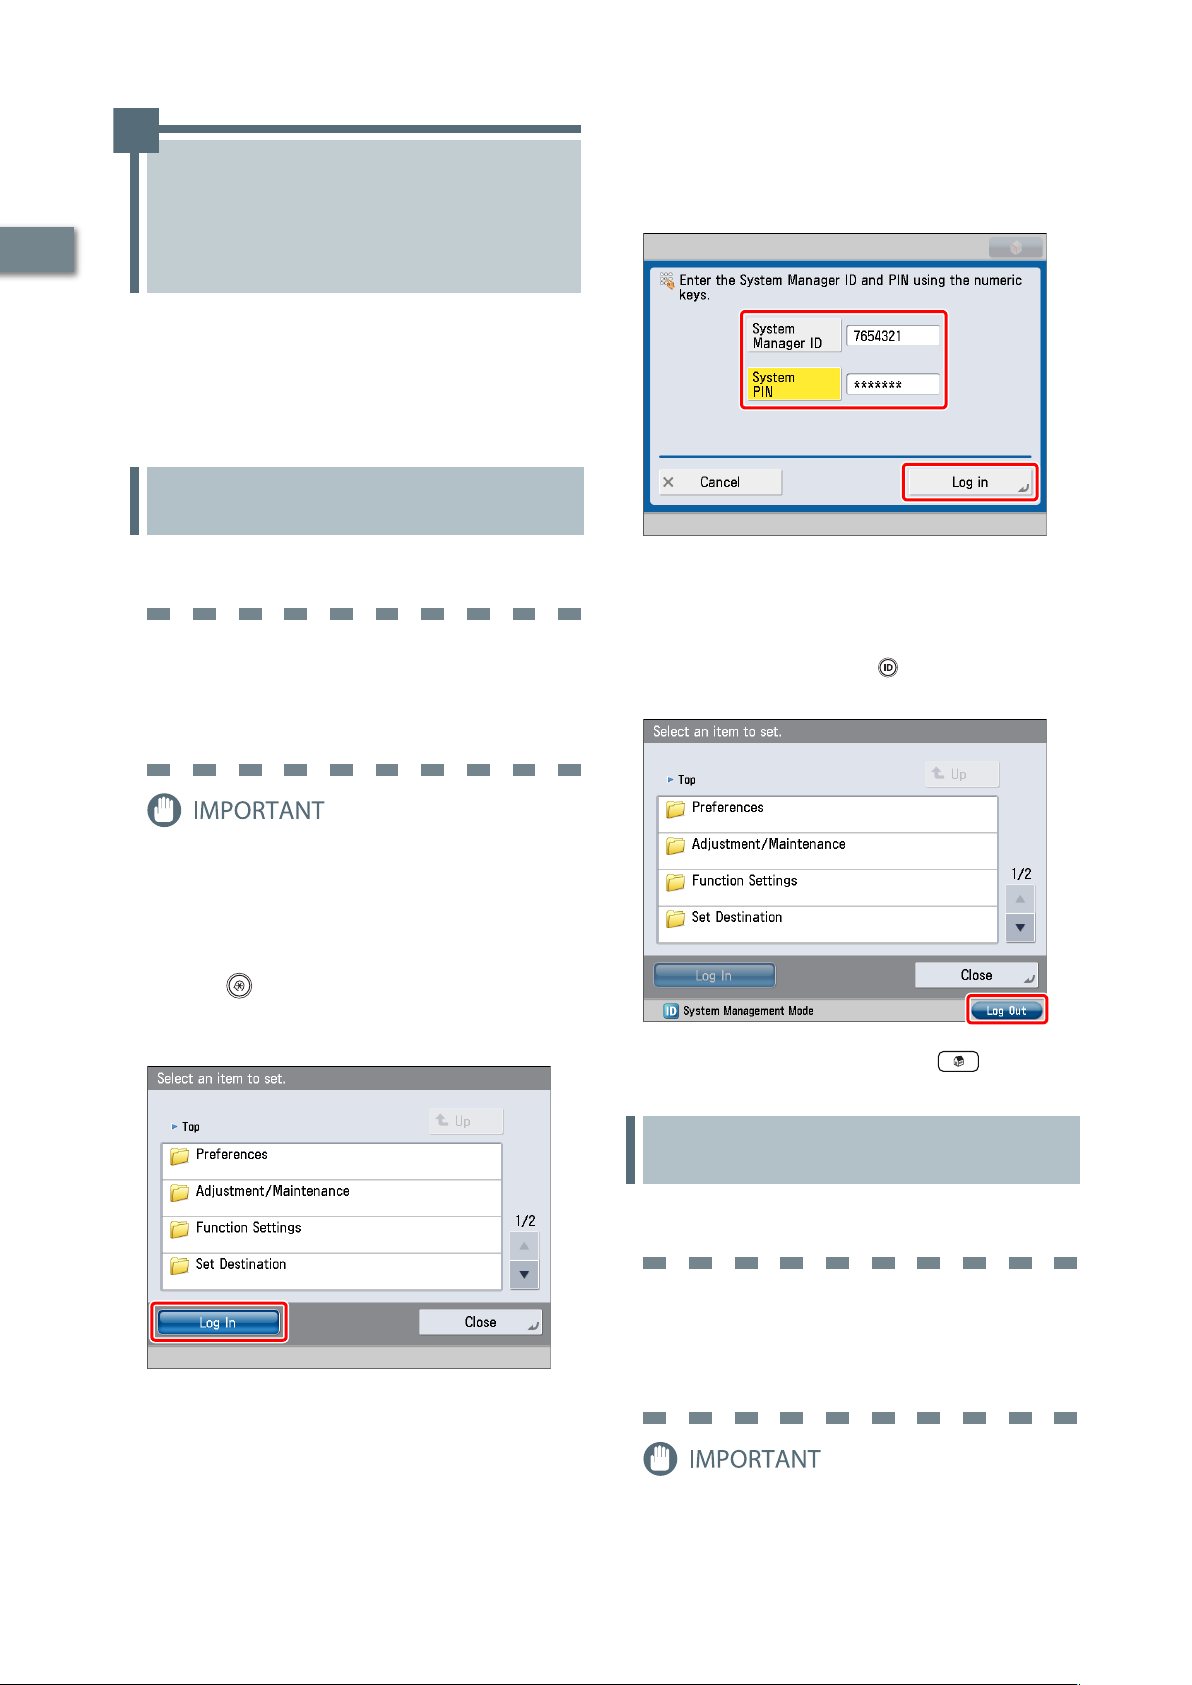
Logging In to the
Machine as an
Enter the System Manager ID and System PIN →
3
press [Log in].
[System Manager ID]: 7654321
[System PIN]: 7654321 (the number you enter is masked with
asterisks)
1
Operations Required to Use the Machine
Administrator
To specify the settings, you must log in to the
machine as an administrator. There are two
methods for logging in; logging in from the
touch panel display of the machine and logging
in from a computer using the Remote UI.
Logging In from the Touch Panel Display
To log in as the administrator using the touch panel display,
enter the System Manager ID and System PIN as follows:
System Manager ID
7654321
System PIN
7654321
You are now logged in to the machine as an administrator.
Refer to Chapter 2, "Setting Up the Machine for the First Time,"
to specify the settings for using each function.
When you have finished specifying settings and performing
operations, press [Log Out] or the (Log In/Out) on the
control panel to log out from the machine.
The default setting for both the System Manager ID and
System PIN is '7654321'. We recommend that you change both
the System Manager ID and System PIN after logging in to the
machine.
In this example, the default System Manager ID and System
PIN are used to log in.
Press (Settings/Registration).
1
Press [Log In].
2
To go back to the Main Menu screen, press (Main Menu).
Logging In Using the Remote UI
To log in as the administrator using the Remote UI, enter the
System Manager ID and System PIN as follows:
System Manager ID
7654321
System PIN
7654321
The default setting for both the System Manager ID and
System PIN is '7654321'. We recommend that you change both
the System Manager ID and System PIN after logging in to the
machine.
8
Page 11
•
To log in as the administrator using the Remote UI, you must
specify the network connection settings in advance. For
instructions on specifying the network connection settings,
see “Connecting the Machine to a Network,” on p. 9.
•
If you are using a login service, see e-Manual > MEAP.
•
If the authentication function is not set, the Log In screen is
not displayed.
•
For information on necessary system environment and
preparation to start the Remote UI, see e-Manual > Remote UI.
Connecting the Machine to a Network
1
To use functions such as the Print or Fax function
from a computer, it is necessary to connect the
machine to a network in advance.
In this example, the default System Manager ID and System
PIN are used to log in.
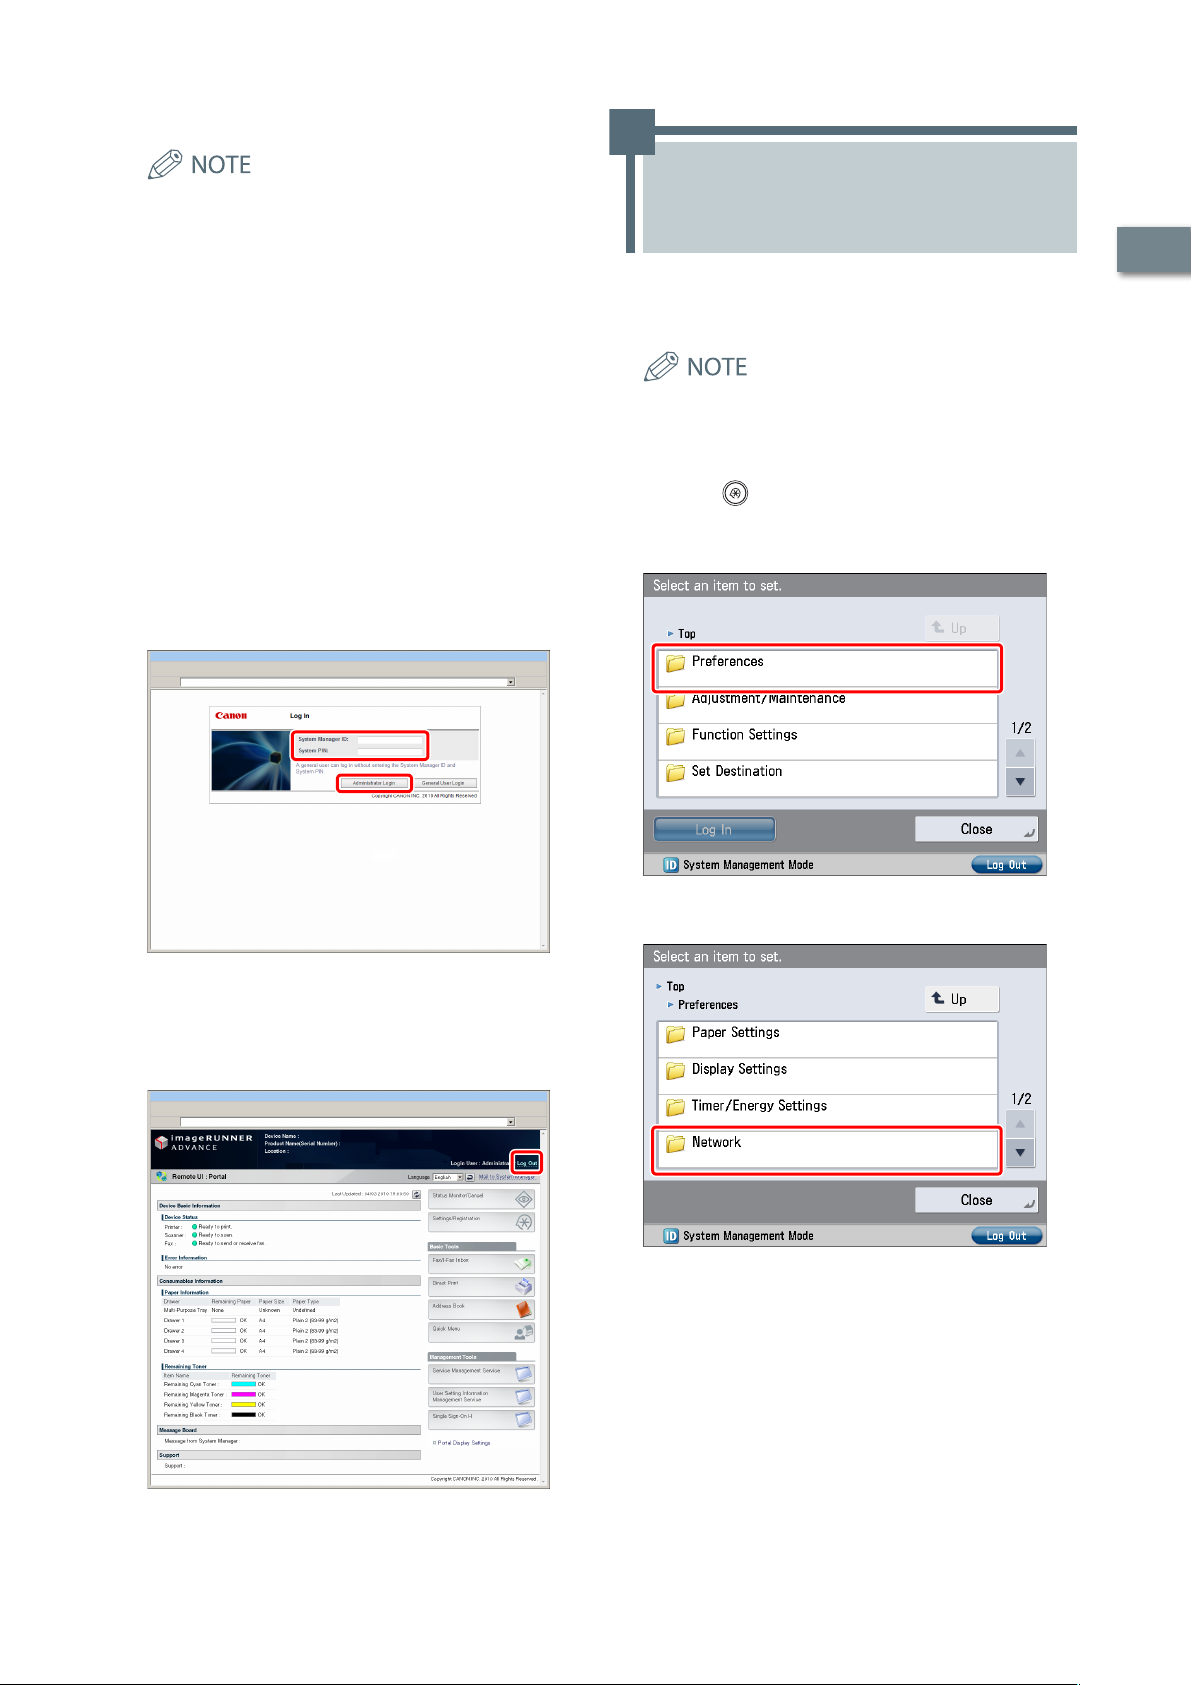
Start your Web browser.
1
Enter 'http://<IP address or host name of the
2
machine>' in [Address].
Enter the System Manager ID and System PIN →
3
click [Administrator Login].
[System Manager ID]: 7654321
[System PIN]: 7654321
Before setting the network connection, it is necessary to
connect the machine and the computer with a network
cable. For details, see e-Manual > Network > Connecting the
Machine to a Computer or Network.
Press (Settings/Registration).
1
Press [Preferences].
2
Press [Network].
3
Operations Required to Use the Machine
You are now logged in to the machine as an administrator.
Refer to Chapter 2, "Setting Up the Machine for the First Time,"
to specify the settings for using each function.
When you have finished specifying settings and performing
operations, press [Log Out] to log out.
9
Page 12
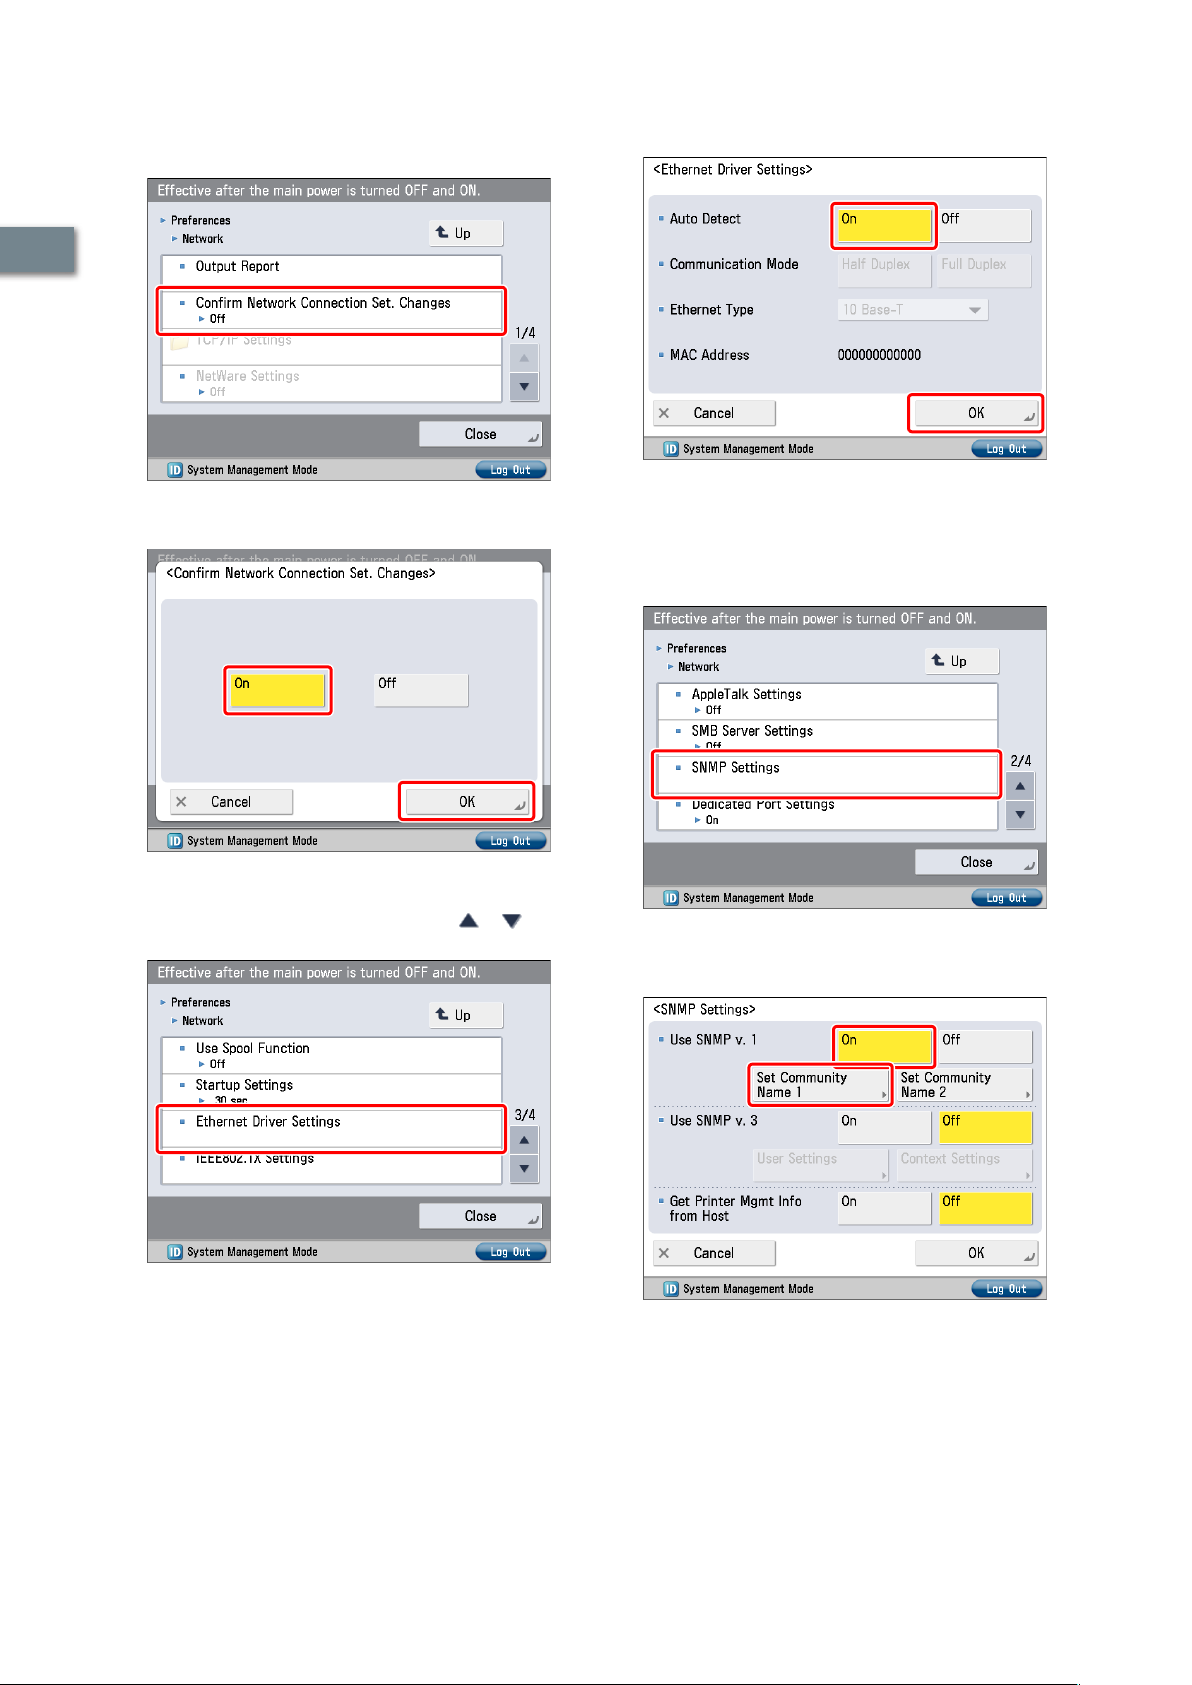
Press [Confirm Network Connection Set.
4
Changes].
Press [On] for <Auto Detect> → [OK].
7
1
The interface settings are now specified.
Press [On] → [OK].
5
Next, set the communication environment for the machine and
the computers on the network.
Operations Required to Use the Machine
Press [Ethernet Driver Settings].
6
If the desired setting is not displayed, press or to scroll
to the desired setting.
Press [SNMP Settings].
8
Press [On] for <Use SNMP v. 1> → press [Set
9
Community Name 1].
10
Page 13
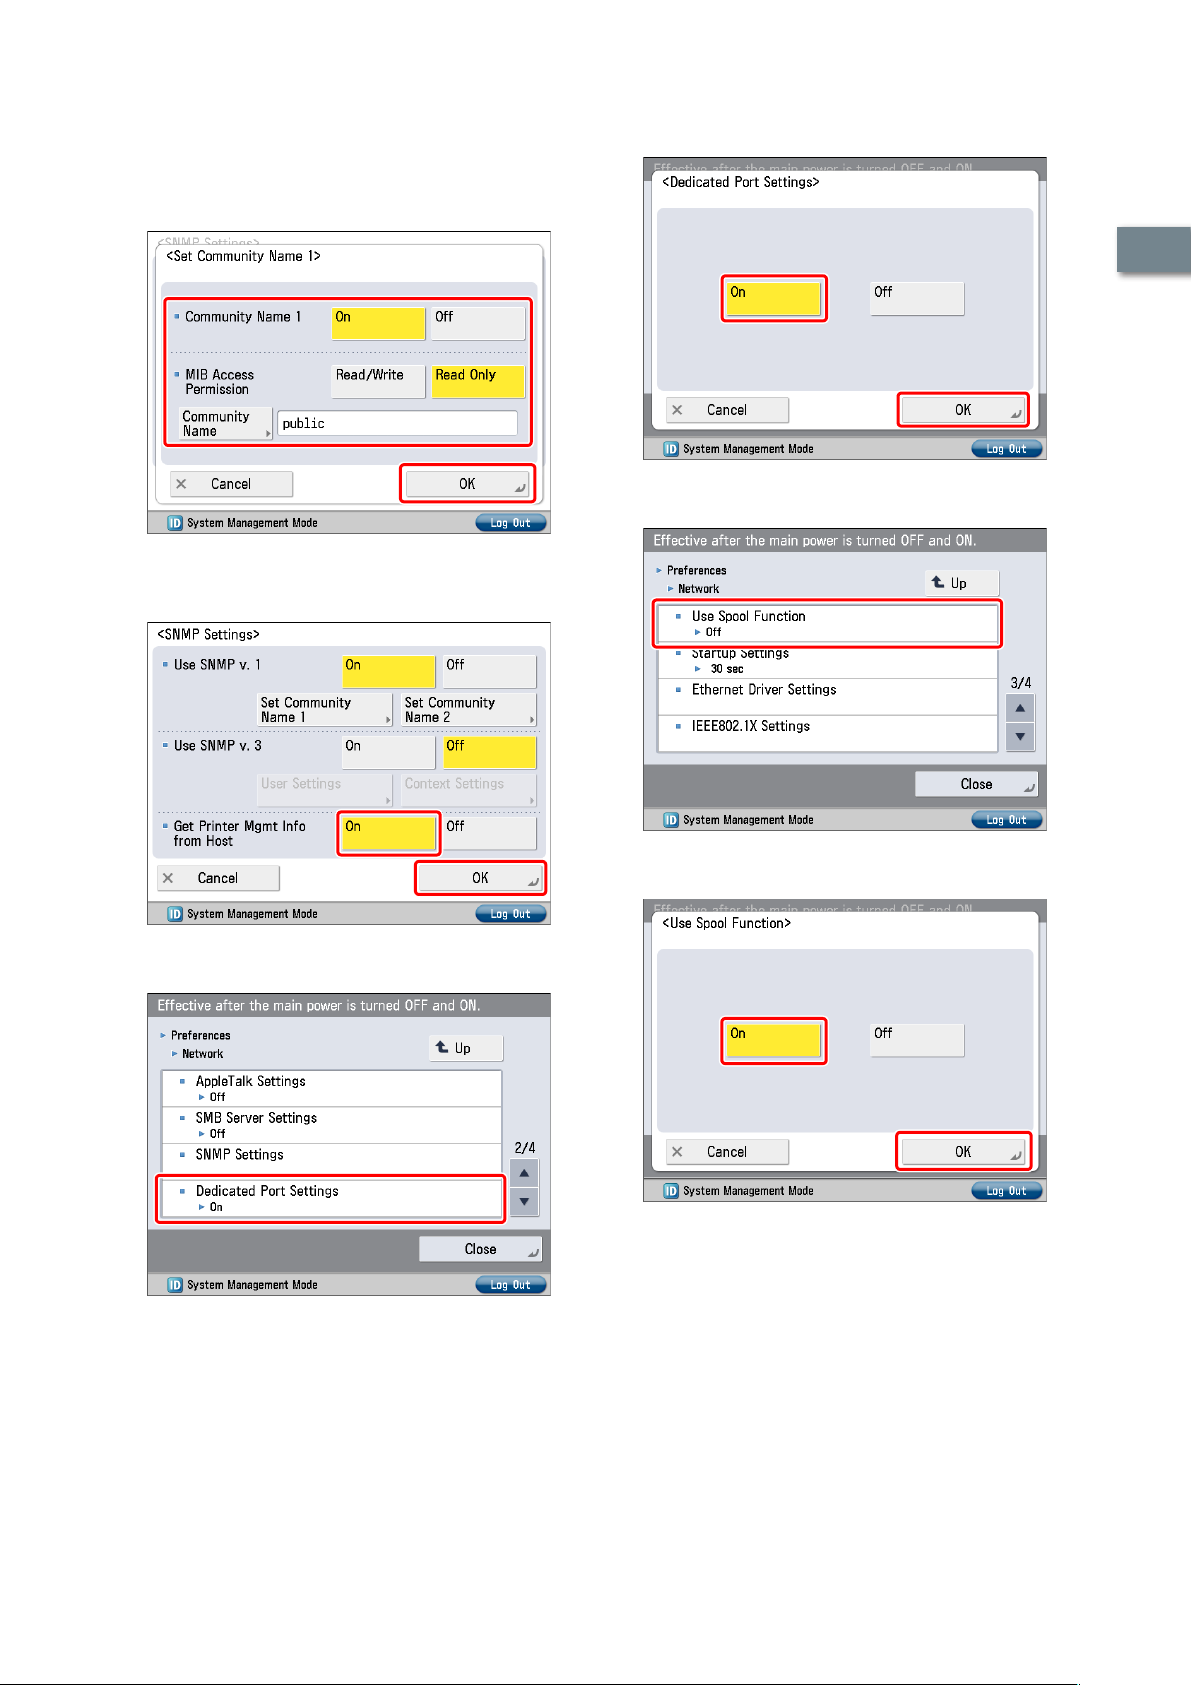
Specify the following settings → press [OK].
10
In this example, the following settings are specified:
<Community Name 1>: [On]
<MIB Access Permission>: [Read Only]
[Community Name]: public
Press [On] → [OK].
13
1
Press [Use Spool Function].
Press [On] for <Get Printer Mgmt Info from Host>
11
→ [OK].
14
Operations Required to Use the Machine
Press [On] → [OK].
15
Press [Dedicated Port Settings].
12
The communication environment settings are now specified.
Next, refer to “Setting a Network on the Machine,” on p. 12 to
specify the settings to use the network.
11
Page 14
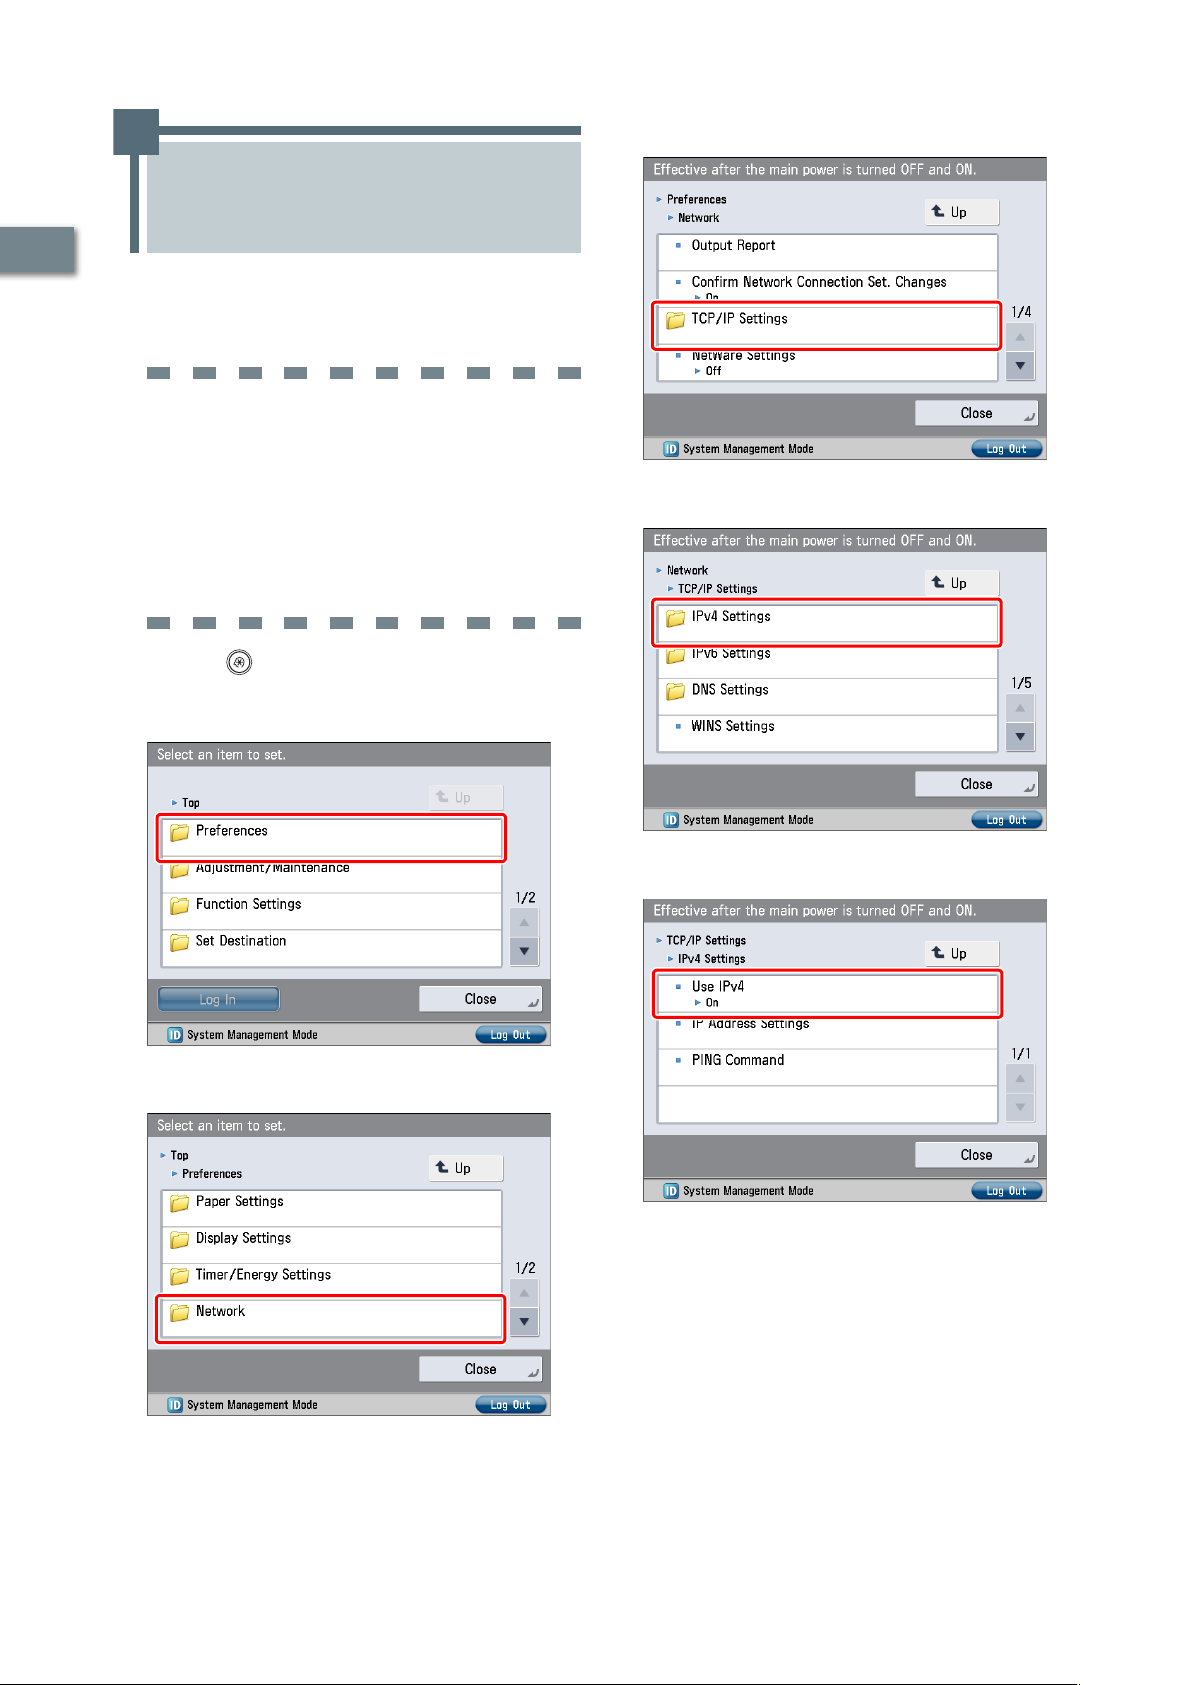
Setting a Network on the Machine
Press [TCP/IP Settings].
4
1
Operations Required to Use the Machine
After connecting the machine to the network,
you must specify the settings on your machine.
In this example, a TCP/IP type network is used.
TCP/IP Settings
[Use IPv4]: On
[IP Address Settings]: 192.168.1.21
DNS Settings
[DNS Server Address Settings]: 192.168.1.22
[Host Name]: host-name
[Domain Name]:
organization.company.com
Press (Settings/Registration).
1
Press [Preferences].
2
Press [IPv4 Settings].
5
Press [Network].
3
Press [Use IPv4].
6
12
Page 15
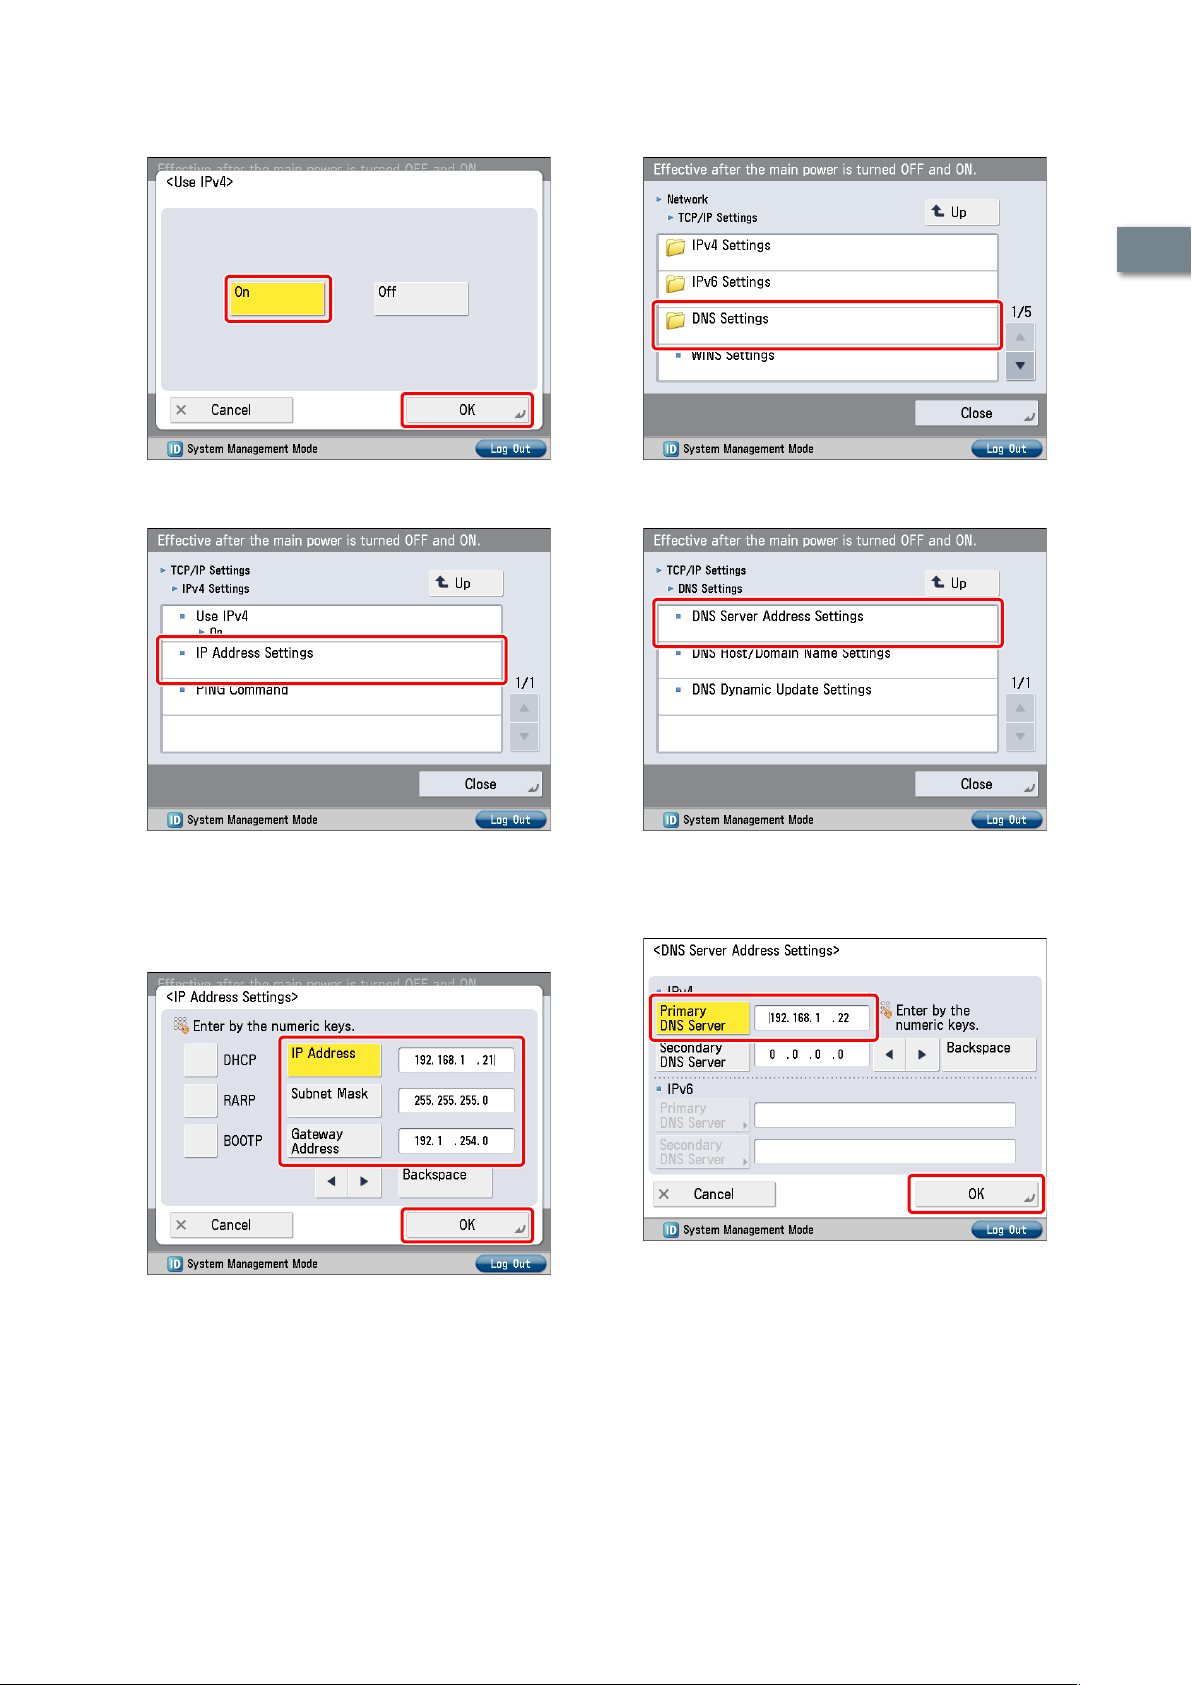
Press [On] → [OK].
7
Press [DNS Settings].
10
1
Press [IP Address Settings].
8
Specify the following settings → press [OK].
9
In this example, the following values are entered:
[IP Address]: 192.168.1.21
[Subnet Mask]: 255.255.255.0
[Gateway Address]: 192.1.254.0
Press [DNS Server Address Settings].
11
Operations Required to Use the Machine
Enter the IP address in [Primary DNS Server] for
12
<IPv4> → press [OK].
In this example, ‘192.168.1.22’ is entered.
The IP address settings are now specified.
Next, specify the DNS settings.
13
Page 16
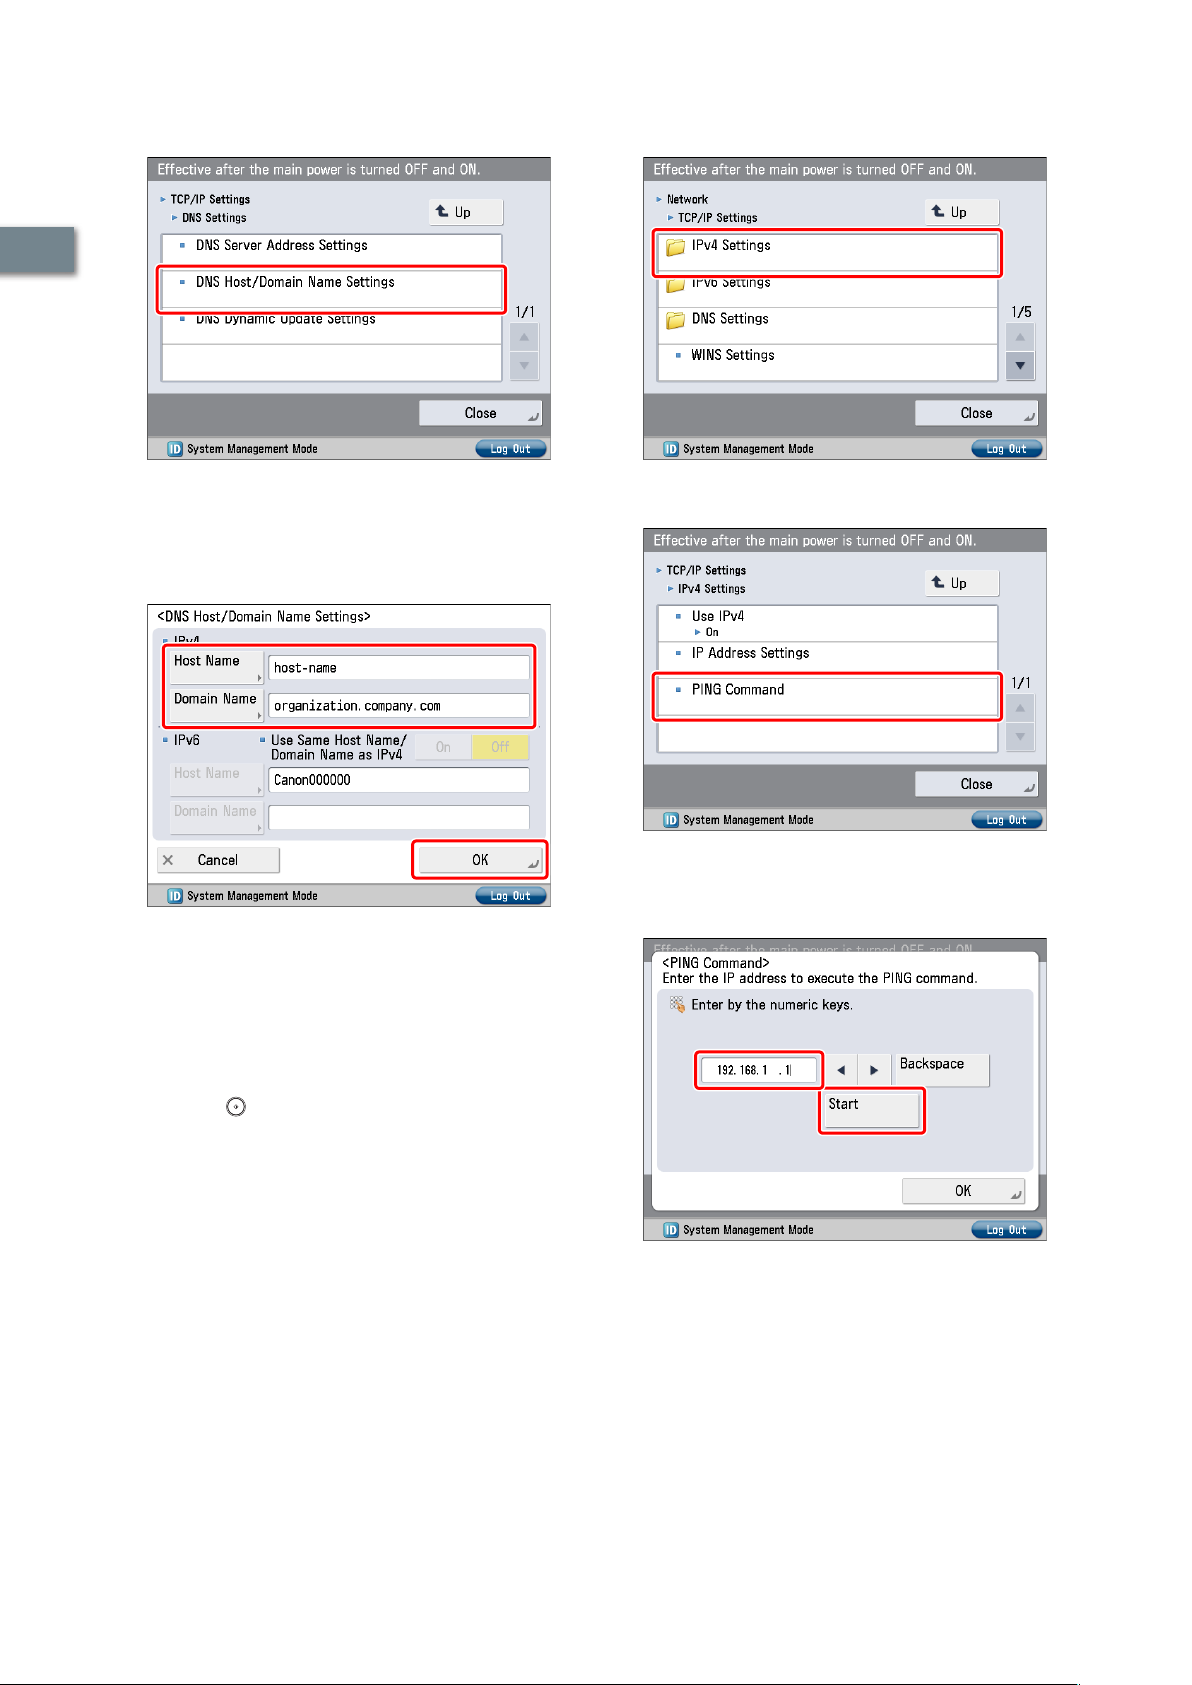
Press [DNS Host/Domain Name Settings].
13
Press [IPv4 Settings].
18
1
Operations Required to Use the Machine
Enter a host name and domain name for <IPv4>
14
→ press [OK].
In this example, the following values are entered:
[Host Name]: host-name
[Domain Name]: organization.company.com
Turn OFF the main power of the machine, and
15
then turn ON the main power again.
The DNS setting becomes effective only after turning the
machine's main power OFF, and then ON.
The DNS settings are now specified.
Next, confirm whether the network is correctly set.
Press [PING Command].
19
Enter an IPv4 address that exists on the network
20
→ press [Start].
In this example, ‘192.168.1.1’ is entered.
14
Press (Start).
16
Press [Preferences] → [Network] → [TCP/IP
17
Settings].
Confirm the response → press [OK].
21
The communication environment settings are now specified.
Next, refer to “Managing the Machine from a Computer,” on p.
15 to specify the settings for using the management functions
from a computer.
Page 17
Managing the Machine from a Computer
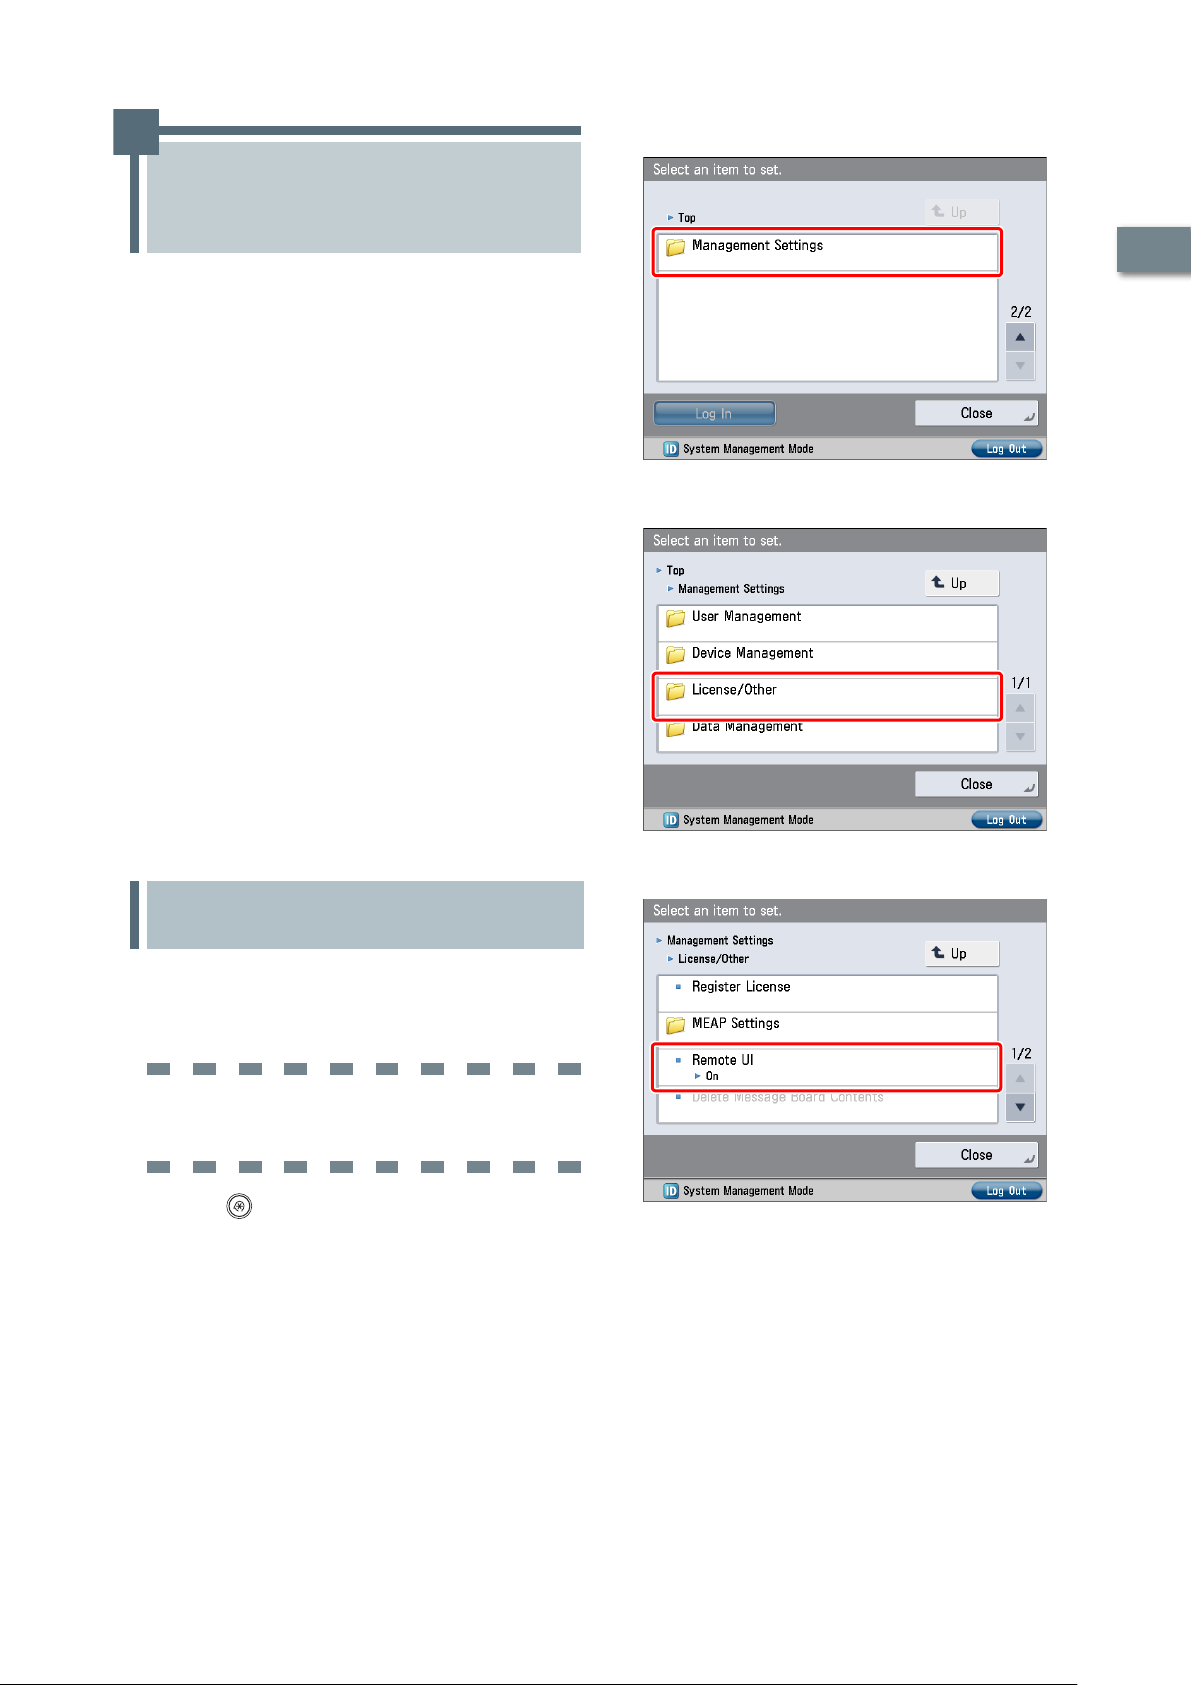
Press [Management Settings].
2
This section describes the operations that the
administrator must perform to enable the
machine to be managed from a computer
screen.
The Remote UI or SMS is used to manage the
machine from a computer.
Remote UI (User Interface):
The Remote UI is software that enables you to access the
machine's functions from your computer's Web browser.
For example, the Remote UI enables you to access the
machine to check job status, execute jobs, and specify
various settings.
Settings Required to Use the Remote UI
1.
Managing the Machine Using the Remote UI
2.
SMS (Service Management Service):
SMS is software that enables you to access the machine’s
functions from your computer’s Web browser to install
and manage MEAP applications (MEAP: the application
platform installed in Canon multitasking machines).
Settings Required to Use SMS
1.
Managing the Machine Using SMS
2.
To use the Remote UI and SMS, you must specify
the settings on your machine in advance.
Press [License/Other].
3
1
Operations Required to Use the Machine
Settings Required to Use the
Remote UI
If you use the Remote UI, you can access the machine using
a Web browser to manage the machine and check its status
from a computer. To start the Remote UI, it is necessary to
enable it on the machine.
Remote UI
[Remote UI]: On
Press (Settings/Registration).
1
Press [Remote UI].
4
15
Page 18
Press [On] for <Remote UI> → [OK].
5
You can specify the desired settings for <Use SSL>.
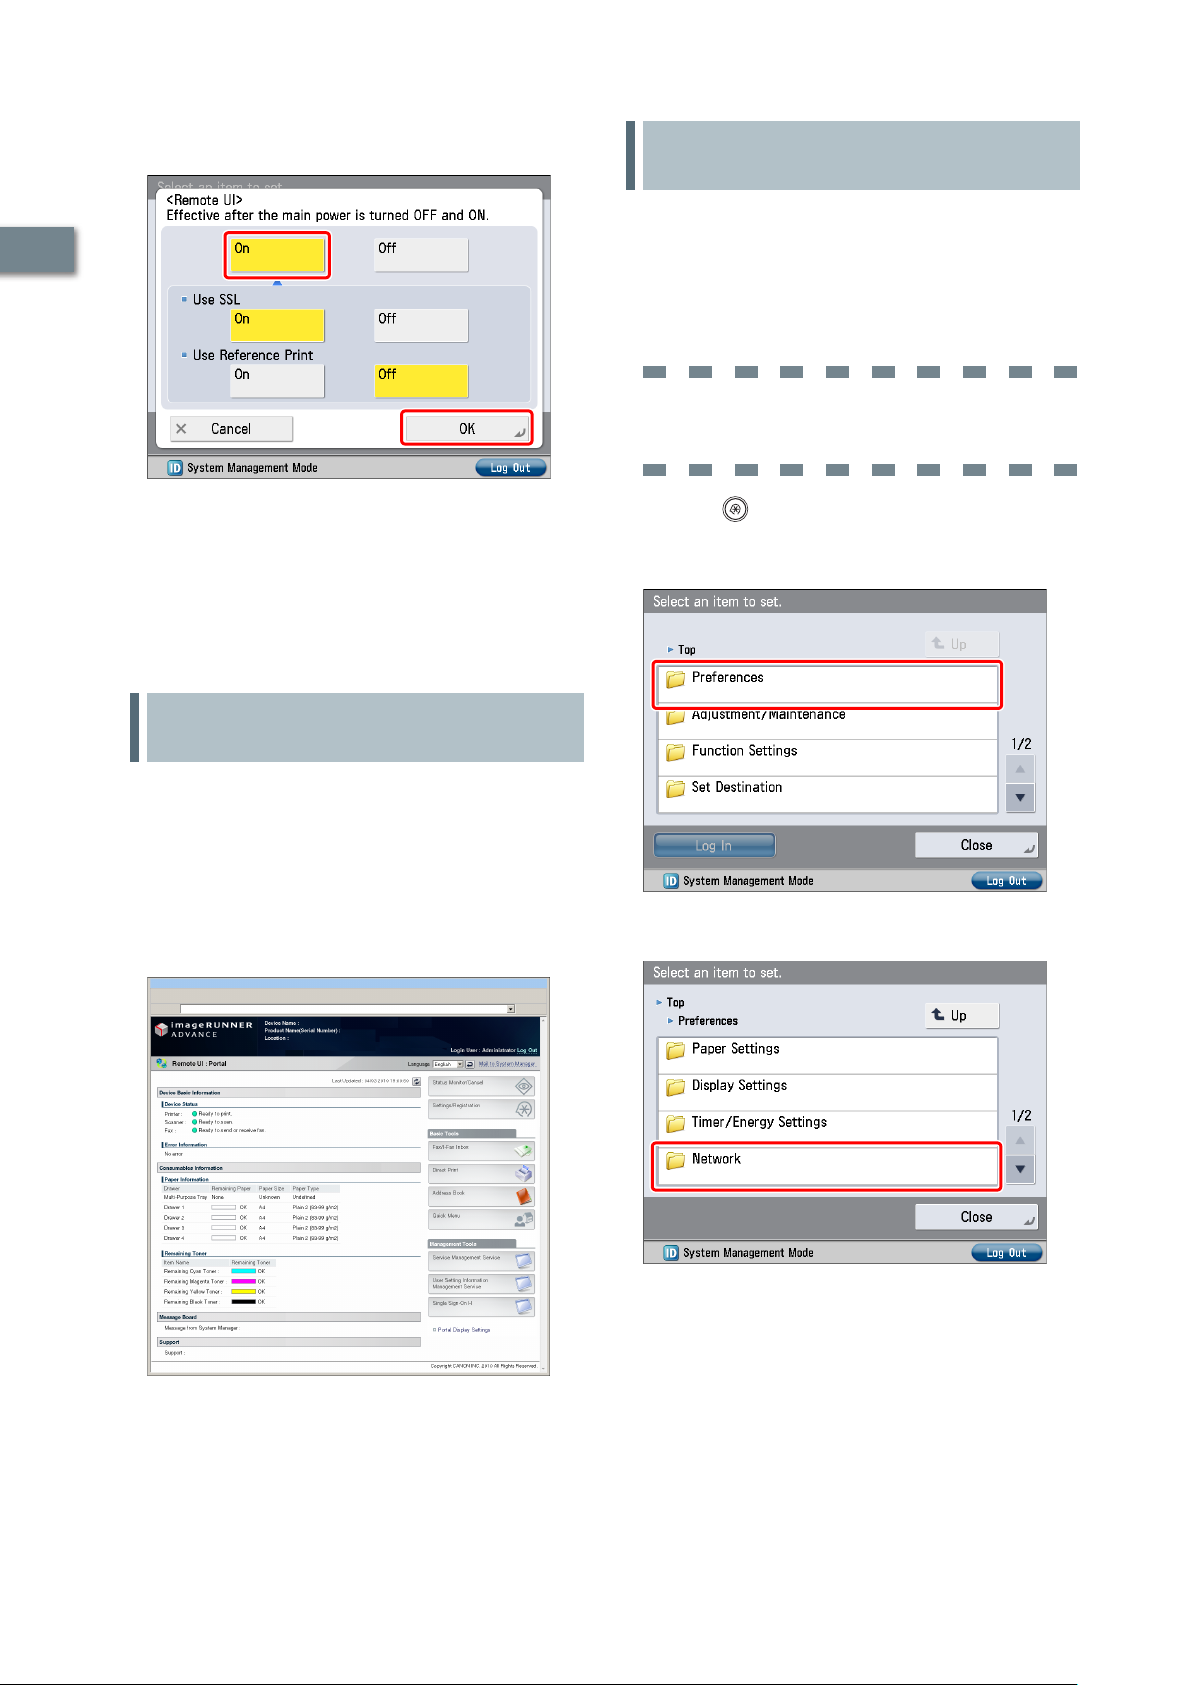
Settings Required to Use SMS
If you use SMS, you can manage the MEAP applications
installed in the machine from the Web browser on your
1
computer.
MEAP applications are software used for customizing and
expanding the functionality of the machine.
To start SMS, it is necessary to enable your computer to
access the machine.
TCP/IP Settings
[Use HTTP]: [On]
Operations Required to Use the Machine
Press [Close].
6
Turn OFF the main power of the machine, and
7
then turn ON the main power again.
The [Remote UI] setting becomes effective only after turning
the machine’s main power OFF, and then ON.
Managing the Machine Using the Remote UI
Start your Web browser.
1
Enter 'http://<IP address or host name of the
2
machine>' in [Address].
The Remote UI screen is displayed.
You can check job statuses, consumable levels,
3
and change various settings.
Press (Settings/Registration).
1
Press [Preferences].
2
Press [Network].
3
16
Page 19
Press [TCP/IP Settings].
4
Press [Use HTTP].
5
Managing the Machine Using SMS
Start your Web browser.
1
Enter 'http://<the IP address or host name of the
2
machine>' in [Address].
Enter the System Manager ID and System PIN →
3
click [Administrator Login].
[System Manager ID]: 7654321
[System PIN]: 7654321
1
Operations Required to Use the Machine
Press [On] → [OK].
6
Press [Close].
7
Turn OFF the main power of the machine, and
8
then turn ON the main power again.
The [Use HTTP] setting becomes effective only after turning
the machine’s main power OFF, and then ON.
You are now logged in to the Remote UI.
Click [Service Management Service].
4
The [Login] page of SMS is displayed.
17
Page 20
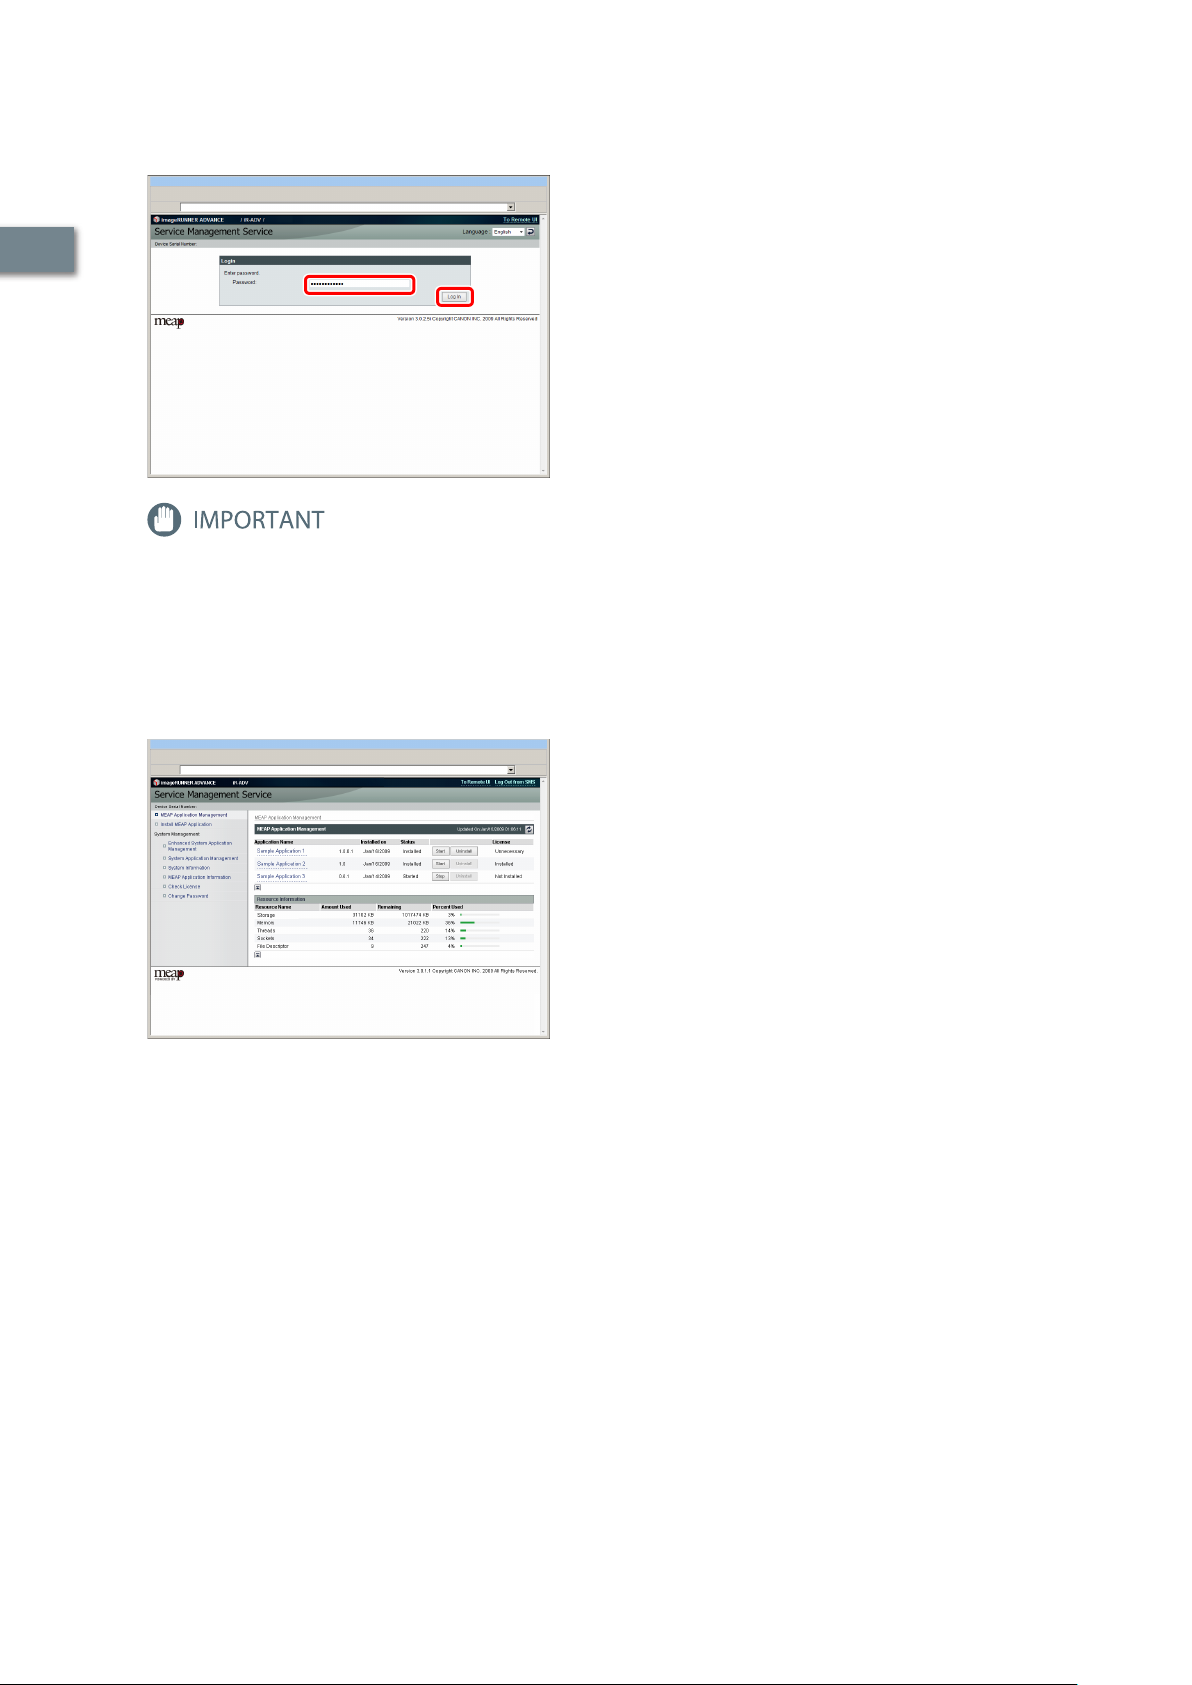
1
Operations Required to Use the Machine
Enter the password → press [Log In].
5
In this example, ‘MeapSmsLogin’ is entered.
The default password is ‘MeapSmsLogin’ (case sensitive). We
recommend that you change the password after logging in to
SMS.
The SMS screen appears.
Perform MEAP application management by
6
confirming and installing the MEAP applications.
For information on each operation, see the e-Manual.
18
Page 21

Setting Up the Machine for the First
Time
Using E-Mail/I-Fax . . . . . . . . . . . . . . . . . . . . . . . . . . . . . . . . . . . . . . . . . . . . . . . . . . .20
Settings Required to Send E-Mail/I-Faxes . . . . . . . . . . . . . . . . . . . . . . . . . . . . . . . . . . . . . . . . . . . . . . . . . . . . . . . . . . . . .20
Sending E-Mail/I-Faxes. . . . . . . . . . . . . . . . . . . . . . . . . . . . . . . . . . . . . . . . . . . . . . . . . . . . . . . . . . . . . . . . . . . . . . . . . . . . . . .21
Sending Scanned Data to a File Server . . . . . . . . . . . . . . . . . . . . . . . . . . . . . . . .24
Settings Required to Send Data to a Computer . . . . . . . . . . . . . . . . . . . . . . . . . . . . . . . . . . . . . . . . . . . . . . . . . . . . . . . 24
Scanning and Sending an Original to the Shared Folder of a Computer . . . . . . . . . . . . . . . . . . . . . . . . . . . . . . . . 27
Sending Faxes . . . . . . . . . . . . . . . . . . . . . . . . . . . . . . . . . . . . . . . . . . . . . . . . . . . . . . .29
Settings Required to Send Faxes . . . . . . . . . . . . . . . . . . . . . . . . . . . . . . . . . . . . . . . . . . . . . . . . . . . . . . . . . . . . . . . . . . . . . 29
Sending Faxes . . . . . . . . . . . . . . . . . . . . . . . . . . . . . . . . . . . . . . . . . . . . . . . . . . . . . . . . . . . . . . . . . . . . . . . . . . . . . . . . . . . . . . . 33
2
Sending/Receiving Faxes via the Remote Fax Server . . . . . . . . . . . . . . . . . . .35
Settings Required to Send Faxes via the Remote Fax Server . . . . . . . . . . . . . . . . . . . . . . . . . . . . . . . . . . . . . . . . . . . 35
Sending Faxes Using the Remote Fax Server . . . . . . . . . . . . . . . . . . . . . . . . . . . . . . . . . . . . . . . . . . . . . . . . . . . . . . . . . . 36
Settings Required to Receive a Fax via the Remote Fax Server . . . . . . . . . . . . . . . . . . . . . . . . . . . . . . . . . . . . . . . . . 37
Sending Faxes from a Computer Using the Machine . . . . . . . . . . . . . . . . . . . .37
Settings Required to Send Faxes from a Computer . . . . . . . . . . . . . . . . . . . . . . . . . . . . . . . . . . . . . . . . . . . . . . . . . . . . 37
Sending Faxes from a Computer . . . . . . . . . . . . . . . . . . . . . . . . . . . . . . . . . . . . . . . . . . . . . . . . . . . . . . . . . . . . . . . . . . . . . 38
Printing a Document from a Computer . . . . . . . . . . . . . . . . . . . . . . . . . . . . . . . .39
Settings Required to Print from a Computer . . . . . . . . . . . . . . . . . . . . . . . . . . . . . . . . . . . . . . . . . . . . . . . . . . . . . . . . . .39
Printing from a Computer . . . . . . . . . . . . . . . . . . . . . . . . . . . . . . . . . . . . . . . . . . . . . . . . . . . . . . . . . . . . . . . . . . . . . . . . . . . . 40
Scanning an Original . . . . . . . . . . . . . . . . . . . . . . . . . . . . . . . . . . . . . . . . . . . . . . . .42
Settings Required to Perform Scanning . . . . . . . . . . . . . . . . . . . . . . . . . . . . . . . . . . . . . . . . . . . . . . . . . . . . . . . . . . . . . .42
Scanning an Original . . . . . . . . . . . . . . . . . . . . . . . . . . . . . . . . . . . . . . . . . . . . . . . . . . . . . . . . . . . . . . . . . . . . . . . . . . . . . . . . 44
Using an Advanced Box on the Network . . . . . . . . . . . . . . . . . . . . . . . . . . . . . . .45
Settings Required to Use an Advanced Box on the Network . . . . . . . . . . . . . . . . . . . . . . . . . . . . . . . . . . . . . . . . . . . 45
Storing Data in an Advanced Box on the Network . . . . . . . . . . . . . . . . . . . . . . . . . . . . . . . . . . . . . . . . . . . . . . . . . . . .48
1919
Page 22

Using E-Mail/I-Fax
You can send originals scanned on the machine
using e-mail or internet fax (I-fax).
This example describes the procedure for
sending a design proposal in PDF format.
The flow of operations is indicated below.
1.
Settings Required to Send E-Mail/I-Faxes
Specifying E-Mail/I-Fax Settings
•
Press [Function Settings].
2
2. Sending E-Mail/I-Faxes
Storing New Destinations
2
•
Sending an E-Mail Message
•
Settings for receiving e-mail/I-faxes must also be specified.
For information on the settings, see e-Manual > Settings/
Registration > Common Communication Settings for E-Mail/IFax.
Press [Send].
3
Settings Required to Send EMail/I-Faxes
Communication settings must be specified to send e-mail/Ifaxes.
Setting Up the Machine for the First Time
The following example describes the procedure for the
settings below:
<Communication Settings: Basic Settings>
[E-Mail Address]: john@example.com
[SMTP Server]: 192.168.1.2
<Communication Settings: Authentication
Settings>
<SMTP Authentication (SMTP AUTH)>: On
[User Name]: user_name
[Password]: password
To specify the communication server settings, you must log in as an
administrator. To log in as an administrator, see “Logging In to the
Machine as an Administrator,” on p. 8.
*1
*1
Press [E-Mail/I-Fax Settings].
4
20
*1 The user name and password for logging in to the SMTP server.
Specifying E-Mail/I-Fax Settings
Press (Settings/Registration).
1
Press [Communication Settings].
5
Page 23
Specify the following settings → press [Next].
6
In this example, the following values are entered:
[E-Mail Address]: john@example.com
[SMTP Server]: 192.168.1.2
Specify the following settings → press [OK].
9
In this example, the following settings are specified:
<SMTP Authentication (SMTP AUTH)>: On
[User Name]: user_name
[Password]: password
2
You can specify the desired settings for <Use POP RX> and
<Use SMTP RX>. For information on the settings, see e-Manual
> Settings/Registration > Common Communication Settings
for E-Mail/I-Fax.
If the [Communication Settings: POP Server
7
Settings] screen is displayed, press [Next].
The [Communication Settings: POP Server Settings] screen is
displayed if you set <Use POP RX> on the [Communication
Settings: Basic Settings] screen to 'On'.
Specify the <SMTP TX> settings → press [Next].
8
The settings for sending e-mail/I-faxes are now set.
Sending E-Mail/I-Faxes
Register e-mail/I-fax destinations in the Address Book before
sending e-mail.
Storing New Destinations
When sending a scanned original using e-mail, register the
information for the destination.
In this example, the e-mail address for the planning
department is registered as the destination.
Press [Scan and Send].
1
Setting Up the Machine for the First Time
You can specify the desired settings for <SMTP RX>. To
•
encrypt data to be sent using SSL, set <SMTP TX> to 'On'.
Even if you select [On] for <SMTP TX>, the data will not be
•
encrypted if the SMTP host does not support encryption.
21
Page 24
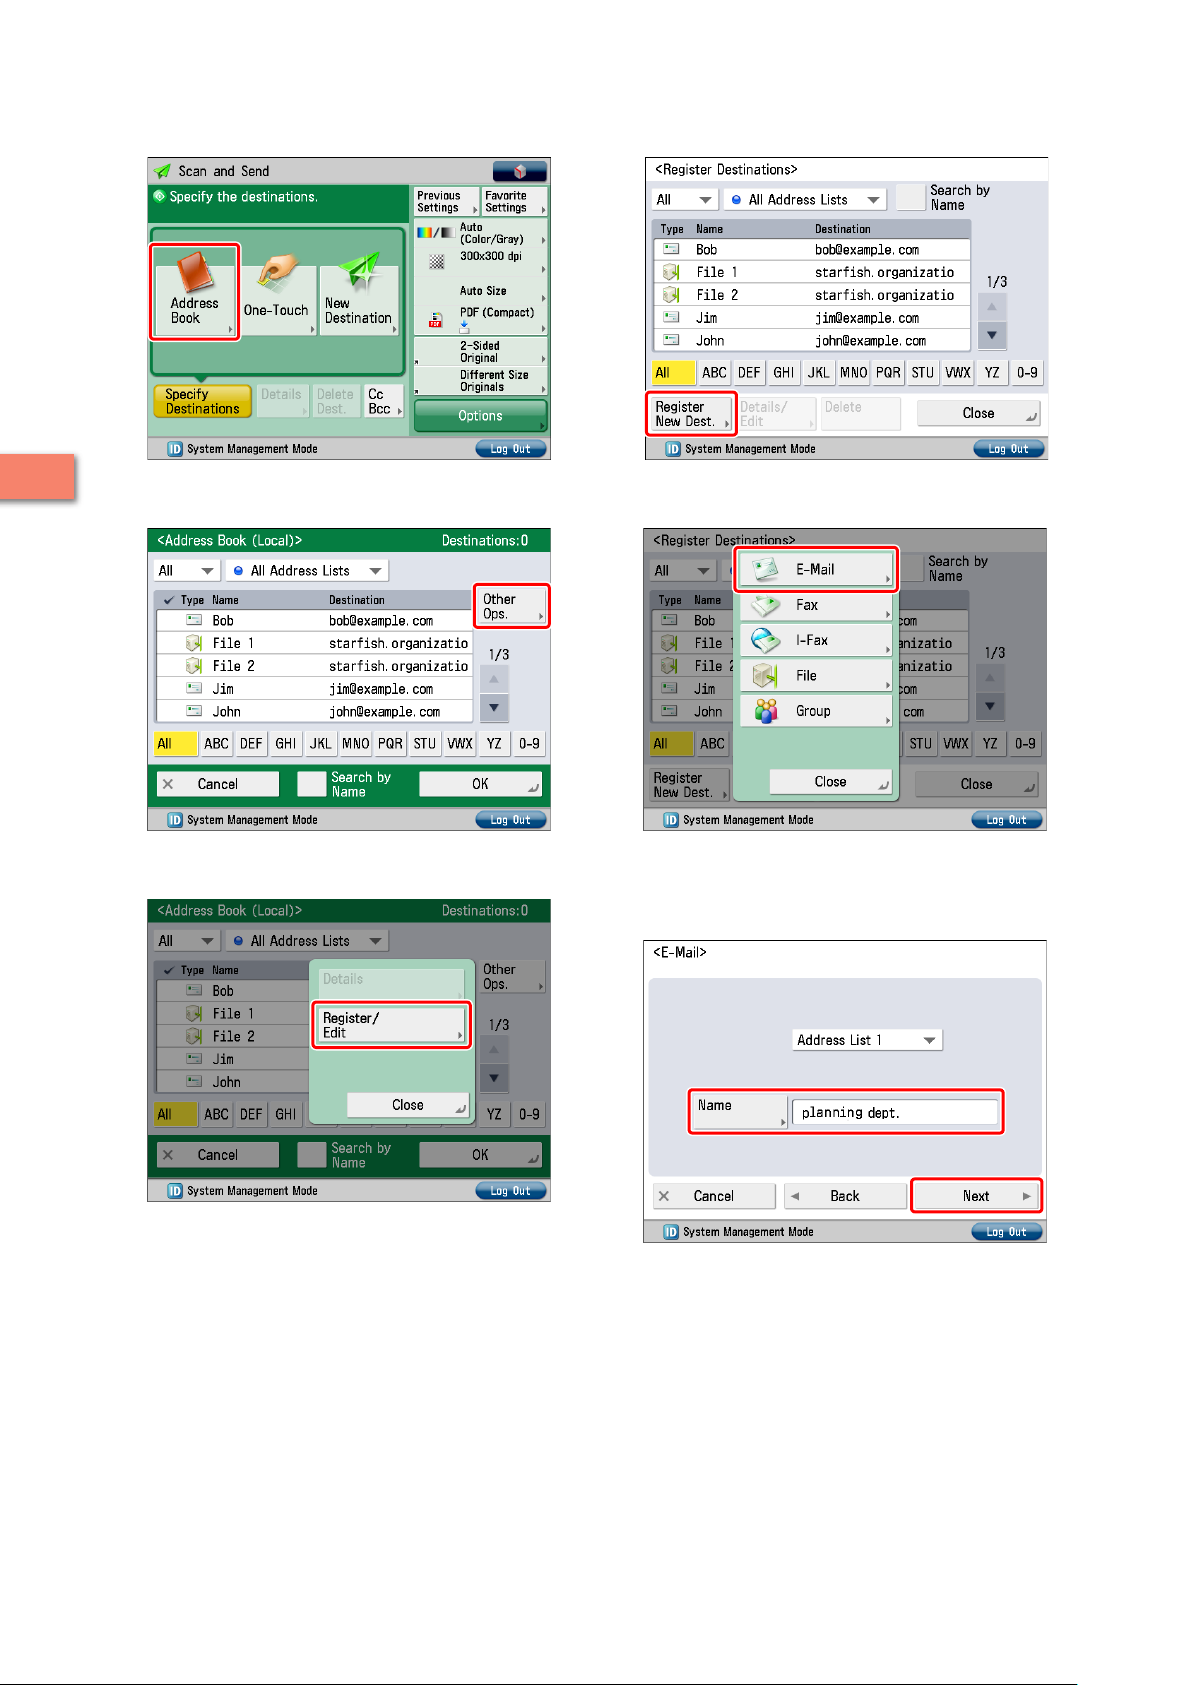
Press [Address Book].
2
Press [Register New Dest.].
5
2
Setting Up the Machine for the First Time
Press [Other Ops.].
3
Press [Register/Edit].
4
Press [E-Mail].
6
Enter the new name → press [Next].
7
In this example, ‘planning dept.’ is entered.
22
Page 25

Enter the e-mail address → press [OK].
8
In this example, ‘mike@example.com’ is entered.
Change the settings as necessary.
4
Press [Close].
9
Press [OK].
10
Sending an E-Mail Message
The scanned data is sent to a destination registered in
“Storing New Destinations,” on p. 21 as an e-mail attachment.
Place your originals.
1
Press [Address Book].
2
Press (Start).
5
If the [Set SMTP Authentication] screen is displayed, enter the
user name and password → press [OK].
If the [Original Size] screen is displayed, specify the size of the
original → press [OK].
Press [Start Sending].
6
The data is attached to the e-mail and sent.
2
Setting Up the Machine for the First Time
Select [planning dept.] → press [OK].
3
23
Page 26

Click [Properties] → check the computer name.
3
Sending Scanned Data to a File Server
This example describes the procedure for
scanning an original and sending it to a file server
(computer) in PDF format.
1.
Settings Required to Send Data to a Computer
•
Setting a Computer
2. Scanning and Sending an Original to the
2
Shared Folder of a Computer
•
Storing New Destinations
•
Sending Scanned Data to a Shared Folder
Settings Required to Send
Data to a Computer
To send data to a computer, you must specify settings for
the shared folder.
The following example describes the procedure for the
settings below:
From the [Start] menu, right-click [Network] →
4
select [Properties].
Setting Up the Machine for the First Time
Computer Settings
TCP/IP Settings
Enable NetBIOS over TCP/IP
Adding users
[User Name]: user_name
[Password]: password
Creating a shared folder
[Share Name]: share
[Permissions]: Full Control
Setting a Computer
Data scanned with the machine can be saved to a shared
folder. The shared folder can be set from your computer.
The following example describes the procedure for setting a
shared folder with Windows Vista:
Log on to Windows with administrator privileges.
1
Click (Start) → right-click [Computer].
2
Click [View Status] for [Local Area Connection].
5
24
Page 27

Click [Properties].
6
Select [Internet Protocol Version 4 (TCP/IPv4)] →
8
click [Properties].
2
Select the following items.
7
[Client for Microsoft Networks]
•
[File and Printer Sharing for Microsoft Networks]
•
[Internet Protocol Version 4 (TCP/IPv4)]
•
Click [Advanced] on the [General] tab.
9
Setting Up the Machine for the First Time
25
Page 28

Click the [WINS] tab.
10
From the [Start] menu, right-click [Computer] →
13
select [Manage].
2
Click [Local Users and Groups] in [System Tools] →
Select [Enable NetBIOS over TCP/IP] → click [OK].
11
14
right-click the [Users] folder → select [New User]
from the pop-up menu.
Setting Up the Machine for the First Time
Restart the computer.
12
The network settings are now specified.
Next, create a user for accessing the shared folder from the
machine.
Specify the following settings → click [Create] →
15
[Close].
In this example, the following values are entered:
[User Name]: user_name
[Password]: password
[Confirm password]: password
26
Page 29

The user is now created.
Next, create a folder for sending data from the machine.
Create the folder to save the data to in a location
16
of your choice.
In this example, a folder named ‘share’ is created.
Right-click the folder → select [Share] from the
17
menu that appears.
Scanning and Sending an Original to the Shared Folder of a Computer
You can send data scanned with the machine to the shared
folder.
Storing New Destinations
Register the information for the shared folder created in
“Setting a Computer,” on p. 24 to the Address Book of the
machine.
Press [Scan and Send].
1
2
Setting Up the Machine for the First Time
Press [Address Book].
2
Select the user to perform sharing with → click
18
[Add] → [Share].
Press [Other Ops.].
3
Click [Done].
19
The setting of the computer are now specified.
27
Page 30

Press [Register/Edit].
4
Enter the new name → press [Next].
7
In this example, ‘Original’ is entered.
2
Press [Register New Dest.].
5
Setting Up the Machine for the First Time
Press [File].
6
Specify the following settings → press [OK].
8
[Protocol]: Windows(SMB)
[Host Name]: \\user-1\share
[User Name]: user_name
[Password]: password
For [Host Name], enter ‘\\<name of your computer>\<name
•
of the shared folder>’.
For [Folder Path], enter ‘\\<name of a folder inside the
•
shared folder>’. This can be omitted as necessary.
Press [Close].
9
Press [OK].
10
Sending Scanned Data to a Shared Folder
Send a scanned original to the shared folder registered in
“Storing New Destinations,” on p. 27.
Place your originals.
1
28
Page 31

Press [Address Book].
2
Press [Start Sending].
6
i
Select 'Original' → press [OK].
3
Change the settings as necessary.
4
The scanned original is sent to the shared folder.
Sending Faxes
This example describes the procedure for
sending a fax.
The flow of operations is indicated below.
1.
Settings Required to Send Faxes
Registering the Fax Number, Unit Name, and Line Type
•
Attaching the Sender’s Name to Sent Documents
•
2. Sending Faxes
Storing New Destinations
•
Sending a Fax
•
Settings Required to Send
Faxes
To send a fax, you must specify a fax number, unit name, and
other settings.
The following example describes the procedure for the
settings below:
2
Setting Up the Machine for the First Time
Press (Start).
5
If the [Original Size] screen is displayed, specify the size of the
original → press [OK].
Fax Number
012XXXXXXX
Unit Name
sales dept.
Line Type
Tone
*1
*1
*1
TX Terminal ID
Print
*1 To specify the telephone line settings, you must log in as an
administrator. To log in as an administrator, see “Logging In to the
Machine as an Administrator,” on p. 8.
29
Page 32

Registering the Fax Number, Unit Name, and Line Type
Register the fax number and unit name displayed/printed
on the destination machine. Set the line type to 'Tone'.
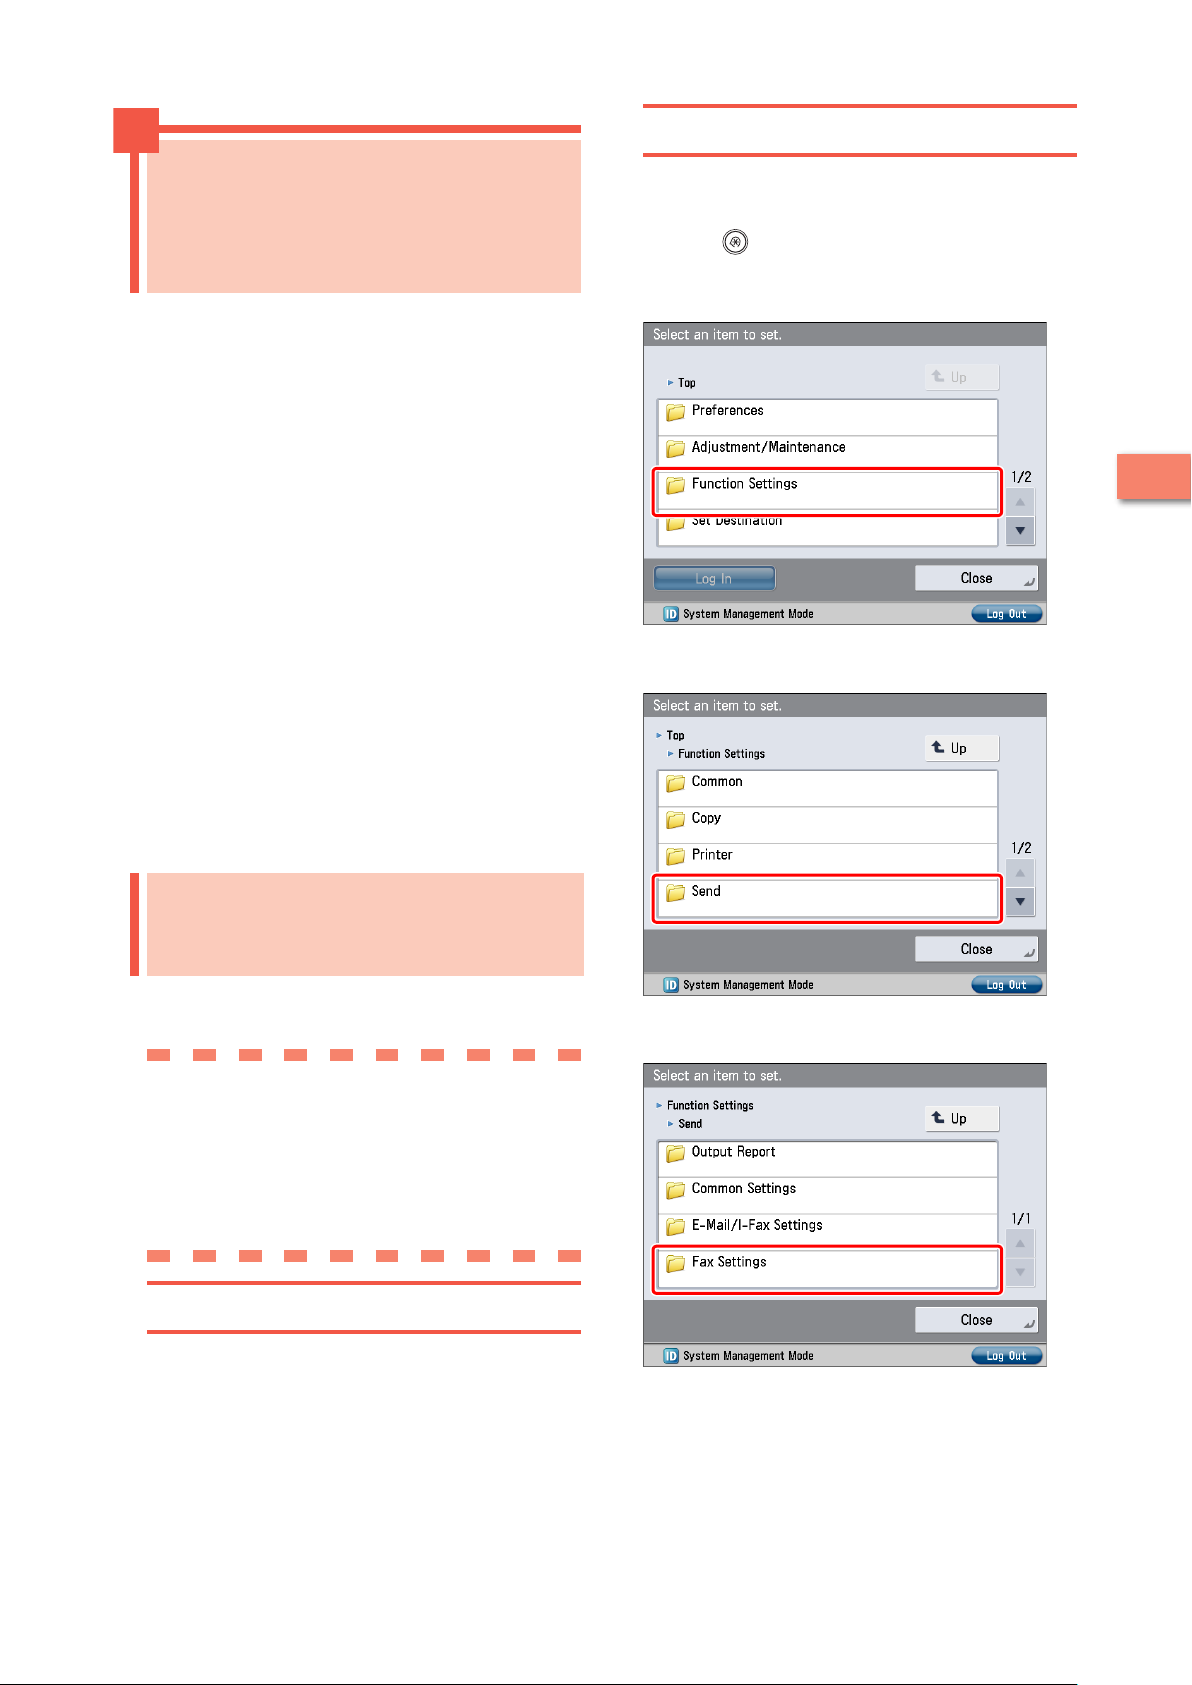
Press (Settings/Registration).
1
Press [Function Settings].
2
Press [Set Line].
5
2
Select the desired line.
6
The number of lines that appear depends on the optional
equipment attached to the machine. In this example, 'Line 1'
is pressed.
Press [Send].
3
Setting Up the Machine for the First Time
Press [Fax Settings].
4
Press [Register Unit Telephone Number].
7
30
Page 33

Enter the sender’s fax number using -
8
(numeric keys).
In this example, ‘012XXXXXXX’ is entered.
Press [OK].
9
The fax number is now registered. Next, register the unit name.
Press [Register Unit Name].
10
Press [Select Line Type].
12
2
Press [Tone] → [OK].
13
Enter the new name → press [OK].
11
In this example, ' sales dept.' is entered.
The unit name is now registered. Next, select the line type.
Press [Close].
14
Setting Up the Machine for the First Time
31
Page 34

Attaching the Sender's Name to Sent Documents
Set the machine so that information for the sender appears
on sent documents.
Press (Settings/Registration).
1
Press [Function Settings].
2
Press [TX Terminal ID].
5
2
Press [Print] → specify the following settings →
6
press [OK].
In this example, the following settings are specified:
[Print Position]: [Outside]
[Display Destination Unit Name]: [On]
[Telephone # Mark]: [Fax]
Press [Send].
3
Setting Up the Machine for the First Time
Press [Common Settings].
4
Press [Close].
7
32
Page 35

Sending Faxes
Register the destination in the Address Book to send faxes
to.
Storing New Destinations
Register the information for the destination in the Address
Book.
In this example, information for the “central sales dept.” is
registered in the Address Book.
Press [Fax].
1
Press [Register/Edit].
4
Press [Address Book].
2
Press [Register New Dest.].
5
Press [Fax].
6
2
Setting Up the Machine for the First Time
Press [Other Ops.].
3
33
Page 36

Enter the new name → press [Next].
7
In this example, ‘central sales dept.’ is entered.
Sending a Fax
Send a fax to the destination registered in “Storing New
Destinations,” on p. 33.
Place your originals.
1
Press [Address Book].
2
Setting Up the Machine for the First Time
Enter the destination fax number using -
8
(numeric keys).
In this example, ‘123XXXXXXX’ is entered.
Press [OK] → [Close].
9
Press [OK].
10
Select [central sales dept.].
3
Press (Start).
4
If the [Original Size] screen is displayed, specify the size of the
original → press [OK].
2
34
Press [Start Sending].
5
The fax is sent.
Page 37
Setting the Client
Sending/Receiving Faxes via the Remote Fax Server
By using the Remote Fax function on your
machine, you can send/receive faxes using a
server machine.
For the purposes of this example, the machine
(another imageRUNNER ADVANCE series
machine) that forwards the fax is called the
"server," and the machine (this machine) from/to
which the fax is sent is called the "client."
The flow of operations is indicated below.
Sending a Fax via the Remote Fax Server
1. Settings Required to Send Faxes via the Remote Fax
Server
Setting the Server
•
Setting the Client
•
Sending Faxes Using the Remote Fax Server
2.
Receiving a Fax via the Remote Fax Server
1. Settings Required to Receive a Fax via the Remote
Fax Server
Setting the Server
•
Setting the Client
•
Set the IP address of the server to send using in the client
machine.
Press (Settings/Registration).
1
Press [Function Settings].
2
Press [Send].
3
2
Setting Up the Machine for the First Time
Settings Required to Send Faxes via the Remote Fax Server
To send a remote fax, it is necessary to specify the following
settings.
Server Settings
[Use Remote Fax]
On
Client Settings
[Remote Fax TX Settings]
[IP Address]: 192.168.1.24 (IP address of the server)
Setting the Server
To use another imageRUNNER ADVANCE series machine
with a fax board as a server, you must specify the Remote
Fax TX settings on that machine.
For more information, see the instruction manuals for the
other imageRUNNER ADVANCE series machine.
Press [Fax Settings].
4
35
Page 38
Press [Remote Fax TX Settings].
5
Sending Faxes Using the Remote Fax Server
Send faxes using the remote fax server.
Place your originals.
1
Press [Fax].
2
2
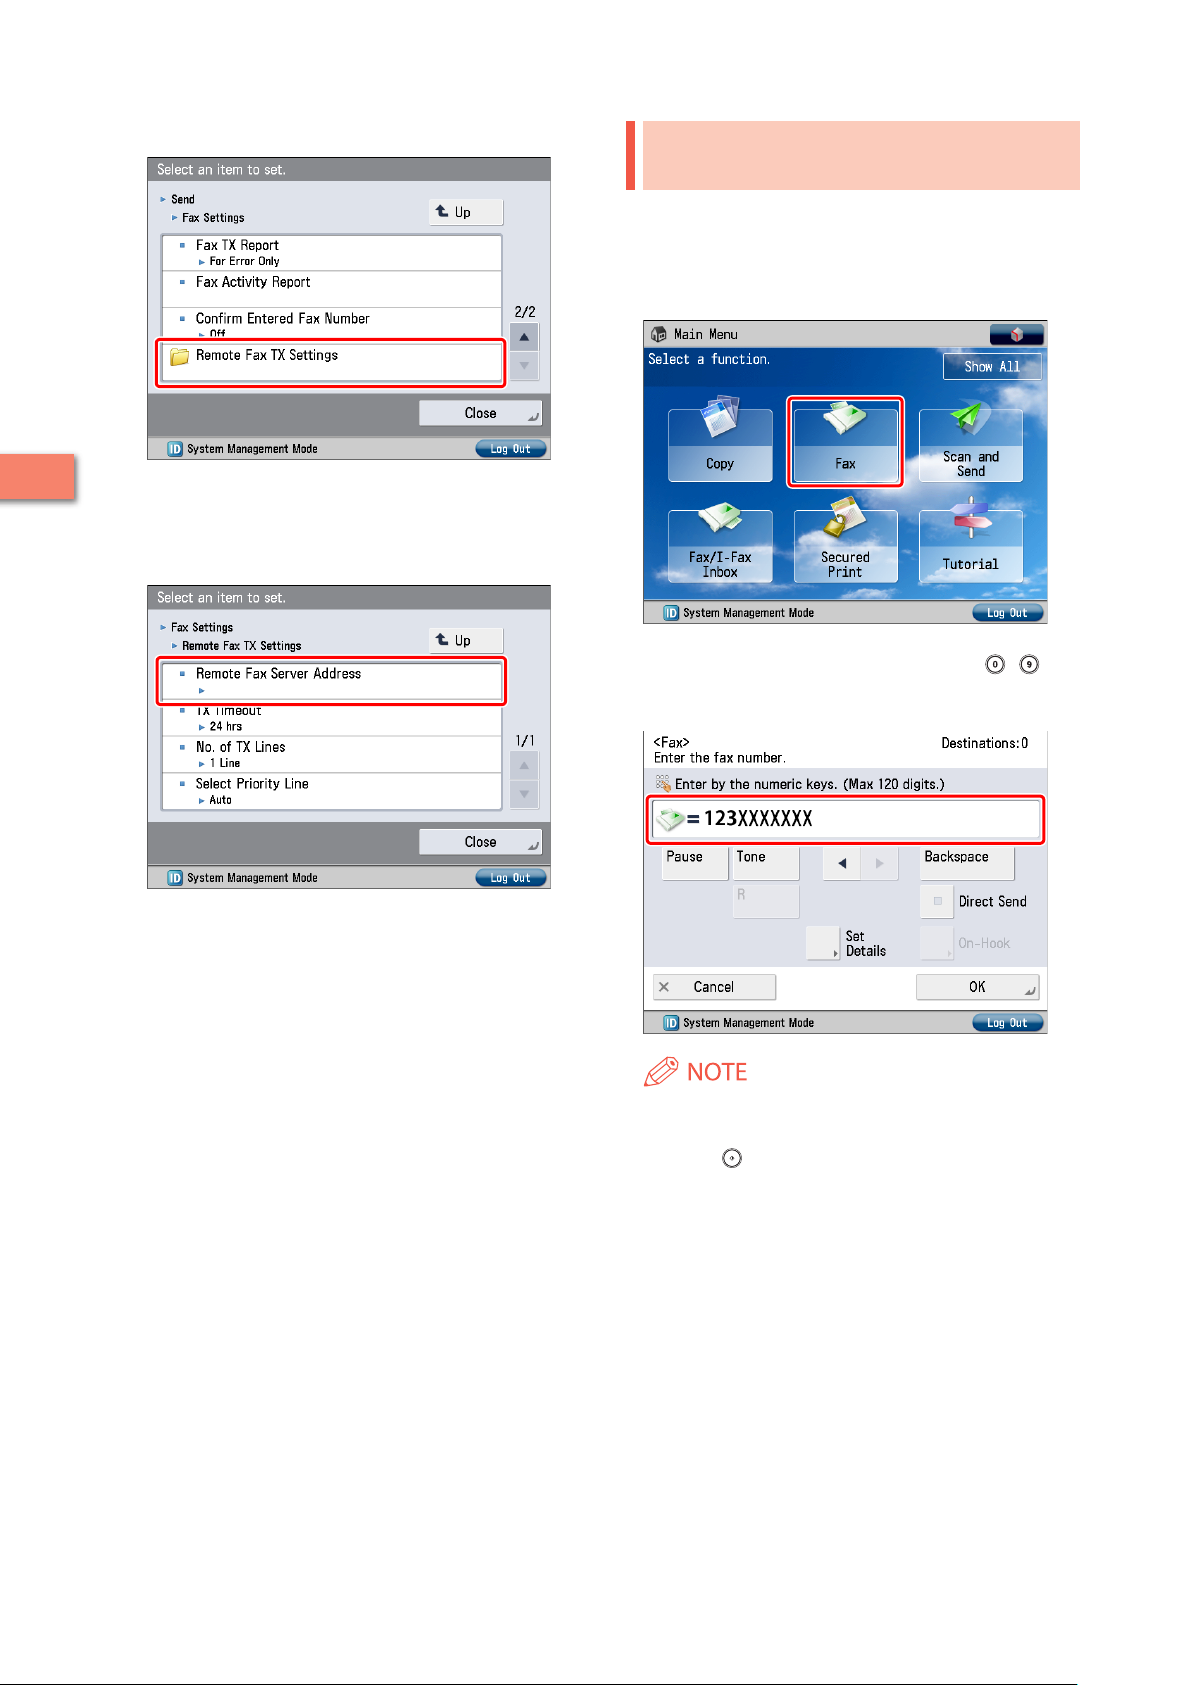
Press [Remote Fax Server Address] → enter the IP
6
address → press [OK].
In this example, ‘192.168.1.24’ is entered for the IP address of
the server.
Enter the destination fax number using -
3
(numeric keys).
In this example, ‘123XXXXXXX’ is entered.
Setting Up the Machine for the First Time
Press [Close].
7
The client settings are now specified.
36
You can also specify a destination from the Address Book. For
more information, see “Sending Faxes,” on p. 33.
Press (Start).
4
If the [Original Size] screen is displayed, specify the size of the
original → press [OK].
Page 39
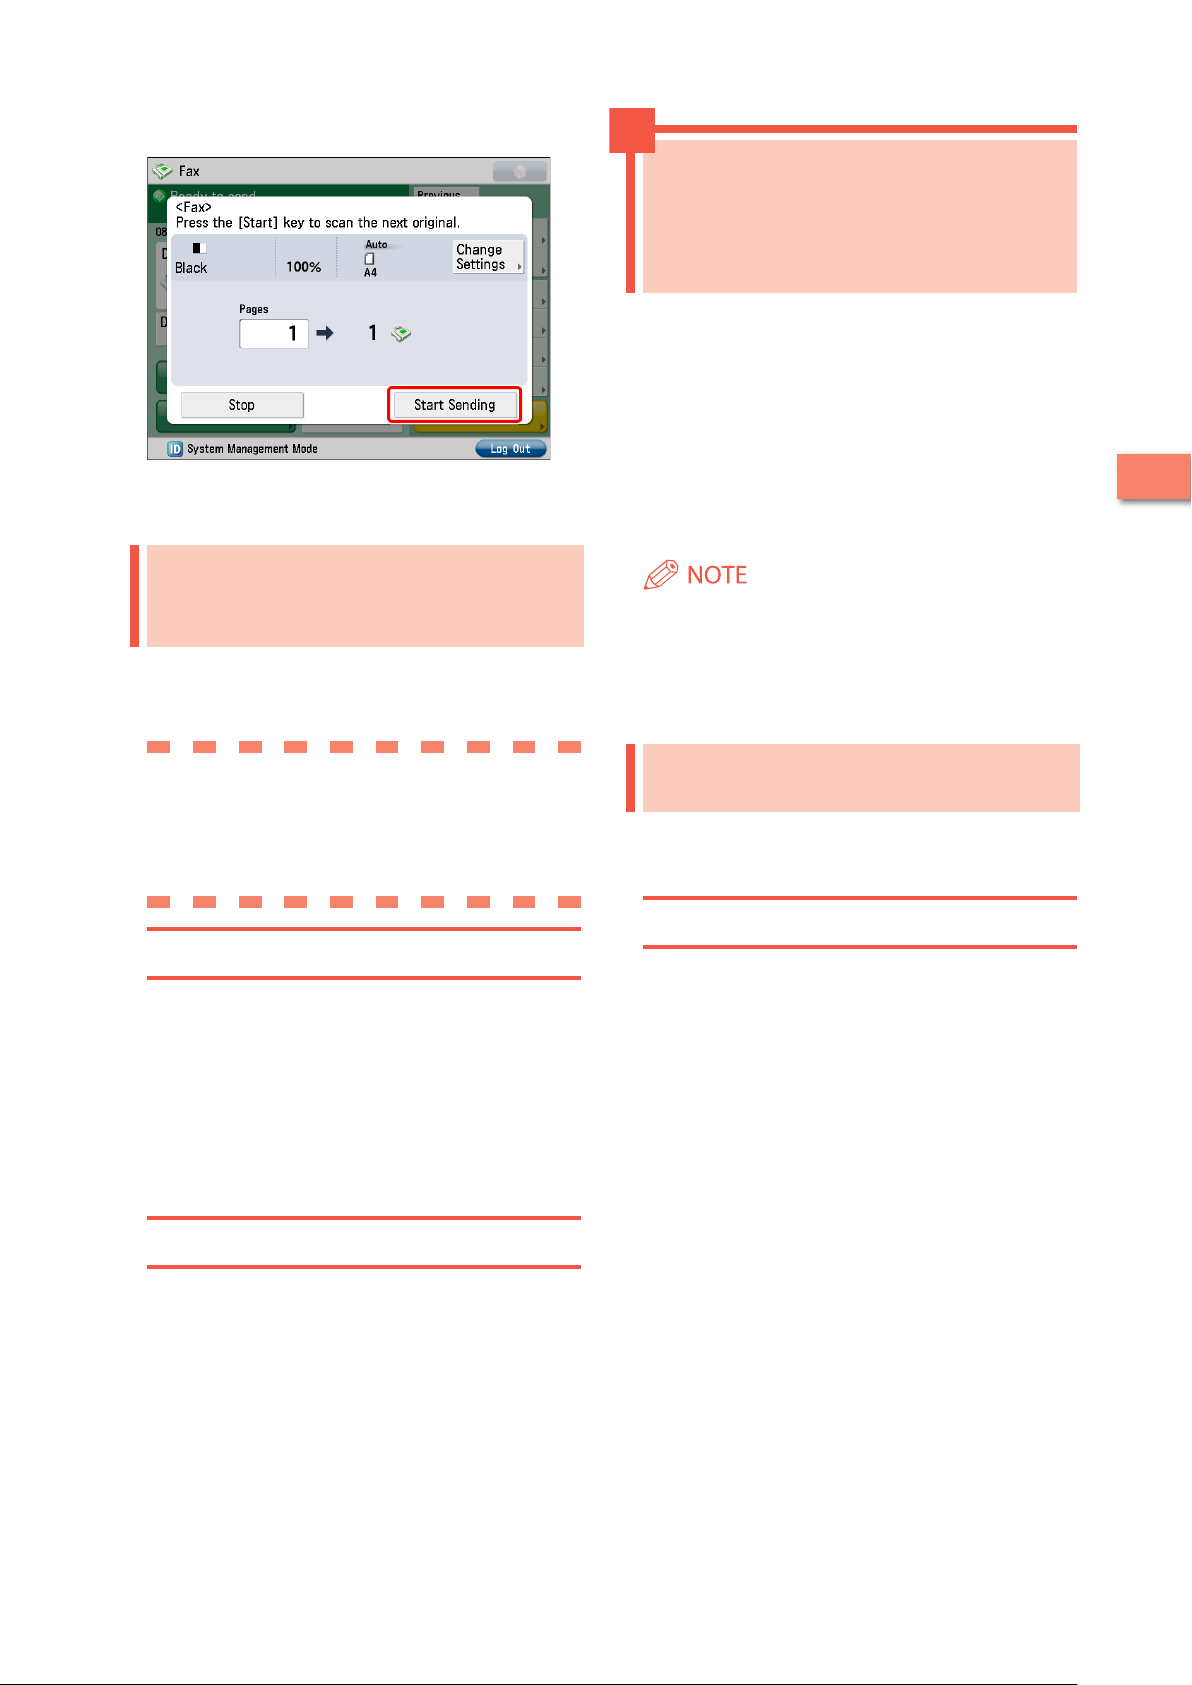
Press [Start Sending].
5
The fax is sent.
Settings Required to Receive
Sending Faxes from a Computer Using the Machine
This example describes the procedure for
sending a document created on a computer as a
fax using the machine.
The flow of operations is indicated below.
1.
Settings Required to Send Faxes from a Computer
Installing the Fax Driver
•
2. Sending Faxes from a Computer
2
a Fax via the Remote Fax
Server
To receive a remote fax using the Remote Fax server, you
must specify settings for the server machine and client
machine respectively.
Server Settings
Forwarding Settings
Client Settings
I-Fax Settings
Setting the Server
To receive a remote fax using the Remote Fax server, you
must specify the settings on the server machine so that the
received fax data is forwarded to the client machine as an
I-fax.
To forward fax data, you must register the client machine's
I-fax address as a forwarding destination on the server
machine, and specify the forwarding conditions as
necessary.
For more information on forwarding settings, see e-Manual
> Settings/Registration.
The procedure for displaying the fax driver screen may differ
•
depending on the applications you are using. For details,
see the instruction manuals provided with the application
software.
The display may differ according to the operating system and
•
version of the fax driver.
Settings Required to Send
Faxes from a Computer
To send a fax from your computer using the machine, you
must install the fax driver in your computer. After installing
the fax driver, specify the fax settings.
Installing the Fax Driver
This example describes the procedure for installing the fax
driver for Windows Vista.
Insert the CD-ROM (the CD-ROM that contains the
1
fax driver) into your computer.
In this example, the Windows fax driver is used.
Setting Up the Machine for the First Time
Setting the Client
To receive a remote fax using the Remote Fax server, you
must specify the settings on the client machine so that
the fax data to be received is forwarded from the server
machine as an I-fax.
For more information on I-fax settings, see e-Manual >
Settings/Registration.
37
Page 40
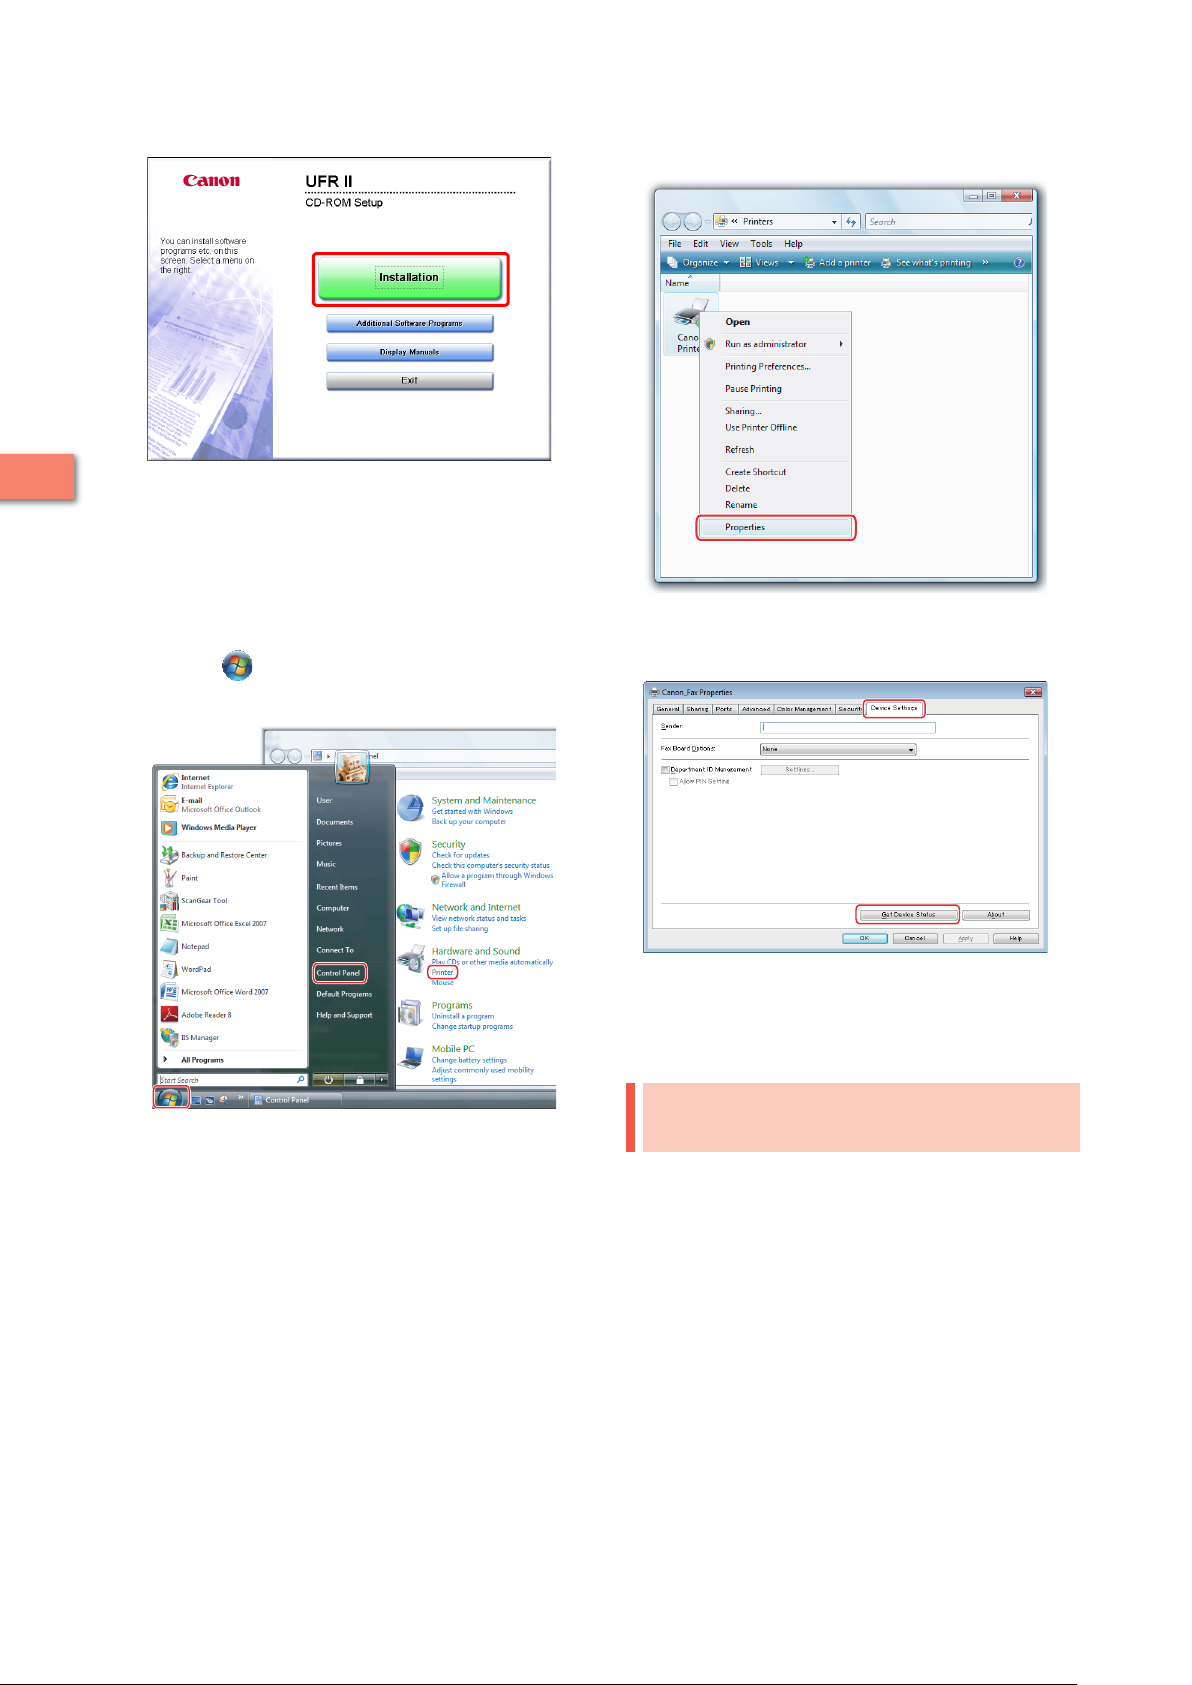
On the CD-ROM Menu screen, click [Installation].
2
2
To browse the Fax Driver Installation Guide, click [Display
Manuals] before you click [Installation].
Follow the instructions on the screen to complete
3
the installation.
The fax driver is now installed.
Next, set the fax environment.
Click (Start) → [Control Panel] → [Printer] in
4
Windows.
Right-click the icon of the fax you use → select
5
[Properties].
Click the [Device Settings] tab → [Get Device
6
Status].
Setting Up the Machine for the First Time
Click [OK].
7
The fax environment settings are now specified.
Sending Faxes from a Computer
Specify a destination and send a fax. The following example
describes the procedure for sending a document, created
using Microsoft Word 2007.
On your computer, open the document to send
1
using the fax function.
38
Page 41

Select [Print] from the menu.
2
The [Print] dialog box is displayed.
Select the fax name to use → click [Print].
3
Click [OK].
5
The fax is sent.
Printing a Document from a Computer
To perform printing, it is necessary to install the
printer driver in a computer. After installing the
printer driver, specify the printing preferences.
2
The [Fax Sending Settings] dialog box is displayed.
On the [Sending Settings] sheet, enter the
4
recipient's name and fax number → click [Add to
Destination List].
1.
Settings Required to Print from a Computer
Installing the Printer Driver
•
2. Printing from a Computer
Printing methods may differ depending on the applications
•
you are using. For details, see the instruction manuals
provided with the application software.
The display may differ according to the operating system, as
•
well as the type and version of the printer driver.
Settings Required to Print
from a Computer
A printer driver is software required for printing from
application software.
It is necessary to install a printer driver in a computer to use
the Print function.
Installing the Printer Driver
This example describes the procedure for installing the
printer driver for Windows Vista.
Insert the CD-ROM (the CD-ROM that contains the
1
printer driver) into your computer.
In this example, the LIPS LX printer driver for Windows is used.
Setting Up the Machine for the First Time
39
Page 42

On the CD-ROM Menu screen, click [Installation].
2
2
To browse the Printer Driver Installation Guide, click [Display
Manuals] before you click [Installation].
Follow the instructions on the screen to complete
3
the installation.
The printer driver is now installed.
Next, set the printer environment.
Click (Start) → [Control Panel] → [Printer] in
4
Windows.
Right-click the icon of the printer → select
5
[Properties].
Click the [Device Settings] tab → [Get Device
6
Status].
Setting Up the Machine for the First Time
Click [OK].
7
The printer environment settings are now specified.
Printing from a Computer
Print documents created on your computer with the
machine. The following example describes the procedure
for printing a document, created using Microsoft Word 2007,
in color:
40
Page 43

Open the Word document you want to print →
1
click [File] → [Print].
Select [Color] for [Color Mode] in the [Quality]
4
sheet → click [OK].
Select the printer you use for [Name].
2
Click [Properties].
3
Set the range to print and the number of copies
5
→ click [OK].
The document is printed.
2
Setting Up the Machine for the First Time
41
Page 44
Scanning an Original
This example describes the procedure for
specifying the settings required for scanning, and
for scanning an original into your computer:
The flow of operations is indicated below.
1.
Settings Required to Perform Scanning
•
Installing the Scanner Driver
•
Setting Remote Scanning Online
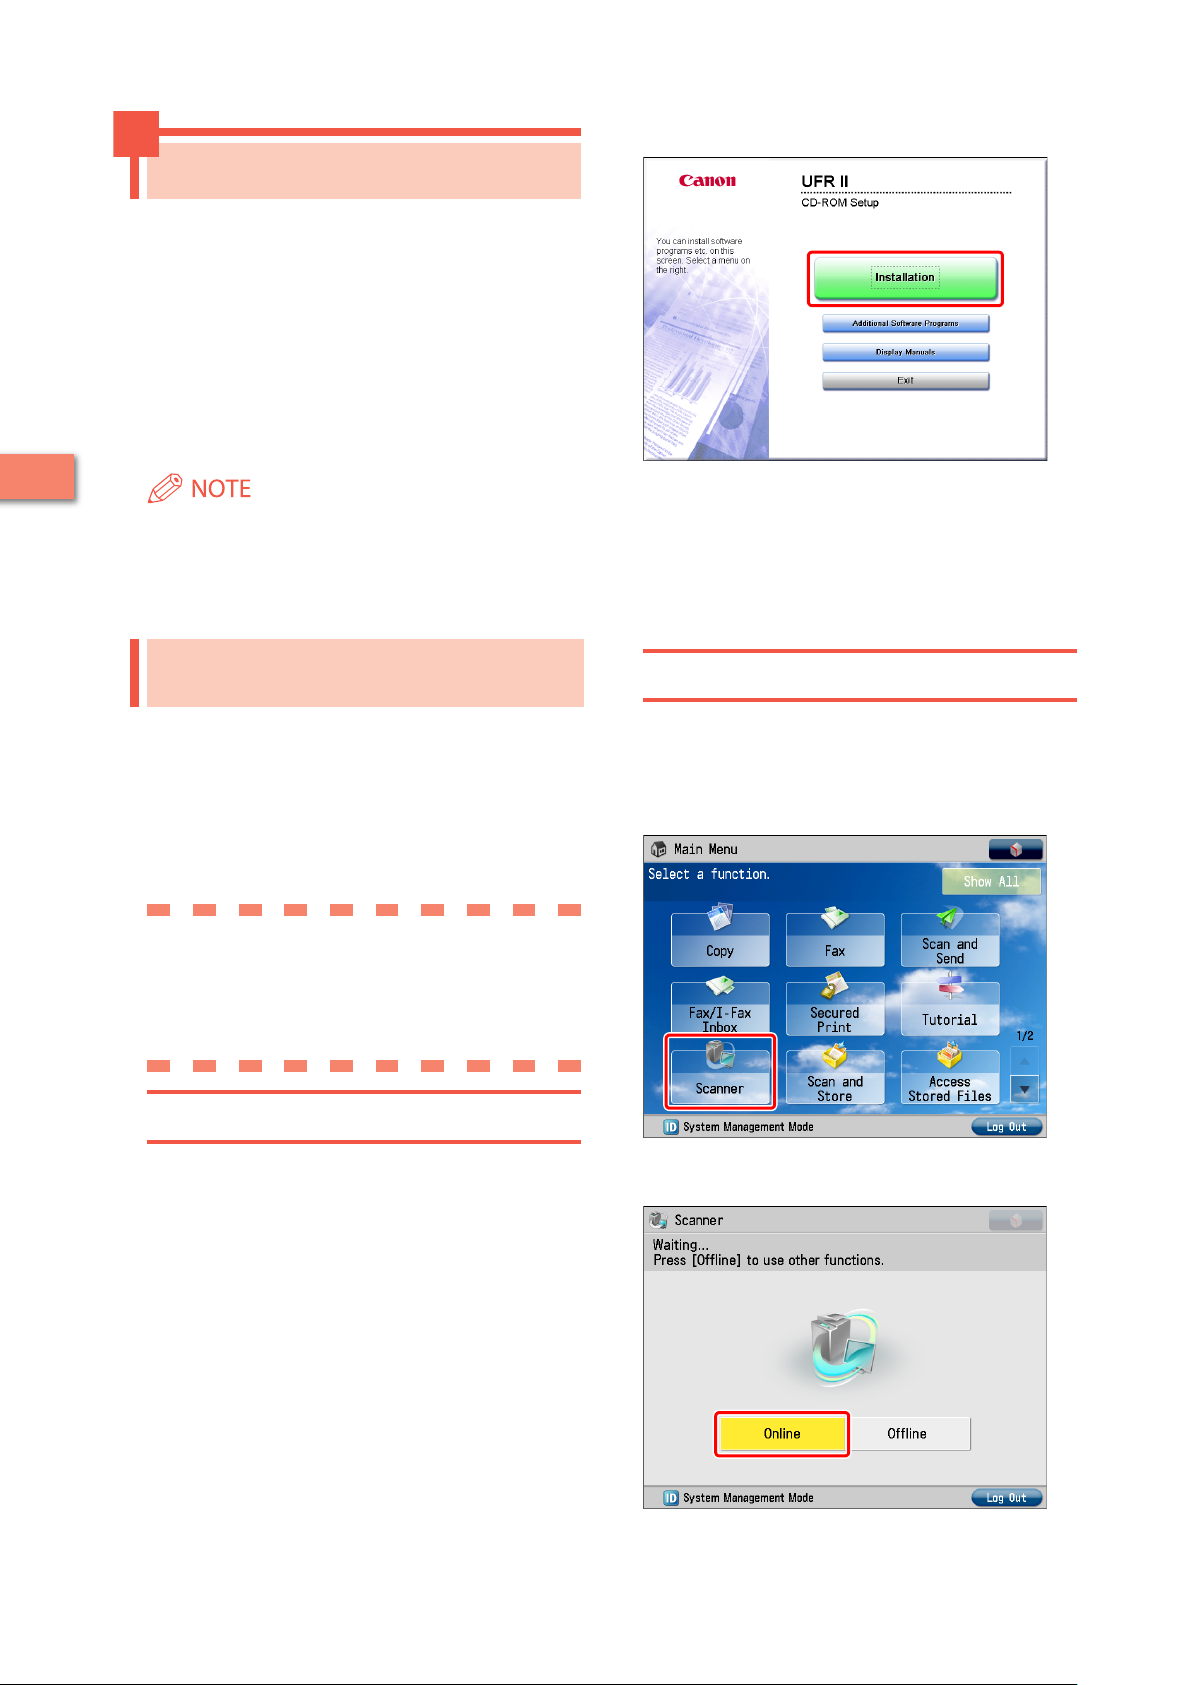
On the CD-ROM Menu screen, click [Installation].
2
2. Scanning an Original
2
•
Remote scanning methods may differ depending on the
applications you are using. For details, see the instruction
manuals provided with the application software.
•
The window displayed may differ according to the operating
system etc.
To browse the Network ScanGear User’s Guide, click [Display
Manuals] before you click [Installation].
Follow the instructions on the screen to complete
3
the installation.
The scanner driver is now installed.
Next, enable remote scanning.
Settings Required to Perform
Scanning
Setting Remote Scanning Online
Setting Up the Machine for the First Time
To use the Scan function of the machine, it is necessary to
install the scanner driver (software for specifying scanner
settings).
The scanner driver can be installed from the same User
Software CD-ROM used for installing the printer driver.
After that, specify the settings to use the remote scanner on
the machine.
The flow of operations is indicated below.
[Scanner] screen on the machine:
Online
[ScanGear Tool] on your computer:
The name of your scanner
To use the Scan function, it is necessary to enable remote
scanning on the machine and enable the network scanner
to use on your computer.
Press [Scanner].
1
42
Installing the Scanner Driver
This example describes the procedure for installing the
scanner driver for Windows Vista.
Insert the CD-ROM in your computer.
1
Color Network ScanGear is used here.
Press [Online] on the [Scanner] screen.
2
The scanner is now online.
Page 45

Scanned data from your computer can now be received.
Next, set the scanner to use on your computer.
Click (Start) → [Programs] → [Color Network
3
ScanGear] → [ScanGear Tool].
Select the scanner to use → click [Select].
5
Click [Exit].
6
ScanGear Tool is closed.
Remote scanning is now enabled.
2
ScanGear Tool is started.
Click [Discover].
4
Setting Up the Machine for the First Time
Scanners on the network are automatically discovered, and
the searched scanners are displayed in [Select Scanner from
List].
43
Page 46

Scanning an Original
The following example describes the procedure for placing
an original on the platen glass of the machine, and using
remote scanning from your computer to paste the data into
a Microsoft Office Word 2007 document:
Confirm that remote scanning is online.
1
Place the original on the platen glass.
2
Select [File] → [Add Clips to Organizer] → [From
6
Scanner or Camera].
The [Insert Picture from Scanner or Camera] dialog box is
displayed.
From the [Device] drop-down list, select Color
7
Network ScanGear → click [Custom Insert].
2
Start Microsoft Office Word 2007.
3
Click the [Insert] tab → click [Clip Art].
4
Setting Up the Machine for the First Time
The [Clip Art] pane is displayed.
Click [Organize clips].
5
Color Network ScanGear screen is displayed.
Click the [Main] tab → select [Platen] for <Original
8
Placement>.
Specify the scanning conditions, such as color
9
mode and resolution.
Click [Preview] to view a preview.
Click [Scan].
10
Scanning starts.
When scanning is complete, the Color Network ScanGear
screen closes and the scanned image is transferred to [Color
Network ScanGear Vx.xx] in [My Collections] in Microsoft Clip
Organizer.
44
Open a document using Microsoft Word 2007.
11
Microsoft Clip Organizer is started.
Page 47

Drag the image scanned using Microsoft Clip
12
Organizer, and drop it into the area where you
want to add the image.
The image is added to the area where drag-and-drop was
performed.
Using an Advanced Box on the Network
You can store originals scanned using your
machine in the Advanced Box of another
imageRUNNER ADVANCE series machine on the
network that can be accessed by your machine.
You can also print the files stored in an Advanced
Box of another imageRUNNER ADVANCE series
machine, from your machine.
The following example describes the procedure
for storing an original scanned using your
machine as a PDF file in an Advanced Box of
another imageRUNNER ADVANCE series machine
that has been made accessible on the network as
an SMB server.
The flow of operations is indicated below.
1.
Settings Required to Use an Advanced Box on the Network
Making an Advanced Box Accessible on the Network
•
(Specified by an Administrator for the Machine to
Open the Advanced Box)
Accessing an Advanced Box on the Network (Specified
•
on this Machine)
2. Storing Data in an Advanced Box on the
Network
2
Setting Up the Machine for the First Time
Settings Required to Use
an Advanced Box on the
Network
To store scanned originals in an Advanced Box on the
Network, you must specify the following settings:
Another imageRUNNER ADVANCE Series
Machine
Making the Advanced Box Accessible on the Network as an
•
SMB Server
Specifying the SMB Server Settings
•
This machine
[Network Place Settings]
[Name]: images
[Protocol]: SMB
[Location]: \\192.168.1.23\share
[Protocol for External Reference]
[SMB]: On
[Store Location Display Settings]
[Network]: On
45
Page 48

Making an Advanced Box Accessible on the Network
On the machine with the Advanced Box to be shared,
specify the settings to make the Advanced Box accessible
on the network as an SMB server, and specify the SMB server
settings. For more information, see the instruction manual
for the machine with the Advanced Box to be shared.
Accessing an Advanced Box on the Network
Specify the Network Place and Protocol for External
Reference settings, followed by the Store Location Display
settings.
Press [Network Settings].
4
2
Press [Network Place Settings].
5
Press [Register].
6
Setting Up the Machine for the First Time
Press (Settings/Registration).
1
Press [Function Settings].
2
Press [Store/Access Files].
3
46
Page 49
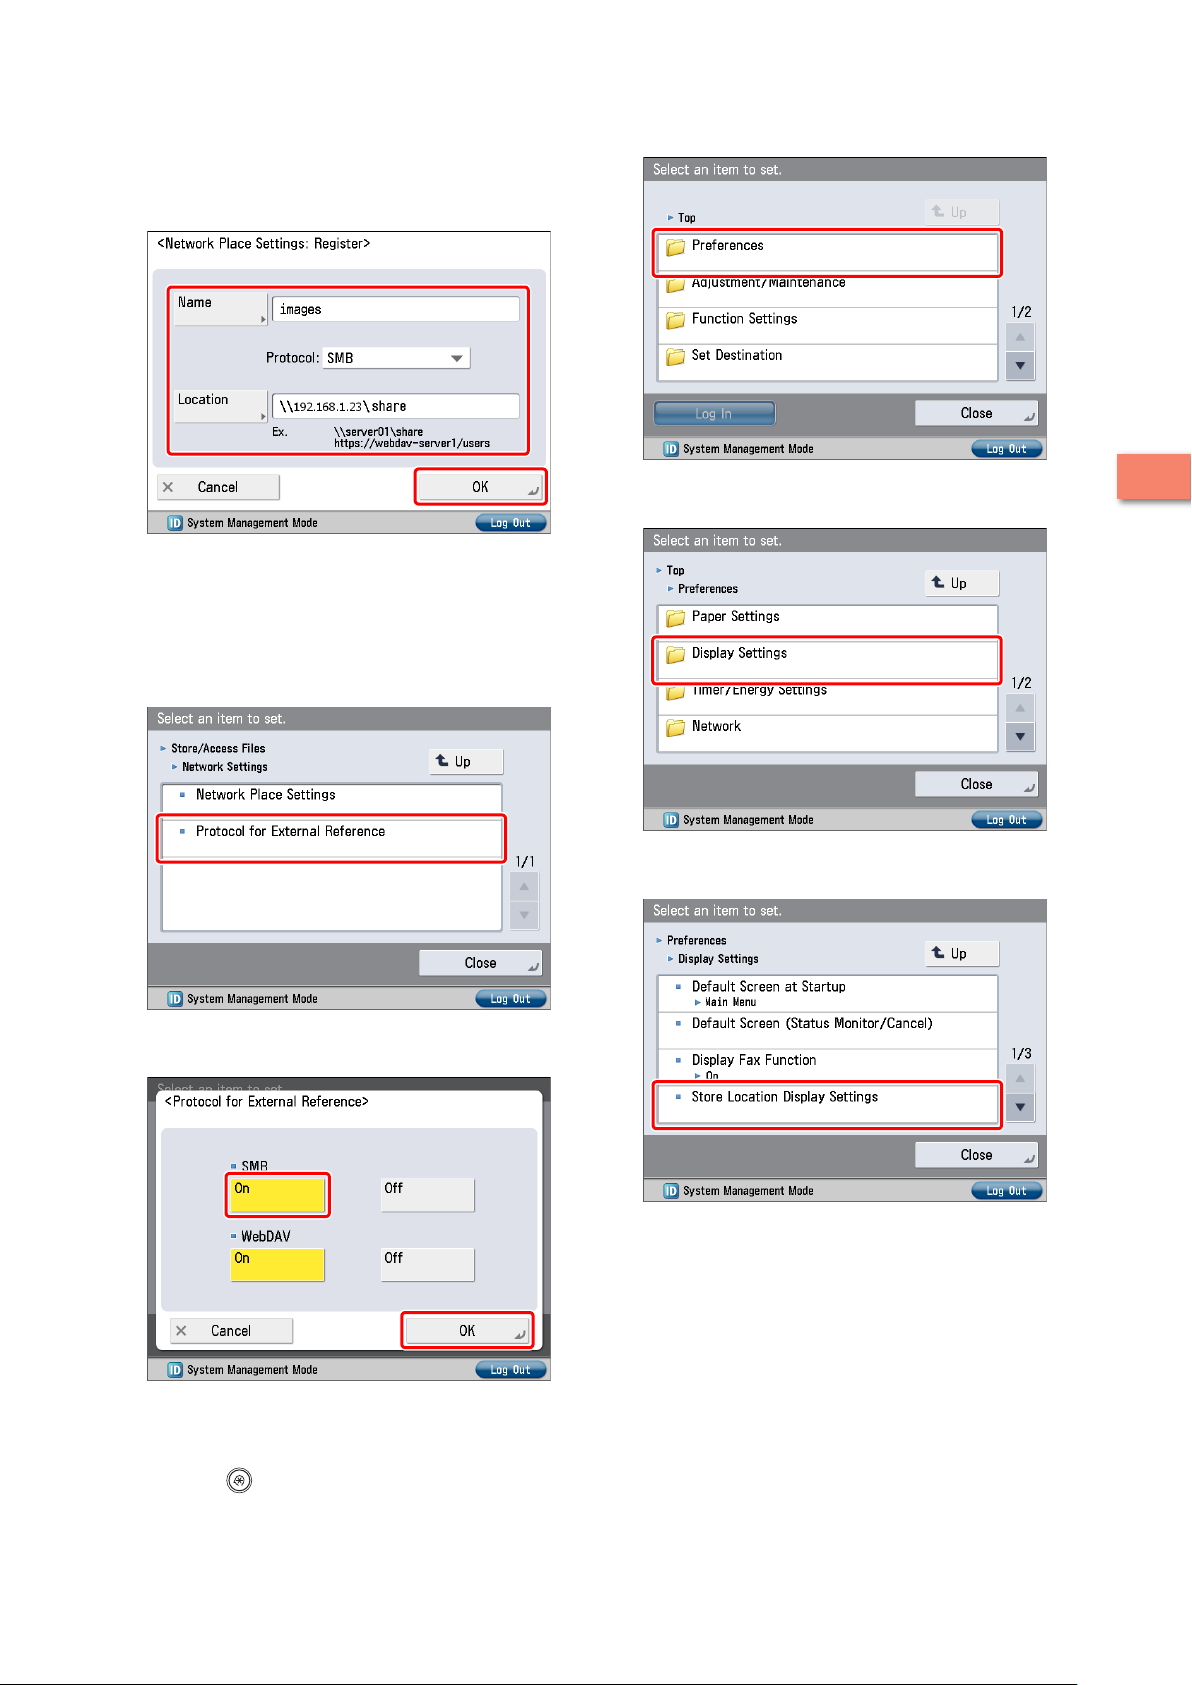
Specify the following settings → press [OK].
7
In this example, the following settings are specified:
[Name]: images
<Protocol>: SMB
[Location]: \\192.168.1.23\share
Press [Preferences].
12
Press [Close].
8
The Network Place Settings are now set.
Next, specify the Protocol for External Reference settings.
Press [Protocol for External Reference].
9
Select [On] for <SMB> → press [OK].
10
Press [Display Settings].
2
13
Press [Store Location Display Settings].
14
Setting Up the Machine for the First Time
The Protocol for External Reference settings are now set.
Next, specify the Store Location Display Settings.
Press (Settings/Registration).
11
47
Page 50

Press [On] for <Network> → press [OK].
15
Select the desired storage location.
4
2
The Store Location Display Settings are now set.
Press [Scan].
5
If an authentication screen is displayed, enter the user name
and password to log in.
Storing Data in an Advanced Box on the Network
Save data scanned on the machine to the Advanced Box of
another imageRUNNER ADVANCE machine on the network.
Place your original on the machine.
1
Press [Scan and Store].
2
Setting Up the Machine for the First Time
Specify each of the settings such as [File Format].
6
48
Press [Network].
3
Press (Start).
7
If the [Scan Size] screen is displayed, specify the scan size →
press [OK].
Page 51
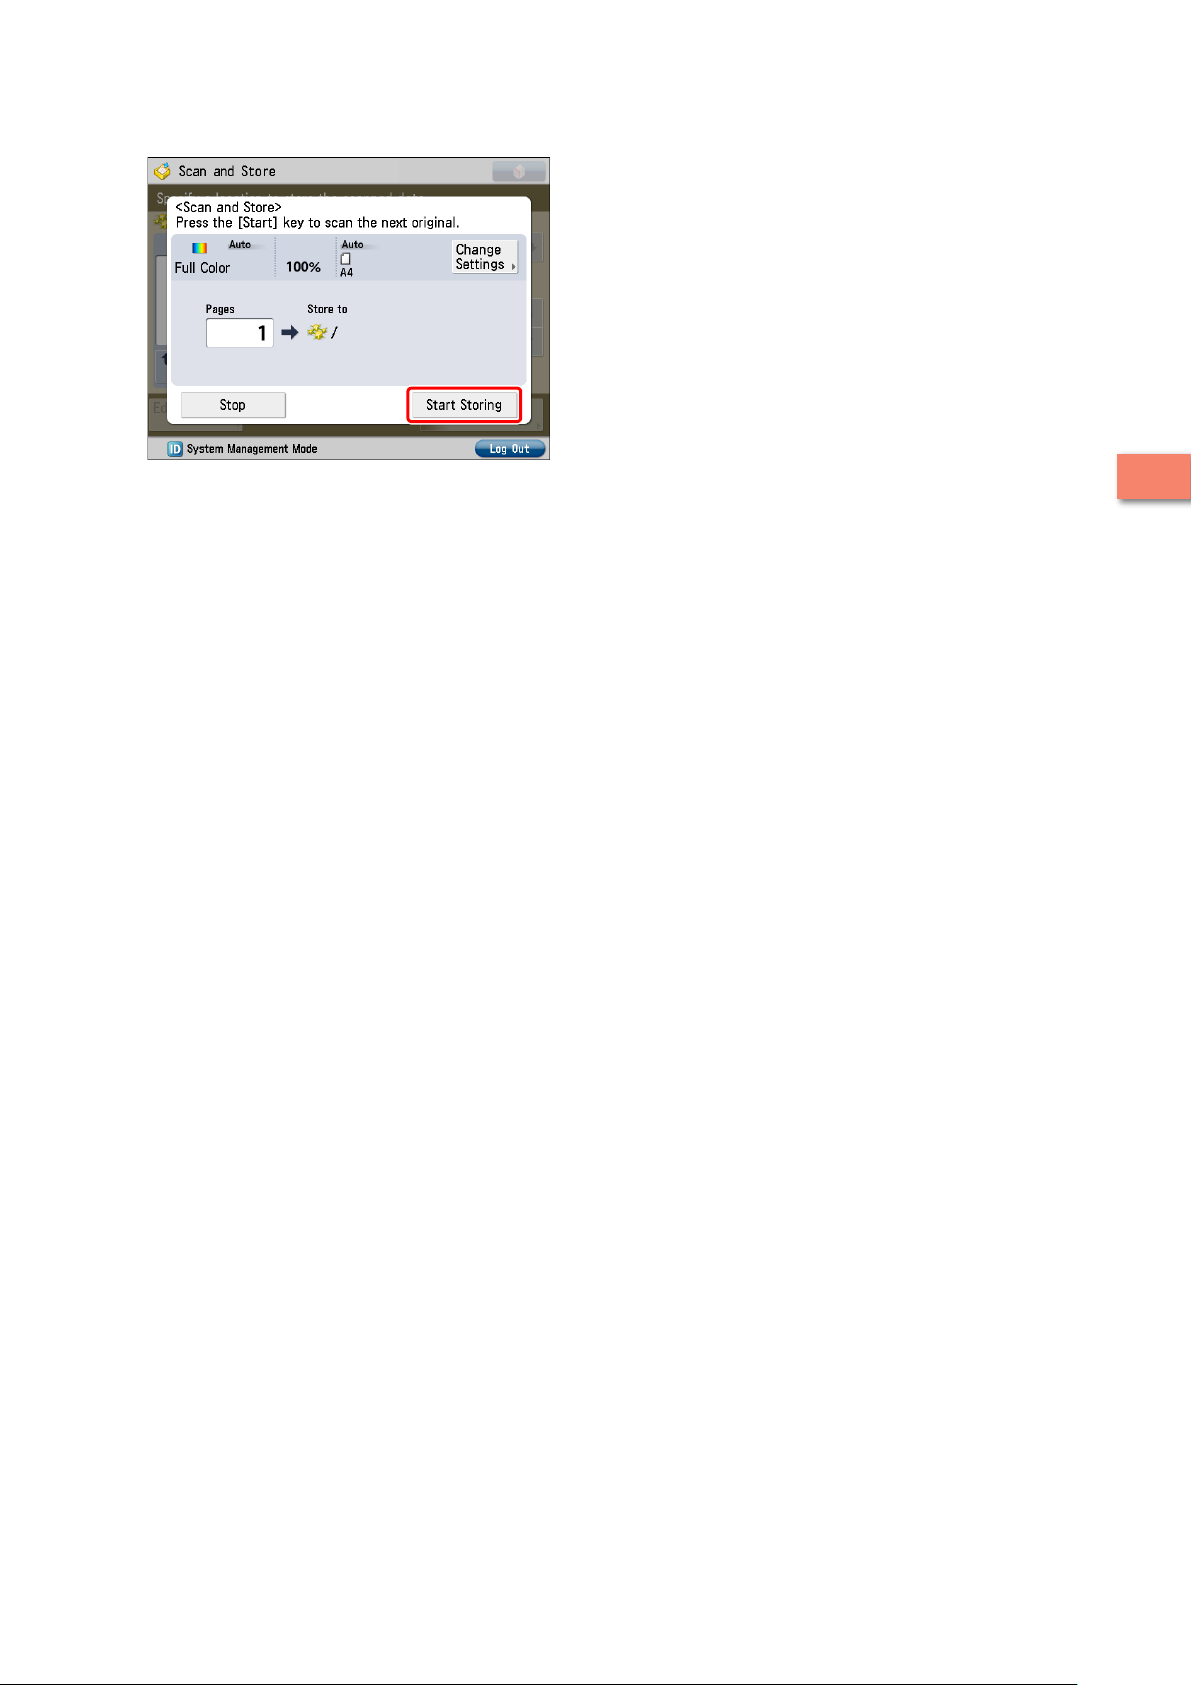
Press [Start Storing].
8
The scanned document is saved to the Advanced Box of
another imageRUNNER ADVANCE machine on the network.
Press [Close].
9
2
Setting Up the Machine for the First Time
49
Page 52

MEMO
2
Setting Up the Machine for the First Time
50
Page 53

Using the System Options/MEAP
Applications
Installing the System Options/MEAP Applications . . . . . . . . . . . . . . . . . . . . .52
Installing by Connecting This Machine to an Outside Network . . . . . . . . . . . . . . . . . . . . . . . . . . . . . . . . . . . . . . . . 52
Installing by Not Connecting This Machine to an Outside Network . . . . . . . . . . . . . . . . . . . . . . . . . . . . . . . . . . . . 52
License Registration . . . . . . . . . . . . . . . . . . . . . . . . . . . . . . . . . . . . . . . . . . . . . . . . .53
System Options/MEAP Applications . . . . . . . . . . . . . . . . . . . . . . . . . . . . . . . . . . . . . . . . . . . . . . . . . . . . . . . . . . . . . . . . . . 53
Installing the System Options/MEAP Applications . . . . . . . . . . . . . . . . . . . . . . . . . . . . . . . . . . . . . . . . . . . . . . . . . . . . 53
Installing by Connecting This Machine to an Outside Network . . . . . . . . . .54
Using the Touch Panel Display to Install (Delivery) . . . . . . . . . . . . . . . . . . . . . . . . . . . . . . . . . . . . . . . . . . . . . . . . . . . . 54
Using the Remote UI to Install (Delivery) . . . . . . . . . . . . . . . . . . . . . . . . . . . . . . . . . . . . . . . . . . . . . . . . . . . . . . . . . . . . . 56
3
Installing by Not Connecting This Machine to an Outside Network . . . . . .57
Obtaining the License Key/License File . . . . . . . . . . . . . . . . . . . . . . . . . . . . . . . . . . . . . . . . . . . . . . . . . . . . . . . . . . . . . . . 57
Installing the System Options Using the Touch Panel Display . . . . . . . . . . . . . . . . . . . . . . . . . . . . . . . . . . . . . . . . . . 57
Installing the System Options Using the Remote UI (Manual) . . . . . . . . . . . . . . . . . . . . . . . . . . . . . . . . . . . . . . . . . . 58
Installing the MEAP Applications Using the Remote UI (Manual). . . . . . . . . . . . . . . . . . . . . . . . . . . . . . . . . . . . . . . 58
Starting the MEAP Applications . . . . . . . . . . . . . . . . . . . . . . . . . . . . . . . . . . . . . . . . . . . . . . . . . . . . . . . . . . . . . . . . . . . . . . 59
Downloading the Manuals and Related Software . . . . . . . . . . . . . . . . . . . . . .60
Managing by Using the Touch Panel Display . . . . . . . . . . . . . . . . . . . . . . . . . . .60
Displaying the Installation Log Using the Touch Panel Display . . . . . . . . . . . . . . . . . . . . . . . . . . . . . . . . . . . . . . . . . 60
Testing Communication Using the Touch Panel Display . . . . . . . . . . . . . . . . . . . . . . . . . . . . . . . . . . . . . . . . . . . . . . . 61
Managing by Using the Remote UI . . . . . . . . . . . . . . . . . . . . . . . . . . . . . . . . . . . .62
Displaying the Installation Log Using the Remote UI . . . . . . . . . . . . . . . . . . . . . . . . . . . . . . . . . . . . . . . . . . . . . . . . . .62
Testing Communication Using the Remote UI . . . . . . . . . . . . . . . . . . . . . . . . . . . . . . . . . . . . . . . . . . . . . . . . . . . . . . . . 62
Updating the Firmware . . . . . . . . . . . . . . . . . . . . . . . . . . . . . . . . . . . . . . . . . . . . . .63
Updating Firmware . . . . . . . . . . . . . . . . . . . . . . . . . . . . . . . . . . . . . . . . . . . . . . . . . . . . . . . . . . . . . . . . . . . . . . . . . . . . . . . . . . 63
Updating Using the Remote UI (Manual) . . . . . . . . . . . . . . . . . . . . . . . . . . . . . . . . . . . . . . . . . . . . . . . . . . . . . . . . . . . . . 63
5151
Page 54
Delivery Server
This Machine
Access Using the Touch Panel
Display
License Authentication/MEAP
Application Delivery
Access Using the Remote UI
Installing by Not Connecting
This Machine
Register the License Key Using the Touch Panel Display
(System Options)
Install the License File Using the Remote UI
(System Options/MEAP Applications*)
1234-5678-1234・・・
* For the MEAP applications, an application file is
necessary.
Obtain the License
Key/License File
Installing the System Options/MEAP Applications
This Machine to an Outside
Network
You can install the System Options/MEAP Applications by
using the license file/license key that you obtained from the
License Management System.
Using the Register/Update Software function,
you can install the System Options/MEAP
Applications to the machine. You can use this
function from both the touch panel display and
the computer (Remote UI).
Installing by Connecting This Machine to an Outside Network
You can install the System Options/MEAP Applications by
accessing the delivery server from this machine.
3
Using the System Options/MEAP Applications
52
Page 55

Installing the System
License Registration
License registration may be required, depending
on the System Options/MEAP Applications that
you are using.
System Options/MEAP Applications
You can enhance the functions of the machine by installing
various system options and MEAP applications.
System Options
The following are the system options you can install on
this machine.
PS Printer Kit
•
PCL Printer Kit
•
Direct Print Kit (for PDF/XPS)
•
Barcode Printing Kit
•
Remote Fax Kit
•
Color Universal Send Kit
•
Universal Send Advanced Feature Set
•
Universal Send Security Feature Set
•
Universal Send Digital User Signature Kit
•
Encrypted Printing Software
•
2.5inch/80GB HDD
•
Secure Watermark
•
Data Erase Kit
•
Web Access Software
•
ACCESS MANAGEMENT SYSTEM KIT
•
Remote Operator's Software Kit
•
*1 If you are using the imageRUNNER ADVANCE C2030H/C2030/
C2025H/C2020H, the Color Universal Send Kit and the 2.5inch/80GB
HDD are standard-equipped. If you are using the imageRUNNER
ADVANCE C2020, depending on the region, the Color Universal
Send Kit and the 2.5inch/80GB HDD are standard-equipped.
MEAP Applications
To enhance the functions of the machine without using
the above system options, install the MEAP applications.
*1
*1
Options/MEAP Applications
The procedures to install the system options or MEAP
applications on the machine differ, depending on whether
the machine is connected or not to an outside network.
Select the procedure that matches your conditions using
the references below.
For instructions on connecting the machine to an outside
network, see “Connecting the Machine to a Network,” on p. 9.
Installing by Connecting this Machine to an Outside Network
Install using one of the following procedures.
To check that the transmission with the delivery server is
properly operating, if necessary, perform a transmission test
before installation. (See “Testing Communication Using the
Touch Panel Display,” on p. 61, and “Testing Communication
Using the Remote UI,” on p. 62.)
Using the touch panel display to install
See “Using the Touch Panel Display to Install (Delivery),”
on p. 54.
Using the Remote UI to install
See “Using the Remote UI to Install (Delivery),” on p. 56.
3
Using the System Options/MEAP Applications
If you want to perform MEAP applications management, such
as the ones shown below, use SMS (Service Management
Service). (See e-Manual > MEAP.)
Checking the MEAP applications installed on this machine
•
Checking the amount of memory the MEAP applications
•
are using
Adding a license to an installed MEAP application
•
53
Page 56
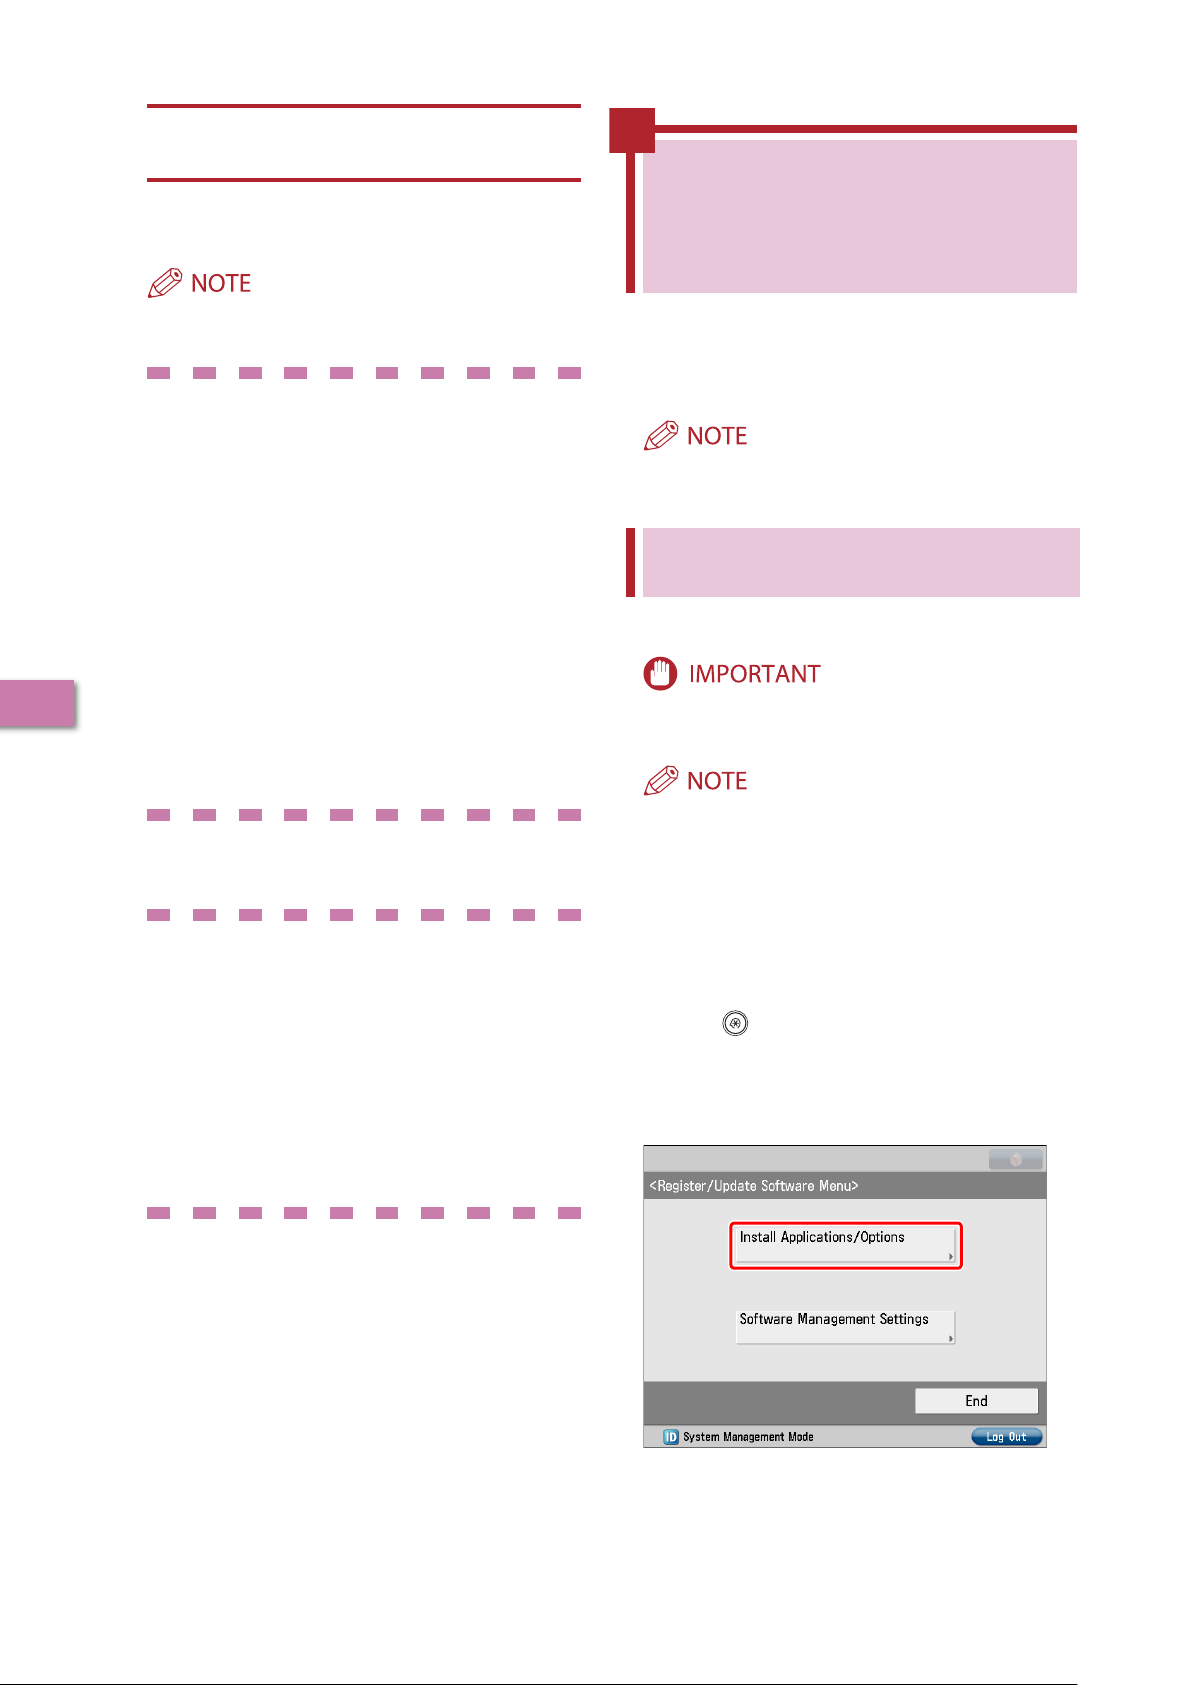
Installing by Not Connecting this Machine to an Outside Network
Installing System Options
Install using one of the following procedures.
Installing by Connecting This Machine to an Outside Network
3
Using the System Options/MEAP Applications
If you want to install multiple system options, we recommend
using the Remote UI.
Using the touch panel display to install
1. Obtain the license key from the License
Management System
See “Obtaining the License Key/License File,” on p.
57.
Register the license key using the touch panel
2.
display
See “Installing the System Options Using the Touch
Panel Display,” on p. 57.
Using the Remote UI to install
1. Obtain the license file from the License
Management System
See “Obtaining the License Key/License File,” on p.
57.
Install the license file using the Remote UI
2.
See “Installing the System Options Using the
Remote UI (Manual),” on p. 58.
Installing MEAP Applications
Use the following procedure to install.
Using the Remote UI to install
1. Obtain the license file from the License
Management System
See “Obtaining the License Key/License File,” on p.
57.
Install the license file and application file using the
2.
Remote UI
See “Installing the MEAP Applications Using the
Remote UI (Manual),” on p. 58.
Start the MEAP applications from SMS
3.
See “Starting the MEAP Applications,” on p. 59.
If the machine is connected to an outside
network, you can install the system options and
MEAP applications by linking with the delivery
server.
Make sure that the license access number that is included with
the package is available.
Using the Touch Panel Display to Install (Delivery)
You can install the system options or MEAP applications to
the machine using the touch panel display.
To perform the procedures described in this section, you must
log in to the machine as an administrator. (See “Logging In
from the Touch Panel Display,” on p. 8.)
The maximum number of MEAP applications that can be
•
installed is 19.
The maximum amount of memory allocated to install MEAP
•
applications is 1GB. (If you are using the imageRUNNER
ADVANCE C2020, this value may vary depending on the
region.)
There may be other system requirements for installation,
•
depending on the MEAP applications. For instructions
on settings, see the manual provided with the MEAP
application.
Press (Settings/Registration) → [Management
1
Settings] → [License/Other] → [Register/Update
Software].
Press [Install Applications/Options].
2
54
Page 57

Press [License Access Number].
3
Enter the license access number four digits at a
4
time.
Select the system options and MEAP applications
6
→ press [Install].
[Do Not Start]: Press to only install the MEAP application and
not start the application.
If [Do Not Start] is selected when installing MEAP applications,
you must start the application before using the MEAP
application. (See “Starting the MEAP Applications,” on p. 59.)
Press [Start].
5
Enter four digits of the license access number → press [OK].
Repeat this step four times to enter a total of 16 digits for the
license access number.
You can select multiple system options and MEAP applications,
but you cannot select the same product with different version
at the same time.
If the agreement screen is displayed, read the agreement. If
you abide with the agreement, press [Accept].
Check the Installation Result screen.
7
When the installation of the system options is completed, the
message <Enabled After Restart> appears on the Installation
Result screen. Restart the machine to enable the function.
You can download the manuals for the installed system
options/MEAP applications from your computer by accessing
the URL for the manual download site displayed on the
Installation Result screen. (See “Downloading the Manuals and
Related Software,” on p. 60.)
3
Using the System Options/MEAP Applications
55
Page 58

Select the system options and MEAP applications
Using the Remote UI to
4
→ click [Start Installation].
Install (Delivery)
You can install the system options or MEAP applications to
the machine using the Remote UI.
To perform the procedures described in this section, you must
log in to the machine as an administrator. (See “Logging In
Using the Remote UI,” on p. 8.)
From the top page of the Remote UI, click
1
[Settings/Registration] → [License/Others] →
[Register/Update Software].
3
Status after Installation:
Start: Starts the installed MEAP applications.
Stop: Stops the installed MEAP applications.
If [Stop] is selected when installing MEAP applications, you
must start the application before using the MEAP application.
(See “Starting the MEAP Applications,” on p. 59.)
If the agreement screen is displayed, read the agreement. If
you abide with the agreement, click [Accept].
Check the Installation Result screen.
5
Using the System Options/MEAP Applications
Click [Delivered Installation].
2
Enter the license access number → click [Next].
3
When the installation of the system options is completed, the
message <Restart the device.> appears. Restart the machine
to enable the function.
To return to the Delivered Installation screen, click [To
Delivered Installation].
You can download the manual for the installed system
options/MEAP applications by accessing the URL for the
manual download site displayed on the Installation Result
screen. (See “Downloading the Manuals and Related Software,”
on p. 60.)
56
Once the license access number is confirmed after contacting
the delivery server, information for the system options/MEAP
applications you can install are displayed.
If the license access number is incorrect, an error page is
displayed.
Page 59

Installing the System
Installing by Not Connecting This Machine to an Outside Network
This section describes how to install the
system options and MEAP applications without
connecting the machine to an outside network.
Obtaining the License Key/ License File
Obtain the license key or license file.
License key:
Obtain the license key when installing the system
options using the touch panel display.
License file:
Obtain the license file when installing the system
options/MEAP applications using the Remote UI.
Make sure that the license access number that is included with
•
the package is available.
If the license access number is not printed on the package of
•
the MEAP application you are using, the license file is issued
by the distributor of the MEAP application. You do not need to
obtain the license key/license file explained in this section. For
more information, see the manual for each MEAP application.
Check the management number you need to
1
obtain the license key or the license file.
To obtain the license key or the license file, the following
management number is required.
License Access Number: Check the license access number
•
certificate.
Device Serial Number: Check and note the serial number
•
which is displayed at the bottom left of the screen when
you press [Counter Check] on the machine.
Access http://www.canon.com/lms/license/.
2
Options Using the Touch
Panel Display
You can install the system options to the machine by
registering the license key using the touch panel display.
To perform the procedures described in this section, you must
log in to the machine as an administrator. (See “Logging In
from the Touch Panel Display,” on p. 8.)
Press (Settings/Registration) → [Management
1
Settings] → [License/Other] → [Register License].
Enter the license key using - (numeric keys).
2
Details of each item are shown below.
: Press to move the cursor.
[Backspace]: Press when you entered a wrong number. The
number in front of the cursor is deleted and you can reenter
the correct number.
If the message <The value for the license key is not correct.
Check the license key.> is displayed, press [OK] → enter the
correct license key.
If the message <The feature required for installation is not
present.> is displayed, you cannot register the license key.
Press [OK] → cancel the registration.
Press [Start] → [OK].
3
The registered functions can be used only after you restart the
machine.
3
Using the System Options/MEAP Applications
Follow the instructions on the screen and obtain
3
the license key/license file.
If the license key is obtained, see “Installing the System
Options Using the Touch Panel Display,” on p. 57.
If the license file is obtained, see “Installing the System Options
Using the Remote UI (Manual),” on p. 58 or “Installing the MEAP
Applications Using the Remote UI (Manual),” on p. 58.
57
Page 60

Installing the System Options Using the Remote UI (Manual)
You can install the system options to the machine using the
Remote UI.
Installing the MEAP Applications Using the Remote UI (Manual)
You can install the MEAP applications to the machine using
the Remote UI.
To perform the procedures described in this section, you
must log in to the machine as an administrator. (See “Settings
Required to Use the Remote UI,” on p. 15.)
From the top page of the Remote UI, click
1
[Settings/Registration] → [License/Others] →
[Register/Update Software].
To perform the procedures described in this section, you
must log in to the machine as an administrator. (See “Settings
Required to Use the Remote UI,” on p. 15.)
The maximum number of MEAP applications that can be
•
installed is 19.
The maximum amount of memory allocated to install MEAP
•
applications is 1GB. (If you are using the imageRUNNER
ADVANCE C2020, this value may vary depending on the
region.)
There may be other system requirements for installation,
•
depending on the MEAP applications. For instructions on
settings, see the manual provided with the MEAP application.
From the top page of the Remote UI, click
1
[Settings/Registration] → [License/Others] →
[Register/Update Software].
3
Click [Manual Installation].
2
Using the System Options/MEAP Applications
Click [Browse] → select the license file to install →
3
click [Next].
File extensions:
License File: A file with the 'lic' extension.
You do not have to use Application File Path.
•
You can also specify the file path by entering it directly.
•
Check the contents that will be installed on the
4
confirmation screen → click [Install].
Click [Manual Installation].
2
58
Page 61

Click [Browse] → select the license file and the
3
application file to install → click [Next].
File extensions:
License File: A file with the 'lic' extension.
Application File: A file with the 'jar' extension.
You cannot install license files only.
•
When installing the MEAP application, make sure you specify
•
the license file. You cannot install the MEAP application
without specifying the license file.
You can also specify the file path by entering it directly.
Confirm the information displayed on the install
4
confirmation page → click [Yes].
Starting the MEAP Applications
This section describes how to start the installed MEAP
application from the SMS screen.
For more information on SMS, see e-Manual > MEAP.
From the top page of the SMS, click [MEAP
1
Application Management].
Click [Start] for the application to start.
2
3
Depending on the MEAP application, a software license
agreement screen may be displayed. Confirm the information
displayed on the screen → click [OK].
If you are installing a new MEAP application, the following
information is displayed on the screen.
Application Information
•
License Information
•
The following information is displayed when you overwrite a
MEAP application.
Current Application Information
•
Application Information after Overwrite
•
Installation will start after the message <Installing... Please
wait.> is displayed again. After the installation, click [To Manual
Installation] to display the Manual Installation screen.
To use the installed MEAP application, you must start the
MEAP application. (See “Starting the MEAP Applications,” on
p. 59.)
Using the System Options/MEAP Applications
59
Page 62

Downloading the
Managing by Using the
Manuals and Related
Software
You can download the manuals for the installed
system options/MEAP applications and their
related software from the following URL.
http://canon.com/fau/downloads
Make sure that the license access number that is included with
•
the package is available.
If you cannot find a manual to download, see the function
•
descriptions in the e-Manual included with this machine.
If you installed from the Remote UI, you can jump to the above
•
URL from the link displayed on the Installation Result screen. If
you do so, the license access number is entered automatically.
Start the Web browser on your computer.
1
Enter the URL in [Address].
2
3
After entering the license access number, follow
3
the instructions on the screen to download the
manuals and related software.
If software is downloaded, refer to the manual of that software
to install.
Touch Panel Display
You can display the installation logs and test
communication using the touch panel display.
To perform the procedures described in this section, you must
log in to the machine as an administrator. (See “Logging In
from the Touch Panel Display,” on p. 8.)
Displaying the Installation Log Using the Touch Panel Display
You can check the installation logs of the system options
and MEAP applications.
Press (Settings/Registration) → [Management
1
Settings] → [License/Other] → [Register/Update
Software].
Press [Software Management Settings].
2
Using the System Options/MEAP Applications
Press [Select Log Display].
3
60
Page 63

Press [Display Update Logs].
4
Press [Test Communication].
3
The installation logs of the system options and MEAP
applications are displayed.
Testing Communication Using the Touch Panel Display
You can check whether the machine can properly
communicate with the delivery server.
4
Press [Yes].
3
Contents for the test are downloaded from the delivery server.
When the communication test is completed, the Test
Communication screen is displayed.
Press (Settings/Registration) → [Management
1
Settings] → [License/Other] → [Register/Update
Software].
Press [Software Management Settings].
2
Using the System Options/MEAP Applications
If 'Failed' is displayed on the Test Communication screen,
check that the network cable is connected and that the
network settings are correct. If the problem is not resolved,
contact your local authorized Canon dealer.
61
Page 64

Managing by Using the Remote UI
You can display the installation logs and test
communication using the Remote UI.
To perform the procedures described in this section, you
must log in to the machine as an administrator. (See “Settings
Required to Use the Remote UI,” on p. 15.)
Displaying the Installation
From the Log View drop-down list, select [Update
3
Logs] → click [Switch].
3
Using the System Options/MEAP Applications
Log Using the Remote UI
You can check the installation logs of the system options
and MEAP applications.
From the top page of the Remote UI, click
1
[Settings/Registration] → [License/Others] →
[Register/Update Software].
Click [Display Logs /Communication Test].
2
The installation logs of the system options and MEAP
applications are displayed.
Testing Communication Using the Remote UI
You can check whether the machine can properly
communicate with the delivery server.
From the top page of the Remote UI, click
1
[Settings/Registration] → [License/Others] →
[Register/Update Software].
62
Page 65

Click [Display Logs /Communication Test] →
Obtaining the
Firmware
Updating the Firmware
Registering the
Firmware from the
Remote UI
This Machine
2
[Communication Test].
When the confirmation dialog is displayed, click [Yes].
Contents for the test are downloaded from the delivery server.
When the communication test is completed, the
communication test result screen is displayed.
If 'Failed' is displayed on the communication test result screen,
check that the network cable is connected and that the
network settings are correct. If the problem is not resolved,
contact your local authorized Canon dealer.
Updating the Firmware
This section describes how to update firmware.
Updating Firmware
Using the Register/Update Software function, you can
update the firmware of the machine to the most recent
version.
For information on the log in service, see e-Manual > MEAP. If
•
the authentication function is not set, the Log In screen is not
displayed.
For information on necessary system environment and
•
preparation to start the Remote UI, see e-Manual > Remote UI.
Multiple users cannot use the Register/Update Software
•
function at the same time.
If another user is logged in to SMS (Service Management
•
Service), you cannot use the Register/Update Software
function from the Remote UI.
If the following procedure is performed, you cannot use the
•
Register/Update Software function from the Remote UI for a
specified time:
When Remote Login Service of the SMS is set and the Web
•
browser was closed without pressing [Portal] or [Log Out]
When Remote Login Service of the SMS is not set and the
•
Web browser was closed without pressing [Portal]
When the Web browser was closed without pressing [Log
•
Out from SMS], [To Remote UI], or [Log out] of the SMS
For more information on SMS, see e-Manual > MEAP.
•
You can update the firmware using the data that is
distributed separately from the machine.
3
Using the System Options/MEAP Applications
Updating Using the Remote UI (Manual)
You can update the firmware from the Remote UI that is
connected to the machine.
To perform the procedures described in this section, you must
log in to the machine as an administrator. (See “Logging In
Using the Remote UI,” on p. 8.)
To perform the procedures described in this section, the data
of the firmware that is distributed separately from the machine
is necessary.
63
Page 66

From the top page of the Remote UI, click
1
[Settings/Registration] → [License/Others] →
[Register/Update Software].
Click [Manual Update].
2
3
Using the System Options/MEAP Applications
Click [Browse] → select the firmware to update →
3
click [Next].
Check the contents that will be updated on the
4
confirmation screen → click [Yes].
64
The new firmware is now applied to the machine.
When the message <The firmware is updated. Restart
the device.> appears, restart the machine.
Page 67

Page 68

CANON INC.
CANON INC.
30-2, Shimomaruko 3-chome, Ohta-ku, Tokyo 146-8501, Japan
30-2, Shimomaruko 3-chome, Ohta-ku, Tokyo 146-8501, Japan
CANON U.S.A., INC.
CANON U.S.A., INC.
One Canon Plaza, Lake Success, NY 11042, U.S.A.
One Canon Plaza, Lake Success, NY 11042, U.S.A.
CANON CANADA INC.
CANON CANADA INC.
6390 Dixie Road Mississauga, Ontario L5T 1P7, Canada
6390 Dixie Road Mississauga, Ontario L5T 1P7, Canada
CANON EUROPA N.V.
CANON EUROPA N.V.
Bovenkerkerweg 59-61 1185 XB Amstelveen, The Netherlands
Bovenkerkerweg 59-61 1185 XB Amstelveen, The Netherlands
(See http://www.canon-europe.com/ for details on your regional dealer)
(See http://www.canon-europe.com/ for details on your regional dealer)
CANON LATIN AMERICA, INC.
CANON LATIN AMERICA, INC.
703 Waterford Way Suite 400 Miami, Florida 33126 U.S.A.
703 Waterford Way Suite 400 Miami, Florida 33126 U.S.A.
CANON AUSTRALIA PTY. LTD
CANON AUSTRALIA PTY. LTD
1 Thomas Holt Drive, North Ryde, Sydney, N.S.W. 2113, Australia
1 Thomas Holt Drive, North Ryde, Sydney, N.S.W. 2113, Australia
CANON CHINA CO., LTD
CANON CHINA CO., LTD
15F Jinbao Building No.89 Jinbao Street, Dongcheng District, Beijing 100005, China
15F Jinbao Building No.89 Jinbao Street, Dongcheng District, Beijing 100005, China
CANON SINGAPORE PTE. LTD.
CANON SINGAPORE PTE. LTD.
1 HarbourFront Avenue #04-01 Keppel Bay Tower, Singapore 098632
1 HarbourFront Avenue #04-01 Keppel Bay Tower, Singapore 098632
CANON HONGKONG CO., LTD
CANON HONGKONG CO., LTD
19/F., The Metropolis Tower, 10 Metropolis Drive, Hunghom, Kowloon, Hong Kong
19/F., The Metropolis Tower, 10 Metropolis Drive, Hunghom, Kowloon, Hong Kong
USRM1-5351-00 © CANON INC. 2010
USRM1-5351-00 © CANON INC. 2010
 Loading...