

Canon 814XL User Manual

C7 ' 'W
Canon
aim
ELECTHOnilC
INSTRUCTIONS


The 814XL Electronic is a precision Super 8
movie camera which incorporates a series of im
provements to the Canon Auto Zoom 814 Elec
tronic in reply to the requests of photographers
who wish to make higher quality 8mm movies.
Thus, the optical performances of the lens and
viewfinder have been improved to give you bet
ter photographic effects. Mechanisms such as
macro-cinematography and variable shutter
opening angle enable you to make enjoyable and
excellent movies.
Before Use
This camera is designed for easy operation and
includes some special filming devices. Because
this instruction manual contains all necessary in
structions for operation of this camera and for
movie filming, please read this manual
thoroughly and become acquainted with the
camera before starting to film in order to avoid
mistakes when operating the camera's many
special shooting mechanisms.
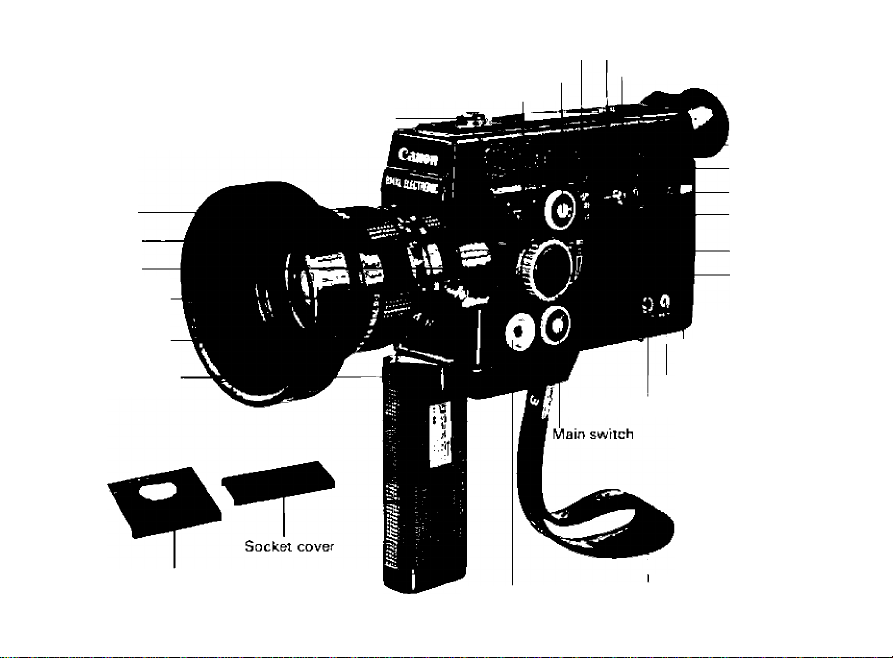
CCA filter cancellation socket (with cover)/
Lighting unit attaching socket
Distance scale
Zooming scale
Zooming ring
Zooming knob and
Macro setting ring
Focusing ring
Shutter release lever
Exposure adjustment knob counter
Filming speed dial
Instant slow motion switch
Frame counter setting knob
Footage counter
Battery check window
Battery check button
Exposure adjustment
scale
Lock button
Variable shutter
control dial
Sound recording jack
(8-pin jack)
Remote control socket
Flash synchronizing socket
Rubber sheet
Manual aperture
control dial
Wrist strap

Outstanding Features
Variable Shutter Opening Angle Mechanism
The variable shutter opening angle mecha
nism sets the angle at 220° for XL filming,
150° for regular shooting and 150° -0° for
fading effects. Exposure is automatically
set at either 220° or 150° to insure correct
exposure. The variable shutter opening
angle is a unique double-blade mechanism.
Synchronous Double Sound Recording System
Shooting with synchronous sound reqord-
ing is possible because of a built-in pulse
generator and by using exclusive adapter,
stereo tape recorder for good quality
sound.
XL Mechanism Excellent for Indoor Shooting
It is possible to film under dim light con
ditions, a dark room or at night because of
this camera's features such as its ac
ceptability of highly sensitive film, 220°
shutter opening angle, exceptionally fast
lens, highly sensitive exposure meter. The
bright viewfinder and highly accurate
range-finder are additional advantages for
this kind of photography.

Viewfinder with Increased Brightness
An XL carnera needs a viewfinder which is
easy to see for easy focusing under dark
conditions. In this camera, the viewfinder's
brightness has been doubled by increasing
the lens' effective aperture and exit pupil to
allow a greater amount of light to reach the
viewfinder. Aberrations are properly com
pensated, the angle of the split-image
prism has been widened for easier viewing
and the accurate metering range has been
increased.
High Quality Lens for Faithful Color Reproduction
This is a new design, large aperture, zoom
lens which gives top performance for both
XL and general shooting. Especially,
aberration in the telephoto range has been
decreased and the ideal light transmission
factor has been attained for high resolu
tion, high contrast and perfect color ba
lance throughout the zooming range. And
the built-in macro-cinematography
mechanism on the wide-angle end gives
you a field-of-view of 33mm x 45mm.
Changing from macro to zoom is always

possible, a technique that is perfect for
scene changes.
Abundant Viewfinder Informatien
Aperture and over/under exposure warning
rnarks, film transport indicator and film end
warning are all indicated by lamps for easy
confirmation under dim light conditions.
And each lamp has been installed out of
the visual field so as not to obstruct the
viewfinder.
High Accuracy Servo EE
This is a TTL exposure metering system,
with a servo meter to control the
diaphragm. The film drive circuit (1C) has
more power for increased reliability. This
makes a diaphragm aperture of f/45
possible and stabilized performance even
with changes of temperature or voltage.
Accessories to Widen Shooting Possibilities
You can use the self-timer and interval
timer coupled to the magnetic shutter
release mechanism. Single frame shooting
with flash is possible by utilizing the flash
synchronizing socket.

Others
Exposure compensation system
Instant slow motion
Collapsible grip
Constant voltage regulator '
Built-in collapsible hood

Specifications
Type: Super 8 SLR for silent XL filming
with circuit and jack for double sound
(pulse-sync) system shooting.
Picture Size: 5.8 x 4.2mm
Lens: f/1.4 zoom lens with focal length of
7.5mm - 60mm. Zooming ratio 8:1.
Lens Construction: 18 elements in 13
groups, Spectra Coating; filter thread
size: 58mm; lens cap size: 60mm; built-in
rubber hood.
Macro-cinematography Mechanism:
Macro-cinematography is possible using
zooming ring in wide angle end of
zooming range. With the distance scale
at °° , the shooting distance from the
film plane indicator is 165mm. The
minimum field of view is 33 x 45mm.
Focusing Adjustment: Rotating front
component.
Distance Scale:
ft. 4 5 7 10 15 50 ^
m 1.2 1.5 2 3 5 10
Zooming: Both power and manual
zooming are possible. Power zooming

speed is about 5 seconds. Manual
zooming is possible by rotating the
zooming ring. Rotating angle is 121 °30'.
Viewfinder Single-lens reflex viewfinder
with split image focusing screen.
Viewfinder Information: Aperture scale,
over/under exposure warning marks,
film transport indicator (green LED) and
film end warning indicator (red LED).
Dioptric Adjustment: Adjustable from
-4 to -I-2 diopters.
EE Mechanism: Automatic exposure
mechanism coupled to ASA film speed
and filming speed. Through-the-lens EE
with CdS photocell, coupled to single
frame shooting.
Light Metering Range: From ASA 400,
f/1.4, m(220°), 9 fps. to ASA 25, f/45
■jOc (150°), instant slow motion of ap
prox. 36 fps.
Film Speed:
Artificial light; AS A 25 - 400
Daylight: ASA 16-250

Film ASA Setting: Automatically set
when cartridge is loaded.
Color Temperature Adjustment Filter:
Manually removed or automatically can
celled when daylight-type film is in
serted, or when CCA filter cancellation
adapter or lighting unit is used.
Exposure Compensation: Two possible
compensations of -(-0.5 and -f-1.5
f/stops (These numbers are actual
f/stops and not multiple exposure fac
tors.)
Manual Exposure Control: Full manual
exposure control is possible by using the
manual aperture control dial.
Filming Speeds: Dial positions for 9, 18
fps., and single frame. Separate switch
for instant SLOW MOTION (approx. 36
fps.)
Angle of Shutter Opening: 220° (ef
fective angle) for XL filming and 150° for
regular filming and these two angles are
provided with a safety lock and click
stop.
8

Shutter Angle Compensation: Automat
ic exposure adjustment at 220° (w~i)
and 150° (-Jof).
Variable Shutter Control; 150° to 0°
continuously by turning the springtensioned fading control downward.
The dial will return automatically to the
■JoJ position if it is released.
Shutter Release Mechanism: Built-in
electromagnetic release system.
Drive System: High-performance electric
micromotor.
Power Source: Four 1.5V penlight (size
AA) batteries in the grip are used to
power the film drive, power zooming
and exposure metering.
Battery Check: A red LED lamp lights up
when the battery check button is press
ed if the batteries are in good condition.
Battery Life: More than 10 cartridges for
18 fps. shooting or more than one car
tridge for single frame shooting.
Remote Control: By use of Remote
Switch 60 or3.

Main Switch: Dial positions for OFF, R
(Running) and RL (Running Lock) on
the main switch.
Footage Counter: Counts exposed foot
age from 0 to 50ft. and automatically
resets itself when cartridge is removed.
There is also a separate frame counter
for 72 frames.
Film End Warning: A red LED lamp lights
in the viewfinder about 2 ft. before the
end of the film.
Recording System: Double sound (pulse-
sync) system. 8 pronged jack for special
use. Sound Recording is accomplished
by a stereo tape recorder using a special
cord or the designated cord. The DIN
method of synchronous recording is
possible with one pulse every 4 frames
by using the cord 'BRP', the adapter
'Synvoton 1-4' and the cord 'SV 2209'
made by Velmut Volland, and the
Philips' '¿OSAV'tape recorder. Simulta
neous starting and stopping of the tape

recorder and camera are possible.
Flash Synchronization: Possible at both
220° and 150° shutter angles. Syn
chronized with single frame shooting.
Grip: Collapsible, doubles as battery com
partment.
Attaching Lighting Unit: Use screw type
socket on the upper surface of the
camera body. CCA filter is automatically
cancelled when lighting unit is attached.
Dimensions and Weight: 265 x 118 x
92.5mm; (10-7/16" x 4-5/8" x 3-5/8"),
1520g (3 lbs. 6 ozs.) (including batteries).
Accessories: Included; Soft Case,
Remote Switch 60, Lens Cap 60, Finder
Cover, CCA Filter Cancellation Adapter,
Rubber Sheet, Socket Cover, Optional;
58mm Filters, Close-up Lenses 450C-8-2
and 240C-8, Self-Timer E, Interval Timer
E, Time Lapse Programmer, and
Remote Switch 3.
Subject to change without notice
Preparations
Before FHming
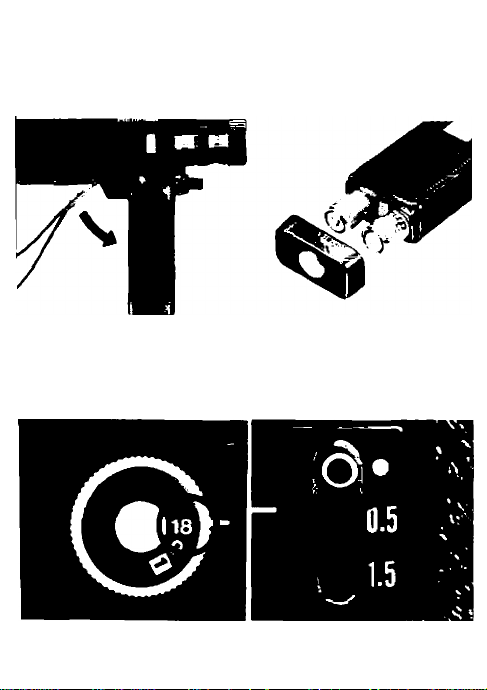
Unfold the grip. 2 Insert batteries.
Set the filming speed at in justment knob to the
18. lU white dot.
9
10
Set the exposure ad-
Check battery power k
level. *• Adjust eyepiece.
3
Actual Filming
Push in the manuai 10 look into the viewfindaperture control dial. IZ er.
n
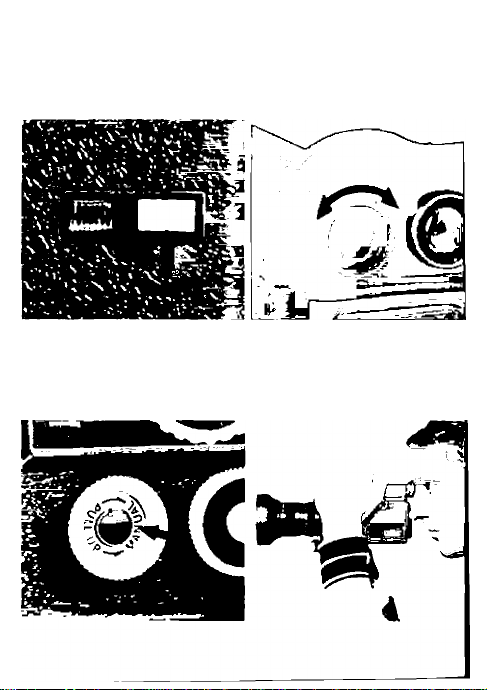
Take the camera and
g Set the main switch to
Insert film.
IQ Adjust the focus in the 1 i Decide composition.
10 telephoto range. I*1 (Zoom as desired |
"R”.
Set the variable shutter
control dial to:
Comfirm film advance.
Film transport indicator
Confirm the exposure at
the first step of the
shutter release lever
_ and shoot at the second „ Remove
13 step of the shutter re- |D shooting,
lease lever.
-Joe- for outdoors
Remove the film after
for indoors
11


Hand Grip and Strap
The hand grip is collapsible and doubles as the
battery compartment. When it is unfolded all the
way, the hand grip will lock in place. It can be
folded again by pushing the grip locking lever up
ward. When holding the camera, please make
sure to put your hand through the strap for
safety.
Lens Hood
The hood is collapsible. Please extend it before
shotting.

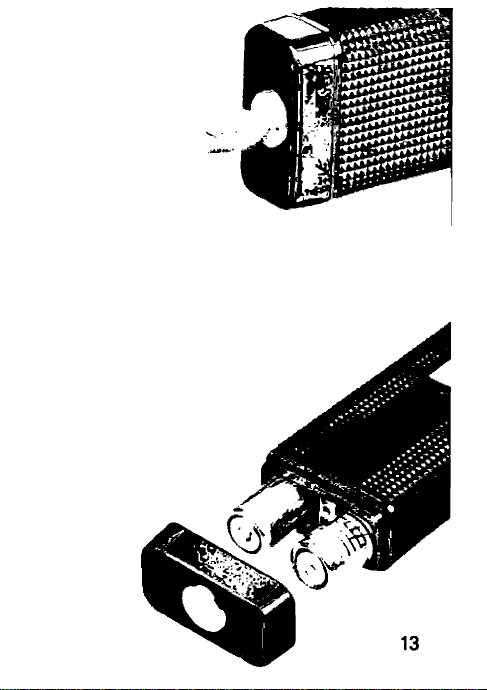
Battery Loading
Both the drive system and the exposure metering
of this camera are powered by the same bat
teries. Please make sure that the batteries are
loaded before filming. Four penlight (size AA)
batteries are used and are loaded into the grip.
1. Remove the battery compartment cover by
unscrewing it as shown by the arrow.
2. Follow the diagram on the side of the grip
when loading the batteries.
3. Replace the cover and tighten the screw.
When changing batteries, be sure to load new
batteries of the same brand and same kind at the
same time. Please be careful when loading them
because if they are loaded the wrong way, the
reversed polarities may damage the camera.
When filming in cold places, battery life will be
shortened so please take extra batteries with
you. The batteries must be kept warm before
shooting in such places. When you shoot in tem
peratures below 0°C, Ni-Cd batteries are highly
recommended. When not using the camera for a
long period of time, take the batteries out to
avoid damage to the camera from leaky bat
teries. When not filming please make sure to
switch off the camera to prevent battery waste.
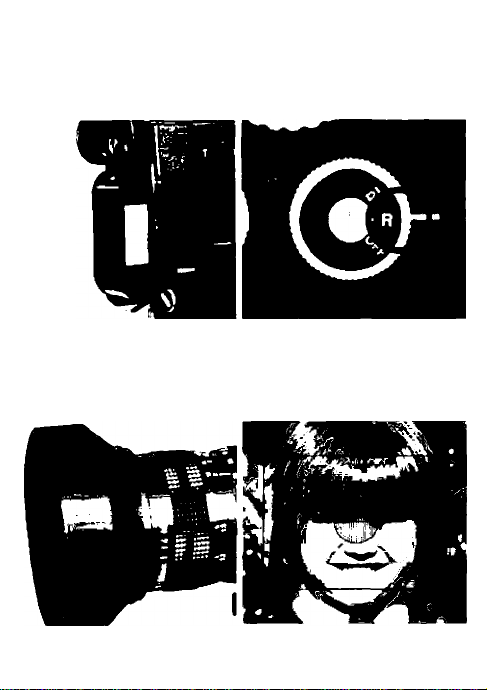
Battery Check
Check the battery's power before filming. Rotate
the Main Switch at the side of the camera body
to the 'R' setting and press the battery check
button. If the lamp lights, battery power is suf
ficient and shooting is possible at any frame
speed. If the lamp starts blinking, correct filming
is possible only at 18 and 9 fps. If the lamp fails to
light, the batteries must be changed. Please
check the batteries if you have just changed bat
teries, you have filmed about 10 cartridges, you
have not used the camera for a long time, and if
you are filming in cold places.
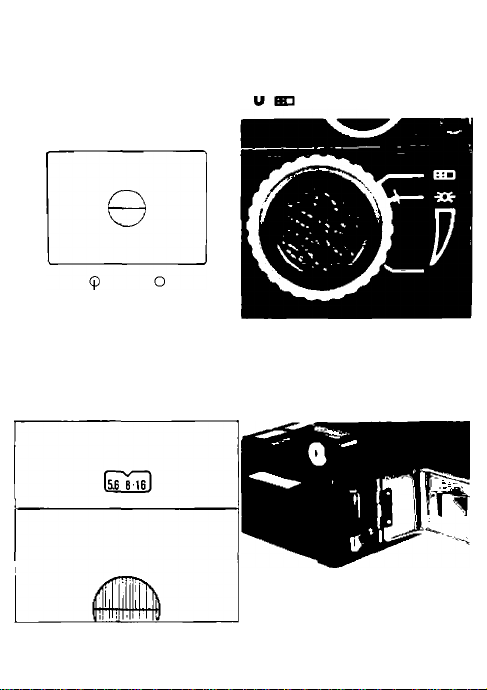
Dioptric Adjustment
Dioptric adjustment is indispensable because
blur will result if the eyepiece is not adjusted to
the user's eyesight. The adjustable range is from
— 4 to -(-2 diopters.
1. Remove the cover and set the distance scale
at 0°.
2. Point the camera toward a window and look
through the eyepiece.
3. Rotate the dioptric adjustment ring.
4. Stop rotating the dioptric adjustment ring
when the line located in the center of the splitimage screen can be clearly seen.

Fim Loading
Please use ASA 40 film for outdoor daylight
shooting and ASA 160 film for indoor shooting
at night.
1. The rear cover will open if you press the rear
cover opening button.
2. Insert the film cartridge so that the film label
can be seen through the window.
3. Push the rear cover until it snaps shut.
4. When loading the film, the film speed will be
automatically set.
Film Speed
Artificial Light: ASA 25 40 64 100 160 250 400
Daylight: ASA 16 25 40 64 100 160 250
Footage Counter
The footage counter indicates exposed footage
and will automatically return to '0' when the car
tridge is removed. It will not move unless a car
tridge is inserted.
Frame Counter
The frame counter can count up to 72 frames (1
ft.) in one full turn and counts two frames per
unit. To confirm exposed frames set the needle
at '0' by rotating the frame counter setting knob.
The counter can also be used for fading and
single-frame shooting.


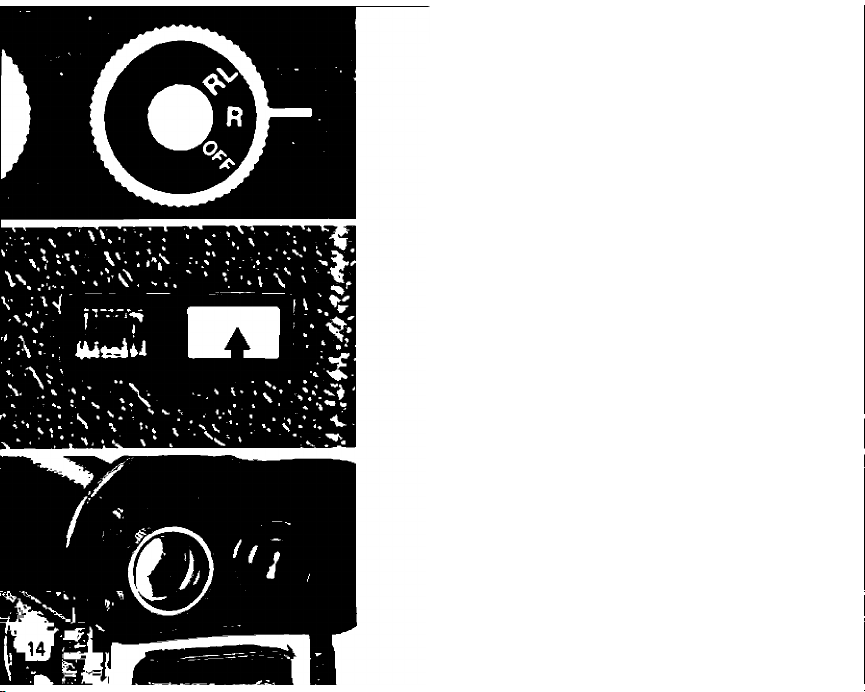
Main Switch
By rotating the Main Switch to the 'R' setting, all
circuits will be turned on and the camera will be
ready. When not using the camera, turn the Main
Switch off to avoid battery waste. The 'RL' set
ting on the switch stands for running lock. This is
used for continuous and remote-control shoot
ing.
Manual Aperture Control Dial
Please leave this dial pushed in. If pulled out, the
camera will be switched to manual exposure
control.
Setting the Filming Speed
Normally, the camera is set at 18 fps. as this is
the standard speed for Super 8 movies.
Changing the speed to 9 fps., is used to speed up
the subject's motion. This speed is also used to
compensate for under-exposure of a still subject
in dim light. Single frame shooting is used for
purposes like animation photography which is
single frame shooting that gives a feeling of
motion.
* Concerning slow motion shooting, please refer
to page 42.

Variable Shuner Control Dial Settings
The dial is set on the ioS- setting for normal
daylight or rather bright indoor conditions, and is
set on the indoor Hn setting for dim light con
ditions. To select a setting, rotate the variable
shutter control dial while pressing the lock but
ton in.
* When the variable shutter control dial rotates
clockwise while pressing the lock button, the
shutter blades will gradually close. They will be
fully closed when the dial reaches its rotational
limit. If you take your fingers away from the dial,
it will be automatically returned to the -Joisetting by a spring. (Refer to page 32.)
* The setting has a shutter opening angle
of 150° for regular shooting. The opening angle
of 220° ( S3) is for XL shooting in dim light con
ditions.
* Be sure to set the Bn setting for filming a TV
screen.
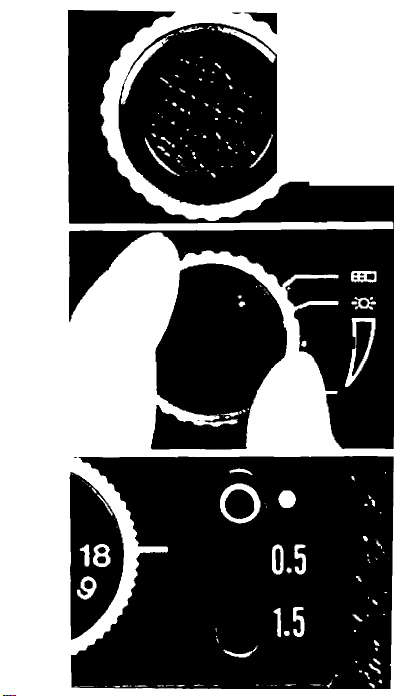
Exposure Adjustment Knob
This is an adjustment knob used for direct-light
shooting. Set it on the white dot for regular
shooting to obtain the correct exposure.
* The 0.5 and 1.5 settings are used for exposure
compensation. (Refer to page23.)
ti
 Loading...