

Page 1

Canon
■;
ÌNSTRUCTiONS engiiìh Edition
B
Page 2

Especially designed for EOS cameras, the
Canon Speedlite 420EZ is a high-perfor
mance, electronic flash unit featuring the
A(Advanced)-TTL automatic flash output
control, which responds to a wide range of
illumination from dark surroundings to
bright (fill-in flash) without troublesome
operations. Advanced techniques such as
bounce and slow-sync flash photography
can be used in the automatic mode. In addi
tion, the large, easy-to-read LCD display
enables you to check shooting information.
Please read this instruction booklet careful
ly for a full understanding.
•The Speedlite 420EZ is sold in both
“meter” and “feet” display versions, but
product availability may vary from area to
area.
Page 3

Page 4
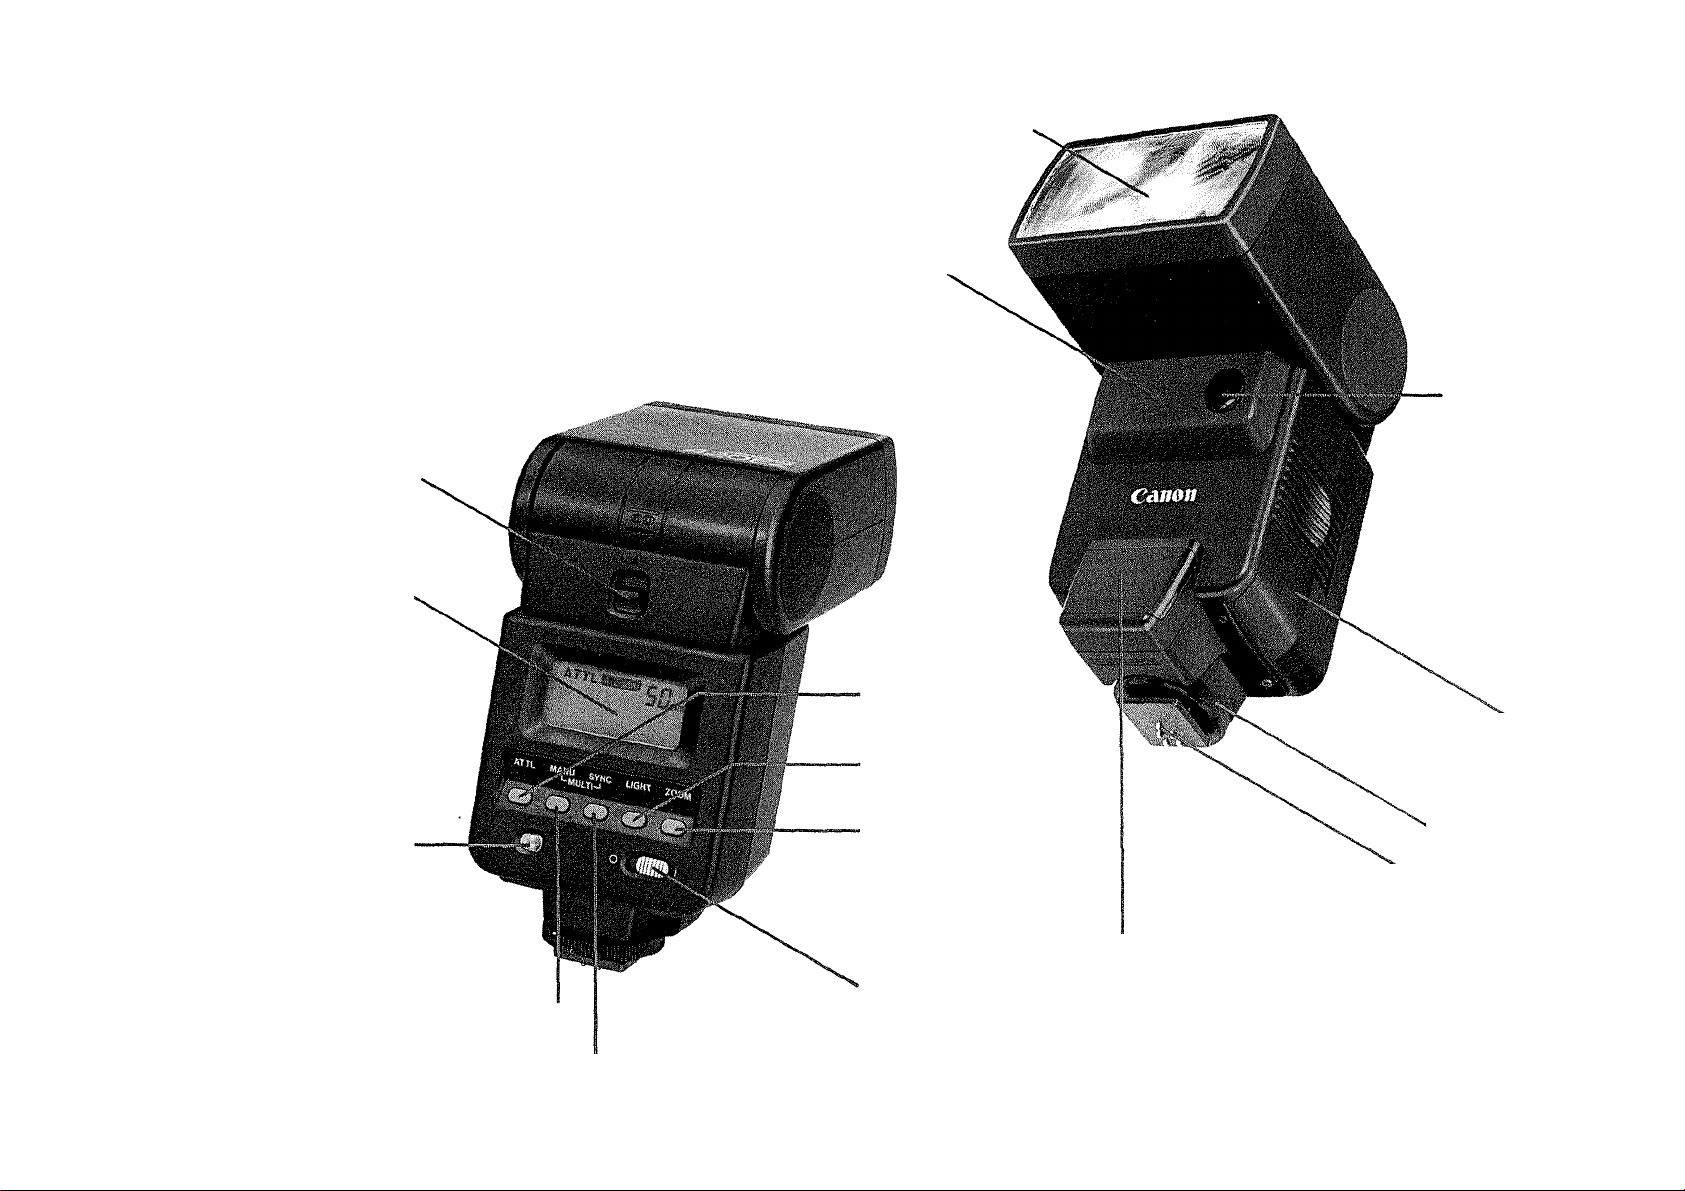
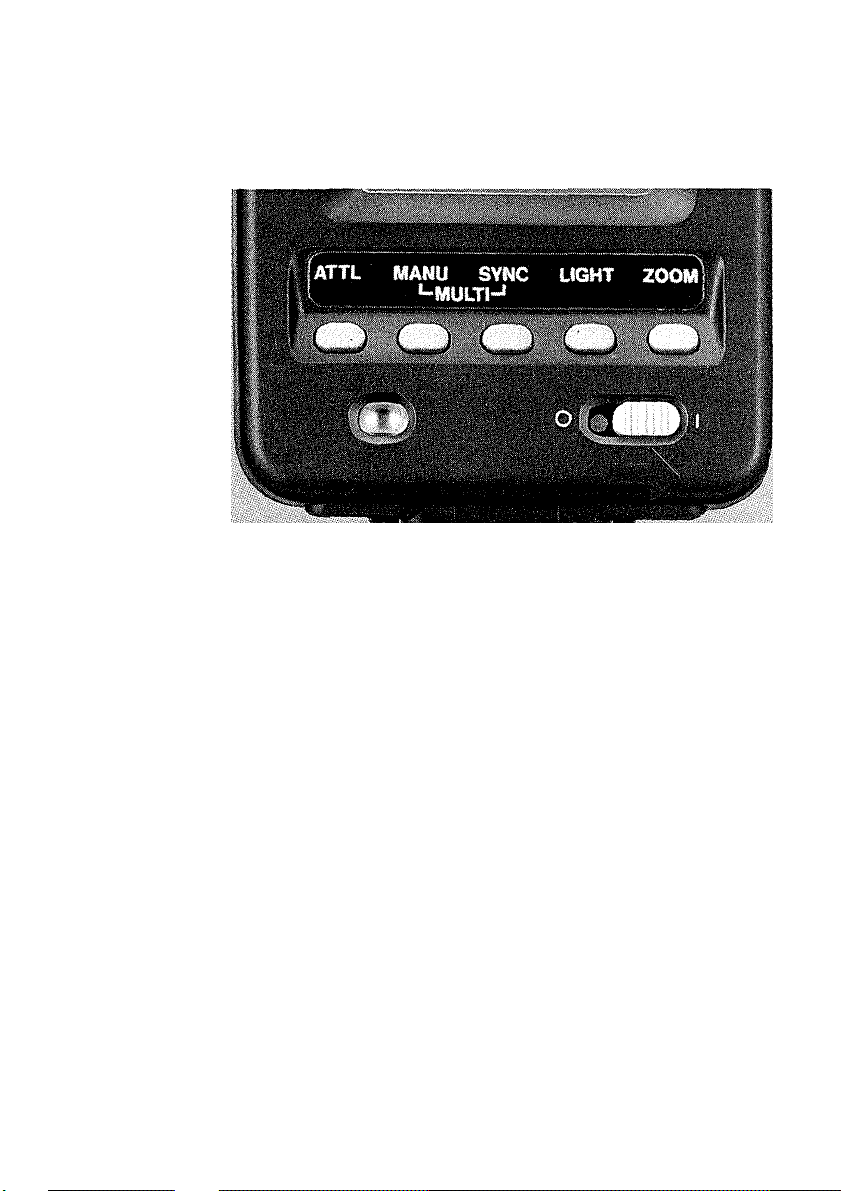
Nomenclature
Bounce Latch
LCD Display Panel
Flash Head
Infrared Light Emitter
Sensor
A-TTL Button
Ready Lamp
Manual Flash Set Button
Sync Position Button
Light Button
Zoom Button
Main Switch
Battery Chamber
Lock Nut
Directly Coupled Contact
AF Auxiliary Light Emitter
Page 5
Page 6

Table of Contents
Preliminary Preparations
1. Loading the Batteries...................... p. 6
2. Mounting the Flash
........................
p. 7
3. Ready Lamp and Test Firing
SE (Save-Energy) Function
Rapid-Fire Flash
Auto Internal Zoom
Mechanism
Display Panel Illumination
AF Auxiliary Light
................................
.......................
................
.........
......
........
......
p. 8
p. 8
p. 9
p.10
p.11
, p.11
Basic Operation....................p.12
□a
For easy reference to the Speedlite’s parts,
please unfold the front flap of this booklet.
Page 7

other Operations
1. Program AE Mode [A-TTL]
2. Shutter-priority AE Mode [A-TTL] ... p.16
3. Aperture-priority AE Mode [A-TTL] . p.18
4. Manual Mode (TTL]........................ p.20
5. Manual Flash Exposure
6. Stroboscopic Flash......................... p.25
7. Bounce Flash Photography
8. Second-Curtain Sync Flash
Photography ...................................p.30
Handling Precautions
Speedlite Care
Program Characteristics
Specifications
..............................
................................
....................
.............
.................
............
................
p.14
p.22
p.27
p.31
p.31
p.32
p.34
Page 8
Preliminary Preparations
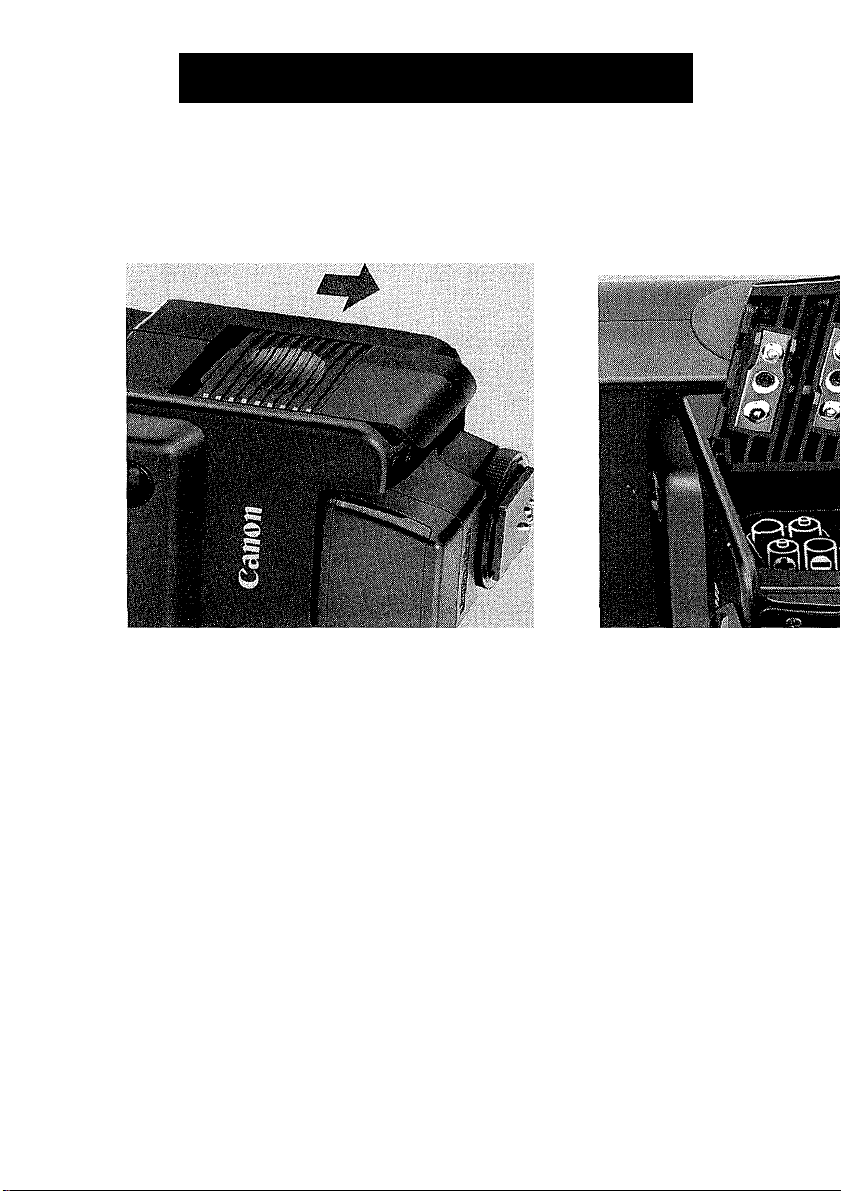
1. Loading the Batteries
Use four, new, size-AA alkaline (LR6) or
Ni-Cd batteries. Carbon-zinc batteries may
also be used, but their life is shorter. Wipe
the battery terminals with a clean, dry cloth
to ensure proper contact.
1) Slide the battery chamber cover down in
the direction of the arrow to open.
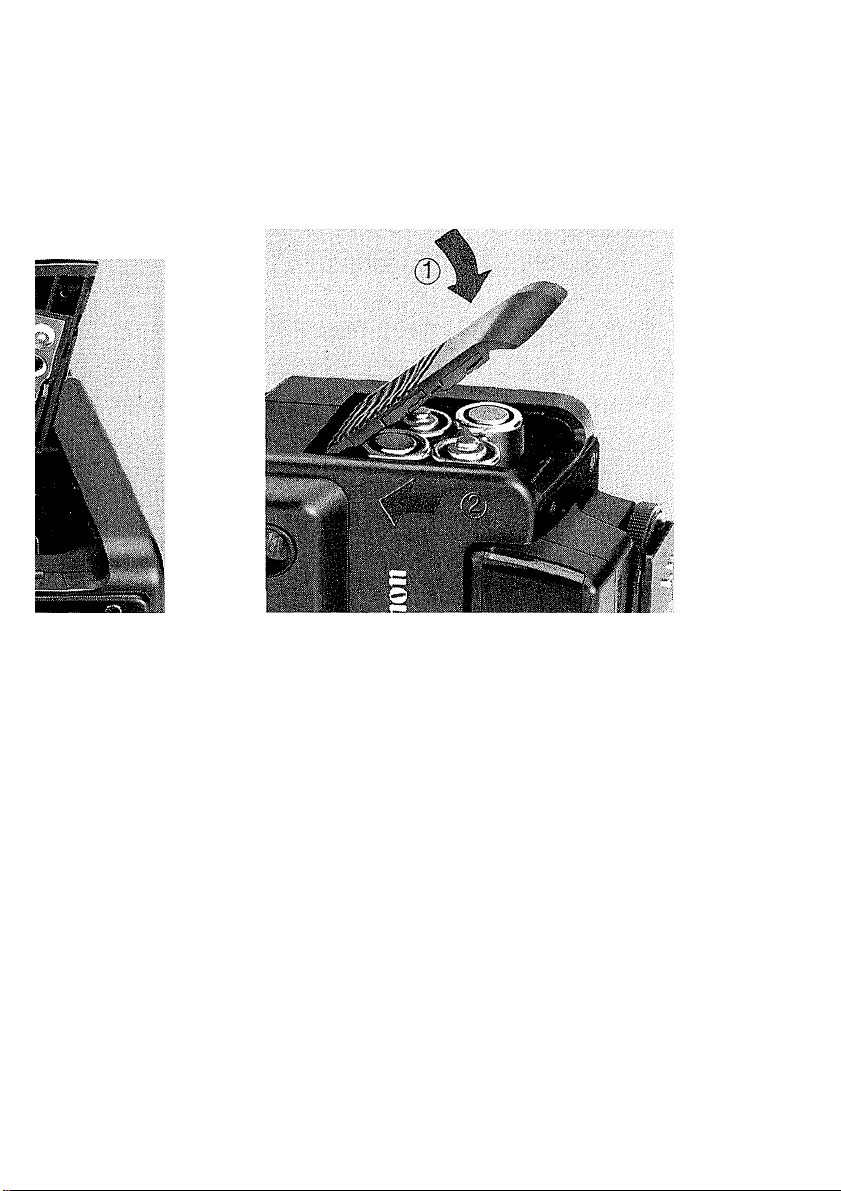
2) Load the batteries so that their terminals
face in the directions indicated by the
diagram inside the battery chamber.
3) Finally, push the cover completely down
and slide it back to close.
Page 9
Notes
• When the batteries become exhausted, replace
all four at the same time with the same brand.
• Remove the batteries if you do not expect to use
the flash unit for about three weeks or longer.
• Battery performance deteriorates in cold
temperatures below 0°C/32°F so please keep
the batteries warm until just before use. For
best results, use fully-charged Ni-Cd batteries in
cold temperatures below 0°C/32°F.
•When using Ni-Cd batteries, please note that
various brands have different types of ter
minals. Be sure to use a suitable type.
Recharge Ni-Cd batteries according to the
manufacturer’s instructions.
Page 10
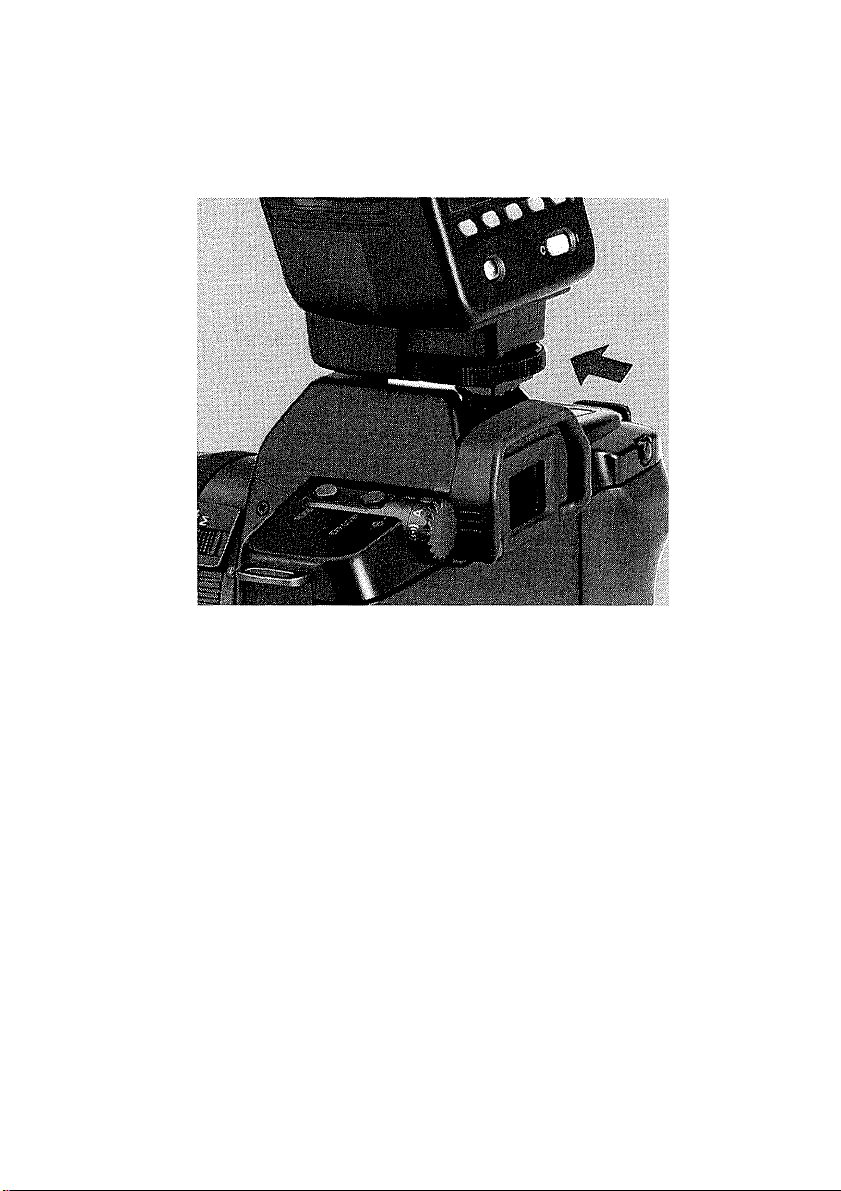
2. Mounting the Flash
1) Loosen the lock nut and slide the flash
unit into the camera’s accessory shoe.
To ensure correct electrical contact,
make sure it is pushed in all the way.
Page 11
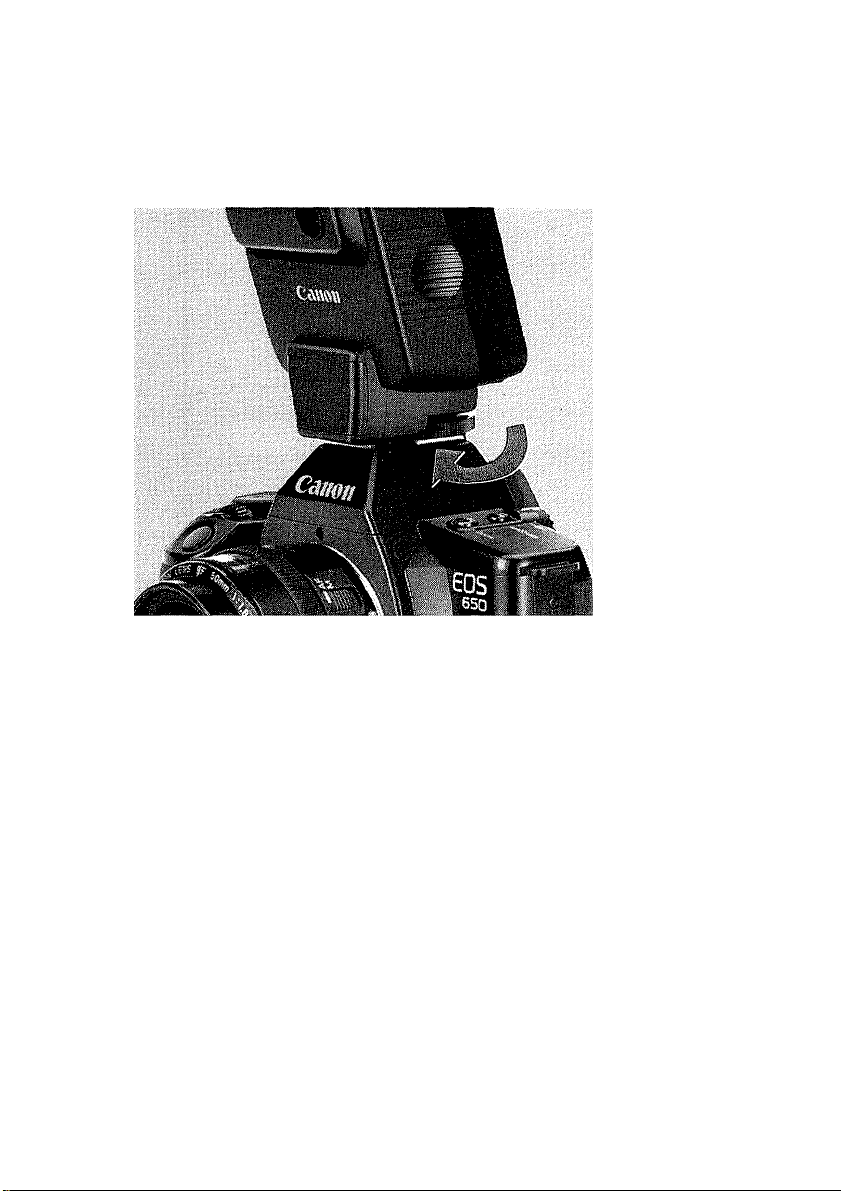
2) Tighten the lock nut.
Page 12
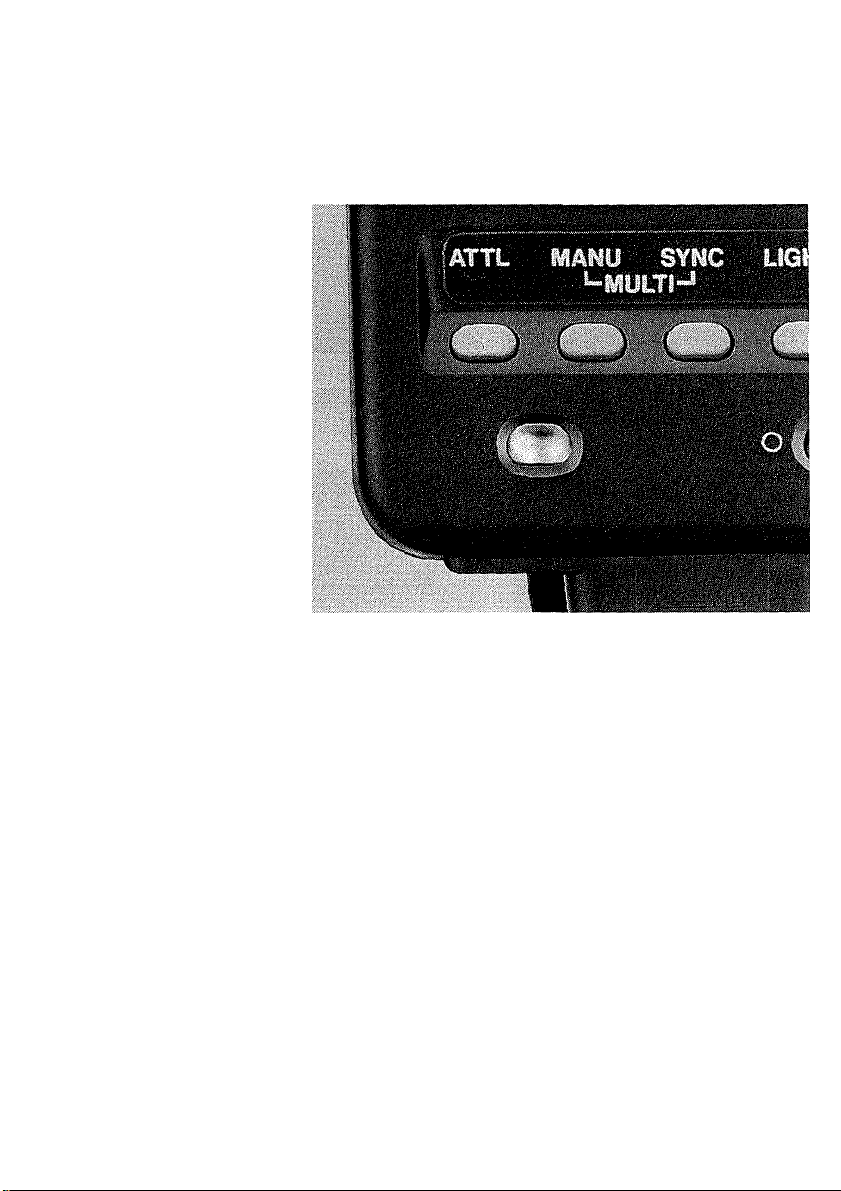
3. Ready Lamp and Test Firing
Turn the main switch ON (“I” mark) and
wait for the ready lamp to light up. To test
functioning, press the ready lamp after it
has lit and if the flash fires it is in proper
working order.
• Be sure to press the ready lamp before press
ing the shutter button halfway. Otherwise, test
firing is not possible.
• Flash charge is also confirmed by the “ i ”
mark in the viewfinder.
• When the shutter button is pressed halfway,
the flash head position automatically adjusts,
(see p.10)
• For interval flash photography, attach the
Technical Back E and set the mode to the in
terval timer or self-timer. The flash charge
starts automatically one minute before shutter
release.
8
Page 13

SE (Save-Energy) Function
Turn the main switch OFF (“O” mark) when
flash photography is finished to prevent un
necessary battery consumption. The
Speedlite 420EZ has a built-in SE (Save-
Energy) function that automatically turns off
power when the flash is not used for approx
imately five minutes (test firing, preflash,
etc.). All panel displays start blinking approx
imately 30 seconds before SE operation.
Press the ready lamp to re-start the flash.
Page 14
Rapid-Fire Flash Capability
To help capture an unexpected moment in
flash photography, the Speedlite 420EZ has
rapid-fire flash capability, a short flash
recycling time, previously impossible with
any other SLR system.
When charged, the color of the ready lamp
changes as follows;
Page 15

(1) Yellow-green
- Indicates the unit in
rapid-fire flash status,
but fires for correct ex
posure.
(2) Red
• See the guide number table for rapid-fire
flash status on p.34.
Replace with new batteries if the yellow-
green lamp does not light for 10 seconds
after the main switch is turned ON.
Indicates the unit is fully-
charged.
Page 16
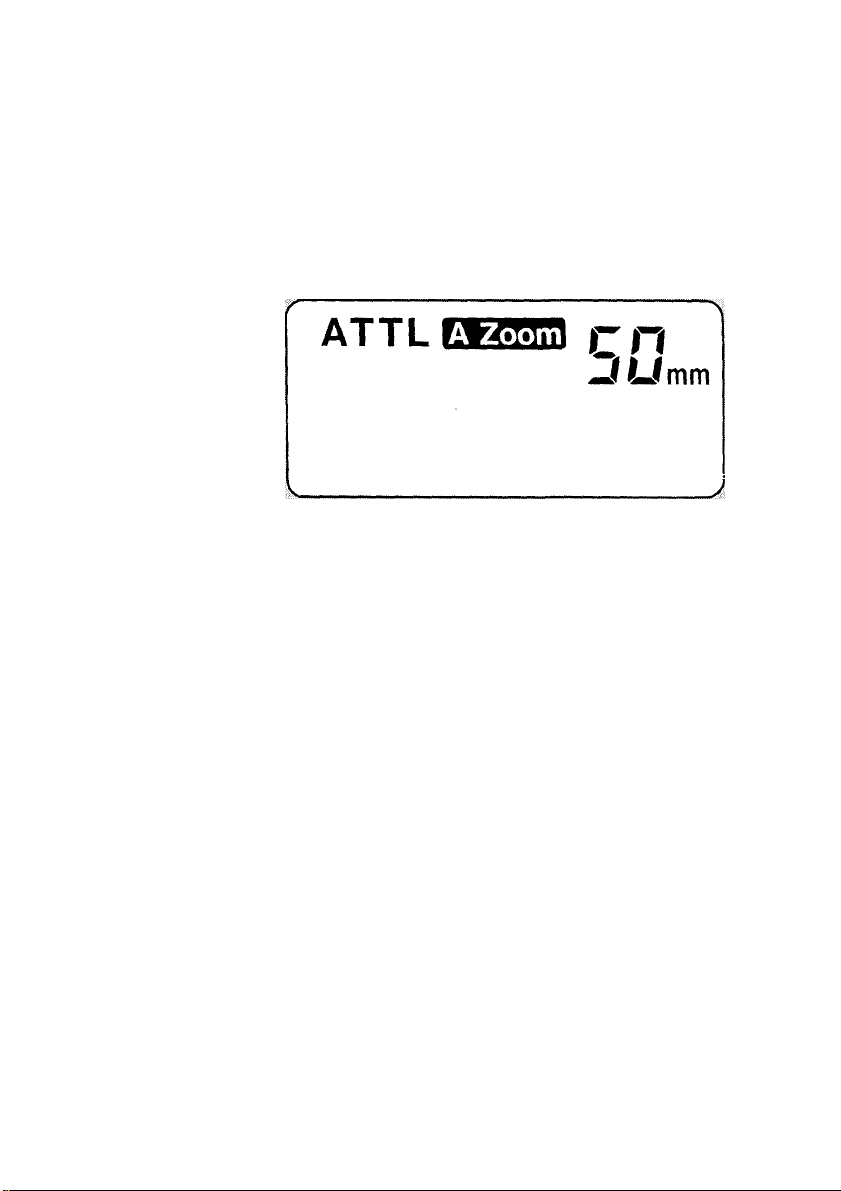
Auto Internal Zoonn Mechanism
The Speedlite 420EZ has an auto zoom
mechanism which automatically adjusts
flash coverage angle to use flash energy
more effectively.
The flash head position automatically ad
justs according to the lens focal length.
When using a zoom lens, it also switches
automatically according to zooming. The
position setting of 24, 28, 35, 50, 70, or
80mm and “A Zoom” appears in the display
panel.
0
Page 17
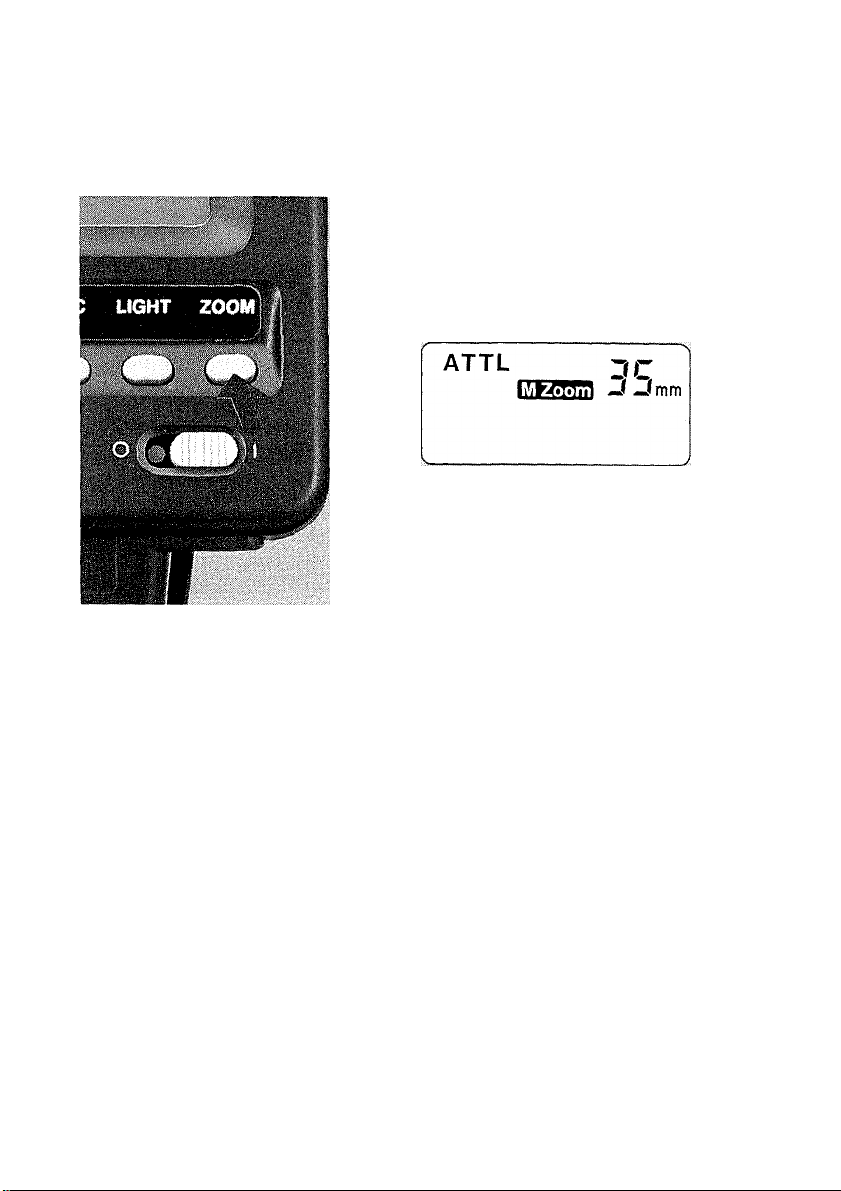
To change the flash head position
manually, press the zoom button until the
desired setting appears, the “M Zoom”
lights. Do not choose a setting larger than
the lens focal length. Always be sure to
set the position equal to or smaller than
the lens focal length, otherwise, exposure
will not be uniform.
The guide number varies according to
the flash head position, see p.34.
Page 18

Display Panel Illumination
Press the light button to illuminate the
display panel for approximately eight sec
onds.
Page 19
AF Auxiliary Light
Canon
In dark settings difficult for autofocusing,
the AF auxiliary light automatically emits to
help the camera focus. The effective
distance range is approximately 0.9-8m.
(3-26.2 ft.) If the subject is too far away, the
AF in-focus indicator blinks. Remove your
finger from the shutter button and move
closer to the subjeot until the AF-focus in
dicator lights steadily when pressed again.
Page 20
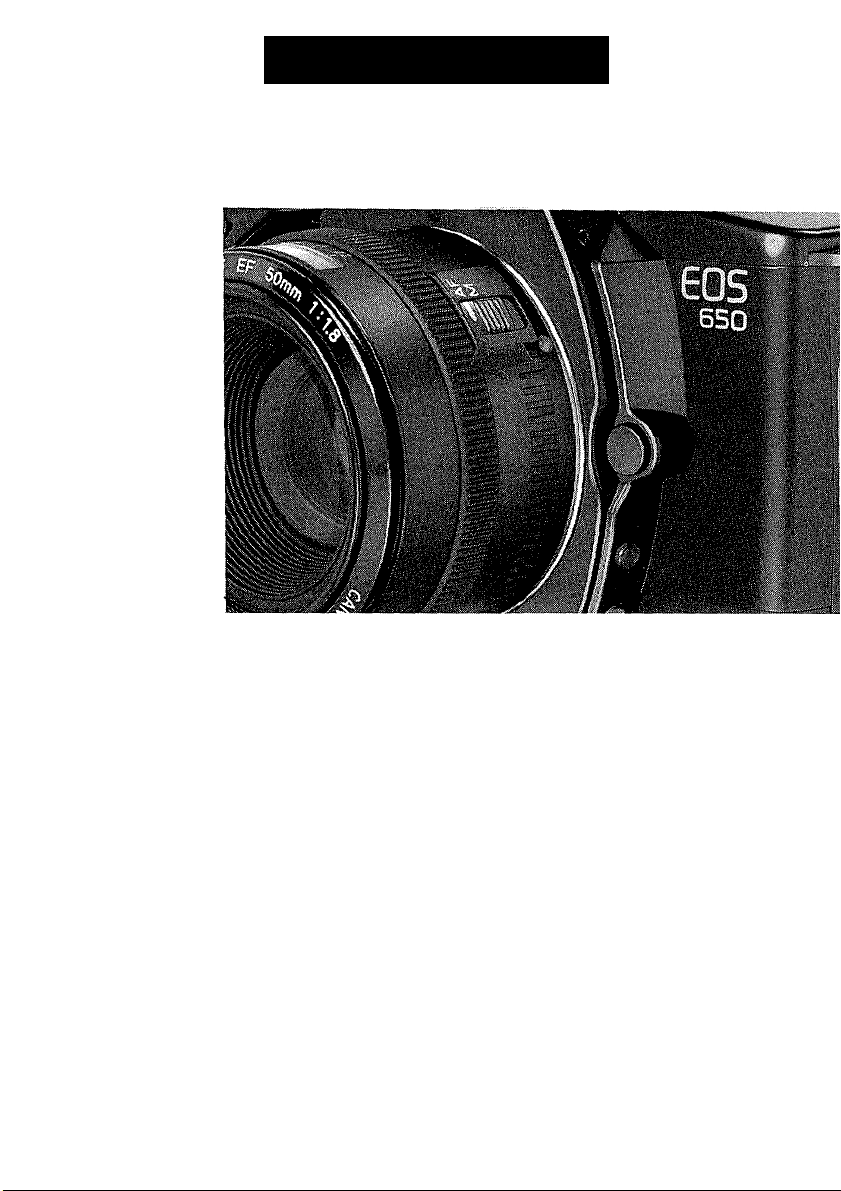
Basic Operation
Use the Speedlite 420EZ in conditions rang
ing from total darkness to supplemental
daytime lighting by following these steps:
1) Slide the lens focus mode switch to
“AF”.
12
Page 21

2) Set the camera’s main switch to the “Full
Auto’’ position (green “o” mark).
Page 22

3) Turn the flash’s nnain switch ON and
nnake sure the ready lamp lights up.
4) Cover the main subject with the AF
frame and press the shutter button
halfway.
•At this point, the near-infrared light
emits from the flash to choose the cor
rect aperture value.
•Both the X-sync shutter speed and
aperture values set automatically.
Page 23

Correct exposure display
X-sync shutter speed
Flash-charge
AF in-focus indicator
completion indicator.
5) Exposure will be correct if the X-sync
shutter speed and aperture values re
main continuously lit.
•When both values blink, the subject is
too far away. Remove your finger from
the shutter button and move closer to
the subject until both values remain
continuously lit when pressed again.
•When shooting in daylight (fill-in flash),
the minimum aperture of the lens in use
may blink. The background will be
overexposed but the main subject cor
rect. (see p.15)
•The camera-shake warning does not
sound when the flash is turned ON.
I3
Page 24

other Operations
A-TTL Automatic Mode;
The Speedlite 420EZ features the A (Advanced)-TTL mode which can be used
under conditions ranging from total dark
ness to fill-in flash.
Flash output is controlled by directly
measuring the light coming through the lens
and reflected from the film surface, using
the sensor inside the camera body. More
over, this A-TTL mode balances the ex
posure between the main subject illumi
nated by the flash and the background in
ambient light to prevent unnatural effects.
The setting for each shooting mode is
slightly different so please read the
following carefully.
• The camera-shake warning does not
sound when the flash is turned ON.
• When the camera is set to the depth-offield AE mode with the flash ON, the
mode is automatically switched to the
program AE mode.
Page 25

1. Program AE Mode [A-TTL]
ONE SHOT
' .1
Set the camera to “P” and the X-sync shut
ter speed and aperture are set automatical
ly so you can concentrate on picture com
S
position. (The X-sync shutter speed is auto
matically set between 1/60 and 1/250 sec
with the EOS 620, and 1/60 and 1/125 sec
with the EOS 650.)
Page 26

1) Turn the main switch ON and make sure
the ready lamp lights up.
2) Cover the main subject with the AF
frame and press the shutter button
halfway.
3) Exposure will be correct if continuously
lit values display.
Page 27

Correct exposure display
X-sync shutter speed AF in-focus indicator
Flash-charge completion indicator
When both values blink, the camera is
warning that the subject is too far away.
Remove your finger from the shutter but
ton and move closer to the subject until
both values light steadily when pressed
again.
2.
In fill-in flash, the aperture value may
start blinking: the camera is warning that
A-TTL Is impossible and the background
will be overexposed. The main subject,
however, will be correctly exposed
because normal TTL (see p.20) functions
instead of A-TTL.
R
Page 28

2. Shutter-priority AE Mode [A-TTL]
Set the camera to “Tv” to set the desired Xsync speed. The X-sync shutter speed can
be set between 30 and 1/250 sec with the
EOS 620, and between 30 and 1/125 sec
with the EOS 650. The aperture is set
automatically.
Page 29

1) Turn the main switch ON and make sure
the ready lamp lights up.
•The shutter speed will be set to the
fastest possible X-sync speed (1/250
sec with the EOS 620 and 1/125 sec
with the EOS 650) automatically if set at
a higher value.
2) Cover the main subject with the AF
frame and press the shutter button
halfway.
Page 30

Correct exposure display
Aperture
íгs ¿8
X-sync shutter speed
Flash-charge completion indicator
AF in-focus indicator
3) Exposure will be correct if continuously
lit values display.
1. When both values blink the camera is
warning that the subject is too far
away. Remove your finger from the
shutter button and move closer to the
subject until both values light steadily
when pressed again.
Page 31

2. When the lens’ maximum aperture
blinks, the camera is warning that ATTL is impossible and the background
will be underexposed. The main sub
ject, however, will be exposed cor
rectly because normal TTL (see p.20)
functions instead of A-TTL.
• The maximum aperture value may
stop blinking when a slower shutter
speed is set; A-TTL is possible but be
careful of camera-shake.
3. When the lens’ minimum aperture
blinks, the camera is warning that
A-TTL is impossible and the back
ground will be overexposed. The main
subject, however, will be exposed cor
rectly because normal TTL (see p.20)
functions instead of A-TTL.
• The minimum aperture may stop
blinking when a faster shutter speed
is set: A-TTL is possible.
Page 32

3. Aperture-priority AE Mode [A-TTL]
Av
r C
J.U
ONE SHOT
s
r-?
_
------------
Set the camera to “Av” to take the subject
depth of field into account. This setting is
best for fill-in flash portraits and slow-sync
flash photography. The aperture is set
manually while the shutter speed is set
___
automatically (between 30 and 1/250 sec
with the EOS 620, and between 30 and
1/125 sec with the EOS 650).
The automatically-set shutter speed will
be comparatively slow in the dark. The
camera-shake warning does not sound
so use a tripod.
8
Page 33

1) Turn the main switch ON and make sure
the ready lamp lights up.
2) Cover the main subject with the AF
frame and press the shutter button
halfway.
Page 34

Correct exposure display
Aperture
X-sync shutter speed ' AF in-focus indicator
Flash-charge completion indicator
3) Exposure will be correct if continuously
lit values display.
1. When both values blink, the camera is
warning that the subject is too far
away. Remove your finger from the
shutter button and move closer to the
subject until both values light steadily
when pressed again.
Page 35

When the shutter speed of 30" blinks,
the camera is warning that A-TTL is
impossible and the background will be
underexposed. The main subject,
however, will be exposed correctly
because normal TTL (see p.20) func
tions instead of A-TTL.
• A blinking shutter speed of 30" may
stop when a larger aperture is set. ATTL is possible but be careful of
camera-shake.
3. When the fastest possible X-sync shut
ter speed (1/250 sec with the EOS 620
and 1/125 sec with the EOS 650)
blinks, the camera is warning that
A-TTL is impossible and the back
ground will be overexposed. The main
subject, however, will be exposed cor
rectly because normal TTL (see p.20)
functions instead of A-TTL.
• A blinking shutter speed may stop
when a smaller aperture is set and
A-TTL is possible.
Page 36

TTL Automatic Mode:
Use this mode to control the exposure by
setting both the shutter speed and the aper
ture manually. In the TTL mode, correct ex
posure can be obtained only for the main
subject while A-TTL balances exposure be
tween the main subject and the background
for correct exposure on both.
20
Page 37

4. Manual Mode [TTL]
A Zoom
TTL
1) Turn the main switch ON and make sure
the ready lamp lights up.
cn
Umm
2) Set the camera’s shooting mode to “M.”
“A-TTL” display automatically changes
to “TTL” in the display panel.
Page 38

Correct exposure display
Aperture
S 5 S
! AFin-X-sync shutter speed | AF in-focus indicator
Fiash-charge completion indicator
3) Set the desired X-sync shutter speed and
aperture values on the camera. (Refer to
the camera’s instruction booklet.)
•The shutter speed vyill be set to the
fastest possible X-sync speed (1/250
sec with the EOS 620 and 1/125 sec
with the EOS 650) automatically if set at
a higher value.
4) Press the shutter button halfway to
check the automatic flash shooting
distance range in the display panel.
Page 39

•The automatic shooting distance range
changes according to the flash head
position, film speed and the aperture
value set on the camera.
•When the automatic shooting distance
range is beyond 30m/99ft, the
mark appears to the right.
•Correct exposure is impossible when
the automatic shooting distance range
display blinks.
•Rapid-fire flash is impossible in the TTL
mode.
21
Page 40

5. Manual Flash Exposure
Sometimes automatic flash may not be
suitable for your subject. For instance, if the
subject’s surroundings are bright white with
strong reflections or if the main subject is
small with a dark or distant background,
automatic flash exposure may be affected
by the contrasting background.
22
Page 41

mV I
A Zoom
M/C'
cn
^fUmm
n cn
JIUmm
A Zoom
мvзг
cn
^ (Jfmm
1) Turn the main switch ON and make sure
the ready lamp lights up.
2) Press the manual flash set button to set
the flash intensity. As this button is press
ed, the flash intensity display appears in
sequence of M1/1, M1/2, M1/4, M1/8,
M1/16, and M1/32.
•Please see the guide number table on
p.34.
Page 42

3) Set the camera-to “M”.
4) Set the desired X-sync shutter speed and
aperture values on the camera. (Refer to
the camera’s instruction booklet.) Cor
rect shooting distance appears in the
display panel.
•The shutter speed will be set to the
fastest possible X-sync speed (1/250
sec with the EOS 620 and 1/125 sec
with the EOS 650) automatically if set at
a higher value.
Page 43

11 /22
- ■ ¡y f i f ? r
5) Set the camera’s AF mode to “ONE
SHOT’’ and focus the subject to read the
distance from the lens’ distance scale.
23
Page 44

6) While pressing the camera’s manual
aperture set button, turn the electronic
input dial. As the aperture changes, the
shooting distance display also adjusts.
24
Page 45

A Zoom
cn
^ U
mm
F U C
r l.J
Aperture
X-sync shutter speed | AF in-focus indicator
Flash-charge completion indicator
C J
J.L
m
7) Turn the electronic input dial until the
shooting distance display nearly equals
the lens’ distance scale.
•The shooting distance display changes ac
cording to the flash head position, film speed
in use and the aperture value set on the
camera.
• When the shooting distance is beyond
30m/99ft, the mark appears to the
right.
• Correct exposure is impossible v/hen the
shooting distance display blinks or when it
does not change.
• Rapid-fire flash is impossible when using
M1/1 and M1/2.
• Press the A-TTL button to reset to the normal
flash mode.
Page 46

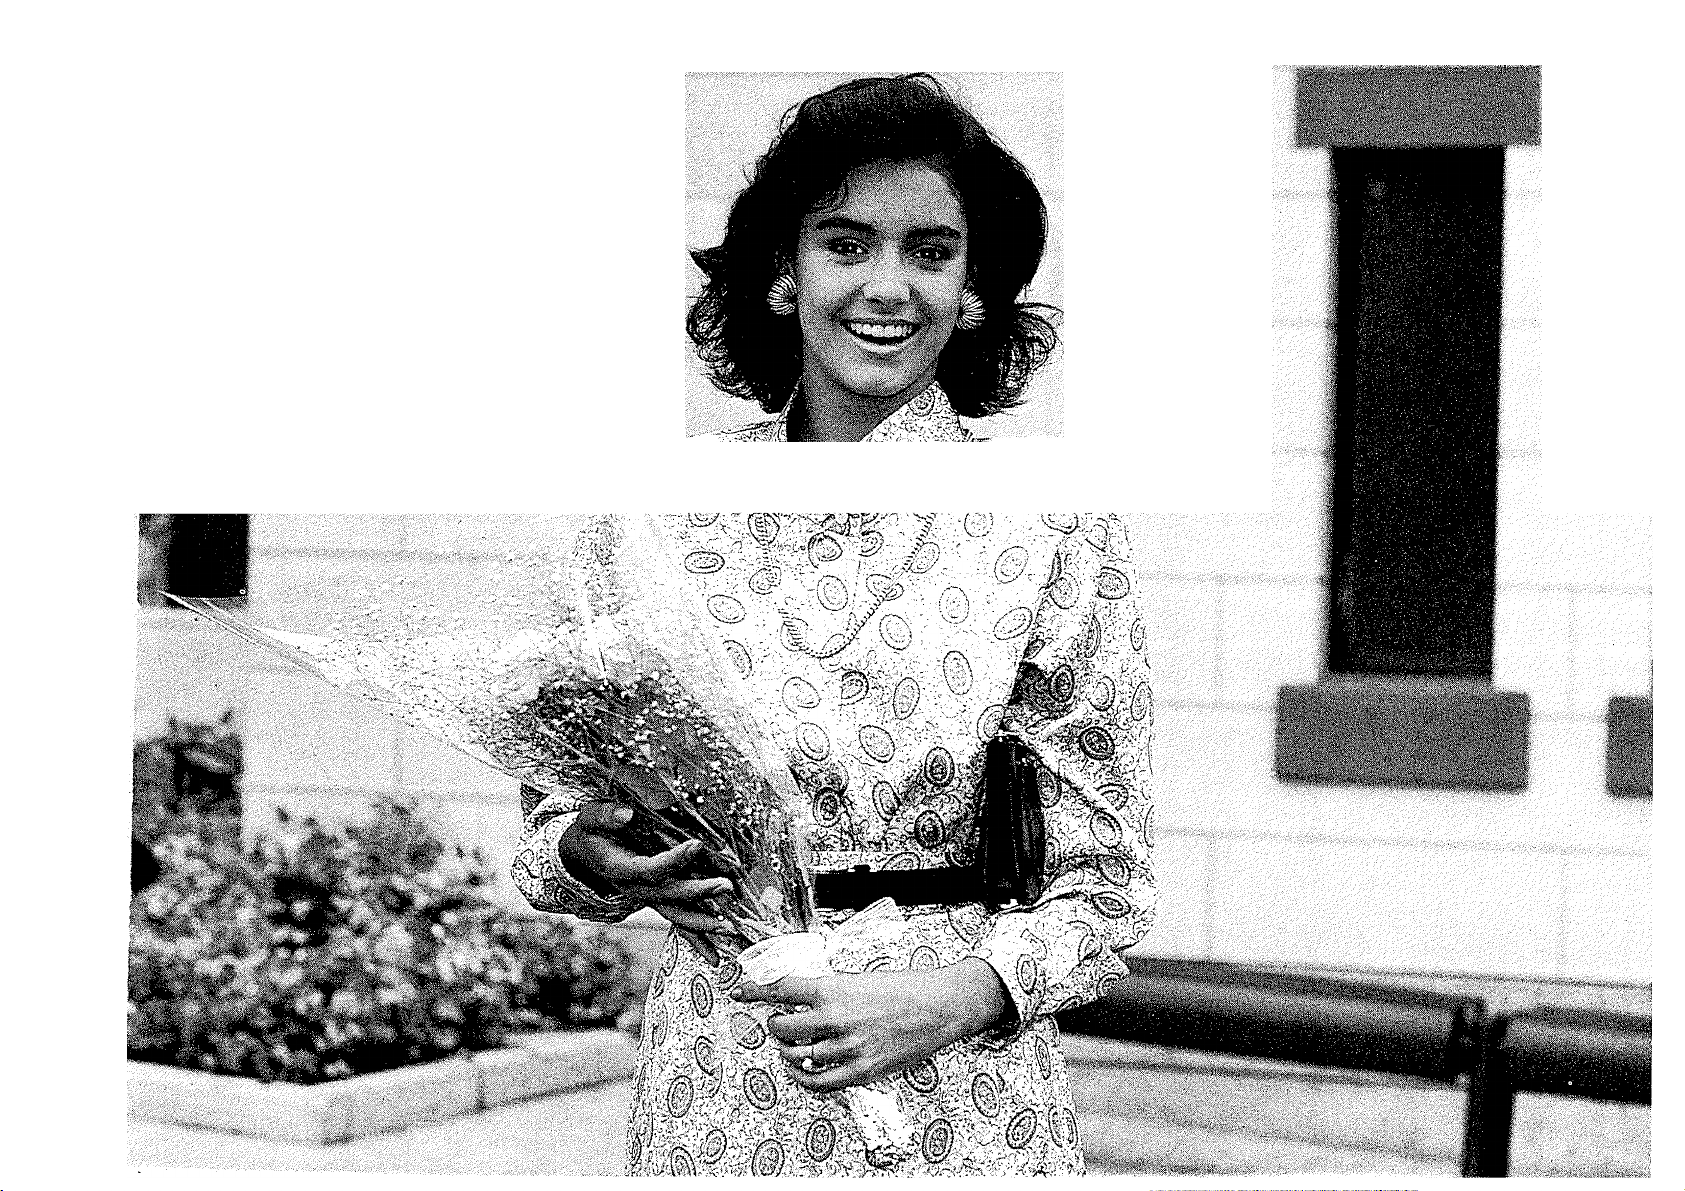
6. Stroboscopic Flash
With the Speedlite 420EZ, it is possible to
take a tricky photo emphasizing the flowing
movement of the subject as if it were
“disassembled” as shown in the photo.
Page 47

M
me
( j
ONE SHOT
c c
J.U
r-^
-
........
s
^
1) Make sure the ready lamp color turns
red.
2) Set the camera to “M”.
3) Set the desired aperture and X-sync
shutter speed to one second or slower.
• Bulb may also be used.
25
Page 48

(example)
4) Press the manual flash set button and
the sync position button simultaneously.
“MVi” and “MULTI 1Hz” appear in the
display panel.
5) Press the manual flash set button to set
the flash intensity.
6) Press the sync position button to set the
number of flashes per second.
•Set the flash intensity and the number
of flashes per second by referring to
the following table as a guideline.
26
Page 49

Maximum Number of Flashes
5Hz
M % 1
M V2
2
y\% 4
MV,
M v„
M V32
(Based on Canon’s Standard Test Method)
•5 Hz, for example, indicates flash fire
approximately five times per second.
•This mode is effective when the main
subject is highly reflective and the
background is as dark and distant as
17
29
4Hz
1
2
4 4
8
8 9 9
18
30
3Hz 2Hz
1 1
2 2
5
20
39 88 244
25
1Hz
173
1
2
5
12
possible.
•A tripod. Remote Switch 60T3 and new
batteries are recommended for this
mode.
•This mode cannot be used for secondcurtain sync photography, (see p.30)
• Press the A-TTL button to reset to the
normal flash mode.
Page 50

7. Bounce Flash Photography
Pointing the flash head toward a wall or ceil
ing and illuminating the subject with light
reflected off of that surface is called bounce
flash. Because the light is reflected, a loss
of light volume is unavoidable, on the other
Bounce Flash Photography
Page 51

hand, there are no dark shadows and a soft
illumination. The Speedlite 420EZ features
A-TTL or TTL automatic output control so
there is no need for exposure calculations.
Direct Flash Photography
Page 52

•Bounce flash can also be used with
various shooting nnodes. (see pp.14-21
for setting and exposure information.)
Confirm exposure before shooting be
cause the actual shooting distance is a
total of the flash-to-reflecting surface
distance and the subject-to-reflecting
surface distance.
•In bounce flash only, the flash head
emits the visible preflash instead of the
near-infrared light.
•When tilted for bounce flash, the flash
head automatically sets to 50mm and
the display The bounce mark {%)
also appears in the display panel. It is
also possible to set the flash head posi
tion manually.
•The zoom head swivels 90° upward,
28
180° to the left and 90° to the right in
any combination. Click stop positions
are provided for extra convenience. To
swing the flash horizontally, first slide
the bounce latch upward and then
rotate the flash left or right.
Page 53

Page 54

Helpful Hints:
With bounce flash photography, it is neces
sary to adjust the flash head so that the sub
ject is not directly illuminated by the flash. If
you only tilt the flash up a few degrees ex
posure will not be uniform. The easiest way
to use bounce flash is to tilt the flash head
up 90° and bounce off a ceiling.
The bounce surface should be white or
nearly white, fairly large and highly reflec
tive. A colored, reflecting surface may
cause the subject to appear tinted that col
or. The subject color may also be
disappointing if the surface reflects poorly.
A very high ceiling does not make a good
surface for bounce flash; a solution would
be to bounce the flash off a white card
reflector. Generally, the closer the flash is to
the bounce surface, the brighter and higher
in contrast the picture will be.
Page 55

'//////////////////////////////////Z.
29
Page 56

8. Second-Curtain Sync Flash Photography
With focal plane shutters, flash synchroniza
tion is made when the first curtain is fully
open. With the Speedlite 420EZ, it is also
possible to make the flash synchronization
just before the second curtain starts run
ning. This is called “second-curtain sync”
and is best when a slower shutter speed is
used. (The shutter-priority AE mode is
recommended.)
When second curtain sync is used with a
moving subject and a slow shutter speed,
the light from the flash clearly illuminates
the subject for a sharp image but creates a
trailing image from ambient light for a flow
ing effect.
Second-Curtain Sync Flash Photography
To set:
Press and release the sync position button.
•When the “tcW’ mark is displayed, the
second curtain sync is made
automatically.
•When no mark is displayed, the first
curtain sync is made.
•The second-curtain sync cannot be us
ed with the stroboscopic flash mode.
30
First-Curtain Sync Flash Photography
Page 57

Handling Precautions
1. Do not take the flash unit apart. If repair
is necessary take it to the nearest Canon
Service Facility.
2. ^Do not get the flash wet. If exposed to
rain or snow, immediately wipe it off with
a clean, dry cloth.
3. Do not fire the flash too close to the.sub
ject’s eyes or while holding it against clo
thing.
4. Do not use the 420EZ with any other
manufacturers’ cameras because the
420EZ is especially designed for use with
Canon EOS cameras.
5. Use a slave unit for multiple flash
photography, but make sure it can be us
ed with the 420 EZ before purchase.
Page 58

Speedlite Care
1. Remove the batteries if you do not ex
pect to use the flash about three weeks
or longer.
2. Do not store the flash in hot or humid
places. Keep it out of direct sunlight.
3. After prolonged storage, test-fire the
flash from time to time to maintain
proper capacitor functioning.
Page 59

Program Characteristics
EOS 650 (when using EF 50mm f/1.8)
A-TTL Program Characteristics
32
Page 60

X-sync Shutter Speed Setting Characteristics
TV
250125
60
-3 -2 -1 0 1 2 3 4 5 6 7 8 9 To 11 12 13 14 Ts 16 17 18 19 20 21
/
EV
Flash Exposure Level Control Characteristics
-4 -3 -2 -1 0 1 2 3
5 6 7 8 9 10 11 12 13 14 15 16 17 18 19 20 21
EV
Page 61

EOS 620 (when using EF 50mm f/1.8)
A-TTL Program Characteristics
Page 62

X-sync Shutter Speed Setting Characteristics
TV
250
125'
60
-4 -3 -2 -1 0 1 2 3 4 5 7 8 9 10 11 12 13 14 15 16 17 18 19 20 21
EV
Flash Exposure Level Control Characteristics
-4 -3 -2 -1 0 1 2 3 4 5 6 7 9 10 11 12 13 14 15 16 17 18 19 20 21
EV
Page 63

Specifications
Type: Energy-saving, automatic, electronic flash
unit uses A-TTL metering system to measure light
reflected from the film surface. Clip-on type with
directly coupled contacts. For exclusive use with
EOS cameras.
Guide Number Table (at ISO 100);
Zoom position (mm)
Normal flash
Rapid-fire flash 1/2 to 1/16 of that for normal f ash
1/1
1/2
1/4
Manual flash
1/8
1/16
1/32
(The above figures in
guide numbers in feet
24
25
(83)
25
(83)
17.7
(59)
12.5
(41)
8.8
(29)
6.3
(21)
4.4
(14)
28
27
(90)
27
(90)
19.1
(63)
13.5
(45)
(31)
(22)
9.5
6.8
4.8
35
30
(100)
30
(100)
21.2
(70)
15
(50)
10.6
(35)
7.5
(25)
5,3
JIZL
50 70 80
35
(116)
(116)
35
24.7
(82)
17.5
(58)
12.4
(41)
8.8
(29)
6.2
(20)
(133)
(133)
28,3
14.1
parentheses indicate the
at ISO 100.)
40
40
(94)
20
(66)
(47)
10
(33)
7.1
(23)
42
(140)
42
(140)
29.7
(99)
21
(70)
14.8
(49)
10.5
(35)
7.4
(24)
Flash Coverage Angle: Covers more than the
fields of view of 24mm, 28mm, 35mm, 50mm,
70mm and 80mm using auto internal zoom
mechanism. Manual switchover possible.
34
Page 64

Recycling Tinne:
Alkaline
Normal flash approx. 0.2 to 13 secs
Rapid-fire flash approx. 0.2 to 1.5 sec
Ni-Cd
approx. 0.2 to 6.5 secs
approx. 0.2 to 1.5 sec
Based on the interval between flash firing and
pilot lannp relighting with new alkaline or fully-
charged Ni-Cd batteries. (Figures on the left in
each column show recycling time for A-TTL
mode, and on the right for Manual 1/1 mode.
Number of Flashes:
Ni-Cd
approx. 45 to 300
Normal flash
Alkaline
approx. 100 to 2000
Based on flash firing at 30 sec intervals with new
alkaline or fully-charged Ni-Cd batteries.
(The figures on the left in each column show
flashes for Manual 1/1 mode, and on the right for
A-TTL mode.
Flash Duration; 1.5 msec or less
X-sync Shutter Speed:
EOS 620 EOS 650 Setting
P 1/60-1/250sec 1/60-1/125sec
TV
Av 30-1/250sec 30-1/125sec
M 30-1/250sec
30-1/250sec
30-1/125sec Manual
30-1/125sec Manual
Automatic
Automatic
Page 65

Flash Control System: TTL series control
system with preflash function.
Flash Exposure Level Control: A maximum of
1.5 BV steps in the A-TTL mode when subject
brightness is more than BV5 according to the
camera’s metering system.
Film Speed Setting: Automatically set by the
camera.
Automatic Shooting Distance Range:
A-TTL normal flash
A-TTL rapid-fire flash (min.)
A-TTL rapid-fire flash (max.)
approx. 0.7 to 21 m (2.3 to 68.8 ft.)
approx. 0.7 to 5m (2.3 to 16,4 ft.)
approx. 0.7 to 16m (2.3 to 52.4 ft.)
Based on EF 50mm' f/1.8 lens at ISO 100.
(The automatic shooting distance range extends
according to film speed.)
Out-of-Coupling Range Warning: If subject is
too far away, the shutter speed and the aperture
value blirik in the viewfinder at the first stroke of
the shutter button.
If subject is too close, the distance display blinks.
Bounce Angle:
Upward; 0-90° (click stop positions at 0, 60, 75,
90)
(/
Page 66

Left; 0-180° (click stop positions at 0, 60, 75, 90,
120, 150, 180)
Right; 0-90° (click stop positions at 0, 60, 75, 90)
AF Auxiliary Light: Ultra-bright red LED (Peak
sensitivity: 700nm). Projected at subject for AF
flash photography. The effective distance is ap
prox. 0.9-8m (3-26.2ft.)
Save-Energy Function: Power automatically
turns off after five minutes of non-use when the
main switch is left on.
Ready Lamp: As soon as it glows, the camera
automatically switches to flash mode. Yellowgreen in the rapid-fire flash status, when suffi
ciently charged, the color turns to red. Test firing
is possible by pressing the ready lamp after flash
charge completion.
Power Source: Four size-AA(LR6) alkaline or Ni-
Cd batteries. Carbon-zinc batteries may also be
used.
Dimensions: 75(W)x 122(H)x 106(D) mm
(2-15/16"x 4-13/16"x 4-3/16")
Weight: 350g (12-3/8 ozs) without batteries
450g (15-7/8 ozs) with batteries
Subject to change without notice.
Ml data are based on Canon’s Standard Test Method.)
35
Page 67

9S
01Л131Л1
Page 68

INCORPORATING OLDTIMER CAMERAS
OTC Ltd,
24 Market Place, Hatfield, Herts, AL10 OLN
Tel: 01707 273773 Fax: 01707 273774 Email: sales@otcworld,co.uk www.otcworld.co.uk
 Loading...