

Page 1
FORNI
ISTRUZIONI PER L’USO
OVENS
USER INSTRUCTIONS
HORNOS EMPOTRABLES
INSTRUCCIONES DE USO
FOURS ENCASTRABLES
NOTICE D’EMPLOI ET D’INSTALLATION
Духовые шкафы
Инстукции для пользователей
PIEKARNIKI DO ZABUDOWY
INSTRUKJA OBSŁUGI
ФУРНИ ЗА ВГРАЖДАНE
ИНСТРУКЦИИ ЗА ПОТРЕБИТЕЛЯ
IT
GB
ES
FR
RU
PL
БГ
CANDY HOOVER GROUP S.R.L. • Via Privata Eden Fumagalli • 20047 Brugherio Milano Italy
Page 2

INDICE
Indicazioni Di Sicurezza
1. Avvertenze Generali
1.1 Dichiarazione Di Conformità
1.2 Informazioni Sulla Sicurezza
1.3 Installazione
1.4 Inserimento Del Mobile
1.5 Importante
1.6 Allacciamento Elettrico
1.7 Dotazione Del Forno (secondo Modello)
2. Consigli Utili
2.1 Griglie Forno - Sistema Di Arresto
2.2 La Cottura Al Grill
2.3 Secondo Modello Pacchetto Di Funzioni Del Sistema
2.4 Secondo Modello U-cook
2.5 Tempi Di Cottura
2.6 Forno Autopulente Catalitico
2.7 Pulizıa E Manutenzione
2.8 Servizio Assistenza Clienti
3. Utilizzo Dell'orologio Analogico/program
3.1 Generale
3.2 Impostazione Dell'ora Del Giorno
3.3 Cottura Manuale
3.4 Impostazione Del Contaminuti
3.5 Cottura Semi Automatica: Programma Di Fine Cottura
3.6 Cottura Pienamente Automatica
3.7 Istruzioni In Caso Di Blackout (opzionale)
4. Istruzioni Per L’uso
5. Tabella Tempi Di Cottura
..................................................................................05
......................................................................................05
....................................................................................06
........................................................................................08
..................................................................04
....................................................................05
.........................................................05
..........................................................05
...................................................................05
....................................................................05
........................................05
....................................................06
..........................................................................06
............................................................06
.............................................................................06
..........................................................06
..................................................................06
..............................................................07
....................................08
....................................................08
..........................................................................08
......................................................08
....................................................08
.....................................08
.......................................................................09
..........................................................10-11
IT
...................06
.................08
CONTENIDO
Instrucciones Para Un Uso Seguro
1. Instruccıones Generales
1.1 Declaracıón De Conformıdad
1.2 Informacıón Sobre Segurıdad
1.3 Instalacıón
1.4 Introduccıón Del Mueble
1.5 Importante
1.6 Conexıón Eléctrıca
1.7 Equıpamıento Del Horno (según El Modelo)
2. Consejos Útıles
2.1 Rejıllas Horno - Sıstema De Sujecıón
2.2 La Coccıón Al Grıll
2.3 Los Modelos U-cook
2.4 Segùn Modelos
2.5 Tıempos De Coccıón
2.6 Horno Autolımpıante Catalítıco
2.7 Lımpıeza Y Mantenımıento
2.8 Asıstencıa Técnıca
3. Uso Del Reloj/programador Analógico
3.1 Operación General
3.2 Ajustar La Hora
3.3 Cocción Manual
3.4 Ajuste Del Cuentaminutos
3.5 Cocción Semiautomática: Apagado Tras Finalización D. T. P.
3.6 Coccıón Totalmente Automátıca
3.7 Indicación De Fallo Eléctrico (opcional)
4. Instruccıones De Uso
5. Tablas De Tıempos De Coccıón
......................................................................................20
.....................................................................................20
........................................................................20
...............................................................................21
..........................................................................21
......................................................................21
..............................................................................21
.....................................................................21
.........................................................................21
.........................................................................22
..............................................................................22
..............................................................................22
......................................................................23
...................................................19
................................................................20
.........................................................20
........................................................20
................................................................20
..................................21
............................................21
.......................................................21
.............................................................21
.........................................22
..............................................................22
.....................................................22
..........................................22
................................................24-25
ES
.......22
CONTENT
Safety Instuructions
1. General Warnings
1.1 Declaration Of Compliance
1.2 Safety Hints
1.3 Installatıon
1.4 Fitting The Oven Into The Kitchen Unit
1.5 Important
1.6 Connecting To The Power Supply
1.7 Oven Equıpment (according To The Model)
2. Useful Tips
2.1 Shelf Safety System
2.2 Grilling
2.3 The U-cook Models
2.4 According To The Model U-see
2.5 Cooking Time
2.6 Self-cleaning Oven With Catalytic
2.7 Cleaning And Maintenance
2.8 Service Centre
3. Use Of Analogue Clock/programmer
3.1 General Operation
3.2 Setting The Timer
3.3 Manual Cooking
3.4 Setting The Minute Minder
3.5 Semi Automatic Cooking: Switch Off At A Set End Time
3.6 Fully Automatic Cooking
3.7 Blackout Indication (optional)
4. Operating Instructions
5. Tables Of Cooking Times
.........................................................................................13
............................................................................................14
..........................................................................12
..........................................................................13
.............................................................13
....................................................................................13
......................................................................................13
..........................................13
...............................................13
...................................13
.....................................................................................14
.......................................................................14
......................................................................14
......................................................14
.................................................................................14
..................................................14
.............................................................14
...............................................................................14
...........................................15
..........................................................................15
...........................................................................15
.............................................................................15
..............................................................15
.................................................................15
.........................................................15
...................................................................16
..........................................................17-18
GB
.................15
CONTENU
Conseils De Sécurité
1. Instructıons Generales
1.1 Declaratıon De Conformıté:
1.2 Consıgnes De Securıte
1.3 Installatıon
1.4 Mıse En Place Du Four Dans Son Meuble
1.5 Important
1.6 Alımentatıon Electrıque
1.7 Important
1.8 Equipement Du Four
2. Consıgnes Utıles
2.1 Grılles Du Four, Nouveau Système D’arrêt
2.2 La Cuısson Au Grıl
2.3 Selon Modèle Le Pack U-cook
2.4 Selon Modèle U-see
2.5 Temps De Cuısson
2.6 Four Autonettoyant Par Catalyse
2.7 Conseıls De Nettoyage Et D’entretıen
2.8 Assıstance Technıque
3. Utilisation De L'horloge
3.1 Fonctionnement General
3.2 Reglage De L'heure
3.3 Mode Manuel
3.4 Reglage De La Minuterie
3.5 Programmation De Fin De Cuisson
3.6 Programmation Tout Automatique
3.7 Problème D'affichage (optional)
4. Instructıons Pour L’utılısatıon
5. Temps De Cuısson
........................................................................................27
........................................................................................27
.........................................................................26
..................................................................27
............................................................27
..................................................................27
......................................................................................27
..................................................................27
......................................................................27
............................................................................28
..............................................................28
.............................................28
...................................................................28
.....................................................................28
.....................................................28
............................................28
....................................................................28
................................................................29
...............................................................29
........................................................................29
.................................................................................29
...............................................................29
.................................................29
...................................................29
....................................................29
......................................................30
....................................................................31-32
FR
.....................................27
...................................28
Page 3
СОДЕРЖАНИЕ
ПРАВИЛА ТЕХНИКИ БЕЗОПАСНОСТИ
1.
1.1
1.2
1.3
1.4
1.5
1.6
ПОЛЕЗНЫЕ СОВЕТЫ
2.
СИСТЕМА БЕЗОПАСНОСТИ ПОЛОК
2.1
2.2
2.3
2.4
2.5
2.6
2.7
2.8
3. Использование Аналоговых Часов/программатора
3.1 Общие Инструкции По Эксплуатации
3.2 Установка Часов (текущего Времени)
3.3 Приготовление Пищи В Ручном Режиме
3.4 Программирование Сигнализирующего Устройства
3.5 Приготовления Пищи В Полуавтоматическом Режиме
3.6 Приготовление Пищи В Полностью Автоматическом Режиме
3.7 Индикация Нарушения Подачи Питающего Напряжения
4.
5.
.........................................................................34
.......................................................................34
.............................................................34
......................................................................................34
.........................................................34
.........................................................34
......................................................................35
....................................................35
........................................................................35
..........................................................35
..............................................................35
...........................................................................35
.........................................................35
..................................................37
....................................33
..........................................34
.........................................35
..................................35
.................36
........................................36
........................................36
....................................36
.................36
..............36
.......36
..........................................38-39
RU
..36
СЪДЪРЖАНИЕ
Правила На Техниката За Безопасност
1.
1.1
1.2
1.3
1.4
1.5
1.6
Полезни Съвети
2.
2.1
2.2
2.3
2.4
2.5
2.6
2.7
2.8
3.
Използване На Аналогов Часовник / Програматор
3.1
Общи Инструкции За Експлоатация
3.2
Настройка На Часа (текущ Час)
3.3 Готвена На Храна В Ръчен Режим
3.4 Програмиране На Сигнализиращото
3.5 Приготвяне На Храна В Полуавтоматичен Режим:
3.6 Приготвяне На Храна В Изцяло Автоматичен Режим
3.7 Индикация За Нарушено Подаване На Захранващо Н.
4.
5.
Препоръки При Готвенето
...............................................................................49
..............................................................49
.......................................................................................49
..........................................................................50
......................................................................50
...........................................................................50
......................................................................50
.............................................................50
.......................................................53-54
.............................................48
........................................................49
...........................................49
....................................................49
.....................................49
......................................50
...........................................50
..................................50
........................................................50
.....................51
...........................................51
.................................................51
..............................................51
...........................................51
.....................51
....................................................52
БГ
................51
.............51
SPIS TREŚCI
Instrukcje Bezpıieczeństwa
1.
1.1
1.2
1.3
1.4
1.5
1.6
2.
2.1
2.2
2.3
2.4
2.5
2.6
2.7
2.8
3. Korzystanie Z Zegara/programatora
3.1 Funkcje Ogólne
3.2.Ustawienie Zegara
3.2 Ustawienia Ręczne
3.4 Ustawienie Minutnika
3.5 Progamowanie Półautomatyczne
3.6 Programowanie Automatyczne
3.7 Przyciemnienie Podświetlenia (opcjonalnie)
4.
5.
...........................................................................................41
....................................................................................41
..................................................................40
..........................................................................41
...............................................................41
...................................................41
.........................................................................41
...................................................................42
........................................................................42
..........................................................42
....................................................................42
....................................................................42
...............................................................42
............................................................................42
.................................................42
.....................................................43
.....................................................................43
...........................................44
...............................................................................44
.........................................................................44
.........................................................................44
.....................................................................44
....................................................44
......................................................44
..................................................................45
..............................................................46-47
PL
...................................44
Page 4

INDICAZIONI DI SICUREZZA
• ATTENZIONE: l'apparecchio e le parti accessibili diventano calde durante l'uso. Prestare attenzione a
non toccare le parti calde.
• I bambini al di sotto di 8 anni dovrebbero essere tenuti a distanza se non continuamente supervisionati.
• L'apparecchio può essere usato da bambini dagli 8 anni in su e persone con ridotte capacità fisiche,
sensoriali o mentali o senza esperienza e conoscenza del prodotto se supervisionate o dando loro
istruzioni riguardo al funzionamento dell'apparecchio in maniera sicura e coscente del rischio possibile.
• I bambini non dovrebbero giocare con l'apparecchio.
• La pulizia e la manutenzione non dovrebbero essere fatte da bambini senza supervisione
• Durante l’uso l’apparecchio diventa molto caldo. Si dovrebbe fare attenzione a non toccare gli elementi
riscaldanti all’interno del forno.
• ATTENZIONE: Le parti accessibili possono diventare molto calde durante l’uso. I bambini dovrebbero
essere tenuti a distanza.
• Non usare per la pulizia materiali ruvidi abrasivi o raschietti metallici affilati per pulire le porte di vetro del
forno dato che possono graffiare la superficie e causare la frantumazione del vetro.
• Spegnere il forno prima di rimuovere lo schermo di protezione e, dopo la pulizia, rimontarlo secondo le
istruzioni.
• Usare solo la sonda termica raccomandata per questo forno.
• Non utilizzare un pulitore a vapore.
• ATTENZIONE: Assicurarsi che l’apparecchio sia spento prima di sostituire la lampada per evitare la
possibilità di scosse elettriche.
• Il mezzo di disconnessione deve essere incorporato nel cablaggio fisso in accordo con le leggi di
cablaggio.
• Le istruzioni devono indicare quale tipo di cavo debba essere utilizzato, tenendo presente la
temperatura della superficie posteriore dell’apparecchio.
• Se il cavo di alimentazione è danneggiato, esso deve essere sostituito da un cavo o un assieme speciali
disponibili presso il costruttore o il suo servizio assistenza tecnica.
• ATTENZIONE: Al fine di evitare ogni pericolo dovuto al riarmo accidentale del dispositivo termico di
interruzione, il presente apparecchio non deve essere alimentato con un dispositivo di manovra esterno,
quale un temporizzatore oppure essere connesso a un circuito che viene regolarmente alimentato o
disalimentato dal servizio.
• ATTENZIONE: Le parti accessibili possono diventare calde quando il grill è in uso. I bambini dovrebbero
essere tenuti a distanza.
• Gli eccessi di materiale tracimato devono essere tolti prima della pulizia.
• Durante la Pyrolisi le superfici possono scaldarsi più del solito è pertanto consigliato tenere i bambini a
distanza.
04 IT
Page 5
1. AVVERTENZE GENERALI
Vi ringraziamo per aver scelto uno dei nostri prodotti, per ottenere da questo elettrodomestico le migliori prestazioni consigliamo di:
• Leggere attentamente le avvertenze contenute nel presente libretto.
• Conservare con cura questo libretto per ogni ulteriore consultazione.
Durante l’uso il forno diventa caldo, fare attenzione a non toccare gli elementi riscaldanti all’interno del forno.
Alla prima accensione del forno può svilupparsi fumo di odore acre, causato dal primo riscaldamento del collante dei pannelli d’isolamento
avvolgenti il forno. Si tratta di un fenomeno assolutamente normale e, in caso si verificasse, occorre attendere la cessazione del fumo prima di
introdurre le vivande.
Il forno è per sua natura un apparecchio che diventa caldo, in modo particolare in corrispondenza del cristallo porta.
1.1 DICHIARAZIONE DI CONFORMITÀ
Questa apparecchiatura nelle parti destinate a venire a contatto con
sostanze alimentari, è conforme alla prescrizione della dir. CEE
89/109 e al D.L. di attuazione N° 108 del 25/01/92.
Apparecchio conforme alle Direttive Europee 73/23/CEE e
89/336/CEE, sostituite rispettivamente da 2006/95/CE e
2004/108/CE, e successive modifiche.
1.2 INFORMAZIONI SULLA SICUREZZA
•Questo apparecchio dovrà essere destinato solo all’uso per il quale è
stato espressamente concepito, e cioè per la cottura di alimenti.
Ogni altro uso (ad esempio riscaldamento ambiente) è da considerarsi
improprio e quindi pericoloso. Il costruttore non può essere considerato
responsabile per eventuali danni derivanti da usi impropri, erronei ed
irragionevoli.
•L’uso di un qualsiasi apparecchio elettrico comporta
l’osservanza di alcune regole fondamentali.
In particolare:
-non tirare il cavo di alimentazione per staccare la spina dalla presa di
corrente
-non toccare l’apparecchio con mani o piedi bagnati o umidi
-non usare l’apparecchio a piedi nudi
-non permettere che l’apparecchio sia usato dai bambini o da
incapaci, senza sorveglianza
-in generale è sconsigliabile l’uso di adattatori, prese multiple e
prolunghe.
- In caso di guasto e/o di cattivo funzionamento dell’apparecchio,
spegnerlo e non manometterlo.
•In caso di danneggiamento del cavo, provvedere tempestivamente alla
sua sostituzione secondo le seguendi indicazioni:
aprire il coperchio morsettiera, togliere il cavo di alimentazione e
sostituirlo con uno corrispondente, (tipo H05RR-F, H05VVF, H05V2V2F) e adeguato alla portata dell’apparecchio.
Tale operazione dovrà essere eseguita da personale professionalmente
qualificato. Il conduttore di terra (giallo-verde), deve obbligatoriamente
essere più lungo di circa 10 mm rispetto ai conduttori di linea.
Per l’eventuale riparazione rivolgersi solamente ad un centro di
assistenza tecnica autorizzato e richiedere l’utilizzo di ricambi originali.
Il mancato rispetto di quanto sopra può compromettere la sicurezza
dell’apparecchio.
•Non rivestire le pareti del forno con fogli d'alluminio da cucina o
fogli monouso commerciali, perche potrebbero fondersi a contatto
con le superfici in smalto caldo e danneggiare le superfici in smalto
all'interno del forno.
1.3 INSTALLAZIONE
L’installazione è a carico dell’acquirente e la Casa Costruttrice è
esonerata da questo servizio; gli eventuali interventi richiesti alla
Casa Costruttrice che dipendono da una errata installazione non sono
compresi nella garanzia.
L’installazione deve essere effettuata secondo le istruzioni da
personale professionalmente qualificato. Una errata installazione può
causare danni a persone, animali o cose, nei confronti dei quali il
costruttore non può essere considerato responsabile.
1.4 INSERIMENTO DEL MOBILE
Inserire l’apparecchio nel vano del mobile (sottopiano o in colonna). Il
fissaggio si esegue con 4 viti attraverso i fori della cornice, visibili
aprendo la porta.(vedere ultima pagina). Per consentire la migliore
aerazione del mobile, i forni devono essere incassati rispettando le
misure e le distanze indicate nella figura in ultima pagina.
Nota: per i forni da abbinamento con piano cottura è indispensabile
rispettare le istruzioni contenute nel libretto allegato all’
apparecchiatura da abbinare.
1.5 IMPORTANTE
Per garantire un buon funzionamento dell’apparecchio da incasso è
necessario che il mobile sia di caratteristiche adatte. I pannelli dei
mobili adiacenti il forno dovranno essere in materiale resistente al
calore. In particolare nel caso di mobili in legno impiallicciato le colle
dovranno essere resistenti alla temperatura di 120°C: materiali
plastici o collanti non resistenti a questa temperatura sono causa di
deformazioni o scollature. In conformità alle norme di sicurezza, una
volta incassato l’apparecchio, non debbono essere possibili eventuali
contatti con le parti elettriche. Tutte le parti che assicurano la
protezione debbono essere fissate in modo tale da non poter essere
tolta senza l’aiuto di qualche utensile.
Per garantire una buona areazione è necessario eliminare la
parete posteriore del vano; inoltre il pianale di appoggio deve
avere una luce posteriore di almeno 45 mm.
1.6 ALLACCIAMENTO ELETTRICO
Inserire la spina in una presa di corrente munita di un terzo contatto
corrispondente alla presa di terra, che deve essere collegata in modo
efficiente.
Per i modelli sprovvisti di spina, montare sul cavo una spina
normalizzata che sia in grado di sopportare il carico indicato in targa. Il
conduttore di messa a terra e contraddistinto dai colori giallo-verde.
Tale operazione dovrà essere eseguita da personale professionalmente qualificato.
In caso di incompatibilità tra la presa e la spina dell’apparecchio fare
sostituire la presa con altra di tipo adatto, da personale professionalmente qualificato. Si può effettuare anche l’allacciamento alla rete
interponendo tra l’apparecchio e la rete un interruttore omnipolare
dimensionato al carico e rispondente alle norme in vigore. Il cavo di
terra giallo-verde non deve essere interrotto dall’interruttore. La presa
o l’interruttore omnipolare usati per l’allacciamento devono essere
facilmente accessibili ad elettrodomestico installato.
Importante: in fase di installazione, posizionare il cavo di
alimentazione in modo che in nessun punto si raggiungano
temperature superiori di 50°C alla temperatura ambiente.
L’apparecchio è conforme ai requisiti di sicurezza previsti dagli istituti
normativi. La sicurezza elettrica di questo apparecchio è assicurata
soltanto quando lo stesso è correttamente collegato ad un efficace
impianto di messa a terra come previsto dalle vigenti norme di
sicurezza elettrica, (in caso di dubbio, richiedere un controllo accurato
dell’impianto da parte di personale professionalmente qualificato).
Importante: la ditta costruttrice resta sollevata da ogni
responsabilità per eventuali danni a persone o cose, derivanti
dal mancato allacciamento della linea di terra.
ATTENZIONE: la tensione e la frequenza di alimentazione sono
indicate in targa matricola (figura in ultima pagina). Verificare
che la portata elettrica dell’impianto e delle prese di corrente
siano adeguate alla potenza massima dell’apparecchio indicate
in targa. In caso di dubbio rivolgersi ad una persona
professionalmente qualificata.
1.7 DOTAZIONE DEL FORNO (secondo modello)
Prima di utilizzare gli accessori del forno per la prima volta è
necessario pulirli. Per questa operazione si consiglia di utilizzare
una spugna. Successivamente risciacquare ed asciugare gli
accessori.
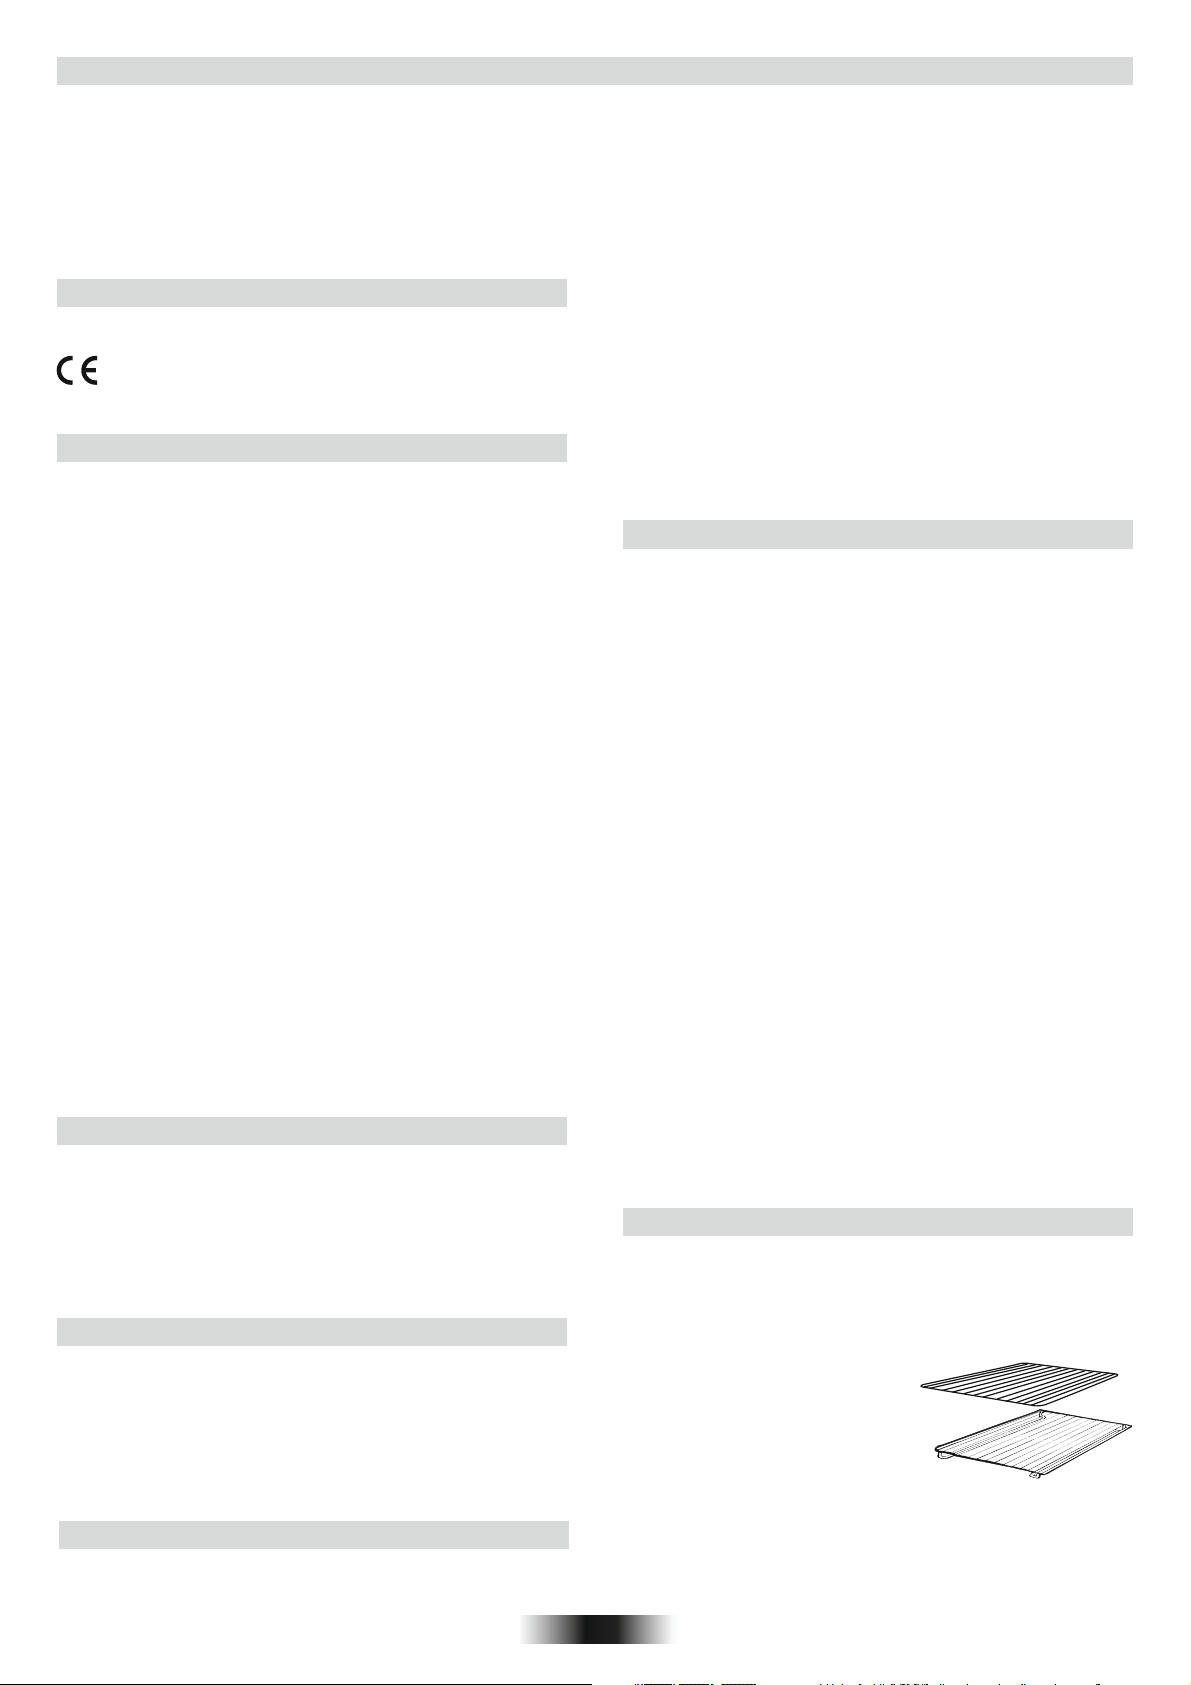
La griglia semplice serve da supporto
per teglie, pirofile, stampi per i dolci.
La griglia porta-piatto serve in
particolare per le grigliate di carne
poiché sostiene anche la leccarda che
raccoglie i grassi che colano.
Grazie ai loro profili speciali, le griglie
restano sempre in orizzontale, anche
quando vengono estratte verso
l'esterno. Non c'é nessun rischio quindi
che i tegami scivolino o si ribaltino.
05 IT
Page 6

La leccarda serve a raccogliere i grassi che colano durante la cottura con il grill. Deve essere utilizzata solamente con il
grill, il girarrosto o il turbo girarrosto, secondo il modello.
Attenzione: in tutti gli altri modi di cottura, la leccarda deve essere tolta dal forno.
Non usare mai la leccarda per cuocere gli arrosti perché ne risulterebbe un eccessivo sviluppo di fumo e vapori e il forno
si sporcherebbe inultimente.
Pizza set é l'idéale per la cottura delle
pizze. Il set deve essere utilizzato in
abbinamento alla funzione Pizza.
Gli accessori devono essere tolti dal forno se non vengono utilizzati.
2. CONSIGLI UTILI
2.1 GRIGLIE FORNO - SISTEMA DI ARRESTO
Il forno è dotato di un nuovo sistema di
arresto griglie. Questo sistema consente
di estrarre le griglie quasi completamente
senza che queste fuoriescano dal forno
mantenendole perfettamente in piano,
consentendo di verificare e mescolare il
cibo con la massima tranquillità e
sicurezza.
Per estrarre le griglie è sufficiente, come indicato sul disegno, alzarle,
prendendole dalla parte anteriore e tirarle.
2.2 LA COTTURA AL GRILL
Questo tipo di cottura consente la doratura rapida dei cibi. A questo
scopo consigliamo di inserire la griglia generalmente nel 3° o 4°
ripiano, secondo le dimensioni dei cibi (Fig. pag. 8). Quasi tutte le
carni possono essere cotte al grill, fanno eccezione alcune carni
magre di selvaggina ed i polpettoni. La carne ed il pesce da cucinare
al grill vanno leggermente unti con olio.
2.3 Secondo modello pacchetto di funzioni
del sistema
I forni sono dotati di controllo elettronico della ventilazione
di cottura, brevettato VarioFan; il sistema cambia automaticamente la
velocità della ventola del multifunzione per ottimizzare le correnti
d'aria e la temperatura interna della cavità mentre il forno sta
cucinando.
Tutti i forni sono dotati di funzione ,
permettendo una gestione della distribuzione di umidità e
temperatura. Riduce la perdita degli alimenti fino al 50%,
donando morbidezza e fragranza alle pietanze. Una
cottura cosi delicata è indicata sopratutto per il pane e la
pasticceria.
Riduce il tempo di preriscaldamento dei forni: sono
sufficienti solo 8 minuti per raggiungere i 200°C.
Offre la possibilità di personalizzare il livello e l'intensità gr
di grigliatura, fino al 50% in più rispetto ad un forno
multifunzione tradizionale.
La nuova porta ”WIDE DOOR” ha un'ampia superficie in vetro che
assicura una più facile pulizia e un miglior isolamento termico.
2.4 SECONDO MODELLO
E’ un sistema che si sostituisce all’illuminazione con tradizionali
lampadine ad incandescenza; nella controporta del forno, completamente
in vetro temprato, sono stati inseriti 14 Led, di altissima qualità a luce
bianca, che illuminano l’interno del forno con una luce diffusa permettendo
una visione della cottura senza ombre, su più livelli.
Il design creato per il supporto dei 14 Led regala un elegante effetto hightech
Vantaggi del sistema :
•Visibilità forno ottimale,
•Durata prolungata nel tempo,
•Consumo energetico estremamemente
basso -95% dei tradizionali sistemi di illuminazione forni,
•Elevato rendimento,
•Design high tech.
“Apparecchio con luce LED bianca di classe 1M secondo la IEC 60825- 1:1993 +
A1:1997 + A2:2001 (equivalente a EN 60825-1: 1994 + A1:2002 + A2:2001) ;
massima potenza ottica emessa =459nm < 150uW. Non osservare direttamente con
strumenti ottici.”
La griglia piatta da combinare con la
leccarda per tutti i tipi di grigliate. Una
presina è fornita per permettere di estrarre
l’insieme dal forno senza scottarsi.
Non lasciare mai la presina nel forno.
2.5 TEMPI DI COTTURA
Alle pagine 8-9 riportiamo una tabella indicativa dove sono indicati
tempi e temperature consigliati per le prime cotture.Ad esperienza
acquisita potrete variare a vostro piacimento i valori riportati nella
tabella stessa.
2.6 FORNO AUTOPULENTE CATALITICO
Speciali pannelli autopulenti ricoperti da uno smalto a struttura
microporosa, offerti come accessori opzionali per tutti i modelli,
eliminano la pulizia manuale del forno.
I grassi proiettati sulle pareti durante la cottura, vengono decomposti
dallo smalto, mediante un processo catalitico di ossidazione e
trasformati in prodotti gassosi.
Schizzi eccessivi di grasso possono ostruire i pori e quindi impedire
l’autopulizia. Tale caratteristica può essere ripristinata mediante un
riscaldamento per circa 10-20 minuti del forno vuoto impostando la
manopola forno in corrispondenza della massima temperatura.
Non usare prodotti abrasivi, pagliette metalliche, oggetti appuntiti,
panni ruvidi, prodotti chimici o detersivi che possono danneggiare
irrimediabilmente lo smalto.
Si consiglia inoltre di utilizzare pentole a bordi alti nel caso di cotture di
vivande particolarmente grasse (arrosti, ecc.) e di usare la leccarda
quando si esegue la cottura al grill.
Qualora, per particolari condizioni di sporco, non fosse sufficiente
l’azione precedente, si consiglia di intervenire asportando i grassi con
un panno morbido od una spugna inumiditi con acqua calda.
La porosità dello smalto è fondamentale per garantire l’azione
autopulente.
N.B.: Tutti i pannelli autopulenti in commercio hanno un’efficacia di
rendimento di circa 300 ore di funzionamento forno. Dopo tale limite i
pannelli dovrebbero essere sostituiti.
2.7 PULIZIA E MANUTENZIONE
Pulire le superfici in acciaio inox e smaltate con acqua tiepida e
sapone, oppure con appositi prodotti in commercio, evitando
assolutamente l’uso di polveri abrasive che danneggerebbero le
superfici e le parti estetiche.
La pulizia del forno è molto importante e deve essere effettuata ogni
volta che questo viene usato. Infatti, sulle pareti si depositano grassi
sciolti durante la cottura che potrebbero, alla successiva accensione,
produrre odori sgradevoli che nuocerebbero al buon esito della
cottura. Per la pulizia usare acqua calda e detersivo, sciacquando
accuratamente.
Per eliminare questo fastidioso intervento, su tutti i modelli possono
essere inseriti pannelli autopulenti, offerti come accessori opzionali:
vedere apposito paragrafo«FORNO AUTOPULENTE CATALITICO »
Usare detersivi e pagliette d’acciaio per le griglie inox. La pulizia delle
superfici in cristallo temperato deve essere eseguita quando le
superfici sono fredde. Eventuali rotture dovute alla non osservanza di
questa regola elementare non rientrano nei termini di garanzia.
La lampada forno può essere sostituita disinserendo elettricamente
l’apparecchio e svitando l’ampolla che la racchiude, sostituendo la
lampada non funzionante con una analoga resistente alle alte
temperature.
06 IT
Page 7
2.8 SERVIZIO ASSISTENZA CLIENTI
CERTIFICATO DI GARANZIA CONVENZIONALE: cosa fare?
Il Suo prodotto è garantito, alle condizioni e nei termini riportati sul
certificato inserito nel prodotto ed in base alle previsioni del
decreto legislativo 24/02, nonché del decreto legislativo 6
settembre 2005, n. 206, per un periodo di 24 mesi decorrenti dalla
data di consegna del bene.
Così come riportato nei testi dei Decreti Legislativi citati, il
certificato di garanzia dovrà essere da Lei conservato,
debitamente compilato, per essere mostrato al Servizio
Assistenza Tecnica Autorizzato, in caso di necessità, unitamente
ad un documento fiscalmente valido rilasciato dal rivenditore al
momento dell’acquisto (bolla di consegna, fattura, scontrino
fiscale, altro) sul quale siano indicati il nominativo del rivenditore,
la data di consegna, gli estremi identificativi del prodotto ed il
prezzo di cessione. Resta pure inteso che, salvo prova contraria,
poiché si presume che i difetti di conformità che si manifestano
entro sei mesi dalla consegna del bene esistessero già a tale data,
a meno che tale ipotesi sia incompatibile con la natura del bene o
con la natura del difetto di conformità, il Servizio diAssistenza
Tecnica Autorizzato Gias, verificato il diritto all’intervento, lo
effettuerà senza addebitare il diritto fisso di intervento a domicilio,
la manodopera ed i ricambi. Per contro, nel successivo periodo di
diciotto mesi di vigenza della garanzia, sarà invece onere del
consumatore che intenda fruire dei rimedi accordati dalla garanzia
stessa provare l’esistenza del difetto di conformità del bene sin dal
momento della consegna; nel caso in cui il consumatore non fosse
in grado di fornire detta prova, non potranno essere applicate le
condizioni di garanzia previste e pertanto il Servizio di Assistenza
Tecnica Autorizzato Gias effettuerà l’intervento addebitando al
consumatore tutti i costi
relativi.
ESTENSIONE DELLA GARANZIA FINO A 5 ANNI: come?
Le ricordiamo inoltre che sullo stesso certificato di garanzia
convenzionale Lei troverà le informazioni ed i documenti
necessari per prolungare la garanzia dell’apparecchio sino a 5
anni e così, in caso di guasto, non pagare il diritto fisso di
intervento a domicilio, la manodopera ed i ricambi.
Per qualsiasi informazione necessitasse, La preghiamo rivolgersi
al numero telefonico del Servizio Clienti 199.12.13.14.
ANOMALIE E MALFUNZIONAMENTI: a chi rivolgersi?
Per qualsiasi necessità il centro assistenza autorizzato è a Sua
completa disposizione per fornirLe i chiarimenti necessari;
comunque qualora il Suo prodotto presenti anomalie o mal
funzionamenti, prima di rivolgersi al Servizio Assistenza
Autorizzato, consigliamo vivamente di effettuare i controlli indicati
sopra.
UN SOLO NUMERO TELEFONICO PER OTTENERE
ASSISTENZA
Qualora il problema dovesse persistere, componendo il “Numero
Utile” sotto indicato, sarà messo in contatto direttamente con il
ServizioAssistenza TecnicaAutorizzato
che opera nella Sua zona di residenza.
Attenzione, la chiamata è a pagamento;
il costo verrà comunicato, tramite
messaggio vocale, dal Servizio clienti
dell’operatore telefonico utilizzato. Dettagli sono presenti sul sito
internet www.candy-group.com
MATRICOLA DEL PRODOTTO. Dove si trova?
E’ indispensabile che comunichi al Servizio Assistenza Tecnica
Autorizzato la sigla del prodotto ed il numero di matricola (16
caratteri che iniziano con la cifra 3) che troverà sul certificato di
garanzia oppure sulla targa matricola del prodotto (figura in ultima
pagina). In questo modo Lei potrà contribuire ad evitare trasferte
inutili del tecnico, risparmiando oltretutto i relativi costi.
Questo apparecchio è contrassegnato in
conformità alla Direttiva europea 2012/19/EU
sulle apparecchiature elettriche ed elettroniche
(WEEE). I WEEE contengono sia le sostanze
inquinanti (che possono provocare
conseguenze negative sull'ambiente) che
componenti di base (che possono essere
riutilizzati). È importante che i WEEE siano
soggetti a rattamenti specifici, per rimuovere e smaltire
correttamente tutti gli inquinanti e recuperare e riciclare tutti i
materiali.
I singoli possono giocare un ruolo importante nell'assicurare
che i WEEE non diventino un problema ambientale; è
essenziale seguire alcune regole di base:
• I WEEE non devono essere trattati come rifiuti domestici.
• I WEEE devono essere portati ai punti di raccolta appositi
gestiti dal comune o da società registrate. In molti Paesi, per i
WEEE grandi, potrebbe essere presente la raccolta
domestica.
• Quando si acquista un nuovo apparecchio, quello vecchio
potrebbe essere restituito al rivenditore che deve acquisirlo
gratuitamente su base singola, sempre che l'apparecchio sia
del tipo equivalente e abbia le stesse funzioni di quello
acquistato.
07 IT
Page 8
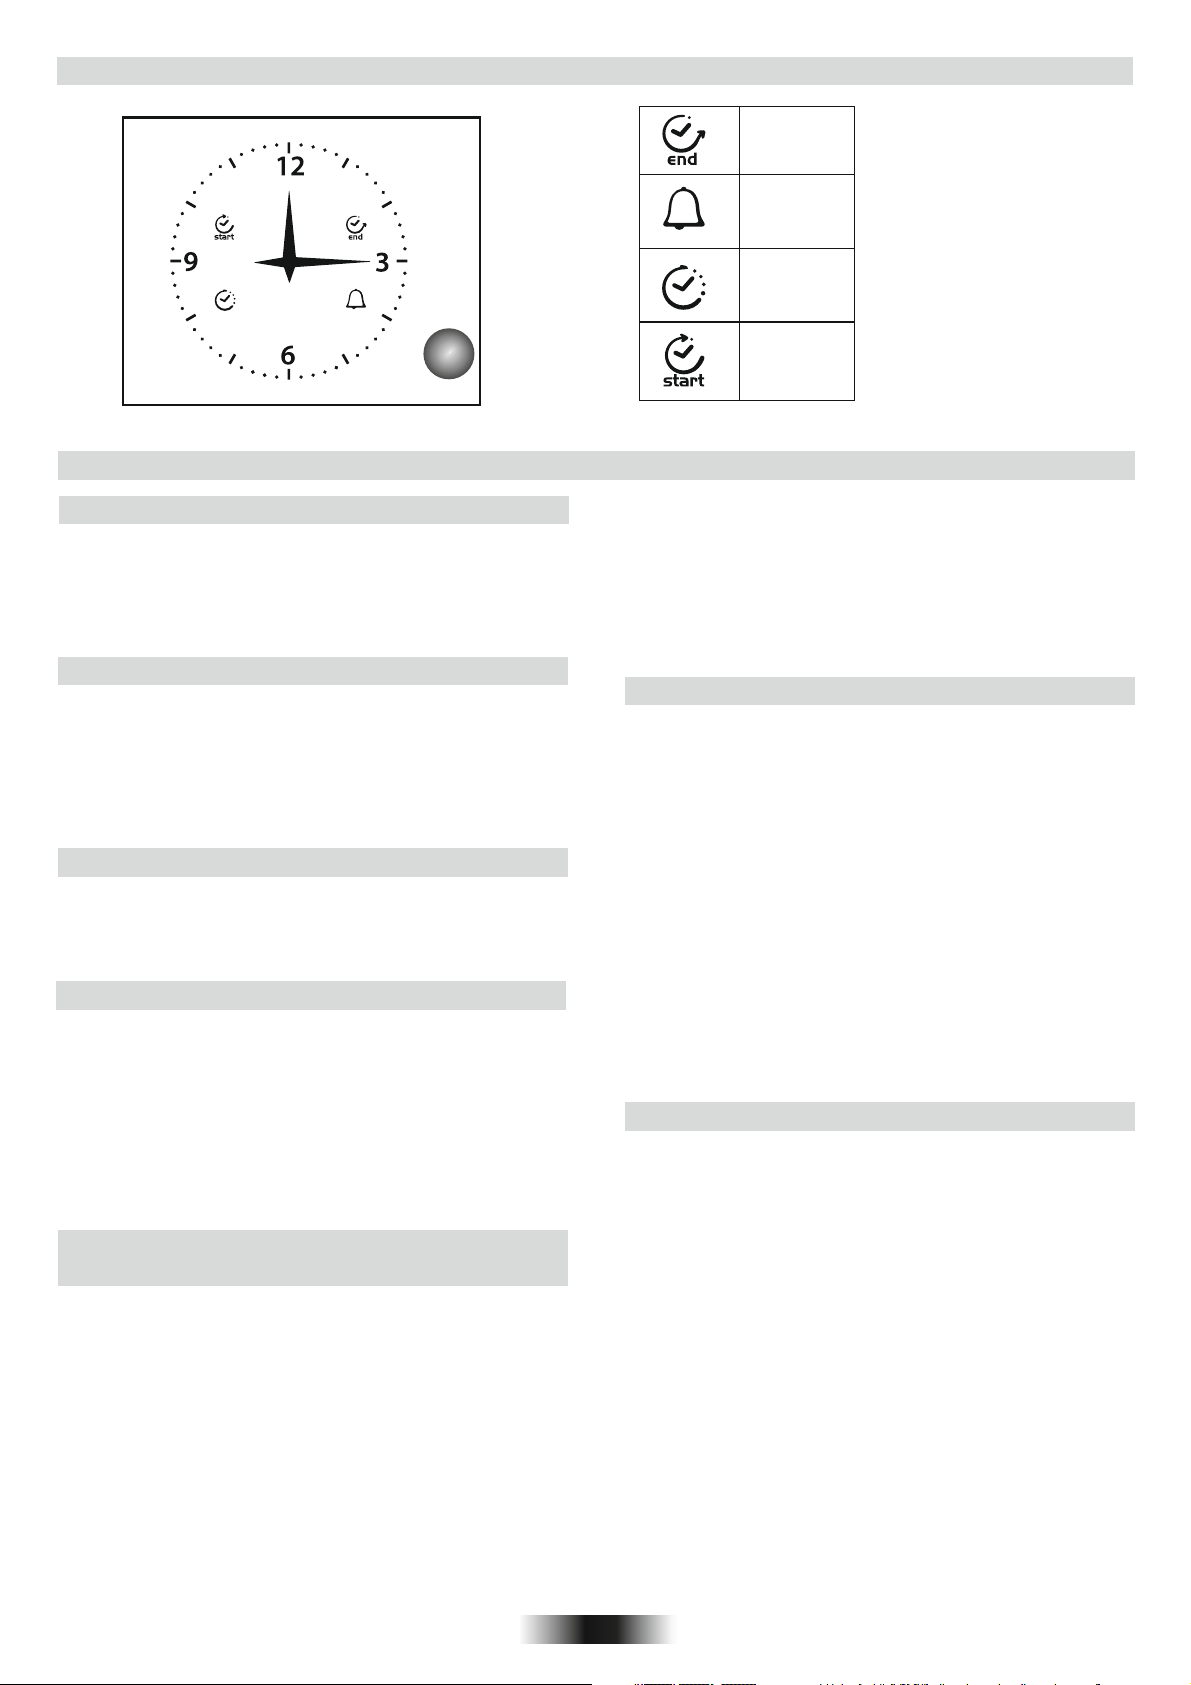
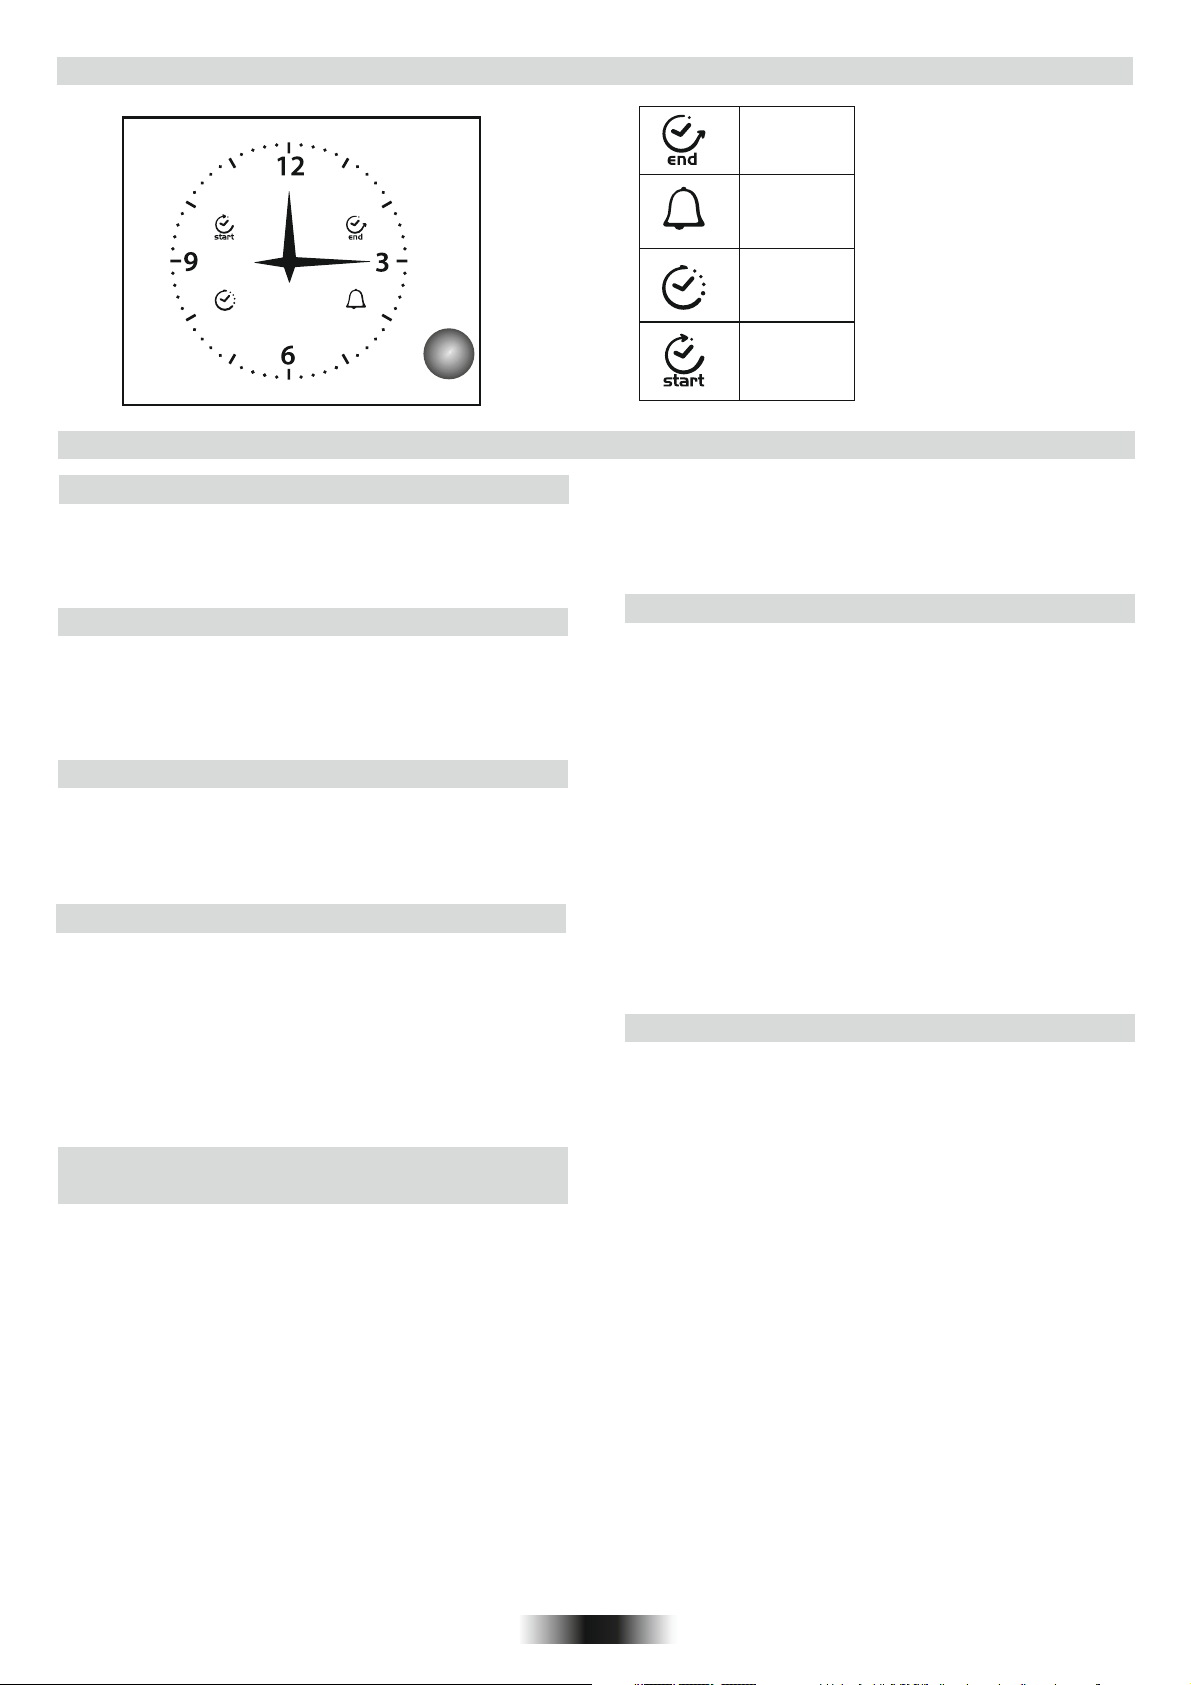
3. UTILIZZO DELL'OROLOGIO ANALOGICO/PROGRAMMATORE
Istruzioni
STOP
TIMER
CLOCK
START
3.1 Generale
Il timer funge da orologio (con le lancette analogiche sul display) e
consente di regolare le funzioni del forno ( per mezzo della manopola
e dei simboli). Premendo sul regolatore a destra dell'orologio , è
possibile: regolare il tempo, programmare inizio e fine cottura,
impostare l'allarme (contaminuti).
3.2 Impostazione dell'ora del giorno
Per impostare l'orario, premere brevemente per 4 volte il
regolatorefino al momento in cui l'icona “CLOCK” inizia a
lampeggiare.
Da questo momento, per aumentare o diminuire il tempo, ruotare il
regolatore in senso orario oppure in senso antiorario. Dopo 10
secondi dall'ultima modifica, il timer elettronico mostrerà
automaticamente l'orario corretto.
3.3 Cottura manuale
Durante le condizioni di default, il timer consente l'accensione
manuale del forno mediante l'interruttore generale (esterno al timer).
ATTENZIONE: dopo aver fornito l'alimentazione al timer, questa
impiega pochi secondi prima di attivarsi.
3.4 Impostazione del contaminuti
La programmazione del contaminuti permette di avere un semplice
segnale dopo un tempo prestabilito, indipendentemente dalla cottura
(modalità contaminuti).
Al fine di programmare un allarme (modalità Contaminuti) premere il
regolatore a destra dell'orologio per tre volte, fino a che l'icona
“TIMER” non inizia a lampeggiare. La programmazione del
contaminuti è identica a quella di programmazione di fine cottura
(guardare il paragrafo corrispondente).
È possibile utilizzare il contaminuti solo quando non è attivo alcun
programma di cottura.
Al termine della cottura, l'icona “STOP” lampeggia ed emette un
segnale acustico.
Dopo 1 minuto, i segnali sono disabilitati e l'icona “STOP” lampeggia
fino a che non si preme sul regolatore a destra dell'orologio.
Per disattivare il programma prima della fine cottura, premere il
regolatore per qualche secondo equesto sarà cancellato facendo sì
che il timer ritorni alle modalità di cottura manuale.
3.6 Cottura pienamente automatica
La programmazione di inizio cottura consente il termine del processo
di cottura in modo del tutto automatico grazie alla regolazione di un
tempo prestabilito.
Al fine di programmare il tempo di inizio cottura, premere brevemente
il regolatore dell'orologio fino ad ottenere il lampeggio dell'icona
“START”.
Aumentare o diminuire l'inizio cottura, ruotando in senso orario o
antiorario il regolatore.
Il simbolo “START” lampeggia ancora per qualche secondo dopo
l'ultima rotazione. Se entro questo lasso di tempo, non si ruota o
preme il regolatore posto a destra dell'orologio, il display torna a
mostrare l'orario e il programma viene cancellato. Premendo il
regolatore, si visualizza l'orario di inizio cottura ( l'icona “START” è
accesa) e il timer segnala il termine della stessa (lampeggio del
simbolo “STOP”).
Il timer di fine cottura seguirà la procedura presente nella precedente
sezione.
La cottura inizierà quando “Tempo di inizio cottura programmato=
tempo presente”.
3.7 Istruzioni in caso di blackout (Opzionale)
Il timer segnala ogni mancanza di alimentazione attraverso il
lampeggio del simbolo “CLOCK”. In questo caso, per disabilitare
premere brevemente il regolatore a destra dell'orologio.
3.5 Cottura semi automatica:
Programma di fine cottura
Il Programma di finecottura consente di iniziare e terminare la cottura
in modo automatico, sulla base di un tempo prestabilito.
Al fine di programmare il tempo di fine cottura, premere brevemente
due volte il regolatore a destra dell'orologio fino al momento in cui
l'icona “STOP” non inizia a lampeggiare. Per aumentare o diminuire il
tempo di cottura, ruotare il regolatore in senso orario o in senso
antiorario.
Il lampeggio dell'icona “STOP” continua per qualche secondo
dall'ultima rotazione. È possibile confermare il programma premendo
sul regolatore (almeno 2 minuti di cottura).
Al momento della conferma del programma, la cottura è iniziata e
l'allarme è automaticamente attivato. La cottura termina nel momento
in cui “Tempo di fine cottura programmato= Tempo presente”.
Al fine di vedere il programma, premere e rilasciare il regolatore
facendo sì che il timer mostri il programma selezionato.
08 IT
Page 9

4. ISTRUZIONI PER L’USO
Temperatura
Manopola
commutatore
proposta
e regolazione
(Type A)
Manopola
termostato
FUNZIONE
Accende la luce interna.
Scongelamento
Questa posizione permette di far circolare l’aria a temperatura ambiente intorno al cibo
surgelato facendolo così scongelare in pochi minuti senza modificare od alterare il
contenuto proteico.
Sprinter
Questa posizione permette un preriscaldamento rapido del forno. Una volta impostata
questa funzione consente un'immediato riscaldamento del forno (ad es. 8 minuti per
raggiungere 200°C), la temperatura desiderata può essere impostata tramite l'apposita
manopola. Il termine della fase di preriscaldamento è indicato tramite la spia del termostato
"°C" che si spegne. Una volta conclusa questa fase è possibile selezionare la funzione di
cottura desiderata ed inserire le pietanze da cucinare. Prestare attenzione a non inserire
alimenti nel forno durante la fase di preriscaldamento rischierebbero di subire danni.
Convezione naturale
Sono in funzione le resistenze superiore e inferiore.
È la cottura tradizionale, ottima per arrostire cosciotti, selvaggina, ideale per biscotti,
mele al forno e per rendere i cibi molto croccanti
Livello 4
1 ÷ 4
Livello 4
1 ÷ 4
Forno ventilato
L’aria calda, viene ripartita sui diversi ripiani; è l’ideale per cuocere contemporaneament
e diversi tipi di cibo (carne, pesce), senza miscelare sapori e odori. Cottura delicata indicata per pan di Spagna, torte Margherita, pasta sfoglia, ecc...
SOFT COOK (a)
Soft cook è la funzione ideale per la pasticceria ed il pane. Grazie alla velocità ridotta
della ventola, questa funzione aumenta l'umidità presente all'interno del forno. Una
maggiore umidità crea le condizioni di cottura ideali per quegli alimenti che hanno
bisogno di mantenere una consistenza elastica mentre cuociono (es. torte, pane,
biscotti) e, di conseguenza, per non sbriciolarsi.
Suola ventilata
Adatta per cotture delicate (torte-soufflè).
Grigliatura tradizionale a porta chiusa
In questa posizione viene inserita la resistenza del grill. Ottima nella cottura di carni di
medie e piccolo spessore (salsicce, costine, bacon).
SUPER GRILL: il forno ha due posizioni
Grill Grill : 2200 W Grill Super : 3000 W
TURBO-GRILL (a) : l'utilizzo del turbo-grill richiede la porta chiusa.
Utilizzando la ventilazione e la resistenza cielo contemporaneamente.
Si cuociono perfettamente grandi pezzi di cibo, come arrosti, pollame, ecc.. Mettete la
griglia a metà del forno e posizione la leccarda sotto di essa per raccogliere i grassi.
Assicuratevi che il cibo non sia troppo vicino al grill. Girate la carne a metà cottura.
Livello 4
1 ÷ 4
(a) SU ALCUNI MODELLI - Funzione con VARIO FAN : Vano Fan é l'esclusivo sistema di funzionamento sviluppato da Candy per ottimizzare i
risultati di cottura, la gestione della temperatura e la gestione dell'umidità. Il sistema Vario Fan modifica automaticamente la velocità di
rotazione della ventola per tutte le cotture in multifunzione. Questo sistema si attiva automaticamente tutte le volte che viene selezionata una
funzione all'interno dell'area tratteggiata sul pannello di controllo.
Grill più girarrosto
Inserimento resistenza grill e motorino girarrosto.
Serve per effettuare cotture allo spiedo.
Funzione pizza
Il calore avvolgente in questa funzione ricrea un ambiente simile a quello
dei forni a legna di pizzeria.
* Programma di prova secondo CENELEC EN 60350-1
** Programma di prova secondo CENELEC EN 60350-1 utilizzato per la definizione della classe energetica.
09 IT
Page 10
5. TABELLA TEMPI DI COTTURA
I tempi suggeriti nelle seguenti tabelle sono indicativi, infatti possono variare secondo la qualità, la freschezza, la dimensione e lo spessore degli
alimenti e secondo il vostro gusto. Lasciare sempre riposare per alcuni minuti prima di servire, perché tutti gli alimenti continuano a cuocere dopo
averli tolti dal forno.
CONSIGLIO UTILE: Per non rendere le superfici troppo secche è
consigliato abbassare la temperatura e allungare i tempi di cottura.
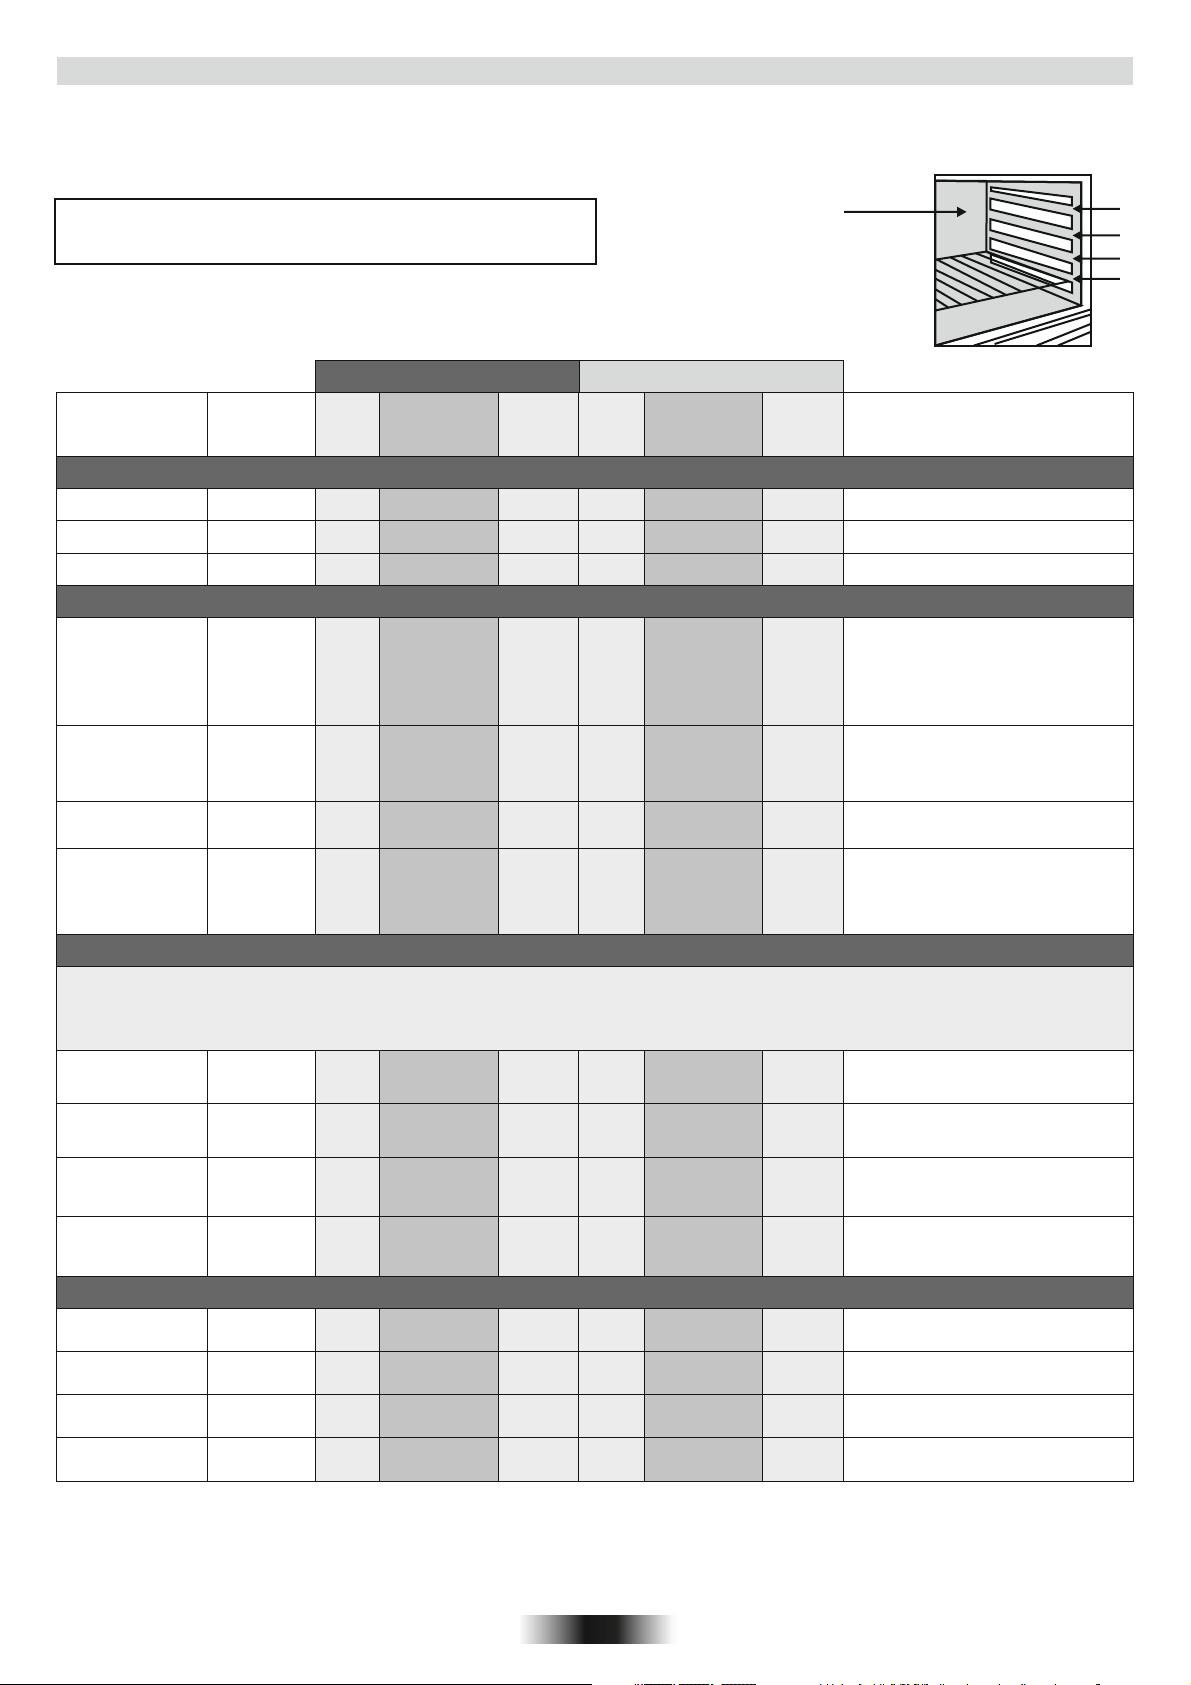
Forno elettrico statico Forno elettrico ventilato
Pietanza
Quantità
Ripiano
Tempo
di cottura
in minuti
Tempe-
ratura
forno
• Pasta
Lasagne
Cannelloni
Pasta al forno
Kg 3,5
Kg 1,8
Kg 2,5
22
22
22
70 ÷ 75
50 ÷ 60
55 ÷ 60
220
220
220
• Paste salate
Pane
Pizze
Pasta sfoglia
Vol au vent
Focaccia
(n° 4)
(Surgelati)
Kg 1
di pasta
Kg 1
n° 24
gr. 200
di pasta cad
22
35
prerisc.10
25 ÷ 35
30 ÷ 35
25 ÷ 30
200
190
220
200
Ripiano
11
21
22
Posizione ripiani
Tempo
di cottura
in minuti
60 ÷ 65
40 ÷ 50
45 ÷ 50
30 ÷ 35
prerisc.10
20 ÷ 25
25 ÷ 30
20 ÷ 25
Tempe-
ratura
forno
200
200
200
180
190
200
180
4
3
2
1
Osservazioni
Inserire le lasagne nel forno freddo
Inserire i cannelloni nel forno freddo
Inserire la pasta al forno nel forno freddo
Preparate la pasta a forma di pagnotta e
incidere con un coltello una croce sulla
parte superiore della forma. Lasciare
lievitare a temperatura ambiente almeno 2
ore, ungere la leccarda e posizionate la
forma bene al centro della stessa.
Preriscaldate per 15min. il forno e
preparate le pizze nella leccarda
smaltata con pomodori, mozzarella e
prosciutto, olio, sale, origano
Disponete 24 vol au vent nella leccarda
e cuocete.
Preriscaldate per 15 min., ungere la teglia
del forno, disporre le 4 focacce oliate e
salate prima di infornare, lasciare lievitare
a temperatura ambiente per almeno 2 ore
• Carne
Tutte le carni possono essere cotte in recipiente con bordo basso o bordo alto.
È consigliabile coprire il recipiente a bordo basso con un coperchio per evitare di sporcare il forno con schizzi del condimento.
Le carni coperte risultano più morbide e succose, mentre quelle scoperte risultano più croccanti.
I tempi indicati valgono per cotture con recipiente coperto o scoperto.
Roastbeef
intero
Arrosto di maiale
arrotolato
Arrosto di vitello
arrotolato
Arrosto di manzo
filetto
• Fish
• Pesci
Trota
Salmone
Sogliola
Orata
Kg 1
Kg 1
Kg 1,3
Kg 1
3 intere/Kg 1
700 g a fette
2,5 cm s.p.
Filetti / Kg 1
2 intere
70 ÷ 80
100 ÷ 110
90 ÷ 110
80 ÷ 90
40 ÷ 45
30 ÷ 35
40 ÷ 45
40 ÷ 45 220
220
220
220
220
220
220
220
33
22
21
22
22
22
22
22
50 ÷ 60
80 ÷ 90
90 ÷ 100
80 ÷ 90
35 ÷ 40
30 ÷ 25
35 ÷ 40
35 ÷ 40
200
Disporre la carne in una teglia Pirex a
bordo alto con sale pepe. Voltare a
metà cottura
Cuocere come sopra
200
Cuocere come sopra
200
Cuocere come sopra
200
Cuocere le trote coperte con olio, sale e
200
cipolle in teglia Pirex.
Cuocere il salmone non coperto in teglia
200
Pirex con sale, pepe e olio.
Cuocete la sogliola con sale e un
200
cucchiaio d’olio.
Cuocere in recipiente coperto le orate con
200
olio e sale
10 IT
Page 11
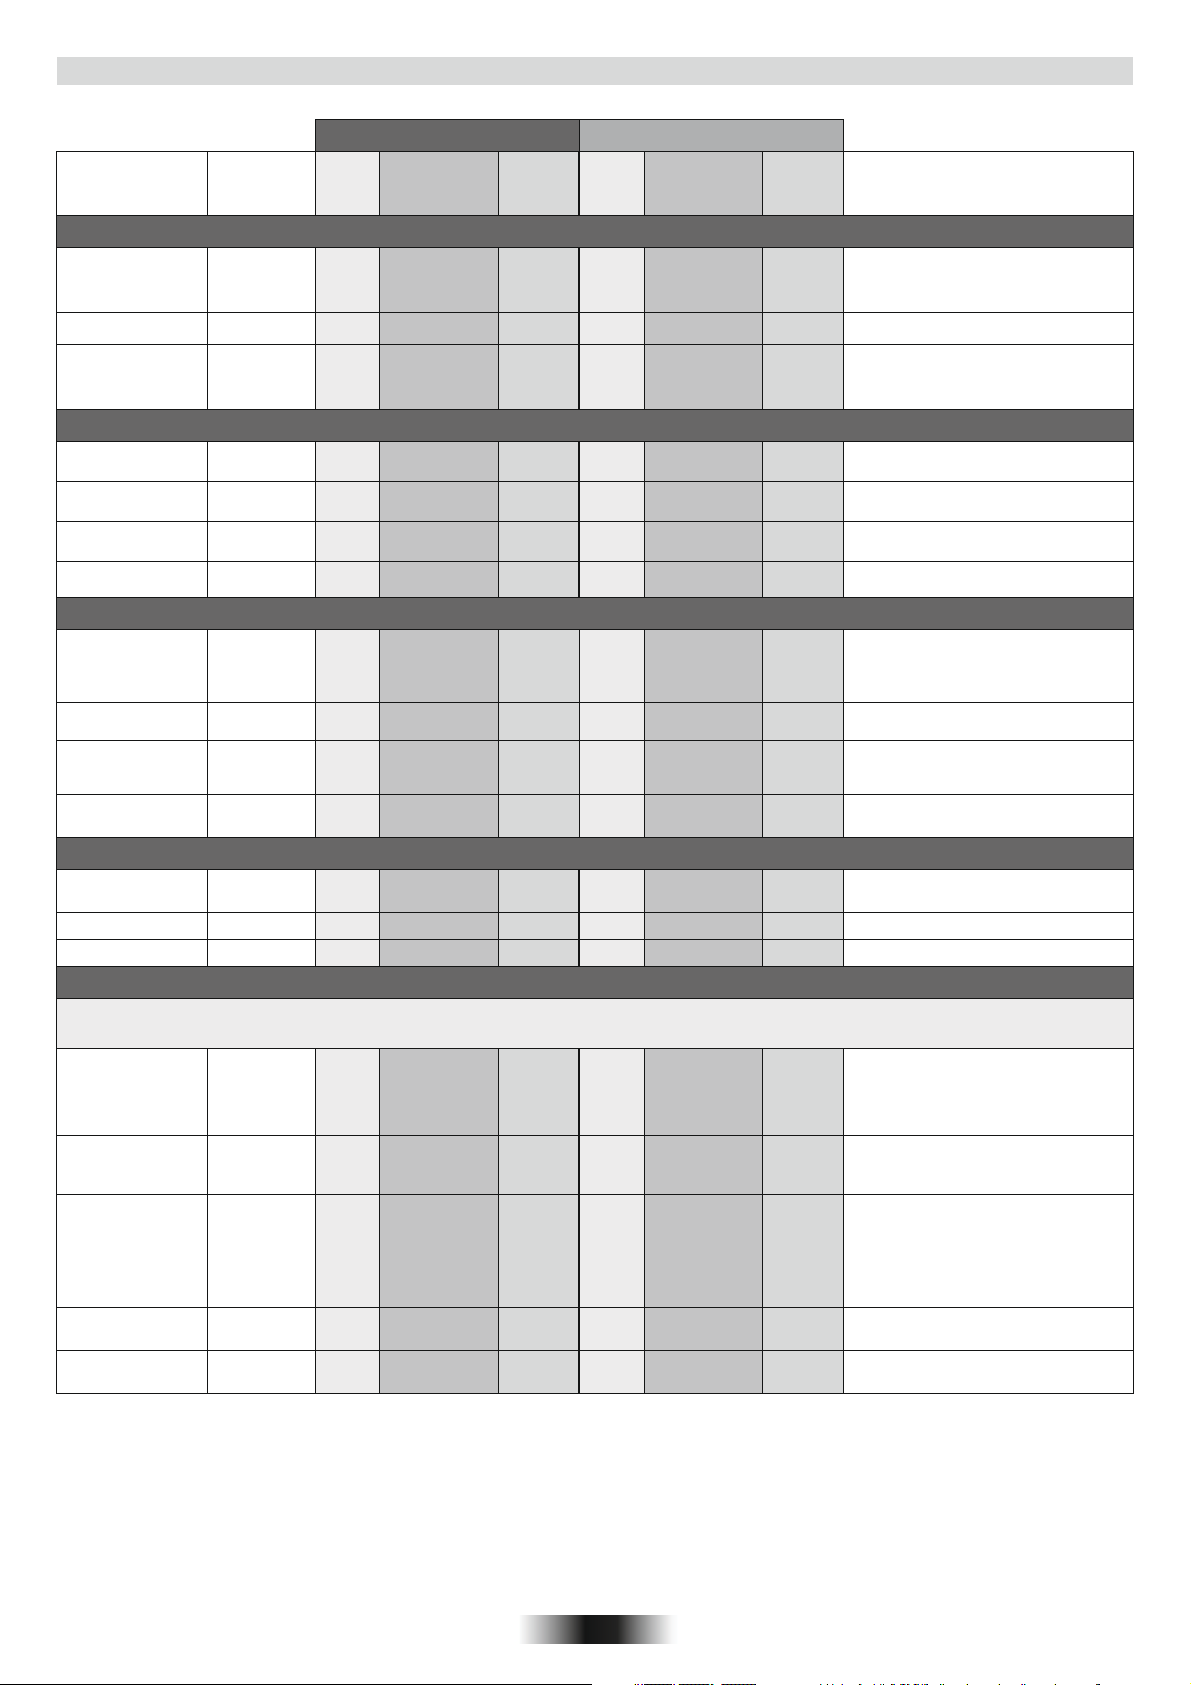
5. TABELLA TEMPI DI COTTURA
Forno elettrico statico Forno elettrico ventilato
Pietanza
Quantità
Ripiano
Tempo
di cottura
in minuti
Tempe-
ratura
forno
Ripiano
Tempo
di cottura
in minuti
Tempe-
ratura
forno
Osservazioni
• Pollame, Coniglio
Faraona
Pollo
Coniglio a pezzi
Kg 1-1,3
Kg 1,5-1,7
Kg 1-1,2
22
22
22
60 ÷ 80
110 ÷ 120
55 ÷ 65
220
220
220
60 ÷ 70
100 ÷ 110
50 ÷ 60
200
200
200
Sistemare la faraona in teglia Pirex o
ceramica a bordo alto condita con aromi
naturali e pochissimo olio.
Come per la faraona
Mettete i pezzi di uguali dimensioni nella
leccarda smaltata, condite con aromi
naturali. Se necessario voltate i pezzi.
• Dolci, Torte
Torta cacao
Torta margherita
Torta di carote
Torta crostata
albicocca
Scatola
Scatola
Scatola
700 gr
1
1
1
1
55
55
65
40
180
175
180
200
1
1
1
2
50
40 ÷ 45
50 ÷ 60
30 ÷ 35
160
160
160
180
In teglia per torte Ø 22. Prerisc. per 10
min.
In teglia per torte Ø 22. Prerisc. per 10
min.
In teglia per torte Ø 22. Prerisc. per 10
min.
In teglia per torte Ø 22. Prerisc. per 10
min.
• Verdura
Disponete i finocchi tagliati in 4 parti e
Finocchi
Zucchine
Patate
Carote
800 gr
800 gr
800 gr
800 gr
1
1
2
1
70 ÷ 80
70
60 ÷ 65
80 ÷ 85
220
220
220
220
1
1
2
1
60 ÷ 70
60 ÷ 70
60 ÷ 65
70 ÷ 80
200
200
200
200
coperti in teglia di Pirex con burro e sale
e possibilmente con la parte interna
verso l’alto
Affettate le zucchine e cuocete in teglia
Pirex coperte con burro e sale
Tagliate le patate in parti uguali e
cuocetele coperte con olio, sale e
origano o rosmarino in teglia Pirex.
Tagliate le carote a fettine, copritele e
cuocetele in teglia Pirex.
• Frutta
Mele intere
Pere
Pesche
Kg 1
Kg 1
Kg 1
1
1
1
45 ÷ 55
45 ÷ 55
45 ÷ 55
220
220
220
2
2
2
45 ÷ 55
45 ÷ 55
45 ÷ 55
200
200
200
Cuocere la frutta in teglia di Pirex o ceramica
non coperta. Lasciare raffreddare in forno.
Come sopra
Come sopra
• Cottura a grill
La cottura con il grill deve essere eseguita ponendo il cibo sotto il grill elettrico. Attenzione: durante il funzionamento il grill diventa di colore rosso vivo. La
leccarda deve essere inserita sotto la griglia per raccogliere i sughi.
Pane carrè
tostato
Toasts farciti
Salsiccie
Costate di manzo
Coscie di pollo
4 fette
4
n°6 / Kg 0,9
n°4 / Kg 1,5
n°4 / Kg 1,5
Inserire il pane carrè sulla griglia supporto.
44
5 (5 prerisc.)
10 (5 prerisc.)
33
44
44
33
25/30
(5 prerisc.)
25
(5 prerisc.)
50/60
(5 prerisc.)
Grill Grill
Grill Grill
Grill Grill
Grill Grill
Grill Grill
5 (10 prerisc.)
5/8
(10 prerisc.)
15/20
(10 prerisc.)
15/20
(10 prerisc.)
50/60
(10 prerisc.)
Dopo la 1° cottura capovolgere fino a
cottura ultimata.
Inserire i toasts sulla griglia supporto
leccarda;dopo la prima brunitura
capovolgere i toasts fino a brunitura ultimata.
Tagliare le salsiccie a metà e disporle sulla
griglia, con la parte interna verso l’alto. A metà
cottura capovolgere le salsiccie fino a cottura
ultimata. Avvertenza: ogni tanto controllate
visivamente l’uniformità di cottura. Nel caso
di disuniformità intercambiare quelle cotte
con quelle meno cotte.
Disporre le fette bene sotto l’azione del grill
e voltarle due volte.
Condite con aromi naturali e voltatele ogni
tanto.
11 IT
Page 12

SAFETY INSTRUCTIONS
WARNING: The appliance and its accessible parts become hot during use. Care should be taken to avoid
touching heating elements.
• Children under 8 Year of age must be kept away from the appliance unless they are continuously
supervised.
• This appliance can be used by children aged from 8 years and above and persons with reduced
physical, sensory or mental capabilities or lack of experience and knowledge if they have been given
supervision or instruction concerning use of the appliance in a safe way and understand the hazards
involved.
• Children must not play with the appliance.
• Cleaning and user maintenance shall not be made by children without supervision.
• During use the appliance becomes hot. Care should be taken to avoid touching heating elements inside
the oven.
WARNING: Accessible parts may become hot during use. Young children must be kept away.
• Do not use harsh abrasive cleaners or sharp metal scrapers to clean the oven door glass since they can
scratch the surface, which may result in shattering of the glass.
• The oven must be switched off before removing the guard, after cleaning, the guard must be replaced in
accordance with the instructions.
• Only use the temperature probe recommended for this oven.
• Do not use a steam cleaner for cleaning operations.
• WARNING: Avoid possibility of electric shock - ensure the appliance is switched off before replacing the
lamp.
• The means for disconnection must be incorporated in the fixed wiring in accordance with the wiring
rules.
• The instructions state the type of cord to be used, taking into account the temperature of the rear surface
of the appliance.
• If the supply cord is damaged, it must be replaced by a special cord or assembly available from the
manufacturer or its service agent.
• CAUTION: In order to avoid a hazard due to inadvertent resetting of the thermal cutout, this appliance
must not be supplied through an external switching device, such as a timer, or connected to a circuit that
is regularly switched on and off by the utility.
CAUTION: Accessible parts may be hot when the grill is in use. Young children must be kept away.
• Excess spillage must be removed before cleaning.
• During self-cleaning pyrolytic operation the surfaces may get hotter than usual and children MUST be
kept away.
12 GB
Page 13

1. GENERAL WARNINGS
Thank you for choosing one of our products. To get the most out of your oven we recommend that you:
• Read the notes in this manual carefully: they contain important instructions on how to install, use and service this oven safely.
• Keep this booklet in a safe place for easy, future reference.
All accessible parts are hot when the appliance is in operation, take care to not touch these elements.
When the oven is first switched on it may give out acrid smelling fumes. This is because the bonding agent for insulating panels around the oven
has been heated up for the first time.
This is a completely normal, if it does occur you merely have to wait for the fumes to clear before putting the food into the oven.
An oven by its very nature becomes very hot. Especially the glass of the oven door.
1.1 DECLARATION OF COMPLIANCE
The parts of this appliance that may come into contact with foodstuffs
comply with the provisions of EEC Directive 89/109.
Appliance complies with European Directives 73/23/EEC and
89/336/EEC, replaced by 2006/95/EC and 2004/108/EC, and
subsequent amendments.
When you have unpacked the oven, make sure that it has not been
damaged in any way. If you have any doubts at all, do not use it:
contact a professionally qualified person. Keep packing materials
such as plastic bags, polystyrene, or nails out of the reach of children
because they are dangerous for children.
1.2 SAFETY HINTS
•The oven must be used only for the purpose for which it was designed:
it must only be used for cooking food. Any other use, e.g. as a form of
heating, is an improper use of the oven and is therefore dangerous.
•The manufacturers cannot be held responsible for any damage
caused by improper, incorrect or unreasonable use. When using any
electrical appliance you must follow a few basic rules.
– Do not pull on the power cable to remove the plug from the socket.
– Do not touch the oven with wet or damp hands or feet.
– Do not use the oven unless you are wearing something on your feet.
– It is not generally a good idea to use adapters, multiple sockets for
several plugs and cable extensions.
– If the oven breaks down or develops a fault switch it off at the mains
and do not touch it.
•If the cable is at all damaged it must be replaced promptly.
When replacing the cable, follow these instructions. Remove the
power cable and replace it with one of the H05RRF, H05VV-F,
H05V2V2-F type. The cable must be able to bear the electrical current
required by the oven. Cable replacement must be carried out by
properly qualified technicians. The earthing cable (yellow-green) must
be 10 mm longer than the power cable.
Use only an approved service centre for repairs and ensure that only
original parts are used. If the above instructions are not adhered to the
manufacturers cannot guarantee the safety of the oven.
•Do not line the oven walls with aluminium foil or single-use
protection available from stores. Aluminium foil or any other
protection, in direct contact with the hot enamel, risks melting
and deteriorating the enamel of the insides.
1.3 INSTALLATION
Installation is the customer’s responsibility. The manufacturers have
no obligation to carry this out. If the assistance of the manufacturer is
required to rectify faults arising from incorrect installation, this
assistance is not covered by the guarantee.
The installation instructions for professionally qualified personal must
be followed. Incorrect installation may cause harm or injury to people,
animals or belongings. The manufacturer cannot be held responsible
for such harm or injury.
1.4 FITTING THE OVEN INTO THE KITCHEN UNIT
Fit the oven into the space provided in the kitchen unit; it may be fitted
underneath a work top or into an upright cupboard. Fix the oven in
position by screwing into place, using the four fixing holes in the frame.
(Fig.on last page).
To locate the fixing holes, open the oven door and look inside.To allow
adequate ventilation, the measurements and distances indicated in
the diagram on last page must be adhered to when fixing the oven.
Note: For ovens that are combined with a hob unit the instructions
contained in the manual for the hob unit must be followed.
1.5 IMPORTANT
If the oven is to work properly, the kitchen housing must be suitable.
The panels of the kitchen unit that are next to the oven must be made
of a heat resistant material. Ensure that the glues of units made of
veneered wood can withstand temperatures of at least 120 °C.
Plastics or glues that cannot withstand such temperatures will melt
and deform the unit. Once the oven has been lodged inside the unit,
the electrical parts must be completely insulated. This is a legal safety
requirement. All guards must be firmly fixed into place so that it is
impossible to remove them without using special tools.
Remove the back of the kitchen unit to ensure an adequate
current of air circulates around the oven. The hob must have a
rear gap of at least 45 mm.
1.6 CONNECTING TO THE POWER SUPPLY
Plug into the power supply. Ensure first that there is a third contact that
acts as earthing for the oven. The oven must be properly earthed.
If the model of oven is not fitted with a plug, fit a standard plug to the
power cable. It must be able to bear the power supply indicated on the
specifications plate. The earthing cable is yellowgreen. The plug must
be fitted by a properly qualified person. If the socket and the plug are
incompatible the socket must be changed by a properly qualified
person.A properly qualified person must also ensure that the power
cables can carry the current required to operate the oven.
An ON/OFF switch may also be connected to the power supply. The
connections must take account of the current supplied and must
comply with current legal requirements. The yellow-green earthing
cable must not be governed by the ON/OFF switch. The socket or the
ON/OFF switch used for connecting to the power supply must be
easily accessible when the oven has been installed.
Important: During installation, position the power cable in such a way
that it will not be subjected to temperatures of above 50°C at any point.
The oven complies with safety standards set by the regulatory bodies.
The oven is safe to use only if it has been adequately earthed in
compliance with current legal requirements on wiring safety. You must
ensure that the oven has been adequately earthed.
The manufacturers cannot be held responsible for any harm or
injury to persons, animals or belongings caused by failure to
properly earth the oven.
WARNING: the voltage and the supply frequency are showed on
the rating plate (fig. on last page).
The cabling and wiring system must be able to bear the maximum
electric power required by the oven. This is indicated on the
specifications plate. If you are in any doubt at all, use the services of a
professionally qualified person.
1.7 OVEN EQUIPMENT (according to the model)
It is necessary to do an initial cleaning of the equipment before
the first use of each of them.Wash them with a sponge. Rinse and
dry off.
The simple shelf can take moulds
and dishes.
The tray holder shelf is especially
good for grilling things. Use it with the
drip tray.
The special profile of the shelves
means they stay horizontal even when
pulled right out. There is no risk of a
dish sliding or spilling.
13 GB
Page 14
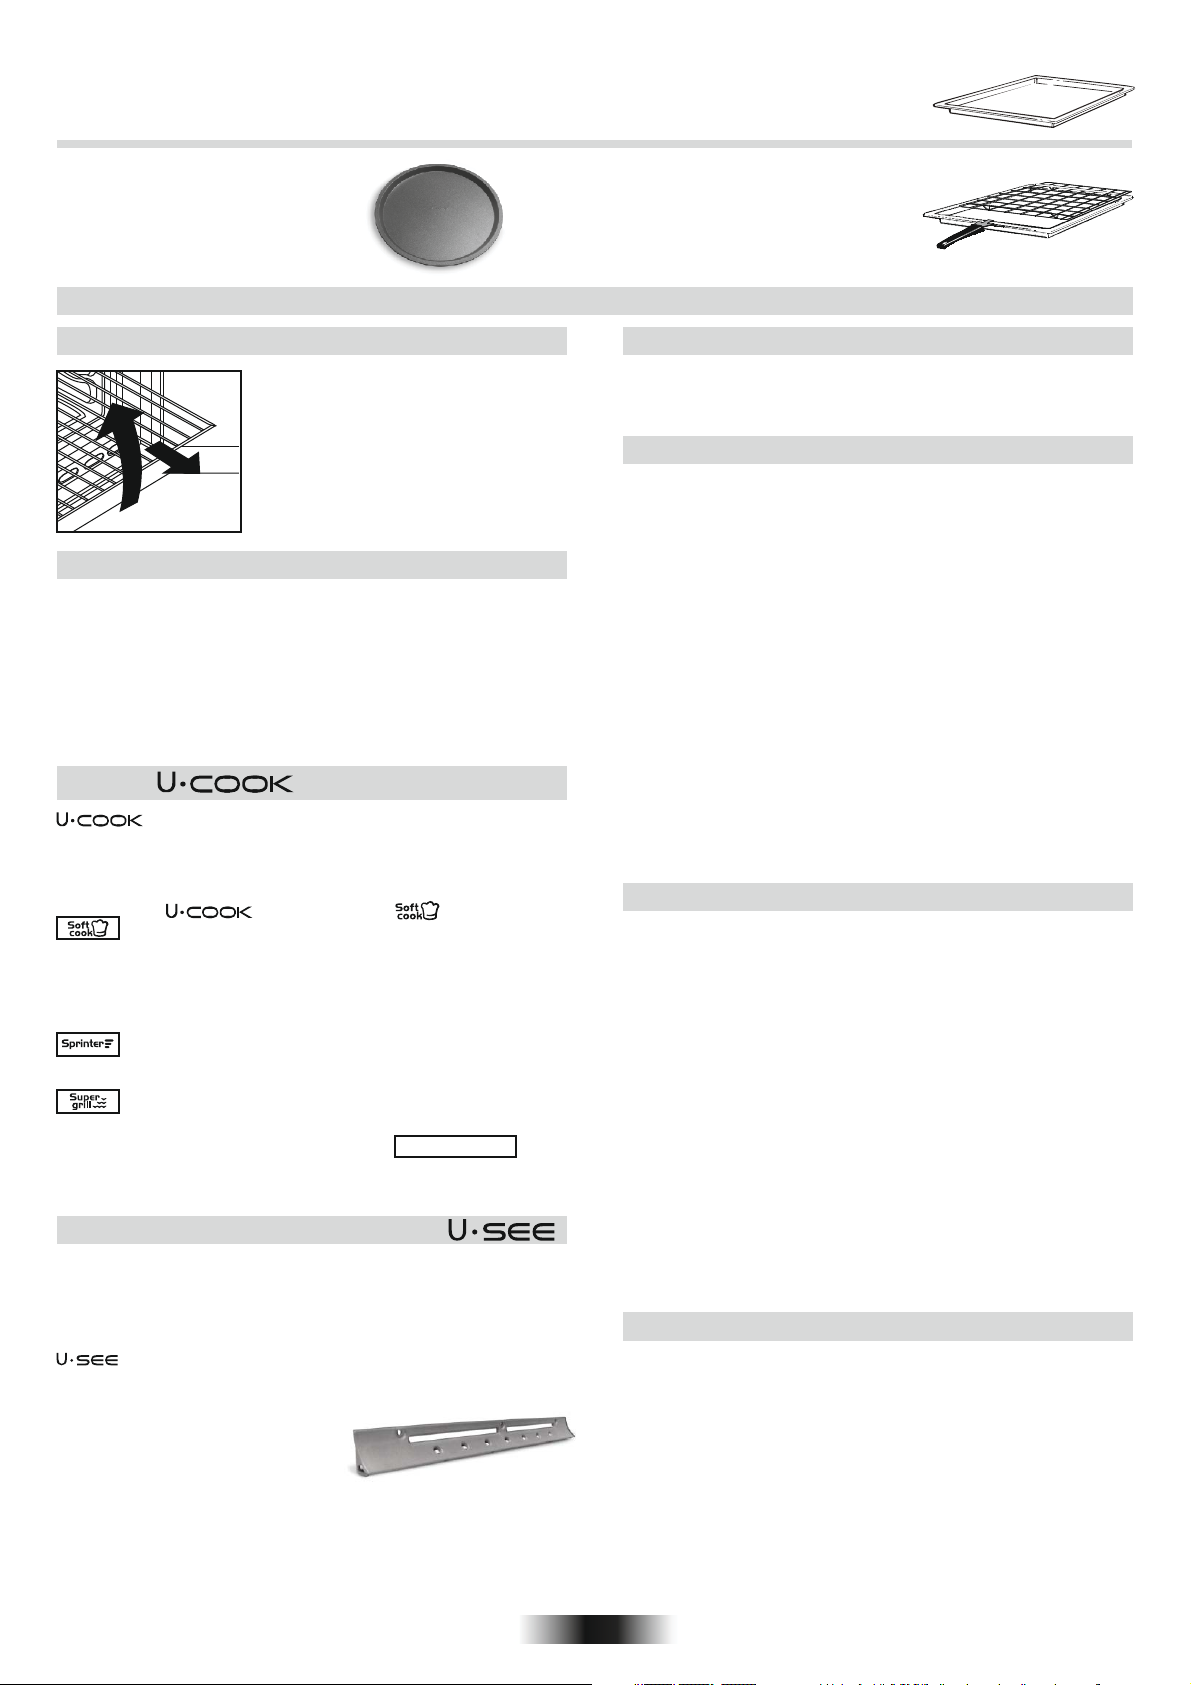
The drip tray catches the juices from grilled foods. It is only used with the Grill, Rotisserie, or Fan Assisted Grill ;
remove it from the oven for other cooking methods.
Never use the drip tray as a roasting tray as this creates smoke and fat will spatter your oven making it dirty.
The pizza set is designed for pizza
cooking. In order to obtain the best
results the set must be used together
with Pizza function.
The tray holder
The tray holder shelf is ideal for grilling. Use it in
conjunction with the drip tray. A handle is included
to assist in moving the both accessories safely.
Do no leave the handle inside the oven.
2. USEFUL TIPS
2.1 SHELF SAFETY SYSTEM
The oven features a new shelf safety
system.
This allows you to pull out the oven
shelves when inspecting the food
without danger of food spillages or
shelves falling accidentally out of the
oven.
To remove the shelves pull out and lift.
2.2 GRILLING
Grilling makes it possible to give food a rich brown colour quickly.
For browning we recommend that you insert the grill onto the
fourth level, depending on the proportions of the food (see fig.
page 7).
Almost all food can be cooked under the grill except for very lean
game and meat rolls.
Meat and fish that are going to be grilled should first be lightly
doused with oil.
2.3 The MODELS
Ovens have an electronic control of the fan speed, called
and patented VARIOFAN. During the cooking, this system changes
automatically the speed of the fan (in multifunction mode) in order to
optimize the air flow and the internal temperature in the cavity of the
oven.
Some ovens are equipped with the new doorj " WIDE DOOR which
has a bigger window area, this allows better maintenance and a
improved thermal insulation.
All ovens feature the function.
This allows a management of the distribution of moisture
and temperature. It reduces the loss of humidity of the 50
%, which guarantees the food remains tender and tastes
better. This a delicate cooking is recommended for the
baking of the bread and pastry.
It reduces the time of preheating of ovens: only 8 minutes
to reach 200 degrees Celsius.
It gives the possibility of setting level and intensity of
grilling, up to 50 % more power in comparison with a
traditional multifunction oven.
"
2.4 According to the model
Is an illumination system which replaces the traditional « light bulb ».
14 LED lights are integrated within the door. These produce white high
quality illumination which enables to view the inside of the oven with
clarity without any shadows on all the shelves.
Advantages :
System, besides providing excellent illumination inside the
oven, lasts longer than the traditional light bulb its easier and to
maintain and most of all saves energy.
• Optimum view
• Long life illumination
• Very low energy consumption, -95% in
comparison with the traditional
illumination High
“Appliance with white light LED of the 1M Class according to IEC
60825- 1:1993 + A1: 1997 + A2: 2001 (equivalent to EN 60825-1: 1994
+ A1: 2002 + A2: 2001); the maximum light power emitted
150uW.
Not observed directly with optical instruments. “
l459nm <
2.5 COOKING TIME
For recommended cooking times and temperatures the first time you
use the oven, refer to the tables on pages 7, 8. You may then wish to
vary these times and settings in the light of your own experience.
2.6 SELF-CLEANING OVEN WITH CATALYTIC
Special self-cleaning panels covered in a micro-porous coating are
available as optional extras for all models. If they are fitted, the oven
no longer needs to be cleaned by hand.
The fat that is splattered onto the sides of the oven during roasting is
eliminated by the microporous coating which breaks the fat down by
catalysis and transforms it into gas.
Excessive splattering may nevertheless block the pores and therefore
hinder self-cleaning. The self-cleaning capacity may be restored by
switching on the empty oven to maximum for about 10-20 minutes.
Do not use abrasive products, metal cleaning wads, sharp objects,
rough cloths, or chemical products and detergents that may
permanently damage the catalytic lining.
It is a good idea to use deep roasting trays to roast fatty foods such as
joints of meat etc. and to put a tray underneath the grill to catch surplus
fat.If the walls of the oven are so thickly coated in grease that the
catalytic lining is no longer effective remove surplus grease with a soft
cloth or sponge soaked in hot water.
The lining must be porous for self-cleaning to be effective.
N.B.: All catalytic linings currently on the market have a working life of
about 300 hours. They should therefore be replaced after about 300
hours.
2.7 CLEANING AND MAINTENANCE
Clean the stainless steel and enamelled surfaces with warm, soapy
water or with suitable brand products. On no account use abrasive
powders that may damage surfaces and ruin the oven’s appearance.
It is very important to clean the oven each time that it is used. Melted
fat is deposited on the sides of the oven during cooking. The next time
the oven is used this fat could cause unpleasant odours and might
even jeopardise the success of the cooking. Use hot water and
detergent to clean; rinse out thoroughly.
To make this chore unnecessary all models can be lined with catalytic
self-cleaning panels: these are supplied as an optional extra (see the
section SELF-CLEANING OVEN WITH CATALYTIC LINING).
Use detergents and abrasive metal pads like «brillo pads» for the
stainless steel grills.
The glass surfaces as the top, oven door and warming compartment
door must be cleaned when they are cold. Damage that occurs to
them because this rule was not adhered to are not covered by the
guarantee.
To replace the interior light:
• switch off the mains power supply and unscrew bulb. Replace with an
identical bulb that can withstand very high temperatures
2.8 SERVICE CENTRE
Before calling the Service Centre
If the oven is not working, we recommend that:
you check that the oven is properly plugged into the power supply.
If the cause of the fault cannot be detected:
disconnect the oven from the mains, do not touch the oven and call the
after sales service.
Before calling the Service Centre remember to make a note of the
serial number on the specifications plate (see fig. On last page).
The oven is supplied with a guarantee certificate that ensures that it
will be repaired free of charge by the Service Centre
14 GB
Page 15
3. USE OF ANALOGUE CLOCK/PROGRAMMER
OPERATION SPECIFICATION
3.1 GENERAL OPERATION
The analogue clock programmer displays the time and operation of
the oven. By pushing the control knob you can:- Adjust the time,
program the start and end time of cooking or set the Minute Minder
alarm.
3.2 SETTING THE TIMER
To adjust the time on the clock press the knob 4 times until the
"CLOCK" symbol flashes. To adjust the time, turn the control knob
either clockwise or counter clockwise. After adjustment is complete
wait for 10 seconds and the electronic timer will automatically set the
time.
3.3 MANUAL COOKING
In the default mode, the timer allows manual operation of the oven
using the main oven switch (external to the timer).
ATTENTION: When power is supplied to the oven timer, there is a
delay of a few seconds.
3.4 SETTING THE MINUTE MINDER
Minute Minder programming enables you to set an audible alarm to
sound after a scheduled time without activating the cooking.
To set an "alarm" (Minute Minder Mode), press the knob 3 times until
the symbol "ALARM" flashes.
Minute minder setting is identical to end of cooking timer settings (see
corresponding paragraph).
It is only possible to use the Minute Minder when no other cooking
program is active.
STOP
TIMER
CLOCK
START
To cancel the program, press the knob for a few seconds and the
program will be cancelled, the timer will return to manual cooking
mode.
3.6 FULLY AUTOMATIC COOKING
Cooking start programing enables to you start and stop cooking
automatically based on the time scheduled.
To program the cooking start time, press the knob once until the
flashing of the "START TIME" symbol.
Increase or decrease the cooking start time by turning the knob
clockwise or counter clockwise. The "START TIME" symbol will
continue to flash for a few seconds after the last rotation. If within this
time you do not turn or press the knob the hands will automatically
return to display the time and the program is cancelled. If you press
the knob the cooking start time is stored ("START TIME" symbol is
turned on) and the timer switches to cooking end programming (the
"END TIME" symbol flashes)
The cooking time end programming will follow the procedure in the
preceding section.
Cooking will begin when "Programmed Start Time equals Preset
Time".
3.7 BLACKOUT INDICATION (OPTIONAL)
The "Clock" symbol will flash when the power supply has been
interupted.
To stop it flashing briefly press the control knob.
3.5 SEMI AUTOMATIC COOKING:
SWITCH OFF AT A SET END TIME
End of cooking programming enables you to start cooking
immediately and stop cooking automatically at a set time.
To program the end of cooking time, press the knob twice until the
"END TIME" symbol flashes. To increase or decrease the cooking
time, turn the knob either clockwise or counter clockwise. The "END
TIME" symbol continues to flash for a few seconds after the last
rotation. The program is confirmed by pressing the knob.
Upon confirmation of the program, cooking starts and the alarm is
automatically activated.
Cooking stops when the the programmed "END TIME" is achieved.
To view the program press and release the knob and the timer will
show the selected program.
When cooking stops the "END TIME" symbol flashes and the alarm
beeps. The alarm will beep for 1 minute and the "END TIME" symbol
will remain flashing until the knob is pressed.
15 GB
Page 16
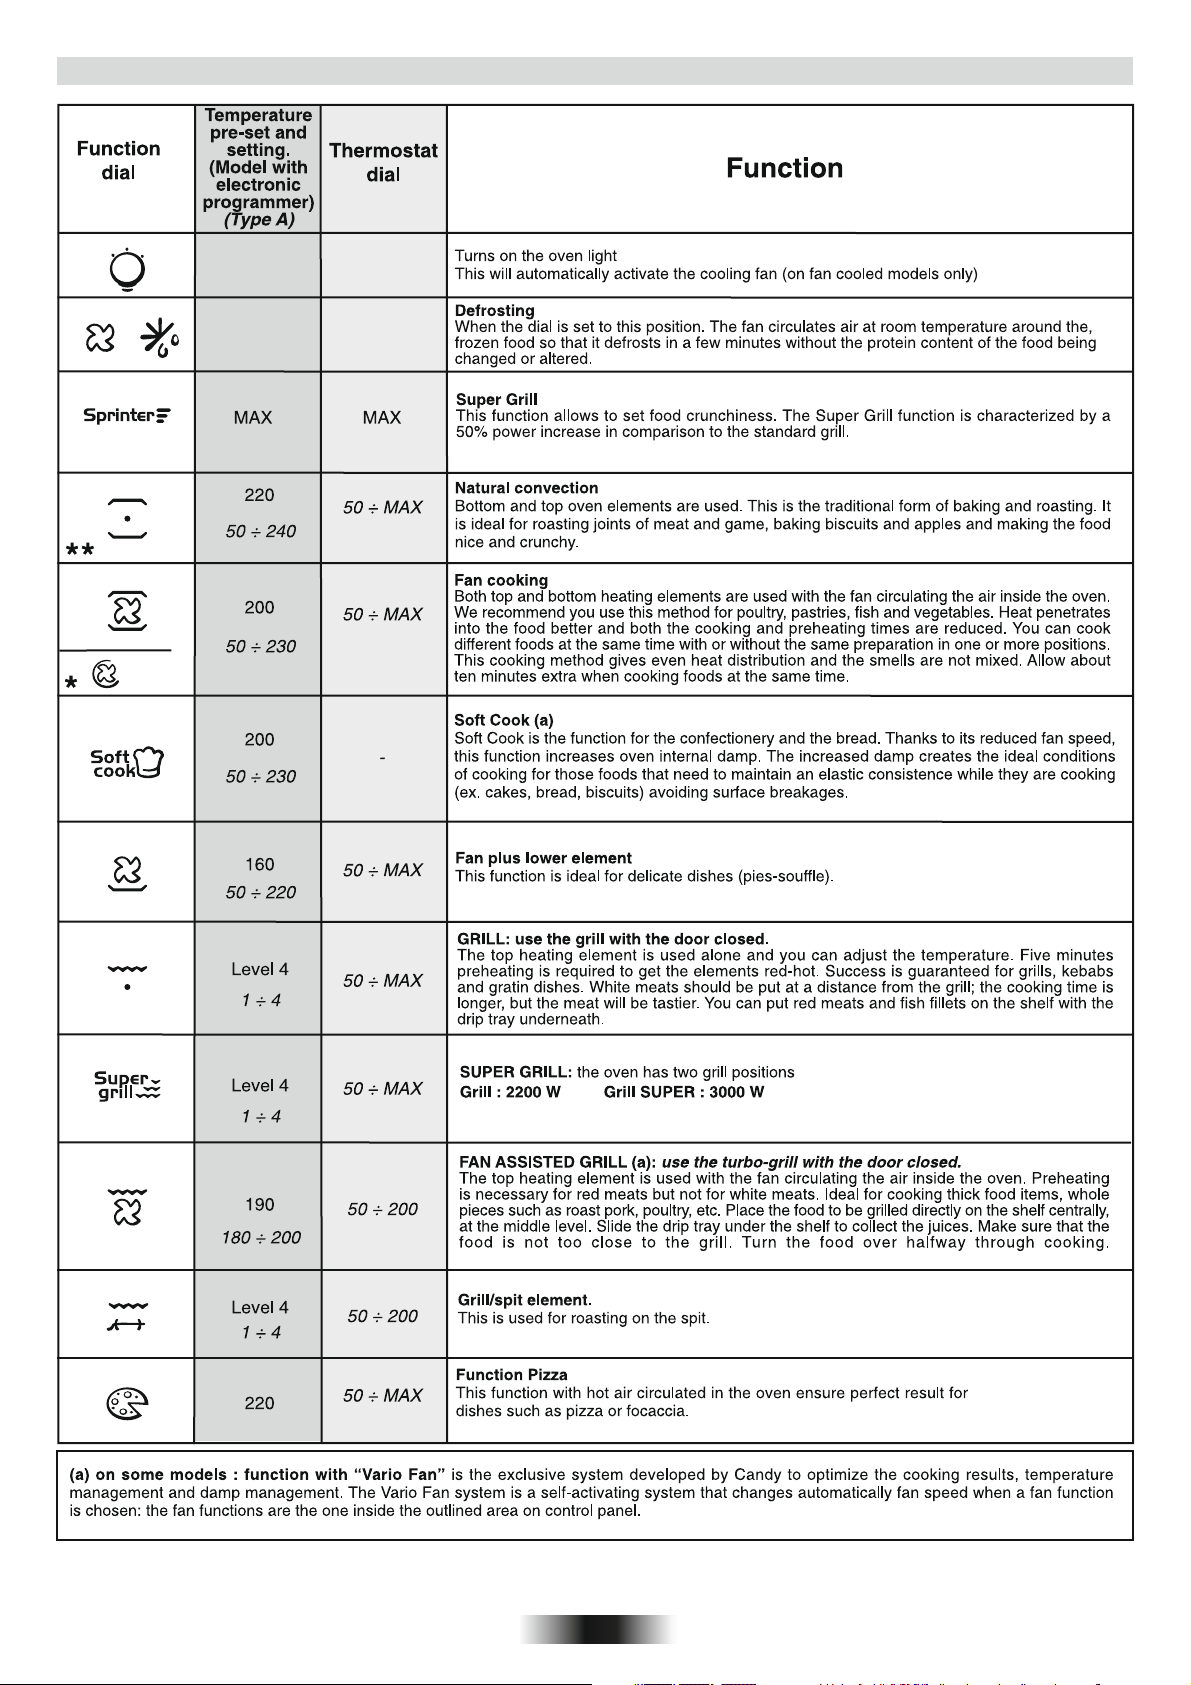
4. OPERATING INSTRUCTIONS
* Tested in accordance with the CENELEC EN .
** Tested in accordance with the CENELEC EN 60350-1 used for definition of energy class.
60350-1
16 GB
Page 17

5. TABLES OF COOKING TIMES
The overall suggested cooking times set out below are intended as a rough guide only. They may in fact vary according to the quality, the freshness,
the size and the thickness of the food cooked and of course cooking time is also partly a matter of taste. Let the food stand for a few minutes before
serving because the ingredients continue cooking after they have been removed from the oven.
HANDY TIP: Lower the temperature so as to avoid the surface of the
food becoming hard and dry.
Static electric oven
Food
Quantity
Shelf
Time
of cooking
in minutes
Oven
tempe-
rature
• Pasta
Lasagne
Cannelloni
Oven baked
pasta
Kg 3,5
Kg 1,8
Kg 2,5
22
22
22
70 ÷ 75
50 ÷ 60
55 ÷ 60
220
220
220
• Baking (not cakes)
Bread
Pizza
Pastry (frozen)
vol au vents
Focaccia
(n° 4)
Kg 1
di pasta
Kg 1
n° 24
gr. 200 of
dough each
22
35
10
(pre-heating)
25 ÷ 35
30 ÷ 35
25 ÷ 30
200
190
220
200
• Meat
Electric fan oven
Shelf
of cooking
in minutes
(pre-heating)
11
21
22
Shelf position
Time
60 ÷ 65
40 ÷ 50
45 ÷ 50
30 ÷ 35
10
20 ÷ 25
25 ÷ 30
20 ÷ 25
Oven
tempe-
rature
200
200
200
180
190
200
180
Remarks
Put the lasagne into an unheated oven
Put the cannelloni into an unheated oven
Put the oven baked pasta into an
unheated oven
Form the dough into a loaf and make a
cross with a knife on top of the dough
leave the dought to rise for at least 2
hours. Grease the baking tin and put the
dough in the middle of it.
Warm the oven for 15 minutes and
place the pizzas on the greased baking
tray. Garnish them with tomatoes,
mozzarella, ham, oil, salt and origano.
Place 24 vol au vents in the oven and
bake.
Warm the oven for 15 minutes, grease
the baking tray, season the 4 focaccia
with oil and salt and leave them to rise at
room temperature for at least 2 hours
before put ting them in the oven.
4
3
2
1
All meats can be roasted in shallow or deep roasting trays.
It is advisable to cover the shallow trays to avoid splattering the sides of the oven with grease.
The roasting times are the same whether the meat has been covered up or not.
Whole joint of
beef
Joint of
deboned
Joint of
deboned veal
Joint of
fillet of beef
• Fish
• Fish
Trout
Salmon
Sole
Bream
Kg 1
Kg 1
Kg 1,3
Kg 1
3 whole trout
or / Kg 1
700 g
2,5 cm slice
Kg 1
2 whole ones
70 ÷ 80
100 ÷ 110
90 ÷ 110
80 ÷ 90
40 ÷ 45
30 ÷ 35
40 ÷ 45
40 ÷ 45 220
220
220
220
220
220
220
220
33
22
21
22
22
22
22
22
50 ÷ 60
80 ÷ 90
90 ÷ 100
80 ÷ 90
35 ÷ 40
30 ÷ 25
35 ÷ 40
35 ÷ 40
200
200
200
200
200
200
200
200
Put the meat into a deep Pyrex dish and
season with salt and pepper; turn the
meat half way through cooking.
Cook the meat in a covered Pyrex dish
with herbs, spice, oil and butter.
Cook as indicated above
Cook as indicated above.
Cover the trout with salt, oil and onions
and cook in a Pyrex dish.
Cook the salmon in an open Pyrex dish
with salt, pepper and oil.
Cook the sole with salt and a spoonful
of oil.
Cook the bream in oil and salt in a
covered dish.
17 GB
Page 18

5. TABLES OF COOKING TIMES
Electric fan oven
Shelf
of cooking
in minutes
Time
Oven
tempe-
rature
Remarks
Food
Quantity
Static electric oven
Shelf
Time
of cooking
in minutes
Oven
tempe-
rature
• Rabbits and Poultry
Guinea fowl
Chicken
Rabbit pieces
Kg 1-1,3
Kg 1,5-1,7
Kg 1-1,2
22
22
22
60 ÷ 80
110 ÷ 120
55 ÷ 65
220
220
220
60 ÷ 70
100 ÷ 110
50 ÷ 60
200
200
200
Place the guinea fowl in a deep Pyrex or
pottery dish with very little oil and
season with herbs and spices.
Follow the procedure for cooking the
guinea fowl.
Put all the pieces of the same size in the
glazed tray.Season with herbs and spices.
Turn the pieces as and when required.
• Cakes
Coconut cake
baked in a tin
Sponge cake
Carrot cake
baked in a tin
Apricot pie
700 gr
1
1
1
1
55
55
65
40
180
175
180
200
1
1
1
2
50
40 ÷ 45
50 ÷ 60
30 ÷ 35
160
160
160
180
Use a tin that is 22 cm deep. Pre-heat for
10 mins.
Use a tin that is 22 cm deep. Pre-heat for
10 mins.
Use a tin that is 22 cm deep. Pre-heat for
10 mins.
Use a tin that is 22 cm deep. Pre-heat for
10 mins.
• Vegetable
Cut the fennel into four pieces, add
Fennel
Courgettes
Potatoes
Carrots
800 gr
800 gr
800 gr
800 gr
1
1
2
1
70 ÷ 80
70
60 ÷ 65
80 ÷ 85
220
220
220
220
1
1
2
1
60 ÷ 70
60 ÷ 70
60 ÷ 65
70 ÷ 80
200
200
200
200
butter, salt and potatoes if required and
place in a Pyrex face up. Cover the dish.
Slice the courgettes, place in a Pyrex
dish and add butter and salt.
Cut the potatoes into equal parts and
place in a Pyrex dish. Season with salt,
origano and rosemary. Cook in oil.
Slice the carrots, place in a Pyrex dish and
cook.
• Fruit
Whole apples
Pears
Peaches
Kg 1
Kg 1
Kg 1
1
1
1
45 ÷ 55
45 ÷ 55
45 ÷ 55
220
220
220
2
2
2
45 ÷ 55
45 ÷ 55
45 ÷ 55
200
200
200
Bake the fruit in an open Pyrex or earthenware dish. Leave it to cool inside the oven.
Follow procedure above.
Follow procedure above.
• Grilling
Place the food to be grilled underneath the infra-red grill. Warning: When the grill is on it takes on a bright red colour. Place the tray underneath the grill to
collect juices and fat from the food being grilled.
Squares of
bread for
toasting
Toasted
sandwiches
Sausages
Ribs of beef
Chicken legs
4 pieces
4
n°6 / Kg 0,9
n°4 / Kg 1,5
n°4 / Kg 1,5
5
(5 to heat up
44
grill)
Grill Grill
10
(10 to heat up
33
grill)
Grill Grill
25/30
(5 to heat up
44
44
33
grill)
25 (5 to
heat up grill)
50/60 (5 to
heat up grill)
Grill Grill
Grill Grill
Grill Grill
5
(10 to heat up
grill)
5/8
(10 to heat up
grill)
15/20
(10 to heat up
grill)
15/20 (10 to
heat up grill)
50/60 (10 to
heat up grill)
Lay the bread on the grill tray. When one
side of the bread has been toasted, turn
over and toast the other side. Remember:
keep the toast warm at the bottom of the
oven until you are ready to serve it.
Lay the bread on the grill tray. When one
side of the sandwich has been toasted, turn
over and toast the other side.
Cut the sausages in half and lay them face
down on the grill. Half way through grilling
turn them over. Every so often, check that
they are being cooked equally all over. (If
this is not happening, turn and reposition
the ones being cooked ether less or more
than the others.
Make sure that the ribs of beef are exposed
to the full effect on the main grill.
Turn them over twice during grilling
This appliance is marked according to the European directive 2012/19/EU on Waste Electrical and Electronic Equipment (WEEE). WEEE
contains both polluting substances (which can cause negative consequences for the environment) and basic components (which can be reused). It is important to have WEEE subjected to specific treatments, in order to remove and dispose properly all pollutants, and recover and
recycle all materials.
Individuals can play an important role in ensuring that WEEE does not become an environmental issue; it is essential to follow some basic rules:
• WEEE shall not be treated as household waste.
• WEEE shall be handed over to the relevant collection points managed by the municipality or by registered companies. In many countries, for
large WEEE, home collection could be present.
• When you buy a new appliance, the old one may be returned to the retailer who has to collect it free of charge on a one-to-one basis, as long as
the equipment is of equivalent type and has the same functions as the supplied equipment.
18 GB
Page 19

INSTRUCCIONES PARA UN USO SEGURO
ADVERTENCIA: El aparato y sus componentes accesibles se calientan durante el uso. Se debe tener
cuidado de no tocar los elementos calefactores.
• Los niños menores de 8 años deben permanecer alejados o supervisados de forma continuada por
una persona adulta.
• Este aparato puede ser usado por niños mayores de 8 años y personas con capacidades físicas,
sensoriales o mentales reducidas o falta de experiencia y conocimiento siempre y cuando hayan sido
supervisadas o instruidas sobre el uso del aparato de forma segura y del conocimiento de los riesgos
que comporta.
• Los niños no deben jugar con el aparato.
• La limpieza y el mantenimiento que debe realizar el usuario no será realizada por niños sin supervisión.
• Durante el uso, se calienta el aparato. Se debe tener cuidado de no tocar los elementos calefactores del
interior del horno.
ADVERTENCIA: Las partes accesibles pueden calentarse durante el uso. Los niños deben permanecer
alejados.
• No utilizar limpiadores abrasivos o rascadores metálicos afilados para limpiar el cristal de la puerta del
horno ya que pueden rayar la superficie, pudiendo comportar la rotura del cristal.
• Se debe apagar el horno antes de retirar la pantalla, después de la limpieza, se debe colocar según las
instrucciones.
• Use solamente el sensor de temperatura recomendado para este horno.
• No utilice limpiadores de vapor para la limpieza del aparato.
ADVERNTENCIA: Asegúrese de que el aparato está apagado antes de sustituir la lámpara para evitar la
posibilidad de una descarga eléctrica.
• Los medios de desconexión deben ser incorporados en el cableado fijo en conformidad con las reglas
del cableado.
• las instrucciones indicarán el tipo de cable a utilizar, teniendo en cuenta la temperature de la parte
posterior del aparato.
• Si el cable de alimentación está dañado, se debe sustituir por un cable o conjunto especial suministrado
por el fabricante o el servicio técnico.
PRECAUCIÓN: Con el fin de evitar peligros derivados de alteraciones en el suministro energético, este
aparato no debe ser suministrado a través de un dispositivo de conmutación externo, como un
temporizador, o conectado a un circuito que sea encendido y apagado frecuentemente por los servicios
públicos.
PRECAUCIÓN: Las partes accesibles se pueden calentar con el uso del grill. Los niños deben
permanecer alejados.
• Se debe eliminar el exceso de derrames antes de la limpieza.
• Durante la operación de auto limpieza pirolítica, las superficies pueden calentarse más de lo habitual;
los niños deben permanecer alejados.
19 ES
Page 20

1. INSTRUCCIONES GENERALES
Le agradecemos que haya elegido uno de nuestros productos. Para obtener de este electrodoméstico las mejores prestaciones aconsejamos:
• Leer atentamente las advertencias contenidas en el presente manual.
• Conservar con cuidado este manual para cualquier consulta posterior.
Cuando el aparato està en funcionamento todos sus elementos assessibles, estan calientes. Por ello, tenga cuidado de no tocar estos elementos.
Durante la primera puesta en funcionamiento del horno puede producirse un humo de olor acre causado por el primer calentamiento del pegamento
de los paneles de aislamiento que envuelven el horno. Se trata de un fenómeno absolutamente normal y, en caso de verificarse, es preciso esperar
a la extinción del humo antes de introducir los alimentos.
1.1 DECLARACIÓN DE CONFORMIDAD
Este aparato, en las partes destinadas a estar en contacto con los
alimentos cumple la Directiva CEE 89/109.
Aparato confrome a la Directiva Europea 73/23/CEE e
89/336/CEE, sustituida respectivamente de 2006/95/CE y
2004/108/CE, y sucesivas modificaciones.
1.2 INFORMACIÓN SOBRE SEGURIDAD
•Este aparato deberá destinarse únicamente al uso para el cual ha
sido especialmente concebido, es decir, para la cocción de alimentos.
Cualquier otro uso (por ejemplo, calentamiento a temperatura
ambiente) debe considerarse impropio, y por lo tanto peligroso.
El fabricante declina toda responsabilidad por los posibles daños
causados por el uso impropio, erróneo e irracional del aparato.
•El uso de cualquier aparato eléctrico comporta la observación de
algunas reglas fundamentales. En particular:
— No tire del cable de alimentación para desenchufar el aparato.
— No toque el aparato con las manos o los pies húmedos o mojados.
— No utilice el aparato si no lleva calzado.
— No utilice adaptadores, ladrones ni alargadores.
— En caso de avería o de mal funcionamiento del aparato, apáguelo y
no lo manipule.
•En caso de deterioro del cable, sustitúyalo inmediatamente con
arreglo a las siguientes indicaciones:
— saque el cable de alimentación y sustitúyalo por uno (tipo H05RRF, H05VV-F, H05V2V2-F) y adecuado a la potencia del aparato.
— esta operación deberá realizarla un técnico especializado. El hilo
de tierra (amarillo-verde) debe ser obligatoriamente 10 mm más largo
que los conductores de línea.
En caso de que el aparato precise ser reparado, diríjase únicamente a
un centro de asistencia técnica autorizado y exija piezas de recambio
originales.
No observar todo lo mencionado puede comprometer la seguridad del
aparato.
•No forrar las paredes del horno con aluminio u otras
protecciones disponibles en tiendas. El aluminio o los
protectores, en contacto directo con el esmalte caliente puede
derretirse y deteriorar el esmalte del interior.
1.3 INSTALACIÓN
La instalación corre a cargo del comprador y el Fabricante queda
exento de este servicio; eventuales intervenciones requeridas a la
Casa Constructora que dependan de una instalación incorrenta no
están incluidas en la Garantia.
La instalación debe ser efectuada según las instrucciones por
personal profesionalmente cualificado. Una instalación errónea
puede causar daños a personas, animales o cosas, de los cuales el
fabricante no puede ser considerado responsable.
1.4 INTRODUCCIÓN DEL MUEBLE
Introduzca el aparato en el hueco del mueble (bajo encimera o en
columna). El horno se fija introduciendo 4 tornillos en los agujeros del
marco, visibles al abrir la puerta.
Con el objeto de permitir una mejor ventilación del mueble, empotre el
horno respetando las medidas y las distancias indicadas en la última
página.
Nota: Para los hornos que deban acoplarse a una encimera, resulta
indispensable respetar las instrucciones contenidas en el manual
adjunto al aparato a acoplar.
1.5 IMPORTANTE
Para garantizar un correcto funcionamiento del aparato encastrable,
es necesario que el mueble tenga las características adecuadas. Los
paneles de los muebles adyacentes al horno deberán ser de un
material resistente al calor. En el caso de los muebles de madera
chapada, el encolado deberá resistir una temperatura de 120°C: los
materiales plásticos o encolados que no resistan esta temperatura
pueden deformarse o despegarse.
De acuerdo con las normas de seguridad, una vez empotrado el
aparato no deben existir contactos con las piezas eléctricas. Todas
las piezas protectoras deben fijarse de manera que no puedan
sacarse sin la ayuda de un utensilio.
Para garantizar una buena ventilación debe eliminarse la pared
posterior del hueco, y el panel de apoyo debe tener una apertura
mínima de 45 mm.
1.6 CONEXIÓN ELÉCTRICA
Enchufe la clavija en una base provista de un tercer contacto
correspondiente a la toma de tierra, la cual deberá conectarse
correctamente.
En los modelos desprovistos de clavija, monte una clavija estándar en
el cable capaz de soportar la carga indicada en la placa de
características. El hilo de tierra es de color amarillo-verde. Esta
operación deberá realizarla un técnico especializado.
En caso de que la base y la clavija del aparato sean incompatibles,
haga que un técnico especializado le cambie la base por otra
adecuada.
También puede efectuar la conexión a la red intercalando entre el
aparato y la red un interruptor omnipolar, preparado para la carga y
con arreglo a las normas vigentes. El hilo de tierra amarilloverde no
debe quedar interrumpido por el interruptor.
La base o el interruptor omnipolar utilizados para la conexión deben
estar situados en un lugar fácilmente accesible y cerca del
electrodoméstico instalado.
Importante: en la fase de instalación, coloque el cable de
alimentación de manera que en ningún punto alcance una
temperatura superior a los 50 °C a temperatura ambiente.
El aparato cumple los requisitos de seguridad previstos por los
institutos normativos. Sólo se garantiza la seguridad eléctrica de este
aparato si ha sido conectado correctamente a una instalación de toma
de tierra eficaz, con arreglo a lo dispuesto en las normas vigentes de
seguridad eléctrica, (en caso de duda, exija un control exhaustivo de
la instalación por parte de un técnico especializado). El fabricante
declina toda responsabilidad por los posibles daños causados por la
falta de conexión a tierra de la instalación.
Importante: el fabricante queda exento de cualquier responsabilidad
por los posibles daños personales o materiales causados por la falta
de conexión a tierra.
ATENCIÓN: La tensión y frecuencia de alimentación están
indicadas en la tarjeta de matrícula (en la última página).
Compruebe que la capacidad eléctrica de la instalación de las bases
sean adecuadas para la potencia máxima del aparato, indicada en la
placa de características. En caso de duda, diríjase a un técnico
cualificado.
1.7 EQUIPAMIENTO DEL HORNO
(
según el modelo)
Es necesario limpiar el equipamiento del horno antes de su primer
uso. Limpie con una esponja, y séquelo.
La rejilla simple sirve de soporte para los moldes y las fuentes.
La rejilla para sostener las fuentes sirve más especialmente para
colocar las parrilladas. Debe utilizarse
junto con la bandeja que recoge el jugo
de cocción (grasera).
Gracias a su perfil especial, las rejillas
permanecen en horizontal hasta el
tope. No hay ningún riesgo de
deslizamiento o de desbordamiento de
la fuente.
20 ES
Page 21

La grasera sirve para recoger el jugo de las parrilladas. Sólo se debe utilizar en modo Grill, Asador o Turbogrill (según el
modelo). Para los otros modos de cocción, retírela del horno.
No utilice nunca la grasera como fuente para asar. Ello provocaría emanación de humos, salpicaduras de grasa y un
ensuciamiento rápido
El Set para Pizza es ideal para cocinar
pizzas. El set debe utilizarse de forma
combinada con la función Pizza.
Durante la utilización del horno, los accesorios que no utilice deben ser retirados del mismo.
2. CONSEJOS ÚTILES
2.1 REJILLAS HORNO - SISTEMA DE SUJECIÓN
El horno está dotado de un nuevo sistema
de sujeción de las rejillas.
Este sistema permite extraer las rejillas
casi por completo sin que caigan y
manteniéndolas perfectamente en plano,
permitiendo verificar y mezclar los
alimentos con la máxima tranqu-ilidad y
seguridad.
Para extraer las rejillas es suficiente, como
se indica en el dibujo, levantarlas,
cogiéndolas por la parte anterior y tirar de ellas.
2.2 LA COCCIÓN AL GRILL
Este tipo de cocción permite el dorado rápido de los alimentos. Con
este fin, le aconsejamos introducir la rejilla generalmente en el 3° o 4°
estante, según las dimensiones de los alimentos. (pág. 24) Casi todas
las carnes pueden ser cocidas al grill, excepto algunas carnes tiernas
de caza y albóndigas.
La carne y el pescado para cocinar al grill deben ser ligeramente
untados con aceite.
2.3 Los modelos
Los hornos tienen un control electrónico de la velocidad
del ventilador que está patentado por Candy y que se llama
VARIOFAN. Durante la cocción, este sistema cambia
automáticamente la velocidad del ventilador (en el modo
multifunción) para optimizar el flujo de aire y la temperature interna
del horno.
Todos los hornos tienen la función .
Esta función permite la distribución de la humedad y de la
temperatura. Reduce la perdida de humedad en un 50 %,
lo que garantiza un alimento más sabroso y tierno. Esta
función es recomendada para cocinar pasteles y pan.
La función Sprinter reduce el tiempo de calentamiento del
horno; en sólo 8 minutos alcanza 200°.
La función Supergrill dá la posibilidad de aumentar la
intensidad del tostado. La potencia Supergrill se
incrementa un 50% respecto a un grill convencional.
Algunos hornos vienen equipados con la nueva contrapuerta de
cristal la cual tiene una mayor área de cristal y permite un mejor
aislamiento.
2.4 SEGÙN MODELOS
Es un sistema de iluminación que reemplaza a la tradicional lámpara. 14
luces LED´s están integrados en el interior de la puertas. Estas producen
una luz blanca de calidad la cual permite ver el interior del horno con
claridad sin ningún tipo de sombra en las diferentes alturas o baldas del
horno.
Ventajas:
El sistema , además de ofrecer una excelente iluminación
dentro del horno, duramucho más tiempo que la bombilla tradicional
y consume mucho menos, por lo que
ahorra energía.
- Visión óptima
- Gran vida útil
- Consumo muy bajo de energía, -95 %
en comparación con la tradicional
iluminación.
El electrodoméstico que lleva un LED blanco de la 1M Clase según IEC
60825-1:1993 + A1: 1997 + A2: 2001 (equivalente a EN 60825-1: 1994 +
A1: 2002 + A2: 2001); la potencia de luz máxima que emite 459nm
<150uW. No observado directamente con los instrumentos ópticos.
La bandeja del horno.
La bandeja del horno es ideal para asar.
Úselo junto con la bandeja de goteo. Un
pomo o manivela viene incluido para ayudar a
mover los accesorios de manera segura. No
deje este pomo o manivela dentro del horno.
2.5 TIEMPOS DE COCCIÓN
En las págs. 24 y 25 mostramos una tabla indicativa de los tiempos y
temperaturas aconsejados para las primeras cocciones. Con la
experiencia podrá variar a su gusto los valores mostrados en la tabla.
2.6 HORNO AUTOLIMPIANTE CATALÍTICO
Los paneles especiales autolimpiantes recubiertos por un esmalte con
estructura microporosa (ofrecidos como accesorios opcionales en unos
modelos o de serie en otros) eliminan la limpieza manual del horno.
Las grasas proyectadas sobre las paredes durante la cocción, son
descompuestas por el esmalte, mediante un proceso catalítico de
oxidación y son transformados en productos gasos.
Salpicaduras excesivas de grasa pueden obstruir los poros y por
consiguiente impedir la autolimpieza, tal característica puedé ser
restablecidá mediante un calentamiento de unos 10-20 minutos del
horno vacío programándo el horno a la máxima temperatura. No usar
productos abrasivos, barillas metálicas, objetos de punta, paños
rugosos, productos químicos o jabones que puedieran dañar
irremediablemente el esmalte.
2.7 LIMPIEZA Y MANTENIMIENTO
Limpiar las superficies de acero inox y esmaltadas con agua templada y
jabón, o con productos específicos de comercios especializados,
evitando absolutamente el uso de polvos abrasivos que dañarían las
superficies y partes estéticas.
La limpieza del horno es muy importante y debe ser efectuada cada vez
que éste es utilizado. En las paredes se depositan grasas derretidas
durante la cocción que podrían, en el sucesivo encendido, producir olores
desagradables que afectarían a la cocción. Para la limpieza utilizar agua
caliente y jabón, aclarando cuidadosamente.
Para eliminar esta tarea, las paredes del horno pueden ser revestidas
con paneles autolimpiantes especiales, accesorios opcionales en
algunos modelos: ver parágrafo específico “HORNO
AUTOLIMPIANTECATALÍTICO”
Utilizar jabón y barillas de acero para las rejillas inox. La limpieza de las
superficies de cristal templado debe ser efectuada cuando las superficies
estén frias. Eventuales roturas debidas a la no observación de esta regla
elemental no están cubiertos por la garantia.
La bombilla del horno puede ser sustituida desconectando eléctricamente
el aparato y destornillando la ampolla que la encierta, sustituyendo la
bombilla por una análoga resistente a altas temperaturas.
Se aconseja además utilizar fuentes con bordes altos en el caso de
cocciones de alimentos particularmente grasos (asados, etc) y utilizar la
grasera al realizar la cocción al grill.
Para el caso que, por condiciones particulares de suciedad, no fuera
suficiente la acción precedente, se aconseja apartar las grasas con un
paño mullido o una esponja humedecidos con agua caliente. La porosidad
del esmalte es fundamental para garantizar la acción autolimpiante.
N.B. Todos los paneles autolimpiantes comercializados en el mercado
tienen una eficacia de rendimiento de aproximadamente 300 horas de
funcionamiento del horno. Pasado dicho límite los paneles deberían ser
sustituidos.
2.8 ASISTENCIA TÉCNICA
En caso de incorrecto funcionamiento del horno le aconsejamos:
—verificar la buena conexión del enchufe en la toma de corriente.
En caso de que no se determine la causa del mal funcionamiento:
apagar el aparato sin manipularlo y llamar al Servicio de Asistencia
Técnica. Antes de llamar al Centro de Asistencia recuerde tomar nota
del número de matrícula situado en la tarjeta matrícula del producto
(Fig. última página).
El aparato está dotado de un certificado de garantía que le permite
disponer del Servicio Asistencia Técnica.
21 ES
Page 22

3. USO DEL RELOJ/PROGRAMADOR ANALÓGICO
DESCRIPCIÓN DE LAS FUNCIONES
3.1 OPERACIÓN GENERAL
Este temporizador gestiona el tiempo mostrado (con manillas
analógicas) y la operativa del horno (empleando mandos “Push” e
iconos indicativos). Pulsando el mando, se puede: ajustar el tiempo,
programar el inicio y fin de cocción o configurar la alarma
(cuentaminutos)
3.2 AJUSTAR LA HORA
Para ajustar el reloj, se debe pulsar el mando 4 veces de forma breve
hasta que el icono “Reloj” parpadee.
A partir de entonces, se puede incrementar o reducir el tiempogirando
el mando siguiendo el sentido de las agujas horarias o bien en sentido
contrario. Transcurrido 10 segundos desde el último ajuste, el
temporizador electrónico saldrá automáticamente del modo “Setting”
(Ajustes).
3.3 COCCIÓN MANUAL
Durante la condición por defecto, el temporizador permite poner en
marcha manualmente el horno utilizando el botón general del horno
(externo al temporizador)
ATENCIÓN: Una vez conectado a la corriente, el temporizador
requiere unos segundos hasta que el relé esté cargado.
3.4 AJUSTE DEL CUENTAMINUTOS
La programacióndel cuentaminutos permite disponer de una alarma
simple tras el final de la programación de un intervalo de tiempo sin
activar la cocción. (Modo Cuentaminutos)
Para programar una “alarma” (Modo Cuentaminutos), pulsar 3 veces
el mando hasta que el icono “TIMER” (Temporizador) parpadee. El
ajuste del Cuentaminutos es idéntico al ajuste del tiempo de final de
cocción (ver parágrafo correspondiente).
Se puede utilizar el cuentaminutos aun cuando no haya programa de
cocción activado.
STOP
TEMPORIZADOR
RELOJ
INICIO
Para cancelar la programación antes del final de la cocción
programada, se debe pulsar el mando durante unos segundos, se
cancelará la programación y el temporizador volverá al modo de
cocción manual.
3.6 COCCIÓN TOTALMENTE AUTOMÁTICA
La programación del inicio de cocción permite iniciar y finalizar la
cocción automáticamente según el tiempo programado.
Para programar el tiempo de inicio de cocción, pulsar brevemente 1
vez el mando hasta que el icono “START”(Inicio) parpadee.
Se puede incrementar o reducir el tiempo girando el mando
siguiendo el sentido de las agujas horarias o en sentido contrario. El
icono “START” (Inicio) continuará parpadeando durante algunos
segundos después de la última rotación. Si durante este tiempo no se
gira o pulsa el mando, automáticamente las manillas volverán a
mostrar la hora y se cancelará la programación.
Si se pulsa el mando, la hora de inicio de cocción queda registrada (
se iluminará el icono “START” (Inicio)) y el temporizador se cambia a
modo “configuración del tiempo final de cocción” (se iluminará el
icono “STOP”).
La programación del tiempo final de cocción seguirá el procedimiento
de la sección anterior.
La cocción se iniciará cuando se alcance el tiempo de inicio
programado.
3.7 INDICACIÓN DE FALLO ELÉCTRICO
(OPCIONAL)
El temporizador indica los fallos de suministro eléctrico mediante el
parpadeo del símbolo “RELOJ”. En este caso, para desactivarlo,
pulsar brevemente el mando
3.5 COCCIÓN SEMIAUTOMÁTICA: APAGADO
TRAS FINALIZACIÓN DEL TIEMPO PROGRAMADO
La programación del tiempo final de cocción permite el inicio
inmediato y el fin de cocción de forma automática según el tiempo
programado. Para programar el tiempo del final de cocción, se debe
pulsar brevemente el mando 2 veces hasta que parpadee el icono
“STOP”.Para incrementar o reducir el tiempo de cocción, girar el
mando siguiendo el sentido de las agujas horarias o en sentido
contrario.
El icono “STOP” continuará parpadeando durante algunos segundos
tras la última rotación. Se puede confirmar la programación pulsando
el mando (Tiempo de cocción mínima: 2 minutos)
Una vez se haya confirmado la programación, se iniciará la cocción y
la alarma se activa automáticamente. Se detendrá la cocción al
finalizar el tiempo programado.
Para visualizar la programación, basta con pulsar y soltar el mando,
el temporizador mostrará la programación seleccionada.
Al finalizar la cocción, el icono “STOP” parpadeará y sonará la alarma.
Tras un minuto, la alarma dejará de sonar y el icono “STOP”
continuará parpadeando hasta que se pulse el mando.
22 ES
Page 23

4. INSTRUCCIONES DE USO
Temperaturas
Mando
selector
predeterminadas
y reglaje para el
programador
electrónico
(Type A)
termostato
Mando
FUNCIÓN
Conecta la luz interior
DESCONGELACIÓN
Funcionamiento de la turbina de cocción que hace circular el aire dentro del espacio
del horno. Ideal para realizar una descongelación previa a una cocción.
Sprinter
Esta posición permite un precalentamiento rápido del horno. Una vez seleccionada esta función,
se consigue un inmediato calentamiento del horno (p.ej: tarda 8 minutos en alcanzar 200°C), y la
temperatura deseada puede seleccionarse mediante el botón correspondiente. El fin de la fase
de precalentamiento se indica al apagarse el piloto del termostato "°C". Una vez concluida esta
fase, es posible seleccionar la función de cocción deseada e introducir los alimentos que se van a
cocinar. Tener cuidado de no introducir alimentos en el horno durante la fase de
precalentamiento, ya que estos podrían resultar dañados.
Convección natural
Funcionan la resistencia inferior y la resistencia superior del horno. Es la cocción
tradicional, ideal para cocinar asados, caza, galletas, manzanas al horno y para
conseguir alimentos crujientes.
CALOR CIRCULANTE (a)
Utilización simultánea de la resistencia inferior, superior y de la turbina que hace circular
el aire dentro del espacio del horno. Función recomendada para las aves, la repostería,
los pescados, las verduras... El calor penetra mejor dentro del alimento a cocer
reduciendo el tiempo de cocción, así como el tiempo de precalentamiento. Se pueden
realizar cocciones combinadas con preparaciones idénticas o distintas en uno o dos
niveles. Este modo de cocción garantiza una distribución homogénea del calor y no
mezcla los olores. Para una cocción combinada se deben prever unos diez minutos más.
SOFT COOK (a)
Soft cook es la función ideal para pasteles y pan. Gracias a la reducida velocidad del ventilador,
esta función aumenta la humedad presente en el interior del horno. Una mayor humedad crea las
condiciones de cocción ideales para aquellos alimentos que necesariamente deben mantener
una consistencia elástica mientras están cociendo (ej. tartas, pan, galletas) a fin de no
desmenuzarse.
Nivel 4
Nivel 4
Nivel 4
RESISTENCIA INFERIOR CIRCULANTE (a)
Utilización de la resistencia inferior más la turbina que hace circular el aire dentro del
espacio del horno. Ideal para hacer tartas de frutas jugosas, tortadas, quiches, pasteles.
Evita que se sequen los alimentos y favorece la subida de bizcochos, masa de pan y
otras cocciones realizadas por debajo. Coloque la rejilla en la ranura inferior.
GRILL: El grill debe utilizarse con la puerta cerrada.
Utilización de la resistencia superior con posibilidad de ajustar la temperatura. Es
necesario un precalentamiento de 5 minutos para que la resistencia se ponga al rojo.
Éxito seguro con las parrilladas, las brochetas y los gratinados. Las carnes blancas
deben alejarse del grill, porque aunque así se alargará el tiempo de cocción, la carne
quedará más sabrosa. Las carnes rojas y los filetes de pescado se pueden colocar
encima de la rejilla colocando debajo la grasera.
SUPER GRILL: el horno tiene dos posiciones Grill
Grill : 2200 W Grill SUPER : 3000 W
TURBOGRILL (a) : La función turbogrill debe utilizarse con la puerta cerrada.
Utilización de la resistencia superior más la turbina que hace circular el aire dentro del
espacio del horno. Se requiere un precalentamiento para las carnes rojas pero no para
las carnes blancas. Ideal para las cocciones de volumen grueso, piezas enteras como
cerdo asado, las aves, etc. Coloque el plato que quiera cocer directamente en la rejilla
en el centro del horno, a un nivel medio. Coloque la grasera debajo de la rejilla para
que las grasas caigan dentro. Asegúrese de que la comida no quede demasiado cerca
del grill. En la mitad de la cocción, gire la pieza que esté cociendo.
Grill asador rotativo
Resistencia grill y motor asador. Sirve para realizar asados.
Modalidad pizza
El calor envolvente en esta modalidad genera un ambiente similar al de los hornos de
leña de las pizzerías.
(a) SEGÚN EL MODELO, Función con VARIO FAN : Fan es el exclusivo sistema de funcionamiento desarrollado porCandy para optimizar los
resultados de cocción, la regulación de la temperatura y la regulación de la humedad. El sistema Vario Fan modifica automáticamente la velocidad de
rotación del ventilador para todo tipo de cocciones en multifunción. Este sistema se activa automáticamente cada vez que es seleccionada una función
en el interior del área descrita en el panel de control.
* Programa de prueba según CENELEC EN
60350-1
** Programa de prueba según CENELEC EN 60350-1 utilizado para la definición de la clase energética
23 ES
Page 24

5. TABLAS DE TIEMPOS DE COCCIÓN
Los tiempos sugeridos en las tablas siguientes son indicativos y pueden variar según la calidad, frescura, dimensión y espesor de los alimentos y
según su gusto. Dejar siempre reposar durante unos minutos antes de servir, ya que todos los alimentos siguen cociéndose tras extraerlos del
horno
CONSEJO ÚTIL: Apagar el horno al menos 10 minutos antes del
tiempo indicado dejando los alimentos en el interior del mismo. Ello le
permitirá ahorrar energiá y completar la cocción según sus gustos.
Para no secar demasiado las superficies es indispensable bajar la
temperatura.
Posición de las repisas
Horno Eléctrico Estático Horno Eléctrico Ventilado
Plato
Cantidad
Estante
Tiempo de
cocción en
minutos
Tempe-
ratura
horno
Estante
Tiempo de
cocción en
minutos
Tempe-
ratura
horno
Observaciones
• Pasta
Lasañas
Canelones
Pasta al horno
Kg 3,5
Kg 1,8
Kg 2,5
2 2
2 2
2 2
70 ÷ 75
50 ÷ 60
55 ÷ 60
220
220
220
60 ÷ 65
40 ÷ 50
45 ÷ 50
200
200
200
Introduzca la lasaña en el horno frío.
Introduzca la canelones en el horno frío.
Introduzca la pasta en el horno frío.
• Pastas saladas
Preparar la pasta en forma redonda e
incida con un cuchillo una cruz sobre la
parte superior de la forma.
Dejar a temperatura ambiente al menos
2 horas, untar la grasera y situar la
forma en el centro de la misma.
Precalentar durante 15 minutos el
horno. Preparar la pizza en la grasera
esmaltada con tomates, mozzarella y
jamón, aceite, sal, orégano.
Situar 24 vol au vent en la grasera y
cocer
Precalentar durante 15 minutos el
horno. Dejar a temperatura ambiente al
menos 2 horas, untar la grasera y situar
la forma en el centro de la misma.
Pan
Pizza
Hojaldre n. 24
vol au vent
Focaccia
(n° 4)
Kg 1
pasta
Kg 1
n° 24
gr. 200
di pasta cad.
2 2
35
prerisc.10
25 ÷ 35
30 ÷ 35
25 ÷ 30
200
190
220
200
30 ÷ 35
prerisc.10
11
21
22
20 ÷ 25
25 ÷ 30
20 ÷ 25
180
190
200
180
• Carne
Todas las carnes pueden ser cocidas en recipientes de borde bajo o borde alto.
Es aconsejable cubrir el recipiente de borde bajo con una tapa para evitar ensuciar el horno con salpicaduras del condimento.
Las carnes cubiertas resultan más blandas y jugosas, mientras que las descubiertas resultan más crujientes.
Los tiempos indicados valen para cocciones con recipiente cubierto o descubierto.
Roastbeef
entero
Solomillo de
cerdo enrollado
Solomillo de
ternera
enrollado
Kg 1
Kg 1
Kg 1,3
70 ÷ 80
100 ÷ 110
90 ÷ 110
220
220
220
33
22
21
50 ÷ 60
80 ÷ 90
90 ÷ 100
200
Situar la carne en una bandeja Pirex de
borde alto con sal y pimienta.
Dele la vuelta a mitad cocción.
Cocer la carne en bandeja Pirex
cubierta con sal,pimienta,aromas
200
naturales,aceite y mantequilla.
Cocer como arriba
200
4
3
2
1
Solomillo de
buey filete
• Fish
• Pescado
Trucha
Salmon
Lenguado
Dorada
Kg 1
3 enteras/
Kg 1
700 g a rodajas
de 2,5 cm esp.
Filetes / Kg 1
2 enteras
80 ÷ 90
40 ÷ 45
30 ÷ 35
40 ÷ 45
220
220
220
220
40 ÷ 45 220
24 ES
22
22
22
22
22
80 ÷ 90
35 ÷ 40
30 ÷ 25
35 ÷ 40
35 ÷ 40
Cocer como arriba.
200
Cocer las truchas cubiertas aceite, sal y
200
cebollas en bandejas de Pirex.
Cocer el salmón no tapado en bandeja
200
Pirex con sal, pimienta y aceite
Cocer el lenguado con sal y una
200
cuchara de aceite.
Cocer las doradas en recipiente
200
cubierto con aceite y sal.
Page 25

5. TABLAS DE TIEMPOS DE COCCIÓN
Horno Eléctrico Estático Horno Eléctrico Ventilado
Plato
Cantidad
Estante
Tiempo de
cocción en
minutos
Tempe-
ratura
horno
Estante
Tiempo de
cocción en
minutos
Tempe-
ratura
horno
Observaciones
• Aves, Conejo
Coloque la pintada en bandeja Pirex o
Pintada
Pollo
Conejo troceado
Kg 1-1,3
Kg 1,5-1,7
Kg 1-1,2
22
22
22
60 ÷ 80
110 ÷ 120
55 ÷ 65
220
220
220
60 ÷ 70
100 ÷ 110
50 ÷ 60
200
200
200
cerámica de borde alto condimentado con
aromas naturales y poquísimo aceite.
Como para la pintada.
Trocear el conejo en partes iguales y
situarlas en la grasera esmaltada,
condi-mente con aromas naturales.
Si fuera necesario darle la vuelta
• Dulces, Pasteles
Pastel cacao en
bote
Pastel Margarita
en bote
Pastel de
zanahorias en bote
Torta crostata
albicocca
Scatola
Scatola
Scatola
700 gr
1
1
1
1
55
55
65
40
180
175
180
200
1
1
1
2
50
40 ÷ 45
50 ÷ 60
30 ÷ 35
160
160
160
180
En bandeja para pasteles Ø 22. Prec.
durante 10 min.
En bandeja para pasteles Ø 22. Prec.
durante 10 min.
En bandeja para pasteles Ø 22. Prec.
durante 10 min.
En bandeja para pasteles Ø 22. Prec.
durante 10 min.
• Verdura
Colocar los hinojos cortados en 4
Hinojos
Calabacín
Patatas
Zanahorias
800 gr
800 gr
800 gr
800 gr
1
1
2
1
70 ÷ 80
70
60 ÷ 65
80 ÷ 85
220
220
220
220
1
1
2
1
60 ÷ 70
60 ÷ 70
60 ÷ 65
70 ÷ 80
200
200
200
200
partes y tapados en bandeja Pirex,con
mantequilla y sal y preferiblemente con
la parte interna hacia arriba.
Rabanar los calabacines y cocer en bandeja
Pirex, cubiertas con mantequilla y sal.
Cortar las patatas en partes iguales y
cocerlas cubiertas con aceite, sal y
orégano o romero en bandeja Pirex.
Cortar las zanahorias y cocerlas
ubiertas en bandeja Pirex.
• Fruta
Manzanas
enteras
Peras
Molocotones
Kg 1
Kg 1
Kg 1
1
1
1
45 ÷ 55
45 ÷ 55
45 ÷ 55
220
220
220
2
2
2
45 ÷ 55
45 ÷ 55
45 ÷ 55
200
200
200
Cocer la fruta en bandeja de Pirex o cerámica
no cubierta. Dejar enfriar en horno.
Como arriba.
Como arriba.
• Cocción al grill
La cocción al grill debe ser realizada colocando el alimento bajo el grill eléctrico a rayos infrarrojos. Atención: durante el funcionamiento el grill está al rojo
vivo. La grasera debe ser colocada bajo la rejilla para recoger las salsas.
Introducir el pan de molde sobre la parrilla
Pan de molde
tostado
Bikinis
Salchichas
Costillas de buey
Muslos de pollo
4 rebanadas
4
n°6 / Kg 0,9
n°4 / Kg 1,5
n°4 / Kg 1,5
44
33
44
44
33
5
(5 precal.)
10
(5 precal.)
25/30
(5 precal.)
25
(5 precal.)
50/60
(5 precal.)
Grill Grill
Grill Grill
Grill Grill
Grill Grill
Grill Grill
5
(10 precal.)
5/8
(10 precal.)
15/20
(10 precal.)
15/20
(10 precal.)
50/60
(10 precal.)
soporte. Tras la 1a cocción dar la vuelta hasta
ultimar la cocción. Advertencia:mantener el
pan de molde en calinete en el fondo del
horno antes de servir.
Introducir los bikins sobre la parrilla soporte
grasera; tras la 1a bruñidura dar la vuelta al
bikini hasta ultimar la bruñidera.
Cortar las salchichas por la mitad y disponerlas
sobre la parrilla, con la parte interna hacia
arriba. A mitad cocción dar la vuelta a las
salchichas hasta ultimar la cocción.
Advertencia: De vez en cuando controlar
visualmente la uniformidad de la cocción. En
caso de desuniformidad intercambiar las
cocidas con las menos cocidas
Disponer las piezas debajo de la acción del
grill grande y darles la vueltas dos veces.
Condimente con aromas naturales y darles
la vuelta de vez en cuando.
Este aparato está etiquetado conforme a la Directiva europea 2012/19/EU sobre residuos de aparatos eléctricos y electrónicos.
(RAEE). La RAEE contiene tanto sustancias contaminantes (que pueden generar consecuencias negativas para el medio ambiente) como
componentes básicos (que pueden reutilizarse). Es importante someter los RAEE a tratamientos específicos, con el fin de
retirar y eliminar correctamente todos los contaminantes y reciclar todos los materiales.
Los usuarios pueden desempeñar una función importante para garantizar que los RAEE no representen un problema ambiental; es esencial
que se sigan algunas reglas:
• Los RAEE no se deben tratar como residuos domésticos.
• Los RAEE se deben depositar en los puntos de recolección correspondientes gestionados por la municipalidad o por empresas registradas.
En muchos países, para los RAEE de gran tamaño, puede existir la recolección domiciliaria.
• Cuando compre un nuevo aparato, el anterior debe devolverse al vendedor que lo debe recolectar gratuitamente de manera individual,
siempre que el equipo sea de un tipo equivalente y que tenga las mismas funciones que el equipo entregado
25 ES
Page 26

CONSEILS DE SÉCURITÉ
• AVERTISSEMENT: L'appareil et les parties accessibles deviennent chauds pendant l'utilisation. Des
précautions doivent être prises pour éviter de toucher les éléments chauffants.
• Les enfants de moins de 8 ans doivent être tenus à l'écart à moins d'être surveillés continuellement.
• Cet appareil n'est pas destiné à être utilisé par des personnes (y compris les enfants) dont les capacités
physiques, sensorielles ou mentales sont réduites, ou ayant un manque d'expérience et de
connaissances, à moins qu'elles n'aient été formées à l'utilisation de l'appareil, par une personne
responsable de leur sécurité.
• Les enfants ne doivent jouer avec l'appareil.
• Le nettoyage et l'entretien par l'utilisateur ne doit pas être fait par des enfants sans surveillance.
• En cours d'utilisation l'appareil devient chaud. Des précautions doivent être prises pour éviter de
toucher les éléments chauds à l'intérieur du four.
AVERTISSEMENT: Les parties accessibles peuvent devenir chaudes pendant l'utilisation. Les jeunes
enfants doivent être tenus à l'écart.
• Ne pas utiliser de nettoyants abrasifs ou de racloirs métalliques tranchants pour nettoyer la vitre de la
porte du four car ils peuvent rayer la surface, entrainant des risques d'explosion.
•Le four doit être éteint avant d'enlever la protection et après le nettoyage, la protection doit être replacé
en respectant les instructions.
• Utiliser seulement la sonde de température recommandée pour ce four.
• Ne pas utiliser de nettoyants vapeur pour le nettoyage.
• AVERTISSEMENT: Assurez-vous que l'appareil est éteint avant de remplacer la lampe afin d'éviter les
risques d'électrocution.
• Un système de déconnexion doit être incorporé dans le compteur conformément aux règles de
câblage.
• Les instructions ndiquent le type de cordon à utiliser, en tenant compte de la température de la surface
arrière de l'appareil.
• Si le cordon d'alimentation est endommagé, il doit être remplacé par un cordon spécial disponible
auprès du fabricant ou de stations de dépannage agrées.
ATTENTION: Pour éviter tout danger dû à une réinitialisation accidentelle, cet appareil ne doit pas être
alimenté par un dispositif de commutation externe, comme une minuterie, ou connecté à un circuit qui est
régulièrement allumé et éteint par l'utilitaire.
ATTENTION: Les parties accessibles peuvent être chaudes lorsque le barbecue est en cours
d'utilisation. les jeunes enfants doivent être tenus à l'écart.
• Le liquide débordé doit être enlevé avant de nettoyer.
• Pendant le fonctionnement de la pyrolyse, les surfaces peut devenir plus chaude que d'habitude et les
enfants doivent être tenus à l'écart.
26 FR
Page 27

1. INSTRUCTIONS GENERALES
— Lire attentivement les instructions contenues dans cette brochure, elles fournissent d’importantes indications sur la sécurité d’installation,
l’emploi du four et son entretien.
— Conserver soigneusement cette notice d’utilisation pour toutes consultations ultérieures.
— Après avoir déballé votre four, vérifier que l’appareil est complet.
— Les emballages comme le plastique, le polystyrène, peuvent constituer un danger pour les enfants. Ne pas les laisser à leur portée.
ATTENTION
Lors de la première utilisation du four, il peut se produire un dégagement de fumée âcre provoqué par le premier échauffement du collant des
panneaux d’isolation enveloppant le four. Ce phénomène est normal. Attendez que la fumée cesse avant de cuire des aliments.
ATTENTION: La tension et la fréquence d’alimentation sont indiquées sur la plaque signalétique (illustration dernière page). Faites appel
à un professionnel pour l’installation de votre four.
1.1 DECLARATION DE CONFORMITÉ:
• Les parties de cet appareil pouvant être en contact avec des
substances alimentaires sont conformes à la prescription de la dir.
CEE 89/109
Cet appareil est conforme aux Directives Européennes
73/23/EEC et 89/336/CEE, remplacées par 2006/95/EC et
2004/108/EC, et les modifications successives.
1.2 CONSIGNES DE SECURITE
Cet appareil est conçu pour cuire des aliments. Tout autre utilisation
(exemple chauffage d’appoint) doit être considéré comme impropre.
Le constructeur ne peut être tenu comme responsable en cas de
dommages liés à une mauvaise utilisation ou a des modifications
techniques du produit.
L’emploi d’un appareil électrique nécessite quelques règles de
sécurité.
- Ne pas tirer sur le fil électrique pour débrancher la prise.
-Ne pas toucher l’appareil avec les pieds ou les mains mouillés.
-Evitez d’utiliser l’appareil pieds nus.
L’utilisation de multiprises et de rallonges pour raccorder votre appareil
est fortement déconseillé. En cas de panne ou de mauvais
fonctionnement il faut éteindre le four avant de le démonter. En cas de
détérioration du fil électrique, remplacez-le rapidement en suivant les
indications suivantes: ôtez le fil d’alimentation électrique et remplacezle par un (du type H05RR-F, H05VV-F, H05V2V2F) adapté à la
puissance de l’appareil. Vous veillerez à ce que cette opération soit
effectuée par un centre technique agréé. Pour l’utilisateur c’est la
certitude d’obtenir des pièces de rechange d’origine. Le non-respect
de ces règles peut compromettre la sécurité de l’appareil.
•Ne pas tapisser les parois du four avec des feuilles en aluminium
ou des protections jetables du commerce. La feuille d'aluminium
ou toute autre protection, en contact direct avec l'email chauffe,
risque de fondre et de deteriorer l'email du moufle..
1.3 INSTALLATION
La mise en service de l’appareil est à la charge de l’acheteur, le
constructeur est dégagé de ce service. Les pannes liées à une
mauvaise installation ne seront pas couvertes par la garantie. Une
mauvaise installation peut provoquer des dommages aux personnes,
aux animaux domestiques; dans ce cas la responsabilité du
contructeur ne peut être engagée.
1.4 MISE EN PLACE DU FOUR DANS SON MEUBLE
Une fois le four inséré dans son meuble, I’ancrage se fait par 4 vis
visibles en ouvrant la porte du four.
Pour permettre une meilleure aération du meuble, les fours doivent
être encastrés conformément aux mesures et distances indiquées sur
l’illustration de la dernière page.
N.B.: Pour les fours à associer avec des plaques de cuisson, il est
indispensable de respecter les instructions contenues dans la
brochure jointe à l’appareil à associer.
1.5 IMPORTANT
Le meuble qui va supporter le four doit avoir des caractéristiques
appropriés. Les panneaux du meuble doivent pouvoir résister à la
chaleur.
Dans le cas de meubles en bois plaqué, les colles doivent résister à
une température de 120°C sinon il y a un risque de décollement ou de
déformations. Conformément aux normes de sécurité, une fois
encastré, aucun contact ne doit être possible avec les parties
électriques.
Toutes les parties qui assurent la protection doivent être fixées de
façon à ne pas pouvoir être enlevées sans outil. Pour garantir une
bonne aération, retirer la paroi arrière du meuble.
1.6 ALIMENTATION ELECTRIQUE
Brancher la fiche dans une prise de courant équipée d’un troisième
contact correspondant à la prise de terre. Montez sur le fil une prise
normaliséé capable de supporter la charge indiquée sur la plaquette.
Le fil conducteur de masse à la terre est identifié par les couleurs
jaune et verte. Veiller à ce que votre installation soit capable de
supporter toute la puissance absorbée par le four. Si votre installation
électrique n’est pas conforme faites la modifier par un électricien afin
de prévenir tous risques. On peut également effectuer le
branchement au réscau en interposant entre l’appareil et le réseau un
interrupteur omnipolaire dimensionnée en fonction de la charge et
conforme aux normes en vigueur. Le fil de terre jaune et vert ne doit
pas être interrompu par l’interrupteur. La prise et l’interrupteur
omnipolaire utilisés doivent être facilement accessibles une fois
l’appareil électroménager installé.
1.7 IMPORTANT
Une fois installé le fil d’alimentation doit être positionné de manière a
ce que sa température ne dépasse pas de 50°C la température
ambiante.
L’appareil est conforme aux exigences de sécurité prévues par les
organismes qui établissent les normes. La sécurité électrique de cet
appareil n’est assurée que si il est correctement installé tout en
respectant les normes de sécurité électrique en vigueur.
Le constructeur ne peut être tenu comme responsable des
dommages résultant du manque de mise à la terre de l’installation.
1.8 EQUIPEMENT DU FOUR
(
EQUIPEMENT DIFFERENT SELON LE TYPE DE FOUR)
Avant la première utilisation des différents accessoires, nous
recommandons un nettoyage avec une éponge additionnée de
produit lessiviel, suivi d'un rinçage et d'un séchage.
La grille simple sert de support aux
moules et aux plats.
La grille porte-plat sert plus
particulièrement à recevoir les grillades.
Elle est à associer au plat récolte sauce.
Grâce à leur profil spécial, les grilles
restent à l'horizontale jusqu'en butée.
Aucun risque de glissement ou de
débordement du plat.
Le plat récolte-sauce est destiné à
recevoir le jus des grillades. Il n'est à
utiliser qu'en mode grilloir, Tournebroche
ou Turbogril (selon modèle de four).
Attention : en cuisson autre que les modes Grilloir,Tournebroche, et
Turbo-gril, le plat récolte-sauce doit être retiré du four.
Ne jamais utiliser le plat récolte-sauce comme plat à rôtir, il en
résulterait des dégagements de fumée, des projections de graisse et
un encrassement rapide du four.
27 FR
Page 28

2. CONSIGNES UTILES
2.1 GRILLES DU FOUR, NOUVEAU SYSTÈME
D’ARRÊT
Tous les fours bénéficient d’un nouveau
système d’arrêt des grilles. Ce système
permet de sortir complètement la grille en
totale sécurité. Parfaitement bloquée elle
ne peut pas basculer vers l’avant malgré la
présence d’un poids important. Plus
stables,ces grilles assurent une plus
grande sécurité et tranquillité.
2.2 LA CUISSON AU GRIL
Le préchauffage est superflu. La cuisson peut se faire porte close et
les aliments doivent être placés par rapport au gril en fonction des
résultats que l’on souhaite obtenir.
— Plus près pour les aliments dorés en surface et saignants.
— Plus loin pour les aliments bien cuits à l’intérieur.
Le lèchefrite permet la récupération du jus.
Ne jamais utiliser le lèchefrite comme plat à rotir, il en résulterait
dégagements de fumée, des projections de graisse et un
encrassement rapide du four.
2.3 Selon modèle Le PACK
2.5 TEMPS DE CUISSON
Dans les pages 48, 49 un tableau récapitulatif indique les temps
de cuisson et les températures selon les préparations.
2.6 FOUR AUTONETTOYANT PAR CATALYSE
Les panneaux autonettoyants à émail microporeux disponibles en
option évite le nettoyage manuel du four.
Pendant la cuisson les projections de graisse sont “l’absorbées”
par les parois catalytiques. La graisse est ensuite détruite par
oxydation en devenant de la poussière. En cas de cuisson
particulièrement grasse, il peut arrivér que la graisse bouche les
pores de l’émail. Pour détruire un surplus de graisse mettez en
fonctionnement votre four à vide sur la position maximale de
température pendant environ 10 à 20 minutes.
Ne jamais utiliser de grattoir, de produit chimique pour nettoyer la
catalyse. Utilisez plutôt de l’eau chaude et une éponge.
Si jamais vous cuisinez un plat très gras ou une viande au gril,
utiliser un plat avec de grands rebords pour limiter les projections
de graisse.
La porosité de la catalyse est primordiale pour vous assurer un
nettoyage optimal.
N.B.: Les panneaux autonettoyants ont une durée de
fonctionnement d’environ 300 heures. En cas de baisse
d’efficacité il est alors possible de les changer.
2.4 Selon modèle
système d'éclairage qui remplace la traditionnelle "lampe à
incandescence".
Dans la contreporte du four sont insérés 14 Leds, de haute qualité à
lumière blanche, qui illuminent la cavité avec une lumière diffuse
permettant une vision de la cuisson sans ombre, sur plusieurs
niveaux.
Le design créé pour le support des
14 Leds offre un élégant effet high-tech.
Avantages du système
Visibilité optimale des plats
- Fiabilité de fonctionnement
- Durée de vie prolongée
- Consommation énergétique extrêmement basse " - 95 % " par
rapport au système traditionnel d'éclairage du four - Rendement élevé
et Facilité d'entretien.
« Les appareils dotés de LED blanches de classe 1M selon la norme
IEC 60825-1:1993 +A1: 1997 + A2: 2001 (équivalente à la norme EN
60825-1: 1994 +A1: 2002 +A2:2001); la puissance maximale
lumineuse émise est de 459nm < 150uW. Donnée non observée
directement avec des instruments optiques. »
2.7 CONSEILS DE NETTOYAGE ET D’ENTRETIEN
Pour nettoyer les surfaces en inox et en émail, utilisez de l’eau
tiède légèrement savonneuse. Vous pouvez utiliser un produit
adapté au nettoyage de ce type de surface. Eviter absolument les
produits abrasifs qui pourraient endommager la surface du four.
En cas de salissures tenaces, évitez d’utiliser des ustensiles
susceptibles de rayer irrémédiablement la surface de votre four. Il
est conseillé de nettoyer régulièrement l’intérieur de votre four
après chaque cuisson.
Si vous ne respectez pas le nettoyage de votre four après chaque
cuisson vous aurez une odeur désagréable, et les projections de
graisse seront encore plus difficiles à enlever. Pour l’intérieur du
four utiliser de l’eau chaude avec une éponge grattoir. Il existe
dans le commerce des produits adaptés au nettoyage du four. Le
nettoyage du four est fastidieux. Il existe en option des panneaux
autonettoyants spéciaux avec un émail microporeux qui peuvent
s’adapter sur les fours (voir paragraphe four autonettoyant par
catalyse).
Pour nettoyer les grilles inox, utilisez une éponge avec grattoir.
Attendre que la surface soit froide avant de la nettoyer. L’utilisation
d’eau froide au contact de la vitre chaude peut briser la vitre. Si
cela devait arriver la garantie ne couvrirait pas ce dommage. Pour
changer l’ampoule d’éclairage du four veillez à débrancher
électriquement le four. Les ampoules de four sont spécifiques,
elles sont conçues pour résister à une température élevée.
2.8 ASSISTANCE TECHNIQUE
En cas de de mauvais fonctionnement, vérifier si la prise est
branchée. Après ces vérifications, adressez vous à votre
revendeur ou prévenez directement notre service technique qui
interviendra dans les plus brefs délais. Veiller à ce que le coupon
de garantie fourni avec le produit soit correctement rempli, avec la
date d’achat du four.
28 FR
Page 29

3. UTILISATION DE L'HORLOGE
OPERATION SPECIFIQUE
STOP
MINUTERIE
MISE A L'HEURE
START
3.1 FONCTIONNEMENT GENERAL
Cette horloge régit l'affichage de l'heure et la programmation du four
(en utilisant les manettes et les icones).
En appuyant sur le bouton, vous pouvez : ajuster le temps, le début de
cuisson, la fin de cuisson, et régler l'alarme.
3.2 REGLAGE DE L'HEURE
Pour régler l'horloge appuyez sur le bouton brièvement 4 fois jusqu'à
ce que vous obteniez le clignotement de l'icône «Horloge».
Pour augmenter ou diminuer le temps, tournez le bouton dans le sens
horaire ou antihoraire.
10 secondes après le dernier réglage de la minuterie, le four sort
automatiquement du mode " réglage du temps"
3.3 MODE MANUEL
En cas d'erreur, vous pouvez éteindre le four avec le bouton. La fin de
cuisson ne doit pas se faire uniqueme,nt en programmant le four.
3.4 REGLAGE DE LA MINUTERIE
La programmation de la minuterie vous permet d'avoir un simple
avertisseur sonore, tel une minuterie, sans activer un programme de
cuisson.
Pour programmer une "alarme", appuyez sur le bouton 3 fois jusqu'à
ce que l'icône de la minuterie clignote.
Il est possible d'utiliser cette fonction uniquement quand il n'y a pas de
programme de cuisson en cours.
3.6 PROGRAMMATION TOUT AUTOMATIQUE
La programmation de début de cuisson permet de démarrer et
d'arrêter automatiquement le four en fonction de l'heure prévue.
Pour programmer le début de cuisson, appuyez brièvement et une
fois sur la manette jusqu'à ce que l'icône « START » apparaisse.
Augmentez ou diminuez l'heure de début de cuisson en tournant le
bouton vers la droite ou vers la gauche.
Une fois l'heure sélectionnée l'icône « START » continue de clignoter
pendant quelques secondes. Si vous ne faites rien, à ce moment, la
programmation est annulée.
Si vous appuyez sur le bouton, la programmation de début de cuisson
est enregistrée et le four affiche l'icône « STOP ». Cette dernière
clignote, vous devez alors programmer l'(heure de fin de cuisson
comme vue précédemment.
3.7 PROBLÈME D'AFFICHAGE (OPTIONAL)
La minuterie signale chaque absence d'alimentation par le
clignotement du symbole "horloge".
Dans ce cas, pour le désactiver appuyez brièvement sur le bouton.
3.5 PROGRAMMATION DE FIN DE CUISSON
La programmation de fin de cuisson vous permet de commencer et
arrêter la cuisson d'une manière automatique basée sur l'heure de fin
prévue.
Pour programmer la fin de cuisson appuyer brièvement 2 fois sur le
bouton jusqu'à ce que vous obteniez l'icône "stop" qui clignote.
Pour augmenter ou diminuer le temps de cuisson, tournez le bouton
dans le sens des aiguilles d'une montre ou dans le sens contraire des
aiguilles d'une montre.
L'icône STOP continue de clignoter quelques secondes après l'heure
choisie.
Pour mettre fin et confirmer la programmation, appuyez sur le bouton.
Des la confirmation de la programmation, le four commencera à
fonctionner automatiquement et l'alarme sera également activée.
La cuisson est finie lorsque le four présente « le programme fin de
cuisson=l'heure prévue ».
Pour connaitre le programme sélectionné, appuyez et relâchez le
bouton et l'horloge indiquera le programme sélectionné.
Quand le programme est terminé l'icône STOP clignote et l'alarme
retentie.
Après une minute de BIP l'alarme se coupe mais l'icône STOP
continue de clignoter jusqu'à ce que vous appuyiez sur la manette.
Pour annuler le programme avant la fin, appuyez sur la manette
pendant quelques secondes et le programme sera effacé et le four
sera à nouveau en mode manuel.
29 FR
Page 30

4. INSTRUCTIONS POUR L’UTILISATION
EN 60350-1
EN 60350-1
30 FR
Page 31

5. TEMPS DE CUISSON
31 FR
Page 32

5. TEMPS DE CUISSON
Le présent appareil est marqué conformément à la
directive 2012/19/UE relative aux déchets
d'équipements électriques et électroniques
(DEEE). Les DEEE contiennent à la fois des
substances polluantes (qui peuvent avoir des
conséquences négatives sur l'environnement) et
des éléments de base (réutilisables). Il est
important de soumettre les DEEE à des
d'éliminer de façon appropriée toutes les substances polluantes,
puis de récupérer et recycler tous les matériaux.
Chacun peut jouer un rôle important quant à la protection de
l'environnement contre les DEEE. Pour atteindre cet objectif, il est
impératif de suivre quelques règles élémentaires :
• Les DEEE ne doivent pas être traités comme des déchets
ménagers.
• Ils doivent être remis aux points de collecte appropriés gérés par
la municipalité ou par des sociétés immatriculées. Dans plusieurs
pays, il est possible de collecter à domicile les DEEE volumineux.
• Lorsque vous achetez un nouvel appareil, vous devez retourner
l'ancien au vendeur qui le récupère gratuitement, au cas par cas,
à condition que l'équipement soit de type équivalent et possède
les mêmes fonctions que celui fourni.
traitements spécifiques, en vue d'extraire et
32 FR
Page 33

ПРАВИЛА ТЕХНИКИ БЕЗОПАСНОСТИ
• ПРЕДУПРЕЖДЕНИЕ: Бытовой электроприбор и его открытые части во время работы могут
нагреваться до высокой температуры. Соблюдайте осторожность, не дотрагивайтесь до них.
• Дети моложе 8 лет не должны приближаться к бытовому прибору без постоянного надзора.
• Данным бытовым электроприбором могут пользоваться дети старше 8 лет, а также люди с
нарушенными физическими или умственными способностями или с отсутствием надлежащего
опыта в том случае, если они находятся под наблюдением и проинструктированы относительно
безопасного использования бытового прибора, а также, если они осведомлены об имеющихся
опасностях.
• Не разрешайте детям играть с бытовым прибором.
• Чистка и обслуживание бытового прибора не должны выполняться детьми без надзора
взрослых.
• бытовой прибор во время работы нагреваются до высокой температуры. Соблюдайте
осторожность, не дотрагивайтесь до электронагревательных элементов, расположенных внутри
печи.
• ПРЕДУПРЕЖДЕНИЕ: Открытые части бытового электроприбора во время его работы могут
нагреваться до высокой температуры. Не разрешайте подходить к нему маленьким детям.
• Не пользуйтесь для чистки стеклянной дверцы печи абразивными чистящими средствами и
острыми металлическими скребками, так как они могут поцарапать поверхность, что, в свою
очередь, может привести к растрескиванию стекла.
• Перед снятием ограждения печь должна быть выключена. После выполнения чистки
ограждение должно быть установлено на место, как написано в инструкции.
• Используйте только такой датчик температуры, который рекомендован для этой печи.
• Не пользуйтесь для чистки парогенератором.
• ПРЕДУПРЕЖДЕНИЕ: Чтобы избежать поражения электрическим током, перед заменой лампы
проверьте, что бытовой электроприбор выключен.
• Электрическое подключение бытовой прибора должно быть выполнено с использованием
разъединительного устройства в соответствии с действующими правилами и нормами
электробезопасности.
• в инструкции должен быть указан тип электрошнура. При этом должна учитываться температура
задней стенки электроприбора.
• В случае повреждения шнура питания он должен быть заменен специальным шнуром питания,
который можно приобрести у производителя или у агента по техобслуживанию.
• ВНИМАНИЕ: Чтобы избежать опасности, связанной со случайным сбросом устройства тепловой
защиты, данный бытовой электроприбор не должен запитываться через наружные
переключающие устройства, например, таймер, или другое устройство, которое регулярно
включает и выключает электроприбор.
ВНИМАНИЕ: При использовании гриля наружные детали могут нагреваться до высокой
температуры. Не разрешайте детям подходить к печи.
• перед выполнением чистки следует удалить пролившуюся жидкость.
• Во время выполнения пиролитической самоочистки поверхности могут нагреваться сильнее чем
обычно. Не разрешайте подходить к печи детям.
33 RU
Page 34

1.
В соответствии с требованиями Федерального закона № 261-ФЗ от 23.11.09 и Постановлением Правительства РФ № 1222 от 31.12.09г., настоящий
товар снабжен информацией на русском языке о классе энергетической эффективности в виде специальной этикетки, которая должна быть
размещена на лицевой части прибора в месте продажи потребителям.
1.1
1.4
1.2
1.5
•Не покрывайте внутренние поверхности духовки алюминиевой
фольгой и другими одноразовыми упаковочными материалами,
которые продаются в хозяйственных магазинах. Алюминиевая
фольга или другой упаковочный материал при контакте с
горячей эмалированной поверхностью духовки может
расплавиться и повредить внутреннюю эмалированную
поверхность духовки.
1.3
I класс защиты от поражения током.
1.6
34 RU
Page 35

СИСТЕМА БЕЗОПАСНОСТИ ПОЛОК
2.1
2.2
2. ПОЛЕЗНЫЕ СОВЕТЫ
2.3
2.4
2.7
2.5
2.6
2.8
Серийный номер состоит из 16 цифр. Первые 8 цифр код модели.
Следующие 4 цифры дата производства (год, неделя). Последние 4
цифры заводские номера.
35 RU
Page 36

3. ИСПОЛЬЗОВАНИЕ АНАЛОГОВЫХ ЧАСОВ/ПРОГРАММАТОРА
ТАЙМЕР
ЭКСПЛУАТАЦИЯ
СТОП
ЧАСЫ
СТАРТ
3.1 ОБЩИЕ ИНСТРУКЦИИ ПО ЭКСПЛУАТАЦИИ
Этот таймер используется в качестве часов (со стрелками) и
управляет работой духового шкафа (с помощью нажатия ручки
регулировки и индикаторных пиктограмм).С помощью нажатия
ручки регулировки вы можете:задать время начала
приготовления пищи, программу приготовления пищи, и время
окончания приготовления пищи, а также установить время
подачи предупреждающего сигнала (напоминание о времени
приготовления пищи).
3.2 УСТАНОВКА ЧАСОВ (ТЕКУЩЕГО ВРЕМЕНИ)
Чтобы установить часы, быстро нажмите ручку регулировки 4
раза.После этого на дисплее появится мигающая пиктограмма
“ЧАСЫ”.
Чтобы увеличить или уменьшить показание времени, поверните
ручку регулировки по часовой стрелке или против часовой
стрелки.Через 10 секунд после выполнения последней
регулировки электронный таймер автоматически выходит из
режима установки времени.
3.3 ПРИГОТОВЛЕНИЕ ПИЩИ В РУЧНОМ
РЕЖИМЕ
При работе в ручном режиме приготовления пищи
(устанавливается по умолчанию) можно выполнять
приготовление пищи в ручном режиме, используя общий
выключатель духового шкафа (работает независимо от
таймера).
ВНИМАНИЕ:таймер включается через несколько секунд после
подачи питающего напряжения.
3.4 ПРОГРАММИРОВАНИЕ
СИГНАЛИЗИРУЮЩЕГО УСТРОЙСТВА (Таймер)
Программирование сигнализирующего устройства
обеспечивает подачу предупреждающего звукового сигнала по
истечении заданного интервала времени без включения
духового шкафа.
Для программирования предупреждающего устройства быстро
нажмите ручку регулировки 3 раза.После этого на дисплее
появится мигающая пиктограмма “ТАЙМЕР”.Установка
предупреждающего устройства аналогична установке времени
приготовления пищи (см. соответствующий параграф
руководства).
Предупреждающее устройство можно использовать только в
том, случае, если в данный момент не выполняется программа
приготовления пищи.
3.5 ПРИГОТОВЛЕНИЯ ПИЩИ В
ПОЛУАВТОМАТИЧЕСКОМ РЕЖИМЕ:
ВЫКЛЮЧЕНИЕ ДУХОВОГО ШКАФА ПРИ
ДОСТИЖЕНИИ ВРЕМЕНИ ОКОНЧАНИЯ
ПРИГОТОВЛЕНИЯ ПИЩИ
Программирование времени окончания приготовления пищи
позволяет вам начать приготовление пищи немедленно и
остановить приготовление пищи в заданное время.
Для программирования времени окончания приготовления пищи
нажмите ручку регулировки 2 раза.После этого на дисплее
появляется мигающая пиктограмма “СТОП”.Чтобы увеличить
или уменьшить время приготовления пищи, поверните ручку
регулировки по часовой стрелке или против часовой стрелки.
Мигание пиктограммы "СТОП" продолжается в течение
нескольких секунд после последнего поворота ручки
регулировки.Программа может быть подтверждена с помощью
нажатия ручки регулировки (минимальное время приготовления
пищи равно двум минутам).
После подтверждения программы начинается приготовление
пищи, и автоматически подается предупреждающий
сигнал.Приготовление пищи заканчивается тогда, когда
"Запрограммированное время окончания приготовления пищи =
Текущее время".
Чтобы просмотреть программу, нажмите и отпустите ручку
регулировки.Таймер показывает выбранную программу.
После окончания приготовления пищи начинает мигать
пиктограмма "СТОП", и подается звуковой предупреждающий
сигнал.Через 1 минуту подача звукового сигнала прекращается,
а пиктограмма "СТОП" продолжает мигать до тех пор, пока вы не
нажмите ручку регулировки.
Чтобы отменить программу до ее завершения, нажмите ручку
регулировки и удерживайте ее в нажатом положении в течение
нескольких секунд. После этого программа отменяется, и
таймер возвращается в ручной режим приготовления пищи.
3.6 ПРИГОТОВЛЕНИЕ ПИЩИ В ПОЛНОСТЬЮ
АВТОМАТИЧЕСКОМ РЕЖИМЕ
Программирование приготовления пищи в полностью
автоматическом режиме позволяет вам начинать и заканчивать
приготовления пищи с помощью установок таймера.
Для программирования времени начала приготовления пищи
нажмите ручку регулировки 1 раз.После этого на дисплее
появляется мигающая пиктограмма “ПУСК”.
Увеличьте или уменьшите время начала приготовления пищи с
помощью вращения ручки регулировки по часовой стрелке или
против часовой стрелки.Мигание пиктограммы "ПУСК"
продолжается в течение нескольких секунд после последнего
поворота ручки регулировки.Если в течение этого интервала
времени вы не повернете ручку регулировки или не нажмете на
нее, то стрелки часов автоматически возвращаются на
показание текущего времени, и программирование
отменяется.Если вы нажимаете ручку регулировки, то в памяти
сохраняется время начала приготовления пищи (загорается
пиктограмма "ПУСК"), и таймер переключается в режим
программирования времени окончания приготовления пищи
(начинает мигать пиктограмма "СТОП").
Процедура программирование времени окончания
приготовления пищи аналогична процедуре программирования
начала приготовления пищи, которая описана выше.
Приготовление пищи начнется тогда, когда
"Запрограммированное время начала приготовления пищи =
Текущее время".
3.7 ИНДИКАЦИЯ НАРУШЕНИЯ ПОДАЧИ
ПИТАЮЩЕГО НАПРЯЖЕНИЯ (ДОПОЛНИТЕЛЬНО)
Таймер сигнализирует о нарушении подачи питающего
напряжения с посредством мигания символа "ЧАСЫ".
Чтобы выключить эту сигнализацию, нажмите на
короткое время ручку регулировки.
36 RU
Page 37

4.
60350-1
60350-1
37 RU
Page 38

5.
4
3
2
1
Данный прибор имеет маркировку в соответствии с Европейской директивой 2012/19/ЕС об отходах производства электрического
и электронного оборудования (WEEE). Отходы производства электрического и электронного оборудования содержат
загрязняющие вещества (которые могут негативно влиять на окружающую среду) и основные компоненты (которые подлежат
повторному использованию). Важно, чтобы отходы производства электрического и электронного оборудования подвергались
специальной обработке с целью удаления и утилизации всех загрязняющих веществ, а также регенерации и повторного
использования всех материалов.
электрического и электронного оборудования; для этого важно придерживаться некоторых основных правил:
• Нельзя обращаться с отходами производства электрического и электронного оборудования, как с бытовыми отходами.
• Отходы производства электрического и электронного оборудования следует передавать в пункты сбора, контролируемые органами
местной власти или зарегистрированными компаниями. Во многих странах при наличии большого количества отходов производства
электрического и электронного оборудования сбор отходов осуществляется на дому.
• При покупке нового прибора старый прибор можно возвратить розничному торговому предприятию, которое обязано принять его бесплатно
на основе взаимно-однозначного соответствия, если это приборы аналогичного типа, и возвращаемый прибор имеет те же функции, что и
продаваемый.
Каждый может сделать существенный вклад в предотвращение экологических проблем, вызываемых отходами производства
38 RU
Page 39

10 минут/кг*
10 минут/кг*
39 RU
Page 40

INSTRUKCJE BEZPIECZEŃSTWA
UWAGA: Podczas pracy urządzenie oraz jego elementy są gorące. Należy zachowac ostrożność i nie
dotykać gorących części.
• Dzieci w wieku do 8 lat nie mogą zbliżać się do urządzenia chyba że pozostaja one pod ciągłym
nadzorem.
• Dzieci w wieku powyżej 8 lat oraz ososby z ograniczeniami ruchowymi, umysłowymi, czuciowymi lub
nie posiadające odpowiedniej wiedzy lub doświadczenia mogą obsługiwać urządzenie jedynie pod
nadzorem lub po przeszkoleniu odnośnie bezpiecznego uzykowania urządzenia i związanych z tym
zagrożeń.
• Dzieci nie mogą bawić się urządzeniem.
• Dzieci bez nadzoru nie mogą obsługiwac ani czyścić urządzenia.
• Podczas użytkowania urządzenie nagrzewa się. Należy zachowac ostrożność i nie dotykać gorących
części wewnątrz piekarnika.
UWAGA: dostępne części mogą być gorące podczas użytkowania. Dzieci nie mogą zbliżać się do
urządzenia.
• Do czyszczenia szyby drzwi piekarnika nie wolno stosować substancji ściernych ani ostrych skrobaków
gdyż mogą one porysować szkło i spowodować jego stłuczenie.
• Wyłaczyć piekarnik przed usunięciem ekranu, po wyczyszczeniu zamontować ekran zgodnie z
instrukcją.
• Używać wyłacznie sondy cieplnej przeznaczonej do tego piekarnika.
• Nie stosować do czyszczenia urządzeń parowych.
UWAGA: należy upewnić się czy urządzenie jest wyłączone przed przystąpieniem do wymiany żarówki
aby uniknąć niebezpieczeństwa porażenia.
• Wyłącznik musi być podłączony do okablowania zgodnie z obowiązujacymi przepisami.
• instrukcja musi określać jaki rodzaj przewodu może być zastosowany, z uwzglednieniem temperatury
tylnej ścianki urządzenia.
• Jeżeli przewód zasilający jest uszkodzony należy go wymienić na nowy dostarczony przez producenta
lub autoryzowany serwis.
UWAGA: w celu uniknięcia zagrożeń związanych z przypadkowym zadziałaniem zabezpieczeń
termicznych urządzenie nie może być zasilane z sieci sterowanej niezależnie lub z obwodów które są
regularnie włączane i wyłączane.
UWAGA: dostępne cześci mogą być gorące podczas używania grilla. Dzieci nie mogą zbliżać się do
urządzenia.
• Pokarm który wykipiał musi być usunięty przed czyszczeniem.
• Podczas pyrolizy powierzchnie mogą się bardzo mocno nagrzewać, proszę pilnowac dzieci aby się nie
zbliżały.
40 PL
Page 41

1.
1.1
1.2
•Nie należy wykładać ścianek piekarnika folią aluminiową lub
jednorazowymi materiałami ochronnymi dostępnymi w sklepach. Użyta
folia aluminiowa lub inne materiały ochronne w zetknięciu z gorącą
emalią mogą spowodować nadtopienie się i pogorszenie jakości
emaliowanych ścianek wnętrza piekarnika.
1.3
1.5
1.4
41 PL
Page 42

1.6
2.
2.1
2.2
2.3
2.5
2.6
2.4
42 PL
Page 43

2.7
2.8
Urządzenie to jest oznaczone zgodnie z Dyrektywą
Europejską 2012/19 / UE w sprawie zużytego sprzętu
elektrycznego i elektronicznego (WEEE). Zużyty
sprzęt elektryczny i elektroniczny zawiera zarówno
substancje zanieczyszczające (o negatywnym
oddziaływaniu na środowisko naturalne), jak i
wielokrotnie). Ważne, aby zużyty sprzęt elektryczny i
elektroniczny poddawać specjalnej obróbce w celu bezpiecznego
usunięcia i pozbycia się wszystkich środków
zanieczyszczających i odzyskania wszystkich surowców
wtórnych.
Poszczególne osoby odgrywają ważną rolę w zapobieganiu
szkodliwemu oddziaływaniu zużytego sprzętu elektrycznego i
elektronicznego na środowisko, ważne aby przestrzegać kilku
podstawowych zasad:
• Zużyty sprzęt elektryczny i elektroniczny nie może być
traktowany jako odpad komunalny.
• Zużyty sprzęt elektryczny i elektroniczny przekazuje się do
właściwych punktów zbiórki prowadzonych przez gminy lub
koncesjonowane firmy. W wielu krajach, gdzie jest dużo zużytego
sprzętu elektrycznego i elektronicznego, odbiera się go z domów.
• gdy kupuje się nowe urządzenie, zużyte można zwrócić do
sprzedawcy, który musi je przyjąć bezpłatnie, na zasadzie
zamiany jeden za jeden, o ile urządzenie to jest tego samego
rodzaju i ma takie same funkcje, jak urządzenie dostarczone
podstawowe elementy (które można użytkować
43 PL
Page 44

3. KORZYSTANIE Z ZEGARA/PROGRAMATORA
OPIS USTAWIEŃ
3.1 FUNKCJE OGÓLNE
STOP
MINUTNIK
ZEGAR
START
Programator służy do ustawienia zegara analogowego i
programowania piekarnika (używając przycisków i symboli).
Wciskając przycisk można ustawić zegar, zaprogramować czas
rozpoczęcia i zakończenia pieczenia oraz ustawić alarm (minutnik).
3.2 USTAWIENIE ZEGARA
W celu ustawienia zegara należy nacisnąć krótko 4 razy przycisk, do
momentu zaświecenia symbolu "ZEGAR". W celu ustawienia
odpowiedniej godziny należy przekręcać pokretło zgodnie ze
wskazówkami ruchu zegara lub w przeciwnym kierunku. Po 10
sekundach od ostatniej regulacji programator automatycznie
zakończy ustawienia.
3.3 USTAWIENIA RĘCZNE
Piekarnik można uruchomić niezależnie od ustawień zegara, za
pomocą włącznika głównego.
UWAGA: Po włączeniu zasilania należy odczekać kilka sekund, aby
programator się uaktywnił.
3.4 USTAWIENIE MINUTNIKA
Ustawienie minutnika pozwala na uruchomienie sygnału
dźwiękowego (alarmu) po zaplanowanym czasie bez konieczności
włączania piekarnika (tryb minutnika).
W celu ustawienia alarmu (tryb minutnika), wciśnij 3 krotnie przycisk
do momentu zaświecenia się symbolu "MINUTNIK". Ustawienie
minutnika przebiega w identyczny sposób jak ustawienie czasu końca
pieczenia (patrz odpowiedni paragraf)
Ustawienie minutnika jest możliwe tylko wtedy, gdy nie jest
uruchomiony żaden z programów pieczenia.
W celu skasowania programowania przed zakończeniem, wciśnij
przycisk na kilka sekund. Programowanie zostanie skasowane i
powróci do ustawień ręcznych.
3.6 PROGRAMOWANIE AUTOMATYCZNE
Programowanie automatyczne pozwala na rozpoczęcie i
zakończenie pieczenia w dokładnie zaplanowanym czasie. W celu
zaplanowania czasu rozpoczęcia pieczenia, naciśnij krótko 1 raz
przycisk do momentu zaświecenia się symbolu "START". W celu
zwiększenia lub zmniejszenia czasu przekręcaj pokrętło zgodnie z
ruchem wskazówek zegara lub w przeciwnym kierunku. Sygnalizacja
"START" będzie się świecić przez kilka sekund po ostatnim obrocie
pokrętłem. Jeśli w tym czasie pokrętło nie zostanie przekręcone lub
wciśnięte, programowanie zostanie automatycznie wykasowane. Po
wciśnięciu pokrętła czas rozpoczęcia pieczenia zostanie zachowany
(sygnalizacja "START" jest włączona) i programator przełączy się na
programowanie czasu zakończenia pieczenia (symbol "STOP"
zacznie się świecić). Czas zakończenia pieczenia jest ustawiany
przez powtórzenie czynności wykonywanych przy ustawieniu czasu
rozpoczęcia pieczenia.
Pieczenie rozpocznie się gdy zaprogramowany "Czas rozpoczęcia
pieczenia"= Aktualny Czas
3.7 PRZYCIEMNIENIE PODŚWIETLENIA
(OPCJONALNIE)
Zegar sygnalizuje każdorazowy brak napięcia poprzez miganie
symbolu "ZEGAR". W celu wyłączenia należy nacisnąć krótko
przycisk.
3.5 PROGAMOWANIE PÓŁAUTOMATYCZNE:
AUTOMATYCZNE WYŁĄCZENIE PIEKARNIKA
PO OKREŚLONYM CZASIE
Zaprogramowanie czasu końca pieczenia pozwala na
natychmiastowe uruchomienie wybranej funkcji pieczenia i
automatyczne wyłączenie piekarnika po określonym czasie.
W celu zaprogramowania czasu końca pieczenia dwukrotnie wciśnij
przycisk do momentu zaświecenia się symbolu "STOP". Aby
zwiększyć lub zmniejszyć czas pieczenia, przekręcaj pokrętło
zgodnie z ruchem wskazówek zegara lub w przeciwnym kierunku.
Kontrolka "STOP" miga przez kilka sekund po ostatnim obrocie.
Programowanie zostanie potwierdzone poprzez naciśnięcie
przycisku (co najmniej 2 minuty czasu pieczenia). Po potwierdzeniu
programowania, piekarnik jest uruchomiony i alarm aktywowany
automatycznie. Pieczenie kończy się gdy "Zaprogramowany czas
końca pieczenia= Aktualny czas"
W celu sprawdzenia wybranego programu naciśnij i zwolnij przycisk.
Programator pokaże wybrany program.
Po zakończeniu pieczenia symbol "STOP" świeci się i rozlega się
sygnał akustyczny. Po 1 minucie sygnał ustaje, kontrolka "STOP"
świeci się do momentu wciśnięcia przycisku.
44 PL
Page 45

4.
60350-1
60350-1
45 PL
Page 46

5.
46 PL
Page 47

5.
47 PL
Page 48

ПРАВИЛА НА ТЕХНИКАТА ЗА БЕЗОПАСНОСТ
• ПРЕДУПРЕЖДЕНИЕ: Битовият електроуред и отктитите му части могат да се нагряват до висока
температура по време на работа. Бъдете внимателни и не ги докосвайте.
• Деца по-малки от 8 години не трябва да бъдат допускани до уреда без надзор.
• Даденият битов електроуред може да бъде използван от деца над 8 години, а също и о лтица с
нарушени физически или умствени способности или такива без опит, само в случай че се намират
под постоянно наблюдение и са инструктирани относно безопасната работа с уреда и осъзнават
възможните опасности.
• Не разрешавайте на децата да играят с уреда.
• Почистване и обслужване на уреда не трябва да бъде извършвано от деца без присъствието на
възрастен
• Уреда се нагрява по време на работа до висока температура. Бъдете внимателни и не се
докосвайте до електронагревателните части във вътрешността на уреда.
• ПРЕДУПРЕЖДЕНИЕ: Откритите части на уреда по време на работа се нагряват до висока
температура. Не позволявайте до него да се доближават деца.
• Не ползвайте за почистване на стъклената врата, абразивни почистващи препарати, остри
метални стъргалки, тъй като те могат да надраскат повърхността, което в свой ред може да довде
до напукване на стъклото.
• Преди сваляне на аксесоарите, фурната трябва да е изключена. След почистването, аксесоарите трябва да се поставят на място, както е описано в инструкциите.
• Използвайте само такъв датчик за температура, който е препоръчан за тази фурна.
• Не използвайте парочистачка за почистване
• ПРЕДУПРЕЖДЕНИЕ: За да избегнете токов удар, преди сманя на осветителното тяло
проверете, дали уреда е изключен.
• Електрическото свързване на уреда трябва да бъде изпълнено с използване на разединително
устройство съобразено с действащите нормативи и правила.
• В инструкциите трябва да е указан типа на ел. кабела. При това трябва да се отчита
температурата на заданата стена на уреда.
• В случай на повреда, захранващият кабел трябва да бъде заменен с оригинален кабел, който
може да закупите от производителя или търговските представители.
• ВНИМАНИЕ: За да се избегнат опасности, свързани незадействане на термо-защитата, дадения
уред не трябва да се включва през устройства, като таймер или др. които регулярно включват и
изключват уреда.
ВНИМАНИЕ: При използване на скарата, външните части могат да се нагреят до висока
температура. Не позволявайте на деца да приближават до фурната.
• Преди да почиствате уреда, трябва да премахнете разляти течности.
• При извършване на пиролитично почистване, повърхностите се нагряват много по силно от
обикновенно. Не се разрешава деца да се доближават до фурната.
48 БГ
Page 49

1.
1.1
1.2
1.4
1.5
1.3
1.6
49 БГ
Page 50

2.1
2.2
2.3
2. ПОЛЕЗНИ СЪВЕТИ
2.7
2.4
2.5
2.6
2.8
50 БГ
Page 51

3. ИЗПОЛЗВАНЕ НА АНАЛОГОВ ЧАСОВНИК / ПРОГРАМАТОР
ЧАСОВНИК
ЕКСПЛОАТАЦИЯ
СТОП
ТАЙМЕР
СТАРТ
3.1 ОБЩИ ИНСТРУКЦИИ ЗА ЕКСПЛОАТАЦИЯ
Тзи таймер се използва в качеството си на часовник (със
стрелки) и управлява работата на фурната ( при натискане на
бутона за регулировка и индикаторните пиктограми).
С помощта на натискането на бутона за регулировка вие
можете: да зададете начален час за готвенето, програма за
готвене и време за край на готвенето, а също така и да
настроите час за подаване на предупреждаващ сигнал
(напомняне за времето за готвене)
3.2 НАСТРОЙКА НА ЧАСА (ТЕКУЩ ЧАС)
За да настроите часа, бързо натиснете бутона за регулировка
4 пъти. След това на дисплея ще се появи мигащата
пиктограма "ЧАСОВНИК".
За да увеличите или намалите стойността на часа, завъртете
бутона за регулировка по часоевиковата стрелка или обратно.
10 секунди след изпълнение на последната регулировка,
електронния таймер автоматично излиза от режима за
настройка на часа.
3.3 ГОТВЕНА НА ХРАНА В РЪЧЕН РЕЖИМ
При работа в ръчен режим, готвенето (настройва се по
подразбиране) може да се готви храна в ръчен режим,
използвайки общия изключвател на фурната (работи
независим о от таймера)
ВНИМАНИЕ: таймера се включва наколко секунди след
подаване на захранващо напрежение.
3.4 ПРОГРАМИРАНЕ НА СИГНАЛИЗИРАЩОТО
УСТРОЙСТВО (Таймер)
Програмирането на сигнализиращото устройство обезпечава
подаването на предупреждаващ звуков сигнал след
изтичането на зададения интервал от време без включване на
фурната.
За програмиране на таймера, натиснете бутона за регулиране
3 пъти. След това на дисплея ще се появи мигащата
пиктограма "ТАЙМЕР". Настройката на таймера е аналогична
на настройката на часа (виж съответния раздел).
Таймера може да се използва само в случай , че в настоящия
момент не изпълнявате програма за приготвяне на храна.
регулиране по часовниковата стрелка или обратно.
Мигането на пиктограмата "СТОП" продължава в
продължение на няколко секунди след последното
завъртане на бурона за регулировка. Програмата може да
бъде потвърдена с натискането на бутона за регулировка
(минималното време за готвене е 2 минути) .
След потвърждаването на програмата, започва процеса на
готвене и автоматично се подава предупреждаващ сигнал.
Готвенето завършва тогава, когато "Запрограмираното време за
край на готвенето = Текущия час".
За да прегледате програмата, натиснете и отпуснете бутона за
регулировка. Таймерът пказва избраната програма. След края
на готвенето, започва да мига пиктограмата "СТОП" и се подава
звуков предупреждаващ сигнал. След 1 минута звуковият
сигнал спира, а пиктограмата "СТОП" продължава да мига, до
момента в който вие натиснете бутона за регулиране.
За да отмените програмата преди нейното приключване,
натиснете бутона за регулировка и го дръжте в натиснато
положение за няколко секунди. След това програмата се отменя
и таймера се връща в ръчен режим на приготвяне на храна.
3.6 ПРИГОТВЯНЕ НА ХРАНА В ИЗЦЯЛО
АВТОМАТИЧЕН РЕЖИМ
Програмирането на приготвянето на храна в изцляо автоматичен
режим, Ви позволява да започвате и завършвате готвенето с
помощта на настройките на таймера.
За програмиране времето за начало на готвенето, натиснете
бутона за регуилране 1 път. След това на дисплея се появява
мигащата пиктограма "СТАРТ" Увеличете или намалете времето
за старт на готвенето с помощта на въртящия се бутон за
регулиране, по часовниковата стрелка или обратно. Мигането на
пиктограмата "СТАРТ" продължава няколко секунди след
последното завъртане бутона за регулировка. Ако в този
интервал не завъртите бутона или не го натиснете, то стрелките
на часа автоматично се връщат на показване на текущия час и
програмирането се отменя. Ако натиснете бутона за регулировка,
то в паметта се съхранява часа за начало на готвенето (светва
пиктограмата"СТАРТ") и таймера се превключва в режим на
програмиране на на часа за край на готвенето (започва да мига
пиктограмата"СТОП").
Процедурата за програмиране времето за край на готвенето е
аналогична на процедурата по програмиране на началото на
готвенето, описна по-горе.
Готвенето започва тогава, когато "Запрограмираното час за старт
на готвенето = Текущия час"
3.5 ПРИГОТВЯНЕ НА ХРАНА В
ПОЛУАВТОМАТИЧЕН РЕЖИМ:
ИЗКЛЮЧВАНЕ НА ФУРНАТА, ПРИ
ДОСТИГАНЕ НА ВРЕМЕТО ЗА КРАЙ НА
ПРИГОТВЯНЕТО НА ХРАНА
Програмирането на времето за край на проеса на готвене ви
позволява да започнете готвенето веднага и да приключите
след известно време.
За програмиране на времето за край на готвенето натиснете
бутона за регулировка пъти. След това на дисплея ще се
появи мигащата пиктограма"СТОП". За да увеличите или
намалите времето за приготвяне, завъртете бутона за
3.7 ИНДИКАЦИЯ ЗА НАРУШЕНО ПОДАВАНЕ НА
ЗАХРАНВАЩО НАПРЕЖЕНИЕ (ДОПЪЛНИТЕЛНО)
Таймера сигнализира за нарушаване на подаването на
захранващо напрежение посредством мигане на символа
"ЧАСОВНИК".
За да изключите тази сигнализация, натиснете за кратко
бутона за регулиране.
51 БГ
Page 52

4.
60350-1
60350-1
52 БГ
Page 53

5. ПРЕПОРЪКИ ПРИ ГОТВЕНЕТО
Температурата и времето за приготвяне са указани само за информация, за да се облекчи използването на фурната. Личният опит ще ви
покаже, какви режими е най-добре да избирате в съответствие с Вашите вкусове и навици. Трябва да отчитате, че при високи температури
соковете пръскат на стените на фурната, което я замърсява и образува дим. По-добре е да намалите температурата за готвене,
независимо че вероятно малко ще се увеличи времето за приготвяне.
Във фурната има няколко нива, номерацията на които започва от долу.
РИБА
Ястие
Костур или платика
Сьомга
Морски език
Риба на грил
приготвяне
Естествена конвекция
Естествена конвекция
Принудителна конвекция
ЗЕЛЕНЧУЦИ И ПОДОБНИ
Ястие
Zадушено зеле
Pечена пастет
Цикория със сирене
Пълнени домати
Лучена питка
Запеканка
Тостове със сирене
Огретен
приготвяне
Естествена конвекция
Естествена конвекция
Принудителна
конвекция
Принудителна
конвекция
Принудителна
конвекция
Принудителна
конвекция
Турбогрил
Турбогрил
Начин на
Грил
Начин на
1 кг цяла
1 кг
6 парчета
6 филета
За 6 души
За 6 души
За 6-8 души
За 6 души
За 6 души
За 6 души
За 6 души
Време за приготвяне
Време за приготвяне
3 минути на всяка
страна +
4 минути със сирене
Ниво
Съвети
Ястие за грил
Колбаси по тулузки
Суфле солено/сладко
Всички ястия се готвят на 1 ниво, с изключение на ястията отбелязани с „*“, които се готвят на средното ниво
Турбогрил
Принудителна
конвекция
За 4 души
За 6 души
2 пъти по 10 мин.,
обърнете след изтичане
на половината
време за готвене
Ястие за грил
Даденият уред има маркировка в съответствие с Европейската директива 2012/19/ЕС за отпадъците от производството на
електрическо и електронно оборудване (WEEE). Отпадъците от производството на електрическо и електронно оборудване
съдържат вещества замърсяващи околната среда (които могат негативно да повлияят на околнатасреда) и основни
компоненти (които подлежат на повторно използване). Важно е всички отпадъци от производството на електрическо и
електронно оборудване да се подлагат на специална обработка с цел отделяне и утилизация на всички замърсяващи
вещества, а също и регенерация и повторно използване на всички материали.
Всеки може да допринесе за предотвратяване на екологични проблеми, свързани с производството на електрическо и
електронно
оборудване; за тази цела трябва да се спазват няколко основни правила:
• Не трябва да се отнасяте с отпадъците от производството на електрическо и електронно оборудване, като с битови отпадъци •
Отпадъците от производството на електрическо и електронно оборудване трябва да се предават в пунктове, контролирани от
органите на местната власт или на регистрирани фирми.
53 БГ
Page 54

МЕСО
Най-удачно е да солите месото в края на готвенето, защото солта способства отделянето на мазнини, което увличава замърсяването на
работната камера и се отделя дим.
Предназначеното за печене телешко, агнешко, свинско или риба може да поставите в студената фурна. Времето за приготвяне се увеличава в
сравнение с предварително подгрятата фурна, но проникването на топлината към центъра на продукта става постепенно, което дава подобри резултати. Правилното предварително подгряване на фурната гарантира добри резултати при готвене на говеждо и свинско.
ГРИЛ
Преди да поставите ястието във фурната: извадете месото от хладилника няколко часа преди приготвянето. Препоръчваме да го поставите
на абсорбираща хартия, по този начин месото ще стане по-нежно и вкусно и няма да се окаже студено от вътре. Преди печенето, трябва да
сложите подправките на месото, но не го солете преди финалната фаза иначе няма да стане толков анежно и вкусно.
Внимателно го намажете с мазнина, като използвате четка. Добавете пипер и подправки
По време на приготвянето: никога не пробивайте месото по време на приготвянето, даже и когато го обръщате иначе целия му сок ще изтече и
то ще.
Ястие
Месо с моркови
Патица
Пуйка
Гъска
Агнешко краче
Пиле
Ростбиф
Заек
Говеждо
Агнешко
Кебап
Свинско
* Всички ястия се готвят на 1 ниво
Начин на
приготвяне
Естествена конвекция
Естествена конвекция
Естествена конвекция
Естествена конвекция
Естествена конвекция
Естествена конвекция
Естествена конвекция
Принудителна
конвекция
Шиш
Шиш
Грил
Грил
За 6 души
1,5 кг
5/6 кг
3/4 кг
1/1,5 кг
800 - 1 кг
1 кг
1 кг
6 броя
6 парчета
Време за приготвяне Съвети
Без предварително
загряване
Без предварително
загряване
Обърнете по
средата на
приготвянето
Обърнете по
средата на
приготвянето
ПЕЧИВА И СЛАДКАРСКИ ИЗДЕЛИЯ
Избягвайте използването на блестящи форми, защото те отразяват топлината, и горната част на ястието може да се препече. Ако ястието твърде
бързо се запича, го покрийте с хартия за печене или алуминиево фолио.
Внимание: слагайте фолиото от правилната странаблестящата страна трябва да е насочена към ястието, иначе топлината се отразява и не
прониква в продукта.
Старайте се да не отваряте вратата през първите 20-25 мин на печенето, иначе всички сладкарски изделия, които трябва да се надигнат по време
на приготвянето, такива като суфле, кифлички и др. веднага ще спаднат. За контрол на процеса на приготвяне пъхнете в ястието клечка за зъби. Ако
тестото не се залепи за клечката, значи е готово и може да изключвате фурната. Ако има залепнало тесто, продължете готвенето, като леко
намалите температурата, за да не прегори горната част.
Ястие
Кифлички
Пай
Основа за торта
Пай от варено тесто
Целувки
Плодова торта
Пай Сан Оноре
* При използване на режима „конвекция с долен нагревателен елемент“ препоръчваме предварително нагряване при помощта на конвекция за
икономия на време
Начин на
приготвяне
Принудителна
конвекция
Принудителна
конвекция
Принудителна
конвекция
Принудителна
конвекция
Конвекция с долен
нагревателен
елемент*
Конвекция с долен
нагревателен
елемент*
Конвекция с долен
нагревателен
елемент*
800 гр
40 парчета
За 6 души
6 парчета
1 тава
За 6 души
6 парчета
Време за
приготвяне
СъветиНиво
2 тави
54 БГ
Page 55

INSTALLAZIONE
IT
INSTALLATION
FR
INSTALLATION
INSTALACIÓN
ИНСТАЛАЦИЯ
545
GB
ES
БГ
УСТАНОВKА
INSTALACJA
4x3.5x25
- Protection trim (supplied with the oven when necessary)
- Зашитна облицовка (доставя се с фурната, когато е
необходимо)
RU
PL
Targhetta matricola
IT
Rating plate
GB
Tarjeta matrícula
ES
Plaque signalitique
FR
Маркировочная табличка
RU
БГ
Табелка с данни
545
IT
La Ditta costruttrice declina ogni responsabilità per eventuali errori di stampa contenuti nel presente libretto. Si riserva inoltre il diritto di apportare le modifiche
che si renderanno utili ai propri prodotti senza compromettere le caratteristiche essenziali.
GB
The manufacturer will not be responsible for any inaccuracy resulting from printing or transcript errors contained in this brochure. We reserve the right to carry
out modifications to products as required, including the interests of consumption, without prejudice to the characteristics relating to safety or function.
ES
La empresa constructora declina toda responsabilidad derivada de eventuales errores de impresión contenidos en el presente libro. Se reserva además el
derecho de realizar las modificaciones que se consideren útiles a los productos sin comprometer las características esenciales.
FR
Le constructeur décline toute responsabilité concernant d'éventuelles Inexacltudes Imputables à des erreurs d'impression ou de transcription contenue dans
cette notice. Le constructeur se réserve le droit de modifier les produits en cas de nécessité, même dans l'intérêt de l'utilisation, sans causer de préjudices
aux caractéristiques de fonctionnement de sécurité des appareils.
RU
Производитель не берет на себя ответственность за ошибки в данной инструкции, возникшие в процессе печати. Производитель имеет право
вносить в свои изделия изменения, которые он сочтет полезными для своих изделий, сохраняя при этом основные характеристики.
PL
Producent nie ponosi Żadnej odpowiedzialności za ewentualne błędy w druku niniejszej instrukcji. Ponadto zastrzega sobie prawo do wprowadzania zmian
do własnych produktów, uznanych przez niego za użyteczne, bez pogarszania podstawowych parametrów.
БГ
Производителят не носи отговорност за допуснати грешки в тази инструкция, възникнали в процеса на печат. Производителят има право да
прави в своите изделия промени, кито сметне за полезни за продуктите, съхранявайки при това основните характеристики.
Tabliczka znamionowa
PL
03.2015 • REV.C • 42813639
 Loading...