

Page 1
PCV 604 C
PCV 604 C
PCE 604 X
PCE
FCO
FCO 404 X
FCO
FCO 104 X
FCO
FCO 104 N
FCO
FCO 104 W
BUILT-IN OVEN AND HOB
USER'S MANUAL
604 X
404 X
104 X
104 N
104 W
ENG
Page 2
Dear
ENG
Installation
Page 3

ENG
Introduction of product
and hob
Transportation
Page 4
M PARTSAIN
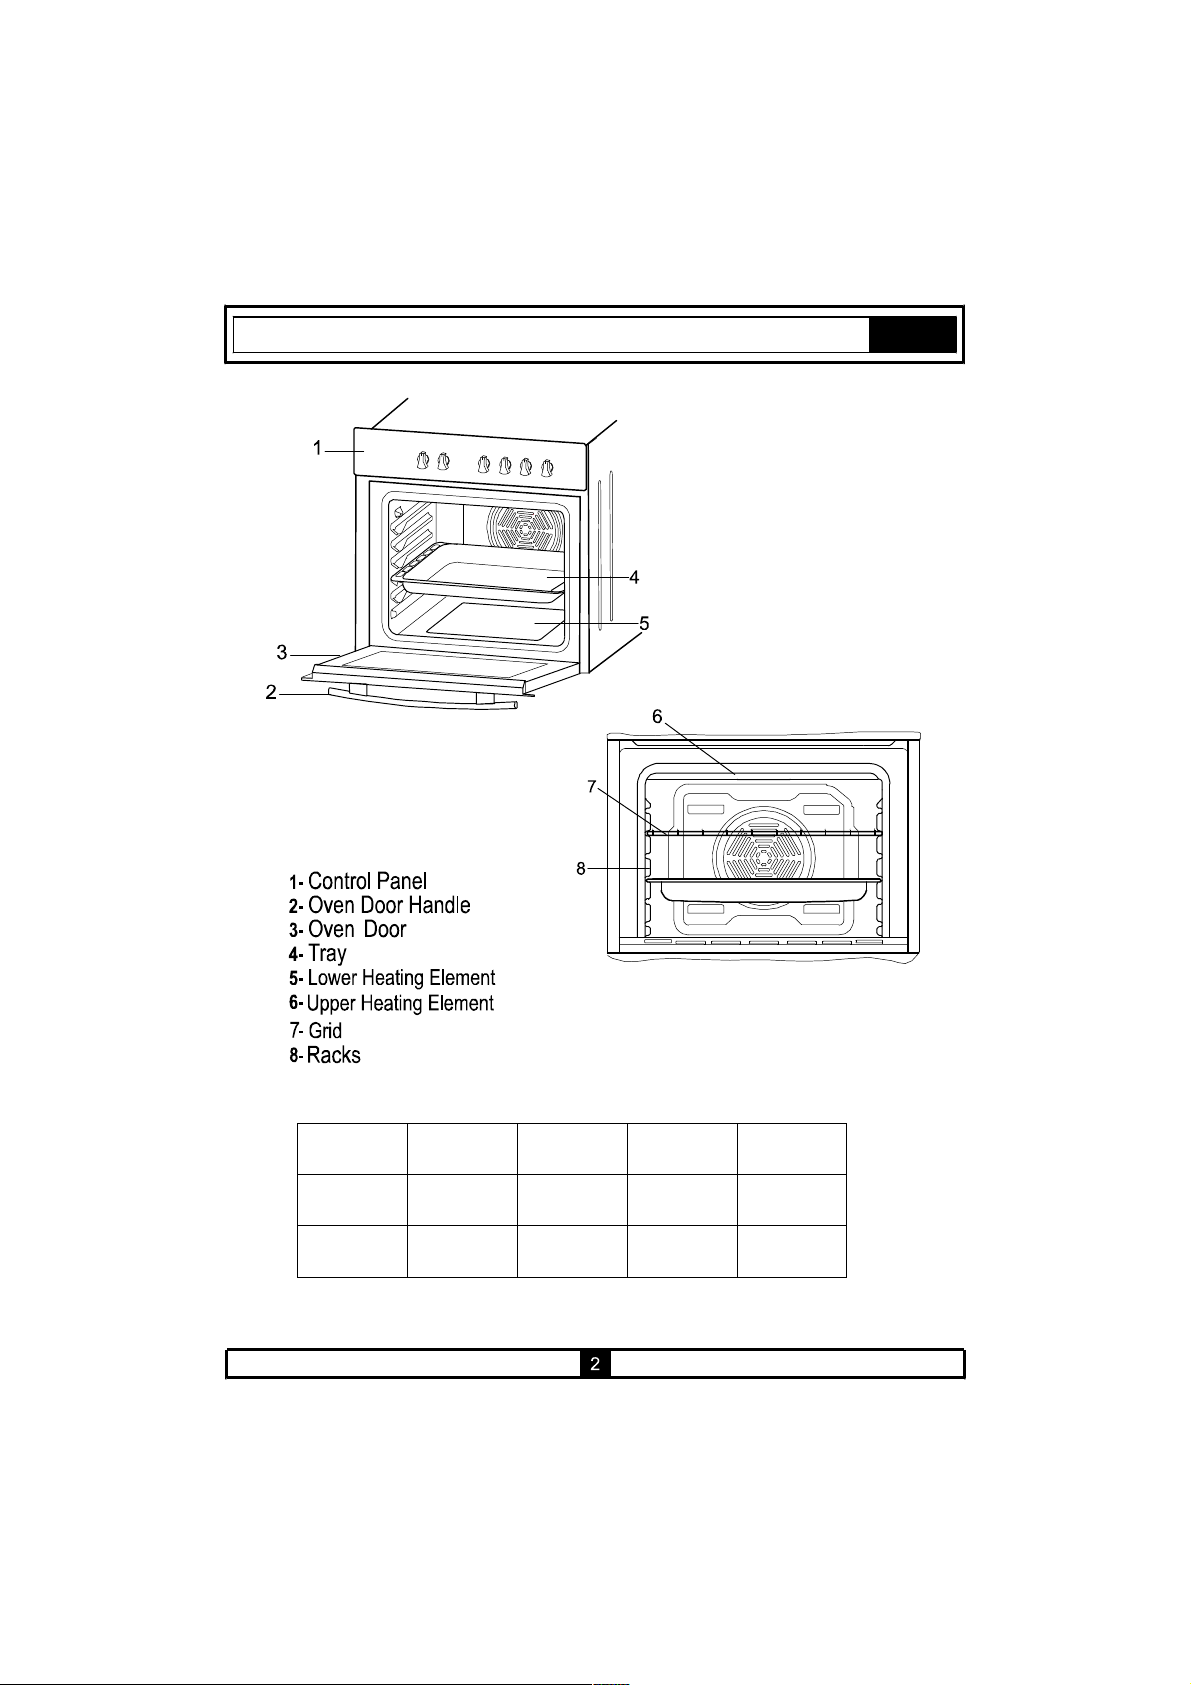
INTRODUCTION OF PRODUCTPART 1:
ENG
Hob - Oven
Combination
Possibility
PC 604 CV
PCE 604 X
FCO 104 W
FCO 104 N FCO 104 X FCO 404 X
√√√√
√√√√
Page 5
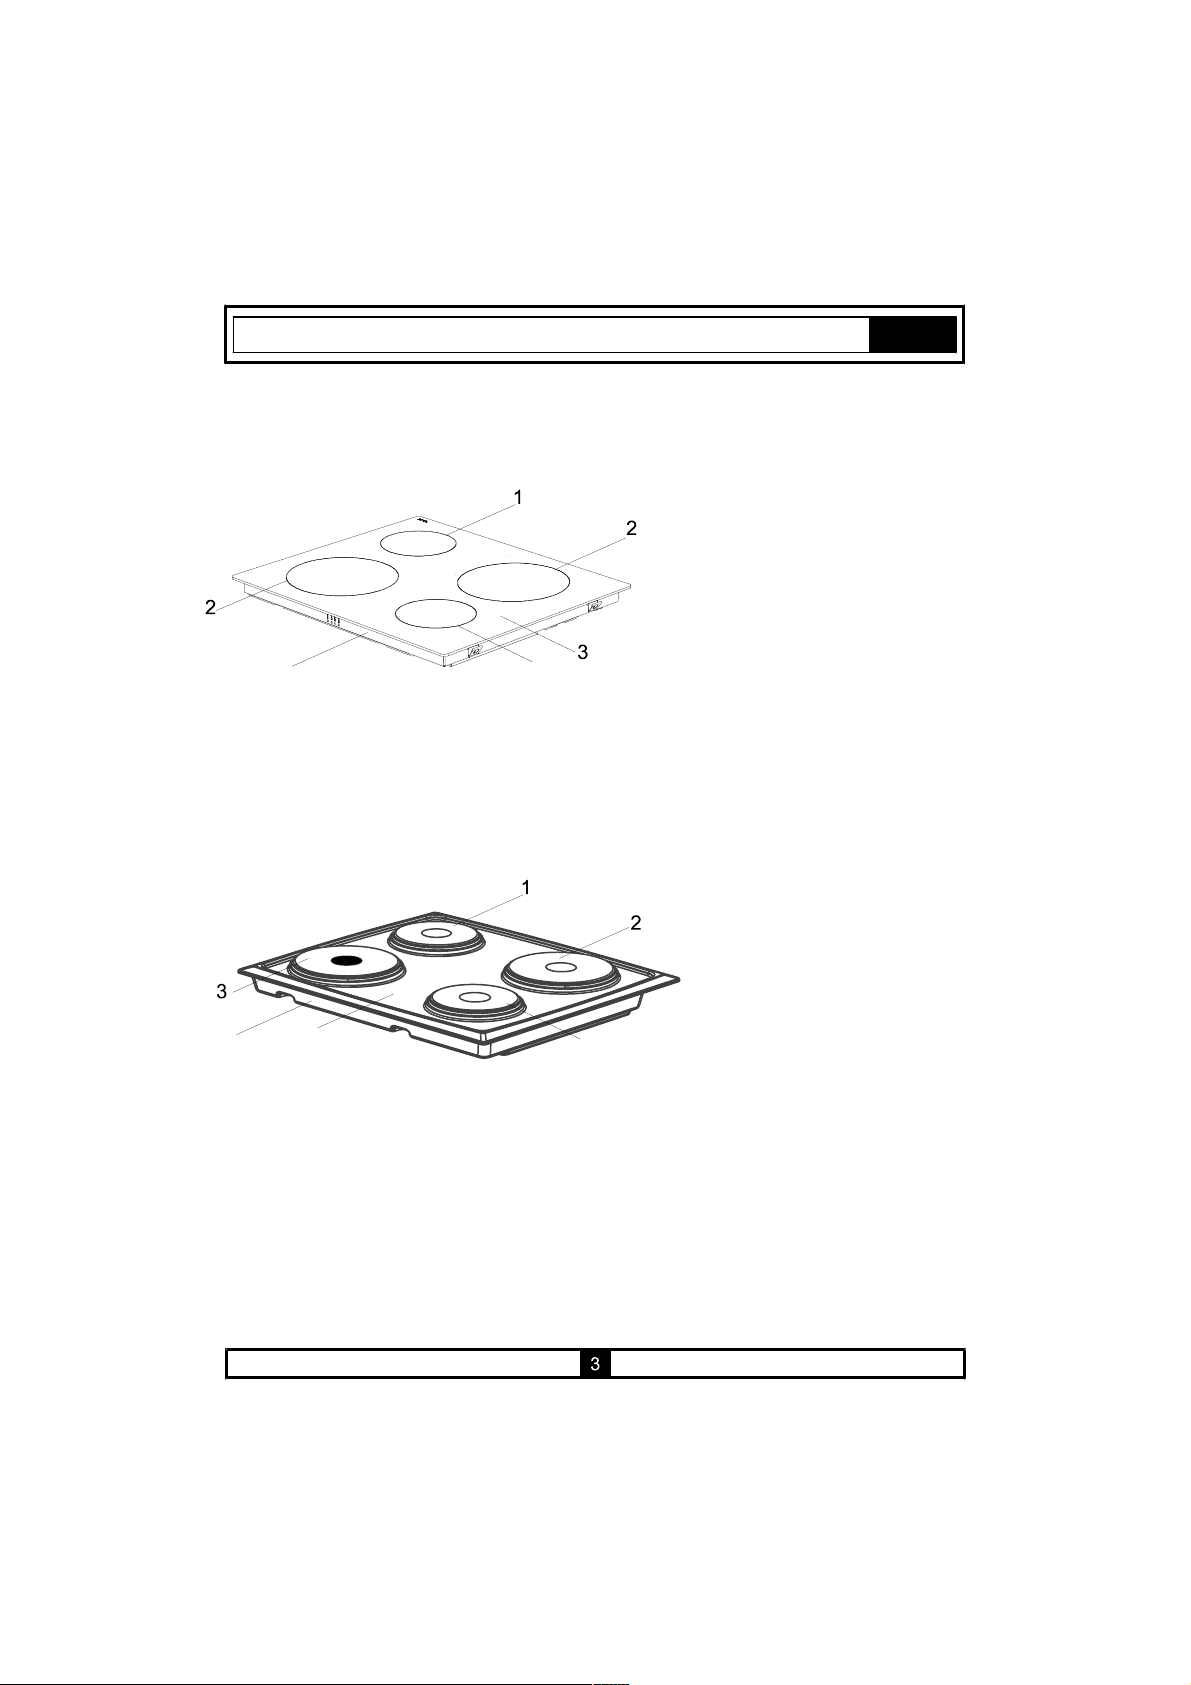
VITROCERAMIC HOB: PCV 604 C
ENG
4
SOLID HOTPLATE HOB: PCE 604 X
5
4
1
1 o 145 Radiant Zone (1200W)
/
2 o 180 Radiant Zone (1700W)
/
3 Vitroceramic Surface
4 Lower Casing
1
1 o 145 Solid Hotplate Burners (1000W)
/
2 o 180 Solid Hotplate Burners (1500W)
/
3 ø 180 Rapid Solid Hotplate (2000W)
4 Cooktop
5 Lower Casing
Page 6

Kknobs
power cord
ENG
power cord
power cord
Kknobs
4
Page 7

ENG
Caution :(Except model FCO404X) The heat vapour is given out through the
ventilation holes at the handle during normal operation of the oven. Please kindly
be aware of that usage .
5
Page 8
IinstallIinstall
ENG
W orktopw
Figure 1
Page 9

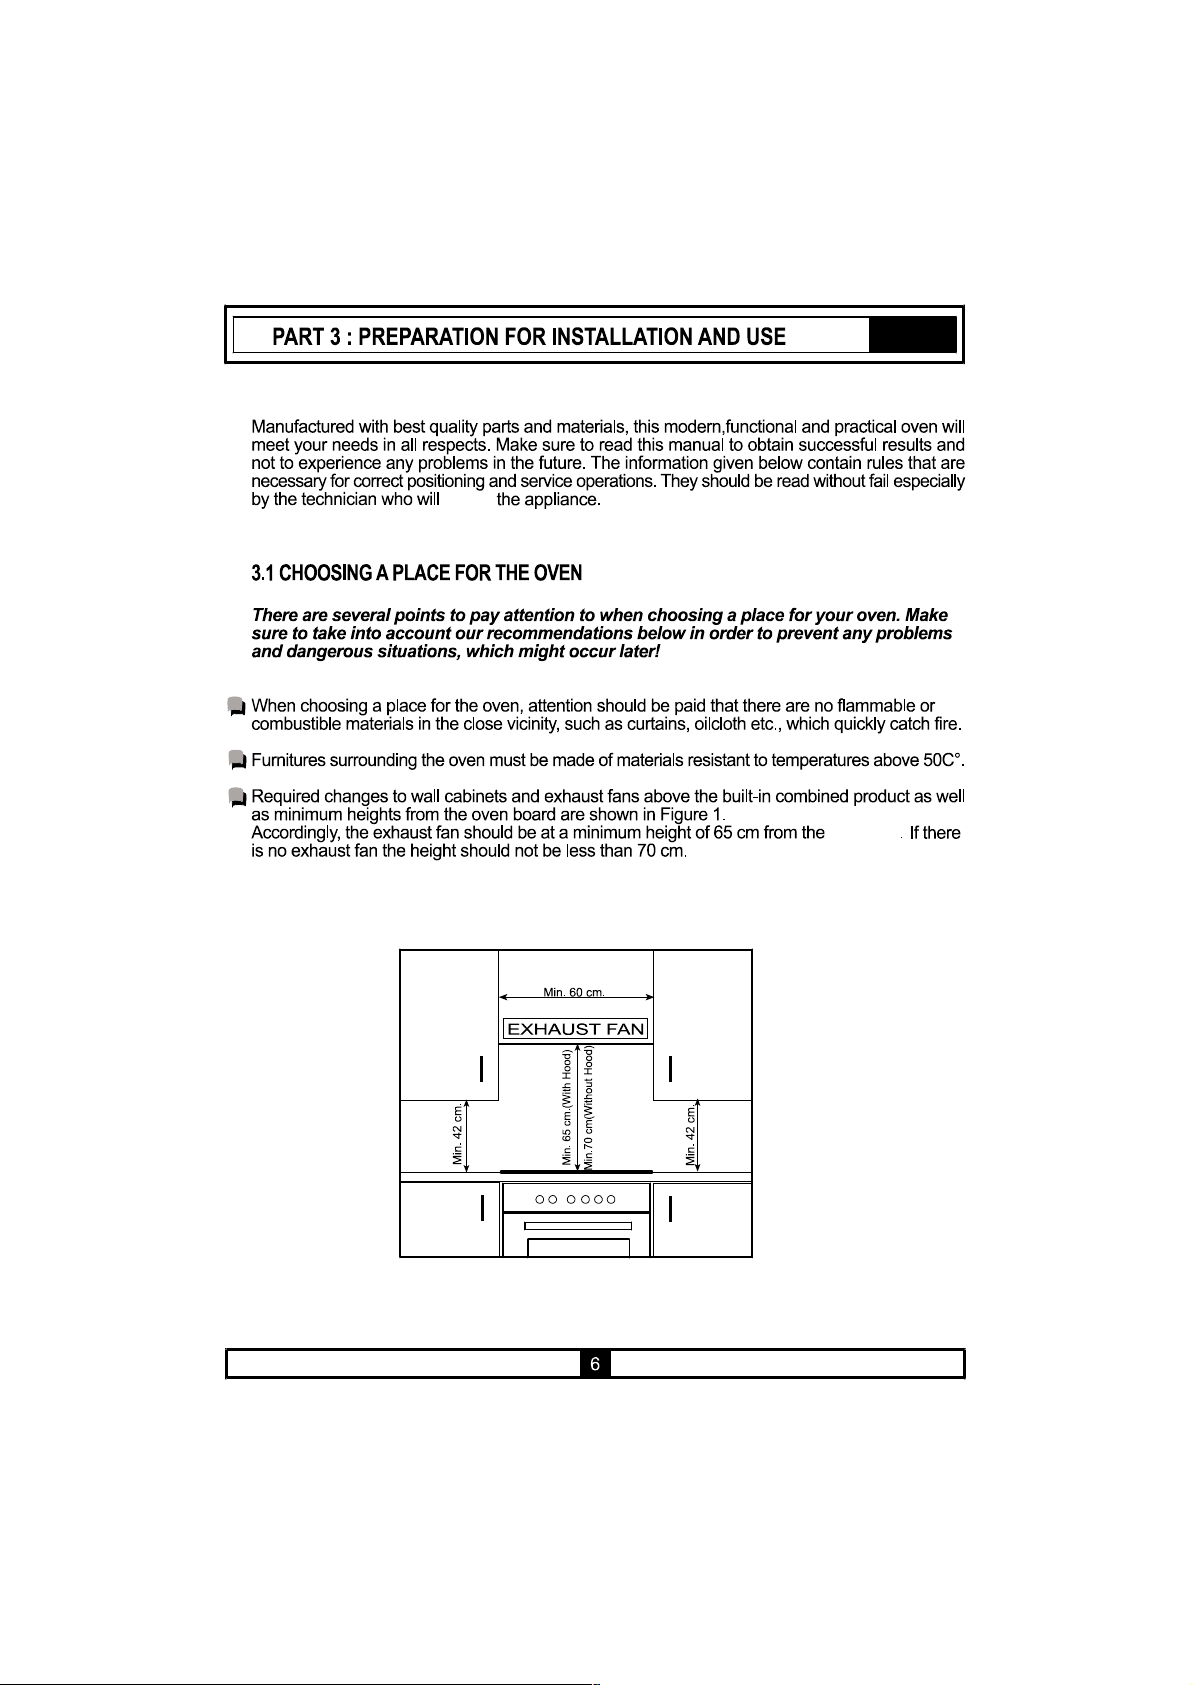
3.2 OVEN and HOB INSTALLATION
Figure A- Flush Installation of Oven
510mm
40mm
580mm
Wooden
part
Min.
60mm
ENG
20mm
Wooden
part
Min.
40mm
Figure B- Regular Installation of Oven
510mm
40mm
580mm
Front
frame
Mounting
screw
Spacer
Wooden
part
Min.
60mm
Page 10

ENG
Installation steps:
1.Place the hob into the opening on worktop. The size of opening is given in Figure A.
Fordetails, see the headings either or
.
hob
2.Connect the hob to the oven using the the plug given on the hob. The socket for plug is
placed on the rear panel of oven.
3.Connect the oven to the electrical supply.
4.Place the oven into its built-in niche. Either placement in Figure A or placement in Figure B
is applicable depending on the size of cabinet opening. For details, see the heading
the oven
.
Fixing the solid hotplate hob:
In order to prevent leakage of any liquids on the counter, a special sealing putty is supplied
together with your oven. Apply this putty around the clearance on the kitchen counter. Extend
the five-piece putty by stretching and apply it around the clearance. Place the hob on it, as
indicated in the FigureA. Make sure tofit all four clamps by usingone screw for exch as shown in
the Figure C. In case the thickness of the kitchen counter is less than 40mm, use the clamp
as shown in the Figure E. After fitting your hob into its place, neatly remove the
excess sealing putty around the sides with the help of a spatula Figure D.
Fixing the solid hotplate hob Fixing the vitroceramic
Fixing
h>40mm
h
Figure C
Figure D
h<40mm
h
Figure E
Fixing the vitroceramic hob:
·
Apply the one-sided self-adhesive sealing tape supplied all the way round the lower edg
of the cooking surface along the outer edge of the glass ceramic panel. Do not stretch it.
·
Screw the 4 worktop mounting brackets on theside walls of product.
·
Place the hob into the opening on the worktop.
ε
Page 11

ENG
wo rkt o p m ou nt ing b ra ck et
Fixing the oven:
Insert the oven into cabinet partly by pushing it forward. Open the oven door and insert 4
screws into countersunk holes on the front frame. Locate the spacers behind the flange of
front frame and screw them till the surface of spacer touches the front frame. While doing
this, please pay attention that the chamfered edge of each spacer is faced to the rounded
edge of front frame. Push forward the product completely and finally screw it to wooden
part.
The dimensions and material of the cabinet in which the oven will be installed must be
correct and resistant to increases in temparature. In a correct installation, contact with
electrical or insulated parts must be pervented. Insulating parts need to be fitted in a way to
ensure that they cannot be removed by using any kind of tool. Installing the appliance in the
close vicinity of a refrigerator or a deep-freezer is not recommended. Otherwise, the
performance of the above-mentioned appliances will be negatively affected due to
emanating heat.
Warning regarding the installation of built-in oven without cooling fan
10mm
Prior inserting the oven, it is necessary to remove the
rear kitchen element panel in the area of the oven
opening.
Equally, the front part of the element must have an
opening of no less than 10 mm.
9
Page 12

ENG
2
Power
10
Page 13

ENG
4
2
WARNING: The cabling and wiring system must be ble to bear the maximum electric power
required by the oven. This i indicated on the rating plate oven. n case of any doubt please
refer to professionals.
sI
.A
2
11
Page 14

4.1 CONTROL PANELS:
ENG
Oven Function
Control Knob
MAX
Oven Thermostat Light
MAX
Oven Thermostat Knob
T
50
2
100
200
150
3 4
61
1
2
5
6
1
2
5
4
3
3
6
1
2
5
4
3
6
5
4
FCO 404 X
T
50
2 5
100
200
150
3 4
61
2 5
3 4
61
2 5
3 4
61
2 5
3 4
61
12
FCO 104 X
FCO 104 N
FCO 104 W
Page 15

4.2 USING THE COOKTOP BURNERS:
ENG
he hob part of the product is controlled via t he on the control panel (Figure 3).
T
7-stage knob
Stage "0" means off position.The remaining 6 stages indicate the following types of use:
1.........Heat Maint enance Position
2 - 3....Heatin g in Low Temperature
Position
1
2
34
Burner
control knob
The upper part of the Solid hotplate is covered w ith a heat-resist ant protective material.
6
5
Figure3
s
4-5-6...Cooking, F rying and Boiling
Position
At first run, in order t o harden the protect ive layer by burning it, bring the electric burner button
to position "3" an d run t he burner for 5 minutes. While us ing t he elec tric burners, attention
should be paid that the pots used h ave smooth even bo tt oms. You can obtain maximum
performance from your hob if you use pots with suitable diameters and even bottoms. Using
pots with small diameters on burners with large diameters is not recommended. Because that
will cause heat loss and lead to a waste of energy.
COR RECT
WRONG
pot bottom is round
WRONG WRONG
po t b utt o m is s ma ll
pot buttom does not sit well
Resistance of the vit roceramic glas s to heat and extreme changes of te
A redness will be noticed on the heated surface with time. When any h
may hear a we ak sound; t his is normal and it has to do with the tec
system .
It does notpose any problems in terms of quality. In case sharp-edged p
or ro ughl y placed o n the vit ro ceramic glass, the surface may b e
recommended that you pay attention to this.
13
mperature is very high.
eating unit is run, you
hnical structure of the
ots should rub against
come da ma ged. It is
Page 16

ENG
WARNINGS
When is brought to another position than the ‘’0’’ position, the
a cooktop burner knob other
operation
Use only pots which fit the burner diameter.
Before placing the pot on the burner, be sure that its bottom is not wet.
light will be on.
Never operate while empty. Pot temperature may be high when the
appliance is in use. Therefore, it is recommended that you keep children and pets away
from the hob both during and after operation.
In case you notice any crack on the , it must be immediately switched off
and replaced by the Authorised Service.
After use (in order to ensure its continuously effective operation and long service life),
hotplates
prevent any formation of rust and preserve their initial appearance, it is recommended to
clean the rubbing them with a of cloth that is slightly damped by oil. Never
use steam cleaners.
In order to prevent waste of energy, the pots to be used should not be smaller or larger
than the burner surfaces.
Take the necessary measures so that small children will not come close to the burner
surface in any way, as it will be hot in operating position.
Due to the flammable nature of hot oil, operations such as frying should be performed with
the container lids closed.
Do not cut anything, bread etc., on the glass. Do not use pots with aluminium bottoms.
Avoid placing too heavy materials on your hob.
Do not place materials such as plastic, aluminium on the glass surface. If for any
reason there should be a plastic or aluminium material melted on it, clean it up with a
spatula immediately.
a cooktop burner
ceramic glass
need to be thoroughly cleaned using appropriate cleaning materials. In order to
hotplates piece
ceramic
Do not wipe the ceramic surface with materials such as dish cloth or sponge. Residues of
detergents may lead to fire as well as cause the glass colour to fade.
14
Page 17

4.3 USING THE OVEN:
First, you need to adjust the oven function (see figure 4) and
then set the oven temperature to desired value (see figure 5).
Otherwise, the oven will not operate.
When the temperature inside your oven reaches the value you
set, the thermostat will cutthe circuit and the thermostat light will
go off. When the temperature falls below the set value, the
thermostat will again be turned on and the thermostat light will
be on.
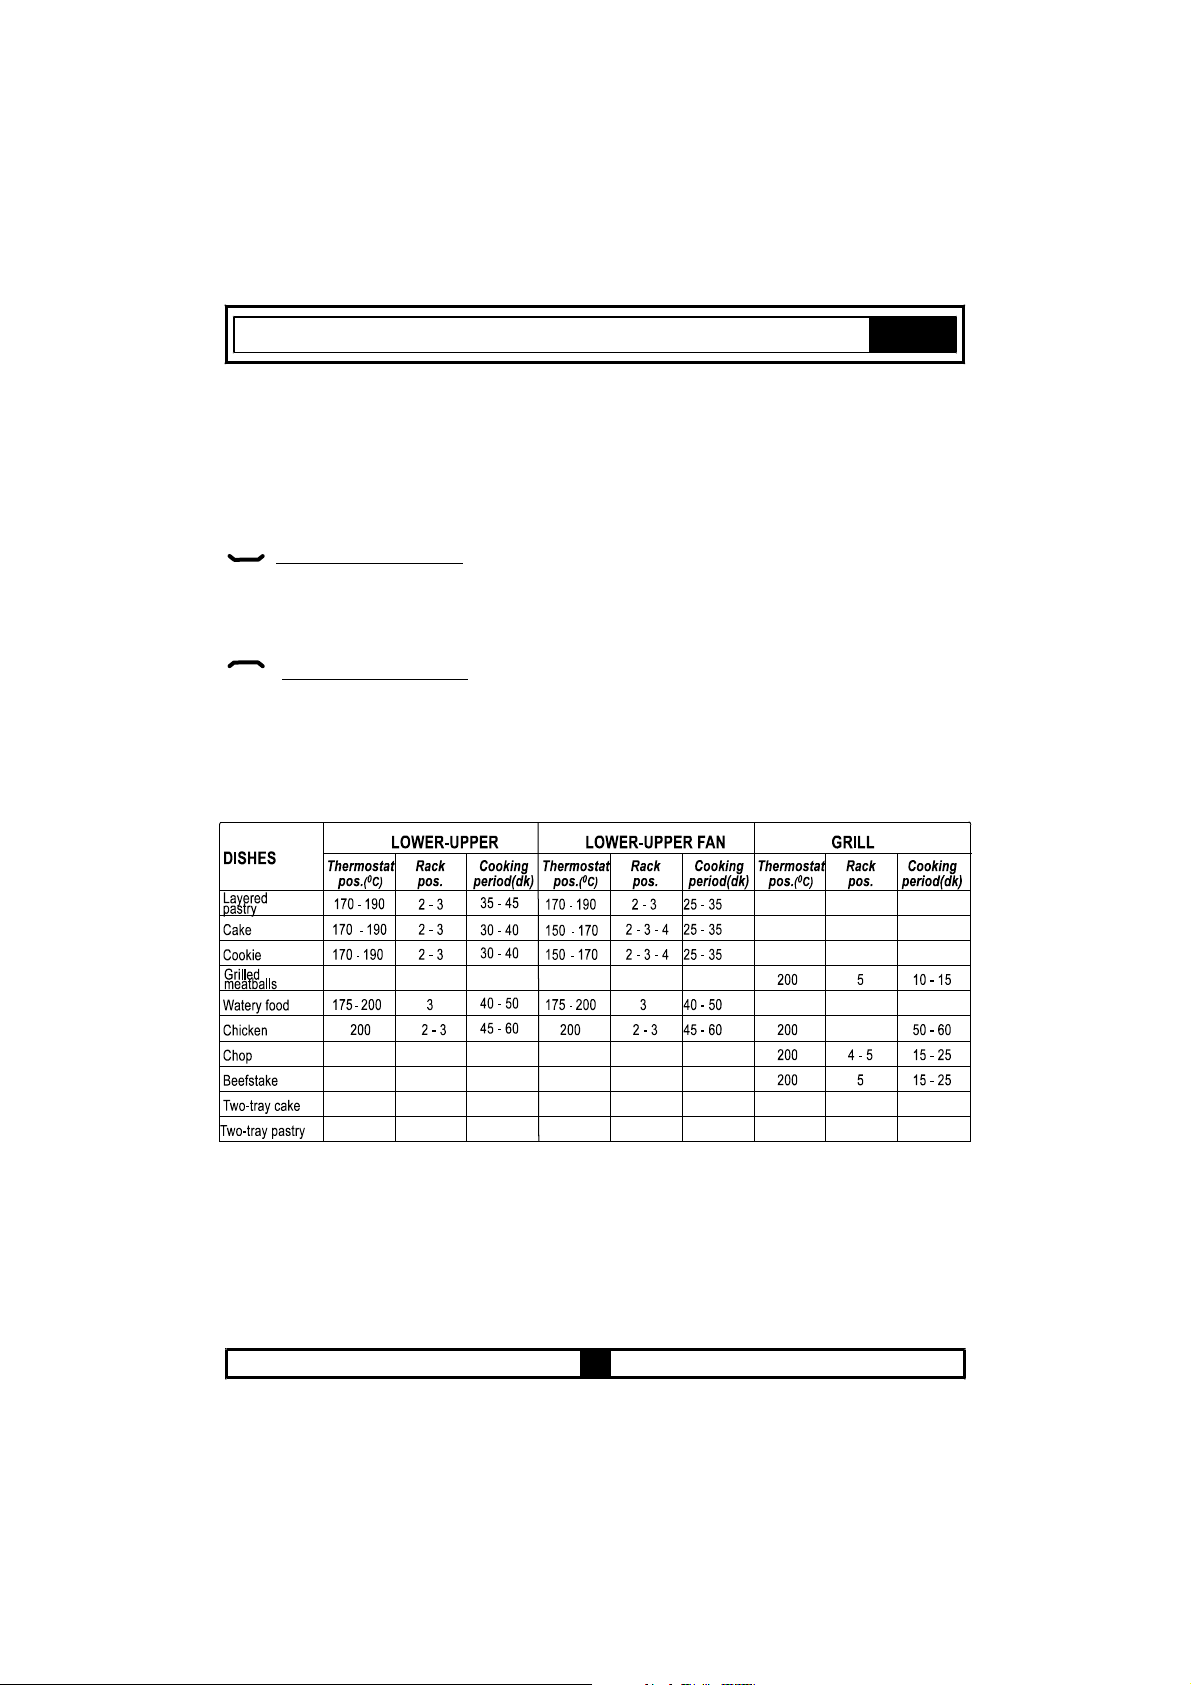
Table 1
MAX
200
ENG
Figure
T
150
Figure
4
50
100
5
Symbol Explanation
Theovenlig
Perfo rms
The oven’s
heating elem
The oven ’s
be switch ed
The ov en’s t
switched on
The ov en’s t
grill heater,
The ov en’s
The ov en’s
ht, the red warning light and the fan will be tur ned on.
the function of defrosting the frozen foods.
thermostat and warning lights and th e lower an d upper
ents will be switched on.
thermostat and w arning lights, th e fan and the turbo heater wil l
on.
hermostat and warn ing lights, the gr ill heater function will be
.
hermostat an d war ning lights, the up per heating element, the
the fan function will be switched on.
upper heating element will be switched on.
l
ower heating element will be swit ched on.
15
Energy Class according to
CENELEC EN 50304
_
B (convection) for
FCO 404 X - FCO 104 X
FCO 104 N - FCO 104 W
B (forced air)
only for
FCO 404 X
_
_
_
_
Page 18

ENG
4.4 FUNCTIONS:
Availability of the functions explained below vary depending on the product model.
Defrost Fun ction :
Yo u can start the defros t oper ation b y p ut ting the fro zen
food into the oven and bringi ng the button to th e indicated
mark. This f unction does not cook /bake the food; it o nly
helps de frost it wi th in a short ti me. P ut the food to b e
defrosted on t he wire r ack that you will place on the thir d
rack sup port from the bottom (Figure 6 ) . To collect th e
water to ac cumulate due to the melting ic e, in sert an oven
tray into the low er rac k.
Figure 6
Lowe r-Upper Heati ng E l ement Func tio n ( Static Co oking) :
In this t ype of cooking which is described a s the traditional method, the heat emanating
evenly from the lower and upper resistors into the oven ens ures even cooking of the low er
and upper side of the food that you are cooking. of your oven to
a temperature recommended on the cooking table for the cooking operation you will perform.
A preheating of the oven for about 10 minutes is recommended. Leave the food to cook, which
is placed in a suitable container, for the recommended duration. This position is a preferred
fu nc tion in m aking cake s, sponge cakes, p as try, bak ed pasta, l asa gne, pizz a.
Adjust the thermostat knob
After the cooking/baking, turn of f the oven function control and the thermostat.
Take the cooked/baked food out of the oven, place it on a safe plac e and ensure that the oven
completelycools off by keeping the oven door open. As the oven will be hot, stay a way from
the oven and keep your children away as well.
16
knob
Page 19

ENG
Fan and the Lower-Upper Heating Element Function (Static Cooking With Fan) :
This is the position w here t he ai r coming from the lower a nd up per heating elements is
circulated into t he ovenby the fan.
Adjust the thermos tat of your oven to a temperature recommended o n the cooking
table for the cooking operation you w ill perform. T urn the o ven so it will point to the
symbol of this function, adjust the ov en timer to the recommended time for the cooking and
preheat the oven for about 10 minutes. The food placed in a suitable container is put into the
oven and the operation is started. This position is a position where usually very good results
are obta ined in baking pastry. All parts of t he f oods will be cooked evenly in this position.
Suitableforcookingwithonetray.
After the cooking/baking, turn off the oven function control and the temperature set ting.
Take the cooked/baked food out of the oven, place it on a safe place and ens ure that the
oven completely cools off by k eeping the ov en d oor open. As the oven will be hot, stay
away from the oven and keep your c hildren aw ay.
b
kno
bkno
bkno
Grill Function :
This function is us ed for grills , roast chic ken and roast on skewer.
on the gri , and on the highes t rack. After placing the oven
rack, you can start the g rill opera tion. The tray pla ced on the rack will ensure
that the oil dro pping fro m the foods will be collected.
When grilling, t he oven door must be closed and t he oven temperature should be
adjusted to 190° .
Turn your oven’s thermostat so it will point to this temperature v alue. After a preheating
period of 5 minutes, put your foods into the oven.
After t he c ooking, turn off the ov en f unction control and the t hermostat
d
place the grid
C
bkno
bkno
For grills; put the foods
tray on the .
third
.
third
Take the cooked/baked food out of the oven, place it on a safe place and ensure that the oven
completely cool s off by k eeping the ov en door open. As the oven will be hot, stay away from
the ov en and keep you r ch ildre n aw ay.
Grill and Fan Function :
At this f unction; ens uring complete frying by working together the fan, grill and
heating element perform the operation.
the grid
place
For grills; put the foods on the gri , and
oven tray on the rack,you can start the grill operation. The tray plac ed on the rack
will ensure
When grilling, the oven door must be closed and the oven temperature should be
adjusted to 190° .
third third
that the oil dropping from the foods will be collected.
C
d
17
on the highest rack. After placing the
upper
Page 20
ENG
Turn y our oven’s t hermostat so it will point to this temperature value. After a preheating
period of 5 minutes, put your foods into the oven.
After the cooking, t urn off the oven f unction control and t he thermostat
Take the cooked/baked food out of the oven, place it on a safe place and ensure that th e oven
completely cools off by keeping the oven door open. As the oven will
oven and keep your children away.
bkno
bkno bkno
be hot, stay away from the
.
Lower Heating Function
At this cooking, the best is spreaded from the lower heating element. Lower heating function
is appropriate for heating the of cooking.food instead
Upper Heating Function
In this type of cooking, the heat emanating from upper heating element cooks the upper side
of the food. Upper heating function is appropriate for frying the upper side of already cooked
food and heating the food.
Table 2
18
Page 21

PART 5 : CLEANING AND MAINTENANCE
ENG
5.1 GENERAL
Before starting to clean your oven, be sure that all controL knobs are off and your appliance
is cooled off. Unplug the a liance.
Do not use cleaning materials containing particles that m ight scratch the enamelled
painted parts of your oven. Use cream cleaners or liquid cleaners, which do not contain
particle s.
As they might har m the surfaces, do not use caustic creams, abrasive cleaning powders,
rough wire wool or hard tools. I n th e event the excess liquids spilling over your oven
shou ld b urn, it may cause a damage to the e namel. I mmediat ely c lean up the spil t li qui ds.
Do not use steam cleaners for cleaning the oven.
pp
and
5.2 CLEANING THE OVEN
Make sure to unplug the oven before starting to clean it. You will obtain best res ult s if you clean
the oven interior w hile the ov en is slightly warm. Wipe your oven with a soft piece of cloth
dampened wit h soap water after each use. Then wipe it again, this time with a wetted cloth, and
wipe it dry. A com plete cleaning may b e necessary from time to tim e, using a liquid
cleaning material. Do not clean using dry and powder ty pe cleaners. For products with catalytic
enamel frames, the rear and side walls of the inner frame do not require cleaning. However;
depending on us age , i t is re commende d that you repl ace them after a cert ain period
of t im e.
5.3 CLEANING THE SOLID HOTPLATE HOB
Hobs should be cleaned wiping w it h a dampened cloth.
should be done only with water and such parts should be wiped dry with a soft cloth or chamois.
Gaps and corners should be cleaned usingliquid detergents or lukewarm v ine gar.
Cleaning of the stainless steel parts
5.4 CLEANING THE VITROCERAMIC HOB
Unplug the appliance before starting the cleaning.
Wait for t he v itroceramic glass to complet ely cool off bef ore starting the cleaning.
Make sure that the cleaning materials you will use do not contain particles that might scratch
t e glass Use cream detergents or liquid detergents.
h
The vitroceramic surface should be wiped with cold water and wiped drywith a soft piece
untilno cleaning mat erial is left on the surface.
You can use the cleaning spatula supplied t ogether with your product, for the cleaning of spilt
foodsand residue.
Dessert type of foodsshould be cleaned immediately after they spill without waiting for the
vitroceramic glas s to cool off.
s.
if,
19
of c loth
Page 22

ENG
Scrubbing with steel cleaning wires may harm the vitroceramic glas s surface. Formations
on the surface shouldbe cleanedup using a dampened cloth.
Changes in colourwhich might occur on the ceramic glass surface do not affect the functional
or permanence of the vitroceramic. The reason for the changes in colour isnot the change
material; it may be because the burnt residues on the surface are not cleaned up or the pots used
have worn the glass surface or bec ause unsuitable cleaning materials were used.
The cleaning spatula should always be used prior tochemical cleaning substances. With this
youcan clean up the tiniest of dirts on the vitroceramicsurf ace. Dirts th at are difficult to remo ve,
as melted plastic, heavy oils, sweet substances, can be removed easily with the spatula. As t he
spatula in cludes a razor, it i s dan gerous and mus t be kept out of reac h of children
During cleaning with the spatula, pay attention not toscrape off the sillicon adhesives found on the sides
of the glass.
.
of du st
structure
in t he
sp atu l a,
such
5.5 MAINTENANCE
Replacing the Oven Light Bulb
Itis recommendedthat you leave this operation totheAuthorisedService.
Unplug the oven first and make sure that itis cold. After removing thelid infrontof the light, take the
b ulb o ut . I ns ert t he new bul b r esi sta nt to 300
place ofthe bulb you have removed. Thenfit the light protecting back into its place.After that,
o ven w ill be re ady f or u se.
0
C,which you find atAuthorised Services, into the
will
lid
your
20
Page 23

PART 6 : SERVICE AND TRANSPORTATION
ENG
6.1 REQUIREMENTS BEFORE TO SERVICECONTACTING
If t he o ven do es no t o per ate ;
The oven may be plugged off, there has been a black out.
If the oven does not heat ;
T emperature temperaturehe t may be not adjusted with oven’s control switch.
If the does not light;oven light does not operate
The electricity be controlled.should
It should b
Coo king (If lower-uppe r part does not cook equally) ;
Control the shelf locations, cooking period and t values according to the manual.emperature
I
n case of the product doesn't work properly and malfunctioning causes cannot be found,
switch off the product. Please do not tamper with it and call the Technical Service.
I
t is important to communicate to Authorized Technical Service the product model and
it's serial number (16 digit starting by number 3) that can be found on the rating label
be controlled whether the defective.
ulb si
.
6.2 INFORMATION RELATED TO TRANSPORT
If you need any transport ;
Keep the original of product and carry it with its original d.
Follow the transport signs on .
If the original packaging is not available;
Take measure for the external (glass and painted surfaces) of oven aganist
possible blows.
packaging packaging when neede
the packaging
surfaces and hob
21
Page 24

The symbol on the product or on its packaging indicates that
this product may not be treated as household waste. Instead it shall
be handed over to the applicable collection point for the recycling
of electrical and electronic equipment. By ensuring this product is
disposed of correctly, you will help prevent potential negative
consequences for the environment and human health, which could
otherwise be caused by inappropriate waste handling of this
product. For more detailed information about recycling of this
product, please contact your local city office, your household
waste disposal service or the shop where you purchased the
product.
520.......
04.2007/R000
 Loading...