

Page 1

INSTRUCTION BOOK
Condenser Tumble Dryer
GVC 7913NB
English
Italiano
Español
2
16
30
Page 2

Introduction
Delivery Information
Safety Reminders
Use
Installation
The Laundry
Ventilation
Environmental Issues
Gias Service
Installation
Electrical Requirements
Adjusting the Feet
Drain Hose Kit: Fitting Instructions
Preparing the Load
Clothes Preparation
Do Not Tumble Dry
Energy Saving
Sorting the Load
Drying Guide
Controls and Indicators
Selecting the Programme
Door and Filter
Opening the Door
Filter
Filter Care Indicator
Water Container
To Remove the Container
Condenser
To Remove the Condenser
Operation
Delay Start Function
Cancelling and Resetting the Programme
Cleaning and Routine Maintenance
Cleaning the Dryer
Technical Specifications
Troubleshooting
Customer Service
Spares
Gias Service
INDEX
3
3
3
4
5
5
6
7
7
7
7
7
8
9
9
9
9
9
9
10
11
12
12
12
12
12
12
13
13
13
14
14
14
14
14
15
15
15
15
EN 2
Page 3
INTRODUCTION
Please read and follow these instructions carefully and operate the machine accordingly. This
booklet provides important guidelines for safe use, installation, maintenance and some useful
advice for best results when usingyour machine.
Keep all documentation in a safe place for future reference or for any future owners .
Delivery nformationI
Please check that the following items are
delivered with the appliance:
Check that no damage has occurred to the
machine during transit. If it as, call for service h
by GIAS.
Ⴠ Instruction manual
Ⴠ Guarantee card
Ⴠ Energy label
SAFETY REMINDERS
Use
Failure to comply with the above can
compromise the safety of the appliance. You
may be charged for a service call if a problem
with your machine is caused by misuse.
Ⴠ This appliance can be used by children aged from 8 years and above
and persons with reduced physical,sensory or mental capabilities or lack
of experience and knowledge if they have been given supervision or
instruction concerning use of the appliance in a safe way and understand
the hazards involved.Children shall not play with the appliance. Cleaning
and user maintenance shall not be made by children without
supervision.Children of less than 3 years should be kept away unless
continuously supervised.
ჀWARNING Misuseofatumbledryermaycreateafirehazard
Ⴠ This appliances is intended to be used in household and similar
applications such as:
- Staff kitchen areas in shops , offices and other working environments;
- Farm houses
- By clients in hotels, motels and other residential type environments;
- Bed and breakfast type environments.
A different use of this appliance from household environment or from
typical housekeeping functions,as commercial use by expert or trained
users, is excluded even in the above applications.
EN 3EN 3
Page 4

INTRODUCTION
SAFETY REMINDERS
Use
If the appliance is used in a manner inconsistent with this it may reduce the
life of the appliance and may void the manufacturer’s warranty. Any
damage to the appliance or other damage or loss arising through use that
is not consistent with domestic or household use ( even if located in a
domestic or household environment) shall not be accepted by the
manufacturer to the fullest extent permitted by law.''
ჀThismachineshouldonlybeusedforitsintendedpurposeasdescribed
inthis manual. Ensure that the instructions for installation and use are
fully understood before operating the appliance.
ჀDonottouchtheappliancewhenhandsorfeetaredamporwet
ჀDonotleanonthedoorwhenloadingthemachineorusethedoortoliftor
move the machine.
notallowchildrentoplaywiththemachineoritscontrols
ჀDo
Ⴠ WARNING Donotusetheproductiftheflufffilterisnotinpositionoris
damaged; fluff could be ignited.
ჀWARNING Wherethehotsurfacesymbol is locatedthetemperature
rise during operation of the tumble dryer may be in excess of 60 degrees C.
Ⴠ Removetheplugfromthe electricitysupplyAlwaysremove the plug
before cleaning the appliance.
ჀDonotcontinue
tousethismachineifitappearstobefaulty
ჀLintandfluffmustnotbeallowedtocollectontheflooraroundtheoutside
of the machine.
Ⴠ The final part of a tumble dryer cycle occurs without heat (cool down
cycle) to ensure that the items are left at a temperature that ensures that
the items will not be damaged.
ჀMaximum load drying weight : 9 kg
ჀThe tumble dryer is not to be used if industrial chemicals have been used
for cleaning.
ჀWARNING: Never stop a tumble dryer before the end of the drying cycle
unless all items are quickly removed and spread out so that the heat is
dissipated.
EN
4
Page 5

SAFETY REMINDERS
Installation
INTRODUCTION
Ⴠ Check that the product has no
visible signs of damage before use.
If damaged do not use and please
call GIAS Service.
Ⴠ Do not use adapters, multiple
connectors and/or extensions.
Ⴠ Never install the dryer against
curtains and be sure to prevent
items from falling or collecting
behind the dryer.
Ⴠ The appliance must not be
installed behind a lockable door, a
sliding door or a door with a hinge
on the opposite side to that of the
tumble dryer.
The Laundry
●Donotdryunwasheditemsinthe
tumbledryer
Ⴠ WARNING Do not tumble dry
fabrics treated with dry cleaning
fluids
ჀWARNING Foamrubbermaterials
can under certain circumstances
when heated become ignited by
spontaneous combustion. Items
such as foam rubber (latex foam),
shower caps, waterproof textiles,
rubber backed articles and clothes
or pillows fitted with foam rubber
pads MUST NOT be dried in the
tumble dryer.
Ⴠ Always refer to thelaundry care
labelsfordirectionsonsuitabilityfor
drying.
Ⴠ Clothes should be spin dried
or
thoroughly wrung before they are
put into the tumble dryer. Clothes
that are dripping wet should not be
put into the dryer.
ჀLightersandmatchesmustnotbe
left in pockets and NEVER use
flammable liquids near the
machine.
Ⴠ Glass fibre curtains should
NEVER beputinthismachineSkin
irritation may occur if other
garments are contaminated with the
glass fibres.
ჀItemsthathavebeensoiledwith
substances such as cooking oil
acetone alcohol petrol, kerosene,
spot removers, turpentine, waxes
and wax removers should be
washed in hot water with an extra
amount of detergent before being
dried in the tumble dryer.
Ⴠ Fabric softeners
or similar
products should be used as
specified by the fabric softener
instructions.
EN 5
Page 6
SAFETY REMINDERS
Ventilation
• Adequate ventilation must be
provided in the room where the
tumble dryer is located to prevent
gases from appliances burning other
fuels, including open fires, being
drawn into the room during operation
of the tumble dryer.
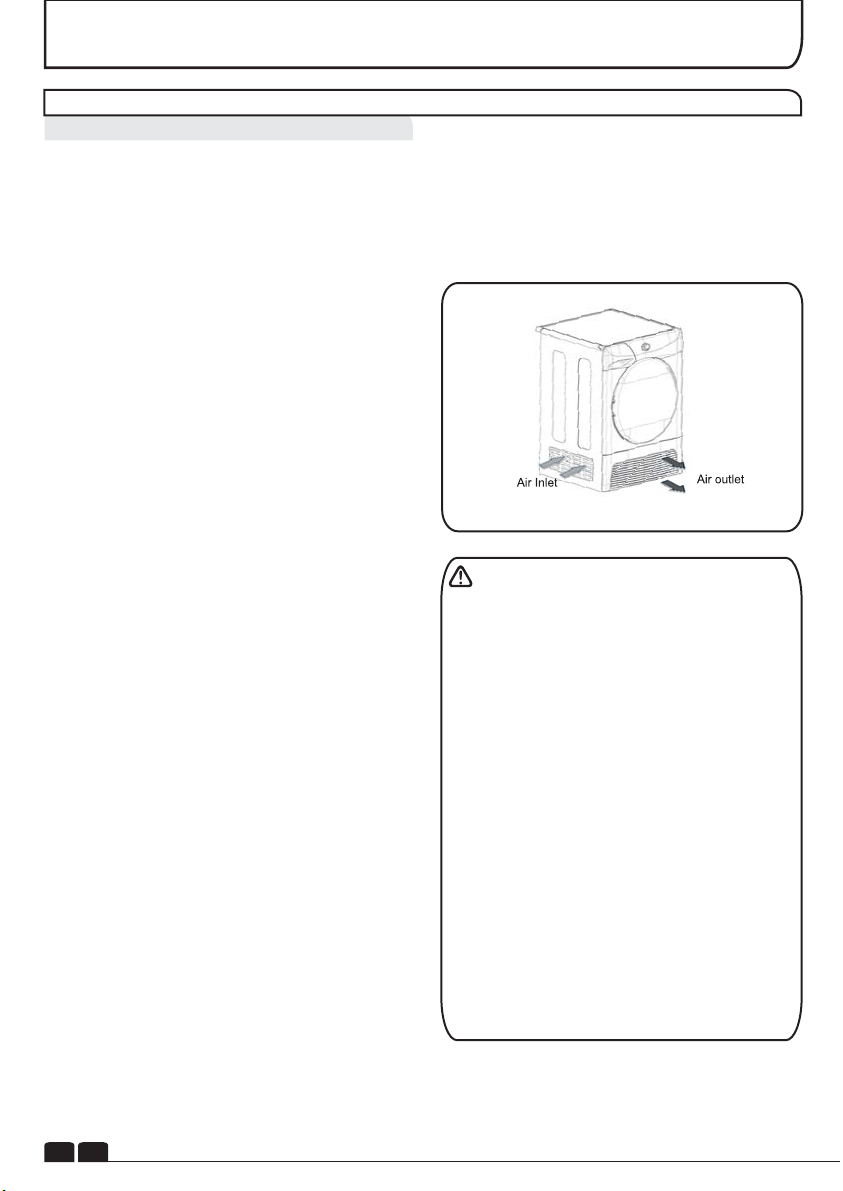
• Installing the rear of the appliance
close to a wall or vertical surface.
•There should be a gap of at least 12
mm between the machine and any
obstrubtions.The inlet and outlet
should be kept clear of obstruction.To
ensure adequate ventilation the
space between the bottom of the
machine and the floor must not be
obstructed.
• Check regularly that the air flowing
through the dryer is not restricted.
• Check frequently the fluff filter after
use, and clean, if necessary.
•Prevent items from falling or
collecting behind the dryer as these
may obstruct the air inlet and outlet
• NEVER install the dryer up against
curtains.
• In cases where the dryer is installed
on top of a washing machine, a
suitable stacking kit must be used
according to the follow configuration.
-Stacking kit Mod 35100019: for
minimum washing machine depth
49 cm
-Stacking kit Mod 35900120: for
minimum washing machine depth
51 cm
The stacking kit shall be one of that
above, obtainable from our spare
service.
6
EN
INTRODUCTION
The instructions for installation and
any fixing attachments, are provided
with the staking kit.
Do not install the product in a
low temperature room or in a room
where there is a risk of frost
occurring. At temperature around
freezing point the product may not
be able to operate properly: there
is a risk of damage if the water is
allowed to freeze in the hydraulic
circuit (valves, hoses, pumps). For
a better product performance the
ambient room temperature must
be between +2°C and +35°C.
Please note that operating in cold
condition (between +2 and +15°C)
might simply some water
condensation and water drops on
floor.
Page 7
INSTALLATION
Environmental Issues
Ⴠ All packaging materials used are
environmentally-friendly and recyclable.
Please help dispose of the packaging via
environmentally-friendly means. Your local
council will be able to give you details of current
means of disposal.
Ⴠ To ensure safety when disposing of an old
tumble dryer disconnect the mains plug from
the socket, cut the mains power cable and
destroy this together with the plug. To prevent
children shutting themselves in the machine
break the door hinges or the door lock.
European Directive 2002/96/EC
This appliance is marked according
to the European directive
2002/96/EC on Waste Electrical and
Electronic Equipment (WEEE).
By ensuring this product is disposed of correctly,
you will help prevent potential negative
consequences for the environment and human
health, which could otherwise be caused by
inappropriate waste handling of this product.
The symbol on the product indicates that this
product may not be treated as household waste.
Instead it shall be handed over to the applicable
collection point for the recycling of electrical and
electronic equipment.
For more detailed information about treatment,
recovery and recycling of this product, please
contact your local city office,your household
waste disposal service or the shop where you
purchased the product. Disposal must be
carried out in accordance with local
environmental regulations for waste disposal.
Electrical Requirements
Tumble dryers are supplied to operate at a
voltage of 220-240V, 50 Hz single phase. Check
that the supply circuit is rated to at least 13A.
Electricity can be extremely dangerous.
This appliance must be earthed.
The socket outlet and the plug on the
appliance must be of the same type.
Do not use multiple adapters and/or
extension leads.
The plug should be accessible for
disconnection after the appliance has been
installed.
CE Appliance complies with European Directive
2004/108/EC, 2006/95/EC and subsequent
amendments.
You may be charged for a service call if a
problem with your machine is caused by
incorrect installation.
If the mains cord on this appliance is
damaged, it must be replaced by a special cord
which is ONLY obtainable from the spares
service. It must be installed by a competent
person.
Do not plug the machine in and switch it
on at the mains until the installation is
completed.For your safety, this dryer must be
correctly installed. If there is any doubt about
installation, call GIAS Service for advice.
GIAS Service
Ⴠ To ensure the continued safe and efficient
operation of this appliance we recommend that
any servicing or repairs are only carried out by
an authorised GIAS service engineer.
If the appliance is not running properly or
breaks down, switch it off and disconnect the
plug from the socket. Consult GIAS Service for
possible repair.
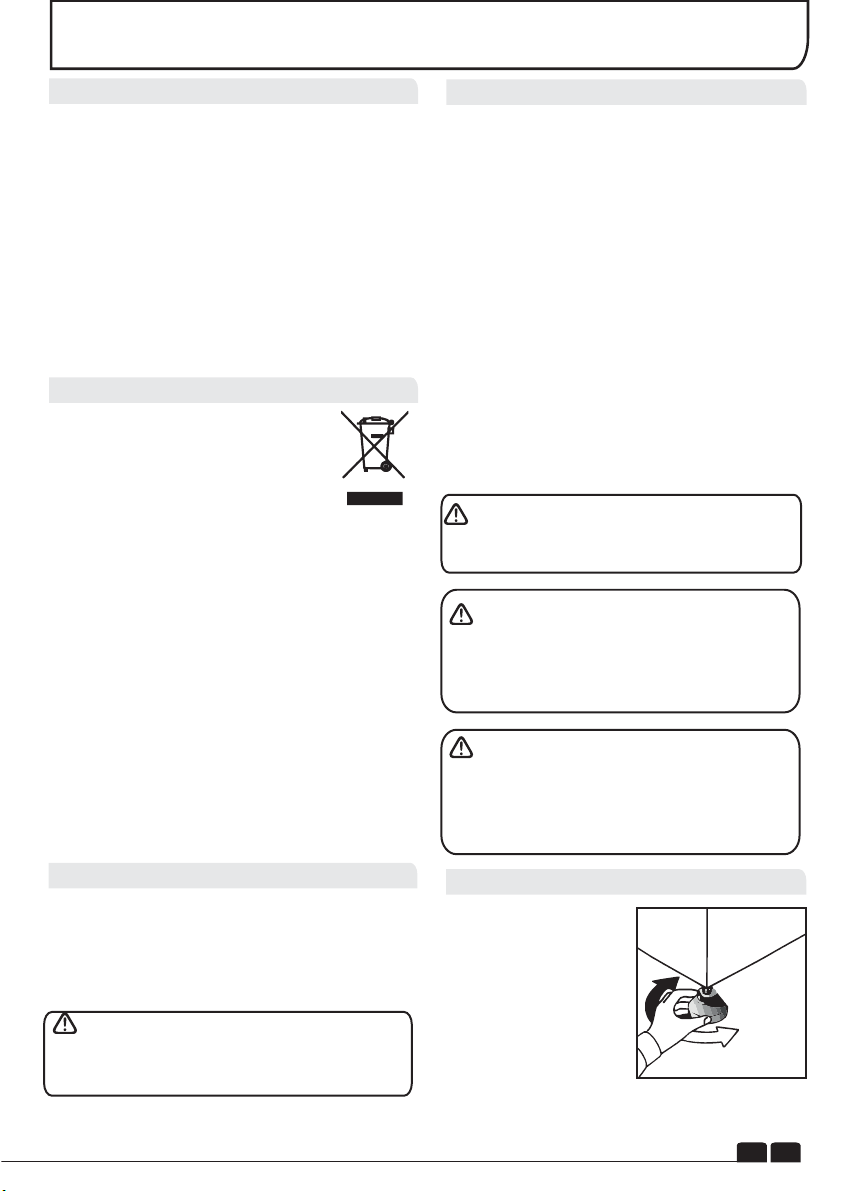
Adjusting the Feet
Once the machine is in
place the feet should
be adjusted to ensure
that the machine is
level.
EN
7
Page 8
DRAIN HOSE : FITTING INSTRUCTIONS
To avoid emptying the water container after
each drying cycle, the water can be
discharged directly to a waste water drain pipe
(the same drainage system as household
sinks). Water Bye-Laws prohibit connection to
a surface water drain. The waste water drain
pipe should be located adjacent to the tumble
dryer.
5. Place the tap
supplied by the kit to
close the remaing
hose.
The kit consists of:1 hose and 1 tap.
WARNING! Switch off and remove the
tumble dryer plug from the electricity supply
before carrying out any work.
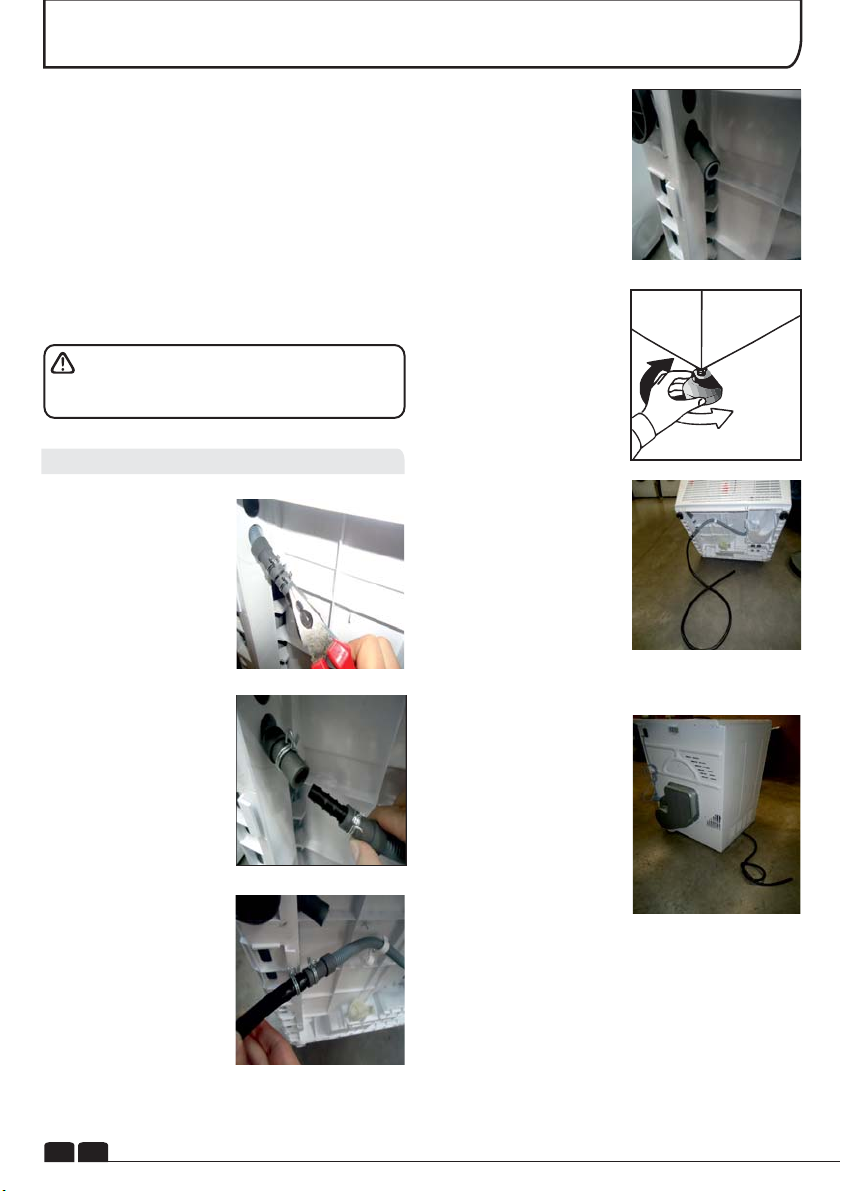
Fit the Hose as Follows:
1.Tilt the machine
backwards.
2. The waste water
pipe is situated at the
right-hand side of the
machine (see the
picture). A grey hose
connects to the bridge
at the left hand side of
the machine. Using
pliers, remove the pipe
retaining clip from the
bridge.
3. Pull the hose off the
bridge connection.
6. Once the machine is
in place the feet should
be adjusted to ensure
that the new hose does
not kink when pushing
the tumble dryer into
position.
7. Connect the new
drain hose to the waste
Water pipe.
8. Connect to the
mains electricity
supply.
4. Attach the black
hose from the kit,
(using the connector
and pipe clips
supplied), to the hose
removed from the
bridge connection.
EN 8
Page 9
PREPARING THE LOAD
Before using the tumble dryer for the first time:
ჀPlease read this instruction book thoroughly.
ჀRemove all items packed inside drum.
Ⴠ Wipe the inside of the drum and door with a
damp cloth to remove any dust which may
have settled in transit.
Clothes Preparation
Make sure that the laundry you are going to dry
is suitable for drying in a tumble dryer, as shown
by the care symbols on each item.
Check that all fastenings are closed and that
pockets are empty. Turn the articles inside out.
Place clothes loosely in the drum to make sure
that they don't get tangled.
Do Not Tumble Dry:
Woollens, silk, delicate fabrics, nylon stockings,
delicate embroidery, fabrics with metallic decorations, garments with PVC or leather
trimmings, training shoes, bulky items such as
sleeping bags, etc.
IMPORTANT: Do not dry articles which
have been treated with a dry cleaning fluid or
rubber clothes (danger of fire or explosion).
During the last 15 minutes the load is always
tumbled in cool air.
Energy Saving
Only put into the tumble dryer laundry which
has been thoroughly wrung or spin-dried. The
drier the laundry the shorter the drying time thus
saving electricity.
ALWAYS
ჀTry to dry the maximum weight of laundry, this
will save time and electricity.
Ⴠ Check that the filter is clean before every
drying cycle.
NEVER
Ⴠ Exceed the maximum weight, this will waste
time and electricity.
Ⴠ Put dripping wet items into the tumble dryer,
this may damage the appliance.
Do not overload the drum, large items
when wet can exceed the maximum admissible
clothes load (for example: sleeping bags,
duvets).
Maximum Drying Weight
Ⴠ Cottons Max. 9 kg
Ⴠ Synthetics Max. 4 kg
Sort the Load as Follows
ჀBycaresymbols
7KHVHFDQEHIRXQGRQWKHFROODURULQVLGHVHDP
Suitable for tumble drying.
. .
Tumble drying at high temperature.
.
Tumble drying at low temperature only.
Do not tumble dry.
,IWKHLWHPGRHVQRWKDYHDFDUHODEHOLWPXVWEH
DVVXPHGWKDWLWLVQRWVXLWDEOHIRUWXPEOHGU\LQJ
ჀByamountandthickness
:KHQHYHU WKH ORDG LV ELJJHU WKDQ WKH GU\HU
FDSDFLW\ VHSDUDWH FORWKHV DFFRUGLQJ WR
WKLFNQHVVHJWRZHOVIURPWKLQXQGHUZHDU
ჀBytypeoffabric
Cottons/linen: 7RZHOVFRWWRQ MHUVH\ EHGDQG
WDEOHOLQHQ
Synthetics:Blouses, shirts, overalls, etc. made
of polyester or polyamid, as well as for cotton/synthetic mixes.
ჀBydryinglevel
6RUWLQWRLURQGU\FXSERDUGGU\HWF)RUGHOLFDWH
DUWLFOHVSUHVVWKH'HOLFDWHVEXWWRQWRVHOHFWORZ
GU\LQJWHPSHUDWXUH
Drying Guide
The standard cycle HANG DRY ( ) is the most
energy efficient and best suited for drying normal wet
cotton laundry.
The table below shows the approximate time and
energy consumption of the main drying programmes.
CYCLE
Perfect Home
Store Dry
Hang Dry
Hang Dry
Iron Dry
Power consumption of "left on-mode"
Power consumption of "off-mode"
LOAD
FULL
FULL
FULL
HALF
FULL
ENERGY TIME
(kWh)
6,24
5,88
5,20
2,80
4,16
(Min)
225
199
168
96
137
0,75 W
0,15 W
EN
9
Page 10

CONTROLS AND INDICATORS
Water Tank
Indicator
Time Selection
Button
Filter Care
Indicator
Delay Start
Button
Programme
Display
Acrylic Synthetic
Button
Anti-Crease
Button
Start/Pause
Button
Programme
Selector
Control Panel and Indicator Lights
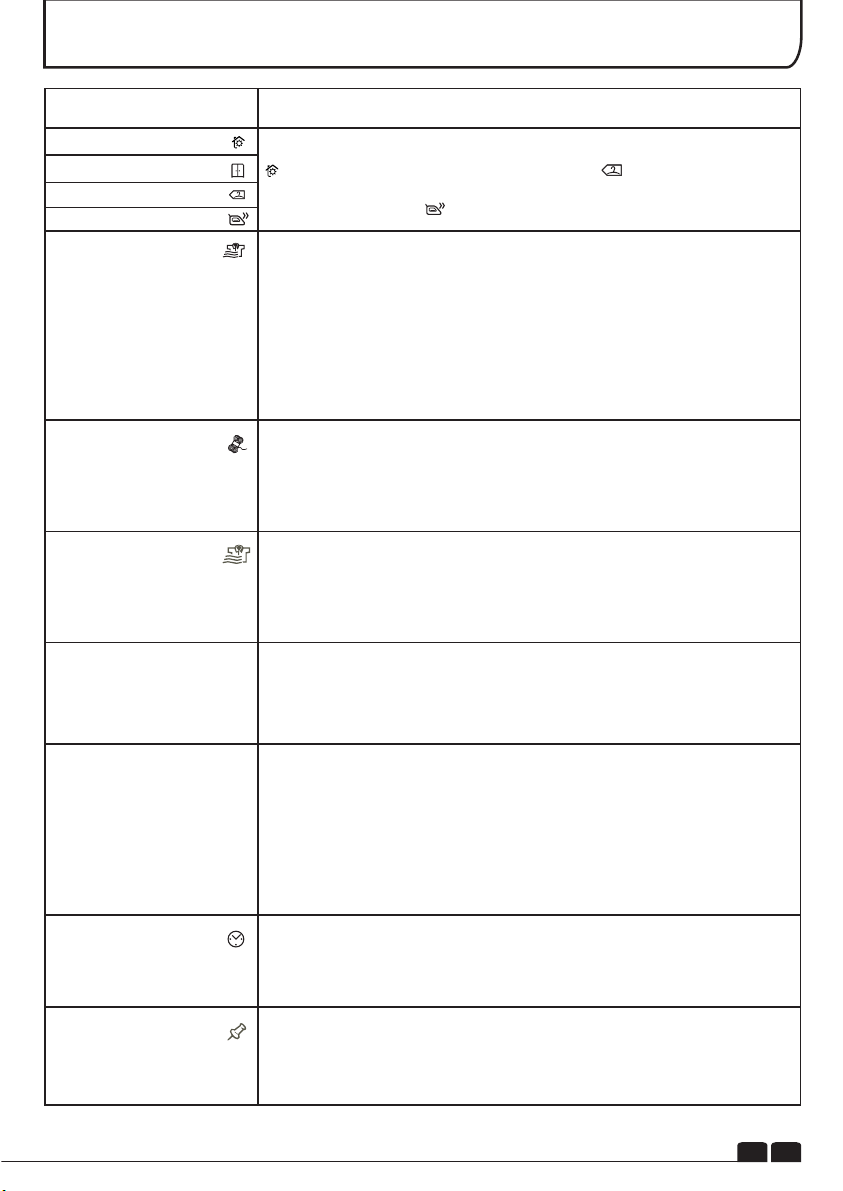
Programme Selector Select the required programme – .
Time Selection Button Allows the user to of th– change duration e programme selected by
Programme Selector. It can be used only with the selection of: Mix&Dry, Shirts and Time
Programmes.
Delay Start Button – Allows the user to delay the start of the drying cycle (see details of
Operation ).
Acrylic and Synthetic Button – select the type of fabrics to dry Acrylic and synthetics Press to ,
when pressed Acrylic Synthetics option is activated and lights upthe indicator .
Anti- Crease Button – Allows the user to select a post drying anti-crease cycle.
Start/Pause Button – / to pause .Press to commence the selected drying programme
Memo Button Xser UecordWheSrogram – Allows to me by pressing simultaneously the Anti-
Crease and the Acrylic Synthetic buttons for 3 seconds, after duration of 2Pinutes theFhosen
Srogram Rptionme/ .
Filter Care indicator ights when the filter needs cleaning – L .
Empty Water indicator – L water container is full.ights when the
Program Display – Related indicator lights when a auto programme has been selected.
Refresh – The indicator lights up when the programme starts the cool down stage.
SELECTING THE PROGRAMME
10
EN
The Candy Sensor Dry machine gives many options for drying the
laundry to suit all circumstances. The table on the next page lists
the programmes and the function of each programme.
Note:
The sensor may not detect a small load of small articles. For small
loads and separate items or pre-dried fabrics with low moisture
content, use the timed programmes.
If the sensor does not detect the item the dryer will only operate for
10 minutes before going into cooldown.
If the load is too large or too wet to tumble dry the dryer will
automatically go into cooldown after approximately 3 hours.
In these cases we advise to use a time cycles between 30 and
75minutes depending on the load size and dryness required, and
select high or low heat depending upon the fabric type.
Page 11
SELECTING THE PROGRAMME
PROGRAMME
Perfect Home
Store Dry
Hang Dry
Iron Dry
Anti Crease
Wool
Mix & Dry
Shirts
DESCRIPTION
Select the degree of dryness that you require. This range from
for bath towels and bathrobes, through for items that will be
put away without ironing, to the programme that leaves the laundry
suitable for ironing.
The programme provides a conditioning and anticrease function.
The dryer will heat the load for 9 minutes followed by a 3 minute cool
down period and is especially good for garments which may have
been left for some time prior to ironing, in a linen basket for
example. Garments may also become stiffened when dried outside
on a washing line or inside on radiators.
This programme relaxes the creases in the fabric making ironing
quicker and easier.
A gentle programme specially created to get woollens softer after
air-drying.This delicate warm air cycle, lasting 12 minutes, can
also be used to get woollens 'refreshed' after being stored in the
wardrobe.
This is a special timed program for a maximum load of 4kg (117
min). The default duration is 99 minutes and allows to dry up to 3kg.
With this program you can dry together cotton and synthetic
fabrics.
This is a special timed program for shirts of max load of 3kg (78
minutes). For synthetic shirts you have to press the Acrylic
Synthetic button. The default duration is 60 minutes and allows to
dry up to 2kg.
Rapid 40 Min.
Time
Memo
The Rapid 40' programme allows a drying cycle to be completed
quickly. This is an ideal programme for having dry, refreshed and
ready-to-wear clothes in less than 40'. This special programme
constantly monitors the temperature in the drum. The maximum load
is 2 kg and the programme is suitable for all types of fabrics where
tumble drying is appropriate.
Time selection includes all the manual time programs: from 30
minutes to 180 minutes. The 20 minutes selection time in only cool
air ventilation (Refresh)
Memo
Program allows toreperforma program thattheuser has
savedbefore, without selecting the correct sequence of program
selector positions and option buttons for that particular program.
11
EN
Page 12
DOOR and FILTER
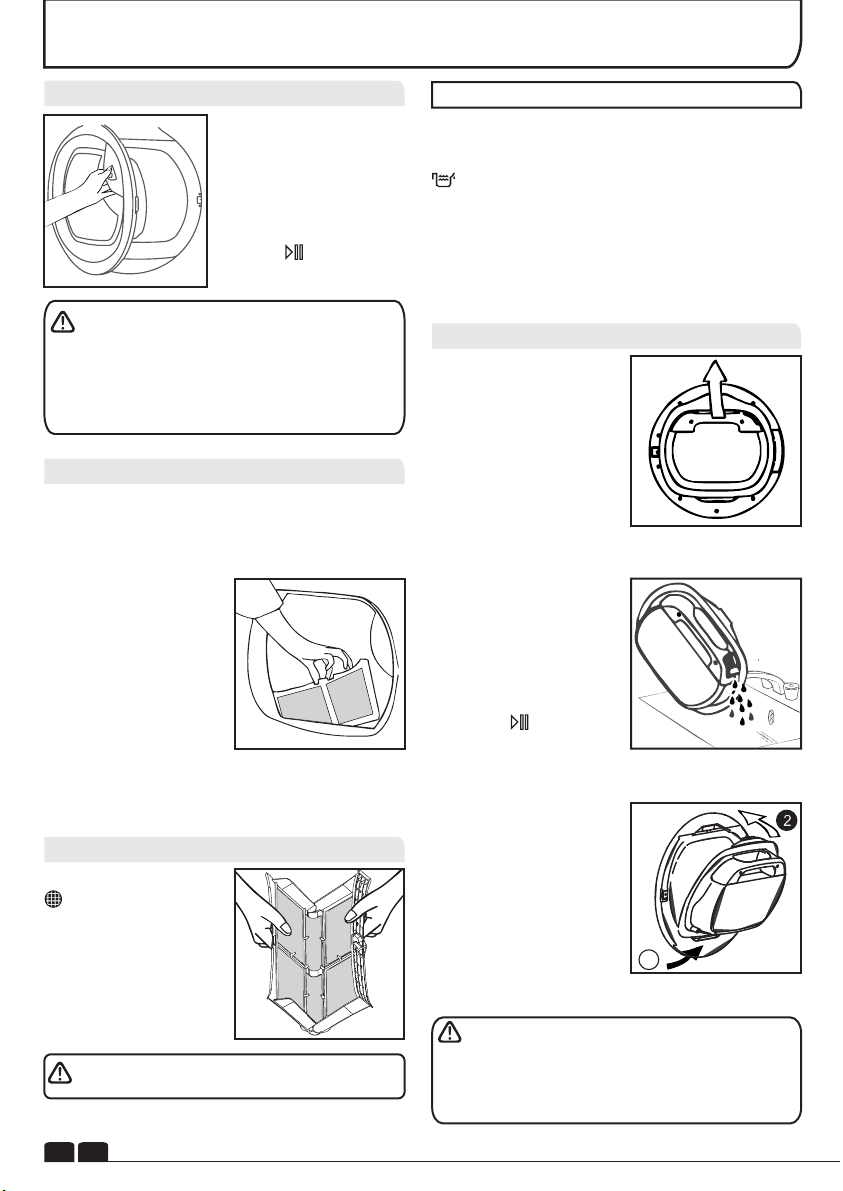
Opening the Door
Pull on handle to open
the door.
To restart the dryer,
close the door and
press .
WARNING! When the tumble dryer is in
use the drum and door may be VERY HOT.
Never stop a tumble dryer before the end of the
drying cycle unless all items are quickly
removed and spread out so that the heat is
dissipated.
Filter
IMPORTANT: To maintain the efficiency of the
dryer check that the fluff filter is clean before
each drying cycle.
1.Pull the filter
upwards.
2. Open filter as shown.
3. Gently remove lint
using a soft brush or
your fingertips.
4.Snap the filter
together and push
back into place.
Filter Care Indicator
Lights when the
filter needs cleaning.
If the laundry is not
drying check that the
filter is not clogged.
DO NOT USE WATER TO CLEAN THE FILTER.
WATER CONTAINER
The water removed from the laundry during the
drying cycle is collected in a container inside the
door of the dryer. When the container is full the
indicator on the control panel will light, and
the container MUST be emptied. However, we
recommend that the container is emptied after
each drying cycle.
NOTE: Very little water will collect during the
first few cycles of a new machine as an internal
reservoir is filled first.
To Remove the Container
1. Gently pull out the
water container
holding the handle.
When it is full the
water container will
weigh about 6 kg.
2. Tilt the water
container to empty the
water out through the
spout.
When empty, replace
the water container
back as shown; first
insert the base of the
container into position
as shown then gentle
push the top into
position.
3. Press Button to
restart the cycle.
NOTE: If you have the
option of drainage near
to the dryer you can
use the discharge kit to
provide a permanent
drainage for the water
collected in the
container of the dryer.
This means that you
don't have to empty the
1
water container.
WARNING! If you open the door mid cycle,
before the cool-down cycle has completed,the
handle may be hot. Please use extreme caution
when attempting to empty the water reservoir
during the cycle.
EN 12
Page 13
CONDENSER
Important: Always switch off and remove the
plug from the electricity supply before cleaning
the condenser.
To maintain the efficiency of the dryer regularly
check that the condenser is clean.
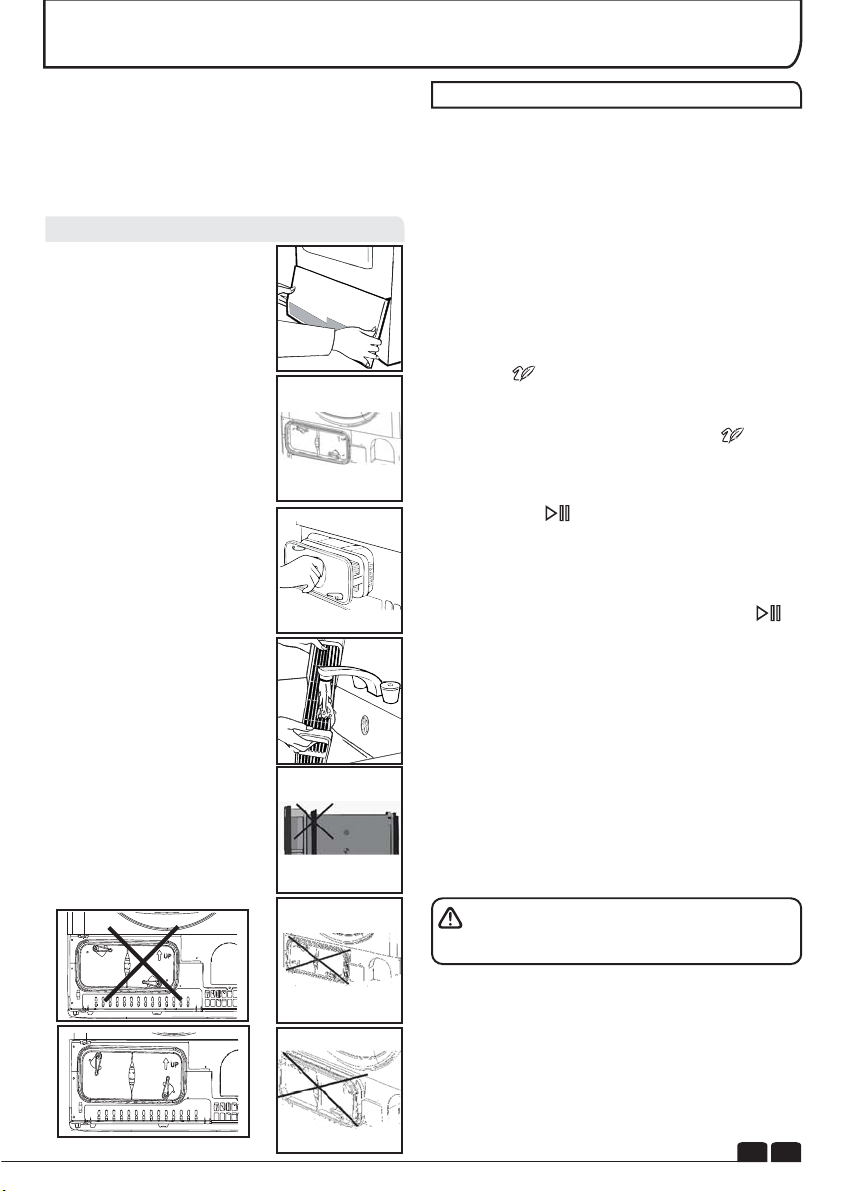
To Remove the Condenser
1. .Remove the kickplate
2. Turn the two locking levers
anti-clockwise and pull out
the condenser.
3.Pull out the condenser
unit.
4. Gently remove any dust or
fluff with a cloth, then wash
the unit by holding it under a
running tap turning it so that
water flows between the
plates, to remove any dust or
fluff.
5.Check the gasket position
after cleaning.Fit the gasket
in to the groove if it is
misaligned.
6.
Refit the condenser ensuring
it is in the correct way (as
indicated by the arrow) and
pushed firmly into place. Lock
the two levers by turning them
clockwise.Be sure that
condenser unit fixed to the
basement tightly.
7. Refit the kickplate.
OPERATION
1. Open the door and load the drum with
laundry. Ensure that garments do not hinder
closure of the door.
2. Gently close the door pushing it slowly until
you hear the door 'click' shut.
3. Turn the Programme Selector dial to select
the required drying programme (see
Programme Guide).
4. If drying synthetics, acrylics or delicate items,
press the button to reduce the heat level.
The indicator will light up when the machine is in
low heat setting. To deselect in the first few
minutes of the programme, press the button
, after this time reset the machine to change the
setting.
5. Press the button. The dryer will start
automatically and the indicator above the
button will be continuously lit.
6. If the door is opened during the programme to
check the laundry, it is necessary to press to
recommence drying after the door has been
closed.
7. When the cycle is nearing completion the
machine will enter the cool down phase, the
clothes will be tumbled in cool air allowing the
load to cool down.
8. Following the completion of the cycle the
drum will rotate intermittently to minimize
creasing. This will continue until the machine is
switched OFF or the door is opened.
Do not open the door during the automatic
programs in order to obtain a proper drying.
EN 13
Page 14
OPERATION
Delay Start Function
The Delay Start Function allows the user to delay the start of the drying cycle by 1 to 24 hours.
When the function is first selected the display will show a delay of 1 hour, subsequent presses of
the button will increase the delay with 1 hour steps.
To commence the programme press and the appliance will complete the drying cycle at the
end of this time. The indicator light will flash to indicate that the start delay is in progress.
Cancelling and Resetting the Programme
To cancel a programme press the button for 3 seconds. In the TIME CONTROL display 0:00
Light will flash to indicate that it has been reset.
CLEANING AND ROUTINE MAINTENANCE
Cleaning the Dryer
Ⴠ Clean the filter and empty the water
container after every drying cycle.
Ⴠ Regularly clean the condenser.
Ⴠ After each period of use, wipe the inside of
the drum and leave the door open for a while to
allow circulation of air to dry it.
Ⴠ Wipe the outside of the machine and the
door with a soft cloth.
Ⴠ DO NOT use abrasive pads or cleaning
agents.
Ⴠ To prevent the door sticking or the build up
of fluff clean the inner door and gasket with a
damp cloth after every drying cycle.
WARNING! The Drum, door and load may
be very hot.
Technical Specifications
Drum capacity 115 litres
Maximum load 9 kg
Height 85 cm
Width 60 cm
Depth 60 cm
Energy Label Band B
Information for Test Laboratory
EN 61121 Programme Programme To Use
-DRY COTTON
-IRON DRY COTTON
-EASY-CARE TEXTILE
IMPORTANT Always switch off and
remove the plug from the electricity supply
before cleaning this appliance.
For electrical data refer to the rating label
on the front of the dryer cabinet (with the door
open).
-HANG DRY
-IRON DRY
-HANG DRY + SYNTHETIC
EN 14
Page 15

What Might be the Cause of...
Defects you can remedy yourself
Before calling GIAS Service for technical
advice please run through the following
checklist. A charge will be made if the machine
is found to be working or has been installed
incorrectly or used incorrectly.
If the problem persists after completing the
recommended checks, please call GIAS
Service, they may be able to assist you over the
telephone.
Time display to end could change during
drying cycle. The time to end is
continuously checked during the drying
cycle and the time is adjusted to give the
best estimation time. The displayed time
may increase or decrease during the cycle
and this is normal.
Drying time is too long/clothes are not dry
enough…
Ⴠ Have you selected the correct drying
time/programme?
Ⴠ Were the clothes too wet? Were the clothes
thoroughly wrung or spindried?
Ⴠ Does the filter need cleaning?
Ⴠ Is the dryer overloaded?
Ⴠ Has the option been selected from a
previous cycle?
TROUBLESHOOTING
The dryer is noisy…
ჀSwitch off the dryer and contact GIAS Service
for advice.
The Indicator is on…
ჀDoes the filter need cleaning?
The Indicator is on…
ჀDoes the water container need emptying?
CUSTOMER SERVICE
Should there still be a problem with your dryer
after completing all the recommended checks,
please call GIAS Service for advice.
They may be able to assist you over the
telephone or arrange for a suitable appointment
for an engineer to call under the terms of your
guarantee. However, a charge may be made if
any of the following applies to your machine:
Ⴠ Is found to be in working order.
Ⴠ Has not been installed in accordance with the
installation instructions.
Ⴠ Has been used incorrectly.
The dryer does not operate…
Ⴠ Is there a working electricity supply to the
dryer? Check using another appliance such as
a table lamp.
Ⴠ Is the plug properly connected to the mains
supply?
Ⴠ Is there a power failure?
Ⴠ Has the fuse blown?
Ⴠ Is the door fully closed?
Ⴠ Is the dryer switched on, both at the mains
supply and at the machine?
Ⴠ Has the drying time or the programme been
selected?
Ⴠ Has the machine been switched on again after
opening the door?
Spares
Always use genuine spares, available direct
from GIAS Service.
GIAS Service
For service and repairs call your local GIAS
Service engineer.
The manufacturer declines all responsibility
in the event of any printing mistakes in this
booklet. The manufacturer also reserves the
right to make appropriate modifications to
its products without changing the essential
characteristics.
EN 15
Page 16

INDICE
Introduzione
Informazioni Sulla Consegna
Consigli di Sicurezza
Utilizzo
Installazione
La Biancheria
Ventilazione
Tutela Dell’ambiente
Servizio Gias
Installazione
Requisiti Elettrici
Regolazione ei Piedinid
Kit di Montaggio Tubo di Scarico: Istruzioni Per il Montaggio
Preparazione della Biancheria
Preparazione ei Capid
dEvitare i Asciugare
Risparmio Energia
Selezione ella Biancheriad
Guida Ad na Corretta Asciugaturau
Comandi e Spie Di Segnalazione
Selezione del Programma
Portellone e Filtro
Apertura el Portelloned
Filtro
Spia i Pulizia Filtrod
Vaschetta Dell’acqua
Per Togliere La Vaschetta
Condensatore
Per Togliere Il Condensatore
Funzionamento
Partenza Ritardata
Annullamento Azzeramento el Programmaed
Pulizia e Manutenzione Ordinaria
Pulizia Dell’asciugatrice
Specifiche Tecniche
Ricerca Guasti
Servizio Assistenza Clienti
Ricambi
Servizio Assistenza Gias
17
17
17
18
19
19
20
21
21
21
21
21
22
23
23
23
23
23
23
24
24
25
26
26
26
26
26
27
27
27
28
28
28
28
28
29
29
29
29
16
IT
Page 17
INTRODUZIONE
Leggere attentamente le istruzioni per un corretto funzionamento della macchina. Questo
opuscolo fornisce importanti linee guida per una manutenzione,un uso e un'installazione sicuri.
Esso contiene inoltre utili consigli che consentiranno di sfruttare al meglio le potenzialità di questa
macchina. Conservare la documentazione in un luogo sicuro per eventuali riferimenti o per futuri
proprietari.
Informazioni sulla onsegna C
Controllare che al momento della consegna
la macchina sia dotata dei seguenti
componenti:
ჀLibretto di istruzioni
ჀCertificato di garanzia
ჀEtichetta efficienza energetica
CONSIGLI DI SICUREZZA
Utilizzo
Verificare che durante il trasporto la
macchina non abbia subito danni. In caso
contrario, rivolgersi al Centro Assistenza GIAS.
La mancata osservanza di tale procedura
potrebbe compromettere la sicurezza
dell’apparecchio. La chiamata può essere
soggetta a pagamento se le cause di
malfunzionamento della macchina sono
attribuibili a un uso improprio.
ჀQuesto apparecchio può essere utilizzato da bambini di 8 anni e oltre e
da persone con capacità fisiche, sensoriali o mentali ridotte o con
mancanza di esperienza e di conoscenza a patto che siano
supervisionate o che siano date loro istruzioni in merito all’utilizzo sicuro
dell’apparecchio e che capiscano i pericoli del suo utilizzo.
Evitare che i bambini giochino con la lavatrice o che si occupino della sua
pulizia e manutenzione senza supervisione.
ჀATTENZIONE L’uso improprio dell’asciugatrice può provocare rischio
di incendio.
Ⴠ Questo apparecchio è destinato ad uso in ambienti domestici e simili
come per esempio:
- aree di ristoro di negozi, uffici o altri ambienti di lavoro;
- negli agriturismo;
- dai clienti di hotel, motel o altre aree residenziali simili;
- nei bed & breakfast.
Un utilizzo diverso da quello tipico dell’ambiente domestico, come l’uso
professionale da parte di esperti o di persone addestrate, è escluso
anche dagli ambienti sopra descritti.
Un utilizzo non coerente con quello
riportato, può ridurre la vita del prodotto e può invalidare la garanzia del
costruttore.
Qualsiasi danno all’apparecchio o ad altro, derivante da un
utilizzo diverso da quello domestico (anche quando l’apparecchio è
installato in un ambiente domestico) non sarà ammesso dal costruttore
in sede legale.
IT 17
Page 18

INTRODUZIONE
CONSIGLI DI SICUREZZA
Utilizzo
ჀLa macchina qui descritta deve essere utilizzata esclusivamente per lo
scopo al quale è destinata secondo quanto illustrato nel presente libretto.
Prima di attivare la macchina, accertarsi di avere letto attentamente e
compreso le istruzioni d’uso e di installazione.
Ⴠ Non toccare l’asciugatrice con mani o piedi umidi o bagnati.
Ⴠ Non appoggiarsi al portellone per caricare la macchina; non utilizzare il
portellone per sollevare o spostare la macchina.
Ⴠ Non consentire ai bambini di giocare con la macchina o con i suoi
comandi.
Ⴠ ATTENZIONE Non utilizzare il prodotto se il filtro antifilacce non è
correttamente posizionato o risulta danneggiato; il filtro non è ignifugo.
Ⴠ ATTENZIONE Se è esposto il simbolo indicante il riscaldamento della
superficie ,quando l’asciugatrice è in funzione la temperatura può
essere superiore a 60 gradi C.
Ⴠ Staccare la spina dalla presa elettrica. Prima di pulire la macchina,
staccare sempre la spina.
Ⴠ Se si presume che la macchina sia guasta, non continuare ad usarla.
ჀEvitare che sul pavimento attorno alla macchina si raccolgano filacce e
IT 15
pelucchi.
ჀDopo il ciclo di asciugatura, l’interno del cestello può essere molto caldo.
Prima di estrarre la biancheria è pertanto opportuno lasciar raffreddare
completamente la macchina.
Ⴠ L'ultima parte del ciclo di asciugatura viene fatta senza calore (ciclo
freddo) per assicurare che i capi siano lasciati ad una temperatura che
non li danneggi.
Ⴠ Massimo carico di asciugatura: far riferimento all'etichetta energetica
9kg
ჀL'asciugatrice non dev'essere usata se sono stati usati prodotti chimici
per il lavaggio
ჀATTENZIONE: mai fermare un' asciugatrice prima della fine del ciclo di
asciugatura senza che tutti i capi siano rimossi velocemente e separati in
modo che il calore si dissolva
18
IT
Page 19

CONSIGLI DI SICUREZZA
INTRODUZIONE
Installazione
Ⴠ Prima dell’uso, controllare che il
prodotto non presenti segni visibili
di danni. Non usare in caso di
danni e contattare il Servizio
Assistenza GIAS.
Ⴠ Non utilizzare adattatori,
connettori multipli e/o prolunghe.
Ⴠ Non installare l’asciugatrice
vicino ai tendaggi e rimuovere
tempestivamente eventuali oggetti
caduti dietro la macchina.
Ⴠ L'apparecchio non deve essere
installato dietro una porta che può
essere chiusa a chiave, una porta
scorrevole o una porta i cui cardini
siano sul lato opposto rispetto a
quelli dell'asciugatrice.
La iancheriaB
Ⴠ Non asciugare capi non lavati
nell'asciugatrice.
Ⴠ ATTENZIONE Evitare di
asciugare articoli trattati con
prodotti di pulizia a secco.
Ⴠ ATTENZIONE In determinate
circostanze, i materiali in gomma
possono essere soggetti ad
autocombustione se riscaldati.
Articoli in gommapiuma (lattice),
cuffie da doccia, tessuti
impermeabili, articoli in caucciù e
vestiti o cuscini imbottiti con
gommapiuma NON VANNO
asciugati nell'asciugatrice.
Ⴠ Leggere attentamente le etichette
con le istruzioni di lavaggio per
conoscere le caratteristiche
dell’asciugatura idonea.
Ⴠ Gli indumenti devono essere
introdotti nell’asciugatrice solo dopo
essere stati opportunamente
centrifugati in lavatrice o strizzati a
mano. EVITARE di caricare nel
cestello indumenti ancora
gocciolanti.
Ⴠ Controllare accuratamente che
nelle tasche degli indumenti da
asciugare non siano presenti
accendini o fiammiferi ed EVITARE
ASSOLUTAMENTE l’uso di prodotti
infiammabili in prossimità della
macchina.
Ⴠ Evitare ASSOLUTAMENTE di
asciugare tende in fibra di vetro. La
contaminazione dei capi con le fibre
di vetro può infatti dar luogo a
fenomeni d’irritazione cutanea.
Ⴠ I capi che sono stati macchiati con
sostanze come olio da cucina,
acetone, alcol, petrolio, cherosene,
smacchiatori, acquaragia, cere e
sostanze per rimuovere le cere
dovrebbero essere lavati in acqua
calda con una quantità extra di
detergente prima di essere asciugati
nell'asciugatrice.
Ⴠ Gli ammorbidenti o prodotti simili
dovrebbero essere utilizzati come
specificato nelle rispettive istruzioni.
19
IT
Page 20

CONSIGLI DI SICUREZZA
VENTILAZIONE
INTRODUZIONE
Il locale in cui viene installata
l’asciugatrice deve essere
adeguatamente ventilato onde
evitare che i gas provenienti da
apparecchiature funzionanti con
altri combustibili, comprese fiamme
libere, siano aspirati nel locale dove
l’asciugatrice è in funzione.
Ⴠ Installare il retro della macchina
vicino al muro o ad una parete
verticale.
ჀCi dovrebbe essere uno spazio di
almeno 12 mm tra la macchina e
qualsiasi ostruzione. La valvola
interna ed esterna dovrebbe essere
tenuta lontana da ostacoli. Per
assicurare un'adeguata
ventilazione lo spazio tra la parte
inferiore della macchina e il
pavimento non dev'essere ostruito.
Ⴠ Non scaricare l’ aria nella canna
fumaria utilizzata per lo scarico di
fumi provenienti da attrezzature
funzionanti a gas o altri
combustibili.
ჀControllare frequentemente il filtro
dopo l'uso, e pulirlo, se necessario.
Ⴠ Dopo l’ uso ispezionare il filtro
antifilacce e, se necessario, pulirlo.
Ⴠ Rimuovere tempestivamente
eventualioggetti caduti, dietro/sotto
la macchina in quanto potrebbero
ostruire le prese e gli sfiati dell’aria.
20
IT
Ⴠ EVITARE ASSOLUTAMENTE d’
installare la macchina contro
tendaggi.
ჀNel caso in cui l'asciugatrice fosse
installata sopra una lavatrice,
dev'essere usato un'accessorio su
misura per separarli, considerando
la seguente configurazione.
- Kit Mod 35100019: per una
macchina profonda almeno 49 cm.
- Kit Mod 35900120: per una
macchina profonda almeno 51 cm.
Il kit dovrebbe essere uno di quelli
sopra indicati, ottenibile dal nostro
servizio ricambi. Le istruzioni per
l'installazione della macchina e di
tutti gli accessori, sono fornite con il
kit.
Non installare il prodotto in luoghi freddi o dove vi
sia il rischio di formazione di ghiaccio. Alla temperatura di
congelamento dell'acqua il prodotto potrebbe non
funzionare correttamente.Se l'acqua del circuito idraulico
ghiaccia sono possibili danni a componenti quali: valvole,
pompe, tubi. Per garantire le prestazioni del prodotto la
temperatura della stanza deve essere compresa tra +2°C e
+35°C. Nel caso l'asciugatrice venga utilizzata in ambienti
con basse temperature (tra +2°C e +15°C) è possibile che
capitino fenomeni di condensazione e di piccole perdite
d'acqua sul pavimento.
Page 21

INSTALLAZIONE
Tutela ell’ambiented
Ⴠ Tutti i materiali utilizzati per l’imballaggio sono
ecologici e riciclabili. Smaltite l’imballaggio con
metodi ecologici. Presso il comune di residenza
si potranno reperire ulteriori informazioni sui
metodi di smaltimento.
Ⴠ Per garantire la sicurezza al momento dello
smaltimento di una asciugatrice, scollegare la
spina dell’alimentazione dalla presa, tagliare il
cavo dell’alimentazione di rete e distruggerlo
insieme alla spina. Per evitare che i bambini
possano rimanere intrappolati all'interno della
lavatrice, rompere i cardini o la chiusura
dell’oblò.
Direttiva Europea 2002/96/CE
Questo elettrodomestico è marcato
conformemente alla Direttiva
Europea 2002/96/CE sui rifiuti da
apparecchiature elettriche ed
elettroniche (WEEE).
Assicurandovi che questo prodotto sia smaltito
correttamente, aiuterete ad evitare possibili
conseguenze negative all’ambiente e alla salute
delle persone, che potrebbero verificarsi a causa
d’un errato trattamento di questo prodotto giunto a
fine vita.Il simbolo sul prodotto indica che questo
apparecchio non può essere trattato come un
normale rifiuto domestico; dovrà invece essere
consegnato al punto più vicino di raccolta per il
riciclo delle apparecchiature elettriche ed
elettroniche. Lo smaltimento deve essere
effettuato in accordo con le regole ambientali
vigenti per lo smaltimento dei rifiuti.
Per informazioni più dettagliate sul trattamento,
recupero e riciclo di questo prodotto, per favore
contattare l’ufficio pubblico di competenza (del
dipartimento ecologia e ambiente), o il vostro
servizio di raccolta rifiuti a domicilio, o il negozio
dove avete acquistato il prodotto.
Servizio GIAS
Ai fini della durata e del buon funzionamento
della macchina, per gli eventuali interventi di
assistenza o riparazione consigliamo di
rivolgersi esclusivamente al servizio assistenza
autorizzato GIAS.
Nel caso in cui la macchina non funzioni
correttamente o sia fuori uso, spegnere e
staccare la spina dalla presa. Per la riparazione,
rivolgersi al Centro Assistenza GIAS.
Requisiti lettriciE
Le asciugatrici sono state progettate per
funzionare ad una tensione di 220-240V, 50 Hz
monofase. Controllare che il circuito
dell’alimentazione sia idoneo per valori di corrente
di almeno 10A.
L’elettricità può essere estremamente
pericolosa
L’apparecchio deve essere opportunamente
collegato a terra.
La presa e la spina dell’apparecchio devono
essere dello stesso tipo.
Non utilizzare adattatori multipli e/o
prolunghe.
Una volta completata l’installazione, la spina
deve risultare accessibile e facilmente
scollegabile.
L’apparecchio con marchio CE è conforme alle
direttive europee 2004/108/EC, 2006/95/EC
e successive modifiche.
La chiamata può essere soggetta a pagamento,
se le cause di malfunzionamento della macchina
sono attribuibili a un’installazione non corretta.
Nel caso risulti danneggiato, il cavo di
alimentazione dell’apparecchio dev’essere
prontamente sostituito con apposito cavo
reperibile ESCLUSIVAMENTE presso il servizio di
ricambi. L’installazione deve essere effettuata da
persone competenti.
-Non inserire la spina nella presa e non accen
dere la macchina finché l installazione non sarà ’
stata completata. Ai fini della sicurezza personale è
essenziale che l asciugatrice venga installata ’
correttamente. In caso di dubbi sull installazione, ’
rivolgersi al Servizio Assistenza GIAS.
Regolazione dei iediniP
Una volta posizionata la
macchina, si dovrebbe
procedere alla
regolazione dei piedini,
per garantire una
perfetta messa in bolla.
21
IT
Page 22

KIT ACCESSORIO TUBO FLESSIBILE DI SCARICO: ISTRUZIONI PER IL MONTAGGIO
Per evitare di dover svuotare il recipiente
dell'acqua al termine di ciascun ciclo di
essicazione, l'acqua normalmente raccolta
può essere scaricata direttamente in un tubo di
scarico dell'acqua di rifiuto (lo stesso sistema
di scarico dei lavandini ad uso domestico). Le
leggi locali sugli impianti idrici vietano il
collegamento ad un sistema di scarico in
superficie. Il sistema con il tubo di scarico
dell'acqua di rifiuto deve essere situato
accanto all'essiccatore a tamburo.
Il kit contiene: 1 tubo flessibile, 1 collare per
tubi.
4.Utilizzando il
raccordo e i collari per
tubi in dotazione,
collegare il tubo
flessibile nero del kit al
tubo precedentemente
rimosso dal raccordo
del ponte.
AVVERTENZA! Spegnere e togliere la
spina dell'essiccatore dalla presa di
alimentazione elettrica prima di eseguire
qualsiasi operazione.
Montare il Kit Come Indicato di Seguito:
1. Inclini la macchina
all'indietro.
2. Il tubo delle acque di
rifiuto è situato sul lato
destro della macchina
(vedi l'immagine).
Utilizzando un paio di
pinze, togliere il collare
di fissaggio del tubo dal
ponte che si trova più
vicino al lato posteriore
della macchina.
3.Estrarre il tubo
flessibile dal raccordo
del ponte.
5.Inserire il tappo per
chiudere il tubo
flessibile rimanente.
6. Accertarsi che il
nuovo tubo flessibile
non si attorcigli sui
piedini mentre la
macchina viene spinta
nella sua posizione
d'origine.
7. Colleghi il nuovo
tubo flessibile di scolo
al tubo delle acque di
rifiuto.
8. Collegare alla presa
di alimentazione.
22
IT
Page 23

PREPARAZIONE DELLA BIANCHERIA
Prima di utilizzare l’asciugatrice per la prima
volta:
ჀLeggere attentamente il presente libretto
d’istruzioni.
Ⴠ Togliere tutti gli articoli presenti all’interno del
cestello.
Ⴠ Pulire l’interno del cestello e il portellone con un
panno umido in modo da eliminare l’eventuale
polvere depositata durante il trasporto.
Preparazione dei apiC
Verificare che la biancheria da asciugare sia
idonea per l’asciugatura meccanica, come
indicato dai simboli sull’etichetta di lavaggio dei
vari articoli.
Controllare che le chiusure siano chiuse e le
tasche vuote. Girare i capi con il rovescio
all’esterno. Introdurre i capi nel cestello uno ad
uno, in modo che non si aggroviglino.
Evitare Di Asciugare:
Articoli di lana, seta, tessuti delicati, calze di
nylon,ricami delicati, tessuti con decorazioni
metalliche, indumenti con guarnizioni in PVC o
in pelle, scarpe da ginnastica, articoli pesanti
come sacchi a pelo ecc.
IMPORTANTE: Evitare di asciugare articoli
preventivamente trattati con prodotti di pulizia a secco o
capi in gomma (pericolo d’incendio o esplosione).
Nel corso degli ultimi 15 minuti, il carico viene sempre
asciugato con aria fredda.
Non sovraccaricare il cestello, in quanto I capi
ingombranti, a caldo, possono superare il carico massimo
consentito. (per esempio sacchi a pelo e piumoni)
Risparmio nergiaE
Introdurre nell’asciugatrice solo biancheria
accuratamente strizzata a mano o centrifugata a
macchina. Quanto più asciutta è la biancheria,
tanto più rapido è il tempo richiesto per
l’asciugatura, con conseguente risparmio di
consumo elettrico.
COSA FARE SEMPRE
Ⴠ Cercare sempre di far lavorare la macchina a
pieno carico di biancheria: si risparmia tempo ed
elettricità.
Ⴠ Prima di ogni ciclo di asciugatura verificare
SEMPRE che il filtro sia pulito.
COSA NON FARE MAI
Ⴠ Non superare mai il peso massimo: si perde
tempo e si consuma più elettricità.
Ⴠ Evitare di caricare capi ancora gocciolanti: si
rischia di rovinare la macchina.
Peso assimo di AsciugaturaM
Ⴠ Capi in cotone Max. 9 kg
Ⴠ Capi sintetici Max. 4 kg
Selezionare La Biancheria Nel Modo Seguente:
Ⴠ In base ai simboli delle etichette di lavaggio
Le etichette di lavaggio sono apposte sul collo o
sulle cuciture interne:
Articolo idoneo per l’asciugatura
meccanica.
. .
Asciugatura ad alta temperatura.
.
Solo asciugatura a bassa temperatura.
Articolo non idoneo all’asciugatura
meccanica.
Se il capo è sprovvisto di etichetta di lavaggio, si
deve presumere che non sia idoneo
all’asciugatura meccanica.
Ⴠ In base al quantitativo ed alla pesantezza
Se il carico è superiore alla capacità della
macchina, separare i capi in base alla pesantezza
(p. es., separare gli asciugamani dalla biancheria
leggera).
Ⴠ In base al tipo di tessuto
Articoli di cotone/lino: Asciugamani, jersey di
cotone, biancheria da tavola/letto.
Articoli sintetici: Camicette, camicie, tute ecc. in
poliestere o poliammide e misti cotone/sintetici.
Ⴠ In base al grado di asciugatura
Selezionare tra: capi asciutti da stirare, capi pronti
da riporre ecc. Per i capi delicati premere il
pulsante ,impostando una temperatura di
asciugatura ridotta.
Guida Ad Una Corretta Asciugatura
Il ciclo standard ( ) è CAPİ ASCİUTTİ DA RİPORRE
quello a maggior efficienza energetica e il più adatto
per un'asciugatura di un normale bucato bagnato in
cotone. La tabella sotto mostra la durata e il consumo
energetico indicativi dei principali programmi di
asciugatura
CICLO
Perfect Home
Capi Extra Asciutti
Capi Asciutti Da Riporre
Capi Asciutti Da Riporre
Capi Asciutti Da Stirare
Consumo di energia modalità "stand-by»
Consumo di energia modalità "spento"
CARICO
PIENO
PIENO
PIENO
MEZZO
PIENO
ENERGIA
(kWh)
6,24
5,88
5,20
2,80
4,16
DURATA
(Min)
225
199
168
96
137
0,75 W
0,15 W
IT 23
Page 24

Spia Elimina
Acqua
COMANDI E SPIE DI SEGNALAZIONE
Spia Pulizia
Filtro
Display
Selettore
Programmi
Pulsante Selezione
Tempo
Pulsante Partenza
Ritardata
Pulsante
Delicati
Pulsante
Anti Piega
Tasto
Avvio/pausa
Pannello i Comando Spie Luminosede
Selettore dei programmi Consente di selezionare il programma desiderato.–
Pulsante Selezione Tempo – Consente di modificare la durata del programma scelto. Può
essere usato solo con il programma : Mix&Dry, Camicie e con i Programmi a tempo.
Tasto Partenza Ritardata – Consente all'utente di ritardare la partenza del ciclo di asciugatura
(vedere i dettagli nella sezione specifica).
Pulsante Acrilici/Sintetici –
Premere questo tasto per asciugare fibre delicate. Si attiverà
l'opzione Acrilici/Sintetici e si accenderà la spia .
Pulsante Anti Piega – Consente all'utente di programmare un ciclo anti piega a fine ciclo.
Pulsante Avvio/Pausa –Per dare inizio o fermare il programma selezionato.
Pulsante Memo – Dopo 2 minuti di avvio di un programma ed eventuali opzioni, è possibile
premendo simultaneamente per 3 secondi i pulsanti Anti Piega e Acrilici/Sintetici, memorizzare il
programma preferito.
Spia di pulizia filtro – S .i accende quando il filtro necessita di essere pulito
Spia elimina acqua – Si accende quando il contenitore dellacqua di condensa è pieno.'
Display Programmi Automatici – Le relative spie luminose di accendono quando un programma
automatico è stato selezionato.
Refresh – La spia si accende quando il programma inizia la fase di raffreddamento.
SELEZIONE DEL PROGRAMMA
La macchina dotata di sensore di asciugatura, offre opzioni di
asciugatura in grado di rispondere alle più svariate esigenze.
Nella tabella che segue viene riportato un elenco dei programmi con la
relativa funzione.
Nota: il sensore potrebbe non essere in grado di individuare un carico
ridotto di articoli di piccole dimensioni. Per carichi ridotti e articoli
separati o per tessuti pre-asciugati leggermente umidi, selezionare i
programmi a tempo.
Impostare il tempo del programma tra 30 e 75 minuti in base alla
quantità del carico e al grado di asciugatura richiesto.
Successivamente, selezionare la temperatura alta o bassa in base al
tipo di tessuto.
Se il sensore non rileva la presenza del capo, l’asciugatrice funziona
solo per 10 minuti,prima di passare alla fase di raffreddamento.
Se il carico è troppo abbondante o troppo bagnato per essere asciugato,
l’asciugatrice passa automaticamente alla fase di raffreddamento dopo
circa 3 ore.
24
IT
Page 25

SELEZIONE DEL PROGRAMMA
PROGRAMMA
Perfect Home
Capi Extra Asciutti
Capi Asciutti Da Riporre
Capi Asciutti Da Stirare
Anti Piega
Lana
Mix & Dry
Camicie
DESCRIZIONE
Selezionare il grado di asciugatura desiderato. Le possibilità
disponibili comprendono l’opzione , ideale per asciugamani e
accappatoi, l’opzione , per i capi che non è necessario stirare, e i
programmi che lasciano la biancheria pronta per la stiratura
Il programma assicura una funzione di trattamento antipiega.
La macchina effettua un ciclo di riscaldamento della biancheria per
9 minuti, seguito da 3 minuti di raffreddamento. Si tratta di una
funzione particolarmente utile quando si prevede di riporre la
biancheria (ad esempio, nel cesto della biancheria) per un periodo
di tempo prima della stiratura. I capi possono “seccarsi”
eccessivamente anche quando vengono fatti asciugare all’aperto
sul filo o vengono posti su radiatori. Il Ciclo attenua le pieghe sul
tessuto rendendo più facile e più rapida la stiratura.
Un programma delicato creato appositamente per ottenere capi
in lana più soffici dopo l’asciugatura ad aria.
Questo ciclo delicato con aria calda, della durata di 12 minuti, si
può utilizzare anche per infrescare i capi in lana dopo averli
tenuti in guardaroba.
Questo è uno speciale programma a tempo per l’asciugatura di
massimo 4 Kg di bucato (117 minuti). Di base, la durata di
asciugatura suggerita è di 99 minuti e permette di asciugare 3 Kg.
Con questo programma è possibile asciugare
contemporaneamente fibre in cotone e fibre sintetiche.
Questo è uno speciale programma a tempo per l’asciugatura di
camicie con un carico massimo di 3 Kg (78 minuti). Per camicie o
maglie sintetiche è possibile pressare il pulsante Acrilici/Sintetici.
Di base la durata del ciclo suggerito dalla macchina è di 60 minuti e
consente di asciugare fino a 2 kg di carico.
Rapid 40 Min.
Time
Memo
Con il programma Rapid 40’, il ciclo di asciugatura è completato
rapidamente. E’ ideale se si vogliono capi asciutti, rinfrescati e pronti
da indossare in circa 40 minuti. Questo speciale programma
monitora continuamente la temperatura nel cesto. Il massimo carico
consentito è 2 Kg e il programma è adatto a qualsiasi tipo di fibra che
in genere può essere asciugata con questo apparecchio.
Include tutti i programmi a tempo manuali: da 30 a 180 minuti. La
selezione del programma a tempo di 20 minuti prevede solo un
ciclo di ventilazione con aria fredda (Refresh).
Consente di riproporre un programma che è stato
precedentemente memorizzato, senza il bisogno di ri-selezionarlo
sulla manopola e di scegliere una eventuale opzione con uno dei
pulsanti.
IT
25
Page 26

PORTELLONE e FILTRO
Apertura del Portellone
Tirare la maniglia per
aprire lo sportello.
Per avviare la
macchina, richiudere
il portellone e
premere il tasto.
AVVERTENZA! Si ricorda che quando la
macchina è in funzione il cestello e il portellone
possono essere MOLTO CALDI. Non arrestare
mai l'asciugatrice prima della fine del ciclo di
asciugatura a meno che tutti i capi in essa
contenuti non vengano rimossi rapidamente e
stesi in modo da dissipare il calore.
Filtro
IMPORTANTE: Ai fini della massima efficacia
della macchina, prima di ogni ciclo di
asciugatura è essenziale verificare la pulizia
del filtro antifilacce.
1. Tirare il filtro verso
l’alto.
2. Aprire il filtro come
illustrato.
3. Rimuovere
delicatamente le
filacce con la punta
delle dita o aiutandosi
con uno spazzolino
morbido.
4. Richiudere il filtro e
reinserirlo in sede.
Spia Di Pulizia Filtro
si accende
segnalando la
necessità di pulire il
filtro.
Se la biancheria non si
asciuga verificare che
il filtro non sia intasato.
NON USARE ACQUA PER PULIRE IL FILTRO
VASCHETTA DELL’ACQUA
L'acqua eliminata dalla biancheria durante il
ciclo di asciugatura viene raccolta in una
vaschetta posta all'interno della porta della
macchina. Quando la vaschetta è piena si
accende la spia sul pannello dei comandi,
segnalando che si DEVE vuotare la vaschetta.
Tuttavia, si consiglia di svuotare la vaschetta
dopo ogni ciclo di asciugatura.
NOTA: Nei primi cicli, quando la macchina è
nuova, si raccoglie poca acqua in quanto si
riempie prima il serbatoio interno.
Poista Säiliö Seuraavasti
1. E s t r a r r e c o n d e l i
c a t e z z a l a vaschetta,
afferrandola dalla
maniglia. Da piena, la
vaschetta dell'acqua
pesa circa 6 kg.
2. Inclinare la vaschetta f
a c e n d o d e f l u i r e l '
ac q u a d a l beccuccio.
Quando è vuota, riporre
la vaschetta nell'alloggio
come indicato; prima
inserire la base della
vaschetta e poi
gentilmente premere la
parte superiore
nell'apposita sede.
3. Premere il pulsante
per riavviare il ciclo.
NOTA: Se c'è uno s c a r i
c o v i c i n o all'asciugatrice, si può usare
l'apposito kit per f a r s c a
r i c a r e costantemente
l'acqua r a c c o l t a d a l l
a m a c c h i n a . C o s ì
facendo si eviterà di
svuotare la vaschetta
dell'acqua.
ATTENZIONE! Se la porta
dell'asciugabiancheria viene aperta durante il ciclo,
prima quindi che sia completata la fase di
raffreddamento, la maniglia della vaschetta può
essere molto calda. Fare attenzione e usare la
massima cautela nel maneggiare vaschetta se la si
vuole svuotare.
1
26
IT
Page 27

CONDENSATORE
IMPORTANTE: Prima di procedere alla pulizia
del condensatore, disattivare sempre
l’apparecchio e staccare la spina dalla presa
elettrica.
Ai fini delle prestazione dell’apparecchio, è
opportuno verificare regolarmente lo stato di
pulizia del condensatore.
Per Togliere Il Condensatore
1.Rimuovere lo zoccolo.
2.Agire sulle due leve di
bloccaggio in senso antiorario
e estrarre il condensatore.
3.Estrarre il modulo
condensatore.
4.Servendosi di un panno,
eliminare delicatamente
polvere e filacce, poi lavare il
modulo tenendolo sotto
l’acqua corrente e facendolo
girare in modo che l’acqua
circoli tra le piastre fino a
perfetta eliminazione delle
impurità
5.Controllare la posizione della
guarnizione dopo averla pulita.
Se disallineata inserirla nella
posizione corretta.
6.Rimontare il condensatore
rispettando il verso giusto
(come indicato dalla freccia) e
accertandosi che sia
perfettamente inserito in sede.
Bloccare le due leve
ruotandole in senso
orario.Assicurarsi che il
condensatore sia
correttamente fissato alla
base.
7.Rimontare lo zoccolo.
FUNZIONAMENTO
1. Aprire la porta e caricare la biancheria nel
cesto. Assicurarsi che i capi non si incastrino
nella porta.
2. Chiudere gentilmente la porta fino a sentire
un “click”.
3. Ruotare il selettore programmi e scegliere il
programma di asciugatura desiderato (per
dettagli, guardare la Guida Programmi).
4. Se bisogna asciugare tessuti sintetici, acrilici
o delicati, premere il pulsante per ridurre la
temperatura di asciugatura. La spia si illumina
quando si sceglie questa opzione. Per deselezionarla, nei primi minuti di avvio del
programma, ri-premere il pulsante e
programmare nuovamente la macchina.
5. Premere il pulsante . L’asciugabiancheria
inizia automaticamente e la spia luminosa
sopra il tasto resta accesa.
6. Se si apre la porta durante il ciclo per
controllare la biancheria, è necessario
successivamente richiudere la porta e premere
il pulsante , il ciclo di asciugatura
ricomincerà nuovamente.
7. Quando il ciclo è prossimo alla fine, inizia una
fase di raffreddamento. I capi vengono
asciugati con aria fredda al fine di raffreddarli.
8. Quando il programma è terminato, la spia
END si illumine sul display.
9. A seguito della fine del ciclo, il cesto effettuerà
delle rotazioni ad intermittenza per minimizzare
le pieghe. Continuerà fino a quando la porta
verrà aperta.
Non aprire la porta durante i cicli di
asciugatura automatici per avere un'asciugatura
sempre efficace.
IT 27
Page 28

FUNZIONAMENTO
Partenza itardataR
La funzione Partenza Ritardata consente all’utente di ritardare la partenza del ciclo di
asciugatura da 1 a 24 ore.
Agendo la prima volta sul tasto di questa funzione, comparirà sul display un ritardo di 1 ora, a ogni
successiva pressione del tasto, si aggiungerà un ulteriore ritardo di 1 ora.
Successivamente, premere il tasto e trascorso il tempo di ritardo selezionato, il ciclo di
asciugatura verrà avviato. La spia luminosa lampeggerà indicando che count down è iniziato.
Annullamento Azzeramento Del Programmae
Per cancellare il programma premere il pulsante per 3 secondi. Nel display “TIME CONTROL”
lampeggerà 0:00 indicando che è stato azzerato il programma.
PULIZIA MANUTENZIONE ORDINARIAE
Pulizia dell’asciugatrice
Ⴠ Si consiglia di pulire il filtro e di svuotare la
vaschetta dell’acqua dopo ogni ciclo di
asciugatura.
Ⴠ Pulire regolarmente il condensatore.
Ⴠ Dopo l’ uso, pulire l’ interno del cestello e
lasciare aperto il portellone per un certo
periodo di tempo in modo che circoli aria e si
asciughi.
Ⴠ Pulire l’esterno della macchina e il portellone
con un panno morbido.
Ⴠ NON usare spugnette abrasive né prodotti di
pulizia.
ჀPre evitare che si accumuli della lanuggine e
che l'oblò abbia difficoltà ad aprirsi/chiudere, a
fine di ogni ciclo d'asciugatura pulire con un
panno umido la parte interna dell'oblò e la
guarnizione.
AVVERTENZA! Il cestello, il portellone e il
carico possono essere molto caldi.
Specifiche Tecniche
Capacità del cestello 115 litri
Carico massimo kg 9
Altezza 85 cm
Larghezza 60 cm
Profondità 60 cm
Efficienza Energetica B
Informazıonı per Test dı Laboratorıo
EN 61121 Programmı
-Cotone Asciutto
-Cotone Asciutto da Stirare
-Tessuti Delicati
IMPORTANTE Prima di procedere alla
pulizia, disattivare sempre la macchina e
staccare la spina dalla presa a muro.
Per i dati elettrici vedere la targhetta dei dati
posta sul davanti del mobile della macchina (con
portellone aperto).
Programmı da uare
-Capi Asciutti da Riporre
-Capi Asciutti da Stirare
-Capi Asciutti da Riporre
+Sintetico
28
IT
Page 29

What Might be the Cause of...
Defects you can remedy yourself
Before calling GIAS Service for technical
advice please run through the following
checklist. A charge will be made if the machine
is found to be working or has been installed
incorrectly or used incorrectly.
If the problem persists after completing the
recommended checks, please call GIAS
Service, they may be able to assist you over the
telephone.
Time display to end could change during
drying cycle. The time to end is
continuously checked during the drying
cycle and the time is adjusted to give the
best estimation time. The displayed time
may increase or decrease during the cycle
and this is normal.
Drying time is too long/clothes are not dry
enough…
Ⴠ Have you selected the correct drying
time/programme?
Ⴠ Were the clothes too wet? Were the clothes
thoroughly wrung or spindried?
Ⴠ Does the filter need cleaning?
Ⴠ Is the dryer overloaded?
Ⴠ Has the option been selected from a
previous cycle?
TROUBLESHOOTING
The dryer is noisy…
ჀSwitch off the dryer and contact GIAS Service
for advice.
The Indicator is on…
ჀDoes the filter need cleaning?
The Indicator is on…
ჀDoes the water container need emptying?
CUSTOMER SERVICE
Should there still be a problem with your dryer
after completing all the recommended checks,
please call GIAS Service for advice.
They may be able to assist you over the
telephone or arrange for a suitable appointment
for an engineer to call under the terms of your
guarantee. However, a charge may be made if
any of the following applies to your machine:
Ⴠ Is found to be in working order.
Ⴠ Has not been installed in accordance with the
installation instructions.
Ⴠ Has been used incorrectly.
The dryer does not operate…
Ⴠ Is there a working electricity supply to the
dryer? Check using another appliance such as
a table lamp.
Ⴠ Is the plug properly connected to the mains
supply?
Ⴠ Is there a power failure?
Ⴠ Has the fuse blown?
Ⴠ Is the door fully closed?
Ⴠ Is the dryer switched on, both at the mains
supply and at the machine?
Ⴠ Has the drying time or the programme been
selected?
Ⴠ Has the machine been switched on again after
opening the door?
Spares
Always use genuine spares, available direct
from GIAS Service.
GIAS Service
For service and repairs call your local GIAS
Service engineer.
The manufacturer declines all responsibility
in the event of any printing mistakes in this
booklet. The manufacturer also reserves the
right to make appropriate modifications to
its products without changing the essential
characteristics.
29
IT
Page 30

ÍNDICE
Introducción
Información de entrega
Advertencias sobre seguridad
Uso
Instalación
La colada
Ventilación
Temas medioambientales
Servicio técnico de GIAS
Instalación
Requisitos eléctricos
Ajuste de las patas
Desagüe: Instrucciones de Colocación
Preparación del material para secar
Preparación de la ropa
Clasificación del material para secar
No secar en secadora
Ahorro de energía
Guía de secado
Controles e indicadores
Selección del programa
Puerta y filtro
Modo de abrir la puerta
Filtro
Control de mantenimiento del filtro
Depósito del agua
Modo de sacar el recipiente
Condensador
Modo de sacar el condensador
Operación
Inicio diferido
Modo de cancelar y restablecer el programa
Limpieza y mantenimiento de rutina
Limpieza de la secadora
Especificaciones técnicas
Resolución de problemas
Servicio de atención al cliente
Servicio de recambios
Servicio técnico de GIAS
31
31
31
32
33
33
34
35
35
35
35
35
36
37
37
37
37
37
38
39
40
40
40
40
40
41
41
41
42
42
42
42
42
42
43
43
43
43
43
ES
30
Page 31

INTRODUCCIÓN
Por favor lea cuidadosamente estas instrucciones y utilice la máquina según sus indicaciones. Este
folleto presenta directrices importantes para el seguro, la instalación y el mantenimiento seguros y
algunos consejos útiles para obtener los mejores resultados de su secadora.
Conserve toda la documentación en un lugar seguro para referencia futura o para los dueños futuros.
Información de Entrega
Por favor verifique que los siguientes artículos
hayan sido entregados con el electrodoméstico:
ჀManual de instrucciones
ჀTarjeta de garantía
ჀEtiqueta de energía
ADVERTENCIAS SOBRE SEGURIDAD
ADVERTENCIAS SOBRE SEGURIDAD
Uso
Uso
Verifique que no se hayan producido daños al
electrodoméstico durante el transporte. De
haberlos, llame al Servicio técnico de GIAS.
El incumplimiento de lo anterior puede
perjudicar a la seguridad del electrodoméstico. Es
posible que se le cobre una llamada al servicio
técnico si el problema con el electrodoméstico es
el resultado de un uso incorrecto.
Ⴠ Este electrodoméstico puede ser utilizado por niños mayores de 8 años
y por personas con capacidades físicas, sensoriales o mentales
limitadas o que carezcan de la experiencia y el conocimiento necesarios,
siempre y cuando estén supervisadas por una persona encargada de
velar por su seguridad o hayan sido instruidas en su utilización de
manera segura.
Los niños no deben jugar con el electrodoméstico. Los niños no deben
ocuparse del mantenimiento ni de la limpieza del electrodoméstico, salvo
que estén supervisados una persona encargada de velar por su
seguridad.
Ⴠ ADVERTENCIA El uso incorrecto de una secadora puede provocar
riesgo de incendio.
ჀEste producto es exclusivamente para uso doméstico o similar:
-zona de cocina para el personal de tiendas, oficinas y otros entornos
laborales;
-granjas;
-pasajeros de hoteles, moteles u otros entornos residenciales;
-hostales (B&B).
No se recomienda el uso de este producto con fines diferentes del
doméstico o similar, por ejemplo, con fines comerciales o profesionales.
27
SL
31
ES
Page 32

INTRODUCCIÓN
ADVERTENCIAS SOBRE SEGURIDAD
ADVERTENCIAS SOBRE SEGURIDAD
Uso
Uso
El empleo de la lavadora con fines no recomendados puede reducir la
vida útil del artefacto e invalidar la garantía. Todos los daños, averías o
pérdidas ocasionados por un uso diferente del doméstico o similar
(aunque ese uso se realice en un entorno doméstico) no serán
reconocidos por el fabricante en la medida en que lo permita la ley.
ჀEstamáquinadebeusarsesolamenteparaelpropósitoparaelcualfue
diseñadatal y como se describe en este manual. Asegúrese de que
entiende todas las instrucciones de instalación antes de utilizar el
electrodoméstico.
Ⴠ No toque el electrodoméstico cuando tenga las manos o los pies
mojados o húmedos.
Ⴠ No se apoye en la puerta al cargar la secadora ni utilice la puerta para
levantar o mover la máquina.
Ⴠ No permita a los niños jugar con la máquina ni los mandos.
Ⴠ ADVERTENCIA No use el producto si el filtro de pelusa no está en su
lugar o si está dañado, ya que la pelusa podría arder.
Ⴠ ADVERTENCIA En el lugar donde aparezca el símbolo de superficie
caliente ,el incremento de temperatura durante la operación de la
secadora puede exceder los 60 grados centígrados.
Ⴠ Desconecte el enchufe de la red del suministro eléctrico. Siempre debe
desenchufar la máquina antes de limpiarla.
Ⴠ No siga usando esta máquina si pareciera tener algún desperfecto.
Ⴠ No hay que dejar que se acumulen lanilla y pelusas en el suelo
alrededor de la máquina.
Ⴠ El tambor interior puede calentarse mucho. Antes de retirar la ropa de la
máquina, siempre deje que ésta termine de enfriarse.
ჀLa última parte del ciclo de secado se realiza sin calor (ciclo frío) para
lograr una temperatura final que no dañe los tejidos.
ჀMáxima capacidad de secado: ver tarjeta de eficiencia energética 9 kg
ჀLa secadora no debe ser usada si se han empleado agentes químicos
en el lavado.
ჀATENCIÓN: Nunca detenga la secadora antes del fin de ciclo sin que
los tejidos hayan sido removidos velozmente y separados de manera que
el calor se disperse.
ES
32
Page 33

ADVERTENCIAS SOBRE SEGURIDADADVERTENCIAS SOBRE SEGURIDAD
Instalación
Ⴠ Verifique que el producto no
muestre daños visibles antes de
usarlo. En caso de presentar algún
daño, no lo use y póngase en
contacto con el Servicio técnico de
GIAS.
Ⴠ No utilice adaptadores,
conectores múltiples y/o
alargaderas.
Ⴠ Nunca instale la secadora junto
a cortinas, y procure que no caigan
objetos ni se acumule nada detrás
de la secadora.
Ⴠ El electrodoméstico no debe
instalarse detrás de una puerta
con cierre, de una puerta
corredera ni de puertas cuyas
bisagras se encuentren en el lado
opuesto del lugar donde se
encuentra la secadora.
La Colada
Ⴠ No utilice la secadora con
prendasquenohayalavado
ჀADVERTENCIA Nodebeusarse
para secar tejidos tratados con
líquidosparalimpiezaen seco.
Ⴠ ADVERTENCIA Losmateriales
de gomaespuma en algunas
circunstanciaspuedenarderpor
combustión espontánea si se
calientan. Los artículos como
gomaespuma (espuma de látex),
los gorros de ducha, los tejidos
impermeables a base de goma,
así como las almohadas o las
prendas de gomaespuma
INTRODUCCIÓN
NO DEBEN secarse en la
secadora.
ჀConsultesiemprelas etiquetas
sobrelavadodelasprendaspara
conocer si se pueden secar en
secadora.
ჀAntes de introducir ropa en la
secadora aquélla debe
centrifugarse o escurrirse bien
Las prendas que escurren agua
NO deben introducirse en la
secadora.
ჀDebensacarse delos bolsillos
encendedores y cerillas y no se
deben NUNCA usar líquidos
inflamables cerca de la máquina.
ჀNosedebenintroducir
NUNCA
cortinasdefibradevidrioenesta
máquina Puede producirse
irritación de la piel si otras prendas
se contaminan con fibras de vidrio.
ჀLas prendas que se hayan
ensuciado con sustancias como
aceite de cocina acetona
alcoholgasolina, queroseno,
limpiamanchas, trementina, ceras
y limpiadores de ceras deben
lavarse en agua caliente con una
cantidad extra de detergente
antes de introducirse en la
secadora.
ჀLossuavizantesdetejidosylos
productos similares pueden
utilizarse siguiendo las
instrucciones del suavizante.
27
SL
33
ES
Page 34

ADVERTENCIAS SOBRE SEGURIDADADVERTENCIAS SOBRE SEGURIDAD
VENTILACIÓN
Debe asegurarse una ventilación
adecuada en la sala donde esté
ubicada la secadora para evitar que
los gases de aparatos que quemen
otros combustibles, incluyendo
llamas abiertas, entren en la sala
cuando se está usando la secadora.
Ⴠ El aire extraído no debe
descargarse dentro de un conducto
que sea utilizado para expulsar
humos de aparatos que quemen
gas u otros combustibles.
Ⴠ Compruebe periódicamente que
no esté obstruido
el paso de la corriente de aire a
través de la secadora.
Ⴠ Después de usar la máquina,
revise el filtro de pelusas y límpielo
si es necesario.
Ⴠ Installar la parte trasera del
aparato cerca de un muro o pared
vertical.
Ⴠ Tiene que dejarse almenos un
espacio de 12 mm entre la secadora
y cualquier obstrucción. La
válvulade entrada y de salida tienen
que estar lejos de obstáculos. Para
asegurarse de una adecuada
ventilación el espacio entre la parte
inferior de la máquina y el
pavimento no debe ser obstruido.
Ⴠ Procure que no caigan objetos ni
se acumulen detrás de la máquina,
ya que éstos pueden obstruir la
entrada y salida de aire.
34
ES
INTRODUCCIÓN
ჀControlar frecuentemente el fitro
despues del uso y limpiarlo, si
fuera necesario.
Ⴠ NUNCA instale lasecadora
juntoacortinas
Ⴠ
En el caso de que la secadora se
instale encima de una lavadora, se
debe instalar el kit accesorio
columna correspondiente de
acuerdo con la siguiente
configuración.
-Kit Mod 35100019: para una
lavadora de profundidad de al
menos 49 cm.
-Kit Mod 35100120: para una
lavadora de profundidad de al
menos 51 cm.
El kit debe ser uno de los indicados
arriba, disponibles en los centros
se asistencia técnica. Las
intrucciones de montaje en la
secadora y de todos los
accesorios están en el própio kit.
No instalar el producto en una habitación expuesta a
bajas temperaturas o en la que exista riesgo de formación
de hielo. A la temperatura de congelación del agua, el
producto podría no funcionar correctamente. Si el agua del
circuito hiela, se pueden producir daños en los
componentes tales como: (válvulas, bombas, tubos...).
Para garantizar las prestaciones del producto, la
temperatura de la habitación debe estar comprendida
entre +2ºC y +35ºC. Por favor, tenga en cuenta que el
funcionamiento del aparato en condiciones de bajas
temperaturas ( entre +2ºC y +15ºC) podría implicar
condensación de agua y la presencia de gotas de agua en
el suel
Page 35

Temas Medioambientales
Ⴠ Todos los materiales de embalaje utilizados son
ecológicos y reciclables. Por favor deshágase de
los materiales de embalaje por medios
ecológicos. Su ayuntamiento podrá informarle de
los medios actuales de desecho.
Ⴠ Por razones de seguridad cuando se deseche
una secadora, desenchufe el cable eléctrico de la
toma general, corte el cable y destrúyalo junto con
el enchufe. Para evitar que los niños se queden
encerrados en la máquina, rompa las bisagras o la
cerradura de la puerta.
Directiva Europea 2002/96/EC
Este electrodoméstico está marcado
conforme a la directiva Europea
2002/96/CE sobre los residuos de
aparatos eléctricos y electrónicos
(WEEE).
Asegurándose que este producto ha sido
eliminado correctamente, ayudará a evitar
posibles consecuencias negativas en el ambiente
y la salud humana, que pudieran ser
consecuencia del tratamiento inapropiado de los
residuos de este producto.
El símbolo sobre el producto indica que este
aparato no puede ser tratado como un residuo
doméstico normal, en su lugar deberá ser
entregado al centro de recogidas para reciclaje de
aparatos eléctricos y electrónicos.
La eliminación debe ser efectuada de acuerdo con
las reglas medioambientales vigentes para el
tratamiento de los residuos.
Para información más detallada sobre el
tratamiento, recuperación y reciclaje de este
producto, por favor contacte con la oficina
competente (del departamento de ecología y
medioambiente), o su servicio de recogida a
domicilio si lo hubiera o el punto de venta donde
compró el producto.
Servicio Técnico de GIAS
Para que esta máquina siga funcionando de modo
seguro y eficiente, recomendamos que todo
mantenimiento o reparación sea efectuado
únicamente por un ingeniero de mantenimiento
autorizado de GIAS.
Si el electrodoméstico no funciona
correctamente o se avería, apáguelo y
desconecte el enchufe de la toma de corriente.
Consulte al Servicio técnico de GIAS para la
posible reparación.
INSTALACIÓN
Requisitos Eléctricos
Las secadoras están preparadas para funcionar
con un voltaje monofásico de 220-240 V, a 50 Hz.
Verifique que el circuito de suministro tenga una
corriente nominal de al menos 10 A.
Ⴠ La electricidad puede ser muy peligrosa.
Este electrodoméstico debe conectarse a
tierra.
Ⴠ La toma de corriente y el enchufe del
electrodoméstico deben ser del mismo tipo.
Ⴠ No utilice adaptadores múltiples y/o
alargaderas.
Ⴠ Después de instalar la máquina, el enchufe
debe quedar en una posición accesible para su
desconexión.
Este electrodoméstico CE cumple la Directiva
europea 2004/108/EC, 2006/95/EC y sus
enmiendas subsiguientes.
Es posible que se le cobre una llamada al
servicio técnico si el problema con el
electrodoméstico es el resultado de una
instalación incorrecta.
Si se dañara el cable eléctrico de este
electrodoméstico, debe reemplazarse con un
cable especial que se puede obtener
ÚNICAMENTE del Servicio de recambios. Una
persona capacitada debe encargarse de la
instalación.
No enchufe el electrodoméstico ni lo encienda
conectado a la red eléctrica hasta que se haya
completado la instalación. Por su seguridad, esta
secadora debe instalarse correctamente.En caso
de alguna duda acerca de la instalación, llame al
Servicio GIAS de Atención al Cliente para obtener
información.
Ajuste de las Patas
Una vez que la
máquina esté en su
sitio, las patas deben
ajustarse para
asegurarse de que
esté nivelada.
SL
ES
27
35
Page 36

DESAGÜE: INSTRUCCIONES DE COLOCACIÓN
Para no tener que vaciar el depósito del agua
después de cada ciclo de secado, el agua
puede eliminarse directamente a las tuberías
de desagüe (el mismo sistema de drenaje que
el de los fregaderos de las casas). La
legislación sobre aguas prohíbe el drenaje
abierto del agua. La tubería de desagüe ha de
colocarse al lado de la secadora.
El kit está compuesto por: 1 tubería y 1 grifo
¡Atención! Desconecte y desenchufe la
secadora antes de proceder.
Ajuste la Tubería Como se Indica:
1. Retire la secadora
hacia fuera.
2. El desagüe está
situado a la derecha
del aparato (véase la
imagen). Un manguillo
gris conecta el puente
de la izquierda con el
aparato. Quite el
bloqueo del puente
con unos alicates.
5.Coloque el grifo del
kit y corte el tubo
sobrante.
6. Una vez que el
aparato esté listo ha de
ajustar el pie para
asegurar que el nuevo
tubito no quede
aplastado cuando
vuelva a colocar la
secadora en su sitio.
7. Conecte el nuevo
tuvo de drenaje a la
tubería de desagüe.
8. Conecte el enchufe a
al electricidad.
3. Suelte la conexión
del manguito.
4. Coloque el manguillo
negro del kit (utilizando
el conector y los clips
de la tubería proporcionados) en el manguito
extraído de la conexión
puente.
36
ES
Page 37

PREPARACIÓN DEL MATERIAL PARA SECAR
Antes de usar por primera vez la secadora:
Ⴠ Por favor lea con atención las instrucciones de
este manual.
ჀRetire todos los artículos que haya guardado en
el interior del tambor.
Ⴠ Con un trapo húmedo, limpie el interior del
tambor y de la puerta para quitar el polvo que
pueda haberse depositado durante el traslado.
Preparación de la Ropa
Compruebe que los artículos que propone secar
sean apropiados para secadora, de acuerdo a
los símbolos sobre cuidado que lleve cada
artículo.
Compruebe que todos los cierres estén
cerrados, y que no quede nada en los bolsillos.
Ponga los artículos del revés. Coloque la ropa en
el tambor, sin presionarla, para asegurar que no
se enrede.
CONSEJOS PARA EL SECADO
No Secar En Secadora:
Prendas de lana, seda, telas delicadas, medias
de nylon,bordados delicados,tela con adornos
metálicos, prendas con guarniciones de PVC o
de cuero, zapatillas de deporte, piezas
voluminosas como sacos de dormir, etc.
No cargue el tambor en exceso; los artículos grandes,
al humedecerse, pueden superar la carga de ropa máxima
admisible (por ejemplo: sacos de dormir, edredones)
IMPORTANTE: No usar la secadora para artículos
que se hayan tratado con líquidos paralimpieza en seco ni
para prendas de goma (peligro de incendio o de
explosión)
Durante los últimos 15 minutos (aproximada-mente) la
carga siempre se seca con aire frío.
Se deben poner en la secadora solamente
artículos que se hayan escurrido bien o que se
hayan centrifugado. A menos humedad que
tengan las prendas que se han de secar, más
corto será el tiempo de secado, lo cual ahorrará
energía eléctrica.
SIEMPRE
Ⴠ Procure secar el máximo peso permitido de
prendas, para economizar tiempo y energía.
Ⴠ Compruebe que el filtro esté limpio antes de
iniciar el ciclo de secado.
NUNCA
Ⴠ Debe excederse del peso máximo, porque de
hacerlo malgastaría tiempo y energía eléctrica.
Ⴠ Introduzca en la secadora artículos que
Guardar
chorreen agua, porque se puede dañar el
aparato.
.
Ahorro De Energía
Peso Máximo de Para el Secado
Ⴠ Algodón máx. 9 kg
Ⴠ Fibras sintéticas máx. 4 kg
Clasifique la Carga de la Siguiente Manera:
ჀSegúnlossímbolosdecuidado
Se encuentran en el cuello o en la costura
interior:
Apropiado para secadora.
. .
Usar secadora a alta temperatura.
Usar secadora solamente a baja
.
temperatura.
No secar en secadora.
Si el artículo no tiene etiqueta de cuidado, se debe
presuponer que no es apropiado para secadora.
ჀSegúnlacantidadyelgrosor
Cuando la cantidad del material para secar sea
mayor que la capacidad de la secadora, separe la
ropa de acuerdo a su espesor (por ej. separe las
toallas de la ropa interior fina).
ჀSegúneltipodetejido
Algodón/hilo: Toallas, jerseys de algodón, ropa
de cama y mantelería.
Fibras sintéticas: Blusas, camisas, monos, etc.
hechos de poliéster o poliamida y también para
mezclas de algodón/fibras sintéticas.
ჀSegúnelgradodesecado
Clasificar los artículos según como tienen que
quedar: listos para planchar, listos para guardar,
etc. Para prendas delicadas, presione el botón
Delicados Sint
éticos para seleccionar una
temperatura más baja de secado.
Drying Guide
El ciclo estandar LİSTO PARA GUARDAR ( ) es
el de mayor eficiencia energética y el pensado para el
secado de una colada normal de algodón. La tabla de
abajo muestra aproximadamente el tiempo y el
consumo energético de los principales ciclos de
CICLO
Perfect Home
Seco
Listo Para Guardar
Listo Para Guardar
Listo Para Planchar
Consumo de electricidad en modo "STAND BY
Consumo de electricidad en modo apagado
CAPACIDAD
LLENO
LLENO
LLENO
MEDIO
LLENO
ENERGÍA
(kWh)
6,24
5,88
5,20
2,80
4,16
TIEMPO
(Min)
225
199
168
96
137
0,75 W
0,15 W
ES
37
Page 38

CONTROLES E INDICADORES
CONTROLES E INDICADORES
Indicador
Depósito Lleno
Botón Selección
Tiempo
Panel De Control Y Luces De Aviso
Indicador De
Mantenimiento Del Filtro
Botón De
Inicio Diferido
Botón Delicados
Sintéticos
Pantalla
Botón Anti-
Arrugas
Start/pausa
Selector De
Programa
Botón
Selector de Programa– Selecciona el programa deseado.
Botón Selección Tiempo – Permite que el usuario modifique la duración del programa seleccionado
por el Selector de Programa. Sólo puede utilizarse con las opciones: Mix&Dry, Shirts y Time.
Botón Inicio Diferido - Permite que el usuario retrase el inicio del ciclo de secado (ver detalles del
funcionamiento).
Botón Delicados Sint
éticos - Cuando se presione se apagará el indicador por defecto y se
iluminará .
Botón Anti- Arrugas – Permite que el usuario seleccione un ciclo antiarrugas post secado.
Botón Start/Pausa – Pulse para iniciar/ detener el programa de secado seleccionado.
Botón Memo – Permite al usuario grabar el programa pulsando simultáneamente los botones Anti-
Crease y Acrylic Synthetic durante 3 segundos, a los 2 minutos de duración del programa/opción
elegido.
Indicador - Se enciende cuando el filtro necesita limpiarse.Se
Indicador Depósito Lleno
Mantenimiento Del Filtro
– Se enciende cuando el contenedor de agua está lleno.
Pantalla – Se enciende el indicador correspondiente cuando se ha seleccionado un programa
automático.
– indicador que se encenderá cuando se seleccione el programa económico.
Refresh – El indicador se enciende cuando el programa inicia la fase de enfriado.
SELECCIÓN DEL PROGRAMA
ES 38
La secadora Hoover Sensor Dry ofrece muchas opciones para
secar la colada y adaptarse a todas las circunstancias.
En la siguiente tabla se enumeran los programas y la función de
cada programa.
Nota: Es posible que el sensor no detecte una pequeña cantidad
de piezas pequeñas.Para cantidades pequeñas y piezas
separadas o telas previamente secadas que contienen poca
humedad, utilice los programas de duración controlada. Ajuste el
programa entre 30 y 75 minutos según la cantidad de piezas que se
quiere secar y el grado de secado requerido, y seleccione
temperatura alta o baja, dependiendo del tipo de tela.
Si el sensor no detecta la pieza, la secadora sólo funcionará
durante 10 minutos antes de entrar en la etapa de enfriamiento.
Si la carga es excesiva o las prendas están demasiado mojadas
para secar en la secadora, ésta entrará automáticamente en la
etapa de enfriamiento después de aproximadamente 3 horas.
Page 39

SELECCIÓN DEL PROGRAMA
SELECCIÓN DEL PROGRAMA
PROGRAMA
Perfect Home
Seco
Listo Para Guardar
Listo Para Planchar
No Crease.
Lana
Mezclar&Secar
Camisas
DESCRIPCIÓN
Seleccione el grado de sequedad que desea. Éste oscila desde
para toallas de baño y albornoces, para prendas que no
necesitan planchado, hasta el programa que deja la ropa lista para
planchar.
El programa cuenta con una función acondicionadora y
antiarrugas. La secadora calentará la carga durante 9 minutos,
seguido de un periodo de enfriamiento de 3 minutos, y es
especialmente útil en prendas que se hayan dejado sin doblar
antes de plancharlas, por ejemplo en el cesto de la ropa. Las
prendas también pueden endurecerse cuando se han secado en
tendederos externos o sobre radiadores dentro de casa. Este
programa alisa las arrugas del tejido, facilitando y agilizando su
planchado.
Un programa delicado especialmente creado para suavizar las
prendas de lana después de secarlas al aire libre. Este ciclo
delicado de aire caliente, que dura 12 minutos, también puede
utilizarse para “refrescar” las prendas de lana que hayan estado
guardadas en el armario.
Se trata de un programa especialmente sincronizado para una
carga máxima de 4kg (117 min.). La duración por defecto es de 99
minutos y permite secar hasta 3kg. Con este programa podrá
secar juntos tejidos de algodón y de fibras sintéticas.
Se trata de un programa especialmente sincronizado para
camisas con una carga máxima de 3kg (78 minutos). Con camisas
sintéticas deberá pulsar el botón
duración por defecto es de 60 minutos y permite secar hasta 2kg.
Delicados Sintéticos. La
R
ápido 40 Min.
Tiempo
Memo
El programa Rápido 40' permite completar rápidamente un ciclo de
secado. Es un programa ideal para tener ropa seca, fresca y lista
para poner en menos de 40'. Este programa especial controla
constantemente la temperatura dentro del tambor. La carga máxima
es de 2 kg y el programa es adecuado para todo tipo de tejidos que
admitan el secado al aire libre.
La opción Tiempo incluye todos los programas de temporización
manual: desde 30 minutos hasta 180 minutos. La opción de
temporización de 20 minutos sólo se permite en ventilación con
aire frío (Refresh)
El programa Memo permite volver a hacer funcionar un programa
que el usuario ha grabado anteriormente, sin seleccionar la
secuencia correcta de las posiciones del selector de programa ni
los botones de función del programa en concreto.
ES
39
Page 40

PUERTA Y FILTRO
Modo De Abrir La Puerta
Tire de la palanca
para abrir la puerta.
Para poner la
secadora en marcha
nuevamente, cierre la
puerta y presione
Start/Pausa.
¡AVISO! Cuando la secadora está en uso,
puede que el tambor y la puerta SE
CALIENTEN MUCHO. Nunca detenga la
secadora antes de finalizar el ciclo de secado.
Si lo hace extraiga rápidamente todas las
prendas y extiéndalas para que se disipe el
calor.
Filtro
IMPORTANTE: Para mantener la eficiencia
de la secadora, compruebe que el filtro de
polvo esté limpio antes de cada ciclo de
secado.
1. Tire del filtro hacia
arriba
2. Abra el filtro de la
manera señalada.
3.Saque las pelusas
usando un cepillo
suave o con la punta de
los dedos.
4.Rearme el filtro,
acoplándolo con un
golpe seco, y empújelo
nuevamente a su sitio.
Indicador Demantenimiento Del Filtro
se ilumina cuando
hay que limpiar el filtro.
Si las prendas no se
secan, verifique que
no se haya obstruido el
filtro..
NO USE AGUA PARA LAVAR EL FILTRO
KONDENSWASSER-BEHÄLTER
EL agua que se elimina de la colada durante el ciclo
de secado se recoge en un contenedor que hay
dentro de la puerta de la secadora. Cuando el
contenedor está lleno se ilumina el indicador del
panel de control y TIENE que vaciarse dicho
contenedor. Sin embargo recomendamos vaciarlo
después de cada ciclo de secado.
NOTA: Durante los primero ciclos se recoge muy
poco agua ya que primero se llena la reserva interna
de la máquina.
Para Quitar el Contenedor
1. Tire del contenedor del
agua sujetando la manilla.
Cuando está lleno el
contenedor pesa unos 6
kilos.
2. Incline el contenedor de
agua para vaciarlo en un
lavabo.
Cuando esté vació,
vuelva a colocar el
contenedor en su sitio
como se muestra: primero
inserte la base del
contenedor como se ve y
luego empuje con fuerza
la parte superior para que
recupere su ubicación
inicial.
3. Pulse Start/Pausa
[Inicio/pausa] para iniciar
el ciclo.
NOTA: Si tiene la opción
de drenaje cerca de la
secadora, puede utilizar
un kit de eliminación para
un drenaje permanente
del agua recabada en el
contenedor de la
secadora. Eso quiere
decir que no tendrá que
volver a vaciar el
contenedor.
¡ATENCIÓN! Si abre la puerta a mitad de
ciclo, antes de que se haya completado el ciclo de
enfriado, puede que el tirador esté caliente. Tenga
mucho cuidado cuando vacíe el agua durante el
ciclo.
1
ES
40
Page 41

IMPORTANTE: Antes de limpiar el
condensador, siempre debe apagar el
suministro de electricidad y sacar el enchufe
del tomacorriente.
Para que la secadora siga funcionando de
modo eficiente, revise el condensador
periódicamente para constatar si está limpio.
Modo De Sacar El Condensador
1.Saque la plancha
protectora.
2.Haga girar las dos
palancas de sujeción hacia
la izquierda y extraiga el
conden-sador.
3.Saque el conden-sador.
4.Con un trapo saque con
cuidado el polvo o lanilla, y
luego lave la unidad
sosteniéndola en el chorro
de agua del grifo, y hágala
girar para que el agua corra
entre las placas, para sacar
el polvo o lanilla que éstas
puedan tener.
5.Comprobar la posición del
burletedespués de la
limpieza. Encajarelburlete
en su hueco en caso
dequese hayamovidode su
posiciónoriginal.
Vuelva a instalar el
6.
condensador, cuidando de
presionarlo de la manera
correcta (según indica la
flecha) hasta que quede en su
posición.Trabe las dos
palancas haciéndolas girar
hacia laderecha.Asegurarse
de que la unidadde
condensación está fijada a la
base firmemente.
7.Vuelva a instalar el
protector.
CONDENSADOR
OPERACIÓN
1. Abra la puerta e introduzca la colada en el
tambor. Asegúrese de que las prendas no
obstaculizan el cierre de la puerta.
2.Cierre con cuidado la puerta, empujándola
suavemente hasta que oiga un “clic”.
3.Gire el mando del Selector de Programa para
seleccionar el programa de secado que desee
(ver Guía de Programas).
4.Al secar tejidos sintéticos, acrílicos o
delicados, pulse el botón
para reducir el nivel de calor. Cuando el aparato
se encuentre en modo de calor bajo se
encenderá el indicador. Para borrar esta
selección durante los primeros minutos del
programa, pulse el botón
Sint
éticosTranscurrido este tiempo, vuelva a
poner a cero el aparato para cambiar la
configuración.
5.Pulse el botón
empezará a funcionar automáticamente y el
indicador situado sobre el botón permanecerá
continuamente encendido.
6.Si abre la puerta durante el programa para
comprobar su colada, es necesario
pulsar para reiniciar el secado una vez cerrada
la puerta.
7. Cuando el ciclo se acerca a su término, el
aparato entrará en la fase de enfriado y se
secará con aire frío, permitiendo que a carga se
refresque.
8. Cuando el programa haya finalizado, el
indicador END aparecerá en el display.
9. Tras el término del ciclo, el tambor rotará de
forma intermitente para minimizar las arrugas
de las prendas. Esta operación continuará
hasta que el aparato se ponga en posición OFF
o se abra la puerta.
Delicados Sintéticos
Delicados
Start/Pausa La secadora
Start/Pausa
ES 10
No abra la puerta durante los programas
automáticos a fin de obtener un óptimo secado.
ES
41
Page 42

OPERACIÓN
Inicio Diferido
La función Inicio Diferido permite al usuario retrasar el inicio del ciclo de secado entre 1 y 24
horas.
Cuando la función se selecciona por primera vez, en el display aparecerá un retraso de 1 hora.
Cuando se pulse este botón sucesivas veces, el retraso se irá incrementando 1 hora.
Para iniciar el programa, pulse
Start/Pausa el electrodoméstico completará el ciclo de secado al
término de este tiempo. La luz del indicador se encenderá para indicar que la función Delay Start
está activada.
Cancelación Y Restablecimiento Del Programa
Para cancelar un programa, pulse el botón Start/Pausa durante 3 segundos. En el display TIME
CONTROL se encenderá la luz del indicador 0:00 para indicar que éste se ha puesto a cero.
LIMPIEZA Y MANTENIMIENTO DE RUTINA
Limpieza De La Secadora
Ⴠ Limpie el filtro después de cada ciclo de
secado.
Ⴠ Después de usar la secadora, pase un trapo
por el interior del tambor y deje la puerta
abierta durante un rato para permitir que
Especificaciones Técnicas
Capacidad del tambor 115 litros
Peso máximo que se puede secar 9 kg
Altura 85 cm
Ancho 60 cm
Profundidad 60 cm
Categoría de consumo de energía B
circule el aire para secarla.
Ⴠ Con un trapo suave, limpie la parte exterior
de la máquina y la puerta.
Ⴠ NO use almohadillas abrasivas ni productos
de limpieza.
Información para las pruebas de laboratorio
EN 61121 Programa
-Algodón Seco
-Planchar Algodón
-Tejidos Delicados
P P E U rograma ara l so
-Listo para guardar
-Listo para planchar
-Listo para guardar + SINTÉTICO
Ⴠ Para evitar que la puerta se atasque o que se
acumule pelusa, limpie la parte interna de la
puerta y la junta con un paño húmedo después
de cada ciclo de secado.
IMPORTANTE Antes de limpiar esta
máquina, siempre debe apagarla y
desenchufarla del suministro eléctrico.
¡AVISO! El tambor, la puerta y las piezas
que se han secado pueden estar muy calientes.
ES 42
Para datos referentes a energía eléctrica,
refiérase a la etiqueta de homologación que se
encuentra en la parte delantera de la secadora
(con la puerta abierta).
Page 43

RESOLUCIÓN DE PROBLEMAS
Causa Posible De...
Defectos que puede solucionar usted mismo
Antes de llamar al Servicio técnico de GIAS para
obtener asesoramiento técnico, lea
detenidamente la siguiente lista de
comprobación. Se cobrará el servicio técnico si
resulta que la máquina funciona correctamente, o
si ha sido instalada o utilizadaincorrectamente. Si
el problema continúa después de completar la
verificación recomendada, por favor llame al
Servicio técnico de GIAS para recibir asistencia
telefónica.
El tiempo restante fin ciclo puede cambiar
durante el ciclo. El tiempo fin está
continuamente controlado durante el ciclo y
el tiempo se adapta para ofrecer la
información mas actualizada posible. El
tiempo puede incrementarse o disminuir
durante el ciclo, lo cual es perfectamente
normal.
El tiempo de secado es excesivamente
largo/la ropa no se seca suficientemente…
Ⴠ Ha seleccionado el tiempo de
secado/programa correcto?
Ⴠ Estaba la ropa demasiado mojada? ¿La ropa
fue bien estrujada o centrifugada?
Ⴠ Hace falta limpiar el filtro?
Ⴠ Hace falta limpiar el condensador?
Ⴠ Se ha sobrecargado la secadora?
ჀEstá enroscada o tapada la manguera de
ventilación?
Ⴠ Se tiene todavía seleccionada la opción
Delicados Sintéticos de un ciclo anterior?
La secadora no funciona…
ჀEstá funcionando el suministro de electricidad
hacia la secadora? Compruébelo
Con otro aparato como una lámpara de mesa.
ჀEl enchufe está correctamente conectado al
suministro de la red?
ჀSe ha cortado la electricidad?
Ⴠ Se ha quemado el fusible?
● ¿La puerta está completamente cerrada?
ჀLa secadora está encendida, tanto en el
suministro de electricidad como en la máquina?
● ¿Se ha seleccionado el programa o el tiempo de
secado?
● ¿Se ha encendido la máquina después de abrir
la puerta?
● La secadora ha dejado de funcionar porque el
depósito del agua está lleno y hay
Que vaciarlo?
La secadora hace mucho ruido…
Ⴠ Apague la secadora y póngase en contacto con el
Servicio técnico de GIAS para obtener asesoría.
El indicador está encendido…
Ⴠ Hace falta limpiar el filtro?
ჀEstá enroscada o tapada la manguera de
ventilación?
El indicador está encendido…
Ⴠ Hace falta sacar el agua del recipiente?
SERVICIO DE ATENCIÓN AL CLIENTE
Si después de realizar todas las
comprobaciones recomendadas persistiera
algún problema con la secadora, llame al
Servicio GIAS de Atención al Cliente para
obtener asesoramiento. Es posible que le
puedan asesorar por teléfono o bien convenir
una hora apropiada para que le visite un
ingeniero bajo los términos de la garantía. Sin
embargo, es posible que se le cobre si alguna
de las situaciones siguientes es aplicable a su
máquina:
Ⴠ Si se halla en buen estado de funcionamiento.
Ⴠ Si no se ha realizado la instalación de acuerdo
a las instrucciones.
Ⴠ Si se ha usado incorrectamente.
Servicio De Recambios
Utilice siempre recambios originales, que se
pueden conseguir a través del Servicio técnico
de GIAS.
Servicio Técnico De Gias
Para mantenimiento y reparaciones, llame al
ingeniero del Servicio técnico de GIAS local.
El fabricante no se hace responsable de los
errores de imprenta que pueda contener este
folleto. El fabricante también se reserva el
derecho de efectuar modificaciones a sus
productos sin cambiar las características
esenciales.
ES 43
Page 44

40008446
 Loading...