

Page 1

OVENS
USER INSTRUCTIONS
ANVÄNDARHANDBOK
UGNAR
BRUKSANVISNING
OVNER
KÄYTTÖOHJE
UUNIT
BRUGERVEJLEDNING
OVN
GB
SV
NO
FI
DK
CANDY HOOVER GROUP S.R.L. • Via Privata Eden Fumagalli • 20047 Brugherio Milano Italy
Page 2

CONTENTS
Safety Instructıons
1. General warnings
1.1 Declaration of compliance
1.2 Safety hints
1.3 Recommendations
1.4 Installation
1.5 Electrical connection
2. Accessories
2.1 Oven equipment
2.2 Rotisserie
2.3 LED VISION
2.4 Removing And Cleaning Wire Racks
3. Cleaning the oven
4. Service centre
5. Description of the display
5.1 Before using the oven for the first time
5.2 How to use the oven
5.3 The programmation
5.4 Using the end of cooking timer
5.5 Cooking tips
5.6 Adjusting the display contrast
5.7 Use Of Touch Control Clock Programmer
5.8 Setting The Correct Time
6. Pyrolytic cycle
7. Child safety
7.1 The Child Lock For Your Children Safety
......................................................................03
...................................................................04
.......................................................04
............................................................................04
..................................................................04
..........................................................................04
..............................................................04
............................................................................05
....................................................................05
...........................................................................05
........................................................................05
.......................................05
....................................................................05
.........................................................................06
.....................................................07
....................................08
...............................................................08
................................................................09
................................................09
...........................................................................09
.................................................09
..........................................................10
....................................................................11
.........................................................................11
GB
................................10
...........................11
SISÄLTÖ
Turvallisuusvinkkejä
1. Yleistä
1.1 Vaatimustenmukaisuusvakuutus
1.2 Turvallisuusohjeıta
1.3 Suositukset
1.4 Asennus
1.5 Sähköliitäntä
2. Varusteet (mallista Riippuen)
2.1 Uunin Varusteet
2.2 Grillivarras
2.3 Led - Valaistus
2.4 Lankahyllynkannatinten Irrotus Ja Puhdistus
3. Uunin Puhdistaminen
4. Huoltopalvelu
5. Nayton Kuvaus
5.1 Ennen Uunin Ensimmäistä Käyttökertaa
5.2 Uunin Käyttö
5.3 Ohjelmointi
5.4 Ajastimen Käyttö
5.5 Ruoanlaitto-ohjeita
5.6 Näytön Kontrastin Säätäminen
5.7 Elektronisen Ohjelmoinnin Käyttö
5.8 Kellonajan Asettaminen
6. Pyrolyyttınen Puhdıstus
7. Lapsılukko
7.1 Lasten Turvallısuus - Lapsılukko
.......................................................................................31
...................................................................................31
.................................................................................38
....................................................................30
...............................................31
....................................................................31
..............................................................................31
.............................................................................31
.................................................32
.......................................................................32
................................................................................32
..........................................................................32
..............................................................32
...........................................................................33
........................................................................34
................................35
.............................................................................35
...............................................................................36
......................................................................36
...................................................................36
................................................36
............................................37
............................................................37
..........................................................38
..............................................38
FI
...........................32
INNEHAL
Turvallisuusvinkkejä
1. Allmänna Varningar
1.1 Förklaring Om Överensstämmelse
1.2 Säkerhetstips
1.3 Rekommendationer
1.4 Installation
1.5 Elektriska Kopplıngar
2. Tillbehör (efter Modell)
2.1 Ugnsutrustning
2.2 Spett
2.3 Diodbelysning
2.4 Avlägsna Och Rengöra Metallstegarna
3. Rengöring Av Ugnen
4. Kundtjänst
5. Beskrivning Av Displayen
5.1 Innan Du Använder Ugnen Första Gången
5.2 Så Använder Du Ugnen
5.3 Program
5.4 Så Använder Du Tiduret För Sluttıd
5.5 Matlagningstıps
5.6 Ändring Av Displayens Kontrast
5.7 Styrning Av Tidsprogrammeringen (med Pekfunktıon)
5.8 Inställning Av Korrekt Tid
6. Pyrolysprocessen
7. Barnsäkerhet
7.1 Barnläset-för Dina Barns Säkerhet
.......................................................................................14
...................................................................................18
......................................................................12
...................................................................13
..........................................................................13
.................................................................13
.............................................................................13
..............................................................13
............................................................14
........................................................................14
..........................................................................14
...............................................................14
................................................................................15
.......................................................16
........................................................17
......................................................................18
.........................................................19
...................................................................20
...........................................................................20
..........................................13
.................................14
..............................17
.........................................18
.............................................18
..........................................20
INHOLD
Sıkkerhetstıps
1. Generelle Advarsler
1.1 Samsvarserklæring
1.2 Sikkerhetstips
1.3 Anbefalinger
1.4 Installering
1.5 Elektrisk Kobling
2. Tilbehør (i Følge Modell)
2.1 Ovnsutstyr
2.2 Rotisseri
2.3 Led-versjon
2.4 Fjerne Og Rengjøre Rister
3. Rengjøring Av Ovnen
4- Servicesenter
5. Beskrivelse Av Displayet
5.1 Før Man Bruker Ovnen For Første Gang
5.2 Bruk Av Ovnen
5.3 Programmer
5.4 Stille Inn Slutten På Steketiden
5.5 Steketips
5.6 Justere Kontrasten På Displayet
5.7 Bruk Av Klokkeprogrammerer Med Berøringskontrol
5.8 Innstilling Av Korrekt Tid
6. Pyrolyse
7. Barnesikring
7.1 Barnesikring - For Dıtt Barns Sıkkerhet
..............................................................................21
..................................................................22
..................................................................22
...........................................................................22
.............................................................................22
...............................................................................22
.....................................................................22
................................................................................23
.......................................................................................23
.............................................................................23
...........................................................................24
.........................................................................26
.............................................................................27
..................................................................................27
.....................................................................................29
.............................................................................29
..........................................................23
.......................................................23
...............................................................23
.........................................................25
................................................27
..........................................................28
.................................26
.............................................27
...................................29
SV
.............19
NO
..............28
INDHOLD
Sikkerhedstip
1. Generelle Advarsler
1.1 Overholdelseserklæring
1.2 Sikkerhedstips
1.3 Anbefalinger
1.4 Installation
1.5 Elektrisk Forbindelse
2. Tilbehør (afhænger Af Modellen)
2.1 Ovnudstyr
2.2 Roterende Spyd
2.3 Led Vision
2.4 Afmontering Og Rengøring Af Wireriste
3. Rengøring Af Ovnen
4. Service Centre
5. Beskrivelse Af Displayet
5.1 Inden Ovnen Bruges For Første Gang
5.2 Sådan Bruges Ovnen
5.3 Programmer
5.4 Sådan Bruges Sluttidspunktet For Tılberedning
5.5 Tilberedningstips
5.6 Justering Af Displayets Kontrast
5.7 Brug Af Berøringsbetjening Til Urets Programmer
5.8 Indstilling Af Det Korrekte Klokkeslæt
6. Pyrolytisk Cyklus
7. Børnesikkerhed
7.1 Børnesikring- For Dit Barns Sıkkerhed
.............................................................................39
..................................................................40
.........................................................................40
.............................................................................40
................................................................................40
.................................................................................41
................................................................................41
..........................................................................42
..............................................................................45
........................................................................47
...........................................................40
................................................................40
......................................................................41
.................................................................41
..........................................................43
...............................................................44
.....................................................................45
......................................................................47
............................................41
...................................41
.....................................44
...............................................45
......................................46
.....................................47
DK
.......................45
..................46
Page 3

SAFETY INSTRUCTIONS
WARNING: The appliance and its accessible parts become hot during use. Care should be taken to avoid
touching heating elements.
• Children under 8 Year of age must be kept away from the appliance unless they are continuously
supervised.
• This appliance can be used by children aged from 8 years and above and persons with reduced
physical, sensory or mental capabilities or lack of experience and knowledge if they have been given
supervision or instruction concerning use of the appliance in a safe way and understand the hazards
involved.
• Children must not play with the appliance.
• Cleaning and user maintenance shall not be made by children without supervision.
• During use the appliance becomes hot. Care should be taken to avoid touching heating elements inside
the oven.
WARNING: Accessible parts may become hot during use. Y oung children must be kept away.
• Do not use harsh abrasive cleaners or sharp metal scrapers to clean the oven door glass since they can
scratch the surface, which may result in shattering of the glass.
• The oven must be switched off before removing the guard, after cleaning, the guard must be replaced in
accordance with the instructions.
• Only use the temperature probe recommended for this oven.
• Do not use a steam cleaner for cleaning operations.
• WARNING: Avoid possibility of electric shock - ensure the appliance is switched off before replacing the
lamp.
• The means for disconnection must be incorporated in the fixed wiring in accordance with the wiring
rules.
• The instructions state the type of cord to be used, taking into account the temperature of the rear surface
of the appliance.
• If the supply cord is damaged, it must be replaced by a special cord or assembly available from the
manufacturer or its service agent.
• CAUTION: In order to avoid a hazard due to inadvertent resetting of the thermal cutout, this appliance
must not be supplied through an external switching device, such as a timer, or connected to a circuit that
is regularly switched on and off by the utility .
• CAUTION: Accessible parts may be hot when the grill is in use. Young children must be kept away .
• Excess spillage must be removed before cleaning.
• During self-cleaning pyrolytic operation the surfaces may get hotter than usual and children MUST be
kept away .
03 GB
Page 4
1. GENERAL WARNINGS
Read the instructions carefully to make the most of your oven. We recommend you keep the instructions for installation and use for later reference,
and before installing the oven, note its serial number in case you need to get help from the after-sales service.
When you have unpacked the oven, make sure that it has not been damaged in any way. If you have any doubts at all, do not to use it. Contact a
professionally qualified person. Keep packing materials such as plastic bags, polystyrene, or nails out of the reach of children because they are
dangerous to children.
The company shall not be liable if the instructions provided in this document are not complied with.
! NOTE: Functions, properties and accessories of ovens which are mentioned in this manual, can be change depending on oven models.
1.1 DECLARATION OF COMPLIANCE
The parts of this appliance that may come into contact with foodstuffs
comply with the provisions of EEC Directive 89/109.Appliance
complies with European Directives 2006/95/EC and
2004/108/EC, and subsequent amendments.When you have
unpacked the oven, make sure that it has not been damaged in
any way. If you have any doubts at all, do not use it: contact a
professionally qualified person.
Keep packing materials such as plastic bags, polystyrene, or nails out
of the reach of children because they are dangerous to children.
1.2 SAFETY HINTS
•The oven must be used only for the purpose for which it was
designed. It must only be used for cooking food. Any other use, e.g. as
a form of heating, is an improper use of the oven and is therefore
dangerous.
•The manufacturers cannot be held responsible for any damage
caused by improper, incorrect or unreasonable use.
When using any electrical appliance you must follow a few basic rules.
- Do not pull on the power cable to remove the plug from the socket.
- Do not touch the oven with wet or damp hands or feet.
- Do not use the oven unless you are wearing something on your feet.
- It is not generally a good idea to use adapters, multiple sockets for
several plugs or cable extensions.
- If the oven breaks down or develops a fault switch it off at the mains
and do not touch it.
• If the cable is damaged it must be replaced promptly.
When replacing the cable, follow these instructions.
Remove the power cable and replace it with one of the H05VV-F type.
The cable must be able to bear the electrical current required by the
oven.Cable replacement must be carried out by properly qualified
technicians.
The earthing cable (yellow-green) must be 10 mm longer than the
power cable.
Use only an approved service centre for repairs and ensure that only
original parts are used. If the above instructions are not adhered to the
manufacturers cannot guarantee the safety of the oven.
•The oven you have just acquired has the described technical
characteristics and you must not make any modifications to it.
•Do not store flammable products in the oven; they can catch fire if the
oven comes on accidentally.
•Do not press on and do not let children sit on the oven door.
•Use kitchen oven gloves, when putting into or removing a dish from
the oven.
1.3 RECOMMENDATIONS
• After each use of the oven, a minimum of cleaning will help keep the
oven perfectly clean.
• Do not line the oven walls with aluminium foil or single-use protection
available from stores. Aluminium foil or any other protection, in direct
contact with the hot enamel, risks melting and deteriorating the
enamel of the insides.
• In order to prevent excessive dirtying of your oven and the resulting
strong smokey smells, we recommend not using the oven at very high
temperature. It is better to extend the cooking time and lower the
temperature a little.
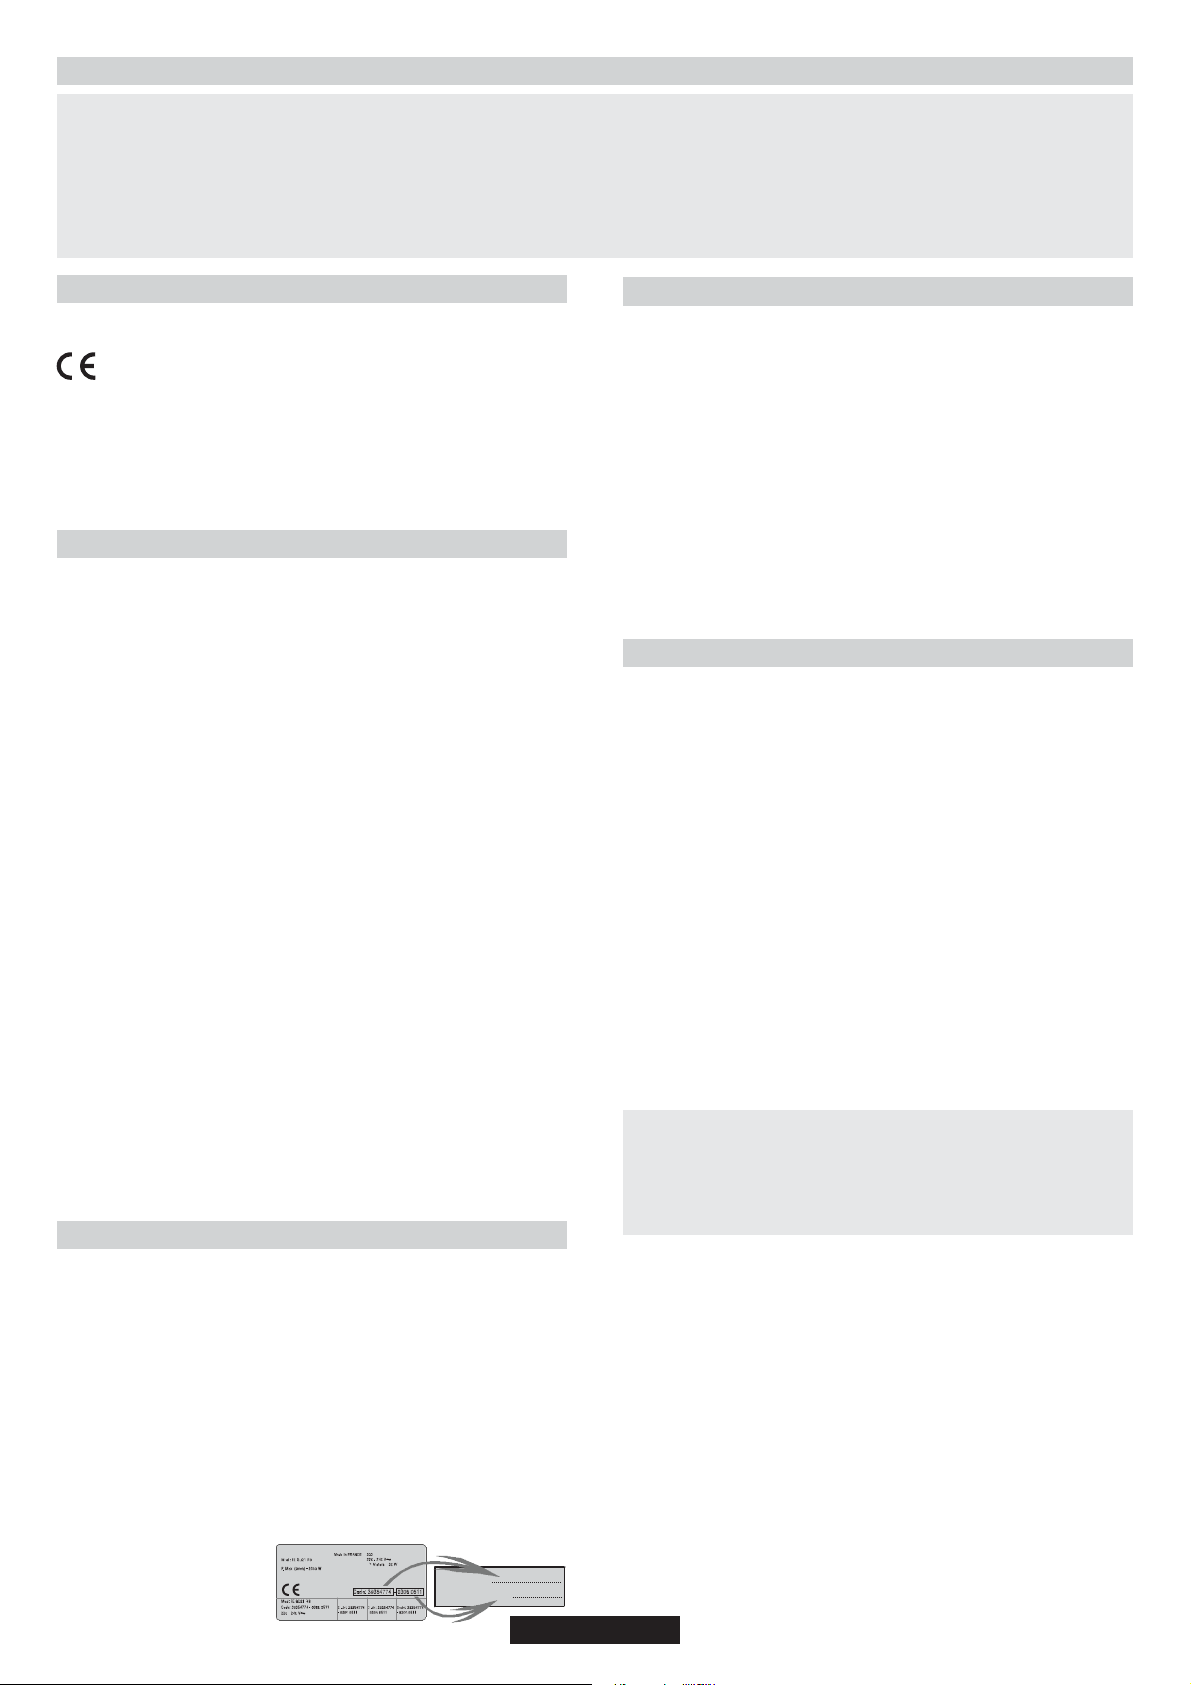
Identification plate
1.4 INSTALLATION
The manufacturers have no obligation to carry this out. If the
assistance of the manufacturer is required to rectify faults arising from
incorrect installation, this assistance is not covered by the guarantee.
The installation instructions for professionally qualified personnel
must be followed. Incorrect installation may cause harm or injury to
people, animals or belongings. The manufacturer cannot be held
responsible for such harm or injury.
The kitchen unit in which the oven is to be fitted must be made of
material resistant to temperatures of at least 70°C.
The oven can be located high in a column or under a worktop.
Before fixing, you must ensure good ventilation in the oven space to
allow proper circulation of the fresh air required for cooling and
protecting the internal parts. Make the openings specified on last page
according to the type of fitting.
1.5 ELECTRICAL CONNECTION
THE ELECTRICAL CONNECTION SHOULD BE CARRIED OUT BY
AN APPROVED CONTRACTOR OR TECHNICIAN WITH SIMILAR
QUALIFICATIONS.
The installation receiving the appliance must comply with the standard
in force in the installation country.
The manufacturer does not accept any responsibility if this provision is
not complied with.
Connection to the network must be by earthed socket outlet, or by
means of a multipole circuit-breaker, in compliance with the
installation country.
The installation must be protected by suitable fuses, and have wires
with a large enough cross-section to supply the oven normally.
CONNECTION:
The oven is fitted with a power lead for connecting exclusively to a
voltage of 220-240 V AC across the phases or across phase and
neutral.
Connection must be carried out having first checked:
-the supply voltage indicated on the meter,
The lead protection wire (green/yellow) connected to the earth
terminal of the oven must be connected to the earth terminal of the
installation.
Caution:
•Have the earth continuity of the installation checked by an electrician
before making the connection.
•The manufacturer will not be liable for any incident, or the possible
consequences that may arise from the use of the oven not earthed, or
connected to an earth with defective continuity.
NB: Do not forget that the oven may require after-sales service.
Also, locate the socket outlet so that the oven can be connected once
it is removed from its space.
Power supply cable: If the power supply cable has to be changed,
please have this done by the after-sales service or by someone with
similar qualifications.
•In addition to the
accessories supplied with the oven, we advise you only use dishes
and baking moulds resistant
to very high T emperatures.
Code produit:
Numéro de série :
04 GB
Page 5
2. ACCESSORIES (According to model)
2.1 OVEN EQUIPMENT
It is necessary to do an initial cleaning of the equipment before the first
use of each of them. Wash them with a sponge. Rinse and dry off.
The shelf can take moulds and dishes.
The drip tray catches the juices from grilled foods.
Never use he drip tray as a roasting tray as fat deposits can be quickly
spread throughout the oven, which produces excess smoke.
Never place the drip tray directly on the oven bottom.
The pizza stone for a crisper pizza equipped according to the model
with its stand and the pizza roller.
LED VISION
2.3
Is an illumination system which replaces the traditional « light bulb ».
14 LED (for non-pyrolitic versions) or 10 High Power LED (for pyrolitic
versions) lights are integrated within the door. These produce white
high quality illumination which enables to view the inside of the oven
with clarity without any shadows on all the shelves.
Advantages :
This system, besides providing excellent illumination inside the oven,
lasts longer than the traditional light bulb its easier and to maintain and
most of all saves energy.
-Optimum view
-Long life illumination
-Very low energy consumption, -95% in comparison with the
traditional illumination High.
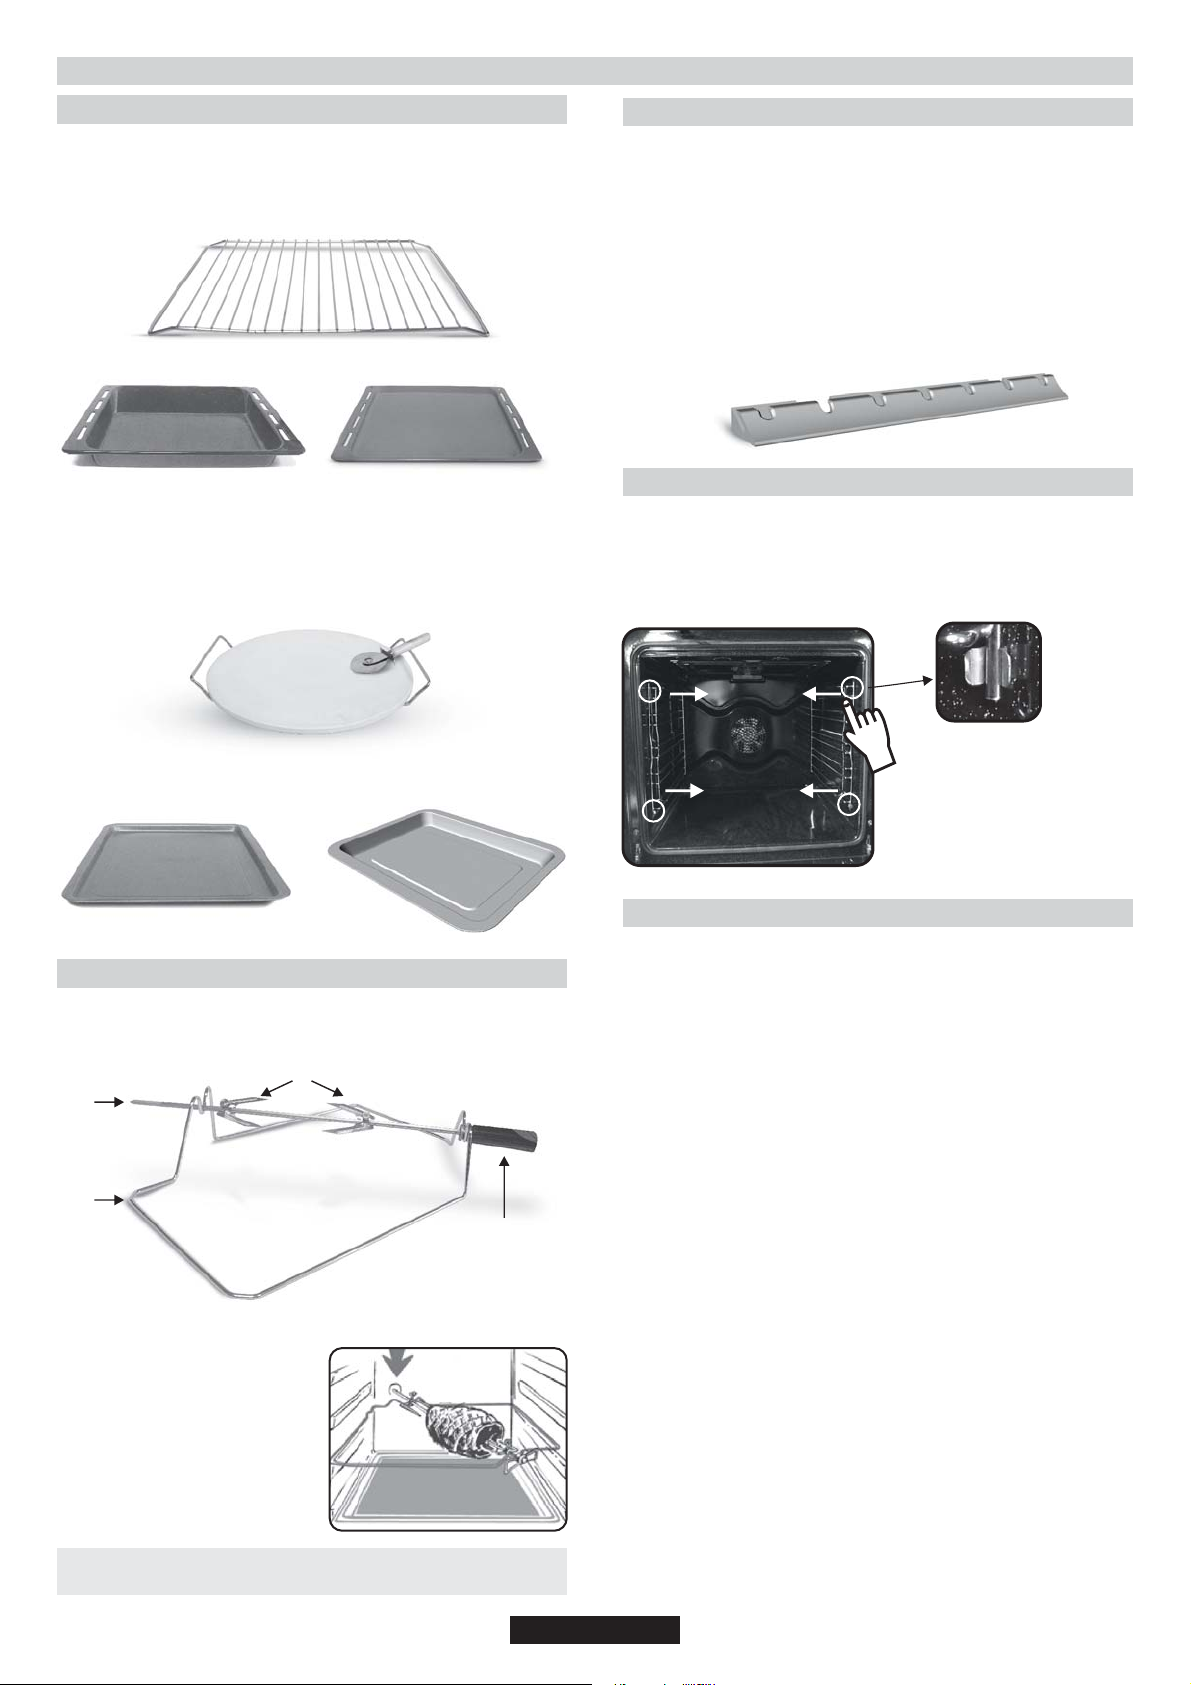
2.4 REMOVING AND CLEANING WIRE RACKS
1- Remove the wire racks by pulling them in the direction of the arrows
(see below)
2- To clean the wire racks either put them in the dishwasher or use a
wet sponge, ensuring that they are dried afterwards.
3- After the cleaning process install the wire racks in reverse
order.
The pastry tray must be placed on the shelf. It is for cooking small
pastries like choux, biscuits, meringues, etc...
Never place the pastry tray directly on the oven bottom.
2.2 ROTISSERIE
No pre-heating is required for rotisserie cooking.
Cooking with the door closed.
The energy consumption is 90-95% less than traditional system.
3
2
1
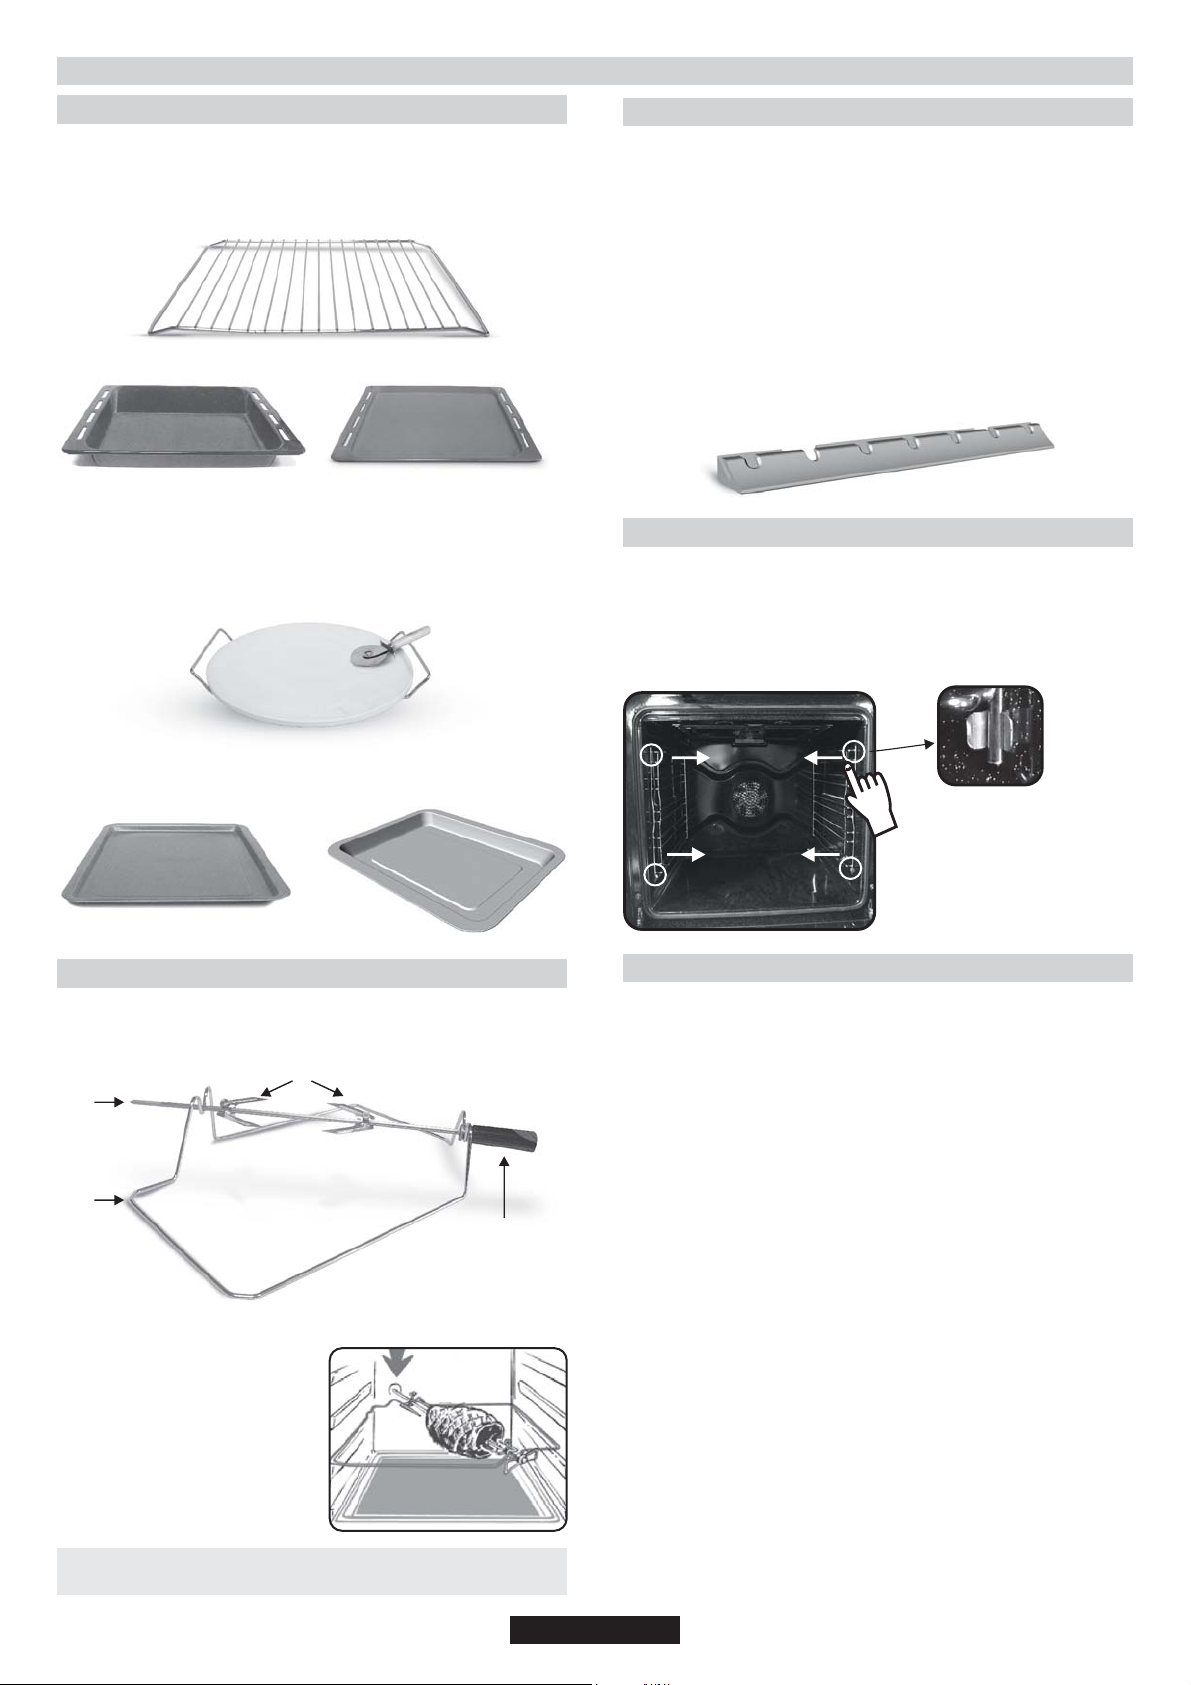
1- Grid
2- Spit
3- Hooks & Screws
4- Handle
HOW TO USE TURNSPIT
1. Unscrew the hooks
2. Put the spit into the meat
3. Fix the meat with the hooks
4. Tighten the screws
5. Insert the spit into the motor hole
6. The handle
When the oven is in use, any unused accessories should be
removed from the oven.
4
3. CLEANING THE OVEN
•Wait for the oven to cool down before doing any cleaning by hand.
•Never clean your oven with abrasive cleaners, wire wool or sharp
objects, or the enamel may be damaged beyond repair.
•Only use soapy water or bleach (ammonia) cleaners.
•Never line the oven sides with aluminium foil.
GLASS PARTS
We recommend you wipe clean the glass door with absorbent kitchen
paper every time you use the oven. If the spattering is heavy, then you
can clean with a well squeezed sponge and detergent, and rinse.
Do not use harsh abrasive cleaners or sharp metal scrapers to clean
the oven door glass since they can scratch the surface, which may
result in shattering of the glass.
OVEN DOOR SEAL
If this gets dirty, clean the oven seal with a slightly damp sponge.
ACCESSORIES
Clean them with a sponge soaked in soapy water. Rinse with clean
water and dry off. A void abrasive cleaners.
DRIP TRA Y
After grilling, remove the drip tray from the oven. T ake care to pour the
warm grease into a container. W ash and rinse the drip tray in hot water
with a sponge soaked in washing up liquid.
If residues remain attached, soak them off in water and detergent.
It can also go in a dishwasher or be cleaned with a commercial oven
cleaner.
Never place a soiled drip tray in the oven.
OVEN LIGHTING
Disconnect the power supply from the oven before cleaning or
replacing the lamp.
The bulb and its cover are made of material resistant to high
temperatures.
05 GB
Page 6
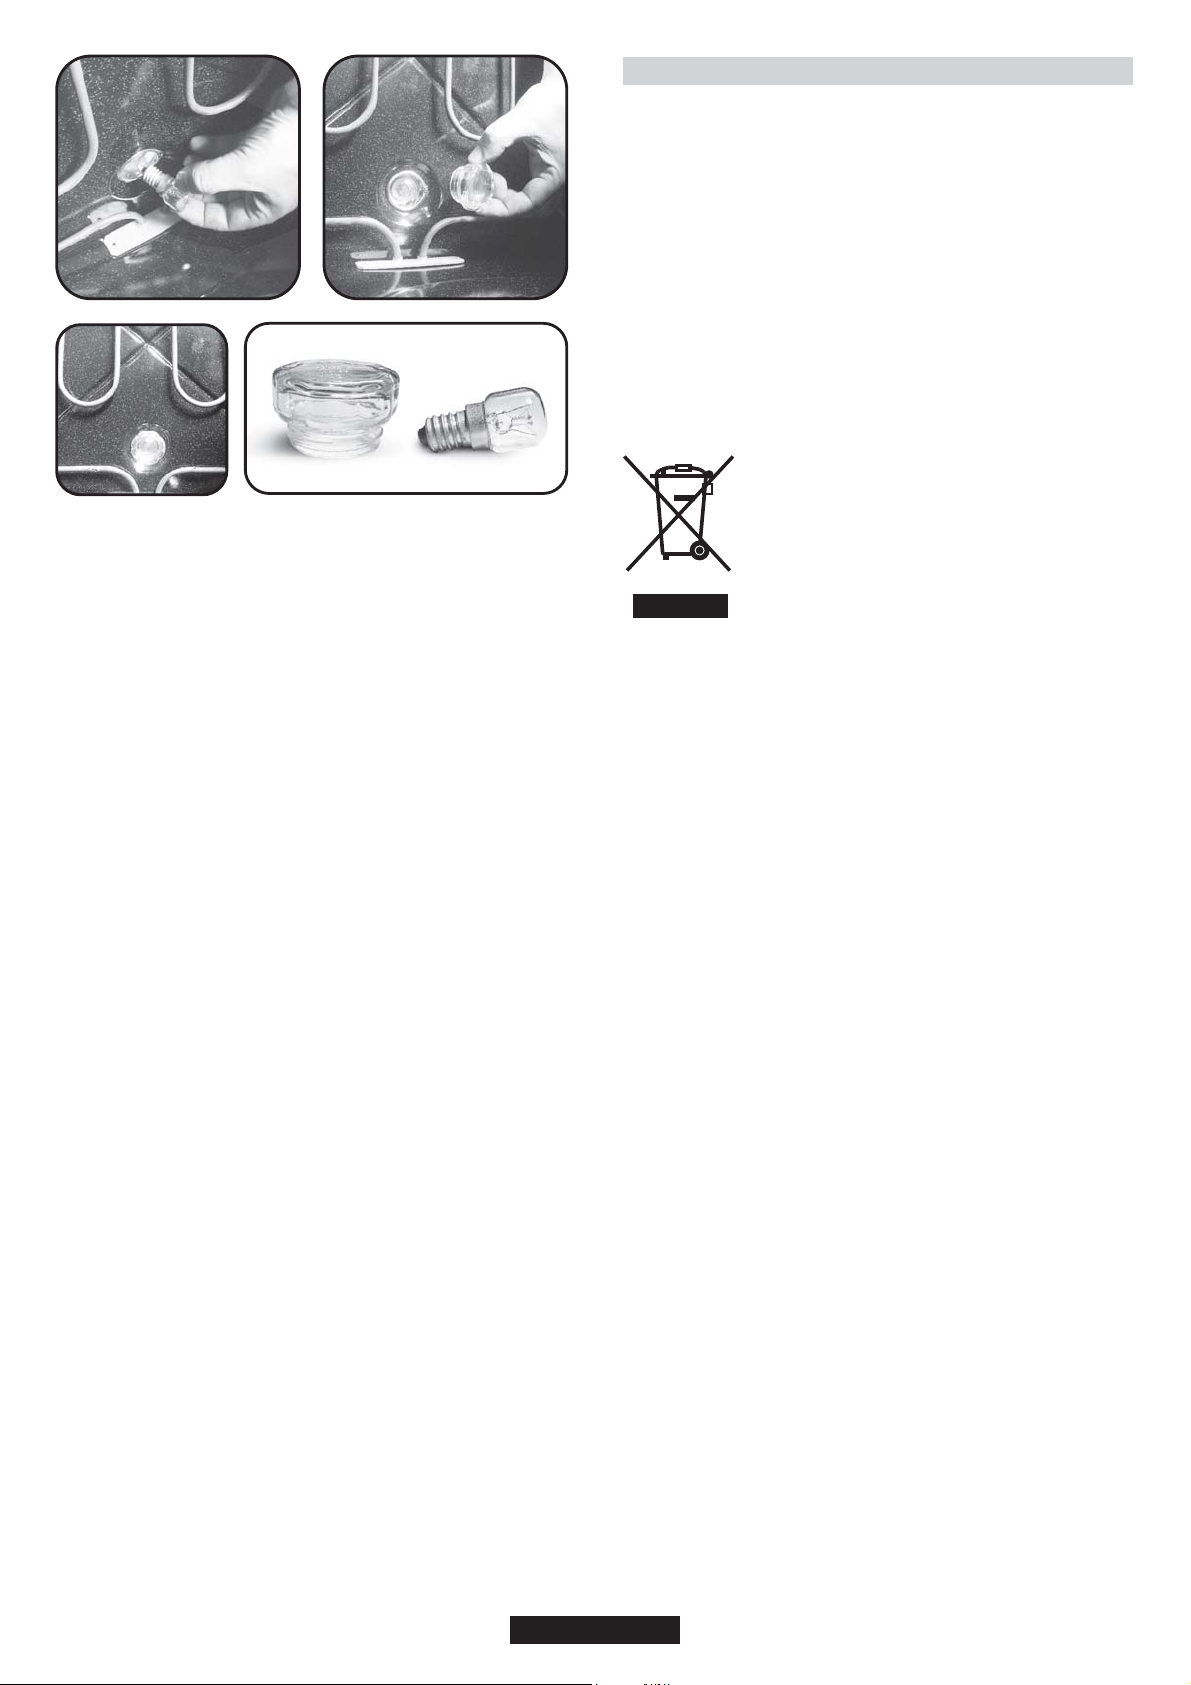
Bulb characteristics:
230 V AC - 25W- E 14 base T emperature 300°C to change a defective
bulb, just :
•Unscrew the glass cover,
•Unscrew the bulb,
•Replace it with the same type: see characteristics above,
•After replacing the defective bulb, screw back the
protective glass cover.
4. SERVICE CENTRE
Before calling the Service Centre.
If the oven is not working, we recommend that:
•Check that, if the oven is properly plugged into the power supply.
If the cause of the fault cannot be detected:
•Disconnect the oven from the mains, do not touch the oven and call
the after sales service.
Before calling the Service Centre remember to make a note of the
serial number on the serial number specifications plate.
The oven is supplied with a guarantee certificate that ensures that it
will be repaired free of charge by the Service Centre whilst under
guarantee.
This appliance is marked according to the European
directive 2012/19/EU on Waste Electrical and
Electronic Equipment (WEEE). WEEE contains both
polluting substances (which can cause negative
consequences for the environment) and basic
components (which can be re-used). It is important to
have WEEE subjected to specific treatments, in order
to remove and dispose properly all pollutants, and
recover and recycle all materials.
Individuals can play an important role in ensuring that
WEEE does not become an environmental issue; it is essential to
follow some basic rules:
• WEEE shall not be treated as household waste.
• WEEE shall be handed over to the relevant collection points
managed by the municipality or by registered companies. In many
countries, for large WEEE, home collection could be present.
• When you buy a new appliance, the old one may be returned to the
retailer who has to collect it free of charge on a one-to-one basis, as
long as the equipment is of equivalent type and has the same
functions as the supplied equipment.
06 GB
Page 7
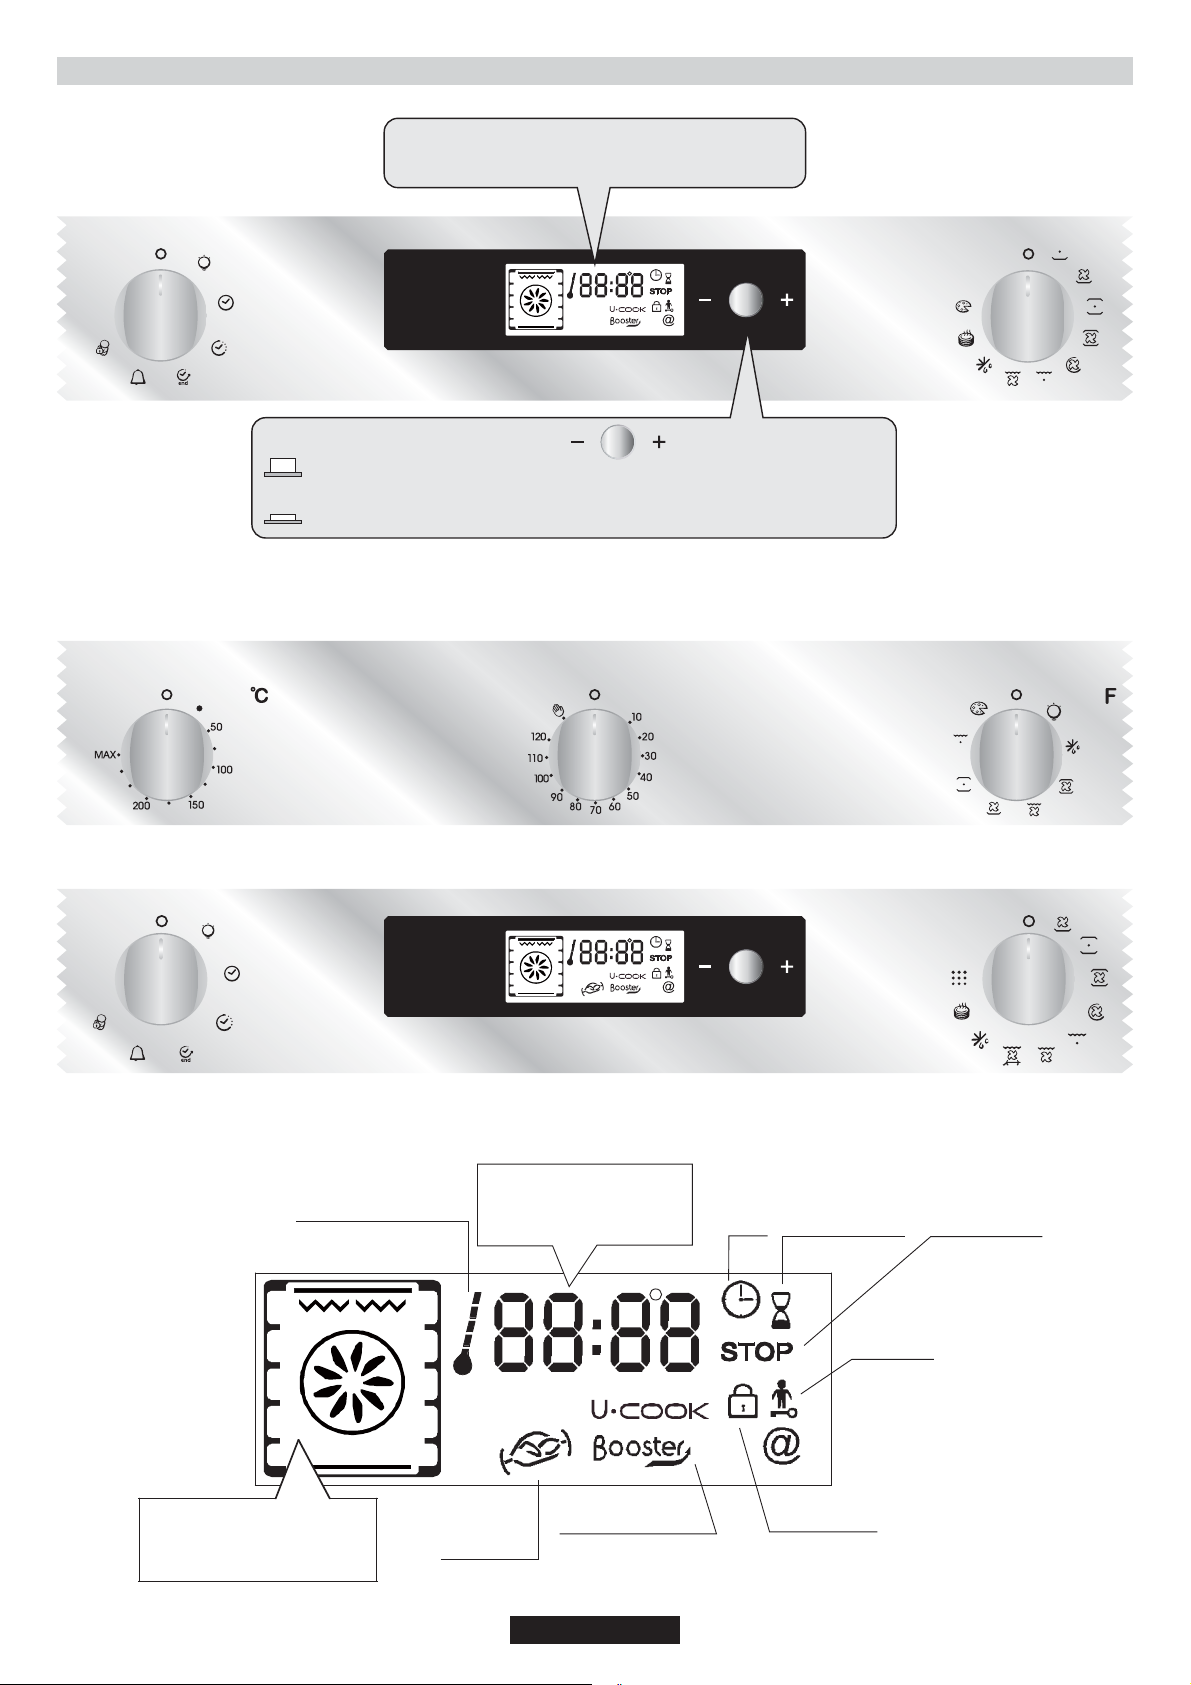
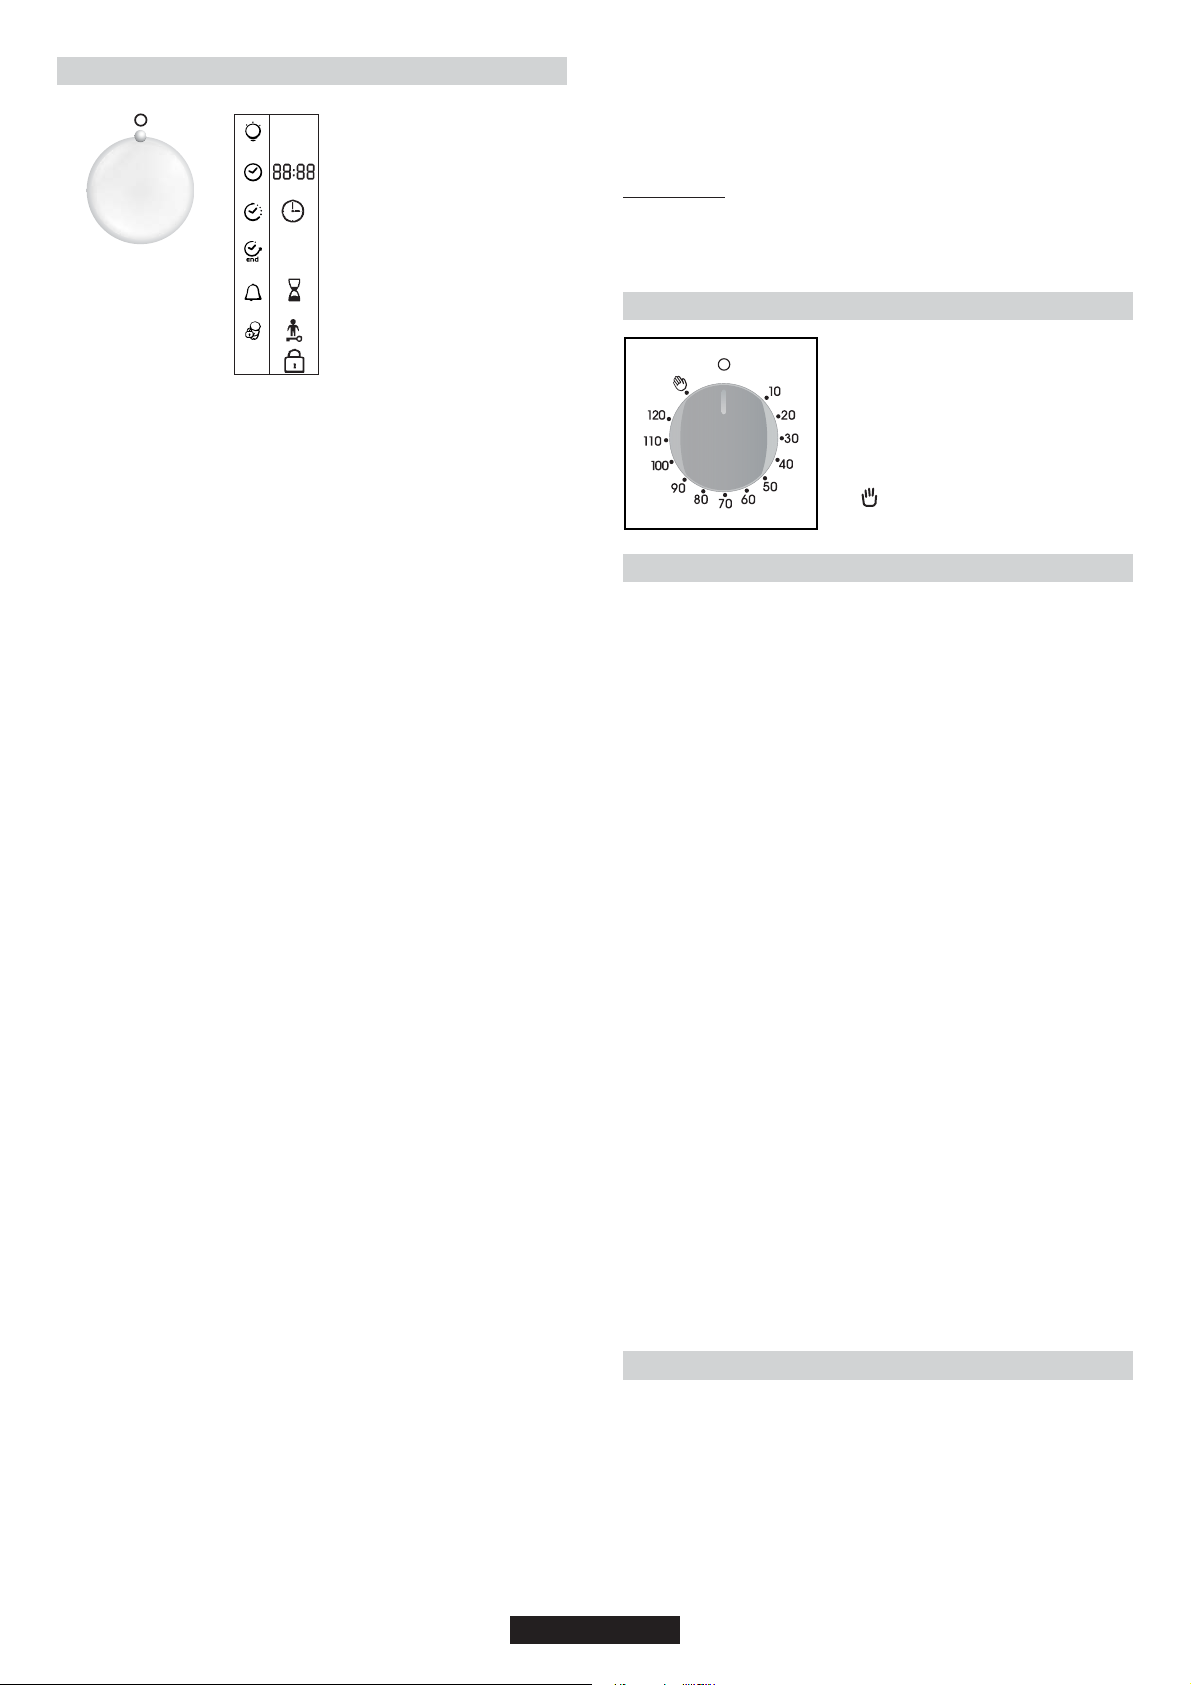
5. DESCRIPTION OF THE DISPLAY
Display panel : time, programming of cooking mode,
indicator lights, cooking temperature function and
shelf positioning
BUTTON FOR REGULATION AND CONFIRMATION
Settings: temperature, programming cooking and end of cooking time -
Regulated by turning the button towards “ - ” or “ + ”
To confirm setting: press the button.
220
Indicator light:
rising temperature
PYRO
Clock /
Programmation /
Cooking temperature
Programme symbol display: cooking
Time Cooking timer
Cooking end
Indicator light
Child safety device
Oven functionning display
and recommended level
position
PYRO
Turnspit
Booster display:
Pre-heating
07 GB
Indicator light
Closing of the oven door
Page 8

5.1 BEFORE USING THE OVEN FOR THE
FIRST TIME
• PRELIMINARY CLEANING
-Clean the oven before using for the first time:
-Wipe over external surfaces with a damp soft cloth.
-Wash all accessories and wipe inside the oven with a solution of hot water
and washing up liquid.
-Set the empty oven to the maximum temperature and leave on for about 1
hour, this will remove any lingering smells of newness. Ensure that the
room is well ventilated while this is being done.
• THINGS TO REMEMBER
Confirmation of operation on timer
Modification must be confirmed by pressing the button.
Stopping the oven:
This may be necessary if you have input an incorrect instruction.
To stop the oven .... turn back the function selector knob to the Stop
Position.
Child safety device:
To lock the oven controls, select the child safety device. Refer to the
section entitled “Programming - The child safety device”.
The cooling fan :
This protects the control panel and electronics from heat damage.
It begins and then stops automatically even when the oven is switched off.
Oven lighting :
By turning to the light symbol, you can switch on the oven light when it is
not in use.
When the oven is in use, the light stays on during all of the oven functions
and when the door is opened.
• CLOCK SETTING
When the oven is connected to the electricity supply or after a long power
cut, the clock must be re-set.
To set the clock :
1 - Turn the control knob to the “Clock” symbol :
2 - Set the clock with the central button by turning to the “-” or “+”,
3 - Turn back the control knob to the STOP position.
10:30
5.2 HOW TO USE THE OVEN
•THE MANUAL MODE
The cooking methods suggested in manual mode are set out in the table
below. A temperature is also suggested for each cooking method. This can
be modified within a pre-determined range.
Function Mode
according to the oven
model
Bottom + Fan
Bottom
Bottom + Top 220 50-240
Bottom + Top + Fan
Circular Heating Element + Fan
Grill
Grill + Fan
Grill + Turnspit + Fan
Defrost
Keep Warm
Pizza
Pyro Pyro
*Booster: rapid temperature raised
**Oven must have this function
1- T urn the oven selector knob to the function required to the cooking.
The heating elements in operation for the selected cooking method are
displayed.
2- The appropriate temperature according to the cooking method
selected is displayed. It can be modified within a pre-determined range see the table above.
To modify the temperature setting, turn the central button and on the
timer confirm the setting by pressing the same button.
... the temperature display is fixed but can be modified during the
cooking cycle.
The oven will start cooking and will start to heat up.
The indicator light flashes until the selected temperature has been
reached. An audible signal sounds at the end of this operation and the
indicator light becomes fixed.
Pre-set
Temperature
**
**
o
C
210
160
210
180
L2
190
240
40
60
230
Pre-determined
Temperature C
50-220
50-220
50-230
50-230
50-200
180-240
ECO: 425 / 65min
SUP: 425 / 1h 30min
o
L1-L3
No
No
230
Function
Booster*
Booster
Booster
Booster
Booster
3- A cooking time and an end of cooking time can be programmed by
turning the programme selector knob to “cooking time” or “end of cooking
time”.
The “cooking time” or “end of cooking time” display starts flashing. Using
the central button, modify the settings as required and on the timer
confirm.
When you have done this, do not forget to turn the programme selector
knob back to “stop position” to confirm the new setting.
For more details about programming, refer to the chapter 5.3
entitled PROGRAMMES.
4- At the end of the cooking cycle, turn the function selector knob back to
“stop position”.
The indicator flashes again, it will remain also turned on after having
extinguished the oven and it will estinguish when the inside temperature
of the oven is sufficiently low.
• COOKING MODE
All cooking should be carried out with the door closed.
BOTTOM + FAN - The combination of the bottom heating
element and fan is ideal for fruit flans, tarts, quiches and pastries. It
prevents food from becoming too dry and encourages bread dough to
rise. Place the shelf in the bottom position in the oven.
BOTTOM - Using the lower element. Ideal for cooking all
pastry based dishes. Use this for flans, quiches, tarts, pâté and any
cooking that needs more heat from below .
BOTTOM + TOP - Both top and bottom heating elements are
in use. This method is ideal for all traditional roasting and baking.When
cooking red meat, roast beef, leg of lamb, game, bread or foil wrapped
foods.
BOTTOM + TOP + FAN - Both top and bottom heating
elements are used in conjunction with the fan, which circulates hot air
throughout the oven.We recommend this method for poultry, pastries,
fish and vegetables. By using this method better heat penetration is
achieved and cooking and preheating times are also reduced. The fan
cooking option allows you to cook different foods together at different
positions in the oven all at the same time, providing even heat
distribution but without the risk of mingling tastes and smells. When
cooking different foods at the same time allow a further 10 minutes.
CIRCULAR HEATING ELEMENT + FAN - Air that has been
heated is blown by the fan onto the different levels. It is ideal for cooking
different types of food at the same time (e.g. Meet and fish) without
mixing tastes and smell. It cooks very gently and is ideal for sponge
cakes, pastries, etc.
GRILL - Using the top heating element. Success is guaranteed
for mixed grills, kebabs and gratin dishes. The grill should be pre-heated
to a high temperature for 5 minutes. White meats should always be
placed at some distance from the grill element, the cooking time is
slightly longer but the meat will be more succulent. Red meat and fish
fillets can be placed directly onto the shelf with the drip tray placed
beneath on lower shelf position.
GRILL + F AN - The top heating element is used in conjunction
with the fan which circulates the hot air around the oven. Pre heating is
recommended for red meats but is not necessary for white meats.
Grilling is ideal for cooking thicker food items such as pork or poultry.
Food to be grilled should be placed directly at the centre of the middle
shelf.
By sliding the drip tray underneath the shelf it will ensure that any juices
are collected. For best results always make sure that the food is not too
close to the grill element and turn the food over half way through the
cooking time.
GRILL + TURNSPIT + FAN - The advantage of using the top
oven element at the same time as the fan and rotisserie is that the food is
evenly cooked, preventing it from becoming dry and tasteless. The
rotisserie is programmed to continue rotating for approximately five
minutes after cooking, making full use of the residual oven heat.No preheating is required for rotisserie cooking.
DEFROST - When the dial is set to this position. The fan
circulates hot air around the frozen food so that it defrosts in a few
minutes without the protein content of the food being changed or altered.
The temperature is preset in 40°C constant, no regulation is possible.
KEEP WARM - This is recommended to reheat precooked
foodstuff, positioning the shelf on the second level from top, or to defrost
bread pizza or pastry by positioning the shelf on the lower level.
The temperature is preset in 60°C constant, no regulation is possible.
PIZZA - With this function hot air circulated in the oven to
ensure perfect result for dishes such as pizza or cake.
PYRO - The oven takes care of the entire inside oven cleaning
-Two choices are possible ECO, SUPER
08 GB
Page 9
5.3 PROGRAMMES
DISPLAY SYMBOLS
Lamp
Time Setting
Cooking time programming
STOP
End of cooking time programming
- set the cooking duration time to 45 minutes
- set the end of cooking time to 12:30.
Cooking will start automatically at 11:45 (12:30 minus 45 mins)
and will continue until the pre-set end-of cooking-time, when the oven will switch itself off automatically.
WARNING.
If the END of cooking is selected without setting the length
of cooking time, the oven will start cooking immediately
and it will stop at the END of cooking time set.
Timer in operation
Selecteur
programmation
THE TIMER:
The timer works independently of the oven and has no effect on the
heating elements. It is simply a reminder.
•Turn the knob to the Timer position. The Timer symbol will appear.
The digits 00:00 will appear on the display.
•The minutes will then flash, turn the central button to the required
number of minutes and confirm by pressing the same button.
•The hours will flash, turn the central button to the required number of
hours and confirm by pressing the same button.
•Turn the knob back to the Stop position.
When the time is up, the cooking time will disappear. An audible signal
will sound for 15 seconds and the Timer display will flash (to stop it
before the 15 seconds are up, just press the central button).
PROGRAMMING THE COOKING TIME:
Various recipes are pre-programmed with a cooking time. In Manual
mode, Defrosting or Keep warm Mode can be pre-set, if required.
•Turn the knob to the Cooking time position. The Cooking time symbol
will appear.A pre-programmed cooking time for the various recipes will
appear, or 00:00 for other functions of the oven.
•With the minutes flashing, turn the central button to the required
number of minutes confirm by pressing the same button.
•With the hours flashing, turn the central button to the required number
of hours and confirm by pressing the same button.
•Turn the programme selector knob back to the Stop position to
confirm the new cooking time.
When the time is up, the cooking time will disappear from the display.
An audible signal will sound for 15 seconds and the Cooking time and
STOP symbols will flash.
•Turn the programme function knob back to Stop. If you do not do this,
the Cooking time and STOP symbols will continue flashing.
PROGRAMMING THE END OF COOKING TIME:
Various recipes are pre-programmed with a cooking time and
therefore with an end of cooking time. In Manual Mode, Defrosting or
Keep warm mode can be pre-set, if required.
•Turn the knob to the End of cooking position.The STOP symbol will
appear. A pre-programmed end of cooking time for the various recipes
will appear, or 00:00 for other oven functions or the time of day will be
shown.
•Turn the programme selector knob to confirm the end time.
•The minutes will flash. Turn the central button to indicate the required
number of minutes, and confirm your choice by pressing the same
button.
•The hours will then flash.Turn the central button to indicate the
required number of hours, and confirm your choice by pressing the
same button.
NB : With a delayed start, the end of programme time will appear on
the display with the “Cooking time” and “STOP” symbols, and only the
function Recipe mode of the oven remains.
The oven automatically calculates the start time (end time minus
cooking time).
At the end of the cycle the oven switches itself off automatically . For 15
seconds, an audible signal lets you know that the cycle has ended and
the “Cooking time” and STOP symbols will flash.
•Turn the function selector knob to Stop. Unless you do this, the
symbols will continue flashing.
This function is typically used with “cooking duration” function.
•
Child safety device operational
Locking oven door
For example if the dish has to be cooked for 45 minutes and
needs to be ready by 12:30;
- select the required function
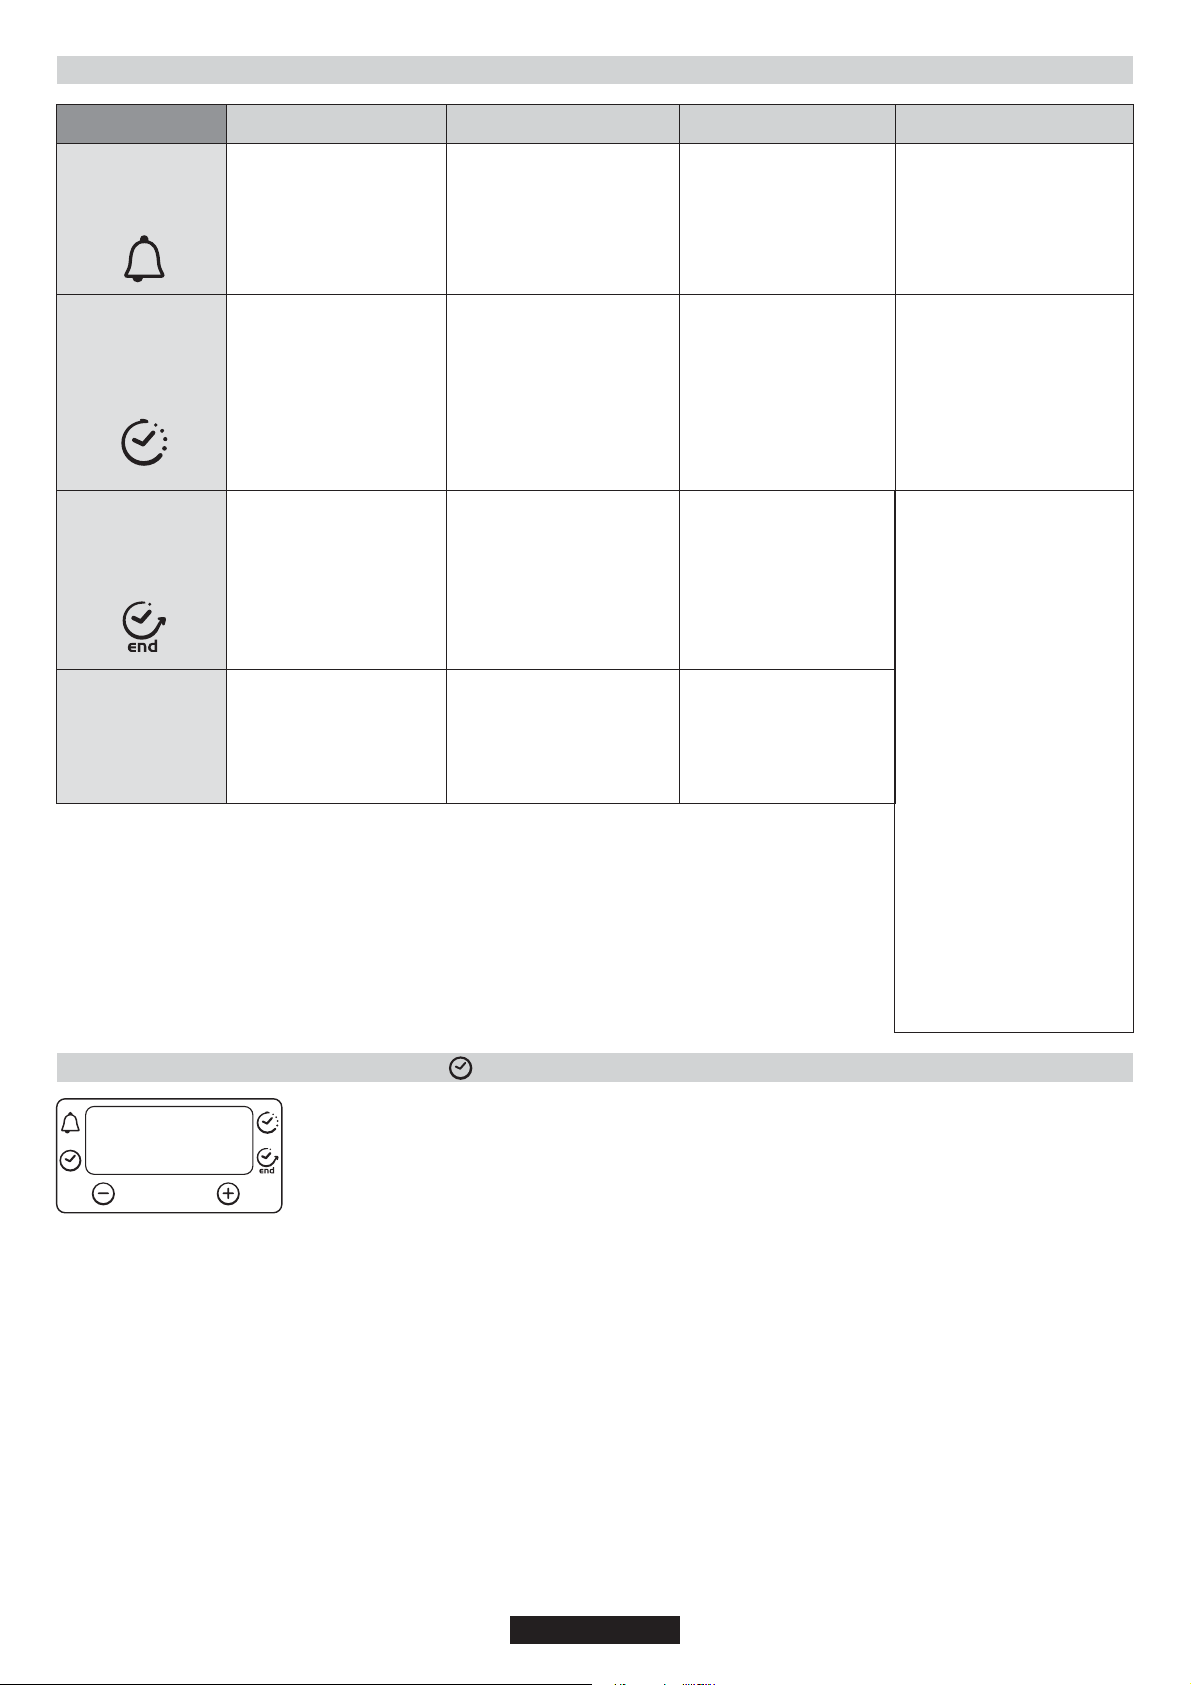
5.4 USING THE END OF COOKING TIMER
This control enables to set the desired
cooking time (max. 120 min.) the oven
will automatically switch off at the end of
the set time.
The timer will count down from the set
time return to the O position and switch
off automatically .
For normal use of oven set the timer to
the position.
T o set the oven ensure the timer is not on
the O position.
5.5 COOKING TIPS
It is better not to salt meats until after cooking as salt encourages the
meat to spatter fat. This will dirty the oven and make a lot of smoke.
Joints of white meat, pork, veal, lamb and fish can be put into the oven
cold. The cooking time is longer than in a preheated oven, but it cooks
through to the centre better as the heat has more time to penetrate the
joint.
Correct preheating is the basis of successful red meat cookery.
GRILLS
• Before loading the grill:
Remove the meat from the refrigerator a few hours before grilling. Lay
it on several layers of kitchen paper. This improves seizing, making it
tastier and avoids it staying cold at the centre.
Add pepper and spices to the meat before grilling, but add any salt
after cooking. This way it will seize better and stay juicy . Baste all the
food to be cooked with a little oil. This is best done with a wide flat
basting brush.Then sprinkle with more pepper and herbs (thyme,
etc.).
• During cooking:
Never pierce the food during cooking even when you turn it. This lets
the juice out and it becomes dry.
BAKING
Avoid using shiny tins, they reflect the heat and can spoil your cakes. If
your cakes brown too quickly, cover them with greaseproof paper or
aluminium foil.
Caution: The correct way to use foil is with the shiny side in towards
the cake. If not the heat is reflected by the shiny surface and does not
penetrate the food.
Avoid opening the door during the first 20 to 25 minutes of
cooking:
Soufflés, brioches, sponge cakes, etc. will tend to fall.Y ou can check if
cakes are done by pricking the centre with a knife blade or metal
knitting needle. If the blade comes out nice and dry, your cake is ready
and you can stop cooking. If the blade comes out moist or with bits of
cake attached, continue baking but slightly lower the thermostat so
that it is finished off without burning.
5.6 ADJUSTING THE DISPLAY CONTRAST
The display contrast can be adjusted at any time.
The default setting is “C5”. T o adjust the setting, carry out the following:
•Turn the programme selector to “Light” and the function selector to “0”.
Press in the central key for 3 seconds and “CX” will appear on the display
(where X = the contrast level).
Turn the central key to adjust the contrast setting. The settings go from 1
to 9. Confirm the new setting by pressing the central key for 3 seconds.
09 GB
Page 10
5.7 USE OF TOUCH CONTROL CLOCK PROGRAMMER
FUNCTION
MINUTE
MINDER
COOKING
TIME
END OF
COOKING
KEY LOCK
HOW TO ACTIVATE IT
•Push the central button
1 times
•Press the buttons "
to set the required time
•Release all the buttons
•Push the central button
2 times
•Press the buttons
-" or "+"
"
to set the lenght of
cooking required
•Release all buttons
•Set the cooking function
with the oven function
selector
•Push the central button
3 times
•Press the buttons
to set the time at which
you wish the oven to
switch off
•Release the buttons
•Set the cooking function
with the oven function
selector
•Child Lock function is
activated by touching Set (+)
for a minimum of 5 seconds.
From this moment on all
other function are locked and
the display will flash STOP
and preset time intermittently.
-" "+"
"-" "+"
HOWTO SWITCH ITOFF WHAT IT DOES WHAT IT IS FOR
•When the set time as
elapsed an audible alarm
is activated (this alarm will
stop on its own, however it
can be stopped immediately
by pressing the button)
SELECT.
•When the time is elapsed
the oven will switch off
automatically. Should you
wish to stop cooking earlier
either turn the function
selector to 0, or set time
to 0:00 (SELECT and
-" "+" buttons)
"
•At the time set, the oven
will switch off. To switch
off manually, turn the oven
function selector to
position O.
•Child Lock function is
deactivated by touching
touchpad Set (+) again for a
minimum of 5 seconds. From
this moment on all functions
are selectable again.
•Sounds an alarm at the
end of the set time.
•During the process, the
display shows the
remaining time.
•It allows to preset the
cooking time required
for the recipe chosen
•To check how long is left
to run press the SELECT
button 2 Times.
•To alter/change the
preset time press SELECT
-
" "+" buttons
and "
•Enables you to set the
end of cooking time
•To check the preset time
push the central button
3 times
•To modify the preset
time press buttons
SELECT + "
-" "+"
•Allows to use the oven as
alarm clock (could be
activated either with
operating the oven or with
out operating the oven)
•Push any button to stop
the signal. Push the central
button to return to the clock
function
•This function is typically used
with “cooking time” function.
For example if the dish has to
be cooked for 45 minutes and
needs to be ready by 12:30,
simply select the required
function, set the cooking time
to 45 minutes and the end of
cooking time to 12:30.
•At the end of the cooking set
time, the oven will switch off
automatically and an audible
alarm will ring.
•Cooking will start
automatically at 11:45 (12:30
minus 45 mins) and will
continue until the pre-set endof-cooking-time, when the
oven will switch itself off
automatically.
WARNING.
If the END of cooking is
selected without setting the
length of cooking time, the
oven will start cooking
immediately and it will stop
at the END of cooking time
set.
5.8 SETTING THE CORRECT TIME
WARNING : the first operation to carry out after the oven has been installed or following the interruption of
power supply (this is recognizable the display pulsating and showing
00:00
select
ATTENTION: The oven will only operate providing the clock is set.
is achieved as follows
•Push the central button 4 times
•Set time with
•Release all buttons.
"-" "+" buttons.
12:00 ) is setting the correct time. This
10 GB
Page 11
6. PYROLYTIC CYCLE
7. CHILD SAFETY
**Oven must have this function
The oven is equipped with a pyrolyser cleaning system, which
destroys food residues at high temperature.The operation is carried
out automatically by means of the programmer.The resulting fumes
are rendered “clean” by passing over a Pyrolyser wich starts as soon
as cooking begins. As very high temperatures are required by the
Pyrolyser, the oven door is fitted with a safety lock.
The pyrolyser can be stopped at any time. The door cannot be opened
until the safety lock is displayed.
NOTE : If a hob has been fitted above the oven, never use the gas
burners or the electric hot-plates while the Pyrolyser is working, this
will prevent the hob from overheating.
TWO PYROL YTIC CYCLE are pre-set.
. ECO PYROCLEAN : Cleans a moderately stained oven.Operates
for a period of 65 minutes.
. SUPER PYROCLEAN : Cleans a heavily stained oven.Operates for
a period of 90 minutes.
Never use commercially available cleaning products on a
Pyrolytic oven !
Tip : Carrying out Pyrolytic cleaning immediately after cooking allows
you to take advantage of residual heat, thus saving energy.
Before carrying out a Pyrolytic cycle :
•Remove all accessories from the oven : They cannot withstand the
high temperatures and would be damaged by pyrolytic temperatures.
•Remove any large spillages or stains as it would take too long to
destroy them. Also excessively large amounts of grease could ignite
when subject to the very high temperatures of the Pyrolyticcycle.
•Close the oven door.
•excess spillage must be removed before cleaning
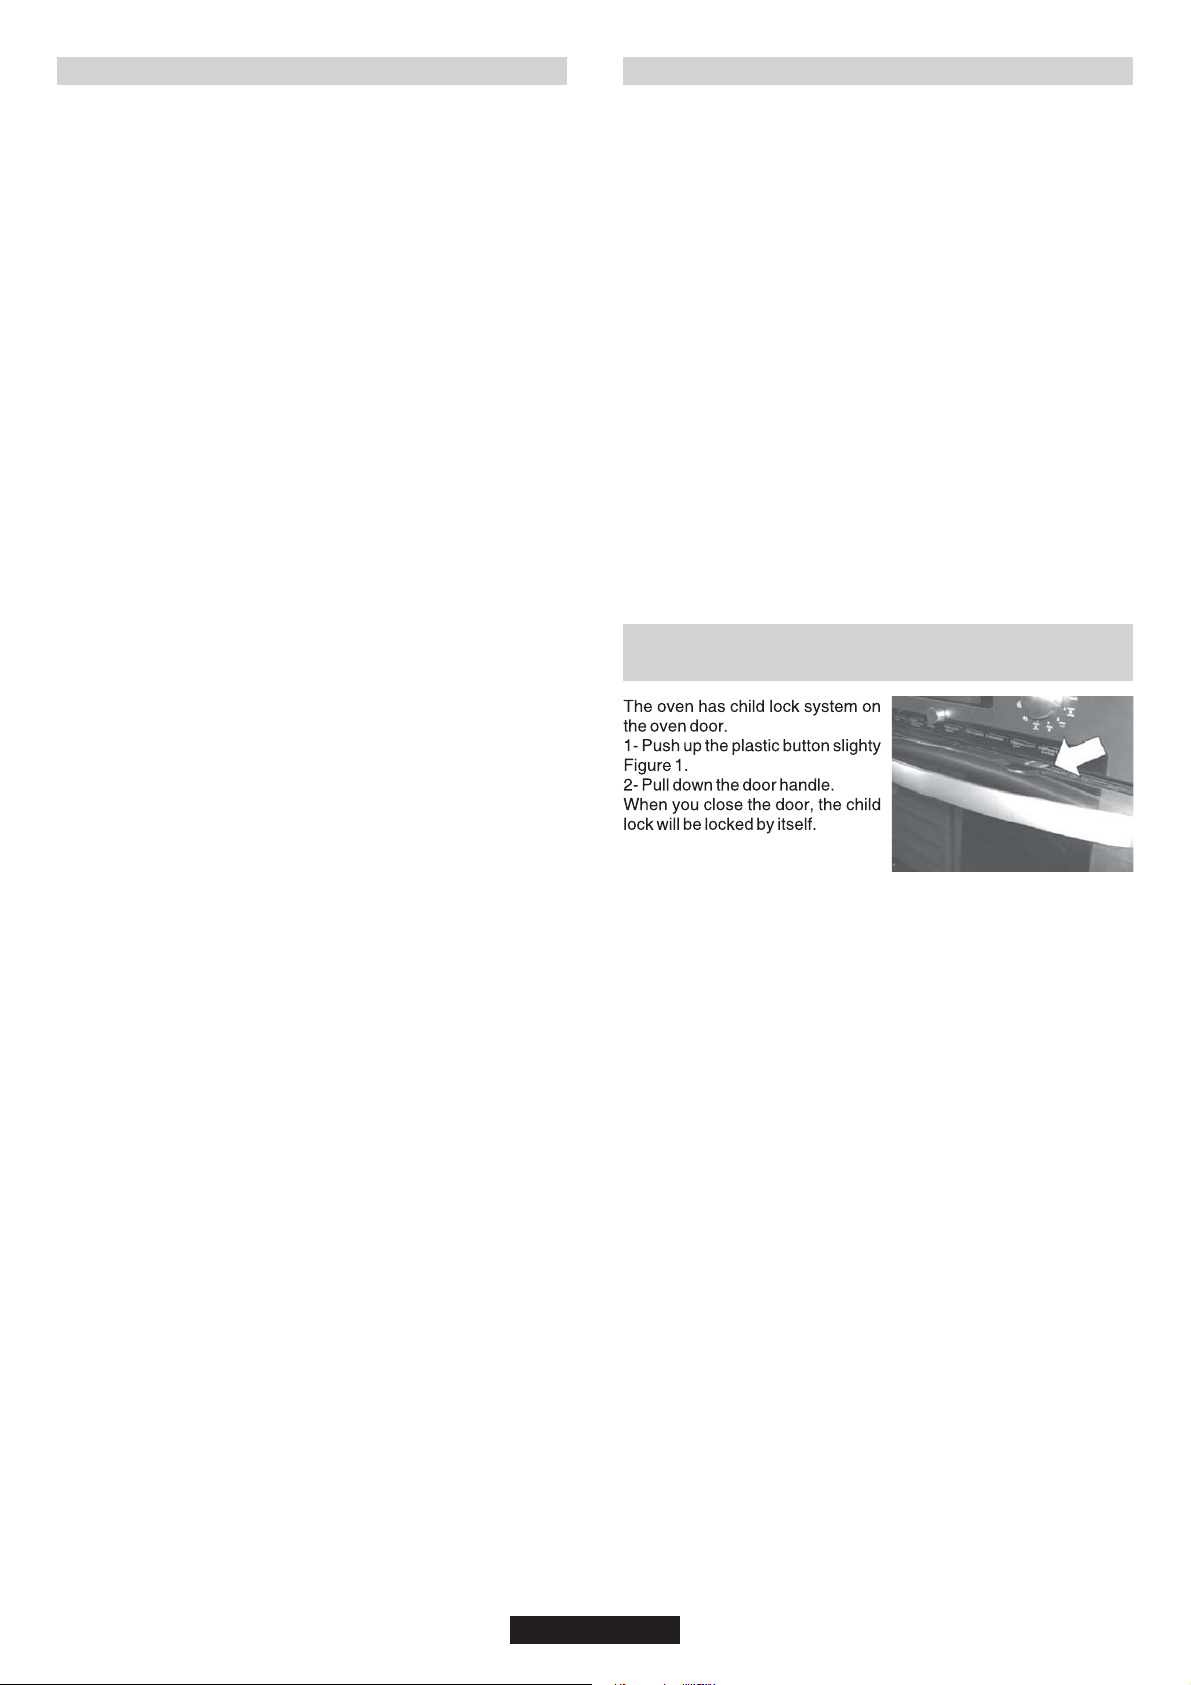
This function is essential, especially when children are around. It
prevents children from switching the oven on or altering the preset
programmes.
This safety system locks the oven control panel while it is operating.
There are two levels of safety :
LEVEL 1 : Locking selector control knob and the central button.
•T o activate : Turn the programmation control knob to child safety .
•Action : The control knobs are inactive*.
•T o deactivate : Turn the programmation control knob to 0.
LEVEL 2 : Locking function selector knobs
•T o activate : T urn the function selector knob to child safety and keep
the central button pressed in for 3 seconds.
•Action : All the controls are inactive*.
•T o dactivate : the same procedure as for activating. T urn the function
selector knob to child safety and keep the central button Pressed in for
3 seconds.
*Note : In all cases, for reasons of safety, even when the controls are
locked, the oven can be switched off by turning the selector knob to 0.
7.1 THE CHILD LOCK-FOR YOUR CHILDREN
SAFETY
Using the pyrolytic cycle :
1- Turn the function selector knob to “Pyrolytic Mode”. “PYRO” will
appear on screen. ECO mode flashes.
Remember : ECO - cycle of 65 minutes - moderately stained oven
SUP - cycle of 90 minutes - heavily stained oven
2- By using the central button select the required Pyrolytic mode,
according the degree of staining : ECO or SUP .
• Your choice is confirmed after 3 seconds...
The oven starts the pyrolytic cycle. The pyrolytic mode selected
flashes and the “time” and “stop” indicator lights will appear.
During the pyrolytic cycle, the locking oven door appears, it indicates
that the door is locked. The cooling fan will operate.
The indicator light flashes until the temperature required is not
reached and then it becomes fixed.
* The start of the pyrolytic cycle can be delayed by selecting an end of
time. Turn the programmation control knob to the end of time and set
the end of time required.
•During sel-cleaning pyrolytic operation the surfaces may get hotter
than usual and children should be kept away.
At the end of the pyrolytic cycle the oven will automatically switch
off.
For 15 seconds, an audible signal lets you know that the cycle has
ended and the “time” and “Stop” indicator lights will flash.
•Turn the function knob to stop. Unless you do this, the
symbols will continue flashing. The symbol “Pyro” disappears on the
Timer, the pyrolytic mode. The oven door will remain locked until the
temperature is high. So, as the locking oven door is light, the oven can
not be opened.
The cooling fan does not switch itself off until the temperature of the
oven components is reasonable.
At the end of the cycle, the indicator flashes again, it will remain also
turned on after having extinguished the oven and it will estinguish
when the inside temperature of the oven is sufficiently low.
Pyrolysis leaves a white residue on the oven walls. Wait for the oven to
cool completely then clean the inside of the oven with a damp sponge
to wipe off the residue.
11 GB
Page 12

SÄKERHETSTIPS
• V ARNING! Produkten och dess åtkomliga delar blir varma under användning. Var noga med att undvika
beröring av värmeelementen.
• Barn under 8 år som befinner sig i närheten av produkten ska alltid hållas under uppsikt.
• Produkten får användas av barn från 8 års ålder och personer med nedsatt fysisk förmåga,
känselförmåga eller mental förmåga, eller personer med bristande erfarenhet eller kunskaper, om de
hålls under uppsikt eller instrueras i dess användning på ett säkert sätt och förstår riskerna med den.
• Låt inte barn leka med produkten.
• Rengöring och underhåll får inte utföras av barn utan uppsikt.
• Produkten blir varm under användning. V ar noga med att undvika beröring av värmeelementen i ugnen.
• V ARNING! Åtkomliga delar kan bli varma under användning. Håll små barn på avstånd.
• Använd inte slipande rengöringsmedel eller vassa metallskrapor för att rengöra ugnsdörrens glas
eftersom dessa kan repa ytan, vilket kan få glaset att spricka.
• Kraftigt spill måste avlägsnas före rengöring.
• ugnen ska stängas av innan skyddet tas bort och efter rengöring ska det sättas tillbaka enligt
anvisningarna.
• Använd endast den temperatursond som rekommenderas för ugnen.
• Använd inte våtdammsugare för rengöring.
• VARNING! Säkerställ att produkten är avstängd innan lampan byts för att undvika risk för elektrisk
chock.
• Frånkopplingsfunktionen måste byggas in i den fasta ledningsdragningen enligt elföreskrifterna.
• i anvisningarna ska uppges vilken typ av sladd som ska användas, med hänsyn till temperaturen på
baksidan av produkten.
• Om strömkabeln skadas måste den bytas ut mot en speciell kabel eller -enhet som är tillgänglig från
tillverkaren eller dess serviceombud.
• ”V ARNING! Åtkomliga delar kan vara varma när grillen används. Håll små barn på avstånd”.
12 SV
Page 13
1. ALLMÄNNA V ARNINGAR
Läs anvisningarna noggrant för att få ut det mesta av din ugn. Vi rekommenderar att du behåller installations- och bruksanvisningarna för
senare användning och att du skriver ner ugnens serienummer innan du installerar den ifall du behöver hjälp från vår kundservice.
När du packar upp ugnen borde du se till att den inte har skadats på något sätt. Om du överhuvudtaget känner dig tveksam bör du inte
använda ugnen. Kontakta istället en kvalificerad yrkesperson. Förvara förpackningsmaterial som plastpåsar, polystyren eller spikar utom
räckhåll för barn eftersom materialen kan vara farliga för barn.
Företaget ska inta hållas ansvarigt om anvisningarna i detta dokument inte följs.
! OBS: Ugnarnas funktioner, egenskaper och tillbehör som nämns i den här bruksanvisningen kan variera mellan olika ugnsmodeller .
1.1 FÖRKLARING OM ÖVERENSSTÄMMELSE
De maskindelar som kan komma i kontakt med livsmedel
överensstämmer med bestämmelserna i EEG-direktiv
89/109. Maskinen överensstämmer med EU-direktiven
2006/95/EG och 2004/108/EG och senare ändringar. När
du packar upp ugnen borde du se till att den inte har skadats
på något sätt. Om du överhuvudtaget känner dig tveksam bör du
inte använda ugnen; kontakta istället en kvalificerad yrkesperson.
Förvara förpackningsmaterial som plastpåsar, polystyren eller
spikar utom räckhåll för barn eftersom materialen kan vara farliga
för barn.
1.2 SÄKERHETSTIPS
Ugnen får bara användas för de ändamål den tillverkats för. Den
får bara användas för att tillaga mat. Alla andra former av
användning, som t.ex. uppvärmning, är olämpliga och därmed
farliga.
Tillverkarna kan inte hållas ansvariga för skador som uppstår på
grund av olämplig, felaktig eller orimlig användning.
När du använder elektriska maskiner finns det ett par grundregler
som du måste följa.
- Dra inte i själva sladden för att ta ut kontakten ur uttaget.
- Rör inte ugnen med fuktiga eller våta händer eller fötter.
- Använd bara ugnen om du har något på fötterna.
- Generellt sett borde du inte använda adaptrar, flera uttag för
flera kontakter eller sladdförlängare.
- Om ugnen går sönder eller om det uppstår ett fel ska du stänga
av den vid elskåpet och inte röra den.
• Om sladden skadas måste den genast bytas ut.
Följ anvisningarna nedan när sladden behöver bytas ut.
Koppla bort strömsladden och ersätt den med en sladd av typen
H05VV-F . Sladden måste kunna tåla den ström som ugnen kräver .
Sladdbytet måste utföras av tekniker med de korrekta
kvalifikationerna.
Jordkabeln (gul-grön) måste vara 10 mm längre än strömkabeln.
Använd bara godkända servicecentra för reparationer och se till
att det bara är originaldelar som används. Om anvisningarna ovan
inte följs kan tillverkarna inte garantera att ugnen är säker.
Ugnen du just skaffat har de tekniska egenskaperna som beskrivs
och du får inte göra några ändringar.
Förvara inte brandfarliga produkter i ugnen. Dessa kan antändas
om ugnen slås på av misstag.
Tryck inte på och låt inte barn sitta på ugnsluckan.
Använd grytvantar när du sätter in eller tar ut kärl från ugnen.
1.3 REKOMMENDATIONER
• Varje gång ugnen har använts behövs det bara minimal
rengöring för att hålla ugnen helt ren.
• Klä inte ugnsväggarna med butiksköpt aluminiumfolie eller
engångsskydd. Aluminiumfolie eller annat skydd kan vid
direktkontakt med den heta emaljen riskera att smälta och bryta
ner insidans emalj.
• För att undvika onödig smuts och de starka röklukter detta
kan leda till rekommenderar vi att inte använda köra ugnen med
mycket höga temperaturer. Det är istället bättre att ha en längre
tillagningstid med lägre temperatur.
Identifieringsplatta
1.4 INSTALLATION
Tillverkarna är inte skyldiga att utföra installationen. Om du
behöver tillverkarens hjälp med problem som uppstått på grund av
felaktig installation kommer denna hjälp inte täckas av garantin.
Installationsanvisningarna för kvalificerade yrkespersoner måste
följas. Felaktig installation kan orsaka skador på människor, djur
eller egendom. Tillverkaren kan inte hållas ansvarig får sådana
skador.
Köksenheten som ugnen passas in i måste vara tillverkad av ett
material som tål temperaturer på minst 70 °C.
Ugnen kan placeras högt i ett skåp eller under en bänk. Innan du
passar in ugnen måste du se till att det finns god ventilation i
ugnsutrymmet för tillräcklig cirkulation av friskluft så att de interna
delarna kan kylas och skyddas. Gör öppningarna enligt sista sidan
utifrån typ av passning.
1.5 ELEKTRISKA KOPPLINGAR
ELEKTRISKA KOPPLINGAR SKA UTFÖRAS A V
GODKÄND LEVERANTÖR ELLER TEKNIKER MED LIKNANDE
KVALIFIKATIONER.
Kopplingarna ska göras i enlighet med installationslandets
elstandarder.
Tillverkaren tar inget ansvar om denna bestämmelse inte följs.
Kopplingen till elnätet ska göras genom jordat uttag eller genom
en flerpolig effektbrytare i enlighet med installationslandets
bestämmelser.
Installationen måste skyddas av lämpliga säkringar och ha kablar
med tillräckliga dimensioner för att kunna förse ugnen normalt.
KOPPLING:
Ugnen har en elkabel som bara ska kopplas till en spänning på
220-240 V AC över faserna eller mellan fas och neutral.
Kopplingen får göras först när följande har kontrollerats:
- matningsspänning som visas på mätaren,
Jordkabeln (gul-grön) som är kopplad till ugnens jordanslutning
måste kopplas till installationens jordanslutning.
Varning:
Låt en elektriker kontrollera installationens jordning innan några
kopplingar görs.
Tillverkaren ska inte hållas ansvarig för olyckor eller möjliga följder
som kan uppstå från användning av en ojordad ugn eller en ugn
kopplad till defekt jordning.
Notera:Glöm inte bort att ugnen kan behöva service.
T a reda på var uttaget finns så att ugnen kan kopplas in efter att ha
flyttats.
Strömsladd: Om strömsladden måste bytas ut borde du låta vår
kundservicepersonal eller personal med liknande kvalifikationer
utföra bytet.
Förutom tillbehören som kommer med ugnen, råder vi dig att
bara använda kärl och
bakformar med högt
temperaturmotstånd.
Code produit:
Numéro de série :
13 SV
Page 14
2. TILLBEHÖR (efter modell)
2.1 UGNSUTRUSTNING
Du måste rengöra utrustningen innan den kan användas för
första gången. Tvätta den med en svamp. Skölj och torka av.
Falsen håller formar och kärl.
Dropplåten fångar upp saften från grillad mat.
Använd aldrig dropplåten för stekning eftersom fett lätt kan
spridas genom ugnen och ge upphov till mycket kraftig rök.
Placera aldrig dropplåten direkt på ugnsbottnen.
Pizzastenenför knaprigare pizzabottnar är beroende på
modellen utrustad med ställ och pizzavals.
2.3 DIODBELYSNING
Ett belysningssystem som ersätter den gamla "glödlampan". 14
lysdioder (icke-pyrolytiska modeller) eller 10 lysdioder med
högprestanda (pyrolytiska modeller) är inbyggda i luckan.
Dioderna skapar högkvalitativ vit belysning som gör att du tydligt
kan se ugnens insida utan skuggor från falsarna.
Fördelar:
Systemet, som ger utmärkt ljus i ugnen, räcker längre än vanliga
glödlampor, underhålls lättare och sparar framför allt energi.
-Optimal insyn
-Lång livstid
-Väldigt låg energiförbrukning, -95 % jämfört med traditionell
belysning.
2.4 AVLÄGSNA OCH RENGÖRA METALLSTEGARNA
1- T a bort metallstegarna genom att dra dem i pilens riktning.
2- Rengör metallstegarna genom att diska dem i diskmaskin eller med
hjälp av en fuktig disksvamp. Låt torka.
3- Sätt tillbaka metallstegarna i omvänd ordning när du har rengjort
dem.
Bakplåten måste placeras på falsen. Den används när du bakar
små bakverk som petit-choux, kakor, marränger och liknande.
Placera aldrig bakplåten direkt på ugnsbottnen.
2.2 SPETT
Ugnen behöver inte förvärmas när du lagar på spett.
Tillaga med luckan stängd.
Energiförbrukningen är 90-95 % lägre jämfört med traditionella
system.
2
1
HUR DU ANVÄNDER SPETTET
1. Skruva loss krokarna
2. Kör in i spettet i köttet
3. Fäst köttet med krokarna
4. Dra åt skruvarna
5. Placera spettet i motorhålet
6. Handtag
När ugnen används ska alla tillbehör som inte behövs tas ut
ur ugnen.
3
1- Galler
2- Spett
3- Krokar och skruvar
4- Handtag
4
3. RENGÖRING AV UGNEN
• Vänta på att ugnen svalnar innan du försöker rengöra den för
hand.
Rengör aldrig ugnen med slipmedel, stålull eller vassa föremål för
då kommer emaljen att skadas och bli oreparerbar.
Använd bara tvål och vatten eller blekmedel med ammoniak.
Klä aldrig ugnssidorna med aluminiumfolie.
GLASDELAR
Vi rekommenderar att du torkar av glasluckan med
hushållspapper varje gång du använt ugnen. Om det finns mycket
stänk kan du rengöra med en väl utkramad svamp och diskmedel
och skölja av.
Använd inte slipmedel eller vassa metallskrapor för att rengöra
luckans glas eftersom det kan ge upphov till repor som i sin tur kan
leda till att glaset spricker.
UGNSLUCKANS TÄTNING
Om tätningslisten blir smutsig kan du rengöra den med en lätt
fuktad svamp.
TILLBEHÖR
Rengör med svamp, tvål och vatten. Skölj med rent vatten och
torka. Undvik slipmedel.
DROPPLÅT
Efter grillning tar du ut dropplåten ur ugnen. Häll försiktigt det heta
fettet i en behållare. Rengör och skölj plåten i varmt vatten med en
svamp och diskmedel.
Om det fortfarande finns fettsamlingar låter du plåten stå i vatten
och diskmedel.
Plåten kan också köras i diskmaskin eller rengöras med
ugnsrengöringsmedel.
Placera aldrig en smutsig plåt i ugnen.
UGNSBELYSNING
Koppla bort strömmen innan du rengör eller byter ut lampan.
Lampan och höljet är tillverkade av material med högt
temperaturmotstånd.
14 SV
Page 15

Lampans specifikationer:
230 V AC - 25W- E 14 Temperatur 300 °C för att byta ut en
trasig lampa behöver du bara:
skruva loss glashöljet,
skruva loss lampan,
ersätta den med samma typ av lampa: se specifikationer ovan,
skruva tillbaka glashöljet efter bytet.
4. KUNDTJÄNST
Innan du ringer till vårt servicecenter.
Om ugnen inte fungerar rekommenderar vi:
Kontrollera att ugnen är korrekt kopplad till elnätet.
Om det inte går att hitta orsaken till felet:
Koppla bort ugnen från elskåpet, rör inte ugnen och ring vår
kundservice.
Innan du ringer vårt servicecenter borde du komma ihåg att skriva
ner serienumret som finns på identifieringsplattan.
Ugnen kommer med ett garantibevis som försäkrar att den kan
repareras utan kostnad på vårt servicecenter så länge garantin
gäller.
Denna produkt är märkt enligt det europeiska
direktivet 2012/19 / EU om avfall från elektriska
och elektroniska produkter (WEEE-direktivet).
WEEE-direktivet innehåller både förorenande
ämnen (som kan orsaka negativa konsekvenser
för miljön) och baskomponenter (som kan
återanvändas). Det är viktigt att WEEE förordnar
särskilda behandlingar, i syfte att ta bort och
kassera alla förorenande ämnen, och att återställa
och återvinna alla material, på rätt sätt.
Individer kan spela en viktig roll för att se till att WEEE-direktivet
inte blir en miljöfråga; det är viktigt att följa vissa grundregler:
• WEEE-relaterade material bör inte behandlas som
hushållsavfall.
• WEEE-relaterade material bör överlämnas till relevanta
insamlingsplatser som förvaltas av kommunen eller av
registrerade företag. I många länder, för stora WEEE-relaterade
material, kan hämtning i hemmet finnas.
• När du köper en ny apparat, kan den gamla återlämnas till den
återförsäljare som bör hämta den gratis enligt ett-till-ettförhållande, så länge produkten är av samma typ och har samma
funktion som den tillhandahållna produkten
15 SV
Page 16

5. BESKRIVNING AV DISPLAYEN
Displayfönstret: tid, programmering av tillagningssätt,
indikatorlampor, funktion för tillagningstemperatur
och ugnsstegens nivå
KNAPP FÖR REGLERING OCH BEKRÄFTELSE
Inställningar: ugnstemperatur, tillagningsprogram och tillagningens sluttid
Regleras genom att knappen vrids mot ” - ” eller ” + ”
Bekräfta inställningen genom att trycka på knappen.
220
Indikatorlampa:
ugnstemperaturen
stiger
PYRO
Klocka /
Programmering /
Tillagningstemperatur
Visning av program: tillagning
Tid Tidur
Tillagning
Indikatorlampa
Barnsäkerhetsanordning
Ugnens funktionsdisplay
och rekommenderat
nivåläge
PYRO
Stekspett
Booster-läge:
Förvärmning
16 SV
Indikatorlampa
Stängning av ugnsluckan
Page 17

5.1 INNAN DU ANVÄNDER UGNEN FÖRSTA
GÅNGEN
• FÖRBEREDANDE RENGÖRING
* Rengör ugnen före första användningen:
* T orka av ytskikten med en mjuk, fuktig trasa.
* Diska alla tillbehör och torka av ugnens insida med varmt vatten blandat
med lite diskmedel.
* Ställ in högsta temperatur medan ugnen är tom och lämna temperaturen
påslagen i ungefär en timme. Detta avlägsnar eventuellt kvardröjande doft
av det nyproducerade ugnsmaterialet. Sörj för god ventilation i rummet
medan du utför detta.
• KOM IHÅG
Bekräfta dina val på tiduret
Dina inställningar måste bekräftas genom att du trycker på knappen.
Avbryt ugnens aktivitet:
Du kan behöva avbryta ugnsaktiviteten om du har gett ett felaktigt
kommando.
För att avbryta ugnens aktivitet - vrid funktionsväljaren tillbaka till läget
STOP.
Barnsäkerhetsanordning:
Lås ugnens kontroller genom att aktivera barnsäkerhetsanordningen. Läs
mer i avsnittet ”Programmering - Barnsäkerhetsanordningen”.
Kylfläkten:
Kylfläkten skyddar kontrollpanelen och elektroniken från värmeskador.
Den slås på och av automatiskt även när ugnen är avstängd.
Ugnsbelysning:
Genom att ställa reglaget så att det pekar på lampsymbolen kan du slå på
ugnsbelysningen även när ugnen inte är i bruk.
När ugnen är i bruk lyser ugnsbelysningen i alla funktionslägen samt när
ugnsluckan öppnas.
• INSTÄLLNING AV KLOCKAN
När ugnen ansluts till elnätet och efter ett eventuellt strömavbrott måste
klockan ställas in på nytt.
Inställning av klockan:
1- * Vrid reglaget så att det pekar mot klocksymbolen:
2- * Ställ in klockan med mittenknappen så att den pekar på ”-” eller ”+”,
3 - * Vrid tillbaka reglaget till läget STOP .
10:30
5.2 SÅ ANVÄNDER DU UGNEN
MANUELLT LÄGE
Funktionsläge beroende på ugnsmodellFörinställd temperatur
oCFörbestämda temperaturgränser.
Funktionsläge
beroende på
ugnsmodell
Undervärme + fläkt
Undervärme
Över- och 220 50-240
Över- och
Cirkelformat
Grill
Grill + fläkt
Grill + stekspett +läkt
Upptining
Varmhållning
Pizza
Pyrolys Pyrolys
*Booster: snabb uppvärmning
**Gäller de ugnsmodeller som har denna funktion
1- Vrid funktionsväljaren så att den pekar på den funktion du önskar
använda för tillredningen. De värmeelement som används för den valda
tillredningsmetoden visas.
2- Passande ugnstemperatur för den valda tillagningsmetoden visas
också. Ugnstemperaturen kan regleras inom de förinställda gränserna - se
tabellen ovan.
För att reglera den inställda temperaturen vrider du först på mittenknappen
och bekräftar sedan valet genom att trycka på tidursknappen.
... temperaturen visas med fast sken på displayen, men kan regleras under
tillagningstidens gång.
3- Tillredningstid och sluttid för tillredning ställs in genom att vrida
programväljaren till ”tillagningstid” eller ”sluttid för tillagning”.
”Tillagningstid” eller ”sluttid för tillagning” börjar då att blinka på displayen.
Använd mittenknappen för att reglera inställningen till önskat läge och
bekräfta valet på tiduret.
Förinställd
temperatur
o
C
**
**
210
160
210
180
L2
190
240
40
60
230
Förbestämda
temperaturgränser
o
C
50-220
50-220
50-230
50-230
L1-L3
50-200
180-240
No
No
230
ECO 425 / 65min(sparläge):
SUP: 425 / 1h 30min
Booster
-funktion*
Booster
Booster
Booster
Booster
17 SV
Därefter måste du vrida tillbaka programväljaren till STOP-läget för att
bekräfta den gjorda inställningen.
Du kan läsa mer om programmering i avsnitt 5.3 under
rubrikenPROGRAM.
4- När tillagningen är avslutad vrider du funktionsväljaren tillbaka till
STOP-läget.
Indikatorn börjar då blinka och fortsätter att lysa även efter att ugnen har
stängts av. Indikatorn släcks först när ugnstemperaturen är tillräckligt låg.
• TILLAGNINGSLÄGE
Ugnsluckan ska hållas stängd vid all tillagning.
UNDERVÄRME + FLÄKT - Kombinationen undre
värmeelement och fläkt är bäst för mördegstårtor, frukt-/bärpajer , matpajer
och bakverk. Med detta val blir maten inte alltför torr och
jäsningsprocessen för bröddegar underlättas. Placera ugnsgallret i det
lägsta läget.
UNDERVÄRME - det undre värmeelementet aktiveras. Välj
detta läge för alla slags bakverk. Välj detta läge för mördegstårtor, pajer,
bakverk, pastejer och all matlagning som kräver lite högre undervärme.
ÖVER- OCH UNDERVÄRME - både det övre och det undre
värmeelementet aktiveras. Denna tillagningsmetod passar utmärkt för
vanliga rätter som ska stekas eller bakas i ugn. Den passar bra för
stekning av kött, rostbiff, lamm och vilt, och vid bakning av bröd samt vid
tillredning av mat i ugnsfolie.
ÖVER- OCH UNDERVÄRME + FLÄKT - både det övre och det
undre värmeelementet aktiveras, tillsammans med fläkten som får
varmluften att cirkulera i hela ugnen. Denna tillagningsmetod
rekommenderas för fågel, bakverk, fisk och grönsaker. Denna
tillagningsmetod ger bättre värmespridning och tiden för förvärmning och
tillagning blir något kortare. Med detta alternativ, där fläkten är aktiverad,
kan du tillaga olika rätter på olika ugnsnivå samtidigt. Värmen fördelas
jämnt i hela ugnen utan att de olika smakerna och dofterna blandas. När
du lagar flera rätter samtidigt kan du behöva lägga till tio minuters
tillagningstid.
CIRKELFORMAT VÄRMEELEMENT + FLÄKT - Fläkten
fördelar den uppvärmda luften till de olika nivåerna i ugnen. Denna metod
passar utmärkt när du tillreder olika rätter samtidigt (t.ex. kött och fisk) och
inte vill att smakerna/dofterna ska blandas. Det är ett skonsamt sätt att
tillreda livsmedel och passar därför bra för sockerkakor och andra bakverk
m.m.
GRILL - det översta värmeelementet aktiveras. Du lyckas
garanterat med olika slags livsmedel som ska grillas, rostas och
gratineras, såsom olika slags gratänger. Grillen bör först förvärmas till hög
temperatur i fem minuter. Ljust kött bör alltid placeras en bit ifrån
grillelementet. Detta förlänger tillagningstiden något men köttet blir
saftigare. Rött kött och fiskfiléer kan placeras direkt på gallret med droppplåten under, i det lägre gallerläget.
GRILL + FLÄKT - det översta värmeelementet används
tillsammans med fläkten som får den heta luften att cirkulera i hela ugnen.
Förvärmning rekommenderas för rött kött men är inte nödvändigt vid
tillagning av ljust kött. Grillning passar bäst när du tillagar ”tjockare”
livsmedel, såsom fläsk och fågel. Livsmedel som ska grillas bör placeras i
mitten av ugnen och i det mittersta gallerläget.
Placera gärna dropp-plåten under gallret för att samla upp eventuell
vätska från kött eller andra livsmedel. Du får bäst resultat om du ser till att
maten inte är placerad alltför nära grillelementet och genom att vända på
maten efter halva tillredningstiden.
GRILL + STEKSPETT + FLÄKT - fördelen med att använda det
översta värmeelementet tillsammans med fläkten och
stekspettsutrustningen är att maten blir jämnt stekt och behåller sin
saftighet och smakrikedom. Stekspettsutrustningen är programmerad så
att den fortsätter att rotera i ungefär fem minuter efter avslutad
tillredningstid. På så sätt drar du nytta av eftervärmen i ugnen. Ingen
förvärmning av ugnen behövs när du tillreder mat med hjälp av
stekspettsutrustningen.
Ugnen börjar nu värmas upp till tillagningsläget.
Indikatorlampan blinkar tills den valda temperaturen har uppnåtts. En
signal ljuder när temperaturen har uppnåtts och indikatorlampan lyser
sedan med fast sken. får varmluften att cirkulera kring den frusna maten så
att den tinar på några minuter utan att proteinet i livsmedlet
förändras.Temperaturen är permanent förinställd på 40 °C; denna
inställning kan inte regleras.
VARMHÅLLNING - denna metod rekommenderas för att värma
upp färdiglagade rätter (placera gallret på den översta nivån) eller för att
tina upp pizza eller bakverk (placera gallret på den lägsta nivån).
Temperaturen är permanent förinställd på 60 °C. Denna inställning kan
inte regleras.
PIZZA - denna funktion gör att het luft cirkulerar i ugnen på ett
sätt som ger bästa möjliga resultat vid pizza- eller kakbak.
- Det finns två alternativ: ECO (sparläge) och SUPER (snabbläge)
PYROLYS - ugnen utför självrengöring av hela ugnens insida
Page 18

5.3 PROGRAM
SYMBOLER I DISPLAYEN
Lampa
Tidsinställning
Programmering av tillagningstid
Sluttid för den programmerade
STOP
tillagningstiden
Tiduret är aktiverat
Programväljare
TIDURET:
Tiduret fungerar fristående från ugnen och påverkar inte
värmeelementen. Det används endast som påminnelsesignal.
Vrid reglaget till läget T idur. Symbolen för tiduret visas.
Siffrorna 00:00 visas på displayen.
När siffrorna för minuter blinkar vrider du på mittenknappen tills korrekt
antal minuter visas, och bekräftar genom att trycka på knappen.
När sifforna för timmar blinkar vrider du på mittenknappen tills önskat
antal timmar visas, och bekräftar än en gång genom att trycka på
samma knapp.
Vrid tillbaka reglaget till läget STOP .
Vid den inställda tidens slut släcks siffrorna. En ljudsignal hörs i 15
sekunder samtidigt som tidurets display blinkar. Vill du stanna tiduret i
förväg trycker du på mittenknappen.
PROGRAMMERING AV TILLAGNINGSTID:
För vissa recept finns det förinställda tillagningstider. I det manuella
läget kan upptining och varmhållning förinställas, vid behov.
Vrid reglaget till läget Tillagningstid. Symbolen för tillagningstid visas
och du kan välja en förprogrammerad tillagningstid för olika recept
eller 00:00 för andra ugnsfunktioner.
När siffrorna för minuter blinkar vrider du på mittenknappen tills önskat
antal minuter visas, och bekräftar genom att trycka på samma knapp.
När sifforna för timmar blinkar vrider du på mittenknappen tills önskat
antal timmar visas, och bekräftar än en gång genom att trycka på
knappen.
Vrid därefter tillbaka programväljaren till läget STOP för att bekräfta
den nya tillagningstiden.
Vid den inställda tidens slut släcks siffrorna som visar tillagningstiden.
En ljudsignal hörs i 15 sekunder samtidigt som symbolerna
Tillagningstid och STOP blinkar .
Vrid tillbaka programväljaren till läget STOP. Om du inte vrider tillbaka
reglaget fortsätter symbolerna Tillagningstid och STOP att blinka.
PROGRAMMERING AV SLUTTID FÖR TILLAGNING:
För vissa recept finns det förinställda tillagningstider, vilket innebär att
de också har en sluttid för tillagningen. I det manuella läget kan
upptining och varmhållning förinställas, vid behov.
Vrid reglaget till läget Sluttid för tillagning. Symbolen STOP visas. Nu
visas antingen förinställda sluttider för tillredning av olika recept,
siffrorna 00:00 för andra ugnsfunktioner eller den aktuella klocktiden.
För att ställa in och bekräfta sluttid för tillagning vrider du på
programväljaren.
Siffrorna för minuter börjar blinka. Vrid på mittenknappen för att ange
önskat antal minuter, och bekräfta valet genom att trycka på samma
knapp.
Siffrorna för timmar börjar blinka. Vrid på mittenknappen tills den visar
det önskade antalet timmar, och bekräfta valet genom att trycka på
knappen.
OBSERVERA!
När du har angett en senare (uppskjuten) starttid visas
programmets sluttid på displayen tillsammans med symbolerna
Tillredningstid och STOP. Ugnen kan nu endast aktiveras i läget
Recept.
Ugnen beräknar automatiskt en starttid (alltså sluttiden minus
- ställ in tillagningstiden på 45 minuter
- ställ in sluttiden för tillagningen på 12.30.
Tillagningen startar automatiskt kl. 11.45 (45 minuter före kl. 12.30 )
och fortsätter fram till den förinställda sluttiden för
tillagningen, då ugnen automatiskt stängs av.
Barnsäkerhetsanordningen är
Aktiverad Ugnsluckan låses
OBSERVERA!
Om du ställer in en sluttid för tillagningen utan att ange
tillagningstidens längd, startas ugnen och stängs av när
sluttiden (END) uppnås.omedelbart
5.4 SÅ ANVÄNDER DU TIDURET FÖR SLUTTID
Med det här reglaget kan du ställa in
önskad tillagningstid (max. 120 min.).
Ugnen stängs av automatiskt enligt
inställningen.
Tiduret räknar nedåt från den inställda
tillagningstiden).Vid programtidens slut
stängs ugnen av automatiskt. En
ljudsignal hörs i 15 sekunder för att
markera programtidens slut samtidigt
som symbolerna Tillagningstid och
STOP blinkar .
• Vrid funktionsväljaren till STOP. Om du
inte vrider tillbaka reglaget fortsätter symbolerna Tillagningstid och
STOP att blinka.
• Denna funktion används vanligen tillsammans med funktionen
Tillagningstid.
Om anrättningen exempelvis ska tillagas i 45 minuter och behöver
vara klar vid klockan 12.30 (visas som 12:30 på displayen);
- välj önskad funktion
5.5 MATLAGNINGSTIPS
Salta köttprodukter först efter tillredningen eftersom saltet gör att fettet
stänker vid stekning. Detta gör att det ryker och att ugnen blir mer
nedsmutsad.
Bitar av ljust kött, fläskkött, kalvkött, lammkött och fisk kan ställas in i
kall ugn för tillagning. Tillagningstiden blir något längre än i en
förvärmd ugn men köttet blir bättre genomstekt genom att värmen får
mer tid att tränga igenom alla delar.
Att förvärma ugnen korrekt är grunden för lyckad tillredning av rött
kött.
GRILLNING
• Innan du fyller rillen:Ta ut köttet från kylskåpet några timmar
innan du tänker grilla det. Lägg det på flera lager hushållspapper.
Köttet tar på så sätt lättare upp kryddorna och blir smakrikare
samtidigt som det hinner bli genomvarmt vid tillredningen.
Strö över peppar och andra kryddor innan du grillar köttet men salta
först efteråt. Detta gör att köttet tar upp kryddsmaken bättre och blir
saftigare. Pensla allt som ska grillas med lite olja. Detta gör du lättast
med en bred och platt pensel. Strö till sist över ytterligare peppar och
kryddor/örter (timjan m.fl.).ytterligare peppar och kryddor/örter (timjan
m.fl.).
• Under tillagningen:
Gör aldrig stickhål i köttet medan det steks, inte ens när du vänder
på det. Då rinner saften ut och köttet blir torrt.
BAKNING
Undvik att använda blanka formar. De får värmen att reflektera (bort)
och kan göra att baket misslyckas. Om bakverken gräddas för snabbt
på ytan kan du täcka över dem med bakplåtspapper eller
aluminiumfolie.
Tänk på: När du använder aluminiumfolie ska den blankaste sidan
vändas inåt mot kakan. Annars återreflekteras ugnsvärmen av den
blanka ytan i stället för att gå in i det som gräddas.
Undvik att öppna ugnsluckan under de första 20 till 25 minuterna
av gräddningstiden:
Suffléer, briocher, sockerkakor o.d. har en benägenhet att kollapsa.
Du kan kontrollera om sockerkakor är färdiga genom att sticka ner ett
knivblad eller en provsticka i kakans mitt. Om kniven eller provstickan
är torr när du drar ut den är kakan färdiggräddad och du kan avsluta
tillagningen. Om kniven eller provstickan är lite kladdig eller drar med
sig kaksmulor fortsätter du gräddningen, fast med lite sänkt värme för
att inte kakan ska bli bränd.
5.6 ÄNDRING AV DISPLAYENS KONTRAST
Displayens kontrast kan ändras när som helst.
Standardinställningen är ”C5”. Gör så här för att ändra inställningen:
Vrid programväljaren till ”Ljus” och funktionsväljaren till ”0”. T ryck och
håll ned mittenknappen i tre sekunder tills ”CX” visas på displayen (X =
kontrastnivån).
Vrid på mittenknappen för att ställa in önskad kontrastnivå. Du kan
ställa in allt mellan 1 och 9. Bekräfta den nya inställningen genom att
trycka ned mittenknappen i tre sekunder.
18 SV
Page 19

5.7 STYRNING AV TIDSPROGRAMMERINGEN (MED PEKFUNKTION)
FUNCTION
TID-
TA GARE
TILLAGNINGSTID
SLUTTID FÖR
TILLAGNING
LÅS
AKTIVERING
•Tryck en gång på
mittenknappen.
• Tryck på knapparna "-" "+"
för att ställa in önskad tid
• Släpp upp alla knappar
•Tryck två gånger på
mittenknappen
• Tryck på knapparna "-" eller
"+" för att ställa in önskad
tillagningstid
• Släpp upp alla knappar
• Ställ in rätt tillagningsfunktion
med funktionsväljaren
• Tryck tre gånger på
mittenknappen
• Tryck på knapparna "-" "+"
för att ställa in den tidpunkt
då du önskar att ugnen
ska stängas av
• Släpp upp alla knappar
• Ställ in rätt
tillagningsfunktion med
funktionsväljaren
• Barnsäkerhetsfunktionen
aktiverar du genom att trycka
på Set (+) i minst fem
sekunder. Så fort du gjort det
låses
alla andra funktioner och
displayen blinkar omväxlande
STOP och förinställd tid.
AVSTÄNGNING
• Vid slutet av den inställda tiden
aktiveras en ljudsignal (signalen
avbryts automatiskt men du kan
också avbryta den i förtid genom
att trycka på knappen SELECT).
•När tiden har förflutit stängs
ugnen av automatiskt.
Om du vill avbryta tillagningen i
förtid kan du antingen vrida
funktionsväljaren till 0 eller
ställa in tiden
på 0:00 (med knapparna
SELECT och "-" "+")
• Vid den inställda tiden
kommer ugnen att stängas av.
Du kan slå av ugnen manuellt
genom att vrida
funktionsväljaren till
läge O
• Barnsäkerhetsfunktionen kan
inaktiveras genom trycka på
Set (+) igen i minst fem
sekunder. När du har gjort det
kan alla funktioner väljas och
aktiveras igen.
SÅ FUNGERAR DET
•Aktiverar en hörbar signal
när den inställda tiden är
inne.
• Under processen visas
återstående tid på displayen.
• Med denna funktion kan
du förinställa den tillagningstid
som passar det valda receptet
• För att kontrollera hur mycket
tid som återstår trycker du två
gånger på knappen SELECT
(välj).
• Du kan ändra/korrigera den
förinställda tiden genom att trycka
på knapparna SELECT och "-" "+
• Med denna funktion kan du
ställa in sluttid för tillagningen
• Du kan kontrollera vilken
tidpunkt som är förinställd
genom att trycka på mittenknappen
tre gånger i rad
• Vill du ändra den förinställda
tidpunkten trycker du på
knapparna SELECT + "-" "+"
ANVÄNDNINGSOMRÅDE
• Denna funktion används
vanligen tillsammans med
funktionen Tillagningstid. Ska
anrättningen exempelvis
tillagas i 45 minuter och
behöver vara klar vid klockan
12.30 (visas som 12:30 på
displayen) så väljer du önskad
funktion, ställer in
tillagningstiden på 45 minuter
och sluttid för tillagning på
12:30.
När tillagningstiden har förflutit
stängs ugnen av automatiskt
och en signal hörs.
Tillagningen startar
automatiskt vid 11:45 (alltså 45
minuter före 12:30) och pågår
fram till den förinställda
sluttiden för tillagning. Ugnen
stängs då av automatiskt.
OBSERVERA!
Om du ställer in en sluttid
(END) för tillagningen utan att
ange tillagningstidens längd,
startas ugnen omedelbart och
stängs av när sluttiden (END)
uppnås.
• Funktionen kan användas
som tidtagarur/väckarklocka
(den kan alltså aktiveras vare
sig ugnen är i bruk eller inte)
• Tryck på valfri knapp för att,
avbryta signalen. Tryck på
mittenknappen för att återgå till
klockfunktionen
5.8 INSTÄLLNING AV KORREKT TID
OBSERVERA! Det första du bör göra när ugnen har installerats eller efter ett strömavbrott (indikeras
genom att displayen blinkar och visar 12:00 ) är att ställa in korrekt tid.Gör så här:
00:00
select
VIKTIGT! Klockan måste ställas in (timmar, minuter) för att ugnen ska fungera.
• Tryck på mittenknappen fyra gånger
• Ställ in tiden med knapparna"-" "+" .
• Släpp upp alla knappar
19 SV
Page 20

6. PYROLYSPROCESSEN
7. BARNSÄKERHET
**Gäller de ugnsmodeller som har denna funktion
Ugnen är utrustad med ett pyrolytiskt rengöringssystem, vilket bryter
ned matrester vid hög temperatur. Processen utförs automatiskt
genom inbyggda program. Den rök som uppstår ”renas” genom
passagen via en pyrolysator som startas så fort ugnen aktiveras för
tillagning. Eftersom pyrolysatorn arbetar vid mycket höga
temperaturer är ugnsluckan försedd med ett säkerhetslås.
Pyrolysatorn kan avbrytas när som helst. Ugnsluckan kan inte öppnas
förrän symbolen för säkerhetslåset visas på displayen.
OBSERVERA! Om ugnen är monterad under en häll ska inga plattor
(varken gas- eller elplattor) användas medan pyrolysatorn är aktiv.
Det finns annars risk för att hällen överhettas.
Det finns TVÅ FÖRINSTÄLLDA PYROL YSPROCESSER.
.ECO PYROCLEAN: Processen används för att rengöra en måttligt
smutsad ugn och tar 65 minuter.
. SUPER PYROCLEAN: Processen används för att rengöra en svårt
smutsad ugn och tar 90 minuter.
Använd aldrig vanliga rengöringsmedel på en ugn med
pyrolytisk rengöringsfunktion!
Tips: Om du utför pyrolytisk rengöring direkt efter att du har lagat mat
kan du dra nytta av eftervärmen och spara energi.
Innan du startar en pyrolytisk process:
Ta bort alla tillbehör från ugnen: Dessa tål inte de höga
temperaturerna i processen och skulle ta skada av pyrolysen.
Ta bort allt större spill eller större fläckar i ugnen eftersom det skulle
krävas för lång pyrolys-tid för att bryta ned dem. Alltför stora mängder
fett skulle kunna antändas av de mycket höga temperaturerna i
pyrolysprocessen.
Stäng ugnsluckan.
Överflödigt spill och fett måste tas bort före rengöringsprocessen
Denna funktion är mycket viktigt - särskilt då det finns barn i närheten
av ugnen. När den är aktiverad hindrar den att barn startar ugnen eller
ändrar de förinställda programmen.
Detta säkerhetssystem låser ugnens kontrollpanel medan ugnen
används.
Det finns två säkerhetsnivåer:
NIVÅ 1: Program-/funktionsväljarna samt mittenknappen låses.
Aktivera så här: Vrid programväljaren så att symbolen för
barnsäkerhet visas.
Detta händer: Väljarreglagen inaktiveras*.
Inaktivera så här: Vrid programväljaren till 0.
NIVÅ 2: Funktionsväljaren låses
Aktivera så här: Vrid funktionsväljaren så att symbolen för
barnsäkerhet visas och håll sedan mittenknappen intryckt i tre
sekunder.
Detta händer: Alla kontroller inaktiveras*.
Inaktivera så här: Utför detsamma som vid aktivering. Vrid
funktionsväljaren så att symbolen för barnsäkerhet visas och håll
sedan mittenknappen intryckt i tre sekunder.
*OBSERVERA! För högsta möjliga säkerhet går det alltid - även då
kontrollerna är låsta - att stänga av ugnen genom att vrida väljaren
till 0.
7.1
Gör så här för att utföra pyrolytisk rengöring:
1- Vrid funktionsväljaren till alternativet ”Pyrolytiskt läge”. ”PYRO”
visas på displayen. Läget ECO visas blinkande.
Kom ihåg: ECO-processen tar 65 minuter och används för måttligt
smutsad ugn, medan SUPER-processen tar 90 minuter och
används då ugnen är svårt smutsad
2- Använd mittenknappen och välj pyrolysläge efter hur smutsig
ugnen är: ECO eller SUP .
• Det val du gör bekräftas efter tre sekunder.
Ugnen startar den pyrolytiska processen. På displayen blinkar det
pyrolysläge som du har valt, och indikatorlamporna för ”tid” och STOP
visas.
Under pyrolysprocessen visas låssymbolen, vilket betyder att
ugnsluckan är låst. Kylfläkten är aktiv under processen.
Indikatorlampan blinkar tills den temperatur som krävs har uppnåtts
och lyser därefter med fast sken.
* Pyrolysprocessen kan startas vid ett senare tillfälle genom att välja
en sluttid för processen.Vrid programväljaren till önskad sluttid och
ställ in den.
Under en pyrolytisk självrengöringsprocess kan ugnens ytskikt bli
varmare än vanligt och barn ska därför hållas på avstånd från ugnen.
När pyrolysprocessen nått sitt slut stängs ugnen av automatiskt.
En ljudsignal hörs i 15 sekunder för att markera att processen är
avslutad samtidigt som symbolerna för tid och STOP blinkar .
symbolerna att blinka. Symbolen PYRO för pyrolysläget försvinner
från tiduret. Ugnsluckan förblir låst så länge temperaturen är hög. Så
länge symbolen för låst ugnslucka lyser kan ugnsluckan alltså inte
öppnas.
Vrid funktionsväljaren till STOP-läget. I annat fall fortsätter
Kylfläkten är aktiverad tills temperaturen i ugnen är avsvalnad.
Mot slutet av processen blinkar indikatorlampan igen och lyser även
efter att ugnen har stängts av. Lampan släcks först när ugnens
innetemperatur är avsvalnad.
Pyrolysprocessen lämnar efter sig ett vitt skikt på ugnens väggar. När
ugnen har svalnat helt rengör du ugnens insida med en fuktig svamp
för att torka bort dessa lämningar.
20 SV
Page 21

SIKKERHETSTIPS
• ADV ARSEL: Produktet og tilhørende deler blir varme under bruk. Vær forsiktig slik at varmeelementene
ikke berøres.
• Barn under 8 år må holdes unna produktet eller være under kontinuerlig tilsyn.
• Produktet kan brukes av barn fra 8 år og oppover samt av personer med reduserte fysiske eller mentale
evner eller personer uten erfaring eller kunnskaper om bruken av produktet, dersom de er under oppsyn
eller har fått opplæring om bruken av produktet på en trygg måte og er innforstått med potensielle farer.
• Barn skal ikke leke med produktet.
• Rengjøring og vedlikehold skal ikke utføres av barn uten tilsyn.
• Produktet blir varmt under bruk. Vær forsiktig slik at du ikke berører varmeelementene inne i ovnen.
• ADVARSEL: T ilgjengelige deler kan bli varme under bruk. Små barn må holdes unna produktet.
• Ikke bruk slipende rengjøringsmidler eller skarpe metallskraper for å rengjøre dørglasset i og med at de
kan lage riper i overflaten, noe som igjen kan føre til at glasset knuser.
• søl må fjernes før rengjøring
• Ved pyrolytisk selvrensing blir overflatene mye varmere enn normalt, og barn må holdes borte fra
produktet.
• ovnen må slås av før beskyttelsen fjernes, og etter rengjøringen må beskyttelsen settes på plass igjen i
samsvar med instruksjonene.
• Bare temperatursonder som er anbefalt for denne ovnen må brukes.
• Ikke bruk damprens i rengjøringsprosessen
• ADV ARSEL: Kontroller at produktet er slått av før du setter inn lampen for å unngå å få elektrisk støt.
• Frakoblingsutstyr må være innlemmet i de fastmonterte kablene i samsvar med koblingsforskriftene.
• instruksjonene må angi hvilken ledningstype som skal brukes, og ta høyde for temperaturen på
baksiden av produktet.
Hvis ledningen er skadet, må den erstattes med en spesialledning eller en enhet som er tilgjengelig fra
produsenten eller fra servicerepresentanten.
• FORSIKTIG: For å unngå farer pga. feil innstilling av varmebryteren, må ikke dette produktet kobles til
en ekstern tilkoblingskilde, som f.eks. en timer, eller kobles til en krets som regelmessig slår produktet av
eller på.
• "FORSIKTIG: T ilgjengelige deler kan bli varme når grillen er i bruk. Små barn må holdes unna."
21 NO
Page 22

1. GENERELLE ADVARSLER
Les bruksanvisningen nøye for å få mest mulig ut av ovnen din. Vi anbefaler at du beholder bruksanvisningen for installasjon og for fremtidig
referanse, og før du installerer ovnen, skriv ned serienummeret i tilfelle du trenger hjelp fra ettersalgsservice.
Når du har pakket ut ovnen, sjekk at den ikke har blitt skadet på noen måte. Hvis du overhodet er i tvil, ikke bruk ovnen. Ta kontakt med en
profesjonell kvalifisert person. Hold emballasje som plastposer, isopor eller spiker ute av rekkevidde for barn fordi disse kan være farlige for barn.
Selskapet skal ikke holdes ansvarlig hvis instruksjonene gitt i dette dokumentet ikke følges.
! MERK: Funksjoner, egenskaper og ovnstilbehør som nevnes i denne bruksanvisningen kan variere avhengig av ovnsmodell.
1.1 SAMSVARSERKLÆRING
De delene av produktet som kan komme i kontakt med matvarer
samsvarer med bestemmelsene i EU direktiv 89/109.
Produktet samsvarer med de europeiske direktivene
2006/95/EC og 2004/108/EC, med påfølgende endringer. Når
du har pakket ut ovnen, sjekk at den ikke har blitt skadet på
noen måte. Hvis du overhodet er i tvil, ikke bruk den: ta kontakt med en
profesjonell kvalifisert person.
Hold emballasje som plastposer, isopor eller spiker ute av rekkevidde
for barn fordi disse kan være farlige for barn.
1.2 SIKKERHETSTIPS
Ovnen må kun benyttes til det formålet den er beregnet. Den må kun
benyttes til matlaging. Enhver annen bruk, for eksempel oppvarming,
er uegnet bruk av ovnen og derfor farlig.
Produsenten kan ikke holdes ansvarlig for skade forårsaket av
uegnet, feil eller urimelig bruk.
Når du benytter elektriske produkter må du alltid følge noen få,
grunnleggende regler.
- Ikke dra i ledningen for å trekke ut kontakten.
- Ikke ta på ovnen med våte eller fuktige hender eller føtter.
- Ikke bruk ovnen hvis du ikke har noe på føttene.
- Generelt er det ikke en god ide å bruke adaptere, flere stikkontakter
for flere kontakter eller skjøteledninger.
- Hvis ovnen bryter sammen eller utvikler en feil, skru den av med
hovedbryteren og ikke ta på den.
• Hvis ledningen er ødelagt må den erstattes umiddelbart.
Følg disse instruksjonene når ledningen skal byttes ut.
Fjern ledningen og erstatt den med en av type H05VV-F. Ledningen
må kunne bære den elektriske strømmen som kreves for ovnen.
Ledningen må byttes ut av en kvalifisert tekniker.
Jordingskabelen (gul-grønn) må være 10 mm lengre enn
strømkabelen.
Bruk kun et godkjent servicesenter for reparasjonen og sørg for at det
kun benyttes originale deler. Hvis de ovennevnte instruksjonene ikke
følges, kan ikke produsenten garantere for sikkerheten ved ovnen.
Ovnen du nettopp har kjøp har de tekniske karakteristikaene som
beskrevet og du må ikke endre på disse.
Ikke oppbevar brennbare produkter i ovnen; de kan ta fyr hvis ovnen
skrus på ved et uhell.
Ikke trykk på eller la barn sitte på ovnsdøren.
Bruk grytekluter når du setter noe inn, eller tar noe ut av ovnen.
1.4 INSTALLERING
Produsenten er ikke forpliktet til å utføre dette. Hvis det er
nødvendig med assistanse fra produsenten for å rette opp feil som
oppstår som følge av feilinstallering, vil denne assistansen ikke
dekkes av garantien. Installeringsinstruksjonene for profesjonelt
kvalifiserte personer må følges. Feilinstallering kan forårsake skade
på mennesker, dyr eller eiendeler. Produsenten kan ikke holdes
ansvarlig for slik skade.
Kjøkkenenheten der ovnen skal installeres må være laget av
materialer som kan motstå temperaturer på minst 70°C.
Ovnen kan installeres i en høy kolonne eller under kjøkkenbenken.
Før den festes, må du sørge for god ventilasjon i ovnen for å tillate
sirkulasjonen av den friske luften som kreves for nedkjøling og
beskyttelse av interne deler. Lag åpningene som oppgitt på siste
side i samsvar med type montering.
1.5 ELEKTRISK KOBLING
DEN ELEKTRISKE KOBLINGEN MÅ UTFØRES A V
EN GODKJENT ELEKTRIKER ELLER TEKNIKER MED
TILSVARENDE KV ALIFIKASJONER.
Den elektriske installasjonen som produktet kobles til må være i
samsvar med standarden som kreves i landet der produktet
installeres.
Produsenten vedkjenner seg ikke noe ansvar hvis denne
bestemmelsen ikke følges.
Koblingen til strømnettet må gjøres via en jordet stikkontakt, eller ved
hjelp av flerpolet strømbryter, i samsvar med bestemmelser i
installeringslandet.
Installeringen må beskyttes av egnede sikringer, og må ha ledninger
med stort nok tverrsnitt til å forsyne ovnen normalt.
TILKOBLING:
Ovnen er montert med en strømledning som kun skal kobles til en
spenning på 220-240 V AC på tvers av fasene eller på tvers av fase og
nøytral.
Tilkoblingen kan utføres etter at en først har sjekket:
- spenningen som leveres i følge måleren,
Beskyttelseslederen (grønn/gul) koblet til jordingsterminalen på
ovnen må kobles til jordingsterminalen i installasjonen.
1.3 ANBEFALINGER
• Etter hver bruk av ovnen, vil en minimal rengjøring hjelpe til med å
holde den helt ren.
• Ikke bekle veggene i ovnen med aluminiumsfolie eller
engangsbeskyttelse som er tilgjengelig i butikker. Aluminiumsfolie
eller annen beskyttelse, i direkte kontakt med varm emalje, risikerer å
smelte eller svekke den innvendige emaljen.
• For å unngå unødvendig tilskitning av ovnen og de streke luktene
som følger, anbefaler vi at du ikke benytter ovnen ved svært høye
temperaturer. Det er bedre å forlenge steketiden og senke
temperaturen litt.
Identifikasjonsplate
I tillegg til
det tilbehøret som følger med ovnen, anbefaler vi at du kun
benytter former og
bakeformer som tåler
svært høye temperaturer.
Code produit:
Numéro de série :
Merk:
Sørg for at jordingskontinuiteten i installasjonen sjekkes av en
elektriker før tilkoblingen.
Produsenten vil ikke være ansvarlig for en hendelse, eller de mulige
konsekvensene som kan oppstå hvis ovnen brukes uten å være
jordet, eller er koblet til en jording med defekt kontinuitet.
NB: Ikke glem at det kan det kan bli nødvendig med ettersalgsservice
for ovnen.
Finn ut hvor stikkontakten er også, slik at ovnen kan kobles til når den
har blitt fjernet fra plassen sin.
Strømledning: Hvis strømledningen må byttes ut, bør dette utføres av
ettersalgsservice eller av noen med lignende kvalifikasjoner.
22 NO
Page 23

2. TILBEHØR (I følge modell)
2.1 OVNSUTSTYR
Alt utstyret må rengjøres før første gangs bruk. Vask dem med en
svamp. Skyll av og tørk.
Hyllene kan holde former og bakeformer.
Dryppbakken samler opp saft/fett fra mat som grilles.
Dryppbakken skal aldri benyttes som et stekebrett da fett kan spres
rundt i ovnen, noe som vil skape overflødig røyk.
Plasser aldri dryppbakken direkte på bunnen av ovnen.
Pizzasteinen for en sprøere pizza utstyrt i samsvar med ovnen med
et stativ og pizzakjevle.
2.3 LED-VERSJON
Er et lyssystem om erstatter den tradisjonelle "lyspæren". 14 LED lys
(for ikke-pyrolyseversjoner) eller 10 høyeffekt LED lys (for
pyrolyseversjoner) er integrert i døren. Disse produserer hvit
belysning av høy kvalitet og gjør det mulig å se klart inn i ovnen uten
skygger på noen hyllene.
Fordeler:
Dette systemet vil, i tillegg til å gi utmerket belysning inne i ovnen, vare
lenger enn tradisjonelle lyspærer, det er enklere å vedlikeholde, og er
fremfor alt energisparende.
- Optimalt innsyn
- Belysning med lang levetid
- Svært lavt energiforbruk, -95 % sammenlignet med den tradisjonelle
belysningen "High".
2.4 FJERNE OG RENGJØRE RISTER
1- Fjern ristene ved å dra dem igjennom pil-retningen.
2- Rengjør ristene i oppvaskmaskinen eller med en våt svamp og tørk
dem etterpå.
3- Etter rengjøringsprosessen installeres ristene tilbake på plass i
motsatt rekkefølge.
Bakeplaten må plasseres på ovnshyllen. Den er beregnet på å
steke små bakverk som vannbakkels, kjeks, marengs, osv ...
Plasser aldri bakeplaten direkte på bunnen av ovnen.
2.2 ROTISSERI
Ingen forvarming er nødvendig ved rotisserigrilling.
Steking skal utføres med døren lukket.
Strømforbruket er 90-95 % mindre enn ved et tradisjonelt system.
3
2
1
1- Rute4
2- Spyd
3- Kroker og skruer
4- Håndtak
1. Skru løs krokene
2. Sett spydet inn i kjøttet
3. Fest kjøttet med krokene
4. Stram skruene
5. Sett spydet inn i motorhullet
6. Håndtaket
Når ovnen er i bruk skal alt unødvendig tilbehør fjernes fra ovnen.
4
3. RENGJØRING AV OVNEN
Vent til ovnsdøren er nedkjølt før du foretar noen rengjøring for hånd.
Bruk aldri skuremidler, stålull eller skarpe gjenstander, ellers kan
emaljen skades så mye at den ikke kan repareres.
Benytt kun vann og såpe eller klor.
Dekk aldri til sidene i ovnen med aluminiumsfolie.
GLASSDELER
Vi anbefaler at du tørker av ovnsdøren med tørkerull hver gang du har
benyttet ovnen. Hvis det er mye sprut fra maten, kan du rengjøre med
en lett fuktig svamp og oppvaskmiddel og deretter skylle av.
Ikke benytt sterke skuremidler eller skarpe metallskraper for å
rengjøre ovnsdøren. Dette kan lage skraper i overflaten, noe som kan
resultere i at glasset knuses.
ORSEGLINGEN PÅ OVNSDØREN
Hvis forseglingen blir skitten, kan den rengjøres med en lett fuktig
svamp.
TILBEHØR
Rengjøres med en svamp i såpevann. Skyll av med rent vann og tørk
dem. Unngå skuremidler.
DRYPPBAKKEN
Etter grilling, fjernes grillbakken fra ovnen. Vær forsiktig når du heller
det varme fettet over i en beholder. V ask og skyll av dryppbakken med
varmt vann med en svamp og oppvaskmiddel.
Hvis det fortsatt sitter fast rester, legg den i bløt i vann med
oppvaskmiddel.
Den kan også settes i oppvaskmaskinen eller rengjøres med en vanlig
ovnsrens.
Sett aldri en skitten dryppbakke i ovnen.
OVNSBELYSNING
Skru av strømbryteren til ovnen før rengjøring eller før lampen skiftes
ut.
Lyspæren og dekselet er laget av et materiale som tåler høye
temperaturer.
23 NO
Page 24

Egenskaper ved lyspæren:
230 V AC – 25W- E 14 base temperatur 300°C for å bytte ut en
lyspære som ikke virker, bare:
Skru av glassdekselet,
Skru ut lyspæren,
Erstatt den med en av samme type, se ovenfor,
Etter at lyspæren er skiftet, skru glassdekselet på igjen.
4- SERVICESENTER
Før du ringer til servicesenteret.
Hvis ovnen ikke virker anbefaler vi at du:
Sjekker at kontakten er satt ordentlig inn i stikkontakten.
Hvis årsaken til feilen ikke finnes:
Trekk ut stikkontakten, ikke rør ovnen og ring til servicesenteret.
Husk å notere serienummeret før du ringer servicesenteret. Dette
finnes på spesifikasjonsplaten for serienummer.
Ovnen leveres med et garantisertifikat som forsikrer at ovnen
repareres gratis av servicesenteret så lenge den er innenfor
garantiperioden.
Dette produktet er i samsvar med det europeiske
direktivet 2012/19/EU om elektrisk og elektronisk
avfall (WEEE). WEEE inneholder både
forurensende stoffer (som kan ha negative
iljøkonsekvenser) og grunnleggende
komponenter (som kan brukes på nytt). Det er
viktig at WEEE gjennomgår bestemte handlinger
for å fjerne og kaste alle forurensende stoffer og
gjenvinne resirkulerbare materialer på en ordentlig
måte.
Enkeltpersoner kan spille en viktig rolle for å sikre at WEEE ikke
blir et miljøproblem. Det er derfor viktig å følge noen
grunnleggende regler:
• WEEE skal ikke behandles som normalt husholdningsavfall.
• WEEE skal leveres til et innsamlingspunkt som forvaltes av
kommunen eller registrerte selskaper. I mange land kan store
WEEE hentes hjemme.
• Når du kjøper et nytt produkt kan det gamle produktet leveres til
forhandleren som må ta det imot gratis, forutsatt at utstyret er av
tilsvarende type og har samme funksjoner som det leverte
utstyret.
24 NO
Page 25

5. BESKRIVELSE AV DISPLAYET
Displaypanel: Tid, programmering av
tilberedningsmodus, indikatorlamper,
steketemperaturfunksjon og hylleplassering
REGULERINGSKNAPP OG BEKREFTELSE
Innstillinger: Temperatur, programmering av tilberedelse og slutten av
steketiden –
Reguleres ved å dreie knappen mot "-" eller "+"
Trykk på knappen for å bekrefte innstillingen.
220
Indikatorlampe
stigende temperatur
PYRO
Klokke /
Programmering /
Steketemperatur
Programsymboldisplay: Steking
Tid Steketid
Steketidens slutt
Indikatorlampe
Barnesikring
Ovnens funksjonsdisplay
og anbefalt nivå
Grillspyd
PYRO
Booster-display:
Forvarming
25 NO
LED slå av når døren åpnes
Indikatorlampe
Lukking av ovnsdøren
Page 26

5.1 FØR MAN BRUKER OVNEN FOR FØRSTE
GANG
• FORHÅNDSRENGJØRING
- Rengjør ovnen før du bruker den for første gang:
- Tørk over ytterflatene med en fuktig klut.
- Vask alt tilbehøret og tørk av overflaten inne i ovnen med en
løsning av varmt vann og oppvaskmiddel.
- Sett den tomme ovnen på makstemperatur og la den stå på i ca. 1
time – dette vil fjerne eventuell gjenværende lukt. Sørg for at rommet
er godt ventilert mens dette utføres.
• TING Å HUSKE PÅ
Bekreftelse av tidsuret
Endringer må bekreftes ved å trykke på knappen.
Stoppe ovnen:
Dette kan være nødvendig hvis du har lagt inn feil instruksjoner.
For å stoppe ovnen: Drei funksjonsvelgeren til "Stopp".
Barnesikring:
Velg barnesikring for å låse ovnen. Se avsnittet "Programmering –
Barnesikring".
Kjøleviften:
Denne beskytter kontrollpanelet og elektronikken fra varmeskader.
Den starter og stopper automatisk, selv når ovnen er avslått.
Ovnsbelysning:
Ved å slå over på lyssymbolet, kan du slå på ovnslyset også når
ovnen ikke er i bruk.
Når ovnen er i bruk, vil lampen være på så lenge ovnen fungerer og
når døren åpnes.
• KLOKKEINNSTILLING
Når ovnen kobles til strømnettet eller når det har vært et lengre
strømbrudd, må klokken stilles inn på nytt.
For å stille inn klokken:
1- Drei bryteren til klokkesymbolet:
2- Still inn klokken med den midtre knappen ved å dreie til "-" eller "+",
3 – 3- Drei bryteren tilbake til posisjonen "STOPP".
Displayet for "Steketid" eller "Sluttsteketid" begynner å blinke. Bruk
sentralknappen til å endre innstillingene og bekreft på tidsuret.
Når du har gjort dette, ikke glem å slå programvelgeren tilbake til "Stopp"posisjonen for å bekrefte den nye innstillingen.
For mer informasjon om programmering, se del 5.3 med tittelen
PROGRAMMER.
3- Ved slutten av steketiden, dreier du funksjonsbryteren tilbake til
"Stopp".
Indikatoren blinker igjen, og den vil forbli påslått også etter at ovnen er
avslått. Den slukker når temperaturen inne i ovnen er tilstrekkelig lav.
• STEKEMODUS
All steking skal utføres med døren lukket.
NEDERST + VIFTE: Kombinasjonen av nederste
varmeelement og viften er ideell for fruktkaker, terter, paier og kaker.
Dette forhindrer at maten blir for tørr og hjelper brøddeig med å heve.
Sett risten nederst i ovnen.
NEDERST: Bruke nedre element. Ideell for tilberedning av
alle retter som er basert på bakverk. Brukes til paier, terter , posteier og
andre retter som trenger mer varme nedenfra.
NEDERST + ØVERST: Både det øverste og nederste
varmeelementet er i bruk. Denne metoden er ideell for all tradisjonelle
steking og baking, f.eks. når du tilbereder rødt kjøtt, roastbiff,
lammelår, viltkjøtt, brød eller folieinnpakket mat.
NEDERST + ØVERST + VIFTE: Både øverste og nederste
varmeelement brukes sammen med viften, noe som gjør at varmluft
sirkulerer gjennom ovnen. Vi anbefaler denne metoden til fjørfe,
bakverk, fisk og grønnsaker. Ved å bruke denne metoden, oppnås
bedre varmeinntrengning, og steke- og forvarmingstiden blir også
redusert. Viftealternativet gjør at du kan tilberede ulike matvarer
samtidig i ulike posisjoner i ovnen, noe som gir jevn fordeling av
varmen, men uten risiko for at smaker og lukter blandes. Når du
tilbereder ulike matvarer samtidig, regn med at det tar rundt 10
minutter ekstra.
10:30
5.2 BRUK A V OVNEN
MANUELL MODUS
Foreslåtte tilberedningsmetoder for manuell modus finner du i
tabellen nedenfor. Det foreslås også en temperatur for hver metode.
Denne kan varieres innenfor et forhåndsbestemt område
Funksjonsmodus
i henhold til
ovnsmodell
Nederst + vifte
Nederst
Nederst + øverst 220 50-240
Nederst + øverst + vifte
Sirkulært
Grill
Grill + vifte
Grill + grillspyd + vifte
Tining
Hold varm
Pizza
Pyro Pyro
* Booster: Rask temperaturøkning
** Ovnen må ha denne funksjonen
1- Drei ovnsbryteren til funksjonen som kreves for den aktuelle typen
tilberedning. Varmeelementene som er i drift for valgt metode vises på
displayet.
2- Passende temperatur i henhold til den valgte stekemetoden
vises også. Denne kan varieres innenfor et forhåndsbestemt område
– se tabellen ovenfor.
Hvis du vil endre temperaturinnstilling, deaktiver sentralknappen og
bekreft innstillingen på tidsuret ved å trykke på den samme knappen.
... temperaturen er fast, men kan endres under tilberedningen.
Ovnen vil begynne å tilberede maten og vil begynne å varme seg opp.
Indikatoren blinker før den valgte temperaturen er nådd. Et lydsignal
høres på slutten av denne operasjonen, og indikatorlampen slutter å
blinke og lyser kontinuerlig.
3- En steketid og sluttsteketid kan programmeres ved å dreie
programvelgeren til "Steketid" eller "Sluttsteketid".
Forhåndsinn
temperatur
**
**
stilt
210
160
210
180
L2
190
240
40
60
230
Forhåndsbestemt
temperatur
ECO: 425 / 65min
SUP: 425 / 1h 30min
oC
50-220
50-220
50-230
50-230
L1-L3
50-200
180-240
Nei
Nei
230
Funksjon
Booster*
Booster
Booster
Booster
Booster
blitt varmet opp blir blåst til de ulike nivåene av viften. Dette er ideelt
SIRKULÆRT VARMEELEMENT + VIFTE: Luften som har
når man skal tilberede forskjellige typer mat samtidig (f.eks. kjøtt og
fisk) uten at smak og lukt blandes. Stekingen er skånsom og er ideell
for kaker, bakverk osv .
GRILL: Bruker øvre varmeelement. Du er garantert suksess
for grillmat, kebab og gratengformer. Risten bør forvarmes til en høy
temperatur i 5 minutter. Hvitt kjøtt skal alltid plasseres i en viss avstand
fra grillelementet. Steketiden blir litt lenger, men kjøttet blir saftigere.
Rødt kjøtt og fiskefilet kan plasseres direkte på risten med
dryppbakken plassert under i nederste hylleposisjon.
GRILL + VIFTE: Øverste varmeelement brukes sammen
med viften, som sirkulerer varm luft rundt i ovnen. Forvarming
anbefales for rødt kjøtt, men er ikke nødvendig for hvitt kjøtt. Grilling er
ideelt for tilberedning av tykkere mat, som svinekjøtt eller fjærfe. Mat
som skal grilles bør plasseres direkte i midten av den midterste hyllen.
Ved å skyve dryppbakken under risten, sikrer du at eventuell saft
samles opp. For å oppnå best mulig resultat, sørg alltid for at maten
ikke er for nær grillelementet, og snu maten halvveis i steketiden.
GRILL + GRILLSPYD + VIFTE: Fordelen med å bruke
øverste ovnselement samtidig med vifte og rotisseri er at maten blir
jevnt stekt og ikke blir tørr og smakløs. Rotisserienheten er
programmert til å fortsette å rotere i ca. fem minutter etter steking for å
utnytte restvarmen til ovnen til fulle. Ingen forvarming er nødvendig
ved rotisserigrilling.
TINING – Når dreiebryteren er stilt til denne posisjonen:
Viften sirkulerer varm luft rundt den frosne maten, slik at den tines i
noen minutter, uten at proteininnholdet i maten blir endret eller
forringet. Temperaturen er forhåndsinnstilt på 40 °C konstant, og
ingen regulering er mulig.
HOLDE VARM – Dette anbefales når man skal varme opp
ferdig tilberedt mat. Da plasseres hyllen på andre nivå fra toppen. Ved
tining av brød, pizza eller bakverk plasseres den på nedre nivå.
Temperaturen er forhåndsinnstilt på 60 °C konstant, og ingen
regulering er mulig.
PIZZA – Med denne funksjonen sirkuleres varmluft i ovnen,
noe som gir et perfekt resultat for retter som pizza eller kake.
PYRO – Ovnen tar seg av hele rengjøringen av innsiden av
ovnen. -T o valg er mulig: ECO og SUPER
26 NO
Page 27

5.3 PROGRAMMER
DISPLAYSYMBOLER
Lampe
Tidsinnstilling
Programmering av steketid
STOP
Programmere slutten på
Programmeringsvalg
Tidsuret er uavhengig av ovnen og har ingen innvirkning på den
varmeelementer. Det er bare en påminnelse.
Drei bryteren til tidsurposisjonen. Tidsursymbolet vises.
Sifrene 00:00 vises på displayet.
Minuttene vil blinke. Drei midtbryteren til ønsket antall minutter og
bekreft ved å trykke på den samme knappen.
Timene vil blinke. Drei midtbryteren til ønsket antall timer og bekreft
ved å trykke på den samme knappen.
Drei bryteren tilbake til posisjonen "Stopp".
Når tiden er ute, vil steketiden forsvinne. Et lydsignal høres i 15
sekunder, og tidsuret blinker (for å stoppe det før de 15 sekundene er
omme, trykker du bare på knappen i midten).
PROGRAMMERING AV STEKETIDEN:
Ulike oppskrifter er forhåndsprogrammert med en steketid. I manuell
modus kan modusene "Tining" eller "Hold varm" forhåndsinnstilles
hvis ønskelig.
Drei bryteren til steketidposisjonen. Steketidsymbolet vises. En
forhåndsprogrammert tid for de ulike oppskriftene vil dukke opp, eller
eventuelt 00:00 for andre ovnsfunksjoner.
Minuttene vil blinke. Drei midtbryteren til ønsket antall minutter og
bekreft ved å trykke på den samme knappen.
Timene vil blinke. Drei midtbryteren til ønsket antall timer og bekreft
ved å trykke på den samme knappen.
Drei programvelgeren tilbake til "Stopp"-posisjonen for å bekrefte den
nye steketiden.
Når tiden er ute, vil steketiden forsvinne fra displayet. Et lydsignal
høres i 15 sekunder, og steketiden og STOPP-symbolet vil blinke.
Drei programvelgeren tilbake til "Stopp". Hvis du ikke gjør dette, vil
steketiden og STOPP-symbolet fortsette med å blinke.
PROGRAMMERE SLUTTEN PÅ STEKETIDEN:
Ulike oppskrifter er forhåndsprogrammert med en steketid og dermed
også med en sluttid. I manuell modus kan modusene "Tining" eller
"Hold varm" forhåndsinnstilles hvis ønskelig.
Drei bryteren til posisjonen for steketidens slutt. STOPP-symbolet
vises. En forhåndsprogrammert sluttid for de ulike oppskriftene vil
dukke opp, eller eventuelt 00:00 for andre ovnsfunksjoner eller
klokkeslettet.
Drei programvelgeren for å bekrefte sluttiden.
Minuttene vil blinke. Drei midtbryteren til ønsket antall minutter og
bekreft valget ved å trykke på den samme knappen.
Timene vil blinke. Drei midtbryteren til ønsket antall timer og bekreft
valget ved å trykke på den samme knappen.
NB: Med forsinket start vil tiden for slutten av programmet vises på
displayet med symbolene "Steketid" og "Stopp", og bare funksjonen
"Oppskriftsmodus" av ovnen gjenstår.
Ovnen beregner automatisk starttiden (sluttiden minus
tilberedningstiden).
Ved slutten av syklusen slår stekeovnen seg av automatisk. Et
lydsignal som varer i 15 sekunder varsler om at syklusen er fullført, og
symbolene for steketid og STOPP vil blinke.
Drei funksjonsvelgeren for å stoppe. Hvis du ikke gjør dette, vil
symbolene fortsette med å blinke.
Denne funksjonen brukes vanligvis sammen med funksjonen
"steketid".
Hvis for eksempel retten skal tilberedes i 45 minutter og skal være
ferdig til kl. 12:30;
- Velg ønsket funksjon
steketiden
Tidsuret fungerer
Barnesikring operativ,
ovnsdøren låses
- still inn slutten av steketiden til 12:30.
Tilberedningen vil starte automatisk kl. 11:45 (12:30 minus 45
minutter) og vil fortsette fram til den forhåndsinnstilte sluttiden
deretter slår ovnen seg av automatisk.
ADVARSEL.
Om SLUTTEN av steketiden stilles inn uten at steketidens
lengde stilles inn, vil ovnen umiddelbart starte tilberedningen
og vil stoppe ved utløpet av den innstilte steketiden.
5.4 STILLE INN SLUTTEN PÅ STEKETIDEN
Denne innstillingen gjør det mulig å stille
inn ønsket tilberedningstid (maks. 120
min.), og ovnen vil slås av automatisk
ved utløpet av den innstilte tiden.
Tidsuret vil telle ned fra innstilt tid tiden
går tilbake til O og slår av ovnen
automatisk.
For normal bruk av ovnen, stil tidsuret
til posisjonen.
For å stille inn ovnen, pass på at
tidsuret ikke er i posisjonen O.
5.5 STEKETIPS
Det er smart å ikke salte kjøttet før etter tilberedningen, ettersom salt
fører til at det kan sprute fett fra kjøttet. Dette vil skitne til ovnen og lage
masse røyk.
Skåret hvitt kjøtt, svin, kalv, lam og fisk kan settes inn i kald ovn.
Steketiden blir lenger enn med forvarmet ovn, men maten tilberedes
helt inn til midten, ettersom varmen har mer tid på seg til å trenge inn i
kjøttstykket.
Riktig forvarming er grunnlaget for vellykket tilberedning av rødt kjøtt.
GRILLING
• Før du bruker grillen:
T a kjøttet ut av kjøleskapet noen timer før grilling. Legg det på flere lag
med kjøkkenpapir. Dette gjør at kjøttet smaker bedre og ikke er
kaldere innerst.
Pepre og krydre før grilling, men ikke ha på salt før etter stekingen. På
denne måten holder kjøttet bedre på saftigheten. Børst på litt olje på
all maten som skal tilberedes. Dette gjøres best med en bred og flat
børste. Dryss deretter på pepper og urter (f.eks. timian e.l.).
• Under tilberedningen:
Stikk aldri i maten under matlaging, selv ikke når du snur kjøttet. Dette
slipper ut saften og gjør kjøttet tørt.
BAKING
Unngå å bruke blanke former – de reflekterer varmen og kan
ødelegge kakene. Hvis kakene brunes for fort, dekk dem med
bakepapir eller aluminiumsfolie.
Merk: Den riktige måten å bruke folie på, er med den blanke siden inn
mot kaken. Hvis ikke blir varmen reflektert av den blanke overflaten og
trenger ikke inn i maten.
Unngå å åpne døren i løpet av de første 20 til 25 minuttene av
steketiden:
Suffleer, brioche, kaker osv . vil kunne falle sammen. Du kan sjekke om
kakene er ferdige ved å stikke et knivblad eller en strikkepinne av
metall i midten på dem. Hvis bladet er like rent og tørt når du trekker
det ut, er kaken ferdig. Hvis bladet er fuktig eller har kakebiter festet på
seg, fortsetter du bakingen, men still termostaten litt lavere for å unngå
at kaken blir svidd.
5.6 JUSTERE KONTRASTEN PÅ DISPLAYET
Kontrasten på displayet kan justeres når som helst.
Standardinnstillingen er "C5". Gjør følgende for å justere innstillingen:
Drei programvelgeren til "Lys" og funksjonsvelgeren til "0". Trykk på
midtknappen i 3 sekunder, så vil "CX" vises på skjermen (der X =
kontrastnivået).
Drei midtbryteren for å justere kontrasten. Innstillingene går fra 1 til 9.
Bekreft den nye innstillingen ved å trykke på midtknappen i 3
sekunder.
- still inn steketiden til 45 minutter
27 NO
Page 28

5.7 BRUK AV KLOKKEPROGRAMMERER MED BERØRINGSKONTROL
FUNKSJON
STOPPEKLOKKE
MINDER
STEKETID
SLUTT PÅ
STEKETIDEN
NØKKELLÅS
SLIK AKTIVERES DEN
• Trykk på midtbryteren 1
ganger.
• Trykk på knappene "-" "+"
for å stille inn ønsket tid
• Slipp alle knappene
• Trykk på midtbryteren 2
ganger
• Trykk på knappene "-"
eller "+" for å stille inn
lengden på ønsket steketid
• Slipp alle knappene
• Still inn tilberedelses funksjonen
med ovnens funksjonsvelger
• Trykk på midtbryteren 3 ganger
• Trykk på knappene "-" "+"
for å stille inn når du ønsker at
ovnen skal skru seg av
• Slipp knappene
• Still inn tilberedelsesfunksjonen
med ovnens funksjonsvelger
• Barnesikringsfunksjonen
aktiveres ved å berøre Set (+)
i minst 5 sekunder. Fra dette
øyeblikket blir alle andre
funksjoner låst, og displayet
vil blinke STOPP og
gjeldende tid.
SLIK SLÅS DEN AV
• Når den innstilte tiden er
utløpt, blir en hørbar alarm
aktivert (denne alarmen vil
stoppe av seg selv, men kan
stoppes umiddelbart ved å
trykke på knappen SELECT).
• Når tiden er utløpt, vil ovnen
skrus av automatisk. Ønsker
du å stanse stekingen
tidligere, skrur du enten
funksjonsvelgeren til 0 eller
stiller inn tiden til 0:00
(SELECT og "-" "+"
knappene)
• Ovnen vil skru seg av ved
det innstilte tidspunktet.
For å skru av manuelt, drei
ovnens funksjonsvelger til
posisjonen O.
• Barnesikringsfunksjon
deaktiveres ved å berøre Set
(+) igjen i minst 5 sekunder.
Fra dette øyeblikket er alle
funksjoner valgbare igjen.
HVA DEN GJØR
• Lydsignal ved slutten av
en definert tidsperiode.
Under prosessen viser
displayet den
gjenværende tiden.
• Den tillater for
håndsinnstilling
av nødvendig steketid for
den valgte oppskriften.
• For å se hvor lang tid som
er igjen, trykkes knappen
SELECT 2 ganger.
• For å endre forhåndsinnstilt
tid, trykk på SELECT og
"-" "+" knappene
• Lar deg stille inn slutten
på steketiden.
For å sjekke
forhåndsinnstilt tid, trykk
på midtbryteren
3 ganger
• For å endre den
forhåndinnstilte tiden,
trykk på knappene SELECT
+ "-" "+"
HVA DEN ER TIL
• Gjør at du kan bruke ovnen
som alarmklokke (kan
aktiveres både når ovnen er i
bruk og når den ikke er i bruk)
• Trykk på hvilken som helst
knapp for å stoppe signalet.
• Trykk på midtbryteren for å
gå tilbake til klokkefunksjonen
Denne funksjonen brukes
vanligvis sammen med
funksjonen "steketid". For
eksempel, om retten skal
tilberedes i 45 minutter og skal
være ferdig til kl. 12:30, velg
ønsket funksjon og sett
steketiden til 45 minutter og
slutten på steketiden til 12:30.
Ved utløpet av den innstilte tiden
vil ovnen automatisk skru seg
av, og en alarm lyder .
Tilberedningen vil starte
automatisk kl. 11:45 (12:30
minus 45 minutter) og vil
fortsette fram til den
forhåndsinnstilte sluttiden.
Deretter slår ovnen seg av
automatisk.
ADVARSEL.
Om SLUTTEN på steketiden
stilles inn uten at tidslengden
stilles inn, vil ovnen
umiddelbart starte
tilberedningen og vil stoppe
ved utløpet av den innstilte
steketiden.
5.8 INNSTILLING AV KORREKT TID
ADVARSEL : Den første operasjonen som må utføres etter at ovnen er installert eller etter brudd på
strømforsyningen (dette gjenkjennes ved at displayet blinker og viser
00:00
select
OBS: Ovnen vil kun virke om klokken er stilt inn.
klokkeslett.Dette gjøres som følger
• Trykk på midtbryteren 4 ganger.
• Still inn klokkeslettet med
• Slipp alle knappene
12:00 ) er å stille inn riktig
"-" "+" knappene.
28 NO
Page 29

6. PYROLYSE
7. BARNESIKRING
**Ovnen må ha denne funksjonen
Ovnen er utstyrt med et pyrolytisk rensesystem som brenner vekk
gjenværende matrester med høy temperatur. Operasjonen utføres
automatisk ved hjelp av programmereren. Avgassene "renses" ved at
de passerer over en pyrolyseenhet, som starter så snart stekingen
begynner. Ettersom det er nødvendig med svært høye temperaturer
for at pyrolyseenheten skal fungere, er ovnsdøren utstyrt med en
sikkerhetslås.
Pyrolysen kan stoppes når som helst. Døren kan ikke åpnes før
sikkerhetslåsen vises.
ADVARSEL : Hvis det er montert en platetopp over ovnen, må man
aldri bruke gassbrennere eller elektriske kokeplater mens pyrolysen
pågår, siden platetoppen kan bli overopphetet.
TO PYROL YSESYKLUSER er forhåndsinnstilt.
.ECO PYROCLEAN: Renser en moderat tilsmusset ovn. Kjører i 65
minutter.
. SUPER PYROCLEAN: Renser en svært tilsmusset ovn. Kjører i 90
minutter.
Bruk aldri vanlige rengjøringsmidler på en pyrolytisk ovn!
Tips : Pyrolytisk rengjøring umiddelbart etter steking gjør at du kan
benytte restvarmen og dermed spare energi.
Før du utfører en pyrolytisk syklus:
Fjern alt tilbehør fra ovnen : De tåler ikke de høye temperaturene og
kan bli skadet ved pyrolytiske temperaturer.
Fjern eventuelle store mengder søl eller flekker, ettersom det ville tatt
for lang tid å ødelegge dem. Dersom det er svært store mengder fett i
ovnen, kan det antennes når det utsettes for de svært høye
temperaturene i pyrolysen.
Lukk ovnsdøren.
Tørk vekk overflødig søl før rengjøringen.
Denne funksjonen er svært viktig, spesielt med barn til stede. Den
hindrer barn fra å slå på ovnen eller endre de forhåndsinnstilte
programmene.
Dette sikkerhetssystemet låser ovnens kontrollpanel mens den står
på.
Det er to sikkerhetsnivåer:
NIVÅ 1: Betjeningsbryter for låsing og midtknappen.
For å aktivere: Drei programmeringsbryteren til "Barnesikring".
Resultat: Betjeningsbryterne er inaktive*.
For å deaktivere: Drei programmeringsbryteren til 0.
NIVÅ 2: Brytere for låsefunksjon
For å aktivere: Drei funksjonsvelgeren til barnesikring og hold
midtknappen inntrykket i 3 sekunder.
Resultat: Alle bryterne er inaktive*.
For å deaktivere: Samme prosedyre som for aktivering. Drei
funksjonsvelgeren til barnesikring og hold midtknappen inntrykket i 3
sekunder.
*Merk: Av sikkerhetsmessige årsaker kan ovnen uansett tilfelle slås
av ved å dreie bryteren til 0 selv når kontrollene er låst.
7.1 BARNESIKRING - FOR DITT BARNS SIKKERHET
Bruke pyrolyse:
1- Drei funksjonsvelgeren til "Pyrolytisk modus". "PYRO" vises på
displayet. ECO-modus blinker.
ADVARSEL : ECO – syklus på 65 minutter – moderat tilsmusset
ovn. SUP – syklus på 90 minutter – svært tilsmusset ovn
2- Bruk midtknappen til å velge ønsket pyrolytisk modus i henhold til
graden av tilsmussing: ECO eller SUP .
• Valget ditt bekreftes etter 3 sekunder ...
Ovnen starter den pyrolytiske syklusen. Den valgte pyrolytiske
modusen blinker, og indikatorlampene for "Tid" og "Stopp" dukker
opp.
Under pyrolysen vises symbolet for at døren er låst og indikerer at
døren ikke kan åpnes. Kjøleviften kjører.
Indikatorlampen blinker til påkrevd temperatur er nådd og lyser
deretter.
* Starten på den pyrolytiske syklusen kan forsinkes ved å velge en
sluttid.Drei programmeringsbryteren til sluttiden og still inn ønsket tid.
I løpet av den selvrensende pyrolysen kan overflatene bli varmere
enn vanlig, og barn bør holdes unna.
Ved slutten av den pyrolytiske syklusen, slår ovnen seg av
automatisk.
Et lydsignal som varer i 15 sekunder varsler om at syklusen er fullført,
og indikatorlampene for "Tid" og "Stopp" vil blinke.
vil symbolene fortsette med å blinke. Symbolet "Pyro" forsvinner på
tidsuret, pyrolytisk modus. Ovnsdøren vil forbli låst så lenge
temperaturen er høy. Så lenge symbolet for låst ovnsdør lyser, kan
ikke ovnen åpnes.
Drei funksjonsvelgeren for å stoppe. Hvis du ikke gjør dette,
Kjøleviften slår seg ikke av før temperaturen i ovnen er akseptabelt
lav.
Ved slutten av syklusen vil indikatoren blinke igjen, og den vil forbli
påslått også etter at ovnen er avslått. Den slukker når temperaturen
inne i ovnen er tilstrekkelig lav.
Pyrolyse etterlater seg et hvitt restprodukt på ovnens vegger. Vent til
ovnen er helt avkjølt før du rengjør innsiden av ovnen med en fuktig
svamp eller klut for å tørke vekk disse restene.
29 NO
Page 30

TURVALLISUUSVINKKEJÄ
• VAROITUS: Laite ja sen kosketettavissa olevat osat kuumenevat käytön aikana. V aro koskettamasta
lämmitysvastuksia.
• Alle kahdeksanvuotiaita lapsia ei saa päästää laitteen lähelle ilman jatkuvaa valvontaa.
• Yli kahdeksanvuotiaat lapset ja henkilöt, joiden fyysinen tai henkinen toimintakyky on rajallinen tai joilla
ei ole kokemusta tai tietoa laitteen käytöstä, voivat käyttää laitetta, jos heitä valvotaan tai heille on
annettu ohjeita laitteen turvallisesta käytöstä ja siihen liittyvistä vaaroista.
• Lapset eivät saa leikkiä tällä laitteella.
• Lapset eivät saa puhdistaa tai huoltaa laitetta ilman valvontaa.
• Laite kuumenee käytön aikana. V aro koskettamasta uunin sisällä olevia lämmitysvastuksia.
• VAROITUS: Kosketettavissa olevat osat saattavat kuumeta käytön aikana. Pidä pienet lapset poissa
laitteen läheltä.
• Älä puhdista uunin luukun lasia hankaavilla puhdistusaineilla tai terävillä metallikaapimilla. koska ne
saattavat naarmuttaa lasin pinta ja aiheuttaa sen rikkoutumisen.
• Aloita puhdistus poistamalla ylimääräiset roiskeet.
Itsepuhdistavan pyrolyysitoiminnon aikana pinnat saattavat olla tavallista kuumempia, ja lapset on
pidettävä poissa laitteen läheltä.
• Uuni on kytkettävä pois päältä ennen suojuksen poistamista, ja puhdistuksen jälkeen suojus on
asetettava paikoilleen ohjeen mukaisesti.
• Käytä vain tätä uunia varten suositeltua lämpötila-anturia.
• Älä puhdista laitetta höyrypesurilla.
• VAROITUS: Varmista ennen lampun vaihtamista, että laite on kytketty pois päältä, jotta vältät
sähköiskun vaaran.
• Kiinteästi kytketyn laitteen virran on oltava kytkettävissä pois säännösten mukaisesti.
• Ohjeissa on mainittava käytettävän johdon tyyppi ottaen huomioon laitteen takapinnan lämpötila.
• Jos virtajohto on vaurioitunut, se on vaihdettava uuteen valmistajalta tai tämän huoltokorjaamolta
saatavaan johtoon tai johdotuskokoonpanoon.
• Laitteet, joissa on Y -tyypin liitin:
• HUOMAUTUS: Jotta vältetään ylikuumenemissuojan asetuksen vahingossa tapahtuvan muuttamisen
aiheuttama vaara, laitteen virransyöttöä ei saa järjestää ulkoisen kytkentälaitteen, kuten ajastimen,
kautta, eikä laitetta saa kytkeä virtapiiriin, jonka virta kytkeytyy säännöllisesti päälle ja pois päältä.
• "HUOMAUTUS: Kosketettavissa olevat osat saattavat kuumeta grilliä käytettäessä. Pidä pienet lapset
poissa laitteen läheltä."
30 FI
Page 31

1. YLEISTÄ
Kiitos, että valitsit tuotteemme. Uunisi toimii mahdollisimman hyvin, kun noudatat seuraavia neuvoja:
• Lue tämä ohjekirja huolellisesti: siinä ovat uunin asennus-, käyttö-ja huolto-ohjeet, joita noudattaen uunin käyttäminen on urvallista.
• Säilytä ohjekirja tulevaa käyttöä varten.
Kun uuni on toiminnassa, se on kuuma kauttaaltaan, joten varo koskettamasta sitä.
Ensimmäisellä käyttökerralla uunista saattaa tulla kitkeränhajuista savua. Se johtuu siitä, että uunia ympäröivien eristyspanee lämpenee
ensimmäisen kerran.
Kyseessä on aivan normaali ilmiö. Jos savua synty y , laita ruoka uuniin vasta, kun savu on hälvennyt.
Uuni on laite, jonka on tarkoitus kuumeta. Erityisesti luukun lasi tulee kuumaksi.
Estä lapsia menemästä toiminnassa olevan uunin läheisyyteen, erityisesti silloin, kun grilli on käytössä.
1.1 VAATIMUSTENMUKAISUUSVAKUUTUS
Laitteen elintarvikkeiden kanssa kosketuksiin joutuvat osat ovat EU-
direktiivin 89/109 säännösten mukaisia. Laite on EUdirektiivien 2006/95/EC ja 2004/108/EC mukainen, sekä niiden
myöhempien muutosten mukainen. Kun olet purkanut uunin
pakkauksesta, tarkista, ettei se ole vaurioitunut. Jos epäilet
laitteen vahingoittuneen, älä käytä sitä, vaan ota yhteyttä huoltoon.
Pidä pakkaustarvikkeet, kuten muovipussit, vaahtomuovit tai naulat
poissa lasten ulottuvilta, sillä ne voivat olla vaarallisia.
1.2 TURVALLISUUSOHJEITA
Uunia saa käyttää ainoastaan tarkoitukseen, jota varten se on
valmistettu, eli elintarvikkeiden kypsentämiseen. Kaikenlainen muu
käyttö esimerkiksi lämmitysmenetelmänä on uunin virheellistä
käyttöä ja siksi vaarallista.
•Valmistaja ei vastaa väärästä, virheellisestä tai huolimattomasta
käytöstä mahdollisesti aiheutuvista vahingoista. Sähkölaitteita
käytettäessä on noudatettava eräitä perussääntöjä.
- Älä irrota pistoketta pistorasiasta sähköjohdosta vetämällä
• Älä koske uuniin märin tai kostein käsin tai jaloin.
- Älä käytä uunia paljain jaloin
- Sovittimien, haaroituspistokkeiden ja jatkojohtojen käyttäminen ei
ole suositeltavaa.
-Jos laite rikkoutuu tai ei toimi moitteettomasti, irrota se
sähköverkosta äläkä kosketa sitä.
• Jos sähköjohto vioittuu, se tulee vaihtaa välittömästi
Kun vaihdat virtajohdon, noudata näitä ohjeita.
Irrota virtajohto ja korvaa se H05VV-F tyyppisellä johdolla.
Virtajohdon on kestettävä uunin tarvitsema sähkövirta. Kaapelin
vaihtaminen on jätettävä valtuutetulle huoltohenkilöstölle.
Maadoitusjohtimen (keltavihreä) on oltava 10 mm virtajohtoa pidempi.
T eetä kaikki korjaustyöt valtuutetussa huoltokeskuksessa ja varmista,
että vain alkuperäisiä osia käytetään. Jos edellä olevia ohjeita ei
noudateta, valmistaja ei voi taata uunin turvallisuutta.
•Uudessa uunissasi on tässä kuvatut tekniset ominaisuudet, eikä
siihen saa tehdä mitään muutoksia.
•Älä käytä höyry- tai korkeapainepesuria uunin puhdistamiseen.
•Älä säilytä syttyviä tuotteita uunissa, sillä ne saattavat syttyä tuleen,
jos uuni kytkeytyy vahingossa toimintaan.
•Älä paina uuninluukkua äläkä anna lasten istua sillä.
•Käytä patakintaita, kun laitat astioita uuniin tai otat niitä ulos uunista.
1.4 ASENNUS
Jos valmistajan apua tarvitaan väärin suoritetusta asennuksesta
johtuvien vikojen korjaamiseen, apu ei sisälly takuuseen eikä
valmistaja ole velvollinen sitä antamaan. Pätevälle
ammattihenkilöstölle suunnattuja ohjeita on noudatettava. Väärin
suoritettu asennus voi aiheuttaa vammoja ihmisille tai eläimille tai
vahinkoja omaisuudelle. Valmistaja ei ole vastuussa tällaisista
vammoista tai vahingoista.
Kalusteen, johon uuni asennetaan, on oltava materiaalia, joka kestää
vähintään 70 °C:n lämpötilan.
Uuni voidaan sijoittaa korkealle kaappiin tai työtason alle.
Ennen kiinnitystä on varmistettava uunitilan ilmanvaihto, jotta raikasta
ilmaa pääsee kiertämään sisäisten osien jäähdyttämisen ja
suojelemisen edellyttämällä tavalla. Tee viimeisen sivun mukaiset
aukot kalusteen tyypin mukaan.
1.5 SÄHKÖLIITÄNTÄ
SÄHKÖLIITÄNNÄN SAA TEHDÄ V AIN PÄTEVÄ
SÄHKÖASENTAJA.
Laitteen asennuksen on täytettävä käyttöpaikan mukaiset normit.
Valmistaja ei ole vastuussa, mikäli tätä ehtoa ei noudateta.
Kytkentä sähköverkkoon on tehtävä maadoitetun pistorasian tai
moninapaisen katkaisimen kautta asennuspaikan normien mukaan..
Asennus on suojattava asianmukaisilla sulakkeilla, ja johdinten
halkaisijan on oltava riittävän suuri virran syöttämiseen uuniin.
LIITÄNTÄ:
Uunissa on virtajohto, jonka saa kytkeä vain 220-240 V AC
vaihtovirtaan vaiheiden tai vaiheen ja nollajohtimen välillä. Liitäntä
tehdään vasta seuraavien asioiden tarkistamisen jälkeen:
-mittarin näyttämä syöttöjännite.
-suojakatkaisijan asetus.
Uunin maadoitusliittimeen kytketty maadoitusjohto (keltavihreä) on
liitettävä asennuspaikan maadoitusliittimeen.
Huomaa:
•Sähköalan ammattilaisen tulee varmistaa maadoitus ennen
verkkovirtaan kytkemistä.
•Valmistaja ei ole vastuussa maadoittamattoman uunin tai virheellisen
maadoituksen aiheuttamista vahingoista tai seuraamuksista.
1.3 SUOSITUKSET
Uuni pysyy täydellisen puhtaana, kun sitä puhdistetaan hieman aina
käytön jälkeen.
• Älä vuoraa uunin seiniä alumiinifoliolla tai kaupoissa myytävillä
kertakäyttösuojilla. Alumiinifolio tai muu suojaus saattaa kuuman
emalin kanssa suorassa kosketuksessa ollessaan sulaa ja
vahingoittaa sisäpinnan emalointia.
Uunin likaantumisen ja siitä aiheutuvan voimakkaan savun hajun
välttämiseksi on suositeltavaa, ettei uunia käytetä erittäin korkeilla
lämpötiloilla. On parempi pidentää kypsennysaikaa ja käyttää hieman
alempaa lämpötilaa.
•Uunin mukana toimitettujen varusteiden lisäksi suosittelemme
ainoastaan erittäin korkeita lämpötiloja kestävien astioiden
ja vuokien käyttöä.
Code produit:
Numéro de série :
Huom: Muista, että uuni saattaa vaatia huoltoa. Sijoita
seinäpistorasia niin, että uuni voidaan yhdistää siihen takaisin, jos se
on otettu pois paikoiltaan.
Virtajohto: Jos virtajohto on tarpeen vaihtaa, pyydä huoltopalvelua
tai valtuutettua sähköalan ammattilaista tekemään se.
31 FI
Page 32

2. VARUSTEET (mallista riippuen)
2.1 UUNIN VARUSTEET
Varusteet on pestävä ennen niiden ensimmäistä käyttökertaa. Pese
ne sienellä. Huuhtele ja kuivaa.
Ritilälle voi laittaa vuokia ja astioita.
Rasvapelti kerää grillattavien ruokien nesteet.
Älä koskaan käytä rasvapeltiä uunipeltinä, sillä kerääntynyt rasva voi
nopeasti levitä ympäri uunia ja savuta voimakkaasti.
Jakaja jakaa uunin kahteen eri tilaan. Se jakaa uunin ylempään ja
alempaan tilaan kun haluat käyttää uunia tuplauunina. Jakaja tulee
asettaa kolmannelle hyllylle.
Älä koskaan jätä jakajaa uuniin kun puhdistat uunia
pyrolyysitoiminnolla.
LED - VALAISTUS
2.3
Valaistusjärjestelmä korvaa tavanomaiset hehkulamput. 14 LEDvaloa (malleissa, joissa ei ole pyrolyysitoimintoa) tai 10 LEDtehovaloa (pyrolyysitoiminnolla varustetut mallit) on integroitu
luukkuun. Ne tuottavat korkealaatuista valkoista valoa, jonka avulla
uunin sisään näkee selkeästi ilman varjoja eri tasoilla.
Valot sammuvat kun uunin luukku avataan (vain pyrolyysi- mallit).
Edut:
Sen lisäksi, että tämä järjestelmä valaisee uunin sisuksen
erinomaisesti, lamput ovat myös pidempi-ikäisiä kuin perinteiset
hehkulamput, hoito on helpompaa ja ennen kaikkea järjestelmä
säästää energiaa.
-Ihanteellinen näkymä
-Pitkäikäinen valaistus
-Erittäin pieni energiankulutus, 95% pienempi kuin perinteisellä
valaistuksella
LED VISION
2.4 LANKAHYLLYNKANNATINTEN IRROTUS JA
PUHDISTUS
1- T a bort metallstegarna genom att dra dem i pilens riktning.
2- Rengör metallstegarna genom att diska dem i diskmaskin eller med
hjälp av en fuktig disksvamp. Låt torka.
3- Sätt tillbaka metallstegarna i omvänd ordning när du har rengjort
dem.
Pizzakivi rapeampien pizzojen paistamiseen mallin mukaan
varusteltuna telineellä ja pizzakoneella.
Leivontapelti on asetettava ritilälle. Sitä käytetään pienten
leivonnaisten, esimerkiksi tuulihattujen, keksien, marenkien jne.
paistamiseen.
Leivontapeltiä ei saa laittaa suoraan uunin pohjalle.
2.2 GRILLIVARRAS
Grillivarrasta käytettäessä esikuumennus ei ole tarpeen. Kypsennys
luukku kiinni.
Energiankulutus on 90–95% pienempi kuin perinteisellä
menetelmällä.
2
1
KUINKA VARRASTA KÄYTETÄÄN
1- Ruuvaa koukut auki
2- Laita liha vartaaseen
3- Kiinnitä liha koukuilla
4- Kiristä ruuvit
5-Aseta varras moottorinreikään
6- Poista kahva
Kun uuni on käytössä, ylimääräiset varusteet tulee ottaa pois
uunista
3
4
1- Hila
2- Paistinvarras
3- Koukut & Ruuvit
4- Kahva
3. UUNIN PUHDISTAMINEN
· Anna uunin jäähtyä ennen käsin tehtäviä puhdistustoimia.
- Älä puhdista uunia hiovilla pesuaineilla, teräsvillalla tai terävillä
apuvälineillä, sillä ne saattavat vahingoittaa emalia niin, ettei sitä
voida enää korjata.
· Käytä vain saippualiuosta tai valkaisuainetta (ammoniakkia)
sisältäviä pesuaineita.
· Älä vuoraa uunin seinämiä alumiinifoliolla.
· Älä käytä höyrypuhdistimia uunin puhdistamiseen.
· Älä anna lasten puhdistaa tai huoltaa uunia ilman valvontaa.
LASIOSAT
On suositeltavaa pyyhkiä luukun lasi imukykyisellä talouspaperilla
aina uunin käytön jälkeen. Jos se on voimakkaasti tahrautunut, sen
voi puhdistaa nihkeällä sienellä ja pesuaineella, minkä jälkeen se
huuhdellaan.'Älä käytä hankaavia pesuaineita tai teräviä
apuvälineitä, sillä ne saattavat naarmuttaa lasin pintaa ja aiheuttaa
jopa lasin hajoamisen.
UUNINLUUKUN TIIVISTE
Jos tiiviste likaantuu, puhdista se kostealla sienellä.
LISÄVARUSTEET
Puhdista varusteet saippualiuoksessa kastetulla sienellä. Huuhtele
puhtaalla vedellä ja kuivaa. Vältä hankaavia pesuaineita.
RASVAPELTI
Ota grillaamisen jälkeen rasvapelti pois uunista. Kaada siihen valunut
rasva varovasti johonkin astiaan. Pese rasvapelti kuumassa
pesuainevedessä kostutetulla sienellä ja huuhtele.
Jos pellissä edelleen tahroja, liota ne pois vedessä ja pesuaineessa.
Rasvapellin voi pestä myös astianpesukoneessa tai kuluttajakäyttöön
myytävällä uuninpuhdistusaineella.
Älä laita likaantunutta rasvapeltiä uuniin.
Älä jätä rasvapeltiä uuniin pyrolyyttisen puhdistuksen ajaksi.
UUNIN VALAISTUS
Irrota virtalähde uunista ennen valon puhdistamista tai vaihtamista.
Valot ja sen kansi on valmistettu korkeita lämpötiloja kestävästä
materiaalista.
32 FI
Page 33

Lampun ominaisuudet:
230 V AC - 25 W- E14-kanta Lämpötila 300 °C Viallinen lamppu
vaihdetaan seuraavasti:
• Avaa lasikansi,
• Kierrä lamppu irti
Vaihda tilalle samanlainen lamppu: katso yllä olevat tiedot
4. HUOLTOPALVELU
Ennen huoltopalveluun soittamista:
Jos uuni ei toimi, suosittelemme seuraavaa:
• T arkista, onko pistoke kunnolla pistorasiassa.
Jos vian syytä ei havaita:
• Irrota uuni verkkovirrasta. Älä koske uuniin vaan soita
huoltopalveluun.
Ennen kuin otat yhteyttä huoltopalveluun, kirjoita muistiin laitteen
sarjanumerokilvessä oleva sarjanumero.
Uunin mukana on toimitettu takuutodistus, joka vahvistaa, että uuni
korjataan takuun aikana veloituksetta huoltopalvelussa.
Tällä laitteella on Euroopan parlamentin ja neuvoston
direktiivin 2012/19/EU sähkö- ja
elektroniikkalaiteromusta (WEEE) mukainen
merkintä. WEEE-direktiivi sisältää sekä saastuttavat
materiaalit (jotka voivat aiheuttaa ympäristöhaittoja)
ja perusmateriaalit (jotka voidaan uusiokäyttää).
WEEE-direktiivin huomioiminen on tärkeää
määrätyissä käsittelyissä, jotta kaikki saastuttavat
materiaalit saadaan poistettua ja hävitettyä sekä
kaikki kierrätys ja uudelleenkäytettävä materiaali saadaan koottua
talteen.
Yksittäisillä henkilöillä on tärkeä merkitys varmistettaessa, ettei
WEEE-materiaalit muodosta ympäristöongelmia ja tiettyjen
perussääntöjen noudattaminen on välttämätöntä.
• WEEE-materiaaleja ei saa käsitellä kotitalousjätteinä.
• WEEE-materiaalit tulee toimittaa niille tarkoitettuihin
paikallisviranomaisten tai jätehuoltoyritysten hallinnoimiin
kierrätyspisteisiin. Monissa maissa suurikokoisille WEEEmateriaaleille on saatavana kotoa noutopalvelu.
• Kun ostat uuden laitteen, vanhan laitteen voi palauttaa
jälleenmyyjälle, jonka on vastaanotettava se ilmaiseksi uutta
vastaavaa tuotetta vastaan, kun laite on samaa tyyppiä ja se toiminnot
on samat kuin hankitun laitteen.
33 FI
Page 34

220
PYRO
34 FI
Page 35

5.1 ENNEN UUNIN ENSIMMÄISTÄ
KÄYTTÖKERTAA
• ALKUPUHDISTUS
-Puhdista uuni ennen ensimmäistä käyttökertaa:
-Pyyhi ulkopinnat kostutetulla pehmeällä liinalla.
-Pese kaikki lisävarusteet ja pyyhin uunin sisäpuoli kuuman veden ja
astianpesuaineen seoksella.
-Aseta uuni korkeimpaan lämpötilaan ja jätä päälle noin 1 tunnin ajaksi.
Tämä poistaa mahdollisen uuden uunin hajun. Varmista, että huoneessa
on hyvä ilmanvaihto tämän toimenpiteen aikana.
• MUISTETTAVAA
Ajastinkäytön vahvistaminen
Muutokset on vahvistettava painikkeella.
Uunin sammuttaminen:
Tämä voi olla tarpeen, jos olet syöttänyt väärät ohjeet.
Uunin sammuttaminen: käännä toimintosäädin Stop-asentoon.
Lapsilukko:
Voit lukita uunin säätimet valitsemalla lapsilukon. Katso kohta
"Ohjelmointi - Lapsilukko".
Jäähdytyspuhallin:
Suojaa ohjauspaneelia ja elektroniikkaa lämpövaurioilta.
Käynnistyy ja pysähtyy automaattisesti silloinkin, kun uuni ei ole
toiminnassa.
Uunin valot:
Valosymbolilla voit sytyttää uunin valon, vaikka uuni ei olisi käytössä.
Kun uuni on käytössä, valo palaa kaikkien uunin toimintojen aikana ja kun
luukku on auki.
• KELLONAJAN ASETUS
Kun uuni kytketään sähköverkkoon tai on ollut pitkä sähkökatkos,
kellonaika on asetettava uudelleen.
Kellonajan asettaminen:
1-Käännä säädin "Kello"-symboliin:
2 - Aseta kellonaika kääntämällä keskipainikettä "-" tai "+"-suuntaan.
3 - Käännä säädin takaisin STOP-asentoon.
10:30
"Kypsennysaika"- tai "kypsennysajan loppu" -näyttö alkaa vilkkua.
Muuta asetuksia keskipainikkeella tarpeen mukaan ja vahvista
ajastimesta.
Kun tämä on tehty, muista kääntää ohjelmavalitsin takaisin stopasentoon uuden asetuksen vahvistamiseksi.
Lisätietoja ohjelmoinnista on kohdassa 5.3 OHJELMOINTI.
4-Kypsennyksen lopussa käännä toimintovalitsin takaisin stopasentoon.
Merkkivalo vilkkuu taas ja se jatkaa palamista myös uunin
sammuttamisen jälkeen siihen saakka, kunnes uunin sisälämpötila on
riittävän matala.
• KYPSENNYSTILA
Uuninluukun on oltava suljettuna aina ruokaa kypsennettäessä.
ALALÄMPÖ+ KIERTOILMA - Alalämpövastuksen ja puhaltimen
yhdistelmä soveltuu erityisen hyvin hedelmäpiirakoille, piiraille ja
leivonnaisille. Se estää ruoan liiallisen kuivumisen ja parantaa
leipätaikinan kohoamista. Laita ritilä uunin alimmalle tasolle.
ALALÄMPÖ - Alalämpövastuksen käyttö. Sopii erityisesti
kaikkien leivospohjaisille ruokalajeille. Käytä tätä piirakoiden ja
piiraiden paistamiseen ja kaikkeen kypsennykseen, jossa tarvitaan
enemmän lämpöä alapuolelta.
ALALÄMPÖ + YLÄLÄMPÖ - Sekä ylä- että alalämpövastus on
käytössä. Tämä tila sopii erityisesti tavanomaiseen paistamiseen ja
kypsennykseen. Punaisen lihan, paahtopaistin, lampaanviulun, riistan,
leivän tai folioon käärittyjen ruokien paistaminen.
ALALÄMPÖ + YLÄLÄMPÖ + KIERTOILMA - Sekä ylä- että
alalämpövastus ovat käytössä samaan aikaan puhaltimen kanssa, joka
kierrättää kuumaa ilmaa läpi uunin. Tätä tilaa suositellaan siipikarjan,
leivosten, kalan ja kasvisten kypsentämiseen. Tällä menetelmällä
saavutetaan parempi lämmön läpäisy, ja myös kypsennys- ja
esilämmitysajat lyhenevät. Kiertoilmatoimintoa käytettäessä voit
kypsentää eri ruokia uunin eri kannatintasoilla samaan aikaan siten, että
lämpö jakautuu tasaisesti mutta maut ja tuoksut eivät pääse
sekoittumaan. Kun eri ruokia kypsennetään yhtä aikaa, lisää
kypsennysaikaan 10 minuuttia.
5.2 UUNIN KÄYTTÖ
• MANUAALINENTILA
Manuaalisessa tilassa suositellut kypsennysmenetelmät on esitetty
seuraavassa taulukossa. Lisäksi kullekin kypsennysmenetelmälle on
suositeltu lämpötilaa. Sitä voi muuttaa ennalta määritetyllä vaihteluvälillä.
Toiminto uunin
mallin mukaan
Alalämpö + kiertoilma
Alalämpö
Alalämpö + ylälämpö 220 50-240
Alalämpö + ylälämpö+ kiertoilma
Rengas + kiertoilma
Grill
Grilli + kiertoilma
Grilli + varras + kiertoilma
Sulatus
Lämpimänä pitäminen
Pizza
Pyro Pyro
*Booster:Tehostin nostaa lämpötilaa nopeasti
** Uunissa on oltava tämä toiminto
1 - Käännä uunin säädin kypsennykseen tarvittavan toiminnon
kohdalle. Valitun kypsennysmenetelmän yhteydessä käytössä olevat
lämpövastukset näkyvät näytöllä.
2 - Näytölle tulee valitulle kypsennysmenetelmälle soveltuva lämpötila.
Sitä voi muuttaa ennalta määritetyllä vaihteluvälillä, katso edellä oleva
taulukko.
Voit muuttaa lämpötila-asetusta kääntämällä keskipainiketta ja
vahvistaa asetuksen ajastimesta painamalla samaa painiketta
uudelleenlämpötila näkyy koko ajan, mutta sitä voi muuttaa
kypsennyksen aikana.Uuni aloittaa kypsennyksen ja alkaa lämmetä.
Merkkivalo vilkkuu, kunnes valittu lämpötila on saavutettu. Äänimerkki
kuuluu tämän toiminnon lopussa ja merkkivalo palaa jatkuvasti.
3- Kypsennysajan ja kypsennysajan lopun voi ohjelmoida kääntämällä
ohjelmavalitsin "kypsennysaika"- tai "kypsennysajan loppu" -kohtaan.
Ennalta
asetet-tu
lämpötila °C
**
**
210
160
210
180
L2
190
240
40
60
230
Ennalta asetettu
lämpötila °C
50-220
50-220
50-230
50-230
L1-L3
50-200
180-240
Ei
Ei
230
ECO: 425 / 65min
SUP: 425 / 1h 30min
Tehostintoiminto*
Tehostin
Tehostin
Tehostin
Tehostin
RENGAS + KIERTOILMA - Sekä ylä- että alalämpövastus ovat
käytössä samaan aikaan rengasvastuksen kanssa, joka kierrättää
kuumaa ilmaa läpi uunin. Tämä tila vastaa kiertoilmatilaa.
GRILLI- Ylälämpövastuksen käyttö. Onnistuminen on taattua
erilaisten grilliruokien, kebabien ja vuokien kypsentämisessä. Grilliä
tulee esilämmittää kuumaksi 5 minuutin ajan. Valkoinen liha tulee laittaa
aina jonkin matkan päähän grillivastuksesta, jolloin kypsennysaika on
hieman pidempi, mutta liha on mehukkaampaa. Punaisen lihan ja
kalafileet voi laittaa suoraan ritilälle siten, että rasvapelti on alapuolella
alemmalla kannatintasolla.
GRILLI + KIERTOILMA - Ylälämpövastus on käytössä yhtä
aikaa puhaltimen kanssa, joka kierrättää kuumaa ilmaa uunin läpi.
Esilämmitys on suositeltavaa punaisten lihojen kohdalla, mutta se ei ole
tarpeen valkoista lihaa kypsennettäessä. Grillaaminen sopii erityisesti
paksumpien ruokalajien, kuten sianlihan tai siipikarjan,
kypsentämiseen. Grillattava ruoka laitetaan suoraan keskiritilän
keskelle.Kun rasvapelti laitetaan ritilän alle, ruosta tuleva neste tippuu
siihen. Parhaan tuloksen saamiseksi varmista aina, ettei ruoka ole liian
lähellä grillivastusta, ja käännä ruoka ympäri kypsennysajan
puolessavälissä.
GRILLI + VARRAS + KIERTOILMA - Ylälämpövastuksen
käyttämisessä yhtä aikaa puhaltimen ja grillivartaan kanssa on etuna se,
että ruoka paistuu tasaisesti eikä kuivu ja tule mauttomaksi. Grillivarras
on ohjelmoitu jatkamaan pyörimistä noin viiden minuutin ajan
kypsennyksen jälkeen, millä käytetään uunin jälkilämpö kokonaan
hyväksi. Grillivartaassa kypsentämisessä ei tarvita esilämmitystä.
SULATUS - Kun toiminto on valittu, puhallin kierrättää kuumaa
ilmaa pakasteen ympärillä siten, että se sulaa muutamassa minuutissa
ilman ruoan proteiinien muuttumista. Lämpötila on esiasetettu jatkuvasti
40 °C:seen, se ei ole säädettävissä.
LÄMPIMÄNÄ PITÄMINEN - Valmista ruokaa lämmitettäessä
kannattaa asettaa ritilä toiseksi ylimmälle tasolle. Leivän, pitsan tai
muiden leivonnaisten sulattamiseen käytä alempaa tasoa. Lämpötila
on esiasetettu jatkuvasti 60 °C:seen, sitä ei voi säätää.
PIZZA - Koko uunitilassa kiertää kuuma ilma, mikä sopii
erinomaisesti pizzan ja focaccian kypsentämiseen.
PYROLYYSI – Uunin puhdistusohjelma, poistaa lian uunin
sisältä. Kolme eri vaihtoehtoa ECO, NORMAL ja SUPER.
35 FI
Page 36

5.3 OHJELMOINTI
STOP
AJASTIN:
Ajastin toimii uunista riippumatta, eikä se vaikuta lämpövastuksiin. Se
on pelkkä muistuttaja.
· Käännä valitsin Ajastin-asentoon. Ajastimen symboli tulee näkyviin.
Numerot 00:00 näkyvät näytöllä.
· Tämän jälkeen minuuttilukema vilkkuu. Käännä keskipainiketta
haluttuun minuuttilukemaan ja vahvista painamalla samaa painiketta.
· Tämän jälkeen tuntilukema vilkkuu. Käännä keskipainiketta
haluttuun tuntilukemaan ja vahvista painamalla samaa painiketta.
· Käännä valitsin takaisin Stop-asentoon.
Kun aika on kulunut, kypsennysaika poistuu näytöltä. Äänimerkki
kuuluu 15 sekunnin ajan ja Ajastin-näyttö vilkkuu (jos haluat
sammuttaa äänimerkin ennen 15 sekunnin kulumista, paina
keskipainiketta).
KYPSENNYSAJAN OHJELMOINTI:
Eri resepteille on esiohjelmoitu kypsennysaika. Manuaalinen tila,
Sulatus- tai Lämpimänä pitäminen -tilat voidaan esiasettaa
tarvittaessa.
· Käännä valitsin Kypsennysaika-asentoon. Kypsennysajan symboli
tulee näkyviin. Näkyviin tulee eri reseptien esiohjelmoitu
kypsennysaika tai muiden uunin toimintojen kohdalla 00:00.
· Tämän jälkeen minuuttilukema vilkkuu. Käännä keskipainiketta
haluttuun minuuttilukemaan ja vahvista painamalla samaa painiketta.
· Tämän jälkeen tuntilukema vilkkuu. Käännä keskipainiketta
haluttuun tuntilukemaan ja vahvista painamalla samaa painiketta.
· Vahvista uusi kypsennysaika kääntämällä ohjelmointivalitsin
takaisin Stop-asentoon.
Kun aika on kulunut, kypsennysaika poistuu näytöltä. Äänimerkki
kuuluu 15 sekunnin ajan ja Kypsennysaika- ja STOP-symbolit
vilkkuvat.
· Käännä ohjelmavalitsin takaisin Stop-asentoon. Jos et tee tätä,
Kypsennysaika- ja STOP-symbolit jatkavat vilkkumista.
KYPSENNYSAJAN LOPUN OHJELMOINTI:
Eri resepteille on esiohjelmoitu kypsennysaika ja näin ollen
kypsennysajan päättyminen. Manuaalinen tila, Sulatus- tai
Lämpimänä pitäminen -tilat voidaan esiasettaa tarvittaessa.
· Käännä valitsin Kypsennysajan päättyminen -asentoon. STOPsymboli tulee näkyviin. Näkyviin tulee eri reseptien esiohjelmoitu
kypsennysaika tai muiden uunin toimintojen kohdalla 00:00 tai
kellonaika.
· Vahvista päättymisaika kääntämällä ohjelmanvalitsinta.
· Minuuttilukema vilkkuu. Valitse haluttu minuuttilukema
keskimmäistä painiketta kääntämällä ja vahvista valintasi samaa
painiketta painamalla.
· Tämän jälkeen tuntilukema vilkkuu. Valitse haluttu tuntilukema
keskimmäistä painiketta kääntämällä ja vahvista valintasi samaa
painiketta painamalla.
HUOM: Viivästetyn käynnistyksen yhteydessä ohjelmoidun ajan
päättyminen näkyy näytöllä yhdessä "Kypsennysaika"- ja "STOP"symbolien kanssa, ja ainoastaan uunin Reseptitila-toiminto jää jäljelle.
Uuni alkaa automaattisesti laskea aloitusaikaa (päättymisaika kypsennysaika).
Lopuksi uuni sammuu automaattisesti. Äänimerkki kertoo toiminnon
loppumisesta 15 sekunnin ajan, ja "Kypsennysaika"- ja STOPsymbolit vilkkuvat.
· Käännä toimintovalitsin Stop-asentoon. Ellet tee tätä, symbolit
jatkavat vilkkumista.
Esimerkiksi: Kello on 10:00, ruokaa pitää kypsentää 45 minuuttia ja
sen tulisi olla valmiina kello 12:30, seuraavia vaiheita noudattamalla
voit ajastaa kypsennyksen:
- valitse haluttu toiminto
- aseta kypsennyksen kestoksi 45 minuuttia
- aseta kypsennyksen päättymisajaksi 12:30
Uuni aloittaa kypsennyksen automaattisesti klo 11:45 (eli klo 12:30
miinus 45 min) ja lopettaa kypsennyksen automaattisesti asetettuna
ajankohtana, sekä kytkeytyy pois päältä automaattisesti.
VAROITUS Jos kypsennyksen päättyminen valitaan asettamatta
kypsennyksen kestoa, aloittaa uuni kypsennyksen välittömästi ja
kypsennys päättyy vasta valittuna ajankohtana.
5.4 AJASTIMEN KÄYTTÖ
Toimintokytkimellä voidaan asettaa
haluttu kypsennysaika (max.120 min.).
Uuni kytkeytyy automaattisesti pois
päältä valitun ajan kuluttua. Ajastin laskee
aikaa alaspäin asetetusta ajasta, palaa
asentoon O ja uuni kytkeytyy pois päältä
automaattisesti.
Normaalissa käytössä (ilman ajastusta)
kytkimen pitää olla asennossa
HUOM! Käyttäessäsi uunia varmista ettei
ajastin ole asennossa O.
5.5 RUOANLAITTO-OHJEITA
On parempi olla suolaamatta lihoja ennen kypsennystä, sillä suola saa
lihan tihkumaan rasvaa. Tämä likaa uunin ja saa aikaan paljon savua.
Valkoinen liha paloina, sianliha, vasikka, lammas ja kala voidaan
laittaa uuniin kylmänä. Kypsennysaika on pidempi kuin
esilämmitetyssä uunissa, mutta myös keskikohta kypsenee
paremmin, koska lämmöllä on enemmän aikaa tunkeutua ruokaan.
Oikea esilämmitys on punaisen lihan onnistuneen kypsennyksen
perusta.
GRILLAUS
· Ennen grilliin asettamista:
Ota liha jääkaapista pois muutama tunti ennen grillaamista. Pane liha
talouspaperin päälle. Tämä parantaa lihan koossa pysymistä,
kypsästä lihasta tulee maukkaampaa eikä sen sisusta jää kylmäksi.
Mausta liha pippurilla ja mausteilla ennen grillaamista, mutta lisää
suola vasta kypsennyksen jälkeen. Näin liha pysyy paremmin koossa
ja mehukkaana. Sivele kaikki kypsennettävä ruoka kevyesti öljyllä.
Tämä on helpointa tehdä leveällä sudilla. Ripottele sitten lisää pippuria
ja yrttejä (timjamia tms.)
· Kypsennyksen aikana:
Älä puhkaise lihan pintaa kypsennyksen aikana, ja ole erityisen
varovainen kääntäessäsi ruokaa. Muuten ruoka kuivuu.
PAISTAMINEN
Vältä kiiltävien vuokien käyttämistä, sillä ne heijastavat lämpöä ja
voivat pilata leivonnaiset. Jos leivonnaisesi ruskistuvat liian nopeasti,
peitä ne leivinpaperilla tai foliolla.
Huomaa: Oikea tapa käyttää foliota on laittaa kiiltävä pinta
leivonnaista kohti. Muuten kiiltävä pinta heijastaa lämpöä, eikä se näin
ollen tunkeudu ruokaan.
Vältä luukun avaamista kypsennyksen ensimmäisten
20–25 minuutin aikana:
Kohokkaat, briossit, kakkupohjat yms. laskevat helposti. Voit tarkistaa
veitsellä tai neulalla keskikohdasta, onko kakku valmis. Jos terä on
puhdas ja kuiva, kakku on valmis ja sen paistamisen voi lopettaa. Jos
terässä on kosteutta tai taikinaa, jatka paistamista hieman alemmalla
lämpötilalla, kunnes kakku on valmis, muttei palanut.
5.6 NÄYTÖN KONTRASTIN SÄÄTÄMINEN
Näytön kontrastia voi säätää milloin tahansa.
Oletusasetus on "C5". Voit säätää asetusta seuraavasti:
· Käännä ohjelmavalitsin "Valo"-asentoon ja toimintovalitsin
"O"-asentoon. Paina keskipainiketta 3 sekunnin ajan, niin "CX" näkyy
näytöllä (X = kontrastiasetus).
Säädä kontrastiasetusta kääntämällä keskipainiketta. Asetukset ovat
välillä 1–9. Vahvista uusi asetus painamalla keskipainiketta 3
sekunnin ajan.
36 FI
Page 37

5.7 ELEKTRONISEN OHJELMOINNIN KÄYTTÖ
TOIMINTO
MINUUTTI
HÄLYTIN
KYPSENNYS
-AIKA
KYPSENNYK-
SEN PÄÄTTY
-MISAIKA
LUKITUS
KYTKEMINEN PÄÄLLE
• Paina valitsin-säädintä
kerran
• Paina painikkeita "+" ja "-"
asettaaksesi halutun ajan
• Vapauta kaikki painikkeet.
• Paina valitsin-säädintä
kaksi (2) kertaa.
• Paina painikkeita "+" ja "-"
asettaaksesi halutun
kypsennysajan.
• Vapauta kaikki painikkeet.
• Aseta kypsennystoiminto
uunin toiminnon valitsimella
• Paina valitsin-säädintä
kolme (3) kertaa Paina
"+" ja "-" painikkeita
asettaaksesi ajan jolloin
haluat uunin kytkeytyvän
pois päältä Vapauta
painikkeet Aseta
kypsennystoiminto uunin
toiminnon valitsimella
• Lukitus / lapsilukko toiminto
aktivoidaan painamalla Set
(+) vähintään 5 sekunnin
ajan. Tästä eteenpäin kaikki
toiminnot onvat lukittuja ja
näytössä vilkkuu STOP ja
kellonaika vuorotellen.
KYTKEMINEN POIS PÄÄLTÄ
• Asetetun ajan kuluttua toiminto
sammuu automaattisesti ja
kuuluu äänimerkki
(äänimerkki hiljenee
automaattisesti, voit myös
hiljentää sen heti painikkeella
SELECT ).
• Asetetun ajan kuluttua uuni
sammuu automaattisesti.
Jos haluat sammuttaa uunin
aikaisemmin, siirrä valitsin
asentoon 0 tai aseta
kypsennysaika arvoon 0:00
(painikkeet SELECT, "+" ja
"-")
• Asetetun ajan kuluttua uuni
sammuu. Jos haluat kytkeä
toiminnon pois päältä käsin,
käännä valitsin asentoon O.
• Lukitus / lapsilukko toiminto
poistetaan painamalla Set (+)
uudestaan vähintään 5
sekunnin ajan.
TEHTÄVÄTT
• Antaa äänimerkin, kun
asetettu aika on kulunut.
• Näyttää toiminnon aikana
jäljellä olevan ajan,
kun painat painiketta
• Mahdollistaa uuniin
laitetun ruoan
kypsennysajan asettamisen.
• Näyttää jäljellä olevan ajan,
kun painat painiketta
valitsin-säädintä kaksi (2)
kertaa. Muuttaaksesi jäljellä
olevaa aikaa paina SELECT
sekä "+" ja "-" painikkeita
• Mahdollistaa kypsennysajan
päättymisen asettamisen.
• Näyttää ohjelmoidun ajan,
kun painat valitsin-säädintä
kolme (3) kertaa.
Muuttaaksesi jäljellä olevaa
aikaa paina SELECT sekä
"+" ja "-" painikkeita
,LUKITUSLukitus
ARKOITUS
• Mahdollistaa uunin ajastimen
käyttämisen aikahälyttimenä
(voidaan käyttää uunin
toimiessa tai ollessa
sammutettu).
• Asetetun ajan kuluttua
toiminto sammuu
automaattisesti ja kuuluu
äänimerkki. Paina mitä
tahansa painiketta äänimerkin
hiljentämiseksi. Paina
valitsin-säädintä palataksesi
Kello-toimintoonKYPSENNYK
• Tätä toimintoa käytetään
tavallisesti yhdessä
Kypsennysaika-toiminnon
kanssa. Jos esimerkiksi
haluat kypsentää ruokaa 45
minuuttia ja sen tulisi olla
valmista kello 12:30, toimi
seuraavasti: Valitse
kypsennystoiminto, aseta
kypsennysajaksi 45 minuuttia
ja kypsennyksen
päättymisajaksi 12.30.
• Kypsennystoiminto alkaa
automaattisesti kello 11:45
(45 minuuttia ennen kuin
kello on 12:30), ja kun kello
tulee kypsennyksen
päättymisajan kohdalle, uuni
sammuu automaattisesti.
Varoitus! Jos asetat vain
kypsennyksen päättymisajan
mutta et kypsennysaikaa,
uuni kytkeytyy päälle heti ja
sammuu, kun kello tulee
kypsennyksen päättymisajan
5.8 KELLONAJAN ASETTAMINEN
HUOMIO! Uunin asennuksen tai sähkökatkon jälkeen (näytössä vilkkuu 12:00) on ensimmäiseksi
asetettava kellonaika. Kellonaika asetetaan seuraavalla tavalla.
00:00
select
HUOMAA! Uuni toimii vain kun kellonaika on asetettu!
• Paina valitsin-säädintä neljä (4) kertaa
• Aseta kellonaika painikkeilla ”+” ja ”-”
• Vapauta kaikki painikkeet
37 FI
Page 38

6. PYROLYYTTINEN PUHDISTUS
**Uunissa on oltava tämä toiminto
Uuni on varustettu pyrolyyttisella puhdistusjärjestelmällä, joka tuhoaa
ruoka-ainejäämät korkeassa lämpötilassa. Uuni puhdistetaan
automaattisesti, kun ohjelma on valittu. Pyrolyysitoiminnon aikana
syntyvät palamiskaasut puhdistetaan pyrolyysin aikana ja puhdistus
aloitetaan heti, kun kuumennus alkaa. Pyrolyysi tarvitsee toimiakseen
hyvin korkean lämpötilan. Tämän vuoksi uunin luukussa on
turvalukko.
Pyrolyysitoiminto voidaan keskeyttää milloin tahansa. Luukku
voidaan avata vasta, kun turvalukkosymboli poistuu näytöstä.
HUOMAUTUS: Jos uunin päälle on asennettu liesitaso, älä koskaan
käytä kaasupoltinta tai sähkölevyä pyrolyysitoiminnon aikana, jotta
liesitaso ei ylikuumentuisi.
KAKSI PYROLYYTTISTA PUHDISTUSOHJELMAA on ohjelmoitu
valmiiksi.
.PYROLYYTTINEN EKOPUHDISTUS Puhdistaa vähän
likaantuneen uunin. Puhdistus kestää 65 minuuttia.
. PYROLYYTTINEN SUPERPUHDISTUS Puhdistaa vaikeasti
likaantuneen uunin. Puhdistus kestää 90 minuuttia.
Älä koskaan käytä kaupasta saatavaa puhdistusainetta uunissa,
jossa on pyrolyysitoiminto.
Vihje: Kun käytät pyrolyyttista puhdistusta heti ruuanvalmistuksen
jälkeen, voit hyödyntää ruuanlaitosta syntyneen jälkilämmön ja siten
säästää energiaa.
Ennen pyrolyysitoiminnon käyttöä toimi seuraavasti:
Poista kaikki irrotettavat tarvikkeet uunista. Ne eivät kestä
toiminnon tarvitsemaa korkeaa lämpötilaa ja vahingoittuvat, jos ne
jätetään uuniin.
Siivoa suuret nestevalumat tai tahrat ennen toiminnon käyttöä, sillä
niiden tuhoaminen korkeassa lämpötilassa kestäisi liian kauan. Ota
myös huomioon, että hyvin suuri määrä rasvaa voi syttyä palamaan
pyrolyysitoiminnon aikana syntyvässä korkeassa lämpötilassa.
Sulje uunin luukku.
Siivoa suuret nestevalumat ennen puhdistustoiminnon käyttöä.
Pyrolyyttisen puhdistuksen kytkeminen käyttöön:
Merkkivalo vilkkuu jälleen puhdistustoiminnon päätyttyä. Se jää
palamaan, kunnes uunin sisälämpötila on laskenut riittävän
alhaiseksi, jolloin merkkivalo sammuu.
Pyrolyyttisen puhdistuksen jäljiltä uunin seiniin jää valkoista tuhkaa.
Odota, kunnes uuni on jäähtynyt kokonaan, ja pyyhi sitten tuhka uunin
sisäpinnoilta kostealla sienellä.
7. LAPSILUKKO
Tämä toiminto on erittäin hyödyllinen etenkin silloin, kun lapsia on
lähettyvillä. Se estää lapsia kytkemästä uuniin virtaa tai muuttamasta
ohjelmoituja toimintoja.
Turvatoiminto lukitsee uunin hallintapaneelin käytön ajaksi.
Turvatasoja on kaksi:
TASO 1 : V alitsimien ja keskipainikkeen lukitseminen.
Käyttöönotto: Käännä ohjelmavalitsin lapsilukko-kohtaan.
Seuraus: Ohjelmavalitsimet eivät ole käytössä.*
Käytöstäpoisto: Käännä ohjelmavalitsin 0-asentoon.
TASO 2: Toimintovalitsimien lukitseminen.
Käyttöönotto: Käännä toimintovalitsin lapsilukkoasentoon ja paina
keskipainiketta 3 sekunnin ajan.
Seuraus: Kaikki valitsimet on poistettu käytöstä.*
Käytöstäpoisto: tee samoin kuin käyttöön otettaessa. Käännä
toimintovalitsin lapsilukkoasentoon ja paina keskipainiketta 3
sekunnin ajan.
*Huomautus: Turvallisuussyistä uuni voidaan aina sammuttaa
kääntämällä valintakytkin 0-asentoon, myös silloin, kun lapsilukko
on kytketty.
7.1 LASTEN TURVALLISUUS - LAPSILUKKO
1- Käännä toimintovalitsin pyrolyyttisen puhdistuksen kohdalle.
Teksti PYRO tulee näkyviin. Näytössä vilkkuu teksti ECO, joka
osoittaa valitun tilan.
Muistettavaa: ECO - 65 minuuttia - vähän likaantunut uuni SUP - 90
minuuttia - vaikeasti likaantunut uuni
2- Valitse keskipainikkeella haluamasi pyrolyyttinen puhdistustila
uunin likaisuuden mukaisesti: ECO tai SUP .
• Valinta vahvistetaan automaattisesti 3 sekunnin kuluttua.
Uunin pyrolyyttinen puhdistus alkaa. Valittu pyrolyyttisen
puhdistuksen tila vilkkuu ja aika- ja seis-merkkivalot syttyvät.
Pyrolyyttisen puhdistuksen aikana näytössä näkyy lukkosymboli,
mikä tarkoittaa, että uunin luukku on lukittu. Jäähdytystuuletin
käynnistyy.
Merkkivalo vilkkuu, kunnes tarvittava lämpötila on saavutettu, minkä
jälkeen valo jää palamaan.
* Pyrolyyttisen toiminnon aloittamista voidaan siirtää valitsemalla
aika, jolloin toiminto päättyy.Käännä ohjelmavalitsin päättymisajan
kohdalle ja aseta haluamasi aika toiminnolle.
Itsepuhdistavan pyrolyysitoiminnon aikana uunin pinnat saattavat
kuumentua normaalia käyttöä enemmän. Pidä lapset loitolla
toiminnon ajan.
Pyrolyyttisen puhdistustoiminnon lopuksi uuni sammuu
automaattisesti.
T oiminnon päättymisen jälkeen kuuluu äänimerkki 15 sekunnin ajan ja
aika- ja seis-merkkivalot vilkkuvat.
vilkkumistaan, kunnes näin tehdään. Pyrolyysitoiminnon symboli
poistuu näkyvistä, kun toiminto on päättynyt. Uunin luukku pysyy
lukittuna niin kauan kuin uuni on hyvin kuuma. Tällöin luukkua ei voi
avata.
Käännä toimintovalitsin seis-asentoon. Symbolit jatkavat
Jäähdytystuuletin sammuu vasta, kun uunin sisäosien lämpötila on
riittävän alhainen.
38 FI
Page 39

SIKKERHEDSTIP
• ADVARSEL: Apparatet og dets tilgængelige dele bliver varme ved brug. Undgå berøring med de varme
dele.
• Børn under 8 år skal holdes fra apparatet, med mindre de er under konstant overvågning.
•Dette apparat kan benyttes af børn fra 8 år og op efter samt af personer med nedsatte fysiske,
sensoriske og mentale evner eller mangel på erfaring og viden om brug af apparatet, hvis de overvåges
eller får instruktion i brug og forstår de farer, der kan være i forbindelse med brug.
• Børn må ikke lege med apparatet.
• Rengøring og vedligeholdelse skal ikke udføres af børn uden overvågning.
•ADV ARSEL: Tilgængelige dele bliver varme ved brug. Små børn skal holdes væk fra apparatet.
• Benyt ikke stærke rengøringsmidler med slibeeffekt eller skapre metalgenstande til at rengøre ovnens
glasdør, da de kan ridse overfladen, hvilket kan resultere i at glasset går i stykker .
• Evt. spild skal fjernes før rengøring.
• Under selvrens med pyrolyse bliver overfalden varmere end normalt og børn skal derfor holdes fra
apparatet.
• Ovnen skal slukkes før sikkerhedsforanstaltningen fjernes og efter rens, skal
sikkerhedsforanstaltningen sættes på plads igen efter anvisningerne.
• Brug kun den temperatursonde, der anbefales til denne type ovn.
• Benyt ikke en damprenser til rengøringsprocedurer.
• ADVARSEL: Sørg for at apparatet er slukket før udskiftning af lampen for at undgå risikoen for elektrisk
stød.
• Frakobling skal ske i de faste ledninger i overensstemmelse med gældende regler og bestemmelser.
• Af instruktionen skal det fremgå, hvilken type ledning, der skal benyttes og temperaturen på bagsiden af
apparatets overflade skal indtænkes.
• Hvis forsyningsledningen er beskadiget, skal den udskiftes med en speciel ledning eller samling, som
skal rekvireres fra producenten eller en serviceagent.
• ADVARSEL: For at undgå mulige farer forårsaget af utilsigtet nulstilling af den termiske afbryder, må
dette apparat ikke forsynes via en ekstern afbryderenhed, som f.eks. en timer, eller tilsluttes et kredsløb,
hvor regelmæssigt tændes og slukkes af forsyningsleverandøren.
• "ADVARSEL: Tilgængelige dele kan blive varme, når grillen benyttes. Små børn skal holdes væk fra
apparatet".
39 DK
Page 40

1. GENERELLE ADVARSLER
Læs anvisningen omhyggeligt, for at få mest muligt ud af din ovn. Vi anbefaler, at du gemmer installations- og brugsanvisningen til senere
reference, og at du, inden du installerer ovnen, noterer dens serienummer, i tilfælde af at du får brug for hjælp fra eftersalgsservicen.
Når du har pakket ovnen ud, skal du sikre, at den på ingen måde er beskadiget. Hvis du på nogen måde er i tvivl, må du ikke bruge den.
Kontakt en fagligt kvalificeret person. Hold emballagematerialer såsom plastikposer, skumplast eller søm utilgængeligt for børn, da de er
farlige for børn.
Virksomheden skal ikke være ansvarlig hvis instruktionerne, der er fremsat i dette dokument, ikke overholdes.
! BEMÆRK: Funktioner, egenskaber og tilbehør til ovne, nævnt i denne manual, kan ændres afhængigt af ovnmodeller .
1.1 OVERHOLDELSESERKLÆRING
Dette apparats dele, der kan komme i kontakt med fødevarer,
overholder bestemmelserne i EØF-direktivet 89/109. Apparatet
overholder de europæiske direktiver 2006/95/EF og
2004/108/EF og efterfølgende ændringer. Når du har pakket
ovnen ud, skal du sikre, at den på ingen måde er beskadiget.
Hvis du på nogen måde er i tvivl, må du ikke bruge den: Kontakt en
fagligt kvalificeret person.
Hold emballagematerialer såsom plastikposer, skumplast eller søm
utilgængeligt for børn, da de er farlige for børn.
1.2 SIKKERHEDSTIPS
Ovnen må kun bruges til det formål, hvortil den blev designet. Den må
kun bruges til tilberedning af mad. Enhver anden brug, så som
opvarmning af rum, er en forkert brug af ovnen og er derfor farlig.
Producenterne kan ikke holdes ansvarlig for nogen skader, der
skyldes upassende, forkert eller ufornuftig brug.
Du skal følge nogle få grundlæggende regler, når du bruger et elektrisk
apparat.
- Du må ikke trække i el-ledningen, for at tage stikket ud af
stikkontakten.
- Du må ikke røre ved ovnen med våde eller fugtige
hænder eller fødder.
- Du må ikke bruge ovnen, medmindre du er iført fodtøj.
- Det er som regel ikke nogen god idé, at bruge adaptere, flere
stikkontakter til adskillige stik eller forlængerledninger.
- Hvis ovnen bryder sammen, eller udvikler en fejl, skal der slukkes
på hovedafbryderen, og der må ikke røres ved ovnen.
• Hvis ledningen er beskadiget, skal den omgående
udskiftes.
Følg disse instruktioner under udskiftning af
ledningen.
Fjern el-ledningen, og udskift den med en ledning af typen H05VV-F.
Kablet skal kunne modstå den elektriske strøm, som er nødvendig for
ovnen. Kabeludskiftning skal foretages af behørigt kvalificerede
teknikere.
Jordledningen (gul-grøn) skal være 10 mm længere end el-ledningen.
Brug kun et godkendt servicecenter til reparationer, og sørg for , at der
kun bruges originale dele. Hvis førnævnte instruktioner ikke
overholdes, kan producenterne ikke garantere ovnens sikkerhed.
Den ovn, du lige har anskaffet dig, har de beskrevne tekniske
karakteregenskaber, og du må ikke foretage nogen ændringer til den.
Brandfarlige produkter må ikke opbevares i ovnen. Der kan gå ild i
dem, hvis der ved et uheld tændes for ovnen.
Du må ikke læne dig op ad, eller lade børn sidde på
ovndøren.
Brug grillhandsker, når du sætter ting i eller tager dem ud af ovnen.
1.3 ANBEFALINGER
• Efter hver brug af ovnen, vil minimal rengøring hjælpe med at holde
ovnen helt ren.
• Ovnens sider må ikke beklædes med aluminiumfolie eller
engangsbeskyttelse, som kan købes. Aluminiumsfolie eller nogen
anden beskyttelse, i direkte kontakt med varm emalje, kan smelte og
svække emaljen på de indvendige sider.
• For at forhindre overdreven tilsmudsning af ovnen og den
resulterende kraftige røgede smag, fraråder vi brug af ovnen ved
meget høje temperaturer. Det er bedre at forlænge tilberedningstiden,
og sænke temperaturen en anelse.
Identifikationsskilt
Foruden det tilbehør, der følger med ovnen, anbefaler vi, at du kun
bruger fade og bageforme, der kan modstå
1.4 INSTALLATION
Producenterne er ikke forpligtede til at udføre dette. Hvis der er
brug for producentens assistance, til at udbedre fejl, der skyldes
forkert installation, er denne assistance ikke dækket af garantien.
Installationsanvisningen til fagligt kvalificeret personale skal følges.
Forkert installation kan forårsage skade på, eller kvæstelse af
personer, dyr eller ejendomme. Producenten kan ikke holdes
ansvarlig for sådanne skader eller kvæstelser.
Køkkenenheden, hvori ovnen skal installeres, skal være fremstillet af
materiale, der kan modstå temperaturer på mindst 70 °C.
Ovnen kan placeres højt på en kolonne eller under et køkkenbord.
Inden fastgørelse skal du sikre god ventilation på ovnpladsen, for at
muliggøre korrekt cirkulation af den friske luft, der er nødvendig til
afkøling og beskyttelse af de interne dele. Lav åbningerne, som er
specificeret på den sidste side i henhold til installationstypen.
1.5 ELEKTRISK FORBINDELSE
DEN ELEKTRISKE FORBINDELSE SKAL FORET AGES AF
EN GODKENDT PROFESSIONEL, ELLER TEKNIKER MED
LIGNENDE KVALIFIKA TIONER.
Den enhed hvor apparatet installeres, skal overholde den standard,
som er i kraft i installationslandet.
Producenten accepterer ikke noget ansvar, hvis denne bestemmelse
ikke overholdes.
Forbindelse til netværket skal ske via en jordet stikkontakt, eller ved
hjælp af en flerpolet afbryder i henhold til installationslandet.
Installationen skal være beskyttet af egnede sikringer og have
ledninger med et tværsnit, der er stort nok til at forsyne ovnen på
normal vis.
FORBINDELSE:
Ovnen er udstyret med en el-ledning udelukkende til forbindelse til en
spænding på 220-240 V AC på tværs af faser eller på tværs af fase og
neutral.
Forbindelsen skal foretages, når følgende er tjekket:
- forsyningsspændingen angivet på måleren,
Beskyttelsesledningen (grøn/gul) forbundet til ovnens jordterminal,
skal være forbundet med enhedens jordterminal.
Forsigtig:
Få enhedens jordkontinuitet tjekket af en elektriker, inden
forbindelsen foretages.
Producenten vil ikke være ansvarlig for nogen hændelser eller
eventuelle konsekvenser, der kan opstå fra brug af ovnen, hvis denne
ikke er jordet eller er forbundet til jord med defekt kontinuitet.
NB: Glem ikke, at ovnen kan behøve eftersalgsservice.
Find også stikkontakten, så ovnen kan forbindes, når først den er
fjernet fra sin plads.
Strømforsyningsledning: Hvis strømforsyningskablet skal skiftes, skal
dette gøres af eftersalgsservicen eller af en person med lignende
kvalifikationer.
meget høje temperaturer.
Code produit:
Numéro de série :
40 DK
Page 41

2. TILBEHØR (afhænger af modellen)
2.1 OVNUDSTYR
Det er nødvendigt at foretage en umiddelbar rengøring af udstyret,
inden hver enkel del anvendes for første gang. Vask dem med en
svamp. Skyl og tør dem.
Hylden kan bruges til forme og fade.
Drypbakken opfanger saften fra grillet mad.
Brug aldrig drypbakken som en bradepande, da fedtaflejringer hurtigt
kan sprede sig overalt i ovnen og producere overdreven røg.
Anbring aldrig drypbakken direkte på ovnbunden.
Pizzastenen, der giver en sprødere pizza, er udstyret i forhold til
modellen, med stativ og pizzaruller.
LED VISION
2.3
Er et belysningssystem, som erstatter den traditionelle « lyspære ».
14 LED'er (til ikke-pyrolytiske versioner) eller 10 kraftige LED'er (til
pyrolytiske versioner) er integreret i døren. Disse producerer hvid
belysning af høj kvalitet, som gør det muligt at se ovnens indvendige
side tydeligt, uden nogen skygger på hylderne.
Fordele:
Ud over at give fremragende belysning inde i ovnen, varer dette
system længere end den traditionelle pære, det er nemmere at
rengøre, og frem for alt er det energibesparende.
- Optimalt udsyn
- Varig belysning
- Meget lavt energiforbrug, - 95 % sammenlignet med den traditionelle
belysning Høj.
2.4 AFMONTERING OG RENGØRING AF WIRERISTE
1- Fjern wireristene ved at trække dem igennem i pilens retning.
2- Rengør wireristene ved at vaske dem med opvaskemiddel, eller
rengøre dem med en våd svamp og tør dem derefter.
3- Efter rengøringsprocessen installer ristene i omvendt rækkefølge.
Bagepladen skal anbringes på hylden. Den er beregnet til at bage
små kager som fx vandbakkelser, småkager , marengs, osv...
Anbring aldrig bagepladen direkte på ovnbunden.
2.2 ROTERENDE SPYD
Forvarmning er ikke nødvendig til madlavning med roterende spyd.
Madlavning med døren lukket.
Energiforbruget er 90-95 % mindre end traditionelle systemer.
3
2
1
1- Rist
2- Stegespid
3- Kroge og skruer
4- Håndtag
1. Skru krogene af
2. Sæt spiddet i kødet
3. Fastgør kødet med krogene
4. Stram skruerne
5. Sæt spiddet i motorhullet
4
Håndtaget
Når ovnen er i brug, skal alt ubrugt tilbehør tages ud af ovnen.
3. RENGØRING AF OVNEN
Vent på, at ovnen er afkølet, inden den rengøres med håndkraft.
Ovnen må aldrig rengøres med slibende rengøringsmidler, ståluld
eller skarpe genstande, da emaljen kan blive så beskadiget, at den
ikke kan repareres.
Brug kun sæbevand eller rengøringsmiddel med blegemiddel
(salmiakspiritus).
Ovnens sider må aldrig beklædes med aluminiumsfolie.
GLASDELE
Vi anbefaler, at du tørrer glasdøren af med absorberende køkkenrulle,
hver gang du bruger ovnen. Hvis der er kraftig stænkning, så kan du
rengøre den med en sammenpresset svamp og rengøringsmiddel og
skylle efter.
Der må ikke bruges barske slibende rengøringsmidler eller skarpe
metalskrabere til rengøring af ovndørens glas, da de kan ridse
overfladen, hvilket kan medføre, at glasset splintrer.
OVNDØRENS TÆTNING
Hvis ovntætningen bliver beskidt, rengøres den med en let fugtig
svamp.
TILBEHØR
Rengør dem med en svamp, vædet med sæbevand. Skyl med rent
vand og tør. Undgå slibende rengøringsmidler .
DRYPBAKK
Efter grillning fjernes drypbakken fra ovnen. Vær omhyggelig med at
hælde det varme fedtstof i en beholder. Vask og skyl drypbakken i
varmt vand med en svamp vædet med opvaskemiddel.
Hvis der fortsat er rester i bakken, gennemblødes de i vand og
rengøringsmiddel.
Den kan også lægges i en opvaskemaskine eller rengøres med en
kommerciel ovnrens.
En beskidt drypbakke må aldrig anbringes i ovnen.
OVNBELYSNINGS
Lå strømforsyningen til ovnen fra, inden lampen rengøres eller
udskiftes.
Pæren og dens låg er lavet af materiale, der kan modstå høje
temperaturer.
41 DK
Page 42

Pærens karakteregenskaber:
230 V AC - 25 W- E 14 basistemperatur 300 °C. For at ændre en
defekt pære skal du blot:
Skrue glaslåget af,
Skrue pæren ud,
Udskifte den med den samme type: Se
karakteregenskaberne ovenfor,
Efter udskiftning af den defekte pære, skal det
beskyttende glaslåg skrues tilbage på plads.
4. SERVICE CENTRE
Inden du ringer til servicecenteret.
Hvis ovnen ikke virker, anbefaler vi, at:
Tjekke, om ovnen er sat korrekt til strømforsyningen.
Hvis årsagen til fejlen ikke kan påvises:
Kobl ovnen fra el-nettet, undlad at røre ved ovnen, og ring til
eftersalgsservicen.
Inden du ringer til servicecenteret, skal du huske at notere
serienummeret fra skiltet med serienummerspecifikationer.
Ovnen leveres med et garantibevis, der sikrer, at den bliver repareret
uden beregning af servicecenteret, så længe den er dækket af
garantien.
Dette produkt er mærket i henhold til EU-direktiv
2012/19 / EU om affald af elektrisk og elektronisk
udstyr (WEEE). WEEE indeholder både forurenende
stoffer (som kan forårsage negative konsekvenser for
miljøet) og grundlæggende komponenter (som kan
genbruges). Det er vigtigt at underkaste WEEE
særlige behandlinger med henblik på at fjerne og
bortskaffe ordentligt alle forurenende stoffer, og
genvinde og genanvende alle materialer.
Enkeltpersoner kan spille en vigtig rolle i at sikre, at
WEEE ikke bliver et miljømæssigt problem; det er vigtigt at følge nogle
grundlæggende regler:
• WEEE skal ikke håndteres som husholdningsaffald.
• WEEE skal udleveres til de relevante indsamlingssteder, der
forvaltes af kommunen eller af registrerede selskaber. I mange lande
findes der ordninger med afhentning af stort WEEE affald.
• Når du køber et nyt apparat, kan det gamle returneres til den
forhandler, der skal indsamle det gratis ved udlevering af et nyt
apparat, så længe udstyret er af tilsvarende art og har de samme
funktioner som det leverede udstyr.
42 DK
Page 43

5. BESKRIVELSE AF DISPLAYET
Displaypanel: Tid, programmering af tilberedningstilstand,
indikatorlamper, tilberedningstemperaturfunktion og
KNAP TIL JUSTERING OG BEKRÆFTELSE
Indstillinger: Temperatur, programmering af tilberedning og sluttidspunkt for tilberedning Justeres ved at dreje knappen mod “ - ” eller “ + ”
For at bekræfte indstillingen: Tryk på knappen.
220
Indikatorlampe:
stigende temperatur
PYRO
Ur/programmering/
Tilberedningstemperatur
Display af programsymbol:
Klokkeslæt
Tilberedningstimer
Indikatorlampe
Børnesikring
Sluttidspunkt
Ovnens funktionsdisplay
og anbefalet
niveauindstilling
PYRO
Stegevender
Booster-display:
Forvarmning
43 DK
LED slukkes, når døren åbnes
Indikatorlampe
Sådan lukkes ovndøren
Page 44

5.1 INDEN OVNEN BRUGES FOR FØRSTE
GANG
• INDLEDENDE RENGØRING
- Rengør ovnen, inden den bruges første gang:
- Aftør udvendige flader med en fugtig, blød klud.
- Vask alt tilbehør og tør ovnen af indvendigt med en opløsning af varmt
vand og opvaskemiddel.
- Sæt den tomme ovn til den højeste temperatur, og lad den være tændt i
ca. 1 time. Det vil fjerne al dvælende lugt af ny ovn. Sørg for, at lokalet er
godt ventileret, mens dette udføres.
• HUSK PÅ FØLGENDE
Bekræftelse på, at timeren fjender
Ændring skal bekræftes ved at trykke på knappen.
Sådan stoppes ovnen:
Dette kan være nødvendigt, hvis du har indtastet en forkert instruktion.
For at stoppe ovnen .... drej funktionsvalgknappen tilbage til Stop-
indstillingen.
Børnesikring:
Vælg børnesikringen for at låse ovnens betjeningsknapper. Der
henvises til afsnittet “Programmering - børnesikring”.
Blæseren:
Den beskytter kontrolpanelet og elektronikken mod varmebeskadigelse.
Den starter og stopper så automatisk, selv når der er slukket for ovnen.
Ovnlampe:
Ved at dreje knappen over på lyssymbolet kan du tænde for ovnlampen,
når den ikke er i brug.
Når ovnen er i brug, bliver lampen ved med at lyse gennem alle
ovnfunktionerne, og når døren åbnes.
• INDSTILLING AF URET
Når ovnen er forbundet til elforsyningen eller efter et langt strømsvigt,
skal uret indstilles igen.
For at indstille uret:
1- Drej betjeningsknappen til “Ur”-symbolet
2- Indstil uret med den midterste knap ved at dreje den til “-” eller “+”,
3 - drej betjeningsknappen tilbage til STOP-indstillingen.
10:30
5.2 SÅDAN BRUGES OVNEN
MANUEL TILST AND
De tilberedningsmetoder, der anbefales til manuel tilstand, er anført i
tabellen nedenfor. Der anbefales også en temperatur til hver
tilberedningsmetode. Den kan ændres inden for et forudbestemt
interval.
**
**
Indstillet
temperatur
oC
210
160
210
180
L2
190
240
40
60
230
Funktionstilstand ud
fra ovnmodellen
Bund + blæser
Bund
Bund + top 220 50-240
Bund + top + blæser
Rundt varmelegeme + blæser
Grill
Grill + blæser
Grill + stegevender + blæser
Optø
Hold varm
Pizza
Pyro Pyro
* Booster: Hurtig temperaturstigning
** Ovnen skal have denne funktion
1- Drej ovnvalgknappen til den ønskede tilberedningsfunktion. De
varmelegemer, der er i brug til den valgte tilberedningsmetode, vises.
2- Den passende temperatur i henhold til den valgte
tilberedningsmetode vises. Den kan ændres inden for et
forudbestemt interval - se tabellen ovenfor.
For at ændre temperaturindstillingen drejes den midterste knap, og
på timeren bekræftes indstillingen ved at trykke på den samme knap.
... temperaturdisplayet er fastsat, men kan ændres i løbet af
tilberedningscyklen.
Ovnen starter tilberedningen og begynder at varme op.
Indikatorlampen blinker, til den valgte temperatur er nået. Et hørbart signal
lyder sidst i denne funktion, og
3- En tilberedningstid og et sluttidspunkt for tilberedningen kan
programmeres ved at dreje programvalgknappen til “tilberedningstid”
eller “sluttidspunkt for tilberedning”.
Forudbestemt
temperatur
ECO: 425 / 65min
SUP: 425 / 1h 30min
oC
50-220
50-220
50-230
50-230
L1-L3
50-200
180-240
Nej
Nej
230
Funktions
booster*
Booster
Booster
Booster
Booster
Displayet “tilberedningstid” eller “sluttidspunkt for tilberedning”
begynder at blinke. Ændr, med den midterste knap, indstillingerne efter
behov, og bekræft på timeren.
Når du har gjort dette, må du ikke glemme at dreje programvalgknappen
tilbage til “stop-indstilling” for at bekræfte den nye indstilling.
For yderligere oplysninger om programmering henvises der til kapitel
indikatorlampen bliver til et fast lys.
5.3 PROGRAMMER.
3- T il slut i tilberedningscyklussen drejes funktionsvalgknappen tilbage
til “stop-indstilling”.
Indikatoren blinker igen, den bliver ved med at lyse, efter der er slukket
for ovnen, og den går ud, når temperaturen inde i ovnen er tilstrækkelig
lav.
• TILBEREDNINGSTILSTAND
Al tilberedning skal foretages med døren lukket.
BUND + BLÆSER - kombinationen med bundvarmelegeme
og blæser er ideelt til frugtflans, tærter, quiches og bagværk. Det
forhindrer maden i at blive tør og får brøddej til at hæve. Anbring pladen
nederst i ovnen.
BUND - Sådan bruges det nederste legeme. Ideelt til
tilberedning af alle butterdejsretter. Brug dette til flans, quiches, tærter,
patéer og al tilberedning, der behøver mere varme nedefra.
BUND + TOP - både top- og bundvarmelegemer er i brug.
Denne metode er ideel til al traditionel stegning og bagning. Ved
tilberedning af rødt kød, roastbeef, lammekølle, vildt, brød og mad
indpakket i sølvpapir.
BUND + TOP + BLÆSER - både top- og bundvarmeelementer
bruges sammen med blæseren, som cirkulerer varm luft rundt i hele
ovnen. Vi anbefaler denne metode til fjerkræ, bagværk, fisk og
grøntsager. Med denne metode opnås der bedre
varmegennemtrængning, og tilberednings- og forvarmningtiderne bliver
også reduceret. Muligheden med blæsertilberedning lader dig tilberede
forskellig mad forskellige steder i ovnen på samme tid, hvilket giver en
jævn varmefordeling, men uden risikoen for at smag og lugt blandes. Når
der tilberedes forskellig mad samtidigt, skal du regne med yderligere 10
minutter.
RUNDT VARMELEGEME + BLÆSER - luft, der er blevet
opvarmet, blæses rundt af blæseren på forskellige niveauer. Det er
ideelt til tilberedning af forskellige slags mad på samme tid (fx kød og
fisk), uden at smag og lugt blandes. Det tilbereder stille og roligt og er
ideelt til sandkager, bagværk osv .
GRILL - sådan bruges topvarmelegemet. Succes er
garanteret for mixed grills, kebabber og gratinretter. Grillen skal
forvarmes til en høj temperatur i 5 minutter. Hvidt kød skal altid anbringes
på nogen afstand af grill-legemet, tilberedningstiden er lidt længere,
men kødet bliver mere saftigt. Rødt kød og fiskefileter kan anbringes
direkte på risten med bradepanden nedenunder nederst i ovnen.
GRILL + BLÆSER - topvarmelegemet bruges sammen med
blæseren, som cirkulerer den varme luft rundt i ovnen. Forvarmning
anbefales til rødt kød, men er ikke nødvendigt til hvidt kød. Grillning er
ideel til tilberedning af tykkere madvarer som fx svinekød eller fjerkræ.
Mad, der skal grilles, skal anbringes lige midt i ovnen.
Ved at sætte bradepanden under risten opfanges al kødsaft. For de
bedste resultater skal der sørges for, at maden ikke er for tæt på
grillelementet, og den skal vendes halvvejs gennem tilberedningstiden.
GRILL + STEGEVENDER + BLÆSER - Fordelen ved at bruge
det øverste ovnelement samtidig med blæseren og et roterende spyd er,
at maden bliver ligeligt tilberedt, hvilket forhindrer den i at blive tør og
smagsløs. Det roterende spyd er programmeret til at fortsætte med at
rotere i ca. fem minutter efter tilberedning, hvormed den resterende
ovnvarme anvendes fuldt ud. Forvarmning er ikke nødvendig til
tilberedning med et roterende spyd.
OPTØ - når indstillingsknappen er sat i denne stilling.
Blæseren cirkulerer varm luft omkring den frosne mad, så den optør på
få minutter, uden at der ændres på madens proteinindhold.
T emperaturen er forudindstillet til 40 °C konstant, og det er ikke muligt at
justere dette.
HOLD VARM - dette anbefales til genopvarmning af allerede
tilberedt mad, hvor pladen anbringes i anden rille ovenfra, eller til at optø
brød, pizza eller bagværk ved at anbringe hylden nederst i ovnen.
T emperaturen er forudindstillet til 60 °C konstant, og det er ikke muligt at
justere dette.
PIZZA - med denne funktion cirkuleres varm luft rundt i ovnen
for at sikre perfekte resultater med retter som fx pizza eller kage.
PYRO - ovnen tager sig af rengøringen af hele ovnens
inderside. -Der er to mulige valg: ECO, SUPER
44 DK
Page 45

5.3 PROGRAMMER
DISPLAYSYMBOLER
Lampe
Tidsindstilling
Programmering af tilberedningtid
Programmering af sluttidspunktet
STOP
for tilberedning
Timeren i brug
Programmering
af valg
TIMEREN:Timeren fungerer uafhængigt af ovnen og har ingen
indflydelse på
varmelegemerne. Det er simpelthen en påmindelse.
Drej knappen til Timer-indstillingen. T imer-symbolet kommer frem.
T allene 00:00 kommer frem på displayet.
Så vil minutterne blinke. Drej den midterste knap til det ønskede antal
minutter, og bekræft ved at trykke på den samme knap.
Timerne vil blinke. Drej den midterste knap til det ønskede antal timer , og
bekræft ved at trykke på den samme knap.
Drej knappen tilbage til Stop-indstillingen.
Når tiden er gået, forsvinder tilberedningstiden. Et hørbart signal lyder i
15 sekunder, og T imer-displayet blinker (tryk blot på den midterste knap
for at stoppe den, inden de 15 sekunder er gået).
PROGRAMMERING AF TILBEREDNINGSTIDEN:
Forskellige opskrifter er forprogrammeret med en tilberedningstid. I
Manuel tilstand kan Optønings- eller Hold varm-tilstanden
forudindstilles, efter behov.
Drej knappen til Tilberedningstid-indstillingen. Tilberedningstidsymbolet kommer frem. En forprogrammeret tilberedningstid for
forskellige opskrifter kommer frem, eller 00:00 for andre af ovnens
funktioner.
Når minutterne blinker, drejes den midterste knap til det ønskede antal
minutter, og det bekræftes ved at trykke på den samme knap.
Når timerne blinker, drejes den midterste knap til det ønskede antal
timer, og det bekræftes ved at trykke på den samme knap.
Drej programvalgknappen tilbage til Stop-indstillingen for at bekræfte
den nye tilberedningstid.
Når tiden er gået, forsvinder tilberedningstiden fra displayet. Et hørbart
signal lyder i 15 sekunder, og Tilberedningstid- og STOP-symbolerne
blinker.
Drej programfunktionsknappen tilbage til Stop. Hvis du undlader at gøre
dette, fortsætter Tilberedningstid- og STOP-symbolerne med at blinke.
PROGRAMMERING AF SLUTTIDSPUNKTET FOR TILBEREDNING:
Forskellige opskrifter er forprogrammeret med en tilberedningstid og
derfor med et sluttidspunkt for tilberedning. I Manuel tilstand kan
Optønings- eller Hold varm-tilstanden forudindstilles, efter behov.
Drej knappen til indstillingen Sluttidspunkt for tilberedning. STOPsymbolet kommer frem. Et forprogrammeret sluttidspunkt for
tilberedningstiden for forskellige opskrifter kommer frem, eller 00:00 for
andre af ovnens funktioner eller tidspunktet bliver vist.
Drej programvalgknappen for at bekræfte sluttidspunktet.
Minutterne vil blinke. Drej den midterste knap for at angive det ønskede
antal minutter, og bekræft dit valg ved at trykke på den samme knap.
Så vil timerne blinke. Drej den midterste knap for at angive det ønskede
antal timer, og bekræft dit valg ved at trykke på den samme knap.
Ovndør med børnesikring
- indstil sluttidspunktet for tilberedning til 12:30.
Tilberedning starter automatisk kl. 11:45 (12:30 minus 45 min) og
fortsætter til det forudindstillede sluttidspunkt for
tilberedningstiden, hvor ovnen automatisk slukkes.
ADVARSEL.
Hvis SLUTTIDSPUNKTET for tilberedning vælges uden at indstille
tilberedningstidens længde, starter ovnen tilberedning med det
samme og den stopper på det indstillede SLUTTIDSPUNKT for
tilberedning
.
5.4 SÅDAN BRUGES SLUTTIDSPUNKTET FOR
TILBEREDNING
Denne kontrol gør det muligt at indstille den
ønskede tilberedningstid (maks. 120 min.),
og ovnen slukkes automatisk på
sluttidspunktet for den indstillede tid.
Timeren tæller ned fra den indstillede tid tid,
vende tilbage til O-indstillingen og slukke
automatisk.
For normal brug af ovnen sættes timeren
til -indstillingen.
For at indstille ovnen skal det sikres, at
timeren ikke er i O-indstillingen.
5.5 TILBEREDNINGSTIPS
Det er bedst ikke at tilføje salt til kød, før tilberedningen er afsluttet, da salt
får kødet til at sprøjte fedt. Det vil gøre ovnen beskidt og fremkalde en
masse røg.
Stege af hvidt kød, svinekød, kalvekød, lammekød og fisk kan sættes i
ovnen, når den er kold. Tilberedningstiden er længere end i en forvarmet
ovn, men den tilberedes bedre hele vejen igennem, da varmen har mere
tid til at trænge gennem stegen.
Korrekt forvarmning er grundlaget for vellykket tilberedning af rødt kød.
GRILL
• Inden der sættes mad under grillen:
T ag kødet ud af køleskabet nogle få timer inden grillning. Læg det på flere
lag køkkenrulle. Det forbedrer fastheden, hvilket gør kødet mere
smagfuldt og forhindrer det i at være koldt i midten.
Krydr kødet med peber og krydderier inden grillning, men tilsæt eventuel
salt efter tilberedning. På den måde bliver kødet fastere og forbliver saftigt.
Dryp al den mad, der skal tilberedes, med lidt olie. Dette gøres bedst med
en bred og flad børste. Drys med lidt mere peber og urter (timian osv.).
• Under tilberedning:
Perforer ikke maden under tilberedning, selv når du vender den. Det lader
saften løbe ud, og maden bliver tør.
BAGNING
Undgå at bruge blanke dåser, da de reflekterer varmen og kan spolere
dine kager. Hvis dine kager bliver brune for hurtigt, dækkes de med
bagepapir eller sølvpapir.
Forsigtig: Sølvpapir bruges korrekt, når den blanke side vender ned mod
kagen. Hvis den blanke side vender opad, reflekteres varmen fra den
blanke flade, så den ikke trænger gennem maden.
Undgå at åbne døren i løbet af de første 20-25 minutters tilberedning:
Souffléer, briocher , sandkager osv . har en tendens til at falde sammen. Du
kan tjekke, om kagerne er færdige ved at prikke midten med et knivsblad
eller en strikkenål af metal. Hvis bladet trækkes ud helt tør, er din kage klar ,
og du kan stoppe tilberedningen. Hvis bladet trækkes ud fugtigt eller med
kagedej, fortsættes bagning, men termostaten sænkes en anelse, så
kagen ikke brænder på, mens den bager færdig.
NB: Med forsinket start kommer sluttidspunktet for den programmerede
tid frem på displayet med “Tilberedningstid”- og “STOP”-symbolerne, og
kun funktionen med ovnens Opskriftstilstand er tilbage.
Ovnen beregner automatisk starttidspunktet (sluttidspunktet minus
tilberedningstiden).
Til sidst i cyklussen slukker ovnen automatisk. I 15 sekunder gør en
hørbar signal dig opmærksom på, at cyklussen er færdig, og
“Tilberedningstid” og STOP-symbolerne blinker .
Drej funktionsvalgknappen til Stop. Med mindre du gør dette, bliver
symbolerne ved med at blinke.
Denne funktion bruges som regel sammen med funktionen
“tilberedningstidens varighed”.
For eksempel hvis retten skal tilberedes i 45 minutter og skal stå klar kl.
12:30:
- vælg den ønskede funktion
- indstil tilberedningstiden til 45 minutter
5.6 JUSTERING AF DISPLAYETS KONTRAST
Displayets kontrast kan justeres når som helst.
Standardindstillingen er “C5”. For at justere indstillingen foretages
følgende:
Drej programvalgknappen til “Lys” og funktionsvalgknappen til “0”. T ryk på
den midterste knap i 3 sekunder, og “CX” kommer frem på displayet (hvor
X = kontrastniveauet).
Drej den midterste knap for at justere kontrastindstillingen.
Indstillingerne går fra 1 til 9. Bekræft den nye indstilling ved at trykke på
den midterste knap i 3 sekunder.
45 DK
Page 46

5.7 BRUG AF BERØRINGSBETJENING TIL URETS PROGRAMMER
FUNCTION
NEDTÆLLINGS-
TIMER
TILBEREDNINGSTID
SLUTTIDSPUNKT
FOR
TILBEREDNING
TASTELÅS
SÅDAN AKTIVERES DEN
•Tryk på den midterste knap
1 gange
• Tryk på knapperne "-" "+"
for at indstille det ønskede
tidspunkt
• Slip alle knapperne
•Tryk på den midterste knap
2 gange
• Tryk på knapperne "-"
eller "+" for at indstille den
længden på den nødvendige
tilberedningstid
• Slip alle knapper
• Indstil tilberedningsfunktionen
med ovnens funktionsvalgknap
• Tryk på den midterste
knap 3 gange
• Tryk på knapperne "-" "+"
for at indstille det tidpunkt,
hvor du ønsker at slukke
for ovnen
• Slip knapperne
• Indstil tilberedningsfunktionen
med ovnens funktionsvalgknap
• Børnesikringen aktiveres
ved at trykke på Indstil (+) i
mindst 5 sekunder. Fra dette
øjeblik er alle andre funktioner
låste, og på displayet blinker
STOP og det forudindstillede
tidspunkt skiftevis.
SÅDAN SLUKKES DEN
• Når den indstillede tid er gået,
aktiveres en hørbar alarm
(denne alarm stopper af sig
selv, men den kan stoppes med
det samme ved at trykke på
knappen) SELECT.
• Når tiden er gået, slukker
ovnen automatisk. Hvis du
ønsker at stoppe
tilberedningen tidligere, kan
du enten dreje
funktionsvalgknappen til 0
eller indstille tidspunktet
til 0:00 (SELECT og
"-" "+" knapperne)
• Ovnen slukkes på det
indstillede tidspunkt. For at
slukke manuelt drejes ovnens
funktionsvalgknap til
O-indstillingen.
• Børnesikringen deaktiveres
ved at røre ved touchpad'en
Indstil (+) igen i mindst 5
sekunder. Fra dette øjeblik
kan alle funktioner atter
vælges.
HVAD DEN GØR
• Der lyder en alarm til sidst
i den indstillede tid.
• Under processen viser
displayet den resterende tid.
• Det gør det muligt at
forudindstille den nødvendige
tilberedningstid til den valgte
opskrift
• For at tjekke hvor lang tid
der er tilbage, trykkes der 2
gange på SELECT-knappen.
• For at ændre det forudindstillede
tidspunkt trykkes der på knapperne
SELECT og "-" "+"
• Gør dig i stand til at indstille
sluttidspunktet for tilberedningstiden
• Tryk på den midterste knap 2
gange 3 gange
• For at ændre det forudindstillede
tidspunkt trykkes der på knapperne
SELECT + "-" "+"
HVAD DEN ER BEREGNET TIL
• Gør det muligt at bruge
ovnen som et vækkeur
(kan aktiveres enten ved at
bruge ovnen eller uden at
bruge ovnen)
• Tryk på den midterste knap
2 gange. Tryk på den midterste
knap for at vende tilbage til
urfunktionen
• Denne funktion bruges som
regel sammen med funktionen
“tilberedningstid”. For
eksempel hvis retten skal
tilberedes i 45 minutter og skal
stå klar kl. 12:30, skal der blot
vælges den ønskede funktion,
tilberedningstiden skal
indstilles til 45 minutter og
sluttidspunktet for tilberedning
til 12:30.
Når den indstillede
tilberedningstid er gået, slukkes
ovnen automatisk, og en hørbar
alarm ringer.
Tilberedning starter automatisk
kl. 11:45 (12:30 minus 45 min)
og fortsætter til det
forudindstillede sluttidspunkt
for tilberedning, hvor ovnen
automatisk slukkes.
ADVARSEL.
Hvis SLUTTIDSPUNKTET for
tilberedning vælges uden at
indstille tilberedningstidens
længde, starter ovnen
tilberedning med det samme,
og den stopper ved
SLUTTIDSPUNKTET for den
indstillede tilberedningstid.
5.8 INDSTILLING AF DET KORREKTE KLOKKESLÆT
ADVARSEL : Det første, der skal gøres, når ovnen er blevet installeret, eller efter strøm svigt (dette kan genkendes
ved, at displayet pulserer og viser 12:00 ), er at indstille det korrekte klokkeslæt.Dette opnås som følger
00:00
select
OBS: Ovnen fungerer kun, hvis uret er indstillet.
• Tryk på den midterste knap 4 gange
• Indstil klokkeslættet med "-" "+" knapperne.
• Slip alle knapper.
46 DK
Page 47

6. PYROLYTISK CYKLUS
7. BØRNESIKKERHED
**Ovnen skal have denne funktion
Ovnen er udstyret med et pyrolyserensningssystem, som nedbryder
madrester ved høj temperatur. Funktionen udføres automatisk med
programmeringsknappen. De resulterende dampe gøres “rene” ved
at løbe over en pyrolysator, som starter, lige så snart tilberedningen
begynder. Da Pyrolysatoren kræver meget høje temperaturer, er
ovndøren udstyret med en sikkerhedslås.
Pyrolysatoren kan stoppes når som helst. Døren kan ikke åbnes, til
sikkerhedslåsen vises.
BEMÆRK : Hvis kogeplader er monteret oven på ovnen, må
gasblussene eller de elektriske kogeplader ikke anvendes, mens
pyrolysatoren er i gang. Det vil forhindre kogepladerne i at blive for
varme.
TO PYROL YTISKE CYKLUSSER er forudindstillet.
.ECO PYROCLEAN: Rengør en moderat beskidt ovn. Kører i 65
minutter.
. SUPER PYROCLEAN : Rengør en meget beskidt ovn. Kører i 90
minutter.
Der må aldrig bruges kommercielt tilgængelige
rengøringsprodukter på en pyrolytisk ovn!
Tip : Ved at foretage pyrolytisk rensning umiddelbart efter madlavning
kan du benytte dig af den resterende varme og dermed spare energi.
Inden en pyrolytisk cyklus foretages:
Tag alt tilbehør ud af ovnen : Det kan ikke modstå de høje
temperaturer og bliver beskadiget af pyrolytiske temperaturer.
Fjern alle store spild eller pletter, da det vil tage for lang tid at nedbryde
dem. Desuden kan alt for store mængder fedtstof antændes, når de
udsættes for den pyrolytiske cyklus' meget høje temperaturer.
Luk ovndøren.
Meget store spild skal fjernes inden rengøring
Denne funktion er altafgørende, særligt når der er børn i nærheden.
Den forhindrer børn i at tænde for ovnen eller ændre de
forudindstillede programmer.
Dette sikkerhedssystem låser ovnens kontrolpanel, mens den er i
gang.
Der er to sikkerhedsniveauer:
NIVEAU 1 : Låser valgbetjeningsknappen og den midterste knap.
For at aktivere: Drej programbetjeningsknappen til børnesikring.
Handling: Betjeningsknapperne er inaktive*.
For at deaktivere: Drej programbetjeningsknappen til 0.
NIVEAU 2: Låser funktionsvalgknapperne
For at aktivere: Drej funktionsvalgknappen til børnesikring, og hold
den midterste knap trykket ned i 3 sekunder.
Handling: Alle betjeningsknapperne er inaktive*.
For at deaktivere : Den samme procedure som ved aktivering. Drej
funktionsvalgknappen til børnesikring, og hold den midterste knap
trykket ned i 3 sekunder.
*Bemærk : I alle tilfælde kan ovnen, af sikkerhedsmæssige årsager,
slukkes ved at dreje valgknappen til 0, selv når betjeningsknapperne
er låste.
7.1 BØRNESIKRING- FOR DIT BARNS SIKKERHED
Sådan bruges den pyrolytiske cyklus:
1- Drej funktionsvalgknappen til “Pyrolytisk tilstand”. “PYRO”
kommer frem på skærmen. ECO-tilstanden blinker.
Husk : ECO - cyklus på 65 minutter - moderat beskidt ovn SUP - cyclus
på 90 minutter - meget beskidt ovn
2- Med den midterste knap vælges den ønskede Pyrolytiske tilstand
ud fra, hvor beskidt ovnen er : ECO eller SUP .
• Dit valg bliver bekræftet efter 3 sekunder..
Ovnen starter den pyrolytiske cyklus. Den valgte pyrolytiske tilstand
blinker, og indikatorlamperne “tid” og “stop” kommer frem.
I løbet af den pyrolytiske cyklus kommer den låste ovndør frem på
displayet, hvilket angiver, at døren er låst. Blæseren er i gang.
Indikatorlampen blinker, til den nødvendige temperatur nås, hvorefter
den lyser fast.
* Starten af den pyrolytiske cyklus kan forsinkes ved at vælge et
sluttidspunkt.Drej programbetjeningsknappen til sluttidspunktet, og
indstil det nødvendige sluttidspunkt.
I løbet af den selvrensende pyrolytiske funktion kan overfladerne blive
varmere end normalt, og børn bør holdes på afstand.
Til slut i den pyrolytiske cyklus slukkes ovnen automatisk.
I 15 sekunder gør en hørbar signal dig opmærksom på, at cyklussen
er færdig, og indikatorlamperne “Tid” og “Stop” blinker .
Drej funktionsvalgknappen til Stop. Med mindre du gør dette, bliver
symbolerne ved med at blinke. Symbolet “Pyro” forsvinder fra
Timeren, den pyrolytiske tilstand. Ovndøren forbliver låst, til
temperaturen er høj. Så når symbolet med en låst ovndør lyser, kan
ovnen ikke åbnes.
Blæseren slukker ikke selv, før ovnkomponenternes temperatur er
rimelig.
Til slut i cyklussen blinker indikatoren igen, den bliver også ved med at
lyse, efter der er slukket for ovnen, og den går ud, når temperaturen
inde i ovnen er tilstrækkelig lav.
Pyrolyse efterlader et hvidt reststof på ovnens sider. V ent på, at ovnen
er helt afkølet, og rengør så ovnens indvendige sider med en fugtig
svamp for at fjerne reststoffet.
47 DK
Page 48

INSTALLATION GB
ASENNUS
560
560
min
590
FI
595
MONTAŽA
INSTALLATION
GB
GB
Oven in column (dimensions mm)
Oven in column (dimensions mm)
SV
Ugn i skåp (mått mm)
Ovnen i kolonnen (dimmensjoner mm)
NO
FI
Uuni kalusteessa (mitat mm)
DK
Ovn dimensioner (mm)
560
440
550
595
17
578
546
552
SV
INSTALLASJON
DK
ATTENTION !
GBGB
Applying torque more than needed to fix the screws can close the ventilation
channels on both sides. Please be sure that, these ventilation channels are
2mm open after installation to furniture.
OBS!
SV
Ifall fästningsskruven vrids för spänt kan ventilationsöppningarna stängas.
Kontrollera att ventilationsöppningarna är 2mm öppna efter installationen.
Merknad:
NO
Dersom skruene festes for hardt kan det stenge for ventilasjonskanalene
på sidene. Vennligst pass på at ventilasjonskanalene har
en 2mm åpning etter monteringen.
HUOMIO!
FI
Jos kiinnitysruuvit väännetään liian tiukalle voivat
ilmanvaihtoaukot sulkeutua. Asennuksen valmistuttua
varmista että ilmanvaihtoaukot ovat 2mm auki.
VIGTIGT!
DK
Hvis skruerne er strammet for meget, kan det lukke for ventilationskanalerne
på begge sider. Sørg venligst for at disse ventilationskanaler er 2 mm åbne
efter indbygning i skabet.
NO
GB
If the furniture is equpped with a
bottom at the back part, provide an
opening for the power supply cable.
SV
Ifall skåpet har botten ända till
22
2mm
bakändan, gör ett hål för strömkabeln
Dersom møbelet er utstyrt med en
GB
Opening 500 x 45
SV
Öppning 500 x 45
NO
Åpning 500 x 45
FI
Aukko 500 x 45
Åbning 500 x 45
DK
4x4.5x25
NO
bunn i bakkant, sørg for å lage et hull til
strømforsyningen
FI
Jos kalusteessa on pohja takaosaan asti,
tee virtajohdolle aukko.
DK
Hvis skabet har bund helt til bagsiden,
skal der laves hul til strømkabel.
GB
Opening 500 x 10
SV
Öppning 500 x 10
Åpning 500 x 10
NO
FI
Aukko 500 x 10
DK
Åbning 500 x 10
GB
Fixing in the location
600 min
Opening 500 x 10
GB
Öppning 500 x 10
SV
Åpning 500 x 10
NO
Aukko 500 x 10
FI
Åbning 500 x 10
DK
TABLE / TOP
FOUR / OVEN
2mm
10 min
GB
Oven fitted under worktop (dimensions mm)
Ugnen placerad under arbetsbänk (mått mm)
SV
NO
Ovnen montert under platetoppen (dimmensjoner mm)
Uuni asennettuna tason alle (mitat mm)
FI
DK
Ovn sat under bordplade (dimensions mm)
GB
Opening 560 x 45
SV
Öppning 560 x 45
Åpning 560 x 45
NO
Aukko 560 x 45
FI
Åbning 560 x 45
DK
Inside the oven there is a bag with four fixing screws. Fixing: When the oven door is open, holes are accessible, they are located on each side. Use
the screws provided to fix the oven.
SV
Installation av ugnen
Inne i ugnen finns en påse med fyra (4) fästningsskruvar. Fästning: Då ugnsluckan är öppen kommer man åt hålen som finns på båda sidorna.
Använd medföljande skruvar vid installationen.
NO
Tilpasse plasseringen
Inne i ovnen er det en pose med 4 monteringsskruer. Montering: Når ovnsdøren er åpen er hullene tilgjengelige, de er plassert på hver side. Benytt
skruene for å feste ovnen.
FI
Uunin kiinnittämien paikalleen
Uunin sisällä on pussi jossa on neljä (4) kiinnitysruuvia. Kiinnitys: Kummallakin puolella oleviin reikiin pääsee käsiksi kun uunin luukku on auki.
Käytä toimitukseen sisältyviä ruuveja kiinnittämiseen.
DK
Installation
Inde I ovnen er der en pose med 4 skruer. Installation: når døren på ovnen er åben er hullerne tilgængelige, de er placeret på hver side. Brug
skruerne til at skrue ovnen fast i skabet.
GB
The manufacturer will not be responsible for any inaccuracy resulting from printing or transcript errors contained in this broc hure. We reserve the right to carr y out modifications to products as required, including
the interests of con sumption, without prejudice to the characteri stics relating to safety or function.
FI
Valmistaja ei vastaa mistään tämän asiakirjan paino- tai kirjoitusvirheistä johtuvista vääristä tiedoista. Varaamme oikeuden tehdä tuotteisiin muutoksia tarpeen mukaan, kuluttajien edut mukaan lukien,
huonontamatta turvallisuuteen t ai toimintaan liittyviä ominaisuuksia
NO
Produsent og importør fraskriver seg ethver t ansvar for trykkfeil i bruksanvisningen. Produsenten forbeholder seg retten til å foret a modifiseringer av produkter uten nærmere varsel om dette.
DK
Producenten påtager sig ikke noget ansvar for unøjagtigheder, der opstår pga. tryk- eller udskriftsfejl i denne brochure. Vi forbeholder os ret til at foretage nødvendige ændringer i produkterne, herunder
forbrugsinteresser, uden præjudice for egenskaberne for sikkerhed eller funktion.
SE
Tillverkaren påtager sig inget ansvar för tryc kfel i denna bruksanvisning. Tillverkaren förbehåller sig också rätten att göra förändringar av produkten så länge dess viktigaste egenskaper inte förändras
01.2015 • REV:A • 42813120
 Loading...