

Candy FCXP645X E0, FCP815X E0, FCP602X E0E, FCP602X E0C, FCP825XL E0 User Instructions
...
• FCP815X E0
• FCP602X E0
• FCP602X E0C
• FCP602X E0E
• FCXP825X E0
• FCXP645X E0
• FCP825XL E0
• FCS600X WIFI
• FCT600N WIFI
• FCXP645X E0/E
• FCXP825X E0/E
USER INSTRUCTIONS
OVENS
KULLANIM KILAVUZU
FIRINLAR
NOTICE D'EMPLOI ET D'INSTALLATION
DES FOURS ENCASTRABLES
MANUALE D’ISTRUZIONI
FORNO
INSTRUCCIONES DE USO
HORNOS EMPOTRABLES
PIEKARNIKI DO ZABUDOWY
INSTRUKJA OBS UGIŁ
EN
TR
FR
IT
ES
PL
02
11
22
31
40
49
• FCP602X E0/E
• FCP602X E0C/E
• FCP602X E0E/E
• FCP815X E0/E
• FCP825XL E0/E
• FCS200X WIFI
• FCT615X WIFI
• FCXT600X WIFI
• FCT612X WIFI
• FCT825XL WIFI
• FCT615XNF WIFI
FORNOS
MANUAL DE INSTRUÇÕES DE UTILIZAÇÃO
EINBAUBACKKÖFEN
BEDIENUNGSANLEITUNG
OVEN
GEBRUIKSAANWIJZING
POKYNY PRO UŽIVATELE
TROUBY
PEĆNICE
KORIŠTENJE PRIRUČNIK
NAVODILO ZA UPORABO
VEČNAMENSKE VGRADNE PEČICE
ΦΟYPNOI
O H IE XPH HΔΣ ΣΣГ
UPUTSTVA ZA KORISNIKE
RERNE
PT
DE
NL
CZ
HR
SL
GR
SRB
58
67
76
85
94
103
112
121
HASZNALATI UTASITASA
SUTŐK
CANDY HOOVER GROUP S.R.L. • Via Comolli 16 • 20861 Brugherio (MB) - Italy
HU
130

General Warnings
• During cooking, moisture may condense inside
the oven cavity or on the glass of the door. This is a
normal condition. To reduce this effect, wait 10-15
minutes after turning on the power before putting
food inside the oven. In any case, the condensation
disappears when the oven reaches the cooking
temperature.
• Cook the vegetables in a container with a lid
insteadofanopentray.
• Avoid leaving food inside the oven after cooking
for more than 15/20 minutes.
• WARNING: the appliance and accessible parts
become hot during use. Be careful not to touch any
hot parts.
•WARNING: the accessible parts can become hot
whentheovenisinuse.Childrenmustbekeptata
safe distance.
•WARNING: ensure that the appliance is switched
off before replacing the bulb, to avoid the possibility
of electricshocks.
•WARNING:before initiating the automatic cleaning
cycle:
- Cleanthe oven door;
- Remove large or coarse food residues from the
inside of the oven using a damp sponge. Do not use
• Connect a plug to the supply cable that is able to
bear the voltage, current and load indicated on the
tag and having the earth contact. The socket must
be suitable for the load indicated on the tag and
must be having the earth contact connected and in
operation. The earth conductor is yellow-green in
colour. This operation should be carried out by a
suitably qualified professional. In case of
incompatibility between the socket and the
appliance plug, ask a qualified electrician to
substitute the socket with another suitable type.
The plug and the socket must be conformed to the
current norms of the installation country.
Connection to the power source can also be made
by placing an omnipolar breaker between the
appliance and the power source that can bear the
maximum connected load and that is in line with
current legislation. The yellow-green earth cable
should notbe interruptedby the breaker. The socket
or omnipolar breaker used for the connection
should be easily accessible when the appliance is
installed.
•The disconnection may be achieved by having the
plug accessible or by incorporating a switch in the
fixed wiring in accordance with the wiring rules.
detergents; •If the power cable is damaged, it must be
- Remove all accessories and the sliding rack kit
(where present);
- Donot place tea towels
• In ovens with meat probe it is necessary, before
making the cleaning cycle, close the hole with the
nut provided. Always close the hole with the nut
when themeat probeis not used.
•Children under 8 must be kept at a safe distance
from the applianceif not continuously supervised.
•Children must not play with the appliance. The
appliance can be used by those aged 8 or over and
by those with limited physical, sensorial or mental
capacities, without experience or knowledge of the
product, only if supervised or provided with
instruction as to the operation of the appliance, in a
safe way with awareness of the possible risks.
•Cleaning and maintenance should not be carried
out byunsupervised children.
•Do not use rough or abrasive materials or sharp
metal scrapers to clean the oven door glasses, as
they can scratch the surface and cause the glass to
shatter.
•The oven must be switched off before removing
the removable parts and, after cleaning, reassemble
them according the instructions.
•Only use the meat probe recommended for this
oven.
•Do not use a steam cleaner for cleaning
substituted with a cable or special bundle available
from the manufacturer or by contacting the
customer service department.
•The typeof power cable must be H05V2V2-F.
•Failure to comply with the above can compromise
the safety of the appliance and invalidate the
guarantee.
•Any excess of spilled material should be removed
beforecleaning.
•During the pyrolytic cleaning process, surfaces can
heat up more than usual, children must therefore
be kept at a safe distance.
•The appliance must not be installed behind a
decorativedoor in order to avoid overheating.
•When you place the shelf inside, make sure that
the stop is directed upwards and in the back of the
cavity.
The shelf must be inserted completely into the
cavity
• WARNING: Do not line the oven walls with
aluminum foil or single-use protection available
from stores. Aluminum foil or any other protection,
in direct contact with the hot enamel, risk melting
and deteriorating theenamel of the insides.
• WARNING: Never remove the oven door seal.
• No additional operation/setting is required in
order to operate the appliance at the rated
frequencies.
operations.
EN 02

Summary
General Instructions
4
Product Description
5
Use of the Oven
6
1.1 Safety indications
1.2 Electrical safety
1.3 Recommendations
1.4 Installation
1.5 Waste management
1.6 Declaration of compliance
2.1 Overview
2.2 Accessories
2.3 First use
3.1 Display description
3.2 Cooking modes
Oven Cleaning and Maintenance
8
Troubleshooting
10
4.1 General notes on cleaning
4.2 Aquactiva Function
4.3 Maintenance
• Removing and cleaning wire racks
• Removal of the oven window
• Removal and cleaning of the glass door
• Changing the bulb
5.1 F.A.Q.
EN 03

1. General Instructions
We thank you for choosing one of our products. For the best results with your oven, you should read
this manual carefully andretainitforfuturereference. Before installingtheoven,takenoteofthe serial
number so that youcangiveit to customer service staffif any repairsarerequired. Having removedthe
oven from its packaging, check that ithasnot been damaged duringtransportation. If you have doubts,
do not use the oven and refer to a qualified technician for advice. Keep all of the packaging material
(plastic bags, polystyrene, nails)out of thereachof children. When theovenisswitchedon for the first
time, strong smelling smoke can develop, which is caused by the glue on the insulation panels
surrounding the oven heating for the first time. This is absolutely normal and, if it occurs, you should
wait for the smoke to dissipate before putting food in the oven. The manufacturer accepts no
responsibilityincaseswheretheinstructionscontainedin thisdocumentarenotobserved.
NOTE: the oven functions, properties and accessories cited in this manual will vary, depending on the
model you havepurchased.
1.1 Safety Indications
foods; any other use, for example as a heat source, is consideredimproper
and thereforedangerous. Themanufacturercannotbeheldresponsiblefor
anydamageresultingfromimproper, incorrector unreasonableusage.
The use of any electrical appliance implies the observance of some
fundamentalrules:
1.2 Electrical Safety
ENSURE THAT AN ELECTRICIAN OR QUALIFIED TECHNICIAN MAKES THE
ELECTRICAL CONNECTIONS. The power supply to which the oven is
connected must conform with the laws in force in the country of
installation. The manufacturer accepts no responsibility for any damage
caused by the failure to observe these instructions. The oven must be
connected to an electrical supply with an earthed wall outlet or a
disconnector with multiple poles, depending on the laws in force in the
country of installation. The electrical supply should be protected with
suitable fuses and the cables used must have a transverse section that can
ensurecorrectsupplytotheoven.
CONNECTION
The oven is supplied with a power cable that should only be connected to
an electrical supply with 220-240 Vac 50 Hz power between the phases or
between the phase and neutral. Before the oven is connected to the
electricalsupply, itisimportantto check:
- do not pull on the power cabletodisconnect theplugfromthesocket;Only use the oven for its intended purpose, that is only for the cooking of
- do not touch the appliance with wet or damp hands or feet;
- in generalthe use of adaptors,multiplesocketsandextensioncablesis not
recommended;
- in case of malfunction and/or poor operation,switchofftheapplianceand
do not tamper with it.
- powervoltageindicatedon thegauge;
- the setting of the disconnector.
The grounding wire connected to the oven's earth terminal must be
connectedtotheearthterminalofthepowersupply.
WARNING
Before connecting theoven to the powersupply, ask a qualified electrician
to check the continuity of the power supply's earth terminal. The
manufacturer accepts no responsibility for any accidents or other
problems caused by failure to connectthe oven to theearth terminalor by
an earth connection thathas defectivecontinuity.
NOTE: as the oven could require maintenance work, it is advisable to keep
another wall socket available sothat theoven canbe connected to this if it
is removed from the space in which it is installed. The power cable must
only be substituted by technical service staff or by technicians with
equivalentqualifications.
1.3 Recommendations
After each use of the oven, a minimum of cleaning will help keep the oven
perfectly clean.
Do not line the oven walls with aluminium foil or single-use protection
available from stores. Aluminium foil or any other protection, in direct contact
with the hotenamel, risks melting and deteriorating the enamel ofthe insides.
In order to prevent excessive dirtying of your oven and the resulting strong
smokey smells, werecommendnot usingthe oven at veryhigh temperature. It
is better to extend the cooking time and lower the temperature a little. In
addition to the accessories supplied with the oven, we advise you only use
dishes andbaking mouldsresistant to veryhightemperatures.
1.4 Installation
The manufacturers have noobligationtocarry thisout. Ifthe assistance of the
manufacturer is required to rectify faults arising from incorrect installation,
this assistance is not covered by the guarantee. The installation instructions
for professionally qualified personnel must be followed. Incorrect installation
may causeharm or injuryto people,animals or belongings.The manufacturer
cannot beheldresponsibleforsuch harmorinjury.
The oven can be located high in a column or under a worktop. Before fixing,
you must ensure good ventilation in the oven space to allow proper
circulation of the fresh air required for cooling and protecting the internal
parts. Make the openings specified on last page according to the type of
fitting.
1.5 Waste management and environmental protection
This appliance is labelled in accordance with European Directive
2012/19/EU regarding electric and electronic appliances (WEEE). The
WEEE contain both polluting substances (thatcanhavea negativeeffect on
the environment)and base elements (thatcan be reused). It is
important that the WEEE undergo specific treatments to
correctly remove and dispose ofthe pollutantsand recover all
the materials. Individuals can play an important role in
ensuring that the WEEE do not become an environmental
problem;itisessentialtofollowafew basicrules:
- the WEEE should not be treatedasdomesticwaste;
- the WEEE should be taken to dedicated collection areas managed by the
towncounciloraregisteredcompany.
In many countries, domestic collections may be available for large WEEEs.
When youbuy anew appliance,the old one can be returned to the vendor
who must accept itfreeof charge asa one-off, as long asthe appliance isof
an equivalenttypeandhasthe same functions as the purchasedappliance.
SAVINGAND RESPECTINGTHEENVIRONMENT
Where possible, avoid pre-heating the oven and always try to fill it. Open
the oven door as infrequently as possible, because heat from the cavity
disperses every timeit is opened.For a significantenergysaving, switch off
the oven between 5 and10 minutes beforethe plannedendof the cooking
time, and use the residual heat that the oven continues to generate. Keep
the seals clean and in order, to avoid any heat dispersal outside of the
cavity. If you have an electric contract with an hourly tariff, the "delayed
cooking" programme makes energy saving more simple, moving the
cookingprocesstostartatthe reducedtarifftime slot.
EN 04
1.6 Declaration of compliance
The parts of this appliance that may come into contact with foodstuffs
complywith the provisionsofEECDirective89/109.
By placing the mark on thisproduct, weareconfirmingcomplianceto
all relevant European safety, health and environmental requirements
which areapplicableinlegislationforthisproduct.
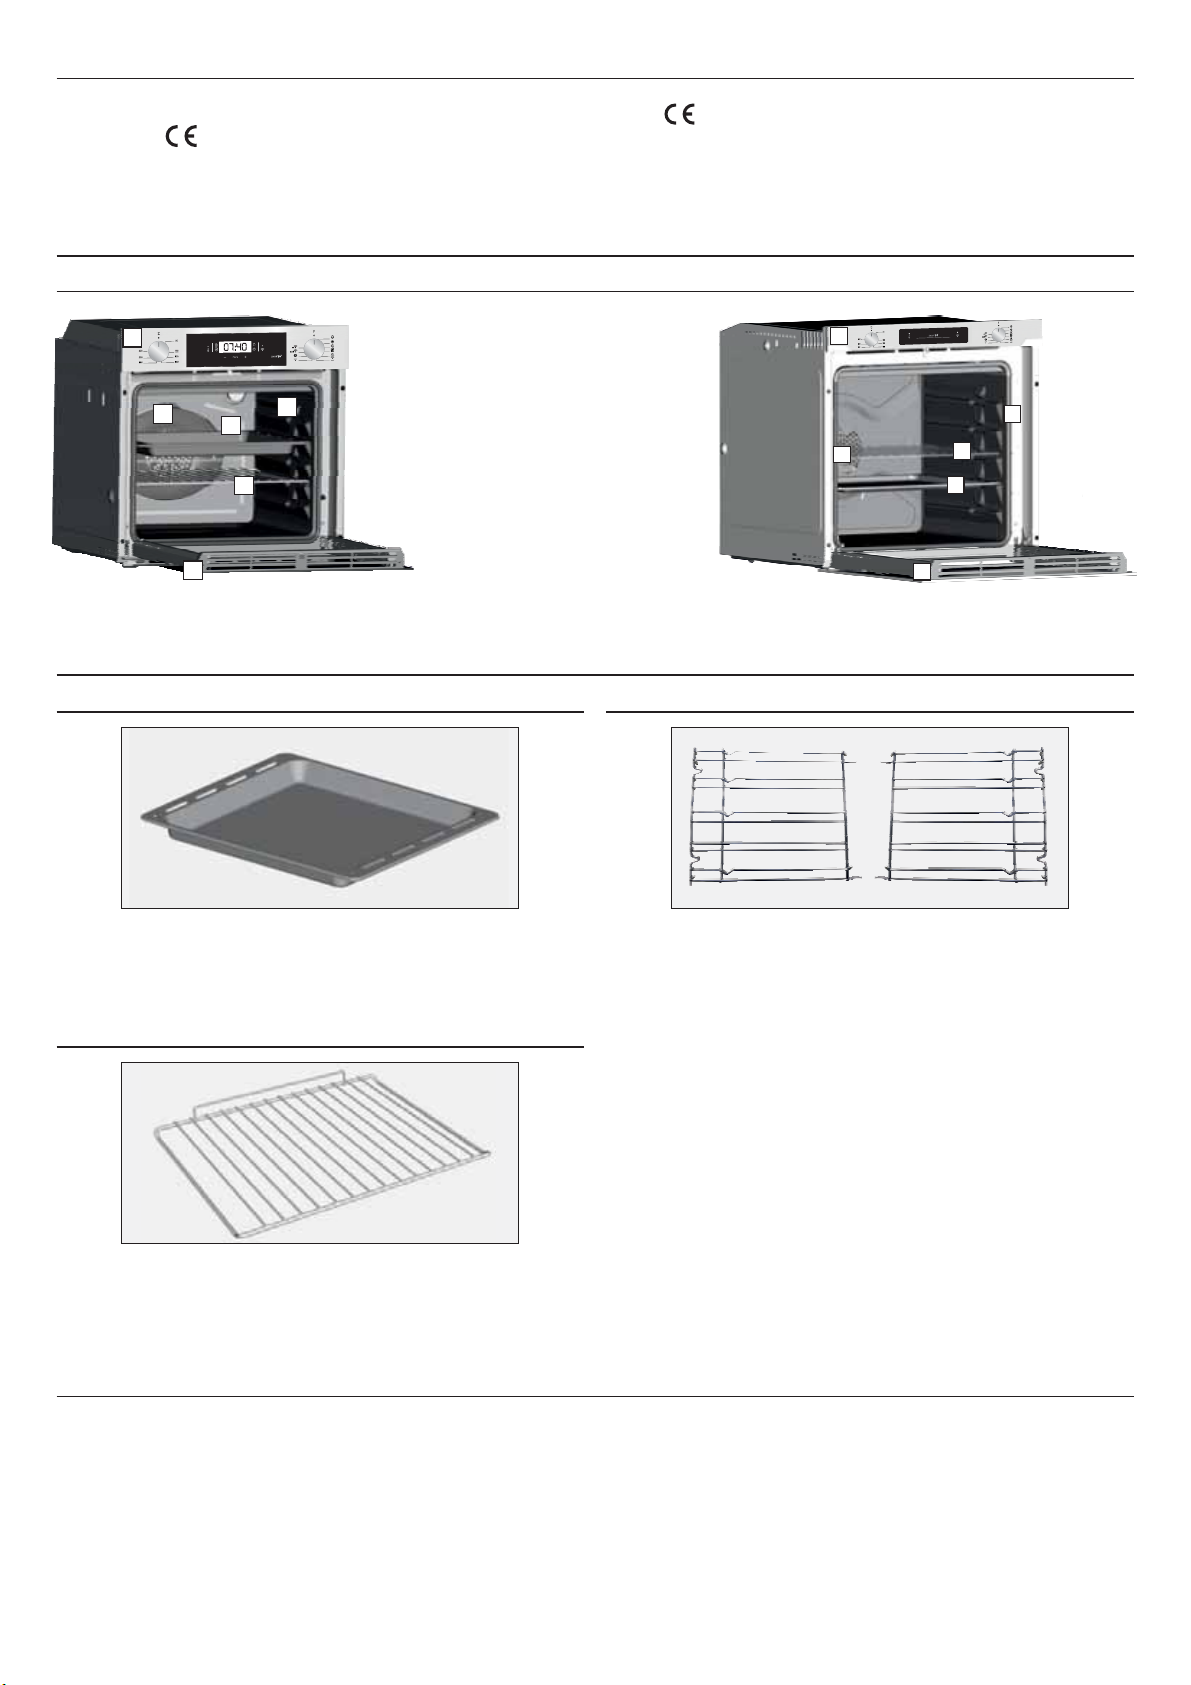
2. Product Description
2.1 Overview
With this the Candy Hoover Group, declares that this appliance marked
with complies with the essential requirements of the Directive
2014/53/EU.
To receive a copy of the declaration of conformity, please contact the
manufacturerat:www.candy-group.com.
1
1. Control panel
5
6
2
4
3
2. Shelf positions
(lateral wire grid if included)
3. Metal grill
4. Drip pan
5. Fan (behind the steel plate)
6. Oven door
2.2 Accessories (According to model)
Drip pan
1
Lateral wire grids
3
1
2
5
3
4
6
Collects the residues thatdripduringthe cookingoffoodsonthegrills.
Metal grill
2
Holds baking trays and plates.
Lateral wire grid if included.
2.3 First Use
PRELIMINARYCLEANING
Clean the oven before using for the first time. Wipe over external surfaces with a damp soft cloth. Wash all accessories and wipe inside the oven with a
solution of hotwater andwashingup liquid. Set theemptyoventothemaximum temperatureandleaveonforabout1 hour, thiswillremoveanylingering
smells of newness.
EN 05

3. Use of the Oven (According to model)
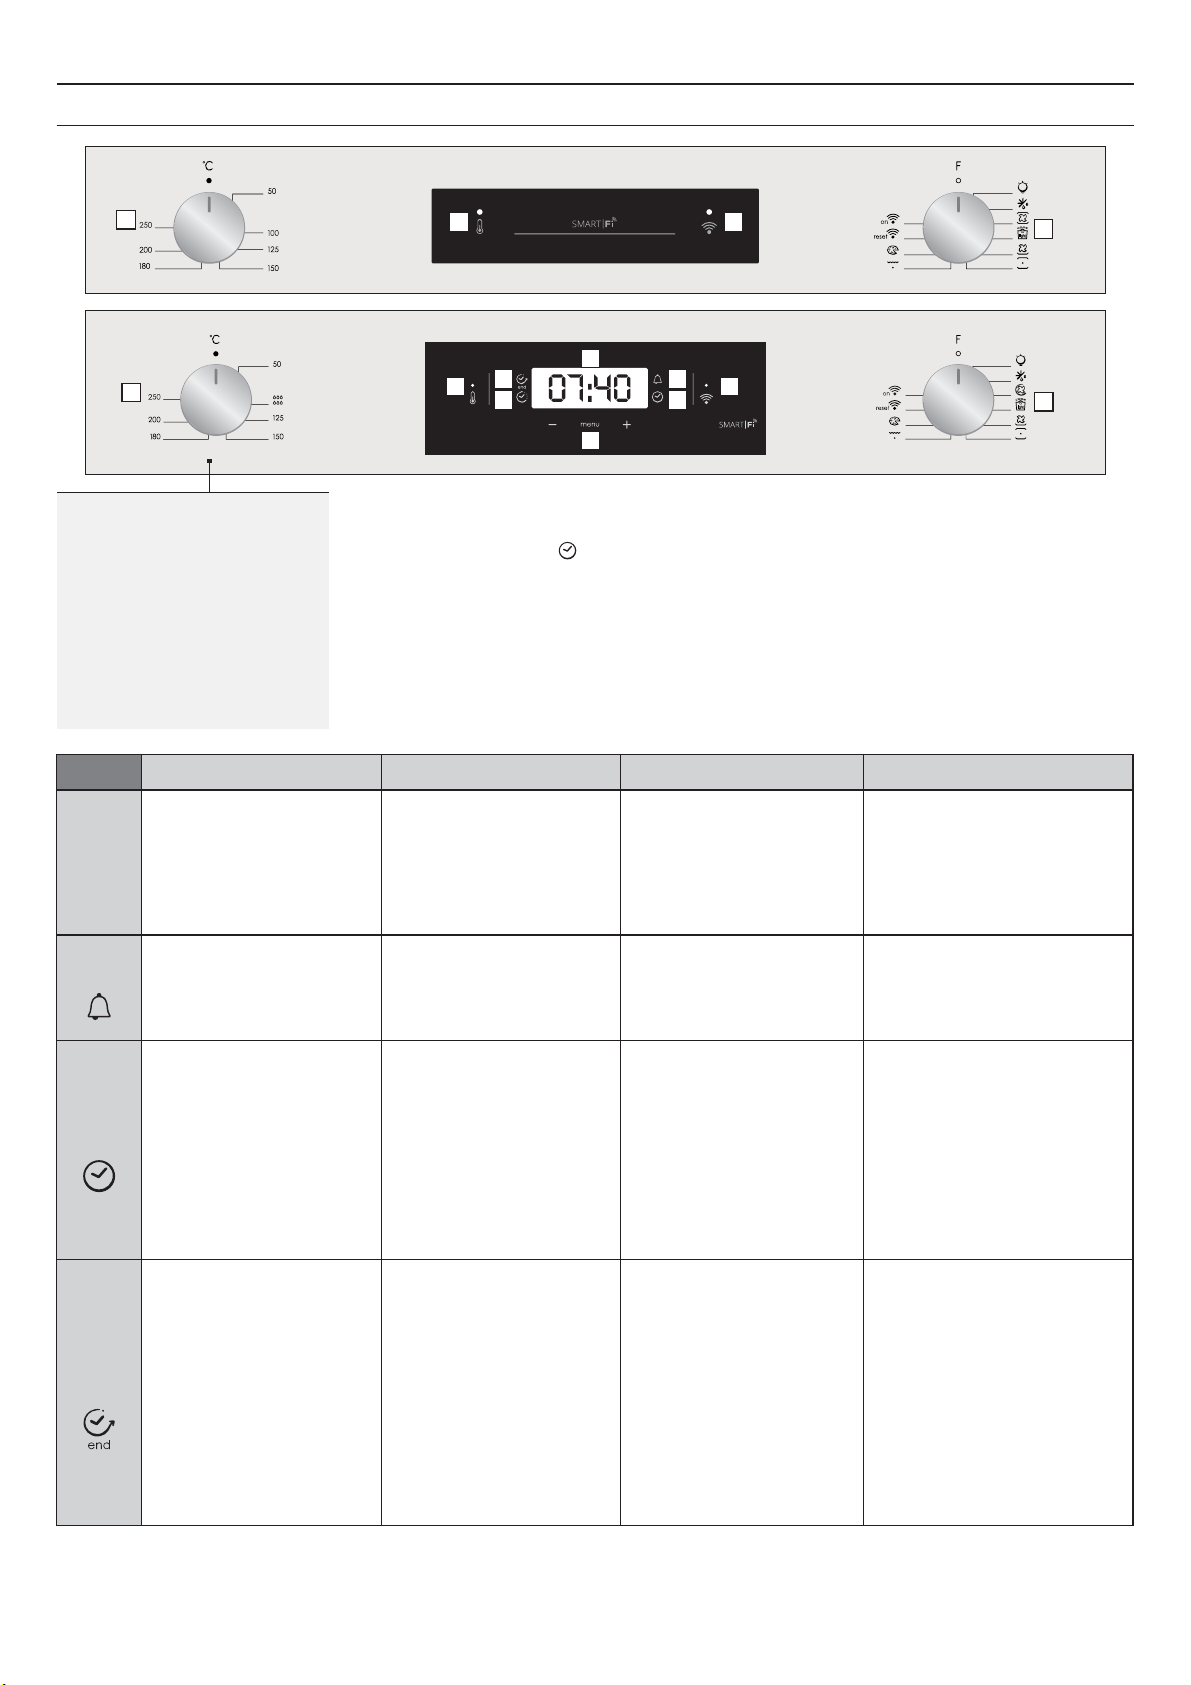
3.1 Display description
1
1
1. Thermostat selector knob
2. Thermostat signal lamp
3. End of cooking
4. Cooking time
5. Temperature or clock display
6. LCD display adjustment controls
7. Minute minder
WARNING : thefirst operation to carry outafter theoven has been installed orfollowing the interruption
of powersupply (thisis recognizable the display pulsating andshowing ) issetting thecorrect time.
The bottomrightLEDflashesatthesametime( ).
•Set time with buttons."-" "+"
•Pushthe Menu buttonor than the clock is setted.wait5 seconds
ATTENTION: Theovenwillonlyoperatesettingthe clock
2 9
3
2 9
4
8. Clock setting
9. Wifi signal lamp
10. Function selector knob
FUNCTION HOW TO DEACTIVATE
•Child Lock function is activated by
touching Set (+) for a minimum of
KEY LOCK
seconds. From this moment on all
other function are locked5and the
display will flash STOP
and presettimeintermittently.
HOW TO USE
3 sec intervals
•Child Lock function isdeactivated by
touching touchpad Set (+) again for a
minimum of seconds. From this
moment on all functions are
selectableagain.
5
10
5
7
8
10
6
12:00
This is achievedas follows.
WHAT IT DOES
NOTE
MINUTE
MINDER
COOKING
TIME
END OF
COOKING
•Push the central button 3 times
•Press the buttons "-" "+" to set
the required time
•Release all the buttons
•Select the cookingfunction withthe
oven function knob, thetemperature
you want to cookwiththethermostat
knob.
• Pushthecentral button1 times
• Press the buttons"-"or "+"to setthe
lenghtofcookingrequired
• Releaseallbuttons
NOTE: If the oven is switched off or
the lamp is functioning, the cooking
time schedulefunctionwill not work.
•Select the cookingfunction withthe
oven function knob, thetemperature
you want to cookwiththethermostat
knob.
•Pushthecentralbutton times2
time at which you wish the oven to
switchoff
•Releasethebuttons
NOTE: If the oven is switched off or
the lamp is functioning, the cooking
time schedulefunctionwill not work.
•When the set time has elapsed, an
audible alarm is
activated this alarm will stop on its
own, however it can be stopped
immediately by pressinganybutton.
•Push any button to stop the signal.
Push the central button to return to
the clock function.
•At the time set, the ovenwillswitch
off. To switch off manually, turn the
ovenfunctionselectorto positionO. •To check the preset time push the
full stop after
•Sounds an alarm at the end of the
set time.
•During the process, the display
shows the remaining time.
• It allows to preset the cooking time
requiredforthe recipechosen.
• To check how long is left to run press
the MENUbutton1 time.
• To alter/changethe preset timepress
MENU and"-" "+" buttons.
•Enables you to set the end of
cookingtime
centralbutton2 times
•To modify the preset time press
buttonsMENU+ "-" "+"•Press the buttons "-" "+" to set the
•Allows to use the oven as alarm clock
(could be activated either with operating
the ovenorwith outoperatingthe oven)
•At the end of the program the program
gives 3 warning signals and “End” appears
on thedisplay.
Set the function selector switch to "0" to
returntothe clock function.
•This function is typically used with
“cookingtime” function.
For exampleif the dishhas tobecooked for
45 minutes and needs to be ready by
12:30, simply select the required
function, set the cooking time to 45
minutes and the end of cooking time to
12:30.
•At the end of the cooking set time, the
oven will switch off automatically and an
audible alarmwillring.
•Cooking will start automatically at 11:45
(12:30 minus 45 mins) and will continue
until the pre-set end-of-cooking-time,
when the oven will switch itself off
automatically.
EN 06
ELETTRONICA ZEROWIFI FUNCTION
For allthedetails related to thelinkbetweenapp andproduct,refer to theQuick Guide.
The QuickGuide isavailable on: go.candy-group.com/candy-ov
Wi Fihas two differentpositions onthecookingselector:
•WiFion:Wi Fi is switched on only if the oven is already enrolled to your device. In this position the oven will be only controlled by
remote.
•WiFireset:After leaving the selector on Wi Fi reset for 30”, Bluetooth will switch on and you will be able to enroll the oven to your
device within5’.
If the enrollment is successful, the oven will be controlled by remote and the Wi Fi icon will switch on. If the enrollment is unsuccessful,
Wi Fiwill switch off andthe oven will be reset.
To proceed withanew enrollment the cookingprogramselectorhasto beturnedout from Wi Firesetposition andmovedagainonit.
Note: Install the App onyourdevice before startingenrolling
Note: Thedevicewhere the App isinstalledmusthaveBluetoothactivated
Note: ForbothWi Fipositions,thetouch buttons do notwork.
Note: It is important to establish a good Wi-Fi signal strength between the home router and the appliance. When the oven is trying to
connect toroutertheiconwill blink3”on and1”off, when itisalreadyconnectedthe icon will switchon.
CANDYSIMPLY-FI:
1 2
3 4
6
For detailed information about HOW TO CONNECT your simply-Fi appliance and HOW TO USE it at its
best,go to http://www.candysimplyfi.com
1. Program selection / 2. Program duration / 3. Cooking start setting / 4- Dedicated recipes selection / 5. Offline and vocal assistant /
6. Tips, suggestions and online user manual
3.2 Cooking Modes
Function
Dial
T °C
Suggested
Function (Depends on the oven model)
5
LAMP: Turns on the oven light.
DEFROST: When the dialis set to this position. The fan circulates air at room temperature around the frozenfood sothat it defrosts in a
fewminuteswithouttheprotein content ofthefoodbeing changedoraltered.
FAN COOKING: We recommend you use this method forpoultry, pastries, fish and vegetables.Heat penetrates into thefood better and
both thecookingand preheating times are reduced. Youcancook different foods at thesame time withorwithout thesamepreparation
180
in one or morepositions.Thiscookingmethodgives evenheatdistributionand thesmellsarenotmixed.
Allow abouttenminutesextrawhen cookingfoodsat thesametime.
The functionallowsyou to cook ina healthier way, by reducing the amountof fat or oilrequired. Thanks to the useof the
""COOK LIGHT
grill and fan combined with apulsating cycleof air, it will retainthe moisture content of the food, grilling the surface and using a shorter
*
cookingtime,withoutcompromisingon taste.
190
It is particularly suitableforcooking meat, roasted vegetables andomelettes. The cycle of pulsed airkeeps the humidityinside theoven
and the moisturecontent ofthefood,preserving thenutritionalvaluesandensuring arapiduniformcooking process.
Tryall yourrecipesandreducethe amountofdressingyou usuallyuseandexperiencethe lightnessofthisnewfunction!
FAN+LOWERELEMENT: The bottomheatingelementis used withthe fan circulatingthe air inside theoven.This method isidealforjuicy
fruit flans, tarts,quichesandpâté.
210
It preventsfoodfrom dryingandencourages risingincakes, breaddough andotherbottom-cooked food.
Place the shelf inthebottomposition.
CONVENTIONAL COOKING: Both top and bottom heating elements are used. Preheat the oven for about ten minutes. This method is
ideal foralltraditionalroastingand baking.Forseizingredmeats,roastbeef, leg of lamb, game,bread,foilwrappedfood (papillotes),flaky
220
pastry. Placethefoodand itsdishonashelfinmidposition.
GRILL: use the grillwiththedoorclosed.
The topheatingelement is usedalone and youcanadjust the temperature. Five minutes preheating is required to get theelementsred-
hot. Successis guaranteed for grills, kebabs and gratin dishes. Whitemeats shouldbe put ata distance from the grill; the cookingtime is
230
longer, butthe meat will betastier. You canput red meats and fishfilletsontheshelf with thedriptray underneath. The oven hastwo grill
positions: Grill: 2140W Barbecue:3340 W
FANASSISTEDGRILL :usetheturbo-grillwiththedoorclosed.
The top heating element is used with the fan circulating the air insidethe oven. Preheating is necessary for red meats but not for white
meats. Ideal for cooking thick food items, whole pieces such as roast pork, poultry, etc. Place the food to be grilled directly on the shelf
200
centrally, at the middle level. Slide the drip tray under the shelf to collect the juices. Make sure that the food is not too close to the grill.
Turnthe foodoverhalfway through cooking.
220
*Tested in accordance with the CENELEC EN 60350-1 used for definition of energy class.
PIZZA:Withthisfunctionhotaircirculatedin theoventoensure perfectresult fordishes suchaspizzaorcake.
WIFI ON: Oven allows wificonnection.
WIFI RESET:Itallows wificonnectiontobe restarted.
EN 07
4. Oven cleaning and maintenance
4.1 General notes on cleaning
The lifecycle of the appliance can be extended through regular cleaning.
Wait for the oven to cool before carrying out manual cleaning operations.
Never use abrasive detergents, steel woolor sharp objects for cleaning, so
as to not irreparably damage the enamelled parts. Use only water, soap or
bleach-based detergents(ammonia).
GLASS PARTS
It isadvisable to cleanthe glass windowwith absorbent kitchen towel after
every use of the oven. To remove more obstinate stains, you can use a
detergent-soaked sponge, wellwrungout,andthenrinsewithwater.
OVENWINDOWSEAL
If dirty, thesealcanbecleanedwithaslightlydampsponge.
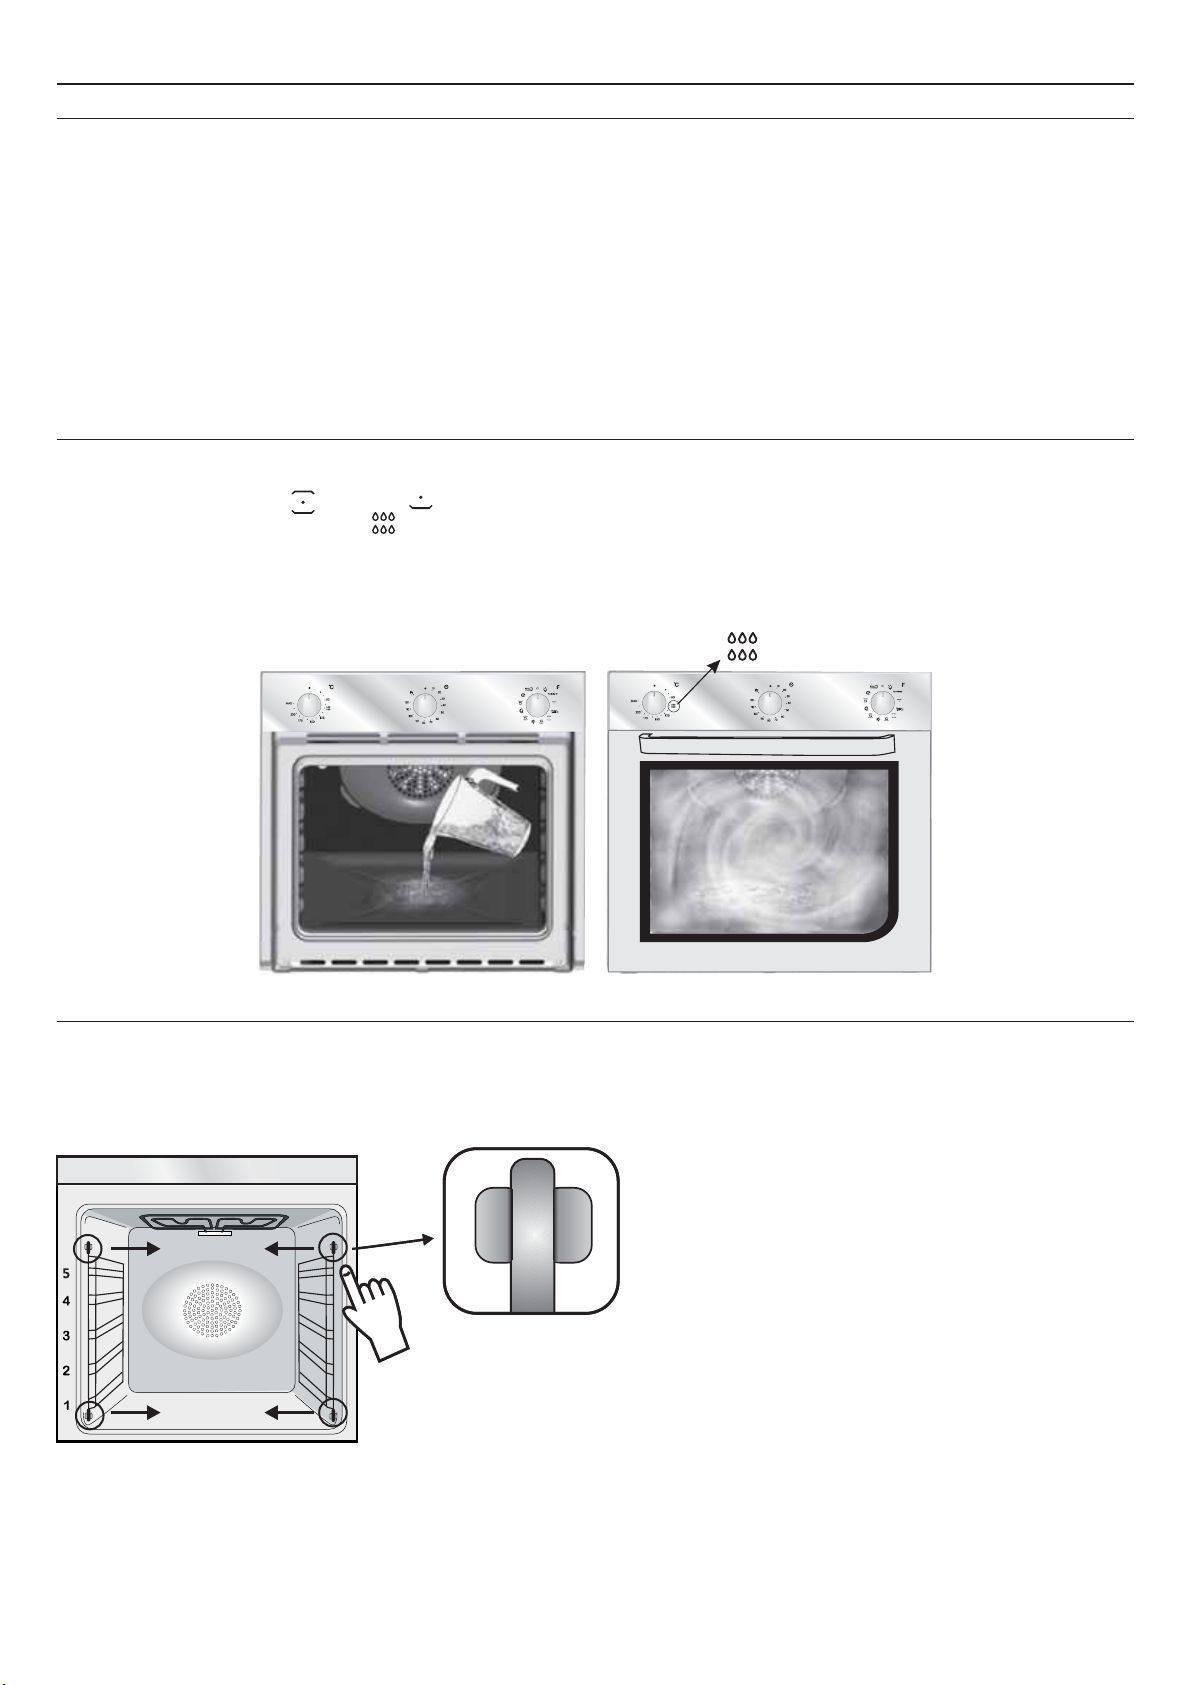
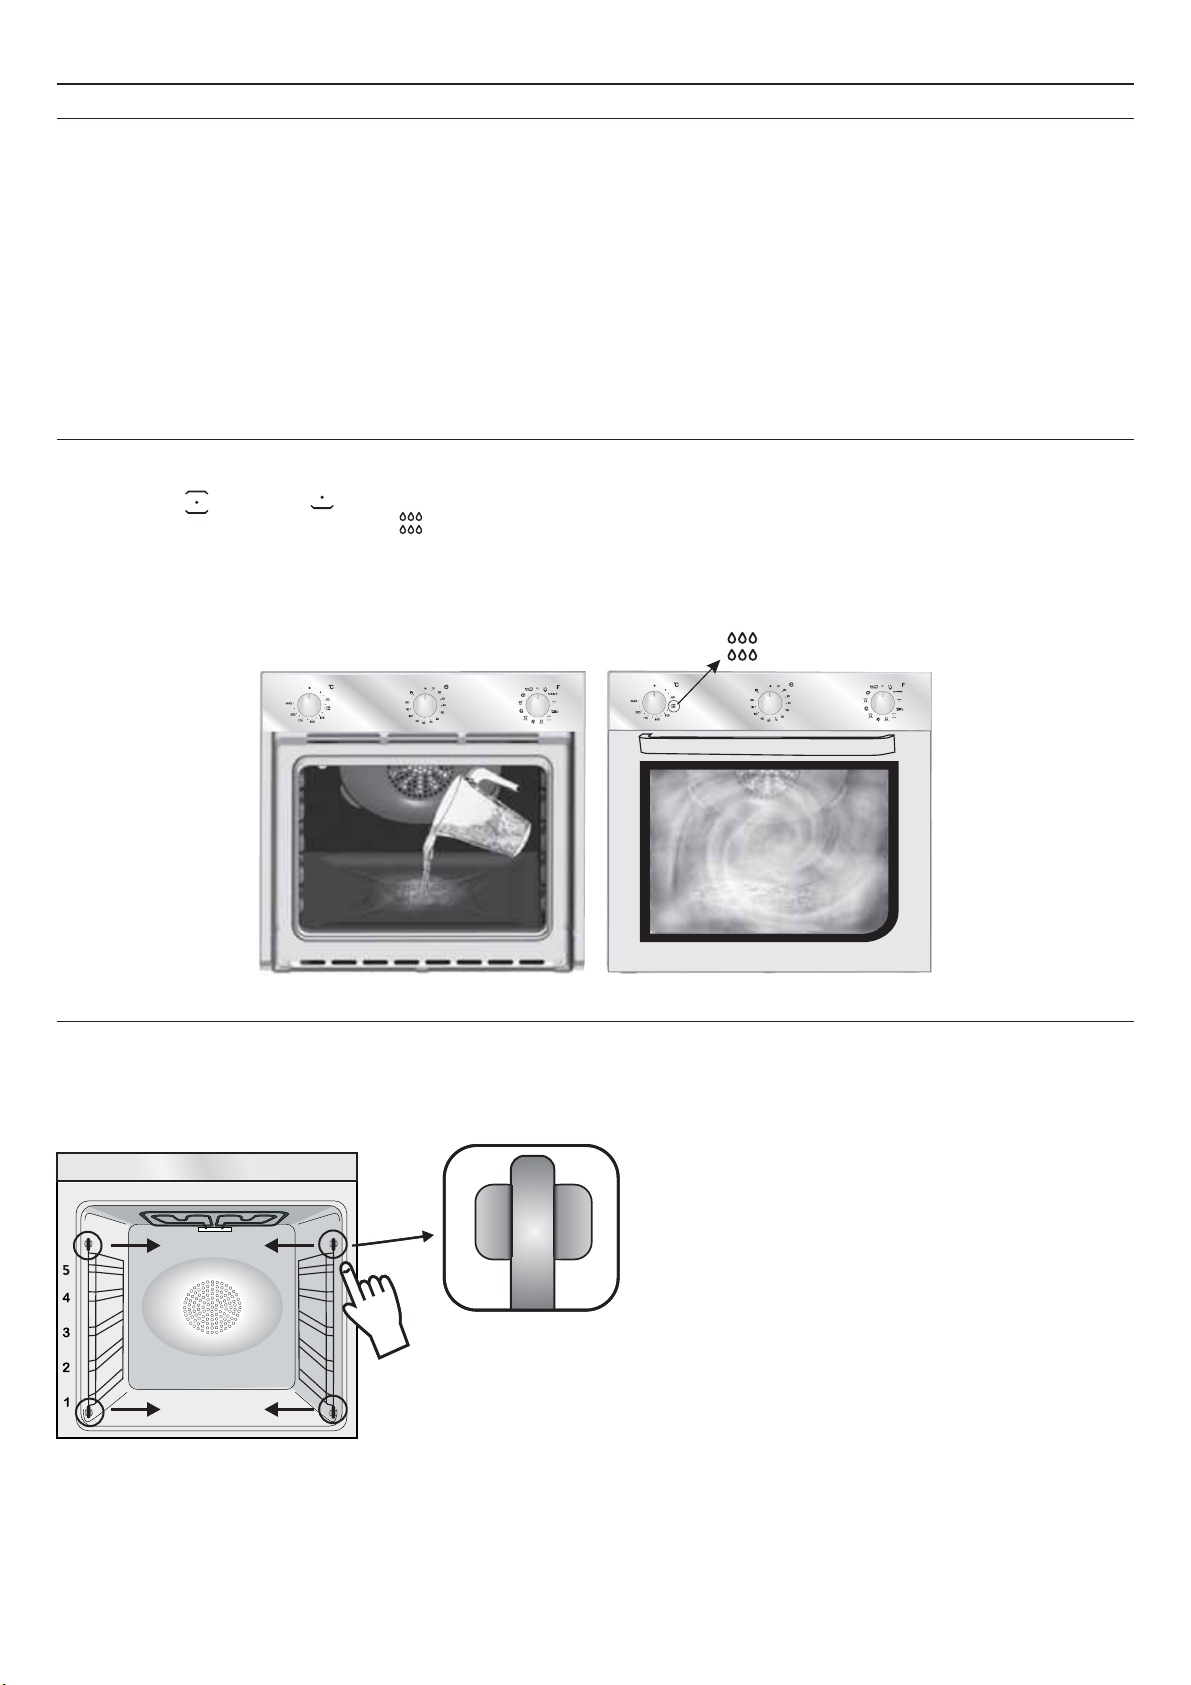
4.2 Aquactiva Function
The Aquactivaprocedureusessteamtohelp removeremainingfat andfoodparticles fromtheoven.
1. Pour300mlof waterintotheAquactivacontainer atthe bottomoftheoven.
2. Set the oven function to Static( )or Bottom( )heater
3. Set the temperaturetotheAquactiva icon
4. Allow the programtooperate for30minutes.
5. After 30 minutesswitchofftheprogramand allowtheoventocooldown.
6. When the appliance is cool, clean the inner surfaces of the oven with a cloth.
Warning: Makesurethattheapplianceiscoolbefore youtouchit.
Caremustbetakenwith allhotsurfacesasthereisariskofburns.
Use distilledor drinkablewater.
ACCESSORIES
Clean accessories with awet, soapyspongebeforerinsing anddrying them:
avoidusingabrasivedetergents.
DRIP PAN
After using the grill, remove the pan from the oven. Pour the hot fat into a
container and wash the pan in hot water, using a sponge and washing-up
liquid.
If greasy residues remain, immerse the pan in water and detergent.
Alternatively, you can wash the pan in thedishwasher oruse a commercial
ovendetergent.Neverput adirtypanback intotheoven.
300 ml
4.3 Maintenance
REMOVINGANDCLEANINGWIRERACKS
1- Removethewireracksbypullingtheminthedirectionofthearrows(seebelow)
2- To cleanthewireracks eitherputtheminthedishwasheroruseawetsponge,ensuringthattheyaredriedafterwards.
3- After the cleaning processinstallthewireracksin reverseorder.
REMOVALOF THEOVENWINDOW
1. Open the frontwindow.
2. Open the clamps of the hinge housing on the right andleftsideofthefrontwindow bypushingthemdownwards.
3. Replacethewindowbycarryingouttheprocedureinreverse.
EN 08

LOW-E
REMOVALAND CLEANINGOFTHEGLASSDOOR
1. Open the oven door.
2.3.4. Lock the hinges, removethescrewsandremovetheuppermetalcover bypullingitupwards.
5.6. Remove theglass, carefullyextracting itfromtheovendoor (NB:inpyrolyticovens,alsoremove thesecondandthirdglass(ifpresent)).
7. Attheendof cleaning or substitution,reassemblethepartsinreverseorder.
On all glass, the indication "Low-E" must be legible and positioned on the left side of the door, close to the left-hand lateral hinge. In this way, the printed
label of the firstglasswillbeinsidethe door.
1.
2.
5.
6.
1
2
3
3.
4.
7.
EN 09

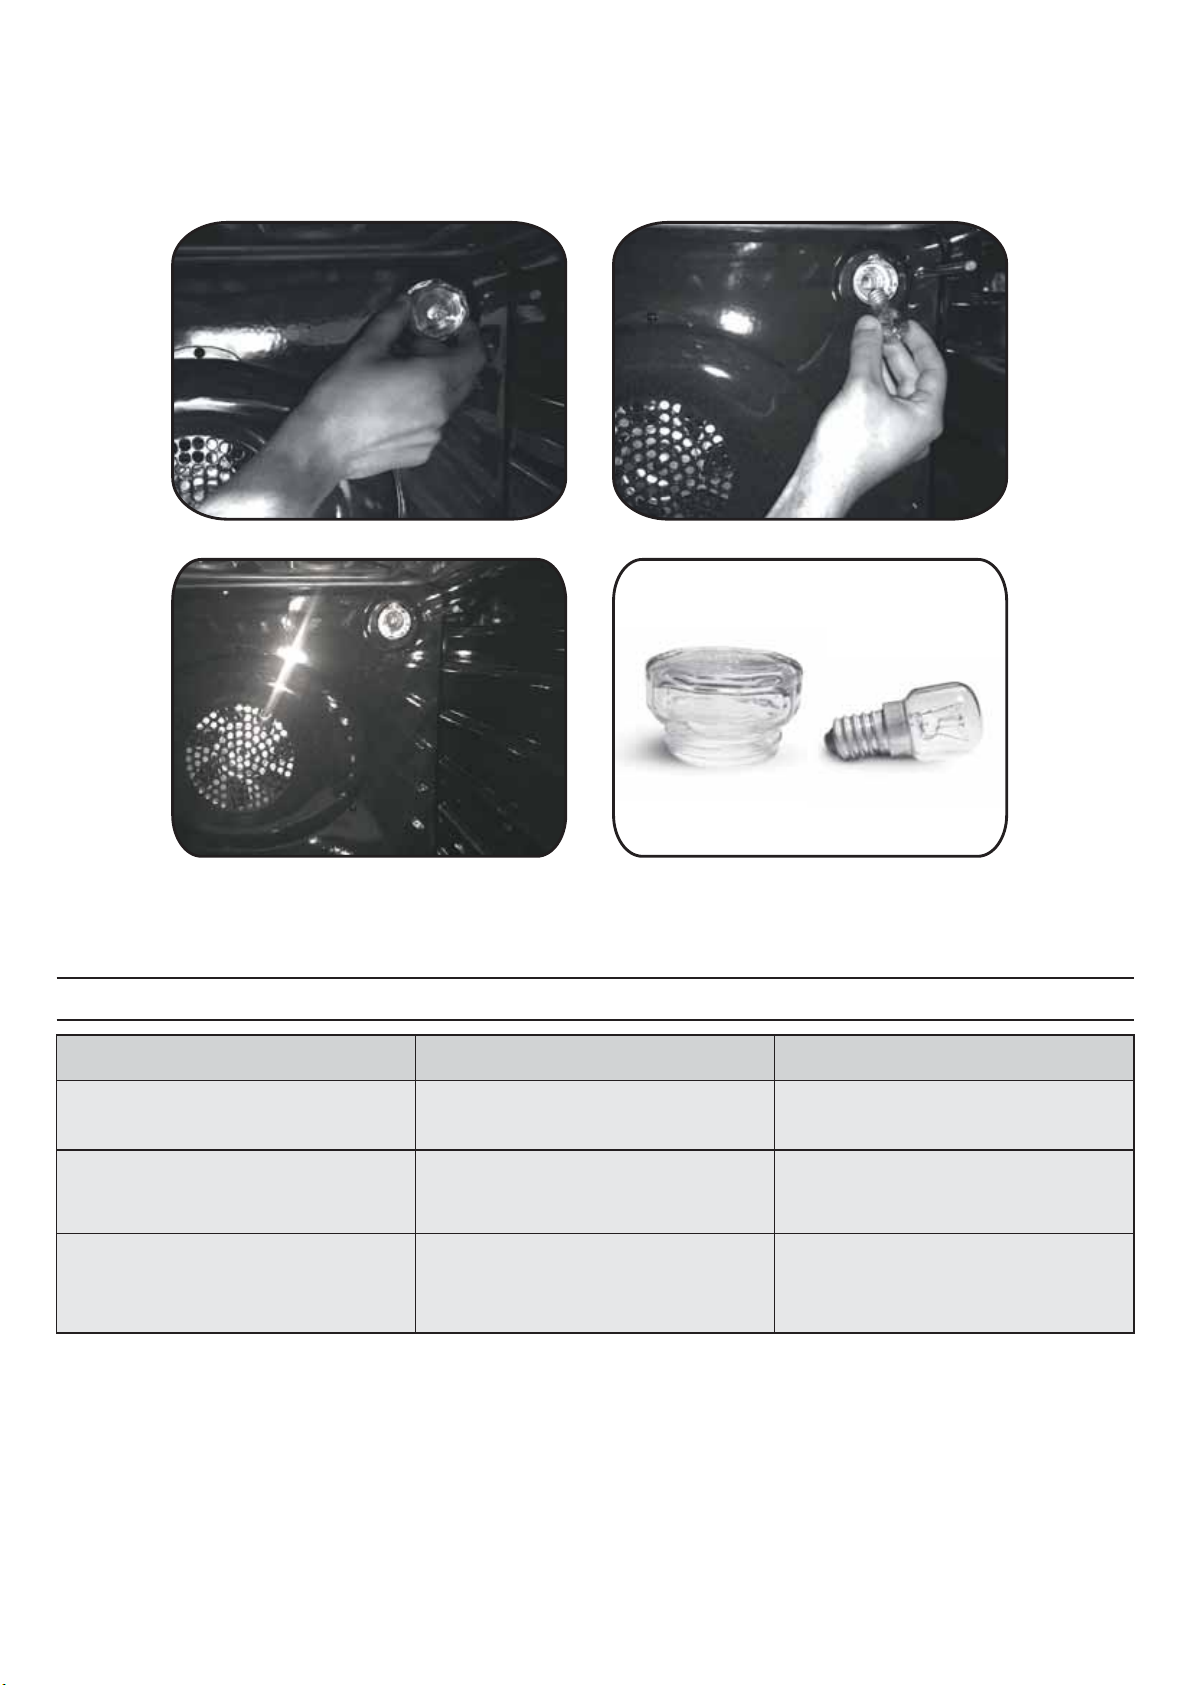
CHANGING THE BULB
1. Disconnect the ovenfromthemainssupply.
2. Undo the glass cover, unscrew thebulbandreplaceitwithanewbulbofthesametype.
3. Once the defectivebulbisreplaced,replacetheglasscover.
5.
Troubleshooting
5.1 FAQ
PROBLEM POSSIBLE CAUSE SOLUTION
The oven does not heat up
The oven does not heat up
No reaction of the touch
user interface
The clock is not set Set the clock
A cooking function and
temperature has not been set
Steam and condensation on
the user interface panel
Ensure that the necessary
settings are correct
Clean with a microfiber cloth the user
interface panel to remove the
condensation layer
EN 10

Güvenlik uyarıları
• Pişirme sırasında nem, fırın içinde veya kapı
camının içinde yoğunlaşabilir. Bu normal. Bu etkiyi
azaltmak için, fırını 10-15 dakika çalıştırınız sonra
yiyeceklerinizi fırının içine koyunuz. Fırın pişirme
sıcaklığına ulaştığında yoğunlaşma ortadankalkar.
• Sebzeleri açık bir tepsi yerine kapaklı bir kapta
pişiriniz.
• Pişirme tamamlandıktan sonra, 15-20 dakikadan
daha uzun bir süre fırında yiyecek bırakmaktan
kaçının.
• UYARI: Cihaz ve aparatları kullanım sırasında
ısınır. Isınmış parçalaradokunmaktankaçınınız.
•UYARI: Fırın kullanımdayken erişilebilir parçalar
çok sıcak olabilir. Çocuklar güvenli bir mesafede
tutulmalıdır.
• Bu cihaz, 8 yaş ve üzeri çocuklar ve fiziksel,
duyusal veya zihinsel yetenekleri veya bilgi ve
tecrübe açısından yetersiz kişiler tarafından ancak
yetişkin bir bireyin denetiminde ve cihazın nasıl
kullanılacağına dair verilen talimatların
uygulanması durumunda ve oluşabilecek
tehlikleri kavradıkları takdirde güvenle
kullanılabilir.
• Çocuklar cihazlaoynamamalıdırlar.
• Cihazın temizlik ve bakımı gözetmen olmaksızın
çocuklartarafından yapılmamalıdır.
• Kullanım sırasında cihaz ısınabilir. Fırının içindeki
ısıtma elemanlarının dokunurken dikkatli
olunmalıdır.
UYARI: Erişilebilir parçalar kullanım sırasında
ısınabilir. Küçük çocuklaruzak tutulmalıdır.
• Fırın kapak camınıtemizlerken kuvvetli aşındırıcı
temizleyiciler veya keskin metal kazıyıcılar
kullanmayın çünkü bu camın kırılmasına veya
yüzeyinçizilmesine neden olabilir.
• Koruma çıkarılmadan önce fırınkapatılmalıdır ve
temizlikten sonra koruma parçası talimatlara
uygunolarak yerine koyulmalıdır.
• Sadece bu fırın için önerilen sıcaklık probu
kullanın.
• Fırını temizlemerken buharlı temizleyiciler
kullanmayınız.
• Besleme kablosuna etikette belirtilen gerilimi,
akımı ve yükü kaldırabilecek, toprak bağlantısı
olan bir fiş takın. Prizin etikette belirtilen yüke
uygun, toprak bağlantısı yapılmış ve çalışır
durumda olması gerekir. Topraklama iletkeni sarıyeşil renklidir. Bu işlem yalnızca uygun yetkinliğe
sahip personel tarafından gerçekleştirilmelidir.
Prizle cihazın fişi arasında uyumsuzluk olması
durumunda, yetkin bir elektrik ustasından prizi
uygun tipte bir prizle değiştirmesini isteyin. Fiş ve
priz kurulumun yapıldığı ülkede geçerli olan
normlara uygun olmalıdır. Güç kaynağı bağlantısı,
cihazla güç kaynağı arasına maksimum bağlı yükü
kaldırabilecek ve geçerli mevzuata uygun olan
omnipolar bir devre kesici yerleştirilerek de
yapılabilir. Sarı-yeşil topraklama kablosu devre
kesici tarafından kesintiye uğratılmamalıdır. Priz
veya bağlantı için kullanılan omnipolar devre
kesici, cihazın kurulumu yapıldığında kolayca
erişilebilir durumda olmalıdır.
•Bağlantı, fişin erişilebilirdurumda tutulması veya
kablolama kurallarına uygun şekilde sabit kablo
tesisatına bir anahtarın eklenmesi yoluyla
kesilebilir.
•Güç kablosu hasarlıysa üreticiden temin edilen
bir kablo veya özel bir demet ile ya da müşteri
hizmetleri departmanıyla iletişim kurularak
değiştirilmelidir.
•Güç kablosu H05V2V2-F tipi olmalıdır.
•Yukarıdaki yönergelere uyulmaması cihazın
güvenliğini tehlikeye atabilir ve garantiyi geçersiz
kılabilir.
•Temizlemeden önce dökülen malzemeler
temizlenmelidir.
•Pirolitik temizleme işlemi sırasında yüzeyler
normalden daha fazla ısınabilir; bu nedenle
çocuklargüvenli bir mesafedetutulmalıdır.
•Cihaz, aşırı ısınmayı önlemek için dekoratif bir
kapınınarkasına monteedilmemelidir.
•Rafı fırının içine yerleştirirken stopun yukarıya
baktığından ve bölmenin arka tarafında
olduğundan emin olun.
Raf, bölmeye tamamen girerek yerleştirilmelidir.
• UYARI: Fırın duvarlarını alüminyum folyoyla
kaplamayın veya mağazalardan alınan tek kullanımlık
koruma malzemelerini kullanmayın. Alüminyum folyo
veya diğer tüm koruma malzemeleri, sıcak emayeyle
doğrudan temas ettiğinde iç yüzeylerdeki emayenin
erimesine ve bozulmasına neden olma riski
taşımaktadır.
• UYARI: Fırın kapağı contasını kesinlikle
çıkarmayın.
• Cihazı anma frekanslarından çalıştırmak için ek
işlem/ayarlamagereklideğildir.
TR 11

Özet
Genel Açıklamalar
13
Ürün Açıklaması
14
Fırının Kullanımı
15
1.1 Güvenlik ipuçları
1.2 Elektriksel güvenlik
1.3 Tavsiyeler
1.4 Kurulum
1.5 Atık yönetimi
1.6 Uygunluk beyanı
2.1 Genel bakış
2.2 Aksesuarlar
2.3 İlk kullanım
3.1 Gösterge açıklamaları
3.2 Pişirme modları
Fırının Temizlenmesi ve Bakımı
17
Sorun Giderme
19
4.1 Temizleme hakkında genel notlar
4.2 Kolay Temizlenme Fonksiyonu
4.3 Bakım
• Yan ızgaraların çıkarılması ve temizlenmesi
• Fırın kapağının sökülmesi
• Camın sökülmesi ve temizlenmesi
• Ampulün değiştirilmesi
5.1 Sorun giderme
• Tüketici hizmetleri
• Garanti belgesi
TR 12

1. Genel Açıklamalar
Ürünlerimizden birinitercihettiğiniz için teşekkürederiz. Fırınınızdan en iyi sonuçlarıalmak için bukılavuzu dikkatle
okuyun ve daha sonra başvurmak için saklayın. Fırının montajından önce, herhangi bir onarım gerekmesi halinde
müşteri hizmetleri personeline vermek üzere seri numarasını not edin.Fırınıambalajındançıkardıktansonranakliye
sırasında hasar almamış olduğunu kontrol edin. Eğer tereddüdünüz varsa fırını kullanmayın ve tavsiye almak için
kalifiyebir teknisyenebaşvurun.
Tüm ambalaj malzemelerini (plastik torbalar, polistiren, vidalar) çocukların erişemeyeceği yerlerde tutun. Fırın
ilk kez çalıştırıldığında güçlü bir duman kokusu oluşabilir, bunun nedeni fırın ilk kez ısındığında yalıtım panelleri
üzerinde bulunan yapışkan maddenin yanmasıdır. Bu kesinlikle normal bir durumdur ve oluştuğu zaman
dumanın yayılması beklendikten sonra yiyeceklerin fırının içine konulması gereklidir. Bu dokümanda verilen
açıklamalarauyulmamasıhalindeortaya çıkabilecekdurumlariçin imalatçıherhangibirsorumlulukkabuletmez.
NOT: Bu kılavuzda belirtilen fırın işlevleri, özellikleri ve aksesuarları satın almış olduğunuz modele bağlı olarak
farklılıkgösterecektir.
1.1 Güvenlik İpuçları
Fırın sadece kullanım amacına uygun biçimde kullanılmalıdır, kullanım amacı
yiyeceklerin pişirilmesidir; başka bir amaç için, örneğin bir ısı kaynağı olarak
kullanılması uygunsuz ve bu nedenle tehlikeli kullanım olarak değerlendirilir.
Uygunsuz, hatalı veya makul olmayan kullanım sonucunda ortaya çıkabilecek
her türlü zarardanimalatçı sorumlututulamaz.
Herhangi bir elektrikli cihazın kullanımı sırasında bazı asli kurallara uyulması
gereklidir:
1.2 Elektriksel Güvenlik
ELEKTRİK BAĞLANTILARINI BİR ELEKTRİKÇİNİN YA DA KALİFİYE BİR
TEKNİSYENİNYAPMASINI SAĞLAYIN
Fırının bağlanmış olduğu elektrik beslemesinin montajın yapıldığı ülkede
yürürlükte bulunan yasalara uygun olması gereklidir. Bu açıklamalara
uyulmaması durumunda ortaya çıkabilecek zararlar için imalatçı herhangi bir
sorumluluk kabul etmemektedir. Montajın yapıldığı ülkede yürürlükte bulunan
yasalarabağlıolarakfırınıntopraklı birprizyadabütünkutuplarıayıran birdevre
kesici kullanılarak elektrik beslemesine bağlanması gereklidir. Elektrik
beslemesinin uygun sigortalarla korunmasıve kullanılan kabloların fırının doğru
bir şekilde beslenebilmesineyeterlikapasitede olmasıgereklidir.
BAĞLANTI
Fırın, faz arası veya faz nötr arası 220-240 VAC 50 Hz olan bir elektrik
beslemesine bağlanması gereken bir elektrik kablosu ile sağlanmıştır. Fırın
elektrik beslemesine bağlanmadan önce aşağıdakilerin kontrol edilmesi
gereklidir:
1.3 Tavsiyeler
Fırını herkullandıktansonrayapılacakkısa süreli temizlik işlemi fırınınher zaman
mükemmel temizlikte kalmasını sağlayacaktır. Fırının yanduvarlarını alüminyum
folyo veya mağazalardan satın alınabilecek tek kullanımlık koruma malzemeleri
ile kaplamayın. Sıcak emaye ile temas eden alüminyum folyo veya başka
herhangi bir koruma malzemesi erime riskine sahiptir ve emaye iç yüzeylerin
- elektrik fişini prizdençıkarmakiçin aslakablodantutarak çekmeyin;
- elleriniz yadaayaklarınızıslak veyanemliiken cihazadokunmayın;
- genellikle adaptörlerin, çoklu prizlerin ve uzatma kablolarının kullanılması
tavsiyeedilmez;
- arızalanması ve/veya düzgün çalışmaması durumunda cihazı kapatın ve
kurcalamayın.
- etikettebelirtilen gerilimdeğeri;
- devrekesicininayarı.
Fırının topraklama klemensine bağlanmış olan topraklama kablosunun elektrik
beslemesinin topraklamaklemensinebağlanmasıgereklidir.
UYARI
Fırını elektrikbeslemesinebağlamadanönce, elektrik beslemesinintopraklama
klemensinin sürekliliğini kontrol etmesi için kalifiye bir elektrikçiye başvurun.
Fırının topraklama klemensine bağlanmaması veya topraklama bağlantısının
sürekliliğinde bir sorunolmasısonucunda ortayaçıkabilecekher türlü kaza veya
zarardaimalatçı herhangibirsorumlulukkabuletmemektedir.
NOT: fırında bazı bakım işlemleri yapılması gerektiğinden, montajın yapılmış
olduğu alandan çıkarılması halinde fırının bağlanabileceği başka bir prizin
yakınlarda bulunması tavsiye edilir. Elektrik kablosunun sadece teknik servis
personeli ya da eşdeğer niteliklere sahip teknisyenler tarafından değiştirilmesi
gereklidir.
bozulmasına neden olabilir. Fırınınızın aşırı kirlenmesini ve bunun sonucunda
duman kokusu oluşmaması için fırını çok yüksek sıcaklıklarda kullanmamanızı
tavsiye ederiz. Pişirme süresini uzun tutmak ve sıcaklığı biraz düşürmek daha
iyidir. Fırın ile birlikte verilen aksesuarlara ek olarak, sadece çok yüksek
sıcaklıklaradayanıklıtabaklarve pişirmekaplarıkullanmanızıtavsiye ederiz.
1.4 Kurulum
Ürünün kurulumufirmanın yetkilendirilmiş servis/yetkilendirilmiş kişi tarafından
yapılmalıdır. Yetkisiz kişi ve kuruluşlar tarafından yapılan kurulumlardan doğan
tüm ürün, kişi, mahal hasarları firmanın sorumluluğunda değildir. Kurulum
yapılacak mahalin ürünün çalışma ve teknik koşullara kullanma kılavuzunda
belirlenen kurallara uygun şekilde olması/sağlanması tüketicinin
sorumluluğundadır. Eğer tüketici tarafından yapılan kurulum nedeniyle ortaya
çıkan hataların düzeltilmesi için imalatçının desteği gerekirse, bu destek garanti
kapsamında sağlanmaz. Kurulum açıklamaları profesyonel kalifiye personel
içindir vekurulumsırasındauyulmasıgereklidir. Hatalıkurulum insanların ve evcil
hayvanların yaralanmasına ve eşyaların zarar görmesine neden olabilir. Böylesi
bir yaralanma veyazarar içinimalatçısorumlu tutulamaz.
Fırın yüksekbir mutfak dolabınayadatezgah altına yerleştirilebilir. Sabitlemeden
önce, iç parçaların soğutulması ve korunması için gerekli temiz havanın uygun
biçimde dolaşımının sağlanması amacıyla fırının etrafında iyi bir havalandırma
Bu cihaz ev standartlarında kullanılmak üzere üretilmiştir. Profesyonel kullanım veya ticare kullanım için kurulmuş olması
durumunda, ilgili ticari hususta uygulanan standartlar dikkate alınmalıdır.
sağlandığından emin olun. Sabitleme şekline göre son sayfada belirtilen hava
alma açıklıklarını açın. Bu cihaz ev standartlarında kullanımına uygun olarak
tasarlanmış ve üretilmiş olup ticari ve profesyonel amaçla kullanımlara uygun
değildir. Ticari kullanımlarda (ev harici) ürün teslim tarihinden itibaren 1 (bir) ay
sure ile üretim hatalarına karşı garanti kapsamındadır. Ticari kullanımlarda
cihazın ömrü kısalabilir ve kullanım beklentilerini karşılamayabilir. Ev ve benzeri
kullanım amacıyla örtüşmeyen (ev veya ev tipi bir mekanda bile olsa) kullanım
dolayısıyla cihazdameydanagelebilecekherhangi bir arıza ve/veyahasarüretici/
satıcı tarafından kabul edilmeyecektir. Ticari amaç ilekullanılan ürünlerde, Malın
ayıplı olduğu teslim sırasındaaçıkçabelliisealıcı2 (iki) güniçinde durumu satıcıya
ihbar etmelidir. Açıkça belli değilse alıcı malı teslim aldıktan sonra 8 (sekiz) gün
içinde incelemek veya incelettirmekle ve bu inceleme sonucunda malın ayıplı
olduğu ortaya çıkarsa, haklarını korumak için durumu bu süre içinde satıcıya
ihbarla yükümlüdür.
1.5 Atık yönetimi ve çevrenin korunması
Bu cihaz, 2012/19/EU Atık Elektrikli ve Elektronik Cihazlar (WEEE)
hakkında Avrupa Yönergesine göre etiketlenmiştir. WEEE hem
kirletici maddeleri (çevreye olumsuz bir etkisi olabilecek), hem de
baz elemanları (yeniden kullanılabilir olan) içermektedir. Kirletici
maddelerin bertaraf edilmesi ve tüm malzemelerin geri
dönüştürülebilmesi için WEEE'lerin doğru bir şekilde tasnif
edilmesi önemlidir. WEEE'lerin çevre açısından bir sorun
oluşturmaması için bireyler önemli bir rol oynayabilir; birkaç temel kurala
uyulması son dereceönemlidir:
- WEEE evsel atıkolarakişlemgörmemelidir;
- WEEE belediyeler veya tescilli bir firma tarafından yönetilen belirlenmiş toplama
alanlarına götürülmelidir.
Birçok ülkede, büyük WEEE'ler için şehir içinde toplama noktaları
bulunmaktadır. Yeni bir cihaz satın aldığınızda, eski cihazın satın alınan cihazla
aynı tipte olması ve aynı işlevlere sahip olması durumunda eski cihazı ücretsiz
olarakbirebirkabuletmesi gereken satıcıyaiadeedebilirsiniz.
ENERJİ TASARRUFU VEÇEVREYESAYGI
Mümkün olduğunda, fırını önceden ısıtmaktan kaçının ve her zaman
doldurmaya çalışın. Fırın kapağını olabildiğince az açın çünkü her açılışında ısı
kaybı oluşur. Önemli oranda enerji tasarrufu için, fırını planlanan pişirme
süresinden 5 ile 10dakika daha önce kapatınvefırının üretmeyedevamedeceği
artakalan ısıyı kullanın. Isının hazne dışına kaçmaması için contaları temiz ve
düzgün tutun. Eğer saatlik bir tarife ile ücretlendirilen bir elektrik sözleşmeniz
varsa, pişirmeye başlama saatini indirimli fiyat tarifesinin saatine taşıyan
"gecikmeli pişirme" programı ile daha basit bir şekilde enerji tasarrufu
yapılabilir.
TR 13

1.6 Uygunluk beyanı
Bu cihazın gıdalarla temas edebilecek parçaları 89/109 EEC Yönetmeliği
hükümlerine uygundur.
Bu ürüne işaretinin yerleştirilmesi ile cihazın bu ürün için yürürlükte
olan tüm ilgili Avrupa güvenlik, sağlık ve çevre standartlarına uygun
olduğunu doğruluyoruz.
2. Ürün Açıklaması
2.1 Genel bakış (Modele göre değişmektedir.)
• Bununla Candy Hoover Grubu, ile işaretli bu cihazın 2014/53 / AB
sayılıDirektifinesasşartlarınauygunolduğunubeyaneder.
Uygunluk beyannamesinin bir kopyasını almak için lütfen www.candygroup.comadresindenüreticiyebaşvurun.
1
5
6
2
4
3
1. Kontrol paneli
2. Raf konumları
(eğer varsa yan tel raflar)
3. Metal ızgara
4. Tepsi
5. Fan (çelik plakanın arkasında)
6. Fırın kapağı
2.2 Aksesuarlar
Tepsi
1
Yiyeceklerinızgara üzerindepişirilmesisırasındadamlayan sularınıtoplar.
Yan tel ızgaralar
3
Eğer dahil yan tel ızgaralar.
1
2
5
3
4
6
Metal ızgara
2
Pişirme tepsilerini ve tabaklarını tutar.
2.3 İlk Kullanım
İLK TEMİZLEME
İlk kez kullanmadan önce fırını temizleyin. Dış yüzeyleri yumuşak bir ıslak bezle silin. Tüm aksesuarları yıkayın ve fırının içini sabunlu su ve sıvı bulaşık
deterjanı karışımına batırılmış birbezle silin. Boş fırını maksimumsıcaklık değerine ayarlayın ve yaklaşık 1saat çalıştırın, bu şekildefırının yeni olmasından
kaynaklıtümkokular giderilecektir.
TR 14
3. Fırının Kullanımı (Modele göre değişmektedir.)
3.1 Gösterge açıklamaları
1
1
1- Sıcaklık seçici düğme
2- Termostat sinyal lambası
3- Saat ayarı
4- Dakika hatırlatıcı
5- Saat ekranı
6- LCD ekran ayar kontrolleri
7- Pişirme sonu
UYARI: Fırın yerinemonteedilip elektrikbağlantısı yapıldığında veya elektrik beslemesikesiliptekrar geri
geldiğinde, gösterge yanıp sönmeye başlar. Bu aşamada saatin ( ) ayarlanması gerekir. Sağ alt LED
aynıandayanıpsönüyor ( ) Saataşağıdakigibi ayarlanır:
• "-" "+" Butonlarıyla zamanı ayarlayınız.
• Menü düğmesine basın veya5 dk. bekleyin, ardındansaatayarlanır.
UYARI: Fırınancaksaatayarlandıysa çalışmaya başlar.
2 9
3
2 9
4
8- Pişirme süresi
9- Wifi sinyal lambası
10- Fonksiyon seçici düğme
PROGRAM DEVREDEN ÇIKARILMASI
ÇOCUK
KİLİDİ
ZAMAN
SAYACI
DEVREYE SOKULMASI
• Çocuk Kilidi işlevini en az 5 saniye
boyunca Set (Ayar) (+) düğmesine
dokunarak etkinleştirebilirsiniz. Bu
andan itibaren diğer tüm işlevler
kilitlenir ve ekran 3 saniye aralıklarla
yanıp sönerek STOP (DURDUR)
metnini ve kesintisiz olarak önceden
ayarlanansaatigösterir.
•Orta düğmeye kez
basınız
•Arzu ettiğiniz süreyiayarlamak için "-"
"+" düğmelerinebasın.
•Bütün düğmelerebasmaya son verin.
3 •Ayarlanan saat geçtiğinde, bir sesli
• Çocuk kilidi fonksiyonu tekrar
dokunmatik ekrandaki(+) sembolüne
en az saniye dokunarak iptal edilir.
5
Bu andan itibaren tüm fonksiyonlar
tekrarseçilebilirhale gelir.
alarm devreye girer. Bu alarm
kendiliğinden durur, bununla birlikte
herhangi bir düğmeye basarak
derhal durdurulabilir.
5
7
8
6
İŞLEVİ
•Ayarlanmış olan sürenin sonunda
alarmı çaldırır.
•İşlem sırasındakalansüreyi gösterir.
10
10
12:00
NOT
•Fırını bir alarmlı saat olarak kullanabilmenize olanak sağlar (fırın çalışırken de
çalışmıyorkende kullanılabilir)
PİŞİRME
SÜRESİ
PROGRAMI
PİŞİRME
SONU
PROGRAMI
• Fırın işlev düğmesiyle pişirme
işlevini, termostat düğmesiyle
pişirmek istediğinizsıcaklığı seçin.
•Ortadüğmeye kez basınız1
•Arzu ettiğiniz pişirme süresini
ayarlamak için "-" "+" düğmelerine
basın.
•Bütün düğmelere basmaya son
verin.
NOT: Fırın kapanırsa veya lamba
çalışırsa, pişirme süresi zamanlama
işlevi çalışmaz.
• Fırın işlev düğmesiyle pişirme
işlevini, termostat düğmesiyle
pişirmek istediğinizsıcaklığı seçin.
• ğ basınız.2Ortadü meye kez
•Arzu ettiğiniz pişirmenin sona erme
saatiniayarlamakiçin basın."+"
•Bütün düğmelere basmaya son
verin.
NOT: Fırın kapanırsa veya lamba
çalışırsa, pişirme süresi zamanlama
işlevi çalışmaz.
•Ayarlanmış olan süre sona
erdiğinde, fırın otomatik olarak
kapanır. Pişirme işlemini daha önce
durdurmak istemeniz durumunda,
işlev seçicisini 0 konumuna getirin
veya süreyi 0:00 olarak ayarlayın
MENU ve"-" "+" düğmeleri.
•Ayarlanmış olan süre sona
erdiğinde, fırın otomatik olarak
kapanır. Pişirme işlemini kendiniz
müdahale ederek durdurmak için
fırın fonksiyon düğmesini O
konumunagetirin.
TR 15
•Seçilmiş olan tarif için gerekli olan
pişirme süresini ayarlayabilmenize
olanak sağlar.
•Ne kadar çalışma süresi kaldığını
görmek içinMENUdüğmesine basın.
•Programlanmış olan süreyi
değiştirmek için MENU ve "-" "+"
düğmelerine basın.
•Pişirme sonu saatini ayarlaya
bilmenizeolanaksağlar.
•Ayarlanmış olan saatikontrol etmek
için o ğ 2 basınız
rta dü meye kez
•Programlanmış olan saati
değiştirmek için MENU ve "-" "+"
düğmelerine basın.
•Program sonunda, program 3 uyarısinyali
verirveekrandaEnd (son)yazısıgörünür.
Saat işlevine geri dönmek için işlev seçici
düğmeyi "0"olarakayarlayın.
•Bu işlev genellikle “pişirme süresi” işlevi
ile birlikte kullanılır. Örneğin yiyeceğin
pişme süresi45 dakikaysa ve saat12:30'da
hazır olması gerekiyorsa, sadece pişirme
süresini 45 dakikaya ve pişirme sonu
saatinide12:30'aayarlamanız yeterlidir.
•Programlanmış olan pişirme süresinin
sonunda fırın otomatik olarak kapanır ve
bir seslialarmverilir.
•Pişirme saat 11:45'de (12:30 eksi 45
dakika) otomatik olarak başlar ve
programlanmış olan pişirme süresi (45
dakika) kadar sürdükten sonra fırın
otomatik olarakkapanır.

ELETTRONICA SIFIRWIFI İŞLEVİ
Uygulama ile ürün arasındaki bağlantıylailgilitümayrıntılariçin,HızlıKılavuza bakın.
Hızlı Kılavuz LINK'te kullanılabilir.go.candy-group.com/candy-ov
WiFi, pişirmeseçici de ikifarklı pozisyonasahiptir:
•WiFiaçık:Wifi yalnızca fırıncihazınızazaten kayıtlıysaaçılır.Bupozisyonda,fırın yalnızcauzaktankumanda edilir.
• WiFi sıfırlama: WiFi sıfırlamadaki seçiciyi 30 dk. bıraktıktan sonra, Bluetooth açılacak ve 5 dk. içerisinde fırını cihazınıza
kaydedebileceksiniz.
Kayıt başarılıysa, fırın uzaktan kumandayla kontrol edilir ve WiFi simgesi açılır. Kayıt başarılı değilse, WiFi kapanacak ve fırın
sıfırlanacaktır.
Yenikayıtla devametmekiçinpişirmeprogramıseçiciWiFisıfırlamapozisyonundan döndürülmeli vetekraropozisyona geçirilmelidir.
Not: Kayda başlamadanönceUygulamayıcihazınıza yükleyin
Not: Uygulamanın yüklendiği cihazdaBluetoothetkinolmalıdır
Not: Heriki WiFi pozisyonu için,dokunmatikdüğmelerçalışmaz.
Not: Ev yönlendiricisi ilecihazarasındaiyi bir WiFisinyal gücü kurmakönemlidir. Fırın, yönlendiriciye bağlanmayaçalıştığında,simge 3
dk. yanıp sönecek ve1 dk. sönecek; bağlanmışsasimge yanacaktır.
1 2
3 4
CANDYSIMPLY-FI:
simply-Fi cihazınızı ve en iyi şekilde ilgili ayrıntılı
bilgi için adresinegidin.
http://www.candysimplyfi.com
NASIL BAĞLAYACAĞINIZ NASIL KULLANACAĞINIZLA
6
5
1. Program seçimi / 2. Program süresi / 3. Pişirme başlangıç ayarı / 4- Özel tarif seçimi / 5. Çevrimdışı ve sesli asistan / 6. İpuçları, öneriler ve çevrimiçi
kullanım kılavuzu
3.2 Pişirme Modları
Fonksiyon
*
ikonu
Varsayılan
sıcaklık °C
180
190
Fonksiyon (Fırın modeline bağlıdır)
LAMBA: Fırın lambasını yakar.
BUZ ÇÖZME: Düğme bu konuma alındığı zaman fan oda sıcaklığında havayı donmuş gıdanın etrafındadolaştırır, böylece gıdanın protein
içeriği değişmeden birkaçdakikaiçindebuzu çözülür.
FANLIPİŞİRME: Buyöntemikümes hayvanları, çörekler, balık ve sebzeler için kullanmanızıtavsiyeederiz. Isıgıdanın içine daha iyi işlerve
hem pişirme, hem deısıtma süreleri azalır. Değişik gıdalarıaynıveya farklı soslarlabir veya dahafazlakonumdapişirebilirsiniz.Bu pişirme
yöntemi ısı yayılımının eşit olmasını sağlar ve kokular birbirine karışmaz. Aynı anda farklı gıdalar pişirdiğiniz zaman fazladan yaklaşık on
dakikadahabekleyin.
"COOK LIGHT" fonksiyonu kullandığınız yağ miktarını azaltarak, daha sağlıklı bir şekilde pişirmenizi sağlar. Pişirme fonksiyonlarının ve
kombinasyonun özel bir bileşimi sayesinde, yiyeceklerin nemini kaybetmesini önleyerek, yüzeyini kızartarak ve en kısa pişirme zamanını
kullanarakyiyecekleritadındanödün vermedenpişirir.
Et, kavrulmuş sebze ve omletler için özellikle uygundur. Fan sayesinde darbeli hava döngüsü, fırındaki yiyeceklerin nemini ve besin
değerlerini korurvebu sayedehızlıvehomojen birpişirmegerçekleşir.
Bu yenifonksiyonile tümtariflerideneyinveyiyeceklerde kullandığınızsos miktarınıazaltarak hafifpişirilmişyiyeceklerinzevkine varın!
FAN+ALT ISITICI: Alt ısıtıcı elemankullanılır, fan fırının içindekihavanın sirkülasyonunusağlar. Bu yöntem sulu meyveler, meyvelipastalar,
turtalar, kişlerve etlibörekleriçinidealdir.
210
Gıdaların kurumasınıönlervekeklerin,ekmeklerin vealttanpişirilen diğergıdalarınkabarmasınıfazlalaştırır.
Rafı alt konumayerleştirin.
STATİK/GELENEKSELPİŞİRME: Hem üst, hem dealtısıtıcıelemanlar kullanılır. Fırınıyaklaşıkondakikaönceden ısıtın. Buyöntem her türlü
geleneksel kızartma ve fırında pişirme için idealdir. Kırmızı etler, rosto, kuzu butu, ekmek, folyoya sarılmış yiyecekler (papillote), katmer
220
içindir. Gıdayıbir tabağıniçindeortarafın üzerine yerleştirin.
IZGARA:fırınkapağıkapalıiken bufonksiyonu kullanın.
Üst ısıtıcı eleman tek başına kullanılır ve sıcaklık ayarı yapılabilir. Elemanların ısınması için beş dakikalık ön ısıtma gereklidir. Izgaralar,
kebaplar ve üstü örtülen yemeklerinpişirilmesinde başarı garanti edilir. Beyaz etlerin ızgaradan biraz açıkta tutulması gereklidir; pişirme
230
süresi dahauzundur, ancak et daha lezzetli olacaktır. Kırmızı etleri vebalık filetolarını altında damlama tepsisi ilerafın üzerine yerleştirin.
Fırın iki ızgarakonumuna sahiptir:Izgara: 2140W Barbekü:3340W
FAN DESTEKLİ IZGARA: fırın kapağı kapalı iken bu fonksiyonu kullanın. Üst ısıtıcı eleman kullanılır, fan fırının içindeki havanın
sirkülasyonunu sağlar. Kırmızı etler için ön ısıtma gereklidir, ancak beyaz etler için gerekmez. Kızarmış domuz, kümes hayvanları, vb gibi
200
kalın parçalar ile bütün parçaların pişirilmesi için idealdir. Pişirilecek gıdayı doğrudan orta konumda bulunan rafın ortasına yerleştirin.
Suları toplamakiçinrafın altına damlamatepsisinikoyun.Gıdanınızgaraya çok yakın olmadığından eminolun. Pişirme süresininyarısında
gıdayıçevirin.
220
PİZZA:Buseçenektesıcakhavasirkülasyonuyla pizza vekek gibiyiyeceklermükemmel birşekildepişirilir.
WIFI AÇIK:Fırın,wifibağlantısınaizinveriyor.
WIFI SIFIRLAMA: WiFi bağlantısınınyenidenbaşlatılmasınaizinveriyor.
*CENELEC EN 60350-1 uyumlu olarak test edilmiştir enerji sınıfının tanımlanması için kullanılmıştır.
TR 16
4. Fırının Temizlenmesi ve Bakımı
4.1 Temizleme hakkında genel notlar
işlemlerini yapmadan önce fırının soğumasını bekleyin. Temizlik için asla
aşındırıcı deterjanlar, çelik tel veya keskin nesneler kullanmayın, aksi
takdirdeemayeparçalardaonarılamazhasarlar oluşabilir. Sadece su, sabun
veyaağartıcıbazlıdeterjanlar(amonyak) kullanın.
CAM PARÇALAR
Fırın her kullanıldıktan sonda pencerenin camının emici bir mutfak bezi ile
temizlenmesi tavsiye edilir. İnatçı lekeleri temizlemek için deterjana
batırılmışveiyicesıkılmış bir sünger kullanınvesonrasuiledurulayın.
FIRIN KAPAKCONTASI
Kirlendiği zamanhafifçeıslatılmışbirsüngerletemizlenebilir.
4.2 olay emizlenme onksiyonu ( quactiva)KT F A
Aquactivabuharyardımıilefırınınızdakiyağve yemekartıklarınıtemizler.
1 Aquctiva. Fırınınızın – KolayTemizlenme bölümüne 300 mlsu ilaveedin.
2()(). Fırınınızı sabit ya databan sıcaklığınaayarlayın.
3 Aquactiva ( ). Isı göstergesini – KolayTemizlenme fonksiyonunagetirin.
4. Programı30dakikaçalıştırın.
5. Cihaz soğuduğunda fırınınızın iç kısmını temiz birbezletemizleyin.
Uyarı:
C önce Sihazınızadokunmadan soğuk olduğundan emin olun. ıcak yüzeylerinyanıkriskitaşıdığınıunutmayın.
İçme suyu kullanın.
AKSESUARLARDüzenli temizlik ile cihazın kullanım ömrü uzatılabilir. Elle temizlik
Aksesuarları sabunlu su ile ıslatılmış bir süngerle temizleyin, ardından
durulayınvekurutun:aşındırıcıdeterjanlarkullanmaktan kaçının.
DAMLAMATEPSİSİ
Izgarayıkullandıktansonratepsiyifırından çıkarın. Sıcak yağı bir kaba dökün
ve bir süngervesıvıbulaşık deterjanıkullanaraktepsiyisıcaksu ileyıkayın.
Eğer yap artıkları kalırsa, tepsiyi deterjanlı suya batırın. Alternatif olarak,
tepsiyi bulaşık makinesinde yıkayabilir veya piyasada bulunan fırın
deterjanlarınıkullanabilirsiniz.Kirlitepsiyiaslafırınagerikoymayın.
300 ml
4.3 Bakım
YAN IZGARALARINÇIKARILMASIVETEMİZLENMESİ
1- Tel rafı, ok yonunde cekerek, tutucu yuvalarından ve fırın duvarından ayrılmasını sağlayın.
2- Tel raflarıbulaşık deterjanı,ılıksuveyumuşakbirbezyadasungerkullanarak temizleyipkurubirbezlekurulayın.
3- Temizlik işlemiardından,telrafları yerinetakın.
FIRIN KAPAĞININ SÖKÜLMESİ
1. Kapağıaçın.
2. Aşağı doğru iterekfırın kapağınınsağvesoltarafındabulunanmenteşeyuvalarının kıskaçlarınıaçın.
3. Bu işlemin tersiniuygulayarak kapağıyerine takın.
TR 17

LOW-E
CAMIN SÖKÜLMESİVETEMİZLENMESİ
1. Fırının kapağınıaçın.
2.3.4. Menteşelerikilitleyin,vidalarıçıkarınveyukarıdoğruçekerek üstmetalkapağı çıkarın.
5.6. Camı dikkatlibirşekildefırınkapağındançekerek çıkarın(Not:pirolitikfırınlarda ikinciveüçüncücamı(eğervarsa) daçıkarın).
7. Temizleme veyedeğişim işlemininsonundaparçalarısökmeişlemininterssıralaması iletoplayın.
Tümcamlarınüzerinde" " kelimesinin okunabilmesive kapağın soltarafında bulunması gereklidir, soldaki yataymenteşeyikapatın.Bu şekilde birinci
camın baskılı yüzeyikapağıniçindekalacaktır.
Low-E
1.
2.
5.
6.
1
2
3
3.
4.
7.
TR 18
AMPULÜNDEĞİŞTİRİLMESİ
1. Fırını elektrik beslemesinden ayırın.
2. Cam kapağısökün, ampulü sökün ve aynıtürdeyenibirampuliledeğiştirin.
3. Arızalıampuldeğiştirildiktensonracamkapağı yerinetakın.
5. Sorun Giderme
5.1 Sorun giderme
SORUN OLASI NEDENİ ÇÖZÜMÜ
Fırın ısınmıyor
Fırın ısınmıyor
Dokunmatik kullanıcı paneli
tepki vermiyor
Saat ayarlanmamış Saati ayarlayın
Bir pişirme işlevi ya da sıcaklık
ayarlanmamış
Kullanıcı panelinde buhar
veya yoğuşma var
Gerekli ayarların doğru
olduğunu kontrol edin
Yoğuşma tabakasını temizlemek için
kullanıcı panelini mikrofiber bir
bezle silin
TR 19

TÜKETİCİ HİZMETLERİ
Yetkili servislerimizden hizmet talebiniz olduğunda veya ürünlerimizle ilgili genel öneri ve talepleriniz için aşağıdaki
numaradan ulaşabilirsiniz.
TÜKETİCİ HATTI: 444 03 98
Sabit telefonlardan veyacep telefonlarından alankodu çevirmeden arayınız.
Ürününüzü kullanmadan önce montaj ve kullanma kılavuzunu mutlaka okuyunuz. Ürünün montaj ve kullanım
kılavuzunda yer alan hususlara aykırı kullanılması, kullanım hataları ve cihazın standart kullanım şartları / amaçları
haricinde kullanılması halindeürün garanti kapsamıdışında kalacaktır.
Ürünün standart ve sorunsuz çalışma koşullarının sağlanması için gerekli / zorunlu olan montaj ve kullanım kılavuzunda
belirtilen teknik özelliklerinin (su basıncı, voltaj değeri, gaz besleme basıncı, sigorta değeri, topraklama, yakıt cinsi,
yakıt kalitesi vb.) uygun olmaması, sabit olmaması ve/veya değişken olması halinde, cihazda meydana gelebilecek
arızalar ve sorunlargaranti kapsamı dışındakalacaktır.
Candy Hoover Euroasia tarafından sağlanangaranti şartları aşağıdakikoşullarda geçersiz olacaktır.
• Ürüne, yetkili servis dışındaki kişiler tarafından müdahale edilmesi, elektrik-su kesintisi ve üründen kaynaklanmayan
kaçaklar garanti kapsamıdışındadır.
• Kullanım hatalarından dolayı oluşan arıza ve hasarlar, elektrik-gaz -su tesisatı ve / veya tesisat ekipmanları nedeniyle
meydana gelebilecek arızalargaranti kapsamı dışındadır.
•Ürünün, müşteriye ulaştırılması sonrası yapılan taşıma işlemine bağlı arıza ve hasarlar, tüketici tarafından yapılan
yanlış depolama veortam koşulları nedeniylecihazda meydana gelenhasarlar ve arızalargaranti kapsamı dışındadır.
• Hatalı elektrik tesisatı, ürünün üzerinde belirtilen voltajdan farklı voltajda kullanılması veya şebeke voltajındaki
dalgalanmalar sonucu oluşan arıza ve hasarlar, doğal afetler, üründen kaynaklanmayan harici/fiziki dış etkenler,
mevsimsel hava şartları ve çevresel etkenler (deprem, yangın, sel, su basması, şiddetli rüzgar, yıldırım düşmesi, kireç,
nem, rutubet, toz, nakliye, taşıma, ürünün dona maruz kalması, susuz çalışma vb.) nedeniyle oluşan arızalar garanti
kapması dışında kalacaktır.
• Kullanım kılavuzunda belirtilen hususlara aykırıkullanılmasından kaynaklanan arızalarve hasarlar.
Yukarıda belirtilen arızaların giderilmesi ücretkarşılığı yapılır.
Ürünün kullanım ömrü 10 (on) yıldır. Bu ürünün tanımlandığı şekilde çalışabilmesi için gerekli yedek parçaları
bulundurma süresidir.
Üretim yeri Türkiye'dir.
İTHALATCI FİRMA:
CANDY HOOVER EUROASIA EV GEREÇLERİ SAN. VE TİC. A.Ş.
İçerenköy Mh. Hal Yolu Cd. Çayır Yolu Sk. No: 11
Sayar İş Merkezi Kat: 7 34752 Ataşehir / İSTANBUL/ TÜRKİYE
Tel: 0216 466 42 42 • Fax: 0216 466 15 45
www.hoover.com.tr • servis@hoover.com.tr
ÜRETİCİ FİRMA:
CANDY HOOVER GROUP
Via Privata E. Fumagalli 20861 Brugherio (MB) - ITALY
Tel: 039.2086.1 • Fax: 039.2086.403
www.candy-group.com
TR 20

GARANTİ BELGESİ
ANKASTRE FIRIN
Ankastre fırın kullanma kılavuzunda gösterildiği şekilde kullanılması ve yetkili kıldığımız servis elemanları dışındaki
şahıslar tarafından bakımı, onarımı veya başka bir nedenle müdahale edilmemiş olması şartıyla bütün parçaları
dahil olmak üzere tamamı malzeme, işçilik ve üretim hatalarına karşı ürünün teslim tarihinden itibaren 3 ( ÜÇ ) YIL
SÜRE İLE CANDY HOOVER EUROASIA A.Ş. TARAFINDAN GARANTİ EDİLMİŞTİR.
Malın bütün parçaları dahil olmak üzere tamamı garanti kapsamındadır.
Malın ayıplı olduğunun anlaşılması durumunda tüketici, 6502 sayılı Tüketicinin Korunması Hakkında Kanunun 11
inci maddesinde yer alan;
a) Satılanı geri vermeye hazır olduğunu bildirerek sözleşmeden dönme,
b) Satılanı alıkoyup ayıp oranında satış bedelinde indirim isteme,
c) Aşırı bir masraf gerektirmediği takdirde, bütün masrafları satıcıya ait olmak üzere satılanın ücretsiz onarılmasını
istem,
ç) İmkan varsa, satılanın ayıpsız bir misli ile değiştirilmesini isteme, seçimlik haklarından birini kullanabilir.
Tüketicinin, Kanunun 11. maddesinde yer alan seçimlik haklarından ücretsiz onarım hakkını seçmesi durumunda
satıcı; işçilik masrafı, değiştirilen parça bedeli ya da başka herhangi bir ad altında hiçbir ücret talep etmeksizin
malın onarımını yapmak veya yaptırmakla yükümlüdür. Tüketici ücretsiz onarım hakkını üretici veya ithalatçıya karşı
da kullanılabilir. Satıcı, üretici ve ithalatçı tüketicinin bu hakkını kullanmasından müteselsilen sorumludur.
Tüketicinin, ücretsiz onarım hakkını kullanması halinde malın;
• Garanti süresi içinde tekrar arızalanması,
• Tamiri için gereken azami sürenin aşılması,
• Tamirinin mümkün olmadığının, yetkili servis istasyonu, satıcı, üretici veya ithalatçı tarafından bir raporla
belirlenmesi durumlarında;
tüketici malın bedel iadesini alıp, ayıp oranında beden indirimini veya imkan varsa malın ayıpsız misli ile
değiştirilmesini satıcıdan talep edebilir. Satıcı, tüketicinin talebini reddetmez. Bu talebin yerine getirilmemesi
durumunda satıcı, üretici ve ithalatçı müteselsilen sorumludur.
Garanti uygulaması sırasında değiştirilen malın garanti süresi, satın alınan malın kalan garanti süresi ile
sınırlıdır.
Malın tamir süresi 20 iş gününü geçemez. Bu süre, garanti süresi içerisinde mala ilişkin arızanın yetkili servis
istasyonuna veya satıcıya bildirimi tarihinde, garanti süresi dışında ise malın yetkili servis istasyonuna teslim
tarihinden itibaren başlar. Malın arızasının 10 iş günü içerisinde giderilememesi halinde, üretici veya ithalatçı; malın
tüketicinin kullanımına tahsis etmek zorundadır. Malın garanti süresi içerisinde arızalanması durumunda, tamirde
geçen süre garanti süresine eklenir.
Malın kullanma kılavuzunda yer alan hususlara aykırı kullanılmasından kaynaklanın arızalar garanti kapsamı
dışındadır.
Tüketici, garantiden doğan haklarının kullanılması ile ilgili olarak çıkabilecek uyuşmazlıklarda yerleşim yerinin
bulunduğu veya tüketici işleminin yapıldığı yerdeki Tüketici Hakem Heyetine veya Tüketici Mahkemesine
başvurabilir.
Garanti belgesinin tekemmül ettirilerek tüketiciye verilmesi ve bu yükümlülüğün yerine getirildiğinin ispatı
satıcıya aittir.
Satılan mala ilişkin olarak düzenlenen faturalar garanti belgesi yerine geçmez.
Satıcı tarafından bu Garanti Belgesinin verilmemesi durumunda, tüketici Gümrük ve Ticaret Bakanlığı Tüketicinin
Korunması ve Piyasa Gözetimi Genel Müdürlüğüne başvurabilir.
CANDY-HOOVER-EUROASIA EV GEREÇLERİ SAN. VE TİC. A.Ş.
Genel Müdür:
Model:..............................
Bandrol ve Seri No:...........
Teslim Tarihi Yeri: ..............
Bu bölümü, ürünü aldığınız Yetkili Satıcı imzalayacak ve kaşeleyecektir.
Bu garanti belgesi ile kesilen fatura garanti süresi boyunca garanti belgesi ile muhafaza edilmesi önerilir.
Fatura Tarihi No: .................
Satıcı Firma Ünvanı: ............
TR 21
Adres:
Tel - Fax:
Satıcı Firma (Kaşe ve İmza):

Conseils De Securite
• Pendant la cuisson de l’humidité peut se créer
dans la cavité ou sur la surface de la porte. Le cas
décrit est normal. Si on veut reduire cet effet, il faut
laisser réchauffer le four 10-15 minutes avant
d’introduire les aliments. L’humidité va disparaître
grâce à la juste température de cuisson
• Nous vous conseillons de faire la cuisson des
légumes dans un récipient avec couvercle pas sur un
plateau
• Une fois que la cuisson est terminée, nous vous
conseillons de ne pas laisser les aliments à l’intérior
de lacavité pour plusde 15/20 minutes
• AVERTISSEMENT: L'appareil et les parties
accessibles deviennent chauds pendant l'utilisation.
Des précautions doivent être prises pour éviter de
toucher les éléments chauffants.
• ATTENTION : les parties accessibles peuvent
devenir très chaudes quand le four est en marche.
Les enfants doivent être tenus à une distance de
sécurité.
• Cet appareil n'est pas destiné à être utilisé par des
personnes (y compris les enfants) dont les capacités
physiques, sensorielles ou mentales sont réduites,
ou ayant un manque d'expérience et de
connaissances, à moins qu'elles n'aient été formées
à l'utilisation de l'appareil, par une personne
responsable de leursécurité.
• Lesenfants nedoivent joueravec l'appareil.
• Le nettoyage et l'entretien par l'utilisateur ne doit
pas être faitpar des enfants sans surveillance.
• En cours d'utilisation l'appareil devient chaud. Des
précautions doivent être prises pour éviter de
toucher les éléments chauds à l'intérieur du four.
AVERTISSEMENT: Les parties accessibles peuvent
devenir chaudes pendant l'utilisation. Les jeunes
enfants doivent être tenus à l'écart.
• Ne pas utiliser de nettoyants abrasifs ou de racloirs
métalliques tranchants pour nettoyer la vitre de la
porte du four car ils peuvent rayer la surface,
entrainantdes risques d'explosion.
•Le four doit être éteint avant d'enlever la
protection et après le nettoyage, la protection doit
être replacé en respectant lesinstructions.
• Utiliser seulement la sonde de température
recommandée pour ce four.
• Ne pas utiliser de nettoyants vapeur pour le
nettoyage.
• Brancher le câble d’alimentation sur une prise de
courant qui supporte le voltage ; le courant et la
charge sont indiqués sur l’étiquette ; vérifier la
présence d’une mise à la terre. La prise
d’alimentation doit supporter la charge indiquée sur
l’étiquette et être dotée d’une mise à la terre en état
de fonctionnement. Le conducteur demise à la terre
est jaune et vert. Cette opération doit être exécutée
FR 22
par du personnel qualifié. En cas d’incompatibilité
entre la prise d’alimentation et la fiche du câble de
l’appareil, demander à un électricien professionnel
de remplacerla prise d’alimentation par un dispositif
compatible. La fiche du câble d’alimentation et la
prise d’alimentation doivent être conformes aux
normes en vigueur dans le pays d’installation. Il est
possible de brancher l’appareil à la prise
d’alimentation en installant un disjoncteur
multipolaire qui supporte la charge électrique
maximale, conformément aux lois en vigueur, entre
l’appareil et la prise d’alimentation. Le conducteur
jaune et vert de mise à la terre ne doit pas être
bloqué par le disjoncteur. La prise d’alimentation ou
le disjoncteur multipolaire utilisé pour le
branchement doit rester à tout moment accessible
lors de l’installation de l’appareil.
•Le débranchement doit se faire en accédant à la
prise d’alimentation ou en prévoyant un
interrupteur sur le circuit électrique fixe, conforme
aux normesélectriques.
•Si le câble d’alimentation est endommagé, il doit
être remplacé par un câble ou un faisceau de câbles
spécial disponible auprès du fabriquant ou en
contactant le service après-vente.
•Le câble d’alimentationrequis estle H05V2V2-F.
•Le non-respect des consignes ci-dessus peut
compromettre la sécurité de l’appareil et annuler la
garantie.
•Tout produit déversé en quantité doit être éliminé
avant le nettoyage.
•Pendant le nettoyage à pyrolyse, les surfaces
peuvent devenir beaucoup plus chaude que
d’habitude, les enfants doivent donc être tenus à
une distance de sécurité.
•Ne pas installer l’appareil derrière une porte
décorative,pour éviter la surchauffe.
•En introduisant le plateau dans le four, s’assurer
que le stop est dirigé vers le haut et au fond de la
cavité.
Le plateau doit complètement être inséré dans la
cavité
• AVERTISSEMENT : Ne tapissez pas les parois du
four avec du papier aluminium ou un autre matériau
de protection jetable en vente dans le commerce.
Tout papier aluminium ou autre matériau de
protection qui entrerait au contact direct de l'émail
chaud risquerait de fondre et de détériorer l'émail
intérieur du four.
• AVERTISSEMENT : Ne retirez jamais le joint de la
porte du four.
• Aucun réglage/opération supplémentaire n’est
requis pour faire fonctionner l’appareil aux
fréquences nominales

SOMMAIRE
Instructions Générales
24
Description du produit
25
Utilisation du Four
26
1.1 Indications de sécurité
1.2 Sécurité électrique
1.3 Recommandations
1.4 Installation
1.5 La gestion des déchets et la
protection de l'environnement
1.6 Déclaration de conformité
2.1 Vue d'ensemble
2.2 Accessoires
2.3 Première utilisation
3.1 Description de l'affichage
3.2 Mode de cuisson
Nettoyage du four et maintenance
28
Dépannage
30
4.1 Remarques générales concernant le nettoyage
4.2 Aquactiva Fonction
4.3 Entretien
• Retrait et nettoyagedes grilles
• Retrait de la porte du four
• Retrait et nettoyage des vitres
• Remplacement de l'ampoule
5.1 F.A.Q.
FR 23

1. Instructions générales
Nous vous remercionsd'avoirchoisiun de nosproduits. Pourobtenirles meilleurs résultatsavecvotrefour, vous
devez lire attentivement ce manuel et le conserver pour toute consultation ultérieure. Avant d'installer le four,
notez le numéro de série, il vous sera demandé par le support technique si des réparations sont nécessaires.
Après avoirenlevé le four de son emballage, vérifiez qu'il n'a pas été endommagé pendant le transport. Si vous
avez des doutes,ne pas utiliserle four et seréférer à untechnicienqualifié pourobtenirdes conseils. Conservez
tous les matériaux d'emballage (sacs en plastique, polystyrène, clous) hors de la portée des enfants.Lors de la
première utilisation du four, il peut se produire un dégagement de fumée âcre provoqué par le premier
échauffementdelacolledespanneauxd’isolationenveloppantlefour. Cephénomèneestnormal.Attendez que
la fumée cesse avant de cuire des aliments. Le fabricant décline toute responsabilité dans les cas où les
instructionscontenuesdansleprésent documentnesontpas respectées.
REMARQUE: les fonctions du four, lespropriétésetlesaccessoires cités dans cemanuelpeuventvarierselonles
modèles.
1.1 Indications de sécurité
Utilisez uniquement le four à sa destination, qui est seulement pour la cuisson
des aliments; toute autre utilisation, par exemple comme une source de
chaleur, est considérée comme impropre et donc . Le fabricant ne
peut être tenu responsabledetoutdommageliéàunemauvaiseutilisationoua
des modificationstechniquesduproduit.
L'utilisation de tout appareil électrique implique le respect de certaines règles
fondamentales:
dangereuse
1.2 Sécurité électrique
LE BRANCHEMENT ELECTRIQUE DOIT ÊTRE REALISE PAR UN INSTALLATEUR
AGREEOUUNTECHNICIENDE E.QUALIFICATION SIMILAIR
L'alimentation électrique àlaquellele four est connecté doit être conformeaux
lois en vigueur dans le pays d'installation. Le fabricant décline toute
responsabilitépourtoutdommagecauséparlenonrespectdeces instructions.
Le four doit être raccordé à l'alimentation électrique avec une prise murale
reliée à la terre ou par l'intermédiaire d'un dispositif à coupure omnipolaire,
selon les lois en vigueur dans le pays d'installation. L'alimentation électrique
doit être protégéepardes fusibles appropriés et lescâbles utilisés doivent avoir
une section transversalequi peutassurerunealimentation normaledufour.
CONNEXION
Le four est livréavec un câble d’alimentation permettant le raccordement sous
une tension électrique de 230 V entre les phases ou entre phase et neutre. Le
raccordementdevra êtreeffectué aprèsavoir vérifié:
- Ne pas tirersurlefilélectriquepourdébrancherla prise.
- Ne pas toucherl'appareilavecles mainsoulespiedsmouillésouhumides;
- En général l'utilisation d'adaptateurs, de prises multiples et de rallonges est
déconseillé;
- En cas de dysfonctionnement et / ou de mauvais fonctionnement, éteindre
l'appareiletnepasytoucher.
- La tensiond'alimentationindiquée surlecompteur;
- Le réglagedudisjoncteur.
Le fil de protection du cordon (vert/jaune) relié à la Borne Terre de l’appareil
doit êtrereliéàlaBorneTerre del’installation.
ATTENTION
Faire vérifier la continuité de la terre de l’installation avant de procéder au
raccordement. Le fabricant décline toute responsabilité en cas d'accidents ou
d'autres problèmes quipourraient survenir àl'usaged'un appareil non relié à la
terre,oureliéàuneterre dontlacontinuité seraitdéfectueuse.
REMARQUE: Le four peut nécessiter une opération de S.A.V. Aussi, placez la
prise de courant de façon à pouvoir brancher le four une fois sorti de sa niche.
Câble d'alimentation: si le changement du câble d'alimentation s'avère
nécessaire, nous vous demandons de faire réaliser cette opération par le
service après-venteouunepersonne dequalificationsimilaire.
1.3 Recommandations
Après chaque utilisation du four, réaliser un petit entretien qui favorisera le
nettoyage parfait dufour. Ne pas tapisserles parois du four avec des feuillesen
aluminium oudes protections jetables du commerce. La feuille d'aluminium ou
toute autreprotection, en contact direct avec l'émail chauffé, risque de fondre
et dedétériorer l'émail dumoufle.Avant installationde l'appareil, il faut relever
le numéro de série et le noter ci-dessous en cas d'éventuelle demande
d'intervention.
Afin d'éviter les salissures excessivesde votrefourainsique les fortes odeursde
fumée pouvant enrésulter, nous recommandons de ne pasutiliser le fourà trop
fortetempérature. Ilestpréférable de
rallonger le temps de cuisson et de baisser la température. Nous vous
conseillons de n'utiliser que des plats, des moules à pâtisserie résistants à de
trèshautestempératures.
1.4 Installation
La mise en service de l’appareil està lacharge de l’acheteur, le constructeur est
dégagéde ce service.Lespannesliéesà une mauvaise installationneserontpas
couvertes par la garantie. Une mauvaise installation peut provoquer des
dommages aux personnes, aux animaux domestiques; dans ce cas la
responsabilité duconstructeurne peut êtreengagée.L'installationdu four doit
être réalisée par un installateur agréé ou un technicien de qualification
similaire.Lefourpeutêtreplacéenhauteurdans unecolonneouenchâssésous
un plan de travail. Avant sa fixation: il est indispensable d'assurer une bonne
aérationdanslaniched'encastrement afindepermettrela bonnecirculationde
l'air fraisnécessaireaurefroidissement età laprotectiondesorganes intérieurs.
Pour cela, réaliser les ouvertures spécifiées selon le type d'encastrement
(dernièrepage).
1.5 La gestion des déchets et la protection de l'environnement
Le présent appareil est marqué conformément à la directive
2012/19/UE relative aux déchets d'équipements électriques et
électroniques
(DEEE). Les DEEE contiennent à la fois des substances polluantes
(qui peuvent avoir des conséquences négatives sur
l'environnement) et des éléments de base (réutilisables). Il est
importantdesoumettreles DEEEàdestraitementsspécifiques, en
vue d'extraire et d'éliminer de façon appropriée toutes les substances
polluantes,puisderécupéreret recyclertousles matériaux.
Chacun peut jouerun rôleimportant quant à laprotection de l'environnement
contre les DEEE. Pour atteindre cet objectif, il est impératif de suivre quelques
règlesélémentaires:
• Les DEEE nedoiventpasêtretraités commedesdéchets ménagers.
• Ils doivent être remis aux points de collecte appropriés gérés par la
municipalité ou par des sociétés immatriculées. Dans plusieurs pays, il est
possible de collecteràdomicilelesDEEEvolumineux.
• Lorsque vous achetez un nouvel appareil, vous devez retourner l'ancien au
vendeur qui le récupère gratuitement, au cas par cas, à condition que
l'équipement soitde type équivalent et possèdeles mêmesfonctionsque celui
fourni.
ÉCONOMIEETRESPECTDEL'ENVIRONNEMENT
Lorsque cela est possible, éviter le préchauffage du four et éviter de le faire
tourner àvide. N'ouvrez la porte du four que lorsquecelaest nécessaire, car il y
a desdéperditionsdechaleur à chaquefoisqu'ilestouvert.Pourune économie
d'énergie significative, éteindre le four entre 5 et 10 minutes avant la fin de
cuisson prévue, et utiliserlachaleur que lefourcontinuedegénérer. Gardez les
joints propres et en bon état, pour éviter toute déperdition d'énergie. Si vous
avez un contrat électrique avec un tarif heure creuse, le programme "cuisson
différée" peut vous faire réaliser des économies d'énergie en déplaçant le
début du programmeàunintervalle detempsà tarifréduit.
FR 24

1.6 Declaration De Conformité
Les parties de cet appareil pouvant être en contact avec des substances
alimentairessontconformes àlaprescription delaDir. CEE89/109.
En utilisant le symbol sur ce produit, nous déclarons sur notre propre
responsabilité que ce produit est conforme à toutes les normes Européennes
relativesàlasécurité,la santéetàl’environnement.
2. Description du produit
2.1. Vue d'ensemble
Aveccela,legroupeCandyHoover déclarequecetappareilportant lamarque
estconformeauxexigences essentiellesdeladirective 2014/53/UE.
Pour recevoir une copie de la déclaration de conformité, veuillez contacter le
fabricantàl'adressesuivante: www.candy-group.com.
1
5
6
2
4
3
2.2 Accessoires (Selon le modèle)
Léchefrite
1
1. Panneau de contrôle
2. Positions d'étagère
(grille latérale si incluse)
3. grille métallique
4. égouttoir
5. Ventilateur
(derrière la plaque d'acier)
6. porte du four
Grilles de fil latéral
3
1
2
5
3
4
6
Alimentairerecueillelesgouttes pendantlacuissonsurlegril.
Grille métalique
2
La grille métalique sert de support aux plats.
Grille fil latéral si inclus.
2.3 Première Utilisation
UN PREMIER NETTOYAGE doit être réalisé avant la première utilisation passer un chiffon doux et humide sur les surfaces extérieures de l'appareil.
Nettoyer avec une éponge additionnée de produit lessiviel, les accessoires et l'intérieur du four. Rincer et sécher. Faire chauffer le four à vide une bonne
heureàla températuremaximalepour fairedisparaître l'odeurduneuf. Pendant cette opération, bienaérerlapièce.
FR 25

3. Utilisation du Four (Selon le modèle)
3.1 Description de l'affichage
1
1
1. Bouton sélecteur de thermostat
2. Témoin de thermostat
3. Fin de la cuisine
4. temps de cuisson
5. Affichage de la température ou de l'horloge
6. Commandes de réglage de l'affichage LCD
7. Minuteur
8. Réglage de l'horloge
2 9
3
2 9
4
ATTENTION: la première opération à exécuter après l'installation ou après une coupure de
courant (de telles situations se reconnaissent parceque leatticheur est sur et clignote)est
réglage de l'heure, comme décrit ci-dessus
temps ( ).
•Réglerl'heureàl'aidedesboutons ."-" "+"
• AppuyezsurlatoucheMenuouattendez5"quel’horlogesoitconfigurée.
ATTENTION: Lefourfonctionneuniquement sil'horlogeestréglée.
9. lampe de signalisation Wifi
10. Bouton sélecteur de fonction
FONCTION COMMENT L’ARRETER
SECURITE
ENFANT
MINUTEUR
TEMPS
DE
CUISSON
COMMENT L’UTILISER
• La fonction de verrouillage parental
estactivéelorsquele fourest éteinten
touchant Set (+) pendant au moins 5
secondes. A partir de ce moment,
toutes les autres fonctions sont
verrouillées et l'affichage clignotera à
intervalles de 3 secondes. STOP et le
tempspréréglépar intermittence.
•Appuyer1foisur latouchecentrale.
•Appuyer sur les touches "-"ou "+"
pour réglerladureé
•Relâcherlestouches.
• Sélectionnez la fonction de cuisson
avec le bouton de fonction du four,
ainsi que la température de votre
choix avecle boutonduthermostat.
•Appuyer fois sur la touche
centrale.
•Appuyer sur les touches "-" ou "+"
pour réglerladurée.
•Relâcherlestouches
•Choisir lafonctiondecuissonavecle
boutondesélection.
REMARQUE: Si lefour est éteintou si
la lampe fonctionne, la fonction de
programmation du temps de cuisson
ne fonctionnepas.
1
• La fonction de verrouillage enfant
est désactivée avec le four éteint en
touchant ànouveaulepavé tactileSet
(+) pendant au moins 5 secondes. A
partir de ce moment, toutes les
fonctions sont sélectionnables à
nouveau.
•A la fin de la durée sélectionnée, le
minuteur secoupeetunsignalsonore
retentit il s'arrête automatique ment,
mais pour le topper de suite,
appuyer surla touche
•Pour arrêter le signal, appuyer sur
l'une des touches au choix.
Appuyer sur latouche centrale pour
retourneràla fonctionhorloge.
s
.
5
7
8
6
BUT
•Emission d'un signal sonore à la fin
d'un tempssélectionné
-
•Durant l'utilisation, l'écran affiche le
tempsrestant.
•S.électionner la durée de la cuisson
des alimentesdansle four
•
Pour visualiser le temps restant
appuyerlatouche .
•
Pour modifier le temps restant
appuyerlatouche + ou
10
10
12:00
. Le voyant LED en bas à droite clignote en même
REMARQUE
SELECT
SELECT "-" “+"
•II permetd' program-mateurdu
four
utilisé avecle fouralluméou éteint).
• À la fin du programme, le programme
émet 3 signaux d’avertissement et le
message End(Fin)apparaît surl’afficheur.
Réglez lesélecteurdefonctionsur "0" pour
reveniràla fonctionhorloge.
utiliser le
comme unrêveilmémoire (il peut être
HEURE DE
FIN DE
CUISSON
• four
• Sélectionnez la fonction de cuisson
avec le bouton de fonction du four,
ainsi que la température de votre
choix avecle boutonduthermostat.
•2 fois
•Appuyer sur les touches "-"ou "+"
pour régler duréela •Quand le temps de cuisson est écoulé, la
•Relâcherlestouches
• e cuissonavecle
Choisir lafonctiond
boutondesélection
REMARQUE: Si lefour est éteintou si
la lampe fonctionne, la fonction de
programmation du temps de cuisson
ne fonctionnepas.
A l'heure sélectionnée le
s'éteint tout seul; pour
avant il est nécessaire de porter le
boutondesélectionen positionO.
l'arrêter en
•Mémoriser l'heuredefin decuisson
• 3 foisPourvisualiserl'heure
•
Pour modifier l'heure
sélectionnée appuyer sur les touche
SELECT "-" "+"
+ou
•Cette fonction est utilisée pour des
cuissons que l'on peut programmer à
l'avance. Par exemple, votreplatdoit cuire
45 mn et être prêt à 12:30; réglez alors
simplement la durée sur 45 mn et l'heure
de findecuissonsur 12:30.
cuisson s'arrête automati quemen et
l'alarme sonne q secondes. La
cuisson commencera auto matiquement
à 11:45(12:30moins 45 mn)et continuera
jusqu'à ceque l'heuredefin de cuissonsoit
atteinte. A ce moment, le tour s'arrêtera
automatiquement
uelques
-
.
FR 26

FONCTION WI-FI ELETTRONICAZERO
Pourconnaîtretousles détailsliésàlarelation entrel’applicationetleproduit,veuillez consulterleGuide Rapide.
Le Guide Rapide estdisponibleau: .go.candy-group.com/candy-ov
Le Wi-Fi a deuxpositionsdifférentes surlesélecteurde cuisson:
• Wi-Fion: LeWi-Fi n’est allumé que si le four est déjàenregistrésur votre dispositif. Dans cetteposition, le foursera uniquement
1 2
commandéàdistance.
• Wi-Fireset: Après avoir laissé le sélecteursurWi-Firesetpendant 30”, leBluetooths’allumera etvouspourrezenregistrerlefour
sur votredispositifdansles5’.
3 4
Si l’enregistrement esteffectué correctement, lefour sera commandéà distance et l’icône Wi-Fisera allumée. Si l’enregistrement
échoue, le Wi-Fi s’éteindra etle fourseraréinitialisé.
Pourl’enregistrer à nouveau,ilfautenleverle sélecteurduprogramme decuissondelapositionWi-Firesetpuis leremettre dessus.
Remarque:Installezl’applicationsurvotredispositif avantde commencerl’enregistrement
Remarque:LeBluetoothdoit êtreactivésurledispositifoùl’applicationestinstallée
Remarque:Pourles deuxpositionsWi-Fi,lestouchestactilesne fonctionnentpas.
Remarque:Il est fondamentald’établir unsignalWi-Fi puissant entre le routeur dudomicile et l’appareil. Quand le four tentede se
connecteraurouteur, l’icôneclignotependant3” alluméeet1”éteinte;quand ilestdéjàconnecté,l’icône s’allume.
6
CANDYSIMPLY-FI :
5
Pour des informations détaillées sur COMMENT CONNECTER votre appareil simply-Fi et COMMENT
L’UTILISERau mieux,visitezlesitehttp://www.candysimplyfi.com
1. Sélection du programme / 2. Durée du programme / 3. Réglage du démarrage de la cuisson / 4. Sélection de recettes dédiées / 5. Assistant vocal et
hors ligne / 6. Astuces, suggestions et manuel d'utilisation en ligne
3.2 Mode de cuisson
Bouton de
sélection
T °C
Suggested
Fonction (selon modèle)
L'AMPOULE: Allumage de l’éclairage du four
DÉCONGÉLATION: fonctionnement dela turbine de cuisson quibrasse l'air dansl'enceinte du four. Idéale pour réaliser unedécongélationavant
une cuisson.
CHALEUR BRASSÉE:fonction recommandéepourlesvolailles,les pâtisseries, les poissons, les légumes... La chaleur pénètremieuxàl'intérieurdu
mets à cuire et réduit le temps de cuisson, ainsi que le temps de préchauffage. Vous pouvez réaliser des cuissons combinées avec préparations
180
identiques ou non sur un ou deux gradins. Ce mode de cuisson assure en effet une répartition homogène de la chaleur et ne mélange pas les
odeurs.Prévoirune dizainedeminutes deplus,pourlacuisson combinée.
La fonction vous permet de cuisiner de manière plus saine en réduisant la quantité de graisse ou d'huile requise. Grâce à
l'utilisation dugril et duventilateur combinés à uncycle d'air pulsé,ilretientla teneur enhumiditédesaliments,grillelasurfaceetréduitletemps
*
de cuissonsanscompromettre legoût.
190
Il est particulièrementadaptéà la cuisson desviandes,deslégumesgrillésetdesomelettes. Le cycledel'airpulsémaintientl'humidité àl'intérieur
du fouretlateneur eneaudel'aliment, préservantainsiles valeursnutritionnelleset assurantun processusdecuissonrapide etuniforme.
Essayez toutes vos recettes et réduisez la quantité de vinaigrette que vous utilisez habituellement et découvrez la légèreté de cette nouvelle
fonction!
SOLE BRASSÉE:idéalepour les tartes à fruitsjuteux,les tourtes,les quiches, lespâtés.Elleévitele dessèchement desalimentsetfavorisela levée
210
pour les cuissons de cakes, pâte à pain et autres cuissons par le dessous. Placer la grille sur le gradin inférieur. Avec ce mode de cuisson, un
préchauffage est nécessaire en Chaleur Brassée pendant une dizaine de minutes.
CONVECTIONNATURELLE: utilisationsimultanée delarésistance desoleet de voûte.
Préchaufferle four une dizainedeminutes.Idéalepourtouteslescuissonsàl'ancienne,poursaisirlesviandesrouges, les rosbifs,gigots,gibiers,le
220
pain, lespapillotes,lesfeuilletages. Placerle metsàcuireà unniveaudegradin moyen.
GRIL: l'utilisation dugrilloir se fait portefermée. Un préchauffage de 5 mins est nécessaire pour le rougissement de la résistance. Succès assuré
pour les grillades,lesbrochetteset lesgratins.Les viandes blanchesdoiventêtreécartées dugrilloir;letemps decuissonseraalors pluslong,mais
la viande sera plus savoureuse. Les viandes rouges et filets de poissons peuvent être placés sur la grille avec le plat récolte sauce glissé
230
dessous.
Le fouradeuxpositions degril:Gril:2140 W Barbecue: 3340W
"COOK LIGHT"
Turbo-Gril: l'utilisation de la position turbo-gril se fait porte fermée. Un préchauffage est nécessaire pour les viandes rouges et inutile pour les
viandes blanches. Idéal pour les cuissons de volume épais, des pièces entières telles que rôti de porc, volailles etc... Placer le mets à cuire
200
directementsurlagrilleaucentredufour, à un niveaumoyen.Glisserlerécolte-saucesous la grille de façon àrécupérerles graisses. S'assurerque
le metsnesoitpastrop prèsdugrilloir.Retournerla pièceàcuireà mi-cuisson.
220
* Programme testé selon le CENELEC, norme européenne EN 60350-1 qui définit la classe énergétique.
PIZZA:Aveccettefonction, l'airchaud circuledanslefour pourassurerun résultatparfait pourlesplats telsqueles pizzasoulesgâteaux.
WIFI ON: Le four permetla connexionWi-Fi.
WIFI RESET:Permet leredémarrage delaconnexion Wi-Fi.
FR 27

4. Nettoyage du four et maintenance
4.1 Remarques générales sur le nettoyage
Le cyclede vie de l'appareil peutêtre étendu grâce à unnettoyage régulier.
Attendezle refroidissement du four avant de procéder à des opérations de
nettoyage manuel. Ne jamais utiliser de détergents abrasifs, de laine
d'acier ou d'objets pointus pour le nettoyage, l'émail serait
irrémédiablement abîmé. Utilisez uniquement de l'eau, du savon ou des
détergentsàbased'eaudeJavel(ammoniac).
PARTIE VITREE
Il est conseillé de nettoyer la vitre avec du papier absorbant après chaque
utilisation du four. Pour enlever les taches plus tenaces, vous pouvez
utiliser une éponge imbibée de détergent,puisrinceràl'eau.
JOINT DE LA PORTE
Si elle est sale, le joint peut être nettoyé avec une éponge légèrement
4.2 Aquactiva Fonction
Le systèmeAquactivautilise lavapeurpouréliminerlesgraissesetlesrestesde nourrituresincrustéessurlesparoisdu four.
1. Verser300 mld’eau danslazoneprévue àceteffet (aucentredelacavité –voirschéma)
2. Mettreleprogrammeconvection naturelle( ) ou sole seule ( ).
3. Mettrelatempératuresur Aquactiva .
4. Laisser agir 30 minutes.
5. Une foisles30 minutesécoulées,éteindreleprogrammeet attendre quelefourrefroidisse.
6. Une foisquelefourestrefroidi passerunlingeproprepour éliminerlesrésidus.
Attention:
Ne pas toucher les paroistantqu’elles n’ont pasrefroidies(risque debrûlures).N’utiliserque del’eau potableou distillée.
humide.
ACCESSOIRES
Nettoyer les accessoires avec une éponge et de l'eau savonneuse puis
rincer. Eviter d'utiliserdesdétergents abrasifs.
LECHEFRITE
Après l'utilisation de la grille, retirez le du four. Prendre soin de
reverser les graisses (tièdes) dans l’évier. Laver et rincer le plat récoltesauce dans del’eau chaude, avec une éponge imbibée de produit lessiviel.
Si les résidus restent collés, le faire tremper dans de l’eau et un produit
détergent. Il peut aussi être nettoyé dans un lave-vaisselle ou avec un
produitducommerce.
Ne jamais replacer le platrécolte-sauceencrassédansunfour.
lêchefrite
300 ml
4.3 Entretien
RETRAIT ET NETTOYAGEDESGRILLES
1-Retirezlesgrillesenlestirantvers l’intérieurdu four (voir schéma)
2- Mettezlesgrillesdirectementaulave-vaisselle oulavez-les simplementavec uneépongehumideetveillezàbienlesessuyer.
3-Une foislesgrillesnettoyées,reclipser-les dansle four(voirschéma)
RETRAIT DE LA PORTE DU FOUR
1. Ouvrezlaporte.
2. Ouvrezlespincesdu boîtier de charnièresurle côtédroitetgauchedelafenêtre avant enlespoussantversle bas.
3. Replacezlaporteenprocédantensensinverse.
FR 28

LOW-E
RETRAIT ET NETTOYAGE DESVITRES
1. Ouvrezlaportedufour.
2.3.4. Bloquer les charnières, enleverlesvis et retirezlecouverclemétallique supérieurenletirantvers lehaut.
5.6. Retirez leverre, soigneusement de laporte du four (NB: danslesfoursde pyrolyse, retirezégalementles deuxièmeettroisième verre (le cas
échéant)).
7. A la fin du nettoyageRemonter lespiècesdansl'ordreinverse.
Sur toutes les vitres, l'indication "Pyro" doit être lisible et positionné surle côté gauche de laporte, à proximité de la charnière latérale gauche.De cette
manière,l'étiquetteimpriméedupremierverresera àl'intérieurdelaporte.
l'extraire
1.
2.
5.
6.
1
2
3
3.
4.
7.
FR 29

REMPLACEMENTDEL'AMPOULE
1. Débranchezlefourdelaprise.
2. Défairelecouvercleen verre,dévisserl'ampouleetlaremplacerparuneampouledumêmemodèle.
3. Une foisl'ampouleremplacée,remettrele couvercleenverre.
5. Dépannage
5.1 FAQ
PROBLEMES CAUSE POSSIBLE SOLUTION
Le four ne chauffe pas
Le four ne chauffe pas
Aucume rèaction de
l'ècran tactile
L'horloge n'est pas réglée Réglez l'horloge
Les réglages nécessaires
ne sont pas imposés
Vapeur et de la condensation
sur l'ècran tactile
Assurez-vous que les paramètres
nécessaires sont corrects
Nettoyer avec un chiffan en microfibres
l'ècran tactile pour enlever la couche de
condensation
FR 30
 Loading...