

Page 1

USER INSTRUCTIONS
OVENS
EN
NOTICE D'EMPLOI ET D'INSTALLATION
DES FOURS ENCASTRABLES
CANDY HOOVER GROUP S.R.L. • Via Privata Eden Fumagalli • 20047 Brugherio Milano Italy
FR
02
15
Page 2

Safety Indications
• WARNING:the applianceand accessibleparts becomehot duringuse.
Be carefulnot to touchany hot parts.
•WARNING: the accessible parts can become hot when the oven is in
use. Childrenmustbe kept atasafe distance.
•WARNING: ensure that the appliance is switched off before replacing
the bulb, toavoid thepossibilityofelectric shocks.
•WARNING:beforeinitiatingthe automatic cleaningcycle:
- Clean theovendoor;
- Removelarge or coarsefood residuesfromthe insideof theoven using
a damp sponge.Donotuse detergents;
- Removeall accessoriesand the sliding rackkit(wherepresent);
- Do notplaceteatowels
• In ovens with meat probe it is necessary, before making the cleaning
cycle, close the hole with the nut provided. Always close the hole with
the nut whenthemeatprobe is not used.
•Children under 8 must be kept at a safe distance from the appliance if
not continuouslysupervised.
•Children must not play with the appliance. The appliance can be used
by those aged 8 or over and by those with limited physical, sensorial or
mental capacities, without experience or knowledge of the product,
only if supervised or provided with instructionastotheoperation of the
appliance, in asafe waywith awareness of thepossiblerisks.
•Cleaning and maintenance should not be carried out by unsupervised
children.
•Do not use rough or abrasive materials or sharp metal scrapers to
clean the oven door glasses, as they can scratch the surface and cause
the glass toshatter.
•The oven must be switched off before removing the removable parts
and, aftercleaning,reassemblethem according the instructions.
•Only use themeatprobe recommendedfor this oven.
•Do not useasteamcleaner for cleaning operations.
• Connect a plug to the supply cable that is able to bear the voltage,
current and load indicated on the tag and having the earth contact. The
socket must be suitable for the load indicated on the tag and must be
EN 02
Page 3

having the earth contact connected and in operation. The earth
conductor is yellow-green in colour. This operation should be carried
out by a suitably qualified professional. In case of incompatibility
between the socketand theapplianceplug,aska qualified electrician to
substitute the socket with another suitable type. The plug and the
socket must be conformed to the current norms of the installation
country. Connection to the power source can also be made by placing
an omnipolar breaker between the appliance and the power source
that can bear the maximum connected load and that is in line with
current legislation. The yellow-green earth cable should not be
interrupted by the breaker. The socket or omnipolar breaker used for
the connection should be easily accessible when the appliance is
installed.
•The disconnection maybeachievedbyhaving the plug accessible or by
incorporating a switch in the fixed wiring in accordance with the wiring
rules.
•If the power cable is damaged, it must be substituted with a cable or
special bundle available from the manufacturer or by contacting the
customerservicedepartment.
•The type ofpowercable must be H05V2V2-F.
•Failure to comply with the above can compromise the safety of the
appliance and invalidatetheguarantee.
•Anyexcessofspilledmaterial should beremoved before cleaning.
•During the pyrolytic cleaning process, surfaces can heat up more than
usual, childrenmustthereforebekept at asafe distance.
•The appliance must not be installed behind a decorative door in order
toavoidoverheating.
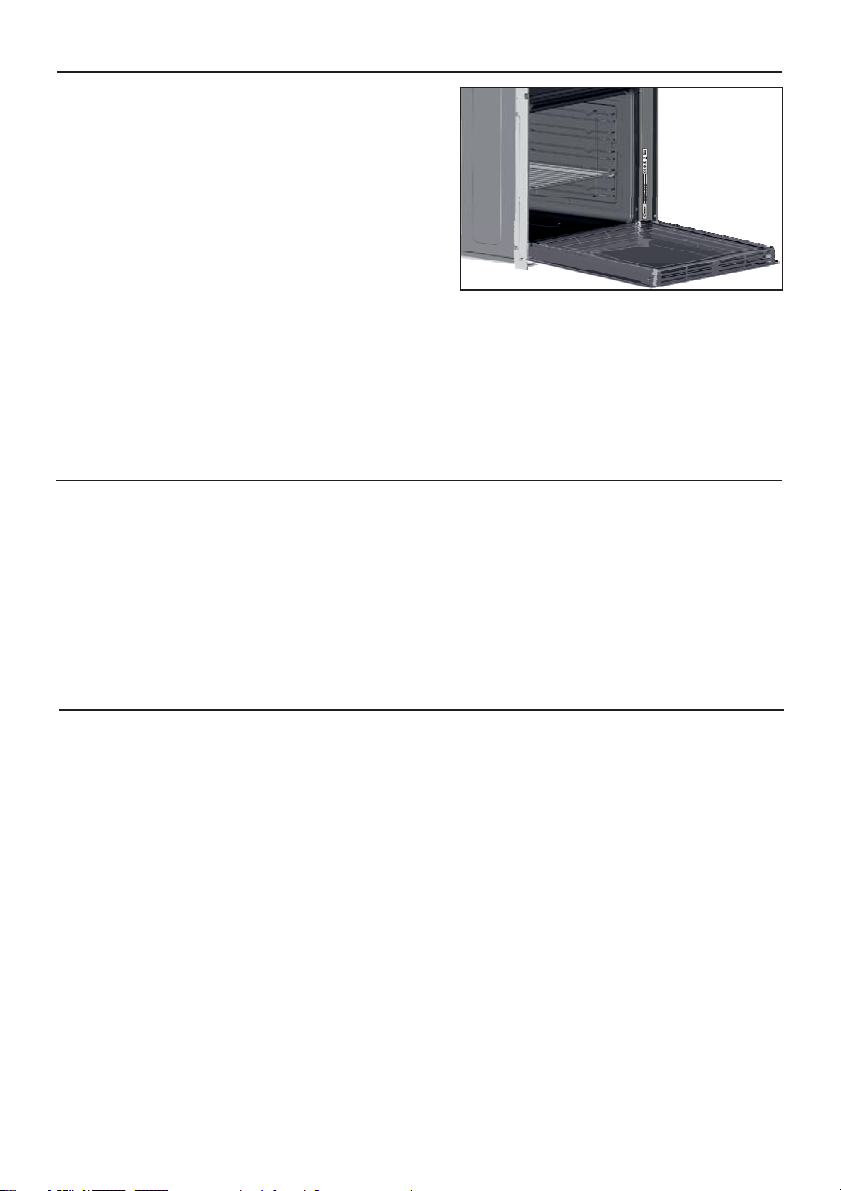
•When you place the shelf inside, make sure that the stop is directed
upwardsand inthe back of the cavity.
The shelf mustbeinserted completely intothecavity
• WARNING: Do not linethe oven walls with aluminum foil or single-use
protectionavailable from stores.Aluminumfoiloranyotherprotection,
in direct contact with the hot enamel, riskmelting and deteriorating the
enamel of theinsides.
• WARNING:Never removetheovendoor seal.
EN 03
Page 4

Summary
General Instructions
5
Product Description
7
Use of the Oven
8
Oven Cleaning and Maintenance
11
1.1 Safety indications
1.2 Electrical safety
1.3 Recommendations
1.4 Installation
1.5 Waste management
1.6 Conformity declaration
2.1 Overview
2.2 Accessories
2.3 First use
3.1 Display description
3.2 Cooking modes
4.1 General notes on cleaning
4.2 Pyrolysis
4.3 Maintenance
• Removal and cleaning of grills
• Changing the bulb
• Removal and cleaning of the glass
door
Troubleshooting
14
5.1 F.A.Q.
EN 04
Page 5
1. General Instructions
We thank you for choosingone of ourproducts. Forthe
best results with your oven, you should read this
manual carefully and retain it for future reference.
Before installing the oven, take note of the serial
number so that you can giveit to customer service staff
if any repairs are required. Having removed the oven
from itspackaging, check thatit has notbeen damaged
during transportation. If you have doubts, do not use
the oven and refer to a qualified technician for advice.
Keep all of the packaging material (plastic bags,
polystyrene, nails) out of the reach of children. When
the oven is switched on for the first time, strong
smelling smoke can develop, whichis causedby the glue on theinsulation panels surrounding the oven
heating for the first time. This is absolutely normal and, if it occurs, you should wait for the smoke to
dissipate before putting food in the oven. The manufacturer accepts no responsibility in cases where
the instructions contained in thisdocument are notobserved.
NOTE: the oven functions, properties and accessories cited in this manual will vary, depending on the
model you have purchased.
1.1 Safety Indications
Only use the oven for its intended purpose, that is only for the cooking of foods; any other use, for
example as a heat source, is considered improper and therefore dangerous. The manufacturer cannot
be held responsibleforany damage resulting fromimproper,incorrector unreasonableusage.
The use ofany electrical applianceimplies theobservance ofsome fundamental rules:
- do notpull onthe powercable to disconnectthe plug fromthe socket;
- do nottouch the appliancewith wetor damphands orfeet;
- in generalthe use ofadaptors,multiple sockets and extensioncables isnot recommended;
- in caseof malfunction and/orpoor operation,switch off theappliance anddo nottamper with it.
1.2 Electrical Safety
ENSURE THAT AN ELECTRICIAN OR QUALIFIED TECHNICIAN MAKESTHE ELECTRICAL CONNECTIONS.
The powersupply to which the ovenis connected must conform with the lawsin forcein the country of
installation.The manufactureraccepts noresponsibility foranydamage causedby thefailure to observe
these instructions. The oven must be connected toan electrical supply with an earthed wall outlet or a
disconnector with multiple poles, depending on the laws in force in the country of installation. The
electrical supply should be protected with suitable fuses and the cables used must have a transverse
section that canensurecorrect supplyto theoven.
CONNECTION
The ovenis supplied with a powercable thatshould only be connected toan electricalsupply with 220240 Vac 50 Hz power between the phases or between the phase and neutral. Before the oven is
connectedto theelectrical supply, itis important to check:
- power voltage indicated onthe gauge;
- the settingof the disconnector.
The groundingwire connectedto the oven's earth terminal mustbe connectedto the earthterminal of
the power supply.
WARNING
Beforeconnecting the ovento thepowersupply,ask aqualified electrician tocheck thecontinuity of the
power supply's earth terminal. The manufacturer accepts no responsibility for any accidents or other
problems caused byfailure to connect the oven tothe earthterminal orby anearth connectionthat has
defectivecontinuity.
EN 05
Page 6

NOTE: as the oven couldrequire maintenance work, itis advisableto keep another wallsocket available
so that the oven can be connected to this if it is removed from the space in which it is installed. The
power cable must only be substituted by technical service staff or by technicians with equivalent
qualifications.
1.3 Recommendations
Aftereach useof the oven,a minimumof cleaningwill helpkeepthe oven perfectly clean.
Do not line the ovenwalls withaluminium foil orsingle-use protection available from stores. Aluminium
foil or any other protection, in direct contact with the hot enamel, risks melting and deteriorating the
enamel of the insides. In order to prevent excessive dirtying of your oven and the resulting strong
smokey smells, we recommend not using the oven at very high temperature. It is better to extend the
cooking time and lower the temperature alittle. In addition to the accessories supplied with the oven,
weadvise youonly use dishesand bakingmoulds resistant to veryhigh temperatures.
1.4 Installation
The manufacturers have no obligationto carry thisout. If the assistance ofthe manufacturer is required
to rectify faults arising from incorrect installation, this assistance is not covered by the guarantee. The
installation instructions for professionally qualified personnel must be followed. Incorrect installation
may cause harm or injury to people, animals or belongings. The manufacturer cannot be held
responsiblefor such harmor injury.
The oven can be located high in a column or under a worktop. Before fixing, you must ensure good
ventilation in the oven space to allow proper circulation of the fresh air required for cooling and
protectingthe internal parts. Make the openingsspecified onlast pageaccordingto thetype of fitting.
1.5 Waste management and environmental protection
This appliance is labelled in accordance with European Directive 2012/19/EU regarding
electric and electronic appliances (WEEE). The WEEE contain both polluting substances
(that can have a negative effect on the environment) and base elements (that can be
reused). Itis important that theWEEE undergospecific treatmentsto correctly remove and
dispose of the pollutants and recover all the materials. Individuals can play an important
role in ensuring that the WEEE do not become an environmental problem; it is essential to
followa fewbasic rules:
- the WEEEshould notbe treatedas domestic waste;
- the WEEE should be taken todedicated collection areas managed by the town council or a registered
company.
In many countries, domestic collections may be available for large WEEEs. When you buy a new
appliance, the old one can be returned tothe vendor whomust accept it free of charge as a one-off,as
long as theappliance isof anequivalent type andhas thesame functionsas thepurchasedappliance.
SAVINGAND RESPECTINGTHE ENVIRONMENT
Where possible,avoid pre-heating theoven andalways tryto fill it. Open theoven door as infrequently
as possible, because heat from the cavity disperses every time it is opened. For a significant energy
saving, switch off theoven between 5 and 10minutes before theplanned end ofthe cooking time, and
use the residualheat that theoven continues togenerate.Keep the sealsclean andin order, toavoidany
heat dispersal outside of the cavity. If you have an electric contract with an hourly tariff, the "delayed
cooking" programme makes energy saving more simple, moving the cooking process to start at the
reducedtariff time slot.
1.6 Declaration of compliance
The parts ofthis appliancethat may comeintocontact with foodstuffs comply withthe provisionsof EEC
Directive89/109.
By placing the mark on thisproduct, we are confirmingcompliance to allrelevantEuropean safety,
health and environmentalrequirements which areapplicable in legislationforthis product.
EN 06
Page 7
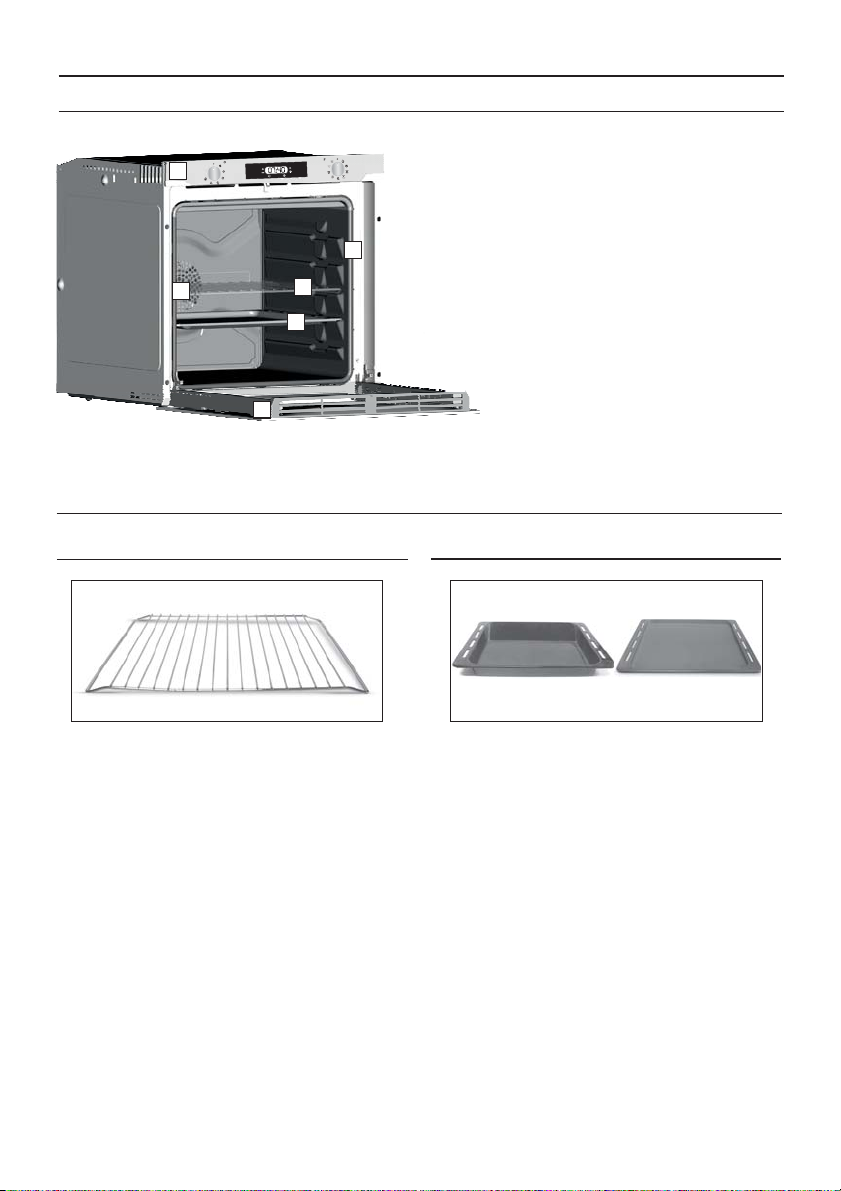
2. Product Description
2.1 Overview
1
2
5
3
4
6
2.2 Accessories (According to model)
Metal grill
1
2
1. Control panel
2. Shelf positions
(lateral wire grid if included)
3. Metal grill
4. Drip pan
5. Fan (behind the steel plate)
6. Oven door
Drip pan
Holds baking trays and plates.
Collects the residues that drip during the cooking
of foods onthe grills.
EN 07
Page 8

2.3 First Use
PRELIMINARYCLEANING
Clean theoven before usingfor thefirst time. Wipe over externalsurfaces witha dampsoft cloth.Wash
all accessories and wipe inside the oven with a solution of hot water and washing up liquid. Set the
empty ovento the maximum temperature and leave on for about1 hour, thiswill removeany lingering
smells of newness.
3. Use of the Oven
3.1 Display description
1. Timer/automatic mode
2. Fan function
3. Defrost mode
4. Temperature or clock display
5. LCD display adjustment controls
6. Function selector knob
7. Programme selector knob
WARNING!
The first operation to carry out after installation,
or after a power cut, is to set the time of day (a
power cut has occured if the display is flashing
12:00).
200°-> The temperature LED “°” flashes until the
displayedtemperatureis reached.
HOT -> When a programmefinishes, if the oven is
still hot, the display shows "HOT", alternatingwith
the time, evenif theknobs are positionedto OFF.
EN 08
Page 9

FUNCTION HOW TO ACTIVATE
SILENCE
MODE
• Rotate the left function
selector to the position
" Silence mode “
HOW TO
DEACTIVATE
• Rotate the function
selector to the position
OFF.
WHAT IT DOES WHY IT IS NEEDED
• Enables you to turn off
the sound of the minute
minder.
• To turn off the sound of the
minute minder
SET
THE TIME
COOKING
DURATION
END OF
COOKING
MINUTE
MINDER
CHILD
SAFETY
LOCK
• Rotate the left function
selector to the position
“Set the time”.
• Use the buttons " + " or
" - " to set the time
• Turn the right function
selector to a cooking
function
• Rotate the left function
selector to the position
"Cooking Time Duration”
• Set the time of cooking
by using buttons " + " and
" - "
• Lighting Auto appears
• Turn the right function
selector to a cooking
function
• Rotate the left function
selector to the position
"End of cooking"
• Set the end time of
cooking by using buttons
" + " and " - "
• Lighting Auto appears
• Turn the left function
selector to the position
Minute Minder.
• Set the time of cooking
by using buttons
“+”and “-”
• Turn the left function
selector to the position
Child lock.
• Press the button " + "
during 5 seconds
• Child lock is available
when " STOP " appears
on display
• Rotate the function
selector to the position
OFF.
•When the cooking time
has elapsed, the oven
switch off automatically
and the alarm rings for
few seconds To stop the
cooking functions early,
turn the function control
to OFF or set the time on
00.00; by rotating the
function selector to
Cooking Time Duration
and by using the buttons "
+ " and " - “
• When the cooking time
has elapsed, the oven
switch off automatically.
• To stop the cooking
functions early, turn the
function control to OFF
• Set the time on 00.00 by
turning the left function
selector to the position
Minute Minder, and using
the button " - “
• Turn back the left
function selector to Child
lock and press button " +
" during 5 seconds.
• Indication STOP
disappears.
• Enables you to set the
time which appears on
the display
• It allows to preset the
cooking time required for
the recipe chosen.
• When the cooking time is
set, turn the function
selector to OFF to go back
to actual time.
• To view the cooking time
selected, turn the left
function selector to
Cooking Time duration.
• It allows to preset the end
of cooking time you want.
• When the cooking time is
set, turn the function
selector to OFF to go back
to actual time.
• To view the cooking time
selected, turn the left
function selector to End of
cooking Time
•Emits an audible signal at
the end of a set time.
•During operation, the
display shows the
remaining time.
• The oven cannot be used.
• To set the time
NB : Set the time when you
first install your oven or just
after a black out (the clock is
showing a pulsating 12.00)
• For cooking the desired
recipes.
•This function is normally
used with the COOKING
DURATION function
•For example, the desired
food needs to cook for 45
minutes and I want it to be
ready for 12.30; in this case: at
the end of the set time, the
oven automatically switches
off and an alarm sounds.
Select the desired cooking
function. Set the cooking
duration to 45 minutes (“-”
“+”). Set the end of cooking to
12:30 (“-” “+”). Cooking will
automatically begin at 11:45
(12:30 minus 45 minutes), at
the end of the set cooking
time, the oven will
automatically switch off.
WARNING: by setting only the
end of cooking time, and not
the cooking duration, the oven
will immediately switch on
and switch off at the end of
the set cooking time.
• Allow to use the oven as
alarm even if the oven is
switch off
• This function is useful
when there are children in
the house.
EN 09
Page 10

3.2 Cooking Modes
Function
Dial
LAMP: Turns on the oven light.
DEFROST: Whenthe dial is set to this position. The fan circulates air at room temperature around
the frozen food so that it defrosts in a few minutes without the protein content of the food being
changed or altered.
KEEP WARM: This is recommended to reheat precooked foodstuff, positioning the shelf on the
secondlevel fromtop, orto defrost bread pizzaor pastryby positioning theshelf on the lowerlevel.
The temperature is presetin 60°Cconstant,no regulation is possible.
FAN COOKING: We recommend you use this method for poultry, pastries, fish and vegetables.
Heat penetrates into the food betterand both thecooking and preheating times are reduced.You
can cook different foods at the same time with or without the same preparation in one or more
positions. This cookingmethod giveseven heat distribution andthe smellsare notmixed.
Allow about tenminutes extrawhen cookingfoods at thesame time.
CONVENTIONAL COOKING: Bothtop andbottom heatingelements areused. Preheat the ovenfor
*
*
about ten minutes. This method is ideal for all traditional roasting and baking. For seizing red
meats, roast beef, leg oflamb, game, bread, foil wrapped food (papillotes), flaky pastry. Place the
foodand itsdish ona shelfin midposition.
FAN+ LOWERELEMENT: The bottomheating elementis used with the fan circulating theair inside
the oven. Thismethod isideal forjuicy fruitflans, tarts, quichesand pâté.
It preventsfood from drying andencourages rising incakes,bread doughand other bottom-cooked
food.
Place the shelfin the bottomposition.
FANASSISTED GRILL: usethe turbo-grillwith thedoor closed.
The top heating element is used with the fan circulating the air inside the oven. Preheating is
necessary for red meats but not for white meats. Ideal for cooking thick food items, whole pieces
such as roast pork, poultry, etc. Place the food to be grilled directly on the shelf centrally, at the
middle level. Slide the drip tray under the shelf to collectthe juices. Make sure that the food is not
tooclose tothe grill.Turnthe food overhalfway through cooking.
GRILL: use thegrill with thedoor closed.
The top heating element is used alone and you can adjust the temperature. Five minutes
preheating is required to get the elements red-hot. Success is guaranteed for grills, kebabs and
gratindishes. Whitemeats shouldbe put ata distance from thegrill; thecooking timeis longer, but
the meat will be tastier. You can put red meats and fish fillets on the shelf with the drip tray
underneath.The ovenhas twogrill positions:
Grill: 2140 W Barbecue: 3340 W
Function (Depends on the oven model)
PYROLYSIS
*Tested in accordance with the CENELEC EN 60350-1 used for definition of energy class.
EN 10
Page 11

4. Oven cleaning and maintenance
4.1 General notes on cleaning
The lifecycle ofthe appliancecan beextended throughregular cleaning.Waitfor the ovento cool before
carrying out manual cleaning operations.Never useabrasive detergents, steel wool or sharp objects for
cleaning, so as to not irreparably damage the enamelled parts. Use only water, soap or bleach-based
detergents(ammonia).
GLASS PARTS
It is advisable to clean the glass window with absorbent kitchen towel after every use of the oven. To
remove more obstinate stains, youcan use a detergent-soaked sponge, well wrung out, and then rinse
with water.
OVENWINDOW SEAL
If dirty,the sealcan be cleanedwith aslightly damp sponge.
ACCESSORIES
Clean accessories with a wet, soapy sponge before rinsing and drying them: avoid using abrasive
detergents.
DRIP PAN
After using thegrill, removethe pan fromthe oven.Pour the hotfat into acontainer and washthe panin
hot water,using asponge andwashing-up liquid.
If greasy residues remain, immerse the panin water anddetergent. Alternatively,you can wash the pan
in the dishwasheror use acommercial oven detergent.Never puta dirty panback into the oven.
4.2 Pyrolysis
The oven is equipped with a pyrolyser cleaning system, which destroys food residues at high
temperature. The operation is carried out automatically by means of the programmer. The resulting
fumes are rendered “clean” by passing over a Pyrolyser wich starts as soon as cooking begins. As very
high temperaturesare required by the Pyrolyser,the ovendoor isfitted with a safety lock. Thepyrolyser
canbe stoppedat anytime. The doorcannot beopened untilthe safetylock isdisplayed.
NOTE: Ifa hobhas beenfitted above the oven,never use thegas burners or theelectric hot-plateswhile
the Pyrolyser is working,this willpreventthe hobfrom overheating.
TWO PYROLYTICCYCLEare pre-set:
ECOPYROCLEAN : Cleansa moderatelystained oven. Operates for aperiod of 90minutes.
SUPER PYROCLEAN :Cleans a heavilystainedoven. Operatesfor a periodof 120minutes.
Never use commerciallyavailable cleaningproductson aPyrolyticoven!
Tip : Carrying out Pyrolytic cleaningimmediately after cooking allows you totake advantage of residual
heat,thus savingenergy.
Beforeexecutinga pyrolyticcycle:
•Remove all the accessories from the oven because they are not able to tolerate the high
temperatures used during the pyrolytic cleaning cycle ; in particular removing grids, side racks and
the telescopic guides(refer tothe chapter REMOVING GRIDS AND SIDE RACKS). In ovens withmeat
probeit isnecessary, beforemaking thecleaning cycle ,close thehole withthe nutprovided.
•Remove any large spillages or stains as it would take too long to destroy them. Also excessively
large amounts of grease could ignite when subject to the very high temperatures of the Pyrolytic
cycle.
•Close the ovendoor.
•Excessspillage must be removedbeforecleaning.
• Clean theoven door.
• Remove large orcoarse foodresidues from theinside ofthe ovenusing adamp sponge.Do notuse
detergents.
• Remove allaccessories and thesliding rackkit (wherepresent).
• Do notplace tea towels.
EN 11
Page 12

Using the Pyroliticcycle:
If apyrolysiscycle ischosen thedisplay shows “ECO”,that lasts 90minutes, blinking;by the“+” and“-“ it
is possible tochange in “SUPER”that lasts 120 minutes.
If a pyrolysisis alreadystartedit isno more possibleto change from“ ECO”to “SUPER” andvice versa.
It is notpossible to modify apyrolysisduration but endingtime canbe modified.
During pyrolysis thebuzzer doesnot sound.
Pyrolysis is not available if separator or side grids or the meat probe are detected, and it is not
programmablevia WiFi.
4.3 Maintenance
REMOVALOF THEOVEN WINDOW
1. Open thefront window.
2. Openthe clamps of the hingehousing on the right andleft side of the front windowby pushing them
downwards.
3. Replace thewindow by carryingout the procedurein reverse.
CHANGING THE BULB
1. Disconnect theoven from themains supply.
2. Undo theglass cover, unscrewthe bulband replaceit witha newbulb ofthe sametype.
3. Once thedefectivebulb isreplaced,replace theglass cover.
EN 12
Page 13

LOW-E
REMOVALAND CLEANINGOF THEGLASS DOOR
1. Open theoven door.
2.3.4. Lock thehinges, remove the screwsand removethe upper metalcover by pullingit upwards.
5.6. Remove the glass, carefully extracting it from the oven door (NB: in pyrolytic ovens, also remove
the second andthird glass (ifpresent)).
7. At theend of cleaningor substitution,reassemble theparts in reverse order.
On all glass, the indication"Pyro" must be legible and positioned on the left sideof thedoor,close to the
left-handlateral hinge. Inthis way, theprinted labelof thefirst glass willbe insidethe door.
1.
2.
3.
5.
6.
1
2
3
7.
4.
EN 13
Page 14

5. Troubleshooting
5.1 FAQ
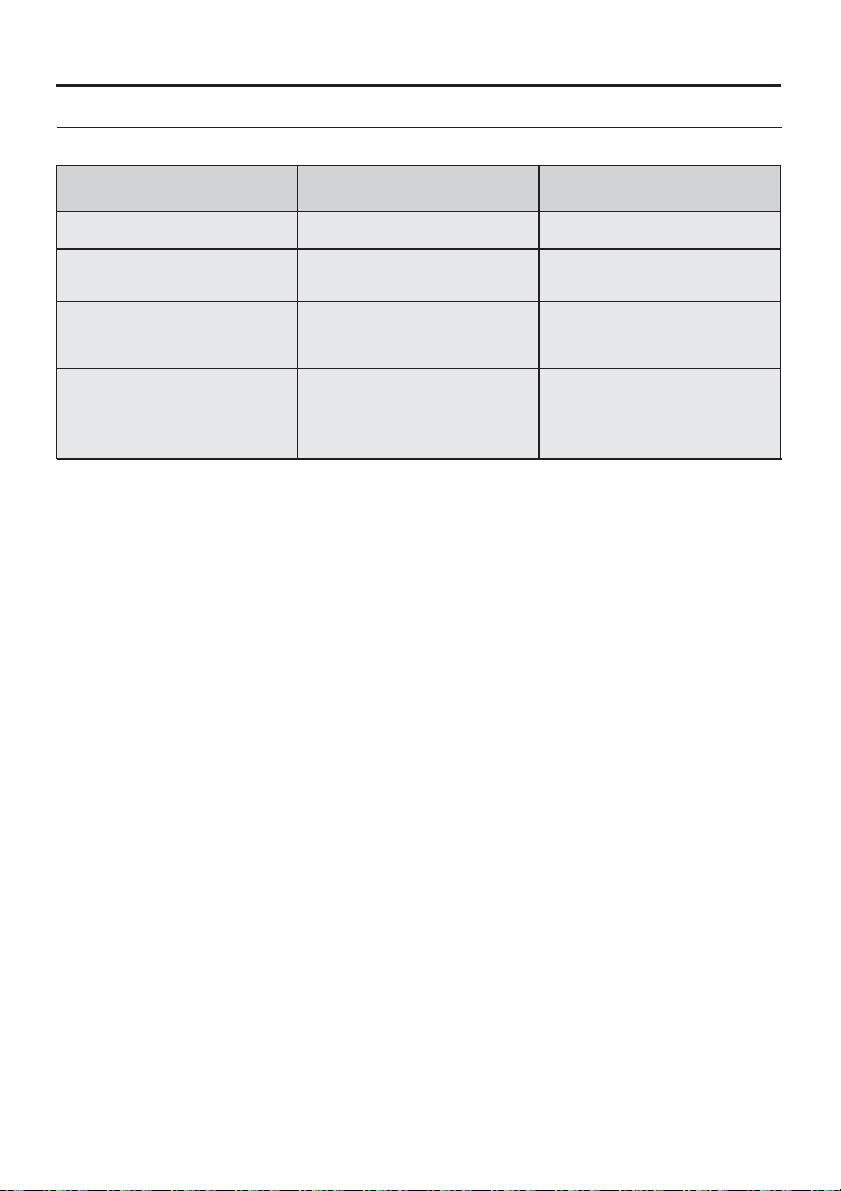
PROBLEM POSSIBLE CAUSE SOLUTION
The oven does not heat up
The oven does not heat up
The oven does not heat up
No reaction of the touch
user interface
The clock is not set Set the clock
The child lock is on
A cooking function and
temperature has not been set
Steam and condensation on
the user interface panel
Deactivate the child lock
Ensure that the necessary
settings are correct
Clean with a microfiber
cloth the user interface
panel to remove the
condensation layer
EN 14
Page 15

Conseils De Sécurité
• AVERTISSEMENT: L'appareil et les parties accessibles deviennent
chauds pendant l'utilisation. Des précautions doivent être prises pour
éviterdetoucherles éléments chauffants.
• ATTENTION : les parties accessibles peuvent devenir très chaudes
quand le four est en marche. Les enfants doivent être tenus à une
distancedesécurité.
• Cet appareil n'est pas destiné à être utilisé par des personnes (y
compris les enfants) dont les capacités physiques, sensorielles ou
mentales sont réduites, ou ayant un manque d'expérience et de
connaissances, à moins qu'elles n'aient été formées à l'utilisation de
l'appareil,parunepersonne responsable de leur sécurité.
• Les enfantsne doivent jouer avecl'appareil.
• Le nettoyage et l'entretien par l'utilisateur ne doit pasêtrefait par des
enfantssans surveillance.
• En cours d'utilisation l'appareil devient chaud. Des précautions
doivent être prises pour éviter de toucher les éléments chauds à
l'intérieurdufour.
AVERTISSEMENT: Les parties accessibles peuvent devenir chaudes
pendantl'utilisation.Les jeunesenfants doiventêtretenus à l'écart.
• Ne pas utiliser de nettoyants abrasifs ou de racloirs métalliques
tranchantspournettoyer la vitredelaporte du four carilspeuventrayer
la surface,entrainantdesrisques d'explosion.
•Le four doit être éteint avant d'enlever la protection et après le
nettoyage,la protectiondoitêtre replacée en respectantles instructions.
• Utiliser seulement la sonde de température recommandée pour ce
four.
• Ne pasutiliserdenettoyantsvapeur pour le nettoyage.
• Brancher le câble d’alimentation sur une prise de courant qui
supporte le voltage; le courantetlachargesontindiquéssurl’étiquette
; vérifier la présence d’une mise à la terre. La prise d’alimentation doit
supporter la charge indiquée sur l’étiquette et être dotée d’une mise à
la terre en état de fonctionnement. Le conducteur de mise à la terre est
jaune et vert. Cette opération doit être exécutée par du personnel
qualifié. En cas d’incompatibilité entre la prise d’alimentationet la fiche
du câble de l’appareil, demander à un électricien professionnel de
FR 15
Page 16

remplacer la prise d’alimentation par un dispositif compatible. La fiche
du câble d’alimentation et la prise d’alimentation doivent être
conformes aux normes en vigueur dans le pays d’installation. Il est
possible de brancher l’appareil à la prise d’alimentation en installant un
disjoncteur multipolaire qui supporte la charge électrique maximale,
conformément aux lois en vigueur, entre l’appareil et la prise
d’alimentation. Le conducteurjauneetvert demise à la terre ne doit pas
être bloqué par le disjoncteur. La prise d’alimentation ou le disjoncteur
multipolaire utilisé pour le branchement doit rester à tout moment
accessible lorsdel’installation de l’appareil.
•Le débranchement doit se faire en accédant à la prise d’alimentation
ou en prévoyant un interrupteur sur le circuit électrique fixe, conforme
aux normes électriques.
•Si le câble d’alimentation est endommagé, il doit être remplacé par un
câble ou un faisceau de câbles spécial disponible auprès du fabriquant
ou en contactantleserviceaprès-vente.
•Le câbled’alimentationrequisest le H05V2V2-F.
•Le non-respect des consignesci-dessuspeutcompromettrelasécurité
de l’appareil et annuler la garantie.
•Tout produit déverséen quantitédoitêtreéliminé avantle nettoyage.
•Pendant le nettoyage à pyrolyse, les surfaces peuvent devenir
beaucoup plus chaude que d’habitude, les enfants doivent donc être
tenusàunedistance desécurité.
•Ne pas installer l’appareil derrière une porte décorative, pour éviter la
surchauffe.
•En introduisant le plateau dans le four, s’assurer que le stop est dirigé
verslehaut etau fond de la cavité.
Le plateaudoitcomplètement être insérédansla cavité
• AVERTISSEMENT : Ne tapissez pas les parois du four avec du papier
aluminium ou un autre matériau de protection jetable en vente dans le
commerce. Tout papier aluminium ou autre matériau de protection qui
entrerait au contact direct de l'émail chaud risquerait de fondre et de
détériorerl'émailintérieur du four.
• AVERTISSEMENT : Neretirez jamaislejointde laporte du four.
FR 16
Page 17

SOMMAIRE
Instructions Générales
18
Description du produit
20
Utilisation du Four
21
Nettoyage du four et
maintenance
24
1.1 Indications de sécurité
1.2 Sécurité électrique
1.3 Recommandations
1.4 Installation
1.5 La gestion des déchets et la
protection de l'environnement
1.6 Déclaration de conformité
2.1 Vue d'ensemble
2.2 Accessoires
2.3 Première utilisation
3.1 Description de l'affichage
3.2 Mode de cuisson
4.1 Remarques générales concernant
le nettoyage
4.2 Pyrolyse
4.3 Entretien
• Retrait de la porte du four
• Remplacement de l'ampoule
• Retrait et nettoyage des vitres
Dépannage
27
5.1 F.A.Q.
FR 17
Page 18

1. Instructions générales
Nous vous remercions d'avoirchoisi unde nosproduits.
Pourobtenir lesmeilleurs résultats avecvotre four, vous
devezlire attentivementce manuelet le conserverpour
toute consultation ultérieure. Avant d'installer le four,
notez le numéro de série, il vous sera demandé par le
support technique si des réparations sont nécessaires.
Après avoir enlevé le four de son emballage, vérifiez
qu'il n'a pas été endommagé pendant le transport. Si
vous avez des doutes, ne pas utiliser lefour et se référer
à un technicien qualifié pour obtenir des conseils.
Conservez tous les matériaux d'emballage (sacs en
plastique, polystyrène, clous) hors de la portée des
enfants.Lors de la première utilisation du four, il peut se produire un dégagement de fumée âcre
provoqué par le premier échauffement de la colle des panneaux d’isolation enveloppant le four. Ce
phénomène estnormal. Attendezque la fuméecesse avantde cuire desaliments. Le fabricant décline
toute responsabilité dans les cas où les instructions contenues dans le présent document ne sont pas
respectées.
REMARQUE: lesfonctions dufour, les propriétés et les accessoirescités dansce manuel peuvent varier
selon les modèles.
1.1 Indications de sécurité
Utilisez uniquement lefour àsa destination, qui estseulement pourla cuissondes aliments; touteautre
utilisation, par exemple comme une source de chaleur, est considérée comme impropre et donc
dangereuse. Le fabricantne peutêtre tenu responsable detout dommagelié àune mauvaiseutilisation
ouà des modificationstechniquesdu produit.
L'utilisationde toutappareilélectrique impliquele respect decertaines règles fondamentales:
- Ne pastirer sur lefil électriquepour débrancher laprise.
- Ne pastoucher l'appareil avecles mainsou lespieds mouillés ouhumides;
- En générall'utilisationd'adaptateurs,de prisesmultiples et derallonges est déconseillé;
- En cas de dysfonctionnement et / ou de mauvais fonctionnement, éteindre l'appareil et ne pas y
toucher.
1.2 Sécurité électrique
LE BRANCHEMENT ELECTRIQUE DOIT ÊTRE REALISE PAR UN INSTALLATEUR AGREE OU UN
TECHNICIENDE E.QUALIFICATION SIMILAIR
L'alimentation électrique à laquelle le four est connecté doit être conforme aux lois en vigueur dans le
pays d'installation. Le fabricant décline toute responsabilité pour tout dommage causé par le non
respect deces instructions. Le four doitêtre raccordéà l'alimentation électrique avec uneprise murale
reliée à la terre ou par l'intermédiaire d'un dispositif à coupure omnipolaire, selon les lois en vigueur
dans le paysd'installation.L'alimentation électrique doitêtre protégéepar desfusibles appropriés etles
câblesutilisés doiventavoir unesection transversale qui peutassurer une alimentationnormale dufour.
CONNEXION
Le four est livré avec un câble d’alimentation permettant le raccordement sous une tension électrique
de 230 V entre les phases ou entre phase et neutre. Le raccordement devra être effectué après avoir
vérifié:
- La tensiond'alimentationindiquée surle compteur;
- Le réglagedu disjoncteur.
Le fil de protection du cordon (vert/jaune) relié à la Borne Terre de l’appareil doit être relié à la Borne
Terrede l’installation.
FR 18
Page 19

ATTENTION
Faire vérifier la continuité de la terre de l’installation avant de procéder au raccordement. Le fabricant
décline toute responsabilité encas d'accidents ou d'autres problèmes qui pourraient survenirà l'usage
d'un appareil nonrelié à laterre, ou reliéà une terredontla continuité serait défectueuse.
REMARQUE: Le four peut nécessiter une opération de S.A.V. Aussi, placez la prisede courant de façonà
pouvoir brancher le four une fois sorti de sa niche. Câble d'alimentation: si le changement du câble
d'alimentations'avère nécessaire, nousvous demandonsde faireréaliser cette opération par le service
après-venteou une personnede qualification similaire.
1.3 Recommandations
Après chaque utilisation du four, réaliser un petit entretien qui favorisera le nettoyage parfait du four.
Ne pas tapisser les parois du four avec des feuilles en aluminium ou des protections jetables du
commerce. La feuille d'aluminium ou toute autre protection, en contact direct avec l'émail chauffé,
risque de fondre et de détériorer l'émail du moufle. Avant installation de l'appareil, il faut relever le
numérode sérieet le noterci-dessous encas d'éventuelledemande d'intervention.
Afin d'éviter les salissures excessives de votre four ainsi que les fortes odeurs de fumée pouvant en
résulter, nousrecommandons de nepas utiliserle fourà trop forte température. Il estpréférablede
rallonger letemps de cuisson et de baisser la température. Nous vous conseillons de n'utiliser que des
plats,des moulesà pâtisserie résistants à detrès hautes températures.
1.4 Installation
La mise en service de l’appareil est à la charge de l’acheteur, le constructeur est dégagé de ce service.
Les pannes liées à une mauvaise installation ne seront pas couvertes par la garantie. Une mauvaise
installation peut provoquer des dommages aux personnes, aux animaux domestiques; dans ce cas la
responsabilité du constructeur ne peut être engagée. L'installation du four doit être réalisée par un
installateur agréé ou un technicien de qualification similaire. Le four peut être placé en hauteur dans
une colonne ou enchâssé sous un plan de travail. Avant sa fixation: il est indispensable d'assurer une
bonne aération dans la niche d'encastrement afin de permettre la bonne circulation de l'air frais
nécessaire au refroidissement et à la protection des organes intérieurs. Pour cela, réaliser les
ouverturesspécifiées selonle type d'encastrement (dernière page).
1.5 La gestion des déchets et la protection de l'environnement
Le présent appareil est marqué conformément à la directive 2012/19/UE relative aux
déchets d'équipements électriqueset électroniques
(DEEE). Les DEEE contiennent à la fois des substances polluantes (qui peuvent avoir des
conséquences négatives sur l'environnement) etdes élémentsde base (réutilisables). Il est
important de soumettre les DEEE à des traitements spécifiques, en vue d'extraire et
d'éliminer de façon appropriée toutes les substances polluantes, puis de récupérer et
recyclertous lesmatériaux.
Chacun peut jouer un rôle important quant à la protection de l'environnement contre les DEEE. Pour
atteindrecet objectif, il estimpératifde suivrequelques règlesélémentaires:
• Les DEEEne doivent pas êtretraitéscomme desdéchets ménagers.
• Ils doivent être remis aux points de collecte appropriés gérés par la municipalité ou par des sociétés
immatriculées.Dans plusieurspays, ilestpossible decollecter à domicileles DEEEvolumineux.
• Lorsque vous achetez un nouvel appareil, vous devez retourner l'ancien au vendeur qui le récupère
gratuitement, au cas par cas, à condition que l'équipement soit de type équivalent et possède les
mêmes fonctions quecelui fourni.
FR 19
Page 20

ÉCONOMIE ET RESPECT DE L'ENVIRONNEMENT
Lorsque cela est possible, éviter le préchauffage du four et éviter de le faire tourner à vide. N'ouvrez la
porte du fourque lorsque celaest nécessaire, car ily ades déperditions dechaleur àchaque foisqu'il est
ouvert. Pour uneéconomie d'énergiesignificative, éteindrele fourentre 5 et 10 minutesavant lafin de
cuisson prévue, et utiliser la chaleur quele fourcontinue de générer. Gardezles jointspropreset enbon
état, pour éviter toute déperdition d'énergie. Si vous avez un contrat électrique avec un tarif heure
creuse, le programme"cuisson différée"peut vousfaireréaliser deséconomies d'énergie en déplaçant
le début duprogrammeà unintervallede tempsà tarifréduit.
1.6 Declaration De Conformité
Les parties de cet appareil pouvant êtreen contact avec des substances alimentaires sont conformes à
la prescription dela Dir.CEE 89/109.
En utilisant le symbole sur ceproduit, nousdéclarons surnotre propreresponsabilité quece produit
est conforme àtoutes les normesEuropéennes relatives à lasécurité, lasanté età l’environnement.
2. Description du produit
2.1. Vue d'ensemble
1
2
5
3
4
6
2.2. Accessoires
Grille métallique
1
La grille métallique sert de support aux plats.
1. Panneau de commande
2. Positions des gradins
(gradins fils si inclus)
3. Grille métalique
4. Léchefrite
5. Ventilateur
(derrière la plaque d'acier)
6. Porte du four
2
Léchefrite
Recueille le jus des grillades. Le lèche frite ne doit
pas être utilisépour les cuissonsautres queGrill et
grill pulsé (Il va provoquer un écran de
température entre le bas et le haut de la cavité).
Rien ne doitêtre posésur la sole dufour (risque de
déformation de l’émail). En casde non respectde
ces conseils, nous ne pourrons être tenu pour
responsable.
FR 20
Page 21

2.3 Première Utilisation
UN PREMIER NETTOYAGE doit être réalisé avant la première utilisation passer un chiffon doux et
humide sur les surfaces extérieures de l'appareil. Nettoyer avec une éponge additionnée de produit
lessiviel, les accessoires et l'intérieur du four. Rincer et sécher. Faire chauffer le four à vide une bonne
heure à la température maximale pour faire disparaître l'odeur du neuf. Pendant cette opération, bien
aérerla pièce.
3. Utilisation du Four
3.1 Description de l'affichage
ATTENTION!
1. Minuteur / Mode automatique
2. Fonction avec chaleur tournante
3. Décongélation
4. Température ou affichage de l'heure
5. Boutons de réglages
6. Manettes de sélection de fonction
7. Manettes de sélection de programme
La première opération à effectuer après
l'installation, ou après une coupure de courant,
est le réglage de l'heure (de telles situations se
reconnaissent parce que l'afficheur est sur 12:00
et clignote).
200 ° -> Le LED "·" clignote jusqu'à ce que la
températureaffichée atteinte.soit
HOT-> Quandun programmese termine,si lefour
est encore chaud, l'écran affiche "HOT", en
alternance avec le temps, même si les boutons
sontpositionnés surOFF.
NB -> Les températures présélectionnées sont
des températures préconisées, celles-ci peuvent
et doivent être adaptées en fonction du plat
cuisiné, la prise en main de chacun permet
d’obtenirun bonrésultat.
En cas dedégagementde fumée, cela indique que
les cuissons sont trop chaudes, il convient à ce
moment-là de baisser les températures de
cuisson.
FR 21
Page 22

FONCTIONS
MODE
SILENCE
COMMENT L'ACTIVER
• Positionner la manette
du programmateur sur la
position “Mode silence”.
COMMENT LE
DESACTIVER
• Tourner la manette sur
la position off.
A QUOI CA SERT POURQUOI EST-CE UTILE
• Permet de couper la
sonnerie.
• Cette fonction est utile pour
couper la sonnerie.
MISE À
L’HEURE
DURÉE DE
CUİSSON
FIN DE LA
CUISSON
MINUTERIE
SÉCURITÉ
ENFANT
• Régler la manette du
programmateur sur la
position Mise à l’heure.
• Utiliser les touches
centrales + et - pour
régler l’heure.
• Sélectionner une
fonction de cuisson
• Régler la manette du
programmateur sur la
position Durée de
cuisson.
• Régler le temps de
cuisson en utilisant les
touches centrales + et -.
• Le voyant Auto s’affiche.
• Sélectionner une
fonction de cuisson
• Régler la manette sur
la position Fin de
cuisson.
• Régler l’heurede finde
cuisson en utilisant les
touchescentrales + et- .
• Le voyant Auto
s’affiche.
• Régler la manette du
position Minuterie.
• Régler le temps de cuisson en utilisant les
touches centrales + et - .
• Régler la manette du
programmateur sur la
position Sécurité enfant.
• Appuyer sur la touche +
pendant 5 secondes.
• La sécurité enfant est
en fonction quand le
display affiche “Stop”.
sur laprogrammateur
• Tourner la manette sur
la position off.
• Une fois le temps
écoulé, le four est
automatiquement mis
hors fonction. Pour
arrêter la cuisson avant, il
faut positionner la
manette des fonctions sur
off, ou régler le temps de
cuisson sur 00:00, en
plaçant la manette sur la
position Durée de cuisson,
et en utilisant la touche
“-”.
• À la fin de la cuisson, le
four s’arrête
automatiquement.
Pour arrêter la cuisson
avant, positionner la
manette des fonctions sur
off.
• Régler le temps sur
00:00, en plaçant la
manette du programmateur sur la position
Minuterie, et en utilisant la
touche “-”.
• Remettre la manette du
programmateur sur la
position Sécurité Enfant
et appuyer sur la touche
+ pendant 3 secondes.
• L’indication Stop
disparaît.
• Permet de régler l’heure
qui apparaît sur le display.
• Permet de régler un
temps de cuisson.
• Quand le temps de
cuisson est réglé,
positionner la manette sur
off pour repasser à l’heure
du jour.
• Pour visualiser le temps de
cuisson sélectionné, tourner
la manette sur la position
Durée de cuisson.
• Permet de régler l’heure
de fin de cuisson.
• Quand l’heure de fin de
cuisson est réglée, ramener la manette sur off
pour revenir à l’heure du
jour.
• Afin de visualiser l’heure
de fin de cuisson, positionner la manette sur la
position Fin de
cuisson.
• Emet un signal sonore à
la fin d'un temps
programmé.
• Pendant le
fonctionnement, l'écran
affiche le temps restant.
Le four est hors fonction.
• Cette fonction vous permet
de régler l’heure en utilisant
les touches centrales + et -.
NB: Régler l’heure lors de
l’installation de votre four ou
juste après une coupure de
courant (12: 00 clignote alors
à l’écran).
• Quand le temps de cuisson
est écoulé, la cuisson s’arrête
automatiquement et l’alarme
sonne quelques secondes.
Cette fonction est utilisée vec
la fonction DUREE DE
CUISSON.
• Par exemple, votre plat doit
cuire pendant 45 minutes et
être prêt à 12.30. Sélectionnez
le mode de cuisson souhaitée.
Réglez la durée de cuisson sur
45 minutes ("-" "+"). Régler la
fin de la cuisson à 12h30 ("-"
"+"). La cuisson commencera
automatiquement à 11h45
(12h30 moins 45 minutes), et
continuera jusqu'à la fin de la
cuisson. A ce moment il
s'arretera automatiquement
et émettra un signal sonore.
AVERTISSEMENT: en ne
réglant que la fin du temps de
cuisson, et non la durée de
cuisson, le four se met
immédiatement en marche et
s'éteindra à la l'heure de fin de
cuisson.
• Utile comme “aide mémoire”, l’alarme sonore
fonctionne indépendamment
du four, même si celui-ci est
éteint.
Cette fonction est utile
surtout en présence de
jeunes enfants.
FR 22
Page 23

3.2 Mode de cuisson
Bouton de
sélection
*
*
Fonction (selon modèle)
L'ampoule: Allumage de l’éclairage du four
Décongélation: fonctionnement de la turbine de cuisson qui brasse l'air dans l'enceinte du four.
Idéale pour réaliserune décongélationavantune cuisson.
Le mode étuve: utilisation simultanée de la résistance de voûte et de sole plus la turbine qui
brassel'air dansl'enceinte dufour.Idéal pourmaintenir unplat au chaudsans risquede surcuisson
et pratique aussipour chaufferles assiettesvides.
La température est pré-réglée à 60°Cconstantsaucun réglage n'estpossible.
Chaleur brassée: fonction recommandée pour les volailles, les pâtisseries, les poissons, les
légumes... Lachaleur pénètremieux àl'intérieur dumets à cuire etréduit letemps de cuisson, ainsi
que le temps de préchauffage. Vous pouvez réaliser des cuissons combinées avec préparations
identiques ou non sur un ou deux gradins. Ce mode de cuisson assure en effet une répartition
homogène de lachaleur et nemélange pas lesodeurs.
Prévoirune dizainede minutesde plus,pour lacuisson combinée.
Convectionnaturelle: utilisation simultanéede larésistancede soleet devoûte.
Préchaufferle fourune dizainede minutes.Idéale pour toutes les cuissons à l'ancienne,pour saisir
les viandesrouges, les rosbifs, gigots,gibiers, le pain, lespapillotes, lesfeuilletages.Placer lemets à
cuireà unniveau degradin moyen.
Sole brassée: idéale pour les tartes à fruits juteux, les tourtes, les quiches, les pâtés. Elle évite le
dessèchement des aliments et favorise la levée pour les cuissons de cakes, pâte à pain et autres
cuissons par le dessous. Placer la grille sur le gradin inférieur. Avec ce mode de cuisson, un
préchauffage est nécessaire en Chaleur Brassée pendant une dizaine de minutes.
Turbo-Gril: l'utilisation de la position turbo-gril se fait porte fermée. Un préchauffage est
nécessaire pour les viandes rouges etinutile pour les viandes blanches. Idéal pour les cuissons de
volume épais, des pièces entières telles que rôti de porc, volailles etc... Placer le mets à cuire
directementsur la grille au centre dufour, àun niveau moyen. Glisserle récolte-sauce sousla grille
de façonà récupérerles graisses.S'assurer quele metsne soit pas tropprès dugrilloir.Retourner la
pièce à cuireà mi-cuisson.
Gril: l'utilisation du grilloir se fait porte fermée. Un préchauffage de 5 mins est nécessaire pour le
rougissement de la résistance. Succès assuré pour les grillades, les brochettes et les gratins. Les
viandes blanches doivent être écartées du grilloir ; le temps de cuisson sera alors plus long, mais la
viande sera plussavoureuse. Les viandes rouges et filets de poissons peuvent être placés sur la
grille avec leplat récoltesauce glissédessous.
Le four adeux positionsde gril:
Gril: 2140 W Barbecue: 3340W
Pyrolyse
* Programme testé selon le CENELEC, norme européenne EN 60350-1 qui définit la classe énergétique.
FR 23
Page 24

4. Nettoyage du four et maintenance
4.1 Remarques générales sur le nettoyage
Le cyclede viede l'appareilpeut être étendu grâceà un nettoyage régulier. Attendezle refroidissement
du four avant de procéder à des opérations de nettoyage manuel. Ne jamais utiliser de détergents
abrasifs, de laine d'acier ou d'objets pointus pour le nettoyage, l'émail serait irrémédiablementabîmé.
Utilisezuniquement del'eau, du savonou desdétergents à based'eau deJavel (ammoniac).
PARTIE VITREE
Il est conseillé de nettoyer la vitre avec du papier absorbant après chaque utilisation du four. Pour
enlever les taches plus tenaces, vous pouvez utiliser une éponge imbibée de détergent, puis rincer à
l'eau.
JOINT DE LAPORTE
Si elle estsale, le jointpeut être nettoyé avec uneéponge légèrement humide.
ACCESSOIRES
Nettoyer les accessoires avec une éponge et de l'eau savonneuse puis rincer. Eviter d'utiliser des
détergentsabrasifs.
LECHEFRITE
Après l'utilisation de la grille, retirez le du four. Prendre soin de reverser les graisses (tièdes)lêchefrite
dans l’évier. Laver et rincer le plat récolte-sauce dans de l’eau chaude, avec une éponge imbibée de
produit lessiviel. Si les résidus restent collés, le faire tremper dans de l’eau et un produit détergent. Il
peut aussi êtrenettoyédans unlave-vaisselle ouavec unproduitdu commerce.
Ne jamais replacerle plat récolte-sauceencrassé dansun four.
4.2 Pyrolyse
Le four est équipé d'un système de nettoyage par pyrolyse, c'est-à-dire par destruction à haute
température des salissures. Cette opération se fait automatiquement au moyen du programmateur. Les
fumées en résultant sont rendues "propres" par passage sur un pyrolyseur dont l'action commence dès
la cuisson des aliments. A cause de la température élevée nécessaire à la pyrolyse, la porte du four est
munie d'une sécurité qui permet son verrouillage pendant le cycle. La Pyrolyse peut être stoppée à tout
moment. Cependant, laporte ne s'ouvrirapas tantque levoyant verrouillage de porteest affiché.
REMARQUE: Si une table de cuisson est installée au dessus du four, ne jamais utiliser la table pendant
l'opérationde pyrolyse dans lebut d'éviter unéchauffement excessif du tableaude bord dufour.
DEUX CYCLES DEPYROLYSEsont pré-programmés.
•PYRO ECO :nettoyage du fourmoyennement sale. Fonctionnement pendant unedurée de 90minutes.
•PYRO SUP: nettoyage du four très sale.Fonctionnement pendant unedurée de 120minutes.
Ne jamais utiliser des produits distribués dans le commerce avant de réaliser le nettoyage du four à
pyrolyse !
Remarque: un nettoyage enchaîné derrière une cuisson permet de bénéficier de la chaleur déjà
emmagasinée dans lefour d'où uneéconomie d'énergie.
Avantd'exécuterun cycle depyrolyse:
• Retirer du four lesaccessoires :ils ne supporteraient passans dommage la températurede pyrolyse;
en particulier les grilles, et les rails télescopiques (se référer au chapitre retrait des grilles et rails
téléscopiques). Dans les fours avec sonde à viande, il est nécessaire, avant d'effectuer le cycle de
nettoyagede refermerl'embout avec l'écroufourni.
• Enlever les débordements importants ou gros déchets dont la destruction demanderait un temps
trop long.De plus, des résidus gras en quantité élevée sont en effet susceptibles de s'enflammer sous
l'action de lachaleur intenseque dégage la pyrolyse.
• Fermer laporte du four.
• Le liquidedébordé doit êtreenlevéavant de nettoyer.
• Nettoyer la portedu four.
• Enlever avecune épongehumide les résidusles plusgros. Nepas utiliser dedétergents.
• Sortir tousles accessoires ainsique le kitéventuel de glissièrescoulissantes.
• Ne pasplacer detorchons oude maniques surla poignéedu four.
FR 24
Page 25

En utilisant lecycle de pyrolyse:
Si uncycle depyrolyse est choisi l'écran affiche "ECO" (90 min) en clignotant. En utilisant le "<" ou">" ,il
estpossible dechanger la pyroliseen «SUPER» (120min).
Si une pyrolyseest déjàdémarrée, il n'estplus possible dechanger de"ECO"pour "SUPER"et vice versa.
Il est impossiblede modifier unedurée depyrolyse, maisle tempsde finpeut êtremodifié.
Durantla pyrolysele buzzer ne fonctionnepas.
Une pyrolyse nepeux pasdémarrer si leséparateur,les grilleslatéralesou lasonde sontdétectés.
Une pyrolyse nepeux pasêtre programmée parWi-Fi.
4.3 Entretien
RETRAIT DE LAPORTE DUFOUR
1. Ouvrez laporte.
2. Ouvrez les pinces du boîtier de charnière sur le côté droit et gauche de la fenêtre avant en les
poussantvers le bas.
3. Replacez laporte enprocédant en sensinverse.
REMPLACEMENTDE L'AMPOULE
1. Débranchez lefour dela prise.
2. Défaire lecouvercle enverre,dévisser l'ampouleet la remplacerpar une ampouledu mêmemodèle.
3. Une foisl'ampoule remplacée, remettrele couvercle en verre.
FR 25
Page 26

RETRAIT ET NETTOYAGEDES VITRES
LOW-E
1. Ouvrez laportedu four.
2.3.4. Bloquerles charnières,enlever lesvis et retirez lecouvercle métallique supérieur en letirant vers
le haut.
5.6. Retirez le verre, soigneusement dela portedu four(NB: dans les foursde pyrolyse,retirezl'extraire
égalementles deuxièmeet troisièmeverre (le caséchéant)).
7. A lafin dunettoyage Remonter lespièces dansl'ordre inverse.
Sur toutes les vitres, l'indication "Pyro" doit être lisible et positionnée sur le côté gauche de la porte, à
proximitéde lacharnière latéralegauche. Decette manière, l'étiquette impriméedu premierverre sera
à l'intérieur dela porte.
1.
5.
2.
3.
4.
6.
1
2
3
7.
FR 26
Page 27
5. Dépannage
5.1 FAQ
PROBLEMES CAUSE POSSIBLE SOLUTION
Le four ne chauffe pas
Le four ne chauffe pas
Le four ne chauffe pas
Aucune réaction de
l'écran tactile
L'horloge n'est pas réglée
La sécurité enfant est
activée
Les réglages nécessaires
ne sont pas imposés
Vapeur et de la
condensation sur l'écran
tactile
Réglez l'horloge
Désactiver la sécurité enfant
Assurez-vous que les
paramètres nécessaires
sont corrects
Nettoyer avec un chiffon en
microfibres l'écran tactile
pour enlever la couche de
condensation
FR 27
Page 28

INSTALLATION GB
INSTALLATION FR
Opening / Ouverture
460 mm x 15 mm
560 mm
560 mm
590 mm
500 mm x 10 mm
560 mm x 45 mm
GB
If the oven does not have a cooling fan, create an
opening 460 mm x 15 mm
FR
Si le four n'a pas de ventilateur de refroidissement,
créer une ouverture. 460 mm x 15 mm
550 mm
580 mm
545 mm
22 mm
GB
If the furniture is equpped with a bottom at the back part,
provide an opening for the power supply cable.
FR
Si le fond du meuble est doté d'un panneau de fermeture,
prévoyez un orifice pour le passage du câble d'alimentation.
560
595 mm
mm
595 mm
560
mm
mm
600
Opening / Ouverture
560 mm x 45 mm
Opening / Ouverture
500 mm x 10 mm
GB
The manufacturerwill notbe responsiblefor anyinaccuracy resultingfrom printingor transcripterrorscontainedin thisbrochure. We
reserve theright tocarry out modificationsto productsas required,including the interestsof consumption, withoutprejudice tothe
characteristicsrelating tosafetyor function.
FR
Le constructeur décline toute responsabilité concernant d'éventuelles Inexacltudes Imputables à des erreurs d'impression ou de
transcriptioncontenue danscette notice. Le constructeurse réserve ledroit de modifier lesproduits encas de nécessité, mêmedans
l'intérêtde l'utilisation, sans causerde préjudicesaux caractéristiquesde fonctionnementde sécuritédes appareils.
10.2017 • REV.A • 42824753
 Loading...