

Page 1
USER INSTRUCTIONS
OVENS
NOTICE D'EMPLOI ET D'INSTALLATION
DES FOURS ENCASTRABLES
MANUALE D’ISTRUZIONI
FORNO
INSTRUCCIONES DE USO
HORNOS EMPOTRABLES
BEDIENUNGSANLEITUNG
BACKOFEN
POKYNY PRO UŽIVATELE
TROUBY
INSTRUKJA OBSŁUGI
PIEKARNIKI DO ZABUDOWY
Инстукции для пользователей
Духовые шкафы
GB
FR
IT
ES
DE
CZ
PL
RU
02
16
31
45
59
73
87
101
PIEKARNIKI DO ZABUDOWY
116
INSTRUKJA OBSŁUGI
CANDY HOOVER GROUP S.R.L. • Via Privata Eden Fumagalli • 20047 Brugherio Milano Italy
PT
Page 2

Safety Indications
• WARNING:the applianceand accessibleparts becomehot duringuse.
Be carefulnot to touchanyhot parts.
•WARNING: the accessible parts can become hot when the grill is in
use. Childrenshouldbe keptatasafe distance.
•WARNING: ensure that the appliance is switched off before replacing
the bulb,toavoid the possibility ofelectricshocks.
•WARNING: in order to avoid any danger caused by the accidental
resetting of the thermal interruption device, the appliance should not
be powered by an external switching device, such as a timer, or be
connectedtoa circuit thatisregularlyswitched on and off.
•WARNING:beforeinitiatingthe automatic cleaning cycle:
- Clean theovendoor;
- Removelarge or coarsefoodresidues from the inside of the ovenusing
a damp sponge.Donotuse detergents;
- Removeall accessoriesand the sliding rackkit(wherepresent);
- Do notplaceteatowels
• In ovens with meat probe it is necessary, before making the cleaning
cycle, close the hole with the nut provided. Always close the hole with
the nut whenthemeatprobe is not used.
•Children under 8 should be kept at a safe distance from the appliance
if not continuouslysupervised.
•Children should not play with the appliance. The appliance can be
used by those aged 8 or over and by those with limited physical,
sensorial or mental capacities,without experience or knowledge of the
product, only if supervised or provided with instruction as to the
operationof the appliance, in asafe way with awareness of the possible
risks.
•Cleaning and maintenance should not be carried out by unsupervised
children.
•Do not use rough or abrasive materials or sharp metal scrapers to
clean the oven door glasses, as they can scratch the surface and cause
the glasstoshatter.
•The oven must be switched off before removing the removable parts
and, aftercleaning,reassemblethem according the instructions.
GB 02
Page 3

•Only use themeatprobe recommendedforthis oven.
•Do not useasteamcleaner.
•Put the plug into a socket equipped with a third contact which
corresponds to the earth and which must be connected and in
operation. For models without a plug, attach a standard plug to the
cable that is able to bear the load indicated on the tag. The earth
conductor is yellow-green in colour. This operation should be carried
out by a suitably qualified professional. In case of incompatibility
between the socketand theapplianceplug,askaqualifiedelectrician to
substitute the socket with another suitable type. Connection to the
power source can also be made by placing an omnipolar breaker
between the appliance and the power source that can bear the
maximum connectedloadandthat isin linewith current legislation. The
yellow-green earth cable should not be interrupted by the breaker. The
socket or omnipolar breaker used for the connection should be easily
accessible whentheapplianceisinstalled.
•If the power cable is damaged, it should be substituted with a cable or
special bundle available from the manufacturer or by contacting the
customerservicedepartment.
If the cable is damaged, replace it promptly in accordance with the
followinginstructions:
- Open thecoverof the terminal block;
- remove the power cable and substitute it with a similar cable which is
compatiblewiththeappliance (typeH05VV-F, H05V2V2-F).
•This operation should be carried out by a suitably qualified
professional. The earth conductor (yellow-green) must be
approximately 10 mm longer than the other conductors. For any
repairs, refer only to the Customer Care Department and request the
use of originalspareparts.
•Failure to comply with the above can compromise the safety of the
appliance andinvalidate the guarantee.
•Anyexcess of spilledmaterialshould beremoved before cleaning.
•During the pyrolytic cleaning process, surfaces can heat up more than
usual, childrenshouldthereforebekept atasafe distance.
GB 03
Page 4

Summary
General Instructions
5
Product Description
7
Use of the Oven
8
Oven Cleaning and Maintenance
12
1.1 Safety indications
1.2 Electrical safety
1.3 Recommendations
1.4 Installation
1.5 Waste management
1.6 Conformity declaration
2.1 Overview
2.2 Accessories
2.3 First use
3.1 Display description
3.2 Cooking modes
4.1 General notes on cleaning
4.2 Self-cleaning oven with catalytic
4.3 Maintenance
• Removal of the oven window
• Removal and cleaning of the side racks
• Removal and cleaning of the glass
door
Troubleshooting
15
5.1 F.A.Q.
GB 04
Page 5
1. General Instructions
We thank you for choosing one of our products. For the
best results with your oven, you should read this
manual carefully and retain it for future reference.
Before installing the oven, take note of the serial
number so that you can give it to customerservice staff
if any repairs are required. Having removed the oven
from itspackaging, check thatit has notbeen damaged
during transportation. If you have doubts, do not use
the oven and refer to a qualified technician for advice.
Keep all of the packaging material (plastic bags,
polystyrene, nails) out of the reach of children. When
the oven is switched on for the first time, strong
smelling smoke candevelop, whichis caused by the glueon the insulation panels surrounding theoven
heating for the first time. This is absolutely normal and, if it occurs, you should wait for the smoke to
dissipate before putting food in the oven. The manufacturer accepts no responsibility in cases where
the instructions contained in thisdocument are notobserved.
NOTE: The oven functions, properties and accessories cited in this manual will vary, depending on the
model you have purchased.
1.1 Safety Indications
Only use the oven for its intended purpose, that is only for the cooking of foods; any other use, for
example as a heat source, is considered improper and therefore dangerous. The manufacturer cannot
be held responsibleforany damage resulting from improper, incorrect orunreasonable usage.
The use ofany electrical applianceimplies theobservance ofsome fundamental rules:
- Do notpull onthe powercable to disconnectthe plug fromthe socket;
- Do nottouch the appliancewith wetor damphands orfeet;
- In generalthe use ofadaptors,multiple sockets andextension cablesis not recommended;
- In caseof malfunction and/orpoor operation, switch offthe applianceand donot tamper withit.
1.2 Electrical Safety
ENSURE THAT AN ELECTRICIAN OR QUALIFIED TECHNICIANMAKES THE ELECTRICAL CONNECTIONS.
The powersupply to which the ovenis connected must conform with the lawsin forcein the country of
installation.The manufacturer accepts noresponsibility for anydamage causedby the failureto observe
these instructions. The oven mustbe connected toan electrical supply with an earthed wall outlet ora
disconnector with multiple poles, depending on the laws in force in the country of installation. The
electrical supply should be protected with suitable fuses and the cables used must have a transverse
section that canensurecorrect supplyto theoven.
CONNECTION
The ovenis supplied with a powercable thatshould only be connected toan electricalsupply with 220240 Vac 50 Hz power between the phases or between the phase and neutral. Before the oven is
connectedto theelectrical supply,it isimportantto check:
- Power voltage indicated onthe gauge;
- The settingof the disconnector.
The groundingwire connectedto the oven's earth terminal mustbe connected to the earthterminal of
the power supply.
WARNING
Beforeconnecting the ovento thepowersupply,ask aqualified electrician tocheck thecontinuity of the
power supply's earth terminal. The manufacturer accepts no responsibility for any accidents or other
problems caused byfailure to connectthe oven tothe earthterminal orby anearth connection thathas
defectivecontinuity.
GB 05
Page 6

NOTE: As theoven couldrequire maintenance work,it isadvisable tokeepanother wallsocket available
so that the oven can be connected to this if it is removed from the space in which it is installed. The
power cable must only be substituted by technical service staff or by technicians with equivalent
qualifications.
1.3 Recommendations
Aftereach useof the oven,a minimumof cleaningwill helpkeepthe oven perfectly clean.
Do notline theoven walls withaluminium foilor single-useprotection available fromstores. Aluminium
foil or any other protection, in direct contact with the hot enamel, risks melting and deteriorating the
enamel of the insides. In order to prevent excessive dirtying of your oven and the resulting strong
smokey smells, we recommend not using the oven at very high temperature. It is better to extend the
cooking time and lower the temperature a little. In addition to the accessories supplied with the oven,
weadvise youonly use dishesand bakingmoulds resistant tovery hightemperatures.
1.4 Installation
The manufacturers have noobligation tocarry thisout. Ifthe assistanceof themanufacturer is required
to rectify faults arising from incorrect installation, this assistance is not covered by the guarantee. The
installation instructions for professionally qualified personnel must be followed. Incorrect installation
may cause harm or injury to people, animals or belongings. The manufacturer cannot be held
responsiblefor such harmor injury.
The oven can be located high in a column or under a worktop. Before fixing, you must ensure good
ventilation in the oven space to allow proper circulation of the fresh air required for cooling and
protectingthe internal parts. Makethe openings specifiedon last page according to thetype offitting.
1.5 Waste management and environmental protection
This appliance is labelled in accordance with European Directive 2012/19/EU regarding
electric and electronic appliances (WEEE). The WEEE contain both polluting substances
(that can have a negative effect on the environment) and base elements (that can be
reused). Itis important thatthe WEEE undergospecific treatments to correctly remove and
dispose of the pollutants and recover all the materials. Individuals can play an important
role in ensuring that the WEEE do not become an environmental problem; it is essential to
followa few basic rules:
- The WEEEshould notbe treatedas domestic waste;
- The WEEE should be taken todedicated collection areas managed by the town councilor a registered
company.
In many countries, domestic collections may be available for large WEEEs. When you buy a new
appliance, the old one can bereturned to thevendor who mustaccept it free of charge as a one-off,as
long as theappliance isof anequivalent type andhas thesame functionsas thepurchasedappliance.
SAVINGAND RESPECTINGTHE ENVIRONMENT
Where possible,avoid pre-heating the oven and always tryto fill it.Open the oven door as infrequently
as possible, because heat from the cavity disperses every time it is opened. For a significant energy
saving, switch off the oven between5 and 10minutes before the planned end of the cooking time,and
use the residualheat that theoven continuesto generate. Keep theseals cleanand inorder, to avoid any
heat dispersal outside of the cavity. If you have an electric contract with an hourly tariff, the "delayed
cooking" programme makes energy saving more simple, moving the cooking process to start at the
reducedtariff time slot.
1.6 Declaration of compliance
The parts ofthis appliancethat may comeintocontact with foodstuffs comply withthe provisionsof EEC
Directive89/109.
By placing the mark on thisproduct, we are confirming compliance toall relevantEuropeansafety,
health and environmental requirements whichare applicablein legislation forthis product.
GB 06
Page 7
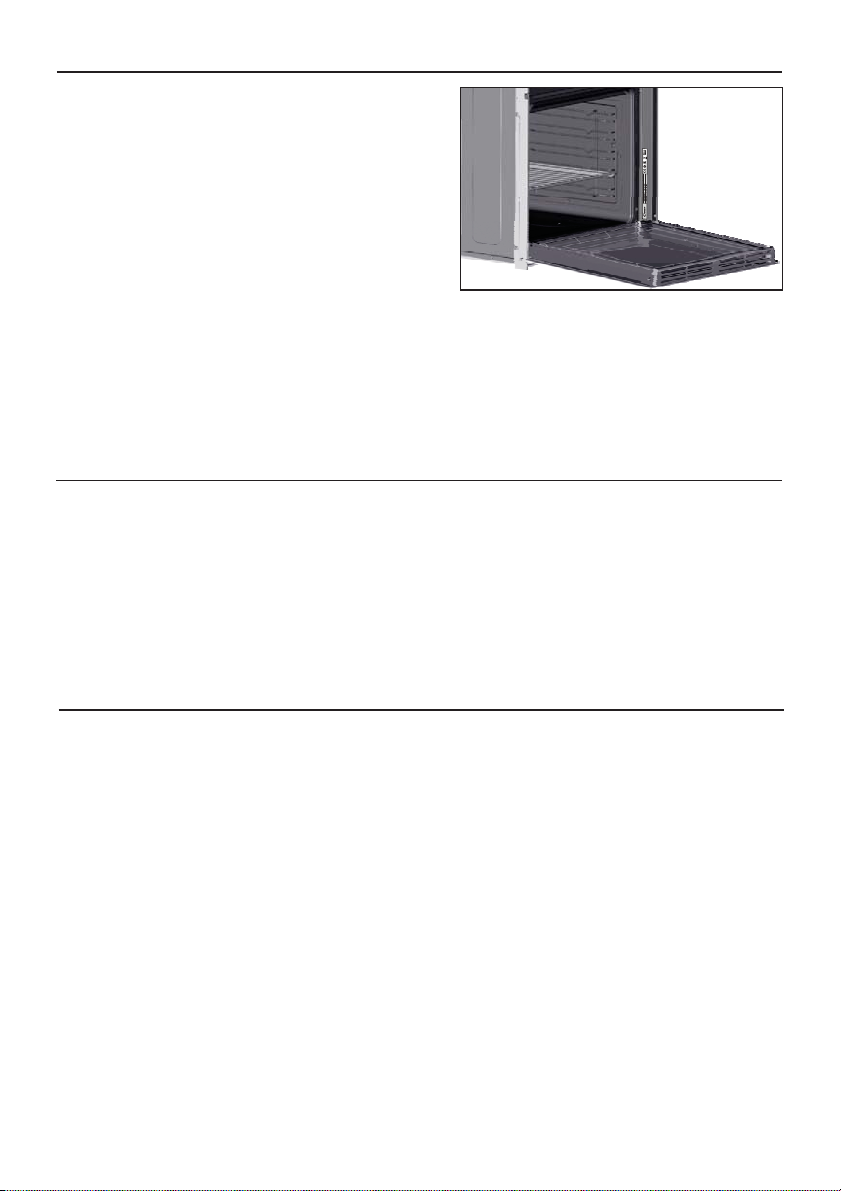
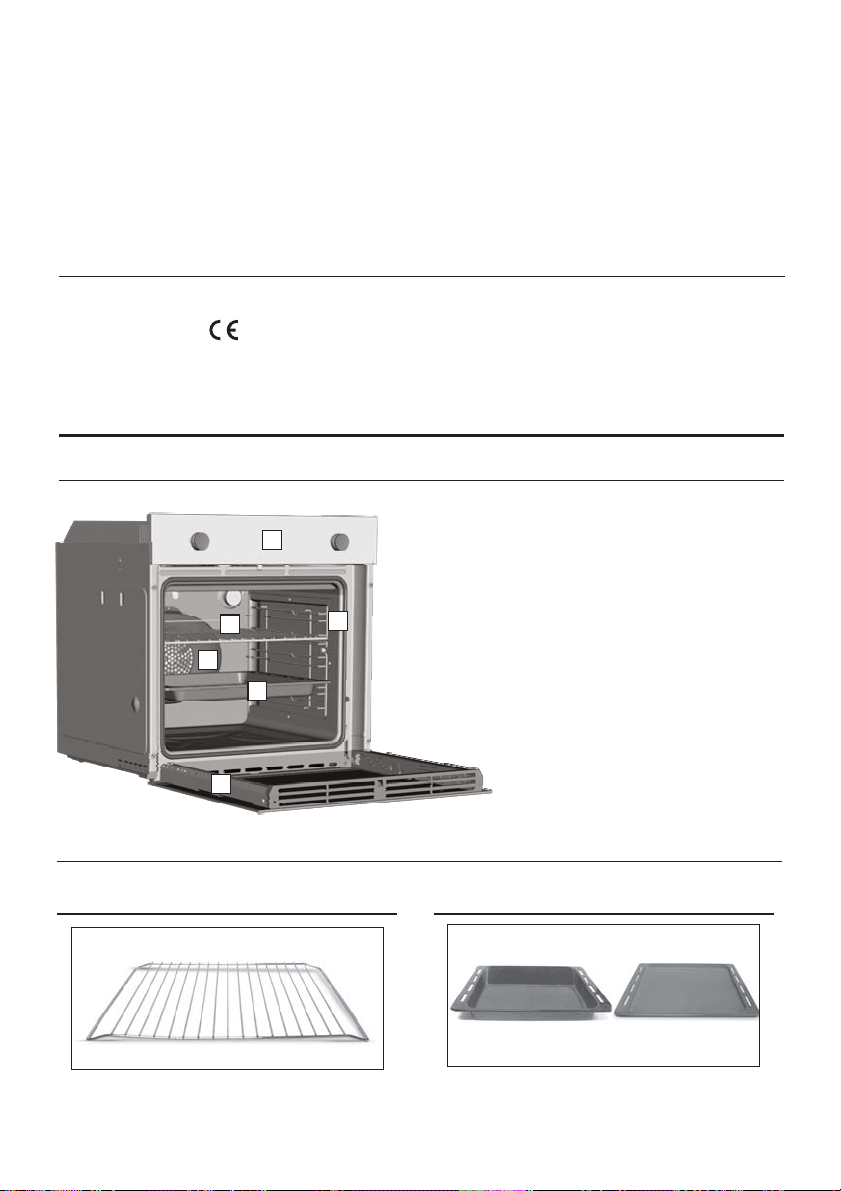
2. Product Description
2.1 Overview
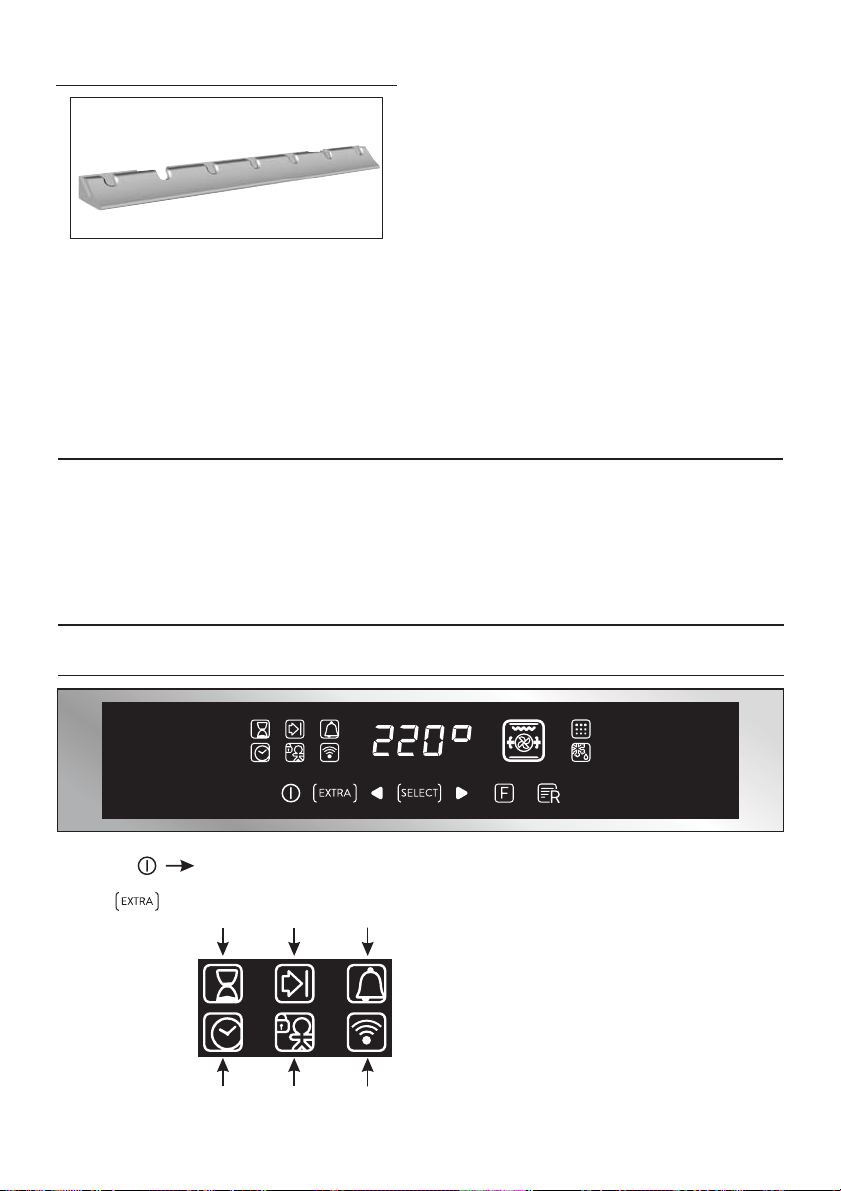
1
3
5
4
6
2
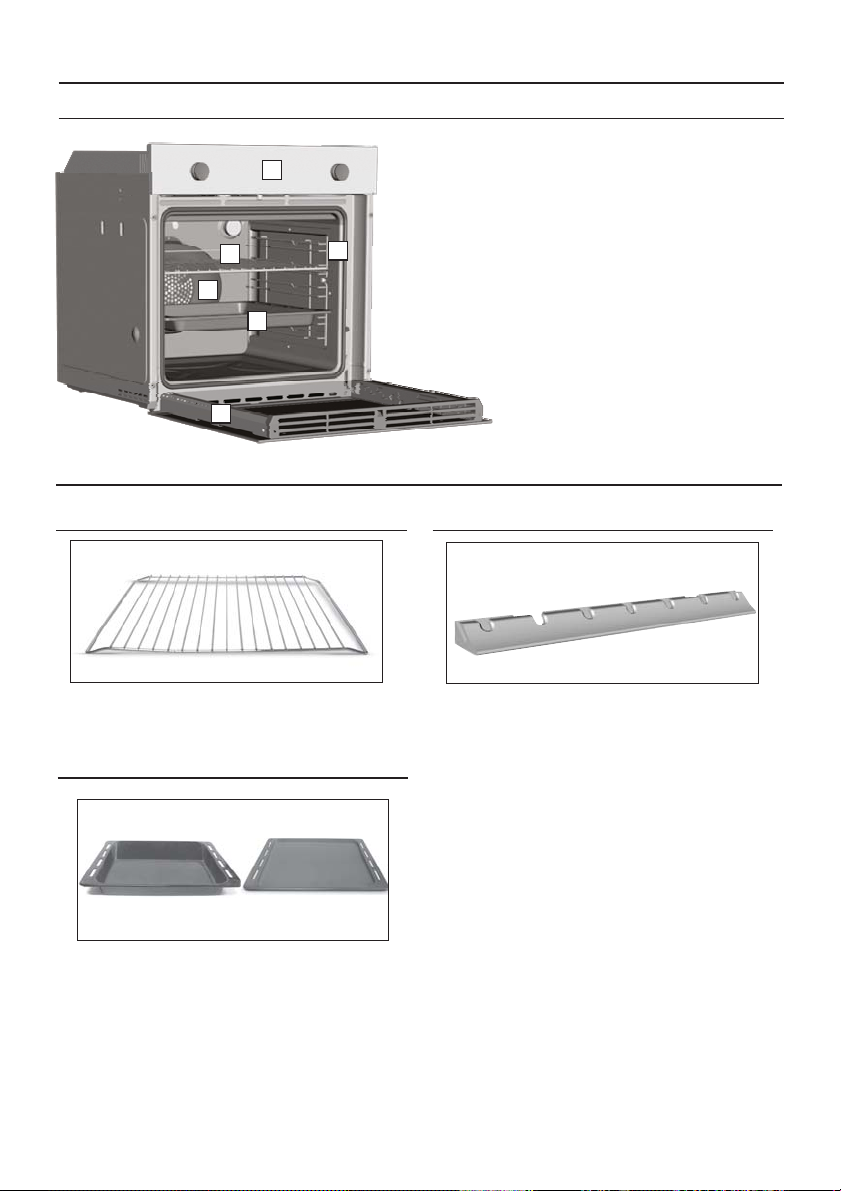
2.2 Accessories (According to model)
Metal grill
1
Holds baking trays and plates.
Drip pan
2
3
Is an illumination system which replaces the
traditional « light bulb ». 14 LED (for non-pyrolitic
versions) or 10 High Power LED (for pyrolitic
versions) lights are integrated within the door.
These produce white high quality illumination
which enables to view the insideof the oven with
clarity without anyshadowson allthe shelves.
1. Control panel
2. Shelf positions
(lateral wire grid if included)
3. Metal grill
4. Drip pan
5. Fan (behind the steel plate)
6. Oven door
Led vision
Collects the residues that drip during the cooking
of foods onthe grills.
Advantages:
This system, besidesproviding excellent illumination
inside the oven,lasts longer thanthe traditional light
bulb its easier and to maintain and most of all saves
energy.
-Optimum view
-Long life illumination
-Verylow energy consumption,-95% in comparison
with thetraditional illumination High.
GB 07
Page 8
2.3 First Use
PRELIMINARYCLEANING
Clean theoven before usingfor thefirst time. Wipe over externalsurfaces witha dampsoft cloth.Wash
all accessories and wipe inside the oven with a solution of hot water and washing up liquid. Set the
empty ovento the maximum temperature and leave on for about1 hour, this will remove any lingering
smells of newness.
3. Use of the Oven
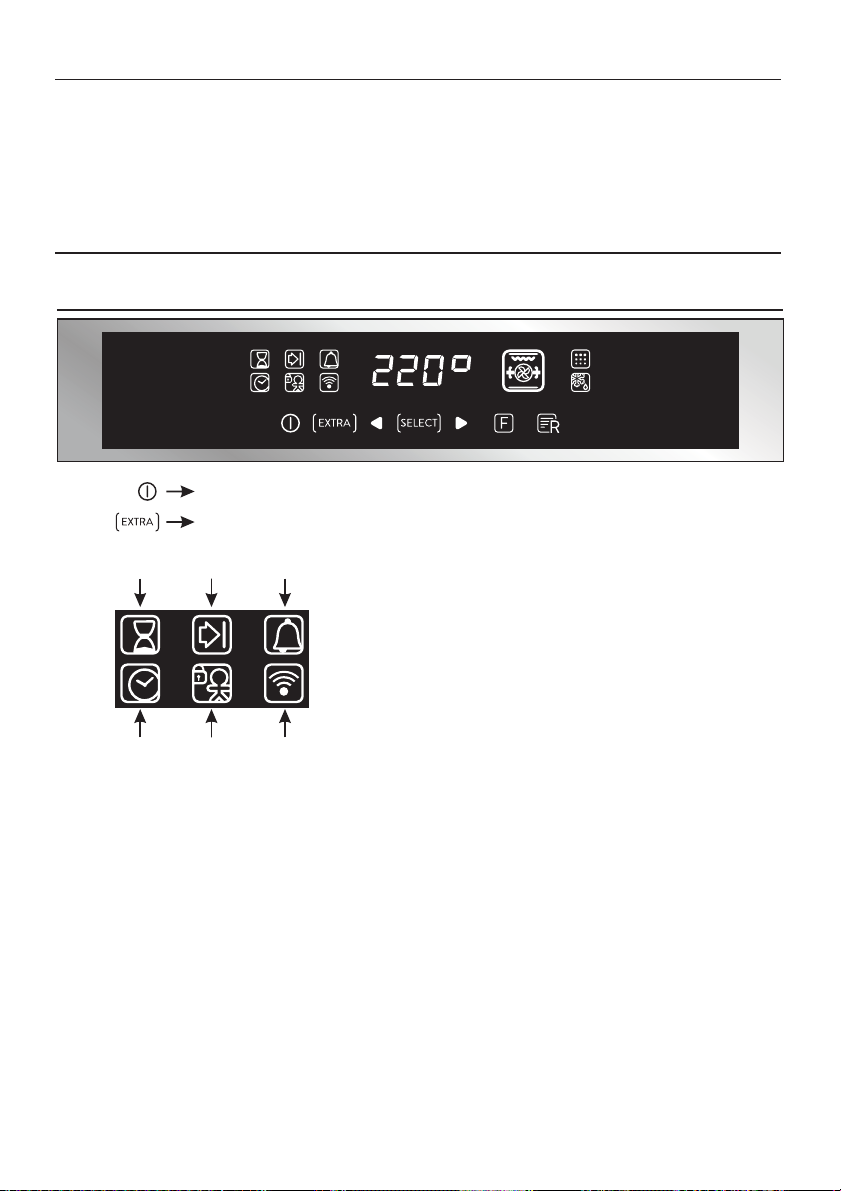
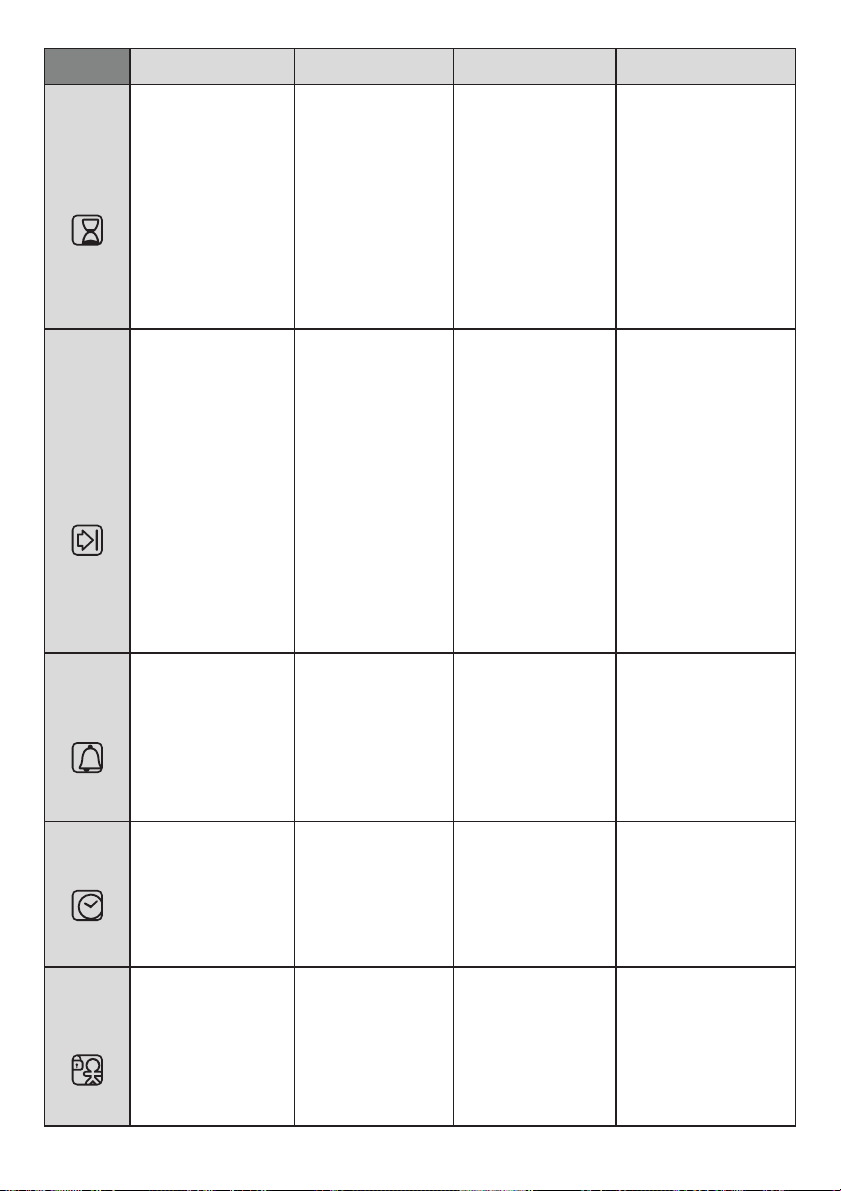
3.1 Display description
ON / OFF
EXTRA
Cooking
duration
Clock
set
The oven is switched on and off with this button.
Cooking
end
Child
lock
Timer
If the oven is switched off, the display shows the clock. When
the oven is inactive, all the functions are available except the
cookingduration and endof cooking.
If the clock is not set, the oven does not work: the display
flashes, showing "12:00" and the only functioning key is
Extra.From theExtra key,the following functionscan beset:
WiFi
GB 08
Page 9
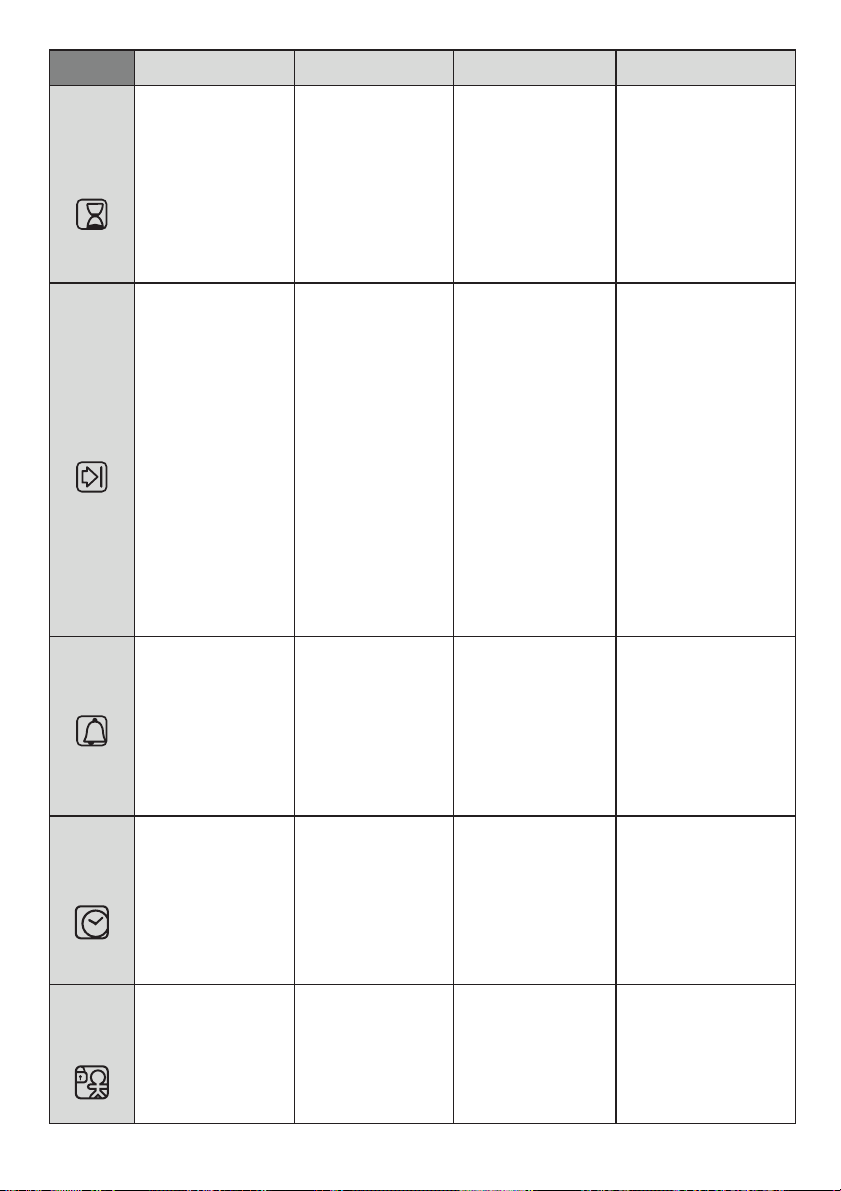
FUNCTION HOW TO ACTIVATE
NB: can only be set with an
activecooking programme.
PressEXTRA twiceand set
COOKING
DURATION
END OF
COOKING
TIMER
SETTING
THE CLOCK
CHILD
SAFETY
LOCK
the timeusing the“+” and
“-” keys, confirming by
pressing"SELECT".
The display shows“00:00”
if nocooking durationhas
been inserted, otherwise
the display showsthe time
remaining.
NB: can only be set with an
active cooking programme.
Press EXTRA enough times
to illuminate the icon, set
the end of cooking time
using the “<” and “>” keys
and confirm by pressing
"SELECT".
Press EXTRA enough times
to illuminate the icon, set
the end of cooking time
using the “<” and “>” keys
and confirm by pressing
"SELECT".
The cooking duration is
automatically calculated.
• The display shows
“00:00” if notime has been
inserted or the time
remaining if this has
alreadybeen set.
Press EXTRA enough times
to illuminate the icon and
use the “<” and “>” keys to
set the time, confirming by
pressingSELECT.
•Switched on for the first
time, the display
illuminates and sh
"12:00".
•To modify the time, press
EXTRA enough times to
illuminate the icon and use
the “<” and “>” keys to set
the time, confirming it by
pressing SELECT.
•Press the EXTRA key
enough times to illuminate
the icon and then either
the “<” or “>” key to
activate this function: the
display will show ON; to
confirm press SELECT.
HOW TO
DEACTIVATE
•To modify cooking before
the set time, press EXTRA
twice and regulate the
cooking time as required
using the “<” and “>”
keys, before pressing
SELECT" once more.
•To cancel the cooking
duration, reset the display
to “00:00”.
To modify the end of
cooking before the set
time, press EXTRA enough
times to illuminate the
icon, regulate the end of
cooking time as required
using the “<” and “>” keys
and confirm by pressing
"SELECT".
To cancel the end of
cooking time, reset the
displayto “00:00”.
•Tomodify the timer, press
EXTRA enoughtimes to
illuminate the icon,
regulatethe cooking time
as required using the “<”
and “>”keys andconfirm
by pressing "SELECT".
ows
•Press the EXTRA key
enough times to illuminate
the icon and then either
the “<” or “>” key to
deactivate this function:
the display will show OFF;
to confirm press SELECT.
WHAT IT DOES WHY IT IS NEEDED
When acooking programme
terminates , the oven
switches off whilethe display
shows "END" (the cooking
programmeicon remainson)
until the On/Off button, the
only functioning key, is
pressed. Whena c oo k in g p
r o g r amme terminates, an
alarm willsound.
When a cooking
programme terminates,
the oven switches off while
the display shows "END"
(the cooking programme
icon remains on) until the
On/Off button, the only
functioning key,is pressed.
When a cooking
programme terminates, an
alarm willsound.
•This functionactivates an
alarm that soundsfor a few
secondswhen theset time
expires(this functiondoes
not switch theoven off).
You can select a time
between00:00 and23:59.
•It allows you to set the
time that appears on the
display.
•If the function is active
only the "Extra" button, to
deactivate the function,
and "On/Off" button can
be used.
When thecooking time has
finished,theoven
automatically switches off
and the alarm sounds for a
fewseconds.
•This function is also used for
cooking that can be scheduled
in advance.
•If a cookingprogramme is set,
it will be lost if the "F" key is
pressed.
•If delayed cooking is set, the
oven switches off and the
display shows the current time
while the cooking programme,
cooking duration and end of
cookingicons areilluminated.
•If a cookingprogramme is set,
by pressing the“<” and “>”keys
you can see and modify the
temperature set: atthe first t o
uch,theoperating
temperature is shown while
another touch will allow you to
modify saidtemperature.
•Thetimerfunctions
regardless of whether the
ovenis switchedon.
•The alarm functions
regardless of whether the
oven is switched on.
•This function is useful
when there are children in
the house.
GB 09
Page 10
WiFi (depends on the oven model)
Pressing"Extra" onthe timerdisplay allows you to selectthe Wi-
Fi menu. Inthe Wi-Fimenu ifyou press the"< >" buttonsyoucan select:
- Off: Wi-Fiis off; theoven isnot controllable viathe app.
- On: Wi-fi is on andthe oven isonly controllable via the app. Itmeans that itis not possible to select cooking
functions, recipes andtemperature from the display. Only the Wi-Fi menu isavailable by pressing "Extra". You
can switch the oven off using the On/Off button, but you cannot switch it back on again viathe display, it can
only be switchedon viathe app.
- Reset: This setting should be used to enrol the oven the first time it connects to your Wi-Fi network and to
reset the current Wi-Fi connection to allow a new enrolment. Once selected, the appliance gives you 5
minutes to complete the enrolment process. During this process the cooking functions, recipes and
temperature setting are notaccessible from thedisplay. Only the Wi-Fi menuis available by pressing "Extra".
Youcan switch theoven off using the On/Off button,but you cannot switch it back onagain via the display, it
can only beswitched on via the app. To exit the enrolment/reset procedure via the display, press "Extra" and
then use "< >" buttons to select "Off". After five minutes, the appliance will exit the enrolment/reset
procedureautomatically.
- Read: the oven sends its status to the app but it cannot be controlled remotely. The oven must be enrolled
beforethis is possible.
If Wi-Fi isnot configured it isonly possibleto choosebetween off andreset.
When theoven is connected toWi-Fi, thedefault cooking timeduration is5 hours, butthis canbe modified by
the user.
Wi-Fi Enrolment:
To enrollthe appliance for Wi-Fi, press "Extra" on the displayuntil the Wi-Fi icon lights,then select "Reset" by
pressing "< >". The procedure on the app should then be followed. Once selected, the appliance gives you 5
minutesto complete theenrolment process.
Wi-Fi icon
- Icon notlit: Wi-Fi isoff.
- Icon blinks1 second onan 1second off:the oven isaccessible toyour Wi-Finetwork andready to beenrolled.
If the enrolmenthas notbeen successful,the Wi-Fiicon will switchoff after 5minutes.
- Icon ispermanently lit: theoven is connectedto yourWi-Fi router.
- The iconblinks 3 secondson and 1second off: theovenis tryingtoconnect toyour Wi-Firouter.
- The iconblinks 1 secondon and 3seconds off: theoven isin readonly mode.
CANDY SIMPLY-FI:
For detailed information about HOW TO CONNECT your simply-Fi appliance and
HOW TO USE it at its best, go to or visit the dedicatedhttp://www.candysimplyfi.com
simply-Fi Customer Service website http://simplyfiservice.candy-hoover.com
LANGUAGE SETTING The language can be set when
the oven is switched off by pressing the Extra and Select
buttonssimultaneously andfor 3".The current language is
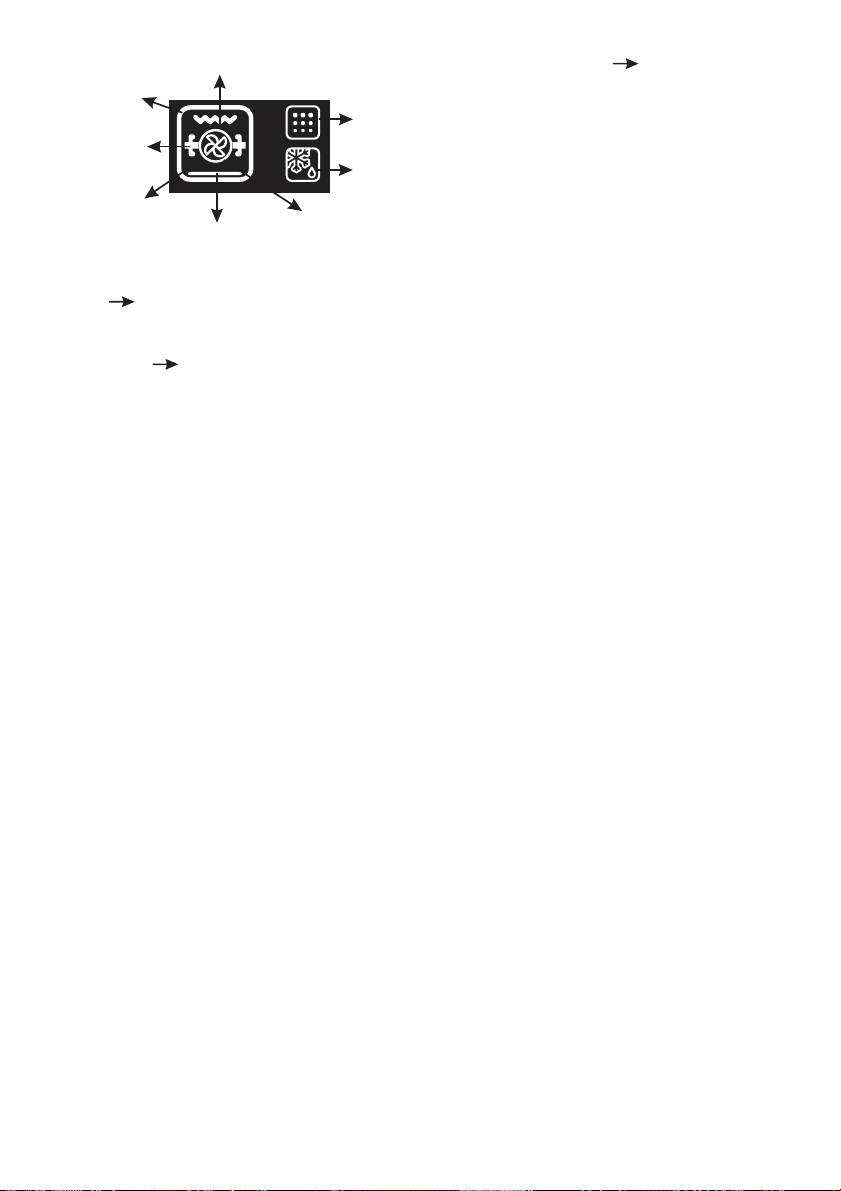
Pyro
shown on thedisplay and can be changed by pressing the
“<” or“>” keys, confirmingit by pressing SELECT. Available
languagesare: Italian,English, Frenchand German.
Defost
SELECT Any selection must be confirmed. If not
confirmed within 15 seconds, the selection is cancelled.
Oven box
Turnspit
Circular
heating element
Bottom heating element
Grill
Fan
Bychanging menu,any unconfirmed selectionis lost.
“HOT” ICON When a cooking programme finishes or when the oven switchesoff, if the oven is still
hot, the displayshowsthe currenttime alternatingwith the message“HOT” at3 intervals.
GB 10
Page 11
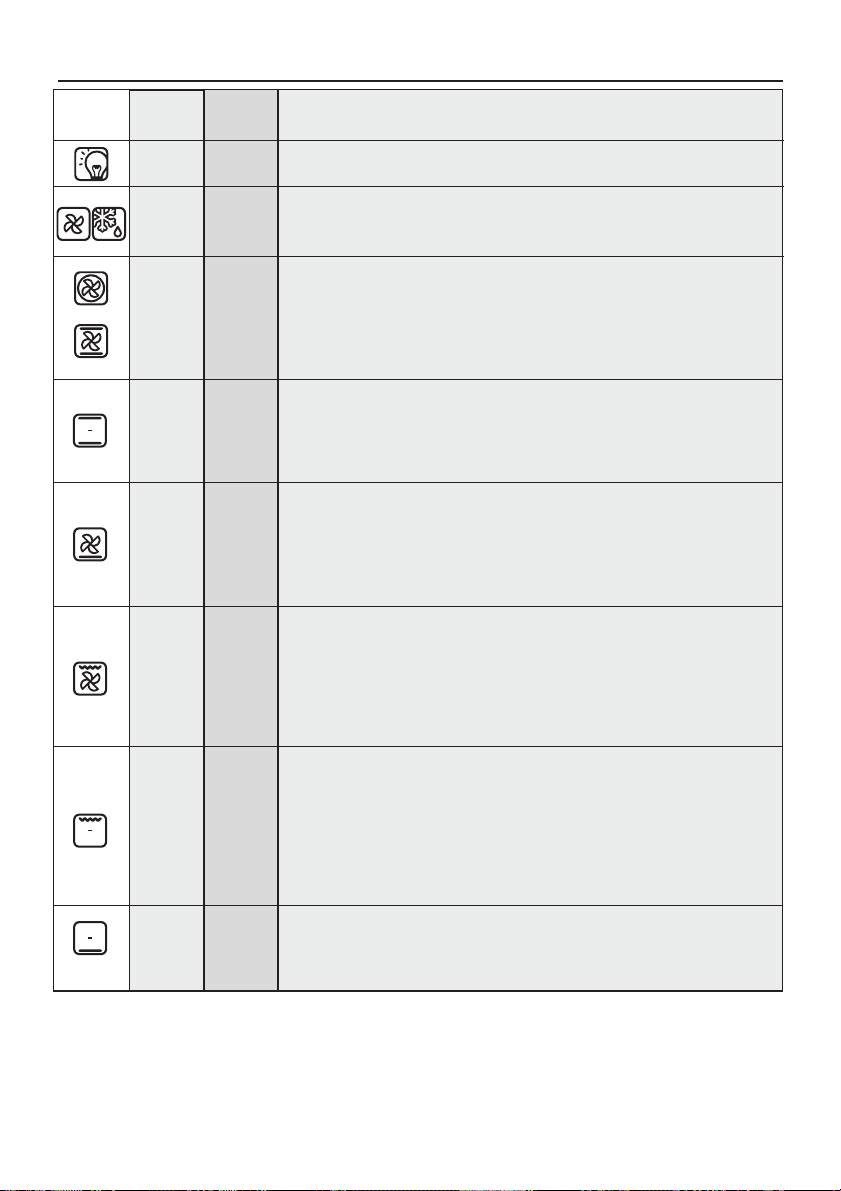
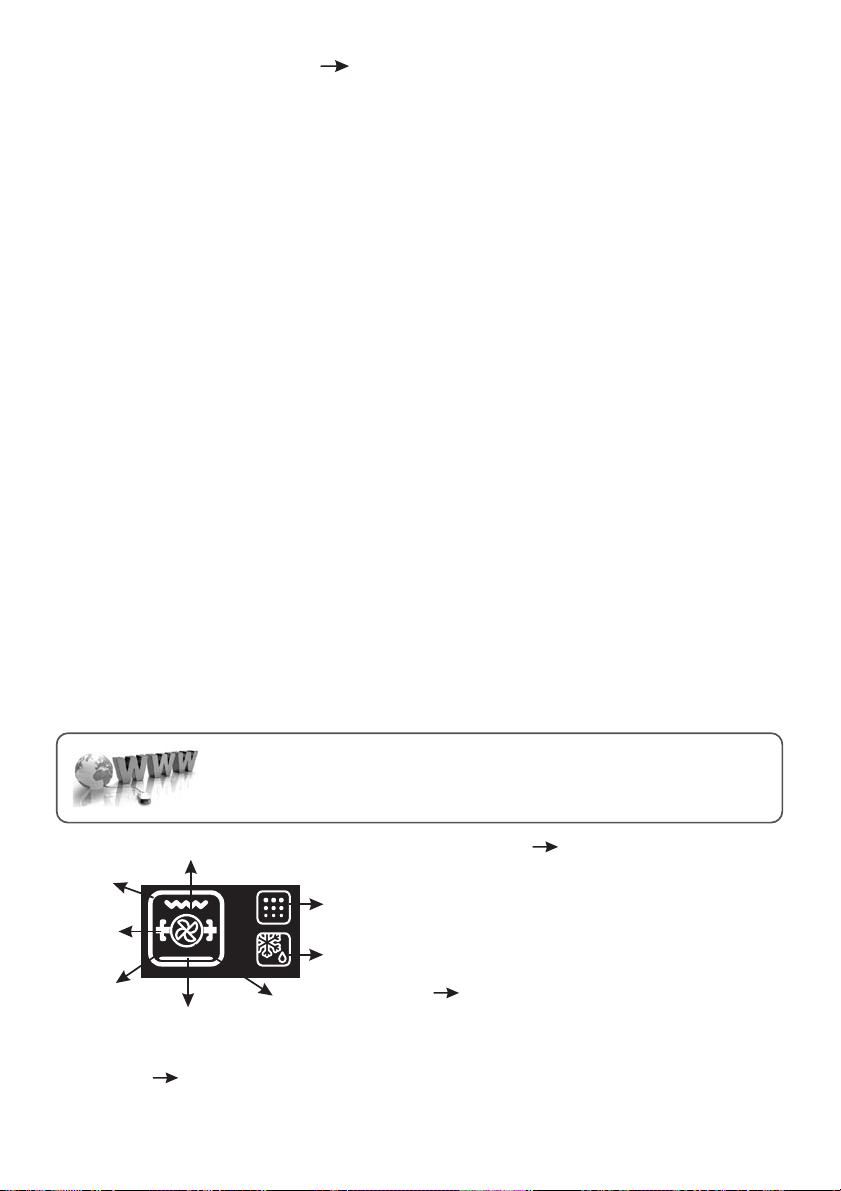
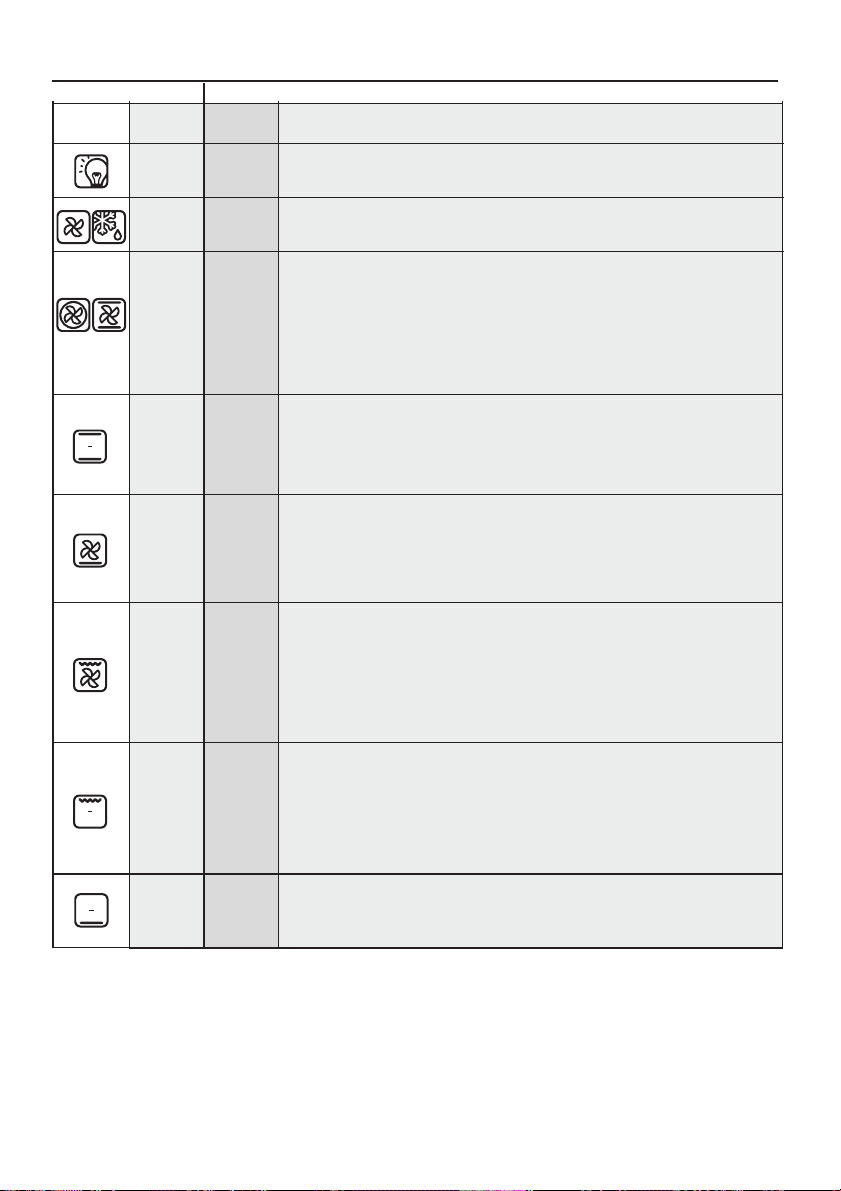
3.2 Cooking Modes
Function
Dial
T °C
default
40
T °C
range
40 ÷ 40
Function (Depends on the oven model)
LAMP: Turns on the oven light.
DEFROST: When the dial is set to this position. The fan circulates air at room
temperaturearound thefrozenfoodso thatit defrostsin afew minutes without
the protein content of thefoodbeing changedor altered.
180
50 ÷ 240
210
50 ÷ 240
*
220
210
50 ÷ 280
50 ÷ 230
*
200 150 ÷ 220
L1 ÷ L5
L3
210 50 ÷ 230
FAN COOKING: We recommendyou use this methodfor poultry, pastries, fish
and vegetables. Heatpenetrates into thefood better andboth the cooking and
preheating times are reduced. You can cook different foods at the same time
with or without the same preparation in one or more positions. This cooking
method gives evenheat distributionand the smellsare not mixed.
Allow about tenminutes extrawhen cookingfoods at thesame time.
CONVENTIONAL COOKING: Both top and bottom heating elements are used.
Preheat the oven for about ten minutes. This method is ideal for alltraditional
roastingand baking.For seizingred meats,roast beef,leg oflamb, game, bread,
foilwrapped food (papillotes),flaky pastry.Place thefoodand itsdish ona shelf
in mid position.
FAN + LOWER ELEMENT: The bottom heating element is used with the fan
circulatingthe airinside theoven. Thismethod isideal for juicyfruit flans,tarts,
quiches and pâté.
It prevents food from drying and encourages rising in cakes, bread dough and
other bottom-cookedfood.
Place the shelfin the bottomposition.
FANASSISTED GRILL: Usethe turbo-grillwith thedoor closed.
The topheating element is used with the fan circulating theair insidethe oven.
Preheatingis necessaryfor red meatsbut notfor whitemeats. Idealfor cooking
thick food items,whole pieces suchas roastpork, poultry, etc. Placethe foodto
be grilled directly on the shelf centrally, at the middle level. Slide the drip tray
under theshelf to collectthe juices. Make surethat the food is nottoo closeto
the grill. Turn the foodover halfwaythrough cooking.
GRILL: Use thegrill with thedoor closed.
The top heatingelement isused aloneand youcan adjust thetemperature. Five
minutes preheating is required to get the elements red-hot. Success is
guaranteed for grills, kebabs and gratin dishes. Whitemeats should be put at a
distance from the grill; the cooking time is longer, but the meat will be tastier.
Youcan putred meatsand fish fillets onthe shelfwith the drip trayunderneath.
The oven hastwo grillpositions:
Grill: 2140 W Barbecue: 3340W
BOTTOM: Using the lower element. Ideal for cooking all pastry based dishes.
Use this for flans, quiches, tarts, pate and any cooking that needs more heat
frombelow.
*Tested in accordance with the CENELEC EN 60350-1 used for definition of energy class.
GB 11
Page 12

4. Oven cleaning and maintenance
4.1 General notes on cleaning
The lifecycle ofthe appliancecan beextended throughregular cleaning.Waitfor the ovento cool before
carrying out manual cleaning operations.Never useabrasive detergents, steel woolor sharpobjects for
cleaning, so as to not irreparably damage the enamelled parts. Use only water, soap or bleach-based
detergents(ammonia).
GLASS PARTS
It is advisable to clean the glass window with absorbent kitchen towel after every use of the oven. To
remove more obstinatestains, you canuse a detergent-soaked sponge, well wrung out, and then rinse
with water.
OVENWINDOW SEAL
If dirty,the sealcan be cleanedwith aslightly damp sponge.
ACCESSORIES
Clean accessories with a wet, soapy sponge before rinsing and drying them: avoid using abrasive
detergents.
DRIP PAN
After using thegrill, removethe pan fromthe oven.Pourthe hotfat into acontainer and washthe panin
hot water,using asponge andwashing-up liquid.
If greasy residuesremain, immerse the pan in water anddetergent. Alternatively,you can wash the pan
in the dishwasheror use acommercial oven detergent. Never puta dirtypan backinto the oven.
4.2 Self-cleaning oven with catalytic
Special self-cleaning panels covered in a micro-porous coating are available as optional extras for all
models. If theyare fitted, theovenno longerneeds to becleaned by hand.
The fat that is splattered onto the sides of the oven during roasting is eliminated by the microporous
coatingwhich breaks thefat downby catalysisand transforms it intogas.
Excessive splattering may nevertheless block the pores and therefore hinder self-cleaning. The selfcleaning capacity may be restored by switching on the empty oven to maximum for about 10-20
minutes.
Do not use abrasive products, metal cleaning wads, sharp objects, rough cloths, or chemical products
and detergents that maypermanentlydamage thecatalyticlining.
It is a good idea to usedeep roastingtraysto roast fatty foods suchas jointsof meat etc.and to put a tray
underneath the grill to catch surplusfat.If the walls of the oven areso thickly coated in grease that the
catalytic lining is no longer effective remove surplus grease with a soft cloth or sponge soaked in hot
water.
The lining mustbe porous forself-cleaning tobe effective.
N.B.: All catalytic linings currently on the market have a working life of about 300 hours. They should
thereforebe replacedafter about 300hours.
GB 12
Page 13
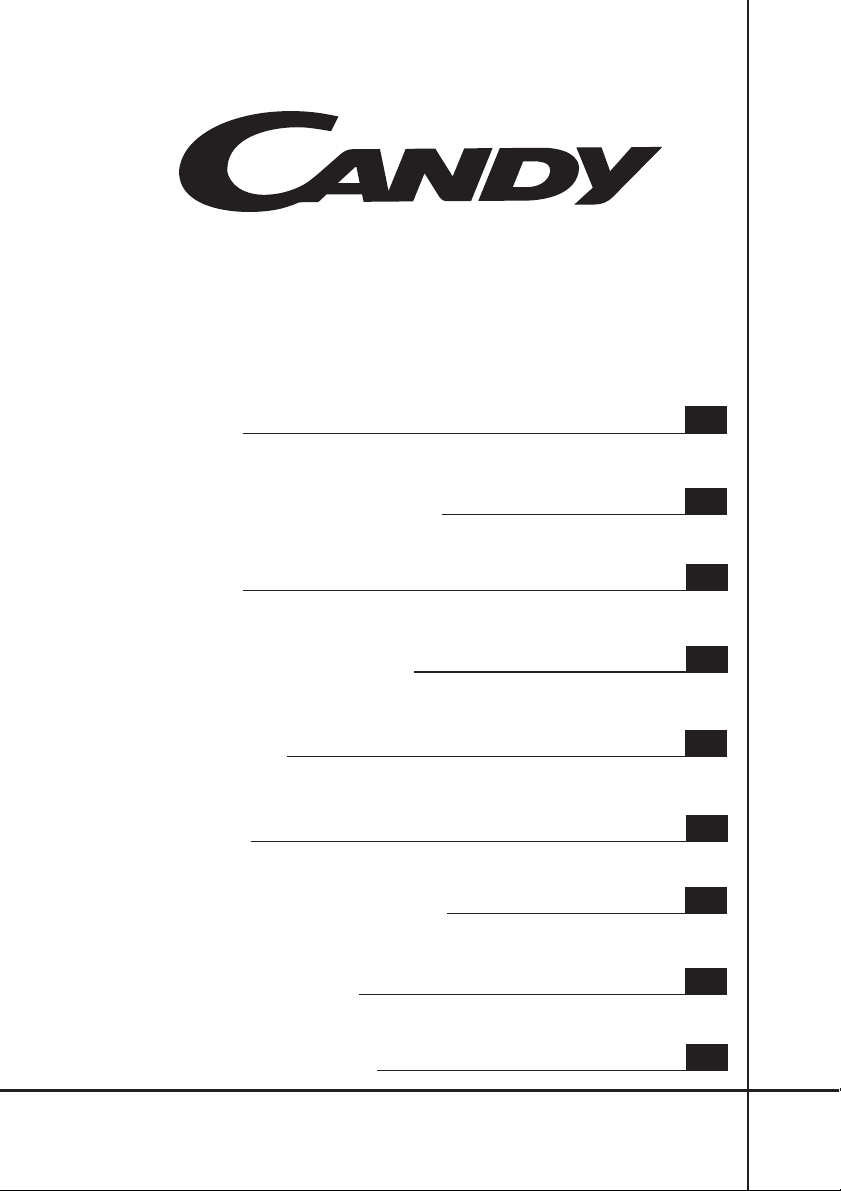
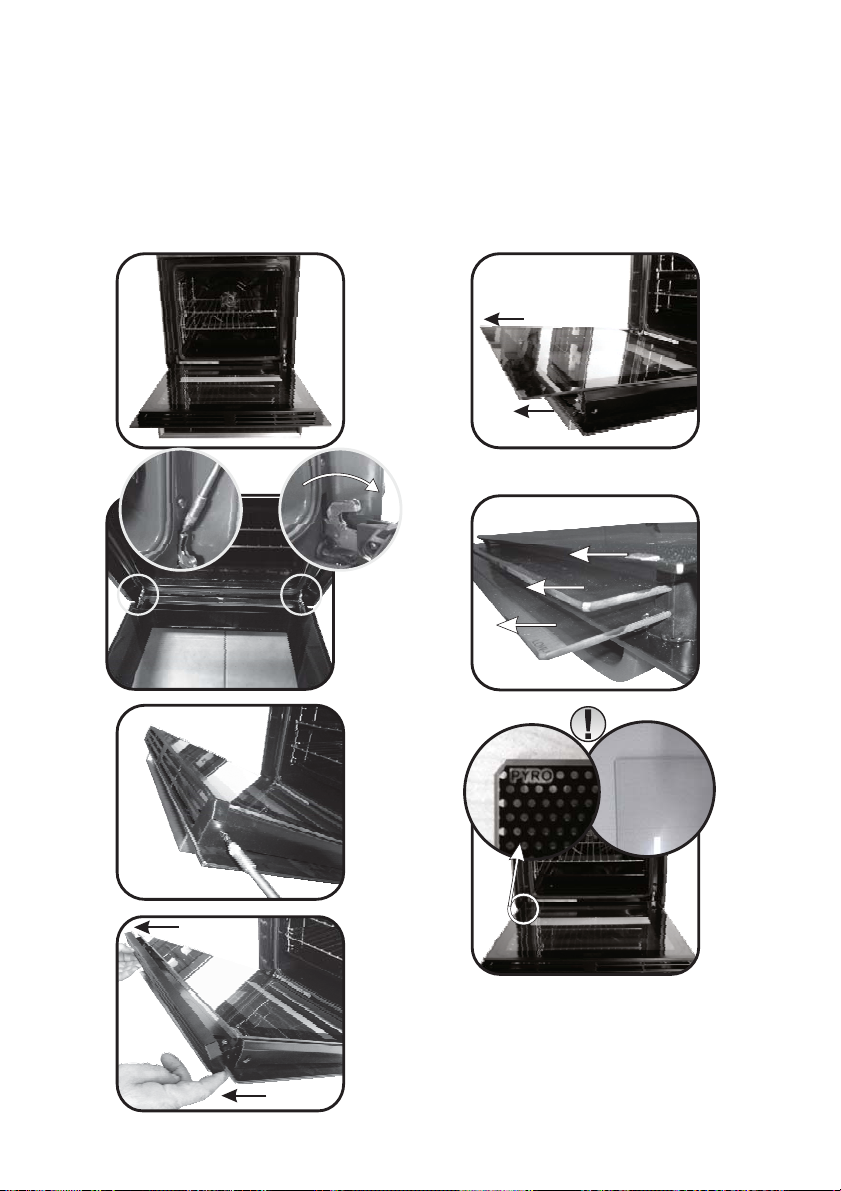
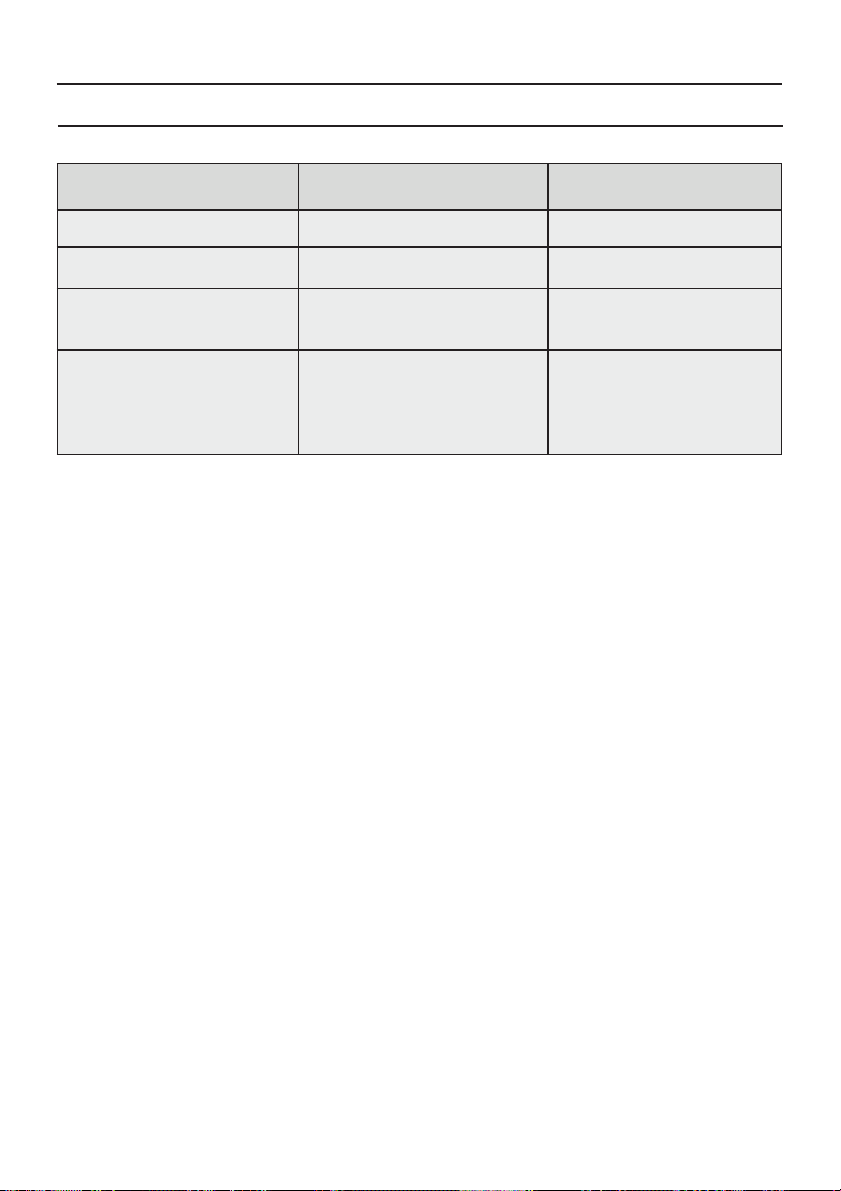
4.3 Maintenance
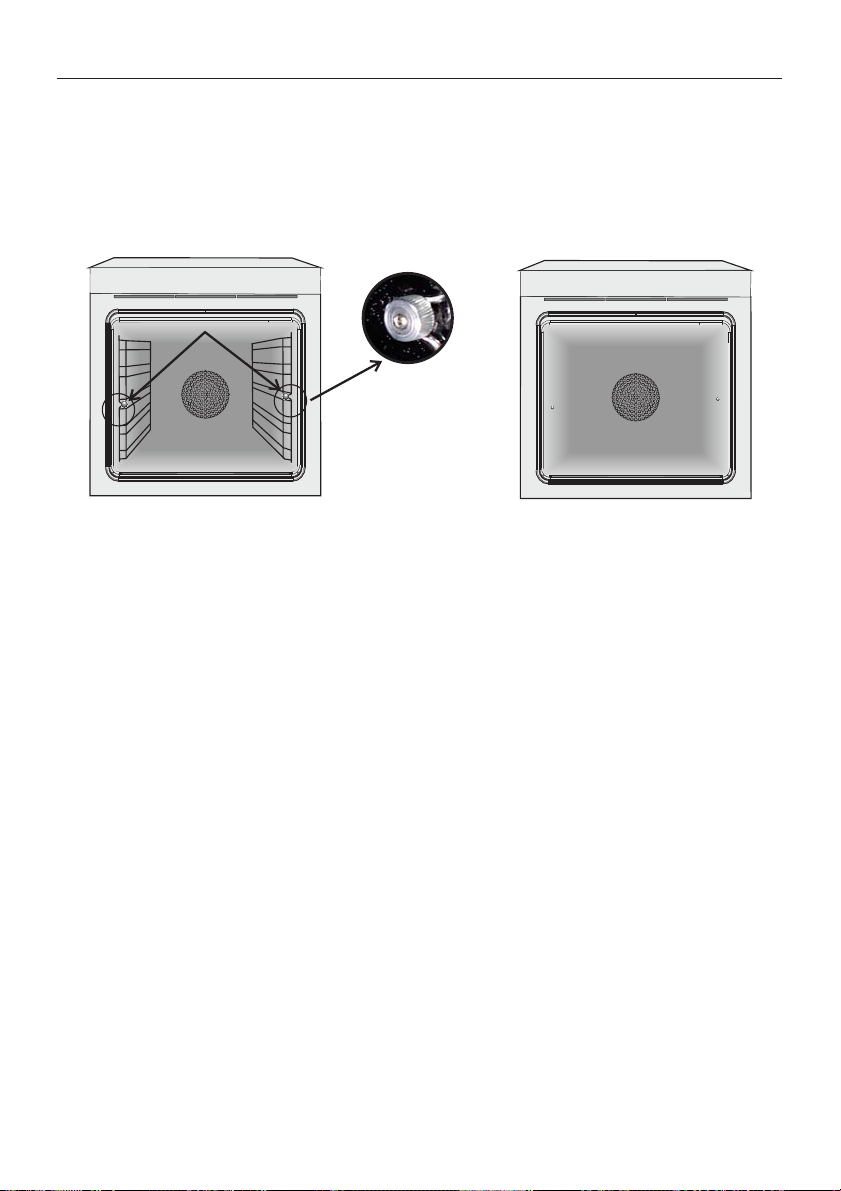
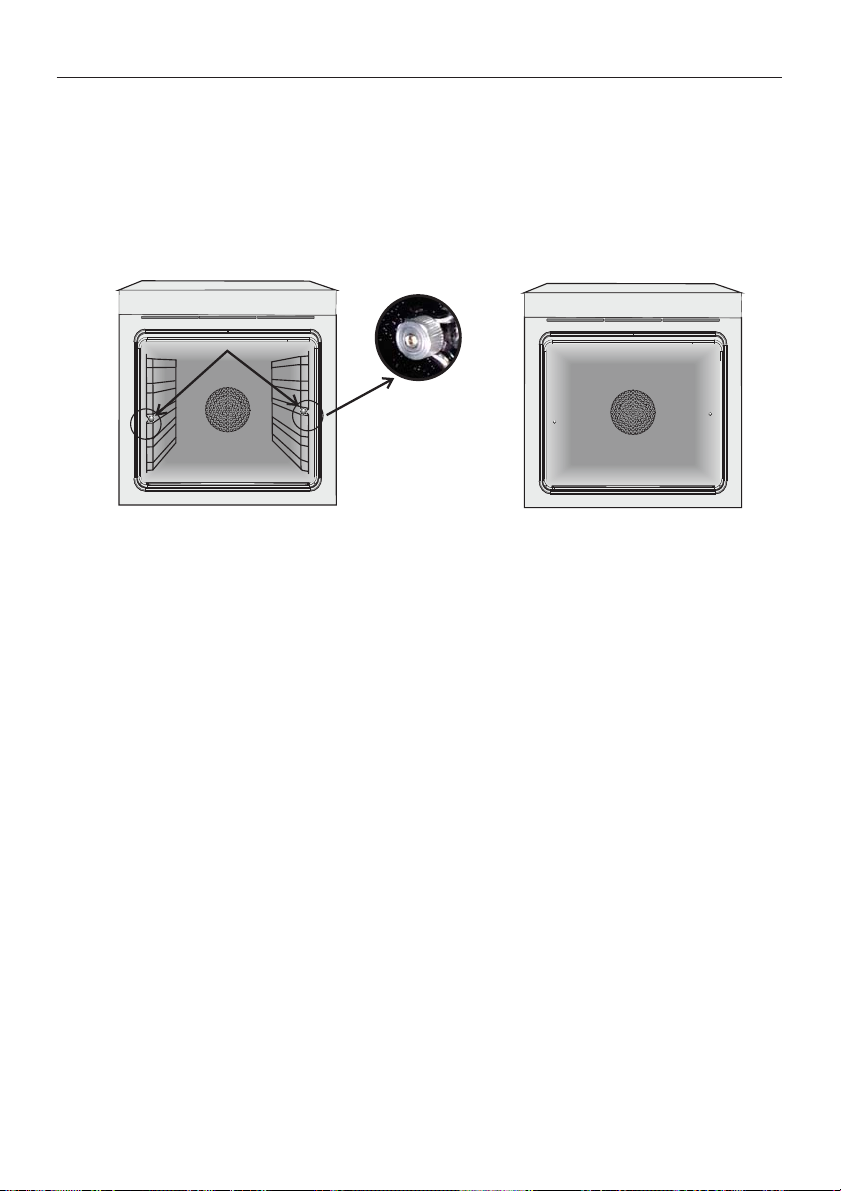
REMOVALAND CLEANINGOF THESIDE RACKS
1. Unscrew thebolt in ananti-clockwise direction.
2. Remove theside racksby pulling themtowardsyou.
3. Clean theside racks in adishwasher or witha wetsponge andthen drythem immediately.
4. Having cleaned the side racks, put them back in and reinsert the bolts, ensuring that they are fully
tightened.
A
REMOVALOF THEOVEN WINDOW
1. Open thefront window.
2. Openthe clamps of the hingehousing on the right andleft side of the front window by pushing them
downwards.
3. Replace thewindow by carryingout the procedurein reverse.
GB 13
Page 14
LOW-E
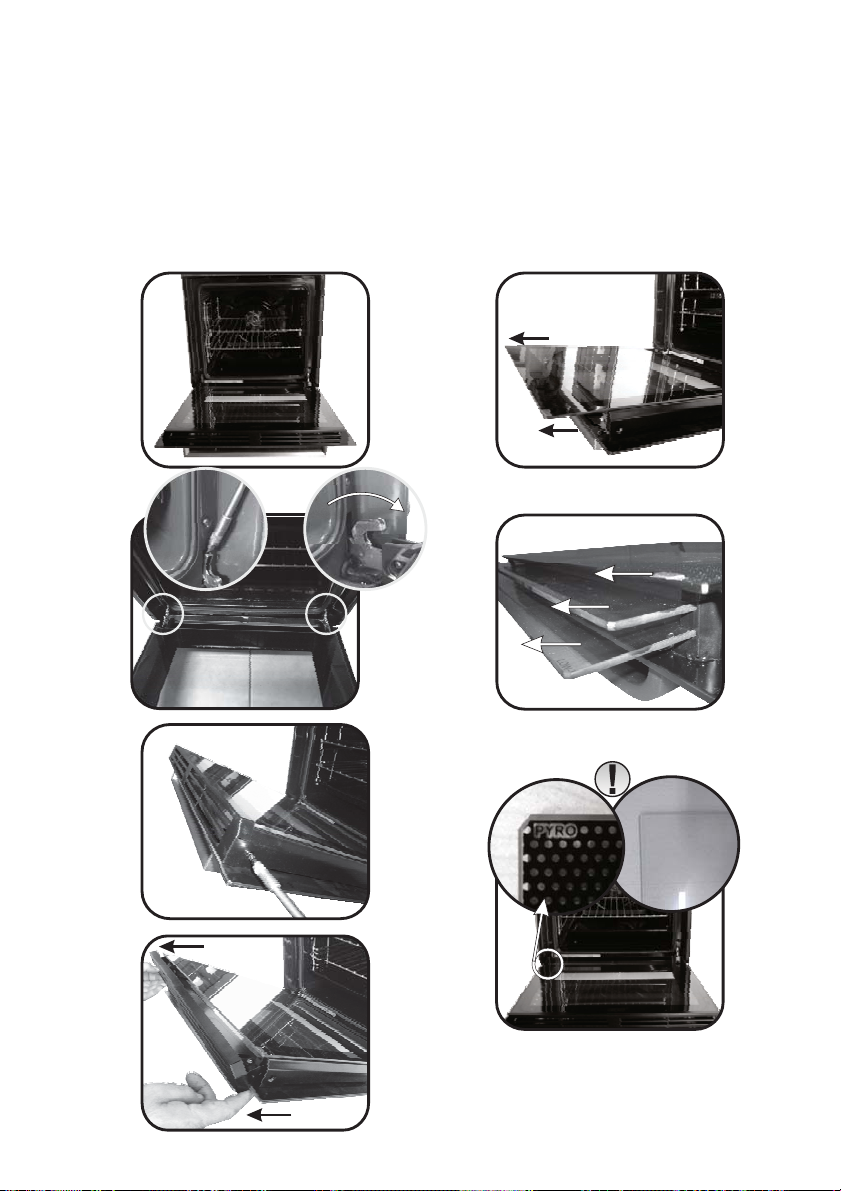
REMOVALAND CLEANINGOF THEGLASS DOOR
1. Open theoven door.
2.3.4. Lock thehinges, remove thescrews andremovethe uppermetalcover by pullingit upwards.
5.6. Remove theglass, carefully extracting itfrom the ovendoor (NB:in pyrolytic ovens, alsoremove the
secondand thirdglass (if present)).
7. At theend of cleaningor substitution, reassemble theparts inreverse order.
On all glass, the indication"Pyro" must belegible andpositioned onthe leftside ofthe door, closeto the
left-handlateralhinge. Inthis way, theprinted label ofthe first glass willbe insidethe door.
1.
2.
3.
5.
6.
1
2
3
7.
4.
GB 14
Page 15
5. Troubleshooting
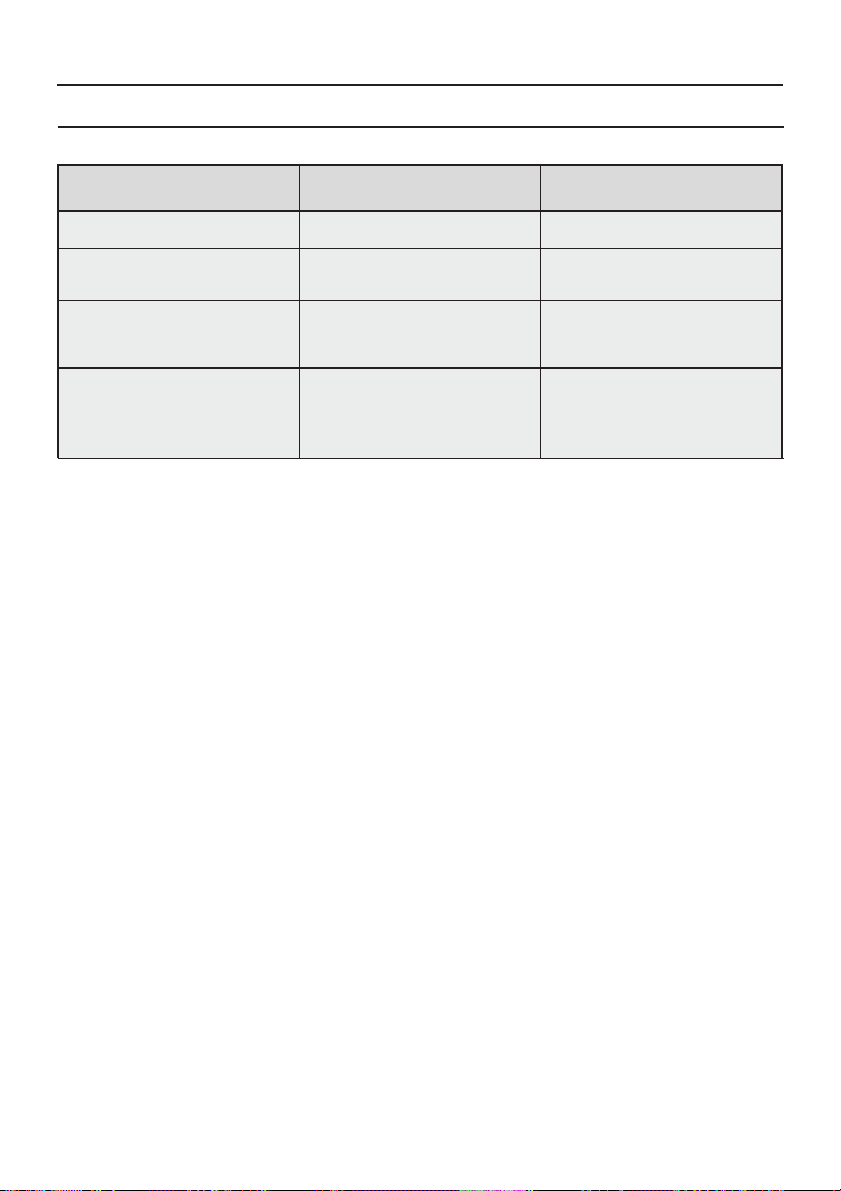
5.1 FAQ
PROBLEM POSSIBLE CAUSE SOLUTION
The oven does not heat up
The oven does not heat up
The oven does not heat up
No reaction of the touch
user interface
The clock is not set Set the clock
The child lock is on
A cooking function and
temperature has not been set
Steam and condensation on
the user interface panel
Deactivate the child lock
Ensure that the necessary
settings are correct
Clean with a microfiber
cloth the user interface
panel to remove the
condensation layer
GB 15
Page 16

Conseils De Securite
• ATTENTION: l'appareil et les parties accessibles deviennent chauds
pendantl'utilisation.Veillezànepastoucherles élements chauffants.
• MISE ENGARDE: les parties accessibles peuvent devenir chaudes lorsque
le gril est en cours d'utilisation. Les enfants doivent être maintenus à une
distance de sécurité.
• ATTENTION: le four doit éteint avant de changer l'ampoule, deêtre
manièreàévitertout risque de .choc électrique
•ATTENTION: pour éviter tout danger dû à une réinitialisation
accidentelle, cet appareil ne doit pas être alimenté par un dispositif de
commutation externe, comme une minuterie, ou connecté à un circuit
qui estrégulièrement allumé et éteintpar .l'utilisateur
• ATTENTION: avantd’activer la fonctiondenettoyageautomatique:
- Nettoyerla porte du four
- Enlever avec une éponge humide les résidus les plus gros. Nepas utiliser
de détergents;
- Sortir tous les accessoiresainsi que le kit éventuel deglissières coulissantes;
- Ne pasplacerdetorchons ou de maniquessurlapoignéedu four.
• Dans les fours avec sonde à viande, il est nécessaire, avant d'effectuer
le cycle de nettoyage de refermer l'embout avec l'écrou fourni.
Refermer toujours le trou avec l'écrou lorsque la sonde de viande n'est
pas utilise.
• Les enfants de moins de 8 ans doivent être tenus à l'écart à moins
d'êtresurveilléscontinuellement.
• Les enfants ne doivent pas joueravecl'appareil.Cet appareil n'est pas
destiné à être utilisé par des personnes (y compris les enfants) dont les
capacités physiques, sensorielles ou mentales sont réduites, ou ayant
un manque d'expérience et de connaissances, à moins qu'elles n'aient
été formées à l'utilisation de l'appareil, par une personne responsable
de leur sécurité.
• Lenettoyage et entretien ne doivent pasêtre effectués par des enfants
sans surveillance.
• Nepas utiliser de matériaux rêches, abrasifs, ou de racloirs métalliques
tranchants pour nettoyer les portes enverredu four car ils peuvent rayer
la surfaceentrainant des risques d'exposions.
FR 16
Page 17

•Le four doit être éteint avant le démontage des accessoires. Après
nettoyage, remonterlesaccessoires en suivantlesinstructions.
• Utilisezuniquementla sondethermique recommandée pour cefour.
• Ne pasutiliserunnettoyeuràvapeur.
• Brancher la fiche dans une prise de courant équipée d’un troisième
contact correspondant à la prise de terre. Monter sur le fil une prise
normalisée capable de supporter la charge indiquée sur laplaquette. Le
fil conducteur de masse à la terre est identifié par les couleurs jaune et
vert. Veillerà cequevotreinstallation soit capable de supporter toute la
puissance absorbée par le four. Si votre installation électrique n’est pas
conforme faites la modifier par un électricien afin de prévenir tous
risques. On peut également effectuer le branchement au réseau en
interposant entre l’appareil et le réseau un interrupteur omnipolaire
dimensionnée en fonction de la charge et conforme aux normes en
vigueur. Le fil de terre jaune et vert ne doit pas être interrompu par
l’interrupteur. La prise et l’interrupteur omnipolaire utilisés doivent
êtrefacilement accessibles une foisl’appareil électroménagerinstallé.
• Si le cordon d'alimentation est endommagé, il doit être remplacé par
un cordon spécial disponible auprès du fabricant ou des stations de
dépannageagrées.
Si le câble est endommagé, remplacez-le rapidement en conformité
aveclesindications suivantes:
- Ouvrir le couvercledela boîte à bornes;
- Retirer le câble d'alimentation et le remplacer par un câble similaire
adaptéeàl'appareil(type , H05V2V2-F).H05VV-F
• Cette opération doit être effectuée par du personnel qualifié. Le
conducteur de terre (jaune-vert) doit être environ 10 mmplus long que
les conducteurs de ligne. Pour toute réparation, reportez-vous
seulement à un centre de service technique agréé et demandez
l'utilisationdepiècesderechange d'origine.
• Le non respect de ce qui précède peut compromettre la sécurité de
l'appareil.
• Tout excédent de produitdéversé doit être enlevéavant de le nettoyer.
• Pendant la pyrolyse, les surfaces peuvent chauffer plus que d'habitude:
les enfantsdoiventdonc êtremaintenusà unedistance de sécurité.
FR 17
Page 18

SOMMAIRE
Instructions Générales
19
Description du produit
21
Utilisation du Four
22
Nettoyage du four et
maintenance
27
1.1 Indications de sécurité
1.2 Sécurité électrique
1.3 Recommandations
1.4 Installation
1.5 La gestion des déchets et la
protection de l'environnement
1.6 Déclaration de conformité
2.1 Vue d'ensemble
2.2 Accessoires
2.3 Première utilisation
3.1 Description de l'affichage
3.2 Mode de cuisson
4.1 Remarques générales concernant
le nettoyage
4.2 Four autonettoyant par catalyse
4.3 Entretien
• Retrait et nettoyage des gradins fils
• Retrait de la porte du four
• Retrait et nettoyage des vitres
Dépannage
30
5.1 F.A.Q.
FR 18
Page 19

1. Instructions générales
Nous vous remercions d'avoir choisiun denos produits.
Pourobtenir lesmeilleurs résultats avec votre four, vous
devezlire attentivementce manuelet leconserver pour
toute consultation ultérieure. Avant d'installer le four,
notez le numéro de série, il vous sera demandé par le
support technique si des réparations sont nécessaires.
Après avoir enlevé le four de son emballage, vérifiez
qu'il n'a pas été endommagé pendant le transport. Si
vous avez des doutes, ne pas utiliser lefour etse référer
à un technicien qualifié pour obtenir des conseils.
Conservez tous les matériaux d'emballage (sacs en
plastique, polystyrène, clous) hors de la portée des
enfants.Lors de la première utilisation du four, il peut se produire un dégagement de fumée âcre
provoqué par le premier échauffement de la colle des panneaux d’isolation enveloppant le four. Ce
phénomène estnormal. Attendezque la fuméecesse avantde cuire desaliments. Le fabricant décline
toute responsabilité dans les cas où les instructions contenues dans le présent document ne sont pas
respectées.
REMARQUE: Les fonctionsdu four, lespropriétés etles accessoires citésdans cemanuel peuvent varier
selon les modèles.
1.1 Indications de sécurité
Utilisez uniquement lefour àsa destination, quiest seulementpour lacuisson desaliments; toute autre
utilisation, par exemple comme une source de chaleur, est considérée comme inapproprié et donc
dangereuse.Le fabricantne peutêtre tenu responsablede toutdommage liéà unemauvaise utilisation
ou a desmodifications techniques duproduit.
L'utilisationde toutappareilélectrique impliquele respect decertaines règles fondamentales:
- Ne pastirer sur lefil électriquepour débrancher laprise.
- Ne pastoucher l'appareil avecles mainsou lespieds mouillés ouhumides;
- En générall'utilisationd'adaptateurs,de prisesmultiples et derallonges est déconseillé;
- En cas de dysfonctionnement et / ou de mauvais fonctionnement, éteindre l'appareil et ne pas y
toucher.
1.2 Sécurité électrique
LE BRANCHEMENT ELECTRIQUE DOIT ÊTRE REALISE PAR UN INSTALLATEUR AGREE OU UN
TECHNICIENDE E.QUALIFICATION SIMILAIR
L'alimentation électrique à laquelle le four est connecté doit être conforme aux lois en vigueur dans le
pays d'installation. Le fabricant décline toute responsabilité pour tout dommage causé par le non
respect deces instructions. Le four doit être raccordéà l'alimentation électrique avec uneprise murale
reliée à la terre ou par l'intermédiaire d'un dispositif à coupure omnipolaire, selon les lois en vigueur
dans le paysd'installation.L'alimentation électrique doitêtre protégée par desfusibles appropriéset les
câblesutilisés doiventavoir unesection transversale qui peutassurer une alimentationnormale dufour.
CONNEXION
Le four est livré avec un câble d’alimentation permettant le raccordement sous une tension électrique
de 230 V entre les phases ou entre phase et neutre. Le raccordement devra être effectué après avoir
vérifié:
- La tensiond'alimentationindiquée surle compteur;
- Le réglagedu disjoncteur.
Le fil de protection du cordon (vert/jaune) relié à la Borne Terre de l’appareil doit être relié à la Borne
Terre de l’installation.
FR 19
Page 20
ATTENTION
Faire vérifier la continuité de la terre de l’installation avant de procéder au raccordement. Le fabricant
décline toute responsabilitéen cas d'accidents ou d'autres problèmesqui pourraientsurvenir à l'usage
d'un appareil nonreliéà laterre,ou reliéà une terredontla continuité serait défectueuse.
REMARQUE: Le four peut nécessiter une opération de S.A.V. Aussi,placez laprise decourant defaçon à
pouvoir brancher le four une fois sorti de sa niche. Câble d'alimentation: si le changement du câble
d'alimentations'avère nécessaire,nous vousdemandons defaire réaliser cetteopération par le service
après-venteou une personnede qualification similaire.
1.3 Recommandations
Après chaque utilisation du four, réaliser un petit entretien qui favorisera le nettoyage parfait du four.
Ne pas tapisser les parois du four avec des feuilles en aluminium ou des protections jetables du
commerce. La feuille d'aluminium ou toute autre protection, en contact direct avec l'émail chauffé,
risque de fondre et de détériorer l'émail du moufle. Avant installation de l'appareil, il faut relever le
numérode sérieet le noterci-dessous encas d'éventuelledemande d'intervention.
Afin d'éviter les salissures excessives de votre four ainsi que les fortes odeurs de fumée pouvant en
résulter, nousrecommandons de nepas utiliserle four àtropforte température. Il estpréférablede
rallonger le temps de cuisson et de baisser la température. Nous vous conseillons de n'utiliser que des
plats,des moulesà pâtisserie résistants à detrès hautes températures.
1.4 Installation
La mise en service de l’appareil est à la charge de l’acheteur, le constructeur est dégagé de ce service.
Les pannes liées à une mauvaise installation ne seront pas couvertes par la garantie. Une mauvaise
installation peut provoquer des dommages aux personnes, aux animaux domestiques; dans ce cas la
responsabilité du constructeur ne peut être engagée. L'installation du four doit être réalisée par un
installateur agréé ou un technicien de qualification similaire. Le four peut être placé en hauteur dans
une colonne ou enchâssé sous un plan de travail. Avant sa fixation: il est indispensable d'assurer une
bonne aération dans la niche d'encastrement afin de permettre la bonne circulation de l'air frais
nécessaire au refroidissement et à la protection des organes intérieurs. Pour cela, réaliser les
ouverturesspécifiées selonle type d'encastrement (dernière page).
1.5 La gestion des déchets et la protection de l'environnement
Le présent appareil est marqué conformément à la directive 2012/19/UE relative aux
déchets d'équipements électriqueset électroniques
(DEEE). Les DEEE contiennent à la fois des substances polluantes (qui peuvent avoir des
conséquences négatives sur l'environnement) etdes élémentsde base (réutilisables). Il est
important de soumettre les DEEE à des traitements spécifiques, en vue d'extraire et
d'éliminer de façon appropriée toutes les substances polluantes, puis de récupérer et
recyclertous lesmatériaux.
Chacun peut jouer un rôle important quant à la protection de l'environnement contre les DEEE. Pour
atteindrecet objectif, il estimpératifde suivrequelques règlesélémentaires:
• Les DEEEne doivent pas êtretraités comme desdéchets ménagers.
• Ils doivent être remis aux points de collecte appropriés gérés par la municipalité ou par des sociétés
immatriculées.Dans plusieurspays, ilestpossible decollecter à domicileles DEEEvolumineux.
• Lorsque vous achetez un nouvel appareil, vous devez retourner l'ancien au vendeur qui le récupère
gratuitement, au cas par cas, à condition que l'équipement soit de type équivalent et possède les
mêmes fonctions quecelui fourni.
FR 20
Page 21
ÉCONOMIE ET RESPECT DE L'ENVIRONNEMENT
Lorsque cela est possible, éviter le préchauffage du four et éviter de le faire tourner à vide. N'ouvrezla
porte du fourque lorsque celaest nécessaire, car ily a desdéperditions dechaleur àchaque fois qu'il est
ouvert. Pour une économie d'énergie significative, éteindre le four entre 5 et10 minutes avant la fin de
cuisson prévue, et utiliser la chaleur quele fourcontinue degénérer. Gardezles jointspropres et en bon
état, pour éviter toute déperdition d'énergie. Si vous avez un contrat électrique avec un tarif heure
creuse, le programme"cuisson différée" peut vousfaire réaliser des économies d'énergie en déplaçant
le début duprogrammeà unintervallede tempsà tarifréduit.
1.6 Declaration De Conformité
Les parties de cet appareil pouvant être en contact avecdes substances alimentaires sontconformes à
la prescription dela Dir.CEE 89/109.
En utilisant lesymbol sur ce produit,nous déclaronssur notrepropreresponsabilité quece produit
estconforme à toutesles normes Européennesrelativesà lasécurité, la santéet à l’environnement.
2. Description du produit
2.1. Vue d'ensemble
1
3
5
4
6
2
2.2. Accessories (Par modele)
Grille métalique
1
La grille métalique sert de support aux plats.
1. Panneau de commande
2. Positions des gradins
(gradins fils si inclus)
3. Grille métalique
4. Léchefrite
5. Ventilateur
(derrière la plaque d'acier)
6. Porte du four
2
Léchefrite
Recueille les résidus suintent au cours de la
cuisson des alimentssur les grilles.
FR 21
Page 22
Led vision
3
Ce système d'éclairage remplace les « ampoules »
traditionnelles. 14 LED (pour les versions nonpyrolyse) ou 10 LED haute puissance (pour les
versions pyrolyse) sont dans la contreintégrées
porte du four. Celles-ci illuminent la cavité avec
une lumière diffuse permettant une vision de la
cuisson sans ombres,sur plusieurs niveaux.
Les avantages :
-Visibilitéoptimales desplats
-Duréede vieprolongée
-Consommation énergétique extrêmement basse
'' -95'' par rapport au système traditionnel
d'éclairage du four « les appareils dotés de LED
blanches de classe 1M selon la norme IEC 60825
1:1993 + A1:1997 + A2: 2001 (équivalent a la
norme EN 60825-1 :1994 + A1:2002+A2:2001 ) la
puissance maximale lumineuse émise est 459nm
< 150uW.Donnée nonobservée directement avec
des instruments optiques».
2.3 Première Utilisation
UN PREMIER NETTOYAGE doit être réalisé avant la première utilisation passer un chiffon doux et
humide sur les surfaces extérieures de l'appareil. Nettoyer avec une éponge additionnée de produit
lessiviel, les accessoires et l'intérieur du four. Rincer et sécher. Faire chauffer le four à vide une bonne
heure à la température maximalepour faire disparaître l'odeur duneuf. Pendant cette opération, bien
aérerla pièce.
3. Utilisation du Four
3.1 Description de l'affichage
ON / OFF
EXTRA
Le four s'allume et s'éteint avec ce bouton.
DUREE DE
CUISSON
REGLAGE
DE L'HEURE
FIN DE
CUISSSON
SECURITE
ENFANT
MINUTEUR
WiFi
Si le four s'éteint, l'écran affiche l'heure. Quand le
four est inactif,toutes les fonctions s'affichent sur
l'écran à l'exception de la fonction de durée de
cuisson et de fin de cuisson. Si l'heure n'est pas
réglée, le four ne fonctionne pas et l'heure 12:00
se met à clignoter sur l'écran. A cet instant, la
seule fonction qui marche est la fonction EXTRA.
Le symboleEXTRA, permet le réglage deplusieurs
fonctions(Voirle tableauà la pagesuivante).
FR 22
Page 23
FONCTION
DUREE DE
CUISSON
FIN DE
CUISSON
MINUTEUR
REGLAGE
DE L'HEURE
SECURITE
ENFANT
COMMENT L'UTILISER
NB : ce dispositif est
fonctionnel une fois que le
programme de cuisson est
activé.
Appuyez deux fois de suite
sur le bouton EXTRA et
déterminez le temps de
cuisson en vous aidant des
touches "+" et "-". Une fois
que le temps souhaité est
atteint, appuyez sur la
touche SELECT. L'écran
affiche"00:00" sila durée
de cuissonn'a pasété
insérée.Dans lecas
échéant,l'écran affiche le
tempsrestant.
NB : ce dispositif est
fonctionnelune fois quele
programmede cuisson est
activé.
Appuyez sur le bouton E X
TRAsuffisamment
longtemps pour que l'icone
s'allume. Determinez la fin
du temps de cuisson en
utilisantles boutons"<" et
">"etconfirmezla
sélection enappuyant surle
bouton "SELECT". La durée
de cuison est a ut om
a ti qu e me nt calculée.
Si aucun temps n'a été
inséré ousi letemps restant
de cuisson est écoulé
l'écranaffiche 00:00
Quand on met en marche
cette fonction pour la
première fois, l'écran
s'allume etindique 12:00.
Pour modifier l'heure
appuyersurEXTRA
suffisamment longtemps
jusqu’à ce que le voyant
s'allume puis tiliser les
touches"<" et">".
Appuyez sur le bouton
EXTRAsuffisamment
longtemps pour que le
voyant s'allume. Puis
appuyer sur la touche "<"
ou ">" pour activer cette
fonction. L'écran affichera
"ON", pour confirmer la
sélection il suffit d'appuyer
sur lebouton "SELECT".
COMMENT LE
DESACTIVER
Pour modifier le temps de
cuisson, appuyez deux fois
sur le bouton EXTRA et
choissisez le nouveau
temps de cuisson en vous
aidant des touches "<" et
">", appuyez sur le bouton
"SELECT"pour confirmerle
nouveautemps choisi.
Pour annuler le temps de
cuisson restant, il suffit de
réinitialiserl'écran à00:00
Pour modifier le temps de
fin de cuisson, appuyez
suffisamment longtemps
sur le bouton EXTRA,
jusqu'a ce que levoyant s '
allume.Ensuite,
choisissez le nouveau
temps de cuisson restant
en vous aidant des
touches "<" et ">",
appuyez sur le bouton
"SELECT" pour confirmer
le nouveau tempschoisi.
Pour annuler la finde cui s
son,ilsuffitde
réinitialiserl'écran à00:00
Pour modifier le minuteur,
appuyer sur la touche
EXTRA assez longtemps
jusqu’àce qu'elles'allume.
Une fois allumée, vous
pouvez régler la durée de
cuisson en appuyant surles
boutons "<" et ">".Une fois
le temps recherché obtenu,
appuyer sur "SELECT" pour
confirmer votre sélection.
Appuyez sur le bouton
EXTRAsuffisamment
longtemps pour que le
voyant s'allume. Puis
appuyer sur la touche "<"
ou ">" pour désactiver
cette fonction. L'écran
affichera "OFF", pour
confirmer votre sélection
il suffit d'appuyer sur le
bouton"SELECT".
FR 23
FONCTION PRINCIPALE
Quand le programmme de
cuisson prend fin, le four
s'éteint et l'écran affiche
"END"(l'iconedu
programme de cuisson res
teallumée).Pour
l'éteindreil faut appuyersur
le bouton On/Off. Une
alarme retentit pour vous
prévenir que le programme
de cuissonest terminé.
Quand le programmme de
cuisson prend fin, le four
s'éteint etl'écran affiche "
END"(l'iconedu
programme de cuisson
reste al lumée). Pour
l'éteindre ilfaut appuyer sur
le boutonOn/Off.
Une alarme retentit pour
vous prévenir que le
programme de cuisson est
terminé.
Cettefonction sertà activer
une alarme qui se
déclenchera unefois quele
temps de cuisson prendra
fin. Attention : cette
fonction n'éteint pas le
four. Vous pouvez choisir
une période de temps qui
variede 00:00à 23:53
Cette fonction permet de
sélectionner le temps qui
apparaîtrasur votreécran.
Si la fonction est activée,
seul la touche EXTRA et
On/Off peut alors être
utilisé.
POURQUOI QUELS
BESOINS ?
Lors que le temps de cuisson
est écoulé, le four s'éteint
automatiquement et une
alarme se déclenche et dure
quelques secondes.
Cette fonction peut aussi être
utilisée pour les cuissons qui
peuvent être programmées en
avance.
Si unprogramme decuisson est
sélectionné, n'appuyez pas sur
le bouton "F", sinon vos
données seront perdues.
Si le départ différé est
programmé, le four s'éteint et
l'écran affiche l'heure pendant
que les fonctions de cuisson,
temps de cuisson et fin de
cuisson sont allumés.
Si unprogramme decuisson est
sélectionné en cliquant sur les
touches "<" et ">", vous
pourrez voir la température en
appuyant une première fois, et
la modifier en appuyant de
nouveau.
Le minuteur s'enchlenche
même si le four n'est pas
allumé.
L'alarme s'enchlenchemême si
le four n'estpas allumé.
Cettefonction estutile lorsque
les enfants sontà la maison.
Page 24
WiFi (selon du four)modèle
La touche"EXTRA" quise trouvesur l'écran d'affichage permet de
sélectionner le menu WIFI. Sivous appuyersur les boutons"<>"vous pouvez sélectionner lesfonctions
suivantes:
- Off (Wi-fi nonconnecté ):Le four ne peutpas être contrôlépar l'application
- On ( Wi-fi connecté):le WIFIest activé etuniquement l'applicationcontrôlele four,ce qui signifie qu'il
est impossible de sélectionnerles fonctions : cuisson, recetteet température sur l'écran d'affichage.
Le menuWIFI s'affiche uniquement lorsquevous appuyez surla touche"EXTRA". Vous pouvez éteindre
le four en utilisant les boutons Marche/Arrêt mais vous ne pouvez pas le rallumer à partir de l'écran
d'affichage.Vousne pouvezallumer lefour qu'à partirde l'application.
- Reset (Réinitialisation): Cette fonction doit être utilisée lors de la première connection du four au
réseau WI-FI ou lorsqu'il faut réinitialiser le réseau WIFI si l'on veut que le four se connecte
automatiquement à un autre réseau. Une fois le réseau WIFI choisi, vous avez 5 minutes pour
compléter le processus d'enregistrement. Lors de ce processus, les fonctions: cuisson,recette et
températurene sontpas accessibles àpartir del'écran d'affichage. Seulle menuWIFI estdisponible, si
l'on appuiesur la touche"EXTRA". Vous pouvez éteindre le four enutilisant les boutons Marche/Arrêt
mais vousne pouvezpas le rallumer à partirde l'écrand'affichage. Vous nepouvez allumer le four qu'à
partir de l'application. Pour sortir du processus d'inscription ou réinitialiser la procédure à travers
l'écran d'affichage, il fautappuyer sur le bouton "EXTRA" et utiliser les boutons "<>"pour sélectionner
la fonction "Off". Après 5 minutes, le dispositif quitte la procédure d'inscription/la procédure de
réinitalisatonautomatiquement.
- Read (Lecture): Le four envoi ses statuts à l'application mais il ne peut etre contrôlé à distance. La
procédured'inscription doit êtrefaiteen amont.
Si le réseau WIFI n'est pas configuré, seules les fonctions Off et Réinitialisation peuvent être utilisées.
Quand lefour est connecté au réseau WIFI, le temps de cuisson par défaut estde 5heures, maisil peut
êtremodifié parl'utilisateur.
Inscription au réseauWI-FI :
Pour s'inscrire au réseau WI-FI, il faut appuyer sur la touche "EXTRA" présente sur l'écran d'affichage
jusqu'à ce que l'icone WI-FI s'allume,il faut ensuite sélectionner la touche "RESET" en s'aidant des
touches "<>". Sur l'application, la procédure se met jour. Une fois sélectionné, vous avez 5 minutes
pour compléter leprocessusd'inscription depuisl'application.
L'icône de laWI-FI
- L'icône n'estpas illuminée :Le WI-FIest désactivé
- L'icône s'allume pendant 1 seconde et s'éteint la seconde qui suit : Le four détecte un accés à votre
réseauWI-FI etest prêt às'enregistrer. Sil'enregristrementéchoue, l'icône s'éteindra après 5minutes.
-L'icôneest enpermenance illuminée :Le four est connectéà votre routeur WI-FI.
-L'icône s'illumine pendant3 secondes ets'éteint pendantune seconde :le fourtente de seconnecter à
votrerouteurWI-FI.
-L'icônes'illumine pendantune seconde ets'éteint pendant 3secondes : Lefour est enmode lecture.
CANDY SIMPLY-FI:
Pour obtenir des informations détaillées sur la manière de CONNECTER vos appareils et
de les UTILISER au mieux, rendez-vous sur ou visitez lehttp://www.candysimplyfi.com
site support dédié aux consommateurs http://simplyfiservice.candy-hoover.com
FR 24
Page 25
CHOIX DE LA LANGUE Une foisque le four
est éteint, il est possible de définir la langue de
votre choix. Il faut appuyer de manière
simultanée sur le bouton EXTRA, SELECT
pendant 3 secondes. La langue actuelle s'affiche
sur l'écran, et il est possible de la changer en
appuyant sur les touches "<" et ">". Une fois que
la nouvelle langue est choisie, il suffit d'appuyer
sur la touche SELECT pour valider son choix. Les
langues disponibles sont : Italien, Anglais,
Cavité
Tournebroche
Résistance
circulaire
Grill
Sole
Pyro
Décongélation
Ventilateur
Francais,et Allemand.
SELECT Toutes leschoix doiventêtre validés. Sivous ne validezpas votre sélection dansles 15secondes, la
sélection s'annule. Sivous changez demenu, toutes lessélections nonvalidées seront perdues.
ICONE "HOT" Si lefour estencore chaudà la find'une cuisson ou lorsquele fourest éteint, l'écranindique
l'heureet alterneavec unmessage stipulant "CHAUD" àintervales de3 sec.
FR 25
Page 26
3.2 Mode de cuisson
Bouton de
sélection
*
*
T °C
par défaut
40
50 ÷ 240
180
50 ÷ 240
210
220 50 ÷ 280
50 ÷ 230
210
150 ÷ 220
200
L3
210 50 ÷ 230
T °C
range
40 ÷ 40
L1 ÷ L5
Fonction (selon modèle)
L'ampoule: Allumage de l’éclairage du four
Décongélation: fonctionnement de la turbine de cuisson qui brasse l'air dans
l'enceintedu four. Idéalepour réaliserune décongélation avant unecuisson.
Chaleur brassée: fonction recommandée pour les volailles, les pâtisseries, les
poissons, les légumes... La chaleur pénètre mieux à l'intérieur du mets à cuire
et réduitle tempsde cuisson, ainsique le temps de préchauffage. Vous pouvez
réaliser des cuissons combinées avecpréparationsidentiques ounon surun ou
deux gradins. Cemode decuisson assureen effet unerépartitionhomogène de
la chaleur etne mélange pasles odeurs.
Prévoirune dizaine deminutes deplus, pour lacuisson combinée.
Convection naturelle: utilisation simultanée de la résistance de sole et de
voûte. Préchauffer le four une dizaine de minutes. Idéale pour toutes les
cuissons à l'ancienne,pour saisir les viandesrouges, les rosbifs, gigots, gibiers,
le pain, les papillotes, les feuilletages. Placer le mets à cuire à un niveau de
gradinmoyen.
Sole brassée: idéale pour les tartes à fruits juteux, les tourtes, les quiches, les
pâtés. Elle évite le dessèchement des aliments et favorise la levée pour les
cuissons de cakes, pâte à pain et autrescuissons par le dessous.Placer la grille
sur le gradin inférieur. Avec ce mode de cuisson, un préchauffage est
nécessaire en Chaleur Brassée pendant une dizaine de minutes.
Turbo-Gril: l'utilisation de la position turbo-gril se fait porte fermée. Un
préchauffageest nécessaire pour les viandesrouges etinutile pour lesviandes
blanches. Idéal pour les cuissons de volume épais, des pièces entières telles
que rôti deporc, volaillesetc... Placerle metsà cuiredirectement sur lagrille au
centre du four, à un niveau moyen. Glisser le récolte-sauce sous la grille de
façon à récupérer les graisses. S'assurer que le mets ne soit pas trop près du
grilloir. Retourner lapièce àcuire àmi-cuisson.
Gril: l'utilisation du grilloir se fait porte fermée. Un préchauffage de 5 mins est
nécessaire pour le rougissement de la résistance. Succès assuré pour les
grillades, lesbrochettes etles gratins.Les viandesblanches doivent être écartées
du grilloir ; le temps de cuisson sera alors plus long, mais la viande sera plus
savoureuse. Les viandes rouges et filets de poissons peuvent être placés sur
la grille avecle platrécoltesauce glissédessous.
Le four adeux positionsde gril: Gril:2140 W Barbecue: 3340W
Sole: Utilisation de la résistance de sole. Idéale pour la cuisson de tartes, de
crème caramel, flans, terrine, toutes préparations qui nécessitent une cuisson
par le dessous(cocottes: poulet, boeuf)
* Programme testé selon le CENELEC, norme européenne EN 60350-1 qui définit la classe énergétique.
FR 26
Page 27

4. Nettoyage du four et maintenance
4.1 Remarques générales sur le nettoyage
Le cyclede viede l'appareilpeut être étendu grâce à un nettoyage régulier.Attendez le refroidissement
du four avant de procéder à des opérations de nettoyage manuel. Ne jamais utiliser de détergents
abrasifs, de laine d'acier ou d'objets pointus pour le nettoyage, l'émail serait irrémédiablementabîmé.
Utilisezuniquement del'eau, du savonou desdétergents à based'eau deJavel(ammoniac).
PARTIE VITREE
Il est conseillé de nettoyer la vitre avec du papier absorbant après chaque utilisation du four. Pour
enlever les taches plus tenaces, vous pouvez utiliser une éponge imbibée de détergent, puis rincer à
l'eau.
JOINT DE LAPORTE
Si il estsale, le jointpeut être nettoyéavec uneéponge légèrementhumide.
ACCESSOIRES
Nettoyer les accessoires avec une éponge et de l'eau savonneuse puis rincer. Eviter d'utiliser des
détergentsabrasifs.
LECHEFRITE
Après l'utilisation de la grille, retirez le du four. Prendre soin de reverser les graisses (tièdes)lêchefrite
dans l’évier. Laver et rincer le plat récolte-sauce dans de l’eau chaude, avec une éponge imbibée de
produit lessiviel. Si les résidus restent collés, le faire tremper dans de l’eau et un produit détergent. Il
peut aussi êtrenettoyédans unlave-vaisselle ou avecun produit ducommerce.
Ne jamais replacerle plat récolte-sauceencrassé dansun four.
4.2 Four autonettoyant par catalyse
Les panneauxautonettoyants àémail microporeuxdisponibles en optionévite le nettoyage manueldu
four.
Pendantla cuissonles projections degraisse sont “l’absorbées”par lesparois catalytiques. Lagraisseest
ensuitedétruite paroxydationen devenant de lapoussière. Encas decuisson particulièrement grasse, il
peut arrivér que la graisse bouche les pores de l’émail. Pour détruire un surplus de graisse mettez en
fonctionnement votre four à vide sur la position maximale de température pendant environ 10 à 20
minutes.
Ne jamais utiliser de grattoir, de produit chimique pour nettoyer la catalyse. Utilisez plutôt de l’eau
chaude et uneéponge.
Si jamais vouscuisinez un plattrès gras ouune viandeau gril, utiliserun platavec degrandsrebords pour
limiterles projectionsde graisse.
La porosité dela catalyseest primordialepour vous assurerun nettoyage optimal.
N.B.: Les panneaux autonettoyants ont une durée de fonctionnement d’environ 300 heures. En cas de
baisse d’efficacitéil estalors possible deles changer.
FR 27
Page 28
4.3 Entretien
RETRAIT ET NETTOYAGE DES GRADINSFILS
1. Dévissez lesécrous moletés dansle sens inverse desaiguilles d'unemontre.
2. Retirez les en les tirantvers vous.gradinsfils
3. Nettoyez les dans le lave-vaisselle ou avec une éponge humide, puis séchez-lesgradins fils
immédiatement.
4. Après avoirnettoyé les ,les remettre dansle four et revisser les écrousmoletés.gradinsfils
A
RETRAIT DE LAPORTE DUFOUR
1. Ouvrez laporte.
2. Ouvrez les pinces du boîtier de charnière sur le côté droit et gauche de la fenêtre avant en les
poussantvers le bas.
3. Replacez laporte enprocédant en sensinverse.
FR 28
Page 29
LOW-E
RETRAIT ET NETTOYAGE DES VITRES
1. Ouvrez laportedu four.
2.3.4. Bloquerles charnières, enleverles viset retirez lecouvercle métallique supérieuren le tirant vers
le haut.
5.6. Retirez le verre, soigneusement de la porte dufour (NB:dans lesfours depyrolyse, retirezl'extraire
égalementles deuxièmeet troisièmeverre (le caséchéant)).
7. A lafin dunettoyage Remonter lespièces dansl'ordre inverse.
Sur toutes les vitres, l'indication "Pyro" doit être lisible et positionné sur le côté gauche de la porte, à
proximitéde lacharnière latérale gauche. Decettemanière, l'étiquette impriméedu premier verresera
à l'intérieur dela porte.
1.
5.
2.
3.
4.
6.
1
2
3
7.
FR 29
Page 30
5. Dépannage
5.1 FAQ
PROBLEMES CAUSE POSSIBLE SOLUTION
Le four ne chauffe pas
Le four ne chauffe pas
Le four ne chauffe pas
Aucune réaction de l'écran
tactile
L'horloge n'est pas réglée
La sécurité enfant est
activée
Les réglages nécessaires
ne sont pas imposés
Vapeur et de la
condensation sur l'écran
tactile
Réglez l'horloge
Désactivez la sécurité enfant
Assurez-vous que les
paramètres nécessaires
sont corrects
Nettoyez avec un chiffon en
microfibres l'écran tactile
pour enlever la couche de
condensation
FR 30
Page 31

Indicazioni di Sicurezza
•ATTENZIONE: l’apparecchio e le parti accessibili diventano calde
durante l’uso. Prestare attenzionea nontoccare le particalde.
•ATTENZIONE: le parti accessibili possono diventare calde quando il
grill è in uso. I bambinidovrebbero essere tenutiadistanza.
•ATTENZIONE: assicurarsi che l’apparecchio sia spento prima di
sostituire la lampadaperevitare la possibilitàdiscosseelettriche.
•ATTENZIONE: al fine di evitare ogni pericolo dovuto al riarmo
accidentale del dispositivo termico di interruzione, il presente
apparecchio non deve essere alimentatocon undispositivo dimanovra
esterno,quale untemporizzatore,oppureessere connesso a un circuito
che viene regolarmente alimentatoodisalimentato dalservizio.
• ATTENZIONE: prima di attivare la funzionedipuliziaautomatica:
- Pulirela porta del forno
- Con una spugna umida togliere dall’interno del forno i residui più
consistenti.Non usare detergenti;
- Estrarre tutti gliaccessorieilkit guidescorrevoli (se presente);
- Non lasciarestrofinacci o presinesullamaniglia.
•I bambini al di sotto di 8 anni dovrebbero essere tenuti a distanza se
non continuamentesupervisionati.
•I bambini non dovrebbero giocare con l’apparecchio. L’apparecchio
può essere usato da bambinidagli 8 anni insu e da personecon ridotte
capacitàfisiche,sensorialiomentali, senza esperienzaeconoscenza del
prodotto, solo se supervisionate o dando loro istruzioni riguardo al
funzionamento dell’apparecchio in maniera sicura e cosciente del
rischio possibile.
•La pulizia e la manutenzione non dovrebbero essere fatte da bambini
senzasupervisione.
•Non usare materiali ruvidi, abrasivi o raschietti metallici affilati per
pulire le porte di vetro del forno dato che possono graffiare la
superficie e causarela frantumazionedelvetro.
•Spegnere il forno prima di rimuovere le parti rimovibili e, dopo la
pulizia, rimontarlesecondo le istruzioni.
•Usaresololasondatermica raccomandataper questo forno.
•Non utilizzareun pulitore a vapore.
IT 31
Page 32

•Inserire la spina in una presa di corrente munita di un terzo contatto
corrispondente alla presa di terra, che deve essere collegata in modo
efficiente. Per i modelli sprovvisti di spina, montare sul cavo una spina
normalizzata che sia in grado di sopportare il carico indicato in targa. Il
conduttore di messa a terra è contraddistinto dai colori giallo-verde.
Tale operazione dovràessereeseguita da personale professionalmente
qualificato. In caso di incompatibilità tra la presa e la spina
dell’apparecchio, fare sostituire la presa con altra di tipo adatto da
personale professionalmente qualificato. Si può effettuare anche
l’allacciamento alla rete interponendo, tra l’apparecchio e la rete, un
interruttore omnipolare dimensionato al carico e rispondente alle
norme in vigore.Il cavo di terra giallo-verde non deve essere interrotto
dall’interruttore. La presa o l’interruttore omnipolare usati per
l’allacciamento devono essere facilmente accessibili ad elettrodomesticoinstallato.
•Se il cavo di alimentazione è danneggiato, esso deve essere sostituito
da un cavooun assieme speciali disponibili presso il costruttoreo il suo
servizio assistenzatecnica.
In caso di danneggiamento del cavo, provvedere tempestivamente alla
sua sostituzione secondoleseguentiindicazioni:
- Aprireilcoperchio morsettiera;
- Togliere il cavodi alimentazioneesostituirloconuno corrispondentee
adeguatoall’apparecchio (tipo ).H05VV-F HO5V2V2-F,
•Tale operazione dovrà essere eseguita da personale professionalmente
qualificato. Il conduttore di terra (giallo-verde), deve obbligatoriamente
essere più lungo di circa 10 mm rispetto ai conduttori di linea. Per
l’eventuale riparazione rivolgersi solamente ad un centro di assistenza
tecnica autorizzatoerichiederel’utilizzo di ricambi originali.
•Il mancato rispetto di quanto detto sopra può compromettere la
sicurezza dell’apparecchio.
•Gli eccessi di materiale tracimato devono essere tolti prima della
pulizia.
•DurantelaPirolisile superficipossonoscaldarsi più del solito: pertanto
è consigliatotenerei bambinia distanza.
IT 32
Page 33

Sommario
Avvertenze Generali
34
Descrizione del Prodotto
36
Utilizzo del Forno
37
Pulizia e Manutenzione del Forno
41
1.1 Suggerimenti sulla sicurezza
1.2 Sicurezza elettrica
1.3 Raccomandazioni
1.4 Installazione
1.5 Gestione dei rifiuti
1.6 Dichiarazione di conformità
2.1 Panoramica
2.2 Accessori
2.3 Primo utilizzo
3.1 Descrizione del display
3.2 Modalità di cottura
4.1.Note generiche di pulizia
4.2 Forno autopulente catalitico
4.3 Manutenzione
• Rimozione e pulizia delle griglie
• Rimozione dello sportello del forno
• Rimozione e pulizia della porta in
vetro
Risoluzione dei problemi
44
5.1 F.A.Q.
IT 33
Page 34

1. Avvertenze Generali
Vi ringraziamo per aver scelto uno dei nostri prodotti.
Per utilizzare il forno in modo ottimale è consigliabile
leggere con attenzione questo manuale e conservarlo
con cura per ogni ulteriore consultazione. Prima di
installare il forno, prendere nota del numero di serie in
modo da poterlocomunicareal personaledel servizio di
assistenza in caso di richiesta di intervento. Dopo aver
rimosso il forno dall’imballaggio, verificare che non
abbia subito danni durante il trasporto. In caso di
dubbi, non utilizzare ilforno e richiedere l’assistenza di
un tecnico qualificato. Tenere tutto il materiale da
imballaggio (sacchetti di plastica, polistirolo, chiodi)
fuori dalla portata dei bambini. Alla prima accensione del forno può svilupparsi fumo di odore acre,
causatodal primoriscaldamento delcollante dei pannelli d’isolamento avvolgentiil forno: sitrattadi un
fenomeno assolutamente normale e, in caso si verificasse, occorre attendere la cessazione del fumo
prima di introdurre le vivande. Il produttore declina ogni responsabilità in caso di mancata osservanza
delle istruzioni contenute in questodocumento.
NOTA: Le funzioni, le proprietà e gli accessori dei forni citati in questo manuale possono variare a
secondadei modelli.
1.1 Suggerimenti sulla Sicurezza
Utilizzare il forno solo per lo scopo per cui è stato progettato, ossia solo per la cottura di alimenti;
qualsiasi altro utilizzo, ad esempio come fonte di riscaldamento, è considerato improprio e quindi
pericoloso. Il costruttore non può essere considerato responsabileper eventuali danni derivanti da usi
impropri,erronei ed irragionevoli.
L’uso di unqualsiasi apparecchio elettrico comporta l’osservanza dialcune regole fondamentali:
- Non tirareil cavodi alimentazione perstaccare laspina dellapresa di corrente;
- Non toccarel’apparecchiocon manio piedibagnati oumidi;
- In generaleè sconsigliabile l’usodi adattatori, prese multiplee prolunghe;
- In casodi guasto e/ocattivofunzionamentodell’apparecchio,spegnerlo enon manometterlo.
1.2 Sicurezza Elettrica
FAREEFFETTUAREI COLLEGAMENTIELETTRICI AD UN’ELETTRICISTA O TECNICOQUALIFICATO.
La rete di alimentazione a cui viene collegato il forno deve essere conforme con le normative in vigore
nel paese di installazione. Il produttore declina ogni responsabilità per eventuali danni derivanti dalla
mancata osservanza di tali disposizioni. Il forno deve essere collegato alla rete elettrica tramite una
presa a muro con messa a terra o tramite un sezionatore con più poli, a seconda delle disposizioni in
vigorenel paesedi installazione. La reteelettrica deve essereprotetta mediante fusibili idoneie devono
essere utilizzati cavi con una sezione trasversale idonea a garantire una corretta alimentazione del
forno.
COLLEGAMENTO
Il forno vienefornitocon uncavodi alimentazioneche deve esserecollegatosolo auna rete elettricacon
una tensionedi 230VCA tra le fasi o tra la fase eil neutro.Prima dicollegare ilforno alla reteelettrica, è
indispensabile controllare:
- la tensionedi alimentazione indicata sulmisuratore;
- l’impostazione delsezionatore.
Il filo di messa a terra collegato al morsetto di terra del fornodeve essere collegato al morsetto di terra
della rete elettrica.
ATTENZIONE
Prima di collegare il forno alla rete elettrica, far controllare la continuità della messa a terra della rete
elettrica ad un elettricista qualificato. Il produttore declinaogni responsabilità pereventuali incidenti o
altri problemi derivanti dalmancato collegamentoa terradel fornoo dal suocollegamentoad una
IT 34
Page 35

messa a terracon unacontinuità difettosa.
NOTA: poiché il forno potrebbe richiedere interventi di assistenza, è consigliabile prevedere la
disponibilità di un’ulteriore presa amuro a cui collegare ilfornodopo cheè stato rimossodallo spazioin
cui è stato installato. Il cavo di alimentazione deve essere sostituito solo dal personale dell’assistenza
tecnicao datecnici con qualificheanaloghe.
1.3 Raccomandazioni
Dopo l’uso sono sufficienti alcune semplici operazioni di pulizia per mantenere il forno perfettamente
pulito. Non rivestire le pareti del forno con fogli d’alluminio da cucina o fogli monouso commerciali,
perché potrebbero fondersi a contatto con le superfici in smalto caldo e danneggiare le superfici in
smalto all’internodel forno. Per evitaredi sporcare eccessivamente il forno e prevenire la diffusionedi
fumo maleodorante, è consigliabile non utilizzare il forno a temperature molto alte. E’ generalmente
preferibileimposta- re un tempo di cottura piùlungo e utilizzare una temperatura più bassa. Oltre agli
accessori forniti conil forno,è consigliabileutilizzarepiatti e teglieresistentialle altetemperature.
1.4 Installazione
Il produttore non è obbligato ad occuparsi dell’installazione. Gli eventuali interventi di assistenza,
necessari per correggere problemi dovuti ad un’errata installazione, non sono coperti da garanzia.
L’installazione deve essere effettuata da un tecnico qualificato e in conformità con queste istruzio- ni.
Un’installazione impropria potrebbe causare infortunialle persone, agli animali domesticio danni alle
attrezzature. Il produttore declinaogni responsabilità per eventuali lesioni o danni dovuti ad un’errata
installazione.
Il forno puòessere installato sopra unacolonna osotto a un piano di lavoro. Prima difissare inposizione
il forno, verificare che lospazio attorno allo stesso siasufficiente a garantire la circolazione del flussodi
aria fresco necessario a garantire il raffreddamento del forno e la sicurezza dei componenti interni.
Realizzarele aperture indicate nell’ultima pagina delmanuale, aseconda del tipo diinstallazione.
1.5 Gestione dei rifiuti e rispetto dell’ambiente
Questo apparecchio è contrassegnato in conformità alla Direttiva europea 2012/19/EU
sulle apparecchiature elettriche ed elettroniche (WEEE). I WEEE contengono sia sostanze
inquinanti (che possono provocare conseguenze negative sull’ambiente) che componenti
di base (che possono essere riutilizzati). E’ importante che i WEEE siano soggetti a
trattamenti specifici per rimuovere e smaltire correttamente tutti gli inquinanti e
recuperare tutti i materiali. I singoli possono giocare un ruolo importante nell’assicurare
base:
- i WEEEnon devono essere trattati come rifiutidomestici;
- i WEEEdevono essere portatiai puntidi raccoltaappositi gestitidal comuneo dasocietà registrate.
In molti paesi, per i WEEE di grandi dimensioni, potrebbe essere presente la raccolta domestica.
Quando si acquista un nuovoapparecchio, quello vecchio potrebbe essere restituitoal rivenditore che
deve acquisirlo gratuitamente su base singola, sempre che l’apparecchio sia del tipo equivalente e
abbia le stessefunzioni di quelloacquistato.
che i WEEE non diventino un problema ambientale; è essenziale seguire alcune regole di
RISPARMIARE ERISPETTAREL’AMBIENTE
Ove possibile, evitare di pre-riscaldare il forno e cercare sempre di riempirlo. Aprire la porta del forno
quanto necessario, perché vi sono dispersioni di calore ogni volta che viene aperta. Per risparmiare
molta energia saràsufficiente spegnere il forno dai5 ai 10minuti prima dellafine del tempo di cottura
pianificato,e servirsidel caloreche ilforno continuaa generare. Tenere leguarnizioni pulitee in ordine,
per evitare eventuali dispersioni di energia. Se si dispone di un contratto di energia elettrica a tariffa
oraria, il programma “cottura ritardata” renderà più semplice il risparmio spostando l’avvio del
programmanegli orari atariffaridotta.
IT 35
Page 36

1.6 Dichiarazione di conformità
Tutti i componenti di questo elettrodomestico destinati a venire a contatto con gli alimenti sono
conformicon le disposizionidella Direttiva CEE 89/109.
Apponendo la marcatura su questo prodotto, dichiariamo, sotto la nostra responsabilità, di
ottemperare a tutti i requisiti relativi alla tutela di sicurezza, salute e ambiente previsti dalla
legislazione europea inessereper questoprodotto.
2. Descrizione del Prodotto
2.1 Panoramica
1
1. Pannello di controllo
2. Posizioni ripiani (castelletto se previsto)
3. Griglia metallica
4. Leccarda
5. Ventola (dietro alla piastra di acciaio)
6. Porta forno
2.2 Accessori
3
5
4
6
2
Griglia metallica
1
Sostiene teglie e piatti.
2
Leccarda
Raccoglie i residui che gocciolano durante la
cotturadi alimenti coni grill.
Led vision
3
Questo sistema di illuminazione sostituisce le
“lampadine” tradizionali.I 14 LED (sui modelli non
pirolitici) o i 10 LED ad alta potenza (sui modelli
pirolitici) sono integrati direttamente nello
sportello. Questi LED producono una luce bianca
di alta qualità che consente di vedere bene tutti i
ripiani all'interno delfornosenza ombre.
Vantaggi :
Oltre a garantire una buona visibilità all'interno
del forno, questosistema è piùresistente rispetto
alla lampadine tradizionali, richiede una minore
manutenzione e consuma meno dei sistemi
tradizionali.
IT 36
Page 37

- Ottima visibilità
- Illuminazione dilunga durata
- Consumi ultra-ridotti, Consuma il 95% in meno
rispettoai sistemi tradizionali
«Elettrodomestico con luci LED bianche di classe
1M, conforme a IEC 60825- 1:1993 + A1: 1997 +
A2: 2001 (equivalente allo standard EN 60825-1:
1994 + A1:2002 + A2: 2001); emissione luminosa
massima pari a459 nm< 150uW.
2.3 Primo utilizzo
PULIZIA PRELIMINARE
Pulire sempre il forno prima di utilizzarlo per la prima volta. Pulire le superfici esterne con un panno
morbido leggermenteinumidito.
Lavare tutti gli accessori e pulire l’interno del forno con del detergente per piatti ed acqua calda.
Verificareche il forno siavuoto,impostare la temperatura massimae lasciarloacceso per almeno 1 ora,
cosìda rimuovere tuttigli odorinormalmente presentinei forninuovi.
3. Utilizzo del Forno
3.1 Descrizione del display
ACCESO / SPENTO
EXTRA
Durata
Cottura
Regolazione
Dell'ora
Fine
Cottura
Blocco Di
Sicurezza
Bambini
Q.uesto pulsante permette di accendere e spegnere il forno
Conta-
Minuti
Se il forno è spento, viene visualizzato l'orologio. Quando il
forno non è attivo, sono disponibili tutte le funzioni ad
eccezionedi durata cottura efine cottura.
Se l'orologio non è regolato, il forno non funziona: il display
lampeggia, indicando "12:00" e l'unico tasto che funziona è
quello di EXTRA. Tramite il tasto EXTRA, si possonoimpostare
le seguenti funzioni:
Wi-Fi
IT 37
Page 38

FUNZIONE COME DISATTIVARE COME FUNZIONA COSA SERVE
DURATA
COTTURA
FINE
COTTURA
CONTAMINUTI
REGOLAZIONE
DELL'ORA
BLOCCO DI
SICUREZZA
BAMBINI
COME ATTIVARE
Nota: l'impostazione è
possibile solo con un
programma di cottura attivo.
Premere due volte EXTRA ed
impostare il tempo utilizzando
i tasti "+" e "-", confermando
premendo "SELECT".
Il display visualizza "00:00" se
non è stata inserita la durata di
cottura, altrimenti visualizza il
tempo restante.
Nota: l'impostazione è
possibile solo con un
programma di cotturaattivo.
Premere EXTRA a sufficienza
per fare accendere l'icona,
impostare la fine del tempo
di cottura utilizzando i tasti
"<" e ">" e confermare
premendo "SELECT".
Premere EXTRA a sufficienza
per fare accendere l'icona,
impostare la fine del tempo
di cottura utilizzando i tasti
"<" e ">" e confermare
premendo "SELECT".
La durata di cottura viene
calcolata automaticamente.
• Il display visualizza "00:00"
se non è stato inserito il
tempo oppure il tempo
rimanente se era già stato
impostato.
Premere EXTRA a sufficienza
per fare accendere l'icona, e
utilizzare i tasti "< " e ">" per
impostare il tempo, quindi
confermare premendo
"SELECT".
•Quando viene attivato per la
primavolta, il display si
accende e visualizza "12:00".
• Per modificare l'ora,
premere
EXTRA a sufficienza per fare
accendere l'icona, e utilizzare i
tasti "<" e ">" per impostare
l'ora, quindi confermare
premendo "SELECT".
• Premere il tasto EXTRA a
sufficienza per fare
accendere l'icona, e quindi
iltasto"<"o">"per
attivare questa funzione; il
display visualizza ON, per
confermare premere
"SELECT".
• Per modificare la cottura
prima del tempo
impostato, premere due
volte EXTRA e regolare il
tempo di cottura come
richiesto utilizzando i tasti
"<" e ">", prima dipremere
nuovamente"SELECT".
Per cancellare la durata di
cottura, azzerare il display
a "00:00".
Per modificarela fine della
cottura, in modo che
avvenga prima del tempo
impostato, premere
EXTRA a sufficienza per
fare accendere l'icona,
regolare la fine del tempo
di cottura a seconda delle
necessità utilizzando itasti
"<" e ">" e confermare
premendo"SELECT".
Per cancellare il tempo di
fine cottura, azzerare il
displaya "00:00".
• Per modificare il contaminuti,
premere EXTRA a sufficienza
per fare accendere l'icona,
regolare il tempo di cottura
come richiesto utilizzando i
tasti "<" e ">" e confermare
premendo "SELECT".
• Preme re il tasto EXTRA a
sufficienza per fare
accendere l'icona, e quindi
iltasto"<"o">"per
disattivare questa funzione;
il display visualizza OFF, per
confermare premere
"SELECT".
When a cooking programme
terminates, the oven
switches off whilethe display
shows "END" (the cooking
programme iconremains on)
until the On/Off button, the
only functioning key, is
pressed. When a cooking
programme terminates, an
alarm willsound.
Quando un programma di
cotturatermina,ilfornosi
spegne e il display visualizza
"END" (l'icona del programma
di cottura rimane accesa) fino
a quando non viene premuto
il pulsante Acceso/Spento,
l'unico ancora funzionante.
Quando un programma di
cotturatermina,siattivaun
allarme.
•Questa funzione attiva un
allarme che suona peralcuni
secondi quando scade il
tempo impostato (questa
funzione non fa spegnere il
forno ).
Si può selezionare un tempo
compreso tra00:00 e 23:59.
• Sipuò impostarel'ora che
saràvisualizzatasul display.
•Se la funzione è attiva si
possono utilizzare solo il
pulsante "EXTRA" per
disattivare la funzione ed il
pulsante "Acceso/Spento".
Quando il tempo di cottura è
terminato, il forno si spegne
automaticamentee l'allarme si
attivaper alcuni secondi.
• Questa funzione è utilizzata
anche per la cottura che può
essere programmata in anticipo.
•Se è impostato un programma di
cottura, se si preme il tasto "F" il
programma va perso.
Se è impostata la cottura•
ritardata, il forno si spegne e il
display visualizza l'ora attuale,
mentre le icone del programma,
della durata di cottura e della fine
cottura sono accese.
Se è impostato un programma•
di cottura, premendo i tasti "<" e
">" si può controllare e modificare
la temperatura impostata;
toccando la prima volta, si
visualizza la temperatura di
funzionamento, toccando un'altra
volta è possibile modificare tale
temperatura.
•Il contaminuti funziona
indipendentemente dal fatto
che ilforno siaacceso.
• L'allarme funziona
indipendentemente dal fatto
che ilforno siaacceso.
• Questa funzione è utile
quando ci sono dei bambini
all'internodella casa.
IT 38
Page 39

Wi-Fi (a seconda del modello)
Premendoil tasto "Extra" suldisplaydel timerè possibile selezionare
il menu Wi-Fi.Nel menuWi-Fi sesi premono itasti "<>" è possibileselezionare:
- Wi-Fiè spento;il fornonon ècontrollabile tramite l'applicazione.Off:
- On: Wi-Fi è attivo e il forno è controllabile solo attraverso l'applicazione. Ciò significa che non è possibile
selezionare funzionidi cottura,ricette e temperatura dadisplay. Solo il menu Wi-Fiè disponibile premendoil
tasto "Extra". È possibile spegnere il forno con il pulsante di accensione / spegnimento, ma non è possibile
riaccenderenuovamente tramite ildisplay,può essere accesosolo tramitel'applicazione.
- Reset: Questaimpostazione deveessere utilizzata perarruolare ilforno laprima volta che si collega allarete
Wi-Fi o per resettare la connessione Wi-Fi e consentire una nuova iscrizione. Una volta selezionato,
l'apparecchio impiega 5 minuti per completare il processo di registrazione. Durante questo processo le
funzioni di cottura, le ricette e la regolazionedella temperatura non sono accessibili dal display. Soloil menu
Wi-Fi è disponibile premendo il tasto "Extra". È possibile spegnere il forno con il pulsante di accensione /
spegnimento, ma non è possibile riaccendere nuovamente tramite il display, può essere acceso solo tramite
l'applicazione. Per uscire dalla procedura di arruolamento/reset tramite il display, premere "Extra" e quindi
usare "< >" per selezionare "Off". Dopo cinque minuti, l'apparecchio esce automaticamente dalla procedura
di arruolamento/reset.
- Read: ilfornoinvia ilsuo statoall'applicazione, manon puòesserecontrollatoda remoto. Ilforno deveessere
arruolatoprima chequesto siapossibile.
Se il Wi-Finon èconfigurato è solopossibile scegliere tra off ereset.
Quando il fornoè collegatoal Wi-Fi,la durata predefinita tempo dicotturaè di5 ore,ma puòessere modificato
dall'utente.
ArruolamentoWi-Fi
Per arruolare l'apparecchio al Wi-Fi, premere "Extra"sul displayfino aquando l'iconaWi-Fi lampeggia, quindi
selezionare "Reset" premendo "<>". La procedura in applicazionedovrebbe quindi essereseguita. Una volta
selezionato,l'apparecchiosi dà5 minuti percompletareil processo diregistrazione.
Icona Wi-Fi
- Icona nonilluminata:Wi-Fi èspento.
- L'icona lampeggia 1 secondo e un 1 secondo si spegne: il forno è accessibile alla rete Wi-Fi e pronto per
esserearruolato. Sel'arruolamento nonha avuto successo, l'icona Wi-Fisi spegnedopo 5minuti.
- Icona èsempreaccesa: ilfornoè collegato al routerWi-Fi.
- L'icona lampeggia3 secondi e1 secondosi spegne:il fornosta tentandodi connettersi al routerWi-Fi.
- L'icona lampeggia1 secondo e3 secondirimane spenta: il fornoè inmodalità disola lettura.
CANDY SIMPLY-FI:
Per informazioni dettagliate su COME CONNETTERE il tuo elettrodomestico simply-Fi e
su COME USARLO al meglio, vai su o visita il sitohttp://www.candysimplyfi.com
dedicato al Servizio Clienti simply-Fi http://simplyfiservice.candy-hoover.com
IMPOSTAZIONE DELLE LINGUE La lingua puòessere
impostata quando il forno è spento premendo
contemporaneamente i pulsanti EXTRA e SELECT, per
circa 3".La lingua corrente è visualizzata sul display e può
Piro
essere modificata premendoi tasti"<" o ">" e confermata
premendo SELECT. Le lingue disponibili sono: italiano,
inglese, francese etedesco.
Scongelamento
SELECT Ogni selezione deve essere confermata. Se
non viene confermata entro 15 secondi, la selezione si
cancella. Cambiando il menu, qualsiasi selezione non
Cavità
Girarrosto
Elemento circolare
Elemento inferiore
Grill
Ventola
confermatava persa.
ICONA "HOT" Quando un programma di cottura termina o quando il forno si spegne,se il fornoè
ancoracaldo ildisplayvisualizza l'ora attuale alternata con ilmessaggio "HOT” (CALDO).
IT 39
Page 40

3.2 Modalità di cottura
Manopola
commuta-
tore
*
*
T° preim-
postata
Intervallo
40 ÷ 40
40
180
50 ÷ 240
210
50 ÷ 240
220 50 ÷ 280
210 50 ÷ 230
200 150 ÷ 220
L1 ÷ L5
L3
di T°
LAMPADA: accende la luce interna.
SCONGELAMENTO: questa posizione permette di far circolare l’aria a
temperatura ambiente intorno al cibo surgelato facendolo così scongelare in
pochi minuti senzamodificare odalterareil contenuto proteico.
FORNO VENTILATO: l’aria calda viene ripartita sui diversi ripiani. E’ ideale per
cuocere contemporaneamente diversi tipi di cibo (carne, pesce), senza
miscelare sapori e odori. Cottura delicata- indicata per pan di spagna, torte
Margherita,pastasfoglia, ecc...
CONVEZIONE NATURALE: sono in funzione le resistenze superiore e inferiore.
È la cottura tradizionale, ottima per arrostire cosciotti, selvaggina, ideale per
biscotti,mele alforno eper rendere icibi moltocroccanti.
SUOLA VENTİLATA: adatta percotture delicate (torte-soufflè).
GRILL + VENTOLA: l'utilizzo del turbo-grill richiede la porta chiusa. Utilizzando
la ventilazione e la resistenza grill contemporaneamente, si cuociono
perfettamentegrandi porzionidi cibo,come arrosti, pollame,ecc.
Mettere la griglia a metà del forno e posizionare la leccarda sotto di essa per
raccoglierei grassi.Assicuratevi cheil cibonon sia troppo vicinoal grill.Girare la
carnea metàcottura.
GRILL: Grigliatura tradizionale a porta chiusa: con questa funzione viene
inserita la resistenza del grill. Ottima nella cottura di carni di medio e piccolo
spessore (salsicce, costine, bacon).
Funzione (a seconda del modello)
ELEMENTO RISCALDANTE INFERIORE + VENTOLA: L'uso combinato
210 50 ÷ 230
* Programma di prova secondo CENELEC EN 60350-1 utilizzato per la definizione della classe energetica.
dell'elemento riscaldante inferiore e della ventola e ideale per la cottura di
tortedi frutta, crostate,quiche edolci.
IT 40
Page 41

4. Pulizia e manutenzione del forno
4.1 Note generiche di pulizia
La vita di servizio dell’apparecchio si allungase questoviene pulitoad intervalli regolari. Attendere cheil
forno si raffreddi prima di effettuare le operazioni di pulizia manuali. Non utilizzare mai detergenti
abrasivi, pagliette diferro o oggetti appuntiti per lapulizia, per non danneggiarein modoirreparabile le
parti smaltate.Utilizzaresolo acqua,sapone odetergentia basedi candeggina (ammoniaca).
PARTI INVETRO
E’ consigliabile pulire lo sportello in vetro con carta assorbente da cucina dopo ogni utilizzo del forno.
Per rimuovere le macchie più ostinate, è possibile anche utilizzare una spugna imbevuta di detergente
ben strizzata e sciacquarecon acqua.
GUARNIZIONEDELLO SPORTELLO DELFORNO
Se sporca, laguarnizione può esserepulitacon unaspugna leggermente inumidita.
ACCESSORI
Pulire gli accessori con una spugna imbevuta con acqua e sapone, sciacquarli e asciugarli : evitare di
usaredetergenti abrasivi.
VASCHETTA DIGOCCIOLAMENTO
Dopo l’uso delgrill, rimuovere lavaschetta dal forno. Versareil grassocaldo inun contenitore elavare la
vaschettain acqua calda,utilizzando una spugnae deldetergente per piatti.
Se rimangono dei residui di grasso, immergere la vaschetta in acqua e detergente. In alternativa, è
possibile anche lavare la vaschetta nella lavastoviglie oppure utilizzare un detergente per forni di tipo
commerciale.Non reinserire mai unavaschettasporca nelforno.
4.2 Forno autopulente catalitico
Speciali pannelli autopulentiricoperti dauno smalto astrutturamicroporosa, offerti comeaccessori opzionali
per tutti imodelli, eliminano lapulizia manuale delforno.
I grassi proiettati sulle pareti durante la cottura, vengono decomposti dallo smalto, mediante un processo
cataliticodi ossidazione etrasformatiin prodotti gassosi.
Schizzi eccessividi grasso possonoostruire ipori equindi impedirel’autopulizia.Tale caratteristica può essere
ripristinatamediante unriscaldamento percirca 10-20 minuti del forno vuoto impostandola manopolaforno
in corrispondenza dellamassima temperatura.
Non usare prodotti abrasivi, pagliette metalliche, oggetti appuntiti, panni ruvidi, prodotti chimici o detersivi
che possono danneggiareirrimediabilmentelo smalto.
Si consiglia inoltre di utilizzare pentole a bordi alti nel caso di cotture di vivande particolarmente grasse
(arrosti,ecc.) edi usarela leccarda quandosi esegue lacotturaal grill.
Qualora, per particolari condizioni di sporco, non fosse sufficiente l’azione precedente, si consiglia di
intervenireasportando i grassicon unpanno morbidood unaspugna inumiditicon acquacalda.
La porosità dellosmalto èfondamentaleper garantirel’azioneautopulente.
N.B.: Tutti i pannelli autopulenti in commercio hanno un’efficacia di rendimento di circa 300 ore di
funzionamentoforno. Dopo talelimite i pannellidovrebberoessere sostituiti.
IT 41
Page 42

4.3 Manutenzione
RIMOZIONEE PULIZIADELLE GRIGLIE
1. Svitare in sensoantiorario i dadizigrinati.
2. Rimuovere legriglie tirandoleversose stessi.
3. Pulire legriglie lavandole inlavastoviglie o conuna spugnabagnata easciugandole subito dopo.
4. Dopo averpulitole griglie,installarlenuovamente, fissando idadi zigrinati.
A
RIMOZIONEDELLO SPORTELLO DEL FORNO
1. Aprire losportello anteriore.
2. Aprire i morsetti dell’alloggiamento della cernierasul lato destro e sinistro dello sportello anteriore,
premendoliverso il basso.
3. Installare nuovamente losportello eseguendola procedura all’inverso.
IT 42
Page 43

RIMOZIONEE PULIZIADELLA PORTAIN VETRO
LOW-E
1. Aprile laporta del forno.
2.3.4. Bloccare le cerniere, rimuovere le viti e rimuovere la copertura metallica superiore tirandola
versol’alto.
5.6. Rimuovere il vetro, estraendolo con molta cura, dallacontroporta delforno (NB: neiforni pirolitici,
rimuovereanche ilsecondo eterzo vetro (sepresente)).
7. Al terminedella pulizia osostituzione riassemblare le partinell’ordineoppostoalla rimozione.
Su tutti i vetri, l’indicazione ”Low-E” deve essere correttamente leggibile e posizionata sul lato sinistro
della porta, vicino alla cerniera laterale sinistra. In questo modo, l’etichetta stampata del primo vetro
rimarràinterna alla porta.
1.
5.
2.
3.
4.
6.
1
2
3
7.
IT 43
Page 44

5. Risoluzione dei Problemi
5.1 FAQ
PROBLEMA POSSIBILE CAUSA SOLUZIONE
Il forno non si scalda
Il forno non si scalda
Il forno non si scalda
Nessuna reazione
quando si usa l'interfaccia
utente di tipo touch
L’orologio non è impostato
Il blocco bambini è attivo
Le regolazioni necessarie
non sono impostate
Vapore e condensa sul
pannello interfaccia utente
Impostare l’orologio
Disattivare il blocco bambini
Assicurarsi che le impostazioni
necessarie siano corrette
Pulire con un panno in
microfibra il pannello
interfaccia utente per togliere
lo strato di condensa
IT 44
Page 45

Indicaciones de seguridad
•ATENCIÓN: el aparato y las piezas accesibles se calientan durante el
uso. Tenga cuidado de no tocarlas piezas calientes.
•ATENCIÓN: las piezas accesibles pueden calentarse cuando la
resistencia está en uso. Mantenga el aparato fuera del alcance de los
niños.
•ATENCIÓN: asegúrese de que el aparato esté apagado antes de
sustituirlalámparapara evitarlaposibilidadde descargaseléctricas.
•ATENCIÓN: con el fin de evitar cualquier peligro debido a un rearme
accidental del dispositivo térmico de interrupción, este aparato no
debe alimentarse con dispositivos de maniobra externos como
temporizadores,niconectarse a un circuito regularmente alimentadoo
interrumpidoporel servicio.
• ATENCIÓN: antes de activarlafunciónde limpieza automática:
- Limpie lapuertadel horno
- Con una esponja húmeda quite los residuos más consistentes del interior
del horno.No utilice detergentes;
- Quitetodoslos accesoriosy el kit guías deslizables(siexiste);
- No dejepañosdecocinao manoplas en la manija.
•Mantenga el aparato fuera del alcance de los niños menores de ocho
años sinoestánconstantementesupervisados.
•No permita que los niños jueguen con el aparato. Los niños mayores
de ocho años y las personas con capacidades físicas, sensoriales o
mentalesreducidas,así como aquellas sin experiencia ni conocimientos
del aparato pueden usarlo únicamente bajo supervisión o siguiendo de
forma segura y consciente del posible riesgo las instrucciones de
funcionamientodelaparato.
•La limpieza y el mantenimiento no deben ser responsabilidad de niños
sin supervisión.
•No use materiales rugosos o abrasivos ni rasquetas metálicas afiladas
para limpiar las puertas de vidrio del horno, ya que pueden arañar la
superficie y agrietarel vidrio.
•Apague el horno antes de extraer la pantalla de protección y, después
de la limpieza,vuelva a montarlaconforme a lasinstrucciones.
•Use sololasondatérmicarecomendada paraestehorno.
ES 45
Page 46

•No utilice limpiadoresde vapor.
•Enchufeel conectorauna toma de corrienteprovista de toma de tierra,
que debe estar correctamente conectada. Para los modelos que no
dispongan de conector, montar en el cable uno normalizado capaz de
soportar la carga indicada en la ficha técnica. El conductor de toma de
tierra se caracteriza por los colores amarillo y verde. Esta operación
deberá confiarse a un profesional cualificado. En caso de
incompatibilidad entre la toma de corriente y el conector del aparato,
hacer que un profesional cualificado sustituya la toma por otra del tipo
adecuado. Se puede efectuar también la conexión a la red
interponiendo, entre el aparato y la red, un interruptor omnipolar
dimensionado a la cargayconforme con la normativavigente.El cablede
tierra amarillo y verde no debe interrumpirse con el interruptor. La toma
o el interruptor omnipolar usadosparala conexión deben ser fácilmente
accesibles paraelelectrodoméstico instalado.
•Si el cable de alimentación está dañado, debe sustituirse por un cable
o un conjuntoespecialmente disponible en el fabricanteo ensu servicio
de asistenciatécnica.
En caso de que el cable esté dañado, proceder puntualmente a su
sustituciónconforme a las indicacionessiguientes:
- Abralacubierta del terminal;
- Extraer el cable de alimentación y sustituirlo por uno análogo y adecuado
al aparato (tipo ).H05VV-F HO5V2V2-F,
•Esta operación deberá confiarse a un profesional cualificado. El
conductor de toma de tierra (amarillo y verde), debe necesariamente
ser aproximadamente 10mm más largo que los conductores de línea.
Para la eventual reparación, diríjase únicamente a un centro de
asistencia técnica autorizado y solicite que se empleen recambios
originales.
•No respetar las indicaciones anteriores puede comprometer la
seguridad delaparato.
•Los excesosde material deben retirarse antesdelimpiar.
•Durante la pirólisis las superficies pueden calentarse más de lo
habitual: por ello es aconsejable mantener el aparato fuera del alcance
de los niños.
ES 46
Page 47

Resumen
Advertencias generales
48
Descripción del producto
50
Utilización del horno
51
Limpieza y mantenimiento
del horno
55
1.1 Recomendaciones de seguridad
1.2 Seguridad eléctrica
1.3 Recomendaciones
1.4 Instalación
1.5 Gestión de residuos
1.6 Declaración de conformidad
2.1 Descripción general
2.2 Accesorios
2.3 Primer uso
3.1 Descripción de la pantalla
3.2 Modalidades de cocción
4.1 Notas genéricas de limpieza
4.2 Horno autolimpiante catalítico
4.3 Mantenimiento
• Extracción de la puerta del horno
• Extracción y limpieza de las rejillas
• Extracción y limpieza de la puerta
de vidrio
Solución de problemas
58
5.1 Preguntas más frecuentes
ES 47
Page 48

1. Advertencias Generales
Le agradecemos que haya elegido uno de nuestros
productos. Para utilizar el horno de forma óptima es
aconsejable leer con atención este manual y
conservarlo para poder consultarlo en el futuro. Antes
de instalar el horno, anote el número de serie para
poder facilitárselo al personal del servicio de asistencia
técnicaen casode solicitar suintervención. Después de
extraer elhorno del embalaje, compruebe que no haya
sufrido daño alguno durante el transporte. En caso de
duda, no utilice el horno y solicite la asistencia de un
técnico cualificado. Conserve todo el material de
embalaje (bolsitas de plástico, poliestireno, clavos)
fuera delalcance de los niños. La primera vez que se enciendeel horno puede producirse un humode
olor acre, causadopor el primercalentamientodel adhesivo delos panelesde aislamiento querecubren
el horno: se trata de un fenómeno absolutamente normal y, en caso de que se produzca, será preciso
esperara quecese elhumo antesde introducir losalimentos. El fabricante declinatoda responsabilidad
en caso deno observarlas instruccionescontenidas enestedocumento.
NOTA: las funciones, las propiedades y los accesorios de los hornos citados en este manual pueden
variarsegún losmodelos.
1.1 Recomendaciones de seguridad
Utilice el horno solo con el fin para el que se ha diseñado, es decir: únicamente para cocer alimentos;
cualquier otro uso, por ejemplo como fuente de calefacción, se considera impropio y por lo tanto
peligroso. El fabricante no puede ser considerado responsable de eventuales daños derivados de usos
impropios,erróneos o irracionales.
El uso decualquier aparatoeléctrico comporta laobservación deuna seriede reglasfundamentales:
- No tirardel cable dealimentación para desenchufar el conectorde latoma decorriente;
- No tocarel aparato con lasmanos nilos piesmojados o húmedos;
- En generalno es aconsejableusar adaptadores, regletas ni alargadores;
- En casode avería omal funcionamiento delaparato,apáguelo y nolo manipule.
1.2 Seguridad eléctrica
CONFÍE LA CONEXIÓNELÉCTRICA A UNELECTRICISTAO AUN TÉCNICO CUALIFICADO.
La red de alimentación a la que se conecte el horno debe cumplir la normativa vigente en el país de
instalación. El fabricante declina toda responsabilidad por eventuales daños derivados de no observar
dicha normativa. Elhorno debeconectarsea lared eléctrica medianteun enchufe depared contoma de
tierra omediante unseccionador con varios polos, segúnla normativa vigente en elpaís de instalación.
La red eléctrica debe estar protegida mediante fusibles adecuados y deben utilizarse cables con una
sección transversalidónea quegaranticeuna correctaalimentación delhorno.
CONEXIÓN
El horno se suministra con un cable de alimentación que debe conectarse únicamente a una red
eléctrica con una tensión de 230 V de CA entre fases o entre la fase y el neutro. Antes de conectar el
horno a lared eléctrica esimprescindible comprobar:
- La tensiónde alimentación indicadapor el medidor;
- La configuracióndel seccionador.
El hilo detoma de tierra conectado al terminal de tierra del hornodebe estar conectado al terminal de
tierrade laredeléctrica.
ATENCIÓN
Antes de conectar el horno a la red eléctrica, confíe la comprobación de la continuidad de la toma de
tierra de la red eléctricaa unelectricista cualificado.El fabricante no se haceresponsable deeventuales
accidentes uotros problemasderivados de no conectar el horno a tierra o deconectarlo a una toma de
tierracon unacontinuidad defectuosa.
ES 48
Page 49

NOTA: puesto que el horno podría requerir la intervención del servicio de asistencia, es aconsejable
prever la disponibilidad de otro enchufe de pared al que conectar el horno después de extraerlo del
espacio donde se ha instalado. El cable de alimentación debe sustituirse únicamente por personal de
asistenciatécnica o portécnicos con unacualificación análoga.
1.3 Recomendaciones
Una limpieza mínima después deutilizar el horno ayudará amantenerlo limpiodurantemás tiempo.No
forrar las paredes del horno con aluminiou otras protecciones disponibles en tiendas. El aluminio o los
protectores, en contacto directo con el esmalte caliente puede derretirse y deteriorar el esmalte del
interior. Paraevitarun exceso desuciedad enel hornoy quepueden derivar enolores y humoen exceso,
recomendamos no utilizar el horno a temperaturas muy elevadas. Es mejor ampliar el tiempo de
coccióny bajarun poco latemperatura.
1.4 Instalación
No es obligación del fabricante instalar el horno. Si se requiere la ayuda del fabricante para subsanar
fallosderivados deuna instalaciónincorrecta,dicha asistencia nola cubrirá lagarantía.
Han de seguirse a rajatabla las instrucciones de instalación para personal cualificado. Una instalación
incorrecta puede provocar daños personales, materiales o en animales. El fabricante no se hace
responsablede esosposibles daños.
El horno se puede colocar encima, en una columna, o debajo de una encimera. Antes de fijar el horno
hay que aseguraruna buenaventilación enel huecodonde sevayaa colocary queel airenecesario para
enfriar y proteger las piezas internas circula sin problema. Realizar las aperturas especificadas en la
última página segúnel tipode altura.
1.5 Gestión de residuos y respeto por el medio ambiente
Este aparato está certificado conforme a la directiva europea 2012/19/EU sobre aparatos
eléctricos y electrónicos (WEEE). Los dispositivos WEEE contienen sustancias
contaminantes (que pueden provocar consecuencias negativas en el medio ambiente) o
componentes básicos (que pueden reutilizarse). Es importante que dichos dispositivos
estén sujetos a tratamientos específicospara eliminar y desechar correctamente todos los
contaminantes y recuperar todos los materiales. Cada individuo puede desempeñar un
papel importante a la hora de asegurar que los dispositivos WEEE no se conviertan en un
problemamedioambiental; es esencialseguir algunasreglasbásicas:
- Los dispositivosWEEE no debentratarsecomo residuos domésticos;
- Losdispositivos WEEEdeben llevarse alos puntosde recogidaespecíficos gestionados porel municipio
o por unasociedad registrada.
En muchos países, para los WEEE de grandes dimensiones, puede haber disponible un servicio de
recogida a domicilio. Cuando se compraun nuevo aparato, el viejo puede entregarse alvendedor, que
debe adquirirlo gratuitamente siempre que el aparato sea de tipo equivalente y tenga las mismas
funciones que elque seha adquirido.
AHORRAR Y RESPETAR ELMEDIO AMBIENTE
Siempre que sea posible,evite precalentar el horno e intenteutilizarlo siemprelleno. Abra lapuerta del
horno lo menos posible, ya que se producen dispersiones de calor cada vez que se lleva a cabo esta
operación.Para ahorrar muchaenergía bastaapagar el horno de 5a 10minutos antesdel fin del tiempo
de cocción planificado y servirse del calor que el horno continúa generando. Mantener las juntas
limpias y en buen estado para evitar posiblesdispersiones de energía. Si se dispone de un contrato de
energía eléctrica por tarifa horaria,el programa decocción retardada permitirá ahorrarmás fácilmente
retrasandoel encendidodel horno hastael horario detarifareducida.
ES 49
Page 50

1.6 Consejos De Cumplimiento
En este equipo, las piezas que se prevé que puedan estar en contacto con los alimentos, cumplen las
regulacionesde laCEE indicadas enla directiva 89/109.
Al mostrar ellogo marcado en este producto, declaramos,bajo nuestra propiaresponsabilidad,
el cumplimiento de todos los requisitos europeos en términos de seguridad, salud y medio ambiente,
establecidosen lalegislación deeste producto.
2. Descripción del producto
2.1 Descripción general
1
3
5
4
6
2
2.2 Accesorios
1 Rejilla metálica
Sostiene fuentes y platos.
2 Bandeja2 Bandeja
Recoge los residuos que gotean durante la
cocciónde alimentoscon lasresistencias.
1. Panel de control
2. Posiciones de las bandejas
(y del soporte elevado si corresponde)
3. Rejilla metálica
4. Bandeja
5. Ventilador (detrás de la placa de acero)
6. Puerta del horno
Visi n Ledó
3
Es un sistema de iluminacion que sustituye el
tradicional sistema “de bombilla”. En la puerta del
horno se integran 14 luces LED (en versiones no
piroliticas) o 10 luces LED de Potencia Superior (en
modelos piroliticos). Las luces LED crean una
iluminaci n blanca de calidad que permite ver dentroó
del horno con claridad todas las bandejas sin
sombras.
Los LEDS permanecen apagados durante la apertura
de la puerta (s lo para hornos piroliticos).ó
ES 50
Page 51

Ventajas:
Este sistema, ademas de proporcionar una
iluminacion excelente dentro del horno, dura mas
que labombilla tradicional,tiene un mantenimiento
mas sencilloy,sobre todo,ahorra energia.
-Visi n ptimaóó
-Iluminaci n duraderaó
consumo energetico muy bajo, reduccion del 95%
en comparacion conla iluminaci n tradicional.ó
“Los hornos con luzblanca LED Clase 1M segunel IEC
60825- 1:1991 + A1:1997 + A2:2001n(equivalente a
la EN 60825-1:1994 +A1:2002 + A2:2001); la
potencia maxima deluz emitida es 459nm<150uW.
No observar directamente con instrumentos
óptimos.”
2.3 Primer uso
LIMPIEZA PRELIMINAR
Limpie el horno antes de utilizarlo por primera vez. Limpie las superficies externas con un paño suave
levementehumedecido.
Lave todos los accesorios y limpie el interior del horno con detergente lavavajillas y agua caliente.
Compruebe queel horno esté vacío, seleccione la temperaturamáxima y déjeloencendido durante un
mínimo de unahora para eliminartodos los oloresque suele haberpresentesen loshornos nuevos.
3. Uso del horno
3.1 Descripción de la pantalla
ENCENDIDO / APAGADO
EXTRA
Tiempo de
cocción
Configuración
del reloj
Fin de
la cocción
Bloqueo
para niños
El horno se enciende y se apaga usando este botón.
Temporizador
Cuando elhorno está apagado, en la pantalla apareceel reloj.
Cuando el horno no está activo, todas las funciones están
disponibles, excepto la del tiempo de cocción y la de fin de la
cocción.
Si el reloj no está configurado, el horno no funciona: la
pantalla parpadea mostrando "12:00" y el único botón que
funciona es el Extra. Utilizando el botón Extra se pueden
WiFi
configurarlas siguientes funciones:
ES 51
Page 52

FUNCIóN CóMO SE ACTIVA CóMO SE DESACTIVA QUÉ HACE PARA QUÉ SIRVE
TIEMPO
DE
COCCIóN
FIN DE LA
COCCIóN
TEMPORIZA
CONFIGUR
ACIóN DEL
RELOJ
BLOQUEO
INFANTIL
Nota: sólo se puede
configurar con un programa
de cocción activo. Pulse dos
veces el botón EXTRA y
configure el tiempo
utilizando los botones “+” y
“-”, acepte la configuración
pulsando "SELECT"
(Seleccionar).
Si no se introdujo ningún
tiempo de cocción , la
pantalla muestra “00:00”; de
lo contrario, la pantalla
muestra el tiempo restante.
Nota: sólo se puede
configurar con un programa
de cocción activo. Pulse el
botón EXTRA las veces
necesarias para que se
encienda el icono, configure
el tiempo de fin de la
cocción utilizando los
botones “<” y “>” y acepte
pulsando "SELECT".
Pulse el botón EXTRA las
veces necesarias para que
se encienda el icono,
configure el tiem po de fin de
la cocción utilizando los
botones “<” y “>” y acepte
pulsando "SELECT".
El tiempo de cocción se
calcula automáticamente.
•
La pantalla muestra
“00:00” cuando no hay
DOR
ningún tiempo programado,
o muestra el tiempo
restante cuando el tiempo
ya está configurado.
Pulse el botón EXTRA las
veces necesarias para que
se encienda el icono y use
los botones “<” y “>” para
configurar el tiempo, acepte
pulsando "SELECT".
•Cuando se enciende por
primera vez, la pantalla se
activa y muestra "12:00".
•Para modificar la hora,
pulse el botón EXTRA las
veces necesarias para que
se encienda el icono y use
los botones “<” y “>” para
configurar la hora, acepte
pulsando "SELECT".
•Pulse el botón EXTRA las
veces necesarias para que
se encienda el icono, y use
el botón “<” o el botón “>”
para activar esta función:
en la pantalla aparece la
palabra ON; acepte
pulsando SELECT.
•Para modificar la cocción
antes del tiempo
configurado, pulse dos
veces el botón EXTRA y
ajuste el tiempo de cocción
según sus necesidades
utilizando los botones “<” y
“>”, luego pulse
nuevamente "SELECT".
•Para borrar el tiempo de
cocción, lleve otra vez la
pantalla a “00:00”.
Para modificar el fin de la
cocción antes del tiempo
configurado, pulse el botón
EXTRA las veces
necesarias para que se
encienda el icono, ajuste el
tiempo de fin de la cocción
según sus necesidades
utilizando los botones “<” y
“>”, y acepte pulsando
"SELECT".
Para borrar el tiempo de fin
de la cocción, lleve otra vez
la pantalla a “00:00”.
•Para modificar el
temporizador, pulse el
botón EXTRA las veces
necesarias para que se
encienda el icono, ajuste el
tiempo de cocción según
sus necesidades utilizando
los botones “<” y “>”, y
acepte pulsando "SELECT".
•Pulse el botón EXTRA las
veces necesarias para que
se encienda el icono, y use
el botón “<” o el botón “>”
para desactivar esta
función: en la pantalla
aparece la palabra OFF;
acepte pulsando SELECT.
Cuando finaliza el programa
de cocción, el horno se
apaga y en la pantalla
aparece la palabra "END"
(Fin) (el icono del programa
de cocción queda encendido)
hasta que se pulsa el botón
de encendido/apagado, el
único botón activo. Cuando
finaliza un programa de
cocción, se genera un sonido
de alarma.
Cuando finaliza el programa
de cocción, el horno se
apaga y en la pantalla
aparece la palabra "END"
(Fin) (el icono del programa
de cocción queda
encendido) hasta que se
pulsa el botón de
encendido/apagado, el
único botón activo. Cuando
finaliza un programa de
cocción, se gene ra un
sonido de alarma.
•Esta función activa una
alarma que suena durante
algunos segundos cuando
se cumple el tiempo
programado (esta función
no apaga el horno).
Puede seleccionar un
tiempo de 00:00 a 23:59.
•Le permite configurar la
hora que aparece en la
pantalla.
•Si la función está activa,
sólo se pueden usar el
botón "Extra", para
desactivar la función y el
botón "On/Off".
Cuando se cumple el tiempo de
cocción, el horno se apaga
automáticamente y suena una
alarma durante algunos
segundos.
•Esta función también se usa
para las cocciones que se
pueden programar
anticipadamente.
•Si hay un programa de cocción
configurado, éste se elimina
cuando se pulsa el botón "F".
•Si se configura una cocción
diferida, el horno se apaga y la
pantalla muestra la hora actual,
mientras que los iconos del
programa de cocción, de tiempo
de cocción y fin de la cocción
quedan encendidos.
•Si hay un programa de cocción
configurado, pulsando los
botones “<” y “>” puede ver y
modificar la configuración de la
temperatura: tocando una
primera vez, aparece la
temperatura de funcionamiento,
mientras que tocando una
segunda vez podrá modificar
esa temperatura.
El temporizador funciona
•
independientemente de si el
horno está encendido.
La alarma funciona
•
independientemente de si el
horno está encendido.
•Esta función es útil en las
casas donde hay niños
pequeños.
ES 52
Page 53

WiFi (depende del modelo de horno) Pulsando el botón "Extra" en la pantalla del temporizador,
puede seleccionar elmenú Wi-Fi.En elmenú Wi-Fi,utilizando losbotones "< >"puede seleccionar:
- Off: elWi-Fi está desactivado; elhorno no sepuede controlar a través dela aplicación.
- On: elWi-Fi estáactivado; el hornosólo sepuede controlar a travésde la aplicación. Esosignifica queno es
posible seleccionar funciones de cocción, recetas ni temperatura utilizando la pantalla. Pulsando el botón
"Extra" está disponible sólo el menú Wi-Fi. Puede apagar el horno utilizando el botón On/Off, pero no
puede encenderlo otravez desdela pantalla; sólo puedeencenderlo usandola aplicación.
- Reset: Esta configuración se puedeutilizarpara registrarel hornola primera vezque loconecta a sured
Wi-Fi y para restablecer laconexión Wi-Fi actual,para permitir unnuevo registro. Cuando lo selecciona, el
aparatole da5 minutospara completar elproceso deregistro.Duranteeste proceso, desde lapantalla no se
puede accedera las funciones de cocción,a las recetas ni ala configuraciónde la temperatura. Pulsando el
botón "Extra" está disponiblesólo el menúWi-Fi. Puedeapagar el hornoutilizando el botónOn/Off,pero no
puede encenderlo otra vez desde la pantalla; sólo puede encenderlo usando la aplicación. Para salir del
procedimiento de registro/reset usando la pantalla, pulse el botón "Extra" y luego use los botones "< >"
para seleccionar "Off". Después de cinco minutos, el aparato sale automáticamente del proceso de
registro/reset.
- Nota: el horno envía su estado a la aplicación, pero no se puede controlar a distancia. Para que eso sea
posible, el hornodebe estar ya registrado.
Si la Wi-Fino está configurada, sóloes posibleseleccionar off yreset.
Cuando elhorno está conectado ala Wi-Fi,el tiempoconfigurado para lacocción esde 5horas, peropuede
ser modificado porel usuario.
RegistroWi-Fi:
Pararegistrarel aparato para la redWi-Fi, pulseel botón "Extra"en la pantallahastaque seencienda elicono
Wi-Fi, luego, seleccione "Reset" pulsando "< >". A continuación se debe seguir el procedimiento presente
en la aplicación.Cuando loselecciona, elaparato le da5 minutosparacompletar elproceso deregistro.
Icono Wi-Fi:
- El iconono se enciende:la Wi-Fino estáactiva.
- Elicono parpadea 1 segundo encendido y 1segundo apagado:se puedeacceder alhorno desdela red WiFi y está preparado para el registro. Si el registro no se completa correctamente, el icono Wi-Fi se apaga
después de 5minutos.
- Icono encendidode forma permanente:el hornoestá conectado asu enrutadorWi-Fi.
- El icono parpadea 3 segundosencendido y 1 segundo apagado: elhorno está intentando conectarse a su
enrutadorWi-Fi.
- El iconoparpadea 1 segundoencendido y3 segundosapagado: el hornoestá en elmodo desólo lectura.
CANDY SIMPLY-FI:
Para información detallada sobre CÓMO CONECTAR tu electrodoméstico simply-Fi y
CÓMO SACARLE el mejor partido, ves a o visita la Webhttp://www.candysimplyfi.com
Atención al cliente http://simplyfiservice.candy-hoover.com
Cavidad del horno
Rustepollos
Elemento
calentador circular
Elemento calentador
inferior
Grill
Piro
Descongelación
Ventilador
CONFIGURACIÓN DEL IDIOMA El idioma se Puede
configurar cuando el horno se apaga pulsando los
botones Extra y Select simultáneamente durante 3". El
idioma actual aparece en la pantalla y se puede
modificar pulsando el botón “<” o el botón “>”, y
aceptando con el botónSELECT. Losidiomas disponibles
son: Italiano, Inglés,Francés yAlemán.
BOTÓN SELECT (Seleccionar) Todas las selecciones
se debenaceptar con este botón. Si no seaceptan en 15
segundos, la selecciónse elimina.Si secambia de menú,se pierden todas lasselecciones noaceptadas.
ICONO “HOT” (Caliente) Cuando finaliza unprogramade cocción,o cuandose apagael horno,si todavía
estácaliente, la pantallamuestra lahora actualque sealterna conel mensaje “HOT”a intervalos de 3".
ES 53
Page 54

3.2 Modalidades de cocción
Mando
selector
*
*
T°C
establecida
40
180
210
220 50 ÷ 280
210
200
150 ÷ 220
L3
210 50 ÷ 230
Rango
de T°C
40 ÷ 40
50 ÷ 240
50 ÷ 240
50 ÷ 230
L1 ÷ L5
FUNCIÓN ( )dependiendo del modelo
LAMPARA: Conecta la luz interior
DESCONGELACIÓN:Funcionamiento de laturbina de cocciónque hace circular
el aire dentro del espacio del horno. Ideal para realizar una descongelación
previaa unacocción.
CALOR CIRCULANTE: Utilización simultánea de la resistencia inferior, superior
y de la turbina que hace circular el aire dentro del espacio del horno. Función
recomendada para las aves, la repostería, los pescados, las verduras... El calor
penetra mejor dentro del alimento a cocer reduciendo el tiempo de cocción,
así como el tiempo de precalentamiento. Se pueden realizar cocciones
combinadas con preparaciones idénticas odistintas en uno o dos niveles. Este
modo de cocción garantiza una distribución homogénea del calor y no mezcla
los olores. Para una cocción combinada se deben prever unos diez minutos
más.
CONVECCİÓN NATURAL: Funcionan la resistencia inferior y la resistencia
superior del horno. Es la cocción tradicional, ideal para cocinar asados, caza,
galletas,manzanasal hornoy paraconseguir alimentos crujientes.
RESISTENCIA INFERIORCIRCULANTE: Utilizaciónde la resistencia inferior más
la turbina que hace circular el aire dentro del espacio del horno. Ideal para
hacer tartasde frutas jugosas, tortadas, quiches,pasteles. Evita que sesequen
los alimentosy favorece la subidade bizcochos, masa de pan y otras cocciones
realizadaspor debajo.Coloque larejilla en laranurainferior.
TURBOGRILL: La función turbogrill debe utilizarse con la puerta cerrada.
Utilización de la resistencia superior más la turbina que hace circular el aire
dentro delespacio del horno. Se requiereun precalentamiento paralas carnes
rojas pero no para las carnes blancas. Ideal para las cocciones de volumen
grueso, piezas enteras como cerdo asado, las aves, etc. Coloque el plato que
quiera cocer directamenteen larejilla en el centrodel horno, a un nivelmedio.
Coloque la grasera debajo de la rejilla para que las grasas caigan dentro.
Asegúrese deque la comida no quededemasiado cercadel grill.En la mitad de
la cocción, girela piezaque estécociendo.
GRILL: El grilldebe utilizarsecon la puertacerrada. Utilización de la resistencia
superior con posibilidad de ajustar la temperatura. Es necesario un
precalentamiento de 5 minutos para que la resistencia se ponga al rojo. Éxito
seguro con las parrilladas, las brochetas y los gratinados. Las carnes blancas
deben alejarse del grill, porque aunque así se alargaráel tiempo de cocción,la
carne quedará mássabrosa. Lascarnes rojasy losfiletes depescado se pueden
colocarencima dela rejillacolocandodebajo lagrasera.
BASE: Utilizar el elementoinferior. Ideal para todo tipo dereposteria. Utilizarpara
flanes, quiches,tartas, pastas yprocesos querequieran mascalor desdeabajo.
* Programa de prueba según CENELEC EN 60350-1 utilizado para la definición de la clase energética.
ES 54
Page 55

4. Limpieza y mantenimiento del horno
4.1 Notas genéricas de limpieza
La vida útildel aparatose prolonga sise limpiaa intervalos regulares. Esperea queel hornose enfríe
antesde llevara cabolas operaciones de limpiezamanuales. No utilicenunca detergentes abrasivos,
estropajosmetálicos ni objetospuntiagudos para lalimpiezacon el finde nodañar de formairreparable
las piezas esmaltadas. Utiliceúnicamente agua,jabón o detergentes a basede amoniaco.
PIEZASDE VIDRIO
Es aconsejable limpiarla puerta devidrio con papelabsorbente decocinadespués decada uso del
horno. Para eliminar lasmanchas máspersistentes,se puedeutilizar también una esponjaempapada
en detergente bien escurriday aclarar con agua.
JUNTA DELA PUERTADEL HORNO
Si se ensucia,la junta se puedelimpiar conuna esponjaligeramentehúmeda.
ACCESORIOS
Limpie los accesorioscon una esponjaempapada enagua y jabón,escúrralos y séquelos:no utilice
detergentesabrasivos.
FUENTE DE GOTEO
Después de usarlas resistencias, extraiga la fuentedel horno. Viertala grasa calienteen unrecipiente y
lavela fuente con aguacaliente utilizando unaesponja ydetergentelavavajillas.
Si quedan residuosgrasos,sumerja lafuenteen aguay detergente. También se puedelavarla fuenteen
el lavavajillaso bien utilizar un elhorno.detergente comercial parahornos. Nuncavuelva aintroducir la
fuentesucia en
4.2 Horno autolimpiante catalítico
Los paneles especiales autolimpiantes recubiertos por un esmalte con estructura microporosa (ofrecidos
comoaccesorios opcionalesen unos modeloso deserie enotros) eliminan lalimpiezamanual delhorno.
Las grasas proyectadas sobre lasparedes durante lacocción, son descompuestaspor elesmalte, mediante un
procesocatalíticode oxidacióny sontransformadosen productos gasos.
Salpicaduras excesivas de grasa pueden obstruir los poros y por consiguiente impedir la autolimpieza, tal
característica puedé ser restablecidá mediante un calentamiento de unos 10-20 minutos del horno vacío
programándo elhorno a la máxima temperatura.No usar productos abrasivos, barillas metálicas,objetos de
punta,paños rugosos,productos químicoso jabonesque puedieran dañarirremediablemente elesmalte.
ES 55
Page 56

4.3 Mantenimiento
EXTRACCIÓNY LIMPIEZADE LAS REJILLAS
1. Desenrosque ensentido antihorario lastuercas estriadas.
2. Extraiga lasrejillas tirandode ellas haciafuera.
3. Límpielas lavándolas en el lavavajillas o con una esponja húmeda y séquelas inmediatamente
después.
4. Una vezlimpias, vuelva ainstalar las rejillasfijando las tuercasestriadas.
A
EXTRACCIÓNDE LAPUERTADEL HORNO
1. Abra lapuertaanterior.
2. Abra las pestañas de alojamiento de la bisagra por el lado derecho e izquierdo de la puerta anterior
presionándolashacia abajo.
3. Vuelva ainstalar lapuertallevando acabo elprocedimientoa lainversa.
ES 56
Page 57

LOW-E
EXTRACCIÓNY LIMPIEZADE LA PUERTA DEVIDRIO
1. Abra lapuerta delhorno.
2.3.4. Bloquee lasbisagras, desenrosque lostornillos y extraiga la cubiertametálica superior tirandohacia
arriba.
5.6. Extraiga el vidrio con mucho cuidado de la contrapuerta del horno (N. B.: si se trata de un horno
pirolítico,extraigatambién elsegundo yel tercervidrio silos hubiera).
7. Altérmino dela limpieza osustitución, vuelvaa ensamblarlas piezasen elorden opuesto ala extracción.
En todos los vidrios, la indicación ”Low-E” debe ser correctamente legibley estar ubicadaa la izquierdade
la puerta, cerca de la bisagra lateral izquierda. De este modo, la etiqueta estampada en el primer vidrio
quedará por el interior dela puerta.
1.
5.
2.
3.
4.
6.
1
2
3
7.
ES 57
Page 58

5. Solución de problemas
5.1 Preguntas más frecuentes
PROBLEMA CAUSA POSIBLE SOLUCIÓN
El horno no se calienta
El horno no se calienta
El horno no se calienta
No hay reacción cuando
se toca la pantalla
El reloj no está en hora Configure el reloj
El bloqueo infantil está
activado
Los ajustes necesarios no
están configurados
Vapor y condensa en la
pantalla
Desactive el bloqueo infantil
Asegúrese de que los ajustes
necesarios sean correctos
Limpiar con un paño de
microfibra la pantalla para
quitar la capa condensación
ES 58
Page 59

Sicherheitshinweise
• WARNUNG: Das Gerät und zugängliche Teile können während des
Betriebs heiß werden. Darauf achten, dass keine heißen Bestandteile
berührt werden.
•WARNUNG: Der Grill und zugängliche Teile können während des
Betriebs heiß werden. Kinder nicht in die Nähe des Geräts gelangen
lassen.
•WARNUNG:Vor dem Austauschen der Glühbirneprüfen,ob das Gerät
ausgeschaltetist,um dieGefahr vonStromschlägenzu vermeiden.
•WARNUNG: Um Gefahren durch das versehentliche Zurücksetzen der
thermischen Schutzeinrichtung zu verhindern, sollte das Gerät nicht
über eine externe Schaltquelle wie einen Timer betrieben oder an
einen Stromkreislauf angeschlossen werden, der regelmäßig ein- und
ausgeschaltetwird.
•WARNUNG:Vor demStartdes automatischen Reinigungszyklus:
- Backofentürreinigen.
- Große oder grobe Speisereste mit einem feuchten Schwamm aus dem
InnerendesBackofensentfernen. KeineReinigungsmittel verwenden.
- Alle ZubehörteileundGleitschienen (falls vorhanden)herausnehmen.
- KeineGeschirrtücherin denOfen legen.
• Bei Backöfen mit Kerntemperaturfühler, das Anschlussloch vor dem
Reinigungszyklus mit der beigefügten Nuss verschließen. Wird der
Kerntemperaturfühler nicht verwendet, sollte das Anschlussloch
immer mit derNussverschlossen werden.
•Kinder unterachtJahren nur unterAufsichtan das Gerätlassen.
•Kinder sollten nicht mit dem Gerät spielen. Dieses Gerät darf nicht von
körperlich oder geistig behinderten bzw. in ihrer Sinneswahrnehmung
beeinträchtigten Personen (einschließlich Kindern) oder von Personen
mit unzureichender Produktkenntnis benutzt werden, es sei denn, sie
werden von einer für ihre Sicherheit verantwortlichen Person
überwachtundeingewiesen.
•Reinigung und Wartung sollten nicht durch unbeaufsichtigte Kinder
erfolgen.
•Für die Reinigung der Glasbestandteile der Backofentür keine
Scheuermaterialien oder scharfkantigen Metallschaber verwenden, da
diese die Oberflächezerkratzenund dasGlas zerspringenkann.
DE 59
Page 60

•Ofen vor dem Herausnehmender Zubehörteile ausschalten und diese
nach der Reinigungentsprechend der Anweisungwiedereinsetzen.
•Nur denfür diesen Ofen empfohlenenKerntemperaturfühler verwenden.
•KeinenDampfreiniger verwenden.
•Den Stecker in eine geerdete, betriebsfähige Steckdose stecken. Bei
Geräten ohne Stecker, einen Standardstecker am Kabel befestigen, der
für die auf dem Siegel angegebene Ladung geeignet ist. Der Erdleiter
hat eine gelb-grüne Farbe. Dieser Vorgang darf nur durch einen
geschultenElektriker ausgeführtwerden. PassenSteckdose und Stecker
nicht zueinander, muss die Steckdose durch einen qualifizierten
Elektrikergegen einegeeignete ausgetauscht werden.DerAnschlussan
die Stromversorgung kann auch mittels eines allpoligen Schalters
zwischen Gerät und Stromquelle erfolgen, der die gesetzlich
zugelassenen maximalen Anschlusswerte tragen kann. Das gelb-grüne
Erdungskabel sollte nicht vom Schalter unterbrochen werden. Bei der
Installation des Geräts darauf achten, dass die für den Anschluss
verwendeteSteckdose oder derallpoligeSchaltergut zugänglich sind.
•Ist das Stromkabel beschädigt, sollte es durch ein vom Hersteller
erhältliches vomKundendienst ersetztwerden.
IstdasKabelbeschädigt, gemäß der folgendenAnweisung austauschen:
- AbdeckungderKlemmleiste öffnen;
- Stromkabelentfernen und durch ein ähnliches ersetzen,das zumGerät
passt(Typ H05VV-F, H05V2V2-F).
•Dieser Vorgang darf nur durch einen geschulten Elektriker ausgeführt
werden. Der Erdleiter (gelb-grün) muss etwa 10 mm länger sein als die
anderen Leiter. Wenden Sie sich für alle Reparaturen an den
Kundendienst und veranlassen Sie die Verwendung originaler
Ersatzteile.
•Die Nichteinhaltung der oben genannten Anweisungen kann die
Sicherheit des Geräts beeinträchtigen und zum Erlöschen der Garantie
führen.
•EventuelleMaterialrestesolltenvor der Reinigung entfernt werden.
•Während der pyrolytischen Selbstreinigung des Herdes können sich
Oberflächen mehr als gewöhnlich erhitzen. Kinder sollten daher einen
ausreichendenSicherheitsabstand einhalten.
DE 60
Page 61

Zusammenfassung
Allgemeine Anweisungen
62
Produktbeschreibung
64
Betrieb des Backofens
65
Reinigung und Wartung des
Backofens
69
1.1 Sicherheitshinweise
1.2 Elektrische Sicherheit
1.3 Empfehlungen
1.4 Installation
1.5 Abfallentsorgung
1.6 Konformitätserklärung
2.1 Übersicht
2.2 Zubehör
2.3 Inbetriebnahme
3.1 Beschreibung der Anzeige
3.2 Funktionen zum Garen
4.1 Allgemeine Reinigungshinweise
4.2 Katalytisches Selbstreinigungsset
4.3 Wartung
Entfernen und Reinigen der
•
Führungsschienen
Entfernen Des Backofenfensters
•
Entfernen und Reinigen der Glastür
•
Fehlerbehebung
72
5.1 Häufig gestellte Fragen
DE 61
Page 62

1. Allgemeine Anweisungen
Vielen Dank, dass Sie sich für eins unserer Produkte
entschieden haben. Damit Sie lange Freude mit Ihrem
Backofen haben, sollten Sie diese Bedienungsanleitung
sorgfältig durchlesen und zum Nachschlagen in der
Zukunft aufbewahren. Notieren Sie sich vor dem
Anschließen desBackofens die Seriennummer, sodassSie
diese im Reparaturfall an den Kundendienst weitergeben
können.Den Backofen nach dem Auspacken aufmögliche
Transportschäden überprüfen. Im Zweifelsfall den Ofen
nicht in Betrieb nehmen und einen qualifizierten
Servicetechniker konsultieren. Verpackungsmaterial
(Plastiktüten, Styropor, Nägel usw.) außerhalb der
Reichweite von Kindern aufbewahren. Beim ersten
Einschalten des Backofens kann einstrengriechender Rauchentstehen.
Dieser kann beim ersten Erhitzen durch den Kleber auf den Dämmplatten hervorgerufen werden. Dies ist
bei der ersten Inbetriebnahme ein normaler Vorgang; es sollte jedoch abgewartet werden, bis der Rauch
sich verzogen hat, bis Lebensmittel in den Ofen geschoben werden. Der Hersteller übernimmt keine
Verantwortung in Fällen,wo die indiesem Dokument enthaltenenAnweisungen nichtbeachtet werden.
HINWEIS: Die in diesem Handbuch erwähnten Funktionen, Eigenschaften und Zubehörteile können je
nach gekauftem Modellvariieren.
1.1 Sicherheitshinweise
Den Backofen nur zum vorbestimmten Zweck, das heißt, für das Garen von Lebensmitteln einsetzen. Alle
anderen Verwendungsmöglichkeiten wie beispielsweise als Heizungsquelle gelten als unsachgemäß und
sind daher gefährlich. Der Hersteller übernimmt keine Haftung für Schäden, die aus einer falschen,
unsachgemäßenoder unverständlichenVerwendunghervorgehen.
Der Betrieb elektrischerGeräteerfordert die Einhaltungeiniger Grundregeln:
- Das Gerätnicht amStromkabelaus derSteckdoseziehen.
- Gerät nichtmit nassenoder feuchtenHänden oderFüßen berühren.
- Die Verwendung von Adaptern,Mehrfachsteckern undVerlängerungskabelnwird nicht empfohlen.
- Bei einerFehlfunktion beziehungsweise beiunzulänglichem BetriebGerät ausschalten undnichtöffnen.
1.2 Elektrische Sicherheit
DER ANSCHLUSS AN DIE STROMQUELLE DARF NUR DURCH EINEN ELEKTRIKER ODER QUALIFIZIERTEN
TECHNIKERERFOLGEN.
Die Stromquelle, andie der Backofen angeschlossen wird,muss dengesetzlichen Voraussetzungendes
Landes entsprechen. Der Hersteller übernimmt keine Haftung für Schäden, die aus der Nichtbefolgung
dieser Anweisungen entstehen.Der Backofen muss entsprechendder geltendenGesetzgebungdes Landes
an eine geerdete Wandsteckdose oder an einen allpoligen Trennschalter angeschlossen werden. Die
Stromquelle sollte durch entsprechende Sicherungen geschützt sein und die verwendeten Kabel müssen
einen Querschnitt aufweisen, dereine ordnungsgemäßeStromversorgung desBackofens gewährleistet.
ANSCHLUSS
Der Backofen wird mit einem Stromkabel geliefert, das an eine Stromquelle mit 220- 240 Vac 50 Hz
angeschlossen werden kann. Bevor der Backofen an die Stromquelle angeschlossen wird, muss Folgendes
überprüft werden:
- Spannung desStromnetzesmit demMessgerät;
- Beschaffenheit und Umfelddes Trennschalters.
Die mit der Erdungsklemme des Backofens verbundene Schutzleitung muss mit der Erdungsklemme der
Stromquelleverbunden werden.
WARNUNG
Vor dem Anschließen des Backofens an die Stromquelle einen qualifizierten Elektriker darum bitten, die
Kontinuität der Erdungsklemme an der Stromquelle zu überprüfen. Der Hersteller übernimmt keine
Verantwortung für Unfälle oder sonstige Probleme, die aus einem nicht sachgemäßen Anschluss des
Backofens an die Erdungsklemme oder an einen geerdeten Anschluss mit defekter Kontinuität entstehen
können.
DE 62
Page 63

HINWEIS: Für eine eventuelle Wartungdes Ofens ist die Zugänglichkeit einer zweiten Wandsteckdose von
Vorteil,sodass er andiese angeschlossen werden kann, wenner ausgebaut werdenmuss. DasStromkabel
darf nur vonqualifizierten Kundendiensttechnikernoder Elektrikern ausgetauscht werden.
1.3 Empfehlungen
Es empfiehlt sich,den Backofen nach jederVerwendunggrobzu reinigen.
Die Ofenwände nicht mit Aluminiumfolie oder sonstiger im Handel erhältlicher Einmalschutzfolie
auskleiden.
Gerät die Aluminiumfolie oder sonstige Schutzfolie mit der heißen Emaille in Berührung, so kann sie
schmelzen und die Qualität der Backofenbeschichtung beeinträchtigen. Es wird empfohlen, den Backofen
nicht beisehr hohenTemperaturen zubetreiben, umeine übermäßigeVerschmutzung und unangenehme
Rauch- und Geruchsentwicklung zu vermeiden. Es ist besser, bei niedrigerer Temperatur die Garzeit zu
erhöhen. Zusätzlichzum mitgelieferten Zubehör sollten nur temperatur- und hitzebeständigeBackformen
und ofenfestesGeschirr verwendet werden.
1.4 Einbau und Installation
Der Hersteller ist nicht zur Installation verpflichtet. Wird das Eingreifen des Hersteller erforderlich, um
Fehler zu beheben, die aus einer falschen Installation hervorgehen, so erfolgtdieses nicht im Rahmen der
Gewährleistungsgarantie. Die Installationsanweisungen für qualifiziertes Fachpersonal müssen befolgt
werden. Eine falsche Installation kann Personen- oder Sachschäden hervorrufen. Für derartige Schäden
oder Verletzungenübernimmt derHersteller keine Haftung.
Der Backofen kann oben ineinem Einbauschrankoder unterder Arbeitsflächeeingebaut werden.Vor dem
Fixieren muss gewährleistet sein, dass im Backofenraum genügend Fischluft zirkulieren kann, um die
Kühlung und den Schutz der innenliegenden Teile zu gewährleisten. Je nach Einbauart die auf der letzten
Seiteangegebenen Öffnungen vornehmen.
1.5 Entsorgung und Umweltschutz
Dieses Elektrohaushaltsgerät ist in Einklang mit der EU-Richtlinie 2012/19/EU über Elektround Elektronik-Altgeräte (WEEE) gekennzeichnet. Elektro- und Elektronik-Altgeräte enthalten
umweltschädigende Substanzen, aber auch Grundkomponenten, die wiederverwendet
werdenkönnen. Daher istes wichtig,Elektro- und Elektronik-Altgerätespezifisch zuentsorgen,
um alle schädlichen Substanzen zu entfernen und wiederverwendbare Teile zu recyceln.
Verbraucherleisten einen wichtigen Beitrag zur Gewährleistung, dassElektro- und ElektronikAltgerätenicht zueinem Umweltproblemwerden. HaltenSie sichdaher bittean die folgenden
Grundregeln:
- Elektro- undElektronik-Altgerätedürfennicht mitdem normalenHausmüll entsorgt werden.
- Elektro-und Elektronik-Altgeräte müssen bei zugelassenen Sammelstellen abgegeben werden, die von
der Stadtverwaltung oder anderenzuständigenStellen verwaltet werden.
In vielen Ländern wird für die Entsorgung großer Elektro- und Elektronik-Altgeräte ein Abholservice
angeboten. Beim Kauf eines neuen Geräts wird das alte möglicherweise vom Händler zurückgenommen,
der es kostenfrei entsorgt, sofern das neue Gerät von einem ähnlichen Typ ist und die gleiche Funktion
erfüllt wie dasAltgerät.
MASSNAHMEN ZUM STROMSPAREN UNDUMWELTSCHUTZ
Sofern möglich, das Vorheizen des Backofens vermeiden und seine Kapazität voll ausnutzen. Die
Backofentür so selten wie möglich öffnen, weil die Hitze aus dem Innenraum bei jedem Öffnen verloren
geht.
Für einedeutliche Energieersparnis den Backofen5-10 Minuten vordem Endeder Garzeit ausschaltenund
mit der Restwärme zuEnde garen.Die Dichtungensollten sauber undunversehrtbleiben, damitkeine Hitze
aus dem Inneren verloren geht. Falls Sie einen Stromversorgungsvertrag mit wechselndem Stundentarif
haben, erleichtert das Programm der „verzögerten Startzeit“ das Stromsparen, indem der Anfang des
Garvorgangsin dieZeit verschobenwird, woder günstigere Stromtarifgilt.
1.6 Konformitätserklärung
Die Teile dieses Geräts, die mit Lebensmitteln in Berührung kommen können, entsprechen der EURichtlinie89/109.
Durch das Zeichen auf diesem Produkt wird seine Einhaltung aller geltenden Sicherheits-,
Gesundheits- und Umweltanforderungenbestätigt,die gesetzlichfür diesesProdukt vorgeschrieben sind.
DE 63
Page 64

2. Produktbeschreibung
2.1 Übersicht
1
3
5
4
6
2.2 Zubehör
2
1. Bedienfeld
2. Führungsschienen
(seitlicher Metallrost, falls enthalten)
3. Backrost
4. Fettpfanne/Backblech
5. Lüfter (hinter der Stahlabdeckung)
6. Backofentür
Backrost
1
Hält Auflauf- und Backformen.
Fettpfanne/Backblech
2
Fängt die beim Backen aus den Lebensmitteln
austretendeFlüssigkeitauf.
Led vision
3
Das ist ein Beleuchtungssystem, dass die
traditionelle Gluhbirne ersetzt. 14 LED-Leuchten
sind inder Backofenturintegriert. Das erzeugte Licht
ist sehr hell und ermoglicht eine fast schattenfreie
Sicht aufallen Ebenen imBackofeninneren.
LED schaltet sich wahrend der Turoffnung aus (nur
fur Pyrolyseofen).
Die Vorteile:
Neben derherausragenden Qualitat und Intensitat
der Beleuchtung, bietet das System U-See auch
eine langere Lebensdauer im Vergleich zu
herkommlichen Backofenlampen, ist auserdem
leicht zu reinigen und vor allem sehr sparsam im
Enerigeverbrauch.
- Optimale Ubersichtauf allenBackofenebenen
- Zuverlassige Funktionund lange Lebensdauer
- Hohe Helligkeit bei sehr niedrigen Energieverbrauch, bis
zu 95%weniger als herkommliche Backofenbeleuchtung
- Leicht zureinigen.
DE 64
Page 65

2.3 Erste Inbetriebnahme
ERSTEREINIGUNG
Den Backofen vor der ersten Inbetriebnahmereinigen. DieAußenflächen miteinem feuchten, weichen
Tuch abwischen. Alle Zubehörteile spülen und den Backofen innen mit warmem Spülwasser
auswischen. Den leeren Backofen auf die Höchsttemperatur einstellen und etwa eine Stunde lang
anlassen, damit derneue Geruchverfliegt.
3. Betrieb des Backofens
3.1 Beschreibung der Anzeige
ON / OFF
EXTRA
Garzeit
Uhrzeit
Über diese Schaltflächen wir der Backofen ein-/ausgeschaltet.
Garzeitende
Kindersich
erung
Timer
WLAN
Ist der Backofen ausgeschaltet, zeigt das Display die Uhrzeit
an. Ist der Backofen inaktiv, können außer der Garzeit und
dem Garzeitende alleFunktionen ausgewähltwerden.
Wenn die Uhrzeit nicht eingestellt ist, funktioniert der
Backofennicht: DasDisplay blinkt undzeigt„12:00“ an.
Die einzige funktionierende Taste ist „EXTRA“. Über die Taste
„EXTRA“ können folgende Funktionen eingestelltwerden:
DE 65
Page 66

FUNKTION
GARZEIT
ENDE DER
GARZEIT
TIMER
UHR
EINSTELLEN
KINDERSICH
ERUNG
VERWENDUNG
Hinweis: Kann nur
zusammen mit einem
aktiven Garprogramm
eingestellt werden. Drücken
Sie zweimal EXTRA und
stellen Sie die Zeit über die
Tasten „+“ und „-“ ein.
Bestätigen Sie dann mit
„SELECT“. Da s Display
zeigt „00:00“ an, wenn keine
Garzeit eingegeben wurde;
anderenfalls zeigt es die
verbleibende Garzeit an.
Hinweis: Kann nur
zusammen mit einem
aktiven Garprogramm
eingestellt werden. Drücken
Sie so lange EXTRA, bis
das Symbol leuchtet.
Stellen Sie das Ende der
Garzeit über die Tasten „<“
und „>“ ein, bevor Sie zum
Bestätigen auf SELECT
drücken.
Drücken Sie so lange
EXTRA, bis das Symbol
leuchtet. Stellen Sie das
Ende der Garzeit über die
Tasten „<“ und „>“ ein,
bevor Sie zum Bestätigen
auf SELECT drücken.
Die Garzeit wird
automatisch berechnet.
•Wurde keine Zeit
eingestellt, zeigt das
Display „00:00“ an,
ansonsten gibt es die
verbleibende Garzeit an.
Drücken Sie so lange
EXTRA, bis das Symbol
leuchtet. Stellen Sie die Zeit
über die Tasten „<“ und „>“
ein, bevor Sie zum
Bestätigen auf SELECT
drücken.
•Beim erstmaligen
Einschalten leuchtet das
Display auf und zeigt
„12:00“ an.
Drücken Sie zum Ändern der
Uhrzeit so lange EXTRA, bis
das Symbol leuchtet. Stellen
Sie die Zeit dann über die
Tasten„<“und„>“ein,bevor
Sie zum Bestätigen auf
SELECT drücken.
•Drücken Sie so lange
EXTRA, bis das Symbol
leuchtet. Aktivieren Sie
dann über die Taste „<“
oder „>“ die Funktion:
Das Display zeigt ON.
Drücken Sie zum
Bestätigen auf SELECT.
DEAKTIVIEREN FUNKTIONSWEISE
•Um die Garzeit vor dem
eingestellten Ende zu ändern,
drücken Sie zweimal EXTRA
und stellen Sie die Zeit über
die Tasten „<“ und „>“ ein,
bevor Sie noch einmal auf
SELECT drücken.
•Um die Garzeit abzubrechen,
setzen Sie die Anzeige auf
„00:00“ zurück.
Um das En de der Garzeit vor
der eingestellten Zeit zu
ändern, drücken Sie so oft
EXTRA, bis das Symbol
leuchtet. Stellen Sie das Ende
der Garzeit über die Tasten
„<“ und „>“ ein, bevor Sie mit
SELECT bestätigen.
•Um das Ende der Garzeit
abzubrechen, setzen Sie die
Anzeige auf „00:00“ zurück.
•Um den Timer umzustellen,
drücken Sie so oft EXTRA, bis
das Symbol leuchtet. Stellen
Sie die Garzeit über die Tasten
„<“ und „>“ ein, bevor Sie mit
SELECT bestätigen.
•Drücken Sie so lange
EXTRA, bis das Symbol
leuchtet. Deaktivieren Sie
dann über die Taste „<“
oder „>“ die Funktion:
Das Display zeigt OFF.
Drücken Sie zum
Bestätigen auf SELECT.
Erreicht ein Garprogramm
das Ende, schaltet sich der
Backofen aus und das
Display zeigt so lange END
(das Symbol für das
Garprogramm bleibt
weiterhin an), bis die einzige
funktionierende T aste
„On/Off“ gedrückt wird.
Erreicht ein Garprogramm
das Ende, ertönt ein
Alarmsignal.
Erreicht ein Garprogramm
das Ende, schaltet sich der
Backofen aus und das
Display zeigt so lange END
(das Symbol für das
Garprogramm bleibt
weiterhin an), bis die einzige
funktionierende T aste
„On/Off“ gedrückt wird.
Erreicht ein Garprogramm
das Ende, ertönt ein
Alarmsignal.
•Diese Funktion schaltet ein
Alarmsignal ein, das einige
Sekunden lang läutet, wenn
die eingestellte Zeit abläuft
(der Ofen wird durch diese
Funktion nicht
ausgeschaltet).
Sie können eine Zeit
zwischen 00:00 und 23:59
einstellen.
•Darüber können Sie die
Uhrzeit einstellen, die im
Display angezeigt wird.
•Ist die Funktion aktiv, lässt
sich nur die Taste EXTRA
zum Deaktivieren und die
Taste ON/OFF bedienen.
DE 66
VERWENDUNGSZWECK
Erreicht die Garzeit das Ende ,
wird der Backofen automatisch
ausgeschaltet und das
Alarmsignal ertönt für einige
Sekunden.
•Diese Funktion kann auch zum
Programmieren der Garzeit
verwendet werden.
•Eingestellte Garprogramme
gehen verloren, wenn „F“
gedrückt wird.
•Wird eine verzögerte Ga rzeit
eingestellt, schaltet sich der
Backofen aus und das Display
zeigt die aktuelle Uhrzeit an.
Dabei sind die Symbole für das
Garprogramm, die Garzeit und
das Ende der Garzeit
beleuchtet.
•Beim Einstellen des
Garprogramms können Sie über
die T asten „<“ und „>“ die
ausgewählte Temperatur
anzeigen und ändern: Beim
ersten Berühren wird die
Temperatur angezeigt, beim
zweiten kann sie geändert
werde n.
Der Timer funktioniert
•
auch dann, wenn der
Backofen ausgeschaltet
ist.
• Die Alarmfunktion
funktioniert auch bei
ausgeschaltetemOfen.
•Diese Funktion ist vor allem
für Haushalte mit kleinen
Kindern zu empfehlen.
Page 67

WLAN (je nach Backofenmodell) Wenn Sie imTimer-Displayauf EXTRA drücken, können Siedas WLANMenü auswählen. ImWLAN-Menü könnenSie über dieTasten „<>“ Folgendesauswählen:
- Off: DasWLAN wird ausgeschaltet, derBackofen kann nichtüber dieApp bedient werden.
- On: Das WLAN wird eingeschaltet, der Backofen kann nur über die App bedient werden. Dies bedeutet, dass
keine Garprogramme, Rezepte oder Temperaturenim Display zurAuswahl stehen. Es steht lediglich das WLANMenü zur Verfügung, indem die Taste EXTRA gedrückt wird. Sie können den Backofen über die ON/OFF-Taste
zwarausschalten, abernicht überdas Display wiedereinschalten. Diesgeht nur überdie App.
- Reset: Mit dieser Einstellung sollte der Backofen sich bei seiner ersten Verbindung mit Ihrem WLAN-Netz
anmelden. Außerdem kann über diese Funktion die aktuelle WLAN-Verbindung für eine erneute Anmeldung
zurückgesetzt werden. Ist die Funktion ausgewählt, gibt Ihnen das Gerät fünf Minuten Zeit, um die Anmeldung
abzuschließen. Während diesesVorgangs lassensich Garfunktionen, Rezepte und Temperaturen nicht über das
Display einstellen. Es steht lediglich das WLAN-Menü zur Verfügung, indem die Taste EXTRA gedrückt wird. Sie
könnenden Backofenüber dieON/OFF-Tastezwarausschalten, abernicht überdas Display wiedereinschalten.
Dies geht nur über die App. Um das Anmelden/Zurücksetzen über das Display zu beenden, drücken Sie EXTRA
und wählen Sie dann über die Tasten „< >“ OFF aus. Nach fünf Minuten beendet das Gerät automatisch das
Anmelden/Zurücksetzen.
- Read: Der Backofen sendet zwar seinen Status an die App, lässt sich aber nicht über das Handy bedienen. Zu
diesem Zweck mussder Backofen erst angemeldet werden.
Istkein WLAN konfiguriert,stehen nurdie OptionenOFF undRESET zurAuswahl.
Wird der Backofen mit dem WLAN verbunden, beträgt die standardmäßige Garzeit fünf Stunden und kann vom
Benutzergeändert werden.
WLAN-Anmeldung:
Um das Gerät am WLAN anzumelden, drücken Sie so lange EXTRA, bis das WLAN-Symbol leuchtet. Wählen Sie
dann über die Tasten „< >“ „Reset“ aus. Folgen Sie dann den Anweisungen in der App. Ist die Funktion
ausgewählt,gibt Ihnendas GerätfünfMinuten Zeit,um dieAnmeldung abzuschließen.
WLAN-Symbol
- Symbol nichtbeleuchtet: WLANist ausgeschaltet.
- Symbol blinkt, eine Sekunde an, eine Sekunde aus: Sie können über Ihr WLAN-Netzwerk auf den Backofen
zugreifen und diesen anmelden. Schlägt die Anmeldung fehl, wird das WLAN-Symbol nach fünf Minuten
ausgeschaltet.
- Das Symbolleuchtetdauerhaft: DerBackofen ist mitIhrem WLAN-Routerverbunden.
- Symbol blinkt, drei Sekunden an, eine Sekunde aus: Der Backofen versucht, sich mit Ihrem WLAN-Router zu
verbinden.
- Symbol blinkt,eine Sekundean, drei Sekundenaus: DerBackofenbefindetsich imLesemodus.
CANDY SIMPLY-FI:
Weitere Informationen zum ANSCHLUSS und zur optimalen NUTZUNG Ihres Candy simplyFiGerätes finden Sie unter oder auf der speziell hierfürhttp://www.candysimplyfi.com
eingerichteten simplyFi-Serviceinternetseite http://simplyfiservice.candy-hoover.com
Ofen Innenraum
Bratspieß
Umluft
Heizelement
Heizelement Boden
Grill
Pyro
Auftauen
Ventilator
SPRACHEINSTELLUNG Die Sprache kann eingestellt
werden, nachdem der Backofen ausgeschaltet wurde.
Dazu die
Tasten EXTRA und SELECT 3 Sekunden lang gleichzeitig
drücken. Die aktuelle Spracheinstellung wird im Display
angezeigt und kann geändert werden, indem die Taste „<“
oder „>“ gedrückt und durch SELECT bestätigt wird.
VerfügbareSprachen:
Italienisch,Englisch, Französisch und Deutsch.
nicht innerhalb von 15 Sekunden bestätigt, wird die Auswahl verworfen. Bei einem Menüwechsel geht die
SELECT Jede Auswahlmuss bestätigtwerden. Wirdsie
unbestätigteAuswahl verloren.
SYMBOL„HOT“ Wenn ein Garprogrammendet odersich derBackofen ausschaltet, zeigt das Displayan,
dass der Ofen noch heiß ist. Dabei variieren die Anzeige „HOT“ und die aktuelle Uhrzeit in 3-SekundenAbständen.
DE 67
Page 68

3.2 Funktionen zum Garen
Funktion
*
*
T °C
standard
40
180
210
220 50 ÷ 280
210
200
T °C
Bereich
40 ÷ 40
50 ÷ 240
50 ÷ 240
50 ÷ 230
150 ÷ 220
Funktion (je nach Backofenmodell)
LAMPE: Schaltet das Licht im Backofen an.
AUFTAUEN: Wenndie Auswahlauf diese Funktioneingestellt wird.Der Ventilator
wälzt die Luft bei Raumtemperatur um, sodass das Tiefkühlprodukt innerhalb
wenigerMinuten aufgetautwird, ohnedass seinEiweißgehaltsich ändert.
UMLUFT:Diese Garmethode ist fürdie Zubereitungvon Geflügel,Backwaren, Fisch
und Gemüse zu empfehlen. Die Hitze gelangt besser in das Lebensmittel und die
Dauer zum Garen und Vorheizen wird reduziert. Es lassen sich unterschiedliche
Lebensmittel und Rezepte gleichzeitig und auf mehreren Garebenen zubereiten.
Diese Garmethode sorgt für eine gleichmäßige Hitzeverteilung und Gerüche
werdennicht vermischt.
Wenn mehrere Gerichte gleichzeitig zubereitet werden, ist eine zusätzliche
Gardauervon 10Minuten erforderlich.
OBER-/UNTERHITZE: Es kommt das obere und untere Heizelement zum Einsatz.
Den Backofen etwa zehn Minuten lang vorheizen. Diese Methode eignet sich für
alle herkömmlichen Brat- und Backrezepte. Für rotes Fleisch, Roastbeef,
Lammkeulen, Wild, Folienrezepte, Blätterteig. Lebensmittel in feuerfestem
Geschirr auf mittlererSchiene garen.
UMLUFT + UNTERHITZE: Das untere Heizelement wird zusammen mit dem
Ventilatorgebraucht, derdie Luftim Ofen umwälzt.Diese Garmethode ist ideal
für saftige Obstkuchen,Quiche undPasteten.
Das Essen trocknet nicht aus, Kuchen, Brotteige und sonstige Rezepte mit
Unterhitzegehen gut auf.Auf unterster Schiene backen.
UMLUFT+ GRILL:Turbogrill mit geschlossenerTür verwenden.
Das obere Heizelement wirdzusammen mitdem Ventilatorgebraucht,der dieLuft
im Ofen umwälzt. Für rotes Fleisch ist Vorheizen erforderlich, für weißes Fleisch
nicht. Ideal zum Garen dicker Leben smittel am Stück wie Schweinebraten,
Geflügel usw. Grillgut in der Mitte des Ofens auf mittlerer Schiene garen.
Bratensaftmit derFettpfanne auffangen. Darauf achten,dass sichder Braten nicht
zu nahe amGrill befindet.Nach derHälfte derGarzeitwenden.
GRILL: Grill mit geschlossener Tür verwenden. Es wirdnur das obere Heizelement
verwendet unddie Temperatur kanneingestellt werden.Damit die Heizelemente
rot glühen ist eine Vorheizdauer von fünf Minuten erforderlich. Grillgerichte,
L1 ÷ L5
L3
210 50 ÷ 230
*Nach CENELEC EN 60350-1 zur Definition der Energieklasse geprüft.
Kebab und Gratin gelingen garantiert. WeißesFleisch sollte mit Abstand zum Grill
gegart werden; die Garzeit ist dann zwar länger, aber das Fleisch bleibt schön
saftig. RotesFleisch und Fischfilet kann aufdem Rostmit der Fettpfanne darunter
gegartwerden.Der Backofen verfügt überzwei Grillstufen:
Grill: 2140 WBarbecue: 3340 W
UNTERHITZE: Beidieser Funktion wird die groste Hitzeim unterenBereich des
Ofenserreicht. Unterhitze eignet sichbesonders furGeback undKuchen.
DE 68
Page 69

4. Reinigung und Wartung des Backofens
4.1 Allgemeine Reinigungshinweise
Die Lebensdauer des Geräts lässt sich durch eine regelmäßige Reinigung verlängern. Den Ofen vor der
Reinigung abkühlen lassen. Keine Scheuermittel, Stahlwolle oder scharfkantige Gegenstände für die
Reinigung verwenden, um die Emaillebeschichtung nicht zu beschädigen. Nur Wasser, Spülmittel oder
Reinigungsmittelmit Bleiche (Ammoniak)verwenden.
BESTANDTEILEAUS GLAS
Es empfiehlt sich, die Glastür nach jeder Verwendung des Backofens mit einem saugfähigen
Küchentuchzu reinigen.
Hartnäckige Flecken können mit einem in Reinigungsmittel getränkten Schwamm gesäubert und mit
klaremWasser abgewaschen werden.
DICHTUNG OFENTÜR
SchmutzigeDichtungen miteinem leicht angefeuchtetenSchwamm reinigen.
ZUBEHÖR
Zubehörteile mit einem feuchten Reinigungsschwamm säubern, abwaschen und abtrocknen. Keine
Scheuermittelverwenden.
FETTPFANNE
Fettpfannenach der Verwendung des Grills aus dem Ofen nehmen. Das heiße Fettabschütten (nichtin
den Abfluss) undFettpfannemit heißem Wasserund Spülmittelreinigen.
Hartnäckige Fettreste durch Einweichen in Spülwasser reinigen. Alternativ lässt sich die Fettpfanne
auch in der Spülmaschine oder mit einem herkömmlichen Backofenreiniger säubern. Schmutzige
Fettpfannenicht wiederzurück inden Backofen schieben.
4.2 Katalytisches Selbstreinigungsset
Der Reinigungsset ist als Zubehör für alle Backöfen erhältlich. Dank der selbstreinigenden Einsätze für
die Innenwände des Backofens wird das mühselige Reinigen von Hand überflüssig. Die Fett-, Öl-,
Fleischsaft- und Soßenspritzer im Backraum werden durch ein katalytisches Verfahren während des
Backens zersetzt und in gasförmige Verbindungen umgewandelt. Die Mikroporen- Beschichtung der
Einsätze kann durch größere Fettspritzer verstopft und die selbstreinigende Wirkung dadurch
vermindert werden. Dies läßt sich jedoch sehr einfach beheben, indem der leere Backofenauf höchste
Hitze eingestellt und ca. 10 bis 20 Minuten lang aufgeheizt wird. Benutzen Sie keinescheuernden oder
ätzenden Mittel, auch keine Stahlwolle, Schaber oder spitzen Gegenstände. Chemische
Reinigungsmittel können die Poren des Emailüberzugs verstopfen und so die Reinigungswirkung
verhindern. Zum Braten von besonders großen bzw. Fetthaltigen Bratenstücken ist es ratsam, einen
hohen Bräter zu benutzen. Beim Grillen empfiehlt es sich, die Fettpfanne zumAuffangen der
Bratflüssigkeit zu benutzen.Entfernen Sie eventuelle Überlaufreste oder Fettrückstände mit einem
feuchten Lappen oder Schwamm. Die Emailbeschichtung muß immer porös bleiben, damit die
Reinigungswirkung optimal gewährleistet ist. HINWEIS: Alle handelsüblichen Selbstreinigungssysteme
haben eine begrenzte Leistungsdauer. Nach ca. 300 Betriebsstunden des Backofens sollte Ihr
Reinigungssetausgetauscht werden.
DE 69
Page 70

4.3 Wartung
ENTFERNEN UND REINIGENDER SEITLICHENFÜHRUNGSSCHIENEN
1. Schraube entgegen demUhrzeigersinn abschrauben.
2. Die seitlichenFührungsschienen herausziehen und ausdem Ofen nehmen.
3. In derSpülmaschine odermit einemfeuchtenSchwamm säubernund sofortabtrocknen.
4. Die gereinigten Führungsschienen wiedereinsetzen und mitden Schrauben sichern.
A
ENTFERNEN DES BACKOFENFENSTERS
1. Die Backofentüröffnen.
2. Die Klemmenam Scharniergehäuse rechts undlinks an derScheibe nachunten drücken undöffnen.
3. Glasscheibe austauschen,indem dieSchritte in umgekehrter Reihenfolgeausgeführt werden.
DE 70
Page 71

LOW-E
ENTFERNEN UND REINIGENDER GLASTÜR
1. Die Backofentüröffnen.
2.3.4. Scharniere sperren,Schrauben entfernen unddie obereMetallkappenach obenabziehen.
5.6. Die Glasscheibe vorsichtig aus der Ofentür ziehen (Hinweis: Bei Backöfen mit PyrolyseReinigungsfunktionauch diezweite (falls vorhanden) und dritteScheibe herausnehmen).
7. Nachder Reinigung oder dem Austausch derScheibe, Einzelteilein umgekehrterReihenfolge wieder
einbauen.
Bei allen Glasscheiben muss die Aufschrift „PYRO“ in der oberen linken Ecke, in der Nähe des linken
Scharniers, gut lesbar sein. Auf diese Weise wird sichergestellt, dass sich die Aufschrift auf der
Innenseiteder ersten Scheibe befindet.
1.
2.
3.
5.
6.
1
2
3
7.
4.
DE 71
Page 72

5. Fehlerbehebung
5.1 HÄUFIG GESTELLTE FRAGEN
STÖRUNG MÖGLICHE URSACHE LÖSUNG
Der Backofen wird nicht heiß.
Der Backofen wird nicht heiß.
Der Backofen wird nicht heiß.
Das Touch-Display reagiert
nicht.
Die Uhr ist nicht eingestellt.
Die Kindersicherung ist
eingeschaltet.
Garfunktion und Temperatur
wurden nicht eingestellt.
Dampf und Kondenstropfen
auf dem Touch-Display.
Uhr einstellen.
Kindersicherung deaktivieren.
Prüfen, ob die nötigen
Einstellungen richtig sind.
Touch-Display mit einem
Mikrofasertuchabtrocknen.
DE 72
Page 73

Bezpečnostní pokyny
• VAROVÁNÍ:spotřebič a přístupné dílyjsouběhempoužíváníhorké.
Buďteopatrníanedotýk ejtesehorkýchsoučástí.
•VAROVÁNÍ: pokud se používá gril, přístupné díly jsou horké. Nenechte
děti přiblížit seke spotřebiči.
•VAROVÁNÍ: aby nedošlo k úrazu elektrickým proudem, před vým ěnou
žárovkyzkontrolujte,že je spotřebičvypnutý.
•VAROVÁNÍ: aby se zabránilo jakémukoliv nebezpečí vyplývajícího z
náhodného resetování tepelné pojistky, spotřebič nesmí být napájen
přes externí vypínací zařízení, jako je časovač nebo být připojen na
obvodnapájení,kterýje pravidelnězapínána vypínán.
•VAROVÁNÍ:před spuštění cyklu automatického čištění:
- Očistětedveře trouby;
- Vlhkouhoubouodstraňte velkénebo hrubézbytky jídla z vnitřku trouby.
Nepoužívejtečisticíprostředky;
- Vyjmětevšechna příslušenství a výsuvnýrošt (jsou-li uvnitř);
- Nepoužívejteutěrky
• U trub se sondou do masa zavřete před prováděním čištění otvor pomocí
dodané matice. Otvor mějte uzavřený vždy, když sondu do masa
nepoužíváte.
•Děti mladší než 8 let by se měly zdržovat v bezpečné vzdálenosti od
spotřebiče,pokudnejsou podnepřetržitým dohledem.
•Děti si nesmí se spotřebičem hrát. Osoby ve věku 8 a více let a osoby s
omezenými fyzickými, smyslovými nebo duševními schopnostmi, bez
zkušeností a znalostí produktu, smějí spotřebič používat pouze pod
dohledem nebo s poučením ohledně provozu spotřebiče, bezpečným
způsobem a svědomímmožných rizik.
•Čištěníaúdržbaby neměly být prováděnydětmi bez dozoru.
•K čištění skel dvířek trouby nepoužívejte drsné nebo abrazivní
materiály ani ostré kovové škrabky, protože mohou poškrábat povrch a
způsobit prasknutískla.
•Před odstraněním odnímatelných částí musí být trouba vypnuta a po
vyčištěnízkompletovánapodle návodu.
CZ 73
Page 74

•Používejte pouze takovou sondu do masa, která je doporučena pro
tutotroubu.
•Nepoužívejteparníčistič.
•Zasuňte zástrčku do zásuvky opatřené třetím kontaktem, který
odpovídá uzemnění a který musí být zapojený a funkční. U modelů bez
zástrčkypřipojte nakabel standardnízástrčku, kterájeschopnápracovat
se zatížením uvedeným na štítku. Zemnicí vodič má žlutozelenou barvu.
Tuto operaci by měl provádět příslušně kvalifikovaný odborník. V
případě nekompatibility mezi zásuvkou a zástrčkou spotřebiče
požádejte kvalifikovaného elektrikáře o nahrazení zásuvky jiným
vhodnýmtypem.
Připojení ke zdroji energie je možné také umístěním omnipolárního
jističe mezi spotřebič a zdroj energie, který je schopen pracovat s
maximálním připojeným zatížením a je v souladu s platnou legislativou.
Žlutozelený zemnicí kabel by neměl být jističem přerušen. Zásuvka a
omnipolární jistič používanépropřipojení byměly býtsnadnopřístupné
při instalacispotřebiče.
•Pokud je napájecí kabel poškozen, měl by být nahrazen kabelem nebo
speciálním svazkem dostupným od výr obce nebo servisního oddělení.
Pokud je kabel poškozen, vyměňte jej bezodkladně následujícím
postupem:
- Otevřetekryt svorkovnice;
- Demontujte napájecí kabel a nahraďte jej podobným kabelem,který je
kompatibilníse spotřebičem (typ H05VV-F, H05V2V2-F).
•Tuto operaci by měl provádět příslušně kvalifikovaný odborník.
Zemnicí vodič (žlutozelený) musí být přibližně o 10 mmdelší než ostatní
vodiče.
V případě jakýchkoli oprav kontaktujte pouze oddělení péčeo zákazníky
a požadujte použití originálních náhradníchdílů.
•Nedodržení výše uvedených pokynů může narušit bezpečnost
spotřebičeazpůsobitztrátu záruky.
•Předčištěním odstraňtejakýk olinadbytečný rozlitýmateriál.
•Během pyrolytického čisticího procesu se mohou povrchy zahřát více
nežobvykle,aproto je nutné držetděti vbezpečné vzdálenosti.
CZ 74
Page 75

Shrnutí
Obecné pokyny
76
Popis výr obku
78
Použití trouby
79
Čištění a údržba trouby
83
1.1 Bezpečnostní pokyny
1.2 Elektrická bezpečnost
1.3 Doporučení
1.4 Instalace
1.5 Odpadové hospodářství
1.6 Prohlášení o shodě
2.1 Přehled
2.2 Příslušenství
2.3 První použití
3.1 Popis displeje
3.2 Režimy vaření
4.1 Obecné poznámky k čištění
4.2 Samočištení trouby pomocí
katalytické vložky
4.3 Údržba
• Demontáž a čištění bočnic
• Demontáž okna trouby
• Demontáž a čištění skleněných
dvířek
Řešení potíží
86
5.1 Často kladené otázky
CZ 75
Page 76

1. Obecné pokyny
Děkujeme Vám, že jste si zvolili jeden z našich výr obků.
Pro dosažení nejlepších výsledků s trouboubyste si měli
pečlivě přečíst tento návod a uschovat jej pro budoucí
použití. Před instalací trouby si poznamenejte výr obní
číslo, abyste jej mohli poskytnout pracovníkům
zákaznických služeb v případě nutnosti opravy. Po
vyjmutí trouby zobalu zkontrolujte, zda nedošlo během
přepravy k jejímu poškození. Máte-li pochybnosti,
troubu nepoužívejte a požádejte kvalifikovaného
technika oradu. Uchovávejtevšechen obalový materiál
(plastové sáčky, polystyrén, hřebíky) mimo dosah dětí.
Při prvním zapnutí trouby se může linout silný
páchnoucí kouř, který je způsoben prvním ohřevem lepidla na izolačních deskách v troubě. To je
naprosto normální, a pokud k tomu dojde, je třeba počkat, než se kouř rozptýlí, a teprve poté vložit do
trouby pokrmy. Výr obce neponese žádnou odpovědnost v případech, kdy nebudou dodrženy pokyny
obsaženév tomto dokumentu.
POZNÁMKA: funkce,vlastnosti a doplňky trouby uváděné vtomto návodu sebudou lišit v závislosti na
modelu, který jstezakoupili.
1.1 Bezpečnostní pokyny
Používejte troubu pouze ke stanovenému účelu, kterým je pečení potravin; jakékoliv jiné použití,
například jako zdroj tepla, je považováno za nevhodné a proto nebezpečné. Výr obce nemůže nést
odpovědnostza případné škodyvzniklé nesprávným či nevhodným používáním.
Použitíjakéhokolivelektrickéhospotřebiče předpokládá dodržováníněkterých základních pravidel:
- Neodpojujte napájecíkabel ze zásuvky taháním;
- Nedotýk ejtese spotřebičemokrýma nebovlhkýma rukamači nohama;
- Použití adaptérů,rozdvojek a prodlužovacích kabelů nenízásadnědoporučeno;
- V případěselhání neboa/nebo špatnéfunkce vypněte spotřebiča nemanipulujte sním.
1.2 Elektrická bezpečnost
ZAJISTĚTE, ABY ELEKTRICKÁZAPOJENÍ PROVÁDĚL ELEKTRIKÁŘNEBO KVALIFIKOVANÝ TECHNIK.
Napájecí zdroj, ke kterému je trouba připojena, musí být v souladu s právními předpisy platnými v zemi
instalace.
Výr obce nenese žádnou zodpovědnost za případné škody způsobené nedodržením těchto pokynů.
Trouba musí být připojena k elektrické síti prostřednictvím uzemněné zásuvky nebo odpojovače s více
póly, vzávislosti na právních
předpisech platných vzemi instalace. Elektrickénapájení jetřeba chránit vhodnými pojistkamia použité
kabelymusístit správné napájení trouby.
ZAPOJENÍ
Trouba je dodávána s napájecím kabelem, který by měl být připojen pouze k elektrickému zdroji s
220–240 V AC 50 Hz mezi fázeminebo mezi fází a nulovým vodičem. Přepřipojením trouby k elektrické
síti je důležitézkontrolovat:
- Napájecí napětíuvedené na voltmetru;
- Nastavení odpojovače.
Uzemňovací vodič připojený k zemnicí svorce trouby musí být připojen k zemnící svorce napájecího
zdroje.
VAROVÁ NÍ
Před připojením trouby k elektrické síti požádejte kvalifikovaného elektrikáře o kontrolu spojitosti
zemnicí svorky elektrického napájení. Výr obce nenese žádnou odpovědnost za nehody nebo jiné
problémy způsobené nepřipojením trouby k zemnící svorce nebo uzemněním, které má vadnou
spojitost.
CZ 76
Page 77

POZNÁMKA: protože trouba může vyžadovat údržbu, je vhodné mít k dispozici další elektrickou
zásuvku, ke které lze troubu připojit po vyjmutí z prostoru, ve kterém je nainstalována. Napájecí kabel
smí být nahrazen pouze servisním technikemnebo technikems rovnocennoukvalifikací.
1.3 Doporučení
Pokaždémpoužití troubynapomůže minimálnívyčištěníudržet troubu vdokonaléčistotě.
Nevykládejte stěny trouby hliníkovou fólií nebojednorázovou ochranou dostupnouve specializovaných
prodejnách.
U hliníkové fólie nebo jakékoliv jiné ochranyhrozí připřímém kontaktu s horkým smaltem rizikotavení a
poškození vnitřního smaltu. Aby se zabránilo nadměrnému znečištění trouby a výsledným silným
kouřovým zápachům, doporučujeme nepoužívat troubu při velmi vysokých teplotách. Je lepší
prodloužitdobu pečenía mírně snížitteplotu.
Vedlepříslušenství dodávaného stroubou doporučujeme používat pouze nádobía pečicíformy odolné
protivelmi vysokým teplotám.
1.4 Instalace
Výr obci nemají žádnou povinnost provádět instalaci. Pokud je požadována pomoc výr obce k nápravě
škod způsobených nesprávnou instalací, na takovou pomoc se nevztahuje záruka. Je nutno dodržet
pokyny pro instalaci určené pro odborně vyškolené pracovníky. Nesprávná instalace může způsobit
újmu nebo zranění na osobách, zvířatech nebo věcech. Výr obce nemůže být za takové škody nebo
zraněnízodpovědný.
Trouba může být umístěna ve výšce ve sloupci nebo pod pracovní deskou. Před upevněním je nutné
zajistit dobré větrání v prostoru pro troubu, které umožní řádnou cirkulaci čerstvého vzduchu
potřebného prochlazení a ochranu vnitřních částí. Na základě typu upevnění vytvořte otvory popsané
na poslední straně.
1.5 Odpadové hospodářství a ochrana životního prostředí
Tento spotřebič je označen v souladu s evropskou směrnicí 2012/19/EU o odpadních
elektrických a elektronických zařízeních (OEEZ). OEEZ obsahují jak znečišťující látky (které
mohou mít negativní vliv na životníprostředí), tak i základní prvky (které mohou být znovu
použity). Je důležité, aby OEEZ podstoupily zvláštní zacházení pro správné odstranění a
likvidaci znečišťujících látek a obnovení všech materiálů. Jednotlivci mohou hrát
významnou roli při ochranně životního prostředí před OEEZ; je nutné dodržovat některá
základnípravidla:
- S odpadnímielektrickými a elektronickými zařízenímise nesmízacházetjako s domovnímodpadem;
- OEEZ by měly být odvezeny do speciálních sběrných dvorů spravovaných místním úřadem nebo
registrovanouspolečností.
V mnoha zemíchmůže být kdispozici vyzvednutí velkých OEEZ u zákazníka. Když koupíte nový spotřebič,
můžete starý odevzdat obchodníkovi, který musí bezplatně přijmout jeden starý spotřebič za jeden
nový prodaný spotřebič, pokud se jedná o ekvivalentní typ se stejnými funkcemi, jaké má nový
zakoupený spotřebič.
Šetrnost aohleduplnost k životnímu prostředíKdykoli jeto možné,vyhněte se předehřátí trouby avždy
se ji snažtenaplnit. Otevírejte dvířka trouby co možná nejméněčasto, protožepři každémotevření uniká
teplo zdutiny. Pro významnou úsporu energie vypnětetroubu 5 až10 minut předplánovaným koncem
doby pečení a využijte zbytkové teplo, které trouba nadále generuje. Udržujte těsnění v čistotě a v
pořádku, aby nedocházelo kunikání tepla z trouby. Máte-li hodinový tarif, program „zpožděnépečení“
usnadňuje úspory energiepřesunutím doby vařenína dobus nižší sazbou.
1.6 Prohlášení o shodě
Součásti tohoto spotřebiče, které mohou přicházet do kontaktu s potravinami, jsou ve shodě s
ustanovenímisměrnice EHS 89/109.
Umístěním značky na tento produkt potvrzujeme shodu se všemi příslušnými evropskými
směrnicemi týk ajícími sebezpečnosti, ochrany zdraví aochrany životního prostředí,které lzepoužít pro
tentoprodukt.
CZ 77
Page 78

2. Popis výrobku
2.1 Přehled
5
6
2.2 Příslušenství
Kovový ro št
1
Drží pečicí plechy a talíře.
Odkapávací plech
2
1
3
4
2
1. Ovládací panel
2. Polohy polic
(podélný dr átěný r ošt, je-li součástí
dodávky)
3. Kovový r ošt
4. Odkapávací plech
5. Ventilátor (za ocelovou deskou)
6. Dvířka trouby
Led vision
3
Je to system osvětleni, ktery nahrazuje klasicke
(žarovky ). 14 LED (u nepyrolytickych modelů) nebo
10 vysokovykonnych LED (u pyrolytickych modelů)
je integrovanych ve dviřkachtrouby.Tyto
nabizeji kvalitni osvětleni, umožňujici jasne
zobrazeni vnitřku trouby bez stinů na všech
urovnich.
Shromažďuje zbytky, které odkapávají během
pečení potravin naroštech.
Vyhody:
Tento system nabizi vyjimečne osvětleni vnitřku
trouby, ma delši životnost než klasicke žarovky,
snadnějši udržbu azejmena šetři energii.
- Optimalni pohled
- Dlouha životnost
- Velmi nizka spotřebaenergie,-95% ve srovnani s
klasickymi žarovkami.
CZ 78
Page 79

2.3 První použití
PŘEDBĚŽNÉ ČIŠTĚNÍ
Před prvním použitím troubu vyčistěte. Otřete vnější povrchy vlhkým měkkým hadříkem. Umyjte
všechna příslušenství a vytřete vnitřek trouby roztokem horké vody a promývací kapaliny. Nastavte
prázdnou troubu na maximální teplotu a ponechte ji zapnutou zhruba po dobu 1 hodiny. To odstraní
veškerézápachynovosti.
3. Použití trouby
3.1 Popis displeje
ZAPNUTÍ/V
YPNUTÍ
Pečení
Nastav
doba
ení
hodin
Pomocí tohoto tlačítka se trouba zapíná a vypíná.
Pečení
konec
Dětský
zámek
Časovač
Pokudje trouba vypnuta, nadispleji se zobrazujíhodiny.
Pokud není trouba aktivní, všechny funkce jsou dostupné,
kromědoby vaření a koncevaření.
Pokud nejsou hodiny nastaveny, trouba nepracuje: displej
bliká,zobrazuje„12:00“ ajediná funkční klávesa jeExtra.
PomocíklávesyExtra lze nastavit následujícífunkce:
WiFi
CZ 79
Page 80

FUNKCE JAK DEAKTIVOVAT CO TO DĚLÁ PROČ JE TO POTŘEBA
DOBA
PEČENÍ
KONEC
PEČENÍ
JAK POUŽÍVAT
Pozn.: může být nastavena
pouze s aktivním
programempečení.
Stiskněte dvakrát klávesu
EXTRA a nastavte dobu
pomocí kláves „+”a „-”.
Potom ji potvrďte
stisknutím tlačítka
„SELECT“. Na displeji se
zobrazí „00:00”, pokud
nebyla zadána žádná doba
pečení, jinak se bude
zobrazovat zbývajícídoba.
Pozn.: může být nastavena
pouze s aktivním
programempečení.
Několikrát stiskněte
tlačítko EXTRA, dokud se
nerozsvítí ikona, nastavte
konec doby pečení pomocí
kláves „<” a „>” a potvrďte
stisknutím klávesy
„SELECT“. Několikrát
stiskněte tlačítko EXTRA,
dokud se nerozsvítí ikona,
nastavte konec doby
pečení pomocí kláves „<” a
„>” a potvrďte stisknutím
klávesy„SELECT“.
Doba pečení je vypočtena
automaticky.
•Chcete-li upravit pečení
před nastaveným časem,
stiskněte dvakrát EXTRA a
upravte dobupečení podle
potřeby pomocí kláves „<”
a „>”. Potom stiskněte ještě
jednou „SELECT“.
•Chcete-li dobu pečení
zrušit, nastavte displej na
„00:00”.
Chcete-li změnit konec
pečení před nastaveným
časem, několikrát
stiskněte tlačítko EXTRA,
dokud se nerozsvítí ikona,
nastavte požadovaný
konec doby pečení pomocí
kláves „<” a „>” apotvrďte
stisknutím klávesy
„SELECT“.
Chcete-li konec doby
pečení zrušit, nastavte
displej na„00:00”.
Když program pečení
skončí,troubase vypnea na
displeji se zobrazí „END“
(konec) (ikona programu
pečení zůstane svítit),
dokud nebude stisknuto
jediné funkční tlačítko,
vypínač. Po skončení
programu pečeníse rozezní
zvukovávýstraha.
Když program pečení
skončí,troubase vypnea na
displeji se zobrazí „END“
(konec) (ikona programu
pečení zůstane svítit),
dokud nebude stisknuto
jediné funkční tlačítko,
vypínač. Po dokončení
programu pečeníse rozezní
zvukovávýstraha.
Po skončení doby pečení se
trouba automaticky vypne a
po několik sekund bude znít
zvukovávýstraha.
•Tato funkce se používá k
pečení, které může být
naplánovánodopředu.
•Pokud je nastaven program
pečení, bude ztracen po
stisknutíklávesy„F“.
•Pokud je nastaveno odložené
pečení, trouba se vypne a na
displeji sezobrazí aktuální čas.
Ikony programu pečení, doby
pečení a konce pečení budou
přitomsvítit.
•Pokud je nastaven program
pečení, stisknutím kláves „<” a
„>” můžete zobrazit a upravit
nastavené parametry: při
prvním dotyku se zobrazí
provozní teplota, zatímco při
druhém dotyku budete moci
tutoteplotu upravit.
ČASOVAČ
NASTAVENÍ
HODIN
BEZPEČNOST
DĚTÍ
• Na displeji se zobrazí
„00:00”, pokud nebyl
zadán žádný čas, nebo
zbývající doba, pokud již
byl čas zadán.
Několikrát stiskněte
tlačítko EXTRA, dokud se
nerozsvítí ikona, nastavte
dobu pomocí kláves „<” a
„>” a potvrďte stisknutím
klávesy„SELECT“.
•Při prvním zapnutí se
displej rozsvítí a zobrazí
„12:00“.
•Chcete-li upravit čas,
několikrát stiskněte
tlačítko EXTRA, dokud se
nerozsvítí ikona, nastavte
časpomocí kláves„<” a„>”
a potvrďte stisknutím
klávesy„SELECT“.
•Několikrát stiskněte
tlačítko EXTRA, dokud se
nerozsvítí ikona, a
následně klávesou „<“
nebo „>“ aktivujte tuto
funkci: na displeji se
zobrazí ON (zapnuto);
potvrďte stisknutím
klávesySELECT.
•Chcete-li změnit časovač,
stiskněteněkolikrátklávesu
EXTRA, než se rozsvítí
ikona,upravtedobu pečení
podle potřeby pomocí
kláves „<” a „>” a potvrďte
stisknutím klávesy
„SELECT“.
•Několikrát stiskněte
tlačítko EXTRA, dokud se
nerozsvítí ikona, a
následně klávesou „<“
nebo „>“ deaktivujte tuto
funkci: na displeji se
zobrazí OFF (vypnuto);
potvrďte stisknutím
klávesySELECT.
CZ 80
•Tato funkce aktivuje
výstrahu,kterázní podobu
několika sekund po
uplynutí nastavené doby
(tato funkce nevypíná
troubu).
Můžetenastavit
•Umožňuje nastavit čas,
který se zobrazuje na
displeji.
•Pokud je funkce aktivní, k
její deaktivaci lze použít
pouze tlačítko „Extra“ a
tlačítko„On/Off“ (vypínač).
• Časovač fungujebez ohledu
na to, zda jetrouba zapnuta.
• Výstraha fungujebez ohledu
na to, zdaje troubazapnuta.
•Tato funkce je užitečná v
domech, ve kterých jsou
děti.
Page 81

WiFi (závisí namodelu trouby) Stisknutí tlačítka „Extra“ na displejičasovače umožňuje otevření
nabídkyWi-Fi. V nabídceWi-Fi můžete stisknutím tlačítek„< >“ vybrat:
- Off (Vypnuto):Wi-Fi je vypnuto;troubunelze ovládat prostřednictvímaplikace.
- On (Zapnuto): Wi-Fi je zapnuto a troubu lze ovládat pouze prostřednictvím aplikace. Znamená to, že
funkce pečení, recepty a teplotu není možné volit z displeje. Dostupná je pouze nabídka Wi-Fi po
stisknutí tlačítka “Extra„. Troubu můžete vypnout vypínačem, nicméně ji nemůžete znovu zapnout
prostřednictvímdispleje, ale pouzeprostřednictvímaplikace.
- Reset: Toto nastavení se používá k registraci trouby při prvním připojení k vaší síti Wi-Fi ak resetování
aktuálního připojení Wi-Fi a umožnění nové registrace. Jakmile je nastavení zvoleno, spotřebič vám
poskytne 5 minut na dokončení procesu registrace. Během tohoto procesu nejsou funkce pečení,
recepty a nastavení teploty dostupné z displeje. Dostupná je pouze nabídka Wi-Fi po stisknutí tlačítka
„Extra“. Troubu můžete vypnout vypínačem, nicméně ji nemůžete znovu zapnout prostřednictvím
displeje, ale pouze prostřednictvím aplikace. Chcete-li opustit proces registrace/resetování
prostřednictvím displeje, stiskněte tlačítko „Extra“ a potom pomocí tlačítek „< >“ vyberte volbu „Off“
(Vypnuto).Po pěti minutáchspotřebič automaticky opustíproces registrace/resetování.
- Read (Číst):trouba odesílásvůj stav doaplikace,ale nemůžebýt ovládána nadálku. Aby tobylo možné,
je nutné troubunejdříve zaregistrovat.
Pokudnení Wi-Fikonfigurováno,je možné vybírat pouze mezi možnostmi off (vypnuto)a reset.
Popřipojení trouby kWi-Fi jevýchozí doba pečení5 hodin,nicméně uživatelji může změnit.
Registracek Wi-Fi:
Chcete-li registrovat spotřebič pro Wi-Fi, tiskněte tlačítko „Extra“ na displeji, dokud se nerozsvítí ikona
Wi-Fi, a potom vyberte volbu„Reset“ stisknutímkláves „< >“. Potom jenutné poskytovat podle pokynů
aplikace. Jakmile je nastavení zvoleno, spotřebič vám poskytne 5 minut na dokončení procesu
registrace.
IkonaWi-Fi
- Ikona nesvítí: Wi-Fi jevypnuto.
- Ikona bliká v intervalech 1 sekundy: trouba je přístupná pro vaši síť Wi-Fi a lze ji zaregistrovat. Pokud
nebyla registrace úspěšná, ikonaWi-Fi po5 minutáchzhasne.
- Ikona trvale svítí: trouba je připojenak vašemu směrovači Wi-Fi.
- Ikona se začne na 3 sekundy rozsvěcet a na 1 sekundu zhasínat: trouba se pokouší připojit k vašemu
směrovačiWi-Fi.
- Ikona sezačne na1 sekundu rozsvěcet a na3 sekundy zhasínat: troubaje v režimupouzepro čtení.
CANDY SIMPLY-FI:
Pro podrobnější informace o ZPŮSOBU PŘIPOJENÍ vašeho simply-Fi spotřebiče a ZPŮSOBU
POUŽITÍ nejlepším způsobem navštivte stránku nebo navštivtehttp://www.candysimplyfi.com
příslušnou webstránku zákaznického servisu simply-Fi http://simplyfiservice.candy-hoover.com
Okno trouby
Rožeň
Otočný
topný pr vek
Gril
Pyro
Rozmrazení
Ventilátor
Spodní topný pr vek
NASTAVENÍJAZYKA Jazyk můžete nastavit, když je
trouba vypnuta stisknutím tlačítek Extra a Select
současně a na dobu 3". Aktuální jazyk se zobrazí na
displeji a můžete jej změnit stisknutím kláves „<“ nebo
„>“ a potvrdit stisknutím tlačítka SELECT. Dostupné
jazyky jsou: italština, angličtina, francouzština a
němčina.
SELECT Všechny volby musí být potvrzeny. Pokud
nebude volba potvrzenado 15sekund, bude zrušena.
Výb ěrem jiné nabídky bude jakákoli nepotvrzená volba
ztracena.
IKONA„HOT“ Pokudje podokončení programu pečení nebo povypnutí trouby troubastále žhavá,
na displeji sebude střídavě zobrazovataktuální čas azpráva„HOT“ (ŽHAVÉ) vintervalech 3".
CZ 81
Page 82

3.2 Režimy vaření
Volič
funkc
*
*
T °C
výchozí
40
180
210
220 50 ÷ 280
210
200
T °C
ozmezí
40 ÷ 40
50 ÷ 240
50 ÷ 240
50 ÷ 230
150 ÷ 220
Funkce (Závisí na modelu trouby)
SVĚTLO: Zapne světlo v troubě.
ROZMRAZOVÁNÍ: Je-li volič nastaven do této polohy. Ventilátor dmýchá
vzduch o pokojové teplotě kolem zmrzlého pokrmu a tak jej za několik minut
rozmrazíbez toho,aby sejakkoli změnil obsahproteinů vpokrmu.
PEČENÍ S VENTILÁTOREM: Doporučujeme používat tuto metodu pro drůbež,
těstoviny, ryby a zeleninu. Teplo proniká do pokrmu lépe a zkrátí se také doba
pečení apředehřevu. Můžete péct různépokrmy zároveň sestejnou přípravou
nebo bez přípravy v jedné nebo více pozicích. Tato metoda pečení zajišťuje
rovnoměrnoudistribuci tepla azabraňujesmísení vůní.
Přisoučasném pečenívíce pokrmůnastavteo desetminut delšídobu.
KONVENČNÍ PEČENÍ: Používají se současně horní i dolní topná tělesa.
Předehřívejte troubu po dobu zhruba deseti minut. Tato metoda je ideálnípro
jakékoli tradiční pečení. Pro přípravu červeného masa, hovězí pečeně,jehněčí
kýty, zvěřiny, chleba, pokrmů ve fólii (papillotes), listového těsta. Umístěte
pokrm a jehonádobu na roštudo střednípolohy.
VENTILÁTOR + SPODNÍ OHŘEV: Spodní topné těleso se používá spolu s
ventilátorem dmýchajícím vzduch uvnitř trouby. Tato metoda je ideální pro
šťavnatéovocnékoláče, dortíky,quiche apaštiky.
Zabraňuje vysoušení pokrmu a podporuje kvašení vdortech, chlebovém těstu
a jiných pokrmechpečených zespodu. Umístěte rošt do dolnípolohy.
GRIL S PODPOROUVENTILÁTORU: používejte turbo-grilse zavřenými dvířky.
Horní topnétěleso se používáspolu s ventilátorem dmýchajícím vzduchuvnitř
trouby. Předehřev je nezbytný u tmavých mas, ale nikoli u bílých mas. Ideální
pro pečení pokrmů o velké tloušťce, celých kusů jako je pečené vepřové,
drůbež atd. Umístěte pokrm určený ke grilování přímo do středu roštu ve
střednípoloze. Zasuňte podroštodkapávací plech prozachyceníšťáv. Zajistěte,
aby nebyl pokrmpříliš blízkou grilu. Vpolovině pečení pokrmobraťte.
GRIL: používejte gril se zavřenými dvířky. Horní topné těleso se používá
samostatněa můžete upravovatteplotu.
L1 ÷ L5
L3
210 50 ÷ 230
* Testováno v souladu s normou CENELEC EN 60350-1, používanou k definování energetické třídy.
Rozžhavení těles do ruda vyžaduje pět minut předehřívání. Úspěch je zaručen
pro grily, kebaby a pokrmy s kůrkou. Bílá masa se umísťují dále od grilu; doba
pečení je delší, ale maso bude chutnější. Tmavá masa a rybí filety můžete
pokládatna rošt nadodkapávací plech.Troubamá dvěpolohy grilu:
Gril: 2140 WBarbecue: 3340 W
SPODNI OHŘEV Použiti spodniho ohřevneho tělesa. Idealni k pečeni všech:
moučniků. Použijtepro dorty, slane kolače a k veškere připravě, kteravyžaduje
vyššiteploty zespodu.
CZ 82
Page 83

4. Čištění a údržba trouby
4.1 Obecné poznámky k čištění
Životnost spotřebiče můžete prodloužit prostřednictvím pravidelného čištění. Před prováděním
ručního čištění počkejte, až trouba vychladne. Nikdy nepoužívejte při čištění brusné mycí prostředky,
drátěnku nebo ostré předměty. Předejdete tak neopravitelnému poškození smaltovaných dílů.
Používejtepouzemycí prostředkyna bázivody, mýdla nebobělidla (čpavek).
SKLENĚNÉ DÍLY
Doporučuje se čistit skleněné okno savou kuchyňskou utěrkou po každém použití trouby. Chcete-li
odstranit odolnějšískvrny, můžete použít dobřevyždímanou houbu napuštěnou mycím prostředkem a
potomopláchnout vodou.
TĚSNĚNÍOKNA TROUBY
Je-li těsnění znečištěné,můžete jejvyčistitmírně navlhčenouhoubičkou.
PŘÍSLUŠENSTVÍ
Příslušenstvívyčistětepřed oplachováním asušením mokroumýdlovouhoubičkou:vyvarujte se použití
abrazivníchmycích prostředků.
ODKAPÁVACÍ PLECH
Po použití grilu vyjměte plech z trouby. Nalijte na plech horký tuk a umyjte jej v horké vodě pomocí
houbičky a prostředku na mytínádobí.
Pokud stále ulpívají mastné skvrny, ponořte plech do vody a mycího prostředku. Alternativně můžete
plech umýt v myčce na nádobí nebo použít komerční saponát na trouby. Nikdy nedávejte znečištěný
plech zpět dotrouby.
4.2 Samočištení trouby pomocí katalytické vložky
Speciální samočisticí panelypokryté mikroporézním povrchem jsouk
dostáníjakosamostatnýdoplněk provšechny modely.Pokud je vložíte,troubunení nutné istit ručně.č
Tuk, který se b hem pečení hromadí po stranách, je eliminován mikroporézním povrchem, který měníě
tuk katalýzoua měníjej na plyn.
Nadměrné stříkánítuku může i přesto zablokovat pórya proto bránit samočištění. Samočisticí kapacitu
je možné obnovit zapnutím prázdné trouby na přibližně 10-20 minut při maximální teplotě.
Nepoužívejte drsné prostředky, kovovou čistící houbu, ostré předměty, drsné látky nebo chemické
produkty, které můžou trvale poškodit katalytický povrch. Na pečení tukových jídel je vhodné použít
hluboképlechy a vložitnádobku pod grilpro zachycení přebytečného tuku.
Pokud jsou stěny trouby pokryté hrubou vrstvou tuku, která znemožňuje práci katalytického čištění,
odstraňte nadbytečný tuk jemným hadříkem nebo houbou namočenou v horké vodě. Povrch musí být
poréznípro efektivní samočištění.
Poznámka:Všechnykatalyticképovrchy,které jsouk dostání v
prodejnách,mají provozní ivotnost přibližně 300hodin. Poté je nutnéje vyměnit.ž
CZ 83
Page 84

4.3 Údržba
DEMONTÁŽ AČIŠTĚNÍ BOČNIC
1. Odšroubujte šroub proti směruhodin.
2. Vyjměte bočnicevytažením směrem ksobě.
3. Vyčistěte bočnice vmyčcena nádobínebo mokrou houbičkou apoté jeihned vysušte.
4. Po vyčištění dejte bočnicezpět, nasaďtezpět šroubya pevně jeutáhněte.
A
DEMONTÁŽ OKNATROUBY
1. Otevřete čelníokno.
2. Otevřete svorky krytu závěsu napravé alevé straněčelního oknastlačením směrem dolů.
3. Vraťte okno zpětprovedenímpředchozího postupu vopačném pořadí kroků.
CZ 84
Page 85

LOW-E
DEMONTÁŽ AČIŠTĚNÍ SKLENĚNÝCHDVÍŘEK
1. Otevřete dvířka trouby.
2.3.4. Zajistěte závěsy, vyšroubujte šrouby ademontujtehorní kovový kryt vytažením směrem nahoru.
5.6. Vyjměte opatrně sklo ze dvířek trouby (Pozn: u pyrolytických trub vyjměte také druhé a třetí sklo
(jsou-li osazena)).
7. Na konci čištěnínebo vým ěny díly znovu sestavteprovedením kroků v opačném pořadí. U všech skel
musí být čitelný znak „Pyro“ umístěný na levé straně dvířek poblíž levého bočního závěsu. Tak bude
natištěnýštítekprvního sklauvnitř dvířek.
1.
2.
3.
5.
6.
1
2
3
7.
4.
CZ 85
Page 86

5. Řešení potíží
5.1 Často Kladené Otázky
PROBLÉM MOŽNÁ PŘÍČINA ŘEŠENÍ
Trouba se nezahřívá
Trouba se nezahřívá
Trouba se nezahřívá
Žádná reakce dotykového
uživatelského rozhraní
Hodiny nejsou nastaveny
Dětský z ámek je aktivní
Funkce pečení a teplota
nebyly nastaveny
Pára nebo kondenzace na
panelu uživatelského rozhraní
Nastavte hodiny
Deaktivujte dětský z ámek
Přesvědčte se, že potřebná
nastavení jsou správná
Vyčistěte panel
uživatelského rozhraní
hadříkem z mikrovláken
a odstraňte kondenzát
CZ 86
Page 87

Instrukcje Bezpieczeństwa
UWAGA: Podczas pracy urządzenie oraz jego elementy są gorące.
Należy zachowacostrożność i nie dotykaćgorących części.
• Dzieci w wieku do 8 lat nie mogą zbliżać się do urządzenia chyba że
pozostaja one podciągłymnadzorem.
• Dzieci w wiekupowyżej8latoraz ososby z ograniczeniamiruchowymi,
umysłowymi, czuciowymi lub nie posiadające odpowiedniej wiedzy lub
doświadczenia mogą obsługiwać urządzenie jedynie pod nadzorem lub
po przeszkoleniu odnośnie bezpiecznego uzykowania urządzenia i
związanych z tym zagrożeń.
• Dzieci niemogąbawićsięurządzeniem.
• Dzieci beznadzoru nie mogą obsługiwacaniczyścić urządzenia.
• Podczas użytkowania urządzenie nagrzewa się. Należy zachowac
ostrożnośći niedotykać gorących części wewnątrzpiekarnika.
UWAGA:dostępne części mogą być gorące podczas użytkowania. Dzieci
nie mogą zbliżaćsiędourządzenia.
• Do czyszczenia szyby drzwi piekarnika nie wolno stosować substancji
ściernych ani ostrych skrobaków gdyż mogą one porysować szkło i
spowodowaćjego stłuczenie.
• Wyłaczyć piekarnik przed usunięciem ekranu, po wyczyszczeniu
zamontować ekranzgodniez instrukcją.
• Używaćwyłaczniesondycieplnejprzeznaczonejdotegopiekarnika.
• Nie stosować do czyszczeniaurządzeńparowych.
UWAGA: należy upewnić się czy urządzenie jest wyłączone przed
przystąpieniem do wymiany żarówki aby uniknąć niebezpieczeństwa
porażenia.
• Wyłącznik musi być podłączony do okablowania zgodnie z
obowiązujacymiprzepisami.
• instrukcjamusi określać jaki rodzajprzewodu może być zastosowany, z
uwzglednieniemtemperatury tylnej ściankiurządzenia.
• Jeżeli przewód zasilający jest uszkodzony należy gowymienić na nowy
dostarczonyprzez producentalub autoryzowany serwis.
UWAGA:w celu uniknięcia zagrożeńzwiązanychzprzypadkowym
PL 87
Page 88

zadziałaniem zabezpieczeń termicznych urządzenie nie może być
zasilane z sieci sterowanej niezależnie lub z obwodów które są
regularniewłączanei wyłączane.
UWAGA: dostępne cześci mogą być gorące podczas używania grilla.
Dzieci nie mogązbliżaćsiędourządzenia.
• Pokarmktóry wykipiał musi być usunięty przedczyszczeniem.
• Podczas pyrolizy powierzchnie mogą się bardzo mocno nagrzewać,
proszępilnowac dzieci aby sięniezbliżały.
PL 88
Page 89

Spis tre ciś
Instrukcje ogólne
90
Opis produktu
92
Obsługa piekarnika
93
Czyszczenie i konserwacja
piekarnika
97
1.1 Wskazówki dotyczące bezpieczeństwa
1.2 Bezpieczeństwo elektryczne
1.3 Zalecenia
1.4 Instalacja
1.5 Zarządzanie odpadami
1.6 Deklaracja zgodności
2.1 Informacje ogólne
2.2 Akcesoria
2.3 Pierwsze użycie
3.1 Opis wyświetlacza
3.2 Tryby pieczenia
4.1 Ogólne informacje dotyczące czyszczenia
ae4.2 Katalityczny piekarniksamooczyszczaj cy si
4.3 Konserwacja
• Wyjmowanie szyby piekarnika
• Wyjmowanie i czyszczenie rusztów
• Wyjmowanie i czyszczenie drzwiczek
Rozwiązywanie problemów
100
5.1 Często zadawane pytania
PL 89
Page 90

1. Instrukcje ogólne
Dziękujemy za wybór jednego z naszych produktów. Aby jak
najlepiej wykorzystywać posiadany piekarnik, zachęcamy do
uważnego przeczytania niniejszej instrukcji i starannego
przechowywania jej, aby móc z niej skorzystać w razie potrzeby w
przyszłości. Przed zainstalowaniem piekarnika należy zanotować
jego numer seryjny, aby móc podać go personelowi biura obsługi
klienta, gdyby wymagane były jakiekolwiek naprawy. Po wyjęciu
piekarnika z opakowania należy sprawdzić, czy nie uległ on
uszkodzeniupodczas transportu.W razie jakichkolwiek wątpliwości
nie należy korzystać z piekarnika i zwrócić się do
wykwalifikowanego technika w celu uzyskania porady. Należy
trzymaćz dalaod dzieciwszystkiemateriały opakowania(folie ochronne, styropian, kołki).
Podczas pierwszego uruchomienia piekarnika może z niego wydobyć się silny dym o nieprzyjemnym zapachu, który
jestspowodowanyprzez klej napanelach izolacyjnychwokółrozgrzewanegopo raz pierwszy piekarnika.
Jest tozjawisko całkowicie normalne inależy wówczas poczekać, aż dym całkowicie sięulotni, przed umieszczeniem
żywności w piekarniku. Producent zrzeka się wszelkiej odpowiedzialności za sytuacje będące wynikiem
nieprzestrzegania instrukcji podanych w niniejszymdokumencie.
UWAGA:Wymienione w niniejszejinstrukcji funkcje, właściwościi akcesoria piekarnika mogąbyć różnew zależności
od zakupionego modelu.
1.1 Wskazówki dotycz ce bezpiecze stwaąń
Z piekarnika należy korzystać wyłącznie zgodnie z jego przeznaczeniem, czyli wyłącznie do pieczenia żywności;
wszelkie inne próby użytkowania, na przykład jako źródło ciepła, uważane są za niewłaściwe, a tym samym
niebezpieczne. Producent nie może ponosić odpowiedzialności za jakiekolwiek uszkodzenia będące skutkiem
nieprawidłowego,błędnego lubnierozsądnegoużytkowania.
Obsługajakiegokolwiekurządzenia elektrycznego wiążesię zkoniecznościąprzestrzeganiapewnych istotnych zasad:
- Nie ciągnąćzaprzewód zasilania wcelu odłączeniago odgniazdka prądowego;
- Nie dotykaćurządzenia mokrymilub wilgotnymi dło mi bądźstopami;ń
- Ogólnie rzeczbiorąc, odradzasię stosowaniaadapterów,gniazdek wielokrotnych iprzedłużaczy;
- W razieusterki i/lubnieprawidłowegodziałania urządzenia należyje wyłączyći nie naruszaćgo.
1.2 Bezpiecze stwo elektryczneń
PRZYŁĄCZA ELEKTRYCZNE POWINNY ZOSTAĆ WYKONANE PRZEZ ELEKTRYKA LUB WYKWALIFIKOWANEGO
TECHNIKA. Sieć zasilająca, do którejpodłączany jestpiekarnik, powinna byćzgodna z przepisami obowiązującymi w
kraju jegoinstalacji. Producentzrzeka sięwszelkiej odpowiedzialności za ewentualne uszkodzenia będącewynikiem
nieprzestrzegania takich przepisów. Piekarnik powinien być podłączony do sieci elektrycznej za pomocą gniazdka
ściennego z uziemieniemlub poprzez wielobiegunowywyłącznik, w zależności odprzepisówobowiązujących wkraju
instalacji. Zasilanie elektryczne powinno być zabezpieczone odpowiednimi bezpiecznikami i powinny być używane
przewodyo przekrojupoprzecznym, który zapewni prawidłowe zasilanie piekarnika.
PODŁĄCZANIE
Piekarnik jest dostarczany z kablem zasilającym, który powinien być podłączany wyłącznie do sieci elektrycznej o
napięciu 220-240V AC pomiędzy fazamilub pomiędzyfazą iprzewodemneutralnym. Przed podłączeniem piekarnika
do sieci elektrycznejnależy sprawdzić:
- napięcie zasilaniapodane namierniku;
- ustawienia wyłącznika.
Przewóduziemienia podłączonydo zaciskuuziemiającego piekarnika musi być podłączonydo zaciskuuziemiającego
sieci elektrycznej.
OSTRZEŻENIE
Przed podłączeniem piekarnika do sieci elektrycznej ciągłość uziemienia sieci elektrycznej powinien sprawdzić
wykwalifikowany elektryk. Producent zrzeka się wszelkiej odpowiedzialności za ewentualne wypadki lub inne
problemy wynikające z braku podłączenia piekarnika do uziemienia lub z powodu uziemienia o nieprawidłowej
ciągłości.
PL 90
Page 91

UWAGA: ponieważ piekarnik może wymagać czynności serwisowych, zaleca się przewidzieć
dodatkowe gniazdko ścienne, do którego będzie można później podłączyć piekarnik po wyjęciu go z
miejsca, w którym go zainstalowano. Przewód zasilający powinien być wymieniany wyłącznie przez
personeltechniczno-serwisowy lubtechników posiadających jednakowe kwalifikacje.
1.3 Zalecenia
Po każdym użyciu piekarnika kilka prostych czynności związanych z czyszczeniem go pozwoli utrzymać
piekarnikw idealnejczystości.
Nie zakrywaj ścian piekarnika papierem aluminiowym ani dostępnymi na rynku foliami jednorazowymi,
ponieważ w kontakcie z powierzchniami gorącej emalii mogłyby one stopić się i uszkodzić emaliowane
powierzchniewewnątrz piekarnika.Aby zapobiecnadmiernemu brudzeniusię piekarnikai wydostawaniu sięz
niego nieprzyjemnie pachnącego dymu, zaleca się nie używać piekarnika na najwyższych temperaturach.
Zwykle lepiej jest wydłużyć czas pieczenia i stosować niższą temperaturę. Poza akcesoriami dostarczanymi z
piekarnikiemzaleca się używaćnaczyń i formodpornych nawysokietemperatury.
1.4 Instalacja
Za instalację piekarnika odpowiedzialny jest użytkownik. Producent nie ma obowiązku wykonania
instalacji. Usterki spowodowanebłędami instalacji nie podlegają warunkom gwarancji udzielanej przez
producenta. Instalacja powinna być powierzona wykwalifikowanym osobom i wykonana zgodnie z
zaleceniami producenta. Nieprawidłowa instalacja stwarza niebezpieczeństwo dla osób, zwierząt lub
rzeczyosobistych. Producent nie ponosiodpowiedzialności za tego typuszkody.
Zespół kuchenny, w którym ma być zainstalowany piekarnik, musi być wykonany z materiałów
odpornychna temperaturę przynajmniej 70ºC.
Piekarnikmoże byćusytuowanyna górze wszafcekuchennejlub podblatem.
Przed zainstalowaniem piekarnika upewnij się, czy w miejscu instalacji zapewniona będzie dobra
wentylacja gwarantująca dopływ świeżego powietrza, niezbędnego do chłodzenia piekarnika i do
zabezpieczenia jego części wewnętrznych. W zależności od typu instalacji należy wykonać wycięcia
przedstawionena końcu instrukcji.
1.5 Gospodarka odpadami i ochrona rodowiskaś
Urządzenie tojest oznaczonezgodnie z DyrektywąEuropejską 2012/19 /UE w sprawiezużytego
sprzętu elektrycznego i elektronicznego (WEEE). Zużyty sprzęt elektryczny i elektroniczny
zawiera zarówno substancje zanieczyszczające (o negatywnym oddziaływaniu na środowisko
naturalne), jak i podstawowe elementy (które można użytkować wielokrotnie). Ważne, aby
zużyty sprzęt elektryczny i elektroniczny poddawać specjalnej obróbce w celu bezpiecznego
usunięcia i pozbycia się wszystkich środków zanieczyszczających i odzyskania wszystkich
surowcówwtórnych.
Poszczególne osoby odgrywają ważną rolę w zapobieganiu szkodliwemu oddziaływaniu zużytego sprzętu
elektrycznegoi elektronicznego naśrodowisko,ważne abyprzestrzegaćkilku podstawowychzasad:
• Zużyty sprzętelektrycznyi elektroniczny niemoże byćtraktowanyjakoodpad komunalny.
• Zużytysprzęt elektryczny ielektroniczny przekazuje siędo właściwychpunktów zbiórkiprowadzonych przez
gminy lub koncesjonowane firmy. W wielu krajach, gdzie jest dużo zużytego sprzętu elektrycznego i
elektronicznego,odbierasię goz domów.
• gdy kupuje się nowe urządzenie, zużyte można zwrócić do sprzedawcy, który musi je przyjąć bezpłatnie, na
zasadzie zamiany jeden za jeden, o ile urządzenie to jest tego samego rodzaju i ma takie same funkcje, jak
urządzeniedostarczone
OSZCZĘDNOŚĆENERGII IPOSZANOWANIE ŚRODOWISKA
Tam gdzie to możliwe, należy unikać wstępnego podgrzewania piekarnika i zawsze starać się go zapełnić. Jak
najrzadziej otwierać drzwiczki piekarnika, ponieważ za każdym razem, gdy zostaną otwarte z wnętrza ucieka
ciepło. W celu uzyskania znacznej oszczędności energii piekarnik należy wyłączyć na 5-10 minut przed
planowanymzakończeniempieczenia, copozwoli nawykorzystanie ciepłaodpadowego, które nadalgeneruje
PL 91
Page 92

piekarnik. Uszczelki powinny być czyste i spełniać swoje zadanie, aby uniknąć wydostawania się ciepła poza
wnętrze piekarnika. Jeśli Twoja umowa z dostawcą energii opiera się na taryfie godzinowej, program
"opóźnionego startu" upraszcza oszczędzanie energii, uruchamiając proces pieczenia w czasie
obowiązywanianiższejtaryfy.
1.6 Deklaracja Zgodno cıś
Niniejszeurządzenie, w części przeznaczonej do kontaktu ze środkami spożywczymi spełnia wymagania
przepisówustanowionychw Dyrektywie 89/109/EWG.
Poprzez umieszczenie oznaczenia na tym produkcie poświadczamy na własną odpowiedzialność
przestrzeganie wszystkich wymogów europejskich dotyczących bezpieczeństwa, ochrony zdrowia i
środowiskaokreślonychw przepisach dla tegoproduktu.
2. Opis produktu
2.1 Informacje ogólne
1
3
5
4
6
2
2.2 Akcesoria (w zale no ci od modelu)żś
Metalowy ruszt
1
Podtrzymuje formy i naczynia.
1. Panel sterowania
2. Pozycje półek
(kratka boczna, zależnie od wyposażenia)
3. Metalowy ruszt
4. Taca na tłuszcz
5. Wentylator (za stalową płytą)
6. Drzwiczki piekarnika
Taca na tłuszcz
2
Gromadzi tłuszcz wyciekający z żywności podczas
pieczeniajej naruszcie.
PL 92
Page 93

O wıetlenıe Ledoweś
3
System oświetlenia ledowego zastępuje tradycyjną
żarówkę. Układ 14 diod LED (w wersjach bez czyszczenia
pirolitycznego) lub 10 diod LED wysokiej mocy (w
wersjach z czyszczeniem pirolitycznym) zamontowano w
drzwiach piekarnika. Wytwarzane wysokiej jakości białe
światło umożliwia obserwowanie wnętrza piekarnika w
sposób wyraźny bez jakichkolwiek cieni na wszystkich
półkachpiekarnika.
Zalety:
System ten, poza zapewnieniem doskonałego oświetlenia wnętrza piekarnika, jest bardziej niezawodny niż
tradycyjnażarówka,łatwiejszy w utrzymaniui przede wszystkim pozwala na zaoszczędzenieenergii.
- Optymalne oświetlenie
- Wysoka niezawodność
- Bardzo niskiezużycie energii,- 95%w porównaniu ztradycyjnym systememoświetlenia
2.3 Pierwsze Użycie
CZYSZCZENIEPRZED PIERWSZYMUŻYCIEM
Przedużyciem piekarnikapo razpierwszy należy:
•Wytrzećpowierzchniezewnętrznepiekarnika miękką wilgotnąszmatką.
•Umyć wszystkie elementy wyposażenia i wytrzeć wnętrze piekarnika używając roztworu gorącej wody i
płynu do zmywanianaczyń.
•Ustawić pusty piekarnik na maksymalną temperaturę i pozostawić włączony przez około 1 godzinę, co
pozwoliusunąć zapachnowości. Wtym czasienależy zapewnićdobrą wentylację pomieszczenia. oven with a
solution of hot water and washing up liquid. Set the empty oven to the maximum temperature and leave on
forabout 1hour,this willremove anylingering smellsof newness.
3. Obsługa piekarnika
3.1 Opis wy wietlacza (w pełni dotykowy, piekarnik dwukomorowy)ś
ON / OFF
EXTRA
Czas Trwania
Pıeczenia
Ustawianie
Zegara
Przycisk ten umożliwia włączanie i wyłączanie piekarnika.
Koniec
Pıeczenıa
Dziecko
zamek
Licznik
Jeśli piekarnik zostaniewyłączony, będziewyświetlany zegar.
Kiedy piekarnik nie jest aktywny, dostępne są wszystkie
funkcjez wyjątkiemczasupieczenia ikońcapieczenia.
Jeśli zegar nie jestustawiony, piekarnik niedziała: wyświetlacz
miga, wskazując godzinę „12:00” i jedyny przycisk, jaki działa,
toprzycisk EXTRA.Za pomocąprzycisku EXTRA możnaustawić
następującefunkcje:
WiFi
PL 93
Page 94

FUNKCJA
CZAS
TRWANIA
PIECZENIA
KONIEC
PIECZENIA
JAK WŁĄCZYĆ JAK WYŁĄCZYĆ
UWAGA: to ustawienie jest
możliwe wyłącznie przy
aktywnym programie pieczenia.
Należy nacisnąć dwukrotnie
przycisk EXTRA i ustawić czas,
posługując się przyciskami „+” i
„-”, a następnie potwierdzić
dokonany wybór przyciskiem
„SELECT”.
Na wyświetlaczu widnieje
„00:00”, jeśli nie ustawiono
czasu pieczenia. W przeciwnym
razie wyświetlany jestpozostały
czas pieczenia.
UWAGA: to ustawienie jest
możliwe wyłącznie przy
aktywnym programie
pieczenia. Naciskać kilkukrotnie
przycisk EXTRA, dopóki nie
podświetli się ikona. Ustawić
koniec pieczenia za pomocą
przycisków„<” i „>”, a następnie
potwierdzić dokonany wybór
przyciskiem„SELECT ”.
Nacisnąć przycisk EXTRA i
przytrzymać tak długo, dopóki
nie podświetli się ikona.
Ustawić koniec pieczenia za
pomocą przycisków „<” i „>”, a
następnie potwierdzić
dokonany wybór przyciskiem
„SELECT”.
Czas pieczenia jest
automatycznieprzeliczany.
• Aby zakończyć pieczenie
przed ustawionym czasem,
należy nacisnąć dwukrotnie
przycisk EXTRA i ustawić
wymagany czas pieczenia,
posługując się przyciskami „<”
i „>”, a następnie ponownie
nacisnąć przycisk „SELECT”.
• Aby anulować odliczanie
czasu pieczenia, należy
wyzerować wyświetlacz
(wskazanie„00:00”).
Aby zakończyć pieczenie przed
czasem, należy naciskać
kilkukrotnie przycisk EXTRA,
dopóki nie podświetli się
ikona. Ustawić żądany
moment zakończenia
pieczenia za pomocą
przycisków „<” i „>”, a
następnie potwierdzić
dokonany wybór przyciskiem
„SELECT”.
Aby anulować moment
zakończenia pieczenia, należy
wyzerować wyświetlacz
(wskazanie„00:00”).
JAK DZIAŁA
W momencie zakończenia się
programu pieczenia piekarnik
wyłącza się, kiedy wyświetlacz
wskazuje„END” (ikona programu
pieczenia pozostaje
podświetlona), dopóki przycisk
Wł./Wył., jedyny działający
przycisk,nie zostanie naciśnięty.
W momencie zakończenia
pieczenia będzie słychać sygnał
dźwiękowy.
W momencie zakończenia się
programu pieczenia piekarnik
wyłącza się, kiedy wyświetlacz
wskazuje „END” (ikona
programu pieczenia pozostaje
podświetlona), dopóki przycisk
Wł./Wył., jedyny działający
przycisk, nie zostanie
naciśnięty. W momencie
zakończenia pieczenia będzie
słychać sygnał dźwiękowy.
DO CZEGO SŁUŻY
W momencie zakończenia
pieczenia piekarnik wyłącza się
automatycznie i przez kilka
sekund emitowany jest sygnał
dźwiękowy.
• Funkcjata stosowanajest również
w przypadku pieczenia, które
można zaplanować z
wyprzedzeniem.
• Jeśli ustawiono program
pieczenia, zostanie on utracony w
momencie naciśnięcia przycisku
„F”.
• Jeśli ustawiono pieczenie z
opóźnieniem, piekarnik wyłącza się
i wyświetlacz pokazuje aktualną
godzinę, natomiast ikony
programu, czasu trwaniapieczenia i
momentu zakończenia pieczenia są
podświetlone.
• Jeśli ustawiono program
pieczenia, poprzez naciskanie
przycisków „<” i „>” można
zobaczyć i zmienić ustawioną
temperaturę: przy pierwszym
dotknięciu wyświetlana jest
temperatura pracy, a kolejne
dotknięcie umożliwia zmianę tej
temperatury.
LICZNIK
USTAWIANIE
ZEGARA
BLOKADA
ZABEZPIE-
CZAJ CAĄ
PRZED
DOST PEMĘ
DZIECI
• Na wyświetlaczu widoczne
jest wskazanie„00:00”, jeśli nie
wprowadzono żadnego czasu
lub pozostały czas, jeśli już go
ustawiono.
Naciskać kilkukrotnie przycisk
EXTRA, dopóki nie podświetli
się ikona, a następnie za
pomocą przycisków „<” i „>”
ustawić czas i potwierdzić
wprowadzone ustawienia za
pomocą przycisku „SELECT”.
• Przy pierwszym uruchomieniu
wyświetlacz zaświeca się i
wskazuje godzinę„12:00”.
• Aby zmienić godzinę, należy
naciskać kilkukrotnie przycisk
EXTRA, dopóki niepodświetli się
ikona, a następnie za pomocą
przycisków„<” i „>” ustawićczas
i potwierdzić wprowadzone
ustawienia za pomocą przycisku
„SELECT”.
• Naciskaćkilkukrotnie przycisk
EXTRA, dopóki nie podświetli
się ikona, a następnie za
pomocą przycisków „<” i „>”
uruchomić tę funkcję: na
wyświetlaczu pojawi się
wskazanie ON; aby
potwierdzić, należy nacisnąć
przyciskSELECT.
• Aby zmienić ustawienie
licznika, należy nacisnąć
przycisk EXTRA i przytrzymać
tak długo, dopóki nie
podświetli się ikona. Ustawić
żądany czas pieczenia za
pomocą przycisków „<” i „>”, a
następnie potwierdzić
dokonany wybór przyciskiem
„SELECT”.
• Nacisnąć przycisk EXTRA i
przytrzymać tak długo, dopóki
nie podświetli się ikona, a
następnie za pomocą
przycisków„<” i „>”wyłączyć tę
funkcję: na wyświetlaczu
pojawi się wskazanie OFF; aby
potwierdzić, należy nacisnąć
przyciskSELECT.
PL 94
• Funkcja ta uruchamia sygnał
dźwiękowy, który emitowany
jest przez kilka sekund w
momencie upłynięcia
ustawionego czasu (funkcja ta
nie powoduje wyłączenia
piekarnika).
Można wybrać czas w
przedzialeod 00:00 do23:59.
• Można w ten sposób ustawić
godzinę, która pojawia się na
wyświetlaczu.
• Jeśli funkcja ta jest aktywna,
można używać wyłącznie
przycisku „EXTRA” w celu
wyłączenia tej funkcji oraz
przycisku„Włącz/Wyłącz”.
• Licznik działa niezależnie od
tego, czy piekarnik jest włączony
czy nie.
• Alarm działa niezależnie odtego,
czy piekarnik jestwłączony czynie.
• Funkcjata jestużyteczna, kiedy w
domu sądzieci.
Page 95

WiFi (w zależności od modelu piekarnika)
Naciśnięcie przycisku„Extra” na wyświetlaczu umożliwia
przejście domenu Wi-Fi.W menu Wi-Fi,jeśli naciśnieszprzyciski „<>”, możeszwybrać następująceopcje:
- Off(Wył.): Wi-Fijest wyłączone;piekarnikiem niemożna sterować zapomocą aplikacji.
-On(Wł.):Wi-Fi jest włączone; piekarnikiem można sterować wyłącznie za pomocą aplikacji. Oznacza to, że nie
można wybraćfunkcji pieczenia, przepisówani sterować temperaturąza pomocąwyświetlacza.
Tylko menu Wi-Fi jest dostępne po naciśnięciu przycisku „Extra”. Piekarnik możesz wyłączyć za pomocą przycisku
On/Off, ale nie możesz włączyć go ponownie za pomocą wyświetlacza, jest to możliwe wyłącznie przy użyciu
aplikacji.
- Reset (Resetowanie): Z tego ustawienia należy skorzystać, aby zarejestrować piekarnik podczas pierwszego
podłączenia go do swojej sieci Wi-Fi i zresetować aktualne sparowanie z siecią Wi-Fi, aby umożliwić nowe
sparowanie. Po wybraniu tej opcji urządzenie daje Ci 5 minut na ukończenie procesu rejestracji. W trakcie tego
procesu dostęp do funkcji pieczenia, przepisów i ustawień temperatury za pośrednictwem wyświetlacza jest
niemożliwy. Tylko menu Wi-Fi jest dostępne po naciśnięciu przycisku „Extra”. Piekarnik możesz wyłączyć za
pomocą przycisku On/Off, ale nie możesz włączyć go ponownie za pomocą wyświetlacza, jest to możliwe
wyłącznie przy użyciu aplikacji. Aby wyjść z procedury rejestracji / resetowania za pośrednictwem wyświetlacza,
należy nacisnąć przycisk „Extra”, a następnie użyćprzycisków„< >” w celuwybrania opcji„Off”. Po pięciu minutach
urządzenie wyjdzieautomatyczniez procesu rejestracji/resetowania.
- Read (Odczyt):piekarnik wysyła informacje o swoim stanie do aplikacji,ale nie można nim sterować zdalnie.Aby
było tomożliwe, piekarnikmusi byćzarejestrowany.
Jeśli Wi-Finie jestskonfigurowane,można wybraćwyłącznie opcje offi reset.
Gdy piekarnik jest podłączony do Wi-Fi, domyślny czas trwania pieczenia to 5 godzin, ale może on zostać
zmieniony przez użytkownika.
Rejestracjaw sieci Wi-Fi:
Aby zarejestrować urządzenie w sieci Wi-Fi, naciśnij na wyświetlaczu przycisk „Extra”do momentu podświetlenia
się ikony Wi-Fi, a następnie wybierz „Reset”, naciskając „< >”. Następnie należy postępować zgodnie z procedurą
wyświetlaną waplikacji. Powybraniu tejopcji urządzeniedaje Ci5 minut naukończenieprocesu rejestracji.
Ikona Wi-Fi
- Ikona niepodświetlona: Wi-Fijest wyłączone.
- Ikona miga(1 sekundęwłączona, 1sekundę wyłączona):piekarnik został udostępnionydla Twojej sieci
Wi-Fi imożna go zarejestrować.Jeśli rejestracjanie powiodłasię, ikonaWi-Fi po 5minutach zgaśnie.
- Ikona jestpodświetlona cały czas: piekarnikjest podłączony do Twojego routera Wi-Fi.
- Ikona miga(3 sekundywłączona, 1sekundę wyłączona):piekarnik próbujepołączyć sięz Twoim routeremWi-Fi.
- Ikona miga(1 sekundęwłączona i3 sekundy wyłączona): piekarnikjest jedyniew trybie odczytu.
- Theicon blinks3 seconds onand 1 secondoff: the oven istrying to connectto yourWi-Fi router.
- Theicon blinks1 second onand 3seconds off: the ovenis in readonly mode.
CANDY SIMPLY-FI:
Szczegółowe informacje na temat W JAKI SPOSÓB PODŁĄCZYĆ urządzenie i JAK JE
UŻYWAĆ znajdziesz na lub na stronie poświęconejhttp://www.candysimplyfi.com
Obsłudze Klienta http: //simplyfiservice.candy- hoover.com
LANGUAGE SETTING (Ustawienia języka) Język
można ustawić, kiedy piekarnik jest wyłączony, naciskając
równocześnieprzyciski EXTRA iSELECT na około 3sekundy.
Aktualny język jest widoczny na wyświetlaczu i można go
zmienić za pomocą przycisków „<” lub „>” oraz potwierdzić
przyciskiem SELECT. Dostępne są następujące języki:włoski,
angielski, francuskii niemiecki.
SELECT (Wybierz) Każdy wybór należy potwierdzić.
Jeśli nie zostanie potwierdzony w ciągu 15 sekund, wybór
zostanie anulowany. W przypadku zmiany menu każdy
Komora
piekarnika
Rożen
obrotowy
Grzałka
okrągła
Grill
Piroliza
Rozmrażanie
Wentylator
Dolna grzałka okrągła
niepotwierdzonywybór zostajeutracony.
IKONA „HOT” (Gorący) Po zakończeniu programu pieczenia lub po wyłączeniu piekarnika jest o n jeszcze
ciepły.Wyświetlana jestwtedy nanim aktualna godzinana przemian zkomunikatem„HOT” (Gorący), co3 sekundy.
PL 95
Page 96

3.2 Tryby pieczenia
Pokrętło
funkcji
*
*
T °C
domyślnie
40
180
50 ÷ 240
210
50 ÷ 240
50 ÷ 280
220
50 ÷ 230
210
200 150 ÷ 220
T °C
zakres
40 ÷ 40
Funkcja (Zależy od modelu piekarnika)
LAMPKA: Włącza oświetlenie piekarnika.
ROZMRAŻANIE: Gdy pokrętło jest ustawione w tym położeniu. Wentylator
wprawia w obieg powietrze o temperaturze pokojowej wokół zamrożonej
żywności, dzięki czemu rozmraża się ona w ciągu kilku minut bez wpływu na
zawartew pożywieniu proteiny.
PIECZENIEZ TERMOOBIEGIEM:Zalecamy korzystaniez tej funkcji wprzypadku
drobiu, wypieków, ryb i warzyw. Ciepło lepiej przenika do żywności i zarówno
czas pieczenia, jaki czaswstępnego nagrzewania sąkrótsze. Możesz piec różne
potrawy jednocześnie, przygotowane wspólnie lub nie, w jednej lub kilku
pozycjach. Ta metoda pieczenia zapewnia równomierne rozprowadzanie
ciepła, a poszczególne zapachy nie mieszają się ze sobą. Podczas pieczenia
żywności w tymsamymczasie wydłuż czas pieczenia ookoło dziesięćminut.
PIECZENIE STANDARDOWE: Używane są zarówno grzałki górne, jak i grzałki
dolne. Należy rozgrzewać piekarnik przez około dziesięćminut. Ta metoda jest
idealna w przypadku wszystkich tradycyjnych wypieków i pieczonych potraw.
Do pieczenia czerwonych mięs, pieczonej wołowiny, nóżek jagnięcych,
dziczyzny, chleba, potraw w folii (w papilotach), kruchego ciasta. Umieść
potrawęi jejnaczynie napółce wśrodkowejpozycji.
WENTYLATOR + GRZAŁKA DOLNA: Dolna grzałka stosowana jest w tym
przypadku z wentylatorem wprawiającym w obieg powietrze wewnątrz
piekarnika. Metoda ta jest idealna w przypadku pieczenia tortów owocowych,
tart,quiche ipasztetów.
Nie wysusza potraw i przyspiesza wyrastanie ciasta, chleba oraz innych dań
pieczonychod spodu.Umieść półkęw pozycjidolnej.
FUNKCJA GRILL Z WENTYLATOREM : Z funkcji turbo-grill korzystaj przy
zamkniętych drzwiczkach. Górna grzałka stosowana jest w tym przypadku z
wentylatorem wprawiającym w obieg powietrze wewnątrz piekarnika.
Wstępne nagrzewanie jest wymagane w przypadku czerwonych mięs, nie w
przypadku mięs białych. Idealna do pieczenia grubych potraw, całych
kawałków, na przykładwieprzowiny, drobiuitp. Umieść potrawę do grillowania
bezpośrednio na środku półki, na poziomie środkowym. Wsuń tacę na tłuszcz
pod półkę,aby zbierać wydobywającesię soki itłuszcz. Upewnij się,że żywność
nie znajduje sięzbyt blisko grilla.Odwróć potrawęw połowieczasupieczenia.
GRILL: Zfunkcji grillkorzystajprzy zamkniętychdrzwiczkach. Górnagrzałka jest
używana samodzielniei możeszregulować temperaturę pieczenia.Wymagane
jest pięć minut wstępnego nagrzewania, aby elementy rozgrzały się do
czerwoności. Doskonała funkcja do grillowania, przyrządzania kebabów i
L1 ÷ L5
L3
210 50 ÷ 230
*Program badań zgodny z CENELEC EN 60350-1 używany dla określenia klasy energetycznej.
zapiekanek. Białemięso należy ustawić nieco dalejod grilla; czaspieczenia jest
dłuższy, ale mięsobędzie miało lepszy smak. Czerwone mięsa i ryby filetowane
możesz umieścić na półce, umieszczając pod nią tacę na tłuszcz. Piekarnik
posiada dwie pozycje grilla:
Grill: 2140 WBarbecue: 3340 W
DÓŁ: Użyciedolnego elementu. Funkcja idealna dopieczenia wszelkich wyrobów
cukierniczych. Korzystaj z niej do pieczenia placków, quiche, tart, pasztetów i
wszelkichinnych potraw wymagających wyższejtemperatury oddołu.
PL 96
Page 97

4. Czyszczenie i konserwacja piekarnika
4.1 Ogólne informacje dotycz ce czyszczeniaą
Żywotność urządzenia będzie dłuższa, jeśli będzie ono regularnie czyszczone. Należy poczekać na
ochłodzenie się piekarnika przed wykonaniem czyszczenia ręcznego. Nie używać nigdy do czyszczenia
ściernych detergentów, myjekdrucianych lubostrych przedmiotów, aby nie uszkodzićw nieodwracalny
sposób elementów emaliowanych. Stosować wyłącznie wodę, mydło lub detergenty na bazie
amoniaku.
ELEMENTY SZKLANE
Po każdym użyciu piekarnika zaleca się przeczyścić szybę drzwiczek papierowym ręcznikiem
kuchennym.
Aby usunąć bardziejuciążliwe plamy, możnarównież użyćgąbki zwilżonej detergentem, dobrze wyżętej
i przepłukać wodą.
USZCZELKADRZWICZEK PIEKARNIKA
W razie zabrudzenia uszczelki drzwiczek piekarnikamożna jąwyczyścić delikatnie zwilżoną gąbką.
AKCESORIA
Akcesoria należy czyścić gąbką zwilżoną wodą i mydłem, przepłukać je i wysuszyć: unikać stosowania
ściernychdetergentów.
TACA NA TŁUSZCZ
Po użyciu rusztu należy wyjąć tacę na tłuszcz zpiekarnika. Wlaćgorący tłuszcz dopojemnika iumyć tacę
gorącą wodą, posługującsię gąbkąi płynemdo mycia naczyń.
W razie pozostałości tłuszczu należy zanurzyć tacę w pojemniku z wodą i detergentem. Ewentualnie
możnarównież umyć tacęw zmywarce lub użyćdostępnychna rynku detergentówdo piekarników.
Nigdynie wkładaćponownie do piekarnikazabrudzonejtacy.
4.2 a eKatalityczny piekarniksamooczyszczaj cy si
Specjalne samooczyszczające się płyty, pokryte lakierem o strukturze mikroporowatej, oferowane dla
wszystkichmodeli jako akcesoria opcjonalne eliminująkonieczność ręcznego czyszczeniapiekarnika.
Kroplętłuszczu osadzające sięna ściankach podczaspieczeniarozłożonezostająprzez emalię wprocesie
katalitycznym utlenianiai przekształcają się naprodukty gazowe.
Zbyt duże plamy mogą zatkać mikropory i tym samym przeszkodzić w automatycznym czyszczeniu.
Odzyskanie właściwości samooczyszczania uzyskuje się za pośrednictwem podgrzania pustego
piekarnika przez okres około 10-20 minut, nastawiając pokrętło piekarnika na maksymalną
temperaturę. Nie wolno stosować produktów ciernych, druciaków, ostrych przedmiotów, szorstkich
ściereczek, produktów chemicznych lub detergentów mogących nieodwracalnie zniszczyć
powierzchnięemalii.
Zaleca się ponadto stosowanie garnków głębokich w przypadku pieczenia potraw szczególnie tłustych
(pieczenie,itd.), zaś w przypadkupieczeniana grillu- stosowanie brytfanny.
Ta prosta wskazówka pozwala na stworzenie idealnych warunków i temperatury dla czyszczenia
katalitycznego Jeśli, z powodu znacznego zabrudzenia piekarnika, nie jest możliwe samooczyszczanie,
zaleca się usunąć tłuszcz za pomocą wilgotnej szmatki lub gąbki zanurzonej w cieplej wodzie.
Porowatość emaliijest jejpodstawowącechą gwarantującądziałanie samooczyszczające.
Uwaga: Wszystkie płyty samooczyszczające się, dostępne w handlu, charakteryzują się skutecznością
działania przez okres około 300 godzin pracy piekarnika. Po upływie tego okresu eksploatacji należy
płyty te wymienić.
PL 97
Page 98

4.3 Konserwacja
WYJMOWANIEI CZYSZCZENIE RUSZTÓW
1. Odkręć śrubęw kierunku przeciwnym doruchu wskazówek zegara.
2. Wyjmij rusztypoprzez pociągnięcieich dosiebie.
3. Wyczyść ruszty wzmywarcelub za pomocą mokrejgąbkii odrazuje wysusz.
4. Po wyczyszczeniu rusztów umieść je z powrotem w piekarniku i wkręć śruby, upewniając się o
prawidłowymich dokręceniu.
A
WYJMOWANIEDRZWICZEK PIEKARNIKA
1. Otworzyć przednie drzwiczki.
2. Otworzyć zaciski gniazd zawiasów poprawej ilewej stronie drzwiczekprzednich, naciskając je wdół.
3. Zainstalować drzwiczki namiejsce, wykonując powyższeczynności wodwrotnejkolejności.
PL 98
Page 99

LOW-E
WYJMOWANIEI CZYSZCZENIE SZYBY DRZWICZEK
1.Otworzyćdrzwiczki piekarnika.
2.3.4. Zablokować zawiasy,wyjąć śrubyi metalową górnąpokrywę, ciągnącją dogóry.
5.6. Wyjąć szybę, wysuwając ją bardzo ostrożnie z drzwiczek piekarnika (UWAGA: w piekarnikach z
funkcjączyszczeniapyrolitycznegonależy wyjąćrównież drugąi trzecią szybę(o ilewystępuje)).
7. Po wyczyszczeniu lub dokonaniu wymiany należy zmontować poszczególne elementy, wykonując
powyższeczynności w odwrotnejkolejności.
Na wszystkich szybach wskazanie „Low-E” musi być czytelne i musi znajdować się po lewej stronie
drzwiczek, w pobliżu bocznego lewego zawiasu. W ten sposób drukowana etykieta pierwszej szyby
pozostaniepo wewnętrznejstroniedrzwiczek.
1.
5.
2.
3.
4.
6.
1
2
3
7.
PL 99
Page 100

5. Rozwi zywanie problemówą
5.1 Cz sto zadawane pytaniaę
PROBLEM MOŻLIWA PRZYCZYNA ROZWIĄZANIE
Piekarnik nie rozgrzewa się
Piekarnik nie rozgrzewa się
Piekarnik nie rozgrzewa się
Brak reakcji dotykowego
wyświetlacza
Zegar nie jest ustawiony Ustawić zegar
Włączona jest blokada dziecięca
Nie ustawiono funkcji pieczenia i
temperatury
Występowanie pary i skroplin
na panelu wyświetlacza
Wyłączyć blokadę dziecięcą
Upewnić się, że wymagane
ustawienia są prawidłowe
Wyczyścić panel wyświetlacza
szmatką z mikrofibry, aby
usunąć powłokę skroplin
PL 100
 Loading...