

Page 1
HOBS
USER INSTRUCTIONS
PIANI COTTURA
ISTRUZIONI D’USO E DI INSTALLAZIONE
TABLE DE CUISSON
NOTICE D’EMPLOI ET D’INSTALLATION
KOCHMULDE
GEBRAUCHS - UND INSTALLATIONSANWEISUNGEN
PLACAS
MANUAL DE INSTRUCCIONES
PLACAS
MANUAL DE INSTRUÇÕES
VARNÉ DESKY
NAVOD POUŽITĺ
GB - IE
IT
FR
DE
ES
PT
CZ
NAVODILA ZA UPORABO
VGRADNJO IN PRIKLJUČITEV
ВСТРАИВАЕМЫЕ ВАРОЧНЫЕ ПОВЕРХНОСТИ
ИНСТРУКЦИИ ПО ЭКСПЛУАТАЦИИ И УСТАНОВКЕ
PŁYTY
INSTUKCJE DLA UŻYTKOWNIKA
KOOKPLAATS
INSTALLATIE-EN GEBRUIKSINSTRUCTIES
HOBS
INSTUKTIONER FÖR ANVÄNDNING OCH INSTALLATION
HOBS
KÄYTTÖ - JA ASENNUSOHJEET
HOBS
BRUGSANVISNING OG INSTALLATION
SL
RU
PL
NL
SE
FI
DK
HOBS
BRUKS - OG MONTERINGSVEILEDNING
ҚОСА ОРНАТЫЛАТЫН ПІСІРЕТІН БЕТТЕР
ІСКЕ ПАЙДАЛАНУ ЖƏНЕ ОРНАТУ ЖӨНІНДЕГІ НҰСҚАУЛЫҚТАР
CANDY HOOVER GROUP S.R.L. • Via Privata Eden Fumagalli • 20047 Brugherio Milano Italy
NO
KAZ
Page 2

CONTENIDO ESCONTENT GB - IE
SAFETY INSTRUCTIONS
1. General Warnings
2. Installation
3. Built-in
4. Electrical connexion
5. Presentation
6. Hob cookware advice
7. Use
................................................................................09-10
8. Cleaning and maintenance
9. Problem solving
10. Aftercare
11 Protection of the environment.
.........................................................................07
................................................................................07
.......................................................................08
..........................................................................11
.........................................................06
...............................................................07
.....................................................07-08
........................................................08
...............................................10
..................................................................11
........................................11
INDICE IT
PRESCRIZIONI DI SICUREZZA
1. Avvertenze generali
2. Installazione
3. Inserimento nel mobile
4. Collegamento elettrico
5. Presentazione
6. Consigli d’utilizzo
7. Utilizzo del piano
8. Manutenzione
9. Problemi e soluzioni
10. Assistenza Post-vendita
11 Rispetto dell’ambiente.
...........................................................13
......................................................................13
..................................................................14
.............................................................14
...........................................................14-15
....................................................................16
...............................................12
.....................................................13
.................................................13-14
.........................................................17
..................................................17
....................................................17
INSTRUCCIONES DE SEGURIDAD
1.1. Instrucciones generales
2.1. Instalacíon
3. Empotramiento
4. Conexion eléctrica
5. Presentación
6. La elección de los utensilios
7. Utilización
8. Mantenimiento
9. Resolución de problemas
10. Assistencia técnica
11. Protección del medioambiente
......................................................................31
..................................................................31
.......................................................31-32
.....................................................................32
...................................................................32-33
.................................................................34
.......................................................35
.........................................30
..................... ............................31
............................................32
.................................................35
......................................35
INDICE PT
INSTRUÇÕES E RECOMENDAÇÕES DE SEGURANÇA
1. Instruções gerais
2. Instalação
3. Encastre
4. Ligação eléctrica
5. Descrição das placas
6. A selecção dos recipientes
7. Como utilizar a placa
8. Limpeza da placa vitrocerâmica
9. Detecção e resolução de problemas
10. Assistência Técnica
11. Protecção do meio ambiente
..........................................................................37
............................................................................37
..............................................................37
..........................................................37-38
........................................................38
...............................................38
...................................................39-40
......................................40
...............................41
........................................................41
..........................................41
..........36
CONSIGNES DE SECURITE
1. Instructions générales
2. Installation
3. Encastrement
4. Raccordement électrique
5. Présentation
6. Le choix des ustensiles
7. Utilisation
8. Entretien
9. Problèmes et solutions
10. Assistance technique
11 Protection de l’environnement.
........................................................................19
....................................................................19
......................................................................20
......................................................................20-21
............................................................................22
....................................................18
......................................................19
............................................19-20
...................................................20
.....................................................23
.....................................................23
.......................................23
INHALT DE
SICHERHEITSHINWEISE
1. Konformitätserklärung
2. Installation
3. Einbau
4. Elektrischer Anschluß
5. Darstellung
6. Wahl des richtigen Kochgeschirrs
7. Nutzungsanweisungen
8. Pflege und Reinigung
9. Problemlösungen
10. Technischer Kundendienst
11. Umweltschutz
.........................................................................25
...............................................................................25
.......................................................................26
.........................................................24
......................................................25
................................................25-26
...................................26
................................................26-27
........................................................28
...............................................................29
.............................................29
..................................................................29
FRCONTENU
VŠEOBECNÁ UPOZORNĚNÍ
1. PROHLÁŠENÍ O SHODĚ
1.1. INSTALACE
2. ELEKTRICKÉ ZAPOJENÍ
3. VESTAVBA
4.PŘIPOJENÍ K ELEKTRICKÉ SÍTI
5. POPIS SPOTŘEBIČE
6. DOPORUČENÍ K NÁVODÍ
7. POUŽITÍ
8. ÚDRŽBA A ČIŠTĚNÍ
9. ODSTRÁNÉNÍ MOŽNÝCH PROBLÉMŮ
10. SERVIS
11. PROHLÁŠENÍ O SHODĚ
................................................................43
.....................................................................43
....................................................................44-45
........................................................................47
...................................................42
...................................................43
....................................................43
....................................43-44
.........................................................44
..................................................44
.........................................................46
................................47
..................................................47
VSEBINA
SPLOŠNI VARNOSTNI NAPOTKI
1. Splošni Napotki
Namestitev In Priključitev 2.
. 3 VGRADNJA
4 Priključitev Na Električno Omrežje
5. Opis Kuhalne Plošče
6. Ustrezna Posoda
. Uporaba7
Vzdrževanje In Čiščenje8.
9. Odpravljanje Nepravilnosti V Delovanju
10. Servisiranje
11. Varstvo Okolja
.......................................................................49
................................................................................49
....................................................................50
..............................................................................51-52
...........................................................................53
.......................................................................53
................................................48
.....................................................49
.................................49-50
............................................................50
......................................................52
............................53
CZOBSAH
SL
02
Page 3

СОДЕРЖАНИЕ
RU
SISÄLLYS
FI
МЕРЫ ПРЕДОСТОРОЖНОСТИ
1. ДЕКЛАРАЦИЯ СООТВЕТСТВИЯ
2. ИНСТРУКЦИИ ПО ВЫПОЛНЕНИЮ УСТАНОВКИ
3. ВСТРАИВАЕМАЯ БЫТОВАЯ ТЕХНИКА
4. ЭЛЕКТРИЧЕСКИЕ ПОДКЛЮЧЕНИЯ
5. ОПИСАНИЕ
............................................................................56
......................................................54
..................................................55
..........................55
........................................55
......................................55-56
6. СОВЕТЫ ОТНОСИТЕЛЬНО ВЫБОРА КУХОННОЙ ПОСУДЫ
ДЛЯ ИСПОЛЬЗОВАНИЯ С ВАРОЧНОЙ ПОВЕРХНОСТЬЮ
7. ЭКСПЛУАТАЦИЯ ПОВЕРХНОСТИ
8. ЧИСТКА И ОБСЛУЖИВАНИЕ
..........................................57-58
......................................................58
9. ВОЗМОЖНЫЕ ПРОБЛЕМЫ И ИХ УСТРАНЕНИЕ
10. ПОСЛЕПРОДАЖНОЕ ОБСЛУЖИВАНИЕ
1 . 1 ЗАЩИТА ОКРУЖАЮЩЕЙ СРЕДЫ
....................................59
............................................59
...................56
...........................59
SPIS TREŚCI
INSTRUKCJE BEZPIECZEŃSTWA
1. Uwagi Ogólne
2. Instalacja
3. Zabudowa
...............................................................61
....................................................................61
....................................................................61
4. Podłączanie Do Instalacji Elektrycznej
5. Opis
...........................................................................62
6. Wskazówki Odnośnie Naczyń
7. Użytkowanie
8. Użytkowanie
..........................................................62-63
................................................................64
9. Rozwiązywanie Problemów
10. Serwis Techniczny
11. Ochrona Środowiska
......................................................65
..................................................65
.......................................60
.....................61-62
.......................................62
..........................................65
PL
YLEISIÄ TURVAOHJEITA
1. Huomaa
2. Asennus
...................................................................................79
.................................................................................79
3. Asennus Kalusteisiinb
4. Sähköliitäntä
5. Esittely
.....................................................................................80
6. Keittoastiat
7. Lasikeraamisen Lieden Käyttäminen
8. Puhdistus Ja Kunnossapito
9. Vianselvitys
10. Huolto
.................................................................................83
11. Ympäristönsuojelu
.................................................................78
...........................................................79
.....................................................................79-80
...........................................................................80
.................................80-81
.....................................................82
.............................................................................83
................................................................83
INDHOLD DK
SIKKERHEDSINSTRUKTIONER
1. Generelle Advarsler
2. Installation
3. Indbygning
................................................................................85
4. Eltilslutning
5. Oversigt
...................................................................................86
.................................................................85
..............................................................................85
.....................................................................85-86
6. Råd Angående Kogegrej Til Pladen
7. Instruktion I Brug
...........................................................86-87
8. Vedligeholdelse Og Rengøring
9. Problemløsning
.......................................................................89
10.ebflteemr Ssoallvgisnsgervice
11. Miljøhensyn
.............................................................................89
...................................................84
......................................86
.............................................88
............................................89
INHOUD NL
VEILIGHEIDSINSTRUCTIES
1. Algemene Aanwijzingen
2. Installatie
3. Inbouw
....................................................................................67
........................................................................................67
4. Elektrische Aansluiting
5. Presentatie - De Zones
6. Selectie Van Kookgerief
7. Gebruik Van Het Kookvlak
8. Onderhoud En Reiniging
9. Problemen Oplossen
10. Service Dienst
..........................................................................71
11. Bescherming Van Het Milieu
............................................................66
..............................................................67
........................................................67-68
.............................................................68
............................................................68
...................................................69-70
...........................................................70
.................................................................71
..................................................71
INNEHÅLL
Säkerhetsinstruktioner
1. Allmänna Varningar
2. Installation
3. Inbyggnad
..................................................................................73
....................................................................................73
4. Elektrisk Anslutning
5. Presentation
...............................................................................74
6. Rekommenderade Kokkärl
7. Använda Glaskeramikhällen
8. Underhåll Och Rengöring
9. Problemlösning
10. Eftervård
11. Miljöskydd
.................................................................................77
...............................................................................77
................................................................72
..................................................................73
.............................................................73-74
.....................................................74
.............................................74-75
.........................................................76
..........................................................................77
SE
INNHOLD NO
SIKKERHETSINSTRUKSJONER
1. Generelle Advarsler
Installering2.
3. Innebygd
.......................................................................91
..........................................................................91
4. Elektrisk Tilkobling
5. Presentasjon
...................................................................92
6. Råd Om Kokekar
7. Bruksanvisning
......................................................91
....................................................91-92
.............................................................92
..........................................................92-93
8. Rengjøring Og Vedlikehold
9. Problemløsning
8. Kundesenter
10. Miljøvern
...............................................................95
....................................................................95
........................................................................95
МАЗМҰНЫ
Сақтық Шаралары
1. Сəйкестік Декларациясы
2. Орнатуды Жүзеге Асыру Жөніндегі Нұсқаулықтар
3. Қоса Орнатылатын Тұрмыстық Техника
4. Электр Қосылыстары
5. Суреттемесі
6. Пісіретін Бетте Пайдалануға Арналған Ас Үй Ыдыс-
Аяғын Таңдауға Қатысты Кеңестер
7. Бетті Іске Пайдалану
8. Тазалау Жəне Қызмет Көрсету
9. Ықтимал Проблемалар Жəне Оларды Жою
10. Сатудан Кейін Қызмет Көрсету
11. Қоршаған Ортаны Қорғау
.................................................................96-97
..........................................................97
..........................................................97-98
..............................................................................98
...........................................................100-101
.........................................90
..........................................94
................97
.................................97
.............................................98
................................................101
...........................101
..............................................101
.......................................................101
KAZ
03
Page 4
Min.15 cm
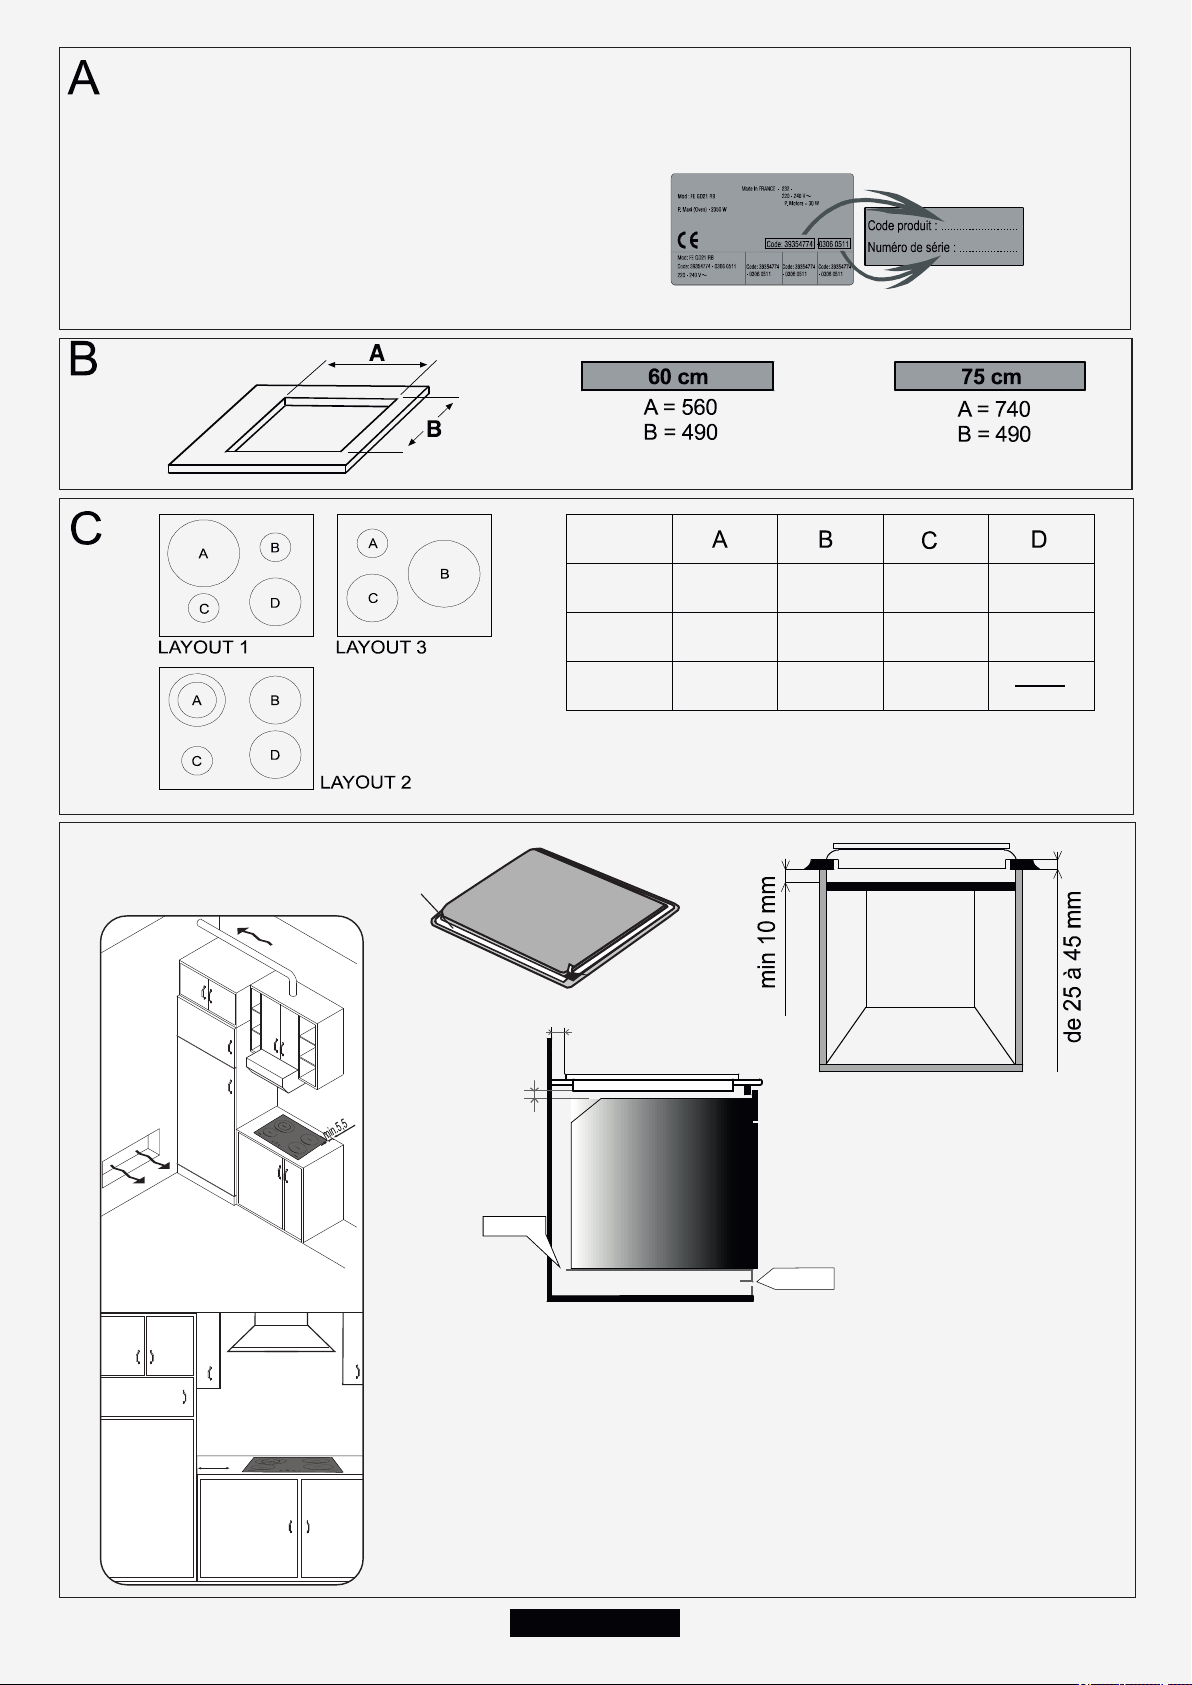
Identification Plate (located under the hob's bottom casing)
Placca segnaletica ( situata sotto la cassetta inferiore del piano)
Plaque signalétique (située sous le caisson inférieur de la table)
Matrikelschild: (befindet sich auf der Unterseite des Gerätes)
Placa de características (está bajo el cajón inferior de la encimera)
Placa de identificação e de características (localizada por baixo da caixa do fundo da placa)
Identifikační štítek (umístěný pod deskou spodním krytu)
Identifikacijsko tablico (ki se nahaja v spodnjem kuhalne plošče v ohišje)
Идентификационной табличке (находится в нижней части корпуса плиты в)
Tabliczka znamionowa (na spodzie plyty)
Identificatieplaatje (aan de onderkant van het kookvlak)
Identifikationsplåt (finns under hällen botten)
Laitekilpi (sijaitsee lieden pohjassa)
Mærkeplade (placeret under pladens bundbeklædning)
Merkeplate (plassert under toppens nedre del)
Сəйкестендіру табличкасы (пісіретін беттің корпусының төменгі бөлігінде орналасқан)
PRODUCT CODE / CODE PRODUIT
SERIAL N° / NUMERO DE SERIE
Seal-Guarnizione-Joint-Dichtungsstreifen-
Junta-Uszczelka-Junta- -Afdichtstrip-Печать
D
Tätning-Tiiviste-Forsegling-Pakning
Прокладка-аратөсем
10 mm
mini
50 mm
LAYOUT 1
LAYOUT 2
LAYOUT 3
2300 W
1200 +
1000 W
1200 W
1200 W
1800 W
2500 W
1200 W
1200 W
1800 W
1800 W
1800 W
500 X 50
500 X 10
GB- It is forbidden to fit the hob above a non-ventilated oven.
IT- É vietato installare il piano su un forno non raffreddato.
FR- Il est interdit d'enchâsser un four non ventilé sous la plaque de cuisson.
DE- Der Einbau in Kombination mit einem Backofen ohne Abkühlventilator ist nicht gestattet.
ES- Se prohibe el empotramiento de un horno sin ventilación por debajo la encimera.
PT- Não é permitida a instalação da placa por cima de um forno que não seja ventilado.
CZ - Je zakázáno, aby se vešly na varnou desku nad non-sušárně.
SL - Prepovedano je, da se prilega kuhalno ploščo zgoraj brez peči z napo.
RU- Это запрещено в соответствии с плитой выше невентилируемых печи.
PL - Zabrania sie instalowania plyty nad piekarnikiem nie majacym wentylacji
NL- Het is verboden een nietgen-ventileerde oven onder het werkbald in te bouwen.
SE- Spishällen får inte monteras ovanför en oventilerad ugn.
FI- Liettä ei saa asentaa sellaisen uunin päälle, jonka ilmanvaihdosta ei ole huolehdittu.
DK- Det er forbudt at montere kogepladen oven på en ovn uden ventilation.
NO- Platetoppen må ikke monteres over en stekeovn som ikke er ventilert.
KAZ- Пісіретін бетті желдетілмейтін пештің үстінгі жағында орнатуға тыйым салынады
04
Page 5

E
According to model - Secondo modello - Selon modèle - Je nach Modell - Según el modelo - Dependendo do modelo - v závislosti na
modelu - v skladu z vzorcem - в зависимости от модели - Zaleznie od modelu - Volgens model - Beroende på modell -
Mallikohtainen - Afhænger af modellen - I samsvar med modell - Модельге байланысты
1. ON / OFF
2. " + "
3. " - "
4. TIMER - MINUTENZÄHLER - RELOJ - CONTA-MINUTOS - ČASOVÝ SPÍNAČ - ČASOVNIK - REGULATOR CZASOWY -
TIMER - AJASTIN - TIMER - TIDTAKER - ТАЙМЕР
5. Additional cooking zone led - Spia della zona di cottura estesa - Diode de fonctionnement du foyer complémentaire - LED für die
zusätzliche Kochzone - Piloto de funcionamiento de la zona complementaria - Indicador luminoso da zona de cozedura adicional Další varné zóny vedlo - Dodatna kuhalno polje pod vodstvom- дополнительная площадь приготовления пищи привело Dodatkowa strefa gotowania doprowadziła - Symbool van uitgebreide kookzone - Lampa för extra tillagningszonKuumennusalueen led-merkkivalo - LED-Indikator for udvidet kogezone - Lampe for tilleggssone - Тамақ пісіретін қосымша
ауданның жарықдиод индикаторы
6. Cooking zone programming indicator - Spia programmazione zona di cottura - Repère de programmation du foyer - Anzeiger der
Kochzonenprogrammierung - Piloto de la zona programada - Indicador luminoso de programação - Varná zóna programování
ukazatel - kuhalno polje programiranje kazalnik - приготовление области программирования индикатор - Strefa wskaźnik
gotowania programowania - Programmatie-icoon van kookzone - Indikator för programmering av tillagningszoner Kuumennusalueen ohjelmoinnin merkkivalo - Indikator for programmering af kogezone - Programmeringsindikator for kokesone -
Тамақ пісіретін ауданды бағдарламалау индикаторы
7. Selection of the zone - Selezione della zona - Sélection de la zone - Auswahl des Bereichs - Selección de la zone - Selecção da
área - Výběr zóny - Izbor območja - Выбор области - Wybór strefy - Selectie van de zone- val av zonen - valinta vyöhykkeenUdvælgelse af zonen - Utvalg av sonen - Ауданды таңдау
05
Page 6

SAFETY INSTRUCTIONS
READ THE INSTRUCTIONS BOOKLET CAREFULLY TO MAKE THE MOST OF YOUR HOB.
We recommend you keep the instructions for installation and use for later reference, and before
installing the hob, note its serial number in case you need to get help from the after sales service.
Warning : the appliance and its accessible parts become hot during use. Care should be taken to
avoid touching heating elements.
• Childen under 8 Year of age must be kept away from the appliance unless they are continuously
supervised.
• This appliance can be used by children aged from 8 years and above and persons with reduced
physical, sensory or mental capabilities or lack of experience and knowledge if they have been given
supervision or instruction concerning use of the appliance in a safe way and understand the hazards
involved.
• Children should be supervised to ensure that they do not play with the appliance.
• Cleaning and user maintenance shall not be made by children without supervision.
Warning : unattended cooking on a hob with fat or oil can be dangerous and may result in fire.
• Never try to extinguish a fire with water, but switch off the appliance and then cover flame e.g. with a
lid or a fire blanket.
• Warning : danger of fire: do not store items on the cooking surfaces.
• Warning : if the surface is cracked, switch off the appliance to avoid the possibility of electric
shock.
• Never use a steam or high pressure spray to clean the appliance.
• This appliance is not intended to be operated by means of an external timer or separate remote-
control system.
• If present do not to stare into halogen lamp hob elements.
• The means for disconnection must be incorporated in the fixed wiring in accordance with the wiring
rules.
• The instructions state the type of cord to be used, taking into account the temperature of the rear
surface of the appliance.
• If the supply cord is damaged, it must be replaced by manufacturer, its service agent or similarly
qualified persons in order to avoid a hazard.
• It is strongly recommended to keep children away from the cooking zones while they are in
operation or when they are switched off, so long as the residual heat indicator is on, in order to prevent
the risks of serious burns.
• Aluminium foil and plastic pans must not be placed on heating zones.
• After every use, some cleaning of the hob is necessary to prevent the build up of dirt and grease.
If left, this is recooked when the hob is used and burns giving off smoke and unpleasant smells,
not to mention the risks of fire propagation.
• Do not touch the heat zones during operation or for a while after use.
• Never cook food directly on the glass ceramic hob. Always use the appropriate cookware.
• Always place the pan in the centre of the unit that you are cooking on.
• Do not use the surface as a cutting board.
• Do not slide cookware across the hob.
• Do not store heavy items above the hob. If they drop onto the hob, they may cause damage.
• Do not use the hob as a working surface.
• Do not use the hob for storage of any items.
06 GB- IE
Page 7

1. GENERAL WARNINGS
We are constantly striving to improve product quality and as such may modify appliances to incorporate the latest technical
improvements.
This equipment, in the parts intended to come into contact with food, complies with the regulations laid down in EEC
directives 89/109.
By placing the mark on this product, we are confirming compliance to all relevant European safety, health and
environmental requirements which are applicable in legislation for this product.
2. INSTALLATION
Installing a domestic appliance can be a complicated operation which if not carried out correctly, can seriously affect consumer
safety. It is for this reason that the task should be undertaken by a professionally qualified person who will carry it out in
accordance with the technical regulations in force. In the event that this advice is ignored and the installation is carried out by an
unqualified person, the manufacturer declines all responsibility for any technical failure of the product whether or not it results in
damage to goods or injury to individuals.
3. BUILT-IN
The furniture in which your hob will be installed and all adjacent
furniture, should be made from materials that can withstand high
temperatures. In addition, all decorative laminates should be fixed
with heat-resistant glue.
Installation (Fig. B / D):
. A watertight seal is supplied with the hob.
Before fitting:
- turn the hob upside down, with the glass surface facing
downwards.
Make sure the glass is protected.
- fit the seal round the hob.
- make sure that it is correctly fitted to avoid any leakage into the
supporting cabinet.
. Leave a gap of at least 5 cm between the appliance and the
vertical sides of the adjacent furniture.
. If, when installing the hob, the lower hob face is adjacent to an
area normally accessible when handling or cleaning, fit a
partition 1 cm below the base of the hob to avoid any risk of
scorching or damage.
When installing the hood above a cooker top, please consult the
installation instructions advising on the correct distance required
from the cooker top.
If it is installed on a cabinet above a cooker top , the minimum
distance requires is 70 cm.
The hob is fitted with a power supply cord which allows it to be
connected only to a power supply of 220-240 V between phases
or between phase and neutral.
. Connect to a socket.
It is however possible to connect the hob to :
. Three phase 220-240 V3~
. Three phase 380-415 V2N~
To proceed to the new connection, you must adhere the
following instructions.
- Before making the connection, make sure that the installation is
protected by a suitable fuse, and that it is fitted with wires of a
large enough section to supply the appliance normally.
- Turn over the hob, glass side against the work top, taking
care to protect the glass.
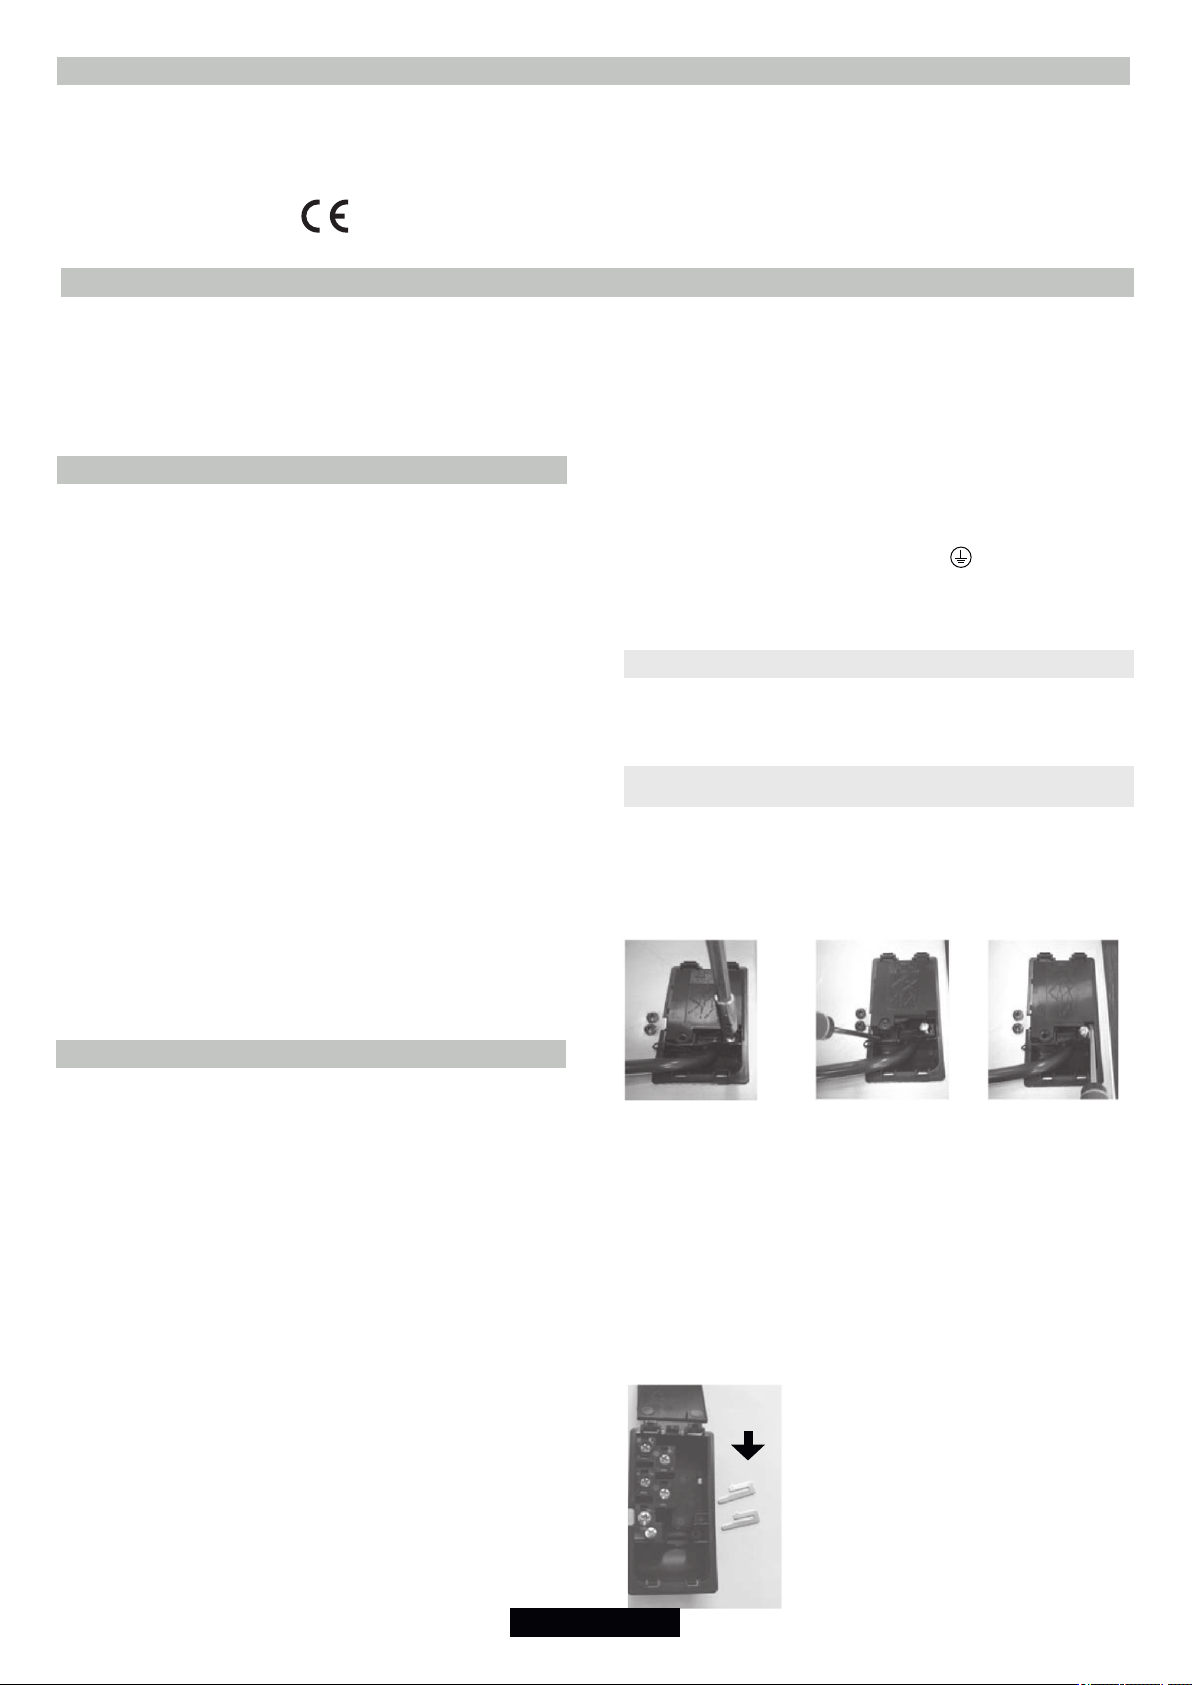
Open the cover in the following sequence:
1 2 3
4. ELECTRICAL CONNECTION
"The installation must conform to the standard directives."
The manufacturer declines all responsibility for any damage that
may be caused by unsuitable or unreasonable use.
Warning:
we cannot be held responsible for any incident or its
consequences that may arise during the use of an appliance
not linked to the earth, or linked to an earth whose continuity
is defective.
. Always check before any electrical operation, the supply tension
shown on the electricity meter, the adjustment of the circuit-
breaker, the continuity of the connection to earth to the
installation and that the fuse is suitable.
. The electrical connection to the installation should be made
according to the rated power of the appliance, this should be
made via an Omni pole cut-out switch.
If the appliance has a socket outlet, it must be installed so that
the socket outlet is accessible.
. The yellow/green wire of the power supply cable must be
connected to the earth of both power supply and appliance
terminals.
. Any queries regarding the power supply cord should be referred
to After Sales Service or a qualified technician.
07 GB- IE
. unscrew the cable clamp "1",
. find the two tabs located on the sides,
. put the blade of a flat screw-driver in front of each tab "2" e "3",
push in and press,
. remove the cover.
To release the power supplying cord.
. remove the screws retaining the terminal block which contains
the shunt bars and the conductors of the supply cord,
. Pull out the supply cord.
Operations to be carried out to make a new connection :
- Choose the power supply cable in
accordance with the recommendations in
the table.
- Pass the power supply cable into the
clamp.
- Strip the end of each conductor of the
supply cord on a 10 mm length, by taking in
account the requested length of the cord for
the connection to the terminal block.
- According to the installation and with the
help of shunt bars which you should have
recovered in the first operation, fix the
conductor as shown on the chart.
- Fix the cover.
- Screw the cable clamp.
Note: make sure the terminal board screws are tight.
Page 8

ATTENTION:
should it be necessary to replace the supply cord, connect the wire
in accordance with the following colours/codes:
BLUE - NEUTRAL (N)
BROWN - LIVE (L)
YELLOW-GREEN - EARTH ( )
Connection to the terminals on the terminal block
LAY OUT
“ 3 ”
3x2,5 3x2,5 3x2,5
4x1,5 4x1,5 4x1,5
4x1,5 4x1,5 4x1,5
Cable
HO5V2V2F
Cable
HO5V2V2F
Cable
HO5V2V2F
LAY OUT
“ 1 ”
LAY OUT
“ 2 ”
THE CHOICE OF COOKWARE - The following information will
help you to choose cookware which will give good performance.
Stainless Steel : highly recommended. Especially good with a
sandwich clad base. The sandwich base combines the benefits of
stainless steel (appearance, durability and stability) with the
advantages of aluminium or copper (heat conduction, even heat
distribution).
Aluminium : heavy weight recommended. Good conductivity.
Aluminium residues sometimes appear as scratches on the hob,
but can be removed if cleaned immediately.
Because of its low melting point, thin aluminium should not be
used.
Cast Iron : usable, but not recommended. Poor performance.
May scratch the surface.
Copper Bottom / stoneware: heavy weight recommended.
Good performance, but copper may leave residues which can
appear as scratches. The residues can be removed, as long as
the hob is cleaned immediately. However, do not let these pots
boil
dry. Overheated metal can bond to glass hobs. An overheated
copper pot will leave a residue that will permanently stain the hob.
Porcelain/enamel : Good perfomance only with a thiny smooth,
flat base.
Monophase 220-240 V~
Three phases 220-240 V3~ Three phases 380-415 V2N~
Ph = Phase
5.
PRESENTATION
• hilight zone :
a metallic conductor strip is spread uniformly over the whole
surface unit. It is effective within 3 seconds and is suitable for
steady, homogeneous and also sustained cooking.
The glass-ceramic hob benefits from greater heat output which is
generated by the hilight cooking zones thereby accelerating the
cooking process. Modifications to the design of the hob have not
affected the capacity of the glass to withstand high temperatures,
but they have improved controllability.
With the "Sprinter" facility, reduced cooking times of up to 15% can
be achieved, depending upon the method of cooking and the type
of saucepans being used.
N = Neutral T = Earth
Two phases 220-240 V2~
6. HOB COOKWARE ADVICE
Using good quality cookware is critical for setting
the best performance from your hob.
• Always use good quality cookware with perfectly flat and
thick bases : using this type of cookware will prevent hot spots
that cause food to stick. Thick metal pots and pans will provide an
even distribution of heat.
• Ensure that the base of the pot or pan is dry : when filling
pans with liquid or using one that has been stored in the
refrigerator, ensure that the base of the pan is completely dry
before placing it on the hob. This will help to avoid staining the
hob.
• Use pans whose diameter is wide enough to completely
cover the surface unit : the size of the pan should be no
smaller than the heating area. If it is slightly wider the energy will
be used at its maximum efficiency.
Glass-ceramic : not recommended. Poor performance. May
scratch the surface.
7. USE
• After powering up the hob, wait some seconds to activate the
electronic controls.
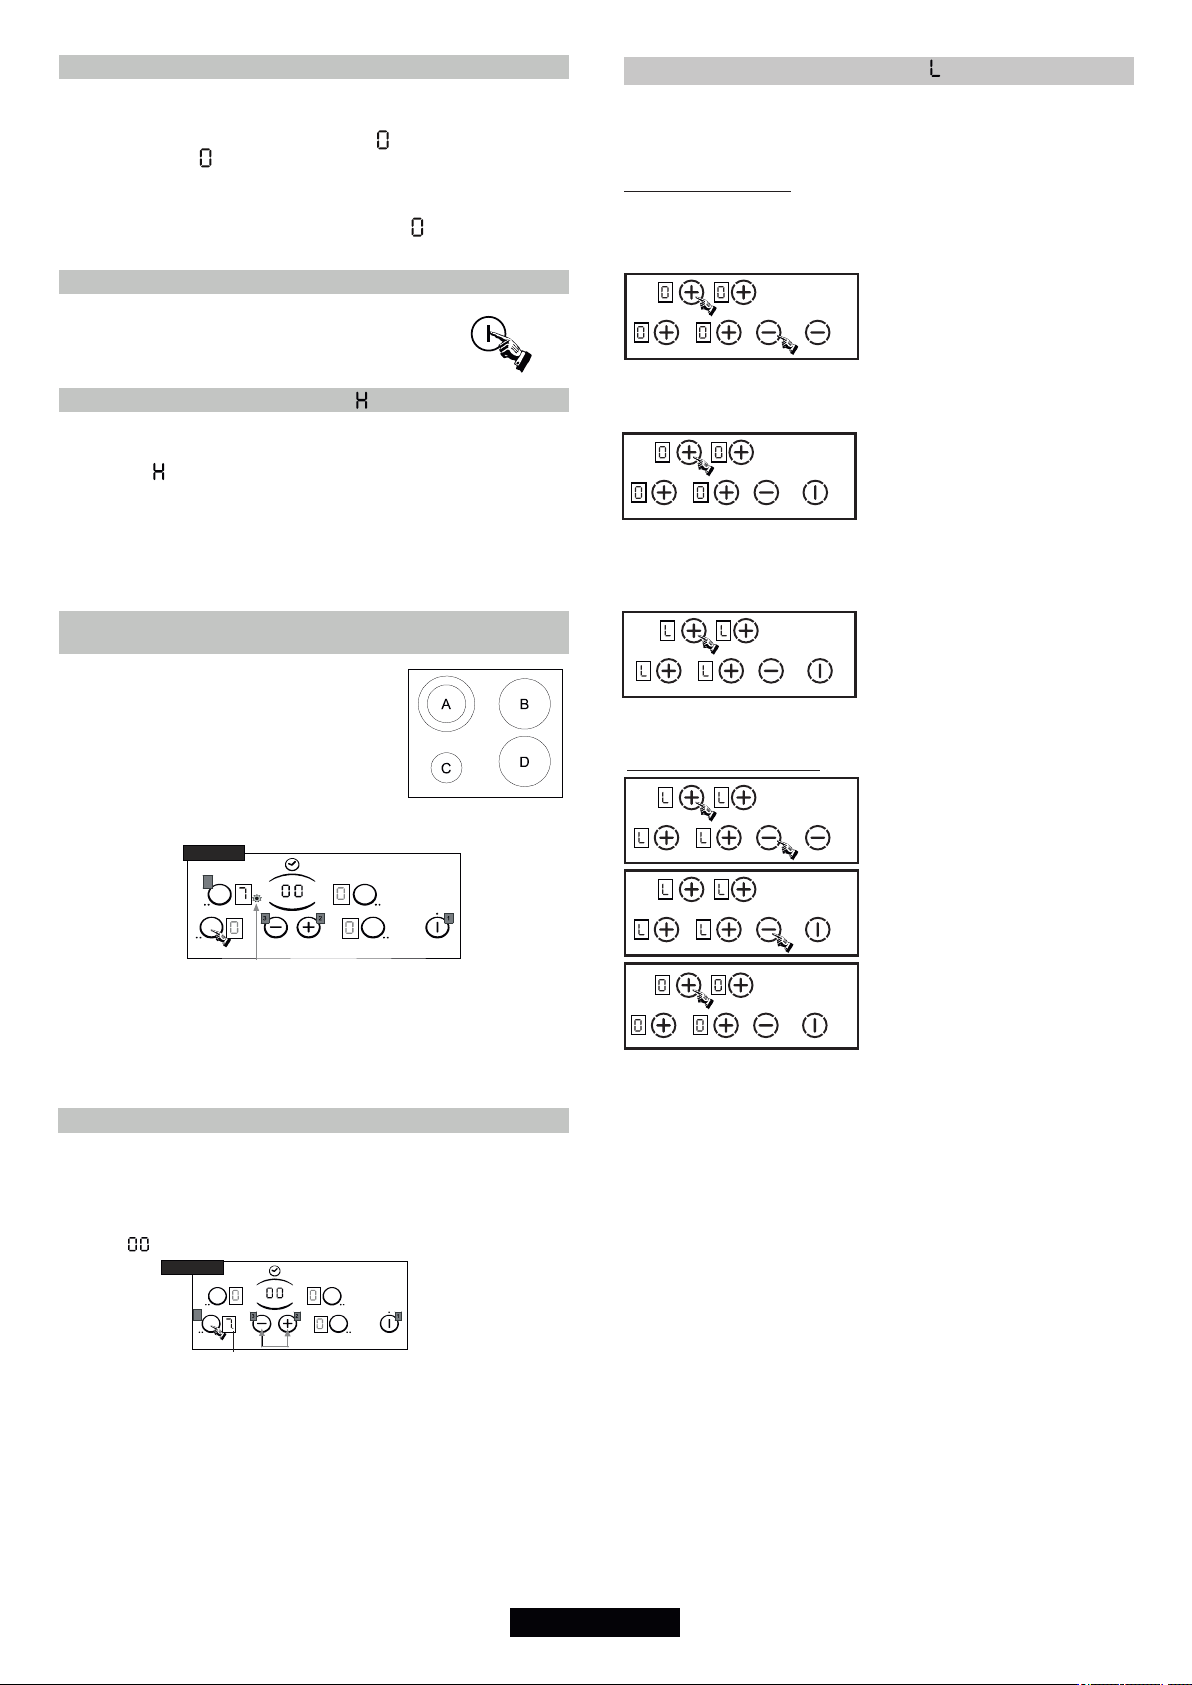
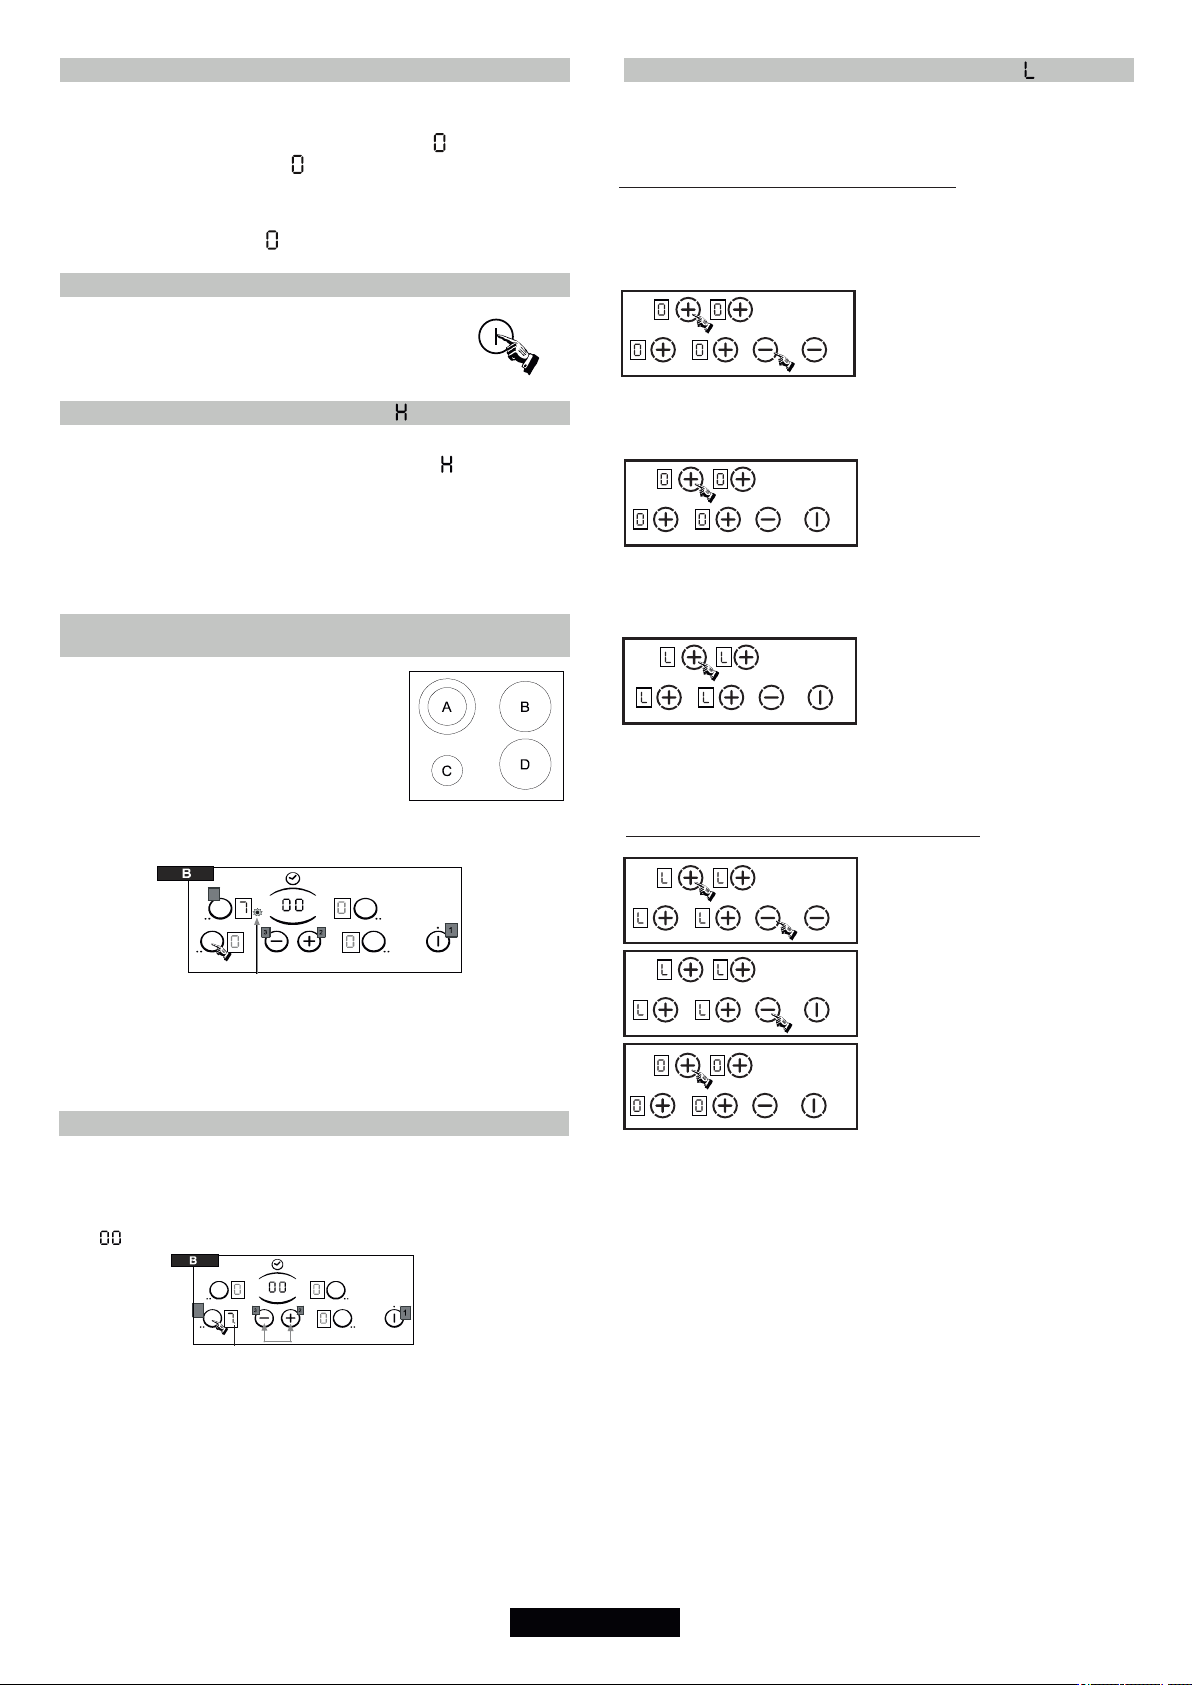
- Press the button . The corresponding indicator lights.
Electronic control of the hob is activated : in each display
zone, the heat level shows .
- After 20 seconds whithout use, the electronic control goes off
and the starting operation has to be repeated.
. STARTING A COOKING ZONE
- Press the selection button of the required cooking zone.
The "0" of the corresponding zone stays lighted when the
light of the others "0" is reduced.
TYPE B
77
- Press the - or + button to select a heat level between 1 and 9.
Hold down the + or - button and the heat level increases or
decreases gradually.
The following examples are for information only. Personal
experience should then let you adapt these settings to your taste
and habits.
0 : Off
U -1 : Dissolving
2 : Melting
3 : Keeping hot
4 : Heating up
5 : Thawing, stewing, full cooking, low temperature
cooking
6 : Cooking without lid
7 : Frying, meat browning and roasting
8 : High temperature cooking and roasting, seizing
9 : Frying, boiling large quantities of water.......
08 GB- IE
Page 9
. STOPPING A COOKING ZONE
- Press the selection button of the required cooking zone.
- Press the "-" button to display heat level . Now the zone goes
off, the indicator goes off after 10 seconds.
- To stop rapidly, press simultaneously the "-" and the
respective cooking zone selection.
The heat level automatically goes down to . The cooking
zone goes off.
. GENERAL STOP
The cooking zones and the timer can be stopped
at any moment by pressing the On-Off button.
. RESIDUAL HEAT INDICATOR
LOCKING BUTTON OPERATION
The locking function prevents the accidental activation of the
hob by children, and it is also useful during the cleaning of the
hob.
TO LOCK THE HOB. (Example for hob with 4 zones)
Press the ON/OFF button and then (only after this operation the
child lock can be activated)
Press simultaneously the minus
key and the top left selection key,
until you hear the beep sound; if
you do not feel a beep sound,
switch OFF the hob and repeat all
the operation of setting.
The control panel tells the user when the surface temperature of
the cooking zones exceeds about 60°C, by the following
displaying: . When the temperature goes back below 60°C, the
display goes off.
For ending the cooking, we advise switching off the cooking zone
and using the residual heat of the zone to finish cooking gently.
N.B. After a cut in the current, the residual heat indicator
disappears completely, even if the surface temperature exceeds
60°C.
. OPERATING THE ADDITIONAL COOKING ZONE
(TWO ZONES)
The cooking zone with two zones is
fitted certain models .............................
>
It is active in totality when the cooking zone is in function ; the
control led of the additional cooking is displayed.
TYPE B
7
LED
Exam ple
To desactivate the additional cooking zone :
- Press again on the additional cooking zone touch. The Led goes
off when it is desactivated.
After press again the top left
selection key.
This operation procedure must
take place within 10 sec, and no
other key than the one described
above may pressed; otherwise the
input will be cancelled for not being completed.
All displays show an “L” for
LOCKED (=child lock against
unintentional activation) – if a
cooking zone is at stage “hot, “L”
and “H” appear alternately.
TO UNLOCK THE HOB
For unlock the control unit, it is
necessary that the minus key and
the top left selection key (cooking
zone back left) are pressed
simultaneously and subsequently
pressing the minus key again.
The looking is now removed and
the Touch Control returns to
STAND BY mode.
To re-activate the additional cooking zone :
- Press on the cooking zone button. The Led is active again.
. PROGRAMMING A COOKING ZONE (according to the model)
Every cooking zone can be programmed for a maximum time of
99 minutes.
- Start the required zone by following the previous instructions.
- Press on simultaneously the touch "-" and "+" to activate the
timer, " " is displayed.
TYPE B
7
LED
- Press again on the "+" button to select a time in minutes
between 0 and 99 minutes or press on the "-" button to decrease
the time between 30 minutes and 0. The timer control led near
the level is displayed.
--> the programmed time can be modified at any moment.
When the time is run, the cooking zone goes off automatically and
an audible beep sounds for 1 minute, press a button to stop it.
--> If any zone is activated, the timer can be used alone, as
reminder, it will ring at the end of the programmed time.
09 GB- IE
Page 10

. FAST HEATER OPERATION
Every cooking zone on the hob is equipped with a fast heater
for raising the cooking zone’s temperature faster.
Starting the fast heater
- Press the on/off button .
- Start the required zone, press the " + " button to obtain position
"9", release the button briefly and press again the " + " button ;
the display alternates showing "A" "fast heater" and "9" heat
level.
- If necessary reduce to the required heat position, the display
alternates showing "A" "fast heater" and the new heat position.
Cooking
position
0
1
2
3
4
5
6
7
8
9
Power
released
(%)
:
0 %
: 2.5 % : 0 : 2 H
:
:
:
:
:
:
:
:
:
3 %
6 %
11 %
16 % :
19 % :
32 % :
45 % :
65 % :
100 % : 0
Time of
fast heater
(minutes)
:
0
:
1
:
3
:
5
6,5
8,5
2,5
3,5
4,5
Maximum
operating
time before
automatic
cut off*
:
0 H
:
6 H
:
6 H
:
5 H
:
5 H
:
4 H
:
1,5 H
:
1,5 H
:
1,5 H
:
1,5 H
E.g. 1800 W zone at position 6 = 32% of 1800 W power released
When the "Fast heater" is on, the zone supplies 1800 W power for
2.5 minutes, and adjusts to 576 W after this time.
* For increased safety, the cooking zones cut off automatically if
they are left on too long. The cut off depends on the heat level
used.
8. CLEANING AND MAINTENANCE
. Before carrying out any maintenance work on the hob, allow it
to cool down.
. Only products, (creams and scrapers) specifically designed for
glass ceramic surfaces should be used. They are obtainable
from hardware stores.
. Avoid spillages, as anything which falls on to the hob surface
will quickly burn and will make cleaning more difficult.
. It is advisable to keep away from the hob all substances which
are liable to melt, such as plastic items, sugar, or sugar-based
products.
MAINTENANCE:
- Place a few drops of the specialised cleaning product on the
hob surface.
- Rub any stubborn stains with a soft cloth or with slightly damp
kitchen paper.
- Wipe with a soft cloth or dry kitchen paper until the surface is
clean.
If there are still some stubborn stains:
- Place a few more drops of specialised cleaning fluid on the
surface.
- Scrape with a scraper, holding it at an angle of 30° to the hob,
until the stains disappear.
- Wipe with a soft cloth or dry kitchen paper until the surface is
clean.
- Repeat the operation if necessary.
A FEW HINTS:
Frequent cleaning leaves a protective layer which is essential to
prevent scratches and wear. Make sure that the surface is clean
before using the hob again. To remove marks left by water, use a
few drops of white vinegar or lemon juice. Then wipe with
absorbent paper and a few drops of specialised cleaning fluid.
The glass ceramic surface will withstand scraping from flatbottomed cooking vessels, however, it is always better to lift them
when moving them from one zone to another.
To desactivate the fast heater
- Switch on the cooking zone, press the " - " button to come back
to a normal heat level, decrease to the heat level required or to
" 0 " to stop the cooking zone.
NB:
30° Maxi
Do not use a sponge which is too wet.
Never use a knife or a screwdriver.
A scraper with a razor blade will not damage the surface,
as long as it is kept at an angle of 30°.
Never leave a scraper with a razor blade within the reach
of children.
Never use abrasive products or scouring powders.
. The metal surround : to safely clean the metal surround wash
with soap and water, rinse, then dry with a soft cloth.
Any change in the colour of the glass-ceramic
surface does not affect its operation or the stability
of the surface. Such discolorations are mostly a
result of burnt food residues or use of cookware
made of materials such as aluminium or copper;
these stains are difficult to remove.
10 GB- IE
Page 11

9. PROBLEM SOLVING
10. AFTERCARE
The cooking zones do not simmer or only fry gently
Only use flat-bottomed pans. If light is visible between the pan
and the hob, the zone is not transmitting heat correctly.
The pan bottom should fully cover the diameter of the selected
zone.
The cooking is too slow
Unsuitable pans are being used. Only use flatbottomed
utensils, that are heavy and have a diameter at least the same
as the cooking zone.
Small scratches or abrasions on the hob's glass surface
Incorrect cleaning or rough-bottomed pans are used; particles
like grains of sand or salt get between the hob and the bottom
of the pan. Refer to the "CLEANING" section; make sure that
pan bottoms are clean before use and only use smooth
bottomed pans. Scratches can be lessened only the cleaning is
done correctly.
Metal marks
Do not slide aluminium pans on the hob. Refer to the cleaning
recommendations.
You use the correct materials, but the stains persist.
Use a razor blade and follow the "CLEANING" section.
Dark stains
Use a razor blade and follow the "CLEANING" section.
Light surfaces on the hob
Marks from an aluminium or copper pan, but also mineral, water
or food deposits; they can be removed using the cream cleaner.
Caramelisation or melted plastic on the hob.
Refer to the "CLEANING" section.
The hob does not operate or certain zones don't work
The shunts are not positioned correctly on the terminal board.
Have a check made that the connection is done he control panel
is locked. Unlock the hob.
The hob does not cut off.
The control panel is locked. Unlock the hob.
The hob stops automatically
A spill covers at least two buttons for more than 10 seconds; the
hob switches to safety, and an audible beep sounds. Clean up
the spill or remove the object.
The cooking zones stop automatically if they are left
on for too long. Refer to the section, "operating time".
Frequency of on/off operations for cooking zones
The on-off cycles vary according to the required heat level:
- low level: short operating time,
- high level: long operating time.
"H" display, residual heat indicator, blinking.
The electronic temperature is too high. A technician should
verify the fitting in compliance with the recommendations.
Before calling out a Service Engineer please check the
following:
— that the plug is correctly inserted and fused;
If the fault cannot be identified switch off the appliance — do not
tamper with it — call the Aftercare Service Centre. The appliance
is supplied with a guarantee certificate that ensures that it will be
repaired free of charge at the Service Centre.
11. PROTECTION OF THE ENVIRONMENT
This appliance is marked according to the
European directive 2012/19/EU on Waste
Electrical and Electronic Equipment (WEEE).
WEEE contains both polluting substances
(which can cause negative consequences for
the environment) and basic components (which
can be re-used). It is important to have WEEE
subjected to specific treatments, in order to
remove and dispose properly all pollutants, and
recover and recycle all materials.
Individuals can play an important role in ensuring that WEEE
does not become an environmental issue; it is essential to follow
some basic rules:
• WEEE shall not be treated as household waste.
• WEEE shall be handed over to the relevant collection points
managed by the municipality or by registered companies. In
many countries, for large WEEE, home collection could be
present.
• When you buy a new appliance, the old one may be returned to
the retailer who has to collect it free of charge on a one-to-one
basis, as long as the equipment is of equivalent type and has the
same functions as the supplied equipment.
11 GB- IE
Page 12

PRESCRIZIONI DI SICUREZZA
LEGGERE ATTENTAMENTE LE ISTRUZIONI INCLUSE IN QUESTO LIBRETTO. Vi danno importanti
indicazioni sulla sicurezza d'installazione, d'impiego e di pulizia, ed anche qualche consiglio per
un'ottimale utilizzo del piano di cottura. Conservare con cura questo documento per consultazione
ulteriore e notare, prima dell'installazione del piano, il numero di serie dell'apparecchio, nel caso di un
ulteriore richiesta d'intervento del servizio di assistenza. ATTENZIONE: l'apparecchio e le parti
accessibili diventano calde durante l'uso. Prestare attenzione a non toccare le parti calde.
• I bambini al di sotto di 8 anni dovrebbero essere tenuti a distanza se non continuamente
supervisionati.
• L'apparecchio può essere usato da bambini dagli 8 anni in su e persone con ridotte capacità fisiche,
sensoriali o mentali o senza esperienza e conoscenza del prodotto se supervisionate o dando loro
istruzioni riguardo al funzionamento dell'apparecchio in maniera sicura e coscente del rischio
possibile.
• I bambini non dovrebbero giocare con l'apparecchio.
• La pulizia e la manutenzione non dovrebbero essere fatte da bambini senza supervisione.
ATTENZIONE: cucinare senza supervisione grasso o olio sul piano cottura può essere pericoloso e può
provocare incendi.
• MAI provare a spegnere il fuoco con acqua. Prima spegnere l'apparecchio e poi coprire le fiamme, ad
esempio con un coperchio o un telo non infiammabile.
ATTENZIONE: pericolo di incendio: non lasciare oggetti sul piano cottura.
ATTENZIONE: Se la superficie è incrinata, spegnere l’apparecchio per evitare la possibilità di scosse
elettriche.
• Non utilizzare un pulitore a vapore.
• L'apparecchio non è progettato per funzionare con un timer esterno o con un sistema di comando
separato.
• I piani di cottura che incorporano lampade alogene non devono essere fissati intensamente.
• Il mezzo di disconnessione deve essere incorporato nel cablaggio fisso in accordo con le leggi di
cablaggio.
• Le istruzioni devono indicare quale tipo di cavo debba essere utilizzato, tenendo presente la
temperatura della superficie posteriore dell’apparecchio.
• Se il cavo di alimentazione è danneggiato, esso deve essere sostituito dal costruttore o dal suo
servizio assistenza tecnica o comunque da una persona con qualifica similare, in modo da prevenire
ogni rischio.
• Tutti le parti accessibili sono calde durante il funzionamento del piano, tenere lontano i
bambini durante il funzionamento del prodotto e fino a quando non si spegneranno le spie di calore
residuo.
• La carta stagnola e i recipienti in materia plastica non devono essere appoggiati sulle superfici calde.
• Si raccomanda, dopo ogni utilizzo, un minimo di pulizia dell'apparecchio, per evitare l'accumulo di
sporcizie e grassi. Questi, infatti, ricuocerebbero ad ogni uso dell'apparecchio, carbonizzandosi e
liberando fumi ed odori sgradevoli, con il rischio di incendiarsi.
• Quando la spia del calore residuo è accesa, non toccare il fuoco in funzionamento o appena spento.
• Non cucinare mai direttamente sul piano, utilizzare sempre le pentole.
• Appoggiare sempre la pentola ben centrata sul bruciatore da utilizzare.
• Non utilizzare la superficie vetroceramica né come piano per tagliare né come piano di lavoro.
• Non far scivolare le pentole sul piano: rischio di graffiature.
• Non appoggiare oggetti pesanti sul piano, potrebbero cascare e rovinare il piano.
• Non lasciare oggetti depositati sul piano di qualunque tipo essi siano.
12 IT
Page 13
1. AVVERTENZE GENERALI
Perseguendo una politica di aggiornamento tecnico-qualitative, il produttore si riserva il diritto di apportarvi modifiche
migliorative, rispettando le norme vigenti.
Dichiarazione di conformità: questo apparacchio, nelle parti progettate per venire a contatto con cibi, è conforme con le
regolamentazioni espresse nelle direttive EEC 89/109.
Apponendo la marcatura su questo prodotto, dichiariamo, sotto la nostra responsabilità, di ottemperare a tutti i
requisiti relativi alla tutela di sicurezza, salute e ambiente previsti dalla legislazione europea in essere per questo prodotto.
2. INSTALLAZIONE
Il collegamento e la messa in funzione degli apparecchi elettrodomestici nel loro ambiente è un'operazione delicata che, se non
viene effettuata correttamente, può causare delle conseguenze anche gravi per la sicurezza dei consumatori. Per questo è
importantissimo che l'operazione di collegamento venga svolta da un professionista, che DEVE attenersi alle norme tecniche
in vigore. Se nonostante questa raccomandazione, il consumatore deciderà di realizzare personalmente il collegamento, il
produttore non sarà ritenuto responsabile per eventuali incidenti tecnici sul prodotto, e neppure per eventuali incidenti a cose
o persone.
3. INSERIMENTO NEL MOBILE
Il mobile o il supporto in cui deve essere incassato il piano e le
pareti dei mobili attigui devono essere di un materiale resistente
per sopportare una temperatura elevata. Inoltre è necessario che
il rivestimento che ricopre il mobile o il supporto sia fissato con
una colla resistente alle alte temperature affinché non si scolli.
Prima dell'installazione (Fig. B/D):
Una guarnizione di tenuta stagna è consegnata con il piano di
cottura.
- Girare il piano, parte in vetro verso il basso.
- Abbiate cura di proteggere il vetro.
- Mettere la guarnizione avvolta intorno al piano.
- Abbiate cura nell'eseguire il lavoro, in quanto tutto questo
eviterà qualsiasi infiltrazione dentro il mobile di supporto.
Prevedere uno spazio di 5 cm. tra l'apparecchio e le pareti
verticali adiacenti.
Prevedere un divisore orizzontale sotto il cassone del piano,
delle stesse dimensioni del vano. Lasciare almeno 1 cm di spazio
sotto il cassone del piano.
Qualora venga installata una cappa sopra il piano cottura,
consultare le istruzioni di montaggio della cappa nelle quali è
riportata la distanza corretta da rispettare.
Qualora venga installato un pensile sopra il piano cottura, la
distanza minima da tenere è di 70 cm.
ATTENZIONE:
Può essere necessario sostituire il cavo di alimentazione;
connettere il cavo seguendo i seguenti colori e codici:
Blu Neutro/ neutral (N)
Marrone Fase/ live (L)
Giallo-Verde Terra/ earth ( )
Il piano vetroceramica viene fornito con un cavo di alimentazione
e puó essere utilizzato con una tensione di 220-240 V tra 2 fasi o
tra fase e neutro.
Allaciarlo ad una presa di corrente.
É anché possibile collegare il piano con :
. Trifase 220-240 V3~
. Trifase 380-415 V2N~
Per procedere al nuovo collegamento, attenersi
scrupolosamente alle indicazioni di sotto indicate.
- Prima di realizzare il collegamento, verificare che
l'installazione sia protetta da un fusibile appropriato, controllare
la sezione dei fili dell'installazione.
- Girare il piano, con la parte del vetro contro il piano di lavoro,
facendo molta attenzione a proteggere il vetro!
Per aprire il coperchio della morsettiera:
1 2 3
4. COLLEGAMENTO ELETTRICO
L'installazione deve essere conforme alle norme vigenti del
Paese d'installazione. Il produttore declina ogni
responsabilità nel caso questa disposizione non venga
rispettata.
Attenzione : Non possiamo essere ritenuti responsabili per
incidenti o per le eventuali conseguenze di incidenti dall'uso
di un apparecchio non collegato a terra o cui la messa a terra
sia difettosa.
- Prima di effettuare il collegamento, controllare la tensione
d'alimentazione indicata sul contatore, la regolazione del
disgiuntore, il calibro del fusibile e la continuità della "terra".
- Il collegamento alla rete deve essere effettuato mediante una
presa di corrente munita di messa a terra o mediante dispositivo a
interruzione omnipolare conforme ai normi del paese
d'installazione.
Se l'unità è dotata di una presa, l'installazione deve essere
eseguita in modo tale che l'uscita della presa sia accessibile.
Il filo giallo/verde del cavo di alimentazione elettrica deve essere
collegato alla messa a terra sia dell'alimentatore che dei terminali
dell'unità.
Per qualsiasi domanda relativa al cavo di alimentazione, rivolgersi
al Servizio di Assistenza o ad un tecnico qualificato.
- Svitare il passacavo "1",
- Individuare le due linguette situate ai lati,
- Inserire la punta di un cacciavite piatto davanti ad ogni
linguetta, "2" e "3", spingere e premere, sollevare il coperchio.
Per liberare il cavo di alimentazione:
- Svitare i viti della morsetteria per liberare il passacavo, ed
anche i ponticelli (shunt),
- liberare il cavo.
Per procedere al nuovo collegamento :
- Scegliere il cavo d'alimentazione attenendosi sempre alla
tabella.
- Posizionare il cavo nel passacavo.
SHUNT
13 IT
- Spelare l'estremità dei conduttori e
collegarli ai terminali. Far riferimento
alle informazioni della tabella seguente
ed alla numerazione presente sulla
morsettiera, inserire i ponticelli
(shunt) - I ponticelli, che trovate nella
morsettiera, servono a collegare tra
loro diversi punti dei terminali.
- Chi u der e il co perc h io de lla
morsettiera,
- Avvitare il cavo nel passacavo.
Page 14

Attenzione ! : un serraggio non corretto delle viti dei terminali
può comportare il rischio di surriscaldamento del cavo di
alimentazione.
CONNESSIONI ELETTRICHE
LAY OUT
“ 3 ”
3x2,5 3x2,5 3x2,5
4x1,5 4x1,5 4x1,5
4x1,5 4x1,5 4x1,5
Monofase 220-240 V~
Cavo
HO5V2V2F
Trifase 220-240 V3~
Cavo
HO5V2V2F
Trifase 380-415 V2N~
Cavo
HO5V2V2F
Monofase 220-240 V~
LAY OUT
“ 1 ”
LAY OUT
“ 2 ”
Bifase 220-240 V2~
/
Bifase 220-240 V2~
LA SCELTA DEI RECIPIENTI
Le informazioni seguenti vi aiuteranno a scegliere i recipienti più
adatti e migliori per ottenere dei buoni risultati.
Inox: consigliato.
Particolarmente buono con il fondo "Sandwich". Il fondo
"Sandwich" unisce le qualità dell'Inox (aspetto, durata estabilità)
con i vantaggi dell'alluminio o del rame (trasmissione del calore e
ripartizione uniforme).
Alluminio: raccomandato fondo spesso.
Buona conduttività. Tal volta i residui di alluminio possono
lasciare qualche macchia sul piano, che possono essere tolte se
pulite rapidamente. L'alluminio con poco spessore non deve
essere utilizzato.
Ghisa/Vetroceramica: sconsigliato.
Prestazioni scarse. Può rigare la superficie.
Fondo in rame: raccomandato fondo spesso.
Buona performance, ma il rame può lasciare delle macchie che
possono sembrare delle righe, che si possono togliere se il piano
viene pulito rapidamente. Tuttavia, non lasciare evaporare
l'acqua completamente dai recipienti, il metallo surriscaldato può
aderire alla superficie. Un recipiente in rame surriscaldato può
lasciare delle macchie che rischiano di sporcare definitivamente
il piano.
Porcellana/Acciaio smaltato: buone prestazioni.
Solamente con fondo piatto, poco spesso e liscio.
Trifase 220-240 V3~ Trifase 380-415 V2N~
Ph = fase N = Neutro T = Terra
5. PRESENTAZIONE
• La zona hilight :
Una striscia di conduzione metallica è distribuita uniformemente
per tutta la superficie dell'unità. È efficace in 3 secondi ed è adatta
per una cottura costante, omogenea e anche sostenuta.
Il piano cottura in vetroceramica garantisce, nelle zone di cottura
evidenziate, maggiore produzione di calore, accellerando così il
processo di cottura. Le modifiche al design del piano cottura non
influenzano la capacità del vetro di sopportare alte temperature,
ma anzi ne migliorano la controllabilità.
Con la modalità "Sprinter", si può raggiungere una diminuzione
fino al 15% del tempo di cottura, in base al metodo di cottura e il
tipo di pentole usate.
6. CONSIGLI D'UTILIZZO
Per ottenere dei buoni risultati di cottura, è necessario
utilizzare dei recipienti di buona qualità.
7. UTILIZZO DEL PIANO
Attendere alcuni secondi dopo la prima accensione del piano
per permettere l'attivazione dei comandi elettronici.
- Premere il tasto . Il LED di controllo lampeggia.
I comandi del piano sono attivi. Viene visualizzato il livello di
potenza per ogni zona di cottura.
- Trascorsi 20 secondi senza alcun utilizzo, i controlli elettronici
si spengono e la procedura di accensione deve essere ripetuta.
. STARTING A COOKING ZONE
- Premere il tasto di selezione della zona di cottura desiderata.
Lo "0" della zona corrispondente rimane illuminato mentre la
luce degli altri "0" è affievolita.
7
- Premere il tasto " - " o " + " e selezionare il livello di potenza da 1 a
9. Tenendo premuti il tasto " + " o " - " il livello di potenza aumenta o
diminuisce progressivamente.
• Utilizzare recipienti di buona qualità con fondo piatto
espesso: il fondo assolutamente piatto elimina tutti i punti di
surriscaldamento sui quali si attaccano gli alimenti e lo spessore
del metallo permette una perfetta distribuzione del calore.
• Assicurarsi che il fondo del recipiente sia asciutto: al
momento di riempire il recipiente o quando viene utilizzata una
pentola che esce direttamente dal frigorifero, ad esempio,
assicurarsi che il fondo sia perfettamente asciutto; questa
precauzione eviterà che il piano di cottura si sporchi.
• Utilizzare recipienti di diametro sufficientemente grande
da coprire completamente il fuoco: è consigliabile assicurarsi
che il fondo sia grande almeno quanto la zona di cottura. Se il
fondo è leggermente più grande, l'energia viene utilizzata in
maniera ottimale.
Le seguenti indicazioni sono fornite solo a titolo indicativo. La
Vostra personale esperienza Vi permetterà di adattare le cotture
al Vostro gusto.
0 : Spento
U -1 : Scioglimento
2 : ) ..... Sciogliere, fondere
3 : Mantenimento in caldo
4 : Riscaldamento
5 : Scongelamento, cotture lente
6 : Cotture senza coperchio
7 : Friggere, rosolare, arrostire
8 : Cotture a temperatura elevata, arrostire
9 : Friggere, portare ad ebollizione importanti quantità
di acqua
14 IT
Page 15
• SPEGNERE UNA ZONA DI COTTURA
- Premere il tasto della zona di cottura desiderata.
- Premere il tasto “-” fino a che il display indica . Ora la zona
di cottura è spenta, il display si spegne dopo 10 secondi.
- Per spegnere immediatamente premere contemporaneamente
i tasti “ - ” e il rispettivo tasto di selezione.
Il display scende subito a e la zona di cottura si spegne.
• FUNZIONAMENTO PULSANTE DI BLOCCO
La funzione di blocco evita l'accensione accidentale del piano
cottura da parte dei bambini ed è utile anche durante la pulizia
del piano cottura.
COME BLOCCARE IL PIANO COTTURA. (Esempio per piano
cottura con 4 zone)
Premere il pulsante ON/OFF, quindi (il blocco bambini può
essere attivato solo dopo questa operazione)
• SPEGNERE TUTTO IL PIANO
Le zone di cottura ed il timer possono essere
fermati quando si desidera premendo il tasto
On / Off.
• INDICATORE DI CALORE RESIDUO
Sul display compare la lettera quando la superficie della zona di
cottura supera la temperatura di 60°C. La lettera si spegne
quando la temperatura scende sotto i 60°C.
Suggerimento: utilizzare il calore residuo della zona di cottura per
completare la cottura in modo lento.
N.B. dopo una interruzione di corrente, la spia di calore residuo si
spegne, anche se la temperatura di superficie supera i 60°C.
• PROGRAMMAZIONE DI DUE ZONE DI COTTURA
ADDIZIONALI (secondo modello)
L’area di cottura con due zone è
compatibile con certi modelli ........................
>
È totalmente attiva quando la zona di cottura è in funzione; il
comando LED della zona di cottura addizionale viene
visualizzato.
7
LED
Esempio
Per disattivare la zona complementaria :
- Premere di nuovo sul tasto della zona addizionale Il Led
scompare.
Per attivare di nuovo la zona addizionale :
- Premere sul tasto della zona di cottura. Il led è di nuovo attivo.
Premere simultaneamente il tasto
meno e il tasto di selezione in alto
a sinistra fino a quando non si
sente un beep; se non viene
emesso alcun beep, spegnere il
piano cottura e ripetere tutte le
operazioni di impostazione.
Subito dopo, premere il tasto di
selezione in alto a sinistra.
Questa procedura deve essere
effettuata in 10 sec e nessun
altro tasto ad eccezione di quelli
succitati deve essere premuto; in
caso contrario l'input viene annullato perché non è stato
completato.
Tutti i display mostrano una “L”
che significa LOCKED (= blocco
bambini contro l'attivazione
accidentale), se una zona di
cottura è in fase "caldo", le lettere
“L” e “H” vengono visualizzate in
alternanza.
COME SBLOCCARE IL PIANO COTTURA.
Per sbloccare l'unità di controllo,
premere simultaneamente il tasto
meno e il tasto di selezione in alto
a sinistra (zon a di cottura
posteriore sinistra) e subito dopo
premere di nuovo il tasto meno.
Il blocco è stato rimosso e i
comandi touch tornano alla
modalità STANDBY.
• PROGRAMMAZIONE DI UNA ZONA (secondo modello)
Ogni zona di cottura può essere programmata per funzionare sino
ad un massimo di 99 minuti.
- Attivare la zona di cottura seguendo le indicazioni precedenti.
- Per attivare il timer premere contemporaneamente il tasto "-" e
"+"; " " compare nel display.
7
LED
- Premere ancora il comando « + » per selezionare il tempo
da 0 a 99 min o « - » per ridurre il tempo da 30 minuti a 0. Il led di
controllo del timer vicino al livello indica che la zona é
programmata.
--> Il tempo programmato può essere modificato in ogni
momento, riattivando la zona cottura e poi il comando del timer.
Quando il tempo è finito, la zona di cottura si spegne
automaticamente e un segnale acustico suona per un minuto,
premere su un tasto per spegnerlo.
--> Il timer può essere utilizzato come promemoria, suonerà allo
scadere del tempo impostato.
15 IT
Page 16

. BOOSTER
Ogni zona di cottura è equipaggiata con una funzione booster
che permette un aumento veloce della temperatura.
Attivare il booster :
- Premereil tasto .
- Attivare la zona di cottura desiderata, premere il tasto " + " sino
ad ottenere il livello di potenza " 9 ", rilasciare brevemente il
tasto e premerlo di nuovo ; sul display appaiono
alternativamente (booster) " A " e " 9 " il nuovo livello di
potenza.
- Se necessario ridurre la potenza al livello desiderato; sul
display appaiono alternativamente (booster) " A " e il nuovo
CONSIGLI:
Una pulizia frequente farà in modo di mantenere sempre lucido il
vostro piano.
Assicurarsi che la superficie sia pulita prima di riutilizzare il piano.
Per togliere le tracce d'acqua e di calcare, utilizzare qualche
goccia d'aceto bianco, o di succo di limone. Per concludere
asciugare con l'aiuto di un foglio di carta assorbente poi applicare
qualche goccia di prodotto specifico e asciugare.
Il vetro del piano in vetroceramica sopporta lo sfregamento degli
utensili da cucina a fondo piatto, ma è comunque consigliabile
sollevarli prima di appoggiarli.
livello di potenza.
Livello
impostato
Potenza
fornita
(%)
Tempo
inserimento
booster
(minuti)
Massimo
Tempo di funzione
prima dello
spegnimento
NOTA :
automatico*
0
1
2
3
4
5
6
7
8
9
Esempio zona cottura da 1800 W in posizione 6 = 32% di 1800W
= 576 W forniti. Quando il booster è attivo, la zona funziona a
:
0 %
: 2.5 % : 0 : 2 H
:
3 %
:
6 %
:
11 %
:
16 % :
:
19 % :
:
32 % :
:
45 % :
:
65 % :
:
100 % : 0
:
:
0
:
1
:
3
5
6,5
8,5
2,5
3,5
4,5
:
0 H
:
6 H
:
6 H
:
5 H
:
5 H
:
4 H
:
1,5 H
:
1,5 H
:
1,5 H
:
1,5 H
- Evitare d'usare una spugna troppo bagnata.
- Non utilizzare mai utensili affilati.
- L'utilizzo di una lametta da barba non può danneggiare la
superficie, se la si tiene inclinata di 30° rispetto al piano.
-Tenere lontano dalla portata dei bambini la lametta.
- Non utilizzare dei prodotti abrasivi o delle pagliette metalliche.
. La cornice del piano (solo su alcuni modelli):
per pulire senza danneggiare la cornice del vostro piano, lavarla
con acqua e sapone ed asciugare con un panno pulito ed asciutto.
1800W per 2,5 minuti, poi si porta ai 576 W impostati.
* Per motivi di sicurezza le zone di cottura si spengono
automaticamente se fatte funzionare in continuo per un tempo
troppo lungo. Il tempo dipende dal livello di potenza impostato.
Per disattivare il booster:
- Accendere la zona di cottura. Premere il tasto "-" per tornare ad
un livello di cottura normale, ridurre il livello di calore richiesto,
oppure alla posizione "0" per spegnere la zona cottura.
30° Maxi
Eventuali cambiamenti di colore della superficie in
vetroceramica non influiscono sulle prestazioni o
sulla stabilità della stessa. I cambiamenti di colore
sono dovuti solitamente alla presenza di residui di
cibo bruciato o all'utilizzo di pentole in materiali
come alluminio o rame; queste macchie sono difficli
da rimuovere.
8. MANUTENZIONE
E' importante prima di iniziare la pulizia della superficie in
vetroceramica, attendere che la stessa si sia completamente
raffreddata.
Per la pulizia della superficie in vetroceramica devono essere
utilizzati solo prodotti specifici: crema e lametta. I suddetti prodotti
si trovano facilmente in commercio, nei supermercati.
Evitare le fuoriuscite di liquido, le sostanze che cadono sul piano
di cottura si carbonizzano rapidamente e sono quindi più difficili
da pulire.
Si raccomanda di tenere lontano dal piano di cottura tutto quanto
possa fondere, come ad esempio, tutti gli oggetti di plastica, la
carta stagnola, lo zucchero……
MANUTENZIONE:
- Versare qualche goccia di un prodotto specifico per la pulizia
della superficie in vetroceramica.
- Strofinare con insistenza dove vi fossero delle macchie
insistenti, con l'aiuto di uno straccio asciutto, o di una spugna
leggermente umida.
- Asciugare con uno straccio asciutto fino a quando la superficie
non sia pulita.
Se dopo questa manutenzione le macchie persistono:
- Versare di nuovo qualche goccia di un prodotto specifico.
- Strofinare con l'aiuto di una lametta rispettando l'angolo di 30°
rispetto al piano, insistendo fino alla scomparsa delle macchie.
- Asciugare con uno straccio asciutto o della carta assorbente fino
a che la superficie non sia pulita.
- Ripetere l'operazione se necessario.
16 IT
Page 17

9. PROBLEMI E SOLUZIONI
10. ASSISTENZA POST-VENDITA
I fuochi non mantengono i sughi o le fritture a fuoco basso.
. Utilizzare esclusivamente recipienti a fondo piatto. Se una luce
filtra tra il recipiente e il piano, il fuoco non trasmette il calore
correttamente.
. Il fondo del recipiente deve ricoprire interamente il diametro del
fuoco scelto.
Cotture troppo lente.
. Utilizzo dei recipienti non adatti. Utilizzare solo degli utensili a
fondo piatto pesante e con un diametro almeno uguale al fuoco.
Graffi o scalfitture sulla superficie in vetro del piano.
. Errato sistema di pulizia, utilizzo di recipienti con fondo ruvido,
presenza di particelle abrasive (sale, sabbia, zucchero) tra il
piano e il fondo del recipiente.
Consultare il capitolo relativo alla pulizia, assicurarsi che i fondi
dei recipienti siano adatti prima dell'utilizzo e utilizzare solo
recipienti con fondo liscio.
Segni di metallo (possono sembrare graffi)
. Non far scivolare dei recipienti di alluminio sul piano. Attenersi
alle istruzioni di pulizia.
. Se non vengono utilizzati dei materiali di buona qualità, le
macchie di qualsiasi tipo esse siano persisteranno. Aiutatevi con
una lametta da barba e seguite le istruzioni del capitolo
"MANUTENZIONE".
Macchie scure
. Utilizzare una lametta da barba e seguire il capitolo
"MANUTENZIONE".
Macchie sul piano
. Macchie causate da recipienti in alluminio, dall'acqua o da
alimenti, possono essere eliminate con una crema pulente.
Segni di caramello o di plastica fusa sul piano.
. Controllare il capitolo "MANUTENZIONE".
Il piano non funziona oppure alcuni fuochi non sono
funzionanti.
. I ponticelli (shunt) sulla morsettiera non sono posizionati
correttamente. Fate controllare da un professionista che il
racc o rdo s ia s t ato e ffett u ato c onf o rmem ente a lle
raccomandazioni.
. Un oggetto o residuo di cibo sta coprendo almeno due comandi
per almeno 10 secondi. Effettuare la pulizia o rimuovere l'oggetto
. Il pannello comandi è bloccato, sbloccarlo.
Prima di rivolgersi al servizio di assistenza, verificare
quanto segue:
— La spina sia correttamente inserita e munita del fusibile
appropriato.
Se non è possibile identificare il problema:
Spegnere l'apparecchio – non manometterlo – rivolgersi al
Centro di Assistenza Post-vendita. L'apparecchio viene fornito
con un certificato di garanzia che assicura che sarà riparato
gratuitamente presso il Centro di assistenza.
smaltire correttamente tutti gli inquinanti e recuperare e riciclare
tutti i materiali.
I singoli possono giocare un ruolo importante nell'assicurare che
i WEEE non diventino un problema ambientale; è essenziale
seguire alcune regole di base:
• I WEEE non devono essere trattati come rifiuti domestici.
• I WEEE devono essere portati ai punti di raccolta appositi gestiti
dal comune o da società registrate. In molti Paesi, per i WEEE
grandi, potrebbe essere presente la raccolta domestica.
• Quando si acquista un nuovo apparecchio, quello vecchio
potrebbe essere restituito al rivenditore che deve acquisirlo
gratuitamente su base singola, sempre che l'apparecchio sia del
tipo equivalente e abbia le stesse funzioni di quello acquistato.
11. RISPETTO DELL'AMBIENTE
Questo apparecchio è contrassegnato in
conformità alla Direttiva europea 2012/19/EU
sulle apparecchiature elettriche ed elettroniche
(WEEE). I WEEE contengono sia le sostanze
in q ui n a n t i (c h e p o s s o n o p r ov o c a r e
conseguenze negative sull'ambiente) che
componenti di base (che possono essere
riutilizzati). È importante che i WEEE siano
soggetti a rattamenti specifici, per rimuovere e
Il piano non si spegne
. Il pannello comandi è bloccato, sbloccarlo.
Il piano si spegne automaticamente
. Un residuo di cibo copre almeno due comandi per almeno 10
secondi; il piano si spegne per sicurezza ed un segnale sono
roviene emesso sino alla pulizia del residuo di cibo.
. Le zone di cottura si spengono automaticamente se vengono
fatte funzionare per un tempo troppo lungo. Vedere la tabella.
ON \ OFF frequenti delle zone di cottura
. I cicli ON \ OFF variano a seconda del livello di potenza scelto:
- bassa potenza: tempi di funzionamento brevi,
- alta potenza: tempi di funzionamento lunghi.
Simbolo "H" , indicatore del calore residuo, lampeggia
. La temperatura del modulo elettronico di comando è troppo
elevata. Un tecnico qualificato deve verificare le condizioni di
installazione; vedere capitulo di riferimento.
17 IT
Page 18

CONSIGNES DE SECURITE
LIRE ATTENTIVEMENT LA NOTICE POUR VOUS PERMETTRE DE TIRER LE MEILLEUR PARTI DE VOTRE
APPAREIL. Nous vous conseillons de conserver la notice d'installation et d'utilisation pour toute
consultation ultérieure, et de noter, avant installation de la table, le numéro de série de l'appareil en
cas d'éventuelle demande d'intervention du service après-vente.
AVERTISSEMENT: L'appareil et les parties accessibles deviennent chauds pendant l'utilisation. Des
précautions doivent être prises pour éviter de toucher les éléments chauffants.
• Les enfants de moins de 8 ans doivent être tenus à l'écart à moins d'être surveillés continuellement.
• Cet appareil n'est pas destiné à être utilisé par des personnes (y compris les enfants) dont les
capacités physiques, sensorielles ou mentales sont réduites, ou ayant un manque d'expérience et de
connaissances, à moins qu'elles n'aient été formées à l'utilisation de l'appareil, par une personne
responsable de leur sécurité.
• Surveillez les enfants pour être sûr qu’ils ne jouent pas avec l’appareil.
• Le nettoyage et l'entretien par l'utilisateur ne doit pas être faits par des enfants sans surveillance.
• Lorsque vous cuisinez avec des graisses ou de l'huile, prenez garde de toujours surveiller le
déroulement de la cuisson car les graisses ou l'huile surchauffées peuvent s'enflammer rapidement.
• Ne jamais tenter d'éteindre un incendie avec de l'eau, mais éteindre l'appareil, puis couvrir la flamme
par exemple avec un couvercle ou une couverture anti-feu.
AVERTISSEMENT: Danger d'incendie: ne pas stocker des éléments sur les surfaces de cuisson.
ATTENTION: Si la surface est fêlée, éteindre l'appareil pour éviter les risques de choc électrique.
• Ne jamais utiliser de nettoyeur vapeur ou à haute pression pour le nettoyage de l'appareil.
• L'appareil n'est pas destiné à être utilisé avec une minuterie externe ou un système de contrôle à
distance.
• Le foyer halogène, selon modèle de table vitrocéramique, dégage une lumière forte, ne pas regarder
fixement les lampes de ce foyer.
• Un système de déconnexion doit être incorporé dans le compteur conformément aux règles de
câblage.
• Les instructions indiquent le type de cordon à utiliser, en tenant compte de la température de la
surface arrière de l'appareil.
• Si le cordon d'alimentation est endommagé, il doit être remplacé par le fabricant, une station de
dépannage agréée ou une personne qualifiée afin d'éviter un danger.
• Pendant son fonctionnement ou dans le cas de l'extinction d'un foyer, tant que l'indicateur de
chaleur résiduelle est allumé, il est vivement conseillé de tenir les enfants à l'écart de la plaque afin
d'éviter les risques de brûlures graves.
• Les feuilles d'aluminium et les récipients en matière plastique ne doivent pas être placés sur les
surfaces chaudes.
• Après chaque utilisation, un petit nettoyage de la table est nécessaire, pour éviter l'accumulation des
salissures et des graisses. Celles-ci recuiraient à chaque nouvel usage et se carboniseraient en
dégageant une fumée et des odeurs désagréables, sans compter les risques de propagation
d'incendie.
• Ne pas toucher les zones de cuisson pendant le fonctionnement de la table ou de suite après
son utilisation.
• Ne jamais cuisiner directement sur la table, employer des récipients.
• Placer toujours la casserole bien centrée sur le foyer utilisé.
• Ne pas faire glisser les casseroles sur la table : risque de rayures...
• Ne pas utiliser la surface de la table comme planche à découper, ou plan de travail.
• Ne pas stocker d'objets lourds au dessus de la table, ils pourraient tomber et endommager la table.
• Ne pas entreposer sur la table des objets quels qu'ils soient.
18 FR
Page 19

1. INSTRUCTIONS GENERALES
Toutes ces caractéristiques sont données à titre indicatif. Soucieux de toujours améliorer la qualité de sa production, le
constructeur pourra apporter à ses appareils des modifications liées à l'évolution technique en respectant les conditions
fixées à l'article R 132-2 du Code de la Consommation.
Cet équipement, dans les parties destinées à entrer en contact avec les aliments, est conforme aux normes fixées par les
directives CEE 89/109.
En utilisant le symbol sur ce produit, nous déclarons sur notre propre responsabilité que ce produit est conforme à
toutes les normes Européennes relatives à la sécurité, la santé et à l’environnement.
2. INSTALLATION
La mise en place fonctionnelle des appareils ménagers dans leur environnement est une opération délicate qui, si elle n'est
pas correctement effectuée, peut avoir de graves conséquences sur la sécurité des consommateurs. Dans ces conditions, il
est impératif de confier cette tâche à un professionnel qui la réalisera conformément aux normes techniques en vigueur. Si
malgré cette recommandation, le consommateur réalisait lui-même l'installation, le constructeur déclinerait toute
responsabilité en cas de défaillance technique du produit entraînant ou non des dommages aux biens et/ou aux personnes.
3. ENCASTREMENT
Le meuble ou le support dans lequel doit être encastrée la table,
ainsi que les parois du meuble qui pourraient juxtaposer celui-ci,
doivent être d'une matière résistant à une température élevée.
De plus, il est nécessaire que le revêtement qui recouvre le
meuble ou le support soit fixé par une colle résistant à la chaleur
afin d'éviter le décollement.
Installation (fig. B / D):
• Un joint d'étanchéité est livré avec la table de cuisson. Pour
procéder à sa mise en place,
- retourner la table, face verre vers le bas, en prenant soin de
protéger le verre.
- placer le joint tout autour de la table.
- veiller particulièrement à le placer correctement afin d'éviter
toute infiltration dans le meuble support.
• Prévoir un espace de 5 cm minimum entre l'appareil et les parois
verticales avoisinantes.
• Si, en fonction de l'installation de la table, la partie inférieure de
son caisson se trouve à proximité d'une zone normalement
accessible lors de manipulations et/ou de rangements, placer une
cloison à 1 cm du fond du caisson, pour éviter tous risques de
brûlure ou de détérioration.
• En cas d'installation d'une hotte au-dessus de la table de
cuisson, veuillez consulter les instructions d'installation fournies
avec la hotte pour connaître la bonne distance.
• Si vous installez un meuble au dessus de la table de cuisson, la
distance minimale devra être de 70cm.
ATTENTION:
Au cas où il serait nécessaire de remplacer le câble
d’alimentation, assurez vous de respecter les codes-couleur
suivants dans le branchement de chacun des fils:
BLEU - NEUTRE (N)
MARRON - PHASE (L)
VERT-JAUNE - TERRE ( )
Elle est livrée avec un câble d'alimentation sans prise permettant
le raccordement exclusivement sous une tension de 230V entre
phases ou entre phase et neutre:
. Raccorder à une prise de courant.
Il est toutefois possible d'adapter l'appareil pour un raccordement
en :
. Triphasé 220-240 V3~
. Triphasé 380-415 V2N~
Pour procéder à un nouveau raccordement, il est impératif de
respecter les consignes citées ci-dessous.
• Tout d'abord, vérifier que l'installation est protégée par un fusible
approprié et que l'installation comporte des fils d'une section
suffisante pour alimenter normalement l'appareil.
• Retourner la table, face verre contre le plan de travail, en prenant
soin de protéger le verre.
- Ouvrir le capot en suivant les étapes suivantes :
4. RACCORDEMENT ELECTRIQUE
"L'installation recevant l'appareil cité en référence doit être
conforme à la norme en vigueur dans le pays d'installation". Le
constructeur décline toute responsabilité en cas de non respect
de cette disposition".
Attention : vérifier la continuité de la terre de l'installation avant de
procéder au raccordement. Notre responsabilité ne saurait être
engagée pour tout incident ou ses conséquences éventuelles qui
pourraient survenir à l'usage d'un appareil non relié à la terre, ou
relié à une terre dont la continuité serait défectueuse.
• Avant de procéder au raccordement, le technicien doit vérifier la
tension d'alimentation indiquée au compteur, le réglage du
disjoncteur, le calibre du fusible et la continuité de la terre de
l'installation.
• Le raccordement électrique au réseau doit être effectué par une
prise de courant avec prise de terre, ou par l'intermédiaire d'un
dispositif à coupure omnipolaire conforme à la norme en vigueur
dans le pays d'installation.
Si l'appareil comporte une prise de courant, il doit être installé de
telle façon que la prise de courant soit accessible.
• Le fil de protection vert/jaune doit être relié aux bornes de terre,
de l'appareil d'une part, et de l'installation d'autre part.
• Toute intervention se rapportant au câble d'alimentation doit
impérativement être réalisée par le Service après-vente ou une
personne de qualification similaire.
1 2 3
• Dévisser la vis du serre-câble "1",
• repérer les deux languettes situées sur chaque côté,
• placer la lame d'un tournevis à l'avant de chaque languette "2"
et "3", enfoncer et presser,
• soulever le capot.
- Libérer le câble d'alimentation :
• dévisser les vis de la plaque à bornes qui maintiennent les
barrettes shunts et les fils conducteurs du câble d'alimentation.
• Retirer le câble d'alimention.
- Opérations à effectuer pour réaliser le nouveau
raccordement:
- Choisir le câble d'alimentation en fonction des recommandations du tableau.
- Passer le câble d'alimentation dans le serre-câble.
19 FR
Page 20

SHUNT
- Dénuder l' extrémité de chaque
conducteur du câble d'alimentation sur
une longueur de 10 mm, en tenant compte
de la longueur nécessaire du câble
d'alimentation pour le raccordement à la
plaque à bornes.
- Comme il est indiqué sur le tableau,
positionner les barrettes shunts que vous
aurez récupérées lors de la première
opération en respectant les marquages
sur la plaque à bornes (les barrettes
shunts permettent d'établir un pont entre
deux bornes), et fixer les conducteurs.
6. LE CHOIX DES USTENSILES
L'utilisation de récipients de qualité est nécessaire pour
obtenir de bons résultats de cuisson :
• Utiliser des récipients de bonne qualité à fond plat : le fond
rigoureusement plat supprimera les points de surchauffe sur
lesquels les aliments attachent, et l'épaisseur du métal permettra
une parfaite répartition de la chaleur.
Veiller à l'efficacité du serrage sur les différentes bornes.
- Refermer le capot et revisser le serre-câble.
Raccordement aux bornes de la plaque
LAY OUT
“ 3 ”
220-240 V2~
3x2,5 3x2,5 3x2,5
4x1,5 4x1,5 4x1,5
4x1,5 4x1,5 4x1,5
Monophasé
Câble
HO5V2V2F
Triphasé
Câble
HO5V2V2F
Triphasé
Câble
HO5V2V2F
Ph = Phase
LAY OUT
LAY OUT
“ 1 ”
220-240 V~
220-240 V3~
380-415 V2N~
Biphasé
N = Neutral T = Earth
“ 2 ”
5. PRESENTATION
• Le foyer hilight : une lame métallique conductrice est répartie
uniformément sur toute la surface du foyer. Efficace en trois
secondes, il permet la réalisation de cuissons régulières,
homogènes, mais également les cuissons soutenues.
La table vitrocéramique permet de mieux tirer profit de la chaleur
élevée générée par les foyers hilight, accélérant ainsi la cuisson.
Les modifications structurelles maintiennent inaltéré les
propriétés de résistance du verre aux températures élevées et
améliorent la capacité de contrôle de la puissance distribuée.
Avec le principe du "Sprinter", on obtient une réduction du temps
de cuisson pouvant aller jusqu'à 15% suivant le type de cuisson et
les récipients utilisés.
• Veiller à ce que le fond des récipients soit sec : lors du
remplissage du récipient ou lorsqu'on utilise une casserole
sortant du réfrigérateur, par exemple, s'assurer que l'ustensile est
bien sec; cette précaution évitera toute salissure sur le plan de
cuisson.
• Utiliser des récipients d'un diamètre suffisant pour
recouvrir entièrement le foyer : il convient de veiller à ce que le
fond soit au moins aussi grand que la zone de cuisson. Si le fond
est légèrement plus grand, l'énergie est utilisée de manière
optimale.
LE CHOIX DES RECIPIENTS - Les informations suivantes vous
aideront à choisir les récipients les mieux adaptés pour obtenir de
bons résultats.
Inox : conseillé.
Spécialement bon avec fond "Sandwich". Le fond "Sandwich" allie
les qualités de l'inox (aspect, durabilité et stabilité) avec les
avantages de l'aluminium ou cuivre (transmission de la chaleur et
répartition uniforme).
Aluminium : fond épais recommandé. Bonne conductivité.
Attention : les résidus d'aluminium apparaissent quelquefois sous
forme de traces sur la table, mais peuvent être enlevés si ils sont
nettoyés rapidement. L'aluminium de faible épaisseur ne doit pas
être utilisé.
Fonte / Vitrocéramique : déconseillé.
Faible performance. Peut rayer la surface.
Fond en cuivre : fond épais recommandé.
Bonne performance, mais le cuivre peut laisser des traces qui
peuvent apparaître comme des rayures. Elles peuvent être
enlevées si la table est nettoyée rapidement.
Cependant, ne pas laisser évaporer l'eau des récipients
complètement, le métal surchauffé peut adhérer à la surface. Un
récipient en cuivre surchauffé peut laisser des traces qui risque de
tacher définitivement la table.
Porcelaine / Acier émaillé : bonne performance.
Seulement avec fond plat, peu épais et lisse.
7. UTILISATION
• Après la mise sous tension de la table, attendre quelques
secondes pour activer les commandes électroniques.
- Presser la touche . Le voyant correspondant s’affiche.
La commande électronique de la table est activée. Dans
chaque zone d'affichage le niveau de puissance s'affiche.
- Sans intervention dans les 20 secondes, la commande
électronique s'éteint et l'opération de mise en route doit être
renouvelée.
20 FR
Page 21

. ACTIVATION D’UN FOYER DE CUISSON
- Presser la touche de sélection du foyer désiré.
L ’indication " 0 " s ’affiche, sa luminosité est plus brillante que
pour les autres foyers non sélectionnés,
TYPE B
Pour désactiver la zone complémentaire :
- Appuyer de nouveau sur la touche du foyer complémentaire. Le
7
Led du foyer complémentaire disparaît.
Pour réactiver la zone complémentaire :
- Appuyer sur la touche du foyer complémentaire. Le Led est de
nouveau actif.
- Presser la touche « - » ou « + » pour choisir un niveau de
puissance entre 1 et 9. En maintenant la pression sur la touche
« - » ou « + », le niveau de puissance augmente ou diminue
progressivement.
. PROGRAMMATION (selon modèle)
Chaque foyer de cuisson est programmable pour une durée
Les exemples suivants sont donnés à titre indicatif. L'expérience
personnelle permet ensuite d'adapter ces réglages aux goûts et
aux habitudes de chacun.
0 : Arrêt
U -1 : ) Fondre
maximale de 99 minutes.
- Mettre en route le foyer désiré en répétant les opérations citées
précédemment.
- Appuyer simultanément sur les touches "-" et "+" pour activer
le minuteur, alors s’affiche .
2 : ) ..... Fondre
3 : Maintien de la chaleur
4 : Réchauffage
5 : Décongélation, cuisson à l'étuvée, cuisson à
point, cuisson à faible température
6 : Cuisson sans couvercle
7 : Sautés, rissolés de viande et rôtis
8 : Cuissons et rôtis à haute température, saisir
9 : Friture, portée à ébullition de grandes quantités
d'eau.......
- Appuyer de nouveau sur la touche "+" pour choisir une durée en
minutes de 0 à 99 minutes ou appuyer sur la touche " - " pour
diminuer le temps de 30 minutes à 0. Le Led près du niveau de
puissance s ’affiche et indique que le foyer est programmé.
--> le temps programmé peut être modifié à tout moment.
Une fois le temps écoulé, le foyer de cuisson s'éteint automa-
. ARRET D’UN FOYER DE CUISSON
- Presser la touche de sélection du foyer désiré.
- Presser la touche « - » jusqu'à afficher le niveau de puissance
tiquement et un bip sonore retentit appuyer sur une des touches
pour le stopper.
--> Le minuteur peut être utilisé seul comme aide mémoire, une
sonnerie retentira à la fin du temps programmé.
. Instantanément le foyer s'éteint, l'indication s'efface après
10 secondes.
- Pour un arrêt rapide, appuyer simultanément sur la touche « - »
et la touche de sélection du foyer désiré. Le niveau de puissance
redescend automatiquement à . Le foyer s'éteint.
. VERROUILLAGE DES COMMANDES
Le verrouillage des commandes empêche l'activation accidentelle
de la table par les enfants, iest aussi utile lors du nettoyage de la
. ARRET GENERAL
Le fonctionnement des foyers ou de la minuterie
peut être stoppé à tout moment par une pression
sur la touche Marche-Arrêt.
table
Pour verrouiller la table. (Exemple pour une table avec 4 foyers)
Appuyer sur le bouton ON/OFF puis (ce n'est qu'après cette
opération que le verrouillage enfant peut être activé)
TYPE B
TYPE B
7
7
LED
LED
Exemple
. VOYANT DE CHALEUR RESIDUELLE
Le tableau de commande informe l'utilisateur lorsque la
température de surface des zones de cuisson dépasse 60°C
environ, par l'affichage suivant : . Lorsque la température
redescend en dessous de 60°C, l'affichage s'efface.
Pour les fins de cuisson, nous conseillons d'éteindre la zone de
cuisson et de profiter de la chaleur résiduelle du foyer de cuisson
pour terminer la cuisson en douceur.
N.B. : après coupure de courant, l'indicateur de chaleur résiduelle
disparaît définitivement et ce, même si la température de surface
dépasse 60°C.
. FONCTIONNEMENT DU FOYER DEUX ZONES
Le foyer deux zones équipe
certains modèles de table. .............................
>
Il s'active dans sa totalité lorsque le foyer correspondant est mis
en fonctionnement; le Led du foyer complémentaire s'affiche.
Appuyer simultanément sur la
touche (–) et la touche de
sélection du foyer arrière gauche,
jusqu'à entendre le bip ; si vous
n'entendez pas de bip, éteindre la
table et recommencer l'opération.
Ensuite appuyer de nouveau sur
la touche de sélection du foyer
arrière gauche.
Cette opération doit être réalisée
en moins de 10 secondes et
aucune autre touche que celles
décrites ne doit être utilisée ; dans le cas contraire la procédure est
annulée.
Tous les afficheurs indiquent “L”
pour LOCKED (verrouillage contre
les activations accidentelles) – Si
une zone de cuisson est chaude,
l'affichage alterne entre “L” et “H”.
21 FR
Page 22

Pour déverrouiller la table
Pour déverrouiller la table de
cuisson, appuyer simultanément
sur la touche (–) et la touche de
sélection du foyer arrière gauche
puis appuyer de nouveau sur la
touche (–).
Le verrouillage est désactivé et les
commandes retournent en mode
veille.
. ACCELERATEUR DE CHAUFFE
Les foyers de cuisson équipant la table sont équipés d’un
accélérateur de chauffe qui permet d ’obtenir une montée en
température plus rapide des zones de cuisson.
Pour activer l'accélérateur de chauffe :
- Appuyer sur la touche Marche/Arrêt .
- Mettre en route le foyer souhaité, appuyer sur la touche "+"
jusqu'à la position 9, relâcher brièvement la pression et appuyer
de nouveau sur la touche "+", l'afficheur indique en alternance "A"
accélérateur de chauffe et " 9 " niveau de puissance.
- Réduire si besoin à la position de chauffe souhaitée, l'afficheur
indique en alternance " A " accélérateur de chauffe et la nouvelle
position de chauffe.
Position
de
cuisson
0
1
2
3
4
5
6
7
8
9
Puissance
libérée
(%)
:
0 %
: 2.5 % : 0 : 2 H
:
:
:
:
:
:
:
:
:
3 %
6 %
11 % :
16 % :
19 % :
32 % :
45 % :
65 % :
100 % : 0
Durée
d'accélération
de chauffe
(minutes)
:
0
:
1
:
3
5
6,5
8,5
2,5
3,5
4,5
Durée de
fonctionnement
maxi avant
coupure
automatique*
:
0 H
:
6 H
:
6 H
:
5 H
:
5 H
:
4 H
:
1,5 H
:
1,5 H
:
1,5 H
:
1,5 H
8. ENTRETIEN
• Il est important lors du nettoyage de la surface vitrocéramique de
la table, d'attendre le refroidissement complet de cette dernière.
• Seuls les produits spécifiques pour le nettoyage de la surface
vitrocéramique, crème et grattoir, doivent être utilisés. Vous les
trouverez facilement dans le commerce.
• Eviter les débordements, les salissures qui tombent sur le plan
de cuisson se carbonisent rapidement et sont donc plus difficiles à
nettoyer.
• Il est recommandé de tenir à l'écart du plan de cuisson tout ce qui
est susceptible de fondre tels que les objets en matière plastique,
sucre ou produits à forte teneur en sucre.
ENTRETIEN :
- disposer quelques gouttes d'un produit nettoyant spécifique pour
la surface vitrocéramique.
- frotter, en insistant sur les parties tachées s'il en existe, à l'aide
d'un chiffon doux ou d'un papier essuie-tout légèrement humide.
- essuyer avec un chiffon doux ou papier essuie-tout sec jusqu'à
ce que la surface soit nette.
Si après cet entretien courant des taches persistent :
- disposer à nouveau quelques gouttes d'un produit spécifique.
- gratter à l'aide d'un grattoir en respectant un angle de 30° par
rapport à la table jusqu'à disparition des taches récalcitrantes.
- essuyer avec un chiffon doux ou un papier essuie-tout sec
jusqu'à ce que la surface soit nette.
- répèter l'opération si nécessaire.
CONSEILS :
Un nettoyage fréquent laisse une couche protectrice essentielle
pour la prévention des rayures et de l'usure.
S'assurer que la surface soit propre avant de réutiliser la table.
Pour enlever les traces d'eau et de calcaire, utiliser quelques
gouttes de vinaigre blanc, ou jus de citron. Pour terminer essuyer
à l'aide d'un papier absorbant puis appliquer quelques gouttes de
produit spécifique et essuyer.
Le verre vitrocéramique supporte le frottement des ustensiles de
cuisson à fond plat, mais il est quand même conseillé de les
soulever pour les déplacer.
NB:
30° Maxi
Ex. Foyer de 1800 W à la position 6 = puissance libérée 32 % de 0
W lorsque la fonction "Accélérateur de chauffe" est activée, le
foyer fournit une puissance de 1800 W pendant 2,5 minutes, et
régule à 576 W après ce laps de temps.
* Les foyers se coupent automatiquement si on les laisse trop
longtemps fonctionner. La coupure dépend du niveau de
puissance utilisé.
Pour désactiver l'accélérateur de chauffe :
- Mettre en route le foyer souhaité, appuyer sur la touche " - " pour
revenir à une position de chauffe normale, réduire à la position
souhaitée ou à la position " 0 " pour arrêter le foyer.
- Eviter d'employer une éponge trop humide.
- Ne jamais utiliser un outil en acier tel que couteau ou tournevis.
- L'utilisation du grattoir avec lame de rasoir ne peut endommager
la surface si un angle de 30°est respectée.
- Ne pas laisser le racloir avec lame de rasoir à la portée des
enfants.
- Ne pas utiliser de produits abrasifs ou de poudres à récurer.
• Le cadre de la table, selon modèle :
Pour nettoyer sans endommager le cadre de votre table, le laver
avec du savon et de l'eau, rincer, puis sécher avec un chiffon
doux.
Tout changement de couleur de la surface du verre
vitrocéramique n’altère en rien le fonctionnement
de l’appareil ou la stabilité de la surface. Ces tâches
sont principalement causées par des résidus
alimentaires brûlés ou l’utilisation de casseroles ou
de poêles en aluminium ou en cuivre. Ces tâches
peuvent être difficiles à enlever.
22 FR
Page 23

9. PROBLEMES ET SOLUTIONS
10. ASSISTANCE TECHNIQUE
Les foyers ne maintiennent pas les petits bouillons ou friture
peu vive.
• N'utiliser que des récipients à fond plat. Si une lumière est visible
entre le récipient et la table, le foyer ne transmet pas la chaleur
correctement.
• Le fond du récipient doit recouvrir entièrement le diamètre du
foyer choisi.
Cuissons trop lentes.
• Utilisation de récipients non adaptés. N'utiliser que des
ustensiles avec fond plat, lourd et d'un diamètre au moins égal au
foyer.
Petites rayures ou éraflures sur la surface vitrée de la table.
• Une mauvaise méthode de nettoyage, ou des récipients avec
fond rugueux sont utilisés, des particules tels que grains de sable,
ou sel se trouvent entre la table et le fond du récipient.
Se reporter au chapitre "ENTRETIEN", s'assurer que les fonds
des récipients sont propres avant utilisation et n'utiliser que des
récipients avec fond lisse. Les rayures peuvent être atténuées
seulement si un bon nettoyage est réalisé.
Marques de métal.
• Ne pas faire glisser des récipients en aluminium sur la table. Se
reporter aux recommandations d'entretien.
• Vous n'utilisez pas les bons matériaux, les taches quelles
qu'elles soient persistent. Aidez-vous d'une lame de rasoir et
suivre le chapitre "ENTRETIEN".
Taches sombres.
• Utiliser une lame de rasoir et suivre le chapitre "ENTRETIEN".
Surfaces claires sur la table.
• Marques provenant de récipient en aluminium ou cuivre, mais
aussi de dépôts de minéraux, de l'eau ou des aliments ; ils
peuvent être enlevés avec de la crème nettoyante.
Caramélisation ou plastique fondu sur la table.
• Se reporter au chapite "ENTRETIEN".
La table ne fonctionne pas.
• Les barrettes shunts ne sont pas positionnées correctement sur
la plaque à bornes. Faire vérifier que le raccordement est effectué
conformément aux recommandations.
• Sur la table vitroceramique avec touches sensitives: un gros
débordement ou objet recouvre au moins 2 touches, pendant 10
secondes au minimum. Nettoyer le débordement ou retirer l'objet.
• Le tableau de bord est verrouillé. Procéder au deverrouillage.
Avant d’appeler le Service d’Assistance Technique
Si la table de cuisson ne fonctionne pas, nous vous conseillons
de:
— vérifier que la fiche soit bien introduite dans la prise de courant;
Si la cause du dysfonctionnement n’est pas trouvée:
— éteindre l’appareil ne pas y toucher et appeler le Service
d’Assistance Technique.
Veillez à ce que le coupon de garantie fourni avec le produit soit
correctement rempli, avec la date d’achat de la table de cuisson.
11. PROTECTION DE L’ENVIRONNEMENT
Le présent appareil est marqué conformément
à la directive 2012/19/UE relative aux déchets
d'équipements électriques et électroniques
(DEEE). Les DEEE contiennent à la fois des
substances polluantes (qui peuvent avoir des
conséquences négatives sur l'environnement)
et
des éléments de base (réutilisables). Il est
important de soumettre les DEEE à des
traitements spécifiques, en vue d'extraire et d'éliminer de façon
appropriée toutes les substances polluantes, puis de récupérer
et recycler tous les matériaux.
Chacun peut jouer un rôle important quant à la protection de
l'environnement contre les DEEE. Pour atteindre cet objectif, il
est impératif de suivre quelques règles élémentaires :
• Les DEEE ne doivent pas être traités comme des déchets
ménagers.
• Ils doivent être remis aux points de collecte appropriés gérés
par la municipalité ou par des sociétés immatriculées. Dans
plusieurs pays, il est possible de collecter à domicile les DEEE
volumineux.
• Lorsque vous achetez un nouvel appareil, vous devez
retourner l'ancien au vendeur qui le récupère gratuitement, au
cas par cas, à condition que l'équipement soit de type
équivalent et possède les mêmes fonctions que celui fourni.
La table ne se coupe pas.
• Le tableau de bord est verrouillé. Procéder au verrouillage.
La table s'arrête automatiquement
• Un débordement recouvre pendant plus de 10 secondes au
moins 2 touches, la table se met en sécurité, et un bip sonore
fonctionne tant que les touches sont recouvertes. Nettoyer le
débordement ou retirer l'objet.
• Les foyers s'arrêtent automatiquement si on les laisse
fonctionner pendant une période assez longue.
Fréquence de fonctionnement arrêt/marche sur foyers
• Les cycles coupure-fonctionnement varient en fonction du
niveau de puissance demandé :
- niveau faible : temps de fonctionnement court,
- niveau élevé : temps de fonctionnement long.
Affichage "H", indicateur de chaleur résiduelle, clignote.
• La température électronique est trop élevée. Un technicien doit
procéder à la vérification de l'encastrement en respectant les
recommandations.
23 FR
Page 24

SICHERHEITSHINWEISE
LESEN SIE DIE BEDIEUNGSANLEITUNG SORGFÄLTIG DURCH, UM DEN GRÖßTMÖGLICHEN NUTZEN
AUS IHREM GERÄT ZU ZIEHEN. Wir empfehlen Ihnen, die Installations- und Bedienungsanleitung für
eine spätere Nutzung aufzubewahren. Notieren Sie auf diesem Heft VOR DER INSTALLATION die
Seriennummer des Gerätes, die bei einem eventuellen späteren Einsatz des Kundendienstes nötig ist.
WARNUNG: Das Gerät und die zugänglichen Teile des Gerätes werden während des Betriebs heiß. Das
Berühren der heißen Geräteteile sollte vermieden werden.
• Kinder unter 8 Jahren sollten ohne Aufsicht nicht in die Nähe des Gerätes gelassen werden.
• Dieses Gerät ist nicht bestimmt zum Gebrauch durch Personen (einschließlich Kindern) mit
beeinträchtigten körperlichen, sensorischen oder geistigen Fähigkeiten oder durch Personen, die
keine entsprechenden Erfahrungen oder Kenntnisse besitzen, es sei denn, sie werden beaufsichtigt
oder angewiesen durch eine Person, die für ihre Sicherheit verantwortlich ist.
• Kinder dürfen nicht mit dem Gerät spielen.
• Die Reinigung und Wartung des Gerätes darf nicht durch Kinder ohne Aufsicht durchgeführt werden.
WARNUNG: unbeaufsichtigtes Kochen auf dem Herd mit Fett oder Öl kann gefährlich sein und
Feuerentstehung verursachen.
• Versuchen Sie NIEMALS das Feuer mit Wasser zu löschen; schalten Sie den Herd aus und bedecken
sie die Flamme mit z.B. einem Deckel oder einer Feuerlöschdecke.
WARNUNG: FEUERGEFAHR - Bewahren Sie keine Gegenstände auf der Herdoberfläche auf.
WARNUNG: ist die Herdoberfläche beschädigt, schalten Sie das Gerät aus, um einen Stromschlag zu
vermeiden.
• Nutzen Sie kein Dampfreinigungsgerät zur Reinigung des Ofens.
• Das Gerät sollte nicht durch einen externen Timer oder eine Fernbedienung gesteuert werden.
• Die Halogenkochzone des Ceranfeldes strahlt ein starkes Licht aus, vermeiden Sie daher, direkt in
die Halogenkochzone zu schauen.
• Die Abschaltung muss mit einer festen Verdrahtung im Einklang mit den Verkabelungsregeln
durchgeführt werden.
• Die Bedienungsanleitung legt die Art des Kabels, das genutzt werden soll, in Abhängigkeit von der
Maximal-Temperatur des Geräts fest.
• Ist das Gerätekabel beschädigt, muss es durch den Kundendienst/Hersteller oder ähnlich
qualifizierten Personen ersetzt werden, um elektrische Schläge zu vermeiden.
• Um das Risiko von Verbrennungen auszuschließen, halten Sie Kleinkinder fern, wenn das Gerät im
Betrieb ist, auch nachdem die Kochstellen abgeschaltet wurden, solange die Restwärmeanzeige
leuchtet.
• Keine Alufolie oder Kunststoffbehälter auf die heiße Ceranoberfläche abstellen.
• Wir empfehlen Ihnen, das Ceranfeld nach jeder Benutzung zu reinigen, um eine Ansammlung von
Verschmutzungen und Fettrückständen zu vermeiden. Sie würden sich bei jeder neuen Benutzung
erhitzen und verkohlen und dabei störenden Rauch und unangenehme Ausdünstungen verbreiten.
Außerdem stellen sie ein Brandrisiko dar.
• Niemals direkt auf dem Ceranfeld kochen. Benutzen Sie stets Kochgeschirr.
• Stellen Sie Töpfe und Pfannen immer in die Mitte des Kochfelds.
• Benutzen Sie die Ceranoberfläche nicht als Schneidebrett oder Arbeitsfläche.
• Schieben Sie das Kochgeschirr nicht von Kochfeld zu Kochfeld: Das könnte Kratzer verursachen.
• Bewahren Sie keine schweren Gegenständen über dem Ceranfeld auf, sie könnten herunterfallen
und das Ceranfeld beschädigen.
• Benutzen Sie die Ceranoberfläche nicht als Aufbewahrungsort für irgendwelche Gegenstände.
• Im unwahrscheinlichen Fall, daß auf der Kochfläche ein Riß auftreten sollte, unterbrechen Sie sofort
die Stromzufuhr zum Ceranfeld und setzen Sie sich mit unserem Kundendienst in Verbindung.
24 DE
Page 25

1. KONFORMITÄTSERKLÄRUNG
Alle Daten dienen der Information. Bemüht, die Qualität ihrer Produkte stets zu verbessern, behält sich der Fabrikant leichte
Änderungen in Verbindung mit technischen Innovationen vor.
Dieses Gerät entspricht in den Teilen, die mit Lebensmitteln in Berührung kommen, den Vorgaben der Europäischen
Richtlinie EEC 89/109.
Mit der Anbringung des -Zeichens am Gerät zeigen wir an, dass wir sämtliche für dieses Produkt geltenden und
notwendigen europäischen Sicherheits-, Gesundheits- und Umweltstandards einhalten und hierfür haftbar sind.
2. INSTALLATION
Der Einbau und die Installation eines Elektrogerätes sind Arbeiten, die mit besonderer Sorgfalt durchgeführt werden müssen. Eine nicht
fachgerechte Installation kann die Sicherheit des Gerätes beeinträchtigen und die Unversehrtheit des Benutzers gefährden.
Es ist daher zwingend notwendig, die Installationsarbeiten einem qualifizierten Fachmann zu überlassen, der sie nach allen Regeln der
Kunst und gemäß den geltenden Normen durchführen kann. Sollte der Endverbraucher trotz dieser dringenden Empfehlung die
Installation selber vornehmen, lehnt der Fabrikant jede Verantwortung für technische Defekte am Gerät oder für eventuell resultierende
Schäden an Personen oder Sachen ab.
3. EINBAU
Das Möbel oder die Arbeitsplatte, in die das Ceranfeld eingebaut
werden soll, so wie die Wände der angrenzenden Möbel, aus
hitzebeständigem Material bestehen. Insbesondere bei
Schränken aus Furnierholz müssen die verwendeten Klebstoffe
hitzebeständig sein, um Verformungen und Entleimungen zu
vermeiden.
Installation (fig. B / D):
• Mit dem Ceranfeld wird einen Dichtungsstreifen mitgeliefert.
Gehen Sie wie folgt vor:
- Drehen Sie das Gerät mit dem Glas nach unten um. Schützen
Sie dabei die Glasoberfläche.
- Kleben Sie den Dichtungsstreifen rund um das Gerät.
- Achten Sie auf einen einwandfreien Sitz des Dichtungsstreifens,
um das Durchsickerm von Feuchtigkeit in das untenstehende
Möbel zu verhindern
• Der Abstand des Gerätes zu den angrenzenden Wänden muß
mindestens 5 cm betragen.
• Falls das Gerät so eingebaut wird, daß unterhalb des
Ceranfeldes ein zugängliches Möbelteil vorgesehen ist, muß
unterhalb des Gerätegehäuses eine Zwischenplatte eingebaut
werden, um das Risiko einer Verbrennung bzw. einer
Beschädigung auszuschließen. Diese muß einen Abstand von
mindestens 1 cm vom Geräteboden haben.
• Beachten Sie bei der Installation einer Dunstabzugshaube über
einem Kochfeld die Installationsanweisungen. Der Abstand bzw.
die Abmessungen sind ebenfalls zu beachten.
• Sollte die Dunstabzugshaube in einem Hängeschrank über das
Kochfeld installiert werden dann muss ein Mindesabstand von 70
cm eingehalten werden.
Das Kochfeld ist mit einer Leitungsschnur versehen, die es ihm
ermöglicht, nur an eine Stromversorgung mit einer Spannung von
220-240 V zwischen den Phasen oder zwischen Phase und
Nullleiter angeschlossen zu sein.
• Schließen Sie das Gerät an eine Steckdose an.
Es ist jedenfalls möglich, das Kochfeld wie folgt
anzuschließen:
- Drehstrom 220-240 V3~
- Drehstrom 380-415 V2N~
Um eine neue Verbindung herzustellen, beachten Sie bitte
folgende Anweisungen:
• Bevor Sie die Verbindung herstellen, stellen Sie sicher, dass
das Gerät durch eine angemessene Sicherung geschützt - und
mit Kabeln mit zu einer normalen Versorgung ausreichendem
Querschnitt ausgestattet ist.
• Drehen Sie das Kochfeld so um, dass die Seite aus Glas auf
der Arbeitsplatte aufliegt, wobei für einen geeigneten Schutz
des Glases zu sorgen ist.
• Klappen Sie den Deckel unter Beachtung der nachstehenden
Reihenfolge auf:
1 2 3
4. ELEKTRISCHER ANSCHLUß
Achtung:
• Vor dem elektrischen Anschluß überprüfen Sie die auf dem
Zähler angegebene Netzspannung, die Sicherung und die
einwandfreie Erdung der Hausinstallation
• Der elektrische Anschluß ans Stromnetz erfolgt mit einem
Stecker
mit Erdung oder mittels einer Vorrichtung zur allpoligen
Unterbrechung.
• Das gelb-grüne Erdungskabel muß an die Klemmleiste des
Gerätes einerseits und der Hausinstallation andererseits
angeschlossen werden.
• Wir lehnen jegliche Verantwortung für Schäden oder deren
Folgen ab, die aus der Benutzung eines nicht oder mangelhaft
geerdeten Gerätes resultieren.
• Alle Eingriffe am Versorgungskabel sind ausschließlich durch
den Werkskundendienst oder durch ähnlich qualifiziertes
Fachpersonal durchzuführen.
ACHTUNG: Falls das Netzkabel ausgetauscht werden sollte,
achten Sie beim Anschluss der einzelnen Kabel unbedingt auf die
folgende Farbenbelegung:
BLAU - NULLLEITER (N)
BRAUN - PHASE (L)
GELB-GRÜN - ERDE ( )
• Lösen Sie die Kabelschellen "1",
• Finden Sie die zwei Stifte, die an den Seiten angebracht sind;
• Legen Sie das Blatt eines Schraubenziehers vor je einen Stift "2"
- "3", legen Sie es hinein und drücken Sie ein;
• Nehmen Sie den Deckel ab.
• Um das Netzkabel entfernen zu können
• ziehen Sie das Netzkabel heraus.Um das Netzkabel entfernen
zu können
• Drehen Sie die Schrauben heraus, welche die Einheit mit den
Shunt-Schienen und den Leitern des Netzkabels halten;
• ziehen Sie das Netzkabel heraus.
• Schritte zur Herstellung einer neuen Verbindung
- Wählen Sie das Netzkabel gemäß den Anweisungen in der
umseitigen Tabelle.
SHUNT
25 DE
- Führen Sie das Netzkabel durch die
Kabelschelle hindurch;
- Isolieren Sie die Enden jedes Leiters auf
eine Länge von 10 mm ab; dabei
berücksichtigen Sie die erforderliche Länge
des Netzkabels für den Anschluss an das
Klemmbrett.
-Auf der Grundlage der nachstehenden
Tabelle positionieren Sie die Shunt-
Schienen, die Sie im dem vorherigen
Arbeitsschritt aufgehoben haben, unter
Page 26
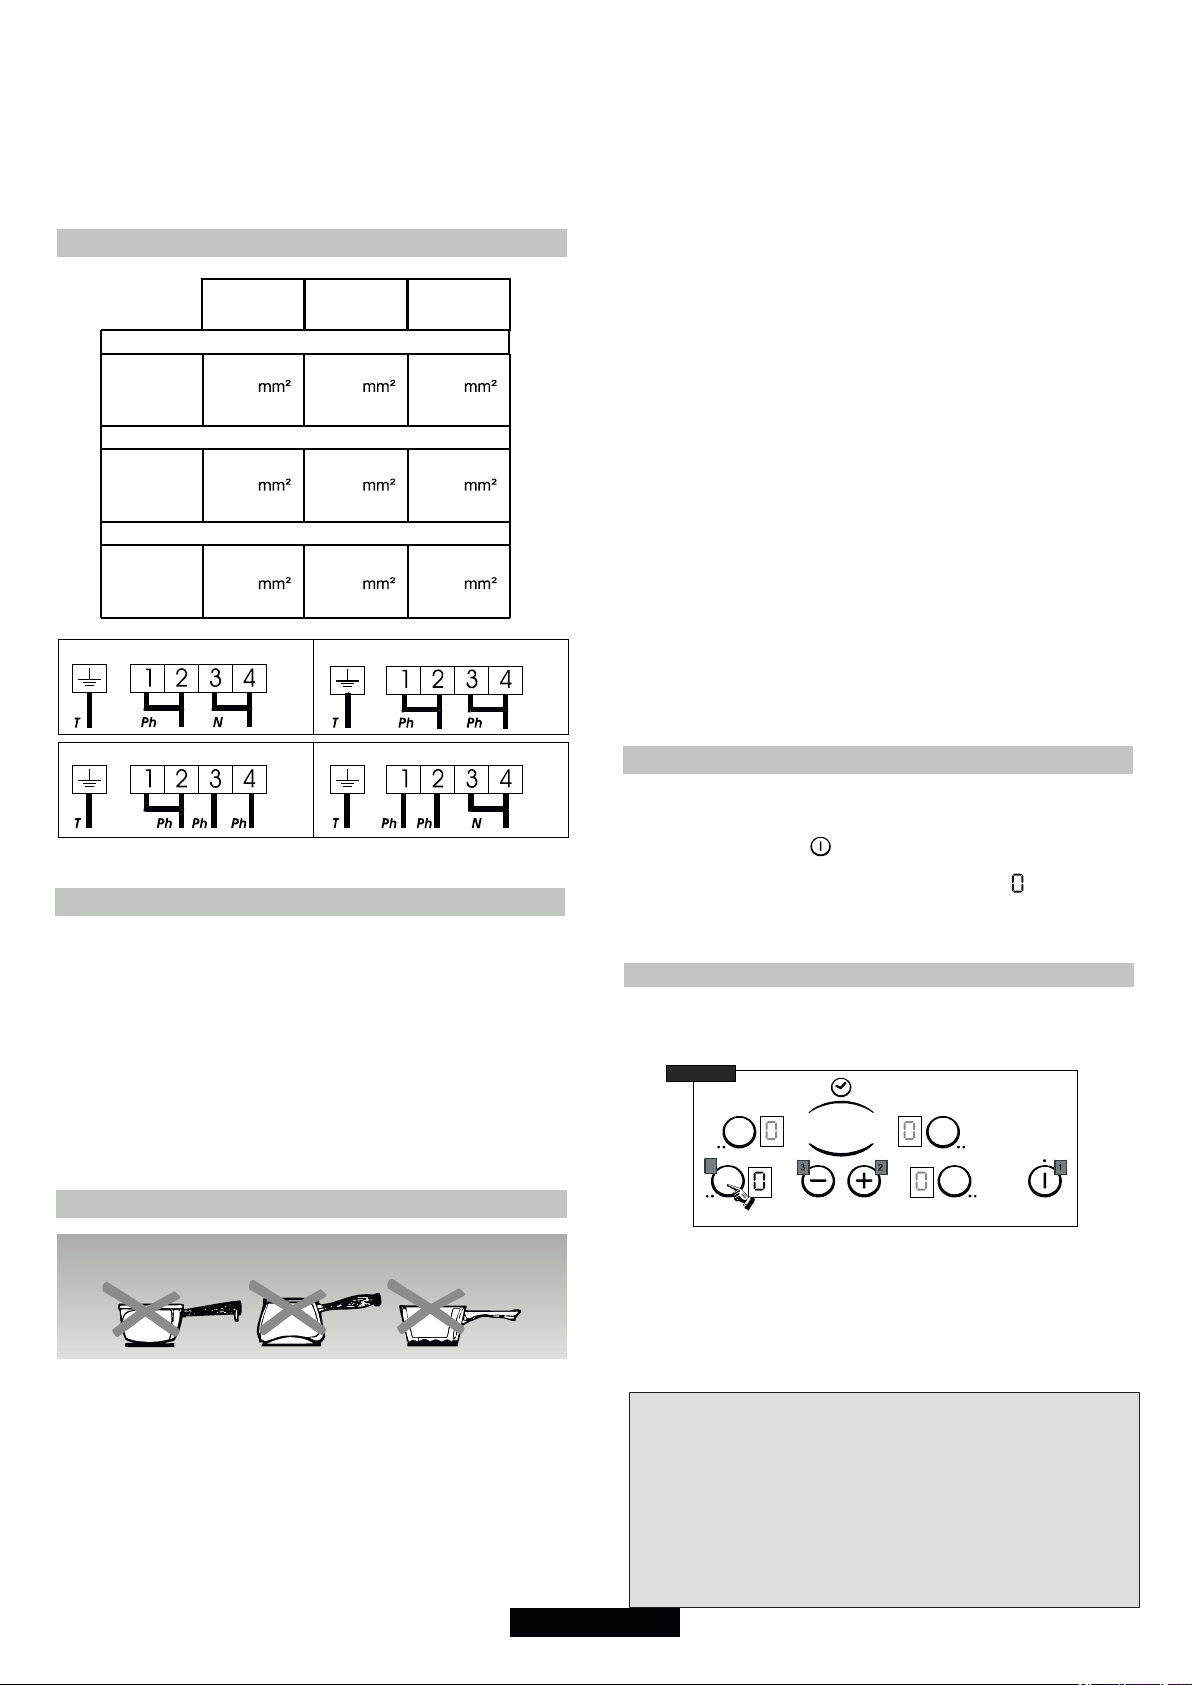
Beachtung der entsprechenden Markierungen auf dem
Klemmbrett (die Shunt- Schienen ermöglichen es, eine Brücke
zwischen zwei Klemmen
herzustellen) und befestigen Sie die Leiter. Überprüfen Sie die
Befestigung an den verschiedenen Klemmen.
- Schließen Sie den Deckel und schrauben Sie die Kabelschelle
wieder auf.
STROMANSCHLUSS
LAY OUT
“ 1 ”
Einphasig 220-240 V~ oder Zweiphasig 220-240 V2~
LAY OUT
“ 2 ”
Cable
HO5V2V2F
Dreiphasig 220-240 V3~
Cable
HO5V2V2F
Dreiphasig 380-415 V2N~
Cable
HO5V2V2F
Einphasig 220-240 V~ Zweiphasig 220-240 V2~
Dreiphasig 220-240 V3~ Dreiphasig 380-415 V2N~
Ph = Phase N = Nulleiter T = Erdung
LAY OUT
“ 3 ”
3x2,5 3x2,5 3x2,5
4x1,5 4x1,5 4x1,5
4x1,5 4x1,5 4x1,5
5. DARSTELLUNG
• Hilight-Kochzone : Er ist innerhalb 3 Sekunden betriebsbereit
und ist für gleichbleibendes, homogenes, langes und intensives
Schmoren vorgesehen.
Das Glaskeramik-Kochfeld ermöglicht es, von der starken Hitze,
die von dem hilight erzeugt wird, zu profitieren und somit den
Kochprozess zu beschleunigen. Die strukturellen Änderungen
beeinflussen in keiner Weise die Temperaturbeständigkeit des
Glases und verbessern die Fähigkeit, die zugeführte Leistung zu
kontrollieren. Durch das Prinzip des "Sprinter" erreicht man eine
Reduzierung der Ankochzeit bis um 15% je nach Kochart und
dem eingesetzten Kochgeschirr.
• Benutzen Sie Kochgeschirr, dessen Durchmesser groß
genug ist, um das Kochfeld völlig abzudecken: Der
Durchmesser des Kochgeschirrs sollte nicht kleiner als das
Kochfeld sein. Wenn der Durchmesser etwas größer ist, wird die
Energie der Kochstelle optimal genutzt.
Die nachfolgenden Informationen werden Ihnen bei der Auswahl
des Kochgeschirrs mit guter Kochleistung helfen:
Rostfreier Edelstahl: sehr empfehlenswert Besonders gut
durch den sogenannten “Sandwich-Boden”. Der Sandwich-
Boden kombiniert die Vorteile des Edelstahls (Erscheinung,
Haltbarkeit und Stabilität) mit denen von Aluminium oder Kupfer
(Leitfähigkeit, gleichmäßige Hitzeverteilung).
Aluminium: es wird schweres Aluminium empfohlen Gute
Leitfähigkeit. Manchmal bleiben Aluminiumrückstände in Form
von Kratzern auf der Kochfläche zurück, aber sie können entfernt
werden, wenn die Kochfläche sofort gereinigt wird. Dünnes
Aluminium sollte nicht verwendet werden.
Glas-Keramik: nicht empfehlenswert Schlechte Leistung.
Kann die Oberfläche verkratzen.
Kupferböden: es wird schweres Kupfer empfohlen. Gute
Leistung, aber Kupfer könnte Rückstände in Form von Kratzern
hinterlassen.
Sie können jedoch entfernt werden, wenn die Kochfläche sofort
gereinigt wird. Lassen Sie dieses Geschirr nie ohne Inhalt auf
dem Herd. Überhitztes Metall kann auf dem Glas verschmelzen.
Ein überhitzter Kupfertopf hinterläßt nicht mehr zu entfernenden
Rückstände auf der Ceranfläche.
Porzellan/ Email: gute Ergebnisse.
Gute Ergebnisse werden nur mit dünnen, flachen, glatten Böden
erzielt.
7.
NUTZUNGSANWEISUNGEN
• Nachdem Sie das Ceranfeld eingeschaltet haben, warten Sie
einige Sekunden, um die elektronische Steuerung su aktivieren.
- Drücken Sie die Taste . Die LED ist aktiv.
Nun ist die elektronische Steuerung des Gerätes aktiviert.
Für jede Kochzone erscheint die Hitze leistung .
- Wenn Sie 20 Sekunden lang nichts unternehmen, schaltet
sichdie elektronische Steuerung ab und Sie müssen den
Einschaltvorgang wiede holen.
. KOCHSTELLE EINSCHALTEN
- Drücken Sie die Wahltaste der gewünschten Kochzone.
Die "0" der entsprechenden Zone bleibt beleuchtet, wenn das
Licht von den anderen "0" reduziert wird
TYP B
7
6. WAHL DES RICHTIGEN KOCHGESCHIRRS
Die Benutzung von guten Kochgeschirr ist sehr wichtig,
um beste Ergebnisse mit Ihrem Ceranfeld zu erzielen:
• Benutzen Sie immer Kochgeschirr von guter Qualität mit
gleichmäßig flachem Boden: Der flache Boden verhindert
vereinzelte heiße Stellen und somit das Anbrennen der Speisen.
Dicke Metalltöpfe und Pfannen ermöglichen eine gleichmäßige
Verteilung der Hitze.
• Vergewissern Sie sich, daß der Boden Ihres Kochgeschirrs
trocken ist: Wenn Sie die Töpfe mit Flüssigkeit füllen, oder wenn
Sie Kochgeschirr benutzen, das im Kühlschrank aufbewahrt
wurde, vergewissern Sie sich, daß der Boden völlig trocken ist.
Das ist eine notwendige Maßnahme, um Ihr Kochfeld nicht zu
verschmutzen.
- Drücken Sie die Taste "+" oder "-" um eine Leistung zwischen1
und 9 zu wählen. Wenn Sie die Taste "+" oder "-" gedrückthalten,
erhöhen bzw. vermindern Sie die eingestellte Leistung.
Die nachfolgenden Beispiele dienen zu Ihrer Information. Die
pe rsönliche Erfahrung wird Ihnen ermögl i chen, die
vorgeschlagenen Einstellungen Ihren Bedürfnissen und Ihrem
Geschmack anzupassen.
0 : Aus
U -1 : )Auflösung
2 : ) ...Schmelzen
3 : Warmhalten
4 : Aufwärmen
5 : Auftauen, schmoren, garen bei niedriger Temperatur
6 : Garen ohne Deckel
7 : Anbraten, Rösten, Fleischbraten
8 : Garen und braten bei hoher Temperatur, backen
9 : Fritieren, Wasser zum Kochen bringen ....
26 DE
Page 27

. KOCHZONE AUSSCHALTEN
- Drücken Sie die Auswahl-Taste der gewünschten Kochzone.
- Drücken Sie die Taste "-" um die Leistungsstufe anzuzeigen.
Jetzt erlischt die Kochzone. Die Anzeige erlischt ebenfalls
nach 10 Sekunden.
- Um schnell zu beenden, drücken Sie gleichzeitig die "-" die
jeweilige Kochzonen Auswahl.
- Die Wärme-Ebene geht automatisch auf . Die Kochzone
erlischt.
. CERANFELD ABSCHALTEN
Es ist möglich, die Funktion der Kochzonen und
des Minutenzählers durch Drücken der Taste
ON-OFF jederzeit abzuschalten.
. RESTWÄRMEANZEIGE
Um anzuzeigen, daß die Temperatur der Kochstellenoberfläche
über 60°C beträgt, erscheint im Steuerungsfeld die Anzeige: " ".
Wir empfehlen, gegen Ende der Garzeit die Kochzone
abzuschalten und die Restwärme auszunutzen, um den
Garvorgang schonend zu Ende zu bringen.
Wenn die Temperatur unter 60°C gefallen ist, erlischt die Anzeige
.
HINWEIS: nach einem eventuellen Stromausfall bleibt die
Restwärmeanzeige ausgeschaltet, selbst wenn die Temperatur
der Glasoberfläche über 60°C beträgt.
. STEUERUNG DER ZUSÄTZLICHEN KOCHZONE
(ZWEI ZONEN)
Mit der Kochzone mit zwei Bereichen
sind einige Modelleausgestattet .....................
>
. VERWENDUNG DER SPERRTASTE
Die Sperrfunktion verhindert das versehentliche Einschalten des
Kochfelds durch Kinder und kann auch beim Reinigen von Vorteil
sein.
So wird das Kochfeld gesperrt (Beispiel für Kochfeld mit 4
Zonen)
Drücken Sie die EIN/AUS-Taste (nur danach kann die
Kindersperre aktiviert werden).
Drücken Sie gleichzeitig die
Minustaste und die Auswahltaste
oben links, bis Sie ein Piepen
hören; wenn es nicht piept,
schalten Sie das Kochfeld AUS
und wi e de rh o le n Si e d e n
Einstellvorgang.
Drücken Sie danach erneut die
Auswahltaste oben links.
Die Einstellung muss innerhalb
von 10 Sekunden erfolgen und es
darf keine andere als die oben
beschriebene Taste gedrückt
werden; anderenfalls wird der Vorgang abgebrochen.
Alle Anzeigen zeigen ein „L“ für
L O C K E D ( G E S P E R R T,
Kindersicherung ist eingeschaltet).
Wenn ein Kochfeld heiß ist, wird
abwechselnd ein „H“ und ein „L“
angezeigt.
Sie ist vollständig aktiv, wenn die Kochzone in Betrieb ist ; die
Steuerung der zusätzlichen Kochzone wird angezeigt.
TYP B
7
LED
Um die zusätzliche Kochzone zu deaktivieren:
- Drücken Sie auf die Anzeige der zusätzlichen Kochzone. Die
LED Anzeige erlischt wenn die zusätzliche Kochzone deaktiviert
ist.
Um die zusätzliche Kochzone zu aktivieren: Drücken Sie die
Taste der Kochzone. Die LED Leuchte wird angezeigt.
. PROGRAMMIERUNG EINER KOCHSTELLE
Jede Kochzone ist für eine maximale Dauer von 99 Minuten
programmierbar.
- Starten Sie die gewünschte Zone, indem Sie die vorherigen
Anweisungen beachten.
- Drücken Sie gleichzeitig auf dem Touch "-" und "+", um den
Timer zu aktivieren, " " wird angezeigt.
TYP B
7
So wird die Sperre des Kochfelds aufgehoben
Um di e B edi ene inh ei t z u
entsperren, drücken Sie gleichzeitig
d i e M i n u s t a s t e un d d ie
Auswahltaste oben links (Kochfeld
hinten links) und drücken Sie dann
erneut die Minustaste.
Die Sperre ist jetzt aufgehoben
und das Touch-Bedienfeld ist
wieder im STAND BY-Modus.
- Drücken Sie erneut auf das "+"-Taste, um eine Zeit in Minuten
LED
zwischen 0 und 99 anzuzeigen oder drücken Sie auf die Option "-"
Taste, um die Zeit zwischen 30 Minuten und 0 zu verringern. Die
Zeitsteuerung wird angezeigt.
--> Die eingestellte Zeit kann jederzeit verändert werden.
Wenn die Zeit abgelaufen ist, schaltet sich die Kochzone automatisch
ab und es ertönt ein akustisches Signal. Drücken Sie irgendeine
Taste, um es zu unterbrechen.
--> Der Minutenzähler kann auch einzeln als Eieruhr benutzt werden.
Am Ende der Zeit ertönt ein Klingelzeichen.
27 DE
Page 28
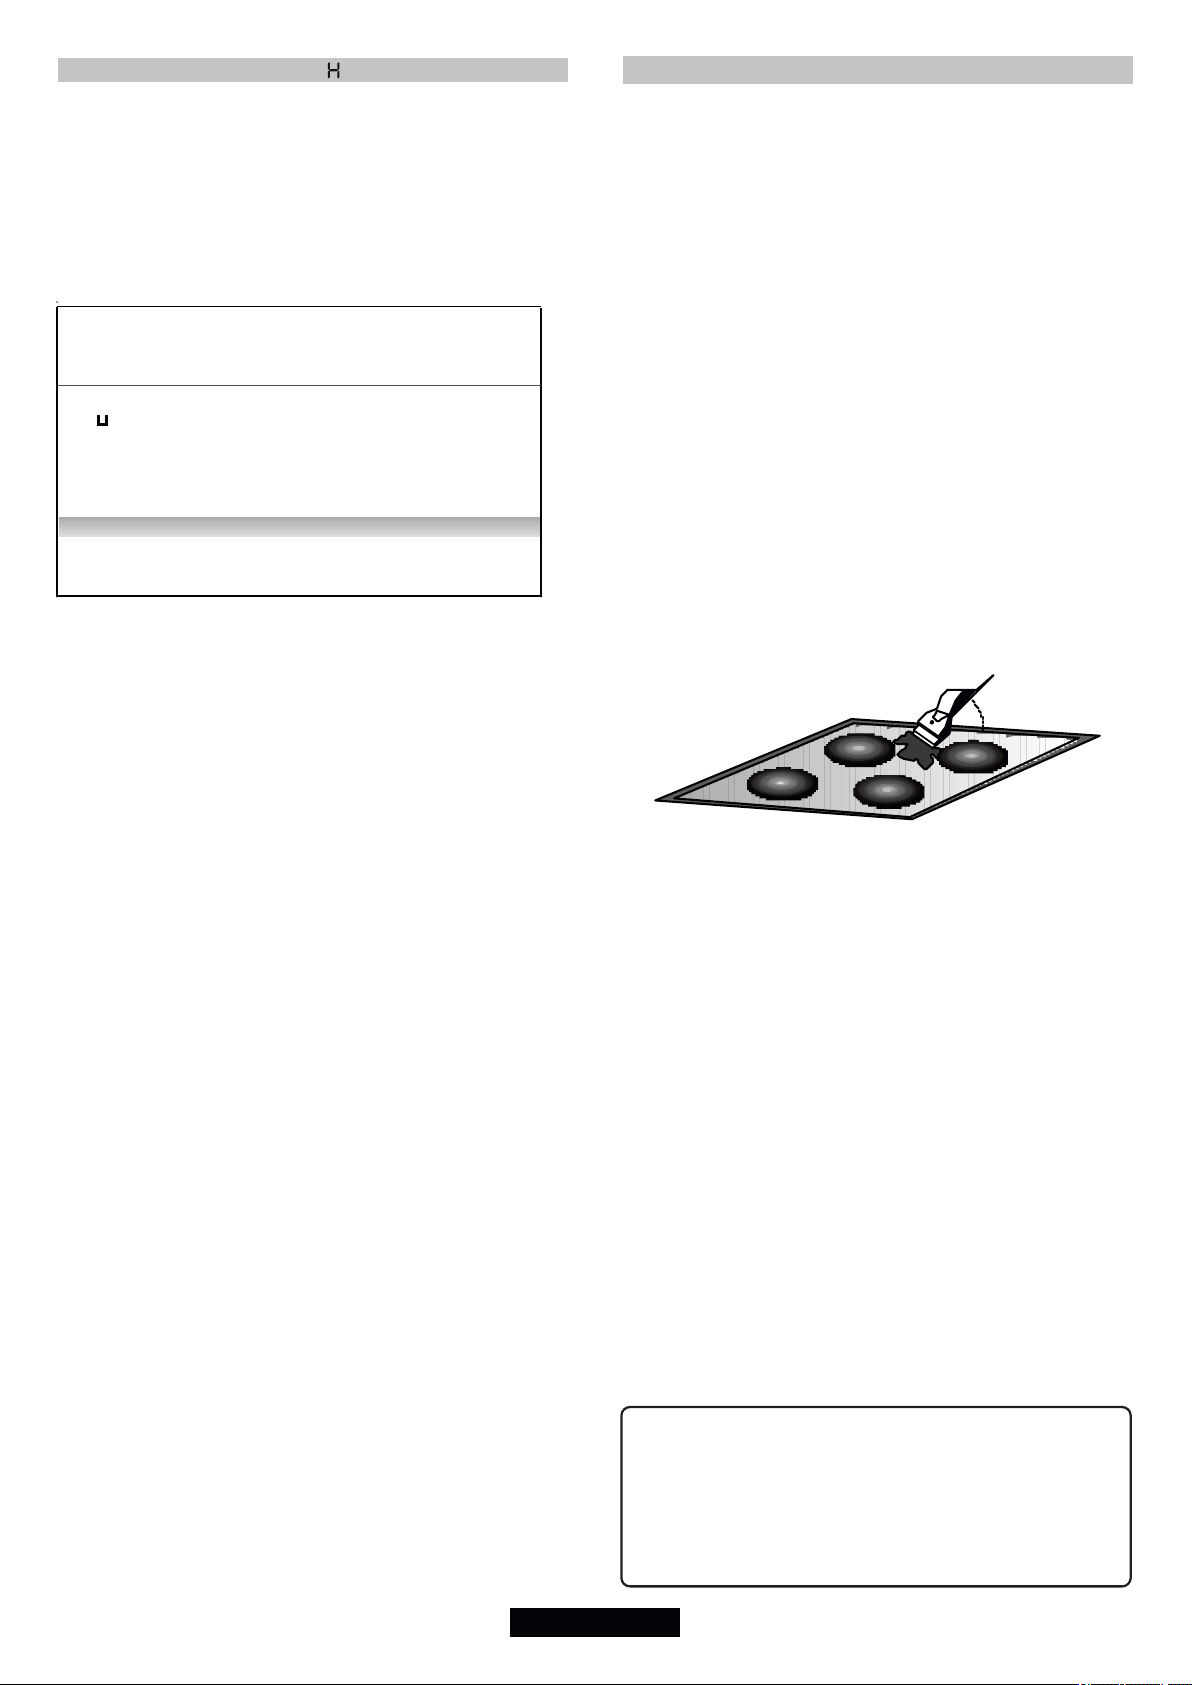
. LEISTUNGSVERSTÄRKER
Al l e K oc hz on en d e s Ce ra nf el d s s in d m it ei n e m
Leistungsverstärker ausgestattet, der bei Bedarf einen
schnelleren Temperaturanstieg der Kochzonen ermöglicht.
Leistungsverstärker einschalten:
- Schalten Sie die gewünschte Kochzone ein, drücken Sie die
Taste "+" bis zur Position “9”, lassen Sie kurz los und drücken Sie
erneut die Taste "+". Die Anzeige zeigt adwechselnd “A”
Leistungsverstärker und "9" Hitzeleistung.
- Wenn nötig, reduzieren Sie die Hitzeposition, das Display zeigt
abwechselnd "A" Leistungsverstärker und die neue Hitzeposition
an.
KochpositionEntwickelte
0
1
2
3
4
5
6
7
8
9
BEISPIEL: eine Kochzone mit 1800 W Leistung ist auf Pos. 6
Leistung
(%)
:
0 %
: 2.5 % : 0 : 2 H
:
3 %
:
6 %
:
11 %
:
16 % :
:
19 % :
:
32 % :
:
45 % :
:
65 % :
:
100 % : 0
Beschleunigungszeit
Leistungsverstärkers
(in Minuten)
:
:
:
:
0
1
3
5
6,5
8,5
2,5
3,5
4,5
Maximale
Betriebsdauer
vor
automatischer
Abschaltung*
:
0 H
:
6 H
:
6 H
:
5 H
:
5 H
:
4 H
:
1,5 H
:
1,5 H
:
1,5 H
:
1,5 H
eingestellt: entwickelte Leistung: 32% von 1800 W. Wenn die
Funktion “Leistungsverstärker” eingeschaltet ist, liefert die
Kochzone die volle Leistung von 1800 W während 2,5 Minuten
und schaltet erst nach dieser Zeit auf 576 W herunter.
* Die Kochzonen schalten sich nach einer bestimmten Zeit
automatisch ab, wenn sie zu lange in Betrieb bleiben. Diese Zeit
hängt von der eingestellten Leistung ab.
Um den Leistungsverstärker zu deaktivieren:
- Schalten Sie die Kochzone ein, drücken Sie die Taste "-", um
zu einer normalen Hitzeleistung zurückzukehren, schalten Sie
herunter auf die erforderliche Hitzeleistung oder auf "0", um die
Kochzone abzuschalten.
8. REINIGUNG UND PFLEGE DES CERANFELDES
• Vor der Reinigung der Glaskeramikoberfläche warten Sie bitte ab,
bis diese vollständig abgekühlt ist.
• Benutzen Sie ausschließlich speifische Reinigungsmittel für
Ceranoberflächen, wie z.B. Reinigungscremen und Schaber.
Nehmen Sie handelsübliche Produkte, die leicht auf dem Markt
zu finden sind.
• Vermeiden Sie das Überlaufen von Speisen auf die
Glasoberfläche. Diese verkohlen schnell während des
Kochvorgangs und erschweren die Reinigung.
• Halten Sie alles, was schnell schmelzen kann, wie Gegenstände
aus Kunststoff, Alufolie aber auch Zucker und stark zuckerhaltige
Produkte, von der Glasoberfläche fern.
PFLEGE :
- Beträufeln Sie die Ceranoberfläche mit einigen Tropfen eines
spezifischen Reinigungsmittel für Ceranfelder,
- Wischen Sie die Flecken mit einem weichen Tuch oder mit leicht
befeuchtetem Küchenpapier ab,
- Trocknen Sie die Oberfläche mit einem wechen Tuch oder mit
Küchenpapier ab.
Sollten noch hartnäckige Flecken vorhanden sein:
- Beträufeln Sie die Oberfläche erneut mit dem Reinigungsmittel.
- Entfernen Sie die Flecken mit einem Schaber, wobei dieser in
einem Winkel von ca. 30° zur Ceranoberfläche gehalten werden
soll.
- Trocknen Sie die Oberfläche mit einem weichen Tuch oder mit
Küchenpapier ab.
- Wiederholen Sie den Vorgang falls notwendig.
30° Maxi
EINIGE EMPFEHLUNGEN: Durch häufiges Reinigen bildet sich
eine Schutzschicht, die Abnutzung und Kratzern vorbeugt.
Vergewissern Sie sich, daß die Ceranoberfläche sauber ist, bevor
Sie das Ceranfeld erneut benutzen.
Um Kalk- und Wasserflecken zu entfernen, benutzen Sie einige
Tropfen Essig oder Zitronensaft. Trocknen Sie mit Küchenkrepp gut
ab. Wischen Sie schließlich mit einigen Tropfen eines spezifischen
Reinigungsmittel ab.
Die Ceranoberfläche kann die Reibung von flachen Geschirrböden
zwar gut aushalten, es ist jedoch empfehlenswert, Töpfe und
Pfannen anzuheben, um sie zu verschieben.
ACHTUNG:
- Vermeiden Sie den Gebrauch eines zu nassen Schwammes.
- Benutzen Sie niemals Werkzeuge aus Stahl wie Messer oder
Schraubenzieher.
- Die Benutzung eines Schabers mit Rasierklinge kann die
Oberfläche nicht beschädigen, wenn ein Neigungswinkel von 30°
zwischen Schaber und Oberfläche eingehalten wird.
- Lassen Sie bitte den Schaber mit Klinge nicht in Reichweite von
Kindern.
- Benutzen Sie keine ätzenden Mittel oder Stahlwolle zur Reinigung
der Ceranoberfläche.
• Reinigung des Bedienfeldes:
Um das Bedienfeld Ihres Ceranfeldes zu reinigen, ohne es zu
beschädigen, benutzen Sie Seifenwasser, wischen Sie ab und
trocknen Sie mit einem weichen Tuch.
Eine Farbänderung der Glaskeramikoberfläche
beeinflusst nicht die Inbetriebnahme sowie die
Stabilität der Oberfläche. Solche Verfärbungen sind
meistens das Ergebnis von ve rbr ann ten
Nahrungsmittelreste oder die Verwendung von
Kochgeschirr aus Materialien wie Aluminium oder
Kupfer. Diese Flecken sind schwierig zu entfernen.
28 DE
Page 29

9. PROBLEM LÖSUNGEN
Die Kochzonen halten keine konstante Kochtemperatur oder das
Anbraten geht nicht schnell genug
• Sie sollten Kochgeschirr mit absolut flachem Boden verwenden.
Wenn Licht zwischen dem Boden des Kochgeschirrs und dem
Kochfeld durchdringt, wird die Hitze nicht richtig weitergeleitet.
• Der Boden des Kochgeschirrs muß den Durchmesser der
Kochfläche völlig bedecken.
Die Speisen kochen zu langsam
• Das falsche Kochgeschirr wurde ausgesucht. Wählen Sie
ziemlich schweres Geschirr mit flachem Boden, dessen
Durchmesser mindestens dem Durchmesser der Kochfläche
entspricht.
Leichte Kratzer oder Abreibungen erscheinen auf dem Glas Ihres
Ceranfeldes.
• Es wurden die falschen Reinigungsmethoden angewendet,
Kochgeschirr mit rauem Boden wurde benutzt oder raue
Gegenstände wie Salz oder Sand befanden sich zwischen
Kochtopf und Ceranfeld. Verwenden Sie die empfohlenen
Reinigungsmethoden, vergewissern Sie sich, daß die Böden
Ihrer Kochtöpfe und das Kochgeschirr sauber sind und achten
Sie auf glatte Böden. Kleine Kratzer sind nicht mehr zu entfernen,
aber sie werden im Laufe der Zeit mit einer guten Reinigung
weniger sichtbar.
Metallrückstände:
• Schieben Sie Aluminiumtöpfe nicht über die Kochflächen.
Verwenden Sie die empfohlenen Reinigungsmethoden.
• Die falschen Reinigungsmittel/Gegenstände wurden
verwendet, die Flecken bleiben auf der Oberfläche. Verwenden
Sie den Schaber mit der Rasierklinge und die empfohlen
Reinigungsmethode.
Dunkle Flecken
• Verwenden Sie den Schaber mit der Rasierklinge und die
empfohlene Reinigungsmethode.
Helle Verfärbungen auf demì Ceranfeld
• Rückstände von Aluminium- oder Kupferpfannen, sowie
Mineralablagerungen durch Wasser oder Lebensmittel können
mit der Reinigungscreme entfernt werden.
Geschmolzener Zucker oder Plastik
• Lesen Sie den Abschnitt zur Reinigung und Pflege des
Ceranfeldes.
Das Ceranfeld arbeitet nicht oder bestimmte Kochstellen
funktionieren nicht.
• Die Shunts sind auf dem Klemmenbrett falsch angeordnet.
Überprüfen Sie den Anschluß auf seine Übereinstimmung mit
dem Anweisungen .
• Größere Überlaufreste oder ein Gegenstand bedecken
mindestens 2 Tasten für mehr als 10 Sekunden. Reinigen Sie die
Oberfläche oder entfernen Sie den Gegenstand.
• Das Bedienfeld ist durch die Sperrfunktion blockiert.
Entsperren Sie das Kochfeld.
10. TECHNISCHER KUNDENDIENST
Sollte Ihr ceranfeldes einmal nicht richtig funktionieren, prüfen Sie
zuerst, ob die Stromversorgung gewährleistet ist. Ist die
Uhrsache der Fehlfunktion nicht ausfindig zu machen, wenden
Sie sich bitte an Ihren zuständigen Werkskundendienst unter
Angabe des Modells und der Seriennummer, die auf dem
Typenschild angegeben sind. Auf Ihr Gerät gewähren wir eine
Garantie von 24 Monaten ab Kaufdatum. Bewahren Sie Ihre
Kaufrechnung sorgfältig auf und legen Sie sie bei Bedarf als
G a r a n t i e n a c h w e is d e m K u n d e n d i e n s t v o r. D i e
Garantiebedingungen sind im beigefügten Serviceheft
angegeben.
11. UMWELTSCHUTZ
Dieses Gerät ist in Übereinstimmung mit der
europäischen Richtlinie 2012/19/EU zu
elektrischen und elektronischen Altgeräten
(WEEE) gekennzeichnet. Elektrische und
elektronische Altgeräte enthalten sowohl
Schadstoffe (die negative Auswirkungen auf
die Umwelt haben können) als auch
Basiskomponenten (die wiederverwendet
werden können). Es ist wichtig, dass
elektrische und elektronische Altgeräte spezifischer
Handhabung unterliegen, damit alle Schadstoffe angemessen
entfernt und entsorgt und alle Materialien wiederverwertet und
recycelt werden.
Verbrauche r s p ielen eine wichtige Rolle bei der
Gewährleistung, dass elektrische und elektronische Altgeräte
nicht zu Umweltproblemen werden; es ist wichtig, einige
grundlegende Regeln zu befolgen:
• Elektrische und elektronische Altgeräte können nicht als
Haushaltsabfall behandelt werden.
• Elektrische und elektronische Altgeräte sollten an relevante
Sam m elp unk t e üb erg e ben wer d en, die v on d er
Stadtverwaltung oder eingetragenen Unternehmen verwaltet
werden. In vielen Ländern können bei großen elektrischen und
elektronischen Altgeräten heimische Sammeldienste
verfügbar sein.
• Wenn Sie ein neues Gerät erwerben, kann das alte Gerät
möglicherweise an den Händler übergeben werden, der es
kostenlos auf einer 1:1-Basis sammeln muss, solange das
Gerät von dem gleichen Typ ist und dieselben Funktionen hat
wie das gelieferte Gerät.
Das Ceranfeld läßt sich nicht ausschalten.
• Das Bedienfeld ist durch die Sperrfunktion blockiert.
Entsperren Sie das Kochfeld.
Das Ceranfeld schaltet sich automatisch ab
• Größere Überlaufreste oder ein Gegenstand bedecken
mindestens 2 Tasten für mehr als 10 Sekunden. Das Ceranfeld
schaltet auf Sicherheitsbetrieb um und ein akustisches Signal
ertönt, solange die Tasten bedeckt bleiben. Reinigen Sie die
Oberfläche oder entfernen Sie den Gegenstand.
• Die Kochflächen schalten sich nach einer gewissen Zeit
automatisch ab, wenn sie für längere Zeit in Betrieb sind. Siehe
Kapitel “Leistungsverstärker” unter dem Punkt über die
“maximale Funktionsdauer”.
Ein- und Abschaltphasen der Kochzonen
• Die Ein- und Abschaltphasen der Kochstellen variieren je nach
der eingestellten Leistungsstufe
- niedrige Leistung: kurze Einschaltphasen,
- hohe Leistung: lange Einschaltphasen.
Die Aufschrift “H” in der Restwärmeanzeige blinkt.
• Die Temperatur des elektronischen Moduls ist zu hoch. Lassen
Sie durch einen Fachmann überprüfen, ob der Einbau nach den
Anweisungen.
29 DE
Page 30

INSTRUCCIONES DE SEGURIDAD
LEA ATENTAMENTE ESTE MANUAL PARA SACAR TODO EL PARTIDO DE SU ENCIMERA. Le recomendamos
conserve el manual de instalación y uso para poder consultarlo en el futuro, y anote, antes de la
instalación de la encimera, el número de serie del aparato por si requiere la intervención del Servicio de
Asistencia Técnica.
ADVERTENCIA: El aparato y sus componentes accesibles se calientan durante el uso. Se debe tener
cuidado de no tocar los elementos calefactores.
• Los niños menores de 8 años deben permanecer alejados o supervisados de forma continuada por
una persona adulta.
• Este aparato puede ser usado por niños mayores de 8 años y personas con capacidades físicas,
sensoriales o mentales reducidas o falta de experiencia y conocimiento siempre y cuando hayan sido
supervisadas o instruidas sobre el uso del aparato de forma segura y del conocimiento de los riesgos
que comporta.
• Los niños no deben jugar con el aparato.
• La limpieza y el mantenimiento que debe realizar el usuario no será realizada por niños sin
supervisión.
ADVERTENCIA: Desatender cocinas, utilizando grasas o aceites, es peligroso y puede ocasionar un
incendio.
• NUNCA trate de apagar un incendio con agua, apague el aparato y cubra la llama con una tapa o
manta ignifuga.
ADVERTENCIA: Peligro de incendio: no almacene artículos en las superficies de cocción.
ADVERTENCIA: Si la superficie está agrietada, apague el aparato para evitar la posibilidad de una
descarga eléctrica.
• No utilice limpiadores de vapor para la limpieza del aparato.
• El aparato no está ideado para ser utilizado mediante un temporizador externo o un sistema de
control remoto independiente.
• El quemador halógeno de la encimera vitrocerámica emite una luz fuerte: nunca mire fijamente las
lámparas de este quemador.
• Los medios de desconexión deben ser incorporados en el cableado fijo en conformidad con las reglas
del cableado.
• Las instrucciones indicarán el tipo de cable a utilizar, teniendo en cuenta la temperature de la parte
posterior del aparato.
• Si el cable de alimentación está dañado, debe ser reemplazado por el fabricante, su servicio técnico o
personas cualificadas, con el fin de evitar riesgos.
• Durante el funcionamiento o tras haber apagado un quemador, y mientras el indicador de calor
residual permanezca encendido, se
recomienda encarecidamente mantener a los niños alejados de la placa para evitar riesgos de
quemaduras graves.
• Nunca deje sobre las superficies calientes hojas de papel de aluminio ni recipientes d
e plástico.
• Después de cada utilización es necesario limpiar ligeramente la encimera para evitar la acumulación
de suciedad y grasas. Éstas, a cada nuevo uso, se irían requemando hasta carbonizarse, lo que
desprende humo y olores desagradables además de suponer un riesgo de incendio.
• La zona de mandos de la encimera es delicada, así que nunca deje sobre la misma recipientes
calientes.
• Nunca cocine directamente sobre la encimera: utilice recipientes.
• Coloque siempre el recipiente bien centrado sobre el quemador a utilizar.
• Nunca utilice la superficie de la encimera para cortar alimentos o como mesa de trabajo
• Nunca deslice los recipientes sobre la encimera: podría rayar su superficie.
• Nunca deje objetos pesados por encima de la encimera, pues podrían caerse y dañarla.
• No deposite nunca sobre la encimera ningún objeto, sea el que sea.
30 ES
Page 31

1. INSTRUCCIONES GENERALES
Todas las características se dan a título meramente indicativo. A causa de su intención de mejorar constantemente la calidad de
su producción, el Fabricante se reserva el derecho de aportar a sus aparatos modificaciones fruto de la evolución técnica,
respetando siempre las condiciones establecidas en el Código del Consumo.
En este equipo, las piezas que se prevé que puedan estar en contacto con los alimentos, cumplen las regulaciones de la CEE
indicadas en la directiva 89/109.
Al mostrar el logo marcado en este producto, declaramos, bajo nuestra propia responsabilidad, el cumplimiento de todos
los requisitos europeos en términos de seguridad, salud y medio ambiente, establecidos en la legislación de este producto.
2. INSTALACIÓN
La instalación funcional de electrodomésticos en su entorno es una operación delicada que, de no efectuarse correctamente,
puede tener graves consecuencias para la seguridad de los usuarios. En estas circunstancias, es imprescindible confiar esta
tarea a un profesional, que la llevará a cabo según las normas técnicas vigentes. Si, a pesar de esta recomendación, el usuario
efectúa por sí mismo la instalación, el Fabricante declina toda responsabilidad en caso de fallo técnico del aparato, tenga o no
como consecuencia daños materiales o personales.
3. EMPOTRAMIENTO
El mueble o el soporte en los cuales debe empotrarse la
encimera, así como las paredes del mueble que podrían
yuxtaponerse al mismo, deben ser de un material resistente a las
altas temperaturas.
Además, es necesario que el revestimiento que recubre le
mueble o el soporte se fije con una cola resistente al calor para
evitar que se despegue.
Instalación (fig. B / D) :
• Con la encimera se entrega una junta de estanqueidad. Para
proceder a su colocación,
- darle la vuelta a la encimera, con la parte del cristal hacia abajo,
con cuidado de no dañar el cristal.
- colocar la junta alrededor de todo el perímetro de la encimera.
- colocarla cuidadosamente en su lugar para evitar cualquier
infiltración en el mueble soporte.
• Hay que dejar un espacio libre de como mínimo 5 cm entre le
aparato y las paredes verticales cercanas.
• Si, en función de la instalación de la encimera, la parte inferior de
su cajón se encuentra cerca de una zona normalmente accesible
al manipular o ordenar, colocar una separación a 1 cm del fondo
del cajón para evitar todo riesgo de quemadura o deterioro.
En caso de instalación de una campana sobre una encimera de
cocción, consulte las instrucciones de instalación de la campana,
donde se debe indicar la distancia correcta.
En caso de instalación en un mueble sobre la encimera de
cocción, la distancia mínima que debe mantenerse es de 70 cm.
ATENCIÓN:
En el caso que sea necesario sustituir el cable de alimentación,
asegurese de respetar el siguiente código de colores durante la
conexión de cada cable:
AZUL - NEUTRO (N)
MARRÓN - FASE (L)
AMARILLO -VERDE -TIERRA ( )
L'aparato e suministrado de un cable de alimentación sin toma de
corriente y permite la conexión exclusivamente con corriente de
220-240 V entre fases o entre fase y neutro.
• Conectar a una toma de corriente.
También es possible adaptar el aparato para una conexión en:
-Trifasico 220-240 V3~
-Trifasico 380-415 V2N~
Para proceder a una nueva conexión, es imperativo respectar
las consignas siguientes:
• antes de realizar la conexión, verificar que la instalación esta
protegida por un fusible apropiado y inclue cables de sección
suficiente para suministrar energia al aparato correctamente.
• Girar la placa, la cara de cristal contra el plano de trabajo
tomando cuidado de proteger el cristal.
Abrir la tapa siguiendo estos pasos:
1 2 3
4. CONEXION ELÉCTRICA
«La instalación del aparato citado en la referencia debe cumplir
la normativa vigente en el país de su instalación». El Fabricante
declina toda responsabilidad en caso de incumplimiento de esta
disposición.
Atención:
• Antes de proceder a la conexión, compruebe el voltaje de
alimentación de su contador, el ajuste del disyuntor, le calibre del
fusible y la continuidad de la toma de tierra de la instalación.
• La conexión eléctrica a la red debe hacerse mediante una toma
de corriente con toma de tierra, o mediante un interruptor de corte
omnipolar.
Si el aparato requiere una toma de corriente, debe instalarse de
forma que dicha toma sea accesible.
• El cable de protección verde/amarillo debe estar conectado a las
bornas de tierra, al aparato por un extremo y a la instalación por el
otro.
• No seremos responsables de ningún incidente, ni de sus
eventuales consecuencias, derivado del uso de un aparato sin
toma de tierra, o conectado a una toma de tierra cuya continuidad
sea defectuosa.
• Cualquier intervención relacionada con el cable de alimentación
debe obligatoriamente ser efectuada por el Servicio de Asistencia
Técnica, o por una persona de cualificación similar.
• desatornille el sujetacable "1",
• localice las dos lengüetas que se encuentran a los lados,
• coloque la hoja de un destornillador delante de cada lengüeta "2"
y "3", húndela y presione,
• levante la tapa.
Libérar el cable de alimentación:
• desatornille los tornillos de la placa a bornes que mantienen los
puentes derivadores y los hilos conductores del cable de
alimentación,
• retirar el cable de alimentación.
Operaciones que deben efectuarse para realizar la nueva
conexión:
- Elija el cable de alimentación en función de las
recomendaciones de la tabla,
- pase el cable por le sujetacables,
- pele la extremidad de cada conductor del cable de alimentación
sobre una longitud de 10 mm., teniendo en cuenta la longitud
necesaria del cable de alimentación para la conexión a la placa a
bornes,
31 ES
Page 32

SHUNT
- como se indica en la tabla, colocar los
puen t es de r ivad ores q ue ha b rán
recuperado en la primera operación
respetando los marcados sobre la placa a
bornes (los puentes derivadores permiten
establecer un puente entre dos bornas), y
fijar los conductores.
6. LA ELECCIÓN DE LOS UTENSILIOS
Para obtener óptimos resultados de cocción es necesario
utilizar recipientes de buena calidad:
- cierre la tapa y atornillar el sujetacables.
Connexión a la corriente
LAY OUT
“ 1 ”
Monofasico 220-240 V~ o Bifasico 220-240 V2~
LAY OUT
“ 2 ”
Cable
HO5V2V2F
Trifasico 220-240 V3~
Cable
HO5V2V2F
Trifasico 380-415 V2N~
Cable
HO5V2V2F
Monofasico 220-240 V~ Bifasico 220-240 V2~
Trifasico 220-240 V3~
Trifasico 380-415 V2N~
LAY OUT
“ 3 ”
3x2,5 3x2,5 3x2,5
4x1,5 4x1,5 4x1,5
4x1,5 4x1,5 4x1,5
• Utilizar recipientes de buena calidad, de fondo plano y
espeso : el fondo rigurosamente plano suprimirá los puntos de
sobrecalentamiento sobre los que los alimentos tienden a
pegarse, y el espesor del metal permitirá una perfecta
distribución del calor.
• Asegurarse de que el fondo de los recipientes esté seco: al
llenar un recipiente o cuando se utiliza una cazuela que ha estado
en la nevera, por ejemplo, asegúrese de que le recipiente esté
bien seco; esta precaución evitará que la encimera se ensucie.
• Utilizar recipientes de un diámetro suficiente para cubrir
completamente el quemador: hay que asegurarse de que le
fondo sea por lo menos igual de grande que la zona de cocción. Si
el fondo es ligeramente mayor, la energía se aprovechará mejor.
A continuación encontrará información que le será útil a la
hora de elegir los recipientes más indicados para obtener
buenos resultados.
Acero inoxidable: altamente recomendado. Especialmente
recomendable si tiene una base revestida en doble capa. La base
en doble capa combina las ventajas del acero inoxidable
(aspecto, duración y estabilidad) con las del aluminio o cobre
(conducción del calor, distribución uniforme del calor).
Aluminio: recomendado el aluminio pesado. Buena
conductividad. Atención: Los residuos de aluminio a veces
aparecen como rayas sobre la encimera, pero pueden eliminarse
si se limpian inmediatamente. Debido a su bajo punto de fusión, le
aluminio pesado fino no debe usarse.
Hierro colado / Vitrocerámica: no recomendado. Pobre
rendimiento. Puede rayar la superficie.
Ph = Fase N = Neutro T = Tierra
5. PRESENTACIÓN
• Zona hilight : en la unidad de cocción se encuentra una banda
metálica conductora que la abarca uniformemente en su
totalidad.
Es efectiva al cabo de 3 segundos, y está indicada para cocinar
de forma estable, homogénea y también para cocinar durante
largos periodos de tiempo.
La placa vitrocerámica permite aprovechar de mejor manera le
potente calor generado por los fuegos Hilight, acelerando de esta
manera la cocción. Las modificaciones estructurales mantienen
inalteradas las propiedades de resistencia del cristal a
temperaturas elevadas, y mejoran la capacidad de control de la
potencia distribuida. Con su principio «Sprinter», se obtiene una
reducción del tiempo de cocción de hasta un 15% dependiendo
del tipo de cocción y de los recipientes utilizados.
Base de cobre: recomendado el cobre pesado. Buen
rendimiento, pero el cobre puede dejar residuos que aparecen
como rayaduras. Estos residuos pueden eliminarse si la encimera
se limpia inmediatamente. Sin embargo, nunca lleve nada a
ebullición en este tipo de recipiente. El metal sobrecalentado
podría pegarse a la superficie vítrea. Un recipiente de cobre
sobrecalentado dejará un residuo que permanecerá para siempre
en la encimera.
Porcelana / Esmalte: Buen rendimiento, pero solo si tiene
una base fina, plana y lisa.
7. UTILIZACIÓN
• Una vez conectada la encimera, esperar algunos segundos
antes de activar los comandos electrónicos
- Pulse la tecla . El comando electrónico de la encimera está
activado. En cada zona de visualización puede verse el nivel de
potencia .
- Si no se hace nada en 20 segundos, el comando electrónico se
apaga y hay que volver a empezar el proceso de encendido.
32 ES
Page 33
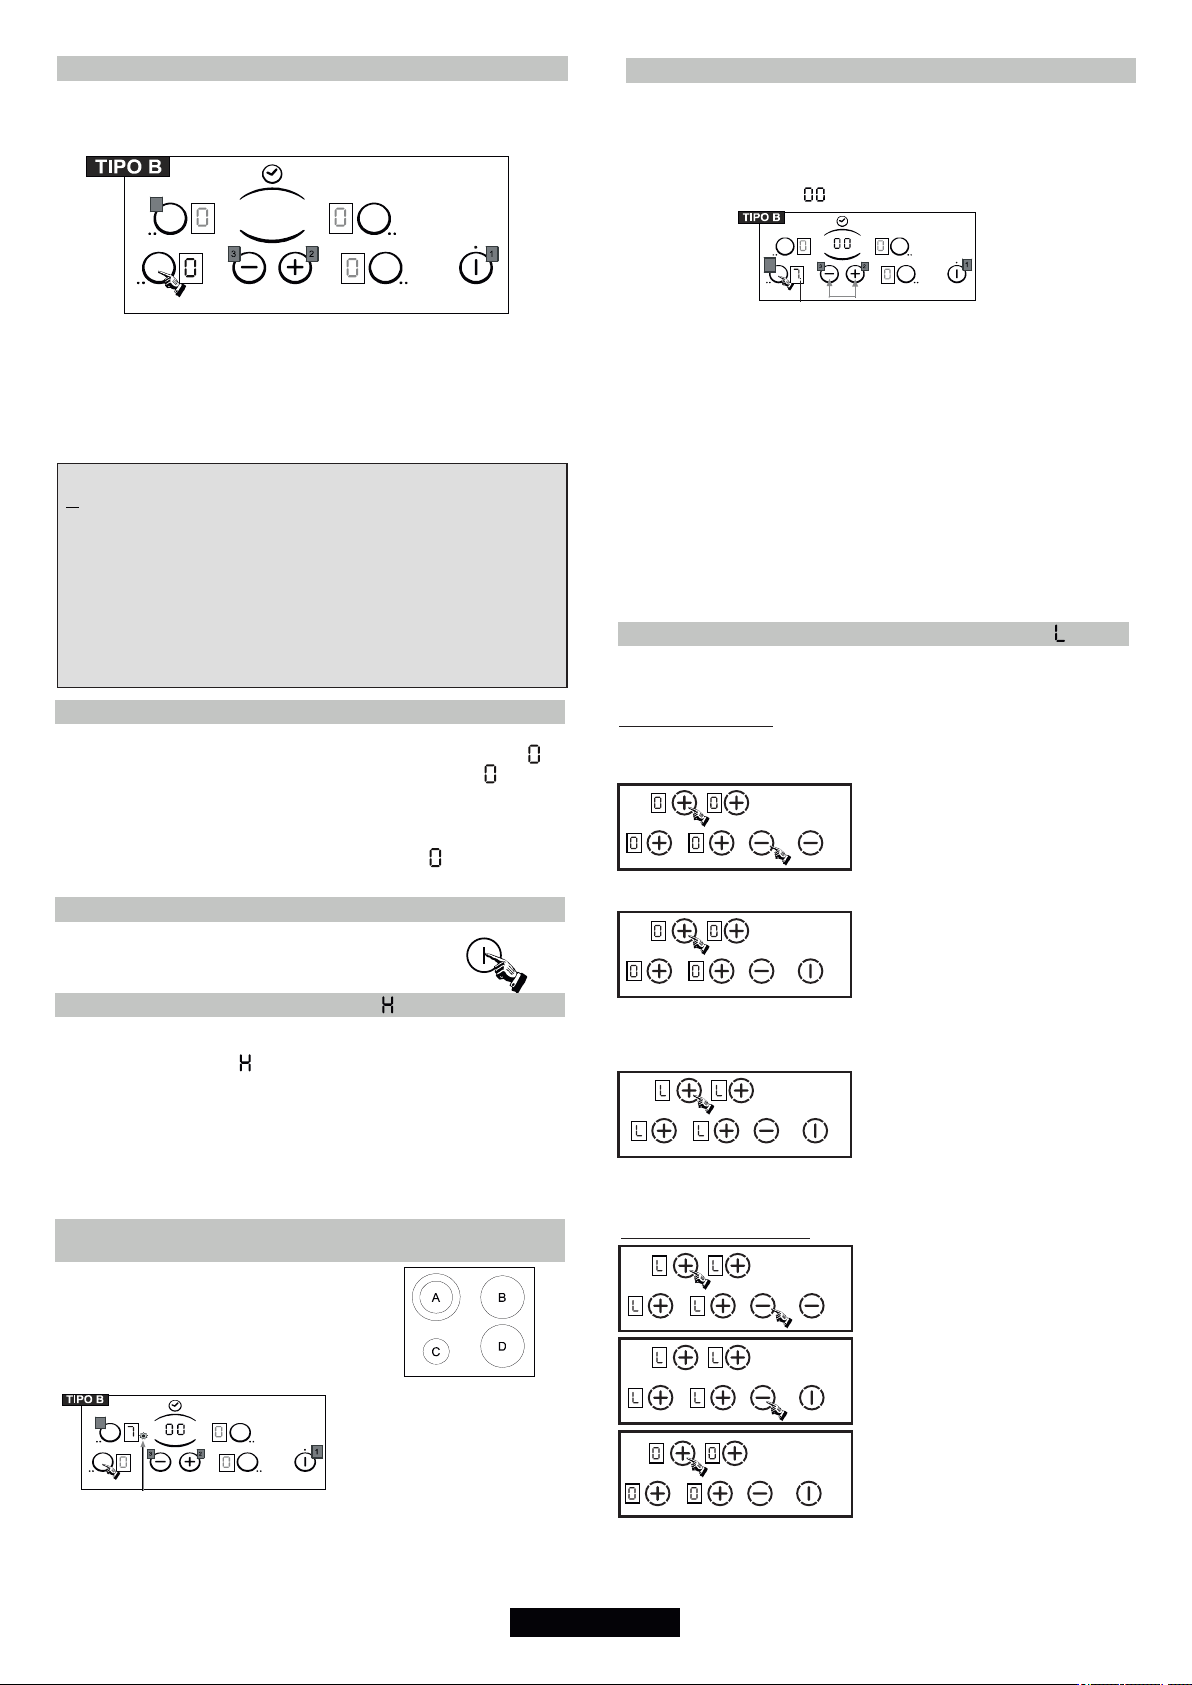
. ACTIVACIÓN DE UN QUEMADOR
- Pulse la tecla de selección del quemador deseado.
Le "0" de la zona correspondiente permanecerá iluminado
mientras que la iluminación de los otros "0" se reduce.
7
- Pulse la tecla - o + para elegir un nivel de potencia entre 1 y 9.
Si mantiene la presión sobre la tecla + o -, el nivel de potencia
aumenta o disminuye progresivamente.
Los ejemplos siguientes se dan meramente a título indicativo. Al
final, su experiencia personal le permitirá adaptar estos ajustes a
sus gustos y costumbres.
0 : Paro
U -1 : ) Disolver
2 : ) Fundir
3 : Mantener le calor
4 : Recalentamiento
5 : Descongelación, estofados, cocción en su punto,
cocción a baja temperatura
6 : Cocción sin tapadera
7 : Saltear, dorar carnes y asados
8 : Cocciones y asados a alta temperatura, soasar
9 : Fritura, ebullición de grandes cantidades de agua.......
. PARO DE UN QUEMADOR
- Pulse la tecla de selección de quemador deseado.
- Pulse la tecla - hasta que se visualice el nivel de potencia .
Instantáneamente el quemador se apaga, y la indicación
desaparece pasados 10 segundos.
Para un paro rápido, pulsar simultáneamente la tecla « - » y la tecla de
selección de la zona de cocción respectiva.
Le nivel de potencia desciende automáticamente a . El quemador se
apaga.
. PARO GENERAL
Le funcionamiento de los quemadores y del reloj
puede detenerse en cualquier momento pulsando la
tecla Encendido-Apagado.
. INDICADOR DE CALOR RESIDUAL
Le cuadro de mandos informa al usuario de que la temperatura de la
superficie de las zonas de cocción sobrepasa aproximadamente los
60°C, mostrando la letra . Cuando la temperatura baje de los 60°C,
la letra desaparecerá.
Para finalizar las cocciones, le recomendamos apague la zona de
cocción y aproveche el calor residual del quemador para acabar la
cocción suavemente.
Nota: tras un corte del suministro eléctrico, el indicador de calor
residual desaparece definitivamente, aunque la temperatura de la
superficie sobrepase los 60°C.
. PROGRAMACIÓN DE UN QUEMADOR (según el modelo)
Cada quemador es programable por un tiempo total de 99
minutos.
- Encender el quemador deseado repitiendo el proceso antes
citado.
- Pulse al mismo tiempo la tecla "-" y "+" para activar el timer,
aparece l ’indicación " ".
7
LED
- Pulse de nuevo la tecla "+" para elegir una duración en minutos
de 0 a 99 minutos, o pulsar la tecla "-" para reducir le tiempo de 30
minutos a 0. El led del reloj se activa.
--> el tiempo programado puede modificarse en cualquier
momento.
Una vez transcurrido el tiempo, el quemador se apaga
automáticamente y se oye una indicación sonora durante 1
minuto. Para detenerla, pulse cualquier tecla.
--> El reloj puede utilizarse simplemente como recordatorio: al
final del tiempo programado sonará un timbre.
. FUNCIONAMIENTO DEL BOTÓN DE BLOQUEO
La función de bloqueo impide que los niños activen accidentalmente
la placa; además, es útil durante la limpieza de la placa.
Bloqueo de la placa. (Ejemplo para una placa con 4 zonas)
Pulse el botón de encendido/apagado (ON/OFF) y luego (solo
después de esta operación se podrá activar el bloqueo para niños)
Pulse simultáneamente la tecla
"menos" y la tecla de selección
superior izquierda, hasta oír un
"bip"; si no oye el "bip", apague la
placa y repita la operación de
configuración completa.
Luego, pulse nuevamente la tecla
de selección superior izquierda.
Este procedimiento debe realizarse
en un lapso de 10 seg., y no se debe
pulsar ninguna otra tecla además
de las mencionadas
Todas las pantallas muestran una
“L” que indica LOCKED (bloqueado)
(= bloqueo para niños para impedir
la activación involuntaria) – si hay
una zona de cocción en la fase
" c al ie n te " (h o t ), a p a r ec en
alternativamente la letra “L” y la “H”.
. FUNCIONAMIENTO DE LA ZONA COMPLEMENTARIA
(DOS QUEMADORES)
Según el modelo de encimera ...................
Se activa en su totalidad cuando el quemador
se pone en funcionamiento. Se indica el piloto
del quemador complementario.
7
>
LED
Para desactivar la zona complementaria : Pulse de nuevo la tecla de
seleccción de la función complementaria. El Led correspondiente se
apaga cuando la zona está desactivada.
Para activar de nuevo la zona complementaria : Pulse la tecla de
seleccción de la función complementaria. El Led correspondiente se
enciende cuando la zona está activa.
Desbloqueo de la placa
Para desbloquear la unidad de
control, es necesario que la tecla
"menos" y la tecla de selección
superior izquierda (parte trasera
izquierda de la zona de cocción) se
pulsen simultán eamen te y, a
continuación, se pulse nuevamente
la tecla "menos".
La visualización ahora se elimina y
el control táctil vuelve
33 ES
Page 34

. FUNCIONAMENTO DEL ACELERADOR DE CALOR
Todos los quemadores de la encimera están provistos de un
acelerador de calor que permite obtener un aumento de
temperatura más rápido de las zonas de cocción:
- Pulse la tecla .
- Ponga en marcha el quemador deseado y pulsar la tecla "+"
hasta la posición 9, reducir brevemente la presión y volver a
pulsar la tecla "+" : en el visualizador se muestran alternadamente
"A" (acelerador de calor) y "9" (nivel de potencia).
- Reducir si es necesario a la posición de calor deseada : en le
visualizador se muestran alternadamente "A" (acelerador de
calor) y el nuevo nivel de potencia.
Posición
de
cocción
0
1
2
3
4
5
6
7
8
9
.Ej : Quemador de 1800 W en posición 6 = potencia liberada 32%
Potencia
liberada
(%)
: 0 %
: 2.5 % : 0 : 2 H
: 3 %
: 6 %
: 11 % :
: 16 % :
: 19 % :
: 32 % :
: 45 % :
: 65 % :
: 100 % : 0
:
:
:
Duración de
aceleración
de calor
(minutos)
0
1
3
5
6,5
8,5
2,5
3,5
4,5
:
:
:
:
:
:
:
:
:
:
Duración de
funcionamiento
máx. antes de
desconexión
automática*
0 H
6 H
6 H
5 H
5 H
4 H
1,5 H
1,5 H
1,5 H
1,5 H
de 1800 W cuando la función «Acelerador de calor» está
activada, el quemador proporciona una potencia de 1800 W
durante 2,5 minutos, y se regula hasta 576 W transcurrido este
tiempo.
* Para mayor seguridad, los quemadores se apagan
automáticamente si se dejan demasiado tiempo sin funcionar. Le
apagado depende del nivel de potencia utilizado.
Para desactivar el acelerador de calor :
- Ponga en marcha el quemador deseado, pulsar la tecla "-" para
volver de nuevo a una posición de calor normal, reducir a la
posición deseada o a la posición «0» para detener le quemador.
8. MANTENIMIENTO
• Es muy importante, antes de efectuar la limpieza de la superficie
vitrocerámica de la encimera, esperar a que ésta esté
completamente fría.
• Solo deben utilizarse los productos específicos para la limpieza
de la superficie vitrocerámica, crema y rascador. No le será
difícil encontrarlos en establecimientos de productos de limpieza.
• Evite los desbordamientos: la suciedad resultante se carboniza
rápidamente sobre el cristal y después es mucho más difícil de
limpiar.
• Recomendamos mantener alejado del plan de cocción cualquier
objeto que pueda fundirse, como objetos de plástico, azúcar o
productos con alto contenido del mismo.
MANTENIMIENTO:
- vierta algunas gotas de un producto limpiador específico para la
superficie vitrocerámica.
- frote, insistiendo en las zonas manchadas si las hubiera, con un
trapo suave o un papel de cocina ligeramente humedecido.
- enjuague, si es necesario.
- seque con un trapo suave o papel de cocina seco hasta que la
superficie quede limpia.
Si después aún persisten algunas manchas:
- vierta de nuevo algunas gotas de un producto específico.
- rasque, ayudándose de un rascador, manteniéndolo siempre en
un ángulo de 30° en relación a la encimera hasta que
desaparezcan las manchas más recalcitrantes. Enjuague, si es
necesario.
- seque con un trapo suave o papel de cocina seco hasta que la
superficie quede perfectamente limpia.
- repita el proceso si es necesario.
CONSEJOS:
La limpieza frecuente produce una película protectora esencial
para evitar las rayaduras y el desgaste.
Asegúrese de que la superficie esté limpia antes de volver a utilizar
la encimera.
Para eliminar los rastros de agua y cal, utilice algunas gotas de
vinagre blanco o zumo de limón. Enjuague y seque con papel de
cocina, y después aplique algunas gotas de un producto específico
y seque.
Le cristal vitrocerámico resiste el rozamiento con los recipientes de
cocción de fondo plano, pero es recomendable levantarlos de la
superficie para desplazarlos.
NOTA :
30° Maxi
- Evite el uso de una esponja demasiado húmeda.
- Nunca utilice un objeto de acero, como un cuchillo o un
destornillador.
- La utilización de un rascador con una hoja de afeitar no
dañará la superficie, siempre que se respete un ángulo de
30°.
- Nunca deje el rascador con la hoja de afeitar al alcance de
los niños.
- No utilice productos abrasivos ni polvos detergentes.
• El cuadro de la encimera, según el modelo:
Para limpiar el cuadro de su encimera sin dañarla, lávelo con agua
y jabón, enjuague y después seque con un trapo suave.
Cualquier cambio en el color de la superficie del
cristal vitrocerámico no afecta a su funcionamiento
o a la estabilidad de la superficie. Tales cambios, en
su mayoría, son el resultado de residuos de
alimentos quemados o el uso de utensilios de
cocina hechos de materiales tales como aluminio o
cobre; estas manchas son difíciles de eliminar.
34 ES
Page 35

9. RESOLUCIÓN DE PROBLEMAS
10. ASISTENCIA TÉCNICA
Los quemadores no mantienen las ebulliciones en
recipientes pequeños o las frituras son poco potentes.
• Utilice solo recipientes de fondo plano. Si puede verse luz entre
el recipiente y la encimera, esto significa que el quemador no
transmite correctamente el calor.
• El fondo del recipiente debe cubrir por completo el diámetro del
quemador elegido.
Cocciones demasiado lentas.
• Utilización de recipientes no adaptados. Utilice solo recipientes
de fondo plano, pesados y de un diámetro por lo menos igual al
del quemador.
Pequeñas rayaduras o arañazos en la superficie vitrocerámica de
la encimera.
• Si se utiliza un método de limpieza inadecuado, o se utilizan
recipientes de fondo rugoso, aparecerán entre la encimera y le
fondo del recipiente partículas como arenilla o sal. Consulte el
capítulo “MANTENIMIENTO”, asegúrese de que los fondos de los
recipientes están limpios antes de usarlos y utilice solo
recipientes de fondo liso. Las rayaduras pueden atenuarse
únicamente si se realiza una buena limpieza.
Marcas de metal.
• No deslice recipientes de aluminio sobre la encimera. Siga las
recomendaciones de mantenimiento.
• No utiliza materiales adecuados, y las manchas persisten.
Utilice una hoja de afeitar y siga las recomendaciones del capítulo
“MANTENIMIENTO”.
Manchas oscuras.
• Utilice una hoja de afeitar y siga las recomendaciones del
capítulo “MANTENIMIENTO”.
Zonas claras sobre la encimera.
• Se trata de marcas procedentes de recipientes de aluminio o
cobre, pero también sedimentos minerales, restos de agua o
alimentos; pueden eliminarse con crema limpiadora.
Restos de caramelización oplástico fundido sobre la
encimera.
• Siga las recomendaciones del capítulo “MANTENIMIENTO”.
La encimera no funciona.
• Los puentes derivadores no están correctamente colocados en
el cuadro de bornas. Haga comprobar la conexión para ver si está
hecha según las recomendaciones.
• Un desbordamiento considerable o un objeto cubre por lo menos
2 teclas, durante 10 segundos como mínimo. Limpie le
desbordamiento o bien retire el objeto.
• El cuadro de mandos está bloqueado. Para desbloquearlo,
pulse la tecla “Bloqueo”.
La encimera no se apaga.
• El cuadro de mandos está bloqueado. Para desbloquearlo,
pulse la tecla “Bloqueo”. Consulte el capítulo “ funcionamiento de
la tecla de bloqueo”.
La encimera se apaga automáticamente
• Un desbordamiento o un objeto cubre durante más de 10
segundos por lo menos 2 teclas, la encimera entra en modo
seguridad y se oye un bip. Limpie el desbordamiento o bien retire
el objeto.
• Los quemadores se apagan automáticamente si se dejan en
funcionamiento durante demasiado tiempo. Consulte el capítulo
“Duración de funcionamiento”.
Frecuencia de funcionamiento apagado/encendido sobre
quemadores
• Los ciclos apagado/encendido varían en función del nivel de
potencia solicitado:
- nivel bajo: tiempo de funcionamiento corto,
- nivel elevado: tiempo de funcionamiento largo.
La letra «H», que indica el calor residual, parpadea.
• La temperatura electrónica es demasiado elevada. Un técnico
debe comprobar que el empotramiento se haya hecho según las
recomendaciones.
Antes de llamar al servicio de Asistencia Técnica.
En caso de fallido funcionamiento de la encimera le aconsejamos
que:
— verifique que el enchufe esté bien introducido en la toma de
corriente;
En caso de no individuar la causa del mal funcionamiento:
apague el aparato, no lo manipule y llame al Servicio de
Asistencia Técnica.
Le aparato está dotado de un certificado de garantía que le
permite disfrutar del Servicio Asistencia Técnica.
11. PROTECCIÓN DEL MEDIOAMBIENTE
Este aparato está etiquetado conforme a la
Directiva europea 2012/19/EU sobre residuos
de aparatos eléctricos y electrónicos.
(RAEE). La RAEE contiene tanto sustancias
conta m inan t es (qu e pued e n gen e rar
consecuencias negativas para el medio
ambiente) como componentes básicos (que
pueden reutilizarse). Es importante someter los
RAEE a tratamientos específicos, con el fin de
retirar y eliminar correctamente todos los contaminantes y
reciclar todos los materiales.
Los usuarios pueden desempeñar una función importante para
garantizar que los RAEE no representen un problema
ambiental; es esencial que se sigan algunas reglas:
• Los RAEE no se deben tratar como residuos domésticos.
• Los RAEE se deben depositar en los puntos de recolección
correspondientes gestionados por la municipalidad o por
empresas registradas. En muchos países, para los RAEE de
gran tamaño, puede existir la recolección domiciliaria.
• Cuando compre un nuevo aparato, el anterior debe
devolverse al vendedor que lo debe recolectar gratuitamente
de manera individual, siempre que el equipo sea de un tipo
equivalente y que tenga las mismas funciones que el equipo
entregado
35 ES
Page 36

INSTRUÇÕES E RECOMENDAÇÕES DE SEGURANÇA
LEIA CUIDADOSAMENTE AS INSTRUÇÕES, PARA PODER TIRAR O MAIOR PARTIDO POSSÍVEL DA SUA PLACA.
O fabricante recomenda que mantenha o manual de instruções sempre à mão, seja durante a instalação da
placa, seja posteriormente, quando a estiver a utilizar, a fim de o poder consultar; antes de proceder à
instalação da placa, registe o número de série no campo previsto para esse efeito nesta página, para a
eventualidade de ter de recorrer aos serviços de assistência técnica.
. AVISO: Durante a sua utilização, tanto o aparelho, como os componentes acessíveis do mesmo ficam muito
quentes. Evite sempre tocar nos elementos de aquecimento.
. Mantenha as crianças de com menos de 8 anos afastadas do aparelho, excepto se estiverem a ser
supervisionadas por um adulto.
. Este electrodoméstico pode ser utilizado por crianças com oito anos ou mais e por pessoas com capacidades
físicas, sensoriais ou mentais diminuídas, ou que não disponham da experiência e dos conhecimentos
necessários, desde que lhes tenham sido dadas instruções sobre a utilização do aparelho por uma pessoa
responsável pela sua segurança, ou que o utilizem sob sua supervisão.
. Nunca deixe as crianças brincarem com este aparelho.
. Crianças sem supervisão não devem nem limpar, nem manter este aparelho
. AVISO: Nunca deixe a placa sem vigilância sempre que a utilizar para confeccionar alimentos com gorduras,
caso contrário corre o risco de incêndio.
. NUNCA utilize água para extinguir um incêndio; desligue o aparelho e, em seguida, abafe a chama com uma
tampa ou uma manta anti-fogo.
. AVISO: Perigo de incêndio: nunca utilize as superfícies de cozedura para arrumar objectos.
. Nunca utilize um sistema de limpeza a vapor para limpar este aparelho.
. Este aparelho nunca pode ser operado com um temporizador externo nem com qualquer outro sistema de
comando à distância.
. As zonas de cozedura com que as placas estão equipadas emitem uma luz muito forte; evite olhar fixamente
para as lâmpadas que produzem o calor.
. O sistema de desligamento tem de estar integrado na instalação fixa, de acordo com as regras aplicáveis à
instalação e ligação eléctrica.
. As instruções têm de indicar o tipo de cabo a ser utilizado, tendo em consideração a temperatura registada na
superfície traseira do aparelho.
. Se o cabo de alimentação de energia estiver danificado, e para evitar perigos, tem o mesmo de ser substituído
pelo fabricante, por um centro de assistência técnica autorizado do mesmo ou por um técnico devidamente
qualificado.
. O fabricante recomenda vivamente que, a fim de evitar queimaduras graves, as crianças sejam mantidas
afastadas das zonas de cozedura, seja enquanto.
. Nunca coloque recipientes de folha de alumínio ou de plástico sobre superfícies quentes.
. Após cada utilização, limpe a placa, se for necessário, a fim de evitar a acumulação de sujidade e de gordura.
Se a sujidade e a gorduras acumuladas não forem limpas após cada utilização, elas voltam a ser cozinhadas
quando a placa volta a ser utilizada, queimando-se e produzindo fumo e cheiros desagradáveis; além disso, se
não limpar as acumulações de sujidade e de gordura, quando voltam a ser aquecidas, elas podem incendiarse.
. Nunca cozinhe alimentos directamente sobre a superfície da placa; use sempre panelas, tachos e
recipientes apropriados.
. Centre sempre o recipiente que estiver a utilizar em relação à zona de cozedura que estiver a utilizar.
. Nunca utilize a superfície da placa como uma tábua para cortar alimentos nem como uma bancada de
trabalho.
. Nunca arraste os recipientes que estiver a usar por cima da superfície da placa. Se o fizer, a superfície poderá
ficar riscada.
. Nunca guarde objectos pesados por cima da placa, pois, se caírem, poderão danificar a placa.
. Nunca utilize a superfície da placa para nela guardar quaisquer objectos.
36 PT
Page 37

1. INSTRUÇÕES GERAIS
Os dados aqui apresentados são meramente informativos. A fim de melhorar a qualidade dos seus produtos, o fabricante
reservase o direito de modificar os seus produtos, introduzindo-lhes melhorias técnicas que satisfaçam o disposto no Código
do Consumidor.
Declaração de conformidade: Este equipamento, nas zonas destinadas a estar em contacto com alimentos, está em
conformidade com os regulamentos constantes nas directivas EEC 89/109.
Ao colocar o símbolo neste produto declaramos, sob nossa responsabilidade, a conformidade com todas as exigências
de segurança europeia, para com a saúde e os requisitos ambientais estabelecidos na legislação em relação a este produto.
2. INSTALAÇÃO
A instalação de electrodomésticos é uma operação delicada que, se não for efectuada correctamente, pode acarretar
consequências graves para a segurança dos consumidores. Por isso, trata-se de uma operação que deve ser confiada a
um profissional que a possa efectuar de acordo com as normas técnicas em vigor. Se, no entanto, apesar desta
advertência, o consumidor decidir proceder ele próprio à instalação da placa, o fabricante declina toda e qualquer
responsabilidade em caso de qualquer falha técnica do produto, quer esta falha dê ou não origem a danos materiais ou a
lesões em pessoas.
3. ENCASTRE
Tanto o móvel no qual a placa vai ser encastrada ou que vai servir
de suporte à placa, como as paredes de quaisquer móveis
adjacentes, têm de ser feitos de material resistente a
temperaturas elevadas. Além disso, o revestimento de laminado
que cobre o móvel ou o suporte deve ser colado com cola
resistente a temperaturas elevadas, a fim de impedir que se
descole.
Instalação (fig. B / D) :
- Com a placa é fornecida uma vedação. Para a instalar:
- Volte a placa de pernas para o ar, com o lado com o vidro voltado
para baixo, tendo o cuidado de proteger o vidro.
- Monte a vedação a toda a volta da placa.
- Certifique-se de que a vedação fica correctamente colocada, a
fim de prevenir qualquer penetração no móvel de suporte.
• Deixe um intervalo de, pelo menos, 5 cm entre a placa e
quaisquer superfícies verticais adjacentes.
• Sempre que, depois de instalada a placa, o fundo da caixa da
placa ficar situado perto de uma zona normalmente acessível
quando está a cozinhar e/ou utilizada para guardar recipientes,
objectos, etc., instale uma divisória a uma distância de 1 cm do
fundo da caixa da placa, a fim de evitar quaisquer riscos de
queimadura ou de deterioração.
• Em caso de instalação de um exaustor por cima da placa/fogão,
deve consultar as instruções de instalação e as distâncias
correctas indicadas.
•Se for instalado num armário, por cima do fogão, a distância
mínima a ser mantida é de 70 cm.
4. LIGAÇÃO ELÉCTRICA
A instalação eléctrica a que esta placa vai ser ligada tem de estar
em conformidade com as normas em vigor no país da instalação.
O fabricante declina toda e qualquer responsabilidade se este
requisito não for devidamente cumprido.
Atenção:
- Antes de proceder à ligação, verifique a tensão da alimentação
de energia apresentada no voltímetro, a posição do disjuntor, a
amperagem do fusível e a continuidade da ligação à terra da
instalação.
- A ligação da placa à rede tem de ser efectuada por meio de uma
tomada devidamente ligada à terra ou por meio de um disjuntor
omnipolar.
- Uma das extremidades do fio de protecção verde/amarelo tem
de ser ligada aos terminais de ligação à terra da placa, tendo a
outra extremidade do fio de ser ligada à instalação de
alimentação de energia.
- O fabricante declina toda e qualquer responsabilidade por
qualquer incidente que possa ocorrer durante a utilização de uma
placa que não esteja ligada à terra, que não esteja devidamente
ligada à terra ou que esteja ligada a uma terra cuja continuidade
da ligação à terra seja deficiente; mais se informa que o
fabricante também declina todas e quaisquer eventuais
consequências de um incidente do tipo acima referido.
-Todas as operações relacionadas com o cabo de alimentação de
energia têm de ser levadas a cabo ou pelos serviços de
assistência técnica ou por um técnico habilitado de forma
equivalente.
ATENÇÃO:
Se for necessário proceder à substituição do cabo de alimentação
de energia, ao efectuar a ligação dos fios individuais, deve
sempre certificar-se de que respeita o seguinte código de cores:
AZUL - NEUTRO (N)
CASTANHO - FASE (L)
AMARELO-VERDE - TERRA ( )
A placa está equipada com um cabo de alimentação que só
permite a ligação da placa a uma fonte de alimentação de
energia de 220-240 V entre fases ou entre a fase e o neutro.
. .Ligue o cabo de alimentação a uma tomada
Apesar de a placa ser fornecida com um cabo de alimentação,
ela também pode ser ligada a:
. Corrente trifásica 220-240 V3~
. Corrente trifásica 380-415 V2N~
Para poder realizar a ligação nova tem de seguir rigorosamente
as instruções apresentadas em seguida.
• Antes de proceder à ligação, certifique-se de que a instalação
está protegida por um fusível e com a amperagem adequados ;
certifique-se também de que a instalação dispõe de fios com
uma secção suficiente para assegurar uma alimentação normal
de energia à placa.
- Volte a placa de pernas para o ar, com o lado com o vidro
voltado para baixo, tendo o cuidado de proteger o vidro.
37 PT
Page 38

Operações a serem levadas a cabo na ligação existente:
1 2 3
- desaparafusar o parafuso do serra-cabos"1",
• Abra a tampa existente na parte de baixo da placa, descrevendo
as operações pela sequência aqui indicada:
- localize as duas patilhas localizadas dos lados "2" e "3",
- coloque a lâmina de uma chave de fendas plana em frente de
cada patilha, empurre para dentro, pressione e, por fim, remova a
tampa.
• Extraia o cabo de alimentação:
- remova os parafusos que prendem o bloco de terminais que
contém as barras de derivação e os condutores para o cabo de
alimentação,
- extraia o cabo de alimentação.
• Operações a serem levadas a cabo para efectuar uma
ligação nova:
- seleccione o cabo de alimentação de acordo com as
recomendações da tabela apresentada.
- assente o cabo de alimentação no interior do serra-cabos.
SHUNT
- monte e prenda a tampa e solte a aparafusar o serra -cabos.
- descarne a extremidade de cada
condutor do cabo de alimentação numa
extensão de 10 mm, tendo em atenção
o comprimento de cabo necessário
para efectuar a ligação ao bloco de
terminais.
- Assim, de acordo com as instruções de
instalação e com a ajuda de barras de
derivação* que deve ter recuperado na
primeira operação, fixe os condutores
da forma indicada no diagrama.
5. DESCRIÇÃO DAS PLACAS
• a zona de cozedura hilight: uma tira condutora metálica está
instalada de modo a abranger de modo uniforme toda a
superfície da zona. Fica pronta a ser utilizada passados 3
segundos da sua ligação e é apropriada para uma cozedura
constante, homogénea e sustentada.
A placa vitrocerâmica permite tirar melhor partido do elevado
nível de calor gerado pelos discos hilight, acelerando assim a
cozedura dos alimentos. As modificações estruturais mantêm
inalteradas as propriedades de resistência do vidro às
temperaturas elevadas, e incrementam significativamente o
controle da distribuição da potência dos discos. Com o principio
do "Sprinter", obtemos uma redução, do tempo necessário para a
cozedura, que pode chegar até 15%, em função do tipo de
cozedura e dos recipientes utilizados.
6. A SELECÇÃO DOS RECIPIENTES
Para obter os melhores resultados de cozedura possíveis,
deve usar sempre recipientes da melhor qualidade:
• Use recipientes de qualidade elevada, com fundos
planos: um fundo muito plano elimina os pontos de
acumulação de calor que fazem com que os alimentos se
agarrem, e a espessura do metal assegura uma distribuição
excelente do calor.
• Assegure-se sempre de que o fundo dos recipientes que
vai utilizar está seco: quando encher o recipiente ou utilizar
um recipiente acabado de retirar do frigorífico, por
exemplo, assegurese de que está seco; estará assim a evitar
que se acumule sujidade na superfície de cozedura.
• Utilize recipientes suficientemente grandes para cobrirem
completamente a fonte de calor: o melhor será utilizar
recipientes cujo fundo tenha, pelo menos, a mesma dimensão
que a zona de cozedura. Se a dimensão do fundo do recipiente
for ligeiramente maior do que a da zona de cozedura, a energia
será utilizada de forma mais eficiente.
LIGAÇÃO Á REDE
LAY OUT
“ 2 ”
3x2,5
4x1,5
4x1,5
LAY OUT
“ 1 ”
Monofásica 220-240 V~ ou Bifásica 220-240 V2~
Cabo
HO5V2V2F
Trifásica 220-240 V3~
Cabo
HO5V2V2F
Trifásica 380-415 V2N~
Cabo
HO5V2V2F
Monofásica 220-240 V~ Bifásica 220-240 V2~
Trifásica 220-240 V3~ Trifásica 380-415 V2N~
3x2,5
4x1,5
4x1,5
LAY OUT
“ 3 ”
3x2,5
4x1,5
4x1,5
As informações que se seguem vão ajudá-lo a seleccionar os
recipientes mais indicados para obter bons resultados.
Aço inoxidável: recomendado. Os mais indicados são os
recipientes com um fundo "Sandwich". O fundo "Sandwich"
combina as qualidades do aço inoxidável (aspecto, durabilidade e
estabilidade) com as vantagens do alumínio ou do cobre
(transmissão de calor e distribuição uniforme).
Alumínio: recomendamos que opte por recipientes de fundo
espesso. Boa condutividade. Aviso: Embora, por vezes, os
recipientes feitos deste material deixam resíduos na superfície da
placa, que parecem marcas, estes podem ser removidos se forem
limpos rapidamente. Nunca utilize recipientes de alumínio com
uma espessura reduzida.
Ferro fundido/cerâmica: desaconselhados. Desempenho
insuficiente. Pode riscar a superfície da placa vitrocerâmica.
Fundo de cobre: Recomendamos que opte por recipientes de
fundo espesso. Desempenho excelente, mas o cobre pode deixar
vestígios que podem ser confundidos com riscos. Estes vestígios
desaparecem se a placa for limpa rapidamente. No entanto,
nunca deixe a água evaporar-se completamente dos recipientes
que está a utilizar, pois, se o deixar, eles aquecem
excessivamente e o metal sobreaquecido pode ficar colado à
superfície da placa. Um recipiente de cobre sobreaquecido pode
deixar vestígios e riscos que nunca mais desaparecem da
superfície da placa.
Porcelana/aço esmaltado: Bom desempenho. Só recipientes
com fundo liso, que não seja espesso e que seja macio.
Ph = Fase N = Neutro T = Terra
38 PT
Page 39

7. COMO UTILIZAR A PLACA
. INDICADOR LUMINOSO DE CALOR RESIDUAL
O painel de comandos informa o utilizador sempre que a
• Depois de ligar a placa, tem de esperar alguns segundos antes
de poder activar os comandos electrónicos da placa.
- OPrima o comando . indicador luminoso de controlo fica a
piscar. Em cada um dos visores de indicação do nível de
potência é indicado o nível de potência " ".
- Sempre que não forem utilizados durante 20 segundos, os
comandos electrónicos desactivam-se automaticamente e a
operação de arranque tem de ser repetida.
. COMO ACTIVAR UMA ZONA DE COZEDURA
temperatura da superfície das zonas de cozedura for superior a
60°C, apresentando a seguinte indicação: " ".
Quando quiser terminar a cozedura, o melhor será desligar a
zona de cozedura e utilizar o calor residual para ajudar a
cozedura a terminar suavemente.
Quando a temperatura da superfície da zona de cozedura atinge
um valor inferior a 60°C, a indicação " " deixa de ser apresentada.
Nota: Sempre que haja uma falha de corrente, o indicador de
calor residual não é apresentado, mesmo que a temperatura da
superfície da zona de cozedura seja superior a 60°C.
- Prima a tecla de selecção correspondente à zona de cozedura
pretendida.
O "0" da zona correspondente mantém-se ligado e iluminado
quando a luz dos outros "0" é reduzida.
. COMO UTILIZAR A ZONA DE COZEDURA ADICIONAL
(DUAS ZONAS)
Determinados modelos dispõem de
uma zona de cozedura constituída ...................
por duas áreas de aquecimento.
7
>
- Prima uma das teclas "+" ou "-" para seleccionar um nível de
potência entre 1 e 9. Mantenha a tecla "+" ou "-" premida, para
aumentar ou diminuir gradualmente o nível de potência.
Os exemplos que passamos a apresentar em seguida são
meramente informativos. À medida que for adquirindo maior
experiência, poderá adaptar estas regulações ao seu gosto e
aos seus hábitos pessoais.
0 : Desligada
U -1: Disolver
2 : Temperatura ideal para derreter manteiga, etc.
3 : Temperatura ideal para manter os alimentos quentes
4 : Temperatura ideal para aquecer alimentos.
5 : Temperatura ideal para descongelar alimentos, para os
guisar, para os cozinhar completamente, para
confeccionar pratos a
temperatura reduzida.
6 : Temperatura ideal para cozinhar alimentos em recipientes
sem tampa
7 : Temperatura ideal para fritar, dourar e assar peças de
carne.
8 : Temperatura ideal para a confecção de pratos que
exigem temperaturas
elevadas, para assar, para grelhar.
9 : Temp. ideal para fritar alimentos e para ferver grandes
quantidades de água, etc.water.......
. COMO DESACTIVAR UMA ZONA DE COZEDURA
- Se não for esse o caso, volte a activar a zona pretendida.
- Prima a tecla "-" para ser apresentada a indicação
correspondente ao nível de potência " ". A zona de cozedura é
desactivada e, depois de passados 10 segundos, a indicação
de potência " " deixa de ser visível.
- Para desactivar rapidamente uma zona de cozedura, prima
simultaneamente as teclas "-" e a zona pretendida. É
automaticamente apresentada a indicação do nível de potência
" ". A zona de cozedura fica desactivada.
. COMO DESLIGAR A PLACA
Tanto as zon as de cozedura com o o
temporizador podem ser desligados em qualquer
momento, para o que só tem de premir o
comando de ligar/desligar.
Esta zona de cozedura fica totalmente activa quando a zona de
cozedura está a ser utilizada; o indicador luminoso de controlo da
zona de cozedura adicional está aceso.
7
LED
Para desactivar a zona de cozedura adicional:
- Volte a activar a zona pretendida. O Led luminoso de controlo
correspondente apaga-se quando essa zona de cozedura
adicional é desactivada.
Para voltar a activar a zona de cozedura adicional:
- Prima o comando da zona de cozedura adicional . O Led
luminoso de controlo da zona de cozedura adicional acende-se.
. COMO PROGRAMAR UMA ZONA DE COZEDURA (de acordo
com modelo)
Cada zona de cozedura pode ser programada para um máximo
de 99 minutos.
- Prima o comando da zona pretendida.
- Prima simultaneamente as teclas "+" e "-" para activar o
temporizador, " " é apresentado.
7
LED
- Volte a premir a tecla de comando para seleccionar um "+"
tempo em minutos, de 0 a 99 minutos, ou prima o comando "-"
para diminuir o tempo entre 30 e 0 minutos. O Led de controlo da
temporizador está aceso.
--> O tempo programado pode ser modificado em qualquer
momento.
Uma vez decorrido o tempo regulado com o temporizador, a zona
de cozedura desliga-se automaticamente, sendo emitido um
sinal sonoro durante 1 minuto. Prima a tecla de comando do
temporizador para calar este sinal sonoro.
--> O temporizador pode ser utilizado apenas como uma
lembrança, tocando depois de decorrido o tempo previamente
programado.
39 PT
Page 40

FUNCIONAMENTO DO BOTÃO DE BLOQUEIO
A função de bloqueio previne a ativação acidental da placa por
crianças, e também é útil durante a limpeza da mesma.
Para bloquear a placa. (Exemplo para placa com 4 bicos)
Pressione o botão ON/OFF e de seguida (apenas após esta
operação o bloqueio para crianças poderá ser ativado)
Pressione simultaneamente a
tecla “menos” e a tecla de seleção
superior esquerda, até ouvir um
“bip”; se não ouvir o “bip”,
DESLIGUE a placa e repita a
operação de configuração.
D e s e gu i d a , p r e s s i o ne
novamente a tecla de seleção
superior esquerda.
E s t e p r o c e d i m e n t o d e
funcionamento deve ocorrer em
10 seg., e nenhuma outra tecla
deve ser pressionada para além da descrita acima; caso
contrário, a operação será cancelada por não ter sido
completada.
Todos os mostradores exibem um
“L” de BLOQUEADO (=bloqueio
contra a activação involuntária
por crianças) – se um bico para
cozinhar estiver na fase “quente
(hot), o “L”e o “H” irão aparecer
alternadamente.
Desbloquear a placa
Para desbloquear a unidade de
controlo, é necessário que a tecla
“menos” e a tecla de seleção
superior esquerda (bico posterior
esquerdo para cozinhar) sejam
pressionadas simultaneamente e
que, de seguida, seja pressionada
novamente a tecla “menos”.
O bloqueio está agora desativado
e o Controlo Tátil volta
. OPERAÇÃO DO DISPOSITIVO DE AQUECIMENTO RÁPIDO
Cada uma das zonas de cozedura da placa está equipada com um
dispositivo de aquecimento rápido, para aumentar mais depressa a
temperatura da zona de cozedura.
Como ligar o dispositivo de aquecimento rápido
- Prima a tecla de ligar/desligar .
- Seleccione a zona de cozedura pretendida, active-a, prima a tecla
"+" para seleccionar o nível de potência "9", liberte brevemente a
tecla "+" e, em seguida, volte a premir esta tecla; as indicações
apresentadas alternam rapidamente entre "A", dispositivo de
aquecimento rápido, e "9", nível de potência.
- Se necessário reduza o nível de potência seleccionado; nesse caso
as indicações apresentadas alternam rapidamente entre "A",
dispositivo de aquecimento rápido, e a indicação do nível de potência
seleccionado.
Tempo de ligação do
dispositivo de
aquecimento
rápido (minutos)
:
0
:
1
:
3
:
5
:
:
:
:
:
6,5
8,5
2,5
3,5
4,5
Tempo de operação
máximo até ao
desligamento
:
:
:
:
:
:
:
:
:
:
As
diferentes
posições
0
1
2
3
4
5
6
7
8
9
Potência
libertada
(%)
:
0 %
: 2.5 % : 0 : 2 H
:
3 %
:
6 %
:
11 %
:
16 %
:
19 %
:
32 %
:
45 %
:
65 %
:
100 % : 0
Por exemplo, zona de 1800 W regulada para o nível de potência 6: a
potência libertada equivale a 32% da potência máxima de 1800 W.
Quando a função "Dispositivo de aquecimento rápido" está activada,
a zona de cozedura liberta uma potência de 1800W durante 2,5
minutos e, em seguida, regula uma potência de 576W.
*Para maior segurança, as zonas de cozedura são automaticamente
desactivadas se permanecerem ligadas durante demasiado tempo.
O momento em que cada zona de cozedura é desactivada depende
do nível de potência seleccionado.
Para desactivar o dispositivo de aquecimento rápido : Ligue a zona
de cozedura, prima a tecla "-" para voltar para um nível de potência
normal, reduza o nível de potência para a potência pretendida (ou
mesmo para "0", se quiser desactivar a zona de cozedura).
8. LIMPEZA DA PLACA VITROCERÂMICA
• Antes de limpar a placa vitrocerâmica, espere sempre que a sua
superfície arrefeça completamente.
• Utilize exclusivamente produtos específicos para a limpeza de
placas vitrocerâmicas, como, por exemplo, creme de limpeza e
raspador. Poderá adquirir estes produtos com toda a facilidade no
mercado.
• Evite derrames; a sujidade que cai na superfície da placa queima
muito depressa, sendo depois mais difícil de limpar.
• Mantenha sempre afastado da superfície de cozedura da placa
qualquer objecto, material ou substância passível de derreter, como,
por exemplo, artigos de plástico, açúcar ou produtos com
um teor elevado de açúcar.
LIMPEZA:
- Deite algumas gotas do produto específico para limpeza de placas
vitrocerâmicas sobre a superfície da placa.
- Utilizando um pano ou um papel de cozinha ligeiramente húmido,
esfregue a superfície da placa, insistindo em pontos com eventuais
manchas.
- Limpe com um pano macio ou com um papel de cozinha seco, até a
superfície da placa ficar limpa
Se, depois de limpar a sua placa da forma habitual, ela continuar a
apresentar manchas:
- Deite mais algumas gotas do produto específico para limpeza de
placas vitrocerâmicas sobre a superfície da placa.
- Utilize um raspador, mantendo-o num ângulo de 30° em relação
à superfície da placa, para eliminar as manchas mais difíceis.
- Limpe com um pano macio ou com um papel de cozinha seco, até a
superfície da placa ficar limpa.
Se for necessário, repita as operações descritas acima.
CONSELHOS: A limpeza regular da superfície da placa deixa uma
camada protectora que é essencial para prevenir riscos e desgaste.
Antes de cada utilização da placa, certifique-se sempre que a sua
superfície está limpa. Para remover eventuais resíduos de água e
eventuais incrustações, deite algumas gotas de vinagre branco ou de
sumo de limão nas zonas da superfície da placa afectadas. Limpe
com papel absorvente e, em seguida, deite algumas gotas do produto
40 PT
automático*
0 H
6 H
6 H
5 H
5 H
4 H
1,5 H
1,5 H
1,5 H
1,5 H
Page 41

específico para a limpeza de placas vitrocerâmicas e esfregue.
Apesar de as placas vitrocerâmicas estarem aptas a suportar o
contacto dos recipientes de cozinha de fundo plano, é sempre
recomendável evitar arrastá-los sobre a superfície da placa.
NOTA :
30° Maxi
- Evite usar uma esponja com demasiada água.
- Nunca utilize uma ferramenta de aço, como, por exemplo, uma
faca ou uma chave de fendas.
- Um raspador com uma lâmina não danifica a superfície desde que
seja utilizado de modo a formar um ângulo de 30º com ela.
- Nunca deixe um raspador com lâmina ao alcance das crianças.
- Nunca use produtos de limpeza abrasivos nem produtos para
arear utensílios.
• A moldura da placa:
Para limpar a moldura da placa, sem correr o risco de a danificar,
lave-a com água e sabão, enxagúe-a e, em seguida, seque-a com um
pano macio.
Qualq uer muda nça na cor da superf ície
vitrocerâmica não afecta o seu funcionamento ou a
estabilidade da superfície. Estas descolorações
são, principalmente, resultado de resíduos de
comida queimada ou a utilização de tachos ou afins
de alumínio e cobre. Estas manchas são difíceis de
remover.
9. DETECÇÃO E RESOLUÇÃO DE
PROBLEMAS
As zonas de cozedura não fervem em fogo lento ou limitamse a
fritar ligeiramente os alimentos.
• Use exclusivamente recipientes que tenham fundo plano. Se a luz
for visível entre o recipiente e a placa, a zona de cozedura não está a
transmitir correctamente o calor.
• O fundo do recipiente deve cobrir totalmente o diâmetro da zona de
cozedura seleccionada.
A cozedura faz-se com demasiada lentidão.
• Estão a ser utilizados recipientes que não são adequados. Use
exclusivamente recipientes de fundo plano, que sejam pesados e
cujo diâmetro seja, pelo menos, correspondente ao diâmetro da zona
de cozedura.
minerais, de água ou de alimentos; pode remover essas marcas com
um produto de limpeza específico em creme.
Presença de resíduos caramelizados ou de plástico na
superfície
• Consulte o capítulo "LIMPEZA DA PLACA VITROCERÂMICA".
A placa não funciona ou determinadas zonas de cozedura não
funcionam.
• As derivações não estão correctamente posicionados na placa de
terminais. Mande verificar se as ligações estão de acordo com as
instruções.
• Um derrame ou um objecto grande está a cobrir ou cobriu duas
teclas durante, pelo menos, 10 segundos. Limpe o derrame ou
remova o objecto.
• O painel de comandos está bloqueado. Desbloqueie a placa.
A placa não se desliga.
• O painel de comandos está bloqueado. Desbloqueie a placa.
A placa desliga-se automaticamente.
• Um derrame está a cobrir ou cobriu duas teclas durante mais de,
pelo menos, 10 segundos; a placa assume o modo de segurança,
sendo emitido um sinal sonoro. Limpe o derrame ou remova o
objecto.
• As zonas de cozedura desligam-se automaticamente se forem
deixadas ligadas durante demasiado tempo. Consulte o ponto
"Tempo de operação".
Frequência das operações de ligar/desligar das zonas de
cozedura.
• Os ciclos de ligar/desligar variam em função do nível de potência
necessário:
- nível de potência baixo: tempo de operação reduzido,
- nível de potência elevado: tempo de operação prolongado.
O indicador luminoso de calor residual "H" está a piscar.
• A temperatura registada nos componentes electrónicos é
demasiado elevada. A instalação da placa tem de ser verificada por
um técnico devidamente qualificado, a fim de confirmar que satisfaz
as instruções.
10. ASSISTÊNCIA TÉCNICA
Antes de telefonar para a assistência técnica
Se o forno não estiver a trabalhar, recomendamos que:
- verifique se a placa está devidamente ligado à corrente (ficha
correctamente introduzida na tomada).
Se lhe for impossível detectar a causa da avaria:
desligue a placa da corrente, não o tente reparar e ligue para os
serviços de assistência técnica.
Antes de ligar para os serviços de assistência técnica, porém, tome
nota do número de série, constante da respectiva placa de
características.
Presença de riscos pequenos ou de abrasões na superfície
vitrocerâmica da placa.
• A placa não tem estado a ser limpa da forma correcta ou têm estado
a ser utilizados recipientes cujo fundo não é plano; ocorre uma
acumulação de partículas, como, por exemplo, de grãos de sal ou de
areia, entre a placa e o fundo do recipiente. Consulte o capítulo
"LIMPEZA DA PLACA VITROCERÂMICA" deste manual; certifiquese sempre de que os fundos dos recipientes utilizados estejam limpos
antes de os utilizar e utilize sempre só recipientes de fundo plano. Os
riscos só podem ser atenuados se a placa for limpa da forma correcta.
Marcas de metal.
• Não arraste quaisquer recipientes de alumínio sobre a superfície da
placa. Consulte as recomendações relativas à limpeza da placa
vitrocerâmica.
• Está a utilizar os materiais correctos, mas as manchas persistem.
Utilize uma lâmina e siga as instruções indicadas no capítulo
"LIMPEZA DA PLACA VITROCERÂMICA".
Manchas escuras.
• Utilize uma lâmina e siga as instruções indicadas no capítulo
"LIMPEZA DA PLACA VITROCERÂMICA".
Superfícies mais claras na placa.
• Essas superfícies são marcas deixadas por recipientes de alumínio
ou de cobre, podendo igualmente ter sido deixadas por depósitos de
11. PROTECÇÃO DO MEIO AMBIENTE
Este aparelho está classificado de acordo com a
Diretiva Europeia 2012/19/UE relativa aos
Res í d u o s de Equ i p a m e n t o s Elétricos e
Eletrónicos (REEE). Os REEE incluem
substâncias poluentes (que podem provocar
consequências negativas no meio ambiente) e
componentes básico (que podem ser reutilizados).
É importante que os REEE sejam submetido a
tratamentos específicos, a fim de
remover e eliminar corretamente todos os
poluentes e recuperar e reciclar todos os materiais.
Os cidadãos individualmente podem desempenhar um papel
importante no sentido de garantir que os REEE não se tornam num
problema ambiental; é essencial seguir algumas regras básicas:
• Os REEE não devem ser tratados como lixo doméstico.
• Os REEE deverão ser entregues nos pontos de recolha relevantes
geridos pelo município ou por empresas registadas. Em muitos
países, no caso de grande REEE, poderão existir serviços de
recolha ao domicílio.
• quando compra um novo aparelho, o antigo pode ser devolvido ao
comerciante que terá a obrigação de o transportar gratuitamente
numa base de um-para-um, desde que o equipamento seja de tipo
equivalente e tenha as mesmas funções que o equipamento
fornecido
41 PT
Page 42

VŠEOBECNÁ UPOZORNĚNÍ
PŘEČTĚTE SI POZORNĚ TYTO POKYNY PRO MAXIMÁLNÍ VYUŽITÍ VAŠÍ VARNÉ DESKY.
Doporučujeme, abyste si návod k obsluze uschovali pro případné použití v budoucnosti a před instalací
desky si poznačte výrobní číslo níže pro případ, že budete potřebovat pozáruční servis.
. UPOZORNĚNÍ: Spotřebič a jeho přístupné části se během použití zahřívají. Nedotýkejte se topných
prvků.
. Děti do 8 let držte mimo dosah spotřebiče, pokud nejsou neustále pod dohledem.
. Tento spotřebič smí používat děti starší 8 let a osoby se sníženými fyzickými, senzorickými nebo
mentálními schopnostmi nebo bez dostatečných zkušeností, pokud jsou pod dohledem a byly poučeny
o použití spotřebiče a možném riziku.
. Nedovolte dětem hrát si se spotřebičem.
. Čištění a údržbu nesmí provádět děti bez dohledu.
. UPOZORNĚNÍ: Vaření na desce s tuky a oleji bez dohledu je nebezpečné a může způsobit požár.
. NIKDY se nepokoušejte uhasit plamen vodou, vypněte spotřebič a poté překryjte plamen pokličkou
nebo protipožární přikrývkou.
. UPOZORNĚNÍ: Riziko požáru: neskladujte žádné předměty na varné desce.
. UPOZORNĚNÍ: Pokud je povrch varné desky prasklý, spotřebič vypněte, abyste zabránili riziku
zasažení elektrickým proudem.
. K čištění nepoužívejte vysokotlaké parní čističe
. Spotřebič nesmíte ovládat pomocí externího časovače nebo samostatného dálkového ovládání.
. Nedoporučujeme se vystavovat přímo halogenovým paprskům.
. Odpojovací zařízení musí být včleněno do napájení v souladu s platnými předpisy.
. Pokyny uvádějí typ kabelu, s ohledem na teplotu zadní strany spotřebiče.
. Pokud je poškozený přívodní kabel, musí jej vyměnit výrobce, servisní technik nebo podobně
kvalifikovaná osoba, aby se zabránilo možnému nebezpečí.
. Důrazně doporučujeme udržovat děti mimo varných zón během provozu i po vypnutí, protože dokud
svítí indikátor zbytkového tepla, je deska ještě horká a může to způsobit vážné popálení.
. Neumísťujte hliníkové a plastové fólie na ohřívací zóny.
. Po každém použití je potřebné určité čištění pro ochranu před nahromaděním nečistot a mastnoty.
Pokud to tak necháte, tato se při dalším vaření spaluje a produkuje dým a zápachy, a zvyšuje riziko
vznícení.
. Nedotýkejte se ohřevných zón během provozu nebo chvíli po použití.
. Nikdy nevařte jídlo přímo na sklené keramické desce. Použijte vždy příslušné nádoby.
. Vždy umístěte nádobí do středu oblasti, na které vaříte.
. Nepoužívejte povrch jako krájecí desku.
. Nepřesouvejte varné nádoby přes ovládací panel.
. Neukládejte těžké předměty nad desku. Pokud by spadly na desku, mohou ji poškodit.
. Nepoužívejte desku jako pracovní podklad.
. Nepoužívejte desku na skladování žádných předmětů.
42 CZ
Page 43

1. PROHLÁŠENÍ O SHODĚ
Instalace domácích spotřebičů může být složitá operace, která, pokud není provedena správně, může vážně ohrozit
bezpečnost uživatele. Z tohoto důvodu požádejte kvalifikovaného technika pro provedení instalace v souladu s platnými
technickými předpisy. V případě nesprávné instalace spotřebiče výrobce nenese žádnou odpovědnost za technické vady
výrobku ani za případná zranění.
Tento spotřebič přicházející do kontaktu s potravinami vyhovuje předpisům směrnice EEC 89/109.
Umístěním značky na produkt deklarujeme na vlastní zodpovědnost shodu se všemi požadavky EU týkajícími se
bezpečnosti, zdraví a životního prostředí, které jsou zakotveny v legislativě a týkají se daného produktu.
2. INSTALACE
Instalace domácích spotřebičů může být složitá operace, která,
pokud není provedena správně, může vážně ohrozit bezpečnost
uživatele. Z tohoto důvodu požádejte kvalifikovaného technika
pro provedení instalace v souladu s platnými technickými
předpisy. V případě nesprávné instalace spotřebiče výrobce
nenese žádnou odpovědnost za technické vady výrobku ani za
případná zranění.
3. VESTAVĚNÍ
Nábytek, do kterého bude vestavěná deska a okolní nábytek,
musí být vyroben z materiálů, které jsou odolné vůči vysokým
teplotám. Je také nutné, aby všechny dekorativní lamináty byly
lepené tepelně odolným lepidlem.
Instalace (obr. B/D):
• S deskou je dodáváno izolační těsnění.
Před usazením:
- otočte desku naopak, skleněným povrchem směrem dolů.
Ujistěte se, že sklo je chráněno.
- napasujte těsnění kolem desky.
- ujistěte se, že je správně nasazené, abyste zabránili přetečení
tekutin do podpěrné skříňky.
• Ponechte otvor nejméně 5 cm mezi deskou a jakýmkoliv okolním
vertikálním povrchem.
• Pokud, při instalaci desky, spodní povrch desky sousedí s částí
standardně přístupnou při čištění, vložte 1 cm příčku pod dno
desky, abyste zabránili riziku popálení nebo poškození.
POZOR:
V případě výměny kabelu připojte vodiče v souladu s
následujícími barevnými kódy:
MODRÝ - NEUTRÁLNÍ (N)
HNĚDÝ - ŽIVÝ (L)
ŽLUTOZELENÝ - UZEMNĚNÍ ( )
Deska je vybavená přívodním kabelem, který umožňuje připojení
k napájení 220-240 V mezi fáze nebo mezi fázi a neutrální.
• Připojte k zásuvce.
Je možné připojit troubu k:
• Tři fáze 220-240 V3~
• Tři fáze 380-415 V2N~
Pro nové připojení musíte dodržovat následující pokyny.
- Před připojením se ujistěte, zda je instalace chráněna vhodnou
pojistkou, a vodiče jsou mají postačující průřez pro správné
napájení spotřebiče.
- Otočte desku, sklem na pracovní desku, chraňte přitom sklo.
• Otevřete kryt v následujícím pořadí:
1 2 3
• V případě instalace nad varnou desku viz pokyny k instalaci s
ohledem na správnou vzdálenost.
• V případě instalace do skříňky nad varnou desku musí být
minimální vzdálenost 70cm.
4. PŘIPOJENÍ K ELEKTRICKÉ SÍTI
„Instalace musí vyhovovat předpisům".
Výrobce nenese žádnou odpovědnost za poškození způsobená
nesprávnou obsluhou.
Upozornění: neneseme odpovědnost za poškození nebo
následky vyplývající z použití neuzemněného spotřebiče,
nebo připojeného k uzemnění, které je poškozené.
• Vždy zkontrolujte před jakýmkoliv elektrickým zásahem, napětí
na elektroměru, nastavení přerušovače obvodu, spojitost
propojení k uzemnění a vhodnost pojistky.
• Elektrické připojení by mělo být provedeno přes zásuvku s
konektorem s uzemněním, nebo přes vícepólový vypínač s
otvorem mezi kontakty nejméně 3 mm.
Pokud je deska vybavena síťovou zástrčkou, musí být instalována
tak, ab byla síťová zástrčka dostupná.
• Žlutozelený vodič kabelu napájení musí být připojen k uzemnění
konektoru napájení a zařízení.
• Jakékoliv požadavky týkající se síťového kabelu je nutné
předkládat servisnímu středisku nebo kvalifikovanému
technikovi.
• odšroubujte svorku kabelu „1",
• uchopte dva kabely po stranách,
• vsuňte čepel plochého šroubováku před každou pojistku „2"
a „3", zatlačte a stlačte,
• sundejte kryt.
Uvolnění přívodního the terminal block which contains
the shunt bars and the cokabelu.
• odšroubujte šrouby na bloku konektorů, které obsahují
propojovací pásky a vodiče napájecího kabelu,
• Vytáhněte napájecí kabel.
• Postup pro nové připojení:
- Zvolte přívodní kabel v souladu s doporučením v tabulce.
- Přetáhněte přívodní kabel přes svorku.
- Odizolujte konec každého vodiče v
délce 10 mm s ohledem na potřebnou
délku kabelu pro připojení ke
konektorům.
- Podle instalace a pomocí
propojovacích pásků získaných z
prvního kroku upevněte vodiče podle
tabulky.
- Připevněte kryt.
- Zašroubujte svorku kabelu.
MŮSTKY
Poznámka: zajistěte, aby připojovací šrouby byly utažené
pevně.
43 CZ
Page 44

Připojení konektorů
Rozmístění 1Rozmístění 2Rozmístění
Jednofáze nebo dvě fáze 220-240V~
KABEL
HO5V2V2F
Tři fáze 220-240V3~
KABEL
HO5V2V2F
Tři fáze 380-415V2N~
KABEL
HO5V2V2F
Jednofáze 220-240V~ Dvě fáze 220-240V~
Tři fáze 220-240V3~ Tři fáze 380-415V2N~
3
3x2,5 3x2,5 3x2,5
4x1,5 4x1,5 4x1,5
4x1,5 4x1,5 4x1,5
VOLBA NÁDOBÍ - Následující informace vám pomůže při výběru
nádobí, které nabízí spolehlivý provoz.
Nerezová ocel: doporučujeme. Zejména dobré s vrstveným
dnem. Vrstvené dno kombinuje výhody nerezavějící oceli (vzhled,
stálost a stabilitu) s výhodami hliníku nebo médi (vedení tepla,
stejnoměrná distribuce tepla).
Hliník: doporučujeme těžké. Dobrá vodivost. Zbytky hliníku se
někdy objevují jako škrábance na desce, ale je možné je ihned
odstranit čištěním. Z důvodu nízkého bodu tavení nepoužívejte
tenký hliník.
Slitina: použitelné, ale nedoporučujeme. Špatná účinnost.
Mohou poškrábat povrch.
Měděné dno/kamenina: doporučujeme těžké. Dobrá účinnost,
ale měď může zanechat zbytky, které se mohou jevit jako
škrábance. Zbytky je možné odstranit okamžitým čištěním desky.
Avšak, nenechávejte tyto nádoby vřít nasucho. Přehřátý kov se
může přilepit ke skleněnému povrchu. Přehřátá měď může
zanechat zbytky, které natrvalo zůstanou na desce.
Porcelán/smalt: Dobrá účinnost pouze u nádobí s tenkým,
hladkým, plochým dnem.
Sklokeramika: nedoporučujeme. Špatná účinnost. Mohou
poškrábat povrch desky.
Ph = fáze N = neutrální T = uzemnění
.
5
POPIS SPOTŘEBIČE
• hilight zóna:
kovový vodivý pásek je rozprostřen stejnoměrně po celém
povrchu spotřebiče. Je efektivní do 3 sekund a je vhodný pro
stálé, homogenní a udržované vaření.
Sklokeramické desky těží z většího výstupu tepla, které je tvořeno
hilight varnými zónami urychlujícími proces vaření. Změny
designu trouby nemají vliv na kapacitu odolnosti skla vůči teplu,
ale mají vylepšenou ovladatelnost. S vybavením „Sprinter »
můžete dosáhnou zkrácení času přípravy až o 15%, v závislosti
od způsobu vaření a typu použitého nádobí.
6. DOPORUČENÍ K NÁVODÍ
Použití kvalitního nádobí je důležité pro dosažení
nejlepších výsledků.
• Vždy používejte kvalitní nádobí s perfektně plochým a
silným dnem: použitím tohoto typu nádobí zabrání horkým
bodům, které způsobují připáleniny. Silné kovové nádobí
poskytují dokonalou distribuci tepla.
• Zajistěte, aby bylo dno nádobí suché: když plníte nádobu
tekutinou vyjmutou z chladničky, zajistěte, aby bylo dno úplně
suché, před umístěním na desku. Tím zabráníte skvrnám na
varné desce.
• Použijte nádobí, kterého průměr je dostatečně široký na
celý povrch jednotky: velikost nádobí by neměla být menší
než ohřívací oblast. Pokud je mírně širší, energie bude použitá
s maximální účinností.
7. POUŽITÍ
• Po zapnutí varné desky počkejte několik sekund do aktivace
elektronických ovladačů.
- Stiskněte tlačítko . LED je aktivní.
Elektronické ovládání trouby se aktivuje. V každé zóně displeje
je zobrazena úroveň tepla a bliká kontrolní LED.
- Po 20 sekundách nečinnosti se elektronické ovladače vypnou a
musíte opakovat postup zapnutí.
. Aktivace varné zóny
- Stiskněte tlačítko požadované varné zóny.
„0“ odpovídající zóny zůstane svítit, když kontrolka ostatních „0“
sníží jas.
TYP B
7
- Stisknutím tlačítek - nebo + zvolte úroveň teploty mezi 1 a 9.
Podržením tlačítek + nebo - se teplota snižuje nebo zvyšuje
rychleji.
Následující příklady jsou pouze pro informaci. Osobní
zkušenosti vám poté pomůžou přizpůsobit tato nastavení
podle vaší chuti a návyků.
0 : Vypnutá
U -1 : rozpouštění
2 : ) ..... Rozpouštění
3 : Udržování tepla
4 : Ohřev
5 : Rozmražení, dušení, plné vaření, vaření s nízkou teplotou
6 : Vaření bez pokličky
7 : Smažení, opékání masa a pečení
8 : Vaření a pečení s vysokou teplotou
9 : Smažení, vaření velkého množství vody .......
44 CZ
Page 45

. Vypnutí varné zóny
- Stiskněte tlačítko volby požadované varné zóny.
- Tlačítkem - zobrazte úroveň tepla . Nyní se zóna vypne,
kontrolka zhasne po 10 sekundách.
- K rychlému zastavení stiskněte najednou tlačítka - a tlačítko
požadované varné zóny. Úroveň tepla se automaticky sníží
na . Varná zóna se vypne.
. Celkové vypnutí
Varné zóny a časovač můžete okamžitě vypnout
stisknutím tlačítka zapnutí-vypnutí.
. Kontrolka zbytkového tepla
Ovládací panel informuje uživatele, když teplota povrchu varných
zón přesahuje 60°C, následujícím zobrazením:
Když teplota klesne pod 60°C, zobrazení zhasne.
K dokončení vaření doporučujeme vypnout varnou zónu a
jemně dokončit vaření pomocí zbytkového tepla.
Poznámka: Po přerušení proudu zmizí kontrolka zbytkového
tepla, i když povrch přesahuje 60°C.
. Ovládání přídavných varných zón
(dvě zóny) - (podle modelu)
Varná zóna s dvěma zónami -------------->
• FUNKCE POJISTNÉHO TLAČÍTKA
Pojistka brání náhodné aktivaci varné desky dětmi a je také
užitečná při čištění varné desky.
Uzamknutí varné desky (Příklad varné desky se 4 zónami)
Stiskněte vypínač a poté (pouze po následujících akcích bude
dětská pojistka aktivována)
Současně stiskněte tlačítko
mínus a levé horní tlačítko výběru.
Přidržte tlačítka stlačená, dokud
neuslyšíte pípnutí. Pokud pípnutí
neuslyšíte, vypněte varnou desku
a opakujte proces nastavení.
Poté znovu stiskněte levé horní
tlačítko výběru.
Tento postup musíte provést do
10 s a nesmí být při tom stisknuté
žádné jiné tlačítko, než je
uvedeno výše; jinak dojde ke
zrušení nedokončeného zadání.
Na v še c h k o n tr o lk á c h j e
zobrazeno písmeno „L“ (= dětská
pojistka proti náhodné aktivaci) –
pokud je zóna horká, bude se
střídat zobrazení písmen „L“ a „H“.
Je plně funkční když je varná zóna v provozu; je zobrazena
kontrolní led přídavné zóny.
TYP B
7
LED
K Deaktivaci přídavné varné zóny:
- Stiskněte tlačítko opět přídavné zóny. Příslušná led kontrolka
přídavné zóny zhasne po deaktivaci.
K opětovné aktivaci přídavné varné zóny:
- Stiskněte tlačítko přídavné zóny. LED je opět aktivní.
. Programování varné zóny (podle modelu)
Každou varnou můžete naprogramovat maximálně na 99 minut.
- Zapněte varnou zónu podle předchozích pokynů.
- Stiskněte společně najednou tlačítka - a +, " " se zobrazí .
TYP B
7
Odemknutí varné desky
Chc ete -li od e mk n ou ř íd icí
jednotku, musíte současně
stisknout tlačítko mínus a levé
horní tlačítko výběru (varná zóna
vzadu vlevo) a následně znovu
stisknout tlačítko mínus.
Varná deska je nyní odemčena a
dotykové ovládání se vrátí do
pohotovostního režimu.
Led Programování
- Opětovným stisknutím + tlačítka zvolte čas v minutách mezi 0 a
99 minutami nebo stiskn ě te tlačítko „-“ k snížení času mezi 30
minutami a 0. LED je aktivní.
--> Naprogramovaného času můžete upravit kdykoliv.
Po uplynutí času se varná zóna automaticky vypne a 1 minutu zní
zvuková signalizace, stisknutím tlačítko jej deaktivujete.
--> čas můžete použít i jako připomínku, bude znít na konci
naprogramovaného času.
45 CZ
Page 46

. Použití rychloohřevu
Každá zóna je vybavena rychloohřevem pro rychlé zvýšení
teploty varné zóny:
Aktivace rychloohřevu
- Stiskněte tlačítko zapnutí/vypnutí .
- Zapněte požadovanou zónu, stisknutím tlačítka „+" nastavte
pozici „9", uvolněte krátce tlačítko a opět stiskněte „+"; displej
střídavě zobrazuje „A" „rychlo ohřev" a „9" úroveň teploty.
- Pokud je to nutné, snižte na požadovanou teplotu, displej
střídavě ukazuje „A" „rychloohřev" a nové nastavení teploty.
Nastave
ná
pozice
0
1
2
3
4
5
6
7
8
9
:
:
:
Čas rychlo-
ohřevu
(minuty)
0
1
3
5
6,5
8,5
2,5
3,5
4,5
Uvolněný
výkon
(%)
:
0 %
: 2.5 % : 0 : 2 H
:
:
:
:
:
:
:
:
:
3 %
6 %
11 % :
16 % :
19 % :
32 % :
45 % :
65 % :
100 % : 0
Maximál-ní doba
provozu
před auto
vypnutím*
:
0 H
:
6 H
:
6 H
:
5 H
:
5 H
:
4 H
:
1,5 H
:
1,5 H
:
1,5 H
:
1,5 H
8. ČIŠTĚNÍ A ÚDRŽBA
• Před provedením jakékoli údržby nechejte varnou desku
ochladit.
• Používejte pouze speciální výrobky určené pro čištění
keramických povrchů (krémy, škrabky), všechny tyto výrobky
jsou běžně dostupné na trhu.
• Vyhýbejte se přetečení, nečistoty, které protečou na varný
povrch, se rychle spálí a pak se velmi obtížně odstraňují.
• Doporučujeme udržovat v dostatečné vzdálenosti od desky
všechny materiály, které se snadno taví, jako jsou plastové
obaly, cukr, nebo produkty na bázi cukru.
Údržba:
- Kápněte několik kapek speciálního čistícího prostředku na
povrch desky.
- Odstraňte hrubé nečistoty pomocí jemné tkaniny, nebo
navlhčené kuchyňské papírové utěrky.
- Utřete jemnou tkaninou nebo kuchyňskou utěrkou, dokud není
povrch čistý.
V případě odolných skvrn:
- Nakapejte více kapek speciálního čistícího roztoku na povrch.
- Odstraňte pomocí škrabky, držením v úhlu 30° od desky, dokud
obtížné stopy nezmizí.
- Utřete jemnou tkaninou nebo kuchyňskou utěrkou, dokud není
povrch čistý.
- Opakujte postup v případě potřeby.
.Př. 1800 W zóna v pozici 6 = 32% z 1800 W uvolněného výkonu.
Pokud je „Rychloohřev" aktivován, zóna nabízí 1800 W výkonu 2.5
minuty a poté se nastaví na 576 W.
* Z důvodu bezpečnosti se varná zóna automaticky vypne, pokud
nezměníte nic dlouhou dobu. Vypnutí závisí od použité úrovně teploty.
Deaktivace rychloohřevu
- Zapněte varnou zónu, stisknutím tlačítka „-" nastavte standardní
úroveň teploty, snižte teplotu nebo nastavte na „0".
NĚKOLIK RAD:
Pravidelné čištění zanechává ochranou vrstvu, která zabraňuje
před poškrábáním a opotřebením. Ujistěte se, zda je povrch čistý
před dalším použitím desky. Pro odstranění stop vody, použijte
několik kapek bílého octa nebo citrónovou šťávu. Pak utřete
savým papírem a použijte několik kapek speciálního čistícího
roztoku.
Sklokeramický povrch snáší tření varného nádobí s plochým
dnem, ale přesto doporučujeme, abyste ho raději místo
přesouvání po povrchu zvedli.
30° Maxi
Nepožívejte houbu s velkým množstvím vody.
Nikdy nepoužívejte nůž nebo šroubovák. Škrabka s ostrou
čepelí nepoškodí povrch, pokud ji držíte v úhlu 30°.
Nikdy nenechávejte škrabku v dosahu dětí. Nikdy
nepoužívejte drsné prostředky nebo brusné prášky.
• Kovový lem: k bezpečnému čištění kovového lemu jej omyjte
saponátem a vodou, opláchněte a důkladně osušte jemným
hadříkem.
46 CZ
Jakákoliv změna barvy sklokeramického povrchu
neovlivňuje jeho provoz nebo stabilitu povrchu.
Toto zbarvení je většinou důsledkem připálenin
zbytků pokrmů nebo použití nádobí z materiálu jako
je hliník nebo měď; tyto skvrny se obtížně
odstraňují.
Page 47
9. PROBLÉMY A ŘEŠENÍ
Varné zóny nevaří, nebo pouze jemně.
• Používejte pouze nádobí s rovným dnem. Pokud je viditelné
světlo mezi nádobím a deskou, zóna nepřenáší teplo správně.
• Dno nádobí musí zcela zakrývat plochu zvolené varné zóny.
Vaření je pomalé.
• Nevhodné nádobí. Použijte pouze nádobí s rovným dnem,
které je těžké a má stejný průměr jako varná zóna.
Drobné škrábance na skleném povrchu
desky.
• Nesprávný způsob čištění, nádobí s drsným dnem nebo drsné
části (písek nebo sůl) mezi nádobím a povrchem desky. Viz
část „Čištění"; ujistěte se, zda je dno nádobí čisté před
použitím a používejte pouze nádobí s rovným dnem.
Škrábance je možné odstranit pouze správným čištěním.
Kovové skvrny.
• Nepřesouvejte hliníkové nádobí po povrchu. Používejte
doporučené postupy čištění na odstranění skvrn.
• Použili jste správné prostředky ale skvrny zůstávají. Použijte
škrabku a přečtĚte si část „Čištění".
Tmavé skvrny.
• Použijte škrabku a přečtěte si část „Čištění".
Lesklé oblasti na varném povrchu.
• Skvrny z hliníkového a měděného nádobí, jako i zbytky z vody
nebo jídla odstraníte čistícím krémem.
Skvrny od cukru/plast roztavený na povrchu.
• Viz část „Čištění".
Varná deska nebo některé zóny nefungují.
• Propojovací pásy na připojovacím konektoru nejsou správně
nasazené. Zkontrolujte propojení, zda je v souladu s pokyny.
• Desky s dotekovými ovladači: velké skvrny nebo předměty
překrývají nejméně dvě tlačítka 10 sekund. Odstraňte skvrny
nebo odstraňte předmět.
• Ovládací panel je uzamčen. Odemkněte desku.
10. SERVIS
Dříve než budete kontaktovar servisní středisko,
zkontrolujte následující:
— Zda je zástrčka správně připojená;
Pokud závadu nelze odstranit:
vyněte spotřebič — nedemontujte jej — kontaktujte autorizované
servisní středisko.
Seznam servisních míst je uveden na www.candy-hoover.cz
11. INFORMACE PRO UŽIVATELE K LIKVIDACI
ELEKTRICKÝCH A ELEKTRONICKÝCH
ZAŘÍZENÍ (DOMÁCNOSTI)
Tento spotřebič je označen v souladu s evropskou
směrnicí 2012/19/EU o odpadu z elektrického a
elektronického zařízení (WEEE). WEEE
obsahuje jak škodlivé látky (které mohou vyvolat
nepříznivý dopad na životní prostředí), tak i
suroviny (které lze použít opakovaně). Je nutno
používat speciální zacházení vzhledem k WEEE,
aby se všechny nečistoty likvidovaly správně a bylo možno
recyklovat všechny materiály.
Jednotlivci mohou hrát významnou úlohu při zajišťování toho,
aby se z WEEE nestal ekologický problém; je nezbytné
dodržovat některá základní pravidla:
• WEEE nelikvidujte jako běžný domovní odpad.
• WEEE předávejte na příslušná sběrná místa řízená městskými
úřady nebo registrovanými společnostmi. V řadě zemí může být
používán systém domácího odběru velkých WEEE.
• Když kupujete nový spotřebič, můžete starý vrátit prodejci,
který jej musí zdarma odebrat na principu kus za kus, pokud jde
o zařízení odpovídajícího typu, které má stejné funkce jako
dodávané zařízení
Varná deska nefunguje.
• Ovládací panel je uzamčen. Odemkněte desku.
Varná deska se zastaví automaticky.
• Skvrna pokrývá nejméně dvě tlačítka na déle než 10 sekund;
deska se vypnula z důvodu bezpečnosti a zvukový signál zní,
dokud jsou tlačítka zakrytá. Vyčistěte skvrnu nebo odstraňte
předmět.
• Varné zóny se zastaví automaticky, pokud je necháte zapnuté
příliš dlouho.
Časté zapnutí/vypnutí varních zón.
• Cykly zapnutí/vypnutí jsou různé v závislosti od požadované
úrovně tepla:
- nízká úroveň: krátký provozní čas,
- vysoká úroveň: dlouhý provozní čas.
Zobrazení „H", indikátor zbytkového tepla,
blikají
• Teplota elektroniky je příliš vysoká. Kvalifikovaný servisní
technik musí zkontrolovat připojení.
47 CZ
Page 48

SPLOŠNI VARNOSTNI NAPOTKI
PROSIMO, DA POZORNO PREBERETE TA NAVODILA, DA SE SEZNANITE Z LASTNOSTMI VAŠE NOVE
KUHALNE PLOŠČE.
Priporočamo, da to knjižico shranite, saj jo boste najbrž še potrebovali. Pred vgradnjo kuhalne plošče si
v to knjižico zabeležite tudi serijsko številko, saj jo boste potrebovali, če se kdaj obrnete na pooblaščeni
servis.
. OPOZORILO: Aparat in njegovi dostopni deli se med uporabo segrejejo. Pazite, da se ne dotaknete
grelcev!
. Otroci, mlajši od 8 let, naj se aparatu ne približujejo nenadzorovani.
. Otroci, starejši od 8 let, ter osebe z zmanjšanimi fizičnimi, zaznavnimi ali umskimi sposobnostmi ali
pomanjkljivimi izkušnjami ter znanjem lahko uporabljajo aparat le pod nadzorom oseb, ki so odgovorne
za njihovo varnost, in ki so jih seznanili z varno uporabo aparata ter le v primeru, da razumejo tveganje,
ki je s tem povezano.
. Otroci se ne smejo igrati z aparatom.
. Otroci lahko sodelujejo pri čiščenju in vzdrževalnih delih le pod nadzorom odraslih.
. OPOZORILO: Pri segrevanju maščobe ali olja se ne oddaljujte od aparata, saj se te snovi zlahka
vnamejo in povzročijo požar.
. NIKOLI ne gasite ognja z vodo, ampak izklopite aparat in nato pokrijte plamen - npr. s pokrovko ali
primerno nevnetljivo krpo ali odejo.
. OPOZORILO: Nevarnost vžiga! Na kuhalno površino ne odlagajte nikakršnih predmetov.
. OPOZORILO: Če je površina razpokana, takoj izklopite aparat, da se izognete tveganju za električni
udar!
. Pri čiščenju ne uporabljajte aparatov za čiščenje s paro.
. Aparat ni namenjen priključitvi na zunanjo programsko uro ali poseben sistem za daljinsko
upravljanje.
. Nikoli ne usmerjajte pogleda direktno v halogenske grelce.
. Pri fiksni priključitvi mora biti zagotovljena možnost izklopa iz električnega omrežja skladno z
veljavnimi predpisi.
. V navodilih je navedena ustrezna vrsta priključnega kabla, saj je potrebno upoštevati temperaturo na
hrbtni strani aparata.
. Če je priključni električni kabel poškodovan, ga je mora zamenjati ustrezno usposobljen strokovnjak
pooblaščenega servisa ali druga strokovna oseba, da se izognete tveganju.
. Kuhališča se med uporabo zelo segrejejo in ostanejo vroča še nekaj časa po delovanju, na kar vas
opozarja indikator preostanka toplote. V tem času pazite, da se otroci ne bi preveč približali in se opekli
na vročih površinah.
- Na vročo površino kuhalne plošče ne odlagajte alu-folije ali plastičnih posod.
- Po vsaki uporabi očistite steklokeramično površino, saj bi se maščoba in druga nečistoča pri naslednji
uporabi lahko začele žgati, kar bi povzročilo neprijeten vonj in dim, lahko bi se pa tudi vžgala, kar bi
pomenilo tveganje za požar.
. Ne dotikajte se vroče steklokeramične površine med uporabo in še nekaj časa po uporabi, dokler je
vroča.
. Nikoli ne kuhajte direktno na steklokeramični površini; vedno uporabljajte lonce in kozice.
. Posodo vedno postavite na sredino kuhališča.
. Kuhalne plošče ne uporabljajte kot odlagalno ali delovno površino.
.Pri premikanju posod teh ne potiskajte po kuhalni plošči, ampak posodo dvignite, da ne bi opraskali
steklokeramične površine.
. Kuhalna plošča ni odlagalna površina; na njo ne odlagajte in ne shranjujte nikakršnih predmetov.
48 SL
Page 49

1. SPLOŠNI NAPOTKI
Stalno težimo k izboljšanju kakovosti naših izdelkov in vanje vgrajujemo najsodobnejše izboljšave, zato si pridržujemo
pravico do sprememb podatkov brez vnaprejšnjega opozorila.
Deli aparata, ki prihajajo v stik z živili, so izdelani skladno z določili, navedenimi v direktivi 89/106.
Z oznako na tem proizvodu izjavljamo, na lastno odgovornost, da je proizvod skladen z vsemi evropskimi zahtevami
o varnosti, zdravju in varstvu okolja, ki se v zakonodaji nanašajo na ta izdelek.
2. NAMESTITEV IN PRIKLJUČITEV
Vgradnja in priključitev električnih gospodinjskih
aparatov je zahtevno opravilo, ki mora biti opravljeno
brezhibno in skladno z veljavnimi predpisi. Nepravilna
vgradnja in priključitev pomeni veliko tveganje za
upor abn ika . Zato ta dela prep ust ite z a to
usposobljenim strokovnjakom, ki bodo pri vgradnji
upoštevali vse veljavne predpise. Če pa se odločite,
da boste ta dela opravili sami, upoštevajte, da v
primeru nestrokovne vgradnje in priključitve aparata
proizvajalec ne prevzema odgovornosti za tehnično
okvaro aparata, tudi če ta povzroči poškodbe oseb ali
premoženja.
3. VGRADNJA
Kuhinjska omarica ali kuhinjski pult, v katerega bo kuhalna plošča
vgrajena, ter poleg stoječe pohištvo morajo biti iz na visoko
temperaturo odpornih materialov. Tudi laminat na površini
kuhinjske omarice ali kuhinjskega pulta mora biti na podlago
prilepljen z na visoko temperaturo odpornim lepilom, da ne bi
odstopil.
Vgradnja (sl. B /D):
Kuhalni plošči je priloženo tesnilo.
Pred vgradnjo:
- kuhalno ploščo obrnite s steklo keramično površino navzdol;
pazite, da se ne poškoduje!
- Položite tesnilo okoli kuhalne plošče.
- Prepričajte se, da je pravilno nameščeno, tako da bo
onemogočalo prodiranje različnih snovi pod kuhalno ploščo.
• Zelena/rumena žica mora biti priključena na ozemljitveni
terminal aparata na eni strani in na ustrezen vod na drugi strani.
• Morebitna vprašanja o ustreznosti priključnega električnega
• Morebitna vprašanja o ustreznosti
kabla naslovite na pooblaščeni servis.
POZOR:
Če je treba zamenjati priključni električni kabel, priključite žice
skladno s spodnjimi barvnimi oznakami/kodami:
MODRA NULA (N)
RJAVA FAZA (L)
RUMENA-ZELENA ZEMLJA ( )
Kuhalna plošča je opremljena s priključnim električnim kablom,
ki omogoča priključitev samo na električno omrežje z
napetostjo 220-240 V med fazami ali med fazo in nulo.
. Priključite na električno omrežje
Kuhalno ploščo pa lahko priključite tudi na:
Trofazno omrežje 220-230 V3~
Trofazno omrežje 380-415 V2N~
Pri priključevanju upoštevajte spodnja navodila!
- Najprej se prepričajte, da je omrežje ustrezno zavarovano z
varovalko in da ožičenje omogoča ustrezno napajanje aparata.
- Obrnite kuhalno ploščo z zgornjo stranjo navzdol; pazite, da ne
poškodujete steklokeramike!
Snemite pokrovček, kot je to prikazano na slikah.
1 2 3
• Kuhalna plošča mora biti od morebiti poleg stoječih omaric ali
oddaljena vsaj 5 cm.
• Če je s spodnje strani kuhalne plošče možen dostop, vgradite
pregradno ploščo 1 cm pod dnom kuhalne plošče, da preprečite
tveganje za opekline ali škodo.
• Ob vgradnji nape nad kuhališčem je potrebno upoštevate
navodila za vgradnjo ter morebitne lokalne predpise za
odaljenost nape od kuhališča.
• Če je napa vgrajena v omarico mora biti minimalna odaljenost
med napo in kuhališčem 70 cm.
4. PRIKLJUČITEV NA ELEKTRIČNO OMREŽJE
Priključitev mora biti izvedena skladno z vsemi veljavnimi
predpisi.
Proizvajalec ne prevzema nikakršne odgovornosti v primeru
škode ali poškodb zaradi neupoštevanja teh navodil!
Opozoril:
Proizvajalec ne prevzema odgovornosti za morebitne
okvare ali posledice teh, povzročene zaradi uporabe brez
ozemljitve ali nepravilno ozemljenega aparata.
Pred priključitvijo kuhalne plošče na električno omrežje
preverite priključno napetost, prekinjalo, moč varovalke in
ozemljitev. Kuhalna plošča mora biti priključena na električno
omrežje preko vtičnice za ozemljeni vtikač ali preko večpolnega
prekinjala.
Če je priključena na vtičnico, mora biti vtičnica dostopna, tako da
jo je v vsakem trenutku možno izklopiti iz električnega omrežja.
• Odvijte vijake, s katerimi je pritrjena sponka »1«.
• Ob straneh boste opazili dva jezička.
• Ob jeziček »2« in »3« potisnite ploski izvijač ter potisnite
jezička navznoter.
Snemite pokrovček.
Odklapljanje priključnega električnega kabla
• Odvijte vijake, ki pridržujejo priključno ploščico z mostički ter
vodniki priključnega električnega kabla.
• Izvlecite kabel.
Priključitev novega kabla
- Izberite ustrezen kabel skladno s priporočili v razpredelnici.
- Potisnite kabel skozi sponko.
- Odstranite zaščitne ovoje na koncu vodov (10 mm) in jih
priključite na terminale skladno s podatki v razpredelnici v
nadaljevanju; odmerite ustrezno
dolžino.
- Ustrezno povežite vode; možnih je več
načinov priključitve. Skladno z navodili
in s pomočjo prej odstranjenih
premostitvenih elementov povežite
vode, kot je to prikazano v
razpredelnici.
- Privijte pokrovček nazaj.
- Privijte sponko kabla.
Opomba: Pazite, da so vijaki priključne
ploščice dobro zategnjeni!
49 SL
PREMOSTITVENI
ELEMENT
Page 50

Priključitev na terminale na priključni ploščici
RAZPORED RAZPORED RAZPORED
“ 1 ”
Enofazno 220-230 V~ ali Dvofazno 220-230 V2~
“ 2 ”
Kabel
HO5V2V2F
Trofazno 220-230 V3~
Kabel
HO5V2V2F
Trofazno 380-415 V2N~
Kabel
HO5V2V2F
Enofazno 220-230 V~
Trofazno 220-230 V3~
Dvofazno 220-230 V2~
Trofazno 380-415 V2N~
“ 3 ”
3x2,5 3x2,5 3x2,5
4x1,5 4x1,5 4x1,5
4x1,5 4x1,5 4x1,5
KAKO IZBRATI USTREZNO POSODO V nadaljevanju boste
našli pomembne podatke, ki vam bodo olajšali izbiro posode za
najboljšo učinkovitost.
Nerjaveče jeklo: Zelo priporočamo! Zelo primerna je
posoda z večplastnim dnom, ki združuje kakovost nerjavečega
jekla (lep videz, dolgotrajnost in stabilnost) s prednostmi
aluminija ali bakra (prevodnost in enakomerna razporeditev
toplote).
Aluminij: Zelo priporočamo! posodo z debelim dnom; dobra
prevodnost. Opozorilo: V določenih primerih aluminij pušča sledi
na kuhalni plošči; te se da odstraniti s takojšnjim čiščenjem.
Ne uporabljajte posod iz tankega aluminija, saj ima nizko tališče!
Lito železo: Primerno, a ne priporočamo. Slaba učinkovitost!
Lahko opraska steklokeramično površino!
Baker: Priporočamo težko posodo z debelim dnom. Učinkovitost
je odlična, vendar pa lahko baker pusti na steklokeramični
površini sledi podobne praskam. Te je mogoče odstraniti, če jih
očistite takoj. Paziti morate, da na kuhalni plošči ne segrevate
prazne posode; pregret baker bi na steklokeramiki pustil
madeže, ki jih ni mogoče odstraniti.
Porcelan/emajl: Primerna je samo posoda s tankim, ravnim,
gladkim dnom.
Stekokeramika: Odsvetujemo. Slaba učinkovitost. Lahko
opraska steklokeramično površino.
Pf = faza, N = nula, T = zemlja
5. OPIS KUHALNE PLOŠČE
Kuhališče hilight:
• kovinski vodnik je enakomerno razporejen pod celo
površino kuhalnega mesta. Učinkovit je že 3 sekunde po vklopu
kuhališča in je primeren za enakomerno, homogeno
segrevanje ter tudi za dolgotrajno kuhanje.
Steklokeramična kuhalna plošča izrablja večji output toplote, ki
ga oddajajo kuhališča hilight, kar pomeni hitrejše kuhanje.
Tovrstne spremembe pa na odpornost steklokeramične površine
na visoke temperature ne vplivajo, le nadzor segrevanja je
izboljšan. »Sprinter« skrajša trajanje kuhanja za do 15%,
odvisno od uporabljenega načina kuhanja in vrste posode.
6. USTREZNA POSODA
Le kakovostna posoda zagotavlja dobre rezultate.
• Uporabljajte le kakovostno posodo z ravnim in debelim
dnom: tako se bo dno enakomerno segrelo, kar bo preprečilo, da
bi se na določenih delih jed prijemala na dno posode; debelo dno
zagotavlja tudi odlično in enakomerno razporejanje toplote.
• Dno posode naj bo vedno suho: ko vlivate tekočino v posodo
ali če na kuhalno ploščo postavite posodo direktno iz hladilnika,
po potrebi posodo na zunanji strani obrišite. Tako se bo kuhalna
plošča manj umazala.
• Uporabljajte dovolj velike posode, ki bodo prekrile celo
kuhališče. Posoda mora biti vsaj takega premera kot je premer
kuhališča; najboljši izkoristek dosežete, če je dno posode
kuhališča; najboljši izkoris nekoliko večje od kuhališča.
7.
UPORABA
Po vklopu kuhalne plošče počakajte nekaj sekund, šele
nato aktivirajte elektronske tipke.
- Pritisnite na tipko za vklop/izklop vklopite kuhalno ploščo.
Lučka LED je osvetljena.
S tem aktivirate elektronsko upravljanje. V prikazovalnikih za vsa
kuhalna mesta se osvetli stopnja , kontrolne lučke utripajo
- Če 20 sekund ne uporabite kuhalne plošče, se spet samodejno
ugasne in postopek vklopa morate ponoviti.
. VKLOP KUHALNEGA MESTA
- Pritisnite na tipko za ustrezno kuhalno mesto.
"0" za ustrezno kuhališče ostane osvetljena, medtem ko se
intenzivnost osvetlitve "0" za druga kuhališča zmanjša.
7
- S pomočjo tipk »+« ali »-« izberite ustrezno stopnjo med 1 in 9
(če pritisnete na tipko »+« ali »-«, se stopnja postopno viša oz.
Niža).
V spodnji razpredelnici so navedeni primeri uporabe
posameznih stopenj moči. Prav kmalu boste znali sami
izbrati ustrezno stopnjo.
0 : Izklopljeno
U -1 : Taljenje
2 : ) … Taljenje masla, čokolade
3 : Ohranjanje toplote
4 : Segrevanje
5 : Taljenje, dušenje, kuhanje pri nizki temperaturi…
6 : Kuhanje brez pokrovk
7 : Cvrenje, pečenje mesa ipd.
8 : Intenzivnejše kuhanje in pečenje …
9 : Zrezki, zarebrnice, cvrenje, segrevanje večje količine
vode
50 SL
Page 51

. IZKLOP KUHALNEGA MESTA
- Pritisnite na tipko za izbiranje kuhalnega mesta.
- S pritiskom na tipko »-« izberite stopnjo . Kuhalno mesto se
izklopi, na prikazovalniku čez 10 sekund ugasne.
- Če želite še hitreje izklopiti kuhalno mesto, istočasno pritisnite
na tipko »-« in »pripadajoča tipka«; na prikazovalniku se takoj
prikaže stopnja in kuhalno mesto se izklopi.
. IZKLOP KUHALNE PLOŠČE
Kuhalna mesta in programsko uro lahko v
vsakem trenutku izklopite s pomočjo tipke za
vklop/izklop kuhalne plošče.
. INDIKATOR PREOSTALE TOPLOTE
Če temperatura kuhalnih površin presega 60°C, vas na to opozori
osvetljen indikator preostale toplote " ".
Priporočamo, da kuhališče izklopite nekoliko pred koncem
kuhanja in s tem izrabite preostalo toploto, da se jed do konca
skuha. Ko se temperatura kuhalnih površin spusti pod 60°C,
indikator preostale toplote " " ugasne.
Opomba: Če za kratek čas zmanjka električne energije, indikator
preostale toplote ugasne in se nato, ko je kuhalna plošča spet pod
napetostjo, ne osvetli več - tudi če je temperatura še visoka.
Bodite previdni!
. UPORABA KUHALNIH MEST Z RAZŠIRITVENIMI VEZJI (2)
Nekateri modeli so opremljeni z
razširitvenim vezjem. .............................
>
. DELOVANJE GUMBA ZA ZAKLEPANJE
Funkcija zaklepanja ščiti otroke pred nenamernim vklopom
kuhalne plošče, uporabna pa je tudi med čiščenjem slednje.
Zaklepanje kuhalne plošče (Primer kuhalne plošče s 4
kuhališči)
Pritisnite gumb za vklop oziroma izklop ON/OFF, zatem pa gumb
(šele ko ste to izvedli, lahko vključite varovalo za otroke).
Sočasno pritisnite tipko minus in
izbirno tipko levo zgoraj ter ju
zadržite pritisnjeni, dokler ne
zaslišite piska; če ne zaslišite
piska, izključite kuhalno ploščo in
pon ovi te c el otn i po st o pe k
nastavitve.
Zatem znova pritisnite izbirno
tipko zgoraj levo.
Ta postopek morate izvesti v 10
sekundah, pri tem pa ne smete
pritisniti nobene druge tipke,
razen tistih, ki so opisane zgoraj,
sicer se vnos prekliče in postopka ni mogoče zaključiti.
Na vseh zaslonih se prikaže črka
“ L ” , k i p o m e n i
L O C K E D / Z A K L E N J E N O
(=zaklepanje za zaščito otrok
pred nen a mernim v k l opom
kuhalne plošče) – če je kuhalna
plošča vroča “hot, se na zaslonu izmenično prikazujeta črki “L” in
“H”.
Če je vklopljeno tudi zunanje vezje, je osvetljena
ustrezna kontrolna lučka .
B
7
LED
Če želite izklopiti zunanje vezje,
- Pritisnite na tipko. Ustrezna kontrolna lučka ugasne.
Če želite ponovno vklopiti zunanje vezje,
- Pritisnite na tipko. Ustrezna kontrolna lučka se osvetli.
. PROGRAMIRANJE KUHALIŠČ (odvisno od modela)
Vsako kuhališče omogoča programiranje delovanja za čas do 99
minut.
- Vklopite izbrano kuhališče, kot je to že opisano.
- Programsko uro aktivirate tako, da se istočasno dotaknete tipal
"-" in "+". Prikaže se vrednost "00".
7
LED
- "+".Pritisnite na tipko
Oznaka za kuhališče ob prikazovalniku programske ure opozarja,
katero kuhališče ste izbrali. S pomočjo tipke programske ure
vnesite čas v minutah med 0 in 99, ali pa30 in 0 min. Lučka LED je
osvetljena
Odklepanje kuhalne plošče
Če želite kuhalno ploščo odkleniti,
sočasno pritisnite tipko minus in
izbirno tipko zgoraj levo (zadnje
levo kuhališče), zatem pa znova
pritisnite tipko minus.
Kuhalno ploščo tako odklenete in
upravljanje na dotik se vrne v
stanje pripravljenosti.
--> .V vsakem trenutku lahko programirani čas spremenite
Ko preteče nastavljeni čas, se kuhališče samodejno izklopi, ob
tem pa se 1 minuto oglaša zvočni signal. Pritisnite na tipko Zvočni
signal izklopite s.
--> Programsko uro pa lahko uporabljate tudi neodvisno
odkuhališč, kot običajno kuhinjsko uro, npr. za kuhanje jajc. Ko
preteče nastavljeni čas, se oglasi zvočni signal.
51 SL
Page 52

. FUNKCIJA HITREGA SEGREVANJA
(segrevanje z ojačano močjo)
Vklop hitrega segrevanja
Pritisnite na tipko za vklop/izklop.
• Vklopite izbrano kuhališče, pritisnete na tipko »+«, da se prikaže
stopnja "9", nato pa na kratko sprostite pritisk na tipko »+« in jo
nato znova pritisnite. Na prikazovalniku se izmenično kažeta črka
"A" (hitro segrevanje) in "9" (nastavljena stopnja moči).
• Če je potrebno, stopnjo moči prilagodite: na prikazovalniku se
izmenično kažeta nova nastavljena stopnja in črka »A«.
Stopnja Moč v
0
1
2
3
4
5
6
7
8
9
%
:
0 %
: 2.5 % : 0 : 2 H
:
3 %
:
6 %
:
11 % :
:
16 % :
:
19 % :
:
32 % :
:
45 % :
:
65 % :
:
100 % : 0
Trajanje hitrega
segrevanja
(min)
:
0
:
1
:
3
5
6,5
8,5
2,5
3,5
4,5
Najdaljši čas
delovanja
pred
samodejnim
izklopom*
:
0 H
:
6 H
:
6 H
:
5 H
:
5 H
:
4 H
:
1,5 H
:
1,5 H
:
1,5 H
:
1,5 H
8. VZDRŽEVANJE IN ČIŠČENJE
. Pomembno je, da pred čiščenjem počakate, da se kuhalna
plošča povsem ohladi.
. Uporabljajte samo namenske proizvode za čiščenje
steklokeramičnih površin in namensko strgalo. Ti proizvodi
so na voljo v specializiranih trgovinah.
. Poskušajte preprečiti, da bi jed kipela iz loncev. Nečistoča
se hitro prižge na steklokeramično površino in jo je nato
težje očistiti.
. Priporočamo vam, da pazite, da se kuhalne plošče ne
dotikajo predmeti iz plastike, sladkor ali snovi z visoko
vsebnostjo sladkorja.
ČIŠČENJE:
- Na površino zlijte nekaj kapljic namenskega čistila za
steklokeramične površine.
- Zdrgnite površino, predvsem tam, kjer opazite madeže, z
vlažno mehko krpo ali papirnato brisačko.
- Površino do čistega obrišite s suho mehko krpo ali papirnato
brisačko.
Če tudi po takem čiščenju na površini ostanejo madeži:
- Na površino zlijte še nekaj kapljic namenskega čistila.
- S pomočjo strgala, ki ga držite pod kotom 30°, odstranite
trdovratne madeže.
- Nato površino do čistega obrišite z mehko suho krpo ali
papirnato brisačko.
- Po potrebi postopek ponovite.
Če npr. vklopimo 1800-W kuhališče na 6 = 32% moči 1800 W, se
kuhališče segreva z močjo 576 W. Če je vklopljena funkcija
hitrega segrevanja, se kuhališče 2,5 minut segreva pri polni
moči (1800 W), nato pa se moč zniža na predvidenih 576 W.
*Zaradi večje varnosti se po določenem času kuhališča
samodejno izklopijo, če jih ne ugasnete. Čas, po katerem se
kuhališče izklopi, je odvisen od nastavljene moči.
Preklic funkcije hitrega segrevanja
- Vklopite kuhališče, pritisnite na tipko »-«, da se vrnete na
običajno stopnjo moči, nato pa nastavite ustrezno stopnjo moči
ali izklopite kuhališče z nastavljanjem stopnje »0«.
NASVET:
Redno čiščenje z namenskim čistilom na steklokeramični
površini naredi zaščitno plast, ki ključno pripomore k
preprečevanju prask in obrabe. Pred ponovno uporabo
kuhalne plošče mora biti kuhalna plošča popolnoma čista!
Vodo in sledi vodnega kamna odstranite z nekaj kapljicami
belega kisa ali limoninega soka. Na koncu površino obrišite z
vpojnim papirjem, nato pa nanesite nekaj kapljic namenskega
čistila in jo obrišite do čistega.
NB:
30° Maxi
Kuhalne plošče ne čistite z gobo, prepojeno z vodo!
Pri čiščenju nikoli ne uporabljajte kovinskih
predmetov, npr. noža ali izvijača!
Kuhalne plošče s strgalom ne morete poškodovati,
če ga držite pod kotom 30°.
Pazite, da strgalo ne pride v roke otrokom!
Za čiščenje ne uporabljajte jedkih čistil ali praškov.
• Kovinski okvir:
čistite ga z milnico in izperite s čisto vodo,nato pa obrišite do
suhega z mehko krpo.
52 SL
Kakršnakoli sprememba barve steklokeramične
površine, ne vpliva na njeno delovanje ali stabilnost
površine. Takšna razbarvanja so večinoma
posledica zagorelih ostankov hrane ali uporabe
posode iz materialov kot so aluminij in baker; te
madežie je težko odstraniti.
Page 53

9. ODPRAVLJANJE NEPRAVILNOSTI V DELOVANJU
10. SERVISIRANJE
Kuhališča se ne segrejejo dovolj.
• Uporabljajte samo posodo z ravnim dnom. Če pod dnom posode
lahko vidite svetlobo, se toplota ne more pravilno prenašati na dno
posode.
• Dno posode mora prekriti cel premer uporabljenega kuhališča.
Kuhanje je počasno.
• Uporabili ste neustrezno posodo. Uporabljajte samo težke
posode z ravnim dnom, katerih premer je vsaj enak premeru
uporabljenega kuhališča.
Na steklokeramični površini opažat praske in odrgnine.
• Steklokeramike ne čistite pravilno, ali pa uporabljate posodo z
grobim dnom. Morda so med dno posode in steklokeramiko zašla
zrnca peska ali soli. Preberite navodilo za čiščenje
steklokeramike; pred uporabo se prepričajte, da je dno posode
čisto in uporabljajte samo posodo z gladkim dnom. S pravilnim
čiščenjem lahko stanje izboljšate.
Kovinski madeži
• Ne potiskajte posode iz aluminija po steklokeramiki. Upoštevajte
navodila za čiščenje.
• Uporabljate ustrezno posodo, a madeži so ostali? Odstranite jih s
pomočjo strgala upoštevajte navodila za čiščenje.
Temni madeži
• Odstranite jih s pomočjo strgala upoštevajte navodila za
čiščenje.
Svetli madeži na steklokeramiki.
• To so madeži, ki jo je povzročila posoda iz aluminija ali bakra, a
tudi vodni kamen ali ostanki hrane. Odstranite jih s pomočjo
namenskega čistila.
Karameliziran sladkor ali staljena plastika
• Upoštevajte navodila za čiščenje.
Kuhalna plošča ali samo nekatera od kuhališč ne delujejo.
•Kuhalna plošča verjetno ni pravilno priključena ali pa
premostitveni elementi na priključni ploščici niso pravilno
nameščeni. Priključitev prepustite ustrezno usposobljenim
strokovnjakom! Strokovnjak naj preveri pravilnost priklopa
(odvisno od modela!).
• Kuhalne plošče za upravljanje z dotikom: večja količina polite
tekočine ali krpa prekriva vsaj 2 tipki dlje kot 10 sekund. Obrišite
tekočino ali odstranite krpo.
• Stikalna plošča je 'zaklenjena'. 'Odklenite' jo.
Preden pokličete pooblaščeni servis, se najprej prepričajte:
- da je vtikač pravilno v vtičnici in da ni pregorela
varovalka.
Če vam ne uspe odpraviti nepravilnosti v delovanju, takoj
izključite kuhalno ploščo iz električnega omrežja in je ne
poskušajte sami popraviti. Aparatu je priložen garancijski list,
tako da bo v garancijskem roku brezplačno popravljen s strani
pooblaščenega servisa.
11. VARSTVO OKOLJA
Ta naprava je označena v skladu z določili
Evropske direktive 2012/17/EU o odpadni
električni in elektronski opremi (OEEO). OEEO
so tako snovi, ki onesnažujejo okolje (lahko
negativno učinkujejo na okolje) kot osnovni
sestavni deli (ki jih je možno ponovno
uporabiti). Pomembno je pravilno ravnati z
OEEO, da pravilno odstranimo in zavržemo
vse snovi, ki onesnažujejo, okolje, ter
obnovimo in recikliramo vse materiale.
Kot posamezniki lahko pomembno vplivamo na to, da OEEO ne
postane okoljska težava; upoštevati moramo le nekaj osnovnih
pravil:
• Z OEEO ne smemo ravnati kot z ostalimi hišnimi odpadki.
• OEEO moramo odnesti v ustrezne centre za zbiranje
odpadkov, ki jih upravlja občina ali pooblaščeno podjetje. V več
državah imajo urejen prevzem večjih kosov OEEO na domu.
• Ob nakupu nove lahko staro napravo vrnemo prodajalcu, ki jo je
dolžen brezplačno prevzeti na osnovi ena za eno, če je oprema
enake vrste in ima enake funkcije kot dobavljena.
Kuhališča ne morete ugasniti.
• Stikalna plošča je 'zaklenjena'. 'Odklenite' jo.
Kuhalna plošča se samodejno izklopi.
• Polita tekočina ali lonec prekriva vsaj dve tipki za dlje kot 10
sekund. Zaradi varnosti se kuhalna plošča v tem primeru
samodejno izklopi in oglasi se zvočni signal. Obrišite kuhalno
ploščo ali odstranite lonec.
• Morda so bila kuhališča predolgo vklopljena (gl. razpredelnico,
kjer so navedeni časi samodejnega izklopa posameznih
kuhališč).
Kontrolne lučke posameznih kuhališč različno hitro utripajo.
• Frekvenca utripanja je odvisna od nastavljene stopnje moči:
- nižja stopnja: kratkotrajnejše delovanje
- višja stopnja: dolgotrajnejše delovanje.
Prikazana je črka "H", indikator preostanka toplote utripa.
• Previsoka temperatura elektronike. Strokovnjak naj preveri
priključitev kuhalne plošče skladno s temi navodili.
53 SL
Page 54

МЕРЫ ПРЕДОСТОРОЖНОСТИ
ЧТОБЫ ДОБИТЬСЯ НАИЛУЧШИХ РЕЗУЛЬТАТОВ ПРИ ЭКСПЛУАТАЦИИ ВАРОЧНОЙ ПОВЕРХНОСТИ,
ВНИМАТЕЛЬНО ПРОЧТИТЕ ЭТУ ИНСТРУКЦИЮ Рекомендуется сохранить эту инструкцию по
установки и эксплуатации и обращаться к ней по мере необходимости и перед установкой
варочной поверхности. В случае обращения за помощью в сервисный центр укажите серийной
номер варочной поверхности, указанный в ее паспортной табличке, как показано ниже.
• ПРЕДУПРЕЖДЕНИЕ: Бытовой электроприбор и его открытые части во время работы могут
нагреваться до высокой температуры. Соблюдайте осторожность, не дотрагивайтесь до них.
• Дети моложе 8 лет не должны приближаться к бытовому прибору без постоянного надзора.
• Данным бытовым электроприбором могут пользоваться дети старше 8 лет, а также люди с
нарушенными физическими или умственными способностями или с отсутствием надлежащего
опыта в том случае, если они находятся под наблюдением и проинструктированы относительно
безопасного использования бытового прибора, а также, если они осведомлены об имеющихся
опасностях.
• Не разрешайте детям играть с бытовым прибором.
• Чистка и обслуживание бытового прибора не должны выполняться детьми без надзора
взрослых.
• ПРЕДУПРЕЖДЕНИЕ: Приготовление пищи на варочной поверхности с использованием жира или
масла без надлежащего присмотра может быть опасным и может привести к пожару.
• НИКОГДА не пытайтесь погасить пламя водой. Выключите бытовой электроприбор, и накройте
пламя крышкой, или огнестойкой тканью.
• ПРЕДУПРЕЖДЕНИЕ: Опасность возгорания: не используйте варочную поверхность для
хранения на ней предметов.
• ПРЕДУПРЕЖДЕНИЕ: В случае появления на варочной поверхности трещины выключите
бытовой прибор, чтобы предотвратить поражение электрическим током..
• Не пользуйтесь для чистки парогенератором.
• бытовой электроприбор не предназначен для управления с помощью внешнего таймера или
отдельной системы дистанционного управления.
• Не рекомендуется смотреть на галогенные лампы.
• Электрическое подключение бытовой прибора должно быть выполнено с использованием
разъединительного устройства в соответствии с действующими правилами и нормами
электробезопасности.
• в инструкции должен быть указан тип электрошнура. При этом должна учитываться температура
задней стенки электроприбора.
• В случае повреждения шнура питания он должен быть заменен производителем, агентом по
техобслуживанию, или специалистом, имеющим достаточную квалификацию. Это необходимо для
того, чтобы избежать опасностей.
• Во избежание серьезных ожогов не разрешайте детям подходить близко к зонам нагрева, когда
они включены, или когда они выключены, но при этом горит индикатор остаточного нагрева.
• После каждого использования требуется очищать варочную поверхность, чтобы предотвратить
образование пригоревшей грязи и жира. Если оставить загрязнения на варочной поверхности, то
при следующем использовании они будут пригорать, и при этом будет выделяться дым и
неприятный запах. Кроме этого, это может привести к пожару.
• Не кладите на зоны нагрева алюминиевую фольгу и не ставьте на них пластмассовую посуду.
• Не прикасайтесь руками к зонам нагрева, когда они включены, или пока они не остыли.
• Никогда не готовьте пищу непосредственно на стеклокерамической варочной поверхности.
Всегда пользуйтесь для этого подходящей кухонной посудой.
• Всегда ставьте кастрюлю или сковородку в центр зоны нагрева, на которой вы готовите пищу.
• Никогда не пользуйтесь варочной поверхностью в качестве доски для резки.
• Не протаскивайте кухонную посуду по варочной поверхности.
• Не храните над варочной поверхностью тяжелые предметы. Если они упадут на варочную
поверхность, то они могут повредить ее.
• Никогда не пользуйтесь варочной поверхностью в качестве рабочего стола.
• Не пользуйтесь варочной поверхностью в качестве места для хранения каких-либо предметов.
54 RU
Page 55

1. Декларация соответствия
Детали данного оборудования, входящие в контакт с пищей, соответствуют требованиям. изложенным в директиве ЕЭС 89/109.
Размещая маркировку на этой продукции, мы заявляем, под нашу ответственность, о соответствии всем Европейским
нормам безопасности, охраны здоровья и экологическим требованиям, изложенным в законодательстве для данного вида
продукции.
Это изделие соответствует техническим регламентам Таможенного Союза:
- ТР ТС 004/2011 «О соответствии низковольтного оборудования»
- ТР ТС 020/2011 «Электромагнитная совместимость технических средств»
Изделие сертифицировано в органе по сертификации продукции и услуг «РОСТЕСТ-МОСКВА», г. Москва.
Получить копию сертификата соответствия Вы можете получить в магазине, где приобретался товар.
Производитель не берет на себя ответственность за ошибки в данной инструкции, возникшие в процессе печати.
Производитель имеет право вносить в свои изделия изменения, которые он сочтет полезными для своих изделий, сохраняя
при этом основные характеристики.
2. ИНСТРУКЦИИ ПО ВЫПОЛНЕНИЮ УСТАНОВКИ
УСТАНОВКА БЫТОВОЙ ТЕХНИКИ ЯВЛЯЕТСЯ СЛОЖН ОЙ
РАБОТОЙ, НЕПРАВИЛЬНОЕ ВЫПОЛНЕНИЕ КОТОРОЙ МОЖЕТ
О Т Р И Ц АТ ЕЛ Ь Н О С КА ЗАТ Ь С Я Н А Б ЕЗ ОП АС НО СТ И
ПОЛЬЗОВАТЕЛЯ. ПО ЭТОЙ ПРИЧИНЕ УСТАНОВКА БЫТОВОЙ
Т Е Х Н И К И Д О Л Ж Н А В Ы П О Л Н Я Т Ь С Я
ВЫСОКОКВАЛИФИЦИРОВАННЫМИ СПЕЦИАЛИСТАМИ, КОТОРЫЕ
В Ы П ОЛ НЯ Т У СТ А Н О ВК У С СО БЛ ЮД ЕН ИЕ М В СЕ Х
ДЕЙСТВУЮЩИХ ПРАВИЛ И НОРМ. В ТОМ СЛУЧАЕ, ЕСЛИ ЭТО
ПРЕДОСТЕРЕЖЕНИЕ БУДЕТ ПРОИГНОРИРОВАНО, И УСТАНОВКА
БУДЕТ ВЫПОЛНЕНА ЛИЦОМ, НЕ ИМЕЮЩИМ ДОСТАТОЧНОЙ
КВАЛИФИКАЦИИ, ПРОИЗВОДИТЕЛЬ НЕ БУДЕТ ПРИНИМАТЬ
Н И К АК ИХ П Р Е Т ЕН ЗИ Й ОТ НО СИ ТЕ ЛЬ НО В ЫХ О Д А
ОБОРУДОВАНИЯ ИЗ СТРОЯ И НАНЕСЕННОГО ПРИ ЭТОМ УЩЕРБА
ИМУЩЕСТВУ ИЛИ ЗДОРОВЬЮ ЛЮДЕЙ.
ВСТРАИВАЕМАЯ БЫТОВАЯ ТЕХНИКА
.
3
Кухонная мебель, в которую будет встраиваться ваша варочная
поверхность, и вся расположенная поблизости от нее мебель должна
быть изготовлена из материалов, которые могут выдерживать
высокие температуры. Кроме этого все декоративные пленки
должны быть приклеены теплостойким клеем.
Установка (рис. B/D):
• В комп л екте с варочной п о верхн о с тью поста вляется
герметизирующая прокладка.
Перед установкой:
.Положите варочную поверхность так, чтобы стеклокерамическая
поверхность была направлена вниз.
Проверьте что стеклокерамическая поверхность защищена.
.Установите прокладку по периметру варочной поверхности.
.Убедитесь в том, что прокладка правильно установлена для того,
чтобы избежать протечек в шкаф, на который опирается варочная
поверхность.
• Расстояние между варочной поверхностью и вертикальными
стенками расположенной рядом с ней кухонной мебелью должен
быть не меньше 5 см.
• Если нижняя сторона установленной варочной поверхности
располагается в области, к которой осуществляется доступ во время
выполнения уборки или других операций, то установите ниже
варочной поверхности перегородку. Перегородка должна быть
установлена на расстоянии 1 см от варочной поверхности для того,
чтобы избежать ожогов или повреждений.
. В случае установки вытяжки над поверхностью для готовки еды,
пожалуйста руководствуйтесь минимальным расстоянием монтажа,
указанным в инструкции к вытяжке.
. В случае установки вытяжки в шкаф над плитой минимальное
расстояние до поверхности готовки должно быть 70 см.
• Желто-зеленый проводник шнура питания должен подсоединяться к
контакту заземления электрической розетки и электроприбора.
• Производитель не несет ответственность за несчастные случаи,
являющиеся следствием того, что электроприбор не был заземлен,
или являющиеся следствием того, что произошел обрыв в линии
заземления.
• При возникновении вопросов, связанных с использованием шнура
питания, следует обратиться в службу послепродажного
обслуживания или к квалифицированному электрику.
• В случае повреждения шнура питания его замена должна
выполняться сотрудником сервисной службы с использованием
специальных инструментов.
ВНИМАНИЕ: Если возникнет необходимость выполнить замену
шнура питания, подсоедините проводники шнура питания в
соответствии с указанными ниже цветовыми кодами.
СИНИЙ - НЕЙТРАЛЬ (N)
КОРИЧНЕВЫЙ - ФАЗА (L)
ЖЕЛТО-ЗЕЛЕНЫЙ - ЗЕМЛЯ ( )
• Варочная поверхность снабжена шнуром питания, который
позволяет подключать этот электроприбор только к
электросети с напряжением 220-240 В между двумя фазами
или между фазой и нейтралью.
− подключите электроприбор к электрической розетке,
защищенной плавким предохранителем
Однако также имеется возможность подключить варочную
поверхность к следующим линиям электросети:
• Три фазы 220-240 В 3~ или • Три фазы 380-415 В 3N~
Для перехода на новое подключение выполните
следующие инструкции:
• Перед выполнением соединения, убедиться, что
электроприбор защищен с помощью подходящего плавкого
предохранителя, и что площадь сечения подводящих
проводников является достаточной, чтобы обеспечивалось
нормальное питание электроприбора.
• Положите варочную поверхность на поверхность стола
стеклокерамической стороной вниз. (Стеклокерамическая
поверхность должна быть защищена!).
• Снимите крышку клеммной колодки, выполнив
следующие операции:
1
2
3
4. ЭЛЕКТРИЧЕСКИЕ ПОДКЛЮЧЕНИЯ
Установка должна выполняться с соблюдением требований
стандартных директив. Производитель не принимает никаких
претензий относительно повреждений, возникших в результате
неправильного использования изделия.
Предупреждения:
• Перед выполнением подключения электроприбора к электросети
обязательно проверьте напряжение в электросети, регулировку
автоматического выключателя, отсутствие обрыва в линии
заземления электроприбора, и номинал плавкого предохранителя.
• Электроприбор должен подключаться к электрической розетке с
помощью вилки, снабженной штырьком защитного заземления, или
через двухполюсный разъединитель с расстоянием между
контактами не менее 3 мм.
Если электроприбор снабжен штепсельной розеткой, то он должен
быть установлен так, чтобы к штепсельной розетке осуществлялся
удобный доступ.
• найдите две лапки, расположенные сбоку,
•нажмите на лапку лезвием плоской отвертки (выполните это
для каждой лапки),
•снимите крышку.
Чтобы снять шнур питания
• отверните винты, которыми крепится клеммная колодка,
в которой находятся шунты и проводники шнура питания,
• вытяните шнур питания.
55 RU
Page 56

Порядок выполнения нового подключения:
• Выберите шнур питания в соответствии с рекомендациями,
представленными в таблице.
• Пропустите шнур питания через зажим шнура питания.
ШУНТ
Примечание: Проверьте, что винты на клеммной колодке
надежно затянуты.
ЭЛEKTPИЧECKИЕ COEДИHEHИЯ
Одна фаза 220-240 В или Две фазы 220-240 В 2~
ШНУР
ПИТАНИЯ
• Зачистите концы всех проводников
шнура питания на длине 10 мм,
принимая в расчет длину шнура
питания, необходимую для выполнения
соединений на клеммной колодке.
• Выполните подключения проводников
и шунтов (были сняты в предыдущей
операции) в соответствии с типом линии
э л е к т р о п и т а н и я , к а к п о к а з
а н о в п р е д с т а в л е н н о й н и ж е
т а бл и ц е .
• Установите крышку.
• Затяните винты зажима шнура
питания.
LAY OUT
“ 1 ”
LAY OUT
“ 2 ”
LAY OUT
“ 3 ”
3x2,5 3x2,5 3x2,5
HO5V2V2F
Три фазы 220-240 В 3~
ШНУР
ПИТАНИЯ
4x1,5 4x1,5 4x1,5
HO5V2V2F
Три фазы 380-415 В 3N~
ШНУР
ПИТАНИЯ
HO5V2V2F
Одна фаза 220-240 В ~ Две фазы 220-240 В 2~
Три фазы 380-415 В 3N~ Три фазы 220-240 В 3~
PH = Фаза
N = Нейтраль
4x1,5 4x1,5 4x1,5
T = Земля
5. ОПИСАНИЕ
• зона нагрева "хайлайт": металлическая токопроводящая
полоска распределена однородно по всей варочной
поверхности. Она разогревается в течение 3 с и может
использоваться для равномерного, однородного и
достаточно продолжительного процесса приготовления
пищи. Стеклокерамическая варочная поверхность обладает
большой тепловой мощностью, генерируемой зоной нагрева
"хайлайт", что обеспечивает быстрое приготовление пищи.
Измене н ия, внес е нные в к онструк ц ию варочной
поверхности, не снизили способность стеклокерамики
выдерживать высокие температуры, но они повысили
гибкость регулирования нагрева.Использование устройства
"спринтер" позволяет снизить время приготовления пищи на
15% в зависимости от способа приготовления пищи и
используемой кухонной посуды.
6. СОВЕТЫ ОТНОСИТЕЛЬНО ВЫБОРА КУХОННОЙ
ПОСУДЫ ДЛЯ ИСПОЛЬЗОВАНИЯ С ВАРОЧНОЙ
ПОВЕРХНОСТЬЮ
Для обеспечения высокой эффективности варочной поверхности
должна использоваться высококачественная кухонная посуда.
• Пользуйтесь только высококачественной кухонной
посудой с совершенно плоским и толстым основанием:
использование такой посуды предотвращает образование
горячих точек, в которых будет подгорать пища. Кастрюли и
сковороды с толстым основанием будут обеспечивать
равномерное распределение тепла.
• Основание кастрюли или сковороды должно быть
сухим: после того, как в посуду будет залита жидкость, или
при использовании кастрюли, которая до этого находилась в
холодильнике, перед тем как поставить кастрюлю на
варочную поверхность проверьте, что основание кастрюли
является совершенно сухим. Это предотвратит образование
на варочной поверхности пятен.
• Пользуйтесь только высококачественной кухонной
посудой с совершенно плоским и толстым основанием: :
диаметр посуды должен быть не меньше диаметра зоны
нагрева. Если диаметр посуды немного больше диаметра
зоны нагрева, то энергия будет использоваться с
максимальной эффективностью.
ВЫ Б О Р П О Д ХОД Я ЩЕ Й К У Х О Н Н О Й П О С У Д Ы -
Представленная ниже информация поможет вам выбрать
по суду дл я приготовле ния пищи с макси мальной
эффективностью.
Пос у д а и з не ржа вею щ ей ста ли: на с тоя тель н о
рекомендуется использовать. Особенно хорошо подходит
кухонная посуда с трехслойной структурой основания.
Основание с трехслойной структурой объединяет в себе
преимущества нержавеющей стали (привлекательный
внешний вид, долговечность и прочность) и преимущества
алюминия или меди (высок ая теплопроводность,
равномерное распределение температуры).
Алюминиевая посуда: рекомендуется использовать
тяжелую
посуду. Высокая теплопроводность. Алюминиевая посуда
иногда оставляет на варочной поверхности следы, похожие
на царапины. Но эти следы легко удаляются, если чистка
варочной поверхности выполняется немедленно после
образования этих следов. Из-за низкой температуры
плавления алюминия, тонкая алюминиевая посуда не
должна использоваться.
Чу г ун на я п осу д а: мо жн о и с по л ьз ов а ть , н о не
рекомендуется. Плохие эксплуатационные характеристики.
Может царапать поверхность.
Посуда с медным дном / каменная к е р а м ика:
рекомендуется использовать тяжелую посуду. Хорошие
эксплуатационные характеристики, но медь может оставлять
на поверхности следы,
похожие на царапины. Эти следу могут быть удалены, если
чистка варочной поверхности выполняется немедленно
после образования этих следов. Однако не ставьте на
варочную поверхность такую посуду без налитой в нее
жидк о сти.П ерегр ет ы й металл м о ж ет пригор еть к
стеклокерамической поверхности. Перегретая посуда с
медным дном может оставить на стеклокерамической
поверхности следы, которые невозможно будет удалить.
Фарфоровая / эмалированная посуда: Хорошие
эксплуатационные характеристики только для посуды с
тонким, гладким, плоским основанием.
Стек л о кера м ическа я посуда: не рек омен д ует с я
использовать. Плохие эксплуатационные характеристики.
Может царапать стеклокерамическую варочную поверхность.
56 RU
Page 57

7. ЭКСПЛУАТАЦИЯ ПОВЕРХНОСТИ
• после включения питания варочной поверхности подождите
несколько секунд для того, чтобы дать прогреться
электронному блоку управления.
•Hажмите кнопку . Дисплей выбранной конфорки активен.
ключается электронный блок управления. каждой зоне
дисплея отображается уровень нагрева , и мигает
индикаторный светодиод.
- Eсли в течение 20 с не выполняется никаких действий,
электронный блок управления выключается, и необходимо
повторить операцию запуска.
. ВКЛЮЧЕНИЕ ЗОНЫ НАГРЕВА
- Hажмите кнопку выбора нужной вам зоны нагрева.
"0" на дисплее выбранной Вами конфорки останется ярко
светиться, в то время как на остальных дисплеях "0"
тускнеет.
Kогда температура зоны нагрева повышается до 60 °c, на
дисплее появляется индикатор . Kогда температура
падает ниже 60 °c, этот индикатор исчезает.
B конце приготовления пищи рекомендуется выключить зону
нагрева и закончить приготовление пищи, используя
остаточное тепло зоны нагрева.
Bажное замечание. nосле отключения питания индикатор
остаточного нагрева гаснет, даже если температура зоны
нагрева превышает 60 °c.
В некоторых моделях имеются
оны нагрева, состоящие
из двух областей. .............................
. ИНДИКАТОР ОСТАТОЧНОГО НАГРЕВА
. УПРАВЛЕНИЕ РАБОТОЙ ДОПОЛНИТЕЛЬНОЙ
ЗОНЫ НАГРЕВА (ДВЕ ЗОНЫ)
>
77
- Bыберите нужный уровень нагрева в диапазоне от 1 до 9 с
помощью кнопки "–" или "+". при нажатии кнопки "+" или "–"
уровень нагрева будет постепенно увеличиваться или
уменьшаться.
Описанные ниже примеры приведены только для справки. С
течением времени вы научитесь правильно выбирать
уста новки нагрева в соответс твии со своими
потребностями.
0 : Выключено
1 : )...плавление
2 : )… Hагрев для распускания продуктов
3 : поддержание пищи в горячем состоянии
4 : Pазогревание пищи
5 : Pазмораживание продуктов, тушение, полное
приготовление пищи, приготовление пищи при низкой
температуре
6 : приготовление пищи без крышки
7 : жарка, поджаривание до золотисто-коричневого цвета, и
обжаривание
8 : приготовление пищи при высокой температуре и
обжаривание
9 : жарка, кипячение большого количества воды…
. ВЫКЛЮЧЕНИЕ ЗОНЫ НАГРЕВА
- Нажмите кнопку выбора соответствующей зоны нагрева.
- Нажимайте "-"кнопку тех пор, пока на дисплее не будет
отображаться уровень нагрева , через 10 с индикатор
уровня нагрева погаснет.
- Для быстрого выключения нажмите кнопки "–" и
соответствующей зоны нагрева одновременно. Уровень
нагрева автоматически установится на позицию . Зона
нагрева выключена.
. ОБЩЕЕ ВЫКЛЮЧЕНИЕ
3она нагрева и таймер могут быть выключены
в любое время с помощью нажатия кнопки
Bкл./Bыкл.
При включении зоны нагрева включаются как
основная, так и дополнительная зона нагрева.
B
7
LED
Для выключения дополнительной зоны нагрева:
Нажмите кнопку дополнительной зоны нагрева. При
выключении дополнительной зоны нагрева светодиод
дополнительной зоны нагрева гаснет.
Для повторного включения дополнительной зоны нагрева:
Нажмите кнопку дополнительной зоны нагрева. При
включении дополнительной зоны нагрева загорается
светодиод дополнительной зоны нагрева.
. ПРОГРАММИРОВАНИЕ ЗОНЫ НАГРЕВА
Каждая зона нагрева может быть запрограммирована
максимум на 99 минут.
- Включите нужную вам зону нагрева, как описано выше.
- Нажмите одновременно клавиши "-" и "+" для включения
таймера, на дисплее отобразиться "00"
7
LED
- Снова нажмите кнопку "+ ", чтобы задать время в минутах в
диапазоне от 0 до 99 минут, или нажмите кнопку "-", чтобы
уменьшить время в диапазоне от 30 минут до 0.
--> время программы может изменяться в любой момент
Когда истечет установленное на таймере время, зона нагрева
автоматически выключится, и на 1 минуту включится
звуковой сигнал. Для выключения звукового сигнала нажмите
кнопку.
--> таймер может использоваться без включения зоны
нагрева для напоминания, по истечении установленного на
таймере времени включается звуковой сигнал.
57 RU
Page 58

. КНОПКА БЛОКИРОВКИ
Функция блокировки предотвращает случайное включение
варочной панели детьми; кроме того, она удобна во время чистки
варочной панели.
Чтобы заблокировать варочную панель. (Пример для
варочной панели с 4 зонами нагрева)
Нажмите кнопку ВКЛ./ВЫКЛ., а затем (блокировка от детей может
быть включена только после этой операции) одновременно
нажмите и удерживайте кнопку со знаком минус и верхнюю левую
кнопку выбора, пока не услышите звуковой сигнал; если звуковой
сигнал не прозвучит, ВЫКЛЮЧИТЕ варочную панель и повторите
все указанные операции снова.
од но в р ем е нн о н а ж м ит е и
удерживайте кнопку со знаком
минус и верхнюю левую кнопку
вы бора, пока не услы шите
звуковой сигнал; если звуковой
с и г н а л н е п р о з в у ч и т ,
ВЫКЛЮЧИТЕ варочную панель и повторите все указанные
операции снова.
После этого снова нажмите
верхнюю левую кнопку выбора.
Данная операция должна занять
не более 10 секунд, необходимо
н а жи ма т ь т ол ь к о кн о п ки ,
указанные выше; в противном
случае ввод будет отменен как незавершенный.
На всех дисплеях отображается
буква “L” для обознач ения
ЗАБЛОКИРОВАНО (LOCKED) (=
б л о к и р о в к а о т д е т е й ,
п р е п я т с т в у ю щ а я
непреднамеренному включению)
– если зона нагрева находится в нагретом состоянии, буквы “L” и
“H” отображаются попеременно.
. БЫСТРЫЙ НАГРЕВ
Включение функции быстрого нагрева
- Нажмите кнопку Вкл./Выкл.
- Включите нужную зону нагрева, с помощью кнопки "+" установите
регулировку уровня нагрева на позицию "9", быстро отпустите кнопку,
а затем нажмите кнопку "+" еще раз. На дисплее попеременно
отображается индикатор "А" (быстрый нагрев) и выбранная позиция
регулятора уровня нагрева "9".
- Если это нужно, уменьшите выбранный уровень нагрева, на
дисплее будет попеременно отображаться индикатор "А" (быстрый
нагрев) и выбранная позиция регулятора уровня нагрева.
Позиция
регулятора
0
1
2
3
4
5
6
7
8 : 65 % : 4,5 : 1,5 H
9 : 100 % : 0 : 1,5 H
Мощность
:
0 %
: 2.5 % : 0 : 2 H
:
:
:
:
:
:
:
3 %
6 %
11 % :
16 % :
19 % :
32 % :
45 % :
Время
выполнения
быстрого
нагрева
:
0
:
1
:
3
5
6,5
8,5
2,5
3,5
Максимальное
время работы до
автоматического
выключения*
:
0 H
:
6 H
:
6 H
:
5 H
:
5 H
:
4 H
:
1,5 H
:
1,5 H
Пример: Для зоны нагрева 1800 Вт выбрана установка уровня
нагрева "6". Мощность нагрева составляет 32% от 1800 Вт.
Когда включена функция "быстрый нагрев", зона нагрева
выдает мощность 1800 Вт в течение 2,5 минут, а затем
мощност ь этой зоны уменьшается до 576 Вт. *По
соображениям безопасности зоны нагрева автоматически
выключаются, если они остаются включенными слишком долго.
Время до отключения зоны нагрева зависит от выбранного
уровня нагрева.
Выключение функции быстрого нагрева
- Включите нужную зону нагрева, с помощью кнопки "-"
установите нормальный уровень нагрева, уменьшите уровень
нагрева до нужного значения, или установите регулировку
нагрева на позицию "0" для того, чтобы выключить зону нагрева.
Чтобы разблокировать варочную панель
Чтобы разблок ировать блок
у п р а в л е н и я, н е о б х о д и м о
одновременно нажать кнопку со
знаком минус и верхнюю левую
кнопку выбора (задняя левая
зона приготовления), а затем
снова нажать кнопку со знаком
минус.
В а р о ч н ая п а н ел ь б уд ет
разблокирована, а сенсорное
8. ЧИСТКА И ОБСЛУЖИВАНИЕ
• Перед тем как начать выполнять какие-либо работы, связанные с
обслуживанием варочной поверхности, дайте варочной поверхности
остынуть.
• Следует использовать только материалы и инструменты (кремы,
скреб к и д ля чи с тки ) , пред н а з начен н ы е дл я ухода за
ст еклокерамич е с кими пове рхностям и . Эти мате р и алы и
инструменты можно приобрести в магазинах хозяйственных товаров.
• Постарайтесь не проливать на варочную поверхность жидкости, так
как они могут быстро пригорать, что значительно усложнит чистку.
• Желательно держать подальше от варочной поверхности вещества,
которые легко расплавляются, например, изделия из пластмассы,
сахар, или продукты, содержащие сахар.
ОБСЛУЖИВАНИЕ:
. Нанесите на поверхность несколько капель специального
чистящего средства.
. Сотрите пятна с помощью мягкой ткани или с помощью влажной
кухонной бумаги.
. Протирайте поверхность мягкой тканью или сухой кухонной
бумагой до тех пор, пока поверхность не будет чистой.
Если по-прежнему остаются трудноудалимые пятна:
. Нанесите на варочную поверхность еще несколько капель
специальной чистящей жидкости.
. Соскребите пятна скребком, держа его под углом 30° к
поверхности.
. Протирайте поверхность мягкой тканью или сухой кухонной
бумагой до тех пор, пока поверхность не будет чистой.
. В случае необходимости повторите эту операцию.
НЕСКОЛЬКО ПОЛЕЗНЫХ СОВЕТОВ:
Регулярная чистка варочной поверхности способствует хорошему
сохранению ее защитного слоя, который необходим для
предотвращения образования царапин и износа поверхности. Перед
тем как включить варочную поверхность, проверьте, что ее
поверхность является чистой. Для удаления пятен, оставшихся от
воды, нанесите на поверхность несколько капель уксуса или
лимонного сока. Затем протрите поверхность промокательной
бумагой, смоченной несколькими каплями специальной чистящей
жидкости.
Стеклокерамическая поверхность не царапается кухонной посудой с
плоским и гладким дном, однако, все же лучше приподнимать посуду,
при перемещении ее из одной зоны нагрева в другую.
58 RU
Page 59

Важные замечания:
Максимум 30°
30° Maxi
Не пользуйтесь слишком влажной губкой.
Никогда не пользуйтесь для чистки поверхности ножом или
отверткой.
Скребок с лезвием бритвы не повредит поверхность, если
он располагается под углом 30°.
Никогда не оставляйте скребок с лезвием бритвы в
доступных для детей местах.
Никогда не пользуйтесь абра зивными чистящими
средствами или абразивными порошками.
Пароочистители не пригодны для использования.
• Mеталлическая рамка:
вымойте металлическую рамку мыльной водой, затем чистой
водой, и протрите насухо тканью.
Любое изменение в цвете стеклокерамической
поверхности не влияет на ее работу или стабильность
поверхности. Такие изменения цвета в основном
являются результатом подгорания остатков пищи или
использования посуды из таких материалов как,
алюминий или медь; эти пятна трудно удалить.
9. ВОЗМОЖНЫЕ ПРОБЛЕМЫ И ИХ УСТРАНЕНИЕ
Недостаточный нагрев
• Пользуйтесь только кухонной посудой с плоским дном. Если между дном
посуды и варочной поверхности имеется просвет, тепло будет плохо
передаваться.
• Дно кухонной посуды должно полностью покрывать зону нагрева.
Пища готовится слишком медленно
• Используется неподходящая кухонная посуда. Пользуйтесь только
тяжелой кухонной посудой, диаметр дна которой не меньше диаметра
зоны нагрева.
Небольшие царапины или потертости на стеклокерамической
варочной поверхности
• Используются неподходящие чистящие средства или неподходящая
кухонная посуда с шероховатым дном. Между варочной поверхности и
дном посуды попали зерна или частички соли. См. раздел "ЧИСТКА И
ОБСЛУЖИВАНИЕ". Перед использованием кухонной посуды, проверьте,
что на дне кухонной посуды нет грязи, и пользуйтесь только кухонной
посудой с гладким дном. Царапины можно уменьшить только при
правильном выполнении чистки.
Следы металла
• Не перетаскивайте алюминиевую посуду по варочной поверхности, См.
рекомендации относительно выполнения чистки.
• Вы пользуетесь подходящими материалами, но пятна остаются.
Используйте для чистки лезвие бритвы, как это описано в разделе
"ЧИСТКА И ОБСЛУЖИВАНИЕ".
Темные пятна на поверхности
• Используйте для чистки лезвие бритвы, как это описано в разделе
"ЧИСТКА И ОБСЛУЖИВАНИЕ".
Варочная поверхность не выключается
· Заблокирована панель управления. Разблокируйте ее.
Варочная поверхность самопроизвольно выключается
· Пролитая на большом участке жидкость или большой объект,
покрывающие, по крайней мере, две кнопки в течение не менее 10 с; в
целях безопасности варочная поверхность автоматически выключается,
и включается звуковой сигнал. Удалите пролитую жидкость или объект.
· Зоны нагрева автоматически выключаются, если они работают слишком
долго. См. пункт "время работы".
Частота циклов включение/выключение для зон нагрева
• Частота циклов включение/выключение зависит от установки уровня
мощности:
. низкий уровень мощности: короткое время цикла,
. высокий уровень мощности: длительное время цикла.
Мигает индикатор "Н", индикатор остаточного нагрева
• Слишком высокая температура блока электроники. Специалист по
техническому обслуживанию должен проверить, что установк а
выполнена в соответствии с рекомендациями
10. ПОСЛЕПРОДАЖНОЕ ОБСЛУЖИВАНИЕ
перед тем как вызвать специалиста по техническому обслуживанию,
выполните следующие проверки:
- проверьте, что вилка шнура питания правильно вставлена в
электрическую розетку, и что не перегорел плавкий предохранитель. Eсли
вы не можете самостоятельно определить причину неисправности,
выключите электроприбор и не пытайтесь отремонтировать его
самостоятельно. позвоните в центр послепродажного обслуживания.
Электроприбор имеет гарантию, и будет отремонтирован в сервисном
центре бесплатно.
11. ЗАЩИТА ОКРУЖАЮЩЕЙ СРЕДЫ
Данный прибор имеет маркировку в соответствии с
Европейской директивой 2012/19/ЕС об отходах
производ ства элек трического и эле ктронного
оборудовани я ( WEEE ). Отходы про изводст ва
элек три ческого и эле ктронного оборудован ия
содержат загрязняющие вещества (которые могут
негативно влиять на окружающую среду) и основные
компонен т ы (к оторые п одлежат по вторному
использованию). Важно, чтобы отходы производства
электрического и электронного оборудования подвергались
специальной обработке с целью удаления и утилизации всех
загрязняющих веществ, а также регенерации и повторного
использования всех материалов.
Каждый может сделать существенный вклад в предотвращение
экологических проблем, вызываемых отходами производства
электрического и электронного оборудования; для этого важно
придерживаться некоторых основных правил:
• Нельзя обращаться с отходами производства электрического и
электронного оборудования, как с бытовыми отходами.
• Отходы производства электрического и электронного оборудования
следует передавать в пункты сбора, контролируемые органами
местной власти или зарегистрированными компаниями. Во многих
странах при наличии большого количества отходов производства
электрического и электронного оборудования сбор отходов
осуществляется на дому.
• При покупке нового прибора старый прибор можно возвратить
розничному торговому предприятию, которое обязано принять его
бесплатно на основе взаимно-однозначного соответствия, если это
приборы аналогичного типа, и возвращаемый прибор имеет те же
функции, что и продаваемый.
Светлые области на поверхности
• Следы от алюминиевой и медной посуды, а также минеральные
отложения, пятна от воды и пищи. Эти пятна можно удалить с помощью
чистящего крема.
Обуглившаяся или расплавленная пластмасса на поверхности
• См. раздел "ЧИСТКА И ОБСЛУЖИВАНИЕ".
Варочная поверхность не работает, или не работают некоторые
зоны нагрева варочной поверхности
• Неправильно установлены шунты (закорачивающие перемычки) на
клеммной колодке. Проверьте, что подключение выполнено в
соответствии с рекомендациями.
• Варочные поверхности с сенсорным управлением: пролитая на большом
участке жидкость или большой объект, покрывающие, по крайней мере,
две кнопки в течение не менее 10 с. Удалите пролитую жидкость или
объект.
Панель управления варочной поверхности заблокирована.
Разблокируйте ее.
59 RU
Page 60

INSTRUKCJE BEZPIECZEŃSTWA
PROSZĘ DOKŁADNIA ZAPOZNAC SIĘ Z NINIEJSZĄ INSTRUKCJĄ PRZED PRZYSTĄPIENIEM DO
INSTALACJI PŁYTY. Zalecamy zachowanie instrukcji oraz, przed zainstalowaniem płyty, spisanie jej
numeru seryjnego potrzebnego w razie kontaktu z serwisem.
• UWAGA: Podczas pracy urządzenie oraz jego elementy są gorące. Należy zachowac ostrożność i nie
dotykać gorących części.
• Dzieci w wieku do 8 lat nie mogą zbliżać się do urządzenia chyba że pozostaja one pod ciągłym
nadzorem.
• Dzieci w wieku powyżej 8 lat oraz ososby z ograniczeniami ruchowymi, umysłowymi, czuciowymi lub
nie posiadające odpowiedniej wiedzy lub doświadczenia mogą obsługiwać urządzenie jedynie pod
nadzorem lub po przeszkoleniu odnośnie bezpiecznego uzykowania urządzenia i związanych z tym
zagrożeń.
• Dzieci nie mogą bawić się urządzeniem.
• Dzieci bez nadzoru nie mogą obsługiwac ani czyścić urządzenia.
•UWAGA: gotowanie na płycie z użyciem oleju lub tłuszczu bez nadzoru może być niebezpieczne i
spowodować pożar.
• NIGDY nie gasić ognia wodą, należy wyłączyc urządzenie i przykryć płomień np. pokrywką lub kocem
ognioodpornym.
• UWAGA: niebezpieczeństwo pożaru. Nie wolno przchowywać przedmiotów na powierzchniach
grzejnych.
• UWAGA: w razie uszkodzenia powierzchni należy wyłączyć urządzenie aby uniknąć niebezpieczeństwa
porażenia prądem elektrycznym.
• Nie stosować do czyszczenia urządzeń parowych.
• Urządzenie nie jest przeznaczone do sterowania zewnętrznym minutnikiem lub oddzielnym
układem zdalnego sterowania.
• Zalecamy nie wpatrywanie się w halogenowe pola grzejne.
• Wyłącznik musi być podłączony do okablowania zgodnie z obowiązujacymi przepisami.
• Instrukcja musi określać jaki rodzaj przewodu może być zastosowany, z uwzglednieniem temperatury
tylnej ścianki urządzenia.
• Jeżeli przewód zasilający jest uszkodzony musi być wymieniony przez producenta lub autoryzowany
serwis tak aby uniknąc wszelkiego ryzyka.
• Stanowczo zalecamy nie dopuszczanie dzieci do urządzenia podczas gotowania a także po
wyłączeniu płyty dopóki wskaźniki temperatury pól nie przestaną się świecić gdyż grozi to poważnymi
poparzeniami.
• Folia aluminiowa oraz naczynia plastikowe nie mogą być umieszczane na polach grzewczych.
• Stanowczo zalecamy nie dopuszczanie dzieci do urządzenia podczas gotowania a także po
wyłączeniu płyty dopóki wskaźniki temperatury pól nie przestaną się świecić gdyż grozi to poważnymi
poparzeniami.,
• Naczynie powinno być umieszczone na środku pola grzejnego.
•Do gotowania należy zawsze stosować naczynia, nie wolno gotować potraw bezpośrednio na płycie.
Naczynie powinno być umieszczone na środku pola grzejnego.
• Nie wolno używać płyty jako powierzchni roboczej ani jako deski do krojenia
• Nie wolno przesuwać naczyń po płycie.
• Proszę nie przechowywać ciężkich przedmiotów nad płytą, jeżeli spadną mogą ja uszkodzić.
• Proszę nie przechowywać nic na powierzchni płyty.
60 PL
Page 61

1. UWAGI OGÓLNE
Producent zastrzega prawo do wprowadzania zmian i ulepszeń technicznych w urządzeniu.
Niniejsze urządzenie, w części przeznaczonej do kontaktu ze środkami spożywczymi spełnia wymagania przepisów
ustanowionych w Dyrektywie 89/109/EWG.
Poprzez umieszczenie oznaczenia na tym produkcie poświadczamy na własną odpowiedzialność przestrzeganie
wszystkich wymogów europejskich dotyczących bezpieczeństwa, ochrony zdrowia i środowiska określonych w przepisach
dla tego produktu.
2. INSTALACJA
Instalacja urządzeń AGD może być czynnością skomplikowaną która, jeżeli nie zostanie przeprowadzona prawidłowo, może
poważnie zagrozić bezpieczeństwu użytkownika. Z tego powodu instalacji powinien dokonywać wykwalifikowany personel
zgodnie z obowiązującymi przepisami. Jeżeli to zalecenie zostanie zignorowane i instalacja zostanie przeprowadzona przez
osoby niewykwalifikowane producent nie ponosi żadnej odpowiedzialności za wszelkie awarie urządzenia niezależnie od
tego czy spowodują one czy nie szkody materialne lub obrażenia u osób.
3. ZABUDOWA
UWAGA:
Zabudowa meblowa pł yty oraz meble przylegające muszą być
wykonane z materiał ów odpornych na wysoką temperaturę,
dodatkowo wszystkie laminaty ozdobne muszą być klejone
odpornym na wysoką temperaturę klejem.
Instalacja (Rys. B/D):
• Wodoodporna uszczelka dostarczana jest razem z płytą
Przed instalacją:
• obrócić pł ytę do doł u szkł em, upewnić się czy szkł o jest
zabezpieczone
- założyć uszczelkę na płytę
- upewnić się czy uszczelka jest poprawnie ułożona tak aby woda
nie dostawała się pod płytę
• pozostawić odstęp przynajmniej 5 cm pomiędzy pytą a
pionowymi ściankami przyległych mebli
• jeżeli po zainstalowaniu płyty przestrzeń pod płytą jest dostępna
to należy zamontować od spodu pł yty przegrodę ochronną
zachowując od dna płyty odstęp przynajmniej 1 cm.
• W przypadku instalacji nad płytą kuchenną należy zachować
odpowiednią odległość, zgodnie z oznakowaniem na okapie i
zaleceniami w instrukcji obsługi.
• Jeśli jest on instalowany na szafce nad płytą kuchenną, należy
zachować minimalną odległość 70 cm.
W razie konieczności wymiany przewodu zasilania należy
przestrzegać następującej zasady podłączenia przewodów:
NIEBIESKI – ZERO (N)
BRĄZOWY – FAZA (L)
ŻÓŁTO-ZIELONY - UZIEMIENIE ( )
Płyta wyposażona jest w przewód zasilania który umożliwia
podłączenie jedynie do 220-240V międzyfazowego lub miedzy
fazą a zerem.
Możliwe jest także podłączenie płyty :
- trójfazowe 220-240 V3~ - trójfazowe 380-415 V2N~
Instrukcja takiego podłączenia jest następująca:
- Przed przystąpieniem do podłączenia należy sprawdzić czy
instalacja jest zabezpieczona odpowiednim bezpiecznikiem, i czy
przekroje przewodów są wystarczające.
• Obrócić płytę do dołu szkłem, upewnić się czy szkło jest
zabezpieczone.
Otworzyć pokrywę w następującej kolejności:
1 2 3
4. PODŁĄCZENIE ELEKTRYCZNE
« Podłączenie musi być zgodne z obowiązującymi przepisami.
Producent nie ponosi żadnej odpowiedzialności za uszkodzenia
spowodowane niewłaściwym lub nierozważnym użytkowaniem."
Uwaga: Producent nie będzie odpowiadał za jakiekolwiek
wydarzenia lub ich skutki które mogą się wydarzyć podczas
użytkowania płyty nie podłączonej do uziemienia lub
podłączonej do uziemienia o niewłaściwej skuteczności.
• Przed podłączeniem proszę zawsze sprawdzić napięcie
zasilania, parametry wyłącznika i bezpiecznika oraz skuteczność
uziemienia instalacji elektrycznej.
• Podłączenie elektryczne powinno być wykonane za pomocą
wtyczki z uziemieniem lub wielopolowego wyłącznika.
• Jeżeli urządzenie podłączone jest za pomocą wtyczki to
powinna być ona dostępna po instalacji.
• Przewód żółtozielony musi być połączony do uziemienia tak po
stronie instalacji jak urządzenia.
• Wszelkie czynności dotyczące przewodu zasilania należy
powierzyć autoryzowanemu serwisowi lub wykwalifikowanemu
technikowi.
• odkręcić przelotkę przewodu 1
• zlokalizować dwa zaczepy po bokach pokrywy
• podważyć je śrubokrętem płaskim
• zdjąć pokrywę
Odłączyć przewód zasilania:
• odkręcić śruby na listwie przyłączeniowej
• odłączyć przewód zasilania
Utworzenie nowego podłączenia:
• wybrać nowy przewód zasilania zgodnie z tabelą
• przeciągnąć przewód przez przelotkę
• usunąć izolację na długości ok. 10mm z końcówek
przewodu zasilania
• Podłączyć przewód oraz zworki do listwy
przyłączeniowej
zgodnie z tabelą
• Zamocować pokrywę
• Dokręcić przelotkę przewodu
UWAGA: sprawdzić czy śruby
mocujące przewody do listwy są
właściwie dokręcone.
SHUNT
61 PL
Page 62

Podłączenie do listwy przyłączeniowej
LAY OUT
“ 1 ”
Jednofazowe 220-240 V~ / Dwufazowe 220-240 V2~
LAY OUT
“ 2 ”
Przewod
HO5V2V2F
Trójfazowe 220-240 V3~
Przewod
HO5V2V2F
Trójfazowe 380-415 V2N~
Przewod
HO5V2V2F
LAY OUT
“ 3 ”
3x2,5 3x2,5 3x2,5
4x1,5 4x1,5 4x1,5
4x1,5 4x1,5 4x1,5
WYBÓR RODZAJÓW NACZYŃ –
poniższe informacje pomogą w wyborze naczyń
zapewniającym optymalne wykorzystanie płyty:
Stal nierdzewna: zdecydowania zalecana. W szczególności z
warstwowym grubym dnem. Warstwowe dno łączy zalety stali
nierdzewnej (wygląd i trwałość) z zaletami aluminium i miedzi
(przewodzenie ciepła, rozkład ciepła).
Aluminium: zalecane tylko te z grubym dnem.
Dobra przewodność. Czasami ślady aluminium pozostają na
płycie ale można je usunąć jeżeli zrobimy to od razu. Z powodu
niskiej temperatury topnienia naczynia z cienkiego aluminium
nie mogą być stosowane.
Żeliwo, ceramika szklana: dopuszczalne ale niezalecane.
Niewielka wydajność, ryzyko porysowania płyty,
Miedź : zalecane te z grubym dnem. Dobra przewodność.
Czasami ślady miedzi pozostają na płycie ale można je usunąć
jeżeli zrobimy to od razu. Nie dopuszczać do wygotowania się
wody gdyż przegrzana miedź nieodwracalnie zabrudzi płytę.
Jednofazowe 220-240 V~ Dwufazowe 220-240 V2~
Trójfazowe 220-240 V3~ Trójfazowe 380-415 V2N~
Ph = Faza N = Zero T = Uziemienie
.
5
OPIS
• Pola highlight:
Metalizowana przewodząca taśma rozłożona jest jednorodnie
na całej powierzchni pola. Uruchamia się w 3 sekundy i
umożliwia pewne, jednorodne i intensywne gotowanie.
Dzięki większej wydajności cieplnej pola highlight proces
gotowania może być przyspieszony. Zmiany wprowadzone w
płycie nie pogarszają jej odporności na wysokie temperatury ale
poprawiają możliwości jej sterowania.
Funkcja „Sprinter” umożliwia zmniejszenie czasu gotowania do
około 15% w zależności od sposobu gotowania i stosowanych
naczyń.
Porcelana i stal emaliowana: dobre własności ale tylko przy
cienkim i płaskim dnie.
7. UŻYTKOWANIE
• Po podłączeniu płyty proszę poczekać kilka sekund przed
uruchomieniem sterowania.
- Wcisnąć przycisk , światło LED włącza.
Elektroniczne sterowanie płyty jest aktywne. Wyświetlacze
wszystkich pól pokazują a kontrolki LED migają.
- Jeżeli przez 20 sekund nie zostaną podjęte dalsze operacje
sterowanie wyłącza się i procedurę uruchomienia należy
powtórzyć.
. WŁĄCZANIE PÓLA
- Wcisnąć obszar sterowania wybranego pola.
"0" na wyświetlaczu pozostaje podświetlone podczas, gdy
pozostałe oznakowania "0" są zredukowane
TYP B
6. WSKAZÓWKI ODNOŚNIE NACZYŃ
Uzywanie dobrej jakosci naczyn jest bardzo istotne
dlawynikow gotowania na plycie
Proszę zawsze stosować naczynia dobrej jakości z grubym i
doskonale płaskim dnem: w takich naczyniach nie powstają
miejscowe przegrzania i pokarm nie przypala się, grube
metalowe naczynia zapewniają równomierne rozkładanie się
ciepła.
Upewnić się czy dno naczynia jest suche: przy napełnianiu
naczyń płynem lub używaniu naczyń wyjętych z lodówki proszę
zadbać aby dno naczynia było suche, zapobiegnie to
zabrudzeniu płyty.
Stosować naczynia takiej wielkości aby pokrywały całość
pola grzejnego: średnica naczynia nie powinna być mniejsza od
średnicy pola, jeżeli będzie ona nieznacznie większa to
sprawność gotowania będzie maksymalna.
777
- Wcisnąć znak - lub + w celu ustawienia mocy gotowania
pomiędzy 1 a 9. Przytrzymanie przycisków powoduje
zmniejszanie lub zwiększanie mocy w sposób ciągły.
Poniższe informacje mają charakter wyłącznie poglądowy. Prosimy
kierować się własnym doświadczeniem i przyzwyczajeniami przy
wyborze mocy gotowania.
0 : Wyłączone
U -1 : Rozpuszczanie
2 : Rozpuszczanie
3 : Podtrzymywanie temperatury
4 : Podgrzewanie
5 : Rozmrażanie, gotowanie na wolnym ogniu
6 : Gotowanie bez przykrycia
7 : Smażenie, rumienienie, pieczenie
8 : Gotowanie na dużym ogniu, pieczenie
9 : Smażenie, gotowanie większych ilości wody
62 PL
Page 63

. WYŁĄCZANIE POLA
- Wcisnąć obszar sterowania wybranego pola.
- Wcisnąć znak – aż do otrzymania wskazania . Pole wyłącza
się, wskazanie zniknie po 10 s.
- Aby natychmiast zatrzymać, wciśnąć jednoczesne znaków – i
odpowiedni strefy gotowania.
. WYŁACZANIE CAŁEJ PŁYTY
Wszystkie pola grzewcze oraz minutnik można
wyłączyć za pomocą przycisku ON-OFF.
. WSKAŹNIK GORĄCEGO POLA
Wskaźnik, wyświetlając znak ,ostrzega użytkownika, że
temperatura pola przekracza 60°C . Po ostygnięciu pola poniżej
60oC wskazanie gaśnie.
W końcowej fazie gotowanie zalecamy wcześniejsze wyłączenie
pola i dogotowanie potrawy z wykorzystaniem ciepła
resztkowego pola.
UWAGA: po odcięciu zasilania wskazanie gorącego pola gaśnie,
nawet jeżeli temperatura pola przekracza 60°C.
. DZIAŁANIE PRZYCISKU BLOKOWANIA
Funkcja blokowania zabezpiecza przed przypadkowym
włączeniem płyty przez dzieci; jest ona również przydatna
podczas czyszczenia płyty.
Blokowanie płyty. (Przykład dla płyty z 4 polami)
Nacisnąć przycisk ON/OFF, a następnie (dopiero po tej czynności
może zostać włączone zabezpieczenie przed dziećmi)
Nacisnąć jednocześnie przycisk
minus oraz lewy górny przycisk
wyboru, do momentu usłyszenia
sygnału dźwiękowego; jeżeli nie
z o s t a n i e w y d a ny s y g n a ł
dźwiękowy, wyłączyć płytę i
powtórzyć czynność ustawiania.
Następnie ponownie nacisnąć
lewy górny przycisk wyboru.
Ta sekwencja czynności musi
zostać wykonana w ciągu 10
sekund, a żaden inny przycisk
oprócz opisanych powyżej nie
może zostać naciśnięty; w przeciwnym razie sekwencja zostanie
anulowana z powodu jej nieukończenia.
. STEROWANIE POLEM POSZERZONYM
(POLE DWUCZĘŚCIOWE)
Niektóre modele płyt wyposażone są w
pola poszerzonekoncentryczne. ...............
>
Uruchomienie pola powoduje jegowłączenie w całości, dioda
sekcji poszerzonej świeci.
TYP B
7777
LED
Wyłączenie sekcji poszerzonej odbywa się poprzez przyciśnięcie
przycisku "7" po czym poszerzenie wyłącza się a dioda gaśnie.
Ponowne włączenie sekcji poszerzonej następuje po
przyciśnięcie przycisku "7" po czym poszerzenie włącza się a
dioda świeci.
. PROGRAMOWANIE POLA GRZEWCZEGO (wybrane modele)
Czas pracy każdego z pól można zaprogramować do maksimum
99 minut.
- Włączyć pole jak opisano wcześniej Kontrolka LED pola świeci
się co oznacza że sterowanie pola jest aktywne
- Naciśnij jednocześnie "-" i "+" aby aktywować zegar, pojawi się
"00".
TYP B
Na wszystkich wyświetlaczach
pokaże się „L” (LOCKED =
blokada zabezpieczająca przed
przy p adko w ym wł ą czen i em
pr z ez dz i ec i) ; je że l i p ol e
grzewcze jest gorące, litery „L” i
„H” będą się pojawiały na zmianę.
Odblokowanie płyty
W celu odblokowania panelu
ste r owa nia k oni ecz n e je st
j e d n o c z e s n e n a ci ś n i ę c i e
przycisku minus oraz lewego
górnego przycisku wyboru (pole
grzewcze z tyłu po lewej), a
następnie ponowne naciśnięcie
przycisku minus.
W tym momencie blokada jest
usunięta, a dotykowy panel
sterowania wraca do trybu
czuwania.
. Wcisnąć ponownie przycisk "+" minutnika w celu wyboru czasu
LED
pracy pola w zakresie od 0 do 99 minut lub przycisk „-” w celu
zmniejszenia mocy pola w zakresie od 30 do 0.
--> Zaprogramowany czas można zmienić w dowolnej chwili
poprzez wyłączenie i włączenie pola i ustawienie minutnika
Po upłynięciu ustawionego czasu pole wyłącza się automatycznie
i uruchamia się na czas 1 minuty sygnał dźwiękowy, sygnał
można wyłączyć przyciskiem.
--> Jeśli jakakolwiek ze stref jest aktywowana, minutnik może
też być użyty niezależnie, sygnał dźwiękowy rozlegnie się po
upływie ustawionego czasu.
63 PL
Page 64

. DOPALACZ (BOOSTER)
Włączanie boostera
• Wcisnąć przycisk ON-OFF
• Włączyć wybrane pole i ustawić znakiem „+” do mocy 9,
zwolnić znak „+” a następnie wcisnąć go ponownie,
wyświetlacz pokazuje na zmianę „A” oraz 9.
• Można zmniejszyć moc pola, wyświetlacz pokaże na zmianą
„A” oraz nowy poziom mocy.
Ustawienie
mocy
Moc (%)
Czas
działania
boostera
(min)
Maksymalny
czas pracy
(godziny)*
0
1
2
3
4
5
6
7
8
9
:
0 %
: 2.5 % : 0 : 2 H
:
3 %
:
6 %
:
11 % :
:
16 % :
:
19 % :
:
32 % :
:
45 % :
:
65 % :
:
100 % : 0
:
0
:
1
:
3
5
6,5
8,5
2,5
3,5
4,5
:
0 H
:
6 H
:
6 H
:
5 H
:
5 H
:
4 H
:
1,5 H
:
1,5 H
:
1,5 H
:
1,5 H
Przykład: dla pola o mocy 1800W i ustawienia 6 = 32% mocy
uruchomienie boostera powoduje zadziałanie pola z mocą
1800W przez 2,5 minuty a następnie z mocą 576W.
Dla bezpieczeństwa pola wyłączane są automatycznie po
przekroczeniu maksymalnego czasu gotowania. Czas ten
zależy od ustawionej mocy.
Wyłączanie boostera
• Aktywować sterowanie pola, znakiem „-” ustawić normalny
poziom mocy gotowania, ustawić wymagany poziom albo dojść
do 0 i wyłączyć pole.
8. UŻYTKOWANIE
• Przed przystąpieniem do czyszczenia płyty poczekać aż
ostygnie.
• Dopuszczalne jest jedynie używanie środków i skrobaków
przeznaczonych do płyt ceramicznych, dostępne są one w
sklepach AGD.
• Proszę unikać rozlewania potraw; wszystko co dostanie się na
płytę podczas gotowania szybko się przypali utrudniając
czyszczenie płyty.
• Proszę trzymać z dala od płyty wszelkie łatwo topiące się
substancje takie jak plastiki, cukier lub wyroby zawierające
cukier.
CZYSZCZENIE
• nalać kilka kropel preparatu do czyszczenia płyt na
powierzchnię płyty
• usunąć zabrudzenia szmatką lub lekko zwilżonym ręcznikiem
papierowym
• wytrzeć do sucha szmatką lub ręcznikiem papierowym aż do
uzyskania czystej powierzchni
Jeżeli na płycie nadal jest brud:
• nalać ponownie kilka kropel preparatu do czyszczenia płyt na
powierzchnię płyty
• użyć skrobaka pod kątem 30o do powierzchni płyty aż do
usunięcia zabrudzeń
• wytrzeć do sucha szmatką lub ręcznikiem papierowym aż do
uzyskania czystej powierzchni
• w razie potrzeby czynność powtórzyć
KILKA WSKAZÓWEK
Częste czyszczenie płyty pozostawia na niej warstwę ochronną.
Gotowanie winno odbywać się na czystej płycie. Ślady po wodzie
można usunąć za pomocą kilku kropli octu lub soku z cytryny.
Następnie należy przetrzeć płytę środkiem do czyszczenia płyt.
Powierzchnia płyty jest odporna na przesuwanie po niej naczyń o
płaskim dnie ale zalecamy ich unoszenie przed zmianą pola
gotowania.
UWAGA:
30° Maxi
- Nie używać zbyt mokrej gąbki
- Nie używać nigdy noża ani śrubokręta
- Skrobak nie uszkodzi płyty jeżeli trzymany jest pod
kątem 30°
- Nigdy nie zostawiaj skrobaka w zasięgu dzieci
- Nigdy nie używaj substancji ściernych lub
metalowych wiórków
Ramka wokół płyty:
czyścić wodą z detergentem, spłukać i wytrzeć miękką szmatką.
Wszelkie zmiany w k o l orze powierzchni szk ł a
ceramicznego nie mają wpływu na jego działanie lub
trwałość powierzchni. Takie przebarwienia są głównie
wynikiem spalonych resztek jedzenia lub korzystania z
naczyń kuchennych wykonanych z materiałów takich jak
aluminium lub miedź; plamy te są trudne do usunięcia.
64 PL
Page 65

9. ROZWIĄZYWANIE PROBLEMÓW
10. SERWIS
Palniki nie podtrzymują temperatury wrzenia, nie pozwalają
na dobre usmażenie potrawy.
• Trzeba korzystać z garnków o idealnie płaskim dnie. Jeśli
pomiędzy dnem garnka a powierzchnią płyty widoczne jest
światło, powierzchnia dna garnka nie przewodzi poprawnie
ciepła.
• Średnice dna garnków powinny dokładnie odpowiadać
średnicom wybranych palników.
Potrawy gotują się zbyt wolno.
• Używasz niewłaściwych garnków. Dna garnków powinny być
płaskie, mieć dostateczną grubość i ciężar i taką samą średnicę
jak wybrany palnik.
Niewielkie rysy (mogące wyglądać jak pęknięcia) lub
porysowania na szklanej powierzchni płyty.
• Niewłaściwa metoda czyszczenia, garnki o szorstkim dnie lub
twarde cząstki (soli lub piasku) pomiędzy dnem garnka a
powierzchnią płyty. Należy stosować się do zalecanych
sposobów czyszczenia. Sprawdzić czy dno garnków jest
czyste wykorzystywać tylko takie naczynia, które mają gładkie
dno. Nie usuniemy w ten sposó małych rys, lecz z czase staną się
one mniej widoczne dzięki regularnemu czyszczeniu.
Ślady metalu (mogą wyglądać tak jak rysy).
• Nie należy przesuwać po powierzchni płyty garnków
aluminiowych. Aby usunąć rysy należy czyścić płytę zgodnie z
zaleceniami.
• W przypadk zastosowania nieodpowiednich materiałów
czyszczących lub pozostawienia plam z rozlanych płynów i
tłuszczów, należy posłużyć się skrobakiem i użyć zalecanego
środka czyszczącego.
Ciemne plamy
• Skorzystać ze skrobaczki i użyć zalecanego środka
czyszczącego.
Odbarwienia na płycie
• Ślady aluminium i miedzi pochodzące z garnków, a także osady
mineralne pochodzące z wody lub z żywności usuwamy pastą
czyszczącą.
Na powierzchni płyty pozostaje roztopiony karmel lub
tworzywo sztuczne
• Patrz rozdział CZYSZCZENIE.
Zanim wezwiesz autoryzowany serwis proszę sprawdzić czy
płyta jest podłączona do instalacji elektrycznej i czy bezpiecznik
nie jest przepalony. Jeżeli nie można zidentyfikować usterki
proszę odłączyć płytę i wezwać serwis. Proszę nie próbować
naprawiać płyty samodzielnie. Płyta objęta jest gwarancja
producenta na warunkach określonych w polskiej karcie
gwarancyjnej. Do naprawy serwisowej wymagany jest dowód
zakupu oraz polska karta gwarancyjna.
11. OCHRONA ŚRODOWISKA
Urządzenie to jest oznaczone zgodnie z
Dyrektywą Europejską 2012/19 / UE w sprawie
z u ż yt e go s pr zę tu e le kt ry c zn eg o i
elektronicznego (WEEE). Zużyty sprzęt
elektryczny i elektroniczny zawiera zarówno
substancje zanieczyszczające (o negatywnym
oddziaływaniu na środowisko naturalne), jak i
podstawowe elementy (które można użytkować
wielokrotnie). Ważne, aby zużyty sprzęt
elektryczny i elektroniczny poddawać specjalnej obróbce w celu
bezpiecznego usunięcia i pozbycia się wszystkich środków
zanieczyszczających i odzyskania wszystkich surowców
wtórnych.
Poszczególne osoby odgrywają ważną rolę w zapobieganiu
szkodliwemu oddziaływaniu zużytego sprzętu elektrycznego i
elektronicznego na środowisko, ważne aby przestrzegać kilku
podstawowych zasad:
• Zużyty sprzęt elektryczny i elektroniczny nie może być
traktowany jako odpad komunalny.
• Zużyty sprzęt elektryczny i elektroniczny przekazuje się do
właściwych punktów zbiórki prowadzonych przez gminy lub
koncesjonowane firmy. W wielu krajach, gdzie jest dużo
zużytego sprzętu elektrycznego i elektronicznego, odbiera się
go z domów.
• gdy kupuje się nowe urządzenie, zużyte można zwrócić do
sprzedawcy, który musi je przyjąć bezpłatnie, na zasadzie
zamiany jeden za jeden, o ile urządzenie to jest tego samego
rodzaju i ma takie same funkcje, jak urządzenie dostarczone
Płyta nie działa lub nie działają niektóre pola
• Nieprawidłowe podłączenie elektryczne. Proszę sprawdzić czy
płyta jest podłączona zgodnie z zaleceniami.
• Płyta ze sterowaniem sensorowym: duża ilość rozlanego płynu
albo duży obiekt może przykrywać niektóre przyciski panelu
sterowania. Usuń obiekt lub oczyść płytę.
• Panel sterowania jest zablokowany. Odblokować.
Nie można wyłączyć płyty
• Panel sterowania jest zablokowany. Odblokować.
Płyta automatycznie wyłącza się.
• Duża ilość rozlanego płynu albo duży obiekt może przykrywać
dwa przyciski panelu sterowania przez ponad 10s. Płyta
przechodzi w stan bezpieczny i rozlega się sygnał akustyczny.
Usuń obiekt lub oczyść płytę.
• Pola grzewcze wyłączają się automatycznie po pewnym zbyt
długim czasie.
Częste wyłączanie się i włączanie pól.
• Czas trwania cyklu włączenia wyłączenia zmienia się zależnie
od ustawionego poziomu mocy:
- Niski poziom: krótki czas pracy,
- Wysoki poziom: dłuższy czas pracy.
Miga wskazanie „H” gorących pól
• Za wysoka temperatura obwodów elektronicznych.
Płyta powinna być sprawdzona przez autoryzowany serwis.
65 PL
Page 66

VEILIGHEIDSINSTRUCTIES
LEES AANDACHTIG DEZE GEBRUIKSAANWIJZING TENEINDE UW KOOKVLAK OPTIMAAL TE KUNNEN
BENUTTEN. Wij raden u aan deze installatie- en gebruiksaanwijzing te bewaren voor toekomstige
raadpleging, en vooraleer het kookvlak in te bouwen, het serienummer van het kookvlak te noteren
voor een eventuele tussenkomst van onze naverkoopdienst.
. WAARSCHUWING: Het apparaat en de bereikbare delen worden heet tijdens het gebruik. Zorg ervoor
dat u de warmingselementen niet aanraakt.
. Kinderen jonger dan 8 jaar niet bij het apparaat llaten mits onder continue toezicht.
. Dit apparaat kan op een veilige manier worden gebruikt door kinderen van 8 jaar en ouder en
personen met verminderde lichamelijke, zintuiglijke of geestelijke vermogens of gebrek aan ervaring
en kennis als zij onder toezicht staan of worden geïnstrueerd over het gebruik van het apparaat.
. Kinderen niiet met het apparaat laten spelen.
. Schoonmaak en onderhoud niet door kinderen laten doen zonder toezicht.
. WAARSCHUWING: Onbeheerd koken op een kookplaat met olie en vet kan gevaarlijk zijn en kunnen
brand als gevolg hebben.
. Probeer NOOIT een vuur met water te doven, maar zet het apparaat uit en dek de vlam af met een
deksel of blusdeken.
. WAARSCHUWING: Gevaar voor brand; bewaar geen items op de kookplaat.
. WAARSCHUWING: Als de kookplaat gebarsten is, zet de kookplaat uit om een mogelijke electrische
schok te voorkomen.
. Gebruik nooit een stoom- of hogedrukspuitbus om het apparaat schoon te maken.
. Het apparaat is niet bedoeld om te worden bediend door middel van een externe timer of een
afstandsbediening.
. De halogeenzone waarmee het kookvlak is uitgerust straalt een aanzienlijk sterk licht uit; vermijd
deze lampen langdurig aan te staren.
. De middelen voor ontkoppeling moeten zijn opgenomen in de vaste bedrading in overeenstemming
met de bedradingsregels
. De instructie vermeldt het type van de kabel dat moet worden gebruikt, rekening houdend met de
temperatuur van de achterkant van het apparaat.
. Als het snoer beschadigd is, moet het worden vervangen door de fabrikant, de dealer of vergelijkbare
bekwame personen om een brand te voorkomen.
. Het is ten zeerste aangeraden kinderen op afstand te houden tijdens het opwarmen en het koelen
van een kookzone zolang de icone voor resthitte brandt, om ernstige brandwonden te voorkomen.
. Plaats geen aluminiumfolie of plastieken bakjes op de warme kookzones.
. Wij raden u aan na elk gebruik het kookvlak schoon te maken om accumulatie van vuil en vetten te
vermijden. Zoniet koken en verkolen deze resten en verwekken ze bij elk verder gebruik rook en
onaangename geuren. Ze kunnen eveneens een brand verwekken.
• Nooit direct op het kookvlak koken, maak gebruik van kookpannen.
• De pan steeds centraal op de kookzone plaatsen.
• Verschuif de pannen niet op het kookvlak; risico voor krassen.
• Gebruik het oppervlak van de kookzone niet als snijd- of werkvlak.
• Geen zware voorwerpen boven het kookvlak plaatsen, ze zouden kunnen vallen en het kookvlak
beschadigen.
• Sla geen voorwerpen op het kookvlak op.
66 NL
Page 67

1. ALGEMENE AANWIJZINGEN
Wij werken voortdurend aan de verbetering van onze producten. Daarom kan de apparatuur zijn aangepast met de nieuwste
technische verbeteringen.
Dit toestel is conform aan de normen vastgelegd in de richtlijn CEE89/109 (voor wat betreft de onderdelen die in contact
komen met voedingsmiddelen).
Door het plaatsen van de markering op dit product, verklaren wij, op onze eigen verantwoordelijkheid, alle Europese
veiligheids-, gezondheids- en milieu-eisen na te leven opgesteld in de regelgeving geldig voor dit product.
2. INSTALLATIE
Het installeren van een huishoudelijk apparaat kan ingewikkeld zijn en moet correct worden uitgevoerd om te voorkomen dat de veiligheid
van de consument ernstig in gevaar komt. Daarom moet dit worden uitgevoerd door een vakkundig en gekwalificeerd persoon en moet
de installatie worden uitgevoerd volgens de geldende technische voorschriften. In het geval dit advies wordt genegeerd en de installatie
door een niet-gekwalificeerd persoon wordt uitgevoerd, wijst de fabrikant alle verantwoordelijkheid voor ieder mogelijk technisch falen
van het product af, of dat nu wel of niet resulteert in schade aan goederen of in verwondingen bij personen.
3. INBOUW
Het meubel of de tafel waarin het kookvlak wordt geïntegreerd
alsook de eventueel aangrenzende meubelwanden moeten
vervaardigd zijn uit een temperatuurbestendig materiaal. Het is
dan ook vereist dat de bekleding die het meubel of de tafel afdekt
wordt bevestigd door een temperatuurbestendige lijm om te
voorkomen dat deze loskomt.
Installatie (fig B / D) :
• Het kookvlak wordt geleverd met een dichtingstrip. Voor de
plaatsing van deze strip,
- bescherm zorgvuldig het glasoppervlak en keer het kookvlak
om, met het glasoppervlak naar onder.
- plaats de afdichtstrip rondom het kookvlak.
- installeer deze heel zorgvuldig teneinde alle infiltratie in het
• Voorzie een ruimte van minstens 5 cm tussen het kookvlak en de
aangrenzende wanden.
• Indien de onderkant van het kookvlakframe zich dichtbij een
zone bevindt die normaal toegankelijk is bij het opbergen of
andere werkzaamheden, plaats een scheidingswand op 1 cm
onder de kookvlakbodem om alle risico’s voor brandwonden of
beschadiging te vermijden.
• In geval van installatie van een dampkap boven de kookplaat,
raadpleeg de installatie-instructies in de dampkap aangaande
van de juiste afstand.
LET OP:
Mocht het nodig zijn dat het aansluitsnoer vervangen moet
worden, verbind de draden dan volgens onderstaande
kleur/codes (wij raden aan dit door een erkende installateur te
laten doen):
BLAUW - NEUTRAAL (N)
BRUIN - FASE (L)
GEEL/GROEN - AARDE ( )
De kookplaat is voorzien van een voedingskabel welke alleen
aangesloten kan worden op 220-240 V tussen fases of fase en
neutraal.
• Aansluiten.
Het is mogelijk om de kookplaat aan te sluiten op:
. Driefasing 220-240 V3~
. Driefasing 380-415 V2N~
• Om verder te kunnen met de nieuwe aansluiting moet u de
instructies volgen.
. Zorg dat u voordat gaat aansluiten dat u de juiste zekering
gebruikt en de draden lang genoeg zijn om normaal te monteren.
. Draai de kookplaat om, glaszijde naar het werkblad, zorg dat u
het glas goed beschermt.
• Open de deksel als volgt :
1 2 3
• Indien het geplaatst wordt op de kast boven de kookplaat, moet
een minimale afstand van 70 cm worden gerespecteerd.
4. ELEKTRISCHE AANSLUITING
De installatie voor het apparaat moet worden uitgevoerd in
overeenstemming met de geldende normen in het land van
installatie. De fabrikant groep wijst alle verantwoordelijkheid af in
geval deze schikking niet wordt nageleefd.
LET OP: Voordat u begint met de electrische aansluiting
controleer goed of de installatie gerandaard is en of er geen
schade is. De fabrikant kan niet verantwoordelijk worden gesteld
voor ongelukken die ontstaan door het aansluiten van haar
apparatuur op niet geaarde stopcontacten.
Opgelet :
• Vooraleer het apparaat aan te sluiten, controleer de voedingsspanning op de teller, de instelling van de stroomverbreker, het
kaliber van de smeltveiligheid en de aardleidingcontinuïteit van
de installatie.
• De elektriciteitsvoorziening moet gebeuren via een stopcontact
met aardleiding of via een omnipolaire breukvoorziening met een
contactopening. Indien het kookvlak is voorzien van een stekker,
moet het stopcontact op een toegankelijke plaats worden
aangebracht.
• De groen/gele beveiligingsdraad moet verbonden worden aan
aardingklemmen van het apparaat enerzijds en van de installatie
anderzijds.
• Onze verantwoordelijkheid dekt geen enkel incident of
eventuele gevolgen hiervan die kunnen voorkomen bij het
gebruik van een apparaat zonder aardingleiding of waarvan de
aardingleiding defect is.
• Schroef de klem los "1"
• Zoek de twee lipjes aan de zijkant.
• Steek de punt van de schroevendraaier voor beide lipjes
"2"en "3" duw en druk, open de deksel.
• Stroomdraad losmaken.
Verwijder de schroeven en zorg dat de overbrugging (shunts)
en geleiders van de kabel op hun plaats blijven.
Trek de kabel eruit.
• De nieuwe aansluiting maken gaat als volgt.
Kies de voedingskabel volgens de tabel.
Shunt
plaatjes
Attentie: Zorg dat de schroeven goed vast zitten!!
67 NL
Strip het einde van elke
voedingskabel (10 mm)
Bevestig deze in de klem met behulp
van de overbruggingen (shunts) let
goed op de wat er is aangegeven in
de tabel.
Plaats de deksel er weer op.
Draai de schroeven vast.
Page 68

AANSLUITING OF HET LICHTNET
LAY OUT
“ 1 ”
Enkelfasing 220-240 V~ of Tweefasing 220-240 V2~
Dikte
LAY OUT
“ 2 ”
HO5V2V2F
Driefasing 220 - 240 V3~
Dikte
HO5V2V2F
Driefasing 380 - 415 V2N~
Dikte
HO5V2V2F
Tweefasing 220-240 V2~Enkelfasing 220-240 V~
LAY OUT
“ 3 ”
3x2,5 3x2,5 3x2,5
4x1,5 4x1,5 4x1,5
4x1,5 4x1,5 4x1,5
De volgende informatie zal u helpen bij het selecteren van de
best aangepaste pannen voor het bekomen van optimale
kookresultaten.
Roestvrij staal: aanbevolen.
Best met “Sandwich” bodem. De “Sandwich” bodem combineert
de kwaliteiten van roestvrij staal (uitzicht, duurzaamheid en
stabiliteit) met de voordelen van aluminium of koper
(warmteoverdracht en gelijkmatige warmteverdeling).
Aluminium: dikwandige bodem aangeraden.
Goede warmtegeleiding. Aluminiumrestjes laten soms sporen op
het kookvlak, maar kunnen bij snelle ingreep makkelijk verwijderd
worden. Vermijd dunwandige aluminiumplaat.
Gietijzer / vitrokeramiek: afgeraden.
Zwakke prestaties. Kan het glasoppervlak krassen.
Koperen bodem: dikwandige bodem aangeraden.
Goede prestaties, maar koper kan sporen nalaten met het uitzicht
van krassen. Deze kunnen verwijderd worden door een spoedige
reiniging van het kookvlak. Let erop het water in de pan niet
volledig te laten verdampen, daar het verhitte metaal aan het
oppervlak kan blijven plakken. Een verhitte koperen pan kan op
het kookvlak definitieve sporen nalaten.
Driefasing 220-240 V3~ Driefasing 380-415 V2N~
Ph = Fase N = Neutraal T = Aarding
5. PRESENTATIE - DE ZONES
• Highlightzone: Werkt binnen 3 seconden en is geschikt voor
rustig, homogeen en langdurig koken.
De keramische kookplaat heeft voordeel door de grotere warmte
afgifte, voortgebracht door de Hightligt kookzones, waardoor het
kookproces versnelt. De modificatie van de kookplaat heeft geen
invloed gehad hitte bestendigheid van het glas, maar heeft wel de
veiligheid verbeterd.
Met de "sprinter" optie kan er een kooktijd verkorting gehaald
worden tot wel 15%, afhankelijk van de manier van koken en de
gebruikte pannen.
6. SELECTIE VAN KOOKGERIEF
Het gebruik van kwaliteitspannen is onontbeerlijk voor
het bekomen van goede kookresultaten
Porselein / geëmailleerd staal: goede prestaties.
Uitsluitend met vlakke bodem, dunwandige en gladde bodem.
7. GEBRUIK VAN HET KOOKVLAK
• Wacht enkele seconden na het aanzetten van het kookvlak
vooraleer de elektronische bediening te activeren.
- Druk op de toets . Het led-lampje is actief.
De elektronische bediening van het kookvlak is ingeschakeld.
Elke displayzone geeft nu het vermogenniveau “ ” .
- Tenzij u binnen 20 seconden reageert, dooft de elektronische
bediening en de opstartprocedure moet herhaald worden.
. ACTIVEREN VAN EEN KOOKZONE
- Druk op de selectietoets van de gewenste kookzone.
De "0" van de overeenkomstige zone blijft oplichten wanneer het
lampje van de andere "0" zones dooft.
TYPE B
77
- Druk op de “-” of “+” toets om het vermogenniveau van 1 tot 9 in te
stellen.
- Bij het aanhoudend indrukken van de “-” of “+” toetsen
verhoogt of verlaagt het vermogenniveau geleidelijk.
• Gebruik kwaliteitspannen met een vlakke bodem: de
volmaakt vlakke bodem vermijdt verhittingspunten waarop het
voedsel kan aanbranden en de dikte van het metaal verschaft een
perfecte warmteverdeling.
• Controleer of de panbodem droog is: bij het vullen van de pan
of bij gebruik van bijvoorbeeld een pan uit de koelkast, controleer
of deze volledig droog is; deze voorzorg vermijdt de vervuiling van
het kookvlak.
• Gebruik pannen met een doormeter die de kookzone
volledig dekt: zorg ervoor dat de panbodem minstens even groot
is als de kookzone. Indien de bodem lichtjes groter is, wordt de
energie optimaal gebruikt.
De volge nde vo orbee lden w orden ter informat ie
aangegeven. De ervaring zal u toelaten deze instellingen
aan uw persoonlijke smaak en gewoonten aan te passen.
0 : Uit
U -1 : Aan
2 : Smelten
3 : Warm houden
4 : Opwarmen
5 : Ontdooien, stoven, garen, op lage temperatuur koken
6 : Koken zonder deksel
7 : Doorbakken vlees en gebraad
8 : Gebraad aan hoge temperatuur koken
9 : Frying, boiling large quantities of water.......
68 NL
Page 69

• UITZETTEN VAN EEN KOOKZONE
. WERKING VAN DE VERGRENDELTOETS
Hiervoor moet de kookzone in werking zijn, selectioneer de
gewenste kookzone.
- Druk op de "-" toets tot het vermogen niveau " " op het
displayscherm verschijnt. De kookzone gaat onmiddellijk uit, de
icoon " " verdwijnt na 10 seconden.
- Voor een snelle stop, drukt u tegelijkertijd op de "-" en zone
selectietoets gewenste.
Het vermogenniveau loopt automatisch tot terug. De
kookzonewordt uitgeschakeld.
. UITZETTEN VAN HET VOLLEDIGE KOOKVLAK
De werking van de kookzones en van de timer
kunnen ten allen tijde worden stopgezet door de
aan/uit toets gedurende 3 seconden in te
drukken.
. WAARSCHUWINGICOON VOOR RESTHITTE
Zodra de temperatuur van het kookzone-oppervlak ongeveer 60°
overschrijd t verschijnt de volgende indicatie op de
bedieningsconsole: .
We raden u aan de kookzone uit te schakelen voor het einde van
de bereidingstijd en van de residuele hitte gebruik te maken om
het kookproces zachtjes te voleindigen.
Zodra de temperatuur minder dan 60° bedraagt verdwijnt de
indicatie.
N.B. : na het uitzetten mits stroomonderbreking verdwijnt de
resthitte-icoon definitief zelfs wanneer de oppervlaktemperatuur
meer dan 60°bedraagt.
. WERKING VAN HET KOOKVLAK MET TWEE ZONES
Bepaalde tafelmodellen zijn uitgerust
met twee zones ..........................
>
Door de vergrendelfunctie kan voorkomen worden dat kinderen
de kookplaat in werking stellen. Deze functie is ook nuttig tijdens
het schoonmaken van de kookplaat.
Om de kookplaat te vergrendelen: (Voorbeeld voor kookplaten
met 4 kookzones)
Druk op de Aan/Uit toets en daarna (alleen na deze handeling kan
de kindervergrendeling ingeschakeld worden)
Druk de “-” toets en de keuzetoets
linksboven gelijktijdig in totdat u
een pieptoon hoort; hoort u geen
pieptoon dan schakelt u de
kookplaat uit en herhaalt u de hele
instelprocedure.
Dru k daa rna w eer op d e
keuzetoets linksboven.
Deze procedure moet binnen 10
sec. plaatsvinden en er mag geen
andere toets dan die hierboven
beschreven ingedrukt worden;
anders zal de instelling geannuleerd worden doordat deze niet
voltooid is.
Op alle displays verschijnt “L”
v o o r “ L O C K E D ”
(=kindervergrendeling tegen
on b ew u s t e i n s c ha k el i ng ) ;
wanneer een kookzone de status
“heet” heeft bereikt, verschijnen
afwisselend “L” en “H”.
Deze wordt helemaal ingeschak e l d w a n n e e r h e t
bijbehorende zone in werking wordt gesteld. De diode van
het aanvullende zone gaat branden.
TYPE B
7
LED
Om het extra zone uit te schakelen:
- Druk nogmaals op de toets "7". De Led die hoort bij het extra
zone gaat uit, wanneer dit kookvlak wordt uitgeschakeld.
Om het extra zone opnieuw in te schakelen:
- . De Led is opnieuw actief.Druk op de toets "7"
. PROGRAMMEREN VAN EEN KOOKZONE (volgens model)
Elke kookzone kan worden geprogrammeerd voor een maximale
duur van 99 minuten.
- Zet de gewenste kookzone aan volgens de voorgaande
instructies.
- Druk tegelijk op de toetsen "-" en "+" om de timer te activeren,
verschijnt.
TYPE B
7
Om de kookplaat te ontgrendelen:
Om de kookplaat te ontgrendelen
moet de “-” toets en de keuzetoets
l i n k s b o v e n ( k o o k z o n e
linksachter) gelijktijdig ingedrukt
worden en moet daarna de “-”
toets weer ingedrukt worden.
De kookplaat is nu ontgrendeld en
het tiptoets bedieningspaneel
gaat weer in STAND-BY staan.
LED
- Druk nogmaals op de toets "+" om een duur in minuten tekiezen
van 0 tot 99 minuten of druk op de toets "-" om de tijdte
verminderen van 30 minuten tot 0. De timer diode in de buurt van
het niveau wordt weergegeven.
--> De ingestelde tijd kan op ieder moment worden gewijzigd.
Wanneer de tijd verstreken is, wordt het kookvlak automatisch
uitgeschakeld en klinkt er een geluidssignaal. Druk op het knop
om dit stop te zetten.
--> De timer kan afzonderlijk worden als alarmsignaal gebruikt
worden; een bel rinkelt dan na afloop van de ingestelde tijd.
69 NL
Page 70

. WERKING VAN DE SNELLE OPWARMFUNCTIE
Alle kookzones zijn voorzien van een snelle opwarmfunctie die
toelaat de kookzone snel op temperatuur te brengen
Activeren van de snelle opwarmfunctie
- Start de gewenste kookzone op, kies met behulp van de toets de
"+" positie “9”, laat de toets even los en druk ze vervolgens weer
in; het scherm vertoont afwisselend "A" (snel opwarmen) en “9”
(vermogenniveau).
- Verminder indien nodig door de gewenste kookpositie te
selecteren.
Max. werkingsduur
vooraleer
automatische
uitschakeling*
:
0 H
:
6 H
:
6 H
:
5 H
:
5 H
:
4 H
:
1,5 H
:
1,5 H
:
1,5 H
:
1,5 H
Kookpositie
0
1
2
3
4
5
6
7
8
9
Geleverd
vermogen
(%)
:
0 %
: 2.5 % : 0 : 2 H
:
:
:
:
:
:
:
:
:
3 %
6 %
11 % :
16 % :
19 % :
32 % :
45 % :
65 % :
100 % : 0
Temperatuur-
stijgingduur
(minuten)
:
0
:
1
:
3
5
6,5
8,5
2,5
3,5
4,5
Bvb.: kookzone van 1800 W in positie 6 = geleverd vermogen 32
% van 1800 W met geactiveerde “snelle opwarmfunctie” levert de
kookzone een vermogen van 1800 W gedurende 25 minuten en
stelt deze na deze periode in op 576 W.
De kookzones worden automatisch uitgeschakeld wanneer ze te
lang in werking zijn. De uitschakelingduur is afhankelijk van het
gebruikte vermogen.
Om de verwarmingsversneller uit te schakelen:
- Stel het gewenste kookvlak in werking, druk op de toets " - "
om terug te keren naar een normale verwarmingspositie, verlaag
tot de gewenste positie of positie " 0 " om het kookvlak uit te tot de
gewenste positie of positie " 0 " om het kookvlak uit te zetten.
8. ONDERHOUD VAN HET VITROKERAMISCH
KOOKVLAK
• Voor de schoonmaak van het glasoppervlak van de kookzone is
het belangrijk te wachten tot deze volledig is afgekoeld.
• Gebruik slechts specifieke schoonmaakproducten voor het
reinigen van het oppervlak van de kookzone, zoals smeer en
krabber. Deze zijn makkelijk verkrijgbaar in de handel.
• Vermijd overkoken; de resten die op het kookvlak vallen branden
snel aan en zijn nadien moeilijk te verwijderen.
• Het is aanbevolen alle stoffen die kunnen smelten zoals
plastieken voorwerpen, suiker en suikerbevattende producten op
afstand te houden van het kookvlak.
ONDERHOUD:
- breng enkele druppels van een specifiek reinigingsmiddel op het
vitrokeramisch oppervlak aan.
- poets met een licht bevochtigde zachte doek of keukenrolpapier,
vooral de vervuilde delen.
- spoel af indien nodig.
- wis het oppervlak af met een droge zachte doek of
keukenrolpapier, tot het volledig schoon is.
Indien na deze onderhoudsbeurt de vlekken aanhouden
- breng opnieuw enkele druppels van een specifiek
reinigingsmiddel op het vitrokeramisch oppervlak aan.
- verwijder met de hulp van een krabber de hardnekkigste
vlekken, rekening houdend met een hoek van 30° ten
opzichte van het kookvlak.
- spoel af indien nodig.
- wis het oppervlak af met een droge zachte doek of
keukenrolpapier, tot het volledig schoon is.
- herhaal de voorgaande procedure indien nodig.
RAADGEVINGEN:
Regelmatige schoonmaakbeurten vormen een beschermende
laag die essentieel is voor het behoeden van krassen en slijtage.
Zorg ervoor dat het kookvlak zuiver is alvorens deze weer te
gebruiken.
Gebruik enkele druppels witte azijn of citroensap om de water- en
kalksporen weg te werken.
Wis vervolgens af met een keukenrolpapier, breng enkele
druppels van een specifiek reinigingsmiddel aan en droog het
oppervlak af. Het vitrokeramisch kookvlak is bestand tegen de
wrijving van kookgerief met vlakke bodem, maar het is
aanbevolen deze tijdens het verplaatsen op te heffen.
NOTA :
30° Maxi
- Vermijd het gebruik van een te vochtige spons.
- Gebruik nooit stalen voorwerpen zoals messen en
schroevendraaiers.
- Bij gebruik van een krabber zal dit het oppervlak niet
beschadigen zolang een invalhoek van 30° wordt
aangehouden.
- Houd de krabber met scheermes op afstand van kinderen.
- Gebruik geen bijtende producten of schuurpoeders.
• De kookvlaklijst, naargelang het model:
Om het kookvlak te reinigen zonder de lijst te beschadigen,
was het geheel af met water en zeep, spoel af en droog met
een zachte doek.
Een verandering in de kleur van het keramische oppervlak
heeft geen enkele invloed op de werking of de stabiliteit
van het oppervlak. Dergelijke verkleuringen zijn meestal
een gevolg van verbrande etensresten of het gebruik van
pannen gemaakt van materialen zoals aluminium of
koper; Deze vlekken zijn moeilijk te verwijderen.
70 NL
Page 71

9. PROBLEMEN OPLOSSEN
10. SERVICE DIENST
De kookzones handhaven geen lichte bouillon of frituur.
• Gebruik uitsluitend pannen met vlakke bodem. Bij de minste
afstand tussen de pan en het kookvlak is een correcte
warmteoverdracht tussen de kookzone en de pan onmogelijk.
• De bodem van de pan moet volledig de diameter van de
geselecteerde kookzone dekken.
Te traag kookproces.
• Gebruik van niet aangepaste pannen. Gebruik uitsluitend
kookgerief met een vlakke, zware bodem en met een diameter die
overeenstemt met de kookzone.
Kleine krassen op het glazen oppervlak.
• Verkeerde reinigingsmethode, of pannen met ruwe bodem, of
zand- of zoutdeeltjes tussen het kookvlak en de pan. Raadpleeg
het hoofdstuk “ONDERHOUD”.
Zorg ervoor dat de panbodem vóór gebruik zuiver is en
gebruik uitsluitend pannen met een gladde bodem. De
krassen kunnen slechts beperkt worden door een doelmatige
schoonmaak.
Sporen van metaal
• Verschuif geen voorwerpen in aluminium op het kookvlak;
raadpleeg de schoonmaakinstructies.
• U gebruikt verkeerd kookgerief. De vlekken blijven. Neem een
kr a b b er en volg de instructies van het hoo f d stuk
“ONDERHOUD”.
Donkere vlekken
• Neem een krabber en volg de instructies van het hoofdstuk
“ONDERHOUD”.
Heldere vlekken op het kookvlak.
• Sporen van aluminium of koperen pannen, maar eventueel ook
van water, mineraal- of voedselresten.
Deze kunnen verwijderd worden met een reinigingscrème.
Gesmolten suiker of plastiek op het kookvlak.
• Raadpleeg het hoofdstuk “ONDERHOUD”.
Het kookvlak werkt niet.
• Een grote overborreling of voorwerp bedekt minstens 3
bedieningstoetsen gedurende minimum 10 seconden. Reinig de
overborreling of verwijder het voorwerp.
• De bedieningsconsole is vergrendeld. Druk op de vergrendelingtoets om de bedieningen te ontgrendelen.
Alvorens u de Service Dienst belt
Indien de oven niet werkt, raden wij u aan:
— na te gaan of het apparaat goed is aangesloten.
Indien u de oorzaak niet kunt ontdekken:
— haal de stekker uit het stopcontact of sluit de elektriciteit van
de oven af middels de hoofdschakelaar
— gebruik de oven niet meer en ga er niet zelf aan sleutelen
— bel de Service Dienst
Noteert u, voordat u de Service Dienst belt, het typenummer
van uw oven (zie binnenzijde van de ovendeur) Bij de oven zit
een garantiecertificaat, welke u recht geeft op één jaar garantie
vanaf de datum van aankoop.
11. BESCHERMING VAN HET MILIEU
Dit apparaat is gemarkeerd volgens de
Europese norm 2012/19/EU inzake Afval van
elektrisch en elektronisch apparatuur (WEEE).
WEEE be v a t zo w el vero n t r e inigen d e
substanties (die negatieve gevolgen op het
milieu kunnen hebben) en basiscomponenten
(die hergebruikt kunnen worden). Het is
be l a ng r ij k om W EE E aan b ep a al d e
behandelingen te onderwerpen om alle
vervuilende onderdelen te verwijderen en op juist wijze afstand
van te doen, en alle materialen te herstellen en te recyclen.
Particulieren kunnen hier een belangrijke rol in spelen door te
zorgen dat een WEEE geen milieukwestie wordt; het is
essentieel de volgende basisregels te volgen:
• WEEE mag niet als huishoudelijk afval worden beschouwd.
• W EEE moet w orden overhan d igd aan r elevant e
inzamelpunten die worden beheerd door de gemeente of door
geregistreerde bedrijven. In veel landen bestaat er voor grote
WEEE een ophaaldienst.
• Als u een nieuw apparaat koopt, kan het oude bij de leverancier
worden ingeleverd, welke het gratis bij u moet afhalen op een
één-op-één basis, zolang het apparaat van soortgelijk type is en
dezelfde functies heeft als de geleverde apparatuur.
Het kookvlak schakelt niet uit.
• De bedieningsconsole is vergrendeld. Druk op de vergrendelingtoets om de bedieningen te ontgrendelen. Raadpleeg het
hoofdstuk “Werkingsduur”.
Het kookvlak schakelt automatisch uit.
• Een grote overborreling bedekt minstens 2 bedieningstoetsen
gedurende minimum 10 seconden, het kookvlak schakelt in
veiligheidsmodus en bliept. Reinig de overborreling of verwijder
het voorwerp.
• De kookzones stoppen automatisch wanneer ze gedurende
een tamelijk lange periode zijn ingeschakeld. Raadpleeg het
hoofdstuk “Werkingsduur”.
Stop/start cyclusduur van kookzones.
• De stop/startcyclus hangt af van het gewenste
vermogenniveau:
- laag vermogen: korte werkingsduur,
- hoog vermogen: lange werkingsduur.
Het gehele kookvlak of sommige kookzones werken niet.
• Vraag een technieker te controleren of de aansluiting
overeenstemt met de instructies.
De «H» resthitte icoon knippert.
• De temperatuur van de elektronische componenten is te hoog.
Vraag een technieker de installatie van het kookvlak te
controleren in overeenstemming met de instructies.
71 NL
Page 72
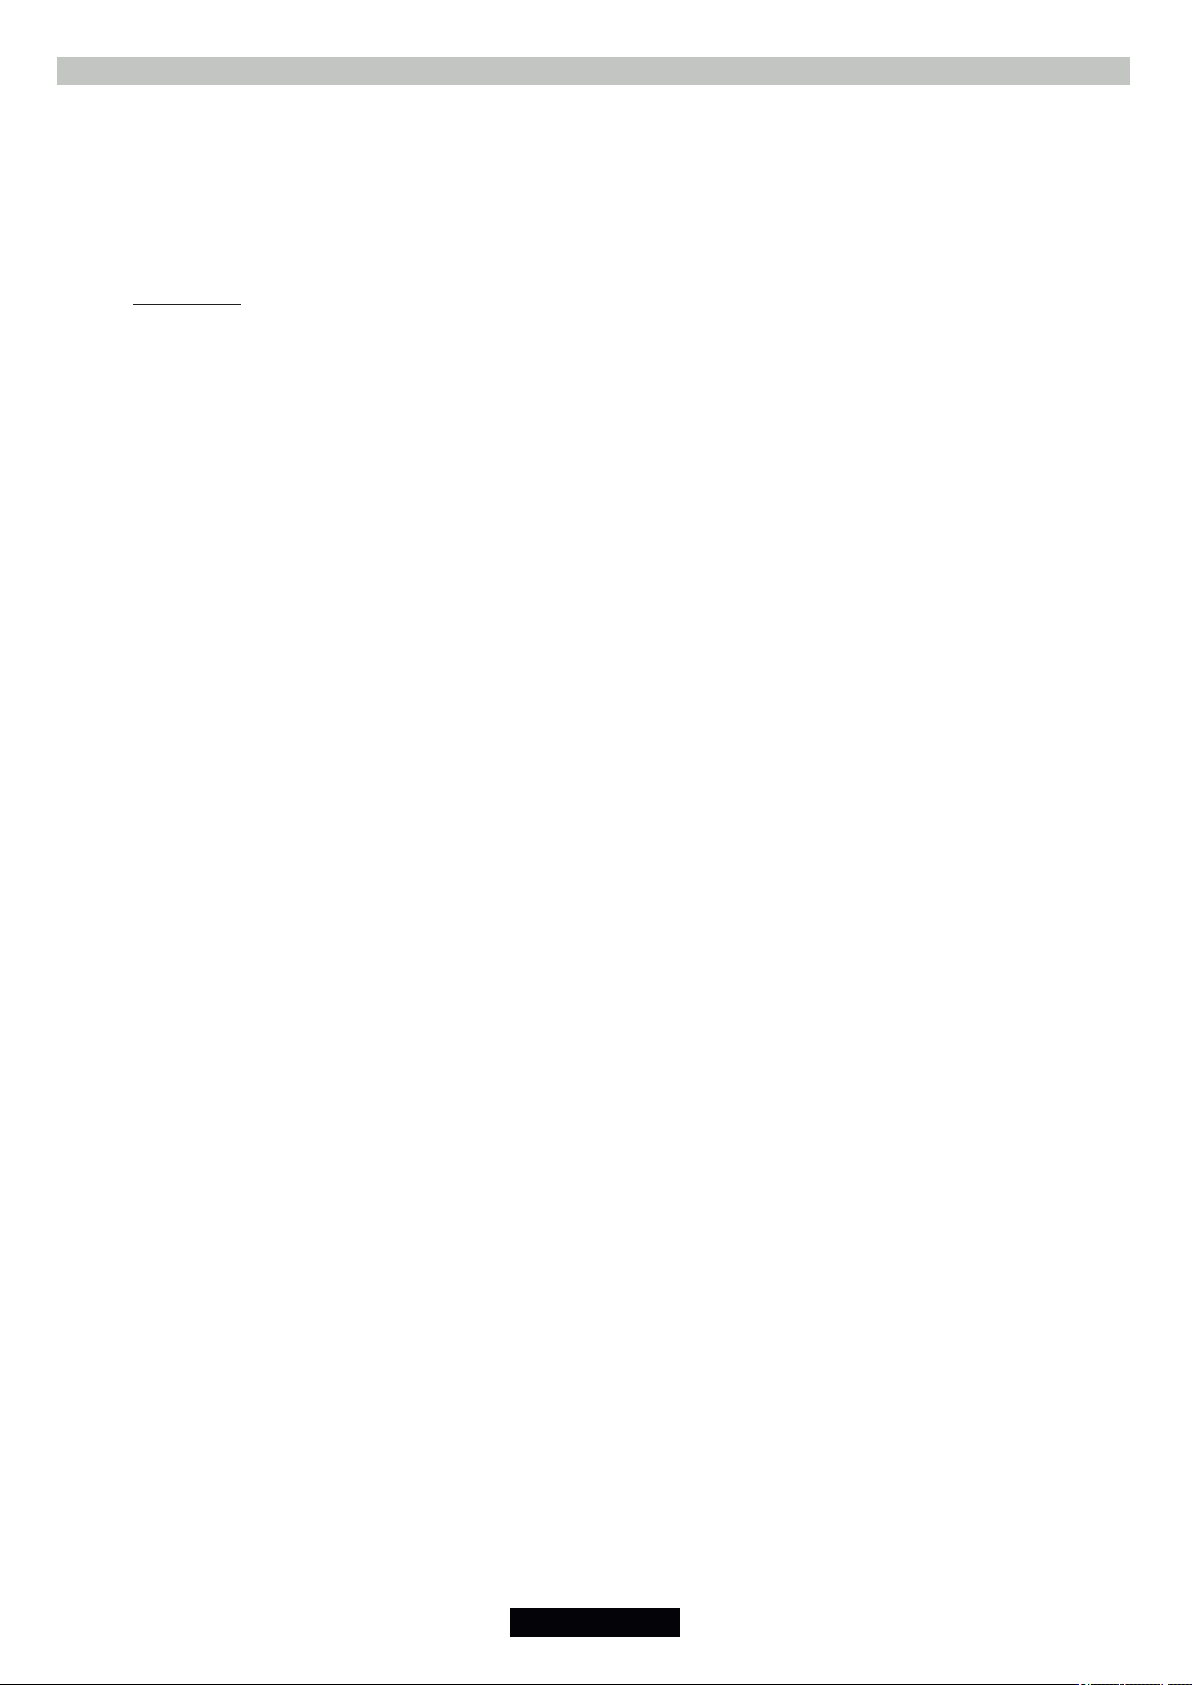
SÄKERHETSINSTRUKTIONER
LÄS ANVISNINGARNA NOGGRANT SÅ ATT DU KAN ANVÄNDA DIN HÄLL PÅ BÄSTA SÄTT. Vi
rekommenderar att du förvarar installations- och bruksanvisningarna för senare referens. Innan du
använder hällen första gången bör du anteckna serienumret nedan, om du skulle behöva underhåll
eller reservdelar.
. VARNING! Produkten och dess åtkomliga delar blir varma under användning. Var noga med att
undvika beröring av värmeelementen.
• Barn under 8 år som befinner sig i närheten av produkten ska alltid hållas under uppsikt.
. Produkten får användas av barn från 8 års ålder och personer med nedsatt fysisk förmåga,
känselförmåga eller mental förmåga, eller personer med bristande erfarenhet eller kunskaper, om de
hålls under uppsikt eller instrueras i dess användning på ett säkert sätt och förstår riskerna med den.
• Låt inte barn leka med produkten.
• Rengöring och underhåll får inte utföras av barn utan uppsikt
• VARNING! Fett eller olja som värms utan uppsikt kan vara farligt och orsaka brand.
• Försök ALDRIG att släcka en brand med vatten, utan stäng av produkten och täck eldslågorna med
exempelvis ett lock eller en brandfilt.
• VARNING! Brandrisk – förvara inte föremål på tillagningszonerna.
• VARNING! Om ytan spricker ska produkten stängas av för att undvika risk för elektrisk chock.
• Använd inte våtdammsugare för rengöring
• Produkten är inte avsedd att användas med hjälp av en extern timer eller ett separat
fjärrkontrollsystem.
• Du bör inte titta direkt på halogenelementen.
• Frånkopplingsfunktionen måste byggas in i den fasta ledningsdragningen enligt elföreskrifterna.
• I anvisningarna ska uppges vilken typ av sladd som ska användas, med hänsyn till temperaturen på
baksidan av produkten.
• Om strömkabeln skadas måste den ersättas av tillverkaren eller dess serviceombud eller liknande
behörig person för att undvika fara.
• För att undvika brännskador rekommenderar vi att du håller barnen borta från tillagningszonerna
oavsett om dessa används eller är avstängda. Så länge som värmeindikatorn är tänd bör försiktighet
iakttas.
• Hällen bör rengöras efter varje användning för att förhindra ansamling av smuts och fett. Med
tanke på obehaglig lukt, rökutveckling och brandrisk bör sådant tas bort från hällen eftersom det
bränns fast nästa gång hällen används.
• Låt bli att vidröra värmezonerna under användning och en stund efteråt.
•Laga aldrig maten direkt på den glaskeramiska hällen. Använd alltid lämpliga kokkärl och redskap.
Kokkärlet ska placeras i mitten på tillagningszonen som används.
Använd inte keramikhällen som skärbräda.
Dra inte kastruller och liknande över hällen.
Förvara inga tunga saker ovanför hällen. Om de ramlar ner på hällen kan hällen skadas.
Använd inte hällen som arbetsyta.
72 SE
Page 73

1. ALLMÄNNA VARNINGAR
Vi strävar ständigt efter att förbättra vår produktkvalitet och modifierar därför våra produkter i takt med de senaste tekniska
landvinningarna.
De delar av produkten som kan komma i kontakt med matvaror uppfyller kraven enligt EU-direktiv 89/109.
Genom att placera märkning på denna product, försäkrar vi att på vårt ansvar övernstämmelse med alla europeiska
säkerhets-, hälso-, och miljökrav som anges I lagstiftningen för denna produkt.
2. INSTALLATION
Att installera en hushållsapparat kan vara komplicerat, och om det inte görs korrekt föreligger risk för allvarliga
personskadorDärför bör du låta en fackman utföra installationen enligt gällande tekniska regler och föreskrifter. Om detta råd
ignoreras, och installationen inte utförs av en fackman, avsäger sig tillverkaren allt ansvar för eventuella tekniska fel på
produkten, oavsett om dessa resulterar i skador på egendom eller personskada.
3. INBYGGNAD
Både utrymmet i vilket spishällen installeras, och dess omgivning,
måste vara tillverkade av värmebeständiga material. Alla
dekorlaminat ska dessutom vara limmade med värmebeständigt
lim.
Installation (fig. B / D):
• En vattentät tätning medföljer hällen.
Före montering:
- vänd hällen upp och ner med glasytan nedåt.
Var noga med att skydda glaset mot skador.
- montera tätningen runt hällen.
- kontrollera att den sitter korrekt, så att inte läckage uppstår in i
underskåpet.
• Spisen skam den undre delen av hällen vid monteringen
monteras minst 5 cm från alla vertikala ytor.
• Oligger nära ett område som normal rengörs vid städning,
montera en avskiljning
1 cm under hällens undre del för att undvika att bränna dig eller
andra skador.
Hällen har en elanslutningskabel som kan anslutas till ett uttag
med 220-240 V mellan faser eller mellan fas och nolla.
• Anslut den till ett uttag. Välj rätt säkring enligt
Hällen kan emellertid anslutas till:
. Trefas 220-240 V3~
. Trefas 380-415 V2N~
Följ nedanstående instruktioner för ansluta apparaten.
• Innan du ansluter hällen, kontrollera att den är avsäkrad med rätt
typ av säkring, och att den har lämpliga kablar som har kapacitet
att spänningsmata den.
• Vänd på hällen, placera glassidan mot arbetsbänken och var
noga med att skydda glaset.
• Öppna locket i följande ordning:
1 2 3
• Vid installering fläkten ovanför spisen, kontrollera
installeringsanvisningarna att försäkra rätt avstånd från spisen.
• Om fläkten är installerad i ett skåp är det minimum avståndet
70 cm.
4. ELEKTRISK ANSLUTNING
"Installationen måste överensstämma med standardföreskrifterna." Tillverkaren avsäger sig allt ansvar för de skador
som kan uppstå vid olämplig eller felaktig användning.
VARNING:
• Kontrollera före all elektrisk användning att elspänningen
som visas på elmätaren är korrekt, att jordfelsbrytarens
inställningar är korrekta, att installationens jordanslutning
är obruten och att enheten är korrekt avsäkrad
• Den elektriska anslutningen vid installationen bör göras till ett
jordat uttag eller en flerpolig frånskiljare.
Om apparaten har ett eluttag måste den installeras så att det
går att komma åt uttaget.
• Elförsörjningens gula och gröna ledning ska anslutas till både
hällens och elnätets jordanslutningar.
• Tillverkaren kan inte hållas ansvarig för olycksfall orsakade av
att apparaten är ojordad eller har bruten jordförbindelse.
• Eventuella frågor om elkabeln ställs till en fackman eller
återförsäljaren.
• skruva loss kabelklämman "1"
• leta reda på de båda flikarna på sidorna
• placera en spårskruvmejsels blad framför varje flik "2" och "3",
skjut in och tryck på
• ta bort locket.
Lossa elsladden.
• ta bort skruvarna som fäster anslutningsplinten, där du hittar
matningsslangens shuntar och ledare
• koppla ifrån matningssladden.
• Åtgärder som ska utföras för att skapa en ny anslutning:
- Välj elsladd enligt rekommendationerna i tabellen.
- Placera elsladden i kabelklämman.
- Skala av 10 mm isolering i
matningssladdens ändar, observera
hur lång sladden måste vara för att
anslutas till anslutningsplinten.
- Fäst ledaren enligt uppställningen i
enlighet med installationen och med
hjälp av shuntarna som du har tagit
fram i den första åtgärden.
- Fäst locket.
- Skruva i kabelklämman.
SHUNT
OBS!
Om du måste byta ut strömsladden ansluter du i enlighet med
följande färger/koder:
BlÅ - NEUTRAL (N)
BRUN - STRÖMFÖRANDE (L)
GULGRÖN - JORD ( )
OBS! Se till att kopplingspanelens skruvar är ordentligt
åtdragna.
73 SE
Page 74

Anslutning till anslutningarna på anslutningsplinten
Följande information är till hjälp när du ska välja vilka kärl som är
lämpligast för att få goda resultat.
LAY OUT
“ 1 ”
Enfas 220-240 V~ / Tvåfas 220-240 V2~
Kabel
LAY OUT
“ 2 ”
HO5V2V2F
Trefas 220-240 V3~
Kabel
HO5V2V2F
Trefas 380-415 V2N~
Kabel
HO5V2V2F
Enfas 220-240 V~ Tvåfas 220-240 V2~
Trefas 220-240 V3~ Trefas 380-415 V2N~
Ph = Fas N = Nollan T = Jord
LAY OUT
“ 3 ”
3x2,5 3x2,5 3x2,5
4x1,5 4x1,5 4x1,5
4x1,5 4x1,5 4x1,5
5. PRESENTATION
• hilight-zoner: en metalledare är jämnt fördelad över ytan. Den
är effektiv inom tre sekunder och passar för stabil, homogen
tillagning samt längre koktider.
Glaskeramikhällen avger mer värme tack vare highlighttillagningszonerna, vilket påskyndar tillagningsprocessen.
Ändringar av hällens design påverkar inte glasets förmåga att
klara av höga temperaturer, men kontrollmöjligheterna har
förbättrats.
Med "Sprinter-funktionen" kan man minska tillagningstiden med
upp till 15 %, beroende på tillagningssätt och vilken typ av kärl
som används.
7. ANVÄNDA GLASKERAMIKHÄLLEN
• När vredet har aktiverats, vänta några sekunder innan
duaktiverar de elektroniska reglagen.
- Tryck på knappen . Led-lampan är aktiv.
Den elektroniska styrningen till hällen är aktiveras.
Värmenivånvisas i varje visningszon och kontrollampan
blinkar.
- E f t e r 2 0 s e k u n d e r ut a n a n vä n d n i ng s l å s d e n
elektroniskastyrningen av och startprocessen måste upprepas.
. AKTIVERA EN TILLAGNINGSZON
- Tryck på valknappen till den tillagnings zon du vill använda.
"0" på det önskade området skiner klarast, medan de andra
områdernas "0" släcks
TYP B
6. REKOMMENDERADE KOKKÄRL
Kokkärl av god kvalitet är avgörande för att hällen ska
fungera så bra som möjligt.
• Använd alltid kokkärl av god kvalitet med helt plan och
tjock botten: Med den här typen av kokkärl undviker du ojämn
värmefördelning som kan få maten att bränna fast. Tjocka
metallkastruller och pannor ger en jämnare värmefördelning.
• Kontrollera att kärlets botten är torr: När du fyller kärlet med
vätska eller använder ett kärl som har förvarats i kylen är det
viktigt att kärlets botten är helt torr innan det placeras på hällen.
På så sätt undviker man att det uppstår fläckar på hällen.
• Använd kärl med en diameter som täcker hela den aktuella
ytan: Kärlets storlek ska inte vara mindre än den uppvärmda
ytan. Om det är något större utnyttjas energin maximalt effektivt.
7
- Tryck på knappen -/+ för att välja värmenivå mellan 1 och 9.
Hållner knappen +/- och värmenivån höjs eller sänks
gradvis.
Följande exempel är endast till för informationsändamål.
Justeradem efter egna erfarenheter så att de passar din
smakoch dina vanor.
0 : Av
1 : ) Långsam uppvärmning
2 : ) ..... Upptining
3 : Varmhållning
4 : Uppvärmning
5 : Upptining, sjudning, kokning, tillagningpå låg temperatur
6 : Kokning utan lock
7 : Fräsning, bryning och stekning av kött
8 : Kokning och stekning på hög temperatur
9 : Stekning
74 SE
Page 75

. STÄNGA AV EN TILLAGNINGSZON
- Tryck på valknappen till den tillagnings zon du vill använda.
- -Tryck på knappen för att visa värmenivån .Nu stängs
zonenav, indikatorn slocknar efter 10 sekunder.
- För snabbavstängning, tryck samtidigt på knappar - och
knappen den tillagnings zon Aktiv.
. LÅSKNAPP - FUNKTION
Låsfunktionen hindrar oavsiktlig aktivering av spishällen av barn,
och det är också användbart vid rengöring av spishällen.
Låsa kokhällen. (Exempel för häll med 4 zoner)
Tryck på ON/OFF knappen och sedan (endast efter denna
operation barnlåset kan aktiveras)
Värmenivån sänks automatiskt till .Tillagningszonen stängs av.
. ALLMÄN AVSTÄNGNING
Tillagningszonerna och timern kan stängas av
när somhelst genom att man trycker på knappen
På-Av.
. INDIKATOR FÖR KVARVARANDE VÄRME
Så här visar kontrollpanelen att tillagningszonernas
yttemperaturöverskrider 60° C: .
När temperaturen sjunker under 60° Csläcks indikatorn .När
matlagningen börjar lida mot sitt slut rekommenderar vi attdu
stänger av hällen och avslutar matlagningen med hjälp
avtillagningszonernas restvärme.
Obs! När strömmen har brutits slocknar indikatorn för
kvarvarandevärme helt även om yttemperaturen är högre än 60°
C.
. ANVÄNDA DEN EXTRA TILLAGNINGSZONEN
(TVÅ ZONER)
Tillagningszonen med två zoner
finns på vissa modeller. .............................
>
När tillagningszonen är i funktion är hela den extra
tillagningszonenaktiv.
TYP B
7
Tryck samtidigt på minusknappen
o c h d e n ö v r e v ä n s t r a
väljarknappen tills du hör en
ljudsignal ; om du inte hör en
ljudsignal, stäng AV hällen och
upprepa hela inställningsproceduren.
Efter det tryck igen den övre
vänstra väljarknappen.
Detta förfarande med proceduren
måste ske inom 10 sekunder och
ingen annan nyckel än den som
beskrivits ovan kan pressas;
annars kommer proceduren att avbrytas för att den inte har blivit
fullföljt.
Alla skärmar visar en "L" för låsta
(= b ar nlå s m o t o av s ik tl i g
aktivering) - om en kokzon är i
laget "varm, "L "och "H" visas
växelvis.
Låsa upp hällen.
För att låsa upp kontrollenheten,
ä r d e t n ö d v ä n d i g t a t t
minusknappen och den övre
vänstra väljarknappen (kokzon
b a ko m v ä n s t e r ) p re s sa s
samtidigt och därefter trycker
man på minusknappen igen.
Låsningen har nu avlägsnats och
pe k st yr n in ge n åt er gå r ti ll
STANDBY läge.
Avaktivera den extra tillagningszonen:
LED
- Tryck igen på knappen "8" för den extra tillagningszonen.
Motsvaran de kontrollampa slockna r när den extra
tillagningszonen avaktiveras.
Återaktivera den extra tillagningszonen:
- Tryck på knappen "7" för den extra tillagningszonen. Led-lampan
tänds igen.
. PROGRAMMERA EN TILLAGNINGSZON (enligt modell)
Alla tillagningszoner kan programmeras till max. 99 minuter.
Dukan endast programmera en zon i taget.
- A kt iv e ra d en ö ns ka d e z on e n g e no m a t t f ö lj a
ovanståendeinstruktioner.
-Tryck samtidigt på "-" och "+" för att aktivera timer, " " visas.
TYP B
7
LED
- Ange tid i minuter mellan 0 och 99 genom att trycka på "+"
knappen igen, eller minska tiden från 30 minuter till 0 genom att
trycka på ”-”.
--> Du kan när som helst ändra den programmerade
När tiden har gått stängs tillagningszonen av automatiskt och en
ljudsignal hörs under 1 minut. Tryck på valfri knapp för att stänga
av den.
--> Timern kan användas utan tillagnings zon, som en
påminnelse, den avger en signal efter den programmerade
tiden.
75 SE
Page 76

. SNABBUPPVÄRMNING
Alla zonerna har en ”snabbuppvärmning” som höjer
temperaturen snabbare. Det är perfekt för att sluta köttporer eller
för att snabbt koka upp stora mängder vätska.
Starta snabbuppvärmningen
- Tryck på på/av-knappen
- Aktivera den önskade zonen, tryck på knappen ”+” för läge ”9”,
släpp knappen en kort stund och tryck på ”+” igen: displayen
visar omväxlande ”A” ”snabbuppvärmning” och ”9” värmenivå.
- Sänk värmen vid behov, då visar displayen omväxlande ”A”
”snabbuppvärmning” och det nya värmeläget.
Tillagnin-
gsläge
Frigjord
effekt (%)
Snab- buppvärm ningstid
(minuter)
Maximal
användningstid
för automatiskt
stopp*
0
:
1
2
3
4
5
6
7
8
9
0 %
: 2.5 % : 0 : 2 H
:
3 %
:
6 %
:
11 % :
:
16 % :
:
19 % :
:
32 % :
:
45 % :
:
65 % :
:
100 % : 0
:
0
:
1
:
3
5
6,5
8,5
2,5
3,5
4,5
:
0 H
:
6 H
:
6 H
:
5 H
:
5 H
:
4 H
:
1,5 H
:
1,5 H
:
1,5 H
:
1,5 H
När ”snabbuppvärmningen” är slutförd visar effektnivån ett stabilt
värde.
8. UNDERHÅLL OCH RENGÖRING
• Låt hällen svalna innan du utför något underhåll på den.
• Använd endast produkter (rengöringsmedel och skrapor) som
är särskilt utformade för keramikhällar. De kan köpas i
järnaffärer.
• Undvik spill eftersom allt som hamnar på hällen snabbt bränns
fast vilket gör rengöringen svårare.
• Det är lämpligt att hålla undan alla substanser från hällen som
kan smälta, exempelvis plast, socker och sockerbaserade
produkter.
UNDERHÅLL:
- Placera ett par droppar av specialrengöringen på hällens yta.
- Gnid bort envisa fläckar med en mjuk trasa eller lätt fuktat
hushållspapper.
- Torka av med en mjuk trasa eller torrt hushållspapper tills hällen
är helt torr.
Om vissa fläckar ändå inte går bort:
- Placera ett par droppar till av specialrengöringen på hällens yta.
- Skrapa med skrapan, med en vinkel på högst 30° mot hällen, tills
fläcken är borta.
- Torka av med en mjuk trasa eller torrt hushållspapper tills hällen
är helt torr.
- Upprepa vid behov.
Några tips:
Regelbunden rengöring skapar ett skyddande lager som
förhindrar repor och slitage. Se till att ytan är ren innan du
använder hällen igen. Du kan få bort fläckar efter hårt vatten med
några droppar vinäger eller citronjuice. Torka sedan med
hushållspapper och några droppar specialrengöring.
Keramikhällens yta tål att du drar kokkärlen över den, men det
bästa är om du lyfter kärlen när du flyttar dem mellan olika
zoner.
Avaktivera snabbuppvärmningen
- Slå på tillagningszonen, tryck på knappen "-" för att återgå till
normal värmenivå, sjunka till önskad värmenivå eller till
"0" för att stänga av tillagningszonen
Obs!
30° Maxi
Använd inte en alltför blöt svamp. Använd aldrig kniv
eller skruvmejsel.
En skrapa med rakblad skadar inte ytan, så länge den
hålls i en vinkel på högst 30°.
Förvara skrapor med rakblad utom räckhåll för barn.
Använd aldrig slipmedel eller skurprodukter.
• Omgivande metall: rengör den omgivande metallen med tvål
och vatten. Skölj och torka med en mjuk trasa.
S VA K A P R O M E N A B O J E N A P O V R Š I N I
STAKLOKERAMIČKE PLOČE NE UTIČU NA NJEN RAD I
STABILNOST. TAKVE FLEKE UGLAVNOM NASTAJU OD
SPALJENIH OSTATAKA HRANE ILI USLED KORIŠĆENJA
POSUĐA NAPRAVLJENIH OD ALUMINIJUMA ILI BAKRA.
OVE FLEKE JE TEŠKO UKLONITI SA POVRŠINE PLOČE.
76 SE
Page 77

9. PROBLEMLÖSNING
10. EBFLTEEMR VSÅORLVD
För låg temperatur på tillagningszonerna • Använd bara kärl
med plan undersida. Om ljus syns mellan kärlet och hällen leder
inte zonen korrekt.
• Kärlets undersida bör täcka den valda zonens diameter helt.
Tillagningen går för långsamt
• Olämpliga kärl används. Använd endast tunga kärl med plan
undersida och en diameter som är minst lika stor som
tillagningszonen.
Små repor eller avlagringar på hällens glasyta
• Felaktig rengöring eller kärl med grov undersida används.
Partiklar som sand- eller saltkort har hamnat mellan hällen och
kärlets undersida. Läs avsnittet om rengöring. Se till att kärlens
undersidor är rena före användning och använd bara kärl med
plan undersida. Repor kan minimeras genom korrekt rengöring.
Metallmärken
• Dra inte aluminiumkärl på hällen.
Se rengöringsrekommendationerna.
• Du använder rätt material, men fläckarna går inte bort. Använd
ett rakblad och följ rengöringsanvisningarna.
Mörka fläckar
• Använd ett rakblad och följ rengöringsanvisningarna.
Ljusa områden på hällen
• Märken efter aluminium- eller kopparkärl, men också rester av
mineraler, vatten eller mat. Dessa kan tas bort med
hällrengöringsmedel.
Karamellisering eller smält plast på hällen.
• Läs avsnittet om rengöring.
Hällen eller vissa zoner fungerar inte
• Shuntarna sitter inte korrekt på kontaktkortet. Kontrollera att
anslutningarna följer rekommendationerna.
• Hällar med känsliga kontroller: Spilld mat eller ett föremål har
täckt minst två knappar under minst 10 sekunder. Torka bort spillet
eller ta bort föremålet.
• Kontrollpanelen är låst. Lås upp hällen.
Kontrollera följande innan du kontaktar en servicetekniker:
– att kontakten sitter i ordentligt och att säkringen är hel.
Om du inte hittar felet slår du av apparaten. Försök inte laga den
själv, utan ring återförsäljaren eller ett Servicecenter. Apparaten
har en garanti som ger kostnadsfri reparation vid servicecentret.
11. MILJÖSKYDD
Denna produkt är märkt enligt det europeiska
direktivet 2012/19 / EU om avfall från
elektriska och elektroniska produkter (WEEEdirektivet). WEEE-direktivet innehåller både
förorenande ämnen (som kan orsaka negativa
konsekvenser för miljön) och baskomponenter
(som kan återanvändas). Det är viktigt att
WEEE förordnar särskilda behandlingar, i
syfte att ta bort och kassera alla förorenande
ämnen, och att återställa och återvinna alla material, på rätt
sätt.
Individer kan spela en viktig roll för att se till att WEEEdirektivet inte blir en miljöfråga; det är viktigt att följa vissa
grundregler:
• WEEE-relaterade material bör inte behandlas som
hushållsavfall.
• WEEE-relaterade material bör överlämnas till relevanta
insamlingsplatser som förvaltas av kommunen eller av
registrerade företag. I många länder, för stora WEEErelaterade material, kan hämtning i hemmet finnas.
• När du köper en ny apparat, kan den gamla återlämnas till
den återförsäljare som bör hämta den gratis enligt ett-till-ettförhållande, så länge produkten är av samma typ och har
samma funktion som den tillhandahållna produkten
Hällen går inte att stänga av.
• Kontrollpanelen är låst. Lås upp hällen.
Hällen stängs av automatiskt
• Spilld mat eller ett föremål har täckt minst två knappar under
minst 10 sekunder. Hällen växlar till säkerhetsläge och en
ljudsignal hörs. Torka bort spillet eller ta bort objektet.
• Tillagningszonerna stängs av automatiskt efter en stund. Se
avsnittet om drifttid.
På/avslagningsfrekvens för tillagningszoner
• På/av-cyklerna varierar beroende på värmen:
- låg nivå: kort drifttid,
- hög nivå: lång drifttid.
Eftervärmesindikatorn ”H” blinkar.
• Elektronikens temperatur är för hög. En elektriker bör
kontrollera att monteringen följer rekommendationerna.
77 SE
Page 78

YLEISIÄ TURVAOHJEITA
LUE OPAS HUOLELLISESTI, JOTTA SAAT LIEDESTÄSI PARHAAN MAHDOLLISEN HYÖDYN.
Suosittelemme, että säilytät asennus- ja käyttöoppaan myöhempää tarvetta varten ja merkitset ennen
lieden asentamista sen sarjanumeron alla olevaan ruutuun siltä varalta, että tarvitset huollon apua.
• VAROITUS: Laite ja sen kosketettavissa olevat osat kuumenevat käytön aikana. Varo koskettamasta
lämmitysvastuksia.
• Alle kahdeksanvuotiaita lapsia ei saa päästää laitteen lähelle ilman jatkuvaa valvontaa.
• Yli kahdeksanvuotiaat lapset ja henkilöt, joiden fyysinen tai henkinen toimintakyky on rajallinen tai
joilla ei ole kokemusta tai tietoa laitteen käytöstä, voivat käyttää laitetta, jos heitä valvotaan tai heille
on annettu ohjeita laitteen turvallisesta käytöstä ja siihen liittyvistä vaaroista.
• Lapset eivät saa leikkiä tällä laitteella.
• Lapset eivät saa puhdistaa tai huoltaa laitetta ilman valvontaa
• VAROITUS: Ruoan kypsentäminen öljyssä tai rasvassa ilman valvontaa on vaarallista ja voi aiheuttaa
tulipalon.
• ÄLÄ KOSKAAAN yritä sammuttaa paloa vedellä, vaan kytke laite pois päältä ja yritä sitten
tukahduttaa tuli esim. kannella tai sammutuspeitteellä.
• VAROITUS: Tulipalon vaara: älä säilytä mitään liesitasoilla.
• VAROITUS: Jos pinnassa on halkeama, kytke laite pois päältä välttääksesi sähköiskun vaaran.
• Älä puhdista laitetta höyrypesurilla.
• Laitetta ei ole tarkoitettu käytettäväksi ulkoisen ajastimen tai erillisen kauko-ohjausjärjestelmän
avulla.
• On parempi olla katsomatta pitkään suoraan halogeenielementteihin
• Kiinteästi kytketyn laitteen virran on oltava kytkettävissä pois säännösten mukaisesti.
• Ohjeissa on mainittava käytettävän johdon tyyppi ottaen huomioon laitteen takapinnan lämpötila.
• Jos virtajohto on vaurioitunut, sen saa vahinkojen välttämiseksi vaihtaa vain valmistaja tai tämän
valtuuttama huoltomies tai henkilö, jolla on vastaava pätevyys.
• On ehdottoman suositeltavaa pitää lapset loitolla keittotasosta sen käytön aikana tai käytön
Jälkeen, kun kuumista keittoalueista varoittavat merkkivalot vielä palavat, jotta ei ole vaaraa vakavista
palovammoista.
• Keittoalueille ei saa laittaa alumiinifoliota tai muovisia astioita.
• Liettä on hieman puhdistettava jokaisen käyttökerran jälkeen, jotta siihen ei keräänny likaa ja
rasvaa. Puhdistamatta jäänyt lika ja rasva kuumenee seuraavalla käyttökerralla ja synnyttää savua
ja epämiellyttävää käryä palonvaarasta puhumattakaan.
• Älä koske keittoalueisiin niiden käytön aikana tai liian pian sen jälkeen.
• Älä milloinkaan kypsennä ruokaa pelkällä keraamisella keittotasolla. Käytä aina asianmukaisia
keittoastioita.
• Aseta astia aina käyttämäsi keittoalueen keskelle.
• Älä käytä tasoa leikkuulautana.
• Älä siirrä astioita vetämällä tasoa pitkin.
• Älä säilytä raskaita esineitä lieden yläpuolella. Ne voivat vaurioittaa sitä, jos ne sattuvat putoamaan
liedelle.
• Älä käytä liettä työtasona.
• Älä käytä liettä säilytyspaikkana.
78 FI
Page 79

1. HUOMAA
Parannamme jatkuvasti tuotteidemme laatua ja saatamme tehdä kodinkoneisiin uusimpien teknisten parannusten mukaisia
muutoksia.
Laitteen osat, jotka saattavat joutua kosketuksiin elintarvikkeiden kanssa, ovat direktiivin 89/109/ETY säännösten mukaisia.
Tämä laite täyttää Euroopan turvallisuus- terveys- ja ympäristövaatimukset, jotka on asetettu lainsäädännössä tälle
laitteelle.
2. ASENNUS
Kodinkoneen asennus voi olla vaativa työ, joka virheellisesti tehtynä saattaa aiheuttaa vakavan vaaran kodinkoneen
käyttäjälle. Tämän vuoksi asennus pitäisi antaa ammatillisesti pätevän henkilön tehtäväksi voimassa olevien teknisten
määräysten mukaisesti. Jos tätä neuvoa ei noudateta, vaan asennuksen tekee epäpätevä henkilö, valmistaja ei vastaa
mistään tuotteen toimintahäiriöstä riippumatta siitä, aiheutuuko siitä vahinkoa tai tapaturmia.
3. ASENNUS KALUSTEISIINB
Kalusteiden, joihin liesi on tarkoitus asentaa, sekä kaikkien sen
vieressä olevien kalusteiden on oltava kuumuuden kestäviä.
Lisäksi kaikki koristelaminaatit on kiinnitettävä kuumuutta
kestävällä liimalla.
Asennus ( fig. B / D ):
• Lieden mukana tulee vedenpitävä tiiviste.
Ennen asennusta:
- Käännä liesi ylösalaisin niin, että keraaminen taso on alaspäin.
Varmista, että keraaminen taso on suojattu.
- Asenna tiiviste lieden ympärille.
- Varmista, että se on kunnolla paikoillaan, jottei mitään pääse
valumaan kalusteiden sisään.
• Jätä vähintään 5 cm:n väli lieden ja viereisten kalusteiden välille.
• Jos liettä asennettaessa lieden alempi puoli on yhteydessä
alueeseen, johon voi ylettyä käsittelyn tai puhdistuksen aikana,
asenna 1 cm:n kokoinen kappale lieden perustan alle, jotta et
aiheuttaisi sille vahinkoa.
• Asennettaessa liesituuletinta keittotason yläpuolelle,tarkista
asennusohjeesta tarvittava etäisyys keittotasoon.
• Asennettaessa kalustoon, keittotason ja liesituulettimen vaadittu
minimi etäisyys on 70 cm.
4. SÄHKÖLIITÄNTÄ
« Asennuksen on oltava tavanomaisten direktiivien mukainen. »
Valmistaja ei ota vastuuta vahingoista, jotka ovat seurausta
sopimattomasta käytöstä.
Varoitus:
•Tarkista aina ennen sähkötöitä mittariin merkitty verkkojännite,
ylivirtasuojan asetus, maadoituskytkennän johtavuus ja
sulakkeen sopivuus.
•Laite tulee kytkeä käyttämällä maadoitettua pistoketta tai
moninapaista kytkintä.
Jos liedessä on pistoke, se on asennettava niin, että siihen
tarvittaessa päästään käsiksi.
•Virtajohdon keltavihreä johdin on kytkettävä maaliittimeen sekä
virtalähteen että lieden päässä.
•Valmistaja ei vastaa onnettomuuksista, jotka aiheutuvat
maadoittam a ttoman lait t een käytöst ä tai huonost a
maadoituskontaktista.
• Kaikissa virtajohtoon liittyvissä ongelmatilanteissa on otettava
yhteyttä huoltopalveluun tai valtuutettuun sähköasentajaan.
Liesi on kuitenkin mahdollista kytkeä myös seuraavanlaisiin
virtalähteisiin:
. Kolmivaihevirta 220–240 V3~.
. Kolmivaihevirta 380–415 V2N~
Noudata seuraavia ohjeita, kun teet uuden liitännän:
• Varmista ennen laitteen liittämistä verkkovirtaan, että laite on
suojattu sopivalla sulakkeella ja että sen sähköjohdot ovat
sopivasti mitoitetut laitteen normaalin toiminnan takaamiseksi.
• Käännä liesi ympäri, lasipuoli työtasoa vasten. Varo rikkomasta
lasia.
• Avaa kansi seuraavaa järjestystä noudattaen:
1 2 3
•Ruuvaa auki johdon kiinnitin "1".
•Etsi sivuilla olevat kaksi tappia.
•Pane tasapäisen ruuvitaltan pää "2"- ja "3"-tapin päälle, paina
sisään ja purista.
•Irrota kansi.
Virtajohdon vapauttaminen.
•Poista ruuvit, jotka pitelevät sivuvirtavastuksen kiinnityslevyt ja
virtajohdon johtimet sisältävää riviliitintä.
•Vedä virtajohto ulos.
Uuden liitännän tekeminen:
• Valitse virtajohto taulukon suositusten perusteella.
• Pujota virtajohto kiinnittimeen.
• Poista eriste virtajohdon johtimien päistä 10 millimetrin matkalta.
Ota huomioon suositeltu johdon pituusriviliittimeen kiinnittämistä
varten.
• Kiinnitä johdin kaavion osoittamalla tavalla asennustavan
mukaan ja ensimmäisessä vaiheessa talteen otettujen
sivuvirtavastuksen kiinnityslevyjen avulla.
• Kiinnitä kansi.
• Ruuvaa johdon kiinnittimet paikoilleen.
SHUNT
HUOMAA
Jos virtajohto on vaihdettava, yhdistä johto seuraavien
värien/koodien mukaisesti:
SININEN - NOLLAJOHTO (N)
RUSKEA - JÄNNITEJOHTO (L)
KELTA/VIHREÄ - MAADOITUSJOHTO ( )
Liesi asennetaan verkkojohdolla, joka mahdollistaa liitännän
ainoastaan 220–240 voltin sähköliitäntään.
H U O MA UT US : Va rm is ta , e tt ä
kytkentäriman ruuvit ovat tiukasti kiinni.
79 FI
Page 80

LIITTIMIEN KIINNITTÄMINEN RIVILIITTIMEEN:
KEITTOASTIOIDEN VALITSEMINEN - Seuraavassa on tietoja,
joiden avulla valitset parhaiten toimivat keittoastiat.
LAY OUT
“ 1 ”
YKSIVAIHEVIRTA 220-240 V~ / KAKSIVAIHEVIRTA 220-240 V2~
JOHTO
HO5V2V2F
KOLMIVAIHEVIRTA 220-240 V3~
JOHTO
HO5V2V2F
KOLMIVAIHEVIRTA 380-415 V2N~
JOHTO
HO5V2V2F
KOLMIVAIHEVIRTA 220-240 V3~
Ph = Vaihe N = Nolla T = Maa
LAY OUT
“ 2 ”
KAKSIVAIHEVIRTA 220-240 V2~YKSIVAIHEVIRTA 220-240 V~
KOLMIVAIHEVIRTA 380-415 V2N~
LAY OUT
“ 3 ”
3x2,5 3x2,5 3x2,5
4x1,5 4x1,5 4x1,5
4x1,5 4x1,5 4x1,5
Ruostumaton teräs: Erittäin suositeltava materiaali. Erityisen
hyvä, kun kattilassa on monikerrospohja. Monikerrospohjassa
yhdistyvät ruostumattoman teräksen edut (ulkonäkö, kestävyys
ja lujuus) alumiinin tai kuparin hyviin ominaisuuksiin
(lämmönjohtavuus, lämmön jakautuminen tasaisesti).
Alumiini: Suositellaan raskaita astioita. Hyvä lämmönjohtavuus.
Alumiinihiukkaset näyttävät joskus keittotasossa olevilta
naarmuilta, mutt a ne saadaan pois puhdist amalla
välittömästi. Alumiinin alhaisen sulamispisteen takia ei ohuita
alumiiniastioita pitäisi käyttää.
Valurauta: Voidaan käyttää, mutta ei suositella. Ei toimi kovin
hyvin. Voi naarmuttaa keraamista pintaa.
Kuparipohjaiset / keraamiset astiat: Suositellaan raskaita
astioita. Toimivat hyvin, mutta kuparista voi keittotasoon jäädä
naarmuilta näyttäviä hiukkasia. Ne voidaan pois taa
puhdistamalla taso välittömästi. Näiden astioiden ei kuitenkaan
saa antaa kiehua tyhjäksi. Ylikuumentunut metalli saattaa tarttua
kiinni keraamiseen tasoon. Ylikuumentunut kuparipohja jättää
pysyvän jäljen.
Posliini/emali: Toimii hyvin vain, kun astian pohja on ohut, sileä
ja tasainen.
Lasi-keramiikka: Ei suositella. Ei toimi kovin hyvin. Saattaa
naarmuttaa keittotason pintaa.
.
7
LASIKERAAMISEN LIEDEN KÄYTTÄMINEN
• Kun olet kytkenyt lieteen virran päälle, odota muutama
sekunti, jotta elektronisella ohjauksella on aikaa käynnistyä.
.
5
ESITTELY
• Korostettu alue: Koko pinnan peittää tasaisesti metalliliuska.
Se alkaa toimia 3 sekunnissa ja sopii tasaiseen, yhtenäiseen ja
pitkäkestoiseen ruoan laittamiseen.
Lasikeraaminen liesi kuumenee erityisen tehokkaasti lämpöä
tuottavilla korostetuilla kuumennusalueilla, mikä nopeuttaa
ruoan laittamista.
Lieteen tehdyt muutokset eivät ole vaikuttaneet lasin kykyyn
kestää korkeita lämpötiloja, vaan muutoksilla on kohennettu
lieden hallittavuutta.
Sprintteri-toiminnolla ruoanvalmistusaika lyhenee jopa 15 %
sen mukaan, millaista keittotapaa ja keittoastiaa käytetään.
6. KEITTOASTIAT
Parhaan tuloksen saat käyttämällä korkealuokkaisia
• Käytä aina laadukkaita keittoastioita, joissa on paksu ja
tasainen pohja: Tämän tyyppisissä keittoastioissa ei synny
paikallisia kuumia kohtia, joihin ruoka tarttuu. Paksut metalliset
padat ja kattilat jakavat lämmön tasaisesti.
astioita.
- Paina -painiketta .
Lieden elektroninen ohjauslaite käynnistyy. Jokaisen
keittoalueen lämpötila näkyy ja valvonta-LED vilkkuu.
- Jos mitään ei tehdä 20 sekunnin kuluessa, elektroninen
ohjauslaite kytkeytyy pois päältä ja käynnistäminen on
tehtävä uudelleen.
Electronic control of the hob is activated : in each display
zone, the heat level shows .
- After 20 seconds whithout use, the electronic control goes off
and the starting operation has to be repeated.
. KEITTOALUEEN KÄYNNISTÄMINEN
- Paina haluamasi keittoalueen valintapainiketta.
Halutun alueen "0" pysyy kirkkaimmin valaistuna ja muiden
alueiden "0" himmenee.
TYPE B
7
- Valitse haluamasi kuumennusteho 1–9 painamalla "-" tai "+"
painiketta. Kun pidät "-" tai "+" painiketta painettuna,
kuumennusteho suurenee tai pienenee vähitellen.
Seuraavat tiedot ovat vain suuntaa-antavia. Kokemuksen avulla
osaat soveltaa niitä omien mieltymystesi mukaan.
• Varmista, että padan tai kattilan pohja on kuiva: Kun
lisäät pataan nestettä tai kun käytät keittoastiaa, joka on ollut
jääkaapissa, varmista, että astian pohja on täysin kuiva, ennen
kuin laitat sen liedelle. Näin vältät liesitason tahriintumista.
• Käytä kattiloita, joiden pohjan halkaisija on riittävän
suuri kokonaan peittämään keittoalueen: Kattila ei saisi olla
pienempi kuin kuumennusalue. Kun se on hieman suurempi,
energiaa käytetään mahdollisimman tehokkaasti.
0 : Pois päältä
U -1: Langsom opvarmning
2 : ..... Sulatuslämpö
3 : Ruoan lämpimänä pitämien
4 : Lämmittäminen
5 : Sulattaminen, hauduttaminen, keittäminen, pienellä
ämmöllä keittäminen
6 : Ilman kantta keittäminen
7 : Paistaminen, lihan ruskistaminen tai paahtaminen
8 : Keittäminen ja paahtaminen korkeassa lämpötilassa
9 : Friteeraaminen, suurten vesimäärien keittäminen.......
80 FI
Page 81

. KEITTOALUEEN SAMMUTTAMINEN
- Paina haluamasi keittoalueen valintapainiketta.
- Paina "-" painiketta, kunnes näkyy kuumennusteho . Keittoalue
kytkeytyy pois päältä ja näyttö sammuu 10 sekunnin kuluttua.
- Voit lopettaa nopeasti, paina samanaikaisesti "-" ja
keittoalueen valinnan.
Kuumennusteho laskee automaattisesti arvoon . Keittoalue
kytkeytyy pois päältä.
. KOKO LIEDEN SAMMUTTAMINEN
Kaikki keittoalueet ja ajastin voidaan milloin
tahansa kytkeä pois päältä painamalla
päävirtakytkintä kolmen sekunnin ajan.
. VAROITUS JÄLKILÄMMÖSTÄ
Ohjaustaulusta käyttäjä näkee, minkä alueiden lämpötila on vielä
yli 60°C. Niiden kohdalla näytössä on . Kun alueen lämpötila
laskee alle 60°C:n, -näyttö sammuu.
Ruokaa valmistettaessa on suositeltavaa kytkeä loppuvaiheessa
keittoalue pois päältä ja käyttää alueen jälkilämpöä ruoan
hauduttamiseen.
HUOM: Sähkökatkoksen sattuessa jälkilämmön varoitusnäyttö
sammuu, vaikka alueen lämpötila olisikin vielä yli 60°C.
. LISÄ KUUMENNUSALUEEN KÄYTTÄMINEN
(KAKSIALUETTA)
Joissakin malleissa on kaksiosainen
kuumennusalue. .............................
>
. LUKITUSPAINIKKEEN TOIMINTA
Lukituspainike estää lapsia käynnistämästä keittolevyä
vahingossa. Se on hyödyllinen myös keittolevyä puhdistettaessa.
Keittolevyn lukitseminen (Esimerkki keittolevylle, joka sisältää
4 aluetta)
Paina ON/OFF-painiketta ja sen jälkeen (vain tämän toiminnon
jälkeen lapsilukko voidaan ottaa käyttöön)
Pai na y ht ä a i ka a m i in usnäppäintä ja valintanäppäintä
ylävasemmalla, kunnes kuulet
piippauksen. Jos e t t unne
piippausta, käännä keittolevy
OFF-asentoon, ja toista koko
säätötoiminto.
P a i n a s it t e n u u d el l e e n
valintanäppäintä ylävasemmalla.
T ä m ä n t oi m en p i t ee n o n
tapa hdu t tav a 10 s e kun nin
kuluessa, eikä muita kuin yllä
mainittua painiketta saa painaa;
muutoin syöte peruutetaan eikä sitä suoriteta.
Kaikissa näytöissä näkyy “L”,
mik ä tar k oit taa L UKI TTUA
( = l a p s i l u k k o t a h a t o n t a
käynnistystä vastaan) – jos
keittoalue on tilassa "kuuma, “L” ja
“H” näkyvät vuorotellen.
Alue on toiminnassa, kun kuumennusaluetta käytetään.
TYPE B
7
LED
Lisä kuumennusalueen ottaminen pois käytöstä:
- Paina lisä kuumennusalueen painiketta "7" uudelleen. Lisä
kuumennusalueen merkkivalo sammuu, kun alue on kytketty
pois päältä.
Lisä kuumennusalueen ottaminen käyttöön:
- Paina lisä kuumennusalueen painiketta "8". Led-valo syttyy
jälleen palamaan.
. KEITTOALUEEN AJASTAMINEN ( Mallikohtainen )
Jokainen keittoalue voidaan ajastaa enintään 99 minuutiksi.
Kerrallaan vain yksi keittoalue voi olla ajastettuna.
- Käynnistä haluamasi alue edellä annettujen ohjeiden
mukaisesti.
- Paina kosketusnäytöllä yhtäaikaisesti "-" ja "+" käynnistääksesi
ajastimen, näytölle tulee näkyviin " ".
TYPE B
7
Keittolevyn lukituksen avaaminen
Avataksesi ohjausyksikön on
välttämätöntä , että miinusnäppäintä ja valintanäppäintä
ylä va s em ma l la (ke it t oa lu e
takana vasemmalla) painetaan
sa ma na ik ai se st i j a s it te n
painetaan miin us-näppäint ä
uudelleen.
Lukitus on nyt poistettu ja
kosketusohjaus palaa VALMIUStilaan.
- Paina uudelleen « + » painiketta valitaksesi ajan 0 ja 99
LED
minuutin väliltä tai paina ”-” painiketta vähentääksesi aikaa 30 0 minuuttia.
--> Ajastettua aikaa voidaan muuttaa milloin tahansa
Kun aika on lopussa, keittoalue sammuu automaattisesti ja
kuuluu 1 minuutin kestävä merkkiääni. Äänimerkki lakkaa, kun
painat mitä tahansa painiketta.
--> Ajastinta voidaan käyttää myös erillisenä minuutti kellona,
asetetun ajan loputtua kuuluu merkkiääni.
81 FI
Page 82

. PIKAKUUMENTIMEN TOIMINTA
Kaikissa lieden alueissa on pika kuumennin, jolla alueen
lämpötila saadaan kohoamaan nopeammin.
Pika kuumentimen käynnistäminen
- Käynnistä haluamasi alue, paina + painiketta, kunnes
kuumennusteho on « 9 » , ja vapauta + painike hetkeksi ja paina
sitä uudelleen; näytössä vilkkuu vuorotellen pika kuumennuksen
symboli « A » ja kuumennustehon symboli « 9 ».
- Vähennä sitten kuumennusteho haluamaasi arvoon.
Kuumen-
nusteho
0
1
2
3
4
5
6
7
8
9
Enimmäistehosta
käytössä
(%)
:
0 %
: 2.5 % : 0 : 2 H
:
:
:
:
:
:
:
:
:
3 %
6 %
11 %
16 % :
19 % :
32 % :
45 % :
65 % :
100 % : 0
Pikakuumen-
nusaika
(minuuttia)
:
0
:
1
:
3
:
5
6,5
8,5
2,5
3,5
4,5
Enimmäiskäyt-
töaika ennen
automaattista
katkaisua*
:
0 H
:
6 H
:
6 H
:
5 H
:
5 H
:
4 H
:
1,5 H
:
1,5 H
:
1,5 H
:
1,5 H
Esimerkki:
1 800 W:n keittoalue teholla 6 käyttää 32 % 1 800W:sta.
Kun pikakuumennus on päällä, alue toimii 1 800 W:n teholla 2,5
minuutin ajan ja säätää tehon sitten arvoon 576 W.
* Turvallisuuden parantamiseksi keittoalueet kytkeytyvät
automaattisesti pois päältä, jos ne jätetään päälle liian pitkäksi
aikaa. Tämä aika vaihtelee valitun kuumennustehon mukaan.
8. PUHDISTUS JA KUNNOSSAPITO
• Anna lieden jäähtyä ennen kuin huollat sitä.
• Käytä vain erityisesti keraamisille liesitasoille suunniteltuja
tuotteita (puhdistusaineita ja kaapimia). Niitä saa rautakaupasta.
• Vältä kaatamasta liedelle mitään, koska kaikki kuumalle liedelle
kaatuneet aineet palavat nopeasti kiinni, mikä vaikeuttaa
puhdistamista.
• Lieden lähistöllä ei kannata säilyttää mitään, mikä voi sulaa,
kuten muoviesineitä, sokeria tai sokeripohjaisia tuotteita.
KUNNOSSAPITO:
-Laita liesitasolle muutama pisara siihen tarkoitettua
puhdistusainetta.
-Hankaa itsepäisiä tahroja pehmeällä kankaalla tai hieman
kostutetulla talouspaperilla.
-Pyyhi pinta puhtaaksi pehmeällä kankaalla tai kuivalla
talouspaperilla.
Jos itsepäisimmät tahrat eivät hävinneet:
-Laita liesitasolle vielä muutama pisara puhdistusainetta.
-Raaputa tahroja kaapimella pitäen sitä 30 asteen kulmassa
liesitasoon nähden kunnes tahrat irtoavat.
-Pyyhi pinta puhtaaksi pehmeällä kankaalla tai kuivalla
talouspaperilla.
- Toista nämä vaiheet tarpeen mukaan.
VIHJEITÄ:
Kun liesi puhdistetaan usein, liesitason pintaan jää naarmuilta ja
kulumiselta suojaava kerros. Varmista, että liesitaso on puhdas
ennen kuin käytät sitä. Veden jättämät jäljet voi poistaa
muutamalla pisaralla etikkaa tai sitruunamehua. Pyyhi lopuksi
imu ky k yi sel lä p ap eri ll a ja käy tä m uu tam a p i sa r a
liedenpuhdistusainetta.
Keraaminen pinta kestää tasapohjaisten keittoastioiden
hankausta. On kuitenkin parempi siirtää ne alueelta toiselle
nostamalla.
HUOM:
30° Maxi
Älä käytä liian kosteaa sientä.
Älä missään tapauksessa käytä veistä tai ruuvitalttaa.
Parranajokoneen terällä varustettu kaavin ei
vahingoita
liesitason pintaa, kunhan se pidetään 30 asteen
kulmassa.
Älä jätä terävää kaavinta lasten ulottuville.
Älä käytä hionta-aineita tai hankausjauheita.
• Metallireunus (tietyissä malleissa): metallireunuksen voi
turvallisesti puhdistaa pesemällä sen vedellä ja saippualla,
huuhtelemalla ja lopuksi kuivaamalla pehmeällä kankaalla
Lasikeraamisen pinnan värivaihtelut eivät vaikuta lieden
toimintaan tai sen toimintavarmuuteen. Värivirheitä
aiheutuu yleensä palaneista ruoanjäännöksistä tai siitä,
jos liedellä on käytetty esimerkiksi alumiinisia tai
kuparisia keittoastioita. Tällaisia tahroja on vaikea
poistaa.
82 FI
Page 83

9. VIANSELVITYS
10. HUOLTO
Keittoalueet eivät kiehuta tai paista kunnolla.
• Sinun tulee käyttää kattiloita, joissa on ehdottoman tasainen
pohja. Jos asetat kattilan pohjan suoran tason kulmaa vasten ja
välistä näkyy valoa, pohja ei ole suora eikä kykene siirtämään
riittävästi lämpöä.
• Kattilan pohjan halkaisijan tulisi vastata valitun keittoalueen
halkaisijaa.
Ruoka kypsyy hitaasti.
• Käytät vääränlaista keittoastiaa. Kattilan pohjan tulisi olla suora,
kohtuullisen paksu ja halkaisijaltaan samaa luokkaa kuin valittu
keittoalue.
Liesitasolla on pieniä naarmuja (jotka saattavat näyttää
halkeamilta tai kulumilta).
• Liettä on puhdistettu väärällä tavalla, keittoastioissa on karheat
pohjat tai keittoastioiden pohjien alla on kiinteitä hiukkasia
(suolaa tai hiekkaa).
Käytä suositeltuja puhdistustapoja, varmista keittoastioiden
puhtaus ennen käyttöä ja käytä keittoastioita, joiden pohja on
sileä.
Metallijälkiä (saattavat näyttää naarmuilta).
• Älä vedä alumiinisia keittoastioita pitkin liesitasoa. Poista jäljet
käyttäen suositeltua puhdistusmenetelmää.
• Liettä on puhdistettu vääriä puhdistusaineita käyttäen ja
pinnassa on edelleen sille kaatuneiden aineiden jälkiä tai
rasvatahroja. Käytä kaavinta ja suositeltua puhdistusainetta.
Tummia juovia tai pilkkuja.
• Käytä kaavinta ja suositeltua puhdistusainetta.
Liesitasossa on värivirheitä.
• Alumiini- ja kuparijäljet sekä vedestä tai elintarvikkeista peräisin
olevat suolajäämät voidaan poistaa puhdistusaineella.
Liesitasoon on sulanut kuumia sokeriliuoksia tai muovia.
• Katso edellä olevia puhdistusohjeita.
Liesi on kokonaan epäkunnossa tai jotkin alueet eivät toimi.
• Suntteja ei ole oikein kytketty kytkentärimaan.
Varmista, että kytkentä annettujen ohjeiden mukainen.
Tark i sta s e uraa v at as iat en nen h u olto k orja a jan
kutsumistapaikalle:
Varmista, että pistoke on pistorasiassa ja sulake ehjä. Jos vikaaei
voida paikallistaa, sammuta liesi – älä kajoa siihen itse – ja
otayhteyttä huoltopalveluun. Liedellä on takuutodistus, jonka
voimassaollessa se korjataan huoltokorjaamolla ilmaiseksi.
11. YMPÄRISTÖNSUOJELU
Tällä laitteella on Euroopan parlamentin ja
neuvoston direktiivin 2012/19/EU sähkö- ja
elektroniikkalaiteromusta (WEEE) mukainen
merkintä. WEEE-direktiivi sisältää sekä
saastuttavat materiaalit (jotka voivat aiheuttaa
ympäristöhaittoja) ja perusmateriaalit (jotka
voidaan uusiokäyttää). WEEE-direktiivin
huomioiminen on tärkeää määrätyissä
käsittelyissä , jotta kaikki saastuttava t
materiaalit saadaan poistettua ja hävitettyä sekä kaikki kierrätys
ja uudelleenkäytettävä materiaali saadaan koottua talteen.
Yksittäisillä henkilöillä on tärkeä merkitys varmistettaessa, ettei
WEEE-materiaalit muodosta ympäristöongelmia ja tiettyjen
perussääntöjen noudattaminen on välttämätöntä.
• WEEE-materiaaleja ei saa käsitellä kotitalousjätteinä.
• WEEE-materiaalit tulee toimittaa niille tarkoitettuihin
paikallisviranomaisten tai jätehuoltoyritysten hallinnoimiin
kierrätyspisteisiin. Monissa maissa suurikokoisille WEEEmateriaaleille on saatavana kotoa noutopalvelu.
• Kun ostat uuden laitteen, vanhan laitteen voi palauttaa
jälleenmyyjälle, jonka on vastaanotettava se ilmaiseksi uutta
vastaavaa tuotetta vastaan, kun laite on samaa tyyppiä ja se
toiminnot on samat kuin hankitun laitteen.
Liesi ei toimi.
• Vähintään kahden painikkeen päälle on kaatunut tai pudonnut
jotain vähintään 10 sekuntia aikaisemmin. Poista kaatunut aine
tai pudonnut esine.
• Ohjaustaulu on lukittu. Vapauta lukitus painamalla
lukitusnäppäintä.
Liesi ei sammu.
• Ohjaustaulu on lukittu. Vapauta lukitus painamalla
lukitusnäppäintä.
Liesi sammuu itsekseen.
• Vähintään kahden painikkeen päälle on kaatunut tai pudonnut
jotain vähintään 10 sekuntia aikaisemmin; liesi kytkeytyy
turvatilaan ja kuuluu äänimerkki, joka kestää siihen saakka, kun
painikkeet vapautetaan. Poista kaatunut aine tai pudonnut esine.
• Keittoalueet kytkeytyvät automaattisesti pois päältä oltuaan
päällä liian kauan.
Keittoalueiden päällä- ja pois-aikojen suhde
• Päällä- ja pois-ajat vaihtelevat sen mukaan, mikä
kuumennusteho on valittu:
- pieni teho – lyhyt päällä-aika,
- suuri teho – pitkä päällä-aika.
Jälkilämmöstä varoittava H-näyttö vilkkuu
• Elektroniikka on ylikuumentunut. Huoltokorjaajan on
tarkastettava, että asennus on tehty vaatimusten mukaisesti.
83 FI
Page 84

SIKKERHEDSINSTRUKTIONER
LÆS INSTRUKTIONSVEJLEDNINGEN OMHYGGELIGT FOR AT FÅ STØRST MULIGT UDBYTTE AF PLADEN
Vi anbefaler, at du gemmer brugs- og installationsvejledningen til senere brug, samt at du noterer
serienummeret nedenfor, inden du installerer pladen, hvis du får behov for at få hjælp fra
servicecenteret.
• ADVARSEL: Apparatet og dets tilgængelige dele bliver varme ved brug. Undgå berøring med de
varme dele.
• Børn under 8 år skal holdes fra apparatet, med mindre de er under konstant overvågning.
• Dette apparat kan benyttes af børn fra 8 år og op efter samt af personer med nedsatte fysiske,
sensoriske og mentale evner eller mangel på erfaring og viden om brug af apparatet, hvis de
overvåges eller får instruktion i brug og forstår de farer, der kan være i forbindelse med brug.
• Børn må ikke lege med apparatet.
• Rengøring og vedligeholdelse skal ikke udføres af børn uden overvågning
• ADVARSEL: Tilberedning af madvarer med fedtstof eller olie skal holdes under opsyn for at undgå
farer eller brand.
• Prøv ALDRIG at slukke brand med vand. Sluk derimod apparatet og dæk flammerne over med f.eks.
et låg eller et brandtæppe.
• ADVARSEL: Brandfare: Opbevar ikke genstande på kogepladerne.
• ADVARSEL: Hvis overfladen er gået i stykker, sluk for apparatet for at undgå elektrisk stød.
• Benyt ikke en damprenser til rengøringsprocedurer.
• Apparatet er ikke beregnet til at blive betjent via en ekstern timer eller et særskilt
fjernbetjeningssystem
• Det frarådes at kigge direkte på halogenelementerne.
• Frakobling skal ske i de faste ledninger i overensstemmelse med gældende regler og bestemmelser
• Af instruktionen skal det fremgå, hvilken type ledning, der skal benyttes og temperaturen på
bagsiden af apparatets overflade skal indtænkes
• Hvis forsyningsledningen er beskadiget, skal den udskiftes af producenten, dennes serviceagent
eller en lignende kvalificeret person for at undgå fare
• Hold børn væk fra kogezonerne, mens disse anvendes, eller efter at de er slukket, så længe
indikatoren for restvarme er tændt, for at undgå alvorlige forbrændinger.
• Placer ikke aluminiumsfolie og plastemballage på kogezonerne.
• Hver gang pladen bruges, er det nødvendigt at rengøre den for at forhindre, at der samler sig snavs
og fedt. Hvis der sidder rester, varmes disse op igen, næste gang pladen bruges, og der afgives røg og
ubehagelige lugte. Desuden er der risiko for, at der opstår brand.
• Pladens kontrolområde er meget følsomt, placer ikke varme genstande derpå.
• Undgå at berøre varmezonerne, mens de er i brug eller et stykke tid, efter at de har været brugt.
•Tilbered aldrig mad direkte på den glaskeramiske plade. Brug altid egnet kogegrej.
Placer altid panden på midten af den kogezone, du bruger.
Brug ikke kogepladen som skærebræt.
Skub ikke køkkenudstyr hen over kogepladen.
Opbevar ikke tunge genstande over kogepladen. De kan medføre skader, hvis de falder ned på
kogepladen.
Brug ikke kogepladen som arbejdsbord.
Brug ikke kogepladen til opbevaring af ting.
84 DK
Page 85

1. GENERELLE ADVARSLER
Vi bestræber os hele tiden på at forbedre kvaliteten af vores produkter, og derfor kan vi ændre apparaterne for at inkorporere
de seneste tekniske forbedringer.
Alle dele af apparatet, der kan komme i kontakt med levnedsmidler, overholder bestemmelserne i direktiv 89/109/EØF.
Ved at placere Mærket på dette produkt, erklærer vi, på eget ansvar, overholdelse af alle europæiske sikkerhed,
sundhed og miljø kravene i lovgivningen for dette produkt.
2. INSTALLATION
Installation af en husholdningsmaskine kan være
kompliceret, som kan få alvorlig betydning for brugerens
sikkerhed, hvis den ikke udføres korrekt. Derfor skal
installationen udføres af en kvalificeret fagmand i
ov e r e n s st em mel s e m e d g æ l d en d e t e k ni sk e
bestemmelser. I tilfælde af at dette råd ignoreres, og
installationen udføres af en person uden kvalifikationer,
afviser fabrikanten ethvert ansvar for tekniske problemer
med produktet, uanset om dette resulterer i tings- eller
personskade.
VIGTIGT!
Hvis det bliver nødvendigt at skifte en medfølgende ledning,
skal tråden tilsluttes i henhold til følgende farver/koder:
BLÅ – NUL (N)
BRUN – STRØMFØRENDE (L)
GUL-GRØN – JORD ( )
Kogepladen er udstyret med en ledning, der kun kan
tilsluttes til et strømudtag med 220-240 V mellem faserne
eller mellem fase og nul.
3. INDBYGNING
Det møbel, hvori kogepladen skal installeres, og alle tilstødende
møbler skal være fremstillet af materialer, som kan modstå høje
temperaturer. Endvidere skal alle dekorationslaminater være
fastgjort med varmebestandig lim.
Installation (Fig. B / D):
• Med pladen følger en vandtæt forsegling.
Inden montering:
- vend pladens øverste side nedad, således at glasfladen peger
nedad.
Sørg for, at glasset er beskyttet.
- placer forseglingen rundt om pladen.
- sørg for, at den placeres korrekt for at undgå utætheder ind til
det understøttende kabinet.
• Efterlad en åbning på mindst 5 cm mellem apparatet og de
lodrette sider på det tilstødende møbel.
• Under installationen af pladen skal du, hvis pladens underside
vender ind mod et område, der normalt er tilgængeligt, indsætte
en adskillelse på 1 cm under pladens bund for at undgå risiko
for brandmærker og skader.
• Når emhætten monteres over kogepladen, så kik venligst i
installations vejledningen, for at få den korrekte afstand mellem
kogeplade og emhætte.
• Hvis den monteres i skabet over kogepladen, er den anbefalede
minimums afstand 70 cm.
4. ELTILSLUTNING
"Installationen skal overholde standarddirektiverne".
Producenten fralægger sig ethvert ansvar for skader, som
skyldes
upassende eller urimelig brug.
Advarsel!
• Kontroller altid følgende inden enhver elinstallation: Den
spænding, der fremgår af elmåleren, effektafbryderens justering,
installationens jordforbindelse, samt at den anvendte sikring er
korrekt.
• Installationens strømforsyning skal føres via et stik med
jordforbindelse eller via en flerpolet afbryder.
Hvis maskinen er forsynet med en stikkontakt, skal den
installeres, så der er adgang til stikkontakten.
• Den gule/grønne tråd på elledningen skal tilsluttes
jordforbindelsen på både netledningen og apparatets klemmer.
• Fabrikanten kan ikke holdes ansvarlig for ulykker, der skyldes
brugen af et apparat uden jordforbindelse eller med defekt
jordforbindelse.
• Kontakt servicecenteret eller en kvalificeret tekniker, hvis du har
spørgsmål angående netledningen.
• Tilsluttes til en stikkontakt.
Det er dog også muligt at tilslutte kogepladen til:
. Trefaset 220-240 V3~ . Trefaset 380-415 V2N~
Når du foretager ny tilslutning, skal du følge nedenstående
anvisninger.
• Inden du foretager tilslutning, skal du kontrollere, at
installationen er beskyttet af en passende sikring, og at den
monteres med ledninger med tilstrækkeligt tværsnit til at klare
almindelig forsyning.
• Vend kogepladen med glassiden mod bordet - sørg for at
beskytte glasset.
• Åbn dækpladen ef ter følgende fremgangsmåde:
1 2 3
• Skru kabelklemmen (1) af.
• Find de to tapper på siderne.
• Sæt spidsen af en flad skruetrækker foran hver tap (2 og 3), skub
indad og tryk ned.
• Fjern dækpladen.
Sådan frigør du ledningen:
• Fjern holdeskruerne på klemrækken, som indeholder
parallelkredsene og ledningens ledere.
• Træk ledningen ud.
Sådan skal du gøre for at foretage ny tilslutning:
- Vælg ledning i overensstemmelse med anbefalingerne i
tabellen.
- Træk ledningen igennem kabelklemmen.
- Fjern de yderste 10 mm af
isoleringen fra hver leder, og husk
at sørge for, at ledningen er lang
nok til at kunne tilsluttes
klemrækken.
- Fastgør derefter lederen som vist i
skemaet i forhold til installationen
og ved hjælp af parallelkredsene,
som kan genanvendes fra den
første tilslutning.
- Fastgør dækpladen.
- Skru kabelklemmen på.
Bemærk! Kontroller, at skruerne til klembrættet er spændt fast.
85 DK
SHUNT
Page 86

Tilslutning til klemmerne på klemrækken
LAY OUT
“ 1 ”
LAY OUT
“ 2 ”
Enkeltfaset / Tofaset 220-240 V~
KABEL
HO5V2V2F
Trefaset 220-240 V3~
KABEL
HO5V2V2F
Trefaset 380-415 V2N~
KABEL
HO5V2V2F
Enkeltfaset 220-240 V~ Tofaset 220-240 V2~
Trefaset 220-240 V3~ Trefaset 380-415 V2N~
LAY OUT
“ 3 ”
3x2,5 3x2,5 3x2,5
4x1,5 4x1,5 4x1,5
4x1,5 4x1,5 4x1,5
VALG AF KOGEGREJ – Følgende oplysninger hjælper dig til at
vælge kogegrej, som sikrer et godt resultat.
Rustfrit stål: Anbefales varmt. Især velegnet med sandwichbund.
Sandwichbunden kombinerer fordelene ved rustfrit stål
(udseende, holdbarhed og stabilitet) med fordelene ved
aluminium eller kobber (varmeledning, jævn varmefordeling).
Aluminium: Det anbefales at bruge tungt kogegrej. God
konduktivitet. Der kan sommetider forekomme ridser i form af
aluminiumrester på kogepladen, men disse kan fjernes ved
øjeblikkelig rengøring.
Tyndt aluminium må ikke anvendes pga. det lave smeltepunkt.
Støbejern: Anvendeligt, men kan ikke anbefales. Dårlig ydeevne.
Kan ridse overfladen.
Kobberbund/stentøj: Det anbefales at bruge tungt kogegrej.
Giver et godt resultat, men kobberet kan efterlade rester, der kan
medføre ridser. Resterne kan fjernes, hvis kogepladen rengøres
øjeblikkeligt. Lad ikke gryder af denne type koge tørre.
Overophedet metal kan smelte fast på glaskogeplader. En
overophedet kobbergryde kan afsætte rester, som laver
permanente pletter på kogepladen.
Porcelæn/emalje: Giver kun et godt resultat med en tynd, glat
og flad bund.
Glaskeramisk: Anbefales ikke. Dårlig ydeevne. Kan ridse
overfladen.
Ph = Fase N = Nul T = Jord
5. OVERSIGT
• Highlight-zone: En metallisk leder er fordelt jævnt over hele
kogezonen. Zonen er klar til brug efter tre sekunder og er
velegnet til konstant, ensartet og længerevarende tilberedning.
Fordelen ved den glaskeramiske kogeplade er en højere
varmeeffekt, som genereres af highlight-kogezonerne og derved
gør madlavningsprocessen hurtigere.
Ændringerne i kogepladens udformning har ikke påvirket
glassets evne til at modstå høje temperaturer, men de har til
gengæld givet forbedrede kontrolmuligheder.
Med funktionen "Sprinter" kan du opnå en reduktion i
madlavningstiden på op til 15 %, afhængigt af den anvendte
metode og de anvendte gryder og pander.
6. RÅD ANGÅENDE KOGEGREJ TIL PLADEN
Det er afgørende at bruge kogegrej af god kvalitet for at
få mest muligt ud af kogepladen.
7. INSTRUKTION I BRUG
• Når du tænder for pladen, skal du vente nogle sekunder med
at aktivere den elektroniske kontrol.
- Tryk på knappen . Led er aktiv.
Nu aktiveres den elektroniske kontrol af pladen. I hvert
displayom r åde vises v a r meniveaue t , og LE D kontrolindikatoren blinker.
- Efter 20 sekunder uden at blive brugt slukker den elektroniske
kontrol, og startproceduren skal gentages.
. SÅDAN TÆNDER DU FOR EN KOGEZONE
- Tryk på knappen for at vælge den ønskede kogezone.
"0" for den tilsvarende zone forbliver tændt, når lyset af de andre
"0" er reduceret.
TYP B
77
- Tryk på knappen + eller - for at vælge et varmeniveau mellem
1 og 9. Hold knappen + eller - ned, hvorefter varmeniveauet
stiger eller falder lidt efter lidt.
• Anvend altid kogegrej af god kvalitet med tyk og helt flad
bund: Hvis du bruger den slags kogegrej, undgår du varme
steder, der får maden til at brænde på. Gryder og pander med
tyk metalbund giver en jævn varmefordeling.
• Sørg for, at gryden eller panden er tør under bunden: Når
du hælder væske i panden eller bruger en pande, der har stået i
køleskabet, skal du kontrollere, om bunden på panden er helt
tør, inden du sætter den på pladen. På denne måde undgår du,
at pladen bliver snavset.
• Brug pander med en diameter, der er stor nok til at dække
kogezonen helt: Panden må ikke være mindre end
varmezonen.
Hvis den er en lidt bredere, bruges energien optimalt.
Følgende eksempler er kun illustrative. På baggrund af dine
egne erfaringer kan du nu foretage disse indstillinger ud fra
smag og brug.
0 : Slukket
U -1 : ) Langsom opvarmning
2 : ) ..... Smeltevarme
3 : Varmevedligeholdelse
4 : Opvarmning
5 : Optøning, lavt blus, fuld t blus, småkogning
6 : Kogning uden låg
7 : Stegning, bruning og ristning
8 : Stærk kogning og stegning, brænding
9 : Stegning, kogning af store mængder vand.......
86 DK
Page 87

. SÅDAN SLUKKER DU FOR EN KOGEZONE
. BETJENING AF LÅSEKNAPPEN
- Tryk på knappen for at vælge den ønskede kogezone.
- Nu Tryk på knappen “-” for at få vist varmeniveauet .
slukkeszonen, indikatoren slukker efter 10 sekunder.
- Hvis du ønsker at slukke hurtigt, trykke samtidigt på "-" og den
respektive kogezone valg.
Varmeniveauet sænkes nu automatisk til .Kogezonen slukkes.
. TOTALSTOP
Kogezonerne og timeren kan slukkes når som
helst ved at trykke i 3 sekunder på tænd/slukknappen.
. INDIKATOR FOR RESTVARME
K o n t ro l p a n e l e t f o r t æ l l e r b r u g e r e n , h v o r n å r
overfladetemperaturen på kogezonerne kommer op over 60°C,
ved at vise følgende: . Når temperaturen falder ned under 60°C,
forsvinder H -visningen.
Når madlavningen er ved at være færdig, anbefaler vi, at du
slukker for kogezonen og bruger restvarmen, indtil maden stille
og roligt er færdig.
NB! Ved strømafbrydelser forsvinder indikatoren for restvarme
fuldstændigt, selvom overfladetemperaturen er over 60°C.
.SÅDAN BRUGER DU DEN UDVIDEDE KOGEZONE
(TO ZONER)
Nogle modeller er udstyret med en
kogezone med to zoner. .............................
>
Hele kogezonen er aktiv, når kogezonen er i brug.
TYP B
7
Låsefunktionen forhindrer, at børn utilsigtet aktiverer komfuret, og
den er også nyttig under rengøring af kogesektionen.
Sådan låses komfuret. (Eksemplet er et komfur med 4 zoner)
Tryk på TÆND/SLUK-knappen, og derefter på (kun efter dette
kan børnelåsen aktiveres)
Tryk samtidigt på minustasten og
øverste venstre valgtast, til du
hører bip-lyden. Hvis du ikke
hører en bip-lyd, skal du SLUKKE
kon f ure t og g ent a ge h ele
indstillingen.
Tryk derefter igen på valgtasten
for øverste valgtast.
Denne fremgangsmåde skal
følges inden 10 sek., og der må
ikke trykkes på andre taster end
den nævnte. Ellers afbrydes
inputtet som ikke gennemført.
Alle display viser et “L” som
LOCKED (LÅST) (=Børnelås mod
utilsigtet aktivering) – hvis en
kogezone er “varm”, vises “L” og
“H” skiftevis.
Sådan låses komfuret op
For at låse styreenheden op skal
minus-tasten og øverste venstre
valgtast (til bageste venstre
kogezone) trykkes samtidigt,
hvorefter minus-tasten trykkes
igen.
Låsningen ophæves nu, og
Touch-styringen vender tilbage til
STAND BY-tilstand.
Sådan deaktiveres den udvidede kogezone:
LED
- Tryk på knappen for den udvidede kogezone. LEDkontrolindikatoren for den udvidede kogezone slukkes, når
kogezonen deaktiveres.
Sådan genaktiveres den udvidede kogezone:
- Tryk på knappen for den udvidede kogezone. LED er aktiv igen.
. SÅDAN PROGRAMMERER DU EN KOGEZONE ( afhænger
af modellen )
Alle kogezoner kan programmeres for højst 99 minutter. Der kan
kun programmeres én zone ad gangen.
-Tænd for den ønskede zone ved at følge ovenstående
anvisninger.
- Paina kosketusnäytöllä yhtäaikaisesti "-" ja "+" käynnistääksesi
ajastimen, näytölle tulee näkyviin " ".
TYP B
7
LED
- Tryk på knappen + for at vælge en tid mellem 0 og 99 minutter
eller tryk på “-” knappen for at mindske tiden mellem 30 minutter
og 0. LED-kontrolindikatoren tæt på varmeniveauet skal være
vist.
--> Den programmerede tid kan ændres når som helst.
Når tiden er gået, slukker kogezonen automatisk og der lyder et
signal i 1 minut, Tryk på en hvilken som helst knap for at stoppe
den.
--> Timeren kan bruges som æggeur og vil ringe ved afslutningen
af den programmerede tid.
87 DK
Page 88

. BRUG AF LYNOPVARMNING
Hver kogezone på pladen er forsynet med en lynopvarmningsfunktion, der får kogezonetemperaturen til at stige hurtigere.
Sådan tænder du for lynopvarmningen
Tryk på tænd/sluk-knappen .
- Tænd for den ønskede zone, tryk på knappen “+” for at indstille
niveau “9”, tryk kort på knappen “+”, og tryk på den igen. Der vises
nu skiftevis “A” “lynopvarmning” og “9” for varmeniveau.
- Hvis det er nødvendigt, sættes varmeindstillingen ned til det
ønskede niveau.
8. VEDLIGEHOLDELSE OG RENGØRING
• Inden du udfører vedligeholdelsesarbejde på pladen, skal den
være helt afkølet.
• Der må kun benyttes produkter (cremer og skrabere), der er
fremstillet specielt til glaskeramiske overflader. De kan købes hos
supermarkeder.
• Undgå spild, da alt, hvad der bliver liggende på pladens
overflade, hurtigt brænder og gør rengøringen vanskeligere.
• Hold alle smeltelige materialer væk fra kogepladen, f.eks.
plastgenstande, sukker eller sukkerbaserede produkter.
Indstilling Frigjort Tid for
energi lynopvarmning
(%) (minutter)
Maks. driftstid
inden
automatisk
slukning*
0
1
2
3
4
5
6
7
8
9
:
0 %
: 2.5 % : 0 : 2 H
:
3 %
:
6 %
:
11 % :
:
16 % :
:
19 % :
:
32 % :
:
45 % :
:
65 % :
:
100 % : 0
:
0
:
1
:
3
5
6,5
8,5
2,5
3,5
4,5
:
0 H
:
6 H
:
6 H
:
5 H
:
5 H
:
4 H
:
1,5 H
:
1,5 H
:
1,5 H
:
1,5 H
.Eks.: 1.800 W-zone i indstilling 6 = 32 % frigjort energi af 1.800
W. Når “Lynopvarmning” er aktiveret, yder zonen en effekt på
1.800 W i 2,5 minutter og indstiller sig herefter på 576 W.
* Til forbedring af sikkerheden slukker kogezonerne automatisk,
hvis de står tændt for længe. Hvornår de slukker, afhænger af
det anvendte varmeniveau.
Sådan deaktiveres lynopvarmning:
- Tænd for kogezonen, tryk på knappen - for at vende tilbage til det
normale varmeniveau, skru ned til det ønskede varmeniveau eller
skru ned til 0 for at slukke kogezonen.
VEDLIGEHOLDELSE:
- Dryp nogle få dråber specialrengøringsmiddel på overfladen.
- Tør eventuelle genstridige pletter af med en blød klud eller et
stykke let fugtet køkkenrulle.
- Tør af med en blød klud eller tør køkkenrulle, indtil overfladen
er ren.
Hvis der er genstridige pletter tilbage:
- Dryp nogle flere dråber specialrengøringsmiddel på overfladen.
- Skrab pletterne af med en skraber, som holdes i en vinkel på
30° i forhold til kogepladen.
- Tør af med en blød klud eller tør køkkenrulle, indtil overfladen er
ren.
- Gentag processen, hvis det er nødvendigt.
NOGLE FÅ TIPS:Hyppig rengøring giver et beskyttende lag,
som er vigtigt til forebyggelse af ridser og slitage. Kontroller, at
overfladen er ren, inden kogepladen anvendes igen. Fjern
mærker fra vand med nogle få dråber eddike eller citronsaft. Tør
heref t er af me d køkke n rulle o g nogl e få drå b er
specialrengøringsmiddel. Den glaskeramiske overflade kan
modstå ridser fra kogegrej med flad bund, men det er altid bedre
at løfte delene, når de flyttes fra en zone til en anden.
Bemærk!
30° Maxi
Brug ikke en svamp med for meget vand. Brug aldrig knive
eller skruetrækkere.
En skraber med et barberblad beskadiger ikke
overfladen, så længe den holdes i en vinkel på 30°.
Hold altid skrabere med barberblade uden for børns
rækkevidde.
Brug aldrig slibemidler eller skurepulvere.
• Metaldele (kun nogle modeller): Til sikker rengøring af
metaldele kan du bruge sæbe og vand, skylle af og så tørre
efter med en.blød klud
Ændringer i farven på den glaskeramiske overflade
ændrer ikke overfladens virke eller stabilitet. Sådan
misfarvning skyldes for det meste rester af brændt mad
eller brug af køkkenudstyr lavet af aluminium eller kobber.
Disse pletter er svære at fjerne.
88 DK
Page 89

9. PROBLEMLØSNING
10. EBFLTEEMR SSOALLVGISNSGERVICE
Kogezoner, der ikke holder en regelmæssig varme, eller
hvor stegning ikke sker hurtigt nok.
• Du skal bruge grej med helt flad bund. Hvis der kan skimtes lys
mellem bund og et punkt på overfladen, overføres varmen ikke
korrekt.
• Bunden på kogegrejet skal passe nøjagtigt til diameteren på
den valgte varmezone.
Langsom tilberedning af maden.
• Der anvendes forkert kogegrej. Bundene skal være flade, ret
tunge og have den samme diameter som den valgte kogezone.
Småridser (kan optræde som sprækker eller
afskrabninger)
på glaspladen.
• Forkerte rengøringsmetoder, kogegrej med grov bund eller
grovkornede partikler (salt eller sand) mellem kogegrej og
pladens overflade.
Brug de anbefalede fremgangsmåder for rengøring. Kontroller,
at bundene er rene, inden kogegrejet tages i brug, og brug gryder
og pander med glat bund.
Metalmærker (kan optræde som ridser).
• Skub ikke kogegrej af aluminium hen over kogepladen. Brug
den anbefalede fremgangsmåde for rengøring for at fjerne
mærkerne.
• Der er anvendt forkerte materialer til rengøring. Spild eller
fedtpletter bliver siddende på overfladen, brug en skraber (med
barberblad) og det anbefalede rengøringsprodukt.
Mørke striber eller pletter.
• Brug en skraber med barberblad og det anbefalede
rengøringsprodukt.
Områder med misfarvning på kogepladen.
• Mærker fra gryder og pander af aluminium og kobber samt
mineralaflejringer fra vand eller mad kan fjernes med
rensecremen.
Varme sukkerblandinger/plastik, der er smeltet fast til
overfladen.
• Se afsnittet Rengøring af glaskogeplader.
Inden du ringer efter Eftersalgsservice, skal du kontrollere
følgende:
– At stikket er sat korrekt i, og at sikringen er ok. Hvis fejlen ikke
kan findes:
Sluk for apparatet – forsøg ikke at reparere det – ring til
eftersalgsservicecenteret. Apparatet leveres med et
garantibevis, der sikrer gratis reparation på servicecenterets
regning.
11. MILJØHENSYN
Dette produkt er mærket i henhold til EUdirektiv 2012/19 / EU om affald af elektrisk og
elektronisk udstyr (WEEE). WEEE indeholder
både forurenende stoffer (som kan forårsage
negative konsekvenser for miljøet) og
grundlæggende komponenter (som kan
genbruges). Det er vigtigt at underkaste WEEE
særlige behandlinger med henblik på at fjerne
og bortskaffe ordentligt alle forurenende
stoffer, og genvinde og genanvende alle materialer.
Enkeltpersoner kan spille en vigtig rolle i at sikre, at WEEE ikke
bliver et miljømæssigt problem; det er vigtigt at følge nogle
grundlæggende regler:
• WEEE skal ikke håndteres som husholdningsaffald.
• WEEE skal udleveres til de relevante indsamlingssteder, der
forvaltes af kommunen eller af registrerede selskaber. I mange
lande findes der ordninger med afhentning af stort WEEE
affald.
• Når du køber et nyt apparat, kan det gamle returneres til den
forhandler, der skal indsamle det gratis ved udlevering af et nyt
apparat, så længe udstyret er af tilsvarende art og har de
samme funktioner som det leverede udstyr
Pladen eller nogle varmezoner fungerer ikke.
• Parallelkredsene er ikke sat ordentlig fast i klemrækken.
Kontroller, at tilslutningen er foretaget i overensstemmelse med
anvisningerne.
Pladen fungerer ikke.
• Et stort spild eller en stor genstand har dækket to knapper i
mindst 10 sekunder. Tør det spildte op, eller fjern genstanden.
• Kontrolpanelet er låst. Tryk på knappen “Lås” for at låse op.
Pladen slukker ikke
• Kontrolpanelet er låst. Tryk på knappen “Lås” for at låse op.
Pladen slukker automatisk
• Et spild har dækket mindst to knapper i over 10 sekunder.
Pladen går over på sikkerhed, og der kommer en biplyd, lige så
længe knapperne er tildækket. Tør det spildte op, eller fjern
genstanden.
• Kogezonerne slukker automatisk, hvis de er tændt for længe.
Varighed af tænd-/slukfunktion for kogezonerne
• Tænd-/slutcyklusserne varierer i forhold til det ønskede
varmeniveau:
- Lavt niveau: kort funktionstid.
- Højt niveau: lang funktionstid.
Indikatoren for restvarme "H" blinker
• Den elektroniske temperatur er for høj. En tekniker skal
kontrollere installationen ud fra anbefalingerne.
89 DK
Page 90

SIKKERHETSINSTRUKSJONER
LES DENNE BRUKERHÅNDBOKEN NØYE SLIK AT DU FÅR MEST MULIG GLEDE AV PLATETOPPEN.
Vi anbefaler at du tar vare på instruksjonene til installeringen og til senere bruk. Før du installerer
platetoppen, bør du skrive ned serienummeret nedenfor hvis du skulle få behov for hjelp fra
serviceavdelingen.
ADVARSEL: Produktet og tilhørende deler blir varme under bruk. Vær forsiktig slik at varmeelementene
ikke berøres.
• Barn under 8 år må holdes unna produktet eller være under kontinuerlig tilsyn.
• Produktet kan brukes av barn fra 8 år og oppover samt av personer med reduserte fysiske eller
mentale evner eller personer uten erfaring eller kunnskaper om bruken av produktet, dersom de er
under oppsyn eller har fått opplæring om bruken av produktet på en trygg måte og er innforstått med
potensielle farer.
• Barn skal ikke leke med produktet.
• Rengjøring og vedlikehold skal ikke utføres av barn uten tilsyn.
• ADVARSEL: Matlaging på en platetopp uten tilsyn der det brukes fett eller olje, kan være farlig og føre
til brann.
• ALDRI prøv å slukke brannen med vann, men slå av platetoppen og slokk flammene med et lokk eller
et brannteppe.
• ADVARSEL: Brannfare: ikke legg fra deg ting på platetoppen.
• ADVARSEL: Hvis det er sprekker i overflaten, må du slå av platetoppen for å unngå fare for elektrisk
støt.
• Ikke bruk damprens i rengjøringsprosessen.
• Produktet skal ikke brukes ved hjelp av en ekstern timer eller egen fjernstyring.
• Det tilrådes ikke å stirre direkte på halogenelementene.
• Frakoblingsutstyr må være innlemmet i de fastmonterte kablene i samsvar med
koblingsforskriftene.
• Instruksjonene må angi hvilken ledningstype som skal brukes, og ta høyde for temperaturen på
baksiden av produktet.
• Dersom ledningen er skadet, må den byttes ut av produsenten eller en servicerepresentant eller en
person med tilsvarende kvalifikasjoner, slik at man unngår farer.
• Det er viktig å holde barn unna kokesonene når de er i bruk eller når de nylig er slått av og
restvarmeindikatoren er på, slik at man forhindrer brannskader.
• Aluminiumsfolie og plastboller må ikke settes på varmesonene.
• Etter bruk er det viktig å rengjøre toppen for å hindre at det bygger seg opp skitt og fett. Hvis ikke,
blir dette stekt når toppen er i bruk, og det kan fremkalle os og ubehagelig lukt. Det kan også ta fyr.
• Ikke rør varmesonene under og en stund etter bruk.
•Tilbered aldri mat direkte på glassplaten. Bruk alltid egnede kokekar.
• Sett alltid pannen/kjelen i midten av sonen du skal bruke.
• Bruk ikke overflaten som skjærebrett.
• Ikke dra panner og kjeler over platetoppen.
• Tunge objekter bør ikke oppbevares over toppen. Hvis de faller ned på platetoppen, kan det oppstå
skader.
• Bruk ikke overflaten som arbeidsbenk.
• Ikke oppbevar objekter på toppen.
90 NO
Page 91

1. GENERELLE ADVARSLER
Vi jobber kontinuerlig for å bedre produktkvaliteten, og vi forbeholder oss retten til å utføre modifikasjoner med de siste
tekniskenyvinningene.
Alle deler av dette apparatet som kan komme i kontakt med matvarer, er i overensstemmelse med bestemmelsene i EØFdirektiv 89/109.
Ved symbol merkingen på dette produktet, compliance til alle europeiske sikkerhet, helse og miljøkravene i lovverket
for dette produktet.
2. INSTALLERING
Det kan være komplisert å installere et elektrisk apparat,
og det kan oppstå skader dersom det ikke installeres
riktig. Derforbør apparatet installeres av en elektriker, som
også vil utføre installeringen i overensstemmelse med
gjeldende forskrifter.Dersom dette rådet ikke følges og
installeringen utføres av en ukvalifisert person, fraskriver
produsenten seg alt ansvar fortekniske feil i produktet,
uansett om dette gir seg utslag i skader på utstyr eller
personer.
MERK:
Koble ledningen i henhold til følgende farger/koder
hvisstrømkabelen må byttes ut:
BlÅ - NØYTRAL (N)
BRUN - STRØMFØRENDE (L)
GUL-GRØNN - JORD ( )
Platetoppen er utstyrt med en ledning som bare kan kobles til
220–240 V-strømforsyning mellom faser eller mellom fase og
nøytral.
3. INNEBYGD
Skapet som toppen skal installeres i, samt annet møblement i
nærheten, bør være av materialer som tåler høye temperaturer.
De ssuten bør alle lamin a ttyper være montert m ed
varmebestandig lim.
Installering (fig. B / D):
• Platetoppen leveres med en vanntett pakning.
Før montering:
- Snu toppen opp ned slik at glassplaten er rettet nedover.
Sørg for å beskytte glassplaten.
- Sett på pakningen rundt platetoppen.
- Pass på at den monteres riktig slik at du unngår lekkasjer til
kabinettet under.
• La det være minst 5 cm avstand mellom platetoppen
ogomkringliggende vertikale flater.
• Hvis den nedre delen av platetoppen under installering er nær et
område som normalt er lett tilgjengelig ved for eksempel
rengjøring, lar du det være en luftespalte på 1 cm under
platetoppen for å unngå fare for skolding eller skader.
• Ved montering av ventilatoren over en platetopp, vennligst se i
monteringsmanualen for påkrevd avstand fra platetoppen.
• Ved montering i skap over en platetopp, er påkrevd
minimumsavtand 70 cm.
4. ELEKTRISK TILKOBLING
Installasjonen må oppfylle gjeldende forskrifter.
Produsenten fraskriver seg ethvert ansvar for skader som
skyldes feil eller uforsvarlig bruk.
Advarsel:
• Før bruk av det elektriske apparatet, må du kontrollere
spenningen som vises på det elektriske måleapparatet,
justeringen av sikringen og riktig jordning av installasjonen, samt
at det benyttes riktig sikring.
• Apparatet må ha en elektrisk tilkobling som er jordet eller via en
jordfeilbryter.
Hvis apparatet har jordet uttak, må det installeres slik at man
kommer til uttaket.
• Den gule/grønne ledningen i strømkabelen må koples til jord på
både strømkontaktens og apparatets terminaler.
• Produsenten er ikke ansvarlig for ulykker som måtte oppstå
dersom apparatet benyttes uten å være koplet til jord, eller
dersom det oppstår en jordfeil.
• Spørsmål om strømkabelen kan du rette til servicesenteret eller
en elektriker.
• Koble ledningen til en stikkontakt etter at du har valgt riktig
sikring.
Platetoppen kan også kobles til:
. Trefaset 220-240 V3~
. Trefaset 380-415 V2N~
Før du fortsetter må du følge instruksjonene nedenfor.
•Før du lager den nye tilkoblingen må du sjekke at installasjonen
er beskyttet av en egnet sikring, og at den er utstyrt med ledninger
som riktig dimensjonert til å forsyne apparatet med strøm.
•Snu platetoppen forsiktig med glassplaten mot benkeplaten.
Husk å beskytte glassplaten.
• Åpne dekselet i følgende rekkefølge:
1 2 3
• Skru av ledningsklemmen "1".
• Finn de to flatstiftene på sidene.
• Sett en flat skrutrekker foran hver flatstift "2" og "3", og trykk
inn.
• Fjern dekselet.
Løsne ledningen
• Fjern skruene på koblingsboksen med rekkeklemmen og
lederne i strømledningen.
• Trekk ut ledningen.
• Lage en ny tilkobling
• Velg ledningen i samsvar med anbefalingene i tabellen.
- Plasser ledningen i klemmen.
-Avisoler ca. 1 cm ytterst på hver av
lederne på ledningen. Husk på å ta
høyde for nødvendig lengde på
ledningen for å koble til
koblingsboksen.
- I henhold til installasjonen og ved
hjelp av rekkeklemmen, som du
allerede har løsnet,fester du lederen
som vist i diagrammet.
-Fest dekselet.
-Skru ledningsklemmen tilbake på
plass.
Merk: Kontroller at skruene på klemmebretter er strammet godt til.
SHUNT
91 NO
Page 92

Tilkobling til polene i koblingsboksen
Følgende informasjon hjelper deg med å velge kjeler som er best
egnet til å gi et godt resultat.
LAY OUT
“ 1 ”
ENFASET 220-240 V~ / TOFASET 220-240 V2~
KABEL
LAY OUT
“ 2 ”
HO5V2V2F
TREFASET 220-240 V3~
KABEL
HO5V2V2F
TREFASET 380-415 V2N~
KABEL
HO5V2V2F
ENFASET 220-240 V~ TOFASET 220-240 V2~
TREFASET 380-415 V2N~TREFASET 220-240 V3~
Ph = Fase
N = Nøytral T = Jord
LAY OUT
“ 3 ”
3x2,5 3x2,5 3x2,5
4x1,5 4x1,5 4x1,5
4x1,5 4x1,5 4x1,5
5. PRESENTASJONR
• hilight-sone: en metallisk lederstripe er fordelt jevnt over hele
overflaten. Den virker innen tre sekunder og passer til jevn og
vedvarende koking.
Den glasskeramiske platetoppen gir større varmeeffekt som
genereres av hilight-kokesonene, og gir raskere oppkok.
Modifiseringer av platetoppen har ikke innvirket på glassets evne
til å tåle høye temperaturer, men derimot gitt bedre kontroll. Med
"Sprinter"-funksjonen reduseres koketiden med inntil 15%,
avhengig av kokemetode og kjele.
7. BRUKSANVISNING
• Vent et par sekunder etter at platetoppen er slått på før du
aktiverer de elektroniske kontrollene.
- Trykk på knappen .
Elektronisk styring av toppen er aktivert. Varmenivået i hver
displaysone vises.
- Etter 20 sekunder uten at toppen har vært i bruk, slås den
elektroniske styringen av, og oppstarten må gjentas.
. STARTE EN KOKESONE
- Trykk på valgknappen for den aktuelle kokesonen.
Symbolet "0" på den tilhørende sonen forblir tent når lyset på de
andre "0" blir redusert
TYPEN B
6. RÅD OM KOKEKAR
For at koketoppen skal fungere optimalt,
er det viktig åbruke kokekar av god kvalitet.
• Bruk alltid kokekar av høy kvalitet med flat og tykk bunn:
Disse kokekarene vil forhindre heteflekker som gjør at maten svis
i bunnen. Tykke metallkjeler og -panner gir jevn varmefordeling.
• Pass på at undersiden av kjelen eller pannen er tørr: Når du
fyller en kjele med væske eller bruker en kjele som har stått i
kjøleskapet, må du passe på at undersiden av kjelen er helt tørr
før du setter den på platen. På denne måten unngår du flekker på
platetoppen.
• Bruk kjeler med en diameter som er stor nok til å dekke hele
platen: Kjelen bør ikke være mindre enn varmeområdet. Hvis
den er litt større, vil platetoppen bruke maksimal effekt.
7
- Trykk på knappen - eller + for å velge varmenivå mellom 1 og 9.
Hold knappen - nede +, og du vil se at varmenivået stigereller
synker gradvis.
Eksemplene nedenfor er bare ment som informasjon. Du kan til
passe disse innstillingene etter egne erfaringer og din
egensmak.
0 : Av
U -1 : Oppløsning
2 : Smeltevarme
3 : Holde varmt
4 : Oppvarming
5 : Opptining, småkoking, sterk koking, koking på lav
temperatur
6 : Koking uten lokk
7 : Steking, bruning av kjøtt og tilberedning av stek
8 : Steking ved høy temperatur, surring
9 : Steking
92 NO
Page 93

. STOPPE EN KOKESONE
. SLIK FUNGERER LÅSEKNAPPEN
- Trykk på valgknappen for den aktuelle kokesonen.
- Trykk på knappen « - » for å vise varmenivå . Sonen slår seg av,
og indikator slår seg av etter 10 sekunder.
- Hvis du vil stoppe kokesonen raskt, trykk samtidig på "-" og
den respektive kokesonen utvalg.
Varmenivået går automatisk ned til . Kokesonen slår seg av.
. STOPP
Kokesonene og timeren kan stoppes når som
helst ved å trykke på av/på-knappen i 3 sekunder.
. RESTVARMEINDIKATOR
Kontrollpanelet viser brukeren når overflatetemperaturen på
kokesonene overstiger ca. 60 °C ved følgende visning i displayet:
. Når temperaturen faller tilbake under 60 °C, blir -en i
displayet borte.
Hvis du skal avslutte tilberedningen, anbefaler vi at du slår av
kokesonen og bruker restvarmen i sonen for å avslutte kokingen
forsiktig.
NB! Etter et strømbrudd forsvinner restvarmeindikatoren
fullstendig selv om overflatetemperaturen er høyere enn 60 °C.
. BRUKE TILLEGGSKOKESONEN (TO SONER)
Kokesonen med to soner finnes
på enkelte modeller. .............................
>
Den er aktiv når kokesonen er i bruk.
TYPEN B
7
Låsefunksjonen hindrer utilsiktet aktivering av koketoppen av
barn, og den er også nyttig under rengjøring av koketoppen.
Slik låser du koketoppen. (Eksempel for koketopp med 4 soner)
Trykk på PÅ-/AV-knappen og deretter (bare etter at denne
operasjonen er utført kan barnesikringen aktiveres)
Trykk samtidig på minus-tasten
og på øverste, venstre valgtast, til
du hører pipelyden. Hvis du ikke
hører en pipelyd, skal du slå AV
koketoppen og gjenta hele
innstillingsoperasjonen.
Etterpå trykker du på den øverste,
venstre valgtasten på nytt.
Denne driftsprosedyren må skje
innen 10 sekunder, og ingen
annen tast enn den som er
beskrevet ovenfor skal trykkes
på, ellers vil innstillingen bli kansellert som ikke fullført.
Alle skjermer viser en «L» for
LÅST (= bar n esikring m ot
utilsiktet aktivering) - hvis en
kokesone er varm, «hot», vises
«L» og «H» vekselvis.
Slik låser du opp koketoppen
For å låse opp styreenheten, er
det nødvendig at minus-tasten og
den øverste, venstre valgtasten
(kokesonen bak til venstre)
trykkes ned samtidig og at det
deretter trykkes på minus-tasten
igjen.
Låsefunksjonen er nå opphevet
og b e r ø r i n g skontrollen går
tilbake i VENTE-modus.
LED
Deaktivere tilleggskokesonen:
- Trykk igjen på knappen "7". Den tilhørende kontrollampen for
tilleggskokesonen slukker når den er deaktivert.
Aktivere tilleggskokesonen igjen:
- Trykk på kokesonen knappen. LED-lyset er aktivert.
. PROGRAMMERE EN KOKESONE (I henhold til modellen)
De ulike kokesonene kan programmeres for maksimalt 99
minutter.
- Start den aktuelle kokesonen ved å følge de forannevnte
instruksjonene.
- Trykk på "-" og "+" samtidig for å aktivere timeren, vises i
displayet.
TYPEN B
7
LED
- Trykk en gang til på knappen + for å velge minutter mellom 0 og
99, eller trykk på "-" for å redusere tiden mellom 30 minutter og
null. Timer-Led må lyse.
--> Den programmerte tiden kan endres når som helst ved å
trykke på timer-knappen.
Når tiden er ute, slås kokesonen av automatisk, og en pipelyd
høres i ett minutt. Trykk på en hvilken som helst knapp for å
stanse den.
--> Tiden kan brukes som en påminnelse, da ringer den når
tidener ute.
93 NO
Page 94

. HURTIGOPPVARMING
Alle sonene er utstyrt med en funksjon for hurtigoppvarming som
gjør at kokesonenes temperatur stiger raskere. Perfekt til fresing
av biff eller hurtig oppkoking av store mengder væske.
Starte hurtigoppvarming
- Trykk på av/på-knappen
- Start ønsket sone, trykk på "+"-knappen til posisjon “9” vises.
Slipp knappen og trykk en gang til på "+"-knappen. Displayet viser
"A" “fast heater” og varmenivå "9" vekselvis.
- Ved behov kan du redusere varmenivået, og da viser displayet
"A" “fast heater” og posisjonen for det nye varmenivået vekselvis.
Cooking
position
0
1
2
3
4
5
6
7
8
9
Power
released
(%)
:
0 %
: 2.5 % : 0 : 2 H
:
:
:
:
:
:
:
:
:
3 %
6 %
11 % :
16 % :
19 % :
32 % :
45 % :
65 % :
100 % : 0
Time of
fast heater
(minutes)
:
0
:
1
:
3
5
6,5
8,5
2,5
3,5
4,5
Maximum
operating
time before
automatic
cut off*
:
0 H
:
6 H
:
6 H
:
5 H
:
5 H
:
4 H
:
1,5 H
:
1,5 H
:
1,5 H
:
1,5 H
Når hurtigoppvarming er utført, lyser effektnivået kontinuerlig på
displayet.
Deaktivere hurtigoppvarming
- Slå på kokesonen, trykk på "-"-knappen for å gå til bake til
normalt varmenivå, reduser varmen til ønsket nivå eller til "0" for
å slå av kokesonen.
8. RENGJØRING OG VEDLIKEHOLD
•La platetoppen avkjøles før du begynner med vedlikehold.
•Bruk kun produkter (kremer og skraper) som er spesielt designet
for glasskeramikkoverflater. Disse får du kjøpt i jernvarebutikker.
•Unngå søl. Det som faller ned på plateoverflaten, vil raskt bli
brent, og rengjøringen blir vanskeligere.
•Alt som kan smelte, bør holdes unna platetoppen, f.eks. plast,
sukker eller sukkerbaserte produkter.
VEDLIKEHOLD:
-Påfør et par dråper med rengjøringsmiddel på platetoppen.
-Skrubb vanskelige flekker med en myk klut eller med lett fuktet
kjøkkenpapir.
-Tørk av med en myk klut eller tørt kjøkkenpapir til overflaten blir
ren.
Hvis det fortsatt er gjenstridige flekker:
-Påfør litt mer rengjøringsmiddel på platetoppen.
-Skrap med en skrape til flekkene blir borte. Hold skrapen i en
vinkel på 30° mot toppen.
-Tørk av med en myk klut eller tørt kjøkkenpapir til overflaten blir
ren.
-Gjenta denne prosedyren om nødvendig.
TIPS:
Hyppig rengjøring etterlater et beskyttende lag som beskytter mot
riper og slitasje. Kontroller at overflaten er ren før du bruker
toppen igjen. Merker etter vann kan fjernes ved å ha på noen
dråper med eddik eller sitronsaft. Deretter tørker du av med
absorberende papir og har på noen dråper med spesiell
rengjøringsvæske. Keramikkoverflaten motstår all skraping når
du bruker kjeler/panner med flat bunn. Det er imidlertid bedre å
løfte dem når du skal flytte dem fra sone til sone.
NB:
30° Maxi
Bruk ikke svamp, den vil være for våt.
Bruk aldri kniv eller skrutrekker.
En skrape med barberblad vil ikke skade overflaten så
lenge den holdes i en vinkel på 30°.
La aldri en skrape med barberblad bli liggende slik at barn
kan få tak i den.
Bruk aldri slipende midler eller skurepulver.
• Metallisten rundt : metallisten rundt toppen vaskes med såpe
og vann, skylles og tørkes med en myk klut.
Endringer i fargen til den glass-keramiske overflaten
påvirker ikke funksjonen eller stabiliteten til overflaten.
Slike misfarginger er som regel et resultat av brente
matrester eller bruk av panner som er laget av materialer
slik som aluminium eller kopper, disse flekkene er
vanskelig å fjerne.
94 NO
Page 95

9. PROBLEMLØSING
10. KUNDESENTER
Kokesonen småkoker ikke, eller steker bare lett
•Bruk kun kjeler og panner med flat bunn. Hvis du kan se lys
mellom bunnen og platetoppen, klarer ikke sonen å
overførevarme riktig.
•Bunnen bør dekke diameteren på den valgte sonen.
Det går for sakte
•Feil panner eller kjeler brukes. Bruk kun tungt utstyr med
flatbunn og en diameter som minst tilsvarer kokesonen.
Små riper på platetoppen
•Feil rengjøring eller grov bunnede panner blir brukt. Partikler
som sand eller salt legger seg mellom platetoppen og kjelen. Les
mer i delen om “RENGJØRING”. Sørg for at bunnen er ren førdu
bruker den, og bruk bare kjeler og panner med glatt bunn. Riper
kan unngås hvis rengjøringen gjøres riktig.
Metallmerker
•Ikke dra aluminiumskjeler over platetoppen. Følg anbefalingene
for rengjøring.
•Du bruker riktig utstyr, men merkene går ikke vekk. Bruk et
barberblad og følg instruksene i “RENGJØRING”.
Mørke flekker
• Bruk et barberblad og følg instruksene i “RENGJØRING”.
Lyse flekker på platetoppen
•Merker etter aluminium eller kopper, vann eller matrester. Disse
fjernes med kremrens.
Karamellisering eller smeltet plast på platetoppen.
•Følg instruksene i “RENGJØRING”.
Platetoppen virker ikke, eller enkelte soner virker ikke
•Shuntene er ikke riktig tilkoplet. Sjekk at koplingene er i sams var
med anbefalingene,
•Platetopper med følsomme kontroller: søl eller en
gjenstanddekker minst to knapper i minst 10 sekunder. Tørk opp
søleteller fjern gjenstanden.
•Kontrollpanelet er låst. Lås opp platetoppen.
Før du kontakter en reparatør, bør du kontrollere følgende:
– At støpselet er riktig satt inn og at det benyttes riktig sikring. Hvis
du ikke finner feilen, slår du av apparatet. Du må ikke prøve deg
frem på egen hånd.
Kontakt service senteret.
Apparat et leveres med en garanti som sikrer at service senter et
reparerer den gratis.
11. MILJØVERN
Dette produktet er i samsvar med det
europeiske direktivet 2012/19/EU om elektrisk
og elektronisk a vfall (WEEE). WEEE
inneholder både forurensende stoffer (som kan
h a n eg a t iv e i l jø k o n se k v e ns e r ) o g
grunnleggende komponenter (som kan brukes
på nytt). Det er viktig at WEEE gjennomgår
bestemte handlinger for å fjerne og kaste alle
fo r u r en s e nd e s t o f f e r og g j en v i n ne
resirkulerbare materialer på en ordentlig måte.
Enkeltpersoner kan spille en viktig rolle for å sikre at WEEE ikke
blir et miljøproblem. Det er derfor viktig å følge noen
grunnleggende regler:
• WEEE skal ikke behandles som normalt husholdningsavfall.
• WEEE skal leveres til et innsamlingspunkt som forvaltes av
kommunen eller registrerte selskaper. I mange land kan store
WEEE hentes hjemme.
• Når du kjøper et nytt produkt kan det gamle produktet leveres til
forhandleren som må ta det imot gratis, forutsatt at utstyret er av
tilsvarende type og har samme funksjoner som det leverte
utstyret.
Platetoppen slås ikke av.
•Kontrollpanelet er låst. Lås opp platetoppen.
Platetoppen stopper automatisk
•Søl dekker minst to knapper i mer enn 10 sekunder,
platetoppenslår over i sikkerhetsmodus og du hører et pip. Tørk
opp søleteller fjern gjenstanden.
•Kokesonene stopper automatisk hvis de står på for lenge.
Frekvensen på av/på for kokesoner
•Av/på-syklusene varierer i forhold til varmenivå:
-lavt nivå: kort på-tid,
-høyt nivå: lang på-tid.
“H”, indikatoren for ettervarme, blinker.
•Den elektroniske temperaturen er for høy. En tekniker bør sjekke
at koplingene er i samsvar med anbefalingene.
95 NO
Page 96

САҚТЫҚ ШАРАЛАРЫ
ПІСІРЕТІН БЕТТІ ІСКЕ ПАЙДАЛАНУ КЕЗІНДЕ БАРЫНША ЖАҚСЫ НƏТИЖЕЛЕРГЕ ҚОЛ ЖЕТКІЗУ
ҮШІН, ОСЫ НҰСҚАУЛЫҚТЫ МҰҚИЯТ ОҚЫП ШЫҒЫҢЫЗ. Осы орнату жəне іске пайдалану
жөніндегі нұсқаулықты сақтап қалуға жəне оны қажеттілігіне қарай жəне пісіретін бетті орнатудың
алдында қарап шығып отыруға кеңес беріледі. Сервистік орталыққа көмек сұрап жүгінген
жағдайда, төменде көрсетілгендей, пісіретін беттің төлқұжаттық табличкасында көрсетілген оның
сериялық нөмірін хабарлаңыз.
• ЕСКЕРТУ: Тұрмыстық электр аспап пен оның ашық бөліктері жұмыс істеген уақытта жоғары
температураға дейін қызуы мүмкі. Сақ болыңыз, оларға қол тигізбеңіз.
• 8 жасқа дейінгі балалар тұрақты қадағалаусыз тұрмыстық аспапқа тақалмауға тиіс.
• Бұл тұрмыстық аспапты егер олар байқаудың астында болса, жəне тұрмыстық аспапты қауіпсіз
пайдалануға қатысты үйретілген болса, сондай-ақ егер олар ықтимал қауіптіліктер жайында
хабардар болған жағдайда, 8 жастан асқан балалар, сондай-ақ қимыл немесе ақыл-ой қабілеті
бұзылған немесе тиісті тəжірибесі жоқ адамдар пайдалана алады.
• Балаларға тұрмыстық аспаппен ойнауға рұқсат етпеңіз.
• Балалар тұрмыстық аспапты тазалауды жəне қызмет көрсетуді ересектердің қадағалауынсыз
жүзеге асырмауға тиіс.
• ЕСКЕРТУ: Пісіретін бетте тоңмай немесе май пайдаланып тамақ пісіру тиісті түрде қараусыз
қауіпті болуы жəне өрт шығуына əкеліп соғуы мүмкін.
• ЕШҚАШАНДА жалынды сумен сөндіруге тырыспаңыз. Тұрмыстық электр аспапты өшіріңіз де,
жалынды үстінен қақпақпен немесе отқа төзімді матамен жабыңыз.
• ЕСКЕРТУ: Өрт шығу қаупі: пісіретін бетті оның үстінде заттар сақтау үшін пайдаланбаңыз.
• ЕСКЕРТУ: Пісіретін бетте жарықшалар пайда болған жағдайда, электр тогының соққысын
алудан сақтану үшін, тұрмыстық аспапты өшіріңіз.
• Тазалау үшін бу генераторын пайдаланбаңыз.
• Тұрмыстық аспап сыртқы таймер немесе бөлек қашықтан басқару жүйесі арқылы басқаруға
арналмаған.
• Галоген шамдарға қарамауға кеңес беріледі.
• Тұрмыстық аспапты токка қосу қолданыстағы электр қауіпсіздік ережелері мен нормаларына
сəйкес ағытқыш құрылғыны пайдалану арқылы жүзеге асырылуға тиіс.
• нұсқаулықта электр бауының типі көрсетілген болуға тиіс. Бұл орайда, электр аспаптың артқы
қабырғасының температурасы ескерілуге тиіс.
• Қоректендіру бауы зақымдалған жағдайда, оны өндіруші, техникалық қызмет көрсету жөніндегі
агент немесе жеткілікті біліктілікке ие маман ауыстыруға тиіс. Бұл қауіптіліктерден сақтану үшін
қажет.
• Қатты күйіп қалудан сақтану үшн, балаларға қыздыру аумақтары қосулы тұрған уақытта немесе,
олар өшірулі тұрған, бірақ бұл орайда қалдық қызудың индикаторы жанып тұрған уақытта тым
жақындауға рұқсат етпеңіз.
• Пісіретін бетті əр пайдаланғаннан кейін күйген кір мен тоңмайдың түзілуіне жол бермеу үшін, оны
тазалап отыру қажет. Егер пісіретін бетте кір қалса, онда келесі пайдаланған кзде ол күйеді жəне
бұл орайда түтін мен мүңкіген иіс шығатын болады. Сонымен қатар, бұл өрт шығуына əкеліп соғуы
мүмкін.
• Қыздыру аумақтарының үстіне алюминий фольга төсемеңіз жəне олардың үстіне пластмасс
ыдыс-аяқ қоймаңыз.
• Қыздыру аумақтары қосулы тұрған уақытта немесе олар суымайынша, оларға қолыңызды
тигізбеңіз.
• Ешқашанда тамақты шыны-керамика пісіретін беттің өзінде пісірмеңіз. Ол үшін əрдайым
лайықты ас үй ыдыс-аяғын пайдаланыңыз.
• Қазанды немесе табаны əрқашанда өзіңіз онда тамақ пісіретін қыздыру аумағының тура
ортасына қойыңыз.
• Ешқашанда пісіретін бетті турауға арналған тақтай ретінде пайдаланбаңыз.
• Ас үй ыдыс-аяғын пісіретін беттің үстімен сырғанатпаңыз.
• Пісіретін беттің үстінде ауыр заттарды сақтамаңыз. Егер олар пісіретін беттің үстіне құласа, онда
оны зақымдауы мүмкін.
• Ешқашанда пісіретін бетті жұмыс үстелі ретінде пайдаланбаңыз.
• Пісіретін бетті қандай да бір заттарды сақтауға арналған орын ретінде пайдаланбаңыз.
96 KZ
Page 97

1. Сəйкестік декларациясы
Бұл жабдықтың тамақпен жанасатын бөлшектері ЕЭО 89/109
директивасында баяндалған талаптарға сəйкес келеді.
Осы өнімге таңбаламасын түсіре отырып, біз өз
жауапкершілігімізге, өнімдердің осы түрі үшін заңнамада
көзделген барлық Еуропалық қауіпсіздік, денсаулық қорғау
нормаларына жəне экологиялық талаптарға сəйкестігі туралы
мəлімдейміз.
Бұл бұйым Кедендік Одақтың төмендегі
техникалық регламенттеріне сəйкес келеді:
- КО ТР 004/2011 «Төмен вольтті жабдықтың
сəйкестігі туралы»
- КО ТР 020/2011 «Техникалық құралдардың
электромагниттік үйлесімдігі»
Бұйым «РОСТЕСТ-МОСКВА» өнімдер мен
қыз м ет терд і серт ифи к атт а у жө н інд е гі о рган ы нда
сертификатталған, Мəскеу қаласы.
Сіз сəйкестік сертификатының көшірмесін тауар сатып
алынған дүкеннен алуыңызға болады.
Өндіруші осы нұсқаулықтағы басып шығарудың
барысында орын алға н қ ателіктер үшін өзіне
жауапкершілік қабылдамайды. Өндірушінің бұл орайда
негізгі техникалық сипаттамаларын сақтай отырып, өзі
шығаратын бұйымдарға ол өзінің бұйымдары үшін
пайдалы деп табатын өзгерістер енгізуге құқығы бар.
2. ОРНАТУДЫ ЖҮЗЕГЕ АСЫРУ ЖӨНІНДЕГІ
НҰСҚАУЛЫҚТАР
ТҰРМЫСТЫҚ ТЕХНИКАНЫ ОРНАТУ КҮРДЕЛІ ЖҰМЫС
БОЛЫП ТАБЫЛАДЫ, ОНЫҢ ДҰРЫС ОРЫНДАЛМАУЫ
ПАЙДАЛАНУШЫНЫҢ ҚАУІПСІЗДІГІНЕ ТЕРІС ƏСЕР ЕТУІ
МҮМКІН. ОСЫ СЕБЕПТЕН, ТҰРМЫСТЫҚ ТЕХНИКАНЫ
ОРНАТУДЫ БІЛІКТІЛІГІ ЖОҒАРЫ МАМАНДАР ЖҮЗЕГЕ
А С Ы РУ Ғ А Т ИІ С, ОЛ АР ОР Н А Т У Д Ы Б АР Л ЫҚ
ҚОЛДАНЫСТАҒЫ ЕРЕЖЕЛЕР МЕН НОРМАЛАРДЫ САҚТАЙ
ОТЫРЫП ЖҮЗЕГЕ АСЫРАДЫ. БҰЛ ЕСКЕРТУ ЕЛЕНБЕГЕН
ЖƏНЕ ОРНАТУДЫ ЖЕТКІЛІКТІ БІЛІКТІЛІГІ ЖОҚ АДАМ
ЖҮЗЕГЕ АСЫРАТЫН ЖАҒДАЙДА, ӨНДІРУШІ ЖАБДЫҚТЫҢ
ІСТЕН ШЫҒУЫНА ЖƏНЕ БҰЛ ОРАЙДА МҮЛІККЕ НЕМЕСЕ
АДАМДАРДЫҢ ДЕНСАУЛЫҒЫНА КЕЛТІРІЛГЕН НҰҚСАНҒА
Қ АТ ЫС Т Ы Е Ш Қ А Н Д А Й К І Н Ə РАТ - ТА ЛА П ТА РД Ы
ҚАБЫЛДАМАЙТЫН БОЛАДЫ.
3. ҚОСА ОРНАТЫЛАТЫН ТҰРМЫСТЫҚ ТЕХНИКА
Бөгет күйіп қалудан немесе зақым алудан сақтану үшін,
пісіретін беттен 1 см қашықтықта орнатылуға тиіс.
• Тамақ пісіретін беттің үстінде ауа тартқыш орнатылатын
жағдайда, ауа тартқышқа арналған нұсқаулықта көрсетілген
минималды монтаждау қашықтығын басшылыққа алыңыз.
• Ауа тартқыш плитаның үстіндегі шкафқа орнатылатын
жағдайда, тамақ пісіретін бетке дейінгі минималды қашықтық
70 см болуға тиіс.
4. ЭЛЕКТР ҚОСЫЛЫСТАРЫ
Орнату стандартты директивалардың талаптарын сақтай
отырып жүзеге асырылуға тиіс. Өндіруші бұйымды дұрыс
пайдаланбаудың нəтижесінде орын алған зақымдарға
қатысты ешқандай кінəрат-талаптарды қабылдамайды.
Ескертулер:
• Электр аспапты электр желісіне қосуды жүзеге асырудан
бұрын, міндетті түрде электр желісіндегі кернеуді, автоматты
ажыратқыштың реттелуін, электр аспаптың жерге тұйықтау
желісінде үзіктің жоқтығын жəне балқыма сақтандырғыштың
номиналын тексеріңіз.
• Электр аспап электр розеткасына қорғаныштың жерге
тұйықтау істігімен жабдықталған ашаның көмегімен немесе
контактыларының арасындағы қашықтық кем дегенде 3 мм
қосполюсті ағытқыш арқылы қосылуға тиіс.
Егер электр аспап штепсельді розеткамен жабдықталған
болса, онда ол штепсельдік розеткаға ыңғайлы қол жеткізу
мүмкіндігі болатындай етіп орнатылуға тиіс.
• Қоректендіру бауының сары-жасыл өткізгіші электр
розеткасы мен электр аспаптың жерге тұйықтау контактысына
жалғануға тиіс.
• Өндіруші электр аспаптың жерге тұйықталмауының салдары
болып табылатын немесе жерге тұйықтау желісінде үзілу
орын алғанының салдары болып табылатын жазатайым
оқиғалар үшін жауапкершілік көтермейді.
• Қоректендіру бауын пайдалануға байланысты сұрақтар
туындаған жағдайда, сатудан кейін қызмет көрсету қызметіне
немесе білікті электрикке хабарласу керек.
• Қоректендіру бауы зақымдалған жағдайда, оны ауыстыруды
сервистік қызметтің қызметкері арнайы құрал-сайманды
пайдаланып жүзеге асыруға тиіс.
НАЗАР АУДАРЫҢЫЗ: Егер қоректендіру бауын ауыстыруды
жүзеге асырудың қажеттілігі орын алса, қоректендіру
бауының өткізгіштерін төменде көрсетілген түстік кодтарға
сəйкес жалғаңыз.
КӨК - НЕЙТРАЛЬ (N)
ҚОҢЫР - ФАЗА (L)
САРЫ-ЖАСЫЛ - ЖЕР ( )
Сіздің пісіретін бетіңіз оған қоса орнатылатын ас үй жиһазы
мен оның маңайында орналасқан бүкіл жиһаз жоғары
температураларға шыдай алатын материалдардан жасалған
болуға тиіс. Сонымен қатар, барлық əшекейлік таспалар
жылуға төзімді желіммен жабыстырылған болуға тиіс.
Орнату (B/D сурет):
• Пісіретін бетпен жиынтықталымда герметикаландыратын
аратөсем жеткізіледі.
Орнатудың алдында:
• Пісіретін бетті шыны-керамика беті төменге қарайтындай
етіп жатқызыңыз.
Шыны-керамика беттің қорғалғанына көз жеткізіңіз.
• Аратөсемді пісіретін беттің периметрінің бойымен
орнатыңыз.
• Пісіретін бет оған тіреніп тұратын шкафқа су ағудан сақтану
үшін, аратөсемнің дұрыс орнатылғанына көз жеткізіңіз.
• Пісіретін бет пен оның қасында орналасқан ас үй жиһазының
вертикалды қабырғаларының арасындағы қашықтық кем
дегенде 5 см болуға тиіс.
• Егер орнатылған пісіретін беттің астыңғы жағы жиыстыруды
немесе басқа шаруаларды орындайтын уақытта қол жеткізу
жүзеге асырылатын аумақта орналасқан болса, онда пісіретін
беттен төменде бөгет орнатыңыз.
Пісіретін бет бұл электр аспапты тек екі фазаның арасындағы
немесе фаза мен нейтральдің арасындағы кернеуі 220-240 В
электр желісіне қосуға мүмкіндік беретін қоректендіру
бауымен жабдықталған.
электр аспапты балқыма сақтандырғышпен қорғалған
электр розеткасына қосыңыз
Алайда, сондай-ақ пісіретін бетті төмендегі электр желілеріне
қосуға мүмкіндік бар:
220-240 В 3~ үш фаза немесе 380-415 В 3N~ үш фаза.
Жаңа қосылуға ауысу үшін төмендегі нұсқаулықтарды
орындаңыз:
Қосылуды жүзеге асырудан бұрын, электр аспап лайықты
балқыма сақтандырғыштың көмегімен қорғалғанына жəне
əкелетін өткізгіштердің қимасының ауданы электр аспапты
қалыпты қоректендіру қамтамасыз етілетіндей жеткілікті
болып табылатынына көз жеткізіңіз.
Пісіретін бетті үстелдің үстіне шыны-керамика жағын төмен
қаратып жатқызыңыз. (Шыны-керамика бет қорғалған болуға
тиіс!).
97 KAZ
Page 98
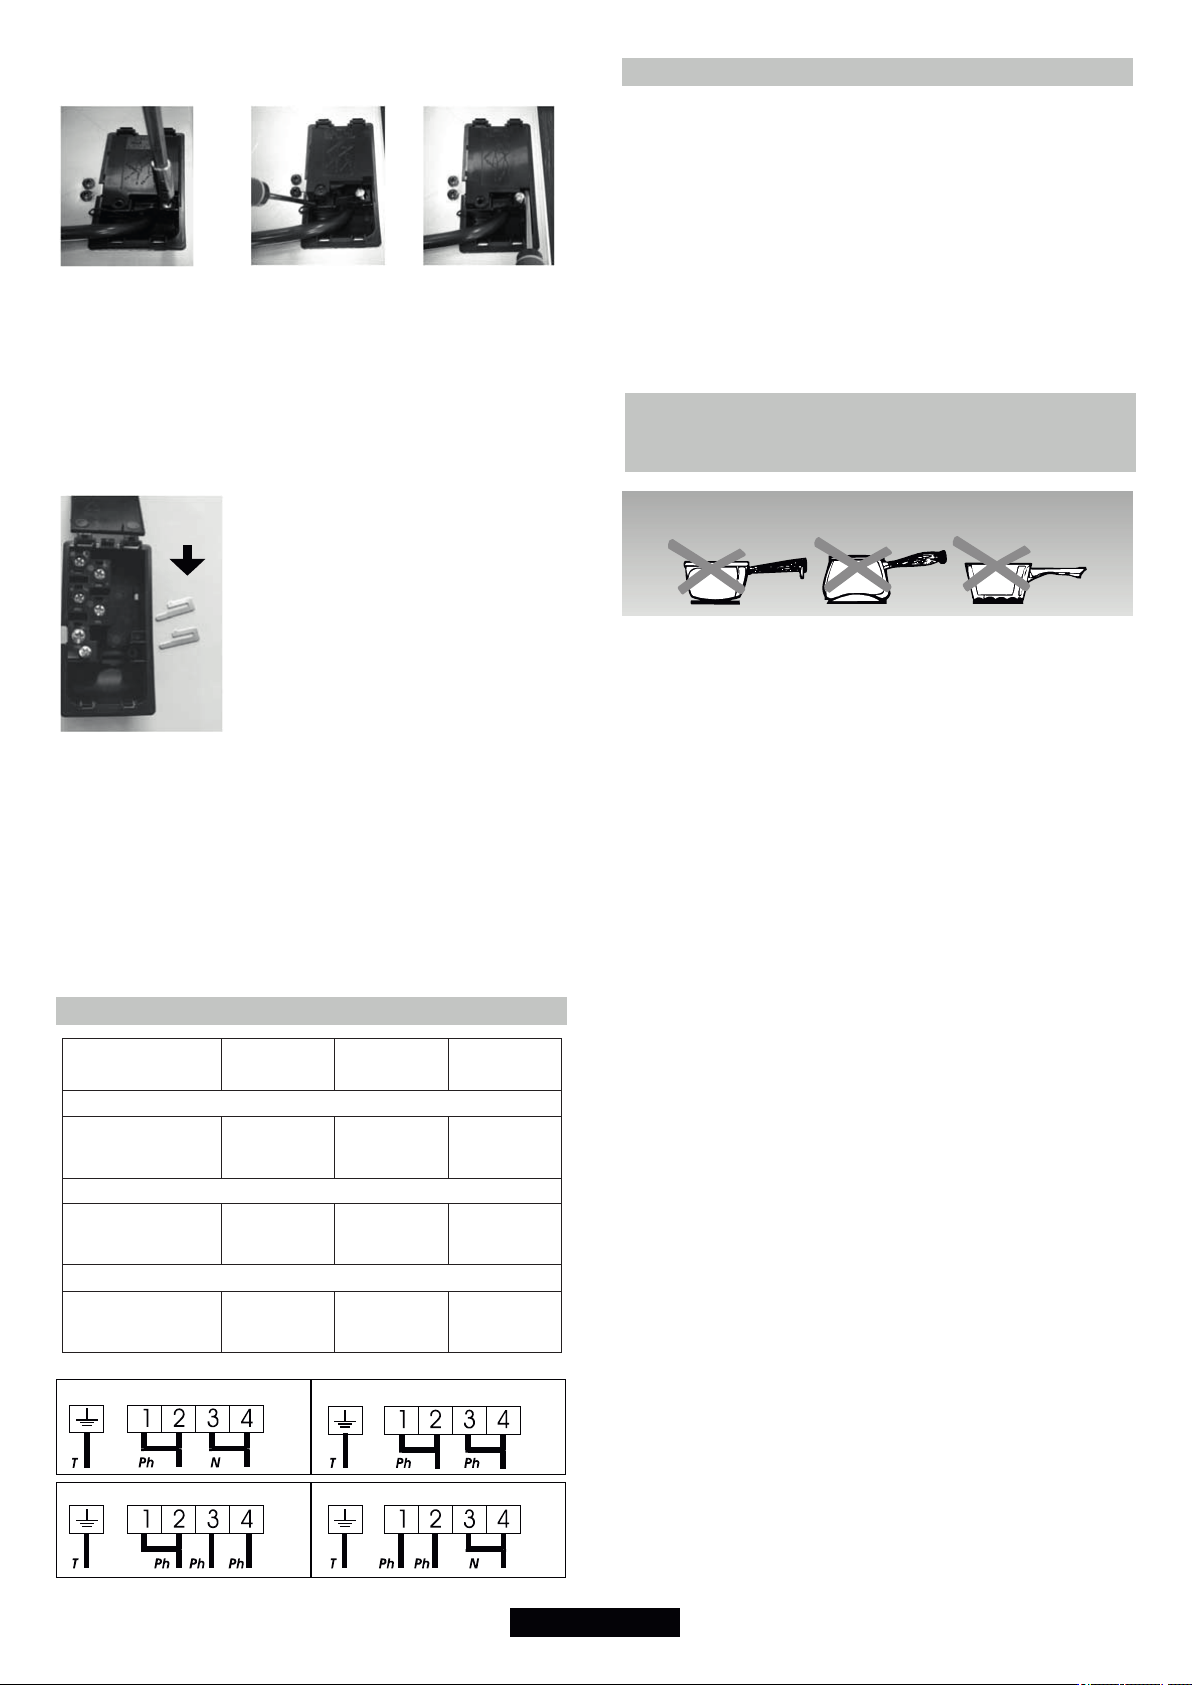
Төмендегі операцияларды орындап, клеммалық
қалыпшаның қақпағын шешіңіз:
1 2 3
қапталда орналасқан екі табаншаны табыңыз,
табаншаның үстінен жайпақ бұрауыштың жүзімен басыңыз
(мұны əр табанша үшін жасаңыз),
қақпақты шешіңіз.
Қоректендіру бауын шешіп алу үшін
онда шунттар мен қоректендіру бауының өткізгіштері бар
клеммалық қалыпша бекітілетін винттерді бұрап алыңыз,
қоректендіру бауын тартып шығарыңыз.
Жаңа қосылуды орындау реті:
SHUNT
Кестеде берілген ұсыныстамаларға
сəйкес қоректендіру бауын таңдап
алыңыз.
Қоректендіру бауын қорек тендіру
бауының қысқышы арқылы өткізіңіз.
Клеммалық қалыпшаға қосылыстарды
орындау үшін қажет қоректендіру
бауының ұзындығын ескере отырып,
қо р е к т е н ді р у б а у ын ы ң ба рл ы қ
өткізгіштерінің шеттері 10 мм ұзындыққа
аршыңыз.
Ө т к і з гі ш т е р м ен ш ун т т а р д ы
(а л ды нд ағ ы о п ер ац ия д а ш еш іп
алынған) төмендегі берілген кестеде көрсетілгендей электр
тогымен қоректендіру желісінің типіне сəйкес қосуды
орындаңыз.
Қақпақты орнатыңыз.
Қоректендіру бауының қысқышының винттерін қатайтып
бұраңыз.
Ескерім: Клеммалық қалыпшадағы винттердің мықтап
қатайтылуын тексеріңіз.
ЭЛЕКТР ҚОСЫЛЫСТАР
LAY OUT
“ 1 ”
3x2,5 мм
4x1,5 мм
4x1,5 мм
Бір фаза 220-240 В НЕМЕСЕ Екі фаза 220-240 В 2~
Қоректендіру
бауы
HO5V2V2F
Үш фаза 220-240 В 3~
Қоректендіру
бауы
HO5V2V2F
Үш фаза 380-415 В 3N~
Қоректендіру
бауы
HO5V2V2F
2
2
2
LAY OUT
“ 2 ”
3x2,5 мм
4x1,5 мм
4x1,5 мм
2
2
2
LAY OUT
“ 3 ”
3x2,5 мм
4x1,5 мм
4x1,5 мм
2
2
2
Бір фаза 220-240 V~
Үш фаза 220-240 V3~ 380-415 V2N~
Екі фаза 220-240 V2~
Үш фаза
PH = Фаза N = Нейтраль T = Жер
5. СУРЕТТЕМЕСІ
“хайлайт" қыздыру аумағы: ток өткізгіш металл жолақша
бүкіл пісіретін бет бойынша бөлінген. Ол 3 секундың ішінде
өрістейді жəне бірқалыпты, біркелкі əрі жеткілікті ұзақ тамақ
дайындау үдерісі үшін пайдаланыла алады. Шыны-керамика
пісіретін бет "хайлайт" қыздыру аумағы өндіретін үлкен жылу
қуаттылығына ие, бұл тамақтың жылдам пісірілуін қамтамасыз
етеді.
Пісіретін беттің конструкциясына енгізілген өзгерістер шыныкерамиканың жоғары температураларға шыдау қабілетін
төмендеткен жоқ, бірақ олар қыздыруды реттеудің икемділігін
арттырды. "Спринтер" құрылғысын пайдалану тамақ пісіру
тəсіліне жəне пайдаланылатын ас үй ыдыс-аяғына
байланысты тамақ пісіру уақытын 15% төмендетуге мүмкіндік
береді.
6. ПІСІРЕТІН БЕТТЕ ПАЙДАЛАНУҒА
АРНАЛҒАН АС ҮЙ ЫДЫС-АЯҒЫН ТАҢДАУҒА
ҚАТЫСТЫ КЕҢЕСТЕР
Пісіретін беттің жоғары тиімділігін қамтамасыз ету үшін,
жоғары сапалы ас үй ыдыс-аяғы пайдаланылуға тиіс.
• Тек табаны мүлдем жайпақ жəне қалың ас үй ыдыс-аяғын
пайдаланыңыз: ондай ыдыс-аяқты пайдалану оларда тамақ
күйетін ыстық орындардың түзілуіне жол бермейді. Табаны қалың
қазандар мен табалар жылудың біркелкі бөлінуін қамтамасыз
ететін болады.
• Қазанның немесе табаның табаны құрғақ болуға тиіс:
ыдысқа сұйық құйылғаннан кейін немесе бұған дейін
тоңазытқышта тұрған қазанды пайдаланатын кезде, қазанды
пісіретін беттің үстіне қоймай тұрып, қазанның табаны əбден
құрғақ болып табылатынына көз жеткізіңіз. Бұл пісіретін бетте
дақтардың түзілуінің алдын алады.
• Тек табаны мүлдем жайпақ жəне қалың ас үй ыдыс-аяғын
пайдаланыңыз: ыдыс-аяқтың диаметрі қыздыру аумағының
диаметрінен кем болмауға тиіс. Егер ыдыс-аяқтың диаметрі
қыздыру аумағының диаметрінен сəл үлкендеу болса, онда
энергия барынша тиімді пайдаланылатын болады.
ЛАЙЫҚТЫ АС ҮЙ ЫДЫС-АЯҒЫН ТАҢДАУ Төмендегі берілген ақпарат сізге тамақты барынша тиімді пісіру
үшін ыдыс-аяқ таңдауға көмектеседі.
Тат баспайтын болаттан жасалған ыдыс-аяқ: пайдалануға
ерекше кеңес беріледі. Əсіресе үш қабатты құрылымды табаны
бар ас үй ыдыс-аяғы жақсы.
Үш қабатты құрылымды табан өз бойында тат баспайтын
болаттың артықшылықтарын (тартымды сырт əлпеті, ұзаққа
жарамдылығы жəне беріктігі) жəне алюминийдің немесе мыстың
артықшылықтарын (жоғары жылу өткізгіштік, температураның
біркелкі таралуы) біріктіреді.
Алюминий ыдыс-аяқ: ауыр ыдыс-аяқты пайдалануға кеңес
беріледі. Жоғары жылу өткізгіштік. Алюминий ыдыс-аяқ кейде
пісіретін бетте сызаттарға ұқсайтын іздер қалдырады. Бірақ, егер
пісіретін бетті тазалау ондай іздер түзілгеннен кейін бірден жүзеге
асырылатын болса, ондай іздер оңай кетіріледі. Алюминийдің
балқу температурасының төмен болуына байланысты, жұқа
алюминий ыдыс-аяқ пайдаланылмауға тиіс.
Шойын ыдыс-аяқ: пайдалануға болады, бірақ қолдануға кеңес
берілмейді. Іске пайдалану сипаттамалары нашар. Бетке сызат
түсіруі мүмкін.
Мыс табанды ыдыс-аяқ / тас керамика: ауыр ыдыс-аяқты
пайдалануға кеңес беріледі. Іске пайдалану сипаттамалары
жақсы, бірақ мыс бетте сызаттарға ұқсайтын іздер қалдырады.
Бірақ, егер пісіретін бетті тазалау ондай іздер түзілгеннен кейін
бірден жүзеге асырылатын болса, ондай іздер оңай кетіріледі.
Алайда, ондай ыдыс-аяқты оған су құйылмай тұрып, пісіретін
беттің үстіне қоймаңыз. Қатты қызған металл шыны-керамика
бетке күйіп жабысуы мүмкін. Қатты қызған мыс табанды ыдыс-аяқ
шыны-керамика бетте кетіру мүмкін болмайтын іздер қалдыруы
мүмкін.
Фарфор / эмаль жалатылған ыдыс-аяқ: Жақсы іске пайдалану
сипаттамалары тек табаны жұқа, тегіс, жайпақ ыдыс-аяқ үшін.
Шыны-керамика ыдыс-аяқ: пайдаланбаған дұрыс. Пайдалану
сипаттамалары нашар. Шыны-керамика пісіретін бетке сызат
түсіруі мүмкін.
98 KAZ
Page 99

7. БЕТТІ ІСКЕ ПАЙДАЛАНУ
пісіретін бетті қоректендіру қосылғаннан кейін, электрондық
басқару блогына қызуға мүмкіндік беру үшін, бірнеше секунд
күте тұрыңыз.
• түймешігін басыңыз. Таңдап алынған конфорканың
дисплейі іске қосылды. Электрондық басқару блогы
қосылады. Дисплейдің ə р аумағында қызу деңгейі
көрсетіледі ж ə н е и н д и к а т о р л ы қ ж а р ы қ д и од
жыпылықтайды.
Eге р 2 0 с ек ун дт ы ң і ші нд е е шқ ан да й ə р ек ет т ер
орындалмайтын болса, электрондық басқару блогы өшіріледі
жəне іске қосу операциясын қайталау қажет.
ҚАЛДЫҚ ҚЫЗУ ИНДИКАТОРЫ Н
Қыздыру аумағының температурасы 60 °C градусқа дейін
жоғарылаған уақытта, дисплейде Н индикаторы пайда
болады. Температура 60 °C градустан төмен құлаған уақытта,
бұл индикатор жоғалады.
Тамақ пісірудің соңына қарай қыздыру аумағын өшіруге жəне
тамақ пісіруді қыздыру аумағының қалдық жылуын пайдалану
арқылы аяқтауға кеңес беріледі.
Маңызды ескертпе. Қоректендіру ажыратылғаннан кейін тіпті
егер қыздыру аумағының температурасы 60 °C градустан
асса да, қалдық қызу индикаторы сөнеді.
ҚЫЗДЫРУ АУМАҒЫН ҚОСУ
- Өзіңізге керекті қыздыру аумағын таңдау түймешігін
басыңыз.
Сіз таңдап алған конфоркаың дисплейінде "0" жарқырап
жанған күйінде қала береді, ал басқа дисплейлерде "0"
көмескіленеді.
TYPE B
77
- "–" немесе "+" түймешігінің көмегімен 1 - 9 аралығындағы
диапазонда керекті қыздыру деңгейін таңдаңыз. "+" немесе
"–" түймешігін басқан кезде, қыздыру деңгейі біртіндеп
ұлғаятын немесе азаятын болады.
Төменде суреттелген мысалдар тек анықтама үшін
келтірілген. Уақыт өте келе сіз өзіңіздің қажеттіліктеріңізге
сəйкес қыздыру орнатылымдарын дұрыс таңдап үйренесіз.
0 : Өшірулі
1 : )...балқыту
2 : )… Өнімдердің кебінуі үшін қыздыру
3 : тамақты ыстық күйінде сақтау
4 : Тамақты ысыту
5 : Өнімдерді жібіту, бұқтыру, тамақты толық пісіру, тамақты
төмен температура жағдайында пісіру
6 : тамақты қақпақсыз пісіру
7 : қуыру, қошқыл-күрең түске дейін шыжғыру жəне
аунатып қуыру
8 : тамақты жоғары температура жағдайында пісіру жəне
аунатып қуыру
9 : қуыру, судың көп көлемін қайнату …
ҚОСЫМША ҚЫЗДЫРУ АУМАҒЫНЫҢ ЖҰМЫСЫН
БАСҚАРУ (ЕКІ АУМАҚ)
Кейбір модельдерде екі аймақтан тұратын қыздыру
аумақтары болады.
.............................
>
Қыздыру аумағы қосылған кезде негізгі, сондай-ақ
қосымша қыздыру аумағы қосылады.
TYPE B
7
LED
Exam ple
Қосымша қыздыру аумағын өшіру үшін:
Қосымша қыздыру аумағының түймешігін басыңыз. Қосымша
қыздыру аумағы өшірілген кезде қосымша қыздыру
аумағының жарықдиоды сөнеді.
Қосымша қыздыру аумағын қайтадан қосу үшін:
Қосымша қыздыру аумағының түймешігін басыңыз. Қосымша
қыздыру аумағы қосылған кезде қосымша қыздыру
аумағының жарықдиоды жанады.
ҚЫЗДЫРУ АУМАҒЫН БАҒДАРЛАМАЛАУ
Əр қыздыру аумағын ең көп дегенде 99 минутқа
бағдарламалауға болады.
- Жоғарыда суреттелгендей, өзіңізге керекті қыздыру аумағын
қосыңыз.
- Таймерді қосу үшін, "-" жəне "+" түймешіктерін қатарынан
басыңыз, дисплейде "00" көрсетіледі.
ҚЫЗДЫРУ АУМАҒЫН ӨШІРУ
- Тиісті қыздыру аумағын таңдау түймешігін басыңыз.
- Дисплейде қыздыру деңгейі 0 көрсетілгенгенге дейін "-"
түймешігі басыңыз, 10 секундтан соң қыздыру деңгейінің
индикаторы сөнеді.
- Жылдам өшіру үшін "–" жəне тиісті қыздыру аумағының
тү ймешіктерін қатар ба сыңыз. Қызд ыру деңге йі 0
позициясына автоматты түрде орнатылады. Қыздыру аумағы
өшірілді.
ЖАЛПЫ ӨШІРУ
Қыздыру аумағы мен таймерді кез келген
уақытта Қосу/Өшіру түймешігін басу арқылы
өшіруге болады.
99 KAZ
TYPE B
7
LED
- 0 – 99 минут аралығындағы диапазонда минуттарда уақыт
беру үшін, "+ " түймешігін қайтадан басыңыз немесе, 30 – 0
минут аралығындағы диапазонда уақытты азайту үшін, "-"
түймешігін басыңыз.
--> бағдарламалау уақытын кез келген сəтте өзгертуге болады
Таймерде орнатылған уақыт өткен шақта, қыздыру аумағы
автоматты түрде өшіріледі жəне 1 минутқа дыбыстық сигнал
қосылады. Дыбыстық сигналды өшіру үшін, түймешікті
басыңыз.
--> таймерді еске салу үшін қыздыру аумағын қосусыз
пайдалануға болады, таймерде орнатылған уақыт өткен соң
дыбыстық сигнал қосылады.
Page 100

. ҚҰЛЫПТАУ ТҮЙМЕСІНІҢ ЖҰМЫСЫ
Құлыптау түймесі плитаны балалардың байқаусызда іске
қосуынан сақтайды, сонымен қатар ол плитаны тазалау
кезінде пайдалы.
Плитаны құлыптау. (4 көзді плитаға мысал)
ON/OFF (Қосу/өшіру) түймесін басыңыз, сосын (тек осыдан
кейін балалардан қорғау құлпы іске қосылады)
Минус түймесі мен жоғарғы сол
жақ тағ ы таң дау түй мес ін
дыбысты сигнал естілгенше
бірге басып тұрыңыз; егер
дыбысты сигнал естілмесе,
плита ны ӨШ І РІП, ба рл ық
қадамдарын қайта орындаңыз.
Сосын жоғарғы сол жақ түймені
қайта басыңыз.
Бұл операция процедурасы 10
секунд ішінде орындалуы керек
жəне ж о ғарыда а йтылғ а н
т ү йм ед ен ба сқ а т ү й м е
басылмауы керек; əйтпесе енгізілген параметрден
процедураның аяқталмау себебінен бас тартылады.
ҚҰЛЫПТАЛҒАН (байқаусызда
балалардың іске қосуынан
қор ғ ау ф у нк ц ияс ы) к езде
ба рл ы қ диспл е йлерде “ L ”
көрсетіледі, ал егер пісіру көзі
"hot" (ыстық) күйінде болса, “L”
жəне “H” əріптері кезекпен көрсетіледі.
Плита құлпын ашу
Басқару тақтасының құлпын
ашу үшін, минус түймесі мен
жоғ а рғы с ол жа қ таң д ау
тү й м е сі н ( п іс і р у к ө зд ер і
аймағының артқы сол жағында)
бірге басып, артында минус
түймесін тағы басу керек.
Осыдан кейін құлып ашылады
да, сенсорлы басқару элементі
STAND BY (Күту) режиміне
оралады.
ЖЫЛДАМ ҚЫЗДЫРУ
− Қосу/Өшіру түймешігін басыңыз
− Керекті қыздыру аумағын қосыңыз, "+" түймешігінің
көмегімен қыздыру деңгейін реттеуді "9" позициясына
орнатыңыз, түймешікті тез жіберіңіз де, содан кейін "+"
түймешігін тағы бір рет басыңыз. Дисплейде "А" индикаторы
(жылдам қыздыру) жəне қыздыру деңгейін реттеуіштің таңдап
алынған "9" позициясы алма-кезек көрсетіледі.
− Егер керек болса, таңдап алынған қыздыру деңгейін
азайтыңыз, дисплейде "А" индикаторы (жылдам қыздыру)
жəне қыздыру деңгейін реттеуіштің таңдап алынған
позициясы алма-кезек көрсетілетін болады.
Реттеуіштің
позициясы
0
1
2
3
4
5
6
7
8
9
Жылдам
қыздырудың
орындалу
уақыты
:
0
:
1
:
3
5
6,5
8,5
2,5
3,5
4,5
Қуаттылығы
:
0
: 2.5 % : 0 : 2 H
:
:
:
:
:
:
:
:
:
%
3 %
6 %
11 % :
16 % :
19 % :
32 % :
45 % :
65 % :
100 % : 0
Автоматты
түрде өшірілгенге
дейін максималды
жұмыс уақыты*
:
:
:
:
:
:
:
:
:
:
0 H
6 H
6 H
5 H
5 H
4 H
1,5 H
1,5 H
1,5 H
1,5 H
Мысал: 1800 Вт қыздыру аумағы үшін қыздыру деңгейінің "6"
орнатылымы таңдап алынған. Қыздыру қуаттылығы 32%-дан
1800 Вт дейін құрайды.
"Жылдам қыздыру" функциясы таңдалған уақытта,
қызд ы ру аумағы 2,5 минуттың ішінде 1800 Вт
қуаттылықты береді, ал содан кейін бұл аумақтың
қуаттылығы 576 Вт дейін төмендейді.*Қауіпсіздік
мақсаттарында, егер қыздыру аумақтары тым ұзақ қосулы
күйінде қалатын болса, олар автоматты түрде өшіріледі.
Қыздыру аумағы өшірілгенге дейінгі уақыт таңдап алынған
қыздыру деңгейіне байланысты.
Жылдам қыздыру функциясын өшіру
- Керекті қыздыру аумағын қосыңыз, "-" түймешігінің көмегімен
қалыпты қыздыру деңгейін орнатыңыз немесе, қыздыру
аумағын өшіру үшін, қыздыруды реттеуді "0" позициясына
орнатыңыз.
8. ТАЗАЛАУ ЖƏНЕ ҚЫЗМЕТ КӨРСЕТУ
Пісіретін бетке қызмет көрсетуге байланысты қандай да бір
жұмыстарды бастардан бұрын, пісіретін бетке суынуға мүмкіндік
беріңіз.
Тек шыны-керамика беттерге күтім жасауға арналған
материалдар мен құрал-сайманды (кремдерді, тазалауға
арналған қырғыштарды) пайдалану керек. Ондай материалдар
мен құрал-сайманды шаруашылық тауарлар дүкендерінен сатып
алуға болады.
Пісіретін беттің үстіне сұйықтарды төгіп алмауға тырысыңыз,
өйткені олар жылдам күйіп жабысуы мүмкін, бұл тазалауды
айтарлықтай қиындатады.
Оңай балқитын заттектрді, мысалы, пластмассадан жасалған
бұйымдарды, қантты немесе құрамында қант бар өнімдерді
пісіретін беттен аулақ ұстаған жөн.
100 KAZ
ҚЫЗМЕТ КӨРСЕТУ:
. Бетке арнайы тазартқыш құралдың бірнеше тамшысын
жағыңыз.
. Дақтарды жұмсақ шүберектің көмегімен немесе дымқыл ас үй
қағазының көмегімен сүртіп тастаңыз.
. Бет таза болғанға дейін, бетті жұмсақ шүберекпен немесе
дымқыл ас үй қағазымен ысқылаңыз.
Егер қиын кетірілетін дақтар қалып жатса:
. Пісіретін бетке тағы бірнеше тамшы тазартқыш сұйық ағызыңыз.
. Дақтарды оны бетке қатысты 30° бұрышта ұстап, қырғышпен
қырып тастаңыз.
. Бетті жұмсақ шүберекпен немесе құрғақ ас үй қағазымен бет
тазаға айналғанға дейін ысқылаңыз.
. Қажет болған жағдайда, бұл операцияны қайталаңыз.
 Loading...