

Page 1

CDB 464
Mode d’emploi
User instructions
FR
EN
Page 2
FR
INDEX
Avant-propos
Notes générales à la
livraison
Garantie
Mesures de sécurité
Données techniques
Mise en place,installation
Description des commandes
Tableau des programmes
Sélection
Tiroir à lessive
Le produit
Lavage
Séchage
Cycle automatique de
lavage/séchage
Nettoyage et entretien
Recherche des pannes
CHAPITRE
CHAPTER
1
2
3
4
5
6
7
8
9
10
11
12
13
14
15
3
EN
INDEX
Introduction
General points on delivery
Guarantee
Safety Measures
Technical Data
Setting up and Installation
Control Description
Table of Programmes
Selection
Detergent drawer
The Product
Washing
Drying cycle
Automatic washing/Drying
cycle
Cleaning and routine
maintenance
Faults Search
2
FR
T
OUS NOS
COMPLIMENTS
En achetant cet appareil
ménager Candy,vous avez
démontré que vous
n’acceptez aucun
compromis: vous voulez
toujours ce qu’il y a de
mieux.
Candy a le plaisir de vous
proposer cette nouvelle
machine à laver qui est le
résultat d’années de
recherches et d’études des
besoins du consommateur.
Vous avez fait le choix de la
qualité,de la fiabilité et de
l’efficacité.
Candy vous propose une
large gamme d’appareils
électroménagers: machines
à laver la vaisselle,machines
à laver et sécher le linge,
cuisinières,fours à microondes,fours et tables de
cuisson,hottes,réfrigerateurs
et congélateurs.
Demandez à votre
Revendeur le catalogue
complet des produits
Candy.
Nous vous prions de lire
attentivement les conseils
contenus dans ce livret.Il
contient d’importantes
indications concernant les
procédures d’installation,
d’emploi,d’entretien et
quelques suggestions utiles
en vue d’améliorer
l’utilisation de la machine à
laver.
Conservez avec soin ce
livret: vous pourrez le
consulter bien souvent.
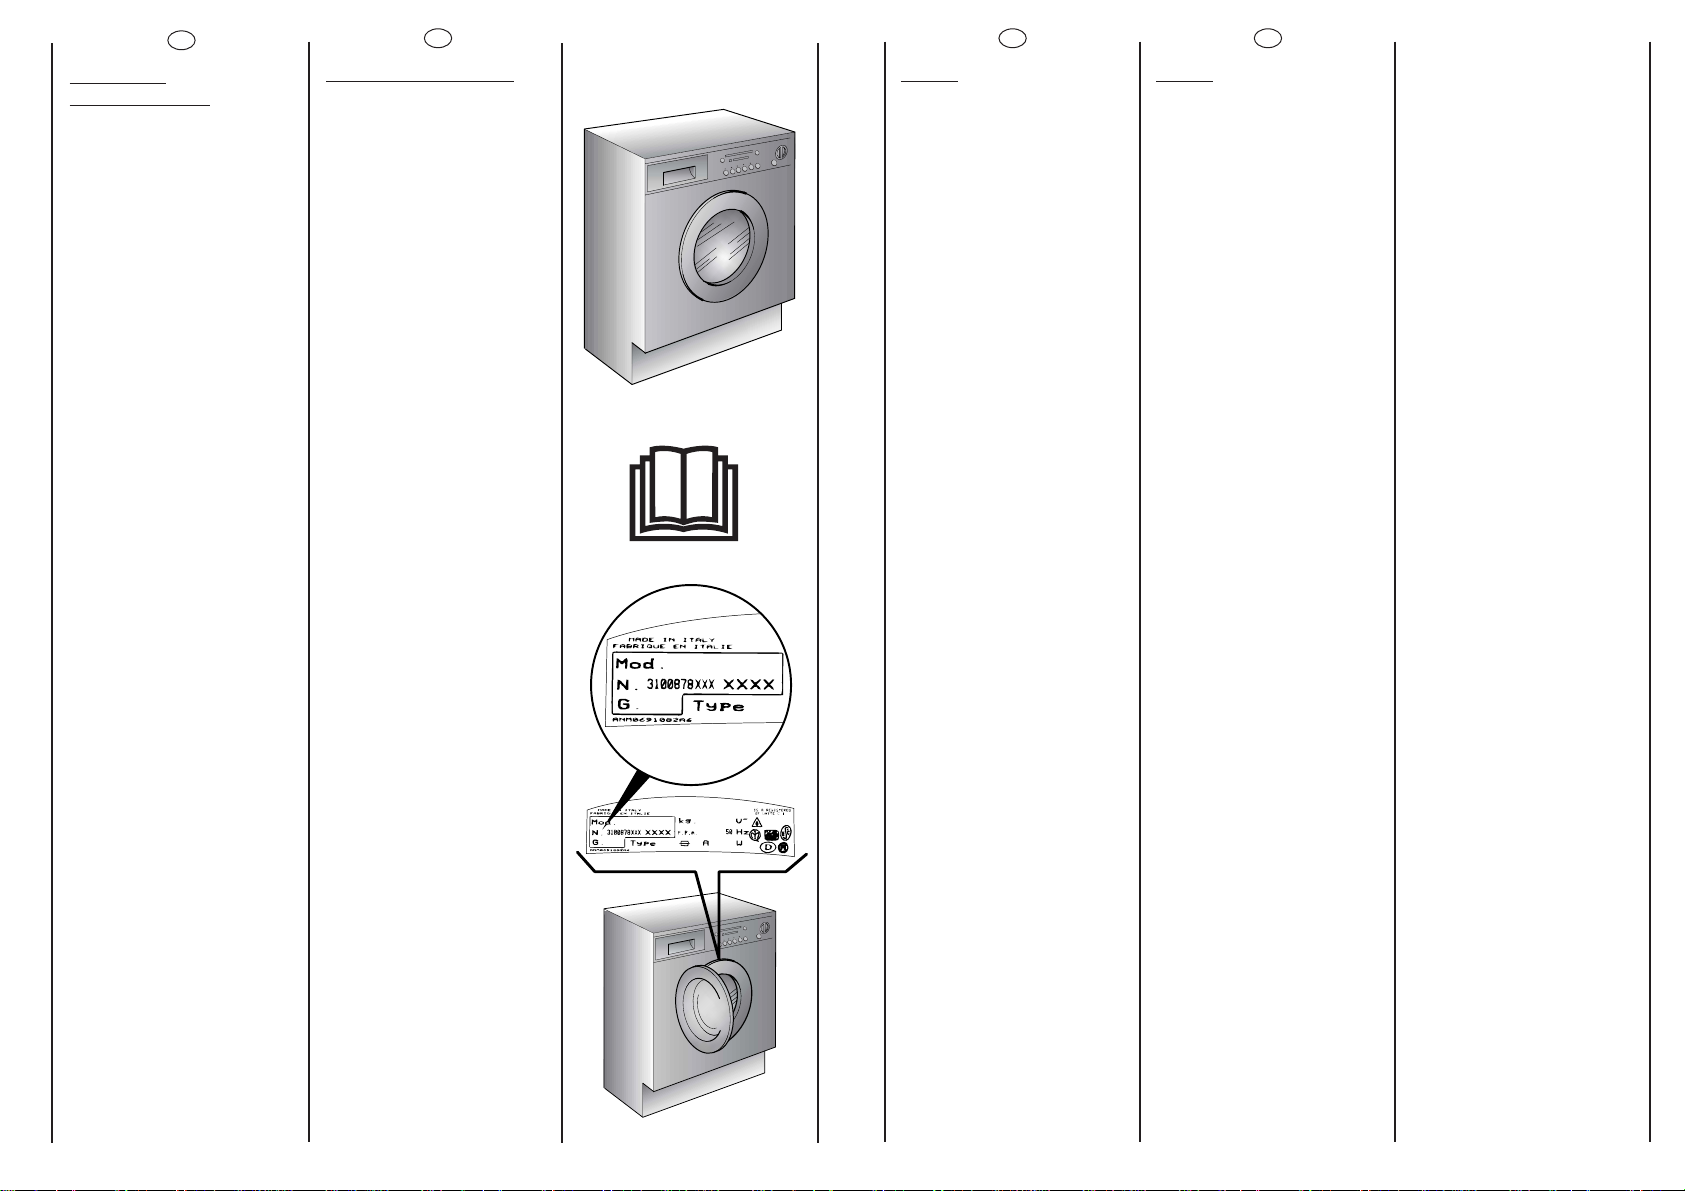
Quand vous communiquez
avec Candy,ou avec ses
centres d’assistance,veuillez
citer le Modèle,le n° et le
numéro G (éventuellement).
EN
OUR COMPLIMENTS
With the purchase of this
Candy household
appliance,you have shown
that you will not accept
compromises: you want only
the best.
Candy is happy to present
their new washing machine,
the result of years of
research and market
experience through direct
contact with Consumers.
You have chosen the quality,
durability and high
performance that this
washing machine offers.
Candy is also able to offer a
vast range of other
household appliances:
washing machines,
dishwashers,washer-dryers,
cookers,microwave ovens.
Traditional ovens and hobs,
refrigerators and freezers.
Ask your local retailer for the
complete catalogue of
Candy products.
Please read this booklet
carefully as it provides
important guide lines for
safe installation,use and
maintenance and some
useful advise for best results
when using your washing
machine.
Keep this booklet in a safe
place for further
consultation.
When contacting Candy
or a Customer Services
Centre always refer to the
Model,No.,and G number
(if applicable of the
appliance see panel).
Page 3
EN
CHAPTER 2
GU
ARANTEE
The appliance is supplied
with a guarantee certificate
which allows free use of the
Technical Assistance Service.
5
FR
CHAPITRE 2
GARANTIE
L’appareil est accompagné
par un certificat de
gàrantie.
4
AB
C
FR
CHAPITRE 1
NO
TES GENERALES
A LA LIVRAISON
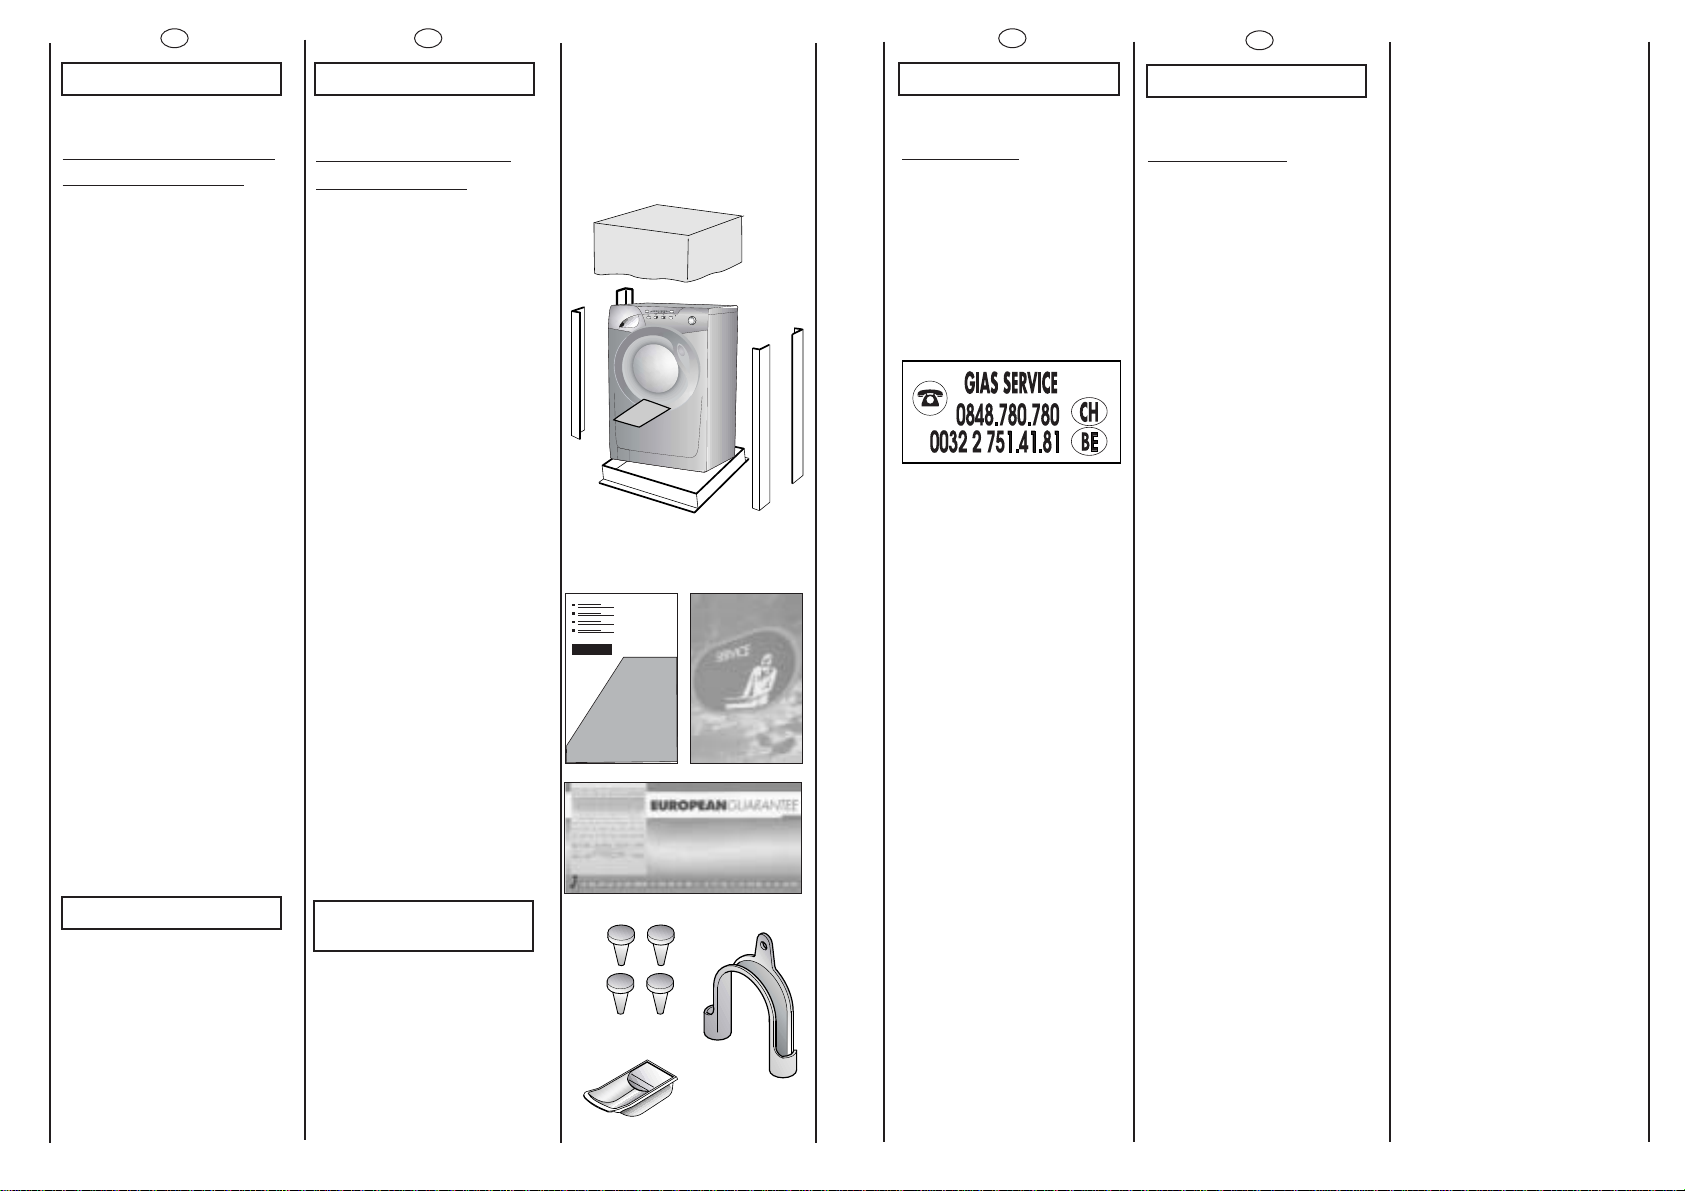
A la livraison veuillez,
contrôler que le matériel
suivant accompagne la
machine:
A) LIVRET
D’INSTRUCTIONS
B) ADRESSES DE SERVICE
APRES VENTE
C)CERTIFICAT DE
GARANTIE
D) BOUCHONS
E) COUDES POUR LE TUBE
DE VIDANGE
F) BAC POUR LES
PRODUITS LESSIVIELS
LIQUIDES OU POUR LES
PRODUITS
BLANCHISSANTS
LIQUIDES
LES CONSERVER
et contrôler que ce matériel
soit en bon état; si tel n’est
pas le cas appelez le centre
Candy le plus proche.
EN
CHAPTER 1
GENERAL POINTS
ON DELIVERY
On delivery,check that the
following are included with
the machine:
A) INSTRUCTION MANUAL
B) CUSTOMER SERVICE
ADDRESSES
C)GUARANTEE
CERTIFICATES
D) CAPS
E) BEND FOR OUTLET TUBE
F) LIQUID DETERGENT OR
LIQUID BLEACH
COMPARTMENT
(CONTAINER)
KEEP THEM IN A SAFE
PLACE
Check that the machine has
not incurred damage during
transport.If this is the case,
contact your nearest Candy
Centre.
E
F
D
Page 4
7
FR
● Ne pas utiliser
d’adaptateurs ou de prises
multiples.
● Cet appareil n’est pas
destiné à être utilisé par des
personnes (notamment les
enfants) incapables,
irresponsables ou sans
connaissance sur l’utilisation
du produit,à moins qu’elles
ne soient surveillées,ou
instruites sur l’utilisation de
l’appareil,par une personne
responsable de leur sécurité.
Surveillez les enfants pour
être sûr qu’ils ne jouent pas
avec l’appareil.
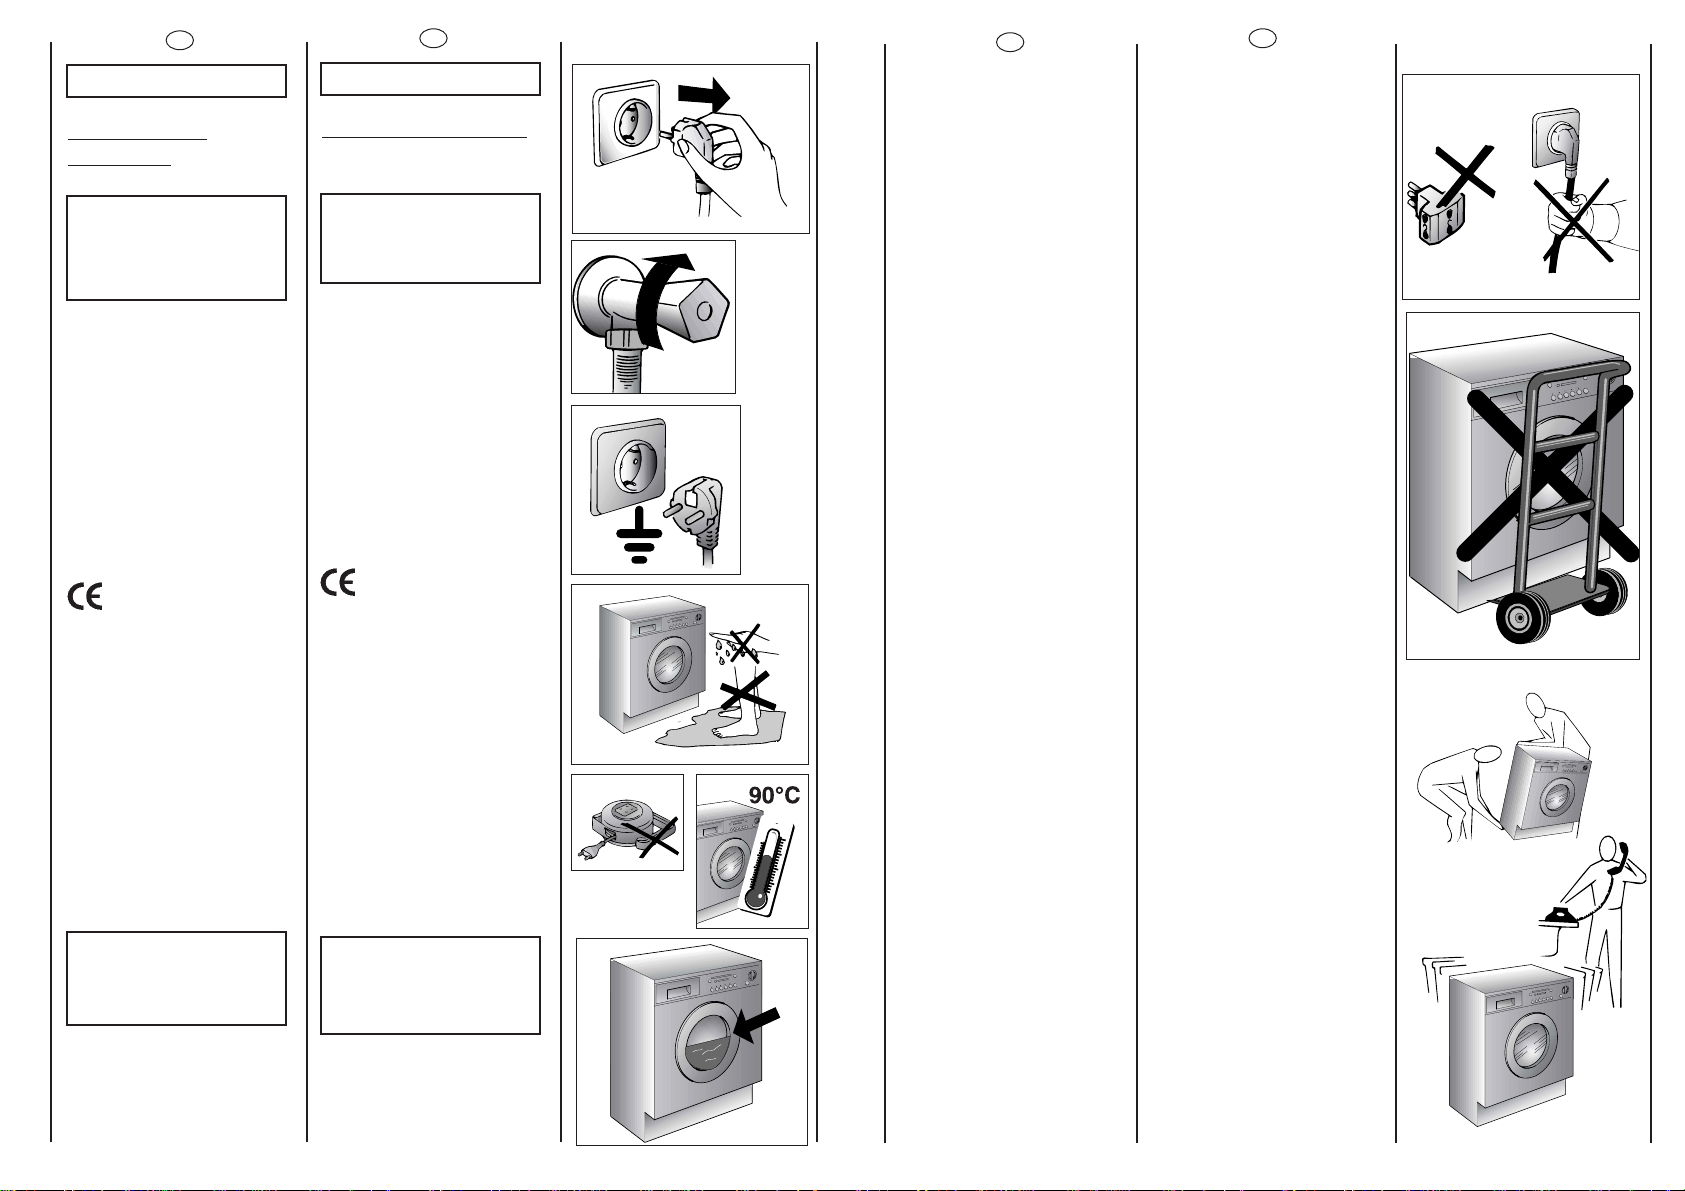
● Pour débrancher la prise,
ne pas tirer sur le câble.
● Ne pas laisser la machine
exposée aux agents
atmosphériques (pluie,soleil,
etc...).
● En cas de déménagement
ne jamais soulever la
machine par les boutons ou
par le tiroir des produits
lessiviels.
● Pendant le transport ne
pas appuyer le hublot sur le
chariot.
Important!
Les ouvertures à la base de
l’appareil ne doivent en
aucun cas être obstruées par
des tapis,moquette ou
autres objets.
● 2 personnes pour soulever
la machine (voir dessin).
● En cas de panne et/ou de
mauvais fonctionnement
éteindre la machine,fermer
le robinet d’alimentation
d’eau et ne pas toucher à la
machine.Pour toute
réparation adressez-vous
exclusivement à un centre
d’assistance technique
Candy en demandant des
pièces de rechange
certifiées constructeur.Le fait
de ne pas respecter les
indications susmentionnées
peut compromettre la
sécurité de l’appareil.
● Si le remplacement du
câble d’alimentation s’avère
nécessaire,il devra être
remplacé par un câble
special fourni par le service
après-vente.
EN
● Do not use adaptors or
multiple plugs.
● This appliance is not
intended for use by persons
(including children) with
reduced physical,sensory or
mental capabilities, or lack of
experience and knowledge,
unless they have been given
supervision or instruction
concerning use of the
appliance by a person
responsible for their safety.
Children should be
supervised to ensure that
they do not play with the
appliance.
● Do not pull the mains lead
or the appliance itself to
remove the plug from the
socket.
● Do not leave the
appliance exposed to
atmospheric agents (rain,sun
etc.)
● In the case of removal,
never lift the appliance by
the knobs or detersive
drawer.
● During transportation
do not lean the door against
the trolley.
Important!
When the appliance
location is on carpet floors,
attention must be paid so as
to ensure that there is no
obstruction to the bottom
vents.
● Lift the appliance in pairs
as illustrated in the diagram.
● In the case of failure
and/or incorrect operation,
turn the washing machine
off, close the water inlet tap
and do not tamper with the
appliance.Contact a Candy
Technical Assistance Centre
for any repairs and ask for
original Candy spare parts.
Avoidance of these norms
may compromise the safety
of the appliance.
● Should the supply cord
(mains cable) be demaged,
this is to be replaced by a
specific cable available from
the after sales service centre.
6
FR
CHAPITRE 3
MESURES DE
SECURITE
ATTENTION:
EN CAS
D’INTERVENTION DE
NETTOYAGE ET
D’ENTRETIEN
● Débrancher la prise de
courant.
● Fermer le robinet
d’alimentation d’eau.
● Toutes les machines Candy
sont pourvues de mise à la
terre.
Vérifier que l’installation
électrique soit alimentée par
une prise de terre,en cas
contraire demander
l’intervention du personnel
qualifié.
Produit compatible
avec les Directives
Européennes 73/23/EEC et
89/336/EEC,remplacé par
2006/95/EC et 2004/108/EC,
et les amendements
successifs.
● Ne pas toucher l’appareil
pieds nus.
● Autant que possible éviter
l’usage de rallonges dans les
salles de bains ou les
douches.
ATTENTION:
PENDANT LE LAVAGE
L’EAU PEUT ATTEINDRE
90°C.
● Avant d’ouvrir le hublot
vérifier que le tambour soit
sans eau.
EN
CHAPTER 3
SAFETY MEASURES
IMPORTANT:
FOR ALL CLEANING
AND MAINTENANCE
WORK
● Remove the plug
● Turn off the water inlet tap.
● All Candy appliances are
earthed.Ensure that the
main electricity circuit is
earthed.Contact a qualified
electrician if this is not the
case.
Appliance complies
with European Directives
73/23/EEC and 89/336/EEC,
replaced by 2006/95/EC and
2004/108/EC,and
subsequent amendments.
● Do not touch the
appliance with wet or damp
hands or feet.
● Do not use the appliance
when bare-footed.
● Extreme care should be
taken if extension leads are
used in bathrooms or shower
rooms.Avoid this where
possible.
WARNING: DURING THE
WASHING CYCLE,THE
WATER CAN REACH A
TEMPERATURE OF 90°C.
● Before opening the
washing machine door,
ensure that there is no water
in the drum.
Page 5
9
FR
CHAPITRE 5
MISE EN PLA
CE
INSTALLATION
Placer la machine près du
lieu d’utilisation sans la base
d’emballage.
Couper avec précaution le
cordon qui maintient le
tuyeau d’évacuation et le
cable d’alimentation
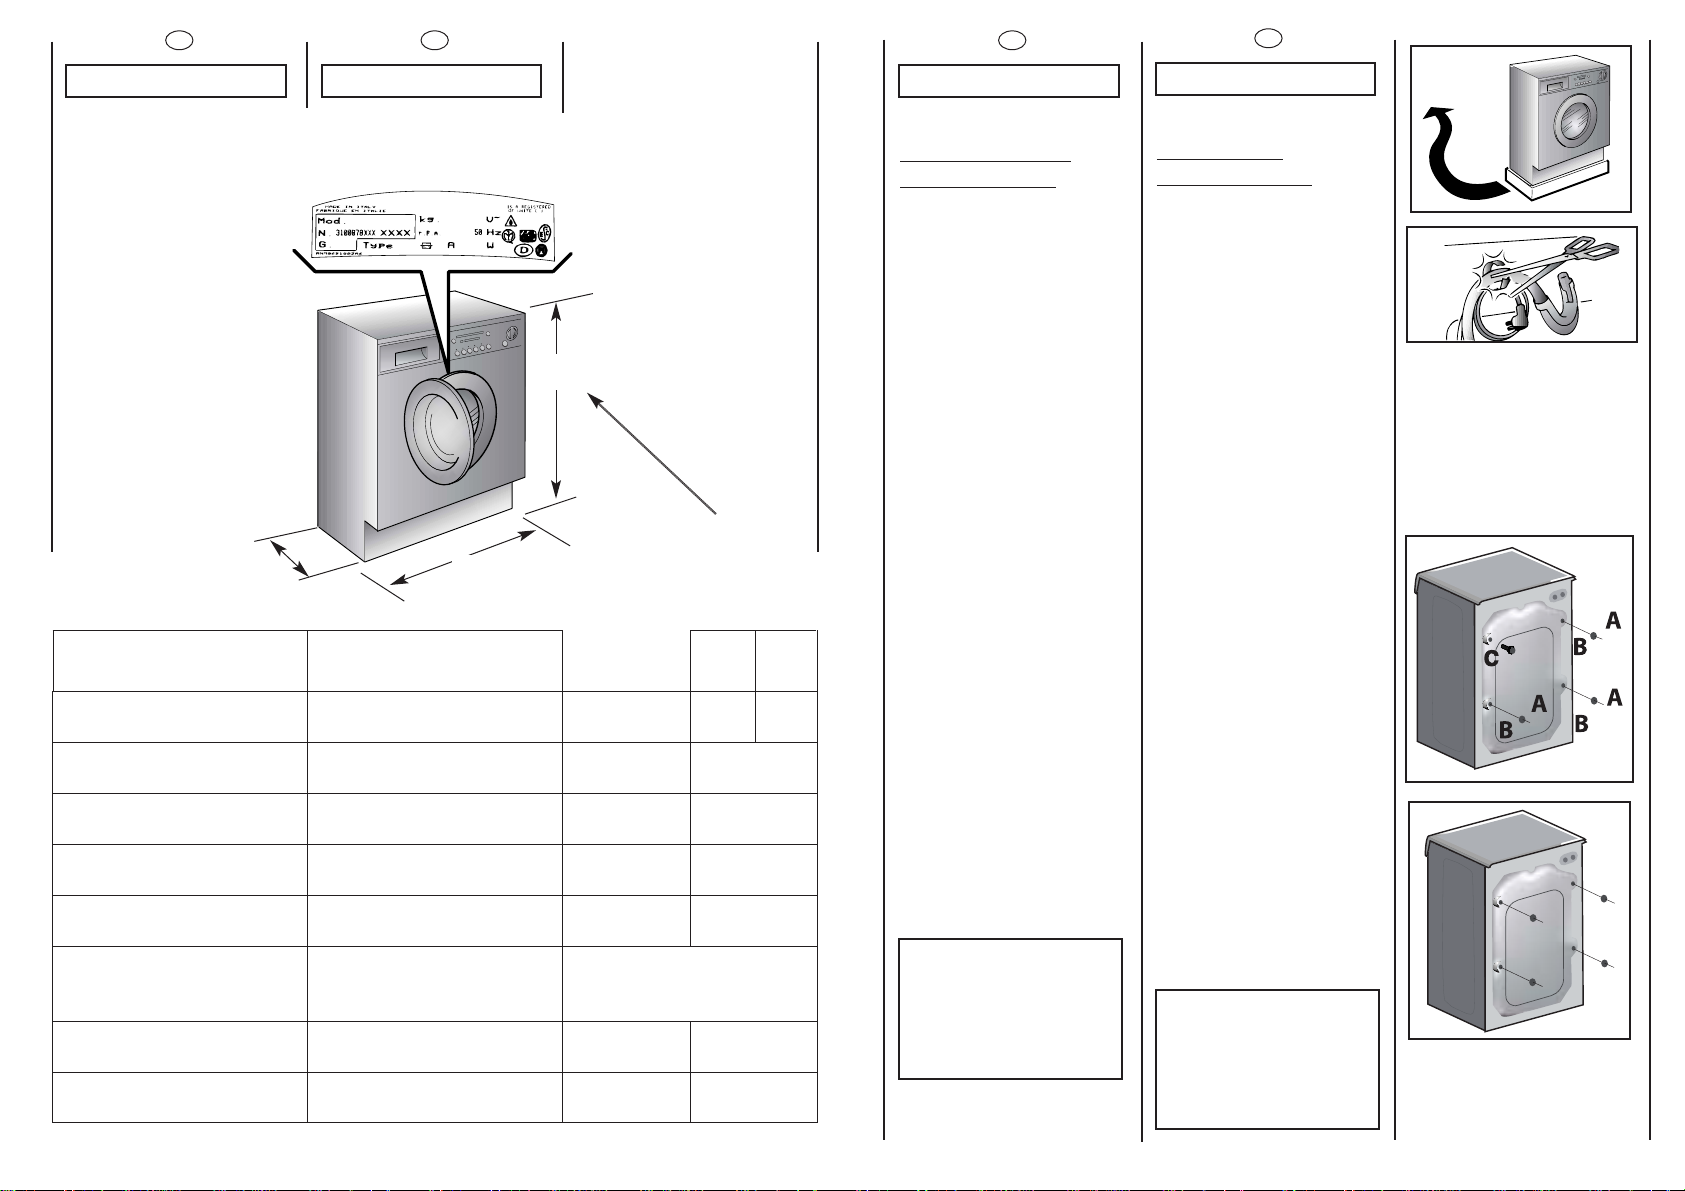
Enlever les 3 vis de fixation
indiquées en (A) et enlever
les espaces indiqués en (B)
Dévisser la vis (C).
Un élément en plastique
tombera à l’intérieur de la
machine à laver.
Incliner la machine vers
l’avant et enlever l’élément
plastique ci-dessus.
Couvrir les quatre trous en
utilisant les capuchons
prévus à cet effet dans le
sachet où se trouve la
notice
ATTENTION:
NE PAS LAISSER À LA
PORTÉE DES ENFANTS
DES ELEMENTS
D’EMBALLAGE QUI
PEUVENT CAUSER DES
RISQUES.
EN
CHAPTER 5
SETTING UP
INSTALLATION
Move the machine near its
permanent position without
the packaging base.
Carefully cut the securing
strap that holds the main
cord and the drain hose.
Remove the 3 fixing screws
marked (A) and remove the
3 spacers marked (B)
Remove the screw (C).
A spacer will fall inside the
machine.
By tilting the machine,
remove the above
mentioned spacer.
Cover the 4 holes using the
caps provided in the
instruction booklet pack.
WARNING:
DO NOT LEAVE THE
PACKAGING IN THE
REACH OF CHILDREN
AS IT IS A POTENTIAL
SOURCE OF DANGER.
8
FR
CHAPITRE 4
CAPACITE DE LINGE
SEC
EAU NIVEAU NORMAL
PUISSANCE
ABSORBEE
CONSOMMATION ENERGIE
(PROG.90°C)
AMPERAGE
ESSORAGE
(Tours/min.)
PRESSION DANS
L’INSTALLATION HYDRAULIQUE
TENSION
DONNÉES TECHNIQUES
kg 4
6÷15
2150
1,8
10
min. 0,05
max. 0,8
220-240
l
W
kWh
A
1400
MPa
V
6
Lavage
Washing
Séchage
Drying
EN
CHAPTER 4
MAXIMUM WASH
LOAD DRY
NORMAL WA TER LEVEL
POWER INPUT
ENERGY CONSUMPTION
(PROG.90°C)
POWER CURRENT FUSE
AMP
SPIN
r.p.m.
WATER PRESSURE
SUPPL Y V OL T AGE
TECHNICAL DATA
82 cm
60 cm
54 cm
85 cm
Page 6

11
FR
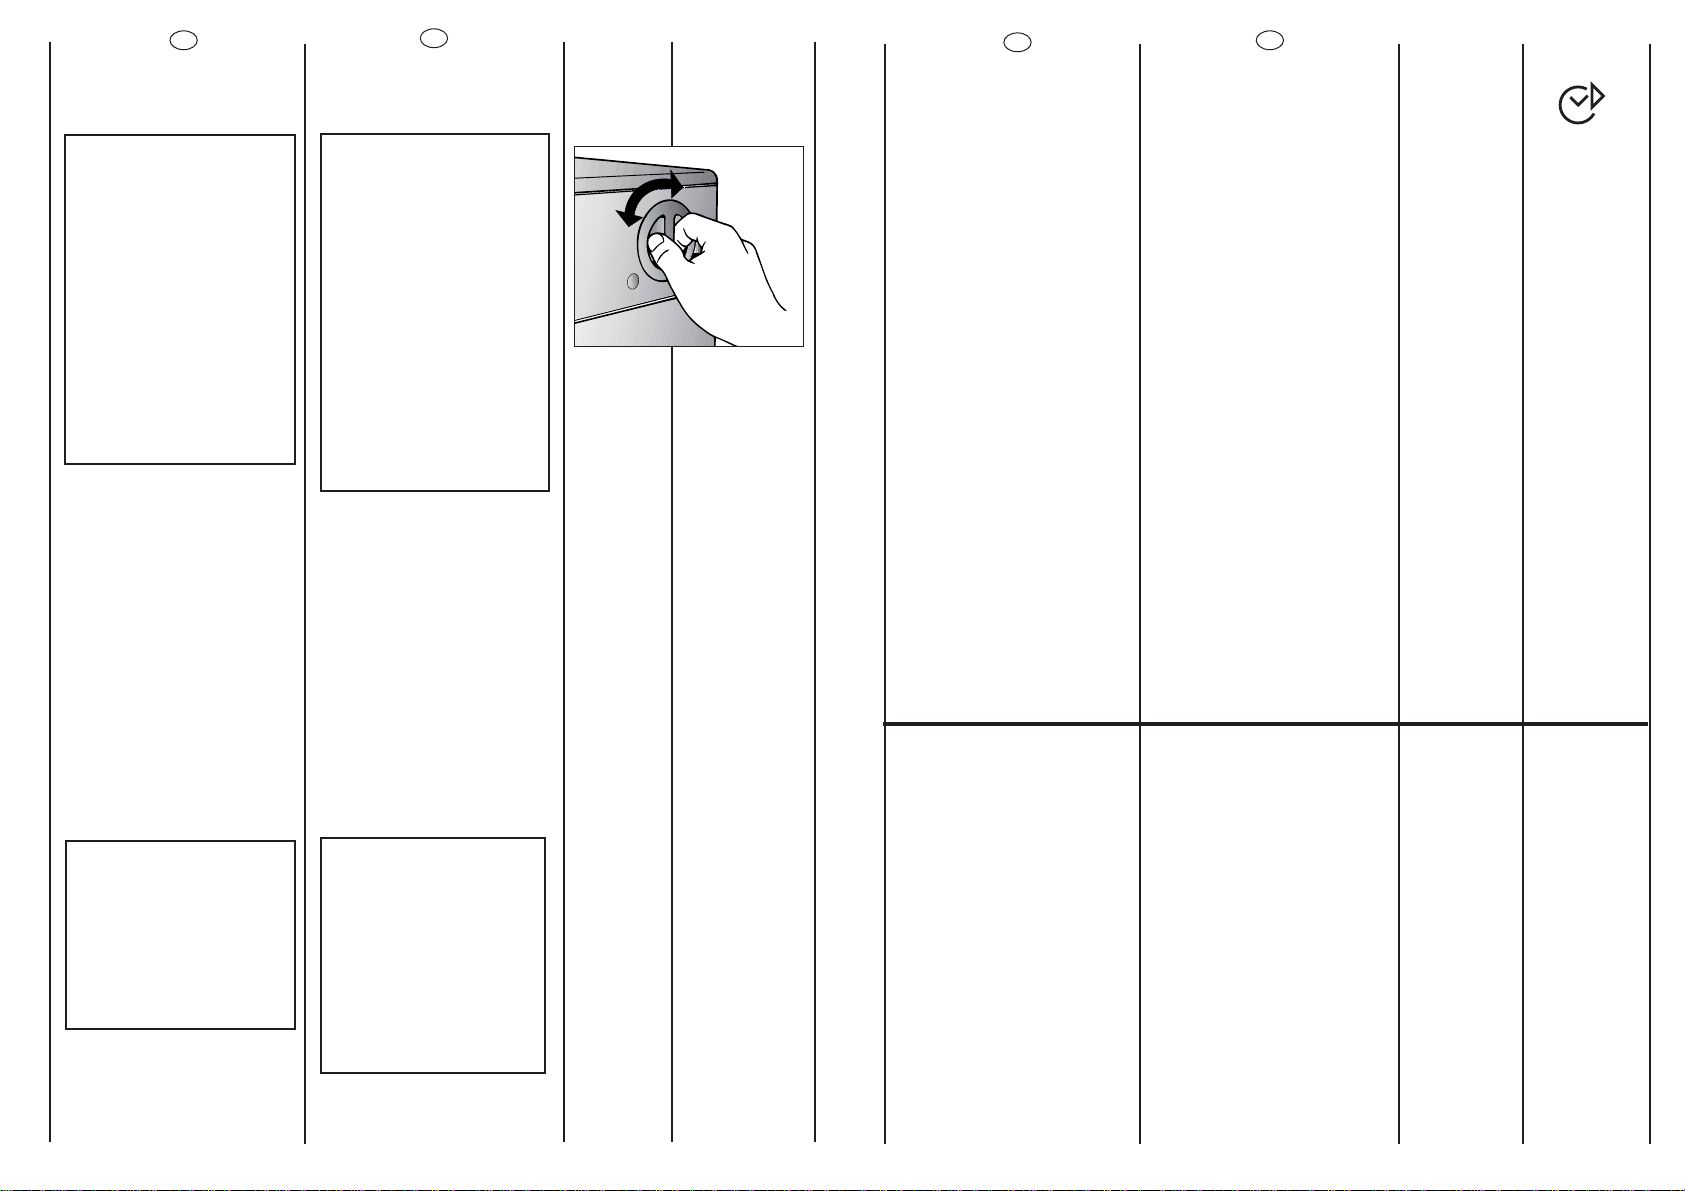
Mettre la machine à niveau
en reglant les 4 pieds:
a) Tourner dans le sens des
aiguilles d’une montre
l’écrou de façon à
dévérouiller la vis du pied.
b) Tourner le pied et le faire
monter ou descendre
jusqu’à obtenir une parfaite
adhérence au sol.
c) Enfin bloquer le pied en
revissant l’écrou dans le sens
inverse des aiguilles d’une
montre et le faire adhérer au
fond de la machine.
Vérifier que la manette soit
sur la position “OFF” et que le
hublot soit fermé.
Brancher la prise.
ATTENTION:
Au cas où il serait nécessaire
de remplacer le cable
d’alimentation,assurez vous
de respecter les codescouleur suivants dans le
branchement de chacun
des fils:
BLEU - NEUTRE (N)
MARRON - PHASE (L)
VERT-JAUNE - TERRE ( )
Une fois l'appareil installé,la
prise électrique doit rester
accessible.
EN
Use the 4 feet to level the
machine with the floor:
a) Turn the nut clockwise to
release the screw adjuster of
the foot.
b) Rotate foot to raise or
lower it until it stands firmly on
the ground.
c) Lock the foot in position
by turning the nut anticlockwise until it comes up
against the bottom of the
machine.
Ensure that the knob is on the
“OFF”position and the load
door is closed
Insert the plug.
ATTENTION:
should it be necessary to
replace the supply cord,
connect the wire in
accordance with the
following colours/codes:
BLUE - NEUTRAL (N)
BROWN - LIVE (L)
YELLOW-GREEN - EARTH ( )
After installation,the
appliance must be
positioned so that the plug is
accessible.
A
B
C
10
min 50 cm
max 85 cm
+2,6 mt max
max 100 cm
min 4 cm
EN
Fix the sheet of corrugated
material on the bottom as
shown in picture.
Connect the fill hose
to the tap.
The appliance must be
connected to the water
mains using new hose-sets.
The old hose-sets should not
be reused.
IMPORTANT:
DO NOT TURN THE TAP
ON AT THIS TIME.
Position the washing
machine next to the wall.
Hook the outlet tube to the
edge of the bath tub,
paying attention that there
are no bends or
contractions along the tube.
It is better to connect the
discharge hose to a fixed
outlet of a diameter greater
than that of the outlet tube
and at a height of min.50
cm.If is necessary to use the
plastic sleeve supplied.
The appliance must not be
installed behind a lockable
door,a sliding door or a door
with a hinge on the opposite
side to that of the washer
dryer.
Appliquer la feuille
supplémentaire sur le fond
comme dans la figure.
Raccorder le tuyau d’arrivée
d’eau au robinet.
L'appareil doit être relié à
l'arrivée d'eau exlusivement
avec les tuyaux fournis .
Ne pas réutiliser les anciens
tuyaux.
ATTENTION:
NE PAS OUVRIR LE ROBINET
Approcher la machine contre
le mur en faisant attention à
ce que le tuyau n’ait ni
coudes ni étranglements.
Raccorder le tuyau de
vidange au rebord de la
baignoire ou,mieux encore,à
un dispositif fixe d’évacuation,
hauteur mini.50 cm,et de
diamètre supérieur au tuyau
de la machine à laver.
En cas de besoin,utiliser le
coude rigide livré avec la
machine.
L’appareil ne doit pas être
installé derrière une porte
fermée à clef,une porte
coulissante ou une porte
avec une fermeture sur le
côté opposé à celui de
l’appareil.
FR
Page 7
FR
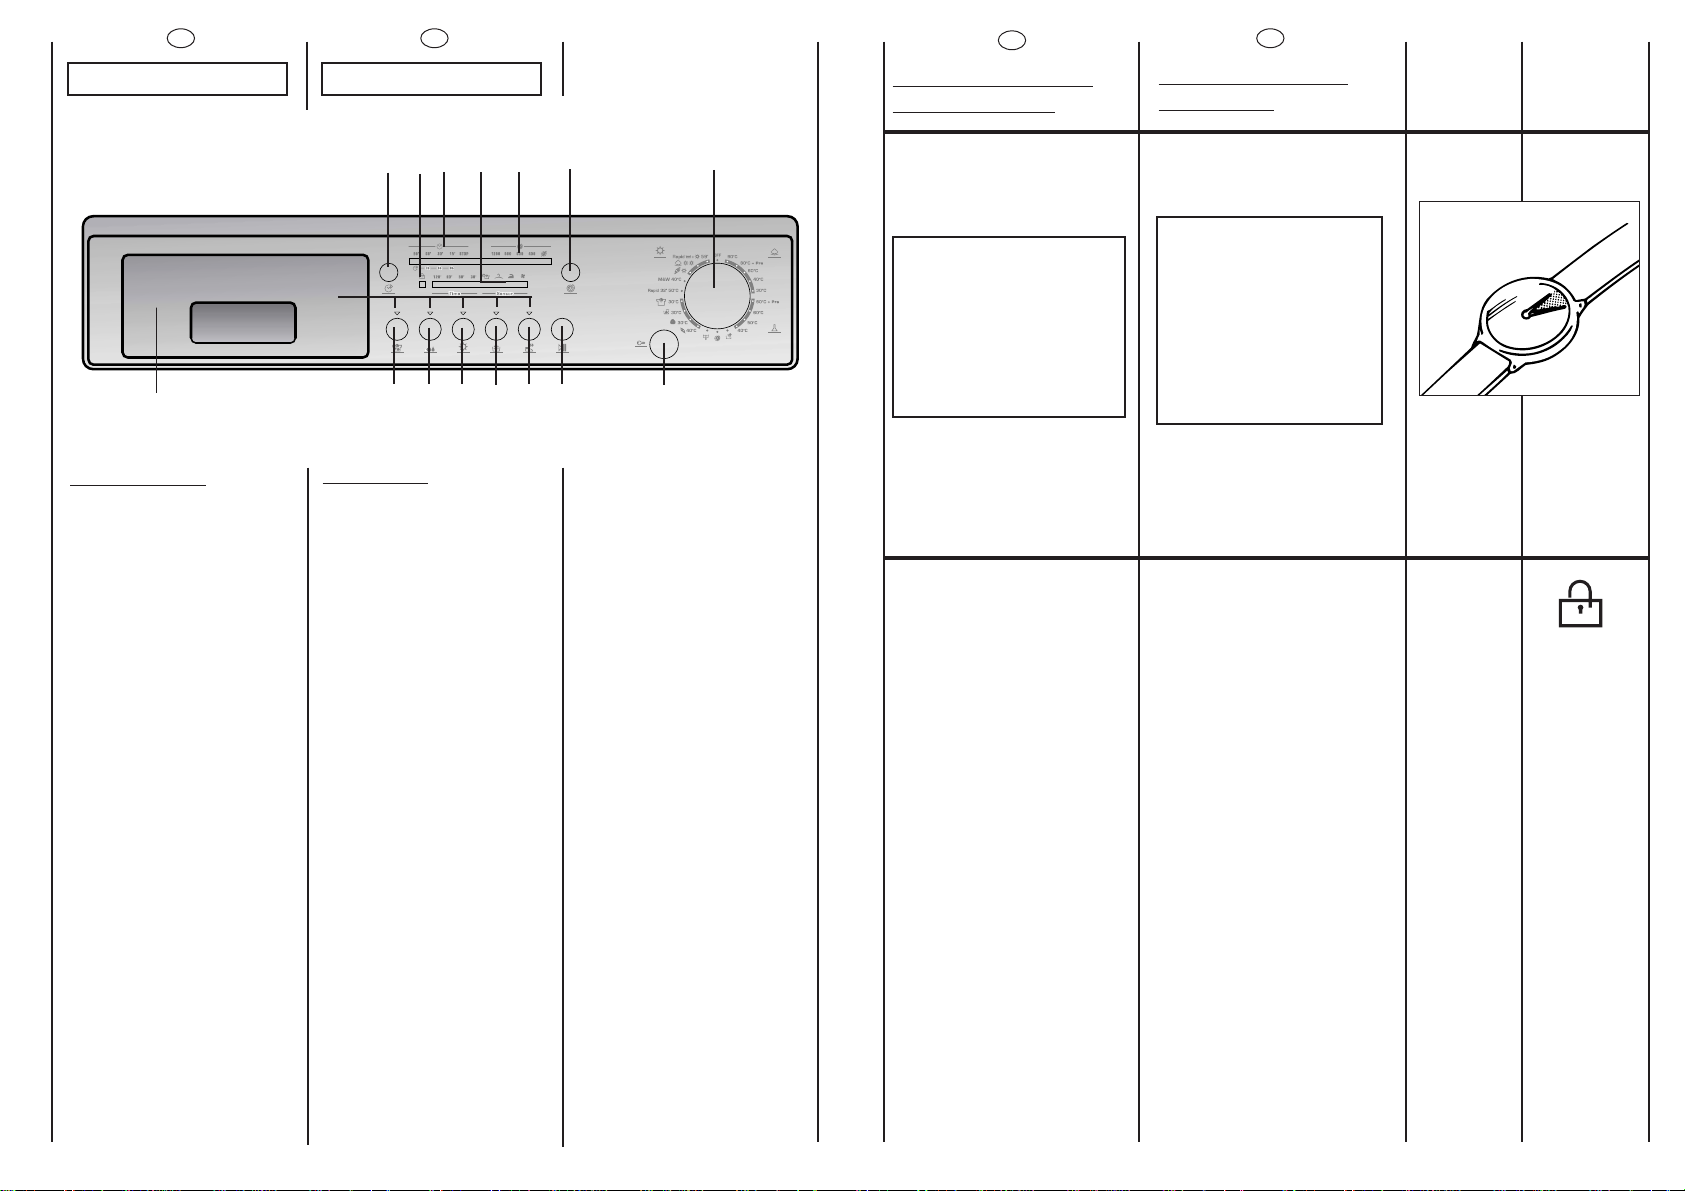
DESCRIPTION DES
COMMANDES
TOUCHE D’OUVERTURE DU
HUBLOT
ATTENTION:
UN DISPOSITIF SPECIAL
DE SECURITE EMPECHE
L’OUVERTURE IMMEDIATE
DU HUBLOT A LA FIN DU
LAVAGE.APRES LA PHASE
D’ESSORAGE,ATTENDRE 2
MINUTES AVANT
D’OUVRIR LE HUBLOT.
TEMOIN DE VERROUILLAGE DE
PORTE
Le voyant lumineux s’allume
lorsque la porte est
totalement fermée et que la
machine est en marche.
Lorsque la touche "MARCHE"
est enfoncée sur la machine
et que la porte est fermée,
l’indicateur clignote
temporairement puis
s’allume.
Si la porte n’est pas
fermée, le voyant lumineux
continue de clignoter.
Un dispositif de sécurité
spécial vous empêche
d’ouvrir la porte
immédiatement après la fin
du cycle.Attendez
2 minutes après la fin du
cycle de lavage et assurezvous que le témoin est éteint
avant d’ouvrir la porte.Par
mesure de sécurité,vérifiez
qu’il n’y a plus d’eau dans le
tambour.A la fin du cycle,
tournez le sélecteur de
programmes à la position
OFF.
13
A
2 min.
B
DESCRIPTION OF
CONTROL
DOOR OPEN BUTTON
IMPORTANT:
A SPECIAL SAFETY
DEVICE PREVENTS THE
DOOR FROM OPENING
AT THE END OF THE
WASH/SPIN CYCLE.AT
THE END OF THE SPIN
PHASE WAIT UP TO 2
MINUTES BEFORE
OPENING THE DOOR.
DOOR LOCKED INDICATOR
The “Door Locked”indicator
light is illuminated when the
door is fully closed and the
machine is ON.
When START/PAUSE is
pressed on the machine
with the door closed the
indicator will flash
momentarily and then
illuminate.
If the door is not closed the
indicator will continue to
flash.
A special safety device
prevents the door from
being opened immediately
after the end of the cycle.
Wait for 2 minutes after the
wash cycle has finished and
the Door Locked light has
gone out before opening
the door.At the end of cycle
turn the programme
selector to OFF .
EN
CHAPITRE 6
COMMANDES
Touche
d’ouverture du hublot
Temoin de verr ouillage de
porte
Manette des programmes de
lavage avec OFF
Touche Départ Différé
Indicateur lumineux temps
restant
Touche "Essorage"
Indicateur lumineux vitesse
d'essorage
Les voyants des touches
Touche "T rès Sale"
Touche "Aquaplus"
Touche de sélection du
programme de séchage
Témoins des programmes de
séchage
Touche Lavage à Froide
Touche "Repassage facile"
Touche marche/pause
Bacs à produits
12
FR
A
B
C
D
E
F
G
H
I
L
M
N
O
P
Q
R
EN
CHAPTER 6
CONTROLS
Door open button
Door locked indicator light
Timer knob for wash
programmes with OFF position
Start Delay button
Time countdown system
Spin Speed button
Spin speed indicator light
Buttons indicator light
Intensive button
Aquaplus button
Drying programme selection
button
Drying programme indicators
Cold wash button
Crease Guard button
Start/Pause button
Detergent drawer
R
D
H
B
E
NG
FC
I
LMOPQ A
Page 8
15
D
FR
TOUCHE DEPART DIFFERE
Cette option permet de
différer jusqu’à 9 heures la
mise en marche du cycle de
lavage.La sélection de
temps se fait en appuyant sur
la touche Départ Différé; Un
voyant indique alors le temps
sélectionné.
Lorsque la période de départ
différé qui convient a été
sélectionnée,appuyez sur la
touche "MARCHE"
Si vous désirez annuler le
Départ Différé,procédez de
la maniére suivante :
Enfoncez la touche "Départ
Différé" pour éteindre le
témoin du Temp (le témoin
"STOP" commence à
clignoter).
Vouz devez alors presser la
touche "MARCHE" pour la
mise en marche du
programme sélectionnée ou
annuler le programme choisi
en tournant la manette
programmes sur la position
"OFF".
INDICATEUR LUMINEUX TEMPS
RESTANT
Afin de mieux gérer votre
temps,ce lave-linge est
équipé d’un système
indicateur lumineux qui vous
informe constamment sur le
temps restant jusqu’à la fin du
cycle.
Voyant “90” s’allume: Temps
restant supérieur à 60 minutes
Voyant “60” s’allume:
Temps restant inférieur à 60
minutes
Voyant “30” s’allume:
Temps restant inférieur à 30
minutes
Voyant “15” s’allume:
Temps restant inférieur à 15
minutes
Voyant “STOP”s’allume:
Fin du programme
START DELAY BUTTON
Appliance start time can be
set with this button,delaying
the star by 3,6 or 9 hours.
Proceed as follow to set a
delayed start:
Select a programme
(“STOP”indicator light blinks)
Press Start Delay button
(each time the button is
pressed the start will be
delayed by 3,6 or 9 hours
respectively and the
corresponding light will
blink).
Press START to commence
the Start Delay operation
(the indicator light
associated with the
selected Start Delay time
stops blinking and remains
ON).
At the end of the required
time delay the programme
will start.
To cancel the Start Delay
function :
press the Start Delay button
until the indicator lights will
be off (The STOP light blinks)
and the programme can be
started manually using the
START button or switch off
the appliance by turning the
programme selector to off
position.
TIME COUNTDOWN SYSTEM
INDICATOR LIGHTS
In order to better manage
your time,this washing
machine features an
indicator light system that
keeps you constantly
informed on the remaining
cycle time.
Indicator light 90: Remaining
time above 60 minutes
Indicator light 60: Remaining
time less than 60 minutes
Indicator light 30: Remaining
time less than 30 minutes
Indicator light 15: Remaining
time less than 15 minutes
Indicator light Stop: End of
the programme.
EN
E
14
FR
MANETTE DES PROGRAMMES
DE LAVAGE AVEC OFF
ELLE PEUT TOURNER
DANS LES DEUX SENS.
LA MACHINE EST MISE
EN MARCHE EN
SELECTIONNANT UN
PROGRAMME SUR LE
SELECTEUR DE
PROGRAMME. CE MODE
EST INDIQUE PAR LE
VOYANT LUMINEUX
STOP,QUI CLIGNOTE
JUSQU’A CE
QUE LA MACHINE SE
METTE EN MARCHE OU
JUSQU’A CE QU’ELLE
SOIT REMISE EN
POSITION OFF.
Appuyez sur la touche
"MARCHE/PAUSE" pour
commencer le cycle.
Le cycle de lavage se
réalisera avec la manette
des programmes arrêtée sur
le programme sélectionné
jusqu'à la fin de celui-ci.
A la fin du lavage,mettez la
machine à l' arrêt en
tournant la manette
programmes sur la position
"OFF"
NOTE: LORS DE LA MISE EN
MARCHE DU CYCLE DE
LAVA GE SUIVANT ,LE
SELECTEUR DE
PROGRAMME DOIT ETRE
REMIS EN POSITION OFF
AVANT DE SELECTIONNER
ET DE LANCER LE
PROGRAMME SUIV ANT.
C
EN
PROGRAMME SELECTOR WITH
OFF POSITION
ROTATES IN BOTH
DIRECTIONS.
THE MACHINE IS
TURNED ON BY
SELECTING A
PROGRAMME VIA THE
PROGRAMME
SELECTOR.
THIS STATUS WILL BE
INDICATED BY THE STOP
INDICATOR LIGHT
FLASHING,THIS LIGHT
WILL CONTINUE TO
FLASH UNTIL THE
MACHINE HAS STARTED
OR THE MACHINE IS
RETURNED TO THE OFF
POSITION.
Press the "Start/Pause"
button to start the selected
cycle.
The programme carries out
with the programme
selector stationary on the
selected programme till
cycle ends.
Switch off the washing
machine by turning the
selector to OFF.
NOTE:
THE PROGRAMME
SELECTOR MUST BE
RETURN TO THE OFF
POSITION AT THE END
OF EACH CYCLE OR
WHEN STARTING A
SUBSEQUENT WASH
CYCLE PRIOR TO THE
NEXT PROGRAMME
BEING SELECTED AND
STARTED.
Page 9

17
I
EN
The option buttons should
be selected before pressing
the START button
INTENSIVE BUTTON
By pressing this button,
which can only be
activated in the Cotton
cycles,the sensors in the
new “Sensor”system come
into operation.They affect
both the selected
temperature,keeping it at a
constant level throughout
the wash cycle,and the
mechanical function of the
drum.
The drum is made to turn at
two different speeds at
crucial moments.When the
detergent enters the
garments, the drum rotates
in such a way that the
detergent is distributed in a
uniform manner; during the
wash and rinse procedures,
however,the speed
increases in order to
maximise the cleaning
action.Thanks to this special
system,the efficiency of the
wash procedure is improved
WITHOUT ANY INCREASE IN
THE LENGTH OF THE
PROGRAM.
FR
Les options doivent être
sélectionnées A VANT
d’appuyer sur la touche
“MARCHE”.
TOUCHE "TRÈS SALE"
En pressant cette touche,
activable uniquement pour
les cycles coton,les capteurs
du nouveau “Sensor” System
agissent sur la température
sélectionnée pour la
maintenir constante durant
toutes les phases du cycle
de lavage et sur la rotation
du tambour.
En effet,le tambour tourne à
deux vitesses différentes dans
les moments déterminants.
Quand la lessive pénètre
dans le linge,le tambour
tourne de manière à ce
qu’elle se répande de façon
homogène ; la vitesse
augmente au moment du
lavage et du rinçage pour
que l’action mécanique soit
maximale.Grâce à cette
option,l’efficacité de lavage
des taches réputées difficiles
est très largement améliorée
SANS AUGMENTER LA DUREE
DU PROGRAMME.
16
F
FR
TOUCHE "ESSORAGE"
La phase d'essorage est très
importante pour la
préparation à un bon séchage
et votre modèle est doté d'une
grande flexibilité pour satisf aire
chaque exigence.
En agissant sur cette touche
vous pouvez réduire la vitesse
maximale possible pour le
programme sélectionnée,
jusqu'à une complète
élimination de l'essorage.
Pour réactiver l'essorage,il est
suff isant de presser la touche
de nouveau,jusqu'à atteindre
la vitesse choisie.
Pour la sauvegarde des tissus,
il n'est pas possible
d'augmenter la vitesse
d'essorage, au-delà de celle
qui est indiquée
automatiquement au moment
de la sélection du programme.
Il est toujours possible de
modifier la vitesse d'essorage,
sans mettre la machine en
PAUSE.
INDICATEUR LUMINEUX VITESSE
D'ESSORAGE
Une fois sélectionné le
programme désiré,le voyant
s'allumera relatif à la vitesse
d'essorage maximale
possible.
En choisissant une vitesse
inférieure en agissant sur la
touche appropriée,le voyant
correspondant s'allumera
.
LES VOY ANTS DES TOUCHES
Ces témoins s’allument
lorsque qu’une option est
choisie
Si une option est
incompatible avec le
programme,le témoin de
l’option clignotera puis
s’éteindra.
G
EN
SPIN SPEED BUTTON
The spin cycle is very
important to remove as
much water as possible from
the laundry without
damaging the fabrics.You
can adjust the spin speed of
the machine to suit your
needs.
By pressing this button,it is
possible to reduce the
maximum speed,and if you
wish,the spin cycle can be
cancelled.
To reactivate the spin cycle
is enough to press the
button until you reach the
spin speed you would like to
set.
For not damage the fabrics,
it is not possible to increase
the speed over that
automatically suitable
during the selection of the
program.
It is possible to modify the
spin speed in any moment,
also without to pause the
machine.
SPIN SPEED INDICATOR LIGHT
When you set a program,
the maximum possible spin
speed will be automatically
shown by the relevant
indicator light.
Choosing a smaller spin
speed by the appropriate
button,the relevant
indicator light will go on.
BUTTONS INDICATOR LIGHT
These light up when the
relevant buttons are
pressed.
If an option is selected that
is not compatible with the
selected programme then
the light on the button first
flashes and then goes off.
H
Page 10

19
M
FR
TOUCHE DE SELECTION DU
PROGRAMME DE SECHAGE
Assurez-vous que le sélecteur
de programme n'est pas réglé
sur OFF,puis appuyez sur le
bouton pour sélectionner le
programme de séchage
souhaité.Chaque fois que vous
appuyez sur le bouton,un
témoin s'allume pour indiquer
le type de séchage
sélectionné.
Si vous souhaitez annuler une
sélection avant le démarrage
du programme de séchage,
appuyez plusieurs fois sur le
bouton,jusqu'à ce que les
témoins s'éteignent,ou réglez
le sélecteur sur OFF.
Pour annuler un cycle pendant
la phase de séchage,
maintenez le bouton enfoncé
pendant 2 secondes jusqu'à ce
que le témoin de
refroidissement s'allume.En
raison de la température
élevée à l'intérieur du tambour,
il est conseillé de patienter
jusqu'à la fin de la phase de
refroidissement avant de régler
le sélecteur de programme sur
OFF et de retirer le linge.
NOTE:
Ne pas sécher du linge non
lavé dans la lavante-séchante.
Pour le linge taché de
substances comme l’huile de
cuisine,l’acétone, l’alcool,
l’essence,le kérosène, les
détachants,la térébenthine,la
cire,et les substances pour
retirer la cire,il convient de le
laver à l’eau chaude avec une
plus grande quantité de lessive
avant de le sécher dans la
lavante-séchante.
Les éléments comme le
caoutchouc,le latex, les
charlottes pour la douche,les
tissus imperméables, les articles
contenant du caoutchouc ou
du latex ne doivent pas être
séchés dans la lavanteséchante.
Adoucissants ou produits
assimilés,doivent être utilisés
conformément aux instructions
relatives aux adoucissants.
La dernière partie du cycle se
déroule sans chaleur (cycle de
refroidissement) pour s’assurer
que les articles soient soumis à
une température qui garantisse
qu’ils ne soient pas abîmés.
ATTENTION:
Ne jamais arrêter la lavanteséchante avant la fin du cycle
de séchage, à moins que tous
les articles ne soient retirés
rapidement et étendus pour
dissiper la chaleur.
EN
DRYING PROGRAMME
SELECTION BUTTON
With the programme selector
not in the OFF position,press
the button to select the
required drying programme; an
indicator will light to display the
drying result selected each
time you press the button.
To cancel the selection before
the start of a drying
programme,press the button
repeatedly until the indicators
go out or return the
programme selector to the OFF
position.
To cancel the cycle during the
drying phase,hold the button
down for 2 seconds until the
cooling indicator lights up;
given the high temperature
inside the drum,we
recommend that you allow the
dryer to complete the cool
down period before returning
the programme selector to the
OFF position and removing the
laundry.
NOTE:
Do not dry unwashed items in
the washer dryer.
Items that have been soiled
with substances such as
cooking oil,acetone, alcohol,
petrol,kerosene,spot removers,
turpentine,waxes and wax
removers should be washed in
hot water with an extra amount
of detergent before being
dried in the washer dryer.
Items such as foam rubber
(latex foam),shower caps,
waterproof textiles,rubber
backed articles and clothes or
pillows fitted with foam rubber
pads should not be dried in the
washer dryer.
Fabric softeners,or similar
products,should be used as
specified by the fabric softener
instructions.
The final part of a washer dryer
cycle occurs without heat
(cool down cycle) to ensure
that the items are left at a
temperature that ensures that
the items will not be damaged.
WARNING:
Never stop a washer dryer
before the end of the drying
cycle unless all items are
quickly removed and spread
out so that the heat is
dissipated.
L
18
EN
“AQUAPLUS” BUTTON
By pressing this button you
can activate a special new
wash cycle in the Colourfast
and Mixed Fabrics
programs,thanks to the new
Sensor System.This option
treats with care the fibres of
garments and the delicate
skin of those who wear
them.
The load is washed in a
much larger quantity of
water and this,together with
the new combined action
of the drum rotation cycles,
where water is filled and
emptied,will give you
garments which have been
cleaned and rinsed to
perfection.The amount of
water in the wash is
increased so that the
detergent dissolves
perfectly, ensuring an
efficient cleaning action.The
amount of water is also
increased during the rinse
procedure so as to remove
all traces of detergent from
the fibres.
This function has been
specifically designed for
people with delicate and
sensitive skin,for whom even
a very small amount of
detergent can cause
irritation or allergy.
You are advised to also use
this function for children’s
clothing and for delicate
fabrics in general, or when
washing garments made of
towelling,where the fibres
tend to absorb a greater
quantity of detergent.
To ensure the best
performance for your wash,
this function is always
activated on the Delicates
and Woollens/Handwash
programs.
FR
TOUCHE "AQUAPLUS"
Grâce au nouveau Sensor
System,il est possible,en
activant la touche Aquaplus,
d’effectuer un cycle de
lavage spécifique pour les
tissus résistants et mixtes.Le
lavage ainsi effectué permet
d’éliminer tout résidu lessiviel
et donc de prendre soin des
peaux délicates qui seront
en contact avec ces fibres.
L’ajout d’une plus grande
quantité d’eau au lavage
ainsi que l’action renforcée
de 5 rinçages avec
essorages intermédiaires
permettent d’obtenir un
linge propre parfaitement
rincé.Afin d’obtenir un
résultat optimal de lavage,la
quantité d’eau est accrue
pendant cette phase du
cycle garantissant une
parfaite dilution de la lessive.
La quantité d’eau est
également accrue au
moment du rinçage de
manière à éliminer toute
trace de lessive des fibres.
Cette fonction a été
spécialement étudiée pour
les PEAUX DELICATES ET
SENSIBLES pour lesquelles
même un minimum de résidu
de lessive peut causer
irritations ou allergies.
Il est aussi conseillé d’utiliser
cette fonction pour le LINGE
DES ENFANTS,pour le LINGE
DELICAT en général ainsi que
pour le lavage des TISSUS
EPONGE dont les fibres
tendent à retenir la lessive.
Pour assurer une meilleure
prestation de lavage,cette
fonction est toujours active
pendant les programmes
Délicat et Laine/lavage a la
main.
Page 11

21
FR
LAVAGE EN EAU FROIDE
En appuyant sur la touche
correspondante on peut faire
exécuter tous les cycles de lavage
sans le chauff age de l’eau,tandis
que toutes les autres
caractéristiques restent
inchangées (niveau d’eau,temps,
rythmes de lavage,etc.).
Les programmes en eau froide sont
conseillés pour le lavage de tous
les tissus de couleur qui ne
supportent pas la température,et
pour le lavage de rideaux,fibres
synthétiques particulièrement
délicates,petits tapis,ou tissus peu
sales.
TOUCHE“REPASSA GE F A CILE”
Si vous utilisez cette touche (Non
disponible sur les programmes
COTON),il vous sera possible de
réduire la formations des plis,
selon le programme choisi et la
nature du tissu lavé.
Tissu mixte et synthetique:
- le refroidissement de l’eau sera
fait graduellement pour éviter les
chocs thermiques;
- la vidange sera faite sans
aucune action mécanique du
tambour;
- une phase d’essorage doux,
pour assurer la distension
maximale des fibres.
Tissu délicat:
- Votre lave-linge effectuera les
actions ci dessus mentionnées,
ensuite un "arrêt cuve pleine"
après le dernier rinçage.
Laine et lavage a la main:
- Votre lave linge effectuera un
"arrêt cuve pleine".
Le indicateur d’option clignote et
le linge reste dans l’eau du
tambour.
Pour terminer le cycle des tissus
délicats, de la laine et lavage a
la main,les opérations à
accomplir sont les suivantes :
1.Relâcher la touche de
repassage facile pour terminer le
cycle.
2.Sinon, vous pouvez effectuer
une simple vidange
- Tourner le sélecteur de
programme à la position “OFF”;
- Sélectionner le programme
“Uniquement vidange” ;
- Allumer de nouveau la lavelinge en appuyant sur la touche
“MARCHE/PAUSE”.
O
EN
COLD WASH BUTTON
By pressing this button it is
possible to transform every
programme into a cold washing
one,without modifying other
characteristics (water level,times,
rythmes, etc...).
Curtains,small carpets,man
made delicate fabrics,non
coulor fast garments can be
safely washed thanks to this new
device.
“CREASE GUARD”BUTTON
The Crease Guard function (Not
available on COTTON
programmes) minimizes creases
as much as possible with a
uniquely designed anti-crease
system that is tailored to specific
fabrics.
MIXED FABRICS - the water is
gradually cooled throughout the
final two rinses with no spinning
and then a delicate spin assures
the maximum relaxation of the
fabrics.
DELICATE FABRICS – final two
rinses with no spinning and then
the fabrics are left in water until it
is time to unload.When you are
ready to unload,press the
"Crease Guard" button – this will
drain.
WOLLENS/HAND WASH – after the
final rinse the fabrics are left in
water until it is time to unload
and the button indicator blinking.
When you are ready to unload,
press the "Crease Guard" button,
this will drain and spin ready for
emptying.
If you do not want to spin the
clothes and activate drain only:
- Turn the programme selector to
the "OFF" position;
- Select programme drain only
;
- Switch on the appliance again
by pressing the "Start/Pause"
button.
P
20
N
FR
TEMOINS DES PROGRAMMES DE
SECHAGE
Les témoins lumineux indiquent
le type de programme et/ou la
durée du séchage :
Programmes automatiques: si
vous sélectionnez l'un des 3
programmes automatiques,la
machine calcule le temps
nécessaire pour le séchage
ainsi que le degré d'humidité
résiduelle requis,en fonction de
la charge et du type de
séchage choisi.
Lorsque vous appuyez sur START,
un témoin s'allume pour
indiquer le temps de séchage
restant.
" " = programme de
séchage extra sec
(recommandé pour les
serviettes,les peignoirs et les
charges volumineuses)
" " = programme de
séchage prêt-à-ranger
" " = programme de
séchage prêt-à-repasser
CONSEILS UTILES :
Pour les petites charges de linge
(inférieures à 1 kg) ou les
charges légèrement humides,il
est recommandé de choisir le
programme de séchage de 30
minutes.La machine interrompt
automatiquement le cycle
lorsque le degré de séchage
sélectionné est atteint.
Pour garantir le bon
fonctionnement de la m achine,
il est préférable d'interrompre la
phase de séchage uniquement
lorsque cela est absolument
nécessaire.
Pr
ogrammes minutés:
120 minutes – 90 minutes – 60
minutes – 30 minutes :
Témoins à double fonction:
Si vous sélectionnez l'un des 3
programmes de séchage
automatiques,les témoins
indiquent le temps de séchage
restant.
Ces témoins peuvent servir à
sélectionner des programmes
de séchage minutés.
Phase de r
efroidissement :
Cette phase est déclenchée au
cours du refroidissement final,
lors des 10 dernières minutes de
chaque phase de séchage.
EN
DRYING PROGRAMME
INDICATORS
The indicators display the
type of programme and/or
drying time:
A
utomatic Programmes: By
selecting one of these 3
automatic programmes,the
washer-dryer will calculate
the time needed for drying
and the residual dampness
required,according to the
load and drying type
selected.
After pressing the START
button,one of the indicators
will light to display the drying
time remaining.
= Extra dry drying
programme (recommended
for towels,bathrobes and
bulky loads)
= Cupboard dry
drying programme
= Iron dry drying
programme
USEFUL TIPS:
The 30 minute drying
programme is recommended
for small loads (less than 1 kg)
or slightly damp loads.
Your washer-dryer ends the
cycle automatically when it
reaches the drying level
selected.
For the correct operation of
the appliance,it is preferable
not to interrupt the drying
phase unless it is really
necessary.
T
imed programmes:
120 minutes – 90 minutes – 60
minutes – 30 minutes:
Dual function indicators:
If one of the 3 automatic
drying programmes is
selected,the indicators
display the drying time
remaining
They may be used to select
timed drying programmes.
Cool down phase :
Switched on during the final
cool down period,in the last
10 minutes of each drying
phase.
Page 12

FR
TOUCHE MARCHE/PAUSE
Après avoir sélectionné un
programme attendre que le
témoin "STOP" commence à
clignoter avant de presser la
touche MARCHE
Appuyez sur la touche pour
commencer le cycle (une
voyant s’allumera).
ATTENTION:
LORSQUE LA TOUCHE
START A ETE ENCLENCHEE
L’APPAREIL NE
COMMENCERA LE CYCLE
QU’APRES QUELQUES
SECONDES.
CHANGER LA
PROGRAMMATION APRES LE
DEMARRAGE DE LA MACHINE
(PAUSE)
Il est possible d’arrêter
momentanément le
programme pendant le cycle
de lavage,en maintenant le
bouton "MARCHE/PAUSE"
enfoncé pendant environ
deux secondes.Lorsque la
machine est en mode de
pause,les voyants des touches
d’options,du temps restant du
programme et de la vitesse
d’essorage clignotent.
Le voyant lumineux " Témoin
de verrouillage de porte "
reste allumé pendant environ
2 minutes.Il est possible
d’ouvrir la porte une fois le
voyant lumineux éteint.
Pour relancer le programme,
appuyez une nouvelle fois
sur le bouton "MARCHE".
ANNULATION D’UN
PROGRAMME SELECTIONNÉ
Afin d’annuler un programme,
positionnez le sélecteur sur OFF
Sélectionnez un programme
différent
Repositionnez le sélecteur sur
OFF.
22
Q
START/PAUSE BUTTON
When a programme is
selecting, wait for the “STOP”
indicator light to flash before
pressing the START button.
Press to start the selected
cycle (according to the
selected cycle one indicator
lights will go on) .
NOTE: WHEN THE START
BUTTON HAS BEEN
PRESSED,THE APPLIANCE
CAN TAKE FEW SECONDS
BEFORE STARTS
WORKING.
CHANGING THE SETTINGS
AFTER THE PROGRAMMES HAS
STARTED (PAUSE)
Once the programme has
started the settings can only
altered by pressing the
relevant buttons.
The programme may be
paused at any time during
the wash cycle by holding
down the "Start/Pause"
button for about two
seconds.When the machine
is in the paused mode,the
indicator light "Time To End",
spin speed and option
buttons will flash.
To restart the programme,
press the "Start/Pause" button
once again.
If you wish to add or remove
items during washing,wait 2
minutes until the safety
device unlocks the door.
When you have carried out
the manoeuvre,close the
door,press START button and
the appliance will continue
working where it left off.
CANCELLING THE
PROGRAMME
To cancel the programme,
set the selector to the OFF
position.
Select a different
programme.
Re-set the programme
selector to the OFF position.
EN
Page 13

CHARGE
MAXI
kg
6
6
6
6
6
3
3
3
3
-
-
-
1,5
1
1
3
2
6
3
4
1,5
TEMP.
°C
90°
60°
60°
40°
30°
60°
60°
50°
40°
-
-
-
40°
30°
30°
30°
50°
40°
-
-
30°
TABLEAU DES PROGRAMMES
Tissus résistants
Coton,lin, chanvre
Coton,mixtes
résistants
Coton,mixte
Tissus mixtes et synthétiques
Mixtes résistants
Mixtes,cotons,
Synthétiques
Synthétiques (Nylon,
mixtes de coton)
Tissus très délicats
Laine
Synthétiques
acryliques
CHARGE DE LESSIVE
Notes importantes
Si les sous-vêtements sont très sales,réduire le chargement à 4 kg maxi.
Pour chaque programme vous avez la possibilité de sélectionner la vitesse d’essorage selon les
conseils du fabricant du tissu.Si l’étiquette du textile ne présente pas d’indication, vous pouvez
essorer à la vitesse maximale.
INFORMATION POUR LES ESSAIS EN LABORATOIRE
(Selon norme EN 50229)
Lavage
Utiliser le programme **.
Séchage
Premier séchage effectué avec 4kg (composition du linge = taies d’oreiller et serviettes)
en sélectionnant le programme séchage coton ( ) prêt-à-rager ( ).
Le second séchage effectué avec 2Kg (composition du linge = 2 draps e serviettes) en
sélectionnant le programme séchage coton ( ) 90 minutes (90’).
*
Programmes pour un séchage automatique.
Quand certaines pièces ont des taches qui doivent être traitées par un produit
blanchissant liquide, vous pouvez les détacher dans la machine. Introduire dans la section
“II“ du tiroir à lessive le bac pour les produits liquide,le remplir avec le produit blanchissant
liquide et sélectionner le programme "RINÇAGE" ( ).
Après ce traitement,tourner la manette des programmes sur la position "OFF",ajouter à
ces pièces le reste du linge et effectuer un lavage normal,selon le programme choisi.
MANETTE DES
PROGRAMME DE
LAVAGE SUR:
PROGRAMME POUR:
Speciaux
Blanc
Couleurs résistantes
avec prélavage
Couleurs résistantes
Couleurs résistantes
Couleurs délicates
Couleurs résistantes
avec prélavage
Couleurs résistantes
Couleurs résistantes
Couleurs délicates
Rinçage
Essorage Energique
Uniquement
vidange
Délicat
Laine “lavable en
machine”
Lavage main
Mixtes, Synthétiques
délicats
Cycle rapide
32’
Programme “Mix &
Wash System”
Mixtes - Séchage
Coton - Séchage
Coton - Mixtes
**
*
*
*
*
II I
●●
●●●
●●
●●
●●
●●●
●●
●●
●●
●
●●
●●
●●
●●
●●
●●
●●
24 25
*
*
*
*
*
*
*
*
*
*
FR
Page 14

WEIGHT
MAX
kg
6
6
6
6
6
3
3
3
3
-
-
-
1,5
1
1
3
2
6
3
4
1,5
TEMP.
°C
90°
60°
60°
40°
30°
60°
60°
50°
40°
-
-
-
40°
30°
30°
30°
50°
40°
-
-
30°
**
*
*
*
*
II I
●●
●●●
●●
●●
●●
●●●
●●
●●
●●
●
●●
●●
●●
●●
●●
●●
●●
26 27
*
*
*
*
*
*
*
*
*
*
PROGRAMME
SELECTOR ON:
Please read these notes
When washing heavily soiled laundry it is recommended the load is reduced to 4 kg maximum.
Information for the test laboratories
(Ref.EN 50229 Standards)
Washing
Use the programme **
Drying
First drying with 4kg (the load consist: pillowcases and hand-towels) selecting the cotton
drying programme ( ) cupboard dry ( ).
Second drying with 2kg (the load consist: 2 sheets and hand towels) selecting the cotton
drying programme ( ) 90 minutes
(90’).
The spin speed may also be reduced, to match any guidelines suggested on the fabric label, or for
very delicate fabrics cancel the spin completely this option is available with a spin speed button.
* Programmes for automatic drying.
When only a limited number of articles have stains which require treatment with liquid bleaching
agents, preliminary removal of stain can be carried out in the washing machine.
Pour the bleach into the liquid bleach container, inserted into the compartment marked "II" in the
detergent drawer, and set the special programme "RINSE" .
When this phase has terminated, turn the programme selector on the "OFF" position, add the rest of
the fabrics and proceed with a normal wash on the most suitable programme.
TABLE OF PROGRAMMES
Resistant fabrics
Cotton, linen
Cotton, mixed
resistant
Cotton, mixed
Mixed fabrics and synthetics
Mixed, resistant
Cotton, mixed fabrics,
synthetics
Synthetics (nylon,
perlon), mixed cotton
Very delicate fabrics
CHARGE DETERGENT
PROGRAM FOR:
SpecialS
Whites
Whites with
Prewash
Fast coloureds
Fast coloureds
Non fast coloureds
Fast coloureds with
Prewash
Fast coloureds
Fast coloureds
Non fast coloureds
Rinse
Fast spin
Drain only
Delicates
“MACHINE
WASHABLE”
woollens
Hand wash
Mixed, delicate
synthetics
Rapid 32 minute
Mix & Wash
system programme
Mixed - Drying
Cotton - Drying
Cotton - Mixed
CHAPTER 7
EN
Page 15

29
EN
SPECIAL DELICATE FIBRES
This is a new wash cycle
which alternates washing
and soaking and is
particularly recommended
for very delicate fabrics.
The wash cycle and rinses
are carried out with high
water levels to ensure best
results.
WOOLMARK PROGRAMME
The special cycle,certified
by WOOLMARK,enables to
thoroughly wash garments
without damaging them.
The cycle comprises of
alternate periods of activity
and pauses with a maximum
temperature of 30°C and
concludes with 3 rinses and
a short spin.
SPECIAL “HAND WASH”
This washing machine also
has a gentle Hand Wash
programme cycle.This
programme allows a
complete washing cycle for
garments specified as
“Hand Wash only”on the
fabric care label.The
programme has a
temperature of 30°C and
concludes with 3 rinses and
a slow spin.
“SHIRTS” PROGRAMME
This programme allows a
complete washing cycle for
shirts.
The main wash and the rinse
gives best results thanks to
the rotation rhythms of the
drum and to the water
levels.
The programme has a
maximum temperature of
30°C and concludes with 3
rinses and a short spin.
FR
TISSUS TRÈS DÉLICATS
Il s’agit d’un nouveau
concept de lavage qui
alterne des moments de
brassage et de trempage du
linge; ce processus est
particulièrement indiqué pour
le lavage de tissus
extrêmement délicats.
Le lavage et le rinçage sont
effectués à pleine eau afin
d’obtenir les meilleures
prestations.
PROGRAMME LAINE
Ce programme spécial,
certifié par WOOLMARK,
permet de laver en
profondeur les fibres délicates
sans les endommager.
Ce cycle alterne les périodes
d’activités et de pauses avec
une température de 30°C et
conclu par 3 rinçages et un
courte phase d’essorage.
LAVAGE A LA MAIN
Cette machine à laver est
également équipée d’un
programme de Lavage à la
main.
Ce programme vous permet
d’effectuer un cycle de lavage
complet pour les vêtements qui
exigent d’être lavés à la main.
Le programme a une
température de 30°C et se
termine par 3 rinçages et un
essorage rapide.
PROGRAMME CHEMISES
Cycle de lavage complet
pour chemises.
Le lavage et le rinçage sont
optimisés au niveau des
rythmes de rotation du
tambour et des niveaux
d’eau.
Le programme atteint une
température maximale de
30°C et se termine par 3
rinçages ainsi qu’un essorage
délicat.
28
FR
CHAPITRE 8
SELECTION
L’appareil dispose de groupes
de programmes différents pour
laver tous types de tissus et
selon différents degrés de
salissure en attribuant au type
de lavage,la température et la
durée (voir tableau des
programmes de lavage).
TISSUS RÉSISTANTS
Ces programmes sont destinés
à accomplir des lavages et des
rinçages avec le maximum
d’efficacité.
Ils sont entrecoupés de cycles
d’essorages qui offrent des
résultats parfaits sur le rinçage.
L’essorage final retire le
maximum d’eau contenue
dans les tissus.
TISSUS MIXTES ET SYNTHÉTIQUES
La combinaison d’un système
de lavage efficace,une
rotation optimum du tambour
et l’autogestion du niveau
d’eau assurent des résultats de
lavage excellents,pendant
qu’un rinçage délicat évite les
faux plis.
PROGRAMME SPÉCIAL
“RINÇAGES COTON”
Ce programme effectue trois
rinçages et un essorage
intermédiaire (qui peut être
réduit ou supprimé en
agissant sur la touche
appropriée).Il peut être utilisé
pour rincer tous types de
tissus,par exemple après un
lavage à la main.
Ce programme peut être en
outre utilisé comme cycle de
BLANCHISSAGE (voir le
tableau des programmes).
PROGRAMME SPÉCIAL
“ESSORAGE ENERGIQUE”
Ce programme effectue un
essorage à la vitesse
maximale (qui peut être
réduit en agissant sur la
touche appropriée).
UNIQUEMENT VIDANGE
Ce programme vous permet
d’effectuer la vidange de
l’eau.
EN
CHAPTER 8
SELECTION
For the various types of
fabrics and various degrees
of dirt the washing machine
has different programme
bands according to: wash
cycle,temperature and
lenght of cycle (see table of
washing cycle
programmes).
RESISTANTS FABRICS
The programmes have been
designed for a maximum
wash and the rinses,with
spin intervals,ensure perfect
rinsing.
The final spin gives more
efficient removal of water.
MIXED AND SYNTHETIC
FABRICS
The main wash and the rinse
gives best results thanks to
the rotation rhythms of the
drum and to the water
levels.
A gentle spin will mean that
the fabrics become less
creased.
SPECIAL “COTTON RINSES”
PROGRAMME
This programme carries out
three rinses with a
intermediate spin (which
can be reduced or
excluded by using the
correct button). It can be
used for rinsing any type of
fabric, eg. use after handwashing.
This program can be also
used as cycle of Bleaching
(see table of washing cycle
programmes).
SPECIAL “FAST SPIN”
PROGRAMME
Programme “FAST SPIN”
carries out a maximum spin
(which can be reduced by
using the correct button).
DRAIN ONLY
This programme drains out
the water.
Page 16

31
FR
SECHAGE MIXTES
Sèchage de tissus mélangés
(synthétiques/coton),tissus
synthétiques.
SECHAGE COTON
Sèchage de tissus en coton,
éponge,lin,chanvre,etc...
59’ TOUT EN 1
Un programme de lavage et
de séchage complet d’une
durée de 59min environ.
C’est le programme idéal
pour obtenir des vêtements
propres et secs prêts à être
portés immédiatement.
- Pour des petites charges
de 1,5 kg maxi (pour 4
chemises par exemple)
- Pour des vêtements peu
sales (coton et mixte)
Il est recommandé de
réduire le dosage de lessive
(par rapport à la charge
normale) pour éviter tout
gaspillage.
EN
SYNTHETICS DRYING
Mixed fabrics
(synthetics/cotton),synthetic
fabrics.
COTTON DRYING
Cotton,terry towelling,linen,
hemp fabrics,etc...
RAPID 59’
A complete express washing
and drying cycle lasting only
59'.This is an ideal program
for having dry, refreshed
and ready-to-wear clothes
as soon as the cycle is
finished.
- Maximum load: 1,5 kg (4
shirts for example)
- Lightly soiled fabrics
(cotton and mixed fabrics)
With this program we
recommend that you
reduce the detergent
loading dose (compared to
the normal one),in order to
avoid detergent waste.
30
EN
32 MINUTE RAPID
PROGRAMME
The 32 minute rapid
programme allows a
complete washing cycle to
be carried out in
approximately 30 minutes,
with up to a maximum load
of 2 kg and a temperature of
50°C.
When selecting the "32
minute rapid" programme,
please note that we
recommend you use only
20% of the recommended
quantities shown on the
detergent pack.
“MIX & WASH SYSTEM”
PROGRAMME
This is an exclusive Candy
system and involves 2 great
advantages for the
consumer:
• to be able to wash
together different type of
fabrics (e.g. cotton +
synthetic etc…) FAST
COLOUREDS;
•to wash with a considerable
energy saving.
The "Mix & Wash" programme
has a temperature of 40°C
and alternate dynamic
phases (the basket that turns)
to static phases (fabrics in
soak in phase of rest) with a
duration programme that
almost reaching the 2 hours.
The energy consumption for
the complete cycle is only
850 W/h.
Important:
•the first washing of new
coloureds fabrics must be
done separately;
• in every case,never mix
NON-FAST COLOUREDS
fabrics.
FR
PROGRAMME “RAPIDE 32
MINUTES”
Ce programme permet
d’effectuer un cycle de
lavage complet en 30
minutes environ pour des
charges de linge jusqu’à 2
kg et à une température de
50°C.
Quand vous sélectionnez le
programme "Rapide 32
minutes",nous vous
recommandons d'utiliser
seulement 20% de la
quantité indiquée sur la
boîte de produit.
PROGRAMME “MIX & WASH
SYSTEM”
Il s'agit d'un brevet exclusif
Candy et il comporte 2
grands avantages pour
l'utilisateur:
• pouvoir laver différents
tissus ensemble (exemple:
coton + synthétique etc…)
QUI NE DÉTEINT PAS;
• effectuer le lavage avec
une économie d'énergie
considérable.
Le programme de lavage
"Mix & Wash" a une
température de 40°C et
alterne phases dynamiques
(le panier qui tourne) aux
phases statiques (linge en
trempage en phase de
repos).
Pour ce motif il a une durée
plus élevée,en atteignant
presque les 2 heures.
La consommation d'énergie
électrique pour le cycle
entier est de seulement 850
W/h.
Important:
• le premier lavage de
nouveau linge colorées,
doit être effectué
séparément;
• dans chaque cas,ne
jamais mélanger du linge
coloré QUI DÉTÉINT.
Page 17

FR
33
CHAPITRE 10
LE PRODUIT
ATTENTION:
si vous devez laver des tapis,
des couvre-lits ou d’autres
pièces lourdes,nous
conseillons de ne pas
essorer.
Pour laver à la machine des
vêtements et de la lingerie
se reporter à l’étiquette qui
doit mentionner “pure laine
vierge”et l’indication “ne se
feutre pas”ou “peut être
lavé en machine”.
ATTENTION:
Au cours de la phase
de sélection vérifier
que:
- aucun objet
métallique ne se
trouve dans le linge à
laver (boucles,
épingles de nourrice,
épingles,monnaie,
etc.);
- les taies d’oreiller
soient boutonnées,les
fermetures à glissière,
les crochets,les oeillets
soient fermés,les
ceintures et les rubans
des robes de chambre
soient noués;
- les anneaux soient
enlevés des rideaux;
- n’oublier pas de lire
attentivement
l’étiquette sur les tissus;
- Si,au cours de la
sélection,vous trouvez
des taches résistantes,
les enlever à l’aide
d’un nettoyant
spécial.
EN
CHAPTER 10
THE PRODUCT
IMPORTANT:
When washing heavy rugs,
bed spreads and other
heavy articles,it is advisable
not to spin.
To be machine-washed,
woollen garments and other
articles in wool must bear
the “Machine Washable
Label”.
IMPORTANT:
When sorting articles
ensure that:
- there are no metal
objects in the washing
(e.g.brooches,safety
pins,pins,coins etc.).
- cushion covers are
buttoned,zips and
hooks are closed,loose
belts and long tapes on
dressing gowns are
knotted.
-runners from curtains are
removed.
- attention is paid to
garment labels.
-when sorting,any tough
stains should be
removed prior to
washing using stain
removers only
recommended on
label.
32
FR
CHAPITRE 9
TIROIR A LESSIVE
Le tiroir à lessive est divisé en
3 petits bacs:
– le bac marquée du
symbole “I” sert pour la
lessive destinée au
prélavage;
– le bac marquée du
symbole “✿✿”sert pour
des additifs spéciaux:
adoucisseurs,parfums,
amidon,produits pour
l’azurage,etc;
– le bac marquée du
symbole “II” sert pour la
lessive destinée au
lavage.
Si vous souhaitez utiliser une
lessive liquide,un récipient
spécial peut être inséré
dans la section “II” du tiroir à
lessive.Grâce à ce système,
la lessive s’écoulera dans le
tambour seulement au bon
moment.
Ce bac doit être introduit
dans la section "II" du tiroir à
lessive,également lorsque
l’on désire utiliser le
programme "RINÇAGE"
comme cycle de
BLANCHISSAGE.
ATTENTION :
NOUS RAPPELONS QUE
CERTAINS PRODUITS
ONT DES DIFFICULTÉS A
ÊTRE ÉVACUÉS; DANS
CE CAS NOUS VOUS
CONSEILLONS D’UTILISER
LE DOSEUR QUI VA
DIRECTEMENT DANS LE
TAMBOUR.
ATTENTION :
DANS LE BAC
MARQUÉE DU SYMBOLE
“
✿✿” N’INTRODUIRE
QUE DES PRODUITS
LIQUIDES. LA MACHINE
EST PROGRAMMÉE DE
MANIÈRE À
AUTOMATIQUEMENT
ABSORBER LES
PRODUITS
COMPLÉMENTAIRES
PENDANT LE DERNIER
RINÇAGE DE TOUS LES
CYCLES DE LAVAGE.
EN
CHAPTER 9
DETERGENT
DRAWER
The detergent draw is split
into 3 compartments:
- the compartment labelled
"I" is for prewash
detergent;
- the compartment
labelled “✿✿” is for special
additives,fabric softeners,
fragrances,starch,
brighteners etc;
- the compartment labelled
"II" is for main wash
detergent.
If liquid detergents are used,
please insert the special
container supplied into the
compartment marked “II”in
the detergent drawer.This
ensures that the liquid
detergent enters the drum
at the right stage of the
wash cycle.
This special container must
be inserted into the
compartment marked "II" in
the detergent drawer, also
when you wish to use the
"RINSE" programme as
BLEACHING cycle.
NOTE: SOME
DETERGENTS ARE
DIFFICULT TO REMO VE.
FOR THESE, WE
RECOMMEND YOU USE
THE SPECIAL DISPENSER
WHICH IS PLACED IN
THE DRUM.
NOTE: ONLY PUT
LIQUID PRODUCTS IN
THE COMPARTMENT
LABELLED “
✿✿”. THE
MACHINE IS
PROGRAMMED TO
AUTOMATICALL Y T AKE
UP ADDITIVES DURING
THE FINAL RINSE
STAGE FOR ALL WASH
CYCLES.
Page 18

FR
LAVAGE
CAPACITÉ V ARIABLE
AUTOMATIQUE
Cette machine peut adapter
automatiquement le niveau
d’eau au type et à la
quantité de linge.Vous
pouvez ainsi obtenir un
lavage “personnalisé”,même
du point de vue énergétique.
Ce système permet de
diminuer la consommation
d’énergie et réduit nettement
les temps de lavage.
EXEMPLE:
Pour les tissus extrêmement
délicats nous conseillons
d’utiliser un filet.
Supposons que le linge à
laver soit en COTON
EXTREMEMENT SALE (s’il a des
taches particulièrement
résistantes les enlever avec
un detachant).
Nous vous conseillons de ne
pas faire un lavage
exclusivement de servietteséponge qui,absorbant
beaucoup d’eau,deviennent
trop lourdes.
● Ouvrir le tiroir à produits
lessiviels.
● Remplir le bac de lavage II
avec 120 g de produit.
● En cas de besoin,remplir le
bac des additifs avec 50 ml
de produit
✿✿
.
● Fermer le tiroir.
35
EN
WASHING
VARIABLE CAPACITY
This washing machine
automatically adapts the level
of the water to the type and
quantity of washing.In this way
it is also possible to obtain a
“personalized”wash from an
energy saving point of view.
This system gives a decrease in
energy consumption and a
sensible reduction in washing
times.
EXAMPLE:
A net bag should be used
for particularly delicate
fabrics.
Let us suppose that the
washing consists of HEAVILY
SOILED COTTON (tough
stains should be removed
with suitable stain removal).
It is advisable not to wash a
load made up entirely of
articles in towelling fabric
which absorb a lot of water
and become too heavy.
● Open the detergent
drawer.
● Put 120 g in the main wash
compartment marked II.
● Put 50 ml of the desired
additive in the additives
compartment ✿✿.
● Close the detergent
drawer.
34
FR
CHAPITRE 11
CONSEILS UTILES
POUR L’UTILISATEUR
SUGGESTION POUR L’UTILISATION
DE VOTRE LAVE-LINGE
Dans le souci du respect de
l’environnement et avec le
maximum d’économie d’énergie,
charger au maximum votre lavelinge pour éliminer les éventuels
gaspillages d’énergie et d’eau.
Nous recommandons d’utiliser la
capacité maximale de
chargement de votre lave-linge.
Vous pouvez ainsi économiser
jusqu’à 50% d’énergie si vous
pratiquez le chargement
maximal.
Effectuez un lavage unique à
l’opposé de 2 lavages en 1/2
charge.
QUAND LE PRE-LAVA GE EST-IL
VRAIMENT NÉCESSAIRE ?
Seulement dans le cas d’un linge
particulièrement sale.Dans le cas
d’un linge normalement sale,ne
sélectionnez pas l’option
" prélavage ",ceci vous permettra
une économie d’énergie de 5 à
15%.
QUELLE TEMPÉRATURE DE LAVAGE
SÉLECTIONNER ?
L’utilisation des détachants avant
le lavage en machine ne rend
pas nécessaire le lavage au-delà
de 60°C.L’utilisation de la
température de 60°C permet de
diminuer la consommation
d’énergie de 50%.
AVANT D’UTILISER UN
PROGRAMME DE SÉCHAGE.
Sélectionnez une vitesse
d’essorage élevée avant de
débuter le séchage.Vous
diminuerez ainsi l’humidité
résiduelle du linge.Grâce à
cette opération vous
obtiendrez des substantielles
économies d’énergie et d’eau
EN
CHAPTER 11
CUST
OMER
AWARENESS
A guide environmentally
friendly and economic use of
your appliance.
MAXIMISE THE LOAD SIZE
Achieve the best use of
energy, water,detergent and
time by using the
recommended maximum
load size.
Save up to 50% energy by
washing a full load instead of
2 half loads.
DO YOU NEED TO PRE-WASH?
For heavily soiled laundry only!
SAVE detergent,time, water
and between 5 to 15% energy
consumption by NOT selecting
Prewash for slight to normally
soiled laundry.
IS A HOT WASH REQUIRED?
Pretreat stains with stain
remover or soak dried in stains
in water before washing to
reduce the necessity of a hot
wash programme.
Save up to 50% energy by
using a 60°C wash
programme.
BEFORE USING A DRYING
PROGRAMME...
SAVE energy and time by
selecting a high spin speed to
reduce the water content in
laundry before using a drying
programme.
Page 19

37
CHAPITRE 12
SECHAGE
NE SÈCHER JAMAIS DES
VÊTEMENTS EN
CAOUTCHOUC MOUSSE
OU DES TISSUS
INFLAMMABLES.
IMPORTANT:
DANS CETTE MACHINE À
LAVER SÉÇHANTE, PEUT
ÊTRE SÉCHÉ
EXCLUSIVEMENT LE
LINGE ESSORÉ ET LAVÉ À
L’EAU.
IMPORTANT
Les indications fournies sont
générales et il sera
nécessaire de s’exercer un
peu pour un fonctionnement
optimal du sèchage.Au
début,nous recomandons
de régler des temps inférieurs
à ceux qui sont indiqués,de
façon à pouvoir définir le
degré de sèchage voulu.
Nous vous recommandons
de ne pas sècher les tissus
qui s’effilochent souvent,du
genre carpette ou
vêtements à poils longs,pour
ne pas obstruer les conduites
d’air.Le dispositif de sèchage
permet un sèchage parfait
des tissus sans aucune
émission de vapeur à
l’extérieur.Un puissant souffle
d’air,idealemént chauffé,
pénètre le linge humide, l’air
saturé d’humidité est recyclé
à travers une conduite dans
laquelle l’eau froide
condense l’humidite
contenue dans l’air; tout le
circuit est fermé et étanche,
donc il n’y a aucune
émission de vapeur à
l’extérieur.
FR
CHAPTER 12
DRYING
DON’T DRY GARMENTS
MADE FROM FOAM
RUBBER OR
FLAMMABLE
MATERIALS.
IMPORTANT:
THIS DRYER CAN ONLY
BE USED FOR LAUNDRY
WHICH HAS BEEN
WASHED AND SPIN
DRIED.
WARNING:
Indications given are
general,therefore some
practice is needed for the
best drying results.We
recommend setting a lower
drying time than indicated,
when first using,so as to
establish the degree of
dryness required.We
recommend not to dry
fabrics that fray easily,such
as rugs or garments with a
deep pile,to avoid air duct
clogging.
The water is then conveyed
to the drain circuit,wich is
sealed and therefore,no
steam can be released
outside.
EN
36
FR
● Vérifier que le robinet
d’eau soit ouvert.
● Vérifier que la vidange soit
placée correctement.
SÉLECTION DU PROGRAMME
Sélectionnez le programme
en tournant le sélecteur de
programmes et en alignant
le nom du programme sur
l’indicateur.
Vérifiez que le voyant
lumineux STOP clignote et
dans le cas contraire,assurez-
vous que la porte est bien
fermée.
Appuyez sur le bouton " START
" et quelques secondes plus
tard,le programme se lance.
Le cycle de lavage se
réalisera avec la manette
des programmes arrêtée sur
le programme sélectionné
jusqu'à la fin de celui-ci.
Attention: En cas de coupure
de courant pendant un
programme de lavage,une
mémoire spéciale restaure le
programme sélectionné et,
lorsque le courant est rétabli,
reprend le cycle là où il s’est
arrêté.
● Lorsque le programme est
terminé le temoin “fin du
cycle”s’allumera.
● Attendez que le verrou de
porte se désactive.Le voyant
lumineux "" Témoin de
verrouillage de porte "
s’éteint après environ 2
minutes;
● Mettez la machine à l’arrêt
en tournant le sélecteur de
programme à la position OFF.
● Ouvrez la porte et enlevez
le linge.
● Fermer le robinet d’eau.
POUR TOUS LES TYPES DE
LAVAGE CONSULTER
TOUJOURS LE TABLEAU
DES PROGRAMMES ET
SUIVRE LA SEQUENCE
DES OPERATIONS
INDIQUEE.
EN
● Ensure that the water inlet
tap is turned on.
● And that the discharge
tube is in place.
PROGRAMME SELECTION
Refer to the programme
guide to select the most
suitable programme.
Turning the selector knob
required programme is
activate.
Wait for the “STOP” indicator
light to flash.
Then press the START button.
When the START button is
pressed the machine sets
the working sequence in
motion.
The programme carries out
with the programme
selector stationary on the
selected programme till
cycle ends.
Warning: If there is any break
in the power supply while
the machine is operating,a
special memory stores the
selected programme
and,when the power is
restored,it continues where
it left off.
● At the end of the
programme the indicator
light “end cycle” will go on.
● Wait for the door lock to
be released (about 2
minutes after the
programme has finished).
● Switch off the machine by
turning the programme
selector to the “OFF”
position.
● Open the door and
remove the laundry.
● Turn off the water supply
after every use.
FOR ALL TYPES OF
WASH CONSULT THE
PROGRAMME TABLE
AND FOLLOW THE
OPERATIONS IN THE
ORDER INDICATED.
Page 20

39
MAX
4 kg
EXEMPLE D’UTILISATION EN
SECHAGE UNIQUEMENT
● Ouvrez le hublot de la
machine.
● Remplissez la machine
(4 kg max.).En cas de linge
de maison de grande taille
(draps,etc.) ou de linge très
absorbant (peignoirs,
pantalons en jean,etc.),il est
préférable de réduire la
charge.
● Refermez le hublot de la
machine.
● Réglez le sélecteur de
programme sur
coton.
● Sélectionner le degré de
séchage désiré.
Les possibilités disponibles
comprennent l’option Linge
extra sec ( ),idéal pour
serviettes et peignoirs,
l’option Linge sec prêt à
ranger ( ) pour du linge
qui ne nécessite pas d’être
repassé,et Linge sec à
repasser ( ) pour du linge
prêt à être repassé.
Si vous désirez sélectionner
un séchage minuté,appuyez
sur la touche " Séchage "
jusqu’à atteindre le niveau
de temps désiré.
PROTECTION DE HUBLOT
La machine-à-laver dispose
d’un dispositif de protection
pour le verre du hublot qui
rejoint des températures
élevées durant la phase de
séchage.
ATTENTION:
NE TOUCHER L’HUBLOT
EN AUCUN CAS.
● S’assurer que le robinet
d’eau est ouvert.
● S’assurer que le tuyau de
vidange soit en position
correcte.
FR
DRYING CYCLE
● Open door.
● Fill with up to 4 kg - in case
of large items (e.g.sheets) or
very absorbent items (e.g.
towels or jeans),it is a good
idea to reduce the load.
● Close door.
● Turn programme dial to
cotton.
● Select the degree of
dryness that you require.
This ranges from Extra Dry
( ) for bath towels and
bathrobes,through
Cupboard Dry ( ) for
items that will be put away
without ironing,to iron dry
( ) that leaves the laundry
suitable
for ironing.
If you wish to select a timed
drying cycle,press the “drying
programme selection”button
until the required time
indicator lights up.
DOUBLE-SKIN DOOR
The appliance door is fitted
with a protective shield to
prevent contact with the
glass door which can reach
high temperatures,during the
drying cycle.
WARNING: DO NOT
TOUCH DOOR FOR
ANY REASON.
● Make sure water inlet valve
is open.
● Make sure water drain is
correctly positioned.
EN
38
ATTENTION:
N'OUVREZ JAMAIS LE
HUBLOT DE LA
MACHINE PENDANT UN
CYCLE DE SÉCHAGE.
PATIENTEZ JUSQU'À LA
PHASE DE
REFROIDISSEMENT
PRÉVUE POUR LE
CYCLE.
Il est possible de sècher
uniquement le linge qui a
déjà été essoré.
Avec la machine à
laver/séchante,deux types
de sèchage peuvent être
accomplis:
1 Sèchage de tissus en
coton,éponge,lin,chanvre,
etc...
Note d’information
Pendant la phase de
séchage, le tambour
effectue des rotations à
grande vitesse pour brasser
le linge et ainsi optimiser le
cycle.
2 Sèchage de tissus
mélangés
(synthétiques/coton),tissus
synthétiques.
FR
IMPORTANT
NEVER OPEN THE DOOR
AFTER THE DRYING
CYCLE HAS BEGUN WAIT UNTIL THE COOL
DOWN PERIOD
PROVIDED FOR BY THE
CYCLE.
Only dry pre-spun laundry
The washer/dryer can
perform two types of drying:
1 Cotton,terry towelling,
linen,hemp fabrics,etc...
Advisory note
During drying phase the
drum will accelerate to a
higher speed to
distribute the load and to
optimize the drying
performance
2 Mixed fabrics
(synthetics/cotton),synthetic
fabrics.
EN
Page 21

41
CHAPITRE 13
CYCLE
A
UTOMATIQUE
LAVAGE/SECHAGE
ATTENTION : LE CYCLE
COMPLET PEUT ÊTRE
UTILISE UNIQUEMENT
AVEC UNE CHARGE
MAXIMALE DE 4KG DE
LINGE SEC. DANS LE CAS
CONTRAIRE LE RESULTAT
DU SECHAGE NE SERA
PAS SATISFAISANT.
Lavage:
Ouvrir le bac à produits et
introduire la lessive dans les
compartiments appropriés.
Consulter la liste des
programmes de lavage et,
selon les tissus à laver (par
exemple,coton très sale) et
sans presser sur la touche de
la mise en marche,préparer
le lavage comme décrit:
Sélectionnez le programme
en tournant le sélecteur de
programmes et en alignant le
nom du programme sur
l'indicateur .
Pressez les boutons d’options si
besoin
Vérifiez que le robinet est
ouvert et que le tuyau
d'évacuation est bien en
place.
Sechage:
Sélectionner le degré de
séchage désiré.
Les possibilités disponibles
comprennent l’option Linge
extra sec ( ),idéal pour
serviettes et peignoirs,
l’option Linge sec prêt à
ranger ( ) pour du linge
qui ne nécessite pas d’être
repassé,et Linge sec à
repasser ( ) pour du linge
prêt à être repassé.
FR
CHAPTER 13
AUT
OMATIC
W
ASHING/DRYING
WARNING: ONLY A
MAXIMUM 4 KG OF DRY
LAUNDRY CAN BE
LOADED OTHERWISE THE
DRIED LAUNDRY WILL BE
NOT SATISFACTORY.
Washing:
Open the drawer, choose
the detergent and put in the
correct amount.
Refer to the list of washing
programmes according to
fabrics to be washed (e.g.
very dirty cotton) and
without pressing Start
button,prepare wash as
described:
Turning the selector knob,
the required programme is
activated.
Press the option buttons (if
required)
Check that the tap is turned
on and that the discharge
hose is positioned correctly.
Drying:
Select the degree of dryness
that you require.
This ranges from Extra Dry
( ) for bath towels and
bathrobes,through
Cupboard Dry ( ) for
items that will be put away
without ironing,to iron dry
( ) that leaves the
laundry suitable for ironing.
EN
40
ATTENTION:
NE PAS SECHER LES
VETEMENTS EN LAINE,
LES VETEMENTS AVEC
DES REMBOURRAGES
PARTICULIERS (DUVET,
ANORAKS, ETC...), LES
VETEMENTS TRES
DELICATS .SI LES
VETEMENTS SONT DU
GENRE “LA VE-REPASSE”,
IL EST RECOMMANDE
DE REDUIRE ENCORE LE
CHARGEMENT POUR
EVITER LA FORMATION
DE PLIS.
● Appuyez sur le bouton
START.
● La phase de séchage
démarre avec le sélecteur
de programme réglé
sur jusqu'à la fin du
cycle de séchage.
● Le voyant du programme
de séchage restera allumé
jusqu’à la phase de
refroidissement ( ).
● Lorsque le programme est
terminé le temoin “fin du
cycle”s’allumera.
● Attendez que le verrou de
porte se désactive.Le
voyant lumineux "" Témoin
de verrouillage de porte "
s’éteint après environ 2
minutes;
● Mettez la machine à
l’arrêt en tournant le
sélecteur de programme à
la position OFF.
● Ouvrez la porte et enlevez
le linge.
● Fermer le robinet d’eau.
FR
WARNING:
DO NOT DRY WOOLLEN
GARMENTS OR ARTICLES
WITH SPECIAL PADDING,
(E.G. QUILTS, QUILTED
ANORAKS, ETC.).
DELICATE FABRICS IF
GARMENTS ARE
DRIP/DRY, LOAD LESS
ITEMS AO AS TO PREVENT
CREASING.
● Press the START button.
● The drying phase will
begin with the programme
dial fixed on the
symbol until the end of
drying.
● The drying programme
indicator will be on until the
cool down phase will begin
and the indicator ( ) will
go on.
● At the end of the
programme the indicator
light “STOP”will go on.
● Wait for the door lock to
be released (about 2
minutes after the
programme has finished).
The "Door Security" indicator
light will go out.
● Switch off the machine by
turning the programme
selector on the “OFF”
position.
● Open the door and
remove the laundry.
● Turn off the water supply
after every use.
EN
Page 22

43
TABLE OF DRYING TIMES (IN MINUTES):
TABLEA U DES DURÉES DE SÉCHAGE (EN MINUTES):
PROGRAMME
Extra sec
Prêt-à-ranger
Prêt-à-repasser
1 Kg Min
30’
30’
30’
1 Kg Min
30’
30’
30’
3 Kg Max
à 170’
à 150’
à 80’
COTON MIXTE
4 Kg Max
à 230’
à 220’
à 170’
FR
EN
PROGRAMME
Extra
Cupboard
Iron
Min 1 Kg
from 30’
from 30’
from 30’
Min 1 Kg
from 30’
from 30’
from 30’
Max 3 Kg
to 170’
to 150’
to 80’
COTTON MIXED
Max 4 Kg
to 230’
to 220’
to 170’
42
Si vous désirez sélectionner un
séchage minuté,appuyez sur
la touche " Séchage " jusqu’à
atteindre le niveau de temps
désiré.
Appuyer sur la touche
"DÉBUT/PAUSE".
Le cycle de lavage se
réalisera avec la manette
des programmes arrêtée sur
le programme sélectionné
jusqu'à la fin de celui-ci.
La machine exécute alors la
totalité du programme de
séchage.
Le voyant du programme de
séchage restera allumé
jusqu’à la phase de
refroidissement ( ).
Lorsque le programme est
terminé le temoin “fin du
cycle”s’allumera.
Attendez que le verrou de
porte se désactive.Le voyant
lumineux "" Témoin de
verrouillage de porte "
s’éteint après environ 2
minutes;
Mettez la machine à l’arrêt
en tournant le sélecteur de
programme à la position OFF.
Ouvrez la porte et enlevez le
linge.
Fermer le robinet d’eau.
FR
If you wish to select a timed
drying cycle,press the
“drying programme
selection”button until the
required time indicator lights
up.
Press the "Start/Pause"
button.
The programme carries out
with the programme selector
stationary on the selected
programme till cycle ends.
The washer-dryer will then
complete the entire drying
programme.
The drying programme
indicator will be on until the
cool down phase will begin
and the indicator ( ) will
go on.
At the end of the
programme the indicator
light “STOP”will go on.
Wait for the door lock to be
released (about 2 minutes
after the programme has
finished).
The "Door Security" indicator
light will go out.
Switch off the machine by
turning the programme
selector on the “OFF”
position.
Open the door and remove
the laundry.
Turn off the water supply
after every use.
EN
Page 23

FR
DEMENAGEMENTS OU
LONGUES PERIODES D’ARRET
DE LA MACHINE
En cas de déménagement,
ou de longues périodes
d’arrêt de la machine dans
des endroits non chauffés,il
faut vidanger
soigneusement tous ses
tuyaux.
Débrancher le courant et se
servir d’un seau.
Enlever la bague sur le tuyau
et le plier vers le bas,dans le
seau,jusqu’à ce qu’il ne
sorte plus d’eau.
Après cette opération,la
répéter en sens inverse.
45
EN
REMOVALS OR LONG PERIODS
WHEN THE MACHINE IS LEFT
STANDING
For eventual removals or
when the machine is left
standing for long periods in
unheated rooms,the drain
hose should be emptied of
all remaining water.
The appliance must be
switched off and unplugged.
A bowl is needed.Detach
the drainage hose from the
clamp and lower it over the
bowl until all the water is
removed.
Repeat the same operation
with the water inlet hose.
FR
CHAPITRE 14
NETT
OYA
GE ET
ENTRETIEN
ORDINAIRE
Ne jamais utiliser de produits
abrasifs,d’alcool et/ou de
diluant,pour laver l’extérieur
de votre machine; il suffit de
passer un chiffon humide.
La machine n’a besoin que
de peu d’entretien:
● Nettoyage des bacs.
● Déménagements ou
longues périodes d’arrêt de
la machine.
NETTOYAGE DES BACS
Même si cette opération
n’est pas strictement
nécessaire,il vaut mieux
nettoyer de temps en temps
les bacs à produits lessiviels.
Il suffit de tirer légèrement
sur le tiroir pour l’extraire.
Nettoyer le tiroir sous un jet
d’eau.
Remettre le tiroir dans sa
niche.
44
EN
CHAPTER 14
CLEANING
AND
ROUTINE
MAINTENANCE
Do not use abrasives,spirits
and/or diluents on the
exterior of the appliance.It is
sufficient to use a damp
cloth.
The washing machine
requires very little
maintenance:
● Cleaning of drawer
compartments.
● Removals or long periods
when the machine is left
standing.
CLEANING OF DRAWER
COMPARTMENTS
Although not strictly
necessary,it is advisable to
clean the detergent,bleach
and additives
compartments occasionally.
Remove the compartments
by pulling gently.
Clean with water.
Put the compartments back
into place
Page 24

47
CHAPTER 15
EN
FAULT
NOTE:
THE MACHINE IS FITTED WITH A SPECIAL ELECTRONIC DEVICE, WHICH PREVENTS THE SPIN CYCLE
SHOULD THE LOAD BE UNBALANCED.
THIS REDUCES THE NOISE AND VIBRATION IN THE MACHINE AND SO PROLONGS THE LIFE OF YOUR
MACHINE.
If the fault should persist,contact a Candy Technical Assistance Centre.For prompt servicing, give the model of
the washing machine,to be found on the label placed on the cabinet inside of the porthole or on the
guarantee certificate.
Important
1The use of environment friendly detersives without phosphates may produce the following effects:
- The discharge rinse water may result cloudier due to the presence of zeolites in suspension. This does not
compromise the efficiency of the rinses.
- The presence of white powder (zeolites) on the washing at the end of the washing cycle. This does not
remain incorporated in the fabric and does not alter the colour.
- The presence of foam in the last rinse water which is not necessarily a sign of inadequate rinsing.
- The non-ionic surface-active agents present in the composition of washing machine detersives are often
difficult to remove from the washing itself and, even in small quantities, may produce visible signs of the
formation of foam.
- Carrying out further rinses, in cases such as this, is not useful.
2If your washing machine fails to function, carry out the above-mentioned checks before calling the Candy
Technical Assistance Service.
1.Does not function
on any
programme
2.Does not load
water
3.Does not discharge
water
4. Water on floor
around washing
machine
5.Does not spin
6.Strong vibrations
during spin
Mains plug not plugged in
Mains switch not on
No power
Electric circuit fuses failure
Load door open
See cause 1
Inlet tap turned off
Timer not set correctly
Discharge tube bent
Leak from the washer between the tap
and inlet tube
The washing machine has not
discharged water
“No spin”setting (some models only)
Washing machine not perfectly level
Transport bracket not removed
Washing load not evenly distributed
Insert plug
Turn on mains switch
Check
Check
Close load door
Check
Turn on water inlet tap
Set timer on correct position
Straighten discharge tube
Replace washer and tighten the tube
on the tap
Wait a few minutes until the machine
discharges water
Turn the programme dial onto spin
setting
Adjust special feet
Remove transport bracket
Distribute the washing evenly
CAUSE
REMEDY
Advisory note
During drying phase the drum will accelerate to a higher speed to distribute the load and to
optimize the drying performance
46
CHAPITRE 15
ANOMALIE
Si le mauvais fonctionnement persiste,adressez-vous au Centre d’Assistance Technique Candy; communiquez
le nom du modèle indiqué sur la plaquette se trouvant sur la carrosserie à l’intérieur du hublot ou sur le bulletin
de garantie.
En indiquant ces informations vous obtiendrez une intervention plus rapide et efficace.
1L’utilisation des produits écologiques sans phosphates peut produire les effets suivants:
-L’eau de vidange du rinçage est trouble à cause de zéolites en suspension; l’efficacité du rinçage n’est
absolument pas compromis;
- Présence de poudre blanche (zéolites) sur le linge à la fin du lavage: cette poudre ne pénètre pas dans le
tissu et n’en altère pas la couleur;
- présence de mousse dans l’eau du dernier rinçage: elle ne signifie pas pour autant un mauvais rinçage;
- Les tensioactifs anioniques de la formule des produits pour machines à laver,s’enlèvent difficilement du linge
et, même en toute petite quantité, ils peuvent provoquer d’importants phénomènes de formation de mousse;
-L’exécution d’autres cycles de rinçage,en de tels cas, n’apporte aucun avantage.
2 Avant d’appeler le Centre d’Assistance technique Candy,si votre machine ne fonctionne pas, effectuer les
contrôles susmentionnés.
NOTE:
LA MACHINE EST DOTEE D’UN DISPOSITIF ELECTRONIQUE QUI EMPECHE LE DÉPART DE
L’ESSORAGE SI LES CHARGES SONT MAL REPARTIES ET LIMITE LES VIBRATIONS ET LE BRUIT DURANT
LE LAVAGE.
1.Aucun
fonctionnement
sur n’importe quel
programme
2.Absence
d’alimentation
d’eau
3.L’eau n’est pas
évacuèe
4. Présence d’eau sur
le sol tout autour
de la machine
5.La machine
n’essore pas
6.De fortes vibrations
pendant la phase
de centrifugation
La fiche n’est pas introduite dans la
prise de courant
L’interrupteur géneral n’est pas branché
L’énergie électrique est coupée
Les valves de l’installation électrique
sont défectueuses
Portillon ouvert
Voir cause 1
Robinet de l’eau fermé
Programmateur mal positionné
Tuyau de vidange plié
Fuite du joint se trouvant entre le robinet
et le tuyau de remplissage
La machine n’a pas encore évacué
l’eau
La fonction “suppression d’essorage”est
introduite (exclusivement sur certains
modèles)
La machine n’est pas à niveau
Les étriers de transport n’ont pas été
enlevés
La charge de linge n’est pas répartie
de façon uniforme
Brancher la fiche
Brancher l’interrupteur général
Contróler
Contróler
Fermer le portillon
Contróler
Ouvrir le robinet d’alimentation d’eau
Positionner correctement le timer
Redresser le tuyau de vidange
Remplacer le joint et serrer à fond le
tube sur le robinet
Attendre quelques minutes et la
machine évacuera l’eau
Relever la touche “exclusion
centrifugation”
Régler les pieds
Enlever les étriers de transport
Répartir le linge de façon uniforme
CAUSE
REMEDE
FR
Note d’information
Pendant la phase de séchage, le tambour effectue des rotations à grande vitesse pour brasser
le linge et ainsi optimiser le cycle.
Page 25

FR
EN
Cet appareil est commercialisé en accord avec la directive européenne 2002/96/CE sur les déchets
des équipements électriques et électroniques (DEEE).
En vous assurant que ce produit est correctement recyclé, vous participez à la prévention des
conséquences négatives sur l’environnement et la santé publique qui pourrait être causé par une
mise au rebut inappropriée de ce produit.
Le symbole sur ce produit indique qu’il ne doit pas être traité comme un déchet ménager. Il doit
être rapporté jusqu’à un point de recyclage des déchets électriques et électroniques.
La collecte de ce produit doit se faire en accord avec les réglementations environnementales
concernant la mise au rebut de ce type de déchets.
Pour plus d’infor mation au sujet du traitement, de la collecte et du recyclage de ce produit, merci
de contacter votre mairie, votre centre de traitement des déchets ou le magasin où vous avez
acheté ce produit.
This appliance is marked according to the European directive 2002/96/EC on Waste Electrical and Electronic
Equipment (WEEE).
By ensuring this product is disposed of correctly, you will help prevent potential negative consequences for the
environment and human health, which could otherwise be caused by inappropriate waste handling of this
product.
The symbol on the product indicates that this product may not be treated as household waste. Instead it shall
be handed over to the applicable collection point for the recycling of electrical and electronic equipment
Disposal must be carried out in accordance with local environmental regulations for waste disposal.
For more detailed information about treatment, recovery and recycling of this product, please contact your
local city office, your household waste disposal service or the shop where you purchased the product.
09.07 - 41031752 - www.graficaestampa.it - Printed in Italy - Imprimé en Italie
Le constructeur décline toute responsabilité pour les éventuelles erreurs d’imprimerie
contenues dans le présent mode d’emploi. Il se réserve en outre le droit d’apporter
toutes modifications qui se révèleraient utiles à ses propes produits sans pour autant
en compromettre les caractéristiques essentielles.
The manufacturer declines all responsibility in the event of any printing mistakes in
this booklet. The manufacturer also reserves the right to make appropriate
modifications to its products without changing the essential characteristics.
 Loading...