

Page 1
RECIPES AND COOKING GUIDE
FOR USE ON STANDARD OUTDOOR GRILLS OR IN
CONVENTIONAL HOME OVENS.
Q uality Cookware at
0212-TKYC-Booklet.indd 1 2/14/12 12:41 PM
Home
Page 2
IMPORTANT - FOR INDOOR AND OUTDOOR USE
• Inspect unit before use. Thoroughly wash Turkey Cannon before initial
use to remove impurities from the manufacturing process.
• The Turkey Cannon roasting accessory is for use on any standard
outdoor barbecue grill or indoor conventional oven. When using the
Turkey Cannon in a conventional oven, always use a walled baking
sheet or formed aluminum foil roasting pan to catch drippings and
prevent flare ups. Some smoking may occur.
• Follow the manufacturer’s instructions for proper use of your outdoor
barbecue grill or smoker. Follow instructions and warnings to avoid
injury or fires.
• Do not discard these safety instructions.
WARNING - HOT
Follow these and other warnings to prevent personal injury or
injury to others.
• Keep children and pets away from unit. Never leave unattended.
• Thoroughly cook food and check with meat thermometer. Meat
temperature should read 170°F in the breast when poultry is finished.
• Only cook with appropriate gear: leather gloves, apron and
close-toed shoes.
• Cook only on a level surface to avoid tipping and spilling.
• Do not drink hot liquid after cooking.
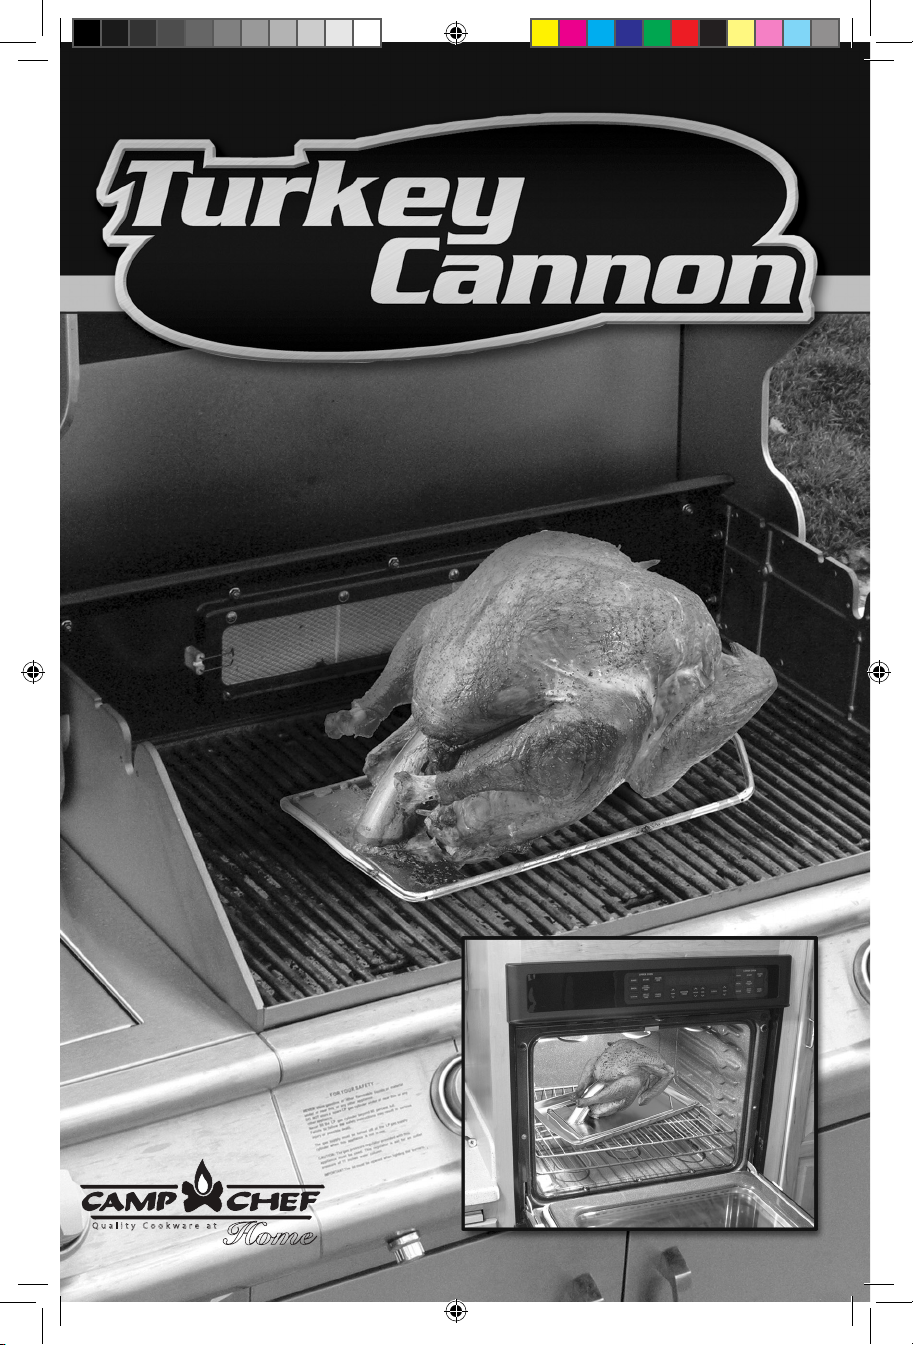
ASSEMBLY
EASY ASSEMBLY
1. Hook cylinder onto rear bar.
2. Drop cylinder down.
1
2
3. Slide to lock into place.
4. Separate for easy cleaning
and compact storage.
FÁCIL DE ENSAMBLAR
1. Sujetar el cilindro sobre
la barra posterior.
2. Desplegar el cilindro.
3. Deslizar para fijar en el lugar.
4. Separar para una limpieza
fácil y un almacenamiento
compacto.
ASSEMBLAGE CONVIVIAL
1. Accrochez le cylindre sur
la barre arrière.
2. Abaissez le cylindre.
3. Faites glisser pour verrouiller.
4. Séparez pour faciliter le
nettoyage et permettre un
rangement compact.
• Trim away excess fat and skin from turkeys to reduce drippings
and prevent flare-ups.
• The accessory will be extremely hot while in use. Do not attempt
to clean or move the unit until it is completely cool.
• Do not operate cooking equipment while intoxicated. Remember
to drink responsibly.
Turkey Cannon, Sport Grill, Big Gass Grill, Keg Roaster, Ultimate Roaster are trademarks from the makers of Camp Chef
and products covered under one or more of the following patents: 378646, D437522, 6427582B1, 5067396
3
1.800.650.2433 • 3985 N. 75 W., Hyde Park, UT 84318
www.CampChef.com
0212-TKYC-Booklet.indd 2-3 2/14/12 12:41 PM
Page 3
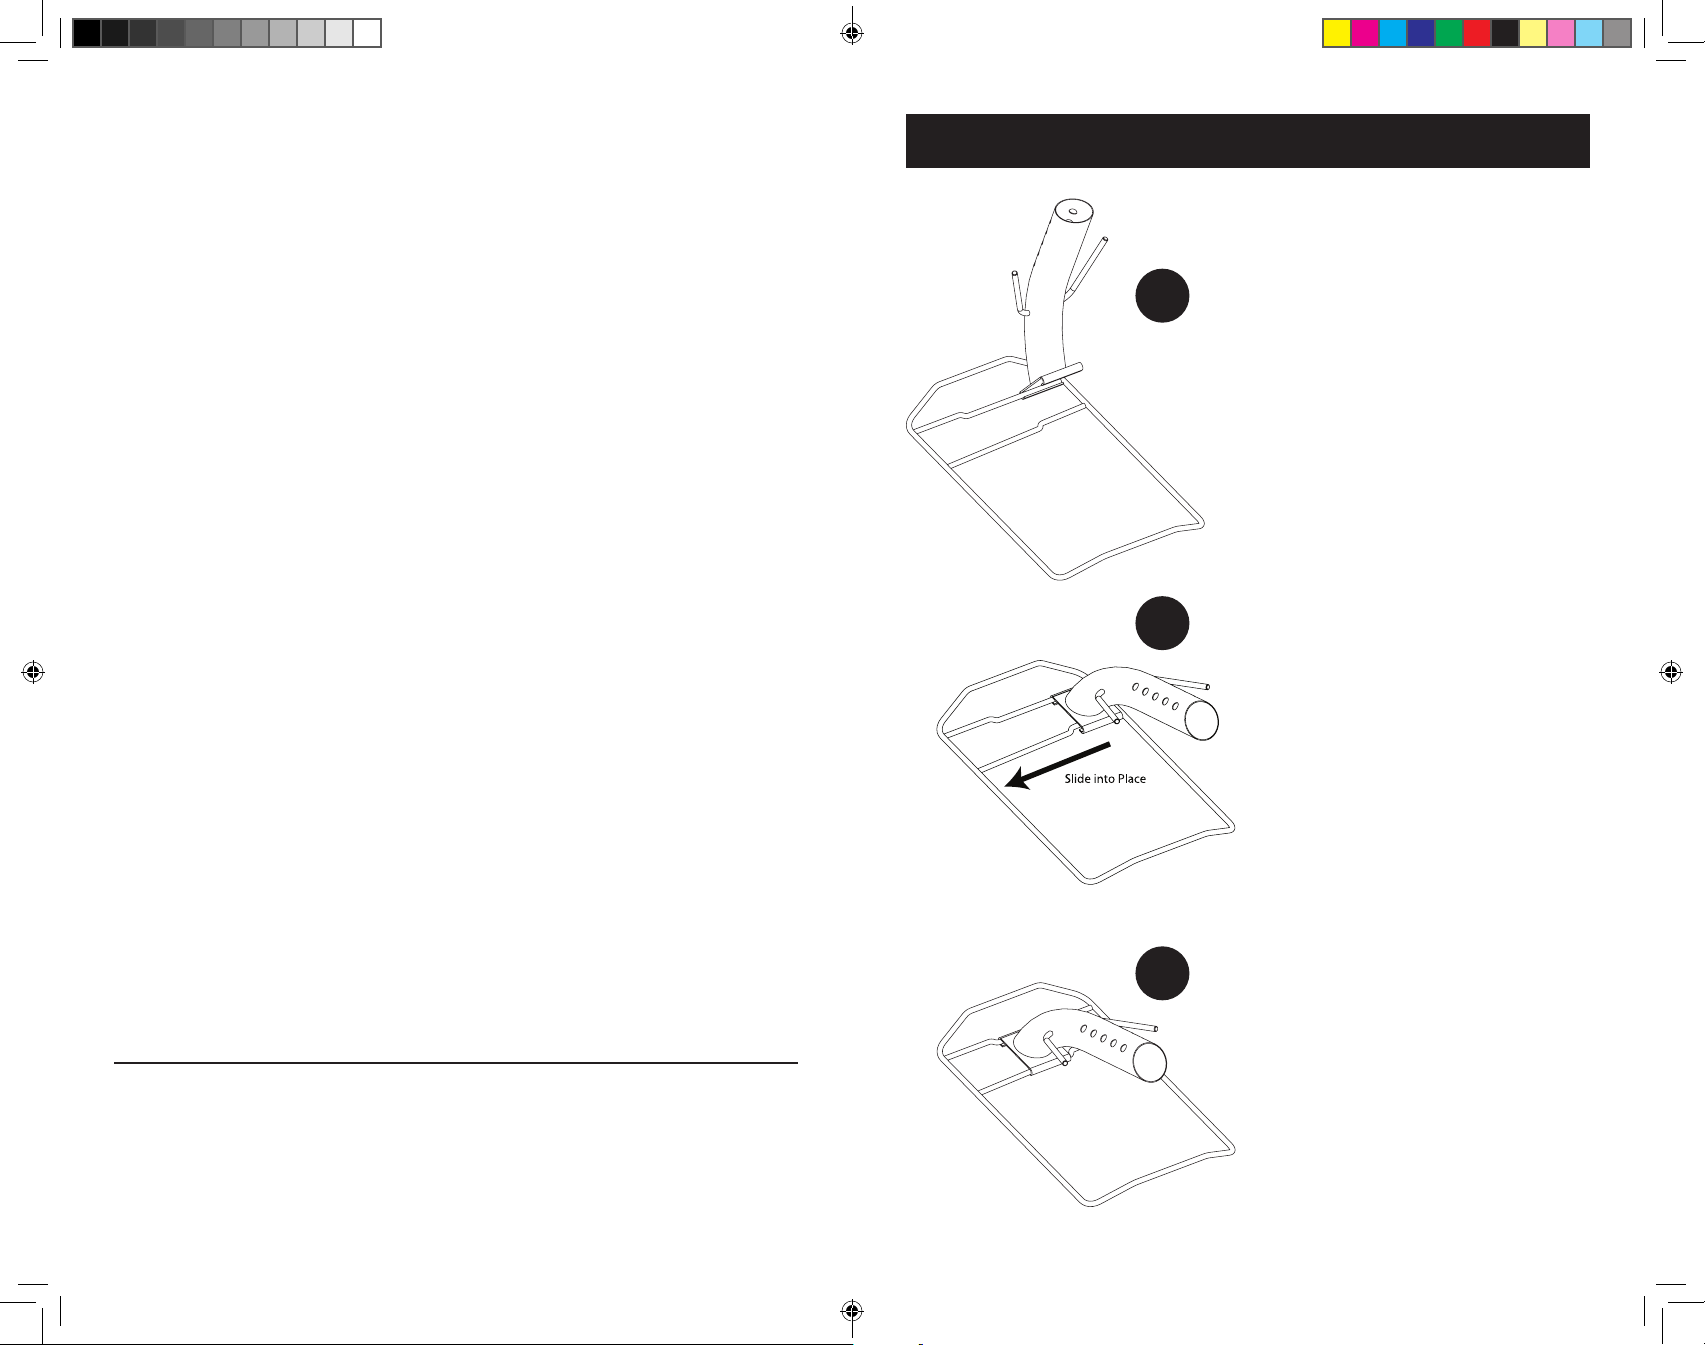
GETTING STARTED
HOW TO COOK
The TURKEY CANNON is for use on standard outdoor barbecue grills with
a deep lid. May also be used in a conventional oven on a high walled
baking sheet or roasting pan.
1 2 3
• Pour liquid into
The Turkey Cannon
• Place turkey over
The Turkey Cannon
• Cook to 170°F
PREPARE TURKEY CANNON:
1. As with all cooking utensils the Turkey Cannon should be washed
thoroughly before use. Using hot soapy water and a clean dish rag,
completely wash the outside of the Cannon to remove any residue
left over from the manufacturing process. Use a long bottle brush
to clean the inside of the Turkey Cannon. Rinse and completely dry.
CHOOSING A TURKEY:
Fresh Turkey
• Allow 1 pound of turkey per person.
• Buy your turkey 1 to 2 days before you plan to cook the poultry.
• Place the turkey on a pan to catch any juices and store in a
refrigerator until you’re ready to cook.
Frozen Turkey
• Allow 1 pound of turkey per person.
• Keep frozen until you’re ready to thaw.
• Turkeys can be kept frozen in the freezer indefinitely; however, cook
within 1 year for best quality.
THAWING TURKEY:
1. Keep the turkey in its original wrapper and place it on a tray or pan
to collect any juices that might leak out. Thaw in a refrigerator set to
40°F or below. Allow approximately 24 hours for every 4 to 5 pounds
of turkey.
POUR LIQUID INTO TURKEY CANNON:
1. Take your favorite beverage, open the lid and pour 1 to 1 1/2 cups
of the liquid into the Turkey Cannon. The liquid can also be injected
into the birds for added flavor. Add one tablespoon of dry seasoning
to canned liquid for added flavor. Discard liquid from Turkey Cannon
after use.
PREPARE POULTRY:
1. Trim skin and fat away from the neck, tail and tail cavity. Remove any
ice and fat from inside of the bird. Excess fat can produce too much
oil and can cause flare-up in your grill or oven.
2. Remove giblets from inside the bird and open a hole under the
neck into the cavity.
3. Rinse your bird in clean cold water and pat dry with a paper towel.
Season if desired with injection marinade and/or dry rub on skin.
4. Place bird on the Turkey Cannon with the cylinder inserted into
the cavity of the bird. Insert a wedge of onion or lemon into the
neck cavity of the bird to retain moisture inside the bird.
COOKING ON AN OUTDOOR GRILL:
1. A 14 pound turkey will cook in approximately 2-3 hours on the
grill. Outdoor elements such as wind, rain, etc can effect cooking
times. Follow manufacturer’s instructions for lighting your grill. Set
temperature controls on medium. Check the internal temperature
of the turkey after 1 hour and every 15 minutes thereafter until the
turkey is done. Allow turkey to rest for 10 minutes before carving
and serving.
COOKING IN A CONVENTIONAL OVEN:
1. When using the Turkey Cannon in a conventional oven, remove all
racks except bottom rack. Place the bottom rack on the lowest level.
Place the Turkey Cannon on a walled baking sheet or roasting pan
to catch drippings and keep your oven clean. Roast the turkey at
325-350°F until done. Check turkey temperature after 1 hour and
every 15 minutes thereafter with a calibrated meat thermometer until
done. Allow turkey to rest for 10 minutes before carving.
0212-TKYC-Booklet.indd 4-5 2/14/12 12:41 PM
Page 4

HOW TO COOK
COOKING TIPS
CHECK TEMPERATURE:
The Turkey Cannon’s unique design pushes heat into the center of the
bird drastically speeding up the cooking process. Check the temperature
after 1 hour and every 15 minute thereafter to ensure that the poultry
doesn’t over cook.
• To check the temperature, insert a calibrated meat thermometer
into the thigh. Do not touch bone or fat to ensure an accurate
reading. Temperature should read at least 165°F in thigh and
170°F in the breast.
COOKING TIPS
1. Use a walled baking sheet or formed aluminum foil roasting pan
to prevent flare ups and to catch drippings.
2. For a stronger flavor, inject and rub the bird at least four hours
before use. Place covered in the refrigerator and let stand until use.
This will allow the marinade or seasoning to saturate the meat and
spread the flavor throughout the whole bird. Keep the turkey cool,
40°F or below is recommended.
3. To add additional flavor, add one tablespoon of seasoning and/or
1/4 of a cup of lemon juice to the liquid.
4. Seal in Juices Method - Cook the bird in a conventional oven at
425°F for 30 minutes. Reduce heat to 350°F and cook until done.
5. Perfect Skin Method - Roast bird at 350°F. Baste with butter or olive
oil every 15 minutes. Raise the cooking temperature to 400°F in the
last 15 to 20 minutes of cooking. This will give the turkey a crisper,
browner skin.
CHICKEN TIPS:
• Adapt any recipe for use with chickens or other poultry (i.e. goose,
pheasants, etc.)
• Check meat temperature after 30 minutes and every 15 minutes
thereafter until chicken is done.
CLEANING:
1. Always remember to wash hands, utensils, cutting boards and
anything that has come in contact with the raw meat. Use hot
soapy water when cleaning.
2. Allow unit to cool completely before cleaning. Empty the Turkey
Cannon into the sink. The Turkey Cannon will contain a mix of the
original liquid and grease from bird. Do not use liquid in cylinder
for cooking.
3. To clean base unit:
a.) Scrape off burnt food, use a bottle brush to clean inside the
Turkey Cannon tube. Wash with hot soapy water. Rinse and
dry thoroughly.
b.) Place completely cooled unit in the dishwasher. Lay the
Turkey Cannon on its side so that liquid will drain out
of the Turkey Cannon.
6. 18 lb or larger turkeys may need to cook with the breasts down.
Place a onion or an apple under the breasts to support it.
SMOKING (OUTDOOR GRILLS ONLY):
1. Soak 1 cup of wood chips in water for 30 minutes. Wrap wood chips
in a single layer of aluminum foil. Cut 10-12 small vent holes in the
top of foil wrapper to allow smoke to escape. Place wrapper near
LIMITED WARRANTY
Manufacturer warrants this accessory to be free from defects in materials and workmanship for 90 days from the
day of purchase. Within this period, manufacturer will replace or repair defective parts deemed unusable from its
original intent by making available the parts thereof FOB Hyde Park, UT 84321.
Product finish is not warranted. Misuse, abuse, overheating and alteration are not covered in this warranty.
Manufacturer will not be held liable for any losses due to neglectful operation. No other warranties are implied.
Prior written approval and a return authorization number must be obtained. Returned items will be accepted for
repair or replacement only. Returns must be shipped prepaid. Collect shipments will not be accepted.
*Applies to contiguous U.S. states only.
poultry on grill. Follow cooking instructions for roasting.
0212-TKYC-Booklet.indd 6-7 2/14/12 12:41 PM
Page 5

IMPORTANTE – PARA USO EN INTERIORES Y EXTERIORES
• Inspeccione la unidad antes de usarla. Lave completamente el Turkey
Cannon antes de su uso inicial para retirar las impurezas que su
puedan haber formado durante el proceso de fabricación.
• El accesorio para asar Turkey Cannon se usa en cualquier parrilla de
barbacoa exterior estándar u horno convencional interior. Cuando se
usa el Turkey Cannon en un horno convencional, siempre utilice una
placa de pared para horno o una cacerola para asar rodeada de papel
de aluminio para contener los derrames y evitar las llamaradas. Se
puede producir una humareda.
• Siga las instrucciones del fabricante para un uso apropiado de su
parrilla de barbacoa exterior o ahumador. Siga las instrucciones y
advertencias para evitar lesiones o incendios.
• No descarte estas instrucciones de seguridad.
ADVERTENCIA - PELIGROSOS
Siga éstas y otras advertencias para evitar lesiones personales o para
lastimar a otros.
• Mantenga a los niños y a las mascotas lejos de la unidad. Nunca debe
dejarla desatendida.
• Cocinar por completo la comida verificándolo con un termómetro de
carne. La temperatura de la carne debe ser de 170ºF en la pechuga
cuando el ave se haya cocinado.
• Cocinar sólo con el equipo adecuado: guantes de cuero,
delantal y zapatos cerrados.
• Cocinar únicamente en una superficie a nivel para evitar
escapes y derrames.
• No beba líquidos calientes después de cocinar.
• Eliminar el exceso de grasa y pellejo de los pavos para reducir los
derrames y evitar las llamaradas.
PARA COMENZAR
El TURKEY CANNON se usa sobre parrillas de barbacoa exterior estándares con una tapa profunda. También se puede utilizar en un horno
convencional, en una placa para horno de pared alta o cacerola para asar.
• Verter su bebida favorita
dentro del cañón
PREPARAR EL TURKEY CANNON:
1. Como sucede con todos los utensilios de cocina, el Turkey Cannon
debe lavarse completamente antes de usar. Utilizando agua caliente
con jabón y un trapo para platos limpio, debe lavar completamente
el exterior del Cannon para retirar cualquier residuo que haya
quedado durante el proceso de fabricación. Use una escobilla larga
para limpiar el interior del Turkey Cannon y después enjuague y
seque completamente.
ESCOGIENDO UN PAVO:
Pavo Fresco
• Calcule 1/2 kilo de pavo por persona.
• Compre el pavo 1 o 2 días antes de cocinarlo.
• Coloque el pavo en una cacerola que utilice para los jugos y guárdelo
en un refrigerador hasta que esté listo para cocinar.
Pavo Congelado
• Calcule 1/2 kilo de pavo por persona.
• Manténgalo congelado hasta que esté listo para descongelar.
• Los pavos pueden guardarse congelados en el refrigerador indefinid-
amente; sin embargo, es recomendable cocinarlo en el plazo de 1 año
para una mejor calidad.
1 2 3
• Colocar aves de corral
sobre el cañón
• Cocinarlo a la temperatura de
170 ºF interna de la carne
• El accesorio estará extremadamente caliente mientras esté en uso. No
intente limpiar o mover la unidad hasta que esté completamente fría.
DESCONGELANDO EL PAVO:
1. Mantener el pavo en su envoltura original y colocarlo sobre una
• No opere el equipo de cocina si ha bebido. Recuerde beber
con responsabilidad.
bandeja o cacerola para evitar que se vierta cualquier líquido que
pueda desprenderse. Descongelarlo en un refrigerador de 40ºF o
menos. Es necesario dejarlo aproximadamente 24 horas por cada
2 o 2.5 kilogramos aproximadamente de pavo.
0212-TKYC-Booklet.indd 8-9 2/14/12 12:41 PM
Page 6

PARA COCINAR
PARA COCINAR
VERTER LÍQUIDO EN EL TURKEY CANNON:
1. Escoge tu bebida favorita, abre la tapa y vierte el líquido en el Turkey
Cannon. El líquido también se puede inyectar en las aves para añadir
sabor. Para conseguir más sabor, añada una cucharada de sazonador
seco a un líquido enlatado. Deseche el líquido del Turkey Cannon
después de utilizarse.
PREPARAR EL AVE:
1. Cortar el pellejo y la grasa del cuello, así como de la cola y la cavidad
de la cola. Retirar cualquier hielo y grasa del interior del ave. El
exceso de grasa puede producir demasiado aceite y puede ocasionar
una llamarada en su parrilla u horno.
2. Retire las vísceras del interior del ave y abra un hoyo debajo del
cuello, en la cavidad. Esto permitirá que por la abertura se mantenga
la humedad del Turkey Cannon.
3. Lave el ave en agua fría limpia y séquela con una toalla de papel.
Sazonar al gusto con marinada inyectada y/o frotando al seco sobre
la piel.
4. Coloque el ave en el Turkey Cannon con el cilindro insertado en la
cavidad del ave. Inserte un trozo de cebolla o limón en la cavidad
del cuello para retener la humedad dentro del ave.
COCINAR EN UNA PARRILLA EXTERIOR:
1. Un pavo de 7 kilos aproximadamente se cocinará en
aproximadamente 2-3 horas sobre la parrilla. Elementos externos tales
como el viento, la lluvia, etc. pueden afectar los tiempos de la cocción.
Siga las instrucciones del fabricante para encender la parrilla. Fije los
controles para conseguir una temperatura media. Verifique la temperatura interna del pavo después de 1 hora y 30 minutos. Deje reposar
al pavo durante 10 minutos antes de cortar y servir.
COCINAR EN UN HORNO CONVENCIONAL:
1. Cuando use el Turkey Cannon en un horno convencional, retire todas
las rejillas excepto la rejilla de la base. Coloque la rejilla de la base
en el nivel más bajo y el Turkey Cannon en la placa para el horno
de pared o en la cacerola de asar envuelta con papel de aluminio.
Esto retendrá los jugos del pavo y mantendrá su horno limpio. Asar
el pavo a 325-350ºF hasta que esté listo. Verificar la temperatura del
pavo regularmente con un termómetro de carne calibrado hasta que
el pavo alcance 170ºF en la pechuga. Dejar reposar el pavo durante
10 minutos antes de cortar y servir.
VERIFICAR LA TEMPERATURA:
El diseño único del Turkey Cannon concentra el calor en el interior
del ave, acelerando drásticamente el proceso de cocción. Verificar la
temperatura regularmente para asegurarse que el ave no se cocine
demasiado.
• Para verificar la temperatura, inserte un termómetro de carne
calibrado en el muslo. No toque el hueso o la grasa para asegurar una
lectura exacta. La temperatura debería ser de al menos 165ºF en el
muslo y 170ºF en el pecho.
INFORMACIÓN
1. Usar una placa para horno de pared o una cacerola para asar envuelta
de papel de aluminio para evitar llamaradas y retener derrames.
2. Para conseguir un sabor más fuerte, inyecte y frote el ave al menos
4 horas antes de su cocción. Colóquelo cubierto en el refrigerador
y dejar allí hasta el momento de cocinarlo. Esto permitirá que la
marinada o sazón impregne la carne y expanda el sabor en toda el
ave. Para mantener fresca el ave, se recomienda dejarla a 40ºF o
menos.
3. Para añadir sabor, añada una cucharada de sazonador y/o 1/4 de una
taza de jugo de limón al líquido.
4. Método de Sellar en Jugos – Cocine el ave en un horno convencional
a 425ºF durante 30 minutos. Después reduzca el calor a 350ºF y
cocínelo hasta que esté listo.
5. Método de Piel Perfecta – Asar el ave a 350ºF. Cubrirlo con
mantequilla o aceite de oliva cada 15 minutos. Elevar la temperatura
de cocción a 400ºF en los últimos 15 o 20 minutos de cocción. Esto le
dará al pavo una piel más dorada y crujiente.
AHUMAR (SÓLO EN PARRILLAS EXTERIORES):
1. Sumergir 1 taza de fragmentos de madera en agua durante
30 minutos. Envolver las fracciones de madera en una capa simple
de papel de aluminio. Hacer unos 10 o 12 agujeros pequeños
respiraderos en la parte superior de la envoltura de papel para
permitir que se escape el humo. Colocar el envoltorio cerca del
ave sobre la parrilla. Siga las instrucciones de cocina para asar.
0212-TKYC-Booklet.indd 10-11 2/14/12 12:41 PM
Page 7

INFORMACIÓN
CONSEJOS PARA EL POLLO:
• Adapte cualquier receta para usar con pollos u otras aves (por
ejemplo, gansos, faisanes, etc.)
• Verifique la temperatura de la carne después de 30 minutos y a partir
de ese momento cada 15 minutos hasta que el pollo esté listo.
LIMPIEZA
LIMPIEZA:
1. Siempre recuerde lavarse las manos, así como los utensilios, las tablas
de cortar y cualquier cosa que haya estado en contacto con la carne
cruda. Use agua jabonosa caliente cuando limpie.
1. Antes de limpiar, espere a que la unidad se enfríe completamente.
Vacíe el Turkey Cannon en el fregadero. El Turkey Cannon contendrá
una mezcla del líquido original y grasa del ave. No utilice líquido en
el cilindro para cocinar.
2. Limpiar la unidad base:
a.) Retire la comida quemada, use una escobilla largo para limpiar
dentro del tubo del Turkey Cannon. Lavar con agua jabonosa
caliente. Enjuagar y secar completamente.
b.) Coloque la unidad completamente fría en el lavaplatos. Déjelo
reposar en uno de sus costados para que el líquido se vierta
fuera del Turkey Cannon.
IMPORTANT – POUR UTILISATION À L’INTÉRIEUR ET À L’EXTÉRIEUR
• Inspectez l’équipement avant de l’utiliser. Lavez bien Turkey Cannon
avant l’utilisation initiale pour enlever les impuretés résultant du
processus de fabrication.
• L’accessoire de rôtisserie Turkey Cannon peut être utilisé sur n’importe
quel gril de barbecue à l’extérieur ou dans un four ordinaire. Lorsque
vous utilisez Turkey Cannon dans un four ordinaire, servez-vous
toujours d’une feuille de cuisson avec parois ou une plaque à rôtir en
aluminium pour récupérer les liquides afin d’éviter toute flambée. Il se
peut que de la fumée s’échappe.
• Procédez selon les instructions du fabricant avant d’utiliser votre gril
de barbecue ou le fumoir à l’extérieur. Respectez les instructions et les
avertissements pour éviter toute blessure ou incendie.
• Ne jetez pas ces consignes de sécurité.
AVERTISSEMENT - CHAUD
Respectez ces consignes ainsi que tout autre avertissement afin d’éviter
de vous blesser ou blesser d’autres personnes.
• Tenez les enfants et les animaux à l’écart de l’équipement. Ne laissez
jamais l’équipement sans surveillance.
• Chauffez bien les aliments et vérifiez la viande avec un thermomètre.
La température de la viande doit être à 77°C dans la poitrine lorsque
la volaille est cuite.
• Cuisinez uniquement avec l’attirail approprié: gants en cuir, tablier et
chaussures fermées.
• Cuisinez uniquement sur une surface à niveau afin d’éviter tout
basculement et renversement.
• Ne buvez pas de liquide chaud après avoir cuisiné.
• Découpez tout excès de graisse et de peau des dindes pour réduire
l’égouttement et les flambées.
• L’accessoire est particulièrement chaud pendant son utilisation.
N’essayez pas de nettoyer ou de déplacer l’unité tant qu’elle n’a pas
totalement refroidi.
• N’utilisez pas d’équipement de cuisson en état d’ébriété. Buvez
toujours avec modération.
0212-TKYC-Booklet.indd 12-13 2/14/12 12:41 PM
Page 8

POUR COMMENCER
POUR CUISINER
Le TURKEY CANNON peut être utilisé sur des grils de barbecue standard
à l’extérieur avec un couvercle profond. Il peut également être utilisé
dans un four ordinaire sur une feuille de cuisson avec de hautes parois
ou une plaque à rôtir.
1 2 3
• Versez votre boisson
préférée dans le canon
• Mettez volaille sur le canon • Faites cuire jusqu’à une
température interne de la
viande de 170°F
PRÉPARATION DE TURKEY CANNON:
1. Comme pour n’importe quel autre ustensile, le Turkey Cannon doit
être bien lavé avant tout usage. En vous servant d’eau savonneuse
et d’un chiffon propre à vaisselle, lavez l’extérieur du Cannon pour
enlever les résidus du processus de fabrication. Utilisez une longue
brosse à bouteille pour nettoyer l’intérieur du Turkey Cannon. Rincez
et séchez bien.
SÉLECTION D’UNE DINDE:
Dinde fraîche
•Il faut compter 1/2 kg de dinde par personne.
•Achetez votre dinde 1 à 2 jours avant de planifier la cuisson de la
volaille.
• Placez la dinde sur une plaque pour récupérer le jus puis dans le
réfrigérateur jusqu’à ce que vous soyez prêt à la cuire.
Dinde surgelée
•Il faut compter 1/2 kg de dinde par personne.
•Maintenez la dinde gelée jusqu’à ce que vous soyez prêts.
• Vous pouvez conserver une dinde gelée indéfiniment ; il est toutefois
recommandé de la cuire dans l’année.
DÉCONGÉLATION DE LA DINDE:
1. Conservez la dinde dans son emballage d’origine et placez-la sur
un plateau ou une plaque pour récupérer le jus qui pourrait couler.
Décongelez dans un réfrigérateur réglé à 5ºC ou moins. Calculez
environ 24 heures pour tous les 2 1/2 kg de dinde.
LIQUIDE DANS LE TURKEY CANNON:
1. Utilisez votre boisson préférée, ouvrez le couvercle et versez le liquide
dans le Turkey Cannon. Le liquide peut également être injecté dans la
volaille pour ajouter du goût. Ajoutez également une cuillère à soupe
d’assaisonnement sec dans le liquide en boîte. Jetez le liquide de
Turkey Cannon après utilisation.
PRÉPARATION DE LA VOLAILLE:
1. Découpez la peau et enlevez la graisse du cou, la queue et la cavité
de la queue. Enlevez la glace et la graisse de l’intérieur de la volaille.
Tout excès de graisse peut produire beaucoup d’huile et créer des
flambées dans votre gril ou four.
2. Enlevez les abattis de l’intérieur de la volaille et faites un trou sous le
cou dans la cavité. Ce trou permet à l’humidité de Turkey Cannon de
s’échapper.
3. Rincez la volaille dans de l’eau froide et propre et essuyez avec un
essuie-tout. Epicez selon le goût avec une marinade d’injection et/ou
frottez à sec sur la peau.
4. Placez la volaille sur le Turkey Cannon avec le cylindre introduit dans la
cavité de la volaille. Insérez un quart d’oignon ou de citron dans la cavité
du cou de la volaille pour retenir l’humidité à l’intérieur de la volaille.
CUISSON SUR UN GRIL D’EXTÉRIEUR:
1. Il faut compter 2 à 3 heures de cuisson sur le gril pour une dinde
de 6,4 kg. Les éléments extérieurs tels que le vent, la pluie, etc..
peuvent affecter le temps de cuisson. Respectez les instructions du
fabricant relatives à l’allumage de votre gril. Réglez les commandes
de température sur moyen. Vérifiez la température interne de la
dinde après 1 heure et demie. Laissez la dinde se reposer pendant
10 minutes avant de la découper et de servir.
CUISSON DANS UN FOUR ORDINAIRE:
1. Lorsque vous utilisez le Turkey Cannon dans un four ordinaire,
enlevez toute les griles sauf celles du bas. Placez la grile du bas au
niveau inférieur. Placez le Turkey Cannon sur une feuille de cuisson
avec parois ou une plaque à rôtir en aluminium. Ces éléments
récupèrent les jus de la dinde et permettent de ne pas salir le four.
Laissez la dinde rôtir à 165 à 175 °C jusqu’à ce qu’elle soit bien cuite.
Vérifiez régulièrement la température de la dinde avec un thermomètre à viande calibré jusqu’à ce que la poitrine de la dinde atteigne
77 °C. Laissez la dinde reposer pendant 10 minutes avant de la
découper et de servir.
0212-TKYC-Booklet.indd 14-15 2/14/12 12:41 PM
Page 9

POUR CUISINER
L’INFORMATION
CONTRÔLE DE LA TEMPÉRATURE:
Le design unique de Turkey Cannon repousse la chaleur vers le centre
de la volaille accélérant considérablement le processus de la cuisson.
Vérifiez régulièrement la température afin que la volaille ne cuise
pas trop.
• Pour vérifier la température, introduisez un thermomètre à viande
calibré dans la cuisse. Ne touchez pas les os ni la graisse pour que la
lecture soit précise. La température doit être à 74°C dans la cuisse
et 77°C dans la poitrine.
L’INFORMATION
1. Utilisez une feuille de cuisson avec parois ou une plaque à rôtir en
aluminium pour éviter toute flambée et récupérer les égouttements.
2. Pour ajouter plus de goût, vous pouvez injecter et frotter la volaille
au moins quatre heures avant de la faire cuire. Placez la dinde
recouverte dans le réfrigérateur et laissez-la dedans jusqu’à ce que
vous ayez l’intention de la cuire. La marinade ou l’assaisonnement
pourront ainsi saturer la viande et répandre le goût dans toute la
volaille. Maintenez la dinde fraîche, une température de 5ºC ou
moins est recommandée.
3. Vous pouvez ajouter une cuillère à soupe d’assaisonnement
et/ou 1/4 de tasse de jus de citron au liquide pour le goût.
4. Méthode de cuisson dans les jus.
Faites cuire la volaille dans un four ordinaire à 220°C pendant 30
minutes. Réduisez la température à 175°C et laissez cuire.
5. Méthode pour une peau parfaite
Faites rôtir la volaille à 175°C. Badigeonnez avec du beurre ou de
l’huile d’olive toutes les 15 minutes. Augmentez la température de
la cuisson à 205°C dans les dernières 15 à 20 minutes de cuisson. La
peau de la dinde sera plus brune et plus croustillante.
SUGGESTIONS POUR LES POULETS:
• Adaptez les recettes pour les poulets ou autre volaille (tels que les
oies, les faisans, etc.)
• Contrôlez la température de la viande après 30 minutes et toutes les
15 minutes par la suite une fois que le poulet est cuit.
NETTOYAGE
NETTOYAGE:
1. Lavez toujours vos mains, les ustensiles, les planches à découper et
tout ce qui pourrait entrer en contact avec la viande crue. Utilisez de
l’eau savonneuse chaude.
2. Laissez l’unité refroidir avant d’entreprendre un nettoyage complet.
Videz le Turkey Cannon dans l’évier. Le Turkey Cannon contient un
mélange de liquide d’origine et de la graisse de la volaille. N’utilisez
pas de liquides dans le cylindre pour la cuisson.
3. Nettoyage de l’unité de base :
a.) Frottez la nourriture brûlée. Utilisez une brosse à bouteille pour
nettoyer l’intérieur du tube de Turkey Cannon. Lavez avec de
l’eau chaude savonneuse. Rincez et séchez bien.
b.) Placez l’unité totalement refroidie dans le lave-vaisselle. Posez le
Turkey Cannon à plat sur son côté de manière à ce que le liquide
puisse s’écouler.
FUMÉ (POUR GRILS EXTÉRIEURS UNIQUEMENT):
1. Laissez tremper une tasse de copeaux de bois dans l’eau pendant
30 minutes. Enveloppez les copeaux dans une couche de feuille
d’aluminium. Percez entre 10 et 12 petits trous sur le dessus de
l’enveloppe d’aluminium pour laisser la fumée s’échapper. Placez le
tout près de la volaille sur le gril. Suivez les instructions de rôtisserie.
0212-TKYC-Booklet.indd 16-17 2/14/12 12:41 PM
Page 10

CREOLE TURKEY
SOUTHWESTERN TURKEY
You will need:
• One large roasting turkey, thawed and trimmed
• Creole Butter injection marinade
• Creole dry rub seasoning
• One can of lemon-lime soda
Set the Turkey Cannon on the cooking surface of the barbecue.
Pop the top on the soda and pour the liquid into the Turkey Cannon.
Sprinkle Creole seasoning thoroughly over the outside of the turkey
and gently rub into bird. Using an injection needle, inject 1/2 cup of
marinade into the turkey. Place the turkey onto the cylinder and place
the Turkey Cannon onto the grill. Set the controls to medium.
Follow the Cooking Instructions at the beginning of this booklet.
Cooking times will vary depending on size of turkeys, weather conditions,
outdoor temperature, temperature of the turkey going into the grill
and elevations. Use a calibrated meat thermometer
to check the doneness of the turkey. Check the temperature of
the meat after 1 hour and every 15 minutes thereafter until meat
thermometer reads 170°F in the breast. Allow turkey to rest for 10
minutes before carving and serving.
Serve with rice and red beans.
You will need:
• Two fresh garlic cloves
• One large roasting turkey, thawed and trimmed
• One can of lemonade punch
• Lemon Pepper seasoning
Peal and slice garlic cloves into slivers. Place two thirds of the garlic
slivers evenly under the skin of the turkey breast. Put the other third
into the Turkey Cannon.
Sprinkle Lemon Pepper on the outside of the turkey and toss half a
teaspoon into the cavity for good measure.
Set the turkey over the Turkey Cannon with the breasts upwards
and roast on
the grill until breast meat is 170°F. The controls of the grill should
be set to medium. Check turkey temperature after 1 hour with a
calibrated meat thermometer and every
15 minutes thereafter until turkey is done. Allow turkey to rest for 10
minutes before
carving and serving. Serve with brown rice and peas.
0212-TKYC-Booklet.indd 18-19 2/14/12 12:41 PM
Page 11

BEER CAN TURKEY
You will need:
• One large roasting turkey, thawed and trimmed
• One 12 oz can of beer*
• All-purpose dry rub seasoning
or
• Paprika based seasoning, preferably without sugar
(Sugar tends to encourage burning on the bottom of the grill)
Open the beverage can and pour liquid into the Turkey Cannon.
Sprinkle seasoning thoroughly over the outside of the turkey and
gently rub into bird. Place the Turkey Cannon onto the grill and set the
controls to medium.
Follow the Cooking Instructions at the beginning of this booklet.
Cooking times will vary depending on size of turkey, weather conditions,
outdoor temperature, temperature of the turkey going into the grill
and elevations. Use a calibrated meat thermometer
to check the doneness of the turkey. Check the temperature of
the meat after 1 hour and every 15 minutes thereafter until meat
thermometer reads 170°F in the breast. Allow turkey to rest for 10
minutes before carving and serving.
It is not recommended to use the liquid in the Turkey Cannon after
cooking. Discard liquid from cylinder after use.
*Any beverage can be used in this recipe.
Remember: Drink responsibly. Do not operate cooking equipment
while intoxicated.
For more recipes, cooking tip and ideas visit us on-line at:
www.CampChef.com
0212-TKYC-Booklet
0212-TKYC-Booklet.indd 20 2/14/12 12:41 PM
 Loading...