

Campbell Hausfeld IN281600AV Operating Instructions Manual
REMINDER: Keep your dated proof of purchase for warranty purposes! Attach it to this manual or file it for safekeeping.
Operating Instructions
Please read and save these instructions. Read carefully before attempting to assemble, install, operate or maintain the product described.
Protect yourself and others by observing all safety information. Failure to comply with instructions could result in personal injury and/or
property damage! Retain instructions for future reference.
Description
This air powered rotary cutting tool is
designed for cutting, sanding and
grinding. This tool may be used with
other brands of cutters, stones, sanding
drums, router bits and grinding points.
Using the correct accessory you can cut,
sand, or grind a large assortment of
materials such as:
Building Material - Acoustical tile,
cement board, ceramic, ceramic wall
tile, drywall, fiberglass, glass,
hardwoods, marble, OSB, plaster,
shell/stone, stucco, underlayment,
wood composites.
Plastic - Acrylic, foam board,
laminates, vinyl siding.
Metals - Aluminum, brass, iron,
steel.
Safety Guidelines
This manual contains information that
is very important to know and
understand. This information is
provided for SAFETY and to PREVENT
EQUIPMENT PROBLEMS. To help
recognize this information, observe the
following symbols.
Danger indicates
an imminently
hazardous situation which, if not
avoided, WILL result in death or
serious injury.
Warning indicates
a potentially
hazardous situation which, if not
avoided, COULD result in death or
serious injury.
C
aution indicates a
potentially
hazardous situation which, if not
avoided, MAY result in minor or
moderate injury.
Notice indicates
important
information, that if not followed, may
cause damage to equipment.
NOTICE
!
CAUTION
!
WARNING
!
DANGER
General Safety
Information
CALIFORNIA PROPOSITION 65
You can create dust when
you cut, sand, drill, grind
material such as wood,
paint, metal, concrete,
cement, or other masonry. This dust
often contains chemicals known to
cause cancer, birth defects, or other
reproductive harm. Wear protective
gear.
WORK AREA SAFETY
Keep your work area clean and well lit.
Cluttered benches and dark areas invite
accidents.
Avoid
a dangerous environment. Do not
use air tools in the presence
of flammable liquids or
gases. Avoid chemical or
corrosive environments.
This air tool is part of a highpressure air system. Do not
exceed the maximum
pressure rating of this tool
or any component in the
system. Release all pressure from the
system before attempting to install,
service, relocate or perform any
maintenance.
!
WARNING
!
DANGER
IN281600AV 11/02
Keep by-standers, children and visitors
away while operating a power tool.
Distractions can cause you to lose focus
and control.
Safety
glasses
and ear protection must be
worn during operation.
Everyone in the work area
must wear the proper safety
equipment. Grinding and cutting
produces sparks, air borne particles and
accessories can fail during use causing
serious personal injury. Use ANSI/OHSA
approved eye, hearing, breathing, skin
and head protection.
Do not overreach. Keep proper footing
and balance at all times. Proper footing
and balance enables better control of
the tool in unexpected situations.
Never work around live
electrical wires. If cutting
into existing walls or other
blind areas where electrical
wiring may exist is
unavoidable, disconnect all fuses or
circuit breakers feeding this work area.
PERSONAL SAFETY
Stay alert, pay
attention and use
common sense when operating any
power tool. Do not use tool while tired
!
WARNING
!
WARNING
BUILT TO LAST
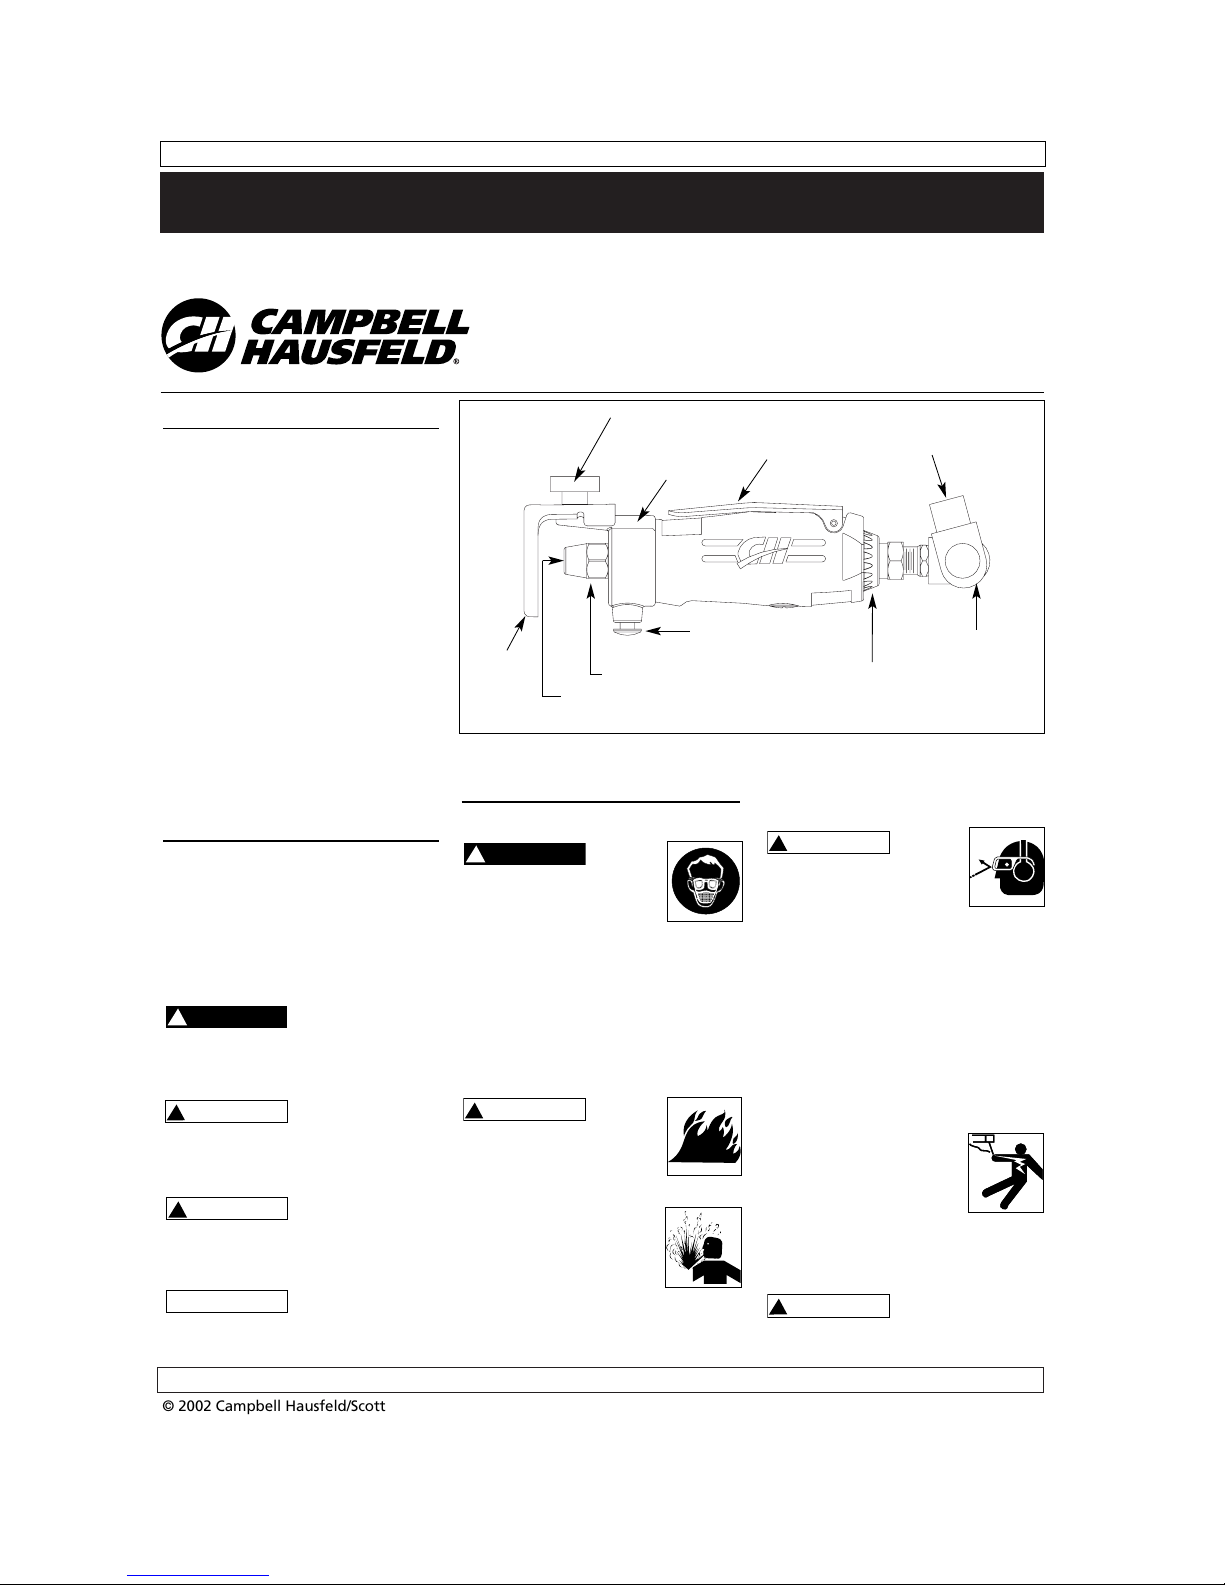
Rotary Cutting Tool
Depth Guide
Locking Knob
Bracket
Trigger
Exhaust
Port
Shaft Lock
Button
Collet Nut
Collet Inside
Depth
Guide
FIgure 1
For parts, product & service information
visit www.chpower.com
Air
Swivel
Air Inlet
Port
© 2002 Campbell Hausfeld/Scott Fetzer
See Warranty on page 5 for important information about commercial use of this product.
Problemas Posibles Causas Acciones a Tomar
La herramienta funciona
lentamente o no funciona
La herramienta expulsa
humedad
Vibración excesiva
Guía de Diagnóstico de Averías
Manual de Instrucciones
2
General Safety
Information (Continued)
or under the influence of drugs,
alcohol or medication. One second of
inattention while operating any power
tool may result in serious personal
injury.
Excessive exposure
to vibration,
working in awkward positions and
repetitive work motions can cause
injury to hands and arms. Stop using
any tool if discomfort, numbness,
tingling or pain occur and consult a
physician.
Do not use tool on
hazardous
materials. Some building materials or
work surfaces may contain known
hazardous materials. If the hazardous
material is touched or particulate
breathed, medical problems could
occur.
Dress properly. Do
not wear loose
clothing or jewelry. Contain long hair.
Keep your hair, clothing and gloves
away from moving parts. Loose
clothing, jewelry or long hair can be
caught in moving parts.
Disconnect the tool from the power
source before making any adjustments,
changing accessories and/or attachments or storing. Such preventive
safety measures will reduce accidents.
TOOL SAFETY AND CARE
Only persons well
acquainted with
these instructions should be allowed to
use this tool. Any persons not wearing
the proper safety equipment or
unfamiliar with this tool’s operation
can become seriously injured.
Do not exceed the
maximum operating
pressure of this tool (90 psig).
Pressures higher than 90 psig will
reduce the life of the tool. Maximum
operating pressure of 90 psig is
measured at the tool air inlet while the
tool is running. Any compensation for
airline pressure drop must be made at
the compressor regulator.
Recommended accessories:
Not all 1/8” or 1/4”
accessories that fit this tool
are recommended. Read the
safety and operating
information provided by the
manufacture of the accessory. Some
accessories with large cutting surfaces
NOTICE
!
WARNING
!
CAUTION
!
DANGER
!
WARNING
might be hard to control due to tool
rotating speed. Do not use 1/4”cutout
bits. The cutting flutes on 1/4” cutout
bits are too aggressive, making it hard
to control this tool.
Do not use
damaged
accessories. Accessory can become
damaged during shipment or after
attachment to the tool. Damaged
accessory can fly apart as the tool
comes up to speed. Inspect accessory
before and after attaching it to the
tool and before each use.
Do not use any accessories that were
not designed for this tool. Use only
accessories with a speed rating higher
than 25,000 RPM’s.
This product is not designed to use cutoff wheels, no guard is provided.
Do not force the
tool. Allow the tool
and accessory to do the work; applying
too much force will damage the
accessory or cause it to break.
Use clamps or other
practical ways to
secure and support the workpiece.
Holding the work-piece in your hand or
against your body is unstable,
dangerous and could cause an
accident, don’t do it.
Always make sure
the workpiece is
free from nails, staples or other
foreign objects. Cutting into a hard
object like a nail can cause the
accessory to break, causing personal
injury.
Use the depth guide when cutting with
bits. The guide, when securely
positioned on the work surface,
improves the stability and control of
the tool.
Do not use dull
accessories. Dull
accessories will require more force to
push the tool, possibly causing the
accessory to break and causing
personal injury.
Never touch the bit during or
immediately after use. The cutting
flutes on bits will cut you if touched
while tool is running. Bits will become
hot to the touch when cutting.
Do not trigger the
tool while the
wrench is on the collet nut or the shaft
lock is engaged. Personal injury can
occur if the wrench is not removed
before turning on the tool.
!
WARNING
!
CAUTION
!
CAUTION
!
WARNING
NOTICE
!
WARNING
Do not engage the shaft lock while the
tool is running. Stopping the tool
quickly with the shaft lock can cause
damage to the tool and a possible
dangerous situation.
After changing the
accessories or
making any adjustments, make sure
the collet nut and other tool parts are
securely tightened. Loose accessories
or parts can cause a loss of control,
which might cause a personal injury.
Never start the tool against the work
surface when a cutting bit is attached.
The bit cutting edge may grab the
material causing loss of control of the
cutter, which might cause personal
injury.
Do not abuse the
hose. Never use the
hose to carry the tool or pull the
compressor. Keep hose away from
heat, oil, sharp edges or moving parts.
Tool service must
be performed only
by qualified repair personnel. Service
or maintenance performed by
unqualified persons could result in
serious personal injury.
Do not use a cut-
off disc mandrel on
this tool unless a safety guard is in
place.
For system setup refer to Instructions
on IN170102AV. Refer to tool diagram
Figure 1 and callouts on front page.
Pre-Operation
Use of a whip hose
prevents accidental
triggering of the tool when pressurized
air is connected to the tool.
Using fittings or air hoses, which are
too small, can create a pressure drop,
which will result in a loss of power in
the tool.
LUBRICATION
Air tools require lubrication throughout the life of the tool. Proper
lubrication is the owner’s responsibility.
Use Campbell Hausfeld airtool oil (Part
No. ST127000AV) to lubricate, clean
and inhibit rust in one step. Failure to
lubricate and maintain an air tool
properly will dramatically shorten the
life of the tool and will void the
warranty. This air tool requires
lubrication before initial use and
before and after each use.
!
WARNING
!
WARNING
!
WARNING
!
WARNING
!
CAUTION
Operating Instructions
www.chpower.com
MANUAL
Pre-Operation (Cont.)
How to lubricate tool:
1. Disconnect the tool from air supply if
connected.
2. Turn the tool with the air swivel
pointing upward.
3. With the trigger pulled, add a
teaspoon of oil to the air inlet port.
4. Release trigger and connect the air
hose. Cover exhaust port with a rag,
then run tool for approximately 20
seconds.
5. Wipe the tool clean.
Cover tool exhaust
port with a rag and
then apply air pressure. Failure to
cover exhaust port will allow oil mist
to be sprayed from tool, which might
cause damage to work piece and cause
personal injury.
Operation
Follow the previous safety instructions.
Check for proper system setup and
connection of the tool.
INSTRUCTIONS ON USING CUTOUT
BITS
Do not use 1/4”
cutout bits with this
tool. The cutting flutes on 1/4” cutout bits
are too aggressive, making this tool hard
to control.
1. With air hose disconnected, install
the cutting bit into the tool by:
A. With the shaft lock button
depressed loosen the collet nut by
turning counter clockwise (CCW)
with a 5/8” wrench. A couple of
rotations CCW are all that is
needed.
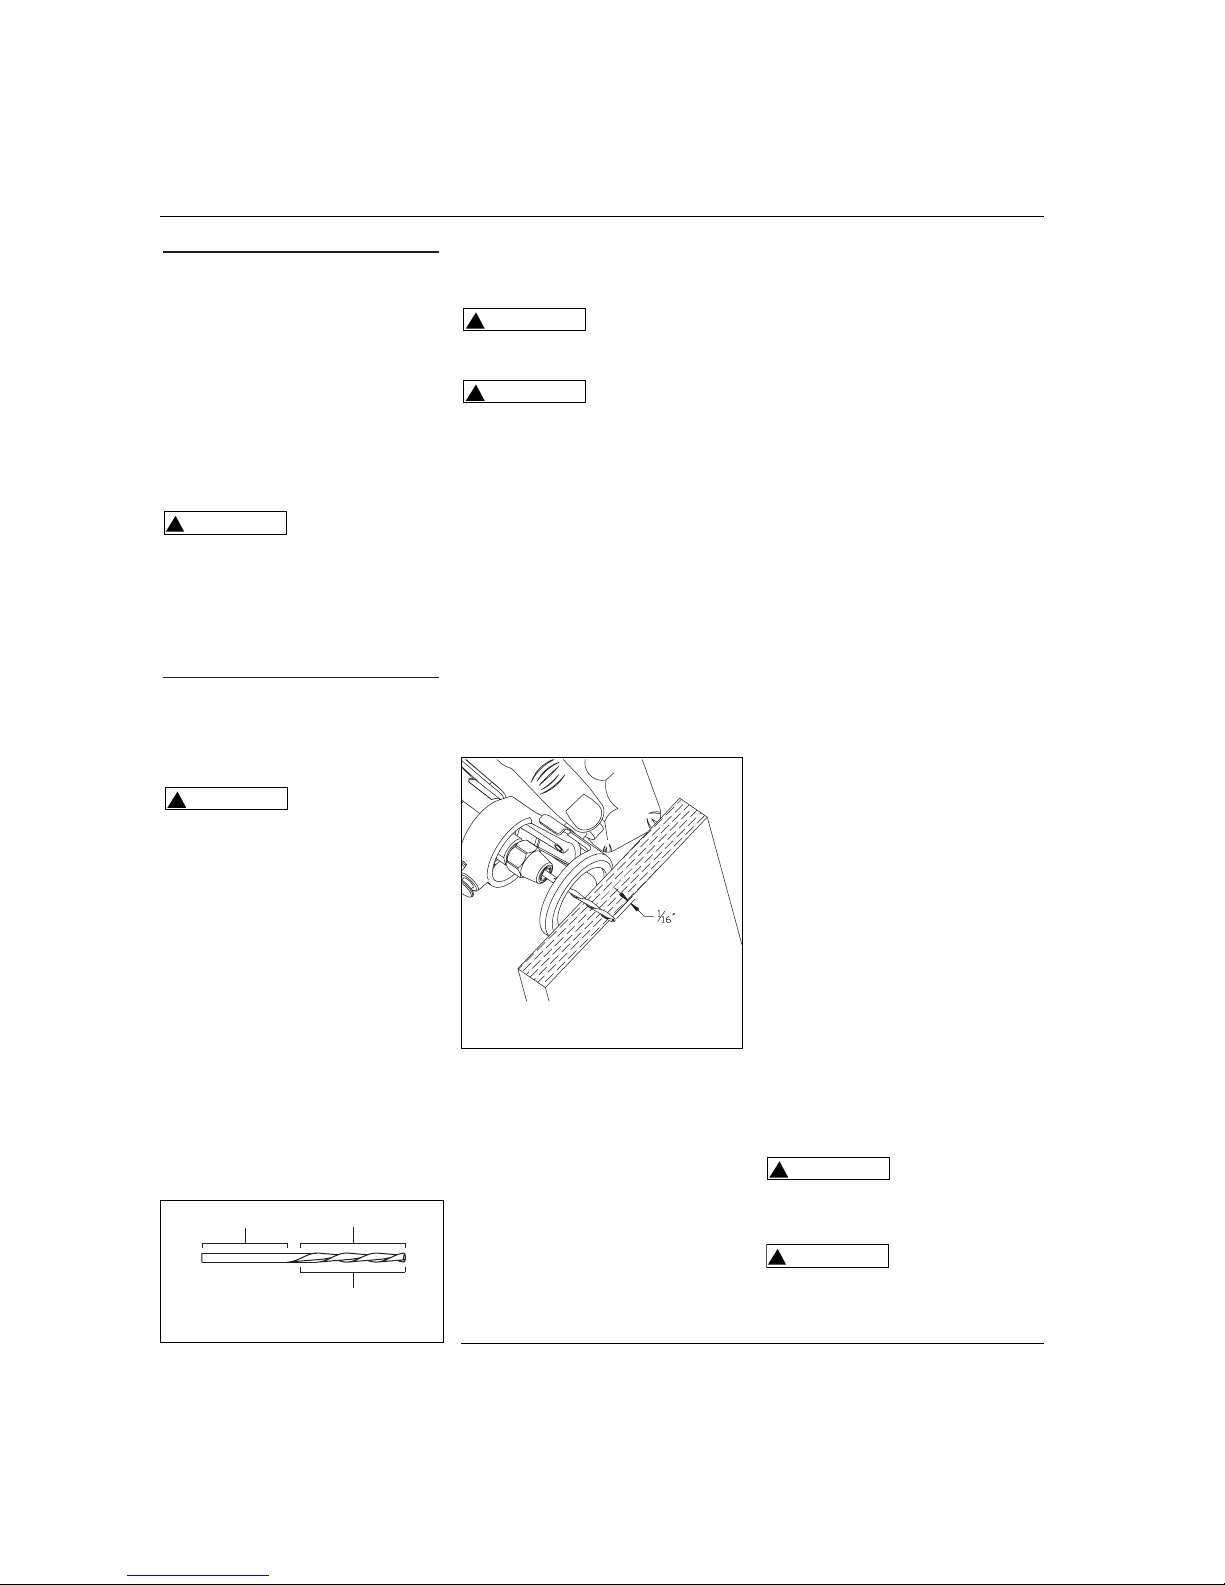
B. Insert the bit into the collet
leaving 1/16” to 1/8” of smooth
shank visible above the collet.
NOTE: The bit flutes are sharp,
handle with care.
C. After properly placing the bit into
the collet, depress the shaft lock
button and simultaneously tighten
!
CAUTION
!
WARNING
3
Operating Instructions
the collet nut in a clockwise (CW)
direction. Tighten collet nut by
hand first, then use a wrench until
bit is held securely.
If the bit flutes are
inside the collet
when the collet nut is tightened, the
bit may break.
If the cutting bit is
removed from the
tool for storage, do not tighten the
collet nut. Tightening the collet nut on
an empty collet will cause the collet
hole to become smaller, preventing
you from inserting a bit in the future.
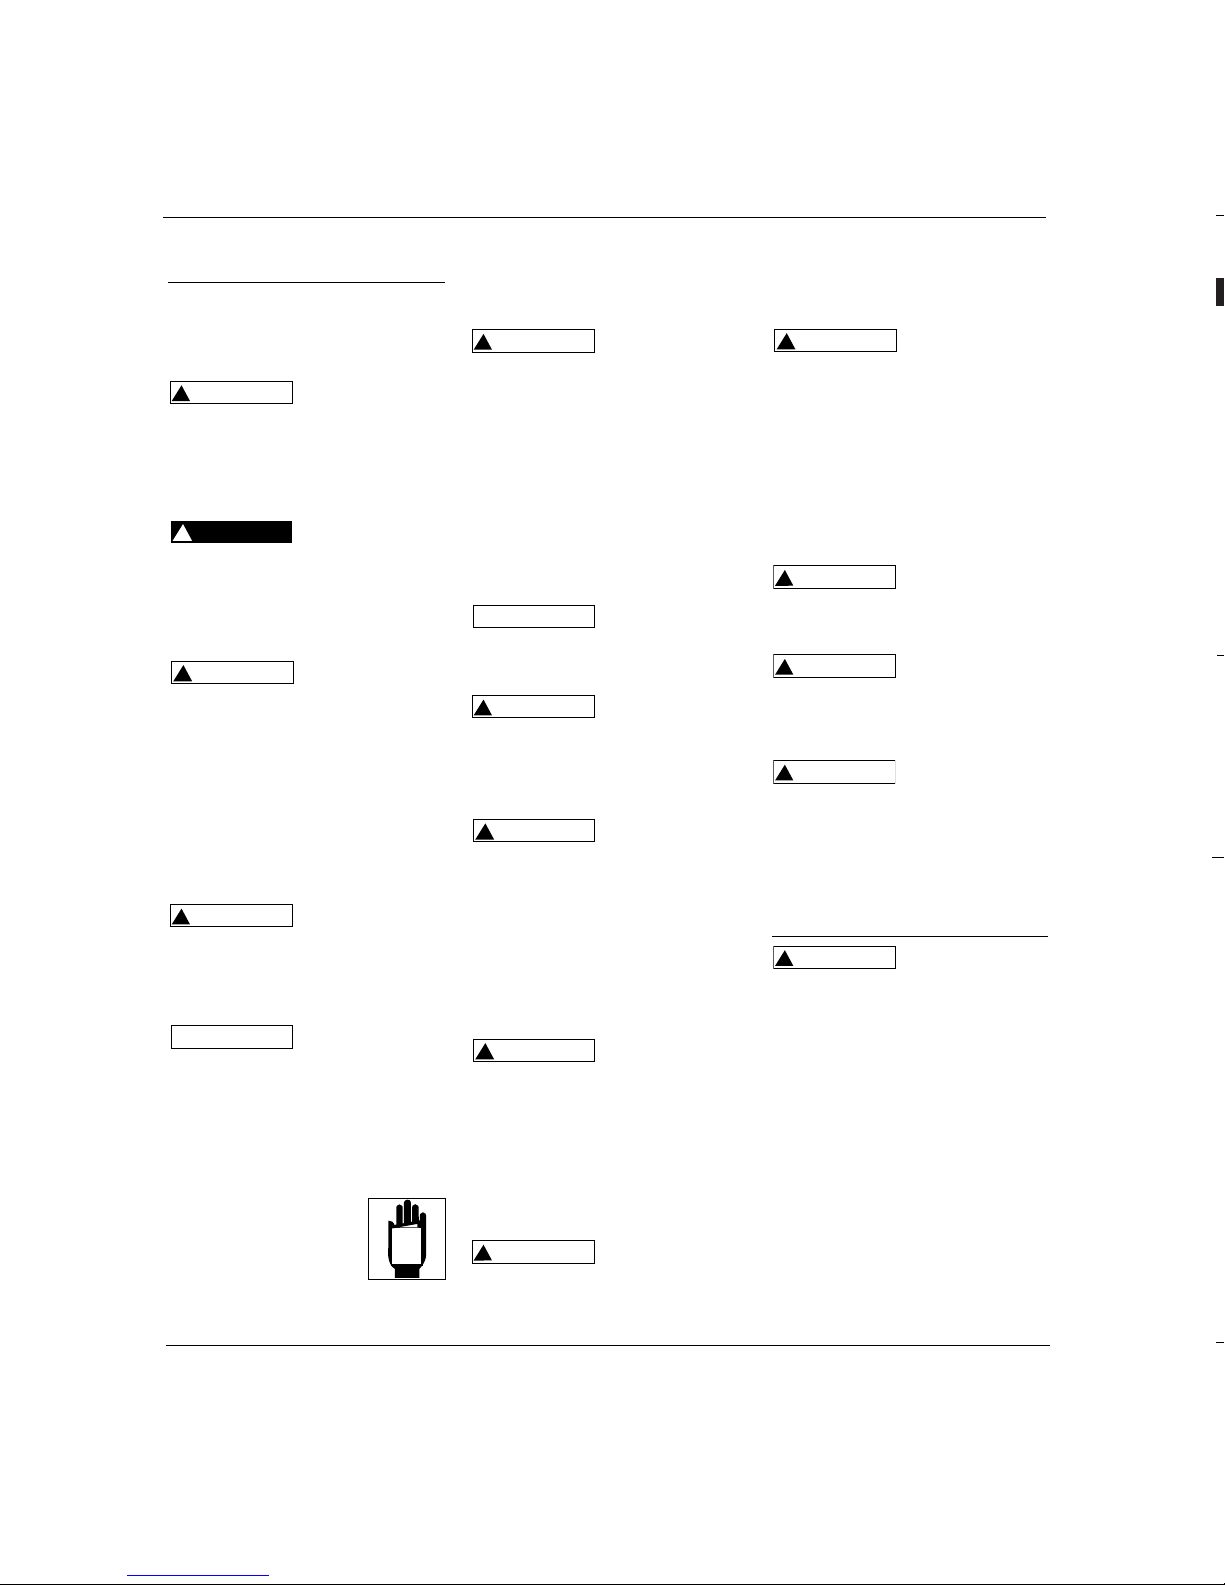
2. Adjust the depth guide. Use the
depth guide to adjust the depth of
the cut. The depth guide assembly
consists of the depth guide, locking
knob and bracket. Loosen the
locking knob by turning counter
clockwise (CCW) enough to enable
the depth guide to slide up or down
to the desired depth of your cut and
retighten the locking knob by
turning clockwise (CW). It is best to
allow the cutting bit to be 1/16”
greater than the material you are
cutting.
3. Check that all parts are tight and
safety equipment is in place before
turning on the tool.
4. Attach the air hose, turn on the tool
while holding tool firmly and apply
to work-piece by inserting the bit
into the material at a 45-degree
angle.
5. Slowly bring it to a 90-degree angle
to begin the cut. The guide should
be firmly touching the work-surface.
For most materials, slide the tool in a
clockwise direction with a slow and
steady pressure to make the cut.
!
CAUTION
!
CAUTION
NOTE: When using a bit and cutting
drywall, use a counter clockwise (CCW)
rotation.
6. After completing your cut, turn off
the tool and carefully remove it from
the work surface.
NOTE: Because of the rotating cutting
action of the bit, there will be a slight
pull when cutting. The slower you cut,
the more control you have. Excessive
force will cause excessive heat and may
shorten the life of the bit.
NOTE: When cutting on a vertical
surface, avoid ending your cut at the
bottom of the hole. If possible, start
and end your cut at the top so scrap
material will not drop onto the
rotating bit.
INSTRUCTIONS ON USING GRINDING
STONES, HIGH-SPEED CUTTERS AND
BURRS
NOTE: This tool is shipped with a 1/8”
collet installed in the tool. If 1/4” bits
are to be used then the 1/8” collet
needs to be removed from the tool.
The 1/8” collet can be removed by
removing the collet nut and pulling out
the 1/8” collet.
Disconnect the air hose.
1. Remove any accessory that is in the
tool.
2. Insert the accessory fully into the
collet, and then pull out
approximately 1/16” before
tightening collet nut.
3. The depth guide may or may not be
used depending on your application.
4. Check that all parts are tight and
safety equipment is in place before
turning on the tool.
5. Attach the air hose and begin
cutting, grinding or sanding.
NOTE: Do not try to use accessories
with 1/32”, 1/16”, or 3/32” diameter
shanks. Some 1/8” shank high-speed
router bits have large cutting edges
and should not be used in this tool.
Do not use wire
brushes, bristle
brushes or polishing wheels in this
tool. These accessories are designed to
work on tools with a low RPM setting.
When using steel
saws, high speed
cutters or tungsten carbide cutters,
always have the work securely
clamped. Never attempt to hold the
!
WARNING
!
CAUTION
Shank Flutes
Cutting
Surface
Figure 2
Figure 3 - Bits can cut material up to
1” thick
www.chpower.com

4
Operating Instructions
Operation (Cont.)
work with one hand while using any of
these accessories. The reason is that
these accessories could grab if they
become slightly canted in the groove
and could kickback or break causing
loss of control, resulting in serious
personal injury. Your second hand
should be used to steady and guide the
hand holding the tool.
Storage
The air tool must be lubricated before
storing. An air motor cannot be oiled
too often.
Technical Service
For information regarding the
operation or repair of this product,
please call 1-800-543-6400.
Troubleshooting Chart
Symptom Possible Cause(s) Corrective Action
Tool runs slowly or will not
operate
Moisture blowing out of tool
Excessive vibration
1. Grit or gum in tool
2. No oil in tool
3. Low air pressure
4. Air hose leaks
5. Pressure drops
6. Worn ball bearing in
motor
1. Water in tank
2. Water in the air
lines/hoses
1. Damaged stone or
burr
2. Collet shaft bent
1. Flush the tool with Campbell Hausfeld air tool oil, gum
solvent, or an equal mixture of SAE 10 motor oil and
kerosene. If Campbell Hausfeld oil is not used, lubricate
the tool after cleaning
2. Lubricate the tool according to lubrication instructions in
Pre-Operation section
3. Adjust the compressor regulator to tool maximum while
the tool is running free
4. Tighten and seal hose fittings if leaks are found
5. Be sure hose is properly sized. Long hoses or tools using
large volumes of air may require a hose with an I.D. of
1/2” or larger depending on total hose length
6. Remove and inspect bearing for rust, dirt, grit or worn
race. Clean and regrease bearing with bearing grease or
replace bearing
1. Drain tank (See air compressor manual). Oil tool and run
until no water is evident. Oil tool again and run 1-2
seconds
2a. Install a water separator/filter (PA2121). NOTE: Separators
work properly only when air steam is cool. Locate
separator/filter as far as possible from compressor
2b. Install an air dryer
2c. Anytime water enters the tool, the tool should be oiled
immediately
1. Replace with new stone or burr
2. Replace shaft or collet
www.chpower.com
Replacement Parts
Information
For information regarding where to
order replacement parts, call toll free
1-800-543-8622. Please provide the
following information:
• Model number
• Stamped-in code
• Part number and description
Address parts correspondence to:
Campbell Hausfeld
Attn: Parts Department
100 Production Drive
Harrison, Ohio 45030 U.S.A.
Manual de Instrucciones
Informaciones
Generales de Seguridad
(Continuación)
Nunca encienda la herramienta contra
la superficie de trabajo cuando está
colocada una mecha de corte. El borde
de la mecha de corte puede asirse al
material, provocando la pérdida de
control de la herramienta lo que puede
causar lesiones personales.
manguera. Nunca use la manguera para
transportar la herramienta o tirar del
compresor. Mantenga la manguera
alejada del calor, aceite, bordes filosos
o piezas móviles.
herramienta debe ser realizado sólo por
personal de reparaciones calificado. El
servicio o mantenimiento realizado por
personas no calificadas puede provocar
graves lesiones personales.
con disco de corte sin haber monta do
una guarda de seguridad
Para la configuración del sistema
consulte las instrucciones en
IN170102AV. Consulte el diagrama de
la herramienta en la Figura 1 y los
nombres en la página delantera.
Pre-Funcionamiento
manguera flexible previene el
accionado accidental de la herramienta
cuando se conecta el aire presurizado a
la misma.
El uso de accesorios o mangueras de
aire demasiado pequeñas puede crear
una caída de presión lo que dará como
resultado una pérdida de la potencia
de la herramienta.
LUBRICACION
Las herramientas neumáticas siempre
requieren lubricación para operar. La
lubricación adecuada es la
responsabilidad del propietario. Utilice
el aceite para herramientas neumáticas
Campbell Hausfeld (ST127000AV) para
lubricar la herramienta, limpiarla e
inhibir el óxido en un solo paso. La
falta de lubricación y mantenimiento
adecuados de una herramienta de aire
reducirá dramáticamente la vida útil de
la herramienta y anulará la garantía.
!
ADVERTENCIA
!
ADVERTENCIA
!
ADVERTENCIA
!
ADVERTENCIA

5
Operating Instructions
www.chpower.com
Limited Warranty
1. DURATION: From the date of purchase by the original purchaser as follows: Standard Duty Products - One Year, Serious
Duty Products - Two Years, Extreme Duty Products - Three Years.
2. WHO GIVES THIS WARRANTY (WARRANTOR): Campbell Hausfeld / Scott Fetzer Company, 100 Production Drive,
Harrison, Ohio, 45030, Telephone: (800) 543-6400
3. WHO RECEIVES THIS WARRANTY (PURCHASER): The original purchaser (other than for purposes of resale) of the
Campbell Hausfeld product.
4. WHAT PRODUCTS ARE COVERED BY THIS WARRANTY: Any Campbell Hausfeld nailer, stapler, air tool, spray gun,
inflator or air accessory supplied or manufactured by Warrantor.
5. WHAT IS COVERED UNDER THIS WARRANTY: Substantial defects in material and workmanship which occur within the
duration of the warranty period.
6. WHAT IS NOT COVERED UNDER THIS WARRANTY:
A. Implied warranties, including those of merchantability and FITNESS FOR A PARTICULAR PURPOSE ARE LIMITED
FROM THE DATE OF ORIGINAL PURCHASE AS STATED IN THE DURATION. If this product is used for commercial,
industrial or rental purposes, the warranty will apply for ninety (90) days from the date of purchase. Some States
do not allow limitation on how long an implied warranty lasts, so the above limitations may not apply to you.
B. ANY INCIDENTAL, INDIRECT, OR CONSEQUENTIAL LOSS, DAMAGE, OR EXPENSE THAT MAY RESULT FROM ANY
DEFECT, FAILURE, OR MALFUNCTION OF THE CAMPBELL HAUSFELD PRODUCT. Some States do not allow the
exclusion or limitation of incidental or consequential damages, so the above limitation or exclusion may not apply
to you.
C. Any failure that results from an accident, purchaser’s abuse, neglect or failure to operate products in accordance
with instructions provided in the owner’s manual(s) supplied with product. Accident, purchaser's abuse, neglect or
failure to operate products in accordance with instructions shall also include the removal or alteration of any safety
devices. If such safety devices are removed or altered, this warranty is void.
D. Normal adjustments which are explained in the owner’s manual(s) provided with the product.
E. Items or service that are normally required to maintain the product, i.e. o-rings, springs, bumpers, debris shields,
driver blades
, fuses, batteries, gaskets, packings or seals, fluid nozzles, needles, sandblast nozzles, lubricants,
material hoses, filter elements, motor vanes, abrasives, blades, cut-off wheels, chisels, chisel retainers, cutters,
collets, chucks, rivet jaws, screw driver bits
, sanding pads, back-up pads, impact mechanism, or any other
expendable part not specifically listed. These items will only be covered for ninety (90) days from date of original
purchase. Underlined items are warranted for defects in material and workmanship only.
7. RESPONSIBILITIES OF WARRANTOR UNDER THIS WARRANTY: Repair or replace, at Warrantor’s option, products or
components which are defective, have malfunctioned and/or failed to conform within duration of the warranty period.
8. RESPONSIBILITIES OF PURCHASER UNDER THIS WARRANTY:
A. Provide dated proof of purchase and maintenance records.
B. Deliver or ship the Campbell Hausfeld product or component to the nearest Campbell Hausfeld Authorized Service
Center. Freight costs, if any, must be borne by the purchaser.
C. Use reasonable care in the operation and maintenance of the products as described in the owner’s manual(s).
9. WHEN WARRANTOR WILL PERFORM REPAIR OR REPLACEMENT UNDER THIS WARRANTY: Repair or replacement will be
scheduled and serviced according to the normal work flow at the servicing location, and depending on the availability
of replacement parts.
This Limited Warranty applies in the United States, Canada and Mexico only and gives you specific legal rights. You may
also have other rights which vary from state to state or country to country.
 Loading...