

Camlink Film scanner User Manual [en, ru, de, es, fr, it, cs]
Type: CL-FS20 Document version: 1
• GB - Film scanner - User manual 3
• DE - Filmscanner - Bedienungsanleitung 11
• FR - Scanner photo - Manuel de l'utilisateur 20
• NL - Filmscanner - Handleiding 30
• ES - Escáner de películas - Manual de Usuario 39
• IT -
• FI - Filmiskanneri - Käyttöopas 58
• SE - Filmskanner - Bruksanvisning 67
• NO - Filmscanner - Brukerveiledning 76
• DK - Filmscanner - Brugsvejledning 84
• CZ - Filmový skener - Návod k použití 93
• HU - Filmolvasó - Használati útmutató 102
• GR - Σαρωτής φιλμ - Εγχειρίδιο χρήσης 111
• RO - Scanner de peliculă - Manual de utilizare 120
• RU - Сканер пленки -
Scanner per negaivi
e diapositive
- Manuale per l'utente 49
Руководство
пользователя
129

Nedis B.V., part of the Nedis Group
De Tweeling 28
5215 MC ‘s-Hertogenbosch
The Netherlands
Tel: +31 73 599 1055
Fax: +31 73 599 9699
Web: www.nedis.com or www.nedis.nl
© Any unauthorised use of the information in this manual is prohibited. No part of this manual
may be reproduced, stored in a database or retrieval system, or published, in any form or in any
way, electronically or mechanically, by print, photocopy, microfilm or by any other means
without the express written permission of NEDIS.
©2012 NEDIS BV. Camlink is a registered trademark of NEDIS BV. Although every effort has been
made to ensure the accuracy of the information contained in this manual specifications are subject to
change and therefore NEDIS BV cannot guarantee its correctness and completeness at all times.
2

GB – English
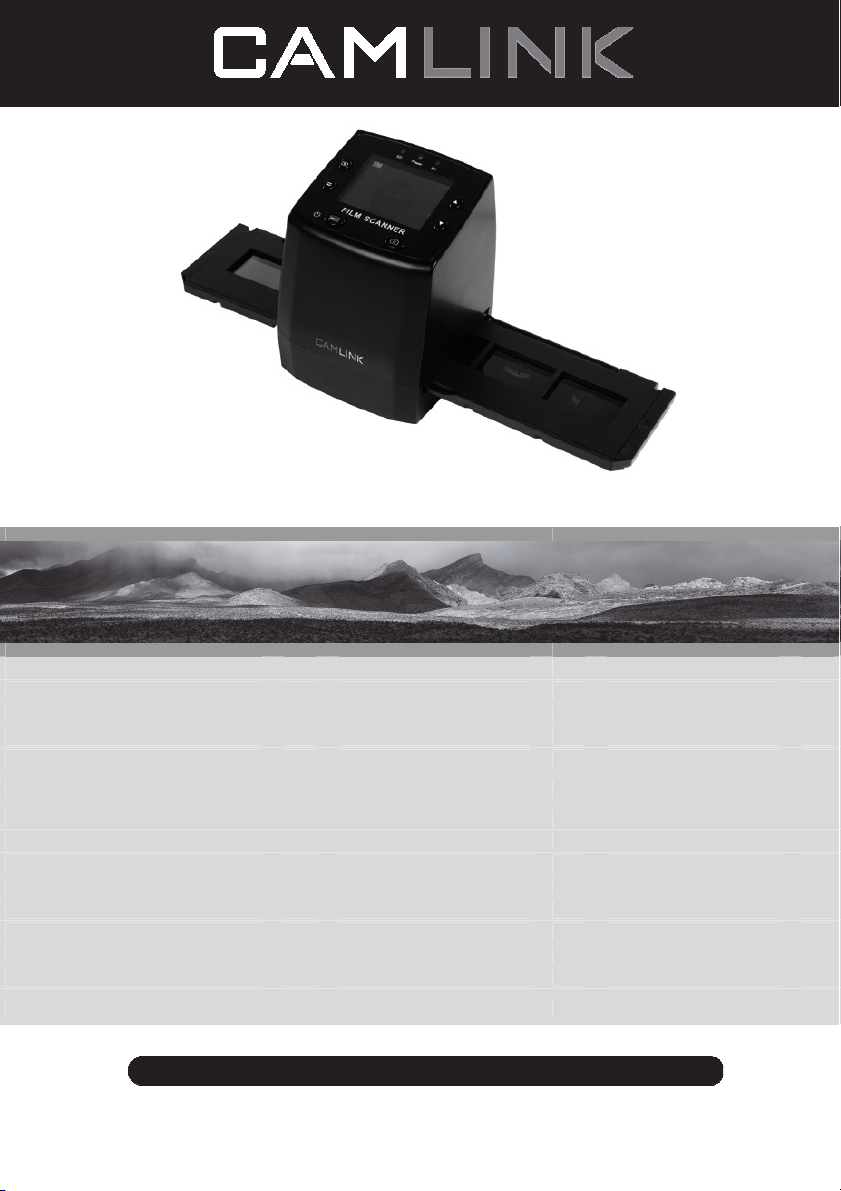
Introduction
No PC needed for operation. 5 Mega pixel stand alone film/slide scan film to your
SD card or computer. Support various SD cards up to 32GB SDHC. USB 2.0
interface with USB power or AC power TV out feature: NTSC/PAL.
◆ Film scanner
◆ USB cable
◆ Video cable
◆ Negative Film holder
◆ Positive slide holder
◆ Rapid slide feeder
◆ DC5V adapter
◆ User’s Manual
◆ Brush
NOTE: You can use the provided brush to clean the backlight panel.
Technical specifications
Size 88.15 (L) X 86.25 (W) X111.20 (H) mm
Weight 301g
Sensor 1/3.2” 5mega CMOS
Effective resolution 5mega
Storage media External: SD card, compatible SDHC card
Sensitivity Auto
Lens Fixed focus F/6.0, F=6.34mm
Focus range 5.6cm
Still image Format: JPEG, resolution: 5M, 10M (interpolation)
Zoom No
Display 2.36” TFT
TV output format NTSC/PAL
Light sources Backlight compensation
White balance Auto
Exposure compensation Auto
Interface MSDC: USB2.0 (high speed)
Auto turn on No
Power DC 5V
Operation system Windows XP, Vista, 7, 8
CPU Intel Pentium 4/2.8GHz above
Memory 512MB above
Video card 64MB or high top video card
Transmission connection Standard USB2.0 or above
Hard disk capacity At least 200MB
©2012 NEDIS BV. Camlink is a registered trademark of NEDIS BV. Although every effort has been
made to ensure the accuracy of the information contained in this manual specifications are subject to
change and therefore NEDIS BV cannot guarantee its correctness and completeness at all times.
3

Adapter Yes
Positive board holder Yes
Negative board holder Yes
Brush Yes
USB cable Yes
Safety precautions
To reduce risk of electric shock, this product should
ONLY be opened by an authorized technician when
service is required. Disconnect the product from mains
and other equipment if a problem should occur. Do not
expose the product to water or moisture.
Ventilation: The device should be situated so that its location or position does not interfere
with its proper ventilation.
Heat: The device should be situated away from sources of high heat such as radiators or
stoves.
Non use period: The USB cord for the device should be unplugged from the computer
when the unit is left unused for a long period of time.
USB overloading: Do not overload the USB connections on your computer. If you have too
many devices connected to your computer such as a wireless mouse, Media player,
Mobile phone or other USB powered devices there may not be enough power for the film
scanner to operate properly.
Servicing: The user should not attempt to service the device beyond those means
described in the operating instructions. All other servicing should be referred to a qualified
person.
Film Holder: The design of film holder is follow ISO standard.
In some cases the holes on the film will not match exactly to alignment of the holder. This
is caused by a non-standard camera. In this case, there will be a small black line on the
edge of the frame that can easily be cropped out using photo editing software.
*ISO-international Organization for Standardization
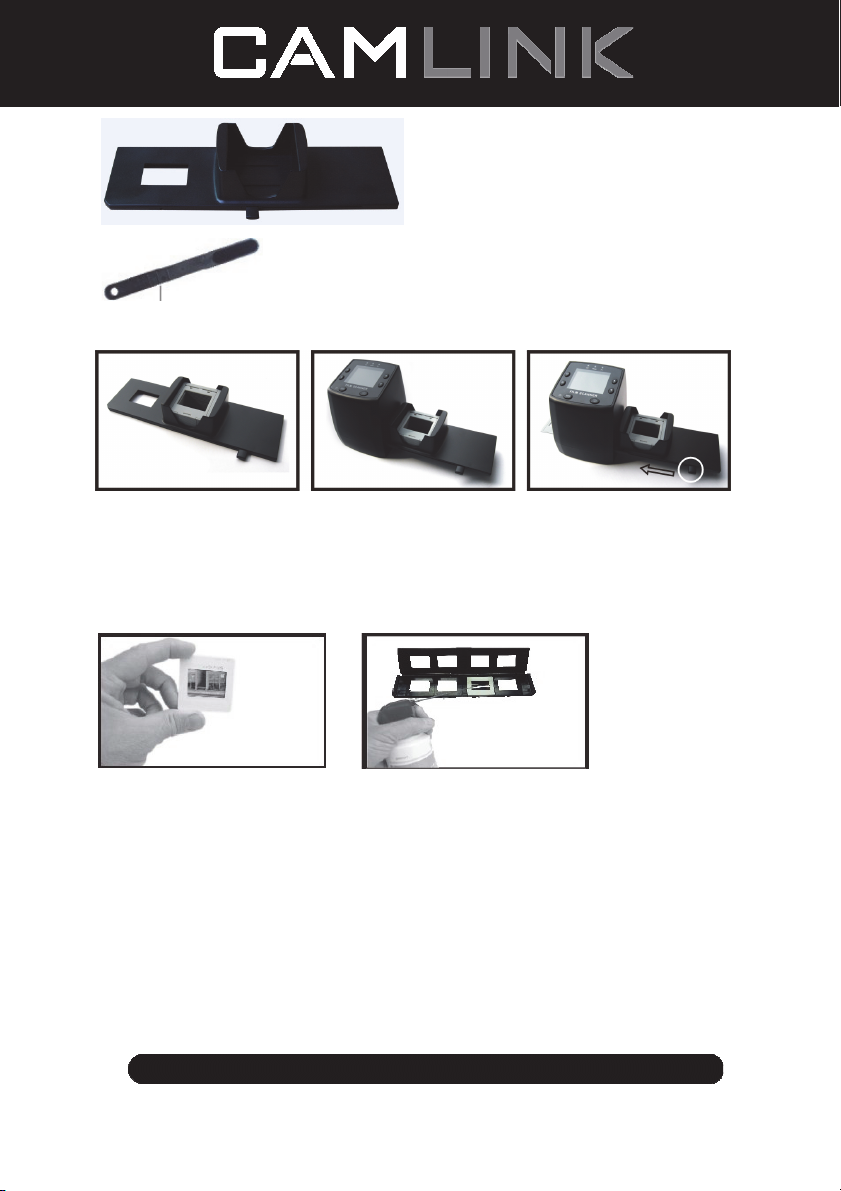
Installation instructions
◆ Place the film scanner on the side and insert the end of the brush into the door on the
right side
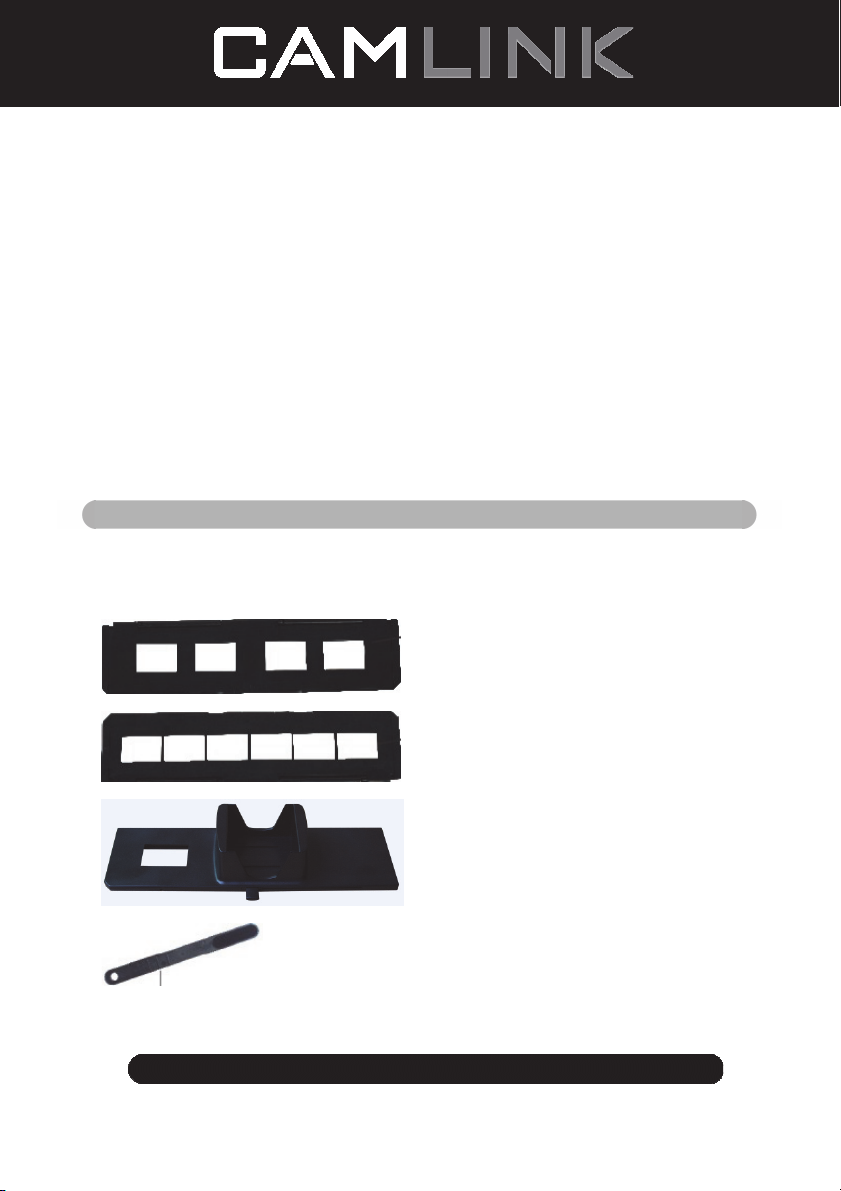
Description of parts:
Positive slide Holder
Negative film Holder
©2012 NEDIS BV. Camlink is a registered trademark of NEDIS BV. Although every effort has been
made to ensure the accuracy of the information contained in this manual specifications are subject to
change and therefore NEDIS BV cannot guarantee its correctness and completeness at all times.
4
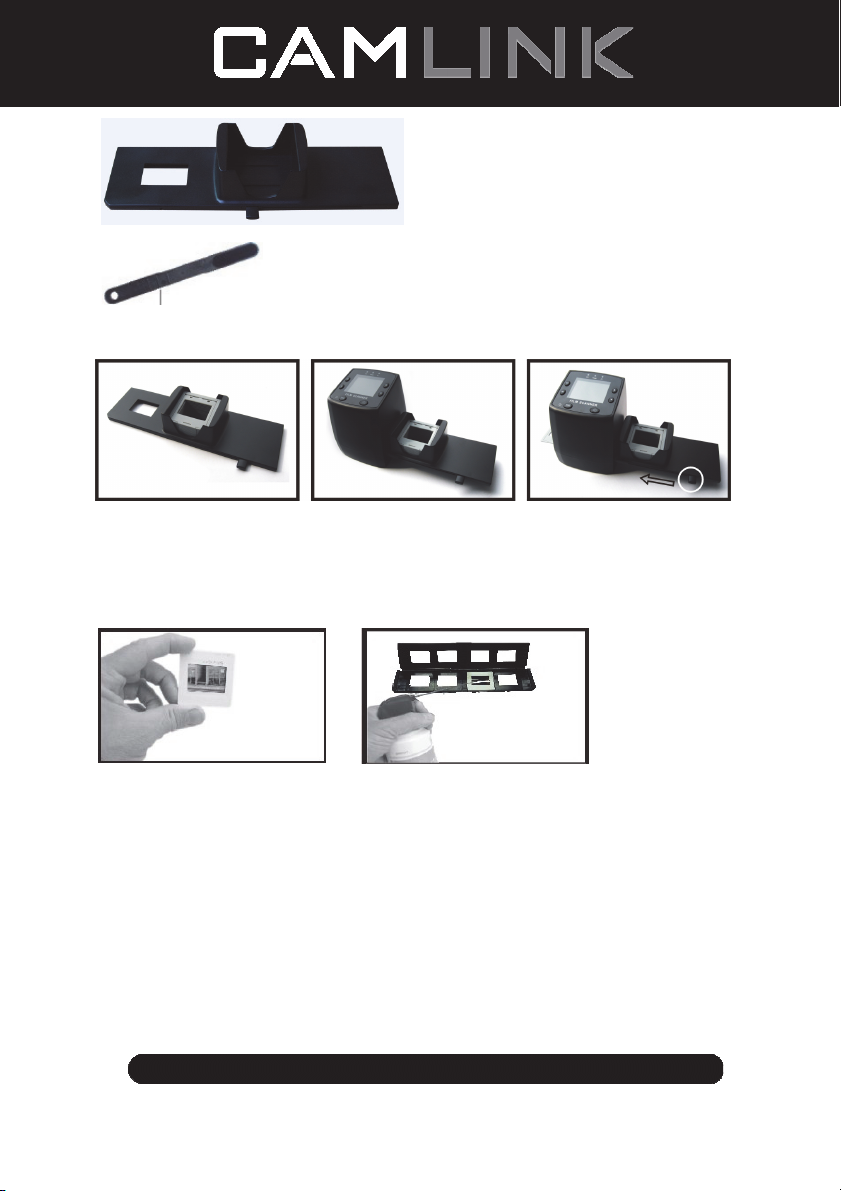
Rapid slide feeder
Brush
Using the included Holders
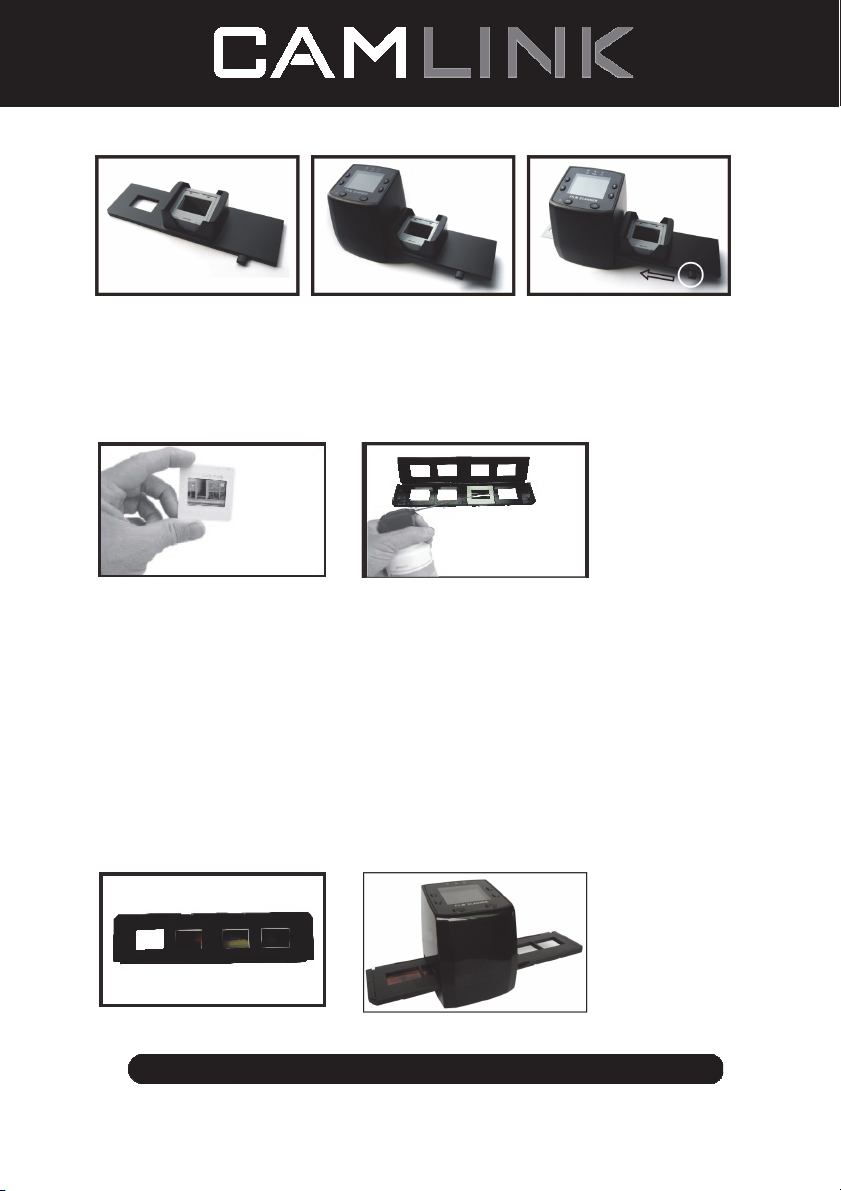
Rapid Slide Feeder
1. With the lever all the way to the right, stack your slides in the rapid slide feeder.
2. Place the rapid slide feeder into the FILM HOLDER SLOT.
3. Push the lever towards the left, then pull the lever back to the right again to load a slide
from the feeder into SLIDES 2. Repeat this step for subsequent slides (which will push
the used slides out the other side).
Loading Slides
(1) Hold up the slide toward the light. Face the trademark slide of the slide away from you.
Look through the slide and it should appear normally (not a mirror image). Now turn the
slide so the image is upside down while looking at the same side.
(2) Open the slide holder at the marked spot on the top. With the slide holder laid open
place the slide into recessed area in the holder - the slide should fit perfectly.
Note: Handle slides with care. Any dust, Scratches or finger prints will show up on your
saved images. If possible, use cotton gloves when handing slides. It is recommended
to use compressed air to remove any dust on the slides. This is not included with the
film scanner but can be purchased from an office supply or electronics retailer.
©2012 NEDIS BV. Camlink is a registered trademark of NEDIS BV. Although every effort has been
made to ensure the accuracy of the information contained in this manual specifications are subject to
change and therefore NEDIS BV cannot guarantee its correctness and completeness at all times.
(1) (2)
5
(3) (4)
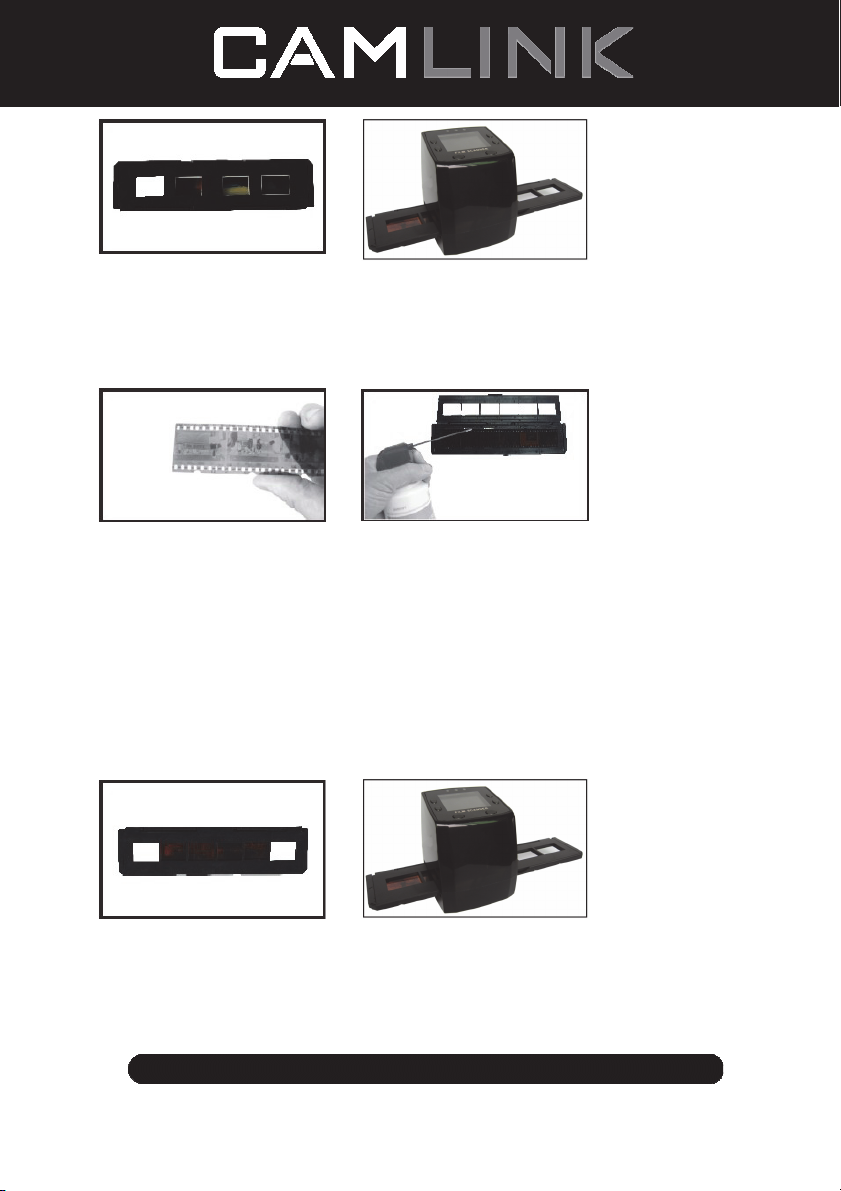
(3) Close the slide holder and press the edges so that it locks in place.
(4) Hold it in the position as showing the film scanner.
Insert the Slide Holder into the slot on the right side of the film scanner as shown.
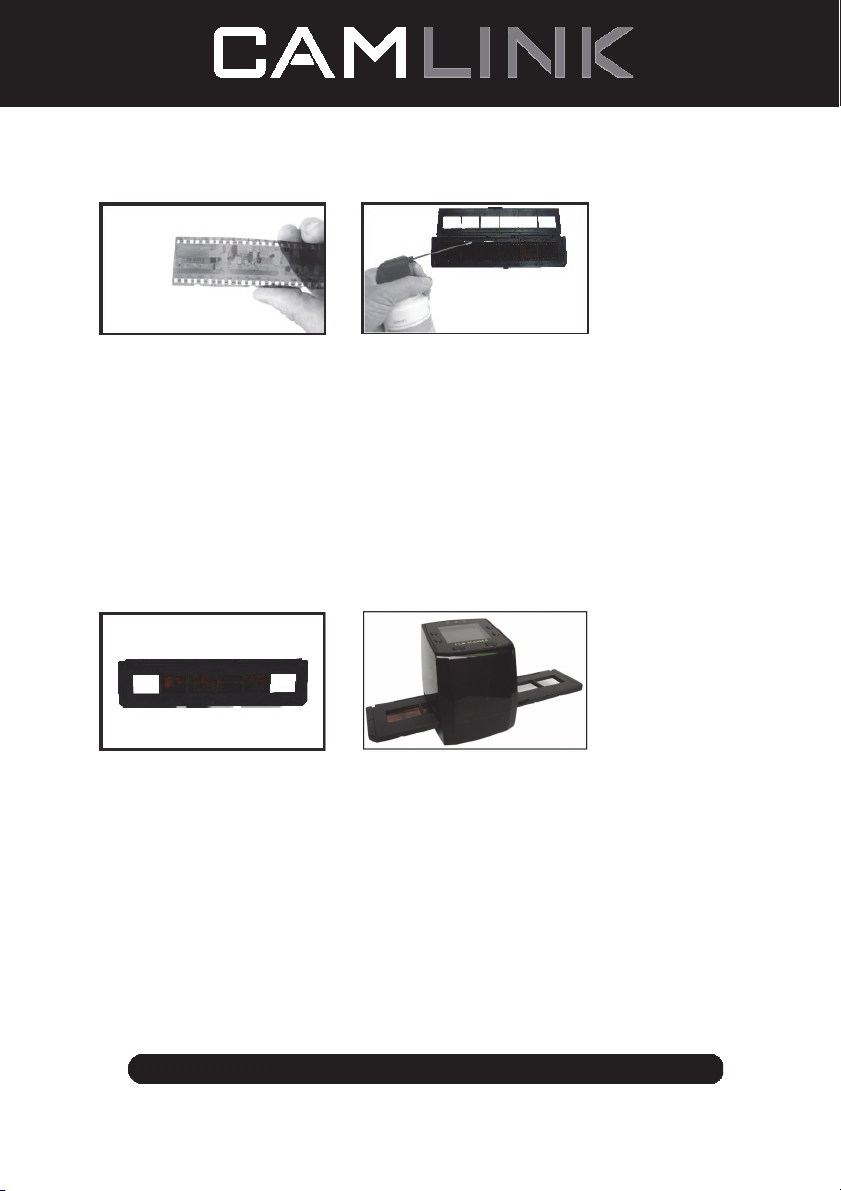
Loading Negatives
(1) (2)
(1) Hold up the negative toward the light. As you look through the negative, you should be
able to read the small negative numbers normally (not a mirror image).
Now turn the negative so the image is upside down while looking at the same side.
(2) Open the negative holder at the marked spot on the top. With the negative holder laid
open place the negative into holder so the notches line up with the notches on the
holder.
Note: Handle negatives with care. Any dust, scratches or finger prints will show up on
your saved images. If possible use cotton gloves when handling negatives. It is
recommended to use compressed air to remove any dust on the negatives.
This is not included with the film scanner but can be purchased from an office supply or
electronics retailers.
(3) Close the negative holder and press the edges so that it locks in place. Hold it in the
position as shown in the film scanner.
(4) Insert the negative holder into the slot on the right side of the film scanner as shown.
©2012 NEDIS BV. Camlink is a registered trademark of NEDIS BV. Although every effort has been
made to ensure the accuracy of the information contained in this manual specifications are subject to
change and therefore NEDIS BV cannot guarantee its correctness and completeness at all times.
(3) (4)
6
Proper Operation Sequence
1. Slide or Load film or negative film to board holder.
2. Insert board holder to scanner.
3. Connect the USB cable to PC.
4. Press power button to turn on scanner.
5. Press scanning button to start scanning.
6. Always take storage card out after finished.
8. Pictures also can be read from pc through USB connection.
User instructions
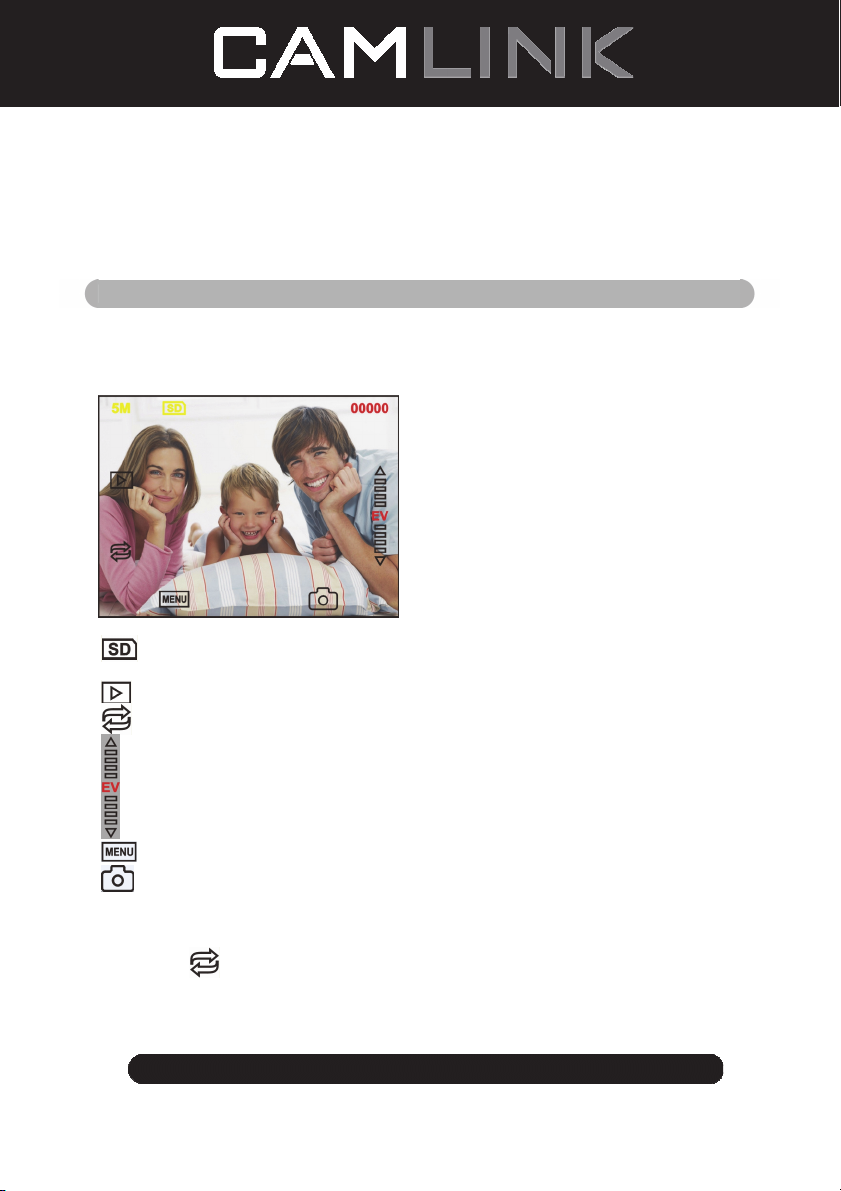
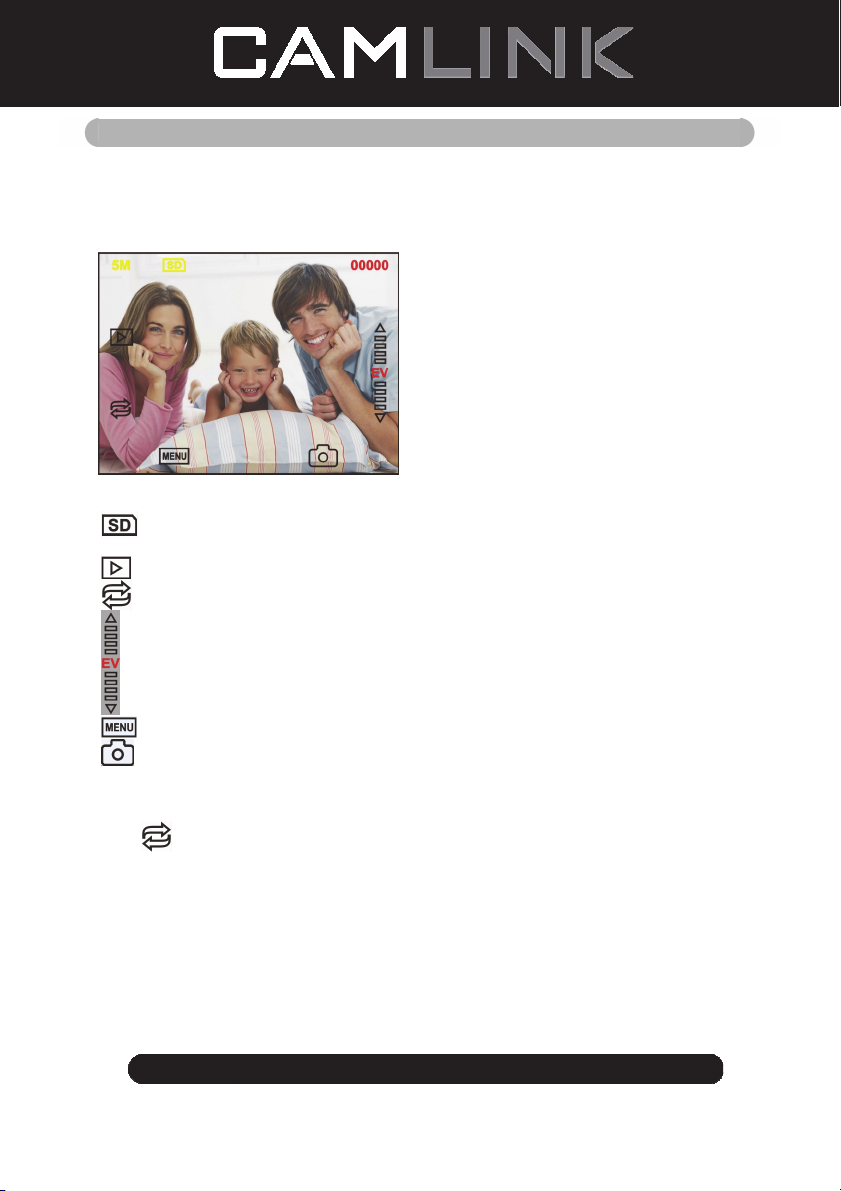
Capture Picture
When the video frequency has been stated, the image can be captured about 3 sec. You
can enter into the main menu to choose Capture mode to set slide style and EV value
when pressing manual key.
5M Resolution
Sign to card
00000 Scanning amount available
Playback mode
Mirror Image/Rotation
Exposure Compensation (EV -2~2)
Menu & Power on/off
Capture mode
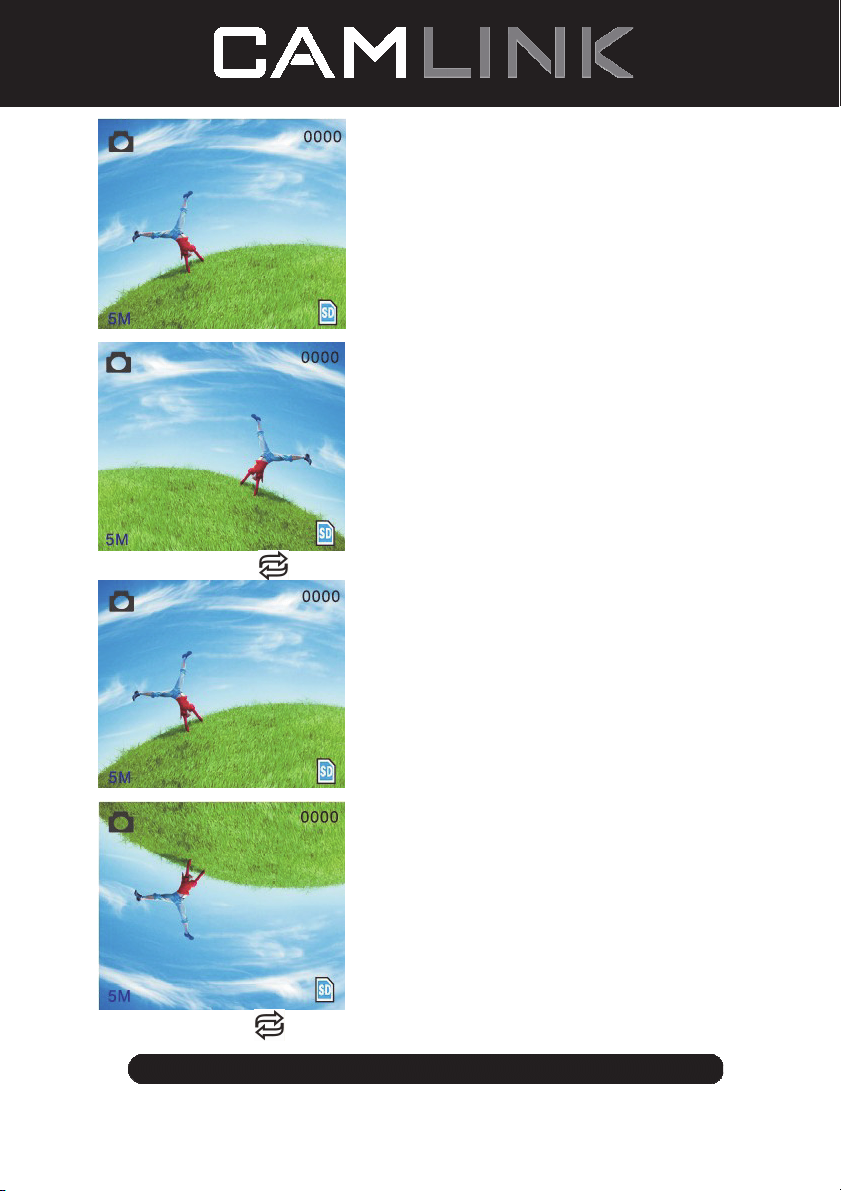
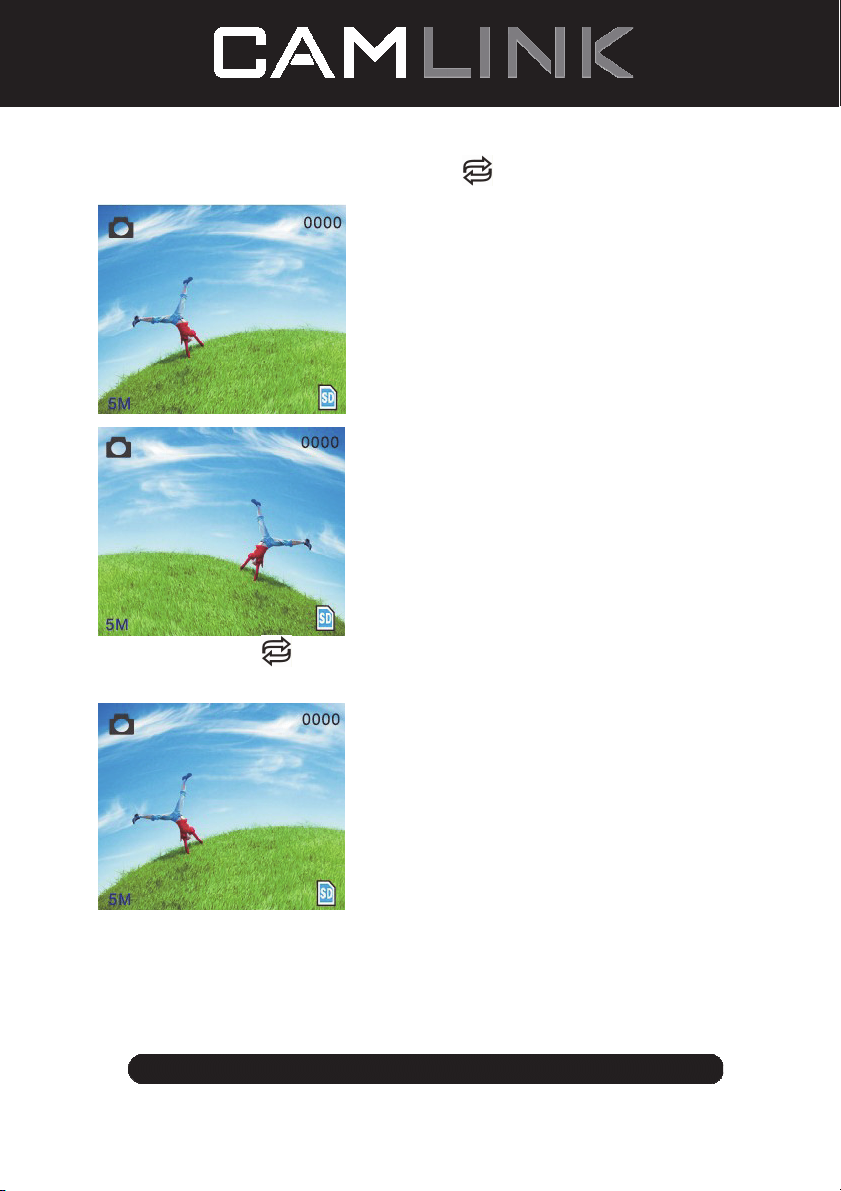
Mirror Image/Rotation
If you need mirror image or rotation image when a picture is being scaned, you can press
the Rotation
©2012 NEDIS BV. Camlink is a registered trademark of NEDIS BV. Although every effort has been
made to ensure the accuracy of the information contained in this manual specifications are subject to
change and therefore NEDIS BV cannot guarantee its correctness and completeness at all times.
key to adjust it, then capture picture.
7

Press
key (mirror image), the image place will be altered (from left to right).
Continue Press
©2012 NEDIS BV. Camlink is a registered trademark of NEDIS BV. Although every effort has been
made to ensure the accuracy of the information contained in this manual specifications are subject to
change and therefore NEDIS BV cannot guarantee its correctness and completeness at all times.
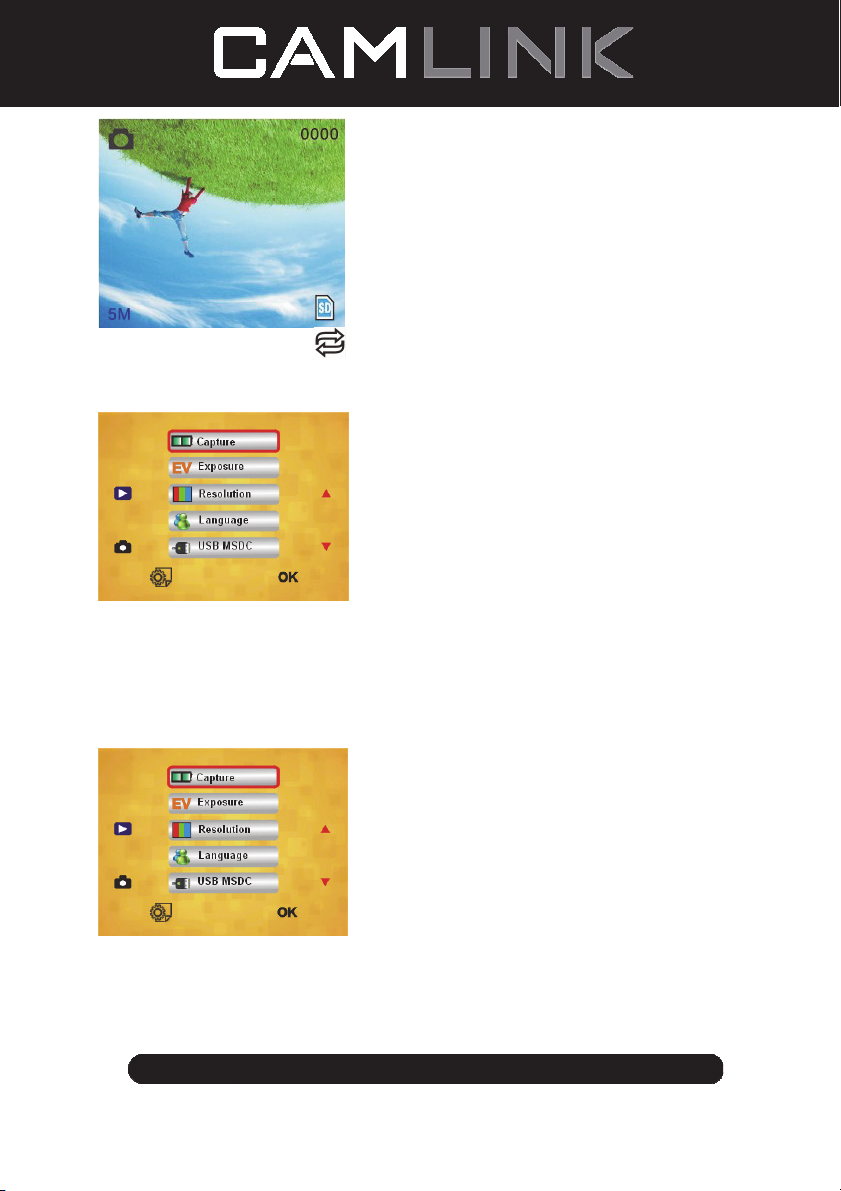
key (rotation), the image place will be altered (from up to down).
8

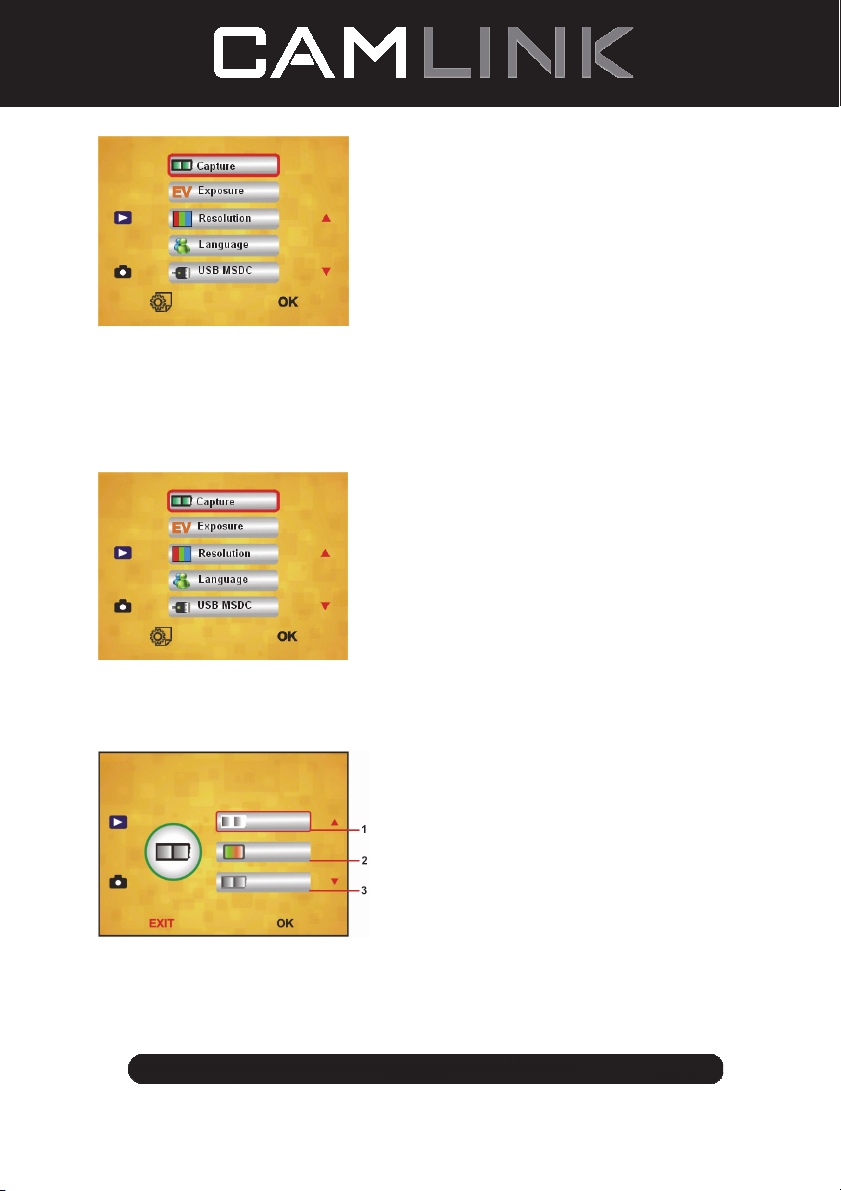
Main Menu
1. Capture mode: A: B&W film B: Positive film C: Negative film.
2. Exposure: Exposure Compensation (EV -2~2).
3. Resolution: 5mega/10mega.
4. Language: English, French, Deutsch, ltalian, Spanish, Chinese, Simplified Chinese,
Japanese.
5. USB MSDC: MSDC mode (mass storage).
Capture mode
Slide style
Press manual key to enter into main manual to choose slide style on shooting mode.
Choose needed image type like positive film, negative Film, B&W.
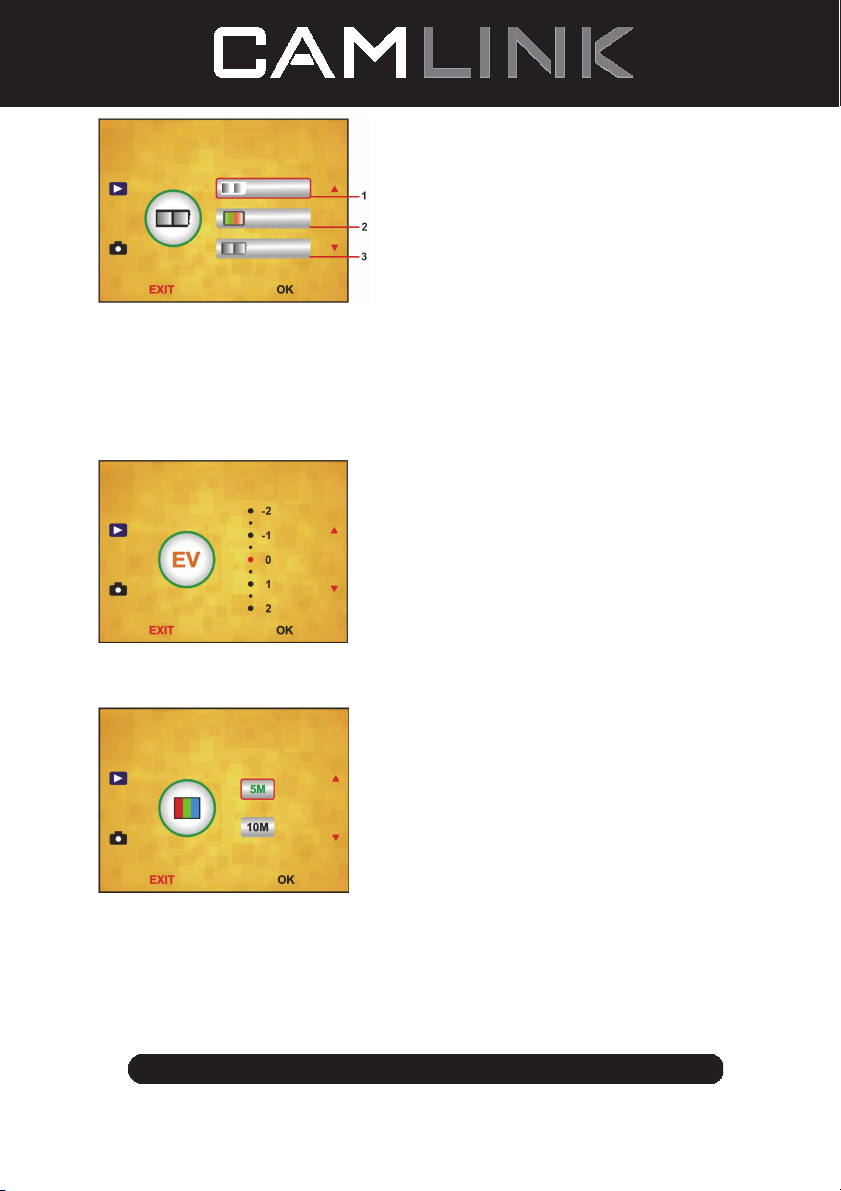
1. B&W film: choose B&W if there is B&W film at board holder.
2. Positive film: choose positive film if there is positive film at board holder.
3. Negative film: choose negative film if there is negative film at Board holder.
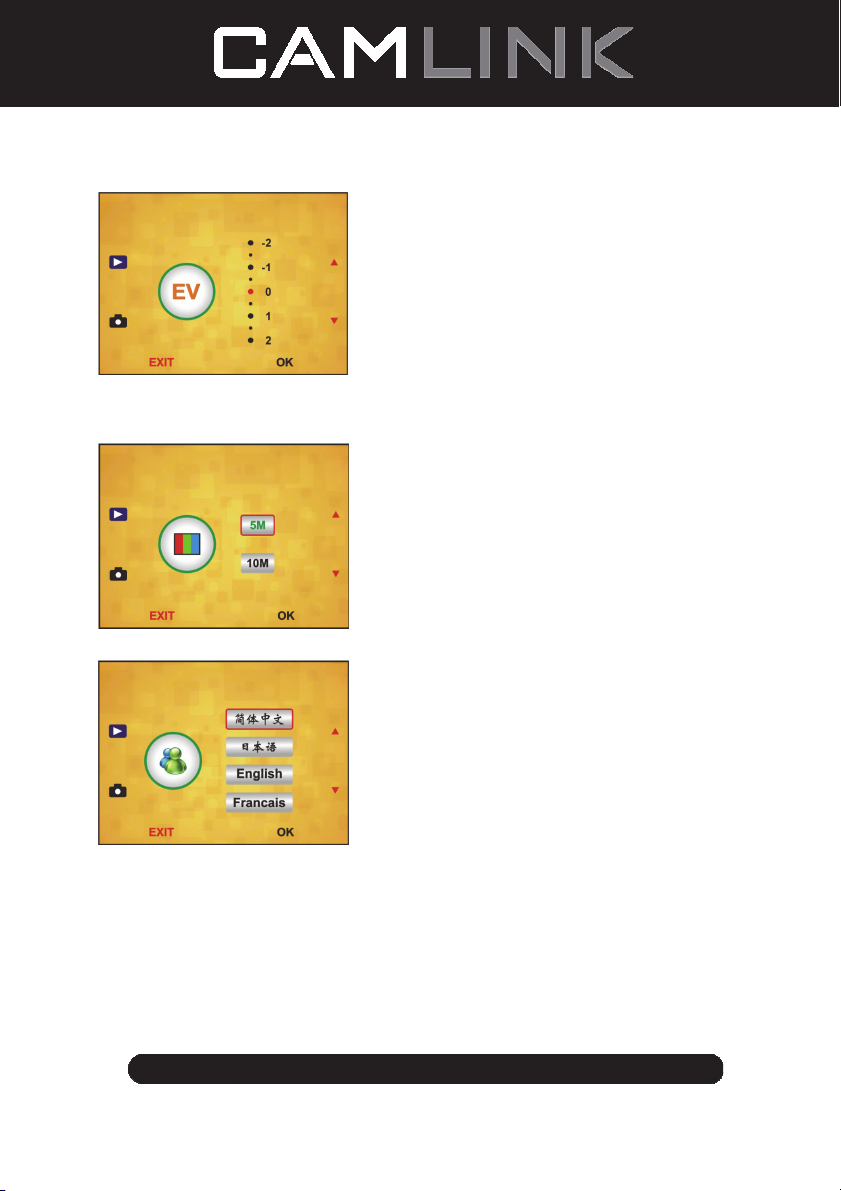
Exposure Compensation
Press the menu key to enter into main menu to choose exposure compensation on
Exposure mode, then setting exposure value of scanning picture.
©2012 NEDIS BV. Camlink is a registered trademark of NEDIS BV. Although every effort has been
made to ensure the accuracy of the information contained in this manual specifications are subject to
change and therefore NEDIS BV cannot guarantee its correctness and completeness at all times.
9
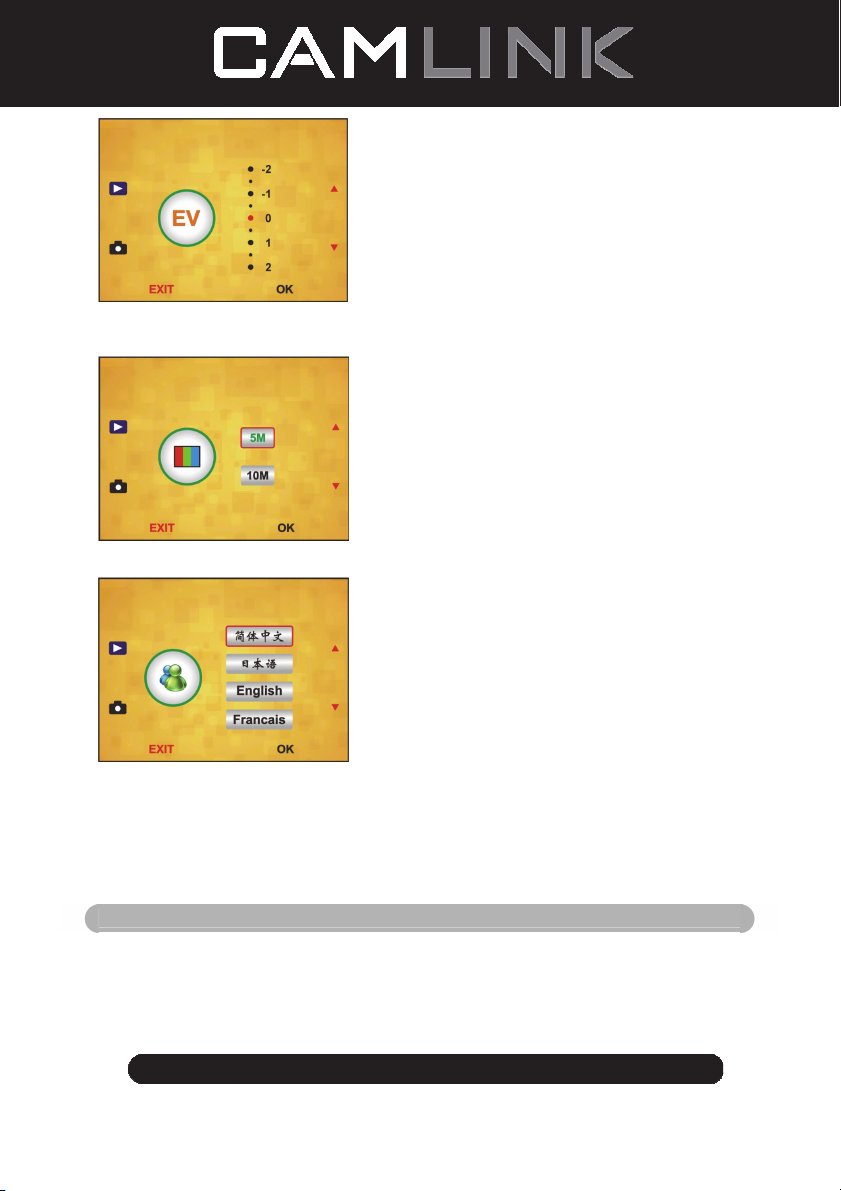
Resolution
5M or 10M can be chosen after enter into subordinate manual of resolution.
Language
Note: Choosing English, French, Deutsch, Italian, Spanish, Chinese, Simplified Chinese,
Japanese. According to user’s need.
USB MSDC
A: After connect the USB cable to PC and turn on the scanner, then enter into main menu.
B: Choose storage through up/down key. Click “OK” to confirm.
C: Open the folder on your PC. Now you can show the pictures on the PC.
Maintenance
Cleaning: We strongly suggest using a clean, dry, non-alcohol cotton swab to clean the
glass surface periodically to produce a clear image.
©2012 NEDIS BV. Camlink is a registered trademark of NEDIS BV. Although every effort has been
made to ensure the accuracy of the information contained in this manual specifications are subject to
change and therefore NEDIS BV cannot guarantee its correctness and completeness at all times.
10

Warranty
No guarantee or liability can be accepted for any changes and modifications of the product
or damage caused due to incorrect use of this product.
Disclaimer
Designs and specifications are subject to change without notice.
All logos brands and product names are trademarks or registered trademarks of their
respective holders and are hereby recognised as such.
Keep this manual and packaging for future reference.
Disposal
• This product is designated for separate collection at an appropriate collection
point. Do not dispose of this product with household waste.
• For more information, contact the retailer or the local authority responsible for
waste management.
This product has been manufactured and supplied in compliance with all relevant
regulations and directives, valid for all member states of the European Union. It also
complies with all applicable specifications and regulations in the country of sales.
Formal documentation is available upon request. This includes, but is not limited to:
Declaration of Conformity (and product identity), Material Safety Data Sheet and
product test report.
Please contact our customer service desk for support:
via website: http://www.nedis.com/en-us/contact/contact-form.htm
via e-mail: service@nedis.com
via telephone: +31 (0)73-5993965 (during office hours)
NEDIS B.V., De Tweeling 28, 5215 MC ’s-Hertogenbosch, THE NETHERLANDS
DE-Deutsch
Einleitung
Für den Gebrauch ist kein PC erforderlich. Freistehender 5 Megapixel Film-/
Diascanner zum Scannen und Speichern von Filmen auf SD-Karten oder
Computern. Unterstützt unterschiedliche SD-Karten von bis zu 32GB SDHC. USB 2.0
für die Verwendung als USB- oder AC-Stromversorgung; TV-Wiedergabe:
NTSC/PAL.
◆ Filmscanner
◆ USB-Kabel
◆ Videokabel
◆ Negativfilm Halterung
◆ Diahalterung
◆ Diawechsler
©2012 NEDIS BV. Camlink is a registered trademark of NEDIS BV. Although every effort has been
made to ensure the accuracy of the information contained in this manual specifications are subject to
change and therefore NEDIS BV cannot guarantee its correctness and completeness at all times.
11

◆ DC 5V Netzteil
◆ Anleitung
◆ Bürste
HINWEIS: Verwenden Sie die mitgelieferte Bürste zum Reinigen des Panels der
Hintergrundbeleuchtung.
Technische Spezifikationen
Größe 88,15 (L) x 86,25 (B) x111,20 (H) mm
Gewicht 301g
Sensor 1/3,2” 5 Megapixel CMOS
Effektive Auflösung 5 Megapixel
Speichermedium Extern: SD-Karte, kompatible SDHC-Karte
Empfindlichkeit Auto
Objektiv Feste Brennweite F/6.0, F=6,34mm
Fokusbereich 5,6cm
Standbild Formatierung: JPEG, Auflösung: 5M, 10M (interpoliert)
Zoom Nein
Display 6 cm TFT
TV-Wiedergabeformat NTSC/PAL
Beleuchtung Gegenlichtkompensation
Weißabgleich Auto
Belichtungskorrektur Auto
Schnittstelle MSDC: USB 2.0 (High Speed)
Automatische Einschaltung Nein
Betrieb DC 5V
Betriebssystem Windows XP, Vista, 7, 8
CPU Intel Pentium 4/2,8GHz oder höher
Speicher 512MB oder höher
Videokarte 64MB
Übertragungsverbindung Herkömmlicher USB2.0 Port oder höher
Festplattenkapazität Mindestens 200MB
Anleitung Ja
Netzteil Ja
Diahalterung Ja
Negativhalterung Ja
Bürste Ja
USB-Kabel Ja
Sicherheitsvorkehrungen
Um das Risiko eines elektrischen Schlags zu verringern,
sollte dieses Produkt AUSSCHLIESSLICH von einem
autorisierten Techniker geöffnet werden. Trennen Sie das
Produkt von anderen Geräten, wenn ein Problem
auftreten sollte. Schützen Sie das Gerät vor Regen oder
Feuchtigkeit.
©2012 NEDIS BV. Camlink is a registered trademark of NEDIS BV. Although every effort has been
made to ensure the accuracy of the information contained in this manual specifications are subject to
change and therefore NEDIS BV cannot guarantee its correctness and completeness at all times.
12
Belüftung: Das Gerät muss so aufgestellt bzw. positioniert werden, dass seine Belüftung
nicht beeinträchtigt wird.
Wärme: Stellen Sie das Gerät nicht in der Nähe von Wärmequellen wie Heizungen oder
Kochherden auf.
Zeiten des Nichtgebrauchs: Wenn Sie das Gerät über einen längeren Zeitraum nicht
verwenden werden, trennen Sie das USB-Kabel vom Computer.
Überlastung des USB-Anschlusses: Der USB-Anschluss Ihres Computers darf nicht
überlastet werden. Falls zu viele Geräte wie z.B. eine schnurlose Maus, ein Mediaplayer,
Handy oder andere USB-betriebene Geräte an Ihrem Computer angeschlossen sind, ist
möglicherweise nicht genügend Strom für den ordnungsgemäßen Betrieb des
Filmscanners vorhanden.
Wartung: Führen Sie nur solche Wartungsarbeiten durch, die in dieser
Bedienungsanleitung beschrieben sind. Lassen Sie alle darüber hinaus gehenden
Wartungsarbeiten von einer Fachkraft durchführen.
Filmhalterung: Das Design der Filmhalterung entspricht ISO-Richtlinien.
Es kann vorkommen, dass die Löcher einiger Filme nicht exakt auf die Stifte der Halterung
passen. Dieses Phänomen tritt bei nicht standardisierten Kameras auf. In solch einem Fall
erscheint am Rand des Rahmens eine kleine schwarze Linie, die mit einer
Bildbearbeitungssoftware problemlos entfernt werden kann.
*ISO-Internationale Organisation für Normung
Installationsanleitungen
◆ Legen Sie den Film-Scanner auf die Seite und stecken Sie das Bürstenende in die
Öffnung an der rechten Seite.
Teilebeschreibung:
Diahalterung
Negativfilm Halterung
Diawechsler
Bürste
©2012 NEDIS BV. Camlink is a registered trademark of NEDIS BV. Although every effort has been
made to ensure the accuracy of the information contained in this manual specifications are subject to
change and therefore NEDIS BV cannot guarantee its correctness and completeness at all times.
13
Gebrauch der mitgelieferten Halterungen
Diawechsler
1. Legen Sie Ihre Dias in den Diawechsler, wobei dessen Arm vollständig nach rechts
ausgestreckt sein muss.
2. Setzen Sie den Diawechsler in die Öffnung der Filmhalterung.
3. Schieben Sie den Arm nach links und anschließend nach rechts, um ein Dia aus dem
Diawechsler in den SLIDES 2 zu laden. Wiederholen Sie diesen Schritt zum Laden der
nächsten Dias (die gescannten Dias werden nach links herausgeschoben).
Dias einlegen
(1) (2)
(1) Halten Sie das Dia gegen das Licht. Die Seite mit dem Markenzeichen muss von Ihnen
wegzeigen. Schauen Sie durch das Dia. Das Bild muss normal sein (kein Spiegelbild).
Drehen Sie das Dia nun auf den Kopf, während Sie noch immer von der gleichen Seite
aus durch das Dia schauen.
(2) Öffnen Sie die Diahalterung oben an der markierten Stelle. Wenn die Diahalterung
offen ist, legen Sie das Dia in die Vertiefung der Halterung – das Dia sollte perfekt
hinein passen.
Hinweis: Gehen Sie mit Dias vorsichtig um. Staub, Kratzer oder Fingerabdrücke
werden auf Ihren gespeicherten Bildern zu sehen sein. Sie sollten bei der Handhabung
von Dias Baumwollhandschuhe tragen. Es wird empfohlen, dass Sie Druckluft
verwenden, um den Staub von den Dias zu entfernen. Diese gehört nicht zum
Lieferumfang, kann jedoch in Schreibwarenläden oder Elektronikgeschäften erworben
werden.
(3) Schließen Sie die Diahalterung und drücken auf die Kanten, bis diese einrasten.
©2012 NEDIS BV. Camlink is a registered trademark of NEDIS BV. Although every effort has been
made to ensure the accuracy of the information contained in this manual specifications are subject to
change and therefore NEDIS BV cannot guarantee its correctness and completeness at all times.
(3) (4)
14
(4) Halten Sie die Halterung gemäß der Markierungen auf dem Filmscanner.
Stecken Sie die Diahalterung wie abgebildet in die Öffnung an der rechten Seite des
Filmscanners.
Negative einlegen
(1) Halten Sie das Negativ gegen das Licht. Während Sie das Negativ hoch halten, sollte
die kleine Negativnummer normal zu sehen sein (kein Spiegelbild).
Drehen Sie das Negativ nun auf den Kopf, während Sie weiterhin von der gleichen
Seite aus durch das Negativ schauen.
(2) Öffnen Sie die Negativhalterung oben an der markierten Stelle. Wenn die
Negativhalterung offen ist, legen Sie das Negativ so in die Halterung, dass die
Einkerbungen des Negativs mit den Stiften in der Halterung ausgerichtet sind.
Hinweis: Gehen Sie mit Negativen vorsichtig um. Staub, Kratzer oder Fingerabdrücke
werden auf Ihren gespeicherten Bildern zu sehen sein. Bei der Handhabung von
Negativen sollten Sie Baumwollhandschuhe tragen. Es wird empfohlen, dass Sie
Druckluft verwenden, um den Staub von den Negativen zu entfernen.
Diese gehört nicht zum Lieferumfang, kann jedoch in Schreibwarenläden oder
Elektronikgeschäften erworben werden.
(1) (2)
(3) Schließen Sie die Negativhalterung und drücken auf die Kanten, bis diese einrasten.
Halten Sie die Halterung gemäß den Markierungen auf dem Filmscanner.
(4) Stecken Sie die Negativhalterung wie abgebildet in die Öffnung an der rechten Seite
des Filmscanners.
Ordnungsgemäße Vorgehensweise
1. Legen Sie das Dia bzw. das Negativ in die Halterung.
2. Setzen Sie die Halterung in den Scanner.
3. Schließen Sie das USB-Kabel an den PC an.
4. Schalten Sie den Scanner mit der Betriebstaste ein.
5. Drücken Sie die Scannen-Taste, um den Scanvorgang zu starten.
6. Entnehmen Sie nach dem Gebrauch die Speicherkarte.
7. Über die USB-Verbindung können Sie auch Bilder vom PC einlesen.
©2012 NEDIS BV. Camlink is a registered trademark of NEDIS BV. Although every effort has been
made to ensure the accuracy of the information contained in this manual specifications are subject to
change and therefore NEDIS BV cannot guarantee its correctness and completeness at all times.
(3) (4)
15
Gebrauchsanweisung
Bild aufnehmen
Nach der Anzeige der Videofrequenz können Sie ein Bild in 3 Sek. aufnehmen. Öffnen Sie
das Hauptmenü und wählen Sie den Aufnahmemodus, um dann die Art des Dias und die
Belichtungskorrektur manuell einzustellen.
5M Auflösung
Auf der Karte speichern
00000 Verfügbarer Platz zum Scannen
Wiedergabemodus
Spiegelbild/Drehung
Belichtungskorrektur (EV -2~2)
Menü & Betrieb ein/aus
Aufnahmemodus
Spiegelbild/Drehung
Falls Sie ein gescanntes Bild drehen oder spiegeln möchten, drücken Sie die DrehenTa st e
das Bild aufnehmen.
für die entsprechende Einstellung. Nach dem Drücken der Taste können Sie
©2012 NEDIS BV. Camlink is a registered trademark of NEDIS BV. Although every effort has been
made to ensure the accuracy of the information contained in this manual specifications are subject to
change and therefore NEDIS BV cannot guarantee its correctness and completeness at all times.
16
Drücken Sie die Taste
(Spiegelbild); das Bild wird gespiegelt (von links nach rechts).
Drücken Sie die Taste
©2012 NEDIS BV. Camlink is a registered trademark of NEDIS BV. Although every effort has been
made to ensure the accuracy of the information contained in this manual specifications are subject to
change and therefore NEDIS BV cannot guarantee its correctness and completeness at all times.
(Drehen) erneut, um das Bild zu drehen (von oben nach unten).
17
Hauptmenü
1. Aufnahmemodus (Aufnahme): A: S&W-Film B: Positivfilm C: Negativfilm.
2. Belichtung (Belichtung): Belichtungskorrektur (EV -2~2).
3. Auflösung (Auflösung): 5Mega/10Mega.
4. Sprache (Sprache): Englisch, Französisch, Deutsch, Italienisch, Spanisch, Chinesisch,
Chinesisch Kurzschrift, Japanisch.
5. USB MSDC: MSDC-Modus (Massenspeichergerät).
Aufnahmemodus
Dia-Art
Drücken Sie die Menü-Taste, um das Hauptmenü zu öffnen und die Dia-Art für den
Bildaufnahmemodus auszuwählen. Wählen Sie die gewünschte Bild-Art aus, z.B.
Positivfilm, Negativfilm, Schwarz/Weiss.
1. S/W-Film: Wählen Sie S/W, wenn Sie einen Schwarz/Weiss-Film in die Halterung
eingelegt haben.
2. Positivfilm: Wählen Sie die Option Positivfilm, wenn Sie einen Positivfilm in die
Halterung eingelegt haben.
3. Negativfilm: Wählen Sie die Option Negativfilm, wenn Sie einen Negativfilm in die
Halterung eingelegt haben.
©2012 NEDIS BV. Camlink is a registered trademark of NEDIS BV. Although every effort has been
made to ensure the accuracy of the information contained in this manual specifications are subject to
change and therefore NEDIS BV cannot guarantee its correctness and completeness at all times.
18
Belichtungskorrektur
Drücken Sie die Menü-Taste, um das Hauptmenü zu öffnen und die Belichtungskorrektur
für den Belichtungsmodus auszuwählen. Hier können Sie den Belichtungswert für das
gescannte Bild einstellen.
Auflösung
Nach der Eingabe im untergeordneten Menü der Auflösung können Sie 5M oder 10M
auswählen.
Sprache
Hinweis: Wählen Sie zwischen Englisch, Französisch, Deutsch, Italienisch, Spanisch,
Chinesisch, Chinesisch Kurzschrift.
USB MSDC
A: Schalten Sie den Scanner ein und öffnen Sie nach dem Anschluss des USB-Kabels an
den PC das Hauptmenü.
B: Wählen Sie mit den Pfeiltasten Hoch/Runter das Speichermedium. Klicken Sie auf
„OK“ zum Bestätigen.
C: Öffnen Sie auf Ihrem Computer den Ordner. Nun können Sie die Bilder am PC
anschauen.
©2012 NEDIS BV. Camlink is a registered trademark of NEDIS BV. Although every effort has been
made to ensure the accuracy of the information contained in this manual specifications are subject to
change and therefore NEDIS BV cannot guarantee its correctness and completeness at all times.
19

Wartung
Reinigung: Wir empfehlen, die Glasoberfläche regelmäßig mit einem sauberen, trockenen
Baumwollstäbchen ohne Alkohol zu reinigen, damit ein klares Bild erzeugt werden kann.
Garantie
Es kann keine Garantie oder Haftung für irgendwelche Änderungen oder Modifikationen
des Produkts oder für Schäden übernommen werden, die aufgrund einer nicht
ordnungsgemäßen Anwendung des Produkts entstanden sind.
Haftungsausschluss
Design und technische Daten können ohne vorherige Ankündigung geändert werden.
Alle Logos, Marken und Produktnamen sind Marken oder eingetragene Marken ihrer
jeweiligen Eigentümer und werden hiermit als solche anerkannt.
Bitte bewahren Sie Bedienungsanleitung und Verpackung für spätere Verwendung auf.
Entsorgung
• Dieses Produkt muss an einem entsprechenden Sammelpunkt zur Entsorgung
abgegeben werden. Entsorgen Sie dieses Produkt nicht mit dem Haushaltsmüll.
• Weitere Informationen erhalten Sie beim Verkäufer oder der für die
Abfallwirtschaft verantwortlichen örtlichen Behörde.
Dieses Produkt wurde hergestellt und geliefert in Übereinstimmung mit allen
geltenden Vorschriften und Richtlinien, die für alle Mitgliedsstaaten der
Europäischen Union gültig sind. Es entspricht allen geltenden Vorschriften und
Bestimmungen im Land des Vertriebs.
Eine formale Dokumentation ist auf Anfrage erhältlich. Diese beinhaltet unter
anderem, jedoch nicht ausschließlich: Konformitätserklärung (und Produktidentität),
Sicherheitsdatenblatt, Testreport des Produkts.
Wenden Sie sich bei Fragen bitte an unseren Kundendienst:
per Internet: http://www.nedis.de/de-de/kontakt/kontaktformular.htm
per E-Mail: service@nedis.com
per Telefon: Niederlande +31 (0)73-5993965 (während der Geschäftszeiten)
NEDIS B.V., De Tweeling 28, 5215 MC ’s-Hertogenbosch, NIEDERLANDE
FR – Français
Introduction
Aucun ordinateur n'est nécessaire pour les opérations. Scanner photo/diapositive
autonome de 5 mégapixels pour numériser une photo sur votre carte mémoire SD
ou sur un ordinateur. Prend en compte différentes cartes mémoires SD ou SDHC
jusqu'à 32 Go. Interface USB 2.0 avec alimentation USB ou sur alimentation secteur.
Fonction de sortie TV : NTSC/PAL.
©2012 NEDIS BV. Camlink is a registered trademark of NEDIS BV. Although every effort has been
made to ensure the accuracy of the information contained in this manual specifications are subject to
change and therefore NEDIS BV cannot guarantee its correctness and completeness at all times.
20

◆ Scanner photo
◆ Câble USB
◆ Câble vidéo
◆ Chargeur de négatif
◆ Chargeur de diapositive
◆ Chargeur rapide de diapositive
◆ Adaptateur 5 V DC
◆ Manuel
◆ Brosse
REMARQUE : Vous pouvez utiliser la brosse fournie pour nettoyer le panneau de
rétroéclairage.
Spécifications techniques
Dimensions 88,15 (L) X 86,25 (l) X111,20 (H) mm
Poids 301 g
Capteur CMOS de 5 mégapixels 1/3,2"
Résolution effective 5 mégapixels
Support de stockage Externe : Carte mémoire SD, compatible carte SDHC
Sensibilité Auto
Objectif Mise au point fixe F/6.0, F = 6,34 mm
Plage de mise au point 5,6 cm
Image fixe
Format : JPEG, résolution : 5 Mégapixels, 10 Mégapixels
(interpolation)
Zoom Non
Écran 6 cm TFT
Format de sortie TV NTSC/PAL
Sources lumineuses Correction du rétroéclairage
Equilibre des blancs Auto
Correction de l'exposition Auto
Interface MSDC : USB 2.0 (haute vitesse)
Déclenchement
automatique
Non
Alimentation 5 V DC
Système d'exploitation Windows XP, Vista, 7, 8
Processeur Intel Pentium 4/2,8 GHz ou supérieur
Mémoire 512 Mo ou supérieure
Carte graphique 64 Mo
Système de connexion USB 2.0 standard ou supérieur
Espace libre sur le
disque dur
Au moins 200 Mo
Manuel Oui
Adaptateur Oui
Chargeur de diapositive Oui
Chargeur de négatif Oui
Brosse Oui
Câble USB Oui
©2012 NEDIS BV. Camlink is a registered trademark of NEDIS BV. Although every effort has been
made to ensure the accuracy of the information contained in this manual specifications are subject to
change and therefore NEDIS BV cannot guarantee its correctness and completeness at all times.
21

Précautions d'emploi
Pour réduire le risque de choc électrique, ce produit ne
doit être ouvert que par un technicien qualifié si une
réparation s'impose. Débranchez l'appareil et les autres
équipements du secteur s'il y a un problème. Ne pas
exposer l'appareil à l'eau ni à l'humidité.
Ventilation : Le dispositif doit être placé de façon à ce que son emplacement ou sa
position ne perturbe pas sa propre ventilation.
Chaleur : Le dispositif doit être placé loin des sources de forte chaleur comme les
radiateurs ou les poêles.
Période d'inutilisation : Le cordon USB du dispositif doit être débranché de l'ordinateur
quand l'unité n'est pas utilisée pour une période prolongée.
Surcharge USB : Ne surchargez pas les connexions USB de votre ordinateur. Si vous avez
de nombreux dispositifs connectés à votre ordinateur comme une souris sans fils, un
lecteur multimédia, un téléphone mobile ou d'autres dispositifs alimentés par USB, il est
possible que l'alimentation ne soit pas suffisante pour faire fonctionner correctement le
scanner photo.
Réparation : L'utilisateur ne doit pas tenter de réparer le dispositif au-delà des
spécifications données dans les instructions de fonctionnement. Pour toute autre
réparation, consultez un personnel de réparation qualifié.
Chargeur de photos : La conception du chargeur de photos respecte la norme ISO.
Dans certains cas, les orifices sur la photo ne s'adaptent pas exactement à l'alignement du
chargeur. La cause est probablement un appareil photographique non standard. Dans ce
cas, une fine bande noire sur les bords de l'image sera présente et peut être facilement
éliminée à l'aide d'un logiciel de retouche d'image.
*ISO : Organisation Internationale de Normalisation.
Instructions d'installation
◆ Placez le scanner photo sur le côté et insérez l'extrémité de la brosse dans
l'emplacement sur le côté droit.
Description des différentes parties :
Chargeur de diapositive
Chargeur de négatif
©2012 NEDIS BV. Camlink is a registered trademark of NEDIS BV. Although every effort has been
made to ensure the accuracy of the information contained in this manual specifications are subject to
change and therefore NEDIS BV cannot guarantee its correctness and completeness at all times.
22
Chargeur rapide de diapositive
Brosse
Utilisation des chargeurs
Chargeur rapide de diapositive
1. Avec le levier entièrement à droite, placez vos diapositives l'une sur l'autre dans le
chargeur rapide de diapositive.
2. Placez le chargeur rapide de diapositive à l'emplacement du chargeur de photo.
3. Tirez le levier vers la gauche puis vers la droite pour charger une diapositive du
chargeur rapide dans le CURSEUR 2. Répétez cette opération pour les diapositives
suivantes (qui pousseront les diapositives visionnées de l'autre côté).
Chargement des diapositives
(1) (2)
(1) Tenez la diapositive face à la lumière. Placez le symbole de marque de la diapositive
vers l'arrière. Regardez la diapositive. Elle doit apparaître normalement (non comme
une image retournée). À présent, tournez la diapositive de façon que l'image soit
inversée alors que vous regardez la même face.
(2) Ouvrez le chargeur de diapositive au niveau du repère sur le haut. Alors que le
chargeur de diapositive est ouvert, placez la diapositive dans la cavité du chargeur : la
diapositive doit s'insérer parfaitement.
Remarque : Manipulez les diapositives avec soin. Toute poussière, rayures ou traces
de doigts seront également présentes sur vos images enregistrées. Si possible, utilisez
des gants en coton lors de la manipulation des diapositives. Il est recommandé
d'utiliser de l'air comprimé pour éliminer la poussière des diapositives. Ce produit n'est
pas fourni avec le scanner photo mais peut être acheté auprès d'un détaillant de
produits électroniques ou un magasin de fournitures de bureau.
©2012 NEDIS BV. Camlink is a registered trademark of NEDIS BV. Although every effort has been
made to ensure the accuracy of the information contained in this manual specifications are subject to
change and therefore NEDIS BV cannot guarantee its correctness and completeness at all times.
23

(3) (4)
(3) Fermez le chargeur de diapositive et appuyez sur les bords afin de le verrouiller en
place.
(4) Placez-le dans la position indiquée sur le chargeur de pellicule.
Insérez le chargeur de diapositive dans l'emplacement sur le côté droit du scanner
photo comme indiqué.
Chargement des négatifs
(1) (2)
(1) Tenez le négatif face à la lumière. Alors que vous regardez le négatif, vous devez
normalement être en mesure de lire les petits nombres négatifs (non comme une
image retournée).
À présent, tournez le négatif de façon que l'image soit inversée alors que vous
regardez la même face.
(2) Ouvrez le chargeur de négatif au niveau du repère sur le haut. Alors que le chargeur
de négatif est ouvert, placez le négatif dans le chargeur de façon que les entailles
s'alignent avec les entailles du chargeur.
Remarque : Manipulez les négatifs avec soin. Toute poussière, rayures ou traces de
doigts seront également présentes sur vos images enregistrées. Si possible, utilisez
des gants en coton lors de la manipulation des négatifs. Il est recommandé d'utiliser de
l'air comprimé pour éliminer la poussière des négatifs.
Ce produit n'est pas fourni avec le scanner photo mais peut être acheté auprès d'un
détaillant de produits électroniques ou un magasin de fournitures de bureau.
©2012 NEDIS BV. Camlink is a registered trademark of NEDIS BV. Although every effort has been
made to ensure the accuracy of the information contained in this manual specifications are subject to
change and therefore NEDIS BV cannot guarantee its correctness and completeness at all times.
(3) (4)
24

(3) Fermez le chargeur de négatif et appuyez sur les bords afin de le verrouiller en place.
Placez-le dans la position indiquée sur le chargeur de photo.
(4) Insérez le chargeur de négatif dans l'emplacement sur le côté droit du scanner photo
comme indiqué.
Séquence d'utilisation habituelle
1. Faites glisser ou charger les photos ou les négatifs dans le chargeur.
2. Placez le chargeur dans le scanner.
3. Branchez le câble USB à un ordinateur.
4. Appuyez sur le bouton d'alimentation du scanner pour l'allumer.
5. Appuyez le bouton de numérisation pour commencer la numérisation.
6. Retirez toujours la carte de stockage après avoir terminé.
7. Les images peuvent aussi être visionnées à partir d'un ordinateur par l'intermédiaire
d'une connexion USB.
Mode d'emploi
Capture d'image
Une fois la fréquence vidéo définie, la prise d'image est possible après environ 3 s. Entrez
dans le menu principal et choisissez le mode Capture pour régler manuellement le type de
diapositive et la valeur d'exposition (EV).
5M Résolution
Enregistrer sur carte
00000 Nombre de captures d'image disponibles
Mode de reproduction
Inverser et tourner l'image
Correction de l'exposition (EV : -2~2)
Menu et Éteindre/Allumer
Mode de capture
©2012 NEDIS BV. Camlink is a registered trademark of NEDIS BV. Although every effort has been
made to ensure the accuracy of the information contained in this manual specifications are subject to
change and therefore NEDIS BV cannot guarantee its correctness and completeness at all times.
25
Inverser et tourner l'image
Si vous avez besoin d'une image retournée ou de tourner l'image quand elle est en cours
de numérisation, appuyez sur la touche de rotation
Après avoir appuyé sur la touche, vous pouvez capturer l'image.
pour effectuer cette opération.
Appuyez sur la touche
(de gauche à droite).
(image retournée), la disposition de l'image sera modifiée
©2012 NEDIS BV. Camlink is a registered trademark of NEDIS BV. Although every effort has been
made to ensure the accuracy of the information contained in this manual specifications are subject to
change and therefore NEDIS BV cannot guarantee its correctness and completeness at all times.
26
Appuyez encore sur la touche
haut vers le bas).
Menu principal
1. Mode de capture (Capture) : A : Photo noir et blanc B : Diapositive C : Négatif.
2. Exposure (Exposition) : Correction de l'exposition (EV : -2~2).
3. Resolution (Résolution) : 5 mégapixels/10 mégapixels.
4. Language (Langue) : Anglais, Français, Allemand, Italien, Espagnol, Chinois, Chinois
simplifié, Japonais.
5. USB MSDC : Mode MSDC (stockage de masse).
Mode de capture
(rotation), l'orientation de l'image sera modifiée (du
Type de diapositive
Appuyez sur la touche du menu pour entrer dans le menu principal pour choisir le type de
diapositive en mode de prise d'image. Choisissez le type d'image nécessaire comme
diapositive, négatif, noir et blanc.
©2012 NEDIS BV. Camlink is a registered trademark of NEDIS BV. Although every effort has been
made to ensure the accuracy of the information contained in this manual specifications are subject to
change and therefore NEDIS BV cannot guarantee its correctness and completeness at all times.
27
1. Photo en noir et blanc : choisissez Noir et Blanc si une photo en noir et blanc est
présente dans le chargeur.
2. Diapositive : choisissez Diapositive si une diapositive est présente dans le chargeur.
3. Négatif : choisissez Négatif si un négatif est présent dans le chargeur.
Correction de l'exposition
Appuyez sur la touche de menu pour entrer dans le menu principal pour choisir la
correction d'exposition en mode exposition. Vous pouvez ici régler l'exposition de l'image
numérisée.
Résolution
Vous pouvez choisir 5 Mégapixels ou 10 Mégapixels après être entré dans le sous-menu
de la résolution.
©2012 NEDIS BV. Camlink is a registered trademark of NEDIS BV. Although every effort has been
made to ensure the accuracy of the information contained in this manual specifications are subject to
change and therefore NEDIS BV cannot guarantee its correctness and completeness at all times.
28

Langue
Remarque : Choisissez entre Anglais, Français, Allemand, Italien, Espagnol, Chinois,
Chinois simplifié ou Japonais.
USB MSDC
A. Allumez le scanner et entrez dans le menu principal après avoir branché le câble USB
à votre ordinateur.
B. Choisissez le stockage avec la touche haut/bas. Cliquez sur OK pour confirmer.
C. Ouvrez le dossier sur votre ordinateur. Maintenant vous pouvez afficher les images sur
l'ordinateur.
Maintenance
Nettoyage : Nous vous conseillons fortement d'utiliser un tampon en coton sans alcool, sec
et propre pour nettoyer régulièrement la surface en verre pour obtenir une image nette.
Garantie
Aucune garantie ou responsabilité ne sera acceptée en cas de modification et/ou de
transformation du produit ou en cas de dommages provoqués par une utilisation incorrecte
de l'appareil.
Avertissement
Le design et les caractéristiques techniques sont sujets à modification sans notification
préalable.
Tous les logos de marques et noms de produits sont des marques déposées ou
immatriculées dont leurs détenteurs sont les propriétaires et sont donc reconnues comme
telles dans ce documents.
Conservez ce manuel et l'emballage pour toute référence ultérieure.
Élimination des déchets
• Ce produit doit être jeté séparément des ordures ménagères dans un point de
collecte approprié. Ne jetez pas ce produit avec les ordures ménagères
ordinaires.
• Pour plus d'informations, contactez le distributeur ou l'autorité locale responsable
de la gestion des déchets.
Ce produit est fabriqué et délivré en conformité avec toutes les directives et
règlements applicables et en vigueur dans tous les états membre de l'Union
©2012 NEDIS BV. Camlink is a registered trademark of NEDIS BV. Although every effort has been
made to ensure the accuracy of the information contained in this manual specifications are subject to
change and therefore NEDIS BV cannot guarantee its correctness and completeness at all times.
29

Européenne. Il est également conforme aux spécifications et à la réglementation en
vigueur dans le pays de vente.
La documentation officielle est disponible sur demande. Cela inclut mais ne se
limite pas à : La déclaration de conformité (et à l'identification du produit), la fiche
technique concernant la sécurité des matériaux, les rapports de test du produit.
Veuillez contacter notre centre de service à la clientèle pour plus d'assistance :
via le site Web : http://www.nedis.fr/fr-fr/contact/formulaire-de-contact.htm
via courriel : service@nedis.com
via téléphone : +31 (0)73-5993965 (aux heures de bureau)
NEDIS B.V., De Tweeling 28, 5215 MC ’s-Hertogenbosch, PAYS-BAS
NL - Nederlands
Inleiding
Geen PC nodig voor gebruik. 5 Megapixel standalone film/diascanner scant film
naar uw SD-kaart of computer. Ondersteunt verschillende SD-geheugenkaarten tot
32 GB SDHC. USB 2.0-interface met USB- of netstroom TV-out functie: NTSC/PAL.
◆ Filmscanner
◆ USB-kabel
◆ Videokabel
◆ Filmhouder negatieven
◆ Filmhouder positieven
◆ Snelle dialader
◆ DC 5 V adapter
◆ Handleiding
◆ Borstel
OPMERKING: U kunt de meegeleverde borstel gebruiken om het backlightpaneel
schoon te maken.
Technische specificaties
Type 88,15 (L) X 86,25 (B) X111,20 (H) mm
Gewicht 301 g
Sensor 1/3,2” 5 megapixel CMOS
Effectieve resolutie 5 megapixel
Opslagmethode
Gevoeligheid Auto
Extern: SD-geheugenkaart, compatibele SDHCgeheugenkaart
Lens Fixed focus F/6.0, F=6,34mm
Focusbereik 5,6 cm
Stilstaand beeld
Format (Formatteren): JPEG, resolutie: 5M, 10M
(interpolatie)
Zoom Nee
Weergave 2,36” TFT
©2012 NEDIS BV. Camlink is a registered trademark of NEDIS BV. Although every effort has been
made to ensure the accuracy of the information contained in this manual specifications are subject to
change and therefore NEDIS BV cannot guarantee its correctness and completeness at all times.
30
 Loading...