

Page 1
CL-STUDIO30
USER MANUAL (EN)
GEBRUIKSAANWIJZING (NL)
BEDIENUNGSANLEITUNG (DE)
MANUAL DE USUARIO (ES)
MANUEL DE L’UTILISATEUR (FR)
MANUALE PER L’UTENTE (IT)
MANUAL DO UTILIZADOR (PT)
BRUGSVEJLEDNING (DA)
BRUKERVEILEDNING (NO)
BRUKSANVISNING (SV)
KÄYTTÖOPAS (FI)
ΕΓΧΕΙΡΙΙΟ XPHΣHΣ (EL)
INSTRUKCJA OBSŁUGI (PL)
NÁVOD K POUŽITÍ (CS)
NÁVOD NA POUŽITIE (SK)
HASZNÁLATI ÚTMUTATÓ (HU)
KASUTUSJUHEND (ET)
LIETOTĀJA ROKASGRĀMATA (LV)
VARTOTOJO VADOVAS (LT)
NAVODILO ZA UPORABO (SL)
KORISNIČKI PRIRUČNIK (HR)
MANUAL DE UTILIZARE (RO)
BG
(RU)
KULLANIM KILAVUZU (TR)
Page 2
CL-STUDIO30
(2x)
(2x)
(2x)
(2x) (2x) (1x)
(2x)
1 2
3 4
(2x)
(2x)
(1x)
2
Page 3
CL-STUDIO30
5
7 8
6
9 10
3
Page 4
CL-STUDIO30
1211
13 14
4
Page 5
English
CL-STUDIO30 - Studio ash light
Safety
General safety
• Read the manual carefully before use. Keep the manual for future reference.
• Only use the device for its intended purposes. Do not use the device for other purposes than described in the
manual.
• Do not use the device if any part is damaged or defective. If the device is damaged or defective, replace the device
immediately.
• Do not expose the product to water or moisture.
• Do not block the ventilation openings.
Electrical safety
• To reduce risk of electric shock, this product should only be opened by an authorized technician when service is
required.
• Disconnect the product from the mains and other equipment if a problem should occur.
Battery safety
• Use only the batteries mentioned in the manual.
• Do not use old and new batteries together.
• Do not use batteries of dierent types or brands.
• Do not install batteries in reverse polarity.
• Do not short-circuit or disassemble the batteries.
• Do not expose the batteries to water.
• Do not expose the batteries to re or excessive heat.
• Batteries are prone to leakage when fully discharged. To avoid damage to the product, remove the batteries when
leaving the product unattended for longer periods of time.
• If liquid from the batteries comes into contact with skin or clothing, immediately rinse with fresh water.
Description
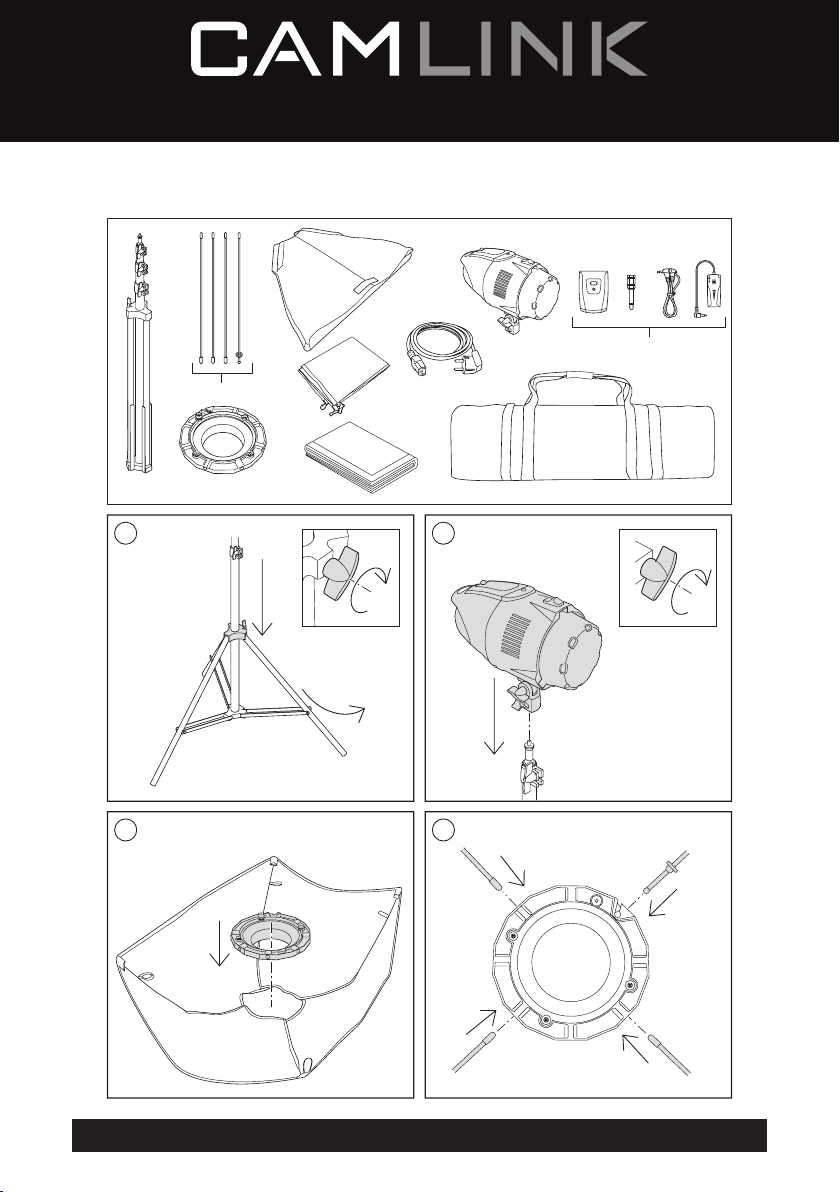
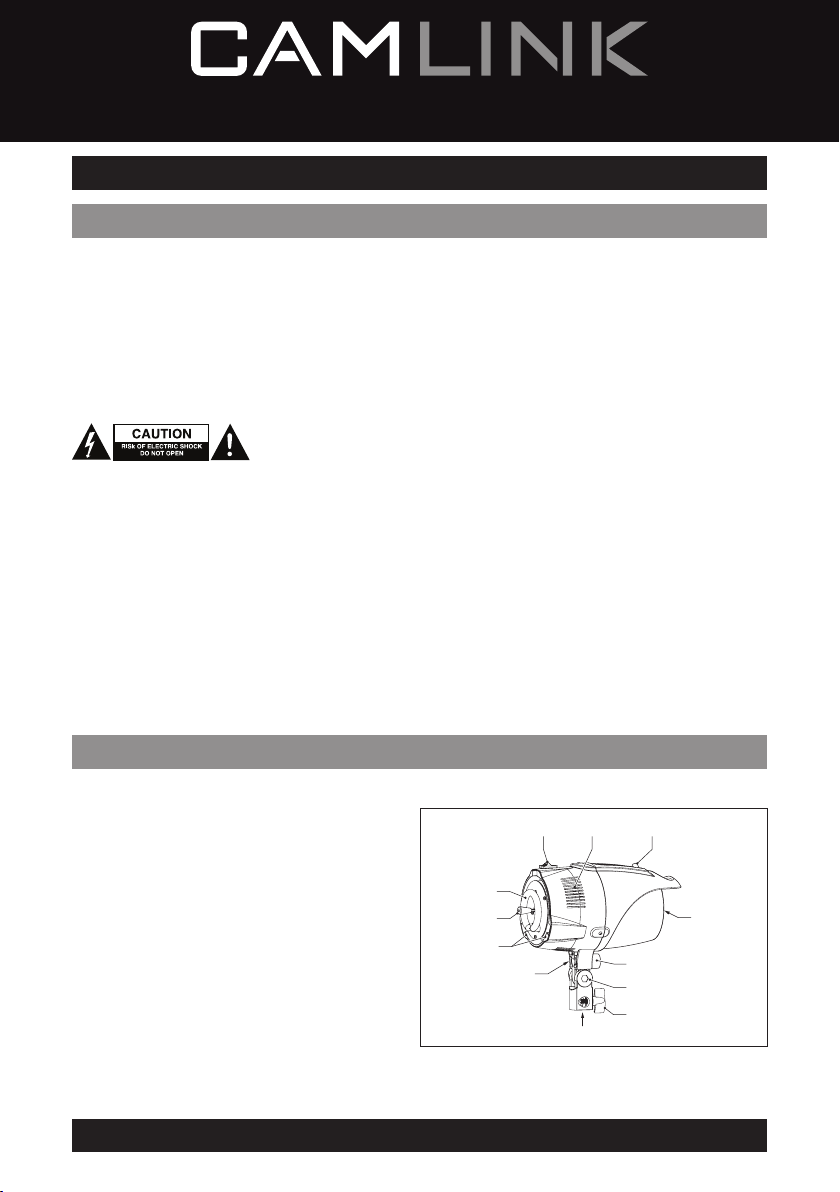
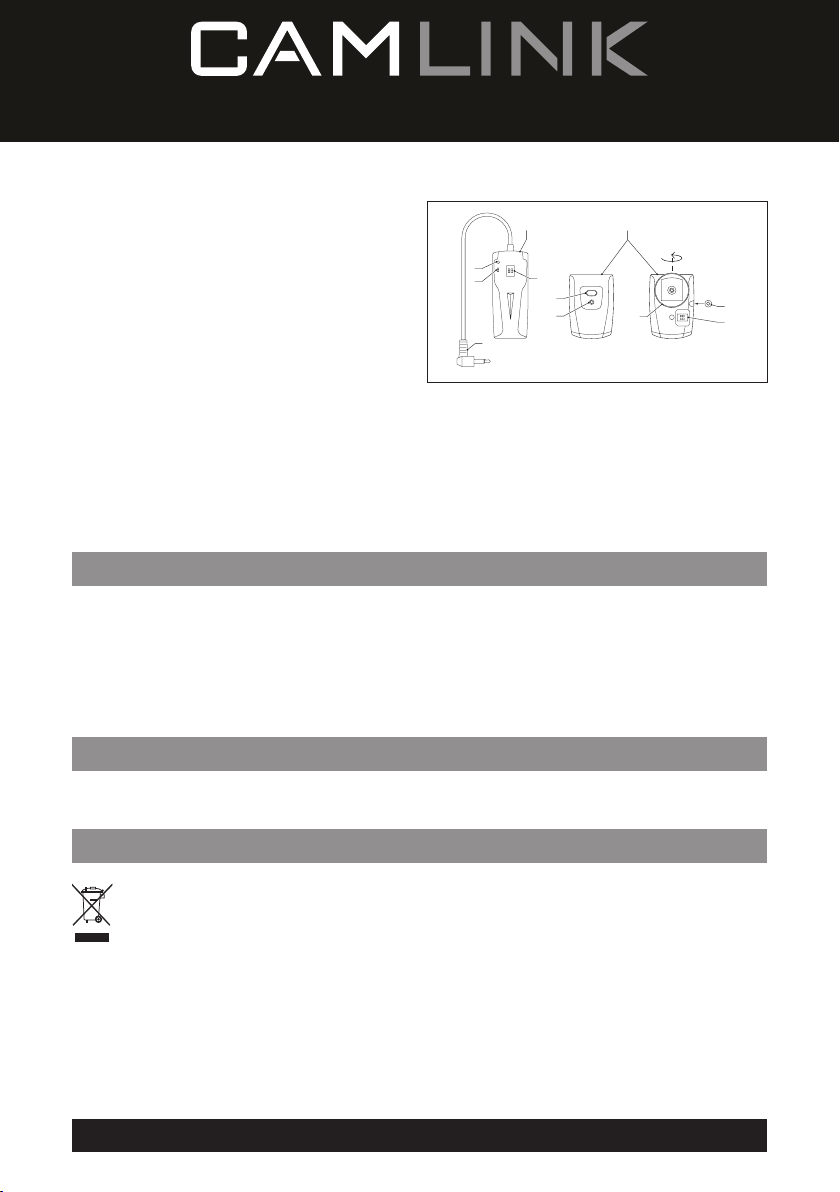
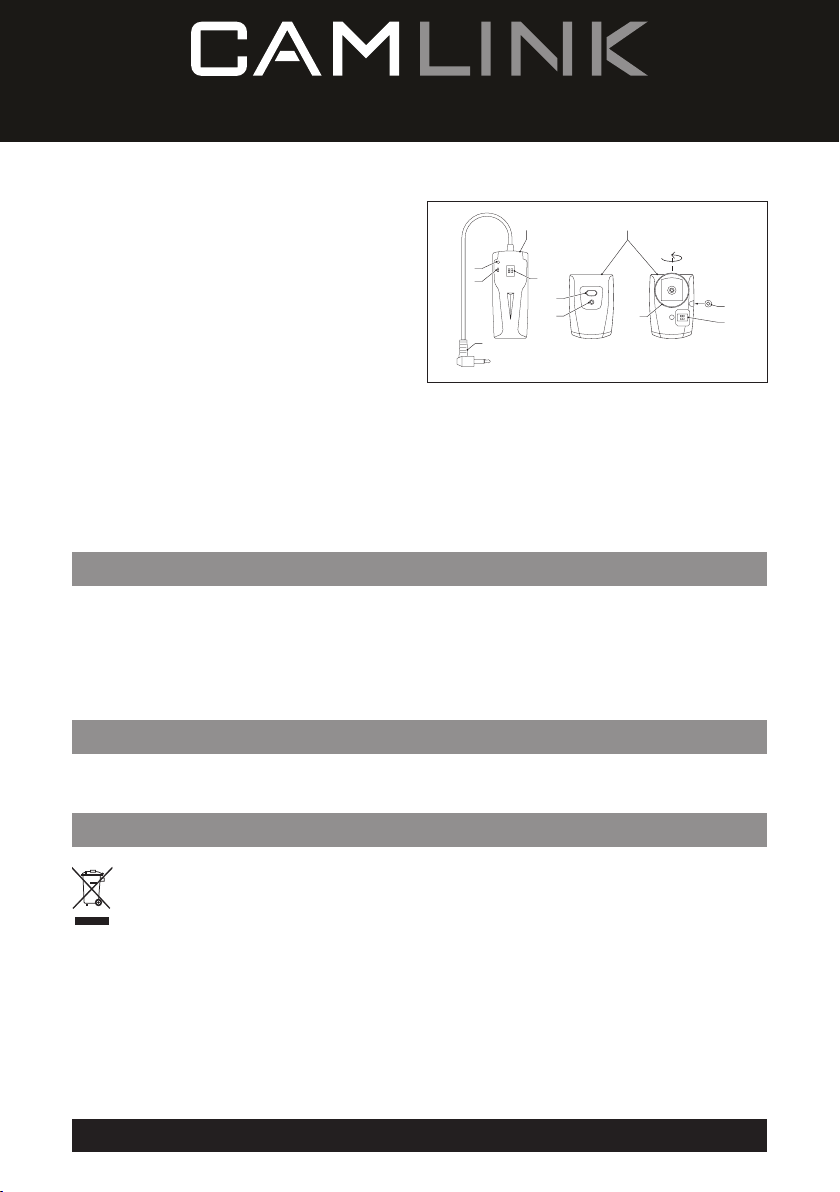
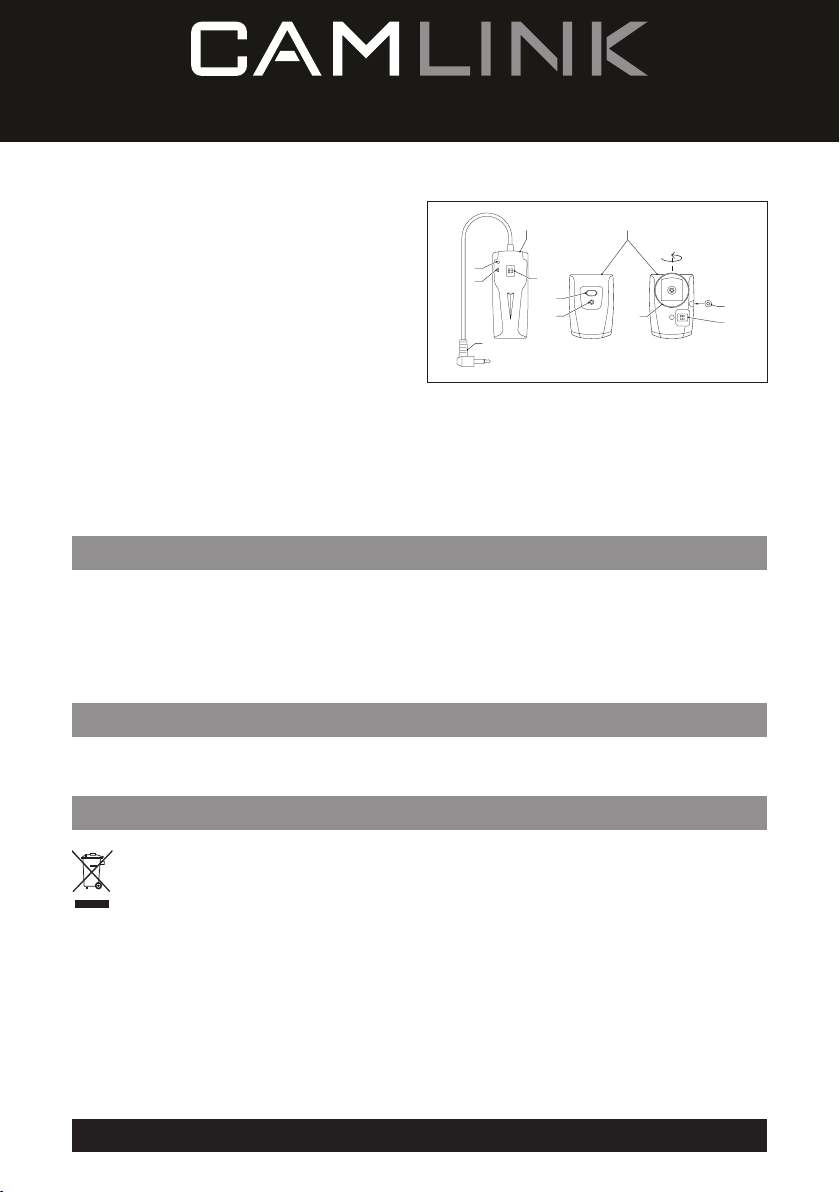
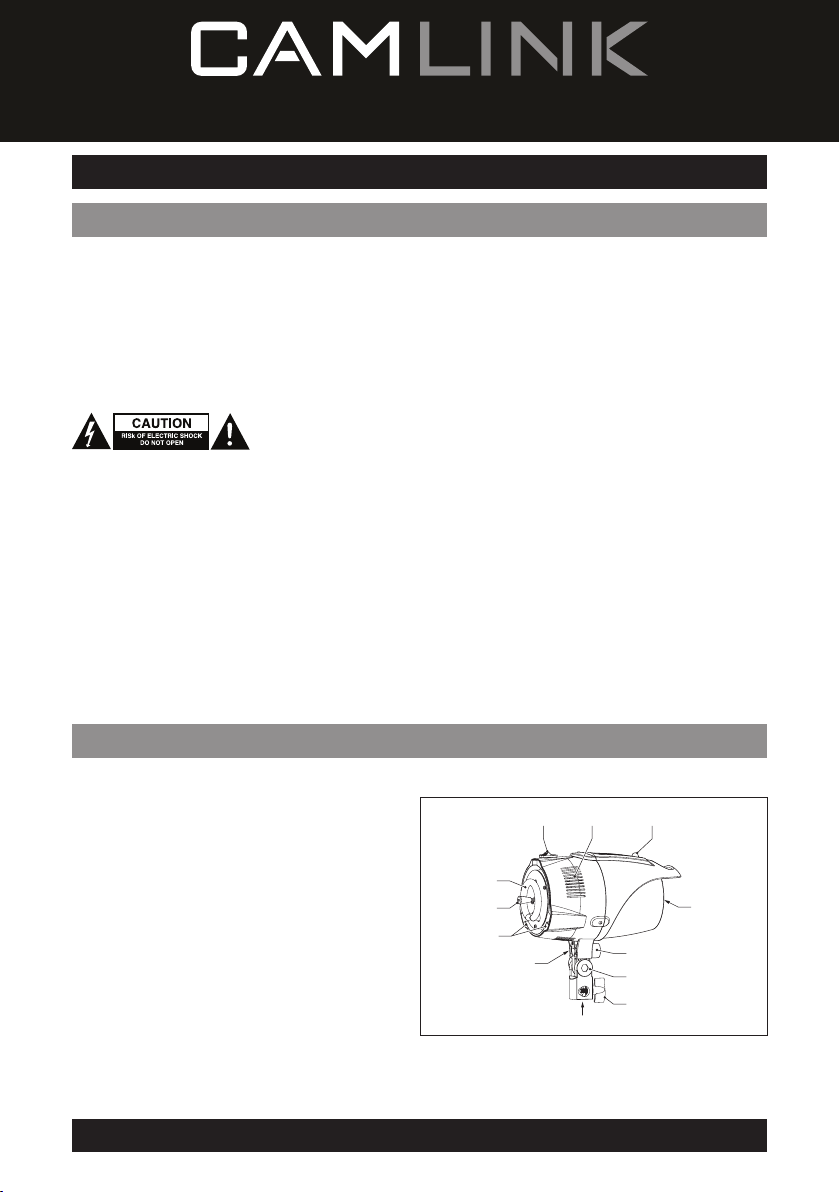
The studio ash light was designed to provide optimum lighting for your location and studio photography purposes.
1. Control panel
2. Remote sensor
3. Lamp
4. Flash tube
5. Adjusting knob (ash light)
6. Ventilation openings
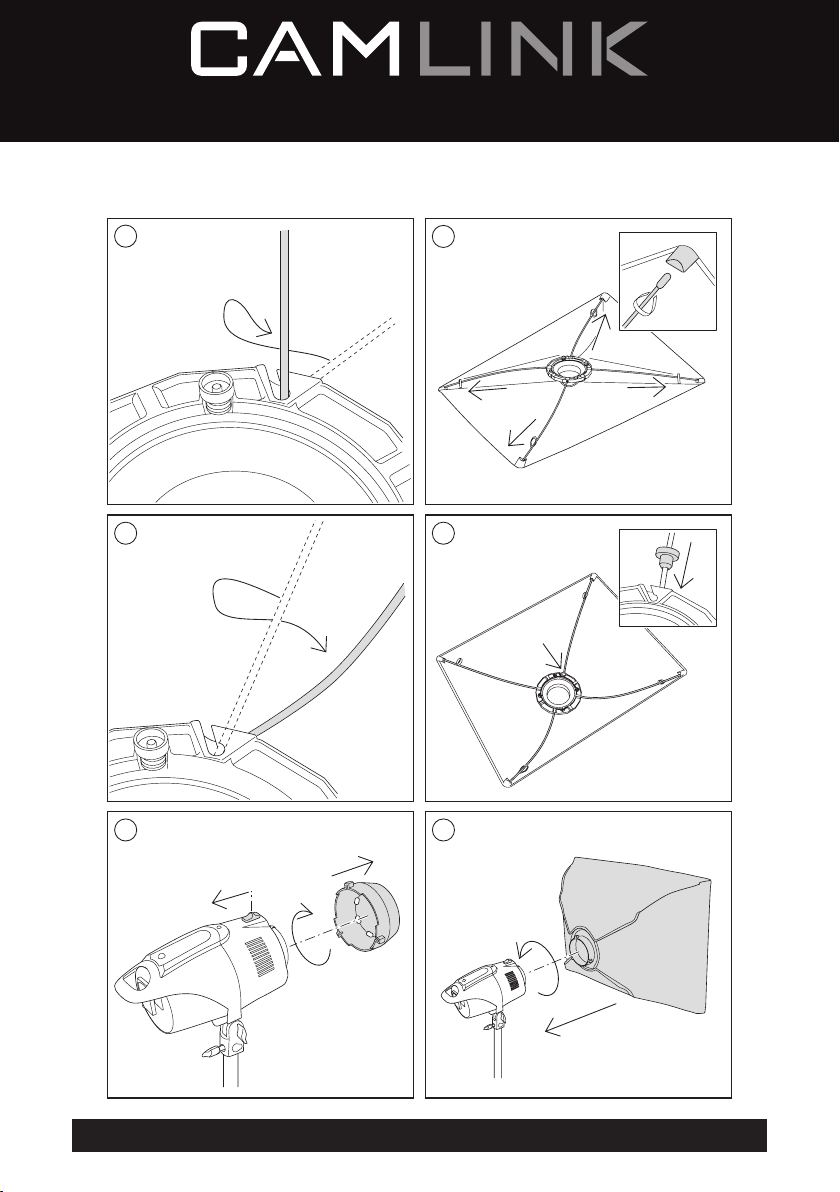
7. Softbox mount
8. Latch (softbox mount)
9. Tripod mount
10. Locking knob (tripod)
11. Umbrella mount
12. Locking knob (umbrella)
4
3
7
11
9
5
268
1
12
5
10
Page 6

Use
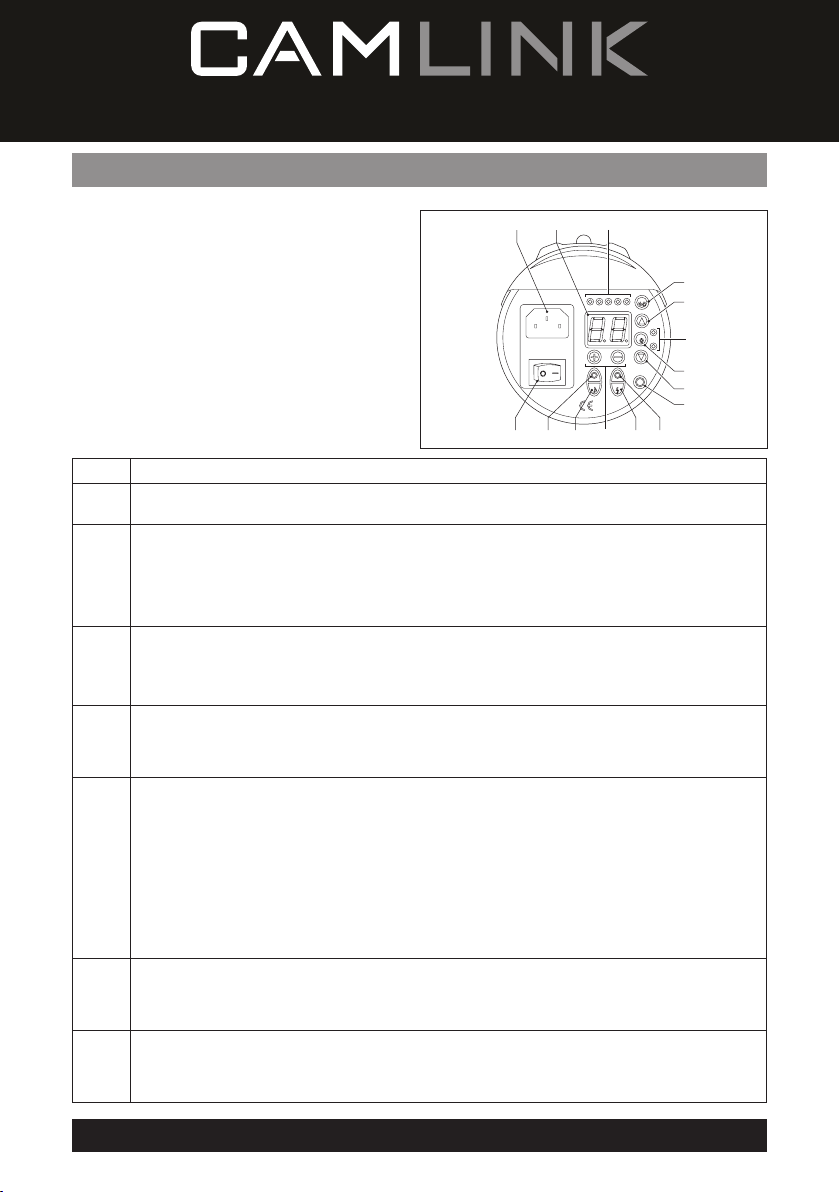
Control panel
1. Mains plug connection
2. On/o switch
3. Lamp selection button
4. Lamp indicator
5. Power control buttons (lamp)
6. Power control buttons (ash tube)
7. Display
8. Sync plug connection
9. Sync button
10. Sync indicators
11. Sound button
12. Sound indicator
13. Test button
14. Test indicator
1 • Connect the mains plug to the mains plug connection.
• To switch on the device, set the on/o switch to the “I“ position.
2
• To switch o the device, set the on/o switch to the “O“ position.
• Press the lamp selection button 1x to adjust the lamps synchronously.
The upper lamp indicator is on. The lower lamp indicator is o.
• Press the lamp selection button 2x to adjust the lamps independently.
3/4
5/7
6/7
8/9/10
11/12
13/14
The upper and lower lamp indicator are on.
• Press the lamp selection button 3x to switch o the lamp.
The upper and lower lamp indicator are o.
• Press the upper power control button to increase the power output of the lamp.
The display shows the power output.
• Press the lower power control button to decrease the power output of the lamp.
The display shows the power output.
• Press the power control button “+“ to increase the power output of the ash tube.
The display shows the power output.
• Press the power control button “-“ to decrease the power output of the ash tube.
The display shows the power output.
• Insert the sync plug of the remote control into sync plug connection.
• Press the sync button 1x to set the standard sync mode. Sync indicator 1 comes on.
• Press the sync button 2x to set the 0.5s-delay sync mode. Sync indicator 2 comes on.
• Press the sync button 3x to set the 2x-trigger delay sync mode. Sync indicator 3 comes on.
• Press the sync button 4x to set the 3x-trigger delay sync mode. Sync indicator 4 comes on.
• Press the sync button 5x to set the 4x-trigger delay sync mode. Sync indicator 5 comes on.
• Press the sound button to activate a buzz sound during charging.
The sound indicator comes on.
• Press the sound button again to deactivate a buzz sound during charging.
The sound indicator goes o.
• Press the test button to start testing the operation of the ash light.
The test indicator comes on.
• Press the test button to stop testing the operation of the ash light.
The test indicator goes o.
1107
12345
SOUND
~220-240V/50Hz
2
12 11 13 14
English
9
CELL
5
LAMP
4
SYNC
TEST
6
3
5
8
6
Page 7
Remote control
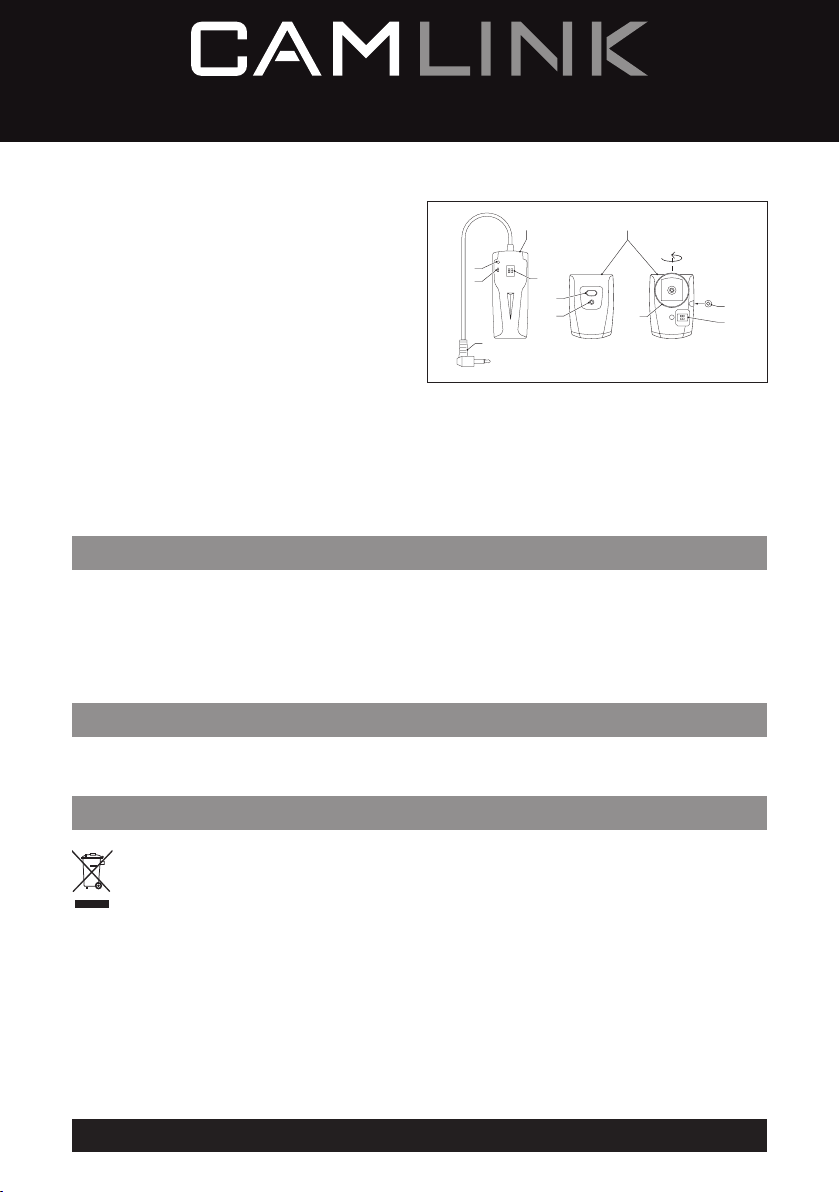
1. Receiver
2. Receiver indicator
3. On/o switch
4. Channel code switch
5. Sync plug
6. Transmitter
7. Transmitter indicator
8. Test button
9. Channel code switch
10. Camera hot shoe mount
1
ON
2
12
3
4
8
7
5
6
12
ON
10
11. PC cable connection
• Insert the sync plug (5) into the sync plug connection of the ash light.
• Set the on/o switch (3) to the on position.
• Set the same channel code for the receiver (1) and the transmitter (6) using the channel code switches (4/9).
• Press the test button (8). The receiver indicator (2) and the transmitter indicator (7) come on.
• Attach the camera hot shoe mount (10) to the camera hot shoe. If the camera does not have a hot shoe, use the
supplied PC cable to connect the transmitter and the camera.
• Press the camera shutter.
Cleaning and maintenance
Warning!
• Do not use cleaning solvents or abrasives.
• Do not clean the inside of the device.
• Do not attempt to repair the device. If the device does not operate correctly, replace it with a new device.
• Clean the outside of the device using a soft, damp cloth.
English
11
9
Warranty
Any changes and/or modications to the product will void the warranty. We cannot accept any liability for damage
caused by incorrect use of the product.
Disposal
• The product is designated for separate collection at an appropriate collection point. Do not dispose of the product
with household waste.
• For more information, contact the retailer or the local authority responsible for waste management.
7
Page 8
English
Technical data
Flash light
Mains voltage 220-240 V
Mains frequency 50 Hz
Exposure index 62 GN
Recycling time 0.2-2.2 s
Colour temperature 5600±100K
Power control
Lamp
Flash tube
Lamp
Remote control
Batteries (receiver) AAA (2x), 1.5 V
Channels 1 (RT-01) / 2 (RT-02) / 4 (RT-04) / 16 (RT-16)
Operation distance
Indoor
Outdoor
Sync speed 1/200 s
Documents
The product has been manufactured and supplied in compliance with all relevant regulations and directives, valid for
all member states of the European Union. The product complies with all applicable specications and regulations in the
country of sales.
Formal documentation is available upon request. The formal documentation includes, but is not limited to the
Declaration of Conformity, the Material Safety Data Sheet and the product test report.
AC
1.0-6.0
1.0-6.0
Halogen lamp, G6.35, 2-pin
75 W (max. 100 W )
≥ 20
≥ 20~30 m
Disclaimer
Designs and specications are subject to change without notice. All logos, brands and product names are trademarks or
registered trademarks of their respective holders and are hereby recognized as such.
8
Page 9

Nederlands
CL-STUDIO30 - Studioitser
Veiligheid
Algemene veiligheid
• Lees de handleiding voor gebruik aandachtig door. Bewaar de handleiding voor latere raadpleging.
• Gebruik het apparaat uitsluitend voor de beoogde doeleinden. Gebruik het apparaat niet voor andere doeleinden
dan beschreven in de handleiding.
• Gebruik het apparaat niet als een onderdeel beschadigd of defect is. Vervang een beschadigd of defect apparaat
onmiddellijk.
• Stel het product niet bloot aan water of vocht.
• Blokkeer de ventilatieopeningen niet.
Elektrische veiligheid
• Dit product mag voor onderhoud alleen worden geopend door een erkend technicus om het risico op elektrische
schokken te verkleinen.
• Koppel het product los van het stopcontact en van andere apparatuur als er zich problemen voordoen.
Batterijveiligheid
• Gebruik alleen de in de handleiding vermelde batterijen.
• Combineer geen oude en nieuwe batterijen.
• Gebruik geen batterijen van verschillende typen of merken.
• Installeer batterijen niet met omgekeerde polariteit.
• Veroorzaak geen kortsluiting van de batterijen. Haal de batterijen niet uit elkaar.
• Stel de batterijen niet bloot aan water.
• Stel de batterijen niet bloot aan vuur of extreme hitte.
• Batterijen kunnen gaan lekken wanneer deze volledig zijn ontladen. Verwijder de batterijen wanneer u het product
gedurende langere tijd onbeheerd achterlaat om schade aan het product te voorkomen.
• Indien vloeistof uit de batterij in contact komt met de huid of kleding, onmiddellijk spoelen met vers water.
Beschrijving
De studioitser is ontworpen om een optimale verlichting te bieden voor fotograe op locatie en in de studio.
1. Bedieningspaneel
2. Afstandssensor
3. Lamp
4. Flitsbuis
5. Stelknop (itser)
6. Ventilatieopeningen
7. Softboxbevestiging
8. Vergrendeling (softboxbevestiging)
9. Statiefbevestiging
10. Vegrendelingsknop (statief)
11. Parasolbevestiging
12. Vegrendelingsknop (parasol)
4
3
7
11
9
9
268
1
12
5
10
Page 10
Gebruik
Bedieningspaneel
1. Netstekkeraansluiting
2. Aan/uit-schakelaar
3. Lampselectieknop
4. Lampindicator
5. Vermogenknop (lamp)
6. Vermogenknop (itsbuis)
7. Weergave
8. Synchronisatiestekkeraansluiting
9. Synchronisatieknop
10. Synchronisatie-indicatoren
11. Geluidsknop
12. Geluidsindicator
13. Testknop
14. Testindicator
• Sluit de netstekker aan op de netstekkeraansluiting.
1
• Zet de aan/uit-schakelaar in de stand "I" om het apparaat in te schakelen.
2
• Zet de aan/uit-schakelaar in de stand "O" om het apparaat uit te schakelen.
• Druk 1x op de lampselectieknop om de lampen synchroon af te stellen.
De bovenste lampindicator is aan. De onderste lampindicator is uit.
• Druk 2x op de lampselectieknop om de lampen onafhankelijk af te stellen.
3/4
5/7
6/7
8/9/10
11/12
13/14
De bovenste en onderste lampindicator zijn aan.
• Druk 3x op de lampselectieknop om de lamp uit te schakelen.
De bovenste en onderste lampindicator zijn uit.
• Druk op de bovenste vermogenknop om het uitgangsvermogen van de lamp te verhogen.
De display toont het uitgangsvermogen.
• Druk op de onderste vermogenknop om het uitgangsvermogen van de lamp te verlagen.
De display toont het uitgangsvermogen.
• Druk op de vermogenknop “+“ om het uitgangsvermogen van de itsbuis te verhogen.
De display toont het uitgangsvermogen.
• Druk op de vermogenknop “-“ om het uitgangsvermogen van de itsbuis te verlagen.
De display toont het uitgangsvermogen.
• Steek de synchronisatiestekker van de afstandsbediening in de synchronisatiestekkeraansluiting.
• Druk 1x op de synchronisatieknop om de standaard synchronisatiemodus in te stellen.
Synchronisatie-indicator 1 gaat branden.
• Druk 2x op de synchronisatieknop om de synchronisatiemodus met 0,5 seconde vertraging in te stellen.
Synchronisatie-indicator 2 gaat branden.
• Druk 3x op de synchronisatieknop om de synchronisatiemodus met 2x activeringsvertraging in te stellen.
Synchronisatie-indicator 3 gaat branden.
• Druk 4x op de synchronisatieknop om de synchronisatiemodus met 3x activeringsvertraging in te stellen.
Synchronisatie-indicator 4 gaat branden.
• Druk 5x op de synchronisatieknop om de synchronisatiemodus met 4x activeringsvertraging in te stellen.
Synchronisatie-indicator 5 gaat branden.
• Druk op de geluidsknop om een zoemgeluid tijdens het opladen te activeren.
De geluidsindicator gaat branden.
• Druk op de geluidsknop om een zoemgeluid tijdens het opladen te deactiveren.
De geluidsindicator gaat uit.
• Druk op de testknop om met het testen van de werking van de itser te starten.
De testindicator gaat branden.
• Druk op de testknop om met het testen van de werking van de itser te stoppen.
De testindicator gaat uit.
1107
12345
SOUND
~220-240V/50Hz
2
12 11 13 14
Nederlands
9
CELL
5
LAMP
4
SYNC
TEST
6
3
5
8
10
Page 11

Nederlands
Afstandsbediening
1. Ontvanger
2. Ontvangerindicator
3. Aan/uit-schakelaar
4. Kanaalcodeschakelaar
5. Synchronisatiestekker
6. Zender
7. Zenderindicator
8. Testknop
9. Kanaalcodeschakelaar
10. Cameraitsschoenbevestiging
11. PC-kabelaansluiting
• Steek de synchronisatiestekker (5) in de synchronisatiestekkeraansluiting van de itser.
• Zet de aan/uit-schakelaar (3) in de aan-stand.
• Stel dezelfde kanaalcode in voor de ontvanger (1) en de zender (6) met behulp van de kanaalcodeschakelaars (4/9).
• Druk op de testknop (8). De ontvangerindicator (2) en de zenderindicator (7) gaan branden.
• Bevestig de cameraitsschoenbevestiging (10) aan de cameraitsschoen. Indien de camera geen itsschoen heeft,
gebruik dan de PC-kabel om de zender en de camera te verbinden.
• Druk op de sluiter van de camera.
Reiniging en onderhoud
Waarschuwing!
• Gebruik geen reinigingsmiddelen of schuurmiddelen.
• Reinig niet de binnenzijde van het apparaat.
• Probeer het apparaat niet te repareren. Indien het apparaat niet juist werkt, vervang het dan door een nieuw
apparaat.
• Reinig de buitenkant van het apparaat met een zachte, droge doek.
1
ON
2
12
3
4
8
7
5
6
11
12
ON
10
9
Garantie
Eventuele wijzigingen en/of aanpassingen aan het product zullen de garantie ongeldig maken. Wij aanvaarden geen
aansprakelijkheid voor schade veroorzaakt door onjuist gebruik van het product.
Afdanken
• Het product is bestemd voor gescheiden inzameling bij een hiertoe aangewezen verzamelpunt. Werp het product
niet weg bij het huishoudelijk afval.
• Neem voor meer informatie contact op met de detailhandelaar of de lokale overheid die verantwoordelijk is voor het
afvalbeheer.
11
Page 12

Nederlands
Technische gegevens
Flitser
Netspanning 220-240 V
Netfrequentie 50 Hz
Belichtingsindex 62 GN
Flitsoplaadtijd 0,2-2,2 s
Kleurtemperatuur 5600±100K
Vermogen
Lamp
Flitsbuis
Lamp
Afstandsbediening
Batterijen (ontvanger) AAA (2x), 1,5 V
Kanalen 1 (RT-01) / 2 (RT-02) / 4 (RT-04) / 16 (RT-16)
Bedrijfsafstand
Binnenshuis
Buitenshuis
Synchronisatiesnelheid 1/200 s
Documenten
Het product is vervaardigd en geleverd in overeenstemming met de relevante reglementen en richtlijnen die voor alle
lidstaten van de Europese Unie gelden. Het product voldoet aan alle van toepassing zijnde specicaties en reglementen
in het land van verkoop.
Ociële documentatie is op aanvraag verkrijgbaar. De ociële documentatie omvat, maar is niet beperkt tot de
Verklaring van Overeenstemming, de Material Safety Data Sheet en het producttestrapport.
AC
1,0-6,0
1,0-6,0
Halogeenlamp, G6.35, 2-pins
75 W (max. 100 W )
≥ 20
≥ 20~30 m
Disclaimer
Ontwerpen en specicaties kunnen zonder kennisgeving worden gewijzigd. Alle logo’s, merken en productnamen
zijn handelsmerken of geregistreerde handelsmerken van de respectievelijke eigenaren en worden hierbij als zodanig
erkend.
12
Page 13

Deutsch
CL-STUDIO30 - Studioblitz
Sicherheit
Allgemeine Sicherheit
• Lesen Sie die Bedienungsanleitung vor dem Gebrauch genau durch. Bitte bewahren Sie die Bedienungsanleitung zur
späteren Bezugnahme auf.
• Verwenden Sie das Gerät nur bestimmungsgemäß. Verwenden Sie das Gerät nur für den in dieser Bedienungsanleitung
beschriebenen Zweck.
• Verwenden Sie das Gerät nicht, falls ein Teil beschädigt oder defekt ist. Ist das Gerät beschädigt oder defekt,
erneuern Sie es unverzüglich.
• Setzen Sie das Gerät keinem Wasser und keiner Feuchtigkeit aus.
• Blockieren Sie nicht die Lüftungsönungen.
Elektrische Sicherheit
• Um die Gefahr eines elektrischen Schlags zu verringern, sollte dieses Produkt bei erforderlichen Servicearbeiten
ausschließlich von einem autorisierten Techniker geönet werden.
• Bei Problemen trennen Sie das Gerät bitte von der Spannungsversorgung und von anderen Geräten.
Batteriesicherheit
• Verwenden Sie ausschließlich die in dieser Anleitung genannten Batterien.
• Verwenden Sie keine alten und neuen Batterien zusammen.
• Verwenden Sie nicht Batterien unterschiedlicher Typen oder Marken.
• Setzen Sie die Batterien nicht mit vertauschter Polarität ein.
• Schließen Sie die Batterien nicht kurz und zerlegen Sie sie nicht.
• Setzen Sie die Batterien keinem Wasser aus.
• Setzen Sie die Batterien keinem Feuer oder übermäßiger Hitze aus.
• Batterien neigen dazu, auszulaufen, wenn Sie vollständig entladen sind. Um eine Beschädigung des Produkts zu
vermeiden, entfernen Sie die Batterien, wenn das Produkt längere Zeit nicht benutzt wird.
• Falls Batterieüssigkeit mit der Haut oder Kleidung in Berührung kommt, spülen Sie die Flüssigkeit sofort mit
frischem Wasser fort.
Beschreibung
Der Studioblitz wurde konstruiert, um eine optimale Ausleuchtung für Ihren Einsatzort sowie für die Studiofotograe zu
bieten.
1. Bedienfeld
2. Fernsensor
3. Lampe
4. Blitzröhre
5. Einstellknopf (Blitzgerät)
6. Belüftungsönungen
7. Softbox-Befestigung
8. Verriegelung (Softbox-Befestigung)
9. Stativbefestigung
10. Sicherungsknopf (Stativ)
11. Schirmbefestigung
12. Sicherungsknopf (Schirm)
4
3
7
11
9
13
268
1
12
5
10
Page 14

Gebrauch
Bedienfeld
1. Netzsteckeranschluss
2. Ein-/Aus-Schalter
3. Lampenauswahltaste
4. Lampenanzeige
5. Leistungsregeltasten (Lampe)
6. Leistungsregeltasten (Blitzröhre)
7. Display
8. Sync-Stecker-Anschluss
9. Sync-Taste
10. Sync-Anzeigen
11. Signaltontaste
12. Signaltonanzeige
13. Test-Taste
14. Test-Anzeige
1 • Stecken Sie den Netzstecker in den Netzsteckeranschluss.
• Um das Gerät einzuschalten, stellen Sie den Ein-/Aus-Schalter auf Position "I".
2
• Um das Gerät auszuschalten, stellen Sie den Ein-/Aus-Schalter auf Position "O".
• Drücken Sie 1x auf die Lampenauswahltaste, um die Lampen synchron einzustellen.
Die obere Lampenanzeige ist an. Die untere Lampenanzeige ist aus.
• Drücken Sie 2x auf die Lampenauswahltaste, um die Lampen unabhängig voneinander einzustellen.
3/4
5/7
6/7
8/9/10
11/12
13/14
Die obere und untere Lampenanzeige ist an.
• Drücken Sie 3x auf die Lampenauswahltaste, um die Lampe auszuschalten.
Die obere und untere Lampenanzeige ist aus.
• Drücken Sie auf die obere Leistungsregeltaste, um die Ausgangsleistung der Lampe zu erhöhen.
Auf dem Display erscheint die Ausgangsleistung.
• Drücken Sie auf die untere Leistungsregeltaste, um die Ausgangsleistung der Lampe zu verringern.
Auf dem Display erscheint die Ausgangsleistung.
• Drücken Sie auf die Leistungsregeltaste “+“, um die Ausgangsleistung der Blitzröhre zu erhöhen.
Auf dem Display erscheint die Ausgangsleistung.
• Drücken Sie auf die Leistungsregeltaste “-“, um die Ausgangsleistung der Blitzröhre zu verringern.
Auf dem Display erscheint die Ausgangsleistung.
• Stecken Sie den Sync-Stecker der Fernbedienung in die Sync-Steckverbindung.
• Drücken Sie 1x auf die Sync-Taste, um den standardmäßigen Sync-Modus einzustellen.
Die Sync-Anzeige 1 leuchtet auf.
• Drücken Sie 2x auf die Sync-Taste, um den Sync-Modus mit der 0,5 Sekunden-Verzögerung einzustellen. Die
Sync-Anzeige 2 leuchtet auf.
• Drücken Sie 3x auf die Sync-Taste, um den Sync-Modus mit der 2x-Auslöseverzögerung einzustellen.
Die Sync-Anzeige 3 leuchtet auf.
• Drücken Sie 4x auf die Sync-Taste, um den Sync-Modus mit der 3x-Auslöseverzögerung einzustellen.
Die Sync-Anzeige 4 leuchtet auf.
• Drücken Sie 5x auf die Sync-Taste, um den Sync-Modus mit der 4x-Auslöseverzögerung einzustellen.
Die Sync-Anzeige 5 leuchtet auf.
• Drücken Sie auf die Signaltontaste, um während des Ladevorgangs den Summer zu aktivieren.
Die Signaltonanzeige leuchtet auf.
• Drücken Sie erneut auf die Signaltontaste, um während des Ladevorgangs den Summer zu deaktivieren.
Die Signaltonanzeige erlischt.
• Drücken Sie auf die Test-Taste, um die Funktion des Blitzgeräts zu überprüfen.
Die Test-Anzeige leuchtet auf.
• Drücken Sie auf die Test-Taste, um die Überprüfung der Funktion des Blitzgeräts auszuschalten.
Die Test-Anzeige erlischt.
1107
12345
SOUND
~220-240V/50Hz
2
12 11 13 14
Deutsch
9
CELL
5
LAMP
4
SYNC
TEST
6
3
5
8
14
Page 15
Deutsch
Fernbedienung
1. Empfänger
2. Empfängeranzeige
3. Ein-/Aus-Schalter
4. Kanalcode-Schalter
5. Sync-Stecker
6. Sender
7. Senderanzeige
8. Test-Taste
9. Kanalcode-Schalter
10. Kamerablitzschuhhalterung
11. PC-Kabel-Anschluss
• Stecken Sie den Sync-Stecker (5) in den Synch-Stecker-Anschluss des Blitzgeräts.
• Stellen Sie den Ein-/Aus-Schalter (3) auf die Ein-Position.
• Stellen Sie für den Empfänger (1) und den Sender (6) unter Verwendung der Kanalcode-Schalter (4/9) auf den
gleichen Kanalcode ein.
• Drücken Sie auf die Test-Taste (8). Die Empfängeranzeige (2) und die Senderanzeige (7) leuchten auf.
• Bringen Sie die Kamerablitzschuhhalterung (10) am Kamerablitzschuh an. Falls die Kamera keinen Kamerablitzschuh
hat, verwenden Sie das mitgelieferte PC-Kabel, um den Sender und die Kamera zu verbinden.
• Drücken Sie auf den Kameraverschluss.
Reinigung und Pege
Warnung!
• Verwenden Sie keine Lösungs- oder Scheuermittel.
• Reinigen Sie das Gerät nicht von innen.
• Versuchen Sie nicht, das Gerät zu reparieren. Falls das Gerät nicht einwandfrei arbeitet, tauschen Sie es gegen ein
neues aus.
• Reinigen Sie das Äußere des Geräts mit einem weichen feuchten Tuch.
1
ON
2
12
3
4
8
7
5
6
11
12
ON
10
9
Garantie
Alle Änderungen und/oder Modizierungen an dem Produkt haben ein Erlöschen der Garantie zur Folge. Wir
übernehmen keine Haftung für Schäden durch unsachgemäße Verwendung des Produkts.
Entsorgung
• Dieses Produkt muss an einer entsprechenden Sammelstelle zur Entsorgung abgegeben werden. Entsorgen Sie das
Produkt nicht mit dem Haushaltsabfall.
• Weitere Informationen erhalten Sie beim Verkäufer oder der für die Abfallwirtschaft verantwortlichen örtlichen
Behörde.
15
Page 16

Deutsch
Technische Daten
Blitzgerät
Netzspannung 220-240 V
Netzfrequenz 50 Hz
Belichtungsindex 62 GN
Blitzfolgezeit 0,2-2,2 s
Farbtemperatur 5600±100K
Leistungsregelung
Lampe
Blitzröhre
Lampe
Fernbedienung
Batterien (Empfänger) AAA (2x), 1,5 V
Kanäle 1 (RT-01) / 2 (RT-02) / 4 (RT-04) / 16 (RT-16)
Betriebsentfernung
In Räumen
Im Freien
Sync-Geschwindigkeit 1/200 s
Dokumente
Dieses Produkt wurde in Übereinstimmung mit allen geltenden Vorschriften und Richtlinien hergestellt und geliefert,
die für alle Mitgliedsstaaten der Europäischen Union gültig sind. Das Produkt entspricht allen geltenden Spezikationen
und Bestimmungen im Land des Vertriebs.
Eine formale Dokumentation ist auf Anfrage erhältlich. Die formale Dokumentation beinhaltet die Konformitätserklärung,
das Datenblatt zur Materialsicherheit und den Produktprüfbericht, ohne jedoch darauf beschränkt zu sein.
AC
1,0-6,0
1,0-6,0
Halogenlampe, G6.35, 2 Stifte
75 W (max. 100 W )
≥ 20
≥ 20~30 m
Haftungsausschluss
Design und technische Daten unterliegen unangekündigten Änderungen. Alle Logos, Marken und Produktnamen sind
Marken oder eingetragene Marken ihrer jeweiligen Eigentümer und werden hiermit als solche anerkannt.
16
Page 17

Español
CL-STUDIO30 - Flash de estudio
Seguridad
Seguridad general
• Lea el manual detenidamente antes del uso. Conserve el manual en caso de futura necesidad.
• Utilice el dispositivo únicamente para su uso previsto. No utilice el dispositivo con una nalidad distinta a la descrita
en el manual.
• No utilice el dispositivo si alguna pieza ha sufrido daños o tiene un defecto. Si el dispositivo ha sufrido daños o tiene
un defecto, sustitúyalo inmediatamente.
• No exponga el producto al agua ni a la humedad.
• No bloquee las aberturas de ventilación.
Seguridad eléctrica
• Para reducir el peligro de descarga eléctrica, este producto sólo debería abrirlo un técnico autorizado cuando
necesite reparación.
• Desconecte el producto de la toma de corriente y de los otros equipos si ocurriera algún problema.
Seguridad de las pilas
• Utilice únicamente las pilas mencionadas en el manual.
• No use conjuntamente pilas nuevas y usadas.
• No utilice pilas de distintos tipo o marcas.
• No instale las pilas con la polaridad invertida.
• No cortocircuite ni desmonte las pilas.
• No exponga las pilas al agua.
• No exponga las pilas al fuego ni a un calor excesivo.
• Las baterías tienden a tener fugas cuando están totalmente descargadas. Para evitar daños en el producto, saque las
pilas cuando no vaya a utilizar el producto durante periodos prolongados de tiempo.
• Si el líquido de las pilas entra en contacto con la piel o la ropa, lave inmediatamente con agua.
Descripción
El ash de estudio se ha diseñado para proporcionar una iluminación óptima para fotografía de exterior y de estudio.
1. Panel de control
2. Sensor remoto
3. Lámpara
4. Tubo del ash
5. Mando de ajuste (ash)
6. Aberturas de ventilación
7. Soporte para ventana de luz
8. Cierre (soporte para ventana de luz)
9. Soporte para trípode
10. Mando de bloqueo (trípode)
11. Soporte para paraguas
12. Mando de bloqueo (paraguas)
4
3
7
11
9
17
268
1
12
5
10
Page 18

Uso
Panel de control
1. Conexión de enchufe de red
2. Interruptor de encendido/apagado
3. Botón de selección de lámpara
4. Indicador de lámpara
5. Botones de control de potencia (lámpara)
6. Botones de control de potencia (tubo del ash)
7. Pantalla
8. Conexión de enchufe de sincronización
9. Botón de sincronización
10. Indicadores de sincronización
11. Botón de sonido
12. Indicador de sonido
13. Botón de prueba
14. Indicador de prueba
1 • Conecte el enchufe de red en la conexión del enchufe de red.
• Para encender el dispositivo, sitúe el interruptor de encendido/apagado en la posición “I“.
2
• Para apagar el dispositivo, sitúe el interruptor de encendido/apagado en la posición “O“.
• Pulse el botón de selección de lámpara 1x para ajustar las lámparas de forma sincronizada.
El indicador de lámpara superior está encendido. El indicador de lámpara superior está apagado.
• Pulse el botón de selección de lámpara 2x para ajustar las lámparas de forma independiente.
3/4
5/7
6/7
8/9/10
11/12
13/14
El indicador de lámpara superior e inferior están encendidos.
• Pulse el botón de selección de lámpara 3x para apagar la lámpara.
El indicador de lámpara superior e inferior están apagados.
• Pulse el botón de control de potencia superior para aumentar la potencia de salida de la lámpara.
La pantalla muestra la potencia de salida.
• Pulse el botón de control de potencia inferior para disminuir la potencia de salida de la lámpara.
La pantalla muestra la potencia de salida.
• Pulse el botón de control de potencia “+“ para aumentar la potencia de salida del tubo del ash.
La pantalla muestra la potencia de salida.
• Pulse el botón de control de potencia “-“ para aumentar la potencia de salida del tubo del ash.
La pantalla muestra la potencia de salida.
• Introduzca el enchufe de sincronización del mando a distancia en la conexión del enchufe de sincronización.
• Pulse el botón de sincronización 1x para ajustar el modo de sincronización estándar.
El indicador de sincronización 1 se enciende.
• Pulse el botón de sincronización 2x para ajustar el modo de sincronización con retardo de 0,5 s.
El indicador de sincronización 2 se enciende.
• Pulse el botón de sincronización 3x para ajustar el modo de sincronización con retardo de 2x el tiempo del
disparador. El indicador de sincronización 3 se enciende.
• Pulse el botón de sincronización 4x para ajustar el modo de sincronización con retardo de 3x el tiempo del
disparador. El indicador de sincronización 4 se enciende.
• Pulse el botón de sincronización 5x para ajustar el modo sincronización con retardo de 4 el tiempo del
disparador. El indicador de sincronización 5 se enciende.
• Pulse el botón de sonido para activar un sonido de pitido durante la carga.
El indicador de sonido se enciende.
• Pulse el botón de sonido de nuevo para desactivar el sonido de pitido durante la carga.
El indicador de sonido se apaga.
• Pulse el botón de prueba para empezar a probar el funcionamiento del ash.
El indicador de prueba se enciende.
• Pulse el botón de prueba para dejar de probar el funcionamiento del ash.
El indicador de prueba se apaga.
1107
12345
SOUND
~220-240V/50Hz
2
12 11 13 14
Español
9
CELL
5
LAMP
4
SYNC
TEST
6
3
5
8
18
Page 19
Español
Mando a distancia
1. Receptor
2. Indicador del receptor
3. Interruptor de encendido/apagado
4. Interruptor de código de canal
5. Enchufe de sincronización
6. Transmisor
7. Indicador del transmisor
8. Botón de prueba
9. Interruptor de código de canal
10. Soporte para zapata de la cámara
11. Cable de conexión a PC
• Introduzca el enchufe de sincronización (5) en la conexión del enchufe de sincronización del ash.
• Sitúe el interruptor de encendido/apagado (3) en la posición de encendido.
• Ajuste el mismo código de canal para el receptor (1) y el transmisor (6) utilizando los interruptores de código de
canal (4/9).
• Pulse el botón de prueba (8). El indicador del receptor (2) y el indicador del transmisor (7) se encienden.
• Fije el soporte de la zapata de la cámara (10) a la zapata de la cámara. Si la cámara no tiene una zapata, utilice el
cable para PC suministrado para conectar el transmisor y la cámara.
• Presione el obturador de la cámara.
Limpieza y mantenimiento
¡Advertencia!
• No utilice disolventes de limpieza ni productos abrasivos.
• No limpie el interior del dispositivo.
• No intente reparar el dispositivo. Si el dispositivo no funciona correctamente, sustitúyalo por uno nuevo.
• Limpie el exterior del dispositivo con un paño suave humedecido.
1
ON
2
12
3
4
8
7
5
6
12
ON
10
11
9
Garantía
Cualquier cambio y/o modicación del producto anulará la garantía. No podemos asumir ninguna responsabilidad por
ningún daño debido a un uso incorrecto del producto.
Eliminación
• El producto está diseñado para desecharlo por separado en un punto de recogida adecuado. No se deshaga del
producto con la basura doméstica.
• Para obtener más información, póngase en contacto con el vendedor o la autoridad local responsable de la
eliminación de residuos.
19
Page 20
Español
Datos técnicos
Flash
Tensión de red 220-240 V
Frecuencia de red 50 Hz
Índice de exposición 62 GN
Tiempo de recarga 0.2-2.2 s
Temperatura del color 5600±100K
Control de potencia
Lámpara
Tubo del ash
Lámpara
Mando a distancia
Pilas (receptor) AAA (2x), 1,5 V
Canales 1 (RT-01) / 2 (RT-02) / 4 (RT-04) / 16 (RT-16)
Distancia de funcionamiento
Interior
Exterior
Velocidad de sincronización 1/200 s
Documentos
El producto se ha fabricado y distribuido de conformidad con todas las normativas y directivas relevantes, válidas para
todos los estados de la Unión Europea. El producto también cumple con todas las especicaciones y normativas en el
país en el cual se comercializa.
Previa solicitud, podremos proporcionarle la documentación formal. La documentación formal incluye, sin limitación,
la declaración de conformidad, la hoja de datos de seguridad del material y el informe sobre las pruebas realizadas al
producto.
CA
1,0-6,0
1,0-6,0
Lámpara halógena, G6.35, 2 pines
75 W (máx. 100 W )
≥ 20
≥ 20~30 m
Renuncia de responsabilidad legal
Las ilustraciones y las especicaciones podrán sufrir cambios sin previo aviso. Todas las marcas de logotipos y nombres de
productos constituyen patentes o marcas registradas a nombre de sus titulares correspondientes, reconocidos como tal.
20
Page 21

Français
CL-STUDIO30 - Flash de studio
Sécurité
Sécurité générale
• Lisez attentivement le manuel avant usage. Conservez le manuel pour toute référence ultérieure.
• Utilisez l'appareil uniquement pour son usage prévu. N'utilisez pas l'appareil à d'autres ns que celles décrites dans
le manuel.
• N'utilisez pas l'appareil si une pièce quelconque est endommagée ou défectueuse. Si l'appareil est endommagé ou
défectueux, remplacez-le immédiatement.
• N'exposez pas l'appareil à l'eau ou à l'humidité.
• Ne bloquez aucune des ouvertures de ventilation.
Sécurité électrique
• Pour réduire le risque de choc électrique, cet appareil doit être ouvert uniquement par un technicien qualié si une
réparation s’impose.
• Débranchez l'appareil et les autres équipements du secteur s'il y a un problème.
Sécurité des piles
• Utilisez uniquement les piles mentionnées dans le manuel.
• N'utilisez jamais des piles usées avec des piles neuves.
• N'utilisez pas des piles de marques ou de types diérents.
• N'installez pas les piles selon une polarité inversée.
• Ne court-circuitez et ne démontez pas les piles.
• N'exposez pas les piles à l'eau.
• N'exposez pas les piles au feu ou à une chaleur excessive.
• Les piles chargées à fond ont tendance à fuir. Pour éviter d'endommager l'appareil, retirez les piles si vous laissez
l'appareil sans surveillance pendant des périodes prolongées.
• Si du liquide s'échappant des piles entre en contact avec la peau ou les vêtements, rincez immédiatement à l'eau claire.
Description
Le ash de studio a été conçu pour assurer un éclairage optimal pour vos activités de photo de terrain et en studio.
1. Panneau de commande
2. Capteur à distance
3. Ampoule
4. Tube de ash
5. Molette de réglage (ash)
6. Ouvertures de ventilation
7. Support de boîte à lumière
8. Loquet (support de boîte à lumière)
9. Support de trépied
10. Molette de verrouillage (trépied)
11. Support de parapluie
12. Molette de verrouillage (parapluie)
4
3
7
11
9
21
268
1
12
5
10
Page 22

Usage
Panneau de commande
1. Connexion de che secteur
2. Commutateur marche/arrêt
3. Sélecteur d'ampoule
4. Témoin d'ampoule
5. Boutons de commande d'alimentation (ampoule)
6. Boutons de commande d'alimentation (tube ash)
7. Écran
8. Connexion de che synchro
9. Bouton synchro
10. Témoins synchro
11. Bouton son
12. Témoin son
13. Bouton test
14. Témoin test
1 • Connectez la che secteur dans la connexion secteur.
• Pour allumer l'appareil, positionnez le commutateur marche/arrêt sur “I“.
2
• Pour éteindre l'appareil, positionnez le commutateur marche/arrêt sur “O“.
• Appuyez sur le sélecteur d'ampoule 1x pour régler les ampoules en synchronisation.
Le témoin supérieur d'ampoule est allumé. Le témoin inférieur d'ampoule est éteint.
• Appuyez sur le sélecteur d'ampoule 2x pour régler les ampoules indépendamment.
3/4
5/7
6/7
8/9/10
11/12
13/14
Les témoins supérieur et inférieur d'ampoule sont allumés.
• Appuyez sur le sélecteur d'ampoule 3x pour éteindre la lampe.
Les témoins supérieur et inférieur d'ampoule sont éteints.
• Appuyez sur le bouton supérieur de commande d'alimentation pour augmenter la sortie de puissance de l'ampoule.
L'écran indique la sortie de puissance.
• Appuyez sur le bouton inférieur de commande d'alimentation pour réduire la sortie de puissance de l'ampoule.
L'écran indique la sortie de puissance.
• Appuyez sur le bouton de commande d'alimentation “+“ pour augmenter la sortie de puissance du tube ash.
L'écran indique la sortie de puissance.
• Appuyez sur le bouton de commande d'alimentation “-“ pour réduire la sortie de puissance du tube ash.
L'écran indique la sortie de puissance.
• Insérez la che synchro de la télécommande dans la connexion de che synchro.
• Appuyez sur le bouton synchro 1x pour régler le mode synchro standard.
Le témoin synchro 1 s'allume.
• Appuyez sur le bouton synchro 2x pour régler le mode synchro sur un délai de 0,5 s.
Le témoin synchro 2 s'allume.
• Appuyez sur le bouton synchro 3x pour régler le mode synchro sur un délai de 2x déclencheur.
Le témoin synchro 3 s'allume.
• Appuyez sur le bouton synchro 4x pour régler le mode synchro sur un délai de 3x déclencheur.
Le témoin synchro 4 s'allume.
• Appuyez sur le bouton synchro 5x pour régler le mode synchro sur un délai de 4x déclencheur.
Le témoin synchro 5 s'allume.
• Appuyez sur le bouton son pour activer un buzzer durant la charge.
Le témoin son s'allume.
• Appuyez à nouveau sur le bouton son pour désactiver un buzzer durant la charge.
Le témoin son s'éteint.
• Appuyez sur le bouton test pour lancer l'opération de test du ash.
Le témoin test s'allume.
• Appuyez sur le bouton test pour stopper l'opération de test du ash.
Le témoin test s'éteint.
1107
12345
SOUND
~220-240V/50Hz
2
12 11 13 14
Français
9
CELL
5
LAMP
4
SYNC
TEST
6
3
5
8
22
Page 23
Français
Télécommande
1. Récepteur
2. Témoin de récepteur
3. Commutateur marche/arrêt
4. Commutateur de code de canal
5. Fiche synchro
6. Émetteur
7. Témoin d'émetteur
8. Bouton test
9. Commutateur de code de canal
10. Support de grie d'appareil photo
11. Connexion de câble PC
• Insérez la che synchro (5) dans la connexion de che synchro du ash.
• Positionnez le commutateur marche/arrêt (3) sur marche.
• Réglez le même code de canal pour le récepteur (1) et l'émetteur (6) avec les commutateurs de code de canal (4/9).
• Appuyez sur le bouton test (8). Les témoins de récepteur (2) et d'émetteur (7) s'allument.
• Fixez le support de grie d'appareil photo (10) sur le porte-accessoires de l'appareil photo. Si l'appareil photo est
dépourvu de grie, utilisez le câble PC fourni pour connecter l'émetteur et l'appareil photo.
• Appuyez sur l'obturateur de l'appareil photo.
Nettoyage et maintenance
Avertissement !
• N'utilisez pas de solvants ni de produits abrasifs.
• Ne nettoyez pas l'intérieur de l'appareil.
• Ne tentez pas de réparer l'appareil. Si l'appareil fonctionne mal, remplacez-le par un neuf.
• Nettoyez l'extérieur de l'appareil avec un chion doux et humide.
1
ON
2
12
3
4
8
7
5
6
11
12
ON
10
9
Garantie
Toute altération ou modication du produit annule la garantie. Nous déclinons toute responsabilité envers les dommages
dus à une utilisation incorrecte du produit.
Mise au rebut
• Le produit doit être jeté séparément des ordures ménagères dans un point de collecte approprié. Ne jetez pas le
produit avec les ordures ménagères ordinaires.
• Pour plus d'informations, contactez le distributeur ou l'autorité locale responsable de la gestion des déchets.
23
Page 24
Français
Caractéristiques techniques
Flash
Tension secteur 220-240 V
Fréquence secteur 50 Hz
Indice d'exposition 62 GN
Temps de recyclage 0,2-2,2 s
Température de couleur 5600±100K
Commande de puissance
Ampoule
Tube de ash
Ampoule
Télécommande
Piles (récepteur) AAA (2x), 1,5 V
Canaux 1 (RT-01) / 2 (RT-02) / 4 (RT-04) / 16 (RT-16)
Distance de fonctionnement
Intérieur
Extérieur
Vitesse de synchro 1/200 s
Documents
Le produit a été fabriqué et fourni en conformité avec toutes les directives et règlements applicables et en vigueur dans
tous les États membres de l'Union Européenne. Le produit est conforme aux spécications et à la réglementation en
vigueur dans le pays de vente.
La documentation ocielle est disponible sur demande. La documentation ocielle inclut notamment la Déclaration
de conformité, la che technique de sécurité et le rapport de test de produit.
CA
1,0-6,0
1,0-6,0
Ampoule halogène, G6,35, 2 broches
75 W (maxi. 100 W )
≥ 20
≥ 20~30 m
Avertissement
Le design et les caractéristiques techniques sont sujets à modication sans notication préalable. Tous les logos de
marques et noms de produits sont des marques déposées ou immatriculées dont leurs détenteurs sont les propriétaires
et sont donc reconnues comme telles dans ce document.
24
Page 25
Italiano
CL-STUDIO30 - Flash da studio
Sicurezza
Istruzioni generali
• Leggere il manuale con attenzione prima dell'uso. Conservare il manuale per riferimenti futuri.
• Utilizzare il dispositivo solo per gli scopi previsti. Non utilizzare il dispositivo per scopi diversi da quelli descritti nel
manuale.
• Non utilizzare il dispositivo se presenta parti difettose. Se il dispositivo è danneggiato o difettoso, sostituirlo
immediatamente.
• Non esporre il prodotto ad acqua o umidità.
• Non ostruire i fori per la ventilazione.
Sicurezza elettrica
• Per ridurre il rischio di scosse elettriche, il presente prodotto deve essere aperto solo da un tecnico autorizzato, nel
caso sia necessario ripararlo.
• Scollegare il prodotto dall’alimentazione e da altri apparecchi se dovesse esserci un problema.
Sicurezza relativa alla batteria
• Utilizzare esclusivamente le batterie indicate nel manuale.
• Non mischiare batterie nuove e vecchie.
• Non utilizzare batterie di tipi o marchi diversi.
• Non installare le batterie invertendo la polarità.
• Non mettere in corto circuito o disassemblare le batterie.
• Non esporre le batterie all'acqua.
• Non esporre le batterie a amme o calore eccessivo.
• Le batterie sono soggette a perdite quando sono completamente scariche. Per evitare di danneggiare il prodotto,
rimuovere le batterie quando viene lasciato incustodito per periodi prolungati.
• Nel caso di contatto del liquido delle batterie con pelle o indumenti, sciacquare immediatamente con acqua fresca.
Descrizione
Il ash da studio è stato progettato per garantire l'illuminazione ottimale di siti o studi fotograci.
1. Pannello di controllo
2. Sensore remoto
3. Lampada
4. Tubo ash
5. Manopola di regolazione (ash)
6. Aperture di ventilazione
7. Attacco per il softbox
8. Fermo (attacco per il softbox)
9. Attacco del treppiede
10. Manopola di bloccaggio (treppiede)
11. Attacco per l'ombrello
12. Manopola di bloccaggio (ombrello)
25
4
3
7
11
9
268
1
12
5
10
Page 26

Uso
Pannello di controllo
1. Presa della spina di alimentazione
2. Interruttore on/o
3. Pulsante di selezione delle lampade
4. Indicatore delle lampade
5. Pulsanti di controllo della potenza (lampada)
6. Pulsanti di controllo della potenza (tubo ash)
7. Display
8. Presa della spina di sincronizzazione
9. Pulsante di sincronizzazione
10. Indicatori di sincronizzazione
11. Pulsante dell'audio
12. Indicatore dell'audio
13. Pulsante di test
14. Indicatore di test
1 • Collegare la spina di alimentazione all'apposita presa.
• Per accendere il dispositivo, posizionare l'interruttore on/o su "I".
2
• Per spegnere il dispositivo, posizionare l'interruttore on/o su "O".
• Premere una volta il pulsante di selezione delle lampade per regolare simultaneamente le lampade.
L'indicatore della lampada superiore è acceso. L'indicatore della lampada inferiore è spento.
• Premere 2 volte il pulsante di selezione delle lampade per regolare le lampade in modo indipendente.
3/4
5/7
6/7
8/9/10
11/12
13/14
Gli indicatori delle lampade superiore e inferiore sono accesi.
• Premere 3 volte il pulsante di selezione delle lampade per spegnere le lampade.
Gli indicatori delle lampade superiore e inferiore sono spenti.
• Premere il pulsante di controllo della potenza superiore per aumentare la potenza di uscita della lampada.
Sul display è visualizzata la potenza di uscita.
• Premere il pulsante di controllo della potenza inferiore per ridurre la potenza di uscita della lampada.
Sul display è visualizzata la potenza di uscita.
• Premere il pulsante di controllo della potenza “+“ per aumentare la potenza del tubo ash.
Sul display è visualizzata la potenza di uscita.
• Premere il pulsante di controllo della potenza “-“ per ridurre la potenza del tubo ash.
Sul display è visualizzata la potenza di uscita.
• Inserire la spina di sincronizzazione del telecomando nell'apposita presa.
• Premere il pulsante di sincronizzazione una volta per impostare la modalità di sincronizzazione standard.
L'indicatore di sincronizzazione 1 si accende.
• Premere il pulsante di sincronizzazione 2 volte per impostare la modalità di sincronizzazione con ritardo di
0,5secondi. L'indicatore di sincronizzazione 2 si accende.
• Premere il pulsante di sincronizzazione 3 volte per impostare la modalità di sincronizzazione con ritardo di
attivazione doppio. L'indicatore di sincronizzazione 3 si accende.
• Premere il pulsante di sincronizzazione 4 volte per impostare la modalità di sincronizzazione con ritardo di
attivazione triplo. L'indicatore di sincronizzazione 4 si accende.
• Premere il pulsante di sincronizzazione 5 volte per impostare la modalità di sincronizzazione con ritardo di
attivazione quadruplo. L'indicatore di sincronizzazione 5 si accende.
• Premere il pulsante dell'audio per attivare un segnale acustico durante la fase di carica.
L'indicatore dell'audio si accende.
• Premere di nuovo il pulsante dell'audio per disattivare un segnale acustico durante la fase di carica.
L'indicatore dell'audio si spegne.
• Premere il pulsante di test per avviare la verica del funzionamento del ash.
L'indicatore di test si accende.
• Premere il pulsante di test per interrompere la verica del funzionamento del ash.
L'indicatore di test si spegne.
1107
12345
SOUND
~220-240V/50Hz
2
12 11 13 14
Italiano
9
CELL
5
LAMP
4
SYNC
TEST
6
3
5
8
26
Page 27

Italiano
Telecomando
1. Ricevitore
2. Indicatore del ricevitore
3. Interruttore on/o
4. Interruttore del codice di canale
5. Spina di sincronizzazione
6. Trasmettitore
7. Indicatore del trasmettitore
8. Pulsante di test
9. Interruttore del codice di canale
10. Supporto di montaggio per l'attacco hot shoe
della fotocamera
11. Connessione del cavo del PC
• Inserire la spina di sincronizzazione (5) nell'apposita presa del ash.
• Regolare l'interruttore on/o (3) sulla posizione on.
• Utilizzando gli interruttori dei codici di canale (4/9), impostare lo stesso codice di canale per il ricevitore (1) e il
trasmettitore (6).
• Premere il pulsante di test (8). L'indicatore del ricevitore (2) e quello del trasmettitore (7) si accendono.
• Collegare l'attacco hot shoe della fotocamera all'apposito supporto di montaggio (10). Se la fotocamera non è dotata
di un attacco hot shoe, utilizzare il cavo del PC in dotazione per collegare trasmettitore e fotocamera.
• Premere l'otturatore della fotocamera.
Pulizia e manutenzione
Attenzione!
• Non utilizzare solventi detergenti o abrasivi.
• Non pulire l'interno del dispositivo.
• Non cercare di riparare il dispositivo. Se il dispositivo non funziona correttamente, sostituirlo con uno nuovo.
• Pulire l'esterno del dispositivo con un panno morbido e umido.
1
ON
2
12
3
4
8
7
5
6
11
12
ON
10
9
Garanzia
Qualsiasi modica e/o cambiamento al prodotto annullerà la garanzia. Si declina ogni responsabilità per danni causati
da un uso non corretto di questo prodotto.
Smaltimento
• Questo prodotto è soggetto a raccolta dierenziata nei punti di raccolta appropriati. Non smaltire il prodotto con i
riuti domestici.
• Per maggiori informazioni, contattare il rivenditore o le autorità locali responsabili per la gestione dei riuti.
27
Page 28

Italiano
Dati tecnici
Flash
Tensione di rete 220-240 V
Frequenza di rete 50 Hz
Indice di esposizione 62 GN
Tempo di ricircolo 0,2-2,2 s
Temperatura del colore 5600±100K
Controllo di potenza
Lampada
Tubo ash
Lampada
Telecomando
Batterie (ricevitore) AAA (2x), 1,5 V
Canali 1 (RT-01) / 2 (RT-02) / 4 (RT-04) / 16 (RT-16)
Distanza operativa
Interno
Esterno
Velocità di sincronizzazione 1/200 s
Documenti
Il presente prodotto è stato realizzato e fornito in conformità a tutte le norme e le direttive vigenti, con validità in tutti
gli stati membri della Comunità Europea. Il presente prodotto è conforme alle speciche e alle normative applicabili nel
paese in cui è stato venduto.
La documentazione uciale è disponibile su richiesta. Detta documentazione uciale comprende, a titolo esemplicativo,
la Dichiarazione di conformità, la scheda tecnica di sicurezza dei materiali e il rapporto dei collaudi del prodotto.
CA
1,0-6,0
1,0-6,0
Lampada alogena, G6.35, 2 pin
75 W (max. 100 W )
≥ 20
≥ 20~30 m
Clausola esonerativa di responsabilità
Il design e le caratteristiche tecniche sono soggetti a modica senza necessità di preavviso. Tutti i marchi, loghi e nomi dei
prodotti sono marchi commerciali o registrati dei rispettivi titolari e sono riconosciuti come tali in questo documento.
28
Page 29

Português
CL-STUDIO30 - Iluminação ash studio
Segurança
Segurança geral
• Leia atentamente o manual de instruções antes de utilizar. Guarde o manual para consulta futura.
• Utilize o dispositivo apenas para a nalidade a que se destina. Não utilize o dispositivo para outras nalidades além
das descritas no manual.
• Não utilize o dispositivo caso tenha alguma peça danicada ou com defeito. Se o dispositivo estiver danicado ou
tenha defeito, substitua imediatamente o dispositivo.
• Não exponha o produto à água ou humidade.
• Não bloqueie as aberturas de ventilação.
Segurança eléctrica
• Quando necessitar de reparação e para reduzir o risco de choque eléctrico, este produto deve apenas ser aberto por
um técnico autorizado.
• Desligue o produto da tomada de alimentação e outro equipamento se ocorrer um problema.
Segurança das pilhas
• Utilize apenas as pilhas indicadas neste manual.
• Não misture pilhas usadas e novas.
• Não utilize pilhas de tipos ou marcas diferentes.
• Não instale as pilhas com polaridade invertida.
• Não coloque as pilhas em curto-circuito nem as desmonte.
• Não exponha as pilhas a água.
• Não exponha as pilhas a fogo ou calor excessivo.
• As pilhas facilmente apresentam fugas quando totalmente descarregadas. Para evitar danos ao produto, retire as
pilhas sempre que não for utilizar o produto durante longos períodos de tempo.
• Se o líquido das pilhas entrar em contacto com a pele ou vestuário, lave imediatamente com água corrente.
Descrição
A iluminação ash studio foi concebida para facultar uma iluminação ideal para o seu local de trabalho e aplicações de
fotograa em studio.
1. Painel de controlo
2. Sensor remoto
3. Lâmpada
4. Lâmpada de ash electrónico
5. Botão de ajuste (iluminação ash)
6. Aberturas de ventilação
7. Montagem da softbox
8. Bloqueio (montagem da softbox)
9. Montagem do tripé
10. Botão de bloqueio (tripé)
11. Montagem do guarda-chuva
12. Botão de bloqueio (guarda-chuva)
4
3
7
11
9
29
268
1
12
5
10
Page 30

Utilização
Painel de controlo
1. Ligação da cha de alimentação principal
2. Interruptor ligar/desligar
3. Botão de selecção da lâmpada
4. Indicador da lâmpada
5. Botões de controlo de alimentação (lâmpada)
6. Botões de controlo de alimentação
(lâmpada de ash electrónico)
7. Visor
8. Ligação da cha de sincronização
9. Botão de sincronização
10. Indicadores de sincronização
11. Botão de som
12. Indicador de som
13. Botão de teste
14. Indicador de teste
1 • Ligue a cha de alimentação principal à respectiva ligação.
• Para ligar o dispositivo, coloque o interruptor de ligar/desligar na posição “I“.
2
• Para desligar o dispositivo, coloque o interruptor de ligar/desligar na posição “O“.
• Prima o botão de selecção da lâmpada 1x para ajustar as lâmpadas de forma sincronizada.
O indicador de lâmpada superior está aceso. O indicador de lâmpada inferior está aceso.
• Prima o botão de selecção da lâmpada 2x para ajustar as lâmpadas de forma independente.
3/4
5/7
6/7
8/9/10
11/12
13/14
O indicador de lâmpada superior e inferior estão acesos.
• Prima o botão de selecção da lâmpada 3x para desligar a lâmpada.
O indicador de lâmpada superior e inferior está apagado.
• Prima o botão de controlo de alimentação superior para aumentar a potência de saída da lâmpada.
O visor apresenta a potência de saída.
• Prima o botão de controlo de alimentação inferior para diminuir a potência de saída da lâmpada.
O visor apresenta a potência de saída.
• Prima o botão de controlo de alimentação “+“ para aumentar a potência de saída da lâmpada de ash electrónico.
O visor apresenta a potência de saída.
• Prima o botão de controlo de alimentação “-“ para diminuir a potência de saída da lâmpada de ash electrónico.
O visor apresenta a potência de saída.
• Ligue a cha de sincronização do comando à respectiva ligação.
• Prima o botão de sincronização 1x para denir o modo de sincronização padrão.
O indicador de sincronização 1 acende-se.
• Prima o botão de sincronização 2x para denir o modo de sincronização com 0,5 segundos de atraso.
O indicador de sincronização 2 acende-se.
• Prima o botão de sincronização 3x para denir o modo de sincronização de atraso de disparador 2x. O indicador
de sincronização 3 acende-se.
• Prima o botão de sincronização 4x para denir o modo de sincronização de atraso de disparador 3x. O indicador
de sincronização 4 acende-se.
• Prima o botão de sincronização 5x para denir o modo de sincronização de atraso de disparador 4. O indicador
de sincronização 5 acende-se.
• Prima o botão de som para activar um zumbido durante o carregamento.
O indicador de som acende-se.
• Prima o botão de som novamente para desactivar um zumbido durante o carregamento.
O indicador de som apaga-se.
• Prima o botão de teste para iniciar o teste ao funcionamento da iluminação ash. O indicador de teste acende-se.
• Prima o botão de teste para parar o teste ao funcionamento da iluminação ash. O indicador de teste apaga-se.
1107
12345
SOUND
~220-240V/50Hz
2
12 11 13 14
Português
9
CELL
5
LAMP
4
SYNC
TEST
6
3
5
8
30
Page 31

Português
Comando
1. Receptor
2. Indicador do receptor
3. Interruptor ligar/desligar
4. Interruptor de código de canal
5. Ficha de sincronização
6. Transmissor
7. Indicador de transmissor
8. Botão de teste
9. Interruptor de código de canal
10. Suporte da sapata quente da câmara
11. Ligação do cabo de PC
• Ligue a cha de sincronização (5) do comando à respectiva ligação da iluminação ash.
• Coloque o interruptor de ligar/desligar (3) na posição ligada.
• Dena o mesmo código de canal para o receptor (1) e transmissor (6) utilizando os interruptores de código de canal
(4/9).
• Prima o botão de teste (8). O indicador do receptor (2) e o indicador do transmissor (7) acende-se.
• Instale o suporte da sapata quente (10) da câmara na respectiva sapata. Se a câmara não possuir uma sapata quente,
utilize o cabo de PC fornecido para ligar o transmissor e a câmara.
• Prima o obturador da câmara.
Limpeza e manutenção
Aviso!
• Não utilize solventes de limpeza ou produtos abrasivos.
• Não limpe o interior do dispositivo.
• Não tente reparar o dispositivo. Se o dispositivo não funcionar correctamente, substitua-o por um dispositivo novo.
• Limpe o exterior do dispositivo utilizando um pano húmido macio.
1
ON
2
12
3
4
8
7
5
6
11
12
ON
10
9
Garantia
Quaisquer alterações e/ou modicações no produto anularão a garantia. Não nos podemos responsabilizar por
qualquer dano causado pelo uso incorrecto do produto.
Eliminação
• O produto deve ser eliminado separadamente num ponto de recolha apropriado. Não elimine este produto
juntamente com o lixo doméstico.
• Para obter mais informações, contacte o revendedor ou o organismo local responsável pela gestão de resíduos.
31
Page 32

Português
Dados técnicos
Iluminação ash
Tensão de alimentação principal 220-240 V
Frequência de alimentação principal 50 Hz
Índice de exposição 62 GN
Tempo de reciclagem 0,2-2,2 s
Temperatura da cor 5600±100K
Controlo de alimentação
Lâmpada
Lâmpada de ash electrónico
Lâmpada
Comando
Pilhas (receptor) AAA (2x), 1,5 V
Canais 1 (RT-01) / 2 (RT-02) / 4 (RT-04) / 16 (RT-16)
Distância de funcionamento
Interior
Exterior
Velocidade de sincronização 1/200 s
Documentos
O produto foi fabricado e fornecido em conformidade com todos os regulamentos e directivas relevantes, válidos
para todos os Estados-Membros da União Europeia. Além disso, está em conformidade com todas as especicações e
regulamentos aplicáveis no país de venda.
Mediante pedido, será disponibilizada documentação formal . A documentação formal inclui, entre outros, a Declaração
de Conformidade, a Ficha de Dados de Segurança e o relatório de teste do produto.
CA
1,0-6,0
1,0-6,0
Lâmpada de halogéneo, G6.35, 2 pinos
75 W (máx. 100 W )
≥ 20
≥ 20~30 m
Limitação de responsabilidade
Os designs e as especicações estão sujeitos a alteração sem aviso. Todos os logótipos, marcas ou logótipos de marcas e
nomes de produtos são marcas registadas dos respectivos proprietários e são reconhecidas como tal neste documento.
32
Page 33

Dansk
CL-STUDIO30 - Atelierlampe
Sikkerhed
Generel sikkerhed
• Læs vejledningen omhyggeligt inden apparatet tages i brug. Gem vejledningen til fremtidig brug.
• Brug kun apparatet til de tilsigtede formål. Brug ikke apparatet til andre formål end dem, som er beskrevet i vejledningen.
• Brug ikke apparatet, hvis det har beskadigede eller defekte dele. Hvis apparatet er beskadiget eller defekt, skal det
omgående udskiftes.
• Udsæt ikke produktet for vand eller fugt.
• Bloker ikke ventilationshullerne.
Elektrisk sikkerhed
• For at nedsætte risikoen for elektrisk stød, må dette produkt kun åbnes af en autoriseret tekniker, når service er
nødvendig.
• Frakobl produktet stikkontakten og andet udstyr, hvis der opstår et problem.
Batterisikkerhed
• Brug kun de batterier, som er nævnt i vejledningen.
• Brug ikke gamle og nye batterier sammen.
• Brug ikke batterier af anden type eller mærker.
• Installer ikke batterierne med omvendt polaritet.
• Kortslut eller afmonter ikke batterierne.
• Udsæt ikke batterierne for vand.
• Udsæt ikke batterierne for ild eller overdreven varme.
• Batterier kan lække, når de er fuldt aadede. For at undgå skade på produktet skal batterierne ernes, når de
produktet efterlades uden opsyn i et længere tidsrum.
• Hvis batterivæsken kommer i kontakt med hud eller tøj skylles omgående med frisk vand.
Beskrivelse
Denne atelierlampe er designet til at give den bedst mulige belysning til fotograformål både på stedet og i dit atelier.
1. Styrepanel
2. Fjernsensor
3. Lampe
4. Blitzrør
5. Reguleringsknap
6. Ventilationsåbninger
7. Softboxmontering
8. Lås (softboxmontering)
9. Trefodsmontering
10. Låseknap
11. Parasolmontering
12. Låseknap (parasol)
4
3
7
11
9
33
268
1
12
5
10
Page 34

Anvendelse
Styrepanel
1. Netstikforbindelse
2. Tænd/sluk-kontakt
3. Lampevælgerknap
4. Lampeindikator
5. Eektreguleringsknapper (lampe)
6. Eektreguleringsknapper (blitzrør)
7. Visning
8. Synk-stikforbindelse
9. Synk-knap
10. Synk-indikatorer
11. Lydknap
12. Lydindikator
13. Testknap
14. Testindikator
• Sæt netstikket i netstikstikforbindelsen.
1
• Tænd for apparatet ved at stille tænd/sluk-kontakten i positionen "I".
2
• Sluk for apparatet ved at stille tænd/sluk-kontakten i positionen "O".
• Tryk på lampevælgerknap 1 gang for at regulere lampen synkront.
Den øvre lampeindikator er tændt. Den nedre lampeindikator er slukket.
• Tryk på lampevælgerknap 2 gange for at regulere lamperne uafhængigt.
3/4
5/7
6/7
8/9/10
11/12
13/14
Den øvre og nedre lampeindikator er tændt.
• Tryk på lampevælgerknap 3 gange for at slukke lampen.
Den øvre og nedre lampeindikator er slukket.
• Tryk på den øvre eektreguleringsknap for at øge lampens udgangseekt.
Displayet viser udgangseekten.
• Tryk på den nedre eektreguleringsknap for at sænke lampens udgangseekt.
Displayet viser udgangseekten.
• Tryk på eektreguleringsknappen “+“ for at øge blitzrørets udgangseekt.
Displayet viser udgangseekten.
• Tryk på eektreguleringsknappen “-“ for at sænke blitzrørets udgangseekt.
Displayet viser udgangseekten.
• Sæt synk-stikforbindelsen i erbetjeningens synk-stikforbindelse.
• Tryk 1 gang på synk-knappen for at indstille standard synk-tilstand.
Synk-indikator 1 tænder.
• Tryk 2x på synk-knappen for at indstille synk-tilstanden 0,5s-forsinkelse.
Synk-indikator 2 tænder.
• Tryk 3x på synk-knappen for at indstille synk-tilstanden 2x-forsinkelse.
Synk-indikator 3 tænder.
• Tryk 4x på synk-knappen for at indstille synk-tilstanden 3x-forsinkelse.
Synk-indikator 4 tænder.
• Tryk 5x på synk-knappen for at indstille synk-tilstanden 4x-forsinkelse.
Synk-indikator 5 tænder.
• Tryk på lydknappen for at aktivere en summelyd under opladning.
Lydindikatoren tænder.
• Tryk igen på lydknappen for at deaktivere en summelyd under opladning.
Lydindikatoren slukker.
• Tryk på testknappen for at starten testen af blitzlysets funktion.
Test-indikatoren tænder.
• Tryk på testknappen for at stoppe testen af blitzlysets funktion.
Testindikatoren slukker.
1107
12345
SOUND
~220-240V/50Hz
2
12 11 13 14
Dansk
9
CELL
5
LAMP
4
SYNC
TEST
6
3
5
8
34
Page 35

Fjernbetjening
1. Modtager
2. Modtagerindikator
3. Tænd/sluk-kontakt
4. Kanalomskifter
5. Synk-stik
6. Transmitter
7. Transmitterindikator
8. Testknap
9. Kanalomskifter
10. Kameraets hotshoe-montering
1
ON
2
12
3
4
8
7
5
6
12
ON
10
11. PC kabelforbindelse
• Sæt synk-stikforbindelsen (5) i synk-stikforbindelsen på blitzlyset.
• Stil tænd/sluk-kontakten (3) i position på.
• Sæt samme kanalkode for modtageren (1) og transmitteren (6) ved hjælp af kanalomskifterne (4/9).
• Tryk på testknappen (8). Modtagerindikatoren (2) og transmitterindikatoren (7) tænder.
• Monter kameraets hotshoe-montering (10) til kameraets hotshoe. Hvis kameraet ikke har en hotshoe, brug det
medfølgende PC-kabel til at forbinde transmitter og kamera.
• Tryk på kamera-shutteren.
Rengøring og vedligeholdelse
Advarsel!
• Brug ikke opløsningsmidler eller slibende rengøringsmidler.
• Gør ikke apparatet rent indvendigt.
• Forsøg aldrig at reparere apparatet. Hvis apparatet ikke fungerer korrekt, skal det udskiftes med et nyt.
• Rengør apparatet udvendigt med en blød, fugtig klud.
Dansk
11
9
Garanti
Ændringer og/eller modikationer af produktet vil medføre bortfald af garantien. Vi fralægger os ethvert ansvar for
skader forårsaget på grund af forkert brug af produktet.
Bortskaelse
• Produktet skal aeveres på et passende indsamlingspunkt. Bortskaf ikke produktet sammen med
husholdningsaald.
• For mere information, kontakt forhandleren eller den lokale myndighed der er ansvarlig for kontrol af aald.
35
Page 36

Dansk
Tekniske data
Blitzlys
Netspænding 220-240 V
Netfrekvens 50 Hz
Eksponeringsindeks 62 GN
Genbrugstid 0,2-2,2 s
Farvetemperatur 5600±100K
Eektregulering
Lampe
Blitzrør
Lampe
Fjernbetjening
Batterier (modtager) AAA (2x), 1.5 V
Kanaler 1 (RT-01) / 2 (RT-02) / 4 (RT-04) / 16 (RT-16)
Funktionsafstand
Indendørs
Udendørs
Synk-hastighed 1/200 s
Dokumenter
Produktet er fremstillet og leveres i overensstemmelse med alle relevante forordninger og direktiver, der er gældende
for alle EUs medlemsstater. Produktet overholder alle gældende specikationer og forskrifter i de lande, hvor produktet
sælges.
Formel dokumentation kan fremlægges på forlangende. Den formelle dokumentation omfatter, men er ikke begrænset
til, konformitetserklæringen, sikkerhedsdatablad for materialet og rapporten fra produkttesten.
AC
1,0-6,0
1,0-6,0
Halogenlampe, G6.35, 2-ben
75 W (maks. 100 W )
≥ 20
≥ 20~30 m
Ansvarsfraskrivelse
Design og specikationer kan ændres uden varsel. Alle bomærker og produktnavne er varemærker eller registrerede
varemærker tilhørende deres respektive ejere og anses herved som sådan.
36
Page 37

Norsk
CL-STUDIO30 - Studio blitslys
Sikkerhet
Generell sikkerhet
• Les bruksanvisningen nøye før bruk. Oppbevar bruksanvisningen for fremtidig bruk.
• Bruk bare enheten for det tiltenkte formålet. Ikke bruk enheten til andre formål enn det som er beskrevet
ibruksanvisningen.
• Ikke bruk enheten hvis noen del er skadet eller defekt. Enheten må erstattes umiddelbart hvis den er skadet eller defekt.
• Ikke utsett produktet for vann eller fuktighet.
• Ikke blokker ventilasjonsåpningene.
Elektrisk sikkerhet
• For å redusere faren for strømstøt, skal dette produktet bare åpnes av en autorisert tekniker når vedlikehold er
nødvendig.
• Koble produktet fra strømmen og annet utstyr dersom et problem oppstår.
Batterisikkerhet
• Bruk bare batteriene som er nevnt i denne veiledningen.
• Ikke bland gamle og nye batterier.
• Ikke bruk batterier av ulike typer eller merker.
• Ikke sett inn batterier i omvendt polaritet.
• Ikke kortslutt eller demonter batteriene.
• Ikke utsett batteriene for vann.
• Ikke utsett batteriene for brann eller overdreven varme.
• Batterier er mer utsatt for lekkasje når de helt utladet. For å unngå skader på produktet, ta ut batteriene når du
forlater produktet uten tilsyn i lengre perioder.
• Hvis væske fra batteriene kommer i kontakt med hud eller klær, må du skylle med friskt vann umiddelbart.
Beskrivelse
Studioet-blitslyset er designet for å gi optimal belysning for din lokalisasjon og studiofotografering.
1. Kontrollpanel
2. Ekstern sensor
3. Lampe
4. Blitsrør
5. Justeringsknapp (blitslys)
6. Ventilasjonsåpninger
7. Softboxmontering
8. Lås (softboxmontering)
9. Stativmontering
10. Låseknott (stativ)
11. Paraplymontering
12. Låseknott (paraply)
37
4
3
7
11
12
10
9
268
1
5
Page 38

Bruk
Kontrollpanel
1. Hovednettplugg-forbindelse
2. På/av-bryter
3. Lampe-valgknapp
4. Lampeindikator
5. Strømkontrollknapper (lampe)
6. Strømkontrollknapper (blitsrør)
7. Display
8. Synkroniseringsplugg-forbindelse
9. Synkroniseringsknapp
10. Synkroniseringsindikatorer
11. Lydknapp
12. Lydindikator
13. Testknapp
14. Testindikator
1 • Koble hovednettpluggen til hovednettplugg-forbindelsen.
• For å slå av enheten, sett på/av-bryteren til “I“-posisjon.
2
• For å slå av enheten, sett på/av-bryteren til “O“-posisjon.
• Trykk på lampe-valgknappen 1x for å justere lampene synkront.
Den øvre lampeindikatoren er på. Den nedre lampeindikatoren er av.
• Trykk på lampe-valgknappen 2x for å justere lampene uavhengig av de andre.
3/4
5/7
6/7
8/9/10
11/12
13/14
Den øvre og nedre lampeindikatoren er på.
• Trykk på lampe-valgknappen 3x for å slå av lampen.
Den øvre og nedre lampeindikatoren er av.
• Trykke på den øvre strømkontrollknappen for å øke utgangseekten til lampen.
Displayet viser utgangseekten.
• Trykke på den nedre strømkontrollknappen for å redusere utgangseekten til lampen.
Displayet viser utgangseekten.
• Trykke på strømkontrollknappen “+“ for å øke utgangseekten til blitsrøret.
Displayet viser utgangseekten.
• Trykke på strømkontrollknappen “-“ for å redusere utgangseekten til blitsrøret.
Displayet viser utgangseekten.
• Sett synkroniseringspluggen til ernkontrollen inn i synkroniseringsplugg-forbindelsen.
• Trykk synkroniseringsknappen 1x for å velge standard synkroniseringsmodus.
Synkroniseringsindikator 1 tennes.
• Trykk synkroniseringsknappen 2x for å velge synkroniseringsmodus med 0,5 s forsinkelse.
Synkroniseringsindikator 2 tennes.
• Trykk synkroniseringsknappen 3x for å velge synkroniseringsmodus med 2x-utløserforsinkelse.
Synkroniseringsindikator 3 tennes.
• Trykk synkroniseringsknappen 4x for å velge synkroniseringsmodus med 3x-utløserforsinkelse.
Synkroniseringsindikator 4 tennes.
• Trykk synkroniseringsknappen 5x for å velge synkroniseringsmodus med 4x-utløserforsinkelse.
Synkroniseringsindikator 5 tennes.
• Trykk på lydknappen for å aktivere en summer under lading.
Lydindikatoren aktiveres.
• Trykk på lydknappe igjen for å deaktiveren en summer under lading.
Lydindikatoren deaktiveres.
• Trykk på testknappen for å begynne å teste driften av blitslyset.
Testindikatoren tennes.
• Trykk på testknappen for å stanse testen av blitslyset.
Lydindikatoren slukkes.
1107
12345
SOUND
~220-240V/50Hz
2
12 11 13 14
Norsk
9
CELL
5
LAMP
4
SYNC
TEST
6
3
5
8
38
Page 39

Fjernkontroll
1. Mottaker
2. Mottakerindikator
3. På/av-bryter
4. Kanalkodebryter
5. Synkroniseringsplugg
6. Transmitter
7. Transmitterindikator
8. Testknapp
9. Kanalkodebryter
10. Blitsskofeste for kamera
1
ON
2
12
3
4
8
7
5
6
12
ON
10
11. PC-kabelforbindelse
• Sett synkroniseringspluggen (5) inn i synkroniseringsplugg-forbindelsen på blitslyset.
• Sett på/av-bryteren (3) til på-posisjon.
• Angi samme kanalkode for mottakeren (1) og senderen (6) ved hjelp av kanalkodebryterne (4/9).
• Trykk testknappen (8). Mottakerindikatoren (2) og transmitterindikatoren (7) tennes.
• Fest kameraets blitsskofeste (10) kameraets blitssko. Hvis kameraet ikke har et blitsskofeste, bruker du den
medfølgende PC-kabelen til å koble til transmitteren og kameraet.
• Trykk kameralukkeren.
Rengjøring og vedlikehold
Advarsel!
• Ikke bruk rensemidler eller skuremidler.
• Ikke rengjør innsiden av enheten.
• Ikke prøv å reparere enheten. Hvis enheten ikke fungerer som den skal, erstatt den med en ny enhet.
• Rengjør utsiden av enheten med en myk, fuktig klut.
Norsk
11
9
Garanti
Eventuelle endringer og/eller modikasjoner av produkter opphever garantien. Vi tar ikke ansvar for skade som
forårsakes av ukorrekt bruk av produktet.
Avhending
• Produktet må avhendes på egnede oppsamlingssteder. Du må ikke avhende produktet som husholdningsavfall.
• Ta kontakt med leverandøren eller lokale myndigheter hvis du ønsker mer informasjon om avhending.
39
Page 40

Norsk
Tekniske data
Blitslys
Nettspenning 220-240 V
Nettfrekvens 50 Hz
Eksponeringsindeks 62 GN
Recsirkuleringstid 0,2-2,2 s
Fargetemperatur 5600±100K
Strømkontroll
Lampe
Blitsrør
Lampe
Fjernkontroll
Batterier (mottaker) AAA (2x), 1,5 V
Kanaler 1 (RT-01) / 2 (RT-02) / 4 (RT-04) / 16 (RT-16)
Driftsavstand
Innendørs
Utendørs
Synk.-hastighet 1/200 s
Dokumenter
Produktet har blitt produsert og levert i henhold til alle relevante bestemmelser og direktiver, gyldig for alle medlemsstater
i EU. Produktet overholder også alle gjeldende spesikasjoner og bestemmelser i landet det selges i.
Formell dokumentasjon er tilgjengelig på forespørsel. Den formelle dokumentasjon inkluderer, men er ikke begrenset
til samsvarserklæringen, HMS-databladet og produkttestrapporten.
AC
1,0-6,0
1,0-6,0
Halogenlampe, G6.35, 2-pin
75 W (maks. 100 W )
≥ 20
≥ 20~30 m
Ansvarsfraskrivelse
Utforming og spesikasjoner kan endres uten forhåndsvarsel. Alle logoer, merker og produktnavn er varemerker eller
registrerte varemerker til de respektive eierne, og skal behandles som dette.
40
Page 41

Svenska
CL-STUDIO30 - Studioblixt
Säkerhet
Allmän säkerhet
• Läs bruksanvisningen noga innan användning. Behåll bruksanvisningen för att kunna använda den igen.
• Använd endast enheten för dess avsedda syfte. Använd inte enheten till andra ändamål än dem som beskrivs i denna
bruksanvisning.
• Använd inte enheten om någon del är skadad eller felaktig. Om enheten är skadad eller felaktig ska den bytas ut
omedelbart.
• Utsätt inte produkten för vatten eller fukt.
• Blockera inte ventilationsöppningarna.
Elsäkerhet
• För att minska risken för elektriska stötar bör denna produkt endast öppnas av behörig tekniker när service behövs.
• Dra ut strömkabeln från eluttaget och koppla ur all annan utrustning om något problem skulle uppstå.
Batterisäkerhet
• Använd endast de batterier som omnämns i denna bruksanvisning.
• Blanda inte gamla och nya batterier.
• Använd inte batterier av olika typ eller märk.
• Montera inte batterierna med polerna felvända.
• Kortslut eller öppna inte batterierna.
• Utsätt inte batterierna för vatten.
• Utsätt inte batterierna för eld eller kraftig värme.
• Det nns risk för att batterierna läcker när de är helt urladdade. Undvik skada på produkten genom att avlägsna
batterierna när produkten inte används under längre perioder.
• Skölj omedelbart med vatten om vätska från batterierna kommer i kontakt med skinn eller kläder.
Beskrivning
Studioblixten utformades för att ge optimalt ljus för din plats och för fotografering i studio.
1. Kontrollpanel
2. Avståndssensor
3. Lampa
4. Blixtrör
5. Justeringsvred (blixtlampa)
6. Ventilationsöppningar
7. Softboxfäste
8. Spärr (softboxfäste)
9. Stativfäste
10. Låsvred (stativ)
11. Paraplyfäste
12. Låsvred (paraply)
41
4
3
7
11
9
268
1
12
5
10
Page 42

Användning
Kontrollpanel
1. Uttag för elkontakt
2. På/av-brytare
3. Lampväljarknapp
4. Lampindikator
5. Eektkontrollknappar (lampa)
6. Eektkontrollknappar (blixtrör)
7. Display
8. Synkuttag
9. Synkknapp
10. Synkindikatorer
11. Ljudknapp
12. Ljudindikator
13. Testknapp
14. Testindikator
1 • Anslut elkontakten till uttaget för elkontakten.
• För att slå på enheten, sätt på/av-brytaren i läge "I".
2
• För att slå av enheten, sätt på/av-brytaren i läge "O".
• Tryck på lampväljarknappen 1x för att justera lamporna synkront.
Den övre lampindikatorn är på. Den nedre lampindikatorn är av.
• Tryck på lampväljarknappen 2x för att justera lamporna oberoende av varandra.
3/4
5/7
6/7
8/9/10
11/12
13/14
Den övre och den nedre lampindikatorn är på.
• Tryck på lampväljarknappen 3x för att stänga av lampan.
Den övre och den nedre lampindikatorn är av.
• Tryck på den övre eektkontrollknappen för att öka lampans eekt.
Displayen visar eekten.
• Tryck på den nedre eektkontrollknappen för att minska lampans eekt.
Displayen visar eekten.
• Tryck på eektkontrollknappen “+“ för att öka blixtrörets eekt.
Displayen visar eekten.
• Tryck på eektkontrollknappen “-“ för att minska blixtrörets eekt.
Displayen visar eekten.
• För in ärrkontrollens synkkontakt i synkuttaget.
• Tryck på synkknappen 1x för att ställa in standardsynkläge. Synkindikator 1 tänds.
• Tryck på synkknappen 2x för att ställa in synkläget till 0,5 s fördröjning. Synkindikator 2 tänds.
• Tryck på synkknappen 3x för att ställa in synkläget 2x utlösarförskjutning. Synkindikator 3 tänds.
• Tryck på synkknappen 4x för att ställa in synkläget 3x utlösarförskjutning. Synkindikator 4 tänds.
• Tryck på synkknappen 5x för att ställa in synkläget 4x utlösarförskjutning. Synkindikator 5 tänds.
• Tryck på ljudknappen för att aktivera ett surrande ljud vid laddning.
Ljudindikatorn tänds.
• Tryck på ljudknappen igen för att avaktivera ett surrande ljud vid laddning.
Ljudindikatorn släcks.
• Tryck på testknappen för att börja testa blixtlampans funktion.
Testindikatorn tänds.
• Tryck på testknappen för att sluta testa blixtlampans funktion.
Testindikatorn släcks.
1107
12345
SOUND
~220-240V/50Hz
2
12 11 13 14
Svenska
9
CELL
5
LAMP
4
SYNC
TEST
6
3
5
8
42
Page 43

Fjärrkontroll
1. Mottagare
2. Mottagarindikator
3. På/av-brytare
4. Kanalkodsväljare
5. Synkkontakt
6. Sändare
7. Sändarindikator
8. Testknapp
9. Kanalkodsväljare
10. Kamerans hotshoe-montering
1
ON
2
12
3
4
8
7
5
6
12
ON
10
11. PC-kabelanslutning
• För in synkkontakten (5) i blixtlampans synkuttag.
• Sätt på/av-brytaren i läge på.
• Ställ in mottagarens (1) och sändarens (6) kanalkod genom att använda kanalkodsväljarna (4/9).
• Tryck på testknappen (8). Mottagarindikatorn (2) och sändarindikatorn (7) tänds.
• Fäst kamerans hotshoe-montering (10) på kamerans hotshoe. Om kameran inte har en hotshoe, använd den
medföljande PC-kabeln för att ansluta sändaren och kameran.
• Tryck på kamerans slutare.
Rengöring och underhåll
Varning!
• Använd inga rengöringsmedel som innehåller lösningsmedel eller slipmedel.
• Rengör inte enhetens insida.
• Försök inte att reparera enheten. Byt ut enheten mot en ny om den inte fungerar som den ska.
• Rengör enhetens utsida med en mjuk fuktad trasa.
Svenska
11
9
Garanti
Alla ändringar och/eller modieringar på produkten gör garantin ogiltig. Vi kan inte ta något ansvar för skador som
orsakats av felaktig användning av denna produkt.
Kassering
• Produkten är avsedd för separat insamling vid en lämplig återvinningscentral. Släng inte denna produkt bland
vanligt hushållsavfall.
• För mer information, kontakta återförsäljaren eller lokal myndighet med ansvar för avfallshantering.
43
Page 44

Svenska
Tekniska data
Blixtlampa
Nätspänning 220-240 V
Nätfrekvens 50 Hz
Exponeringsindex 62 GN
Återställningstid 0,2-2,2 s
Färgtemperatur 5600±100K
Eektkontroll
Lampa
Blixtrör
Lampa
Fjärrkontroll
Batterier (mottagare) AAA (2x), 1,5 V
Kanaler 1 (RT-01) / 2 (RT-02) / 4 (RT-04) / 16 (RT-16)
Driftavstånd
Inomhus
Utomhus
Synkhastighet 1/200 s
Dokument
Produkten har tillverkats och levereras i enlighet med alla relevanta regler och direktiv som gäller för alla medlemsstater
inom Europeiska unionen. Den uppfyller även alla tillämpliga specikationer och regler i försäljningslandet.
Formell dokumentation nns att beställa på begäran. Den formella dokumentationen inbegriper, men är inte
begränsad till, försäkran om överensstämmelse, säkerhetsdatablad och testrapporten.
AC
1,0-6,0
1,0-6,0
Halogenlampa, G6.35, 2-pin
75 W (max. 100 W )
≥ 20
≥ 20~30 m
Friskrivningsklausul
Utseende och specikationer kan komma att ändras utan föregående meddelande. Alla logotyper och produktnamn är
varumärken eller registrerade varumärken som tillhör sina ägare och är härmed erkända som sådana.
44
Page 45

Suomi
CL-STUDIO30 - Studiosalamavalo
Turvallisuus
Yleinen turvallisuus
• Lue käyttöopas huolella ennen käyttöä. Säilytä käyttöopas tulevaa käyttöä varten.
• Käytä laitetta vain sille tarkoitettuun käyttötarkoitukseen. Älä käytä laitetta muuhun kuin käyttöoppaassa kuvattuun
tarkoitukseen.
• Älä käytä laitetta, jos jokin sen osa on vioittunut tai viallinen. Jos laite on vioittunut tai viallinen, vaihda laite välittömästi.
• Älä altista laitetta vedelle ja kosteudelle.
• Älä tuki tuuletusaukkoja.
Sähköturvallisuus
• Sähköiskun riskin pienentämiseksi, ainoastaan valtuutettu huoltohenkilö saa avata tämän laitteen huoltoa varten.
• Jos ongelmia ilmenee, irrota laite verkkovirrasta ja muista laitteista.
Paristoturvallisuus
• Käytä vain käsikirjassa mainittuja paristoja.
• Älä käytä vanhoja ja uusia paristoja yhdessä.
• Älä käytä eri tyyppisiä tai eri merkkisiä paristoja.
• Älä asenna paristoja väärin päin.
• Älä aiheuta paristoissa oikosulkua tai pura niitä.
• Älä altista paristoja vedelle.
• Älä altista paristoja tulelle tai liialliselle kuumuudelle.
• Akut saattavat vuotaa, kun ne ovat täysin tyhjät. Jotta tuote ei vaurioidu, poista paristot jättäessäsi tuotteen
valvomatta pitemmäksi aikaa.
• Jos paristoista vuotava neste joutuu kosketuksiin ihon tai vaatteiden kanssa, huuhtele välittömästi raikkaalla vedellä.
Kuvaus
Studiosalamavalo on suunniteltu tarjoamaan ihanteellisen valaistuksen olinpaikassasi ja studiokuvauksessa.
1. Hallintapaneeli
2. Etäanturi
3. Lamppu
4. Välähdysputki
5. Säätönuppi (salamavalo)
6. Tuuletusaukot
7. Softbox-kiinnike
8. Salpa (softbox-kiinnike)
9. Kolmijalkakiinnike
10. Lukitusnuppi (kolmijalka)
11. Varjostinkiinnike
12. Lukitusnuppi (varjostin)
4
3
7
11
9
45
268
12
5
10
1
Page 46

Käyttö
Hallintapaneeli
1. Pistokeliitäntä
2. Virtakytkin
3. Lampun valintapainike
4. Lampun merkkivalo
5. Virranhallintapainikkeet (lamppu)
6. Virranhallintapainikkeet (välähdysputki)
7. Näyttö
8. Synkronointipistokeliitäntä
9. Synkronointipainike
10. Synkronoinnin merkkivalot
11. Äänipainike
12. Äänen merkkivalo
13. Testauspainike
14. Testimerkkivalo
1 • Kytke pistoke pistorasiaan.
• Laite kytketään päälle kytkemällä virtakytk in “I“-asentoon.
2
• Laite sammutetaan päälle kytkemällä virtakytkin “O“-asentoon.
• Paina lampunvalintapainiketta 1x säätääksesi lamppuja synkronoidusti.
Ylempi lampun merkkivalo palaa. Alempi lampun merkkivalo on sammuksissa.
• Paina lampunvalintapainiketta 2x säätääksesi lamppuja itsenäisesti.
3/4
5/7
6/7
8/9/10
11/12
13/14
Ylempi ja alempi lampun merkkivalo palavat.
• Paina lampunvalintapainiketta 3x sammuttaaksesi lampun.
Ylempi ja alempi lampun merkkivalo ovat sammuksissa.
• Paina ylempää virranhallintapainiketta lisätäksesi lampun tehoa.
Näytössä ilmoitetaan teho.
• Paina alempaa virranhallintapainiketta pienentääksesi lampun tehoa.
Näytössä ilmoitetaan teho.
• Paina virranhallintapainiketta “+“ lisätäksesi välähdysputken tehoa.
Näytössä ilmoitetaan teho.
• Paina virranhallintapainiketta “-“ pienentääksesi välähdysputken tehoa.
Näytössä ilmoitetaan teho.
• Kytke kaukosäätimen synkronointipistoke synkronointipistokkeen liitäntään.
• Paina synkronointipainiketta 1x siirtyäksesi vakiosynkronointitilaan.
Synkronoinnin merkkivalo 1 syttyy.
• Paina synkronointipainiketta 2x siirtyäksesi 0.5s-viivesynkronointitilaan.
Synkronoinnin merkkivalo 2 syttyy.
• Paina synkronointipainiketta 3x siirtyäksesi 2x-laukaisinviivesynkronointitilaan.
Synkronoinnin merkkivalo 3 syttyy.
• Paina synkronointipainiketta 4x siirtyäksesi 3x-laukaisinviivesynkronointitilaan.
Synkronoinnin merkkivalo 4 syttyy.
• Paina synkronointipainiketta 5x siirtyäksesi 4x-laukaisinviivesynkronointitilaan.
Synkronoinnin merkkivalo 5 syttyy.
• Paina äänipainiketta aktivoidaksesi summeri latauksen aikana.
Äänen merkkivalo syttyy.
• Paina äänipainiketta uudelleen poistaaksesi summerin käytöstä latauksen aikana.
Äänen merkkivalo sammuu.
• Paina testipainiketta aloittaaksesi salamavalon toiminnan testauksen.
Testimerkkivalo syttyy.
• Paina testipainiketta pysäyttääksesi salamavalon toiminnan testauksen.
Testimerkkivalo sammuu.
1107
12345
SOUND
~220-240V/50Hz
2
12 11 13 14
Suomi
9
CELL
5
LAMP
4
SYNC
TEST
6
3
5
8
46
Page 47

Kaukosäädin
1. Vastaanotin
2. Vastaanottimen merkkivalo
3. Virtakytkin
4. Kanavakoodin kytkin
5. Synkronointipistoke
6. Lähetin
7. Lähettimen merkkivalo
8. Testauspainike
9. Kanavakoodin kytkin
10. Kameran varustekenkäkiinnitys
1
ON
2
12
3
4
8
7
5
6
12
ON
10
11. PC-kaapelin liitäntä
• Kytke synkronointipistoke (5) salamavalon synkronointipistokeliitäntään.
• Aseta virtakytkin (3) on-asentoon.
• Aseta vastaanottimelle (1) ja lähettimelle (6) sama kanava kanavakoodin kytkimellä (4/9).
• Paina testipainiketta (8). Vastaanottimen merkkivalo (2) ja lähettimen merkkivalo (7) syttyvät.
• Kiinnitä kameran varustekenkäkiinnitys (10) kameran varustekenkään. Jos kamerassa ei ole varustekenkää, kytke
lähetin ja kamera toisiinsa mukana tulleella PC-kaapelilla.
• Paina kameran suljinta.
Puhdistus ja huolto
Varoitus!
• Älä käytä liuottimia tai hankausaineita.
• Älä puhdista laitteen sisäpuolta.
• Älä yritä korjata laitetta. Jos laite ei toimi asianmukaisesti, vaihda se uuteen.
• Puhdista laite ulkopuolelta pehmeällä, kostealla liinalla.
Suomi
11
9
Takuu
Takuu mitätöityy, mikäli laitteeseen tehdään mitä tahansa muutoksia. Emme ole myöskään vastuussa vahingoista, jotka
johtuvat tämän tuotteen virheellisestä käytöstä.
Hävittäminen
• Tämä tuote tulee toimittaa hävitettäväksi asianmukaiseen keräyspisteeseen. Tuotetta ei saa hävittää kotitalousjätteen
mukana.
• Lisätietoja antaa jälleenmyyjä tai paikallinen jätehuollosta vastaava viranomainen.
47
Page 48

Tekniset tiedot
Salamavalo
Verkkovirran jännite 220-240 V
Verkkovirran taajuus 50 Hz
Valaistusindeksi 62 GN
Kierrätysaika 0,2-2,2 s
Värilämpötila 5600±100K
Virranhallinta
Lamppu
Välähdysputki
Lamppu
Kaukosäädin
Paristot (vastaanotin) AAA (2x), 1,5 V
Kanavat 1 (RT-01) / 2 (RT-02) / 4 (RT-04) / 16 (RT-16)
Käyttöetäisyys
Sisätiloissa
Ulkona
Synkronointinopeus 1/200 s
AC
1,0-6,0
1,0-6,0
halogeenilamppu, G6.35, 2-nastainen
75 W (max. 100 W )
≥ 20
≥ 20~30 m
Asiakirjat
Tämä tuote on valmistettu ja toimitettu noudattaen kaikkia sitä koskevia asetuksia ja direktiivejä, jotka ovat voimassa
kaikissa Euroopan unionin jäsenvaltioissa. Se täyttää kaikki myyntimaassa sovellettavat vaatimukset ja määräykset.
Viralliset asiakirjat ovat saatavilla pyynnöstä. Viralliset asiakirjat sisältävät mm. yhdenmukaisuusvakuutuksen,
käyttöturvallisuustiedotteen ja tuotteen testausraportin.
Suomi
Vastuuvapauslauseke
Muutoksia malliin ja teknisiin ominaisuuksiin voidaan tehdä ilmoituksetta. Kaikki logot, merkit ja tuotenimet ovat niiden
vastaavien omistajien tuotemerkkejä tai rekisteröityjä tuotemerkkejä ja niitä on käsiteltävä sellaisina.
48
Page 49

Ελληνικά
CL-STUDIO30 - Στούντιο φλας
Ασφάλεια
Γενική ασφάλεια
• Διαβάστε το εγχειρίδιο προσεκτικά πριν από τη χρήση. Φυλάξτε το εγχειρίδιο για μελλοντική αναφορά.
• Χρησιμοποιείτε τη συσκευή μόνο για τους προοριζόμενους σκοπούς. Μη χρησιμοποιείτε τη συσκευή για
διαφορετικούς σκοπούς από τους περιγραφόμενους στο εγχειρίδιο.
• Μη χρησιμοποιείτε τη συσκευή, εάν οποιοδήποτε τμήμα της έχει ζημιά ή ελάττωμα. Εάν η συσκευή έχει ζημιά ή
ελάττωμα, αντικαταστήστε την αμέσως.
• Μην εκθέτετε το προϊόν σε νερό ή υγρασία.
• Μην φράζετε τις οπές αερισμού.
Ηλεκτρική ασφάλεια
• Για να μειώσετε τον κίνδυνο ηλεκτροπληξίας, το προϊόν αυτό θα πρέπει να ανοιχθεί μόνο από εξουσιοδοτημένο
τεχνικό όταν απαιτείται συντήρηση (σέρβις).
• Αποσυνδέστε το προϊόν από την πρίζα και άλλο εξοπλισμό αν παρουσιαστεί πρόβλημα.
Ασφάλεια μπαταριών
• Χρησιμοποιείτε μόνο τις μπαταρίες που αναφέρονται στο παρόν εγχειρίδιο.
• Μην χρησιμοποιείτε μαζί παλιές και νέες μπαταρίες.
• Μην χρησιμοποιείτε μπαταρίες διαφορετικού τύπου ή μάρκας.
• Μην εγκαθιστάτε μπαταρίες με αντίστροφη πολικότητα.
• Μην βραχυκυκλώνετε ή αποσυναρμολογείτε τις μπαταρίες.
• Μην εκθέτετε τις μπαταρίες σε νερό.
• Μην εκθέτετε τις μπαταρίες σε φωτιά ή υπερβολική θερμότητα.
• Υπάρχει μεγάλη πιθανότητα διαρροής των μπαταριών εάν αποφορτιστούν πλήρως. Προς αποφυγή ζημιάς στο
προϊόν, αφαιρέστε τις μπαταρίες όταν αφήνετε το προϊόν ανεπιτήρητο για μεγαλύτερες χρονικές περιόδους.
• Εάν υγρό των μπαταριών έρθει σε επαφή με το δέρμα ή το ρουχισμό, ξεπλύνετε αμέσως με καθαρό νερό.
Περιγραφή
Το στούντιο φλας έχει σχεδιαστεί για να παρέχει τον καλύτερο φωτισμό για τους σκοπούς φωτογράφισης τοποθεσίας
και στούντιο.
1. Πίνακας ελέγχου
2. Απομακρυσμένος αισθητήρας
3. Λυχνία
4. Ηλεκτρονικός λαμπτήρας έκλαμψης
5. Κουμπί ρύθμισης (φλας)
6. Ανοίγματα εξαερισμού
7. Τοποθέτηση Softbox
8. Κλείδωμα (τοποθέτηση softbox)
9. Τοποθέτηση τρίποδα
10. Κουμπί κλειδώματος (τρίποδας)
11. Τοποθέτηση ομπρέλας
12. Κουμπί κλειδώματος (ομπρέλα)
4
3
7
11
9
49
268
1
12
5
10
Page 50

Χρήση
Πίνακας ελέγχου
1. Σύνδεση φις
2. Διακόπτης On/O
3. Κουμπί επιλογής λαμπτήρα
4. Ένδειξη λαμπτήρα
5. Κουμπί ελέγχου ισχύος (λαμπτήρα)
6. Κουμπιά ελέγχου ισχύος
(ηλεκτρονικός λαμπτήρας έκλαμψης)
7. Προβολή
8. Σύνδεση φις συγχρονισμού
9. Κουμπί συγχρονισμού
10. Ενδείξεις συγχρονισμού
11. Κουμπί ήχου
12. Ένδειξη ήχου
13. Κουμπί δοκιμής
14. Ένδειξη δοκιμής
1 • Συνδέστε το φις στη σύνδεση φις.
• Για να ενεργοποιήσετε τη συσκευή, θέστε το διακόπτη on/o στη θέση "Ι".
2
• Για να απενεργοποιήσετε τη συσκευή, θέστε το διακόπτη on/o στη θέση "Ο".
• Πατήστε το κουμπί επιλογής λαμπτήρα μια φορά για να ρυθμίσετε συγχρονισμένα τους λαμπτήρες.
Η ένδειξη άνω λαμπτήρα είναι στο on. Η ένδειξη κάτω λαμπτήρα είναι στο o.
• Πατήστε το κουμπί επιλογής λαμπτήρα δύο φορές για να ρυθμίσετε ανεξάρτητα τους λαμπτήρες.
3/4
5/7
6/7
8/9/10
11/12
13/14
Η ένδειξη άνω και κάτω λαμπτήρα είναι στο on.
• Πατήστε το κουμπί επιλογής λαμπτήρα τρεις φορές για να απενεργοποιήσετε τον λαμπτήρα.
Η ένδειξη άνω και κάτω λαμπτήρα είναι στο o.
• Πατήστε το άνω κουμπί ελέγχου ισχύος για να αυξήσετε την έξοδο ισχύος του λαμπτήρα.
Η οθόνη προβάλει την έξοδο ισχύος.
• Πατήστε το κάτω κουμπί ελέγχου ισχύος για να μειώσετε την έξοδο ισχύος του λαμπτήρα.
Η οθόνη προβάλει την έξοδο ισχύος.
• Πατήστε το κουμπί ελέγχου ισχύος “+“ για να αυξήσετε την έξοδο ισχύος του ηλεκτρονικού λαμπτήρα έκλαμψης.
Η οθόνη προβάλει την έξοδο ισχύος.
• Πατήστε το κουμπί ελέγχου ισχύος “-“ για να μειώσετε την έξοδο ισχύος του ηλεκτρονικού λαμπτήρα έκλαμψης.
Η οθόνη προβάλει την έξοδο ισχύος.
• Εισάγετε το βύσμα συγχρονισμού του τηλεχειριστηρίου στη σύνδεση βύσματος συγχρονισμού.
• Πατήστε το κουμπί συγχρονισμού μια φορά για να ρυθμίσετε την στάνταρ λειτουργία συγχρονισμού.
Η ένδειξη συγχρονισμού 1 ανάβει.
• Πατήστε το κουμπί συγχρονισμού δύο φορές για να ρυθμίσετε τη λειτουργία συγχρονισμού καθυστέρησης 0,5 δευτ.
Η ένδειξη συγχρονισμού 2 ανάβει.
• Πατήστε το κουμπί συγχρονισμού τρεις φορές για να ρυθμίσετε τη λειτουργία συγχρονισμού καθυστέρησης
διπλής ενεργοποίησης. Η ένδειξη συγχρονισμού 3 ανάβει.
• Πατήστε το κουμπί συγχρονισμού τέσσερις φορές για να ρυθμίσετε τη λειτουργία συγχρονισμού καθυστέρησης
τριπλής ενεργοποίησης. Η ένδειξη συγχρονισμού 4 ανάβει.
• Πατήστε το κουμπί συγχρονισμού πέντε φορές για να ρυθμίσετε τη λειτουργία συγχρονισμού καθυστέρησης
τετραπλής ενεργοποίησης. Η ένδειξη συγχρονισμού 5 ανάβει.
• Πατήστε το κουμπί ήχου για να ενεργοποιήσετε έναν ήχο βόμβου κατά τη διάρκεια της φόρτισης.
Η ένδειξη ήχου ενεργοποιείται.
• Πατήστε εκ νέου το κουμπί ήχου για να απενεργοποιήσετε τον ήχο βόμβου κατά τη διάρκεια της φόρτισης.
Η ένδειξη ήχου απενεργοποιείται.
• Πατήστε το κουμπί δοκιμής για να εκκινήσετε δοκιμή της λειτουργίας του φλας. Η ένδειξη δοκιμής ενεργοποιείται.
• Πατήστε το κουμπί δοκιμής για να σταματήσετε την δοκιμή της λειτουργίας του φλας.
Η ένδειξη δοκιμής απενεργοποιείται.
1107
12345
SOUND
~220-240V/50Hz
2
12 11 13 14
Ελληνικά
9
CELL
5
LAMP
4
SYNC
TEST
6
3
5
8
50
Page 51

Ελληνικά
Τηλεχειριστήριο
1. Δέκτης
2. Ένδειξη δέκτη
3. Διακόπτης On/O
4. Διακόπτης κωδικού καναλιού
5. Φις συγχρονισμού
6. Πομπός
7. Ένδειξη πομπού
8. Κουμπί δοκιμής
9. Διακόπτης κωδικού καναλιού
10. Περιστρεφόμενη υποδοχή φωτογραφικής μηχανής
11. Σύνδεση καλωδίου Η/Υ
• Εισάγετε το βύσμα συγχρονισμού (5) στη σύνδεση βύσματος συγχρονισμού του φλας.
• Θέστε τον διακόπτη on/o (3) στη θέση on.
• Ρυθμίστε τον ίδιο κωδικό καναλιού για τον δέκτη (1) και τον πομπό (6) χρησιμοποιώντας τους διακόπτες κωδικού
καναλιού (4/9).
• Πιέστε το κουμπί δοκιμής (8). Η ένδειξη δέκτη (2) και η ένδειξη πομπού (7) ανάβουν.
• Προσαρτήστε την περιστρεφόμενη υποδοχή φωτογραφικής μηχανής (10) στην ειδική υποδοχή για φλας της
φωτογραφικής μηχανής. Εάν η φωτογραφική μηχανή δεν διαθέτει ειδική υποδοχή για φλας, χρησιμοποιήστε το
παρεχόμενο καλώδιο Η/Υ για να συνδέσετε τον πομπό και τη φωτογραφική μηχανή.
• Πατήστε το κλείστρο φωτογραφικής μηχανής.
Καθαρισμός και συντήρηση
Προειδοποίηση!
• Μη χρησιμοποιείτε διαλύτες ή λειαντικά.
• Μην καθαρίσετε το εσωτερικό της συσκευής.
• Μην επιχειρήσετε να επισκευάσετε τη συσκευή. Εάν η συσκευή δεν λειτουργεί σωστά, αντικαταστήστε την με μια
νέα.
• Καθαρίζετε το εξωτερικό της συσκευής χρησιμοποιώντας ένα μαλακό, νωπό πανί.
1
ON
2
12
3
4
8
7
5
6
11
12
ON
10
9
Εγγύηση
Η εφαρμογή αλλαγών ή/και τροποποιήσεων στο προϊόν συνεπάγεται ακύρωση της εγγύησης. Δεν φέρουμε καμία
ευθύνη για πιθανές βλάβες που ενδέχεται να προκληθούν από την ακατάλληλη χρήση του προϊόντος.
Απόρριψη
• Το προϊόν προορίζεται για ξεχωριστή συλλογή σε κατάλληλο σημείο συλλογής. Μην απορρίπτετε το προϊόν μαζί με
τα οικιακά απόβλητα.
• Για περισσότερες πληροφορίες επικοινωνήστε με τον αντιπρόσωπό σας ή τις τοπικές αρχές διαχείρισης αποβλήτων.
51
Page 52

Ελληνικά
Τεχνικά χαρακτηριστικά
Στούντιο φλας
Τάση ηλεκτρικού δικτύου 220-240 V
Συχνότητα ηλεκτρικού δικτύου 50 Hz
Δείκτης ένδειξης 62 GN
Χρόνος ανακύκλωσης 0,2-2,2 δευτ.
Θερμοκρασία χρώματος 5600±100K
Έλεγχος ισχύος
Λυχνία
Ηλεκτρονικός λαμπτήρας έκλαμψης
Λαμπτήρας
Τηλεχειριστήριο
Μπαταρίες (δέκτης) AAA (2x), 1,5 V
Κανάλια 1 (RT-01) / 2 (RT-02) / 4 (RT-04) / 16 (RT-16)
Απόσταση λειτουργίας
Εσωτερικά
Εξωτερικά
Ταχύτητα συγχρονισμού 1/200 δευτ.
Τεκμηρίωση
Το προϊόν αυτό κατασκευάστηκε και παρέχεται σε συμμόρφωση με το σύνολο των αντίστοιχων κανονισμών και
οδηγιών που ισχύουν για τα κράτη μέλη της Ευρωπαϊκής Ένωσης. Επίσης, συμμορφώνεται με το σύνολο των ισχυουσών
προδιαγραφών και κανονισμών της χώρας διάθεσης.
Επίσημη τεκμηρίωση διατίθεται κατόπιν αιτήματος. Η επίσημη τεκμηρίωση περιλαμβάνει, χωρίς περιορισμό, τη Δήλωση
Συμμόρφωσης, το Δελτίο Δεδομένων Ασφάλειας Υλικού και την έκθεση δοκιμής προϊόντος.
AC
1,0-6,0
1,0-6,0
Λαμπτήρας αλογόνου, G6.35, 2 ακίδων
75 W (μέγ. 100 W)
≥ 20
≥ 20~30 m
Δήλωση αποποίησης ευθύνης
Το σχέδιο και τα χαρακτηριστικά μπορούν να αλλάξουν χωρίς καμία προειδοποίηση. Όλα τα λογότυπα, οι επωνυμίες και
οι ονομασίες προϊόντων είναι εμπορικά σήματα ή σήματα κατατεθέντα των αντίστοιχων κατόχων και δια του παρόντος
αναγνωρίζονται ως τέτοια.
52
Page 53

Polski
CL-STUDIO30 - Studyjna lampa błyskowa
Bezpieczeństwo
Ogólne zasady bezpieczeństwa
• Przed rozpoczęciem korzystania z urządzenia należy dokładnie przeczytać instrukcję. Zachowaj instrukcję do
wykorzystania w przyszłości.
• Urządzenie powinno być używane zgodnie ze swoim przeznaczeniem. Nie należy używać urządzenia w celach
innych niż określono w instrukcji.
• Nie wolno korzystać z urządzenia, jeśli jakakolwiek część jest uszkodzona lub wadliwa. Jeśli urządzenie jest
uszkodzone lub wadliwe, należy niezwłocznie wymienić urządzenie.
• Nie wystawiać urządzenia na działanie wody lub wilgoci.
• Nie blokować otworów wentylacyjnych.
Bezpieczeństwo elektryczne
• W celu zmniejszenia ryzyka porażenia prądem elektrycznym, niniejsze urządzenie powinno być otwierane wyłącznie
przez osobę z odpowiednimi uprawnieniami, kiedy wymagane jest przeprowadzenie przeglądu.
• W przypadku wystąpienia problemu odłączyć urządzenie od sieci i innego sprzętu.
Bezpieczne korzystanie z baterii
• Używać wyłącznie baterii wskazanych w instrukcji.
• Nie używać razem starych i nowych baterii.
• Nie używać baterii różnych typów lub marek.
• Nie zakładać baterii w odwrotnej biegunowości.
• Nie powodować zwarcia baterii ani ich nie demontować.
• Nie wystawiać baterii na działanie wody.
• Nie wystawiać baterii na działanie ognia lub zbyt wysokiej temperatury.
• Przy całkowitym rozładowaniu baterii może dojść do ich wycieku. Aby uniknąć uszkodzenia urządzenia, należy wyjąć
z niego baterie, jeśli nie jest ono używane przez dłuższy okres czasu.
• Jeśli płyn z baterii wejdzie w styczność ze skórą lub ubraniem, należy niezwłocznie przepłukać czystą wodą.
Opis
Studyjna lampa błyskowa została zaprojektowana w celu zapewnienia optymalnego oświetlenia do zastosowań
fotograi plenerowej i studyjnej.
1. Panel sterowania
2. Zdalny czujnik
3. Lampa
4. Palnik błyskowy
5. Pokrętło regulacyjne (lampa błyskowa)
6. Otwory wentylacyjne
7. Mocowanie softboxu
8. Zatrzask (mocowanie softboxu)
9. Mocowanie statywu
10. Pokrętło blokujące (statyw)
11. Mocowanie parasolki
12. Pokrętło blokujące (parasolka)
4
3
7
11
9
53
268
1
12
5
10
Page 54

Użytkowanie
Panel sterowania
1. Gniazdo zasilania sieciowego
2. Przełącznik włączania/wyłączania
3. Przycisk wyboru lampy
4. Wskaźnik lampy
5. Przyciski regulacji mocy (lampa)
6. Przyciski regulacji mocy (palnik błyskowy)
7. Wyświetlacz
8. Gniazdo synchronizacji
9. Przycisk synchronizacji
10. Wskaźniki synchronizacji
11. Przycisk dźwięku
12. Wskaźnik dźwięku
13. Przycisk testu
14. Wskaźnik testu
1 • Podłącz wtyczkę sieci elektrycznej do gniazda zasilania.
• Aby włączyć urządzanie, ustaw przełącznik włączania/wyłączania w pozycję „I”.
2
• Aby wyłączyć urządzanie, ustaw przełącznik włączania/wyłączania w pozycję „O”.
• Naciśnij przycisk wyboru lampy 1 raz, aby regulować lampy synchronicznie.
Zostaje włączony wskaźnik górnej lampy. Zostaje wyłączony wskaźnik dolnej lampy.
• Naciśnij przycisk wyboru lampy 2 razy, aby regulować lampy niezależnie.
3/4
5/7
6/7
8/9/10
11/12
13/14
Zostaje włączony wskaźnik górnej i dolnej lampy.
• Naciśnij przycisk wyboru lampy 3 razy, aby wyłączyć lampę.
Zostaje wyłączony wskaźnik górnej i dolnej lampy.
• Naciśnij górny przycisk regulacji mocy, aby zwiększyć moc wyjściową lampy.
Wyświetlacz pokazuje moc wyjściową.
• Naciśnij dolny przycisk regulacji mocy, aby zmniejszyć moc wyjściową lampy.
Wyświetlacz pokazuje moc wyjściową.
• Naciśnij przycisk regulacji mocy “+“, aby zwiększyć moc wyjściową palnika błyskowego.
Wyświetlacz pokazuje moc wyjściową.
• Naciśnij przycisk regulacji mocy “-“, aby zmniejszyć moc wyjściową palnika błyskowego.
Wyświetlacz pokazuje moc wyjściową.
• Włóż wtyczkę synchro pilota do gniazda synchronizacji.
• Naciśnij przycisk synchronizacji 1 raz, aby ustawić standardowy tryb synchronizacji.
Włącza się wskaźnik synchronizacji 1.
• Naciśnij przycisk synchronizacji 2 razy, aby ustawić tryb synchronizacji z opóźnieniem 0,5 s.
Włącza się wskaźnik synchronizacji 2.
• Naciśnij przycisk synchronizacji 3 razy, aby ustawić tryb synchronizacji z 2-krotnym opóźnieniem wyzwolenia.
Włącza się wskaźnik synchronizacji 3.
• Naciśnij przycisk synchronizacji 4 razy, aby ustawić tryb synchronizacji z 3-krotnym opóźnieniem wyzwolenia.
Włącza się wskaźnik synchronizacji 4.
• Naciśnij przycisk synchronizacji 5 razy, aby ustawić tryb synchronizacji z 4-krotnym opóźnieniem wyzwolenia.
Włącza się wskaźnik synchronizacji 5.
• Naciśnij przycisk dźwięku, aby aktywować dźwięk buczenia podczas ładowania.
Włącza się wskaźnik dźwięku.
• Naciśnij przycisk dźwięku ponownie, aby dezaktywować dźwięk buczenia podczas ładowania.
Wyłącza się wskaźnik dźwięku.
• Naciśnij przycisk testu, aby rozpocząć testowanie działania lampy błyskowej.
Włącza się wskaźnik testu.
• Naciśnij przycisk testu, aby przerwać testowanie działania lampy błyskowej.
Wyłącza się wskaźnik testu.
1107
12345
SOUND
~220-240V/50Hz
2
12 11 13 14
Polski
9
CELL
5
LAMP
4
SYNC
TEST
6
3
5
8
54
Page 55

Polski
Pilot
1. Odbiornik
2. Wskaźnik odbiornika
3. Przełącznik włączania/wyłączania
4. Przełącznik kodu kanału
5. Wtyczka synchro
6. Nadajnik
7. Wskaźnik odbiornika
8. Przycisk testu
9. Przełącznik kodu kanału
10. Mocowanie gorącej stopki aparatu
11. Złącze kabla PC
• Włóż wtyczkę synchro (5) do gniazda synchronizacji lampy błyskowej.
• Ustaw przełącznik włączania/wyłączania (3) w pozycji wł.
• Ustaw taki sam kod kanału dla odbiornika (1) i nadajnika (6) za pomocą przełączników kodu kanału (4/9).
• Naciśnij przycisk testu (8). Włączają się wskaźnik odbiornika (2) i wskaźnik nadajnika (7).
• Zamontuj mocowanie gorącej stopki (10) do gorącej stopki aparatu. Jeśli aparat nie jest wyposażony w gorącą stopkę,
wykorzystaj dołączony kabel PC, aby połączyć nadajnik i aparat.
• Naciśnij migawkę aparatu.
Czyszczenie i konserwacja
Ostrzeżenie!
• Nie używać do czyszczenia rozpuszczalników ani materiałów ściernych.
• Nie czyścić wewnętrznej strony urządzenia.
• Nie podejmować prób naprawy urządzenia. Jeśli urządzenie nie działa poprawnie, należy wymienić je na nowe
urządzenie.
• Zewnętrzną stronę urządzenia czyścić miękką, wilgotną szmatką.
1
ON
2
12
3
4
8
7
5
6
11
12
ON
10
9
Gwarancja
Wszelkie zmiany i/lub modykacje produktu spowodują unieważnienie gwarancji. Nie możemy ponosić
odpowiedzialności za uszkodzenia spowodowane przez nieprawidłowe korzystanie z produktu.
Utylizacja
• Produkt jest przeznaczony do oddzielnej zbiórki w odpowiednim punkcie odbioru. Nie należy pozbywać się
produktu razem z odpadami gospodarstwa domowego.
• Aby uzyskać więcej informacji, należy skontaktować się ze sprzedawcą lub lokalnym urzędem odpowiedzialnym za
gospodarkę odpadami.
55
Page 56

Dane techniczne
Lampa błyskowa
Napięcie sieciowe 220–240 V
Częstotliwość sieciowa 50 Hz
Wskaźnik ekspozycji 62 GN
Czas ładowania 0,2-2,2 s
Temperatura barwowa 5600±100K
Regulacja mocy
Lampa
Palnik błyskowy
Lampa
Pilot
Baterie (odbiornik) AAA (2x), 1,5 V
Kanały 1 (RT-01) / 2 (RT-02) / 4 (RT-04) / 16 (RT-16)
Odległość działania
Wewnątrz
Na zewnątrz
Prędkość synchronizacji 1/200 s
1,0-6,0
1,0-6,0
Lampa halogenowa, G6.35, 2-stykowa
75 W (maks. 100 W )
≥ 20
≥ 20~30 m
AC
Dokumenty
Produkt został wyprodukowany i dostarczony zgodnie z wszelkimi odpowiednimi przepisami i wytycznymi,
obowiązującymi wszystkie państwa członkowskie Unii Europejskiej. Produkt jest zgodny z wszystkimi specykacjami
iprzepisami obowiązującymi w kraju sprzedaży.
Formalna dokumentacja jest dostępna na życzenie. Formalna dokumentacja zawiera między innymi deklarację
zgodności, kartę charakterystyki i raport z badań produktu.
Polski
Zastrzeżenia
Wzory i specykacje mogą ulec zmianie bez powiadomienia. Wszystkie logo, marki i nazwy produktów są znakami
towarowymi lub zarejestrowanymi znakami towarowymi ich właścicieli i niniejszym są uznane za takie.
56
Page 57

Čeština
CL-STUDIO30 - Studiový blesk
Bezpečnost
Všeobecné bezpečnostní pokyny
• Před použitím si pozorně přečtěte příručku. Příručku uschovejte pro pozdější použití.
• Zařízení používejte pouze k jeho zamýšleným účelům. Nepoužívejte zařízení k jiným účelům, než je popsáno v příručce.
• Nepoužívejte zařízení, pokud je jakákoli část poškozená nebo vadná. Pokud je zařízení poškozené nebo vadné,
okamžitě jej vyměňte.
• Nevystavujte zařízení působení vody nebo vlhkosti.
• Nezakrývejte ventilační otvory.
Elektrická bezpečnost
• Abyste snížili riziko úrazu elektrickým proudem, měl by být vpřípadě potřeby tento výrobek otevřen pouze
autorizovaným technikem.
• Dojde-li k závadě, odpojte výrobek ze sítě a od jiných zařízení.
Bezpečnost baterie
• Používejte pouze baterie uvedené v návodu.
• Nevkládejte zároveň staré a nové baterie.
• Nepoužívejte baterie jiného typu ani značky.
• Baterie neinstalujte s obrácenou polaritou.
• Baterie nezkratujte ani nedemontujte.
• Nevystavujte baterie působení vody.
• Nevystavujte baterie působení ohně či nadměrného tepla.
• Při úplném vybití mají baterie tendence vytékat. Abyste zabránili poškození produktu, vyjměte baterie, pokud
necháváte produkt na delší dobu bez dozoru.
• Pokud se kapalina z baterie dostane do styku s pokožkou nebo oblečením, okamžitě je opláchněte čistou vodou.
Popis
Studiový blesk byl navržen pro zajištění optimálního osvětlení vašich prostor a pro účely vytváření studiových fotograí.
1. Ovládací panel
2. Dálkový snímač
3. Žárovka
4. Výbojka
5. Nastavovací knoík (výbojky)
6. Ventilační otvory
7. Montáž do softboxu
8. Západka (montáž do softboxu)
9. Montáž na trojnožku
10. Pojistný knoík (trojnožka)
11. Montáž na deštník
12. Pojistný knoík (deštník)
4
3
7
11
9
57
268
1
12
5
10
Page 58

Použití
Ovládací panel
1. Napájecí zástrčka
2. Vypínač
3. Tlačítko volby žárovky
4. Ukazatel žárovky
5. Ovládací tlačítko výkonu (žárovka)
6. Ovládací tlačítko výkonu (výbojka)
7. Displej
8. Spoj zástrčky pro synchronizaci
9. Tlačítko synchronizace
10. Ukazatelé synchronizace
11. Tlačítko zvuku
12. Ukazatel zvuku
13. Testovací tlačítko
14. Ukazatel testu
1 • Napájecí kabel zastrčte do elektrické zásuvky.
• Pro zapnutí zařízení nastavte vypínač do polohy "I".
2
• Pro vypnutí zařízení nastavte vypínač do polohy "O".
• Pro synchronní nastavení žárovek 1x stiskněte tlačítko volby žárovky.
Ukazatel horní žárovky svítí. Ukazatel dolní žárovky nesvítí.
• Pro nezávislé nastavení žárovek 2x stiskněte tlačítko volby žárovky.
3/4
5/7
6/7
8/9/10
11/12
13/14
Ukazatele horní a dolní žárovky svítí.
• Pro zhasnutí žárovek 3x stiskněte tlačítko volby žárovky.
Ukazatele horní a dolní žárovky nesvítí.
• Pro zvýšení jasu žárovky stiskněte horní ovládací tlačítko výkonu.
Na displeji se zobrazí výstupní výkon.
• Pro snížení jasu žárovky stiskněte dolní ovládací tlačítko výkonu.
Na displeji se zobrazí výstupní výkon.
• Pro zvýšení jasu výbojky stiskněte ovládací tlačítko výkonu “+“.
Na displeji se zobrazí výstupní výkon.
• Pro snížení jasu výbojky stiskněte ovládací tlačítko výkonu “-“.
Na displeji se zobrazí výstupní výkon.
• Zástrčku pro synchronizaci dálkového ovládání zastrčte do spoje zástrčky pro synchronizaci.
• Pro nastavení standardního režimu synchronizace stiskněte 1x tlačítko synchronizace.
Ukazatel synchronizace 1 se rozsvítí.
• Pro nastavení synchronizace s 0,5s prodlevou stiskněte 2x tlačítko synchronizace.
Ukazatel synchronizace 2 se rozsvítí.
• Pro nastavení synchronizace s prodlevou 2x spuštění stiskněte 3x tlačítko synchronizace.
Ukazatel synchronizace 3 se rozsvítí.
• Pro nastavení synchronizace s prodlevou 3x spuštění stiskněte 4x tlačítko synchronizace.
Ukazatel synchronizace 4 se rozsvítí.
• Pro nastavení synchronizace s prodlevou 4x spuštění stiskněte 5x tlačítko synchronizace.
Ukazatel synchronizace 5 se rozsvítí.
• Pro aktivaci bzučáku během nabíjení stiskněte tlačítko zvuku.
Rozsvítí se ukazatel zvuku.
• Pro deaktivaci bzučáku během nabíjení znovu stiskněte tlačítko zvuku.
Ukazatel zvuku zhasne.
• Pro testovací provoz blesku stiskněte tlačítko test.
Rozsvítí se ukazatel testu.
• Pro zastavení testovacího provozu blesku stiskněte tlačítko test.
Ukazatel testu zhasne.
1107
12345
SOUND
~220-240V/50Hz
2
12 11 13 14
Čeština
9
CELL
5
LAMP
4
SYNC
TEST
6
3
5
8
58
Page 59

Dálkové ovládání
1. Přijímač
2. Ukazatel přijímače
3. Vypínač
4. Přepínač kódu kanálu
5. Zástrčka pro synchronizaci
6. Vysílač
7. Ukazatel vysílače
8. Testovací tlačítko
9. Přepínač kódu kanálu
10. Držák fotoaparátu se sáňkami
1
ON
2
12
3
4
8
7
5
6
12
ON
10
11. Počítačový spojovací kabel
• Zástrčku pro synchronizaci (5) zasuňte do spoje zástrčky pro synchronizaci na výbojce.
• Vypínač (3) nastavte do polohy zapnuto.
• Pomocí spínačů kódu kanálu (4/9) nastavte stejný kód kanálu pro přijímač (1) a vysílač (6).
• Stiskněte tlačítko test (8). Ukazatel přijímače (2) a ukazatel vysílače (7) se rozsvítí.
• Držák fotoaparátu se sáňkami (10) nasaďte na sáňky fotoaparátu. Pokud fotoaparát sáňky nemá, použijte pro
připojení vysílače k fotoaparátu dodaný počítačový kabel .
• Stiskněte závěrku fotoaparátu.
Čištění a údržba
Upozornění!
• Nepoužívejte čisticí rozpouštědla ani abrazivní čisticí prostředky.
• Nečistěte vnitřek zařízení.
• Nepokoušejte se zařízení opravovat. Pokud zařízení nepracuje správně, vyměňte jej za nové zařízení.
• Venek zařízení očistěte měkkým, suchým hadříkem.
Čeština
11
9
Záruka
Při změnách a/nebo modikacích výrobku zanikne záruka. Při nesprávném používání tohoto výrobku výrobce nenese
odpovědnost za vzniklé škody.
Likvidace
• Likvidaci tohoto produktu provádějte v příslušné sběrně. Nevyhazujte tento výrobek s komunálním odpadem.
• Pro více informací se obraťte na prodejce nebo místní orgány odpovědné za nakládání s odpady.
59
Page 60

Čeština
Technické údaje
Blesk
Napájecí napětí 220-240 V
Napájecí frekvence 50 Hz
Index expozice 62 GN
Doba opakované přípravy 0,2-2,2 s
Teplota chromatičnosti 5600±100K
Ovládání výkonu
Žárovka
Výbojka
Žárovka
Dálkové ovládání
Baterie (přijímač) AAA (2x), 1,5 V
Kanály 1 (RT-01) / 2 (RT-02) / 4 (RT-04) / 16 (RT-16)
Provozní vzdálenost
Uvnitř
Venku
Rychlost synchronizace 1/200 s
Dokumenty
Tento produkt byl vyroben a je dodáván v souladu se všemi příslušnými nařízeními a směrnicemi platnými ve všech
členských státech Evropské Unie. Splňuje také veškeré relevantní specikace a předpisy v zemi prodeje.
Ociální dokumentaci lze získat na vyžádání. Ociální dokumentace zahrnuje také (avšak nejenom) Prohlášení o shodě,
Bezpečnostní technické listy materiálu a správu o testování produktu.
AC
1,0-6,0
1,0-6,0
Halogenová žárovka, G6.35, 2-kolíková
75 W (max. 100 W )
≥ 20
≥ 20~30 m
Vyloučení zodpovědnosti
Design a specikace výrobku mohou být změněny bez předchozího upozornění. Všechna loga a obchodní názvy jsou
registrované obchodní značky příslušných vlastníků a jsou chráněny zákonem.
60
Page 61

Slovenčina
CL-STUDIO30 - Štúdiový blesk
Bezpečnosť
Všeobecné bezpečnostné informácie
• Pred použitím si pozorne prečítajte príručku. Príručku uschovajte pre neskoršie použitie.
• Zariadenie používajte len na účely, na ktoré je určené. Nepoužívajte zariadenie na iné účely, než je opísané v príručke.
• Nepoužívajte zariadenie, ak je akákoľvek časť poškodená alebo chybná. Ak je zariadenie poškodené alebo chybné,
ihneď ho vymeňte.
• Nevystavujte výrobok pôsobeniu vody ani vlhkosti.
• Nezakrývajte ventilačné otvory.
Elektrická bezpečnosť
• Na obmedzenie rizika poranenia elektrickým prúdom smie tento výrobok otvárať iba oprávnený technik v prípade
potreby servisu.
• Pokiaľ sa vyskytne problém, výrobok odpojte z elektrickej siete a od ostatných zariadení.
Bezpečnosť batérie
• Používajte iba batérie uvedené v tejto príručke.
• Nepoužívajte staré a nové batérie spoločne.
• Nepoužívajte batérie rôznych typov či značiek.
• Neinštalujte batérie s obrátenou polaritou.
• Batérie neskratujte ani nedemontujte.
• Nevystavujte batérie pôsobeniu vody.
• Nevystavujte batérie pôsobeniu ohňa ani nadmerného tepla.
• Pokiaľ sa batérie úplne vybijú, majú tendenciu vytekať. Aby ste zabránili poškodeniu výrobku, vyberte batérie vždy,
keď výrobok nechávate na dlhší čas bez dozoru.
• Pokiaľ sa tekutina z batérie dostane do styku s pokožkou či oblečením, okamžite miesto opláchnite tečúcou vodou.
Opis
• Štúdiový blesk je určený na to, aby zabezpečil optimálne osvetlenie podľa potrieb vášho priestoru a fotograckého
štúdia.
1. Ovládací panel
2. Diaľkový snímač
3. Žiarovka
4. Výbojka
5. Nastavovací gombík (výbojka)
6. Ventilačné otvory
7. Montáž na softbox
8. Západka (montáž na softbox)
9. Montáž na trojnožku
10. Poistný gombík (trojnožka)
11. Montáž na dáždnik
12. Poistný gombík (dáždnik)
4
3
7
11
9
61
268
1
12
5
10
Page 62

Použitie
Ovládací panel
1. Napájací kábel
2. Vypínač
3. Tlačidlo výberu žiarovky
4. Ukazovateľ žiarovky
5. Ovládacie tlačidlo výkonu (žiarovka)
6. Ovládacie tlačidlo výkonu (výbojka)
7. Displej
8. Spoj zástrčky na synchronizáciu
9. Tlačidlo synchronizácie
10. Ukazovatelia synchronizácie
11. Tlačidlo zvuku
12. Ukazovateľ zvuku
13. Testovacie tlačidlo
14. Ukazovateľ testu
1 • Zástrčku zapojte do elektrickej zástrčky.
• Na zapnutie výrobku otočte vypínač do polohy "I".
2
• Na vypnutie výrobku otočte vypínač do polohy "O".
• Na synchronizované nastavenie žiaroviek stlačte 1x tlačidlo voľby žiarovky.
Rozsvieti sa horný ukazovateľ žiarovky. Dolní ukazovateľ žiarovky nesvieti.
• Na nezávislé nastavenie žiaroviek stlačte 2x tlačidlo voľby žiarovky.
3/4
5/7
6/7
8/9/10
11/12
13/14
Rozsvieti sa horný a dolný ukazovateľ žiarovky.
• Na vypnutie žiarovky stlačte 3x tlačidlo voľby žiarovky.
Horný a dolný ukazovateľ žiarovky nesvietia.
• Na zvýšenie výkonu žiarovky stlačte horné ovládacie tlačidlo výkonu.
Na displeji sa zobrazí výstupný výkon.
• Na zníženie výkonu žiarovky stlačte dolné ovládacie tlačidlo výkonu.
Na displeji sa zobrazí výstupný výkon.
• Na zvýšenie výkonu výbojky stlačte ovládacie tlačidlo výkonu “+“.
Na displeji sa zobrazí výstupný výkon.
• Na zníženie výkonu výbojky stlačte ovládacie tlačidlo výkonu “-“.
Na displeji sa zobrazí výstupný výkon.
• Zástrčku na synchronizáciu zastrčte do spoja zástrčka na synchronizáciu.
• Na nastavenie štandardného cyklusu synchronizácie stlačte 1x tlačidlo synchronizácie.
Rozsvieti sa ukazovateľ synchronizácie 1.
• Na nastavenie režimu synchronizácie s 0,5-s odkladom stlačte 2x tlačidlo synchronizácie.
Rozsvieti sa ukazovateľ synchronizácie 2.
• Na nastavenie režimu synchronizácie s odložením o 2x-spustenia stlačte 3x tlačidlo synchronizácie.
Rozsvieti sa ukazovateľ synchronizácie 3.
• Na nastavenie režimu synchronizácie s odložením o 3x-spustenia stlačte 4x tlačidlo synchronizácie.
Rozsvieti sa ukazovateľ synchronizácie 4.
• Na nastavenie režimu synchronizácie s odložením o 4x-spustenia stlačte 5x tlačidlo synchronizácie.
Rozsvieti sa ukazovateľ synchronizácie 5.
• Na zapnutie bzučiaku v priebehu nabíjania stlačte tlačidlo zvuku.
Rozsvieti sa ukazovateľ zvuku.
• Na vypnutie bzučiaku v priebehu nabíjania znovu stlačte tlačidlo zvuku.
Ukazovateľ zvuku zhasne.
• Na spustenie testovacej prevádzky blesku stlačte testovacie tlačidlo.
Rozsvieti sa ukazovateľ testu.
• Na zastavenie testovacej prevádzky blesku stlačte testovacie tlačidlo.
Ukazovateľ testu zhasne.
1107
12345
SOUND
~220-240V/50Hz
2
12 11 13 14
Slovenčina
9
CELL
5
LAMP
4
SYNC
TEST
6
3
5
8
62
Page 63

Slovenčina
Diaľkové ovládanie
1. Prijímač
2. Ukazovateľ prijímača
3. Vypínač
4. Prepínač kódov kanálov
5. Zástrčka na synchronizáciu
6. Vysielač
7. Ukazovateľ vysielača
8. Testovacie tlačidlo
9. Prepínač kódov kanálov
10. Fotoaparát so sánkovým spojom
11. Spojenie cez počítačový kábel
• Zástrčku na synchronizáciu (5) vsuňte do spoja zástrčky na synchronizáciu výbojky.
• Vypínač (3) otočte do polohy zapnuté.
• S pomocou prepínačov kódu kanálu (4/9) nastavte na prijímači (1) a vysielači (6) rovnaký kanál.
• Stlačte testovacie tlačidlo (8). Ukazovateľ prijímača (2) a ukazovateľ vysielača (7) sa rozsvietia.
• Sánkový spoj fotoaparátu (10) pripojte k sánkam fotoaparátu. Pokiaľ fotoaparát sánkový spoj nemá, použite na
spojenie vysielača a fotoaparátu počítačový kábel z balenia.
• Stlačte uzávierku fotoaparátu.
Čistenie a údržba
Upozornenie!
• Nepoužívajte čistiace rozpúšťadlá ani abrazívne čistiace prostriedky.
• Nečistite vnútro zariadenia.
• Nepokúšajte sa zariadenie opravovať. Ak zariadenie nepracuje správne, vymeňte ho za nové zariadenie.
• Vonkajšok výrobku utrite mäkkou, suchou handričkou.
1
ON
2
12
3
4
8
7
5
6
12
ON
10
11
9
Záruka
Pri zmenách a/alebo modikáciách výrobku zanikne záruka. Pri nesprávnom používaní tohto výrobku výrobca nenesie
zodpovednosť za vzniknuté škody.
Likvidácia
• Likvidáciu tohto produktu zverte príslušnej zberni. Nevyhadzujte tento výrobok s komunálnym odpadom.
• Ďalšie informácie získate od predajcu alebo miestnych orgánov zodpovedných za nakladanie s odpadmi.
63
Page 64

Slovenčina
Technické údaje
Blesk
Napájacie napätie 220-240 V
Napájacia frekvencia 50 Hz
Index expozície 62 GN
Čas opakovanej prípravy 0,2-2,2 s
Teplota farieb 5600±100K
Ovládanie výstupu
Žiarovka
Výbojka
Žiarovka
Diaľkové ovládanie
Batérie (prijímač) AAA (2x), 1,5 V
Kanály 1 (RT-01) / 2 (RT-02) / 4 (RT-04) / 16 (RT-16)
Prevádzková vzdialenosť
Vo vnútri
Vonku
Rýchlosť synchronizácie 1/200 s
Dokumenty
Tento produkt bol vyrobený a je dodávaný v súlade so všetkými príslušnými nariadeniami a smernicami platnými vo
všetkých členských krajinách Európskej únie. Spĺňa tiež všetky relevantné špecikácie a predpisy v krajine predaja.
Ociálna dokumentácia je k dispozícii na požiadanie. Ociálna dokumentácia zahŕňa aj (ale nielen) Vyhlásenie o zhode,
Bezpečnostný technický list materiálu a správu o testovaní produktu.
AC
1,0-6,0
1,0-6,0
halogénová žiarovka, G6.35, 2-kolíková
75 W (max. 100 W )
≥ 20
≥ 20~30 m
Vylúčenie zodpovednosti
Dizajn a špecikácia výrobku sa môžu zmeniť bez predchádzajúceho upozornenia. Všetky logá a obchodné názvy sú
registrované obchodné značky príslušných vlastníkov a sú chránené zákonom.
64
Page 65

Magyar
CL-STUDIO30 - Stúdióvaku
Biztonság
Általános biztonsági tudnivalók
• A használat előtt gyelmesen olvassa el a kézikönyvet. Tegye el a kézikönyvet, hogy szükség esetén belenézhessen.
• Csak rendeltetése szerint használja a készüléket. Ne használja a készüléket a kézikönyvben feltüntetettől eltérő célra.
• Ne használja a készüléket, ha valamely része sérült vagy meghibásodott. A sérült vagy meghibásodott készüléket
azonnal javíttassa meg, vagy cseréltesse ki.
• Vigyázzon, hogy ne érje a terméket víz vagy nedvesség.
• Ne takarja el a szellőzőnyílásokat.
Elektromos biztonság
• Az áramütés veszélyének csökkentése érdekében ezt a terméket kizárólag a márkaszerviz képviselője nyithatja fel.
• Hiba esetén húzza ki a termék csatlakozóját a konnektorból, és kösse le más berendezésekről.
Elemekkel kapcsolatos biztonsági előírások
• Kizárólag az útmutatóban meghatározott elemeket használja.
• Ne keverje a használt és új elemeket.
• Ne használjon eltérő típusú vagy márkájú elemeket.
• Ne próbálja fordított polaritással behelyezni az elemeket.
• Ne zárja rövidre és ne szerelje szét az elemeket.
• Vigyázzon, hogy az elemeket ne érje víz.
• Vigyázzon, hogy az elemeket ne érje tűz vagy túlzott mértékű hő.
• A teljesen kisült elemek hajlamosak elfolyni. A termék esetleges megrongálódásának elkerülése érdekében az
elemeket ki kell venni, ha a terméket hosszabb ideig nem kívánja használni.
• Ha az akkumulátorból szivárgó folyadék bőrrel vagy ruhával érintkezik, akkor a szennyezett felületet azonnal öblítse
le tiszta vízzel.
Megnevezés
A stúdióvaku célja, hogy optimális világítási körülményeket teremtsen a stúdiófényképezésre használt helyiségekben.
1. Vezérlőpult
2. Távirányító-érzékelő
3. Lámpa
4. Vakucső
5. Állítógombja (vaku)
6. Szellőzőnyílások
7. Softbox-foglalat
8. Rögzítőkapcsa (softbox-foglalat)
9. Állványfoglalat
10. Rögzítőgombja (állvány)
11. Esernyőfoglalat
12. Rögzítőgombja (esernyő)
4
3
7
11
9
65
268
1
12
5
10
Page 66

Használat
Vezérlőpult
1. Tápcsatlakozó
2. Be-/kikapcsoló gomb
3. Lámpaválasztó gomb
4. Lámpa jelzőfénye
5. Teljesítményszabályozó gombjai (lámpa)
6. Teljesítményszabályozó gombjai (vakucső)
7. Kijelző
8. Szinkronizálási csatlakozóaljzat
9. Szinkronizálási gomb
10. Szinkronizálási jelzőfények
11. Hangjelző gomb
12. Hang mód jelzőfénye
13. Próbagomb
14. Próbajelzőfény
1 • Csatlakoztassa a tápdugót a tápcsatlakozóhoz.
• A készülék bekapcsolásához állítsa a be-/kik apcsoló gombot „I” helyzetbe.
2
• A készülék kikapcsolásához állítsa a be-/k ikapcsoló gombot „O” helyzetbe.
• A lámpák egyidejű (szinkronizált) beállításához nyomja meg egyszer a lámpaválasztó gombot.
A felső lámpajelzőfény világít. Az alsó lámpajelzőfény nem világít.
• A lámpák egymástól független beállításához nyomja meg kétszer a lámpaválasztó gombot.
3/4
5/7
6/7
8/9/10
11/12
13/14
A felső és az alsó lámpajelzőfény egyaránt világít.
• A lámpa kikapcsolásához nyomja meg háromszor a lámpaválasztó gombot.
Sem a felső, sem az alsó lámpajelzőfény nem világít.
• A lámpa kimeneti teljesítményének növeléséhez nyomja meg a felső teljesítményszabályozó gombot.
A kijelzőn megjelenik a kimeneti teljesítmény.
• A lámpa kimeneti teljesítményének csökkentéséhez nyomja meg az alsó teljesítményszabályozó gombot.
A kijelzőn megjelenik a kimeneti teljesítmény.
• A vakucső kimeneti teljesítményének növeléséhez nyomja meg a teljesítményszabályozó gombot “+“.
A kijelzőn megjelenik a kimeneti teljesítmény.
• A vakucső kimeneti teljesítményének csökkentéséhez nyomja meg az teljesítményszabályozó gombot “-“.
A kijelzőn megjelenik a kimeneti teljesítmény.
• Csatlakoztassa a távirányító szinkronizálási dugóját a szinkronizálási csatlakozóaljzathoz.
• A normál szinkronizálási mód beállításához nyomja meg egyszer a szinkronizálási gombot.
A(z) 1. szinkronizálási jelzőfény világítani kezd.
• A 0,5 mp késleltetésű szinkronizálási mód beállításához nyomja meg kétszer a szinkronizálási gombot.
A(z) 2. szinkronizálási jelzőfény világítani kezd.
• A(z) kétszeres kioldási késleltetésű szinkronizálási mód beállításához nyomja meg háromszor a szinkronizálási
gombot. A(z) 3. szinkronizálási jelzőfény világítani kezd.
• A(z) háromszoros kioldási késleltetésű szinkronizálási mód beállításához nyomja meg négyszer a szinkronizálási
gombot. A(z) 4. szinkronizálási jelzőfény világítani kezd.
• A(z) négyszeres kioldási késleltetésű szinkronizálási mód beállításához nyomja meg ötször a szinkronizálási
gombot. A(z) 5. szinkronizálási jelzőfény világítani kezd.
• Ha töltés közben berregő hangot szeretne megszólaltatni, nyomja meg a hangjelző gombot.
Világítani kezd a hang mód jelzőfénye.
• Ha töltés közben szeretné elhallgattatni a berregő hangot, nyomja meg még egyszer a hangjelző gombot.
A hang mód jelzőfénye kialszik.
• A vakuteszt indításához nyomja meg a próbagombot.
Világítani kezd a próbajelzőfény.
• A vakuteszt leállításához nyomja meg a próbagombot.
A próbajelzőfény kialszik.
1107
12345
SOUND
~220-240V/50Hz
2
12 11 13 14
Magyar
9
CELL
5
LAMP
4
SYNC
TEST
6
3
5
8
66
Page 67

Magyar
Távirányító
1. Vevőegység
2. Vevőegység jelzőfénye
3. Be-/kikapcsoló gomb
4. Csatornakód-kapcsoló
5. Szinkronizálási dugó
6. Jeladó
7. Jeladó jelzőfénye
8. Próbagomb
9. Csatornakód-kapcsoló
10. Fényképezőgép vakupapucsbetétje
11. Számítógépes adatkábel
• Csatlakoztassa a szinkronizálási dugót (5) a vaku szinkronizálási csatlakozóaljzatához.
• A be-/kikapcsoló gombot (3) állítsa „On” (Be) helyzetbe.
• A csatornakód-kapcsolók (4/9) segítségével állítsa be ugyanazt a csatornakódot a vevőegységhez (1) és a jeladóhoz (6).
• Nyomja meg a próbagombot (8). A vevőegység jelzőfénye (2) és a jeladó jelzőfénye (7) világítani kezd.
• Csatlakoztassa a fényképezőgép vakupapucsbetétjét (10) a fényképezőgép vakupapucsához. Ha a fénykép
nem rendelkezik vakupapuccsal, akkor a jeladó és a fényképezőgép összekapcsolásához használja a mellékelt
számítógépes adatkábelt.
• Nyomja meg a fényképezőgomb kioldógombját.
Tisztítás és karbantartás
Figyelmeztetés!
• Tisztító- és súrolószerek használatát mellőzze.
• Ne tisztítsa ki a készülék belsejét.
• Ne próbálja megjavítani a készüléket. Ha a készülék nem működik megfelelően, cserélje le egy új készülékre.
• Törölje át a készülék külső felületeit egy puha, nedves törlőkendővel.
1
ON
2
12
3
4
8
7
5
6
11
12
ON
10
9
Jótállás
A termék illetéktelen módosítása érvényteleníti jótállását. Nem vállalunk felelősséget a termék szakszerűtlen használata
miatti károkért.
Leselejtezés
• A terméket elkülönítve, a megfelelő gyűjtőhelyeken kell leselejtezni. Ne dobja ki a készüléket a háztartási hulladék közé.
• További információért lépjen kapcsolatba a forgalmazóval, vagy a hulladékkezelésért felelős helyi hatósággal.
67
Page 68

Magyar
Műszaki adatok
Vaku
Tápfeszültség 220–240 V
Táphálózati frekvencia 50 Hz
Expozíciós index 62 GN
Újrafeldolgozási idő 0,2–2,2 mp
Színhőmérséklet 5600±100K
Teljesítményszabályozás
Lámpa
Vakucső
Lámpa
Távirányító
Elemek (vevőegység) AAA (2x), 1,5 V
Csatornák 1 (RT-01) / 2 (RT-02) / 4 (RT-04) / 16 (RT-16)
Hatótávolság
Beltéren
Kültéren
Szinkronizálási sebesség 1/200 mp
1,0–6,0
1,0–6,0
2-tűs halogén lámpa (G6.35)
75 W (max. 100 W )
≥ 20 m
≥ 20~30 m
Dokumentumok
A termék az Európai Unió minden tagállamában érvényes vonatkozó rendelkezések és irányelvek betartásával készült és
került forgalomba. A termék megfelel az értékesítési országban rá vonatkozó minden előírásnak és rendelkezésnek.
Kérésre hivatalos dokumentációt is rendelkezésre bocsátunk. A formális dokumentáció a teljesség igénye nélkül a
következőket tartalmazza: megfelelőségi nyilatkozat, anyagbiztonsági adatlap, a termék vizsgálati jegyzőkönyve.
AC
Felelősségelhárító nyilatkozat
A kivitel és a műszaki jellemzők előzetes értesítés nélkül is módosulhatnak. Minden logó, terméknév és márkanév a
tulajdonosának márkaneve vagy bejegyzett márkaneve, azokat ennek tiszteletben tartásával említjük.
68
Page 69

CL-STUDIO30 – Stuudiovalgusti
Ohutus
Üldised ohutusnõuded
• Lugege kasutusjuhend enne seadme kasutamist hoolikalt läbi. Hoidke kasutusjuhend hilisemaks kasutamiseks alles.
• Kasutage seadet ainult sihtotstarbeliselt. Ärge kasutage seadet eesmärkidel, mida pole toodud käesolevas
kasutusjuhendis.
• Ärge kasutage seadet, kui selle mis tahes osa on kahjustatud või vigane. Kui seade on kahjustatud või vigane,
vahetage see kohe välja.
• Ärge jätke toodet vihma või niiskuse kätte.
• Ärge blokeerige ventilatsiooniavasid.
Elektriohutus
• Elektrilöögi ohu vähendamiseks tohib toodet hooldamiseks avada ainult volitatud tehnik.
• Probleemi tekkimisel eemaldage toode vooluvõrgust ja teistest seadmetest.
Aku ohutus
• Kasutage ainult käesolevas kasutusjuhendis mainitud akusid.
• Ärge kasutage samal ajal vanu ja uusi akusid.
• Ärge kasutage erinevat tüüpi või mudelit akusid.
• Paigaldage akud õige polaarsusega.
• Ärge lühistage ega demonteerige akusid.
• Ärge jätke akusid vihma kätte.
• Ärge jätke akusid tule või liigse kuumuse kätte.
• Kui akud on täiesti tühjad, võivad need lekkima hakata. Toote kahjustamise vältimiseks eemaldage akud, kui jätate
toote pikemaks ajaks seisma.
• Kui akudest tulev vedeliku puutub kokku naha või riietega, loputage kohe värske veega.
Eesti
Kirjeldus
Stuudiovalgusti on mõeldud teie võtteplatsi optimaalseks valgustamiseks ja kasutamiseks stuudiofotograaas.
1. Juhtpaneel
2. Kaugandur
3. Lamp
4. Välklamp
5. Reguleerimisnupp (välklamp)
6. Ventilatsiooniavad
7. Softboxi kinnituskoht
8. Riiv (softboxi kinnituskoht)
9. Statiivi kinnituskoht
10. Lukustusnupp (statiiv)
11. Vihmavarju kinnituskoht
12. Lukustusnupp (vihmavari)
4
3
7
11
9
69
268
1
12
5
10
Page 70

Kasutamine
Juhtpaneel
1. Toitejuhtme ühenduskoht
2. Sisse-/väljalülitamise lüliti
3. Lambi valiku nupp
4. Lambi näidik
5. Võimsuse juhtnupud (lamp)
6. Võimsuse juhtnupud (välklamp)
7. Näidik
8. Sünkroonimispistiku ühendus
9. Sünkroonimisnupud
10. Sünkroonimisnäidikud
11. Helinupp
12. Helinäidik
13. Testnupp
14. Testnäidik
1 • Ühendage toitejuhe pistikusse.
• Seadme sisselülitamiseks pange sisse-/väljalülitamise lüliti asendisse "I".
2
• Seadme väljalülitamiseks pange sisse-/väljalülitamise lüliti asendisse "O".
• Vajutage lambi valiku nuppu ühe korra, et reguleerida lampe samaaegselt.
Lambi ülemine näidik on sisselülitatud. Lambi alumine näidik on väljalülitatud.
• Vajutage lambi valiku nuppu kaks korda, et reguleerida lampe iseseisvalt.
3/4
5/7
6/7
8/9/10
11/12
13/14
Lambi ülemine ja alumine näidik on sisselülitatud.
• Vajutage lambi valiku nuppu kolm korda, et lamp välja lülitada.
Lambi ülemine ja alumine näidik on väljalülitatud.
• Vajutage ülemist võimsuse juhtnuppu, et suurendada lambi väljundvõimsust.
Näidikul kuvatakse väljundvõimsus.
• Vajutage alumist võimsuse juhtnuppu, et vähendada lambi väljundvõimsust.
Näidikul kuvatakse väljundvõimsus.
• Vajutage võimsuse juhtnuppu “+“, et suurendada välklambi väljundvõimsust.
Näidikul kuvatakse väljundvõimsus.
• Vajutage võimsuse juhtnuppu “-“, et vähendada välklambi väljundvõimsust.
Näidikul kuvatakse väljundvõimsus.
• Sisestage kaugjuhtimispuldi sünkroonimispistik sünkroonimispistiku ühendusse.
• Vajutage sünkroonimisnuppu ühe korra, et valida standardne sünkroonimisrežiim.
Süttib sünkroonimisnäidik 1.
• Vajutage sünkroonimisnuppu kaks korda, et valida 0,5-sekundilise viivitusega sünkroonimisrežiim.
Süttib sünkroonimisnäidik 2.
• Vajutage sünkroonimisnuppu kolm korda, et valida kahekordse päästikuviivitusega sünkroonimisrežiim.
Süttib sünkroonimisnäidik 3.
• Vajutage sünkroonimisnuppu neli korda, et valida kolmekordse päästikuviivitusega sünkroonimisrežiim.
Süttib sünkroonimisnäidik 4.
• Vajutage sünkroonimisnuppu viis korda, et valida neljakordse päästikuviivitusega sünkroonimisrežiim.
Süttib sünkroonimisnäidik 5.
• Vajutage heli nuppu, et aktiveerida laadimise helisignaal.
Süttib helinäidik.
• Vajutage heli nuppu uuesti, et desaktiveerida laadimise helisignaal.
Helinäidik kustub.
• Vajutage testnuppu, et alustada välklambi toimimise testi.
Süttib testnäidik.
• Vajutage testnuppu, et lõpetada välklambi toimimise test.
Testnäidik kustub.
1107
12345
SOUND
~220-240V/50Hz
2
12 11 13 14
Eesti
9
CELL
5
LAMP
4
SYNC
TEST
6
3
5
8
70
Page 71

Kaugjuhtimispult
1. Vastuvõtja
2. Vastuvõtja näidik
3. Sisse-/väljalülitamise lüliti
4. Kanali koodi lüliti
5. Sünkroonimispistik
6. Saatja
7. Saatja näidik
8. Testnupp
9. Kanali koodi lüliti
10. Kaamera sünkroonpesa kinnituskoht
1
ON
2
12
3
4
8
7
5
6
11
12
ON
10
9
11. Arvuti kaabli ühenduskoht
• Sisestage sünkroonimispistik (5) välklambi sünkroonimispistiku ühendusse.
• Seadke sisse-/väljalülitamise lüliti (3) sisselülitatud asendisse.
• Kasutage kanali koodi lüliteid (4/9), et seada vastuvõtjale (1) ja saatjale (6) sama kanali kood.
• Vajutage testnuppu (8). Vastuvõtja näidik (2) ja saatja näidik (7) süttivad.
• Kinnitage kaamera sünkroonpesa kinnituskoht (10) kaamera sünkroonpesa külge. Kui kaameral pole sünkroonpesa,
kasutage saatja ja kaamera ühendamiseks arvuti kaablit.
• Vajutage kaamera katikunuppu.
Puhastamine ja hooldus
Hoiatus!
• Ärge kasutage puhastuslahuseid ega abrasiivmaterjale.
• Ärge puhastage seadet seestpoolt.
• Ärge üritage seadet parandada. Kui seade ei tööta korralikult, vahetage see välja.
• Puhastage seadme välispinda kuiva ja niiske riidega.
Eesti
Garantii
Seadmele tehtud muudatused muudavad garantii kehtetuks. Me ei võta enda peale vastutust kahjustuste eest, mille on
põhjustanud seadme vale kasutamine.
Utiliseerimine
• Toode tuleb viia sobiva kogumispunkti vastavasse alasse. Ärge visake toodet olmejäätmete hulka.
• Lisateabe saamiseks võtke ühendust edasimüüja või kohaliku jäätmekäitlusspetsialistiga.
71
Page 72

Tehnilised andmed
Välklamp
Võrgupinge 220–240 V (vahelduvvool)
Võrgusagedus 50 Hz
Säritustegur 62 GN
Välgu laadimise aeg 0,2–2,2 s
Värvitemperatuur 5600±100K
Võimsuse juhtimine
Lamp
Välklamp
Lamp
Kaugjuhtimispult
Patareid (vastuvõtja) AAA (2x), 1,5 V
Kanalid 1 (RT-01) / 2 (RT-02) / 4 (RT-04) / 16 (RT-16)
Töökaugus
Sees
Väljas
Sünkroonimiskiirus 1/200 s
1,0–6,0
1,0–6,0
Halogeenlamp, G6.35, 2-kontaktiline
75 W (max 100 W )
≥ 20
≥ 20~30 m
Dokumendid
Toode on toodetud ja tarnitud kooskõlas kõigi asjakohaste määruste ja direktiividega, mis kehtivad kõigis Euroopa Liidu
liikmesriikides. Toode on kooskõlas müügiriigi kõigi tehniliste tingimuste ja määrustega.
Ametlik dokumentatsioon on saadaval soovi korral. Ametliku dokumentatsiooni hulka kuuluvad muu hulgas
vastavusdeklaratsioon, materjali ohutuskaart ja toote katseprotokoll.
Eesti
Lahtiütlus
Kujundused ja tehnilised andmed võivad muutuda ette teatamata. Kõik logod, kaubamärgid ja tootenimed on
vastavate omanike kaubamärgid või registreeritud kaubamärgid ja neid tunnustatakse siinkohal sellistena.
72
Page 73

Latviešu
CL-STUDIO30 - Studijas zibspuldze
Drošība
Vispārīgie drošības noteikumi
• Pirms lietošanas rūpīgi izlasiet lietošanas rokasgrāmatu. Saglabājiet rokasgrāmatu turpmākai lietošanai.
• Izmantojiet ierīci tikai tai paredzētiem nolūkiem. Neizmantojiet ierīci citiem nolūkiem, kas atšķiras no rokasgrāmatā
aprakstītajiem nolūkiem.
• Neizmantojiet ierīci, ja kāda tās detaļa ir bojāta vai nepilnīga. Nekavējoties aizvietojiet ierīci, ja tā ir bojāta vai nepilnīga.
• Nepakļaujiet ierīci ūdens vai mitruma iedarbībai.
• Nebloķējiet ventilācijas atveres.
Elektrodrošība
• Lai mazinātu elektrotrieciena risku, ierīce jāatver tikai pilnvarotam speciālistam, ja nepieciešama tehniska apkalpošana.
• Atvienojiet ierīci no strāvas un cita aprīkojuma, ja radusies problēma.
Bateriju drošība
• Lietojiet tikai rokasgrāmatā norādītās baterijas.
• Nelietojiet kopā jaunas un vecas baterijas.
• Nelietojiet dažādu veidu vai prečzīmju baterijas.
• Neievietojiet baterijas pretējā polaritātē.
• Neradiet īssavienojumu vai neizjauciet baterijas.
• Nepakļaujiet baterijas ūdens iedarbībai.
• Nepakļaujiet baterijas uguns vai pārmērīga siltuma iedarbībai.
• Pilnīgi izlādētas baterijas var noplūst. Lai novērstu ierīces bojājumu, izņemiet baterijas, ja atstājat ierīci bez
uzraudzības ilgākā laika periodā.
• Ja bateriju šķidrums nonāk uz ādas vai apģērba, rūpīgi noskalojiet to ar ūdeni.
Raksturojums
Studijas zibspuldze tika konstruēta, lai nodrošinātu vislabāko apgaismojumu Jūsu lmēšanas vietai un studijas
fotografēšanas nolūkiem.
1. Vadības panelis
2. Tālvadības sensors
3. Spuldze
4. Zibspuldze
5. Pielāgojams rokturis (zibspuldzei)
6. Ventilācijas atveres
7. Softbox statīvs
8. Fiksators (softbox statīvam)
9. Trijkāja statīvs
10. Fiksējošās spailes (trijkājim)
11. Lietussarga statīvs
12. Fiksējošās spailes (lietussargam)
4
3
7
11
9
73
268
1
12
5
10
Page 74

Lietošana
Vadības panelis
1. Tīkla kontaktdakšas savienojums
2. Slēdzis ieslēgt/izslēgt
3. Spuldžu izvēlnes poga
4. Spuldžu indikators
5. Jaudas kontrolēšanas pogas (lampai)
6. Jaudas kontrolēšanas pogas (zibspuldzei)
7. Displejs
8. Sinhronizācijas vada savienojums
9. Sinhronizācijas poga
10. Sinhronizācijas indikators
11. Skaņas poga
12. Skaņas indikators
13. Testēšanas poga
14. Testēšanas indikators
1 • Ievietojiet tīkla kontaktdakšu tīkla kontaktligzdā.
• Lai ieslēgtu ierīci, iestatiet slēdzi ieslēgt/izslēgt pozīcijā "I".
2
• Lai ieslēgtu ierīci, iestatiet slēdzi ieslēgt/izslēgt pozīcijā "O".
• Nospiediet spuldžu izvēlnes pogu 1x, lai sinhroni pielāgotu spuldzes.
Augšējās spuldzes indikators ir ieslēgts. Apakšējās spuldzes indikators ir ieslēgts.
• Nospiediet spuldžu izvēlnes pogu 2x, lai atsevišķi pielāgotu spuldzes.
3/4
5/7
6/7
8/9/10
11/12
13/14
Augšējās un apakšējās spuldzes indikators ir ieslēgts.
• Nospiediet spuldžu izvēlnes pogu 3x, lai izslēgtu spuldzi.
Augšējās un apakšējās spuldzes indikators ir izslēgts.
• Nospiediet augšējo jaudas kontrolēšanas pogu, lai palielinātu spuldzes jaudas izvadi.
Displejs attēlo jaudas izvadi.
• Nospiediet apakšējo jaudas kontrolēšanas pogu, lai samazinātu spuldzes jaudas izvadi.
Displejs attēlo jaudas izvadi.
• Nospiediet jaudas kontrolēšanas pogu “+“, lai palielinātu zibspuldzes jaudas izvadi.
Displejs attēlo jaudas izvadi.
• Nospiediet jaudas kontrolēšanas pogu “-“, lai samazinātu zibspuldzes jaudas izvadi.
Displejs attēlo jaudas izvadi.
• Ievietojiet tālvadības sinhronizācijas vadu sinhronizācijas vada savienojumā.
• Nospiediet sinhronizācijas pogu 1x, lai iestatītu standarta sinhronizācijas režīmu.
Sinhronizācijas indikators 1 ir ieslēgts.
• Nospiediet sinhronizācijas pogu 2x, lai iestatītu sinhronizācijas režīmu ar 0.5s aizturi.
Sinhronizācijas indikators 2 ir ieslēgts.
• Nospiediet sinhronizācijas pogu 3x, lai iestatītu sinhronizācijas režīmu ar 2x palaides aizturi.
Sinhronizācijas indikators 3 ir ieslēgts.
• Nospiediet sinhronizācijas pogu 4x, lai iestatītu sinhronizācijas režīmu ar 3x palaides aizturi.
Sinhronizācijas indikators 4 ir ieslēgts.
• Nospiediet sinhronizācijas pogu 5x, lai iestatītu sinhronizācijas režīmu ar 4x palaides aizturi.
Sinhronizācijas indikators 5 ir ieslēgts.
• Nospiediet skaņas pogu, lai aktivizētu dūkšanas skaņu uzlādes laikā.
Skaņas indikators ir ieslēgts.
• Vēlreiz nospiediet skaņas pogu, lai deaktivizētu dūkšanas skaņu uzlādes laikā.
Skaņas indikators ir izslēgts.
• Nospiediet testēšanas pogu, lai sāktu zibspuldzes darbības pārbaudi.
Testēšanas indikators ir ieslēgts.
• Nospiediet testēšanas pogu, lai pabeigtu zibspuldzes darbības pārbaudi.
Testēšanas indikators ir izslēgts.
1107
12345
SOUND
~220-240V/50Hz
2
12 11 13 14
Latviešu
9
CELL
5
LAMP
4
SYNC
TEST
6
3
5
8
74
Page 75

Latviešu
Tālvadība
1. Uztvērējs
2. Uztvērēja indikators
3. Slēdzis ieslēgt/izslēgt
4. Kanāla kodu slēdzis
5. Sinhronizācijas vads
6. Raidītājs
7. Raidītāja indikators
8. Testēšanas poga
9. Kanāla kodu slēdzis
10. Kameras iekšējās zibspuldzes paliktni
11. PC kabeļa savienojums
• Ievietojiet sinhronizācijas vadu (5) zibspuldzes sinhronizācijas vada savienojumā.
• Iestatiet slēdzi ieslēgt/izslēgt (3) ieslēgt pozīcijā.
• Iestatiet vienādu kanāla kodu uztvērējam (1) un raidītājam (6), lietojot kanāla kodu slēdžus (4/9).
• Nospiediet testēšanas pogu (8). Uztvērēja indikators (2) un raidītāja indikators (7) ir ieslēgts.
• Pievienojiet kameras iekšējās zibspuldzes paliktni (10) iekšējai zibspuldzei. Ja kamerai nav iekšējās zibspuldzes,
lietojiet iekļauto PC kabeli, lai savienotu raidītāju un kameru.
• Nospiediet kameras aizslēgu.
Tīrīšana un tehniskā apkope
Brīdinājums!
• Nelietojiet tīrīšanas šķīdinātājus vai abrazīviem.
• Netīriet ierīci no iekšpuses.
• Nemēģiniet salabot ierīci. Ja ierīce darbojas nepareizi, aizvietojiet to ar jaunu ierīci.
• Tīriet ierīces ārējo daļu, lietojot mīkstu samitrinātu lupatu.
1
ON
2
12
3
4
8
7
5
6
12
ON
10
11
9
Garantija
Jebkuras ierīces izmaiņas un/vai pārveidojumi anulēs garantiju. Mēs nenesam atbildību par bojājumiem, kurus izraisījusi
nepareiza ierīces lietošana.
Likvidēšana
• Ierīce ir paredzēta speciālai savākšanai piemērotā savākšanas vietā. Neizmetiet ierīci kopā ar mājturības atkritumiem.
• Papildus informācijai sazinieties ar mazumtirgotāju vai vietējo pašvaldību, kas ir atbildīga par atkritumu
apsaimniekošanu.
75
Page 76

Latviešu
Tehniskie dati
Zibspuldze
Tīkla spriegums 220-240 V
Tīkla frekvence 50 Hz
Tuvinājuma indekss 62 GN
Apstrādes laiks 0,2-2,2 s
Krāsas temperatūra 5600±100K
Jaudas kontrole
Lampa
Zibspuldze
Spuldze
Tālvadība
Baterijas (uztvērējam) AAA (2x), 1,5 V
Kanāli 1 (RT-01) / 2 (RT-02) / 4 (RT-04) / 16 (RT-16)
Darbības attālums
Iekšdurvju
Ārdurvju
Sinhronizācijas ātrums 1/200 s
Dokumenti
Prece tika ražota un piegādāta saskaņā ar visiem vajadzīgajiem noteikumiem un norādījumiem, kas derīgi visiem Eiropas
Savienības valstu pārstāvjiem. Prece atbilst visām piemērojamām instrukcijām un noteikumiem pārdošanas valstī.
Ociālie dokumenti ir pieejami pēc pieprasījuma. Ociālajos dokumentos ietilpst (bet ar to neaprobežojas) Atbilstības
deklarācija, Materiālu drošības datu lapa un produkta izmēģinājuma atskaite.
AC
1,0-6,0
1,0-6,0
Halogēnspuldze, G6.35, 2-kontaktu
75 W (maks. 100 W )
≥ 20
≥ 20~30 m
Atteikšanās
Dizaini un instrukcijas var mainīties bez brīdinājuma. Visi logo, prečzīmes un produktu nosaukumi ir tirdzniecības zīmes
vai to atbilstošo turētāju reģistrētas tirdzniecības zīmes un līdz ar to šādi arī atpazīstamas.
76
Page 77

Lietuvių
CL-STUDIO30 – Studijai skirta blykstė
Sauga
Bendroji sauga
• Prieš naudodami atidžiai perskaitykite naudotojo vadovą. Išsaugokite vadovą ateičiai.
• Prietaisą naudokite tik pagal numatytąją paskirtį. Nenaudokite prietaiso kitiems tikslams, nenurodytiems naudotojo
vadove.
• Nenaudokite prietaiso, jei kuri nors jo dalis sugadinta ar prasti veikia. Jei prietaisas sugedęs ar veikia netinkamai,
nedelsdami jį pakeiskite.
• Saugokite prietaisą nuo vandens ir drėgmės.
• Neuždenkite vėdinimo angų.
Elektros sauga
• Siekiant sumažinti elektros smūgio riziką, šį gaminį atidaryti, kai reikia atlikti jo techninę priežiūrą, turėtų tik įgaliotas
technikas.
• Jei kiltų problemų, atjunkite prietaisą nuo maitinimo tinklo ir kitos įrangos.
Maitinimo elementų sauga
• Naudokite tik vadove nurodytus maitinimo elementus.
• Nenaudokite kartu senų ir naujų maitinimo elementų.
• Nenaudokite skirtingų tipų ar prekių ženklų maitinimo elementų.
• Maitinimo elementus dėkite atsižvelgdami į jų poliškumą.
• Neatlikite maitinimo elementų trumpojo jungimo ir jų neardykite.
• Saugokite maitinimo elementus nuo vandens.
• Saugokite maitinimo elementus nuo ugnies ir didelio karščio.
• Visiškai išeikvoti maitinimo elementai gali imti pratekėti. Kad nesugadintumėte gaminio, prieš palikdami jį
nenaudojamą ilgesniam laikui, išimkite maitinimo elementus.
• Jei skysčio iš maitinimo elementų patektų ant odos ar drabužių, nedelsdami nuplaukite švariu vandeniu.
Aprašas
Studijai skirta blykstė naudojama fotografuojant studijoje jūsų vietai optimaliai apšviesti.
1. Valdymo pultas
2. Nuotolinis jutiklis
3. Lemputė
4. Blykstės vamzdelis
5. Reguliavimo rankenėlė (blykstės)
6. Vėdinimo angos
7. Tvirtinimas prie šviesdėžės
8. Skląstis (tvirtinimui prie šviesdėžės)
9. Tvirtinimas prie trikojo
10. Fiksavimo rankenėlė (trikojui)
11. Tvirtinimas prie skėčio
12. Fiksavimo rankenėlė (skėčiui)
77
4
3
7
11
268
1
12
5
10
9
Page 78

Naudojimas
Valdymo pultas
1. Maitinimo tinklo kištuko lizdas
2. Įjungimo / išjungimo jungiklis
3. Lemputės pasirinkimo mygtukas
4. Lemputės indikatorius
5. Maitinimo valdymo mygtukai (lemputės)
6. Maitinimo valdymo mygtukai (blykstės vamzdelio)
7. Ekranas
8. Sinchronizavimo kištuko lizdas
9. Sinchronizavimo mygtukas
10. Sinchronizavimo indikatoriai
11. Garso mygtukas
12. Garso indikatorius
13. Patikrinimo mygtukas
14. Patikrinimo indikatorius
1 • Maitinimo tinklo kištuką įk iškite į maitinimo tinklo kištuko jungtį.
• Norėdami įjungti prietaisą, nustatykite įjungimo / išjungimo jungiklį į padėtį „I“.
2
• Norėdami išjungti prietaisą, nustatykite įjungimo / išjungimo jungiklį į padėtį „O“.
• Vieną kartą paspauskite lemputės pasirinkimo mygtuką, kad sinchronišk ai sureguliuotumėte lemputes.
Viršutinis lemputės indikatorius įjungtas. Apatinis lemputės indikatorius išjungtas.
• Du kartus paspauskite lemputės pasirinkimo mygtuką, kad lemputes sureguliuotumėte atskirai.
3/4
5/7
6/7
8/9/10
11/12
13/14
Viršutinis ir apatinis lemputės indikatorius įjungti.
• Tris kartus paspauskite lemputės pasirinkimo mygtuką, kad lemputę išjungtumėte.
Viršutinis ir apatinis lemputės indikatorius išjungti.
• Paspauskite viršutinį maitinimo valdymo mygtuką, kad padidintumėte lemputės galios išvestį.
Ekrane parodoma galios išvestis.
• Paspauskite apatinį maitinimo valdymo mygtuką, kad sumažintumėte lemputės galios išvestį.
Ekrane parodoma galios išvestis.
• Paspauskite maitinimo valdymo mygtuką “+“, kad padidintumėte blykstės vamzdelio galios išvestį.
Ekrane parodoma galios išvestis.
• Paspauskite maitinimo valdymo mygtuką “-“, kad sumažintumėte blykstės vamzdelio galios išvestį.
Ekrane parodoma galios išvestis.
• Įkiškite nuotolinio valdymo pulto sinchronizavimo kištuką į sinchronizavimo kištuko lizdą.
• Vieną kartą paspauskite sinchronizavimo mygtuką, kad nustatytumėte standartinį sinchronizavimo režimą.
Įsižiebs 1 sinchronizavimo indikatorius.
• Du kartus paspauskite sinchronizavimo mygtuką, kad nustatytumėte 0,5 s delsos sinchronizavimo režimą.
Įsižiebs 2 sinchronizavimo indikatorius.
• Tris kartus paspauskite sinchronizavimo mygtuką, kad nustatytumėte 2 k. paleidimo delsos sinchronizavimo
režimą. Įsižiebs 3 sinchronizavimo indikatorius.
• Keturis kartus paspauskite sinchronizavimo mygtuką, kad nustatytumėte 3 k. paleidimo delsos sinchronizavimo
režimą. Įsižiebs 4 sinchronizavimo indikatorius.
• Penkis kartus paspauskite sinchronizavimo mygtuką, kad nustatytumėte 4 k. paleidimo delsos sinchronizavimo
režimą. Įsižiebs 5 sinchronizavimo indikatorius.
• Paspauskite garso mygtuką, kad krovimo metu aktyvintumėte skambučio garsą.
Įsižiebia garso indikatorius.
• Dar kartą paspauskite garso mygtuką, kad krovimo metu deaktyvintumėte skambučio garsą.
Garso indikatorius išsijungia.
• Paspauskite patikrinimo mygtuką, kad pradėtumėte tikrinti, kaip veikia blykstė.
Įsižiebia patikrinimo indikatorius.
• Paspauskite patikrinimo mygtuką, kad sustabdytumėte tikrinimą, kaip veikia blykstė.
Patikrinimo indikatorius išsijungia.
1107
12345
SOUND
~220-240V/50Hz
2
12 11 13 14
Lietuvių
9
CELL
5
LAMP
4
SYNC
TEST
6
3
5
8
78
Page 79

Lietuvių
Nuotolinio valdymo pultas
1. Imtuvas
2. Imtuvo indikatorius
3. Įjungimo / išjungimo jungiklis
4. Kanalo kodo jungiklis
5. Sinchronizavimo kištukas
6. Siųstuvas
7. Siųstuvo indikatorius
8. Patikrinimo mygtukas
9. Kanalo kodo jungiklis
10. Fotoaparato „hot shoe“ jungtis
11. Kompiuterio kabelio jungtis
• Įkiškite sinchronizavimo kištuką (5) į blykstės sinchronizavimo kištuko jungtį.
• Nustatykite įjungimo / išjungimo jungiklį (3) į įjungimo padėtį.
• Nustatykite tą patį imtuvo (1) ir siųstuvo (6) kanalo kodą, naudodami kanalo kodo jungiklius (4/9).
• Paspauskite patikrinimo mygtuką (8). Įsižiebia imtuvo indikatorius (2) ir siųstuvo indikatorius (7).
• Fotoaparatui skirtą „hot shoe“ jungtį (10) prijunkite prie atitinkamos fotoaparato jungties. Jei fotoaparate „hot shoe“
jungties nėra, naudokite pridėtą kompiuterio kabelį, kad sujungtumėte siųstuvą ir fotoaparatą.
• Paspauskite fotoaparato užraktą.
Valymas ir priežiūra
Įspėjimas!
• Nenaudokite valymo tirpiklių ir abrazyvinių medžiagų.
• Nevalykite prietaiso vidaus.
• Nebandykite remontuoti prietaiso. Jei prietaisas veikia netinkamai, pakeiskite jį nauju prietaisu.
• Prietaiso išorę valykite minkšta, drėgna šluoste.
1
ON
2
12
3
4
8
7
5
6
11
12
ON
10
9
Garantija
Bet kokie gaminio pakeitimai ir (arba) modikacijos anuliuos garantiją. Neprisiimame jokios atsakomybės už žalą, kilusią
netinkamai naudojant gaminį.
Išmetimas
• Išmetamą gaminį reikia atiduoti į atitinkamą atliekų surinkimo vietą. Neišmeskite gaminio su buitinėmis atliekomis.
• Jei reikėtų daugiau informacijos, susisiekite su mažmeninės prekybos pardavėju ar vietine valdžios institucija,
atsakinga už atliekų tvarkymą.
79
Page 80

Lietuvių
Techniniai duomenys
Blykstė
Maitinimo tinklo įtampa 220–240 V kintamoji srovė
Maitinimo tinklo dažnis 50 Hz
Ekspozicijos indeksas 62 GN
Recirkuliacijos trukmė 0,2–2,2 s
Spalvų temperatūra 5600±100K
Galios valdymas
Lemputė
Blykstės vamzdelis
Lemputė
Nuotolinio valdymo pultas
Maitinimo elementai (imtuvo) AAA (2x), 1,5 V
Kanalai 1 (RT-01) / 2 (RT-02) / 4 (RT-04) / 16 (RT-16)
Naudojimo atstumas
Patalpoje
Lauke
Sinchronizavimo greitis 1/200 s
Dokumentai
Šis gaminys buvo pagamintas ir pateiktas į rinką kaip atitinkantis visus taikytinus reglamentus ir direktyvas, galiojančias
visose Europos Sąjungos valstybėse narėse. Gaminys atitinka visas pardavimo šalyje taikytinas specikacijas ir taisykles.
Ocialią dokumentaciją galima gauti pateikus prašymą. Ociali dokumentacija apima, neapsiribojant, atitikties
deklaraciją, medžiagų saugos duomenų lapą ir gaminio bandymo ataskaitą.
1,0–6,0
1,0–6,0
Halogeninė lemputė, G6.35, 2 kištukų
75 W (maks. 100 W )
≥ 20
≥ 20~30 m
Atsisakymas
Dizainas ir specikacijos gali būti keičiami be įspėjimo. Visi logotipai, prekių ženklai ir gaminių pavadinimai yra jų
atitinkamų savininkų prekių ženklai arba registruotieji prekių ženklai ir čia yra pripažįstami kaip tokie.
80
Page 81

Slovenščina
CL-STUDIO30 - Studijska bliskavica
Varnost
Splošna varnost
• Pred uporabo pozorno preberite priročnik. Shranite ta priročnik za prihodnji ogled.
• Napravo uporabljajte le v njen namen. Naprave ne uporabite za druge namene kot pa so opisani v priročniku.
• Ne uporabljajte naprave, če je poškodovan ali pokvarjen kateri koli del. Če je naprava poškodovana ali pokvarjena,
jonemudoma zamenjajte.
• Izdelka ne izpostavljajte vodi ali vlagi.
• Ne blokirajte odprtin za prezračevanje.
Električna varnost
• Da zmanjšate tveganje za električni udar, lahko ta izdelek odpre le pooblaščen tehnik, ko je potreben servis.
• Če se pojavijo težave, odklopite izdelek iz omrežnega napajanja in druge opreme.
Varnost pri rokovanju z baterijami
• Uporabljajte le baterije navedene v tem priročniku.
• Ne uporabljajte starih baterij z novimi.
• Ne uporabljajte baterij različnih proizvajalcev.
• Ne namestite baterij z obrnjeno polarnostjo.
• Baterij ne razstavljajte in ne naredite kratkega stika.
• Baterij ne izpostavljajte vodi.
• Baterij ne izpostavljajte ognju ali prekomerni vročini.
• Ko so baterije popolnoma izpraznjene, lahko puščajo. Da preprečite poškodbe izdelka, odstranite baterije, ko izdelek
pustite nenadzorovan za daljša časovna obdobja.
• Če tekočina iz baterij pride v stik s kožo ali oblačili, nemudoma sperite s svežo vodo.
Opis
Studijska bliskavica je zasnovana za zagotavljanje optimalne osvetlitve vaše lokacije in za namene studijske osvetlitve.
1. Nadzorna plošča
2. Daljinski senzor
3. Lučka
4. Cev z lučjo
5. Nastavitveni gumb (bliskavica)
6. Odprtine za prezračevanje
7. Podstavek softbox
8. Zapah (podstavek softbox)
9. Podstavek trinožnik
10. Gumb za blokiranje (trinožnik)
11. Podstavek dežnik
12. Gumb za blokiranje (dežnik)
4
3
7
11
9
81
268
1
12
5
10
Page 82

Uporaba
Nadzorna plošča
1. Povezava glavnega napajanja
2. Stikalo za vklop/izklop
3. Gumb za izbiro luči
4. Signalna lučka
5. Gumbi za upravljanje jakosti (lučka)
6. Gumbi za upravljanje jakosti (cev z lučjo)
7. Zasl-SIon
8. Povezava sync vtiča
9. Sync gumb
10. Sync pokazatelji
11. Gumb za zvok
12. Pokazatelj zvoka
13. Gumb Test
14. Pokazatelj Test
1 • Povežite vtič napajanja z omrežnim napajanjem.
• Za vklop naprave nastavite stikalo za vklop/izklop v položaj "I".
2
• Za izklop naprave nastavite stikalo za vklop/izklop v položaj "O".
• Pritisnite gumb za izbiro luči 1-krat, da nastavite luči sočasno.
Zgornji pokazatelj lučke zasveti. Spodnji pokazatelj lučke je izključen.
• Pritisnite gumb za izbiro luči 2-krat, da nastavite luči neodvisno.
3/4
5/7
6/7
8/9/10
11/12
13/14
Zgornji in spodnji pokazatelj lučke zasvetita.
• Pritisnite gumb za izbiro luči 3-krat, da luči izklopite.
Zgornji in spodnji pokazatelj lučke se izklopita.
• Pritisnite zgornji gumb za upravljanje jakosti, da povečate izhodno moč luči.
Na zaslonu je prikazana izhodna jakost.
• Pritisnite spodnji gumb za upravljanje jakosti, da zmanjšate izhodno moč luči.
Na zaslonu je prikazana izhodna jakost.
• Pritisnite gumb za upravljanje jakosti “+“, da povečate izhodno moč cevi z lučjo.
Na zaslonu je prikazana izhodna jakost.
• Pritisnite gumb za upravljanje jakosti “-“, da zmanjšate izhodno moč cevi z lučjo.
Na zaslonu je prikazana izhodna jakost.
• Vstavite vtič sync daljinskega upravljanja v povezavo vtiča sync.
• 1-krat pritisnite gumb sync, da nastavite standardni način sinhronizacije.
Indikator 1 sinhronizacije zasveti.
• 2-krat pritisnite gumb sync, da nastavite način sinhronizacije z 0,5 sekundnim zamikom.
Indikator 2 sinhronizacije zasveti.
• 3-krat pritisnite gumb sync, da nastavite način sinhronizacije z 2-kratno zakasnitvijo sprožilca.
Indikator 3 sinhronizacije zasveti.
• 4-krat pritisnite gumb sync, da nastavite način sinhronizacije z 3-kratno zakasnitvijo sprožilca.
Indikator 4 sinhronizacije zasveti.
• 5-krat pritisnite gumb sync, da nastavite način sinhronizacije z 4-kratno zakasnitvijo sprožilca.
Indikator 5 sinhronizacije zasveti.
• Pritisnite gumb za zvok, da aktivirate zvok med polnjenjem.
Indikator zvoka zasveti.
• Ponovno pritisnite gumb za zvok, da deaktivirate zvok med polnjenjem.
Indikator zvoka se izklopi.
• Pritisnite gumb Test, da začnete preverjanje delovanja bliskavice.
Indikator test zasveti.
• Pritisnite gumb Test, da ustavite preverjanje delovanja bliskavice.
Indikator preverjanja se izklopi.
1107
12345
SOUND
~220-240V/50Hz
2
12 11 13 14
Slovenščina
9
CELL
5
LAMP
4
SYNC
TEST
6
3
5
8
82
Page 83

Slovenščina
Daljinski upravljalnik
1. Sprejemnik
2. Pokazatelj sprejemnika
3. Stikalo za vklop/izklop
4. Stikalo kode kanala
5. Vtič sinhronizacije
6. Oddajnik
7. Pokazatelj oddajnika
8. Gumb Test
9. Stikalo kode kanala
10. Nastavek "hot shoe" za kamero
11. Kabelska povezava računalnika
• Vstavite vtič sync (5) v povezavo vtiča sync na bliskavici.
• Nastavite stikalo vklop/izklop (3) v položaj vklopljeno.
• Nastavite enako kodo kanala za sprejemnik (1) in oddajnik (6) s stikali za kodo kanala (4/9).
• Pritisnite gumb Test (8). Pokazatelj sprejemnika (2) in pokazatelj oddajnika (7) zasvetita.
• Pritrdite nastavek "hot shoe" (10) na povezovalni nastavek kamere. Če kamera tega nastavka nima, uporabite
priložen računalniški kabel za povezavo oddajnika in kamere.
• Pritisnite zaslonko kamere.
Čiščenje in vzdrževanje
Pozor!
• Ne uporabljajte čistilnih topil ali jedkih čistil.
• Ne čistite notranjosti naprave.
• Ne poskušajte popravljati naprave. Če naprava ne deluje pravilno, jo zamenjajte z novo napravo.
• Očistite zunanjost izdelka z mehko, vlažno krpo.
1
ON
2
12
3
4
8
7
5
6
12
ON
10
11
9
Jamstvo
Vse spremembe in/ali modikacije izdelka izničijo garancijo. Se sprejemamo odgovornosti za poškodbe, ki jih povzroči
nepravilna uporaba izdelka.
Varstvo okolja
• Izdelek je zasnovan za ločeno zbiranje na ustreznem zbirnem mestu. Ne odlagajte ta izdelek skupaj z gospodinjskimi
odpadki.
• Za več informacij se obrnite na trgovca ali lokalno upravo odgovorno za upravljanje z odpadki.
83
Page 84

Slovenščina
Tehnični podatki
Bliskavica
Omrežna napetost 220-240 V
Frekvenca napajanja 50 Hz
Indeks izpostavljenosti 62 GN
Čas recikliranja 0,2-2,2 s
Temperatura barve 5600±100K
Upravljanje napajanja
Lučka
Cev z lučjo
Lučka
Daljinski upravljalnik
Baterije (sprejemnik) AAA (2x), 1,5 V
Kanali 1 (RT-01) / 2 (RT-02) / 4 (RT-04) / 16 (RT-16)
Obseg delovanja
V notranjih prostorih
Na prostem
Hitrost sinhronizacije 1/200 s
Dokumenti
Izdelek je proizveden in dobavljen v skladu z vsemi zadevnimi predpisi in direktivami, ki veljajo za države članice
Evropske skupnosti. Izdelek je skladen z vsemi specikacijami in predpisi v državi prodaje.
Uradno dokumentacijo lahko dobite po povpraševanju. Uradna dokumentacija vključuje, a ni omejena na, izjavo o
skladnosti, podatkovni varnostnim listom materiala in poročilom o preskusu izdelka.
AC
1,0-6,0
1,0-6,0
Halogenska luč, G6.35, 2-zatiča
75 W (maks. 100 W )
≥ 20
≥ 20~30 m
Zavrnitev odgovornosti
Oblika in specikacije se lahko spremenijo brez predhodnega obvestila. Vsi logotipi, blagovne znamke in imena izdelka
so blagovne znamke ali registrirane blagovne znamke zadevnih lastnikov in so prepoznavne kot takšne.
84
Page 85

Hrvatski
CL-STUDIO30 - Studijska bljeskalica
Sigurnost
Opća sigurnost
• Pročitajte pažljivo priručnik prije korištenja. Pohranite ovaj priručnik radi korištenja u budućnosti.
• Uređaj koristite samo u svrhu za koju je namijenjen. Nemojte koristiti ovaj uređaj za druge namjene, osim one
opisane u ovom priručniku.
• Ne koristite ovaj uređaj ako mu je bilo koji dio oštećen ili pokvaren. Ako je uređaj oštećen ili popravljen odmah ga
zamijenite.
• Proizvod nemojte izlagati vodi ili vlazi.
• Ne blokirajte ventilacijske otvore.
Električna sigurnost
• Kako biste smanjili opasnost od strujnog udara, ovaj bi proizvod u slučaju potrebe za servisiranjem trebali otvarati
samo ovlašteni servisni tehničari.
• U slučaju problema iskopčajte uređaj s napajanja i s druge opreme.
Sigurnost baterije
• Koristite isključivo baterije opisane u priručniku.
• Ne miješajte stare baterije s novima.
• Nemojte koristiti baterije različite vrste ili marke.
• Nemojte umetati baterije suprotnim polaritetom.
• Nemojte rastavljati baterije niti ih spajati ukratko.
• Ne izlažite baterije vodi.
• Baterije nemojte izlagati vatri niti visokoj temperaturi.
• Baterije su sklone curenju kad su potpuno ispražnjene. Kako biste izbjegli oštećenje proizvoda, izvadite baterije ako
proizvod ostavljate bez nadzora dulje vrijeme.
• Ako tekućina iz baterija dođe u doticaj s kožom ili odjećom, odmah isperite svježom vodom.
Opis
Studijska bljeskalica je dizajnirana kako bi osigurala optimalnu rasvjetu za vašu lokaciju i potrebe fotograranja u
studiju.
1. Upravljačka ploča
2. Daljinski senzor
3. Lampa
4. Cijev bljeskalice
5. Okrugli gumb za prilagodbu (bljeskalica)
6. Ventilacijski otvori
7. Softbox nosač
8. Kvačica (Softbox nosač)
9. Montaža na tronožac
10. Okrugli gumb za zaključavanje (tronožac)
11. Nosač za kišobran
12. Okrugli gumb za zaključavanje (kišobran)
4
3
7
11
9
85
268
1
12
5
10
Page 86

Korištenje
Upravljačka ploča
1. Priključak za strujni utikač
2. Prekidač za uključivanje/isključivanje
3. Gumb za odabir lampe
4. Indikator lampe
5. Gumbi za kontrolu napajanja (lampa)
6. Gumbi za kontrolu napajanja (cijev bljeskalice)
7. Zaslon
8. Priključak za utikač za sinkronizaciju
9. Gumb za sinkronizaciju
10. Indikatori za sinkronizaciju
11. Gumb za zvuk
12. Indikator za zvuk
13. Gumb za testiranje
14. Indikator za testiranje
1 • Spojite strujni utikač za strujni utikač.
• Za uključivanje uređaja postavite prekidač za uključivanje/isključivanje u položaj "I".
2
• Za isključivanje uređaja postavite prekidač za uključivanje/isključivanje u položaj "O".
• Jednom pritisnite gumb za odabir lampe kako biste sinkronizirano podesili lampe.
Indikator gornje lampe je uključen. Indikator gornje lampe je isključen.
• Dvaput pritisnite gumb za odabir lampe kako biste neovisno podesili lampe.
3/4
5/7
6/7
8/9/10
11/12
13/14
Indikatori gornje i donje lampe su uključeni.
• Pritisnite gumb za odabir lampe tri puta kako biste isključili lampu.
Indikatori gornje i donje lampe su isključeni.
• Pritisnite gornji gumb za kontrolu napajanja kako biste povećali izlaznu snagu lampe.
Zaslon prikazuje izlaznu snagu.
• Pritisnite donji gumb za kontrolu napajanja kako biste smanjili izlaznu snagu lampe.
Zaslon prikazuje izlaznu snagu.
• Pritisnite gumb za kontrolu napajanja “+“ kako biste povećali izlaznu snagu cijevi bljeskalice.
Zaslon prikazuje izlaznu snagu.
• Pritisnite gumb za kontrolu napajanja “-“ kako biste smanjili izlaznu snagu cijevi bljeskalice.
Zaslon prikazuje izlaznu snagu.
• Umetnite utikač za sinkronizaciju daljinskog upravljača u priključak za utikač za sinkronizaciju.
• Jednom pritisnite gumb za sinkronizaciju kako biste postavili standardni način sinkronizacije. Indikator za
sinkronizaciju 1 se uključuje.
• 2 puta pritisnite gumb za sinkronizaciju kako biste postavili način sinkronizacije s odgodom od 0,5 s. Indikator
za sinkronizaciju 2 se uključuje.
• Pritisnite gumb za sinkronizaciju 3 puta kako biste postavili način sinkronizacije s odgodom 2x-okidač. Indikator
za sinkronizaciju 3 se uključuje.
• Pritisnite gumb za sinkronizaciju 4 puta kako biste postavili način sinkronizacije s odgodom 3x-okidač. Indikator
za sinkronizaciju 4 se uključuje.
• Pritisnite gumb za sinkronizaciju 5 puta kako biste postavili način sinkronizacije s odgodom 4x-okidač. Indikator
za sinkronizaciju 5 se uključuje.
• Pritisnite gumb za zvuk kako biste aktivirali zvuk zujanja tijekom punjenja.
Indikator zvuka se uključuje.
• Ponovno pritisnite gumb za zvuk kako biste deaktivirali zvuk zujanja tijekom punjenja.
Indikator zvuka se isključuje.
• Pritisnite gumb za testiranje kako biste započeli s testiranjem rada bljeskalice.
Indikator testa se uključuje.
• Pritisnite gumb za testiranje kako biste zaustavili testiranje rada bljeskalice.
Indikator testa se isključuje.
1107
12345
SOUND
~220-240V/50Hz
2
12 11 13 14
Hrvatski
9
CELL
5
LAMP
4
SYNC
TEST
6
3
5
8
86
Page 87

Hrvatski
Daljinski upravljač
1. Prijemnik
2. Indikator za prijemnik
3. Prekidač za uključivanje/isključivanje
4. Prekidač za šifru kanala
5. Utikač za sinkronizaciju
6. Predajnik
7. Indikator za predajnik
8. Gumb za testiranje
9. Prekidač za šifru kanala
10. Nosač za bljeskalicu na fotoaparatu
11. Priključak za kabel za računalo
• Umetnite utikač za sinkronizaciju (5) u priključak za utikač za sinkronizaciju bljeskalice.
• Postavite prekidač za uključivanje/isključivanje (3) u položaj Uključeno.
• Postavite istu šifru kanala za prijemnik (1) i za predajnik (6) koristeći prekidače za šifre kanala (4/9).
• Pritisnite gumb za testiranje (8). Indikator prijemnika (2) i indikator predajnika (7) se uključuju.
• Postavite nosač za montažu bljeskalice (10) na priključak za bljeskalicu na kameri. Ako kamera nema priključak za
bljeskalicu, upotrijebite priloženi kabel za računalo kako biste povezali predajnik i kameru.
• Pritisnite okidač na kameri.
Čišćenje i održavanje
Upozorenje!
• Nemojte koristiti otapala ili abrazivna sredstva.
• Nemojte čistiti uređaj iznutra.
• Ne pokušavajte popravljati uređaj. Ako uređaj ne radi ispravno, zamijenite ga novim.
• Vanjštinu uređaja očistite mekom, vlažnom krpicom.
1
ON
2
12
3
4
8
7
5
6
11
12
ON
10
9
Jamstvo
Svaka izmjena i/ili modikacija na proizvodu poništava jamstvo. Ne možemo prihvatiti nikakvu odgovornost za
oštećenja nastala zbog nepravilne uporabe proizvoda.
Odlaganje u otpad
• Proizvod je namijenjen odvojenom prikupljanju na odgovarajućim točkama za prikupljanje. Ne odlažite ovaj
proizvod zajedno s otpadom iz domaćinstva.
• Za više informacija se obratite prodavatelju ili lokalnom tijelu odgovornom za gospodarenje otpadom.
87
Page 88

Hrvatski
Tehnički podaci
Bljeskalica
Napon mreže 220-240 V
Frekvencija električne mreže 50 Hz
Indeks izloženosti 62 GN
Vrijeme recikliranja 0,2-2,2 s
Temperatura boje 5600±100K
Kontrola snage
Lampa
Cijev bljeskalice
Lampa
Daljinski upravljač
Baterije (prijemnik) AAA (2x), 1,5 V
Kanali 1 (RT-01) / 2 (RT-02) / 4 (RT-04) / 16 (RT-16)
Radna udaljenost
Unutra
Vani
Brzina sinkronizacije 1/200 s
Dokumenti
Proizvod je proizveden i isporučen u skladu sa svim relevantnim odredbama i direktivama koje vrijede za sve države
članice Europske Unije. Proizvod je sukladan sa svim relevantnim specikacijama i odredbama u zemlji prodaje.
Formalna dokumentacija dostupna je na zahtjev. Formalna dokumentacija uključuje, bez ograničenja, izjavu o
sukladnosti, list s podacima o sigurnosti materijala i izvješće o testiranju proizvoda.
AC
1,0-6,0
1,0-6,0
Halogena lampa, G6.35, 2-igle
75 W (maks. 100 W )
≥ 20
≥ 20~30 m
Odricanje od odgovornosti
Dizajn i specikacije mogu se mijenjati bez prethodne najave. Svi logotipi, robne marke i nazivi proizvoda su zaštitni
znakovi ili registrirani zaštitni znakovi njihovih vlasnika i ovdje se spominju kao takvi.
88
Page 89

Română
CL-STUDIO30 - Bliţ de studio
Siguranţă
Instrucţiuni generale de siguranţă
• Citiţi manualul cu atenţie înainte de utilizare. Păstraţi manualul pentru consultări ulterioare.
• Utilizaţi dispozitivul numai în scopurile prevăzute. Nu utilizaţi dispozitivul în alte scopuri decât cele descrise în manual.
• Nu utilizaţi dispozitivul dacă are piese deteriorate sau defecte. Dacă dispozitivul este deteriorat sau defect, înlocuiţi
imediat dispozitivul.
• Nu expuneţi produsul apei sau umezelii.
• Nu blocaţi gurile de aerisire.
Instrucţiuni de siguranţă electrică
• Pentru a se reduce pericolul de electrocutare, acest produs va desfăcut numai de către un tehnician avizat, când
este necesară depanarea.
• Deconectaţi produsul de la priza de reţea sau alte echipamente în cazul apariţiei unei probleme.
Instrucţiuni de siguranţă privind bateriile
• Folosiţi numai bateriile indicate în manual.
• Nu utilizaţi baterii noi şi vechi împreună.
• Nu utilizaţi baterii de tipuri sau mărci diferite.
• Nu instalaţi bateriile cu polaritatea inversată.
• Nu scurtcircuitaţi şi nu dezasamblaţi bateriile.
• Nu expuneţi bateriile la acţiunea apei.
• Nu expuneţi bateriile la acţiunea focului sau a căldurii intense.
• Bateriile sunt predispuse la scurgeri când sunt complet descărcate. Pentru a evita deteriorarea produsului, scoateţi
bateriile dacă lăsaţi produsul nesupravegheat pe perioade mai lungi de timp.
• Dacă lichidul din baterii intră în contact cu pielea sau îmbrăcămintea, clătiţi imediat cu apă curată.
Descriere
Bliţul de studio a fost conceput să ofere condiţii de iluminare optime pentru spaţiul dumneavoastră de lucru şi studioul
foto.
1. Panou de comandă
2. Senzor de la distanţă
3. Lampă
4. Tub de bliţ
5. Buton de reglare (bliţ)
6. Fante de ventilaţie
7. Suport softbox
8. Închizător (suport softbox)
9. Suport trepied
10. Buton blocare (trepied)
11. Suport umbrelă
12. Buton blocare (umbrelă)
4
3
7
11
9
89
268
1
12
5
10
Page 90

Utilizare
Panou de comandă
1. Conexiune ştecăr
2. Întrerupător on/o (pornire/oprire)
3. Buton selecţie lampă
4. Indicator lampă
5. Butoane de comandă a puterii (lampă)
6. Butoane de comandă a puterii (tub bliţ)
7. Aşaj
8. Conexiune mufă sincronizare
9. Buton sincronizare
10. Indicatoare sincronizare
11. Buton sunet
12. Indicator sunet
13. Buton testare
14. Indicator testare
1 • Conectaţi ştecărul la conexiunea de ştecăr.
• Pentru a porni dispozitivul, aduceţi întrerupătorul on/o în poziţia „I”.
2
• Pentru a opri dispozitivul, aduceţi întrerupătorul on/o în poziţia „O”.
• Apăsaţi butonul de selectare a lămpii o dată pentru a sincroniza lămpile.
Indicatorul lămpii superioare este pornit. Indicatorul lămpii inferioare este oprit.
• Apăsaţi butonul de selectare a lămpii de 2 ori pentru a regla lămpile independent una de cealaltă.
3/4
5/7
6/7
8/9/10
11/12
13/14
Indicatoarele lămpii superioare şi inferioare sunt pornite.
• Apăsaţi butonul de selectare a lămpii de 3 ori pentru a opri lampa.
Indicatoarele lămpii superioare şi inferioare sunt oprite.
• Apăsaţi butonul superior de comandă a puterii pentru a creşte puterea lămpii.
Aşajul indică puterea produsă.
• Apăsaţi butonul inferior de comandă a puterii pentru a reduce puterea lămpii.
Aşajul indică puterea produsă.
• Apăsaţi butonul de comandă a puterii “+“ pentru a creşte puterea tubului de bliţ.
Aşajul indică puterea produsă.
• Apăsaţi butonul de comandă a puterii “-“ pentru a reduce puterea tubului de bliţ.
Aşajul indică puterea produsă.
• Introduceţi mufa de sincronizare din telecomandă în conexiunea mufei de sincronizare.
• Apăsaţi butonul de sincronizare o dată pentru a seta modul de sincronizare standard.
Indicatorul de sincronizare 1 se aprinde.
• Apăsaţi butonul de sincronizare de 2 ori pentru a seta modul de sincronizare cu temporizare de 0,5 secunde.
Indicatorul de sincronizare 2 se aprinde.
• Apăsaţi butonul de sincronizare de 3 ori pentru a seta modul de sincronizare cu temporizare şi declanşare de 2 ori.
Indicatorul de sincronizare 3 se aprinde.
• Apăsaţi butonul de sincronizare de 4 ori pentru a seta modul de sincronizare cu temporizare şi declanşare de 3 ori.
Indicatorul de sincronizare 4 se aprinde.
• Apăsaţi butonul de sincronizare de 5 ori pentru a seta modul de sincronizare cu temporizare şi declanşare de 4 ori.
Indicatorul de sincronizare 5 se aprinde.
• Apăsaţi butonul de sunet pentru a activa semnalul sonor în timpul încărcării.
Indicatorul de sunet se aprinde.
• Apăsaţi butonul de sunet din nou pentru a dezactiva semnalul sonor în timpul încărcării.
Indicatorul de sunet se stinge.
• Apăsaţi butonul de testare pentru a începe să testaţi funcţionarea bliţului.
Indicatorul de testare se aprinde.
• Apăsaţi butonul de testare pentru a opri testarea funcţionării bliţului.
Indicatorul de testare se stinge.
1107
12345
SOUND
~220-240V/50Hz
2
12 11 13 14
Română
9
CELL
5
LAMP
4
SYNC
TEST
6
3
5
8
90
Page 91

Română
Telecomandă
1. Receptor
2. Indicator receptor
3. Întrerupător on/o (pornire/oprire)
4. Comutator cod canal
5. Mufă sincronizare
6. Transmiţător
7. Indicator transmiţător
8. Buton testare
9. Comutator cod canal
10. Suport hot shoe cameră
11. Conexiune cablu PC
• Introduceţi mufa de sincronizare (5) în conexiunea mufei de sincronizare a bliţului.
• Aduceţi întrerupătorul on/o (3) în poziţia on (pornire).
• Setaţi acelaşi cod de canal pentru receptor (1) şi transmiţător (6) cu ajutorul comutatoarelor de cod al canalelor (4/9).
• Apăsaţi butonul de testare (8). Indicatorul receptorului (2) şi indicatorul transmiţătorului (7) se aprind.
• Prindeţi suportul hot shoe al camerei (10) la hot shoe-ul camerei. În cazul în care camera nu are hot shoe, utilizaţi
cablul PC furnizat pentru a conecta transmiţătorul şi camera.
• Apăsaţi declanşatorul camerei.
Curăţare şi întreţinere
Avertisment!
• Nu folosiţi solvenţi sau agenţi de curăţare abrazivi.
• Nu curăţaţi interiorul dispozitivului.
• Nu încercaţi să reparaţi dispozitivul. Dacă dispozitivul nu funcţionează corect, înlocuiţi-l cu unul nou.
• Curăţaţi exteriorul dispozitivul cu o cârpă umedă şi moale.
1
ON
2
12
3
4
8
7
5
6
11
12
ON
10
9
Garanţie
Orice schimbări şi/sau modicări ale produsului vor anula garanţia. Nu putem accepta responsabilitatea pentru daunele
provocate de utilizarea incorectă a produsului.
Eliminare
• Produsul a fost creat pentru colectare separată la un punct de colectare adecvat. Nu eliminaţi produsul odată cu
deşeurile menajere.
• Pentru mai multe informaţii, contactaţi magazinul sau autoritatea locală responsabilă pentru gestionarea deşeurilor.
91
Page 92

Română
Specicaţii tehnice
Bliţ
Tensiune reţea 220-240 V
Frecvenţă reţea 50 Hz
Indice expunere 62 GN
Timp reciclare 0,2-2,2 s
Temperatura culorii 5600±100K
Comandă putere
Lampă
Tub de bliţ
Lampă
Telecomandă
Baterii (receptor) AAA (2x), 1,5 V
Canale 1 (RT-01) / 2 (RT-02) / 4 (RT-04) / 16 (RT-16)
Distanţă de funcţionare
Interior
Exterior
Viteză sincronizare 1/200 s
Documentaţie
Produsul a fost fabricat şi furnizat în conformitate cu toate reglementările şi directivele relevante, valabile în toate
statele membre ale Uniunii Europene. Produsul este conform cu toate specicaţiile şi reglementările aplicabile în toate
ţările în care se vinde.
Documentaţia ocială este disponibilă la cerere. Documentaţia ocială include, fără limitare, Declaraţia de Conformitate,
Fişa cu Date de Securitate şi raportul de testare a produsului.
CA
1,0-6,0
1,0-6,0
Lampă halogen, G6.35, 2 pini
75 W (max. 100 W )
≥ 20
≥ 20~30 m
Renunţarea la răspundere
Designul şi specicaţiile produsului pot modicate fără o noticare prealabilă. Toate siglele mărcilor şi denumirile
produselor sunt mărci comerciale sau mărci comerciale înregistrate ale proprietarilor de drept şi prin prezenta sunt
recunoscute ca atare.
92
Page 93

Български
CL-STUDIO30 - Студийната светкавица
Безопасност
Общи мерки за безопасност
• Внимателно прочетете ръководството преди употреба. Запазете ръководството за справки в бъдеще.
• Използвайте устройството само за цели, за които е предназначено. Не използвайте устройството за други
цели, различни от указаните в ръководството.
• Не използвайте устройството, ако някоя част е повредена или дефектна. Ако устройството е повредено или
дефектно, сменете устройството веднага.
• Не подлагайте продукта под въздействие на вода или влага.
• Не запушвайте вентилационните отвори.
Електрическа безопасност
• За да намалите риска от токов удар в случая, ако продуктът се нуждае от сервиз, той трябва да се отваря само
от оторизиран техник.
• Изключете устройството от електрическата мрежа и друго оборудване, ако има вероятност да възникне проблем.
Безопасна работа с батерията
• Използвайте само батериите, посочени в ръководството.
• Не използвайте стари и нови батерии заедно.
• Не използвайте батерии от различни видове или марки.
• Не поставяйте батериите в обратна полярност.
• Не съединявайте на късо и не разглобявайте батериите.
• Не подлагайте батериите под въздействие на вода.
• Не подлагайте батериите под въздействие на огън или прекомерна топлина.
• Батериите са податливи на течове, когато са напълно изтощени. За да се избегне повреждането на продукта,
извадете батериите при оставянето на продукта без надзор за по-дълъг период от време.
• Ако течност от батериите влезе в контакт с кожата или дрехите, веднага ги изплакнете с вода.
Описание
Студийната светкавица е предназначена да осигури оптимално осветление за целите на вашата снимачна
площадка и студийна фотография.
1. Панел за управление
2. Сензор за дистанционно управление
3. Лампа
4. Тубуларна лампа-светкавица
5. Бутон за регулиране (светкавица)
6. Вентилационни отвори
7. Байонет за софтбокс
8. Запънка (байонет за софтбокс)
9. Гнездо за статив
10. Заключващ бутон (статив)
11. Държач за чадър
12. Заключващ бутон (чадър)
4
3
7
11
9
93
268
1
12
5
10
Page 94

Използване
Панел за управление
1. Гнездо за захранващ кабел
2. Бутон включване/изключване
3. Бутон за избор на лампа
4. Индикатор за лампа
5. Бутони за управление на мощността (лампа)
6. Бутони за управление на мощността
(тубуларна лампа-светкавица)
7. Дисплей
8. Гнездо за кабел за синхронизиране
9. Бутон за синхронизиране
10. Индикатори за синхронизиране
11. Бутон за звук
12. Индикатор за звук
13. Тест-бутон
14. Тест-индикатор
1 • Поставете захранващия кабел в гнездото за захранващ кабел.
• За да включите устройството, поставете бутон включване/изключване в позиция "I".
2
• За да изключите устройството, поставете бутон включване/изключване в позиция "О".
• Натиснете бутона за избор на лампа един път, за да настроите лампите синхронно.
Индикаторът на горната лампа е включен. Индикаторът на долната лампа е изключен.
• Натиснете бутона за избор на лампа 2 пъти, за да настроите лампите индивидуално.
3/4
5/7
6/7
8/9/10
11/12
13/14
Индикаторите на горната и долната лампа са включени.
• Натиснете бутона за избор на лампа 3 пъти за да изключите лампите.
Индикаторите на горната и долната лампа са изключени.
• Натиснете горния бутон за управление на мощността, за да се увеличи мощността на лампата.
На дисплея се показва изходната мощност.
• Натиснете долния бутон за управление на мощността, за да се намали мощността на лампата.
На дисплея се показва изходната мощност.
• Натиснете бутон за управление на мощността “+“, за да се увеличи мощността на тубуларната лампатасветкавица. На дисплея се показва изходната мощност.
• Натиснете бутон за управление на мощността “-“, за да се намали мощността на тубуларната лампатасветкавица. На дисплея се показва изходната мощност.
• Поставете кабела за синхронизиране на дистанционното управление в гнездото за кабела за синхронизиране.
• Натиснете бутона за синхронизиране един път, за да зададете стандартен режим на синхронизиране.
Индикатор за синхронизиране 1 светва.
• Натиснете бутона за синхронизиране 2 пъти, за да зададете режим на синхронизиране с 0,5 сек. забавяне.
Индикатор за синхронизиране 2 светва.
• Натиснете бутона за синхронизиране 3 пъти, за да зададете режим на синхронизиране с 2х-импулсно
забавяне. Индикатор за синхронизиране 3 светва.
• Натиснете бутона за синхронизиране 4 пъти, за да зададете режим на синхронизиране с 3х-импулсно
забавяне. Индикатор за синхронизиране 4 светва.
• Натиснете бутона за синхронизиране 5 пъти, за да зададете режим на синхронизиране с 4х-импулсно
забавяне. Индикатор за синхронизиране 5 светва.
• Натиснете бутона за звук, за да активирате бръмчене по време на зареждане.
Индикаторът за звук светва.
• Натиснете отново бутона за звук, за да деактивирате бръмчене по време на зареждане.
Индикаторът за звук изгасва.
• Натиснете тест-бутона, за да започне тестване на работата на светкавицата. Тест-индикаторът светва.
• Натиснете тест-бутона, за да спрете тестване на работата на светкавицата. Тест-индикаторът изгасва.
1107
12345
SOUND
~220-240V/50Hz
2
12 11 13 14
Български
9
CELL
5
LAMP
4
SYNC
TEST
6
3
5
8
94
Page 95

Български
Дистанционно управление
1. Приемник
2. Индикатор на приемника
3. Бутон включване/изключване
4. Превключвател на кодовете на канали
5. Букса на кабела за синхронизиране
6. Предавател
7. Индикатор на предавателя
8. Тест-бутон
9. Превключвател на кодовете на канали
10. "Гореща обувка" за монтиране към фотоапарат
11. Връзка за PC кабел
• Поставете буксата на кабела за синхронизиране (5) в гнездото за кабела за синхронизиране на светкавицата.
• Поставете бутона включено/изключено (3) в положение "включено".
• Установете един и същи код на канала за приемника (1) и за предавателя (6) като използвате превключвателя
на кодовете на канали (4/9).
• Натиснете тест-бутон (8). Индикаторът на приемника (2) и индикаторът на предавателя (7) светват.
• Закрепете "горещата обувка" за монтиране към фотоапарат (10) към "горещата обувка" на самия фотоапарат.
Ако фотоапаратът няма "гореща обувка", използвайте приложения РС кабел, за да свържете предавателя и
фотоапарата.
• Натиснете спусъка на фотоапарата.
Почистване и поддръжка
Внимание!
• Не използвайте почистващи разтворители или абразиви.
• Не почиствайте вътрешността на устройството.
• Не се опитвайте да поправите устройството. Ако устройството не работи правилно, заменете го с ново
устройство.
• Почиствайте външната част на устройството с мека, влажна кърпа.
1
ON
2
12
3
4
8
7
5
6
11
12
ON
10
9
Гаранция
Каквито и да е промени и/или модификации на продукта, ще анулират гаранцията. Ние не можем да носим
отговорност за щети, причинени от неправилно използване на продукта.
Изхвърляне
• Продуктът е предназначен за разделно събиране на съответния пункт за събиране. Не изхвърляйте продукта
с битовите отпадъци.
• За повече информация се свържете с търговеца или местните власти, които отговарят за управлението на
отпадъците.
95
Page 96

Български
Технически данни
Светкавица
Напрежение в мрежата 220-240 V
Мрежова честота 50 Hz
Индекс на експонацията 62 GN
Време за зареждане 0,2-2,2 s
Цветна температура 5600±100K
Управление на мощността
Лампа
Тубуларна лампа-светкавица
Лампа
Дистанционно управление
Батерии (приемник) AAA (2x), 1,5 V
Канали 1 (RT-01) / 2 (RT-02) / 4 (RT-04) / 16 (RT-16)
Работно разстояние
На закрито
На открито
Скорост на синхронизацията 1/200 s
Документи
Продуктът е произведен и доставен в съответствие с всички приложими разпоредби и директиви, валидни
за всички държави членки на Европейския съюз. Продуктът отговаря на всички приложими изисквания и
разпоредби в страната на продажба.
Официална документация е на разположение при поискване. Официалната документация включва, но не се
ограничава само с това, Декларацията за съответствие, Информационния лист за безопасност на материала и
протокола от изпитването на продукта.
AC
1,0-6,0
1,0-6,0
Халогенна лампа, G6.35, 2-пина
75 W (макс. 100 W )
≥ 20
≥ 20~30 m
Отказ от отговорност
Дизайнът и спецификациите подлежат на промяна без предизвестие. Всички лога, търговски марки и имена на
продукти са търговски марки или регистрирани търговски марки на съответните им притежатели и с настоящото
се признават като такива.
96
Page 97

Русский
CL-STUDIO30 - Студийная фотовспышка
Требования безопасности
Общие требования
• Перед началом работы внимательно прочитайте руководство. Сохраните руководство для будущего
использования.
• Используйте устройство строго по назначению. Устройство должно использоваться только по прямому
назначению в соответствии с руководством по эксплуатации.
• Запрещается использовать устройство с поврежденными или неисправными компонентами. Немедленно
замените поврежденное или неисправное устройство.
• Не допускайте воздействия воды или влаги.
• Запрещается закрывать вентиляционные отверстия.
Требования электробезопасности
• В целях предотвращения поражения электрическим током следует открывать устройство только для
проведения обслуживания и только силами авторизованного персонала.
• При возникновении неполадок отключите устройство от сети и другого.
Безопасность при работе с аккумулятором.
• Применяйте только указанные в руководстве батареи.
• Не используйте старые и новые батареи одновременно.
• Не используйте батареи различных типов и различных марок.
• Не устанавливайте батареи в обратной полярности.
• Не замыкайте контакты батарей и не разбирайте их.
• Не подвергайте батареи воздействию воды.
• Не подвергайте батареи воздействию пламени или высокой температуры.
• Полностью разряженные батареи могут протекать. Во избежание повреждения изделия при долгом хранении
извлекайте батареи.
• При попадании жидкости из батареи на кожу или одежду немедленно промойте пятно пресной водой.
Описание
Студийная вспышка предназначена для оптимального освещения заданной точки и используется в фотостудиях.
1. Панель управления
2. Датчик ДУ
3. Лампа
4. Вспышка
5. Ручка регулировки (вспышка)
6. Вентиляционные отверстия
7. Крепление чехла
8. Защелка (крепления кожуха)
9. Крепление штатива
10. Фиксирующая рукоятка (штатив)
11. Крепление зонта
12. Фиксирующая рукоятка (зонт)
4
3
7
11
9
97
268
1
12
5
10
Page 98

Эксплуатация
Панель управления
1. Гнездо разъема электропитания
2. Выключатель (вкл./выкл.)
3. Кнопка выбора лампы
4. Индикатор лампы
5. Кнопки управления мощностью (лампы)
6. Кнопки управления мощностью (вспышка)
7. Экран
8. Гнездо разъема синхронизации
9. Кнопка синхронизации
10. Индикаторы синхронизации
11. Кнопка зуммера
12. Индикатор зуммера
13. Кнопка «Тест»
14. Индикатор «Тес т»
1 • Подключите разъем электропитания.
• Для включения устройства переведите выключатель в положение «I».
2
• Для выключения устройства переведите выключатель в положение «O».
• Для синхронной регулировки ламп однократно нажмите кнопку выбора лампы.
Верхний индикатор лампы включен. Нижний индикатор лампы выключен.
• Для независимой регулировки ламп двукратно нажмите кнопку выбора лампы.
3/4
5/7
6/7
8/9/10
11/12
13/14
Верхний и нижний индикаторы лампы включены.
• Для выключения лампы трижды нажмите кнопку выбора лампы.
Верхний и нижний индикаторы лампы выключены.
• Для увеличения выходной мощности лампы нажмите верхнюю кнопку управления мощностью.
На экране отобразится выходная мощность.
• Для уменьшения выходной мощности лампы нажмите нижнюю кнопку управления мощностью.
На экране отобразится выходная мощность.
• Для увеличения выходной мощности вспышки нажмите кнопку управления мощностью “+“.
На экране отобразится выходная мощность.
• Для уменьшения выходной мощности вспышки нажмите кнопку управления мощностью “-“.
На экране отобразится выходная мощность.
• Подключите разъем синхронизации дистанционного управления к гнезду синхронизации .
• Для установки стандартного режима синхронизации однократно нажмите кнопку синхронизации.
Загорится индикатор синхронизации 1.
• Для установки режима синхронизации с 0,5 с задержкой дважды нажмите кнопку синхронизации.
Загорится индикатор синхронизации 2.
• Для установки режима синхронизации с 2-кратной задержкой срабатывания трижды нажмите кнопку
синхронизации. Загорится индикатор синхронизации 3.
• Для установки режима синхронизации с 3-кратной задержкой срабатывания четырежды нажмите кнопку
синхронизации. Загорится индикатор синхронизации 4.
• Для установки режима синхронизации с 4-кратной задержкой срабатывания нажмите кнопку
синхронизации пять раз. Загорится индикатор синхронизации 5.
• Нажмите на кнопку зуммера и активируйте звуковой сигнал во время зарядки.
Загорится индикатор зуммера.
• Для выключения звукового сигнала зарядки нажмите на кнопку зуммера еще раз.
Индикатор потухнет.
• Для начала проверки работоспособности вспышки нажмите кнопку «Тес т».
Загорится индикатор «Тес т».
• Для прекращения проверки работоспособности вспышки нажмите кнопку «Тест».
Индикатор «Тес т» погаснет.
1107
12345
SOUND
~220-240V/50Hz
2
12 11 13 14
Русский
9
CELL
5
LAMP
4
SYNC
TEST
6
3
5
8
98
Page 99

Русский
Дистанционное управление
1. Приемник
2. Индикатор приемника
3. Выключатель (вкл./выкл.)
4. Переключатель кода каналов
5. Разъем синхронизации
6. Передатчик
7. Индикатор передатчика
8. Кнопка «Тест»
9. Переключатель кода каналов
10. Крепление для центрального синхроконтакта камеры
11. Гнездо PC-синхрокабеля
• Подключите разъем синхронизации (5) в гнездо разъема синхронизации вспышки.
• Переведите выключатель (3) в положение «вкл».
• При помощи переключателей каналов (4/9) установите на приемнике (1) и передатчике (6) одинаковый код
канала.
• Нажмите кнопку «Тес т» (8). Загораются индикатор приемника (2) и индикатор передатчика (7).
• Установите крепление (10) в разъем центрального синхроконтакта фотоаппарата. Если аппарат не
имеет центрального синхроконтакта, то для соединения передатчика и фотоаппарата используется PCсинхрокабель, входящий в комплект поставки.
• Спустите затвор фотоаппарата.
Очистка и обслуживание
Предупреждение!
• Не производите очистку растворителями или абразивами.
• Не выполняйте очистку внутренних поверхностей устройства.
• Не пытайтесь самостоятельно ремонтировать устройство. Неправильно работающее устройство следует
заменить новым.
• Очистите корпус устройства при помощи мягкой влажной ткани.
1
ON
2
12
3
4
8
7
5
6
11
12
ON
10
9
Гарантия
Любые изменения и / или модификации устройства приведут к аннулированию прав пользователя на
гарантийное обслуживание. Мы не несем ответственности за ущерб, понесенный вследствие неправильного
использования этого продукта.
Утилизация
• Это устройство предназначено для раздельного сбора в соответствующем пункте сбора отходов. Не
выбрасывайте это устройство вместе с бытовыми отходами.
• Для получения дополнительной информации обратитесь к продавцу или в местный орган власти,
ответственный за утилизацию отходов.
99
Page 100

Русский
Технические данные
Вспышка
Напряжение электропитания 220-240 В
Частота электропитания 50 Гц
Индекс экспозиции 62 GN
Время перезарядки 0,2-2,2 с
Цветовая температура 5600±100K
Управление мощностью
Лампа
Вспышка
Лампа
Пульт дистанционного управления
Батареи (приемник) AAA (2x), 1,5 В
Каналы 1 (RT-01) / 2 (RT-02) / 4 (RT-04) / 16 (RT-16)
Рабочее расстояние
В помещении
Вне помещений
Скорость синхронизации 1/200 с
Документы
Устройство изготовлено и поставлено в соответствии со всеми применимыми положениями и директивами,
действующими для всех стран-членов Европейского Союза. Оно также соответствует всем нормами и правилами,
действующим в стране продажи.
Официальная документация предоставляется по запросу. Официальная документация включает декларацию
соответствия, паспорт безопасности и отчет по проверке продукта, но не ограничивается данным перечнем.
перем. ток
1,0-6,0
1,0-6,0
Галогенная лампа, G6.35, двухконтактная
75 Вт (макс. 100 Вт)
≥ 20
≥ 20~30 м
Оговорки
Дизайн и технические характеристики могут быть изменены без предварительного уведомления. Все логотипы
брендов и названия продуктов являются товарными знаками или зарегистрированными торговыми марками их
соответствующих владельцев и следовательно признаются таковыми.
100
 Loading...