

Page 1
Type: CL-RL80 Document version: 1
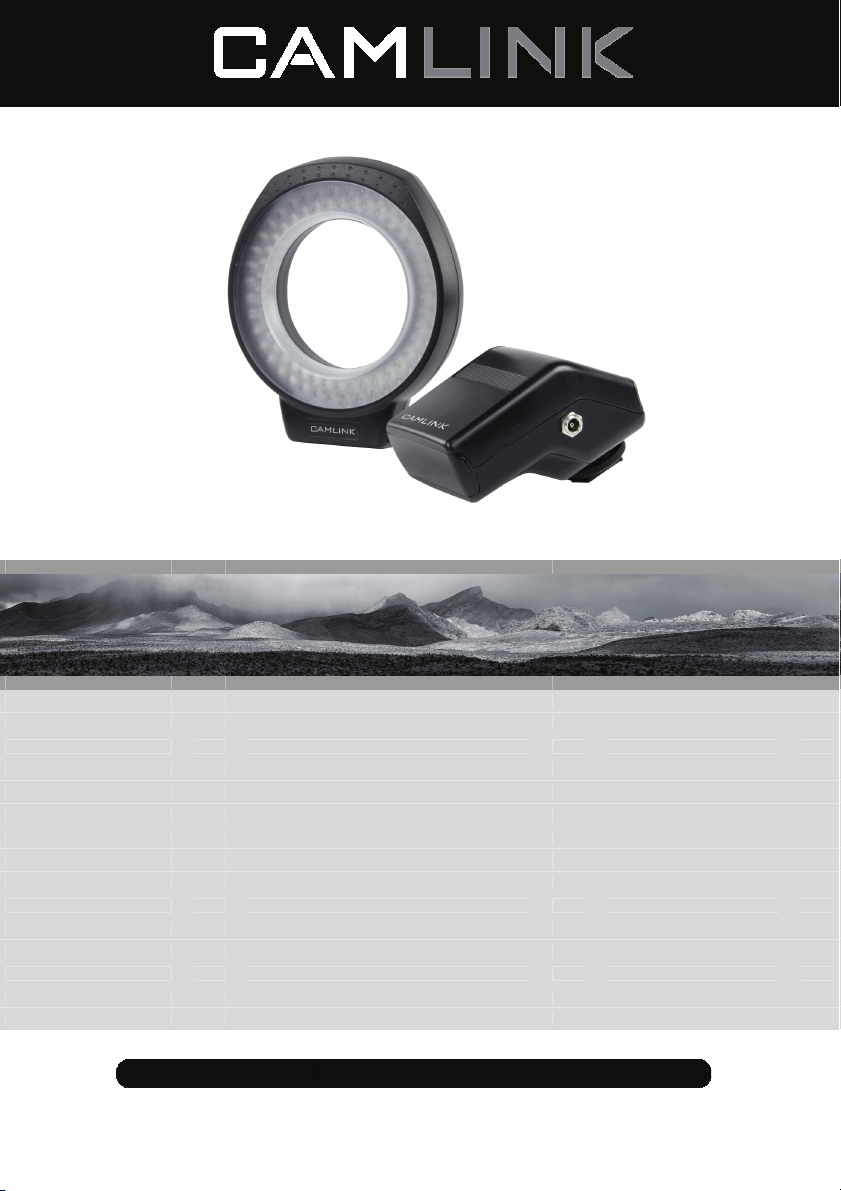
• GB - Close-up Flash LED Ring Light - User manual 3
• DE - Nahbereichsblitz LED-Ringlicht - Bedienungsanleitung 4
• FR - Flash pour plan rapproché Flash annulaire LED - Manuel de l’utilisateur 5
• NL - Close-up Flash LED-ringverlichting - Gebruikershandleiding 6
• ES - Flash de primer plano Anillo de luz LED - Manual de Usuario 7
• IT - Flash primo piano Luce Anello LED - Manuale Utente 8
• FI - Lähisalama LED-rengasvalo - Käyttöopas 9
• SE - Närbildsblixt LED-ringlampa - Bruksanvisning 10
• NO - Nærbilde-blits LED-ringlys - Brukermanual 11
• DK - Blitz til nærbillede LED ring lampe - Brugervejledning 12
• CZ - Blesk pro detailní záběr LED světelný kroužek - Návod k použití 13
• HU - Közelfelvételi vaku Gyűrűs LED fényforrás - Használati útmutató 14
• GR - Φλας κοντινού πλάνου Φωτεινός δακτύλιος LED - Εγχειρίδιο Χρήστη 15
• RO - Bliţ pentru prim-plan Lampă bliţ LED circulară - Manual de instrucţiuni 16
• RU - Ближнее освещение LED кольцевой светильник - Руководство пользователя 17
Page 2

Nedis B.V., part of the Nedis Group
De Tweeling 28
5215 MC ‘s-Hertogenbosch
The Netherlands
Tel: +31 73 599 1055
Fax: +31 73 599 9699
Web: www.nedis.com or www.nedis.nl
© Any unauthorised use of the information in this manual is prohibited. No part of this manual may be reproduced, stored in a
database or retrieval system, or published, in any form or in any way, electronically or mechanically, by print, photocopy,
microfilm or by any other means without the express written permission of NEDIS.
©2012 NEDIS BV. Camlink is a registered trademark of NEDIS BV. Although every effort has been made
to ensure the accuracy of the information contained in this manual specifications are subject to change
and therefore NEDIS BV cannot guarantee its correctness and completeness at all times.
2
Page 3
GB – English
Technical specifications
Light source: 80 high power LEDs
Colour temperature: 5400 K
Light intensity: 380 lm
Guide number: 33 (100 ISO)
Range: 4 ft
Battery: 4x AA
Safety precautions
To reduce risk of electric shock, this product should ONLY be opened by an authorised
technician when service is required. Disconnect the product from mains and other
equipment if a problem should occur. Do not expose the product to water or moisture.
Installation instructions
1. Insert 4 AA Alkaline or Ni-MH rechargeable batteries into the battery compartment. Check that the batteries are
installed according to the symbols shown inside the battery compartment.
2. Mount the power pack onto the camera.
3. Select the correct mounting ring and slide the power pack into the grooves on the back of the ring light until it snaps
into position.
4. Screw the ring light onto the filter threads of the lens and adjust it horizontally.
5. Attach the power cord from the power pack to the ring light.
User instructions
1. Use the dimmer on the power pack to adjust the intensity.
2. Select between F (Flash) mode and L (LED) mode by using the switch on the rear of the power pack.
Note: this flash works only with cameras which have a hot shoe.
3. To test the flash, press the “test” button.
4. When you are done using the ring light, remove the power cord first and then unscrew the ring light.
Maintenance
1. Please turn off the power after use to avoid long term heat generation and a waste of the battery and service life of
the LED bulbs.
2. Remove the batteries when you are not using the LED lamp.
3. Please install the batteries carefully to avoid damage to the battery holder.
Warranty
No guarantee or liability can be accepted for any changes and modifications of the product or damage caused due to
incorrect use of this product.
Disclaimer
Designs and specifications are subject to change without prior notice.
All logos, brands and product names are trademarks or registered trademarks of their respective holders and are hereby
recognized as such. Keep this manual and packaging for future reference.
Disposal
• This product is designated for separate collection at an appropriate collection point. Do not dispose
of this product with household waste.
• For more information, contact the retailer or the local authority responsible for waste management.
©2012 NEDIS BV. Camlink is a registered trademark of NEDIS BV. Although every effort has been made
to ensure the accuracy of the information contained in this manual specifications are subject to change
and therefore NEDIS BV cannot guarantee its correctness and completeness at all times.
3
Page 4
DE-Deutsch
Spécifications techniques
Lichtquelle: 80 hochleistungs-LEDs
Farbtemperatur: 5400 K
Lichtintensität: 380 lm
Leitzahl: 33 (100 ISO)
Reichweite: 4 ft
Batterie: 4 x AA
Sicherheitsvorkehrungen
Um das Risiko eines elektrischen Schlags zu verringern, sollte dieses Produkt
AUSSCHLIESSLICH von einem autorisierten Techniker geöffnet werden. Bei
Problemen trennen Sie das Gerät bitte von der Spannungsversorgung und von
anderen Geräten ab. Stellen Sie sicher, dass das Gerät nicht mit Wasser oder
Feuchtigkeit in Berührung kommt.
Installationsanleitungen
1. Legen Sie 4 AA Alkali- oder Ni-MH-Akkus in das Batteriefach ein. Stellen Sie sicher, dass die Batterien richtig
eingelegt werden, siehe Symbole im Inneren des Batteriefachs.
2. Befestigen Sie das Netzteil auf der Kamera.
3. Wählen Sie den korrekten Einbauring und schieben Sie das Netzteil bis es einschnappt auf die Rillen auf der
Rückseite des Ringlichtes.
4. Schrauben Sie das Ringlicht auf die Filtergewinde der Linse und stellen Sie es horizontal ein.
5. Befestigen Sie das Netzkabel vom Netzteil an das Ringlicht.
Benutzerhinweise
1. Benutzen Sie den Dimmer am Netzteil, um die Lichtstärke einzustellen.
2. Wählen Sie mit dem Schalter auf der Rückseite des Netzteils zwischen dem Modus F (Flash) und L (LED).
Hinweis: Dieser Blitz funktioniert ausschließlich mit Kameras, die über einen Zubehörschuh verfügen.
3. Drücken Sie die Taste „test“, um den Blitz zu testen.
4. Wenn Sie das Ringlicht nicht mehr benötigen, entfernen Sie zuerst das Netzkabel und schrauben Sie dann das
Ringlicht ab.
Wartung
1. Schalten Sie das Ringlicht nach der Benutzung bitte aus, um eine Hitzeentwicklung zu vermeiden und die Batterie
und LEDs zu schonen.
2. Entnehmen Sie die Batterien, wenn Sie die LED-Lampe nicht verwenden.
3. Setzen Sie die Batterien bitte sorgfältig ein, um Schäden an der Batteriehalterung zu vermeiden.
Garantie
Es kann keine Garantie oder Haftung für irgendwelche Änderungen oder Modifikationen des Produkts oder für Schäden
übernommen werden, die aufgrund einer nicht ordnungsgemäßen Anwendung des Produkts entstanden sind.
Haftungsausschluss
Design und technische Daten können ohne vorherige Ankündigung geändert werden.
Alle Logos, Marken und Produktnamen sind Marken oder eingetragene Marken ihrer jeweiligen Eigentümer und werden
hiermit als solche anerkannt. Bitte bewahren Sie Bedienungsanleitung und Verpackung für spätere Verwendung auf.
©2012 NEDIS BV. Camlink is a registered trademark of NEDIS BV. Although every effort has been made
to ensure the accuracy of the information contained in this manual specifications are subject to change
and therefore NEDIS BV cannot guarantee its correctness and completeness at all times.
4
Page 5
Entsorgung
FR – Français
Caractéristiques techniques
Source lumineuse : 80 diodes à haute puissance
Température de couleur : 5400 K
Intensité lumineuse : 380 lm
Nombre guide : 33 (100 ISO)
Portée : 4 ft
Piles : 4 piles AA
Consignes de sécurité
Pour réduire le risque de choc électrique, ce produit ne doit être ouvert que par un
technicien qualifié si une réparation s’impose. Débranchez l’appareil et les autres
équipements du secteur s’il y a un problème. Ne pas exposer l’appareil à l’eau ni à
l’humidité.
Notice de montage
1. Installez 4 piles alcalines AA ou des piles rechargeables Ni-MH dans le logement prévu à cet effet. Vérifiez que les
piles sont bien installées conformément aux signes inscrits à l'intérieur du logement.
2. Installez le bloc d'alimentation sur l'appareil photo.
3. Choisissez la bague de montage qui convient, et faites glisser le bloc d'alimentation dans les rainures situées sur la
face arrière du flash annulaire jusqu'à ce qu'il s'enclenche.
4. Vissez le flash annulaire sur le filetage du filtre des lentilles, et réglez-le horizontalement.
5. Reliez le flash annulaire au cordon d'alimentation en provenance du bloc d'alimentation.
Mode d'emploi
1. Servez-vous du variateur situé sur le bloc d'alimentation pour régler l'intensité de la lumière.
2. Choisissez le mode F (Flash) ou le mode L (LED) à l'aide de l'interrupteur situé au dos du bloc d'alimentation.
Remarque : cette lampe flash ne fonctionne qu'avec les appareils munis d'une griffe porte-accessoires.
3. Pour tester le flash, appuyez sur la touche « test ».
4. Après avoir fini de vous servir du flash annulaire, débranchez d'abord le cordon d'alimentation, puis dévissez le flash
annulaire.
Entretien
1. Veillez à bien couper la source d'alimentation afin d'éviter de générer de la chaleur pendant un long moment, et pour
éviter le gaspillage des piles ainsi que la réduction de la durée de vie des ampoules LED.
2. Enlevez les piles lorsque vous ne vous servez pas de la lampe LED.
3. Veillez à installer les piles avec soin afin d'éviter d'endommager le logement de piles.
Garantie
Aucune garantie ou responsabilité ne sera acceptée en cas de modification et/ou de transformation du produit ou en cas
de dommages provoqués par une utilisation incorrecte de l’appareil.
• Dieses Produkt muss an einem entsprechenden Sammelpunkt zur Entsorgung abgegeben werden.
Entsorgen Sie dieses Produkt nicht mit dem Haushaltsmüll.
• Weitere Informationen erhalten Sie beim Verkäufer oder der für die Abfallwirtschaft
verantwortlichen örtlichen Behörde.
©2012 NEDIS BV. Camlink is a registered trademark of NEDIS BV. Although every effort has been made
to ensure the accuracy of the information contained in this manual specifications are subject to change
and therefore NEDIS BV cannot guarantee its correctness and completeness at all times.
5
Page 6
Avis de non responsabilité
Le design et les caractéristiques techniques sont sujets à modification sans notification préalable.
Tous les logos de marques et noms de produits sont des marques déposées ou immatriculées dont leurs détenteurs
sont les propriétaires et sont donc reconnues comme telles dans ce documents. Conservez ce manuel et l’emballage
pour toute référence ultérieure.
Elimination
NL - Nederlands
Technische specificaties
Lichtbron: 80 hoog vermogen Leds
Kleurtemperatuur: 5400 K
Lichtsterkte: 380 lm
Richtgetal: 33 (100 ISO)
Bereik: 1,22 m
Batterij: 4x AA
Veiligheidsvoorschriften
Om het risico op elektrische schokken te voorkomen mag dit product ALLEEN worden
geopend door een erkende technicus wanneer er onderhoud nodig is. Koppel het
product los van de elektrische voeding en van andere apparatuur als zich problemen
voordoen. Stel het product niet bloot aan water of vocht.
Installatie-instructies
1. Plaats 4 AA Alkaline of Ni-MH oplaadbare batterijen in het batterijvak. Controleer of de batterijen volgens de
aangegeven markeringen in het batterijvak zijn geplaatst.
2. Monteer de power pack op de camera.
3. Selecteer de juiste montagering en schuif de power pack in de groeven op de achterkant van de ringverlichting
totdat deze op zijn plaats vastklikt.
4. Schroef de ringverlichting op de filterschroefdraad van uw lens en stel het horizontaal in.
5. Sluit het voedingsnoer vanaf de power pack op de ringverlichting aan.
Gebruiksaanwijzing
1. Gebruik de dimmer op de power pack om de lichtintensiteit aan te passen.
2. Kies tussen F (Flash)-modus en L (LED) -modus met behulp van de schakelaar op de achterkant van de power
pack.
Opmerking: deze flitser werkt alleen met camera’s die een hot shoe hebben.
3. Om de flitser te testen, drukt u op de “Test”- knop.
4. Wanneer u klaar bent met het gebruik van de ringverlichting, verwijder eerst het voedingssnoer en draai vervolgens
de ringverlichting los.
Onderhoud
1. Schakel de voeding na gebruik uit om langdurige warmteontwikkeling en verspilling van de batterij en de levensduur
van de LED-lampen te voorkomen.
2. Verwijder de batterijen wanneer u de LED-lamp niet gebruikt.
3. Installeer de batterijen zorgvuldig om schade aan de batterijhouder te voorkomen.
• Ce produit doit être jeté séparément des ordures ménagères dans un point de collecte approprié.
Ne jetez pas ce produit avec les ordures ménagères ordinaires.
• Pour plus d'informations, contactez le distributeur ou l'autorité locale responsable de la gestion des
déchets.
©2012 NEDIS BV. Camlink is a registered trademark of NEDIS BV. Although every effort has been made
to ensure the accuracy of the information contained in this manual specifications are subject to change
and therefore NEDIS BV cannot guarantee its correctness and completeness at all times.
6
Page 7

Garantie
Voor wijzigingen en veranderingen aan het product of schade veroorzaakt door een verkeerd gebruik van dit product,
kan geen aansprakelijkheid worden geaccepteerd. Tevens vervalt daardoor de garantie.
Disclaimer
Wijziging van ontwerp en specificaties zonder voorafgaande mededeling onder voorbehoud.
Alle logo’s, merken en productnamen zijn handelsmerken of geregistreerde handelsmerken van de respectievelijke
eigenaren en worden hierbij als zodanig erkend. Bewaar deze gebruiksaanwijzing voor latere raadpleging.
Afvoer
ES – Español
Especificaciones técnicas
Fuente lumínica: 80 LED de alta potencia
Temperatura del color: 5400 K
Intensidad lumínica: 380 lm
Número de guía: 33 (100 ISO)
Alcance: 4 ft
Pilas: 4x AA
Medidas de seguridad
Para reducir el peligro de descarga eléctrica, este producto SÓLO lo debería abrir un
técnico autorizado cuando necesite reparación. Desconecte el producto de la toma de
corriente y de los otros equipos si ocurriera algún problema. No exponga el producto al
agua ni a la humedad.
Instrucciones de instalación
1. Inserte las 4 pilas recargables alcalinas o Ni-MH AA en el compartimento de las pilas. Compruebe que las pilas
están instaladas según los símbolos que se muestran en el interior del compartimento de las pilas.
2. Monte el pack de alimentación en la cámara.
3. Seleccione el anillo de montaje correcto y deslice el pack de alimentación en los surcos del anillo de luz hasta que
se ajuste en su posición.
4. Atornille el anillo de luz en los hilos de las lentes y ajústelo horizontalmente.
5. Fije el cable de alimentación del pack de alimentación al anillo de luz.
Instrucciones de usuario
1. Use el potenciómetro del pack de alimentación para ajustar la intensidad.
2. Seleccione entre el modo F (Flash) y el modo L (LED) usando el interruptor situado en la parte posterior del pack de
alimentación.
Nota: este flash funciona únicamente con cámaras que disponen de zapata.
3. Para probar el flash, pulse el botón “test”.
4. Cuando haya acabado de usar el anillo de luz, retire el cable de alimentación primero y posteriormente desatornille
el anillo de luz.
• Dit product is bestemd voor gescheiden inzameling bij een daartoe aangewezen verzamelpunt.
Gooi dit product niet weg bij het huishoudelijk afval.
• Neem voor meer informatie contact op met de detailhandelaar of de lokale overheid die
verantwoordelijk is voor het afvalbeheer.
©2012 NEDIS BV. Camlink is a registered trademark of NEDIS BV. Although every effort has been made
to ensure the accuracy of the information contained in this manual specifications are subject to change
and therefore NEDIS BV cannot guarantee its correctness and completeness at all times.
7
Page 8

Mantenimiento
1. Por favor, apague la alimentación tras su uso para evitar una generación de calor durante un periodo prolongado de
tiempo y un desgaste de las pilas y de la vida útil de las lámparas LED.
2. Retire las pilas cuando no use la lámpara LED.
3. Por favor, instale las pilas con cuidado para evitar causar daños al soporte de las pilas.
Garantía
No se aceptará ninguna garantía o responsabilidad derivada de cualquier cambio o modificaciones realizadas al
producto o daños provocados por un uso incorrecto del producto.
Exención de responsabilidad
Las ilustraciones y las especificaciones podrán sufrir cambios sin previo aviso.
Todas las marcas de logotipos y nombres de productos constituyen patentes o marcas registradas a nombre de sus
titulares correspondientes, reconocidos como tal. Conserve este manual y el embalaje en caso de futura necesidad.
Eliminación
IT – Italiano
Specifiche tecniche
Sorgente luminosa: 80 LED ad alta intensità
Temperatura del Colore: 5400 K
Intensità luminosa: 380 lm
Numero guida: 33 (100 ISO)
Portata: 4 ft
Batteria: 4x AA
Precauzioni di sicurezza
Per ridurre il rischio di shock elettrico, questo prodotto dovrebbe essere aperto SOLO
da un tecnico autorizzato quando è necessario ripararlo. Scollegare il prodotto
dall’alimentazione e da altri apparecchi se dovesse esserci un problema. Non esporre il
prodotto ad acqua o umidità.
Istruzioni di installazione
1. Inserire 4 batteria Alkaline o Ni-MH AA nel comparto batterie. Assicuratevi che le batterie siano installate rispettando
il diagramma mostrato dentro il comparto batterie.
2. Montare il pacco alimentazione sul retro della videocamera.
3. Selezionare l'anello di montaggio corretto e farlo scivolare all'interno delle scanalature della luce ad anello fino a che
si incastri in posizione.
4. Avviare la luce ad anello sul filetto del filtro delle lenti e regolarla orizzontalmente.
5. Installate il cavo di alimentazione dal gruppo energia alla luce ad anello
Istruzioni utente
1. Utilizzate il controllo di luminosità sul gruppo energia per regolare l'intensità della luce.
2. Selezionare tra la modalità F (Flash) e modalità L (LED) utilizzando l'interruttore sul retro del pacco d'alimentazione.
Note: questo flash funziona solo con le videocamera che hanno una presa a caldo.
• Este producto está diseñado para desecharlo por separado en un punto de recogida adecuado. No
se deshaga de este producto con la basura doméstica.
• Para obtener más información, póngase en contacto con el vendedor o la autoridad local
responsable de la eliminación de residuos.
©2012 NEDIS BV. Camlink is a registered trademark of NEDIS BV. Although every effort has been made
to ensure the accuracy of the information contained in this manual specifications are subject to change
and therefore NEDIS BV cannot guarantee its correctness and completeness at all times.
8
Page 9

3. Per testare il flash, premere il pulsante “test”.
4. Quando avete completato l'uso della luce ad anello, rimuovete prima il cavo di alimentazione e poi svitata la luce.
Manutenzione
1. Vi preghiamo di spegnere l'alimentazione dopo l'uso per evitare la generazione di calore a lungo termine e lo spreco
della batteria e della durata della vita dei bulbi del LED.
2. Rimuovere le batterie quando non state usando la lampada LED.
3. Vi preghiamo di installare le batterie con attenzione per evitare di danneggiare il porta batterie.
Garanzia
Non sarà accettata alcuna garanzia o responsabilità in relazione a cambiamenti e modifiche del prodotto o a danni
determinati dall’uso non corretto del prodotto stesso.
Disclaimer
Il design e le caratteristiche tecniche sono soggetti a modifica senza necessità di preavviso.
Tutti i marchi a logo e i nomi di prodotto sono marchi commerciali o registrati dei rispettivi titolari e sono riconosciuti
come tali in questo documento Tenere questo manuale e la confezione per riferimento futuro.
Smaltimento
FI – Suomi
Tekniset tiedot
Valolähde: 80 tehokasta LEDiä
Värilämpötila: 5400 K
Valovirta: 380 lm
Ohjenumero: 33 (100 ISO)
Kantomatka: 4 ft
Paristot: 4 x AA
Turvallisuuteen liittyvät varoitukset
Sähköiskun riskin pienentämiseksi, AINOASTAAN valtuutettu huoltohenkilö saa avata
tämän laitteen huoltoa varten. Jos ongelmia ilmenee, irrota laite verkkovirrasta ja
muista laitteista. Älä altista laitetta vedelle äläkä kosteudelle.
Asennusohjeet
1. Aseta neljä uudelleen ladattavaa AA-alkaliini- tai Ni-MH-paristoa paristotilaan. Tarkista, että paristot on asetettu
oikein paristotilan merkintöjen mukaisesti.
2. Kiinnitä paristopakkaus kameran päälle.
3. Valitse oikean kokoinen kiinnitysrengas ja liu'uta paristopakkaus rengasvalon takana oleviin hahloihin, kunnes se
napsahtaa paikoilleen.
4. Kierrä rengasvalo linssin suotimeen ja säädä se vaakatasossa.
5. Yhdistä paristopakkauksen virtajohto rengasvaloon.
Käyttöohjeet
1. Säädä valovirran määrää paristopakkauksen himmentimellä.
• Questo prodotto è progettato per la raccolta differenziata nei punti di raccolta appropriati. Non
smaltite il prodotto con la spazzatura domestica.
• Per maggiori informazioni, contattate il rivenditore o l'autorità locale responsabile per la gestione
dei rifiuti.
©2012 NEDIS BV. Camlink is a registered trademark of NEDIS BV. Although every effort has been made
to ensure the accuracy of the information contained in this manual specifications are subject to change
and therefore NEDIS BV cannot guarantee its correctness and completeness at all times.
9
Page 10

2. Valitse F (Flash/salama) tai L (LED) paristopakkauksen takaosan kytkimellä.
Huomaa, että tämä salama toimii ainoastaan kameroissa, joissa on hot shoe -liitin.
3. Voit testata salaman painamalla ”test”-painiketta.
4. Kun lopetat rengasvalon käytön, irrota ensin virtajohto ja kierrä sitten rengasvalo irti.
Huolto
1. Virta tulee sammuttaa käytön jälkeen ylikuumenemisen, paristojen ehtymisen ja LED-lamppujen palamisen
välttämiseksi.
2. Poista paristot, kun LED-lamppu ei ole käytössä.
3. Aseta paristot takaisin varoen, jottei paristotila vahingoitu.
Takuu
Takuu ja vastuuvelvollisuus mitätöityvät, jos tuote vaurioituu siihen tehtyjen muutoksien tai sen väärinkäytön takia.
Vastuuvapaus
Muutoksia malliin ja teknisiin ominaisuuksiin voidaan tehdä ilmoituksetta.
Kaikki logot, merkit ja tuotenimet ovat niiden vastaavien omistajien tuotemerkkejä tai rekisteröityjä tuotemerkkejä ja niitä
on käsiteltävä sellaisina. Säilytä käyttöohjeet ja pakkaus myöhempää käyttötarvetta varten.
Hävittäminen
SE – Svenska
Tekniska specifikationer
Ljuskälla: 80 högeffekts LED-lampor
Färgtemperatur: 5 400 K
Ljusintensitet: 380 lm
Guidenummer: 33 (100 ISO)
Räckvidd: 4 ft
Batteri: 4x AA
Säkerhetsanvisningar
För att minska risken för elektriska stötar bör denna produkt ENDAST öppnas av
behörig tekniker när service behövs. Dra ut strömkabeln från eluttaget och koppla ur all
annan utrustning om något problem skulle uppstå. Utsätt inte produkten för vatten eller
fukt.
Installationsinstruktioner
1. Sätt i 4 AA alkalinbatterier eller Ni-MH laddningsbara batterier i batterifacket. Kontrollera att batterierna sätts i enligt
symbolerna som syns inuti batterifacket.
2. Montera nätdelen på kameran.
3. Välj rätt monteringsring och låt nätdelen glida in i spåren på ringlampans baksida tills den knäpps fast i sitt läge.
4. Skruva på ringlampan på linsens filtergängor och justera den horisontellt.
5. Fäst strömkabeln från nätdelen i ringlampan.
Bruksanvisning
1. Använd dimmern på nätdelen för att justera intensiteten.
• Tämä tuote tulee toimittaa hävitettäväksi asianmukaiseen keräyspisteeseen. Tuotetta ei tule
hävittää kotitalousjätteen mukana.
• Lisätietoja antaa jälleenmyyjä tai paikallinen jätehuollosta vastaava viranomainen.
©2012 NEDIS BV. Camlink is a registered trademark of NEDIS BV. Although every effort has been made
to ensure the accuracy of the information contained in this manual specifications are subject to change
and therefore NEDIS BV cannot guarantee its correctness and completeness at all times.
10
Page 11

2. Välj mellan F- (Flash) läge och L- (LED) läge med hjälp av växlaren på nätdelens baksida.
Anmärkning: blixten fungerar endast med kameror som har hotshoe.
3. För att testa blixten trycker du på ”test”-knappen.
4. När du inte ska använda ringlampan mer tar du först bort strömkabeln och sedan skruvar du loss ringlampan.
Underhåll
1. Stäng av strömmen efter användning för att undvika värmealstring under lång tid och slöseri med batterier och LEDlampornas livslängd.
2. Ta ur batterierna när du inte använder LED-lampan.
3. Sätt in batterierna försiktigt så att inte batterihållaren skadas.
Garanti
Ingen garanti gäller vid ändringar eller modifieringar av produkten eller för skador som har uppstått på grund av felaktig
användning av denna produkt.
Friskrivningsklausul
Utseende och specifikationer kan komma att ändras utan föregående meddelande.
Alla logotyper och produktnamn är varumärken eller registrerade varumärken som tillhör sina ägare och är härmed
erkända som sådana. Behåll bruksanvisningen och förpackningen för eventuellt framtida behov.
Kassering
NO– Norsk
Tekniske spesifikasjoner
Lyskilde: 80 høyeffekts-LED-er
Fargetemperatur: 5400 K
Lysintensitet: 380 lm
Ledetall: 33 (100 ISO)
Rekkevidde: 4 ft
Batteri: 4x AA
Sikkerhetsforholdsregler
For å redusere faren for strømstøt, skal dette produktet BARE åpnes av en autorisert
tekniker når vedlikehold er nødvendig. Koble produktet fra strømmen og annet utstyr
dersom et problem oppstår. Ikke utsett produktet for vann eller fuktighet.
Installasjonsanvisninger
1. Sett inn 4 AA alkaliske eller Ni-MH oppladbare batterier i batterirommet. Kontroller at batteriene er installerte i
henhold til symbolene vist på innsiden av batterirommet.
2. Monter effektdelen på kameraet.
3. Velg den korrekte monteringsringen og sett effektdelen i sporene på baksiden av ringlyset inntil den låser seg på
plass.
4. Skru ringlyset på filtergjengene til objektivet og juster det horisontalt.
5. Fest strømkabelen fra effektdelen til ringlyset.
• Denna produkt är avsedd för separat insamling vid en lämplig återvinningscentral. Släng inte denna
produkt bland vanligt hushållsavfall.
• För mer information, kontakta återförsäljaren eller myndigheten på ort som ansvarar för
avfallshantering.
©2012 NEDIS BV. Camlink is a registered trademark of NEDIS BV. Although every effort has been made
to ensure the accuracy of the information contained in this manual specifications are subject to change
and therefore NEDIS BV cannot guarantee its correctness and completeness at all times.
11
Page 12

A
Brukerinstruksjoner
1. Bruk dimmeren på effektdelen til å justere intensiteten.
2. Velg mellom modusene F (blits) og L (LED) ved å bruke bryteren på baksiden av effektdelen.
Merknad: denne blitsen fungerer kun med kameraer som har et blitsfeste.
3. For å teste blitsen, trykk på ”test”-knappen.
4. Når du er ferdig med å bruke ringlyset, fjern strømkabelen først og deretter skru løs ringlyset.
Vedlikehold
1. Vennligst slå av strømmen etter bruk for å unngå langsiktig varmeutvikling og sløsing av batterier, og for å forlenge
levetiden til LED-pærene.
2. Fjern batteriene når du ikke bruker LED-lampen.
3. Vennligst installer batteriene på forsiktig vis for å unngå skade på batteriholderen.
Garanti
Ingen garanti eller erstatningsansvar aksepteres ved endringer og modifiseringer av produktet eller skade forårsaket av
uriktig bruk av dette produktet.
Ansvarsfraskrivelse
Utforming og spesifikasjoner kan endres uten forhåndsvarsel.
lle logoer, merker og produktnavn er varemerker eller registrerte varemerker til de respektive eierne, og skal behandles
som dette. Behold denne veiledningen og innpakningen for fremtidig referanse.
Avhending
DK– Dansk
Tekniske specifikationer
Lyskilde: 80 kraftfulde LED-pærer
Farvetemperatur: 5400 K
Lysstyrke: 380 lm
Vejledning nummer: 33 (100 ISO)
Område: 4 fod
Batteri: 4x AA
Sikkerhedsforholdsregler
For at nedsætte risikoen for elektrisk stød, må dette produkt, f.eks. når der kræves
service, KUN åbnes af en autoriseret tekniker. Frakobl produktet stikkontakten og
andet udstyr, hvis der opstår et problem. Udsæt ikke produktet for vand eller fugt.
Installationsvejledninger
1. Indsæt 4 AA Alkaline eller Ni-MH genopladelige batterier i batteriholderen. Kontroller at batterierne er installeret i
henhold til symbolerne inden i batteriholderen.
2. Monter batteripakken på kameraet.
3. Vælg den korrekte monteringsring og skub batteripakken ind i udfræsningerne på bagsiden af ringlampen, indtil den
klikker på plads.
4. Skru ringlampen på linsens filtergevind og indstil den vandret.
• Dette produktet må avhendes på egnede oppsamlingssteder. Du må ikke avhende dette produktet
som husholdningsavfall.
• Ta kontakt med leverandøren eller lokale myndigheter hvis du ønsker mer informasjon om
avhending.
©2012 NEDIS BV. Camlink is a registered trademark of NEDIS BV. Although every effort has been made
to ensure the accuracy of the information contained in this manual specifications are subject to change
and therefore NEDIS BV cannot guarantee its correctness and completeness at all times.
12
Page 13

A
5. Forbind strømledningen fra batteripakken til ringlampen.
Brugervejledninger
1. Brug lysdæmperen på batteripakken til at indstille lysstyrken.
2. Vælg mellem F (Blitz) tilstand og L (LED) tilstand ved at bruge kontakten på bagsiden af batteripakken.
Bemærk: denne blitz virker kun på kameraer med Hot shoe.
3. For at afprøve blitzen, tryk på knappen ”test”.
4. Når du er færdig med at bruge ringlampen, aftages strømledningen først og derefter skrues ringlampen af.
Vedligeholdelse
1. Sluk for strømmen efter brug for at undgå længere fremkaldelse af varme og spild af batteri og LED pærernes
levetid.
2. Fjern batterierne når du ikke bruger LED lampen.
3. Installer venligst batterierne forsigtigt for at undgå beskadigelse af batteriholderen.
Garanti
Ingen garanti og ikke noget ansvar kan påtages for ændringer af produktet eller for skade på grund af forkert brug af
dette produkt.
Friskrivningsklausul
Design og specifikationer kan ændres uden varsel.
Alle bomærker og produktnavne er varemærker eller registrerede varemærker tilhørende deres respektive ejere og
anses herved som sådan. Gem brugervejledningen og emballagen til senere brug.
Kassering
CZ – Cesky
Technické údaje
Světelný zdroj: 80 LED o vysoké svítivosti
Teplota chromatičnosti: 5400 K
Intenzita osvětlení: 380 lm
Pomůcka čísla: 33 (100 ISO)
Rozsah: 4 ft
Baterie: 4x AA
Bezpečnostní opatření
byste snížili riziko úrazu elektrickým šokem, měl by být tento výrobek otevřen POUZE
autorizovaným technikem, je-li to nezbytné. V případě, že dojde k závadě, odpojte
výrobek ze sítě a od jiných zařízení. Výrobek nevystavujte vodě nebo vlhkosti.
Pokyny k instalaci
1. Vložte do prostoru pro baterie 4 AA alkalické nebo Ni-MH dobíjecí baterie. Zkontrolujte zdali jsou baterie správně
vloženy tak, aby směřovaly ke kladnému nebo zápornému pólu vyznačeném na prostoru pro baterie.
2. Připevněte napájecí zdroj na fotoaparát.
3. Vyberte správný upevňovací kruh a posuňte napájecí zdroj do drážek v zadní části světelného kroužku, dokud
• Denna produkt är avsedd för separat insamling vid en lämplig återvinningscentral. Släng inte denna
produkt bland vanligt hushållsavfall.
• För mer information, kontakta återförsäljaren eller myndigheten på ort som ansvarar för
avfallshantering.
©2012 NEDIS BV. Camlink is a registered trademark of NEDIS BV. Although every effort has been made
to ensure the accuracy of the information contained in this manual specifications are subject to change
and therefore NEDIS BV cannot guarantee its correctness and completeness at all times.
13
Page 14

nezapadne do své pozice.
4. Zašroubujte světelný kroužek na závit filtru objektivu a nastavte ho horizontálně.
5. Připevněte napájecí kabel napájecího zdroje k světelnému kroužku.
Pokyny k použití
1. Použijte regulátor světlosti na napájecím zdroji k nastavení intenzity světla.
2. Vyberte si mezi režimy F (blesk) a L (LED) pomocí přepínače v zadní části napájecího zdroje.
Poznámka: Tento blesk je pouze pro fotoaparáty, které mají zásuvku pro připojení blesku a jiných zařízení.
3. K vyzkoušení blesku stiskněte tlačítko „test“.
4. Po ukončení fotografování za použití světelného kroužku, vyjměte nejprve napájecí kabel a poté vyšroubujte
světelný kroužek.
Údržba
1. Vypněte prosím všechna zařízení po použití aby nedocházelo ke generaci tepla, vybíjení baterie a ke zkracování
provozní životnosti LED žárovek.
2. Jestliže nebudete LED lampu delší dobu používat vyjměte z ní baterie.
3. Baterie prosím vkládejte opatrně aby nedošlo k poškození prostoru pro baterie.
Záruka
Jakékoli změny, modifikace nebo poškození zařízení v důsledku nesprávného zacházení se zařízením ruší platnost
záruční smlouvy.
Vyloučení zodpovědnosti
Design a specifikace výrobku mohou být změněny bez předchozího upozornění.
Všechna loga a obchodní názvy jsou registrované obchodní značky příslušných vlastníků a jsou chráněny zákonem. Pro
budoucí použití uschovejte tento návod a obal.
Likvidace
HU – Magyar
Műszaki adatok
Fényforrás: 80 nagy fényerejű LED
Színhőmérséklet: 5400 K
Fényáram: 380 lm
Kulcsszám: 33 (100 ISO)
Hatótávolság 4 ft
Elem: 4x AA
Biztonsági óvintézkedések
Az áramütés veszélyének csökkentése érdekében ezt a terméket KIZÁRÓLAG a
márkaszerviz képviselője nyithatja fel. Hiba esetén húzza ki a termék csatlakozóját a
konnektorból, és kösse le más berendezésekről. Vigyázzon, hogy ne érje a terméket
víz vagy nedvesség.
Üzembe helyezési útmutató
1. Helyezze a teleptartóba a 4 db AA alkáli elemet vagy Ni-MH akkuelemet. Az elemeket a teleptartóban feltüntetett
• Tento produkt je určen pro tříděný odpad v příslušné sběrně. Nevyhazujte tento výrobek s
komunálním odpadem.
• Pro více informací se obraťte na prodejce nebo místní orgány odpovědné za nakládání s odpady.
©2012 NEDIS BV. Camlink is a registered trademark of NEDIS BV. Although every effort has been made
to ensure the accuracy of the information contained in this manual specifications are subject to change
and therefore NEDIS BV cannot guarantee its correctness and completeness at all times.
14
Page 15

polaritással helyezze be.
2. Erősítse a teleptartót a kamerára.
3. Válassza ki a megfelelő felerősítőgyűrűt, és csúsztassa a teleptartót gyűrű hátoldali hornyaiba, amíg a helyére nem
kattan.
4. Csavarozza a gyűrűs fényforrást az objektív szűrőmenetére és állítsa be vízszintesen.
5. Kösse a teleptartó tápkábelét a gyűrűs fényforrásra.
Használati útmutató
1. A teleptartó fényerőszabályzójával állítsa be a kívánt fényerősséget.
2. A teleptartó hátoldalán levő kapcsolóval válassza az F (Flash, vaku) vagy L (LED) üzemmódot.
Megjegyzés: ez a vaku csak vakupapucsos fényképezőgépeken működik.
3. A vaku kipróbálásához nyomja meg a „test” gombot.
4. A gyűrűs fényforrásnak az objektívról való levételhez először kösse le a teleptartó tápkábelét, s csak utána csavarja
le a fényforrást.
Gondozás, ápolás
1. Használat után kapcsolja ki, hogy ne termeljen hőt és ne pocsékolja az elemek és a LED fényforrás élettartamát.
2. Ha hosszabb ideig nem fogja használni a LED lámpát, vegye ki belőle az elemeket.
3. Vigyázva helyezze be az elemeket, hogy meg ne sértse a teleptartót.
Jótállás
Nem vállalunk jótállást és felelősséget a terméken végzett változtatás vagy módosítás vagy a termék helytelen
használata miatt bekövetkező károkért.
Jogi nyilatkozat
A kivitel és a műszaki jellemzők előzetes értesítés nélkül is módosulhatnak.
Minden logó, terméknév és márkanév a tulajdonosának márkaneve vagy bejegyzett márkaneve, azokat ennek
tiszteletben tartásával említjük. Őrizze meg ezt az útmutatót és a csomagolást.
Leselejtezés
GR– Ελληνικa
Τεχνικά χαρακτηριστικά
Πηγή φωτός: 80 υψηλής ισχύος LED
Θερμοκρασία χρώματος: 5400 K
Ένταση φωτός: 380 lm
Αριθμός οδηγού: 33 (100 ISO)
Εμβέλεια: 4 ft
Μπαταρία: 4x AA
Οδηγίες ασφαλείας
Για να μειώσετε τον κίνδυνο ηλεκτροπληξίας, το προϊόν αυτό θα πρέπει να ανοιχθεί
ΜΟΝΟ από εξουσιοδοτημένο τεχνικό όταν απαιτείται συντήρηση (σέρβις).
Αποσυνδέστε το προϊόν από την πρίζα και άλλο εξοπλισμό αν παρουσιαστεί
πρόβλημα. Μην εκθέτετε το προϊόν σε νερό ή υγρασία.
• A terméket elkülönítve, a megfelelő gyűjtőhelyeken kell leselejtezni. Ne dobja ki a készüléket a
háztartási hulladék közé.
• További információért lépjen kapcsolatba a forgalmazóval, vagy a hulladékkezelésért felelős helyi
hatósággal.
©2012 NEDIS BV. Camlink is a registered trademark of NEDIS BV. Although every effort has been made
to ensure the accuracy of the information contained in this manual specifications are subject to change
and therefore NEDIS BV cannot guarantee its correctness and completeness at all times.
15
Page 16

Οδηγίες εγκατάστασης
1. Τοποθετήστε 4 αλκαλικές μπαταρίες AA ή 4 επαναφορτιζόμενες μπαταρίες Ni-MH στη θήκη μπαταριών. Βεβαιωθείτε
ότι οι μπαταρίες έχουν τοποθετηθεί σύμφωνα με τα σύμβολα στο εσωτερικό της θήκης μπαταριών.
2. Συναρμολογήστε το πακέτο τροφοδοσίας στη φωτογραφική μηχανή.
3. Επιλέξτε τον κατάλληλο δακτύλιο στερέωσης και σύρετε το πακέτο τροφοδοσίας στις αυλακώσεις που βρίσκονται
στο πίσω μέρος του φωτεινού δακτυλίου μέχρι να κλειδώσει.
4. Βιδώστε τον φωτεινό δακτύλιο στο σπείρωμα φίλτρου του φακού και ρυθμίστε τον οριζοντίως.
5. Συνδέστε το καλώδιο τροφοδοσίας του πακέτου τροφοδοσίας στον φωτεινό δακτύλιο.
Οδηγίες χρήσης
1. Χρησιμοποιήστε το ρυθμιστή φωτός του πακέτου τροφοδοσίας για να ρυθμίσετε την ένταση.
2. Επιλέξτε λειτουργία F (Φλας) ή L (LED) από το διακόπτη που βρίσκεται στο πίσω μέρος του πακέτου τροφοδοσίας.
Σημείωση: αυτό το φλας λειτουργεί μόνο σε φωτογραφικές μηχανές με ειδική υποδοχή για φλας.
3. Για να δοκιμάσετε το φλας, πατήστε το κουμπί «test» (δοκιμή).
4. Αν δεν χρειάζεστε πλέον τον φωτεινό δακτύλιο, αποσυνδέστε αρχικά το καλώδιο τροφοδοσίας και, στη συνέχεια,
ξεβιδώστε τον φωτεινό δακτύλιο.
Συντήρηση
1. Αποσυνδέστε τη συσκευή από το ρεύμα μετά τη χρήση για την αποφυγή υπερθέρμανσης, καθώς και άσκοπης
εξάντλησης των μπαταριών και της διάρκειας ζωής των λαμπτήρων LED.
2. Αφαιρέστε τις μπαταρίες όταν δεν χρησιμοποιείτε το λαμπτήρα LED.
3. Τοποθετήστε τις μπαταρίες με προσοχή για την αποφυγή πρόκλησης βλάβης στη θήκη μπαταριών.
Εγγύηση
Ουδεμία εγγύηση ή ευθύνη δεν είναι αποδεκτή σε περίπτωση αλλαγής ή μετατροπής του προϊόντος ή βλάβης που
προκλήθηκε λόγω εσφαλμένης χρήσης του προϊόντος.
∆ήλωση αποποίησης ευθύνης
Το σχέδιο και τα χαρακτηριστικά μπορούν να αλλάξουν χωρίς καμία προειδοποίηση.
Όλα τα λογότυπα, οι επωνυμίες και οι ονομασίες προϊόντων είναι εμπορικά σήματα ή σήματα κατατεθέντα των
αντίστοιχων κατόχων και δια του παρόντος αναγνωρίζονται ως τέτοια. Φυλάξτε το παρόν εγχειρίδιο και τη συσκευασία
για μελλοντική αναφορά.
Απόρριψη
RO- Română
Date tehnice
Sursa de lumină: 80 LED-uri de putere mare
Temperatura culorii: 5400 K
Intensitatea luminii: 380 lm
Numărul seriei: 33 (100 ISO)
Distanţa: 4 ft
Baterii: 4x AA
• Αυτό το προϊόν προορίζεται για ξεχωριστή συλλογή σε κατάλληλο σημείο συλλογής. Μην
απορρίπτετε το προϊόν μαζί με τα οικιακά απόβλητα.
• Για περισσότερες πληροφορίες επικοινωνήστε με τον αντιπρόσωπό σας ή τις τοπικές αρχές
διαχείρισης αποβλήτων.
©2012 NEDIS BV. Camlink is a registered trademark of NEDIS BV. Although every effort has been made
to ensure the accuracy of the information contained in this manual specifications are subject to change
and therefore NEDIS BV cannot guarantee its correctness and completeness at all times.
16
Page 17

Măsuri de siguranţă
Pentru a se reduce pericolul de electrocutare, acest produs va fi desfăcut NUMAI de
către un tehnician avizat, când este necesară depanarea. Deconectaţi produsul de la
priza de reţea sau alte echipamente în cazul apariţiei unei probleme. Nu expuneţi
produsul apei sau umezelii.
Instrucţiuni de instalare
1. Introduceţi 4 baterii AA alcaline sau 4 baterii reîncărcabile Ni-MH în compartimentul pentru baterii. Verificaţi ca
bateriile să fie instalate în conformitate cu simbolurile indicate în interiorul compartimentul pentru baterii.
2. Montaţi power pack-ul pe aparat.
3. Selectaţi inelul de montare adecvat şi glisaţi power pack-ul pe adânciturile din spatele lămpii circulare până când
acesta se fixează în poziţia corectă cu un clic.
4. Înşurubaţi lampa circulară pe filetul filtrului ce aparţine lentilelor şi reglaţi-o pe orizontală.
5. Ataşaţi cablul de alimentare cu electricitate al power pack-ului la lampa bliţ circulară.
Instrucţiuni de utilizare
1. Utilizaţi dimmer-ul power pack-ului pentru a regla intensitatea.
2. Selectaţi între modul F (Flash) (Bliţ) şi modul L (LED) prin utilizarea comutatorului din partea din spate a power packului.
Notă: Acest bliţ funcţionează doar cu aparate foto care au un hot shoe.
3. Pentru a testa bliţul, apăsaţi butonul „test”.
4. Atunci când aţi terminat utilizarea lămpii circulare, mai întâi îndepărtaţi cablul de alimentare cu electricitate şi apoi
deşurubaţi lampa circulară.
Întreţinere
1. Vă rugăm să opriţi alimentarea cu electricitate după utilizarea dispozitivului pentru a evita generarea de căldură pe
termen lung, epuizarea bateriei şi diminuarea duratei de viaţă a becurilor LED.
2. Îndepărtaţi bateriile atunci când nu utilizaţi lampa bliţ LED.
3. Vă rugăm să instalaţi bateriile cu atenţie pentru a evita deteriorarea suportului de baterii.
Garanţie
Nu oferim nicio garanţie şi nu ne asumăm niciun fel de responsabilitate în cazul schimbărilor sau modificărilor aduse
acestui produs sau în cazul deteriorării cauzate de utilizarea incorectă a produsului.
Renunţarea la răspundere
Designul şi specificaţiile produsului pot fi modificate fără o notificare prealabilă.
Toate siglele mărcilor şi denumirile produselor sunt mărci comerciale sau mărci comerciale înregistrate ale proprietarilor
de drept şi prin prezenta sunt recunoscute ca atare. Păstraţi acest manual şi ambalajul pentru consultări ulterioare.
Eliminare
RU -Русский
Технические условия
Источник света: 80 высокомощный LED
Цветная температура: 5400 K
• Acest produs a fost creat pentru colectare separată la un punct de colectare adecvat. Nu eliminaţi
acest produs odată cu deşeurile menajare.
• Pentru mai multe informaţii, contactaţi magazinul sau autoritatea locală responsabilă pentru
gestionarea deşeurilor.
©2012 NEDIS BV. Camlink is a registered trademark of NEDIS BV. Although every effort has been made
to ensure the accuracy of the information contained in this manual specifications are subject to change
and therefore NEDIS BV cannot guarantee its correctness and completeness at all times.
17
Page 18

Интенсивность освещения: 380 лм
Ведущее число фотоспышки: 33 (100 ISO)
Диапазон: 1 метр
Батареи: 4x AA
Меры безопасности
Для снижения риска поражения электрическим током, если потребуется
техническое обслуживание, то это устройство должно быть открыто ТОЛЬКО
уполномоченным техническим специалистом. Отключите устройство от сети и
другого оборудования, если возникнут проблемы. Не подвергайте устройство
воздействию воды или влаги.
Инструкция по установке
1. Вставьте 4 AA щелочных или Ni-MH аккумулятора в батарейный отсек. Убедитесь, что аккумуляторы
установлены согласно символам в батарейном отсеке.
2. Установите модуль питания в камеру.
3. Выберите правильное опорное кольцо и вдвиньте модуль питания в канавки сзади кольца до его фиксации.
4. Ввинтите кольцевой светильник в резьбу фильтра объектива и отрегулируйте его горизонтально.
5. Подключите кабель питания от модуля питания к кольцевому светильнику.
Инструкция пользователя
1. Используйте регулятор освещенности на модуле питания.
2. Выберите режим F (вспышка) и режим L (LED) при помощи переключателя на задней панели модуля
питания.
Примечание: эта вспышка работает только с камерами, которые имеют горячий башмак.
3. Для испытания вспышки нажмите кнопку «test».
4. При использовании кольцевого светильника сначала отключите кабель питания, а потом отвинтите
кольцевой светильник.
Обслуживание
1. Во избежание длительной генерации тепла, разрядки батарей и сокращения срока службы LED лампы после
использования выключите питание.
2. Если вы не используете LED лампу, снимите батареи.
3. Во избежание повреждения держателя батарей вставляйте батареи аккуратно.
Гарантия
Гарантия не действует и не может быть принята ответственность для изменения и модификации устройства или
в случае, когда устройство было повреждено вследствие его неправильного использования.
Оговорки
Дизайн и технические характеристики могут быть изменены без предварительного уведомления.
Все логотипы брендов и названия продуктов являются товарными знаками или зарегистрированными торговыми
марками их соответствующих владельцев и следовательно признаются таковыми. Храните это руководство и
упаковку для дальнейшего использования.
Утилизация
• Это устройство предназначено для раздельного сбора в соответствующем пункте сбора
отходов. Не выбрасывайте это устройство вместе с бытовыми отходами.
• Для получения дополнительной информации обратитесь к продавцу или в местный орган
власти, ответственный за утилизацию отходов.
©2012 NEDIS BV. Camlink is a registered trademark of NEDIS BV. Although every effort has been made
to ensure the accuracy of the information contained in this manual specifications are subject to change
and therefore NEDIS BV cannot guarantee its correctness and completeness at all times.
18
Page 19

CE Declaration of Conformity
Declaration of conformity / Konformitätserklärung / Déclaration de conformité / Conformiteitsverklaring /
Yhdenmukaisuusvakuutus / Overensstämmelseförklaring / Prohlášení o shodě / Declaraţie de conformitate /
∆ήλωση συμφωνίας / Overensstemmelseerklæring / Overensstemmelseforklaring / Заявление о соответствии
We, / Wir, / Nous, / WIJ, / Questasocietà, / La empresa infrascrita, / Mi, / Me, / Vi, / Společnost, / Noi, / Eμέίς / Мы
Nedis B.V., De Tweeling 28, 5215MC, ‘s-Hertogenbosch
The Netherlands / Niederlande / Pays-Bas / Nederland / Paesi Bassi / Países Bajos / Hollandia / Alankomaat / Holland /
Nizozemí / Olanda / Ολλανδία / Нидерланды
Tel / Tél / Puh / Tηλ. / Тел.: 0031 73 5991055
Email / Couriel / Sähköposti / e-post: info@nediscom
Declare that product /erklären, dass das Produkt: / Déclarons que Ie produit : / verklaren dat het product: / Dichiara che
il prodotto: / Declara que el producto: / Kijelentjük, hogy a terrnék, amelynek: / Vakuutamme, että: / Intygar att
produkten: / prohlašuje, ze výrobek: / Declarǎm cǎ acest produs: / ∆ηλώνουμε ότι το προϊον: / Erklærer at produktet: /
Forsikrer at produktet: / Заявляем, что продукт:
Brand: / Marke: / Marque : / Merknaam: / Marca: / Márkája: / Merkki: /Märke: / Značka: / Mάρκα: / Mærke: / Merke: /
Марка: CAMLINK
Model: / Modell: / Modèle : / Modello: / Modelo: / Típusa: / Malli: / Mοντέλο: / Модель: CL-RL80
Description:
Beschreibung:
Description :
Omschrijving:
Descripción:
Descrizione:
Kuvaus:
Beskrivning:
Beskrivelse:
Beskrivelse:
Popis:
Megnevezése:
Περιγραφή:
Descriere:
Описание:
Is in conformity with the following standards: / den folgenden Standards entspricht / est conforme aux normes
suivantes : / in overeenstemming met de volgende normen is: / è conforme ai seguenti standard: / es conforme a
las siguientes normas: / Megfelel az alábbi szabványoknak: / Täyttää seuraavat standardit: / Överensstämmer
med följande standarder: / splňuje následující normy / Este înconformitate cu următoarele standard: /
Συμμορφώνεται με τις ακόλουθες προδιαγραφές: / Overensstemmelse med følgende standarder: /
Overensstemmer med følgende standarder: / Соответствует следующим стандартам:
EN 55015:2006+A1:2007+A2:2009
EN 61547:2009
EU Directive(s) / EG-Richtlinie(n) / Directive(s) EU / EU richtlijn(en) / Direttiva(e) EU / Directiva(s) UE / EU direktívák /
EU Toimintaohje(et) / Eu Direktiv(en) / Směmice EU / Directiva(e) UE / Οδηγία(ες) της EE / EU direktiv(er) / EUdirektiv(ene): / Директива(ы) ЕС: 2004/108/EC
's-Hertogenbosch, 12-07-2012
Mr. / Hr. / M. / Dhr. / Sig. / Sr. D./ Úr / Mr. / Herr./ Pan / Dl./ Κ. / Hr. / Herr / Г-н
Randolf Richardson
Chief Operating Officer / Geschäftsführer / Chef des opérations /
Operationeel Directeur / Responsabile Operativo / Director de Operaciones / Üzemviteli Igazgató / Käyttöpäällikkö /
Driftschef / Provozní ředitel / Director principal / Γενικός ∆ιευθυντής Επιχειρήσεων / Chief Operating Officer /
Administrerende Driftsdirektør / Директор по производству
Dichiarazione di conformita / Declaración de conformidad / Megfelelõségi nyilatkozat /
Close-up Flash LED Ring Light
Nahbereichsblitz LED-Ringlicht
Flash pour plan rapproché Flash annulaire LED
Close-up Flash LED-ringverlichting
Flash de primer plano Anillo de luz LED
Flash primo piano Luce Anello LED
Lähisalama LED-rengasvalo
Närbildsblixt LED-ringlampa
Nærbilde-blits LED-ringlys
Blitz til nærbillede LED ring lampe
Blesk pro detailní záběr LED světelný kroužek
Közelfelvételi vaku Gyűrűs LED fényforrás
Φλας κοντινού πλάνου Φωτεινός δακτύλιος LED
Bliţ pentru prim-plan Lampă bliţ LED circulară
Ближнее освещение LED кольцевой светильник
©2012 NEDIS BV. Camlink is a registered trademark of NEDIS BV. Although every effort has been made
to ensure the accuracy of the information contained in this manual specifications are subject to change
and therefore NEDIS BV cannot guarantee its correctness and completeness at all times.
19
 Loading...