

Page 1

Type: CL-FS20 Document version: 1
• GB - Film scanner - User manual 3
• DE - Filmscanner - Bedienungsanleitung 11
• FR - Scanner photo - Manuel de l'utilisateur 20
• NL - Filmscanner - Handleiding 30
• ES - Escáner de películas - Manual de Usuario 39
• IT -
Scanner per negaivi
e diapositive
- Manuale per l'utente 49
• FI - Filmiskanneri - Käyttöopas 58
• SE - Filmskanner - Bruksanvisning 67
• NO - Filmscanner - Brukerveiledning 76
• DK - Filmscanner - Brugsvejledning 84
• CZ - Filmový skener - Návod k použití 93
• HU - Filmolvasó - Használati útmutató 102
• GR - Σαρωτής φιλμ - Εγχειρίδιο χρήσης 111
• RO - Scanner de peliculă - Manual de utilizare 120
• RU - Сканер пленки -
Руководство
пользователя
129
Page 2

2
©2012 NEDIS BV. Camlink is a registered trademark of NEDIS BV. Although every effort has been
made to ensure the accuracy of the information contained in this manual specifications are subject to
change and therefore NEDIS BV cannot guarantee its correctness and completeness at all times.
Nedis B.V., part of the Nedis Group
De Tweeling 28
5215 MC ‘s-Hertogenbosch
The Netherlands
Tel: +31 73 599 1055
Fax: +31 73 599 9699
Web: www.nedis.com or www.nedis.nl
© Any unauthorised use of the information in this manual is prohibited. No part of this manual
may be reproduced, stored in a database or retrieval system, or published, in any form or in any
way, electronically or mechanically, by print, photocopy, microfilm or by any other means
without the express written permission of NEDIS.
Page 3

3
©2012 NEDIS BV. Camlink is a registered trademark of NEDIS BV. Although every effort has been
made to ensure the accuracy of the information contained in this manual specifications are subject to
change and therefore NEDIS BV cannot guarantee its correctness and completeness at all times.
GB – English
Introduction
No PC needed for operation. 5 Mega pixel stand alone film/slide scan film to your
SD card or computer. Support various SD cards up to 32GB SDHC. USB 2.0
interface with USB power or AC power TV out feature: NTSC/PAL.
◆ Film scanner
◆ USB cable
◆ Video cable
◆ Negative Film holder
◆ Positive slide holder
◆ Rapid slide feeder
◆ DC5V adapter
◆ User’s Manual
◆ Brush
NOTE: You can use the provided brush to clean the backlight panel.
Technical specifications
Size 88.15 (L) X 86.25 (W) X111.20 (H) mm
Weight 301g
Sensor 1/3.2” 5mega CMOS
Effective resolution 5mega
Storage media External: SD card, compatible SDHC card
Sensitivity Auto
Lens Fixed focus F/6.0, F=6.34mm
Focus range 5.6cm
Still image Format: JPEG, resolution: 5M, 10M (interpolation)
Zoom No
Display 2.36” TFT
TV output format NTSC/PAL
Light sources Backlight compensation
White balance Auto
Exposure compensation Auto
Interface MSDC: USB2.0 (high speed)
Auto turn on No
Power DC 5V
Operation system Windows XP, Vista, 7, 8
CPU Intel Pentium 4/2.8GHz above
Memory 512MB above
Video card 64MB or high top video card
Transmission connection Standard USB2.0 or above
Hard disk capacity At least 200MB
Page 4
4
©2012 NEDIS BV. Camlink is a registered trademark of NEDIS BV. Although every effort has been
made to ensure the accuracy of the information contained in this manual specifications are subject to
change and therefore NEDIS BV cannot guarantee its correctness and completeness at all times.
Adapter Yes
Positive board holder Yes
Negative board holder Yes
Brush Yes
USB cable Yes
Safety precautions
To reduce risk of electric shock, this product should
ONLY be opened by an authorized technician when
service is required. Disconnect the product from mains
and other equipment if a problem should occur. Do not
expose the product to water or moisture.
Ventilation: The device should be situated so that its location or position does not interfere
with its proper ventilation.
Heat: The device should be situated away from sources of high heat such as radiators or
stoves.
Non use period: The USB cord for the device should be unplugged from the computer
when the unit is left unused for a long period of time.
USB overloading: Do not overload the USB connections on your computer. If you have too
many devices connected to your computer such as a wireless mouse, Media player,
Mobile phone or other USB powered devices there may not be enough power for the film
scanner to operate properly.
Servicing: The user should not attempt to service the device beyond those means
described in the operating instructions. All other servicing should be referred to a qualified
person.
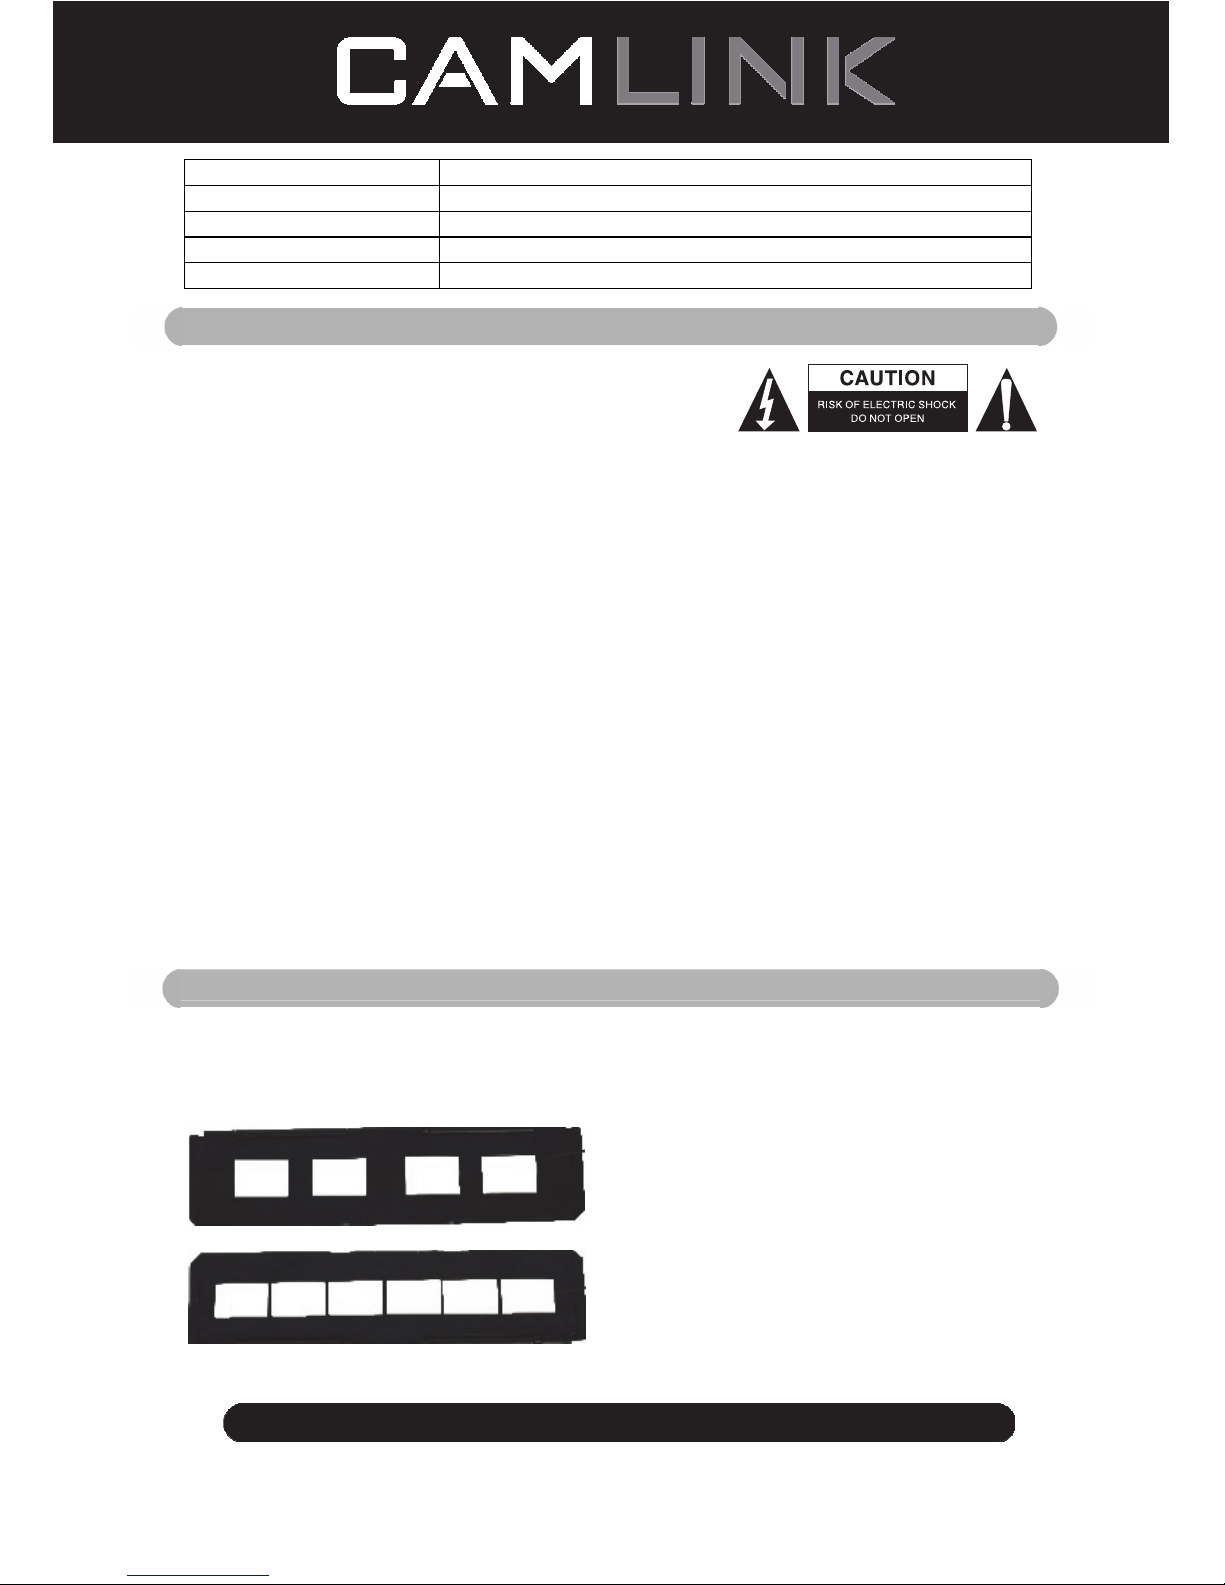
Film Holder: The design of film holder is follow ISO standard.
In some cases the holes on the film will not match exactly to alignment of the holder. This
is caused by a non-standard camera. In this case, there will be a small black line on the
edge of the frame that can easily be cropped out using photo editing software.
*ISO-international Organization for Standardization
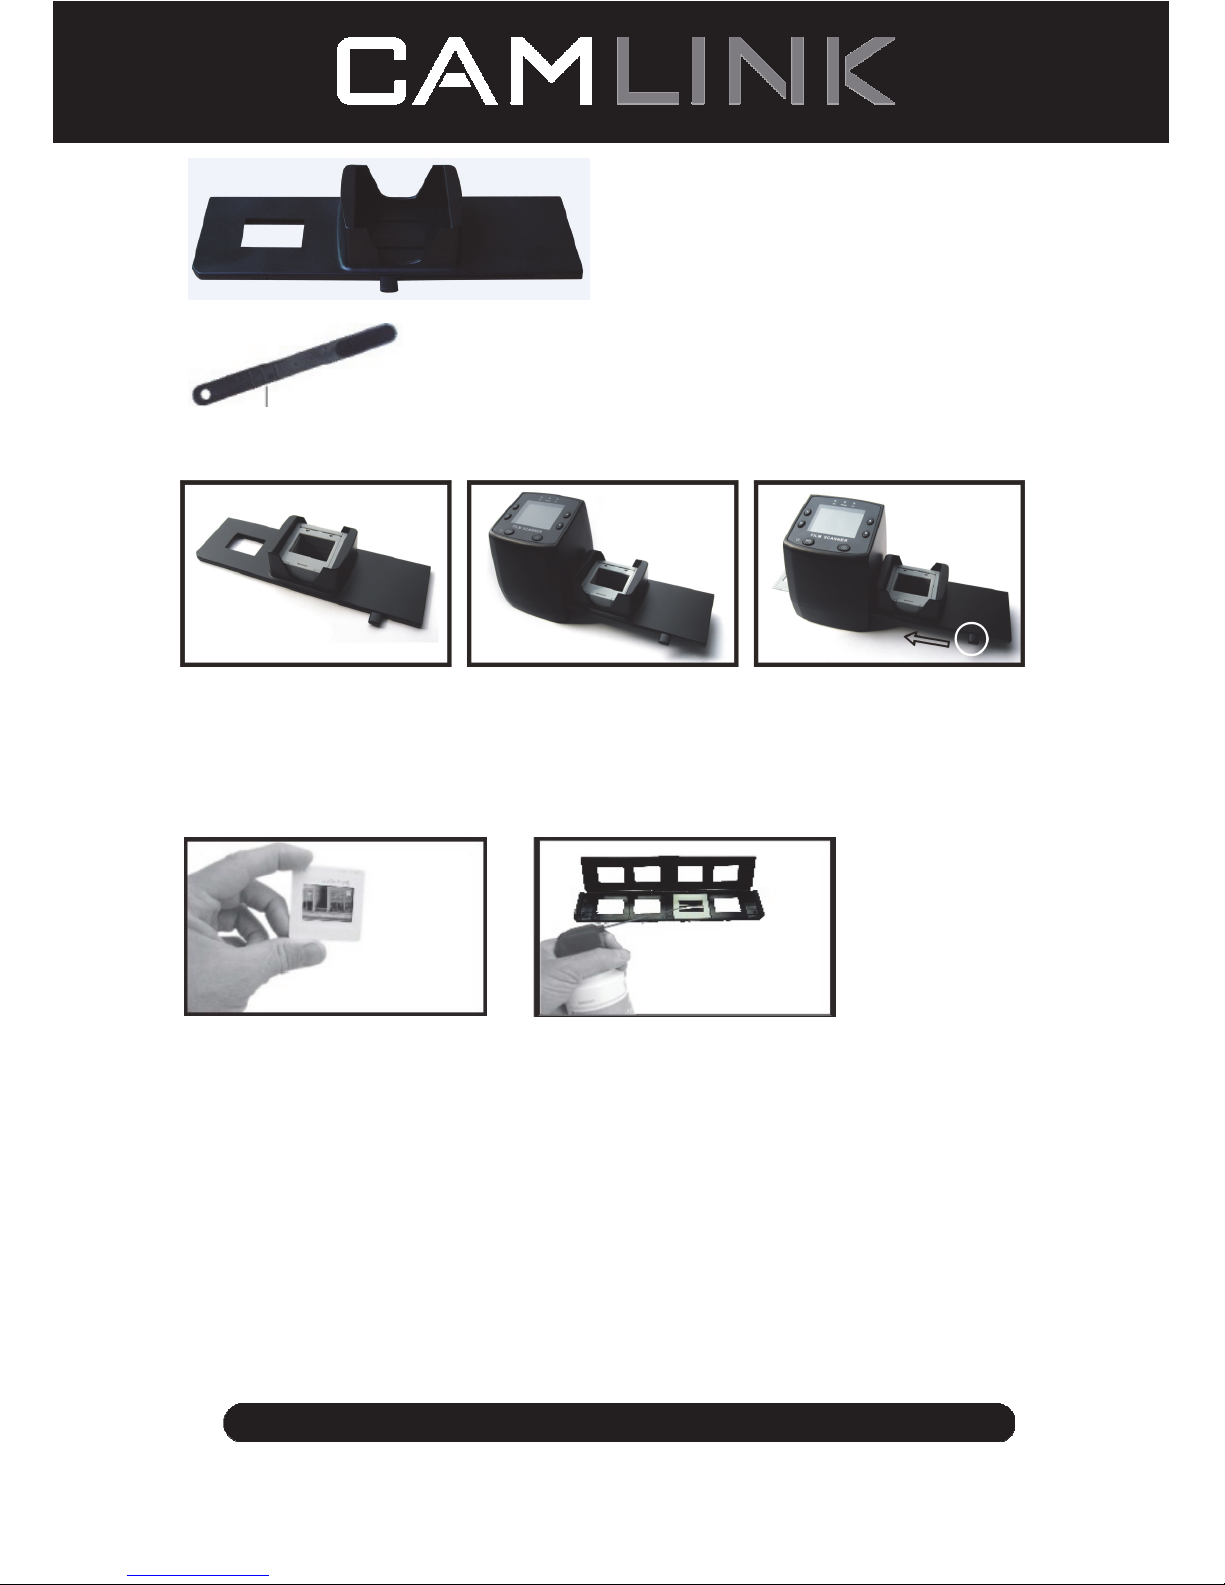
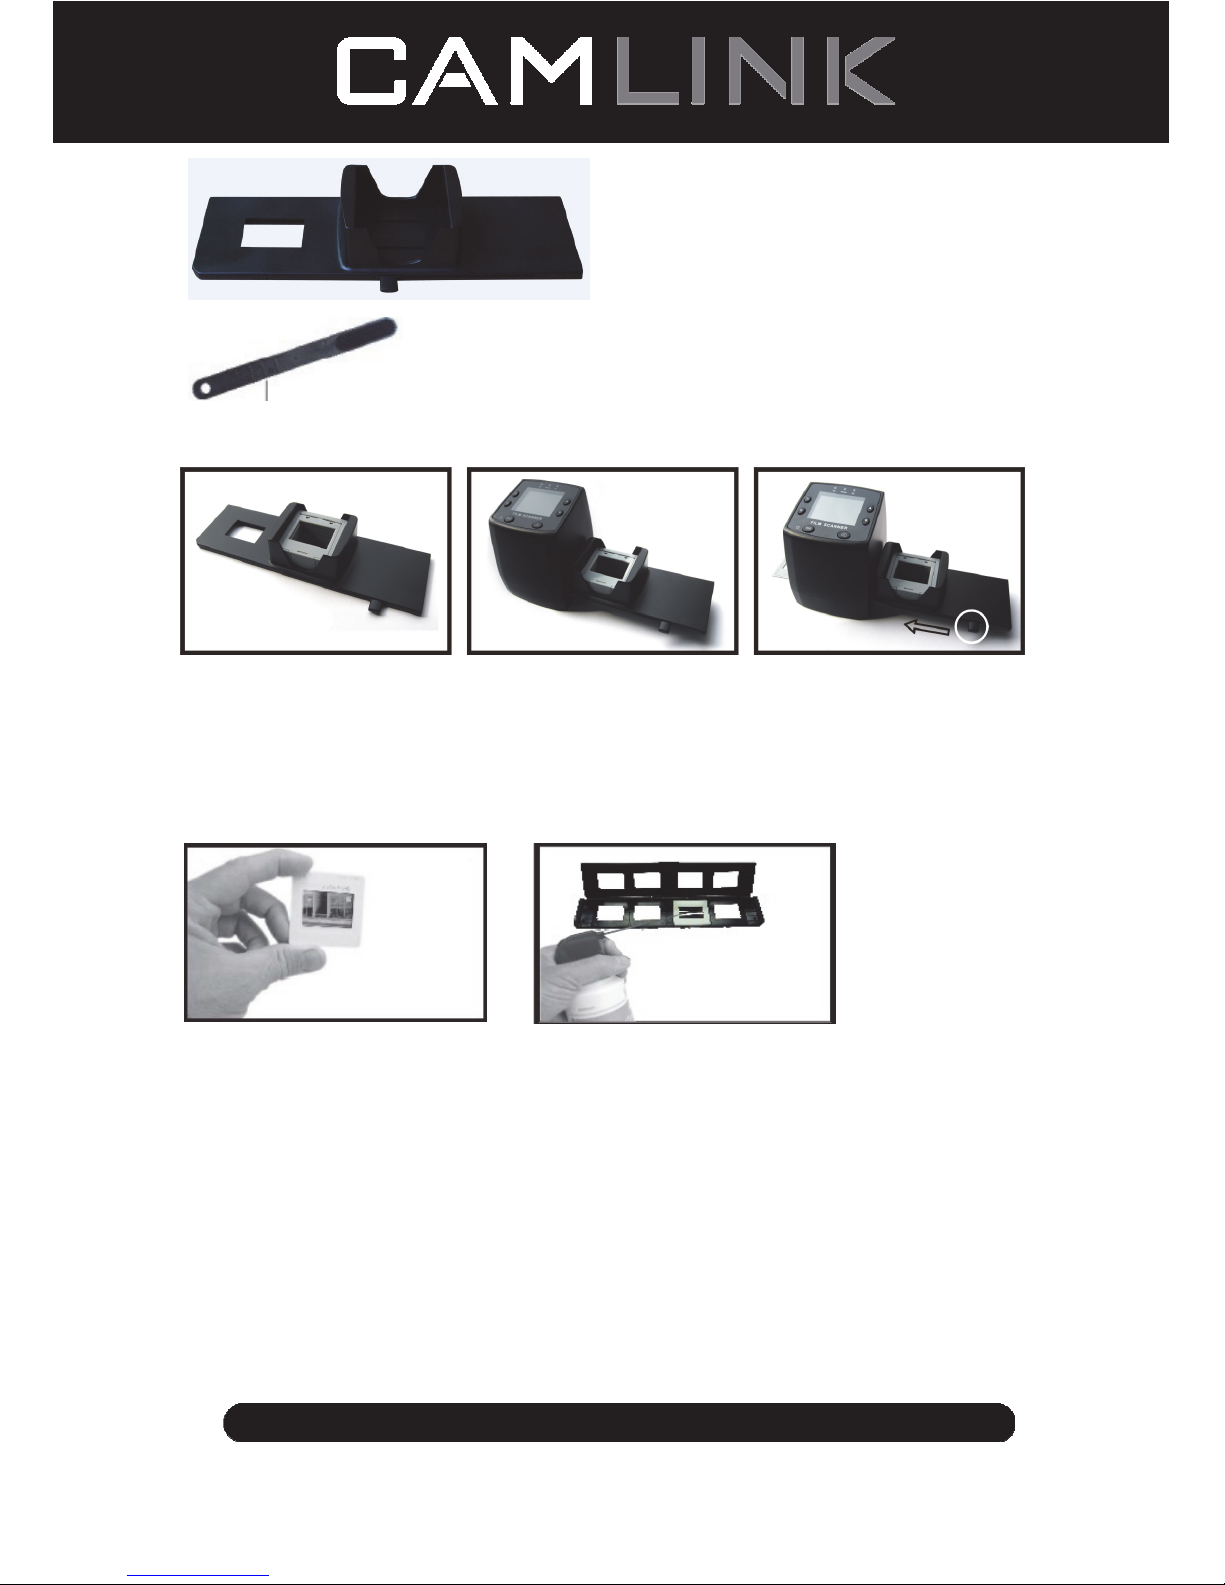
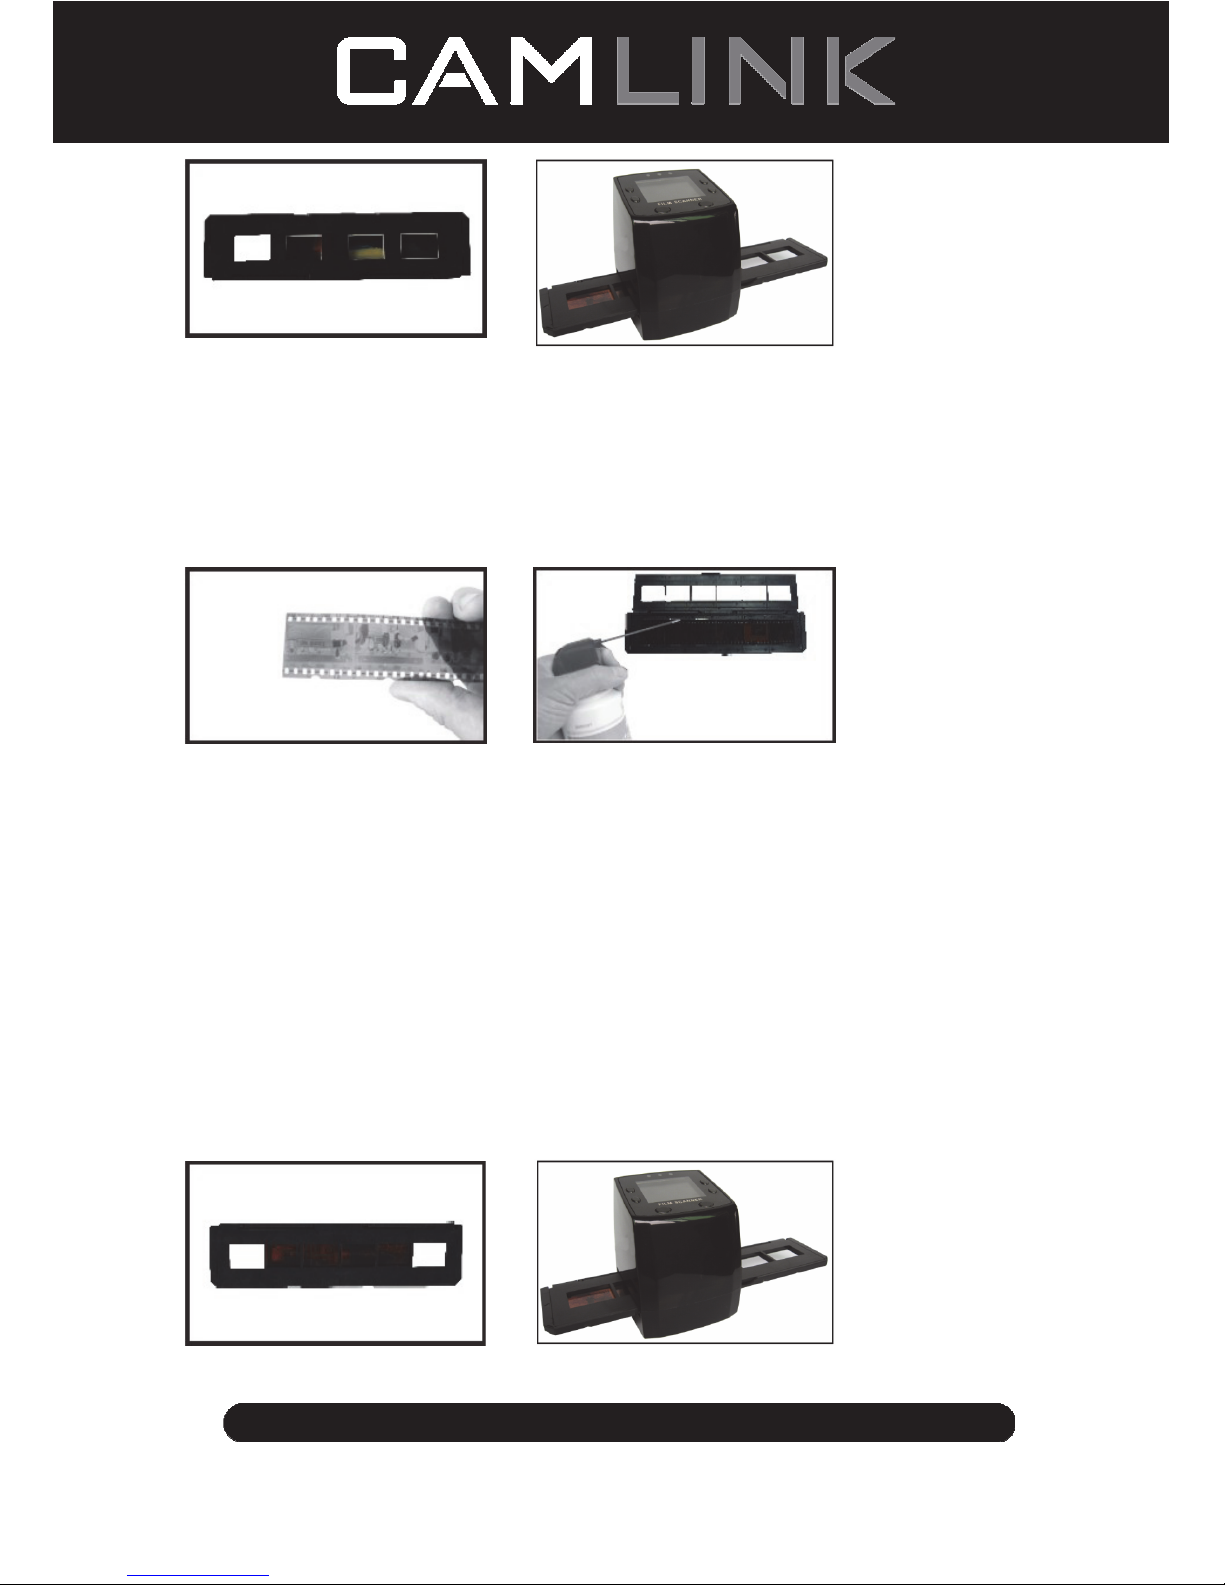
Installation instructions
◆ Place the film scanner on the side and insert the end of the brush into the door on the
right side
Description of parts:
Positive slide Holder
Negative film Holder
Page 5
5
©2012 NEDIS BV. Camlink is a registered trademark of NEDIS BV. Although every effort has been
made to ensure the accuracy of the information contained in this manual specifications are subject to
change and therefore NEDIS BV cannot guarantee its correctness and completeness at all times.
Rapid slide feeder
Brush
Using the included Holders
Rapid Slide Feeder
1. With the lever all the way to the right, stack your slides in the rapid slide feeder.
2. Place the rapid slide feeder into the FILM HOLDER SLOT.
3. Push the lever towards the left, then pull the lever back to the right again to load a slide
from the feeder into SLIDES 2. Repeat this step for subsequent slides (which will push
the used slides out the other side).
Loading Slides
(1) (2)
(1) Hold up the slide toward the light. Face the trademark slide of the slide away from you.
Look through the slide and it should appear normally (not a mirror image). Now turn the
slide so the image is upside down while looking at the same side.
(2) Open the slide holder at the marked spot on the top. With the slide holder laid open
place the slide into recessed area in the holder - the slide should fit perfectly.
Note: Handle slides with care. Any dust, Scratches or finger prints will show up on your
saved images. If possible, use cotton gloves when handing slides. It is recommended
to use compressed air to remove any dust on the slides. This is not included with the
film scanner but can be purchased from an office supply or electronics retailer.
Page 6
6
©2012 NEDIS BV. Camlink is a registered trademark of NEDIS BV. Although every effort has been
made to ensure the accuracy of the information contained in this manual specifications are subject to
change and therefore NEDIS BV cannot guarantee its correctness and completeness at all times.
(3) (4)
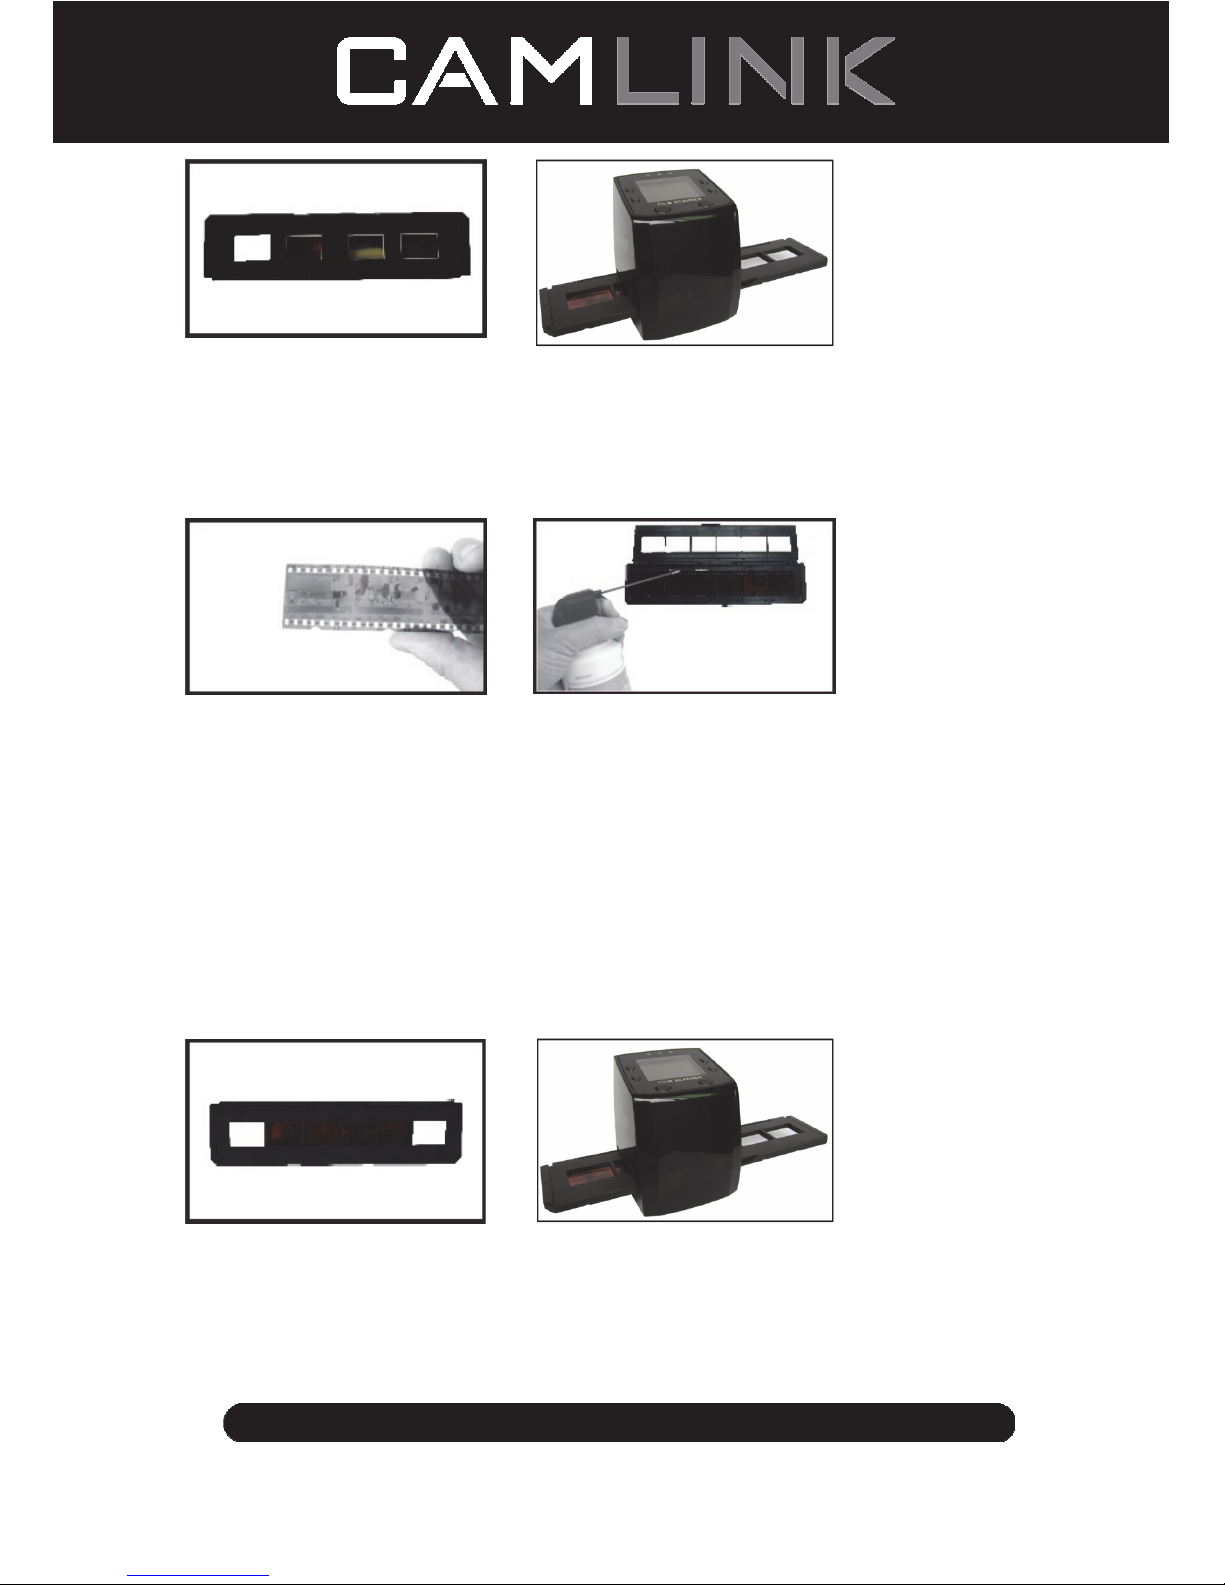
(3) Close the slide holder and press the edges so that it locks in place.
(4) Hold it in the position as showing the film scanner.
Insert the Slide Holder into the slot on the right side of the film scanner as shown.
Loading Negatives
(1) (2)
(1) Hold up the negative toward the light. As you look through the negative, you should be
able to read the small negative numbers normally (not a mirror image).
Now turn the negative so the image is upside down while looking at the same side.
(2) Open the negative holder at the marked spot on the top. With the negative holder laid
open place the negative into holder so the notches line up with the notches on the
holder.
Note: Handle negatives with care. Any dust, scratches or finger prints will show up on
your saved images. If possible use cotton gloves when handling negatives. It is
recommended to use compressed air to remove any dust on the negatives.
This is not included with the film scanner but can be purchased from an office supply or
electronics retailers.
(3) (4)
(3) Close the negative holder and press the edges so that it locks in place. Hold it in the
position as shown in the film scanner.
(4) Insert the negative holder into the slot on the right side of the film scanner as shown.
Page 7
7
©2012 NEDIS BV. Camlink is a registered trademark of NEDIS BV. Although every effort has been
made to ensure the accuracy of the information contained in this manual specifications are subject to
change and therefore NEDIS BV cannot guarantee its correctness and completeness at all times.
Proper Operation Sequence
1. Slide or Load film or negative film to board holder.
2. Insert board holder to scanner.
3. Connect the USB cable to PC.
4. Press power button to turn on scanner.
5. Press scanning button to start scanning.
6. Always take storage card out after finished.
8. Pictures also can be read from pc through USB connection.
User instructions
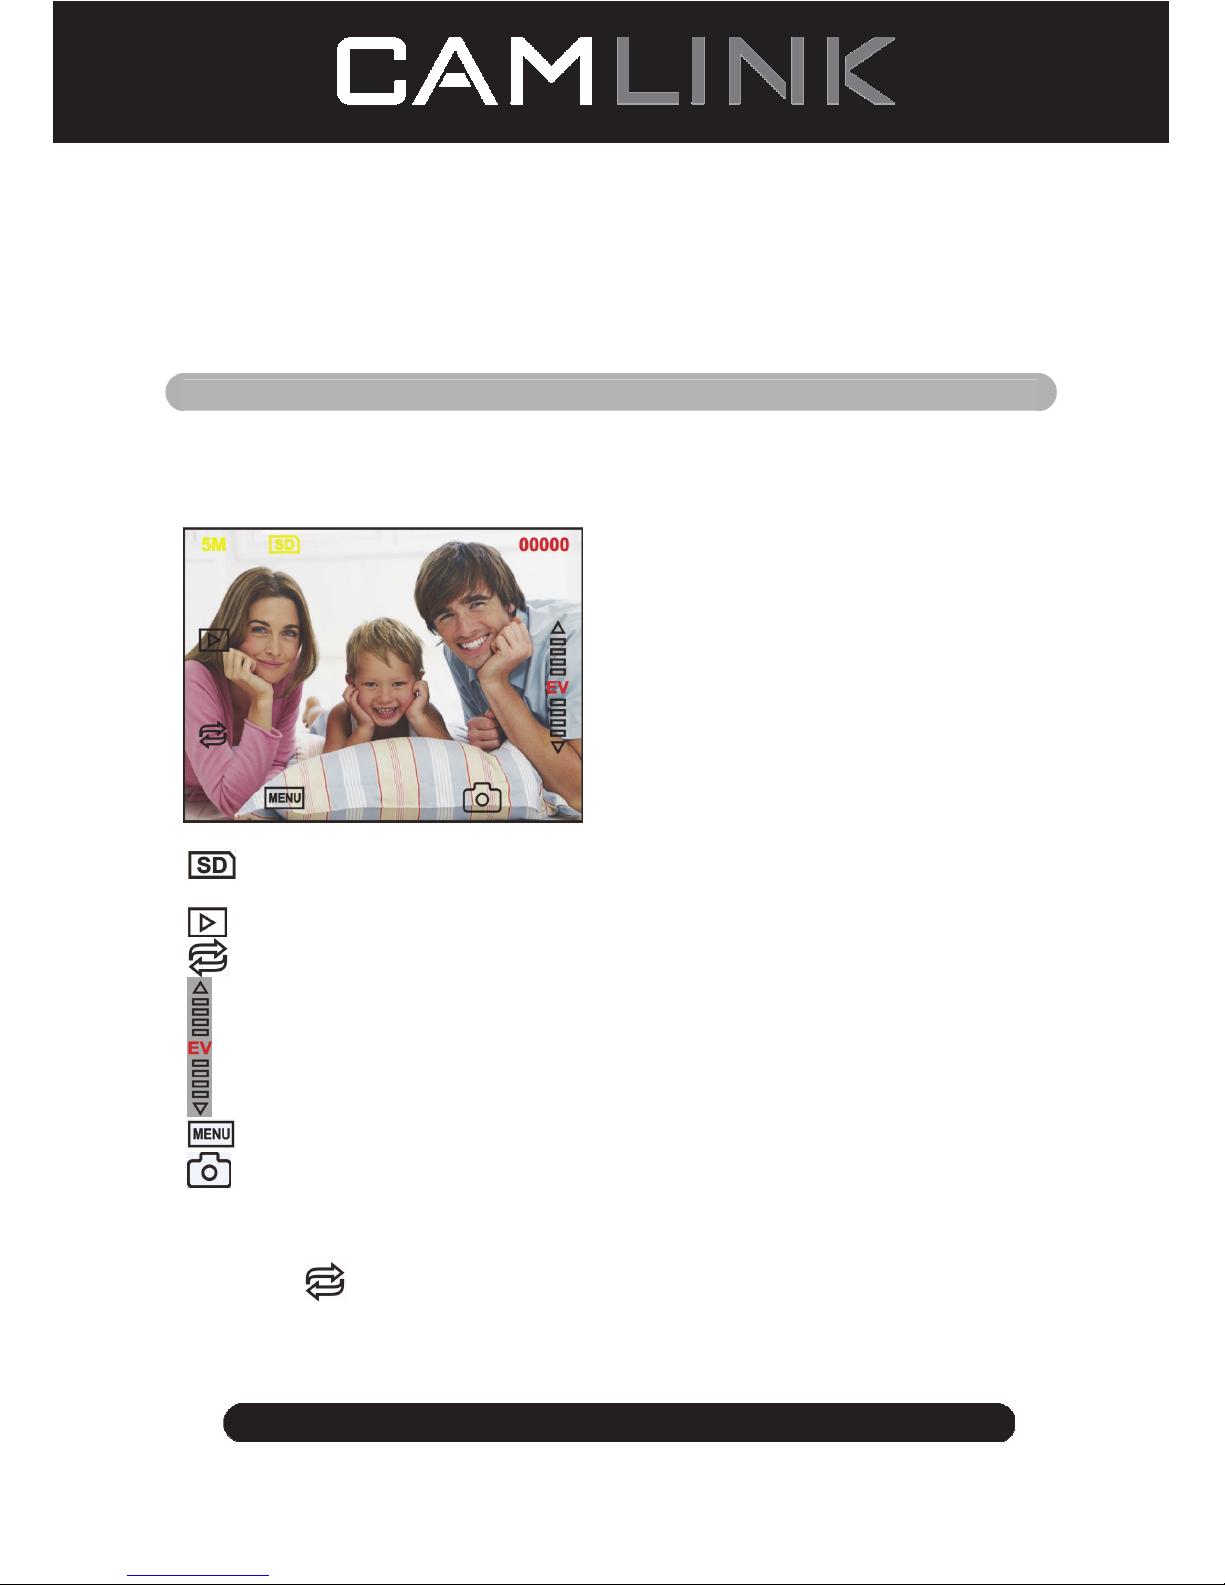
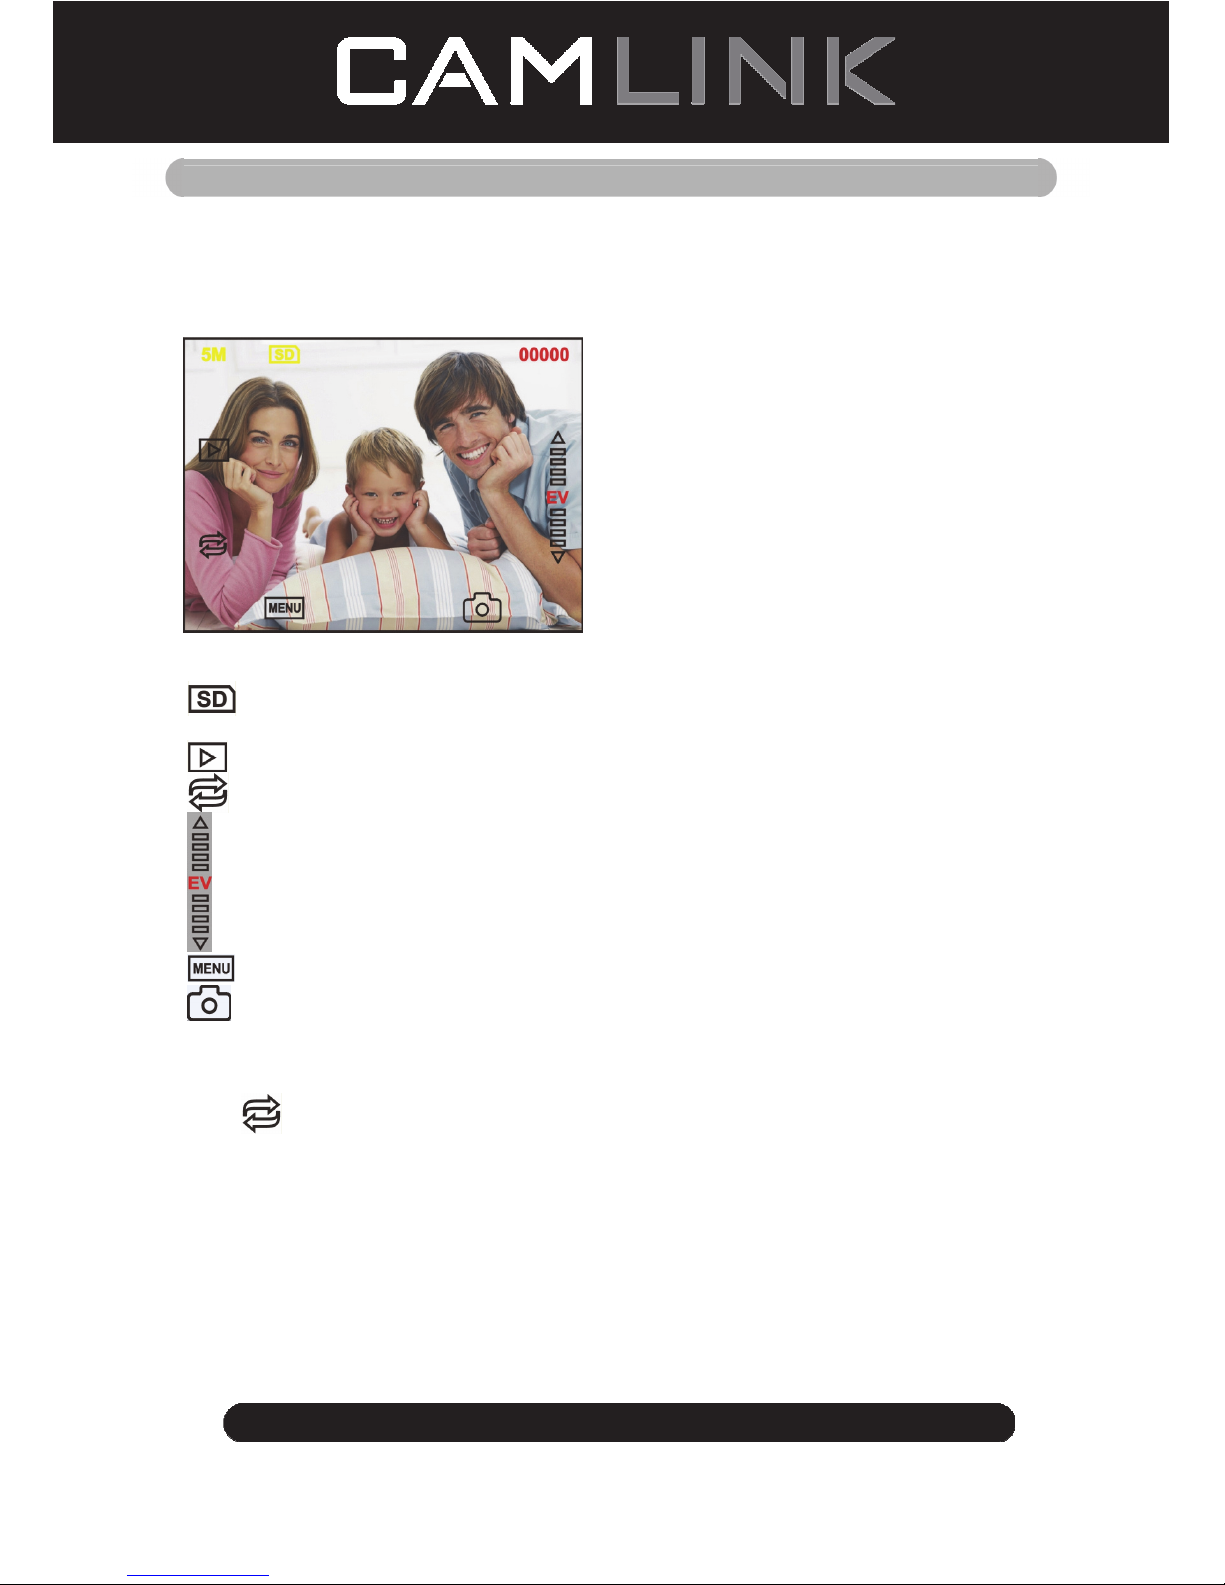
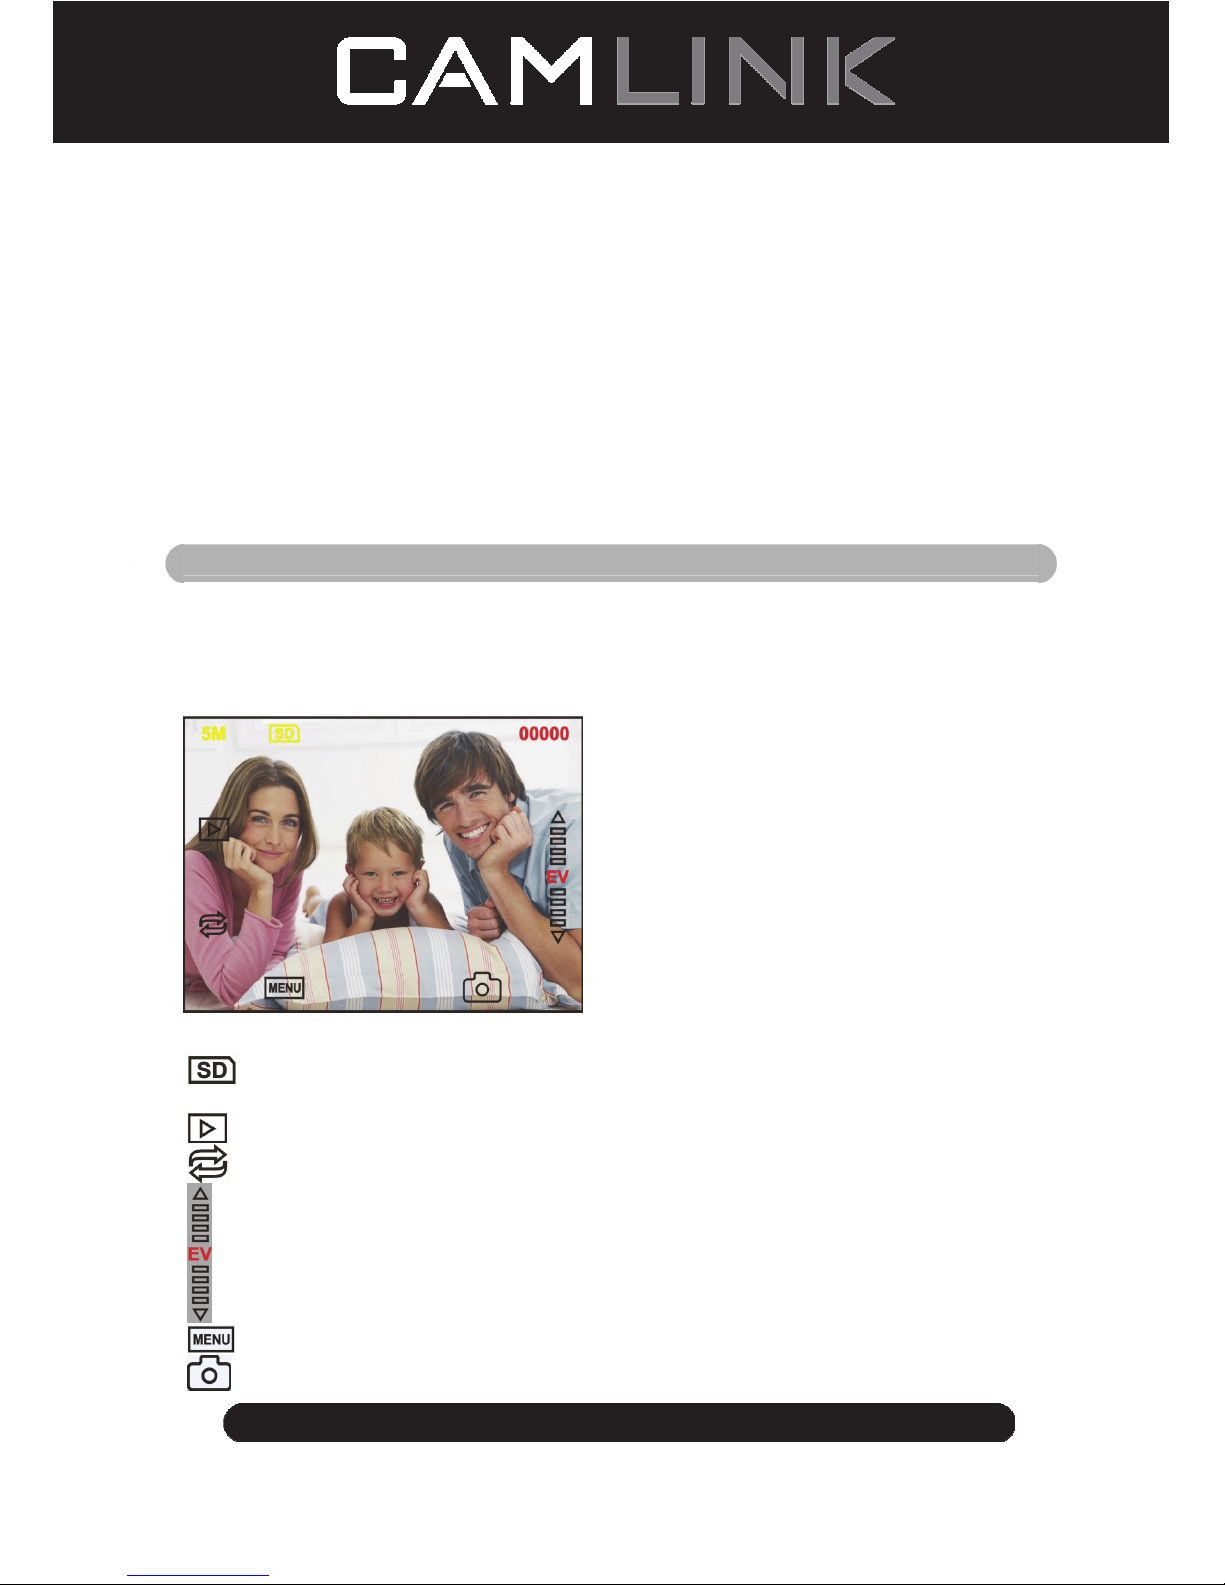
Capture Picture
When the video frequency has been stated, the image can be captured about 3 sec. You
can enter into the main menu to choose Capture mode to set slide style and EV value
when pressing manual key.
5M Resolution
Sign to card
00000 Scanning amount available
Playback mode
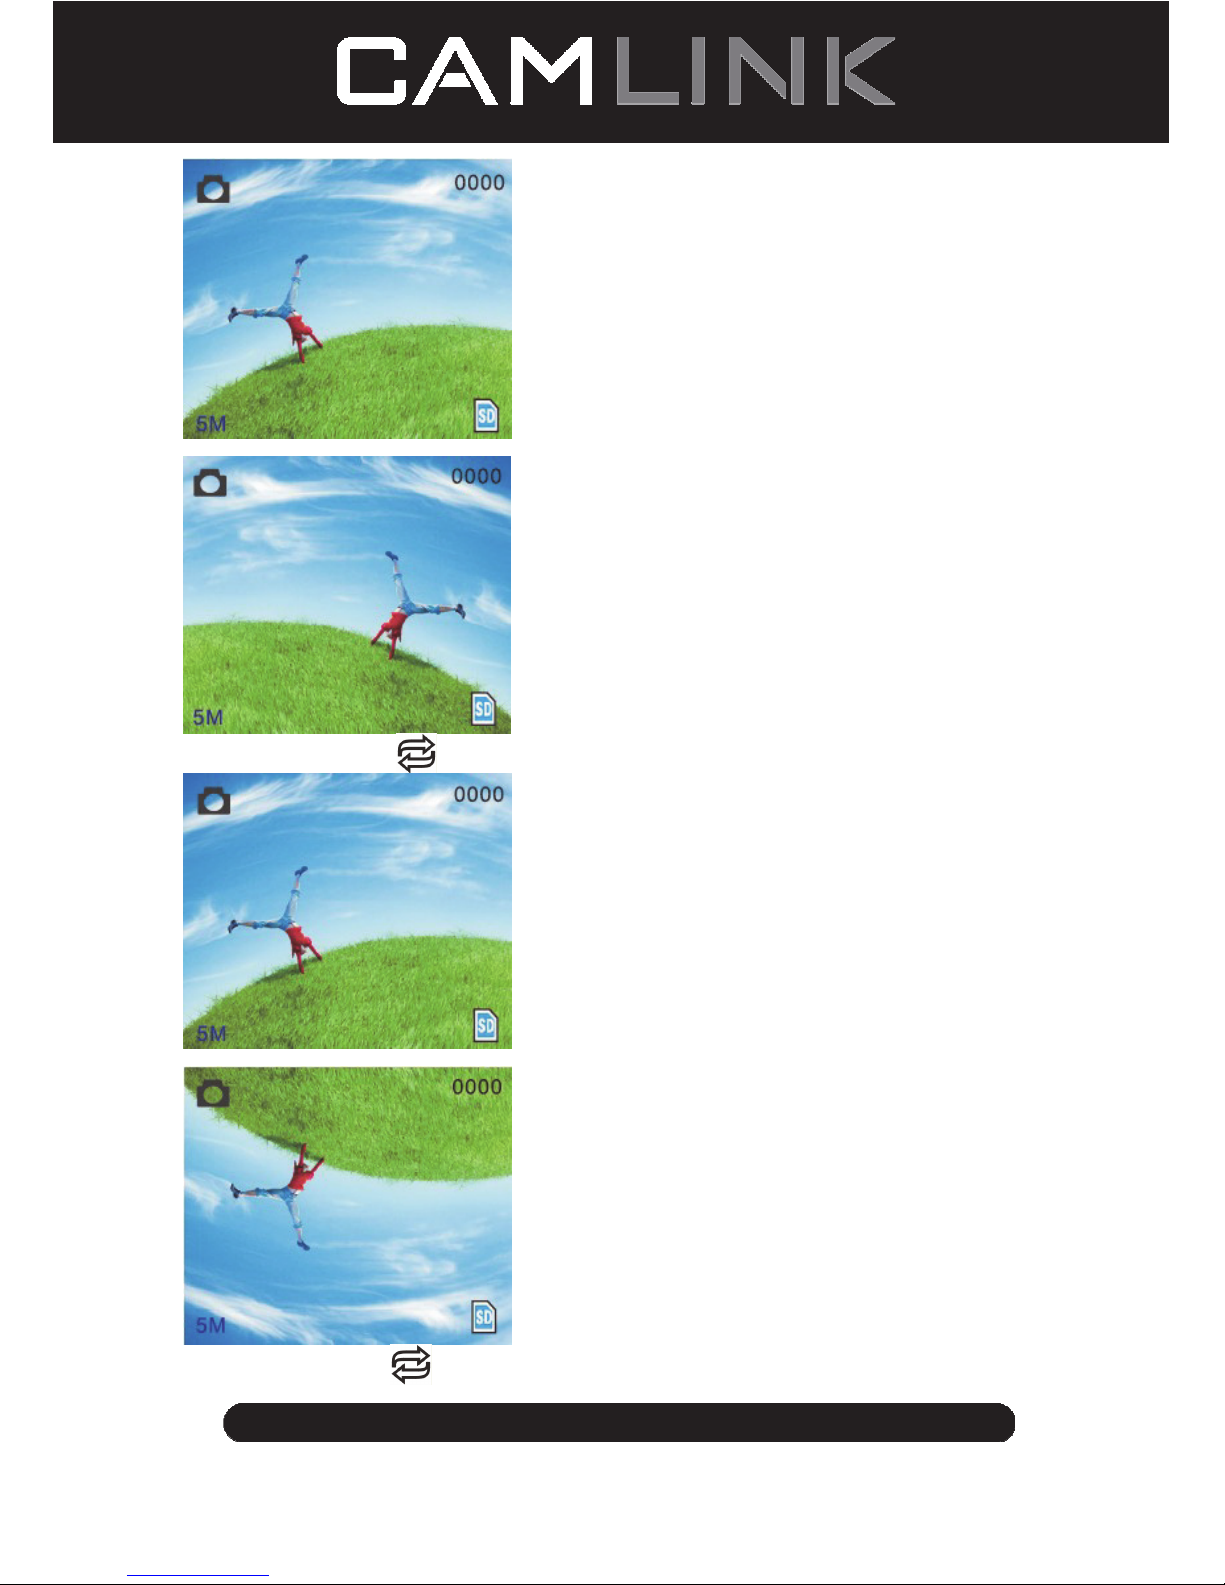
Mirror Image/Rotation
Exposure Compensation (EV -2~2)
Menu & Power on/off
Capture mode
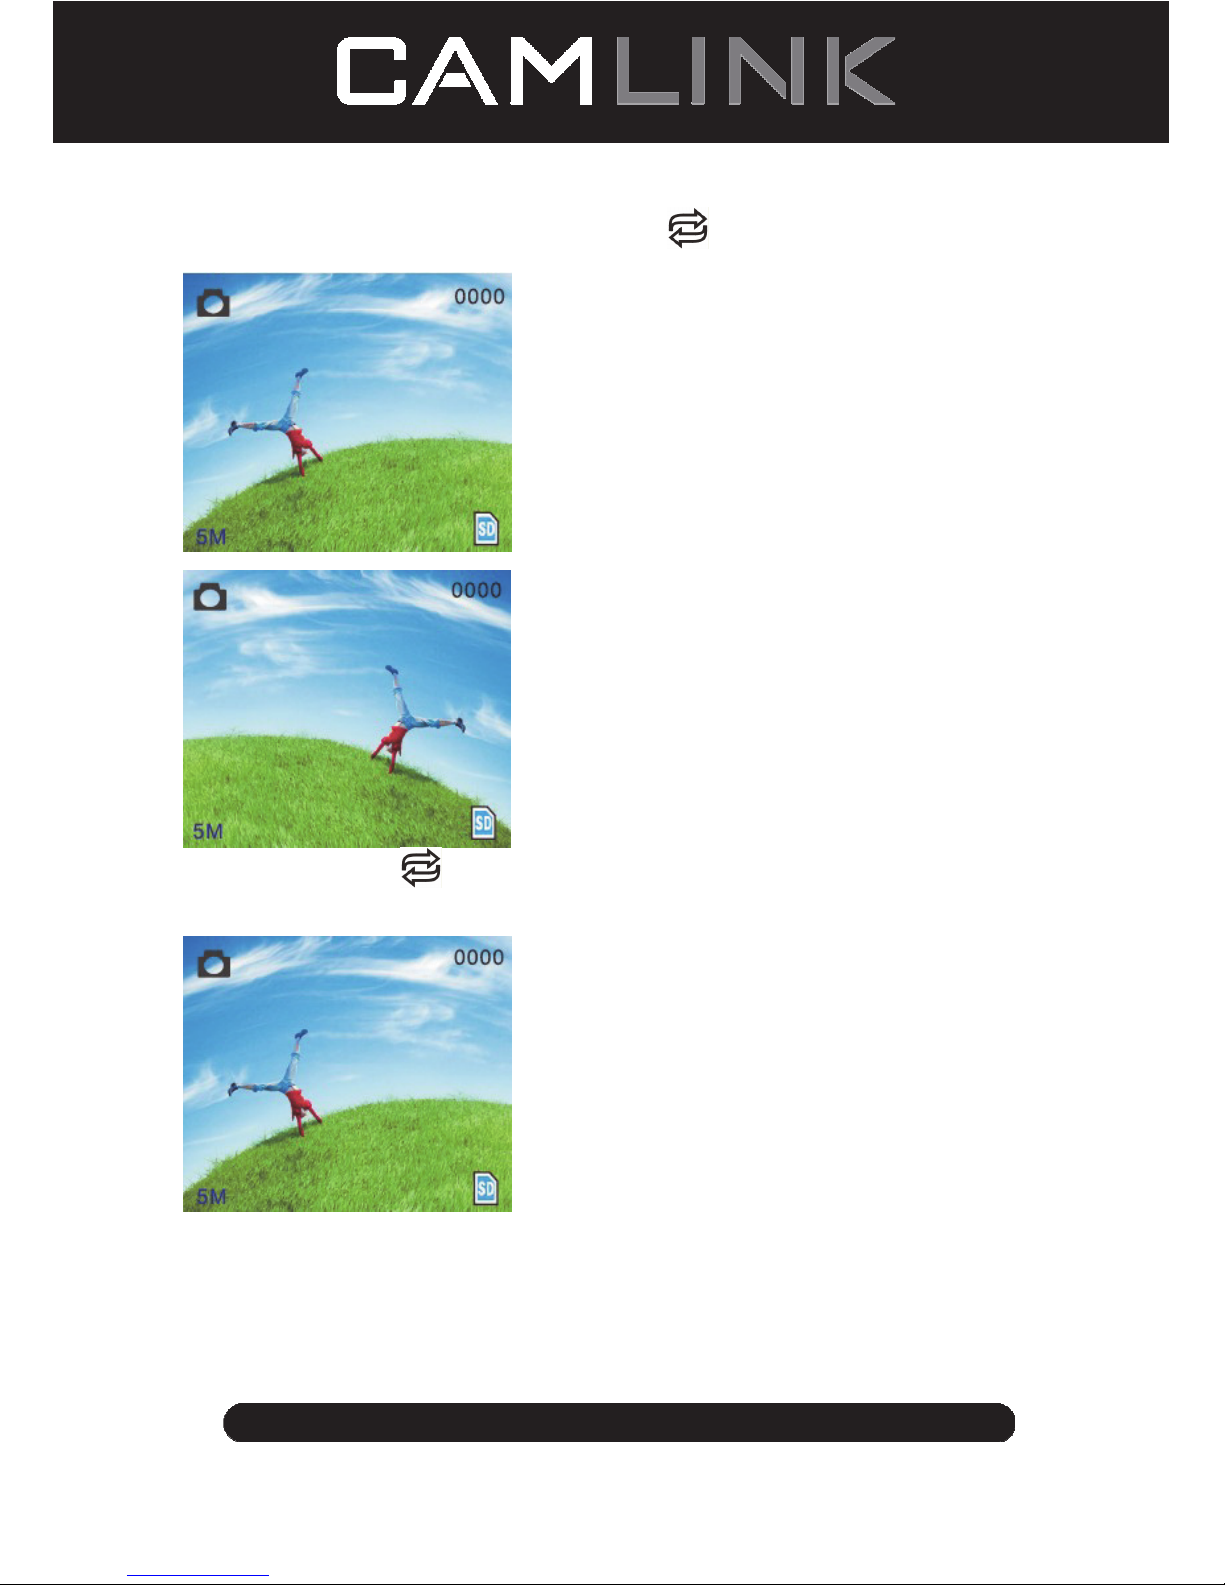
Mirror Image/Rotation
If you need mirror image or rotation image when a picture is being scaned, you can press
the Rotation
key to adjust it, then capture picture.
Page 8

8
©2012 NEDIS BV. Camlink is a registered trademark of NEDIS BV. Although every effort has been
made to ensure the accuracy of the information contained in this manual specifications are subject to
change and therefore NEDIS BV cannot guarantee its correctness and completeness at all times.
Press
key (mirror image), the image place will be altered (from left to right).
Continue Press
key (rotation), the image place will be altered (from up to down).
Page 9

9
©2012 NEDIS BV. Camlink is a registered trademark of NEDIS BV. Although every effort has been
made to ensure the accuracy of the information contained in this manual specifications are subject to
change and therefore NEDIS BV cannot guarantee its correctness and completeness at all times.
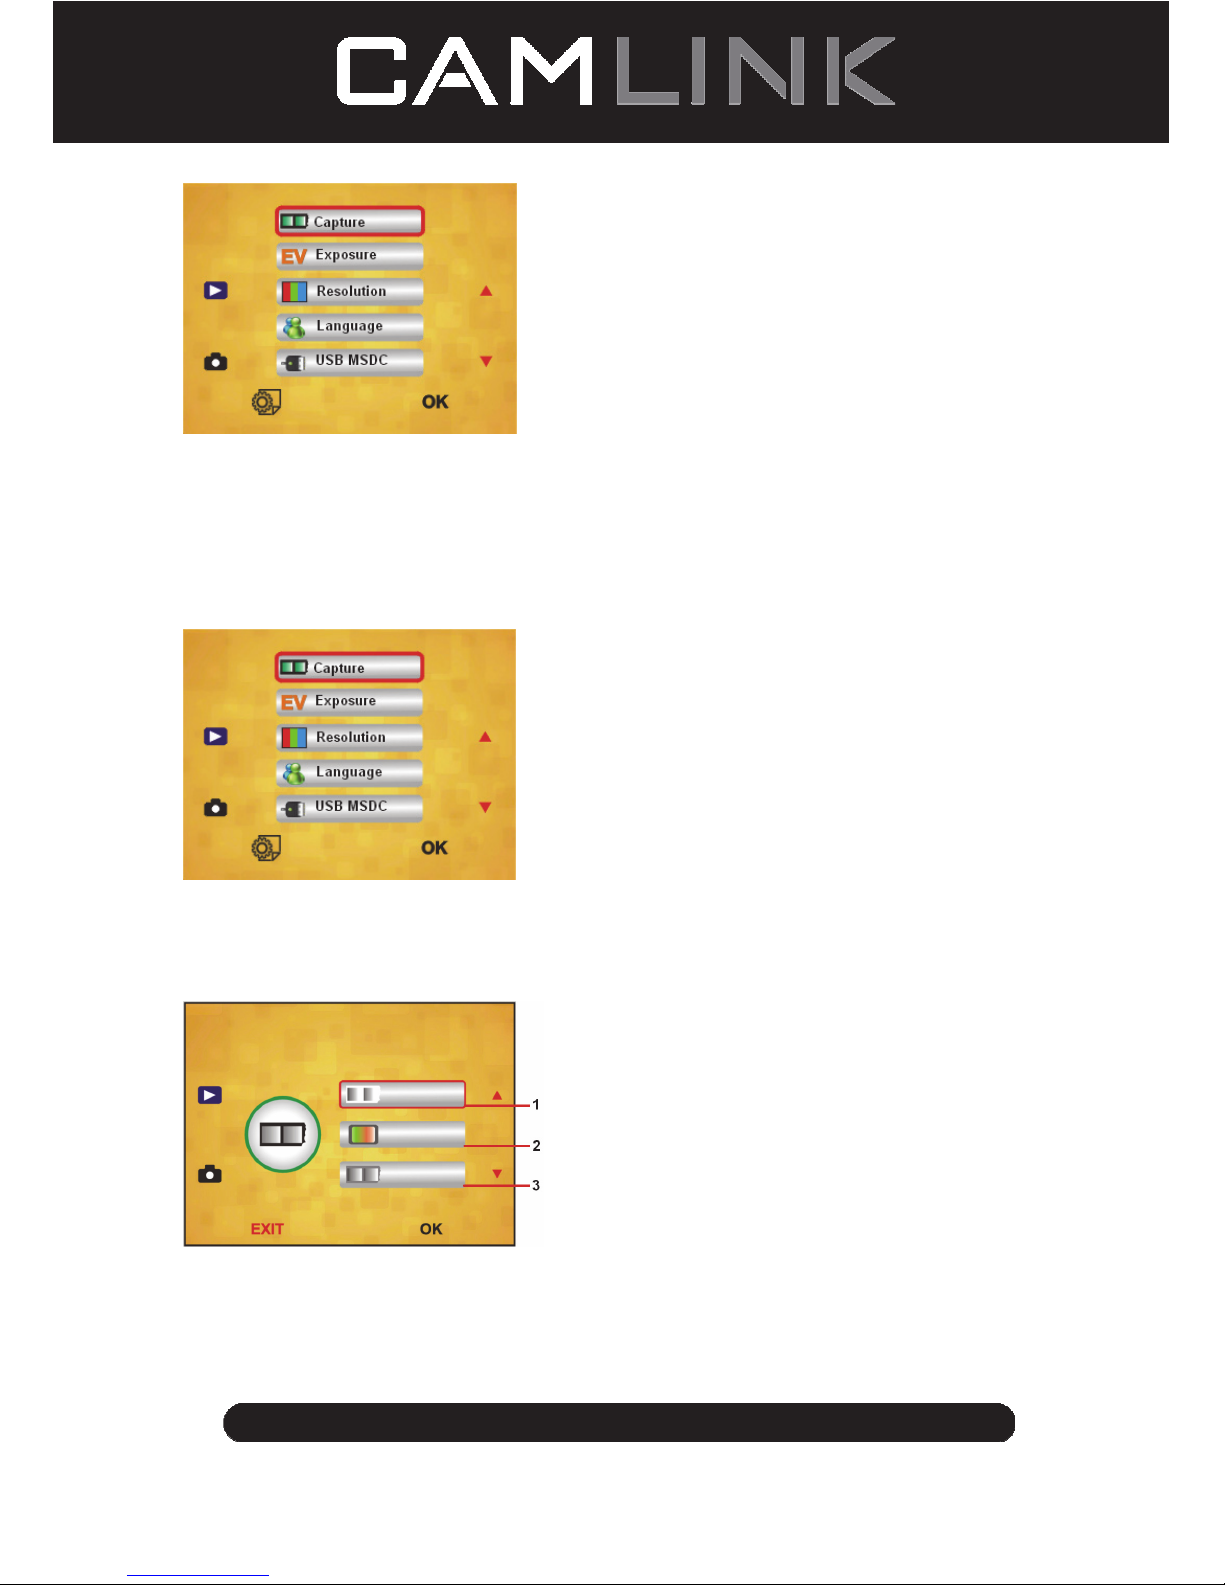
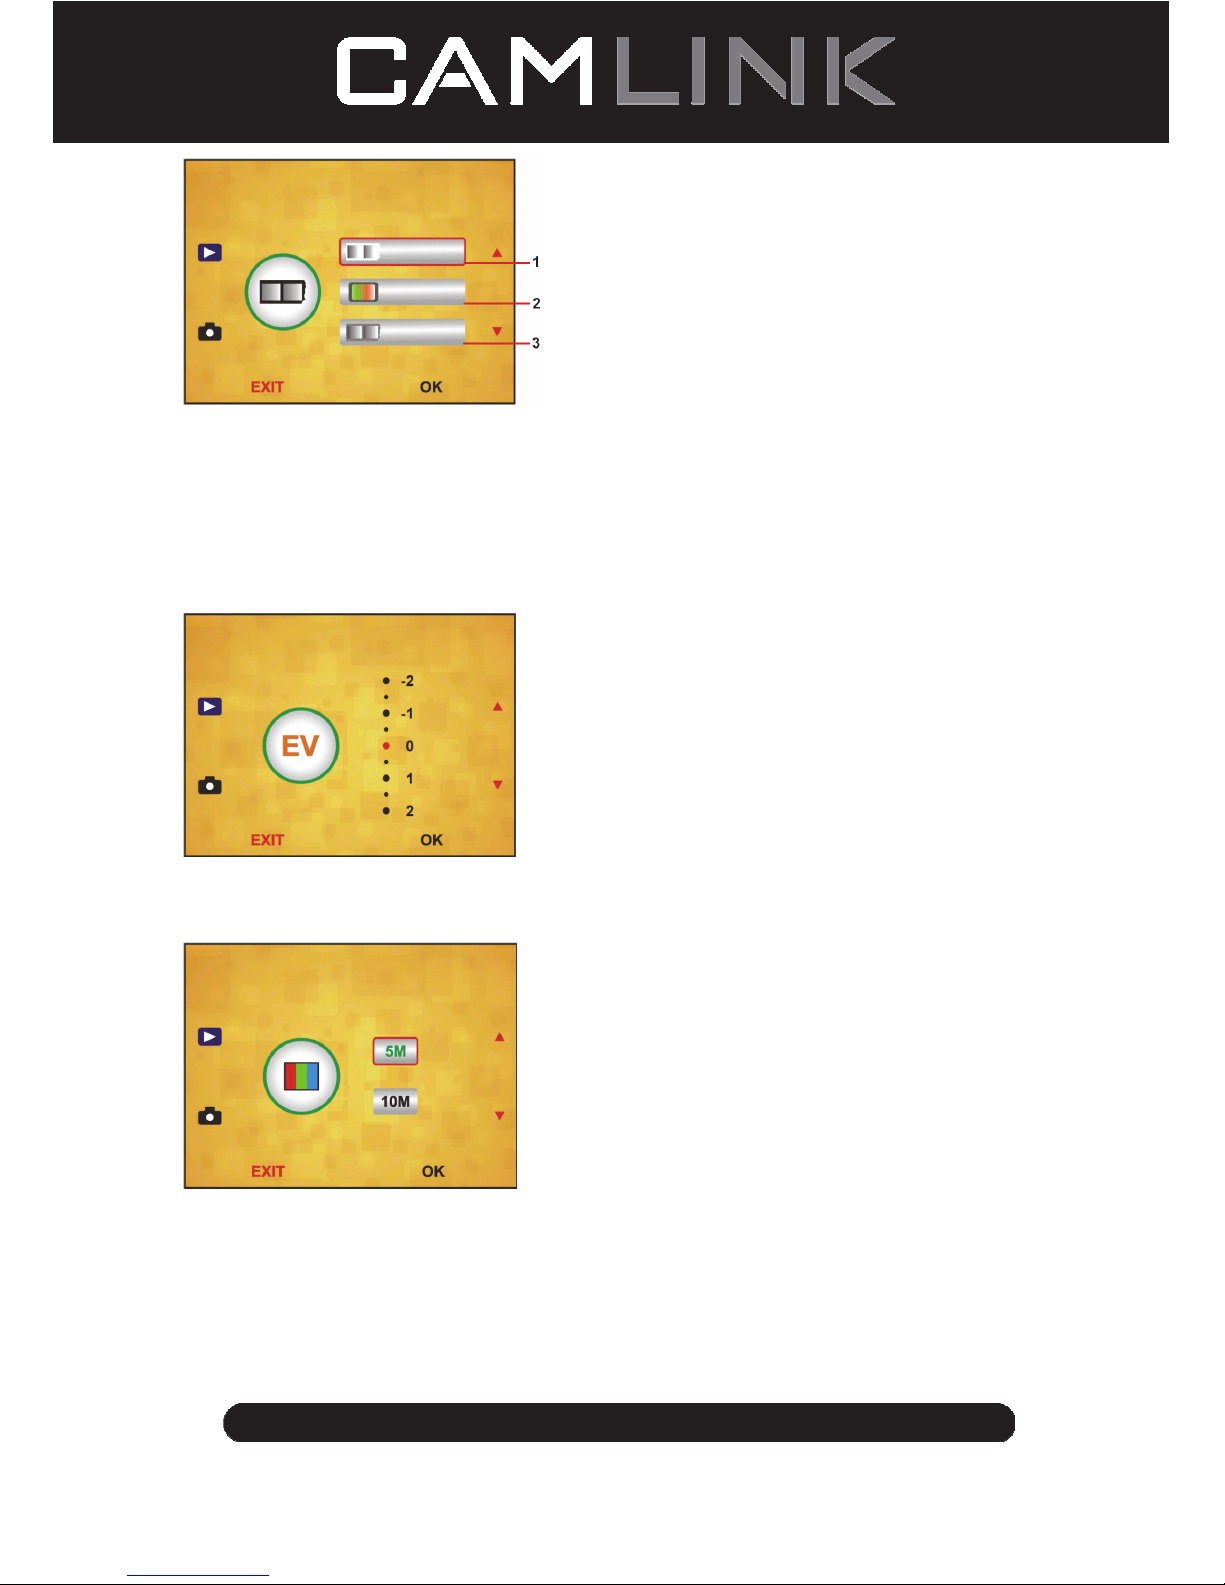
Main Menu
1. Capture mode: A: B&W film B: Positive film C: Negative film.
2. Exposure: Exposure Compensation (EV -2~2).
3. Resolution: 5mega/10mega.
4. Language: English, French, Deutsch, ltalian, Spanish, Chinese, Simplified Chinese,
Japanese.
5. USB MSDC: MSDC mode (mass storage).
Capture mode
Slide style
Press manual key to enter into main manual to choose slide style on shooting mode.
Choose needed image type like positive film, negative Film, B&W.
1. B&W film: choose B&W if there is B&W film at board holder.
2. Positive film: choose positive film if there is positive film at board holder.
3. Negative film: choose negative film if there is negative film at Board holder.
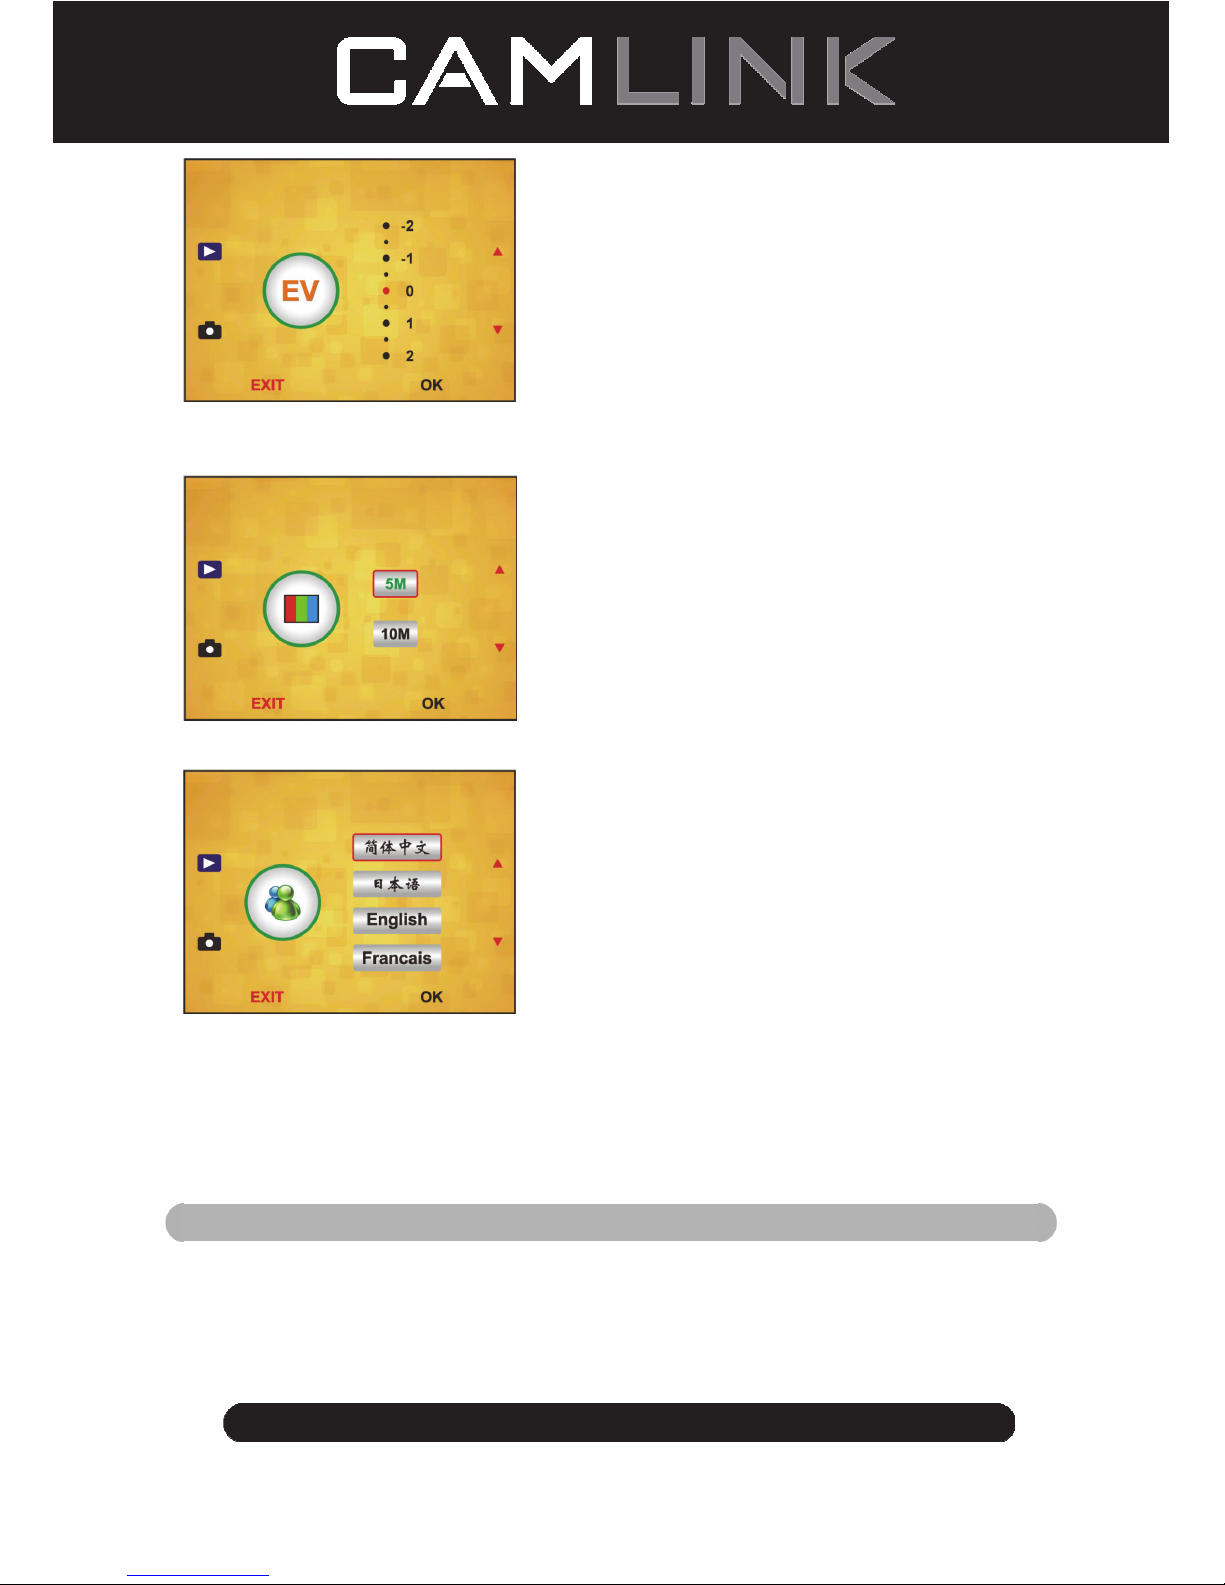
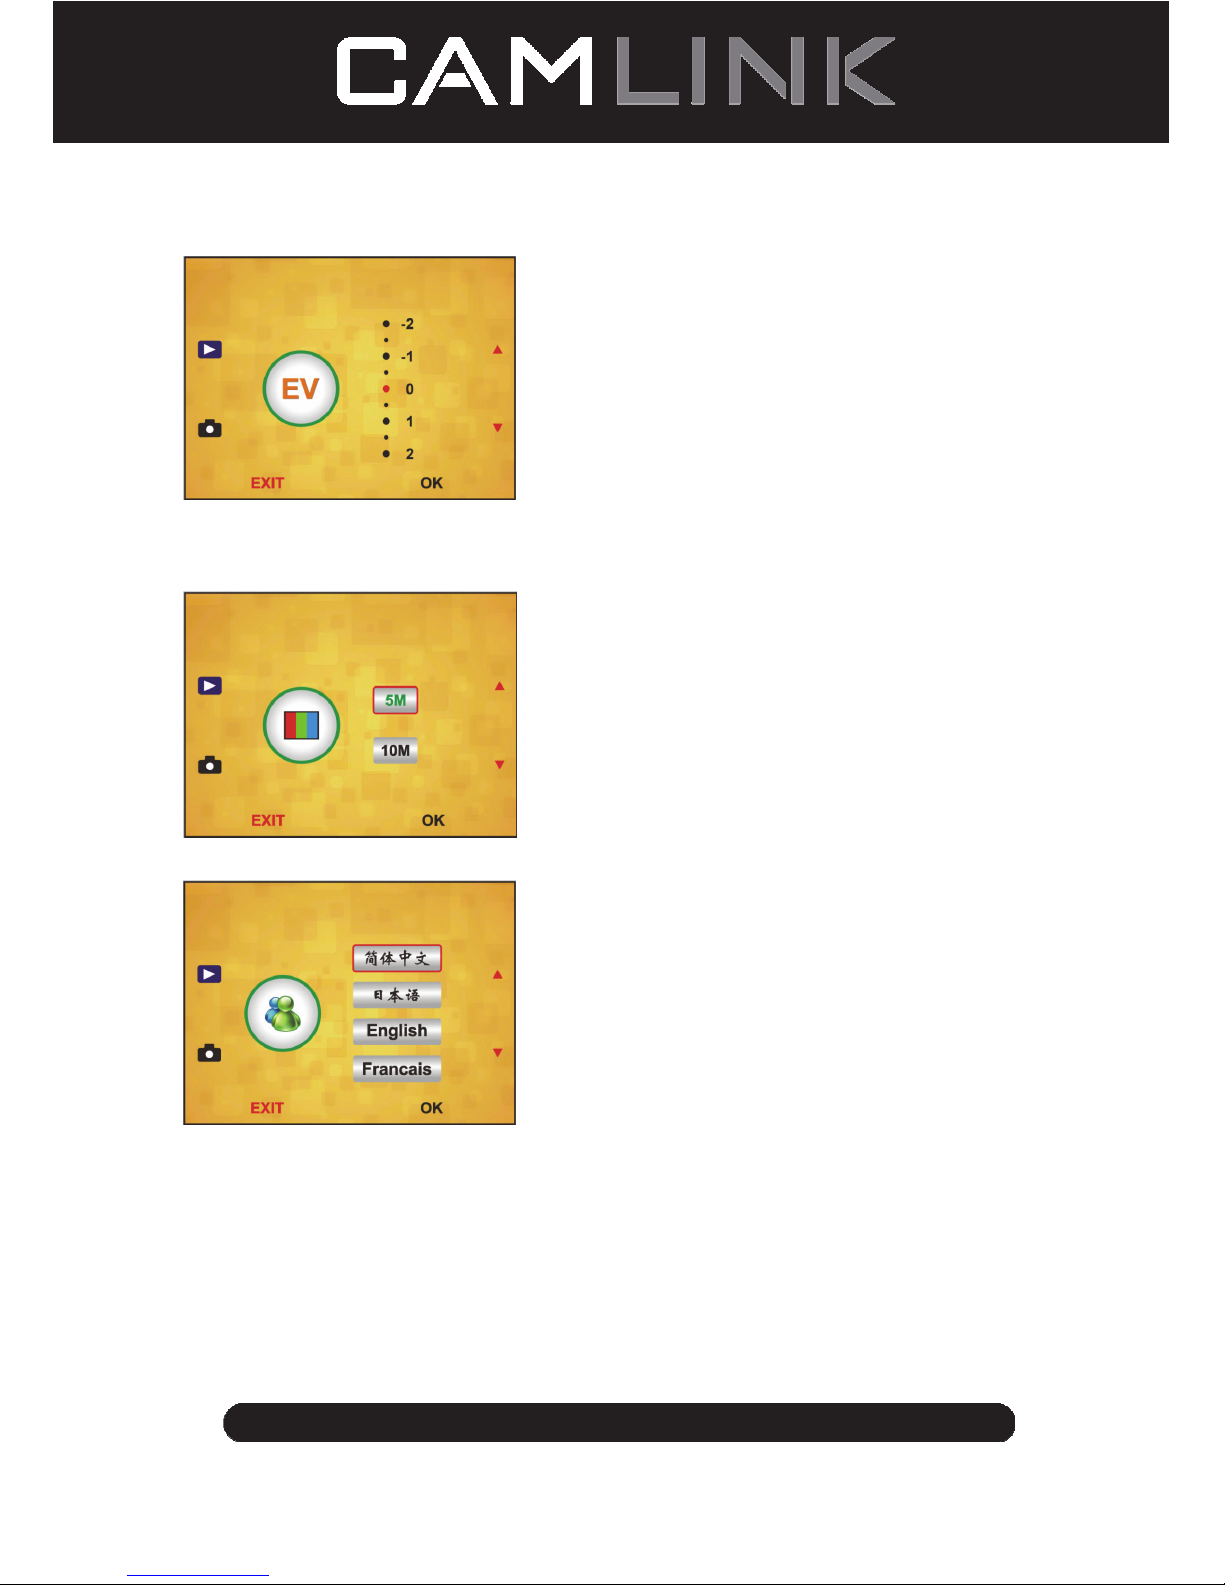
Exposure Compensation
Press the menu key to enter into main menu to choose exposure compensation on
Exposure mode, then setting exposure value of scanning picture.
Page 10
10
©2012 NEDIS BV. Camlink is a registered trademark of NEDIS BV. Although every effort has been
made to ensure the accuracy of the information contained in this manual specifications are subject to
change and therefore NEDIS BV cannot guarantee its correctness and completeness at all times.
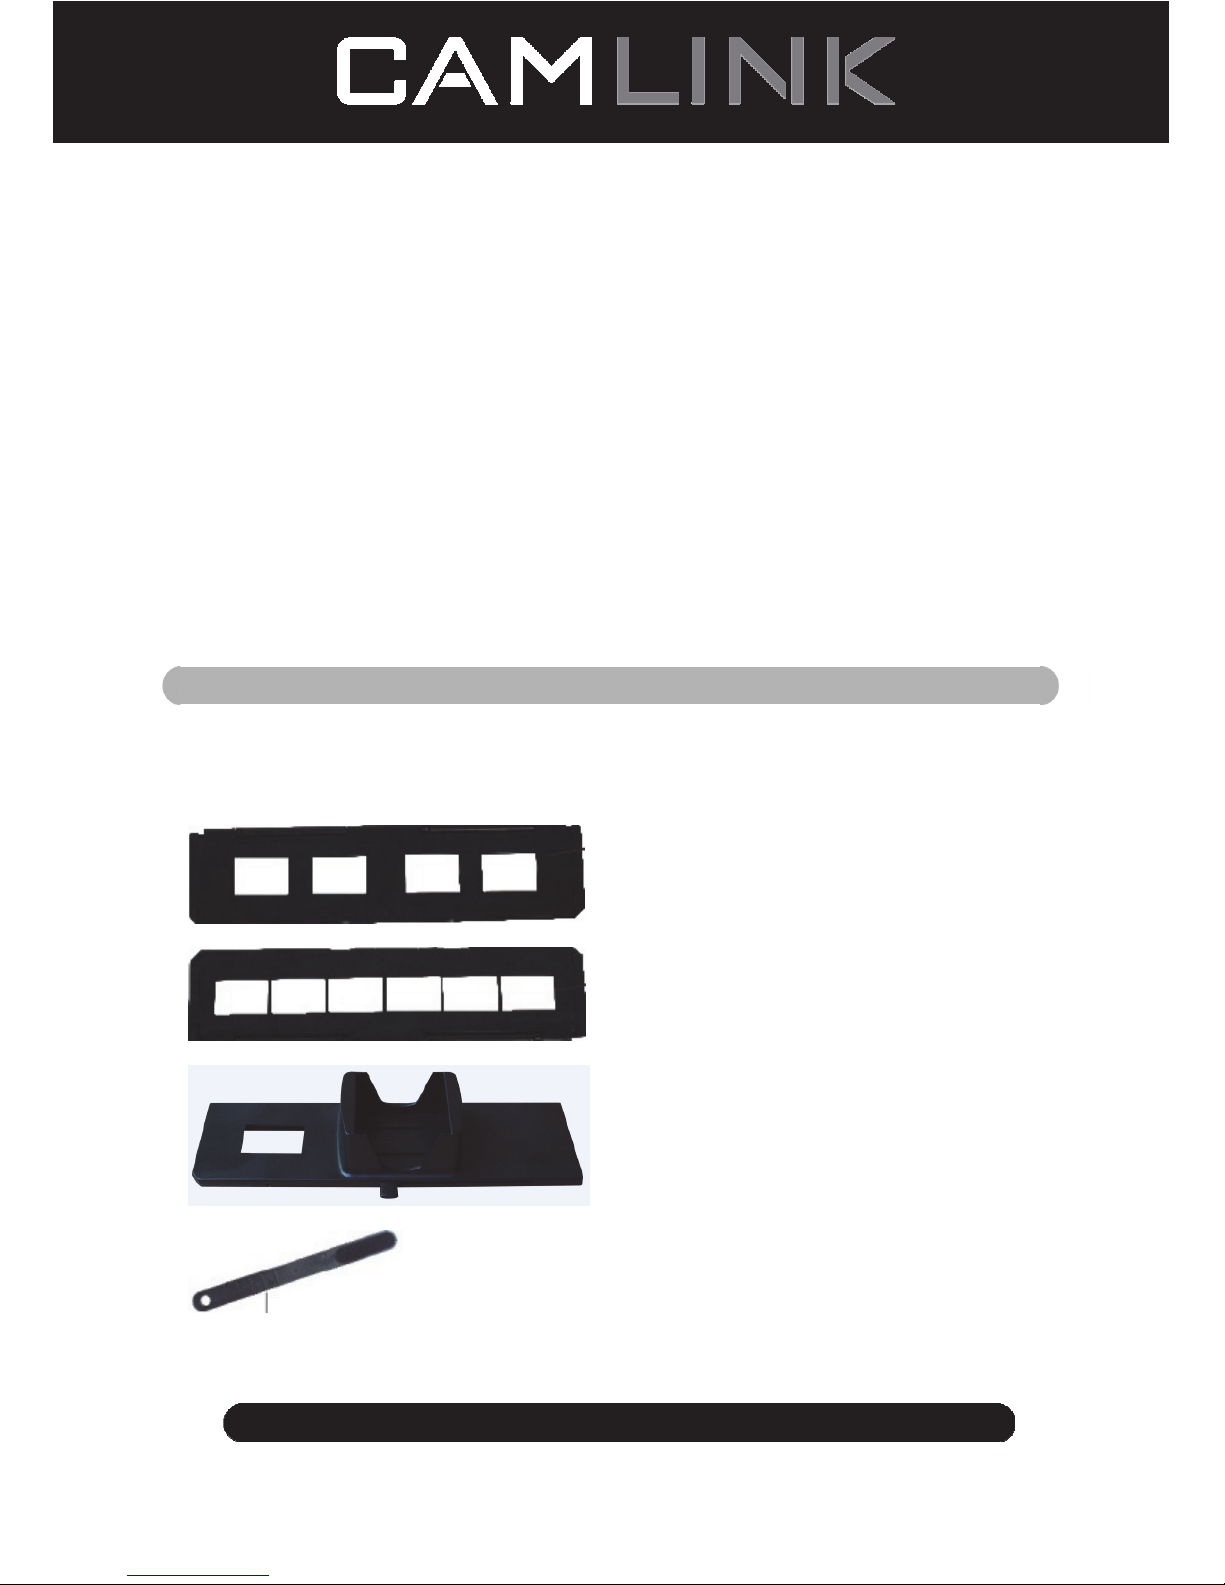
Resolution
5M or 10M can be chosen after enter into subordinate manual of resolution.
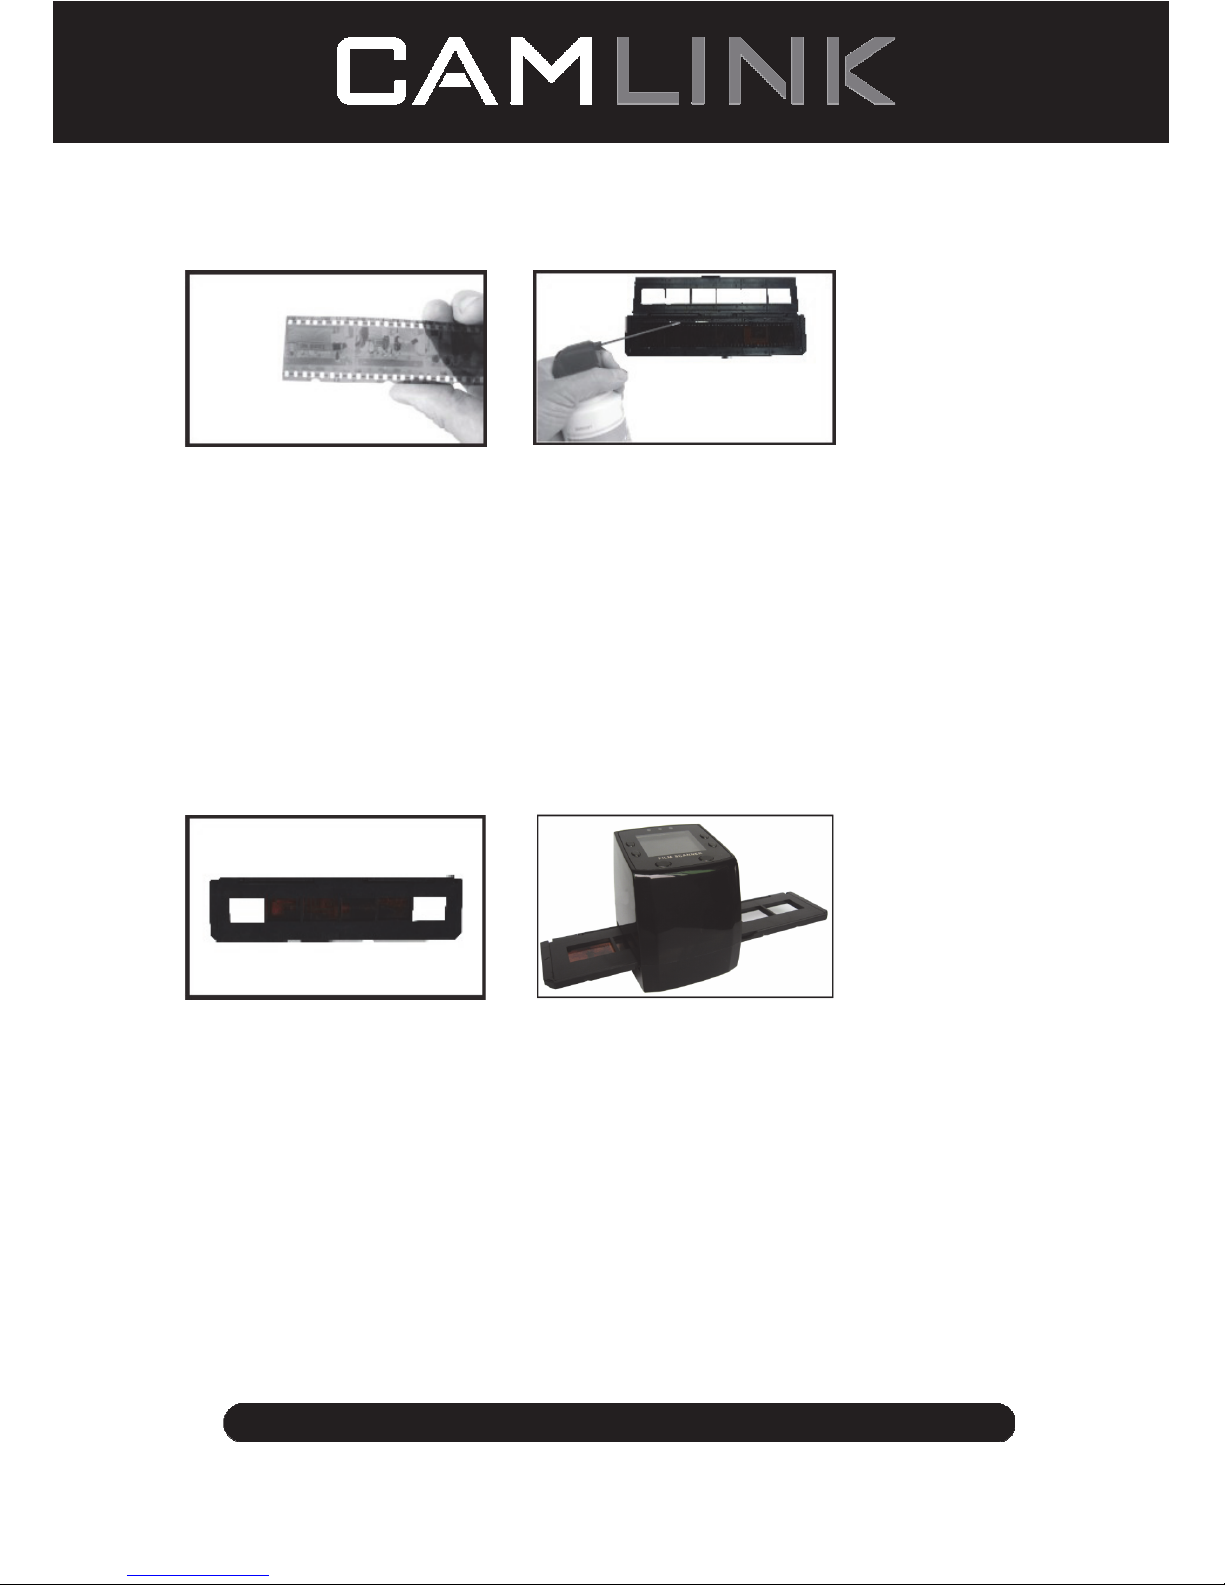
Language
Note: Choosing English, French, Deutsch, Italian, Spanish, Chinese, Simplified Chinese,
Japanese. According to user’s need.
USB MSDC
A: After connect the USB cable to PC and turn on the scanner, then enter into main menu.
B: Choose storage through up/down key. Click “OK” to confirm.
C: Open the folder on your PC. Now you can show the pictures on the PC.
Maintenance
Cleaning: We strongly suggest using a clean, dry, non-alcohol cotton swab to clean the
glass surface periodically to produce a clear image.
Page 11

11
©2012 NEDIS BV. Camlink is a registered trademark of NEDIS BV. Although every effort has been
made to ensure the accuracy of the information contained in this manual specifications are subject to
change and therefore NEDIS BV cannot guarantee its correctness and completeness at all times.
Warranty
No guarantee or liability can be accepted for any changes and modifications of the product
or damage caused due to incorrect use of this product.
Disclaimer
Designs and specifications are subject to change without notice.
All logos brands and product names are trademarks or registered trademarks of their
respective holders and are hereby recognised as such.
Keep this manual and packaging for future reference.
Disposal
• This product is designated for separate collection at an appropriate collection
point. Do not dispose of this product with household waste.
• For more information, contact the retailer or the local authority responsible for
waste management.
This product has been manufactured and supplied in compliance with all relevant
regulations and directives, valid for all member states of the European Union. It also
complies with all applicable specifications and regulations in the country of sales.
Formal documentation is available upon request. This includes, but is not limited to:
Declaration of Conformity (and product identity), Material Safety Data Sheet and
product test report.
Please contact our customer service desk for support:
via website: http://www.nedis.com/en-us/contact/contact-form.htm
via e-mail: service@nedis.com
via telephone: +31 (0)73-5993965 (during office hours)
NEDIS B.V., De Tweeling 28, 5215 MC ’s-Hertogenbosch, THE NETHERLANDS
DE-Deutsch
Einleitung
Für den Gebrauch ist kein PC erforderlich. Freistehender 5 Megapixel Film-/
Diascanner zum Scannen und Speichern von Filmen auf SD-Karten oder
Computern. Unterstützt unterschiedliche SD-Karten von bis zu 32GB SDHC. USB 2.0
für die Verwendung als USB- oder AC-Stromversorgung; TV-Wiedergabe:
NTSC/PAL.
◆ Filmscanner
◆ USB-Kabel
◆ Videokabel
◆ Negativfilm Halterung
◆ Diahalterung
◆ Diawechsler
Page 12

12
©2012 NEDIS BV. Camlink is a registered trademark of NEDIS BV. Although every effort has been
made to ensure the accuracy of the information contained in this manual specifications are subject to
change and therefore NEDIS BV cannot guarantee its correctness and completeness at all times.
◆ DC 5V Netzteil
◆ Anleitung
◆ Bürste
HINWEIS: Verwenden Sie die mitgelieferte Bürste zum Reinigen des Panels der
Hintergrundbeleuchtung.
Technische Spezifikationen
Größe 88,15 (L) x 86,25 (B) x111,20 (H) mm
Gewicht 301g
Sensor 1/3,2” 5 Megapixel CMOS
Effektive Auflösung 5 Megapixel
Speichermedium Extern: SD-Karte, kompatible SDHC-Karte
Empfindlichkeit Auto
Objektiv Feste Brennweite F/6.0, F=6,34mm
Fokusbereich 5,6cm
Standbild Formatierung: JPEG, Auflösung: 5M, 10M (interpoliert)
Zoom Nein
Display 6 cm TFT
TV-Wiedergabeformat NTSC/PAL
Beleuchtung Gegenlichtkompensation
Weißabgleich Auto
Belichtungskorrektur Auto
Schnittstelle MSDC: USB 2.0 (High Speed)
Automatische Einschaltung Nein
Betrieb DC 5V
Betriebssystem Windows XP, Vista, 7, 8
CPU Intel Pentium 4/2,8GHz oder höher
Speicher 512MB oder höher
Videokarte 64MB
Übertragungsverbindung Herkömmlicher USB2.0 Port oder höher
Festplattenkapazität Mindestens 200MB
Anleitung Ja
Netzteil Ja
Diahalterung Ja
Negativhalterung Ja
Bürste Ja
USB-Kabel Ja
Sicherheitsvorkehrungen
Um das Risiko eines elektrischen Schlags zu verringern,
sollte dieses Produkt AUSSCHLIESSLICH von einem
autorisierten Techniker geöffnet werden. Trennen Sie das
Produkt von anderen Geräten, wenn ein Problem
auftreten sollte. Schützen Sie das Gerät vor Regen oder
Feuchtigkeit.
Page 13
13
©2012 NEDIS BV. Camlink is a registered trademark of NEDIS BV. Although every effort has been
made to ensure the accuracy of the information contained in this manual specifications are subject to
change and therefore NEDIS BV cannot guarantee its correctness and completeness at all times.
Belüftung: Das Gerät muss so aufgestellt bzw. positioniert werden, dass seine Belüftung
nicht beeinträchtigt wird.
Wärme: Stellen Sie das Gerät nicht in der Nähe von Wärmequellen wie Heizungen oder
Kochherden auf.
Zeiten des Nichtgebrauchs: Wenn Sie das Gerät über einen längeren Zeitraum nicht
verwenden werden, trennen Sie das USB-Kabel vom Computer.
Überlastung des USB-Anschlusses: Der USB-Anschluss Ihres Computers darf nicht
überlastet werden. Falls zu viele Geräte wie z.B. eine schnurlose Maus, ein Mediaplayer,
Handy oder andere USB-betriebene Geräte an Ihrem Computer angeschlossen sind, ist
möglicherweise nicht genügend Strom für den ordnungsgemäßen Betrieb des
Filmscanners vorhanden.
Wartung: Führen Sie nur solche Wartungsarbeiten durch, die in dieser
Bedienungsanleitung beschrieben sind. Lassen Sie alle darüber hinaus gehenden
Wartungsarbeiten von einer Fachkraft durchführen.
Filmhalterung: Das Design der Filmhalterung entspricht ISO-Richtlinien.
Es kann vorkommen, dass die Löcher einiger Filme nicht exakt auf die Stifte der Halterung
passen. Dieses Phänomen tritt bei nicht standardisierten Kameras auf. In solch einem Fall
erscheint am Rand des Rahmens eine kleine schwarze Linie, die mit einer
Bildbearbeitungssoftware problemlos entfernt werden kann.
*ISO-Internationale Organisation für Normung
Installationsanleitungen
◆ Legen Sie den Film-Scanner auf die Seite und stecken Sie das Bürstenende in die
Öffnung an der rechten Seite.
Teilebeschreibung:
Diahalterung
Negativfilm Halterung
Diawechsler
Bürste
Page 14

14
©2012 NEDIS BV. Camlink is a registered trademark of NEDIS BV. Although every effort has been
made to ensure the accuracy of the information contained in this manual specifications are subject to
change and therefore NEDIS BV cannot guarantee its correctness and completeness at all times.
Gebrauch der mitgelieferten Halterungen
Diawechsler
1. Legen Sie Ihre Dias in den Diawechsler, wobei dessen Arm vollständig nach rechts
ausgestreckt sein muss.
2. Setzen Sie den Diawechsler in die Öffnung der Filmhalterung.
3. Schieben Sie den Arm nach links und anschließend nach rechts, um ein Dia aus dem
Diawechsler in den SLIDES 2 zu laden. Wiederholen Sie diesen Schritt zum Laden der
nächsten Dias (die gescannten Dias werden nach links herausgeschoben).
Dias einlegen
(1) (2)
(1) Halten Sie das Dia gegen das Licht. Die Seite mit dem Markenzeichen muss von Ihnen
wegzeigen. Schauen Sie durch das Dia. Das Bild muss normal sein (kein Spiegelbild).
Drehen Sie das Dia nun auf den Kopf, während Sie noch immer von der gleichen Seite
aus durch das Dia schauen.
(2) Öffnen Sie die Diahalterung oben an der markierten Stelle. Wenn die Diahalterung
offen ist, legen Sie das Dia in die Vertiefung der Halterung – das Dia sollte perfekt
hinein passen.
Hinweis: Gehen Sie mit Dias vorsichtig um. Staub, Kratzer oder Fingerabdrücke
werden auf Ihren gespeicherten Bildern zu sehen sein. Sie sollten bei der Handhabung
von Dias Baumwollhandschuhe tragen. Es wird empfohlen, dass Sie Druckluft
verwenden, um den Staub von den Dias zu entfernen. Diese gehört nicht zum
Lieferumfang, kann jedoch in Schreibwarenläden oder Elektronikgeschäften erworben
werden.
(3) (4)
(3) Schließen Sie die Diahalterung und drücken auf die Kanten, bis diese einrasten.
Page 15
15
©2012 NEDIS BV. Camlink is a registered trademark of NEDIS BV. Although every effort has been
made to ensure the accuracy of the information contained in this manual specifications are subject to
change and therefore NEDIS BV cannot guarantee its correctness and completeness at all times.
(4) Halten Sie die Halterung gemäß der Markierungen auf dem Filmscanner.
Stecken Sie die Diahalterung wie abgebildet in die Öffnung an der rechten Seite des
Filmscanners.
Negative einlegen
(1) (2)
(1) Halten Sie das Negativ gegen das Licht. Während Sie das Negativ hoch halten, sollte
die kleine Negativnummer normal zu sehen sein (kein Spiegelbild).
Drehen Sie das Negativ nun auf den Kopf, während Sie weiterhin von der gleichen
Seite aus durch das Negativ schauen.
(2) Öffnen Sie die Negativhalterung oben an der markierten Stelle. Wenn die
Negativhalterung offen ist, legen Sie das Negativ so in die Halterung, dass die
Einkerbungen des Negativs mit den Stiften in der Halterung ausgerichtet sind.
Hinweis: Gehen Sie mit Negativen vorsichtig um. Staub, Kratzer oder Fingerabdrücke
werden auf Ihren gespeicherten Bildern zu sehen sein. Bei der Handhabung von
Negativen sollten Sie Baumwollhandschuhe tragen. Es wird empfohlen, dass Sie
Druckluft verwenden, um den Staub von den Negativen zu entfernen.
Diese gehört nicht zum Lieferumfang, kann jedoch in Schreibwarenläden oder
Elektronikgeschäften erworben werden.
(3) (4)
(3) Schließen Sie die Negativhalterung und drücken auf die Kanten, bis diese einrasten.
Halten Sie die Halterung gemäß den Markierungen auf dem Filmscanner.
(4) Stecken Sie die Negativhalterung wie abgebildet in die Öffnung an der rechten Seite
des Filmscanners.
Ordnungsgemäße Vorgehensweise
1. Legen Sie das Dia bzw. das Negativ in die Halterung.
2. Setzen Sie die Halterung in den Scanner.
3. Schließen Sie das USB-Kabel an den PC an.
4. Schalten Sie den Scanner mit der Betriebstaste ein.
5. Drücken Sie die Scannen-Taste, um den Scanvorgang zu starten.
6. Entnehmen Sie nach dem Gebrauch die Speicherkarte.
7. Über die USB-Verbindung können Sie auch Bilder vom PC einlesen.
Page 16
16
©2012 NEDIS BV. Camlink is a registered trademark of NEDIS BV. Although every effort has been
made to ensure the accuracy of the information contained in this manual specifications are subject to
change and therefore NEDIS BV cannot guarantee its correctness and completeness at all times.
Gebrauchsanweisung
Bild aufnehmen
Nach der Anzeige der Videofrequenz können Sie ein Bild in 3 Sek. aufnehmen. Öffnen Sie
das Hauptmenü und wählen Sie den Aufnahmemodus, um dann die Art des Dias und die
Belichtungskorrektur manuell einzustellen.
5M Auflösung
Auf der Karte speichern
00000 Verfügbarer Platz zum Scannen
Wiedergabemodus
Spiegelbild/Drehung
Belichtungskorrektur (EV -2~2)
Menü & Betrieb ein/aus
Aufnahmemodus
Spiegelbild/Drehung
Falls Sie ein gescanntes Bild drehen oder spiegeln möchten, drücken Sie die DrehenTa st e
für die entsprechende Einstellung. Nach dem Drücken der Taste können Sie
das Bild aufnehmen.
Page 17
17
©2012 NEDIS BV. Camlink is a registered trademark of NEDIS BV. Although every effort has been
made to ensure the accuracy of the information contained in this manual specifications are subject to
change and therefore NEDIS BV cannot guarantee its correctness and completeness at all times.
Drücken Sie die Taste
(Spiegelbild); das Bild wird gespiegelt (von links nach rechts).
Drücken Sie die Taste
(Drehen) erneut, um das Bild zu drehen (von oben nach unten).
Page 18
18
©2012 NEDIS BV. Camlink is a registered trademark of NEDIS BV. Although every effort has been
made to ensure the accuracy of the information contained in this manual specifications are subject to
change and therefore NEDIS BV cannot guarantee its correctness and completeness at all times.
Hauptmenü
1. Aufnahmemodus (Aufnahme): A: S&W-Film B: Positivfilm C: Negativfilm.
2. Belichtung (Belichtung): Belichtungskorrektur (EV -2~2).
3. Auflösung (Auflösung): 5Mega/10Mega.
4. Sprache (Sprache): Englisch, Französisch, Deutsch, Italienisch, Spanisch, Chinesisch,
Chinesisch Kurzschrift, Japanisch.
5. USB MSDC: MSDC-Modus (Massenspeichergerät).
Aufnahmemodus
Dia-Art
Drücken Sie die Menü-Taste, um das Hauptmenü zu öffnen und die Dia-Art für den
Bildaufnahmemodus auszuwählen. Wählen Sie die gewünschte Bild-Art aus, z.B.
Positivfilm, Negativfilm, Schwarz/Weiss.
1. S/W-Film: Wählen Sie S/W, wenn Sie einen Schwarz/Weiss-Film in die Halterung
eingelegt haben.
2. Positivfilm: Wählen Sie die Option Positivfilm, wenn Sie einen Positivfilm in die
Halterung eingelegt haben.
3. Negativfilm: Wählen Sie die Option Negativfilm, wenn Sie einen Negativfilm in die
Halterung eingelegt haben.
Page 19
19
©2012 NEDIS BV. Camlink is a registered trademark of NEDIS BV. Although every effort has been
made to ensure the accuracy of the information contained in this manual specifications are subject to
change and therefore NEDIS BV cannot guarantee its correctness and completeness at all times.
Belichtungskorrektur
Drücken Sie die Menü-Taste, um das Hauptmenü zu öffnen und die Belichtungskorrektur
für den Belichtungsmodus auszuwählen. Hier können Sie den Belichtungswert für das
gescannte Bild einstellen.
Auflösung
Nach der Eingabe im untergeordneten Menü der Auflösung können Sie 5M oder 10M
auswählen.
Sprache
Hinweis: Wählen Sie zwischen Englisch, Französisch, Deutsch, Italienisch, Spanisch,
Chinesisch, Chinesisch Kurzschrift.
USB MSDC
A: Schalten Sie den Scanner ein und öffnen Sie nach dem Anschluss des USB-Kabels an
den PC das Hauptmenü.
B: Wählen Sie mit den Pfeiltasten Hoch/Runter das Speichermedium. Klicken Sie auf
„OK“ zum Bestätigen.
C: Öffnen Sie auf Ihrem Computer den Ordner. Nun können Sie die Bilder am PC
anschauen.
Page 20

20
©2012 NEDIS BV. Camlink is a registered trademark of NEDIS BV. Although every effort has been
made to ensure the accuracy of the information contained in this manual specifications are subject to
change and therefore NEDIS BV cannot guarantee its correctness and completeness at all times.
Wartung
Reinigung: Wir empfehlen, die Glasoberfläche regelmäßig mit einem sauberen, trockenen
Baumwollstäbchen ohne Alkohol zu reinigen, damit ein klares Bild erzeugt werden kann.
Garantie
Es kann keine Garantie oder Haftung für irgendwelche Änderungen oder Modifikationen
des Produkts oder für Schäden übernommen werden, die aufgrund einer nicht
ordnungsgemäßen Anwendung des Produkts entstanden sind.
Haftungsausschluss
Design und technische Daten können ohne vorherige Ankündigung geändert werden.
Alle Logos, Marken und Produktnamen sind Marken oder eingetragene Marken ihrer
jeweiligen Eigentümer und werden hiermit als solche anerkannt.
Bitte bewahren Sie Bedienungsanleitung und Verpackung für spätere Verwendung auf.
Entsorgung
• Dieses Produkt muss an einem entsprechenden Sammelpunkt zur Entsorgung
abgegeben werden. Entsorgen Sie dieses Produkt nicht mit dem Haushaltsmüll.
• Weitere Informationen erhalten Sie beim Verkäufer oder der für die
Abfallwirtschaft verantwortlichen örtlichen Behörde.
Dieses Produkt wurde hergestellt und geliefert in Übereinstimmung mit allen
geltenden Vorschriften und Richtlinien, die für alle Mitgliedsstaaten der
Europäischen Union gültig sind. Es entspricht allen geltenden Vorschriften und
Bestimmungen im Land des Vertriebs.
Eine formale Dokumentation ist auf Anfrage erhältlich. Diese beinhaltet unter
anderem, jedoch nicht ausschließlich: Konformitätserklärung (und Produktidentität),
Sicherheitsdatenblatt, Testreport des Produkts.
Wenden Sie sich bei Fragen bitte an unseren Kundendienst:
per Internet: http://www.nedis.de/de-de/kontakt/kontaktformular.htm
per E-Mail: service@nedis.com
per Telefon: Niederlande +31 (0)73-5993965 (während der Geschäftszeiten)
NEDIS B.V., De Tweeling 28, 5215 MC ’s-Hertogenbosch, NIEDERLANDE
FR – Français
Introduction
Aucun ordinateur n'est nécessaire pour les opérations. Scanner photo/diapositive
autonome de 5 mégapixels pour numériser une photo sur votre carte mémoire SD
ou sur un ordinateur. Prend en compte différentes cartes mémoires SD ou SDHC
jusqu'à 32 Go. Interface USB 2.0 avec alimentation USB ou sur alimentation secteur.
Fonction de sortie TV : NTSC/PAL.
Page 21

21
©2012 NEDIS BV. Camlink is a registered trademark of NEDIS BV. Although every effort has been
made to ensure the accuracy of the information contained in this manual specifications are subject to
change and therefore NEDIS BV cannot guarantee its correctness and completeness at all times.
◆ Scanner photo
◆ Câble USB
◆ Câble vidéo
◆ Chargeur de négatif
◆ Chargeur de diapositive
◆ Chargeur rapide de diapositive
◆ Adaptateur 5 V DC
◆ Manuel
◆ Brosse
REMARQUE : Vous pouvez utiliser la brosse fournie pour nettoyer le panneau de
rétroéclairage.
Spécifications techniques
Dimensions 88,15 (L) X 86,25 (l) X111,20 (H) mm
Poids 301 g
Capteur CMOS de 5 mégapixels 1/3,2"
Résolution effective 5 mégapixels
Support de stockage Externe : Carte mémoire SD, compatible carte SDHC
Sensibilité Auto
Objectif Mise au point fixe F/6.0, F = 6,34 mm
Plage de mise au point 5,6 cm
Image fixe
Format : JPEG, résolution : 5 Mégapixels, 10 Mégapixels
(interpolation)
Zoom Non
Écran 6 cm TFT
Format de sortie TV NTSC/PAL
Sources lumineuses Correction du rétroéclairage
Equilibre des blancs Auto
Correction de l'exposition Auto
Interface MSDC : USB 2.0 (haute vitesse)
Déclenchement
automatique
Non
Alimentation 5 V DC
Système d'exploitation Windows XP, Vista, 7, 8
Processeur Intel Pentium 4/2,8 GHz ou supérieur
Mémoire 512 Mo ou supérieure
Carte graphique 64 Mo
Système de connexion USB 2.0 standard ou supérieur
Espace libre sur le
disque dur
Au moins 200 Mo
Manuel Oui
Adaptateur Oui
Chargeur de diapositive Oui
Chargeur de négatif Oui
Brosse Oui
Câble USB Oui
Page 22

22
©2012 NEDIS BV. Camlink is a registered trademark of NEDIS BV. Although every effort has been
made to ensure the accuracy of the information contained in this manual specifications are subject to
change and therefore NEDIS BV cannot guarantee its correctness and completeness at all times.
Précautions d'emploi
Pour réduire le risque de choc électrique, ce produit ne
doit être ouvert que par un technicien qualifié si une
réparation s'impose. Débranchez l'appareil et les autres
équipements du secteur s'il y a un problème. Ne pas
exposer l'appareil à l'eau ni à l'humidité.
Ventilation : Le dispositif doit être placé de façon à ce que son emplacement ou sa
position ne perturbe pas sa propre ventilation.
Chaleur : Le dispositif doit être placé loin des sources de forte chaleur comme les
radiateurs ou les poêles.
Période d'inutilisation : Le cordon USB du dispositif doit être débranché de l'ordinateur
quand l'unité n'est pas utilisée pour une période prolongée.
Surcharge USB : Ne surchargez pas les connexions USB de votre ordinateur. Si vous avez
de nombreux dispositifs connectés à votre ordinateur comme une souris sans fils, un
lecteur multimédia, un téléphone mobile ou d'autres dispositifs alimentés par USB, il est
possible que l'alimentation ne soit pas suffisante pour faire fonctionner correctement le
scanner photo.
Réparation : L'utilisateur ne doit pas tenter de réparer le dispositif au-delà des
spécifications données dans les instructions de fonctionnement. Pour toute autre
réparation, consultez un personnel de réparation qualifié.
Chargeur de photos : La conception du chargeur de photos respecte la norme ISO.
Dans certains cas, les orifices sur la photo ne s'adaptent pas exactement à l'alignement du
chargeur. La cause est probablement un appareil photographique non standard. Dans ce
cas, une fine bande noire sur les bords de l'image sera présente et peut être facilement
éliminée à l'aide d'un logiciel de retouche d'image.
*ISO : Organisation Internationale de Normalisation.
Instructions d'installation
◆ Placez le scanner photo sur le côté et insérez l'extrémité de la brosse dans
l'emplacement sur le côté droit.
Description des différentes parties :
Chargeur de diapositive
Chargeur de négatif
Page 23
23
©2012 NEDIS BV. Camlink is a registered trademark of NEDIS BV. Although every effort has been
made to ensure the accuracy of the information contained in this manual specifications are subject to
change and therefore NEDIS BV cannot guarantee its correctness and completeness at all times.
Chargeur rapide de diapositive
Brosse
Utilisation des chargeurs
Chargeur rapide de diapositive
1. Avec le levier entièrement à droite, placez vos diapositives l'une sur l'autre dans le
chargeur rapide de diapositive.
2. Placez le chargeur rapide de diapositive à l'emplacement du chargeur de photo.
3. Tirez le levier vers la gauche puis vers la droite pour charger une diapositive du
chargeur rapide dans le CURSEUR 2. Répétez cette opération pour les diapositives
suivantes (qui pousseront les diapositives visionnées de l'autre côté).
Chargement des diapositives
(1) (2)
(1) Tenez la diapositive face à la lumière. Placez le symbole de marque de la diapositive
vers l'arrière. Regardez la diapositive. Elle doit apparaître normalement (non comme
une image retournée). À présent, tournez la diapositive de façon que l'image soit
inversée alors que vous regardez la même face.
(2) Ouvrez le chargeur de diapositive au niveau du repère sur le haut. Alors que le
chargeur de diapositive est ouvert, placez la diapositive dans la cavité du chargeur : la
diapositive doit s'insérer parfaitement.
Remarque : Manipulez les diapositives avec soin. Toute poussière, rayures ou traces
de doigts seront également présentes sur vos images enregistrées. Si possible, utilisez
des gants en coton lors de la manipulation des diapositives. Il est recommandé
d'utiliser de l'air comprimé pour éliminer la poussière des diapositives. Ce produit n'est
pas fourni avec le scanner photo mais peut être acheté auprès d'un détaillant de
produits électroniques ou un magasin de fournitures de bureau.
Page 24
24
©2012 NEDIS BV. Camlink is a registered trademark of NEDIS BV. Although every effort has been
made to ensure the accuracy of the information contained in this manual specifications are subject to
change and therefore NEDIS BV cannot guarantee its correctness and completeness at all times.
(3) (4)
(3) Fermez le chargeur de diapositive et appuyez sur les bords afin de le verrouiller en
place.
(4) Placez-le dans la position indiquée sur le chargeur de pellicule.
Insérez le chargeur de diapositive dans l'emplacement sur le côté droit du scanner
photo comme indiqué.
Chargement des négatifs
(1) (2)
(1) Tenez le négatif face à la lumière. Alors que vous regardez le négatif, vous devez
normalement être en mesure de lire les petits nombres négatifs (non comme une
image retournée).
À présent, tournez le négatif de façon que l'image soit inversée alors que vous
regardez la même face.
(2) Ouvrez le chargeur de négatif au niveau du repère sur le haut. Alors que le chargeur
de négatif est ouvert, placez le négatif dans le chargeur de façon que les entailles
s'alignent avec les entailles du chargeur.
Remarque : Manipulez les négatifs avec soin. Toute poussière, rayures ou traces de
doigts seront également présentes sur vos images enregistrées. Si possible, utilisez
des gants en coton lors de la manipulation des négatifs. Il est recommandé d'utiliser de
l'air comprimé pour éliminer la poussière des négatifs.
Ce produit n'est pas fourni avec le scanner photo mais peut être acheté auprès d'un
détaillant de produits électroniques ou un magasin de fournitures de bureau.
(3) (4)
Page 25
25
©2012 NEDIS BV. Camlink is a registered trademark of NEDIS BV. Although every effort has been
made to ensure the accuracy of the information contained in this manual specifications are subject to
change and therefore NEDIS BV cannot guarantee its correctness and completeness at all times.
(3) Fermez le chargeur de négatif et appuyez sur les bords afin de le verrouiller en place.
Placez-le dans la position indiquée sur le chargeur de photo.
(4) Insérez le chargeur de négatif dans l'emplacement sur le côté droit du scanner photo
comme indiqué.
Séquence d'utilisation habituelle
1. Faites glisser ou charger les photos ou les négatifs dans le chargeur.
2. Placez le chargeur dans le scanner.
3. Branchez le câble USB à un ordinateur.
4. Appuyez sur le bouton d'alimentation du scanner pour l'allumer.
5. Appuyez le bouton de numérisation pour commencer la numérisation.
6. Retirez toujours la carte de stockage après avoir terminé.
7. Les images peuvent aussi être visionnées à partir d'un ordinateur par l'intermédiaire
d'une connexion USB.
Mode d'emploi
Capture d'image
Une fois la fréquence vidéo définie, la prise d'image est possible après environ 3 s. Entrez
dans le menu principal et choisissez le mode Capture pour régler manuellement le type de
diapositive et la valeur d'exposition (EV).
5M Résolution
Enregistrer sur carte
00000 Nombre de captures d'image disponibles
Mode de reproduction
Inverser et tourner l'image
Correction de l'exposition (EV : -2~2)
Menu et Éteindre/Allumer
Mode de capture
Page 26
26
©2012 NEDIS BV. Camlink is a registered trademark of NEDIS BV. Although every effort has been
made to ensure the accuracy of the information contained in this manual specifications are subject to
change and therefore NEDIS BV cannot guarantee its correctness and completeness at all times.
Inverser et tourner l'image
Si vous avez besoin d'une image retournée ou de tourner l'image quand elle est en cours
de numérisation, appuyez sur la touche de rotation
pour effectuer cette opération.
Après avoir appuyé sur la touche, vous pouvez capturer l'image.
Appuyez sur la touche
(image retournée), la disposition de l'image sera modifiée
(de gauche à droite).
Page 27

27
©2012 NEDIS BV. Camlink is a registered trademark of NEDIS BV. Although every effort has been
made to ensure the accuracy of the information contained in this manual specifications are subject to
change and therefore NEDIS BV cannot guarantee its correctness and completeness at all times.
Appuyez encore sur la touche
(rotation), l'orientation de l'image sera modifiée (du
haut vers le bas).
Menu principal
1. Mode de capture (Capture) : A : Photo noir et blanc B : Diapositive C : Négatif.
2. Exposure (Exposition) : Correction de l'exposition (EV : -2~2).
3. Resolution (Résolution) : 5 mégapixels/10 mégapixels.
4. Language (Langue) : Anglais, Français, Allemand, Italien, Espagnol, Chinois, Chinois
simplifié, Japonais.
5. USB MSDC : Mode MSDC (stockage de masse).
Mode de capture
Type de diapositive
Appuyez sur la touche du menu pour entrer dans le menu principal pour choisir le type de
diapositive en mode de prise d'image. Choisissez le type d'image nécessaire comme
diapositive, négatif, noir et blanc.
Page 28
28
©2012 NEDIS BV. Camlink is a registered trademark of NEDIS BV. Although every effort has been
made to ensure the accuracy of the information contained in this manual specifications are subject to
change and therefore NEDIS BV cannot guarantee its correctness and completeness at all times.
1. Photo en noir et blanc : choisissez Noir et Blanc si une photo en noir et blanc est
présente dans le chargeur.
2. Diapositive : choisissez Diapositive si une diapositive est présente dans le chargeur.
3. Négatif : choisissez Négatif si un négatif est présent dans le chargeur.
Correction de l'exposition
Appuyez sur la touche de menu pour entrer dans le menu principal pour choisir la
correction d'exposition en mode exposition. Vous pouvez ici régler l'exposition de l'image
numérisée.
Résolution
Vous pouvez choisir 5 Mégapixels ou 10 Mégapixels après être entré dans le sous-menu
de la résolution.
Page 29

29
©2012 NEDIS BV. Camlink is a registered trademark of NEDIS BV. Although every effort has been
made to ensure the accuracy of the information contained in this manual specifications are subject to
change and therefore NEDIS BV cannot guarantee its correctness and completeness at all times.
Langue
Remarque : Choisissez entre Anglais, Français, Allemand, Italien, Espagnol, Chinois,
Chinois simplifié ou Japonais.
USB MSDC
A. Allumez le scanner et entrez dans le menu principal après avoir branché le câble USB
à votre ordinateur.
B. Choisissez le stockage avec la touche haut/bas. Cliquez sur OK pour confirmer.
C. Ouvrez le dossier sur votre ordinateur. Maintenant vous pouvez afficher les images sur
l'ordinateur.
Maintenance
Nettoyage : Nous vous conseillons fortement d'utiliser un tampon en coton sans alcool, sec
et propre pour nettoyer régulièrement la surface en verre pour obtenir une image nette.
Garantie
Aucune garantie ou responsabilité ne sera acceptée en cas de modification et/ou de
transformation du produit ou en cas de dommages provoqués par une utilisation incorrecte
de l'appareil.
Avertissement
Le design et les caractéristiques techniques sont sujets à modification sans notification
préalable.
Tous les logos de marques et noms de produits sont des marques déposées ou
immatriculées dont leurs détenteurs sont les propriétaires et sont donc reconnues comme
telles dans ce documents.
Conservez ce manuel et l'emballage pour toute référence ultérieure.
Élimination des déchets
• Ce produit doit être jeté séparément des ordures ménagères dans un point de
collecte approprié. Ne jetez pas ce produit avec les ordures ménagères
ordinaires.
• Pour plus d'informations, contactez le distributeur ou l'autorité locale responsable
de la gestion des déchets.
Ce produit est fabriqué et délivré en conformité avec toutes les directives et
règlements applicables et en vigueur dans tous les états membre de l'Union
Page 30

30
©2012 NEDIS BV. Camlink is a registered trademark of NEDIS BV. Although every effort has been
made to ensure the accuracy of the information contained in this manual specifications are subject to
change and therefore NEDIS BV cannot guarantee its correctness and completeness at all times.
Européenne. Il est également conforme aux spécifications et à la réglementation en
vigueur dans le pays de vente.
La documentation officielle est disponible sur demande. Cela inclut mais ne se
limite pas à : La déclaration de conformité (et à l'identification du produit), la fiche
technique concernant la sécurité des matériaux, les rapports de test du produit.
Veuillez contacter notre centre de service à la clientèle pour plus d'assistance :
via le site Web : http://www.nedis.fr/fr-fr/contact/formulaire-de-contact.htm
via courriel : service@nedis.com
via téléphone : +31 (0)73-5993965 (aux heures de bureau)
NEDIS B.V., De Tweeling 28, 5215 MC ’s-Hertogenbosch, PAYS-BAS
NL - Nederlands
Inleiding
Geen PC nodig voor gebruik. 5 Megapixel standalone film/diascanner scant film
naar uw SD-kaart of computer. Ondersteunt verschillende SD-geheugenkaarten tot
32 GB SDHC. USB 2.0-interface met USB- of netstroom TV-out functie: NTSC/PAL.
◆ Filmscanner
◆ USB-kabel
◆ Videokabel
◆ Filmhouder negatieven
◆ Filmhouder positieven
◆ Snelle dialader
◆ DC 5 V adapter
◆ Handleiding
◆ Borstel
OPMERKING: U kunt de meegeleverde borstel gebruiken om het backlightpaneel
schoon te maken.
Technische specificaties
Type 88,15 (L) X 86,25 (B) X111,20 (H) mm
Gewicht 301 g
Sensor 1/3,2” 5 megapixel CMOS
Effectieve resolutie 5 megapixel
Opslagmethode
Extern: SD-geheugenkaart, compatibele SDHC-
geheugenkaart
Gevoeligheid Auto
Lens Fixed focus F/6.0, F=6,34mm
Focusbereik 5,6 cm
Stilstaand beeld
Format (Formatteren): JPEG, resolutie: 5M, 10M
(interpolatie)
Zoom Nee
Weergave 2,36” TFT
Page 31

31
©2012 NEDIS BV. Camlink is a registered trademark of NEDIS BV. Although every effort has been
made to ensure the accuracy of the information contained in this manual specifications are subject to
change and therefore NEDIS BV cannot guarantee its correctness and completeness at all times.
Indeling TV-uitvoer NTSC/PAL
Lichtbronnen Compensatie backlight
Witbalans Auto
Belichtingscompensatie Auto
Interface MSDC: USB 2.0 (hoge snelheid)
Automatische inschakeling Nee
Voeding DC 5 V
Besturingssysteem Windows XP, Vista, 7, 8
CPU Intel Pentium 4/2,8 GHz of hoger
Geheugen 512 MB of hoger
Videokaart 64 MB
Verbindingswijze Standaard USB2.0 of hoger
Benodigde harde schijfruimte Minimaal 200 MB
Handleiding Ja
Adapter Ja
Houder positieven Ja
Houder negatieven Ja
Borstel Ja
USB-kabel Ja
Veiligheidsvoorschriften
Om het risico op elektrische schokken te voorkomen mag
dit product ALLEEN worden geopend door een erkende
technicus wanneer er onderhoud nodig is. Koppel het
product los van de elektrische voeding en van andere
apparatuur als er zich problemen voordoen. Stel het
product niet bloot aan water of vocht.
Ventilatie: Het apparaat dient zodanig geplaatst te worden dat de locatie of positie een
juiste ventilatie waarborgt.
Hitte: Het apparaat dient uit de buurt van hittebronnen zoals radiators en kachels geplaatst
te worden.
Wanneer het product niet gebruikt wordt: Verwijder de USB-kabel van het apparaat uit
de computer wanneer het product gedurende een langere periode niet gebruikt wordt.
Overbelasting UBS: Zorg ervoor dat de USB-verbindingen op uw computer niet worden
overbelast. Wanneer er teveel apparaten op de computer zijn aangesloten, zoals een
draadloze muis, mediaspeler, mobiele telefoon of andere USB-apparaten, kan er niet
genoeg stroom zijn om de filmscanner correct te laten werken.
Reparatie: Probeer het apparaat niet zelf te repareren anders dan op de wijze die
beschreven is in de gebruiksaanwijzing. Alle andere reparaties dienen te worden
uitgevoerd door technisch personeel.
Filmhouder: Het ontwerp van de filmhouder volgt de ISO-standaard.
In sommige gevallen komen de openingen in de film niet exact overeen met de houder. Dit
is het geval bij een camera die niet standaard is. In dit geval is er een kleine zwarte lijn aan
de rand van het frame. Deze kan eenvoudig met fotobewerkingssoftware worden
verwijderd.
*ISO-international Organization for Standardisation.
Page 32

32
©2012 NEDIS BV. Camlink is a registered trademark of NEDIS BV. Although every effort has been
made to ensure the accuracy of the information contained in this manual specifications are subject to
change and therefore NEDIS BV cannot guarantee its correctness and completeness at all times.
Installatie-instructies
◆ Plaats de filmscanner op de zijkant en steek het uiteinde van de borstel in de deur aan
de rechterkant.
Beschrijving van onderdelen:
Filmhouder positieven
Filmhouder negatieven
Snelle dialader
Borstel
Gebruik van de inbegrepen houders
Snelle dialader
1. Zorg dat de hendel volledig naar rechts staat en plaats de dia's in de snelle dialader.
2. Plaats de snelle dialader in de filmhoudersleuf.
3. Breng de hendel naar links en daarna naar rechts om een dia van de lader te laden in
DIA'S 2. Herhaal deze stap voor elke dia (de volgende dia drukt de gebruikte dia aan
de andere kant naar buiten).
Page 33

33
©2012 NEDIS BV. Camlink is a registered trademark of NEDIS BV. Although every effort has been
made to ensure the accuracy of the information contained in this manual specifications are subject to
change and therefore NEDIS BV cannot guarantee its correctness and completeness at all times.
Dia's laden
(1) (2)
(1) Houd de dia omhoog tegen het licht. Draai de merknaamdia van de dia naar buiten,
weg van uzelf. Kijk door de dia heen. De dia hoort er normaal uit te zien (niet in
spiegelbeeld). Draai de dia nu zodat het beeld ondersteboven is zonder de dia om te
draaien.
(2) Open de diahouder aan de gemarkeerde plek aan de bovenkant. Plaats, terwijl de
diahouder open staat, de dia in de uitsparing in de houder - de dia hoort precies te
passen.
Opmerking: Behandel de dia's voorzichtig. Stof, krassen of vingerafdrukken zijn
zichtbaar op uw opgeslagen afbeeldingen. Gebruik indien mogelijk katoenen
handschoenen tijdens het hanteren van dia's. We raden aan om perslucht te gebruiken
om stof te verwijderen van de dia's. Deze is niet bijgesloten met de filmscanner, maar
is verkrijgbaar in een kantoorartikelen- of electronicazaak.
(3) (4)
(3) Sluit de diahouder en druk op de hoeken zodat deze vastklikt.
(4) Houd de diahouder in de positie zoals afgebeeld op de filmscanner.
Plaats de diahouder in de sleuf aan de rechterkant van de filmscanner zoals
afgebeeld.
Negatieven laden
(1) (2)
(1) Houd het negatief omhoog tegen het licht. Kijk door het negatief. U moet de kleine
nummers van het negatief normaal kunnen lezen (niet in spiegelbeeld).
Draai het negatief nu zodat het beeld ondersteboven is, zonder de dia om te draaien.
Page 34

34
©2012 NEDIS BV. Camlink is a registered trademark of NEDIS BV. Although every effort has been
made to ensure the accuracy of the information contained in this manual specifications are subject to
change and therefore NEDIS BV cannot guarantee its correctness and completeness at all times.
(2) Open de negatievenhouder bij de gemarkeerde plek aan de bovenkant. Plaats het
negatief in de houder terwijl de negatievenhouder open is, zodat de inkepingen
overeenkomen met de inkepingen op de houder.
Opmerking: Behandel de negatieven voorzichtig. Stof, krassen of vingerafdrukken zijn
zichtbaar op uw opgeslagen afbeeldingen. Gebruik indien mogelijk katoenen
handschoenen tijdens het hanteren van negatieven. We raden aan om perslucht te
gebruiken om stof te verwijderen van de negatieven.
Deze is niet bijgesloten met de filmscanner, maar is verkrijgbaar in een
kantoorartikelen- of electronicazaak.
(3) (4)
(3) Sluit de negatievenhouder en druk op de hoeken zodat deze vastklikt. Houd de
negatievenhouder zoals afgebeeld op de filmscanner.
(4) Plaats de negatievenhouder in de sleuf aan de rechterkant van de filmscanner zoals
afgebeeld.
Juiste gebruikswijze
1. Schuif of laad de film of het negatief in de houder.
2. Plaats de houder in de scanner.
3. Sluit de USB-kabel aan op de pc.
4. Druk op de stroomknop om de scanner in te schakelen.
5. Druk op de scantoets om het scannen te starten.
6. Verwijder altijd de opslagkaart na het voltooien van het scannen.
7. Afbeeldingen kunnen ook worden gelezen vanaf de PC door middel van de USBverbinding.
Gebruiksaanwijzing
Beeld vastleggen
Wanneer de videofrequentie is vastgelegd, kan het beeld worden vastgelegd op ongeveer
3 seconden. U kunt het hoofdmenu openen en de vastleggen (Vastleggen)-stand
selecteren om de diastijl en EV-waarde in te stellen door op de knop Handmatig te
drukken.
Page 35

35
©2012 NEDIS BV. Camlink is a registered trademark of NEDIS BV. Although every effort has been
made to ensure the accuracy of the information contained in this manual specifications are subject to
change and therefore NEDIS BV cannot guarantee its correctness and completeness at all times.
5M Resolutie
Opslagkaart
00000 Beschikbare scanhoeveelheid
Afspeelstand
Spiegelbeeld/draaien
Belichtingscompensatie (EV -2~2)
Menu & inschakeling/uitschakeling
Capture mode (vastleggen)
Spiegelbeeld/draaien
Indien u tijdens het scannen een spiegelbeeld of gedraaid beeld nodig hebt, kunt op de
knop Draaien
drukken om het beeld aan te passen. Leg vervolgens de afbeelding
vast.
Page 36

36
©2012 NEDIS BV. Camlink is a registered trademark of NEDIS BV. Although every effort has been
made to ensure the accuracy of the information contained in this manual specifications are subject to
change and therefore NEDIS BV cannot guarantee its correctness and completeness at all times.
Druk
op de toets (spiegelbeeld). Het beeld zal draaien (van links naar rechts).
Druk vervolgens
op de toets (draaien). Het beeld zal draaien (van boven naar beneden).
Hoofdmenu
Page 37

37
©2012 NEDIS BV. Camlink is a registered trademark of NEDIS BV. Although every effort has been
made to ensure the accuracy of the information contained in this manual specifications are subject to
change and therefore NEDIS BV cannot guarantee its correctness and completeness at all times.
1. Capture (Vastleg) stand: A: Z&W-film B: Positief film C: Negatief film.
2. Exposure (Belichting): Belichtingscompensatie (EV -2~2).
3. Resolution (Resolutie): 5mega/10mega.
4. Language (Taal): English (Engels), French (Frans), German (Duits), ltalian (ltaliaans),
Spanish (Spaans), Chinese (Chinees), Simplified Chinese (Vereenvoudigd Chinees),
Japanese (Japans).
5. USB MSDC (USB MSDC): MSDC-stand (massaopslag).
Vastleggen
Diastijl
Druk op de knop handmatig om naar het hoofdmenu te gaan om de diastijl te kiezen onder
opnamestand. Kies het benodigde beeldtype zoals positieve film, negatieve film, Zwart/wit.
1. Zwart/witfilm: kies zwart/wit als er een zwart/witfilm op de houder is.
2. Positieve film:kies positieve film als er een positieve film op de houder is.
3. Negatieve film:kies negatieve film als er een negatieve film op de houder is.
Belichtingscompensatie
Druk op de menuknop om naar het hoofdmenu te gaan. Hier kan onder de
belichtingsstand bij belichtingscompensatie de belichtingswaarde worden geselecteerd
van de gescande afbeelding.
Page 38

38
©2012 NEDIS BV. Camlink is a registered trademark of NEDIS BV. Although every effort has been
made to ensure the accuracy of the information contained in this manual specifications are subject to
change and therefore NEDIS BV cannot guarantee its correctness and completeness at all times.
Resolutie
5M of 10M kan worden gekozen na het handmatig invoeren van de resolutie.
Taal
Opmerking: Kies English (Engels), French (Frans), German (Duits), Italian (ltaliaans),
Spanish (Spaans), Chinese (Chinees), Simplified Chinese (Vereenvoudigd Chinees) of
Japanese (Japans).
USB MSDC
A: Sluit de USB-kabel aan op de PC en schakel de scanner in. Open vervolgens het
hoofdmenu.
B: Kies opslag met de toets omhoog/omlaag. Klik op OK om te bevestigen.
C: Open de map op uw pc. U kunt nu de afbeeldingen weergeven op uw pc.
Page 39

39
©2012 NEDIS BV. Camlink is a registered trademark of NEDIS BV. Although every effort has been
made to ensure the accuracy of the information contained in this manual specifications are subject to
change and therefore NEDIS BV cannot guarantee its correctness and completeness at all times.
Onderhoud
Schoonmaak: We raden ten zeerste aan een schone, droge, niet op alcoholgebaseerde
wattenschijf te gebruiken voor het periodiek schoonmaken van het glazen oppervlak om
een helder beeld te behouden.
Garantie
Voor wijzigingen en veranderingen aan het product of schade veroorzaakt door een
verkeerd gebruik van dit product, kan geen aansprakelijkheid worden geaccepteerd.
Tevens vervalt daardoor de garantie.
Disclaimer
Ontwerpen en specificaties kunnen zonder voorafgaande kennisgeving worden gewijzigd.
Alle logo's, merken en productnamen zijn handelsmerken of geregistreerde
handelsmerken van de respectievelijke eigenaren en worden hierbij als zodanig erkend.
Bewaar deze gebruiksaanwijzing voor latere raadpleging.
Afvoer
• Dit product is bestemd voor gescheiden inzameling bij een daartoe aangewezen
verzamelpunt. Gooi dit product niet weg bij het huishoudelijk afval.
• Neem voor meer informatie contact op met de detailhandelaar of de lokale
overheid die verantwoordelijk is voor het afvalbeheer.
Dit product is vervaardigd en geleverd in overeenstemming met de relevante
reglementen en richtlijnen die voor alle lidstaten van de Europese Unie gelden. Het
voldoet ook aan alle toepasselijke specificaties en reglementen van het land van
verkoop.
Op aanvraag is officiële documentatie verkrijgbaar. Inclusief, maar niet uitsluitend:
Conformiteitsverklaring (en productidentiteit), materiaalveiligheidsinformatie en
producttestrapport.
Wend u tot onze klantenservice voor ondersteuning:
via de website: http://www.nedis.nl/nl-nl/contact/contact-formulier.htm
via e-mail: service@nedis.nl
telefonisch: +31 (0)73-5993965 (tijdens kantooruren)
NEDIS B.V., De Tweeling 28, 5215 MC ’s-Hertogenbosch, NEDERLAND
ES – Español
Introducción
No necesita un PC para su funcionamiento. Escáner de películas/diapositivas
autónomo de 5 Megapíxeles para escanear películas a su tarjeta SD u ordenador.
Soporta diferentes tarjetas SD de hasta 32GB SDHC. Interfaz USB 2.0 con
alimentación USB o función con alimentación CA. Salida de TV: NTSC/PAL.
Page 40

40
©2012 NEDIS BV. Camlink is a registered trademark of NEDIS BV. Although every effort has been
made to ensure the accuracy of the information contained in this manual specifications are subject to
change and therefore NEDIS BV cannot guarantee its correctness and completeness at all times.
◆ Escáner de películas
◆ Cable USB
◆ Cable de vídeo
◆ Soporte para negativos
◆ Soporte para diapositivas
◆ Alimentador de diapositivas rápido
◆ Adaptador de CC 5V
◆ Manual
◆ Cepillo
NOTA: Puede utilizar el cepillo incluido para limpiar el panel de retroiluminación.
Especificaciones técnicas
Tamaño 88,15(L) x 86,25(An) x 111,20(Al) mm
Peso 301g
Sensor CMOS de 1/3,2” 5 megapíxeles
Resolución efectiva 5 megapíxeles
Medios de
almacenamiento
Externo: Tarjeta SD, tarjeta SDHC compatible
Sensibilidad Automática
Lente Foco fijo F/6.0, F=6,34mm
Rango de enfoque 5,6cm
Imagen fija Formato: JPEG, resolución: 5M, 10M (interpolación)
Zoom No
Pantalla 2,36” TFT
Formato de salida de TV NTSC/PAL
Fuentes de luz Compensación de luz de fondo
Balance de blancos Automática
Compensación de
exposición
Automática
Interfaz MSDC: USB 2.0 (alta velocidad)
Encendido automático No
Alimentación 5V CC
Sistema operativo Windows XP, Vista, 7, 8
CPU Intel Pentium 4/2,8GHz o superior
Memoria 512MB o superior
Tarjeta de vídeo 64MB
Conexión de transmisión USB 2.0 estándar o superior
capacidad del disco duro 200MB como mínimo
Manual Sí
Adaptador Sí
Soporte de positivos Sí
Soporte de negativos Sí
Cepillo Sí
Cable USB Sí
Page 41

41
©2012 NEDIS BV. Camlink is a registered trademark of NEDIS BV. Although every effort has been
made to ensure the accuracy of the information contained in this manual specifications are subject to
change and therefore NEDIS BV cannot guarantee its correctness and completeness at all times.
Precauciones de seguridad
Para reducir el peligro de descarga eléctrica, este
producto SÓLO lo debería abrir un técnico autorizado
cuando necesite reparación. Desconecte el producto de
la toma de corriente y de los otros equipos si ocurriera
algún problema. No exponga el producto al agua ni a la
humedad.
Ventilación: El dispositivo deberá situarse de forma que su ubicación o posición no
impida su correcta ventilación.
Calor: El dispositivo deberá situarse alejado de fuentes de calor excesivo como
radiadores o estufas.
Períodos de no utilización: El cable USB del dispositivo deberá desconectarse del
ordenador cuando no se vaya a utilizar la unidad durante un largo período de tiempo.
Sobrecarga USB: No sobrecargue las conexiones USB de su ordenador. Si tiene
demasiados dispositivos conectados a su ordenador, como un ratón inalámbrico,
reproductores multimedia, teléfonos móviles u otros dispositivos alimentados por USB,
puede no haber suficiente energía para que el escáner de películas funcione
correctamente.
Reparación: El usuario no deberá tratar de reparar el dispositivo empleando métodos más
allá de los descritos en las instrucciones de uso. Todas las demás reparaciones deberán
remitirse al personal cualificado.
Soporte de película: El diseño del soporte de películas sigue los estándares ISO.
En algunos casos, los orificios de la película no coinciden exactamente con la alineación
del soporte. Esto es debido a una cámara no estandarizada. En ese caso, habrá una
pequeña línea negra en el borde del marco que puede recortarse fácilmente mediante un
programa de edición fotográfica.
*ISO – Organización internacional de estandarización.
Instrucciones de instalación
◆ Coloque el escáner de películas en un lateral e inserte el extremo del cepillo en la
puerta de la parte derecha.
Descripción de las partes:
Soporte para diapositivas
Soporte para negativos
Page 42

42
©2012 NEDIS BV. Camlink is a registered trademark of NEDIS BV. Although every effort has been
made to ensure the accuracy of the information contained in this manual specifications are subject to
change and therefore NEDIS BV cannot guarantee its correctness and completeness at all times.
Alimentador de diapositivas rápido
Cepillo
Utilizar los soportes incluidos
Alimentador de diapositivas rápido
1. Con la palanca totalmente a la derecha, apile sus diapositivas en el alimentador de
diapositivas rápido.
2. Coloque el alimentador de diapositivas en la ranura del soporte de película.
3. Empuje la palanca hacia la izquierda y después hacia la derecha para cargar una
diapositiva desde el alimentador en SLIDE 2. Repita este paso para las siguientes
diapositivas (lo que irá expulsando las diapositivas utilizadas por el otro extremo).
Cargar diapositivas
(1) (2)
(1) Sostenga la diapositiva hacia la luz. Oriente la marca de la dispositiva alejada de
usted. Mire a través de la diapositiva. Deberá aparecer normal (no una imagen
espejo). Ahora gire la dispositiva para que la imagen esté bocabajo mientras mira
hacia el mismo sitio.
(2) Abra el soporte de diapositivas por el punto marcado de la parte superior. Con el
soporte abierto en plano, coloque la diapositiva en el área hueca del soporte – la
diapositiva deberá encajar perfectamente.
Nota: Manipule las diapositivas con cuidado. Cualquier mota de polvo, arañazo o
huella aparecerá en sus imágenes guardadas. Si es posible, utilice guantes de
algodón cuando manipule las diapositivas. Se recomienda que utilice aire comprimido
para eliminar cualquier suciedad de las diapositivas. Éste no se incluye con el escáner,
pero puede comprarlo en cualquier distribuidor o vendedor de electrónica.
Page 43

43
©2012 NEDIS BV. Camlink is a registered trademark of NEDIS BV. Although every effort has been
made to ensure the accuracy of the information contained in this manual specifications are subject to
change and therefore NEDIS BV cannot guarantee its correctness and completeness at all times.
(3) (4)
(3) Cierre el soporte de diapositivas y presione en los bordes para que quede bloqueado.
(4) Sosténgalo en la posición que se indica en el escáner de películas.
Inserte el soporte de diapositivas en la ranura de la parte derecha del escáner, como
indicamos.
Cargar negativos
(1) (2)
(1) Sostenga el negativo hacia la luz. Cuando mire a través del negativo, deberá poder
leer con normalidad los pequeños números del negativo (no una imagen espejo).
A
hora gire el negativo para que la imagen esté bocabajo mientras mira hacia el mismo
sitio.
(2) Abra el soporte de negativos por el punto marcado de la parte superior. Con el soporte
de negativos abierto, coloque el negativo en el soporte de forma que las muescas
estén alineadas con las del soporte.
Nota: Manipule los negativos con cuidado. Cualquier mota de polvo, arañazo o huella
aparecerá en sus imágenes guardadas. Si es posible, utilice guantes de algodón
cuando manipule los negativos. Se recomienda que utilice aire comprimido para
eliminar cualquier suciedad de los negativos.
Éste no se incluye con el escáner, pero puede comprarlo en cualquier distribuidor o
vendedor de electrónica.
(3) (4)
(3) Cierre el soporte de negativos y presione en los bordes para que quede bloqueado.
Sosténgalo en la posición que se indica en el escáner de películas.
(4) Inserte el soporte de negativos en la ranura de la parte derecha del escáner, como
indicamos.
Page 44

44
©2012 NEDIS BV. Camlink is a registered trademark of NEDIS BV. Although every effort has been
made to ensure the accuracy of the information contained in this manual specifications are subject to
change and therefore NEDIS BV cannot guarantee its correctness and completeness at all times.
Secuencia correcta de operación
1. Deslice o cargue la película o negativo en el soporte.
2. Coloque el soporte en el escáner.
3. Conecte el cable USB al PC.
4. Pulse el botón de encendido para encender el escáner.
5. Pulse el botón de escaneo para empezar a escanear.
6. Extraiga siempre la tarjeta de memoria cuando termine.
7. Las imágenes pueden leerse también desde el PC a través de la conexión USB.
Instrucciones del usuario
Capturar una imagen
Cuando se haya establecido la frecuencia del vídeo, la imagen podrá capturarse a unos
3 segundos. Entre en el menú principal y escoja el modo captura para configurar
manualmente el estilo de la diapositiva y el valor de EV.
5M Resolución
Almacenar en tarjeta
00000 Cantidad disponible de escaneo
Modo de reproducción
Imagen espejo/Rotación
Compensación de exposición (EV -2~2)
Menú y Encendido/apagado
Modo de captura
Imagen espejo /Rotación
Si necesita una imagen espejo o rotar la imagen mientras la imagen se está escaneando,
puede pulsar la tecla Rotación
para ajustarlo. Tras pulsar la tecla, puede capturar la
imagen.
Page 45

45
©2012 NEDIS BV. Camlink is a registered trademark of NEDIS BV. Although every effort has been
made to ensure the accuracy of the information contained in this manual specifications are subject to
change and therefore NEDIS BV cannot guarantee its correctness and completeness at all times.
Pulse la tecla
(imagen espejo), la posición de la imagen se verá modificada (de
izquierda a derecha).
Page 46

46
©2012 NEDIS BV. Camlink is a registered trademark of NEDIS BV. Although every effort has been
made to ensure the accuracy of the information contained in this manual specifications are subject to
change and therefore NEDIS BV cannot guarantee its correctness and completeness at all times.
Continúe pulsando la tecla (rotación), la posición de la imagen se verá modificada
(de arriba a abajo).
Menú principal
1. Modo Capture (Captura): A: Película en B&N B: Positivo de película C: Negativo de
película.
2. Exposure (Exposición): Compensación de exposición (EV - 2~2).
3. Resolution (Resolución): 5mega/10mega.
4. Language (Idioma): Inglés, Francés, Alemán, Italiano, Español, Chino, Chino
simplificado, Japonés.
5. USB MSDC: Modo MSDC (almacenamiento masivo).
Modo de captura
Estilo de diapositiva
Pulse la tecla manual para entrar al menú principal y escoger el estilo de diapositiva en el
modo de disparo. Escoja el tipo de imagen deseado entre positivo de película, negativo de
película y B&N.
Page 47

47
©2012 NEDIS BV. Camlink is a registered trademark of NEDIS BV. Although every effort has been
made to ensure the accuracy of the information contained in this manual specifications are subject to
change and therefore NEDIS BV cannot guarantee its correctness and completeness at all times.
1. Película en B&N: escoja B&N si hay una película en blanco y negro en el soporte.
2. Positivo de película: escoja positivo si hay una película en positivo en el soporte.
3. Negativo de película: escoja negativo si hay una película en negativo en el soporte.
Compensación de exposición
Pulse la tecla menú para entrar al menú principal y escoger la compensación de
exposición en el modo Exposición. Aquí puede establecer el valor de exposición de la
imagen escaneada.
Resolución
Puede escogerse 5M o 10M tras entrar en el menú subordinado de resolución.
Idioma
Nota: Escoja entre Inglés, Francés, Alemán, Italiano, Español, Chino, Chino simplificado y
Japonés.
USB MSDC
A: Encienda el escáner y entre al menú principal tras conectar el cable USB con su PC.
B: Escoja el almacenamiento con la tecla arriba/abajo. haga clic en “Aceptar” para
confirmar.
C: Abra la carpeta en su PC. Ahora puede visualizar las imágenes en el PC.
Page 48

48
©2012 NEDIS BV. Camlink is a registered trademark of NEDIS BV. Although every effort has been
made to ensure the accuracy of the information contained in this manual specifications are subject to
change and therefore NEDIS BV cannot guarantee its correctness and completeness at all times.
Mantenimiento
Limpieza: Le recomendamos que utilice un bastoncillo de algodón limpio, seco y sin
alcohol para limpiar periódicamente la superficie de cristal para que la imagen producida
sea clara.
Garantía
No se aceptará ninguna garantía o responsabilidad derivada de cualquier cambio o
modificaciones realizadas al producto o daños provocados por un uso incorrecto del
producto.
Renuncia de responsabilidad legal
Las ilustraciones y las especificaciones podrán sufrir cambios sin previo aviso.
Todas las marcas de logotipos y nombres de productos constituyen patentes o marcas
registradas a nombre de sus titulares correspondientes, reconocidos como tal.
Conserve este manual y el embalaje en caso de futura necesidad.
Eliminación
• Este producto está diseñado para desecharlo por separado en un punto de
recogida adecuado. No se deshaga de este producto con la basura doméstica.
• Para obtener más información, póngase en contacto con el vendedor o la
autoridad local responsable de la eliminación de residuos.
Este producto se ha fabricado y distribuido de conformidad con todas las
normativas y directivas relevantes, válidas para todos los estados de la Unión
Europea. También cumple con todas las especificaciones y normativas en el país
en el cual se comercializa.
Previa solicitud, podremos proporcionarle la documentación formal. Esta
documentación incluye, entre otros: Declaración de conformidad (e identidad del
producto), hoja de datos de seguridad del material, informe sobre las pruebas
realizadas al producto.
Póngase en contacto con nuestro servicio de atención al cliente para obtener
información adicional:
por medio de nuestro sitio web: http://www.nedis.es/es-es/contacto/formulario-de-
contacto.htm
enviando un correo electrónico: service@nedis.com
o llamando por teléfono: +31 (0)73-5993965 (en horario de oficina)
NEDIS B.V., De Tweeling 28, 5215 MC ’s-Hertogenbosch, PAÍSES BAJOS
Page 49

49
©2012 NEDIS BV. Camlink is a registered trademark of NEDIS BV. Although every effort has been
made to ensure the accuracy of the information contained in this manual specifications are subject to
change and therefore NEDIS BV cannot guarantee its correctness and completeness at all times.
IT – Italiano
Introduzione
Per il funzionamento non è necessario alcun computer. Scanner indipendente da
5 megapixel per negativi di pellicole e diapositive per effettuare la scansione di
pellicole e archiviarle su una scheda di memoria SD o su un computer. Compatibile
con numerose schede SD fino a 32 GB SDHC. Interfaccia USB 2.0 con alimentazione
tramite USB o rete CA, uscita TV: NTSC/PAL.
◆ Scanner per negaivi e diapositive
◆ Cavo USB
◆ Cavo video
◆ Supporto per negativi
◆ Carrello per diapositive
◆ Caricatore rapido per diapositive
◆ Alimentatore 5 V CC
◆ Manuale
◆ Pennello
NOTA: Potete usare il pennello in dotazione per pulire il pannello di
retroilluminazione.
Specifiche Tecniche
Dimensioni 88,15 (L) x 86,25 (P) x 111,20 (A) mm
Peso 301 g
Sensore CMOS 1/3,2” da 5 megapixel
Risoluzione effettiva 5 megapixel
Supporto di archiviazione Esterno: scheda SD, scheda compatibile SDHC
Sensibilità Automatica
Obiettivo A fuoco fisso F/6.0, F=6,34mm
Campo di messa a fuoco 5,6 cm
Immagine fissa Formato: JPEG, risoluzione: 5 M, 10 M
(interpolazione)
Zoom No
Display TFT da 2,36”
Formato uscita TV NTSC/PAL
Sorgenti luminose Compensazione della retroilluminazione
Bilanciamento del bianco Automatica
Correzione dell'esposizione Automatica
Interfaccia MSDC: USB 2.0 (high speed)
Accensione automatica No
Alimentazione 5 V CC
Sistema operativo Windows XP, Vista, 7, 8
CPU Intel Pentium 4/2,8 GHz o superiore
Memoria 512 MB o superiore
Page 50

50
©2012 NEDIS BV. Camlink is a registered trademark of NEDIS BV. Although every effort has been
made to ensure the accuracy of the information contained in this manual specifications are subject to
change and therefore NEDIS BV cannot guarantee its correctness and completeness at all times.
Scheda video 64 MB
Collegamento di trasmissione USB 2.0 standard o superiore
Capacità del disco rigido 200 MB o superiore
Manuale Sì
Alimentatore Sì
Carrello per diapositive Sì
Supporto per negativi Sì
Pennello Sì
Cavo USB Sì
Misure di sicurezza
Per ridurre il rischio di scosse elettriche, il presente
dispositivo deve essere aperto SOLO da un tecnico
autorizzato, nel caso sia necessario ripararlo. Scollegare
il prodotto dalla rete di alimentazione e da altri apparecchi
se dovesse verificarsi un problema. Non esporre
l'apparecchio ad acqua o umidità.
Ventilazione: L'apparecchio deve essere disposto in modo tale da assicurare una
ventilazione sufficiente.
Calore: Il dispositivo deve essere disposto lontano da sorgenti di calore eccessivo, quali
termosifoni o fornelli.
Periodo di non utilizzo: Il cavo USB per il dispositivo deve essere scollegato dal
computer, quando l'unità è lasciata inutilizzata per lungo tempo.
Sovraccarico della porta USB: Non sovraccaricate le connessioni USB del vostro
computer. Se avete troppi dispositivi collegati al computer, come ad esempio mouse senza
fili, lettore multimediale, telefono cellulare o altri dispositivi alimentati tramite USB,
potrebbe non esserci abbastanza energia per far funzionare correttamente lo scanner per i
negativi .
Manutenzione: L'utente non deve tentare di eseguire interventi di manutenzione sul
dispositivo, tranne le istruzioni descritte nel presente manuale. Contattate del personale di
assistenza qualificato per tutti gli altri interventi di manutenzione.
Telaio per negativi: Il design del telaio per i negativi segue lo standard ISO.
In alcuni casi i fori sulla pellicola non corrispondono completamente all'allineamento sulla
slitta. Ciò è causato da fotocamere non standard. In questi casi sarà presente una piccola
striscia nera sul bordo del fotogramma che può essere ritagliata con facilità utilizzando un
programma di elaborazione di immagini.
*ISO-organizzazione internazionale per la standardizzazione
Istruzioni per l'installazione
◆ Girate il dispositivo di lato e inserite la punta del pennello nello sportello sul lato destro.
Descrizione delle parti:
Carrello per diapositive
Page 51

51
©2012 NEDIS BV. Camlink is a registered trademark of NEDIS BV. Although every effort has been
made to ensure the accuracy of the information contained in this manual specifications are subject to
change and therefore NEDIS BV cannot guarantee its correctness and completeness at all times.
Supporto per negativi
Caricatore rapido per diapositive
Pennello
Uso dei supporti in dotazione
Caricatore rapido per diapositive
1. Con la leva spostata tutta a destra, sistemate le diapositive nel caricatore rapido.
2. Mettete il caricatore nella scanalatura del telaio per pellicole.
3. Spingete la leva verso sinistra e poi verso destra per caricare una diapositiva dal
caricatore in SLIDES 2. Ripetere quest'operazione per le diapositive successive (che
spingeranno le diapositive utilizzate verso l'esterno dalla parte opposta).
Caricamento delle diapositive
(1) (2)
(1) Tenete la pellicola in controluce. Il lato della diapositiva con il marchio deve trovarsi dal
lato opposto al vostro. Osservate la diapositiva. Le immagini devono apparire
correttamente (non come un'immagine speculare). Con lo stesso lato rivolto verso di
voi, ruotate la diapositiva in modo che l'immagine risulti capovolta.
(2) Aprite il telaio per diapositive con il punto contrassegnato in alto. Con il telaio aperto,
posizionate una diapositiva nella rientranza all'interno dell'alloggiamento: la diapositiva
dovrebbe perfettamente inserirsi nel suo interno.
Page 52

52
©2012 NEDIS BV. Camlink is a registered trademark of NEDIS BV. Although every effort has been
made to ensure the accuracy of the information contained in this manual specifications are subject to
change and therefore NEDIS BV cannot guarantee its correctness and completeness at all times.
Nota: Maneggiate con cura le diapositive. Eventuali tracce di polvere, graffi e impronte
appariranno sulle immagini salvate. Se possibile, utilizzate dei guanti di cotone mentre
maneggiate le diapositive. Consigliamo di utilizzare aria compressa per eliminare la
polvere dalle diapositive. Quest’accessorio non è fornito in dotazione con lo scanner
per pellicole, ma può essere acquistato presso un negozio di elettronica o di prodotti
per l'ufficio.
(3) (4)
(3) Chiudere il telaio e premere gli angoli in modo che si blocchi in posizione.
(4) Tenerlo nella posizione mostrata nello scanner per pellicole.
Inserire il telaio nell'alloggiamento sul lato destro dello scanner, come mostrato.
Caricamento dei negativi
(1) (2)
(1) Tenete il negativo in controluce. Osservando il negativo, dovreste essere in grado di
leggere il numero del negativo in modo normale (non come immagine speculare).
Con lo stesso lato rivolto verso di voi, ruotate il negativo in modo che l'immagine risulti
capovolta.
(2) Aprite il telaio per negativi con il punto contrassegnato in alto. Con il telaio per negativi
aperto, posizionate il negativo nell'alloggiamento, in modo che le tacche sul negativo
combacino con quelle sul telaio.
Nota: Maneggiate con cura i negativi. Eventuali tracce di polvere, graffi e impronte
appariranno sulle immagini salvate. Se possibile, utilizzate dei guanti di cotone mentre
maneggiate i negativi. Consigliamo di utilizzare aria compressa per eliminare la
polvere dai negativi.
Quest'accessorio non è fornito in dotazione con lo scanner per pellicole, ma può
essere acquistato presso un negozio di elettronica o di prodotti per l'ufficio.
Page 53

53
©2012 NEDIS BV. Camlink is a registered trademark of NEDIS BV. Although every effort has been
made to ensure the accuracy of the information contained in this manual specifications are subject to
change and therefore NEDIS BV cannot guarantee its correctness and completeness at all times.
(3) (4)
(3) Chiudere il telaio per negativi e premere gli angoli in modo che si blocchi in posizione.
Tenerlo nella posizione mostrata nello scanner per pellicole.
(4) Inserire il telaio per negativi nella scanalatura sul lato destro dello scanner, come
mostrato.
Corretta sequenza di operazioni
1. Fate scorrere o caricate la pellicola o i negativi nel telaio.
2. Inserite il telaio nello scanner.
3. Collegate il cavo USB al computer.
4. Premete l'interruttore per accendere lo scanner.
5. Premete il tasto di scansione per avviare la scansione.
6. Al termine, estraete sempre la scheda di memoria.
7. Le immagini possono essere lette da un computer tramite la connessione USB.
Istruzioni per l'utente
Acquisizione delle immagini
Quando la frequenza video è stata riconosciuta, le immagini possono essere acquisite in
circa 3 secondi. Accedete al menu principale e selezionate la modalità di acquisizione per
impostare manualmente il tipo di diapositiva e il valore EV.
5 M Risoluzione
Salva su scheda
00000 Scansione quantità disponibile
Modalità di riproduzione
Immagine speculare/Rotazione dell'immagine
Page 54

54
©2012 NEDIS BV. Camlink is a registered trademark of NEDIS BV. Although every effort has been
made to ensure the accuracy of the information contained in this manual specifications are subject to
change and therefore NEDIS BV cannot guarantee its correctness and completeness at all times.
Correzione dell'esposizione (EV -2~2)
Menu e interruttore
Modalità di acquisizione
Immagine speculare/Rotazione dell'immagine
Se durante la scansione di un'immagine desiderate un'immagine speculare o capovolta,
premete il tasto Capovolgi
per modificarla. Dopo aver premuto il tasto potrete
acquisire l'immagine.
Premendo il tasto
(immagine speculare), l'immagine sarà modificata (da sinistra
verso destra).
Page 55

55
©2012 NEDIS BV. Camlink is a registered trademark of NEDIS BV. Although every effort has been
made to ensure the accuracy of the information contained in this manual specifications are subject to
change and therefore NEDIS BV cannot guarantee its correctness and completeness at all times.
Continuate a premere il tasto
(immagine capovolta) per modificare l'immagine
(dall'alto verso il basso).
Menu principale
1. Modalità di acquisizione (Capture): A: pellicola in bianco e nero B: diapositiva C:
pellicola negativa.
2. Exposure (Esposizione): Correzione dell'esposizione (EV - 2~2).
3. Resolution (Risoluzione): 5 mega/10 mega.
4. Language (Lingua): inglese, francese, tedesco, italiano, spagnolo, cinese, cinese
semplificato, giapponese.
5. USB MSDC: modalità MSDC (memoria di massa).
Page 56

56
©2012 NEDIS BV. Camlink is a registered trademark of NEDIS BV. Although every effort has been
made to ensure the accuracy of the information contained in this manual specifications are subject to
change and therefore NEDIS BV cannot guarantee its correctness and completeness at all times.
Modalità di acquisizione
Stile diapositiva
Premere il tasto manuale per accedere al menu principale e selezionare lo stile diapositiva
in modalità di scatto. Selezionare il tipo di immagine desiderata: diapositiva, pellicola
negativa, bianco e nero.
1. Pellicola in bianco e nero: selezionare BN se c'è una pellicola BN nel supporto.
2. Diapositiva: selezionare diapositiva se c'è una diapositiva nel supporto.
3. Pellicola negativa: selezionare negativo se c'è un negativo nel supporto.
Correzione dell'esposizione
Premere il tasto del menu per accedere al menu principale e selezionare correzione
dell'esposizione in modalità di esposizione. Qui potete impostare il valore di esposizione
dell'immagine scansionata.
Risoluzione
I valori 5 M o 10 M possono essere selezionati dopo averli immessi nel menu subordinato
di risoluzione.
Page 57

57
©2012 NEDIS BV. Camlink is a registered trademark of NEDIS BV. Although every effort has been
made to ensure the accuracy of the information contained in this manual specifications are subject to
change and therefore NEDIS BV cannot guarantee its correctness and completeness at all times.
Lingua
Nota: Selezionate inglese, francese, tedesco, italiano, spagnolo, cinese, cinese
semplificato.
USB MSDC
A:
A
ccendere lo scanner e accedere al menu principale dopo aver collegato il cavo USB al
computer.
B: Selezionate l'archivio con il tasto su/giù. Fate clic su OK per confermare.
C: Aprite la cartella sul vostro PC. Adesso potete vedere le immagini sul computer.
Manutenzione
Pulizia: Per ottenere immagini chiare, consigliamo di utilizzare un batuffolo di cotone
pulito e asciutto per pulire regolarmente la superficie in vetro.
Garanzia
Non sarà accettata alcuna garanzia o responsabilità in caso di cambiamenti e modifiche
apportate al prodotto o a danni determinati dall’uso non corretto del prodotto stesso.
Disclaimer
Il design e le caratteristiche tecniche sono soggetti a modifica senza necessità di
preavviso.
Tutti i loghi, i marchi e i nomi di prodotto sono marchi commerciali o registrati dei rispettivi
titolari e sono riconosciuti come tali nel presente documento.
Conservare questo manuale e la confezione per riferimenti futuri.
Page 58

58
©2012 NEDIS BV. Camlink is a registered trademark of NEDIS BV. Although every effort has been
made to ensure the accuracy of the information contained in this manual specifications are subject to
change and therefore NEDIS BV cannot guarantee its correctness and completeness at all times.
Smaltimento
• Questo prodotto è soggetto a raccolta differenziata nei punti di raccolta
appropriati. Non smaltire dispositivi elettronici con i rifiuti domestici.
• Per maggiori informazioni, contattare il rivenditore o le autorità locali responsabili
per la gestione dei rifiuti.
Il presente prodotto è stato realizzato e fornito in conformità a tutte le norme e le
direttive vigenti, con validità in tutti gli stati membri della Comunità Europea. Inoltre
è conforme alle specifiche e alle normative applicabili nel paese in cui è stato
venduto.
La documentazione ufficiale è disponibile su richiesta. Essa include a titolo
esemplificativo ma non limitativo: Dichiarazione di conformità (e di identità del
prodotto), scheda di sicurezza dei materiali, rapporto di prova del prodotto.
Contattare il nostro servizio clienti per assistenza:
tramite il nostro sito web: http://www.nedis.it/it-it/contatti/modulo-contatto.htm
tramite e-mail: service@nedis.com
tramite telefono: +31 (0)73-5993965 (in orario di ufficio)
NEDIS B.V., De Tweeling 28, 5215 MC ’s-Hertogenbosch, Paesi Bassi
FI – Suomi
Esittely
Ei tarvitse tietokonetta toimiakseen. 5 megapikselin filmi-/diaskanneri kuviesi
skannaukseen SD-kortille tai tietokoneelle. Tukee useita SD-kortteja aina 32 Gt
DSHC-kortteihin asti. USB 2.0 -liitäntä USB-virralla, TV-ulostulo: NTSC/PAL.
◆ Filmiskanneri
◆ USB-kaapeli
◆ Videokaapeli
◆ Negatiivipidike
◆ Diapidike
◆ Diojen syöttölaite
◆ DC 5 V -virtalähde
◆ Manuaalinen
◆ Harja
HUOMAA: Voit käyttää toimitettua harjaa takavalopaneelin puhdistamiseen.
Tekniset tiedot
Koko 88,15 (pit.) X 86,25 (lev) X 111,20 (kor.) mm
Paino 301 g
Kenno 1/3,2” 5 megapikselin CMOS
Tehollinen resoluutio 5 megapikseliä
Tallennusväline Ulkoinen: SD-kortti, yhteensopiva SDHC-kortti
Page 59

59
©2012 NEDIS BV. Camlink is a registered trademark of NEDIS BV. Although every effort has been
made to ensure the accuracy of the information contained in this manual specifications are subject to
change and therefore NEDIS BV cannot guarantee its correctness and completeness at all times.
Herkkyys Automaattinen
Objektiivi Kiinteä polttoväli, F/6.0, F=6,34 mm
Tarkennusalue 5,6 cm
Still-kuva
Format (formatointi): JPEG, resoluutio: 5M, 10M
(interpolaatio)
Zoomi Ei
Näyttö 2,36” TFT
TV-ulostulo NTSC/PAL
Valolähteet Takavalon kompensointi
Valkotasapaino Automaattinen
Valotuksen kompensointi Automaattinen
Liitäntä MSDC: USB 2.0 (high speed)
Autom. virta päälle Ei
Virtalähde DC 5 V
Käyttöjärjestelmä Windows XP, Vista, 7, 8
CPU Intel Pentium 4/2,8 GHz tai parempi
Muisti 512 Mt tai parempi
Näytönohjain 64 Mt
Siirtoliitäntä Standardi USB 2.0 tai parempi
Kiintolevytila Vähintään 200 Mt
Manuaalinen Kyllä
Adapteri Kyllä
Diapidike Kyllä
Negatiivipidike Kyllä
Harja Kyllä
USB-kaapeli Kyllä
Turvallisuustoimenpiteet
Sähköiskun riskin pienentämiseksi, AINOASTAAN
valtuutettu huoltohenkilö saa avata tämän laitteen huoltoa
varten. Jos ongelmia ilmenee, irrota laite verkkovirrasta ja
muista laitteista. Älä altista laitetta vedelle ja kosteudelle.
Ilmanvaihto: Laite tulee sijoittaa niin, ettei sen sijainti häiritse sen ilmanvaihtoa.
Lämpö: Laitetta ei tule sijoittaa lämpölähteiden, kuten lämmittimet tai liedet, lähelle.
Käyttämättömyys: Laitteen USB-kaapeli tulee irrottaa tietokoneesta jos laite on pitkään
käyttämättä.
USB:n ylikuormitus: Älä ylikuormita tietokoneesi USB-liitäntöjä. Jos olet yhdistänyt
tietokoneesi liian monta laitetta, kuten langattoman hiiren, mediasoittimen,
matkapuhelimen tai muun USB-liitännästä virtaa saavan laitteen, filmiskanneri ei saata
saada tarpeeksi virtaa toimiakseen kunnolla.
Huolto: Käyttäjän ei tule yrittää huoltaa laitetta käyttöoppaassa kuvattuja ohjeita
pidemmälle. Kaikki muut huoltotoimenpiteet tulee suorittaa pätevän henkilöstön toimesta.
Filmipidike: Filmipidike vastaa ISO-standardia.
Joissain tapauksissa filmin reikäreuna mahdu oikein pidikkeeseen. Näin tapahtuu normista
poikkeavaa kameraa käytettäessä. Näissä tapauksissa kuvan laitaan ilmestyy ohut musta
viiva, joka on helppo leikata pois kuvankäsittelyohjelmalla.
*ISO-international Organization for Standardisation
Page 60

60
©2012 NEDIS BV. Camlink is a registered trademark of NEDIS BV. Although every effort has been
made to ensure the accuracy of the information contained in this manual specifications are subject to
change and therefore NEDIS BV cannot guarantee its correctness and completeness at all times.
Asennusohjeet
◆ Käännä filmiskanneri kyljelleen, ja työnnä harjanpää sisään oikealla sivulla olevasta
ovesta.
Osien kuvaus:
Diapidike
Negatiivipidike
Diojen syöttölaite
Harja
Mukana tulevien pidikkeiden käyttö
Diojen syöttölaite
1. Pinoa diasi syöttölaitteeseen vivun ollessa täysin oikealla.
2. Työnnä syöttölaite filmipidikkeen aukkoon.
3. Vedä vipua vasemmalle ja taas oikealle syöttääksesi dian syöttölaitteesta skanneriin.
Toista nämä vaiheet seuraaville dioille (jotka työntävät skannatut diat ulos toiselta
puolelta).
Diojen syöttäminen
(1) (2)
Page 61

61
©2012 NEDIS BV. Camlink is a registered trademark of NEDIS BV. Although every effort has been
made to ensure the accuracy of the information contained in this manual specifications are subject to
change and therefore NEDIS BV cannot guarantee its correctness and completeness at all times.
(1) Pidä diaa valoa vasten. Käännä dian tuotemerkkipuoli pois itsestäsi. Katso dian läpi.
Sen pitäisi näyttää normaalilta (ei peilikuvalta). Käännä dia niin, että kuva on
ylösalaisin samalta puolelta katsottuna.
(2) Avaa diapidike sen päälle merkitystä kohdasta. Laita dia avoimen diapidikkeen
syvennettyyn kohtaan. Dian pitäisi sopia siihen täysin.
Huomaa: Käsittele dioja varovasti. Pöly, naarmut ja sormenjäljet näkyvät tallennetuissa
kuvissa. Jos mahdollista, käytä puuvillahanskoja dioja käsitellessä. Suosittelemme
pölyn puhdistamista dioista paineilman avulla. Paineilmakanisteria ei tule skannerin
mukana, mutta niitä voi ostaa toimistotarvike- tai elektroniikkaliikkeestä.
(3) (4)
(3) Sulje diapidike ja paina sen reunoja kunnes ne lukkiintuvat paikalleen.
(4) Pidä sitä kuvan osoittamassa asennossa skannerissa.
Laita diapidike skannerin oikealla puolella olevaan aukkoon kuvan osoittamalla tavalla.
Negatiivien syöttäminen
(1) (2)
(1) Pidä negatiivia valoa vasten. Kun katsot negatiivin lävitse, sinun pitäisi pystyä
lukemaan pienet numerot normaalisti (ei peilikuvana).
Käännä negatiivi niin, että kuva on ylösalaisin samalta puolelta katsottuna.
(2) Avaa negatiivipidike sen päälle merkitystä kohdasta. Aseta negatiivi pidikkeeseen niin,
että siinä olevat lovet vastaavat pidikkeen lovia.
Huomaa: Käsittele negatiiveja varovasti. Pöly, naarmut ja sormenjäljet näkyvät
tallennetuissa kuvissa. Jos mahdollista, käytä puuvillahanskoja negatiiveja käsitellessä.
Suosittelemme pölyn puhdistamista negatiiveista paineilman avulla.
Paineilmakanisteria ei tule skannerin mukana, mutta niitä voi ostaa toimistotarvike- tai
elektroniikkaliikkeestä.
Page 62

62
©2012 NEDIS BV. Camlink is a registered trademark of NEDIS BV. Although every effort has been
made to ensure the accuracy of the information contained in this manual specifications are subject to
change and therefore NEDIS BV cannot guarantee its correctness and completeness at all times.
(3) (4)
(3) Sulje negatiivipidike ja paina sen reunoja kunnes ne lukkiintuvat paikalleen. Pidä sitä
kuvan osoittamassa asennossa skannerissa.
(4) Laita negatiivipidike skannerin oikealla puolella olevaan aukkoon kuvan osoittamalla
tavalla.
Oikea käyttöjärjestys
1. Liu'uta tai laita filmi tai negatiivi pidikkeeseen.
2. Laita pidike skanneriin.
3. Yhdistä USB-kaapeli tietokoneeseen.
4. Laita skanneri päälle virtapainikkeesta.
5. Paina skannauspainiketta aloittaaksesi skannauksen.
6. Ota tallennuskortti pois aina kun olet valmis.
7. Kuvat voi lukea tietokoneelle myös USB-liitännän kautta.
Käyttöohjeet
Kuvankaappaus
Kun videotaajuus on asetettu, kuvan voi kaapata noin 3 sekunnissa. Mene päävalikkoon,
ja valitse kaappaustila asettaaksesi dian tyylin ja EV-arvon manuaalisesti.
5M Resoluutio
Tallenna kortille
00000 Skannauksia saatavilla
Toistotila
Peilikuva/kääntö
Page 63

63
©2012 NEDIS BV. Camlink is a registered trademark of NEDIS BV. Although every effort has been
made to ensure the accuracy of the information contained in this manual specifications are subject to
change and therefore NEDIS BV cannot guarantee its correctness and completeness at all times.
Valotuksen kompensaatio (EV -2~2)
Valikko ja virta päälle/pois
Kaappaustila
Peilikuva/kääntö
Jos haluat kuvasta peilikuvan, tai kääntää sitä, kuvaa skannatessa, paina kääntöpainiketta
säätääksesi sen. Sen jälkeen voit kaapata kuvan.
Paina
-painiketta (peilikuva), niin kuva peilautuu (vasemmalta oikealle).
Page 64

64
©2012 NEDIS BV. Camlink is a registered trademark of NEDIS BV. Although every effort has been
made to ensure the accuracy of the information contained in this manual specifications are subject to
change and therefore NEDIS BV cannot guarantee its correctness and completeness at all times.
Jatka
-painikkeen (kääntö) painamista, niin kuva käännetään (ylhäältä alas).
Päävalikko
1. Kaappaustila (Capture): A: Mustavalkofilmi B: Positiivifilmi C: Negatiivifilmi.
2. Exposure (valotus): Valotuksen kompensaatio (EV -2~2).
3. Resolution (resoluutio): 5M/10M.
4. Language (kieli): Englanti, ranska, saksa, italia, espanja, kiina, yksinkertaistettu kiina,
japani.
5. USB MSDC: MSDC-tila (massamuisti).
Kaappaustila
Dian tyyli
Mene päävalikkoon valikkonäppäimellä valitaksesi dian tyylin kuvaustilassa. Valitse
tarvittava kuvatyyppi, kuten positiivifilmi, negatiivi, mustavalkoinen.
Page 65

65
©2012 NEDIS BV. Camlink is a registered trademark of NEDIS BV. Although every effort has been
made to ensure the accuracy of the information contained in this manual specifications are subject to
change and therefore NEDIS BV cannot guarantee its correctness and completeness at all times.
1. Mustavalkofilmi: Valitse mustavalkofilmi jos pidikkeessä on mustavalkofilmiä.
2. Positiivifilmi: Valitse positiivifilmi jos pidikkeessä on positiivifilmiä.
3. Negatiivifilmi: Valitse negatiivifilmi jos pidikkeessä on negatiivifilmiä.
Valotuksen kompensointi
Mene päävalikkoon valikkonäppäimellä valitaksesi valotuksen kompensoinnin
valotustilassa. Täältä voit asettaa skannattujen kuvien valotusarvon.
Resoluutio
5M tai 10M voidaan valita resoluutio-alavalikosta.
Page 66

66
©2012 NEDIS BV. Camlink is a registered trademark of NEDIS BV. Although every effort has been
made to ensure the accuracy of the information contained in this manual specifications are subject to
change and therefore NEDIS BV cannot guarantee its correctness and completeness at all times.
Kieli
Huomaa: Valitse englanti, ranska, saksa, italia, espanja, kiina, yksinkertaistettu kiina tai
japani.
USB MSDC
A: Laita skanneri päälle, ja mene päävalikkoon USB-kaapelin tietokoneeseen
yhdistämisen jälkeen.
B: Valitse massamuisti ylös/alas-painikkeella. Paina ”OK” vahvistaaksesi.
C: Avaa kansio tietokoneellasi. Voit nyt näyttää valokuvat tietokoneellasi.
Huolto
Puhdistus: Suosittelemme lasipinnan puhdistamista puhtaalla, kuivalla,
ei-alkoholipitoisella pumpulipuikolla kirkkaiden kuvien tuottamiseksi.
Takuu
Takuu ja vastuuvelvollisuus mitätöityvät, jos tuote vaurioituu siihen tehtyjen muutoksien tai
sen väärinkäytön takia.
Vastuuvapauslauseke
Muutoksia malliin ja teknisiin ominaisuuksiin voidaan tehdä ilmoituksetta.
Kaikki logot, merkit ja tuotenimet ovat niiden vastaavien omistajien tuotemerkkejä tai
rekisteröityjä tuotemerkkejä ja niitä on käsiteltävä sellaisina.
Säilytä käyttöohjeet ja pakkaus myöhempää käyttötarvetta varten.
Hävittäminen
• Tämä tuote tulee toimittaa hävitettäväksi asianmukaiseen keräyspisteeseen.
Tuotetta ei saa hävittää kotitalousjätteen mukana.
• Lisätietoja antaa jälleenmyyjä tai paikallinen jätehuollosta vastaava
viranomainen.
Tämä tuote on valmistettu ja toimitettu noudattaen kaikkia sitä koskevia asetuksia ja
direktiivejä, jotka ovat voimassa kaikissa Euroopan unionin jäsenvaltioissa. Se
täyttää myös kaikki myyntimaassa sovellettavat vaatimukset ja määräykset.
Viralliset asiakirjat ovat saatavilla pyynnöstä. Asiakirjoihin sisältyvät seuraavat,
mutta näihin rajoittumatta: Vaatimustenmukaisuusvakuutus (ja tuotteen tunniste),
käyttöturvallisuustiedote, tuotteen testiraportti.
Page 67

67
©2012 NEDIS BV. Camlink is a registered trademark of NEDIS BV. Although every effort has been
made to ensure the accuracy of the information contained in this manual specifications are subject to
change and therefore NEDIS BV cannot guarantee its correctness and completeness at all times.
Saat neuvoja ottamalla yhteyttä asiakaspalveluumme:
verkkosivun kautta: http://www.nedis.fi/fi-fi/ota-yhteytta/yhteyslomake.htm
sähköpostilla: service@nedis.com
puhelimitse: +31 (0)73-5993965 (toimistoaikoina)
NEDIS B.V., De Tweeling 28, 5215 MC ’s-Hertogenbosch, ALANKOMAAT
SE – Svenska
Inledning
Ingen dator behövs för att använda skannern. Fristående 5 megapixlars film-/
diabildsskanner för skanning av film till SD-kort eller dator. Stöd för flera SD-kort
upp till 32 GB SDHC. USB 2.0-gränssnitt genom USB-kontakt eller TV:ns AC-uttag:
NTSC/PAL.
◆ Filmskanner
◆ USB-kabel
◆ Videokabel
◆ Hållare för negativ film
◆ Hållare för diapositiv
◆ Snabbmatare för diabilder
◆ 5 V DC-adapter
◆ Instruktionsbok
◆ Borste
Obs! Du kan använda den medföljande borsten för att rengöra
bakgrundsbelysningens panel.
Tekniska specifikationer
Storlek 88,15 (L) x 86,25 (B) x 111,20 (H) mm
Vikt 301 g
Sensor 1/3,2" 5 megapixlars CMOS
Effektiv upplösning 5 megapixlar
Lagringsmedia Externt: SD-kort, kompatibelt SDHC-kort
Känslighet Automatisk
Lins Fixerad fokus F/6.0, F=6,34 mm
Fokusintervall 5,6 cm
Stillbild Format: JPEG, upplösning: 5 M, 10 M (interpolering)
Zoom Nej
Visa 2,36" TFT
TV-system NTSC/PAL
Ljuskällor Kompensation för bakgrundsbelysning
Vitbalans Automatisk
Kompensation för
exponering
Automatisk
Page 68

68
©2012 NEDIS BV. Camlink is a registered trademark of NEDIS BV. Although every effort has been
made to ensure the accuracy of the information contained in this manual specifications are subject to
change and therefore NEDIS BV cannot guarantee its correctness and completeness at all times.
Gränssnitt MSDC: USB 2.0 (hög hastighet)
Automatisk påsättning Nej
Ström DC 5 V
Operativsystem Windows XP, Vista, 7, 8
CPU Intel Pentium 4/2,8 GHz eller högre
Minne 512 MB eller mer
Videokort 64 MB
Överföringsanslutning Standard USB 2.0 eller högre
Hårddiskens kapacitet Minst 200 MB
Instruktionsbok Ja
Adapter Ja
Hållare för positiv film Ja
Hållare för negativ film Ja
Borste Ja
USB-kabel Ja
Säkerhetsanvisningar
För att minska risken för elektriska stötar bör denna
produkt ENDAST öppnas av behörig tekniker när service
behövs. Dra ut strömkabeln från eluttaget och koppla ur
all annan utrustning om något problem skulle uppstå.
Utsätt inte produkten för vatten eller fukt.
Ventilation: Enheten bör placeras så att den får ordentlig ventilation.
Värme: Enheten bör inte placeras i närheten av värmekällor som t.ex. element eller spisar.
Perioder utan användning: Enhetens USB-kabel bör kopplas bort från datorn om
enheten inte ska användas under en längre period.
Överbelastning av USB-kontakter: Överbelasta inte din dators USB-kontakter. Om du har
alltför många enheter anslutna till din dator, som en trådlös mus, mediaspelare,
mobiltelefon eller andra USB-drivna enheter, kanske det inte finns tillräckligt med ström för
att filmskannern ska kunna fungera ordentligt.
Service: Användaren bör inte försöka laga enheten på något sätt som inte nämns i
användarinstruktionerna. Alla andra reparationer/service bör överlåtas till behörig
servicepersonal.
Filmhållare: Filmhållarens design följer ISO-standarder.
I vissa fall kommer filmens hål inte passa hållaren perfekt. Detta kan bero på att filmen
tagits med en kamera som inte är en standardkamera. Om så är fallet kommer det att bli
små svarta streck på fotoramarnas kant. Dessa kan lätt beskäras med ett
fotoredigeringsprogram.
*ISO-international Organization for Standardisation
Installationsinstruktioner
◆ Placera filmskannern på sidan och för in borstens ände i luckan på höger sida.
Page 69

69
©2012 NEDIS BV. Camlink is a registered trademark of NEDIS BV. Although every effort has been
made to ensure the accuracy of the information contained in this manual specifications are subject to
change and therefore NEDIS BV cannot guarantee its correctness and completeness at all times.
Beskrivning av filmskannerns delar:
Hållare för diapositiv
Hållare för negativ film
Snabbmatare för diabilder
Borste
Använda de medföljande hållarna
Snabbmatare för diabilder
1. Se till att spaken är så långt åt höger som det går och stapla dina diabilder i
snabbmataren för diabilder.
2. Placera snabbmataren i filmhållarens öppning.
3. Tryck spaken först åt vänster och sedan till höger för att ladda en diabild från hållaren
till SLIDES 2. Upprepa det här steget för alla diabilderna (genom detta kommer de
använda diabilderna att matas ut på den andra sidan).
Ladda diabilder
(1) (2)
(1) Håll upp diabilden mot ljuset. Placera den sidan av diabilden som är markerad vänd
bort från dig. Se genom diabilden. Den bör se normal ut (ej spegelvänd). Vänd nu på
diabilden så att bilden är upp-och-ned-vänd samtidigt som du har samma sida mot dig.
Page 70

70
©2012 NEDIS BV. Camlink is a registered trademark of NEDIS BV. Although every effort has been
made to ensure the accuracy of the information contained in this manual specifications are subject to
change and therefore NEDIS BV cannot guarantee its correctness and completeness at all times.
(2) Öppna diabildshållaren vid markeringen på ovansidan. Placera diabilden i hållarens
nedsänkta del (med diabildshållaren helt öppen) - diabilden bör passa perfekt i
hållaren.
Obs! Hantera diabilderna varsamt. Eventuellt damm, repor eller fingeravtryck kommer
att synas på dina sparade bilder. Använd om möjligt bomullshandskar när du hanterar
diabilderna. Det är rekommendabelt att du använder tryckluft för att avlägsna damm
från diabilderna. Tryckluft medföljer inte filmskannern men kan enkelt köpas i butiker
som säljer kontorsmaterial eller elektronik.
(3) (4)
(3) Stäng diabildshållaren och tryck på kanterna så att den låses på plats.
(4) Håll hållaren i den position som visas på filmskannern.
Sätt i diabildshållaren i öppningen på filmskannerns högra sida såsom visas.
Ladda negativ
(1) (2)
(1) Håll upp negativet mot ljuset. När du ser genom negativet bör du kunna läsa de små
siffrorna normalt (ej spegelvänt).
Vänd nu på negativet så att bilden är upp-och-ned-vänd samtidigt som du har samma
sida mot dig.
(2) Öppna negativhållaren vid markeringen på ovansidan. Placera negativet i hållaren
(med negativhållaren helt öppen) så att hålen i filmen passar i hållaren.
Obs! Hantera negativen varsamt. Eventuellt damm, repor eller fingeravtryck kommer
att synas på dina sparade bilder. Använd om möjligt bomullshandskar när du hanterar
negativen. Det är rekommendabelt att du använder tryckluft för att avlägsna damm från
negativen.
Tryckluft medföljer inte filmskannern men kan enkelt köpas i butiker som säljer
kontorsmaterial eller elektronik.
Page 71

71
©2012 NEDIS BV. Camlink is a registered trademark of NEDIS BV. Although every effort has been
made to ensure the accuracy of the information contained in this manual specifications are subject to
change and therefore NEDIS BV cannot guarantee its correctness and completeness at all times.
(3) (4)
(3) Stäng negativhållaren och tryck på kanterna så att den låses på plats. Håll hållaren i
den position som visas på filmskannern.
(4) Sätt i negativhållaren i öppningen på filmskannerns högra sida såsom visas.
Korrekt ordningsföljd för skanning
1. Skjut in eller ladda filmen eller den negativa filmen i hållaren.
2. Placera hållaren i skannern.
3. Anslut USB-kabeln till datorn.
4. Tryck på strömknappen för att sätta på skannern.
5. Tryck på skanningsknappen för att påbörja skanningen.
6. Ta alltid ut minneskortet efter att du är klar.
7. Bilderna kan också läsas från datorn genom USB-anslutning.
Bruksanvisning
Ta bilder
När videofrekvensen har ställts in kan bilden tas om cirka 3 sekunder. Gå till huvudmenyn
och välj bildtagningsläget (Capture mode) för att ställa in bildstil och EV-värde manuellt.
5 M Upplösning
Spara på kort
00000 Tillgängligt skanningstal
Uppspelningsläge
Spegelbild/rotering
Page 72

72
©2012 NEDIS BV. Camlink is a registered trademark of NEDIS BV. Although every effort has been
made to ensure the accuracy of the information contained in this manual specifications are subject to
change and therefore NEDIS BV cannot guarantee its correctness and completeness at all times.
Kompensation för exponering (EV -2~2)
Meny och ström på/av
Bildtagningsläge
Spegelbild/rotering
Om du behöver en spegelbild eller roterad bild när en bild skannas kan du trycka på
roteringsknappen
för att justera bilden. Efter att du tryckt på knappen kan du ta
bilden.
Tryck på spegelbildsknappen
för att ändra på bildens håll (från vänster till höger).
Page 73

73
©2012 NEDIS BV. Camlink is a registered trademark of NEDIS BV. Although every effort has been
made to ensure the accuracy of the information contained in this manual specifications are subject to
change and therefore NEDIS BV cannot guarantee its correctness and completeness at all times.
Fortsätt trycka på roteringsknappen
för att vända upp och ner på bilden.
Huvudmenyn
1. Bildtagningsläge (Capture): A: Svartvit film B: Positiv film C: Negativ film.
2. Exponering (Exposure): Kompensation för exponering (EV - 2~2).
3. Upplösning (Resolution): 5 megapixlar/10 megapixlar.
4. Språk (Language): Engelska, franska, tyska, italienska, spanska, kinesiska, förenklad
kinesiska, japanska.
5. USB MSDC: MSDC-läge (masslagring).
Bildtagningsläge
Bildstil
Tryck på menyknappen för att gå till huvudmenyn för att välja bildstil för bildtagningsläget.
Välj önskad bildtyp som positiv film, negativ film, svartvit.
Page 74

74
©2012 NEDIS BV. Camlink is a registered trademark of NEDIS BV. Although every effort has been
made to ensure the accuracy of the information contained in this manual specifications are subject to
change and therefore NEDIS BV cannot guarantee its correctness and completeness at all times.
1. Svartvit film: välj svartvitt om du har svartvit film i hållaren.
2. Positiv film: välj positiv film om du har positiv film i hållaren.
3. Negativ film: välj negativ film om du har negativ film i hållaren.
Kompensation för exponering
Tryck på menyknappen för att gå till huvudmenyn för att välja kompensation för
exponering i exponeringsläget. Här kan du ställa in exponeringsvärde för den skannade
bilden.
Upplösning
Du kan välja 5 M eller 10 M i undermenyn för upplösning.
Page 75

75
©2012 NEDIS BV. Camlink is a registered trademark of NEDIS BV. Although every effort has been
made to ensure the accuracy of the information contained in this manual specifications are subject to
change and therefore NEDIS BV cannot guarantee its correctness and completeness at all times.
Språk
Obs! Välj engelska, franska, tyska, italienska, spanska, kinesiska, förenklad kinesiska eller
japanska.
USB MSDC
A: Sätt på skannern och gå till huvudmenyn efter att USB-kabeln anslutits till datorn.
B: Välj lagringsplats med upp-/ned-knappen. Bekräfta med OK.
C: Öppna mappen på datorn. Du kan nu visa bilderna på datorn.
Underhåll
Rengöring: Vi rekommenderar starkt att använda en ren och torr bomullstrasa (utan
alkohol) för att göra rent glasytan regelbundet för att få tydliga bilder.
Garanti
Varken garanti eller skadeståndsskyldighet gäller vid ändringar eller modifieringar av
produkten, eller för skador som har uppstått på grund av felaktig användning av denna
produkt.
Friskrivningsklausul
Utseende och specifikationer kan komma att ändras utan föregående meddelande.
A
lla logotyper, varumärken och produktnamn är varumärken eller registrerade varumärken
som tillhör sina respektive ägare och är härmed erkända som sådana.
Behåll bruksanvisningen och förpackningen för eventuellt framtida behov.
Kassering
• Denna produkt är avsedd för separat insamling vid en lämplig
återvinningscentral. Släng inte denna produkt bland vanligt hushållsavfall.
• För mer information, kontakta återförsäljaren eller lokal myndighet med ansvar
för avfallshantering.
Den här produkten har tillverkats och levereras i enlighet med alla relevanta regler
och direktiv som gäller för alla medlemsstater inom Europeiska Unionen. Den
efterlever även alla tillämpliga specifikationer och regler i försäljningslandet.
Formell dokumentation finns att beställa på begäran. Detta omfattar, men är inte
begränsat till: Deklaration om överensstämmelse (och produktidentitet),
materialsäkerhetsdatablad, produkttestrapport.
Page 76

76
©2012 NEDIS BV. Camlink is a registered trademark of NEDIS BV. Although every effort has been
made to ensure the accuracy of the information contained in this manual specifications are subject to
change and therefore NEDIS BV cannot guarantee its correctness and completeness at all times.
Kontakta vår kundtjänst för att få hjälp:
via webbplatsen: http://www.nedis.com/en-us/contact/contact-form.htm
via e-post: service@nedis.com
via telefon: +31 (0)73-5993965 (under kontorstid)
NEDIS B.V., De Tweeling 28, 5215 MC ’s-Hertogenbosch, NEDERLÄNDERNA
NO– Norsk
Innledning
Ingen PC nødvendig for bruk. 5 megapiksels uavhengig film/slide-scanner for å
scanne inn film til ditt SD-kort eller datamaskin. Støtter diverse SD-kort med en
størrelse på opptil 32 GB SDHC. USB 2.0-grensesnitt med USB-drift eller strømdrift,
TV ut-funksjon: NTSC/PAL.
◆ Filmscanner
◆ USB-kabel
◆ Videokabel
◆ Negativ film-holder
◆ Positiv lysbilde-holder
◆ Hurtigmater for lysbilde
◆ DC 5 V-adapter
◆ Instruksjonshefte
◆ Børste
MERK: Du kan bruke den medleverte børsten for å rengjøre baklyspanelet.
Tekniske spesifikasjoner
Størrelse 88,15 (L) × 86,25 (B) × 111,20 (H) mm
Vekt 301 g
Sensor 1/3,2” 5 megapiksel CMOS
Effektiv oppløsning 5 megapiksel
Lagringsmedia Ekstern: SD-kort, kompatibel med SDHC
Følsomhet Auto
Linse F# 6.0, f = 6,34 mm
Fokusområde 5,6 cm
Stillbilde Format: JPEG-oppløsning: 5M, 10M (interpolering)
Zoom Nei
Display 2,36” TFT
TV-utgangsformat NTSC/PAL
Lyskilder Baklyskompensasjon
Hvitbalanse Auto
Eksponeringskompensasjon Auto
Grensesnitt MSDC: USB 2.0 (high speed)
Automatisk påslåing Nei
Page 77

77
©2012 NEDIS BV. Camlink is a registered trademark of NEDIS BV. Although every effort has been
made to ensure the accuracy of the information contained in this manual specifications are subject to
change and therefore NEDIS BV cannot guarantee its correctness and completeness at all times.
Strøm DC 5V
Operativsystem Windows XP, Vista, 7, 8
CPU Intel Pentium 4/2,8 GHz eller høyere
Minne 512 MB eller mer
Videokort 64 MB
Overføringstilkobling Standard USB2.0 eller høyere
Harddiskkapasitet Minst 200 MB
Instruksjonshefte Ja
Adapter Ja
Positiv bordholder Ja
Negativ bordholder Ja
Børste Ja
USB-kabel Ja
Sikkerhetsforhåndsregler
For å redusere faren for strømstøt, skal dette produktet
BARE åpnes av en autorisert tekniker når vedlikehold er
nødvendig. Koble produktet fra strømmen og annet utstyr
dersom et problem oppstår. Ikke utsett produktet for vann
eller fuktighet.
Ventilasjon: Enheten må plasseres slik at god ventilasjon ikke hindres.
Varme: Enheten bør plasseres unna svært varme kilder som radiatorer eller ovner.
Perioder uten bruk: USB-kabelen til enheten bør plugges ut fra datamaskinen hvis
enheten ikke skal brukes på lang tid.
USB-overbelastning: Overbelast ikke USB-tilkoblingene på datamaskinen din. Hvis du har
for mange enheter koblet til datamaskinen din som trådløs mus, mediaspiller, mobiltelefon
eller andre USB-drevne enheter, kan det hende at det ikke er nok strøm for at
filmscanneren skal virke riktig.
Service: Brukeren bør ikke prøve å utføre service på enheten utover det som er beskrevet
i bruksanvisningen. All annen service må gjøres av en kvalifisert person.
Filmholder: Designet til filmholderen følger ISO-standard.
I noen tilfeller vil ikke hullene i filmen stemme helt med oppsettet til holderen. Dette skyldes
et ikke-standard kamera. I dette tilfellet vil det bli en liten sort linje på kanten av rammen
som enkelt kan klippes vekk med et bilderedigeringsprogram.
*ISO-international Organization for Standardisation
Installasjonsanvisninger
◆ Plasser filmscanneren på siden og sett inn enden av børsten til døren på høyre side.
Beskrivelse av delene:
Positiv lysbilde-holder
Page 78

78
©2012 NEDIS BV. Camlink is a registered trademark of NEDIS BV. Although every effort has been
made to ensure the accuracy of the information contained in this manual specifications are subject to
change and therefore NEDIS BV cannot guarantee its correctness and completeness at all times.
Negativ film-holder
Hurtigmater for lysbilde
Børste
Bruke de inkluderte holderne
Hurtigmater for lysbilde
1. Når spaken er helt til høyre, stables lysbildene i hurtigmateren.
2. Plasser hurtigmateren i filmholdersporet.
3. Skyv spaken til venstre og deretter til høyre for å mate inn et lysbilde fra materen til
SLIDES 2. Gjenta dette steget for påfølgende lysbilder (som vil skyve de brukte
lysbildene ut den andre side).
Laster inn lysbilder
(1) (2)
(1) Hold lysbildet opp mot lyset. Lysbildesiden med merket vendes fra deg. Se gjennom
lysbildet. Det skal se normalt ut (ikke et speilbilde). Snu nå lysbildet slik at bildet blir
opp-ned mens du ser på samme side.
(2) Åpne lysbildeholderen på det markerte stedet på toppen. Med lysbildeholderen åpen,
plasseres lysbildet i det nedsenkede området i holderen – lysbildet skal passe perfekt.
Merk: Håndter lysbildene forsiktig. Støv, skraper eller fingeravtrykk vil vises på dine
lagrede bilder. Bruk hvis mulig bomullshansker når du håndterer lysbilder. Det
anbefales at du bruker trykkluft for å fjerne støv på lysbildene. Dette er ikke inkludert
Page 79

79
©2012 NEDIS BV. Camlink is a registered trademark of NEDIS BV. Although every effort has been
made to ensure the accuracy of the information contained in this manual specifications are subject to
change and therefore NEDIS BV cannot guarantee its correctness and completeness at all times.
med filmscanneren men kan kjøpes hos en forhandler for kontorutstyr eller elektronikk.
(3) (4)
(3) Lukk lysbildeholderen og trykk på kantene slik at den låses på plass.
(4) Hold den på plass som vist på filmscanneren.
Sett inn lysbildeholderen i sporet på høyre side av filmscanneren som vist.
Laste inn negativer
(1) (2)
(1) Hold negativet opp mot lyset. Når du ser gjennom negativetl, skal du kunne lese de
små negative tallene normalt (ikke et speilbilde).
Snu nå negativet slik at bildet blir opp-ned mens du ser på samme side.
(2) Åpne negativholderen på det markerte stedet på toppen. Med negativholderen åpen,
plasseres negativen i holderen slik at hullene stemmer med hullene på holderen.
Merk: Håndter negativer forsiktig. Støv, skraper eller fingeravtrykk vil vises på dine
lagrede bilder. Bruk hvis mulig bomullshansker når du håndterer negativer. Det
anbefales at du bruker trykkluft for å fjerne støv på negativene.
Dette er ikke inkludert med filmscanneren men kan kjøpes hos en forhandler for
kontorutstyr eller elektronikk.
(3) (4)
(3) Lukk negativholderen og trykk på kantene slik at den låses på plass. Hold den på plass
som vist på filmscanneren.
(4) Sett inn negativholderen i sporet på høyre side av filmscanneren som vist.
Page 80

80
©2012 NEDIS BV. Camlink is a registered trademark of NEDIS BV. Although every effort has been
made to ensure the accuracy of the information contained in this manual specifications are subject to
change and therefore NEDIS BV cannot guarantee its correctness and completeness at all times.
Riktig bruksrekkefølge
1. Skyv eller mat filmen eller negativet inn i holderen.
2. Plasser holderen i scanneren.
3. Koble USB-kabelen til PC-en.
4. Trykk på strømknappen for å slå på scanneren.
5. Trykk på scanneknappen for å starte scanningen.
6. Ta alltid ut lagringskortet etter at du er ferdig.
7. Bilder kan også leses fra PC-en med USB-tilkoblingen.
Brukerveiledning
Fang bilde
Når videofrekvensen har blitt satt, kan bildet fanges i omtrent 3 sek. Gå inn i
hovedmenyen og velg Fang-modus for å velge lysbildestil og EV-verdi manuelt.
5 M Oppløsning
Lagre til kort
00000 Scannemengde tilgjengelig
Avspillingsmodus
Speilbilde/rotering
Eksponeringskompensasjon (EV -2~2)
Meny og strøm på/av
Scannemodus
Speilbilde/rotering
Hvis du behøver et speilbilde eller rotert bilde når et bilde scannes, kan du trykke på
rotasjonsknappen
for å justere. Etter at knappen trykkes kan du scanne bildet.
Page 81

81
©2012 NEDIS BV. Camlink is a registered trademark of NEDIS BV. Although every effort has been
made to ensure the accuracy of the information contained in this manual specifications are subject to
change and therefore NEDIS BV cannot guarantee its correctness and completeness at all times.
Trykk
-knappen (speilbilde), bildet vil endres (fra venstre til høyre).
Fortsett å trykke
-knappen (rotasjon), bildestedet vil endres (fra opp til ned).
Page 82

82
©2012 NEDIS BV. Camlink is a registered trademark of NEDIS BV. Although every effort has been
made to ensure the accuracy of the information contained in this manual specifications are subject to
change and therefore NEDIS BV cannot guarantee its correctness and completeness at all times.
Hovedmeny
1. Capture (Scanne)-modus: A: Sort/hvitt-film: Positiv film C: Negativ film.
2. Exposure (Eksponering): Eksponeringskompensasjon (EV -2~2).
3. Resolution (Oppløsning): 5 mega/10 mega.
4. Language (Språk): Engelsk, fransk, tysk, italiensk, spansk, kinesisk, forenklet kinesisk,
japansk.
5. USB MSDC: MSDC-modus (masselagring).
Scannemodus
Lysbildestil
Trykk manuell-knappen for å gå inn i hovedmenyen for å velge lysbildestil i
bildetakingsmodus. Velg ønsket bildetype som positiv film, negativ film, sort/hvitt.
1. S/H-film, velg B&W hvis det er S/H-film på bordholderen.
2. Positiv film, velg positiv film hvis det er positiv film på bordholderen.
3. Negativ film, velg negativ film hvis det er negativ film på bordholderen.
Eksponeringskompensasjon
Trykk meny-knappen for å gå inn i hovedmenyen i eksponeringsmodus. Her kan du velge
eksponeringsverdi til det scannede bildet.
Page 83

83
©2012 NEDIS BV. Camlink is a registered trademark of NEDIS BV. Although every effort has been
made to ensure the accuracy of the information contained in this manual specifications are subject to
change and therefore NEDIS BV cannot guarantee its correctness and completeness at all times.
Oppløsning
5 M eller 10 M kan velges etter at det er lagt inn i undermenyen for oppløsning.
Språk
Merk: Velg Engelsk, fransk, tysk, italiensk, spansk, kinesisk, forenklet kinesisk eller og.
USB MSDC
A: Skru på scanneren og gå inn i hovedmenyen etter å ha koblet USB-kabelen til din PC.
B: Velg lagring med opp/ned-tasten. Klikk "OK" for å bekrefte.
C: Åpne mappen på din PC. Nå kan du vise bildene på PC-en.
Vedlikehold
Rengjøring: Vi anbefaler sterkt at du bruker en ren, tørr bomullspinne uten alkohol for å
rengjøre glassoverflaten periodisk for å få et rent bilde.
Garanti
Ingen garanti eller erstatningsansvar aksepteres ved endringer og modifiseringer av
produktet eller skade forårsaket av uriktig bruk av dette produktet.
Page 84

84
©2012 NEDIS BV. Camlink is a registered trademark of NEDIS BV. Although every effort has been
made to ensure the accuracy of the information contained in this manual specifications are subject to
change and therefore NEDIS BV cannot guarantee its correctness and completeness at all times.
Ansvarsfraskrivelse
Utforming og spesifikasjoner kan endres uten forhåndsvarsel.
Alle logoer, merker og produktnavn er varemerker eller registrerte varemerker til de
respektive eierne, og skal behandles som dette.
Behold denne veiledningen og innpakningen for fremtidig referanse.
Avhending
• Dette produktet må avhendes på egnede oppsamlingssteder. Du må ikke
avhende dette produktet som husholdningsavfall.
• Ta kontakt med leverandøren eller lokale myndigheter hvis du ønsker mer
informasjon om avhending.
Dette produktet har blitt produsert og levert i henhold til alle relevante
bestemmelser og direktiver, gyldig for alle medlemsstater i EU. Det overholder også
alle gjeldende spesifikasjoner og bestemmelser i landet det selges i.
Formell dokumentasjon er tilgjengelig på forespørsel. Dette inkluderer, men
begrenser seg ikke til: Samsvarserklæring (og produktidentitet) dataark for
materialsikkerhet produkttestrapport.
Vennligst kontakt kundeservice for hjelp:
på nettsiden: http://www.nedis.com/en-us/contact/contact-form.htm
via e-post: service@nedis.com
via telefon: +31 (0)73-5993965 (i kontortiden)
NEDIS B.V., De Tweeling 28, 5215 MC ’s-Hertogenbosch, THE NETHERLANDS
DK– Dansk
Introduktion
Ingen pc nødvendig til brug. 5 Megapixel separat film/diasscanner til at scanne dine
film til dit SD-kort eller computer. Understøtter forskellige typer SD-kort op til 32GB
SDHC. USB 2.0 brugerflade med USB-strøm eller vekselstrøms tv-out-funktion:
NTSC/PAL.
◆ Filmscanner
◆ USB-kabel
◆ Videokabel
◆ Filmholder til negativer
◆ Filmholder til positiver
◆ Kvikdiaslader
◆ 5V-adapater, jævnstrøm
◆ Vejledning
◆ Pensel
BEMÆRK: Du kan bruge den medfølgende pensel til rengøre lyspanelet.
Page 85

85
©2012 NEDIS BV. Camlink is a registered trademark of NEDIS BV. Although every effort has been
made to ensure the accuracy of the information contained in this manual specifications are subject to
change and therefore NEDIS BV cannot guarantee its correctness and completeness at all times.
Tekniske specifikationer
Størrelse 88,15 (L) X 86,25 (B) X 111,20 (H) mm
Vægt 301g
Sensor 1/3,2” 5 megapixel CMOS
Effektiv opløsning 5 megapixel
Lagringsmedie Ekstern: SD-kort, kompatibelt SDHC-kort
Sensitivitet Auto
Linse Fikseret fokus F/6.0 F = 6,34mm
Fokusområde 5,6cm
Stilbillede Format: JPEG, opløsning: 5M, 10M (interpolering)
Zoom Nej
Visning 2,36” TFT
Tv-outputformat NTSC/PAL
Lyskilder Baggrundsbelysning
Hvidbalance Auto
Eksponeringskompensation Auto
Brugerflade MSDC: USB 2.0 (højhastighed)
Automatisk aktivering Nej
Strømforsyning 5V, jævnstrøm
Operativsystem Windows XP, Vista, 7, 8
CPU Intel Pentium 4/2,8GHz eller højere
Hukommelse 512MB eller højere
Videokort 64MB
Overførselsforbindelse Standard USB 2.0 eller højere
Harddiskkapacitet Mindst 200MB
Vejledning Ja
Adapter Ja
Diasholder til positiver Ja
Diasholder til negativer Ja
Pensel Ja
USB-kabel Ja
Sikkerhedsforholdsregler
For at nedsætte risikoen for elektrisk stød, må dette
produkt, f.eks. når der kræves service, KUN åbnes af en
autoriseret tekniker. Frakobl produktet stikkontakten og
andet udstyr, hvis der opstår et problem. Udsæt ikke
produktet for vand eller fugt.
Ventilation: Enheden bør placeres således, at dens position eller placering ikke hindrer
passende ventilation.
Varme: Enheden bør placeres væk fra kilder med stærk varme, såsom radiatorer eller
ovne.
Inaktiv periode: USB-kablet bør frakobles computeren, når enheden ikke bruges i
længere perioder.
Page 86

86
©2012 NEDIS BV. Camlink is a registered trademark of NEDIS BV. Although every effort has been
made to ensure the accuracy of the information contained in this manual specifications are subject to
change and therefore NEDIS BV cannot guarantee its correctness and completeness at all times.
USB-belastning: Belast ikke USB-forbindelserne på din computer. Hvis du har for mange
enheder tilsluttet til din computer, såsom en trådløs mus, mediecenter, mobiltelefon eller
USB-drevne enheder, er der muligvis ikke nok strøm til, at filmscanneren kan operere
korrekt.
Vedligeholdelse: Brugeren bør ikke forsøge at udbedre enheden, udover som angivet i
brugervejledningen. Al anden vedligeholdelse bør udføres af kvalificeret personale.
Filmholder: Filmholderens design er i overensstemmelse med ISO-standarderne.
I nogle tilfælde vil hullerne i filmen ikke matche helt præcist med justeringen i holderen.
Dette forårsages af et atypisk kamera. I dette tilfælde vil der være en lille sort linje i kanten
af billedet, som let kan redigeres bort ved hjælp fotoredigeringssoftware.
*ISO-International Organisation for Standardisering
Installationsvejledninger
◆ Placer filmscanneren på siden og indfør enden af penslen i den lille dør på højre side.
Beskrivelse af dele:
Filmholder til positiver
Filmholder til negativer
Kvikdiaslader
Pensel
Brug af medfølgende holdere
Kvikdiaslader
1. Med håndtaget i yderste højre position, indsat da dine dias i kvikdiasladeren.
2. Placer kvikdiasladeren i filmholderens åbning.
Page 87

87
©2012 NEDIS BV. Camlink is a registered trademark of NEDIS BV. Although every effort has been
made to ensure the accuracy of the information contained in this manual specifications are subject to
change and therefore NEDIS BV cannot guarantee its correctness and completeness at all times.
3. Tryk håndtaget til venstre og derefter til højre for indføre et dias fra indlæseren til
DIAS 2. Gentag dette trin for efterfølgende dias (hvilket vil skubbe forrige dias ud på
den anden side).
Isætning af dias
(1) (2)
(1) Hold dias op mod lyset. Vend varemærkediasset på diasset væk fra dig selv. Se
gennem diasset. Det bør se normalt ud (ikke spejlvendt). Vend nu diasset, så billedet
vendes på hovedet, stadig med samme side mod dig selv.
(2) Åbn diasholderen ved markeringen i toppen. Med diasholderen åben, placer diasset i
det afmærkede område i holderen - diasset bør passe perfekt ind.
Bemærk: Behandl dias forsigtigt. Støv, ridser eller fingeraftryk vil optræde på dine
gemte billeder. Hvis muligt, så brug bomuldshandsker ved behandling af dias. Det
anbefales, at du bruger komprimeret luft til fjerne støv fra dias. Dette følger ikke med
filmscanneren, men kan købes hos de fleste forhandlere af kontorartikler eller
elektronik.
(3) (4)
(3) Luk diasholderen og tryk på kanterne så det låses fast.
(4) Hold det i samme position, som angivet på filmscanneren.
Indsæt diasholderen i åbningen på højre side af filmscanneren, som vist.
Indføring af negativer
(1) (2)
(1) Hold negativet op mod lyset. Når du ser på negativet, bør du være i stand til at læse de
små talnegativer normalt (ikke spejlvendt).
Vend nu negativet så billedet vendes på hovedet, stadig med samme side mod dig selv.
Page 88

88
©2012 NEDIS BV. Camlink is a registered trademark of NEDIS BV. Although every effort has been
made to ensure the accuracy of the information contained in this manual specifications are subject to
change and therefore NEDIS BV cannot guarantee its correctness and completeness at all times.
(2) Åbn negativholderen ved markeringen i toppen. Med negativholderen åben, placer nu
negativet i holderen, så mærkerne flugter med mærkerne på holderen.
Bemærk: Behandl negativer forsigtigt. Støv, ridser eller fingeraftryk vil optræde på dine
gemte billeder. Hvis muligt, så brug bomuldshandsker ved behandling af negativer. Det
anbefales, at du bruger komprimeret luft til fjerne støv fra negativer.
Dette følger ikke med filmscanneren, men kan købes hos de fleste forhandlere af
kontorartikler eller elektronik.
(3) (4)
(3) Luk negativholderen og tryk på kanterne så det låses fast. Hold det i samme position
som angivet på filmscanneren.
(4) Indsæt negativholderen i åbningen på højre side af filmscanneren, som vist.
Korrekt anvendelsessekvens
1. Indfør eller indsæt film eller negativer i holderen.
2. Placer holderen i scanneren.
3. Forbind USB-kablet til pc'en.
4. Tryk på tænd/sluk-knappen for at tænde scanneren.
5. Tryk på scan-knappen for at påbegynde scan.
6. Tag altid hukommelseskortet ud efter brug.
8. Billeder kan også åbnes på pc'en via USB-forbindelsen.
Brugervejledninger
Fasthold billede
Når videofrekvensen er angivet, kan billedet fastholdes ved omkring 3 sek. Åbn
hovedmenuen og vælg funktionen Fasthold til at angive diasstil og EV-værdi manuelt.
5M Opløsning
Gem på kort
Page 89

89
©2012 NEDIS BV. Camlink is a registered trademark of NEDIS BV. Although every effort has been
made to ensure the accuracy of the information contained in this manual specifications are subject to
change and therefore NEDIS BV cannot guarantee its correctness and completeness at all times.
00000 Tilgængelig scankapacitet
Afspilningstilstand
Spejlvend/rotation
Eksponeringskompensation (EV - 2~2)
Menu og tænd/sluk
Fasthold
Spejlvend/rotation
Hvis du har brug for at spejlvende eller rotere et billede når det scannes, kan du trykke på
tasten rotation
for at justere det. Efter at have trykket på tasten, kan du fastholde
billedet.
Tryk på
tasten (spejlvend), billedets justering ændres (fra venstre til højre).
Page 90

90
©2012 NEDIS BV. Camlink is a registered trademark of NEDIS BV. Although every effort has been
made to ensure the accuracy of the information contained in this manual specifications are subject to
change and therefore NEDIS BV cannot guarantee its correctness and completeness at all times.
Fortsæt med at trykke på
tasten (rotation), billedets justering ændres (fra op til ned).
Hovedmenu
1. Fasthold (Fasthold): A: Sort-hvid film B: Positiv film C: Negativ film.
2. Eksponering (Eksponering): Eksponeringskompensation (EV - 2~2).
3. Opløsning (Opløsning): 5mega/10mega.
4. Sprog (Sprog): Engelsk, fransk, tysk, italiensk, spansk, kinesisk, forenklet kinesisk,
japansk.
5. USB-MSDC: MSDC-tilstand (lager).
Page 91

91
©2012 NEDIS BV. Camlink is a registered trademark of NEDIS BV. Although every effort has been
made to ensure the accuracy of the information contained in this manual specifications are subject to
change and therefore NEDIS BV cannot guarantee its correctness and completeness at all times.
Fasthold
Diasstil
Tryk på tasten manuel for at åbne den manuelle hovedmenu og vælge diasstil for
fototilstand. Vælg den ønskede billedtype f.eks. positiv film, negativ film, sort-hvid.
1. Sort-hvid film: vælg sort-hvid, hvis der bruges sort-hvid film i holderen.
2. Positiv film: vælg positiv film, hvis der bruges positiv film i holderen.
3. Negativ film: vælg negativ film, hvis der bruges negativ film i holderen.
Eksponeringskompensation
Tryk på tasten menu for at åbne hovedmenuen og vælge eksponeringskompensation
under eksponeringstilstand. Her kan du indstille eksponeringsværdien for det scannede
billede.
Opløsning
5M eller 10M kan vælges indtastning i undermenuen for opløsning.
Page 92

92
©2012 NEDIS BV. Camlink is a registered trademark of NEDIS BV. Although every effort has been
made to ensure the accuracy of the information contained in this manual specifications are subject to
change and therefore NEDIS BV cannot guarantee its correctness and completeness at all times.
Sprog
Bemærk: Vælg Engelsk, fransk, tysk, italiensk, spansk, kinesisk, forenklet kinesisk eller og.
USB-MSDC
A: Tænd for scannere og åbn hovedmenuen efter tilslutning af USB-kablet til din pc.
B: Vælg lagring med op/ned-tasterne. Klik ”OK” for at bekræfte.
C: Åbn mappen på din pc. Du kan nu se billederne på din pc.
Vedligeholdelse
Rengøring: Vi anbefaler kraftigt at bruge en ren, tør, alkoholfri vatpind til at rense
glasoverfladen regelmæssigt for et klart billede.
Garanti
Ingen garanti og ikke noget ansvar kan påtages for ændringer af produktet eller for skade
på grund af forkert brug af dette produkt.
Ansvarsfraskrivelse
Design og specifikationer kan ændres uden varsel.
Alle bomærker og produktnavne er varemærker eller registrerede varemærker tilhørende
deres respektive ejere og anses herved som sådan.
Gem brugervejledningen og emballagen til senere brug.
Page 93

93
©2012 NEDIS BV. Camlink is a registered trademark of NEDIS BV. Although every effort has been
made to ensure the accuracy of the information contained in this manual specifications are subject to
change and therefore NEDIS BV cannot guarantee its correctness and completeness at all times.
Bortskaffelse
• Dette produkt skal afleveres på et passende affalds indsamlingspunkt. Bortskaf
ikke dette produkt sammen med husholdningsaffald.
• For mere information, kontakt forhandleren eller den lokale myndighed der er
ansvarlig for kontrol af affald.
Dette produkt er fremstillet og leveres i overensstemmelse med alle relevante
forordninger og direktiver, der er gældende for alle EUs medlemsstater. Produktet
overholder ligeledes alle gældende specifikationer og forskrifter i de lande, hvor
produktet sælges.
Formel dokumentation kan fremlægges på forlangende. Dette omfatter, men er ikke
begrænset til: Overensstemmelseserklæring (og produkt-ID), Sikkerhedsdatablad,
testrapport for produktet.
Kontakt venligst vores kundeservice for support:
via vores website: http://www.nedis.dk/da-dk/kontakt/kontaktformular.htm
via e-mail: service@nedis.com
via telefon: +31 (0)73-5993965 (i kontortiden)
NEDIS B.V., De Tweeling 28, 5215 MC ’s-Hertogenbosch, NEDERLANDENE
CZ – Cesky
Úvod
K používání zařízení není nutný počítač. Jedná se o 5megapixelový samostatný
skener filmů a diapozitivů s možností ukládání na kartu SD nebo do počítače.
Zařízení podporuje různé SD karty až do 32 GB SDHC. Napájení prostřednictvím
rozhraní USB 2.0 nebo AC napájecím adaptérem. Výstup do televizoru: NTSC a PAL.
◆ Filmový skener
◆ Kabel USB
◆ Videokabel
◆ Zásobník na negativy
◆ Zásobník na diapozitivy
◆ Rychlý podavač diapozitivů
◆ 5 V stejnosměrný napájecí adaptér
◆ Návod
◆ Štěteček
POZNÁMKA: Dodávaný štěteček lze použít k čištění panelu s podsvícením.
Technické údaje
Velikost 88,15 × 86,25 × 111,20 mm (d × š v)
Hmotnost 301 g
Snímač 1/3,2" CMOS 5 megapixelů
Efektivní rozlišení 5 megapixelů
Page 94

94
©2012 NEDIS BV. Camlink is a registered trademark of NEDIS BV. Although every effort has been
made to ensure the accuracy of the information contained in this manual specifications are subject to
change and therefore NEDIS BV cannot guarantee its correctness and completeness at all times.
Úložná média Externí: SD karta, kompatibilní SDHC karta
Citlivost Automatická
Objektiv Pevná ohnisková vzdálenost F/6.0, F=6,34 mm
Rozsah zaostření 5,6 cm
Snímek
Formát: JPEG, rozlišení: 5 megapixelů, 10 megapixelů
(interpolovaně)
Zoom Ne
Displej 2,36" TFT
Výstupní formát pro televizor NTSC a PAL
Světelné zdroje Kompenzace protisvětla
Vyvážení bílé Automatická
Kompenzace expozice Automatická
Rozhraní MSDC: USB 2.0 (high speed)
Automatické zapnutí Ne
Napájení 5 V stejnosm.
Podporovaný operační systém Windows XP, Vista, 7, 8
Procesor Intel Pentium 4/2,8 GHz a vyšší
Paměť 512 MB a větší
Videokarta 64 MB
Datové připojení Standardní USB 2.0 nebo vyšší
Kapacita pevného disku Alespoň 200 MB
Návod Ano
Adaptér Ano
Držák diapozitivů Ano
Držák negativů Ano
Štěteček Ano
Kabel USB Ano
Bezpečnostní opatření
Abyste snížili riziko úrazu elektrickým proudem, měl by
být tento výrobek otevřen POUZE autorizovaným
technikem, je-li to nezbytné. Dojde-li k poruše, odpojte
výrobek ze sítě a od ostatních zařízení. Výrobek
nevystavujte vodě nebo vlhkosti.
Ventilace: Zařízení je třeba umístit na takové místo a do takové polohy, aby byla zajištěna
jeho dostatečné ventilace.
Teplo: Zařízení by mělo být umístěno mimo dosah zdrojů tepla, jako jsou radiátory nebo
vařiče.
Období nepoužívání: Nepoužíváte-li zařízení po delší dobu, odpojte USB kabel zařízení
od počítače.
Přetížení USB: Nepřetěžujte USB konektory počítače. Je-li k počítači připojeno příliš
mnoho zařízení, jako je bezdrátová myš, přehrávač médií, mobilní telefon nebo jiná USB
zařízení, nemusí zbývat dostatečná napájecí kapacita k správnému fungování filmového
skeneru.
Údržba: Uživatel by sám neměl provádět údržbu mimo rozsah údržby popsané v tomto
návodu k použití. Jakákoli jiná údržba by měla být svěřena kvalifikované osobě.
Držák filmu: Provedení držáku filmu je v souladu s normou ISO.
Page 95

95
©2012 NEDIS BV. Camlink is a registered trademark of NEDIS BV. Although every effort has been
made to ensure the accuracy of the information contained in this manual specifications are subject to
change and therefore NEDIS BV cannot guarantee its correctness and completeness at all times.
V některých případech se však perforace filmu nemusí přesně shodovat s výstupky
držáku. Tento jev je způsoben nestandardním fotoaparátem. V takovém případě se na
okraji rámečku vytvoří slabá černá linka, kterou lze pomocí softwaru pro úpravu fotografií
snadno odstranit.
*ISO – International Organization for Standardisation (Mezinárodní organizace pro
standardizaci).
Pokyny k instalaci
◆ Položte filmový skener na stranu a do dvířek na pravé straně vložte konec štětečku.
Popis dílů:
Držák diapozitivů
Zásobník na negativy
Rychlý podavač diapozitivů
Štěteček
Používání dodávaných držáků
Rychlý podavač diapozitivů
1. Posuňte páčku zcela doprava a do rychlého podavače diapozitivů vložte diapozitivy.
2. Vložte rychlý podavač diapozitivů do otvoru pro držák filmu.
3. Přesunutím páčky doleva a poté opět doprava posunete diapozitiv z podavače držáku
další snímek. Opakujte tento krok i s dalšími diapozitivy (oskenované diapozitivy se
budou vysunovat na druhé straně).
Page 96

96
©2012 NEDIS BV. Camlink is a registered trademark of NEDIS BV. Although every effort has been
made to ensure the accuracy of the information contained in this manual specifications are subject to
change and therefore NEDIS BV cannot guarantee its correctness and completeness at all times.
Vkládání diapozitivů
(1) (2)
(1) Podržte diapozitiv proti světlu. Stranu diapozitivu s ochrannou známkou otočte směrem
od sebe. Zkontrolujte diapozitiv. Snímek by měl být zobrazený normálně (nikoli
zrcadlově). Nyní diapozitiv otočte, aby byl snímek při pohledu ze stejné strany vzhůru
nohama.
(2) V místě označeném na horní části otevřete držák diapozitivů. Nechte držák diapozitivů
otevřený a vložte dovnitř diapozitivy. Velikost by měla přesně odpovídat.
Poznámka: Manipulujte s diapozitivy opatrně. Jakýkoli prach, škrábance nebo otisky
prstů budou zobrazeny ve výsledném snímku. Je-li to možné, používejte při manipulaci
s diapozitivy bavlněné rukavice. Doporučujeme odstranit prach z diapozitivu pomocí
stlačeného vzduchu. Sprej se stlačeným vzduchem nebo zařízení pro odprašování
není součástí dodávky, ale lze jej zakoupit v jakémkoli obchodu s kancelářskými
potřebami nebo obchodu s elektronikou.
(3) (4)
(3) Zavřete držák na diapozitivy a stiskněte okraje, dokud nedojde k zacvaknutí.
(4) Podržte jej v poloze zobrazené na filmovém skeneru.
Držák diapozitivů vložte dle obrázku do otvoru na pravé straně filmového skeneru.
Vkládání negativů
(1) (2)
(1) Podržte negativ proti světlu. Prohlédněte si jej – malá čísla negativu byste měli
normálně (nikoli zrcadlově) přečíst.
Nyní negativ otočte, aby byl snímek při pohledu ze stejné strany vzhůru nohama.
Page 97

97
©2012 NEDIS BV. Camlink is a registered trademark of NEDIS BV. Although every effort has been
made to ensure the accuracy of the information contained in this manual specifications are subject to
change and therefore NEDIS BV cannot guarantee its correctness and completeness at all times.
(2) V místě označeném na horní části otevřete držák negativů. Nechte držák negativů
otevřený a vložte do něj negativy tak, aby jejich zářezy odpovídaly zářezům v držáku.
Poznámka: Manipulujte s negativy opatrně. Jakýkoli prach, škrábance nebo otisky
prstů budou zobrazeny ve výsledném snímku. Je-li to možné, používejte při manipulaci
s negativy bavlněné rukavice. Doporučujeme odstranit prach z negativu pomocí
stlačeného vzduchu.
Sprej se stlačeným vzduchem nebo zařízení pro odprašování není součástí dodávky,
ale lze jej zakoupit v jakémkoli obchodu s kancelářskými potřebami nebo obchodu
s elektronikou.
(3) (4)
(3) Zavřete držák na negativy a stiskněte okraje, dokud nedojde k zacvaknutí. Podržte jej
v poloze zobrazené na filmovém skeneru.
(4) Držák negativů vložte dle obrázku do otvoru na pravé straně filmového skeneru.
Správné pořadí postupu
1. Zasuňte nebo vložte film nebo negativ do držáku.
2. Vložte držák do skeneru.
3. Připojte USB kabel k počítači.
4. Stisknutím tlačítka napájení zapněte skener.
5. Začněte skenovat stisknutím tlačítka skenování.
6. Po ukončení skenování vždy vyjměte paměťovou kartu.
8. Obrázky si lze prohlédnout prostřednictvím USB připojení také na počítači.
Pokyny k použití
Snímání obrázku
Po nastavení videofrekvence se snímek naskenuje přibližně během 3 sekund. Otevřete
hlavní nabídku, vyberte režim Capture (Snímání) a ručně nastavte vzhled diapozitivů a
hodnotu EV.
Page 98

98
©2012 NEDIS BV. Camlink is a registered trademark of NEDIS BV. Although every effort has been
made to ensure the accuracy of the information contained in this manual specifications are subject to
change and therefore NEDIS BV cannot guarantee its correctness and completeness at all times.
5M Rozlišení
Ukládání na kartu
00000 Množství skenů k dispozici
Režim přehrávání
Zrcadlové převrácení/rotace snímku
Kompenzace expozice (EV -2 až 2)
Nabídka, zapnutí a vypnutí
Režim Capture (Snímání)
Zrcadlové převrácení/rotace snímku
Pokud je třeba při skenování zrcadlově převrátit obrázek, můžete jej upravit stisknutím
tlačítka rotace
. Po stisknutí tlačítka můžete sejmout obrázek.
Page 99

99
©2012 NEDIS BV. Camlink is a registered trademark of NEDIS BV. Although every effort has been
made to ensure the accuracy of the information contained in this manual specifications are subject to
change and therefore NEDIS BV cannot guarantee its correctness and completeness at all times.
Stiskněte tlačítko
(pro zrcadlové převrácení) a snímek se stranově převrátí (zleva
doprava).
Budete-li dále tisknout tlačítko
(pro rotaci), snímek se otočí vzhůru nohama (horní
stranou dolů).
Page 100

100
©2012 NEDIS BV. Camlink is a registered trademark of NEDIS BV. Although every effort has been
made to ensure the accuracy of the information contained in this manual specifications are subject to
change and therefore NEDIS BV cannot guarantee its correctness and completeness at all times.
Hlavní nabídka
1. Režim Capture (Snímání): A: B&W film (Černobílý film) B: Positive film (Pozitiv) C:
Negative film (Negativ).
2. Exposure (Expozice): Kompenzace expozice (EV -2 až 2).
3. Resolution (Rozlišení): 5 megapixelů/10 megapixelů.
4. Language (Jazyk): Angličtina, francouzština, němčina, italština, španělština, čínština,
zjednodušená čínština a japonština.
5. USB MSDC: Režim MSDC (hromadné úložiště).
Režim Capture (Snímání)
Vzhled diapozitivu
Stisknutím tlačítka nabídky otevřete hlavní nabídku a v režimu snímání zvolte vzhled
diapozitivu. Vyberte požadovaný typ snímku, například pozitiv, negativ nebo černobílý.
1. B&W film (Černobílý film): Je-li v držáku černobílý film, vyberte možnost B&W film
(Černobílý film).
2. Positive film (Pozitiv): Je-li v držáku pozitiv, vyberte možnost Positive film (Pozitiv).
3. Negative film (Negativ): Je-li v držáku negativ, vyberte možnost Negative film (Negativ).
 Loading...