

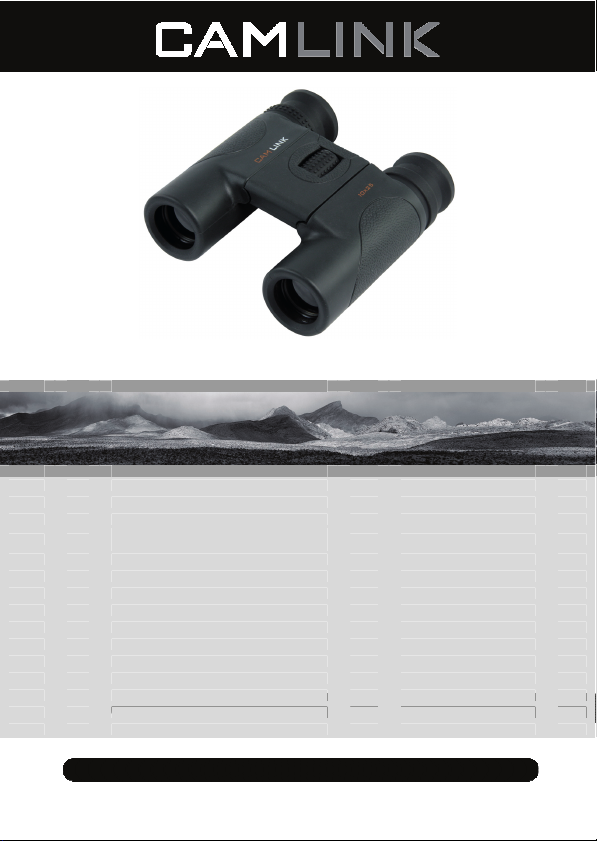
Camlink 8x25 mm binoculars User Manual [en, ru, de, es, fr, it, cs]
Foto
• GB - Nitrogen-Filled Waterproof Binoculars - User manual 3
• DE - Stickstoffgefülltes, wasserdichtes Fernglas - Bedienungsanleitung 5
• FR - Jumelles étanches remplies d’azote - Manuel de l’utilisateur 7
• NL -
• ES - Prismáticos impermeables rellenos de nitrógeno - Manual de Usuario 11
• IT - Binocolo impermeabile riempito con azoto - Manuale Utente 13
• FI - Typellä täytetyt vesitiiviit kiikarit - Käyttöopas 15
• SE - Kvävefyllda vattentäta kikare - Bruksanvisning 17
• NO - Nitrogen-Filled Waterproof Binoculars - Brukermanual 19
• DK - Kvælstoffyldt vandtæt kikkert - Brugervejledning 21
• CZ - Dalekohled plněný dusíkem - Návod k použití 23
• HU - Nitrogénnel töltött vízálló távcső - Használati útmutató 25
• GR - Αδιάβροχα κιάλια γεμισμένα με άζωτο - Εγχειρίδιο Χρήστη 27
• RO - Binoclu impermeabil umplut cu azot - Manual de instrucţiuni 29
• RU - Азото наполненный влагозащитный бинокль - Руководство пользователя 31
Type: CL-LANGHAM825
CL-LANGHAM1025
Waterbestendige met Stikstof Gevulde
Verrekijker
Document version: 1
- Gebruikershandleiding 9
©2012 NEDIS BV. Camlink is a registered trademark of NEDIS BV. Although every effort has been
made to ensure the accuracy of the information contained in this manual specifications are subject to
change and therefore NEDIS BV cannot guarantee its correctness and completeness at all times.

Nedis B.V., part of the Nedis Group
De Tweeling 28
5215 MC ‘s-Hertogenbosch
The Netherlands
Tel: +31 73 599 1055
Fax: +31 73 599 9699
Web: www.nedis.com or www.nedis.nl
© Any unauthorised use of the information in this manual is prohibited. No part of this manual may be reproduced,
stored in a database or retrieval system, or published, in any form or in any way, electronically or mechanically, by
print, photocopy, microfilm or by any other means without the express written permission of NEDIS.
©2012 NEDIS BV. Camlink is a registered trademark of NEDIS BV. Although every effort has been
made to ensure the accuracy of the information contained in this manual specifications are subject to
change and therefore NEDIS BV cannot guarantee its correctness and completeness at all times.
2
GB – English
Introduction
These binoculars are designed and built using the latest waterproof and anti-fogging technology. Integral
O-ring seals give complete moisture protection. Dry nitrogen filling of the binoculars also prevents the
internal optics from fogging.
Package contents:
• Binoculars
• Carry case
• Camera strap
• Manual
DO NOT LOOK DIRECTLY AT THE SUN THROUGH YOUR BINOCULARS TO AVOID SEVERE EYE
Technical specifications
CL-LANGHAM825
Type: 8 x 25
Magnification: 8x
Objective lens diameter: 25 mm
Type of prism: BaK-4 Roof Prism
Lens coating: Fully coated, broad band multicoated
objective lens
View angle: 6.4°
Field of view at 1000 m: 115 m
Field of view at 1000 yd: 345 ft
Exit pupil: 3.1 mm
Minimum focal length: 5 m
Dioptre adjustment length:+-5
Weight: 344 g
User instructions
CAUTION
DAMAGE.
CL-LANGHAM1025
Type: 10 x 25
Magnification: 10x
Objective lens diameter: 25 mm
Type of prism: BaK-4 Roof Prism
Lens coating: Fully coated, broad band multicoated
objective lens
View angle: 5.3°
Field of view at 1000 m: 96 m
Field of view at 1000 yd: 288 ft
Exit pupil: 2.5 mm
Minimum focal length: 5 m
Dioptre adjustment length:+-5
Weight: 346 g
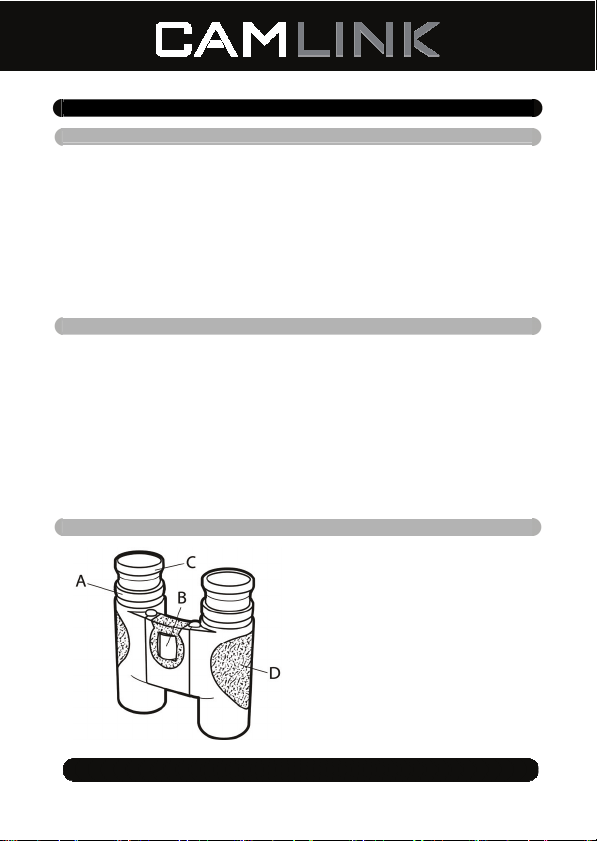
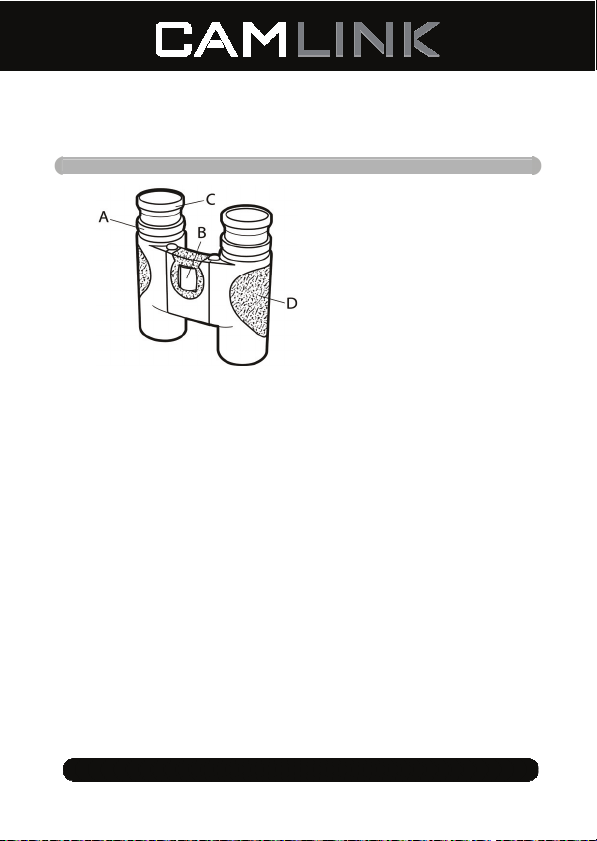
A: Diopter adjustment
B: Focus wheel
C: Twist up eye cups
D: Textured grip
©2012 NEDIS BV. Camlink is a registered trademark of NEDIS BV. Although every effort has been
made to ensure the accuracy of the information contained in this manual specifications are subject to
change and therefore NEDIS BV cannot guarantee its correctness and completeness at all times.
3

A
How to adjust the binoculars to your eyes
The distance between the eyes, which is called the interpupillary distance, varies from person to person.
To achieve perfect alignment of the binocular’s lenses to your eyes, follow these simple steps:
1. Hold your binoculars in the normal viewing position.
2. Grasp each barrel firmly. Gently move the barrels closer together or further apart until you see a
single circular field. Note the settings for future use.
How to adjust for individual eye strength
As individual eyesight varies from one person to another, there is a dioptre ring that allows you to fine-tune
the binoculars to your vision as described below:
1. Adjust interpupillary distance as described above.
2. Set the dioptre setting to zero and view a distant object.
3. Keep both eyes open at all times.
4. Using a lens cap, cover the right front objective lens (the side with the dioptre ring).
5. Adjust the central focus wheel to focus on a distant object with fine detail (e.g. brick wall, tree
branches etc.) until it appears as sharp as possible.
6. Uncover the right objective lens and cover the left objective lens, then view the same object.
7. Turn the dioptre ring until the object is as sharp as possible. Do not try to force the dioptre ring
beyond its stop position as this may damage it.
8. Your binoculars should now be adjusted to your eyes. Simply turn the central focus wheel to focus
the binoculars to any distance. Make a note of the dioptre setting for your eyes for future use.
Eyecups (for spectacles/sunglasses users)
Make sure the eyecups are in the twist-down position if you wear spectacles. This will bring your eyes
closer to the binoculars’ lenses to improve your field of view.
Maintenance
Caring for your binoculars
lways store your binoculars with eyecups extended. This avoids excessive stress and wear and tear
1.
on the eyecups when folded down.
2. Do not drop the binoculars.
3. Store in a cool and dry place.
Cleaning
1. Blow away any loose dust or debris on the lens (or use a soft lens brush).
2. To remove dirt or finger prints, clean gently with a good quality soft lens cloth. An unsuitable cloth or
unnecessary rubbing may scratch the lens surface and eventually cause permanent damage. A
microfibre cleaning cloth (available at most photo dealers) is ideal for routine cleaning of the optical
surfaces.
For a more thorough cleaning, photographic lens tissue and photographic-type lens cleaning fluid or
isopropyl alcohol may be used. Always apply cleaning fluid to the cleaning cloth - never directly to the
lens.
Warranty
No guarantee or liability can be accepted for any changes and modifications of the product or damage
caused due to incorrect use of this product.
Disclaimer
Designs and specifications are subject to change without notice.
All logos brands and product names are trademarks or registered trademarks of their respective holders
and are hereby recognised as such. Keep this manual and packaging for future reference.
©2012 NEDIS BV. Camlink is a registered trademark of NEDIS BV. Although every effort has been
made to ensure the accuracy of the information contained in this manual specifications are subject to
change and therefore NEDIS BV cannot guarantee its correctness and completeness at all times.
4
DE-Deutsch
Einleitung
Diese Ferngläser sind unter Verwendung der neuesten Wasserdicht- und Antibeschlagtechnologie
konzipiert und bearbeitet. Integrale O-Ringdichtungen geben vollständigen Feuchtigkeitsschutz. Trockene
Stickstoff-Füllung des Fernglases verhindert auch ein Beschlagen der internen Optik.
Packungsinhalt:
• Fernglas
• Tragetasche
• Kameratrageriemen
• Handbuch
SCHAUEN SIE NIEMALS MIT IHREM FERNGLAS DIREKT IN DIE SONNE, UM SCHWERE
Technische Daten
CL-LANGHAM825
Typ: 8 x 25
Leistung: 8 x
Objektivdurchmesser: 25 mm
Prismentyp: BaK-4 Dachkantenprisma
Linsenvergütung: Vollvergütete, mehrfach vergütete
Objektive mit dem Breitband
Betrachtungswinkel: 6,4°
Sichtfeld auf 1000 m: 115 Meter
Sichtfeld auf 1000 Yards: 345 Fuß
Austrittspupille: 3,1 mm
Kleinste Brennweite: 5 Meter
Dioptrie-Einstellungslänge:+-5
Gewicht: 344 g
Bedienungsanleitung
AUGENSCHÄDEN ZU VERMEIDEN.
VORSICHT
CL-LANGHAM1025
Typ: 10 x 25
Leistung: 10 x
Objektivdurchmesser: 25 mm
Prismentyp: BaK-4 Dachkantenprisma
Linsenvergütung: Vollvergütete, mehrfach vergütete
Objektive mit dem Breitband
Betrachtungswinkel: 5,3°
Sichtfeld auf 1000 m: 96 Meter
Sichtfeld auf 1000 Yards: 288 Fuß
Austrittspupille: 2,5 mm
Kleinste Brennweite: 5 Meter
Dioptrie-Einstellungslänge:+-5
Gewicht: 346 g
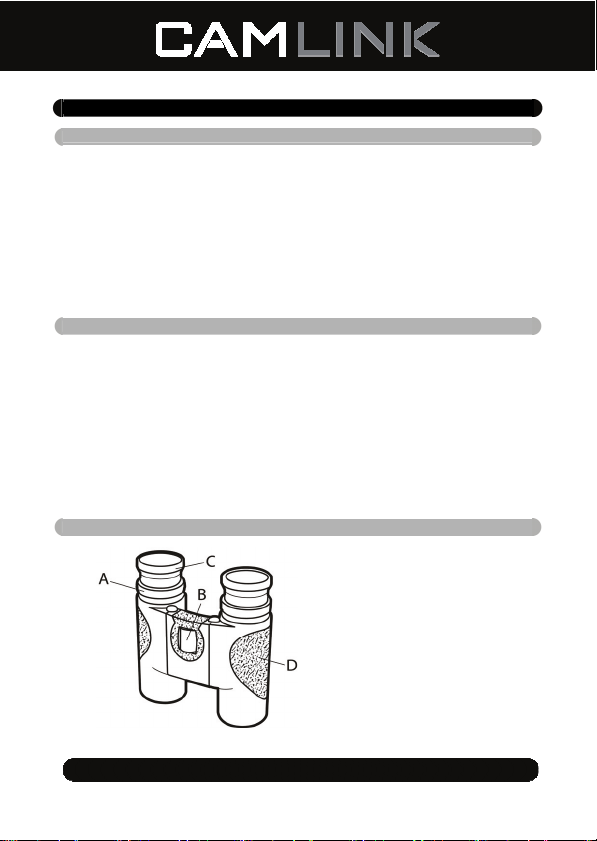
A: Dioptrie-Einstellung
B: Fokussierrad
C: Drehaugenmuscheln
D: Strukturierter Griff
©2012 NEDIS BV. Camlink is a registered trademark of NEDIS BV. Although every effort has been
made to ensure the accuracy of the information contained in this manual specifications are subject to
change and therefore NEDIS BV cannot guarantee its correctness and completeness at all times.
5

Einstellung des Fernglases, um an Ihre Augen anzupassen
Der Abstand zwischen den Augen, der so genannte Augenabstand, variiert von Person zu Person. Um die
perfekte und auf Ihre Augen abgestimmte Ausrichtung der Linsen im Fernglas zu erreichen, folgen Sie
diesen einfachen Schritten:
1. Halten Sie Ihr Fernglas in der normalen Betrachtungsposition.
2. Fassen Sie jeden Zylinder des Fernglases fest an. Verschieben Sie die Zylinder näher zusammen
oder weiter auseinander, bis Sie ein einziges kreisförmiges Feld sehen. Setzen Sie immer wieder Ihr
Fernglas in diese Position, bevor Sie sie.
Wie Sie Ihre persönliche Sehstärke anpassen
Da die individuelle Sehstärke von Mensch zu Mensch variiert, gibt es eine Dioptrie-Einstellung, die Ihnen
eine Feinabstimmung des Fernglases auf Ihre Vision, wie unten beschrieben, ermöglicht:
1. Stellen Sie den Augenabstand ein, wie oben beschrieben.
2. Stellen Sie die Dioptrie-Einstellung auf Null und betrachten Sie ein entferntes Objekt.
3. Halten Sie beide Augen jederzeit offen.
4. Mit einem Objektivdeckel decken Sie die rechte, vordere Objektivlinse (die gleiche Seite, die eine
Dioptrie-Einstellung hat).
5. Richten Sie das Fokussierrad aus, um sich auf ein entferntes Objekt mit feinen Details (z. B.
Ziegelmauer, Äste usw.) zu konzentrieren, bis es so scharf wie möglich erscheint.
6. Decken Sie die Objektivlinse auf der Dioptrie-Einstellungsseite auf, decken Sie die andere
Objektivlinse, dann betrachten Sie das gleiche Objekt.
7. Verwenden Sie nur den Dioptrie-Einstellungsring und drehen Sie ihn, bis das betrachtete Objekt so
scharf wie möglich ist. Versuchen Sie nicht, diesen Ring über seine Endposition zu forcieren, da er
dadurch beschädigt werden kann.
8. Ihr Fernglas sollte jetzt an Ihre Augen angepasst werden. Mit einfachem Drehen des zentralen
Fokussierrades wird das Fernglas in jeder Entfernung fokussiert. Notieren Sie sich die DioptrieEinstellung für Ihre Augen für eine spätere Verwendung.
Augenmuscheln (für Brillen-/Sonnenbrillen-Benutzer)
Achten Sie darauf, dass die Augenmuscheln in der Position der Drehung nach unten sind, wenn Sie eine
Brille tragen. Dies wird Ihre Augen den Linsen des Fernglases näher bringen, womit sich das Sichtfeld
verbessert.
Wartung
Pflege für Ihr Fernglas
1. Lagern Sie Ihr Fernglas immer mit ausgefahrenen Augenmuscheln. Dies vermeidet übermäßige
Beanspruchung und Verschleiß an den Augenmuscheln im eingeklappten Zustand.
2. Lassen Sie das Fernglas nicht fallen.
3. Lagern Sie es an einem kühlen, trockenen Ort.
Reinigung
1. Blasen Sie losen Staub oder Schmutz auf der Linse weg (oder verwenden Sie einen weichen Pinsel
für die Linse).
2. Um Schmutz oder Fingerabdrücke zu entfernen, reinigen Sie vorsichtig mit einem hochwertigen,
weichen Linsentuch. Unter Verwendung eines ungeeigneten Tuchs oder mit unnötigem Reiben kann
die Linse zerkratzt werden, und dies kann zu dauerhaften Schäden führen. Ein MikrofaserReinigungstuch (erhältlich bei den meisten Fotohändlern) ist ideal für die regelmäßige Reinigung der
optischen Flächen.
Für eine gründlichere Reinigung können fotografisches Linsentuch und fotografische ObjektivReinigungsflüssigkeit oder Isopropylalkohol verwendet werden. Geben Sie immer die
Reinigungsflüssigkeit auf das Tuch - niemals direkt auf die Linse.
©2012 NEDIS BV. Camlink is a registered trademark of NEDIS BV. Although every effort has been
made to ensure the accuracy of the information contained in this manual specifications are subject to
change and therefore NEDIS BV cannot guarantee its correctness and completeness at all times.
6

Garantie
Es kann keine Garantie oder Haftung für irgendwelche Änderungen oder Modifikationen des Produkts
oder für Schäden übernommen werden, die aufgrund einer nicht ordnungsgemäßen Anwendung des
Produkts entstanden sind.
Haftungsausschluss
Design und technische Daten können ohne vorherige Ankündigung geändert werden. Alle Logos, Marken
und Produktnamen sind Marken oder eingetragene Marken ihrer jeweiligen Eigentümer und werden
hiermit als solche anerkannt. Bitte bewahren Sie Bedienungsanleitung und Verpackung für spätere
Verwendung auf.
FR – Français
Introduction
Ces jumelles sont conçues et fabriquées à l’aide des dernières technologies d’étanchéité et d’antibuée.
Des joints toriques complets assurent la protection contre l’humidité. Le remplissage des jumelles à
l’azote sec empêche l’intérieur des optiques de se couvrir de buée.
Contenu de l’ensemble:
• Jumelles
• Etui de transport
• Sangle de caméra
• Manuel
NE REGARDEZ PAS LE SOLEIL DIRECTEMENT AVEC LES JUMELLES AFIN D’EVITER DE
Spécifications techniques
CL-LANGHAM825
Type: 8 x 25
Puissance: 8 x
Diamètre de la lentille d’objectif: 25 mm
Type de prisme: Prisme supérieur BaK-4
Recouvrement de lentille: Lentilles d’objectif à plage
élargie, multicouche, entièrement recouvertes
Angle de vision: 6.4°
Champs de vision à 1000 m: 115 mètres
Champs de vision à 1000 yards: 345 pieds
Pupille de sortie: 3.1 mm
Longueur minimum de focale: 5 mètres
Longueur de réglage de dioptrie:+-5
Poids: 344 g
GRAVES LESIONS OCCULAIRES.
ATTENTION
CL-LANGHAM1025
Type: 10 x 25
Puissance: 10 x
Diamètre de la lentille d’objectif: 25 mm
Type de prisme: Prisme supérieur BaK-4
Recouvrement de lentille: Lentilles d’objectif à plage
élargie, multicouche, entièrement recouvertes
Angle de vision: 5.3°
Champs de vision à 1000 m: 96 mètres
Champs de vision à 1000 yards: 288 pieds
Pupille de sortie: 2.5 mm
Longueur minimum de focale: 5 mètres
Longueur de réglage de dioptrie:+-5
Poids: 346 g
©2012 NEDIS BV. Camlink is a registered trademark of NEDIS BV. Although every effort has been
made to ensure the accuracy of the information contained in this manual specifications are subject to
change and therefore NEDIS BV cannot guarantee its correctness and completeness at all times.
7
Mode d'emploi
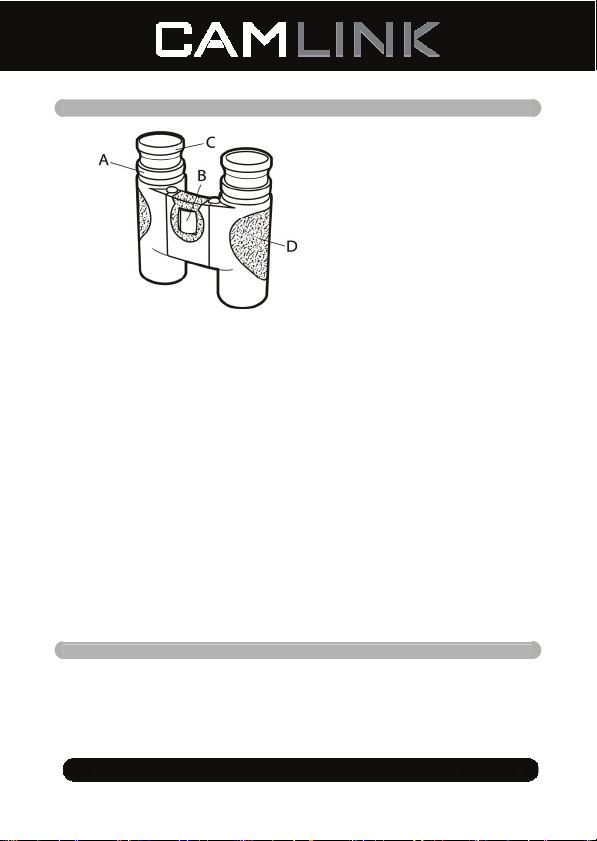
A: Réglage de dioptrie
B: Roulette de focale
C: Coupelles oculaires en spirale
D: Prise ergonomique
Réglage des jumelles correspondant à vos yeux
La distance entre les yeux, appelée distance interpupillaire, varie selon les personnes. Pour obtenir le
parfait alignement des lentilles des jumelles avec vos yeux, suivez ces simples étapes:
1. Tenez les jumelles en position normale.
2. Tenez chaque partie fermement. Rapprochez ou écartez les parties jusqu’à ne voir qu’un seul champ
circulaire. Remettez toujours vos jumelles dans cette position avant de les utiliser.
Comment régler individuellement à la vue.
Comme la vue varie d’une personne à l’autre, il faut ajuster finement comme suit la dioptrie pour que les
jumelles soient à votre vue:
1. Ajustez la distance interpupillaire comme décrit plus haut.
2. Réglez la dioptrie à zéro et observez un objet à distance.
3. Gardez les deux yeux ouverts à tout moment.
4. Couvrez la lentille d’objectif droit avec un capuchon (du côté du réglage de dioptrie).
5. Ajustez la roulette de focale pour observer les petits détails d’un objet à distance (par exemple un
mur de briques, des branches d’arbre, etc.) jusqu’à ce qu’ils apparaissent aussi nets que possible.
6. Découvrez la lentille d’objectif du côté réglage de dioptrie, couvrez l’autre lentille puis observez le
même objet.
7. Tournez uniquement la bague de réglage de dioptrie jusqu’à ce que l’objet observé soit le plus net
possible. N’essayez pas de forcer cette bague au-delà de sa position de butée car cela pourrait
l’endommager.
8. Vos jumelles sont maintenant réglées à votre vue. En tournant simplement la roulette centrale de
focale, vous pourrez focaliser à n’importe quelle distance. Prenez note du réglage de dioptrie de vos
yeux pour un usage futur.
Coupelles oculaires (pour les porteurs de lunettes de correction ou de soleil)
Assurez-vous que les coupelles sont vers le bas si vous portez des lunettes. Cela rapprochera vos yeux
des lentilles de jumelles apportant ainsi un meilleur champ de vision.
Entretien
Prendre soin de vos jumelles
1. Rangez toujours vos jumelles avec les coupelles tirées. Ceci diminue les efforts produits et l’usure
sur les coupelles quand elles sont retournées.
2. Ne faites pas tomber les jumelles.
3. Entreposez-les dans un endroit frais et sec.
©2012 NEDIS BV. Camlink is a registered trademark of NEDIS BV. Although every effort has been
made to ensure the accuracy of the information contained in this manual specifications are subject to
change and therefore NEDIS BV cannot guarantee its correctness and completeness at all times.
8

Nettoyage
1. Soufflez toute la poussière ou débris sur les lentilles (ou utilisez une brosse douce).
2. Pour retirer la saleté ou les traces de doigt, nettoyez doucement avec un chiffon doux de bonne
qualité. Employer un mauvais chiffon ou trop frotter peut rayer la surface des lentilles et entrainer
éventuellement des dégâts permanents. Un chiffon de nettoyage en microfibre (disponible chez la
plupart des marchands photographiques) est idéal pour le nettoyage de routine des surfaces
optiques.
Pour un nettoyage plus en profondeur, un fluide de nettoyage ou de l’isopropylène et un tissu pour les
lentilles photographiques peuvent être employés. Déposez toujours le fluide de nettoyage sur le chiffon,
jamais directement sur les lentilles.
Garantie
Aucune garantie ou responsabilité ne sera acceptée en cas de modification et/ou de transformation du
produit ou en cas de dommages provoqués par une utilisation incorrecte de l’appareil.
Avis de non responsabilité
Le design et les caractéristiques techniques sont sujets à modification sans notification préalable. Tous
les logos de marques et noms de produits sont des marques déposées ou immatriculées dont leurs
détenteurs sont les propriétaires et sont donc reconnues comme telles dans ce documents. Conservez ce
manuel et l’emballage pour toute référence ultérieure.
NL - Nederlands
Introductie
Deze verrekijker is aan de hand van de modernste condenswerende waterbestendige technologie
ontworpen en vervaardigd. De o-ring pakkingen bieden een complete bescherming tegen vocht. De droge
stikstofvulling van de verrekijker vermijdt tevens dat het optiek van binnen beslaat.
Inhoud van de verpakking:
• Verrekijker
• Draagtas
• Bandje
• Handleiding
MET DE VERREKIJKER NIET DIRECT IN DE ZON KIJKEN OM SCHADE AAN UW OGEN TE
Technische specificaties
CL-LANGHAM825
Type: 8 x 25
Vergroting: 8x
Diameter objectieflens: 25 mm
Soort prisma: BaK-4 Roof Prisma
Coating lens: Compleet gecoat, breedband
meerlagige, gecoate lens
Beeldhoek: 6,4°
Gezichtsveld op 1000 m: 115 m
Gezichtsveld op 1000 yd: 345 ft
©2012 NEDIS BV. Camlink is a registered trademark of NEDIS BV. Although every effort has been
made to ensure the accuracy of the information contained in this manual specifications are subject to
change and therefore NEDIS BV cannot guarantee its correctness and completeness at all times.
VOORZICHTIG
VERMIJDEN.
CL-LANGHAM1025
Type: 10 x 25
Vergroting: 10x
Diameter objectieflens: 25 mm
Soort prisma: BaK-4 Roof Prisma
Coating lens: Compleet gecoat, breedband
meerlagige, gecoate lens
Beeldhoek: 5,3°
Gezichtsveld op 1000 m: 96 m
Gezichtsveld op 1000 yd: 288 ft
9
Uittredepupil: 3,1 mm
Minimum brandpuntsafstand: 5 m
Verstelbare afstand dioptrie: +-5
Gewicht: 344 g
Gebruiksinstructies
De verrekijker aan uw ogen aanpassen
De afstand tussen de ogen, de pupilafstand, verschilt per persoon. Pas de volgende eenvoudige stappen
toe om de lenzen van de verrekijker perfect met uw ogen uit te lijnen:
1. Pak de verrekijker op normale wijze beet.
2. Pak beide telescopen goed vast. Breng de telescopen dichter naar elkaar toe of beweeg ze van
elkaar vandaan tot u één rond beeld ziet. Plaats de verrekijker altijd in deze stand alvorens u hem
gebruikt.
De sterkte per oog instellen
Aangezien het gezichtsvermogen per persoon verschilt, is de verrekijker uitgerust met een dioptrieinstelling. Pas de verrekijker aan uw gezichtsvermogen aan door de volgende stappen toe te passen:
1. Stel de pupilafstand af, zie hierboven.
2. Stel de dioptrie-instelling af op nul en kijk naar een voorwerp op afstand.
3. Houd beide ogen te allen tijde open.
4. Dek met een lensdop de voorkant van de rechterlens af (dit is de zijde met de dioptrie-instelling).
5. Draai aan het centrale stelwieltje tot u de fijne details van een voorwerp op afstand (bijv. een stenen
muur, boomtakken, enz.) scherp ziet.
6. Haal de lensdop van de zijde met de dioptrie-instelling, dek de andere lens af en kijk naar hetzelfde
voorwerp.
7. Draai aan de dioptrie-instelling tot u het voorwerp zo scherp mogelijk ziet. Om schade te vermijden,
forceer de dioptrie-instelling niet als u de eindaanslag heeft bereikt.
8. De verrekijker moet nu perfect aan uw ogen zijn aangepast. Draai aan het centrale stelwieltje en de
verrekijker zal op iedere afstand scherp stellen. Registreer de dioptrie-instelling van uw ogen voor de
volgende keer.
Eyecups (voor gebruik met bril/zonnebril)
Plaats de eyecups in de ingeschoven versie als u een bril draagt. Op deze manier zijn uw ogen dichter op
de lenzen geplaatst en ziet u dus beter.
Uittredepupil: 2,5 mm
Minimum brandpuntsafstand: 5 m
Verstelbare afstand dioptrie: +-5
Gewicht: 346 g
A: Dioptrie-instelling
B: Centraal stelwieltje
C: Uittrekbare eyecups
D: Ruwe grip
©2012 NEDIS BV. Camlink is a registered trademark of NEDIS BV. Although every effort has been
made to ensure the accuracy of the information contained in this manual specifications are subject to
change and therefore NEDIS BV cannot guarantee its correctness and completeness at all times.
10
 Loading...