

Page 1
CANCELLI AUTOMATICI
IP54
70
I
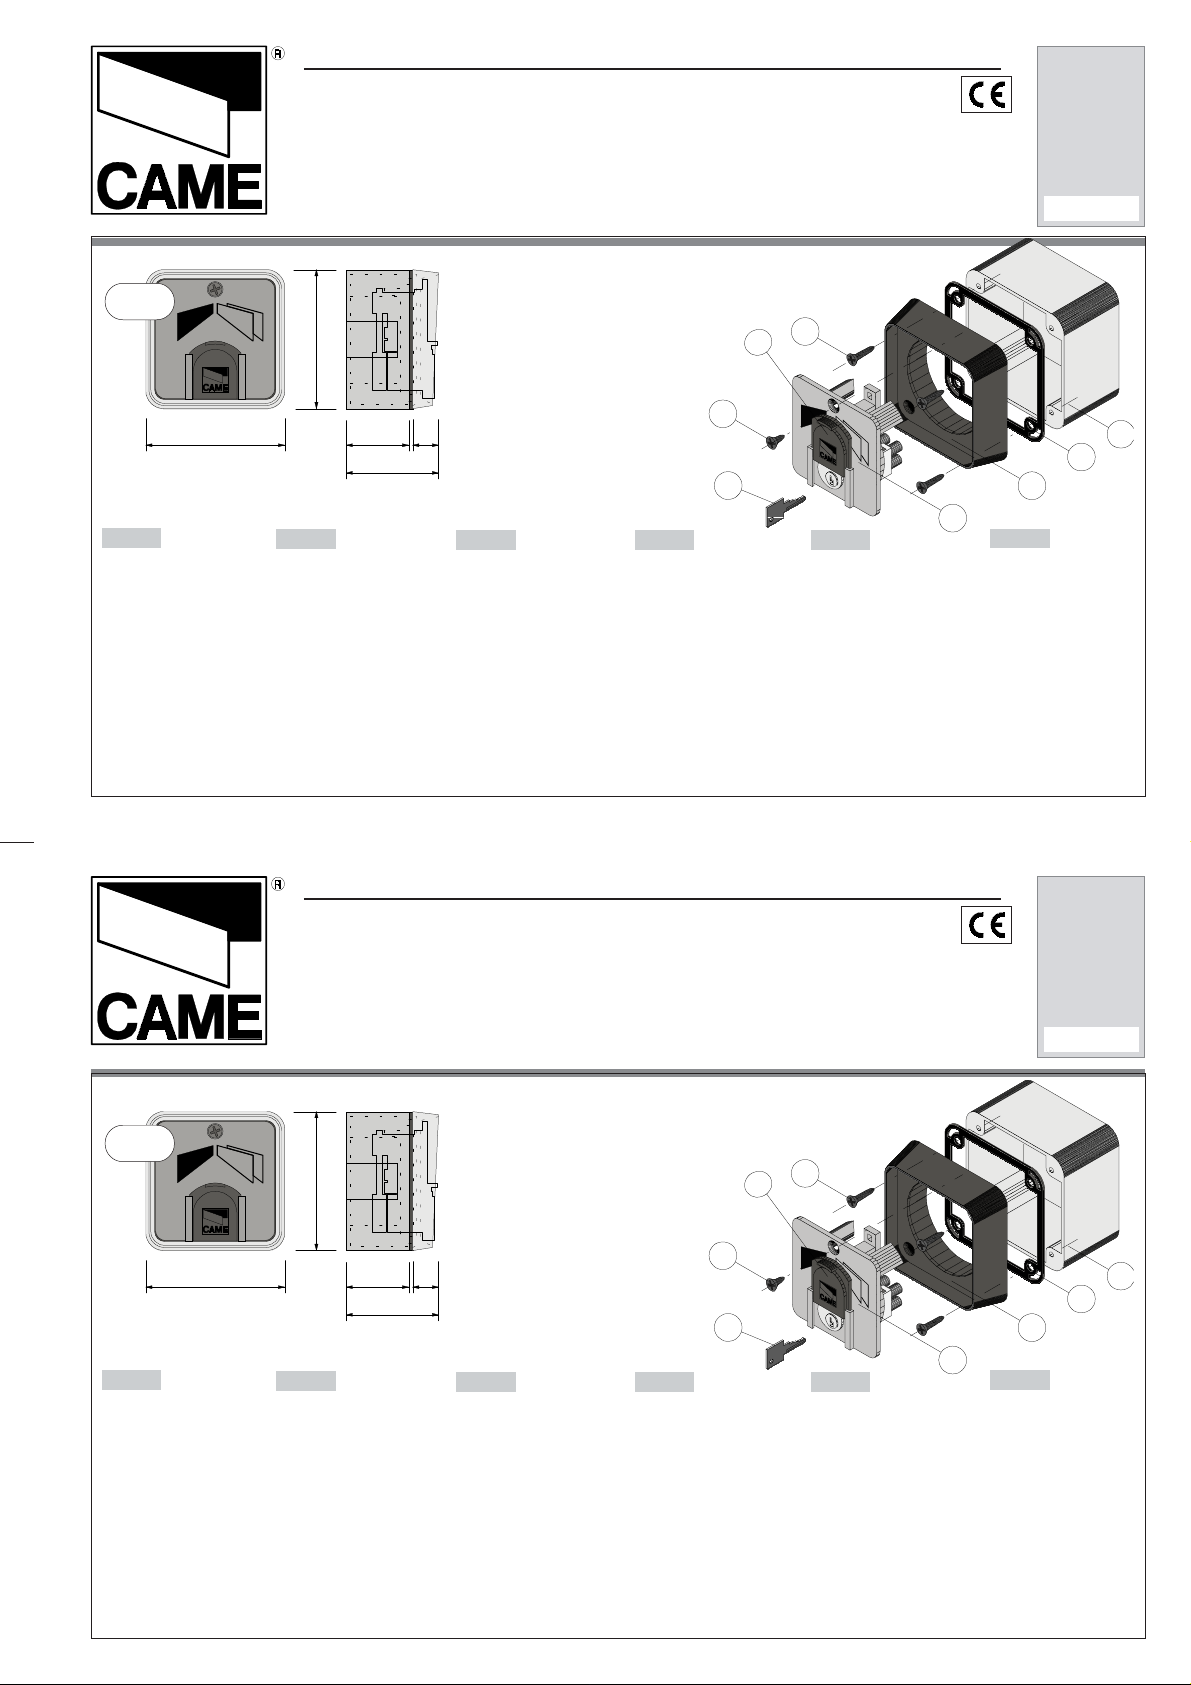
1) Contenitore per
selettore
2) Guarnizione di
tenuta
3) Telaio frontale
4) Viti fissaggio telaio
5) Gruppo selettore
6) Vite fissaggio
gruppo
7) Chiave selettore
8) Coperchietto
serratura
SERIE R |
R
SERIES
|
SELETTORE
KEY-OPERATED SWITCH
SÉLECTEUR
SCHLÜSSELSCHALTER
SELECTOR
KEUZESCHAKELAAR
70
Schlüsselschalter, Modell
31 13
45
GB
1) Casing for
keyswitch
2) Gasket
3) Front frame
4) Frame fixing
screws
5) Keyswitch unit
6) Unit fixing screws
7) Switch key
8) Lock cover
Sleutelkeuzeschakelaar
1)Boîtier pour
sélecteur
2) Joint d’étanchéité
3) Bâti couvercle
4) Vis de fixation du
bâti
5) Groupe sélecteur
6) Vis de fixation du
groupe
7) Clé sélecteur
8) Couvercle serrure
SÉRIE R |
BAUREIHE
R |
Selettore a chiave
ANTISCASSO
TAMPERPROOF
key-operated switch
Sélecteur a clé
ANTI-EFFRACTION
EINBRUCHSSICHER
Selector con Ilave
ANTIRROBO
BESCHERMD TEGEN
BESCHADIGING
1) Schaltergehäuse
2) Dichtung
3) Schalterfrontteil
4)Befestigungsschrauben
Frontteil
5) Schalter
6)Befestigungsschrauben
Schalter
7) Schlüssel
8) Schlossabdekung
DF
SERIE R |
SET JB
8
6
ø 3,9 x 9,5
7
SERIE
R
4
ø 3,9 x 16
E
1) Caja para selector
2) Junta estanca
3) Frente
4) Tornillos de
sujeción frente
5) Grupo selector
6) Tornillo de
sujeción grupo
7) Llave selector
8) Tapa cerradura
Documentazione
119RT01
3
5
NL
1) Inbouwdoos
2) Afdichting
3) Frontaal frame
4)Bevestigingsschroeven
frame
5) Eenheid met
keuzeschakelaar
6) Bevestigingsschroef
eenheid
7) Sleutel
keuzeschakelaar
8) Deksel Slot.
Tecnica
T01
rev. 1.0
08/2002
©
CAME
CANCELLI
AUTOMATICI
2
1
CANCELLI AUTOMATICI
IP54
70
I
1) Contenitore per
selettore
2) Guarnizione di
tenuta
3) Telaio frontale
4) Viti fissaggio telaio
5) Gruppo selettore
6) Vite fissaggio
gruppo
7) Chiave selettore
8) Coperchietto
serratura
SERIE R |
R
SERIES
|
SELETTORE
KEY-OPERATED SWITCH
SÉLECTEUR
SCHLÜSSELSCHALTER
SELECTOR
KEUZESCHAKELAAR
70
Schlüsselschalter, Modell
31 13
45
GB
1) Casing for
keyswitch
2) Gasket
3) Front frame
4) Frame fixing
screws
5) Keyswitch unit
6) Unit fixing screws
7) Switch key
8) Lock cover
Sleutelkeuzeschakelaar
1)Boîtier pour
sélecteur
2) Joint d’étanchéité
3) Bâti couvercle
4) Vis de fixation du
bâti
5) Groupe sélecteur
6) Vis de fixation du
groupe
7) Clé sélecteur
8) Couvercle serrure
SÉRIE R |
BAUREIHE
R |
Selettore a chiave
ANTISCASSO
TAMPERPROOF
key-operated switch
Sélecteur a clé
ANTI-EFFRACTION
EINBRUCHSSICHER
Selector con Ilave
ANTIRROBO
BESCHERMD TEGEN
BESCHADIGING
1) Schaltergehäuse
2) Dichtung
3) Schalterfrontteil
4)Befestigungsschrauben
Frontteil
5) Schalter
6)Befestigungsschrauben
Schalter
7) Schlüssel
8) Schlossabdekung
DF
SERIE R |
SET JB
8
6
ø 3,9 x 9,5
7
SERIE
R
4
ø 3,9 x 16
E
1) Caja para selector
2) Junta estanca
3) Frente
4) Tornillos de
sujeción frente
5) Grupo selector
6) Tornillo de
sujeción grupo
7) Llave selector
8) Tapa cerradura
Documentazione
119RT01
3
5
NL
1) Inbouwdoos
2) Afdichting
3) Frontaal frame
4)Bevestigingsschroeven
frame
5) Eenheid met
keuzeschakelaar
6) Bevestigingsschroef
eenheid
7) Sleutel
keuzeschakelaar
8) Deksel Slot.
Tecnica
T01
rev. 1.0
08/2002
©
CAME
CANCELLI
AUTOMATICI
2
1
Page 2
MONTAGGIO
- Fissare il
contenitore del
selettore,
predisponendo i cavi
elettrici di
collegamento
all’interno del
contenitore stesso
(usare allo scopo i
fori pretracciati).
- Posizionare la
guarnizione di tenuta
e fissare il telaio
frontale.
- Procedere al
collegamento
elettrico.
- Inserire il gruppo
selettore tenendo
girata la chiave, e
fissarlo al telaio.
ASSEMBLY
- Fasten the
keyswitch’s casing,
inserting the electric
wiring in the casing
itself (making use of
the marked holes).
- Position the gasket
and affix the front
frame.
- Make the necessary
power connections.
- Insert the switch unit
while keeping the key
turned, and fasten it to
the frame.
portata contatto
current rating of contact
portée contact
Stromfestigkeit der K ontakte
alcance contacto
capaciteit contact
F
MONTAGE
- Fixer le boîtier du
sélecteur en
introduisant les câbles
électriques de
branchement à
l’intérieur du boîtier
(utiliser pour cela les
trous déjà percés).
- Placer le joint
d’étanchéité et fixer le
bâti du couvercle.
- Effectuer le
branchement
électrique.
- Installer le groupe
sélecteur en tenant la
clé tournée et le fixer
au bâti.
MONTAGE
- Die Anschlußkabel
durch die
vorgestanzten Löcher
in das
Schaltergehäuse
führen und das
Schaltergehäuse
anbringen.
- Die Dichtung
plazieren und das
Schalterfrontteil
anbringen.
- Die elektrischen
Kabel anschließen.
- Den Schalter
einsetzen und
befestigen. Dabei den
Schlüssel gedreht
halten.
EI DGB
MONTAJE
- Fije la caja del
selector, colocando
los cables eléctricos
de conexión adentro
de la misma (use las
perforaciones
marcadas).
- Coloque la junta
estanca y fije el frente.
- Realice la conexión
eléctrica.
- Introduzca el grupo
selector manteniendo
girada la llave y fíjelo
al frente.
NL
MONTAGE
- Plaats de doos van
de keuzeschakelaar
door de elektrische
kabels correct in de
doos te
schikken(gebruik de
voorziene vooraf
gemaakte gaatjes).
- Plaats de afdichting
en bevestig het
frontale frame.
- Maak de elektrische
aansluiting.
- Plaats de eenheid
met keuzeschakelaar
door de sleutel
gedraaid te houden
en bevestig dit aan
het frame.
MONTAGGIO
- Fissare il
contenitore del
selettore,
predisponendo i cavi
elettrici di
collegamento
all’interno del
contenitore stesso
(usare allo scopo i
fori pretracciati).
- Posizionare la
guarnizione di tenuta
e fissare il telaio
frontale.
- Procedere al
collegamento
elettrico.
- Inserire il gruppo
selettore tenendo
girata la chiave, e
fissarlo al telaio.
3A - 250V
ASSEMBLY
- Fasten the
keyswitch’s casing,
inserting the electric
wiring in the casing
itself (making use of
the marked holes).
- Position the gasket
and affix the front
frame.
- Make the necessary
power connections.
- Insert the switch unit
while keeping the key
turned, and fasten it to
the frame.
portata contatto
current rating of contact
portée contact
Stromfestigkeit der K ontakte
alcance contacto
capaciteit contact
F
MONTAGE
- Fixer le boîtier du
sélecteur en
introduisant les câbles
électriques de
branchement à
l’intérieur du boîtier
(utiliser pour cela les
trous déjà percés).
- Placer le joint
d’étanchéité et fixer le
bâti du couvercle.
- Effectuer le
branchement
électrique.
- Installer le groupe
sélecteur en tenant la
clé tournée et le fixer
au bâti.
MONTAGE
- Die Anschlußkabel
durch die
vorgestanzten Löcher
in das
Schaltergehäuse
führen und das
Schaltergehäuse
anbringen.
- Die Dichtung
plazieren und das
Schalterfrontteil
anbringen.
- Die elektrischen
Kabel anschließen.
- Den Schalter
einsetzen und
befestigen. Dabei den
Schlüssel gedreht
halten.
EI DGB
MONTAJE
- Fije la caja del
selector, colocando
los cables eléctricos
de conexión adentro
de la misma (use las
perforaciones
marcadas).
- Coloque la junta
estanca y fije el frente.
- Realice la conexión
eléctrica.
- Introduzca el grupo
selector manteniendo
girada la llave y fíjelo
al frente.
NL
MONTAGE
- Plaats de doos van
de keuzeschakelaar
door de elektrische
kabels correct in de
doos te
schikken(gebruik de
voorziene vooraf
gemaakte gaatjes).
- Plaats de afdichting
en bevestig het
frontale frame.
- Maak de elektrische
aansluiting.
- Plaats de eenheid
met keuzeschakelaar
door de sleutel
gedraaid te houden
en bevestig dit aan
het frame.
3A - 250V
2
 Loading...