

Page 1
CAME UNITED KINGDOM LTD
UNIT 3
ORCHARD PARK INDUSTRIAL ESTATE,
TOWN STREET, SANDIACRE,
NOTTINGHAM NG10 5BP
TEL: 0115 921 0430
FAX: 0115 921 0431
INTERNET - www.cameuk.com
E-MAIL - enquiries@cameuk.com
TECHNICAL
HELPLINE
0115 921 0430
GARD G6000
Installation Instructions
for swift road barriers
THE GARD KIT CONSISTS OF:
BARRIER UNIT
CONTROL PANEL
ALUMINIUM BARRIER ARM
RED PHOSPHORESCENT STICKERS
SAFETY BEAM POST
SAFETY BEAM
Page 2

INTRODUCTION
THESE INSTRUCTIONS WILL SHOW YOU HOW TO INSTALL A
GARD AUTOMATION SYSTEM FOR SWIFT ROAD BARRIERS.
PLEASE READ THESE INSTRUCTIONS AND DIAGRAMS
CAREFULLY BEFORE STARTING ANY WORK.
UNDER NO CIRCUMSTANCES SHOULD THIS EQUIPMENT BE OPERATED UNLESS FITTED TO AGATE.
FAILURE TO COMPLY WILL INVALIDATE THE GUARANTEE.
1
Page 3

GENERAL SPECIFICATION
DESCRIPTION:
This unit can be used to control entrances up to 6.5 metres wide (with accessories on the barrier up
to 6metres). Designed and constructed by CAME in compliance with current safety standards (UNI
8612) and with an IP54 protecting rating.
Guaranteed for 12 months unless tampered with by unauthorised personnel.
MODELS:
G6000. Barrier with non-reversible 24V DC gear motor, case in galvanised steel with enamel finish,
control panel and internal drive system.
OPTIONAL ACCESSORIES:
G0601 Rectangular cross-section, 100x40x6850mm aluminium barrier with white enamel finish.
G0602 Tubular cross-section, 100mm dia x 6850mm aluminium barrier with white enamel finish
(recommended for areas subject to strong winds)
G0603 Red anti-collision bumper strip with end caps, for G0601 barrier.
G0460 Pack of 6, 24V DC signal lamps with brackets for fitting to G0401 barrier with flash control
circuit board.
G0461 Red phosphorescent stickers for barrier.
G0462 Non-moving support for barrier.
G0463 Moving support for barriers.
G0465 White enamelled aluminium fencing for barriers.
G0467 Joint for G0601 barrier.
G0468 Support for attachment of safety beam to casings.
G0469 Support for attachment of flashing light assembly.
ATTENTION! For ease of installation and conformance to current safety norms, we recommend
installation of CAME safety and control accessories.
2
Page 4
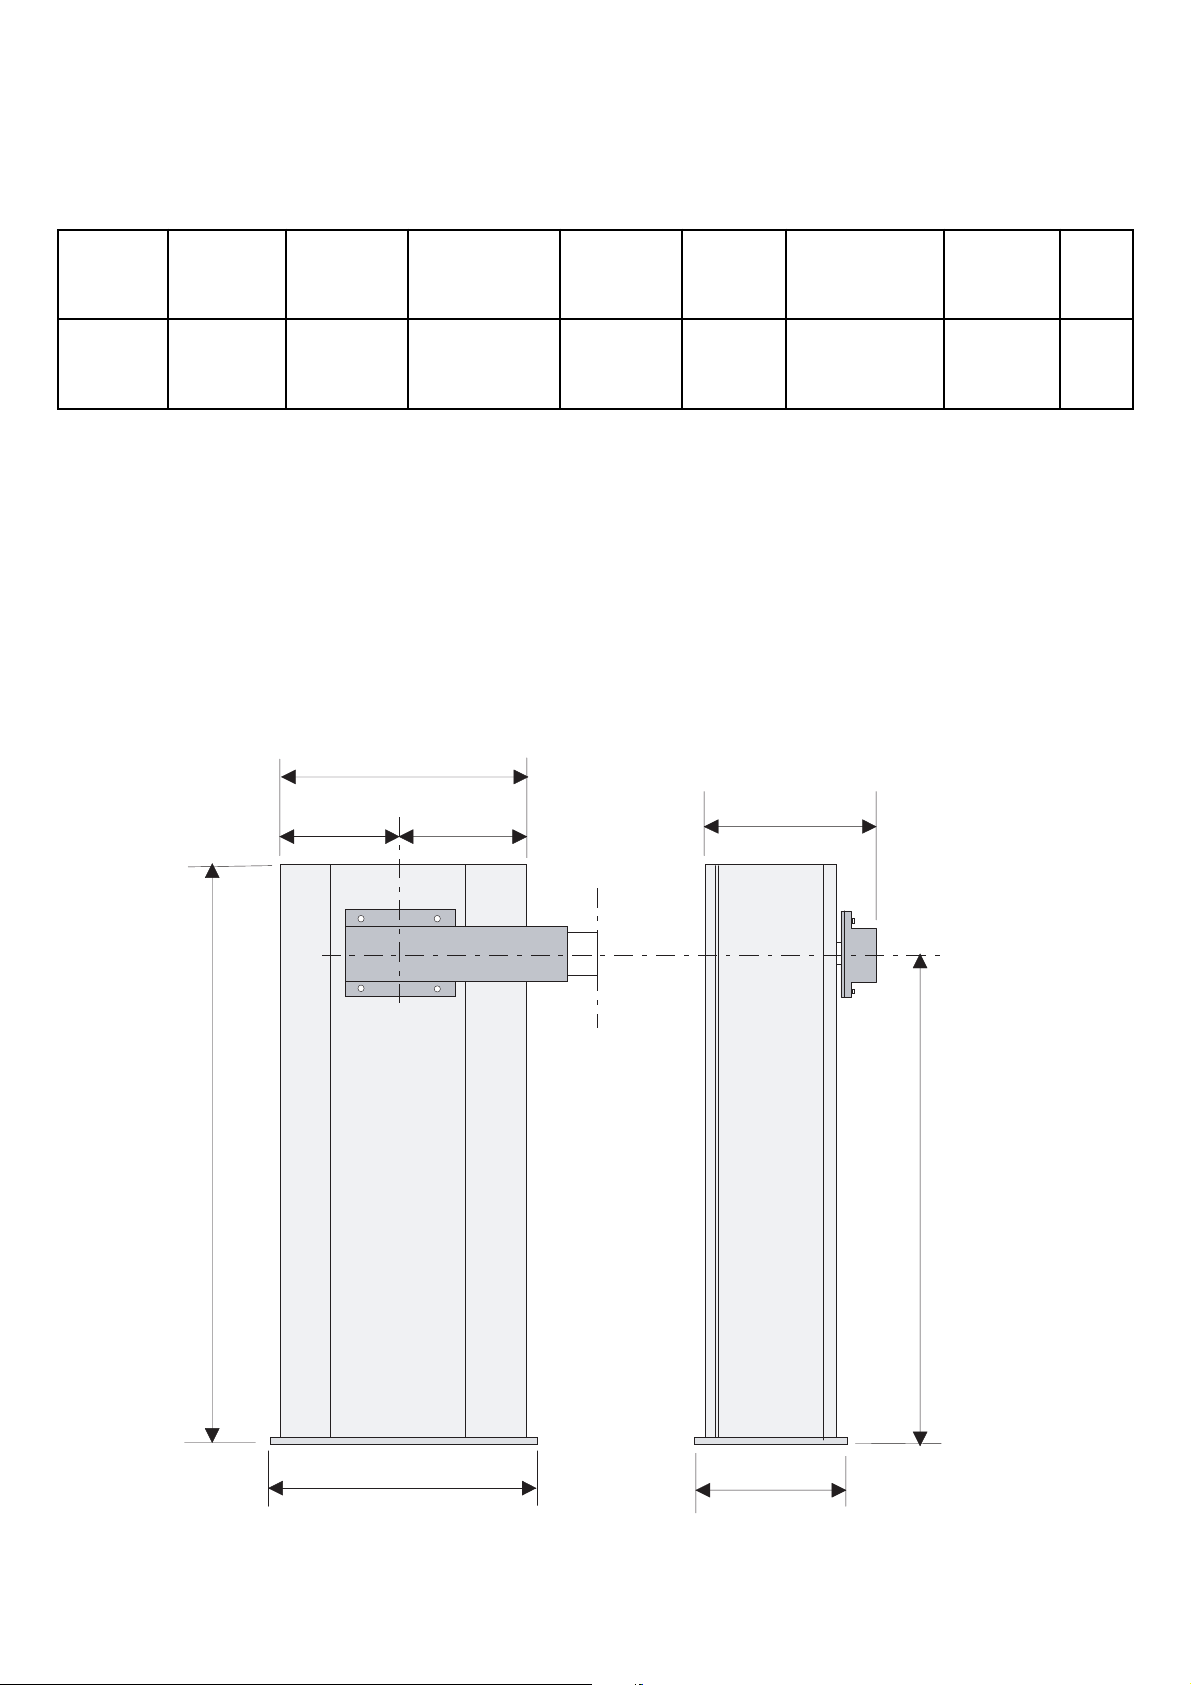
TECHNICAL CHARACTERISTICS
EXTERNAL DIMENSIONS
TYPE WEIGHT POWER CURRENT MOTOR DUTY REDUCTION MAX TIME
KG SUPPLY DRAW POWER CYCLE RATIO TORQUE
G6000 230V AC 1.3A-230V 300W HEA VY
G6001 72 24V DC 15A-24V DUTY 1/202 600Nm 4-8s
3
450
460 240
914
==
1077
295
Page 5
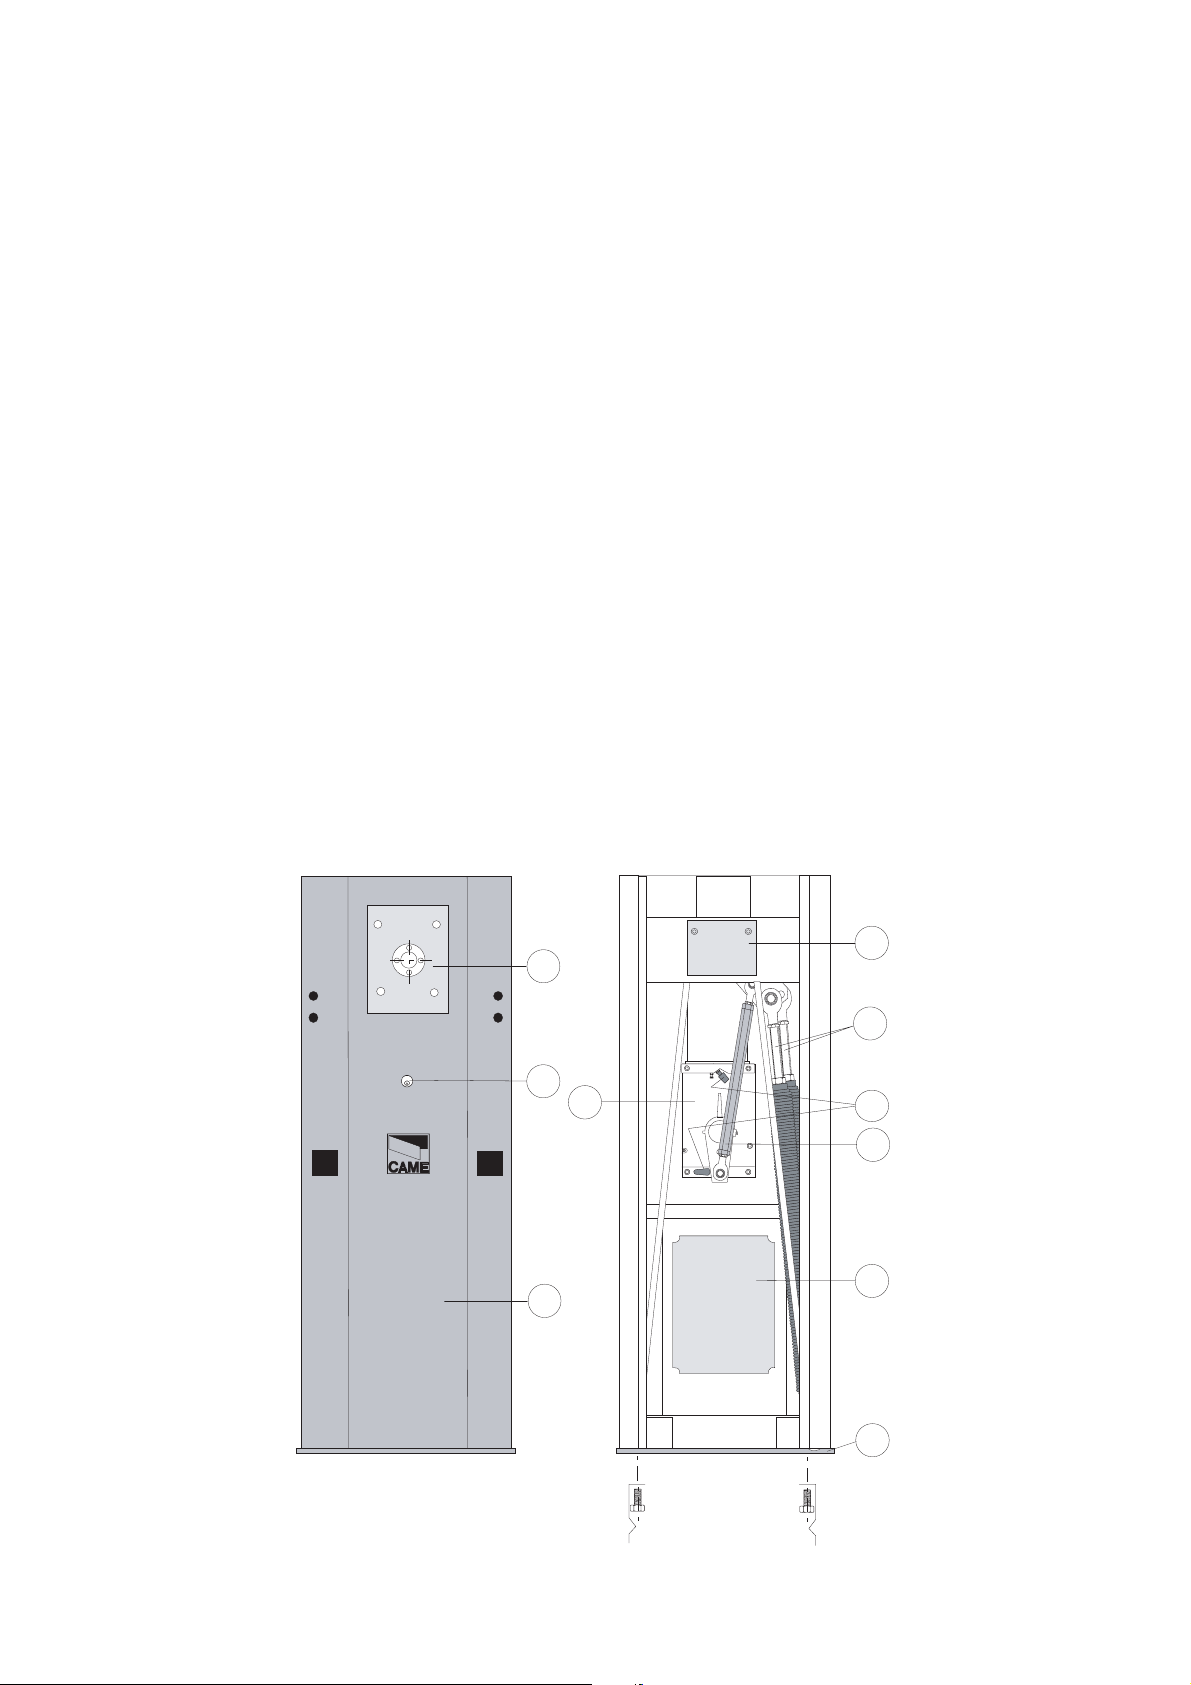
TECHNICAL DESCRIPTION
A Case constructed in 2.5mm galvanised stainless sheet with an enamel finish (G6000), or in 2mm
stainless steel, with a satin finish (G6001), factory configured to accept all required accessories.
The access door for inspection can be locked onto the case with a personal key.
B Mounting base in galvanised steel with anchor stays and bolts for anchoring the case to the
baseplate.
C The flange is in galvanised steel. This holder allows the barrier to be quickly and securely locked.
D Manual release system.
E Motor: 24V DC reduction gear, non-reversible with die-cast aluminium housing and is
permanently lubricated with liquid grease.
F A spring acts as counterbalance for precise uniform movement.
G An internal shock absorber/travel stop is provided.
H Limit switch assembly.
I Control panel (ZL37F)
4
C
D
E
A
I
F
L
B
G
H
#
%
$
s
s
s
Page 6
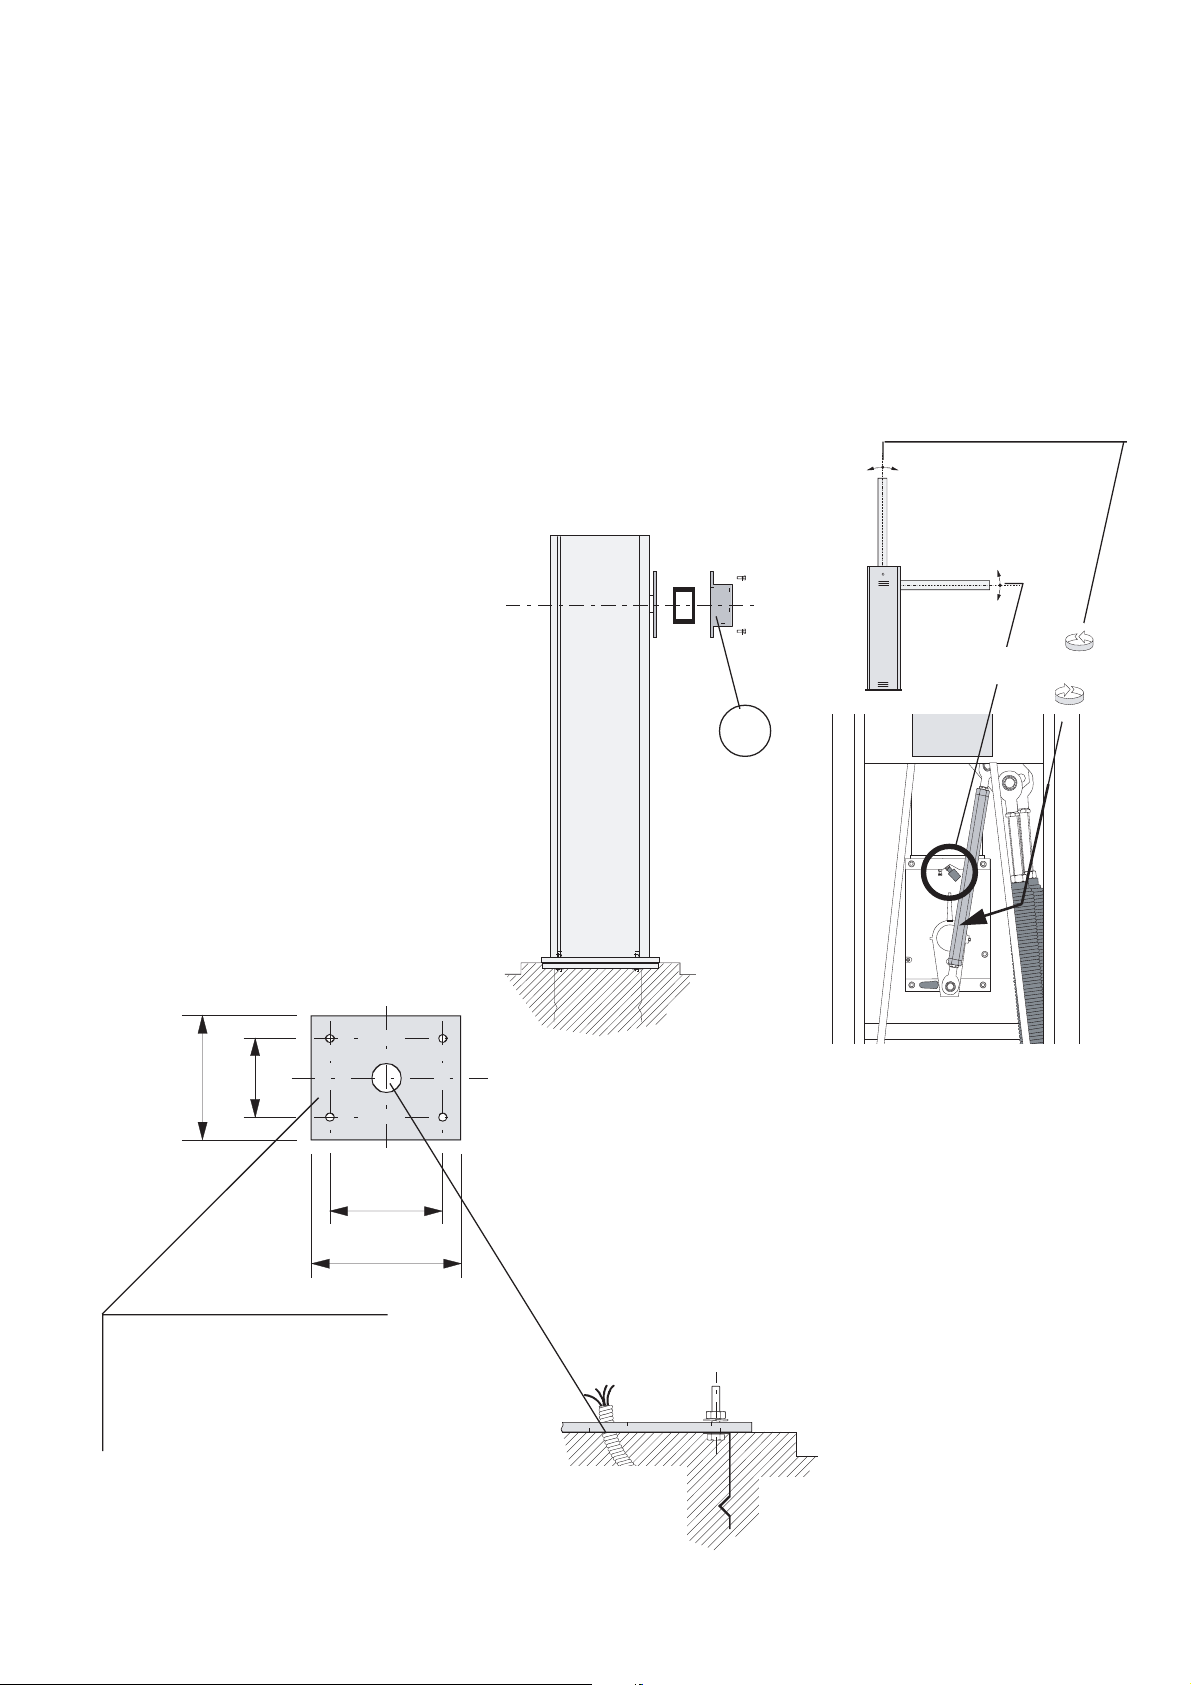
INSTALLATION
Construct an adequate concrete base of the correct size for the installation of the unit. When pouring,
sink the anchoring stays and the mounting base for the unit into the concrete. The concrete base must
be perfectly level and clean from end to end. All screw threads must be completely accessible from
the surface of the concrete base. The electrical cables from the unit must also protrude from the base.
When the concrete is set place the unit on the base. It is good practice to have the inspection door
on the inside of the property .Tighten the unit down and check for level. Fit the barrier arm and adjust
the mechanical stops to stop the arm in the desired position.
5
B
C
A
140
240
380
Mounting base for case
460
Cable exit
Page 7
COMMISSIONING
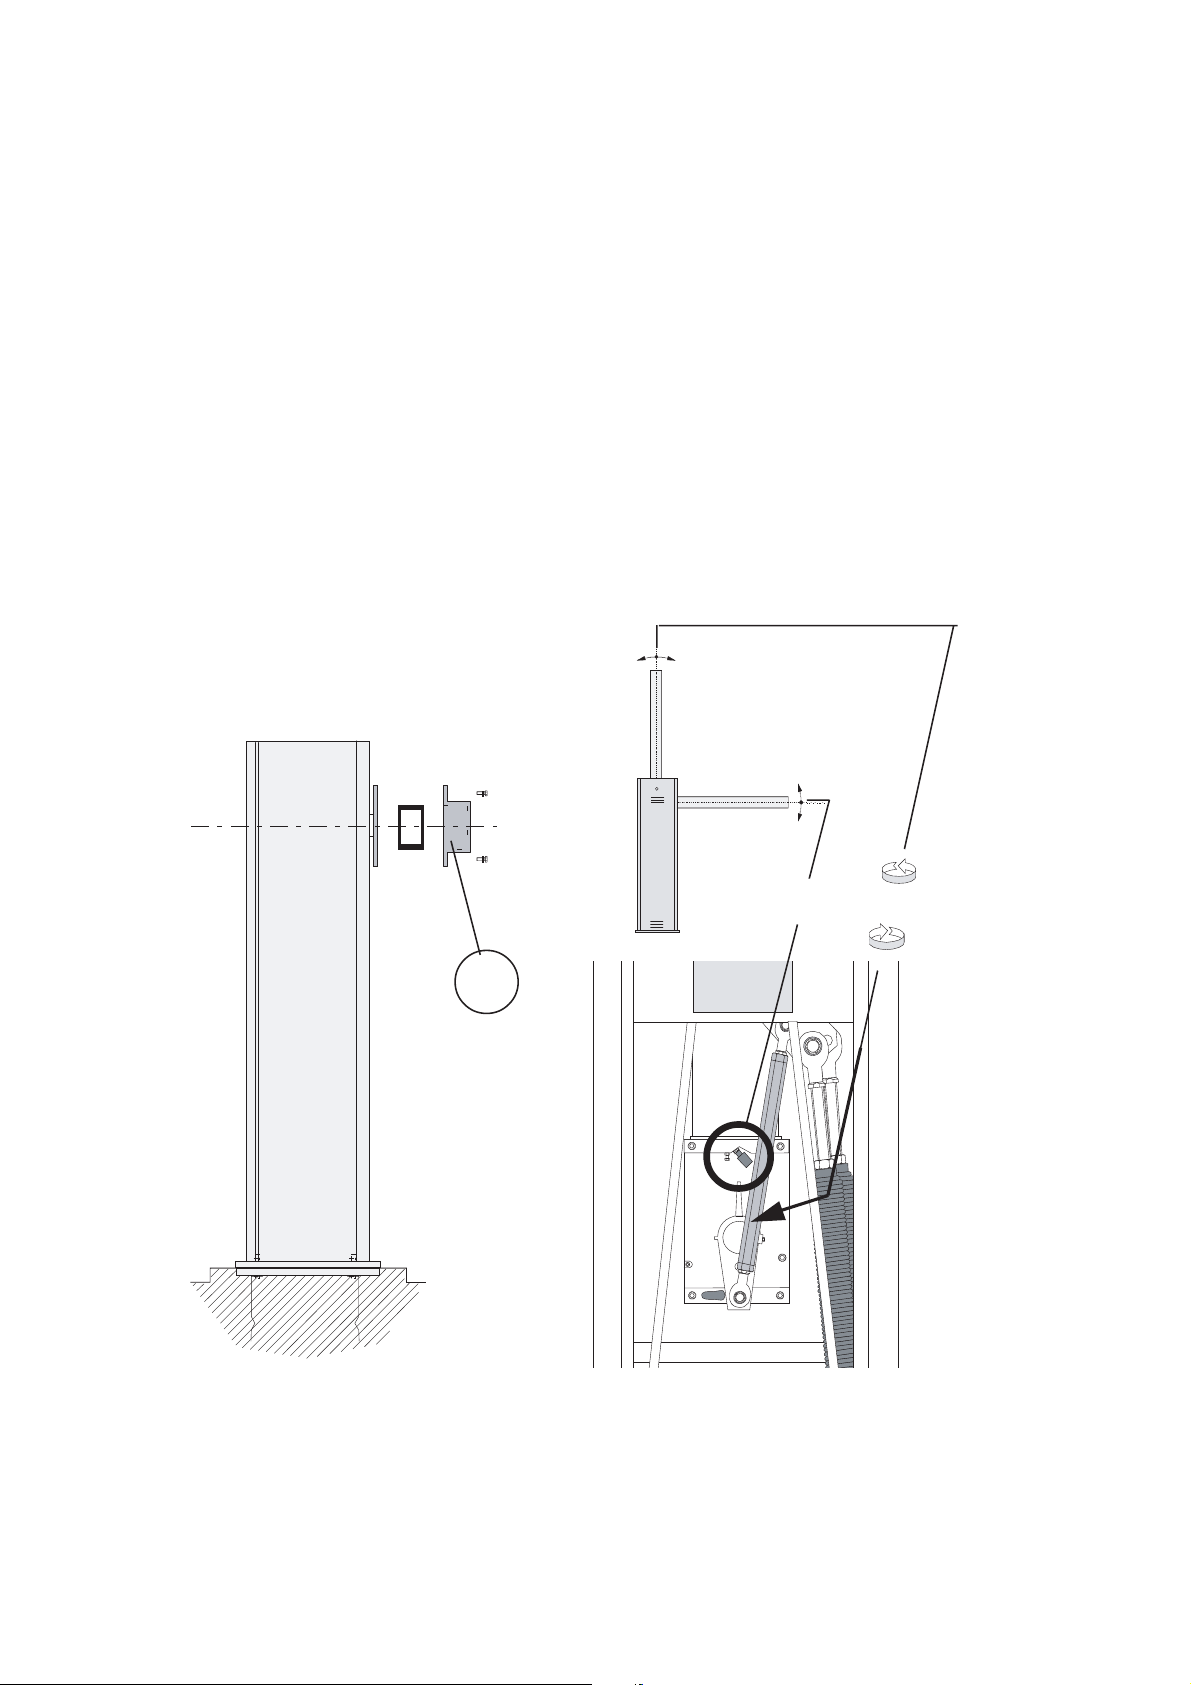
1. Ensure that the barrier is securely fastened to the base plate with the bolts provided. It is good
practice to install the barrier so that the access door is on the inside of the installation.
2. First determine the length of our barrier arm the insert the arm into the holder and secure with the
four allen screws provided. Adjust the mechanical stops B and C to obtain the desired vertical and
horizontal positions. (see figure 1)
6
A
B
C
Page 8
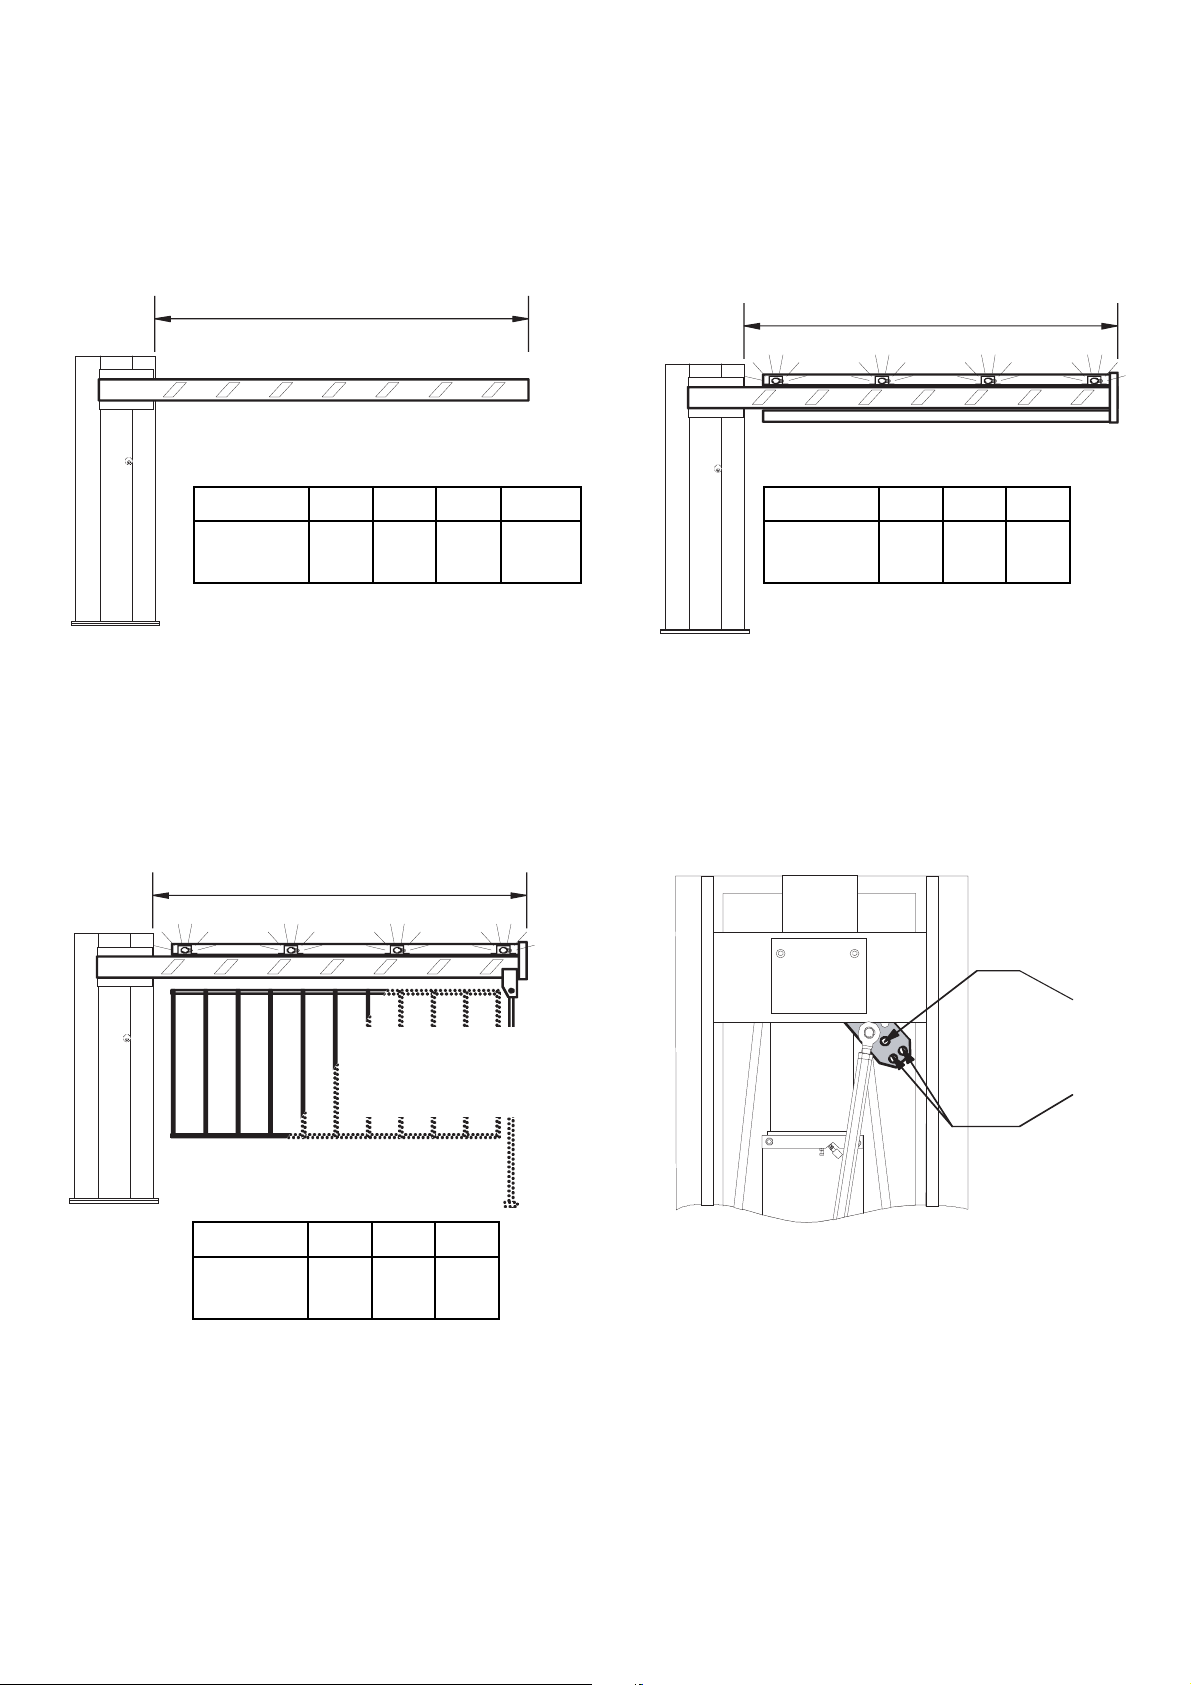
3. The G6000 Barrier is supply with both springs installed in position B. If the final configuration of you
barrier requires a spring change follow the illustrations below.
7
L m <4 <5 <6 <6.5
Spring 1A 1A 1B 1A
Positions 1B
L m <4 <5 <6
Spring 1A 1B 1A
Position 1B
Spring
attachment
Points
With skirts or
Mobile support
L m <4 <5 <6
Spring 1B 1A 2B
Position 1B
L
L
L
A
B
Page 9

4. Unlock the gearmotor and change the position of the springs (do not throw away the spring if not
used)
5. The barrier arm should be balanced at 45º for the barrier to work correctly.
1) Manually release the gear motor by using the manual release key.
2) Loosen locknuts B on the tension rods A.
3) Manually adjust the springs to increase/decrease their tension until the barrier arm is balanced at
45º.
4) Now tighten the locknuts and re engage the gear motor by using the manual release key.
8
200 max80 max
A
B
Page 10

6) Connect mains power to terminals L1 and L2 and connect to a suitable earth.
7) Set all dipswitches off accept 8 and 9 ON for commissioning and insert a wire link between
terminals 2 and C1
8) Set potentiometer SENS to the halfway position for commissioning.
9) Set potentiometer TCA to minimum for commissioning
10) Set the Transformer as follows for commissioning: - SPEED to minimum and DECLERATION to
minimum.
To set the speed and deceleration, move the faston connectors “A” and “B” onto the indicated
terminals
11) Ensure that the barrier arm is locked in the 45° position.
12) Momentarily pulse terminals 2 and 3 and the barrier should move to the open Position. Once the
barrier is in the up position pulse terminals 2 and 7 to make the barrier come down.
13) Prove and adjust the open and closed limit stops to the desired position.
9
Deceleration
Max Min Min Med Max
C
O
M
Speed
Page 11

14) Check the sensitivity of the barrier by physically trying to stop the barrier when it is moving to the
closed position, If the arm is easily stopped the power needs to increased by turning
potentiometer SENS more to the minus position.
TRIMMER SENS
15) If automatic closing is required move dipswitch 1 to the on position and adjust potentiometer TCA
until the desired time is achieved.
16) If safety beams or induction loops are used to prevent the barrier closing onto vehicles, remove
the wire link between terminals 2 and C1. This will give you re-opening during closing.
17) If “Emergency stop” is required insert the safety device (normally closed) into terminals 1 and 2
and move dipswitch 9 to the OFF position.
18) If a closed only button is required move the jump strap that is positioned between the terminal
blocks to the number 4 position. This will give you closed only on terminals 2 and 7.
19) If a full-length barrier arm is fitted with accessories it is advised to use the increased braking facility
by moving dipswitch 10 to the OFF position.
10
Page 12

TROUBLE SHOOTING
Fault Action
Barrier goes up but will not go down If NO safety devices are fitted check that there is
a link fitted between terminals 2 and C1.
If safety devices are fitted check that they are
giving a closed circuit when the are working
normally.
The barrier stalls when moving up or down Check that the barrier is balanced at the 45∞when
the barrier is manually released.
Check that the barrier sensitivity is set correctly
and adjust accordingly.
(minimum sensitivity gives you maximum power)
The barrier arm stalls when a Check all of the above
short arm is fitted Check that the increased braking facility has not
been used (dipswitch 10)
TECHNICAL HELP LINE
0115 9210430
11
Page 13

12
TECHNICAL DESCRIPTION OF ZL37F
CONTROL PANEL
This control board is powered by 230V a.c. across terminals L1 and L2, and is protected by a 3.15A
fuse on the main power line. Control systems are (24) powered by low voltage and protected with by
a 2A fuse. The total power consumption of 24V accessories must not exceed 20 W.
SAFETY
Photocells can be connected to obtain:
a) Re-opening during the closing cycle;
b) Total stop: the movement of the bar is interrupted, and the automatic closure cycle is disactivated.
Use the keyboard or the radio transmitter to resume movement of the bar;
- Amperometric safety device: see
NOTE;
- Fixed operating time of 20 sec.
OTHER FUNCTIONS
- Automatic closing: The automatic closing timer is automatically activated at the end of the opening
cycle. The preset, adjustable automatic closing time is automatically interrupted by the activation of
any safety system, and is deactivated after a total stop command or in case of power failure;
- Immediate closure (the bar is lowered automatically after the vehicle has passed the safety devices,
on the terminals 2-C5 of the control panel;
- "Operator present" function. Bar operates only when the pushbutton is held down (the radio remote
control system is deactivated);
- Obstacle detection: When the motor is stopped (bar is closed, open or half-open after an
emergency stop command), the transmitter and the control pushbutton will be deactivated if an
obstacle is detected by one of the safety devices (for example, the photocells);
- Flashing light activated before opening and closing cycle begins;
- Activation of a 24V output signal during the movement phases and in the closed position;
- "Slave" operation when two motors are used in combination (see page 22);
- Increases the braking action on the barrier;
- Selection of command sequence: open-close, open only.
ACCESSORIES CONNECTED IN SERIES
- Flashing signal light (25W max.), when bar is in motion.
OPTIONAL ACCESSORIES
- Open barrier pilot lamp (3W max.). This is a light that indicates the barrier open position and turns
off when the barrier activates the closing end-stop (terminals 10-5);
- LB35 board, used to power the automation system using battery power in case of a power failure.
When the power supply is restored, the batteries are recharged automatically (refer to instruction
sheet);
ADJUSTMENTS
- Sensitivity of amperometric safety system: min./max.
- Automatic closing time
Page 14

13
ZL37F MOTHERBOARD
MAIN COMPONENTS
1 Terminal block for external connections
2 3.15A line fuse
3 2A accessories fuse
4 "Function selection" dip-switch
5 Radiofrequency board socket (see table)
6 TCA trimmer: automatic closing time adjustment
7 SENS trimmer: amperometric sensitivity adjustment
8 Button for memorizing code numbers
9 Radio code / automatic closing signal LED
10 Connectors for power supply motor
11 Connectors for connection to battery charger (LB35)
12 Jumper for selection of type of control for button in 2-7
L1T
L2T
M
PT
"B"
Min.Max.
Max.Med.Min.
"A"
QU A DRO CO M AND O
ZL 37
21 345678910
Page 15

14
DIPSWITCH SELECTION OF FUNCTIONS
1 ON Automatic closure enabled;
2 ON "Only open" radio control or pushbutton function enabled (with plug-in radiofrequency
board);
2 OFF "Open-close-reverse" radio control or pushbutton function enabled (with plug-in radio
frequency board);
3 ON 24V output voltage on 10-E terminals when the barrier is in motion and in the barrier's
closed position, enabled;
3 OFF 24V output voltage on 10-E terminals when the barrier is in motion, enabled;
4 ON "Operator present" function enabled;
5 ON Pre-flashing (aperture and closure) enabled;
6 ON Obstacle detection device (motor of limit position) enabled;
7 ON "Slave" operation (motor is controlled externally) enabled;
8 OFF Immediate closure function enabled; activate safety device (2-C5);
9 OFF "Stop" button enabled; activate safety device (1-2);
10 ON Function that increases the braking action on the barrier enabled;
ON
2345678910
ON
OFF
L1
QU ADRO COMAND O
ZL 37
L1TL2
PT
L2T
0
Vel.
Rall.
74
21 345678910
Page 16

15
PROGRAMMING THE REMOTE CONTROLS
T432S (MINI-PINK) Remotes
Remove the battery cover off of the remote and change the Factory set code to a unique code for the
installation via the 10 dipswitches.
Insert the frequency card into the control panel (item 5 on motherboard). Identify the little yellow button
on the motherboard and press and hold the little yellow button in and an LED will flash. Then press
the button on the remote control you wish to operate the equipment with and then let go of both
buttons. Make sure any additional remotes are the same code. You do not have to program these into
the board - they should work.
Channel 1
Channel 3
Channels
selection
jumpers
Code selection
dipswitch:
set the same
code
programmed
on receiver
actionning LED
4 pins strip
1st key fixed
on channel 1
2nd key preset on
channel 2; put the
jumpers as shown in
figures to change
Channel 4
Channel 2
Channels Scheme
"AF" BOARD
- T.C.A .
-
OFFON
NS. -
MOTHERBOARD
1ON2345678910
Page 17

16
PROGRAMMING THE REMOTE CONTROLS
Use on existing system
(with TOP at 433.92 MHz)
1. Press the key to encode until, after 7 seconds of
flashing, the red signalling LED remians on. (fig A)
2. Within 10 seconds, bring the existing transmitter
closer from the rear part and press the pushbutton you
want to copy for a few seconds. (fig B)
Once it has been saved, the LED will flash 3 times
and the transmitter will be ready for use.
Repeat 1 and 2 for the other pushbuttons. (NB: the code of
another system can be saved).
Use on new system
Consult the documentation of the electric board to save the first transmitter, then follow the procedure
described above to duplicate it in the quantity desired.
To open battery compartment, press and slide.
Red signalling LED
A
B
Page 18

17
ZL37F
ELECTRICAL CONNECTIONS
11
L1
L2
M
N
10
E
E
+10 - 11 1 2 C 1 C 5
230V (a.c.) power supply
24V (d.c.) motor
Uscita 24V in movimento (es.lampeggiatore - dip 3 OFF)
24V output in motion (e.g. flashing light - Pos. B Jumper)
Sortie 24V en mouvement (ex. branchement clignotant - Jumper Pos. B)
Ausgang 24V in Bewegung (z.B. Blinker-Anschlufl - Jumper Pos. B)
24V output
Salida de 24V en movimento (ej. l· mpara intermitente - Jumper Pos. B)
7
5
3
during movement (e.g. flashing light)
during movement and in the closed position
INTERBLOCCO
FA FC F
PT
MN
DIP 3
OFF
DIP 3
ON
10
5
10
11
1
2
24V -3W max. "bar-opened" signal lamp
Power supply accessories (max. 40W):
24V (a.c.) with power supply at 230V (a.c.)
24V (d.c.) with power supply at 24V (d.c.)
Pushbutton stop (N.C.)
N.B. When connecting the
photocells (TX and RX),
observe the correct
polarities.
TX
RX
NO C NC
101011
Page 19

18
ZL37F
ELECTRICAL CONNECTIONS
2
3
2
7
2
C1
Open pushbutton (N.O.)
Collegamento radio e/o pulsante (N.O.)
per tipo comando, vedi dip-switch 2
Connector (N.O.) radio and/or pushbutton. See DIP 2 for command type
Connector (N.O.) radio and/or pushbutton
see dip-switch 2 for command type
Connection radio et/ou bouton-poussoir (N.O.)
pour commande voir dip-switch 2
Anschlufl Funkkontakt und/oder Taste (N.O.)
Steuerart siehe dip-switch 2
Button operation: closure only
ConexiÛn radio y/o pulsador (N.O.)
para mando mirar dip-switch 2
Contact (N.C.) for ´ re-aperture during closureª
if not used
JUMPER
JUMPER
2-C1
E 10 111 2 3 5 7C1 C
5
2
C5
F
FA
F
FC
Contact (N.C.) of ´ immediate closureª
Connection microswitch deceleration opens
Connection microswitch deceleration closes
if not used
dip 8 ON
Antenna connection
Page 20

19
ZL37
BARRIER SPEED ADJUSTMENT
To set the barrier speed and deceleration, move the faston connectors “A”+”B” onto the indicated
terminals
C
O
M
BA
DECEL
SPEED
ARM
SPEED
Max Min Min Med Max
Page 21

CONNECTION FOR TWO COMBINED MOTORS
CONTROLLED TOGETHER
1) On one of the two control
panels, set Dip 7 to ON in order
to select the motor controlled
externally (slave).
2) Wire the electrical
connections only on the
terminal board for the pilot
motor in the normal.
3) Connect the two control
panels using the interlock
terminals as shown in the
figure.
ad
ad
20
SX DX
CAME
1)
2)
Slave motor 2∞ control panel
Deceleration
SpedVelocit‡
Rallentamento
Vitesse
Ralentissement
Geschw.
Geschw.
Velocidad
Abnahme
DeceleraciÛn
C
O
M
Max.Med.Min.Min.Max.
"B" "A"
0
Vel.
Ral.
line fuse
motor fuse
accessories fuse
74ZL 37
Deceleration
Speed
Rallent amen to
Veloc it ‡
Vitesse
Ralentissement
Geschw.
Geschw.
Abnah m e
Velocidad
DeceleraciÛn
C
O
M
Max.Med.Min.Min.Max.
"B" "A"
PT
L1TL2L1
L2T
0
Vel.
line fuse
motor fuse
CONTROL PANEL
ZL 37
Rall.
74
accessories fuse
21 3 45678910
(pilot) motor 1∞ terminal block
3)
Deceleration
Speeeed
Rallentamento
Velocit‡
Ralentissement
Vitesse
Geschw.
Geschw.
Abnahme
Velocidad
DeceleraciÛn
C
O
M
Max.Med.Min.Min.Max.
"B" "A"
2C1C5
735 INTERBLOCCO
PT
L1TL2L1
L2T
0
Vel.
Rall.
line fuse
motor fuse
accessories fuse
CONTROL PANEL
74
ZL 37
213456 78910
E
+10-11 1 2 C1C5
FAFC F
PT
3
MN
7
5
INTERBLOCCO
Deceleration
Speeeed
Rallentamento
Velocit‡
Ralentissement
Vitesse
Geschw.
Geschw.
Abnahme
Velocidad
DeceleraciÛn
C
O
M
"B" "A"
E
+10 - 1 1 1 2 C1 C 5
PT
L1TL2L1
L2T
0
Vel.
Rall.
line fuse
motor fuse
accessories fuse
CONTROL PANEL
74
ZL 37
FA FC F
Max.Med.Min.Min.Max.
735 INTERBLO CCO
21345678910
Slave motor 2∞ terminal block(pilot) motor 1∞ terminal block
PT
MN
Page 22

21
HANDING THE G6000 BARRIER
SX = With the barrier arm on the outside and the cabinet facing the inside of the property. This unit is
usually positioned on the left.
DX = With barrier arm on the outside and the cabinet facing the inside of the property. This unit is
usually positioned on the right.
OUTSIDE
INSIDE
SX DX
IF THERE ARE ANY PROBLEMS PLEASE CONTACT THE CAME
TECHNICAL HELPLINE:
0115 921 0430
Page 23

22
NOTES
Page 24

CONTACT INFORMATION
CAME UNITED KINGDOM LTD
UNIT 3
ORCHARD PARK INDUSTRIAL ESTATE
TOWN STREET, SANDIACRE, NOTTINGHAM NG10 5BP
TEL: 0115 921 0430
FAX: 0115 921 0431
INTERNET : www.cameuk.com
E-MAIL: enquiries@cameuk.com
THIS INSTALLATION WAS COMPLETED BY:
.........................................................................
NAME..............................................................
ADDRESS........................................................
.........................................................................
.........................................................................
.........................................................................
TEL........................ MOBILE............................
DATE OF INSTALLATION................................
 Loading...