

Page 1

Instructions for:
®
New Ensemble
II
By Henry Kloss
Contents
Important—Please Read First ................................................................... 1
Unpacking The System ............................................................................. 2
Overview .................................................................................................. 3
Speaker Placement ................................................................................... 3
Hookup Options ....................................................................................... 5
Preparing Speaker Wires .......................................................................... 6
Making Connections ................................................................................. 7
Optimizing The Sound Of Your System .................................................... 8
About Amplifier Power ............................................................................. 9
Finalizing Your Installation ................................................................... 10
10-Year Limited Warranty ...................................................................... 11
Cleaning The Cabinets ............................................................................ 11
Difficulty? ............................................................................................... 12
Page 2

Important – Please Read First
hank you for choosing
New Ensemble II. Like all
speaker systems, its sound is
T
very much influenced by its
placement in the listening room.
Unlike conventional systems, however, it consists of three compact
units that can be placed where they
sound best without intruding on
your living space. There is no need
to sacrifice sound quality to decor,
or vice-versa.
If you place New Ensemble II in
your listening room casually, it will
sound at least as good as conventional speakers. However, to achieve
even better sound, we urge you to
experiment with placement at some
length, a process aided by the
instructions that follow.
If you have any questions or
problems, please consult the store
where you purchased the system, or
call a Cambridge SoundWorks
Audio/Video Consultant toll-free.
Cambridge SoundWorks
1-877-YES-HIFI
(1-877-937-4434)
24 hours a day,
every day
In Canada: 1-800-987-9104
Outside US or Canada:
Tel: 617-332-5936
Fax: 617-527-3194
www.cambridgesoundworks.com
E-mail:
info@cambridgesoundworks.com
1
Page 3

Unpacking The System
As you unpack your New Ensemble II
system, please examine each speaker
unit carefully for signs of shipping
damage. If there is any damage, do
not install or use the system. Consult
the store where you purchased the
system or call Cambridge SoundWorks at 1-877-YES-HIFI for assistance.
It’s a good idea to save the shipping carton and its inserts in case
you have to ship your system later.
All the items shown to the right
should be included; inform the store
or Cambridge SoundWorks if anything is missing.
Subwoofer
Satellites (2)
GE
ID
R
B
M
A
C
S
K
OR
W
D
N
U
O
S
GE
D
I
R
B
S
K
M
A
OR
C
W
D
N
U
O
S
Satellite feet
(2 strips of 4)
GE
S
K
BRID
M
OR
A
W
C
D
N
U
O
S
2
Page 4
Overview
Read through the guidelines that
follow before starting to install your
speakers.
First, decide where to place the
New Ensemble II speaker units in
your listening room. Consider
locations where conventional
speakers would not fit. New
Ensemble II satellites can be located
on bookshelves, hung from a wall
with No. 10 screws or wall-mounted
B
A
Cambridge
Cambridge
SoundWorks
SoundWorks
with a variety of swivel adapters
available from Cambridge
SoundWorks. Floor stands are also
available. See page 10, “Finalizing
Your Installation.”
Next, consult page 5 and decide
which of the different hookup
options is best. Prepare the speaker
wire and make the connections.
Listen to the system and be sure you
are satisfied with the placement
before concealing the wires.
Cambridge
Cambridge
SoundWorks
SoundWorks
45°
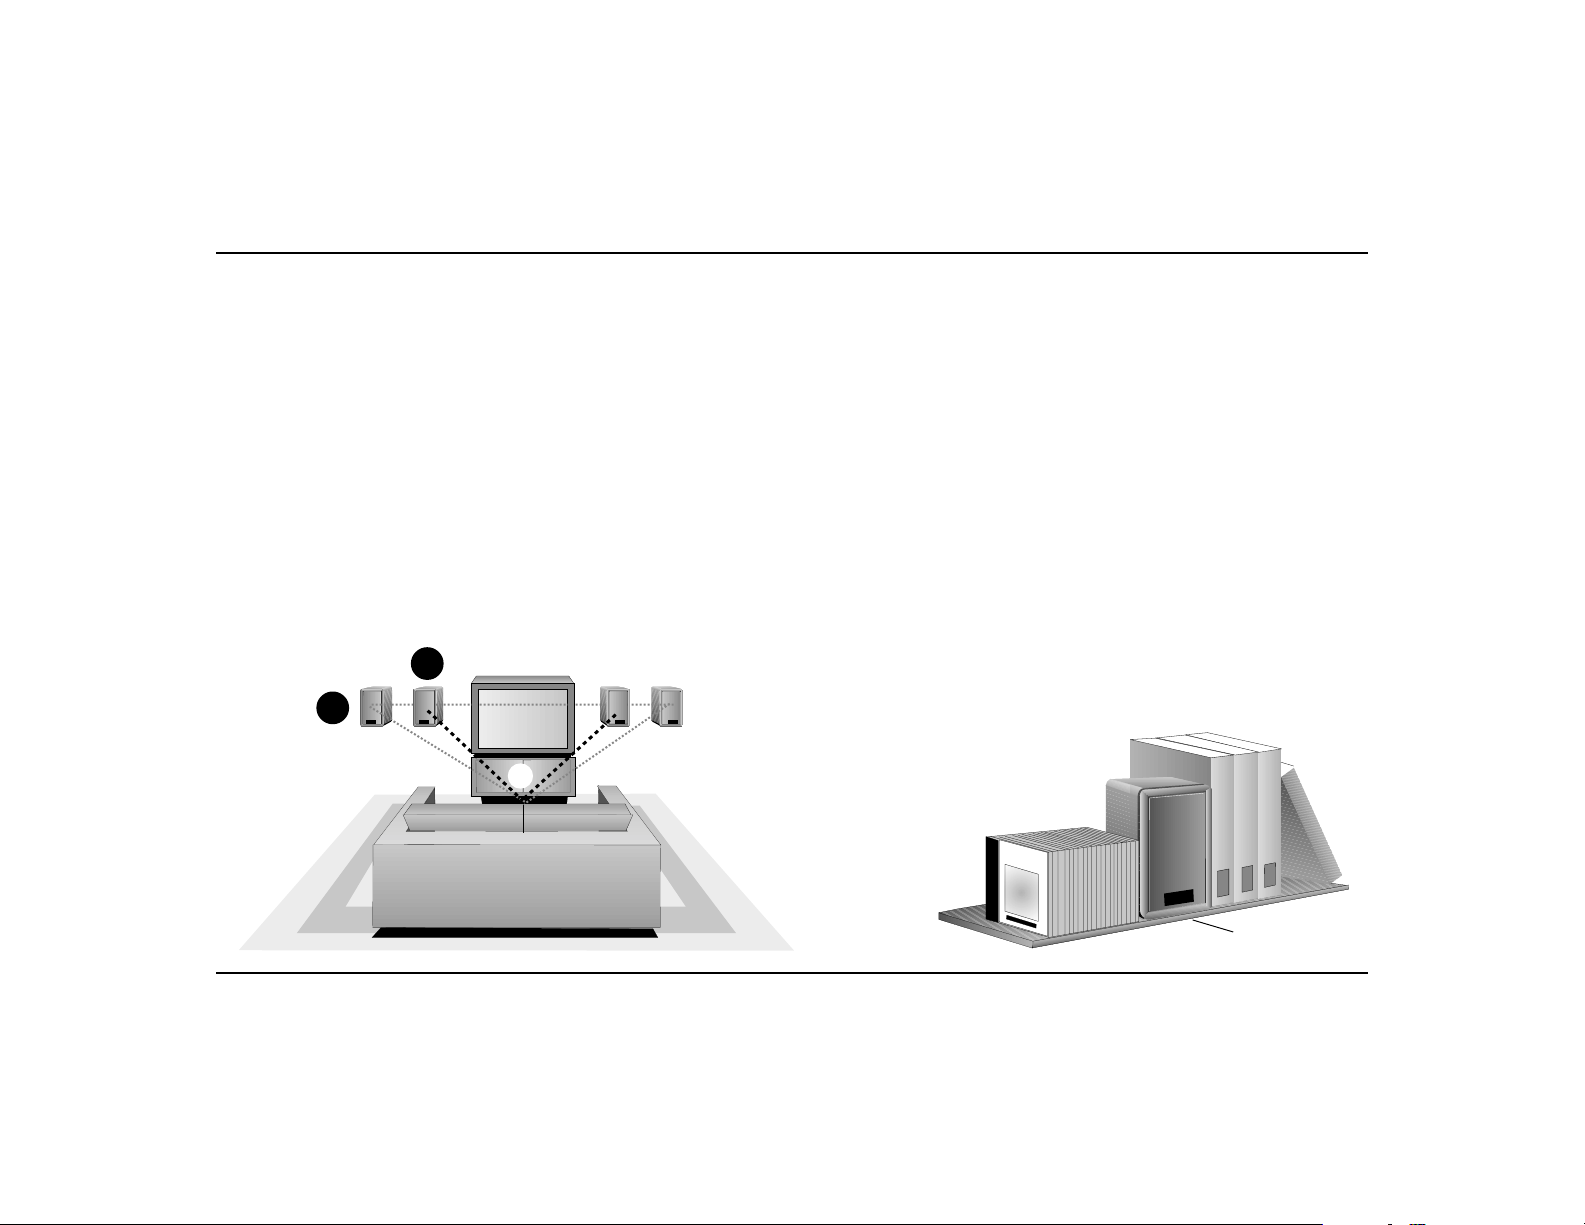
Speaker Placement
The satellites
• For music listening, place the
satellites to form an equal-sided
triangle with your favorite listening position (A, below). Perfectly
symmetrical placement is not
necessary.
• In a home theater installation,
place the satellites so that they
form a 45° angle with your pre-
ferred seat (B), which is how
movie soundtracks are mixed. The
subwoofer and satellites are not
magnetically shielded, and must
be at least 18 inches from the TV
to prevent picture distortion.
• Have a clear line of sight to the
satellites, so that higher frequencies are not blocked.
• The satellites can be placed either
vertically or horizontally.
M
O
Z
A
S
R
y
T
m
p
h
o
N
n
ie
o
. 3
s
9
&
4
1
• If the satellites are across the room
from the listening area, their
height is usually not critical; they
can go down on the floor, up near
the ceiling, or most anywhere in
between. If they are close to the
listening area, however, it is best
to have them at or near ear level.
• If you put the satellites in bookshelves or a wall system, place
them with their front surfaces
flush with the front of the shelves;
you can then surround them with
books, CDs, etc., as shown below.
• Take advantage of the satellites’
small size and consider locations
where regular speakers wouldn’t
fit, such as window sills or a
mantelpiece.
GE
ID
R
B
M
A
C
ORKS
W
OUND
S
SHAKESPEARE
SHAKESPEARE
SHAKESPEARE
1
2
The Sun Also Rises
3
Flush
3
Page 5

The subwoofer
• Because the ear cannot localize
low-bass, the New Ensemble II’s
subwoofer does not contribute
significantly to the stereo effect.
Therefore it need not be particularly close to the satellites, and
can be hidden under or behind
furniture. Low-bass will appear to
emanate from the satellites.
• To start with, simply place the
subwoofer on the floor against
the wall nearest the satellites.
You can experiment with placement using the guidelines which
follow.
• The flared output vent on the
subwoofer must be at least 2
inches from the nearest surface.
• The strength of low bass depends
on how close the subwoofer is to
intersecting room surfaces as
shown below. The most bass—
results from the unit in a corner
on the floor. The least bass
results with the unit out in the
room away from corners and
walls.
• While we usually don’t recommend placing the subwoofer
behind the listening area, try it if
you’re tight for space.
• Don’t place the subwoofer on the
same shelf system as a turntable.
Left Satellite
Right Satellite
Subwoofer
Left Satellite Right Satellite
Subwoofer
A. Least Bass B. More Bass
4
Left Satellite Right Satellite
Subwoofer
C. Most Bass
Page 6

Hookup Options
The New Ensemble II may be connected to
your receiver or amplifier using any one
of the three following diagrams. All of the
three options are acoustically and
electrically identical. Choosing the right
connection option minimizes the length of
speaker wire you have to use (and
possibly conceal).
If you wish to audition your speakers in
different positions before deciding on the
their final locations, connect your
speakers according to Hookup Option (1)
and allow ample wire length for experimentation. Afterwards, you can reconnect
the wires in the most efficient routing.
OPTION
2
GE
D
I
R
B
M
ORKS
A
W
C
OUND
S
GE
BRID
AM
C
S
K
OR
W
D
N
U
O
S
○○○○○○○○○○○○○○○○○○○○○○
102.7
LASER DISC
GE
ID
R
B
M
ORKS
A
W
C
OUND
S
OPTION
1
AMBRIDGE
C
S
K
OR
W
D
N
U
O
S
S
K
OR
AMBRIDGE
W
C
D
N
U
O
S
GE
GE
D
S
I
K
R
BRID
B
RKS
OR
O
AM
M
W
C
D
A
W
N
C
U
O
S
OUND
S
Left satellite
○○○○○○○○○○○○○○○○○○○○○○
102.7
LASER DISC
Receiver or amplifier
Subwoofer
L
R
SPEAKERS
+
+
–
+
+
–
Receiver or amplifier
Right satellite
Twist bared ends
together (see p. 7)
IMPORTANT NOTE
+
+
–
L
SPEAKERS
The complete
must be connected ONLY to the Speaker
A or Speaker B terminals on your receiver
+
or amplifier, just like a pair of conventional
speakers. DO NOT connect the satellites
to one set of terminals and the subwoofer
R
+
+
–
to the other. With many receivers, this
would connect the satellites and bass
speaker in series, which would do no
damage, but could seriously degrade the
New Ensemble II’s
New Ensemble II
system
performance.
5
Page 7

OPTION
3
LASER DISC
Preparing Speaker Wires
1. After choosing the connection
configuration, cut speaker wire
bridge
bridge
Cam
orks
ndW
Sou
Cam
SoundWorks
AMBRIDGE
C
S
K
OR
W
D
N
U
O
S
into four appropriate lengths.
We recommend you use a wire
cutter/stripper.
2. Separate the two individual
leads for a distance of one inch
(as shown in C, below) at both
ends of each of the four wires.
1
3. Strip
102.7
/2 inch of insulation from
each individual lead end, being
careful to apply only enough
pressure to cut through the
insulation and not the wire
strands.
4. Twist the bared wire strands
tightly together (D). Be sure that
there are no loose strands that
could short across the connect-
○○○○○○○○○○○
ing terminals on the speakers or
receiver (E).
• The leads in each pair are usually
differentiated by a ridge or color
stripe down one lead’s insulation,
and/or through the use of different color wire (copper and silver).
This is important when making
connections as described in the
next section.
• Use at least 18-gauge wire for
runs of up to 50 feet, and at least
16-gauge for longer runs.
D
+
–
L
+
SPEAKERS
C
R
+
+
–
1"
E
1/2"
6
Page 8

Making Connections
When connecting your system,
follow these guidelines:
• Unscrew all of the speakers’ red
(+) and black (–) connectors to
expose the holes in their threaded
shafts. Insert the stripped ends of
the wires in the holes. Hand
tighten the connectors clockwise
as shown in (F and G). Be sure
that no stray strands of wire short
across the speaker terminals or
those on your receiver or amplifer.
Alternatively you can attach
standard banana plugs to the
speaker wires and plug them into
the speaker connectors.
• Connect all the speaker units
identically by connecting the red
(+) and black (– ) terminals on the
speaker units to their red and
black counterparts on your receiver or amplifier as shown in the
system diagrams on pages 5-7.
Use the marked/copper leads for
interconnecting the red terminals,
and the unmarked leads for the
black terminals.
Connecting the speakers identically assures that they operate “in
phase” (their cones move in and
out together). “Out of phase”
connections can muddy the stereo
effect. Sounds like solo voices,
that should appear to come from
a single point between the two
satellites, will sound “split”
between them.
• When connecting two wires to a
single connector, twist the
marked (copper) and unmarked
(silver) leads for the satellite and
subwoofer together as shown in
(H), below.
F
Rear of
+
–
satellite
G
–
+
Underside
of subwoofer
H
+
–
7
Page 9

Optimizing The Sound Of Your System
It is almost impossible to find an
acoustically ideal placement for a
conventional speaker in a listening
room. This is because room acoustics affect low-bass differently from
the rest of the range of sound. If you
place a speaker so the room helps its
bass, it is likely to hinder the upper
ranges (and vice versa). Thus,
placing conventional speakers
inevitably entails a sonic compromise, even before proper stereo
effect, decor, and convenience are
taken into account.
This compromise doesn’t apply to
the New Ensemble II. It separates the
low-bass from the rest of the range.
This means you can place the
subwoofer and the satellites differently to take advantage of the room
in both the lower and upper ranges.
Yet the units are so compact that
even when placed optimally, they
have little or no visual impact on
your living space.
We urge you to take full advantage of the New Ensemble II by
trying the speaker units in different
locations within your listening
room. Of course, if the system
sounds satisfactory from the moment you connect it and first turn it
on, you may wish to go no further.
But if you wish to see if an improvement can be made, we suggest you
experiment with placement using the
following guidelines:
• Let your ears be your guide, and
trust them. When the New
Ensemble II sounds right to you,
you’ve found the best placement.
• A small change in placement can
have a large effect on the sound.
For example, low-bass increases as
you move the subwoofer closer to
the intersecting room surfaces. The
sound will be brighter with the
satellites close to the listening area
than with them across the room.
And the apparent fullness of the
sound, a function of mid-bass
rather than low-bass, is greater
with the satellites against a wall
than with them out in the room.
This is not to imply that “more
is better,” whether it be bass,
brightness, or fullness. The point is
that a change can easily be effected
simply by moving one or more of
the speaker units. And with New
Ensemble II, that is easy to do.
• Program material varies greatly, so
be sure to listen to a variety of
recordings to prevent being misled
by unusual characteristics of
a particular recording.
• If it is necessary to place the
satellites close to the listening
area and you find the sound too
bright, try placing the units at an
angle so that listeners aren’t
directly on their axis (I).
balance is usually best with the
satellites against a wall. If they
are out from the wall and sound
too thin, particularly on vocal
recordings, try moving them back
toward the wall.
Mid-bass and mid-range
• The subwoofer reproduces only the
lowest bass, such as bass drum, organ
pedals, and the lowest notes of string
basses and synthesizers. Refer to the
illustration on page 4 for guidance if
the low-bass is either too strong or
not strong enough. Also, not all
recordings have truly low-bass on
them, so be sure to make judgments
on recordings which do.
• If you’re not happy with what you hear
and are having trouble improving it,
check with your store, or call a Cambridge SoundWorks Audio/Video
Consultant at 1-877-YES-HIFI toll-free.
I
8
Page 10

About Amplifier Power
The amount of amplifier or
receiver power needed to drive New
Ensemble II satisfactorily varies
significantly with such factors as the
size of the listening room, its acoustics and furnishings, the type of
music you listen to, and how loud
you like to play it. When surveying
a representative variety of listeners
and circumstances, we encountered
power needs ranging from as little
as 25 to as much as 150 watts per
channel.
The New Ensemble II system can
be used safely to play music with
the most powerful amplifiers and
receivers designed for home listening. However, use common sense to
prevent strong non-musical transients; keep the volume down when
connecting or disconnecting components, raising or lowering your
turntable’s tonearm, and so on. This
will help protect your ears as well as
the speaker units.
At high volume levels, if the
sound is consistently “grainy” or
“gritty”, and/or there is clearly
noticeable distortion on deep bass,
you may be overdriving your amplifier or receiver. Back- off on the
volume control until the symptoms
disappear. If this level is not loud
enough for you, you may need a
more powerful amplifier or receiver
for satisfactory results.
If you suspect your amplifier or
receiver is inadequate, contact the
store where it was purchased or call
a Cambridge SoundWorks Audio/
Video Consultant, who will advise
you on how much power would be
appropriate for your particular
circumstances.
9
Page 11

Finalizing Your Installation
The New Ensemble II satellites can
be placed on a shelf, a mantel, or
anywhere convenient. Apply the
four small dome-shaped feet on the
bottom of each satellite. The feet
protect the supporting surface and
compensate for uneven or slick
conditions. If you ever need to
remove a foot, gently slide the edge
of a knife under one side and
slowly peel it off. If you attempt
to“pop” it off, you many damage
the speaker’s finish.
The satellites may be hung
directly on a wall. Apply the dome
shaped feet to the back of the
satellite to insure a more secure
installation. Screw a No. 10 screw
into the wall so the head protrudes
3
about
/8 inch. Plastic anchors may
be needed to secure the screws in
particularly hard or soft materials.
If so, drill the appropriate size holes
in the wall and tap in the anchors
until they are flush with the
surface. The exposed screw head
can then fit into the keyhole slot on
the rear of the New Ensemble II
satellite (see K). If necessary Adjust
the the space between the screw
head and the wall for the best fit.
Swivel brackets are also available
for hanging the speakers and
directing their sound towards the
listening area. Use the threaded
socket to attach these to the speakers
(see J). Ceiling brackets (L) are
available from Cambridge
SoundWorks and can be used for
hanging speakers where there are no
convenient locations for wall
mounting.
NEWE
NSEMBLE II
BY HENRY KLOSS
FOR USE WITH ENSEMBLE AND ENSEMBLE II
CAMBRIDGE SOUNDWORKS, INC.
NEWTON, MASSACHUSETTS USA
MADE IN TAIWAN
1-800-367-4434 USA 617-332-5936 (OUTSIDE USA)
00000
6 OHMS
®
NEWE
NSEMBLE II
BY HENRY KLOSS
FOR USE WITH ENSEMBLE AND ENSEMBLE II
CAMBRIDGE SOUNDWORKS, INC.
NEWTON, MASSACHUSETTS USA
MADE IN TAIWAN
1-800-367-4434 USA 617-332-5936 (OUTSIDE USA)
00000
6 OHMS
L
KJ
NEWE
NSEMBLE II
BY HENRY KLOSS
FOR USE WITH ENSEMBLE AND ENSEMBLE II
CAMBRIDGE SOUNDWORKS, INC.
NEWTON, MASSACHUSETTS USA
MADE IN TAIWAN
1-800-367-4434 USA 617-332-5936 (OUTSIDE USA)
00000
6 OHMS
10
Page 12

10-Year Limited Warranty
To the original purchaser, Cambridge SoundWorks, Inc. will
warrant the New Ensemble II
speaker system to be free from
defects in material and workmanship for a period of ten (10) years
from date of purchase. With respect
to defects, Cambridge SoundWorks
will, at its option, replace the
product or repair the defect in the
product with no charge to the
original purchaser for parts or labor.
This warranty does not extend to
any defect, malfunction or failure
caused by misuse, abuse, accident,
faulty hookup, defective associated
equipment or use of the speaker
with equipment for which it is not
intended.
This warranty is valid only when
the speaker is returned to the store
where it was purchased. Or, if you
bought directly from Cambridge
SoundWorks, call for a Return
Authorization Number for the unit
and return it to the address below,
freight prepaid, together with a copy
of the original sales slip to establish
warranty status. Please do not
return New Ensemble II, or any of its
parts, to the factory without prior
authorization.
This is the sole and express
warranty. This warranty is in lieu of
all other warranties, expressed or
implied, of merchantability, fitness
for purpose or otherwise. In no
event shall Cambridge SoundWorks
be liable for incidental or consequential damages or have any
liability with respect to defects other
than the obligations set forth above.
To ensure warranty coverage it is
incumbent upon the original
purchaser to inform Cambridge
SoundWorks or any of its Authorized Service Agencies of the defect
within the warranty period. The
only acceptable method of establishing warranty status is a copy of the
original proof of purchase indicating
customers name and purchase date.
For warranty information contact:
Cambridge SoundWorks, Inc.
311 Needham St.
Newton, MA 02464
1-877-YES-HIFI
(1-877-937-4434)
www.cambridgesoundworks.com
info@cambridgesoundworks.com
email:
Cleaning
The Cabinets
The satellites can be cleaned with a
window cleaning product. Use a
soft, lint-free cloth only. Avoid
spraying the cleaner directly on the
speaker grilles to prevent damage
to the speaker drivers. Also, avoid
getting cleaner on the serial
number plate on the rear of each
speaker as it may remove the
numbers.
Clean the subwoofer with a
damp cloth. Do not use polish.
Difficulty?
If you suspect there’s a problem
with your New Ensemble II system,
contact the store where you
purchased it, or call a Cambridge
SoundWorks Audio/Video Consultant who will help you track the
problem, which could be in some
other component in your system. If
together you agree that there is
something wrong with your New
Ensemble II system, you should
return it to the store where you
bought it. Or, if you bought directly
from Cambridge SoundWorks, we
will supply you with a Return
Authorization Number for the unit.
Please do not return the New
Ensemble II system, or any of its
parts, to the factory without prior
authorization.
® Ensemble and Cambridge SoundWorks are registered trademarks of Cambridge SoundWorks Incorporated
11
Page 13

311 Needham Street, Newton MA 02464
1-877-937-4434 Fax: 617-527-3194
www.cambridgesoundworks.com
Email: info@cambridgesoundworks.com
P81-1260 0400 A Company
 Loading...