

Page 1

User’s Guide
DTT3500 Digital
Information in this document is subject to change without notice and does not represent a commitment on the part of Creative Technology Ltd. No part of this manual may be
reproduced or transmitted in any form or by any means, electronic or mechanical, including photocopying and recording, for any purpose without the written permission of
Creative Technology Ltd. The software described in this document is furnished under a license agreement and may be used or copied only in accordance with the terms of the
license agreement. It is against the law to copy the software on any other medium except as specifically allowed in the license agreement. The licensee may make one copy of
the software for backup purposes.
Copyright © 2000 by Creative Technology Ltd. All rights reserved.
Version 1.0
August 2000
© 2000 Cambridge SoundWorks, Inc. All rights reserved. Cambridge SoundWorks is a registered trademark, and DeskTop Theatre is a trademark of Cambridge SoundWorks,
Inc., Newton, MA. The Creative logo, Sound Blaster and the Sound Blaster logo are registered trademarks, and EAX, the EAX logo, PC-DVD, CMSS, Live! and Creative Multi
Speaker Surround are trademarks of Creative Technology, Ltd in the United States and/or other countries. NOMAD is a registered trademark of Aonix and is used by Creative
Technology and/or its affiliates under license. The DTT3500 Digital’s Dolby Digital decoder/amplifier is manufactured under license by Dolby Laboratories. Dolby, Dolby
Digital, Pro Logic, AC-3 and the Double D symbol are trademarks of Dolby Laboratories, Inc. Confidential unpublished works. Copyright 1992-1997 Dolby Laboratories. All
rights reserved. Sony is a registered trademark and PlayStation 2 is a trademark of Sony Computer Entertainment Inc. Microsoft and DirectSound are registered trademarks of
Microsoft Inc. All other brand and product names are trademarks or registered trademarks of their respective holders.
All specifications are subject to change without prior notice. Actual contents may differ slightly from those pictured.
1
Page 2

Safety & Regulatory Information
CAUTION: This device is intended to be installed by the user in a CSA/TUV/UL certified/listed IBM AT or
compatible personal computers in the manufacturer’s defined operator access area. Check the equipment operating/
installation manual and/or with the equipment manufacturer to verify/confirm if your equipment is suitable for userinstalled application cards.
The following sections contain notices for various countries:
Any changes or modifications not expressly approved by the grantee of this device could void the user’s authority to
operate the device.
WARNING: To prevent fire or
shock hazard, do not expose this
appliance to rain or moisture.
Modifications
Compliance
This product conforms to the following Council Directive:
❑
Directive 89/336/EEC, 92/31/EEC (EMC) 72/23/EEC (LVD)
Important Notice
The serial number for the
in a secure area. This is for your security.
DTT3500 Digital
is located on the subwoofer. Please write this number down and keep it
2
Page 3

IMPORTANT SAFETY INSTRUCTIONS
READ INSTRUCTIONS - All safety and
operating instructions should be read
before the DTT3500 Digital amplified
subwoofer/satellite system is operated.
RETAIN INSTRUCTIONS - The safety and
operating instructions should be retained
for future reference.
HEED WARNINGS - All warnings on the
subwoofer and in the operating instructions
should be adhered to.
FOLLOW INSTRUCTIONS - All operating and
use instructions should be followed.
CLEANING - Unplug the subwoofer from the
wall outlet or other power source before
cleaning. Do not use liquid cleaners or aerosol
cleaners. Use a damp cloth for cleaning.
ATTACHMENTS - Do not use attachments not
recommended by Cambridge SoundWorks
as they may cause hazards.
WATER AND MOISTURE - Do not use the
subwoofer near water—for example, near a
bath tub, wash bowl, kitchen sink, or
laundry tub; in a wet basement; or near a
swimming pool; and the like.
ACCESSORIES - Do not place the DTT3500
Digital system on an unstable car t, stand,
tripod, bracket, or table. The subwoofer or
satellites may fall, causing serious injury to
a child or adult, and serious damage to the
product. Use only with a cart, stand, tripod,
bracket, or table recommended by
Cambridge SoundWorks, or sold with the
product. Any mounting of the satellites or
subwoofer should follow the
manufacturer’s instructions, and should use
a mounting accessory recommended by
Cambridge SoundWorks.
VENTILATION - Slots and openings in the
cabinet are provided for ventilation, to
ensure reliable operation of the subwoofer
and to prevent it from overheating; and
these openings must not be blocked or
covered. The openings should never be
blocked by placing the product on a bed,
sofa, rug, or other similar surface. The
subwoofer should not be placed in a built-in
installation such as a bookcase or rack
unless proper ventilation is provided or
Cambridge SoundWorks’ instructions have
been adhered to.
HEAT - The subwoofer should be situated
away from heat sources such as
radiators, heat registers, stoves, and
other products (including amplifiers) that
produce heat.
POWER SOURCES - The subwoofer should
be operated only from the type of power
source indicated on the marking label. If
you are not sure of the type of power supply
to your home, consult your product dealer
or local power company. For products
intended to operate from battery power or
other sources, refer to the operating
instructions.
POLARIZATION - The subwoofer may be
equipped with a polarized alter natingcurrent line plug (a plug having one blade
wider than the other). This plug will fit into
the power outlet only one way. This is a
safety feature. If you are unable to insert
the plug fully into the outlet, tr y reversing
the plug. If the plug should still fail to fit,
contact your electrician to replace your
obsolete outlet. Do not defeat the safety
purpose of the polarized plug.
POWER-CORD PROTECTION - Power-supply
cords should be routed so that they are not
likely to be walked on or pinched by items
placed upon or against them, paying
particular attention to cords at plugs,
convenience receptacles, and the point
where they exit from the subwoofer.
LIGHTNING - For added protection for the
DTT3500 Digital system during a lightning
storm, or when it is left unattended and
unused for long periods of time, unplug it
from the wall outlet. This will prevent
damage to the subwoofer due to lightning
and power-line surges.
OVERLOADING - Do not overload wall outlets,
extension cords, or integral convenience
receptacles as this can result in a risk of fire
or electric shock.
OBJECT AND LIQUID ENTRY - Never push
objects of any kind into the subwoofer
through openings as they may touch
dangerous voltage points or shor t out par ts
that could result in a fire or electric shock.
Never spill liquid of any kind on the
subwoofer.
SERVICING - Do not attempt to service the
subwoofer yourself as opening or removing
covers may expose you to dangerous
voltage or other hazards. Refer all ser vicing
to qualified service personnel.
DAMAGE REQUIRING SERVICE - Unplug
the subwoofer from the wall outlet or other
power source and refer servicing to
qualified ser vice personnel under the
following conditions:
a) When the power-supply cord or plug is
damaged.
b) If liquid has been spilled, or object have
fallen into the subwoofer.
c) If the subwoofer has been exposed to rain
or water.
d) If the subwoofer does not operate normally
by following the operating instructions; or
exhibits a distinct change in performance.
e) If the product has been dropped or
damaged in any way.
REPLACEMENT PARTS - When replacement
parts are required, be sure the service
technician has used replacement parts
specified by Cambridge SoundWorks or
have the same characteristics as the
original part. Unauthorized substitutions
may result in fire, electric shock, or other
hazards.
SAFETY CHECK - Upon completion of any
service or repairs to the DTT3500 Digital
system, ask the service technician to
perform safety checks to deter mine that the
DTT3500 Digital system is in proper
operating condition.
WALL OR CEILING MOUNTING - The
DTT3500 Digital satellites should be
mounted to a wall or ceiling only as
recommended by Cambridge SoundWorks.
3
Page 4
DTT3500 Digital
Contents
Introduction
Inventory.................................................................................................. 6
Recommended Signal Sources................................................................. 6
Installation Sequence............................................................................... 7
Speaker System Connections................................................................... 7
Speaker System Connection Diagram ..................................................... 8
Signal Source Connections...................................................................... 9
Signal Source Connection Diagram....................................................... 10
Speaker Cable and Stand Installation .................................................... 11
Mounting Speakers................................................................................ 12
Speaker Placement................................................................................. 13
Decoder Amplifier Placement ............................................................... 16
Decoder Amplifier Functions ................................................................ 17
Surround Reference ............................................................................... 19
Multiple Connections............................................................................. 21
Applications Guide ................................................................................ 22
Playback Levels..................................................................................... 25
Specifications......................................................................................... 25
EAX....................................................................................................... 25
Technical Support.................................................................................. 27
Limited Warranty................................................................................... 30
................................................................................................ 5
4
Page 5

®
®
®
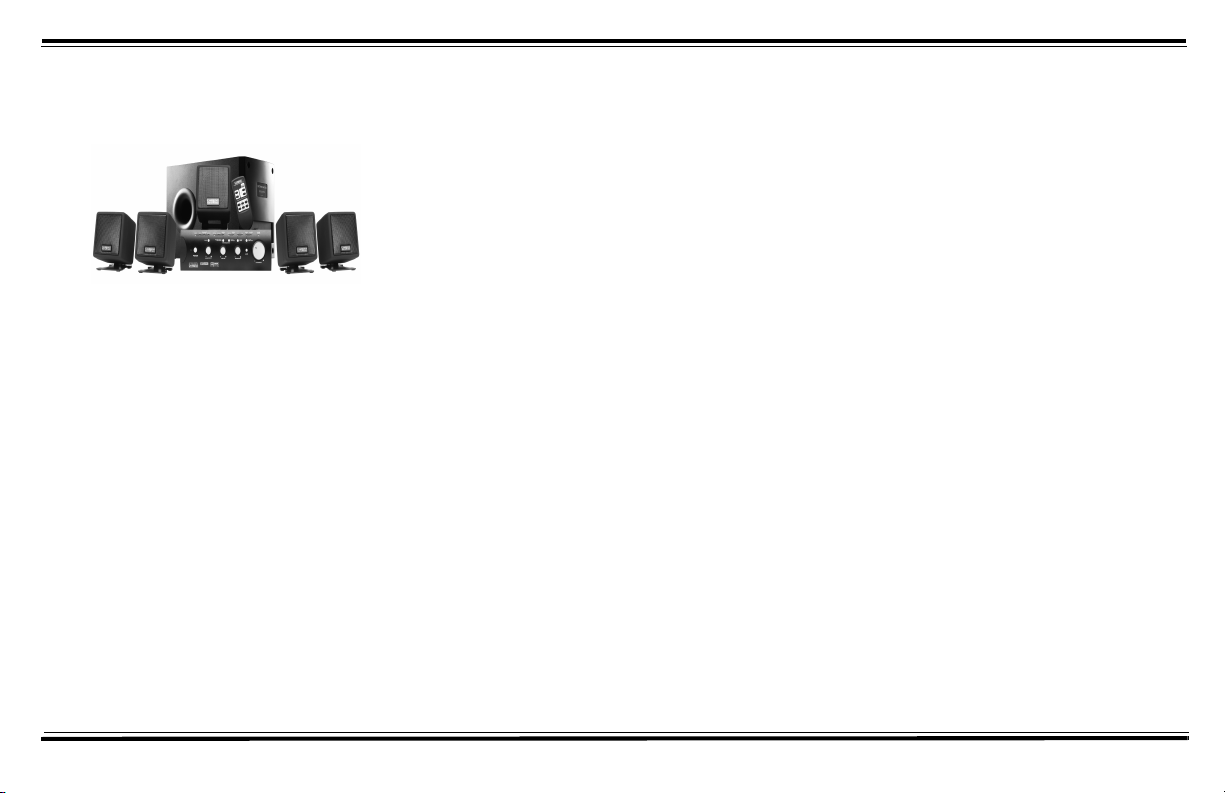
Introduction
Thank you for purchasing DTT3500
Digital by Cambridge SoundWorks.
DTT3500 Digital lets you experience
the full potential of Dolby Digital
multichannel sound from your DVD
player or game console, with a
dynamic output that rivals a
component home theater system. It
processes both Dolby Digital and
Dolby Surround program material.
DTT3500 Digital includes an
OPTICAL connection to enhance the
connectivity and usability to any
devices with OPTICAL output.
DTT3500 Digital also includes a
DIGITAL DIN input which supports
discrete 5.1-channel output.
DTT3500 Digital offers up to 6channel discrete audio support for
Microsoft DirectSound 3D and its
other derivatives. In some of today’s
best CD-based action games,
DTT3500 Digital can decode the
Dolby Digital cut-scenes while
offering enveloping positional multichannel audio. It’s ready for the new
era of DVD-based games.
Also included is Creative Multi
Speaker Surround (CMSS), which
lets you hear all of your favorite
stereo program material with a new
and exciting three-dimensional
quality.
DTT3500 Digital comes equipped
with an I.R. Remote Control,
providing wireless control over a
variety of audio functions.
The Memory Retention feature of
the DTT3500 Digital system
remembers the last used user settings
in standby mode.
5
Page 6
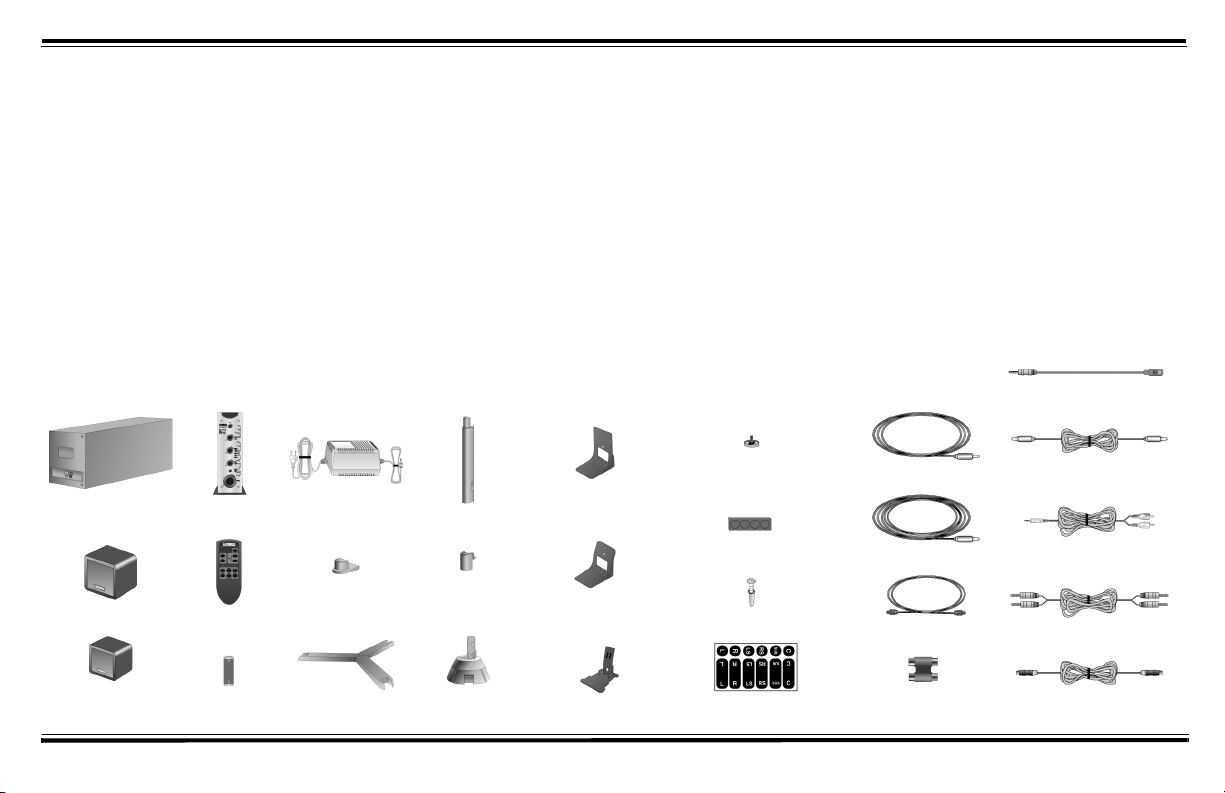
Inventory
Examine each unit carefully for
shipping damage. If there is any, do not
install or use the system. For advice, call
the store where you made your purchase
or call Creative Technology Ltd. technical
support. Save the shipping carton and
inserts in case you have to transport the
system later. All of the items shown in the
illustration below should be included with
your system. If anything is missing, notify
the retailer.
Recommended Signal Sources
The
DTT3500 Digital
signal source inputs, both analog and
digital. For example:
1. DVD players with Dolby Digital
(AC-3) optical outputs. DVD players
with coaxial outputs (for example, the
Creative labs PC-DVD Encore) may
also be used.
2. Sound cards that support
DirectSound
supports many
®
3D sound processing,
including front and rear 2-channel
minijack line outputs (like Sound
Blaster Live! series or Creative Labs
Sound Blaster PCI series).
Sound Blaster Live! owners should
utilize the exclusive Digital DIN
connection to hear the clearest digital
audio available.
3. Conventional 2-channel sound cards
such as Sound Blaster 16 or the
4. Game consoles like the
Sound Blaster AWE series can also
be used with the
DTT3500 Digital
PlayStation 2 using the Optical
or Analog Line In connections.
Minijack to DIN Cable
.
Subwoofer
Center Speaker
Satellites (4)
6
Decoder Amplifier
Remote Control
“AA”- Size Battery (2)
15V 4A DC
Powe r A da pter
Feet (6)
Frames (2)
Support
Extends (18)
Supports (6)
Holder/Cap (2)
Monitor Stand
(for Center Speaker)
Desktop Stand
(for Center
Speaker)
Desktop Stand (4)
(for Satellites)
Screw (for Center
Speaker Stands)
Strips of Rubber Feet (2)
Screws and Plastic
Anchors (2)
Identification Labels
3m Speaker Cable
5m Speaker Cable (2)
Optical Cable
Dual Female-to-Female
RCA Adapter
SPDIF Cable (RCA to RCA)
Stereo to Dual RCA Cable
Tandem Audio Cable
SPDIF DIN Cable
Page 7

Installation Sequence
Speaker System
1. Read all of the instructions
before installing the speaker
system.
2. Attach the provided stand to the
Decoder Amplifier if you wish to
place the unit vertically. For
more details see “Decoder
Amplifier Placement” on page
16.
3. Connect the Satellites, Center
Speaker, and Subwoofer to the
Decoder Amplifier.
4. Connect the Dolby Digital
output of your digital program
source to the coaxial and/or
optical Dolby Digital input of the
Decoder Amplifier.
5. Connect your normal audio
signal sources via the Analog
Line In inputs. An owner of a
Sound Blaster Live! sound card
with a Digital DIN output should
use the supplied cable to connect
it to the Digital DIN input
instead.
6. Using the placement instructions
as a guide, position the Satellites,
the Center Speaker and
Subwoofer. Install the Desktop
Stands and Floor Stands as
appropriate. If you wish to
substitute a powered subwoofer
for the subwoofer that comes
with DTT3500 Digital, read
“Substituting a powered
subwoofer” on page 15.
7. Connect the Power Adapter to
the Decoder Amplifier.
8. Turn on the power. Use the
TEST function on the Remote
Control to position and balance
the speakers.
9. You may wish to experiment
with speaker placement briefly
before concealing the connecting
cables and making the
installation more permanent.
10. The unit is ready for you to
enjoy.
Connections
Speaker Connections
Insert one satellite’s plug into the
corresponding Speaker Output on the
Decoder Amplifier. Repeat this
process for the remaining satellites,
center speaker and subwoofer. For
more details see “Speaker Cable and
Stand Installation” on page 11.
If substituting a powered
subwoofer, connect it to the
Subwoofer Line Out. For more
details see “Substituting a powered
subwoofer” on page 15.
Power Adapter Connections
Insert the small DC connector into
the 15V DC IN jack on the back of
the Decoder Amplifier. Insert the
Power Adapter’s AC plug into an
appropriate receptacle.
Note: Set the Decoder Amplifier to
standby mode before unplugging or
turning off the power supply.
7
Page 8
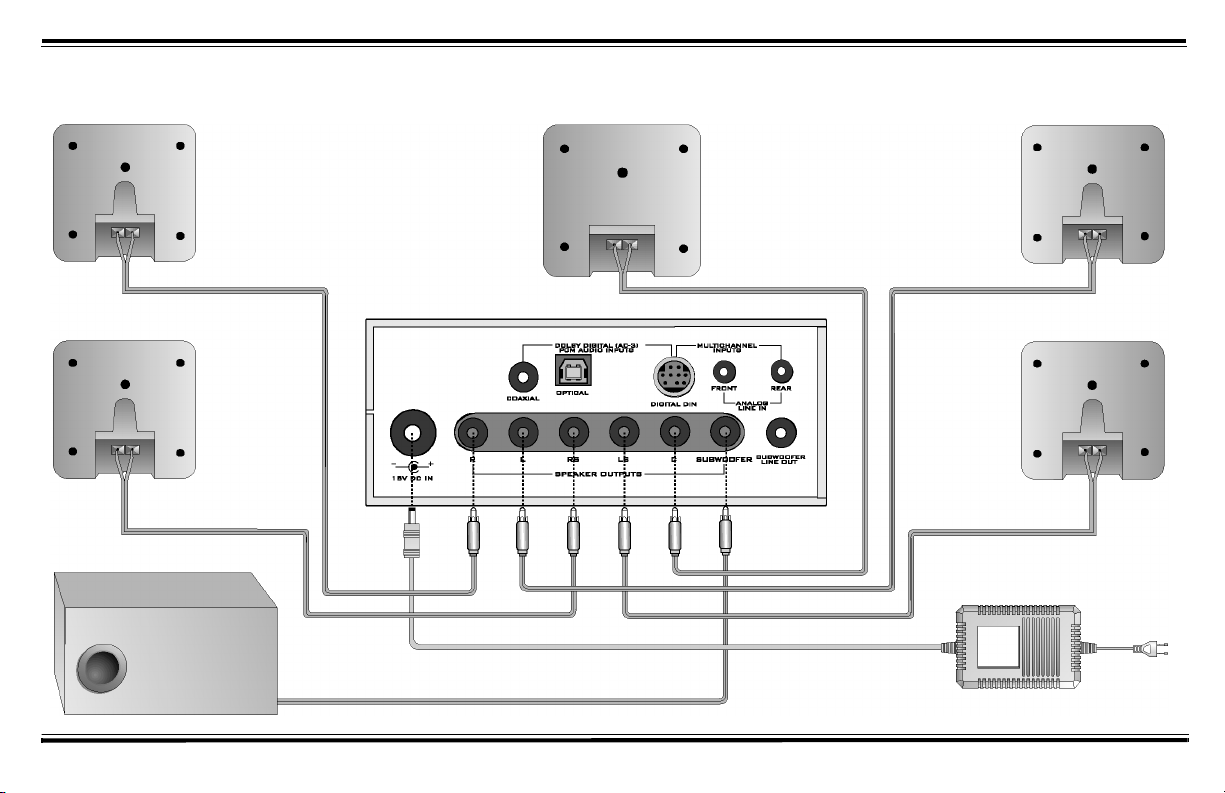
Speaker System Connection Diagram
Front Right Satellite
8
Rear Right Satellite
Subwoofer
Center Speaker
Front Left Satellite
Rear Left Satellite
Power Adapter
Page 9

Signal Source Connections
Dolby Digital source
Connect the Dolby Digital/SPDIF
output of your signal source to the
Decoder Amplifier’s Dolby Digital
(AC-3) / PCM Audio Inputs
COAXIAL or OPTICAL jack using
the SPDIF Cable (RCA to RCA) or
the Optical Cable.
Game consoles
Connect the optical output of the
game console (e.g. PlayStation 2) to
the OPTICAL input with the
Optical Cable.
Use the Stereo to Dual RCA
Cable and the Dual Female-toFemale RCA Adapter to connect to
the game console’s RCA output
through the multiple A/V plug. Then
connect the miniplug end of the
Stereo to Dual RCA Cable to the
FRONT jack of the Decoder
Amplifier.
For devices with optical output
Connect the optical output of these
devices (e.g. CD or MD players) to
the OPTICAL input with the
Optical Cable.
For Sound Blaster Live! sound
cards with Digital Out output
Connect the sound card’s Digital
Out output to the
input with the
and the
Cable
.
Cable
Minijack to DIN
SPDIF DIN
Digital DIN
For DIN Bracket bundled
with Live! Drive IR
Connect its Digital DIN output to the
DIGITAL DIN input with the
SPDIF DIN Cable.
For all other sound cards
Use the Tandem Audio Cable.
Connect the lime-green stereo
miniplugs to the Line Out minijack
output of your sound card and to the
FRONT minijack input of the
Decoder Amplifier. Connect the
black stereo miniplugs to the Rear
Out minijack output of your sound
card (if present) and to the Rear
minijack input of the Decoder
Amplifier.
9
Page 10

Signal Source Connection Diagram
Dual Female-to-Female RCA Adapter
Red
White
Stereo to Dual RCA Cable
DIGITAL OUT
Digital Ou tput (Eg. PC-DVD Encore )
Game Console
OPTICAL OUT-
SPDIF Cable
(RCA to RCA)
4-Ch Sound Card Output
(Eg. Sound Blast er Live!)
REAR OUT
LINE OUT
Lime-Green
Black
2-Ch Sound Car d Output
(Eg. Sound Blas ter AWE64)
LINE OUT
Lime-Green
Optical Cable
COAXIAL OUTPUT
Tandem Audio Cable
DIGITAL OUT
OR
DVD Playe r
Digital Outpu t (Sound Blaste r 5.1 Sound Card)
Minijack to DIN Cable
DIGITAL OUT
OR
Lime-Green
Black
CD Player
Digital Output
(Bundled wi th Live! Drive IR)
SPDIF DIN Cable
MD Player
10
Page 11

Speaker Cable and Stand Installation
Speaker Cable
Installation
Typically, the 3 meter (5 feet) Speaker
Cables will connect the front Satellites
and the Center Speaker to the Decoder
Amplifier and the 5 meter (9 feet)
Speaker Cables will connect the rear
Satellites to the Decoder Amplifier. A
panel of twelve self-adhesive labels is
provided to identify each Satellite and
Subwoofer and the opposite end of the
cable connected to a Satellite and
Subwoofer.
1. Identify a 3 meter Speaker Cable.
Most often, a Satellite will be used
with a Desktop Stand. In this case,
thread the bare cable end of a 3
meter Speaker Cable through the
hole in the Desktop Stand.
Connect this end to a Satellite (as
shown in
Diagram A
). Carefully
insert the Desktop Stand’s
attachment arm into the socket in
the back of the Satellite, taking up
any slack in the cable as required.
2. To use this Satellite in the front left
position, remove the backing from
the small, round “L” label and
apply it to the back of the Satellite
(see
Diagram A
3. Remove the backing from the
remaining, longer “L” label and
wrap it around the opposite end of
the Speaker Cable near the RCA
plug.
4. Place the Satellite in the front left
position.
5. Repeat this process using another
3 meter Speaker Cable for the
front right Satellite, using the “R”
labels.
6. Connect another 3 meter Speaker
Cable to the Center Speaker. Use
the “C” (center) labels. For details
on attaching Center Speaker
stands, see “Center Speaker Stand
Installation” on page 12.
7. Use the RS and LS labels (right
and left surround) and 5 meter
Speaker Cables for the rear
Satellites.
).
8. If you wish to use the Floor
Stands with the rear Satellites,
assemble the stand according to
the
Floor Stand Assembly
leaflet.
9. Use the last 3 meter Speaker
Cable and the “SUB” labels for
the Subwoofer.
Speaker Cable Usage
To connect the Speaker Cable to each
speaker, press one of the springloaded tabs to expose the connection
hole.
Insert the bare end of the cable into
the exposed hole, then release the tab
to lock the cable in place. Connect
cables with red bands to red tab
connectors, and unmarked wires to
black tab connectors.
Matching red cables to red
Notes:
tabs and unmarked cables to black
tabs insures the speakers all play “in
phase”. “Out-of-phase” connections
will do no electrical harm, but the
overall sound quality will be greatly
reduced. You can substitute regular
18 gauge speaker cable to create
longer cables, if needed. The 5 meter
cables may also be used for the front
satellites if required.
A
Socket
Attachment
11
Page 12

Center Speaker Stand
Installation
Unlike the Desktop Stand (for
Satellites), the stands for the
Center Speaker are of the screw-in
type.
1. Align the Attachment Arm to
the Center Speaker (see
Diagram B).
2. Use the screw provided to
connect the Attachment Arm
to the Center Speaker.
B
Attachment Arm
Mounting Speakers
Screw Mounting
Mounting the rear satellites on side
walls will give you superior surround
effects.
For a secure installation, mount the
rear satellites only on walls that are
structurally sound.
1. Place the following near you: rear
satellites, screws, plastic anchors
and rubber pads (supplied). You will
also need a drill and hammer.
2. Mark the wall where each rear
satellite screw will be. Position
the speakers behind you and
slightly above ear level.
3. Drill a hole about 2 cm (1 inch)
deep into each wall. Tap a plastic
anchor into the hole until it is
flush with the wall (see Diagram
C).
4. Screw a M5 x 25 mm screw into
each anchor, leaving about
0.5 cm (¼ inch) of the screw
protruding.
5. Apply four rubber pads on the
corners at the back of each rear
satellite. The rubber pads will
cushion the satellites from any
vibration and help keep them in
position.
6. Slip the keyhole of each rear
satellite onto a protruding screw
to complete the installation.
C
12
Page 13

Speaker Placement
The Front Satellites
The left front and right front
Satellites play stereo music, the offscreen sounds of video playback and
the front channels of 4-channel
games.
These Satellites should be placed
to the sides of your T.V. or monitor.
Try to form an equilateral triangle
with your head and the satellites (see
Diagram D). Be sure to have a clear
line of sight from your listening
position to these Satellites.
D
Install the Satellite’s Desktop
Stands when using them on the
desktop, see “Speaker Cable and
Stand Installation” on page 11.
The Center Speaker
The Center Speaker provides the onscreen effects and dialog in Dolby
Digital, Dolby Surround or Creative
Multi Speaker Surround modes. It
should be placed as close to the
center of your T.V. or monitor as
possible.
There are many mounting
possibilities. The Center Speaker can
be placed on top of the T.V or
monitor by using the provided
Monitor Stand. It directs the sound
E F
down towards the listener (see
Diagram E).
Use the Center Speaker Desktop
Stand to position a Center Speaker in
front of the T.V. or monitor. It directs
the sound up towards the listener (see
Diagram F).
13
Page 14

The Rear Satellites
The rear Satellites provide the
surround effects in Dolby Digital,
Dolby Surround or Creative Multi
Speaker Surround modes. They also
produce the discrete rear sounds of
4-channel sound cards.
5 meters (16 feet) of cable is
provided with the two remaining
Satellites for more flexibility in rear
channel placement. The rear
Satellites may be placed in any
convenient sites alongside the
listener, including sites slightly
forward of the listening location. The
rear Satellites do not have to be at
exactly the same height as the front
Satellites.
If you have side walls close to your
listening position, excellent
placement for the rear Satellites is
slightly behind your listening
position, slightly above ear level (see
Diagram G). The Satellites may be
hung on the wall using the Screw and
Wall Anchors provided, see
“Mounting Speakers” on page 12.
Any rear Satellite placement to the
left and right side of the listening
position will also provide strong
directional and surround effects.
The rear Satellites may be installed
on their convenient Floor Stands.
The stands should be positioned to
the left and right of your listening
position (see Diagram H).
Larger T.V. consoles or desktops
can accommodate both front and
surround pairs of Satellites. Try the
extreme corners of a console or desk
using the Desktop Stands (see
Diagram I).
After you have positioned the rear
Satellites, use the TEST function on
the Remote Control to make sure
each speaker can be heard clearly.
G
14
H
I
Page 15

The Subwoofer
The Subwoofer’s optimum position
is on the floor against the wall. The
closer the Subwoofer is to a corner,
the stronger the maximum bass
output. We strongly recommend
placing the Subwoofer on the floor
(see Diagram J). Leave at least 5 cm
(2 inches) of space between the
Subwoofer face and a wall. Position
the Subwoofer so that it’s connection
panel is facing a wall, shielded from
inadvertent contact. The Subwoofer
is not magnetically shielded, so
position it at least 46 cm (18 inches)
away from the T.V. or computer
monitor.
Substituting a powered
subwoofer
You may substitute a powered
subwoofer for the subwoofer that
comes with the DTT3500 Digital.
Connect its line level input (typically
an RCA jack) to the dedicated
Subwoofer Line Out on the back of
the Decoder Amplifier, using a
shielded audio cable with RCA plugs
on each end. Refer to the powered
subwoofer’s User Manual for
adjustment procedures.
J
15
Page 16

Decoder Amplifier Placement
The Decoder Amplifier can be
placed on the desktop, a shelf or any
site that makes the controls
convenient.
The Power Adapter cord must be
able to reach from the Decoder
Amplifier back panel to your AC
power receptacle.
Place the Decoder Amplifier on a
hard, flat surface.
There are ventilation slots on the
Decoder Amplifier’s enclosure. Do
not block these ventilation slots by
placing materials over them.
L
Model Variations
There are two models of the Decoder
Amplifier.
If you have purchased the
horizontal version please ignore the
following sections. Other than the
changeable face plate feature, all
functions remain the same.
The changeable face plate version
is supplied with mylar sheets which
enable you to choose a different
design or orientation (horizontal or
vertical).
M
Decoder Amplifier Stand
If placing the unit vertically, attach
the provided stand to the base of the
Decoder Amplifier (see Diagram
K).
Face Plate Installation
The face of the front panel may be
changed to reflect a different design
or orientation. Remove the clear
plastic cover and replace the
underlying mylar sheet with
another of your choice, (see
Diagram K). Replace the cover.
Horizontal Placement
Place the Decoder Amplifier
horizontally if there is adequate
desktop space, (see Diagram L).
Vertical Placement
If your desktop space is limited you
may choose to place the Decoder
Amplifier vertically, (see Diagram
M).
K
Stand
Mylar Sheet
Front Panel
16
Page 17

Decoder Amplifier Functions
The Standby LED lights up when the Power
Adapter is connected to the mains. Press the
Power button to turn on the Decoder
Amplifier.
The CMSS Music LED will
remain illuminated after initial startup. The last used CMSS mode’s light
will illuminate for subsequent startups from system standby mode.
The Optical LED also lights up
after initial start-up. The last used
Dolby Digital/PCM Audio input’s
light will illuminate for subsequent
start-ups from system standby mode.
The Digital DIN or Line In LED
lights up, depending on whether
Digital DIN or Analog Line In is
connected. The Digital DIN LED
will blink if a PC connected to the
Decoder Amplifier is off but a
Digital DIN input is connected.
Turning on your PC stops the LED’s
blinking.
The indicator light for Dolby
Digital will illuminate automatically
if a Dolby Digital program is
playing. That is, when a Dolby
Digital signal passes through the
Decoder’s processor via the
Optical,Coaxial or Digital DIN
(Dolby Digital/PCM Audio) inputs.
Sets the system to
1.
POWER
“On” or standby. When set to
“On”, the Standby LED above
the power button turns off.
2. SUBWOOFER, CENTER
AND SURROUND: These
controls adjust the level of the
indicated channels. Their output
level should be balanced with the
fixed output level of the Left and
Right front Satellites.
3.
MASTER
of the entire system. The Master
volume knob is servo controlled
via the Remote Control.
4.
CMSS
Multi Speaker Surround)
processes analog program
material. Repeated presses of
this button step through four
different operation modes.
MOVIE: Creates a 5.1 speaker
soundfield appropriate for movie
or game enjoyment from an
analog sound source.
:
Adjusts the volume
:
CMSS
:
(Creative
2
10
3
1
10
11
4
12
5
6
7
8
9
Legend
Button
LED
17
Page 18

MUSIC: Creates a 5.1 speaker
soundfield appropriate for music
from any analog sound source.
FOURPOINT/5.1 DIN: Use
this mode for DVD games
having Dolby Digital
soundtracks with EAX or
Microsoft DirectSound3D for
real-time positioning of sound
effects. Typically a Dolby Digital
5.1-channel + analog signal
source.
If a signal source is connected to
the Analog Line In minijacks, 4.1channel output is produced.
If the signal source is connected to
the Digital DIN input, up to 5.1channel output is produced.
Typically when using a Sound
Blaster Live! 5.1 sound card or the
DIN bracket bundled with Live!
Drive IR. For more details, see
“Signal Source Connection
Diagram” on page 10.
The DIN LED blinks if no signal
or an invalid audio signal like an
AC-3 signal is detected. In the case
of an AC-3 signal, select Digital
DIN at the Dolby Digital/PCM
Audio input selection.
18
STEREO: Use this mode when you
want to hear just stereo effects or the
stereo Dolby Digital downmix of a
DVD. The Dolby Surround Pro
Logic processor is disabled in this
mode.
5. DOLBY DIGITAL /PCM
AUDIO: Use this button to
select the signal source input.
Repeated presses of the button
cycles between Optical, Coaxial,
Digital DIN and Off.
6.
MULTI-CHANNEL:
this button to select the signal
source input. Repeated presses of
the button cycle between Line In,
Digital DIN and Off.
7.
AUDIO MODE
button to play just the left or
right channels of a stereo digital
signal (PCM from an audio CD,
a Video CD or a stereo signal
from a DVD). Use this when, for
example, a Video CD has
different languages on the left
and right channels.
Repeated presses of the button
select which channel is fed to both
the Left and Right front speakers.
Use this
:
Use
LL-Left channel program is directed
to both Left and Right front
speakers.
RR-Right channel program is
directed to both Left and Right front
speakers. See “Audio Mode
Selection” on page 20 for further
information about this feature.
8. DOLBY PRO LOGIC: This
button cycles from Dolby Pro
Logic processing of the digital
input to Dolby Pro Logic
processing of the analog input,
then to no Pro Logic processing.
9. DOLBY DIGITAL: This light
turns on whenever a Dolby
Digital signal is detected at the
SPDIF input of the DTT3500
Digital. For Dolby Digital 5.1
sound reproduction, make sure
only this light is illuminated.
Mutes all output from
10.
:
MUTE
the DTT3500 Digital. Press the
button once to mute. The blue
LED on the Master volume knob
blinks and all functions are
operable except speaker test.
Press a second time to restore
audio output. After being muted
for more than thirty minutes, the
Decoder Amplifier goes to
standby mode and the Standby
LED lights up.
Press this button to start
11.
:
TEST
the “test sound” generator. Use
this test sound to position all the
speakers and to balance their
relative output.
The test sound moves in sequence
from the left Satellite, the Center
Speaker, the right Satellite, then to
the rear right Satellite, rear left
Satellite and the subwoofer. All
indicator lights will blink on and off
while the test sound generator is in
operation.
The test sound will operate for
three complete cycles and then stop.
You can terminate the sound at any
point by pressing the Test button
again.
First use the test sound to verify
that each speaker is operating.
Then make sure the speakers are
positioned so that the test sound can
be clearly heard.
Finally, adjust the front panel level
controls for the Center, Subwoofer
and rear Satellites. Adjust each
control so its speaker achieves a
Page 19

balanced output level with the left
and right satellites (which provide a
fixed “reference” output level).
All functions except for the level
controls are disabled while the test
sound is running.
The speaker level controls operate
at all times. If desired, you may
adjust these controls during program
material to fine-tune the balance.
(This function is only available on
the Remote Control)
Note: Volume levels during the test
sequence are lower than during
normal operation.
12.
DYNAMIC MODE:
this button to experience the full
dynamic range of Dolby Digital
programs. The LEDs on the
upper half of the Decoder
Amplifier light up momentarily.
The program source will sound
louder in Dynamic Mode. If you
press this button again, the
default mode (compressed)
resumes. The LEDs on the lower
half of the Decoder Amplifier
light up momentarily.
(This function is only available
on the Remote Control)
Press
Surround Reference
Dolby Digital
Dolby Digital (earlier called AC-3)
delivers five discreet full-range
channels (left front, center, right
front, left surround and right
surround) plus a separate Low
Frequency Effects (LFE) channel.
Many soundtracks on the latest
generation laser discs, DVDs and
High Definition Television (HDTV),
are encoded with Dolby Digital
technology.
When a 5.1-channel Dolby Digital
program source is playing, such as
from a Creative PC-DVD player,
DVD player or game console, the
Dolby Digital indicator light will
illuminate automatically.
Note: Not every section of a DVD
will be 5.1-channel encoded. On
many DVDs, only the main movie
program will be available in 5.1channel sound. Other supporting
chapters (like a “Director’s
Comment” section) may be in stereo
or mono. These sections will not
light the Dolby Digital indicator even
though the sound will be properly
reproduced by the DTT3500 Digital.
Dolby Pro Logic
Dolby Surround is an earlier
surround sound standard which is
decoded with a Pro Logic processor
in the DTT3500 Digital. The Pro
Logic steering circuitry derives
separate center and rear channels
from encoded stereo program
sources.
Pro Logic processing provides a
convincing movie soundfield when
the material is specifically encoded
for Dolby Surround. Most older
stereo movie soundtracks will only
be encoded for Dolby Surround,
even though the program source may
be a DVD’s digital output. Most
DVDs containing Dolby Surround
program material will cause both the
Dolby Digital and Dolby Pro Logic
lights to illuminate. DTT3500
Digital will decode these digitally
transferred Dolby Surround
programs through the digital Pro
Logic decoder automatically.
CD-ROMs and CDs with Dolby
Surround encoding will feature the
Dolby Surround logo at the
beginning of the program or on the
packaging.
Process these programs by
selecting Analog In using the Dolby
Pro Logic button for input through
Analog Line In.
If using Digital DIN input, ensure
that the Digital DIN on the Dolby
Digital/PCM Audio input is selected.
Then select Digital In using the
Dolby Prologic button.
When Dolby Pro Logic is selected
CMSS is turned off. To turn on
CMSS again, turn off Dolby Pro
Logic first.
Do not select a Pro Logic decoding
mode if the program material is not
encoded for Dolby Surround.
Excessive center channel output will
result, and most of the stereo effect
will be lost. Use CMSS “Movie” or
“Music” modes to upmix stereo
programs to a realistic 5.1-channel
sound field.
19
Page 20

Creative Multi Speaker
Surround (CMSS)
CMSS is a 2-channel to 5.1-channel
sound processor similar in some
aspects to a Dolby Surround Pro
Logic processor.
The Music mode creates a
convincing 5.1-channel surround
soundfield with typical stereo
sources, whether they are Dolby
Surround-encoded or not. It works
well with Dolby Pro Logic, WAVE,
AVI and MIDI program material. In
essence, CMSS Music mode puts
you “on the stage” for the music’s
performance, surrounding you with
the performers.
In a similar manner, Movie mode
provides the sonic impression of
being front and center at a movie
screening. Dialog and all normally
centered sounds from a stereo
program are heard through the center
speaker. Use this mode whenever a
music program has sounds you want
to blend with on-screen action or
dialog.
Unlike Pro Logic decoding, CMSS
Music, Movie and FourPoint/5.1
DIN modes are appropriate for use
with multi-coded sources such as
DVD games. In some game titles, the
movie sequences may be encoded in
Dolby Surround but the game
sequences may be in the WAV
format. CMSS Movie mode supports
5.1-channel output for .WAV, .AVI,
.MIDI and other audio software
formats. Few, if any of these kinds of
formats are Dolby Surround
encoded.
The FourPoint/5.1 DIN mode
passes the four discreet channel
audio of 4-channel games direct to
each satellite channel. It does not
synthesize rear channel output, so
stereo signal in this mode will play
just through the front two speakers
and subwoofer.
The STEREO mode plays the Left
and Right Front speakers and the
subwoofer. It also lets you hear the
stereo downmix from any DVD.
The Dolby Pro Logic processor is
disabled in this mode.
Audio Mode Selection
The stereo soundtracks of some
movies on Video CDs (VCD format)
contain different languages. For
example, a 2-channel soundtrack
may contain Mandarin on the right
channel and English on the left
channel. The VCD program
literature should indicate the
presence of dual-language
soundtracks. Similarly, some movies
in the DVD format will contain duallanguage soundtracks. DTT3500
Digital lets you select one of these
languages and play it through both
the Left and Right speakers.
If there is no indication of which
channel is which, and you hear two
different language soundtracks
during stereo playback, select the
“LL” and “RR” settings until you
find the language soundtrack you
want.
The Audio Mode selection feature
can only be used with the PCM
digital soundtrack of a Video CD or
DVD with a dual soundtrack, not a
DVD encoded with Dolby Digital
5.1 sound or Dolby Surroundencoded material. If you have an
analog program with separate left
and right channels (the analog output
of a CD ROM, or the analog stereo
output of a “software” Video CD, for
instance), you will have to use the
balance control in your PC’s audio
software to mute the undesired
channel.
20
Page 21

Multiple Connections
The DTT3500 Digital system has many
configuration possibilities. Typically, the
system can be connected to either a game
console or a PC.
However, the DTT3500 Digital
allows you to connect to both,
forming a hybrid system.
Connecting to a Game Console and a
PC
You can connect your game console
and PC to the DTT3500 Digital
system while sharing one monitor by
following the instructions below.
Audio Connection:
1. Connect your game console’s audio
output to the Decoder Amplifier’s
Front minijack input with the
provided Dual Female-to-Female
RCA adapter.
2. Connect your PC’s audio output
to the Decoder Amplifier.
Video Connection:
1. Connect your game console’s video
output to a RF to VGA video
converter box.
2. Connect your video converter’s
output to a VGA switch box.
3. Connect your PC’s VGA output
to the VGA switch box.
4. Connect the PC monitor’s VGA
input socket to the output of the
VGA switch box.
After completing the above
connections you will be able to
choose the display output between
your PC and game console by using
the switch box.
To select the audio output, use the
Dolby Digital/PCM Audio or Multichannel input buttons on the Decoder
Amplifier.
PC
Video Signal
Monitor
VGA switch
box
Audio Signal
RF to VGA
converter box
Game Console
Video Signal
DTT3500 Digital
Audio Signal
21
Page 22

Applications Guide
Playing Games:
Playing Multi-format DVD Games
These games have Dolby Digital or
Dolby Pro Logic movie clips mixed
with the actual game sequence.
These DVD games have a mix of
Dolby Digital 5.1 sound (a digital
signal at the SPDIF input) and
soundcard wavetable output (a signal
at the analog input).
PC-DVD Setup
For AC-3 signal source connected to
COAXIAL input:
Select the COAXIAL input using the
DOLBY DIGITAL/PCM AUDIO
input selection button. The Dolby
Digital or Dolby Pro Logic source
signal will be automatically
processed.
For multi-channel inputs (FRONT
and REAR ANALOG LINE IN or
DIGITAL DIN):
1. Select LINE IN or DIGITAL DIN
input using the MULTI-CHANNEL
button.
2. Select the FOURPOINT/5.1 DIN
mode using the CMSS button.
For 2-channel sound cards:
1. Select LINE IN input using the
MULTI-CHANNEL button.
2. Select MOVIE or MUSIC mode
using the CMSS button.
Software DVD Player
For sound card’s with analog output
to FRONT and REAR ANALOG
LINE IN or digital output to
DIGITAL DIN:
Use the software DVD player to
process all signals into multi-channel
output.
1. Select LINE IN or DIGITAL DIN
using the MULTI-CHANNEL
button.
2. Select FOURPOINT/5.1 DIN
mode using the CMSS button.
Playing Microsoft DirectSound3D or
EAX Games
1. Select LINE IN or DIGITAL DIN
input using the MULTI-CHANNEL
button.
2. Under CMSS on your DTT3500
Digital decoder amplifier, select
FOURPOINT/5.1 DIN to fully
enjoy up to 5.1-channel gaming
experience from Microsoft
DirectSound3D or Creative EAX
titles.
3. For Sound Blaster Live! users,
enable the multi-channel
configuration on your PC.
Playing Conventional Games
Select MUSIC or MOVIE by
pressing the CMSS button until the
LED for MUSIC or MOVIE mode
lights up.
Playing Console Games
1. Select LINE IN input using the
MULTI-CHANNEL button and/or
OPTICAL input using the DOLBY
DIGITAL/PCM AUDIO button.
2. Select MUSIC or MOVIE by
pressing the CMSS button until
the LED for MUSIC or MOVIE
mode lights up.
Playing DVD Movies
Using PC-DVD player on a PC
Select the COAXIAL input using the
DOLBY DIGITAL/PCM AUDIO
input selection button.
Listening to PC-DVD movies with 5.1channel Dolby Digital sound
Be sure to listen only to the digital
program source. You can do this by:
1. Making sure your PC-DVD player’s
stereo downmix is not sent to your
soundcard. For example,
disconnect any cable link between
the cards, or
2. Muting the CD input of your
computer’s software mixer/
volume control application.
Using software DVD player on a PC
1. Set the software DVD player to pass
through AC-3 to DIGITAL DIN
output.
2. Select DIGITAL DIN using the
DOLBY DIGITAL/PCM
AUDIO input selection button.
22
Page 23

Using set-top DVD player or
PlayStation 2
Select OPTICAL or COAXIAL
using the DOLBY DIGITAL/PCM
AUDIO input selection button.
For movies with Dolby Digital (AC-3)
soundtracks
This signal is detected automatically
and the DOLBY DIGITAL LED
lights up. You will experience Dolby
Digital 5.1-channel output.
For 2-channel movies which are
Dolby Surround-encoded carried
within the Dolby Digital compressed
bitstream
The Dolby Pro Logic decoder will
automatically decode the program
for 5.1-channel movie experience.
For 2-channel DVD movies which
are Dolby Surround-encoded
The Dolby Pro Logic decoder will
automatically decode the program
for 5.1-channel movie experience.
Playing VCD Movies
Using PC-DVD player on PC
Select the COAXIAL input using the
DOLBY DIGITAL/PCM AUDIO
input selection button.
Using SoftMPEG player or
PlayCenter on PC
1. Select LINE IN or DIGITAL DIN
input using the MULTI-CHANNEL
button.
2. Select the Movie mode by
pressing the CMSS button until
the LED for Movie mode lights
up.
This mode lets you experience
the surround sound with 5.1channel output; all dialog and
central sounds will be heard
through the center speaker, while
music and off-stage sounds are
heard through the other four
satellites.
3. If you are using PlayCenter to
play the VCDs, disable all
CMSS effects in your PlayCenter
- use only DTT3500 Digital’s
Movie mode.
Using set-top VCD player
1. Select LINE IN input using the
MULTI-CHANNEL button.
2. Select the Movie mode by
pressing the CMSS button until
the LED for Movie mode lights
up. You can experience surround
sound instead of mono/stereo
sound; all dialog and central
sounds will be heard through the
center speaker, while music and
off-stage sounds are heard
through the other four satellites.
For VCD movies with Dolby
Surround-encoded stereo program
Use the Dolby Pro Logic decoder for
5.1-channel movie viewing
experience.
For source connected to OPTICAL/
COAXIAL/DIGITAL DIN:
1. Select OPTCAL/COAXIAL/
DIGITAL DIN input using the
DOLBY DIGITAL/PCM AUDIO
button.
2. Press the DOLBY PRO LOGIC
button until the DIGITAL IN
LED lights up.
For source connected to ANALOG
LINE IN
1. Select LINE IN input using the
MULTI-CHANNEL button.
2. Select ANALOG IN using the
DOLBY PRO LOGIC button.
CD Audio Music
Enjoying CD Audio on PC
1. Select LINE IN or DIGITAL DIN
input using the MULTI-CHANNEL
button.
2. Select the Music mode by
pressing the CMSS button until
the LED for Music mode lights
up. This mode creates an
enveloping five-speaker surround
effect that enhances stereo
music.
23
Page 24

Karaoke Music
Singing Karaoke on PC with Sound
Blaster Live! only (with Creative
PlayCenter)
1. Select LINE IN or DIGITAL DIN
input using the MULTI-CHANNEL
button.
2. Ensure your microphone is
connected to the MIC IN of
Sound Blaster Live!.
3. Enable the Microphone source in
the Mixer.
4. Select one of the seven Karaoke
modes under Environment in
Creative Launcher.
5. Click the Audio Menu button on
the Creative PlayCenter to hear
only the music, i.e. with the
vocal portion masked out.
Singing Karaoke on PC with Sound
Blaster Live! and Creative PC-DVD
Decoder Card (with Creative
Navigator application)
1. Ensure your microphone is
connected to the MIC IN minijack of
Sound Blaster Live!.
2. Enable the Microphone source in
the Mixer.
3. Select one of the seven Karaoke
modes under Environment in
Creative Launcher.
4. Select the COAXIAL input using
the DOLBY DIGITAL/PCM
AUDIO input selection button.
5. Press the AUDIO MODE button
of the DTT3500 Digital decoder
amplifier unit until you hear only
the music i.e. vocal portion is
masked out.
24
Page 25

Important!
Specifications
EAX
™
Playback Levels
DTT3500 Digital is intended for
individual or small group listening
and can achieve surprisingly high
output levels. However, playing
heavy-bass program material
continuously at overly loud, distorted
levels may blow the system’s internal
fuse.
The fuse can be replaced only by a
qualified representative. To avoid
this inconvenience and a possible
non-warranty repair charge, reduce
the playback volume when the
system shows obvious signs of
stress, for example, when it sounds
raspy, fuzzy, and/or muddy.
DTT3500 Digital
6-Channel Amplifier
Satellite speaker:
7 watts RMS per channel
Center Channer amplifier:
21 watts RMS per channel
Subwoofer amplifier:
35 watts RMS per channel
These specifications apply to
DTT3500 Digital operating from the
supplied 15V 4A DC power adapter.
EAX is a collection of powerful,
innovative audio technologies.
Developed by Creative's world-class
audio scientists and built into
groundbreaking Personal Digital
Entertainment (PDE) solutions, EAX is
changing the way you experience audio.
EAX offers advanced, interactive audio
and high-definition sound to a new
generation of portable audio appliances,
audio applications, and internet services.
Advanced technologies for incredible,
cutting edge audio are built into powerful
tools. EAX-enabled products let you
shape and customize your audio
experience, and include advanced audio
features for music composition and
sound design.
The DTT3500 Digital is the most
complete 5.1 speaker system for movies
and games. The built-in Dolby Digital
decoder and 24-bit Digital-to-Analog
Converter (DAC) delivers a thrilling,
high quality home theater audio
experience. When used with Sony's
PlayStation 2™, direct digital interfacing
via the optical connector is possible,
assuring the best possible DVD audio
experience.
Different audio content from games to
movies to music files can be further
enhanced with the advanced EAX
technologies incorporated into the
DTT3500 Digital. "Movie" mode
expands the soundfield across the full 5.1
speaker configuration - great for
enhancing playback of regular stereo
audio soundtracks. In addition, the
"Music" mode provides special
processing to enhance playback of audio
CDs and music files.
o the original purchaser, Cambridge
SoundWorks, Inc. will warrant the
speaker system to be free of defects
in material and workmanship for a
period of
one (1) year from date of purchase.
With respect to defects, Cambridge
SoundWorks will, at its option,
replace the product or repair the
defect in the product with no charge
to the original purchaser for parts or
labor.
25
Page 26

Technical Support
We are committed to giving you the best product as well as the best technical
support.
Note: Before contacting “European Help Line”, please ensure that you
have read the ‘Troubleshooting’ Appendix. The Creative web site at
www.creative.com
troubleshooting tips.
For fast and efficient Technical Support solutions, please use the Creative
Web Support services in the first instance. If your Creative product was
pre-installed in your computer, your primary source of technical support
is the Personal Computer supplier who provided the system.
gives you access to the latest drivers and
The European support area on our web site at www.creative.com is
continuously updated and contains the following:
FAQ : Access the latest information on Creative
products with advice on how to resolve
c o m m o n l y a s k e d q u e s t i o n s
Solve Your Own Problem: Enter keywords to search the comprehensive
library of product and technical information
Download Drivers: Quick access to the latest Creative drivers
Library: Find the documents for a wide range of
Creative products
Email Your Problem: Complete the technical support web form and
submit for a response
Telephone Support: European Telephone Support contact details.
See also European Helpline section in manual
for contact details.
27
Page 27

If You Have a Problem
Please retain all contents including packaging and proof of purchase until you
are fully satisfied with product.
If you have a problem installing or using your Creative product, please use the
Creative Web Support and/or Telephone Support services for assistance. Note
the following information for reference should you require technical
assistance:
❑ The model and serial number of your Creative product
❑ Error information on the screen and how it came about
❑ Information on the adapter cards which may be causing a conflict
❑ Hardware configuration information such as the base I/O address,
IRQ line, DMA channels used
❑ Motherboard information: BIOS manufacturer/version and chipset
manufacturer
❑ Type and version of your operating system, e.g., DOS 6.0, Windows 3.1x,
Windows 95, Windows 98 or Windows NT
If, after using the Creative support services, you believe your Creative
product to be defective, you should verify the purchase date and the take the
appropriate action as detailed below:
Less than 30 days since date of purchase
Should your store receipt indicate that the product is less than 30 days old,
you have the option of returning the full product to the dealer/retailer for a
replacement or credit. The 30-day time period may not apply in all instances,
so please check the seller’s replacement/credit terms.
More than 30 days since date of purchase
Contact European Technical Support to clarify the nature of the problem and
to obtain details of our repair returns procedure. Creative Labs requires that
all returns for repair/replacement must first be issued with an authorisation
number.
28
Page 28

Returning a product for repair
❑ Contact Technical Support to receive your authorisation number for repair/
replacement of product.
❑ Technical Support will communicate how to return the product in question
for repair/replacement.
❑ You should only return the hardware item in question and return it to the
address detailed by Technical Support. Please retain all software,
accessories and the original packaging.
❑ Please quote the authorisation number clearly on the outside of the
packaging in which you return the hardware item in question.
❑ Upon receipt of the faulty item, Creative Labs will process your request
and arrange a return or replacement.
Creative may replace or repair the product with new or re-conditioned parts,
and the faulty parts will become the property of Creative. The warranty period
for your repaired/replacement item is 90 days from the date of shipment from
Creative, or what is left on the original item’s warranty, whichever is longer.
To avoid tariffs when shipping a product to Creative Labs from outside the
E.U., you must complete the relevant customs documentation before shipping
the product (please allow 30 days).
29
Page 29

Limited Warranty
Creative Labs (Ireland) Limited (“Creative”) warrants to you, the original
purchaser only, that the hardware product will be free of defects in materials
and workmanship for a period of two years after the date of purchase, or such
other period as may be expressly specified by Creative or required by
applicable law (“Warranty Period”).
Creative’s entire liability and your remedy will be, at Creative’s sole
discretion, the repair or replacement (with the same or similar model) of any
hardware or accompanying item(s) not meeting the “Limited Warranty”
explained above that is returned to Creative’s authorised distributor or dealer
during the Warranty Period with a copy of your receipt.
What this warranty does not cover
Note: This warranty gives you specific legal rights. You may have other rights
which vary from country to country. Certain limitations in this warranty are
not permitted by the jurisdiction of some countries, so some limitations here
may not apply to you.
To the maximum extent permitted by applicable law, Creative disclaims all
other warranties and conditions, expressed or implied, including the
conditions of quality, merchantability or fitness for a particular purpose with
respect to the use of this product. Creative also disclaims any obligation to
support products for all operating environments - for example, by ensuring
interoperability with future versions of software or hardware. In no event
shall Creative or its licensors be liable for any indirect, incidental, special or
consequential loss or for any lost profits, savings or data arising from or
relating to the use of this product, even if Creative or its licensors have been
advised of the possibility of such loss.
Specifically, this warranty does not cover failures of the product which result
from accident, abuse, misuse, alterations (by persons other than Creative or its
authorized repair agents), moisture, corrosive environments, shipping, high
voltage surges, or abnormal working conditions. This warranty does not cover
normal wear and tear. You are specifically advised to take a backup copy of
any software provided with the Creative product for security purposes.
30
Page 30

Creative European Help Line
CREATIVE LABS (IRELAND) LTD.,
Technical Support Department,
Ballycoolin Business Park, Blanchardstown, Dublin 15,
Ireland.
Fax: +353 1 8205052
United Kingdom
Tel +44 (0) 870 8760876
Germany
Tel +49 69-66982900
Ireland
Tel +353 1 820 7555
France
Tel +33 1 55 46 87 77
Spain
Tel +34 (91) 66 25 116
Operating Hours / Heures d’ouverture / Öffnungszeiten / Ore d’ufficio / Horario de oficina / Openingstijden / Horário de abertura
EUROPE
Mon-Fri : Business Hours Sat-Sun & Public Holidays : Closed
Lun. au vend. : Heures de bureau Sam., dim. et jours fériés : Fermé
Mo-Fr : Geschäftszeiten Sa, So & gesetzl. Feiertage : Geschlossen
Lunedì-venerdì : Orario d’ufficio Sabato, domenica e festivi : Chiuso
Lunes-Viernes : Horario de oficina Sábados, domingos y festivos : Cerrado
Maandag-Vrijdag : Kantooruren Zat.-Zon. & Nationale Feestdagen : Gesloten
Segunda a sexta-feira : Horário de expediente Sábado, domingo e feriados : Fechado
Italy
Tel +39 02 4828 0000
Austria
Tel +43 (01) 589 244 320
Belgium
Tel +32 (02) 7171 198
Denmark
Tel +45 3525 9498
Finland
Tel +358 (09) 2294 3101
Norway
Tel +47 2305 0401
Sweden
Tel +46 (08) 7519 147
Holland
Tel +31 (0) 205040616
Switzerland
Tel +41 (01) 2121 868
Portugal
Tel 800 8 53066
Czech Republic
Tel +353 1 8066964
Poland
Freephone 00 800 353 1229
Hungary
Freephone 06 800 12222
Russia
Tel +353 1 8066967
Internet To receive technical support via the Internet, please e-mail: support@europe.creative.com
Web Site www.creative.com
 Loading...