

Page 1
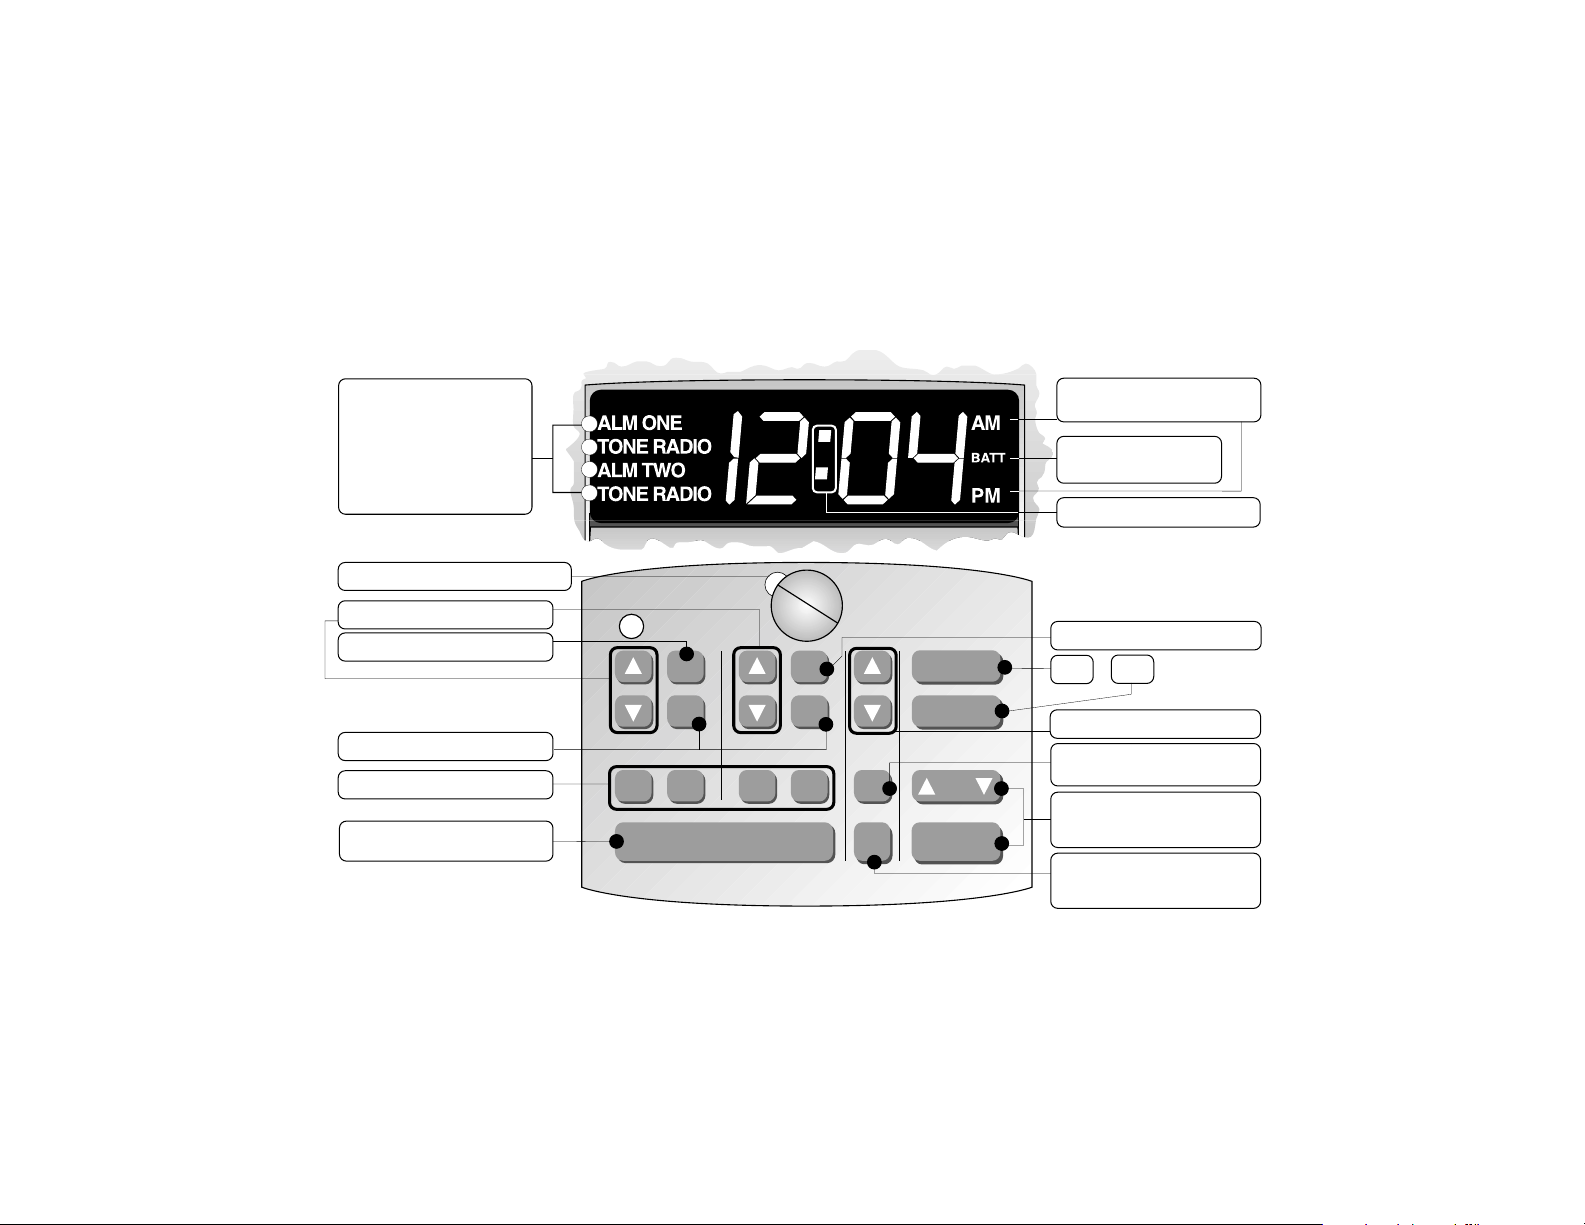
An Overview of the Control Clock 88
“ALM ONE” - indicates
alarm 1 is on
“TONE RADIO” - indicates
which type of alarm will
activate; tone, radio or both
“ALM TWO” - indicates
alarm 2 is on
Directional infrared control emitter
“▲” “▼” - alarm time set controls
“T” - activates “Tone” wake-up
“R” - activates “Radio” wake-up
Turns alarm one or two “on” or “off”
“SNOOZE” - pressing once
delays tone or radio wake-up
T
R
ALARM
ONE
ON OFF
T
R
ALARM
TWO
SNOOZE
CONTROL CLOCK 88
TIME
SLP
DL Y
ON
OFF
RADIO
VOLSETON OFF
AM FM
PRESET
“AM” or “PM” - indicates
morning or evening
“BATT” - indicates
battery needs replacing
Colon flashes every second
“T” - activates “Tone” wake-up
On
“▲” “▼” - clock time set controls
“SET” - press and
hold for time set
“▲ VOL▼” and “AM FM
PRESET” buttons - control
Model 88
“SLP DLY” - hold down
to activate sleep delay
turn off period
Off
radio functions
Page 2
Thank you for purchasing the Control Clock 88 by Henry Kloss. It adds
“clock radio” functions to your Model 88. Place your Model 88 anywhere
in the room. Your Control Clock 88 keeps all essential control functions
close at hand.
The Control Clock 88 offers the convenience of two separate alarms.
Either may be set to tone wake-up, music wake-up, or both. See next
page for alarm setting instructions.
Please read this operation manual to receive maximum benefit from your
Control Clock 88. Save this manual for future reference.
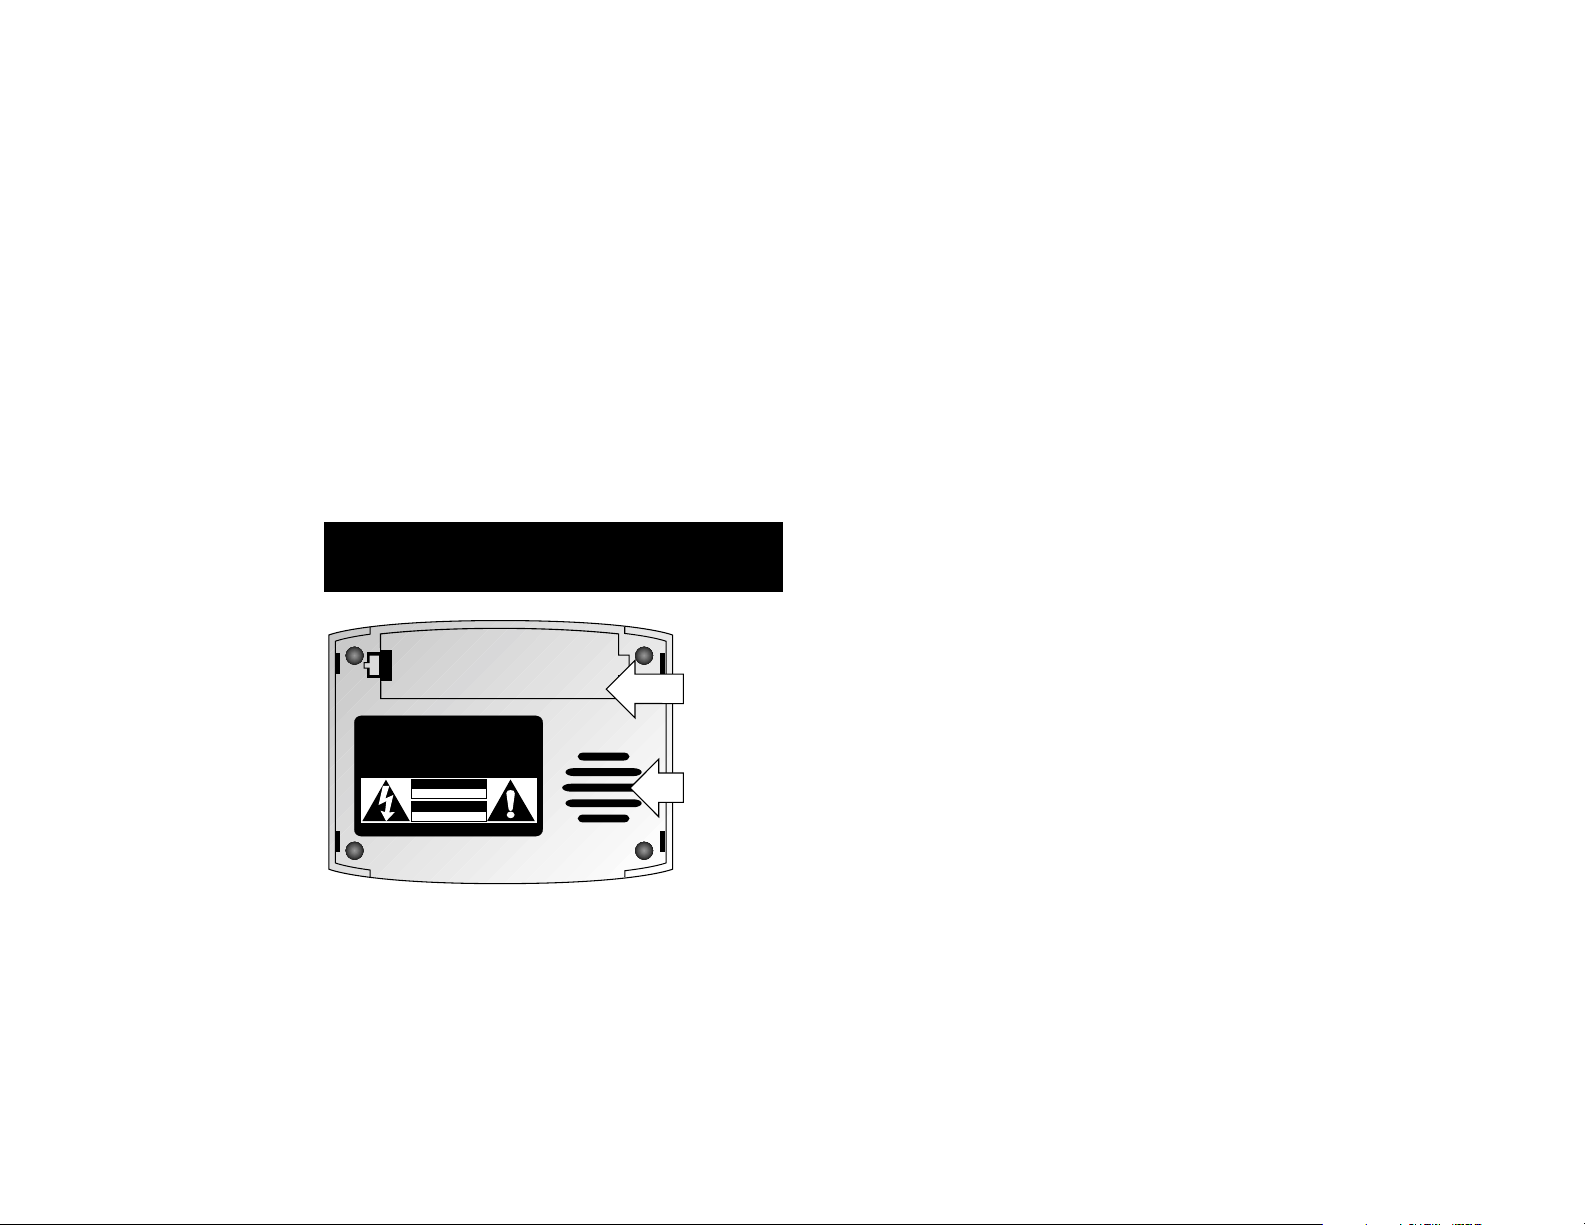
IMPORTANT: Remove battery when unit is not
connected to AC Power for more than an hour.
Battery
Compartment
CONTROL CLOCK 88
MANUFACTURED UNDER LICENSE FOR CAMBRIDGE SOUNDWORKS, INC.
311 NEEDHAM ST., NEWTON, MASSACHUSETTS 02464 USA
THIS DEVICE COMPLIES WITH PART 15 OF THE FCC RULES. OPERATION
IS SUBJECT TO THE CONDITION THAT THIS DEVICE DOES NOT CAUSE
HARMFUL INTERFERENCE.
DO NOT EXPOSE TO RAIN OR MOISTURE.
MADE IN CHINA
CAUTION
RISK OF ELECTRIC SHOCK
DO NOT OPEN
ATTENTION
RISQUE DE CHOC ELECTRIQUE
NE PAS OUVRIR
117VAC 50/60Hz 1 Amp
Opening for
alarm tone
Setting up
Installing a 9-volt battery maintains accurate time in case of a power
outage. Install it in the bottom of the unit (see Figure 1). An alkaline
battery is recommended.
During a power outage, the display will not light up. If the Control Clock
88 “TONE” alarm was on when the power was interrupted, it will still
function. The “RADIO” wake-up will not work during a power outage.
The battery maintains time and alarm settings for approximately 48
hours. Remove the battery if the unit is unplugged for more than an hour
or so. The low battery indicator (see Figure 2) will light if the battery
needs replacement or power is interrupted. After battery replacement or
when power is restored, this indicator may take 15 minutes to
disappear. This is normal. Verify time and alarm settings after battery
replacement.
Placement
The Control Clock 88 tone alarm is most effective when the unit is
placed on a hard, flat surface. If the unit is placed on a soft cloth
surface, the tone output level may be reduced.
Plug the Control Clock 88 into an unswitched AC outlet.
Place the Control Clock 88 in a convenient location.
Place your Model 88 in its best sounding location. You may wish to
adjust the Model 88’s subwoofer control for optimum bass output. Test
the remote control functions of the Control Clock 88 to verify proper
operation. Adjust the Control Clock 88’s directional emitter as necessary
to establish control of the Model 88 (see Figure 4).
Figure 1
Page 3

Front display
“ALM ONE” Indicates alarm 1 is on.
“TONE RADIO” Indicates which wake-up will activate; tone, radio or
“ALM TWO” Indicates alarm 2 is on.
CLOCK DISPLAY Shows the current time. When either alarm’s “on”
“BATT” Indicates battery needs replacing. After replacement,
To set clock
Hold down “SET” (G) button to activate time setting. Use the “TIME”
buttons, “▲” or “▼” (H), to change the current time setting. When setting
time, the display moves forward or back slowly for the first 5 digits, then
proceeds rapidly. If you pass the desired setting, simply reverse direction
to set desired time. The “▲” and “▼” buttons are not active unless “SET”
(G) is held down.
both.
button (see Figure 3, F) is pressed, it shows the
alarm time, which remains displayed for about 5
seconds after release of the button.
this display may take up to 15 minutes to disappear.
This is normal.
Low
Battery
Indicator
Figure 2
Wakeup Operation
• The Control Clock 88 stores two separate wake up times (ALARM ONE
and ALARM TWO).
• Each Control Clock 88 alarm can activate the clock’s internal alarm
(TONE), turn on the Model 88 (RADIO), or both. These instructions
apply to either alarm.
• To wake to the radio, be sure the Model 88 is off, and was last tuned to
a radio station and left at an adequate volume.
• The wake up time for either ALARM ONE or ALARM TWO can be
adjusted to an earlier or later time by pressing the “▲” and “▼”
buttons (C). This adjustment can be made at any time.
Activating ALARM ONE or ALARM TWO
to “Wake To Radio” and “Wake To Tone”
Press the “ON” button (F). The “TONE” and “RADIO” displays begin
blinking. While the display blinks, select either “T” (tone), “R” (radio), or
both. Pressing either “T” or “R” again will turn off that choice. “ALM
ONE,” “ALM TWO,” “TONE,” or “RADIO” will illuminate on the display. The
Control Clock 88 is now set to wake you as desired.
The display will revert to the current time approximately 5 seconds after
the last button is pressed. To check either alarm’s “Wake To” time, press
the “On” button (F). The time will be displayed for 5 seconds.
Turning off the alarms
After the “Wake To Radio“ feature has turned on the Model 88 radio, you
may turn off the radio with the “OFF” button (J). The radio may also be
turned off with its faceplate “OFF” button or remote control’s power
button “•”. Control Clock 88’s “Wake To Radio” feature remains active
and will turn on the radio 24 hours later.
After the Control Clock 88 wakes you by sounding its internal TONE alarm,
defeat the tone by pressing the “OFF” button (F) on the Control Clock 88.
This “OFF” button (F) may also be used to deactivate either “Wake To
Radio” or “Wake To Tone” settings. “Wake To Radio” or “Wake To Tone”
must be reactivated every time the “OFF” button (F) is pressed.
Page 4

Top controls
A Infrared control emitter.
B Directional infrared control emitter. This
emitter rotates 350° (see
Figure 4). Place your Model 88 radio in
its best sounding location. Test the
operation of the radio controls of the
Control Clock 88. Adjust the emitter if
needed.
C “▲” or “▼” - alarm one or two time set
controls.
T
C
A
T
C
R
F
N
ALARM
ONE
ON OFF
R
SNOOZE
CONTROL CLOCK 88
T Turns on tone for alarm one or two.
R Turns on Model 88 radio for alarm one
or two.
F Turns alarm one or two “on” or “off”.
G “SET” - activates time set.
H “▲” or “▼” - set desired time.
ALARM
TWO
T
B
T
R
TIME
SLP
DLY
M
H
ON
OFF
RADIO
VOLSETON OFF
AM FM
PRESET
G
Radio controls
I “ON”
J “OFF”
K “▲VOL▼” - press left side of button to
raise volume. Press right side to lower
volume.
L “AM FM PRESET” - press left side of
button to cycle through AM preset
stations. Press right side of button to
cycle through FM preset stations.
M “SLP DLY” - Press and hold to activate
sleep delay turn-off period for Model 88
radio (in 10 minute increments up to 60
minutes). Display will show “d10” up to
“d60”, depending on length of time
I
J
K
L
button is held.
N “SNOOZE” - pressing once will defeat
tone or radio sound for a nine minute
period. This is repeatable until the alarm
is shut off.
Adjust for best radio control
(see Placement)
Figure 3 Figure 4
Page 5

Important Safety Information
1. Read Instructions. All the safety information and operating instructions
should be read before the product is operated.
2. Retain Instructions. The safety information and operating instructions
should be kept for future reference.
3. Observe Warnings. All warnings, either on the product or in the
operating guide should be followed.
4. Follow Instructions. Operate the product in accordance with the
written instructions.
5. Cleaning. Unplug this product from a wall outlet before cleaning. Do not
use liquid or spray cleaners. Use a cloth moistened with water for
cleaning.
6. Water and Moisture. Do not use this product near water – for
example, near a bathtub, wash basin or sink, or washing machine; in an
area subject to water leakage, like a basement; near a swimming pool or
other similar areas.
7. Accessories. Do not place this product on an unstable surface of any
kind. The product may fall causing serious injury to a child or adult. Falls
may also damage the product. Any mounting of the product should be
secure and not subject to failure when struck or vibrated. Always
transport the product alone. Do not transport the product within or on top
of a rolling carrier.
8. Power Sources. This product should be operated only from the type of
power source indicated on the marking label. If you are not sure of the
type of power supply to your home, consult your local power company.
9. Grounding or Polarization. This product is equipped with a polarized
alternating-current line plug (a plug having one blade wider than the
other). This plug will fit into the power outlet only one way. This is a safety
feature. If you are unable to insert the plug fully into the outlet, try
reversing the plug. If the plug should still fail to fit, contact your electrician
to replace your obsolete outlet. Do not defeat the safety purpose of the
polarized plug.
10. Power-Cord Protection. Power-cords should be routed so that they are
not likely to be walked on or pinched by items placed upon or against
them, paying particular attention to the security of a power-cord near
where it meets a plug, convenience receptacles, and the point where the
power-cord exits the product.
11. Periods Of Inactivity. The power-cord of the product should be
unplugged from an outlet when left unused for a long period of time.
12. Lightning. For added protection of this product during a lightning storm,
or when it is to be left unattended and unused for a long period of time,
unplug it from the wall outlet.
13. Overloading. Do not overload wall outlets, extension cords, or integral
convenience outlets, as this can result in a risk of fire or electric shock.
14. Object and Liquid Entry. Never push objects of any kind into this
product through openings, as they may touch dangerous voltage points or
short out parts that could result in a fire or electric shock. Never spill
liquid of any kind on the product.
15. Servicing. Do not attempt to service this product yourself, as opening or
removing covers may expose you to dangerous voltage or other hazards.
Refer all servicing to qualified service personnel.
16. Damage Requiring Service. Unplug this product from the wall outlet
and refer servicing to qualified service personnel under the following
conditions:
• The power-cord or the plug has been damaged;
or
• Objects have fallen onto, or liquid has been spilled into the product;
or
• The product has been exposed to rain or water;
or
• The product does not operate normally when following the operating
instructions. Do not attempt to open the product to adjust any
internal parts;
or
• The product has been dropped or damaged in any way;
or
• The product presents a noticeable and obvious change in
performance – this indicates a need for service.
17. Replacement Parts. Do not allow anyone, including qualified service
technicians, to use replacement parts other than those recommended by
the manufacturer. Unauthorized substitutions may result in fire, electric
shock or other hazards.
18. Safety Check. Upon completion of any service or repair to this product,
ask the service technician to perform safety checks to determine whether
the product is in proper operating condition.
19. Heat. The product should be positioned away from heat sources such as
radiators, stoves, or other products that produce heat.
Note: Do not change or modify this device in any manner. Any changes or
modifications could void the owner’s authority to operate this device.
Page 6

WARNING
SHOCK HAZARD
DO NOT OPEN
AVIS
RISQUE DE CHOC ELECTRIQUE
NE PAS OUVRIR
CAUTION:
To prevent electric shock, match wide blade of plug to
wide slot. Insert fully.
ATTENTION:
Poer eviter les chocs electriques, introduire la lame
la plus large de la fiche dans la borne correspondante
dede la prise et pousser jusqu’au fond.
Batteries
Please dispose of used batteries properly, following any
local regulations. Do not incinerate.
1-Year Limited Warranty
To the original purchaser, Cambridge SoundWorks, Inc. will warrant the Control Clock 88 to be
free from defects in material and workmanship for a period of one (1) year from date of purchase. With respect to defects, Cambridge SoundWorks will, at its option, replace the product
or repair the defect in the product with no charge to the original purchaser for parts or labor.
This warranty does not extend to any defect, malfunction or failure caused by misuse, abuse,
accident, faulty hookup, defective associated equipment or use of the Control Clock 88 with
equipment for which it is not intended.
This warranty is valid only when the Control Clock 88 is returned to Cambridge SoundWorks.
Call for a Return Authorization Number for the unit and return it to the accompanying address,
freight prepaid, together with a copy of the original sales slip to establish warranty status.
Please do not return the Control Clock 88, or any of its parts, to Cambridge SoundWorks
without prior authorization.
This is the sole and expressed warranty. This warranty is in lieu of all other warranties, expressed or implied, of merchantability, fitness for purpose or otherwise.
In no event shall Cambridge SoundWorks be liable for incidental or consequential damages or
have any liability with respect to defects other than the obligations set forth above.
To ensure warranty coverage it is incumbent upon the original purchaser to inform Cambridge
SoundWorks or any of its Authorized Service Agencies of the defect within the warranty period.
The only acceptable method of establishing warranty status is a copy of the original proof of
purchase indicating customers name and purchase date.
For warranty information contact:
311 Needham Street, Newton MA 02464
1-877-937-4434 Fax: 617-527-3194
www.cambridgesoundworks.com
Email: info@cambridgesoundworks.com
P81-1310 0400
A Company
 Loading...