

Page 1

Page 2

WARNING
TO PREVENTFIRE OR SHOCKHAZARD, DO NOT USE THISPLUG WITH AN EXTENSION
CORD,RECEPTACLE OR OTHER OUTLET UNLESS THE BLADES CAN BE FULLY INSERTED
TO PREVENT BLADE EXPOSURE
TO PREVENTFIRE OR SHOCKHAZARD, DO NOT EXPOSE THIS APPLIANCE TO RAIN OR
MOISTURE.
The lightning flash with arrowhead
symbol,within anequilateraltriangle,
is intended to alert the user to the
presence of uninsulated “dangerous
vol tage” wit hin the produ ct’s
enclosure that may be of sufficient
magnitudeto constituteariskof electric
shockto persons.
The exc lamatio n p oint w ithin an
equilateraltriangle,is intendedto alert
the user tothe presenceof important
operatingand maintenance(servicing)
ins tructi ons i n the lit eratur e
accompanyingthe appliance.
CAUTION:TO REDUCE THE RISKOF
ELECTRICSHOCK,DO NOT REMOVE
CO VE R (O R B ACK ). NO U SE RSE RV ICE AB LE P AR TS IN SI DE .
REFER SERVICING TO QUALIFIED
SERVICEPERSONNEL.
CA U TION
RISKOF ELECTRICSHOCK
DO NOTOPEN
1) Read these instructions.
2) Keep these instructions.
3) Heed all warnings.
4) Follow all instructions.
5) Do not use this apparatus near water.
6) Clean only with dry cloth.
7) Do not block any ventilation openings. Install in accordance with the manufacturer’s
instructions.
8) Do not install near any heat sources such as radiators, he a t registers, stoves, or other
apparatus (including amplifiers) that produce heat.
9) Do not defeat the safety purpose of the polarized or grounding-type plug. A polarized
plug has two blades with one wider than the other. A grounding plug-type plug has two
blades and a third grounding prong. The wide blade or the third prong are pro v i d e d for
your safety. If th e provided plug does not fit into your outlet, consult an electrician for
replacement of the obsolete outlet.
10) Protect the power cord from being walked on or pinched, particularly at plugs, convenience
receptacles, and the point where they exit from the a p p a r a t u s.
11) Only use attachments/accessories specified by the manufacturer.
12) Unplug this apparatus during lightning storms or when unused for long periods of time.
13)
14)
Refer all servicing to qualified service personnel. Servicing is required when the apparatus
has been damaged in any way, such as when the power-supply cord or plug is damaged,
liquid has been spilled or objects have fal len into the apparatus, the apparatus has been
exposed to rain or mois t u r e , does not operate normall y, or has been dropped.
The appliance shall not be exp o s e d to drippng or splashing water and that no object
filled with liquid such as vases shall be placed on the apparatus.
IMPORTANT SAFETY INSTRUCTIONS
Page 3
MENU
ENTER
ADJUST
HOLD TO
JOG
FM AM AU X
FAVORITE
FAVORITE
SLEEP
SNOOZE
MUTE
7
8
0
9
1
2
3
4
5
6
VOLUME
SOUNDW ORKS RAD IO
STEREO
WIDE
INFO
1
2
#
TUNE
SEEK
PRESETS
ENTRY
NUMERIC
Page Index
Product Carton Contents ........................................................................................ 1
Initial Setup ............................................................................................................. 2-3
Radio Operation ......................................................................................................... 4
Favorites Organizer Band Operation .................................................................. 5
Faceplate and Remote Control Quick Reference ....................................... 6-7
Additional Information
Jog Menus, Headphone/Aux Jacks ......................................................... 8-9
Alarm Features ........................................................................................................... 9
Alarm Operation 1 - Wakeup Settings Adjustment ..............................10-13
Alarm Operation 2 - Alarm Activation .............................................................14
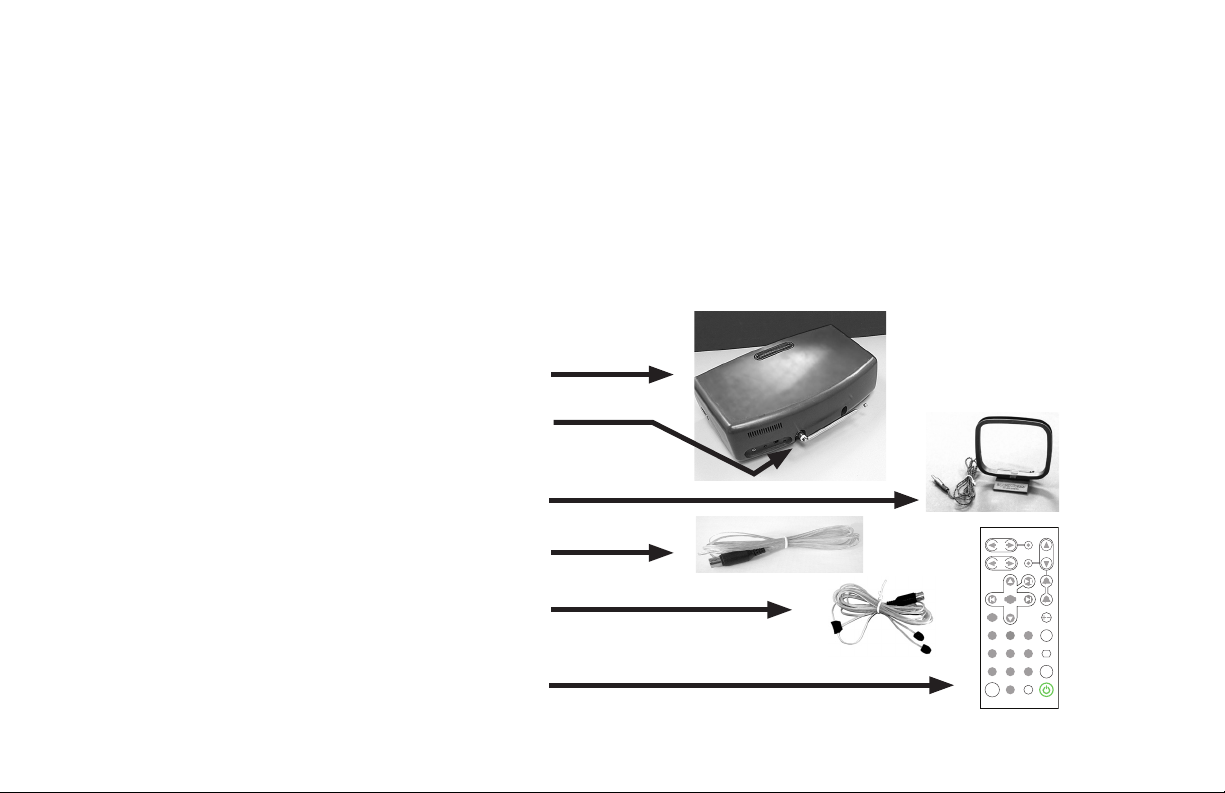
Product Carton Contents
1) SoundWorks Radio 720
2) FM telescoping whip Antenna (packed separately,
shown attached to radio)
3) AM loop Antenna
4) FM external wire Antenna
5) FM external dipole Antenna
6) Infrared remote control
The contents of this document are subject to change without notice. Please check www.cambridgesoundworks.com for updates.
-1-
Page 4
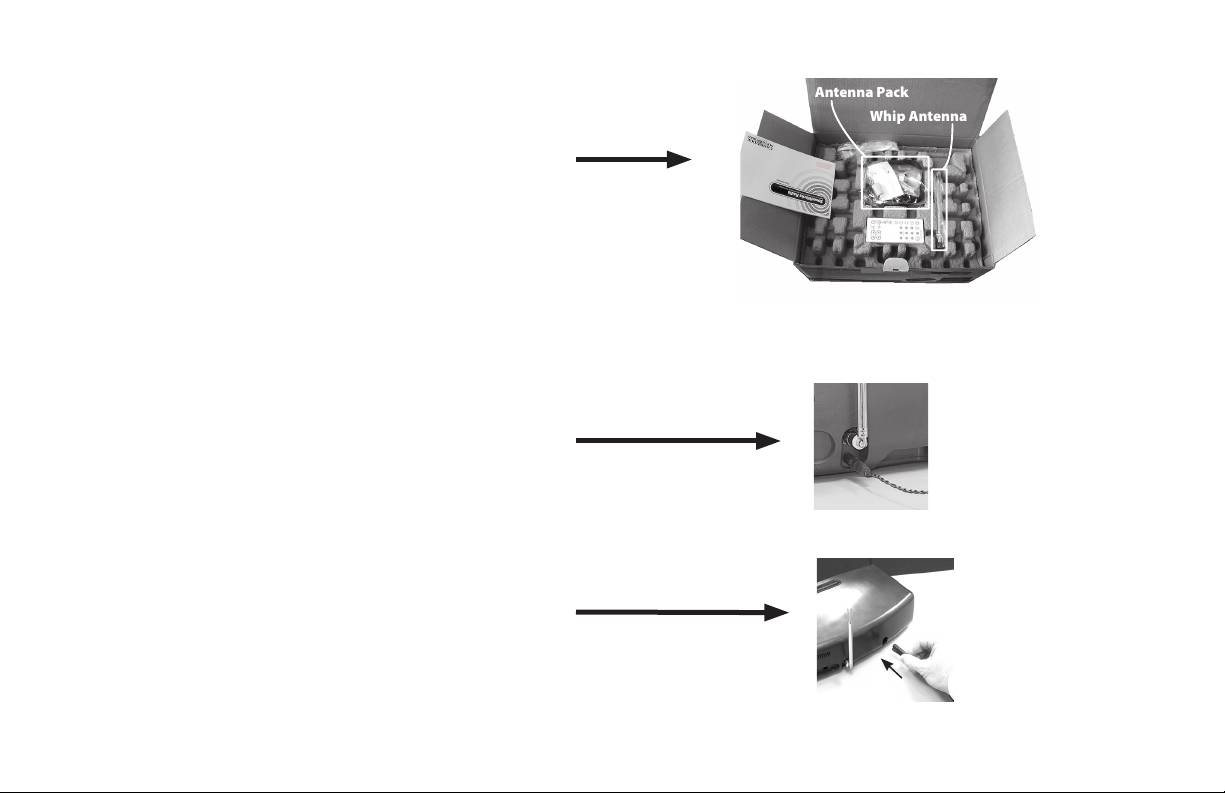
Setup
Antenna Pack
Whip Antenna
1) Locate and remove the Antenna Pack and the
Whip Antenna from the carton.
Remove the Antenna Connection leaet, the AM
Antenna, the FM wire Antenna and the FM dipole
Antenna from the Antenna Pack.
2) Refer to the Antenna Connection leaet.
Choose and connect an FM Antenna.
Position the FM Antenna.
Connect and position the AM Antenna.
-2-
3) Insert the AC cord.
FIRMLY push the
AC cord connector
into the back panel
socket.
Page 5
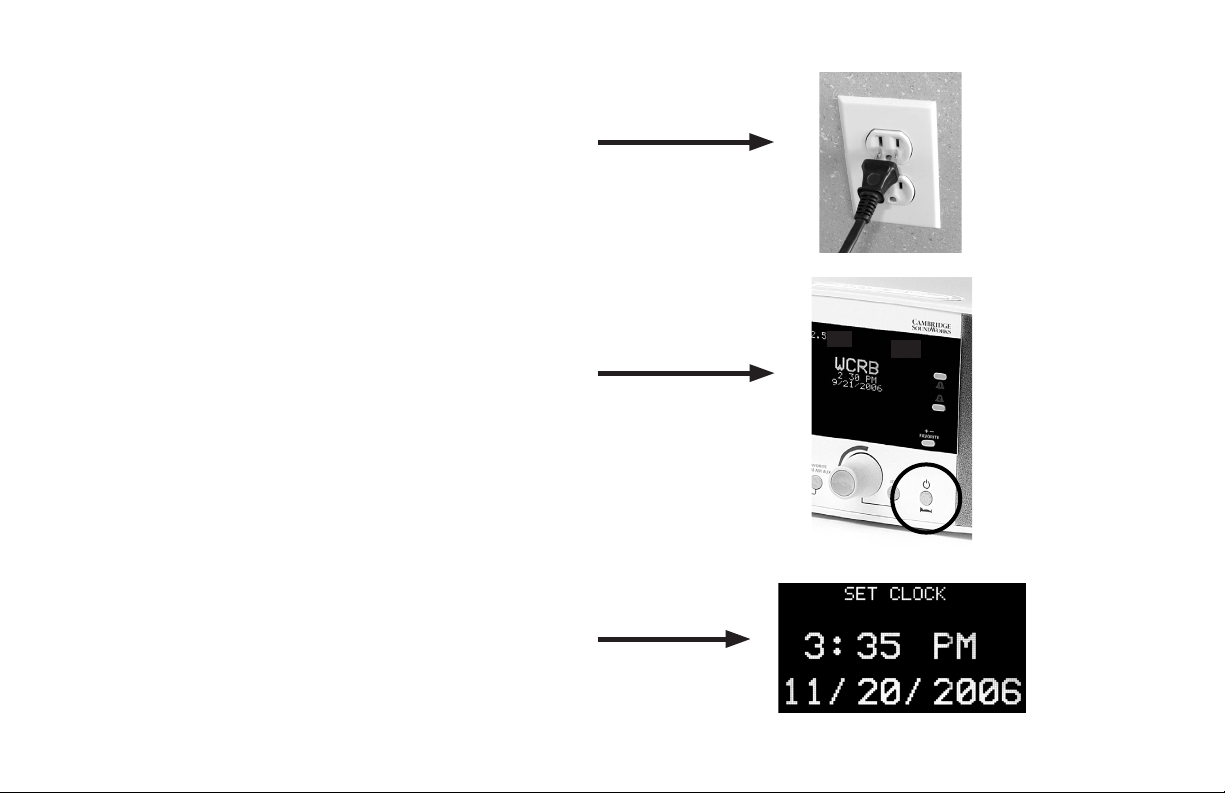
4) Place the radio in its intended location.
Connect the AC plug to a 120 VAC outlet.
5) Press the Power button.
You can now set the date and time.
6) To reach the date and time adjustment screen:
First press and hold the JOG button until you see
"SET SNOOZE" on the display.
Then briey press the JOG button three more times
to reach the "SET CLOCK" screen.
Use the VOLUME control to make an adjustment,
then press the JOG button again to reach the
next Date and Time value. Repeat this process
for each Date and Time values.
After the last value is set, either wait for the screen
to return to normal radio operation, or press the
JOG button until you see the normal radio display.
-3-
Page 6
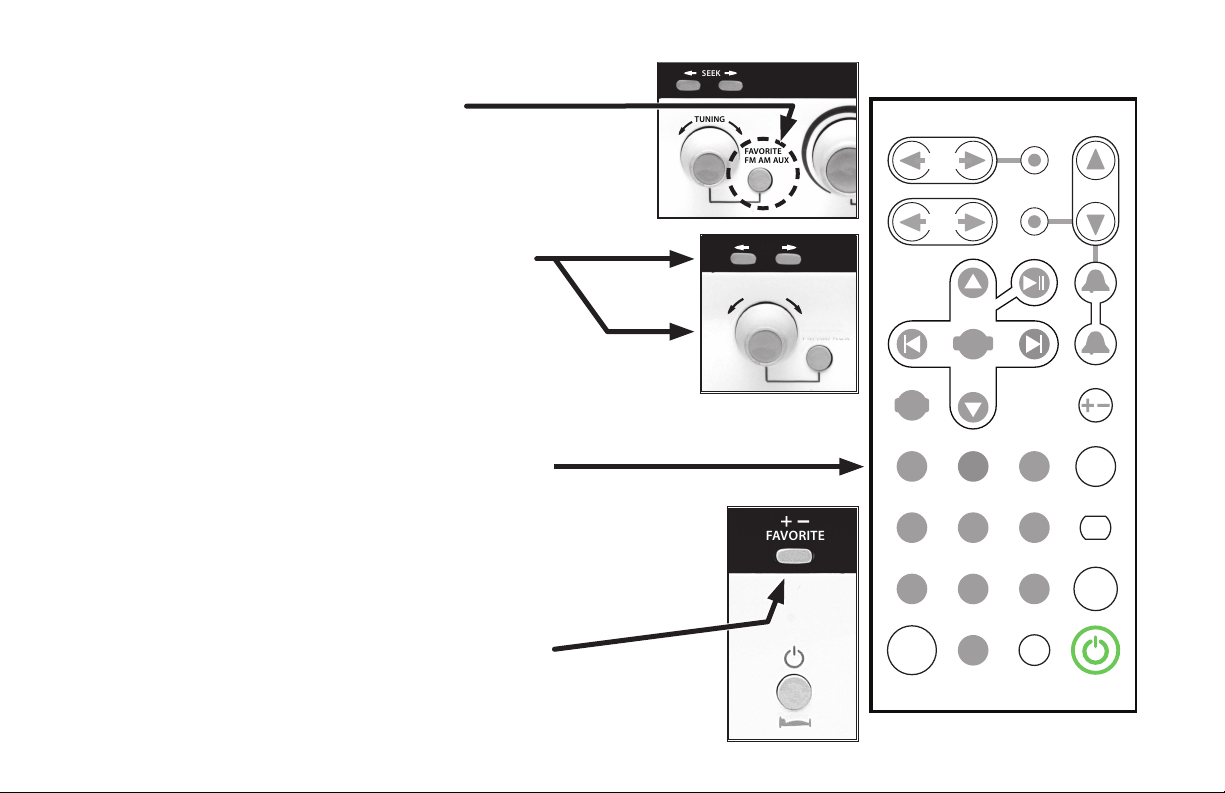
Radio Operation
FAVORITE
FM AM AUX
SEEK
JOG
TUNING
FAVORITE
FM AM AUX
SEEK
TUNING
MENU
ENTER
ADJUST
HOLD TO
JOG
FM AM AU X
FAVOR ITE
FAVOR ITE
SLEEP
SNOOZE
MUTE
7
8
0
9
1
2
3
4
5
6
VOLUME
SO UN DW OR KS R ADIO
STERE O
WIDE
INFO
1
2
#
TUNE
SEEK
PRESETS
ENTRY
NUMER IC
FAVORITE
1) Select the FM or AM band by pressing the
AM/FM/Aux button on the front panel
or the remote control.
2) Tune stations using TUNE or SEEK (faceplate or
remote). See page 8 for more information.
Numeric Entry Tuning (remote control only)
Press the NUMERIC ENTRY button, then enter
the station frequency using the PRESET
numbered buttons.
Preset Button Assignment
3) If desired, store ten radio stations (either AM or FM)
for immediate recall. While tuned to the station, press
and hold down a PRESET button on the remote control
for at least two seconds. The display will conrm the
station is stored.
Favorite Assignment
4) Besides using the ten PRESET buttons on the remote
-4-
control, you can assign an additional twenty stations to
appear in the FAVORITE organizer band. See the next
page for a description of its operation.
Tune & Seek
Buttons
Favorite
Button
Page 7

FAVORITE Organizer Band Operation
The Favorite band organizes up to thirty of your favorite
stations. It combines the stations you assign to the
Remote Control numeric keypad as Presets with up to
twenty additional Favorite stations. The Favorite band
always places these stations in their frequency order, with
FM stations followed by AM stations.
1) Each station assigned as a PRESET is included in
the FAVORITE band. If you assign ten stations to
the remote control's PRESET buttons, you already
have a ten station FAVORITE band.
2)
Besides your PRESET selections, you can assign
up to twenty additional AM and FM stations
as Favorites. Tune to a station that isn't already
assigned to a Preset button, then press and hold
the FAVORITE button (front panel or remote) for
over two seconds. The display conrms Favorite
assignment.
3) To remove Favorite status from a station, simply
tune to that station, then press and hold the
FAVORITE button for more than two seconds. The
display conrms removal of Favorite assignment.
4) To use the Favorite band, select it using the
AM/FM/Aux button.
Indicates the FAVORITE
band is selected
Conrmation
of stored Favorite
Selecting
the FAVORITE
Band
-5-
Page 8

FAVORITE
FM AM AUX
SEEK FAVORITE
JOG
TUNING
Quick Reference
Faceplate and Remote Control
All Faceplate controls are also
on the Remote Control.
If the AM band or FM Band is active, these
buttons tune to the next broadcast.
If the Favorite Band is active, these buttons
move to the next Favorite (broadcast or
If the AM or FM band is selected, adjust this
knob to tune the radio frequency.
If the Favorite band is selected, adjust to
select among Favorites (broadcasts or
-6-
SEEK
multicast stream).
TUNING
multicast streams).
Faceplate
SOURCE
Push repeatedly to select the
FM, AM or Favorite bands or
the Aux input.
VOLUME
In normal operation, this knob adjusts
volume output.
In a JOG or ALARM adjustment mode,
this knob selects various radio and
mode settings.
Page 9

MENU
ENTER
ADJUS T
HOLD TO
JOG
FM AM AU X
FAVOR ITE
FAVOR ITE
SLEEP
SNOOZE
MUTE
7
8
0
9
1
2
3
4
5
6
VOLUME
SO UN DW ORK S RAD IO
STERE O
WIDE
INFO
1
2
#
TUNE
SEEK
PRESET S
ENTRY
NUMER IC
ALARM 1, ALARM 2
Push and quickly release either button
to activate Wake to Music Alarm, Wake
to Tone Alarm or No Wakeup.
Push and hold either button for two
seconds to engage alarm setting
adjustment. Alternate between the
Volume control and the alarm button
to make adjustments.
FAVORITE
While the AM or FM band is selected,
push and hold this button for two
seconds to assign FAVORITE status to a
station.
If the current station already holds
Favorite status, push and hold this
button to remove FAVORITE status.
POWER/SLEEP
Press and quickly release once to select
On or Standby.
Rapid, repeated pushes engages a
timed shuto mode (SLEEP).
JOG [see page 10 for complete menu listings]
Press quickly to enter the adjustment
mode for the primary radio settings.
Press and hold to enter the adjustment
mode of the secondary radio settings.
Alternate between the Volume control
and the JOG button for adjustments.
Remote Control
The designated buttons
are unique to the Remote
Control. The other buttons
function like the controls
on the Faceplate.
iPod Dock Control
This button group is for
iPod control when used
with optional dock.
PRESETS/KEYPAD
Press and hold any of these
buttons to store a station
for immediate recall.
Press briey to recall the
station.
INFO
Pressing this button displays
useful information briey or
starts the Audio Display. In
sequence, this button shows:
* Alarm settings (if an alarm is
activated)
* The date and time
STEREO/WIDE
This button switches between
Stereo and Wide sound modes.
SLEEP
Sleep mode automatically
turns the radio o after a userdetermined interval. Repeated
presses of the button increase
the interval in 15 minute
increments.
NUMERIC ENTRY
Press this button, then enter
a station frequency using the
PRESET buttons as numbers.
The radio chooses AM or FM
based on the frequency.
-7-
Page 10

Additional Information
1) JOG menu
After a brief press of the JOG button, the following choices can be
made by further brief presses of the JOG button:
Bass & Treble adjustment
Audio Mode (Stereo, Wide, Mono)
Display Text (Fixed, Scrolling, O )
Favorites Mode (Enabled, Disabled, Clear All)
After a press and hold of the JOG button, the following choices can
be made by further brief presses of the JOG button:
Set Snooze (5 to 55 minutes)
Loudness (On, O)
ID Text (On, O)
Set Clock (and date)
Contrast (-4 to +4)
2) Headphone Jack, Auxiliary Inputs:
The side-mount headphone jack accepts any
headphone with a 3.5 mm stereo miniplug.
The side-mount auxiliary input accepts a 3.5 mm
stereo miniplug. Use it with all portable audio devices. This
input takes precedence over the rear auxiliary input.
NOTE: Headphone use
mutes the speakers
-8-
Page 11

Additional Information Continued
12VDC
OUT
OPT DIGITAL
OUT
FM
ANT
AM
ANT
Alarm Features
3) Rear Input Conguration:
The rear auxiliary input accepts a 3.5 mm stereo
miniplug. Use it with all portable audio devices.
The 12 VDC OUT can be used with special accessories,
like a Cambridge SoundWorks portable audio player dock.
The SoundWorks Radio 720 has two independent wakeup
alarms.
ACTIVATION
Each alarm can be set to Wake To Music or Wake to Tone (a
beep sound) using the Alarm 1 and Alarm 2 buttons.
RESET
Once either alarm activates, reset the alarm by pressing
either the Alarm 1 button, the Alarm 2 button or Power.
SNOOZE
The Snooze bar silences the wakeup alarm for a userdetermined interval. The wakeup alarm reactivates after the
snooze interval.
DAILY PATTERN
Each alarm can be programmed to activate in a daily
pattern. The four daily patterns are Once, Daily, Weekday
(Monday through Friday) and Weekend (Saturday and
Sunday).
The rst section of Alarm Operation explains how to adjust
each alarm. The adjustments are wakeup time, radio band
and frequency, music wakeup volume and daily pattern.
The second section of Alarm Operation explains how to
quickly choose the Alarm Activation mode (music wakeup,
tone wakeup, or no wakeup) using the Alarm buttons.
-9-
Page 12

Alarm Operation 1 - Wakeup Settings Adjustment
FAVORITE
FM AM AUX
JOG
1) Press and hold down either Alarm button for two
seconds. The radio switches to the HOUR adjustment
display.
2 sec
2) Adjust VOLUME to select the desired hour.
3) Tap the Alarm button again to move to the MINUTES
adjustment display.
HOUR
adjustment
HOUR
change
MINUTES
adjustment
-10-
Page 13

4) Adjust VOLUME to select the desired MINUTES setting.
FAVORITE
FM AM AUX
JOG
FAVORITE
FM AM AUX
JOG
5) Tap the Alarm button again to move to the BAND
adjustment display.
6) Adjust VOLUME to select the band of a wakeup
station.
MINUTES
change
BAND
adjustment
BAND
change
-11-
Page 14

5) Tap the Alarm button again to move to the FREQUENCY
FAVORITE
FM AM AUX
JOG
FAVORITE
FM AM AUX
JOG
adjustment display.
6) Adjust VOLUME to select the frequency of a wakeup
station.
7) Tap the Alarm button again to move to the WAKEUP
VOLUME adjustment display.
8) Adjust VOLUME to select the desired wakeup volume.
FREQUENCY
adjustment
FREQUENCY
change
WAKEUP
VOLUME
adjustment
WAKEUP
VOLUME
change
-12-
Page 15

9) Tap the Alarm button again to move to the DAILY PATTERN
FAVORITE
FM AM AUX
JOG
adjustment display.
10) Adjust VOLUME to select the desired daily alarm repetition.
Daily Alarm Options
Daily: Alarm sounds every day.
Weekdays: Alarm sounds every Mon, Tue,
Wed, Thu, Fri.
Weekend: Alarm sounds every Sat, Sun.
Once: Alarm sounds once, then cancels
after reset.
11) Tap the Alarm button again to complete the alarm adjustment
session.
DAILY
PATTERN
adjustment
DAILY
PATTERN
change
NORMAL
DISPLAY
-13-
Page 16

Alarm Operation 2 - Alarm Activation
1) Press and quickly release either the Alarm 1 or the Alarm 2
button ("tap" the button). The radio switches to the Alarm
Activation display.
2) While the display is visible, continue to use the Alarm
button to choose between Music Wakeup alarm, Tone
Wakeup alarm and NO alarm.
3) Once you see the desired Alarm Activation mode on
the display, wait ve seconds. The radio will store your
request and return the radio to normal operation.
rst tap
second tap
third tap
WAIT ve
seconds after
your choice
ALARM
ACTIVATION
display
TONE
WAKEUP
display
ALARM
OFF
display
NORMAL
operation
-14-
Page 17

Alarm Operation 2 - Alarm Reset and Snooze
RESET
Once either alarm activates, reset the alarm by pressing either
the Alarm 1 button, the Alarm 2 button or Power.
SNOOZE
The Snooze bar silences the wakeup alarm for a user-determined
interval. The wakeup alarm reactivates after the snooze interval.
These buttons reset a
Wakeup Alarm
Faceplate
Remote
Control
-15-
Page 18

R1
11NOV2009
English
 Loading...