


Page 1
azur 540V
DVD receiver
User’s manual
Page 2
2 azur DVD receiver
Page 3

540V DVD receiver
azur DVD receiver 3
Introduction ........................................................................4
Safety precautions..............................................................5
Installation...........................................................................6
Using the remote handset..................................................6
Rear panel connections......................................................7
Front Panel Controls.........................................................11
Some notes on loudspeakers...........................................12
Operating instructions (DVD menu display) ....................13
Operating instructions......................................................15
Troubleshooting.................................................................17
Specifications....................................................................17
Limited warranty...............................................................18
CONTENTS
Page 4

4 azur DVD receiver
Congratulations oon ppurchasing tthis CCambridge AAudio AAzur rrange DDVD
receiver. IIt iis tthe rresult oof oour m
most eextensive eever rresearch aand
development pprogram iin oover tthree ddecades oof pproducing qquality HHiFi
products. WWe hhope tthat yyou wwill aappreciate tthe rresults aand eenjoy mmany
years oof rrewarding oownership.
A bbrief iintroduction tto DDVD aand DDVD Audio
DVD is well known for its extraordinarily large capacity and outstanding
audio-video effects. Its capacity is as high as 4.7-17 GB (approximately
7-26 times the capacity of CD). With 500-line horizontal resolution of
picture and Dolby Digital 5.1 Channel surround sound, it brings a new
era to audio visual entertainment .
Using MLP Lossless from Dolby Laboratories, DVD-Audio discs can store
up to six channels of 24-bit/96 kHz audio, including a separate lowfrequency bass channel. Compare that to two channels of 16-bit/44.1
kHz sound from CD's! For stereo buffs, a DVD-Audio disc can
alternatively hold two channels of 24-bit/192 kHz audio, exceeding the
quality of any music audio format previously developed.
DVD-Audio discs can also add a visual element to your music. Discs can
carry picture galleries, lyrics, notes, or any combination of still images,
animation, and text. Producers and artists can even add audio
commentary, similar to that found on many DVD-Video discs. And, as
with DVD-Video, each DVD-Audio disc can also contain full-motion video,
with accompanying Dolby Digital sound in up to 5.1 channels
About tthis uunit
The Azur DVD Receiver encompasses the most sophisticated picture
reproduction, including the ability to reproduce a progressive scan
image in both PAL and NTSC. This allows f or a stunningly realistic picture
on a suitably equipped television. The integrated amplifiers are able to
create a powerful, lifelike sound without the need for additional boxes.
The result is a capable yet discrete unit.
Sonically, the 540V adds DVD-Audio playback for the best possible
musical performance in both multi channel surround and high quality
stereo discs. Cambridge Audio has also worked hard to ensure that CD
replay is excellent and up to the standards of the rest of the 540V.
To maximise the performance from this equipment we would encourage
you to use only high quality viewing sources, and capable loudspeakers.
We particularly recommend cabling from the Cambridge Audio range,
which has been designed to the same exacting standards as the rest of
our products.
Now we invite you to sit back, relax and enjoy!
Matthew Bramble
Technical Director
INTRODUCTION
Page 5
540V DVD receiver
azur DVD receiver 5
Checking tthe ppower ssupply rrating
For your own safety please read the following instructions carefully before
attempting to connect this unit to the mains.
Check that the rear of your unit indicates the correct supply voltage. If your mains
supply voltage is different, consult your dealer.
This unit is designed to operate only on the supply voltage and type that is
indicated on the rear panel of the unit. Connecting to other power sources may
damage the unit.
This equipment must be switched off when not in use and must not be used unless
correctly earthed. To reduce the risk of electric shock, do not remove the unit's
cover (or back). There are no user serviceable parts inside. Refer servicing to
qualified service personnel. If the power cord is fitted with a moulded mains plug
the unit must not be used if the plastic fuse carrier is not in place.
The lightning flash with the arrowhead symbol within an equilateral
triangle is intended to alert the user to the presence of uninsulated
'dangerous voltage' within the product's enclosure that may be of
sufficient magnitude to constitute a risk of electric shock to
persons.
The exclamation point within an equilateral triangle is intended to
alert the user to the presence of important operating and
maintenance instructions in the service literature relevant to this
appliance.
This product complies with European Low Voltage (73/23/EEC)
and Electromagnetic Compatibility (89/336/EEC) Directives
when used and installed according to this instruction manual. For
continued compliance only Cambridge Audio accessories should
be used with this product and servicing must be referred to
qualified service personnel.
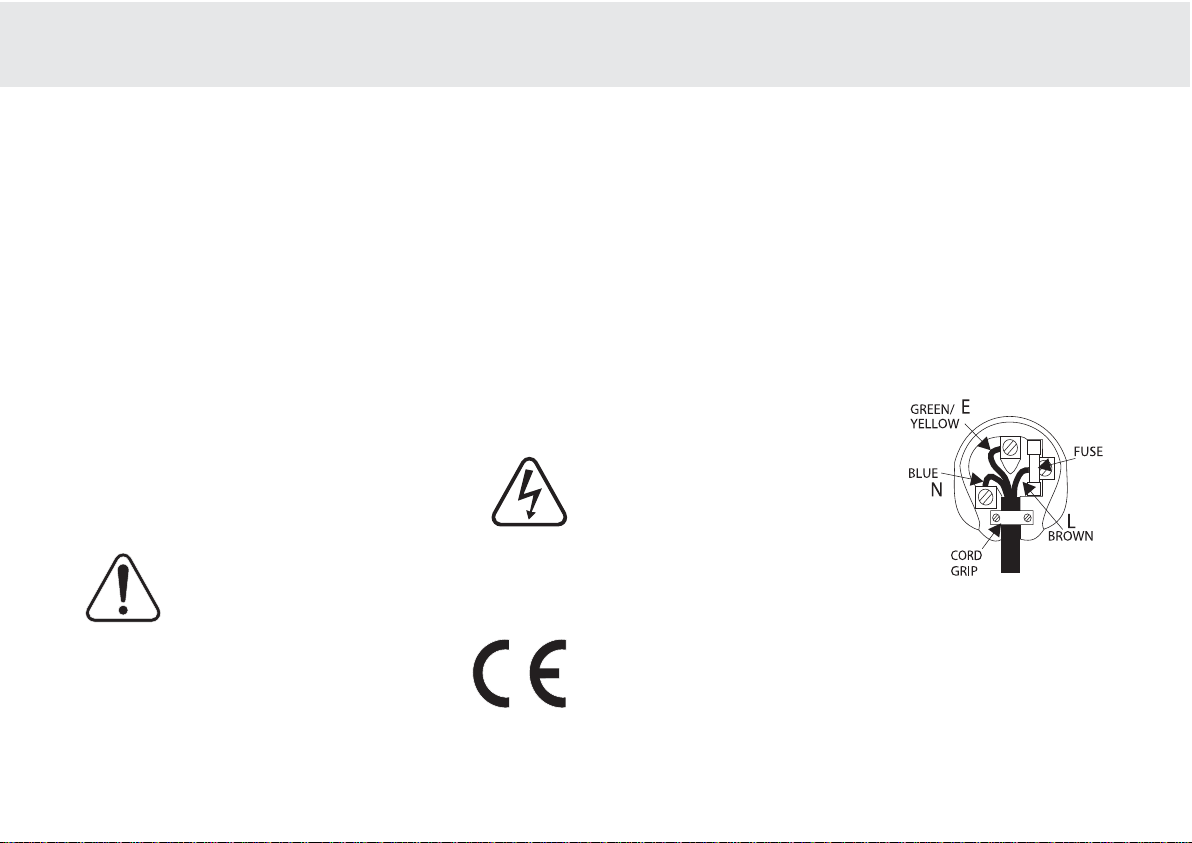
Plug ffitting iinstructions ((UK only)
The cord supplied with this appliance is factory fitted with a 13A mains plug fitted
with a 5A fuse inside. If it is necessary to change the fuse, it is important that a 5A
one is used. If the plug needs to be changed because it is not suitable for your
socket, or becomes damaged, it should be cut off and an appropriate plug fitted
following the wiring instructions below. The plug must then be disposed of safely,
as insertion into a 13A socket is likely to cause an electrical hazard. Should it be
necessary to fit a 3-pin BS mains plug to the power cord the wires should be fitted
as shown in this diagram. The colours of the wires in the mains lead of this
appliance may not correspond with the coloured markings identifying the
terminals in your plug. Connect them as follows:-
The wire which is coloured BLUE must be
connected to the terminal which is marked
with the letter 'N' or coloured BLACK.
The wire which is coloured BROWN must be
connected to the terminal which is marked
with the letter 'L' or coloured RED
The wire which is coloured GREEN/YELLOW
must be connected to the terminal which is
marked with the letter 'E' or coloured
GREEN.
If your model does not have an earth wire,
then disregard this instruction.
SAFETY PRECAUTIONS
Page 6
6 azur DVD receiver
Please take a moment to read these notes before installing your Azur
DVD receiver, they will enable you to get the best performance and
prolong the life of your unit.
This unit must be installed on a sturdy, level surface.
The unit requires ventilation. Do not situate it on a rug or other soft
surface and do not obstruct any air inlets or outlet grilles.
Do not place in a sealed area such as a bookcase or in a cabinet. Any
space open at the back (such as a dedicated equipment rack) is fine.
Never allow this unit to come into contact with w at er or other liq uids and
ensure that small objects do not fall through any ventilation grille. In
either event, switch it off immediately, disconnect it from the mains
supply and contact your dealer for advice.
Do not route the power cable so that it can be walked upon or damaged
by other items near it.
Like all audiophile electronic components, this unit will subtly improve
with some initial running in.
If you do not intend to use this unit for a long period, switch it off and
unplug it from the mains socket.
To clean the unit, wipe its case with a moist, lint-free cloth. Do not use
any cleaning fluids containing alcohol, ammonia or abrasives. Do not
spray an aerosol at or near your DVDreceiver.
This product is not user serviceable. If you have checked the
troubleshooting guide at the back of the manual with no improvement,
do not attempt to repair, disassemble or reconstruct the unit. A serious
electric shock could result if this precautionary measure is ignored. In
the event of a problem or failure, please contact your dealer.
INSTALLATION USING THE REMOTE HANDSET
When you have unpacked your remote handset, inser t the supplied AAA
batteries to activate it. The remote can control all of the standard
playback options but is also important in setting up your DVD player as
many of the menus are most easily accessed from the remote.
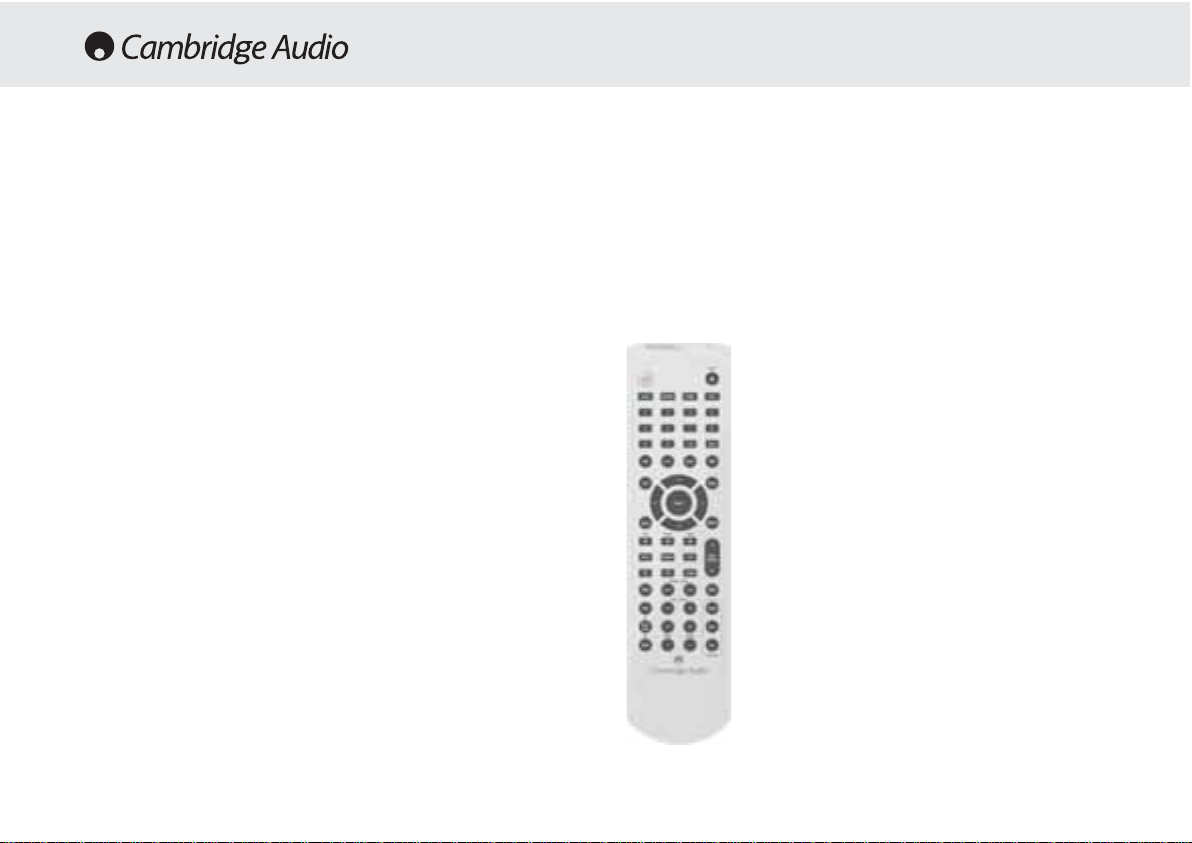
To navigate menus, the four cursor buttons marked with arrows will
move you around the menus and the SELECT button in the middle of
them will access the item highlighted at the time. This applies to both
the setup menus on the 540V and the menus on DVD discs themselves.
Note - TThe 5540V rremote ccontrol ffeatures sseparate
Skip aand SSearch bbuttons
The SSkip bbuttons wwill sskip bbe
tween
chapters/tracks oon aa DDVD/CD wwhilst tthe SSearch
buttons sshould bbe uused tto ssearch wwithin aa
chapter/track.
Page 7

540V DVD receiver
azur DVD receiver 7
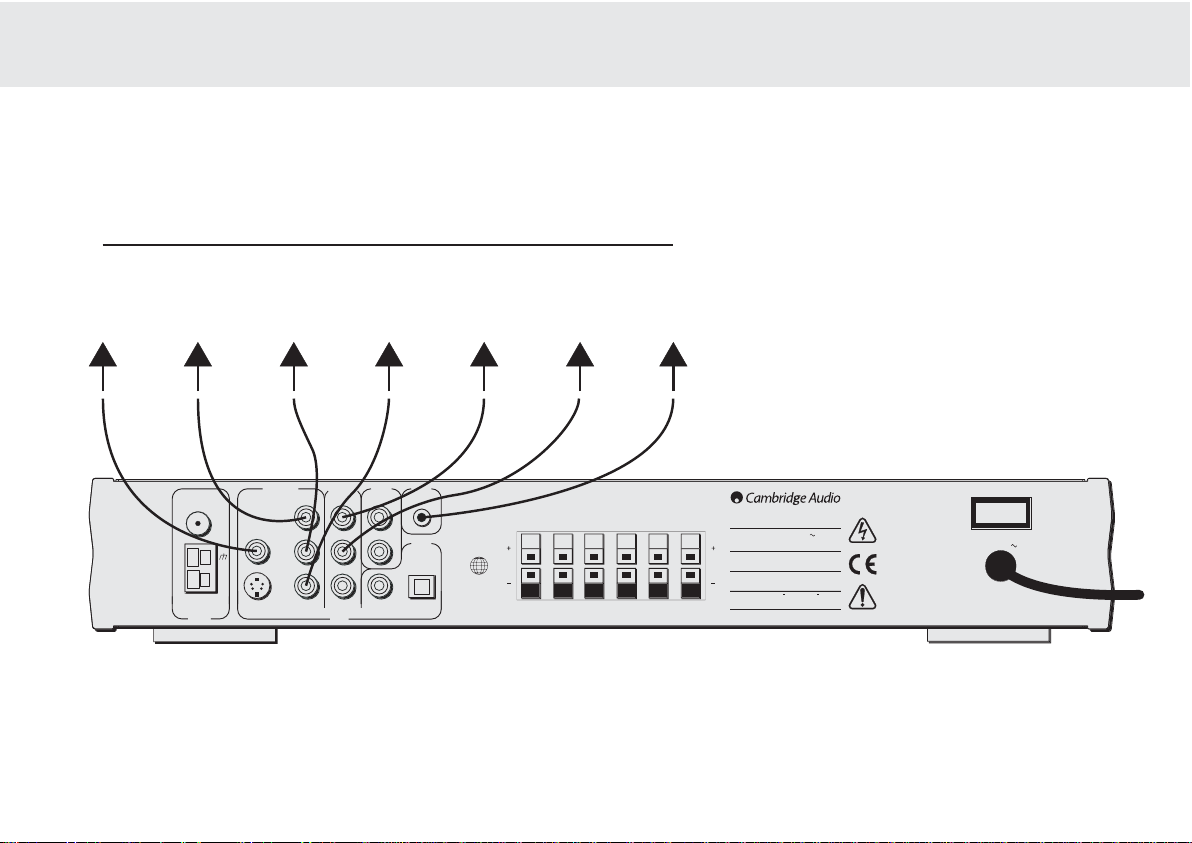
Video CConnections
(see ppage 88 ffor ddiagram)
The 540V is equipped with Composite (CVBS), S-Video (SVHS) and
Component (YC
bCr
) Video connections. Progressive Scan is only
available from the Component video output. These outputs are picture
only. It is only necessary to use one video connection at any one time.
RBG through SScart
(see ppage 99 ffor ddiagram)
It is possible to connect the 540V to a TV’s Scart socket using the
dedicated RGB Trigger to Scart cable available from Cambridge Audio,
which is connected via the component video outputs (R,G and B) and
the RBG Select socket.
Note
- RGB output must be selected in the Set-Up menu (see page 13)
Audio CConnections
(see ppage 110 ffor ddiagrams)
Digital ooutputs
- The 540V is equipped with an optical and a coaxial
digital output. These allow for a digital soundtrack on a DVD disc to be
sent to a suitably equipped AV receiver for decoding and amplification.
This means that if you choose to upgrade to a separate receiver, the
540V can be used purely as a DVD player. Both outputs perform the
same function- simply choose the type that best suits your needs.
REAR PANEL CONNECTIONS
Analogue ooutputs ((audio oout)
- The 540V carries a stereo RCA (phono)
output for connecting to a conventional stereo amplifier. This could be
used for CD replay, for example. To listen to audio through your TV
connect to the matching audio inputs on your TV. The subwoofer audio
out is for the connection of an active subwoofer for use with 5.1 only.
Aux iinput -
An additional stereo source component can be connected
here for output through the 540V
Speaker TTerminals -
The 540V has five surround speaker terminals and
a passive subwoofer terminal (use the subwoofer audio out to attach an
active subwoofer). Connect suitable loudspeakers using speaker cable
to these terminals. The sound will be muffled and weak if the speakers
are incorrectly wired. When stereo downmix is selected in the set-up
menu only the front left and right loudspeaker terminals will be active.
Tuner CConnection
- The 540V carries an internal AM/FM tuner. The
supplied aerials for satisfactory reception are connected here.
AC ppower ssocket
Once you have completed all connections to the amplifier, plug the AC
Power Cable into an appropriat e mains socket. Your DVD receiver is now
ready for use.
Coaxial
RGB
Select
L
Digital
Audio Out
R
Optical
Rear
Right
1
FM
AM
Tuner
Video Out Audio Out Aux In
Y
Cb
Pb
Cr
Pr
Component
L
R
5.1 Sub
DVD
Composite
Video
S-Video
Loudspeaker Terminals
Front
Centre
Right
Serial Number Label Removed
Designed and Engineered in London, England
Rear
Left
Power Rating: 100-240V AC 50/60Hz
Max Power Consumption: 190W
Caution
Avis
Achtung
azur 540V DVD Receiver
Caution
Subwoofer
Front
Left
Risk of electric shock
Do not open
Risque de choc electrique
Ne pas ouvrir
Vorm offnen des gerates
Netzstecker ziehen
Part 1040 at date of
manufacture
Apparatus claims of US patent nos.
4,631,603; 4,577,216; 4,819,098;
and 4,907,093 licensed
for limited viewing only
"DTS" and "DTS Digital Out"
are trademarks of
Digital Theatre Systems Inc.
Manufactured under license
from Dolby Laboratories.
"Dolby" and the double - D
symbol are trademarks of
Dolby Laboratories.
Confidential Unpublished Works
© 1992-1997 Dolby Laboratories.
All rights reserved
Class 1 Laser Product
Luokan 1 Laserplaite
Klass 1 Laserapparat
Power AC
www.cambridge-audio.co.uk
Manufactured in an
ISO9002 approved facility
This product complies with DHSS rules
21 CFR, Chapter 1, Subchapter J,
Page 8

8 azur DVD receiver
Video Connections to a TV
To TTV
Component
video iinput
using aa 775 OOhm
Component vvideo
cable
(3RCA-33RCA)
To TTV
Composite
video iinput
using a
a 775 OOhm
Composite vvideo
cable
(RCA-RRCA)
To TTV
S-VVideo iinput
using
S-VVideo ccable
(MINIDIN-
MINIDIN)
OR
To TTV AAudio
input uusing
phono
cable
(2RCA-22RCA)
If your TV has S-Video inputs, an S-Video interconnect can be used to
connect this player. When the S-Video output is used the component
video outputs cannot be used.
If the TV has a component video input, the component video output of
this player can be used. When the component video outputs are in use
the S-Video output cannot also be used.
If the Audio Out of this player is connected to your TV, the Audio Out
sockets should be connected to your TV’s Audio In terminals.
One oof tthese cconnections wwith This ppair
OR
Tuner
Composite
FM
AM
Video Out Audio Out Aux In
Video
S-Video
Y
Cb
Pb
Cr
Pr
L
R
Component
5.1 Sub
DVD
Coaxial
RGB
Select
L
Digital
Audio Out
R
Optical
Rear
Right
1
Loudspeaker Terminals
Front
Centre
Right
Serial Number Label Removed
This product complies with DHSS rules
21 CFR, Chapter 1, Subchapter J,
Caution
Subwoofer
Part 1040 at date of
Front
Left
Left
Power Rating: 100-240V AC 50/60Hz
Max Power Consumption: 190W
Caution
Avis
Achtung
azur 540V DVD Receiver
Risk of electric shock
Do not open
Risque de choc electrique
Ne pas ouvrir
Vorm offnen des gerates
Netzstecker ziehen
Designed and Engineered in London, England
Rear
manufacture
Apparatus claims of US patent nos.
4,631,603; 4,577,216; 4,819,098;
and 4,907,093 licensed
for limited viewing only
"DTS" and "DTS Digital Out"
are trademarks of
Digital Theatre Systems Inc.
Manufactured under license
from Dolby Laboratories.
"Dolby" and the double - D
symbol are trademarks of
Dolby Laboratories.
Confidential Unpublished Works
© 1992-1997 Dolby Laboratories.
All rights reserved
Class 1 Laser Product
Luokan 1 Laserplaite
Klass 1 Laserapparat
Power AC
www.cambridge-audio.co.uk
Manufactured in an
ISO9002 approved facility
Page 9
540V DVD receiver
azur DVD receiver 9
Video Connection to a TV’s Scart socket using the dedicated
Cambridge Audio RGB Trigger to Scart cable
Yellow ccable
from
Composite
video oout
To tthe SScart ssocket oon aa TTV
Green ccable
from
Component
video oout ((Y)
Blue ccable
from
Component
video oout ((Pb)
Red ccable
from
Component
video
oout ((Pr)
White ccable
from
Left aaudio oout
Black ccable
from
Right aaudio oout
Orange ccable
from
RGB Select
Tuner
Video Out Audio Out Aux In
Composite
Video
FM
AM
S-Video
Y
Cb
Pb
Cr
Pr
Component
L
R
5.1 Sub
DVD
Coaxial
L
R
RGB
Select
Digital
Audio Out
Optical
1
Front
Rear
Right
Right
Loudspeaker Terminals
Subwoofer
Centre
Caution
Serial Number Label Removed
Rear
Front
Left
Left
Designed and Engineered in London, England
azur 540V DVD Receiver
Power Rating: 100-240V AC 50/60Hz
Max Power Consumption: 190W
Risk of electric shock
Caution
Do not open
Avis
Risque de choc electrique
Ne pas ouvrir
Vorm offnen des gerates
Achtung
Netzstecker ziehen
This product complies with DHSS rules
21 CFR, Chapter 1, Subchapter J,
Part 1040 at date of
manufacture
Apparatus claims of US patent nos.
4,631,603; 4,577,216; 4,819,098;
and 4,907,093 licensed
for limited viewing only
"DTS" and "DTS Digital Out"
are trademarks of
Digital Theatre Systems Inc.
Manufactured under license
from Dolby Laboratories.
"Dolby" and the double - D
symbol are trademarks of
Dolby Laboratories.
Confidential Unpublished Works
© 1992-1997 Dolby Laboratories.
All rights reserved
Class 1 Laser Product
Luokan 1 Laserplaite
Klass 1 Laserapparat
Power AC
www.cambridge-audio.co.uk
Manufactured in an
ISO9002 approved facility
Page 10
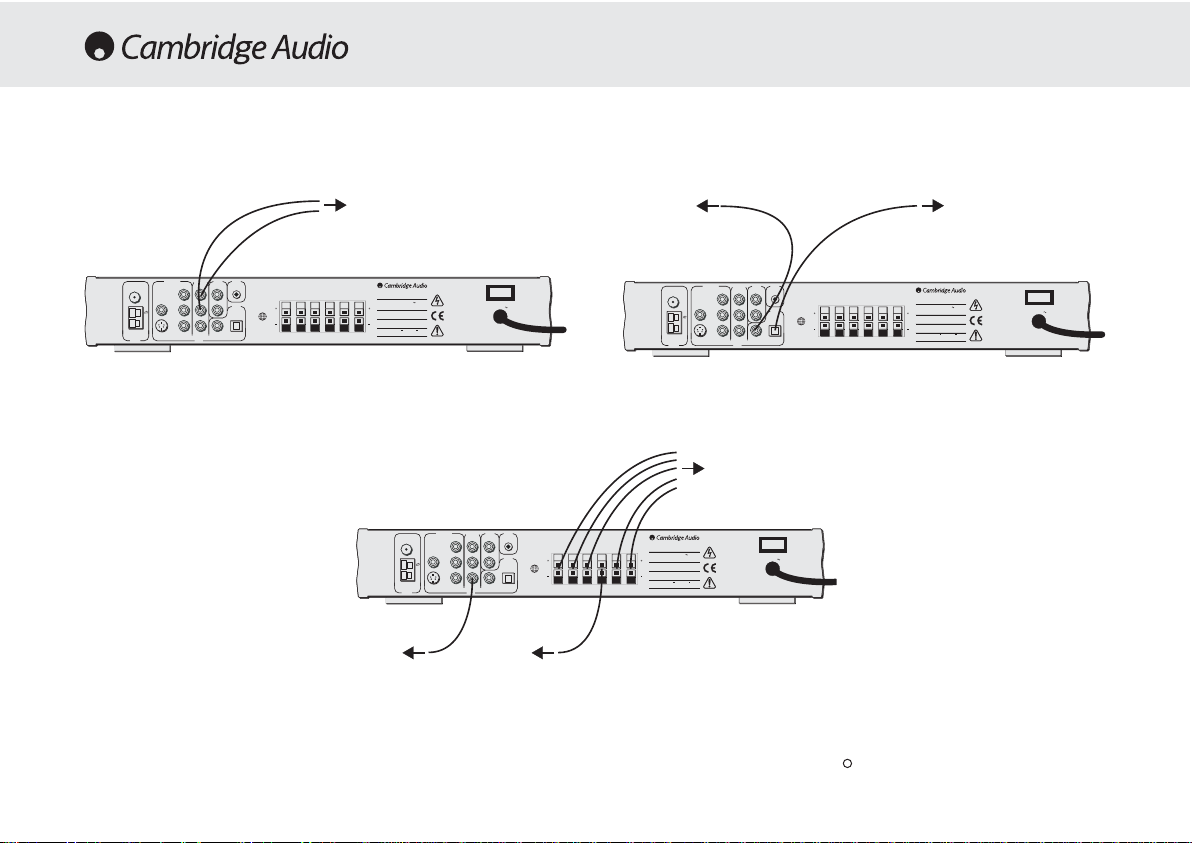
These cconnections aare ffor aaudio oonly - rretain cchosen vvideo cconnections
MMaannuuffaaccttuurreedd uunnddeerr lliicceennssee ffrroomm DDoollbbyy LLaabboorraattoorriieess.. ““DDoollbbyy”” aanndd tthhee ddoouubbllee-DD ssyymmbbooll aarree ttrraaddeemmaarrkkss ooff DDoollbbyy LLaabboorraattoorriieess.. CCoonnffiiddeennttiiaall uunnppuubb