

Cambium Networks 89FT0046 Users manual

pmp-2398_002v002 (March 2019)
Accuracy
While reasonable efforts have been made to assure the accuracy of this document, Cambium Networks
assumes no liability resulting from any inaccuracies or omissions in this document, or from use of the
information obtained herein. Cambium reserves the right to make changes to any products described
herein to improve reliability, function, or design, and reserves the right to revise this document and to
make changes from time to time in content hereof with no obligation to notify any person of r evisions
or changes. Cambium does not assume any liability arising out of the application or use of any product,
software, or circuit described herein; neither does it convey license under its patent rights or the rights
of others. It is possible that this publication may contain references to, or information about Cambium
products (machines and programs), programming, or services that are not announced in your country.
Such references or information must not be construed to mean that Cambium intends to announce such
Cambium products, programming, or services in your country.
Copyrights
This document, Cambium products, and 3rd Party software products described in this document may
include or describe copyrighted Cambium and other 3rd Party supplied computer programs stored in
semiconductor memories or other media. Laws in the United States and other countries preserve for
Cambium, its licensors, and other 3rd Party supplied software certain exclusive rights for copyrighted
material, including the exclusive right to copy, reproduce in any form, distribute and make derivative
works of the copyrighted material. Accordingly, any copyrighted material of Cambium, its licensors, or
the 3rd Party software supplied material contained in the Cambium products described in this document
may not be copied, reproduced, reverse engineered, distributed, merged or modified in any manner
without the express written permission of Cambium. Furthermore, the purchase of Cambium products
shall not be deemed to grant either directly or by implication, estoppel, or otherwise, any license under
the copyrights, patents or patent applications of Cambium or other 3rd Party supplied software, except
for the normal non-exclusive, royalty free license to use that arises by operation of law in the sale of a
product.
Restrictions
Software and documentation are copyrighted materials. Making unauthorized copies is prohibited by
law. No part of the software or documentation may be reproduced, transmitted, transcribed, stored in a
retrieval system, or translated into any language or computer language, in any form or by any means,
without prior written permission of Cambium.
License Agreements
The software described in this document is the property of Cambium and its licensors. It is furnished by
express license agreement only and may be used only in accordance with the terms of such an
agreement.
High Risk Materials
Cambium and its supplier(s) specifically disclaim any express or implied warranty of fitness for any highrisk activities or uses of its products including, but not limited to, the operation of nuclear facilities,
aircraft navigation or aircraft communication systems, air traffic control, life support, or weapons
systems (“High Risk Use”).
This product is not restricted in the EU. Any High Risk is unauthorized, is made at your own risk and you
shall be responsible for any and all losses, damage or claims arising out of any High-Risk Use.
© 2019 Cambium Networks Limited. All Rights Reserved.

Page i
Contents
About This User Guide .......................................................................................................................... 3
Contacting Cambium Networks .................................................................................................... 4
Purpose ........................................................................................................................................... 5
Cross references ............................................................................................................................. 5
Feedback ......................................................................................................................................... 5
Declaration of Conformity .................................................................................................................... 6
Part 15 FCC Rules ........................................................................................................................... 6
Class B Digital Device or Peripheral ............................................................................................. 6
GNU GPL Information .................................................................................................................... 7
Conventions, warnings, cautions, and notes ..................................................................................... 9
Conventions .................................................................................................................................... 9
Warnings ......................................................................................................................................... 9
Cautions .......................................................................................................................................... 9
Notes ............................................................................................................................................... 9
Chapter 1: Product Description ....................................................................................................... 10
Hardware Installation .......................................................................................................................... 11
Chapter 2: Basic Settings ................................................................................................................ 12
Web Management Interface ........................................................................................................ 12
Accessing and Configuring cnPilot Home Router via cnMaestro ............................................ 16
Configuring via Voice Commands .............................................................................................. 17
Chapter 3: Advanced Configuration ................................................................................................ 24
Two-Level Management ..................................................................................................................... 25
Setting the Time Zone ........................................................................................................................ 26
Status ................................................................................................................................................... 27
Configuring an Internet Connection .................................................................................................. 32
Network ................................................................................................................................................ 34
WAN .............................................................................................................................................. 34
IPv6 Address configuration ......................................................................................................... 46
LAN ................................................................................................................................................ 51
Wireless ................................................................................................................................................ 63
WDS ............................................................................................................................................... 76
SIP ......................................................................................................................................................... 77
FXS1 ..................................................................................................................................................... 85
FXS2 ..................................................................................................................................................... 95
Security ................................................................................................................................................ 96
Application ........................................................................................................................................... 99
Storage ............................................................................................................................................... 101

Contents
Page ii
Administration ................................................................................................................................... 104
Management ............................................................................................................................... 104
Firmware Upgrade ..................................................................................................................... 111
Provision ..................................................................................................................................... 111
SNMP........................................................................................................................................... 114
TR-069.......................................................................................................................................... 115
Scheduled Tasks ......................................................................................................................... 129
Diagnosis .................................................................................................................................... 130
Operating Mode ......................................................................................................................... 133
System Log ................................................................................................................................. 133
Logout ......................................................................................................................................... 134
Reboot ......................................................................................................................................... 134
Chapter 4: Troubleshooting Guide ................................................................................................ 135
Configuring PC to get IP Address automatically ..................................................................... 135
Cannot connect to the Web GUI ............................................................................................... 135
Forgotten Password ................................................................................................................... 135
cnMaestro On-boarding troubleshooting ................................................................................ 135
Appendix: Third Party Software ........................................................................................................ 138
Appendix: Part Numbers ................................................................................................................... 139
Glossary ............................................................................................................................................. 140

Page 3
About This User Guide
Thank you for choosing Cambium cnPilot Home &
Small Business Wi-Fi Router with ATA (optional) and
PoE(optional).
This manual provides basic information about how to
install and deploy the cnPilot Home Routers.
For remote configuration and deployment, an Internet
connection is required.
The cnPilot Home Router is a managed device (that yet
can act as a stand-alone router if desired). In addition
to Wi-Fi, this product provides high quality voice calls
(VoIP models only) as well as the optional ability to
power Cambium’s ePMP series subscriber module or
the PMP450 series subscriber module by supporting
Cambium’s (Canopy) PoE. For voice calls, the product
is fully compatible with the SIP industry standard and
can interoperate with many other SIP devices and
softwares.
This guide contains the following chapters:
• Chapter 1: Product description
• Chapter 2: Basic Settings
• Chapter 3: Advanced Configuration
• Chapter 4: Troubleshooting Guide

Chapter 1: Product Description
Declaration of Conformity
Page 4
Contacting Cambium Networks
Support website:
https://www.cambiumnetworks.com/support
Main website:
https://www.cambiumnetworks.com
Sales enquiries:
solutions@cambiumnetworks.com
Support enquiries:
support@cambiumnetworks.com
Repair enquiries
rma@cambiumnetworks.com
Telephone number list:
https://www.cambiumnetworks.com/contact
Address:
Cambium Networks Limited,
Linhay Business Park,
Eastern Road,
Ashburton,
Devon, UK,
TQ13 7UP

Chapter 1: Product Description
Declaration of Conformity
Page 5
Purpose
Cambium disclaims all liability whatsoever, implied or express, for any risk of damage, loss or
reduction in system performance arising directly or indirectly out of the failure of the customer, or
anyone acting on the customer's behalf, to abide by the instructions, system parameters, or
recommendations made in this document.
Cross references
References to external publications are shown in italics. Other cross references, emphasized in blue
text in electronic versions, are active links to the references.
This document is divided into numbered chapters that are divided into sections. Sections are not
numbered, but are individually named at the top of each page, and are listed in the table of contents.
Feedback
We appreciate feedback from the users of our documents. This includes feedback on the structure,
content, accuracy, or completeness of our documents. Send feedback to
support@cambiumnetworks.com.

Chapter 1: Product Description
Declaration of Conformity
Page 6
Declaration of Conformity
Part 15 FCC Rules
This device complies with Part 15 of the FCC Rules. Operation is subject to the following two
conditions:
• This device may not cause harmful interference, and
• This device must accept any interference received, including interference that may cause
undesired operation.
Class B Digital Device or Peripheral
This equipment has been tested and found to comply with the limits for a Class B digital device,
pursuant to Part 15 of the FCC Rules. These limits are designed to provide reasonable protection
against harmful interference in a residential installation. This equipment can generate, use and
radiate radio frequency energy. If not installed and used in accordance with the instruction manual,
may cause harmful interference to radio communications. However, there is no guarantee that
interference does not occur in an installation.
Note
Changes or modifications not expressly approved by the party responsible for
compliance could void the user’s authority to operate the equipment.
If this equipment does cause harmful interference to radio or television reception, which can be
determined by turning the equipment off and on, the user is encouraged to try to correct the
interferences by one or more of the following measures:
• Reorient or relocate the receiving antenna.
• Increase the separation between the equipment and receiver.
• Connect the equipment into an outlet on a circuit different from that to which the receiver is
connected.
• Consult the dealer or an experienced radio/TV technician for help.
Note
• The distance between user and products should be no less than 20cm.
• Operations in the 5.15-5.25GHz band are restricted to indoor usage only.

Chapter 1: Product Description
Declaration of Conformity
GNU GPL Information
Note
cnPilot Home Router firmware contains third-party software under the GNU General Public License
(GPL). Please refer to the GPL for the exact terms and conditions of the license. Important
regulatory information.
IC Warning
This device complies with Industry Canada licence‐exempt RSS standard(s). Operation is subject to
the following two conditions:
(1) this device may not cause interference, and
(2) this device must accept any interference, including interference that may cause undesired
operation of the device.
Le présent appareil est conforme aux CNR d'Industrie Canada applicables aux appareils radio
exempts de licence. L'exploitation est autorisée aux deux conditions suivantes:
(1) il ne doit pas produire de brouillage et
(2) l’ utilisateur du dispositif doit étre prêt à accepter tout brouillage radioélectrique reçu, même
si ce brouillage est susceptible de compromettre le fomctionnement du dispositif.
- This Class B digital apparatus complies with Canadian ICES-003.
- Cet appareil numerique de la classe B est conforme a la norme NMB-003 du Canada.
• The distance between user and products should be no less than 20cm
• La distance entre l'utilisateur et les produits ne doit pas être inférieure à 20
cm
• the device for operation in the band 5150–5250 MHz is only for indoor use to
reduce the potential for harmful interference to co-channel mobile satellite
systems
• le dispositif destiné à fonctionner dans la bande 5150–5250 MHz est
uniquement destiné à une utilisation en intérieur afin de réduire le risque de
brouillage préjudiciable des systèmes mobiles par satellite à co-canal
Page 7

Chapter 1: Product Description
Declaration of Conformity
Page 8
CE Note
Manufacturer: Cambium Networks Inc.
Address: 3800 Golf Road, Suite 360 Rolling Meadows, IL 60008 USA
Hereby, Cambium Networks Inc. declares that this device is in compliance with the essential
requirements and other relevant provisions of Directive 2014/53/EU
Importers: Flyingvoice Network Technology Co., Ltd.
Address: Room 207~209, 2/F, Bldg B52#, Zhongchuang industrial park, Liuxian Avenue,
Taoyuan street, Nanshan District, Shenzhen
A copy of the declaration of conformity can be obtained with this user manual; this product
is not restricted in the EU.
Hardware Version: R195W_V1_2
Software Version: V3.20(201901291603)
The wireless operation frequency
WIFI: 2412MHz-2472MHz, Max EIRP Power 18.95dBm
WIFI: 5180-5240MHz, Max EIRP Power 21.85dBm
WIFI: 5180-5240MHz, Max EIRP Power 21.85dBm
WIFI: 5745-5825MHz, Max EIRP Power 13.36dBm
Safety warning and Attentions
If use adapter, adapter must be comply 2014/30/EU Directive
Adapter Caution: Adapter shall be installed near the equipment and shall be easily
accessible.
Do not store or use your product in temperatures higher than 45ºC
RF Exposure Statement
The distance between user and products should be no less than 20cm

Chapter 1: Product Description
Conventions, warnings, cautions, and notes
Page 9
Conventions, warnings, cautions, and notes
The following describes how conventions, warnings, cautions, and notes are used in this
document and in all documents of the Cambium Networks document set.
Conventions
The following convention is used throughout this User Guide:
cnPilot Home Router: (cnPilot R195W model)
Warnings
Warnings precede instructions that contain potentially hazardous situations. Warnings are used to
alert the reader to possible hazards that could cause loss of life or physical injury. A warning has
the following format:
Warning
Warning text and consequence for not following the instructions in the warning.
Cautions
Cautions precede instructions and are used when there is a possibility of damage to systems,
software, or individual items of equipment within a system. However, this damage presents no
danger to personnel. A caution has the following format:
Caution
Caution text and consequence for not following the instructions in the caution.
Notes
A note means that there is a possibility of an undesirable situation or provides additional
information to help the reader understand a topic or concept. A note has the following format:
Note
Note text.

Chapter 1: Product Description
Conventions, warnings, cautions, and notes
Page 10
Chapter 1: Product Description
This chapter covers:
• Hardware Installation
Chapter 1: Product Description
Hardware Installation
Page 11
Hardware Installation
Before configuring your router, please see the procedure below for instructions on connecting the
cnPilot Home Router in your network.
Procedure 1 Configuring the Router
1. Connect analog phone to ATA Port with an RJ11 cable.
2. Connect the WAN port to the Internet via your network’s modem/switch/router/ADSL
equipment using an Ethernet cable.
3. Connect one end of the power cord to the power port of the device. Connect the other end
to the wall outlet.
4. Push the ON/OFF button to power on the router (If available).
5. Check the Power, WAN, and LAN LEDs to confirm network connectivity.
Warning
Please do not attempt to use unsupported power adapters and do not remove power
during configuring or updating the cnPilot Home Router device. Using other power
adapters may damage the cnPilot Home Router and will void the manufacturer
warranty.
Warning
Changes or modifications not expressly approved by the party responsible for
compliance can void the user’s authority to operate the equipment.
This equipment has been tested and found to comply with the limits for a Class B
digital device, pursuant to Part 15 of the FCC Rules. These limits are designed to
provide reasonable protection against harmful interference in a residential
installation. This equipment generates, uses and can radiate radio frequency energy
and, if not installed and used in accordance with the instructions, may cause harmful
interference to radio communications. However, there is no guarantee that
interference will not occur in a particular installation.
If this equipment does cause harmful interference to radio or television reception,
which can be determined by turning the equipment off and on, the user is
encouraged to try to correct the interference by one or more of the following
measures:
• Reorient or relocate the receiving antenna.
• Increase the separation between the equipment and receiver.
• Connect the equipment into an outlet on a circuit different from that to which the
receiver is connected.
• Consult the dealer or an experienced radio/TV technician for help.

Chapter 2: Basic Settings
Hardware Installation
Page 12
Chapter 2: Basic Settings
This chapter covers:
• Web Management Interface
• Accessing and Configuring cnPilot Home Router via cnMaestro
• Configuring via Voice Commands
Web Management Interface
cnPilot Home Routers feature a web browser-based interface that may be used to configure and
manage the device. See below for information.
Note
By default, http access is disabled. Only https is allowed.
Logging in from the LAN port
Ensure your PC is connected to the router’s LAN port correctly.
Note
You may either set up your PC to get an IP dynamically from the router or set up the
IP address of the PC to be the same subnet as the default IP address of router is
192.168.11.1. For detailed information, see Chapter 4: Troubleshooting Guide.
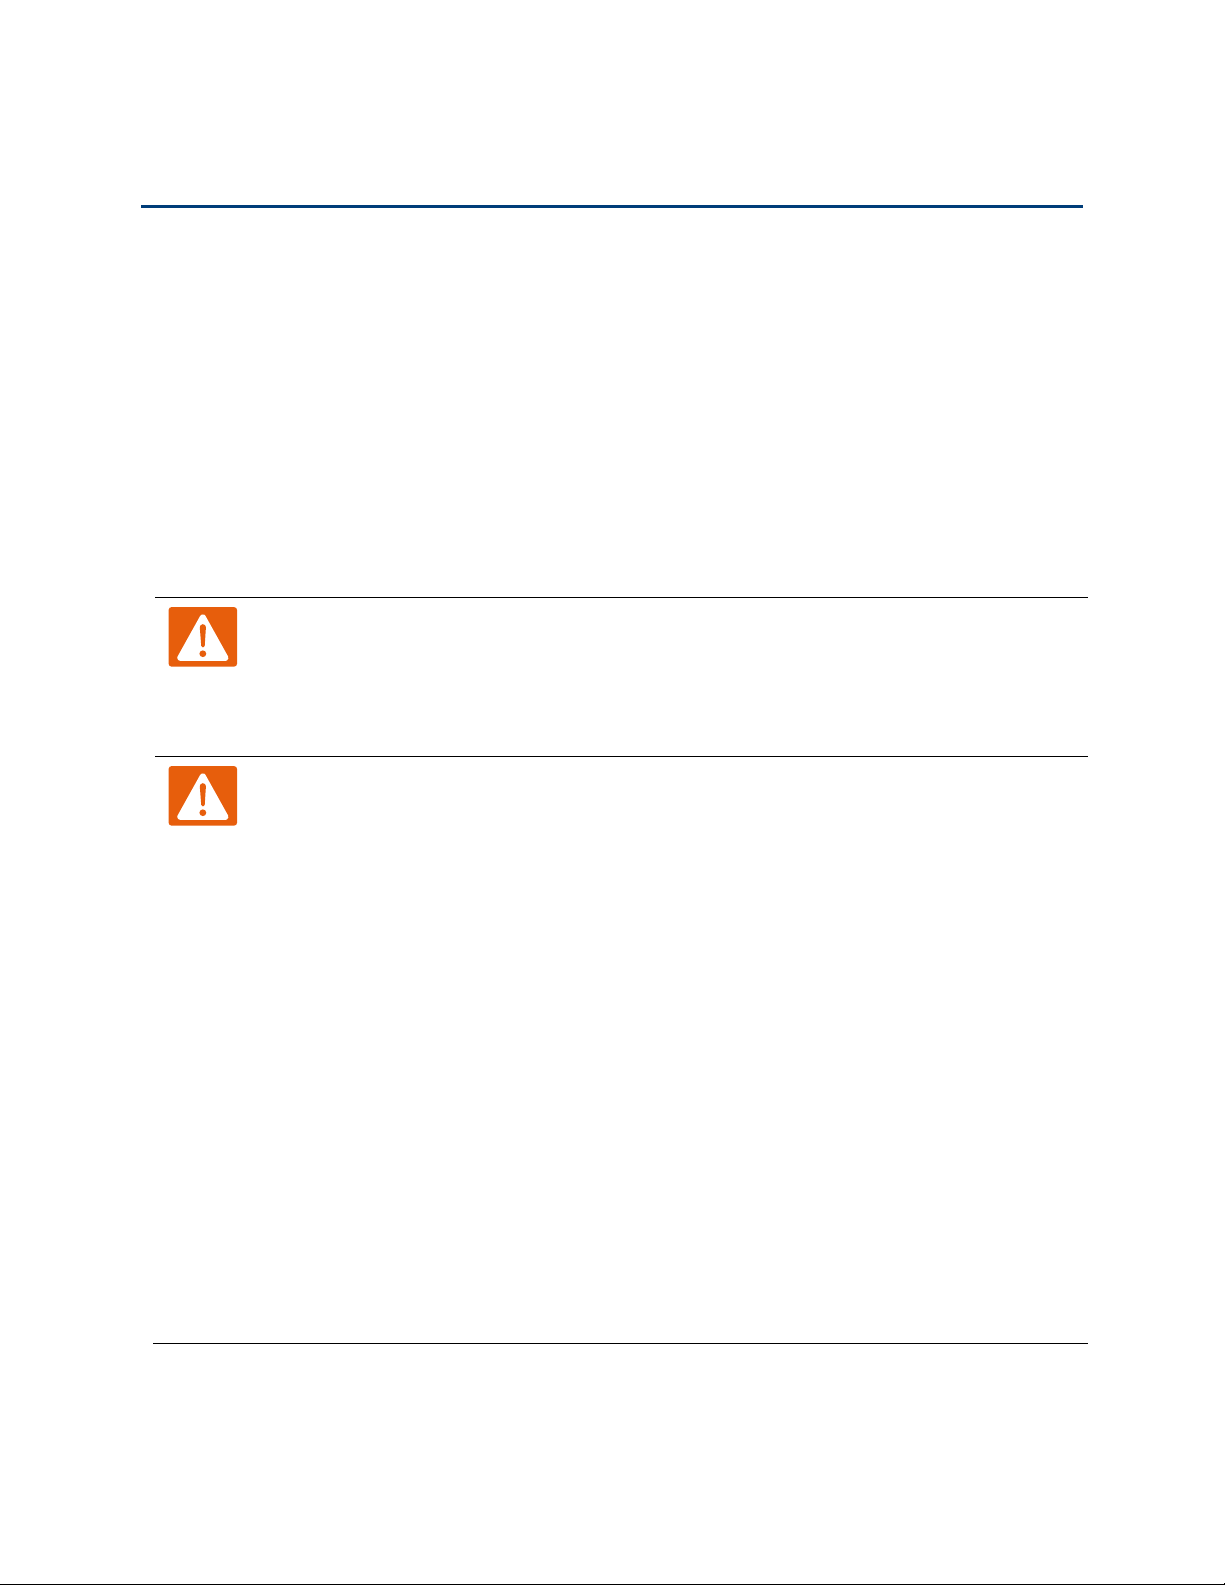
EZ UI
cnPilot Home Routers provides an additional simplified management interface for home users. The
home users can connect to any of the LAN port of the device and access the EZ UI by entering
https://mywifi.net in the browser.
Home users needs to provide the default Basic User credentials as useradmin/admin.
Note
Please check with your ISP in case the Basic User credentials have been changed
for improved security.
Figure 3 EZ UI
Chapter 2: Basic Settings
Hardware Installation
Page 13
The ISP allows the home user to access the EZ UI through a wireless client connected to the cnPilot
Home Router. Using the EZ UI, the user can easily change the basic device configurations such as
Wi-Fi names, Wi-Fi passwords and parental control.
Note
Management access from a wireless client is disabled by default.
Refer Enabling Mangement access for wireless client on "how to enable
management access for wireless clients".
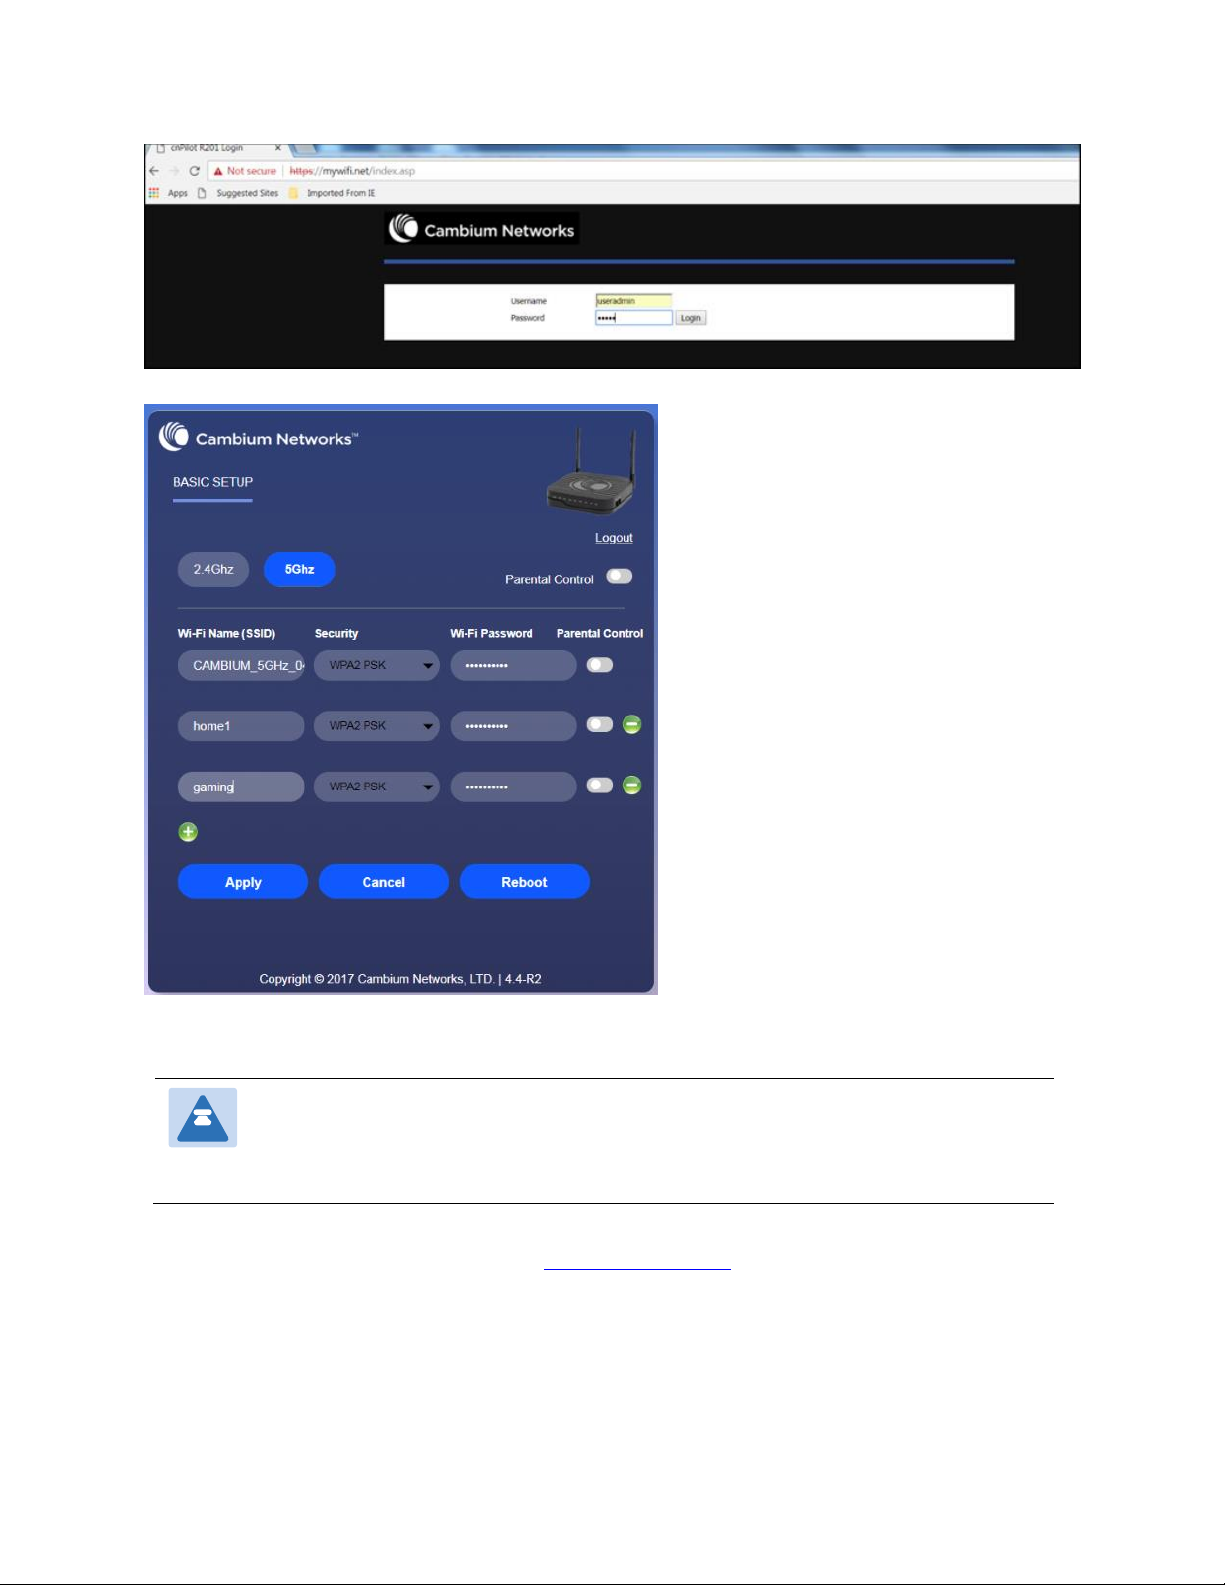
Open a web browser on your PC and type https://192.168.11.1/. The following window appears that
prompts for Username and Password.
Chapter 2: Basic Settings
Hardware Installation
Page 14
Figure 1 Login Prompt – LAN Port
For administrator mode operation, please type admin/admin on Username/Password and click
Login to begin configuration. For user mode operation, please type user/user on
Username/Password and click Login to begin configuration.
Note
If you are unable to access the web configuration, please see Chapter 4:
Troubleshooting Guide for more information.
The web management interface automatically logs out the user after 5 minutes of inactivity.
Logging in from the WAN port
Note
By default, the web access from WAN interface is disabled from 4.3.3 release
onwards for security reasons.
Ensure your PC is connected to the router’s WAN port correctly.
Obtain the IP addresses of WAN port using Voice prompt or by logging into the device web
management interface via a LAN port and navigating to Status page.
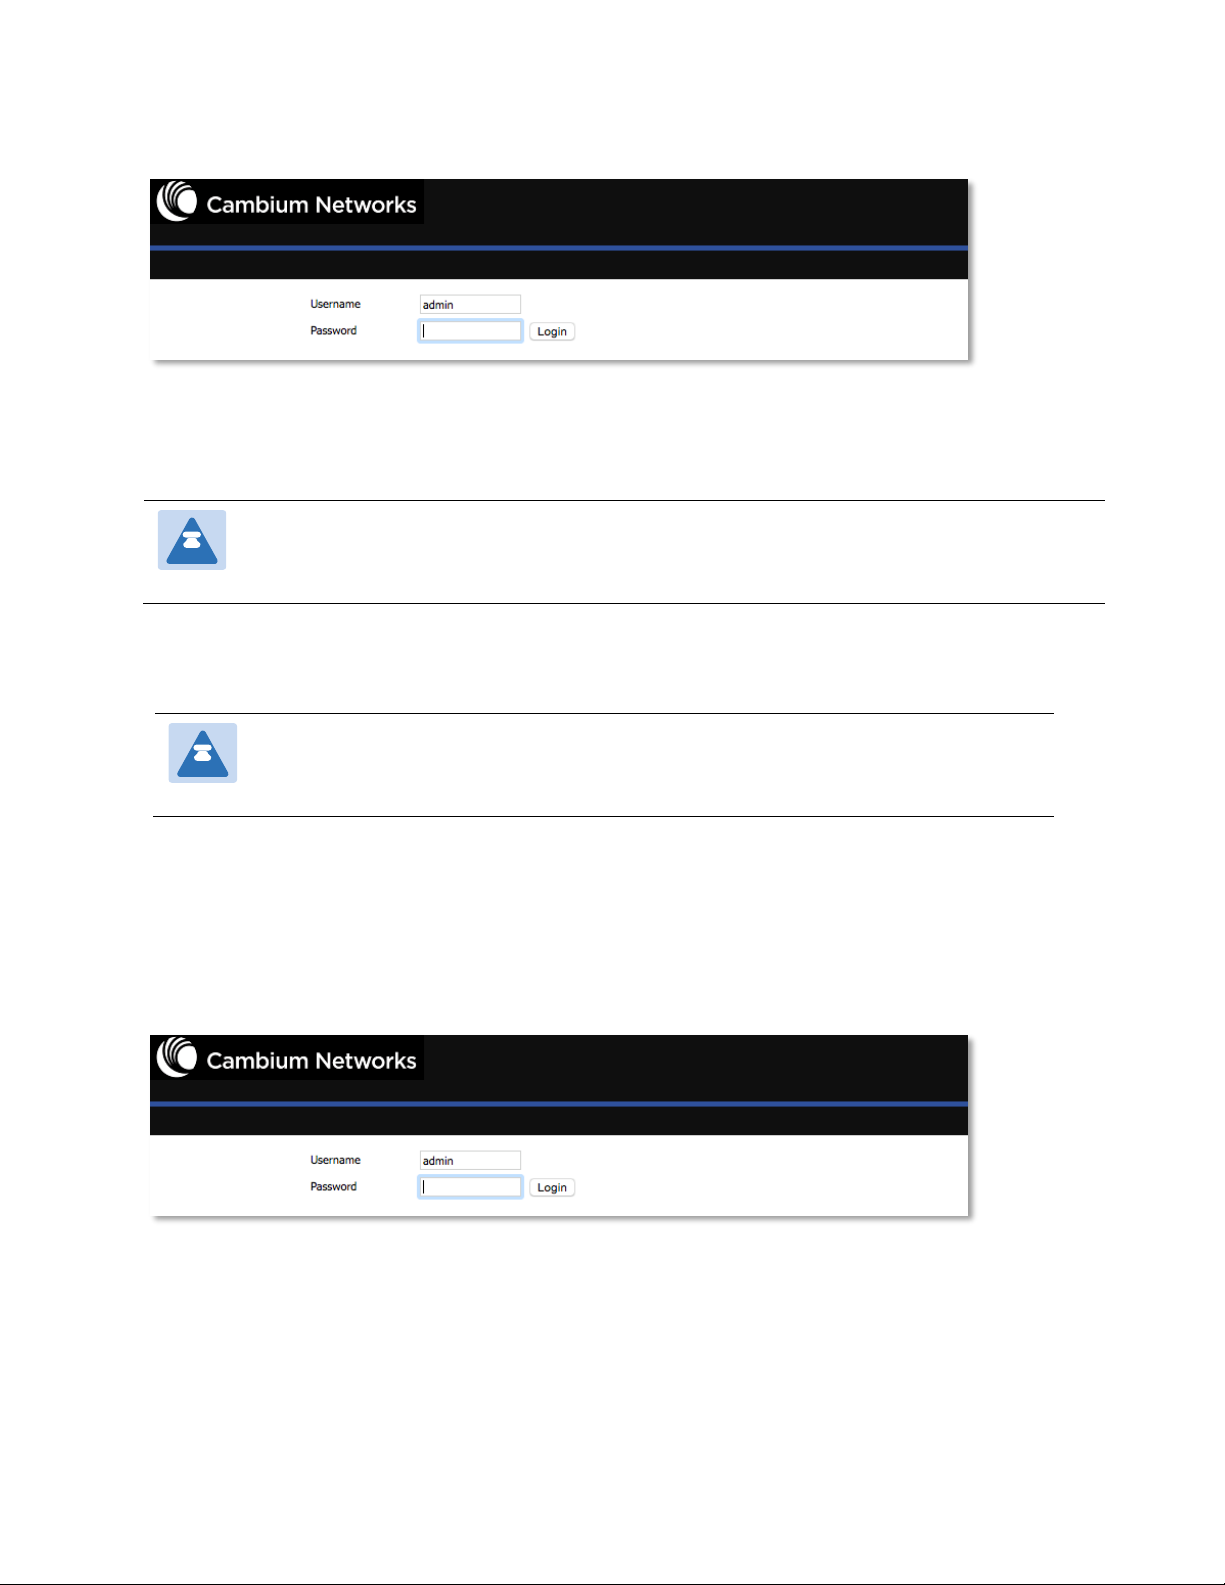
Open a web browser on your PC and type http://<IP address of WAN port>. The following login
page will be opened to enter username and password.
Figure 2 Login Prompt – WAN Port
For administrator mode operation, type admin/admin on Username/Password and click Login to
begin configuration. For user mode operation, type user/user on Username/Password and click
Login to begin configuration.
Chapter 2: Basic Settings
Hardware Installation
Page 15
Note
If you fail to access to the web configuration, see Chapter 4: Troubleshooting
Guide for more information.
The web management interface automatically logs out the user after 5 minutes of inactivity.
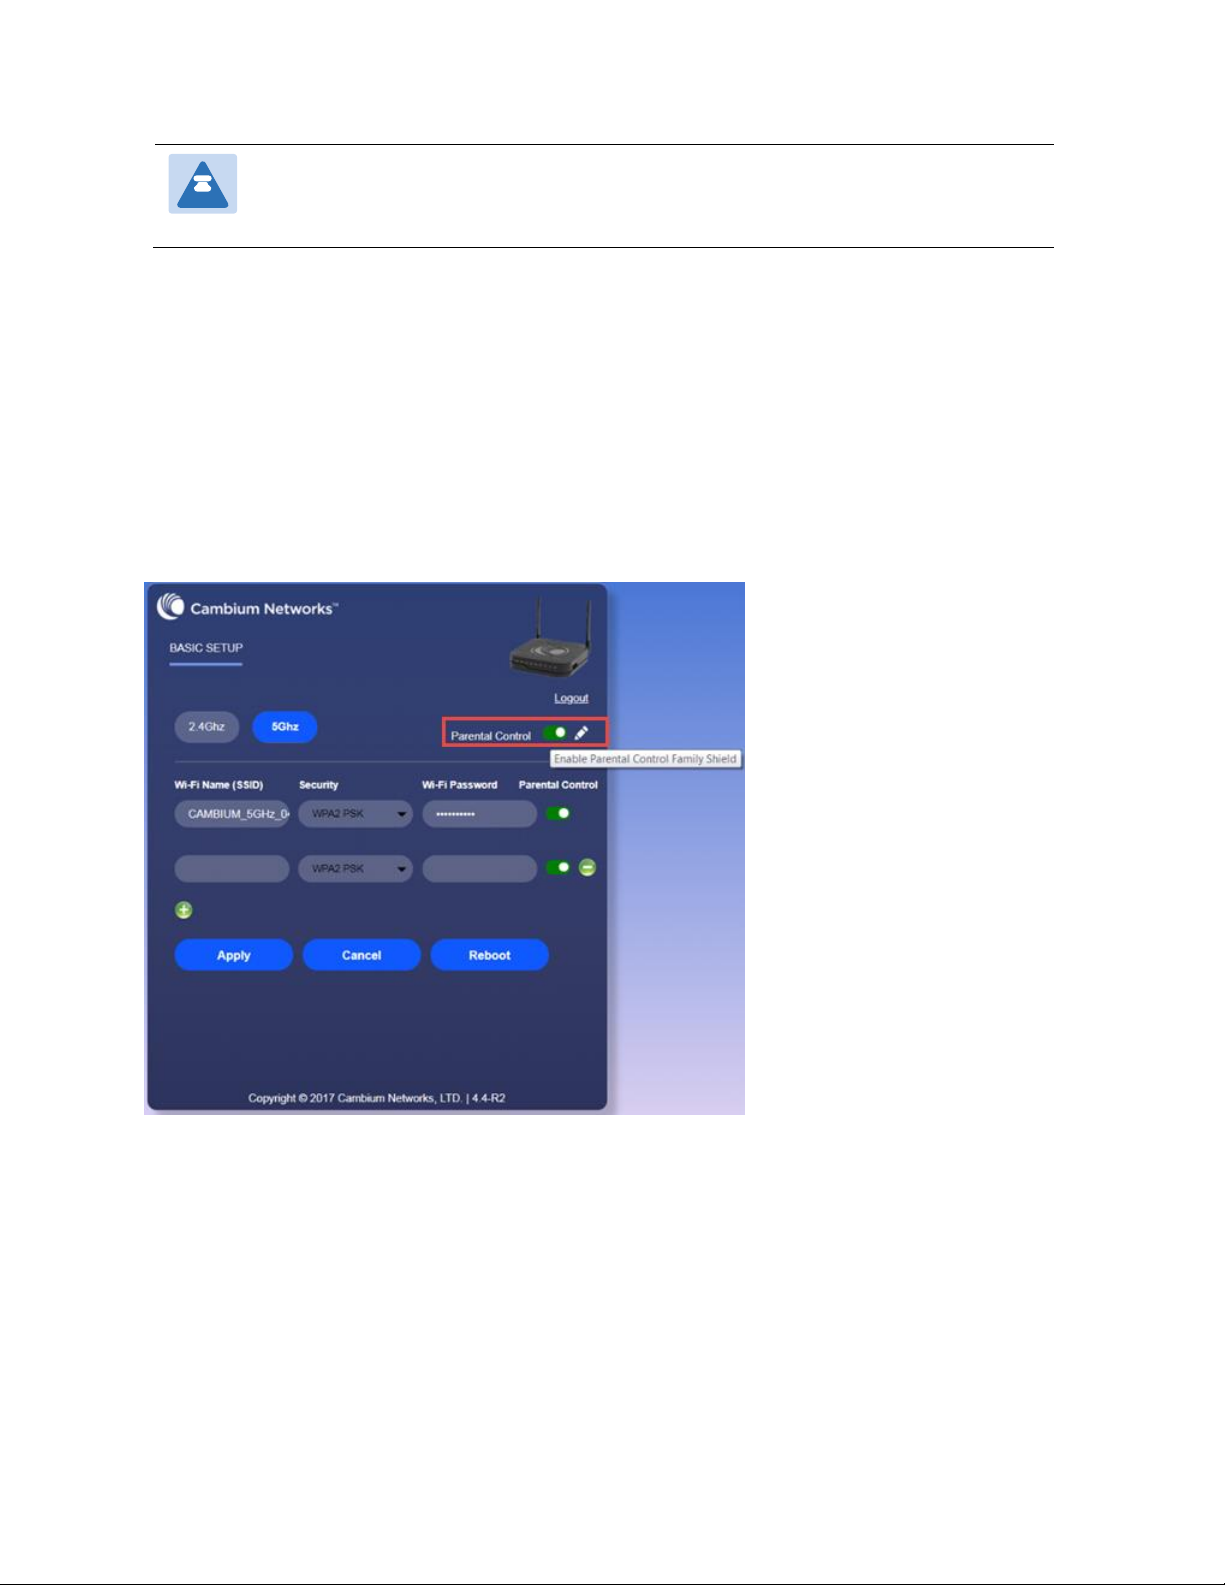
Parental Control
cnPilot Home Routers provide parental control feature for home users. Parental control allows home
users to restrict access to unlawful/adult content over their WiFi network. This feature is based on
external DNS filtering (like OpenDNS).
Parental Control feature is only available while using EZ UI. To enable parental control feature, tap
on the Parental Control button.
To configure cnPilot Home Router with the DNS server IP(s) provided by the Parental control service
provider:

Chapter 2: Basic Settings
Hardware Installation
Page 16
Parental control feature can be applied only to a specific WiFiName/SSID while the other SSIDs can
be free from any such restrictions. Once the device is setup for Parental control service, any DNS
request from its clients will be forwarded to the external DNS servers configured for
filtering/restricting the content.
When Parental control is enabled, it is applied to all the LAN clients and it cannot be disabled for
specific LAN ports.
Accessing and Configuring cnPilot Home Router via cnMaestro
cnMaestro, Cambium’s next generation network management system is the recommended
method for managing Cambium’s cnPilot Home Routers. As Cambium develops new features, you
may find the latest information on operating these features at the Cambium Community Forum.
Register at Cambium’s support forum (http://community.cambiumnetworks.com/) for instructions,
discussions, and helpful tips on managing cnPilot Home Routers.
Managing device via cnMaestro
cnMaestro is a suite of cloud-based tools for network management: inventory management,
onboarding devices, daily operations and maintenance. cnMaestro offers full visibility across the
entirety of a network.
Preparing the device:
The prerequisites at device side are:
1
Power on the cnPilot Home Router. Configure the IP Address using either the DHCP or
Static mode.
2
Check for the Internet connectivity. This is required, as the device needs to communicate
with the cnMaestro Server hosted in the AWS.

Chapter 2: Basic Settings
Hardware Installation
Page 17
3
Allow the IP Addresses of the devices in the Firewall Server using an ACL. Also, enable
the protocols like HTTP/HTTPS and SSL.
This is required as the device communicates with the cnMaestro Server using web
sockets and for security reasons SSL certificates are exchanged between the device and
the cnMaestro Serve
4
By default, the cnMaestro Server URL will be configured in the devices for
communication with cnMaestro. The default URL is
https://cloud.cambiumnetworks.com
For details on Onboarding cnPilot Wi-Fi routers and the related details, please refer the cnMaestro
User Guide posted in the cnMaestro User Guide.
Performing Speed Test
The cnPilot Home Routers support speed test service and it can be triggered from cnMaestro OnPremises server.
Note
The port that is used for Wi-Fi performance in cnMaestro On-Premises is 18301
(UDP and TCP).
The cnMaestro On-Premises supports the speed test feature from 1.5.1 release onwards. For more
information, refer to the section on Wi-Fi performance in On-Premises User Guide.
Configuring via Voice Commands
cnPilot Home Routers may be configured by navigating the unit’s voice menu. By using your
phone and dialing a sequence of commands, the device may be configured for operation. Each
device configuration section may be accessed by entering a certain operation code, as shown
below.
Table 1 Voice Menu Setting Options
Operation
code
Menu Navigation

Chapter 2: Basic Settings
Hardware Installation
Page 18
1
Network
configuration
1. Pick up phone and press “****” to start IVR
2. Choose “1”.
3. Prompt "Please enter password”, user needs to input password and press “#”
key, if user wants to configure Network.
4. The different options are described below.
The unit reports “Operation Successful” if the changes are successful. The
cnPilot Home Router returns to the prompt “please enter your option …”
5. To quit, enter “*”
1
Network
configuration
1. WAN Port
Connection
Type
1. Pick up phone and press “****” to start IVR
2. Choose “1”, and cnPilot Home Router reports the current WAN
port connection type
3. Prompt "Please enter password”, user needs to input
password and press “#” key, if user wants to configuration
WAN port connection type.
The password in IVR is same as web management interface
login, the user may use phone keypad to enter password
directly
4. For example: WEB login password is “admin”, so the
password in IVR is “admin”. The user may “23646” to access
and then configure the WAN connection port. The unit reports
“Operation Successful” if the password is correct.
5. Prompt "Please enter password”, user needs to input
password and press “#” key if user wants to configuration
WAN port connection type.
6. Choose the new WAN port connection type (1) DHCP or (2)
Static
The unit reports “Operation Successful” if the changes are
successful. The cnPilot Home Router returns to the prompt
“please enter your option …”
7. To quit, enter “*”

Chapter 2: Basic Settings
Hardware Installation
Page 19
2. WAN Port IP
Address
1. Pick up phone and press “****” to start IVR
2. Choose “2”, and cnPilot Home Router reports current WAN
Port IP Address
3. Input the new WAN port IP address and press “#” key:
4. Use “*” to replace “.”, for example user can input
192*168*20*168 to set the new IP address 192.168.20.168
5. Press # key to indicate that you have finished
Report “operation successful” if user operation is ok.
6. To quit, enter “**”.
1
Network
configuration
3. WAN Port
Subnet Mask
1. Pick up phone and press “****” to start IVR
2. Choose “3”, and cnPilot Home Router reports current WAN
port subnet mask
3. Input a new WAN port subnet mask and press # key:
4. Use “*” to replace “.”, user can input 255*255*255*0 to set the
new WAN port subnet mask 255.255.255.0
5. Press “#” key to indicate that you have finished
Report “operation successful” if user operation is ok.
6. To quit, enter “**”.
4. Gateway
1. Pick up phone and press “****” to start IVR
2. Choose “4”, and cnPilot Home Router reports current gateway
3. Input the new gateway and press “#” key:
4. Use “*” to replace “.”, user can input 192*168*20*1 to set the
new gateway 192.168.20.1.
5. Press “#” key to indicate that you have finished.
Report “operation successful” if user operation is ok.
6. To quit, press “**”.

Chapter 2: Basic Settings
Hardware Installation
Page 20
5. DNS
1. Pick up phone and press “****” to start IVR
2. Choose “5”, and cnPilot Home Router reports current DNS
3. Input the new DNS and press # key:
4. Use “*” to replace “.”, user can input 192*168*20*1 to set the
new gateway 192.168.20.1.
5. Press “#” key to indicate that you have finished.
Report “operation successful” if user operation is ok.
6. If you want to quit, press “**”.
2
Phone Port
Configuration
1. Pick up phone and press “****” to start IVR
2. Choose “2”, and cnPilot Home Router reports the current Phone port
connection type
3. Prompt "Please enter password”, user needs to input password and press “#”
key, if user wants to configuration Phone port connection type.
4. Prompt "Please enter password”, user needs to input password and press “#”
key if user wants to configuration WAN port connection type.
5. To quit, enter “*”
3
Factory Reset
1. Pick up phone and press “****” to start IVR
2. Choose “3”, and cnPilot Home Router reports “Factory Reset”
3. Prompt "Please enter password", the method of inputting password is the
same as operation 1.
4. If you want to quit, press “*”.
Prompt “operation successful” if password is right and then cnPilot Home
Router will be in factory default configuration.
5. Press “7” reboot to make changes effective.
4
Reboot
1. Pick up phone and press “****” to start IVR
2. Choose “4”, and cnPilot Home Router reports “Reboot”
3. Prompt "Please enter password", the method of inputting password is same
as operation 1.
4. cnPilot Home Router reboots if password is right and operation is ok.

Chapter 2: Basic Settings
Hardware Installation
Page 21
5
WAN Port
Login
1. Pick up phone and press “****” to start IVR
2. Choose “5”, and cnPilot Home Router reports “WAN Port Login”
3. Prompt "Please enter password", the method of inputting password is same
as operation 1.
4. If user wants to quit, press “*”.
5. Report “operation successful” if user operation is ok.
6
WEB Access
Port
1. Pick up phone and press “****” to start IVR
2. Choose “6”, and cnPilot Home Router reports “ WEB Access Port”
3. Prompt “Please enter password”, the method of inputting password is same
as operation 1.
Report “operation successful” if user operation is ok.
4. Report the current WEB Access Port
5. Set the new WEB access port and press “#” key.
6. Report “operation successful” if user operation is successful.
7
Firmware
Version
1. Pick up phone and press “****” to start IVR
2. Choose “7” and cnPilot Home Router reports the current Firmware version

Chapter 2: Basic Settings
Hardware Installation
Page 22
Note
1. While using Voice menu, press * (star) to return to main menu.
2. If any changes made in the IP assignment mode, the router must be
rebooted for the settings to take effect.
3. While entering an IP address or subnet mask, use "*" (star) to enter "." (Dot)
and use "#" (hash) key to finish entering IP address or subnet mask
For example, to enter the IP address 192.168.20.159 by keypad,
press these keys: 192*168*20*159, use the #(hash) key to indicate
that you have finished entering the IP address.
Use the # (hash) key to indicate that you have finish entering the IP address
or subnet mask
4. While assigning an IP address in Static IP mode, setting the IP address,
subnet mask and default gateway is required to complete the configuration.
If in DHCP mode, please make sure that a DHCP server is available in your
existing broadband connection to which WAN port of cnPilot Home Router
is connected.
5. The default LAN port IP address of cnPilot Home Routers is 192.168.11.1
and this address should not be assigned to the WAN port IP address of
cnPilot Home Router in the same network segment of LAN port.
6. The password can be entered using phone keypad, the mapping table
between number and letters as follows:
To input: D, E, F, d, e, f -- press ‘3’
To input: G, H, I, g, h, i -- press ‘4’
To input: J, K, L, j, k, l -- press ‘5’
To input: M, N, O, m, n, o -- press ‘6’
To input: P, Q, R, S, p, q, r, s -- press ‘7’
To input: T, U, V, t, u, v -- press ‘8’
To input: W, X, Y, Z, w, x, y, z -- press ‘9’
To input all other characters in the administrator password-----press ‘0’,
E.g. password is ‘admin-admin’, press ‘236460263’
Making a Call
Calling phone or extension numbers
To make a phone or extension number call:
• Both ATA and the other VoIP device (i.e., another ATA or other SIP products) must have public
IP addresses, or

Chapter 2: Basic Settings
Page 23
• Both ATA and the other VoIP device (i.e., another ATA or other SIP products) are on the same
LAN using private or public IP addresses, or
• Both ATA and the other VoIP device (i.e., another ATA or other SIP products) can be connected
through a router using a public or private IP addresses.
To make a call, first pick up the analog phone or turn on the speakerphone on the analog phone,
enter the extension or phone number directly, end with #.
Direct IP calls
Direct IP calling allows two phones, that is, an ATA with an analog phone and another VoIP Device,
to talk to each other without a SIP proxy. VoIP calls can be made between two phones if:
• Both ATA and the other VoIP device (i.e., another ATA or other SIP products) have public IP
addresses, or
• Both ATA and the other VoIP device (i.e., another ATA or other SIP products) are on the same
LAN using private or public IP addresses, or
• Both ATA and the other VoIP device (i.e., another ATA or other SIP products) can be connected
through a router using public or private IP addresses.
To make a direct IP call, first pick up the analog phone or turn on the speakerphone on the analog
phone, Input the IP address directly, with the end “#”.
Call Hold
While in conversation, pressing the “*77” to put the remote end on hold, then you will hear the
dial tone and the remote party will hear hold tone at the same time.
Pressing the “*77” again to release the previously hold state and resume the bi-directional media.
Blind Transfer
Assume that call party A and party B are in conversation. Party A wants to Blind Transfer B to C:
Party A dials “*78” to get a dial tone, then dials party C’s number, and then press immediately key
# (or wait for 4 seconds) to dial out.
A can hang up.
Attended Transfer
Assume that call party A and B are in a conversation. A want to Attend Transfer B to C:
Party A dials “*77” to hold the party B, when hear the dial tone, A dials C’s number, then party A
and party C are in conversation.
Party A dials “*78” to transfer to C, then B and C now in conversation.
If the transfer is not completed successfully, then A and B are in conversation again.
Conference
Assume that call party A and B are in a conversation. A want to add C to the conference:
Party A dials “*77” to hold the party B, when hear the dial tone, A dial C’s number, then party A
and party C are in conversation.
Party A dials “*88” to add C, then A and B, for conference.

Chapter 3: Advanced Configuration
Page 24
Chapter 3: Advanced Configuration
This chapter guides users to execute advanced (full) configuration through admin mode operation.
This chapter covers:
• Two-Level Management
• Setting the Time Zone
• Status
• Configuring an Internet Connection
• Network
• Wireless
• SIP
• FXS1
• FXS2
• Security
• Application
• Administration
• System Log
• Logout
• Reboot

Chapter 3: Advanced Configuration
Two-Level Management
Page 25
Two-Level Management
This section explains how to setup a password for an administrator or user and how to adjust
basic and advanced settings.
cnPilot Home Router supports two-level management: administrator and user. For administrator
mode operation, please type “admin/admin” on Username/Password and click Login button to
begin configuration. For user mode operation, please type “user/user” on Username/Password
and click Login button to begin configuration.
Note
It is highly recommended to change the admin/user passwords to non-default values.
Chapter 3: Advanced Configuration
Setting the Time Zone
Page 26
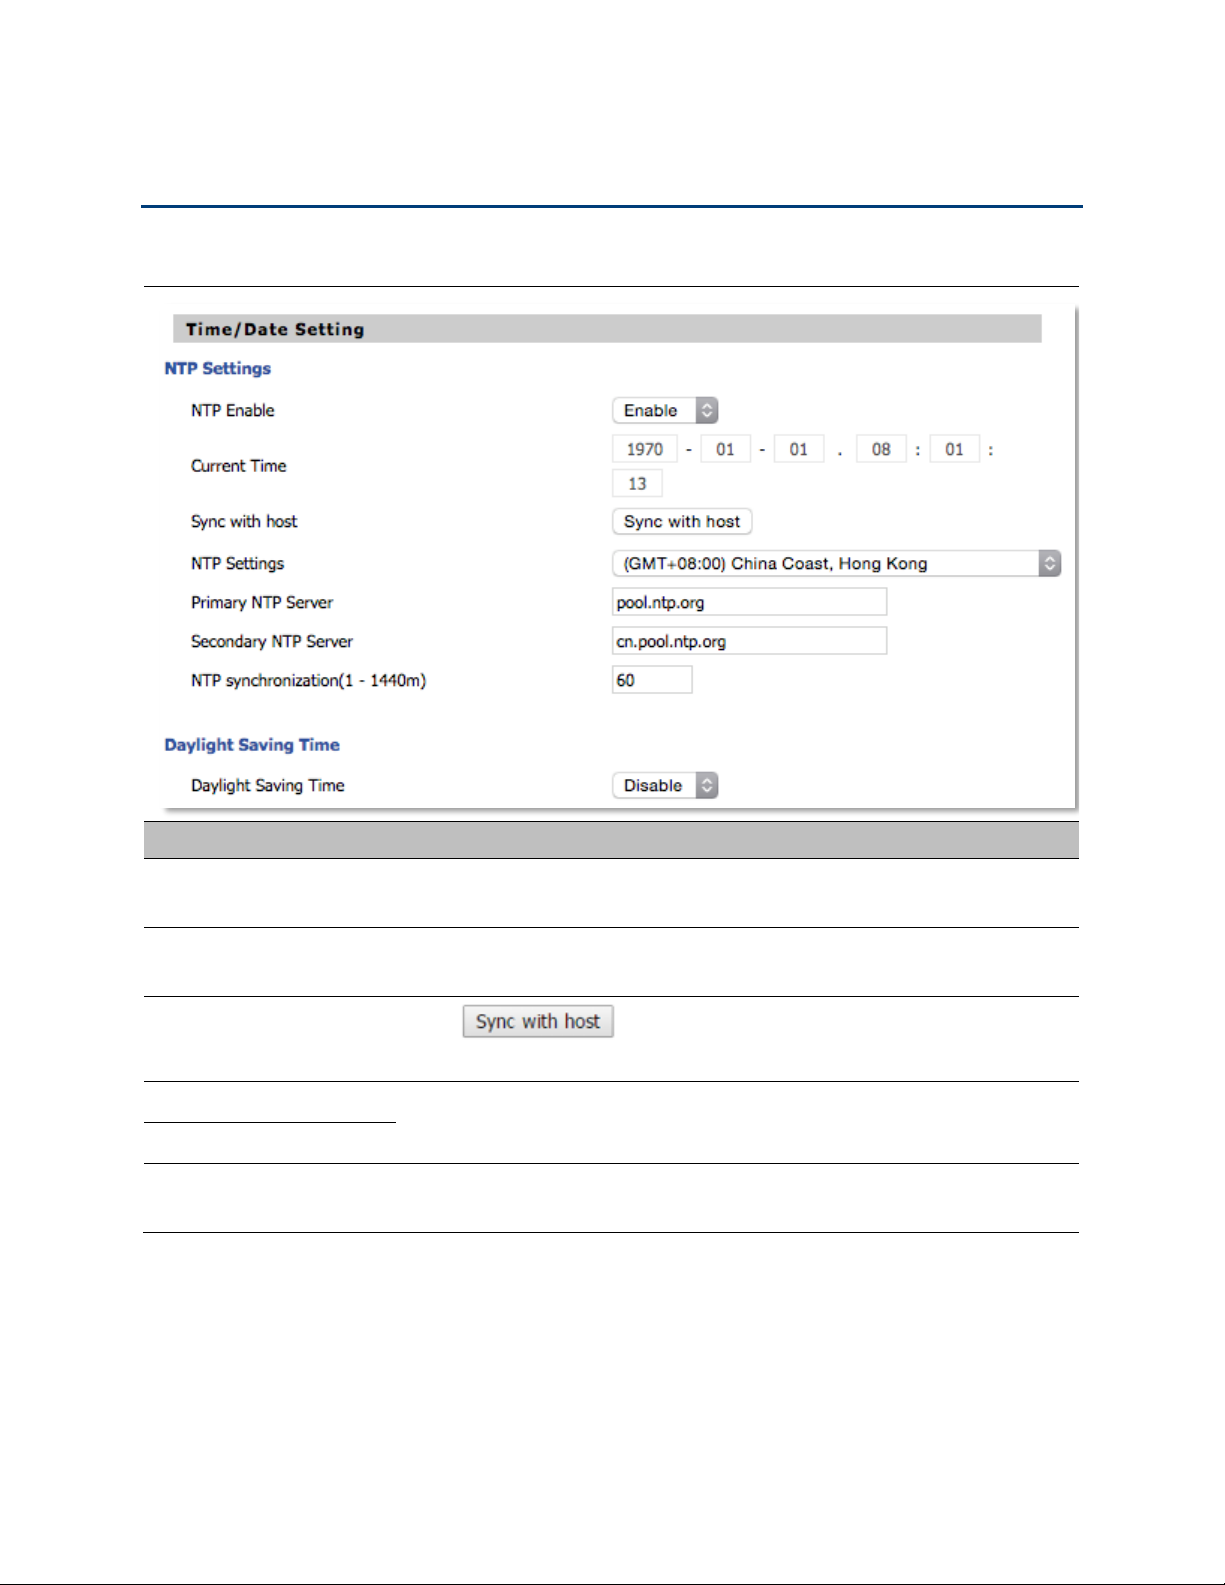
Setting the Time Zone
Table 2 Setting time zone
Field Name
Description
NTP Enable
Enable NTP (Network Time Protocol) to automatically retrieve time
and date settings for the device
Current Time
When NTP Enable is set to “Disable”, manually configure the time
and date via the Current Time parameter
Sync with host
Press button to synchronize the host PC date, time
and time zone.
Primary NTP Server
Primary and secondary NTP server address for clock synchronization.
A valid NTP server must be reachable for full NTP functionality.
Secondary NTP Server
NTP Synchronization
(1- 1440m)
The synchronization period with NTP (1-1440 minutes), default is 60
Chapter 3: Advanced Configuration
Status
Page 27
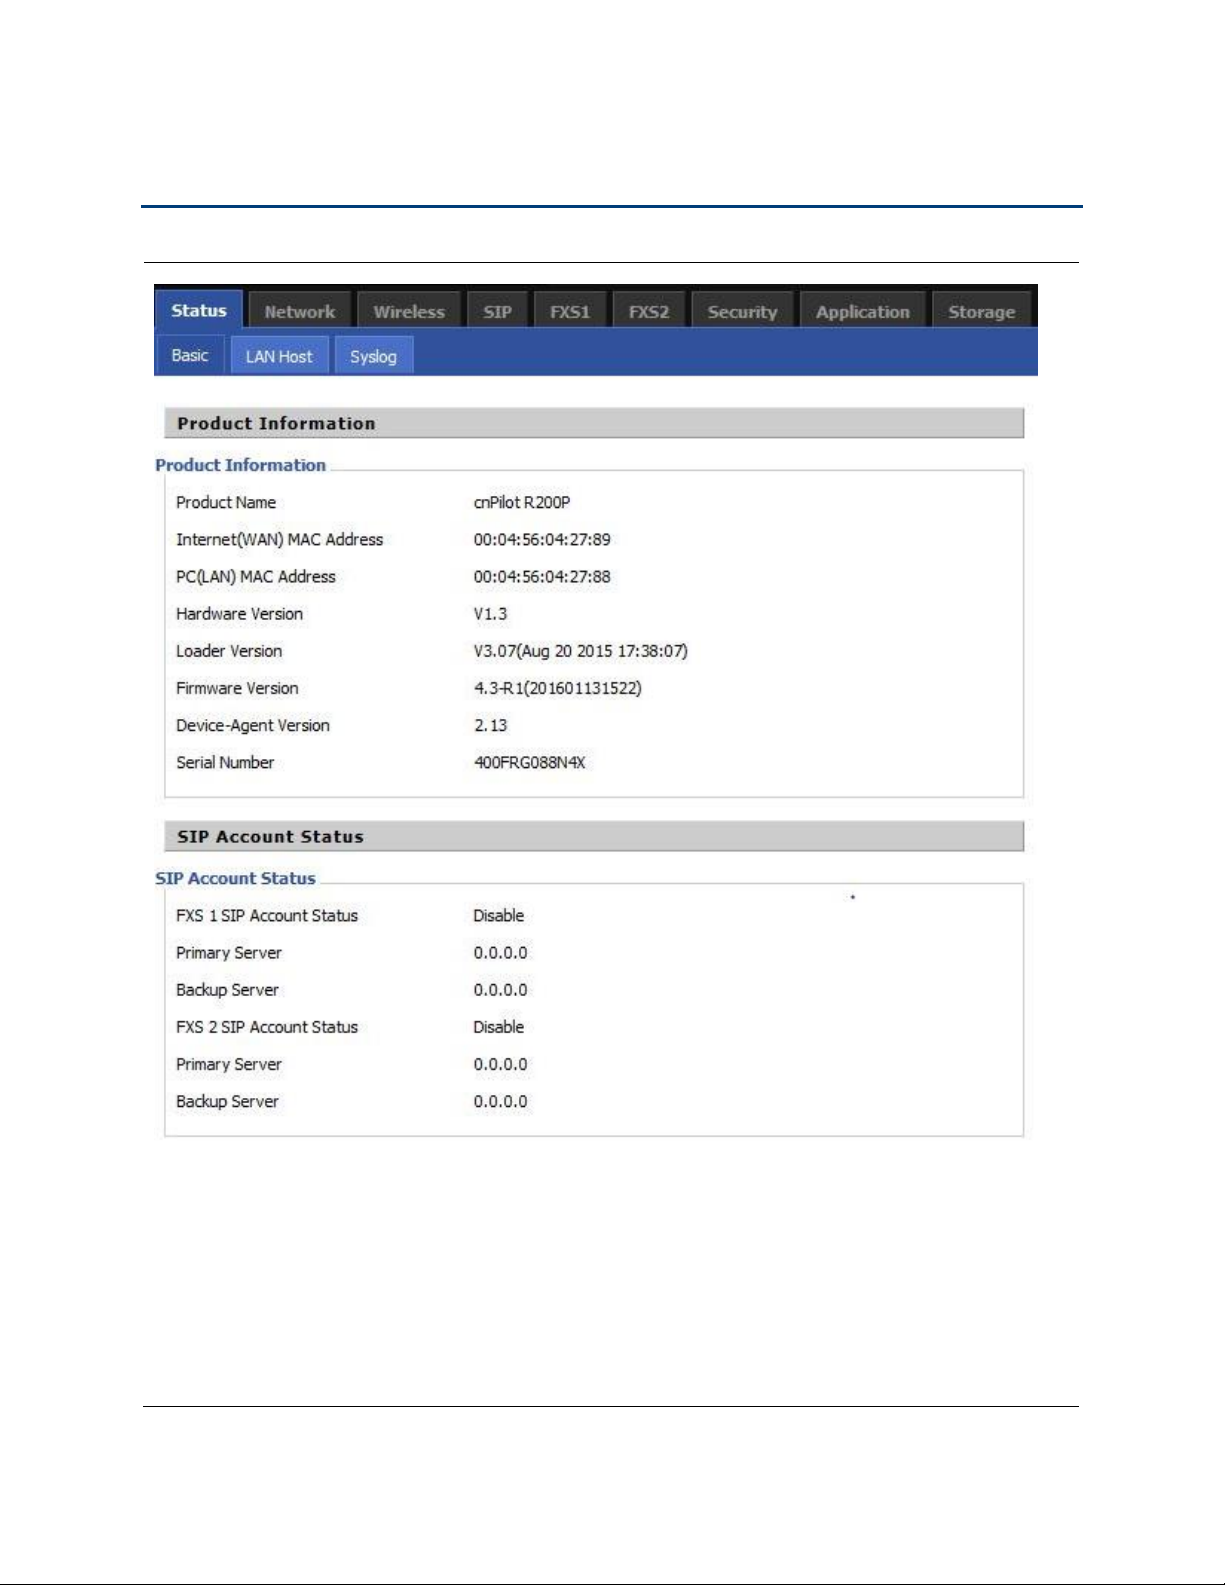
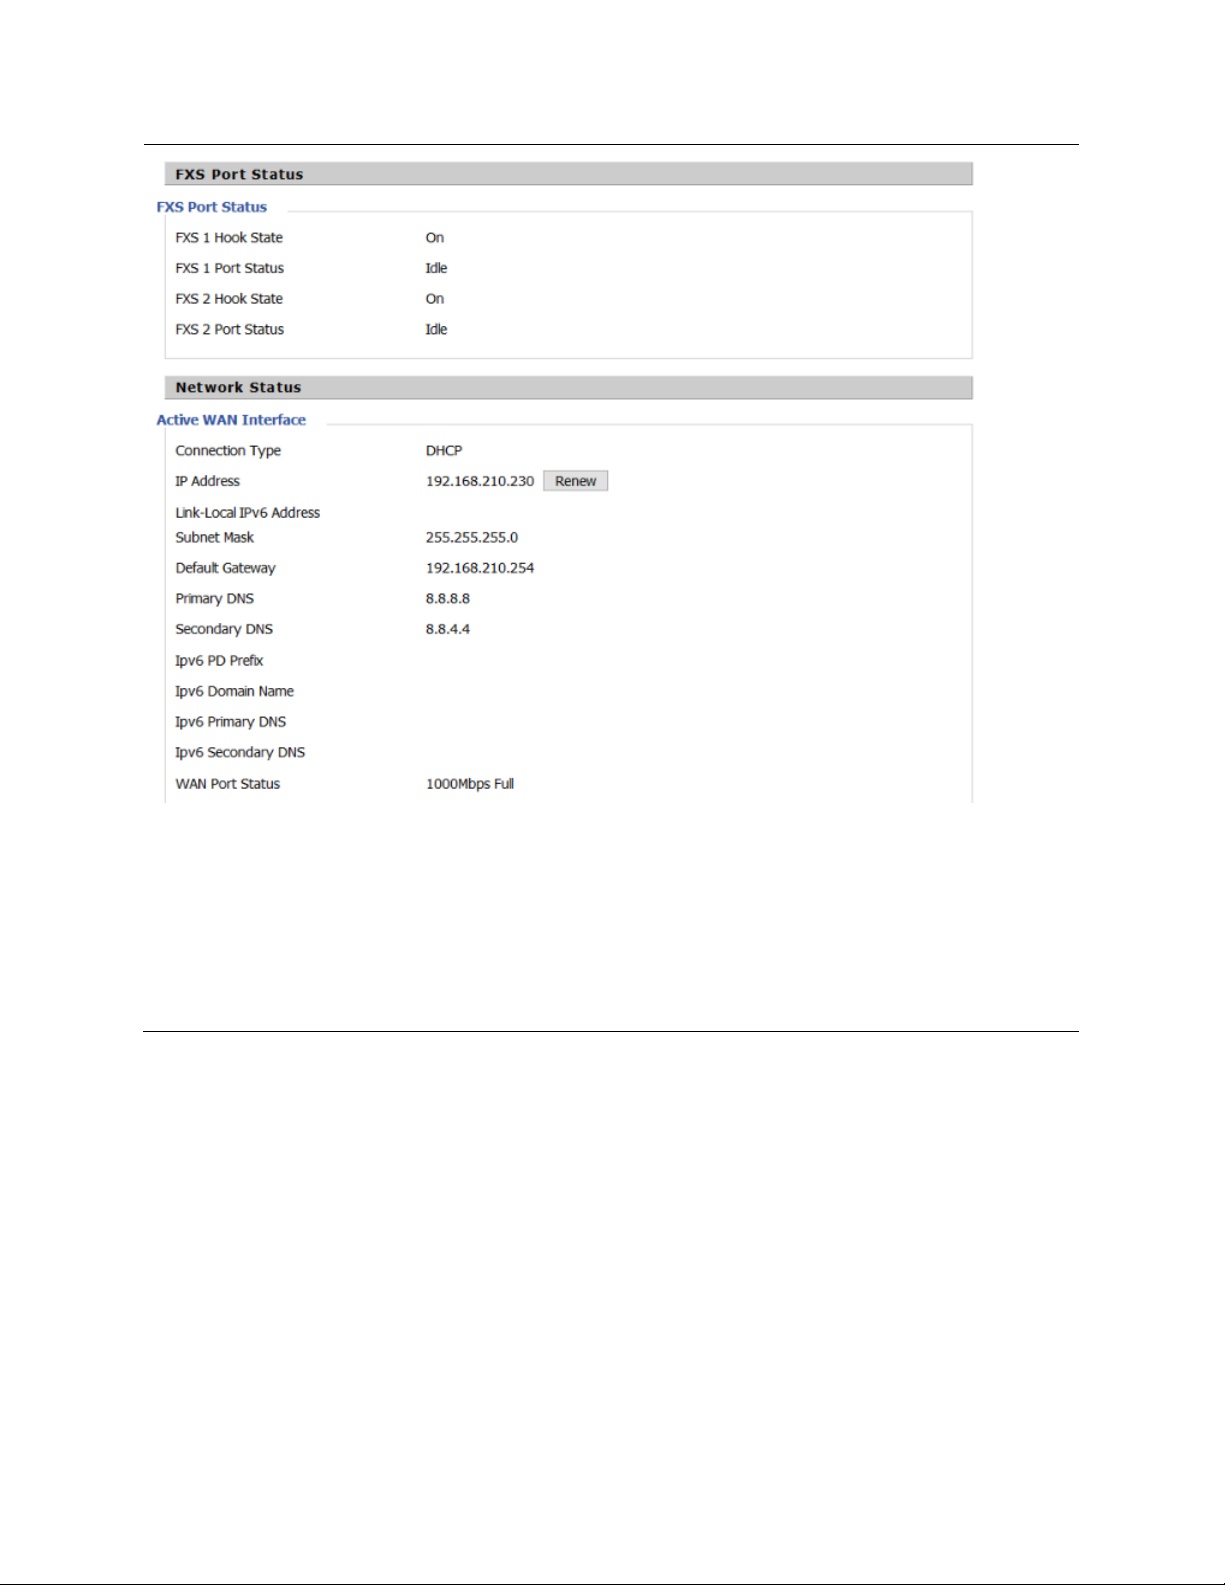
Status
Table 3 Status > Basic Page
Chapter 3: Advanced Configuration
Status
Page 28
 Loading...