


XL Convection Oven
USER GUIDE
Model HE650CO
Four à convexion XL
GUIDE DE L’UTILISATEUR
Modèle HE650CO
Thank you for choosing the Calphalon® XL Convection Oven. All Calphalon small electrics are engineered to deliver premium heating performance.
The Calphalon OPTI-HEATTM System is made up of two parts: premium materials and optimal heat delivery, which work together to offer even heating and create beautiful results.
We know you are excited to get cooking, and we promise to enhance your culinary experience every step of the way. So whether you’re a novice in the kitchen, or an experienced gourmet, the tips and recipes in this guide will help you express your flavor – with your new convection oven.
Table of Contents |
|
Important Safeguards |
page 3 |
Parts and Features |
page 6 |
|
|
Assembling Your XL Convection Oven |
page 8 |
|
|
Operating Your XL Convection Oven |
page 9 |
Cleaning and Care |
page 12 |
Frequently Asked Questions |
page 13 |
Warranty/Customer Service |
page 14 |
Recipes |
page 17 |
Table des matières |
|
|
|
Mise en gardes importantes |
page 23 |
|
|
Pièces et fonctions |
page 27 |
Assemblage du four à convexion XL |
page 30 |
Utilisation du four à convexion XL |
page 30 |
Nettoyage et entretien |
page 34 |
|
|
Foire aux questions |
page 35 |
Garantie/service client |
page 37 |
Recettes |
page 39 |
2
What You Need To Know About
Safety Instructions
Warning and Important Safeguards appearing in this guide are not meant to cover all possible conditions and situations that may occur. Common sense, caution and care must be exercised when maintaining or operating your Calphalon XL Convection Oven. Always contact your dealer, distributor, service agent or manufacturer about problems or conditions you do not understand.
Recognize Safety Symbols, Words, Labels
 WARNING
Warning – Hazards or unsafe practices which COULD result in severe personal injury or death.
 CAUTION
Caution – Hazards or unsafe practices which COULD result in minor personal injury.
IMPORTANT SAFEGUARDS
 WARNING
When using electrical appliances, basic safety precautions should always be followed including the following.
1.Read all instructions
2.Do not touch hot surfaces. Use handles or knobs.
3.To protect against electrical shock do not immerse cord, plugs, or the convection oven in water or other liquid.
4.Close supervision is necessary when any appliance is used by or near children.
3

5.Unplug from outlet when not in use and before cleaning. Allow to cool before putting on or taking off parts.
6.Do not operate any appliance with a damaged cord or plug or after the appliance malfunctions or has been damaged in any manner. Return appliance to the near-
est authorized service facility for examination, repair, or adjustment.
7.The use of accessory attachments not recommended by Calphalon may cause injuries.
8.Do not use outdoors.
9.Do not let cord hang over edge of table or counter, or touch hot surfaces.
10.Do not place on or near a hot gas, electric, or induction burner, or in a heated oven.
11.Extreme caution must be used when moving an appliance containing hot oil or other hot liquids.
12.This product is designed for household use only. Do not use appliance for other than intended purpose.
13.Oversized foods or metal utensils must not be inserted in a convection oven as they may create a fire or risk of electric shock.
14.A fire may occur if the convection oven is covered or touching flammable material, including curtains, draperies, walls, and the like, when in operation. Do not store any item on top of the appliance when in operation.
15.Do not clean the convection oven with metal scouring pads. Pieces can break off the pad and touch electrical parts involving a risk of electric shock.
16.Extreme caution should be exercised when using containers or baking pans constructed from materials other than metal or glass.
17.Do not store any materials, other than manufacturers recommended accessories, in this oven when not in use.
18.Do not place any of the following materials in the oven: paper, cardboard, plastic, or any other flammable materials.
4

19.Do not cover crumb tray or any part of the oven with metal foil. This will cause overheating of the oven.
20.In case of malfunction, the convection oven may be turned off by pressing the “Toast” button if you are toasting in the convection oven, or by turning the “Timer” knob to the “Off” position if you are baking. Once turned off, carefully unplug the electrical cord from the outlet.
21.Do not use the convection oven as a source for heat or for drying.
22.The appliance must only be used in the upright position, never lying down, tilted or upside down.
23.Empty the crumb tray regularly.
Electrical Requirements
Avoid electrical shock. This appliance is equipped with a 3-prong grounding plug for your protection against shock hazard and it should be plugged directly into a properly grounded receptacle. Do not cut or remove the grounding
prong from this plug. If the plug fails to fit into an existing outlet, contact a qualified electrician to update the outlet.
Use proper extension cord. The extension cord must be a grounding-type 3-wire cord. A short power-supply cord should be used to reduce the risk resulting from becoming entangled in or tripping over a longer cord. Extension cords are available and may be used if care is exercised in their use. If an extension cord is used, the marked electrical rating of the cord set or extension cord should be at least as great as the electrical
rating of the appliance and the cord should be arranged so that it will not drape over the countertop or tabletop where it can be pulled on by children or tripped over unintentionally.
SAVE THESE INSTRUCTIONS.
5
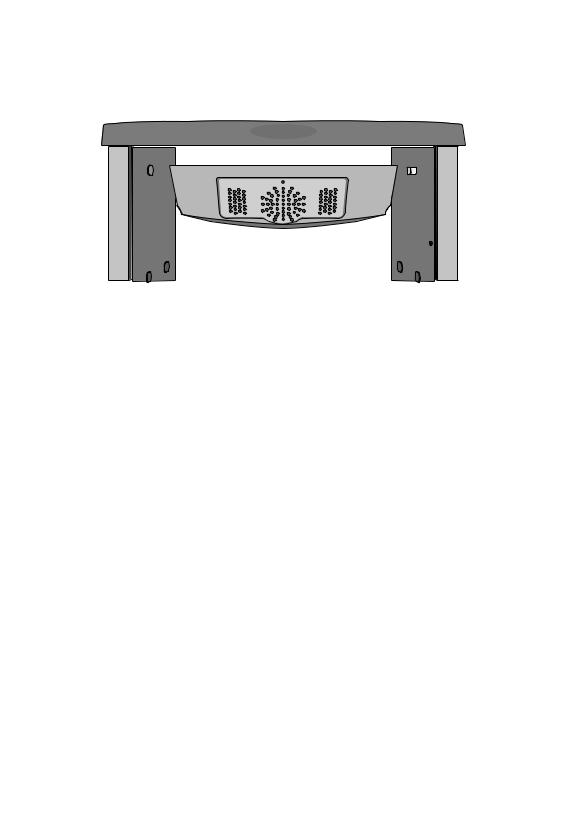
Convection Fan
Heating
Elements
Baking
Rack Slots
|
Toast Shade |
Bake/Broil |
Bake/Broil |
|
|
|
|
||||
|
Selection Knob |
Temperature |
Time Selection |
|
|
|
|
Selection |
Knob |
|
|
|
|
|
Knob |
|
|
|
Toast Start/Stop |
Convection Fan |
|
||
|
Button |
|
Start/Stop Button |
|
|
Parts and Features
OPTI-HEATTM System
Optimal Heat Delivery:
The precision placement of the upper and lower convection oven heating elements, along with the reflective interior and internal sensor, help create even browning.
Premium Materials:
Your convection oven’s high performance bronze nonstick finish is backed with our exclusive 5-year warranty, and it offers flawless release as well as easy clean-up. The nonstick coated heavy gauge 9x13-inch baking pan/broil rack is the ideal size for everyday cooking tasks.
6

Sleek, Contoured Design – The updated, contoured shape of your convection oven complements contemporary kitchen designs, and the sleek stainless steel housing coordinates with other Calphalon countertop appliances.
More Usable Capacity – The generous .7 cubic feet capacity and .49 cubic feet of usable oven space is large enough to accommodate a 9x13-inch baking pan and a 13-inch pizza pan. So, use your convection oven as a second oven (or as an energy-saving smaller oven.)
Elevated, Easy-to-Read Controls – No more straining to see control knobs and settings. Our raised controls illuminate so you know when the convection oven is “On” and “Off” and how much cooking time remains. Choose from a variety of standard oven temperatures, as well as “Warm” and “Broil” settings. And, set the oven to toast from “Light” to “Dark” with the toast shade selector.
Auto-off Timer – For your safety, if the convection oven is operated continuously for more than two hours, it will automatically turn itself off. Or, if you set the convection oven for a designated cook time, it will chime and automatically turn off at the end of that time.
Super-sized Toasting Capability – Toast up to 6 slices of bread, bagel or English muffin halves at once using the convection oven toasting feature. Choose from “Light”, “Medium” and “Dark” settings.
Quality Convection Cooking – Achieve superior browning and evenness of baking and roasting with the convection fan. With the touch of a button, the convection fan is designed to run during the baking cycle, circulating warm air around the food. And when you use convection, you will reduce traditional cooking times, so be sure to check your cooking progress.
Broiling – Not only does the convection oven toast and bake, it also broils. So, with a turn of the control knob, the upper heating element will sear meats or melt the cheese on your garlic bread.
7

Removable Crumb Tray – This handy crumb tray slides out easily so you can discard crumbs quickly.
Baking Pan and Broil Rack – Your convection oven comes complete with a high performance bronze nonstick 9x13-inch baking pan/broil rack. It is designed specifically for use with the oven and the nonstick coating offers easy release, which makes cleaning a breeze.
Assembling Your Convection Oven
1.Carefully remove all the pieces of the convection oven from the packaging and place the oven on counter near a suitable electrical outlet. (See page 5 for information regarding electrical requirements.)
2.Before the first use, wash the removable crumb tray, wire rack, baking pan, and broil rack in hot, soapy water. Rinse and dry thoroughly.
3.Slide wire rack into oven.
4.Slide crumb tray into place through the door at the bottom of the oven.
5.Plug power cord into 3-prong electrical outlet. The oven should be the only appliance operating on the circuit. Continue with steps for “Operating Your Convection Oven”.
8

Operating Your Convection Oven
Toasting
Step 1: Position the oven rack in the lower slot with the rack oriented upwards. Make sure the rack is level and securely in place.
Step 2: Insert bread and close oven door. Place bread (or bagel, English muffin) slices in a single layer on rack. The rack will accommodate six standard slices of bread.
Step 3: Turn the Toast control knob clockwise to the desired level of browning. Choose from “Light”, “Medium” and “Dark” settings.
Step 4: Press the “Toast” button to start the toasting cycle. The toaster will begin toasting. If for any reason you need to stop the toaster, press the “Toast” button again.
Baking
Step 1: Position the oven rack in the lower slot with the rack oriented upwards. Make sure the rack is level and securely in place.
Step 2: Place food in baking pan, put on oven rack and close oven door. Use one of the baking pans that came with the oven, or select one of your own that fits within the oven cavity. Do not use over-sized pans that touch the oven walls or keep the door from closing.
Step 3: Choose heat setting. Turn the temperature control knob to the desired heat setting. Choose from temperature settings ranging from 250˚F to 450˚F.
Step 4: Set the timer. The oven does not begin operating until the timer is set. Once the timer is set, lights around the tem-
9
perature control knob illuminate. To set the timer, turn the timer knob from the “Off” position to the right and select the desired time up to 60 minutes. As the cooking time elapses, the timer knob will tick and gradually turn to 0. A chime will sound when the timer expires.
If you prefer that the oven be on for more than 60 minutes, turn the timer knob from the “Off” position to the left to the “Always On” position. Remember that your oven will automatically shut off after two hours of continuous operation.
Step 5: Do not open the door while cooking. Any time you open the oven door heat escapes and this extends the baking time. Instead, look through the glass door to observe cooking progress.
Convection Baking
Set up and operate the oven as described for Baking, then press the “Convection” button to start the convection fan. Press the “Convection” button again to stop the fan.
NOTE: Reduce traditional cooking times by about 15 percent when you use the convection fan feature.
Broiling
Step 1: Position the oven rack in the middle slot with the rack oriented upwards. Make sure the rack is level and securely in place.
Step 2: Put food on baking pan/broil rack, place on wire oven rack, and close oven door. Use the baking pan/broil rack that came with the oven or select one of your own that fits within the oven cavity. Do not use over-sized pans that touch the oven walls or keep the door from closing.
10
Step 3: Choose “Broil” setting. Turn the temperature control knob to the “Broil” setting.
Step 4: Set the timer. The convection oven does not begin operating until the timer is set. Once the timer is set, lights around the temperature control knob illuminate.
To set the timer, turn the timer knob from the “Off” position to the right and select the desired time up to 60 minutes. As the broil time elapses, the timer knob will tick and gradually turn to 0. A chime will sound when the timer expires.
NOTE: We recommend that you do not operate the convection oven in the “Always On” setting when using the broil feature. Use only the timer feature for broiling.
Warming
Step 1: Position the oven rack in the lower slot with the rack oriented upwards. Make sure the rack is level and securely in place.
Step 2: Put food in baking pan, place on oven rack and close oven door. Use the baking/broiling pan provided with the oven. Or, select one of your own that fits within the oven cavity. Do not use over-sized pans that touch the oven walls or keep the door from closing.
Step 3: Choose “Warm” setting. Turn the temperature control knob to “Warm”.
Step 4: Set the timer. The convection oven does not begin operating until the timer is set. Once the timer is set, lights around the temperature control knob illuminate.
To set the timer, turn the timer knob from the “Off” position to the right and select the desired time up to 60 minutes. As the cooking time elapses, the timer knob will tick and gradually turn to 0. A chime will sound when the timer expires.
11
If you prefer that the oven be on for more than 60 minutes, turn the timer knob from the “Off” position to the left to the “Always On” position. Remember that your convection oven will automatically shut off after two hours of continuous operation.
Auto-off Safety Feature – For your safety, when using the “Always On” mode, the convection oven will automatically shut down after two hours of continuous operation. So if you forget to turn it off, the oven turns itself off.
Cleaning and Care
1.Metal utensils will damage the nonstick coating. Use only nonmetal, temperature resistant utensils, such as wood or nylon.
2.When you are done using the convection oven, be sure to turn it off. If you are using the convection oven for toasting, press the “Toast” button to stop the oven. If you are warming, baking, or broiling, turn the timer control knob to the “Off” position. Once turned off, carefully unplug the electrical cord from the outlet.
3.Allow the convection oven, wire rack, baking pan, and broil rack to cool before cleaning.
4.Wipe the inside and outside of the oven and the oven rack with a clean, damp cloth. Wash the baking pan and broiling rack in hot soapy water. Rinse and dry thoroughly.
 WARNING
5.DO NOT use abrasive cleaners or scouring pads, as they may scratch the nonstick surfaces of the convection oven. DO NOT immerse the convection oven in water.
12

Frequently Asked Questions
My convection oven is not heating; what am I doing wrong? Be sure the power cord is plugged into a suitable outlet. See page 5 for electrical requirements. If you are trying to Toast, make sure that the Toast control knob is set to the desired setting and that you have pressed the “Toast” button. If you are trying to Warm, Bake, or Broil, make sure that the temperature control knob is set to the desired temperature, and that the timer control knob is set to the desired cooking time or to the “Always On” position.
Can I bake a cake in my convection oven?
Yes. Standard cake mixes can be baked in a 9x13-inch baking pan, so they fit perfectly into the convection oven.
Should I place bread slices on a baking pan to toast them? No. Actually, it is best to place slices of bread directly on the wire rack for toasting. This allows the heat to more effectively reach the bread and toast it on both sides.
Does the convection oven have a self-cleaning cycle?
No. The premium nonstick surfaces in your convection oven make clean up a breeze. Simply allow the oven to cool completely and wipe the interior with a clean, damp cloth. Even baked on foods will release from the surface. Use a nylon or polyester mesh cleansing pad to remove heavier food soils.
DO NOT use abrasive cleansers or scouring pads, as they may scratch the surfaces of the oven.
Is it okay to place garlic cheese bread directly on the oven rack? It is better to place cheese bread (or any foods that have an ingredient that will melt) on a baking pan. That way, if the cheese oozes over, the pan will catch the cheese instead of allowing it to fall on the heating elements in the bottom of the oven.
13
If a baking pan fits in the oven, but the door won’t quite close, is it safe to use? No. Baking pans should fit completely inside the oven so the door closes and so that the pan does not touch the sides of the oven. Having this space allows warm air to circulate around the food and cook it properly.
Do I need to preheat the convection oven? For baking or broiling, we recommend that you preheat your convection oven for 5 minutes to allow the oven to fully heat to the selected temperature.
Should I use the same time and temperature for the convection oven as what I use for my regular oven?
Yes, your favorite recipes may be used in the toaster oven following the same times and temperatures.
Warranty/Customer Service
Warranty
If you could take a few moments to register your product, it would greatly expedite any warranty inquiries you may have. Also, with your help, we can continue to develop new products and services that make your culinary experience even better. Please visit www.calphalon.com for complete details.
Limited One Year and Five Year Warranty
Calphalon will repair or replace any XL Convection Oven found defective in material or workmanship within one year of the original purchase. In addition, Calphalon will repair or replace any XL Convection Oven if the nonstick coating in the convection oven or on the baking pan or broil rack is found defective in material or workmanship
14

within five years of original purchase. This warranty applies when the convection oven is put to normal household use and is operated and cared for according to the instructions. Minor imperfections, surface markings as a result of shipping, and slight color variation in the nonstick coating are normal. This excludes damage from misuse or abuse, such as improper cleaning, use of metal utensils, neglect, accident, alteration, fire, theft, or use in a commercial establishment.
This warranty excludes all incidental or consequential damages, except in those states that do not allow the exclusion or limitation of these damages.
If You Have a Warranty Claim
If you believe you have a defective product, send the product, freight pre-paid, with a letter explaining the defect, to this address:
Calphalon Consumer Relations 240 Metty Drive, Suite D
Ann Arbor, MI 48103
All items must be shipped freight pre-paid. Please use a package delivery service able to track and/or insure your return items – we recommend DHL, UPS or FedEx ground service. All appliances confirmed as defective (as described) will be replaced, free of charge, with an identical item or, if the item is no longer available, with a comparable product. Warranty replacements will be processed within 10 to 15 business days after receipt.
Please call Calphalon Consumer Relations at 1-800-809-7267 if you have additional questions.
15
 Loading...