

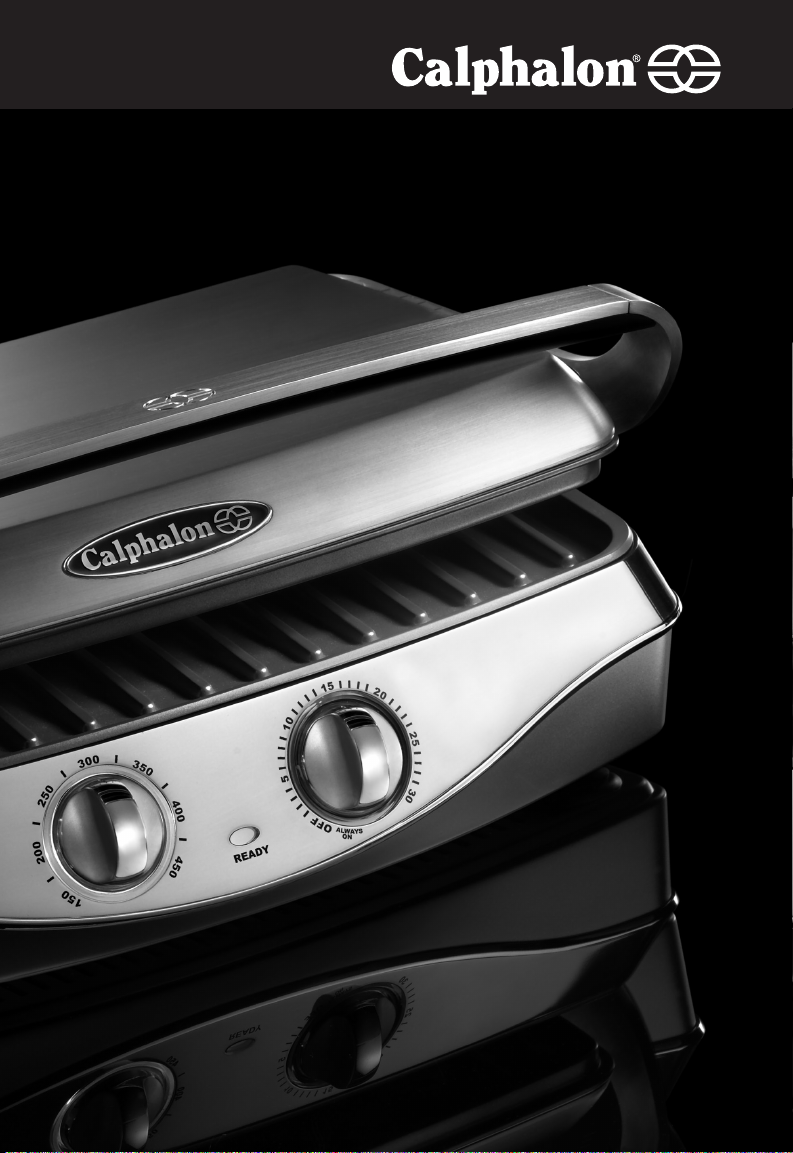
Removable Plate Grill
USER GUIDE
Model HE600CG
Gril à plaques
amovibles
GUIDE DE
L’UTILISATEUR
Modèle HE600CG
Thank you for choosing a Calphalon® removable plate grill.
All Calphalon small electrics are engineered to deliver premium
heating performance.
The Calphalon OPTI-HEATTM System is made up of two
parts: premium materials and optimal heat delivery, which
work together to offer even heating and create beautiful results.
We know you are excited to start grilling, and we promise
to enhance your culinary experience every step of the way.
So whether you’re a novice in the kitchen, or an experienced
gourmet, the tips and recipes in this guide will help you express
your flavor – with sizzling grill sensations.
Table of Contents
Important Safeguards page 3
Parts and Features page 6
Assembling Your Removable Plate Grill page 7
Operating Your Removable Plate Grill page 8
Cleaning and Care page 12
Frequently Asked Questions page 13
Warranty/Customer Service page 14
Recipes page 16
Table des matières
Mise en gardes importantes page 19
Pièces et fonctions page 22
Assemblage de votre gril à plaques amovibles page 24
Utilisation de votre gril à plaques amovibles page 25
Nettoyage et entretien page 30
Foire aux questions page 31
Garantie/service client page 32
Recettes page 35
2
What You Need To Know About
Safety Instructions
Warning and Important Safeguards appearing in this guide
are not meant to cover all possible conditions and situations
that may occur. Common sense, caution and care must be
exercised when maintaining or operating your removable plate
grill. Always contact your dealer, distributor, service agent
or manufacturer about problems or conditions you do not
understand.
Recognize Safety Symbols, Words, Labels
WARNING
Warning – Hazards or unsafe practices which COULD result
in severe personal injury or death.
CAUTION
Caution – Hazards or unsafe practices which COULD result in
minor personal injury.
IMPORTANT SAFEGUARDS
WARNING
When using electrical appliances, basic safety precautions
should always be followed including the following.
1. Read all instructions
2. Do not touch hot surfaces. Use handles or knobs.
3. Always remove the plug from the wall outlet before
removing the grill plates from the removable plate grill.
4. Always allow the grill plates to cool fully before removing
the grill plates from the removable plate grill. Do not
remove the grill plates while the unit is in use.
3

5. To protect against electrical shock do not immerse cord,
plugs, or removable plate grill base in water or other
liquid. Do not install the grill plates into the removable
plate grill base when they are wet.
6. Close supervision is necessary when any appliance is used
by or near children.
7. Unplug from outlet when not in use and before cleaning.
Allow to cool before assembling or removing parts.
8. Do not operate any appliance with a damaged cord
or plug or after the appliance malfunctions or has been
damaged in any manner.
9. The use of accessory attachments not recommended by
Calphalon may cause injuries.
10. Do not use outdoors.
11. The power cord must be fully unwound from the cord wrap
when in use.
12. Do not let cord hang over edge of table or counter, or
touch hot surfaces.
13. Do not place on or near a hot gas, electric, or induction
burner, or in a heated oven.
14. Do not operate the removable plate grill on any surface
that may be affected by heat. Use a heat-resistant mat on
these surfaces.
15. Extreme caution must be used when moving an appliance
containing hot oil or other hot liquids.
16. To disconnect, turn any control to “off”, then remove plug
from wall outlet.
17. This product is designed for household use only. Do not
use appliance for other than intended purpose.
18. This appliance generates heat and may create steam
during use. Take precautions to prevent burns, fires or
other personal injury or property damage.
19. Do not place anything on top of or underneath this product
while it is operating or when it is being stored.
4

20. Do not leave your removable plate grill unattended during
use.
21. Be sure to leave adequate space around the removable
plate grill for air circulation and keep it away from
flammable fabrics and surfaces.
22. When placing food on or removing food from the grill,
prevent the grill from accidentally closing by holding the
handle for the upper grill plate with an oven mitt.
23. The removable plate grill is not intended for use with the
top housing open.
Electrical Requirements
Avoid electrical shock. This appliance is equipped with a
3-prong grounding plug for your protection against shock
hazard and it should be plugged directly into a properly
grounded receptacle. Do not cut or remove the grounding
prong from this plug. If the plug fails to fit into an existing outlet,
contact a qualified electrician to update the outlet.
Use proper extension cord. The extension cord must be a
grounding-type 3-wire cord. A short power-supply cord should
be used to reduce the risk resulting from becoming entangled in
or tripping over a longer cord. Extension cords are available
and may be used if care is exercised in their use. If an
extension cord is used, the marked electrical rating of the cord
set or extension cord should be at least as great as the electrical
rating of the appliance and the cord should be arranged so that
it will not drape over the countertop or tabletop where it can be
pulled on by children or tripped over unintentionally.
SAVE THESE INSTRUCTIONS.
5

Parts and Features
OPTI-HEATTM System
Optimal Heat Delivery:
The precision placement of the grill’s heating element, along
with the internal sensor, help maintain even heat across the
cooking surface.
Premium Materials:
Your grill’s high performance bronze nonstick finish is backed
with our exclusive 5-year warranty, and it offers flawless release
as well as easy clean-up. The removable plates are made from
heavy-gauge cast aluminum.
Sleek, Contoured Design – The updated, contoured shape
of your removable plate grill complements contemporary kitchen
designs, and the sleek stainless steel housing coordinates with
other Calphalon countertop appliances.
Extra-Large Grill Capacity – Cook for a few or for a crowd
with the extra large grill capacity. Sized to fit 6 burgers, 6 (4ounce) chicken breasts, or 4 Panini, the grill is ready for action
year round. And, since the grill cooks food from both sides at
the same time, it grills quickly and efficiently.
Elevated, Easy-to-Read Controls – Our raised controls
illuminate so you know when the grill is “On” and “Off” and
how much cooking time remains. Choose from a variety of
temperatures to toast your favorite Panini or sear a juicy steak.
Select “Always On” for continuous grilling or set the timer for a
designated cooking time.
Adjustable Grill Height – Adjust the grill for various
thicknesses of food. Slide the height selector into the desired
position, so you can accommodate everything from thick steaks
to more delicate grilled cheese sandwiches.
6

Removable Dishwasher-safe Grill Plates – Take the
hassle out of clean up by placing the removable grill plates in
the dishwasher.
Internal Drip Tray – As the grill sears the outside of meats
and poultry, excess fat drains away into the handy, hidden drip
tray. After your removable plate grill cools, simply slide the tray
out and dispose of the drippings after each use. The tray can
be placed in the dishwasher for clean up.
Upright Storage – Save space in the kitchen with the
convenient upright storage of the removable plate grill. Just
empty and clean the drip tray, close the grill, move the height
selector into the lock position, and tuck the grill away standing
upright for space-saving convenience.
Assembling Your Removable Plate Grill
1. Carefully remove all the pieces of the removable plate
grill from the packaging and place on counter near a
suitable electrical outlet. (See page 5 for information
regarding electrical requirements.) Remove all packaging
materials, including any stickers or tags, from the grill
before the first use.
2. Before the first use, wash the removable grill plates and
drip tray in hot, soapy water. Rinse and dry thoroughly.
3. Attach grill plates to removable plate grill base by
snapping into place. Insert drip tray.
4. Plug power cord into 3-prong electrical outlet and continue
with steps for “Operating Your Removable Plate Grill”.
7

Operating Your Removable Plate Grill
WARNING
NEVER PLUG THE CORD INTO THE WALL OUTLET WITH THE
GRILL PLATES REMOVED FROM THE REMOVABLE PLATE GRILL.
Setting The Controls
Step 1: Choose the heat setting. Turn the control knob
clockwise to the desired heat setting. Consider the following
general tips for selecting a heat setting.
200˚F – Use this setting to keep grilled foods warm until
serving.
300˚F – Choose this setting for toasting breads or
sandwiches such as grilled cheese and other Panini-style
sandwiches.
400˚F – This setting is ideal for grilled burgers, pork
chops and chicken breasts.
450˚F – Try this setting for searing the outside of meats,
such as steaks, when you want the outside brown, while
the inside stays juicy and pink.
Step 2: Preheat the grill. The removable plate grill does
not begin operating until the timer is set. To set the timer, turn
the knob clockwise from the “Off” position to the desired
number of minutes or counterclockwise to the “Always On”
position. Preheat the grill for 5 minutes before inserting food.
You will know the grill is preheated when the green “Ready”
light comes on.
8

Step 3: Place food on preheated grill. Carefully open
the grill using the handle and a pot holder, avoiding contact
with the hot grill plates. Place the food on the lower grill plate.
Carefully close the grill, sandwiching the food in between
the hot grill plates. See the Grilling Guide on page 10 for
suggested grilling times.
Step 4: Set the timer. To set the timer, turn the knob
clockwise to the desired number of minutes or counterclockwise
to “Always On”. The “Always On” feature lets you operate
your grill for longer cooking times without needing to watch or
reset the timer. If you select a cooking time, as the grilling time
elapses, the timer knob will tick and gradually count down to 0.
A bell will sound when the timer reaches zero and the grill will
stop heating. To cook another round, set the timer again.
Step 5: Remove food from grill. When the food is done,
lift the handle and carefully remove it from the grill using a
heat-resistant, non-metal utensil (being careful not to
scratch the grill plates with a metal utensil). Check the internal
temperature of meats and poultry to make sure they are at the
desired level of doneness. Unplug the cord from the outlet when
finished cooking. Allow to cool before cleaning or removing the
grill plates.
9
Grilling Guide
Food Cooking Time Temperature
Beef steaks
Thin 2 to 3 minutes 450˚F
Thick 5 to 7 minutes 450˚F
Ground meat patties 5 to 6 minutes 400˚F
Pork chops 5 to 7 minutes 400˚F
Lamb chops 3 to 4 minutes 400˚F
Chicken
Boneless breast half 5 to 8 minutes 400˚F
Thigh 5 to 6 minutes 400˚F
Sandwich, Panini,
Focaccia 2 to 5 minutes 300˚F
Fish fillets 3 to 4 minutes 400˚F
Shrimp 2 to 3 minutes 400˚F
Note: Cooking times will vary depending on the size and
thickness of the food. Adjust cooking times, as needed, to make
sure foods are thoroughly cooked.
Removing the Grill Plates
WARNING
ALWAYS REMOVE THE PLUG FROM THE WALL OUTLET
BEFORE REMOVING THE GRILL PLATES FROM THE
REMOVABLE PLATE GRILL.
10

ALWAYS ALLOW THE GRILL PLATES TO COOL FULLY BEFORE
REMOVING THE GRILL PLATES FROM THE REMOVABLE PLATE
GRILL. DO NOT REMOVE THE GRILL PLATES WHILE THE UNIT
IS IN USE.
To remove the grill plates for cleaning:
1. Unplug the cord from the outlet.
2. Allow the removable plate grill to fully cool down after use.
3. Hold the top grill plate and press the “Release” button on
the right side of the top housing. Set the top plate aside.
4. Press the “Release” button on the right side of the lower
housing. Remove the lower grill plate and set it aside.
Inserting the Grill Plates
WARNING
NEVER PLUG THE CORD INTO THE WALL OUTLET WITH THE
GRILL PLATES REMOVED FROM THE REMOVABLE PLATE GRILL.
To insert the grill plates for use or storage:
1. Select the bottom grill plate, with the slotted hole, and
insert it into the catches on the bottom grill housing. The
slotted hole must be aligned in the back of the grill.
2. Press the front of the grill plate down, locking it in place in
the lower housing.
3. Select the top grill plate, without the slotted hole, and insert
it into the catches on the upper grill housing.
4. Press the front of the grill plate, locking it in place in the
upper housing.
11

Using the Adjustable Grill Height Selector
WARNING
THE ADJUSTABLE GRILL HEIGHT SELECTOR MAY BE HOT
WHILE THE REMOVABLE PLATE GRILL IS IN USE. USE CARE
WHEN ADJUSTING IT.
Your Calphalon Removable Plate Grill includes an adjustable
height feature that lets you control how much pressure is placed
on delicate foods like grilled cheese sandwiches. It provides
a stop for the upper housing which limits how far it will close.
And, it allows you to set the grill to heat your food from the
bottom only, if desired.
1. Preheat the grill with the top housing fully closed.
2. Open the grill and place your food on the lower plate.
3. Set the adjustable height to the desired height and
carefully close the grill, lowering the top housing until it
rests on the slider.
4. If you need to adjust the height, open the grill, reset the
slider, and carefully close the grill again.
Cleaning and Care
1. Metal utensils may damage the nonstick coating. Use only nonmetal, temperature resistant utensils, such as wood or nylon.
2. When you are done using the removable plate grill, turn it
“Off” and carefully unplug it.
3. Allow the removable plate grill to cool and then remove
the grill plates and the drip tray.
4. Discard drippings from the drip tray. For everyday
clean-up of the drip tray and grill plates, use hot sudsy
water and a dish cloth. For grease build-up on the grill
plate nonstick surface, clean with a Dobie® pad and a
nonabrasive cleaner such as Soft Scrub® to remove any
12
food residue. Rinse and dry thoroughly. You can also
 Loading...