


813Gv2 GigaHub Quick Start/Safety and
Regulatory Statements Guide
This document provides general installation practices for the GigaHub model 813Gv2.
This document also provides guidance for site preparation, installation, basic troubleshooting, and safety/Regulatory statements.
Scan the QR code at left to access the installation instructions for this product. All product documentation is available online from the Calix Resource Center (support.calix.com).
Package Contents
GigaHub - Model 813Gv2
Power Adapter (Optional - may ship separately or with UPS*) Tabletop Mounting Stand
GigaHub Quick Start Guide (this document)
Product identification labels with login credentials (x2)
* NOTE: For instructions on installing the optional UPS, refer to the GigaHub Installation Guide.
P/N 220-01066 Rev 10 |
www.calix.com |
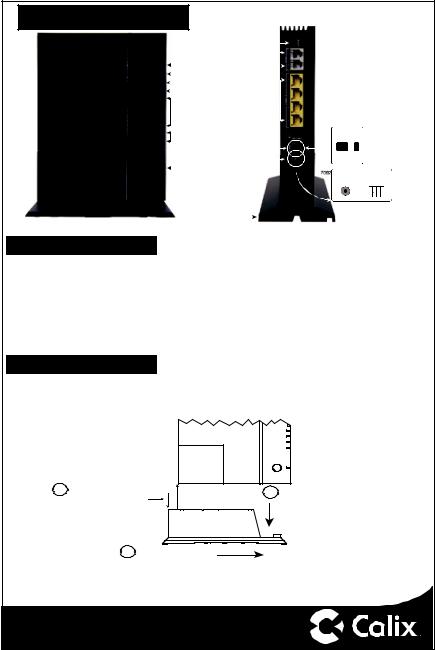
A Quick Look
|
|
|
|
|
|
|
|
|
|
Reset Button |
|
|
|
|
|
|
|
|
|
|
|
|
|
|
|
|
|
|
|||
|
|
|
|
|
|
|
|
|
|
|
|
|
|
|
|
|
|
|
|
|
|
|
|
|
|
||||||
POWER |
|
|
Power |
Telephone Ports (x2) |
|
|
|
|
|
|
|
|
|
|
|
|
|
|
|
|
|
||||||||||
|
|
|
|
|
|
|
|
|
|
|
|
|
|
|
|
|
|||||||||||||||
|
|
|
(RJ-11) |
|
|
|
|
|
|
|
|
|
|
|
|
||||||||||||||||
BROADBAND |
|
|
|
|
Broadband |
|
|
|
|
|
|
|
|
|
|
|
|
|
|||||||||||||
|
|
|
|
|
|
|
|
|
|
|
|
|
|
|
|
|
|
|
|
|
|
|
|
|
|
||||||
SERVICE |
|
|
|
|
|
|
Service |
|
|
|
|
|
|
|
|
|
|
|
|
|
|
|
|
|
|
|
|
|
|
||
WiFi 2.4 GHz |
|
|
|
|
2.4 GHz Wi-Fi |
|
|
|
|
|
|
|
|
|
|
|
|
||||||||||||||
ETHERNET 1 |
|
|
|
Ethernet Ports (x4) |
|
|
|
|
|
|
|
|
|
|
|
|
|
|
|
||||||||||||
ETHERNET 2 |
|
|
|
|
(RJ-45) |
|
|
|
|
|
|
|
|
|
|
|
|
||||||||||||||
|
|
Ethernet (1-4) |
|
|
|
|
|
|
|
|
|
|
|
|
|||||||||||||||||
ETHERNET 3 |
|
|
|
|
|
|
|
|
|
|
|
|
|
|
|||||||||||||||||
|
|
|
|
|
|
|
|
|
|
|
|
|
|
||||||||||||||||||
|
|
|
|
|
|
|
|
|
|
|
|
|
|
|
|
|
|
|
|
|
|
|
|
|
|||||||
ETHERNET 4 |
|
|
|
|
|
|
|
|
|
|
|
|
|
|
|
|
|
|
|
|
|
|
|
|
|
||||||
PHONE 1 |
|
|
|
|
|
|
|
|
|
|
|
|
|
|
|
|
|
Model 813Gv2-2 |
|
|
|
|
|||||||||
PHONE 2 |
|
Telephone (1-2) |
|
|
|
|
|
|
Only |
|
|
|
|
||||||||||||||||||
|
|
|
|
|
|
|
|
|
|
|
|
|
|||||||||||||||||||
|
|
|
|
|
|
|
|
|
|
Power On/Off |
|
|
|
|
|
|
|
|
|
|
|
|
|||||||||
|
USB |
|
|
|
|
|
|
|
|
(Toggle Switch) |
|
|
|
|
|
|
|
|
|
|
|
|
|
||||||||
|
|
|
|
|
|
|
|
|
|
Power Adapter Port |
|
|
|
|
|
|
|
|
|
OFF ON |
|
|
|
|
|||||||
|
|
|
|
|
|
|
|
|
|
|
|
|
|
|
|
|
|
|
|
|
|||||||||||
|
|
|
|
|
|
|
|
|
|
|
|
|
|
|
|
|
|
|
|
|
|
|
|
|
|
|
|
|
|
||
WPS |
|
|
|
WPS |
|
|
|
|
|
|
|
|
|
|
|
|
|
|
|
|
|
|
|
|
|
|
|||||
|
|
|
|
|
|
|
|
|
|
|
|
|
|
|
|
|
|
|
|
|
|
|
|
|
|
|
|
|
|
|
|
|
|
|
|
|
|
|
|
|
|
|
|
|
|
|
|
|
|
|
|
|
|
|
|
|
Model 813Gv2-2 Model 813Gv2-1 |
||||||
|
|
|
|
|
|
|
|
|
|
|
|
|
|
|
|
|
|
|
|
|
|
|
|
|
Barrel Power |
8-Pin Power |
|||||
|
|
|
|
|
|
|
|
|
|
|
|
|
|
|
|
|
|
|
|
|
|
|
|
|
|
Connector |
Connector |
||||
|
|
|
|
|
|
|
7616 |
|
|
|
|
|
|
|
|
|
|
|
|
|
|
|
|
|
|
|
|
|
|
||
|
|
|
|
|
|
|
|
|
|
|
|
|
|
|
|
|
|
|
|
|
|
|
|
|
|
|
|
|
|||
|
|
|
|
|
|
|
|
|
|
|
|
|
|
|
|
|
|
|
|
|
|
|
|
|
|
|
|
|
|||
|
|
|
|
|
|
|
|
|
Tabletop Stand |
|
|
|
|
|
|
|
|
|
|
|
|
|
|
||||||||
|
|
|
|
|
|
|
|
|
|
|
|
|
|
|
|
|
|
|
|
|
|
||||||||||
Installation Variables
Before installing the 813Gv2 GigaHub, consider what additional services may be implemented. Various Ethernet and telephone ports are available on the back of the unit which may or may not be used. Prior to determining the unit’s final location, you need to account for the following variables:
•Where will the telephone lines be routed?
•Where will the Ethernet cables be routed?
•What type of building material is used in the home? Make sure you have the appropriate drills, drill bits and fasteners for routing subscriber services and/or power cables as they pass through walls and the like.
Tabletop Mounting
Calix GigaHubs can be mounted on a tabletop in a “tower” configuration using the tabletop stand shipped with the product.
Assemble the tabletop stand and the GigaHub as shown in the following diagram.
ETHERNET 2 |
ETHERNET 1 |
PHONE 1 |
PHONE 2 |
USB |
WPS |
1 |
Line-up GigaHub and |
|
Tabletop Stand as shown. |
Allow a 9/16” offset between the bottom corner of the GigaHub and the top edge of the Tabletop Stand
3Push stand to the right while pulling the GigaHub to the left until locked into place
2Slide GigaHub down onto Tabletop Stand until flush
7077
— 2 —

Connecting the Equipment
In order to facilitate table-top mounting of the 813Gv2 GigaHub, do the following:
1.Remove the 813Gv2 GigaHub from its packaging and inventory all parts.
2.Remove the fiber access cover and set aside temporarily.
3.Plug in the power adapter to an available wall socket and attach the other end to the GigaHub’s power port.
4.Attach the fiber pigtail to the bulkhead fitting on the GigaHub until it snaps into place. Re-install the fiber access cover.
5.Push the ON/OFF switch (model 813Gv2-2 only) to ON and allow the GigaHub to boot up (about 3 minutes).
NOTE: To ensure proper airflow around the unit, do not block the sides of the GigaHub. |
||||||
|
|
|
|
|
|
WAN Interface |
Reset |
|
|
|
|
|
(Fiber) |
|
|
|
|
|
|
|
1 |
2 |
1 |
2 |
3 |
4 |
ON/OFF POWER |
PHONE |
|
ETHERNET |
|
|
||
7742 |
|
|
|
|
|
|
|
|
|
|
|
|
Power Adapter (110/220 VAC) |
|
|
Ethernet Cable |
|
|
||
Connecting Outside Services
Subscriber voice, IP video and data services are attached to the rear of the GigaHub.
1.Locate the telephone, video, and data cables coming from the home.
2.Connect the incoming telephone lines to the RJ-11 connectors on the rear of the GigaHub.
3.Connect CAT5 or better to the LAN Ethernet (RJ-45) ports for direct-attached devices.
4.Secure all subscriber service wiring as appropriate.
Default Device Settings
Inserted inside the shipping carton of each 813Gv2 GigaHub, the inventory label (x2) provides necessary product information. This information may be attached to a work order or applied to the exterior of the device for future reference.
•Serial Number of the 813Gv2 GigaHub
•ONU MAC address
•Default Wi-Fi security type
•Wi-Fi security key (WPA Key)
•Default IP address of the home gateway router (needed at initial turn-up)
•Default login credentials (User Name/Password)
— 3 —
Getting Started
To turn up network services on the 813Gv2 GigaHub, two options are available:
1.Connect an active optical fiber to the 813Gv2 GigaHub’s bulkhead fitting, power the unit on, and allow the network OLT (for example, a Calix E7) to discover the device as an unprovisioned ONT. At the OLT, the network administrator will provision the GigaHub and provide operational parameters remotely.
2.With the fiber disconnected, access the Smart Activate or Voice Activate application included with the 813Gv2 and then enter the Registration ID into the application. With the Registration ID having previously been entered at the OLT, once the fiber is connected, the GigaHub will come up as a provisioned ONT based on the pre-provisioning that was completed for that Registration ID.
Home Gateway Settings
To turn up home gateway services on the GigaHub, complete the following tasks:
1.Connect your PC to any LAN Ethernet port on the GigaHub using a standard Ethernet cable.
2.Open a browser and enter the IP address of the GigaHubs Embedded Web Interface (EWI): http://192.168.1.1.
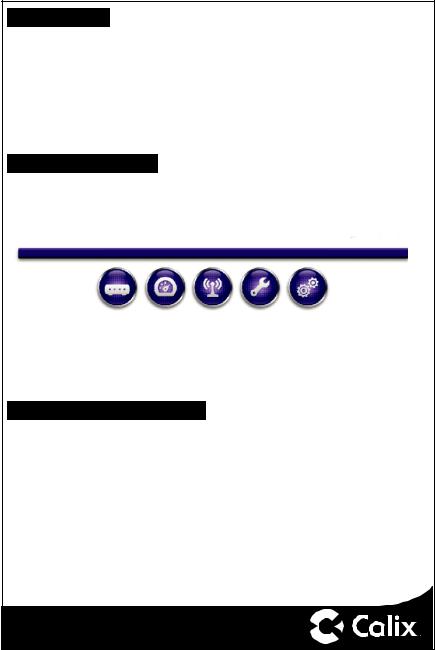
Home |
Help |
Logon |
About |
Status |
Quick Start |
Wireless |
Utilities |
Advanced |
3.Enter the credentials provided on the label shipped inside the GigaHub box.
4.Navigate to the Quick Start Menu and set-up the following:
a.Choose how to connect to the Internet
b.Configure your 2.4 GHz Wireless Network
c.Set the local time zone (may be automatically set by network)
For more information about device provisioning from the EWI, refer to the GigaHub User’s Guide.
Frequently Asked Questions
Q: How do I reset the device without having to unplug the unit?
A: If the RESET button is depressed for less than 5 seconds, it resets the unit using the current configuration settings.
Q: How do I reset the device back to factory settings?
A: Pressing the RESET button on the back of the unit for at least 5 seconds, or access the “Restore Defaults” reset button located in the “Utilities” section of the Embedded Web Interface.
Q: How does the WPS button work?
A: Pressing the WPS button broadcasts the GigaHubs credentials (network password) to other WPS capable devices for a period of 2 minutes, allowing these devices to gain access to the wireless network.
Q: Is the Wireless radio on by Default? A: Yes.
— 4 —
 Loading...