

Page 1

S
CALE
M
ASTER
USER’S
GUIDE
®
II
PC I
NTERFACE SOFTWARE
INSTALLATION and USER’S GUIDE
Page 2

User’s Guide — 1
TABLE OF CONTENTS
INTRODUCTION ....................................................................................2
CONNECTING THE SCALE MASTER II TO YOUR PC.......................3
INSTALLING THE PC INTERFACE SOFTWARE .................................4
Windows (9x/NT/2000/ME/XP) Installation........................................4
Windows 3.1 Installation..................................................................10
DOS Installation...............................................................................10
SENDING V ALUES T O Y OUR SPREADSHEET
APPLICATION PROGRAM .................................................................13
Sending Areas or Volumes ..............................................................15
Sending Counts ...............................................................................17
Sending Values Stored in Memory ..................................................17
EXITING AND REACTIVATING THE PROGRAM...............................18
Exiting SM2 CONNECT Interface Program.....................................18
Reactivating SM2 CONNECT Interface Program............................18
PC INTERFACE COMMANDS ............................................................19
TROUBLESHOOTING .........................................................................20
HYPERTERMINAL ..............................................................................22
LICENSE AND LIMITED WARRANTY................................................24
LEGAL NOTES....................................................................................27
LOOKING FOR NEW IDEAS ..............................................................27
Page 3

2 — Scale Master®II – PC Interface
INTRODUCTION
The
Scale Master®II
PC Interface Kit lets you transfer values from
your
Scale Master II (SMII)
digital plan measuring system directly to
your favorite application program (e.g., Excel spreadsheet or
estimating software). This saves you time while reducing costly
estimating errors!
KIT INCLUDES: interface cable, USB adapter and software
REQUIREMENTS:
• PC or compatible with CD-ROM drive
• DOS, Windows 3.1/9x/NT/2000/ME/XP
• One 9-pin serial port or USB port
• Windows: 1.6MB RAM for installation;
40K for software operation
• DOS: 170K RAM for installation;
2K for software operation
Page 4

User’s Guide — 3
CONNECTING THE
SCALE MASTER II
TO YOUR PC
Follow the instructions below to connect your
Scale Master II (SMII)
Digital Plan Measuring System to your PC:
1. If using the serial port turn your computer off. If using the USB port
go to 1b.
1a. Serial Port — Plug the 9-pin side of the black interface cable
(included in your kit) into the serial port on the back of your
computer’s hard drive. Tighten the screws. If necessary, attach
an adapter.* Turn your computer on.
1b. USB Port — Plug the USB adapter into the USB port on your
computer. Make sure the other end of the USB adapter cable is
attached to the 9-pin serial interface cable.**
2. Plug the other end of the serial interface cable into the
Scale Master
II
and switch the
SMII
on (the On/Off switch is located above the
cable). If the
SMII
display does not show zero (0), press the red
[RESET] key to clear the display.
3. Proceed to page 4, “Installing the PC Interface Software,” to install
the PC Interface program.
* Serial ports are either 9-pin or 25-pin. The SMII requires a 9-pin port
on your PC. If your computer has a 25-pin port, you must use a
serial port adapter (available at most stores carrying computer
products).
** USB Connection is not supported by DOS, Windows 3.X, or
Windows 95.
Cable Length
The interface cable measures 10 feet (3.0 meters). You may attach a
standard serial cable to lengthen the connection, if desired.
Page 5

4 — Scale Master®II – PC Interface
INSTALLING THE PC INTERFACE
SOFTWARE
The next step is installing the PC Interface software program to your
computer’s hard drive. Please follow the instructions below for Windows
9x/NT/2000/ME/XP, or the instructions beginning on page 10 for
Windows 3.1 or DOS.
Windows (9x/NT/2000/ME/XP) Installation
1. Insert the compact disc (included in your kit) into your PC’s CDROM drive.
2. If your CD Drive is configured for Autostart, you will see the startup
menu. If this is the case, skip to Step 4.
(continued)
Page 6
User’s Guide — 5
(continued)
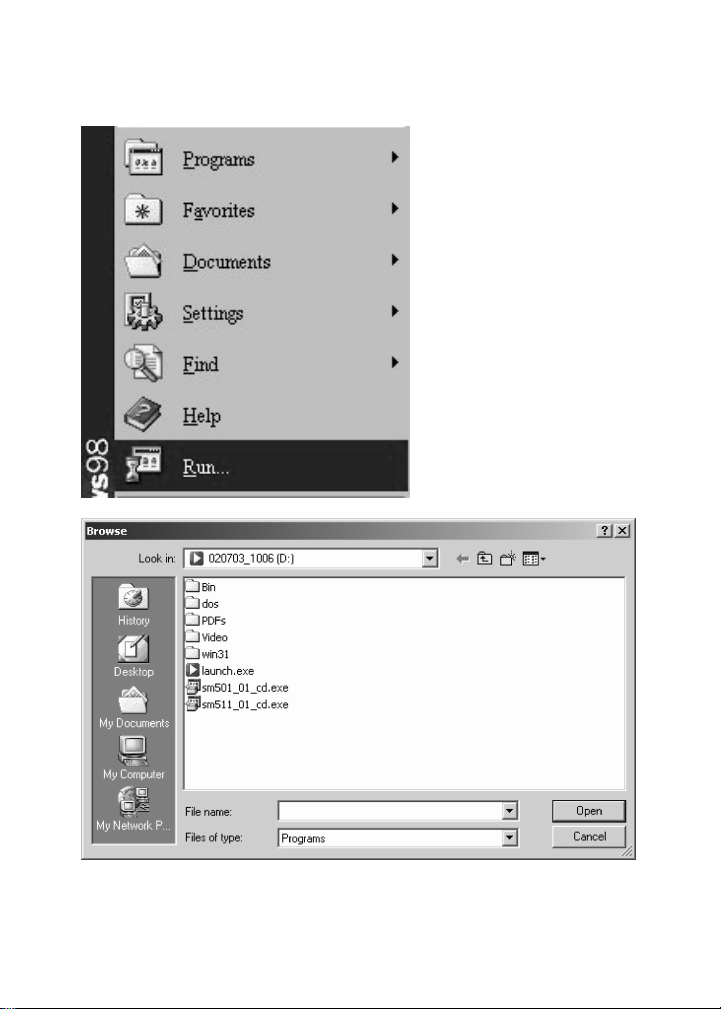
3. If your CD Drive does not Autostart, select Run from the Start menu
and click Browse. Select your CD Drive within the “Look in:” box.
Double-click on the launch.exe icon. Click OK.
Page 7
6 — Scale Master®II – PC Interface
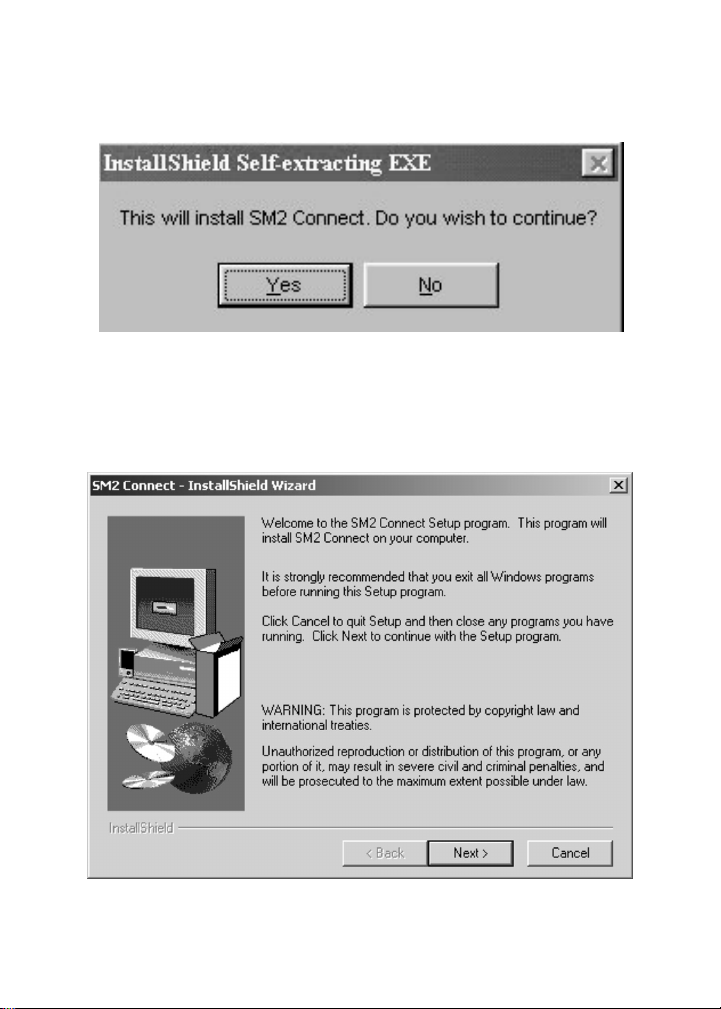
4. Click the “Install SM2 PC Interface Software” button on the Startup
menu. Asmall menu will pop up which says, “This will install SM2
Connect. Do you wish to continue?” Click Yes. The program will self-
extract.
5. An installation menu
(InstallShield Wizard)
will appear. You are
ready to begin installation to your computer’s hard drive. Click on
the Next button to begin. Follow the instructions and continue
selecting Next until installation is complete.
(continued)
Page 8
User’s Guide — 7
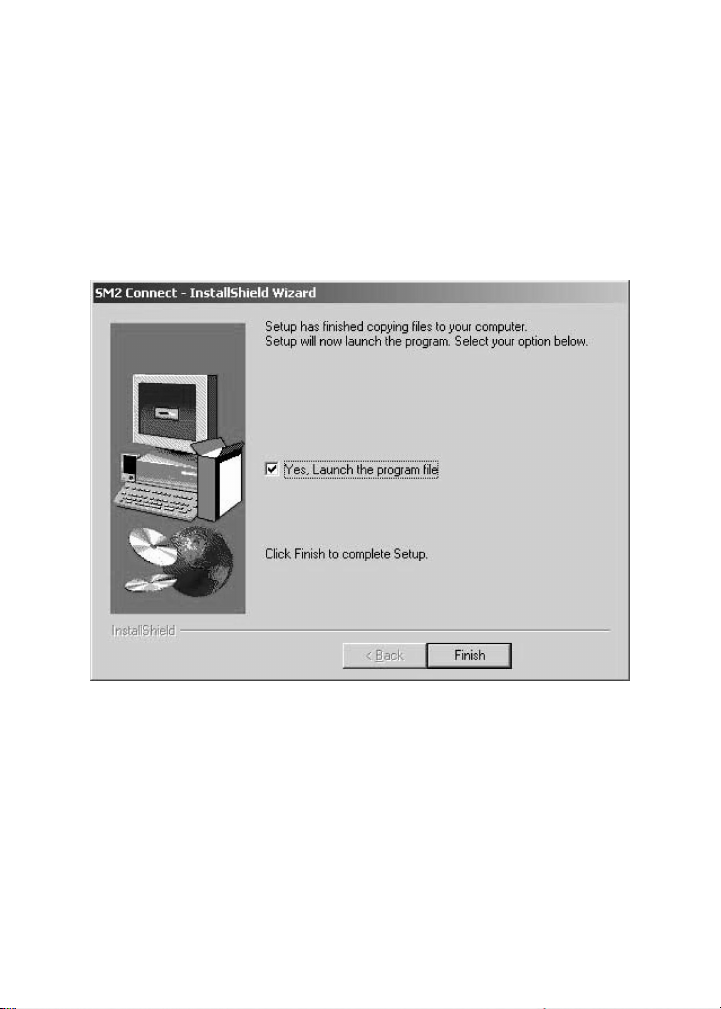
6. When installation is complete, the final menu will prompt you to
finish the setup. Check “Yes, Launch the program file”, then click
“Finish” in order to complete the installation process and start the
SM2 Interface program. Some computers may request to be
restarted at this time.
NOTE:
If you do not launch the program file at this time, you can
start the program later by double-clicking the SM2 Connect icon on
your Desktop.
(continued)
Page 9
8 — Scale Master®II – PC Interface
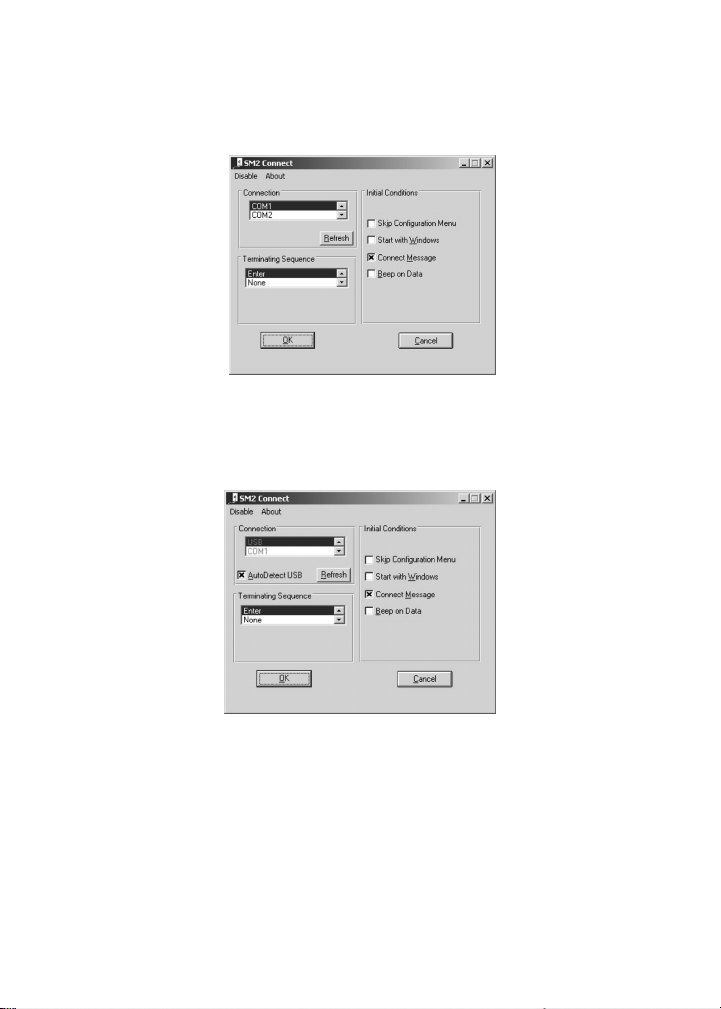
7. The SM2 Connect Configuration Menu will be displayed.
7a. If you are using the serial port connection, and no changes
need to be made to the defaults, then click OK to start the SM2
interface program.
7b. If you are using the USB adapter, select “USB” from the
Connection Menu, and check the AutoDetect USB checkbox. If
no changes need to be made to the defaults, then click OK to
start the SM2 interface program.
NOTE:
To make changes to the Configuration Menu defaults, please
refer to the section entitled “About the Configuration Menu” on page
11.
(continued)
Page 10

User’s Guide — 9
8.
If using the Serial port, a “Driver is Active On COM1” prompt will
then appear.
If using the USB port, a “Driver is Active On USB” prompt will then
appear.
Click on the OK button. This will minimize or move the Menu to the
bottom of your screen.
9.
Remove the CD-ROM.
10. You are ready to begin. Proceed to page 13, “Sending Values to
Your Spreadsheet Application Program.”
Page 11

10 — Scale Master®II – PC Interface
Windows 3.1 Installation
1. Select Run from the Start menu, and click Browse. Select the win31
folder and double-click on it, then find setup1.exe and double-click
on it.
2. Follow the instructions. See page 11, “About the Configuration
Menu,” for Configuration Settings.
DOS Installation
You must be in native DOS mode (not a DOS window in Windows) for
the installation and the driver to work properly.
1. If your computer starts with Windows, you will need to restart in
DOS mode. Go to Start, then Shut Down. Select “Restart in MSDOS Mode” and click OK.
2. After your computer has rebooted in DOS mode, change to your
CD-ROM drive by typing d: and pressing enter.
3. Next type cd dos and press enter to change to the Directory with the
DOS Install file. You should see a prompt similar to the following on
your screen: D:\DOS>
4. Now proceed with the installation by typing sm2pc.bat and follow
the on-screen instructions.
5. See page 11, “About the Configuration Menu,” for Configuration
Settings.
NOTE for AOL Users: If you plan to install this program in DOS
instead of Windows, please note that your AOL may periodically lock
up. In order to avoid this problem, make sure the “Start with Windows”
box in the Configuration Menu is not selected (page 11,
“About the
Configuration Menu”
).
Page 12

User’s Guide — 11
ABOUT THE CONFIGURATION MENU
Connection — The first section of the Configuration Menu,
Connection, selects the
Communications Port
that the
SMII
will
use to interface with your PC. Com 1 is the recommended port
and is therefore the default. If you know that COM 1 is already
being used by another device on your computer, or receive the
message, “Couldn’t open COM 1,” then try selecting COM 2, COM
3, or COM 4 until you have tried all four COM ports. If none of the
four COM ports work, refer to “HyperTerminal” on page 22.
USB PORT — In order to use your device with a USB Port, you
will need to select “USB” from the Connection Menu. By checking
the AutoDetect USB checkbox, the software will automatically
detect when you have your device connected.
INITIAL CONDITIONS — The next section of the Configuration
Menu, Initial Conditions, lets you choose the various software
configuration settings below:
• Click on “Skip Configuration Menu” if you don’t want to see this
menu appear upon startup.
• Click on “Start with Windows” if you want the interface program
to automatically start when you turn your computer on (i.e., so
that you don’t need to reactivate it every time; see “Reactivating
SM2 CONNECT Interface Program” on page 18).
• Click on “Beep on Data” if you want your
SMII
to register a beep
when it transfers data to your PC spreadsheet program. NOTE:
The source of the beep is the Multimedia Speaker System. If
you do not have Multimedia speakers, select “Use PC Speaker”
instead.
(continued)
Page 13

12 — Scale Master®II – PC Interface
TERMINATING SEQUENCE — The selections on the left side of
the Configuration Menu have to do with how your data is
transferred to your spreadsheet or other software program.
Currently, it is defaulted to “Enter,” which commands your cursor
to enter transferred data in a column of cells (down) or in a row
(to the right) in your spreadsheet, depending on your program’s
setup. You can change the way your cursor inputs, however,
by selecting the following settings:
• None—Does not move your cursor to the next cell
(this allows you to insert text, if desired).
• Right Arrow—moves your cursor to the right cell, in a row.
• Down Arrow—moves your cursor down to the cell below, in a
column.
• Down Arrow (
BidMan Pro Only
)—if you are using the
Bid-Man
Pro
software program, you need to select this setting. Moves
your cursor down.
• Tab—moves cursor in the direction preprogrammed by your
software.
• Custom—Lets you add a fixed character (letters or numbers) to
the end of each measurement (e.g., square feet, etc.). Abox
labeled “Custom String” will appear under Custom. Enter the
desired character here.
Page 14

User’s Guide — 13
SENDING VALUES TO YOUR
SPREADSHEET APPLICATION PROGRAM
The PC interface program sends a
single value
(the main value on
your display) measured by your
Scale Master II
to your wordprocessing program, a selected cell in your spreadsheet or estimating
software program, or any other Windows application that accepts
keyboard entry. The Interface program sends linear distances, areas,
volumes or counts directly to your PC.
To send a value to your PC, use the [SET] key located to the left of
the
Scale Master II
’s display and follow the instructions below:
1. Make sure your
Scale Master II
has the interface cable securely
connected to your
SMII
and to your PC’s serial or USB port.
2. Turn the
Scale Master II
on.
3. Open the application program (e.g., Excel spreadsheet or estimating
software program) you wish to send values to.
4. IMPORTANT: Insert your cursor or click in the desired cell where
you’d like to start. This is where the
SMII
will send the first
measurement.
5. Select the desired measuring mode and scale on your
Scale Master
II
by pressing the [MODE] and [SCALE] keys. Press the red
[RESET] key to make sure the unit is cleared.
6.
You’re ready to begin rolling and transferring values!
Begin rolling a
distance on your blueprint (be sure to hold the unit upright while
rolling).
(continued)
Page 15

14 — Scale Master®II – PC Interface
7. When finished rolling, press the [SET] key on your
Scale Master II
to send the value on the display to the selected cell in your
spreadsheet or application program.
NOTE:
If measuring in feet and inches, the value is automatically
converted from feet-inch format to decimal feet.
8. Once you see the value transferred to the spreadsheet, press the
red [RESET] key on the
Scale Master II
to reset the unit and
continue measuring by repeating the above steps.
NOTE:
The next value will automatically move to the next cell
directly below the first cell.
Page 16

User’s Guide — 15
Sending Areas or Volumes
Sending Areas
1. Open your spreadsheet or application program and click on a
desired cell.
2. Roll the first dimension with your
Scale Master II
and press
[LENGTH]. This will store the value as length.
NOTE: The SMII will reset to zero after you press Length or Width.
3. Roll the second dimension and press [WIDTH].
4. Press [SQ/CU] [SET]. This will calculate the area from the stored
length and width values and send it to your PC. Note that you must
press the [SQ/CU] key first to find the area, then press [SET] to
send the value to your PC.
Sending Volumes
1. Open your spreadsheet or application program and click on a
desired cell.
2. Roll the first dimension and press [LENGTH].
3. Roll the second dimension and press [WIDTH].
4. To set a height, roll a third dimension and press [RCL] [SET]
[SQ/CU]. The measurement will display and the units of
measurement (i.e., FT-IN) will be flashing.
5. Press [SET] to store as height.
NOTE: Once you set your height in Steps 4 & 5, you do not need to
enter it again unless you want to change it, as the height is semipermanently stored.
6. Press [SQ/CU] to calculate the area. Press the [SQ/CU] key again
to find the volume. Press [SET] to send the value to your PC. Press
[SQ/CU] a third time to display the value stored as height.
Page 17

16 — Scale Master®II – PC Interface
Clearing Values in Registers
Values stored in Length, Width and Height are semi-
permanently
stored, meaning they will remain stored even
after a [RESET], but will
clear if the
SMII
is turned off.
To clear values without turning the SMII off:
1. Clear stored length: press [RESET] and [LENGTH] tog ether
2. Clear stored width: press [RESET] and [WIDTH] tog ether
3. Clear stored height: press [RCL] [SET] then [RESET] and
[SQ/CU] together
Page 18

User’s Guide — 17
Sending Counts
1. Press the [COUNT] key to count the value.
2. Press [RCL] [COUNT] to move this counted value to the main
display of your
SMII
.
3. Press [SET] to send this count to your PC.
4. To reset the count, press [RESET] and [COUNT] at the same time.
Sending Values Stored in Memory
The Memory function allows you to add multiple values and send them
to your PC. To send rolled values:
1. Roll the first value. Press [SET] [M+] to send this value to the
computer and store it in memory. The display will reset to “0.”
2. Roll the next value. Press
[SET] [M+]
. This value is added to your
previous value in memory and sent to the computer.
3. You can continue to add values. To send the total value stored in
memory, press [RCL] [M+] to recall the total on the main display.
Then press [SET] to send the value.
NOTE:
You cannot add dimensioned (rolled) and non-dimensioned
(counted) values together.
Page 19

18 — Scale Master®II – PC Interface
EXITING AND REACTIVATING
THE PROGRAM
Exiting SM2 CONNECT Interface Program
The Disable option within the Configuration Menu will close the
connection to the communication port and exit the program.
Reactivating SM2 CONNECT Interface Program
Your
Scale Master II
PC Interface program must be
reactivated or
opened
after you turn your computer off and on in order to activate the
interface capability.
If you do not open the program, your SMII will
not be able to communicate with your spreadsheet or estimating
program.
You may instruct the PC Interface program to start up automatically
with Windows by selecting the “Start with
Windows” setting in the
Configuration Menu. See Windows (9x/NT/2000/ME/XP) Installation,
page 18, “About the Configuration Menu.”
Or, simply open the PC Interface program by clicking the Start icon at
the bottom left of your PC screen, then Programs, then the SM2
Connect folder, and clicking the SM2 Connect icon to start the
program.
Page 20

User’s Guide — 19
PC INTERFACE COMMANDS
[SET]
Sends the displayed value to a cell in your PC’s spreadsheet or
estimating program. The numerical value on the main display will be
sent without display legends or annunciators. Also, this value will
only be displayed on your PC in decimal format.
[RCL] [SET]
This will allow you to use the [SET] key as if it were not connected
to the PC.
[RCL] [COUNT] [SET]
Recalls the Count value to the main display, then sends the value to
your PC.
[RESET]
Clears all non-permanent registers.
[RESET] and [SUB] together
Full Reset. Clears all semi-permanent registers.
Page 21

20 — Scale Master®II – PC Interface
TROUBLESHOOTING
Q: Why won’t my
SMII
send values to my computer?
A: Check or adjust any of the following:
1. Check the interface program to make sure it is turned on or
activated (open the Interface program by selecting Start:
Programs: SM2 Connect: SM2 Connect and click OK). The
SM2 Connect menu will minimize, or appear at the bottom
menu of your computer screen.
2. Are you using the serial or USB interface?
a. Ensure that the cable is plugged in properly on both ends.
Make absolutely sure the cable end is pushed all the way
into the
Scale Master
. It can appear in, yet be lacking the
last 1/8" – 1/16" and not send.
b. If USB, plug the cable in before installing the
SM2
software.
3. Do you have a PDA (i.e ., Palm, Pocket PC) attached to your
computer?
(most common issue)
a. Unplug the PDA and disable HotSync or ActiveSync.
Disable it by going to the systray (bottom right of the
screen, next to the clock), right click the icon and select
Exit. You can restart the PDA software when not using SM2
Connect, by clicking on Start ➝ Programs ➝ Palm Desktop
or Microsoft ActiveSync.
(continued)
Page 22

User’s Guide — 21
4. Are any USB devices attached to your computer?
a. Devices such as digital cameras, digitizers, USB mice, etc.
may interfere.
b. Remove the other USB device, restart your computer, plug
your
ScaleMaster
in, install SM2 Connect software, and
then plug the other USB device back in.
5. Are you using it with an estimating program?
a. If it works in Windows programs such as Excel, notepad,
etc., but not with your estimating program, contact
technical support at the manufacturer of your program.
6. Does it work with Excel or Notepad? (For serial connection)
a. If it does not run in Windows programs, close SM2 Connect
and refer to “HyperTerminal” in the next section.
b. If you are using the serial interface and having the above
port issues, you can purchase our USB adapter from
Customer Service and that usually solves the problem.
7. Restart your computer, then restart the interface program and
your application.
IF YOU STILL CANNOT GET THE SMII TO SEND VALUES, CALL
TECHNICAL SUPPORT AT 1-800-854-8075.
Page 23

22 — Scale Master®II – PC Interface
HYPERTERMINAL (For Serial Connection)
1. If the
Scale Master II
is not sending values to your bid program or
your spreadsheet, you may need to check your
Communications
Ports (COM ports) by using HyperTerminal
. HyperTerminal is a
Windows program that checks to see if the Communications Ports
are sending to Windows, without the use of any software.
2. To access HyperTerminal, click the Start icon at the bottom left of
your screen. Now click on Run, type in hypertrm.exe, and then click
on OK.
3. This brings up a window, which is titled, “Connection Description.” In
the space provided, you will need to name your New Connection.
Simply type “SM2”, and then click OK.
4. Next, the window titled, “Phone Number” or “Connect To” will open.
Go down to where it says, “Connect Using” and click on the down
arrow at the far right.
5. You will then see several Communications Port options. Generally
your modem (if you have one) will be listed first. Following your
modem will be several COM port or “Direct To COM port” options.
Choose one of these and click OK. It is best to choose the first one
and go down the list, as you will need to test them all separately. (If
the one you select has a message that reads, “Unable to open
COM#,” then go to the next one.)
6. Once you have selected a COM Port that is available, a window
called, “COM # Properties” will open. You will need to make certain
that you change the settings to the proper configuration. Click on
Restore Defaults. Change the settings to match those listed below,
by clicking on the down arrow to the right of each separate setting.
(continued)
Page 24

User’s Guide — 23
The settings should read:
Bits per second
9600
Data bits
8
Parity
None
Stop bits
1
Flow control
None
7. After changing the settings click OK.
8. Once you find a communications port that is active (does not
have an error message and you see a blank screen), you
should turn on your
Scale Master II
, roll a measurement, and
press [SET] to send it to HyperTerminal. The value should appear
within the HyperTerminal window.
9. If your
Scale Master II
does not send the value to HyperTerminal,
try a different Communications Port than the one you are
currently using. (See step 10.)
10. Go to File in the upper left part of the window titled, “
SM2
–
HyperTerminal.” Click on, “New Connection.” A message will
come up, “You are currently connected. Are you sure you want
to disconnect now?” Click Yes. After which, another message
will come up, “Do you want to save session SM2?” or “Do you
want to save the connection named SM2?” Click No.
11. Redo steps 2-7 (changing to a new COM port at Step 4) until
you have tried all the COM ports listed under “Connect Using.”
12. If you have no success in sending a value to HyperTerminal on
any of the COM ports, you have a Windows communications
port problem. This must be configured properly by a Windows
expert.
Page 25

24 — Scale Master®II – PC Interface
LICENSE AND LIMITED WARRANTY
PLEASE READ THIS LICENSE CAREFULLY BEFORE USING THIS
SOFTWARE. BY USING THIS SOFTWARE,YOU AGREE TO BECOME BOUND
BY THE TERMS OF THIS LICENSE.IF YOU DO NOT AGREE TO THE TERMS OF
THIS LICENSE, DO NOT USE THIS SOFTWARE AND PROMPTLY RETURN IT
TO THE PLACE WHERE YOU OBTAINED IT FOR A FULL REFUND.
The enclosed computer program(s) (“Software”) is licensed, not sold, to you by
Calculated Industries, Inc., for use only under the terms of this License, and
Calculated reserves any rights not expressly granted to you. You own the media
on which the Software is recorded or fixed, but Calculated and its licensors retain
ownership of the Software itself.
1. License. This License allows you to:
a) Use one copy of the Software on a single computer at a time. To “use” the
Software means that the Software is either loaded in the temporary memory (i.e.,
RAM) of a computer or installed on the permanent memory of a computer (i.e.,
hard disk. etc.). You may install the Software on a common storage device which
is accessible by multiple computers, provided that if more computers have access
to the common storage device than the number of licensed copies of the Software,
you must have some software mechanism which locks-out any concurrent users
in excess of the number of licensed copies of the Software (an additional license
is not needed for the one copy of Software installed on the common storage device
accessed by multiple computers).
b) Make one copy of the Software in machine-readable form solely for backup
purposes. Additionally, only so long as the Software is installed only on the
permanent memory of a single desktop computer which is not accessible by
multiple computers and that single desktop computer is used by one user for at
least 80% of the time the computer is in use, that same user may also make a copy
of the Software to use on a portable or home computer which is primarily used by
such user. As an express condition of this License, you must reproduce on each
copy any copyright notice or other proprietary notice that is on the original copy
supplied by Calculated.
c) Permanently transfer all your rights under this License to another party by
providing to such party all copies of the Software licensed under this License
together with a copy of this License and the accompanying written materials,
provided that the other party reads and agrees to accept the terms and conditions
of this License.
Page 26

User’s Guide — 25
d) Notwithstanding any other terms in this License, if the Software is licensed as
an upgrade or update, then you may only use the Software to replace previously
validly licensed versions of the same software. You agree that the upgrade or
update does not constitute the granting of a second license to the Software (i.e.,
you may not use the upgrade or update in addition to the software it is replacing,
nor may you transfer the software which is being replaced to a third party).
2. Restrictions. The Software contains trade secrets in its human perceivable
form and to protect them, you may not REVERSE ENGINEER, DECOMPILE,
DISASSEMBLE OR OTHERWISE REDUCE THE SOFTWARE TO ANY HUMAN
PERCEIVABLE FORM. YOU MAY NOT MODIFY, ADAPT, TRANSLATE, RENT,
LEASE, LOAN OR CREATE DERIVATIVE WORKS BASED UPON THE
SOFTWARE OR ANY PART THEREOF.
3. Dual Media. Even if this Calculated product includes the Software on more than
one medium (e.g., on both a CD and on magnetic disks; or on both 3.5 inch disks
and 5.25 inch disks), you are only licensed to use one copy of the Software as
described in Section 1 (a). You may not use the Software stored in the other
medium on another computer or common storage device, nor may you rent, lease,
loan or transfer it to another user except as part of a transfer pursuant to Section
1 (c).
4. Termination. This License is effective until terminated. This License will
terminate immediately without notice from Calculated or judicial resolution if you
fail to comply with any provision of this License. Upon such termination you must
destroy the Software, all accompanying written materials and all copies thereof,
and Sections 6, 7 and 8 will survive any termination.
5. Expor t Law Assurances. You agree that neither the Software nor any direct
product thereof is being or will be shipped, transferred or re-exported, directly or
indirectly, into any country prohibited by the United States Export Administration
Act and the regulations thereunder or will be used for any purpose prohibited by
the Act.
6. Limited Warranty. Calculated warrants for a period of ninety (90) days from
your date of purchase that (i) the media on which the Software is recorded will be
free from defects in materials and workmanship under normal use, and (ii) the
Software as provided by Calculated will substantially conform to Calculated’s
published specifications for the Software. Calculated’s entire liability and your sole
and exclusive remedy for any breach of the foregoing limited warranty will be, at
Calculated’s option, replacement of the media, refund of the purchase price or
repair or replacement of the Software.
Page 27

26 — Scale Master®II – PC Interface
THIS LIMITED WARRANTY IS THE ONLY WARRANTY PROVIDED BY
CALCULATED. CALCULATED AND ITS LICENSORS EXPRESSLY DISCLAIM
ALL OTHER WARRANTIES, EITHER EXPRESS OR IMPLIED, INCLUDING BUT
NOT LIMITED TO IMPLIED WARRANTIES OF MERCHANTABILITY AND
FITNESS FOR AP AR TICULAR PURPOSE WITH REGARD T O THE SOFTWARE
AND ACCOMPANYING WRITTEN MATERIALS. BECAUSE SOME
JURISDICTIONS DO NOT ALLOW THE EXCLUSION OR LIMITATION OF
IMPLIED WARRANTIES, THE ABOVE LIMITATION MAY NOTAPPLY TO YOU.
7. Limitation of Remedies and Damages. In no event will Calculated, its parent
or subsidiaries or any of the (censors, directors, officers, employees or affiliates of
any of the foregoing be liable to you for any consequential, incidental, indirect or
special damages whatsoever (including, without limitation, damages for loss of
business profits, business interruption, loss of business information and the like),
whether foreseeable or unforeseeable, arising out of the use of or inability to use
the Software or accompanying written materials, regardless of the basis of the
claim and even if Calculated or a Calculated representative has been advised of
the possibility of such damage. Calculated’s liability to you for direct damages for
any cause whatsoever, and regardless of the form of the action, will be limited to
the greater of $200 or the money paid for the Software that caused the damages.
THIS LIMITATION WILL NOT APPLY IN CASE OF PERSONAL INJURY ONLY
WHERE AND TO THE EXTENT THAT APPLICABLE LAW REQUIRES SUCH
LIABILITY. BECAUSE SOME JURISDICTIONS DO NOT ALLOW THE
EXCLUSION OR LIMITATION OF LIABILITY FOR CONSEQUENTIAL OR
INCIDENTAL DAMAGES, THE ABOVE LIMITATION MAY NOT APPLY TO YOU.
8. General. This License will be construed under the laws of the State of Nevada,
except for that body of law dealing with conflicts of law. If any provision of this
License shall be held by a court of competent jurisdiction to be contrary to law, that
provision will be enforced to the maximum extent permissible, and the remaining
provisions of this License will remain in full force and effect. If the software is
supplied to the United States Government the Software is classified as
“RESTRICTED COMPUTER SOFTWARE” as defined in clause 52.227-19 of the
FAR. The United States Government’s rights to the Software are as provided in
clause 52.227-19 of the FAR.
Page 28

User’s Guide — 27
LEGAL NOTES
Software copyrighted and licensed to Calculated Industries, Inc., by
Scale Master Technologies, LLC, 2003.
User’s Guide copyrighted by Calculated Industries, Inc., 2003.
Scale Master
®
and
Calculated Industries
®
are registered trademarks of
Calculated Industries, Inc.
ALL RIGHTS RESERVED
LOOKING FOR NEW IDEAS
Calculated Industries, a leading manufacturer of special function
calculators and digital measuring instruments, is always looking for new
product ideas in these areas.
If you have one, or if you have any suggestions for improvements to
this product or its User’s Guide, please call or write or e-mail our Product
Development Department. Thank you.
Calculated Industries, Inc.
4840 Hytech Drive
Carson City, NV 89706 U.S.A.
1-800-854-8075 • Fax: 1-775-885-4949
E-mail: techsup@calculated.com
www.calculated.com
Page 29

28 — Scale Master®II – PC Interface
NOTES
 Loading...