

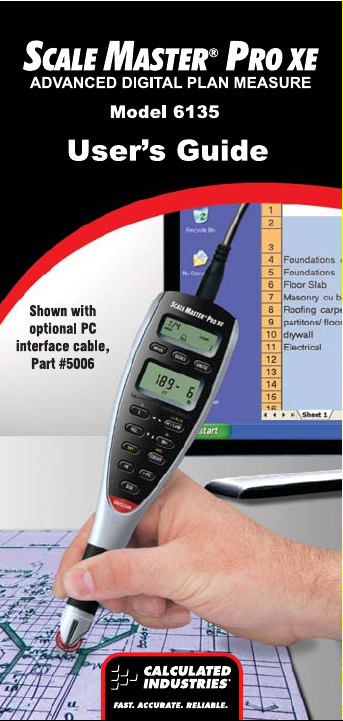
Page 1
Page 2

SCALE MASTER® PRO XE
Introduction
The Scale Master Pro XE Multi-Scale Digital
Plan Measure has been specifically designed
to simplify takeoffs from architectural and
engineering drawings.
• Finds linear measurements of any
shape
• Finds rectangular areas and volumes
• Converts between scales and
dimensions
• Built-in push button counter
• Auto-Count function
• Constant (+K) function
• Subtract function
• Ten Custom Scales that let you define
and roll in any scale
Page 3

TABLE OF CONTENTS
Getting Started
Key Definitions ................................................1
Operation Keys .............................................1
Setup Keys .....................................................3
Measuring Keys .............................................5
Function Keys ...............................................7
Using the Scale Master Pro XE
Adjusting the Wheel.........................................9
Preferences ..................................................... 10
Imperial/Metric Modes ................................ 12
Built-In Scales ................................................ 13
Imperial (Standard) Units ......................... 13
Metric Units ................................................ 14
Changing Modes ............................................15
Changing Scales ............................................. 15
Changing Units .............................................. 15
Locking Modes, Scales and Units ............... 15
Operation ....................................................... 16
Rolling a Measurement ................................. 17
Using the Memory Function ...................... 18
Additional Memory Functions .................19
Using Ruler Mode ......................................... 19
Programming Mode ...................................... 20
Setting Custom Scales ...................................21
Rolling a Custom Scale .............................. 21
Entering a Custom Scale ........................... 22
Setting an Auto-Count .................................. 24
Setting a Constant (+K) ............................... 25
Additional Constant Functions ................ 26
Setting a Height ............................................. 27
Finding Area and Volume ............................ 27
Finding Area ............................................... 28
Finding Volume .......................................... 28
Additional Area/Volume Functions ....... 29
Connecting to a PC (optional)..................... 29
Page 4

Appendix
Error/Auto-Range Function ....................... 30
Interference .................................................... 30
Battery/Automatic Shut-Off ...................... 31
Battery Replacement ..................................... 31
Default Settings .............................................32
Specifications ................................................. 33
Repair and Return ......................................... 34
Warranty.......................................................... 35
FCC Class B ................................................... 37
Looking for New Ideas ................................37
Contact Us ...................................................... 38
Page 5

GETTING STARTED
Key Definitions
Operation Keys
[ON/CLEAR] – On/Clear
Turns power on. Press once to clear the
display. This will not clear the last rolled
measurement as it is a permanent value
and can be recalled to the main display at
any time by pressing
[SET] [ON/CLEAR] – Off
Turns power off. Turning power off clears
the display and semi-permanent values
(length, width, count). All permanent
values and settings, such as modes, scales
and units, remain intact. Holding down
[ON/CLEAR] key for 2 seconds also
the
powers the unit off.
[ON/CLEAR] + [MODE] – Clear All
Clears all values, including memory.
Resets all permanent settings except
Preferences.
[SET] [ON/CLEAR] to turn the device off,
[MODE] + [ON/CLEAR] –
then
Software Reset
Clears all values, including memory.
Resets all permanent settings, including
Preferences.
[RCL] [RCL].
1 – Scale Master® Pro XE
Page 6

[RESET] – Hardware Reset
If your Scale Master Pro XE should ever
“lock up,” use a paperclip or similar size
object to press the RESET hole. Clears all
values, including memory. All permanent
settings, including Preferences, remain
intact.
[SET] – Set Key
Used with other keys to access second
functions and place the Scale Master
Pro XE into programming mode. If in
programming mode already, pressing
[SET] will store the displayed value and
exit programming mode. A press of
[SET] after rolling locks the measurement.
While locked, the displayed value will not
be affected by rolling the Scale Master Pro
XE. A second press of [SET] will unlock
the measurement.
[RCL] – Recall Key
Used to recall stored values. When you
press [RCL] [RCL], the last value rolled
is displayed, allowing roll to continue
from this value. Recalling any other value
disables measuring until the recalled value
is cleared with a press of [ON/CLEAR].
[IMP/MET] – Imperial/Metric Switch
Toggles between Imperial and Metric
modes.
User’s Guide – 2
Page 7

[LOCK] – Lock Switch
The Lock Switch is located on the side
of the unit. When the lock is activated, a
lock symbol will be displayed in the LCD.
While active you cannot alter Scales,
Modes, Units, Preferences or the IMP/
(Imperial/Metric) switch. You also
MET
cannot perform a Clear All or a Software
Reset. It is advised to use the Scale Master
Pro XE in the locked position unless
you are specifically setting or changing
a setting.
Setup Keys
[MODE] – Mode Selection
Repeated presses of [MODE] will
scroll through the available modes. See
“Changing Modes” section.
[SUB] + [MODE] – Scrolls Back Modes
Holding [SUB] and repeated presses of
[MODE] will scroll backward through the
available modes.
[SCALE] – Scale Selection
Repeated presses of [SCALE] will
scroll through the available scales. See
“Changing Scales” section.
3 – Scale Master® Pro XE
Page 8

[SUB] + [SCALE] – Scrolls Back Scales
Holding [SUB] and repeated presses of
[SCALE] will scroll backward through the
available scales.
[UNITS] – Unit Selection
Repeated presses of [UNITS] will
scroll through the available units of
measurement. See “Imperial Units” and
“Metric Units” sections.
[SUB] + [UNITS] – Scrolls Back Units
Holding [SUB] and repeated presses of
[UNITS] will scroll backward through the
available units.
[SET] [MODE] – Preferences
Accesses the preference settings. See
“Preferences” section.
[W] ([L]) – Left Arrow
Moves to the left when setting values for
custom scales, auto-count, constant, and
height. Will scroll back through available
settings within the preferences.
[X] ([W/LxW]) – Right Arrow
Moves to the right when setting values
for custom scales, auto-count, constant,
and height. Will scroll forward through
available settings within the preferences.
User’s Guide – 4
Page 9

[T] ([RCL]) – Down Arrow
Decreases the number when setting values
for custom scales, auto-count, constant,
and height. Will scroll down through the
preferences.
[S] ([M+]) – Up Arrow
Increases the number when setting values
for custom scales, auto-count, constant,
and height. Will scroll up through the
preferences.
Measuring Keys
[L] – Length
Enters the displayed measurement into
length.
[RCL] [L] – Length Recall
Displays the stored length value. On a
clear display, [L] can be pressed without
[RCL].
[ON/CLEAR] + [L] – Length Clear
Clears the length value.
[W/LxW] – Width/Area
Enters the displayed measurement into
width. The total area will be displayed
when the width is entered. Repeated
presses will scroll through the following
results:
5 – Scale Master® Pro XE
Page 10

1) Area
2) Perimeter
3) Volume (if Height is entered)
4) Wall Area (if Height is entered)
5) Stored Height (if Height is entered)
6) Stored Length
7) Stored Width
[RCL] [W/LxW] – Width Recall
Displays the stored width value. On a clear
display, [W/LxW] can be pressed without
[RCL].
[ON/CLEAR] + [W/LxW] – Width Clear
Clears the width value.
[SET] [L] (H) – Height Set
Enters the height setting mode. See the
“Setting a Height” section.
[RCL] [SET] [L] – Height Recall
Displays the stored height value.
[SET] [W/LxW] (LxWxH) – Volume
After pressing [SET], repeated presses
of [W/LxW] will scroll through the
following results:
1) Volume (if Height entered)
2) Wall Area (if Height entered)
3) Stored Height (if Height entered)
4) Stored Length
5) Stored Width
6) Area
7) Perimeter
User’s Guide – 6
Page 11

Function Keys
[M+] – Memory Plus
Adds the displayed value to the
accumulative value.
[RCL] [M+] – Memory Recall
Displays the value stored in accumulative
memory.
[ON/CLEAR] + [M+] – Memory Clear
Clears the accumulative memory value.
[SET] [M+] (M-) – Memory Minus
Subtracts the displayed value from the
accumulative memory. [SUB] + [M+] will
perform the same function.
[COUNT] – Count
Increases the count value by one.
[SUB] + [COUNT] – Count Subtract
Decreases the count value by one.
[RCL] [COUNT] – Count Recall
Displays the count value in the main
display.
[ON/CLEAR] + [COUNT] – Count Clear
Clears the count value.
[SET] [COUNT] – Auto-Count
Enters auto-count setting mode. See the
“Setting an Auto-Count” section.
7 – Scale Master® Pro XE
Page 12

[RCL] [SET] [COUNT] – Auto-Count Recall
Displays the stored Auto-Count value.
[XPC] – PC Send
When connected to a PC, sends the value
from the main display of the Scale Master
Pro XE to the PC. All values are sent in
decimal format.
[+K] – Constant Add
Adds the constant value to the displayed
measurement value.
[SET] [+K] – Constant Set
Enters constant setting mode. See the
“Setting a Constant (+K)” section.
[SUB] + [+K] – Constant Subtract
Subtracts the constant value from the
displayed measurement value.
[RCL] [+K] – Constant Recall
Displays the stored constant value.
[ON/CLEAR] + [+K] – Constant Clear
Clears the constant value.
[SUB] – Subtract Mode
Toggles subtract mode on and off. When
subtract mode is on, rolling forward or
backward will subtract from the displayed
measurement. Press [SUB] a second time
or press [ON/CLEAR] to turn subtract
mode off.
User’s Guide – 8
Page 13
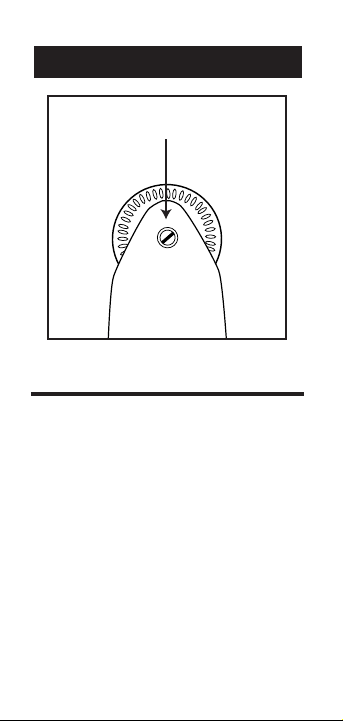
Rotate to Adjust Wheel
USING THE SCALE MASTER PRO XE
Adjusting the Wheel
The Celcon® polymer wheel can be adjusted
for each user’s preference. To adjust the
wheel, take a small, flat-head jeweler’s
screwdriver and slightly rotate the screw
located near the wheel tip. Rotating the
screw about 1/4 to 1/3 turn should be
sufficient. Rotating the screw within those
two values should adjust the wheel between
free spinning (which is too loose) to skidding
(which is too tight).
9 – Scale Master® Pro XE
Page 14

Preferences
Preferences allow customization of how the
Scale Master Pro XE functions during certain
operations. The following preferences are
available:
Button Beep (butn) – Toggles on or off
the beep sound that occurs at the press of a
button or during auto-count.
Beep, On – Button beep on
Beep, Off – Button beep off
Rolling Click (roll) – Toggles on or off the
clicking sound that occurs while rolling.
Clic, On – Rolling click on
Clic, Off – Rolling click off
Stored Value Display (Stor) – Toggles
whether the value remains displayed or is
cleared after being stored.
Clr Lcd – Display cleared
No Clr – Display not cleared
(cont’d)
User’s Guide – 10
Page 15

(cont’d)
PC Terminate (End PC) – Determines
where the “cursor” moves after a value is
sent to the PC. The settings represent the
key being pressed on the PC keyboard:
Enter – PC Enter
Tab – PC Tab
Left – PC Left Arrow
Right – PC Right Arrow
Up – PC Up Arrow
Dn – PC Down Arrow
None – No Terminate
PC Send Display (SEnd PC) – Toggles
whether the value remains displayed or is
cleared after being sent to the PC.
Clr Lcd – Display cleared
No Clr – Display not cleared
PC Send Beep (SEnd PC) - Toggles
whether or not a beep sounds when a value
is sent to the PC. It is a single beep for a
successful send and a double beep for an
unsuccessful send or error.
Beep, On – Button beep on
Beep, Off – Button beep off
11 – Scale Master® Pro XE
Page 16

Setting Preferences:
1) Press
[SET] [MODE] to access the
preferences.
2) Press the
[M+] (S) key to move up
or the [RCL] (T) key to move down
through the list of preferences.
3) When the preference to be changed is
displayed, press the [W/LxW] (X) key to
move forward or the [L] (W) key to move
backward through the settings for the
selected preference.
4) Once the desired setting is displayed,
press the
[M+] (S) or [RCL] (T) key
to move to another preference or press
[SET] to save and exit.
Imperial/Metric Modes
The Scale Master Pro XE is set up to use
Imperial (Standard) dimensional units
by default. The Scale Master Pro XE can
be set to Metric Mode by switching the
IMP/MET switch to MET.
While in Metric mode, MET will remain lit
in the display.
User’s Guide – 12
Page 17

Built-In Scales
Imperial (Standard) Units
Architect Engineer-I Engineer-II Map
ARCH ENGI ENGII MAP
1 foot= 1 inch= 1 inch= 1 inch=
1/4” 10.0’ 300.0’ 1.0 Mi
3/8” 20.0’ 333.3’ 1.5 Mi
1/2” 30.0’ 400.0’ 2.0 Mi
3/4” 40.0’ 416.6’ 3.0 Mi
1/1 (1”) 50.0’ 500.0’ 4.0 Mi
1
/
3/2 (1
2”) 60.0’ 583.3’ 5.0 Mi
2/1 (2”) 83.3’ 600.0’ 6.0 Mi
3/1 (3”) 100.0’ 625.0’ 10.0 Mi
4/1 (4”) 166.6’ 666.6’ 20.0 Mi
1/32” 200.0’ 750.0’ 24.0 Mi
1/16” 250.0’ 1,000.0’ 25.0 Mi
3/32” 1,200.0’
1/8” 2,000.0’
3/16” 3,000.0’
13 – Scale Master® Pro XE
Page 18

Metric Units
Architect Engineer-I Engineer-II Map
ARCH ENGI ENGII MAP
1:50 1:100.0 1:1,000 1:100k
1:75 1:125.0 1:1,250 1:125k
1:1 1:150.0 1:1,500 1:200k
1:2 1:200.0 1:1,625 1:250k
1:3 1:250.0 1:2,000 1:500k
1:4 1:300.0 1:2,500 1:1,000k
1:5 1:400.0 1:5,000 1:2,000k
1:10 1:500.0 1:6,000 1:2,500k
1:20 1:10k
1:25 1:12.5k
1:30 1:20k
1:40 1:25k
1:50k
User’s Guide – 14
Page 19

Changing Modes
Repeated presses of the [MODE] key will
scroll through the list of available modes.
Holding [SUB] when pressing [MODE] will
scroll backward through the list of available
modes.
Changing Scales
Repeated presses of the [SCALE] key will
scroll through the list of available scales.
Holding [SUB] when pressing [SCALE] will
scroll backward through the list of available
scales.
Changing Units
Repeated presses of the [UNITS] key will
scroll through the list of available units.
Holding [SUB] when pressing [UNITS] will
scroll backward through the list of available
units.
Locking Modes, Scales and Units
Your Scale Master Pro XE comes equipped
with a lock switch that prevents inadvertently
changing drawing scales. When the lock is
activated, a lock symbol will be displayed in the
LCD. While active, the Mode, Scale and Units
cannot be revised.
15 – Scale Master® Pro XE
Page 20

Operation
User’s Guide – 16
Page 21

Rolling a Measurement
To take a measurement with the Scale Master
Pro XE:
1) Turn the unit on. If the display does not
show zero (0), press the
key to clear the display.
2) Select your type of scale by pressing the
[MODE] key. Then press the [SCALE]
key to select your scale.
3) Begin rolling. The display will register
your measurements. When you roll the
unit, be sure to hold the unit upright
(see the first picture in the "Operation"
section).
Also make sure you start and stop at
the exact points you are measuring.
Otherwise your roll may not be
accurate (see the second picture in the
"Operation" section).
4) Press the [ON/CLEAR] key to clear the
display and begin a new measurement.
[ON/CLEAR]
17 – Scale Master® Pro XE
Page 22

Using the Memory Function
The Memory function allows you to add
rolled or counted values. However, you
cannot add dimensioned (rolled) and nondimensioned (counted) values together.
To add rolled values:
1) Roll the first value.* Press
Memory indicator “M” appears and the
value is added to Memory.
2) Roll the next value. Press
value is added to your previous value
stored in Memory.
3) You can continue to add values using
[M+] key. Press [RCL] [M+] to
the
review the total in Memory.
*Note: For count values, you must press the
[COUNT] key to count your value. Then press
[RCL] [COUNT] to move the count value to the main
display. Press [M+] to add this value to Memory.
See the "Function Keys" section for
additional memory functions.
[M+]. The
[M+]. This
User’s Guide – 18
Page 23

Additional Memory Functions
[SET] [M+]
Subtracts the value in the main display
from the value stored in Memory.
[RCL] [M+]
Displays the total accumulated value in
Memory. Repeated presses of
[M+] will
toggle between total accumulated value,
number of entries in Memory, and
average value of all entries in Memory.
[ON/CLEAR] + [M+]
Clears the Memory register.
Using Ruler Mode
Your Scale Master Pro XE can be used as a
rolling ruler, which is especially useful for
measuring irregular shapes.
To change to Ruler Mode, press the
key until the Ruler Mode is indicated in the
upper display as “TAPE.” Begin rolling.
[MODE]
19 – Scale Master® Pro XE
Page 24

Programming Mode
The Scale Master Pro XE allows you to pre-set
frequently used values, including:
● Custom Scales (5 Imp/5 Met)
● Auto-Count distance
● +K (Constant) value
● Height value
To begin setting values, press the
and then the desired key to be programmed.
The following keys are used in programming
mode:
[UNITS] Toggles through available units.
[W/LxW] (X) Advances the cursor to the
next place to the right.
[L] (W) Moves the cursor back to the next
place to the left.
[M+] (S) Increases the selected value.
[RCL] (T) Decreases the selected value.
[ON/CLEAR] Exits without saving any
changes.
[SET] Exits and saves changes.
[SET] key
User’s Guide – 20
Page 25

Setting Custom Scales
You can store ten Custom Scales: five in
Imperial Mode and five in Metric Mode.
You can set a custom scale two ways: by
“rolling in” a known distance or by entering
the exact distance.
Rolling a Custom Scale
1) Press [MODE] until # OPEN (# being
a number 1-5) appears in the scale box
display.
2) Press
3) Roll desired distance. “
4) Press
5) To change the units of measurement,
[SET] [SCALE]. “ROLL” will appear
in the main display.
ROLLING” now
appears in the main display.
[SCALE]. The annunciator will
begin flashing “FT IN” for Imperial
Mode, “M” for Metric Mode.
press
[UNITS] until your desired units
appear. Press the [W/LxW] (X) or the
[L] (W) key to begin setting the distance.
The selected digit will start flashing.
21 – Scale Master® Pro XE
Page 26

6) Press [M+] (S) to increase or [RCL] (T)
to decrease the selected digit. Press the
[W/LxW] (X) key to move to the next
digit to the right or the [L] (W) key to
move back to the left.
7) Once the desired value has been entered,
[SET] to store value and exit the
press
programming mode.
Note:
Pressing [ON/CLEAR] will exit the
programming mode without saving any value as
the Custom Scale.
Entering a Custom Scale
1) Press [MODE] until # OPEN (# being
a number 1-5) appears in the scale box
display.
2) Press
3) Press
Note:
[SET] [SCALE]. “ROLL” will appear
in the main display.
[SCALE] again. The annunciator
will begin flashing “FT IN” for Imperial
Mode. The left-most digit flashes for
Metric Mode.
If in Metric Mode, skip to Step 5.
(cont’d)
22 – User’s Guide
Page 27

(cont’d)
4) To change the units of measurement,
press [UNITS] until your desired units
appear. Press the [W/LxW] (X) or the
[L] (W) key to begin setting the distance.
The selected digit will start flashing.
5) In Imperial mode, the scale will be one
inch equals the distance you entered. In
Metric mode, entered scales are direct
ratios.
6) Press
[M+] (S) to increase or [RCL] (T)
to decrease the selected digit. Press the
[W/LxW] (X) key to move to the next
digit to the right or the [L] (W) key to
move back to the left.
7) Once the desired value has been entered,
press
[SET] to store value and exit the
programming mode.
Press
[RCL] [SCALE] while in custom
mode to display the current custom
scale.
23 – Scale Master® Pro XE
Page 28

Setting an Auto-Count
The Scale Master Pro XE has an Auto-Count
function that allows you to count how many
times you’ve rolled a certain distance. You
will hear a beep each time you roll that
distance.
To set an Auto-Count:
1) Press
2) To change the units of measurement,
3) Press
[SET] [COUNT] to access the
Auto-Count function. The appropriate
annunciator will begin flashing “FT IN”
for Imperial mode or “M” for Metric
mode. “AUTO COUNT” will appear in
the display.
press
[UNITS] until your desired units
appear. Press the [W/LxW] (X) or the
[L] (W) key to begin setting the distance.
The selected digit will start flashing.
[M+] (S) to increase or [RCL] (T)
to decrease the selected digit. Press the
[W/LxW] (X) key to move to the next
digit to the right or the [L] (W) key to
move back to the left.
(cont’d)
User’s Guide – 24
Page 29

(cont’d)
4) Once the desired value has been entered,
press [SET] to save changes and put the
unit into Auto-Count mode.
5) Roll a distance. The unit will beep each
time you roll the programmed distance.
The count number in the display will
increase.
6) Press
[SET] [COUNT] to exit Auto-Count
mode.
Setting a Constant (+K)
This function is used to store a constant
value. Once a constant value has been
stored, pressing [+K] will add that value to
the displayed measurement.
To set a constant:
1) Press [SET] [+K] to access the constant
function. The appropriate annunciator
will begin flashing “FT IN” for Imperial
Mode or “M” for Metric Mode. “PLUSk”
will appear in the display.
25 – Scale Master® Pro XE
Page 30

2) To change the units of measurement,
press [UNITS] until your desired units
appear. Press the [W/LxW] (X) or the
[L] (W) key to begin setting the distance.
The selected digit will start flashing.
3) Press
[M+] (S) to increase or [RCL] (T)
to decrease the selected digit. Press the
[W/LxW] (X) key to move to the next
digit to the right or the [L] (W) key to
move back to the left.
4) Once the desired value has been entered,
press the
[SET] key to save and exit.
Additional Constant Functions
[RCL] [+K]
Allows you to verify the current
constant value.
[SUB] + [+K]
Subtracts the constant value from the
displayed measurement value.
[ON/CLEAR] + [+K]
Resets the constant value to zero.
User’s Guide – 26
Page 31

Setting a Height
The height function is used to enter a height
value for finding volume.
To set a Height:
1) Press
[SET] [L] to access the height
function. The appropriate annunciator
will begin flashing “
FT IN” for Imperial
mode or “M” for Metric mode. An “H”
will appear in the display.
2) To change the units of measurement,
press
[UNITS] until your desired units
appear. Press the [W/LxW] (X) or the
[L] (W) key to begin setting the distance.
The selected digit will start flashing.
3) Press
[M+] (S) to increase or [RCL] (T)
to decrease the selected digit. Press the
[W/LxW] (X) key to move to the next
digit to the right or the [L] (W) key to
move back to the left.
4) Once the desired value has been entered,
[SET] key to save and exit.
press the
Finding Area and Volume
The Scale Master Pro XE can calculate Area
and Volume once you have your values
set for Length, Width, and (for Volume)
Height.
27 – Scale Master® Pro XE
Page 32

Finding Area
1) Roll the first side and press the [L] key
to store as Length.
2) Roll the second side and press
to store as Width. The main display will
show the calculated Area.
[W/LxW]
Finding Volume
To access Volume after you have your
values set for Length, Width, and Height,
press [SET] [W/LxW]. Continued presses of
the [W/LxW] key will display the following
results:
1) Volume*
2) Wall Area**
3) Height**
4) Stored Length
5) Stored Width
6) Area
7) Perimeter
* If Height is not entered, a 0 will be displayed
and continued presses of [W/LxW] will not
redisplay the zero volume.
** Wall Area and Height do not display if a
Height has not been set.
User’s Guide – 28
Page 33

Additional Area/Volume Functions
[RCL] [L]
Displays the value stored in the Length
register.
[RCL] [W/LxW]
Displays the value stored in the Width
register.
[ON/CLEAR] + [L]
Clears the value stored as Length.
[ON/CLEAR] + [W/LxW]
Clears the value stored as Width.
Connecting to a PC (optional)
The Scale Master Pro XE has a computer
interface connection so that you can use it
with estimating and spreadsheet software
programs. Like your keyboard, it sends a
single value from the Scale Master Pro XE to
the selected cell in your program.
Only the value currently on the main display
will be sent to the PC. To send the displayed
value to your PC, press the [XPC] key.
Note: When connected to a PC, a small PC-shaped
icon ( ) will appear in the upper display, indicating
a valid connection has been established. This icon
will be displayed only when the USB cable is securely
connected to the Scale Master Pro XE and the PC.
29 – Scale Master® Pro XE
Page 34

APPENDIX
Error/Auto-Range Function
Error Message – If you make an incorrect
entry (such as trying to add dimensioned
and non-dimensioned values together), the
Scale Master Pro XE will display the word
“
ERROR.” Press [ON/CLEAR] to clear.
Auto Range Function – If the value is too
large to display in the selected units of
measurement, the answer will be displayed
in the next larger measurement units
instead of showing an error (for example:
“10,000,000 MM” cannot be displayed, so
“10,000 M” will be displayed instead).
Interference
Exposure to direct light or close proximity
to cell phones and other electronic devices
may cause interference with the Scale Master
Pro XE device and result in erroneous
measurements.
User’s Guide – 30
Page 35

Battery/Automatic Shut-Off
The Scale Master Pro XE is powered by two
3-Volt CR-2032 Lithium batteries (6 volts
total). To conserve battery power, the unit
will shut itself off if it is not used for 4-6
minutes. Press the [ON/CLEAR] to restore
power. All registers and settings remain
intact, including all temporary registers.
Battery Replacement
To replace the batteries:
(1) To remove battery
door, release snap lock in
slot and lift;
(2) Remove batteries and
replace with new batteries
positive side up.
(3) To replace the door,
slide it at an angle and
push down.
31 – Scale Master® Pro XE
Page 36

Default Settings
The following are the factory defaults of the
Scale Master Pro XE:
Default Default
Settings Imperial Metric
Mode ARCH ARCH
Scale 1/4" 1:50
Custom Scales 1”:1” 1:1
Linear FT IN MM
Area SQ FT SQ M
Volume CU YD CU M
Length 0-0 0.00
Width 0-0 0.00
Height 0-0 0.00
+K constant 0-0 0.00
Auto-Count 0-0 0.00
Count 0 0
Subtract Mode Off Off
Preferences Default
Button Beep On
Rolling Click On
Stored Value Display Clear LCD
PC T erminate Enter
PC Send Display Clear LCD
PC Send Beep On
User’s Guide – 32
Page 37

Specifications
Power Source:
Two 3-Volt CR-2032 lithium batteries.
Approximately 400 hours normal use.
Display Method:
LCD with commas, annunciators and zero
suppression.
Display Capacity (Main Display):
9,999,999 (7 digits)
Resolution/Accuracy:
.025 Inch/99.75%
Note: Based on start/stop point and scale
magnitude, users typically experience ± 2% - 3%
rolling error.
Dimensions:
7.2” x 1.8” x 0.4”
182mm x 45mm x 10mm
33 – Scale Master® Pro XE
Page 38

Repair and Return
Repair and Return Information
Return Guidelines:
1. Please read the Warranty in this User's
Guide to determine if your Calculated
Industries product remains under
warranty before calling or returning any
device for evaluation or repairs.
2. If your product won't turn on, check the
batteries as outlined in the User's Guide.
3. If you need more assistance, please go to
our website listed below
4. If you believe you need to return
your product, please call a Calculated
Industries representative between the
hours of 7:00am to 4:30pm Pacific Time
for additional information and a Return
Merchandise Authorization (RMA).
Call Toll Free: 1-800-854-8075
Outside USA: 1-775-885-4900
www.calculated.com/warranty
User’s Guide – 34
Page 39

Warranty
Warranty Repair Service — USA
Calculated Industries (“CI”) warrants this product against
defect s in materials and workmansh ip for a peri od of one
(1) year fr om the date of or iginal c onsumer purc hase in the
U.S. If a d efect exists during the war ranty pe riod, CI , at its
discretion , will either repai r (using new or remanufactured
part s) or replace (with a new or remanufact ured un it) the
product at no charge .
THE WAR RAN TY WI LL NOT AP PLY TO THE
PRODUCT I F IT HAS BEEN DA MAGED BY MI SUSE,
ALTE RATION , ACCIDEN T, IMPROPE R HAN DLING
OR OPERAT ION, OR IF UNAUTHORIZE D REPAIRS
AR E ATTEM PTE D OR MADE . SOME EX AMPLES
OF DAM AGES NOT COVE RED BY WAR RANTY
INCLUDE, BUT A RE NOT L IMIT ED TO, BATT ERY
LEA KAGE, BE NDING, A “ BLACK I NK SPO T” OR
VISI BLE CR ACKING OF THE LCD, W HICH AR E
PRESUMED T O BE DAMAGES R ESULTING FROM
MISUSE OR ABUSE.
To obtain wa rrant y service in the U.S ., please go to the
website . A repair ed or replace ment product assumes t he
remaining w arrant y of the orig inal product or 90 days,
which ever is longer.
Non-warranty Repair Service — USA
Non-warranty r epair cove rs serv ice beyond t he warranty
perio d, or serv ice requested due to dam age resu lting from
misuse or abuse.
Contac t Calcu lated Indu stries at t he number l isted above
to obta in curr ent product re pair in formation and char ges.
Repa irs are g uarante ed for 90 days .
35 – Scale Master® Pro XE
Page 40

Repair Service — Outside the USA
To obtain warranty or non-warranty repair service for
goods pu rchased outside the U. S., conta ct the dea ler
through which y ou initi ally pu rchased t he product . If
you can not reasonab ly have the pro duct repa ired in you r
area , you may contac t CI to obtai n curre nt product rep air
infor mation and ch arges, i ncludi ng freight a nd duties.
Disclaimer
CI M A KE S NO WA RR A N T Y O R R E PR E SE N TA TI ON ,
EITHER EXPRESS OR IMPLIED, WITH RESPECT
TO THE P RODUCT’S QUALIT Y, PERFOR MANC E,
MERC HANTA BILITY, OR FIT NESS FOR A
PARTICULAR PURPOSE . AS A RE SULT, THIS
PRODUCT, IN CLUDING BUT NOT LI MITE D TO,
KEY STROKE PROCEDUR ES, M ATHEM ATICA L
ACCUR ACY AND P REPROGR AMM ED MAT ERIA L,
IS SOL D “AS IS,” AND YOU T HE PURCH ASER
ASSU ME THE E NTIR E RISK A S TO ITS QUALITY
AND PE RFOR MANCE . IN NO EV ENT WI LL CI
BE LIA BLE FOR DIR ECT, INDIRECT, SP ECIAL ,
INCI DENTAL , OR CONSEQU ENTI AL DAM AGES
RES ULTING F ROM ANY DEF ECT IN T HE
PRODUCT OR I TS DOCUME NTATION.
The warranty, d isclai mer, and remed ies set fort h above are
exclusive and replace all ot hers, ora l or writte n, expressed
or implied. No CI dealer, agent, or employee is authorized
to make any modifi cation, extension, or addition to
thi s warrant y. Some state s do not allow t he exclusion or
lim itation of i mplied wa rrant ies or liability fo r incident al
or conseq uentia l damage s, so the above l imit ation or
exclusion may not apply to you. This warrant y gives you
specifi c rights, and you may also h ave other ri ghts, which
vary f rom state to state.
User’s Guide – 36
Page 41

FCC Class B
Note: This equipment has been tested and found to comply
with the limits for a Class B digital device, pursuant to Part
15 of the FCC Rules. These limits are designed to provide
reasonable protection against harmful interference in a
residential installation. This equipment generates, uses and
can radiate radio frequency energy and, if not installed and
used in accordance with the instructions, may cause harmful
interference to radio communications.
However, there is no guarantee that interference will not
occur in a particular installation. If this equipment does
cause harmful interference to radio or television reception,
which can be determined by turning the equipment off and
on, the user is encouraged to try to correct the interference
by one or more of the following measures:
• Reorient or relocate the receiving antenna.
• Increase the separation between equipment and
receiver.
• Connect the equipment into an outlet on a circuit
different from that to which the receiver is connected.
• Consult the dealer or an experienced radio/TV
technician for help.
Warning: Changes or modifications to this unit not expressly approved
by the party responsible for compliance could void the user’s authority
to operate the equipment.
This device complies with Part 15 of the FCC Rules.
Operation is subject to the following two conditions:
(1) this device may not cause harmful interference,
and (2) this device must accept any interference
received, including inteference that may cause
undesired operation.
Looking for New Ideas
Calculated I ndustrie s, a leadi ng manuf acture r of specia lfunc tion calculator s and dig ital meas uring i nstru ments, is
always intereste d in new product ideas in t hese areas . If you
have a new pr oduct idea , please vi sit our "Bri ght Idea" page
at ww w.calcul ated.com/br ightidea .asp. For sug gestions
about imp roving th is product or othe r products, ple ase visit
us at ww w.calculat ed.com under "C ontact Us". Thank You.
37 – Scale Master® Pro XE
Page 42

Contact Us
Mail
Calculated Industries, Inc.
4840 Hytech Drive
Carson City, NV 89706 U.S.A.
Phone
(775) 885–4900
Fax
(775) 885–4949
E-mail
techsup@calculated.com
World Wide Web
www.calculated.com
User’s Guide – 38
Page 43

Software copyrighted and licensed to
Calculated Industries by
Scale Master Technologies, LLC, 2009.
User’s Guide copyrighted by
Calculated Industries, 2009.
Scale Master
®
and Calculated Industries®
are registered trademarks of
Calculated Industries, Inc.
ALL RIGHTS RESERVED
CALCULATED INDUSTRIES
®
4840 Hytech Drive
Carson City, NV 89706 U.S.A.
1-800-854-8075 or 1-775-885-4900
Fax: 1-775-885-4949
E-mail: info@calculated.com
www.calculated.com
Designed in the U.S.A.
Printed in China
10/08
UG6135E-A
 Loading...