

Page 1

®
Operating Manual
Page 2

Cafina AG, Römerstrasse 2, CH–5502 Hunzenschwil
E-mail: info@cafina.ch, www.cafina.ch
Page 3

Contents
1 Appliance identifi cation and contact
details 2
1.1 Contact details 2
1.2 Identifying type of appliance 3
1.3 Short description of appliances 4
2 For your safety 5
2.1 What the safety symbols mean 5
2.2 Basic safety instructions 5
2.3 User rights Cafi na A
2.4 Certifi cation of Cafi na A
3 Overview of appliances 8
3.1 General overview 8
3.2 Display and arrangement of keys 8
4 Delivery and installation 9
4.1 Delivery 9
4.2 Installation 9
5 Connecting power and water 10
5.1 Connecting power and water 10
6 Initial use 11
6.1 Very fi rst use 11
6.2 Initial operation after a breakdown
or prolonged period of non-use 11
7 On/off switching 12
7.1 Cafina A and milk part 12
7.2 Milk Cooler 12
7.3 Cup Warmer 12
10 Settings and functions of the
«MANAGER» menu 19
10.1 Product-related settings
«MANAGER» 19
10.2 Submenu «Beverages» 19
10.3 Submenu «Functions» 20
10.4 Submenu «Price/Gratis» 21
10.5 Submenu «Counter» 21
10.6 Submenu «Clock time and date» 22
11 Emptying and refi lling 23
11.1 Emptying 23
11.2 Refi lling 23
12 Cleaning 24
12.1 Automatically activated
cleaning of the coff ee machine 24
12.2 Periodic cleaning of
the coff ee machine 24
12.3 Cleaning outside of
the coff ee machine 25
12.4 Cleaning the Milk Cooler 25
12.5 Cleaning the Cup Warmer 25
13 Taking out of service and storage 26
13.1 Temporary taking out of service
or taking out of service for good 26
13.2 Storage 26
14 Disposal 26
14.1 Disposal of consumables 26
14.2 Disposal of appliance 26
8 Obtaining a beverage 13
8.1 Coff ee and milk drinks 13
8.2 Hot water 13
8.3 Foaming and heating milk with the
steam valve 14
9 Key Cards 15
9.1 «USER» 15
9.2 «MANAGER» 15
9.3 «MEMORY» 17
9.4 Additional Key Cards 18
15 Fault diagnosis, error messages
and fault rectifi cation 27
15.1 Checklist for fault diagnosis and
rectifi cation 27
15.2 Error display via diagnosis points 27
16 Technical specifi cations and
installation diagram 28
16.1 Installation diagram for the
Cafi na A with optional
container ejection 31
17 Index 33
Cafi na ALPHA – 04/2006
1
Page 4
1 Appliance identifi cation and contact details
1.1 Contact details
A
MELITTA System Service
International GmbH
Ziegeleistrasse 31
5020 Salzburg
Fon 0043 662 88 28 88 33
Fax 0043 662 88 28 88 99
AUS
Global Coffee Solutions PTY LTD
Unit 5/77 Jardine Street
Fairy Meadow NSW 2519
Fon 0061 1300 55 28 83
Fax 0061 0242 84 60 99
B
MELITTA System Service Benelux
Bijkantoor MELITTA Syst. Service
Brandstraat, 8
9160 Lokeren
Fon 0032 9 331 52 30
Fax 0032 9 331 52 35
BR
Melitta Brasil Industria e Commercio Ltda.
Av. Paulista 854 – 6° Andar,
BR – CEP 01310913 – 100,
Cerqueira Cesar Sao Paulo
Fon 0055 11 31 45 12 00
Fax 0055 11 31 45 17 22
www.melitta.com.br
CDN
MELITTA Canada Inc.
1 Greensboro Drive
Suite 202
Rexdale, Ontario M9W 1C8
Fon 001 416 243 89 79 19
Fax 001 416 243 89 79 12
www.melitta.ca
CH
CAFINA AG
Römerstrasse 2
5502 Hunzenschwil
Fon 0041 62 889 42 42
Fax 0041 62 889 42 89
D
MELITTA System Service
GmbH & Co. KG
Zechenstrasse 60
32429 Minden-Dützen
Fon 0049 571 50 49 0
Fax 0049 571 50 49 233
DK
Aromateknik a/s
Industrivej 44
4000 Roskilde
Fon 0045 46 75 33 66
Fax 0045 46 75 38 10
N
E
Tecnimel Hosteleria, S.L.
Avda. Esparteros, 15
Pol. S. J. de Valderas Sanahuja
28918 Leganés (Madrid)
Fon 0034 91 644 81 30
Fax 0034 91 644 81 31
F
MELITTA System Service
France SA
16, Rue P.H. Spaak
Saint Thibault des Vignes
77462 Lagny sur Marne Cedex
Fon 0033 1 64 30 32 95
Fax 0031 1 64 30 33 40
FIN
Hackman
Metos Oy AB
Ahjonkaarre
04220 Kerava
Fon 00358 204 39 13
Fax 00358 204 39 44 33
GB
M.S.S. (UK) Limited
21 Grove Park
White Waltham
Maidenhead Berkshire
SL6 3LW
Fon 0044 1628 82 98 88
Fax 0044 1628 82 51 11
J
MELITTA Japan Ltd.
9F abc Kaikan
2-6-3, Shiba-koen, Minato-ku
Tokyo 105-0011 Japan
Fon 0081 3 54 70 27 70
Fax 0081 3 54 70 27 74
KR
Edward Keller (Korea) Ltd.
3F. Nasan Bldg. 1024
Daechi-dong
Kangnam-gu
Seoul 135-173
Fon 0082 2 21 92 95 41
Fax 0082 2 21 92 95 90
NL
MELITTA
System Service Benelux BV
Industriestraat 6
3371 XD Hardinxveld
Giessendam
Fon 0031 18 467 16 60
Fax 0031 18 461 04 14
RC
Edward Keller
21/F Southmark
11 Yip Hing St.
Hongkong/China
Fon 0085 2 28 95 96 20
Fax 0085 2 28 95 00 39
RUS
MELITTA Russland
Sofiskaya 14 of. 805
192236 St. Petersburg
Fon 007 812 3 26 65 56
Fax 007 812 3 26 65 57
S
Aromateknik A/S
Radiovägen 2
Box 662
13526 Tyresö
Fon 0046 8 7 98 77 88
Fax 0046 8 7 98 90 18
TH
Great Earth International Co., Ltd.
5th Floor, M Thai Tower,
All Seasons Place
87 Wireless Road, Patumwan
Bangkok 10330
Fon 0066 2 654 11 18
Fax 0066 2 654 11 19
TW
JAS Corporation
B1, No. 17, Lane 28
Sec. 1, Huan Shan Rd.,
Nei Hu Area
Taipei
Fon 00886 2 27 27 06 30
Fax 00886 2 27 27 06 40
USA
Michaelo Espresso, Inc.
3801 Stone Way N.
Seattle, WA 98 103
Fon 001 206 548 90 00
Fax 001 206 695 49 51
Melitta North America Inc.
13925 – 58th Street North,
USA – Clearwater, Florida 33760
Fon 001 727 5 35 21 11
Fax 001 727 5 35 73 76
Cafi na ALPHA – 04/2006
2
Page 5

1 Appliance identifi cation and contact details
1.2 Identifying type of appliance
The Cafi na ALPHA comes in the following four
versions:
ALPHA–1W Coffee and hot water
(Basic version)
ALPHA–12C Coffee, hot water and steam
(with steam nozzle for foaming
milk)
ALPHA–12M Coffee, hot water and milk
(with milk jet for all-in-one serving
of hot milk)
LPHA–12CM Coffee, hot water, steam and
A
milk
(with steam nozzle and milk jet
for all-in-one serving of hot milk
and foam)
ALPHA–mc Milk Cooler, self-contained
ALPHA–mca Milk Cooler, attached to
coffee machine
Milk Cooler Coffee machine Cup Warmer
Power supply
Rating
(in wattage)
ALPHA–cw Cup Warmer, self-contained
ALPHA–cwa Cup Warmer, attached to
coffee machine
To perform some operating steps you will need
to fi nd out the type of appliance of your Cafi na
ALPHA, as requirements can differ from one type of
appliance to the next. You can fi nd out the type of
appliance from the type plate on your Cafi na ALPHA
(for examples, see illustrations below).
The type plate of the Cafi na ALPHA is located
behind the drawer.
Year of
construction
(month.year)
Serial number of
coffee machine
Type description
Cafi na ALPHA – 04/2006
3
Page 6
1 Appliance identifi cation and contact details
1.3
Short description of appliances
1.3.1 Cafi na ALPHA
The Cafi na ALPHA is a fully automatic coffee machine,
serving various coffee-based beverages as well
as heating and foaming milk. A dual-section bean
hopper and a feed-in hopper enable the processing
of both whole beans and ready-ground coffee.
The basic version allows preset coffee bever ages
to be served with the Cafi na ALPHA. The serve
command is activated by direct-selection keys
located on the operating panel. Selection of
beverages and additional functions (cleaning,
operation statuses, fi ll level, etc.) are displayed on
the operating panel.
1.3.2 Milk Cooler (optional)
Whether attached or
self-contained, the Milk
Cooler serves purely
to cool milk. The milk
container inside the appliance comes in two
variations: either as a
nine-litre version or with
two separate chambers,
each of which can hold
four litres of milk. This
dual-chamber system
enables storage of two
various types of milk (e.g. whole milk and low-fat
milk). Serving is automatic, depending on the type
of beverages.
1.3.3 Cup Warmer (optional)
Whether attached or
self-contained, the Cup
Warmer has three levels
with heating elements
underneath them. It is
possible for experts to
preselect four temperature levels for the heating elements.
Cafi na ALPHA – 04/2006
4
Page 7
2 For your safety
2.1 What the safety symbols mean
DANGER: Risk of fatality
from electric shock!
This symbol warns of a high likelihood of electric
shock and a resultant risk of fatality.
WARNING
This symbol warns of a risk of injury (e.g. scalding).
CAUTION
This symbol warns of possible damage to the
Cafina ALPHA.
This symbol precedes important and useful information on operating the Cafina A
LPHA.
2.2 Basic safety instructions
Please follow ALL safety instructions
contained in this Operating Manual!
2.2.1 Information on this Operating
Manual
Please keep the Operating Manual handy at
all times. Ideally, store in a fi le with all other
documents relating to the Cafi na ALPHA.
2.2.2 Correct use
The Cafi na ALPHA and its accessories are intended
solely for use in catering or in factories and offi ces!
The Cafi na ALPHA and its accessories must not be
operated by children!
This symbol denotes a cross reference to another
point in the Manual or in the Quick Manual.
Use only original accessories. Any accessories not expressly recommended by
Cafi na can cause damage to the appliance,
and also fi re, electric shock and injury.
Cafi na ALPHA – 04/2006
5
Page 8
2 For your safety
2.2.3 General risks when using
the appliance
DANGER: Risk of fatality
from electric shock!
• Never operate appliance that is damaged or
has a damaged mains connection.
• Where there are signs of damage (a smell of
burning for example), immediately disconnect
appliance from the mains and contact your
service engineer.
• If there is damage to the mains connection of
this appliance, it must be replaced by a special
connection installed by a qualifi ed service engineer.
• Never allow the mains cable to dangle freely.
The mains cable can trip someone up or can
itself be damaged.
• Ensure that appliance and mains cable are
not near hot surfaces, such as gas or electric
cookers or ovens.
• Ensure mains cable is not pinched or chafes
against sharp edges.
• Never open and repair appliance yourself. Do
not modify appliance yourself unless described
in the manual.
• Appliance contains live parts. After opening
appliance, a risk of fatality is present.
• Repairs may be undertaken only by service
engineers with original spares and accessories.
WARNING: Risk of eye injury,
general injury and irreparable
damage to appliance!
Inserting objects into the grinder can result in
splinters being ejected as well as machine
becoming defective.
➤ Do not place any objects in the coffee hopper
and the passage to the grinder.
➤ Do not poke any object into the feed-in apertures!
WARNING: Risk of injury!
If you reach into the machine, internal parts can
cause crushing and grazing.
➤ Never open machine and reach inside!
The Cafi na ALPHA may be opened only by
authorized experts.
WARNING
Sour milk and coffee residue are hazards!
Irregular cleaning can lead to milk and coffee
residue adhering in the machine, blocking spouts
or fi nding their way into beverages.
The Cafi na A
is switched off.
➤ Please also clean once a day!
➤ Read Chapter 12 «Cleaning»!
LPHA is automatically cleaned when it
WARNING: Risk of burning!
• Appliance always emits hot water and hot steam
during automatic and manually activated
cleaning.
➤ Keep clear of spouts during cleaning!
• Beverage spout, hot water spout and steam
nozzle become hot.
➤ Do not touch spouts!
• Cup Warmer racks are hot.
➤ Do not touch racks!
• Appliance always emits hot water and hot steam
➤ Keep clear of spouts during cleaning!
• Beverages themselves pose a risk of scalding
➤ Take care when handling hot drinks!
• Inadvertently touching the operating panel can
➤ Because the operating panel is highly responsive,
WARNING: Risk of scalding!
during automatic and manually activated
cleaning.
whilst being served.
cause unwanted serving of coffee.
only touch this with care and deliberation.
CAUTION: Risk of
irreparable damage!
Placing objects in the feed-in apertures for
powder and for cleaning tablets can lead to
machine becoming defective.
➤ Do not insert any objects.
➤ Do not poke any object into the feed-in apertures!
Cafi na ALPHA – 04/2006
6
CAUTION: Risk of
irreparable damage!
The Cafi na ALPHA is not protected against
sprayed water.
➤ Avoid using sprayed water or high-pressure
cleaners when cleaning appliance.
➤ Note Chapter 12 «Cleaning».
Page 9
2 For your safety
2.3 User rights Cafi na ALPHA
User rights of the Cafi na ALPHA are subdivided
according to three different user groups.
1| USER (standard users)
2| MANAGER (user authorized to make settings
and adjustments)
3| ENGINEER (comprehensive authority to
undertake service and maintenance)
The various levels of authority are specifi ed by the
Key Cards. The correct Key Card is needed to carry
out all operating steps, settings and functions as
well as on/off switching.
Read Chapter 9 «Key Cards» before distributing
Key Cards.
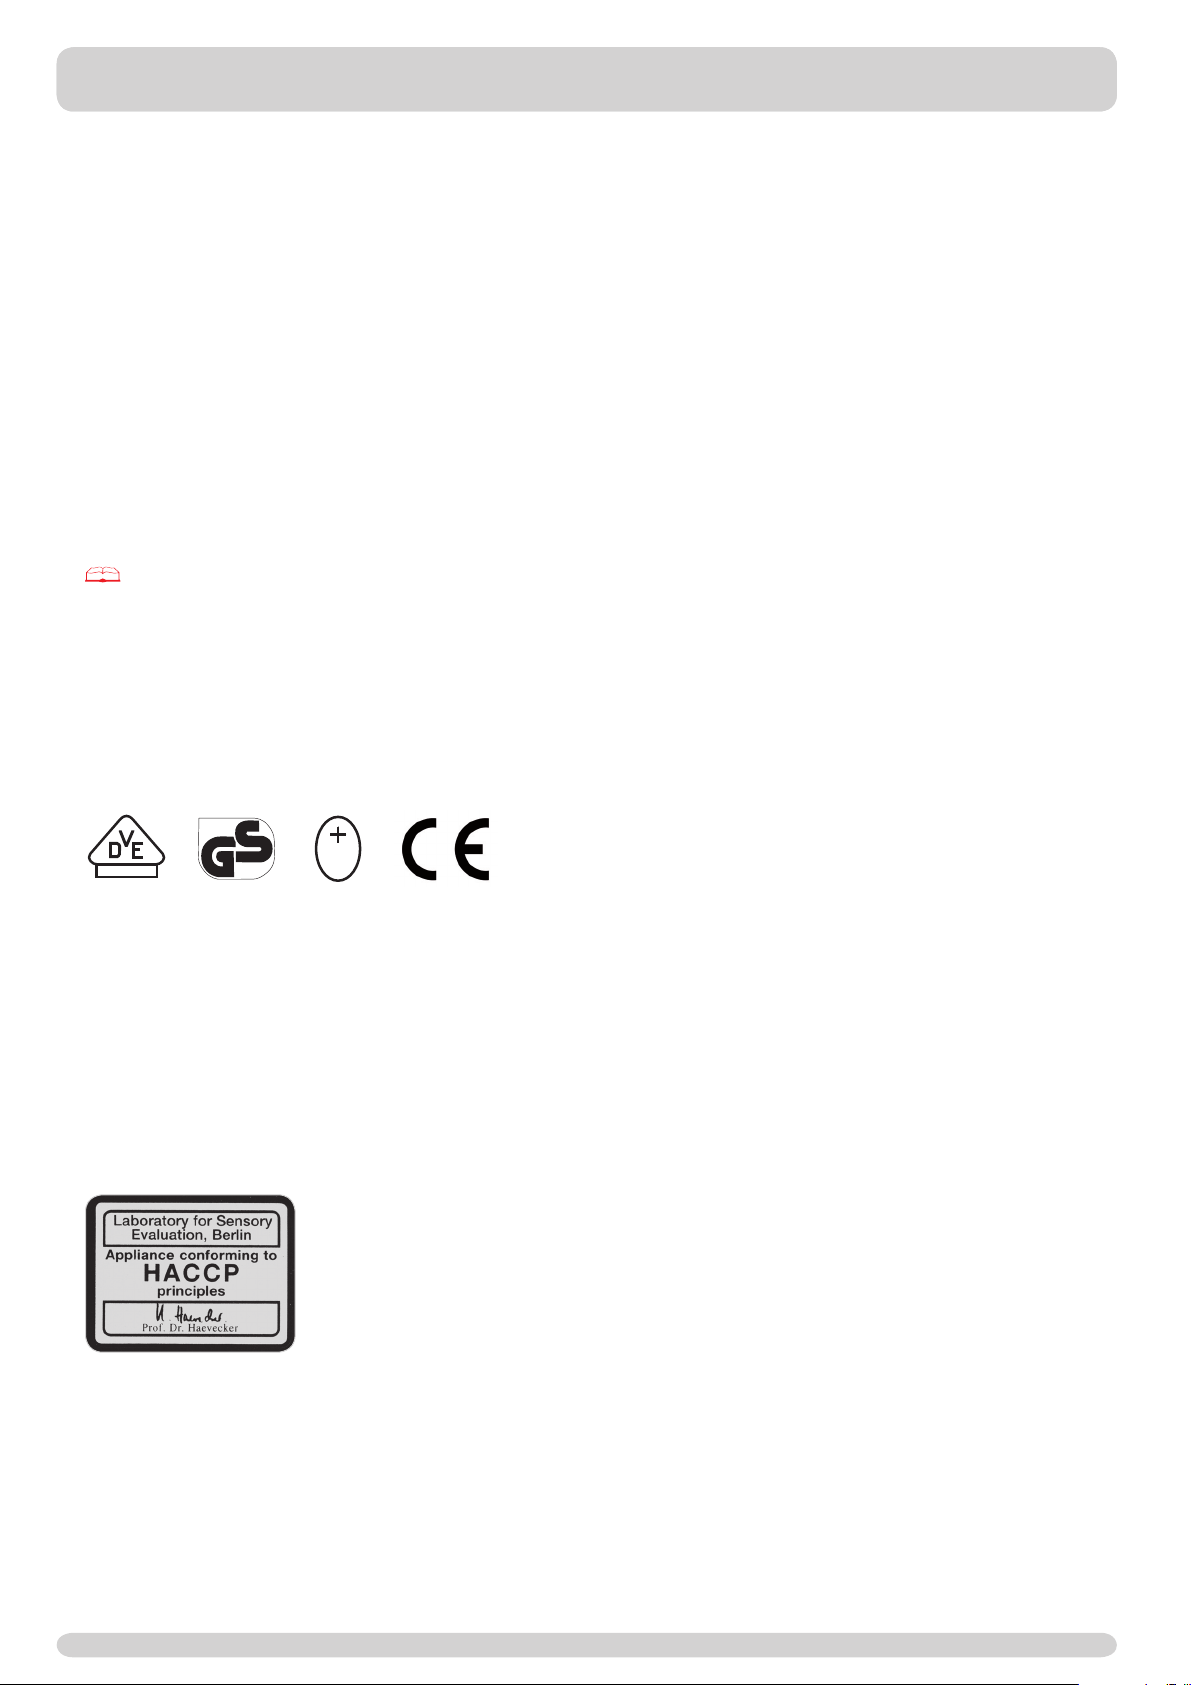
2.4 Certifi cation of Cafi na ALPHA
The Cafi na ALPHA comes with the currently required
certifi cation marks, in accordance with the certifi cation carried out:
GEPRÉFTE
3ICHERHEIT
3
For processing both cold and hot milk with the
all-inclusive, fully automatic cleaning system, the
Cafi na ALPHA satisfi es hygiene standards as specifi ed
by Professor Haevecker of the Specialist Laboratory for Sensory Evaluation in Berlin (Fachlabor für
Sensorik Berlin) (HACCP – Hazard Analysis Critical
Control Point).
Cafi na ALPHA – 04/2006
7
Page 10
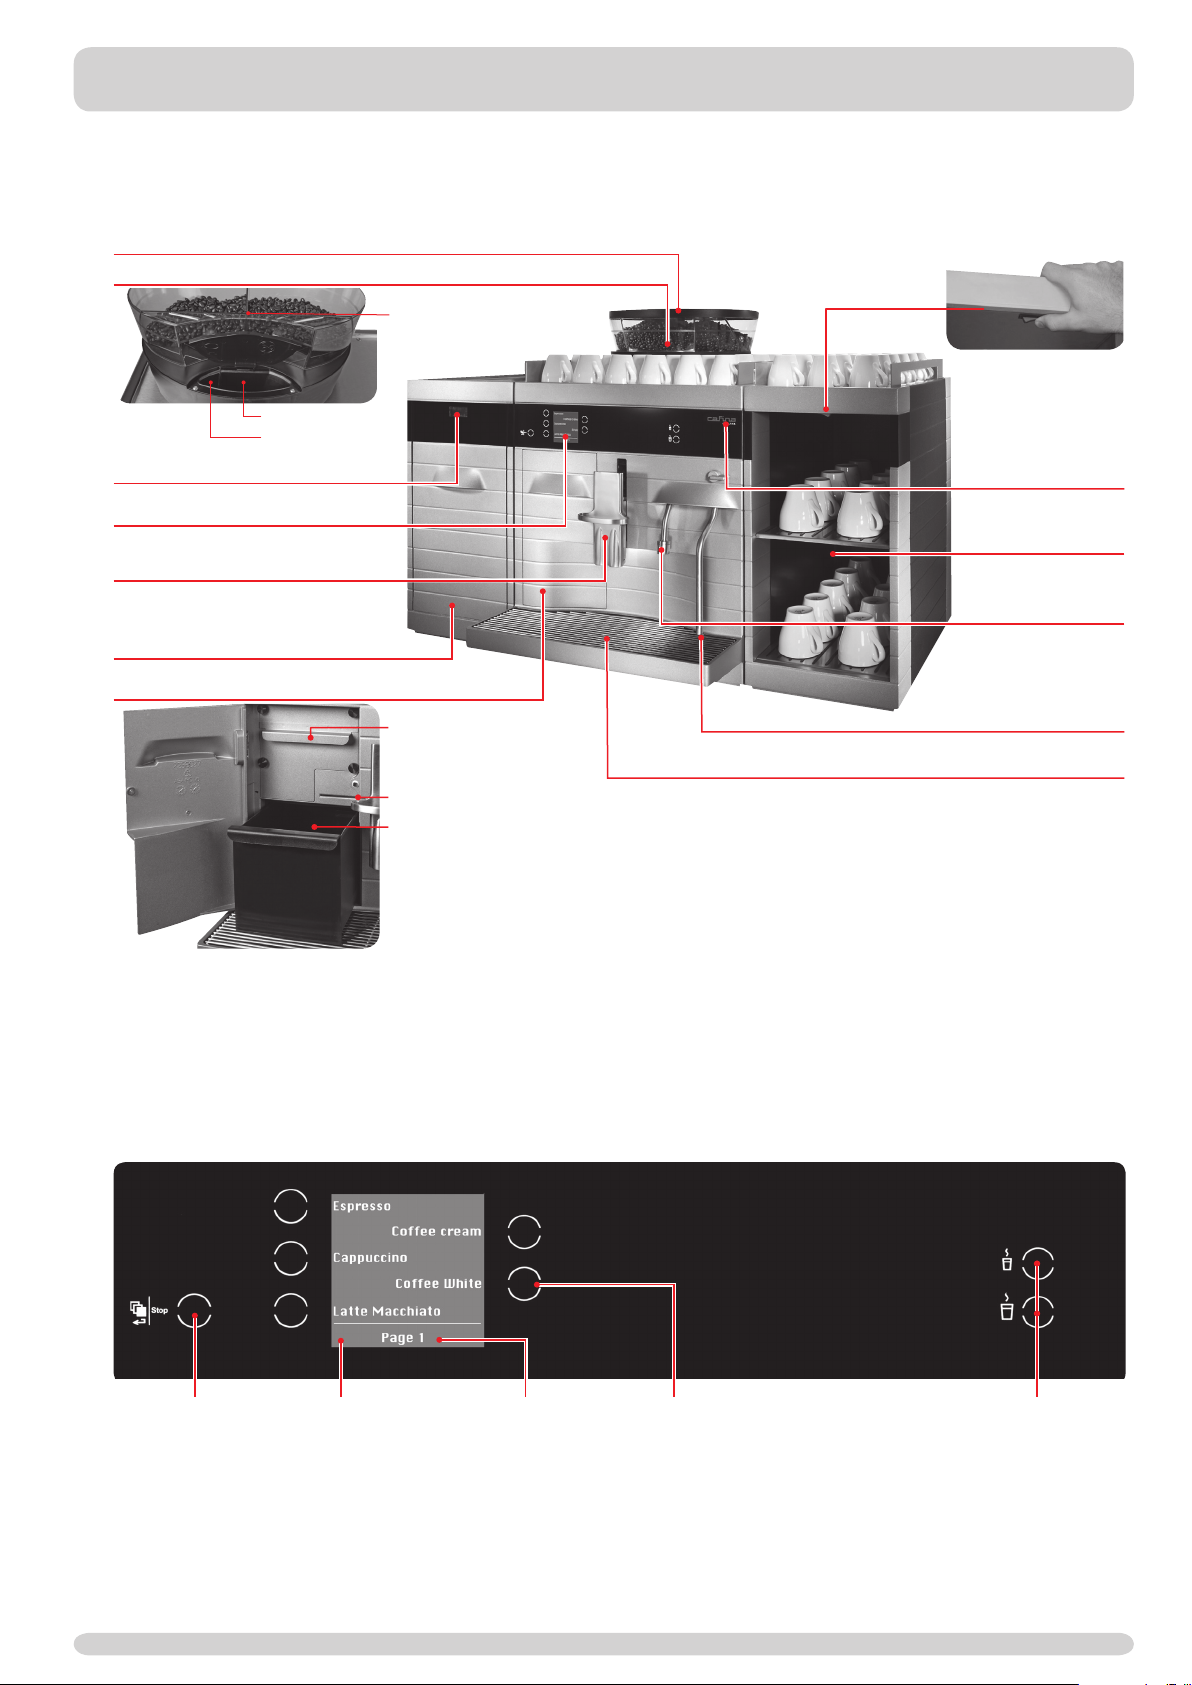
3 Overview of appliances
3.1 General overview
Coffee bean container with cover
Feed-in aperture for ready-ground coffee/cleaning tablet
Coffee beans
(left and right
container)
Ready-ground coffee
Cleaning tablet
Milk temperature display
Display
Beverage spout
height adjustable
Milk Cooler
(optional)
Front door
Milk Jet cover
Key Card slot
Drawer
Cup Warmer is activated.
Turn red switch.
Status light
When appliance is
connected to mains,
Cafi na Logo glows red.
Cup Warmer
(optional)
Hot water spout
Steam nozzle
(optional)
Drip tray
3.2 Display and arrangement of keys
Shift/Stop key
Cafi na ALPHA – 04/2006
8
Display with product
selection keys
Page number/
Status display
Product selection keys
Hot water
selection keys
Page 11

4 Delivery and installation
4.1 Delivery
Your Cafi na ALPHA comes with the following ten
accessories:
• 1 cleaning container PP, 1 litre
• 1 pack of cleaning tablets
• 1 microfi bre cloth
• 1 measuring spoon, 8 g
• 1 armoured tube L 1500 3/8"
• 2 nylon seals D 14.5 x 8 x 2 mm
• 1 Key Card holder
• 2 «USER» Key Cards
• 1 «MANAGER» Key Card
• 1 «MEMORY» Key Card
4.2 Installation
The Cafi na ALPHA is installed and serviced solely by authorized experts.
The Cafi na ALPHA is 500 mm in width, 700 mm in
height and 625 mm deep. To achieve the best an gle
of view, ensure that a suitable location is available
(see illustration).
There are four different intermediate feet, enabling height
adjustment of between 25.4 and 101.6 mm (1–4 inches).
The surface on which appliance stands must be capable of
withstanding at least 100 kg.
For further measurements and information on
preparatory steps, see:
Chapter 16 «Technical specifi cations and
installation diagram».
To prevent danger to third parties, appliance may
only be installed where it can be supervised by trained
personnel.
1600 mm
870 – 950 mm
660 – 800 mm
Cafi na ALPHA – 04/2006
9
Page 12

5 Connecting power and water
5.1 Connecting power and water
Preparation
The following is not supplied by Cafi na, and must be
provided by you for installation:
CAUTION
On the installation side, an all-pole separator
with minimum contact-opening of 3 mm per
pole must be provided.
• Maximum system impedance 0.10 ohms at
mains connection of building. (You can enquire a
bout impedance from your power supplier.)
• Plug and socket for power connection
• External main switch for power connection
• Pipes and main tap for water connection
•
Maximum pressure of water supply 0.5 MPa
(5 bar)
•
Maximum fl ow temperature of water: 20° C
Please ensure that these preparations have
been made or that this equipment is to hand by
the day when installation is to take place.
DANGER: Risk of fatality
from electric shock!
• If sockets are used with the incorrect voltage,
electric shock will result, along with irreparable
damage to the Cafina ALPHA.
➤ In the event of power or water being discon-
nected, use the connections allocated by the
service engineer. If in doubt, always contact
authorized experts.
WARNING
A damaged appliance is unsafe and can cause
serious injury and fi re.
➤ Protect appliance from weather such as rain,
frost and direct sunlight, to prevent damage
along with potential injury and fi re.
➤ Do not immerse appliance or parts of appliance
such as cables and connections in water.
CAUTION
Observe national regulations when connecting
to the water supply.
Cafi na ALPHA – 04/2006
10
Page 13

6 Initial use
6.1 Very fi rst use
The very fi rst use of all appliances (Cafina ALPHA,
Cup Warmer, Milk Cooler) is carried out by authorised experts after installation. Initial operation after a
breakdown is described in the next subchapter.
6.2 Initial operation after a
breakdown or prolonged
period of non-use
Restarting the appliance afresh will be necessary if
the Cafina Alpha and/or accessories, Cup Warmer
and Milk Cooler are not used for a prolonged period
and have been disconnected from the mains.
CAUTION: Risk of
irreparable damage!
Only allow authorized experts to restart
frozen machines. Otherwise, machine could
be damaged beyond repair.
5| Switch on Cafina ALPHA with the «USER» Key
Card. Insert Key Card. Remove card when
instructed to do so by display.
6.2.2 Milk Cooler (self-contained)
The Milk Cooler also comes as an attached
version. Power supply is active only when
coffee machine is switched on. When
machine is switched off, no milk storage is
possible in the cooler.
1| Insert main plug of Milk Cooler into
a suitable socket.
See: Chapter 4
«
Delivery and installation».
2| Fill up milk container.
3| After prolonged period of non-use:
Clean out appliance, see:
Chapter 12.1 «Automatically activated
cleaning of the coffee machine»
or
After a fault has occurred:
Rectify fault, see:
Chapter 15.1 «Checklist for fault diagnosis
and rectifi cation».
6.2.1 Cafina ALPHA
1| Plug main plug of the Cafina ALPHA into a
suitable socket.
2| Switch on external main switch.
3| Check water connection and level of coffee
beans.
4| Open front door.
6.2.3 Cup Warmer (self-contained)
The Cup Warmer also comes as an
attached version.
1| Connect Cup Warmer to mains.
2| Switch on Cup Warmer and place
cups on it.
Software does not monitor Cup
Warmer and Milk Cooler for faults.
Cafi na ALPHA – 04/2006
11
Page 14

7 On/ off switching
7.1 Cafina ALPHA and milk part
7.1.1 Switching on
1| Insert main plug of Cafina ALPHA.
2| Open front door.
3| Insert «USER» Key Card.
4| Remove Key Card when instructed to do so by
display.
Appliance is automatically rinsed when it is
DANGER: Risk of scalding!
switched on, with hot steam being produced.
Hot water is discharged through the coffee
spout. Ensure that steam nozzle is closed
when appliance is switched on.
CAUTION
➤ Always clean out appliance before swit-
ching off.
Otherwise dried milk and coffee residue
can lead to pipe blockages!
➙ Cleaning operation begins.
➙ After cleaning, machine switches off
automatically.
7.2 Milk Cooler
7.2.1 Switching on
1| If Milk Cooler is self-contained, insert
plug into a normal household socket.
➙ Temperature on display lights up.
2| Wait until 2–5° C is reached.
7.2.2 Switching off
1| Clean out appliance.
2| Isolate Milk Cooler from mains if self-contained.
➙ Display indicates status of warming-up phase.
5| After a short time, you will be instructed by the
display to refi ll with milk.
• Press «No» to use Cafina A
being served or later activation of the milk
part.
• Refi ll with milk and press «Yes» for use with
milk being served.
For later activation of milk part:
1| Check Milk Cooler for operation.
2| Fill milk container.
3| If there is no Milk Cooler,
connect external milk container.
4| Open front door.
5| Insert «USER» Key Card.
6| Remove Key Card when
instructed to do so by display.
7|
Select «Milk on».
7.1.2 Switching off
1| Open front door.
2| Insert «USER» Key Card.
3| Remove Key Card when instructed to do so by
display.
Select «Switch off».
4|
LPHA without milk
The self-contained Milk Cooler has the
same functions as a normal household refrigerator as well as an external power
supply. The milk can therefore continue to
be cooled in the Milk Cooler even when
Cafi na ALPHA is not in use. Please note
cleaning instructions.
7.3 Cup Warmer
7.3.1 Switching on
1| If Cup Warmer is self-contained, insert plug
into a normal household socket.
2| Press toggle switch to the right.
3| Fill cups.
7.3.2 Switching off
1| Press toggle switch to the left.
No need to isolate from the mains.
Cafi na ALPHA – 04/2006
12
Page 15

8 Obtaining a beverage
Shift/Stop key
Specially prepared instructions for frequent
and quick use on obtaining a beverage can
be found in the Cafi na Quick Manual.
8.1 Coffee and milk drinks
8.1.1 Scrolling through list of bever-
Display with
product selection
Page number/
Status display
ages and obtaining a beverage
1| The fi rst page of the list of beverages is
displayed in the standard image on the display.
2| Pressing Shift/Stop will display subsequent
pages of the product list.
3| Place a cup to fi t underneath spout.
WARNING:
Risk of scalding!
There is a risk of scalding whilst the beve-
rage itself is served.
➤ Avoid direct contact with the coffee spout
and also with the beverages.
4| Serve beverage desired by pressing the
particular key.
Product selection keys
Beverages are programmed in upon initial
operation by authorized experts. Using the
« MANAGER» Key Card enables already saved
types of beverages to be changed. See:
Chapter 9 «Key Cards».
8.1.3 Stopping a serving
Stopping a beverage order and deleting
subsequent tasks:
Press the Shift/Stop key twice.
Deleting subsequent beverage tasks:
Press Shift/Stop once.
A single beverage order in serving
mode 1 or 2 can be deleted by
pressing Shift/Stop once.
To completely delete a number of beverage
orders in serving mode 1 or 2, press
Shift/Stop twice in succession.
Hot water
selection keys
8.1.2 Selecting number of cups
The quantity served is determined by how often
a beverage key is pressed. During serving, the
number of cups required, though not yet served, is
displayed.
Serving mode 1: One cup served.
Serving mode 2: Two cups served at
the same time.
Type of serving
Total quantity
8.2 Hot water
8.2.1 Obtaining a beverage
1| Place glass or cup under the hot water spout.
WARNING: Risk of burning!
The hot water spout becomes very hot!
➤ Proceed with care and avoid direct contact
with spout.
2| Select portion by portion or manually.
8.2.2
Stopping a serving
1|
Press again the serving key that has already been
pressed.
Cafi na ALPHA – 04/2006
13
Page 16

8 Obtaining a beverage
8.2.3 Selecting serving mode
WARNING: Risk of scalding
from beverages themselves whilst being served.
➤ Avoid direct contact with hot water spout and
water.
Serving mode 1, portion by portion
One cup served:
1| Press beverage key briefl y.
Serving mode 2
Serving manually:
1| Hold down beverage key.
2| Beverage will continue to be served until key is
released.
Authorized experts can set the serving mode
portion by portion or manually on an individual
basis.
8.3 Foaming and heating milk with
the steam valve
CAUTION
➤ Do not touch base of vessel.
Thin glasses can be damaged by the pressure.
8.3.1 Boiling
WARNING: Risk of scalding
from hot spray!
➤ Always immerse steam nozzle in fl uids.
➤ Never switch steam nozzle on without a
container present.
➤ Avoid direct contact with the steam nozzle.
1| Immerse steam nozzle deep into the fl uid.
2| Rotate steam valve anticlockwise.
3| Shut steam valve to stop.
8.3.2 Foaming
WARNING: Risk of scalding
from hot spray!
➤ Always immerse steam nozzle in fl uids.
➤ Never switch steam nozzle on without a
container present.
➤ Avoid direct contact with the steam nozzle.
1| Immerse steam nozzle in the fl uid.
2| Rotate steam valve anticlockwise.
3| Lower vessel slowly. Repeat procedure until
desired quantity of foam has been obtained.
4| Shut steam valve to stop.
WARNING: Risk of burning!
The hot water spout becomes very hot!
Proceed with care and avoid direct contact
with the steam valve.
➤ Never switch steam nozzle on without a
container present. Always immerse steam
nozzle in fl uids.
Preparation:
1| Carefully rotate steam valve anticlockwise.
2| Condensed water is ejected.
3| Close steam valve.
CAUTION
➤ After use, reopen steam valve and allow
residual steam to escape.
➤ Wipe steam nozzle clean with a damp cloth.
➤ Always carry out these steps after use.
Otherwise steam nozzle can become
blocked, and milk crust will form around the
steam nozzle.
Cafi na ALPHA – 04/2006
14
Page 17

9 Key Cards
The Key Cards allow access to various
functions and settings of the Cafi na ALPHA.
Various types of user rights are governed by
the Key Cards, therefore preventing access by
unauthorized persons.
This Chapter explains the various Key Cards
and user authorization governed by them.
9.1 «USER»
9.1.1 Available functions
«USER» Key Card
This Chapter lists all functions and
settings that you can perform and make with the
«USER» Key Card, according to menu structure.
Depending on the operating mode of the coffee
machine, some functions will be excluded.
Main function
On/off switching
Obtaining a beverage
Cleaning and periodic
cleaning
Description
• Starting a cleaning
operation
• Separate cleaning for
coffee part and milk
part
9.1.2 Basic operation
«USER» Key Card
Switching on:
1| Insert «USER» Key Card.
2| Leave card inserted until instructed by display
to remove it.
➙ «USER» menu appears.
3| Pressing Shift/Stop changes the display view,
allowing you to select your desired beverage.
Switching off:
1| Reinsert card.
2| Leave card inserted until instructed by display
to remove it.
3| Select «Switch off» and perform the cleaning
operation, see:
Chapter 12 «Cleaning».
9.2 «MANAGER»
9.2.1 Navigation
up/down = to select main
menu item
right = to open submenu
items
left = to return to selec-
tion of «MANAGER»
menu
+ or – = to set values
+ and – = acknowledge
Counter • Beverage (displaying
beverage counter)
• Coffee
• Hot water
• Steam
• Milk
Milk suction Milk suction reactivated
Activating milk part
Switching on milk part
if not already activated
previously
9.2.2 Available functions
«MANAGER» Key Card
with extended menu
This Chapter lists all functions and settings that you can perform and make
using the «MANAGER» Key Card (extended menu),
according to menu structure. The «MANAGER» Key
Card allows you to make use of several service
engineer functions.
inserted for less than fi ve seconds, then it has
the same functions as a «USER» Key Card.
If a «MANAGER» Key Card is
Cafi na ALPHA – 04/2006
Cafi na ALPHA – 04/2006
15
15
Page 18

9 Key Cards
Main function
Products
Water quantity Controlling water
Coffee quantity Controlling coffee
1. Pre-inf fl owing
time
2. Pre-inf fl owing
time
Post-inf fl owing time Control of time of milk
Functions
Timer on/off
Timer Extern
Timer Self
Buzzer
Sound
Keylock On/off switching
Price/Gratis
Counters
Clear counters
Beverage
Coffee View coffee counter
Hot water View hot water counter
Steam View steam counter
Milk View milk counter
Time/Date
Clock time Set time
Date Set date
Description
quantity
quantity
Controlling time of fi rst
milk beverage served
before coffee
Controlling time of
second milk beverage
served before coffee
beverage served after
coffee
Coffee machine with
on/off switching of timer
External appliance with
on/off switching of timer
Coffee machine in
self-service mode with
on/off switching of timer
On/off switching of
sound
Setting «beep» or «click»
type of sound
Price
Gratis
Price Line Unit (PLU)
View beverage-total
counter
Switching on:
1| Insert «MANAGER» Key Card.
2| Leave card inserted approx.
fi ve seconds; remove when signal
sounds for second time
➙ «MANAGER» menu appears.
3| Press red keys to navigate through navigation
menu.
Switching off:
1| Reinsert card.
2| Leave card inserted until instructed by display
to remove it.
To set and change all functions, see:
Chapter 10 «Settings and functions of
the «MANAGER» menu».
Cafi na ALPHA – 04/2006
16
Page 19

9 Key Cards
9.2.3 Available functions
Key Card «MANAGER»
with simple menu
This Chapter lists all functions and settings that you
can perform and set with the «MANAGER» Key Card
(simple menu), according to menu structure. The
«MANAGER» Key Card allows you to make use of
several service engineer functions.
Main function
Functions
Timer on/off
Timer Extern
Timer Self
Counters
Clear counters
Beverage
Coffee View coffee counter
Hot water View hot water counter
Steam View steam counter
Milk View milk counter
Time/Date
Clock time Set clock time
Date Set date
Switching on:
1| Insert «MANAGER» Key Card.
2| Leave card inserted for approx.
fi ve seconds; remove card when
second signal sounds.
➙ «MANAGER» menu appears.
3| Press red keys to navigate through navigation
menu.
Settings
Coffee machine with
on/off switching of timer
External appliance with
on/off switching of timer
Coffee machine in
self-service mode with
on/off switching of timer
View beverage-total
counter
Switching off:
1| Reinsert card.
2| Leave card inserted until instructed by display
to remove it.
To set and change all functions, see:
Chapter 10 «Settings and functions of the
«MANAGER» menu».
9.3 «MEMORY»
9.3.1 Available functions
«MEMORY» Key Card
Main function
Playback of most recent functional status after a
breakdown.
9.3.2 Using the «MEMORY» Key Card
The «MEMORY» Key Card serves to provide addi tional
safeguards to all settings of your Cafi na ALPHA.
Stored on this card are the most recent settings
made by authorized experts.
If the system memory of the Cafi na A
as a result of a breakdown, then the data can be rerecorded from the «MEMORY» Key Card.
Coffee machine reset:
1| Isolate Cafi na ALPHA from mains.
2| Insert «MEMORY» Key Card and leave it in.
3| Connect Cafi na A
4| Press «Yes» to acknowledge display prompt
«Read memory card».
➙ Reset starts.
LPHA to mains.
LPHA is deleted
Cafi na ALPHA – 04/2006
17
Page 20

9 Key Cards
9.4 Additional Key Cards
The additional Key Cards are function cards.
They activate functions, though it is not possible to
navigate in the menu.
You can order the following additional Key Cards
directly through your contact, see:
Chapter 1.1 «Contact details».
9.4.1 «FREE VEND»
The «FREE VEND» Key Card enables free-of-charge
beverages when external modules are used.
Switching on:
1| Insert «FREE VEND» Key Card.
2| Leave card inserted until instructed by display
to remove it.
Switching off:
1| Reinsert card.
2| Leave card inserted until instructed by display
to remove it.
9.4.2 «SELF»
The «SELF» Key Card allows direct on/off switching
of the self-service mode of the Cafi na A
the need to intervene in the machine’s program
settings. In the self-service mode, all drinks can
be served only one by one, and stopping beverage
serving is not possible. The user has no access to
any further functions and program settings.
LPHA without
9.4.3 «EXTERN»
The «EXTERN» Key Card allows on/off switching
of external modules such as tills, coin checking
systems etc. without the need to intervene in the
program settings of Cafi na ALPHA.
Switching on:
1| Insert «EXTERN» Key Card.
2| Leave card inserted until instructed by display
to remove it.
Switching off:
1| Reinsert card.
2| Leave card inserted until instructed by display
to remove it.
9.4.4 «KEYLOCK»
The «KEYLOCK» Key Card allows barring of all
operating keys without the need to intervene in the
program settings of the Cafi na ALPHA.
Switching on:
1| Insert «KEYLOCK» Key Card.
2| Leave card inserted until instructed by display
to remove it.
Switching off:
1| Reinsert card.
2| Leave card inserted until instructed by display
to remove it.
Switching on:
1| Insert «SELF» Key Card.
2| Leave card inserted until instructed by display
to remove it.
Switching off:
1| Reinsert card.
2| Leave card inserted until instructed by display
to remove it.
Cafi na ALPHA – 04/2006
18
Page 21

10 Settings and functions of the «MANAGER» menu
10.1 Product-related
settings
«MANAGER»
up/down = to select main menu item
left/right = to open current submenu items
+/– = to set values. Pressing +/–
simultaneously deletes or
re- initializes values
Acknowledging the settings is not necessary.
Operation:
1| Main-menu point: Selection of beverages
➙ Beverage selected is displayed on lower edge
of display.
Beverage keys are allocated to the same
beverages as on the beverage menu.
Use Shift/Stop to scroll between beverage
pages or between beverage levels.
10.2.2 Coffee quantity
You can set the coffee quantity for each beverage
separately.
Operation:
1| Select submenu item «Coffee quantity».
2| Select beverage by pressing round beverage
keys.
➙ Beverage selected is displayed on lower edge
of display.
3| Press red plus and minus keys to set the coffee
quantity. Maximum setting range: +/– 1 g.
4| Quit submenu item «Coffee quantity» by
pressing left red arrow key.
10.2.3 First beverage served 1
(1. Pre-inf fl owing time)
This menu item allows you to set the quantity of the
fi rst beverage served before the coffee with mixed
beverages. Depending on the beverage, this will be
hot milk, cold milk or milk foam.
Operation:
1| Select submenu item «1. Pre-inf fl owing time».
2| Select beverage by pressing round beverage
keys.
➙ Beverage selected is displayed on lower edge
of display.
3| Press red plus and minus keys to set time
required.
4| Quit submenu item «1. Pre-inf fl owing time» by
pressing left red arrow key.
10.2 Submenu «Products»
10.2.1 Water quantity
You can set the water quantity for each beverage
separately.
Operation:
1| Select submenu item «Water quantity».
2| Select beverage by pressing round beverage
keys.
➙ Beverage selected is displayed on lower edge
of display.
3| Press red plus and minus keys to set water
quantity.
4| Quit submenu item «Water quantity» by pres-
sing left red arrow key.
10.2.4 First beverage served 2
(2. Pre-inf fl owing time)
This menu item allows you to set the quantity of
the second beverage served before the coffee with
mixed beverages. Depending on the beverage, this
will be hot milk, cold milk or milk foam.
Operation:
1| Select submenu item «2. Pre-inf fl owing time».
2| Select beverage by pressing round beverage
keys.
➙ Beverage selected is displayed on lower edge
of display.
3| Press red plus and minus keys to set time
required.
4| Quit submenu item «2. Pre-inf fl owing time» by
pressing left red arrow key.
Cafi na ALPHA – 04/2006
19
Page 22

10 Settings and functions of the «MANAGER» menu
10.2.5 Beverage subsequently served
(Post-inf fl owing time)
This menu item allows you to set the quantity of the
beverage served after the coffee when mixed beverages are served. Depending on the beverage, this
will be hot milk, cold milk or milk foam.
Operation:
1| Select submenu item «Post-inf fl owing time».
2| Select beverage by pressing round beverage
keys.
➙ Beverage selected is displayed on lower edge
of display.
3| Press red plus or minus key to set time
required.
4| Quit submenu item «Post-inf fl owing time»
by pressing left red arrow key.
10.3 Submenu «Functions»
10.3.1 Timer on/off
Here, you can set whether the Cafi na ALPHA is to
automatically switch on and off, if the times have
been programmed by authorized experts.
Bevor you switch off the Cafi na ALPHA,
the Maschine ask for cleaning.
4| Make further settings or quit «MANAGER» menu
by inserting «MANAGER» Key Card.
10.3.3 Timer Self
This function allows on/off switching of the self-service mode, if the times have been programmed by
authorized experts. All beverages for this mode are
served one by one, with all other functions barred.
This way, your guests can serve themselves at the
Cafi na A
Operation:
1| Select submenu item «Timer Self».
2| Press red plus or minus key to activate «Timer
3| Quit submenu item «Timer Self» by pressing left
4| Make further settings or quit «MANAGER» menu
10.3.4 Buzzer
Under this menu point you can set or delete key
sounds of the Cafi na ALPHA.
LPHA without inadvertently altering settings.
Self». Pressing «Yes» and «No» terminates the
input.
red arrow key.
by inserting «MANAGER» Key Card.
Operation:
1| Select submenu item «Timer on/off».
2| Press red plus or minus key to activate timer.
3| Quit submenu item «Timer on/off» by pressing
left red arrow key.
4| Make further settings or quit «MANAGER» menu
by inserting «MANAGER» Key Card.
10.3.2 Timer Extern
This menu point provides you with the option of setting connection or disconnection of external recording units (e.g. waiter lock, till, coin checker, card
systems, etc.) by time control, if the times have
been programmed by authorized experts.
Operation:
1| Select submenu item «Timer Extern».
2| Press red plus or minus key to activate
« Timer Extern». Pressing «Yes» and «No»
will terminate input.
3| Quit submenu item «Timer Extern» by pressing
left red arrow key.
Operation:
1| Select submenu item «Buzzer».
2| Press red plus or minus key to activate key
sounds. Pressing «Yes» and «No» terminates
the input.
3| Quit submenu item «Buzzer» by pressing left
red arrow key.
4| Make further settings or quit «MANAGER» menu
by inserting «MANAGER» Key Card.
10.3.5 Sound
This menu item allows you to set the type of sound
for keys. A beep or click is available.
Operation:
1| Select submenu item «Sound».
2| Press red plus or minus key to select between
the two key sounds «beep» and «click».
3| Quit submenu item «Sound» by pressing left red
arrow key.
4| Make further settings or quit «MANAGER» menu
by inserting «MANAGER» Key Card.
Cafi na ALPHA – 04/2006
20
Page 23

10 Settings and functions of the «MANAGER» menu
10.3.6 Keylock
This function allows barring of the keypad of the
Cafi na ALPHA (e.g. if you wish to leave the machine
unsupervised for a while). After unlocking keypad
barring, the Cafi na ALPHA is immediately ready for
use again.
Operation:
1| Select submenu item «Keylock».
2| Press red plus or minus key to activate keypad
barring. Pressing «Yes» and «No» terminates
the input.
3| Quit submenu item «Keylock» by pressing left
red arrow key.
4| Make further settings or quit «MANAGER» menu
by inserting «MANAGER» Key Card.
10.4 Submenu «Price/ Gratis»
This function allows you to store a price or a
«Gratis» for each product, to enable linked external
billing (e.g. till) for self-service.
10.5 Submenu «Counters»
10.5.1 Clear counters
This function allows all counter statuses to be
cleared.
Operation:
1| Select submenu item «Clear counters».
2| Press red plus and minus keys simultaneously
and hold down keys until «Release» appears on
display.
➙ «Done» then appears on display.
3| Quit submenu item «Clear counters» by pres-
sing left red arrow key.
4| Make further settings or quit «MANAGER» menu
by inserting «MANAGER» Key Card.
know. Pressing Shift/Stop takes you to the
second and third product level.
➙ Beverage selected is displayed on lower edge
of display.
➙ Counter status of this beverage appears on
display.
3| Quit submenu item «Beverage» by pressing left
red arrow key.
4| Make further settings or quit «MANAGER» menu
by inserting «MANAGER» Key Card.
10.5.3 Coffee
This function allows you to view the quantity of
beverages served consisting only of coffee (no milk
beverages).
Operation:
1| Select submenu item «Coffee».
➙ The counter status of coffee beverages is
displayed as the number of beverages served.
2| Quit submenu item «Coffee» by pressing left
red arrow key.
3| Make further settings or quit «MANAGER» menu
by inserting «MANAGER» Key Card.
10.5.4 Hot water
This function allows you to view the quantity of hot
water served.
Operation:
1| Select submenu item «Hot water».
➙ Counter status of hot water served is displayed
as the number of beverages served.
2| Quit submenu item «Hot water» by pressing left
red arrow key.
3| Make further settings or quit «MANAGER» menu
by inserting «MANAGER» Key Card.
10.5.2 Beverage
This function allows you to view the number of beverages you have selected (type of beverage: coffee,
milk, hot water, steam).
Operation:
1| Select submenu item «Beverage».
2| Select beverage by pressing round beverage
keys, the counter status of which you wish to
10.5.5 Steam
This function allows you to view the quantity of
steam ejected with the option steam valve.
1| Select submenu item «Steam».
➙ Counter status of steam served is displayed.
2| Quit submenu item «Steam» by pressing left red
arrow key.
3| Make further settings or quit «MANAGER» menu
by inserting «MANAGER» Key Card.
Cafi na ALPHA – 04/2006
21
Page 24

10 Settings and functions of the «MANAGER» menu
10.5.6 Milk
This function allows you to view the quantity of milk
beverages served.
1| Select submenu item «Milk».
➙ Counter status of milk beverages is displayed
as the number of beverages served.
2| Quit submenu item «Milk» by pressing left red
arrow key.
3| Make further settings or quit «MANAGER» menu
by inserting «MANAGER» Key Card.
10.6 Submenu «Time/Date»
10.6.1 Clock time
This function allows you to set the clock time (e.g.
changeover from winter/summer time).
1| Select submenu item «Clock time».
2| Hours: Press red arrow key to the right.
➙ Hours appear grey.
3| Press plus and minus keys to increase or
decrease hours.
4| Minutes: Press red arrow key again.
➙ Minutes appear grey.
5| Press plus and minus keys to increase or
decrease minutes.
6| Quit submenu item «Clock time» by pressing
left red arrow key.
7| Make further settings or quit «MANAGER» menu
by inserting «MANAGER» Key Card.
10.6.2 Date
This function allows you to set the date.
1| Select submenu item «Date».
2| Day: Press red arrow key to the right.
➙ Day appears grey.
3| Press plus and minus keys to increase or
decrease days.
4| Month: Press red arrow key again.
➙ Month appears grey.
5| Press plus or minus keys to increase or
decrease months.
6| Year: Press red arrow key again.
➙ Year appears grey.
7| Press plus and minus keys to increase or
decrease years.
8| Quit submenu item «Date» by pressing left red
arrow key.
9| Make further settings or quit «MANAGER» menu
by inserting «MANAGER» Key Card.
Cafi na ALPHA – 04/2006
22
Page 25

11 Emptying and refi lling
11.1 Emptying
11.1.1 Waste
When waste container is full, a message appears on
display of the Cafi na ALPHA.
➙ Message «Waste full» appears on display.
1| Empty waste canister.
2| Replace waste canister.
3| Press «Yes» to acknowledge enquiry on display
«Waste empty».
CAUTION
There is a risk of odours, stubborn contamination
and mould forming in the waste canister.
➤
Observe the details given in this chapter!
The waste canister must be emptied at least once
a day.
11.1.2 Coffee grounds
If drawer is overfi lled, the Cafi na ALPHA will stop
operating. To ensure trouble free operation,
empty drawer immediately when message
appears on display.
Always empty drawer when message «Empty
drawer» appears on display of Cafi na ALPHA.
Operation:
➙ Message «Empty drawer» appears on display.
1| Remove and empty drawer.
2| Replace drawer.
➙ Message «Drawer empty?» appears on display.
3| Press «Yes» to acknowledge.
11.2 Refi lling
11.2.1 Coffee beans and ready-ground
coffee
When one of the coffee bean containers is empty,
a message appears on the display of the Cafi na
ALPHA.
11.2.2 Fresh water
When fresh water container is empty, a message
appears on the display of the Cafi na ALPHA.
How canister operates with level indicator:
➙ Message «Fresh water empty» appears on
display.
1| Refi ll fresh water canister.
2| Press «Yes» to acknowledge enquiry on display
«Fresh water fi lled?»
To operate direct connection for fresh water:
➙ Message «No water» appears on lower edge of
display.
1| Check to ensure that shut-off valve of external
water supply is on. Open if necessary.
11.2.3 Milk
(Only if milk level indicator is present)
If one of the milk containers is empty, a message
appears on display of Cafi na ALPHA.
Operation:
➙ Message «Refi ll with milk» appears on display.
1| Refi ll with milk.
➙ Message «Milk refi lled?» appears on display.
➙ The appliance automatically changes to operat-
ing mode after milk has been refi lled.
If fl ow of milk is interrupted, milk pump is activated
via function «Milk suction» and the whole system is
fi lled with milk.
Operation:
1| Insert «USER» Key Card.
2| Select «Milk suction».
➙ System draws in milk.
Operation:
➙ Messages «Beans 1 (or 2) empty» and
«Fill beans 1 (or 2)» alternate on display.
1| Refi lling coffee beans.
2| Acknowledge by pressing Shift/Stop.
➙ Message «Bean hopper fi lled?» appears on
display.
3| Press «Yes» to acknowledge.
Cafi na ALPHA – 04/2006
23
Page 26

12 Cleaning
WARNING
➤ Perform cleaning operations at the times
described below, though at least once a day.
Otherwise, hygiene is no longer guaranteed.
WARNING: Damage to
machine and fi re risk
can result from the use of alcohol and solvents.
➤ Do not use any combustible cleaning agents.
CAUTION: Risk of
irreparable damage!
• Both the Cafi na ALPHA and accessories must
always be cleaned before switching off.
➤ Therefore, never interrupt the automatically
activated cleaning operation!
➤
Clean unit once a day.
➤
Do not hose down or spray appliance.
➤ Use only Cafi na-COMBI-Tabs for disinfecting,
rinsing, descaling and cleaning.
• You will fi nd all daily cleaning operations
illustrated in detail in the Quick Manual of the
Cafi na A
LPHA!
12.1 Automatically activated
cleaning of the coffee
machine
Before switching off each time, the cleaning
operation for the coffee- and milk parts (if used) is
started.
CAUTION
Premature wear of milk part!
➤ Instead of Cafi na-COMBI-Tab, the Cafi na-AMC
powder can be added once a week.
This effects an acidic cleaning of the milk
part.
3| Insert Cafi na cleaning container with cleaning
tablet and acknowledge on display.
➙ Rinsing begins.
1
1
0
1
9
8
7
12
1
2
3
4
: 1 min
5
6
4| Put cleaning tablet for coffee part in the hopper
provided.
➙ Coffee- and milk parts are cleaned.
12.2 Periodic cleaning of
the coffee machine
CAUTION
➤ Clean unit once a day.
Failure to follow this instruction can result in
damage!
Procedure:
1| Insert »USER« Key Card.
2| Remove card when instructed to do so by
display.
3| Select periodic cleaning on display.
➙ Selection display appears.
4| Select: «Clean coffee part?»,
«Clean milk part?» or
«Clean both?»
Procedure:
Carry out instructions as follows on display of the
Cafi na ALPHA.
12
11
0
1
9
8
7
6
1
2
3
4
: 16 min
5
1| Empty drawer and acknowledge on display.
2| Remove milk and acknowledge on display.
Cafi na ALPHA – 04/2006
24
12.2.1 «Clean coffee part?»
Only the coffee part of the Cafi na ALPHA is cleaned.
Procedure:
Carry out instructions as follows on display of the
Cafi na ALPHA.
1| Empty drawer and acknowledge on display.
➙ Rinsing begins.
1
1
10
9
8
12
1
5
7
6
2
3
4
: 5 min
11
10
9
8
7
12
1
2
3
4
: 1 min
5
6
2| Put cleaning tablet for coffee part in the hopper
provided.
3| Coffee part is cleaned.
Page 27

12 Cleaning
12.2.2 «Clean milk part?»
Only the milk part of the Cafi na ALPHA is cleaned.
Procedure:
Carry out instructions as follows on display of the
Cafi na A
LPHA.
12
11
0
1
9
8
7
6
1
2
3
4
: 11 min
5
1| Remove milk and acknowledge on display.
2| Insert Cafi na cleaning container with cleaning
tablet and acknowledge on display.
➙ Milk part is cleaned.
12.2.3 «Clean both?»
Coffee- and milk parts of the Cafi na ALPHA are
cleaned.
Procedure:
Carry out instructions as follows on display of the
Cafi na A
LPHA.
12
1
1
10
9
8
7
6
1
2
3
4
: 16 min
5
1| Empty drawer and acknowledge on display.
2| Remove milk and acknowledge on display.
3| Insert Cafi na cleaning container with cleaning
tablet and acknowledge on display.
➙ Rinsing begins.
11
10
9
8
12
1
7
6
2
3
4
: 1 min
5
4| Put cleaning tablet for coffee part into hopper
provided.
➙ Coffee- and milk parts are cleaned.
Cleaning the bean container and powder
hopper:
CAUTION
➤ Do not use cleaning agents.
Residues can affect the taste of the coffee.
1| Wipe the bean container and powder hopper
with a damp cloth.
12.4 Cleaning the Milk Cooler
DANGER
➤ Carry out these cleaning operations daily and
before fi lling with milk!
Otherwise, hygiene is no longer guaranteed.
CAUTION
➤ Do not use corrosive or abrasive household
cleaning agents.
Otherwise scratch marks will appear on
display and housing!
1| Clean milk container of Milk Cooler after
automatically activated cleaning and after
switching off Cafi na ALPHA.
2| Wipe internal part of Milk Cooler with a cloth.
3| Clean housing of Milk Cooler with a damp cloth.
12.3 Cleaning outside of
the coffee machine
Cleaning housing of the Cafi na ALPHA:
CAUTION
➤ Do not use corrosive or abrasive household
cleaning agents.
Otherwise scratch marks will appear on
display and housing!
1| Clean housing and display of Cafi na A
damp cloth.
LPHA with a
12.5 Cleaning the Cup Warmer
CAUTION
➤ Do not use corrosive or abrasive household
cleaning agents.
Otherwise scratch marks will appear on
housing!
1| Clean internal part of Cup Warmer
with a damp cloth.
2| Clean housing of Cup Warmer with
a damp cloth.
Cafi na ALPHA – 04/2006
25
Page 28

13 Taking out of service and storage
13.1 Temporary taking out of
service or taking out of service
for good
1| Carry out all necessary cleaning operations.
2| Properly isolate the Cafi na ALPHA, Cup Warmer
and Milk Cooler from the mains.
CAUTION
Failure to follow this instruction will result in
mould forming in the machine.
3| Remove all food residue from the Cafi na ALPHA.
13.2 Storage
CAUTION
Failure to follow these instructions will lead
to frost damage!
Drain the Cafi na ALPHA professionally by authorized experts.
Storage temperature must be between +5° C
and +30° C. Air humidity must be 80 %
maximum.
14 Disposal
14.1 Disposal of consumables
Observe current statutory regulations of your region
when disposing of consumables and litter.
14.2 Disposal of appliance
If you have to dispose of your Cafi na ALPHA you can
do so directly at your retailer.
If you wish to dispose of your Cafi na ALPHA yourself,
please observe the current statutory regulations of
your region.
Cafi na ALPHA – 04/2006
26
Page 29

15 Fault diagnosis, error messages and fault rectifi cation
The status line displays error messages and diagnosis points. The most important of these are
shown in the table below. If faults persist, contact the service engineer. If a number of faults or
diagnosis points occur simultaneously, these will be displayed alternately in the status line.
15.1 Checklist for fault diagnosis and rectifi cation
LCD plain text, error
messages
«Refi ll with milk»
«Drawer missing» Insert drawer correctly.
«No water»
«Bean hopper (1 or 2)
empty»
«Fill bean hopper (1 or 2)»
«Filter» Contact technical service
«Coffee service» Contact technical service Whole system must be serviced.
«Milk service» Contact technical service Milk system must be serviced.
What to do to rectify fault Causes of fault
Check level of milk.
Refi ll with milk.
Open shut-off valve of fresh water
supply.
Check water connection.
Fill with coffee beans. Bean hopper 1 or 2 is empty.
Milk level too low.
Drawer not inserted or incorrectly
inserted.
Water connection incorrect.
Water fi lter is worn and must be replaced.
Insert «USER» Key Card.
«Piston fault»
15.2 Error display via diagnosis points
Diagnosis point What to do to rectify fault Causes of fault
• Check drawer.
«DP 7»
«DP 0» –
«DP 31»
except for «DP 7»
• Empty drawer correctly.
• Contact technical service if problem
persists.
Contact technical service. System fault.
Follow instructions.
Contact technical service if problem
persists.
Fault in brewing unit.
Coffee grounds block may not have
been ejected.
Drawer is full.
Cafi na ALPHA – 04/2006
27
Page 30

16 Technical specifi cations and installation diagram
Type of machine ALPHA -1W-1G ALPHA -1W-2G ALPHA -12C-1G ALPHA -12C-2G
Number of piston units 1 1 1 1
Hot water service 1 1 1 1
Steam service none none 1 1
Grinders 1 2 1 2
Milk none none none none
Number of beverages
Number of cups served per hour:
Coffee cream 200 200 200 200
Espresso 250 250 250 250
Cappuccino 0 0 0 0
30 litres/hour,
Hot water
Maximum servings per
annum
Nominal rating 2.8 kW 2.8 kW 6.8 kW 6.8 kW
Power supply 230V, 16A 230V, 16A 400 V, 16 A 400 V, 16 A
Noise level 51 dB(A) 51 dB(A) 51 dB(A) 51 dB(A)
Ambient temperature
Relative humidity max. 80 % max. 80 % max. 80 % max. 80 %
125 tea servings,
each 200 ml
100 000 cups 100 000 cups 100 000 cups 100 000 cups
min. 5° C,
max. 30° C
30 litres/hour,
125 tea servings,
each 200 ml
min. 5° C,
max. 30° C
40 litres/hour,
175 tea servings,
each 200 ml
min. 5° C,
max. 30° C
40 litres/hour,
175 tea servings,
each 200 ml
min. 5° C,
max. 30° C
External dimensions:
Width 50 cm 50 cm 50 cm 50 cm
Height 70 cm 70 cm 70 cm 70 cm
Depth 62.5 cm 62.5 cm 62.5 cm 62.5 cm
Dry weight 65.2 kg 70.7 kg 71.2 kg 76.7 kg
Cafi na ALPHA – 04/2006
28
Page 31

16 Technical specifi cations and installation diagram
Type of machine ALPHA -12M -1G ALPHA -12M - 2G ALPHA -12CM-1G ALPHA -12CM-2G
Number of piston units 1111
Hot water service 1111
Steam service none none 1 1
Grinders 1212
Milk yes yes yes yes
Number of beverages
Number of cups served per hour:
Coffee cream 200 200 200 200
Espresso 250 250 250 250
Cappuccino 200 200 200 200
40 litres/hour,
Hot water
Maximum servings per
annum
Nominal rating 6.8 kW 6.8 kW 6.8 kW 6.8 kW
Power supply 400 V, 16 A 400 V, 16 A 400 V, 16 A 400 V, 16 A
Noise level 51 dB(A) 51 dB(A) 51 dB(A) 51 dB(A)
Ambient temperature
Relative humidity max. 80 % max. 80 % max. 80 % max. 80 %
175 tea servings,
each 200 ml
100 000 cups 100 000 cups 100 000 cups 100 000 cups
min. 5° C,
max. 30° C
40 litres/hour,
175 tea servings,
each 200 ml
min. 5° C,
max. 30° C
40 litres/hour,
175 tea servings,
each 200 ml
min. 5° C,
max. 30° C
40 litres/hour,
175 tea servings,
each 200 ml
min. 5° C,
max. 30° C
External dimensions:
Width 50 cm 50 cm 50 cm 50 cm
Height 70 cm 70 cm 70 cm 70 cm
Depth 62.5 cm 62.5 cm 62.5 cm 62.5 cm
Dry weight 71.2 kg 76.7 kg 71.2 kg 76.7 kg
Cafi na ALPHA – 04/2006
29
Page 32

16 Technical specifi cations and installation diagram
Type of machine
Milk 9 litres capacity 9 litres capacity
Nominal rating 0.15 kW 0.30 kW 0.15 kW 0.30 kW
Power supply 230 V, 10 A 230 V, 10 A 230 V, 10 A 230 V, 10 A
Ambient temperature
Relative humidity max. 80 % max. 80 % max. 80 % max. 80 %
External dimensions:
Width 28 cm 28 cm 28 cm 28 cm
Height 58 cm 58 cm 58 cm 58 cm
Depth 48 cm 48 cm 48 cm 48 cm
Dry weight 26.5 kg 19.5 kg 26.5 kg 19.5 kg
ALPHA-mc
(Milk Cooler)
min. 5° C,
max. 30° C
ALPHA-cw
(Cup Warmer)
min. 5° C,
max. 30° C
ALPHA-mc-a
(Milk Cooler)
min. 5° C,
max. 30° C
ALPHA-cw-a
(Cup Warmer)
min. 5° C,
max. 30° C
Cafi na ALPHA – 04/2006
30
Page 33

16 Technical specifi cations and installation diagram
16.1 Installation diagram for the Cafi na ALPHA with optional container ejection
MIN
MIN
O
Description Type of machine
1 Ideal drop-in height: above bean container 180 mm all ALPHA coffee machines
2 Plug and socket 3N 400 volts 16 amps A
Plug and socket 1N 230 volts 16 amps A
LPHA-12C, ALPHA-12M, ALPHA-12CM
LPHA-1W
3 Run-off tube for coffee-machine outlet all ALPHA coffee machines
4 120 mm diameter for inlets and outlets all A
LPHA coffee machines
5 150 mm diameter for optional container ejection on all appliances with the optional container
ejection system
6 Main valve for untreated water all ALPHA coffee machines
3
7 Feed G
/8" 0.4 MPa (4 bar) all ALPHA coffee machines
8 Descaling appliance (Aqua Quell Purity) all ALPHA coffee machines
Cafi na ALPHA – 04/2006
31
Page 34

16 Technical specifi cations and installation diagram
CAUTION
On the installation side, an all-pole separator
with contact-opening of 3 mm minimum per
pole must be provided.
• Maximum system impedance at mains
0.10 ohms. (You can enquire about impedance
from your power supplier.)
• Plug and socket for power supply
• External main switch for power supply
• Supply and main valve for water connection
•
Maximum water pressure 0.5 MPa (5 bar)
•
Maximum fl ow temperature of water: 20° C
Please ensure that these preparations have
been made or that this equipment is to hand by
the day when installation is to take place.
Cafi na ALPHA – 04/2006
32
Page 35

17 Index
A
Appliance identifi cation 3
B
Bean container 25
Beverage subsequently served 20
Boiling 14
Buzzer 20
C
CE 7
Certifi cation 7
Clean both 25
Clock time 22
Coffee 13
Coffee quantity 19
Connection 2, 10
Contact details 2
Correct use 5
Counter 21
Cup Warmer 4, 11, 12, 25
I
Initial operation 11
Installation 9
Installation diagram 31
Intermediate feet 9
K
Keylock 18, 21
Key arrangement 8
L
Load 9
M
Main function 15
Manager 7, 15, 19
Memory 17
Milk 23
Milk Cooler 4, 11, 12, 25
Milk foam 14
D
Date 22
Delivery 9
Diagnosis point 27
Dimensions 28, 29, 30
Display 8
Disposal 26
E
Extern 18
Emptying 23
Engineer 7
Error/Faults 27
F
Faults 27
Faults, cause of 27
Fault diagnosis 27
Foaming 14
Free Vend 18
Fresh water 23
G
Gratis 21
GS 7
H
HACCP 7
Hot water 13
Housing 25
N
Number of cups 13
O
Output 28, 29, 30
Overview of appliances 8
P
Periodic cleaning 25
Power connection 10
Power supply 28, 29, 30
Preliminary beverage 19
Price 21
R
Refi lling 23
S
S+ 7
Safety 5
Safety instructions 5
Self 18
Serving 13
Servings per hour 28, 29
Serving mode 14
Sound 20
Stopping a serving 13
Storage 26
Switching off 12
Switching on 12
Cafi na ALPHA – 04/2006
33
Page 36

17 Index
T
Taking appliance out of service 26
Technical specifi cations 28, 29, 30
Timer 20
Type of appliance 3
Type plate 3
U
User 7
User authorization 7
V
VDE 7
W
Waste 23
Waste canister 23
Water connection 10
Water quantity 19
Weight 28, 29, 30
Cafi na ALPHA – 04/2006
34
 Loading...