

Cadillac Escalade Hybrid 2009 Owner's Manual

2009 Cadillac Escalade Two-mode Hybrid M
Seats and Restraint System
Restraint System Check
Features and Controls
Storage Areas
Starting and Operating Your Vehicle
Instrument Panel
Climate Controls
Warning Lights, Gages, and Indicators
Driver Information Center (DIC)
Audio System(s)
Driving Your Vehicle
Your Driving, the Road, and the Vehicle
Towing
........................................... 2-2
............................................. 3-1
........................................ 3-2
........................................ 3-9
..................................................... 4-2
............................. 1-1
.............................. 1-2
..................................... 2-1
....................................... 4-1
............. 2-3
.......... 3-3
.................... 3-7
....... 4-2
Service and Appearance Care
Service
Checking Things Under the Hood
Four-Wheel Drive
Electrical System
Tires
Capacities and Specifications
Maintenance Schedule
Maintenance Schedule
Index
..................................................... 5-2
..................................... 5-21
...................................... 5-22
...................................................... 5-24
..................................... 6-1
................................................................ 1
.......................... 5-1
................. 5-3
..................... 5-51
................................ 6-2

GENERAL MOTORS, GM, the GM Emblem, CADILLAC,
the CADILLAC Crest & Wreath, and the name
Escalade are registered trademarks of General Motors
Corporation.
The information in this manual supplements the owner
manual. This manual includes the latest information
at the time it was printed. GM reserves the right to make
changes after that time without further notice.
Keep this manual in the vehicle for quick reference.
Introduction
Your hybrid SUV is designed to be more fuel efficient
than the standard SUV, which results in reduced carbon
dioxide emissions.
Using this Supplement
This supplement contains information specific to the
hybrid components of the vehicle. It does not explain
everything you need to know about the vehicle.
Read this supplement along with the owner manual to
learn about the vehicle’s features and controls.
Index
A good place to look for what you need is the Index in
back of this supplement. It is an alphabetical list of
what is in the supplement, and the page number where
you will find it.
Litho in U.S.A.
Part No. 25785841 A First Printing
ii
©
2008 General Motors Corporation. All Rights Reserved.

Section 1 Seats and Restraint System
Restraint System Check ...................................1-2
Replacing Restraint System Parts After a
Crash ....................................................... .1-2
1-1

Restraint System Check
Replacing Restraint System Parts After a Crash
If an airbag inflates or the vehicle has been in a crash,
the vehicle’s sensing system may command the
automatic hybrid battery disconnect to open. When the
battery disconnect is open, the hybrid battery will be
off and the vehicle will not start.
The airbag readiness light and/or SERVICE HYBRID
SYSTEM message may come on in the Driver
Information Center (DIC). See “Airbag Readiness Light”
in the owner manual and Driver Information Center
(DIC) on page 3-7 for more information.
To operate the vehicle, the automatic hybrid battery
disconnect must be reconnected by a qualified service
technician and sensing system parts will need to be
replaced. Have the vehicle serviced right away.
1-2

Section 2 Features and Controls
Storage Areas ..................................................2-2
Power Outlet Alternating Current .......................2-2
Starting and Operating Your Vehicle .................2-3
Starting the Vehicle ........................................2-3
Active Fuel Management™ ..............................2-5
Automatic Transmission Operation ....................2-6
Four-Wheel Drive ...........................................2-9
Shifting Into Park ..........................................2-14
Regenerative Braking ....................................2-16
Running the Vehicle While Parked ..................2-16
2-1
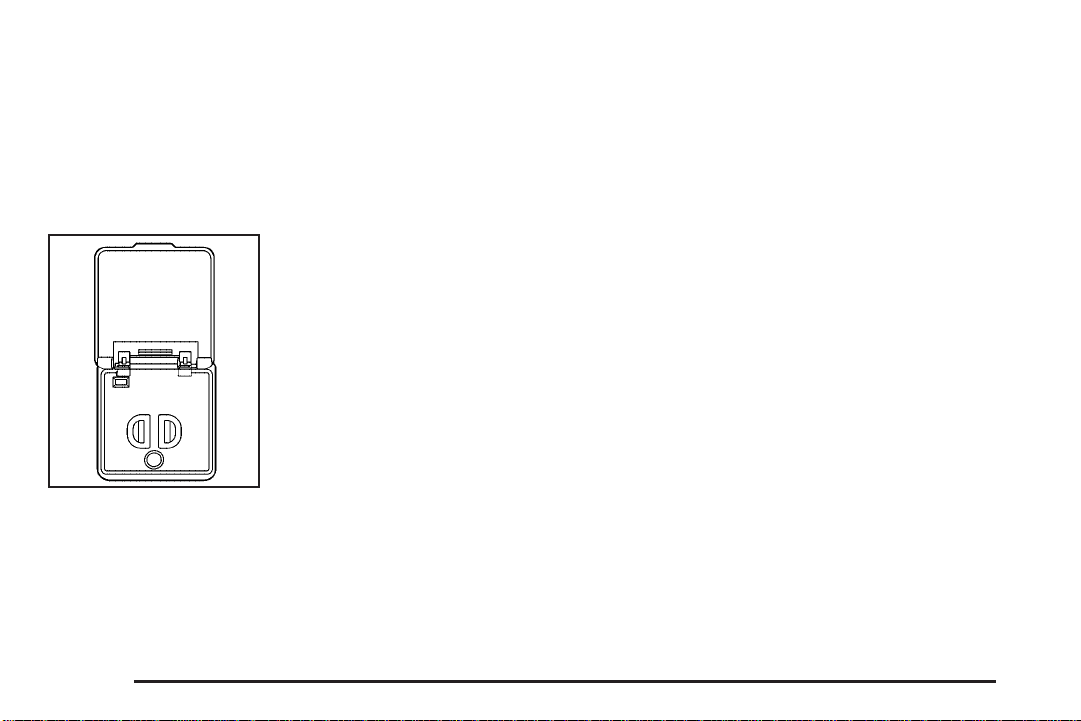
Storage Areas
Power Outlet Alternating Current
The vehicle may have a power outlet that can be used
to plug in electrical equipment that uses a maximum
limit of 150 watts.
The power outlet is located
in the rear cargo area on
the driver side.
An indicatorlight on the outlet turns on to show it is in
use. The light comes on when the ignition is in ON/RUN
and equipment requiring less than 150 watts is plugged
into the outlet, and no system fault is detected.
The indicator light does not come on when the ignition
is in LOCK/OFF or if no equipment is plugged into
the outlet.
If equipment is connected using more than 150 watts, or
a system fault is detected, a protection circuit shuts off
the power supply and the indicator light turns off. To reset
the circuit, unplug the item and plug it back in or turn the
Retained Accessory Power (RAP) off and then back on.
The power restarts when equipment using 150 watts or
less is plugged into the outlet and a system fault is not
detected.
The power outlet is not designed for the following
electrical equipment and may not work properly if these
items are plugged into the power outlet:
• Equipment with high initial peak wattage such as:
compressor-driven refrigerators and electric
power tools.
• Other equipment requiring an extremely stable
power supply such as: microcomputer-controlled
electric blankets, touch sensor lamps, etc.
See High Voltage Devices and Wiring on page 5-3.
2-2

Starting and Operating Your Vehicle
Starting the Vehicle
{ CAUTION:
Exiting the vehicle, without first shifting into
P (Park), may cause the vehicle to move, and you
or others can be seriously injured. Because the
vehicle has the Automatic Engine Start/Stop
feature, the vehicle’s engine might seem to be
shut off when you come to a complete stop.
However, once the brake pedal is released, the
vehicle can move. The vehicle’s engine can also
restart at any time.
Shift to P (Park) and turn the ignition to LOCK/OFF,
before exiting the vehicle.
Start the engine as you would any other engine.
See “Starting the Engine” in the owner manual for more
information on starting. The hybrid system provides
very quiet engine starting. If pulling a trailer with trailer
brakes, see Towing a Trailer on page 4-7 for more
information.
Auto Stop
The vehicle has an Auto Stop feature. After a successful
engine start, the engine may turn off and operate in
the Auto Stop mode. Some of the vehicle conditions
that allow the engine to stop running and enter the
Auto Stop mode are:
• Ignition switch is in the ON/RUN position.
• The hood is closed.
• The gear selector is in P (Park), N (Neutral) or
D (Drive).
• The hybrid battery is at an acceptable state of
charge.
• The hybrid battery voltage, temperature or power
limits are not exceeded. In very hot conditions,
Auto Stop may be unavailable until the hybrid
battery has cooled.
• The engine is at operating temperature.
If you are on an incline, the hybrid drive motor can help
keep the vehicle from rolling backwards, even if the
engine is in Auto Stop.
2-3

With your foot off the brake and the vehicle on
level ground, the hybrid drive motor may cause the
vehicle to roll slowly forward, even when the engine is
in Auto Stop.
Keep your foot firmly on the brake pedal until you are
ready for the vehicle to move.
Engine OFF and AUTO STOP modes are indicated on
the tachometer display. When the tachometer needle
indicates OFF, the engine is not running and will remain
off until the ignition key is placed in the START
position or a remote vehicle start is performed. When
the tachometer needle indicates AUTO STOP, the hybrid
system is on, the engine is not running, but may Auto
Start at any time without notice. See Tachometer
on page 3-4 for more information.
A chime will sound if the driver door is opened while in
Auto Stop as a reminder that the ignition switch is
not in the LOCK/OFF position. Always turn the ignition
switch to LOCK/OFF and remove the key from the
ignition switch when exiting the vehicle.
Auto Start
The vehicle also has an Auto Start feature. The engine
will remain off while in Auto Stop mode until vehicle
conditions require the engine to run. The near-instant
starting of the engine from Auto Stop mode is called
Auto Start. Some of the vehicle conditions that
may cause the engine to Auto Start are:
• The hood is opened.
• The gear selector is in M (Manual Mode) or
R (Reverse).
• The hybrid battery state of charge is too low.
• The hybrid battery voltage, temperature or power
limits are exceeded.
• The engine is not at operating temperature.
• Acceleration demands require the use of the engine.
2-4

EV Mode
The vehicle also has an EV mode which uses only the
electric motor to move the vehicle. Depending on
the state of battery charge, the vehicle can travel up to
two miles (3.2 km) in EV mode. EV mode is unavailable
when the vehicle is out of fuel.
With light acceleration, the vehicle will drive in EV mode.
If increased acceleration is required, or the vehicle
reaches approximately 25 mph (40 km/h), the engine
will start automatically. The engine shuts off at speeds
below 25 mph (40 km/h) unless the transmission is
in M (Manual Mode) or Auto Stop is disabled.
During heavy acceleration, both the engine and
hybrid electric motors supply power. A sensation similar
to a transmission gear change can be felt as the
transmission changes modes. Engine RPM may remain
above 4,000 RPM for a longer period during hard
acceleration.
Active Fuel Management™
Vehicles with V8 engines may have Active Fuel
Management™. This system allows the engine to
operate on either all or half of its cylinders, depending
on the driving conditions.
When less power is required, such as cruising at a
constant vehicle speed, the system will operate in the
half cylinder mode, allowing the vehicle to achieve better
fuel economy. When greater power demands are
required, such as accelerating from a stop, passing, or
merging onto a freeway, the system will maintain
full-cylinder operation.
If the vehicle has an Active Fuel Management™
indicator, see DIC Operation and Displays in the index
of the Owner Manual for more information on using
this display.
2-5
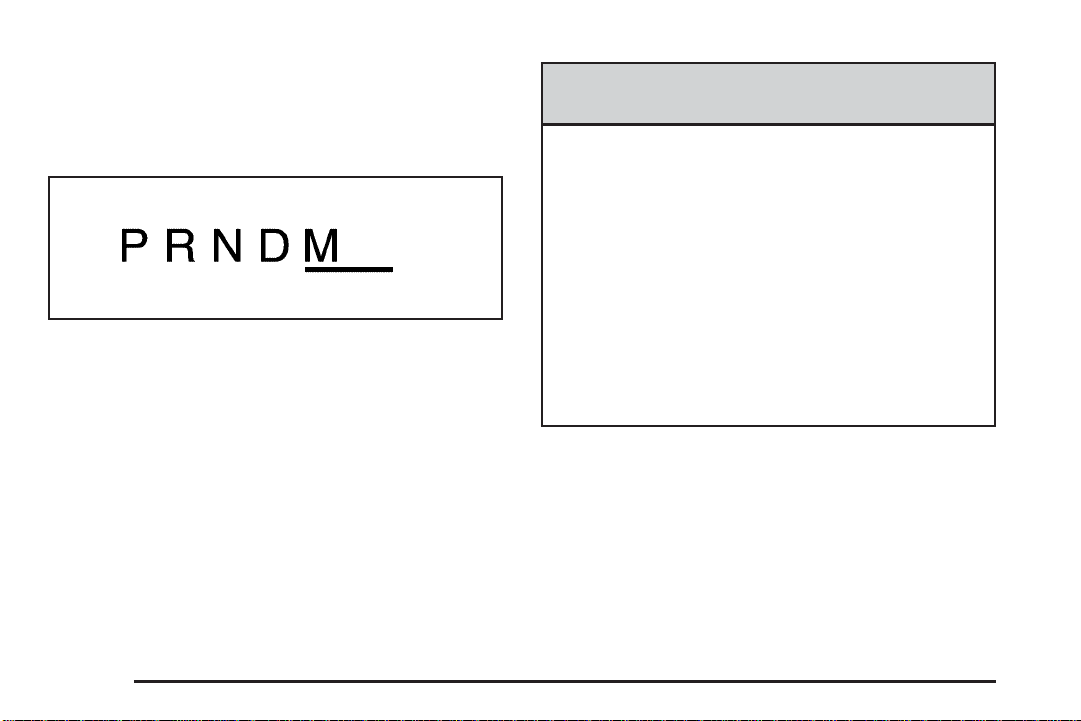
Automatic Transmission Operation
The vehicle has an electronic shift position indicator
within the instrument panel cluster.
There are several different positions for the shift lever.
See “Range Selection Mode” later in this section.
P (Park): This position locks the rear wheels. It is the
best position to use when you start the engine because
the vehicle cannot move easily.
When parked on a hill, especially when the vehicle has
a heavy load, you may notice an increase in the
effort to shift out of P (Park). See “Shifting Into P (Park)”
in the Index of vehicle’s owner manual for more
information.
{ CAUTION:
It is dangerous to get out of the vehicle if the shift
lever is not fully in P (Park) with the parking brake
firmly set. The vehicle can roll.
Do not leave the vehicle when the engine is
running unless you have to. If you have left the
engine running, the vehicle can move suddenly.
You or others could be injured. To be sure the
vehicle will not move, even when you are on fairly
level ground, always set the parking brake and
move the shift lever to P (Park). See Shifting Into
Park in the Owner Manual. If you are pulling a
trailer, see Towing a Trailer on page 4-7.
2-6
{ CAUTION:
{ CAUTION:
If you have Four-Wheel Drive, the vehicle will
be free to roll — even if the shift lever is in
P (Park) — if the transfer case is in Neutral.
So, be sure the transfer case is in a drive gear,
Two-Wheel Drive High or Four-Wheel Drive High
or Four-Wheel Drive Low — not in Neutral.
See “Shifting Into Park” in the Owner Manual.
R (Reverse): Use this gear to back up.
Notice: Shifting to R (Reverse) while the vehicle is
moving forward could damage the transmission.
The repairs would not be covered by the vehicle
warranty. Shift to R (Reverse) only after the vehicle
is stopped.
To rock the vehicle back and forth to get out of snow,
ice, or sand without damaging the transmission,
see “If Your Vehicle is Stuck in Sand, Mud, Ice, or
Snow” in the Index of the vehicle’s owner manual.
N (Neutral): In this position, the engine and
transmission are not connected with the wheels.
To restart the engine when the vehicle is already
moving, use N (Neutral) only.
Shifting into a drive gear while the engine is
running at high speed is dangerous. Unless your
foot is firmly on the brake pedal, the vehicle could
move very rapidly. You could lose control and hit
people or objects. Do not shift into a drive gear
while the engine is running at high speed.
Notice: Shifting out of P (Park) or N (Neutral) with
the engine running at high speed may damage
the transmission. The repairs would not be covered
by the vehicle warranty. Be sure the engine is
not running at high speed when shifting the vehicle.
D (Drive): This position is for normal driving. It
provides the best fuel economy. If you need more
power for passing, and you are:
• Going less than about 35 mph (55 km/h), push the
accelerator pedal about halfway down.
• Going about 35 mph (55 km/h) or more, push the
accelerator all the way down.
2-7
D (Drive) or M (Manual Mode) can be used when towing
a trailer, carrying a heavy load, driving on steep hills,
or for off-road driving. You may want to shift the
transmission to a lower gear selection if the transmission
shifts too often.
Downshifting the transmission in slippery road conditions
could result in skidding. See “Skidding” under “Loss of
Control” in the Index of the vehicle’s owner manual
for more information.
When temperatures are very cold, the transmission’s
gear shifting may be delayed, providing more stable
shifts until the engine warms up. Shifts may be more
noticeable with a cold transmission. This difference
in shifting is normal.
M (Manual Mode): This position lets drivers select the
range of gears appropriate for current driving conditions.
If the vehicle has this feature, see “Range Selection
Mode” later in this section.
Notice: Spinning the tires or holding the vehicle in
one place on a hill using only the accelerator pedal
may damage the transmission. The repair will not be
covered by the vehicle warranty. If you are stuck, do
not spin the tires. When stopping on a hill, use the
brakes to hold the vehicle in place.
The vehicle has a shift stabilization feature that adjusts
the transmission shifting to the current driving conditions
to reduce rapid upshifts and downshifts. If the shift
stabilization feature determines that a current vehicle
speed cannot be maintained, the transmission does not
upshift. In some cases, this may appear to be a delayed
shift, however the transmission is operating normally.
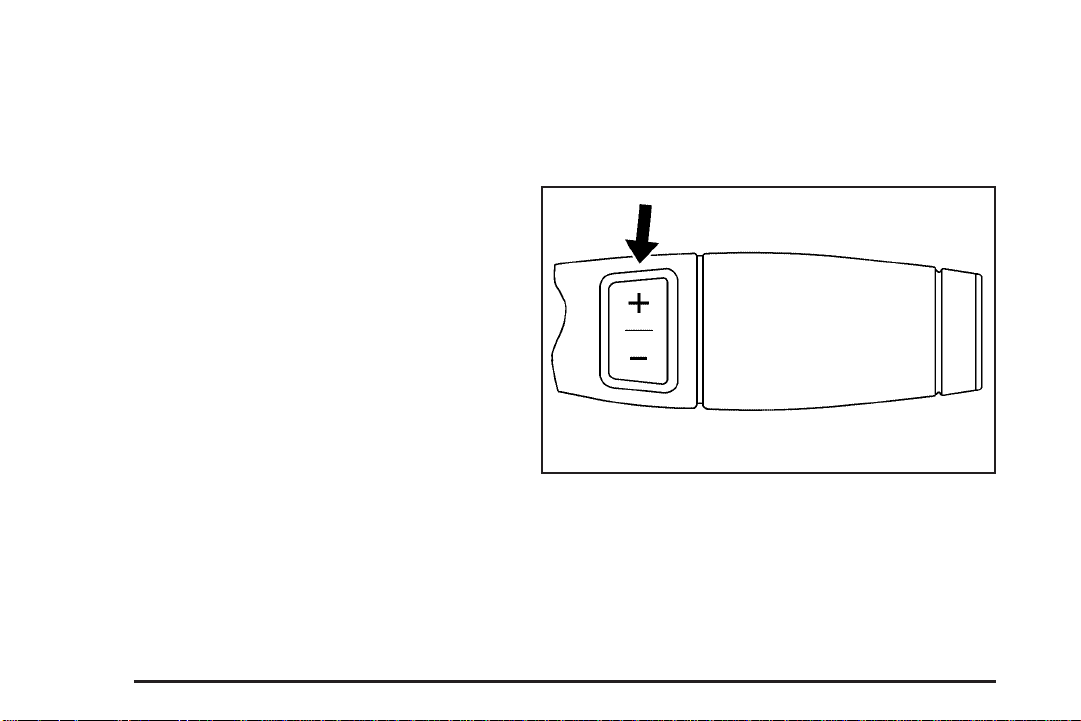
Range Selection Mode
The Range Selection Mode controls the vehicle’s
transmission.
To use this feature:
1. Move the shift lever to the M (Manual Mode).
2. Press the plus/minus button, to upshift or downshift
selecting the desired range of gears.
2-8

A number displays next to the M, indicating the current
gear that has been selected. The number displayed
in the gear indicator is the highest gear that can
be used. The vehicle can automatically shift to lower
gears as it adjusts to driving conditions. When 3 (Third)
is selected, 1 (First) through 3 (Third) gears are
automatically shifted by the vehicle, but 4 (Fourth)
cannot be used until it is selected.
The Range Selection Mode controls the vehicle and
engine speed while driving down a hill or towing a trailer,
by allowing you to select a desired range of gears.
When you move the shift lever into M, the transmission
will default to M4. In this gear range, effective engine
braking occurs at speeds above 45 mph (72 km/h).
Pushing the minus (−) button on the shift lever reduces
the gear range.
In the M3 gear range, effective engine braking occurs at
speeds above 35 mph (56 km/h).
In the M2 gear range, effective engine braking occurs at
speeds above 25 mph (40 km/h).
In the M1 gear range, effective engine braking occurs at
speeds above 10 mph (16 km/h).
When operating in M (Manual Mode), Auto Stop is
disabled. For better vehicle efficiency, operate the
vehicle in D (Drive) not M (Manual Mode).
Cruise control can be used while using the Range
Selection Mode.
Four-Wheel Drive
If the vehicle has four-wheel drive, you can send the
engine’s driving power to all four wheels for extra
traction. Read the following before using four-wheel
drive.
Notice: Driving on clean, dry pavement in
Four-Wheel-Drive High or Four-Wheel-Drive Low for
an extended period of time may cause premature
wear on your vehicle’s powertrain. Do not drive on
clean, dry pavement in Four-Wheel-Drive High or
Four-Wheel-Drive Low for extended periods of time.
While driving on clean dry pavement and during tight
turns, you may experience a vibration in the steering
system.
The vehicle has StabiliTrak
Four-Wheel-Drive Low will turn Traction Control and
StabiliTrak
®
off. See StabiliTrak®System in the index
of the Owner Manual for more information.
Front Axle
The front axle engages and disengages automatically
when you shift the transfer case. Some delay for
the axle to engage or disengage is normal.
®
. Shifting into
2-9

Automatic Transfer Case
The transfer case knob is
located to the left of the
instrument panel cluster.
Use this dial to shift into and out of four-wheel drive.
You can choose among five driving settings:
Indicator lights in the switches show you which setting
you are in. The indicator lights will come on briefly when
you turn on the ignition and the last chosen setting
will stay on. If the lights do not come on, you should take
the vehicle to your dealer/retailer for service. An
indicator light will flash while shifting. It will stay on
when the shift is completed. If for some reason
the transfer case cannot make a requested shift, it will
return to the last chosen setting.
2
m (Two-Wheel Drive High): This setting is used for
driving in most street and highway situations. The front
axle is not engaged in two-wheel drive. This setting
also provides the best fuel economy.
AUTO (Automatic Four-Wheel Drive): This setting is
ideal for use when road surface traction conditions
are variable. When driving your vehicle in AUTO, the
front axle is engaged, but the vehicle’s power is primarily
sent to the rear wheels. When the vehicle’s software
determines a need for more traction, the system
will transfer more power to the front wheels. Driving in
this mode results in slightly lower fuel economy than
Two-Wheel Drive High.
4
m (Four-Wheel Drive High): Use the four-wheel
high position when you need extra traction, such
as on snowy or icy roads or in most off-road situations.
This setting also engages the front axle to help drive
the vehicle. This is the best setting to use when
plowing snow.
4
n (Four-Wheel Drive Low): This setting also engages
the front axle and delivers extra torque. You may
never need this setting. It sends maximum power to all
four wheels. You might choose Four-Wheel Drive
Low if you are driving off-road in deep sand, deep mud,
deep snow, and while climbing or descending steep hills.
2-10

The vehicle has StabiliTrak®. Shifting into
Four-Wheel-Drive Low will turn Traction Control and
StabiliTrak
the Owner Manual for more information.
®
off. See StabiliTrak®System in the index of
{ CAUTION:
Shifting Into Four-Wheel Drive High or
AUTO (Automatic Four-Wheel Drive)
Turn the knob to the Four-Wheel High or AUTO position.
This can be done at any speed, except when shifting
from Four-Wheel Drive Low. The indicator light will flash
while shifting. It will remain on when the shift is
completed.
Shifting the transfer case to N (Neutral) can cause
the vehicle to roll even if the transmission is in
P (Park). You or someone else could be seriously
injured. Be sure to set the parking brake before
placing the transfer case in N (Neutral). See
Parking Brake in the index of the Owner Manual
for more information.
N (Neutral): Shift the vehicle’s transfer case to
N (Neutral) only when towing the vehicle. See
Recreational Vehicle Towing or Towing Your Vehicle in
the index of the Owner Manual.
If the SERVICE 4 WHEEL DRIVE message stays on,
you should take the vehicle to your dealer/retailer
for service. See DIC Warnings and Messages on
page 3-7 for more information.
Shifting Into Two-Wheel Drive High
Turn the knob to the Two-Wheel High position. This can
be done at any speed, except when shifting from
Four-Wheel Drive Low.
See “Shifting Out of Four-Wheel Drive Low” later in this
section for more information.
Shifting Into Four-Wheel Drive Low
When Four-Wheel Low is engaged, vehicle speed
should be kept below 45 mph (72 km/h). Extended
high-speed operation in 4L may damage or shorten the
life of the drivetrain.
To shift to the Four-Wheel Drive Low position, the
ignition must be in ON/RUN and the vehicle must be
stopped or moving less than 3 mph (5 km/h) with
the transmission in N (Neutral). The preferred method
for shifting into Four-Wheel Drive Low is to have
the vehicle moving 1 to 2 mph (1.6 to 3.2 km/h).
Turn the knob to the Four-Wheel Drive Low position.
2-11

You must wait for the Four-Wheel Drive Low indicator
light to stop flashing and remain on before shifting
the transmission into gear.
Notice: Shifting the transmission into gear before
the Four-Wheel Drive Low indicator light has
stopped flashing could damage the transfer case.
To help avoid damaging the vehicle, always wait for
the Four-Wheel Drive Low indicator light to stop
flashing before shifting the transmission into gear.
The vehicle may have significant engagement noise
and bump when shifting between Four-Wheel Drive Low
and Four-Wheel Drive High ranges or from N (Neutral)
while the engine is running.
If the knob is turned to the Four-Wheel Drive Low
position when the vehicle is in gear and/or moving, the
Four-Wheel Drive Low indicator light will flash for
30 seconds and not complete the shift unless the vehicle
is moving less than 3 mph (5 km/h) and the transmission
is in N (Neutral). After 30 seconds the transfer case
will shift to Four-Wheel Drive High mode.
Shifting Out of Four-Wheel Drive Low
To shift from Four-Wheel Drive Low to Four-Wheel Drive
High, AUTO, or Two-Wheel Drive High, the vehicle
must be stopped or moving less than 3 mph (5 km/h)
with the transmission in N (Neutral) and the ignition
in ON/RUN. The preferred method for shifting out of
Four-Wheel Drive Low is to have your vehicle moving
1 to 2 mph (1.6 to 3.2 km/h). Turn the knob to the
Four-Wheel Drive High, AUTO, or Two-Wheel Drive
High position. You must wait for the Four-Wheel Drive
High, AUTO, or Two-Wheel Drive High indicator
light to stop flashing and remain on before shifting the
transmission into gear.
Notice: Shifting the transmission into gear before
the Four-Wheel Drive Low indicator light has
stopped flashing could damage the transfer case.
To help avoid damaging the vehicle, always wait for
the Four-Wheel Drive Low indicator light to stop
flashing before shifting the transmission into gear.
The vehicle may have significant engagement noise
and bump when shifting between Four-Wheel Drive Low
and Four-Wheel Drive High ranges or from N (Neutral)
while the engine is running.
If the knob is turned to the Four-Wheel Drive High,
AUTO, or Two-Wheel Drive High switch position when
the vehicle is in gear and/or moving, the Four-Wheel
Drive High, AUTO or Two-Wheel Drive High indicator
light will flash for 30 seconds but will not complete
the shift unless the vehicle is moving less than 3 mph
(5 km/h) and the transmission is in N (Neutral).
2-12

Shifting into Neutral
To shift the transfer case into N (Neutral):
1. Make sure the vehicle is parked so that it will not roll.
2. Set the parking brake and apply the regular brake
pedal. See Parking Brake in the index of the
Owner Manual for more information.
3. Start the vehicle or turn the ignition to ON/RUN.
4. Put the transmission in N (Neutral).
5. Shift the transfer case to Two-Wheel Drive High.
6. Turn the transfer case dial clockwise to N (Neutral)
until it stops and hold it there until the N (Neutral)
light starts blinking. This will take at least
10 seconds. Then slowly release the dial to the
Four-Wheel Drive Low position. The N (Neutral) light
will come on when the transfer case shift to
N (Neutral) is complete.
7. If the engine is running, verify that the transfer case
is in N (Neutral) by shifting the transmission to
R (Reverse) for one second, then shift the
transmission to D (Drive) for one second.
8. Turn the ignition to ACC/ACCESSORY, which will
turn the engine off.
9. Place the transmission shift lever in P (Park).
10. Release the parking brake prior to moving the
vehicle.
11. Turn the ignition to LOCK/OFF.
Shifting Out of Neutral
To shift the transfer case out of N (Neutral):
1. Set the parking brake and apply the regular brake
pedal.
2. Turn the ignition to ON/RUN with the engine off,
and shift the transmission to N (Neutral).
3. Turn the transfer case dial to the desired transfer
case shift position (Two-Wheel Drive High,
Four-Wheel Drive High, AUTO).
After the transfer case has shifted out of N (Neutral),
the N (Neutral) light will go out.
4. Release the parking brake prior to moving the
vehicle.
Notice: Shifting the transmission into gear before
the Four-Wheel Drive Low indicator light has stopped
flashing could damage the transfer case. To help
avoid damaging the vehicle, always wait for the
Four-Wheel Drive Low indicator light to stop flashing
before shifting the transmission into gear.
5. Start the engine and shift the transmission to the
desired position.
Excessively shifting the transfer case into or out of the
different modes may cause the transfer case to enter the
shift protection mode. This will protect the transfer case
from possible damage and will only allow the transfer
case to respond to one shift per 10 seconds. The transfer
case may stay in this mode for up to three minutes.
2-13

Shifting Into Park
{ CAUTION:
It can be dangerous to get out of the vehicle if the
shift lever is not fully in P (Park) with the parking
brake firmly set. The vehicle can roll. If you have
left the engine running, the vehicle can move
suddenly. You or others could be injured. To be
sure the vehicle will not move, even when you are
on fairly level ground, use the steps that follow.
With four-wheel drive, if the transfer case is in
N (Neutral), the vehicle will be free to roll, even if
the shift lever is in P (Park). So, be sure the
transfer case is in a drive gear — not in
N (Neutral). If you are pulling a trailer, see Towing
a Trailer on page 4-7.
1. Hold the brake pedal down, then set the parking
brake.
See Parking Brake in the index of the Owner
Manual for more information.
2. Move the shift lever into the P (Park) position by
pulling the shift lever toward you and moving it up
as far as it will go.
3. Be sure the transfer case is in a drive gear — not
in N (Neutral).
4. Turn the ignition key to LOCK/OFF.
5. Remove the key and take it with you. If you can
leave the vehicle with the ignition key in your
hand, the vehicle is in P (Park).
2-14
Leaving the Vehicle With the Engine
Running
{ CAUTION:
It can be dangerous to leave the vehicle with the
engine running. The vehicle could move suddenly
if the shift lever is not fully in P (Park) with the
parking brake firmly set.
If you have four-wheel drive and the transfer case is
in N (Neutral), the vehicle will be free to roll, even if
the shift lever is in P (Park). So be sure the transfer
case is in a drive gear — not in N (Neutral).
And, if you leave the vehicle with the engine
running, it could overheat and even catch fire. You
or others could be injured. Do not leave the vehicle
with the engine running unless you have to.
If you have to leave the vehicle with the engine running,
be sure your vehicle is in P (Park) and the parking
brake is firmly set before you leave it. After you move
the shift lever into P (Park), hold the regular brake pedal
down. Then, see if you can move the shift lever away
from P (Park) without first pulling it toward you.
If you can, it means that the shift lever was not fully
locked into P (Park).
Torque Lock
If parking on a hill and the transmission not shifted into
P (Park) properly, the weight of the vehicle may put
too much force on the parking pawl in the transmission.
You may find it difficult to pull the shift lever out of
P (Park). This is called torque lock. To prevent torque
lock, set the parking brake and then shift into P (Park)
properly before you leave the driver seat. To find
out how, see Shifting Into Park on page 2-14.
When you are ready to drive, move the shift lever out of
P (Park) before you release the parking brake.
If torque lock does occur, you may need to have another
vehicle push yours a little uphill to take some of the
pressure from the parking pawl in the transmission, then
you will be able to pull the shift lever out of P (Park).
2-15

Regenerative Braking
Regenerative braking is a hybrid technology that
enables the electric drive motor to operate as a
generator when coasting or braking. Energy from the
moving vehicle recharges the hybrid battery.
The hydraulic disc brakes work with the regenerative
braking to insure effective braking, such as when a high
braking demand is requested.
The braking system is computer controlled and blends
the regenerative braking with the conventional hydraulic
disc brakes to meet any requirements for deceleration.
The controller interprets the braking request and
uses regenerative braking, conventional hydraulic
braking or a combination of both as necessary. Because
the controller applies the hydraulic brakes through its
high pressure accumulator, you may occasionally
hear the motor driven pump when it recharges the
system. This is normal.
See “Warning Lights, Gages, and Indicators” and “Driver
Information Center (DIC)” in the Index of the owner
manual. In the event of a controller problem, the brake
pedal may be harder to push and the stopping
distance may be longer.
Running the Vehicle While Parked
It is better not to park with the engine running. But if you
ever have to, here are some things to know.
{ CAUTION:
Exiting the vehicle, without first shifting into
P (Park), may cause the vehicle to move, and you
or others can be seriously injured. Because the
vehicle has the Automatic Engine Start/Stop
feature, the vehicle’s engine might seem to be
shut off when you come to a complete stop.
However, once the brake pedal is released, the
vehicle can move. The vehicle’s engine can also
restart at any time.
Shift to P (Park) and turn the ignition to LOCK/OFF,
before exiting the vehicle.
Follow the proper steps to be sure the vehicle will not
move. See “Shifting Into Park” in the owner manual
for more information.
If pulling a trailer, see Towing a Trailer on page 4-7 for
more information.
2-16

Section 3 Instrument Panel
Climate Controls ..............................................3-2
Warning Lights, Gages, and Indicators ..............3-3
Instrument Panel Cluster .................................3-3
Tachometer ...................................................3-4
Charging System Light ....................................3-4
Fuel Economy Gage .......................................3-5
Oil Pressure Light ...........................................3-6
Driver Information Center (DIC) .........................3-7
DIC Warnings and Messages ...........................3-7
Audio System(s) ..............................................3-9
Navigation/Radio System .................................3-9
3-1

Climate Controls
For more information on the vehicle’s climate control
system, see “Climate Control System” in the owner
manual.
Electric Air Conditioning Compressor
This hybrid vehicle has a electrically powered air
conditioning compressor. This allows for continuous air
conditioning operation and passenger comfort, even
while the hybrid engine cycles on and off.
When operating the climate control system, select the
AUTO mode and the desired temperature setting.
The climate control system automatically adjusts the fan
speed and airflow direction. The climate control
system continues to adjust the climate control settings
chosen for best use of electrical power.
To get maximum engine off time, select a warmer
temperature setting or turn off the air conditioning to
shut off the compressor. Continuous air conditioning use
can cause the engine to autostart more frequently.
Some noise may be heard occasionally from the
compressor, especially when air conditioning use is high
and the engine has turned off.
3-2
Warning Lights, Gages, and Indicators
Instrument Panel Cluster
United States version shown, Canada similar
The instrument cluster is designed to show at a glance how the vehicle is running. It shows how fast the vehicle is
going, about how much fuel is left, and many other things needed to know to drive safely and economically.
3-3
Tachometer
Charging System Light
United States Version shown, Canada
similar
When the gas engine is off and the key is in the
ON/RUN position, the tachometer indicates the state of
the vehicle:
• AUTO STOP position indicates that the vehicle is
still able to move and the engine could restart, by
an Auto Start, at any time.
• OFF position indicates that either the vehicle was
turned off or the engine has stalled.
When the engine is on, the tachometer indicates the
engine’s revolutions per minute.
3-4
This light will come on
briefly when the ignition is
turned to ON/RUN, but
the engine is not running,
as a check to show it
is working.
It should go out once the engine has been started. If it
stays on, or comes on while driving, there could be
a problem with the charging system. A charging system
Driver Information Center (DIC) message may also
appear. See DIC Warnings and Messages on page 3-7
for more information. This light could indicate that
there are electrical problems. Have it checked right
away. If a short distance must be driven with the light
on, be certain to turn off all the accessories, such as the
radio and air conditioner.
Fuel Economy Gage
Driving behavior that improves fuel efficiency makes the
fuel indicator move to the high efficiency band on the
fuel gage. When driving in a way that decreases
fuel economy, the indicator moves into the less efficient
band. There are several zones on the gage, indicating
several levels of efficiency while accelerating or
decelerating.
United States
This gage shows when the vehicle is operating at a fuel
efficient point.
Canada
3-5
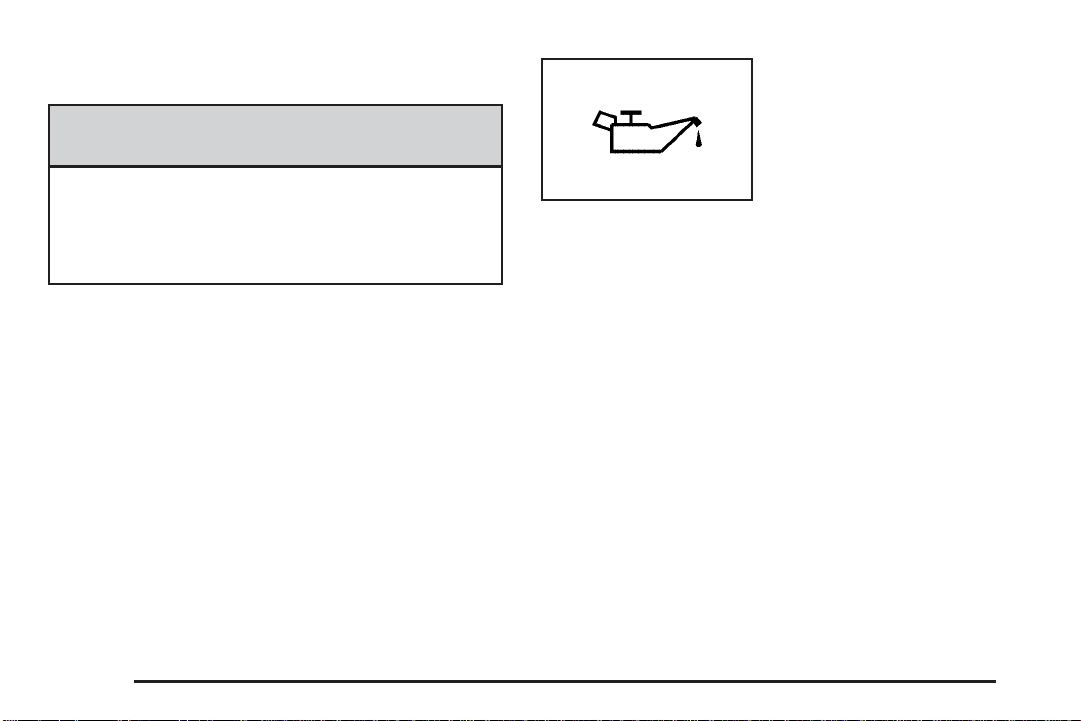
Oil Pressure Light
{ CAUTION:
Do not keep driving if the oil pressure is low. The
engine can become so hot that it catches fire.
Someone could be burned. Check the oil as soon
as possible and have the vehicle serviced.
Notice: Lack of proper engine oil maintenance
can damage the engine. The repairs would not be
covered by the vehicle warranty. Always follow the
maintenance schedule in this manual for changing
engine oil.
This light comes on briefly
as a check it works, when
the ignition is in ON/RUN.
If it does not, have the
vehicle serviced.
If the light comes on and stays on, it means that oil is
not flowing through the engine properly. The vehicle
could be low on oil and might have some other system
problem.
During an AUTO STOP there is zero oil pressure, but
this light will not come on.
3-6

Driver Information Center (DIC)
Trip/Fuel Menu Items
Press the trip/fuel button to display the instantaneous
economy. For more items see “DIC Operation and
Displays” in the owner manual.
INST (Instantaneous) ECONOMY
This display normally shows instantaneous fuel
economy. When the vehicle is in Auto Stop mode AUTO
STOP will be displayed. See Starting the Vehicle on
page 2-3 for more information. The display may
also show if the vehicle is currently in V4 MODE or
V8 MODE. See Active Fuel Management™ on page 2-5
for more information.
DIC Warnings and Messages
Warning messages are displayed on the DIC to notify
the driver that the status of the vehicle has changed
and that some action may be needed by the driver
to correct the condition. If there is more than one
message that needs to be displayed they will appear
one after another. Some messages may not require
immediate action but you should press the select button
or the trip odometer reset stem on the instrument panel
cluster to acknowledge that you received the message
and clear it from the display. Some messages cannot be
cleared from the display because they are more
urgent; these messages require action before they can
be removed from the DIC display. The following are
the possible messages that can be displayed and some
information about them. For information on other DIC
messages, see “DIC Warnings and Messages” in
the owner manual Index.
HOOD OPEN
If the hood isnot fully closed or there is a problem with
the hood switch, this message will be displayed. Close
the hood to clear the message. If the HOOD OPEN
message continues to be displayed after verifying the
hood is closed, you should have the hood switch
serviced. Pressing the select button or the trip odometer
reset stem on the instrument panel cluster will
acknowledge this message and clear it from the DIC
display.
When this message is displayed, the auto stop
function will not operate. If the vehicle is in auto stop
mode when this message appears, the engine will
instantly start.
3-7

OIL PRESSURE LOW STOP ENGINE
If engine oil pressure is low, this message will be
displayed on the DIC. Stop the vehicle as soon as safely
possible and do not operate it until the cause of the
low oil pressure has been corrected. Check your oil level
as soon as possible and have your vehicle serviced.
See “Engine Oil” in the owner manual Index.
SERVICE 4 WHEEL DRIVE
This message may display if a problem occurs with the
four-wheel-drive system. If this message appears,
stop as soon as possible and turn off the vehicle. Make
sure the key is in the LOCK/OFF position for at least
one minute and then restart the vehicle and check
for the message on the DIC display. If the message is
still displayed or appears again when you begin
driving, the four-wheel-drive system needs service. See
your dealer/retailer.
SERVICE BATTERY CHARGING
SYSTEM
If the hybrid battery system faults or fails this message
will appear on the DIC. The engine auto stop feature
will be disabled and the battery/charging system light will
appear in the instrument panel cluster. See “Battery
Warning Light” in the owner manual Index.
Driving with this light on could drain your batteries.
Have the electrical system checked as soon as possible.
Pressing the select button or the trip odometer reset
stem on the instrument panel cluster will acknowledge
this message and clear it from the DIC display.
SERVICE BRAKE SYSTEM
This message may be displayed if there is a problem
with the brake system. You will still be able to brake, but
it will be noticeably more difficult. Pull off the road to a
safe location and have your vehicle towed to the nearest
dealer/retailer for service. See “Brakes,” “Brake
System Warning Light,” and “ABS Brake System
Warning Light” in the owner manual Index.
This message may also come on when you are towing
a trailer. See “Trailer Brakes” under Towing a Trailer
on page 4-7 for more information.
SERVICE HYBRID SYSTEM
If this message is displayed on the DIC, the vehicle may
continue to operate, but you need to have it serviced
as soon as possible.
SERVICE POWER STEERING
This message displays if a problem has been detected
with the electric power steering. Have your vehicle
serviced by your dealer/retailer immediately.
3-8
Audio System(s)
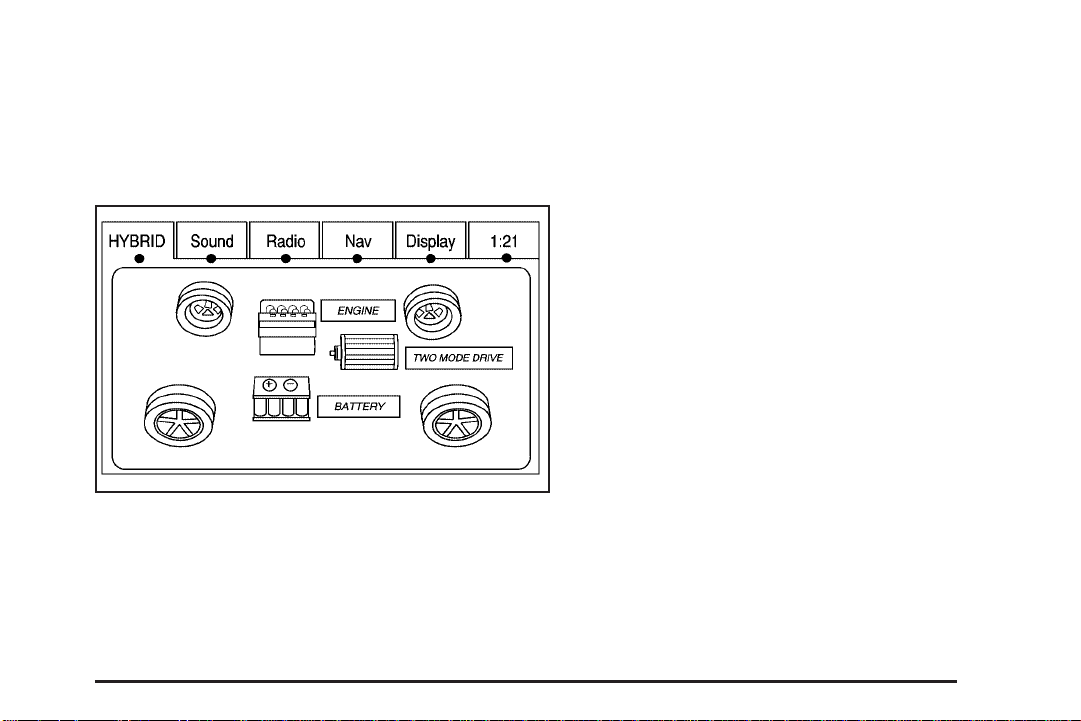
Navigation/Radio System
The vehicle has a navigation radio system. See the
owner manual for more information.
Press the CONFIG button on the radio to display the
hybrid screen.
The screen shows:
• Auto Stop
• Battery Charging
• Engine Idle
• 2-Wheel and 4-Wheel Drive Modes for:
− Engine Power
− Battery Power
− Hybrid Power
3-9
 Loading...