


2018
ESCALADE
Convenience &
Personalization Guide
cadillac.com
Review this quick reference guide for an overview of some important features in your Cadillac
Escalade. Some optional equipment described in this guide (denoted by ♦) may not be included in
your vehicle. More information can be found in your Owner's Manual and at my.cadillac.com.
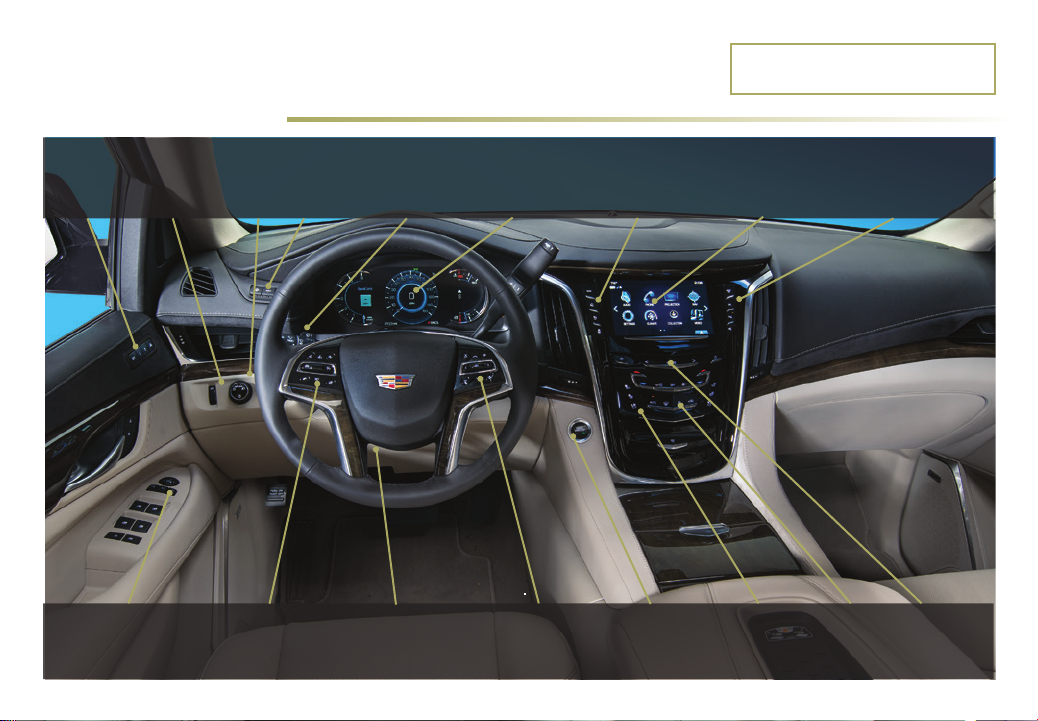
INSTRUMENT PANEL
Memory
Seat
Buttons
Instrument
Panel/Exterior
Lamp Controls
4WD
Control
Head-Up
Display
Controls
♦
Windshield
Wipers
Lever
Instrument
Cluster/Driver
Information
Center
Driver Mode Control/
Adjustable Pedals/
Traction Control and
StabiliTrak Buttons
Certain restrictions, precautions and safety
procedures apply to your vehicle. Please read
your Owner’s Manual for complete instructions.
Cadillac User
Experience
Touch
Screen
Glove Box/Lane Keep
Assist♦/Parking Assist/
Automatic Parking Assist
♦
Power Mirror Control/
Door Lock Switch/
Window Buttons
Cruise Control/
Voice Recognition/
Heated Steering
Wheel Buttons
Power Tilt/
Telescope Steering
Wheel Control
Audio Steering
Wheel Controls/
5-way Control
2
Engine Start/
Stop Button
Heated/Cooled
Seat Buttons
Climate
Controls
Audio
System
Controls

REMOTE KEYLESS ENTRY
TRANSMITTER (KEY FOB)
Lock
Press to lock all doors.
Unlock
Press to unlock the driver’s door. Press
again to unlock all doors. Press and hold
for 4 seconds to open all windows.
Liftglass
Press twice to open the liglass.
Power Liftgate
Press twice to open or close the power ligate.
Remote Start
Use to start the engine from outside the vehicle. See Adaptive
Remote Start on page 4.
Vehicle Locator/Panic Alarm
Press and release to locate your vehicle. e turn signal lamps ash
and the horn sounds.
Press and hold for 3 seconds to activate the alarm. e turn
signal lamps ash and the horn sounds for 30 seconds or until
the buon is pressed again.
Door Key
Press the buon (A) on the side of the transmier to pull the door
key out of the transmier. Use the key to lock/unlock the driver’s
door if needed.
Note: If a transmitter is left in the vehicle when locking the vehicle, the
Remote Left in Vehicle Alert may sound. To change the Remote Keyless Entry
settings, go to Settings > Vehicle > Remote Lock, Unlock, Start.
See Keys, Doors and Windows in your Owner's Manual.
♦ Optional equipment
A
KEYLESS ACCESS SYSTEM
e Keyless Access System enables operation of the doors, ligate
and ignition without removing the Remote Keyless Entry transmit-
ter from your pocket or purse. e transmier must be within 3
feet of the door being unlocked or the ligate.
KEYLESS UNLOCKING
With the transmier within range:
Press the lock buon on the
driver’s door handle to unlock
the driver’s door; press it again
within 5 seconds to unlock all
doors.
Press the lock buon on a
passenger door handle to unlock
alldoors.
Press the touch pad on the ligate handle to open the
power ligate.
KEYLESS LOCKING
With the ignition o, the transmier out of the vehicle, and all
doorsclosed:
Press the lock buon on any door handle to lock all doors
immediately.
If Passive Locking is turned on, all doors will lock automatically
aer a short delay once all doors are closed.
Note: To change the door lock and unlock settings, go to Settings > Vehicle
> Remote Lock, Unlock, Start.
See Keys, Doors and Windows in your Owner's Manual.
3

KEYLESS (PUSHBUTTON) START
START
With the vehicle in
Park or Neutral,
press the brake pedal
and then press the
ENGINE START/
STOP buon to start
the engine. e green
indicator on the button will illuminate.
Note: The Remote Keyless Entry transmitter must be in the vehicle to turn
on the ignition. If the transmitter battery is weak, place the transmitter
inthe pocket in the center console storage compartment to enable the
engine to start. Replace the transmitter battery as soon as possible.
STOP/OFF
Shi to Park and press the ENGINE START/STOP buon to
turn o the engine.
Power will be available for 10 minutes to operate the audio system
until the driver’s door is opened and to operate the windows and
sunroof♦ until any door is opened.
ACCESSORY
With the engine o and the brake pedal NOT depressed, press
the ENGINE START/STOP buon to place the ignition system
in the Accessory mode. e amber indicator on the buon will
illuminate.
See Driving and Operating in your Owner's Manual.
ADAPTIVE REMOTE START
STARTING THE VEHICLE
1. Press and release the Lock buon on the Remote Keyless
Entry transmier.
2. Immediately press and hold the Remote Start buon until
the turn signal lamps ash (about 4 seconds).
When the vehicle starts, the doors remain locked and the park-
ing lamps will light and remain on while the engine is running.
e engine will continue running for 10 minutes. Repeat these
steps for a 10-minute time extension. Remote start can be
extended only once.
3. Before driving, press the brake pedal and then press the
ENGINE START/STOP buon to turn on the ignition.
CANCELING A REMOTE START
Press and hold the Remote Start buon until the parking
lamps turn o.
HEATED/COOLED SEAT OPERATION
Remote Start Auto Heated/Cooled Seats – e heated or cooled
seats will turn on during a remote start when outside temperatures
warrant if the Remote Start Heated or Cooled Seats option is select-
ed in the Seings menu. Go to Seings > Vehicle > Remote Lock,
Unlock, Start. During a remote start, the seat buon indicators do
not illuminate. e heated or cooled seats turn o when the ignition is turned on. For the seats to remain on aer the remote start,
the Auto Heated and Cooled Seats feature must be enabled.
Auto Heated and Cooled Seats – Anytime the vehicle is on, the
heated or cooled seats will activate automatically based on the vehi-
cle’s interior temperature. e seat buon indicators will illuminate
when the heated or cooled seats are on. To enable this feature, go to
Seings > Vehicle > Climate and AirQuality.
See Keys, Doors and Windows in your Owner's Manual.
4

STEERING WHEEL CONTROLS
CRUISE CONTROL
On/O
SET Set Speed
With Cruise Control on, press
the control bar down fully to
setthe cruise speed. e
indicator illuminates in green.
RES Resume Speed
With Cruise Control on, press the control bar up fully to resume the
previous set speed. Adaptive Cruise Control♦ can be resumed from
a stop.
+ – Adjust Speed
When active, press the control bar up (+) or down (–) lightly to
increase or decrease the set speed by 1-mph increments; press and
hold to continue increasing/decreasing speed.
With Adaptive Cruise Control♦, press and release the control bar
up (+) or down (-) to increase or decrease the set speed by 1-mph
increments; press and hold momentarily to increase ordecrease
the set speed to the next 5-mph interval on the speedometer.
Cancel
Press to cancel cruise control without erasing the set speed
frommemory.
Switching between Regular Cruise Control and Adaptive
Cruise Control
Adaptive Cruise Control (ACC) maintains the driver-selected
following gap by braking or accelerating automatically.
♦
Press and hold the Cancel buon to switch between regular
cruise control and Adaptive Cruise Control. When ACC is active, a
green indicator illuminates and the following gap is displayed.
When the vehicle is turned on, the cruise control is set to the last
mode used.
Following Gap (Adaptive Cruise Control
Press repeatedly to set a following gap (the time between your
vehicle and a detected vehicle ahead) of Far, Medium, or Near.
When a slower vehicle is detected ahead, the Vehicle Ahead
symbol is displayed and the vehicle brakes to maintain the selected
following gap. e ACC system may slow your vehicle to a stop
behind the detected vehicle. When the ACC system is holding the
vehicle at a stop, be prepared to manually apply the brakes.
If driver action is required to apply sucient braking behind a
detected vehicle, a red alert ashes on the windshield and the
Safety Alert Seat pulses or beeps sound (if selected). See Safety
Alert Seat on page 14.
Note: Changing the gap settings automatically changes the alert timing
sensitivity for the Forward Collision Alert system.
See Driving and Operating in your Owner's Manual.
VOICE RECOGNITION
Push to Talk
Press to interact with the OnStar, Bluetooth or Cadillac User
Experience system. Wait for the beep before speaking.
End Call/Mute
Press to end/decline a call or mute the audio system.
See Instruments and Controls in your Owner's Manual.
♦
)
♦ Optional equipment
5

DRIVER INFORMATION
CENTER CONTROLS
e 5-way control moves le/
right, up/down, and in.
Left/Right
Press to move between the
display zones on the
instrument cluster.
Press the le to exit a
centerdisplay menu.
Up/Down
Press the control bar up or down to scroll through a menu.
SEL Select
Press to select a highlighted menu item.
See Instruments and Controls in your Owner's Manual.
AUDIO CONTROLS
+ – Volume
Press + or – to increase or decrease the volume.
Next/Previous
Press or to go to the next or previous favorite radio station
or track.
See your Cadillac User Experience Manual.
INSTRUMENT CLUSTERSTEERING WHEEL CONTROLS
CLUSTER DISPLAY ZONES
Use the 5-way control on the steering wheel to move between the
dierent display zones and scroll through the various menus in
each cluster conguration.
CLUSTER CONFIGURATIONS
1. Use the 5-way control to view the Options page in one of the
display zones on the cluster. Press SEL (Select) to enter the
Options menu.
2. Scroll down to highlight Display Layout; press SEL.
3. Scroll up or down to highlight one of the cluster
displays; press SEL.
4. Press to exit the menu.
See Instruments and Controls in your Owner's Manual.
6
 Loading...