

Page 1

2007 Cadillac Escalade/Escalade ESV and
Escalade EXT Navigation System
Overview
Overview
Features and Controls
Features and Controls
Navigation Audio System
Navigation Audio System
........................................................ 3
.................................................. 4
................................ 15
............................ 16
............................ 61
........................ 62
Voice Recognition
Voice Recognition
Phone
Index
.......................................................... 95
Phone
.................................................... 96
............................................................ 97
M
....................................... 89
................................... 90
1
Page 2

GENERAL MOTORS, GM, the GM Emblem,
CADILLAC, the CADILLAC Crest & Wreath,
the names Escalade, Escalade/ESV, and EXT
are registered trademarks of General Motors
Corporation.
The information in this manual supplements the
owner manual. This manual includes the latest
information available at the time it was printed.
We reserve the right to make changes in the
product after that time without notice. For vehicles
first sold in Canada, substitute the name General
Motors of Canada Limited for Cadillac Motor
Car Division whenever it appears in this manual.
Keep this manual with the owner manual in
the vehicle, so it will be there if it is needed. If the
vehicle is sold, leave this manual in the vehicle.
Canadian Owners
For Canadian owners that would like to obtain a
French language manual, see “Canadian Owners”
in the Index of your vehicle’s owner manual.
®
Dolby
Laboratories. Dolby®and the double-D symbol
are trademarks of Dolby
is manufactured under license from Dolby
®
Laboratories.
Litho in U.S.A.
Part No. 15810216 C Third Printing
2
®
©
2007 General Motors Corporation. All Rights Reserved.
Page 3

Section 1 Overview
Overview ......................................................... 4
Navigation System Overview ......................... 4
Getting Started .............................................. 6
Cleaning the Video Screen .......................... 14
3
Page 4
Overview
Navigation System Overview
Screen shown with Map Disc Inserted
4
Page 5

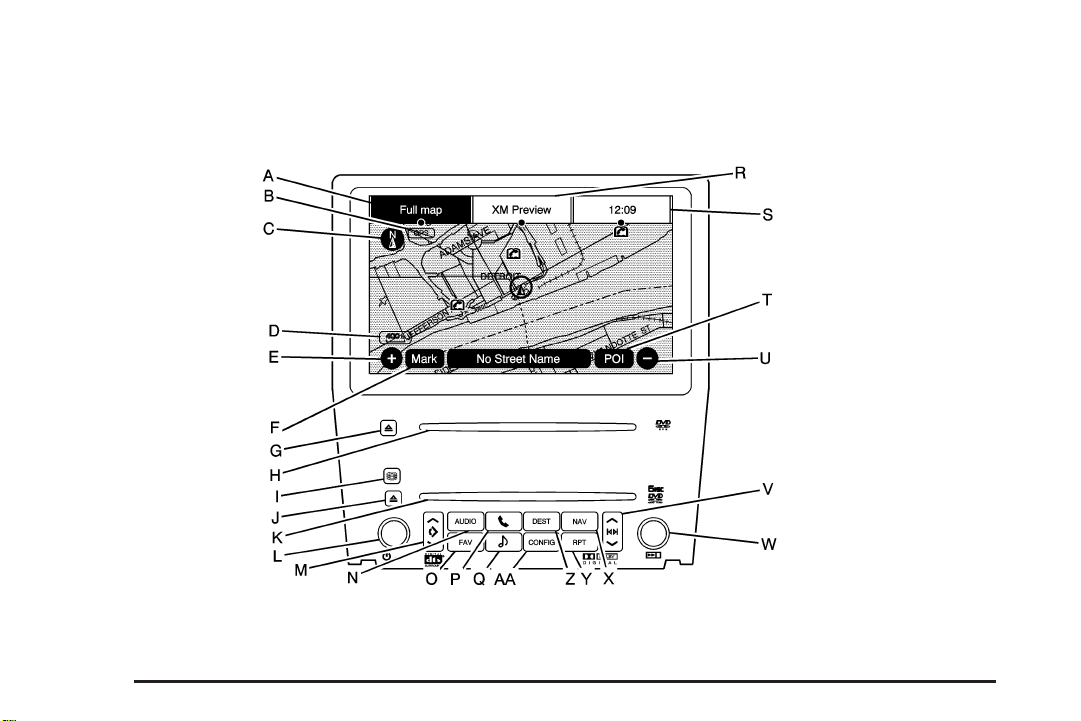
A. FULL MAP Touch Screen Button. See “NAV”
under “Hard Keys” under Using the Navigation
System on page 16 for more information.
B. No GPS Symbol. See Symbols on page 21 for
more information.
C. North Up/Heading Up Symbol. See Symbols on
page 21 for more information.
D. Map Scale. See “Map Scales” under Maps on
page 18 for more information.
0 (Zoom In) Touch Screen Button. See “Map
E.
Scales” under Maps on page 18 for more
information.
F. Mark Touch Screen Button. See “Adding
Destinations to the Address Book” under
Destination on page 28 for more information.
Z (DVD Map Disc Eject) Key. See Maps
G.
on page 18 for more information.
H. Map DVD Slot. See “Installing the Map DVD”
under Maps on page 18 for information on how
to install and eject a map DVD.
M (Load) Key. See CD Player on page 71 or
I.
DVD Player on page 80 for more information.
J.
Z (CD/DVD Video/Audio Eject) Key. See CD
Player on page 71 or DVD Player on page 80
for more information.
K. CD/DVD Video/Audio Slot. See CD Player on
page 71 or DVD Player on page 80 for
more information.
O / n (Power/Volume) Knob. See Navigation
L.
Audio System on page 62 for more information.
m (Tilt) Key. See “Hard Keys” under Using
M.
the Navigation System on page 16 for more
information.
N. AUDIO Key. See Navigation Audio System on
page 62 for more information.
O. FAV (Favorite) Key. See “Storing Radio Station
Presets” under Navigation Audio System on
page 62 for more information.
5 (Phone) Key. See Phone on page 96 for
P.
more information.
e (Sound) Key. See “Sound Menu” under
Q.
Navigation Audio System on page 62 for more
information.
R. Source (AM, FM, XM, CD, etc.) Touch Screen
Button. See Navigation Audio System on
page 62 for more information.
5
Page 6

S. Clock Touch Screen Button. See “Setting the
Time” under Configure Menu on page 44
for more information.
T. POI (Point of Interest) Touch Screen Button.
See “Displaying Points of Interest (POI) on the
Map Screen” under Symbols on page 21 for
more information.
1 (Zoom Out) Touch Screen Button. See “Map
U.
Scales” under Maps on page 18 for more
information.
y©¨z(Seek) Key (Previous/Next).
V.
See Navigation Audio System on page 62 for
more information.
w (Tune) Knob. See Navigation Audio
W.
System on page 62 for more information.
X. NAV (Navigation) Key. See “Hard Keys” under
Using the Navigation System on page 16
for more information.
Y. RPT (Repeat) Key. See “Hard Keys” under
Using the Navigation System on page 16
for more information.
Z. DEST (Destination) Key. See Destination on
page 28 for more information.
AA. CONFIG (Configure) Key. See Configure Menu
on page 44 for more information.
Getting Started
Before you begin tooperatethe navigation system,
read this manual thoroughly to become familiar with
it and to understand how the system works.
Any route suggestions made by this navigation
system may never override local traffic regulations,
your own judgement, and/or knowledge of safe
driving practices.
Disregard route suggestions made by the
navigation system if such suggestions would;
cause you to perform a hazardous or illegal
maneuver, place you in a hazardous situation,
or route you into an area you consider unsafe.
Keeping your mind on the drive is important for
safe driving. See “Defensive Driving” in the Index of
your vehicle’s owner manual for more information.
Get familiar with your vehicle’s navigation system
so you can use it with less effort and take full
advantage of its features. Your navigation system
includes not only navigation, but also audio
functions. While your vehicle is parked:
• Familiarizeyourself with all of its controls: hard
keys on the faceplate and touch-sensitive
screen buttons.
• Familiarizeyourself with its operation.
6
Page 7

• Setup your audio by presetting your favorite
stations, setting the tone, and adjusting the
speakers. Then, when driving conditions
permit, you can tune to your favorite stations
using the presets and steering wheel controls.
• Setup the navigation features that can only be
done before you begin driving, such as entering
an address or a preset destination.
Entering a destination or alphanumeric text
requires many steps, so you can only perform
these operations when the vehicle is in PARK (P).
You will notice that touch-sensitive screen
buttons leading to the alphanumeric keyboard are
dimmed out while driving.
Other functions may also be locked out while
driving and they too will appear grayed out on the
screen — but all functions are available when
parked. Some functions can be performed while
driving, as long as you can do so without diverting
too much of your attention from your driving.
{CAUTION:
This system provides you with a far greater
access to audio stations and song listings.
Giving extended attention to entertainment
tasks while driving can cause a crash and
you or others can be injured or killed.
Always keep your eyes on the road and
your mind on the drive — avoid engaging
in extended searching while driving.
7
Page 8
{CAUTION:
Looking at the moving map on the
navigation screen frequently or for too
long while driving can cause a crash and
you or others can be injured or killed.
Keep your eyes and mind on the road and
avoid looking too long or too often at the
moving map on the navigation screen.
Use the voice guidance directions
whenever possible.
The navigation system allows you to do the
following:
• Plan a route with provided turn-by-turn route
and map guidance with voice prompts.
• Select a destination using various methods
and choices.
• Receive Radio Data System (RDS) broadcast
announcements.
The information in the system may not always be
complete. Road conditions, such as prohibited
turns, detours, and construction zones, change
frequently. It is important to consider whether you
can follow the directions given by the system
for the current conditions.
Every fifty times the vehicle is started and the
navigation system is turned on, the Caution screen
will appear. If the Caution screen appears, touch
OK to load the map DVD information. If OK is not
selected, all hard keys except for NAV (Navigation)
and DEST (Destination) can be accessed. Once the
NAV or DEST hard keys are pressed, this Caution
screen will appear and OK must be pressed to load
the map DVD information from the map disc.
8
Page 9

When getting started you may set the navigation
system to your preference or delete information
you may have entered using various options.
To do so, reference the following topics.
Language — English/Metric
To change the language of the navigation screens,
see “Driver Information Center, DIC Vehicle
Customization” in the Index of your vehicles
owner manual.
To change the navigation screens from English
or metric, see “Driver Information Center, DIC
Operation and Displays” in the Index of your
vehicles owner manual.
Deleting Personal Information
This navigation system can record and store
personal information such as names and
addresses. At times, such as when you are
disposing of your vehicle, you may want to
delete this information. See “Edit Address
Book — Edit/View” under Configure Menu on
page 44 for deleting information from the
address book.
Storing Radio Station Presets
To set preset radio stations, do the following:
1. Press the
system on.
2. Press the AUDIO hard key and select the
desired band (AM, FM1, FM2, XM1, or
XM2 (if equipped)).
3. Use the
arrows to tune to the desired station.
4. Press and hold one of the five preset screen
buttons, at the bottom of the screen, until you
hear a beep or see the station displayed
on the selected preset button.
5. Repeat the steps for each preset.
See “Storing Radio Station Presets” under
Navigation Audio System on page 62 for more
information.
O (power) knob to turn the
w (tuning) knob or the SEEK
9
Page 10

Setting the Time
The navigation system time and the analog clock
are separate features. Changing the time through
the navigation system will not change the time on
the analog clock and vice versa. See “Analog
Clock” in the Index of your vehicles owner manual
to change the analog clock time.
To set the time for the navigation system, do the
following:
1. Press the CONFIG key to enter the configure
menu options, then press the CONFIG key
repeatedly until the time is selected or
touch the time screen button.
2. Press the Hours and Minutes − (minus) and
+ (plus) signs to decrease or to increase
the time.
See “Setting the Time” under Configure Menu on
page 44 for more information.
Entering an Address and Point of
Interest, and Storing Preset
Destinations
Entering an Address
To enter a destination by inputting the city name
first, do the following:
1. If the radio is already on with a map disc
inserted, skip to Step 5.
2. Press the
system on.
3. Insert the DVD map disc. See “Installing the
Map DVD” under Maps on page 18 for more
information.
4. A caution may appear. Touch the OK screen
button to proceed.
5. Press the DEST hard key.
6. Press the
O (power) knob to turn the
2 Address Entry screen button.
10
Page 11

7. Select the state/province screen button,
if needed, to change the current state or
province. A list of all of the available states
and provinces will appear. Select the state or
province.
8. Once a state or province has been selected
the City name category will automatically be
selected for entry.
If five or less names are available, a list will
display. If more than five are available, the
List screen button will have a number in it,
it represents the number of available
cities. Select this button to view the list
and select a city.
9. Once a city has been selected the Street
name category will automatically be selected
for entry.
If five or less streets are available for the
selected city, the system will display the list of
streets. If more than five streets are available
the system will display the alpha keyboard.
Start entering the street name. If five or less
names are available, a list will display. If more
than five are available, the List screen button
will have a number in it, it represents the
number of available streets. Select this button
to view the list and select a street.
10. Once a street has been selected, select the
House # screen button to enter the house
number. The system will display the house
number range that is available for the street.
11. Select the Go screen button. A map screen,
with the destination marked, will appear.
12. Select the route preference (Fastest, Shortest,
or Other). The system will calculate and
highlight the route.
13. Select the Start Guidance screen button.
You are now ready to start your route.
See “Address Entry ” under Destination on
page 28 for more information.
11
Page 12

Entering a Point of Interest (POI)
To set a destination by entering a Point of
Interest (POI), do the following:
1. If the radio is already on with a map disc
inserted, skip to Step 5.
2. Press the
system on.
3. Insert the DVD map disc. See “Installing the
Map DVD” under Maps on page 18 for more
information.
4. A caution may appear. Touch the OK screen
button to proceed.
5. Press the DEST hard key.
6. Press the
7. Select the state/province screen button,
if needed, to change the current state or
province. A list of all of the available states
and provinces will appear. Select the state or
province.
O (power) knob to turn the
i Point of Interest screen button.
8. Enter the specific title of the POI in the POI
name space (e.g. Washington Monument).
If five or less names are available, a list
will display. If more than five are available,
the List screen button will have a number in it,
it represents the number of available POIs.
Select this button to view the list.
9. Select the Go screen button next to the POI.
A map screen, with the destination marked,
will appear.
10. Select the route preference (Fastest, Shortest,
or Other). The system will calculate and
highlight the route.
11. Select the Start Guidance screen button.
You are now ready to start your route.
See “Point of Interest (POI)” under Destination on
page 28 for more information.
12
Page 13

Storing Preset Destinations
1. If the radio is already on with a map disc
inserted, skip to Step 5.
2. Press the
system on.
3. Insert the DVD map disc. See “Installing the
Map DVD” under Maps on page 18 for more
information.
4. A caution may appear. Touch the OK screen
button to proceed.
5. Press the DEST hard key.
Enter a destination. See Destination on
page 28 for more information on how to enter
a destination.
6. Press the DEST hard key, the Route screen
will display. Press the Final Destination or
Stopover screen button. The information
screen will display for that location. Press
the Add to Address Book screen button.
The address book screen will appear.
7. Select the Name screen button. An
alpha-keyboard will display. Enter the
name. Select the Back screen button.
O (power) knob to turn the
8. Press and hold one of the screen buttons at
the bottom of the screen until the name
appears in the screen button on the display.
The name will appear in that preset destination
screen button and is now available to select
from the Destination Entry screen. See “Using
Your Stored Preset Destinations” next in
this section to select it as a destination.
See “Adding or Changing Preset Destinations”
under Destination on page 28 for more
information on how to add preset destinations.
Using Your Stored Preset Destinations
These destinations are available for selection
while driving.
1. If the radio is already on with a map disc
inserted, skip to Step 5.
2. Press the
system on.
3. Insert the DVD map disc. See “Installing the
Map DVD” under Maps on page 18 for more
information.
4. A caution may appear. Touch the OK screen
button to proceed.
O (power) knob to turn the
13
Page 14

5. Press the DEST hard key.
6. Select one of the available preset destination
screen buttons. A map screen, with the
destination marked, will appear.
7. Select the route preference (Fastest, Shortest,
or Other). The system will calculate and
highlight the route.
8. Select the Start Guidance screen button.
You are now ready to start your route.
See “Preset Destination” under Destination on
page 28 for more information.
Canceling Guidance
Guidance will be canceled once you arrive at your
final destination. To cancel guidance prior to
arrival at the final destination, do the following:
1. Press the DEST hard key.
2. Press the Cancel Guidance screen button.
3. Press OK to confirm.
Guidance Volume
To adjust the volume of voice guidance prompts,
do the following:
1. Press the CONFIG hard key to enter the
menu options, then press the CONFIG
key repeatedly until Nav is selected or touch
the Nav screen button.
2. Press the Voice Prompt screen button.
3. Press the + (plus) or – (minus) screen buttons
to increase or to decrease the volume of the
voice prompts. The system will respond
with the adjusted voice level.
See “Voice Prompt ” under Configure Menu on
page 44 for more information.
Cleaning the Video Screen
When cleaning the video screen, use only a soft
clean cotton cloth dampened with clean water.
14
Page 15

Section 2 Features and Controls
Features and Controls .................................. 16
Using the Navigation System ....................... 16
Maps ........................................................... 18
Symbols ...................................................... 21
Destination .................................................. 28
Configure Menu ........................................... 44
Rear Vision Camera .................................... 51
Global Positioning System (GPS) ................ 56
Vehicle Positioning ...................................... 57
Problems with Route Guidance ................... 58
If the System Needs Service ....................... 59
Ordering Map DVDs .................................... 59
Database Coverage Explanations ................ 59
15
Page 16

Features and Controls
Using the Navigation System
This section presents basic information needed to
operate the navigation system.
Use the hard keys located on the navigation
system along with the available touch-sensitive
screen buttons on the navigation screen to operate
the system. See Navigation System Overview
on page 4 for more information.
Once the vehicle is moving, various functions will
be disabled to reduce driver distractions.
Hard Keys
The following hard keys are located on the
navigation system:
O / n (Power/Volume): Press this knob to
turn the system on and off. Turn the knob to
increase or decrease the volume to the audio
system.
Press and hold this knob for more than
two seconds to turn off the navigation system, the
Rear Seat Entertainment (RSE), and Rear Seat
Audio (RSA). If the vehicle has not been tuned off,
the RSE and the RSA can be turned back on
by pressing this knob and will continue play of the
last active source.
w (Tune): Turn the tune knob to go to the
next or previous radio station or disc track
or chapter. See Navigation Audio System on
page 62, CD Player on page 71,orDVD Player
on page 80 for more information.
Z (DVD Map Disc Eject): Press the eject
button, located next to the upper disc slot, to eject
the DVD map disc. See Maps on page 18 for
more information.
M (Load): Press the load button to load CDs or
audio/video DVDs. See CD Player on page 71
or DVD Player on page 80 for more information.
Z (CD/DVD Eject): Press the eject button,
located under the load button, to eject CDs
or audio/video DVDs. See CD Player on page 71
or DVD Player on page 80 for more information.
16
Page 17

m (Tilt): Press this key up or down to tilt the
screen.
AUDIO: Press this key to access the full Audio
screen to change AM, FM, XM™ Satellite
Radio Service (if equipped), CD/DVD, and auxiliary
input. See “Audio” under Navigation Audio
System on page 62 for more information.
FAV (Favorite): Press this key to access the
preset stations. See “Storing Radio Station
Presets” under Navigation Audio System on
page 62 for more information.
5 (Phone): Press this key to access calling
through OnStar
information. See “OnStar®System” in the Index
of your vehicle’s owner manual for more
information.
®
. See Phone on page 96 for more
e (Sound): Press this key to access the Sound
screen to adjust bass, midrange, treble, and
Digital Signal Processing (DSP). See “Sound
Menu” under Navigation Audio System on page 62
for more information.
DEST (Destination): Press this key to access the
Destination Entry screen to plan a destination.
See Destination on page 28 for more information.
CONFIG (Configure Menu): Press this key to
adjust features for sound, radio, navigation,
and the display. See Configure Menu on page 44
for more information.
NAV (Navigation): Press this key to view your
vehicle’s current position on the map screen. Each
press of this key will cycle through Full Map and
the tab that displays the current audio source (AM,
FM, CD, etc.). Full Map displays the screen in
full map view. Selecting the audio tab will split the
screen between the map screen and the current
audio source screen menu. See “Audio” under
Navigation Audio System on page 62 for
more information.
RPT (Navigation Repeat): Press this key to
repeat the last voice guidance prompt.
y©¨z(Seek): Press the seek arrows to
seek and scan radio stations, to seek tracks
on a CD, and to seek chapters on a DVD. See
Navigation Audio System on page 62, CD Player
on page 71,orDVD Player on page 80 for
more information.
17
Page 18

Touch-Sensitive Screen Buttons
Touch-sensitive screen buttons are located
on the screen. When a screen button has been
selected, a beep will sound. Screen buttons
are highlighted when a feature is available.
Alpha-Numeric Keyboard
Letters of the alphabet, symbols, punctuation,
and numbers, when available, will display on
the navigation screen as an alpha or numeric
keyboard. The alpha keyboard will display when
the system requires entry of a city or street name.
All characters are touch-sensitive screen
buttons. Touch a character to select it.
A-Y (Accent Alphabet): Select this screen button
to select letters with accent symbols. This button
may toggle to A-Z.
0-9 (Numbers): Select this screen button to
select numbers.
U (Space): Select the space screen button to
enter a space between characters or the words
of a name.
Backspace: Select this screen button if an
incorrect character has been selected.
To make name selections easier, the system will
only highlight the characters that can follow
the last one entered. For example, if a Z is
entered, a T may not be available for selection.
If a name is not display after entry, it may need
to be entered differently or the map DVD disc may
not contain that information. See Database
Coverage Explanations on page 59 for more
information.
A-Z (Alphabet): Select this screen button to
select letters from the alphabet. This button may
toggle to A-Y.
18
Maps
This section includes basic information that you
need to know about the map database.
The maps are stored on a DVD. The United
States, Canada, and Puerto Rico are contained on
one disc.
Page 19

Detailed Areas
Road network attributes are contained in the map
database for detailed areas. Attributes include
information such as street names, street address,
turn restrictions, etc. A detailed area will include
all major highways, service roads, and residential
roads. The detailed areas include points of
interest (POI) such as: restaurants, airports, banks,
hospitals, police stations, gas stations, tourist
attractions, historical monuments, etc. The map
database may not include data for newly
constructed areas or map database corrections
that are completed after the production of the disc.
The navigation system will provide full route
guidance in the detailed map areas.
Limited Guidance Areas
Any area that is not classified as detailed is a
limited guidance area. Limited guidance streets
will be displayed on the map display but route
guidance may not be given on these streets.
Some POI categories, such as the city center POI
category, and some street addresses are
included in the limited guidance areas.
The navigation system will inform you by voice
prompts when you are traveling into a limited
guidance area where route guidance will not be
available. The street maps and the directional
arrow displayed on the navigation system can
then be used to determine the remaining route to
your destination.
Installing the DVD Map Disc
Your dealer/retailer may have installed the map
DVD. If the map DVD was not installed, do
the following to load it:
1. Turn the ignition on.
2. Press the
navigation system on.
3. Load the map DVD partway into the slot
located just below the screen. The system
will pull it in.
4. If the Caution screen appears, touch the OK
screen button to agree.
O (power) knob to turn the
19
Page 20

DVD Map Disc Messages
Map Adjustments
If Disc Read Error appears on the display and/or
the map disc comes out, it could be for one of
the following reasons:
• If the map disc was installed into the CD slot.
See “Installing the DVD Map Disc” previously.
• It is very hot, when the temperature returns to
normal, the map disc should play.
• You are driving on a very rough road. When
the road becomes smoother, the map disc
should play.
• The map disc is dirty, scratched, wet, or
upside down.
If any error occurs repeatedly or if an error cannot
be corrected, contact your dealer/retailer.
Ejecting the DVD Map Disc
Z
(DVD Map Disc Eject): Press the eject
button, located next to the upper disc slot, to eject
the DVD map disc.
The system allows you to adjust the scale of view
on the map. Also, as you drive, the map will
scroll automatically based on the direction of
travel.
Map Scales
+/− (Zoom In/Zoom Out): Touch the zoom in
or out screen buttons or the scale on the bar to
change the level of map detail. The scale will
appear on the screen once the zoom in or zoom out
screen buttons are selected. The system will adjust
the map accordingly. The scale of a map can range
from 1/32 mi. (50 m) to 256 mi. (400 k). To change
English or metric, see “Driver Information Center,
DIC Operation and Displays” in the Index of your
vehicle’s owner manual.
20
Page 21
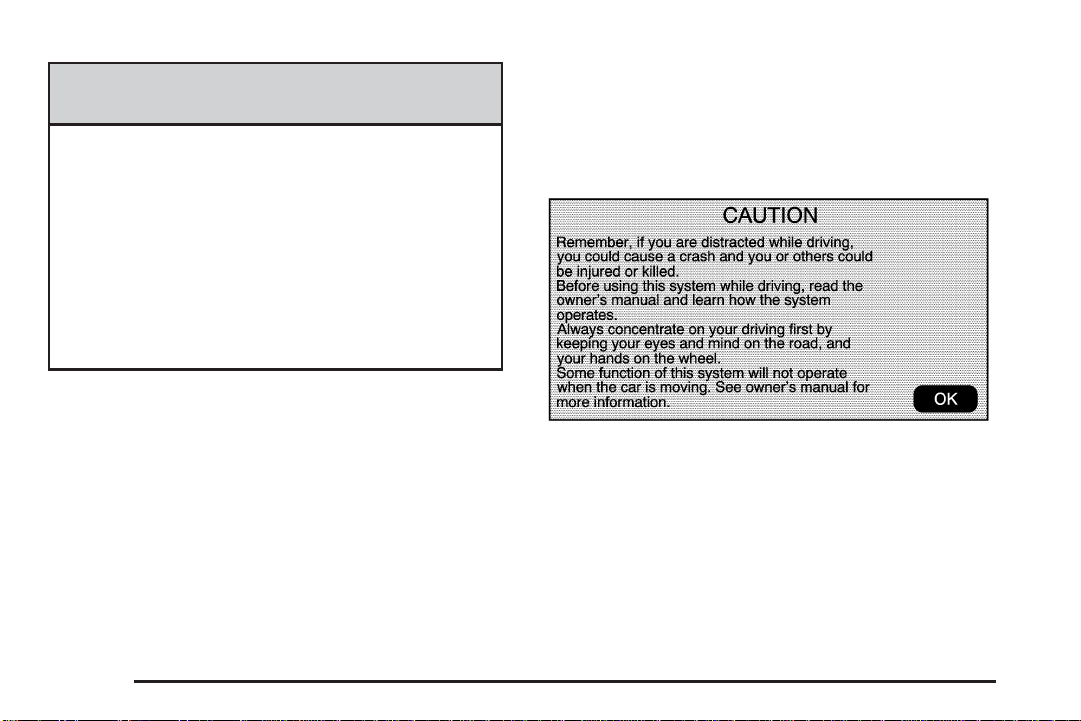
Scrolling the Map
Touch anywhere on the
map screen and the
scroll symbol will
appear. Use this feature
to scroll across the map.
You can use the scroll feature on the map to set a
destination. See “From Map” under Destination
on page 28 for more information.
When scrolling on the map without a planned route,
press the GO screen button to calculate the route
from your current position to the destination mark.
Symbols
Move your finger in any direction on the map
screen and the map will continue to scroll in that
direction until you remove your finger.
If scrolling while your vehicle is in PARK (P), the
system will scroll initially at a slower rate. It
will increase if you continue touching the map
screen.
If scrolling while your vehicle is in motion, you
have one scroll speed and a limited distance to
scroll. You have to keep touching the map screen
to scroll for a longer distance.
If you have used the scroll feature to scroll the
map and your vehicle icon becomes lost, press the
NAV (Navigation) key to return to the current
vehicle location on the map.
The following symbols are the most common
symbols that will appear on a map screen.
Your vehicle is shown
as this symbol. It
indicates the current
position and the
direction your vehicle is
traveling on the map.
21
Page 22
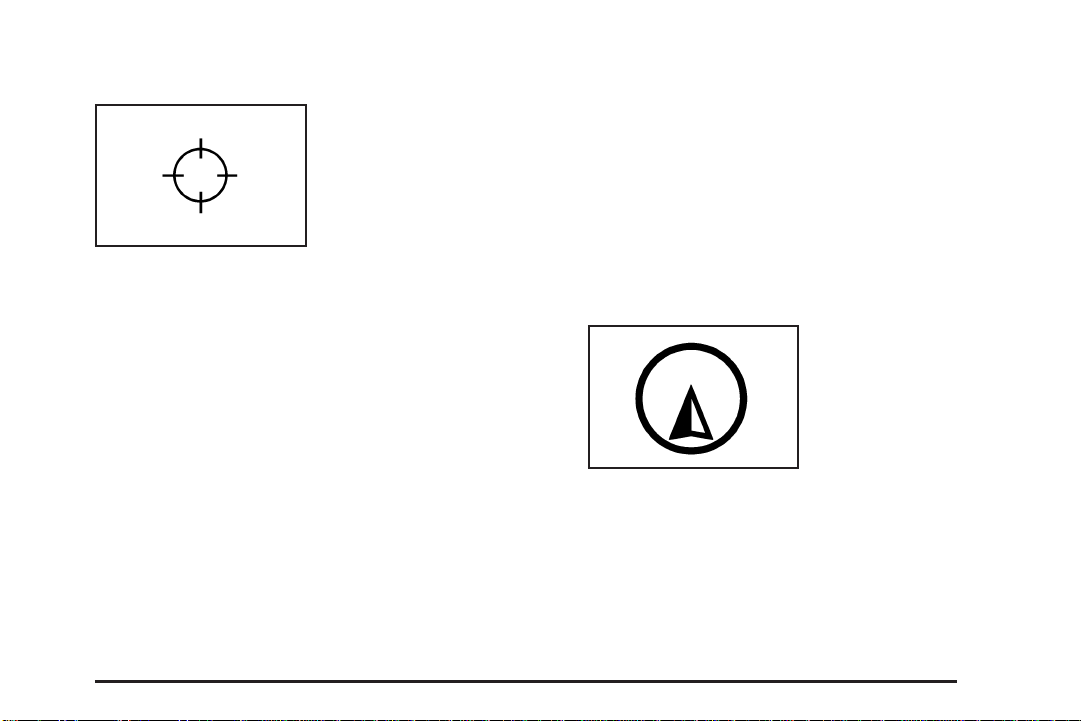
The destination symbol
will appear on the map,
after a route has
been planned, marking
the final destination.
The stopover symbol
will display on the map
after a stopover has
been added to the route.
The stopover symbols are numbered one through
three, depending on how many stopovers have
been set.
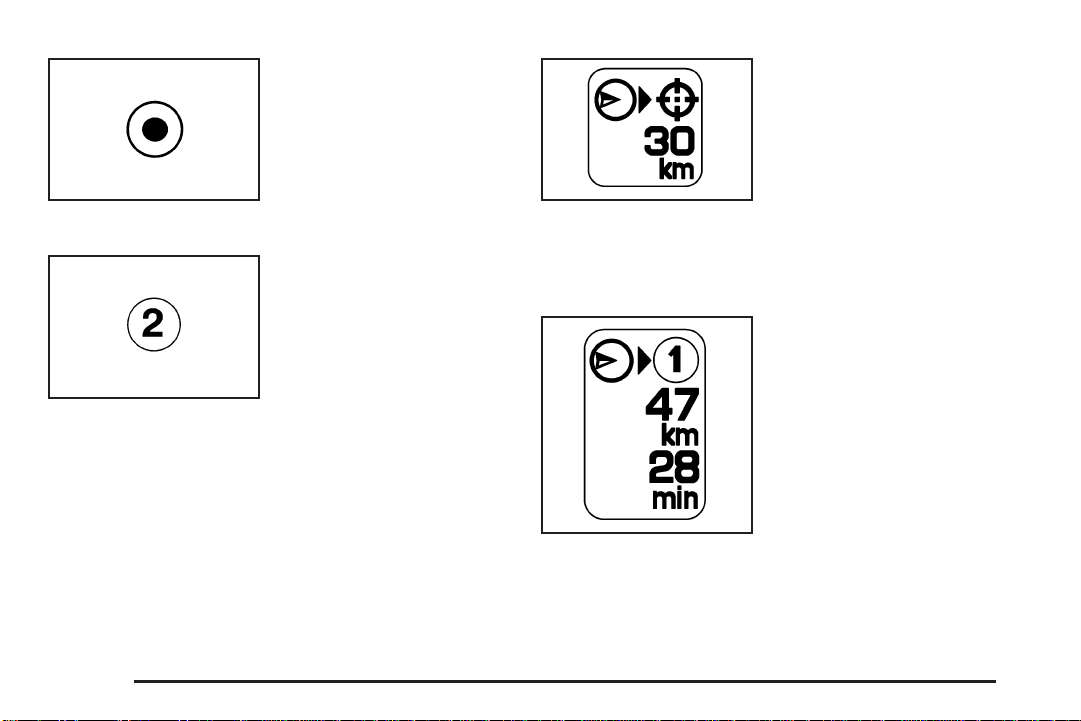
The distance to
destination symbol
indicates the distance to
the final destination.
This symbol only appears when the time to the
destination is not available or while you are
scrolling on the map.
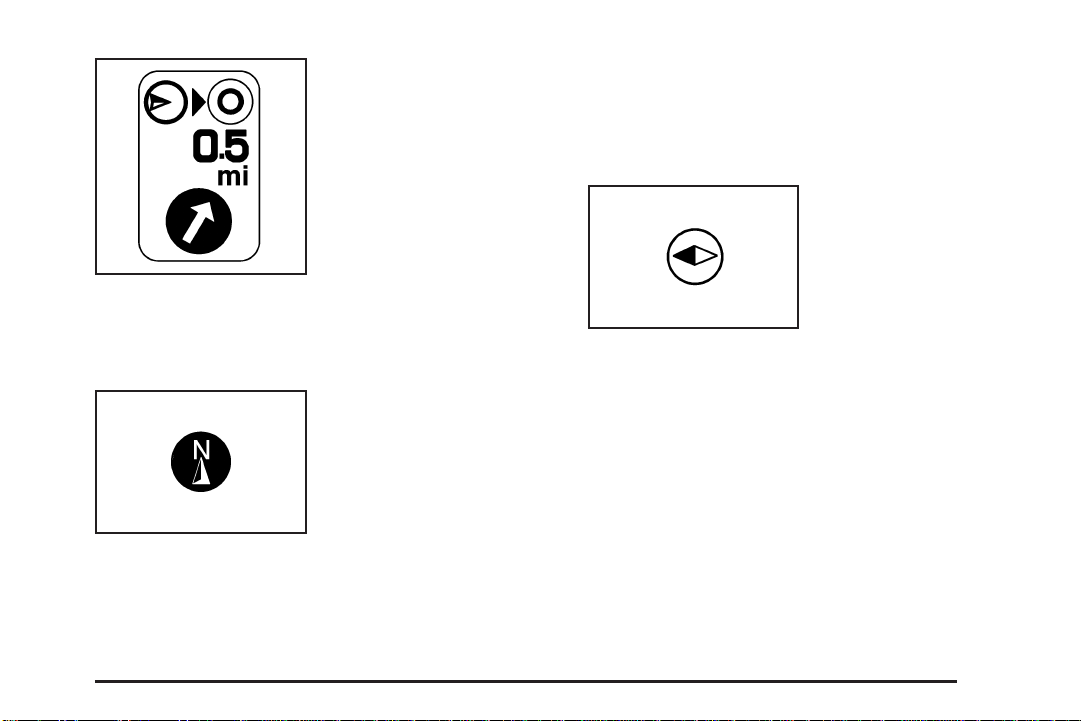
The distance and time
to destination symbol
indicates the distance
and the estimated
time remaining to
your final destination,
depending on the
option selected.
22
Page 23
The straight line to
distance symbol
indicates the
straight-line distance to
your destination.
This symbol will appear before you start driving on
the route or if you are on a road where navigation
guidance cannot be given.
The north up symbol
indicates the map with
North Up, known as
North Up mode.
While in North Up mode, the vehicle icon will
follow the north direction on the map regardless of
which direction the vehicle is traveling. Select
this screen symbol to switch between North Up,
Heading Up, and 3–D view modes.
The heading up symbol
indicates that the
vehicle is traveling up
on the map and is
known as Heading
Up mode.
The shaded triangle indicates the North direction.
While in Heading Up mode the direction at the
top of the screen and the way the vehicle icon is
heading indicates the direction your vehicle is
traveling. Select this screen symbol to switch
between Heading Up, North Up, and 3–D view
modes.
Three-dimensional (3–D) view mode will change
the appearance of the map display to a road
level view.
23
Page 24
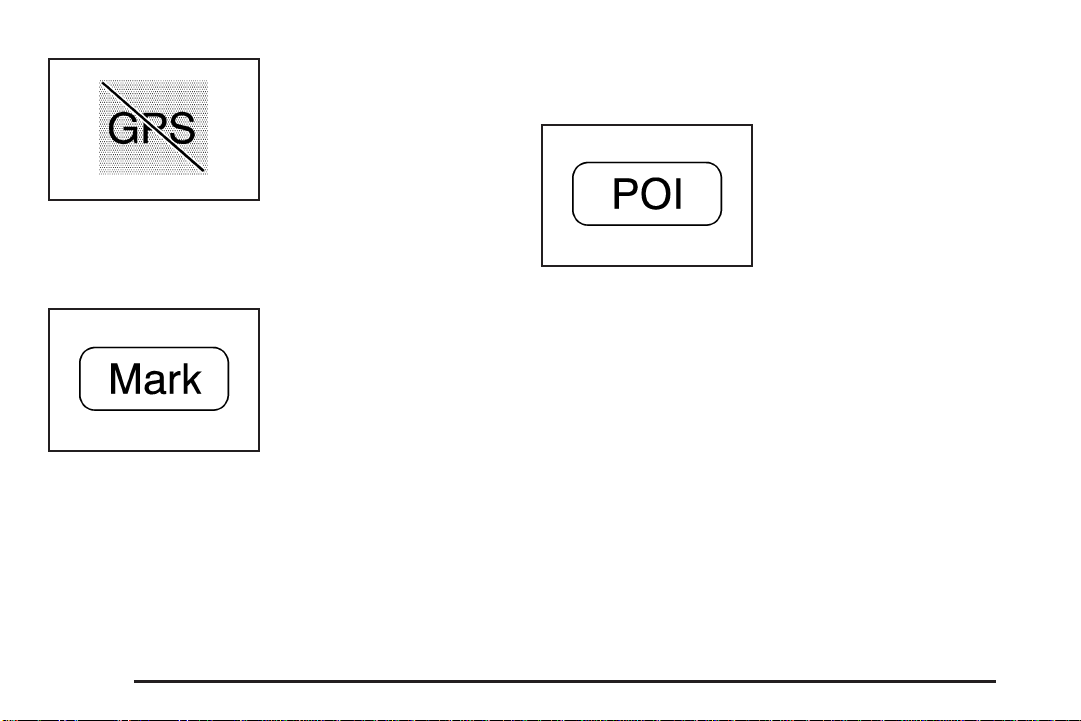
The No GPS symbol will
appear when your
vehicle is acquiring or
not receiving a Global
Positioning System
(GPS) satellite signal.
See Global Positioning System (GPS) on page 56
for more information.
Select the Mark screen
button to store the
location on the screen
in your address book.
The system will automatically store the point in the
address book. See “Adding Destinations to the
Address Book” under Destination on page 28 for
more information.
Displaying Points of Interest (POI) on the
Map Screen
Select the POI screen
button to display or
delete POI icons from
the map.
Displaying POI icons on the map lets you know
where POIs (e.g. restaurants, gas stations,
etc.) are located. This screen will appear after
selecting the POI screen button.
24
Page 25
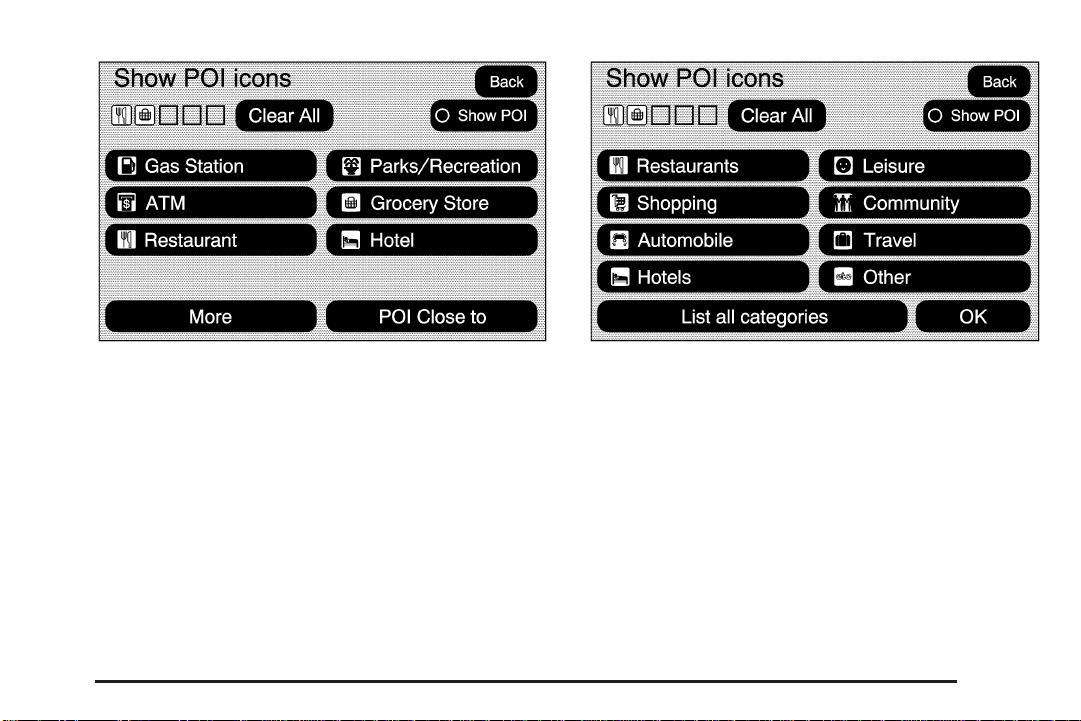
Select one of the POI categories to display or to
delete POI icons from the map screen. Once
a category has been selected the POI icon will
display at the top of the screen. Five categories
can be selected to display on the map screen.
When a category is selected those POI icons will
display on the map. Press the POI screen
button again to add more POI icons.
More: Select this screen button to view more POI
categories.
POI Close to: Once a category has been
selected, select this screen button to display
the list of available POIs for the selected POI
categories. The list provides the POI icon,
the name, the direction, and the distance to the
POI from your vehicle’s current position. Use
the scroll arrows to move up and down the list.
Use the sorting screen buttons: Dist (distance),
Icon, Name, and on Route as desired.
Go: Select this screen button, next to the desired
POI, to make this POI a destination or a stopover.
25
Page 26
Select a POI name to receive information about
the POI. From this screen you can select: Address
Book, Go, or Map.
Address Book: Press this screen button to add
this POI to the address book. See “Nav” under
Configure Menu on page 44 for information
on editing address book entries.
Go: Select this screen button to make this POI a
destination or a stopover.
Delete: To delete a specific POI category, select
the category.
Clear All: Select this screen button to clear all
selected POI categories.
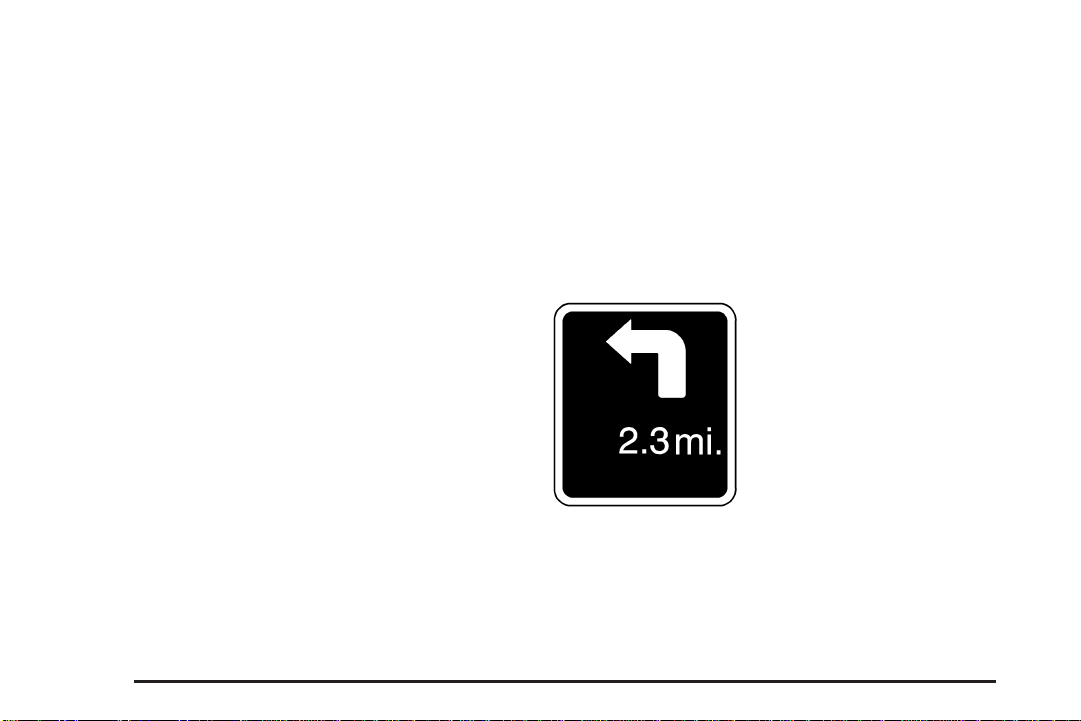
Driving on a Route
When a destination has been routed and you are
driving on route, the map screen will automatically
display the next maneuver.
Map: Select this screen button to display the map
showing the location of the POI.
OK: Select this screen button to display the map
screen.
Show POI: Select this screen button to display or
remove the POI icons from the map screen.
List all Categories: Select this screen button to
list all POIs sorted alphabetically.
26
The pop-up will display
the next maneuver
direction and how many
miles or kilometers
you are from it.
Page 27
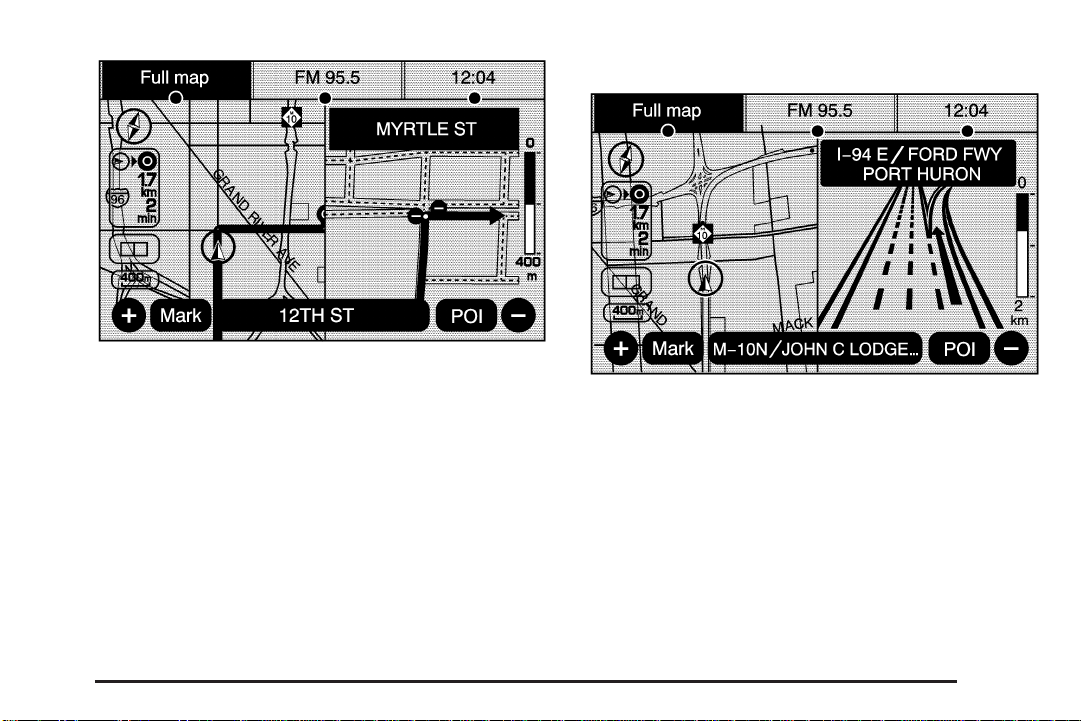
When you are approximately 1/4 mi (400 m) from
the next maneuver, the screen will display the
name and a detailed view of the next maneuver.
3–D Lane Guidance
Some major metropolitan areas may include a
3–D lane guidance feature for highway exits and
junctions. This feature gives you a more vivid
representation of the exits and junctions on your
route. Cities that include this feature are New York,
Los Angeles, Chicago, Detroit, and San Francisco,
and may also include Philadelphia, Washington
D.C., and other major highway junctions.
27
Page 28
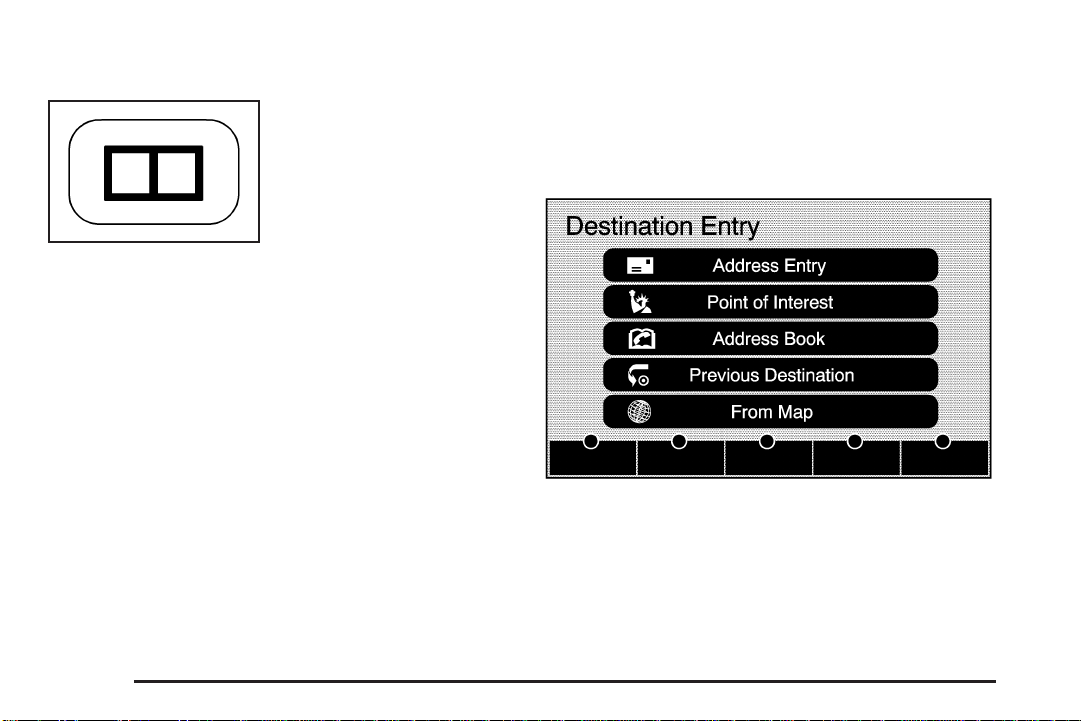
Dual Mode
Destination
This dual screen symbol
will display when the
screen is in dual mode.
Dual mode displays the route on half of the screen
and a maneuver or turn list on the other half.
Press this button to switch between dual screen
and full screen which displays the entire route.
Auto Reroute
When your destination is set and you are off the
planned route, the system will automatically plan a
new route and begin to reroute. The new route
will be highlighted on the screen.
28
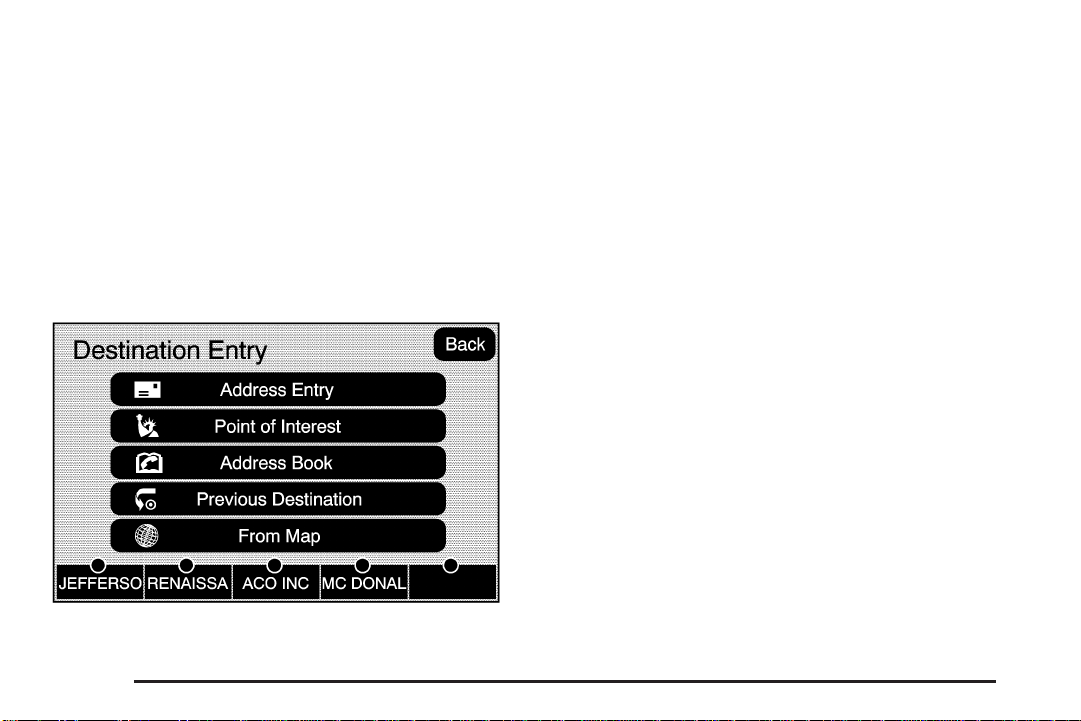
Press the DEST key to access the Destination
Entry screen. From this screen, you can
select from several options to plan a route by
entering destination points.
Page 29
To enter a destination, choose from one of the
following destination entry methods:
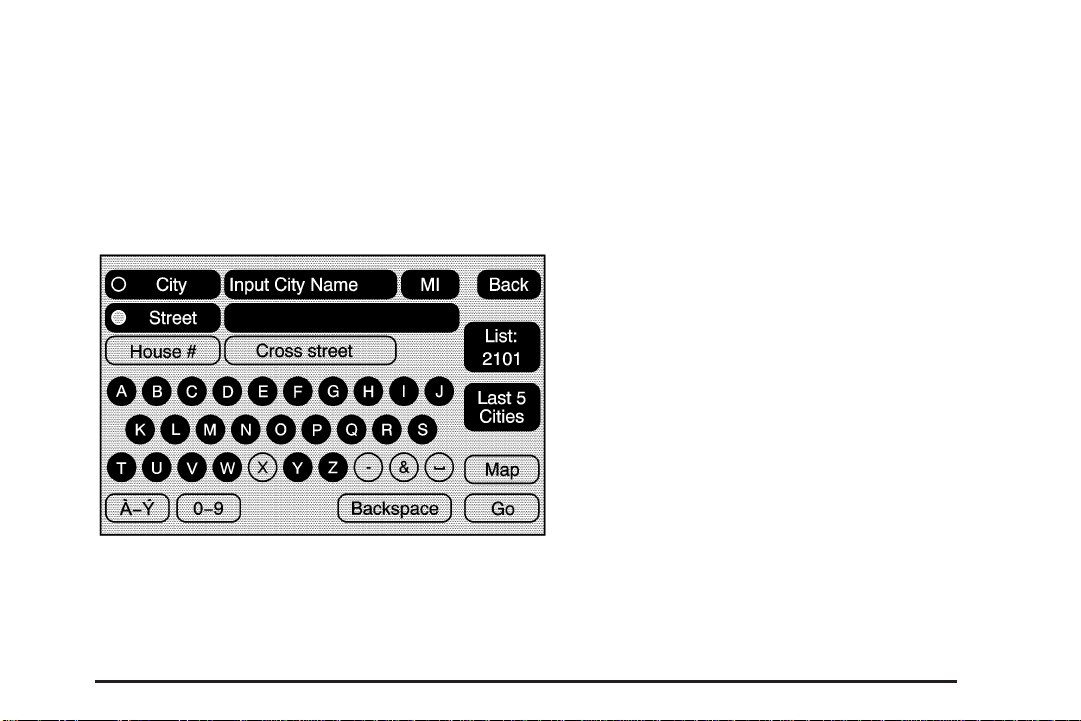
Address Entry
2 Address Entry: The address entry
destination method allows you to enter an address
by providing the system with a city name or a
street name.
To enter a destination by inputting the city name
first, do the following:
1. Press the DEST hard key.
2. Select the 2 Address Entry screen button.
3. Select the state/province screen button, if
needed, to change the current state or
province. A list of all of the available states
and provinces will appear. Select the state or
province.
4. Once a state or province has been selected
the City name category will automatically be
selected for entry.
Enter the City Name or touch the Last 5 Cities
screen button.
The Last 5 Cities screen will display a list of
the last five city names that had been entered.
Select a city from the list and it will appear
in the City name area.
If using the alpha keyboard, finish entering the
city name. If five or less names are available,
a list will display. If more than five are
available, the List screen button will have a
number in it, it represents the number of
available cities. Select this button to view the
list and select a city.
29
Page 30

5. Once a city has been selected the Street
name category will automatically be selected
for entry.
Start entering the street name. If five or
less names are available, a list will display.
If more than five are available, the List screen
button will have a number in it, it represents
the number of available streets. Select
this button to view the list.
6. Once a street has been selected, press the
House # screen button to enter the house
number. The system will display the house
number range that is available for the street.
7. Select the Go screen button. The map screen,
with the destination marked, will display.
8. Select the route preference (Fastest, Shortest,
or Other). The system will calculate and
highlight the route.
9. Select the Start Guidance screen button.
You are now ready to start your route.
See “Getting Started on Your Route” later in
this section for more information.
To enter a destination by entering the street name
first, do the following:
1. Press the DEST hard key.
2. Select the
3. Select the state/province screen button,
if needed, to change the current state or
province. A list of all of the available states
and provinces will appear. Select the state or
province.
4. Select the Street screen button and start
entering the street name or touch the Last
5 Streets screen button.
If the street name is common, the system may
need input of the city name first.
The Last 5 Streets screen will display a list
of the last five street names that had
been entered. Select a street from the list
and it will appear in the Street name area.
If using the alpha keyboard, finish entering the
street name. If five or less names are available,
a list will display. If more than five are available,
the List screen button will have a number in it,
it represents the number of available streets.
Select this button to view the list and select a
street.
2 Address Entry screen button.
30
Page 31

5. Once a street has been selected, select the
House # screen button to enter the house
number. The system will display the house
number range that is available for the street.
6. Once the house number is selected, the city
name will automatically populate. If there is
more than one city available for selection,
a list of cities will display. Select the city.
7. Select the Go screen button. The map screen,
with the destination marked, will display.
8. Select the route preference (Fastest, Shortest,
or Other). The system will calculate and
highlight the route.
9. Select the Start Guidance screen button.
You are now ready to start your route.
See “Getting Started on Your Route” later in
this section for more information.
To enter a destination by entering a cross street,
do the following:
1. Press the DEST hard key.
2. Select the
2 Address Entry screen button.
3. Select the state/province screen button, if
needed, to change the current state or
province. A list of all of the available states
and provinces will appear. Select the state or
province.
4. Select the Street screen button and start
entering the street name or touch the Last
5 Streets screen button.
If the street name is common, the system may
need input of the city name first.
The Last 5 Streets screen will display a list
of the last five street names that had
been entered. Select a street from the list
and it will appear in the Street name area.
If using the alpha keyboard, finish entering the
street name. If five or less names are available,
a list will display. If more than five are available,
the List screen button will have a number in it,
it represents the number of available streets.
Select this button to view the list and select a
street.
31
Page 32

5. Once a street has been selected, select the
Cross Street screen button and start entering
the cross street name. If five or less names
are available, a list will display. If more
than five are available, the List screen button
will have a number in it, it represents the
number of available streets. Select this button
to view the list and select a street.
6. Select the Go screen button. The map screen,
with the destination marked, will display.
7. Select the route preference (Fastest, Shortest,
or Other). The system will calculate and
highlight the route.
8. Select the Start Guidance screen button.
You are now ready to start your route.
See “Getting Started on Your Route” later in
this section for more information.
Point of Interest (POI)
The Point of Interest (POI) destination entry
method allows you to select a destination from the
POI list.
i Point of Interest: Touch this screen button to
access the POI (Point of Interest) screen. From this
screen you have two options to select/enter a
destination; enter the name using the alpha
keyboard or select a category from the category list.
32
Page 33

To use the point of interest destination entry
method by inputting the name, do the following:
1. Press the DEST hard key.
2. Select the
3. Select the state/province screen button,
if needed, to change the current state or
province. A list of all of the available states
and provinces will appear. Select the state or
province.
4. Enter the POI name.
If five or less names are available, a list will
display. If more than five are available, the List
screen button will have a number in it, it
represents the number of available POIs.
Select this button to view the list.
5. Select the Go screen button next to the POI.
The map screen, with the destination marked,
will display.
6. Select the route preference (Fastest, Shortest,
or Other). The system will calculate and
highlight the route.
7. Select the Start Guidance screen button.
You are now ready to start your route.
See “Getting Started on Your Route” later in
this section for more information.
i Point of Interest screen button.
To use the point of interest destination entry
method by selecting a category, do the following:
1. Press the DEST hard key.
2. Select the i Point of Interest screen button.
3. Select the Browse POI Categories screen
button to view the list of POI categories.
4. Select a category.
The system will display available POI names
in the selected category.
5. Select the Go screen button next to the POI.
The map screen, with the destination marked,
will display.
6. Select the route preference (Fastest, Shortest,
or Other). The system will calculate and
highlight the route.
7. Select the Start Guidance screen button.
You are now ready to start your route.
See “Getting Started on Your Route” later in
this section for more information.
33
Page 34
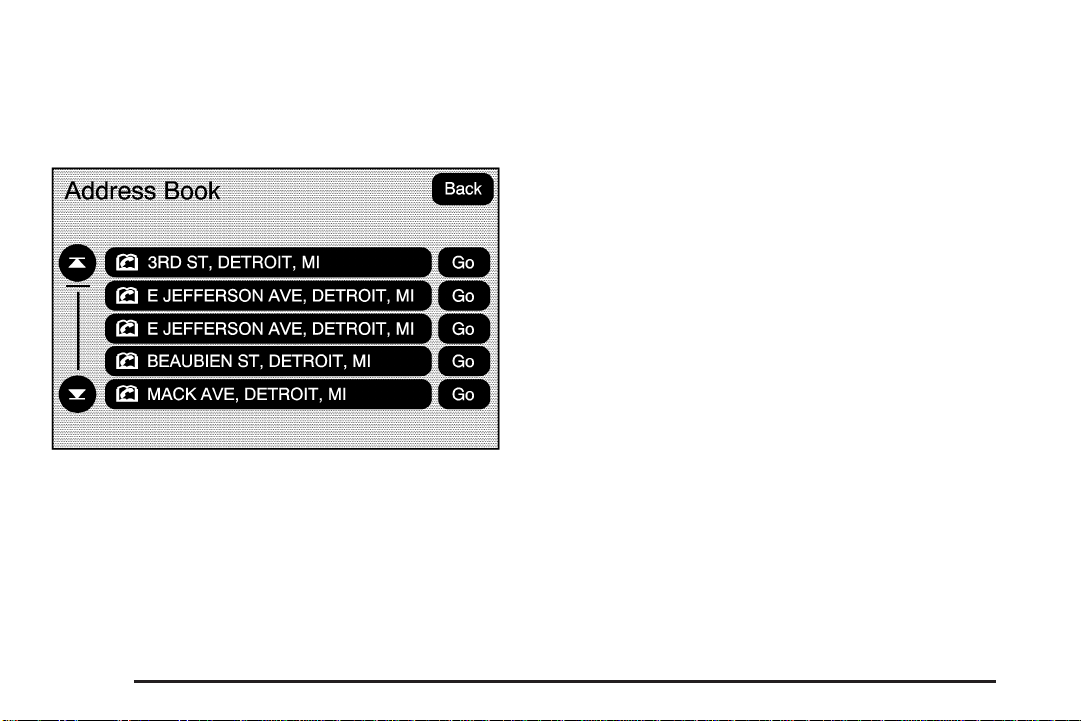
Address Book
The address book entry method allows you to
select a destination by selecting an address that
has been stored in your address book.
g Address Book: Touch this screen button to
access the Address Book screen. From this screen
you can select an address that already exists as
the destination.
To use the address book entry method, do the
following:
1. Press the DEST hard key.
2. Select the
A list of your address book addresses will
display.
3. Select the Go screen button next to the
destination. The map screen, with the
destination marked, will display.
4. Select the route preference (Fastest, Shortest,
or Other). The system will calculate and
highlight the route.
5. Select the Start Guidance screen button.
You are now ready to start your route.
See “Getting Started on Your Route” later in
this section for more information.
See “Adding Destinations to the Address
Book” later in this section.
g Address Book screen button.
34
Page 35

Previous Destination
The previous destination entry method allows you
to select a destination from a list of previous
destination points.
/ Previous Destination: Touch this screen
button to access the Previous Destination screen.
The system will store up to 100 points that
have been previously entered. As new destinations
are entered, the system will automatically delete
the oldest destinations and add the new
destinations.
To use the previous destination entry method, do
the following:
1. Press the DEST hard key.
2. Select the
button.
3. Select a previous destination from the list.
Use the arrow to the right of the destination
to view the entire destination name as
necessary. Use the scroll arrows to the left to
scroll through the list.
4. Select the Go screen button next to the
destination. The map screen, with the
destination marked, will display.
5. Select the route preference (Fastest, Shortest,
or Other). The system will calculate and
highlight the route.
6. Select the Start Guidance screen button.
You are now ready to start your route.
See “Getting Started on Your Route” later in
this section for more information.
/ Previous Destination screen
35
Page 36

From Map
This destination entry method allows you to select
a destination by scrolling on the map.
) From Map: Touch this screen button to enter
the from map destination entry method.
To use this destination entry method, do the
following:
1. Press the DEST hard key.
2. Select the
screen will display with the scrolling symbol.
3. Use the
and touch on the map to find the area that
you would like to select as your destination.
Pressing/holding and dragging your finger
on the map will activate fast scrolling.
4. Press/touch once on the area that you would
like to set as your destination.
The map screen will display the address
information.
5. Select the Go screen button. The map screen,
with the destination marked, will display.
6. Select the route preference (Fastest, Shortest,
or Other). The system will calculate and
highlight the route.
7. Select the Start Guidance screen button.
You are now ready to start your route.
See “Getting Started on Your Route” later in
this section for more information.
) From Map screen button. A map
0 / 1 (zoom in/out) screen buttons
36
Page 37

Map Coordinates
The coordinates destination entry method allows
you to select a destination by entering latitude and
longitude coordinates.
Map Coordinates: Touch this screen button to
access the Coordinates Entry screen.
To use the coordinates destination entry method,
do the following:
1. Press the DEST hard key.
2. Select the From Map screen button.
3. Select the Map Coordinates screen button.
4. Select Latitude and select either N (north) or
S (south) to enter the direction of the latitude
coordinate. Enter the numeric portion of
the latitude coordinate.
5. Select Longitude and select either E (east) or
W (west) next to enter the direction of the
longitude coordinate. Enter the numeric
portion of the longitude coordinate.
6. Once both coordinates are entered, select the
Go screen button. The map screen, with the
destination marked, will display.
7. Select the route preference (Fastest, Shortest,
or Other). The system will calculate and
highlight the route.
8. Select the Start Guidance screen button.
You are now ready to start your route.
See “Getting Started on Your Route” later in
this section for more information.
37
Page 38
Preset Destination
The preset destination entry method allows you
to set a destination by selecting from one of five
previously stored destinations. Besides voice
tagged destinations, these are the only destinations
available to set while the vehicle is moving. If a
destination is not set for one of the screen buttons,
the button will be dimmed and not be available for
use. See “Adding or Changing Preset Destinations”
later in this section for information on how to add a
preset destination.
To use the preset destination entry method, do the
following:
1. Press the DEST hard key.
2. Select the desired preset destination screen
button. The screen buttons are labeled with
the name that was selected for the destination
when it was stored. The map screen, with
the destination marked, will display.
3. Select the route preference (Fastest, Shortest,
or Other). The system will calculate and
highlight the route.
4. Select the Start Guidance screen button.
You are now ready to start your route.
See “Getting Started on Your Route” later in
this section for more information.
38
Page 39

Getting Started on Your Route
Once you have entered a destination there are
several functions that can be performed. Press the
DEST hard key to access the Route screen.
Turn List
Turn List: Touch this screen button to view the
list of turn maneuvers for the entire route and
to avoid turns on the route.
r / q (Scroll Arrows): Touch the up and
down arrow screen buttons to scroll through the
list of maneuvers.
Avoid: Touch this screen button, next to the
adjacent street name, to avoid the maneuver.
The map screen will display. The route will
re-calculate without the selected avoided
maneuver.
39
Page 40

Route Preview: Select this screen button to
preview the entire route in either direction.
t (Reverse Skip): Select this screen button to
go back to the start point or previous stopover.
q / r (Reverse Scroll): Select this screen
button to scroll to the start point or previous
stopover. The
to a fast reverse screen button.
t (reverse skip) button will change
j (Pause): Select this screen button to pause
the route preview, while in reverse or fast forward
scroll.
r / [ (Fast Forward Scroll): Select this screen
button to scroll to the next stopover or to the
final destination. The
will change to a fast speed fast forward.
u (fast forward skip) button
u (Fast Forward Skip): Select this screen
button to go to the next stopover or to the final
destination.
Detour
Detour: Select this screen button from the Route
screen, then select to detour 1 mile, 3 miles, or
5 miles (1 km, 3 km, 5 km) around the current
route. You may also select to detour the whole
route if necessary. This option is only available
while you are driving on your current planned route.
Voice Volume
Select this screen button from the Route screen to
turn voice guidance on or off and to change the
volume of voice prompts. See “Nav” under
Configure Menu on page 44 for more information.
40
Page 41

Add Stopover
Add Stopover: Select this screen button from the
Route screen. This feature allows you to add up
to three stopovers to the current route, between
your start point and final destination. Once a
stopover has been added, the points can be edited
or deleted.
To add a stopover:
1. Press the DEST hard key.
2. Select the Add Stopover screen button. This
button will only appear if a route has been
calculated.
3. Using the desired method of entering a
destination, enter the stopover. See
“Destination” previously for more information.
4. Select the route preference (Fastest, Shortest,
or Other). The system will calculate and
highlight the route.
5. Select the Start Guidance screen button.
You are now ready to start your route.
6. To add the second and third stopovers, press
the DEST hard key, then select the Add
screen button, where you would like the next
waypoint to fall on the route.
7. Select the route preference (Fastest, Shortest,
or Other). The system will calculate and
highlight the route.
8. Select the Start Guidance screen button.
You are now ready to start your route.
41
Page 42

To delete a stopover from your current route:
1. Press the DEST hard key.
2. Select the Delete screen button for the
desired stopover to delete.
3. The system will display a pop-up confirmation
message. Choose Yes to delete the stopover;
touch No to cancel this operation.
4. Select the route preference (Fastest, Shortest,
or Other). The system will calculate and
highlight the route.
5. Select the Start Guidance screen button.
You are now ready to start your route.
Suspend Guidance
Press this screen button, from the Route screen,
to put the current route on hold.
Resume Guidance
Press this screen button, from the Route screen,
to resume guidance on the current route.
Cancel Guidance
Press this screen button, from the Route screen,
to cancel the current route.
Adding Destinations to the Address
Book
There are two ways to add a destination to the
address book:
• To add the current vehicle position to the
address book, press the Mark screen
button from the map screen. The system
will automatically save the current vehicle
information in the address book. When
scrolling on the map the Mark screen button
will automatically add the current scrolled
position information in the address book.
• Press the Add to Address Book screen button
when available on POI information screens,
Destination Entry screens, or POI screens.
The system will automatically save this
information in the address book.
See “Nav” under Configure Menu on page 44 for
information on editing address book entries.
42
Page 43

Adding or Changing Preset
Destinations
This feature allows you to add or change one of
five preset destinations. When a destination
has been added as a preset destination, it will be
available to select from the Destination Entry
screen. See “Preset Destination” previously for
information on how to select a preset destination
as a final destination.
To store the current vehicle position as a preset
destination:
1. Select the Mark screen button from the map
screen to add the current vehicle position to
the address book. The Address Book
screen will appear.
2. Select the Name screen button. An
alpha-keyboard will display. Enter the name.
Press the OK screen button then the Back
screen button to return to the address
book information screen.
3. Press and hold one of the buttons at the
bottom of the screen until the name appears
in that preset destination screen button. It
is now available to select from the Destination
Entry screen.
To store an address book entry as a preset
destination:
1. Select the CONFIG hard key.
2. Select the Nav screen button or press the
CONFIG key until Nav is selected or touch
the Nav screen button.
3. Select the Edit/View screen button.
4. Select the address book entry that you would
like to store as the preset destination. Select
the Name screen button to add a name, if
needed.
5. Press and hold one of the buttons at the
bottom of the screen until the name appears
in that preset destination screen button. It
is now available to select from the Destination
Entry screen.
43
Page 44

Configure Menu
Press the CONFIG (Configure) hard key to adjust
several of your system’s features and preferences.
The last selected CONFIG screen will be the
screen that displays; Sound, Radio, Nav
(navigation), Display, or Time.
Sound
Press the CONFIG key to enter the configure
menu options, then press the CONFIG key
repeatedly until Sound is selected or touch the
Sound screen button to make speaker and
DSP (Digital Signal Processing) adjustments. See
Navigation Audio System on page 62 for more
information.
Radio
Press the CONFIG key to enter the configure
menu options, then press the CONFIG key
repeatedly until Radio is selected or touch the
Radio screen button to make changes for
radio information displayed, preset pages, XM™
categories, and Bose
Audio System on page 62 for more information.
®
AudioPilot®. See Navigation
44
Page 45

Nav (Navigation)
Press the CONFIG key to enter the configure
menu options, then press the CONFIG key
repeatedly until Nav is selected or touch the Nav
screen button.
Voice Prompt
Voice Prompt: Touch the Voice Prompt screen
button to change the volume of the voice prompts
or to turn voice guidance on and off.
Volume: Touch the + (plus) or − (minus) screen
buttons to increase or to decrease the volume
of the voice prompts. The system will respond with
the adjusted voice level.
Voice Guidance: Touch the On or Off screen
buttons to turn voice instructions on and off while
traveling on a planned route.
Route Preference
Touch the Route Preference screen button to
change route options when the system calculates
a route.
Allow Major Roads: This feature allows the
system to use major roads when calculating a
planned route.
Allow toll road: This feature allows the system to
use toll roads when calculating a planned route.
Allow ferry: This feature allows the system to use
ferries when calculating a planned route.
Allow time and seasonal restricted road: This
feature allows the system to use time restricted and
seasonal roads when calculating a planned route.
45
Page 46

Edit Address Book — How to Add
To add an address to the address book, see
“Adding Destinations to the Address Book” under
Destination on page 28.
Edit Address Book — Edit/View
To edit the name of an address book:
1. Select the CONFIG hard key.
2. Select the NAV screen button.
3. Select the Edit/View Address Book screen
button.
4. Select the Address book entry.
5. Touch the Name screen button and use the
alpha keyboard to edit or add the name.
6. Touch the OK screen button to save your
changes, then touch the Back screen
button to return to the Address Book
information screen.
46
Page 47

To add or change the phone number of an
address book entry:
1. Select the CONFIG hard key.
2. Select the NAV screen button.
3. Select the Edit/View Address Book screen
button.
4. Select the address book entry to change.
5. Touch the Phone # screen button and use the
numeric keyboard to input or change the
phone number.
6. Touch the OK screen button to save your
changes, then touch the Back screen
button to return to the Address Book
information screen.
To change the map icon of an address book entry:
1. Select the CONFIG hard key.
2. Select the NAV screen button.
3. Select the Edit/View Address Book screen
button.
4. Select the address book entry to change.
5. Select the Icon screen button.
6. Select an icon from the list.
To add a voice tag to an address book entry:
1. Select the CONFIG hard key.
2. Select the NAV screen button.
3. Select the Edit/View Address Book screen
button.
4. Select the Add Voice Tag screen button.
5. The system will ask for you to state the name.
You will have four seconds to state the name.
The system will respond back with the
name and prompt you to repeat the name for
confirmation.
To delete an address book entry:
1. Select the CONFIG hard key.
2. Select the NAV screen button.
3. Select the Edit/View Address Book screen
button.
4. Select the address book entry to delete.
5. Press the Delete screen button to delete the
address book entry.
6. A confirmation pop-up will display. Select Ok
to delete; select Cancel to cancel the
operation.
47
Page 48

To delete the entire address book:
1. Select the CONFIG hard key.
2. Select the NAV screen button.
3. Select the Edit/View Address Book screen
button.
4. A list of all the address book entries will
display. Press and hold the Clear All
screen button.
5. A confirmation pop-up will display. Select Ok
to delete; select Cancel to cancel the
operation.
5 Call: Press this screen button to make a phone
call. See Phone on page 96 for more information.
Map Database Information
Touch the Map Database Information screen button
to view the coverage areas of the map DVD.
48
Page 49

Off-Road Mode
To turn the Off-road mode on or off, do the
following:
1. Press the CONFIG hard key.
2. Press the Nav screen button.
3. Press the Off-Road mode screen button.
The button will be highlighted when the
feature is on.
When the off-road mode is turned on, the
navigation system will show the path being
traveled by the vehicle when not on a marked
road. This path will be a simulation since the map
database coverage will not have these roads
on the DVD. This path will be stored in the
navigation system’s memory, see “Previous
Destination” under Destination on page 28 for
more information.
See “Off-Road Driving” in the Index of your
vehicle’s owner manual for more information about
off-road driving.
Display
Press the CONFIG key to enter the configure
menu options, then press the CONFIG key
repeatedly until Display is selected or touch the
Display screen button.
Display Off
Touch this screen button to turn the display off.
Press any hard key to view the display.
49
Page 50

Brightness/Contrast/Mode
Touch this screen button to change the brightness,
contrast, and mode of the display.
] (Brightness): Touch the + (plus) or − (minus)
screen buttons to increase or decrease the
brightness of the screen.
_ (Contrast): Touch the + (plus) or − (minus)
screen buttons to increase or decrease the
contrast of the screen.
Auto (Automatic): Touch this screen button for
the system to automatically adjust the screen
background depending on exterior lighting
conditions.
50
Night: Touch this screen button and the system
will make the map background darker.
Day: Touch this screen button and the system will
make the map background brighter.
Setting the Time
The navigation system time and the analog clock
are separate features. Changing the time through
the navigation system will not change the time on
the analog clock and vice versa. See “Analog
Clock” in the Index of your vehicles owner manual
to change the analog clock time.
Press the CONFIG key to enter the configure
menu options, then press the CONFIG key
repeatedly until the time is selected or touch the
time screen button.
Hours: Press the − (minus) or + (plus) signs to
decrease or increase the hours.
Minutes: Press the − (minus) or + (plus) signs to
decrease or increase the minutes.
12/24 Format: Select the 12 screen button for
standard time; select the 24 screen button
for military time.
Page 51

Rear Vision Camera
Your vehicle may be equipped with a rear vision
camera system. Read this entire section before
using the camera system.
The rear vision camera system is designed to
help the driver when backing up by displaying a
view, on the navigation screen, of the area behind
the vehicle when the driver shifts the vehicle
into REVERSE (R). Once the driver shifts out of
REVERSE (R), the navigation screen will go back
to the last screen that had been displayed, after
a delay.
Turning the Rear Vision Camera System
On or Off
To turn the rear vision camera system on or off,
do the following:
1. Shift into PARK (P).
2. Press the CONFIG hard key to enter the
configure menu options, then press the
CONFIG hard key to select Display or touch
the Display screen button.
3. Select the Rear Camera Options screen
button. The Rear Camera Options screen
will display.
51
Page 52

4. Select the Video screen button. When the
video button is highlighted, RVC system is on.
The delay that is received after shifting out of
REVERSE (R) is approximately 10 seconds.
The delay can be cancelled by performing one
of the following:
• Pressing a hard key on the navigation system
or touching the navigation screen.
• Shifting in to PARK (P).
• Reach a vehicle speed of 7 mph (11 km/h).
There is a message on the rear vision camera
screen that states “Check Surroundings for Safety”.
{CAUTION:
The Rear Vision Camera (RVC) system
does not replace driver vision.
RVC does not:
• Detect objects that are outside the
camera’s field of view, below the
bumper, or underneath the vehicle.
• Detect children, pedestrians,
bicyclists, or pets.
CAUTION: (Continued)
52
Page 53

CAUTION: (Continued)
Do not back the vehicle by only looking at
the rear vision camera screen, or use the
screen during longer, higher speed
backing maneuvers or where there could
be cross-traffic. Your judged distances
using the screen will differ from actual
distances.
So if you do not use proper care before
backing up, you could hit a vehicle, child,
pedestrian, bicyclist, or pet, resulting in
vehicle damage, injury, or death. Even
though the vehicle has the RVC system,
always check carefully before backing up
by checking behind your vehicle.
Rear Vision Camera Location
Escalade, Escalade ESV shown; Escalade EXT
similar
The image is provided by the camera located
above the license plate or under the endgate
handle.
53
Page 54

The camera uses a special lens. The distance of
the image that appears on the screen differs
from the actual distance. The area displayed by
the camera is limited. The camera does not display
objects which are close to either corner of the
bumper or under the bumper. The area displayed
on the screen may vary according to vehicle
orientation or road conditions.
The following illustration shows the field of view
that the camera provides.
54
Page 55

Adjusting the Brightness and Contrast of
the Screen
To adjust the brightness and contrast of the
screen, press the CONFIG key while the rear
vision camera image is on the display. Any
adjustments made will only effect the rear vision
camera screen.
] (Brightness): Touch the + (plus) or – (minus)
screen buttons to increase or decrease the
brightness of the screen.
_ (Contrast): Touch the + (plus) or – (minus)
screen buttons to increase or decrease the
contrast of the screen.
Symbols
The navigation system may have a feature for you
to view symbols on the navigation screen while
using the rear vision camera. The Ultrasonic Rear
Park Assist (URPA) system must not be disabled
to use the caution symbols. If URPA has been
disabled and the symbols have been turned on, an
error message may display, Rear Parking Assist
Symbols Unavailable.
The symbols will appear when an object has been
detected by the URPA system. The symbol
may cover the object when viewing the navigation
screen.
To turn the symbols on or off, do the following:
1. Make sure that URPA has not been disabled.
2. Shift into PARK (P).
3. Press the CONFIG hard key to enter the
configure menu options, then press the
CONFIG hard key repeatedly until Display
is selected or touch the Display screen button.
4. Select the Rear Camera Options screen
button. The Rear Camera Options screen
will display.
5. Touch the Symbols screen button. The screen
button will be highlighted when on.
55
Page 56

When the System Does Not Seem To Work
Properly
The rear vision camera system may not work
properly or display a clear image in the following
situations:
• The feature may be turned off. See “Turning
the Rear Vision Camera System On or Off”
earlier in this section.
• In the dark.
• When the sun or the beam of headlights is
shining directly into the camera lens.
• If ice, snow, mud, or anything else builds up
on the camera lens. Clean the lens, rinse it
with water, and wipe it with a soft cloth.
• If the back of the vehicle is in an accident, the
position and mounting angle of the camera
may change or the camera may be affected.
Be sure to have the camera and its position
and mounting angle checked at your
dealer/retailer.
• Extreme high or low temperatures or extreme
temperature changes can affect the image
displayed.
Rear Vision Camera Error Messages
Rear Vision Camera System Unavailable: This
message may display when the system is not
receiving information it requires from other vehicle
systems.
Service Rear Vision Camera System: This
message may display when the system is
not receiving video from the camera.
If any other problem occurs or if a problem
persists, see your dealer/retailer.
Global Positioning System (GPS)
The navigation system determines the position of
your vehicle by using satellite signals, various
vehicle signals, and map data.
At times, other interferences such as the satellite
condition, road configuration, the condition of
the vehicle and/or other circumstances can
interfere with the navigation system’s ability to
determine the accurate position of the vehicle.
The GPS shows the current position of your
vehicle using signals sent by the GPS Satellites of
the United States Department of Defense.
56
Page 57

When your vehicle is not receiving signals from
the satellites, a symbol will appear on the
map screen. Refer to Symbols on page 21.
This system may not be available or interferences
may occur if any of the following are true:
• Signals are obstructed by tall buildings, trees,
large trucks, or a tunnel.
• Objects are located on the rear shelf.
• Satellites are being repaired or improved.
• After-market glass tinting has been applied to
the vehicle’s rear windshield.
Notice: Do not apply after-market glass tinting
to the vehicle’s windows. Glass tinting will
interfere with the system’s ability to receive
GPS signals and cause the system to
malfunction. You might have to replace the
window to correct the problem. This would not
be covered by your warranty.
For more information if you are experiencing a
problem, see If the System Needs Service
on page 59 and Problems with Route Guidance on
page 58.
Vehicle Positioning
At times, the position of the vehicle on the map
may be inaccurate due to one or more of the
following reasons:
• The road system has changed.
• The vehicle is driving on slippery road
surfaces such as in sand, gravel, and/or snow.
• The vehicle is traveling on winding roads.
• The vehicle is on a long straight road.
• The vehicle is approaching a tall building or a
large vehicle.
• The surface streets run parallel to a freeway.
• The vehicle has just been transferred by a
vehicle carrier or a ferry.
• The current position calibration is set
incorrectly.
• The vehicle is traveling at high speed.
• The vehicle changes directions more than
once, or when the vehicle is turning on a
turn table in a parking lot.
• The vehicle is entering and/or exiting a
parking lot, garage, or a lot with a roof.
57
Page 58

• The GPS signal is not received.
• A roof carrier is installed on your vehicle.
• The vehicle is being driven with tire chains.
• The tires are replaced.
• The tire pressure for your tires is incorrect.
• The tires are worn.
• The first time the map DVD is inserted.
• The battery is disconnected for several days.
• The vehicle is driving in heavy traffic where
driving is at low speeds, and the vehicle is
stopped and started repeatedly.
If you experience problems with your system,
see your dealer/retailer.
Problems with Route Guidance
Inappropriate route guidance may occur under one
or more of the following conditions:
• You have not turned onto the road indicated.
• Route guidance may not be available
when using automatic rerouting for the next
right or left turn.
• The route may not be changed when using
automatic rerouting.
• There is no route guidance when turning at an
intersection.
• Plural names of places may be announced
occasionally.
• It may take a long time to operate automatic
rerouting during high-speed driving.
• Automatic rerouting may display a route
returning to the set stopover if you are heading
for a destination without passing through a
set stopover.
• The route prohibits the entry of a vehicle due
to a regulation by time or season or any
other regulation which may be given.
• Some routes may not be searched.
• The route to the destination may not be
shown if there are new roads, if roads
have recently changed, or if certain roads are
not listed on the map DVD. See Ordering
Map DVDs on page 59.
To recalibrate the vehicle’s position on the map,
see your dealer/retailer.
58
Page 59

If the System Needs Service
Database Coverage Explanations
If your system needs service and you have
followed the steps listed here and still are
experiencing problems, see your dealer/retailer for
assistance.
Ordering Map DVDs
The map DVD in your vehicle is the most
up-to-date information available when your
vehicle was produced. The map DVD is updated
periodically, provided that the map information
has changed. To order a new map DVD, contact
your dealer/retailer.
Coverage areas vary with respect to the level of
map detail available for any given area. Some
areas will feature greater levels of detail than
others. If this happens, it does not mean there is a
problem with the system. As the map DVD is
updated, more detail may become available for
areas which previously had limited detail. See
Ordering Map DVDs on page 59.
59
Page 60

✍ NOTES
60
Page 61

Section 3 Navigation Audio System
Navigation Audio System ............................. 62
CD Player ................................................... 71
DVD Player ................................................. 80
Auxiliary Devices ......................................... 87
61
Page 62

Navigation Audio System
Notice: Before adding any sound equipment
to your vehicle, such as an audio system,
CD player, CB radio, mobile telephone,
or two-way radio, make sure that it can be
added by checking with your dealer/retailer.
Also, check federal rules covering mobile radio
and telephone units. If sound equipment can
be added, it is very important to do it properly.
Added sound equipment can interfere with
the operation of your vehicle’s engine, radio,
or other systems, and even damage them.
Your vehicle’s systems can interfere with
the operation of sound equipment that has
been added.
Notice: The chime signals related to seat
belts, parking brake, and other functions of
your vehicle operate through the navigation
system. If that equipment is replaced or
additional equipment is added to your vehicle,
the chimes may not work. Make sure that
replacement or additional equipment is
compatible with your vehicle before installing
it. See “Accessories and Modifications” in
the Index of your vehicle’s owner manual.
Playing the Radio
O
/ n (Power/Volume): Press this knob to
turn the audio system on and off. Turn the knob to
increase or to decrease the volume.
Press and hold this knob for more than two
seconds to turn off the navigation system, the
Rear Seat Entertainment (RSE) video screen, and
Rear Seat Audio (RSA). If the vehicle has not
been tuned off, the RSE and the RSA can
be turned back on by pressing this knob and
will continue play of the last active source.
w (Tuning Knob): Turn this knob to go to
the next or previous frequency or disc track
or chapter. See CD Player on page 71 or DVD
Player on page 80 for more information.
AUDIO: Press this key to display the audio
screen. Press the key to switch between AM, FM,
or XM, if equipped, DISC, or AUX (Auxiliary),
or touch the screen button. See CD Player
on page 71, DVD Player on page 80, and Auxiliary
Devices on page 87 for more information.
62
Page 63

Finding a Station
FM source shown, other sources similar
AM source shown, other sources similar
If viewing a map screen, touch the source screen
(AM, FM, XM, CD, etc.) button. The display
will split between the audio screen and the map
screen. All station-changing functions can be
performed from this screen.
If you do not want to view a split screen or you
are not on a map screen, press the AUDIO
hard key.
AM/FM/XM: Touch the source (AM, FM, or XM,
if equipped) screen button or press the AUDIO key
repeatedly until the desired source is highlighted.
63
Page 64

FM source shown, other sources similar
See “Radio Menu” later in this section to add and
remove XM categories from the category list.
The categories, when removed, will not be enabled
to select from the category list screen or when
using the right and left arrow category screen
buttons.
FM lists may also contain a category to select
if stations in your area support Radio Data
Systems (RDS).
2 Refresh List: Touch this screen button to
refresh the list of AM or FM stations.
When viewing a map screen, the name of the
station or channel will appear on the display.
Category: Touch the screen button, located in
the middle of the screen, to receive a list of all of
the selected band stations in the area. Use the
up and down arrow screen buttons to scroll
the frequencies. Touch the desired frequency.
XM lists will also contain a category to select
and the stations or channels that pertain to
the category. For XM, touch the left and right arrow
screen buttons to change categories. The station
information will appear on the display.
64
y©¨z(Seek): To seek stations, press the
up or down arrow keys to go to the next or
previous station.
To scan stations, press and hold either arrow for
more than two seconds. The radio will go to a
station, play for a few seconds, then go on to the
next station. To stop scanning, press either
arrow again.
Page 65

Storing Radio Station Presets
This feature allows you to store up to 30 preset
stations. You can mix AM, FM, and XM (if
equipped). To store presets, do the following:
1. Press the
system on.
2. If viewing a map screen, touch the source
screen button, press the AUDIO key, or
press the FAV (favorite) key.
3. Select the band.
4. Seek, scan, or tune to the desired station, to
select the station.
5. Press and hold one of the preset screen
buttons for more than two seconds or until
you hear a beep.
6. Repeat the steps for each preset.
O (power) knob to turn the
Sound Menu
e
(Sound): Press this key or press the CONFIG
key to access the Sound menu to adjust the treble,
midrange, bass, fade, balance, and Digital Signal
Processing (DSP). The system automatically stores
audio adjustment settings as changes are made
for each audio source including AM, FM, XM
(if equipped), CD, and AUX.
65
Page 66

Setting the Tone
Select from the following DSP settings:
TREBLE: Touch the plus (+) or minus (−) sign to
increase or decrease the treble. If a station is
weak or noisy, decrease the treble.
MID (Midrange): Touch the plus (+) or minus (−)
sign to increase or decrease the midrange.
BASS: Touch the plus (+) or minus (−) sign to
increase or decrease the bass.
Adjusting the Speakers
L/R (Left/Right) (Balance): To adjust the balance
between the left and the right speakers, touch
and hold the L or R screen buttons.
Front/Rear (Fade): To adjust the fade between
the front and the rear speakers, touch and hold the
Front or Rear screen buttons.
Digital Signal Processing (DSP)
The system has Digital Signal Processing (DSP).
DSP is used to provide a choice of four different
listening experiences. DSP can be used while
listening to the audio system. Not all DSP modes
are available for all source types. The type of
DSP selected is displayed on the status line.
Normal: Select this screen button to adjust the
audio to be in normal mode. DSP will be off.
Surround: Select this screen button to turn on
surround sound listening for a CD, MP3, or a DVD
stereo audio source.
Driver: Select this screen button to adjust the
audio to give the driver the best possible sound
quality.
Rear: Select this screen button to adjust the
audio to give the rear seat occupants the
best possible sound quality.
2 CH. (Channel): Select this screen button to
enhance surround sound.
5.1 CH. (Channel): Select this screen button to
give a full affect of surround sound listening.
This button is only available when playing DVD
video and DVD audio discs that support 5.1 audio
and the RSA is off.
66
Page 67

Radio Menu
Press the CONFIG key to enter the configure
menu screen, then press the CONFIG key
repeatedly until Radio is selected or touch the
Radio screen button to make changes for
radio information displayed, number of preset
pages, XM categories, and Bose
®
AudioPilot®.
Additional Information Displayed
Touch the Additional Information Displayed screen
button to turn station, channel, CD, and MP3
information on or off. The information will display
when the screen button is highlighted.
When the screen button is highlighted the system
will display, when it is available, for the following;
FM: RDS category name and radio text, XM: Song
Title and Artist Name, CD: CD text, MP3: tag
information.
Number of Preset Pages
Touch the Number of Preset Pages screen button
to change the number of preset pages, 1 through 6.
Each preset page can contain five preset stations.
Touch the desired numbered screen button.
67
Page 68

Bose AudioPilot
®
AudioPilot®: If the system has the Bose®sound
system, it includes Bose AudioPilot®noise
compensation technology.
®
To use AudioPilot
:
1. Press the CONFIG key to enter the menu
screen, then press the CONFIG key
repeatedly until Radio is selected or touch the
Radio screen button
2. Press the Automatic Volume Control screen
button to access the AudioPilot
®
menu.
3. Press the ON screen button.
To turn it off, touch the OFF screen button. When
on, AudioPilot
®
continuously adjusts the audio
system equalization, to compensate for
background noise, so that your music always
sounds the same at the set volume level.
This feature is most effective at lower volume
settings where background noise can affect how
well you hear the music being played through
your vehicle’s audio system. At higher volume
settings, where the music is much louder than
the background noise, there may be little or
no adjustments by AudioPilot
®
. For more
information on AudioPilot®, visit
www.bose.com/audiopilot.
Remove/Add XM Categories
Touch the Remove/Add XM Categories screen
button to remove or add XM categories when
selecting XM categories from the category
list screen. The list of XM categories will appear
on the screen. Use the up and down arrow screen
buttons to scroll through the list. The categories
to remove will be highlighted and the categories to
add will be dark in color. Touch the category
that you would like to add or remove. Touch the
Restore All Categories screen button to add
all categories that have been removed.
68
Page 69

Radio Data System (RDS)
XM™ Satellite Radio Service
The audio system has a Radio Data System
(RDS). RDS features are available for use only on
FM stations that broadcast RDS information.
With RDS, the radio can do the following:
• Seek to stations broadcasting the selected
type of programming
• Receive announcements concerning local and
national emergencies
• Display messages from radio stations
This system relies on receiving specific information
from these stations and will only work when the
information is available. In rare cases, a radio
station may broadcast incorrect information that
will cause the radio features to work improperly.
If this happens, contact the radio station.
The RDS system is always on. When information is
broadcast from the FM station you are listening to,
the station name or call letters will be displayed on
the audio screen. RDS may provide a program type
(PTY) for current programming and the name of the
program being broadcasted.
XM™ is a satellite radio service that is based in
the 48 contiguous United States and Canada.
XM™ offers a large variety of coast-to-coast
channels including music, news, sports, talk,
traffic/weather (U.S. subscribers), and children’s
programming. XM™ provides digital quality
audio and text information that includes the
channel name and number, song title, and artist
name. A service fee is required in order to receive
the XM™ service. For more information, contact
XM™; In the U.S. at www.xmradio.com or
call 1-800-852-XMXM (9696) or in Canada at
www.xmradio.ca or call 1-877-GET-XMSR
(438-9677).
When XM™ is active, the channel name and
number, song title, and artist will display on the
screen.
69
Page 70

XM™ Radio Messages
XL (Explicit Language Channels): XL on the
radio display, after the channel name, indicates
content with explicit language. These channels, or
any others, can be blocked at a customer’s
request by calling 1-800-852-XMXM (9696).
XM Updating: The encryption code in the receiver
is being updated and no action is required.
No XM signal: The vehicle is in a location that is
blocking the XM™ signal. When the vehicle is
moved into an open area, the signal should return.
Loading XM: The audio system is processing
audio and text data received. No action is needed.
Channel Off Air: This channel is not currently
in service.
Channel Unavail: This previously assigned
channel is no longer assigned.
No Artist Info: No artist information is available.
The system is working properly.
No Title Info: No song title information is
available. The system is working properly.
No CAT Info: No category information is
available. The system is working properly.
Not Found: There are no channels available for
the selected category. The system is working
properly.
No Information: No text or informational
messages are available. The system is working
properly.
XM Theftlocked: The XM™ receiver may have
previously been in another vehicle. For security
purposes, XM™ receivers cannot be swapped
between vehicles. If this message is received after
having your vehicle serviced, check with your
dealer/retailer.
XM Radio ID: If tuned to channel 0, this message
will alternate with the XM™ Radio eight digit
radio ID label. This label is needed to activate the
service.
Unknown: If this message is received when
tuned to channel 0, there may be a receiver fault.
Consult with your dealer/retailer.
Check XM Receiver: If this message does not
clear within a short period of time, the receiver
may have a fault. Consult with your dealer/retailer.
70
Page 71

CD Player
The player can be used for CD, MP3, DVD audio,
and as a DVD video player. See DVD Player
on page 80 for more information about DVD audio
and video.
Six-Disc CD Player
While playing a CD, the navigation system is
available.
When you insert a CD, the CD tab will display.
If you select a DSP setting for the CD, it will
be activated each time you play a CD.
If you turn off the ignition or radio with a CD in the
player, it will stay in the player. When you turn
on the ignition or radio, the CD will start playing
where it stopped, if it was the last selected
audio source.
As each new track starts to play, the track number
will appear on the display.
If playing a CD-R the sound quality may be
reduced due to CD-R quality, the method of
recording, the quality of the music that has been
recorded, and the way the CD-R has been
handled. There may be an increase in skipping,
difficulty in finding tracks, and/or difficulty in
loading and ejecting. If these problems occur,
check the bottom surface of the CD. If the surface
of the CD is damaged, such as cracked, broken,
or scratched, the CD will not play properly. If
the surface of the CD is soiled, see “Care of
Your CDs” in the Index of your vehicle’s owner
manual.
If there is no apparent damage, try a known
good CD.
Notice: If a label is added to a CD, or more
than one CD is inserted into the slot at a time,
or an attempt is made to play scratched or
damaged CDs, the CD player could be
damaged. While using the CD player, use only
CDs in good condition without any label, load
one CD at a time, and keep the CD player and
the loading slot free of foreign materials,
liquids, and debris.
Do not add any label to a CD, it could get caught
in the CD player. If a CD is recorded on a
personal computer and a description label is
needed, label the top of the recorded CD with a
soft marker.
71
Page 72

If an error appears on the display, see “CD
Messages” later in this section.
If viewing a map screen, touch the CD screen
button. The display will split between the audio
screen and the map screen. If you do not want to
view a split screen or you are not on a map
screen, press the AUDIO key then press the
AUDIO key repeatedly until CD is selected
or touch the CD screen button.
3. Once a disc is loaded, the system will display
“Insert Disc (number)” again. Load the next
disc. Repeat this procedure for each disc.
The player takes up to six discs, do not try
to load more than six. The system will
not display the disc types when loading all,
until the discs have been read by the system.
Once all discs have been inserted, the
system will start playing the last loaded disc.
M (Load): To load one disc, do the following:
1. Press the load hard key and follow the screen
message displayed.
2. When the system displays “Insert Disc
(number)”, insert the disc partway into the slot,
label side up. The system will pull it into the
first available slot and start playing. The
system will display the type of disc inserted.
To load multiple discs, do the following:
1. Press and hold the load hard key and follow
the screen message displayed.
2. When the system displays “Insert Disc
(number)”, insert the disc partway into the slot,
label side up. The system will pull it in.
72
Z (Eject): To eject a disc, do the following:
1. Press the eject hard key.
2. The system will display “Ejecting Disc”.
Press the DISC screen button to display the
Disc Changer screen. Select the disc to eject.
If a selection is not made, the system will eject
the disc from the current slot. If the disc is not
removed from the slot, the system will pull it
back in after 10 seconds and start playing it.
To eject all discs, press and hold the eject hard
key. The system will display the disc number being
ejected.
Page 73

Playing an Audio CD
j / r (Pause/Play): Touch this button to pause
the CD. This button will then change to the play
button. Touch the play button to play the CD.
Random: Touch this button to hear the tracks in
random, rather than sequential, order. Touch
Random again to turn off random play.
DISC: Touch this screen button to view the list of
loaded disc(s). Select the disc to play.
r (Rewind): Touch and hold this button to
rewind quickly through a track selection.
You will hear sound at a reduced volume. Release
this button to stop rewinding. The display will
show the elapsed time of the track.
[ (Forward): Touch and hold this button to fast
forward quickly through a track selection. You
will hear sound at a reduced volume. Release this
button to stop fast forwarding. The display will
show the elapsed time of the track.
y©¨z(Seek): To seek tracks, press the up
arrow to go to the next track. Press the down
arrow to go to the start of the current track, if more
than eight seconds have played. If either arrow
is pressed more than once, the player will continue
moving backward or forward through the CD.
The sound will mute while seeking.
w (Tuning Knob): Turn this knob
counterclockwise one notch to go to the start of
the current track, turn it again to go to the previous
track. Turn this knob clockwise to go to the next
track.
When playing an audio CD the rear seat operator
can power on the RSE video screen and use
the remote control to navigate through the tracks
on the CD.
73
Page 74

Using an MP3 CD
MP3 Format
There are guidelines that must be met, when
creating an MP3 disc. If the guidelines are not met
when recording a CD-R(W), the CD may not
play. The guidelines are:
• Sampling rate: 16 kHz, 22.05 kHz, 24 kHz,
32 kHz, and 44.1 kHz.
• Bit rates supported: 32, 40, 48, 56, 64, 80, 96,
112, 128, 160, 192, 224, 256, and 320 kbps.
• ID3 tag information is displayed by the radio if
it is available. The radio supports ID3 tag
information v1.0, v1.1, or v2.0. The radio will
display a filename, song name, artist
name, album name, and directory name.
• Maximum 32 characters, including spaces,
in a file or folder name.
• Maximum number of folders is 253 with a
maximum hierarchy of eight folders.
• Create a folder structure that makes it easy to
find songs while driving. Organize songs by
albums using one folder for each album.
Each folder or album should contain 18 songs
or less.
• It is recommended that there is a maximum of
192 files on a disc.
• The files can be recorded on a CD-R or
CD-RW with a maximum capacity of 700MB.
• DVD with MP3 are not playable on this
system.
Root Directory
The root directory will be treated as a folder. If the
root directory has compressed audio files, the
directory will be displayed as No Folder or ALL.
74
Page 75

Empty Directory or Folder
If a root directory or a folder exists
somewhere in the file structure that contains
only folders/subfolders and no compressed files
directly beneath them, the player will advance to
the next folder in the file structure that contains
compressed audio files and the empty folder will
not be displayed or numbered.
No Folder
When the CD contains only compressed files,
the files will be located under the root folder. The
next and previous folder functions will have no
function on a CD that was recorded without folders
or playlists. When displaying the name of the
folder the radio will display No Folder.
Order of Play
Play will begin from the first track under the root
directory. When all tracks from the root directory
have been played, play will continue from files
according to their numerical listing. After playing
the last track from the last folder, play will
begin again at the first track of the first folder or
root directory.
When play enters a new folder, the display will not
automatically show the new folder name. The
new track name will appear on the display.
File System and Naming
The song name that will display will be the song
name that is contained in the ID3 tag. If the
song name is not present in the ID3 tag, then
the radio will display the file name without
the extension (such as .mp3) as the track name.
Track names longer than 32 characters or
four pages will be shortened. The display will not
show parts of words on the last page of text
and the extension of the filename will not display.
75
Page 76

Playing an MP3
While playing a CD, the navigation system is
available.
When you insert a CD, the CD tab will display.
If you select a DSP setting for the CD, it will
be activated each time you play a CD.
If you turn off the ignition or radio with a CD in the
player, it will stay in the player. When you turn
on the ignition or radio, the CD will start playing
where it stopped, if it was the last selected
audio source.
As each new track starts to play, the track number
will appear on the display.
If playing a CD-R the sound quality may be reduced
due to CD-R quality, the method of recording, the
quality of the music that has been recorded, and the
way the CD-R has been handled. There may be an
increase in skipping, difficulty in finding tracks,
and/or difficulty in loading and ejecting. If these
problems occur, check the bottom surface of the
CD. If the surface of the CD is damaged, such as
cracked, broken, or scratched, the CD will not play
properly. If the surface of the CD is soiled, see
“Care of Your CDs” in the Index of your vehicle’s
owner manual.
If there is no apparent damage, try a known
good CD.
Notice: If a label is added to a CD, or more
than one CD is inserted into the slot at a time,
or an attempt is made to play scratched or
damaged CDs, the CD player could be
damaged. While using the CD player, use only
CDs in good condition without any label,
load one CD at a time, and keep the CD player
and the loading slot free of foreign materials,
liquids, and debris.
Do not add any label to a CD, it could get caught
in the CD player. If a CD is recorded on a
personal computer and a description label is
needed, label the top of the recorded CD with a
soft marker.
If an error appears on the display, see “CD
Messages” later in this section.
If viewing a map screen, touch the CD screen
button. The display will split between the audio
screen and the map screen. If you do not want to
view a split screen or you are not on a map
screen, press the AUDIO key then press the
AUDIO key repeatedly until CD is selected
or touch the CD screen button.
76
Page 77

M (Load): To load one disc, do the following:
1. Press the load hard key and follow the screen
message displayed.
2. When the system displays “Insert Disc
(number)”, insert the disc partway into the slot,
label side up. The system will pull it into the
first available slot and start playing. The
system will display the type of disc inserted.
To load multiple discs, do the following:
1. Press and hold the load hard key and follow
the screen message displayed.
2. When the system displays “Insert Disc
(number)”, insert the disc partway into the slot,
label side up. The system will pull it in.
3. Once a disc is loaded, the system will display
“Insert Disc (number)” again. Load the next
disc. Repeat this procedure for each disc.
The player takes up to six discs, do not try to
load more than six. The system will not
display the disc types when loading all, until
the discs have been read by the system.
Once all discs have been inserted, the system
will start playing the last loaded disc.
Z (Eject): To eject a disc, do the following:
1. Press the eject hard key.
2. The system will display “Ejecting Disc”.
Press the DISC screen button to display the
Disc Changer screen. Select the disc to eject.
If a selection is not made, the system will eject
the disc from the current slot. If the disc is not
removed from the slot, the system will pull it
back in after 10 seconds and start playing it.
To eject all discs at once, press and hold the eject
hard key. The system will display the disc
number being ejected.
77
Page 78

j / r (Pause/Play): Touch this button to pause
the CD. This button will then change to the play
button. Touch the play button to play the CD.
Random: Touch this button to hear the tracks in
random, rather than sequential, order. Touch
Random again to turn off random play.
DISC: Touch this screen button to view the list of
loaded disc(s). Select the disc to play.
r (Rewind): Touch and hold this button to
rewind quickly through a track selection. You will
hear sound at a reduced volume. Release this
button to stop rewinding. The display will show the
elapsed time of the track.
[ (Forward): Touch and hold this button to fast
forward quickly through a track selection. You
will hear sound at a reduced volume. Release this
button to stop fast forwarding. The display will
show the elapsed time of the track.
qr (Folder/Artist/Album): Select the left or
right arrow to go to the previous or next folder,
artist, or album on the disc.
Press the middle screen button, with the folder,
artist, or album name, to sort the MP3 by
folder, artist, or album. It may take a few minutes
for the system to sort the MP3.
y©¨z(Seek): To seek tracks, press the up
arrow to go to the next track. Press the down
arrow to go to the start of the current track, if more
than eight seconds have played. If either arrow
is pressed more than once, the player will continue
moving backward or forward through the CD.
The sound will mute while seeking.
78
Page 79

w (Tuning Knob): Turn this knob
counterclockwise one notch to go to the start of
the current track, turn it again to go to the previous
track. Turn this knob clockwise to go to the next
track.
When playing an MP3 the rear seat operator can
power on the RSE video screen and use the
remote control to navigate through the MP3.
CD Messages
If Disc Read Error appears on the display and/or
the CD comes out, it could be for one of the
following reasons:
• If a disc was inserted with an invalid or
unknown format.
• If the map DVD disc was installed into the CD
slot. See “Installing the Map DVD” under
Maps on page 18 for more information.
• It is very hot. When the temperature returns to
normal, the CD should play.
• You are driving on a very rough road.
When the road becomes smoother, the CD
should play.
• The CD is dirty, scratched, wet, or
upside down.
• The air is very humid. If so, wait about an
hour and try again.
• There may have been a problem while
burning the CD.
• The label may be caught in the CD player.
If the CD is not playing correctly, for any other
reason, try a known good CD.
If any error occurs repeatedly or if an error cannot
be corrected, contact your dealer/retailer.
79
Page 80

DVD Player
The player can be used for CD, MP3, DVD audio,
and as a DVD video player.
DVD video will not display on the navigation screen
unless the vehicle is in PARK (P). It will operate on
the rear seat entertainment screens while the
vehicle is moving. The Rear Seat Entertainment
(RSE) video screen will start play of the DVD when
a DVD video has been inserted into the navigation
system. The DVD player can be controlled by the
buttons on the navigation system, the Rear Seat
Audio (RSA) system, and the remote control. The
DVD player can also be used for the rear seat
passengers with the radio off. The rear seat
passengers can power on the video screen and use
the remote control to navigate the disc. See “Rear
Seat Entertainment System” in the Index of your
vehicle’s owner manual for more information.
The DVD player is only compatible with DVDs of
the appropriate region code that is printed on
the jacket of most DVDs.
The DVD slot is compatible with most audio CDs,
CD-R, CD-RW, DVD-Video, DVD-Audio,
DVD-R/RW, DVD+R/RW media along with MP3
and WMA formats.
If playing any compatible DVD-R the sound quality
may be reduced due to disc quality, the method of
recording, the quality of the video that has been
recorded, and the way the disc has been handled.
There may be an increase in skipping, difficulty in
finding chapters, and/or difficulty in loading and
ejecting. If these problems occur, check the bottom
surface of the DVD. If the surface of the DVD is
damaged, such as cracked, broken, or scratched,
the DVD will not play properly.
If there is no apparent damage, try a known
good DVD.
Notice: If you add any label to a DVD, insert
more than one DVD into the slot at a time,
or attempt to play scratched or damaged DVDs,
you could damage the DVD player. When
using the DVD player, use only DVDs in good
condition without any label, load one DVD
at a time, and keep the DVD player and
the loading slot free of foreign materials,
liquids, and debris.
Do not add any label to a DVD, it could get caught
in the DVD player. If a DVD is recorded on a
personal computer and a description label
is needed, label the top of the recorded DVD with
a soft marker.
80
Page 81

If an error appears on the display, see “DVD
Messages” later in this section.
M (Load): To load one disc, do the following:
1. Press the load hard key and follow the screen
message displayed.
2. When the system displays “Insert Disc
(number)”, insert the disc partway into the slot,
label side up. The system will pull it into the
first available slot and start playing. The
system will display the type of disc inserted.
To load multiple discs, do the following:
1. Press and hold the load hard key and follow
the screen message displayed.
2. When the system displays “Insert Disc
(number)”, insert the disc partway into the slot,
label side up. The system will pull it in.
3. Once a disc is loaded, the system will display
“Insert Disc (number)” again. Load the next
disc. Repeat this procedure for each disc.
The player takes up to six discs, do not try
to load more than six. The system will
not display the disc types when loading all,
until the discs have been read by the system.
Once all discs have been inserted, the
system will start playing the last loaded disc.
Z (Eject): To eject a disc, do the following:
1. Press the eject hard key.
2. The system will display “Ejecting Disc”.
Press the DISC screen button to display the
Disc Changer screen. Select the disc to eject.
If a selection is not made, the system will eject
the disc from the current slot. If the disc is not
removed from the slot, the system will pull it
back in after 10 seconds and start playing it.
To eject all discs at once, press and hold the eject
hard key. The system will display the disc
number being ejected.
81
Page 82

Playing a DVD
DVD Menu Options
There are three ways to play a DVD:
• Once a DVD is inserted, the system will
automatically start play of the DVD.
• If you are on a map screen, touch the DVD
screen button.
• Press the AUDIO hard key, then touch the
DVD screen button.
When a DVD is loaded, the rear seat passengers
can power on the RSE video screen and use
the remote control to navigate through the DVD.
O / 3 (Power/Volume): Press this knob
to turn the system on and off. Turn the knob to
increase or decrease the volume of the audio
system.
Press and hold this knob for more than
two seconds to turn off the navigation system,
RSE video screen, and RSA. If the vehicle has
not been tuned off, the RSE and the RSA can
be turned back on by pressing this knob and will
continue play of the last active source.
Once a DVD starts to play, the menu options and
cursor screen buttons will automatically appear.
To display the menu Options screen button while a
DVD is playing, touch anywhere on the screen.
Options: Select this screen button to view
the menu option screen buttons. Menu options
are available when they are highlighted. Some
menu options are only available when the DVD is
not playing.
Cursor: Touch this button to access the cursor
menu. The arrows and other cursor options
allow you to navigate the DVD menu options.
The cursor menu options are only available if a
DVD has a menu. Use the cursor menu to start a
DVD video from the disc main menu.
q, Q, r, R (Arrow Buttons): Use these
arrow buttons to move around the DVD menu.
Enter: Touch this button to select the highlighted
option.
Return: Touch this button to go back to the
previous DVD menu.
82
Page 83

Back: Touch this button to go back to the main
DVD display screen.
Move: Touch this button to move the cursor
buttons back and forth from the bottom-right corner
to the top-left corner of the screen.
j / r (Pause/Play): Touch this button to pause
the DVD. This button will then change to the
play button. Touch the play button to play
the DVD. Touch this button in a DVD disc
main menu to start the movie.
c (Stop): Touch this button to stop play of the
DVD. Press the play button to continue playing
the DVD from where the DVD was stopped. Press
this button twice to return to the beginning of
the DVD.
DISC: Touch this screen button to view the list of
loaded disc(s). Select the disc to play.
r (Rewind): Touch and release this button to
rewind through the scene, chapters, and titles.
Touch this button again to increase the rewinding
speed. Touch the play button to stop rewinding.
This button may not work when the DVD is playing
the copyright information or the previews.
[ (Forward): Touch and release this button to
advance rapidly through the scene, chapters,
and titles. Touch this button again to increase the
fast forwarding speed. Touch the play button to
stop fast forwarding. This button may not
work when the DVD is playing the copyright
information or the previews.
Hide Options: Press this screen button to
remove all menu options from the display, except
Options and Cursor.
83
Page 84

Top Menu: Touch this button to display the first
menu of the DVD. This is not available on all DVDs.
Menu: Touch this button to display the DVD
menu of the current area of the DVD that
is playing. This button is not available for DVD
audio.
Audio: Press this button to display the audio
options. Select the audio options that best improve
sound quality. This is not available on all DVDs
or when the DVD is stopped. This button is
not available for DVD audio.
Subtitle: Touch this button to playback the video
with subtitles. This is not available on all DVDs
or when the DVD is stopped. This button is
not available for DVD audio.
Angle: Touch this button to adjust the viewing
angle of the DVD. Repeatedly press this button to
toggle through the angles. This is not available
on all DVDs or when the DVD is stopped.
This button is not available for DVD audio.
q (Previous Scene): Press this button to go to
the previous scene. This button does not work
when the DVD is stopped. This button is not
available for DVD video.
r (Next Scene): Press this button to go to the
next scene. This button does not work when
the DVD is stopped. This button is not available
for DVD video.
Search: Touch this button to display the search
screen. Select Title or Chapter Search for DVD
video and Group or Track for DVD audio.
The keyboard allows you to type in the
title/chapter/group/track number that you
would like to watch or listen to. This button
does not work when the DVD is stopped.
Setup: Touch this button to display the DVD
Setup screen. This button is only available when
the DVD is not playing. The DVD Setup screen
allows you to change the brightness, contrast, and
mode, change the viewing on the monitor and
to change the initial settings; language, parental
level, and aspect.
! (Brightness): Touch the up or down screen
arrows to increase or decrease the brightness
of the navigation screen.
_ (Contrast): Touch the up or down screen
arrows to increase or decrease the contrast of the
navigation screen.
84
Page 85

Auto (Automatic): Touch this screen button for
the system to automatically adjust the navigation
screen background depending on exterior
lighting conditions.
Night: Touch this screen button and the system
will make the navigation screen background
brighten.
Day: Touch this screen button and the system will
make the navigation screen background darken.
Monitor: From the DVD Setup screen, touch this
button to adjust the viewing angle of the DVD on the
navigation screen. This is not available on all DVDs.
This button is not available for DVD audio
Touch the
left and right sides.
Touch the
and right sides.
Touch the
bottom.
Settings: From the DVD Setup screen, touch this
button to change the default audio, subtitle, and
menu languages, parental level, audio, and to view
the aspect of the DVD. These settings are not
available on all DVDs. This button is not available
for DVD audio.
e button to close the screen in from the
J button to fill the screen on the left
d button to fill the screen on the top and
Audio Language: Touch English, Francais,
Espanol, Italiano, or Deutsch to change the default
language that the DVD player uses for each disc.
The audio language must be available on the disc.
The audio language may vary for each DVD.
Subtitle Language: Touch English, Francais,
Espanol, Italiano, or Deutsch to change the default
language of the subtitles that the DVD player
uses for each disc. The subtitle language must
be available on the disc. The subtitle language
may vary for each DVD.
85
Page 86

Menu Language: Touch English, Francais,
Espanol, Italiano, or Deutsch to change the default
language of the DVD video menus. The menu
language must be available on the disc. The menu
language may vary for each DVD.
Parental Level: Touch this button to change the
rating level to only allow the play of DVDs with a
certain rating. The rating selection is 1 through 8,
with 1 Kids Safe being a G rating. If the 1 is
selected, any DVD with a rating above G will not be
able to be viewed without entering a password.
When the parental level is first entered a keyboard
will appear on the display and a four-digit password
will need to be created. Type in a password that you
will be able to remember. Once the password is
created, you can then select a rating level.
If you would like to change the rating level, press
the Parental Level button, then press the Password
button. Type in the password and then change the
rating level.
If the password has been forgotten, contact your
dealer/retailer.
This may not be available on all DVDs.
Aspect: Touch this button to change the aspect
ratio of the DVD. This may not be available
on all DVDs.
y (Next Track/Chapter): Press this hard key to
go to the next track or chapter. This button
may not work when the DVD is playing the
copyright information or the previews.
z (Previous Track/Chapter): Press this hard
key to return to the start of the current track
or chapter. Press this button again to go to the
previous track or chapter. This button may
not work when the DVD is playing the copyright
information or the previews.
w (Tuning Knob): Turn this knob
counterclockwise one notch to go to the start of
the current chapter/track, turn it again to go to the
previous chapter/track. Turn this knob clockwise
to go to the next chapter/track.
86
Page 87

DVD Messages
If Disc Read Error appears on the display and/or
the DVD comes out, it could be for one of the
following reasons:
• If a disc was inserted with an invalid or
unknown format.
• If the disc is not from a correct region.
• If the map DVD disc was installed into the
DVD audio/video slot. See “Installing the
Map DVD” under Maps on page 18 for more
information.
• It is very hot. When the temperature returns to
normal, the DVD should play.
• You are driving on a very rough road. When
the road becomes smoother, the DVD
should play.
• The DVD is dirty, scratched, wet, or
upside down.
• The air is very humid. If so, wait about an
hour and try again.
• There may have been a problem while
burning the DVD.
• The label may be caught in the DVD player.
If the DVD is not playing correctly, for any
other reason, try a known good DVD.
If any error occurs repeatedly or if an error cannot
be corrected, contact your dealer/retailer.
Auxiliary Devices
Your vehicle may have a rear entertainment
system (RSE) with a second and third row screen.
The RSE has audio adapters to allow you to
connect auxiliary devices. The audio can be heard
through the speakers or through the wireless or
wired headphones. See “Audio/Video Jacks” under
“Rear Seat Entertainment System” in the Index
of your vehicle’s owner manual for more
information.
87
Page 88

Drivers are encouraged to set up any auxiliary
device while the vehicle is in PARK (P). See
“Defensive Driving” in the Index of your vehicles
owner manual for more information on driver
distraction.
To switch the RSE system to use an auxiliary
device, do the following:
1. Connect the auxiliary device to the RSE
system, for the second or third row.
2. Press the AUDIO key then press the AUDIO
key repeatedly until AUX (auxiliary) is selected
or touch the AUX screen button. An auxiliary
device must be connected for the AUX
screen button to appear as an option to select.
3. For the second row display select the Rear
AUX screen button next to Rear Display 1 and
for the third row display select the Rear AUX
screen button next to Rear Display 2. Each
screen works independently of the other. The
second row screen can watch a DVD while the
third row screen can use the auxiliary device.
The rear seat passengers can also use the remote
control to change the functions of the RSE. See
“Rear Seat Entertainment System” in the Index of
your vehicle’s owner manual for more information.
88
Page 89

Section 4 Voice Recognition
Voice Recognition ........................................ 90
89
Page 90

Voice Recognition
The navigation system’s voice recognition allows
for hands-free operation of the navigation system,
audio system, and OnStar
disc must be installed in the navigation system for
voice recognition to work. See “Installing the DVD
Map Disc” under Maps on page 18.
Voice recognition can be used when the ignition is
on or when Retained Accessory Power (RAP) is
active. See “Retained Accessory Power (RAP)” in
the Index of your vehicle’s owner manual for
more information.
To use voice recognition, do the following:
2. Clearly state one of the commands listed on
the following pages.
®
features. The DVD map
1. Push and hold the
talk symbol steering
wheel control
until you hear a
beep. The audio
system will mute.
Helpful Hints for Stating Commands
•
When a multiple command is available, choose
the command that works best for you.
• Words that are in brackets are optional.
For example, for the command Radio [band]
[select] FM, stating Radio FM or Radio
select FM are both valid commands.
• When the system recognizes the command
the system will do one of the following:
− Perform the function.
− Ask you to confirm your choice.
− Issue an error message “Did not
recognize. Voice Recognition Canceled.”
• If the system is not yet ready, the system will
display a message.
• To cancel a command or if the system
response does not match your verbal
command, press and hold the talk symbol
button. The system will reply, “Voice
Recognition Canceled”.
90
Page 91

• If you experience difficulty with the system
recognizing a command, try saying it more
softly, and wait for a few seconds after
the beep, or you may just try saying it again.
• Background noise may cause voice
commands to be misunderstood, including
airflow noise from wind.
• To use the voice recognition system, the map
DVD must be loaded and the navigation
system must be on.
This system is able to recognize commands in
three different languages. The system will
only recognize commands based on the language
selected from the Driver Information Center
(DIC). See “Driver Information Center, DIC Vehicle
Personalization” in the Index of your vehicles
owner manual.
Voice Recognition Commands
The following list shows all of the voice commands
available for the navigation system with a brief
description of each. The commands are listed with
the optional words in brackets. To use the voice
commands, refer to the instructions listed
previously.
Voice Tag Commands
The following are voice tag commands you can
access by clearly stating the commands exactly as
they are written. You may have up to 40 voice
tag entries for destinations.
Navigation go to [destination], navigation
select: These commands instruct the system to
select a destination saved under the voice tag you
have stored. The system will prompt you for a
destination name then wait for you to state
the name.
If you are not currently driving on a route, the
system will automatically create the voice tag
destination as the final destination. If you are
currently driving on a route, the system will
automatically create the voice tag destination as a
stopover. Up to three stopovers can be created.
Storing Voice Tags
From the address book entry information page,
press the Add Voice tag screen button. The system
will respond “Name Please?” and you will have
four seconds to record a name. The system will ask
for confirmation of the name before saving it as a
voice tag.
91
Page 92

Navigation Help
Navigation Help: This command instructs the
system to assist with navigation commands.
Display Commands
Use the following display commands to set the
display mode.
Display [set] day [mode]: Use this command to
set the display to daytime mode.
Display [set] night [mode]: Use this command
to set the display to night mode.
Display [set] auto [mode]: Use this command to
set the display to automatic mode. The system
will change between day and night mode
automatically.
System help: This command instructs the system
to assist with display commands.
Radio Commands
The following are radio commands you can
access by clearly stating the commands exactly as
they are written.
Radio [band] [select] AM, radio [band] [select]
FM, radio [band] [select] XM, radio [band]
[select] satellite: These commands instruct the
system to go to either the AM, FM, or XM
(if equipped).
Radio [select] (frequency) AM, radio [select]
(frequency) FM: These commands instruct
the system to go to a specific frequency on either
AM or FM.
Radio [select] (channel) XM, radio [select]
(channel) satellite: These commands instruct the
system to go to a specific channel on the XM™
band (if equipped).
Radio help: This command instructs the system
to assist with radio commands.
92
Page 93

CD Commands
The following are CD, MP3, and DVD commands
that can be accessed by clearly stating the
commands exactly as they are written.
CD, DVD, Disc: Use this command to select a
CD, DVD, or disc that is currently loaded.
CD, DVD, Disc, [select] track (one, two, three,
etc.): This command instructs the system to
select a specific track number.
CD, DVD, Disc select next folder: Use this
command to select the next folder on the MP3 or
audio DVD.
Auxiliary Commands
The following auxiliary commands can be
accessed by clearly stating the commands exactly
as they are written. The commands are available
when the auxiliary source is available.
Aux, Auxiliary: Use this command to select the
auxiliary device, when a device is connected.
OnStar®Command
OnStar: This command instructs the system to
connect to OnStar
voice recognition system. Refer to your OnStar
owner guide for more information.
®
. You will enter the OnStar
®
®
CD, DVD, Disc select previous folder: Use this
command to select the previous folder on the
MP3 or audio DVD.
CD help, DVD help, Disc help: This command
instructs the system to assist with CD and
DVD commands.
Voice Help
Voice help: This command will provide a
description of help commands that can be used.
93
Page 94

✍ NOTES
94
Page 95

Section 5 Phone
Phone ............................................................ 96
95
Page 96

Phone
The navigation system has a calling feature if you
have a subscription for OnStar®personal calling.
See the OnStar
feature allows you to call phone numbers that are
listed in your personal address book that is on the
navigation system. See “Nav” under Configure
Menu on page 44 for more information on adding
phone numbers to the address book.
To call a phone number, press the
Use the numeric keyboard to input the phone
number then press the Call screen button.
The numeric keyboard is not available while the
vehicle is moving. This function is only available
when the vehicle is in PARK (P).
®
manual for more information. This
5 (Phone) key.
Call: Press this screen button to dial the phone to
number.
Address: Press this screen button to add the
phone number to the address book, or to look up
the phone number that you would like to call.
Last 10: Press this screen button to view the list
of the last 10 incoming and outgoing phone
numbers.
96
Page 97

A
Adding Destinations to the Address Book ...... 42
Adding or Changing Preset Destinations ........ 43
Alpha-Numeric Keyboard ............................... 18
Audio System ................................................ 62
Auto Reroute ................................................. 28
Auxiliary Devices ........................................... 87
C
Canadian Owners ........................................... 2
Canceling Guidance ...................................... 14
CD
Player ........................................................ 71
CD Messages ............................................... 79
CD Player ..................................................... 71
Cleaning the Video Screen ............................ 14
Configure Menu ............................................ 44
D
Database Coverage Explanations .................. 59
Deleting Personal Information .......................... 9
Destination .................................................... 28
Detailed Areas ............................................... 19
Display .......................................................... 49
Driving on a Route ........................................ 26
DVD
Player ........................................................ 80
DVD Map Disc Messages ............................. 20
DVD Menu Options ....................................... 82
DVD Messages ............................................. 87
DVD Player ................................................... 80
E
Ejecting the DVD Map Disc ........................... 20
Entering an Address and Point of Interest,
and Storing Preset Destinations ................. 10
97
Page 98

F
Finding a Station ........................................... 63
G
Getting Started, Navigation .............................. 6
Getting Started on Your Route ...................... 39
Global Positioning System (GPS) .................. 56
Guidance Volume .......................................... 14
H
Hard Keys ..................................................... 16
I
Installing the DVD Map Disc ......................... 19
L
Language — English/Metric ............................. 9
Limited Guidance Areas ................................ 19
M
Map Adjustments ........................................... 20
Map Scales ................................................... 20
Maps ............................................................ 18
Menu
Configure ................................................... 44
N
Nav (Navigation) ........................................... 45
Navigation
Getting Started ............................................ 6
System Overview ......................................... 4
Using the System ...................................... 16
98
Page 99

O
Ordering
Map DVDs ................................................. 59
Overview, Navigation System .......................... 4
Owners, Canadian .......................................... 2
R
Radio ..................................................... 44, 62
Radio Data System (RDS) ............................ 69
Radio Menu .................................................. 67
Rear Vision Camera ...................................... 51
P
Park Aid ........................................................ 51
Phone ........................................................... 96
Playing a DVD .............................................. 82
Playing the Radio .......................................... 62
Problems with Route Guidance ..................... 58
S
Scrolling the Map .......................................... 21
Setting the Time ..................................... 10, 50
Six-Disc CD Player ....................................... 71
Sound ........................................................... 44
Sound Menu ................................................. 65
Storing Radio Station Presets .................. 9, 65
Symbols ........................................................ 21
System Needs Service, If .............................. 59
99
Page 100

T
Touch-Sensitive Screen Buttons .................... 18
U
Using an MP3 CD ......................................... 74
Using Your Stored Preset Destinations .......... 13
V
Vehicle Positioning ........................................ 57
Video Screen, Cleaning ................................. 14
Voice Recognition .......................................... 90
Voice Recognition Commands ....................... 91
X
XM™ Satellite Radio Service ........................ 69
100
 Loading...