

Cadillac Escalade ESV 2005 Get To Know Manual
2005
CUSTOMER CONVENIENCE/PERSONALIZATION GUIDE

ESCALADE/ESCALADE ESV
TABLE OF CONTENTS
DRIVER INFORMATION
• Instrument Panel
• Instrument Panel Cluster
SEATS AND MIRRORS
• Heated Front Seats
• Power Lumbar Front Seats
• Second Row Seat Features
• Passenger Automatic Locking
Restraint (ALR)
• Automatic Dimming Rearview
Mirror with OnStar®, Compass and
Temperature Display
• Adjustable Pedals
• Power Folding Mirrors
ENTERTAINMENT/CONVENIENCE
FEATURES
• Heated and Cooled Front
Cupholders
• AM/FM Stereo with CD and
Cassette Player
• Navigation Radio System
• Six-Disc CD Changer
• Rear Seat Entertainment
(RSE) System
• HomeLink®Transmitter
• Steering Wheel Controls
(OnStar®/Radio)
• Cruise Control
• Automatic Headlamp Controls
VEHICLE PERSONALIZATION
• Memory Positions for Driver’s Seat,
Outside Rearview Mirrors, and
Power Adjustable Pedals
• Driver Information Center
Personalization
• Odometer/Trip Settings
OWNER PRIVILEGES
TM
AUTOMATIC CLIMATE CONTROLS
• Tri-Zone Automatic Climate Control
System
• Rear Automatic Climate Control
System
• Sunroof
DRIVE AND SECURITY SYSTEMS
• StabiliTrak®System
• Ultrasonic Rear Parking Assist
(URPA)
• Tire Pressure Monitor
• Content Theft-Deterrent System
1
2
Driver
Information
9 10 12
8
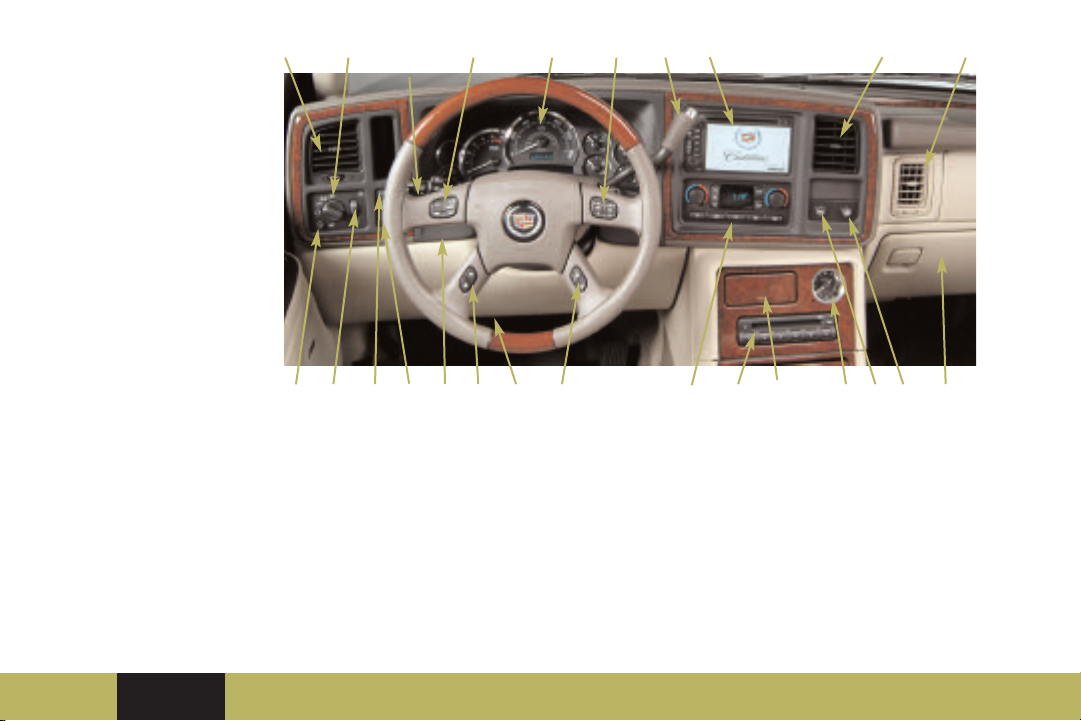
INSTRUMENT PANEL
1. Air Outlets
2. Exterior Lamps Control
3. Turn Signal/Multifunction Lever,
Front Wipers, Cruise Control
®
4. OnStar
Wheel Buttons
5. Instrument Panel Cluster
6. Shift Lever/Tow/Haul Selector
Button
7. Audio System
8. Dome Override Button
Refer to Owner Manual for further information.
and Radio Steering
Driver
Information
Seats and
Mirrors
3
11
4
13
14
5
15
4
9. Internal Light Dimming Switch
10. Rear Wiper / Washer
11. Fog Lamps Button (below rear
wiper/washer)
12. Tilt Lever
13. Driver Information Center (DIC)
Buttons; Trip and Fuel
Information
14. Parking Brake Release
Automatic
Climate
Controls
Entertainment/
Convenience
Features
Drive and
Security
Systems
6
16
7
18
17
19
1
20
15. Driver Information Center (DIC)
Buttons; Personalization
16. Automatic Climate Control
System
17. Compact Disc Changer
18. Storage Area
19. Clock
20. Ultrasonic Rear Parking Assist
Disable Button
21. StabiliTrak
®
Disable Button
22. Glove Box
Vehicle
Personalization
Privileges
21
Owner
1
22
TM

ESCALADE/ESCALADE ESV
INSTRUMENT PANEL CLUSTER
1. Security Light
2. Malfunction Indicator Lamp (MIL)/Service Engine
Soon Light
3. Turn Signal Indicators
4. Tire Pressure Monitor Light
5. Tow/Haul Mode Light
6. Traction Control Off Light
7. Charging System Light
8. Air Bag Readiness and Warning Light
9. Cruise Control Light
10. Safety Belt Reminder Light
11. Headlamp High Beam Indicator Light
12. Transmission Temperature Gauge
13. Antilock Brake System Warning Light
14. Brake System Warning Light
15. Tachometer
16. Speedometer/Gear Selector Indicator
17. Driver Information Center (DIC)
Display/Odometer
18. Oil Pressure Gauge
19. Fuel Gauge
20. Engine Coolant Temperature Gauge
21. Voltmeter
10
11
5
21
3
4
3
8
9
12
13 14
15 16
17 1918
7
6
21
20
Important: The instrument panel
cluster is designed to let you know
about many important aspects of your
vehicle’s operation. The message
center can provide critical information
to prevent damage to your vehicle.
It is important to read your Owner
Manual and become familiar with the
information that is being relayed to
you by the lights, gauges and
indicators, particularly the message
center, and what action can be taken
to ensure your safety and to prevent
damage.
Seats and Mirrors
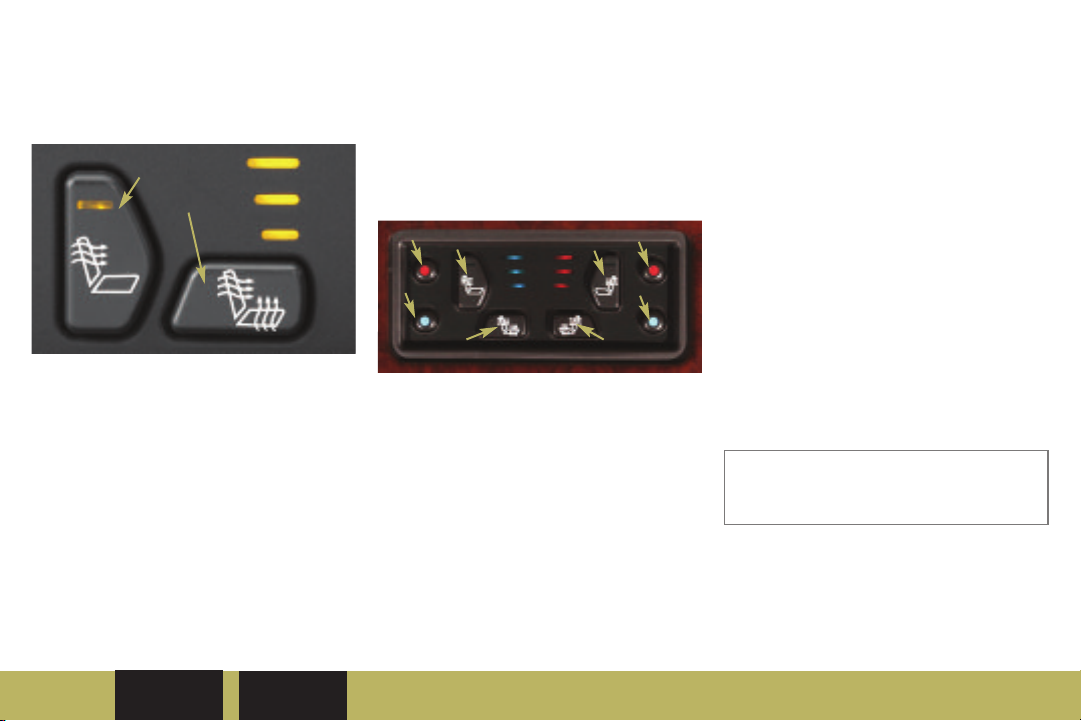
HEATED FRONT SEATS
2
1
This feature allows you to heat the front
seatbacks and seat cushions
simultaneously or just the seatbacks.
Three heat settings are available. The
controls are located on the driver and
front passenger door panels.
Select a heat setting for both the
seatback and seat cushion
• Press and release the horizontal
button (“1” above) until the indicator
light shows the desired setting.
Refer to Owner Manual for further information.
Driver
Information
Seats and
Mirrors
Select a heat setting for the seatback
only
• Press and release the vertical button
(“2” left) until the indicator light
shows the desired setting.
1
2
1
3
1
2
1
3
CLIMATE CONTROL SEATS —
PLATINUM EDITION
With the climate control seats you can
choose to heat or cool your seat. The
seats will only operate either in the heat
or cool mode; for example, you cannot
cool the seat cushion while heating the
seatback. To operate the climate
controlled seats, do the following:
• Press the red heat button or the blue
cool button (“1” above).
Automatic
Climate
Controls
Entertainment/
Convenience
Features
Drive and
Security
Systems
• Seatback Only: This can only be used
for the heat feature. Press this button
(“2” left) to heat the seatback and
cycle through the heat settings of
high, medium, low and off. Red
indicator lights will glow for each heat
setting chosen: three lights for high,
two for medium and one for low. A
light in the button will also glow to
indicate the seatback heat is on.
• Entire Seat: Press this button (“3” left)
to heat or cool the entire seat and
cycle through the settings of high,
medium, low and off. Red (for heat)
or blue (for cool) indicator lights will
glow for each setting chosen: three
lights for high, two for medium and
one for low.
You may hear a fan running when the
Note:
climate control seats are turned on. This is
normal for the operation of this feature.
Vehicle
Personalization
Owner
Privileges
TM
ESCALADE/ESCALADE ESV
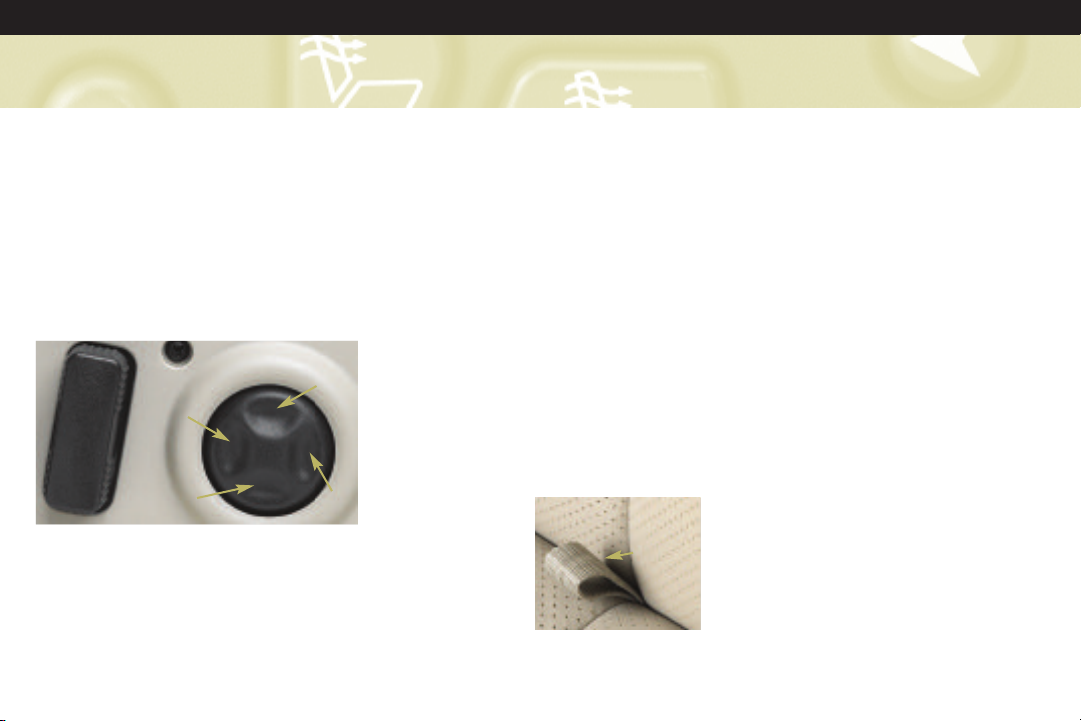
POWER LUMBAR FRONT SEATS
Adjust lumbar support
• Press the front or rear of the control
located on the side of the seat
cushion near the door (“1” below).
Release at the preferred setting.
Adjust side bolster support
• Press the top or bottom of the lumbar
control (“2” below). Release at the
preferred setting.
2
1
2
1
SECOND ROW SEAT FEATURES
Outboard Heated Seat Cushions
Use the button located on the back of
the center console to select one of two
heat settings for the second row seat
cushion.
• Press the button once for High; twice
for Low. Press it again to turn off the
heat feature.
Recline the second row bucket
seatback(s)
• Pull up the lever located at the rear
outboard side of the seat cushion.
• Release the lever to lock the seatback
where you want it.
Return bucket seatback(s) to upright
position
• Pull the seat lever and allow the
seatback to move forward.
Fold either side of the second row
bench seat
Both sides of the second row seat can
be folded down for access to the third
row seat, or to create additional cargo
space.
To fold, follow
these steps:
• Pull up on the
strap at the
rear of the seat
cushion
(“1” right) and
pull the cushion
forward into an upright position.
1
• Pull the seatback forward so that it
folds down into a flat position. The
head restraint will automatically fold
flat. On ESV only, lift the lever at the
base of the seat to release the
passenger-side seatback.
Return seat to occupant position
• Lift and move the seatback into the
upright position.
• Return the cushion to the seating
position until it latches.
• Pull up on the seat cushion and
forward on the seatback to ensure
that they are secure. On Escalade,
pull head restraints upright. Ensure
that driver-side seat belts are not
under the seat cushions.
Use the second row easy entry/exit
feature (ESV models)
The passenger’s side of the second row
60/40 bench seat has an easy entry/exit
feature that makes it easy to get in and
out of the third row seat. To operate:
• Lift the black release lever located on
the bottom-back side of the seat.
• Tilt the seatback toward the front of
 Loading...