

Page 1

2004
CUSTOMER CONVENIENCE/PERSONALIZATION GUIDE
Page 2
ESCALADE/ESCALADE ESV
TABLE OF CONTENTS
DRIVER INFORMATION
• Instrument Panel
• Instrument Cluster
SEATS AND MIRRORS
• Heated Front Seats
• Power Lumbar Front Seats
• Second Row Seat Features
• Passenger Automatic Locking
Restraint (ALR)
• Automatic Dimming Rearview
Mirror with OnStar®, Compass and
Temperature Display
• Power Folding Mirrors
AUTOMATIC CLIMATE CONTROLS
•Tri-Zone Automatic Climate Control
System
• Rear Climate Control System
• Sunroof
ENTERTAINMENT/CONVENIENCE
FEATURES
• AM/FM Stereo with CD and
Cassette Player
• Six-Disc CD Changer
• Navigation Radio System
•HomeLink®Transmitter
• Steering Wheel Controls
(OnStar®/Radio)
• Automatic Headlamp Controls
DRIVE AND SECURITY SYSTEMS
• StabiliTrak®System
• Ultrasonic Rear Parking Assist
(URPA)
•Tire Pressure Monitor
• Content Theft-Deterrent System
VEHICLE PERSONALIZATION
• Memory Positions for Driver’s Seat,
Mirrors, Pedals, Radio and Climate
Controls
• Driver Information Center
Personalization
• Odometer/Trip Settings
VEHICLE SYMBOLS GLOSSARY
OWNER PRIVILEGES
TM
Page 3
213 4 5 6
Driver
Information
8
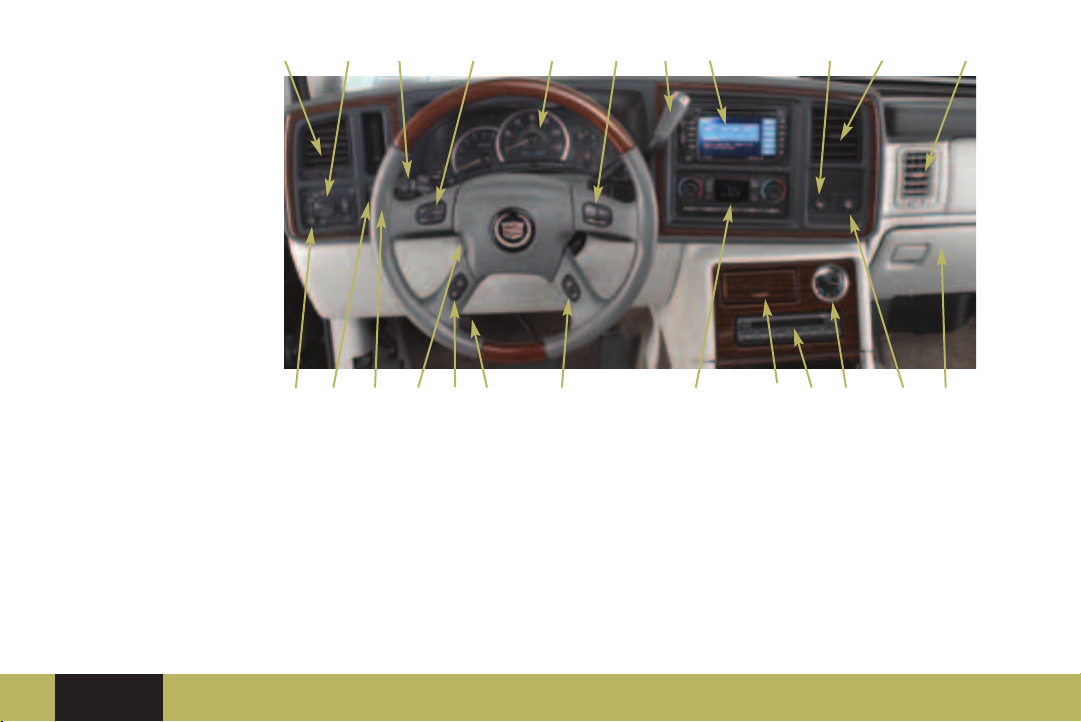
INSTRUMENT PANEL
1. Air Outlets
2. Exterior Lamps Control
3. Turn Signal/Multifunction Lever,
Front Wipers, Cruise Control
4. OnStar®and Radio Steering
Wheel Buttons
5. Instrument Cluster
6. Shift Lever/Tow/Haul Selector
Button
13
11
11
7. Audio System
8. Dome Override Button
9. Rear Wiper / Washer
10. Fog Lamps Button (below rear
wiper/washer)
11. Driver Information Center (DIC)
Buttons
12. Parking Brake Release
13. Tilt Lever
16
15
184
19
7 1
14 17
14. Automatic Climate Control
System
15. Compact Disc Changer
16. Storage Area
17. Clock
18. Ultrasonic Rear Parking Assist
Disable Button
19. StabiliTrak®Disable Button
20. Glove Box
1
209 10 12
Driver
Information
Seats and
Mirrors
Automatic
Climate
Controls
Entertainment/
Convenience
Features
Drive and
Security
Systems
❏ Reviewed with Customer (Please Check Box)Refer to Owner Manual for further information.
Vehicle
Personalization
Vehicle
Symbols
Glossary
Owner
Privileges
TM
Page 4
ESCALADE/ESCALADE ESV
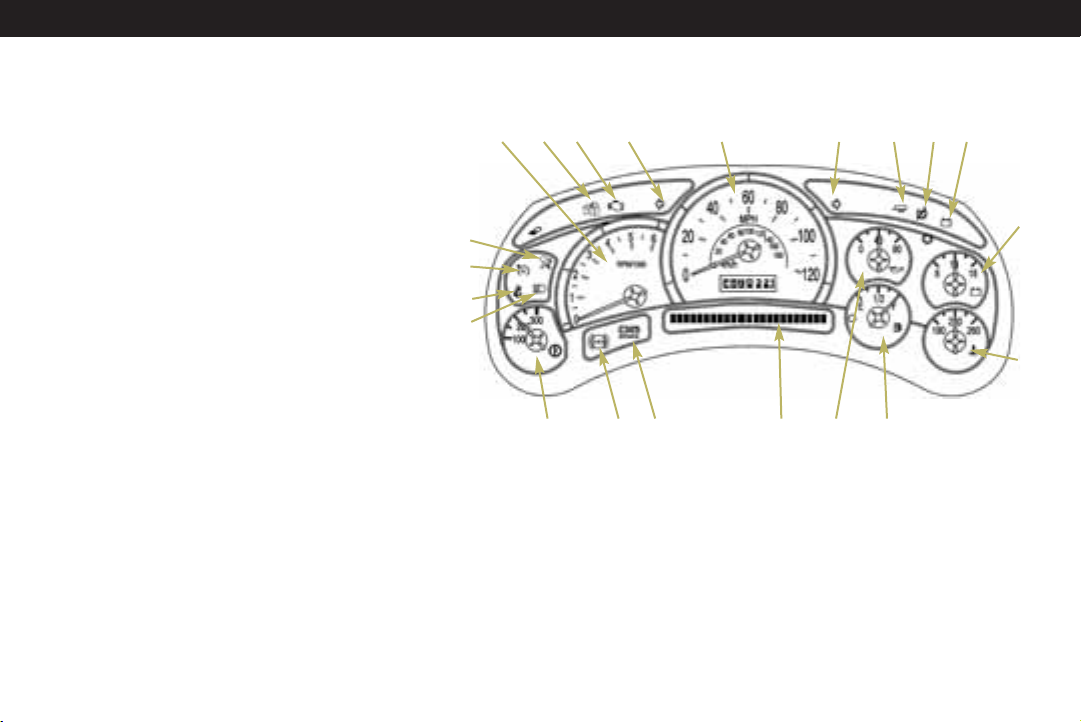
INSTRUMENT CLUSTER
1. Security Light
2. Malfunction Indicator Lamp (MIL)/Service Engine
Soon Light
3. Turn Signal Indicator
4. Cruise Control Light
5. Air Bag Readiness Light
6. Safety Belt Reminder Light
7. Headlamp High Beam Indicator Light
8. Transmission Temperature Gauge
9. Tachometer
10. Antilock Brake System Warning Light
11. Brake System Warning Light
12. Speedometer/Gear Selector Indicator
13. Driver Information Center (DIC) Display
14. Tow/Haul Mode Light
15. Traction Off Light
16. Charging System Light
17. Oil Pressure Gauge
18. Fuel Gauge
19. Voltmeter
20. Engine Coolant Temperature Gauge
21 12
9
3
5
4
6
7
8
10 11
13 1817
3
14
15
16
19
20
Important: The instrument cluster
is designed to let you know about
many important aspects of your
vehicle’s operation. The message
center can provide critical information
to prevent damage to your vehicle.
It is important to read your Owner
Manual and become familiar with the
information that is being relayed to
you by the lights, gauges and
indicators, particularly the message
center, and what action can be taken
to ensure your safety and to prevent
damage.
Page 5

Seats and Mirrors
HEATED FRONT SEATS
2
1
This feature allows you to heat the front
seatbacks and seat cushions
simultaneously or just the seatbacks.
Three heat settings are available. The
controls are located on the driver and
front passenger door panels.
Select a heat setting for both the
seatback and seat cushion
1 Press and release the horizontal
button until the indicator light shows
the desired setting.
Driver
Information
Seats and
Mirrors
Automatic
Controls
Select a heat setting for the seatback
only
2 Press and release the vertical button
until the indicator light shows the
desired setting.
POWER LUMBAR FRONT SEATS
Adjust lumbar support
1 Press the front or rear of the control
located on the side of the seat
cushion near the door. Release at the
preferred setting.
Adjust side bolster support
2 Press the top or bottom of the lumbar
control. Release at the preferred
setting.
1
2
Climate
Entertainment/
Convenience
Features
Drive and
Security
Systems
2
1
❏ Reviewed with Customer (Please Check Box)Refer to Owner Manual for further information.
Vehicle
Personalization
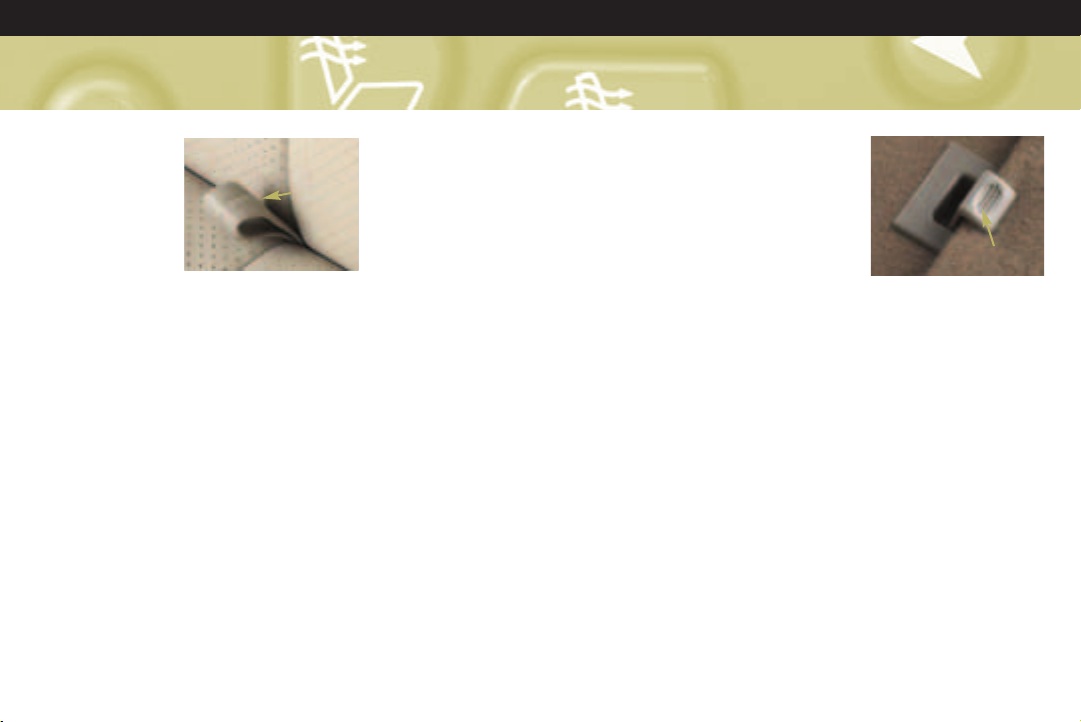
SECOND ROW SEAT FEATURES
Use the button located on the back of
the center console to select one of
two heat settings for the second row
seat cushion
•Press the button once for High; twice
for Low. Press it again to turn off the
heat feature.
Recline the second row bucket
seatback(s)
• Pull up the lever located at the rear
outboard side of the seat cushion.
• Release the lever to lock the seatback
where you want it.
Return bucket seatback(s) to upright
position
• Pull the seat lever and allow the
seatback to move forward.
Fold either side of the second row
bench seat
Both sides of the second row seat can
be folded down for access to the third
row seat, or to create additional cargo
space.
Vehicle
Symbols
Glossary
Owner
Privileges
TM
Page 6
ESCALADE/ESCALADE ESV
To fold, follow
these steps:
1 Pull up on the
strap at the
rear of the seat
cushion and
pull the
cushion
forward into an upright position.
• Pull the seatback forward so that it
folds down into a flat position. The
head restraint will automatically fold
flat. On ESV only, lift the lever at the
base of the seat to release the
passenger-side seatback.
Use the second row easy entry/exit
feature (ESV models)
The passenger’s side of the second row
60/40 bench seat has an easy entry/exit
feature that makes it easy to get in and
out of the third row seat. To operate:
• Lift the release lever located on the
back of the seat
• Tilt the seatback toward the front of
the vehicle (the seat will release)
1
• Pull (or push if exiting the third row
with no assistance) the seat forward
until it stops
Return seat to occupant position
• Lift and move the seatback into the
upright position.
• Return the cushion to the seating
position until it latches.
• Pull up on the seat cushion and
forward on the seatback to ensure
that they are secure. On Escalade,
pull head restraints upright. Ensure
that driver-side seat belts are not
under the seat cushions.
Fold second row bucket seats
• Pull up on the strap loop located at
the rear of the seat cushion and pull
the seat cushion up and fold it
forward.
• Pull the seatback release lever
upward and pull the seatback forward
and fold it down until it is flat. (Note:
On ESV models, you must first
remove the headrest and store it on
the top of the seat cushion.)
• Pull the headrest out from the
seatback and slide the pins into the
holes provided
in the top of
the seat
cushion.
Create a load
floor on ESV
models
1 Release the
load floor
panels from the seatbacks by pushing
forward on the latches.
• Fold the panels back to cover the rear
seat footwell area.
1
PASSENGER AUTOMATIC LOCKING
RESTRAINT (ALR)
The safety belt is designed to lock
during an accident, but it will also lock if
it is pulled out all the way during initial
buckling, and you may be unaware that
this has happened.
If the safety belt does lock, unbuckle it
and allow it to retract fully, then pull it
out and re-buckle the belt.
Page 7

AUTOMATIC DIMMING REARVIEW
MIRROR WITH ONSTAR®, COMPASS
AND TEMPERATURE DISPLAY
When on, the automatic interior
dimming rearview mirror automatically
dims to the proper level to minimize
glare from lights behind you when it’s
dark outside.
Turn the self-dimming function on or
off
1 Press and hold this button for
approximately eight seconds.
Use the OnStar®Communications
system
3 Press this button to connect to an
OnStar®Advisor.
2 Press this button to answer or end a
call from the OnStar®Center.
4 Press this button in an emergency to
connect to an OnStar®Advisor who
can contact the nearest emergency
services provider.
Driver
Information
Seats and
Mirrors
Automatic
Climate
Controls
1234
Turn the outside temperature displays
and compass readings on or off
1 Press this button.
Display temperature
1 Press this button and hold for four
seconds to toggle between °C and °F.
Once the desired °C or °F is
displayed, release the button. Wait
four seconds and the temperature will
be displayed.
Entertainment/
Convenience
Features
Drive and
Security
Systems
POWER FOLDING
MIRRORS
Fold mirrors
1 Move this
selector switch
located above
the mirror
control to the
center position.
2 Press the right side of the four-way
control pad to fold the mirrors in.
•Press the left side of the four-way
control pad to fold the mirrors out.
If the mirrors have been folded
manually, they must be moved through
the power folding cycle three times to
reset them in their tracks.
❏ Reviewed with Customer (Please Check Box)Refer to Owner Manual for further information.
Vehicle
Personalization
Vehicle
Symbols
Glossary
Owner
Privileges
1
2
TM
Page 8

ESCALADE/ESCALADE ESV
Automatic Climate Controls
TRI-ZONE AUTOMATIC CLIMATE
CONTROL SYSTEM
Escalade’s Tri-Zone Automatic Climate
Control System features dual zone
operation in the front and single zone
operation for rear seat passengers.
Front Dual-Zone Climate Control
System
Adjust settings for automatic
operation
1 Push the AUTO button and adjust the
temperature knob (“2”) to the desired
2
temperature to set automatic air
delivery mode, fan speed, A/C and
recirculation functions for the driver.
(Note: Because this is an automatic
system, the A/C mode is the default
setting.)
Set same temperature for driver and
front passenger
1 Press and hold the AUTO button for
four seconds.
Select air distribution manually
3 Press and release the MODE button
4
until the desired source of air is
indicated on the display.
Manually raise or lower fan speed
4 Press the upper or lower portion of
the FAN control button.
1
3
Page 9

Additional Climate Control System
Functions
: Recirculates interior air while in
Vent, Bi-Level positions. To prevent
window fogging, Recirculation will not
operate in the Defog, Defrost or Floor
mode.
: Clears windshield and front side
windows of fog/frost.
: Clears rear glass of fog/frost and
activates heated outside rearview
mirrors.
: Turns the air conditioning system on
and off. This symbol ( ) appears on
the display when the A/C system is
turned off.
Note: When the climate control system is in
the OFF position ( ), outside air will continue
to enter the vehicle and will be directed
according to the mode position selected. This
is normal climate control operation.
Driver
Information
Seats and
Mirrors
REAR CLIMATE CONTROL SYSTEM
The front or rear passengers can control
the air temperature, airflow and fan
speed for the rear seat passengers.
Rear Climate Controls
The system has an overhead control near
the driver (shown below) and a control
on the back of the center console.
To use the rear seat controls, the driver
overhead control must be in the AUX
position.
Front Overhead Control
Automatic
Climate
Controls
Entertainment/
Convenience
Features
Drive and
Security
Systems
SUNROOF (if equipped)
The sunroof controls are located in the
overhead console.
Close the sunroof
1 Hold the front portion of the button
down until the sunroof motor stops.
The sunroof will tilt up slightly to seal.
This is normal.
1
❏ Reviewed with Customer (Please Check Box)Refer to Owner Manual for further information.
Vehicle
Personalization
Vehicle
Symbols
Glossary
Owner
Privileges
TM
Page 10

ESCALADE/ESCALADE ESV
Entertainment/Convenience Features
1 2
AM/FM STEREO WITH CD AND
CASSETTE PLAYER
Set the time
1 Press and hold the HR button until
the correct hour appears on the
display.
2 Press and hold the MN button
until the correct minute appears
on the display.
Note: The time may be set with the
ignition on or off.
Program radio station presets
•Turn the radio on.
•Press BAND to select the band
(AM, FM1/FM2/XM1/XM2).
• Use the SEEK or TUNE knob to
tune in the desired station.
•Press AUTO EQ or AUTO TONE (as
applicable to your radio) to select
the equalization that best suits the
type of station selected.
•Press and hold one of the six
numbered buttons until a beep
sounds; release the button.
• Repeat these steps for each station
preset, using a different numbered
button for each station.
Access one of the two available
XM Satellite Radio bands
•Press the BAND button until XM1
or XM2 appears on the display.
Note: Requires subscription to XM
Radio (See your Owner Manual for
additional XM Satellite Radio
information).
SIX-DISC CD CHANGER
Loading/Unloading
2
Quick Load:
1 Press LOAD for two seconds. The
lowest available number will flash.
2 Wait for amber lights to flash on
sides of slot before inserting CD.
The next available number will
flash and accept another CD until
all are occupied.
•To exit Quick Load, press either a
number with a CD in it or LOAD.
Quick Unload:
•Press EJECT ( ) for two seconds;
all CDs will eject from highest
number to lowest.
1
Page 11

Load 1 CD
•Press LOAD, all available numbers
will flash amber.
• Select the number desired.
•Wait for amber lights to flash on
sides of slot before inserting CD.
• Repeat to load more CDs.
Unload 1 CD
•Press EJECT.
•Press number for CD desired.
Play a CD
• Option 1: Select the number for
the CD desired (wait eight
seconds).
• Option 2: Press 5/SIDE button on
radio face to scroll through CDs.
Select CD Track
• Option 1: PREV/NEXT on radio.
• Option 2: SEEK arrows on radio.
• Option 3: SEEK arrows on steering
wheel.
Driver
Information
Seats and
Mirrors
Automatic
Climate
Controls
NAVIGATION RADIO SYSTEM
1
2
3
Preset a radio station
1 Press the power button to turn the
radio on.
2 Press BAND button repeatedly to
choose one of the following
bands: AM/FM1/FM2 or
XM1/XM2 (if equipped).
3 Use either the joystick or the
SEEK button to tune to a station.
4 Press and hold one of the six
buttons on the right side of the
radio until you hear a beep or see
the station displayed next to the
button pushed.
Set the time
•Turn the radio on.
•Press the CONFIG hard key.
•Press the CLOCK soft key.
•Use joystick to highlight the hour
and minute box (near top of
screen).
Entertainment/
Convenience
Features
Drive and
Security
Systems
• Move joystick up or down to
select correct hour and minute(s).
• Push the joystick in to store the
correct time.
Note: See your Navigation Radio
4
Supplement/Instructional CD or Navigation
Quick Reference Guide for detailed
operating instructions.
HomeLink®TRANSMITTER
Program HomeLink
Your vehicle’s engine should be
turned off while programming the
transmitter. Follow these steps to
program up to three channels:
1.Press and hold down the two
outside buttons, releasing only
when the indicator light begins to
flash, after 20 seconds. Do not
hold down the buttons for longer
than 30 seconds and do not
repeat this step to program a
second and/or third transmitter to
the remaining two HomeLink
buttons.
2. Position the end of your hand-held
transmitter about 1 to 3 inches (3
to 8 cm) away from the HomeLink
buttons while keeping the
indicator light in view.
❏ Reviewed with Customer (Please Check Box)Refer to Owner Manual for further information.
Vehicle
Personalization
Vehicle
Symbols
Glossary
Owner
Privileges
TM
Page 12

ESCALADE/ESCALADE ESV
3. Simultaneously
press and hold
both the desired
button on
HomeLink and
the hand-held
transmitter
button. Do not release the buttons
until Step 4 has been completed.
4. The indicator light will flash slowly at
first and then rapidly after HomeLink
successfully receives the frequency
signal from the hand-held transmitter.
Release both buttons.
5.Press and hold the newly trained
HomeLink button and observe the
indicator light. If the indicator light
stays on constantly, programming is
complete and your device should
activate when the HomeLink button
is pressed and released.
To program the remaining two
HomeLink buttons, begin with Step 2
under “Program HomeLink.”
Do not repeat Step 1, as this will erase
all of the programmed channels.
Note: If your transmitter has a “rolling code”
feature, the above process may not work. Please
refer to your Garage Door Owner Manual or
contact HomeLink at 1-800-335-3515
(www.homelink.com).
STEERING WHEEL CONTROLS
(ONSTAR®/RADIO)
1 This button will activate “personal
calling.” Pressing this button also acts
as a “barge in” for voice mail.
1
2
4
4SEEK: Seek radio stations,
CD tracks.
5VOL: Radio volume.
2 PROG: Sequence
3
through stored
presets for AM, FM
and XM radio.
3SOURCE :
To select AM, FM1,
FM2, XM1, XM2
5
Satellite Radio,
cassette, CD, in-dash
6-Disc CD Changer,
RSE.
AUTOMATIC HEADLAMP CONTROLS
Turn off Daytime Running Lamps (DRL)
and automatic headlamps
1 Turn the exterior lamps knob (located
to the left of the steering wheel) to
OFF.
3
2
1
Activate the automatic headlamp
system
2 Turn the exterior lamps knob to
AUTO. The automatic headlamp
system will turn on the front and rear
lamps.
Manually illuminate the parking
lamps, taillamps, instrument
panel/radio lights, license plate lamps
3 Turn the exterior lamps knob to the
parking lamp position.
Manually activate the headlamps, all
exterior tail/marker lamps and the
instrument panel/radio lights
4 Turn the exterior lamps knob to this
position.
Turn the fog lamps on or off
5 Press the fog lamp button located on
the left side of the instrument panel.
An indicator lamp will illuminate
when the fog lamps are on.
4
5
Page 13

Drive and Security Systems
STABILITRAK
SYSTEM
StabiliTrak helps you
maintain direction
control during most
driving conditions.
In some driving
situations, such as
becoming stuck on slippery terrain and
vehicle “rocking” is required to free it,
it may be necessary to limit StabiliTrak
control. The StabiliTrak limit button
decreases the amount of Traction
Control engagement and disables the
lateral and yaw sensors.
Limit StabiliTrak
•Press the StabiliTrak button (shown
above) located on the instrument
panel.
ULTRASONIC REAR PARKING ASSIST
(URPA)
This feature helps you determine how
close an object is to
your rear bumper.
Both a variable
audible chime and a
visual display,
located on the
passenger’s side
rear upper trim
Driver
Information
®
®
1
Seats and
Mirrors
Automatic
Climate
Controls
panel, convey distance to an object. In
some circumstances such as trailering,
the system can be disabled.
Disable URPA
1 Press the URPA on/off button located
near the climate control system and
radio.
TIRE PRESSURE MONITOR
This feature alerts you when a large
change in pressure occurs in one of your
vehicle’s tires. If this occurs, a CHECK
TIRE PRESSURE message will appear in
the instrument panel cluster. This
message will remain on until you reset
the system.
Note: This system identifies a low tire pressure
situation but does not indicate which tire.
Reset the tire pressure monitor
•To reset the tire pressure message,
you must fill the tires with the correct
amount of air.
Note: The Tire Pressure Monitor can alert you
about low tire pressure, but it doesn’t replace
normal tire maintenance.
•Pressing the cluster stem button on
your instrument panel cluster or the
Entertainment/
Convenience
Features
Drive and
Security
Systems
Personalization
Reset button on your steering wheel
will temporarily eliminate the
message. However, at the next
vehicle start-up, the message will
reappear. The tire pressure must be
corrected to permanently eliminate
the message.
CONTENT THEFT-DETERRENT
SYSTEM
Arm the System
• Lock the doors using the power door
lock switch or the Keyless Entry
System transmitter. The alarm is
activated when the symbol ( ) goes
off (approximately 30 seconds).
Use the Driver Information Center
to program the alarm to one of the
following
• Both Horn/Headlamps
• Horn only
• Lamps only
•Off
Note: Your vehicle’s factory default setting is
Horn and Lamps. See the Vehicle Personalization
section of this booklet for more information.
❏ Reviewed with Customer (Please Check Box)Refer to Owner Manual for further information.
Vehicle
Vehicle
Symbols
Glossary
Owner
Privileges
TM
Page 14

ESCALADE/ESCALADE ESV
Vehicle Personalization
MEMORY POSITIONS FOR
DRIVER’S SEAT, MIRRORS,
PEDALS, RADIO AND CLIMATE
CONTROLS
Use the
driver’s
door
mounted
controls
to:
• Adjust
driver seat, including lumbar
adjustment and side bolster
• Adjust gas and brake pedals
• Adjust the outside rearview
mirrors
Note: Memory 1 or 2 is dependent on the
RKE transmitter being used and the key
being in the ignition during programming.
1
• Set the
radio
presets and
• Set climate
control
temperature
1 To store the
above settings, press and hold
Memory 1 or 2 until two chimes
sound (about four seconds). To set
up for another driver, repeat the
process with the other memory
button.
These settings can be restored by
pressing the Memory 1 or 2 button
on the driver’s door or by using the
Remote Keyless Entry (RKE)
transmitter.
settings will correspond to the
number on the RKE: 1 or 2.
Set Easy Exit Driver Seat Position
1. Briefly press memory button 1 or
2 (depending on which RKE you
have).
2. Adjust the seat to the desired exit
position.
The vehicle memory
3. Press and hold the exit button
( ) on the driver’s door until
two chimes sound. (Note: Seat
Exit must be “On” in your
programmed settings.)
DRIVER INFORMATION CENTER
PERSONALIZATION
You can personalize your vehicle with
the following features:
• Automatic Locking
• Delayed Locking
• Automatic Unlocking
• Remote Lock Feedback
• Remote/Unlock Feedback
•Headlamps On at Exit
• Perimeter Lighting
• Seat Position Recall
• Easy Exit Driver Seat
• Curb View Assist
• Alarm Warning Type
• Display Language
• Display Units
Page 15

Selection Options
To cycle through the features below,
use the Menu button ( ) located
on your steering wheel. Use the
Select button ( ) to choose your
desired setting. The last setting
remaining on the display will be the
selection of choice. Continue cycling
through the menu to set other
preferences.
Automatic Door Locking
1. Lock Doors Out of Park
2. Lock Doors Manually
3. Lock Doors with Speed
(approx. 8 mph)
Delayed Locking
1. Delayed Locking ON
2. Delayed Locking OFF
Automatic Door Unlocking
1. Unlock All in Park
2. Unlock All at Key Out of Ignition
3. Unlock Manually
4. Unlock Driver Only in Park
Remote Lock Feedback
1. Flash Lamps
2. Sound Horn
3. Both Lamps and Horn
4. Off
Driver
Information
Seats and
Mirrors
Automatic
Climate
Controls
Remote Unlock Feedback
1. Flash Lamps
2. Sound Horn
3. Both Lamps and Horn
4. Off
Seat Position Recall Options
1. Seat Position Recall Off (Memory
Seat position will only be recalled
when you press memory button 1
or 2 on the driver’s door)
2. Seat Position Recall at Key In
3. Seat Position Recall On Remote
Easy Exit Driver Seat Position
1. Easy Exit Seat ON
2. Easy Exit Seat OFF
Curb View Assist Options
1. Curb View Off
2. Curb View Passenger
3. Curb View Driver
4. Curb View Both
The Curb View Assist feature
automatically tilts your outside
mirrors downward to allow you to
see curbs when backing up (Default
setting).
Entertainment/
Convenience
Features
Drive and
Security
Systems
Set Curb View Assist position
• Enable one of the four selections
above.
• Adjust the mirrors while the
vehicle is in reverse. When the
vehicle is shifted out of reverse,
your selection is saved in Memory
1 or 2.
ODOMETER/TRIP SETTINGS
Your vehicle’s personal trip and
business trip odometers operate only
when they are
turned on.
Enable the
system
1 Press the
Trip button
until the
word
“Personal” or “Business” appears.
2 Then press the Select button to
turn off the Personal or Business
trip computer.
•Press the Trip button again to
monitor your mileage.
❏ Reviewed with Customer (Please Check Box)Refer to Owner Manual for further information.
Vehicle
Personalization
Vehicle
Symbols
Glossary
1
3
2
Owner
Privileges
TM
Page 16

ESCALADE/ESCALADE ESV
Reset trip information
•Press and hold the Select button
for two seconds while viewing any
of the trip modes on the Driver
Information Center.
Use the above procedure to monitor
the following settings:
• Personal/Business: Miles
• Personal/Business: Gal.
• Personal/Business: MPG
• Personal/Business: Avg. MPH
• Personal/Business: Annual %
Usage
• Business: Hourmeter (Total Engine
Run Time)
• Business: Annual Log
• Business: Timer
Note: You can select and reset trip features
by using the Trip Odometer Reset Stem
located on the instrument panel cluster.
Access fuel information
3 Press the Fuel information button
to view the following:
• RANGE: The remaining distance
you can drive without refueling.
(Fuel range cannot be reset.)
•AVG ECON: How many miles per
gallon your vehicle is getting
based on current and past driving
conditions. To reset AVG ECON,
press and hold the Select button
for two seconds while AVG ECON
is displayed in the Driver
Information Center.
•INST ECON: How many miles per
gallon your vehicle is getting at
the particular moment in time.
(Instant Fuel Economy cannot be
reset.)
Page 17

Vehicle Symbols Glossary
Following are examples of symbols you may find on your vehicle. It is important to become familiar with them,
as they alert you to various vehicle operating conditions.
Air Bag Readiness Light
Air Conditioning (A/C)
Antilock Brake System
Warning Light
Brake System Warning Light
Content Theft Deterrent
Cruise Control Set
Dome Lamps Override Button
DIC Trip Information Button
(on steering wheel)
Driver
Information
Seats and
Mirrors
Automatic
Climate
Controls
DIC Fuel Information Button
(on steering wheel)
DIC Personalization Button
(on steering wheel)
DIC Select Button
(on steering wheel)
Fog Lamps
Headlamps
Instrument Panel Brightness
Control
Malfunction Indicator Lamp
(Check Engine Light)
Entertainment/
Convenience
Features
Drive and
Security
Systems
❏ Reviewed with Customer (Please Check Box)Refer to Owner Manual for further information.
Vehicle
Personalization
Off
Off/On
On
Parking Lamps
Rear Door Security Locks
Rear Window Defogger
Safety Belt Reminder Light
Tow/Haul Mode Light
Traction Off Light
Vehicle
Symbols
Glossary
Privileges
Owner
TM
Page 18

ESCALADE/ESCALADE ESV
Owner Privileges
1-800-882-1112
Roadside Service provides every
Cadillac owner with the advantage of
contacting a Cadillac advisor and,
when appropriate, a Cadillac-trained
dealer technician who can provide
on-site services.
•Towing Service
• Battery Jump-Starting
• Lockout Assistance
• Fuel Delivery
• Flat Tire Change
(covers change only)
Trip Interruption – If your trip is
interrupted due to a component
failure covered under warranty,
incidental expenses may be
reimbursed, including hotel, meals
and rental car.
TM
Courtesy Transportation may also
be provided for warranted repairs,
including shuttle service for sameday repairs and loaner transportation
for overnight repair. Roadside Service
is also available to Cadillac customers
beyond the warranty period for a
charge.
Customer Assistance
1-800-458-8006
Should you need to ask questions,
make a comment or request
additional information, the exclusive
Cadillac Customer Assistance Center
is staffed around the clock with
professionals to serve you.
When you call Cadillac Roadside
Service or Customer Assistance,
when possible, please provide the
phone advisor with:
•Your telephone number
•Your location
•Your Cadillac’s location
•A description of the problem
•Vehicle ID number
•Year and model of your Cadillac
•Delivery date
• Current mileage
This book contains the latest
information available to Cadillac at
the time of printing. Cadillac reserves
the right to make changes to the
product after that time without
further notice.
ESV is a registered trademark of
Cadillac Motor Car Division and
General Motors Corporation.
Copyright 2003 by Cadillac Motor
Division. All rights reserved.
Page 19

Driver
Information
Seats and
Mirrors
Automatic
Climate
Controls
04ESCALADEGTK
Entertainment/
Convenience
Features
Drive and
Security
Systems
Vehicle
Personalization
Vehicle
Symbols
Glossary
Owner
Privileges
TM
Page 20

 Loading...