


The 2003 Cadillac Navigation System Supplement M
Overview
Overview
Features and Controls
Features and Controls
........................................................ 1-1
.................................................. 1-2
..................................... 2-1
................................ 2-2
Navigation Audio System
Navigation Audio System
Voice Recognition
Voice Recognition
.................................................................1
Index
........................................... 4-1
................................ 3-1
............................ 3-2
...................................... 4-2

GENERAL MOTORS, GM and the GM Emblem,
CADILLAC and the CADILLAC Crest & Wreath are
registered trademarks of General Motors Corporation.
This supplement includes thelatest information available
at the time itwas printed. We reserve theright to make
changes in the productafter that time without notice.
Please keep this supplement with the owner’s manual in
your vehicle, so it will be there if you ever need it
while you’re on the road. If you sell your vehicle, leave
this owner’s manual supplement and the owner’s
manual with the vehicle.
This device complies with Part 15 of the FCC Rules.
Operation is subject to the following two conditions:
(1) this device may not cause harmful interference,
(2) this device must accept any interference received,
including interference that may cause undesired
operation.
This device complies withRSS-210 of Industry Canada.
Operation is subject tothe following two conditions:
(1) this device maynot cause interference, (2) thisdevice
must accept any interference,including interference that
may cause undesired operationof the device.
Manufactured under license from Dolby Laboratories.
Dolby and the double-D symbol are trademarks of Dolby
Laboratories. Confidential unpublished works. Copyright
1992–1997 Dolby Laboratories. All rights reserved.
This product incorporates copyright protection
technology that is protected by method claims of certain
U.S. patents and other intellectual property rights
owned by Macrovision Corporation and other rights
owners. Use of this copyright protection technology must
be authorized by Macrovision Corporation, and is
intended for home and other limited viewing uses only
unless otherwise authorized by Macrovision Corporation.
Reverse engineering or disassembly is prohibited.
Litho in U.S.A.
Part No. 25739769 A First Edition
ii
©
Copyright General Motors Corporation 06/19/02
All Rights Reserved

Section 1 Overview
Overview .........................................................1-2
Introduction ...................................................1-2
Setup Menu ...................................................1-3
1-1

Overview
Introduction
This display screen is located in the center of your
instrument panel. The Navigation System allows you to
plan a route and provides turn-by-turn route and
map guidance with voice prompts.
The database allows you to select a destination from
various areas and choices (addresses, intersections,
destinations stored in memory, all points of interest,
etc.). These features are explained later in this
supplement.
The Navigation System can also communicate with the
audio system to receive broadcast announcements
on traffic, weather information and emergency
alert communications.
Before you begin to operate this system, read this
manual thoroughly to become familiar with it and
to understand how the system works.
Also, be aware that the information in the system may
not always be complete. Road conditions, such as
no left turns, detours and construction, change
frequently. It is important to see whether you can follow
the directions given by the system safely and legally.
Use of this feature may be restricted in some states. You
can check with your state motor vehicle agency.
1-2

Setup Menu
Press the SETUP hard key to display the following
menu. Under the Setup menu, you can make
adjustments to the functions listed on the menu using
the touch-sensitive buttons on the screen.
Navigation Settings
This menu allows you to change the following options
for the Navigation System.
1-3

Restore Default Settings
This feature will automatically reset the system to the
default values. The default settings are:
Distance Unit Mile
Minimize Time/Dist Time
Use Major Roads Yes
Use Toll Roads Yes
Use Ferries No
Detour Distance on
Freeway
Detour Distance not on
Freeway
Voice Guidance ON
Guidance Appearance Auto, Arrow, 2 D
Map Appearance 2 D
Quick POI Selection
Search Area Region 9
20 mi. ( 32 km )
4 mi. ( 6 km )
Gas, All Restaurant,
Supermarket, ATM, Park,
Hotel
To restore the default settings:
1. Touch the RESTORE DEFAULT SETTINGS button.
2. Touch ENTER.
3. Touch RETURN to exit this feature.
System Configuration
Once you touch the SYSTEM CONFIGURATION
button, you will have the following choices:
Adjust Vehicle Position: To correct the position of
your vehicle on the map (if your vehicle has been
shipped, for example) or to change to the correct
position, do the following:
1. Touch the ADJUST VEH POSITION button. The
system will display POSITION ADJUSTMENT.
The vehicle position icon and the scroll symbol will
appear on the map.
2. Use the scroll symbol and the zoom in/zoom out
feature to locate the vehicle position on the map.
3. Touch the ENTER button to set the correct vehicle
position. The system will display POSITION
ADJUSTMENT and two arrows will appear on the
map screen.
1-4

4. Touch the arrows to adjust the direction of the
vehicle icon counterclockwise or clockwise.
When you touch one of the arrows, you will see the
vehicle icon direction changing.
5. When you have completed setting the vehicle to the
correct direction, touch the ENTER button. The
system will display RELOCATION COMPLETE.
The correct vehicle position and direction is
now set.
If you begin to drive your vehicle during this
procedure, the system will not be able to adjust the
position or direction of your vehicle.
6. Touch the RETURN button to exit out of this menu.
Calibrate Vehicle Speed Signal: If there are tire
pressure differences or if a spare tire is installed, the
Navigation System will automatically re-calibrate
the system but it may take longer. You may choose to
calibrate it yourself by doing the following:
1. Touch START to begin calibration.
2. Touch RETURN to exit this menu.
Display Units
You can select either the English or metric
measurements to appear for distances on the map.
Touch the ENGLISH or METRIC button to change
between English and metric units.
Time to Destination
This feature allows you to reset or turn on or off the
estimated time to travel from your current position to the
destination. The estimated travel time is based on the
calculated route information and the vehicle’s average
speed. When on, the time to destination will display
along with the distance to destination.
RESET: Touch this button if you want to reset the
average speed to the default values.
ON: Touch this button to display the estimated travel
time on the map screen along with the distance to
destination.
OFF: Touch this button to turn the estimated travel time
feature off. The time to destination will no longer be
displayed along with the distance to destination.
1-5

Quick POI (Point of Interest) Selection
This feature allows you to choose a point of interest,
such as gas stations, restaurants, hotels, etc. to
be displayed on the map screen. You can also set a
destination to a specific point of interest.
The six Quick POI default settings are GAS, ALL REST,
SUPERMKT., ATM, PARK and HOTEL.
To access the QUICK POI SELECTION menu, do the
following:
1. Press the SETUP hard key.
2. Touch QUICK POI.
Setting the Quick POI menu
This feature is used to set the Quick POI list displayed
on the map screen.
1. Select the category you would like to replace.
2. Select a Quick POI category from the Quick POI
selection menu list. The system will return to the
Quick POI selection screen when a POI is selected.
3. Touch RETURN to save the setting and the system
will take you back to the previous menu.
1-6

Displaying Quick POI Icons
This feature will allow you to display the icons of a
category type in its location on the map screen.
To display the icons of a category do the following:
1. Touch the map screen once.
2. Touch the POI button. The QUICK POI SELECTION
list will be displayed.
3. Select a category type or touch LIST CATEGORIES
OR ALL LOCAL POIs to display the icon of the
selected category in their locations on the
map screen.
Removing Quick POI Icons
This feature will allow you to remove the displayed
icons from the map screen. To remove the POI icons
from the map screen do the following:
1. Touch the map screen once.
2. Touch the POI OFF button. The current POI icons
will be removed from the map screen.
Setting a Destination Using Quick POI
This feature will allow you to plan a destination to a point
of interest from the map screen. To plan a route using
a POI icon do the following:
1. Touch the POI icon on the map screen that you
wish to set a destination to.
2. The selected icon will be surrounded with a blinking
box. The name of the selected icon will be displayed
on the map screen. Touch the INFO button to
view the POI name, address, city and phone
number (if available).
3. Touch the ENT DEST button.
If a final destination is already entered, you can
add the POI as a waypoint.
4. Touch the ENTER button to start planning your
route.
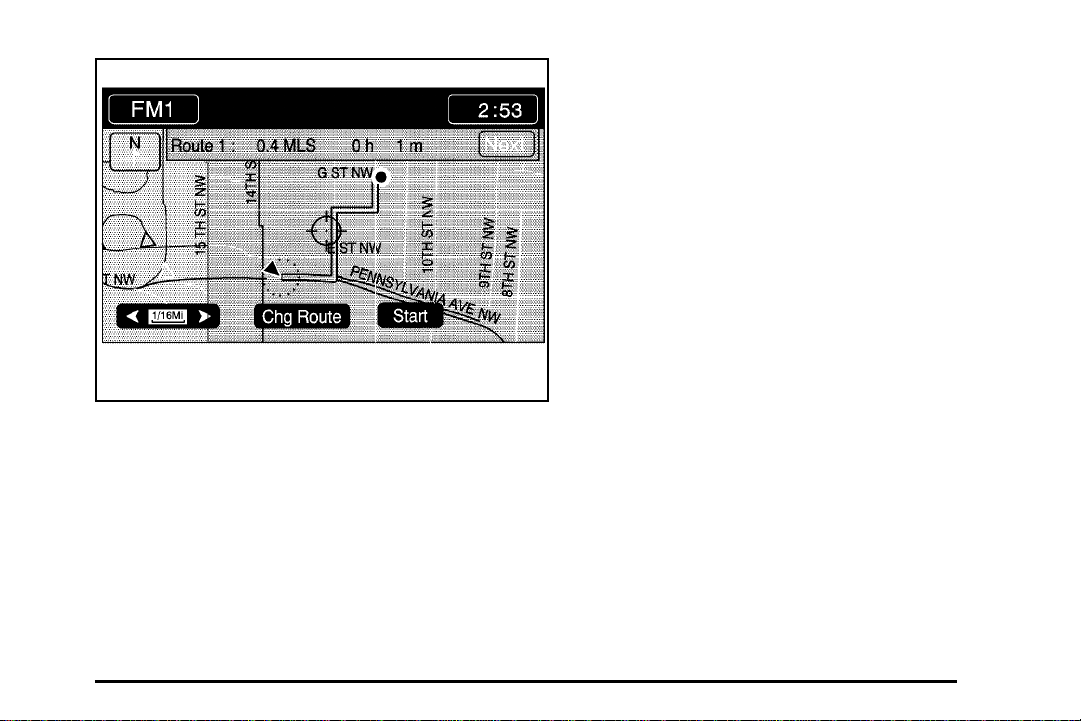
If available, the systemwill display up to threeroutes
in a pop-up windowindicating the total mileage and
time to destination forthe planned route which can
be selected by usingthe NEXT button. The mapwill
display the difference between thethree routes by
displaying them each indifferentcolors. The
selected route is highlightedin red.
1-7

5. To start route guidance, touch the START button or
begin driving the vehicle. Route guidance will
automatically begin after a short distance.
If you touch the CHG ROUTE button before the
START button you will be able to change your route
preferences if desired. See “Route Preference”
later in this section for more information.
When your route guidance has been planned, it will
be highlighted and a bulls-eye symbol will appear
on the map to show your final destination. A
waypoint symbol will also appear on the map if a
waypoint is set.
If you wish to cancel the route you have just set, do the
following:
1. Press the ROUTE hard key.
2. Touch the ROUTE PREFERENCES button.
3. Touch the CANCEL ROUTE button.
4. Select YES to cancel or NO to continue.
See “Cancel Route” under Easy Planning Route on
page 2-3 for more information.
1-8
Guidance Appearance
This menu allows you to set up the following three
options for the guidance appearance screen which is
displayed on the map while on a planned route.
The current setting will appear as light blue.
Split Map: Touch this button to have the guidance
screen displayed on the map at all times.
Full Screen: Touch this button to have the guidance
screen displayed on the map when approaching a
maneuver.

Turn List Guidance
TURN LIST: Touch this button to have the guidance
screen display several upcoming turns. Directional
arrows, street name and distance to the next turn will
also be displayed. As you approach the next turn,
the system will automatically display a zoomed-in view
of the upcoming maneuver.
ARROW: Touch this button to have the guidance
screen display the next turn. A directional arrow, street
name and distance to the turn will also be displayed.
As you approach the turn, the system will automatically
display a zoomed-in view of the upcoming maneuver.
Arrow Guidance
1-9

2D: Touch this button to have the guidance screen
display as a two-dimensional view.
3D: Touch this button to have the guidance screen
display as a three-dimensional view.
Map Appearance
This menu allows you to set up one of the following
options for the map appearance screen. The current
setting will appear as light blue.
2D: Touch this button to have the map screen display
as a two-dimensional view.
3D: Touch this button to have the map screen display
as a three-dimensional view.
SET 3D VIEWING ANGLE: This allows you to adjust
the 3D viewing angle. To adjust the viewing angle,
do the following:
1. Select 3D from the MAP APPEARANCE menu.
2. Touch the SET 3D VIEWING ANGLE button.
The map screen with 3D viewing angle bar will
be displayed.
3. Touch the vertical scroll up or down arrows to set
your preferred viewing angle.
4. Touch RETURN to save your settings and to exit
this menu or touch RESET to restore the viewing
angle to the default settings.
1-10

Voice Guidance Volume Settings
This feature allows youto set the voice promptvolume
level or to turnthe voice prompts on oroff.The voice
prompts will not beheard while using voice recognition
and while using thefactory-installed phone system. The
last voice prompt canbe repeated by using theREPEAT
hard key. See Mapand Repeat on page 2-2.
Set the voice prompt volume level by touching the
numbered (one to six) buttons to increase or decrease
the volume level with one being the lowest volume
level and six being the highest.
Voice prompts can be turned on or off by touching the
ON or OFF button.
If a voice prompt is active while the audio system is on,
the audio system volume will decrease and will fade
to the rear speakers and the voice prompt will be heard
through the left front speaker.
Touch the RETURN button to go back to the SETUP
main menu.
1-11

✍ NOTES
1-12

Section 2 Features and Controls
Features and Controls ......................................2-2
Using the Navigation System ...........................2-2
Navigation Menus ...........................................2-2
Map and Repeat ............................................2-2
Plan Route ....................................................2-3
Easy Planning Route ......................................2-4
Maps ..........................................................2-37
Symbols ......................................................2-47
Global Positioning System (GPS) ....................2-51
Vehicle Positioning ........................................2-52
Problems with Route Guidance .......................2-52
If the System Needs Service ..........................2-53
Ordering Map DVDs ......................................2-53
Database Coverage Explanations ....................2-53
2-1

Features and Controls
Using the Navigation System
This section describes the basic information you will
need to know to operate the Navigation System.
You should read this section thoroughly to become
familiar with it.
Navigation Menus
In this section, the hard keys, touch-sensitive buttons
and menus to plan a route are explained.
Map and Repeat
Press the MAP hard key to take you to your current
location on the map screen. This button will work while
you are in any menu.
When you press the MAP hard key, the map screen can
display the following information:
• The north or heading up symbol.
• The map scale in the lower left corner.
• How many miles/meters until you reach your final
destination, if a route is planned.
• The GPS symbol if the Global Positioning System
signal is not being received. See Symbols on
page 2-47.
• Any options you have selected for reaching your
current destination.
• The time.
• The radio band and presets if selected to be
displayed on the screen.
If you have a route planned and you wish to hear the
last voice prompt repeated, press the REPEAT hard key.
To learn more about the features shown on the map
screen, you can find each feature listed in the Index.
2-2

Plan Route
To plan a route, press the ROUTE hard key. After
pressing this hard key, the plan route main menu screen
will display the following:
There are two methods for planning a route. They are
the following:
• By using the easy planning method, you can locate
your destination by using the scroll arrows from the
map screen. See Easy Planning Route on
page 2-4.
• By using an address, all points of interest, memory
points, previous destinations, home, set by map,
freeway entrance/exit or intersection. To use one of
these methods, see “Enter Destination″ later in
this section.
2-3

Easy Planning Route
With the easy planning route feature, you are able to
select the destination you wish to go to using the scroll
icon from the map screen. You can use this feature
without entering the destination selection menu. To use
the easy planning method, do the following:
1. First press the MAP hard key.
2. Touch the map screen twice to make the scroll
symbol appear. Touch the map or drag the scroll
symbol in the direction of your destination.
3. Touch and hold the map screen continuously to
scroll through the map faster. See Symbols on
page 2-47 for more information. The address of the
scrolled to location on the map will appear at the
top of the screen.
4. If needed, use the Zoom In and Zoom Out feature
of the map scale to locate your destination. See
Maps on page 2-37 for more information.
Touch the ENT DEST button to set this location as
your destination. Touch the MARK button if you
wish to store this location as a memory point.
2-4

The system will use the planning methods you
have previously selected. These methods will be
displayed in a pop-up window under the ROUTE
SETTING heading on the map. Touch the CHANGE
button if you wish to change the route planning
methods before continuing. See “Home” later in this
section for more information.
5. Touch the ENTER button to start planning your
route.
If available, the system will display up to three
routes in a pop-up window indicating the total
mileage and time to destination for the planned
routes. Select one using the NEXT button. The map
will display the difference between the three
routes by displaying them each in different colors.
The selected route is highlighted in red.
6. To start route guidance, touch the START button or
begin driving the vehicle. Route guidance will
automatically begin after a short distance.
If you touch the CHG ROUTE button before the
START button you will be able to change your route
preferences if desired. See “Route Preference”
later in this section for more information.
When your route has been planned, it will be highlighted
and a bulls-eye symbol will appear on the map to
show your final destination.
Enter Destination
To enter a destination, touch the ENTER DESTINATION
button in the PLAN ROUTE menu.
This menu will let you plan a route by several methods.
These methods are explained in the following pages.
2-5

Touch the right arrow (Next Page) button to see
additional methods.
Address
This feature allows youto select a route byinputting an
address (without a zipcode) and to store it.You need to
provide the system witha street number, street nameand
a city.
1. Press the ROUTE hard key.
2. Touch ENTER DESTINATION.
3. Touch the ADDRESS button.
2-6

4. Enter the name of a street by touching the alphabet
key pad. There may be many streets within the
map database with the same name. Therefore, you
may have difficulty selecting the correct street
name from the list given. If this occurs you may
enter the city name first. To enter the city name
touch the CITY button on the ADDRESS menu.
Enter the name of the city by touching the alphabet
key pad. Select the desired city name. After you
have selected the city name the system will prompt
you to enter the name of the street or will give
you a list of street names to choose from. Enter a
street name using the alphabet key pad or view the
desired street names by pressing the LIST button.
Then select the desired street name from the list.
If you touch a wrong character, use the left arrow to
back up a character, or touch and hold the left
arrow to delete all of the characters.
5. As information is entered, the system automatically
searches for available names based on the
information given. While inputting a name, the LIST
button will become available once there are
10,000 or fewer choices to choose from. Touch the
LIST button to view the list of available name
choices or continue to spell the name to further
reduce the list of available items. The system will
supply a list of names to make a selection from
when the number of available items is five or less.
The system displays the number of available
items to the right of the street name.
If you are unsuccessful when inputting a name, the
name may need to be entered differently or the
map DVD (database) may not contain this
information. See Database Coverage Explanations
on page 2-53.
6. Enter the address number from the number key pad
and then touch the ENTER button. The system will
list the address number range available for the
street. If you have entered an address number that
is incorrect or not available the system will
indicate that the address number is not registered
and will prompt you to see if you want to view
from the midpoint of the street.
2-7

7. If you did not previously select the city name the
system may prompt you to select the city name
from the alphabet key pad or from a provided list of
names prior to entering the street address. Select
the desired city name.
The system will return to the street address menu.
Refer to Step 4 to see how to enter a street
address.
The system will use the planning methods you
previously selected. These methods will be
displayed in a pop-up window under the ROUTE
SETTING heading on the map. Touch the CHANGE
button if you wish to change the route planning
methods before continuing. See “Route Setting”
later in this section for more information.
8. Touch the ENTER button to start planning
your route.
If available, the system will display up to three
routes in a pop-up window indicating the total
mileage and time to destination for the planned
route. Select one using the NEXT button. The map
will display the difference between the three
routes by displaying them each in different colors.
The selected route is highlighted in red.
9. To start route guidance, touch the START button or
begin driving the vehicle. Route guidance will
automatically begin after a short distance.
If you touch the CHG ROUTE button before the
START button you will be able to change your route
preferences if desired. See “Route Setting” later
in this section for more information.
2-8
When your route has been planned, it will be
highlighted and a bulls-eye symbol will appear on
the map to show your final destination and a
waypoint symbol will appear on the map if a
waypoint is set.
If you wish to cancel the route you have just set, do the
following:
1. Press the ROUTE hard key.
2. Touch the ROUTE PREFERENCE button.
3. Touch the CANCEL ROUTE button.
4. Select YES to cancel or NO to continue.
See “Cancel Route” later in this section for more
information.
2-9

All Points of Interest
This feature helps you to easily locate a destination by
type of facility.
The following list shows the types of categories and
sub-categories of POIs (Points of Interest) in the map
DVD database that you can choose from:
POI Category POI Sub-category
All Restaurants
Japanese
Chinese
French
Restaurant
Shops Shopping Mall
Italian
Other
American
Continent
Mexican
Seafood
Supermarket
POI Category POI Sub-category
Gas
Garage
Parking Lot
Auto
Hotel Hotel
Entertain
Rental Car
General Motors
Dealerships
Auto Club
Auto Service
Golf
Ski resort
Amusement Park
Sport Complex
Casino
Marina
Tourist
Winery
2-10

POI Category POI Sub-category
City Hall
Police
Library
Community
Travel
Hospital
Park
Commercial Center
Exhibition Center
Courthouses
Train Station
Airport
Bus Station
Rail Station
Ferry
Park & Ride
Rest Area
Information
POI Category POI Sub-category
Historical Monuments
Performing Arts
Museum
Bank
Other
School
ATM
Higher Education
Business Facility
City Center
2-11

Selecting a POI (Point of Interest)
1. Press the ROUTE hard key.
2. Touch ENTER DESTINATION.
3. Touch the ALL POINTS OF INTEREST button. An
alphabet key pad will appear.
4. Enter the name of the POI or city using the alphabet
key pad.
While inputting a point of interest or city name, the
LIST button will become available once there
are 10,000 or fewer options to choose from.
As information is entered, the system automatically
searches for available point of interest and city
names based on the information given. The system
will supply a list of names to make a selection
from when the choice is five or less.
2-12
5. You have three ways to select a point of interest
from this screen:
• You can type in a point of interest by NAME
using the alphabet key pad. As you enter a
name, the system will search for an available
match to your input. Select the desired point of
interest.
• You can select a point of interest by choosing
the CATEGORY button. Use the up and down
arrows or the INDEX UP or INDEX DOWN
arrows to scroll through the categories listed.

Select a category and then any appropriate
sub-categories. If the list of available points of
interests for the selected category is still too long,
then you may need to enter in the point of
interest name or city.
• You can select the CITY button, then type in a
city you wish to select a point of interest from.
A list of cities will appear. Choose a city. If the list
of available points of interest for the selected
city is still too long, you may need to enter in the
points of interest name or choose a category.
6. The system will give a listing of all points of interest
available and will also show how many there are
available. For example, if you type in the name of a
bank, there may be 51 locations available to
select from, sorted by name (NAME SORT) in
alphabetical order. Touch the DIST SORT button
and the system will automatically list the points
of interest by distance from your current location.
7. Select the desired location from the list and the
system will show the selected point of interest on
the map screen. If available, a pop-up window
will be displayed on the map screen. Press
the INFO button to view the selected POI name,
address, city and phone number (if available).
8. Touch the ENTER button to start planning your
route.
The system will use the planning methods you
selected previously. These methods will be
displayed in a pop-up window under the ROUTE
SETTING heading on the map. Touch the CHANGE
button if you wish to change the route planning
methods before continuing. See“Route Setting” later
in this section for more information.
2-13

If available, the system will display up to three
routes in a pop-up window indicating the total
mileage and time to destination for the planned
routes. Select one using the NEXT button. The map
will display the difference between the three
routes by displaying them each in different colors.
The selected route is highlighted in red.
9. To start route guidance, touch the START button or
begin driving the vehicle. Route guidance will
automatically begin after a short distance. If you
touch the CHG ROUTE button before the START
button you will be able to change your route
preferences if desired. See “Route Preference” later
in this section for more information.
When your route has been planned, it will be
highlighted and a bulls-eye symbol will appear on
the map to show your final destination. A waypoint
symbol will also appear on the map if a waypoint
is set.
2-14

If you wish to cancel the route you have just set, do the
following:
1. Press the ROUTE hard key.
2. Touch the ROUTE PREFERENCE button.
3. Touch the CANCEL ROUTE button.
4. Select YES to cancel or NO to continue.
See “Cancel Route” later in this section for more
information.
Memory Points
This menu allows you to select a destination by
choosing a memory point. Each time you store a
destination from the map screen, the destination is
stored under MARKED POINT. See “Editing Memory
Points” later in this section for more information on
memory points.
You must have destinations stored as memory points to
select a destination from PERSONAL, BUSINESS,
ENTERTAINMENT or MARKED POINT. If you have
renamed the memory point category name(s), the
name(s) will appear as you changed them.
If a destination is not stored, the MEMORY POINT
button will not be available.
To select a destination from this menu, do the following:
1. Touch the MEMORY POINT button.
2. Select one of the categories.
3. Select your desired destination from the selected
category. Use the up and down arrows to scroll
through the memory points in the selected category.
These can be sorted by date, name, distance
and icon.
The system will use the planning methods you
previously selected. These methods will be
displayed in a pop-up window under the ROUTE
SETTING heading on the map. Touch the CHANGE
button if you wish to change the route planning
methods before continuing. See “Route Setting”
later in this section for more information.
2-15

4. Touch the ENTER button to start planning your
route.
If available, the systemwill display up to threeroutes
in a pop-up windowindicating the total mileage and
time to destination forthe planned route which can
be selected by usingthe NEXT button. The mapwill
display the difference between thethree routes by
displaying them each indifferentcolors. The
selected route is highlightedin red.
5. To start route guidance, touch the START button or
begin driving the vehicle. Route guidance will
automatically begin after a short distance.
If you touch the CHG ROUTE button before the
START button you will be able to change your route
preferences if desired. See “Route Preference”
later in this section for more information.
When your route has been planned, it will be
highlighted and a bulls-eye symbol will appear on
the map to show your final destination. A waypoint
symbol will also appear on the map if a waypoint
is set.
If you wish to cancel the route you have just set, do the
following:
1. Press the ROUTE hard key.
2. Touch the ROUTE PREFERENCE button.
3. Touch the CANCEL ROUTE button.
4. Select YES to cancel or NO to continue.
See “Cancel Route” later in this section for more
information.
Previous Destination
This feature allows you to select and choose as a
destination any one of the last 10 destinations you have
entered into the system.
This button will not be available if no destinations have
been entered.
1. Press the ROUTE hard key.
2. Touch ENTER DESTINATION.
3. Touch the PREVIOUS DESTINATION button.
2-16

4. Use the up and down arrows to view the list.
5. Select the desired destination from the list. Touch
the PREVIOUS STARTING POINT button to plan a
route back to where you last started from.
The system will use the planning methods you
previously selected. These methods will be
displayed in a pop-up window under the ROUTE
SETTING heading on the map. Touch the CHANGE
button if you wish to change the route planning
methods before continuing. See “Route Setting”
later in this section for more information.
6. Touch the ENTER button to start planning your route.
If available, the systemwill display up to threeroutes
in a pop-up windowindicating the total mileage and
time to destination forthe planned route which can
be selected by usingthe NEXT button. The mapwill
display the difference between thethree routes by
displaying them each indifferentcolors. The
selected route is highlightedin red.
7. To start route guidance, touch the START button or
begin driving the vehicle. Route guidance will
automatically begin after a short distance.
If you touch the CHG ROUTE button before the
START button you will be able to change your route
preferences if desired. See “Route Preference”
later in this section for more information.
When your route has been planned, it will be
highlighted and a bulls-eye symbol will appear on
the map to show your final destination. A waypoint
symbol will also appear on the map if a waypoint
is set.
If you wish to cancel the route you have just set, do the
following:
1. Press the ROUTE hard key.
2. Touch the ROUTE PREFERENCE button.
3. Touch the CANCEL ROUTE button.
4. Select YES to cancel or NO to continue.
See “Cancel Route” later in this section for more
information.
2-17

Home
This feature allows you to plan a route to one previously
stored destination that you have selected as a “home.”
If a home destination is not stored, the HOME button will
not be available.
1. Press the ROUTE hard key
2. Touch ENTER DESTINATION.
3. Touch the HOME button.
4. The system will use the planning methods you
previously selected. These methods will be
displayed in a pop-up window under the ROUTE
SETTING heading on the map. Touch the CHANGE
button if you wish to change the route planning
methods before continuing. See “Route Setting”
later in this section for more information.
2-18

5. Touch the ENTER button to start planning your
route.
If available, the system will display up to three
routes in a pop-up window indicating the total
mileage and time to destination for the planned
route. Select one using the NEXT button. The map
will display the difference between the three
routes by displaying them each in different colors.
The selected route is highlighted in red.
6. To start route guidance, touch the START button or
begin driving the vehicle. Route guidance will
automatically begin after a short distance.
If you touch the CHG ROUTE button before the
START button you will be able to change your route
preferences if desired. See “Route Preference”
later in this section for more information.
When your route has been planned, it will be
highlighted and a bulls-eye symbol will appear on
the map to show your final destination. A waypoint
symbol will also appear on the map if a waypoint
is set.
If you wish to cancel the route you have just set, do the
following:
1. Press the ROUTE hard key.
2. Press the ROUTE PREFERENCE button.
3. Touch the CANCEL ROUTE button.
4. Select YES to cancel or NO to continue.
See “Cancel Route” later in this section for more
information.
Set by Map
This method allows you to select a destination by using
the scroll icon. To use this feature, do the following:
1. Press the ROUTE hard key.
2. Touch ENTER DESTINATION.
3. Touch the SET BY MAP button. Once this button is
selected, you will return to the current position of
your vehicle’s location on the map.
2-19

4. Use the scroll icon to select your desired
destination. The zoom in and zoom out feature can
be used at this time to assist you in finding the
desired location. See Maps on page 2-37.
The system will use the planning methods you
previously selected. These methods will be
displayed in a pop-up window under the ROUTE
SETTING heading on the map. Touch the CHANGE
button if you wish to change the route planning
methods before continuing. See “Route Setting”
later in this section for more information.
5. Touch the ENTER button to start planning your
route.
If available, the system will display up to three
routes in a pop-up window indicating the total
mileage and time to destination for the planned
route. Select one using the NEXT button. The map
will display the difference between the three
routes by displaying them each in different colors.
The selected route is highlighted in red.
6. Touch the START button or begin driving the
vehicle to start route guidance. Route guidance will
automatically begin after a short distance.
If you touch the CHG ROUTE button before the
START button you will be able to change your route
preferences if desired. See “Route Preference”
later in this section for more information.
When your route has been planned, it will be
highlighted and a bulls-eye symbol will appear on
the map to show your final destination. A waypoint
symbol will also appear on the map if a waypoint
is set.
2-20

If you wish to cancel the route you have just set, do the
following:
1. Press the ROUTE hard key.
2. Touch the ROUTE PREFERENCE button.
3. Touch the CANCEL ROUTE button.
4. Select YES to cancel or NO to continue.
See “Cancel Route” later in this section for more
information.
Freeway Entrance/Exit
You can select either a freeway entrance or an exit as a
destination. To enter a freeway name, do the following:
1. Press the ROUTE hard key.
2. Touch ENTER DESTINATION.
3. Touch the FREEWAY ENTRANCE/EXIT button.
4. Enter the freeway name using the alphabet key pad.
Freeways may have aname and a number
associated with them. Youmay need to refer tothis
associated name or numberwhen entering the
freeway information. Freeways arealso referred to
by their abbreviated names.For example,
Interstate 75 inthe U.S. is selected byentering I–75.
2-21

5. As you enter a freeway name, the LIST button will
become available.
Touch the LIST button to view the list of available
name choices or continue to spell the name to
further reduce the list of available items. The
system will supply a list of names to make a
selection from when the choice is five or less.
If you are unsuccessful when inputting a name, the
name may need to be input differently, the map
DVD (database) may not contain this information, or
the name may be misspelled.
6. Select a freeway from the list.
7. The ENTRANCE or EXIT options will appear. Press
ENTRANCE to select the entrance to the freeway
that you selected in Step 4. Press EXIT to select the
exit ramp of the freeway you selected in Step 4.
When either button is touched, it will give an
alphabetical list of every freeway entrance and exit
ramp on the freeway you entered. You may
touch the DIST SORT toggle button to sort the
selection by distance from your current location. To
change back to a sort by name, touch the NAME
SORT toggle button.
8. Select the desired freeway entrance or exit from the
list. A map will appear with the destination shown.
The system will use the planning methods you
previously selected. These route methods will be
displayed in a pop-up window under the ROUTE
2-22
SETTING heading on the map. Touch the CHANGE
button if you wish to change the route planning
methods before continuing. See “Route Setting”
later in this section for more information.
9. Touch the ENTER button to start planning your
route.
If available, the system will display up to three
routes in a pop-up window indicating the total
mileage and time to destination for the planned
route. Select one using the NEXT button. The map
will display the difference between the three
routes by displaying them each in different colors.
The selected route is highlighted in red.
10. To start route guidance, touch the START button or
begin driving the vehicle. Route guidance will
automatically begin after a short distance. If you
touch the CHG ROUTE button before the START
button you will be able to change your route
preferences if desired. See “Route Preference” later
in this section for more information.
When your route has been planned, it will be
highlighted and a bulls-eye symbol will appear on
the map to show your final destination (a waypoint
symbol will also appear on the map if a waypoint
is set).

If you wish to cancel the route you have just set, do the
following:
1. Press the ROUTE hard key.
2. Touch the ROUTE PREFERENCE button.
3. Touch the CANCEL ROUTE button.
4. Select YES to cancel or NO to continue.
See “Cancel Route” later in this section for more
information.
Intersection
Intersection allows you to select a destination by
inputting the intersecting roads you wish to travel to. To
enter a intersection, do the following:
1. Press the ROUTE hard key.
2. Touch ENTER DESTINATION.
3. Touch the INTERSECTION button.
4. Enter the name of the first street with the correct
prefixes and/or suffixes in the intersection using
the alphabet key pad.
5. To view the list of available name choices, touch
the LIST button or continue to spell the name to
further reduce the list of available items. The system
will automatically supply an alphabetical list of the
intersecting streets if the number of intersecting
streets is five or less.
6. Select the first street.
2-23

7. Enter the second street name with the correct
prefixes and/or suffixes using thealphabet key pad.
8. Select the second street name from the alphabetical
list of the intersectingstreets. To view the listof
available name choices, touchthe LIST button or
continue to spell thename to further reduce thelist of
available items. The systemwill automatically supply
an alphabetical list ofthe intersecting streets if the
number of intersecting streetsis five or less.
If there are multiple intersections of the same two
roads, the system will give a list in alphabetical
order of cities to choose from. Choose a city from
this list. A map with the intersections for that
city will appear.
The system will use the planning methods you
previously selected. These methods will be
displayed in a pop-up window under the ROUTE
SETTING heading on the map. Touch the CHANGE
button if you wish to change the route planning
methods before continuing. See “Route Setting”
later in this section for more information.
9. Touch the ENTER button to start planning your
route.
If available, the system will display up to three
routes in a pop-up window indicating the total
mileage and time to destination for the planned
route. Select one using the NEXT button. The map
2-24
will display the difference between the three routes
by displaying them each in different colors. The
selected route is highlighted in red.
10. To start route guidance, touch the START button or
begin driving the vehicle. Route guidance will
automatically begin after a short distance.
If you touch the CHG ROUTE button before the
START button you will be able to change your route
preferences if desired. See “Route Preference”
later in this section for more information.
When your route has been planned, it will be
highlighted and a bulls-eye symbol will appear on
the map to show your final destination. A waypoint
symbol will also appear on the map if a waypoint
is set.
If you wish to cancel the route you have just set, do the
following:
1. Press the ROUTE hard key.
2. Touch the ROUTE PREFERENCE button.
3. Touch the CANCEL ROUTE button.
4. Select YES to cancel or NO to continue.
See “Cancel Route” later in this section for more
information.

Edit Memory Point
Touch the EDIT MEMORY POINT button to store,
delete and edit memory points. See also “Memory
Points” listed previously in this section for more
information.
To access the EDIT MEMORY POINT menu, do the
following:
1. Press the ROUTE hard key.
2. Touch EDIT MEMORY POINT.
You can store memory points for the following
categories.
Memory points are stored when you select either the
START or the MARK buttons when setting a destination
on the map or when you store destinations in memory.
A total of 60 locations can be stored. The last
10 destinations entered will automatically be stored
under PREVIOUS DESTINATION. In addition, one
memory point can be stored under the HOME category.
If all 60 stored points are entered, the system will
notify you that there is no available storage left in
memory points. A stored memory point must be
removed in order to add additional memory points.
2-25

Registering Memory Points
This feature allows you the ability to store a memory
point. To store a memory point in a category:
1. Select one of the categories listed on the EDIT
MEMORY POINT menu.
2. Touch the REGISTER button.
3. Select the desired method of entering a destination
to enter the memory point. See “Enter Destination”
listed previously in this section for more information.
A map screen will appear displaying the selected
memory point location.
4. If available, touch the INFO button to view the
address information of the selected point.
5. Touch ENTER to store the point as a memory
point.
Editing Memory Points
This feature allows you to edit the contents stored in
memory.
The following items can be edited:
• Changing the icon of a memory point displayed on
the map
• Name of a memory point
• Moving a memory point to a different category
• Changing the location of a memory point on the
map
• Changing the phone number of a memory point
Icon Editing of a Memory Point
This feature will allow you the ability to modify the
default icon that each memory point is displayed with.
To edit an icon, do the following:
1. Select the category where the memory point exists.
2. Select the item you wish to edit.
3. Touch the icon button. The edit memory point icon
screen will appear.
2-26

4. Touch the icon of choice. The system will
automatically return to the edit memory point menu
when an icon is selected.
5. Touch the RETURN button to take you back to the
previous screen.
You will see the stored memory point icon on the map.
When selecting the icon, you will be provided with
18 different icons, three of which are sound icons that
can be selected for that memory location. The same icon
may be used on other memory points as well.
Name Editing of a Memory Point
This feature allows you to modify the name of a stored
memory point. To change the name of an item, do
the following:
1. Select the category where the memory point exists.
2. Select the memory point desired to edit.
3. Touch the NAME button. The alphabet key pad will
appear.
4. Use the alphabet key pad and the backspace arrow
as appropriate to edit the name.
5. Touch the RETURN button to take you back to the
previous screen when you have finished.
The names can consist of up to 15 alpha and/or
numeric characters. If an incorrect letter or number is
entered, you can use the left arrow key to back up
or touch and hold the left arrow to delete all of
the characters.
2-27

Moving Memory Points
This feature allows you to select a memory point and
move the contents from one category to one of the other
three categories. To move an item, do the following:
1. Select the category where the memory point exists.
2. Select the memory point desired to edit.
3. Touch the CATEGORY button. A list of the four
categories will appear. The current category
where the item exists will be highlighted and cannot
be selected.
4. Touch the CATEGORY button that you want the
item to be placed in. A pop-up window will appear
displaying the change in the category names.
5. Touch the RETURN button to take you back to the
previous screen when you have finished.
Adjusting of a Memory Point
This feature allows you to relocate the memory point.
To adjust a location of an item, do the following:
1. Select the category where the memory point exists.
2. Select the memory point desired to edit.
3. Touch the POSITION button. A map screen with
the position of this item will appear.
4. Touch anywhere on the screen to use the scroll
feature.
5. Touch the ENTER button. The memory point is now
moved.
6. Touch the RETURN button to take you back to the
previous screen when you have finished.
Changing the Phone Number of a Memory
Point
This feature allows you to edit and add the phone
number of a point stored in memory. To change a phone
number of a memory point, do the following:
1. Select the category where the memory point exists.
2. Select the memory point desired to edit.
3. Touch the PHONE button. A numeric keypad will
appear.
4. Use the numeric keypad and the backspace arrow
to edit as appropriate.
5. Touch the RETURN button to take you back to the
previous screen when you have finished.
2-28

Deleting Single Memory Points
This feature allows you to delete a single memory point.
To delete a memory point, do the following:
1. Press the ROUTE hard key.
2. Touch EDIT MEMORY POINT.
3. Select the category where the memory point exists.
4. Touch the DELETE button.
5. Select the memory point you wish to delete.
6. A confirmation window will appear. Touch YES to
delete the memory point or NO to return to the
previous menu.
7. Touch the RETURN button to take you back to the
previous screen when you have finished.
Deleting All Memory Points
This feature allows you to delete all memory points in a
category. To do this, use the following steps:
1. Press the ROUTE hard key.
2. Touch EDIT MEMORY POINT.
3. Select the desired category.
4. Touch the DELETE ALL button.
5. A confirmation window will appear. Touch YES to
delete the memory points or NO to return to the
previous menu.
6. Touch the RETURN button to take you back to the
previous screen when you have finished.
Edit Category
This feature allows you to change the name of a
category. To change the name of a category, do the
following:
1. Press the ROUTE hard key.
2. Touch EDIT MEMORY POINT.
3. Select the category desired.
4. Touch the EDIT CATEGORY button and the
alphabet key pad will appear.
5. Use the alphabet key pad and the backspace arrow
as appropriate to edit the category name.
6. Touch the RETURN button to take you back to the
previous screen when you have finished.
The name can consist of up to 15 alpha and/or numeric
characters. If an incorrect letter or number is entered,
you can use the left arrow key to back up or touch and
hold the left arrow to delete all of the characters.
2-29

Marked Point
A marked point is a memory point which has been
stored by selecting the MARK button while traveling on
a planned route. You can also use the scroll feature
to plan a destination on the map after reaching a
destination and pressing the map screen, or by moving
a destination memory point to a marked point
category. See “Moving Memory Points” listed previously
in this section for more information.
Previous Destination Memory
Each time you select the START button from the map
screen, that destination will be stored as a memory point
under PREVIOUS DESTINATION. This category will
store up to 10 destination points.
The previous destination memory category will not let
you know when you have stored more than
10 destinations. The system will remove the oldest
destination stored and add the most recent one selected
to the list.
If you do not want a destination that is stored to be lost,
you must move the destination into PERSONAL,
BUSINESS, ENTERTAINMENT or MARKED POINT.
See “Moving Memory Points” listed previously in
this section.
Home Memory
This is a memory point which is stored by selecting the
HOME button from the edit memory point screen.
See “Home” and “Registering Memory Points” listed
previously for more information on how to save a
destination to this category.
You can register one specific destination using the
home feature. This feature should be used to store a
destination that you frequently travel to.
2-30
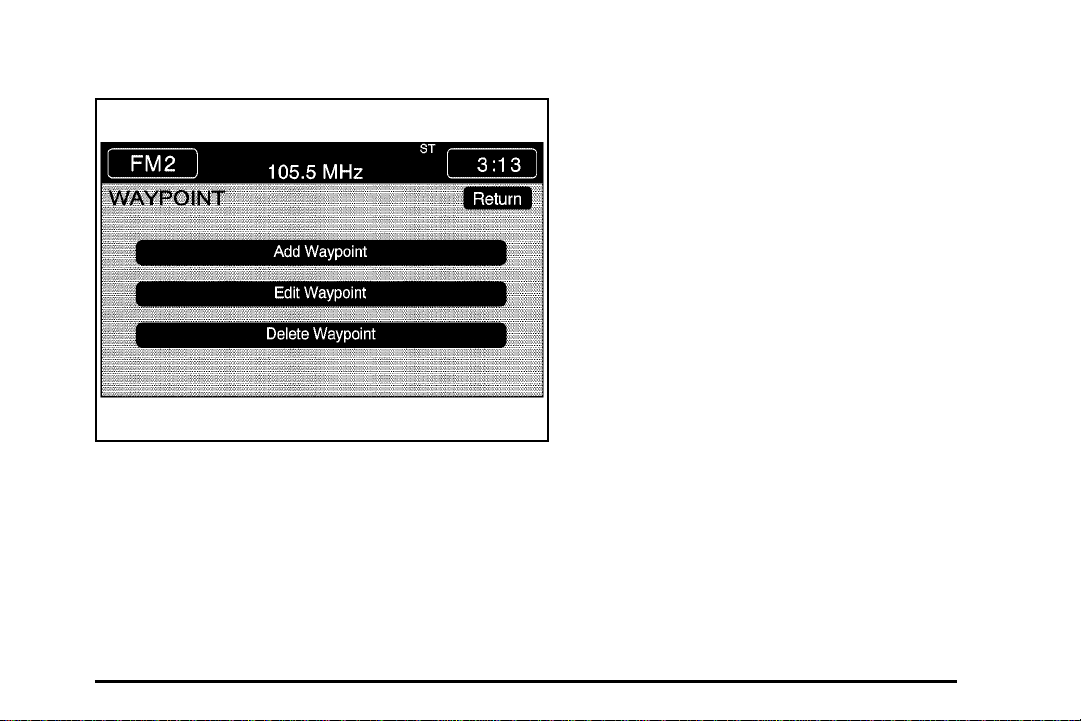
Edit Waypoint
This feature allows you to add, edit and delete
waypoints, which are destinations you can set along the
waytoafinal destination.
The system will allow you to set up to five waypoints,
excluding your final destination.
To access the WAYPOINT menu, do the following:
1. Press the ROUTE hard key.
2. Touch EDIT WAYPOINT.
Adding a Waypoint
To add a waypoint to your route, do the following:
1. Touch the ADD WAYPOINT button.
2. Enter a destination by selecting your desired
method of entering a destination. See “Enter
Destination” listed previously in this section.
3. A map screen will appear showing the location of
the waypoint. Touch ENTER to add your waypoint.
4. Touch the ADD button to insert the waypoint in the
desired order.
5. The system will display the ROUTE INFORMATION
screen. At this screen, several options are available.
2-31

LIST: Touch this button if you wish to view the waypoint
on the map screen or to change the order of the
waypoints and final destination. To change the order,
touch the CHG ORDER button and then touch the blank
button next to the destination to select the order of
the waypoints and final destination. Press the MAP
button to view the destination and the waypoints on the
map screen.
2-32
DELETE: Touch this button if you wish to delete any of
the waypoints or the final destination. A confirmation
window will appear. Touch YES to delete the point
or touch NO to return to the previous screen.
DELETE ALL: Touch this button if you wish to delete
all of the waypoints and the final destination. A
confirmation window will appear. Touch YES to delete
all waypoints or touch NO to return to the previous
screen.
CHANGE: Touch this button if you wish to change the
final destination. Enter a destination by selecting the
desired method for entering a destination. See “Enter
Destination” listed previously in this section.
ADD: Touch this button if you wish to add additional
waypoints. Refer to steps listed previously in this
section.
CALCULATE: Touch this button to begin route
calculation. This button will only be available if the final
destination has been set.
Edit Waypoint
This button allows you to edit waypoints that have
already been set. After touching the EDIT WAYPOINT
button, touch MAP to view the destination location
on the map screen. Touch CHANGE ORDER to change
the order of the waypoints and the final destination.
You can also use the map scroll to change a waypoint
from one location to another.

Delete Waypoint
This button allows you to delete waypoints that have
already been set. To delete waypoints, do the following:
1. Touch the DELETE WAYPOINT button.
2. Select the waypoint you wish to delete.
3. A confirmation window will appear. Touch YES to
delete the waypoint or NO to return to the previous
menu.
Edit Avoid Point/Area
This menu will let you register, edit and delete an area
to be avoided while planning a route. The system
can also save these areas in memory so the system
can automatically avoid areas when planning a route.
To access the AVOID POINT/AREA menu, do the
following:
1. Press the ROUTE hard key.
2. Touch EDIT AVOID POINT AVOID/AREA.
Register Avoid Point/Area
To store an avoid point/area, do the following:
1. Touch the REGISTER AVOID POINT/AREA button.
2. Enter a location by selecting the desired method
of entering a destination. See “Enter Destination”
listed previously in this section.
3. If desired, reduce or enlarge the area around the
point you want to avoid by using the REDUCE or
ENLARGE buttons.
If an avoid point cannot be avoided, the system will
display “Avoid Point and Area Stored. Route
May Not Avoid the Avoid Point and Areas.”
2-33

4. Touch ENTER to set the area as an avoid point
area. When using the REDUCE or ENLARGE
buttons, a square will appear to represent the area
or an X will appear to represent the area avoided.
When an avoid point is set, the square will
appear as green.
Touch the RETURN button to go back to the plan route
main menu.
Edit Avoid Point/Area
This feature allows you to edit the registered avoid
points that are stored in the system. To edit an avoid
point area, do the following:
1. Touch the EDIT AVOID POINT/AREA button and
the list of avoided points will appear.
2. Select the avoided point desired. A map of the
avoided area will appear.
3. You can now use REDUCE or ENLARGE to edit
the avoided point.
4. Touch ENTER to set your new avoided area. The
system will display “Area Adjusted.”
Touch the RETURN button to take you back to the
previous screen when you have finished.
Delete Avoid Point/Area
This feature allows you to delete the registered avoid
points that are stored in the system. To delete an avoid
point:
1. Touch the DELETE AVOID POINT/AREA button
and the list of avoided points will appear.
2. Select an avoid point to be deleted.
3. After you have selected the point, the system will
ask “Delete avoid and area? Yes or No.”
4. Touch Yes and the area will no longer be avoided
when traveling on a planned route.
Touch the RETURN button to take you back to the
previous screen when you have finished.
2-34

Route Preference
Use this feature to change your planning options.
1. Press the ROUTE hard key to enter the PLAN
ROUTE menu.
2. Touch the ROUTE PREFERENCE button.
The following options will be available in this menu. The
following section will explain how to use each feature.
Detour
This feature allows you to choose a distance in miles or
kilometers to detour. Select the detour distance
desired for residential roads and freeways.
The next time you use DETOUR, the system will use
these settings unless you change them.
2-35

Touch the ALTERNATE button and the system will
provide a new route that doesn’t use the detour settings
you have stored previously.
Touch the RETURN button to take you back to the
previous screen when you have finished.
Route Setting
only major roads, using toll roads and using ferries
based on the systems’ information and information
contained on the map DVD.
To access the ROUTE SETTING menu, do the
following:
1. Press the ROUTE hard key.
2. Touch ROUTE SETTING.
Minimize Time/Dist: The system will calculate the
fastest route or shortest route possible. The system
determines the fastest route based on the amount
of turns necessary and the type of navigable roads
available or the shortest route available based on
mileage.
Use Major Roads: The system will calculate the best
route by using only major roads unless a route
cannot be found without the use of a secondary road.
This selection will not always offer the shortest distance
or time to your destination.
Use Toll Roads: The system will calculate the best
route using toll roads wherever possible. This selection
will not always offer the shortest distance or time to
your destination.
ROUTE SETTING allows you to display and change the
planning methods used each time you plan a route.
With the planning method options, you are able to select
the fastest route based on time or distance, using
2-36
Use Ferries: The system will calculate the best route
using ferries when possible. This selection will not
always offer the shortest distance or time to your
destination.

Display Whole Route
Touch this button to display your entire planned route.
The total mileage and time to destination for the planned
route will be displayed on the map screen. Press the
RETURN button to take you back to the Route
Preference menu.
Calculate Route
Touch this button to begin the route calculation for the
selected destination.
Cancel Route
If you are traveling on a planned route and would like to
cancel it, touch the CANCEL ROUTE button. The
system will ask you to confirm by touching the YES
button. Touch the YES button to cancel your planned
route or touch the RETURN button to not cancel
your planned route.
Maps
This section includes basic information that you need to
know about the map database.
Regional Maps
The maps are stored on a DVD (Digital Video Disc).
The United States (excluding Alaska and Hawaii)
and portions of Canada are contained in one disc.
If a regional map does not contain a specificnameofa
city, the map DVD may not contain the city or it may
be misspelled.
Refer to the Navigation System Map Disc manual to
view a detailed explanation of map coverage and
detailed city lists in each region. This manual will be in
your map DVD case when the vehicle is delivered
from the factory.
2-37

Installing the Map DVD
When your vehicle is delivered from the factory, the
dealer may have installed the map DVD. If the map DVD
was not installed in your vehicle when first purchased,
use the following directions to load the map DVD:
Read the following steps completely before operating
this feature.
1. Turn the ignition to ON or ACCESSORY.
2. With the vehicle in PARK (P), press and hold the
TILT hard key until a beep is heard. The faceplate
of the system will open.
3. If already loaded, the map DVD or a CD will eject
from the slot which is only visible when the
faceplate is open.
4. Load the map DVD into the slot by inserting it
partially until the system pulls it in.
5. Press and release the TILT hard key to close the
faceplate.
Notice: Shifting out of PARK (P) with the system’s
faceplate open will cause the faceplate to close
automatically. This could cause damage to a
CD, DVD or the system if it is partially loaded. Before
shifting out of PARK (P), make sure that the DVD
or CD is loaded properly. The vehicle must be
shifted back into PARK (P) to close the faceplate.
Once the map DVD is inserted correctly or when
you press the map hard key, you will have the following
two choices:
• LANGUAGE (Language Symbol)
• I AGREE
You can change the language to one of the five that are
available by touching the language symbol or you can
touch “I AGREE.” See Setup Menu on page 1-3 for more
information. Once a language is selected, touch I
AGREE to plan a route. The map will appear with your
current vehicle position on the map.
Setting the Search Area
Use the following directions to determine and change
the system’s search area.
1. Press the ROUTE hard key to view the PLAN
ROUTE screen.
2. Touch the ENTER DESTINATION button.
2-38

3. Touch the CHANGE
button under the
Search Area heading.
The system will
display a map with
each region
represented.
4. Select the desired region by touching the
appropriate button (US1, US2, CAN, etc.). The
name of the states or the country included on the
selected region are displayed at the bottom of
the screen and the area displayed on the map
image is highlighted.
5. Touch ENTER to set the region chosen as the
system’s search area.
6. Touch RETURN to go back to the destination
screen.
2-39

Map Adjustments
Scrolling the Map
The system allows you to adjust the scale of view on
the map. Also, as you drive, the map will scroll
automatically based on the direction you are traveling.
Map Scales
To view a larger or smaller
scale of the map, touch
the map scale arrows.
You can change the level of map detail by either
zooming in or zooming out using the arrow buttons or
by touching the scale on the bar. The system will adjust
the map accordingly. The scale of a map can range
from 1/32 of a mile (0.05 km) to 128 miles (256 km).
2-40
Touch anywhere on the
map screen twice and the
scroll symbol will appear.
Use this feature to
scroll through the map.
You can hold your finger in any direction outside of the
scroll symbol and the map will continue to scroll in
that direction until you remove your finger from the map
screen.
If scrolling while your vehicle is in PARK (P), the system
will scroll initially at a slower rate. It will increase if
you continue touching the map screen.
If scrolling while your vehicle is in motion, you have one
scroll speed and a limited distance to scroll. You
have to keep touching the map screen to scroll for a
longer distance.
If you have used the scroll feature to scroll the map and
your vehicle icon becomes lost, press the MAP hard
key to return to the current vehicle location on the map.
You can use the scroll feature on the map to set a
destination. See Easy Planning Route on page 2-4.

Hard Keys, Touch-Sensitive Buttons
and Symbols Used
This system operates by the hard keys on the outside of
the Navigation System and the touch-sensitive buttons
on the screen.
Hard Keys
The following hard keys are located on the outside of
the navigation screen:
PWR (Power): Press this knob lightly to turn the
system on or off.
VOL (Volume): To increase volume, turn the knob
clockwise. Turn it counterclockwise to decrease
the volume.
When the audio system is on, you will hear the audio
system even if you are using a menu screen. The
volume will be decreased and faded to the rear speakers
whenever a voice prompt message from the Navigation
system is active. The volume will be muted while
using OnStar or while on a call with the factory-installed
cellular phone.
«TUNE SEEK ª: Use this switch to seek to the next
or previous station when listening to the radio.
While using the CD player, optional CD changer or the
DVD player, this switch can be used to advance or
reverse tracks and chapters. See Audio System on
page 3-2, Six-Disc CD Changer on page 3-22 and
CD/DVD Player on page 3-26 for more information.
BAND: This hard key changes the selected audio
source (AM, FM 1/2, XM 1/2 if equipped, WX). If you
are in a map mode and press this hard key, the
audio source preset menu will not change but the audio
source will. See Audio System on page 3-2 for more
information.
CD: This hard key is used to display the CD changer or
the CD player menus. This button is not available if a
CD is not loaded in the CD changer or in the CD player.
See Audio System on page 3-2 for more information.
DVD: This hard key is used to display the DVD player
menu when a DVD is installed. See Audio System
on page 3-2 for more information.
e (Audio Adjust): This hard key is used to display
the audio system’s main menu. See Audio System
on page 3-2 for more information.
REPEAT: This hard key will repeat the last voice
prompt heard while on a planned route. See Map and
Repeat on page 2-2 for more information.
MAP: Pressing this hard key will take you to the map
screen.
ROUTE: This hard key is used to display the plan route
menu. See Plan Routeon page 2-3 formore information.
2-41

SETUP: This hard key is used to display the Navigation
System’s setup menu. See Setup Menu on page 1-3
for more information.
Y: This hard key is used to open the Navigation
TILT
System’s faceplate for loading or removing the map
DVD, a video DVD, or an audio CD. This hard key can
only be used when the vehicle is in PARK (P). See
Maps on page 2-37 and/or Audio System on page 3-2
for more information.
Alphabet Touch Screen
The alphabet touch screen(s) will automatically be
available whenever the system needs information
from you.
To make your name selections easier, the system will
allow you to only select the characters that are currently
available. The system will automatically show the
available and unavailable characters.
If you touch a wrong character, use the left arrow to
back up.
There are two pages of available symbols/characters to
select from in the alphabet key pad. If the name you
are trying to enter contains a number, punctuation mark,
hyphen, accent mark or other symbol then touch the
CHAR button to display the available symbols and
numbers. Touch the A–Z button to return to displaying
the alphabet keys.
2-42
The space icon is available on both alphabet key pad
pages to enter a space.
If you are unsuccessful when inputting a name, the
name may need to be selected slightly differently or the
map DVD (database) may not contain this information.
See Database Coverage Explanations on page 2-53.
Touch-Sensitive Buttons
Touch-sensitive buttons are located on the screen.
When you touch a button on the screen, a beep will be
heard. If you touch a button on the screen and it
doesn’t beep, move your finger away from the screen
and then try again. These buttons will be lighted when a
feature is available (active) and dim when they are
unavailable (not active). There are some toggle
touch-sensitive buttons that will be light blue when on
and dark blue when off.
The following buttons are the most common buttons that
will appear on the map screen.
This button will appear on
the map screen after you
have entered your
selected route.

This button will appear on
the map screen after
inputting a destination
using the Easy Planning
Route or when you
touch the map screen
without a planned route.
You can select this button to store a location as a
memory point. See Easy Planning Route on page 2-4.
This button will appear on
the map screen under the
ROUTE SETTING
heading after inputting a
destination.
After touching this CHANGE button, the system will take
you to the ROUTE SETTING screen where you can
change your planning options. See Easy Planning Route
on page 2-4.
This button will appear on
the map view screen after
route planning has
been completed.
When you touch the START button, the system will start
providing you with route guidance and return to your
guidance method. See Easy Planning Route on
page 2-4.
This button allows you to
turn off the POI (Point of
Interest) category icons.
When you touch POI Off, the system will remove the
POI category icons from the map. See “Removing Quick
POI Icons” under Setup Menu on page 1-3 for more
information.
2-43

This button allows you to
turn on the POI (Point of
Interest) category icons
and make them available
to appear on the map
screen. See Setup Menu
on page 1-3.
This button allows you to
enter a waypoint from the
map screen when using
the Easy Planning Route.
See Easy Planning
Route on page 2-4.
This button will appear on
the map view screen while
on a planned route. It
allows you to minimize or
maximize your view of
the guidance screen.
Touch this button again to return to the normal view of
the guidance screen. See Setup Menu on page 1-3.
This button will appearon
the map screen whileon a
planned route. When this
button is selected, the
DEST MAP, WHOLE and
TURN LIST buttons are
displayed on the map
screen.
2-44
These buttons can be used as follows:
Whole Route
Dest (Destination) Map
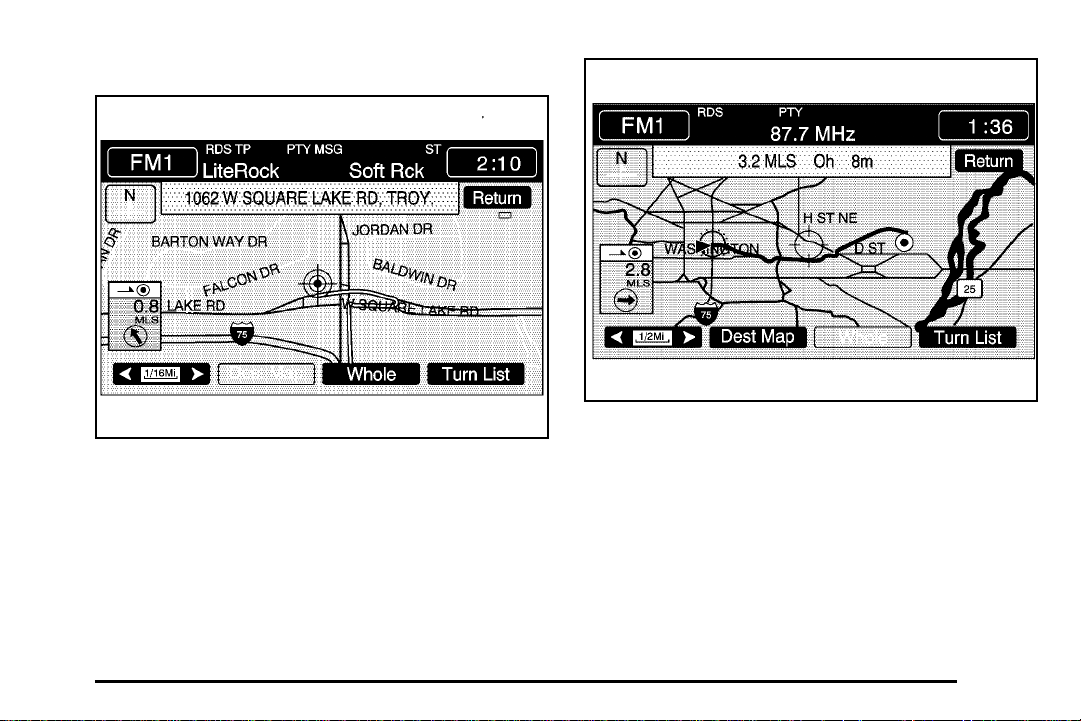
DEST (Destination) MAP: This button will allow you to
view the final destination location. The destination
name or address will be displayed on the map screen.
Touch the RETURN button when finished.
WHOLE: This button will allow you to view the entire
planned route. The distance and miles to destination will
be displayed on the map screen. Touch the RETURN
button when finished.
2-45

Turn List
TURN LIST: This button will allow you to view a
step-by-step listing of upcoming street names, the
distance that you will travel on the road and turns you
will need to make during your planned route.
After touching the TURN LIST button, the system may
take some time to create the turn list. The length of time
will vary on the length of your route and the planning
methods that you have selected.
The list reads from bottom to top. The bottom street
name is the street you are currently on. The system
automatically updates this screen as you make each
turn. You are also able to touch the scroll up and down
arrow buttons providing scroll is available. Touching
the down arrow button brings you to your current
location. Touching the up arrow button will give you
upcoming streets. At times, there may not be names
available for entrance or exit ramps.
To avoid a turn, touch the AVOID button for the turn
you wish to avoid. You can now use REDUCE or
ENLARGE to edit the avoided point. Touch Reroute or
press the map hard key to start calculating your
new route.
To view your current position and to turn the list screen
off, touch the RETURN button.
To plan a new route touch REROUTE or press the MAP
hard key to start calculating your new route.
2-46

Symbols
The following symbols are the most common symbols
that will appear on a map screen.
Your vehicle is shown as
this symbol. It indicates the
current position and
heading direction of your
vehicle on the map screen.
This symbol will appear on
the map screen after a
route has been planned
showing your final
destination location.
When a waypoint has
been planned, you will see
this type of symbol on
the map screen.
The waypoint symbol will be numbered from one
through five depending on how many waypoints have
been set.
This symbol indicates the
distance to your final
destination.
2-47

This symbol indicates the
distance and the estimated
time remaining to your
final destination when the
Estimated Travel Time
function is selected to
be on.
This symbol indicates the
vehicle icon is in “north up”
direction.
Regardless of the direction of vehicle travel, the vehicle
icon will always follow the north compass direction.
This symbol indicates the
vehicle icon is in “heading
up” direction.
Select this view to see your vehicle icon always traveling
in an up direction on the map screen regardless of
compass direction.
By touching either the North Up heading or the Vehicle
Up heading will alternate between settings.
This symbol is displayed
whenever the Navigation
System is unable to
utilize the GPS signal.
See Global Positioning System (GPS) on page 2-51 for
more information.
2-48

When a point of interest or
street address name is too
long to be displayed, an
arrow symbol will appear.
Touch the right or left arrow button to scroll through the
entire name.
This symbol indicates the
position of the next turn
instruction.
Auto Reroute
When your destination is set and you are off the
planned route, the system will automatically begin to
reroute. You will be able to see the new route
highlighted on the screen.
2-49

Traveling Across Regions
If you plan to drive across many states, you may have
to change the region selected to represent the area
you are traveling to.
There are two ways you can plan a destination when
traveling across regions.
This first method is suggested and provides the most
route guidance and map display functions of the
two methods.
First Method
1. Change the selected region in the search area
when you get closer to the area you’re traveling
to. See “Setting the Search Area” under Maps
on page 2-37.
2. Enter your destination and route settings. See Plan
Route on page 2-3 for more information.
For example, if you were traveling from Michigan to
Florida, change the region currently selected in
the search area to Florida. Enter a destination in
Florida under the ENTER DESTINATION menu.
2-50
Second Method
Keep your currently selected region in the search area
and enter your destination. This method allows you
to only select a destination from the Easy Planning
Route method or from the All Points of Interest (POI)
categories with the “All Search Areas” comment
(US Only). For example, tourist is a category that
features this comment. See Easy Planning Route on
page 2-4 for more information.
If you are traveling in or to Canada and you cross the
regional border the only map scale views available
are 4 mi, 8 mi, 31 mi, and 128 mi (8 km, 16 km, 64 km
and 256 km). Change the selected region in the
search area when you get closer to the area you’re
traveling to. See “Setting the Search Area” under Maps
on page 2-37 for more information.
Using the Remote Keyless Entry (RKE)
Transmitter
When you insert your key into the ignition, you will see
Driver 1 or Driver 2 displayed on the screen. If the
driver is unknown, a message will not appear on the
screen. The number on the back of the RKE transmitter
corresponds to driver 1 or driver 2. The Navigation
System can store memory points for driver 1 and
2 individually. See Easy Planning Route on page 2-4 for
more information.

Cellular Phone
When using the factory-installed cellular phone, the
navigation voice prompts and audio will be turned off
during a call. For information on the cellular phone, refer
to your cellular phone owner’s manual or contact your
dealer.
OnStar
When using the OnStar®system, the audio system will
be muted and the navigation voice prompts will be
disabled during the call. The volume of the OnStar
can be adjusted by using the steering wheel volume
controls. See “OnStar
owner’s manual index for more information.
®
®
call
®
System” in your vehicle’s
Global Positioning System (GPS)
The Navigation System determines the position of your
vehicle by using satellite signals, various vehicle
signals and map data.
At times, other interferences such as the satellite
condition, road configuration, the condition of the vehicle
and/or other circumstances can interfere with the
Navigation’s ability to determine the accurate position of
the vehicle.
The GPS shows the accurate current position of your
vehicle using signals sent by the GPS Satellites of
the United States Department of Defense. When your
vehicle is not receiving signals from the satellites,
a symbol will appear on the map screen. Refer to
Symbols on page 2-47.
This system may not be available/or interference may
occur if the following happens:
• Signal obstructions caused by tall buildings, large
trucks, tunnels,
• objects located on the rear shelf,
• satellites will not send signals if they are being
repaired or improved,
• after-market glass tinting has been applied to the
vehicle’s rear window.
Notice: Do not apply after-market glass tinting to
the vehicle’s rear window. Glass tinting will interfere
with the system’s ability to receive GPS signals
and cause the system to malfunction. You might
have to replace the rear window to correct the
problem. This would not be covered by your
warranty.
For more information if you are experiencing a problem,
see If the System Needs Service on page 2-53 and
Problems with Route Guidance on page 2-52.
2-51

Vehicle Positioning
At times, the position of the vehicle on the map may be
inaccurate due to one or more of the following
reasons:
• The road system has changed.
• The vehicle is driving on slippery road surfaces
such as in sand, gravel and/or snow.
• The vehicle is traveling on winding roads.
• The vehicle is on a long straight road.
• The vehicle is approaching a tall building or a large
vehicle.
• The surface streets run parallel to a freeway.
• The vehicle has just been transferred by a vehicle
carrier or a ferry.
• The current position calibration is set incorrectly.
• The vehicle is traveling at high speed.
• The vehicle changes directions more than once, or
when the vehicle is turning on a turn table in a
parking lot.
• The vehicle is entering and/or exiting a parking lot,
garage or a lot with a roof.
• The GPS signal is not received.
• A roof carrier is installed on your vehicle.
2-52
• The vehicle is equipped with tire chains.
• The tires are replaced.
• The tire pressure for your tires are incorrect.
• The tires are worn.
• The first time the map DVD is inserted.
• The battery is disconnected for several days.
• The vehicle is driving in heavy traffic where driving
is at low speeds, and the vehicle is stopped and
started repeatedly.
To relocate the vehicle position on the map, see Setup
Menu on page 1-3.
If you experience problems with your system, you may
need to calibrate the system. This may be due to
tire pressure differences, or if a spare tire is installed.
To calibrate the system, see Setup Menu on page 1-3.
Problems with Route Guidance
Inappropriate route guidance may occur under one or
more of the following conditions:
• You have not turned onto the road indicated.
• Route guidance may not be available when using
automatic rerouting for the next right or left turn.
• The route may not be changed when using
automatic rerouting.

• There is no route guidance when turning at an
intersection.
• Plural names of places may be announced
occasionally.
• It may take a long time to operate automatic
rerouting during high-speed driving.
• Automatic rerouting may display a route returning to
the set waypoint if you are heading for a destination
without passing through a set waypoint.
• The route prohibits the entry of a vehicle due to a
regulation by time or season or any other regulation
which may be given.
• Some routes may not be searched.
• The route to the destination may not be shown if
there are new roads, if roads have recently
changed or if certain roads are not listed on the
map DVD. See Ordering Map DVDs on page 2-53.
To relocate the vehicle position on the map, see Setup
Menu on page 1-3.
If the System Needs Service
If your system needs service and you have followed the
steps listed here and still are experiencing problems,
see your dealer for assistance. For more information on
calibrating the system, see Setup Menu on page 1-3.
Ordering Map DVDs
The map DVDs in your vehicle are the most up-to-date
information available when your vehicle was purchased.
The map DVD is updated once a year, provided that
the map information has changed. To order a new map
DVD, contact your dealer’s service department. You
can also log on to www.cadillac.com and search
for Navigation to view new, updated database
information is available.
Database Coverage Explanations
The United States, excluding Alaska and Hawaii, and
portions of Canada are contained on one DVD disc. The
map database contains three different levels of
coverage: detailed areas, non-detailed areas and limited
guidance areas. Detailed areas are available for the
United States and Canada and are primarily located
around metropolitan areas. Limited guidance areas are
only available for the United States. The roads are
displayed on the map, but route and voice guidance is
not available. Non-detailed areas are available for
Canada only. Major roads are included depending upon
available coverage.
For more detailed information on database coverage,
see the Navigation System Map Disc manual included
inside the map DVD case. You may also log on to
www.cadillac.com.
2-53

✍ NOTES
2-54

Section 3 Navigation Audio System
Navigation Audio System ..................................3-2
Audio System ................................................3-2
Six-Disc CD Changer ....................................3-22
CD/DVD Player ............................................3-26
Radio Personalization with Home and Away
Feature ....................................................3-31
3-1

Navigation Audio System
Audio System
The audio system has been designed to operate easily
and give years of listening pleasure. You will get the
most enjoyment out of it if you acquaint yourself with it
first. Find out what your audio system can do and
how to operate all its features, to be sure you’re getting
the most out of the advanced engineering that went
into it.
The ignition must be in a position other than OFF or
retained accessory power must be active for your audio
system to work. See “Retained Accessory
Power (RAP)” in your vehicle owner’s manual index.
The audio system is controlled by using the menus in
the Navigation system screen. These audio menus
are explained in this section.
3-2

Playing the Radio
e
(Audio): Press this hard key to view the main audio
screen.
PWR (Power): Press this knob lightly to turn the
system on or off.
VOL (Volume): Turn this knob clockwise or
counterclockwise to increase or decrease the volume.
«TUNE SEEK ª: Press and release the up or down
arrow on this switch repeatedly to manually tune to a
radio station. To seek to the next higher or lower station,
press and hold the up or down arrow on the switch
for a few seconds. To fast tune, press and hold the up
or down arrow on the switch.
While using the CD player, optional CD changer or the
DVD player, this switch can be used to advance or
reverse tracks and chapters. See Six-Disc CD Changer
on page 3-22 and CD/DVD Player on page 3-26 for
more information.
BAND: This hard key changes the selected audio
source (AM, FM 1/2, XM 1/2 if equipped, WX). If you
are in a map mode and press this hard key, the
audio source preset menu will not change but the audio
source will.
Preset Selection: Here you can program the audio
system’s presets to recall your home settings by
touching the HOME button. You can also recall the
presets you use when traveling to another area
by touching the AWAY button. For more information on
how to store preset stations, see “Preset Station
Menu” later in this section.
The Home and Away feature is not available for the
XM™ Satellite Radio Service bands (if equipped).
3-3

Display Presets on the Map: When this feature is on,
your audio system’s presets for the current audio
source will be displayed on the left of the map screen.
Touch the ON button to turn this feature on. Touch
the OFF button to turn this feature off.
Automatic Volume Control (AVC): If your vehicle has
the Bose system, you will have this feature. With
AVC, your audio system monitors the noise in the
vehicle. Then, AVC automatically adjusts the volume
level so that it always sounds the same to you. To use
AVC, touch the ON button. To turn it off, touch the
OFF button.
Clock
Touch the button with the clock symbol or touch and
hold the time display button in the upper right corner
from any menu to see the menu for setting the clock.
Touching the time display button will also display
the date.
3-4

HOUR: Touch the up arrow to increase the hour or the
down arrow to decrease the hour. If you touch and
hold one of the arrows, the numbers will advance
quickly.
MIN.: Touch the up arrow to increase the minutes or
the down arrow to decrease the minutes. If you
touch and hold one of the arrows, the numbers will
advance quickly.
12H: Touch 12H to set the clock in a.m. and p.m. time.
24H: Touch 24H to set the clock in military time.
GPS TIME: The current GPS (Global Positioning
System) time will be displayed to the right of this button.
Touch GPS TIME to set the Navigation System’s time
to match the current GPS time. If the seconds for
the present minute are greater than thirty when GPS
TIME is selected the clock will automatically round up to
the next minute.
DAYLIGHT SAVING TIME: Touch this button to
increase the time settingby one hour. Then touchGPS
TIME to save thenew setting. If the buttonis light blue,
the daylight savings timefunction is on. If thebutton is
dark blue, the daylightsavings time function is off.
TIME ZONE: The selected time zone will appear to the
right of this touch sensitive button. Touch this button
to change the time zone. The time of the selected zone
is displayed to the right of the GPS TIME button. To
set the system clock to the new settings touch
GPS TIME.
If the system is not receiving GPS information, you can
still set the time manually as described above but
the GPS time and the daylight saving time functions will
not be available.
Touch the RETURN button to go back to the previous
menu. Your time is now set.
3-5

Screen Adjust
To adjust the brightness or contrast of the screen, touch
the SCREEN ADJUST button to display the
following menu.
K (Contrast): Touch the plus (+) or minus (−)to
adjust the contrast of the screen.
You will see the screen change. Touch the SET button
to confirm the setting and take you back to the
previous screen.
3-6
!(Brightness): Touch the plus (+) or minus (−)to
adjust the brightness of the screen.
You will see the screen change. Touch the SET button
to confirm the setting and take you back to the
previous screen.
AUTO: This setting automatically adjusts the contrast
and brightness of the screen. It does this by using
the sensors in conjunction with your vehicle’s lighting
system. See “Exterior Lamps” in your owner’s manual
index for more information.
DAY: This setting leaves the screen in day mode. Day
mode is the mode best suited for daylight conditions.
The displays on the screen are usually brighter
with a lighter background so that you can see them
better during the brighter daylight hours.
NIGHT: This setting leaves the screen in night mode.
Night mode is the mode best suited for nighttime
conditions. The displays on the screen are usually
dimmer with a darker background so that you can see
them better during the darker nighttime hours.
SCREEN OFF: Press the SCREEN OFF button to turn
off the screen. Press any hard key to turn the screen
back on. The appropriate menu screen for that hard key
will appear.
SET: Press SET to save your choices and exit the
clock menu.

Language
Your vehicle has been set for the English language. If
you wish to change the language to French, Italian,
Spanish or Dutch, do the following:
1. Touch the button with the globe symbol on it.
2. Select the language you prefer. Scroll up or down if
needed.
3. Touch the RETURN button to take you back to the
previous screen.
If the language is changed from English to a different
language, the majority of the voice guidance prompts
and the screen text will change to the selected
language. Remember that the menu screens will not
match word-for-word as they appear in this supplement.
If you accidentally select a language and do not
understand the menus, turn your engine off and open
and close your door. Your Navigation System will
turn off. Start the vehicle again and then touch the
language symbol button to select the correct language
from the start-up screen.
Sound
SOUND: Press this button to access the Sound menu.
See “Sound Menu (Tone, DSP, Fade and Balance)”
later in this section for more information.
DSP
DSP (Digital Signal Processing): Press this button to
access the DSP menu. See “Adjusting the Speakers”
later in this section for more information.
3-7

Finding a Station
Non-XM™ Satellite Radio Service screen shown,
other sources similar
Press the BAND hard key to switch to the desired audio
source (AM, FM 1/2, XM 1/2 if equipped and WX).
Touch the AM, FM, XM (if equipped) or WX button to
switch to the desired source menu.
The source menu screen allows you to do the following:
• change sources (AM, FM 1/2, XM 1/2 if equipped
and WX),
• set your preset stations,
• scan,
• turn AutoSET on and off,
• turn Radio Data Systems (RDS) on and off while in
the FM mode,
• set the sound levels (mid-range, treble, bass,
balance and fade) and
• set the Digital Signal Processing (DSP) settings (if
equipped).
AM, FM 1/2, XM 1/2 (if equipped) and WX (Weather
Band): Touch one of these buttons to choose which
source you prefer. When you touch the desired source,
the selected source will turn on and the source menu
screen will appear.
«TUNE SEEK ª: Use this switch to seek to the next
or previous station when listening to the radio.
While using the CD player, optional CD changer or the
DVD player, this switch can be used to advance or
reverse tracks and chapters. See Six-Disc CD Changer
on page 3-22 and CD/DVD Player on page 3-26 for
more information.
3-8

Preset Station Menu
There are six buttons to allow you to store your favorite
stations. You can store up to 36 stations with XM™
Satellite Radio Service (if equipped) or 24 stations
without it (6 AM, 6 FM 1, 6 FM 2, 6 XM 1, 6 XM 2 and
6 WX) for home and for away. Use the following steps to
store your presets:
1. Turn the audio system on.
2. Access your preset stations by touching AM, FM,
XM (if equipped) or WX source button to display
the desired source screen.
3. Your preset station menu will appear.
4. Tune in the desired station by using the
TUNE/SEEK hard key.
5. Touch the SOUND button to set the bass,
mid-range, treble and DSP for your preset, if
desired. See “Sound Menu (Tone, DSP, Fade and
Balance)” later in this secton for more information.
6. Touch and hold one of the six numbered preset
buttons for more than two seconds or until you
hear a beep.
7. Repeat the steps for each preset and source.
When battery power is removed and later applied, you
will not have to reset your radio preset stations
because the audio system remembers them.
SCAN: Touch this button to scan through the stations
on the audio system. The audio system will go to a
station, stop for five seconds, then go to the next station.
Touch the SCAN button again to stop scanning. If a
station has weak reception, the audio system will
not stop at the station.
If you touch and hold SCAN for two seconds, you can
scan through your preset stations. It will only scan
AM (alone), both FM 1/2, XM 1 (alone), XM 2 (alone)
and WX (alone). When the audio system stops on
a preset radio station, the preset will be light blue on the
screen. You can also touch a preset or the SCAN
button again to stop scanning.
RDS (Radio Data Systems): See “Radio Data System
(RDS)” later in this section for more information on
this button.
MSG (Message): See “Radio Data System (RDS)” later
in this section for more information on this button.
AutoSet: This button will replace your currently stored
preset stations with the strongest stations available
in the immediate area when selected. Touch this button
again and the system will return to the original preset
radio stations.
SOUND: See “Sound Menu (Tone, DSP, Fade and
Balance)” following for more information on this button.
DSP: See “Adjusting the Speakers” later in this
section for more information on this button.
3-9

Sound Menu (Tone, DSP, Fade and
Balance)
Use the SOUND button to change the TONE, DSP (if
equipped), FADE and BALANCE for all of the sources.
To access a screen where the SOUND button is
available:
1. Press the Audio hard key to access the ADJUST
screen. See “Playing the Radio” listed previously
for more information.
2. Touch the SOUND button.
3. Touch the plus (+) or minus (−) buttons to adjust
your treble, bass, mid-range, balance and fade to
the desired level.
4. Touch the DSP button to adjust your DSP (if
equipped). See “Adjusting the Speakers” later in this
section.
After adjustments are made, touch the AM, FM 1/2,
XM 1/2 (if equipped) or WX source button. This will take
you back to the preset station menu. Whenever you
touch that button, the previously stored information you
have entered for each preset station will be recalled.
3-10

Adjusting the Tone
You can adjust the tone using the SOUND menu. The
audio system has a separate setting for these features
for each source preset. The audio system keeps
one fade and balance setting for all audio sources (AM,
FM 1/2, XM 1/2 if equipped, WX, CD and DVD). The
following features can be adjusted for each preset and
source:
TREB (Treble): Touch the TREB plus (+) or minus (−)
buttons to select the desired level.
MID (Mid-Range): Touch the MID plus (+) or minus (−)
buttons to select the desired level.
BASS: Touch the BASS plus (+) or minus (−) buttons
to select the desired level.
FADE: Touch the F button for more speaker sound in
the front of the vehicle and the R button for more
speaker sound in the rear of the vehicle. The middle
position balances the sound between the front and rear
speakers.
BALANCE: Touch the L button for more speaker sound
on the left of the vehicle and the R button for more
speaker sound on the right of the vehicle. The middle
position balances the sound between the left and
right speakers.
To adjust the tone for each preset, use the following
steps:
1. Press the BAND hard key until the desired source
appears on the display. See “Preset Station Menu”
listed previously for more information.
2. Touch the AM, FM 1/2, XM 1/2 or WX source
button to access the preferred preset screen.
3. Touch the SOUND button.
4. Touch the TREB, MID, BASS and DSP buttons to
select your preferred settings.
5. Once you’ve completed the adjustments, touch the
RETURN button to exit to the preset station menu.
6. Touch and hold one of the six preset buttons for
more than two seconds or until you hear a beep.
Whenever you touch that preset button for less than
two seconds, the station and the previously
stored information you have entered for each preset
station will be set recalled.
7. Repeat the procedure for additional presets if
necessary.
DSP (Digital Signal Processing): See “Adjusting the
Speakers” following for more information on this button.
Return: Touch this button to exit the SOUND menu
and set your choices.
3-11

Adjusting the Speakers
DSP (Digital Signal Processing): If you have the
Bose system, you will have this feature. The DSP
feature is used to provide a choice of four different
listening experiences. DSP can be used while listening
to the audio system or the CD player. The audio
system can store separate DSP settings for each source
(except weather band, which is always set to TALK)
and preset stations.
3-12
To save the DSP settings for your preset stations, you
can use the SOUND button or touch the DSP button
from the preset station menu to access the DSP menu.
See “Sound Menu (Tone, DSP, Fade and Balance)”
listed previously in this section for more information.
Touch the DSP button to change the following options:
ON/OFF: Touch this toggle button to turn DSP on or off.
FRONT SEAT: This button adjusts the audio to give
the front seat occupants the best possible sound
qualities. FRONT SEAT can be used at any time for any
material. Rear seat passengers in the vehicle may not
get the same effect.
TALK: This button is used when listening to
non-musical material such as news, talk shows and
sports broadcasts. TALK makes spoken words sound
very clear.
SPACIOUS: This button is used to make the listening
space seem larger.
AMBIENCE: This button is used to enhance the stereo
effect.
LEVEL: Select a DSP setting. Then touch the minus (−)
or plus (+) buttonsto change the level ofthe DSP effect.
SOUND: Touch this button to access the Sound menu.
See “Sound Menu (Tone, DSP, Fade and Balance)”
listed previously in this section for more information.

Radio Data Systems (RDS)
Your audio system is equipped with Radio Data Systems
(RDS). RDS mode gives you many useful new
features. When RDS is on, the audio system can:
• Seek to stations with traffic announcements,
• receive announcements concerning local and
national emergencies,
• receive and display messages from radio stations
and
• search for a stronger station when a station is too
weak for listening.
RDS features are only available for use on FM stations
which broadcast RDS information.
RDS: Touch this button to use the alternate RDS
functions located in the preset menu for FM 1/2 only.
When you touch RDS, you will only have approximately
five seconds to choose RDS ON/OFF, TA, MSG,
PTY or SEL PTY. If you do not make a selection, the
system will return to the previous menu.
If you are tuned to a station broadcasting RDS
information, the station’s Program Service (PS) and
Program Type (PTY) will replace the station’s frequency
on the status line at the top of the display. After
approximately five seconds, if available, the program
type will be replaced on the display by the station’s
program type name. The program type and program
type name may be the same or different.
3-13

If the audio system is tuned to a station that is not
broadcasting RDS information, the station’s frequency
will remain on the display. While RDS is on, the
audio system will search for a stronger station in the
network, when a station gets too weak for listening.
The RDS feature relies upon receiving specific
information from the RDS stations. These features will
only work when RDS information is available.
TA: Touch this button to receive traffic announcements.
The audio system will turn on the TA display. TA will
appear on the display if the tuned station broadcasts
traffic announcements. You may also receive traffic
announcements from stations in the network related to
the tuned station. If the current tuned station does
not broadcast traffic announcements, the audio system
will seek to a station which will. When the audio
system finds a station which broadcasts traffic
announcements, it will stop. If no station is found, the
TA icon will turn off.
While a traffic announcement plays, the audio system
uses a special type of volume called TA volume.
To increase TA volume, touch the VOL button on your
steering wheel or use the VOL up or down buttons
during the announcement. See “Voice Guidance Volume
Settings” under Setup Menu on page 1-3 for more
information.
When a traffic announcement comes on the current
radio station or a related network station, you will hear
it, even if the volume is muted or a compact disc is
playing. If the audio system tunes to a related network
station for a traffic announcement, it will return to
the original station when the announcement is finished.
If the compact disc player was being used, the
compact disc will stay in the player and resume play at
the point where it stopped.
Touch the RDS button, followed by the TA button again
to turn TA off.
MSG (Message): When RDS is on, if the current
station has a message, the MSG icon will appear on the
display. Touch the message button from the preset
screen menu to view the message. If the whole
message does not appear on the display, parts of the
message will appear every three seconds until the
message is completed. Once the complete message
has been displayed, the MSG icon will disappear from
the display until another new message is received.
The message button will remain available to allow you
to display the entire message again.
3-14

PTY: PTY allows you to seek only stations with types
of programs you want to listen to. This button is used to
turn on and off Program Type (PTY) features.
With RDS on touch the RDS button, followed by the
PTY button. The PTY display will turn on and will appear
on the display. Touch the RDS button, followed by
this button again to turn the PTY display off.
Select PTY (Select Program Type): With RDS and
PTY on, touch the RDS button, then the SEL PTY
button. The PTY menu screen will appear. Use the scroll
up and down arrows to select a PTY. Touch your
PTY selection and the system will return you to the
screen with the preset stations shown. See Steps 1
through 7 under “Preset Station Menu” to store
the selected PTYs. The selected PTY is then stored on
the preset. You can now touch the PTY preset to
recall your settings.
When the PTY display is on, press TUNE/SEEK and
SCAN to find radio stations of the PTY selected. The last
PTY selected will be used for seek and scan modes.
If a station with the selected PTY is not found, NONE
FOUND will appear on the display. If both PTY and TA
are on, the audio system will search for stations with
traffic announcements and the selected PTY.
PTY (Program Type) Presets: The six preset buttons
let you return to your favorite Program Types (PTYs).
These buttons have factory PTY preset stations.
See “RDS Program Type (PTY) Selections” later in this
section. You can set up to 12 PTYs (6 FM 1 and
6 FM2). To save a PTY preset, do the following:
1. Touch the FM 1/2 source button.
2. Touch the RDS button to enter the RDS menu.
3. Touch the RDS ON/OFF button to turn RDS on.
4. Touch the PTY button.
3-15

5. Touch the SEL PTY button and select the desired
PTY from the list. See “RDS Program Type (PTY)
Selections” following for a listing of PTYs available.
6. Touch and hold one of the six buttons for more than
two seconds or until you hear a beep. Whenever
you touch that numbered button for less than
two seconds, the PTY you set will return.
7. Repeat the steps for each preset button.
Once you have stored a PTY for each of your preset
stations, you can recall a PTY preset by touching
the preset station for less than two seconds. Then use
TUNE/SEEK or SCAN to locate a station for that
PTY selection.
When battery power is removed and later re-applied,
you will not have to reset your RDS preset stations
because the audio system remembers them.
ALERT: This type of announcement warns of national
or local emergencies. You will not be able to turn
off alert announcements. Alert announcements will come
on even if RDS mode is turned off. ALERT appears
on the display when an alert announcement plays. The
audio system uses TA volume during these
announcements. To increase volume, touch the VOL
button on your steering wheel or use the VOL up
and down buttons during the announcement. See “Voice
Guidance Volume Settings” under Setup Menu on
page 1-3 for more information. When an alert
announcement comes on the tuned radio station or a
related network station, you will hear it, even if the
volume is muted or a compact disc is playing. If
the audio system tunes to a related network station for
an alert announcement, it will return to the original
station when the announcement is finished. If the
compact disc player is playing, the player will stop for
the announcement and resume when the announcement
is finished.
3-16

RDS Program Type (PTY) Selections
PTY List Description
Adlt Hit Adult Hits
Any Any
Cls Rock Classical Rock
Classicl Classical
College College
Country Country
Info Information
Jazz Jazz
Language Language
News News
Nostalga Nostalgia
Oldies Oldies
Persnlty Personality
Public Public
R & B Rhythm and Blues
Rock M Rock Music
Rel Musc Religious Music
Rel Talk Religious Talk
Soft Soft
Soft R & B Soft R & B
Soft Rck Soft Rock
RDS Program Type (PTY) Selections
(cont’d)
PTY List Description
Sports Sports
Talk Talk
Top 40 Top 40
Weather Weather
Factory PTY Presets
Your audio system comes with these factory PTY preset
stations. To change the factory settings, see
Step 1 through 5 under “PTY (Program Type) Presets”
listed previously.
Preset FM 1 FM 2
Preset 1 Adult Hits Jazz
Preset 2 Classical Oldies
Preset 3 News Religious Music
Preset 4 Public Soft Rock
Preset 5 Rock M R & B
Preset 6 Country Top 40
3-17

XM™ Satellite Radio
XM is a continental U.S. based satellite radio service
that offers up to 100 coast to coast channels including
music, news, sports, talk and children’s programming.
XM provides digital quality audio and text information,
including song title and artist name. A service fee
is required in order to receive the XM service. For more
information, contact XM at www.xmradio.com or call
1-800-852-XMXM (9696).
INFO (Information): Touch this button while in XM
mode to retrieve various pieces of information related to
the current song or channel. By touching the INFO
button, you may retrieve four different categories
of information: Artist Name/Feature, Song/Program Title,
Channel Category, and other Additional Information
that may be broadcast on that channel. Additional
Information messages may only be available at certain
times or on certain programs. If an Additional
Information is being broadcast on the tuned channel,
INFO will appear on the display.
Each of the four information types may have multiple
pages of text. To reach a category, touch the INFO
button repeatedly until the desired type is displayed. If
there are multiple pages of text for the information
selected type, the radio will automatically display all the
pages for that type at a rate of approximately one
page every three seconds before timing out and
returning to the default display. You may override this
feature by touching the INFO button to review all of the
pages at your own pace.
XL (Explicit Language Channels): XL on the radio
display, after the channel name, indicates content with
explicit language. These channels, or any others,
can be blocked at a customer’s request, by calling
1-800-852-XMXM (9696).
3-18

Setting Program Type (PTY) Preset
Stations
To select a desired PTY, do the following:
1. Touch the
2. Once the desired category is displayed, press
TUNE/SEEK to select the category and take
you to the category’s first station.
3. If you want to go to another station within that
category, press TUNE/SEEK once.
4. Touch and hold one of the desired P1–P6 presets
to store the selected station as a preset.
5. If PTY times out and is no longer one the display,
go back to step 1.
SCATorCATT to select a category.
SCAN: Use this button to scan through the channels
within a category or scan through the preset stations. To
scan through the channels in a category, do the
following:
1. Select a category by touching
2. Once the desired category is displayed, touch
SCAN and the radio will begin scanning within
your chosen category.
3. Touch SCAN again to stop at a particular section.
To scan through your preset stations, touch and hold the
SCAN button. Touch the button again to stop scanning.
SCAT or CAT T.
3-19

XM Radio Messages
Radio Display Message Condition Action Required
XM Updating Updating encryption code The encryption code in your receiver is being updated, and
No XM signal Loss of signal Your system is functioning correctly, but you are in a
Loading XM Acquiring channel audio
(after 4 second delay)
Channel Off Air Channel not in service This channel is not currently in service. Tune in to another
Channel Unavail Channel no longer
available
No Artist Info Artist Name/Feature not
available
No Title Info Song/Program Title not
available
No CAT Info Category Name not
available
no action is required. This process should take no longer
than 30 seconds.
location that is blocking the XM signal. When you move into
an open area, the signal should return.
Your radio system is acquiring and processing audio and
text data. No action is needed. This message should
disappear shortly.
channel.
This previously assigned channel is no longer assigned.
Tune to another station. If this station was one of your
presets, you may need to choose another station for that
preset button.
No artist information is available at this time on this channel.
Your system is working properly.
No song title information is available at this time on this
channel. Your system is working properly.
No category information is available at this time on this
channel. Your system is working properly.
3-20

Radio Display Message Condition Action Required
Not Found No channel available for
the chosen category
No Information No Text/Informational
message available
XM Theftlocked Theft lock active The XM receiver in your vehicle may have previously been
XM Radio ID Radio ID label
(channel 0)
Unknown Radio ID not known
(should only be if
hardware failure)
Check XM Receiver Hardware failure If this message does not clear within a short period of time,
There are no channels available for the category you
selected. Your system is working properly.
No text or informational messages are available at this time
on this channel. Your system is working properly.
in another vehicle. For security purposes, XM receivers
cannot be swapped between vehicles. If you receive this
message after having your vehicle serviced, check with the
servicing facility.
If you tune to channel 0, you will see this message
alternating with your XM Radio 8 digit radio ID label. This
label is needed to activate your service.
If you receive this message when you tune to channel 0,
you may have a receiver fault. Consult with your dealer.
your receiver may have a fault. Consult with your retail
location.
3-21

Six-Disc CD Changer
With the compact disc changer, you can play up to six
discs continuously. Normal size discs may be played
using the trays supplied in the magazine. The smaller
discs (8 cm) can be played only with specially
designed trays.
You must first load the magazine with discs before you
can play a compact disc. Each of the six trays holds
one disc.
Load the trays from bottom to top, placing a disc in the
tray label side up. If you load a disc label side down,
the disc will not play and an error will occur. Repeat this
procedure for loading up to six discs in the magazine.
Once you have loaded the discs into the magazine,
slide the CD changer door open. Push the magazine into
the changer in the direction of the arrow marked on
top of the magazine.
3-22

Close the door by sliding it all the way to the right.
When the door is closed, the changer will begin
checking for discs in the magazine. This will continue
for up to one and a half minutes, depending on the
number of discs loaded. You may hear noise, but this is
normal. The CD changer is initializing.
To eject the magazine from the player, slide the CD
changer door all the way open. Press the EJECT button,
located inside of the changer door, and the magazine
will eject. Remember to keep the door closed whenever
possible to keep dirt and dust from getting inside the
changer.
To eject CDs from the magazine, you must push the
RELEASE switch on the bottom of the magazine
to release the CDs.
Press the CD hard key to access the six-disc CD
changer screen. You can also use the system’sDVD
player for single CD play once the map DVD is removed.
See “CD/DVD Player” later in this section for more
information.
If no CD is loaded in the CD/DVD Player and you press
the CD hard key, the message “No CD loaded” will
appear on the display.
3-23

CD Changer Screen
Once you access the CD changer screen, you can
select one of the numbered buttons to go from
one compact disc to another among those loaded in the
CD changer and use the arrows to rewind or fast
forward through the disc selected.
The following features are also available from this
screen:
• REPEAT THE TRACK,
• REPEAT THE DISC,
• SCAN THE DISCS or SCAN THE TRACKS
• and RANDOM ALL or RANDOM DISC.
The numbered buttons (1 through 6) represent the order
of the discs loaded in the changer. If there are only
two CDs loaded, buttons 1 and 2 will only be available
to choose from.
r (Play): Touch this button to begin playing a CD.
RANDOM DISC: Touch this button to hear the tracks in
random, rather than sequential, order on the disc
selected. Press the TUNE/SEEK hard key to randomly
seek through the tracks on this disc. Touch RANDOM
DISC again to turn off random play mode.
SCAN TRACKS: Touch this button to hear the first
10 seconds of each track on the selected disc. Touch
this button again to stop scanning. The CD will mute
while scanning.
3-24

REPEAT TRACK: Touch this button to repeat the track
on the selected disc. Touch this button again to turn
off the REPEAT TRACK mode.
r (Rewind): Touch this button to rewind quickly
through a track selection.
j (Pause): Touch this button to pause CD play.
Touch it again to resume play or touch the play button.
RANDOM ALL: Touch this button to hear the tracks
on all of the discs in the CD changer in random, rather
than sequential, order. Press the TUNE/SEEK hard
key while RANDOM ALL is on to randomly seek within
that disc. Touch RANDOM ALL again to turn off
random mode.
SCAN DISCS: Touch this button to hear the first
10 seconds of first track on each disc. Touch this button
again to stop scanning. The CD will mute while
scanning.
REPEAT DISC: Touch this button to repeat the
selected disc. Touch REPEAT DISC again to turn off
the REPEAT DISC mode.
[ (Forward): Touch this button to fast forward quickly
through a track selection.
«TUNE SEEK ª: Press the up arrow on the
TUNE/SEEK switch to seek to the next selection on the
compact disc. If playing last track of disc, pressing
the up arrow will seek to the first track of the next disc.
Press the down arrow to seek to the previous
selection on the compact disc. If playing the first track of
disc, pressing the down arrow will seek to the last
track on the selected disc. The sound will mute while
seeking.
RDS (Radio Data Systems): See “Radio Data Systems
(RDS)” listed previously for information on this button.
SOUND: See “Sound Menu (Tone, DSP, Fade and
Balance)” for information on this button.
DSP (Digital Signal Processing): See “Adjusting the
Speakers” listed previously for information on this button.
CD Changer Errors
CD ERROR could be displayed for the following:
• The road is too rough. The disc should play when
the road is smoother.
• The disc is dirty, scratched, wet or not loaded label
side up.
• The air is very humid. If so, wait about an hour and
try again.
3-25

If any error occurs repeatedly or if an error cannot be
corrected, please contact your dealer dealer. If your
audio system displays an error number, write it down
and provide this information to your dealer when
reporting the problem.
CD/DVD Player
The player that is used for the Navigation map DVD can
also be used as a single music CD player or a video
DVD player.
CD Player
To use the player as a single music CD player, you
must first remove the Navigation map DVD. While
playing a CD in the CD/DVD Player, the Navigation
system is not available. The message “The disc installed
is not a map DVD” will appear on the display if any of
the Navigation hard keys are pressed.
To remove the Navigation map DVD and load a music
CD, use the following steps:
1. Turn the ignition to ON.
2. Press and hold the TILT hard key until you hear a
beep. This will open the faceplate of the system.
3. If one is loaded, the Navigation map DVD will eject
from the slot.
4. Gently remove the Navigation map DVD from the
slot and return it to its case.
5. Insert the music CD into the slot. The system will
pull the CD into the player.
6. Press and release the TILT hard key to close the
faceplate.
Notice: Shifting out of PARK (P) with the system’s
faceplate open will cause the faceplate to close
automatically. This could cause damage to a
CD, DVD or the system if it is partially loaded. Before
shifting out of PARK (P), make sure that the DVD
or CD is loaded properly. The vehicle must be
shifted back into PARK (P) to close the faceplate.
3-26

RANDOM DISC: Touch this button to hear the tracks in
random, rather than sequential, order on the disc.
Touch RANDOM DISC again to turn off random mode.
SCAN TRACKS: Touch this button to hear the first
10 seconds of each track on the disc. Touch this button
again to stop scanning. The CD will mute while
scanning.
REPEAT TRACK: Touch this button to repeat the
selected track.
r (Rewind): Touch this button to rewind quickly
through a track selection.
j (Pause): Touch this button to pause CD play.
Touch it again to resume play or touch the play button.
CD Player Screen
Once a music CD is loaded, the CD player menu will
appear on the display. When using the system as
a single CD player, the CD hard key will alternate
between the CD player and the six-disc CD changer if
CDs are loaded.
r (Play): Touch this button to begin playing a CD.
[ (Forward): Touch this button to fast forward
quickly through a track selection.
«TUNE SEEK ª: Touch the up arrow on the
TUNE/SEEK hard key to seek to the next selection on
the compact disc. If playing last track of disc, touching
the up arrow will seek to the first track of disc. Touch the
down arrow to seek to the previous selection on the
compact disc. If playing the first track of disc, touching
the down arrow will seek to the last track of disc.
The sound will mute while seeking.
3-27

DVD Player
To use the player as a video DVD player, you must first
remove the Navigation map DVD or music CD. While
playing a video DVD, the Navigation system is not
available. The message “The disc installed is not a map
DVD” will appear on the display if any of the Navigation
hard keys are pressed.
This feature will not operate unless the vehicle is in
PARK (P).
To remove the Navigation map DVD and load a video
DVD, use the following steps:
1. With the vehicle in PARK (P) and the ignition ON,
press and hold the TILT hard key until a beep is
heard. The faceplate of the system will open.
2. If a map DVD or a music CD is loaded, the system
will automatically eject it. Gently remove it from the
slot and return it to its case.
3. Load the video DVD into the slot. The system will
pull the DVD into the player.
4. Press and release the TILT hard key to close the
faceplate.
Notice: Shifting out of PARK (P) with the system’s
faceplate open will cause the faceplate to close
automatically. This could cause damage to a
CD, DVD or the system if it is partially loaded. Before
shifting out of PARK (P), make sure that the DVD
or CD is loaded properly. The vehicle must be
shifted back into PARK (P) to close the faceplate.
Once the faceplate is closed and a video DVD is loaded,
the system will automatically play the DVD.
Playing a DVD
There are three ways to play a DVD depending on what
screen you are on. They are the following:
• Once a DVD is inserted, the system will
automatically play the DVD.
• If you are on a map screen, touch the DVD source
button.
• From the audio screen, press the DVD hard key.
3-28

DVD Menu Options
To display the menu choices while a DVD is playing,
touch anywhere on the screen and the menu will appear.
IMAGE: Touch this button to either start playing a DVD
or to remove the DVD menu screen.
AUDIO PROGRAM: Touch this button to change the
audio language heard.
VIEWING ANGLE: Touch this button to adjust the
viewing angle of the DVD. Some DVDs allow you to
change the camera angle. This may not be available on
all DVDs. Depending on the type of DVD you are
using, this button may or may not be available.
SUBTITLE: Touch this button to playback the video
with subtitles. This may not be available on all DVDs.
Depending on the type of DVD you are using, this button
may or may not be available.
SCREEN ADJUST: Touch this button to adjust the
brightness, contrast and red/green color adjustments.
CURSOR: Touch this button to access the left/right and
up/down cursors on the screen. The cursors allow
you to navigate menu options on the screen.
MENU: Touch this button to access the DVDs menu
options. Depending on the type of DVD you are
using, this button may or may not be available. Touch
the button labeled one, two or blank to change the
image size displayed on the screen.
TITLE: Touch this button to display the title of the DVD.
Depending on the type of DVD you are using, this
button may or may not be available.
3-29

SETTING: Touch this button to adjust the following:
• LANGUAGE PREFERENCES
• PARENTAL LOCK
Under LANGUAGE PREFERENCES, you can select
different languages for AUDIO, SUBTITLE and
DVD MENUS.
1. To change languages, first select the option you
wish to change.
2. Select a language from the list given.
3. Touch RETURN to end out the menu. Your
language is now saved.
Under PARENTAL LOCK, you can select SET RATING
LIMIT and SET PIN.
To SET RATING, first touch the button. Then, make
your selection. Touch RETURN to end out the menu.
Your selection is now saved.
To use PARENTAL LOCK, first touch the button. Then,
enter a four-digit numeric password. Touch RETURN
to end out the menu.
SEARCH: Touch this button to search to a certain
scene on the DVD. Depending on the type of DVD you
are using, this button may or may not be available.
r (Rewind): Touch this button to rewind through a
scene during playback.
r (Resume): Touch this button to resume playing a
DVD.
c (Stop): Touch this button to stop the DVD.
j (Pause): Touch this button to pause the DVD.
[ (Forward): Touch this button to advance rapidly
during playback.
L (Frame Advance): Touch this button to advance by
chapter during playback.
3-30

Radio Personalization with Home
and Away Feature
If your vehicle hasthis feature, you can recallthe latest
audio system settings asadjusted the last time your
vehicle was operated. Thisfeature allows two different
drivers to store andrecall their own audio system
settings. The settings recalledby the audio system are
determined by which RKEtransmitter (1 or 2) wasused to
enter the vehicle. Thenumber on the back ofthe RKE
transmitter corresponds to driver1 or to driver 2.The
audio system settings willautomatically adjust to where
they were last setby the identified driver. Thesettings
can also be recalledby briefly pressing the MEMORY
seat switches 1 or2 located on the driver’sdoor.
Your audio system can store HOME and AWAY preset
stations. HOME and AWAY preset stations allow
you to use one set of preset radio settings in the area
where you live, and another set when you go out of
town. That way, you will not need to reprogram
your preset stations every time you travel.
To select HOME and AWAY preset stations, do the
following:
1. With the audio system on, touch the Audio hard key
and turn the audio system off.
2. Touch the HOME or AWAY button from the preset
screen.
The next time the audio system is turned on, the
system will recall the last active preset selection.
When battery power is removed and later applied, you
will not have to reset your home audio system preset
stations because the audio system remembers
them. However, you will have to reset your away radio
preset stations.
3-31

✍ NOTES
3-32
 Loading...