

Cabasse CINEOLE Owners Manual

CinéOle
notice d,installation • owner,s manual
• betriebsanleitung
www.cabasse.com
f r a n c a i s e n g l i s h
d e u t s c h
1
2
YES
NO
WARNING:
AVIS:
Manufactured under license from Dolby Laboratories.
Dolby and the double-D symbol are trademarks of Dolby Laboratories.
3
4
f r a n c a i s e n g l i s h
d e u t s c h
24
1
103
11
18
21
20
25
27
2
12
19
22
23
26
28
1713
29
40
42
43
46
47
CinéOle
48
44
49
30
41
45
39
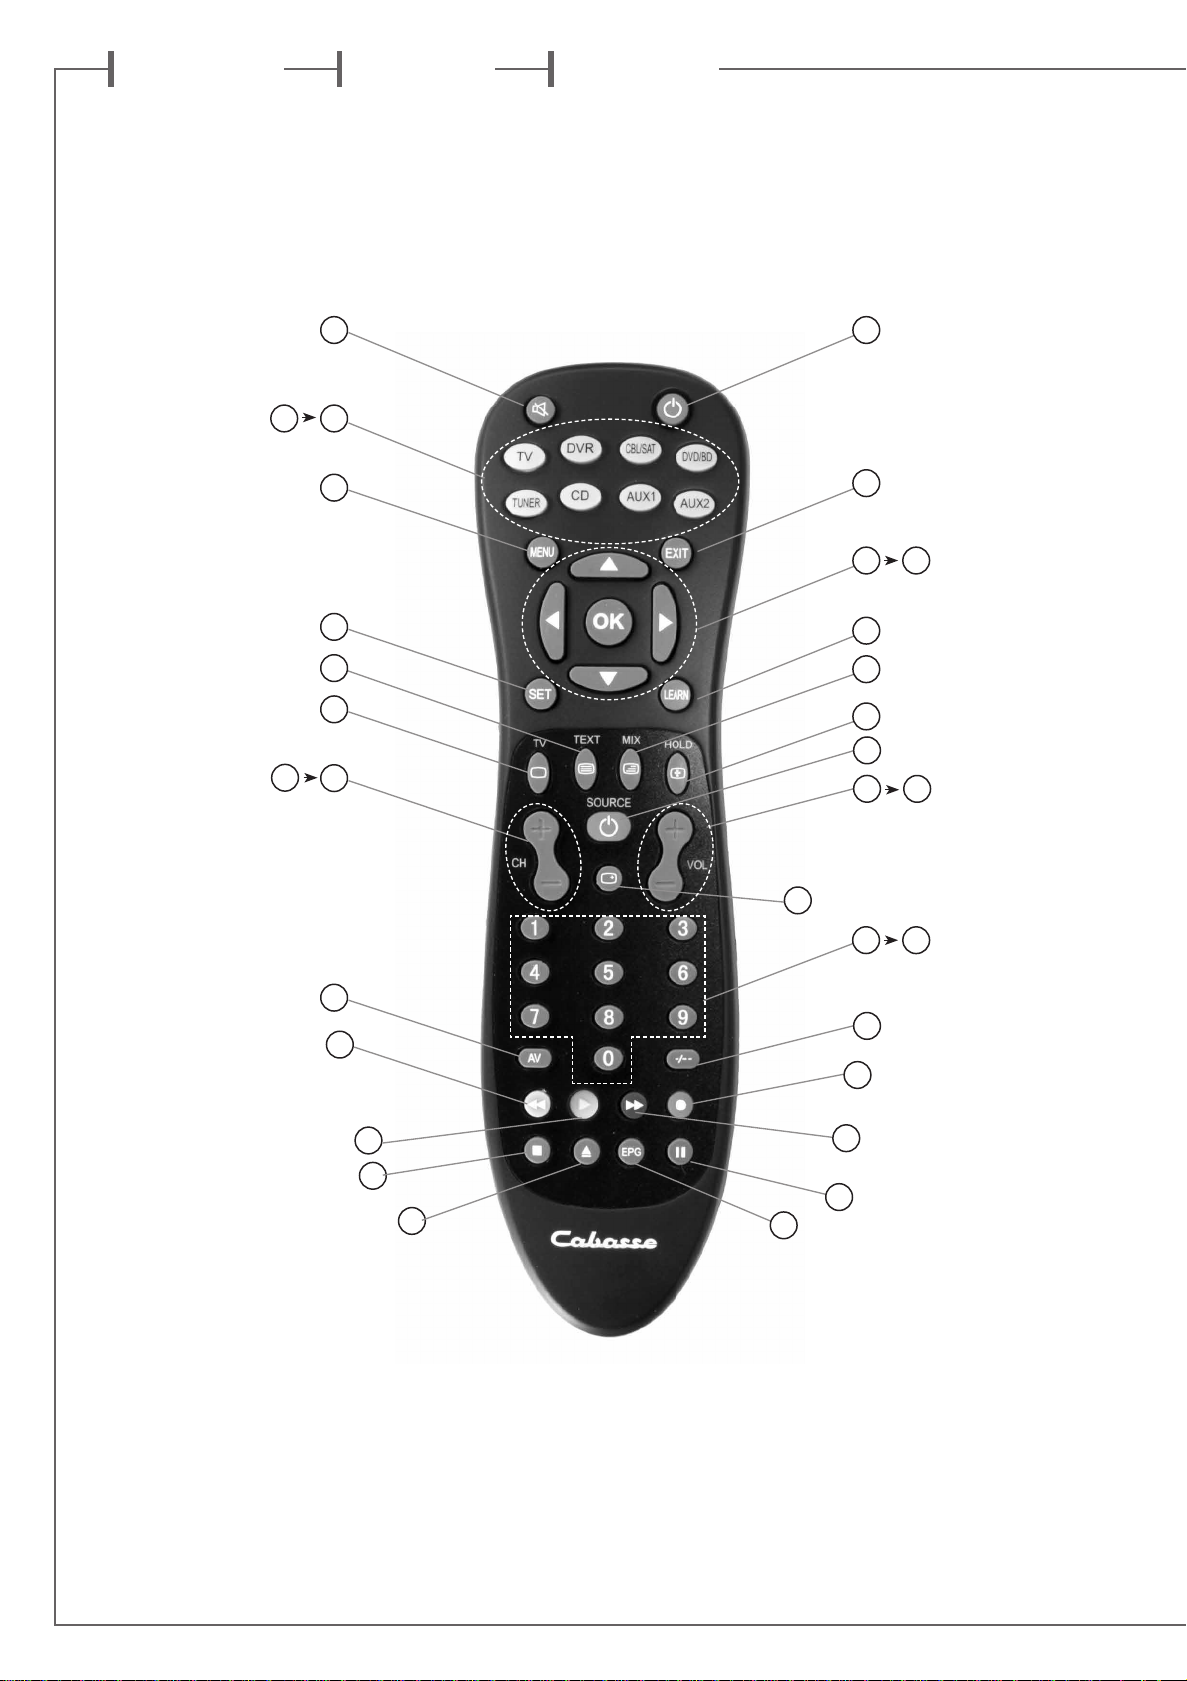
IDENTIFYING
CONTROLS
IDENTIFICATION
DES COMMANDES
ANORDNUNG
DER BEDIENENELEMENTE
1
2
TV, DVR, CBL/SAT,
3>10
13>17
DVD/BD, TUNER,
CD, AUX1, AUX2
11 Menu Device's Menu function Fonction Menu de la source Menüaktivierung für externe Geräte
12 EXIT Exit function Fonction sortie
OK
18 SET Remote set up key Programmation de la télécommande Programmieren der Fernbedienung
19 LEARN Learn a new code Apprentissage d'un nouveau code
20
21
22
23
TV
TEXT
MIX
HOLD
CinéOle Mute on/off
CinéOle On/Standby Mise en Marche / Veille du CinéOle
Device selection Sélection de la source Wahl der Tonquelle
UP, DOWN, LEFT, RIGHT, OK
menu functions
Television modes Permutation entre les modes TV Schaltet in die Fernsehmodi
Teletext mode Permute en mode Télétexte Schaltet in den Teletext-Modus
TV and Teletext mixed
Page hold Fige ou défige l'image
Active et désactive la coupure
du son CinéOle
Fonctions déplacements
et confirmation dans menu
Fonction télévision et Télétexte simultanée
Schaltet die Stummschaltung ein/aus
Schaltet das CinéOle-System ein/in
den Bereitschaftszustand
Taste zum Verlassen des Menüs
für externe Geräte
Menübedienung externe Geräte :
AUF, AB, LINKS, RECHTS
Lässt die Fernbedienung einen
neuen Code lernen
Aktiviert gemischtes Bild aus Teletext
und Fernsehprogramm
Anzeigen einer Teletext-Unterseite
über längere Zeit
24>25 CH +/- Channel up and down
26
27
28>29 VOL+ / VOL- CinéOle Volume UP/DOWN Réglage du volume Lautstärketasten + und – für CinéOle
30>39 0-9
40 AV AV input selection Permute sur le mode AV du téléviseur Wahl des AV-Eingangs
41 -/-- 1 or 2 digits channel numbers
42
43
44
45
46
47
Source/Device On/Standby Marche/Veille de la source sélectionnée Ein-/Ausschalten eines Quellgerätes
Shows program information
Number buttons for channel
or page selection
REW (fast reverse) Retour rapide sur la source sélectionnée Schneller Rücklauf
PLAY (operate your DVD, CD etc.) Lecture sur la source sélectionnée Wiedergabe starten
FFWD (fast forward)
REC (record)
STOP (terminate your operation)
CD DVD Eject
Sélection des chaînes
par pas de 1 en + et en -
Affiche les informations sur
le programme en cours
Touches numériques pour la sélection
de chaîne ou de page
Permute sur la sélection de chaînes
à 1 ou 2 chiffres
Avance rapide sur la source
sélectionnée
Enregistrement sur la source
sélectionnée
Arrêt de la lecture sur la source
sélectionnée
Ouverture/fermeture du tiroir
de la source sélectionnée
Kanalwahl auf- und abwärts
Zeigt Informationen des gerade
dargestellten Fernsehprogramms
Zifferntasten zur Programm-
und Seitenwahl
Wahl zwischen ein- und
zweistelligen Programmnummern
Schneller Vorlauf
Aufnahme starten
Wiedergabe stoppen
Am gewählten Quellgerät
Disc-Lade öffnen/schließen
48 EPG
49
Electronic Program Guide, shows
the channel Information
PAUSE
Guide des programmes Elektronischer Programmführer
Pause de la lecture
sur la source sélectionnée
Wiedergabe unterbrechen (Pause)
NOTE : les touches 42 à 45 servent également à naviguer dans le menu des sources en fonction de leur couleur.
NOTE : the keys 42 to 45 can also be used for menu navigation of selected source according to their specific color.
ANMERKUNG : Die Tasten 42 bis 45 können – entsprechend ihrer Farben – ebenfalls zur Navigation in Bildschirmmenüs
verwendet werden.
f r a n c a i s e n g l i s h
d e u t s c h
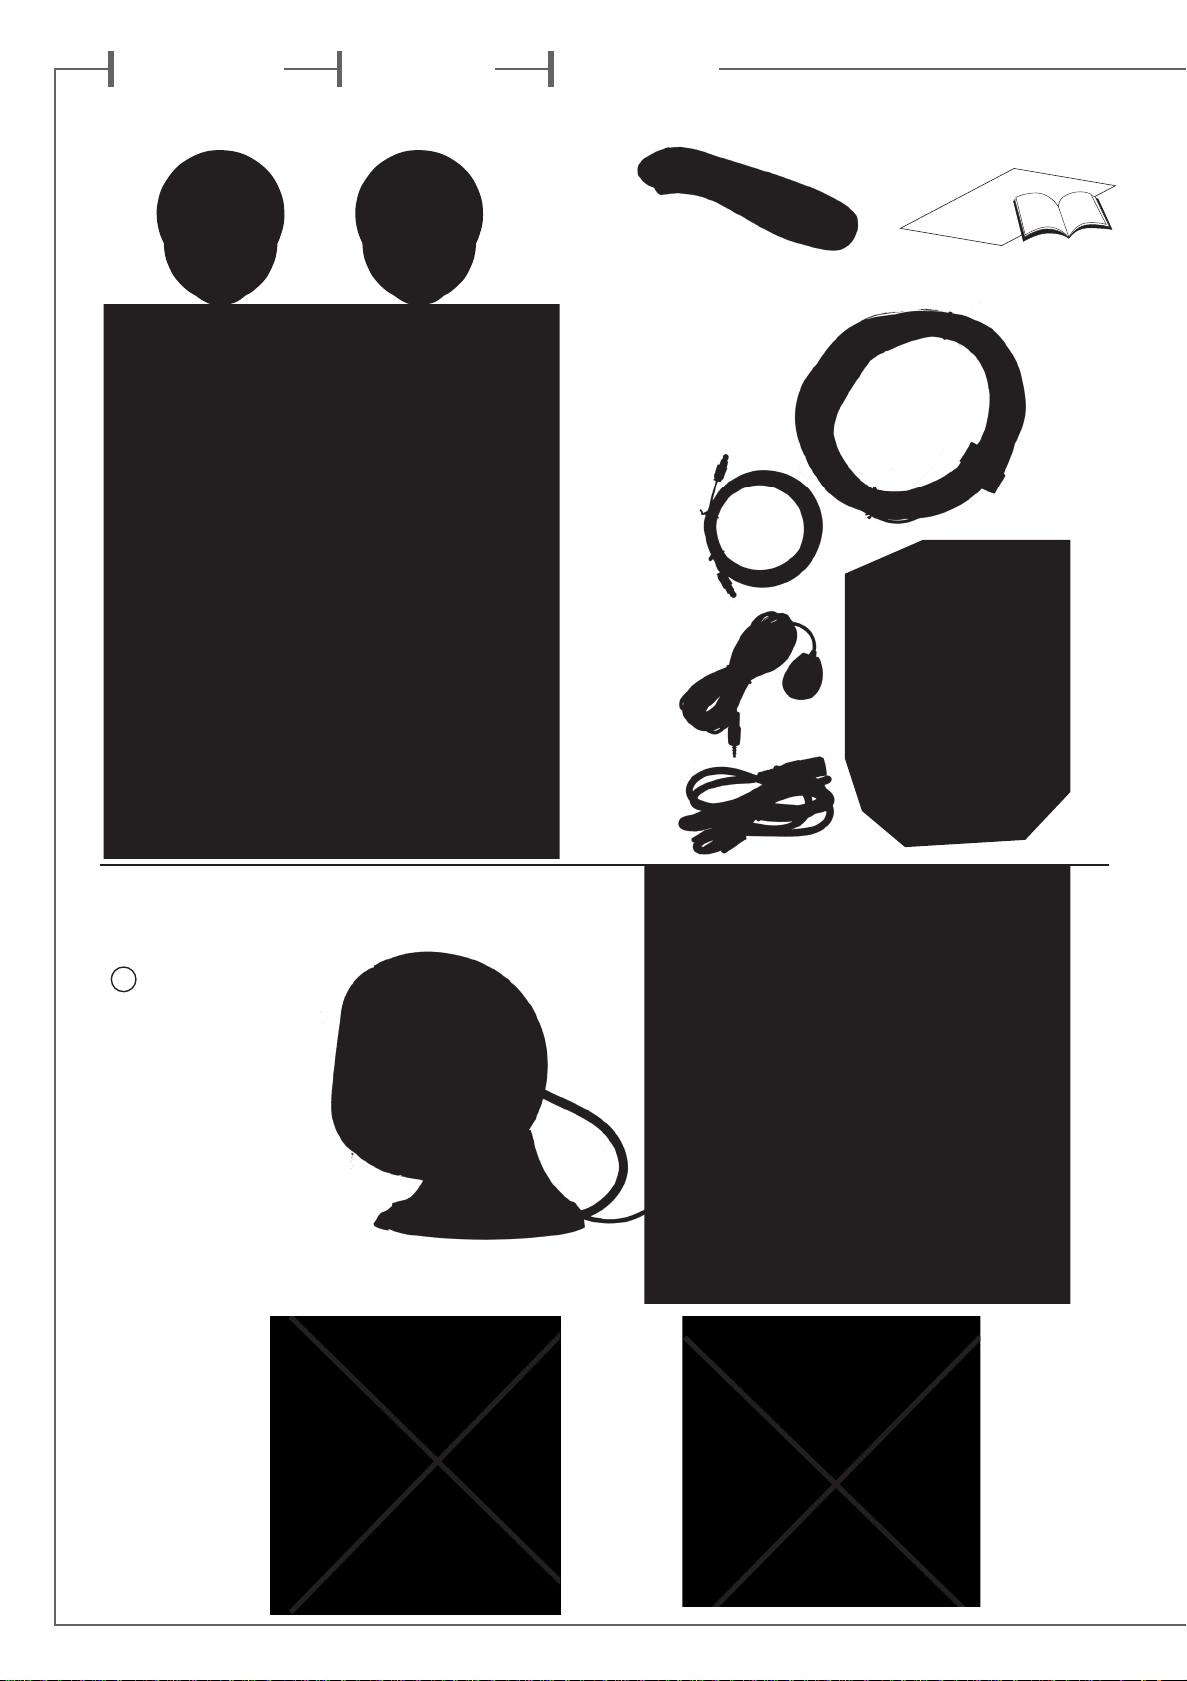
INSTALLATION RAPIDE
QUICK PLUG & PLAY
KURZANLEITUNG INSTALLATION
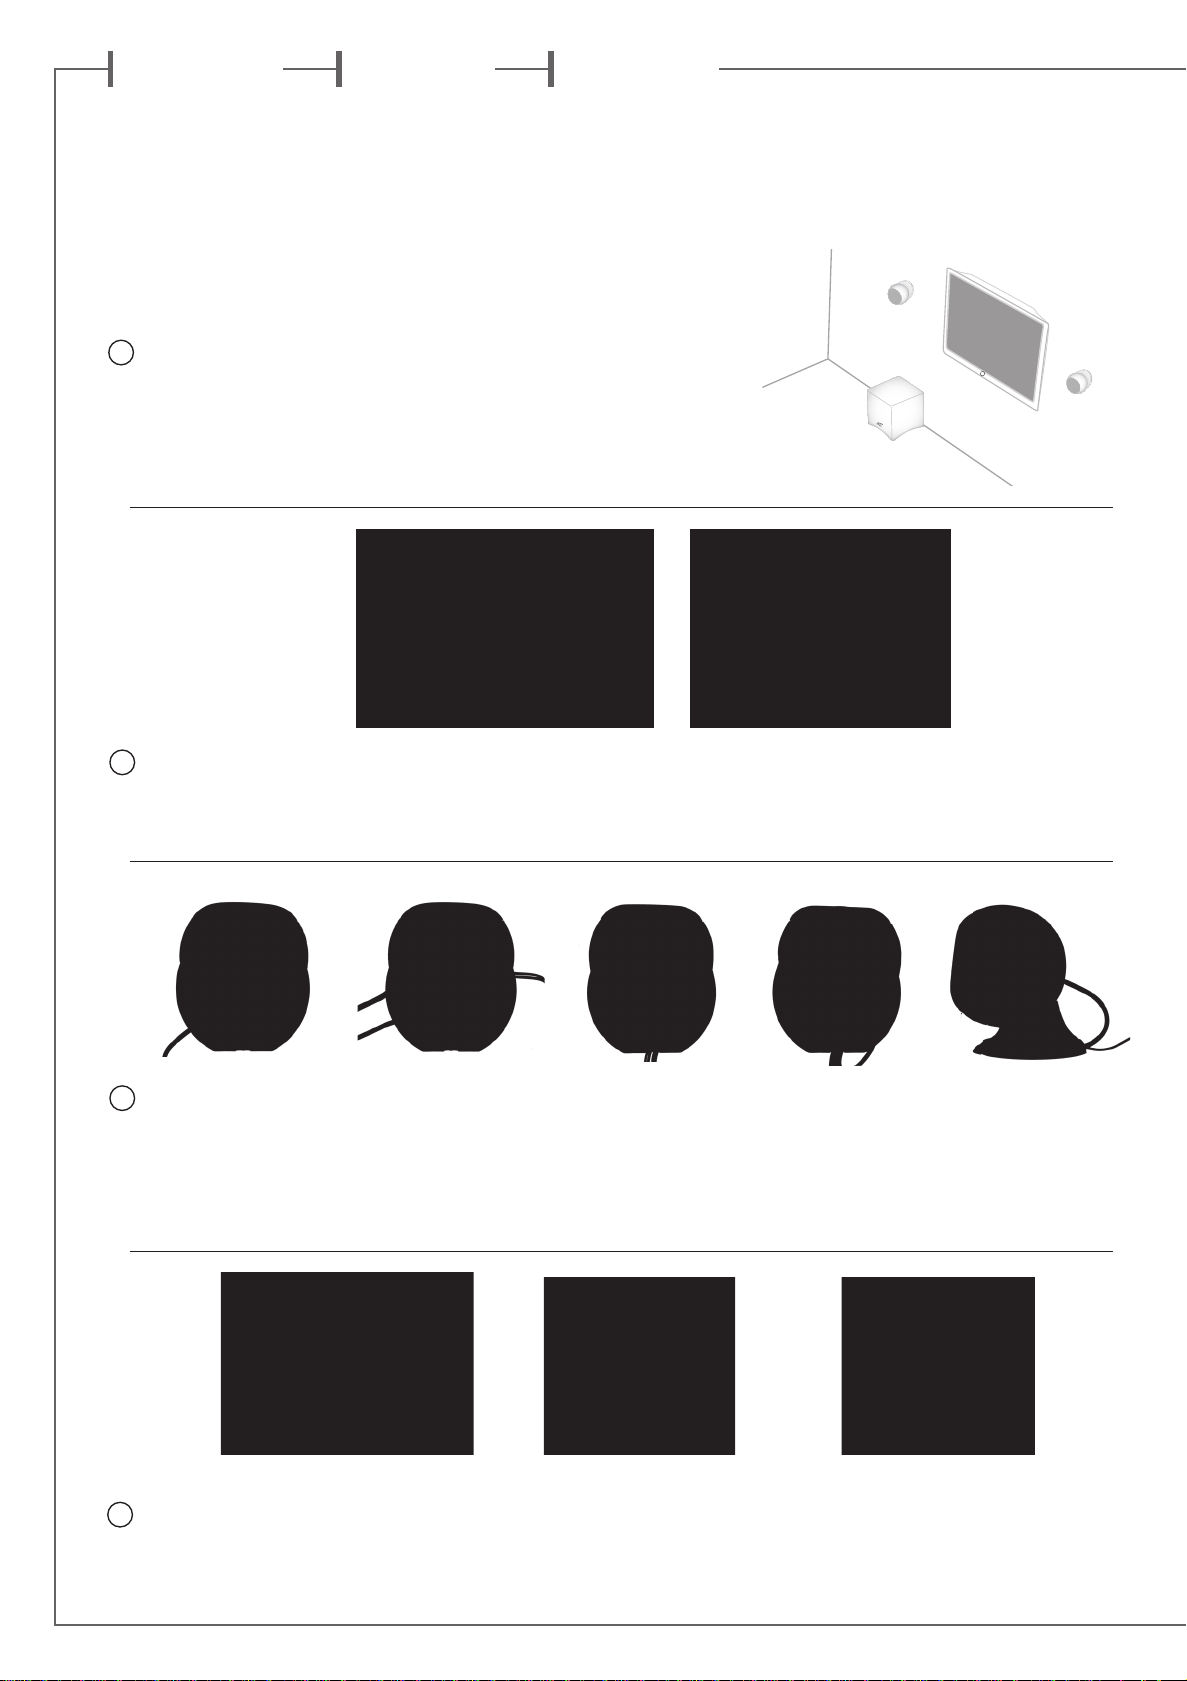
Déterminer la place des
9
satellites et du santorin
21C : voir page 4 nos
2 suggestions autour
d’un écran plat.
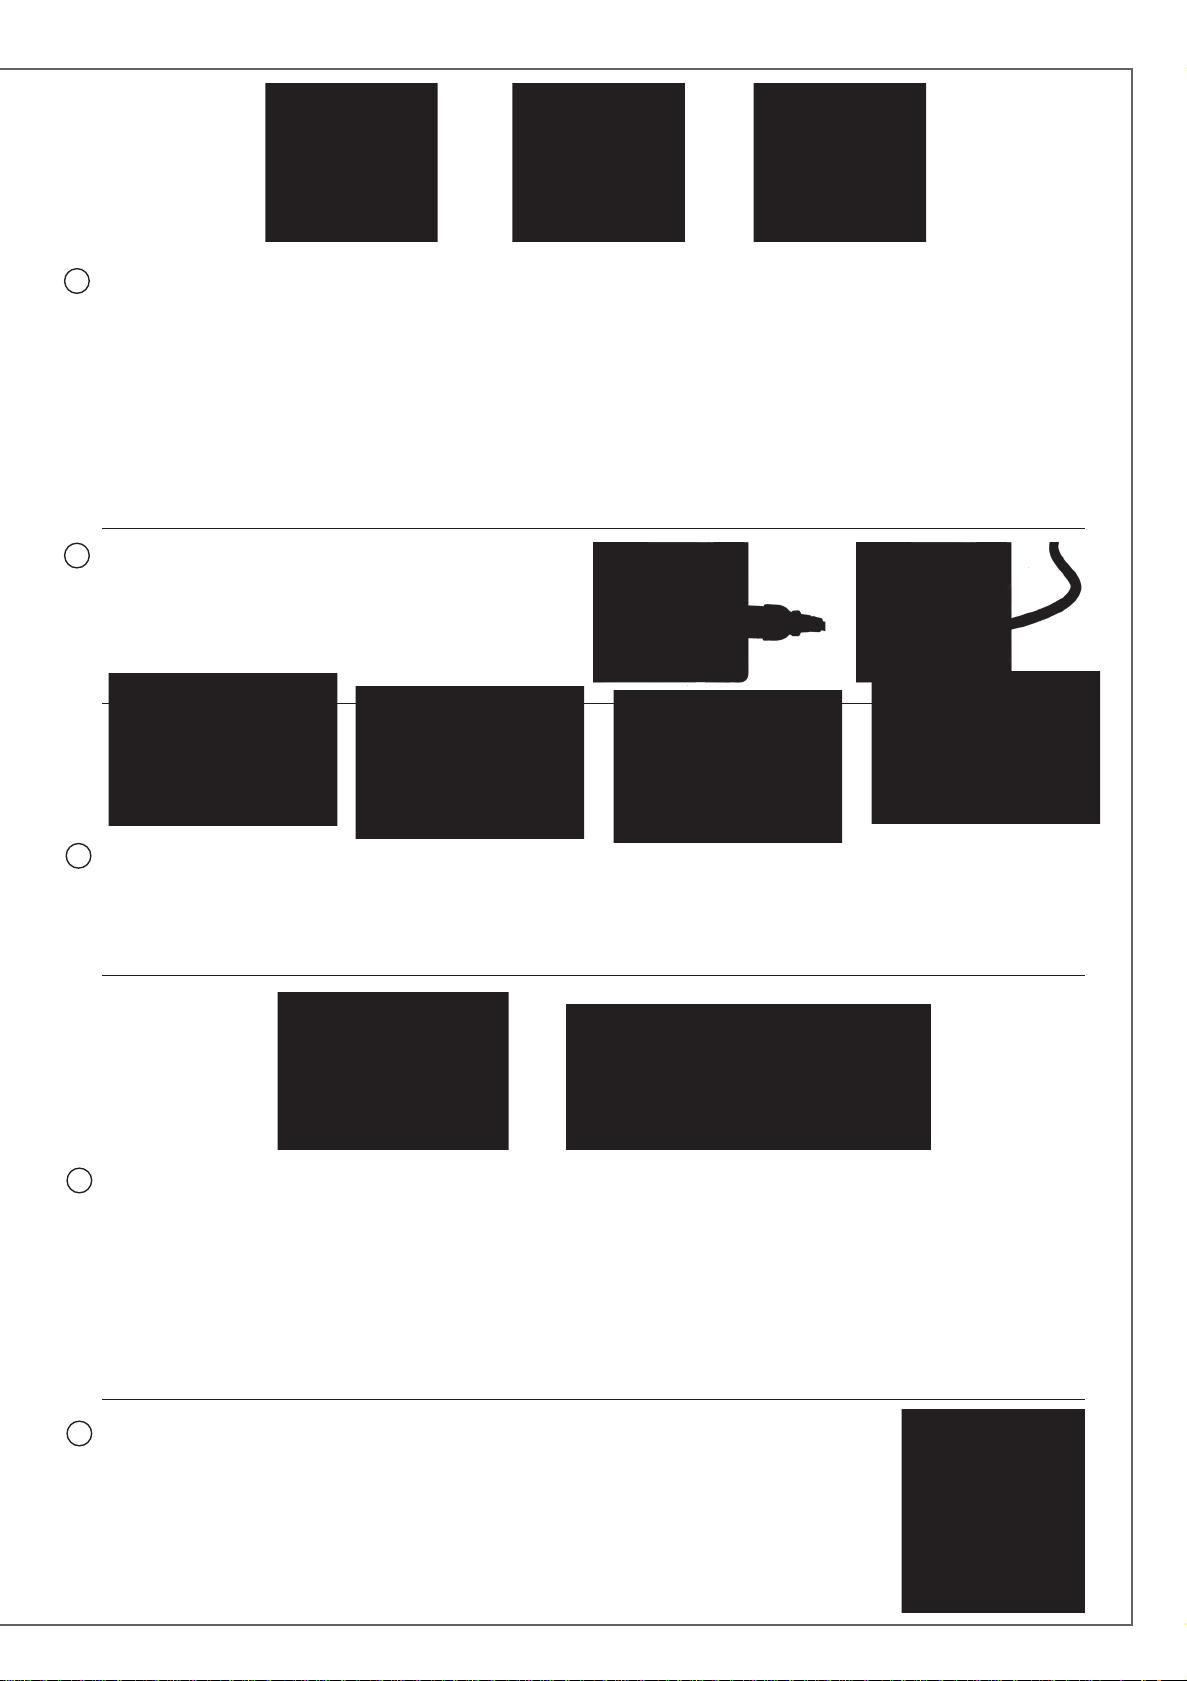
Brancher le cable haut-parleur à l’arrière
10
du Santorin 21C. Amener le cable avec la
prise droite (R) vers la position choisie pour
le satellite droit, celui marqué (L) vers la
position du satellite gauche.
Choose the positions
for the satellites and the
Santorin 21C.
Consider our suggestions
around a TV set on page 4.
Connect the loudspeaker cable in the
SPEAKER socket on the back of the Santorin
21C. Approach the «R» plug to the place for
the right satellite, the «L» one to the place of
the left satellite.
Wählen Sie einen
Aufstellungsort für die
Satelliten und den Santorin
21C. Beachten Sie dabei
unsere Empfehlungen
bezüglich eines Fernsehers
auf Seite 4.
Verbinden Sie die Lautsprecherkabel mit den
„SPEAKER“-Buchsen auf der Rückseite des
Santorin 21C. Benutzen Sie das Kabel mit der
Kennzeichnung „R“ für den Satelliten auf der
rechten Seite, das Kabel mit „L“ für den auf
der linken Seite.
Connecter les satellites: le câble
11
marqué «L» sera utilisée pour
l’enceinte de gauche, le «R» pour
la droite. Réunir une sphère et un
socle, connecter les 2 prises, insérer
l’ensemble dans la goutière, fermer
avec la base.
Positionner le module IR à un endroit d’où il
12
sera discrètement visible, si possible prêt du
capteur du téléviseur. Le brancher sur la prise
«IR REMOTE RECEIVER»
Connect the satellites: «L» plug for
the left satellite and «R» for the
right one. Join a sphere and a base,
connect both plugs, insert them
in the slot, close the base with the
bottom plate.
Place the IR module where it will be discrete
but visible. We recommend placing it near
the IR receiver of the television set. Connect
the cable into the «IR REMOTE RECEIVER»
of the Santorin 21C
Anschluss der Satelliten: Das Kabel an der „L“_Buchse
für den linken Satelliten, das an der „R“-Buchse für den
rechten. Verbinden Sie die Lautsprecherkugeln mit ihren
Basen, verbinden Sie beide Stecker mit den jeweiligen
Gegenstücken, schieben Sie beide Verbindungen in den dafür
vorgesehenen Schlitz und verschließen Sie dann die Basen
mit Hilfe der Bodenplatten.
Platzieren Sie den IR-Empfänger an einem
diskreten, aber trotzdem sichtbaren Ort. Wir
empfehlen eine Platzierung nahe dem IREmpfänger des Fernsehers. Schließen Sie das Kabel
des IR-Empfängers an die Buchse „IR REMOTE
RECEIVER“ des Santorin 21C an.
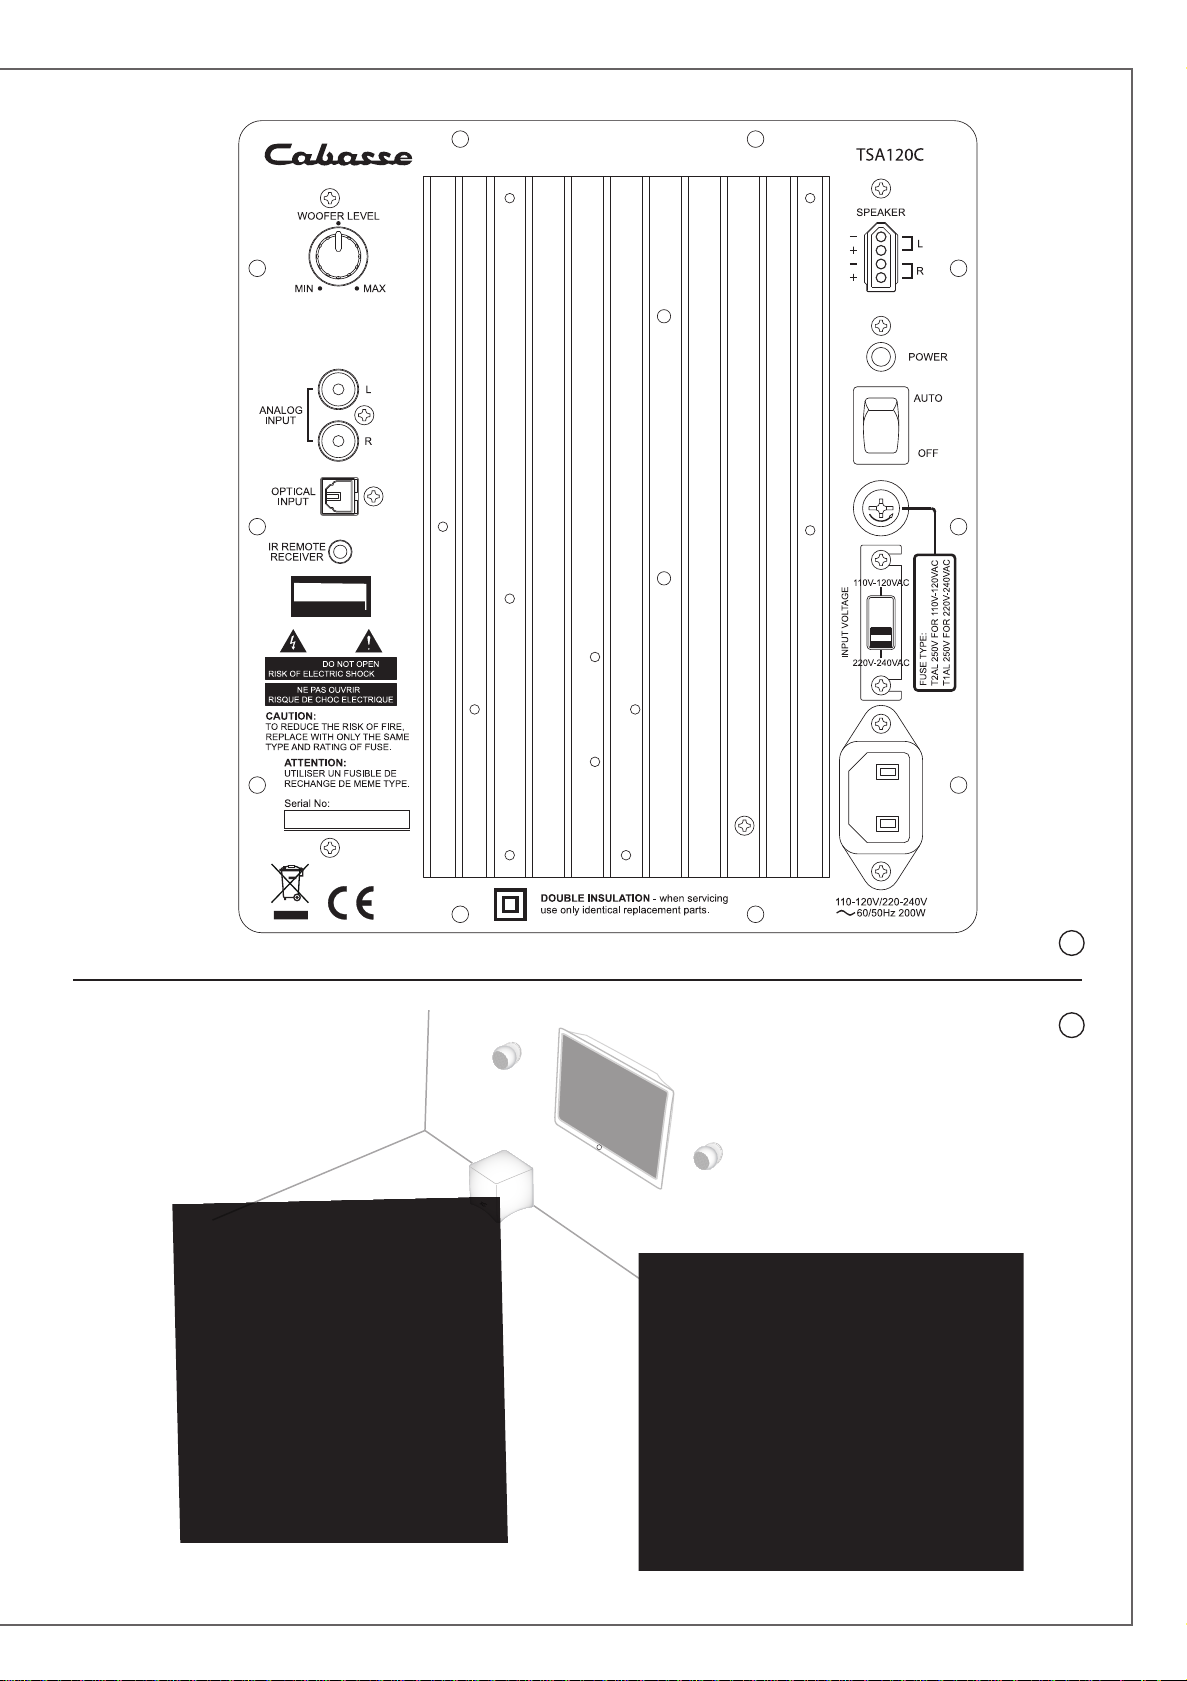
Connecter le CinéOle à votre téléviseur.
13
Avec le cable optique si celui-ci est équipé
d’une sortie audio numérique optique
(Digital Audio out), sinon avec le cable
RCA-RCA à la prise «Audio Out» de votre
source. Faire correspondre la sortie droite
de la source et l’entrée droite du CinéOle
avec les fiches rouges du câble RCA-RCA.
Les fiches RCA de l'extrémité du câble
équipée d'une ferrite cylindrique seront
branchées sur le CinéOle.
Connecter le Santorin 21C au secteur et positionner
14
l’interrupteur sur «AUTO»
Connect the Santorin 21C to the mains and switch the
power button to «AUTO»
Schließen Sie den Santorin 21C ans Stromnetz an und
bringen Sie den Netzschalter in die „AUTO“-Position.
Connect the CinéOle to your TV set. Use
the optical cable if your TV is fitted with
a digital audio output and connect it to
the «OPTICAL INPUT» of the Santorin
21C. Otherwise use the RCA-RCA cable
between the «Audio Out» of the TV and
the «ANALOG INPUT» of the Santorin
21C. The red RCA sockets must be used
for the right output of the TV and the right
input of the CinéOle so as not to invert the
channels. The side of the RCA cable fitted
with a cylindrical ferrite must be connected
to the CinéOle.
Verbinden Sie das CinéOle-System mit Ihrem
Fernseher. Falls das Fernsehgerät über einen
optischen Digitalausgang verfügt, benutzen Sie
das mitgelieferte optische Kabel, und schließen Sie
dieses an den Fernseher und den „OPTICAL INPUT“
des Santorin 21C an. Andernfalls verbinden Sie mit
dem Cinchkabel den Audio-Ausgang des Fernsehers
mit dem „ANALOG INPUT“ auf der Rückseite des
Santorin 21C. Die roten Stecker des Cinchkabels
gehören dabei jeweils in die Buchsen für den rechten
Kanal, die schwarzen Stecker in die Buchsen für
den linken Kanal. Die Seite des Cinchkabels mit
der zylindrischen Ferritperle muss am Santorin 21C
angeschlossen werden.
Mettre les piles type LR3-AAA dans la
15
télécommande universelle: retourner la
télécommande, enlever le couvercle en
appuyant sur la languette noire, mettre les
2 Piles LR3-AAA fournies en respectant le
dessin au fond du logement. Refermer le
couvercle.
Activer la source, par exemple mettre le
16
téléviseur sur «on»: le CinéOle se met
automatiquement en mode «on», et la diode
du module IR s’allume. La diode clignote
pour confirmer l'initialisation du système
puis reste allumée. Le son de la source est
ensuite automatiquement reproduit.
Ajuster le niveau sonore avec les touches
«VOL+» et «VOL-» de la télécommande.
Si nécessaire, baisser au minimum le son
des haut-parleurs du téléviseur avec la
télécommande d'origine.
Place the LR3-AAA type batteries in the
universal remote control: Lift the clasp and
remove the rear lid, load the two batteries
properly as indicated by the marks in the
battery compartment, put the rear cover
back on.
Activate the playback component, for
instance turn the TV set on: CinéOle
automatically turns on, the LED of the IR
module flickers during initialisation. The
sound from the source is reproduced by
CinéOle after the LED stops flickering.
Adjust the sound level with the «VOL+»
and «VOL-» keys of the remote control.
If necessary, turn the sound of the TV
loudspeakers off with the TV remote control.
Zum Einlegen der Batterien in die
Fernbedienung (Typ LR3-AAA): Heben Sie
die Klammer auf der Rückseite des Gebers an
und entfernen den Deckel. Nun legen Sie die
Batterien entsprechend der Kennzeichnung
im Batteriefach ein und schließen dann den
Deckel wieder.
Schalten Sie eine Wiedergabequelle,
beispielsweise den Fernseher, ein: Das CinéoleSystem schaltet sich automatisch ein, die
LED des IR-Moduls flackert während der
Initialisierung. Der Ton des Wiedergabegeräts
wird wiedergegeben, sobald die LED aufhört zu
flackern.
Stellen Sie mit den „VOL+“ und „VOL-“
-Tasten der Fernbedienung die gewünschte
Wiedergabelautstärke ein. Wenn nötig, schalten
Sie den Ton der Fernseher-Lautsprecher mit
dessen eigener Fernbedienung ab.
Régler le contrôle de volume du
17
Santorin 21C à midi (réglage
standard). Après avoir écouté des
sources musicales et/ou vidéo
connues, ajuster le niveau des
graves à votre convenance.
Set the volume control on the
twelve o’clock position (standard
setting). If necessary adjust the level
of low frequencies after listening
to well known audio and/or video
clips.
Stellen Sie den Lautstärkeregler des
Santorin 21C auf die Mittelposition
(Standard-Einstellung). Regeln Sie
wenn nötig den Tiefton-Pegel nach,
zur Überprüfung und Korrektur der
Einstellung sollten Sie sich einige
Ihnen gut bekannte Musikstücke
und/oder Filmabschnitte anhören.
e n g l i s h
Thank you very much for choosing Cabasse speakers.
Please read these instructions carefully before setting up your speakers.
With CinéOle, Cabasse presents a 2.1 audio video system
based on the Spatially Coherent Source (SCS) principles
coming from our high end ARTIS range of speakers. With
these 2-way speakers combined with a Santorin 21C active
subwoofer, you can add a very high quality sound system to
the picture of your TV screen.
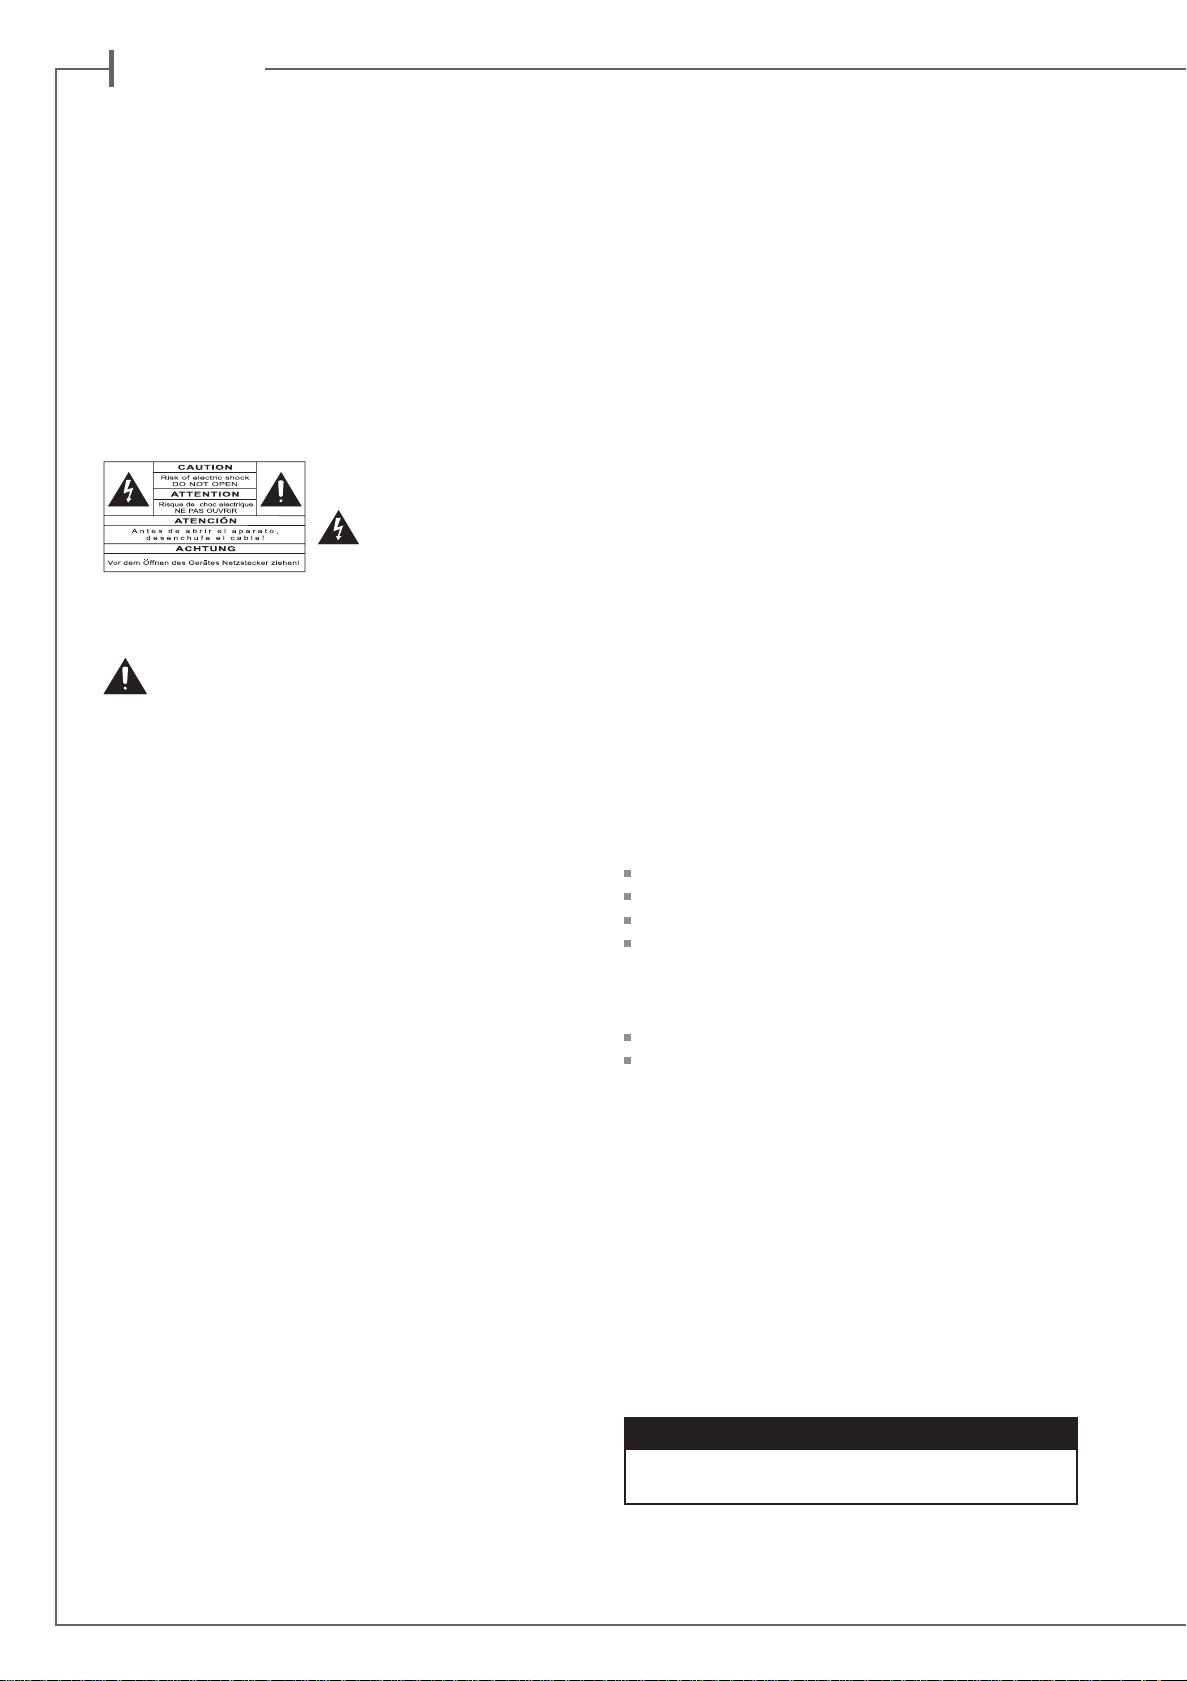
SAFETY INSTRUCTIONS
Explanation of graphical
symbols -
triangle, is intended to alert you
to the presence of uninsulated “dangerous voltage” within the
product’s enclosure that may be of sufficient magnitude to
constitute a risk of electric shock to persons.
The exclamation point within an equilateral triangle
is intended to alert you to the presence of important
operating and maintenance (servicing) instructions in the literature accompanying the appliance.
The lightning flash
with arrowhead symbol,
within an equilateral
Instructions - Carefully read through all the safety and ope-
rating instructions before switching on any device for the first
time.
Keep these instructions in mind - They will be constant-
ly referred to through this manual.
Pay special care to warnings - All the warning labels on
the product or warning notes in the user’s manual must be
followed.
Follow the instructions - Follow carefully all the installa-
tion and operation instructions.
Cleaning - Always remove the power cord before cleaning
the device. Do not use cleaning solvent, whether liquid or air
spray. Using a soft damp cloth is recommended.
Accessories - To avoid incidents, only use accessories ex-
pressly recommended by Cabasse.
Water and moisture -
damp or wet locations, such as humid basements, next to a
bathtub, sink, swimming pool or any other similar conditions.
The product shall not be used in
Carts and Stands - The appliance should be
used only with a cart or stand that is recommended by the manufacturer.
> Portable cart warning
Installation on a piece of furniture and stands - Do
not place this device on an unsteady surface, i.e. a stand, tripod, table, shelf, etc. It may fall and cause serious injury to a
nearby child or adult.
Ventilation outlets - The device shall not be placed in a
position that restrains the operation of its fans. Avoid installing the device on a bed, couch, blanket or other similar
surfaces that may prevent the appropriate air flow. Do not
install the device in a confined space, such as a book shelf or
other piece of furniture, that could prevent sufficient air from
flowing freely.
Power - The device shall only be connected to a source of
power compliant to the one described in this manual or on
relevant printed labels on the product. If you are not sure of
the type of power available, please contact your reseller or the
local power company.
Power cords - The power cords must be laid out in such
a way that they cannot be walked on, pinched, bent under
other devices. Also pay special attention to the matching of
the plugs and the connection of the cord to the device.
Lightning - For better protection against lightning or if the
device must remain unused for long stretches of time, unplug
the power cord and antenna jack. This minimizes potential
damages due to lightning or line surges.
Overloads - Avoid overloading the power plugs, extension
cords or power relays. This could result in fire or electric
shocks.
Foreign bodies and liquids - Avoid letting foreign mate-
rials or liquids enter the device. They could cause fire or electric shocks. Never spill any liquid on the device.
Maintenance - Users must never attempt to maintain the
device on their own, except for those maintenance operations
described in this manual. Any task beyond regular user maintenance must be performed by qualified service operators.
Troubleshooting - You must unplug your device from the
power supply and have it checked by a qualified technician if:
The power supply or the plug is damaged.
Foreign bodies or liquid penetrated the device.
The device was exposed to dripping or splashing.
The device does not seem to work correctly under normal
operating conditions. Only operate the controls described
in this manual. Any other operation could damage the de-
vice and require on-site visit of a qualified technician.
The device has fallen or its housing is damaged.
The performances of the device are strongly altered.
Spare parts - If spare parts are needed to repair the device,
make sure that the technician followed the manufacturer’s recommendations or that the replacing parts feature the same
specifications as the original ones. Non-compliant parts can
result in multiple damage, including fire or electric shocks.
Checks - After any servicing of the device, ask the technician
to perform appropriate testing to make sure that the device
works safely.
Exposure to high temperatures - The device should be
kept away from heating sources, such as radiators, heaters,
amplifiers or any other similar item likely to make the operating temperature rise excessively.
Applicable for USA, Canada or where approved for usage
Caution ! To prevent electric shock, match wide blade plug to wide
slot, insert fully.
 Loading...