

Page 1
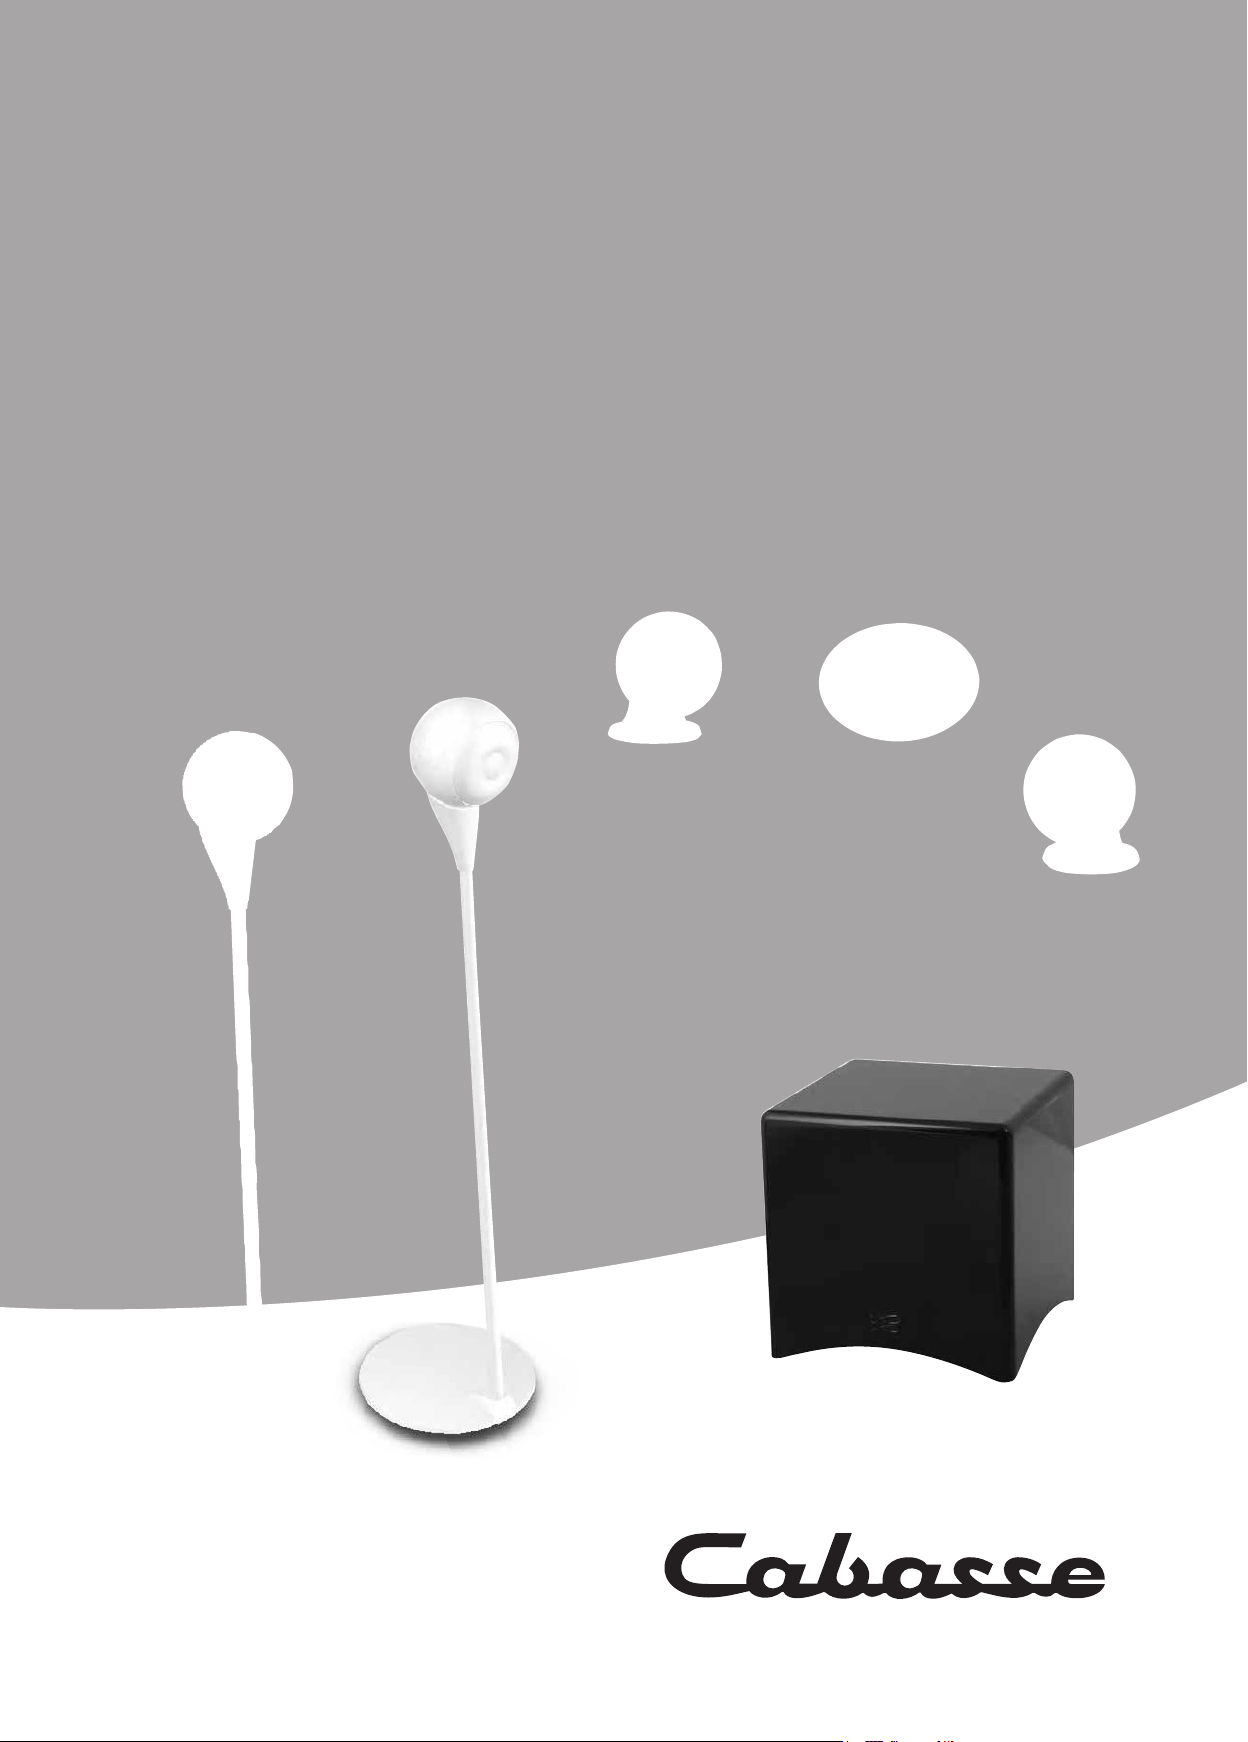
EOLE 2
notice d,installation • owner,s manual
betriebsanleitung • 使用说明书
www.cabasse.com
Page 2
AVENANT A LA NOTICE D’INSTALLATION éOle 2
ADDENDUM TO éOle 2 OWNER’S MANUAL
NACHTRAG ZUR
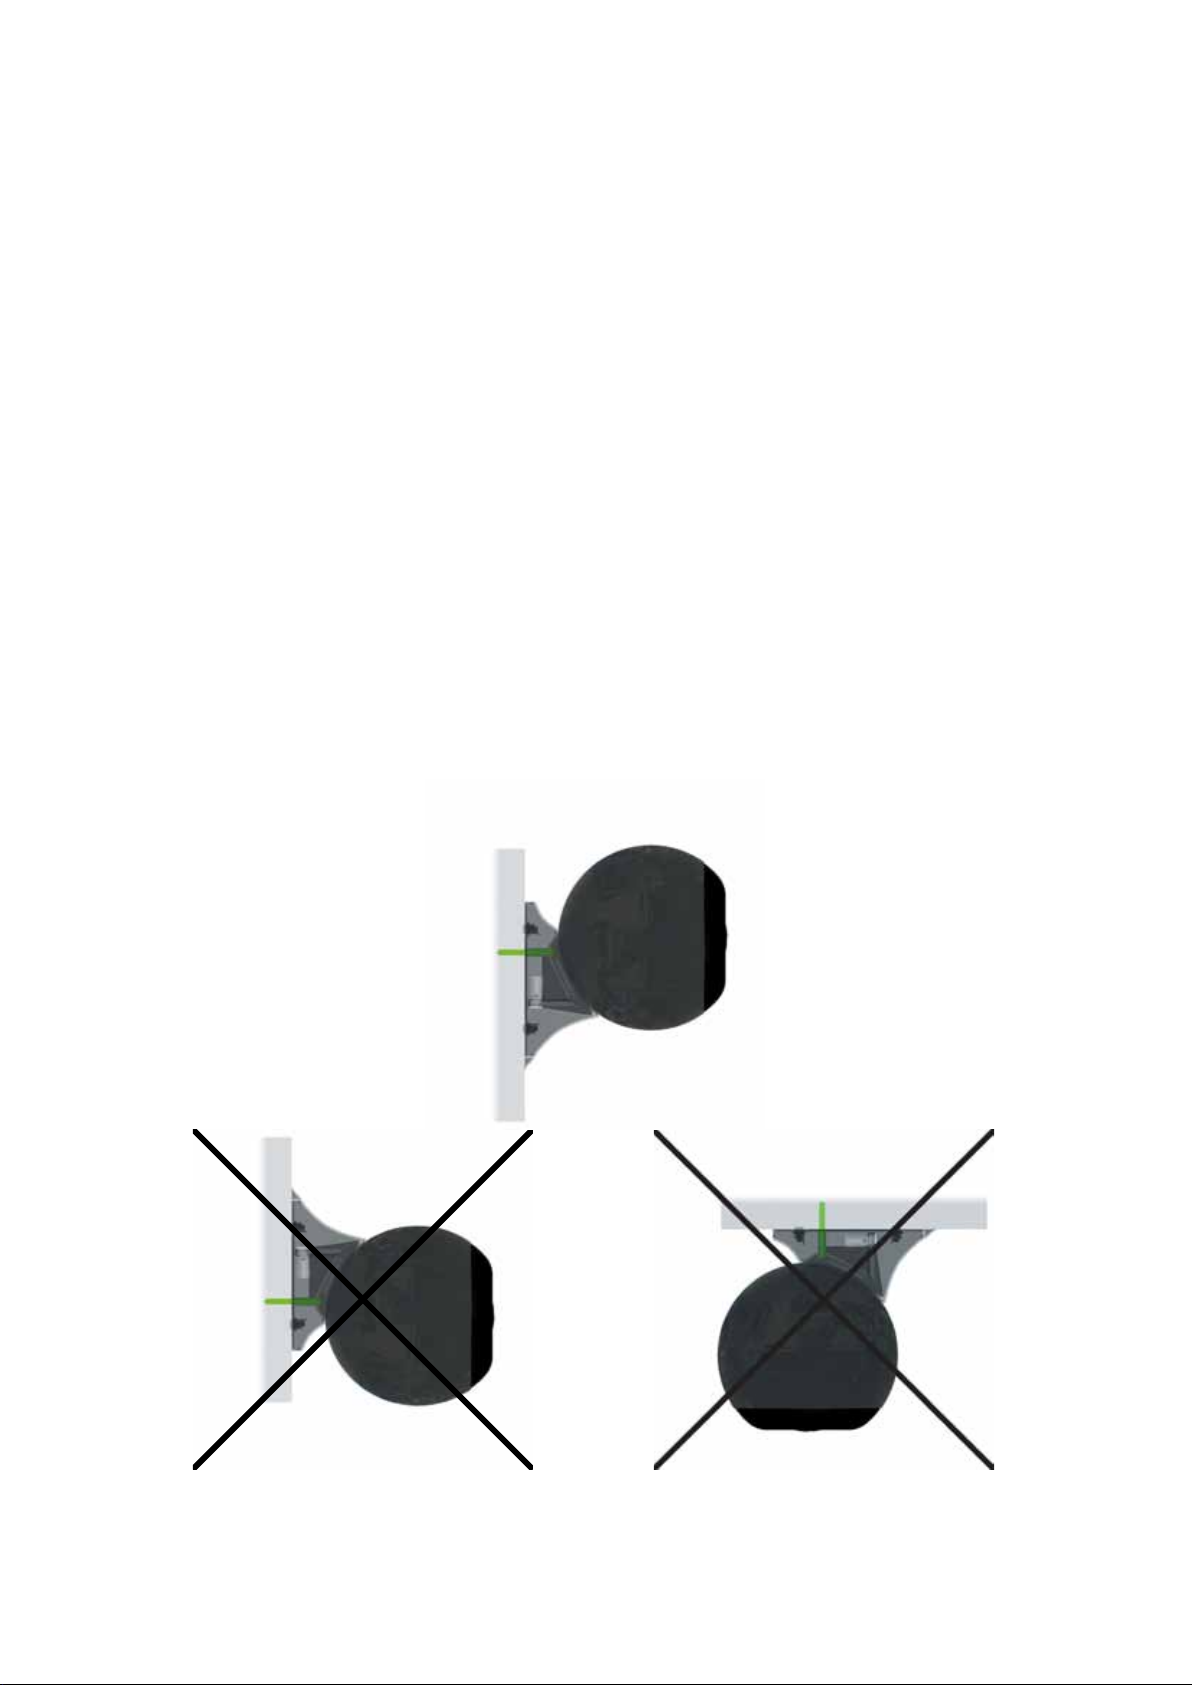
ATTENTION! : Pour le montage mural du socle, bien respecter le posionnement du premier
dessin ci-dessous. Le système n’est pas conçu pour les 2 montages barrés d’une croix: socle
inversé et socle au plafond. Vérier avant de xer le socle au mur que la tête de la vis ulisée
est susamment plate pour ne pas aecter la liaison magnéque ni rayer le satellite
ATTENTION! : For wall mount always follow the rst hereunder drawing regarding the set
up of the base. The system is not designed for the here-under crossed-out layouts: reversed
base and ceiling mounng. Check before wall mount of the base that the head of the screw
is at enough neither to alter the magnec link nor damage the paint of the satellite
ACHTUNG! : Bei der Wandmontage muss darauf geachtet werden das die Kugel schräg oben
sitzt, siehe Abbildung. Der Haltemagnet ist für eine hängende Montage an Wand und Decke
nicht geeignet. Bei der Wahl der Schrauben muss darauf geachtet werden das der Schraubenkopf die Kugel beim aufsetzen auf den Sockel nicht berührt.
éOle 2 BETRIEBSANLEITUNG
Page 3
f r a n c a i s
d e u t s c he n g l i s h c h i n e s e
1
2
Page 4
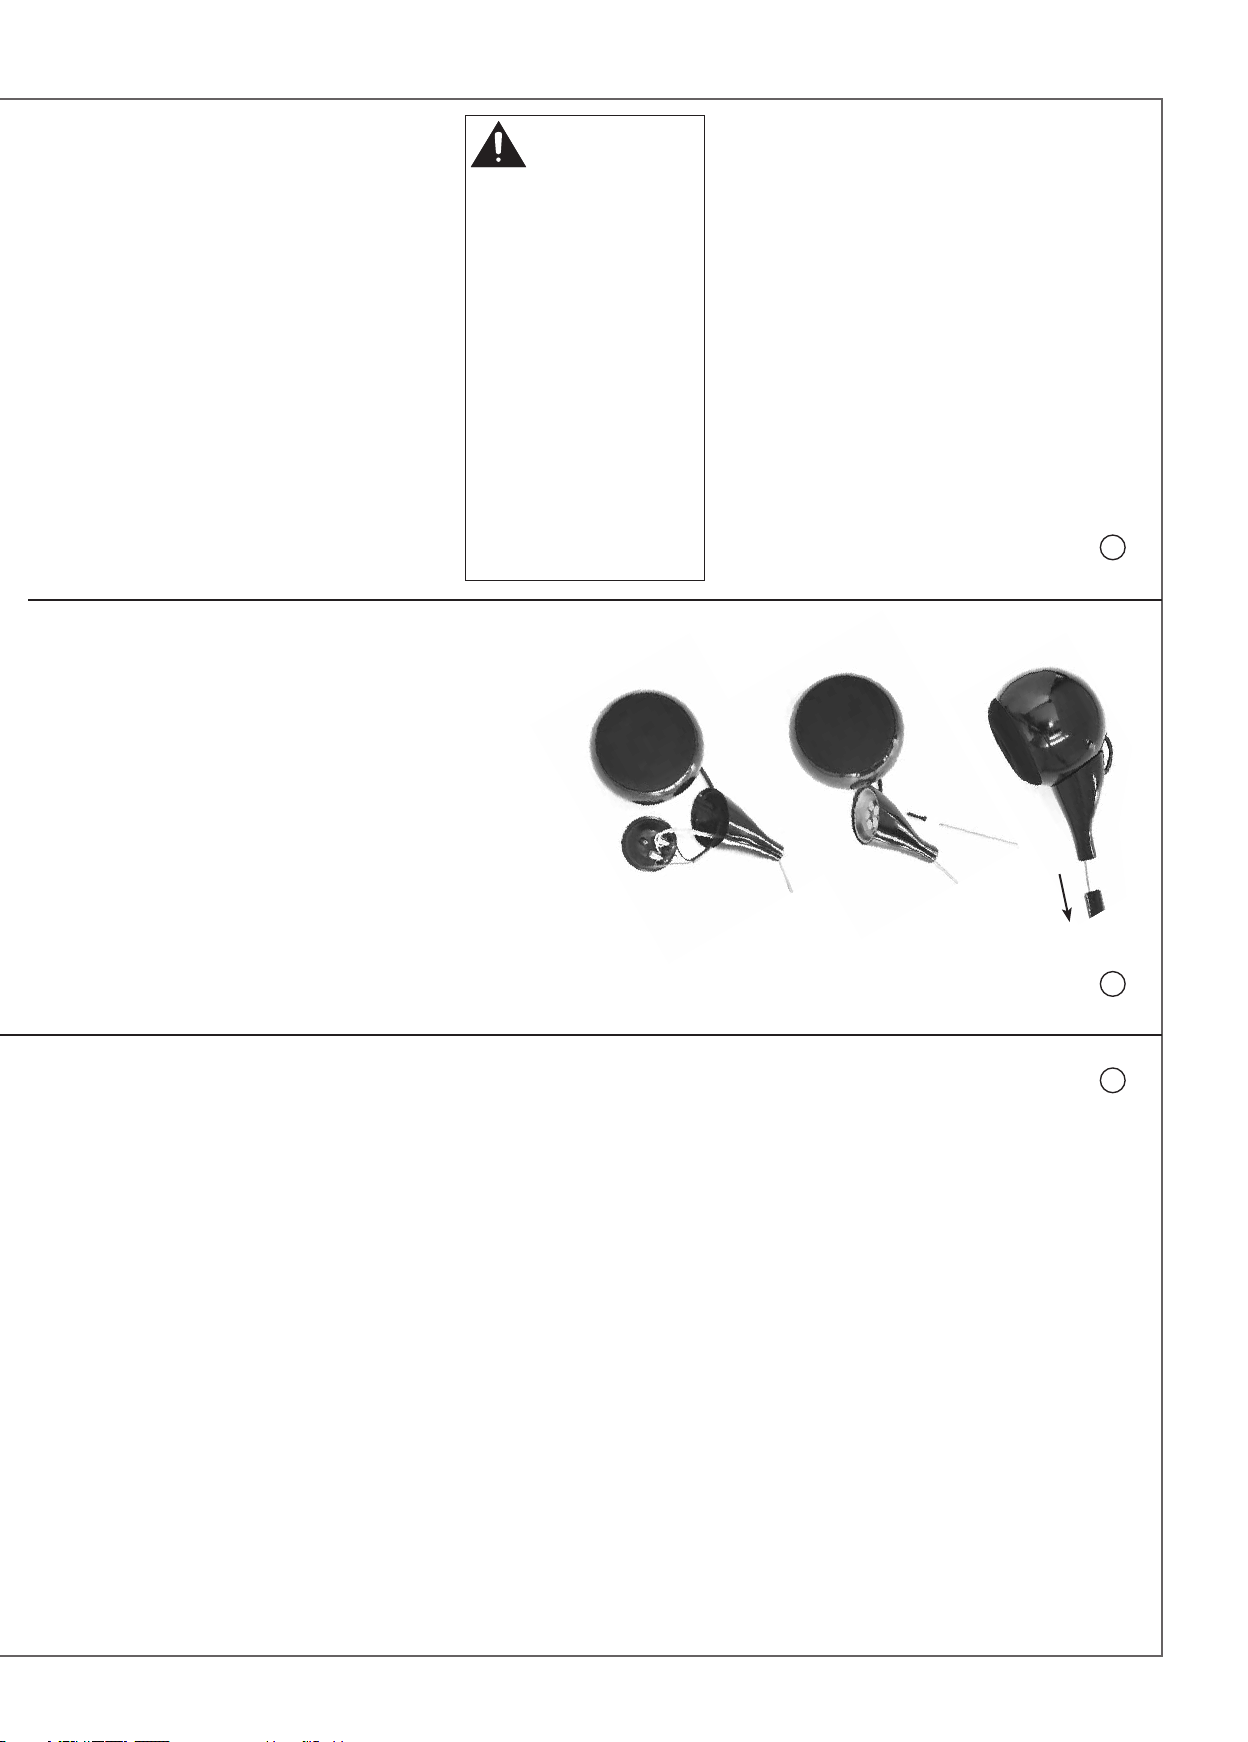
En mode mural, toujours
bloquer le câble allant
au satellite dans le frein
placé entre les 2 bornes dorées. Ce
câble doit passer par la sortie supérieure comme indiqué sur le dessin.
On wall use requires to always
squeeze the cable leading to the satellite in the device placed between
the gold platted terminals. This cable must go through the upper exit
as shown on the drawing.
Bei Wandbefestigung muss das
Kabel immer mit Hilfe des Befestigungsklipps zwischen den goldfarbenen Terminals blockiert werden.
Dabei muss das Kabel durch den
oberen Ausgang geschoben werden,
wie aus der Zeichnung ersichtlich.
挂墙安装时必须将接入卫星音
箱的连线塞进镀金接线端子之
间的装置中,这根连线必须要
如图中显示的那样引入上部的
出线口。
3
4
5
Page 5
f r a n c a i s
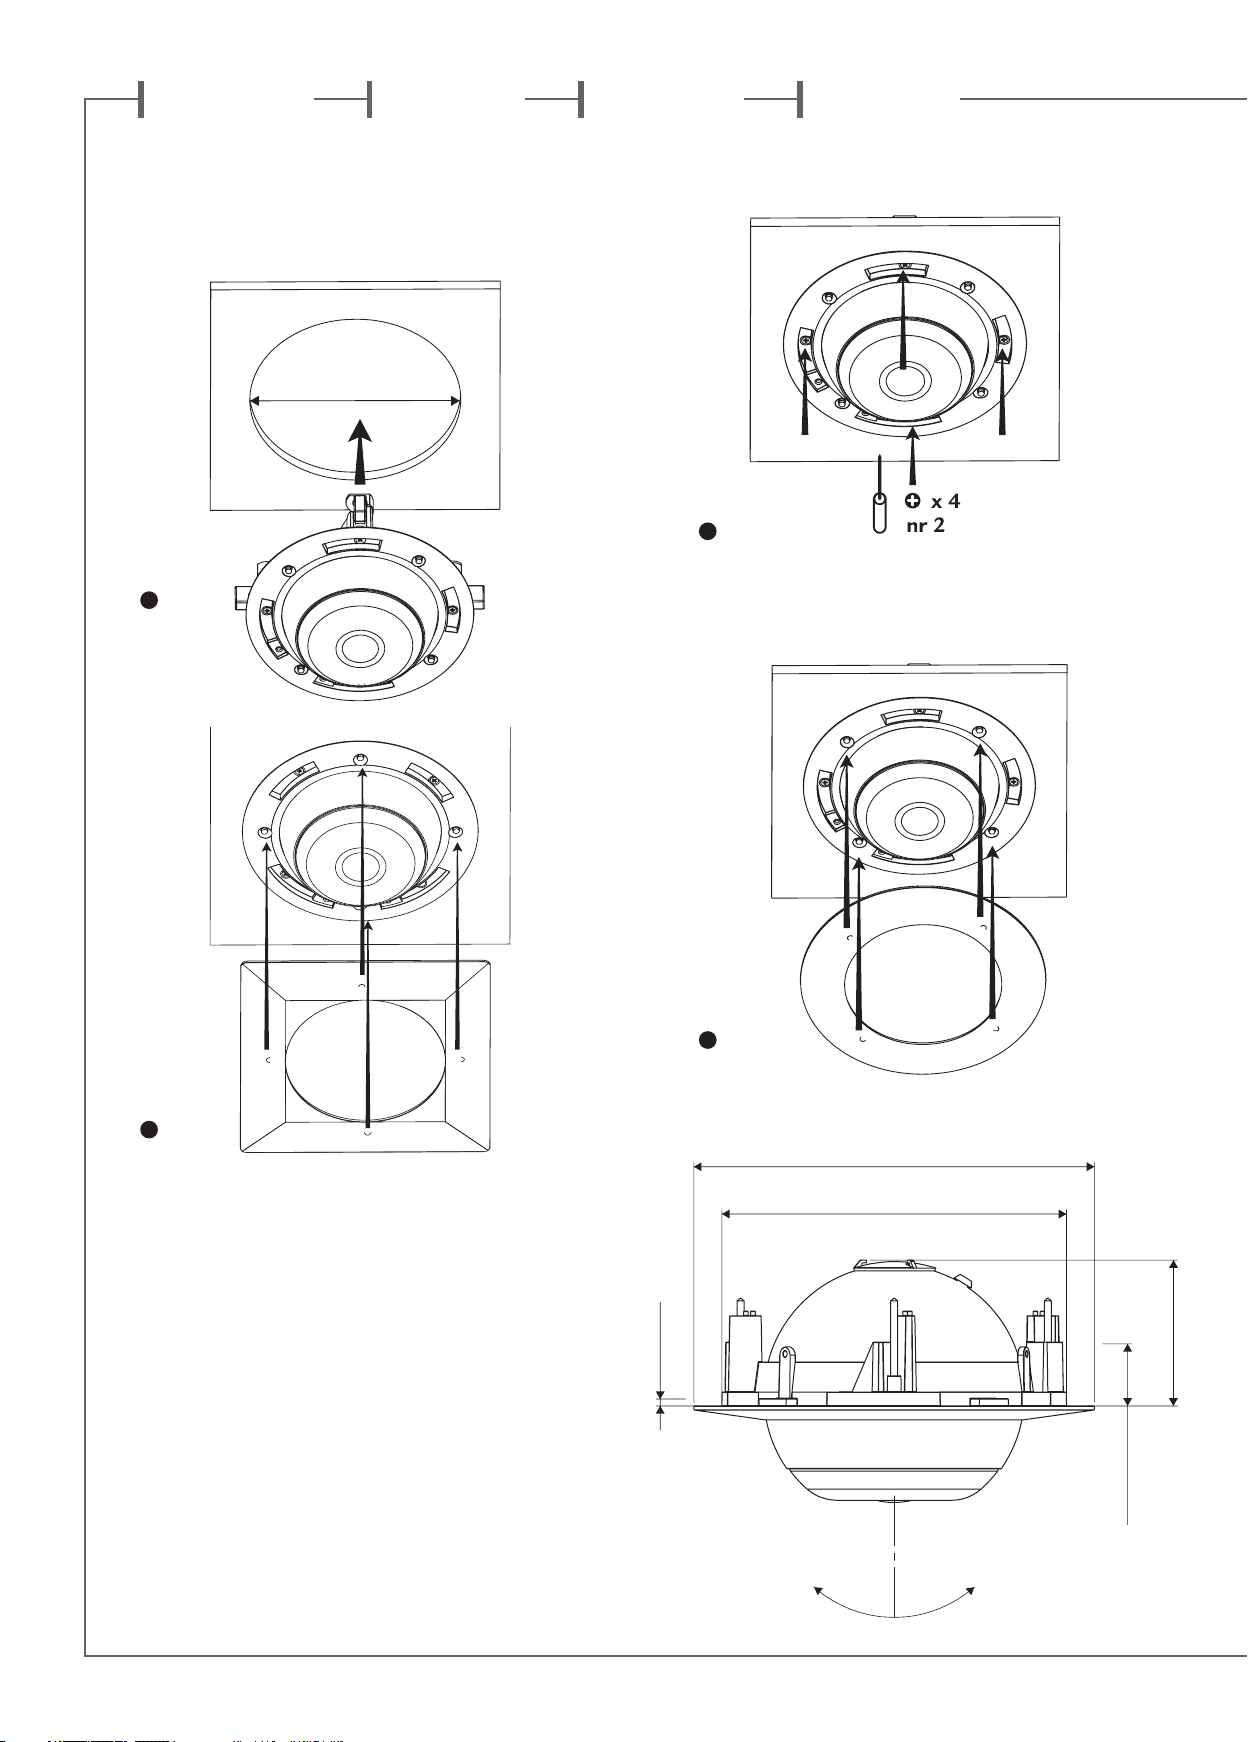
LA VERSION IN CEILING DU SATELLITE EOLE
The In Celling version of the Eole speaker
Die Deckeeinbau Version des Eole Satelliten
Eole音箱的天花安装版本。
Ø 175 mm
1
d e u t s c he n g l i s h c h i n e s e
3
2
Montage des enjoliveurs : positionner les aimants de l’enjoliveur et de la couronne face à face. Pour l’enjoliveur carré, avant
le serrage des vis de fixation murales, vérifier que la disposition
des aimants de la couronne donnera bien le positionnement
souhaité pour l’enjoliveur.
Assembling the caps : the magnets on the cap and on the
frame of the Eole 2 must be facing each other. When using the
square cap, check before tightening the screws of the doglegs
that the magnets on the frame are aligned the way they should
be to give the expected result when the cap is on.
Befestigung der Kappen : Die Magneten der Kappe und die
des Halterahmens müssen einander gegenüber angebracht
werden. Beim Anbringen der eckigen Kappe bitte vor dem Anziehen der Wandhalterungsschrauben prüfen, ob die Magneten
des Halterahmens richtig positioniert sind, damit die Kappe
wie gewünscht ausgerichtet ist.
组装盖板:盖板表面的磁体和Eole 2音箱外圈的磁体必须
正对安装。安装正方形盖板时,在上紧螺丝之前,需要检
查音箱外圈的磁体准确定位,以确保盖板安装上去之后可
达到理想的效果。
4
Ø 200 mm (7”
Ø 172 mm (6”
) mini
5/32
3,6 mm (0”
+24° -24°
7/8
)
3/4
)
)
7/8
73 mm (2”
) max
7/32
31 mm (1”
0°
Page 6

SYSTÈME 2.1
2.1 SYSTEM
2.1 SYSTEM
2.1系统接线方式
+ -
6
SYSTÈME 5.1 / 5.1 SYSTEM / 5.1 SYSTEM / 5.1系统接线方式
+ -
7
8
SUBWOOFER/LFE:ON RIGH T:SMA L L
LEFT :SMAL L CENT ER:SM A LL
SURROUND: SMALL SUBW OOFER:1 40 Hz
Page 7

f r a n c a i s
Vous venez d’acheter des enceintes Cabasse et nous vous remercions de votre confiance.
Dans le but d’optimiser au maximum votre installation, nous vous recommandons
de lire attentivement cette notice.
Avec le système Eole 2®, Cabasse vous propose un ensemble audio vidéo 5.1 dans la continuité de la technologie SCS
(Source à Cohérence Spatiale) issue de la prestigieuse gamme
ARTIS. Les satellites Eole 2 2-voies, associés au caisson de
graves Santorin 21, vous permettront de construire un système de très grande qualité en configuration 5.1 (reproduction
5 canaux).
INSTRUCTIONS DE SECURITE
Explication des symboles -
L’éclair dans un triangle
équilatéral avertit de
l’existence de tension élevée dangereuse non isolée à l’intérieur
du coffret du produit, d’une valeur suffisante pour présenter
un risque d’électrocution.
Le point d’exclamation dans un triangle équilatéral
avertit de l’existence d’instructions importantes quant
à l’utilisation et la maintenance dans la documentation jointe
à ce produit.
Instructions - Toutes les instructions de sécurité et d’utilisa-
tion doivent avoir été lues avant d’allumer tout appareil pour
la première fois.
Retenez les instructions - Elles doivent servir de référence
permanente pour tout ce qui suit.
Tenez compte des avertissements - Les avertissements
présents sur le produit ou dans les notices d’utilisation doivent être pris en compte.
Suivez les instructions -
et de mise en oeuvre doivent être scrupuleusement suivies.
Toutes les instructions d’utilisation
Nettoyage - Débranchez l’appareil avant tout nettoyage.
N’utilisez pas de solutions nettoyantes sous forme liquide ou
en aérosols. Employez de préférence un chiffon humide.
Accessoires - N’utilisez pas d’accessoires qui ne soient pas
explicitement recommandés par le constructeur, sous peine
de risquer divers accidents.
Eau et humidité - L’appareil ne doit pas être utilisé près
de l’eau, par exemple à proximité d’une baignoire, d’un évier,
dans un sous-sol humide, près d’une piscine, ou de tout ce
qui y ressemble de près ou de loin.
Chariots et supports - La manutention doit
être effectuée seulement avec des chariots et supports agréés par le fabricant.
> Attention aux chariots de manutention
Installation sur mobiliers et supports - Ne placez pas
cet appareil sur un support instable, qu’il s’agisse de pieds,
trépieds, tables, étagères, etc. Il pourrait tomber et causer des
blessures sérieuses à un enfant ou un adulte qui se trouverait
à proximité.
Ventilations - L’appareil doit être positionné de telle sorte
qu’il ne gêne pas sa propre ventilation. Par exemple, il ne
doit pas être installé sur un lit, un canapé, une couverture
ou des surfaces similaires qui pourraient bloquer ses orifices d’aération. Il ne doit pas non plus être encastré dans
des enceintes confinées comme des étagères étroites ou des
meubles qui pourraient limiter la quantité d’air disponible
aux entrées d’air.
Alimentation - L’appareil ne doit être relié qu’à une source
électrique du type écrit dans le mode d’emploi ou conforme à
la sérigraphie sur le produit. Si vous n’êtes pas sûr du type de
courant fourni à l’endroit où vous vous trouvez, adressez-vous
à votre revendeur ou à la compagnie électrique locale.
Protection des câbles d’alimentation - Le cheminement
des câbles d’alimentation doit être prévu de telle sorte qu’ils
ne puissent pas être piétinés, pincés, coincés par d’autres appareils posés dessus, et une attention toute particulière doit
être accordée à l’adéquation des prises et à la liaison du cordon avec l’appareil.
Foudre - Pour une meilleure protection de l’appareil pen-
dant les orages ou s’il doit rester inutilisé pendant une longue
période, débranchez le cordon d’alimentation et débranchez
la prise d’antenne, vous éviterez ainsi les risques de détérioration dus à la foudre ou aux surtensions.
Surcharges électriques - Ne surchargez pas les prises d’ali-
mentation, les prolongateurs ou les rappels d’alimentation. Il
pourrait en résulter incendies ou électrocutions.
Corps et liquides étrangers - On doit être attentif à ne
jamais laisser entrer d’éléments ou de liquides étrangers dans
l’appareil. Ils pourraient occasionner incendies ou électrocutions. Ne versez jamais aucun liquide d’aucune sorte sur l’appareil.
Entretien - L’utilisateur ne doit pas tenter de s’occuper des
opérations de maintenance au-delà de celles décrites dans le
mode d’emploi. Tout ce qui dépasse le simple niveau de l’entretien doit être effectué par un personnel qualifié.
Maintenance - Dans les cas suivants, vous devez impéra-
tivement débrancher votre appareil et le faire vérifier par un
technicien qualifié :
l’alimentation ou la prise a été endommagée.
des corps étrangers ou du liquide se sont introduits dans
l’appareil.
l’appareil a été exposé à la pluie ou a été aspergé d’eau.
l’appareil ne semble pas marcher correctement alors que
vous l’utilisez dans le cadre de ses instructions de fonction-
nement normal. Ne manipulez que les contrôles couverts
par le mode d’emploi. Toute autre procédure pourrait le dé-
tériorer et nécessiter l’intervention d’un technicien qualifié.
l’appareil est tombé ou bien sa carrosserie est endommagée.
l’appareil affiche des performances nettement modifiées.
Pièces détachées - Si la réparation a nécessité l’utilisation
de pièces détachées, assurez-vous que le technicien a bien utilisé les références préconisées par le fabricant ou présentant
les mêmes caractéristiques que les pièces originales. Des pièces non conformes peuvent provoquer incendies, électrocutions ou autres.
Vérifications - Après toute intervention sur l’appareil, de-
mandez au technicien d’effectuer des tests afin de garantir
que l’appareil fonctionne en toute sécurité.
Exposition aux fortes températures - L’appareil doit
être tenu éloigné de sources de chaleur comme radiateurs,
chauffage divers, amplificateurs, ou tous autres éléments susceptibles de le placer dans des conditions de températures
anormalement élevées.
Valable aux USA, au Canada et autres pays concernés
Attention ! pour éviter les chocs électriques, introduire la lame la plus
large de la fiche dans la borne correspondante et pousser jusqu’au fond.
Page 8
DEBALLAGE
Ouvrir largement le carton puis sortez un à un les différents
éléments. Si l’un des éléments du carton vous semble endommagé, ne pas l’utiliser, le replacer dans le carton d’origine et
contactez immédiatement votre revendeur.
Conservez votre emballage pour un éventuel transport ultérieur de votre système.
ATTENTION ! Manipulez avec précaution les 11,5 kg du
caisson de graves pour ne pas vous blesser.
ATTENTION ! Afin de réduire les risques d’incendie ou de choc électrique, ne pas exposer vos enceintes à la pluie ou à l’humidité.
ATTENTION ! Afin d’éviter tous risques d’asphyxie les emballages
plastiques doivent être placés hors de portée des enfants.
INSTALLATION
LES COMPOSANTS DE VOTRE SYSTÈME
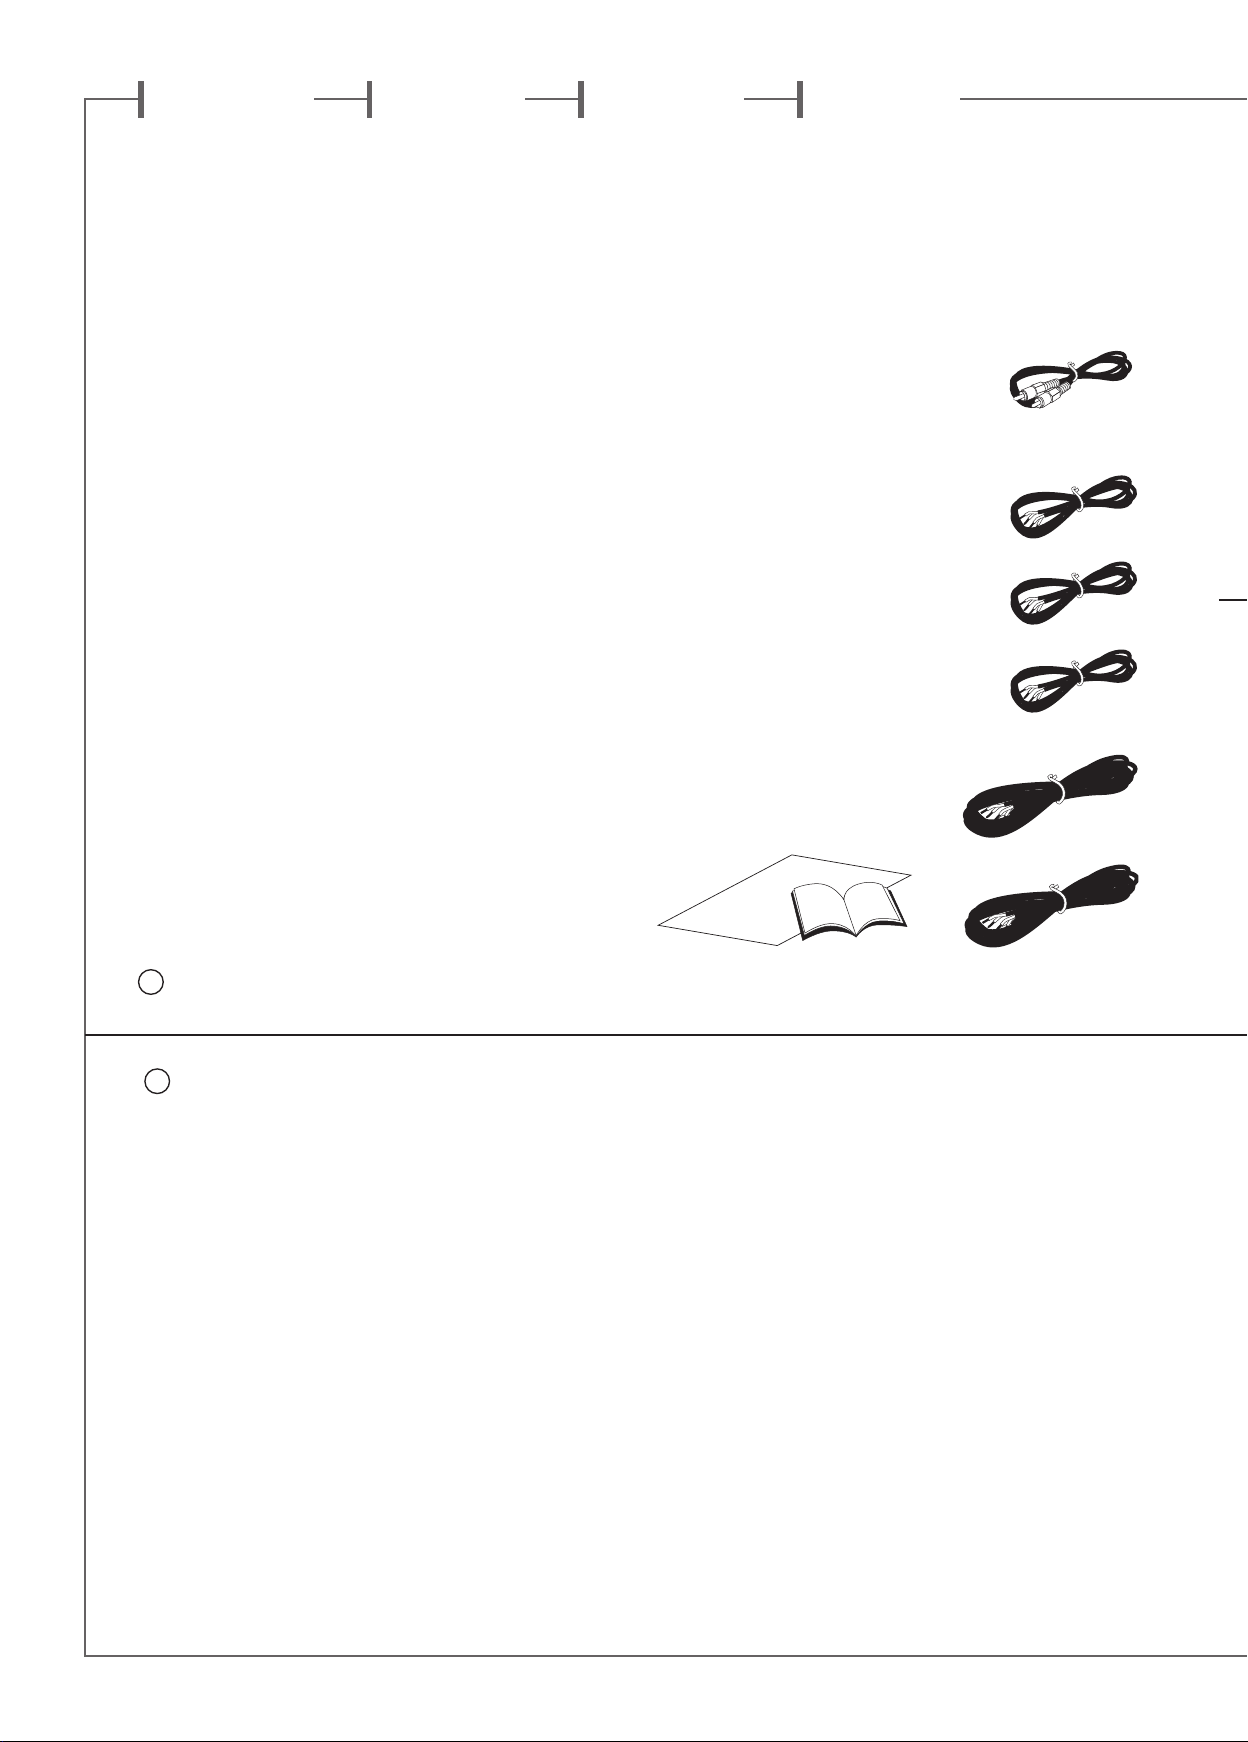
5 satellites Eole 2 avec socles magnétiques pour utilisation
murale ou sur étagère, deux pieds.
La version avec socle n’est pas conçue pour être montée
au plafond.
1 caisson de graves actif Santorin 21 et ses 4 pointes de
découplage, 1 câble CINCH, 5 câbles haut-parleurs (3 x
6 m et 2 x 12 m), 1 cordon d’alimentation. Le satellite Eole
2 peut être posé
2
, fixé au mur 3 ou fixé sur un pied 4.
1
:
BRANCHEMENT DU SYSTEME EN 5.1
ATTENTION ! Avant d’effectuer tout raccordement, éteindre votre amplificateur audio video et votre caisson de graves
et les débrancher du secteur.
ATTENTION ! Il est impératif, avant tout branchement, de respecter
la mise en phase en reliant les bornes +/rouges de l’amplificateur aux
bornes +/rouges des satellites. Procéder ensuite de la même façon pour
les bornes -/noires.
Une entrée LINE IN est reliée à la sortie SUBWOOFER/LFE
de l’amplificateur audio vidéo à l’aide du câble CINCH.
Vérifiez tous les raccordements effectués sur les satellites,
le caisson de graves et l’amplificateur audio vidéo. Assurezvous que chaque satellite est raccordé convenablement en
fonction de sa position dans la pièce. Vérifiez que tous les
conducteurs sont bien en phase (+/rouge dans +/rouge et
-/noir dans - /noir). Un branchement incorrect peut entraîner une perte totale de signal. Une fois cette vérification
faite vous pouvez brancher votre amplificateur audio vidéo
et le caisson de graves sur le secteur.
BRANCHEMENT DU SYSTEME EN 2.1
Avec le câble haut-parleur fourni, connecter les sorties de
votre amplificateur intégré Hi-Fi aux bornes HIGH-LEVEL
INPUT de l’amplificateur du Santorin 21, ensuite utiliser les
sorties HIGH-LEVEL OUTPUT du Santorin 21 pour connecter les satellites Eole 2. Attention : respecter les polarités en
reliant les bornes + entre elles et bien connecter les sorties
gauche (L) aux entrées gauche (L).
6
6
5
PLACEMENT DU SYSTEME
Les satellites Eole 2 étant tous identiques, ils peuvent être
utilisés indifféremment sur n’importe quel canal. Tous les
satellites sont blindés magnétiquement de façon à prévenir
toute interférence avec l’image de votre téléviseur, ils peuvent donc être placés à proximité de tout écran.
Aucun élément (table, fauteuil...) ne doit gêner la propa-
gation directe entre les enceintes et l’auditeur.
Les satellites avant gauche et avant droit doivent être di-
rigés vers la zone d’écoute et placés de chaque côté de
l’image, une distance comprise entre 2 et 5 m doit séparer
les 2 satellites.
Le satellite central doit être placé le plus près possible de
l’image : au dessus, en dessous ou directement posé sur
votre écran. Placer le satellite à la verticale du centre de
l’image pour une cohésion et une précision parfaite entre
les dialogues et l’image.
Les satellites arrières doivent être placés à hauteur d’oreille
ou plus haut si possible et légèrement en arrière de la zone
d’écoute.
Le caisson de graves Santorin 21 doit être placé dans la
zone d’écoute avant. Pour obtenir le meilleur résultat, il
est toujours nécessaire de faire des essais d’emplacement
du caisson de graves en fonction de l’acoustique de votre
pièce. Afin de prévenir toute interférence avec l’image de
votre téléviseur, placer le caisson de graves Santorin 21 à
au moins 60 cm de votre téléviseur.
:
ATTENTION ! Afin de prévenir les risques de choc électrique, veillez à enfoncer complètement les prises du cordon
d’alimentation reliant le caisson de graves au secteur.
RÉGLAGES DU CAISSON
DE GRAVES SANTORIN 21 7
Veiller à bien positionner le commutateur de secteur 115V/230V
sur le voltage adéquat. Le commutateur marche/arrêt du caisson de graves Santorin 21 dispose de 3 positions :
ON : Marche permanente.
AUTO : Marche automatique : le système se met automa-
tiquement sur ON ou OFF en fonction de la présence ou de
l’absence de signal venant de l’amplificateur. Pour arrêter le
système il suffit donc d’éteindre l’amplificateur audio vidéo.
OFF : Arrêt.
Mettre le commutateur de marche sur AUTO ou ON.
CROSSOVER : régler le potentiomètre sur 140 Hz en mode
2.1 et 200 Hz en mode 5.1.
VOLUME : le réglage de niveau s’effectue suivant les be-
soins. Le réglage moyen est obtenu avec le potentiomètre
VOLUME en position 12 H. Pour un réglage optimum de
ce niveau, nous vous conseillons de l’effectuer à partir
d’une source stéréo (CD). À l’aide du TEST TONE de votre
amplificateur audio vidéo, ajuster le niveau du canal.
PHASE : en général, il faut positionner le potentiomètre sur 0°.
Cependant, nous vous conseillons les 2 positions suivantes :
- régler le potentiomètre sur 0° lorsque le caisson de graves
et les satellites avant sont positionnés sur un arc de cercle à
équidistance de la zone d’écoute.
- régler le potentiomètre sur 180° lorsque le caisson de graves est positionné à 1,50 m en avant ou en arrière de l’arc de
cercle formé par les satellites.
:
Page 9
f r a n c a i s
RÉGLAGE DE VOTRE AMPLIFICATEUR
AUDIO VIDÉO
Le tableau ci-dessous vous indique les réglages à adopter dans
le menu «SET-UP» de votre amplificateur audio-vidéo :
Enceintes Réglage
AVANT GAUCHE/FRONT LEFT SMALL
AVANT DROIT/FRONT RIGHT SMALL
CENTRE/CENTER SMALL
ARRIÈRE GAUCHE/SURROUND LEFT SMALL
ARRIÈRE DROIT/SURROUND RIGHT SMALL
SUBWOOFER/LFE ON / 140 Hz
Après avoir sélectionné le mode «ON» pour le caisson de graves, il faut régler la fréquence de coupure haute du caisson
sur 150 Hz.
8
amplificateur AV
MARQUAGE DEEE
Traitement des appareils électriques et électro-
niques en fin de vie (applicable dans les pays de
l’Union européenne).
Ce symbole, représentant une poubelle sur roues barrée d’une
croix, apposé sur le produit, indique que ce produit ne doit pas être traité avec les déchets ménagers. Il doit être remis à un point de collecte
pour le traitement des équipements électriques
et électroniques en fin de vie. En s’assurant que
ce produit est bien mis au rebut de manière appropriée, vous
aiderez à prévenir les conséquences négatives potentielles
pour l’environnement et la santé humaine.
matériaux aidera à conserver les ressources naturelles. Pour
toute information supplémentaire au sujet du recyclage de ce
produit, vous pouvez contacter votre municipalité, votre déchetterie ou le magasin où vous avez acheté le produit.
Le recyclage des
SPECIFICATIONS ELECTRIQUES DU CAISSON
DE GRAVES SANTORIN 21
Alimentation : 110-120V/220-240V~ 60/50Hz
Consommation : 200W
Consommation en mode veille :
0,49W @ 220-240VAC --- 0,5W @ 110-120VAC
Consommation en mode arrêt :
0,04W @ 220-240VAC --- 0,04W @ 110-120VAC
Température d’utilisation : +5°C to +35°C
Temperature de stockage : -5°C to +40°C
Taux d’humidité en utilisation : 40% to 70%
IDENTIFICATION DES PROBLÈMES
Si vous avez un disfonctionnement avec votre système, éteindre votre source audio vidéo et rechercher la solution dans le
tableau à suivre. Si le problème persiste, prenez contact avec
votre revendeur Cabasse ou notre service consommateur.
Problèmes Solutions
Le système
ne fonctionne pas
Pas assez ou
trop de graves
Pas de son
surround
• Assurez-vous que l’amplificateur audio
vidéo et le caisson de graves sont bien
raccordés au secteur et en position ON
ou AUTO.
• Assurez-vous que la source est bien sélectionnée sur l’amplificateur audio vidéo
(vidéo, CD, DVD, tuner...).
• Vérifiez les raccordements des satellites.
• Assurez-vous que les connexions entrées
sorties numériques entre lecteur CD/DVD
et amplificateur audio vidéo sont correctes et faites par câble coaxial ou optique.
• Approchez le caisson de graves du mur ou
d’un angle de la pièce pour augmenter le
niveau de l’extrême grave.
• Éloignez le caisson de graves du mur ou
d’un angle de la pièce pour diminuer le
niveau de l’extrême grave
• Ajuster le potentiomètre VOLUME du
caisson de graves.
• Ajuster le contrôle LFE de votre amplificateur audio vidéo.
• Vérifiez que les réglages de votre amplificateur audio vidéo sont corrects.
NETTOYAGE DES ENCEINTES
le système Eole 2 peut-être nettoyé à l’aide d’un linge doux,
ne pas utiliser de détergeant ni de liquide pouvant couler à
l’intérieur des enceintes.
N’utiliser aucun solvant, produit chimique ou solution de nettoyage contenant de l’alcool, de l’ammoniaque ou un abrasif.
Le tissu de protection des satellites ou du caisson Santorin 21
peut être nettoyé à l’aide d’un aspirateur si nécessaire ; attention les haut-parleurs du satellite Eole 2 étant très proches de
la grille de protection, une aspiration à trop forte puissance
pourrait endommager votre satellite Eole 2.
SERVICE APRÈS VENTE
Cabasse dispose d’un réseau de revendeurs agréés qui est à
votre disposition pour assurer le service après vente de votre
matériel.
Pour connaître la liste des revendeurs agréés Cabasse, contactez-nous ou consultez notre site Internet www.cabasse.com.
En suivant les conseils d’installation, de branchement et d’emploi explicités dans cette notice, vous êtes assurés d’un fonctionnement parfait de
votre Eole 2 SYSTEM. Nous recevons tous les jours des lettres de clients satisfaits du choix de leurs enceintes et ces lettres sont pour nous la plus
belle récompense de nos efforts.
Page 10
e n g l i s h
Thank you very much for choosing Cabasse speakers.
Please read carefully these instructions before setting up your speakers.
With the Eole 2 SYSTEM, Cabasse proposes a 5.1 audio
video system based on the Spatially Coherent Source (SCS)
principles coming from our high end ARTIS range of speakers. With these 2-way speakers combined with a Santorin 21
active subwoofer, you can get a very high quality system, in a
5.1 configuration (5 channels system).
SAFETY INSTRUCTIONS
Explanation of graphical
symbols -
triangle, is intended to alert you
to the presence of uninsulated “dangerous voltage” within the
product’s enclosure that may be of sufficient magnitude to
constitute a risk of electric shock to persons.
The exclamation point within an equilateral triangle
is intended to alert you to the presence of important
operating and maintenance (servicing) instructions in the literature accompanying the appliance.
The lightning flash
with arrowhead symbol,
within an equilateral
Instructions - Carefully read through all the safety and ope-
rating instructions before switching on any device for the first
time.
Keep these instructions in mind - They will be constant-
ly referred to through this manual.
Pay special care to warnings - All the warning labels on
the product or warning notes in the user’s manual must be
followed.
Follow the instructions - Follow carefully all the installa-
tion and operation instructions.
Cleaning - Always take off the power cord before cleaning
the device. Do not use cleaning solvent, whether liquid or air
spray. Using a soft damp cloth is recommended.
Accessories - To avoid incidents, only use accessories ex-
pressly recommended by Cabasse.
Water and moisture -
damp or wet locations, such as humid basements, next to a
bathtub, sink, swimming pool or any other similar conditions.
The product shall not be used in
Carts and Stands - The appliance should be
used only with a cart or stand that is recommended by the manufacturer.
> Portable cart warning
Installation on a piece of furniture and stands - Do
not place this device on an unsteady surface, i.e. a stand, tripod, table, shelf, etc. It may fall and cause serious injury to a
nearby child or adult.
Ventilation outlets - The device shall not be placed in a
position that restrains the operation of its fans. Avoid installing the device on a bed, couch, blanket or other similar
surfaces that may prevent the appropriate air flow. Do not
install the device in a confined space, such as a book shelf or
other piece of furniture, that could prevent sufficient air from
flowing freely.
Power - The device shall only be connected to a source of
power compliant to the one described in this manual or on
relevant printed labels on the product. If you are not sure of
the type of power available, please contact your reseller or the
local power company.
Power cords - The power cords must be laid out in such
a way that they cannot be walked on, pinched, bent under
other devices. Also pay special attention to the matching of
the plugs and the connection of the cord to the device.
Lightning - For better protection against lightning or if the
device must remain unused for long stretches of time, unplug
the power cord and antenna jack. This minimizes potential
damages due to lightning or line surges.
Overloads - Avoid overloading the power plugs, extension
cords or power relays. This could result in fire or electric
shocks.
Foreign bodies and liquids - Avoid letting foreign mate-
rials or liquids enter the device. They could cause fire or electric shocks. Never spill any liquid on the device.
Maintenance - Users must never attempt to maintain the
device on their own, except for those maintenance operations
described in this manual. Any task beyond regular user maintenance must be performed by qualified service operators.
Troubleshooting - You must unplug your device from the
power supply and have it checked by a qualified technician if:
The power supply or the plug is damaged.
Foreign bodies or liquid penetrated the device.
The device was exposed to dripping or splashing.
The device does not seem to work correctly under normal
operating conditions. Only operate the controls described
in this manual. Any other operation could damage the de-
vice and require on-site visit of a qualified technician.
The device has fallen or its housing is damaged.
The performances of the device are strongly altered.
Spare parts - If spare parts are needed to repair the device,
make sure that the technician followed the manufacturer’s recommendations or that the replacing parts feature the same
specifications as the original ones. Non-compliant parts can
result in multiple damages, including fire or electric shocks.
Checks - After any servicing of the device, ask the technician
to perform appropriate testing to make sure that the device
works safely.
Exposure to high temperatures - The device should be
kept away from heating sources, such as radiators, heaters,
amplifiers or any other similar item likely to make the operating temperature rise excessively.
Applicable for USA, Canada or where approved for usage
Caution ! To prevent electric shock, match wide blade plug to wide
slot, insert fully.
Page 11
e n g l i s h
UNPACKING
Open carton flaps; leave one by one all the components. If
the speakers or the subwoofer appear damaged, do not use
them. Repack everything in the original packing and contact
your authorized Cabasse dealer immediately. We suggest you
to retain the packing for future use.
CAUTION ! Handle with care the 23.5 lb (11.5 kg) of the
subwoofer. Use good lifting practice to avoid injury.
CAUTION ! To avoid electric shock or fire hazards, do not expose
speakers to rain or moisture.
CAUTION ! To avoid danger of suffocation keep the plastic bags that
wrap these speakers out of the reach of children.
SETTING UP
THE COMPONENTS OF YOUR SYSTEM 1
5 Eole 2 speakers with magnetic cups for use on bookshelf
and on wall, 2 stands.
1 Santorin 21 active subwoofer subwoofer with its 4
spikes, 1 CINCH cable, 5 loudspeaker cables (3 x 6 m /
20 ft - 2 x 12 m / 40 ft).
The Eole 2 speaker can be placed on a shelf
3
wall
or fixed on a stand 4.
:
This version with cup is not designed for ceiling mounting.
2
, fixed on a
CONNECTIONS OF 5.1 CONFIGURATION
CAUTION ! Before making any connection turn off your
AV amplifier and unplug it from the outlet. Not doing so
may result in damage to your system.
CAUTION ! It is imperative before any connection to respect the setting in phase by connecting the terminals +/red of the AV amplifier to
the terminal +/red of the speakers. Proceed then in the same way for
terminals -/black.
Connect of the LINE IN inputs of the subwoofer to the
output SUBWOOFER/LFE of the AV amplifier using the
CINCH cable.
Check all the connections carried out on the speakers, the
subwoofer and the amplifier. Ensure that each speaker is
connected according to its position in the room. Check that
all the speakers are well in phase (+/red in +/red and -/black
in - /black). Once this checking made you can connect your
amplifier and the subwoofer to the sector.
CONNECTIONS OF 2.1 CONFIGURATION
Use the supplied loudspeaker cables to connect the speaker outputs of your integrated stereo amplifier to the HIGH
LEVEL INPUTS of the Santorin 21, then connect the HIGH
LEVEL OUTPUTS of the Santorin 21 to the terminals of the
eOle loudspeakers. ATTENTION: be assured that all “+”
inputs are effectively connected to “+” outputs as well as all
left outputs to left inputs.
6
6
POSITIONNING 5
Eole 2 speakers have all the same technical features; they
can be used on any channel. All the speakers are magnetically shielded to prevent interference with the image of your
television set; they can thus be placed near any screen.
No solid object or piece of furniture should be placed
between the speakers and the listener.
Front left and right speakers must be directed towards the
listening area and placed on either side of the screen with at
least a distance of 7 ft and 16 ft (2 and 5 m) between the
2 speakers.
The centre satellite should be placed as close as possible to
the screen: on the top, below, or directly on your television
set. Place the satellite at the vertical of the screen for a perfect cohesion and precision between dialogues and picture.
Surround speakers should be placed against the side walls,
at listening height or higher if possible and slightly behind
the listening area.
The Santorin 21 subwoofer should be placed in the front
listening area. To get the best result, it is always necessary
to carry out tests according to the acoustics of the room. To
prevent interference with the screen of your television set,
place the subwoofer at least 2 ft (0.6m) of your television
set.
:
CAUTION ! To prevent the risks of electric shock take care
to completely insert plugs of mains cords.
SUBWOOFER ADJUSTING 7
Take care of positioning the sector switch 115V/230V on the
right position according to your country.
The switch ON/OFF (located on the back) of the subwoofer
has 3 positions:
ON
AUTO : Automatic, the system is put automatically on ON
or OFF according to the presence of signal coming from
the AV amplifier. Put the switch ON/OFF on AUTO or ON
position.
OFF
CROSSOVER : adjust the potentiometer on 140 Hz for 2.1
configuration and 200 Hz for the 5.1one.
VOLUME : the adjustment of the volume will depend upon
room positioning, type of amplifiers… With Eole 2 SYS-
TEM the average position is on a “12 AM” position. For
an optimum adjustment of the volume, we advise you to
carry out it starting from a stereo source (CD). Then use
the TEST TONE of your AV amplifier to adjust the level of
channel SUBWOOFER/LFE.
PHASE : usually it is necessary to position the potentiome-
ter on 0°, however 2 positions can be used 0° and 180 °.
- adjust the potentiometer on 0° when the subwoofer and
the front speakers are positioned at the same distance of the
listening area.
- adjust the potentiometer on 180° when the subwoofer is
positioned 5 ft (1.5m) ahead or behind the front speakers.
:
Page 12
SETTING YOUR AV AMPLIFIER
The table below shows the specific adjustments to be entered
during the setup of the AV receiver :
Speakers AV amplifier
FRONT LEFT SMALL
FRONT RIGHT SMALL
CENTER SMALL
SURROUND LEFT SMALL
SURROUND RIGHT SMALL
SUBWOOFER/LFE ON / 140 Hz
After having selected the «ON» option for the use of the
subwoofer in the setup menu, select or enter 140 Hz as the
upper cross-over frequency for the subwoofer.
8
adjusting
WEEE MARK
Disposal of Wastes of Electrical & Electronic
Equipment (Applicable in the European Union)
This symbol on the product, consisting of the crossed-out
wheeled bin, indicates that this product shall
not be treated as household waste. Instead it
shall be handed over to the applicable collection point for the disposal of electrical and elec-
tronic equipment at the end of life. By ensuring
this product is disposed of correctly, you will help prevent potential negative consequences for the environment and human
health, which could otherwise be caused by inappropriate
waste handling of this product. The recycling of materials will
help to preserve natural resources. For more detailed information about recycling of this product, please contact your local
city office, your household waste disposal service or the shop
where you purchased the product.
SANTORIN 21 SUBWOOFER POWER
REQUIREMENT
Voltage : 110-120V/220-240V~ 60/50Hz
Power consumption : 200W
Standby power consumption :
0.49W @ 220-240VAC --- 0.5W @ 110-120VAC
Power consumption when off :
0.04W @ 220-240VAC --- 0.04W @ 110-120VAC
Useable temperature range : +5°C to +35°C
Storage temperature : -5°C to +40°C
Useable humidity range : 40% to 70%
TROUBLESHOOTING
If you have a problem with your Eole 2 SYSTEM, turn off your
sound source and try the solutions below. If you still have a
problem, contact your Cabasse dealer to arrange for service.
Problems Solutions
The system does not
function at all
Not enough or
too much bass
No surround sound • Check that the adjustments of your AV
• Make sure the amplifier and the subwoofer plugged into an operating AC wall
outlet and that the subwoofer is turned
ON or AUTO.
• Be sure that the right source is selected on the amplifier (video, CD, DVD,
tuner…).
• Check the speaker connections.
• Turn the subwoofer on ON or AUTO.
• For digital sound, be sure a coaxial or
optical cable connects the digital output
of the DVD player with the digital input
of your amplifier..
• Move the subwoofer closer to a wall
or a corner to increase very low bass
frequencies.
• Move it farther away from a wall or a corner to decrease very low bass frequencies.
• Adjust the LFE level control of your AV
amplifier
amplifier are correct.
CLEANING THE SPEAKERS
The cabinets of Eole 2 speakers may be cleaned with a soft
damp cloth. Do not use any sprays near the system or allow liquids to spill into any openings. Also, do not use any solvents,
chemicals, or cleaning solutions containing alcohol, ammonia, or abrasives.
The grill assemblies on the speakers may be carefully vacuumed, if necessary. Please note that the drivers are located directly behind the grille cloth, and are easily damaged if reasonable care is not taken.
AFTER SALE SERVICE
Cabasse retailers’ network is at your disposal to ensure the
after sale service of your material. To get the list of Cabasse retailers, contact us or consult our web site www.cabasse.com.
Thanks to the above information, your Eole 2 SYSTEM is now nicely set up and we hope you will enjoy your speaker system for many years. We
receive every day letters from customers expressing the ever growing satisfaction and musical emotion they have been getting with our speakers over
the years. These letters are our first motivation.
Page 13
d e u t s c h
Sie haben kürzlich Cabasse Lautsprecher erworben und wir danken Ihnen für das uns
entgegengebrachte Vertrauen. Damit Sie den unvergleichlichen Musikgenuss der Cabasse
Lautsprecher über lange Zeit genießen können, empfehlen wir Ihnen diese Hinweise
vor Inbetriebnahme der Lautsprecher sorgfältig zu lesen.
Das Cabasse Alcyone SYSTEM ist eine Audio-Video Anlage,
welche die aus der anspruchsvollen ARTIS Reihe stammende
SCS Technologie (Source à Cohérence Spatiale) weiterführt.
Mit den Alcyone 2 Weg-Lautsprechern, in Verbindung mit einem Alcyone Subwoofer, können Sie ein sehr anspruchsvolles
System zusammenstellen: Konfiguration 5.1 (5 Kanal-Wiedergabe).
SICHERHEITSHINWEISE
Bedeutung der Symbole :
Der Blitz mit Pfeilspitze
in einem gleichseitigen
Dreieck dient als Warnhinweis für
unisolierte Stromspannung inne-
rhalb des Gerätegehäuses, die stark genug sein kann, um eine
Stromschlaggefahr zu bilden.
Das Ausrufezeichen in einem gleichseitigen Dreieck
dient als Warnhinweis für umfangreiche Bedienungsund Instandhaltungshinweise in der beiliegenden Dokumentation.
Hinweise: Alle Sicherheits- und Verwendungshinweise müs-
sen vor der Inbetriebnahme aufmerksam gelesen werden.
Hinweise beachten: Es muss grundsätzlich auf diese
Hinweise Bezug genommen werden.
Warnhinweise beachten: Die Warnhinweise am Produkt
oder in den Gebrauchsanleitungen sind grundsätzlich zu
beachten.
Hinweise befolgen: Alle Verwendungs- und Dur-
chführungshinweise müssen genauestens befolgt werden.
Reinigung: Vor jeder Reinigung ist der Gerätestecker zu zie-
hen. Keine flüssigen oder Sprüh-Reinigungsmittel verwenden.
Am besten eignet sich ein feuchtes Tuch.
Zubehör: Bitte nur vom Hersteller empfohlene Zubehörteile
verwenden. Ansonsten besteht Unfallgefahr.
Wasser und Feuchtigkeit: Das Gerät darf nicht in der
Nähe von Wasser, z.B. in der Nähe einer Badewanne, einer
Spüle, eines Swimmingpools, in einem feuchten Keller o.ä.,
benutzt werden.
Rollwagen und Standfüße - Die Geräte soll-
ten nur mit vom Hersteller empfohlenen Rollwagen oder Standfüßen verwendet werden.
> Warnung für transportable Rollwagen
Unterlage: Das Gerät nicht auf unstabile Unterlagen, z.B.
Standfüße, ein Stativ, Tisch, Regale o.ä. stellen, wo es herabfallen und Verletzungen verursachen könnte.
Belüftung: Das Gerät so unterbringen, dass die Eigenbelüf-
tung nicht beeinträchtigt wird. Nicht auf ein Bett, Sofa, eine
Decke o.ä. stellen, weil sich die Belüftungsöffnungen verstopfen könnten. Es darf wegen der Gefahr des Luftmangels auch
nicht stark eingeengt werden, z.B. auf schmalen Regalen oder
in einem geschlossenen Schrank.
Stromversorgung: Das Gerät darf nur an eine Stromquelle
angeschlossen werden, wie in der Gebrauchsanleitung oder
auf dem Aufdruck beschrieben ist. Wenn Sie sich der verfügbaren Stromstärke nicht sicher sind, wenden Sie sich bitte an
Ihren Fachhändler oder Ihren Elektrizitätsversorgungsbetrieb.
Schutz der Netzanschlussleitungen : Die Netzanschlus-
sleitungen dürfen nicht gequetscht oder eingeklemmt werden
(z.B. von anderen, darauf stehenden Geräten). Es muss insbesondere auf die richtigen Anschlüsse geachtet werden.
Gewitter : Aus Sicherheitsgründen sollte das Gerät bei
Gewitter nicht benutzt werden. Wenn es längere Zeit unbenutzt bleibt, sollten Stecker und Antennenanschluss herausgezogen werden, um Blitzeinschlag oder Beschädigungen
durch elektrische Überlastung vorzubeugen.
Elektrische Überlastung : Verlängerungsleitungen oder
Steckdosen nicht überlasten. Feuer- oder Stromschlaggefahr!
Fremdkörper und -flüssigkeiten : Darauf achten, dass
keine Fremdkörper oder Flüssigkeiten in das Gerät gelangen.
Feuer- oder Stromschlaggefahr!
Wartung und Pflege : Instandhaltungsarbeiten, die über
die in der Gebrauchsanleitung beschriebenen Vorgänge hinausgehen, sind von qualifizierten Fachkräften auszuführen.
Instandhaltung : In folgenden Fällen muss der Gerätestec-
ker gezogen und das Gerät von einer qualifizierten Fachkraft
geprüft werden:
Beschädigung an Netzkabel oder Netzanschluss.
Fremdkörper oder -flüssigkeiten im Gerät.
Das Gerät hat im Regen gestanden oder wurde mit Wasser
bespritzt..
Das Gerät scheint nicht einwandfrei zu funktionieren,
obwohl Sie es normal benutzen. Nur die in der Gebrauchsanleitung beschriebenen Bedienelemente dürfen Sie selbst
ausprobieren. Alle sonstigen Eingriffe sind von einer qualifizierten Fachkraft auszuführen..
Das Gerät ist heruntergefallen oder das Gehäuse ist bes-
chädigt.
Die Geräteleistung scheint beeinträchtigt zu sein.
Ersatzteile : Wenn bei der Reparatur Teile ausgewechselt
wurden, stellen Sie bitte sicher, dass der Techniker die vom
Hersteller empfohlenen Ersatzteile oder solche Teile verwendet hat, die die gleichen Merkmale wie die Originalteile besitzen. Ansonsten besteht Feuer- oder Stromschlaggefahr o.ä.
Kontrollen: Nach jedem technischen Eingriff sollte die Ge-
rätesicherheit von einer qualifizierten Fachkraft kontrolliert
werden.
Wärmeeinwirkung : Das Gerät muss von Wärmequellen
wie Heizkörpern, Heizelementen, Verstärkern oder sonstigen
Teilen, die starke Wärme erzeugen, fern gehalten werden.
Page 14
AUSPACKEN
DER LAUTSPRECHERBOXEN
Öffnen Sie bitte den Karton, um nach und nach jedes einzelne Element Ihres Eole 2 SYSTEMS herauszuholen. Wir empfehlen Ihnen die Verpackung aufzubewahren und diese flach
zu lagern für eine spätere Verwendung.
VORSICHT ! Vorsicht ! Bitte gehen Sie vorsichtig mit dem
11,5 Kg schweren Subwoofer um, damit Sie sich nicht verletzen.
VORSICHT ! Um Brandrisiken und Stromschlaggefahr zu vermeiden,
halten Sie bitte die Lautsprecher von Feuchtigkeit und Wasser fern.
VORSICHT ! Um eine Erstickungsgefahr zu vermeiden bewahren Sie
bitte die Verpackung weit entfernt von Kindern auf.
MONTAGE UND AUFBAU
DIE EINZELNEN BESTANDTEILE
IHRES SYSTEMS 1
5 Eole 2 Satelliten mit Sockel mit Befestigung and der
Wand und Aufstellung auf einer waagerechten Oberfläche,
2 Ständer.
Version ist nicht für eine Deckenbefestigung geeignet.
1 aktiver Cabasse Santorin 21 Subwoofer mit 4 Spikes,
1 CINCH-Kabel, Lautsprecherkabel (3 x 6 m und 2 x 12 m).
Die Eole 2 Satelliten können auf einem Regal
Wand angebracht
4
den
.
AUFSTELLUNG DES EOLE SYSTEMS 5
Da alle Satelliten des Eole 2 identisch sind, können diese
für jeden Kanal Ihrer Anlage verwendet werden. Alle Satelliten sind magnetisch abgeschirmt, um jegliche Einstreuung
in Ihren Fernseher zu verhindern, somit können diese direkt
neben einer Bildquelle aufgestellt werden.
Kein Mobiliar (Tisch, Sessel, usw.) sollte die direkte Abstra-
hlung von den Lautsprechern zum Hörer beeinträchtigen.
Die beiden vorne links und rechts aufgestellten Satelliten
müssen in Richtung des Hörplatzes abstrahlen und das Bild
sollte möglichst mittig stehen, mit jeweils einem Abstand
von 2 bis 5 Metern zwischen dem Bild und den Satelliten.
Der Center-Satellit sollte so nahe wie nur möglich an das
Bild angekoppelt werden, entweder über, unter oder direkt
auf den Fernseher stehend. Der Center-Satellit sollte mittig
auf dem Fernseher stehen, damit eine Kohärenz zwischen
dem Bild und den Dialogen aus dem Satelliten entsteht.
Die hinteren Satelliten sollten möglichst in Ohrhöhe oder
höher und leicht hinter dem Hörplatz aufgestellt werden.
Der Subwoofer sollte möglichst in der vorderen Hälfte des
Hörraums aufgestellt werden. Jedoch ist es wichtig, den genauen Aufstellungsplatz des Subwoofers zu orten, indem
man diesen an verschiedenen Punkten des Hörraums ausprobiert. Der Klang ist immer raumbedingt. Um jegliche
Einstreuung in den Fernseher zu vermeiden sollte der Santorin 21 Subwoofer mindestens 0,6 Meter von dem Fernsehgerät entfernt sein.
:
2
, an der
3
oder auf einen Standfuß montiert wer-
:
ANSCHLUSS 5.1 SYSTEM 6
VORSICHT ! Vor dem Anschluss bitte Verstärker und
Subwoofer ausschalten, am besten indem Sie die Netzstecker der genannten Geräte ziehen.
VORSICHT ! Bitte verwenden Sie nie beschädigte Kabel; Kontakte und
elektrische Kurzschlüsse könnten Ihre Anlage unwiderruflich beschädigen. Vor der Inbetriebnahme sollten Sie sich vergewissern, dass alle Phasen stimmen, indem Sie überprüfen ob die +/roten Klemmen des Verstärkers mit den +/roten Klemmen der Satelliten verbunden sind. Bitte
überprüfen Sie nach dem gleichen Muster die - /schwarzen Klemmen.
Verbinden Sie mit dem CINCH-Kabel einen Eingang LINE
IN am Subwoofer mit dem Ausgang SUBWOOFER/LFE am
Audio/Video-Verstärker.
Kontrollieren Sie bitte, ob alle Anschlüsse und Verbindungen
korrekt durchgeführt wurden : Satelliten und SubwooferVerbindungen mit Ihrem Audio-Videoverstärker. Vergewissern Sie sich, dass alle Satelliten korrekt aufgestellt wurden,
sodass Ihr Audio-Videoverstärker auch die richtigen Satelliten ansteuert. Überprüfen Sie bitte, dass alle Lautsprecherkabel phasengleich angeschlossen sind (+/rot auf +/rot und
schwarz/- auf schwarz/–). Ein nicht korrekt angeschlossenes Kabel kann einen Signalverlust verursachen. Sobald Sie
diese Überprüfung durchgeführt haben, können Sie Ihren
Subwoofer und Ihren A/V Verstärker ans Netz anschliessen.
ANSCHLUSS 2.1 SYSTEM 6
Verbinden Sie mit Hilfe des Lautsprecher-Kabels die Ein-
gänge HIGH-LEVEL INPUT am Subwoofer mit den Lautsprecherausgängen am Audio-Verstärker. Dann verbinden
Sie den Ausgängen HIGH-LEVEL OUTPUT am Subwoofer
mit die Eingänge am Eole 2 Satelliten. Überprüfen Sie bitte, dass alle Lautsprecherkabel phasengleich angeschlossen sind (+/rot auf +/rot und schwarz/- auf schwarz/-),
und dass alle Linken Ausgängen mit Linken Eingänge angeschlossen sind.
VORSICHT ! Um einem Stromschlagrisiko vorzubeugen,
vergewissern Sie sich, dass Sie den Netzstecker bis zum Anschlag in die Subwoofer-Gerätebuchse hineingedrückt haben.
SUBWOOFER-EINSTELLUNGEN 7
Bitte überprüfen Sie, ob der Netzspannungsschalter
115V/230V korrekt eingestellt ist.
Der Ein/Aus-Schalter des Subwoofers verfügt über 3 Positionen:
ON : Permanent eingeschaltet
AUTO : Einschaltautomatik. Das System schaltet sich auto-
matisch ein oder aus, je nachdem, ob ein Signal aus dem
A/VVerstärker anliegt oder nicht. Um das System auszuschalten, reicht es den A/V-Verstärker auszuschalten.
OFF : Ausgeschaltet Stellen Sie bitte den Schalter auf
AUTO oder ON.
CROSSOVER : Drehen Sie bitte das Potentiometer bis zur
Position 140 Hz beim 2.1 System und 200 hz beim 5.1 System auf.
VOLUME : Der Pegel wird nach Ihrem Empfinden einges-
tellt. Ein Mittelwert wird erzielt wenn man das Potentiometer Volume auf 12 Uhr stellt. Um eine perfekte Feinabstimmung zu erzielen empfehlen wir Ihnen, diese an einer
Stereoquelle zu tätigen (CD). Dank des <TEST TONE>
Ihres A/V-Verstärkers können Sie Ihren Subwoofer genau
einpegeln.
:
Page 15
d e u t s c h
PHASE : Im Normalfall sollte das Potentiometer auf 0° ste-
hen, dennoch empfehlen wir Ihnen die folgenden 2 Einstellungen.
- Das Potentiometer auf 0° stellen, wenn die vorderen Satelliten und der Subwoofer einen Halbkreis in Bezug auf Ihren
Hörplatz bilden.
- Das Potentiometer auf 180° stellen wenn Ihr Subwoofer 1,5
Meter nach vorne oder nach hinten, in Bezug auf den von Satelliten gebildeten Halbkreis, entfernt steht.
EINSTELLUNG IHRES
AUDIO/VIDEOVERSTÄRKERS
Die Folgende Tafel zeigt Ihnen an, welche Einstellungen im
«SET-UP» Menü Ihres Audio/Video-Verstärkers vorzunehmen
sind :
Lautsprecher Einstellung
FRONT LEFT SMALL
FRONT RIGHT SMALL
CENTER SMALL
SURROUND LEFT SMALL
SURROUND RIGHT SMALL
SUBWOOFER/LFE ON / 140 Hz
Nach Wahl des Modus «ON» für den Subwoofer, regeln Sie dessen Übernahmefrequenz auf 140 Hz.
8
A/V-Verstärker
WEEE KENNZEICHNUNG
Behandlung der Elektro- und Elektronik-Altgeräte
(Verwendbar in die Europaïsche Union).
Dieses Symbol, das eine durchgestrichene Abfalltonne auf Rädern darstellt, ist auf dem Produkt
angebracht und bedeutet, dass dieses Produkt
nicht als unsortierten Siedlungsabfall zu beseiti-
gen ist. Es muss in eine Sammlungspunkt für die
Behandlung von Elektro- und Elektronik-Altgeräte eingerichtet sein. Versichernd, dass dieses Produkt auf geeignete Weise
beseitigt ist, Sie werden helfen, die potentiellen negativen Folgen
für die Umwelt und die Humangesundheit vorzubeugen. Recycling von Baustoffe wird helfen, die Bodenschätzen zu bewahren. Für jede zusätzliche Information bezüglich des Recyclings
dieses Produktes können Sie mit Ihrer Stadtverwaltung, Ihrer
öffentliche Rücknamestelle oder dem Geschäft kontaktieren, wo
Sie das Produkt gekauft haben.
SANTORIN 21 STROMDATEN
Stromversorgung : 110-120V/220-240V~ 60/50Hz
Leistungsaufnahme : 200W
Standby Stromverbrauch :
0,49W @ 220-240VAC --- 0,5W @ 110-120VAC
Stromverbrauch Off-Modus :
0,04W @ 220-240VAC --- 0,04W @ 110-120VAC
Zulässige Umgebungstemperatur für Betrieb : +5°C to +35°C
Zulässige Umgebungstemperatur für Lagerung -5 °C bis +40 °C
Zulässige Luftfeuchtigkeit für Betrieb 40 % bis 70 %
FEHLERSUCHE
Sollte ein Fehler an ihrem Eole 2 SYSTEM auftreten, schalten Sie bitte Ihren Verstärker aus. Suchen Sie bitte den
Fehler indem Sie sich an die folgende Beschreibungstafel
lehnen. Im Falle, dass Sie den Fehler nicht beheben können,
rufen Sie bitte unseren Verbraucherservice an oder nehmen
Kontakt mit Ihrem Händler auf.
Fehler Lösungen
Alcyone SYSTEM®
funktioniert nicht
Zu wenig
oder zu viel Bass
Keinen
Surround Klang
• Vergewissern Sie sich, dass Verstärker und
Subwoofer am Netz angeschlossen sind,
und dass diese auf Position ON oder
AUTO stehen.
• Vergewissern Sie sich, dass die richtige
Eingangsquelle ausgewählt wurde (Video,
CD, DVD, Tuner...).
• Überprüfen Sie die Lautsprecheranschlüsse.
• Schalten Sie Ihren Subwoofer auf ON
oder AUTO.
• Vergewissern Sie sich, dass der Anschluss
per koaxialem Digitalkabel oder Lichtleiter zwischen Ihrem DVD-Player und
Ihrem A/V-Verstärker korrekt ist.
• Stellen Sie Ihren Subwoofer in Wandnähe
oder in einer Ecke auf, sodass Sie mehr
Tiefbass erzielen.
• Entfernen Sie Ihren Subwoofer von Ihrer
Wand oder Ecke, sodass Sie weniger
Tiefbass erzielen.
• Passen Sie das Volume Potentiometer
Ihrem gewünschten Basspegel an.
• Passen Sie den LFE Pegel Ihres Verstärkers
an.
• Überprüfen Sie, Surround Klang ob die
Einstellungen Ihres A/V-Verstärkers richtig
sind.
SÄUBERN DER LAUTSPRECHER
Ihr Eole 2 SYSTEM kann mit einem weichen Tuch gesäubert
werden, bitte benutzen Sie keine Ätz- oder Reinigungsmittel
die in die Lautsprecher fließen könnten.
Bitte benutzen Sie keine Lösungsmittel, keine Chemikalien oder Reinigungsmittel, die Alkohol, Salmiakgeist oder
Scheuermittel enthalten.
Den Stoffbezug Ihrer Satelliten können Sie, falls notwendig,
mit einem Staubsauger reinigen. Vorsicht ! Der Lautsprecher
sitzt ganz nahe hinter dem Stoffbezug, ein zu starkes Saugen
kann Ihren Satelliten beschädigen.
KUNDENDIENST
Cabasse verfügt über ein zugelassenes Händlernetz, dessen
Kundendienst Ihnen voll und ganz zur Verfügung steht. Wenn
Sie die Adressen der Händler erfahren wollen, rufen Sie uns
an oder besuchen Sie unsere Webseiten unter www.cabasse.
com.
Wenn Sie unseren Aufbau- und Verkabelungs-Empfehlungen folgen und Sie sich nach der Bedienungsanleitung orientieren, ist ein perfektes Funktionieren Ihres Eole 2 SYSTEMS gesichert. Zufriedene Kunden schreiben uns jeden Tag, und das ist für uns die schönste Belohnung.
Page 16
c h i n e s e
非常感谢您选用Cabasse音箱。
在安装音箱前请仔细阅读以下指导说明。
Eole 2系统是Cabasee推出的一套5.1声道影音系统,采用了
我们在高档级别的ARTIS系列音箱中的Spatially Coherent
Source(空间一致音源,简称SCS)设计准则。将系统中
的二路音箱和Santorin 21有源超低音音箱搭配,以5.1声道
方式组合,你便可拥有一套优质的5.1多声道系统。
安全指导
图标说明:
等边三角形 中有一个带
箭头的闪电 符号,意思
是警告阁下产品内部存在着未
绝缘的“危险电压”,极有可
能对人体造成电流冲击的危险。
等边三角形中有一个惊叹号的符号,意思是提醒阁
下随机文件内有重要的操作或保养(服务)提示。
说明:
首次开关任何设备之前,仔细阅读所有安全及操作说明。
记住以上说明:
本说明书中会一直提到这些内容。
警告标志需要特别注意:
产品上的所有警告标志和说明书中的所有警告内容必须遵
守。
遵守说明:
仔细遵守安装和使用说明。
清洁:
清洁设备之前必须拔下电源线。切勿使用任何液态或喷雾
状溶剂。推荐使用润湿的软布清洁。
附件:
为避免发生事故,仅限使用由Cabasse明确推荐的附件产
品。
水与潮气:
本产品切勿在潮湿或有水的环境中使用,例如:潮湿的地
下室;靠近浴缸、水盆、游泳池或类似地方的环境。
推车和底座:
本产品仅限使用由生产商推荐的推车和底座
搬运。
警告:切勿使用便携式推车。
安装在家具或支架上:
切勿把本设备放在不稳定的表面上,例如:支架、三脚
架、桌子、书架等。设备有可能落下对附近的小孩和成人
造成严重伤害。
通风状况:
切勿将本设备放在使其风扇运行受限的位置。避免将本设
备放置在床上、沙发上、地毯上或其它类似表面之上,这
些地方有可能会影响到正常所需的空气流动。避免将本设
备放在空间受限的地方,例如:书架或其它家具的隔间
中,否则会影响空气的自由流动。
电源:
本设备只能与符合本说明书描述或产品相关标签内容的电
源设备连接。如果你不确定现有电源类型,请联系销售商
或本地的电力公司。
电源线:
切勿将电源线放置在可能会有人踩踏、造成挤压、或在其
它设备下方造成扭曲的地方。特别要注意电源线插头要与
设备的插孔相匹配。
雷电:
为了更好地保护本设备不受雷电损坏,或是设备长时间不
使用时,请拔下电源线插头和天线插头。在雷电天气和电
流浪涌时可以将潜在的损坏可能降到最低。
过载:
避免在使用电源线插头、电源延长线或功率继电器时造成
电源过载,否则可能会产生火灾或电击事故。
外来的杂物和液体:
避免杂物和液体进入到设备内部,否则可能会造成火灾或
电击事故。绝不能将液体倾倒在设备上。
日常保养:
除了本说明书中讲到的日常保养操作之外,用家绝不能尝
试自行保养本设备。任何非普通用家的保养操作,均需由
经过认证的服务人员来进行。
故障处理:
如果发生以下情况,必须断开设备的电源,将设备交给经
过认证的技术人员检查:
电源部分或电源插头损坏;
外来杂物或液体渗漏到机内;
有液体滴或泼到设备上;
在正常操作情况下设备不能正常工作,只能按照本说明
书的描述进行操作,任何其它操作可能会损坏本设备,
并且需要请当地经认证的技术人员进行检查。
本设备从高处跌下来,或机壳损坏。
设备的声音表现异常。
更换零部件:
如果本设备的零部件需要更换,请确保技术人员按照生产
厂家的建议进行操作,并且用于更换的零部件规格参数要
与原机零部件一致。不兼容的零部件有可能会造成多重损
坏,包括火灾或电击事故。
检查:
使用设备之后,请让技术人员进行适当的检查以保证设备
安全工作。
暴露在高温之下:
本设备必须远离热源,例如;辐射器、加热器、放大器或
其它类似的可能令操作温度快速上升的器件。
适用于美国、加拿大及其它允许使用的地方:
注意!为了避免电击事故,请将宽口插头完整插入到
宽口插座中。
Page 17
c h i n e s e
拆开包装
打开包装箱;一件一件地将所有部件取出。如果卫星音箱
或超低音音箱看起来有损坏,就不要使用它们。然后用原
包装将所有部件全部装回,并立刻联系Cabasse的授权销
售商。我们建议你保留原包装以备未来使用。
注意!搬运重23.5磅(11.5公斤)的超低音音箱时
务必小心,热身之后再进行以避免受伤。
注意!切勿将音箱暴露在雨水和潮气中,以避免电击或起火
危险。
注意!避免发生产品塑料袋造成的窒息危险,将塑料袋放到
小孩触不到的地方。
安装与设置
本系统中的各个部件(注
五只Eole卫星音箱,两只带磁盖书架式及挂墙式安装;
两只音箱脚架。
这种版本的防磁盖不是为天花安装而设计的。
一只由四只脚钉支撑的Santorin 21有源超重低音音箱;
一根CINCH信号线、五根音箱线(6米/20英尺三根、
12米/40英尺两根)。
Eole 2卫星音箱可以放置在书架上(注
3
(注
)或固定在脚架上(注4)。
1
):
2
)、固定在墙上
5.1声道接线方式(注6)
注意!在连接设备之前,务必关闭影音放大器电源
并且拔下电源线插头。否则有可能造成系统损坏。
注意!在连接设备之前,务必考虑匹配连接相位,将影音放
大器的红色正极与音箱的红色正极相连,并将影音放大器的
黑色负极与音箱的黑色负极相连。
使用随机的CINCH信号线,将超低音音箱的LINE IN
(线路输入 ) 端 子 与 影音放大器的 S U B WOOFER /
LFE(超低音/低频效果)声道输出端子相连。
仔细检查卫星音箱、超低音音箱和放大器的所有连接,
确保每只音箱都依据其在房间中的摆位正确连接。仔细
检查所有音箱的连接相位(红色正极连接红色正极,黑
色负极连接黑色负极),确保放大器与超重低音音箱正
确连接。
2.1声道接线方式(注6)
使用随机 的 音箱线, 将 合并式立 体 声放大器 的 音箱输
出接线端子与Santorin 21超低音音箱的HIGH LEVEL
IN PUTS(高电 平输入)端子连 接,然后,将S antorin
21的HIGH LEVEL OUTPUTS(高电平输出)端子与Eole
2卫星音箱连接。注意:所有输入端子的正极均要与所有
输出端子的正极一一对应连接,同时所有左声道输出端
子均要与左声道输入端子一一对应连接。
注意 !为避免电流冲击,请仔细完全插 好每 个插
头、连接好每根线材。
摆位(注5):
每只Eole 2卫星音箱技术参数均相同,可使用在任何一
个声道。所有的Eole 2卫星音箱都具有磁屏蔽功能,不
会影 响到电视机的画面,所以 可以 靠近任何电视机摆
位。
音箱之间以及音箱和听者之间,不要放置大的对象或是
家具。
左前及右前音箱必须正对听音区域,并且放在电视屏幕
两边,两者距离至少要2-5米或7-16英尺。
中置卫星音箱尽量摆放靠近电视屏幕,放在屏幕上方、
下方或就放在电视顶部。将中置音箱与屏幕垂直平面完
全一致,以保证对白和画面的准确同步。
环绕卫星音箱应贴侧墙摆放,高度与听音位一致,可能
的话摆得略高于听音位并且略靠近听音区域后部。
Santorin 21 超重低音音箱应摆放在听音区域前部。为
了得到最佳效果,需要根据房间的声学待征进行声学测
试。为了避免干扰电视屏幕,超重低音音箱应该放在离
屏幕至少0.6米(2英尺)以外的位置。
调节超低音音箱(注7):
根据所在国家的情况,将115伏/230伏切换钮切换到正确
的电压值。
超低音音箱背面的ON/OFF(开/关)键有三档可选:
开
自动 : 系统根据是否有信号从影音放大器输入来自动选
择开或关的状态。将开/关键位于AUTO或ON的位置。
关
分频点 : 2.1声道方式下,将电位器调节到140赫兹;
5.1声道方式下,将电位器调节到200赫兹。
音量 : 音量调节是根据在房间的摆位、放大器类型等
因素。当使用Eole 2系统时,LEVEL(电平)电位器的
平均位置大约是在十二点钟。为了实现音量调节的最优
化,我们建议你首先使用立体声音源(如CD)来进行
调节,然后再使用影音放大器的TESTTONE(测试音
调)功能来调节超低音/低频效果声道线路输出端子的
电平级。
相位 : 一般来讲是将相位电位器置于0度位置,不过还
有一档180度位置也可以使用。
- 当超低音音箱和前置卫星音箱摆放的位置距离听音位相
同时,将相位电位器置于0度位置。
- 当超低音音箱放在前置卫星音箱的前方或后方5英尺
(1.5米)位置时,将相位电位器置于180度位置。
Page 18
设置你的放大器(注
下方的表格表示当设置影音接收器时,需要作出以下调
节:
8
)
故障处理
如果在使用Eole 2 系统时出现问题,请关闭音源设备并尝
试以下解决方法。如果问题仍然存在,请联系Cabasse销
售商安排售后服务。
音箱 影音放大器调节
前左声道 小
前右声道 小
中置声道 小
左环绕声道 小
右环绕声道 小
超重低音/低频效果声道 开/140赫兹
使用超重低音音箱时,在设置菜单中选择“开”选项后,
选择或输入140赫兹作为分频点。
电子电气设备废弃物处理标志(适用于欧盟)
产品上 此标志由 打上叉 的带轮子 垃圾桶构
成,表示此产品不能够被当作家庭废弃物处
理,而是要在报废后送到合适的电子电气设
备集中处理点进行处理。通过确保此产品被
正确处理,有助于避免对环境和人类健康产
生潜在的负面影响,而这些负面影响有可能在不正确地处
理这 些产 品时 产生 。这 些原 料的 回收 有助于保护自然资
源。关于回收这类产品的更多详细信息,请联系当地城市
相关部门、家庭废弃物处理服务机构或购买产品的商店。
问题 解决方法
系统根本不工作
低频不够或低频太多
没有环绕声效果
• 确保放大器和超低音音箱插在电源
插座上,并且超低音音箱开关位
于“开”或“自动”位置。
• 确保放大器正确选择了信号源通道(视
频、CD、DVD、调谐器等)。
• 检查音箱连接。
• 超低音音箱开关位于“开”或“自
动”位置。
• 播放数字音频时,确保将DVD播放机
的数字音频输出端子与放大器数字音频
输入端子通过同轴信号线或光纤信号
线连接。
• 将超低音音箱靠近墙壁或墙角以增强超
低频响应
• 将超低音音箱远离墙壁或墙角以减弱超
低频响应
• 调节影音放大器上的LFE低频效果声道
电平控制。
• 检查家庭影院放大器的调节选项是否
正确。
EOLE 2 5.1系统功率要求
电压: 110-120 伏/220-240伏 ~ 60/50赫兹
消耗功率: 200瓦
待机消耗功率:
0.49瓦 @ 220-240VAC --- 0.5瓦@ 110-120VAC
关机后消耗功率:
0.04瓦 @ 220-240VAC --- 0.04瓦@ 110-120VAC
使用温度范围: 正5度到正35度
储存温度范围: 负5度到正40度
使用湿度范围: 40%到70%
清洁音箱
Eole 2 音箱的箱体表面可以用润湿的软布进行清洁。切勿
靠近系统使用任何清洁喷雾,也不要让任何液体和溢出物
掉进系统表面的缝隙中。另外,切勿使用任何溶剂、化学
剂或含有酒精、氨水、磨蚀剂的清洁剂。
音箱的单元网罩必要时可以小心地进行吸尘清洁。请注意
音箱单元正位于网罩后方,如果不小心清洁的话很容易造
成单元损坏。
售后服务
Cabasse的销售商网络为你的产品作售后服务。联系我们或
者查看我们的网站www.cabasse.com可获得Cabasse销售商
名单。
CCC 产品认证:
- EOLE 2 5.1 系统白色: ENC1036H
- EOLE 2 5.1 系统黑色: ENC1037CH
感谢阅读以上信息,Eole 2 系统现在已经完全设置好,希望你在往后的日子里都能够享受这套音箱系统。多年以来,我们
每天都会收到消费者的来信,表达他们从我们的音箱中获得的满足感和音乐感动。这些信件是我们首要的动力。
Page 19
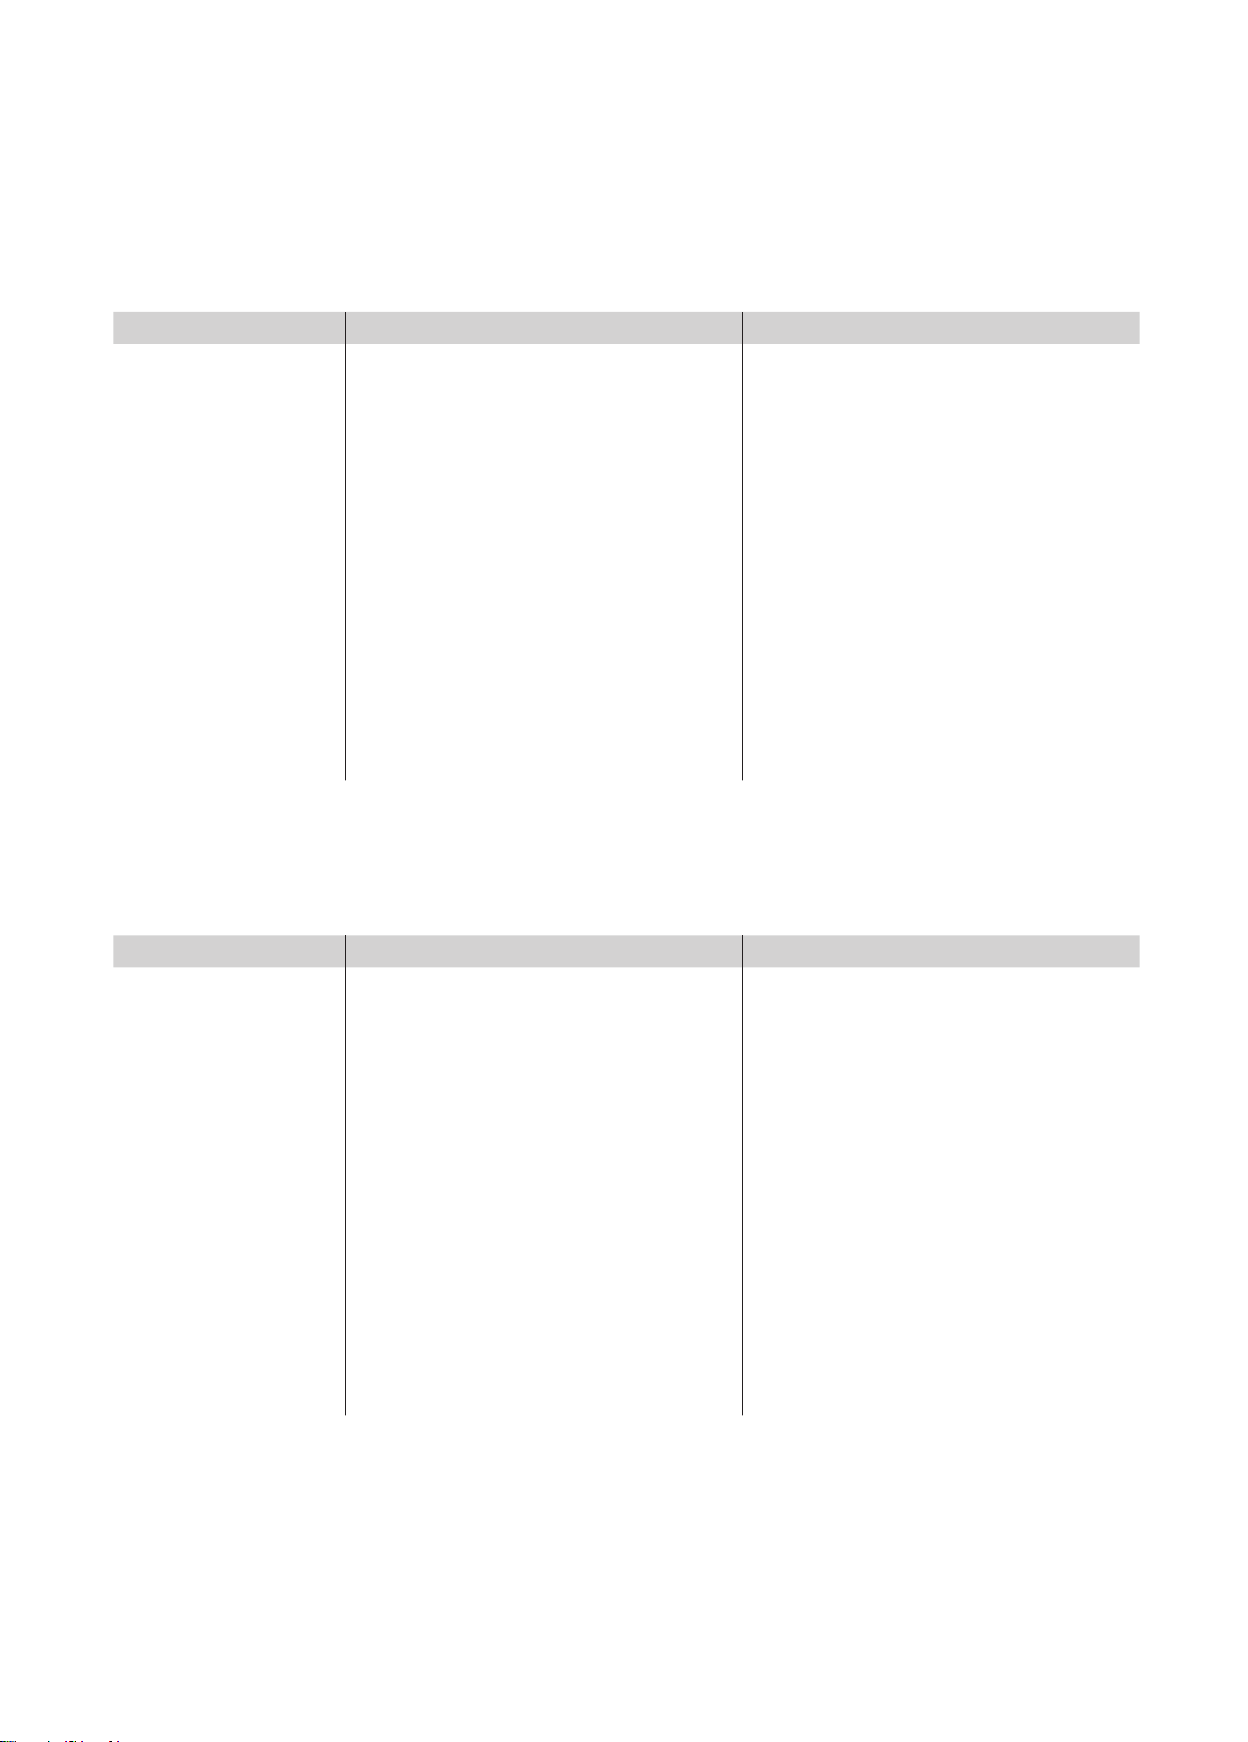
SPECIFICATIONS SATELLITE CAISSON DE GRAVES
Utilisation
Voie
Haut-parleurs
Filtre
Phase
Bande passante
Efficacité 1 W / 1 m
Impédance nominale
Impédance minimale
Puissance nominale
Puissance crête
Blindage magnétique
Dimensions (h x l x p)
Poids
Finition
Étant donné l’évolution des techniques mises en oeuvre pour une fiabilité accrue et une recherche constante de qualité optimale,
Cabasse se réserve le droit d’apporter toutes modifications aux modèles présentés sur les fiches techniques ou les documents publicitaires.
Bibliothèque / au mur / sur pied / encastré caisson de graves
2 1
coaxial médium-tweeter DOM18/10T15
membrane Soft Dome / P2C
4 000 Hz réglable 20 - 200 Hz
- réglable 0°-180°
170 - 22 000 Hz 35 - 200 Hz
91 dB actif
8 ohms actif
4 ohms actif
70 W 250 W
490 W 750 W
oui non
Ø 13 cm 33 x 33 x 36 cm
1,3 kg 11,5 kg
noir / blanc noir / blanc
graves 21MT3 - 21 cm membrane fibre de cellulose
SPECIFICATIONS SPEAKER SUBWOOFER
Installation
Way
Drivers
Cross-over point
Phase
Frequency response
Sensitivity 1 W / 1 m
Nominale impedence
Minimum impedence
Power handling
Peak power
Magnetic shielded
Dimensions (h w l x d)
Weight
Finish
Because of technical improvements already under way in our constant search for optimum quality,
Cabasse reserves the right to modify all the models presented in specification sheets, advertising materials and manuals without prior notice.
Bookshelf / on wall / stand / in ceiling subwoofer
2 2
coaxial midrange-tweeter DOM18/10T15
Soft Dome / P2C diaphragm
4,000 Hz adjustable 20 - 200 Hz
- adjustable 0°-180°
170 - 22 000 Hz 35 - 200 Hz
91 dB active
8 ohms active
4 ohms active
70 W 250 W
490 W 750 W
yes no
Ø 13 cm / 5.1 in 33 x 33 x 36 cm / 13 x 13 x 14.2 in
1,3 kg / 2.9 lb 11,5 kg / 25.3 lb
black / white black / white
woofer 21TMT3 - 21 cm / 8 in cellulose pulp
Page 20
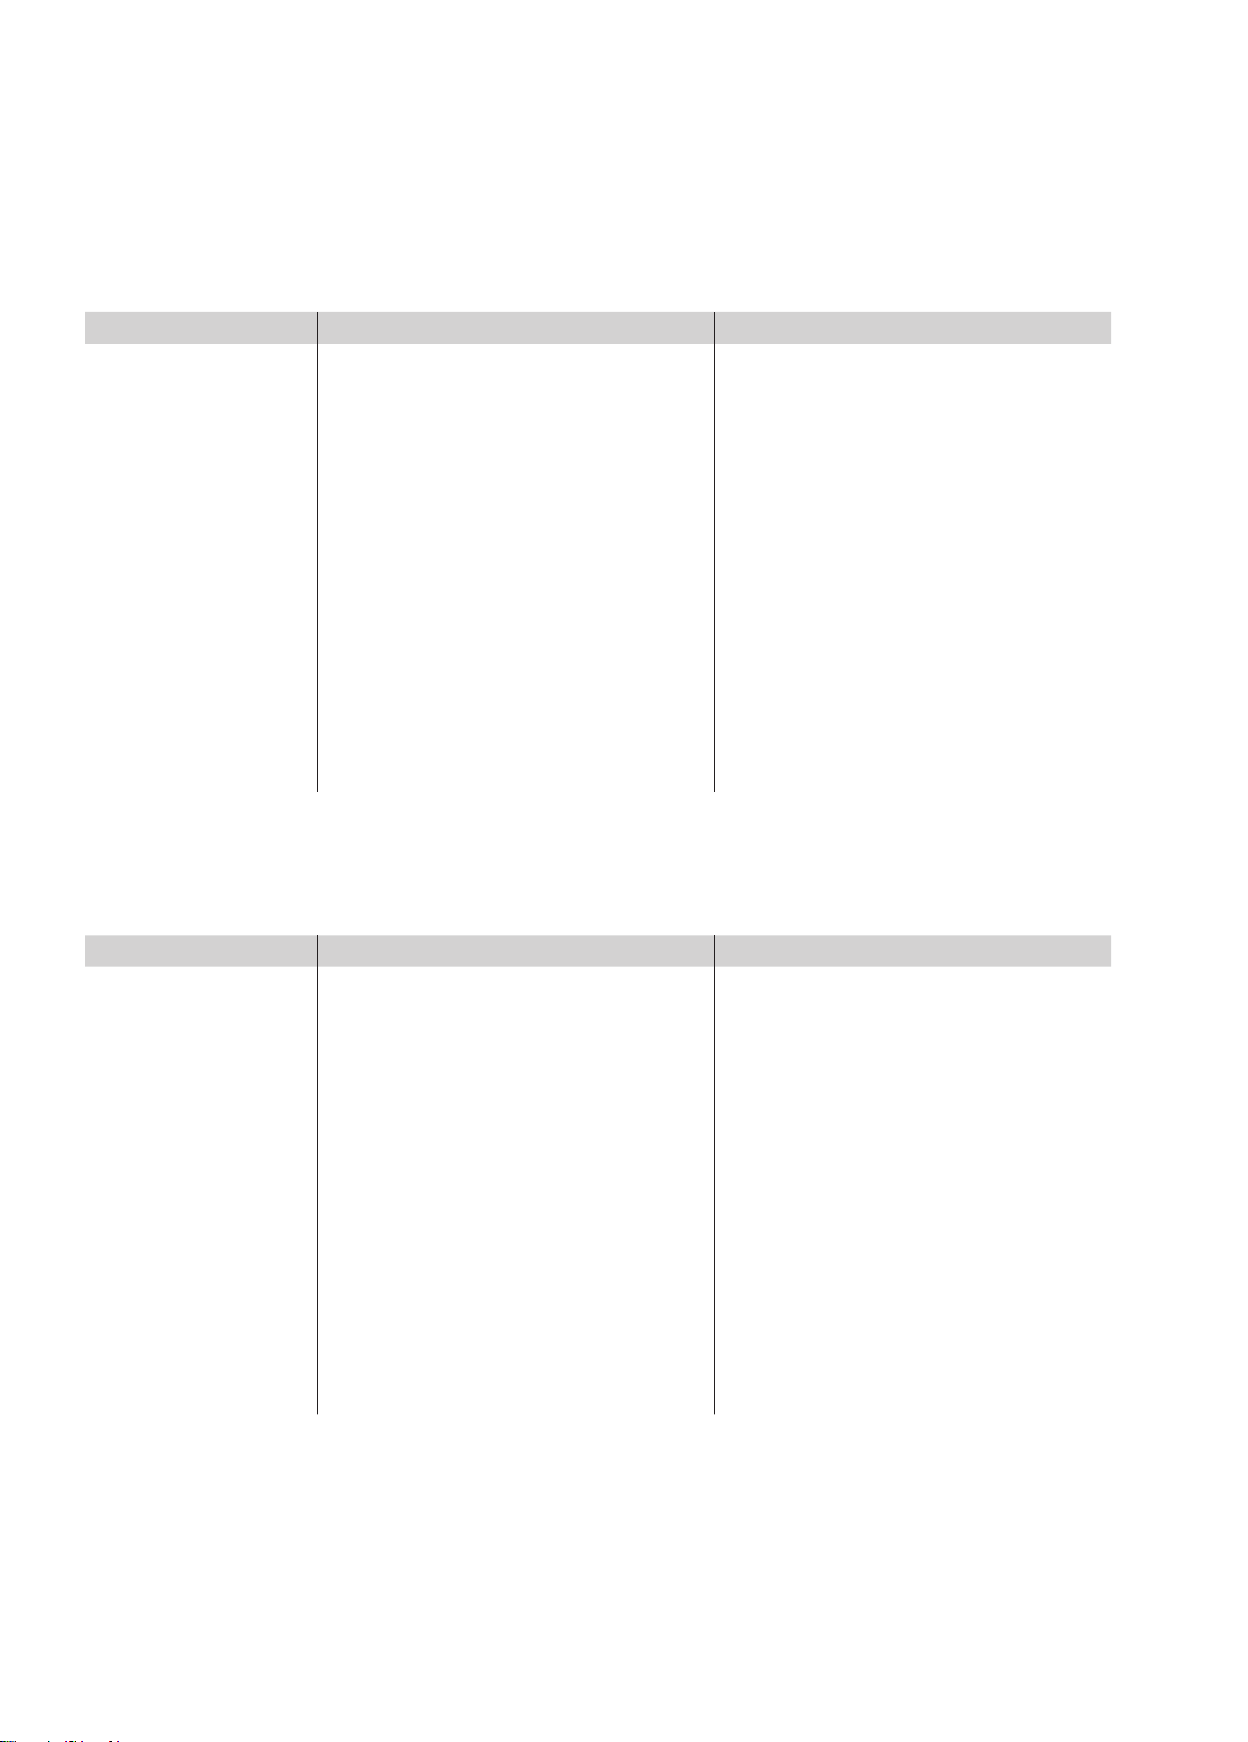
TECHNISCHE DATEN SATELLITEN SUBWOOFER
Verwendung
Wege
Chassis
Trennfrequenz
Phase
Übertragungsbereich
Wirkungsgrad 1 W / 1 m
Nennimpedanz
Impedanzminimum
Nennbelastbarkeit
Spitzenbelastbarkeit
Magnetische Abschirmung
Abmessungen (H x B x T)
Gewicht
Ausführung
Für hohe Zuverlässigkeit und optimale Qualität entwickelt Cabasse seine Geräte permanent weiter und behält sich deshalb das Recht vor,
an den auf technischen Unterlagen oder Werbematerial gezeigten Modellen Änderungen vorzunehmen.
Regal / Wand / Stand / Einbau Aktiv Subwoofer
2 1
Koaxial Mittel-Hochtöner DOM18/10T15
Soft Dome / P2C Membran
4 000 Hz Regelbar 20 - 200 Hz
- Regelbar 0°-180°
170 - 22 000 Hz 35 - 200 Hz
91 dB Aktiv
8 ohms Aktiv
4 ohms Aktiv
70 W 250 W
490 W 750 W
ja nein
Ø 13 cm 33 x 33 x 36 cm
1,3 kg 11,5 kg
Schwarz / Weiß Schwarz / Weiß
Tieftöner 21MT3 - 21 cm Cellulose Membran
基本参数 卫星音箱 超低音音箱
安装方式 书架式/挂墙/落地支架/天花 超低音
分频方式
使用单元
分频点
相位
频响范围
灵敏度(1瓦/1米
额定阻抗
最小阻抗
承载功率
最大输出功率
磁屏蔽
外形尺寸(高×宽×深)
重量
外饰
由于我们不断研究如何取得最佳音质,随时进行技术改进,所以Cabasse保留未经事前通
知而调整所有产品参数表、宣传材料和产品说明书的权利。
2分频 2分频
同轴中/高音 DOM18/10T15
软球体 / P2C震膜
4000赫兹 20-200赫兹可调
- 0度-180度可调°
170-22000赫兹 35-200赫兹
91分贝 有源
8欧姆 有源
4欧姆 有源
70瓦 250瓦
490瓦 750瓦
是 否
直径 13厘米 / 5.1英寸 33×33×36厘米 13×13×14.2英寸
1.3公斤/2.9磅 11.5公斤/25.3磅
黑色/白色 黑色/白色
低音21TMT3 – 21厘米 / 8英寸
纤维纸浆
Page 21

Cabasse SA - 210, rue René Descartes - BP 10 - 29280 Plouzané
Tel +33 (0)2 98 05 88 88 - Fax +33 (0)2 98 05 88 99
www.cabasse.com
NOT02 94 - 110 4
 Loading...