

Page 1
stream
amP 100
notice d'installation
owner's manual
betriebsanleitung
用户手册
www.cabasse.com
Page 2
f r a n c a i s
22
Page 3
218
218
91
190
3
Page 4
f r a n c a i s
1
11
8
9
1
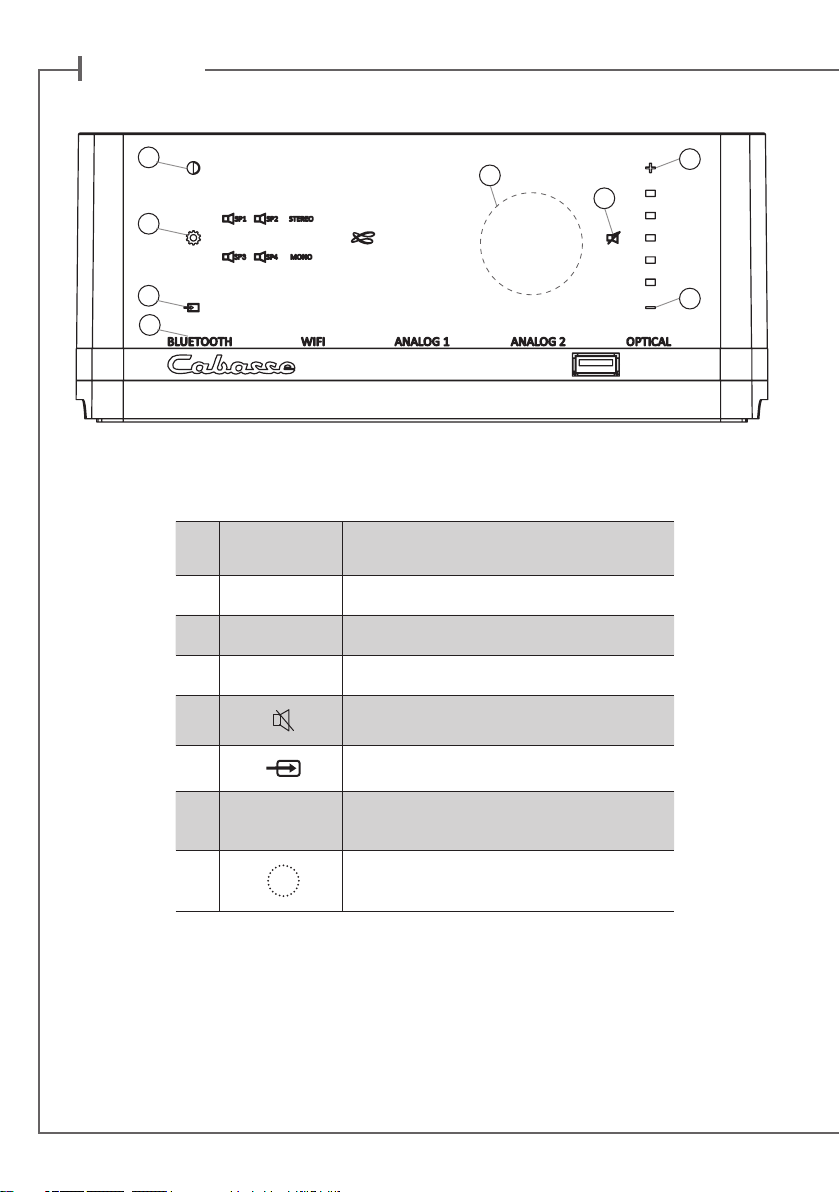
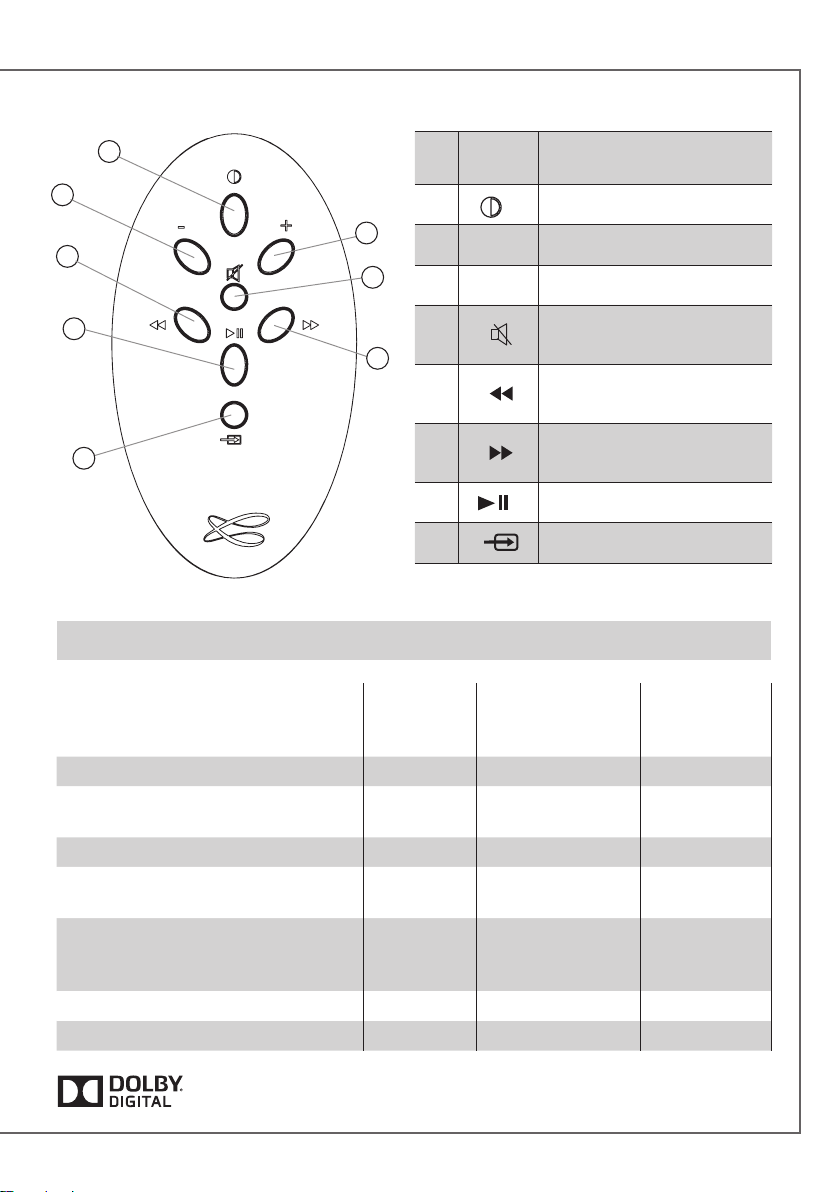
LED DISPLAY MARCHE (diode blanche)/ ECO(diode rouge)
2 VOL - Diminution du volume
3 VOL + Augmentation du volume
4
Active et désactive la coupure du son
10
3
4
2
IDENTIFICATION
DES COMMANDES
8
9 SOURCES
10
Selection de la source
BLUETOOTH - WIFI (WiFi/Ethernet) - RCA
ANALOG 1 - RCA ANALOG 2 - OPTIQUE
Position du patch NFC
44
Page 5
1
2
3
5
4
1
2 VOL - Diminution du volume
3 VOL + Augmentation du volume
IDENTIFICATION
DES COMMANDES
MARCHE / ECO
7
8
FONCTIONS
Diffusion audio loss less
Accès à tous les supports audio
depuis le reseau WIFI (ordinateur…)
Multi-room
Diffusion des contenus audio
smartphone/tablette
Diffusion application audio
(youtube…) depuis smartphone/
tablette
Diffusion à partir de supports USB
Web radio /DEEZER
4
6
5
6
7 Pause/Lecture
8
Connexion
Bluetooth
via routeur internet
Activation et désactivation
de la coupure du son
Titre précédent
de l'album en cours de lecture
Titre suivant
de l'album en cours de lecture
Selection de la source
WIFI/ETHERNET
/ box internet
4 4
4
4
4 4 4
4
4 4
4
WIFI direct
smartphone/
tablette
Fabriqué sous licence de Dolby Laboratories. Dolby et le symbole du
double D sont des marques déposées de Dolby Laboratories.
5
Page 6
1
f r a n c a i s
INSTALLATION RAPIDE
Installer votre STREAM AMP à proximité d'une
prise de courant. Prévoir un espace suffisant
autour, dessous (sur une surface solide et
plane) et au dessus de l'appareil pour un bon
fonctionnent des antennes Bluetooth et WIFI
et une bonne ventilation de l'électronique de
puissance. La face avant de l'appareil doit rester
visible.
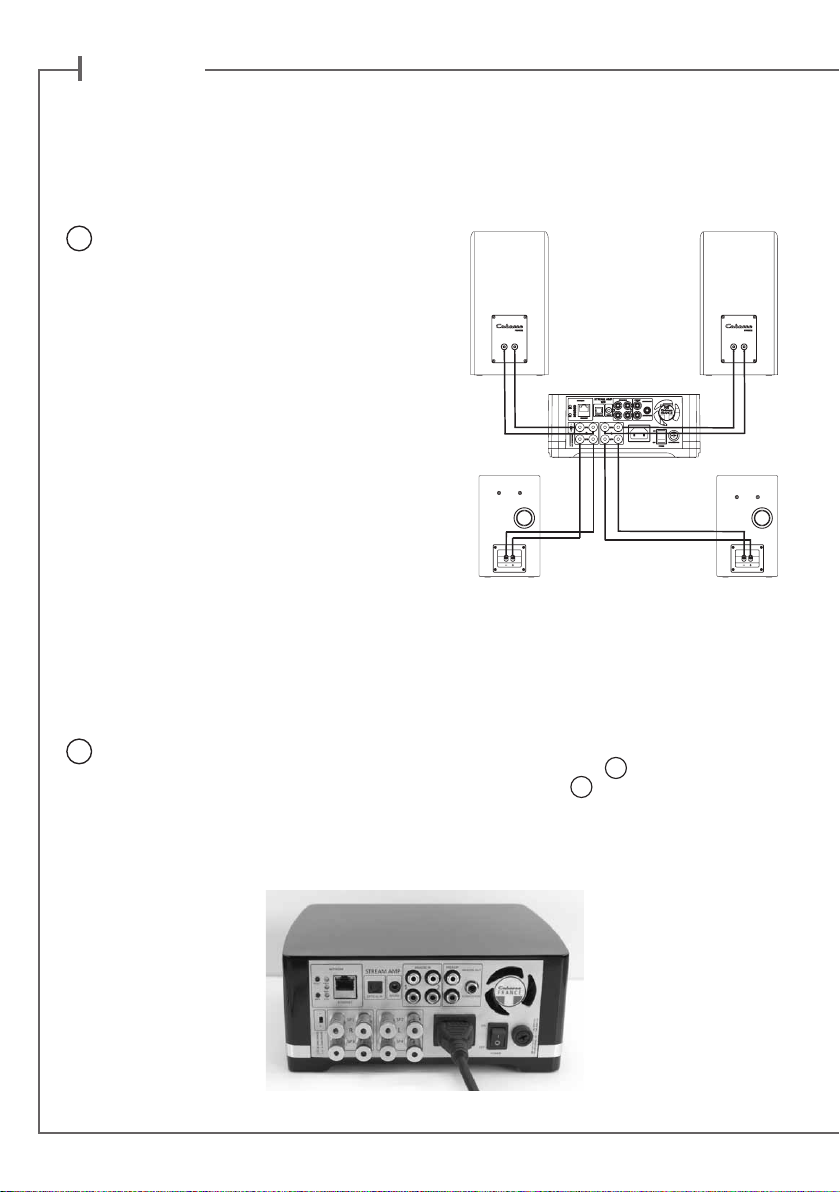
Brancher 2 ou 4 enceintes aux bornes de
STREAM AMP. Si 2 enceintes, choisir la sortie
SP1 pour l’enceinte droite, la sortie SP2 pour la
gauche.
ATTENTION: respecter les polarités en reliant
les bornes + entre elles et bien connecter les
sorties gauche (L) aux entrées gauche (L).
Sélecteur d’impédance:
Position « I » (réglage usine) : STREAM
AMP délivre 2 x 50 W ou 4 x 25 W RMS pour
les enceintes avec une impédance minimum
inférieure à 6,4 ohms, 2 x 25 W ou 4 x 12,5 W
avec des impédances supérieures.
Position « II » : à utiliser avec des enceintes acoustiques dont l’impédance minimum est supérieure
ou égale à 6,4 ohms pour obtenir 2 x 50 W ou 4 x 25 W RMS. Choisir cette position pour les
modèles Cabasse de la gamme Archipel et pour Antigua IW.
Connecter le câble d'alimentation au STREAM AMP puis au secteur et basculer l'interrupteur
2
marche/arrêt sur "on". STREAM AMP est opérationnel dès que la diode
(mode ECO). Passer en mode MARCHE en appuyant sur la touche
télécommande.
NOTE : la fonction DLNA de STREAM AMP devient opérationnelle lorsque la diode PWR (power)
est passée du rouge au vert, environ 40 secondes après la mise sous tension.
1
s'allume en rouge
1
du STREAM AMP ou de la
6
Page 7
3
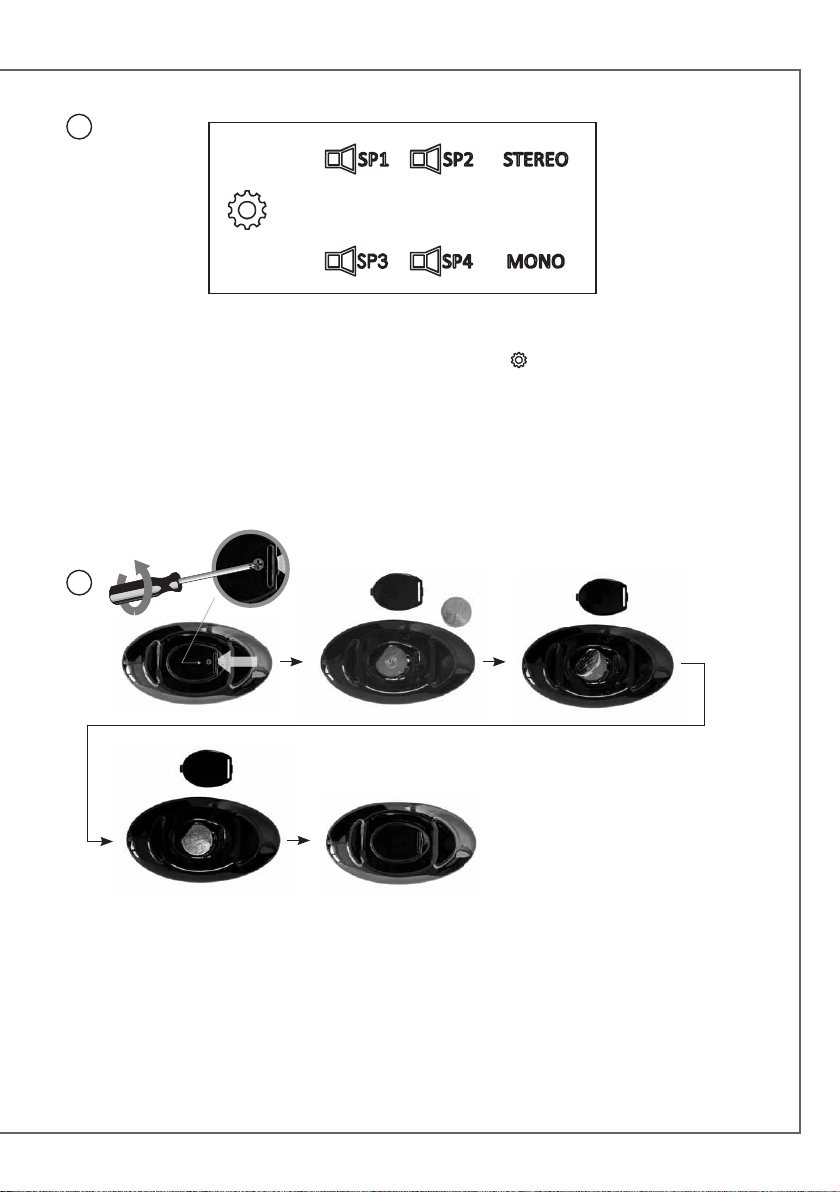
Paramétrage des sorties enceintes.
Sélectionner une des 4 options par appuis successifs sur la touche
Stream Amp:
- 1 paire d’enceintes en STEREO (réglage par défaut). Les diodes SP1, SP2, STEREO sont allumées.
- 2 paires d’enceintes en STEREO. Les diodes SP1, SP2, SP3, SP4 et STEREO sont allumées.
- 2 enceintes en MONO. Les diodes SP1, SP2, MONO sont allumées.
- 4 enceintes en MONO. Les diodes SP1, SP2, SP3, SP4 et MONO sont allumées.
après la première mise en route du
4
Avant la première utilisation, dévisser la vis (tournevis PH00), enlever le couvercle, retirer la
languette de protection, remettre le couvercle et resserrer la vis. .
Remplacement de la pile bouton type CR-2025 : retourner la télécommande, dévisser la vis, enlever
le couvercle, enlever la pile usagée, insérer la pile neuve, coté marquée "+" vers l'extérieur, remettre le
couvercle, resserrer la vis.
7
Page 8
f r a n c a i s
5
6
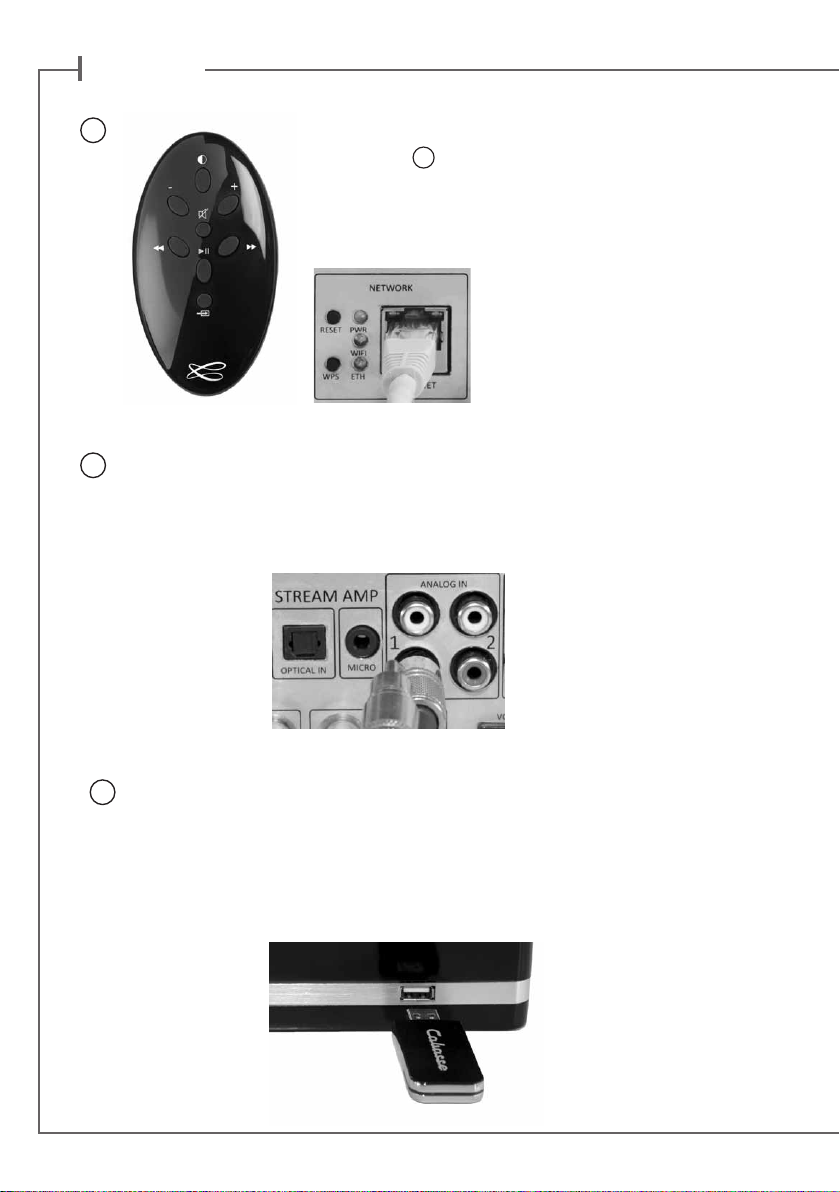
Une fois les connexions Bluetooth et Wi-Fi/Ethernet activées (voir
chapitres suivants), sélectionner la source avec des appuis successifs
sur la touche
du Stream Amp. Le Stream Amp affiche l'entrée sélectionnée. La
LED Wi-fi représente la connexion Wi-Fi, la LED ETH représente la
connexion réseau. La solution Ethernet est prioritaire.
8
de la télécommande Stream ou de la face-avant
ENTREES ANALOGIQUES 1 ET 2
Choisissez les entrées 1 ou 2 pour pour connecter une source audio (TV, lecteur CD,
lecteur MP3, smartphone) équipée d'une sortie analogique type RCA ou mini-jack.
Pour un appareil équipé d'une sortie mini-jack, utiliser un cordon mini-jack/RCA
(non fourni).
ENTREE USB
7
Connecter une clé USB ou un disque dur contenant des fichiers audio à cette entrée pour
les mettre automatiquement en réseau. Tous les fichiers aux formats reconnus par le
serveur DLNA inclus dans STREAM AMP sont alors listés dans l'application Stream Audio
Control et peuvent être lus par tous les lecteurs Cabasse Stream connectés au même
réseau. La prise USB de STREAM AMP est pourvue d'une alimentation de 1 ampère pour
l'utilisation d'un disque dur nomade sans recours à une alimentation externe.
8
Page 9

CONNEXION BLUETOOTH
Le STREAM AMP est configuré en mode ouvert pour les connexions Bluetooth. il suffit donc, dans le menu
de l'appareil à connecter, de sélectionner "Cabasse STREAM AMP" dans la liste des appareils Bluetooth
disponibles. Sélectionner si nécessaire la source Bluetooth en pressant le bouton
"Stream" ou de Stream Amp jusqu'à ce que la diode
connecté en Bluetooth avec STREAM AMP, il faut interrompre cette liaison avant d'en réaliser une nouvelle
avec un autre appareil.
EXEMPLE DE CONNEXION BLUETOOTH AVEC UNE TABLETTE ANDROID : voir la version française en
page 16.
CONNEXION ET UTILISATION AVEC UN ORDINATEUR APPLE: version française en page 17.
9
BLUETOOTH s'illumine. Si un appareil est déjà
8
de la télécommande
CONNEXION BLUETOOTH INSTANTANEE AVEC UN SMARTPHONE NFC
1) Installation de l'application NFC Cabasse
a) Activer le mode NFC dans le menu de votre smartphone NFC.
b) Vérifier/activer la connexion du smartphone à Internet (réseau cellulaire wifi ou 3G, 4G).
c) Approcher le smartphone du patch NFC
d) Valider la demande d'installation de l'application Cabasse NFC via Google Play.
e) Votre smartphone est prêt pour sa première connexion NFC.
2) Utilisation de l'application Bluetooth NFC Cabasse
a) Approcher votre smartphone du patch NFC
le STREAM AMP sort du mode Eco, la source Bluetooth est automatiquement sélectionnée et le
premier morceau de la playlist de votre smartphone est joué par STREAM AMP.
b) Approcher une nouvelle fois le smartphone du patch NFC
Bluetooth.
NOTE : Une fois installée sur votre smartphone NFC, l'application NFC Cabasse fonctionne en
permanence de manière invisible. Elle est présente dans la liste des applications mais il n'y pas
d'icône correspondant sur le bureau.
10
au milieu de la face avant du STREAM AMP.
10
pour établir la connexion Bluetooth : si nécessaire
10
pour interrompre la connexion
9
Page 10
f r a n c a i s
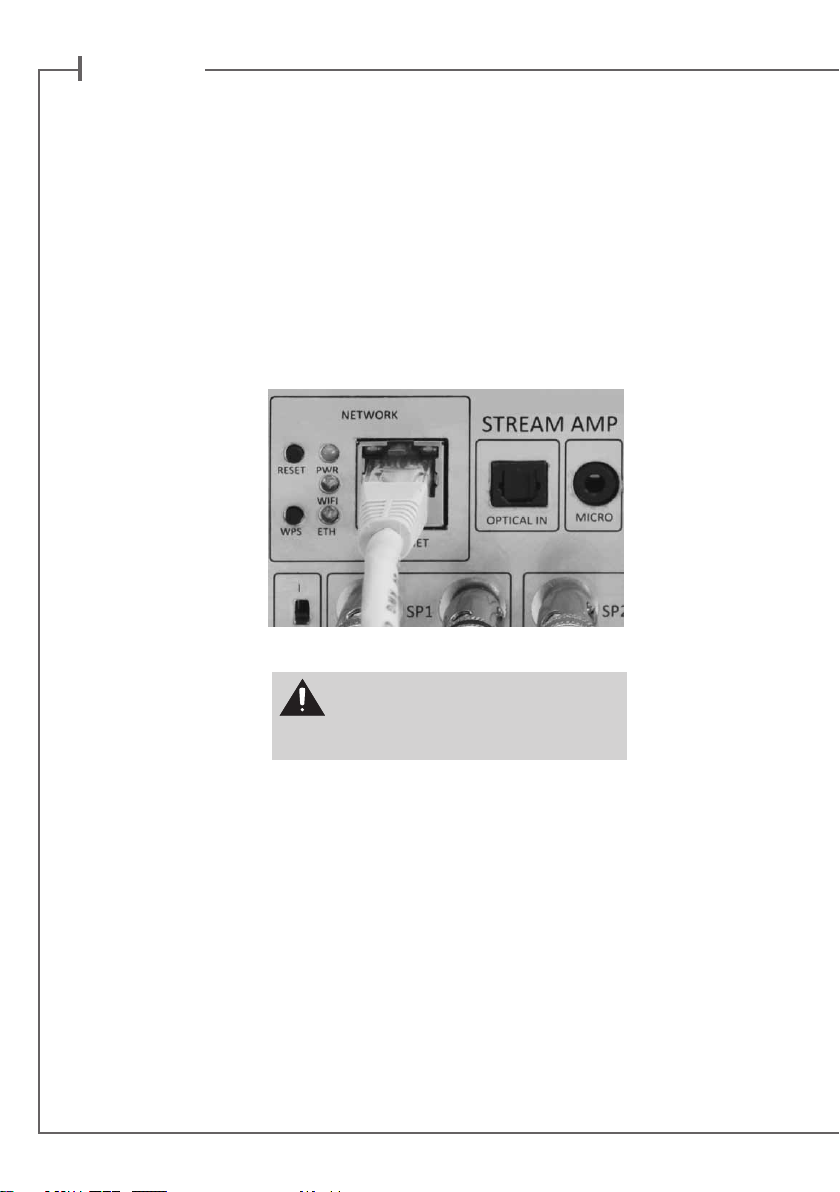
CONNEXION FILAIRE (LAN) AU RESEAU ETHERNET
La liaison filaire Ethernet garantit un débit de transfert optimum et constant dans tout environnement.
Utilisez la si le fonctionnement en mode Wi-Fi présente des coupures ou arrêts intempestifs de la
musique, signes d’un réseau Wi-Fi saturé ou d’une distance routeur-Stream trop importante.
Connectez un câble RJ45 entre le STREAM AMP et votre routeur (ou Box Internet). La connexion est
établie quand la diode ETH passe au bleu fixe.
ATTENTION : le mode DHCP du routeur doit être activé.
Appuyer sur le bouton "RESET" avant
d'utiliser un nouveau mode de connexion wifi
(filaire, automatique, semi-auto, manuelle) ou
un nouveau routeur.
MODE WIFI DIRECT
Ce mode de connexion permet de diffuser en qualité wifi les fichiers audio présents dans la tablette (ou le
smartphone) et sur le support (disque dur, clé) USB connecté à l'entrée USB de STREAM AMP sans avoir recours
ou besoin d'un réseau Wi-Fi. Il ne donne pas accès aux sources internet (Vtuner, Deezer) ni aux fichiers audio
présents dans le réseau domestique et ne permet pas les mises à jour du STREAM AMP.
Une fois l'application Stream Audio Control installée sur la tablette ou le téléphone et le STREAM AMP activé,
ouvrir l'application et choisir "utiliser ce lecteur en mode d'accès direct".
Suivez les instructions et commencez à écouter vos musiques préférées.
10
Page 11

CONNEXION DLNA SANS FIL (WLAN) AU RESEAU WIFI
IL EXISTE 2 SOLUTIONS POUR CONNECTER LE
STREAM AMP AU RESEAU WIFI :
1) CONNEXION WPS AUTOMATIQUE avec l'utilisation des touches WPS
du STREAM AMP et du routeur (ou box Internet) s'il en est équipé: presser le
bouton WPS du routeur pendant au moins 2 secondes puis presser dans les
2 minutes (ces durées sont indicatives, à vérifier dans le manuel du routeur)
qui suivent presser le bouton WPS du STREAM AMP. La connexion est
effective quand la diode bleue "WIFI CONFIGURATION" cesse de clignoter
et reste allumée. Continuer à la page 19 avec l'installation de l'application
Cabasse.
2) CONNEXION SEMI-AUTOMATIQUE AVEC L’APPLICATION
CABASSE sur un smartphone ou une tablette connecté(e) au réseau Wi-Fi.
a) Installer l’application Cabasse sur la tablette/smartphone depuis “Play Store” pour un appareil
Android ou “App store” pour un produit Apple.
b) Mettre le STREAM AMP sous tension (ou appuyer sur le bouton reset), activer le mode wifi dans
l’application “paramètres” du smart phone ou de la tablette.
c) Sélectionner STREAM AMP parmi les appareils disponibles et demander la connexion.
d) Une fois la connexion établie, ouvrir l’application Cabasse et choisir: "configurer le réseau Wi-Fi
pour ce lecteur". Suivre pas à pas les instructions d'installation.
Note : vous pouvez lancer l'application Cabasse dès la fin de la phase b), et continuer le processus
de connexion, l'assistant de configuration apparaissant automatiquement pour la première utilisation.
e) Vérifier que la diode bleue Wifi à l’arrière du STREAM AMP clignote.
f) Après environ 30 secondes la diode Wifi bleue est fixe : appuyer sur “Fermer la Page”.
STREAM AMP est prêt à lire les fichiers audio partagés de votre réseau ou les radios web proposées
par vTuner.
ATTENTION ! Une mise à jour du logiciel du STREAM AMP peut démarrer automatiquement dès
qu'une connexion au réseau internet est réalisée. la diode
de la mise à jour. Le STREAM AMP n'est pas fonctionnel durant cette phase jusqu'au redémarrage en
mode ECO, diode
Ne pas éteindre ou déconnecter le STREAM AMP durant les mises à jours qui peuvent durer jusqu'à 15 minutes.
9
rouge fixe. Appuyer sur la touche 1 pour passer en mode actif et utiliser STREAM AMP.
9
passe au blanc et clignote jusqu'à la fin
11
Page 12
f r a n c a i s
Vous venez d’acheter un produit Cabasse et nous vous remercions de
votre confiance. Dans le but d’optimiser au maximum votre installation, nous vous recommandons de lire attentivement cette notice.
INSTRUCTIONS DE SECURITE
Explication des symboles
L’éclair dans un triangle équilatéral aver-
tit de l’existence de tension élevée dangereuse non isolée à l’intérieur du coffret du
produit, d’une valeur suffisante pour présenter
un risque d’électrocution.
Le point d’exclamation dans un triangle
équilatéral avertit de l’existence d’instructions importantes quant à l’utilisation et
la maintenance dans la documentation jointe
à ce produit.
Nettoyage - Débranchez l’appareil avant
tout nettoyage. N’utilisez pas de solutions nettoyantes sous forme liquide ou en aérosols.
Employez de préférence un chiffon humide.
Installation sur mobiliers et supports
- Ne placez pas cet appareil sur un support ins-
table, qu’il s’agisse de pieds, trépieds, tables,
étagères, etc. Il pourrait tomber et causer des
blessures sérieuses à un enfant ou un adulte
qui se trouverait à proximité.
Ventilations - L’appareil doit être position-
né de telle sorte qu’il ne gêne pas sa propre
ventilation. Par exemple, il ne doit pas être
installé sur un lit, un canapé, une couverture
ou des surfaces similaires qui pourraient bloquer ses orifices d’aération. Il ne doit pas non
plus être encastré dans des enceintes confinées
comme des étagères étroites ou des meubles
qui pourraient limiter la quantité d’air disponible aux entrées d’air.
Alimentation - L’appareil ne doit être relié
qu’à une source électrique du type écrit dans le
mode d’emploi ou conforme à la sérigraphie
sur le produit. Si vous n’êtes pas sûr du type de
courant fourni à l’endroit où vous vous trou-
vez, adressez-vous à votre revendeur ou à la
compagnie électrique locale.
Surcharges électriques - Ne surchargez
pas les prises d’alimentation, les prolongateurs ou les rappels d’alimentation. Il pourrait
en résulter incendies ou électrocutions.
Corps et liquides étrangers - On doit
être attentif à ne jamais laisser entrer d’éléments ou de liquides étrangers dans l’appareil. Ils pourraient occasionner incendies ou
électrocutions. Ne versez jamais aucun liquide
d’aucune sorte sur l’appareil.
Maintenance - Dans les cas suivants, vous
devez impérativement débrancher votre appareil et le faire vérifier par un technicien qualifié :
l’alimentation ou la prise a été endommagée.
des corps étrangers ou du liquide se sont
introduits dans l’appareil.
l’appareil a été exposé à la pluie ou a été as-
pergé d’eau.
l’appareil ne semble pas marcher correcte-
ment alors que vous l’utilisez dans le cadre
de ses instructions de fonctionnement normal. Ne manipulez que les contrôles couverts
par le mode d’emploi. Toute autre procédure
pourrait le détériorer et nécessiter l’intervention d’un technicien qualifié.
l’appareil est tombé ou bien sa carrosserie est
endommagée.
l’appareil affiche des performances nette-
ment modifiées.
Dans un environnement secteur perturbé
(orage etc…), le produit peut parfois nécessiter l’arrêt et la remise en route au moyen de
l’interrupteur secteur ON/OFF situé sur le panneau arrière de l’appareil pour fonctionner correctement de nouveau.
12
Page 13
Pièces détachées - Si la réparation a
nécessité l’utilisation de pièces détachées,
assurez-vous que le technicien a bien utilisé
les références préconisées par le fabricant ou
présentant les mêmes caractéristiques que les
pièces originales. Des pièces non conformes
peuvent provoquer incendies, électrocutions
ou autres.
CONSIGNES DE SÉCURITÉ IMPORTANTES !
Vérifications - Après toute intervention sur
l’appareil, demandez au technicien d’effectuer
des tests afin de garantir que l’appareil fonctionne en toute sécurité.
Sacs plastiques - Ne pas laisser les sacs
plastiques de l’emballage à portée des enfants
afin d’éviter tout risque d’étouffement.
1. LIRE ces consignes.
2. CONSERVER ces consignes.
3. RESPECTER tous les avertissements.
4. SUIVRE toutes les consignes.
5. NE PAS utiliser cet appareil à proximité
de l’eau.
6. NETTOYER UNIQUEMENT avec un
chiffon sec.
7. NE PAS OBSTRUER les orifices de
ventilation. Installer conformément aux
instructions du constructeur.
8. NE PAS installer à proximité de sources
de chaleur telles que les radiateurs, les
grilles de chauffage, les cuisinières et les
autres appareils (notamment les amplificateurs) dégageant de la chaleur.
9. NE PAS neutraliser le dispositif de
sécurité que constitue la fiche polarisée
ou à broche de terre. Une fiche polarisée
a une lame plus large que l’autre. Une
fiche à broche de terre est munie de
deux lames et d’une troisième broche
pour la terre. La lame large ou la troisième broche est prévue pour la sécurité
de l’utilisateur. Si la fiche fournie ne
rentre pas dans la prise de courant,
demander à un électricien de remplacer
cette prise d’un type trop ancien.
10. PROTÉGER le cordon d’alimentation
en s’assurant qu’il ne risque pas d’être
piétiné ou écrasé, en particulier près
des fiches, des blocs multiprises et de
son point de sortie de l’appareil.
11. UTILISER UNIQUEMENT les accessoires préconisés par le constructeur.
12. UTILISER EXCLUSIVEMENT
avec un chariot, un support,
un trépied, une console ou
un bâti recommandé par le
fabricant ou vendu avec l’appareil.
Lorsqu’un chariot est utilisé, faire
preuve de prudence pour déplacer
l’ensemble chariot/appareil afin
d’éviter un renversement pouvant
causer des blessures.
13. DÉBRANCHER cet appareil en cas
d’orage ou lorsqu’il reste inutilisé pendant une longue durée.
14. CONFIER tout travail de dépannage
à un réparateur professionnel compétent. Faire réparer l’appareil en cas
de dommages, par exemple : fiche ou
cordon d’alimentation endommagé,
liquide renversé sur l’appareil ou objet
inséré dans l’appareil, appareil exposé
à la pluie ou à l’humidité, mauvais
fonctionnement ou après une chute.
Attention : ne pas ingérer la pile,
risque de brûlure chimique.
13
Page 14
f r a n c a i s
DÉBALLAGE
Ouvrir largement le carton puis sortez un à un
les différents éléments. Si l’un des éléments
du carton vous semble endommagé, ne pas
l’utiliser, le replacer dans le carton d’origine et
contactez immédiatement votre revendeur.
Conservez votre emballage pour un éventuel
transport ultérieur de votre système.
INSTALLATION
LES COMPOSANTS DE VOTRE
SYSTÈME :
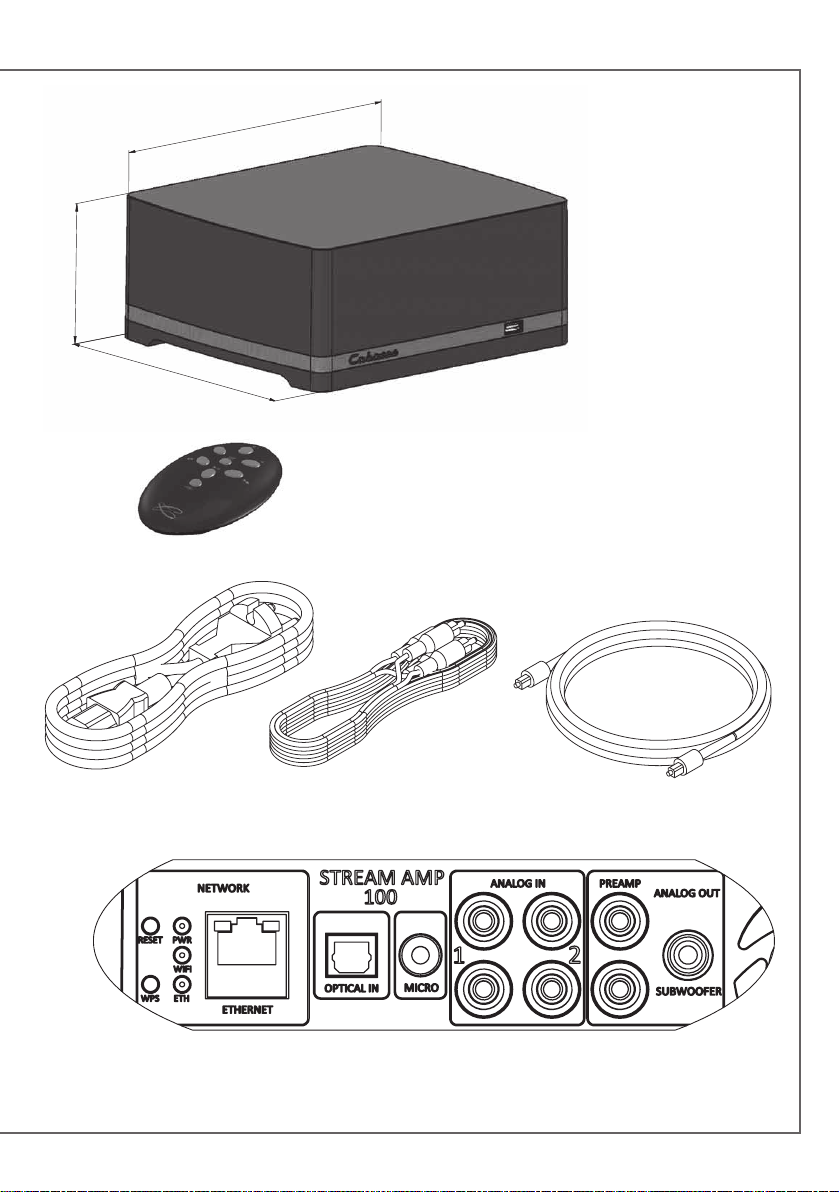
1 STREAM AMP, 1 cordon d'alimentation, 1
télécommande, 1 cordon RCA-RCA, 1 cordon
optique, 1 notice et 1 carte de garantie.
PLACEMENT DU SYSTEME :
Installer le STREAM AMP à portée d'une
prise électrique murale.
Laisser suffisamment d'espace au dessus et
autour de l'appareil pour :
- favoriser les transmissions wifi et Bluetooth,
- permettre le passage d'un smartphone
pour la connexion Bluetooth avec le patch
NFC
- obtenir une bonne circulation de l'air
autour de l'appareil.
BRANCHEMENT DU SYSTEME
Connecter le cordon secteur au STREAM
AMP, le brancher au secteur et basculer l'interrupteur marche/arrêt sur "on". STREAM
AMP est opérationnel en mode ECO (basse
consommation) dès que la diode
lume.
NB : la fonction wifi de STREAM AMP devient
opérationnelle lorsque la diode PWR (power)
est passée du rouge au vert, environ 40 secondes après la mise sous tension.
9
s'al-
MARCHE - ECO
a) Activation du mode ECO: appuyer sur
la touche
STREAM AMP.
Sous ce mode, les fonctions wifi et
Bluetooth sont disponibles. L'électronique
d'amplification audio est désactivée.
b) Passage en mode MARCHE:
- Appuyer sur la touche
télécommande ou du STREAM AMP ou
- Effectuer une connexion Bluetooth (NFC ou
manuelle) ou
- Valider la lecture d'un fichier audio avec
l'application StreamCONTROL.
1
de la télécommande ou du
1
de la
14
Page 15
1
11
10
3
4
8
9
1
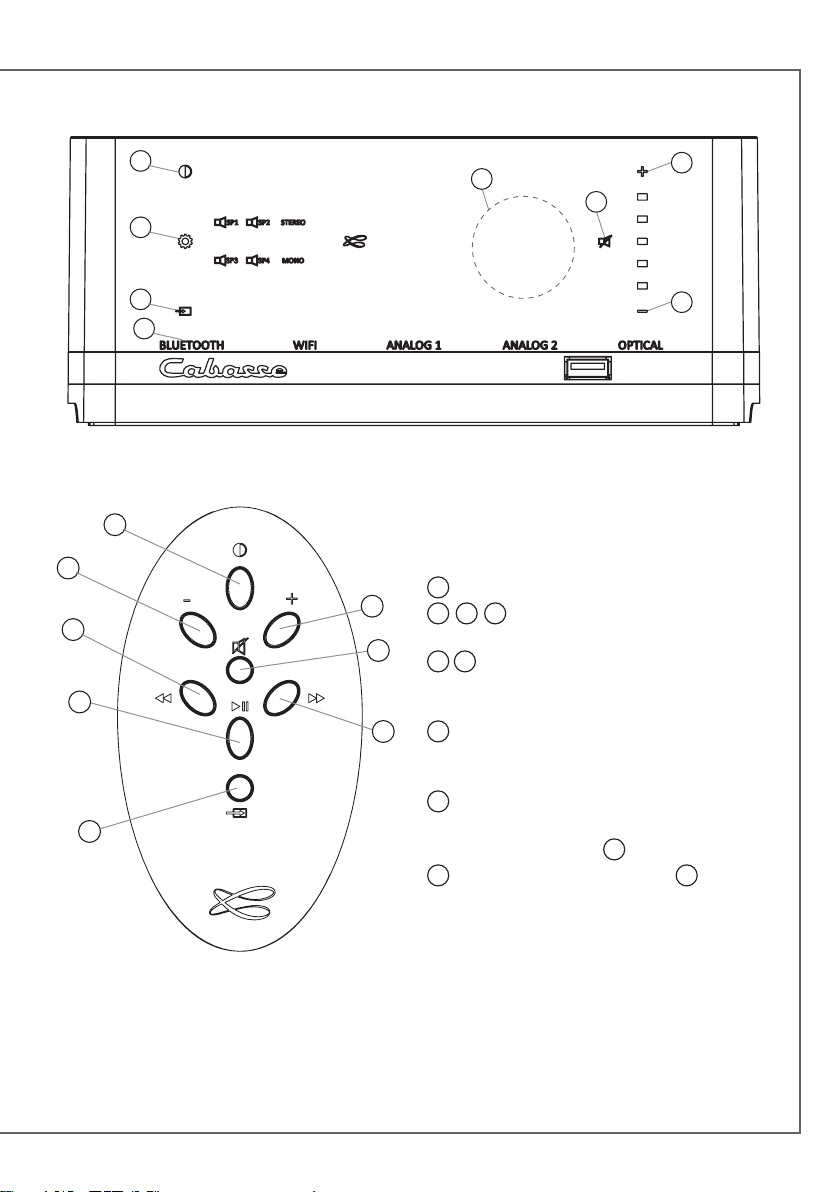
TOUCHES DE COMMANDES
(Stream Amp et télécommande)
2
2
1
3
5
4
7
6
8
Activer/désactiver le mode ECO
2 3 4
volume.
5 6
Bluetooth : titre précédent / suivant de l'album
ou de la playlist en cours.
7
wifi. Téléphone mains libres Bluetooth: décrocher/raccrocher.
8
touche pour choisir entre les sources connectées: Bluetooth (diode
9
contrôles + et - , marche/arrêt du
Wifi : retour et avance rapide
Musique: lecture et pause en Bluetooth et
sélection des sources : appuyer sur cette
9
bleue), wifi (diode
orange) et analogique (diode 9 verte).
15
Page 16
f r a n c a i s
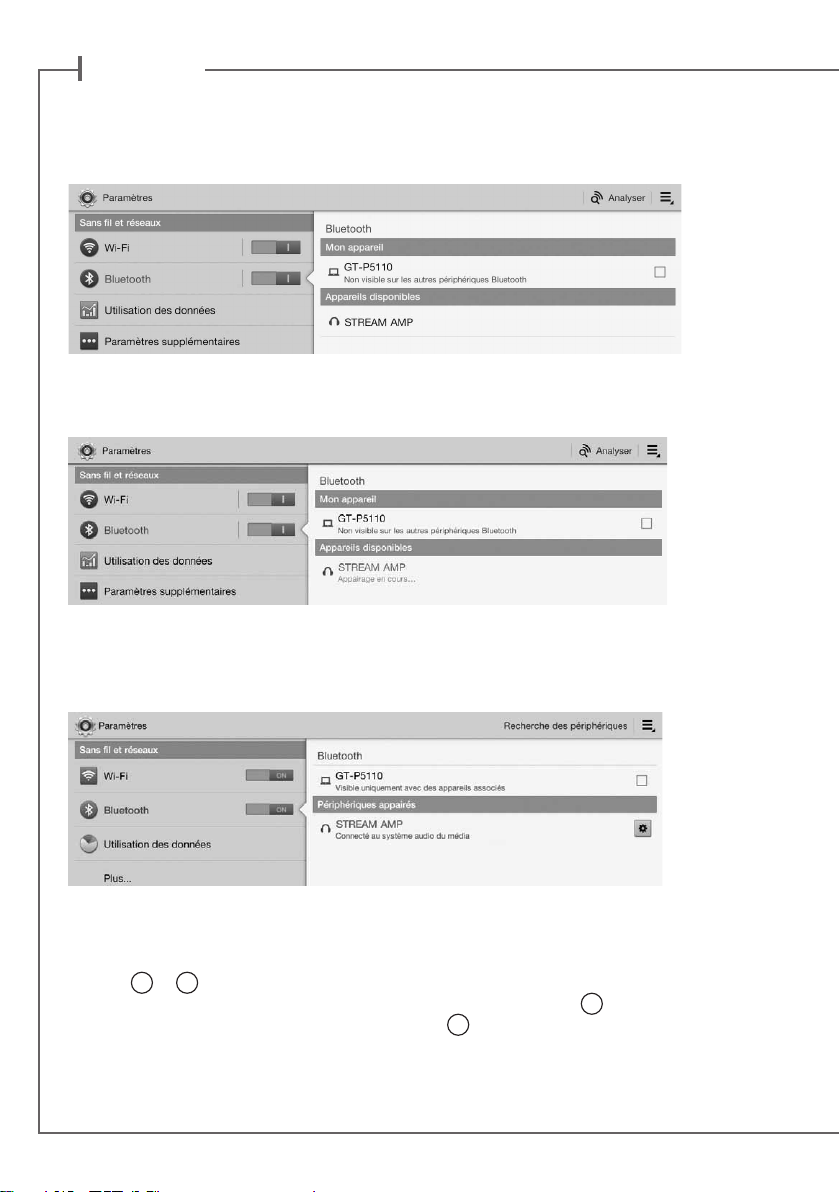
CONNEXION BLUETOOTH AVEC UNE TABLETTE ANDROID NON NFC
- Activer si ce n’est déjà fait la fonction Bluetooth dans le menu paramètres de la tablette en appuyant sur le pavé OFF-ON
- Dans la liste des appareils disponibles, cliquer sur Cabasse « STREAM AMP ».
Si le STREAM AMP n'est pas connecté en Bluetooth à un autre appareil, la connection à la tablette
suit automatiquement l'appairage.
Si le message «Connexion...» n’apparait pas, vérifiez qu'un autre appareil n'est pas déjà connecté au
STREAM AMP. Déconnecter cet appareil et appuyer une nouvelle fois sur "Cabasse STREAM AMP".
Votre STREAM AMP est maintenant connecté.
Pour écouter les fichiers audio présents sur la tablette, ouvrir votre application de lecture de
fichiers audio et lancer une lecture. Si aucun son, vérifier que le contrôle général de volume de
la tablette ou du smartphone n’est pas sur mute ou au minimum, régler le volume dans l’application si cette fonction existe, régler le volume de STREAM AMP avec sa télécommande ou les
touches
Enfin si une source wi-fi est active, changer de source avec la touche
sur STREAM AMP jusqu’à ce que la diode frontale
2
et 3 sur le STREAM AMP.
9
soit bleue.
8
de la télécommande ou
CONNEXION BLUETOOTH INSTANTANEE VIA NFC Voir page 9.
16
Page 17
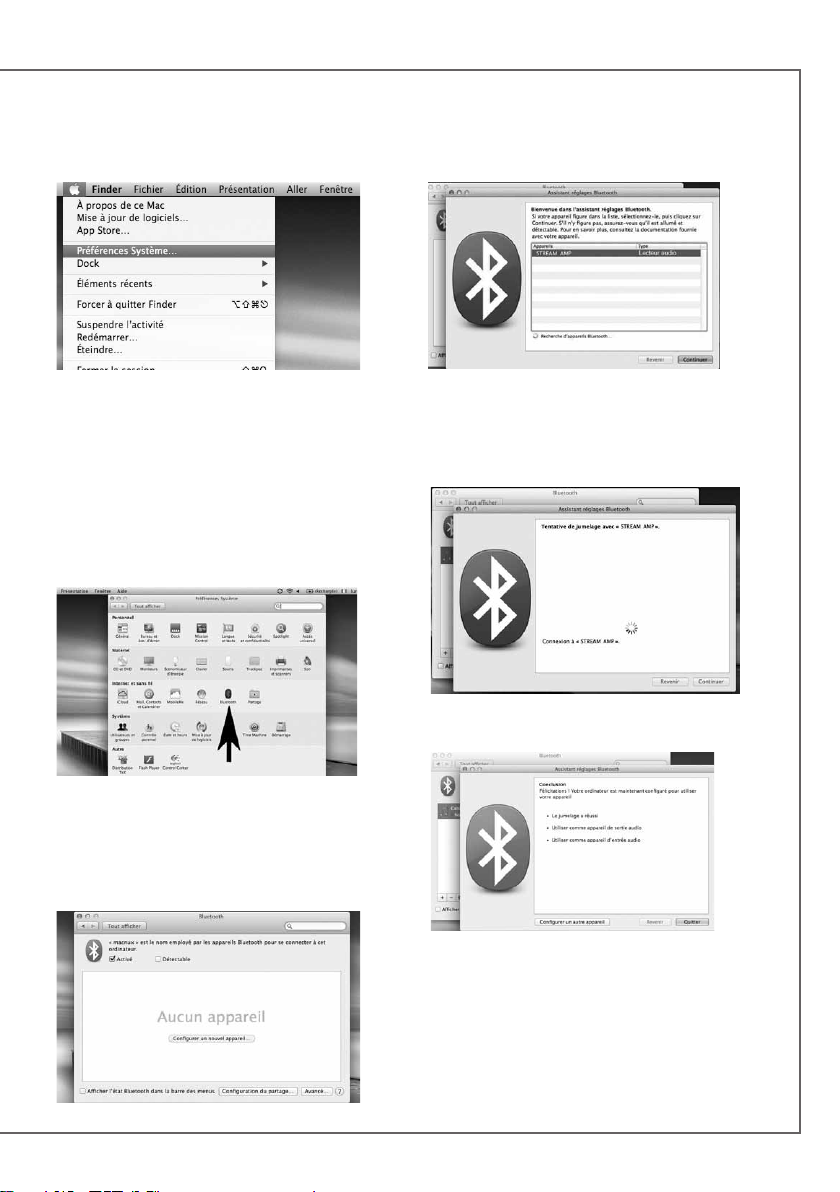
CONNECTION BLUETOOTH AVEC UN ORDINATEUR APPLE
1) ACTIVATION DE LA LIAISON BLUETOOTH
Connecter le STREAM AMP au secteur.
Si le STREAM AMP est déjà sous tension,
interrompre si elle existe toute liaison
Bluetooth active entre le STREAM AMP et un
autre appareil.
Activer, si ce n’est pas déjà fait, la fonctionnalité
Bluetooth de l’ordinateur en cliquant sur le
menu « pomme » puis « Préférences systèmes ».
Une fois que la fenêtre de préférences
s’affiche, Cliquer sur l’icône Bluetooth.
Cliquer sur « Activé » et sur « Configurer un
nouvel appareil »
STREAM AMP apparait dans la liste des
appareils, sélectionner le puis cliquer sur
« Continuer »
Connexion en cours…
Connexion réussie. STREAM AMP est maintenant jumelé avec votre Mac.
17
Page 18
f r a n c a i s
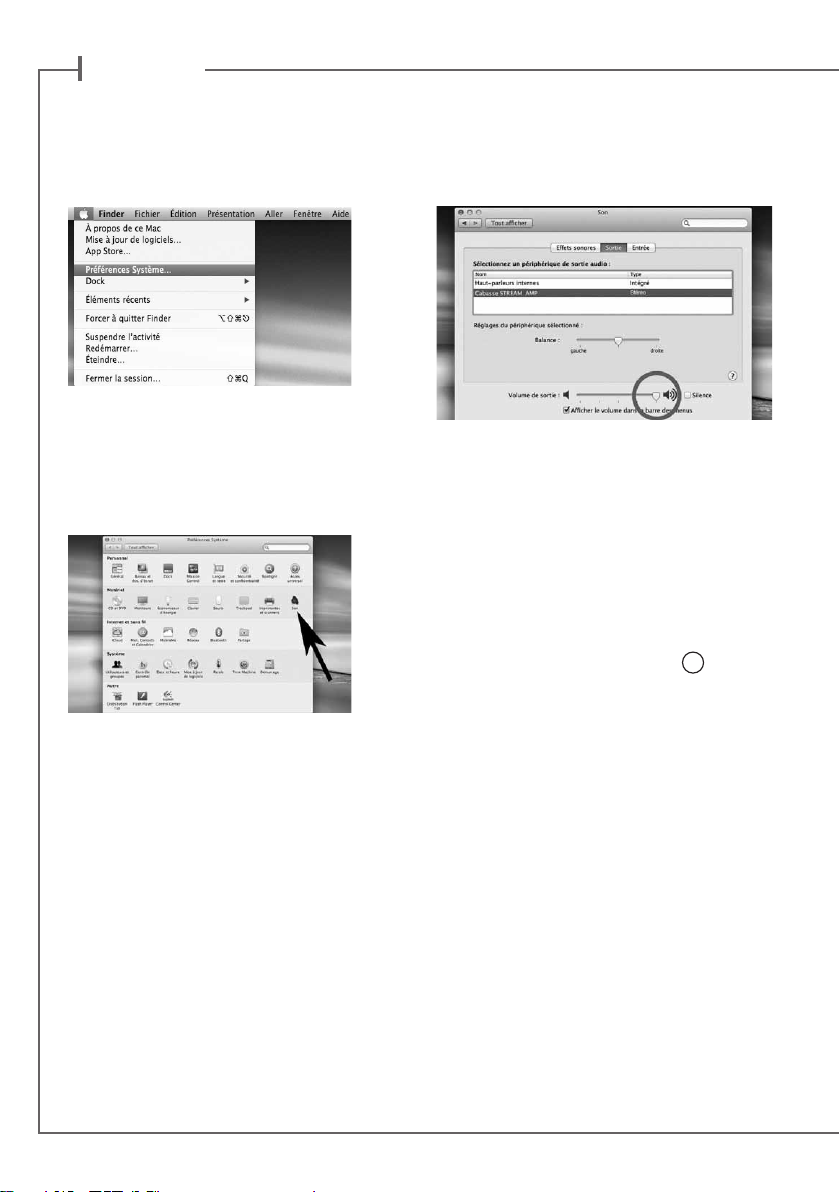
2) SÉLECTION DU PÉRIPHÉRIQUE DE SORTIE AUDIO
Pour écouter vos musiques avec votre Mac,
vous devrez sélectionner votre STREAM AMP
en tant que périphérique de sortie audio dans
les préférences système.
Sélectionner « Son » dans la ligne « Matériel »
Sélectionner l’onglet "Sortie" puis la ligne
"STREAM AMP stereo". Le lecteur "STREAM
AMP" dans cette fenêtre correspond à la
configuration mains libres pour smartphones,
inappropriée à l'écoute musicale.
Régler le volume de sortie sur la position maximum. Fermer la fenêtre.
Si le STREAM AMP est actif et connecté à une
source wi-fi ou analogique, sélectionner la
source Bluetooth avec la touche
commande ou du STREAM AMP et ajuster le
volume.
8
de la télé-
18
Page 19
UTILISATION DU STREAM AMP
AVEC L'APPLICATION StreamCONTROL
1 - Basculer l'interrupteur marche/arrêt du Stream Amp sur "on". STREAM AMP est opérationnel
1
dès que la diode
sur la touche
2 - Connecter au réseau wifi la tablette ou le smartphone que vous utiliserez avec l’application
StreamCONTROL.
3 - Télécharger gratuitement l'application Cabasse Stream Audio Control sur Playstore pour les
appareils Android, sur l'App Store pour les appareils Apple.
Installer l’application StreamCONTROL sur le smartphone ou la tablette.
Vous pouvez installer librement l’application StreamCONTROL sur plusieurs supports et les
utiliser simultanément avec un STREAM AMP comme avec plusieurs Stream.
4- Lancer l’application en cliquant sur son icône et suivre les instructions pour finaliser la
première mise en route d'un appareil Stream.
A l'invite au démarrage, choisir entre le mode Wifi direct (cf page 10) et le mode réseau si le
Stream Amp n’est pas déjà connecté au réseau (cf pages 11).
L'utilisation de l'application est intuitive.
Cependant, où que vous soyez dans l'application, appuyer sur "?" vous donnera un accès direct
au mode d'emploi de l'application et aux options offertes pour la page concernée.
Vous pouvez maintenant lire les fichiers audio présents dans la tablette ou le smartphone, dans
les disques durs reliés au réseau (NAS, ordinateurs PC et Mac), à une source digitale connectée
à une entrée USB d'un Stream Amp, Stream 1 ou Stream Source, écouter des radios internet et
faire du streaming avec Deezer.
s'allume en rouge (mode ECO). Passer en mode MARCHE en appuyant
1
du STREAM AMP ou de la télécommande.
Plusieurs appareils Stream peuvent être contrôlés simultanément par un ou plusieurs smartphones
et tablettes. Des groupes d'appareils connectés de façon identique au réseau (Ethernet ou Wi-Fi)
peuvent être créés pour la diffusion simultanée dans plusieurs pièces.
19
Page 20
f r a n c a i s
MARQUAGE DEEE
Traitement des appareils électriques
et électroniques en fin de vie (applicable dans les pays de l’Union européenne).
Ce symbole, représentant une poubelle sur roues barrée d’une croix,
apposé sur le produit, indique que ce
produit ne doit pas être traité avec
les déchets ménagers. Il doit être
remis à un point de collecte pour le traitement
des équipements électriques et électroniques
en fin de vie. En s’assurant que ce produit est
bien mis au rebut de manière appropriée, vous
aiderez à prévenir les conséquences négatives
potentielles pour l’environnement et la santé
humaine.
conserver les ressources naturelles. Pour toute
information supplémentaire au sujet du recyclage de ce produit, vous pouvez contacter votre
municipalité, votre déchetterie ou le magasin où
vous avez acheté le produit.
Le recyclage des matériaux aidera à
REMPLACEMENT DE LA PILE
DE LA TÉLÉCOMMANDE
Retourner la télécommande, coté face vers le
sol. Enlever la pile usagée et la remplacer par
une autre pile bouton type CR-2025. Mettre la
pile usagée au rebut suivant les informations cidessous.
Informations sur les piles et accumulateurs présents dans l’équipement
(Applicable dans les pays de l’Union
européenne).
Ce symbole, représentant une poubelle sur roues barrée d’une croix,
apposée sur une pile ou un accumulateur, indique que cette pile ou ac-
cumulateur ne doit pas être éliminé
comme un déchet ménager non trié mais qu’il
doit être collecté de manière séparée de sorte
d’en faciliter le traitement et le recyclage. Il doit
être remis à un point de collecte pour le traitement des piles et accumulateurs usagés. En s’assurant que ce produit est bien mis au rebut de
manière appropriée, vous aiderez à prévenir les
conséquences négatives potentielles pour l’environnement et la santé humaine. Le recyclage des
matériaux aidera à conserver les ressources naturelles. Pour toute information supplémentaire
au sujet du recyclage de ce produit, vous pouvez
contacter votre municipalité, votre déchetterie
ou le magasin ou vous avez acheté le produit.
ATTENTION au danger d'explosion
si la batterie n'est pas correctement
remplacée : utiliser seulement une
batterie identique ou équivalente. Ne pas exposer
les batteries à une source de chaleur excessive
comme le soleil, un feu ou équivalent.
20
Page 21
MISE A JOUR AUTOMATIQUE
Les mises à jour du logiciel de STREAM AMP
sont automatiques.
La durée de mise à jour est variable et peut durer
jusqu'à une demi-heure notamment lors de la
première connexion au réseau internet.
La diode
la fin de la mise à jour.
Le STREAM AMP n'est pas fonctionnel durant
cette phase.
Note: la référence de la version du logiciel en
cours est disponible via l'application Cabasse
Stream: onglet "Paramètres" + sous-onglet "lecteurs audio"+ STREAM AMP.
1
passe au rouge et clignote jusqu'à
ATTENTION ! Ne pas éteindre ou
déconnecter le STREAM AMP du sec-
teur pendant les phases de mise à jour!
Une mise à jour peut durer jusqu'à environ une
demi-heure.
NETTOYAGE
le STREAM AMP peut-être nettoyé à l’aide d’un
linge doux, ne pas utiliser de détergent ni de
liquide pouvant couler à l’intérieur de l'appareil.
N’utiliser aucun solvant, produit chimique ou
solution de nettoyage contenant de l’alcool, de
l’ammoniaque ou un abrasif.
FAQ
Consultez nos réponses aux questions souvent
posées sur www.cabasse.com, à la page FAQ
STREAM.
SERVICE APRÈS VENTE
Cabasse dispose d’un réseau de revendeurs
agréés qui est à votre disposition pour assurer le
service après vente de votre matériel.
Pour connaître la liste des revendeurs agréés
Cabasse, contactez-nous ou consultez notre site
Internet www.cabasse.com.
21
Page 22
f r a n c a i s
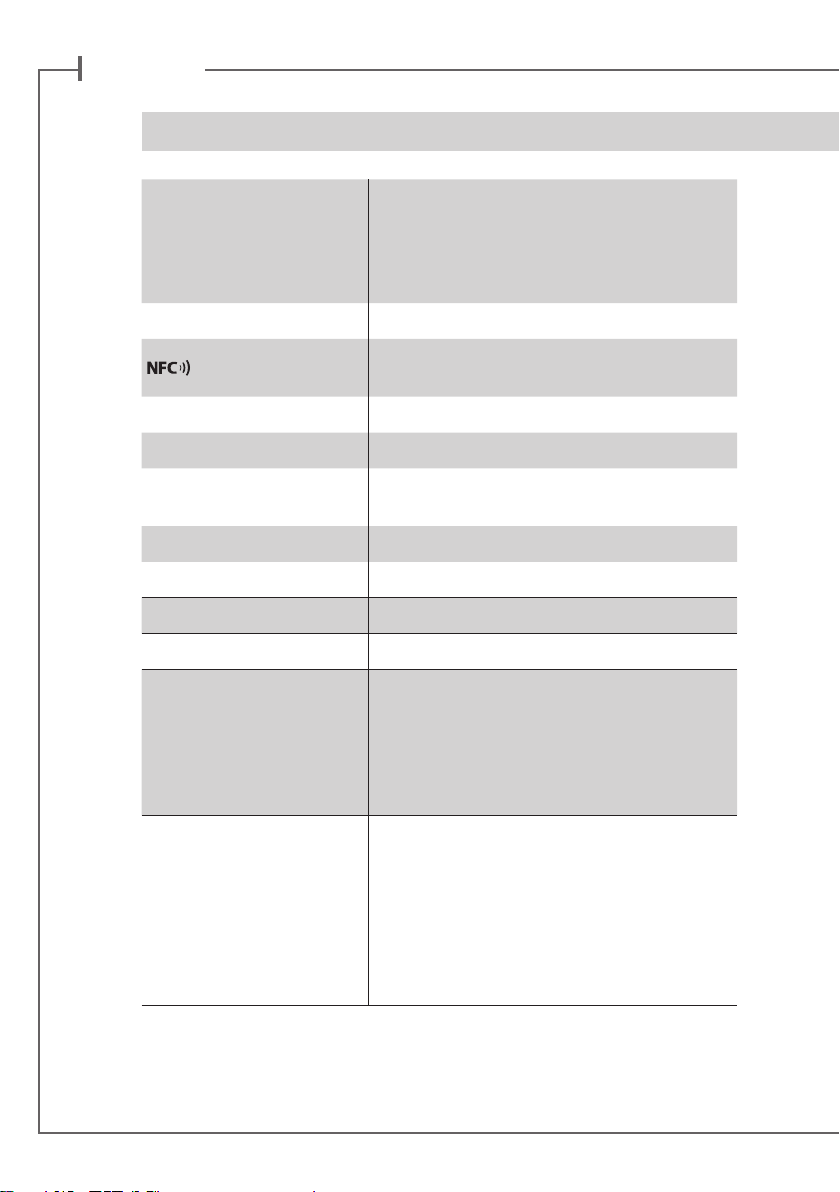
STREAM AMP 100
Entrées
digitales
- 1 entrée DLNA : soit filaire avec prise RJ45
soit WiFi
- 1 entrée Bluetooth APTX
- 1 entrée optique S/PDIF
- 1 entrée USB
Entrées analogiques
Alimentation
Consommation
Consommation en mode Eco
Consommation en mode arrêt
Température d’utilisation
Température de stockage
Taux d’humidité en utilisation
Réseau
Formats audio
Wifi/RJ45
2 RCA stéréo
Patch NFC au centre de la façade avant
Connexion Bluetooth instantannée
110-240 V ~60/50 Hz, 2A
150W
11 W @ 110-240VAC~50/60Hz
0 W @ 110-240VAC~50/60HZ
+5°C à +35°C
-5°C à +40°C
40% à 70%
10/100Mb Ethernet
MAC & PHY
Wireless LAN 802.11b/g/n
Sécurité WPS 2.0
Lecteur audio digital
(DMR sous DLNA 1.5)
MP3 (jusqu’à 320kbps)
WMA
(WMA9, CBR,CBR, jusqu'à 320kbps)
PCM (16 bits-44.1kHz, 24 bits-44/48/96 kHz,
.wav, .aiff, .aif, aifc files, HTTP streams)
AAC-LC (jusqu’à 320kbps),
ALAC (.m4a), FLAC (16 bits-44.1kHz,
24 bits-44/48/96 kHz)
22
Page 23
Amplification
2 x 50 W RMS/4-8 ohms
ou
4 x 25 W RMS/4-8 ohms
Taux de distorsion plus
bruit
(THD+N sur la bande
20-20 000 Hz pour une puissance de
100 mW et plus)
Dimensions
(h x l x p)
Poids
FONCTIONS
Diffusion audio loss less
Accès à tous les supports
audio depuis le reseau
WIFI (ordinateur…)
Multi-room
Diffusion des contenus
audio smartphone/
tablette
Diffusion application
audio (youtube…) depuis
smartphone/tablette
Diffusion à partir de
supports USB
Web radio /DEEZER
Wifi : < 0,1%
Bluetooth : < 0,1%
Analogique : < 0,1%
Optique < 0.1% THD+N
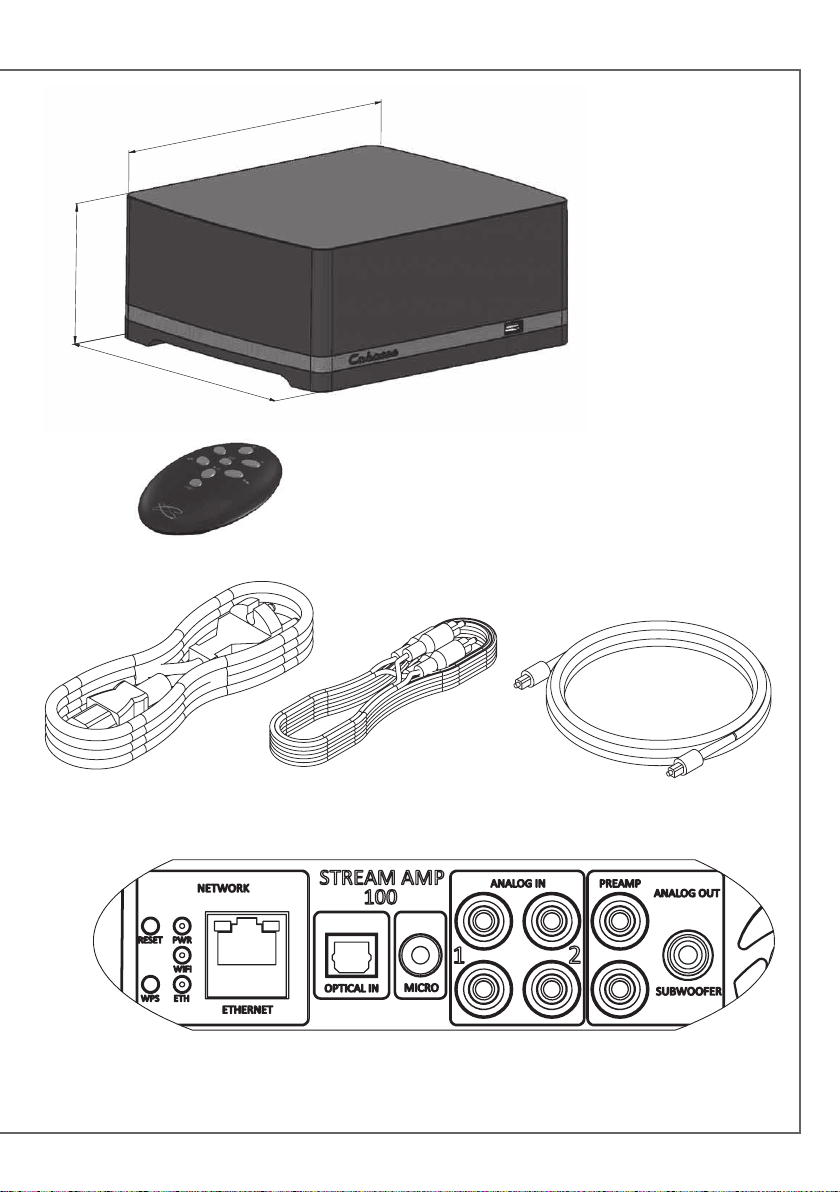
91 x 218 x 190 mm
1,9 kg
Connexion
Bluetooth
WIFI/ETHER-
NET via routeur
internet / box
internet
4 4
4
4
4 4 4
4
4 4
4
WIFI direct
smartphone/
tablette
Fabriqué sous licence de Dolby Laboratories. Dolby et le symbole du
double D sont des marques déposées de Dolby Laboratories.
23
Page 24
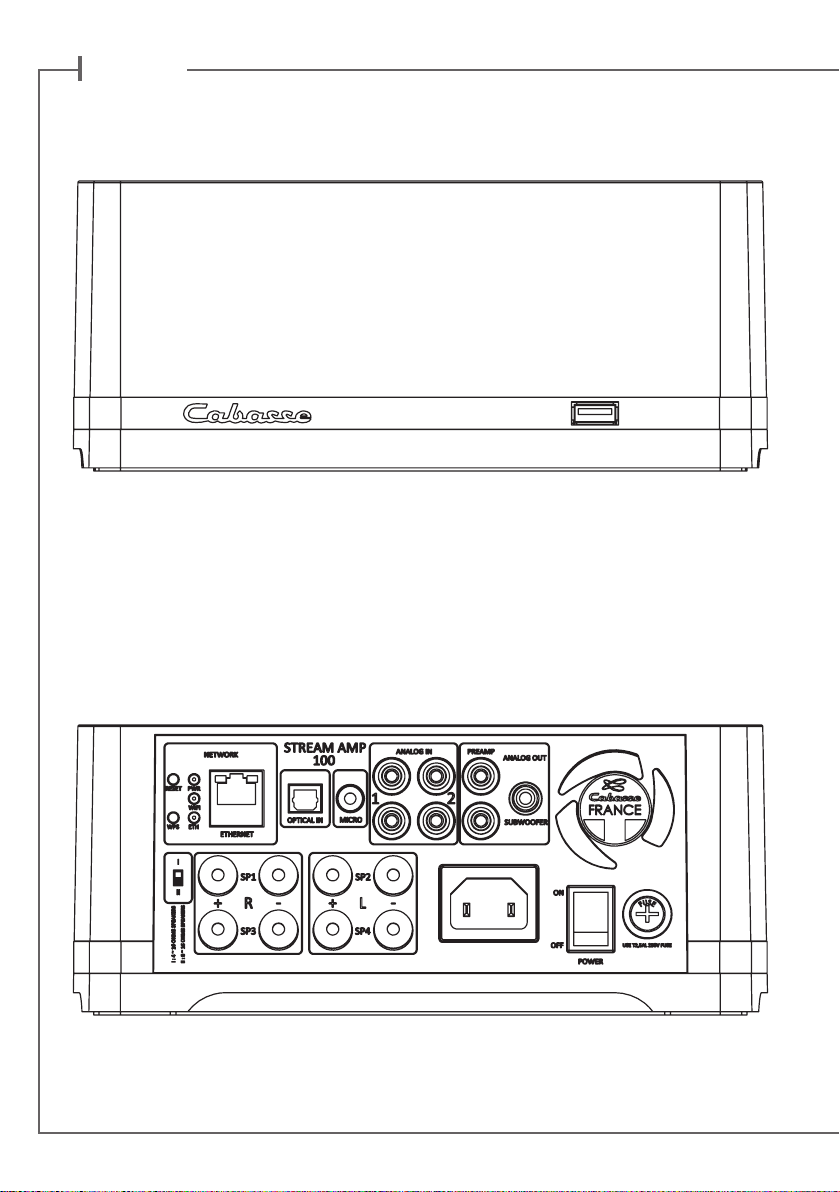
e n g l i s h
2424
Page 25
218
218
91
190
25
Page 26
e n g l i s h
1
11
8
9
1
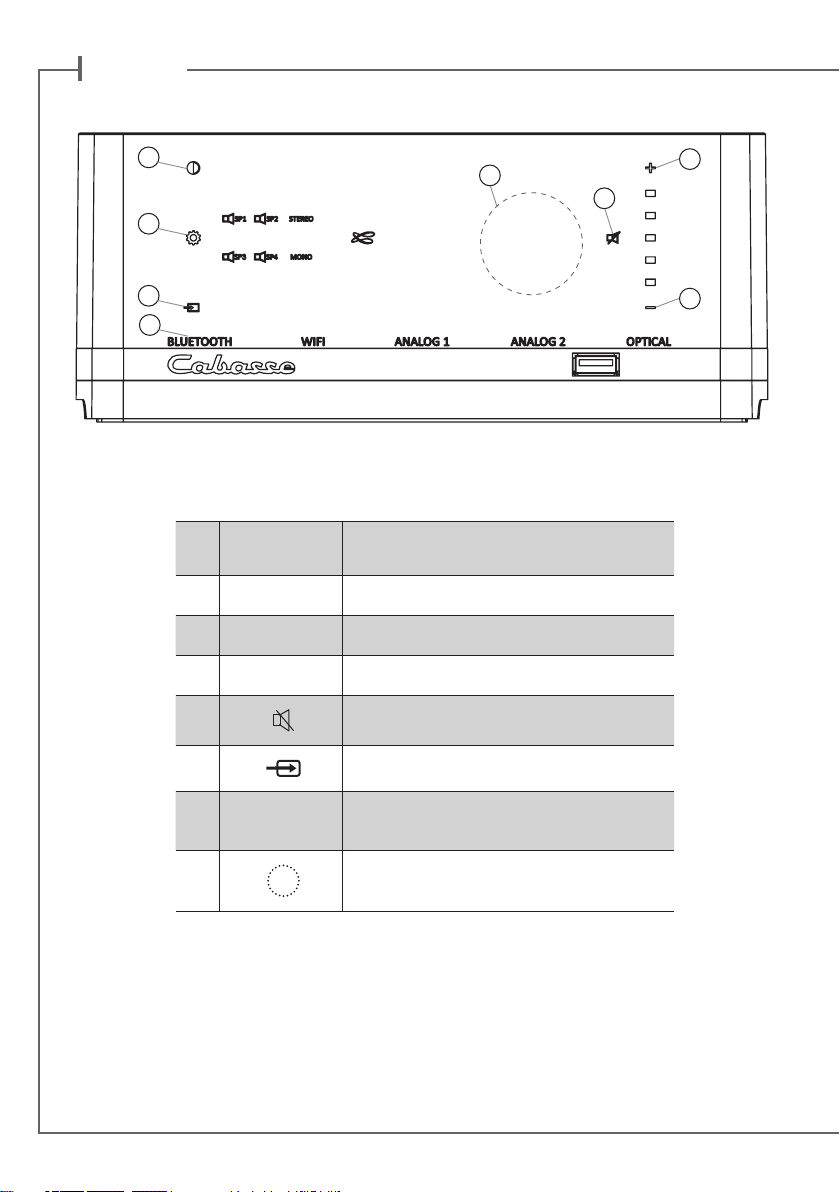
LED DISPLAY ON (white LED) / ECO (red LED)
2 VOL - Volume DOWN
3 VOL + Volume UP
4
10
3
4
2
IDENTIFYING
CONTROLS
Mute on/off
8
9 SOURCES
10
Source selection
BLUETOOTH - WIFI (WLAN/LAN) - RCA ANALOG 1 - RCA ANALOG 2 - OPTICAL
Position of the NFC patch
2626
Page 27

1
2
3
5
4
1
2 VOL - Volume DOWN
3 VOL + Volume UP
IDENTIFYING
CONTROLS
ON / ECO
7
8
FEATURES
Loss less audio playback
Access to any audio from
WLAN network (desktop...)
Multi-room
Tracks playback from
smartphone/tablet
Playback smartphone/
tablet a audio applications
(youtube…)
Playback from USB device
Web radio /DEEZER
Mute on/off
Previous title
of the played album
Next title
of the played album
Source selection
6
Bluetooth
connection
4
5
6
7 Pause/Play
8
WIFI/ETHERNET
via internet router
4 4
4
4
4 4 4
4
4 4
4
WIFI direct to
smartphone/tablet
Manufactured under licence form Dolby Laboratories.
Dolby and the double D symbol are trademarks of Dolby Laboratories.
27
Page 28
e n g l i s h
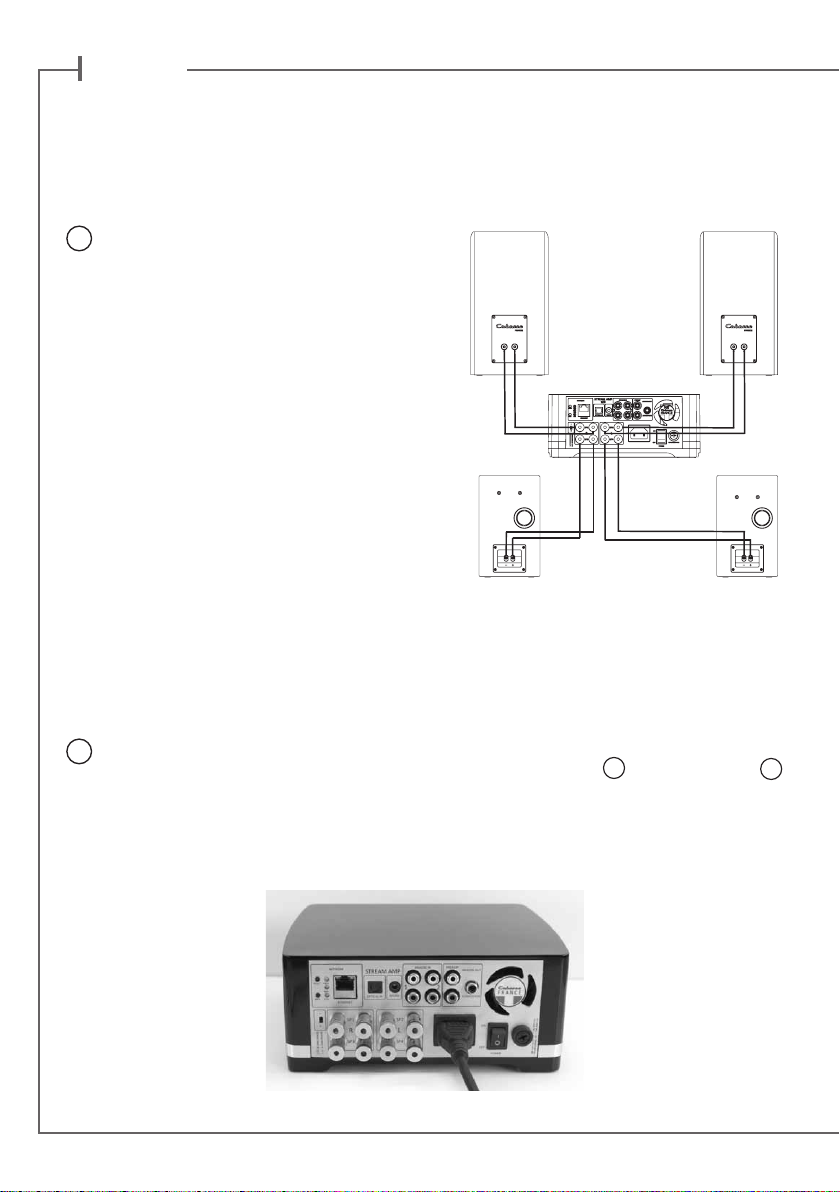
QUICK PLUG & PLAY
Place the STREAM AMP on a solid shelf
1
close to a mains plug, with enough available
headroom above, under and around, for
the optimum efficiency of the Bluetooth and
WIFI antennas and proper ventilation of the
amplifier.
Connect 2 or 4 loudspeakers to the
STREAM AMP. For a single pair of
loudspeakers, use SP1 (right speaker) and SP2
(left speaker) binding posts.
CAUTION: be assured that all “+” inputs are
effectively connected to “+” outputs as well as
all left outputs to left inputs.
Impedance range selector:
Position “I” (factory preset): power output is
2 x 50 W or 4 x 25 W RMS for loudspeakers
with a minimum impedance value below 6.4
ohms. It goes down to 2 x 25 W and 4 x 12.5
W for loudspeakers with minimum impedance
value above (or equal to) 6.4 ohms.
Position “II” : use this position to get 2 x 50 W
or 4 x 25 W RMS with minimum impedance value above (or equal to) 6.4 ohms, for instance
Cabasse Antigua IW or Archipel models.
Connect the power cable to the STREAM AMP, plug it to the mains and position the POWER
2
ON/OFF switch on "ON". STREAM AMP is ready to play when the LED
either on the STREAM AMP or the remote to get STREAM AMP on.
NOTE: the DLNA mode of STREAM AMP is available when the PWR (Power) LED has turned
from red to green, around 40 seconds after powering on the STREAM AMP.
28
1
turns on. Press key
1
Page 29
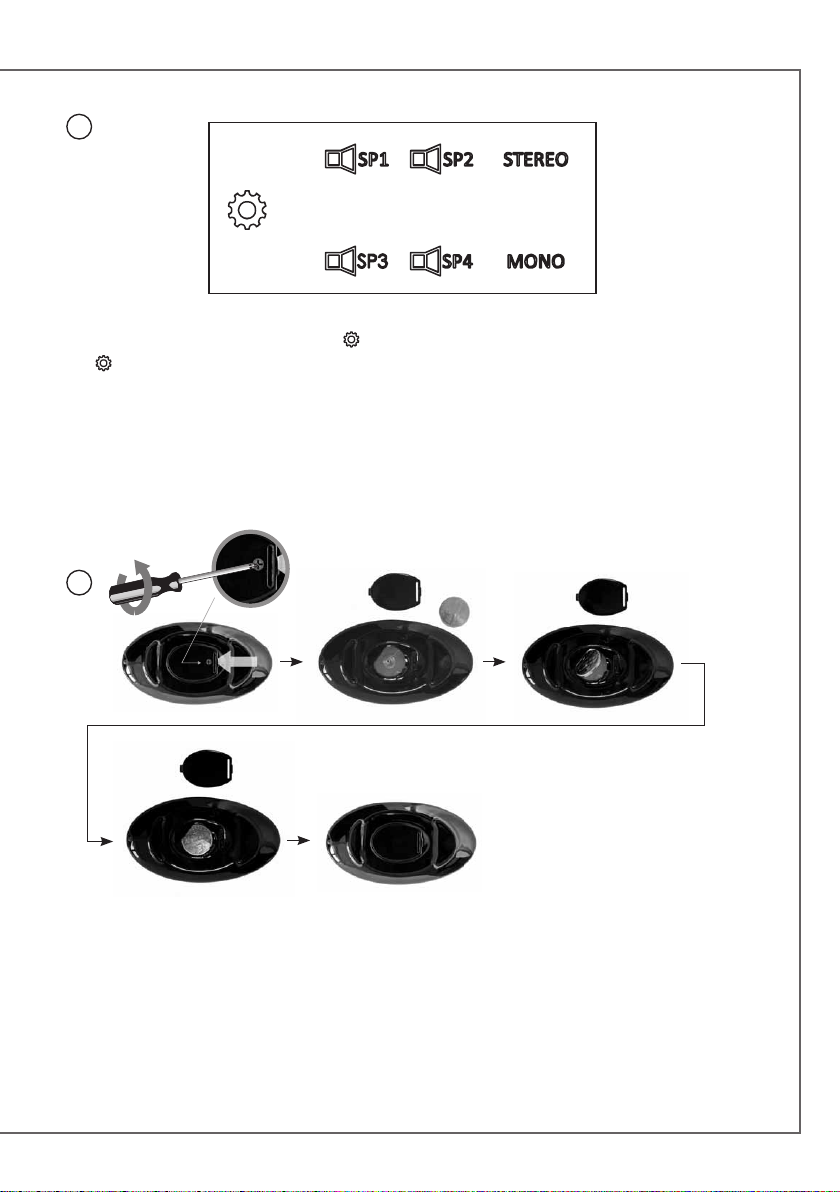
3
Settings of the loudspeakers outputs .
to select between the 4 possible set-ups:
Press
- 1 STEREO pair of loudspeakers (default mode). The SP1, SP2, STEREO LEDs are on.
- 2 STEREO pairs of loudspeakers. The SP1, SP2, SP3, SP4 and STEREO LEDs are on.
- 2 loudspeakers playing MONO. The SP1,SP2 and MONO LEDs are on.
- 4 loudspeakers playing MONO. The SP1,SP2, SP3,SP4 and MONO LEDs are on.
4
Before first use, loosen the screw (PH00 screwdriver), remove the back cover, remove the battery
protection tab, replace the cover, retighten the screw.
Replacement of the CR-2025 type battery in the Stream remote control: loosen the screw, remove the
rear lid, remove the old battery and load the new battery properly with the "+" side on the clasp side,
put the rear cover back on, retighten the screw.
29
Page 30
e n g l i s h
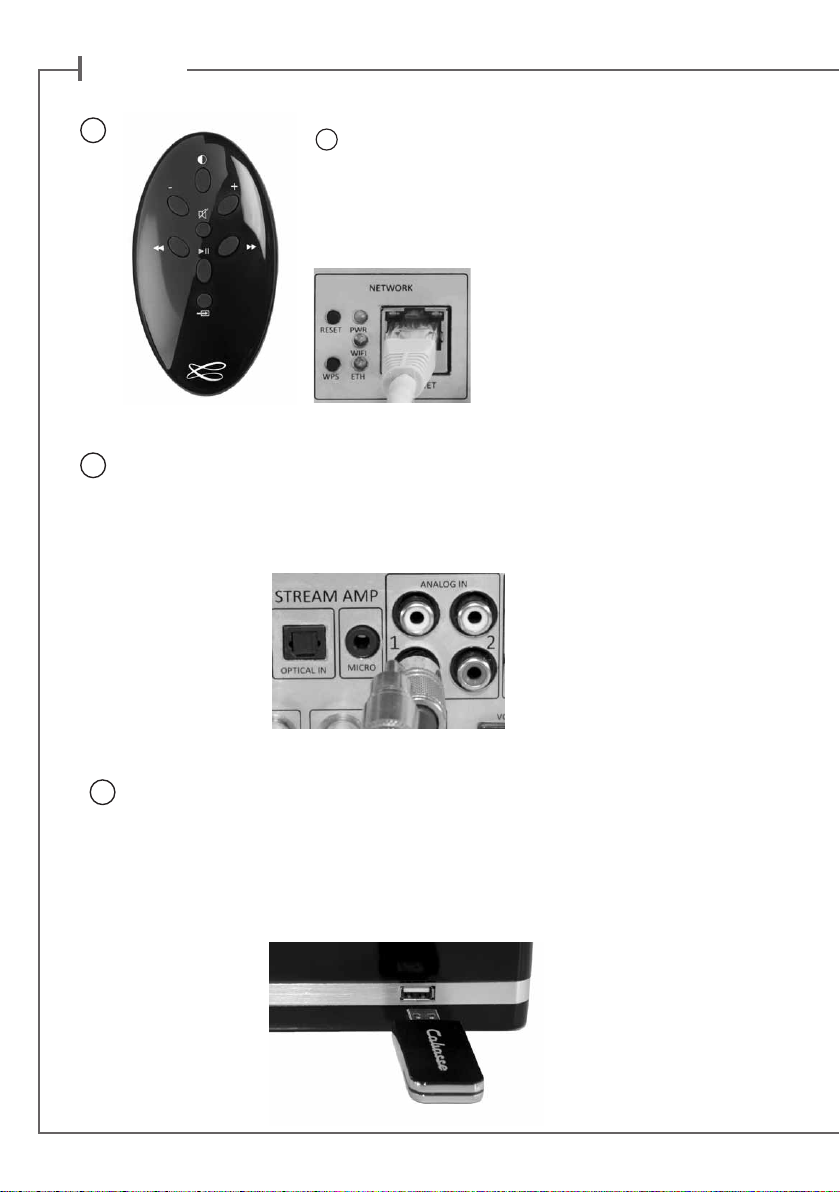
5
6
Once the Bluetooth and Wi-Fi connections activated, press the
8
key of the remote control or on the front panel until you get
the requested source, with the appropriate LED on the panel
being on. The Wifi LED stands for the Wifi/WLAN source, the
ETH LED stands for the Ethernet/LAN source.
ANALOG INPUTS 1 AND 2
Select an audio source fitted with an analogue output, either RCA or mini-jack type.
Get a RCA/mini-jack if the source is fitted with a mini-jack output.
USB INPUT
7
Plug in an USB stick or a hard-drive to this input to get all the stored audio files available on
the domestic network. All the audio files, under formats compatible with the built-in DLNA
server of STREAM AMP, will be listed in the Stream Audio Control apps and can be played
by any Cabasse Stream player connected to the same domestic network. The USB input is
fitted with a 1 ampere power output enabling the use of a portable hard drive with no need
of an external power supply.
30
Page 31
BLUETOOTH CONNECTION
STREAM AMP is set in on open mode for Bluetooth connections.
Select "Cabasse STREAM AMP" in the available Bluetooth devices list. Select the BLUETOOTH input
8
with
key on the Stream remote or on the Stream Amp. If a Bluetooth source is already connected
to STREAM AMP, disconnect this item before selecting a new one.
BLUETOOTH CONNECTION WITH AN ANDROID TABLET: see the English explanation on page 38.
CONNECTION AND USE OF STREAM AMP WITH AN APPLE COMPUTER: see the English version
page 39.
INSTANT NFC BLUETOOTH CONNECTION WITH A NFC SMARTPHONE
1) Installation of the Cabasse NFC application
a) Enable the NFC function in the set up of the NFC smartphone.
b) Check/activate the wifi or 3G connection of the smartphone to Internet.
c) Touch the smartphone together with the NFC patch
STREAM AMP.
d) Accept the installation of the Cabasse NFC app from Google Play.
e) Your smartphone is now ready for instant Bluetooth NFC connections.
2) Using the Cabasse Bluetooth NFC application
a) Tap your smartphone on the NFC patch
Bluetooth pairing; if necessary the STREAM AMP turns on, then the Bluetooth input is automatically
selected and the first cut of the smartphone’s playlist is being played by STREAM AMP.
b) Tap again to unpair both items and before pairing another smartphone to the STREAM AMP.
NOTE: The Cabasse NFC application runs in background once installed in the smartphone. This
application can be found in the list of applications, but there is no icon on the desktop.
10
10
in the middle of the front panel of
in the middle of the STREAM AMP for instant
31
Page 32
e n g l i s h
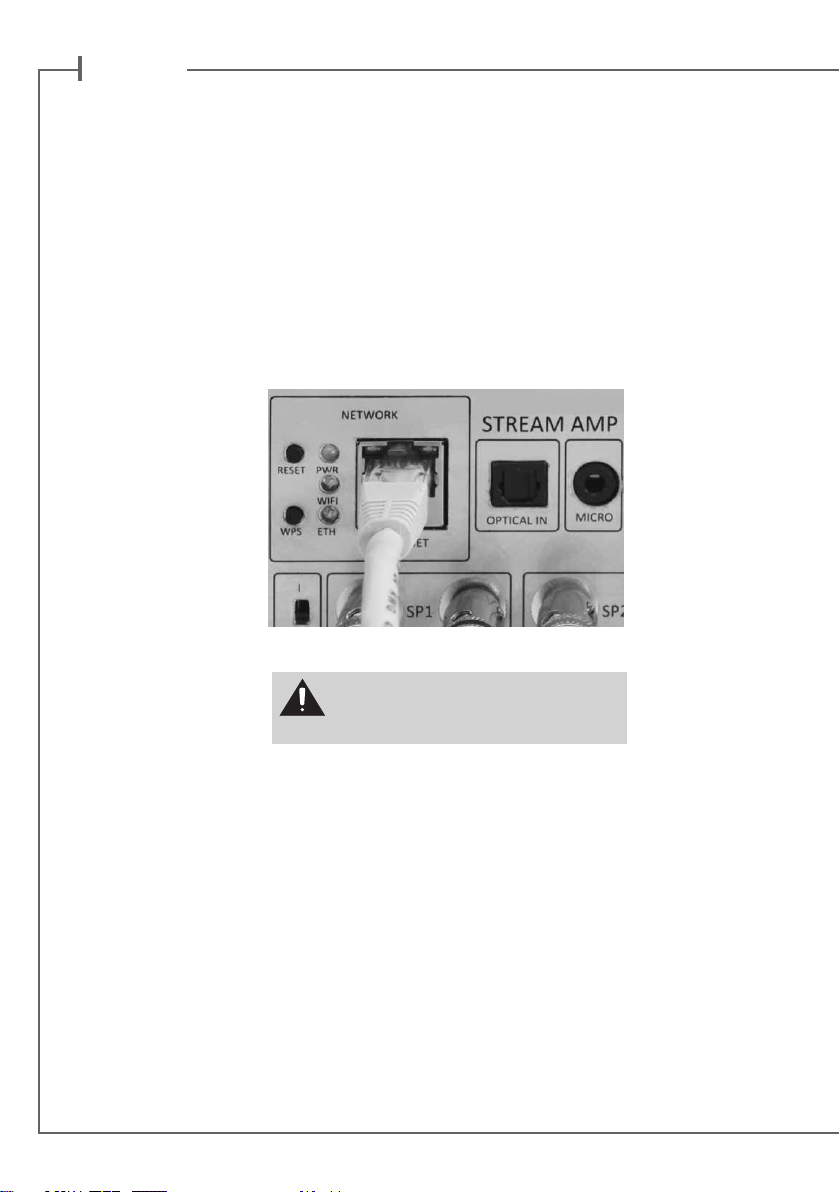
LAN WIRE CONNECTION TO THE ETHERNET NETWORK
The LAN wire connection ensures a constant and optimum transfer rate. Use it if music reproduction
stops or is erratic under Wi-Fi mode, because of a saturated Wi-Fi bandwidth or the distance between
the router and the Stream unit being too long.
Use a RJ45 type cable to connect STREAM AMP to the domestic router.
The connection is running when the blue LED “ETH” stops flashing and remains on.
ATTENTION: set up the router on DHCP mode.
Press "RESET" before starting a new
connection process (wired, auto, easy,
manual) or connecting to a new router.
WIFI DIRECT MODE
Wi-Fi direct allows to play with wifi quality all the audio tracks available in the tablet or the smartphone
as well as those availble in the hard-disk or USB-stick connect to the USB input of STREAM AMP,
without need of a wifi network. Internet sources such as Vtuner, Deezer and the STREAM AMP firmware
updates are not available.
Activate the STREAM AMP, Install and open the Cabasse app on your tablet/smartphone and select
"Use this device in standalone mode" instead of "configure this audio device". Follow the instructions
and start playing your music.
32
Page 33
DLNA (WLAN) WIRELESS CONNECTION TO THE WIFI NETWORK
THERE ARE 2 SOLUTIONS TO CONNECT
STREAM AMP TO THE WIFI NETWORK:
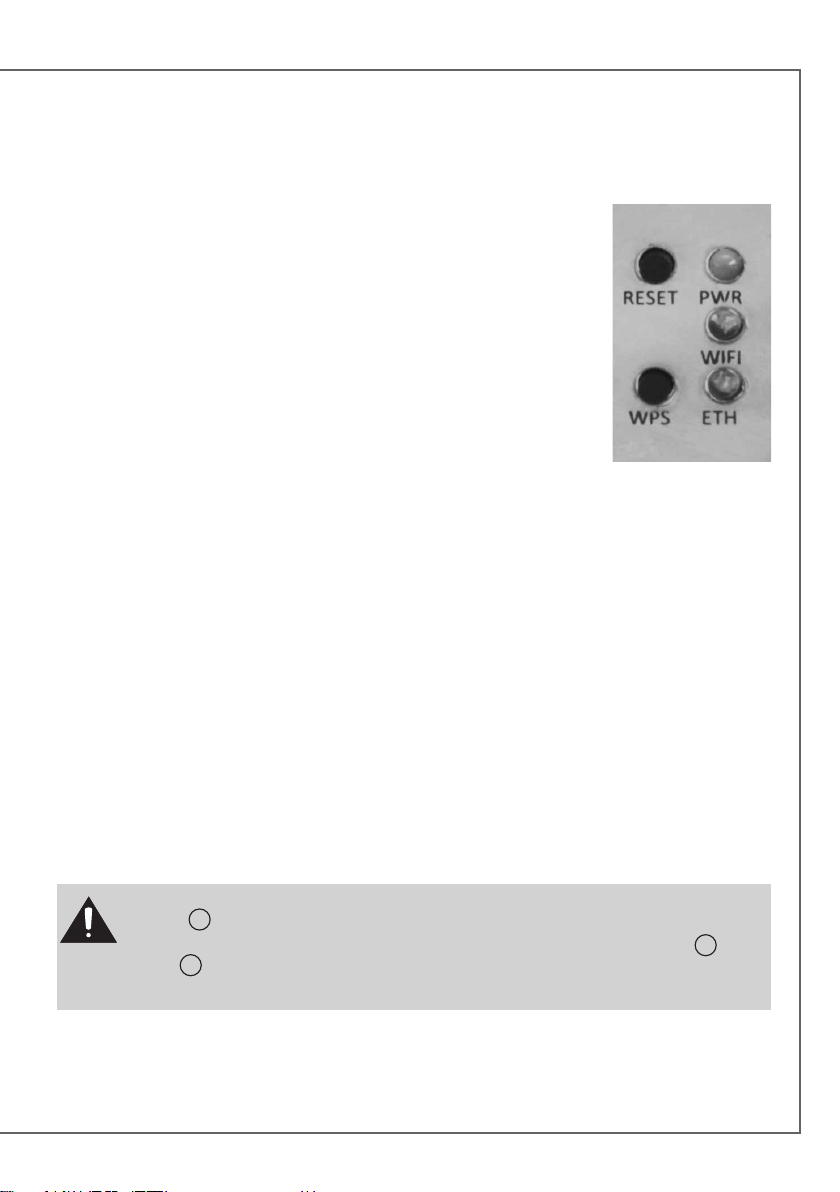
1) WPS CONNECTION: push the WPS button of the wireless router for
2 seconds or more and push the WPS button of the STREAM AMP within
around 2 minutes (check for precise delays in the router's manual). The
connection is completed when the blue LED "WIFI CONFIGURATION" is
on. Now go to page 41 to install the Cabasse application.
2) EASY WI-FI CONNECTION WITH THE CABASSE STREAM APP
& with a smartphone or tablet wi-fi connected to the domestic network.
a) Install the Cabasse Stream App on an Android or Mac tablet or
smartphone from “Play Store” or “App Store”.
b) Switch the STREAM AMP on or press the reset button if already on. Activate the Wi-Fi in the
“settings” application mode of the smartphone or tablet.
c) Select STREAM AMP among the available items and launch the connection.
d) Launch the Cabasse Stream app. Once connected to STREAM AMP, select STREAM AMP in the
available wifi networks list and follow the set-up instructions.
Note: from phase b), you may open the Cabasse application and follow the instructions of the online
guide, which is launched automatically when connecting for the first time.
e) The Wifi blue LED on the back of STREAM AMP flashes for around 30 seconds.
f) The Wifi blue LED stops flashing and remains on: press on “Close This Window”. STREAM AMP is
now ready to play all the shared audio files in your network as well as all the web radios proposed by
vTuner.
CAUTION! An automatic update of the firmware might start as soon as STREAM AMP is connected to the
Web. The
Do not try to use STREAM AMP during the update, wait until STREAM AMP has restarted, when
is steady red. Press
Do not shut down or unplug STREAM AMP during updates.
9
LED turn to white and flashes for 5 to 15 minutes until the update is fully completed.
1
to turn the STREAM AMP on and carry on.
33
9
LED
Page 34
e n g l i s h
Thank you very much for choosing Cabasse speakers. Please read
these instructions carefully before setting up your speakers.
IMPORTANT SAFETY INSTRUCTIONS
Explanation of graphical symbols
The lightning flash with arrowhead
-
symbol, within an equilateral triangle,
is intended to alert you to the presence of
uninsulated “dangerous voltage” within the
product’s enclosure that may be of sufficient
magnitude to constitute a risk of electric shock
to persons.
The exclamation point within an equi-
lateral triangle is intended to alert you
to the presence of important operating and
maintenance (servicing) instructions in the literature accompanying the appliance.
Cleaning - Always take off the power cord
before cleaning the device. Do not use cleaning
solvent, whether liquid or air spray. Using a
soft damp cloth is recommended.
Installation on a piece of furniture
and stands -
an unsteady surface, i.e. a stand, tripod, table,
shelf, etc. It may fall and cause serious injury to
a nearby child or adult.
Do not place this device on
Ventilation outlets - The device shall not
be placed in a position that restrains the operation of its fans. Avoid installing the device on
a bed, couch, blanket or other similar surfaces
that may prevent the appropriate air flow. Do
not install the device in a confined space, such
as a book shelf or other piece of furniture, that
could prevent sufficient air from flowing freely.
Power - The device shall only be connected
to a source of power compliant to the one described in this manual or on relevant printed
labels on the product. If you are not sure of the
type of power available, please contact your
reseller or the local power company.
Easy access to mains plug - To comple-
tely disconnect this product from the mains,
disconnect the plug from the wall socket outlet. The mains plug is used to completely interrupt the power supply to the unit and must be
within easy access by the user.
Overloads - Avoid overloading the power
plugs, extension cords or power relays. This
could result in fire or electric shocks.
Foreign bodies and liquids - Avoid let-
ting foreign materials or liquids enter the device. They could cause fire or electric shocks.
Never spill any liquid on the device.
Troubleshooting - You must unplug your
device from the power supply and have it checked by a qualified technician if:
The power supply or the plug is damaged.
Foreign bodies or liquid penetrated the de-
vice.
The device was exposed to dripping or
splashing.
The device does not seem to work correctly
under normal operating conditions. Only
operate the controls described in this manual. Any other operation could damage the
device and require on-site visit of a qualified
technician.
The device has fallen or its housing is da-
maged.
The performances of the device are strongly
altered.
34
Page 35
Spare parts - If spare parts are needed to
repair the device, make sure that the technician followed the manufacturer’s recommendations or that the replacing parts feature
the same specifications as the original ones.
Non-compliant parts can result in multiple
damages, including fire or electric shocks.
IMPORTANT SAFETY INSTRUCTIONS
Checks - After any servicing of the device, ask
the technician to perform appropriate testing
to make sure that the device works safely.
1. READ these instructions.
2. KEEP these instructions.
3. HEED all warnings.
4. FOLLOW all instructions.
5. DO NOT use this apparatus near water.
6. CLEAN ONLY with dry cloth.
7. DO NOT block any ventilation openings.
Install in accordance with the manufacturer’s instructions.
8. DO NOT install near any heat sources
such as radiators, heat registers, stoves, or
other apparatus (including amplifiers) that
produce heat.
9. DO NOT defeat the safety purpose of
the polarized or grounding type plug. A
polarized plug has two blades with one
wider than the other. A grounding type
plug has two blades and a third grounding
prong. The wider blade or the third prong
are provided for your safety. If the provided
plug does not fit into your outlet, consult
an electrician for replacement of the obsolete outlet.
10. PROTECT the power cord from being
walked on or pinched, particularly at
plugs, convenience receptacles, and the
point where they exit from the apparatus.
11. ONLY USE attachments/accessories
specified by the manufacturer.
12. USE ONLY with a cart,
stand, tripod, bracket, or table
specified by the manufacturer,
or sold with the apparatus.
When a cart is used, use caution when
moving the cart/apparatus combination to
avoid injury from tip-over.
13. UNPLUG this apparatus during
lightning storms or when unused for long
periods of time.
14. REFER all servicing to qualified service
personnel. Servicing is required when
the apparatus has been damaged in any
way, such as power-supply cord or plug is
damaged, liquid has been spilled or objects
have fallen into the apparatus, the apparatus has been exposed to rain or moisture,
does not operate normally, or has been
dropped.
The mains plug is used as the disconnect
device, the disconnect device shall remain
readily operable.
Warning: don't ingest battery,
chemical burn hazard
35
Page 36
e n g l i s h
UNPACKING
Open carton flaps; remove all the components. If the speakers or the subwoofer appear
damaged, do not use them. Repack everything
in the original packing and contact your
authorised Cabasse dealer immediately. We
suggest you to retain the packing for future
use.
SETTING UP
THE COMPONENTS
OF YOUR SYSTEM
1 STREAM AMP, 1 power cord, 1 optical
cable, 1 RCA-RCA cable, 1 remote control, 1
manual and one warranty card.
INSTALLATION
Place STREAM AMP within reach of a mains
plug.
Leave enough free room above and around
STREAM AMP in order to:
- allow good wifi and Bluetooth transmission,
- give access to a smartphone for easy NFC
tap Bluetooth connection.
- provide a good air circulation for cooling.
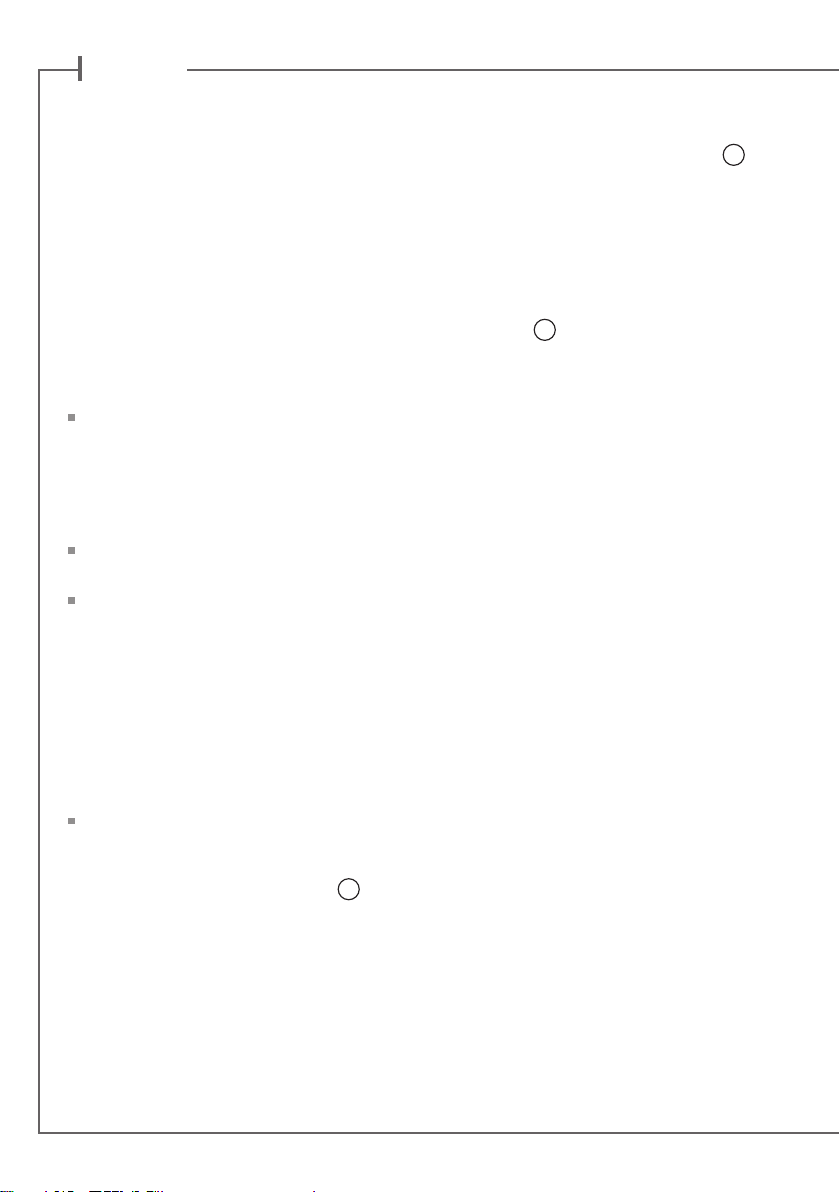
ON / ECO
a) Switching to ECO mode: press the
key of the Stream remote control or of the
STREAM AMP keypad. The wifi and Bluetooth
functions remain available. The audio section
of STREAM AMP is no longer powered.
b) Getting back to ON mode:
- press the
control or of the STREAM AMP keypad or
- launch a Bluetooth connection (NFC or
other) or
- press "Play" on the StreamCONTROL
application.
1
key of the Stream remote
1
POWER CONNECTION
Connect the power cord to the STREAM
AMP, plug it into the mains and position the
POWER ON/OFF switch to "ON" Stream
Amp is ready to play when the LED
on.
NOTE: the WIFI mode of STREAM AMP is
available when the PWR (Power) LED has
turned from red to green, around 40 seconds
after switching on the STREAM AMP.
9
turns
36
Page 37
1
11
10
3
4
8
9
1
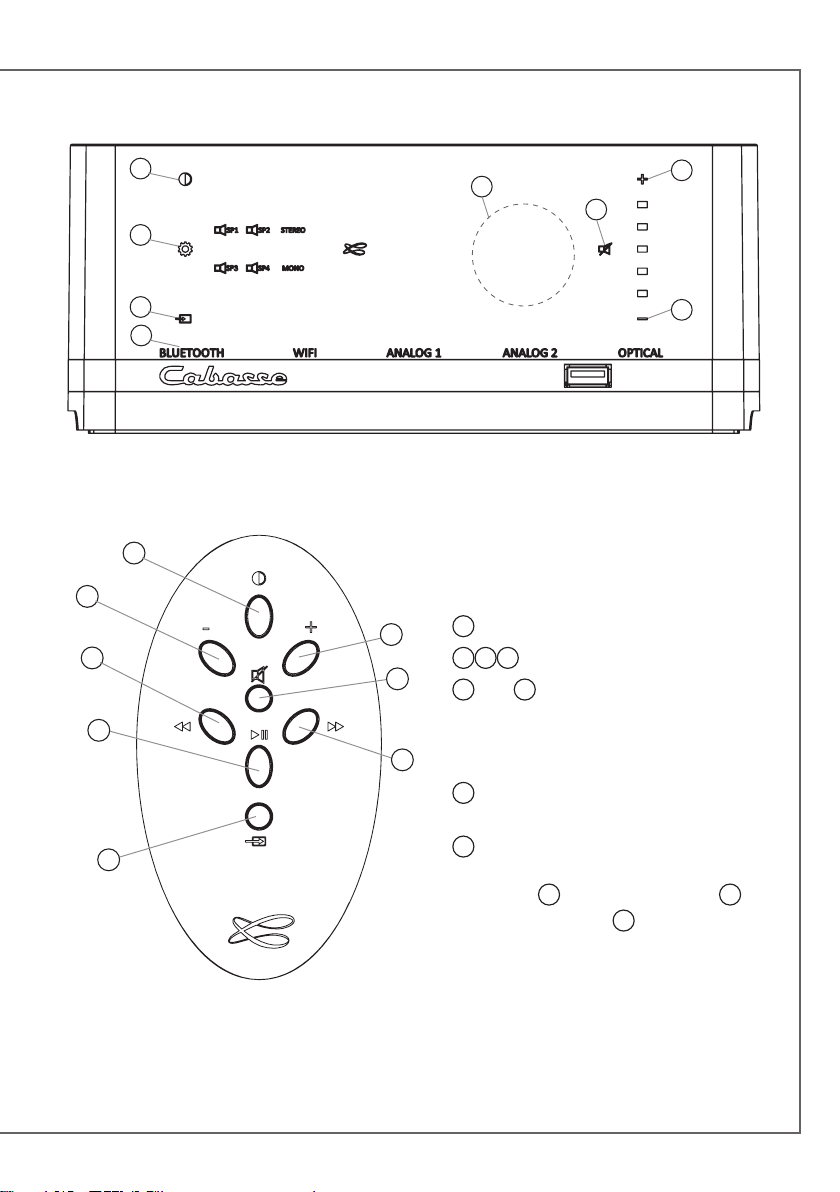
USE OF STREAM AMP WITH
2
CONTROL KEYS AND THE
2
3
5
4
7
8
STREAM REMOTE CONTROL
1
ECO / ON mode selection
2 3 4
5
ning
Bluetooth: previous and next title of the
6
played album or playlist.
7
tooth)
8
one of the connected sources: Bluetooth
(blue LED
analogue (green LED
VOL "+" and "-", Mute keys
and 6 wifi: reverse and forward scan-
Music: play or pause (wifi and Blue-
Source selection: press this key to select
9
), wifi (orange LED 9) or
9
).
37
Page 38
e n g l i s h
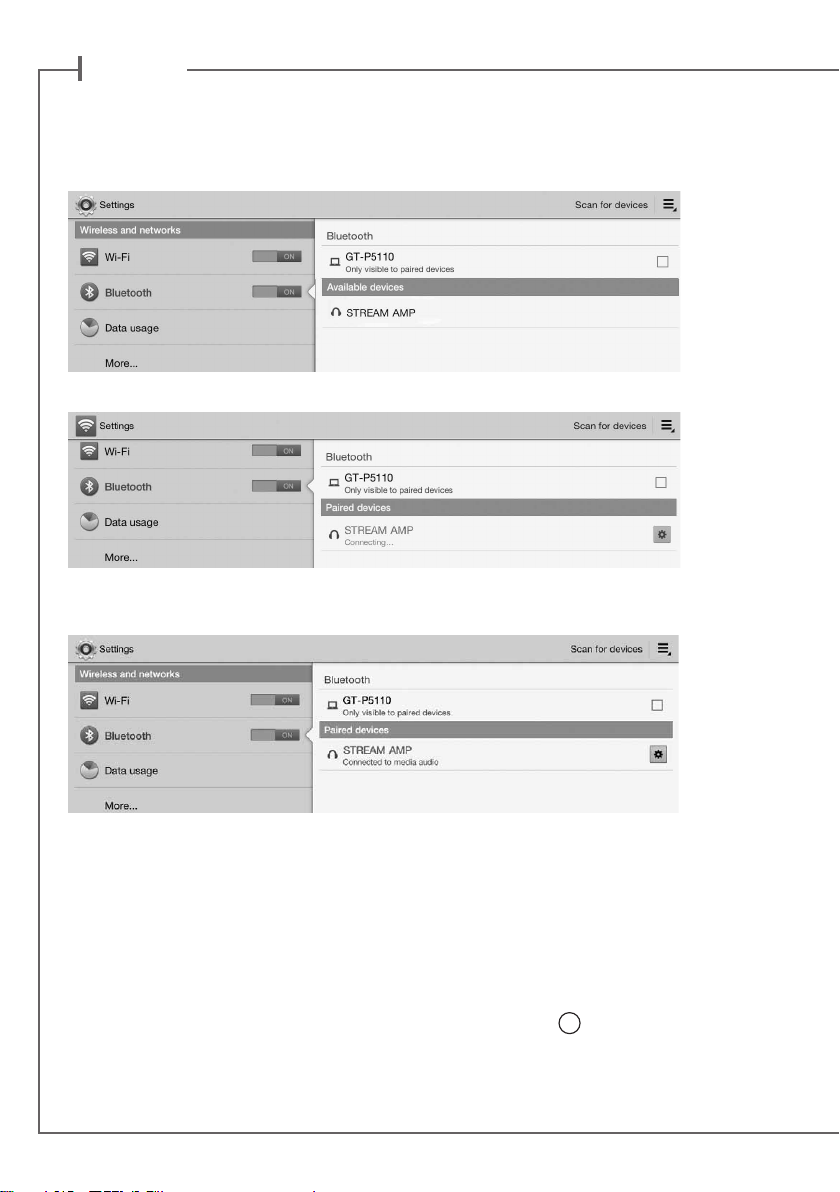
BLUETOOTH CONNECTION TO AN ANDROID TABLET
- If not already done, activate the Bluetooth Function in the « Settings » menu of your tablet by
pressing on the ON-OFF switch.
- Press “Scan for devices” and select « Cabasse STREAM AMP » among the available devices.
STREAM AMP is now paired with the tablet and connected to STREAM AMP is no other Bluetooth connection to STREAM AMP is active.
If the message « Connection.. » does not show up, stop the running Bluetooth connection with
another device, either through the set up menu of the device or by switching off and on the
STREAM AMP. Press on « Cabasse STREAM AMP » again.
To play on STREAM AMP the audio files stored in the tablet (or smartphone), open the audio
player application, select a file and press on “play”.
If STREAM AMP remains silent, first check that the main volume of the tablet (or smartphone)
is not down to zero level and that « mute » is off. Adjust the volume in the player application
and finally raise the volume of the STREAM AMP with the Stream remote. Finally select «
Bluetooth » as the active source on STREAM AMP pressing the
until the blue LED flashes.
8
key of the Stream remote
INSTANT BLUETOOTH CONNECTION VIA NFC TAGS See page 31.
38
Page 39
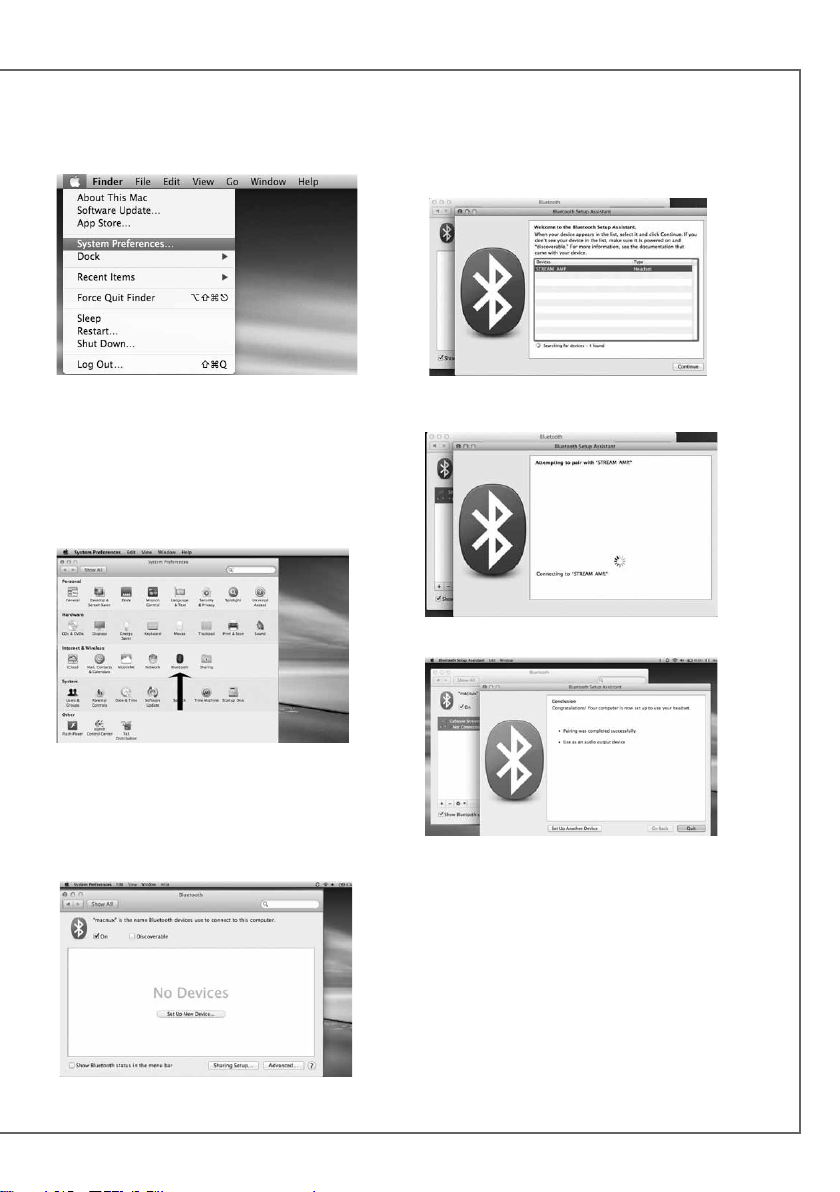
BLUETOOTH CONNECTION TO AN APPLE COMPUTER
1) BLUETOOTH MODE ACTIVATION
Connect the STREAM AMP to mains to power
it on. If STREAM AMP is already on, stop
any running Bluetooth connection between
STREAM AMP and any other item.
Activate the Bluetooth function of the computer: open the « apple » menu and select « Systems Preferences ».
Select « Bluetooth » in the window for the
« Systems Preferences ».
Select « On » and click on « Set Up New
Device”
Select « STREAM AMP » in the list of items
and click on “Continue”
Connecting…
Connection completed. STREAM AMP is now
paired with your Mac computer.
39
Page 40
e n g l i s h
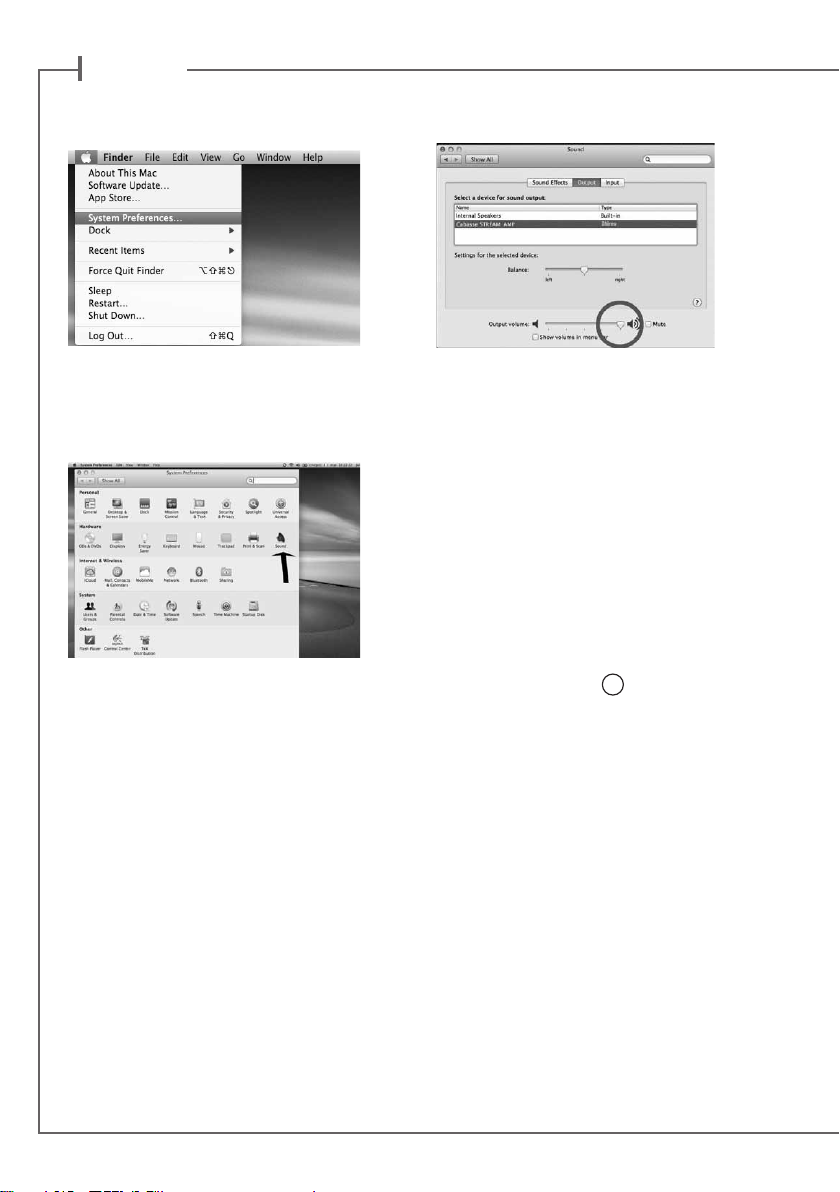
2) SELECTION OF THE AUDIO OUTPUT DEVICE
To enjoy the musics stored on you Mac with
STREAM AMP, set up STREAM AMP as your
audio output device in the “System Preferences” menu.
Select « Sound » in the « Hardware » section.
Select "STREAM AMP Stereo" in the « Output » tab. The line "STREAM AMP" stands for
the hands free set up to be used only with a
smartphone.
Set the volume control on far right position.
Close the “Sound” window.
If the STREAM AMP is on Eco mode, it will
take around 6 seconds to start playing, the
Bluetooth input being automatically selected.
Use the Stream remote control to adjust the
sound level.
If STREAM AMP is active and connected to
another active source (wifi, analog) use the
Stream remote control and select the Blue-
tooth input with the
sound level.
8
key, then adjust the
40
Page 41
USE OF STREAM AMP wITH StreamCONTROL APP
1 - Switch ON the POWER button on the back of the STREAM AMP. STREAM AMP IS ready to
play when the LED
STREAM AMP or on the remote control to get STREAM AMP on.
2 - Connect the smartphone or the tablet to the WLAN network to be used with STREAM AMP.
3 - Download and install the free application names StreamCONTROL on Playstore for Android
or on the App Store for iOS.
4 - Launch the application and follow the instructions from the setup wizard. Choose between
direct Wi-Fi (see page 32) or network mode (see pages 33) upon request.
The app is easy to use
When necessary (after an application update for instance), pressing the “?” key gives specific help
and hints at each level of navigation.
You can now enjoy Stream, play all the audio files listed in your smartphones or tablets, PC and
Mac computers, NAS hard disks, as well as the HD or USB sticks directly connected to any Stream
Amp, Stream Source or Stream 1 connected to the network, discover thousands of web radios
and stream with Deezer.
All the Stream players of the same network can be controlled by one or several smartphones and
tablets. Groups of Stream players connected the same way ( LAN or WLAN) can be created to
play synchronised music with individual level control.
1
illuminates red (stand-by mode), press key 1 on the front board of
41
Page 42
e n g l i s h
BATTERY REPLACEMENT
Take the remote control in your hand with the
keyside facing the floor. Lift the locker and
pull out the battery. Remove the dead battery
and replace it with a new CR-2025 battery.
Dispose of the old batteries according to
these instructions.
CAUTION: there is a danger of explosion
if the battery is incorrectly replaced.
Replace only with the same or equivalent
type. The battery shall not be exposed to excessive
heat such as sunshine, fire or the like.
WEEE MARK
Disposal of Wastes of Electrical &
Electronic Equipment (Applicable in
the European Union)
This symbol on the product,
consisting of the crossed-out
wheeled bin, indicates that this
product shall not be treated as
household waste. Instead it shall be
handed over to the applicable collection point
for the disposal of electrical and electronic
equipment at the end of life. By ensuring this
product is disposed of correctly, you will help
prevent potential negative consequences for
the environment and human health, which
could otherwise be caused by inappropriate
waste handling of this product. The recycling
of materials will help to preserve natural
resources. For more detailed information about
recycling of this product, please contact your
local city office, your household waste disposal
service or the shop where you purchased the
product.
AUTO UPDATE
The updates of the firmware for STREAM
AMP are done automatically. The duration of
an update can vary from 5 minutes to half an
hour.
1
The
LED turns to red and flashes until the
update is fully completed. STREAM AMP cannot be used during the updates.
ATTENTION: Do not shut down
STREAM AMP during updates.
CLEANING STREAM AMP
The STREAM AMP may be cleaned with a soft
damp cloth. Do not use any sprays near the
system or allow liquids to spill into any openings. Also, do not use any solvents, chemicals, or cleaning solutions containing alcohol,
ammonia, or abrasives.
FAQ
Looking for more information? Read our detailed answers to the Frequency Asked Question
on www.cabasse.com, page STREAM.
CUSTOMER SUPPORT SERVICE
The Cabasse retailer network is at your disposal
to ensure the after sale service of your product.
To get the list of Cabasse retailers, contact us
or consult our web site www.cabasse.com.
By following the above instructions, your STREAM
AMP system is now properly set up and we hope you
will enjoy your speaker system for many years. We
receive letters every day from customers expressing
the ever growing satisfaction and musical emotion
they have been getting with our speakers over the
years. These letters are our first motivation.
42
Page 43
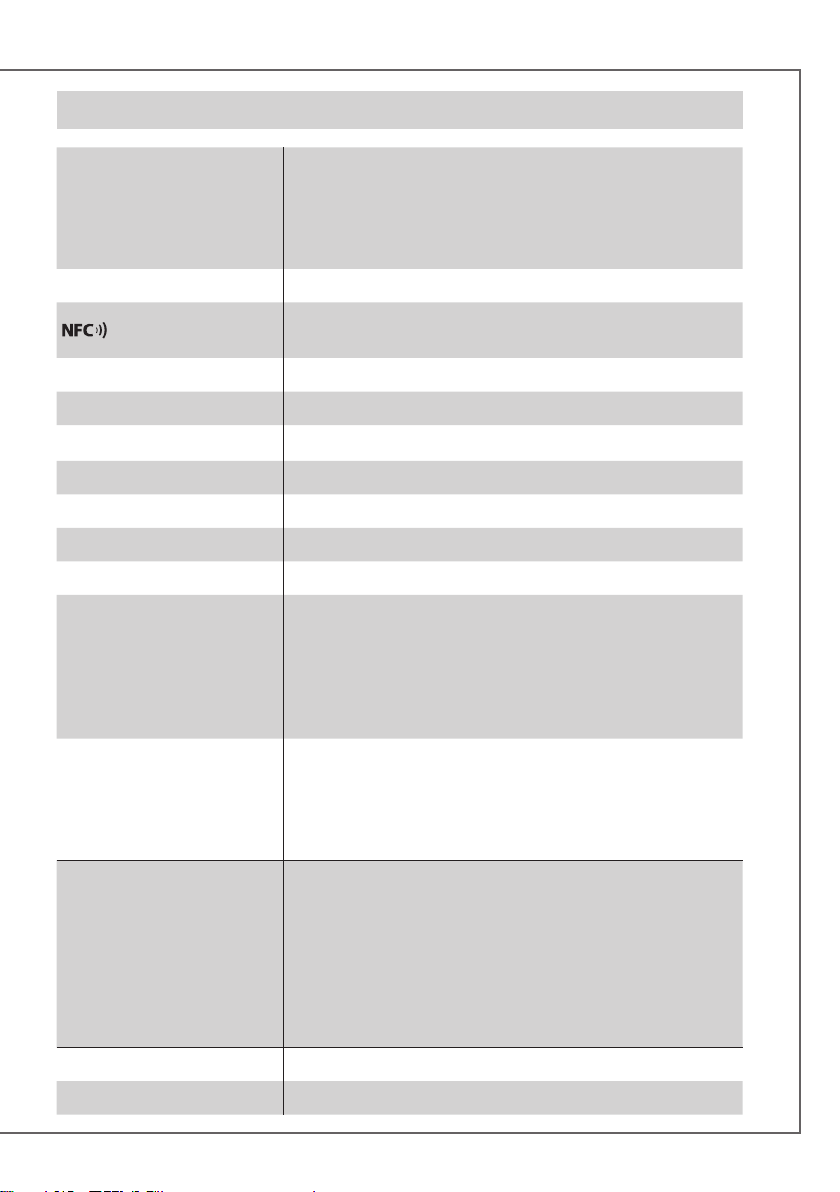
STREAM AMP 100
Digital inputs
Analogue input
Voltage
Power consumption
- 1 DLNA input: either wired with RJ45 cable
or Wifi
- 1 Bluetooth APTX input
- 1S/PDIF optical
- 1 USB input
2 stereo RCA
NFC patch in the center of the front panel
Instant Bluetooth Connection
110-240V~60/50 Hz, 2A
150W
Eco power consumption
Power consumption when off
Useable temperature range
Storage temperature
Useable humidity range
Network
Audio formats
(WiFi/RJ45)
Amplification
Distortion rate
and noise
(THD+N for the 20-20,000 Hz bandwidth
and for 100 mW power output and more)
Dimensions (H x W x D)
Weight
11 W @ 110-240VAC~50/60Hz
0 W @ 110-240VAC~50/60Hz
+5 °C to +35 °C
-5 °C to +40 °C
40 % to 70 %
10/100Mb Ethernet
MAC & PHY
Wireless LAN 802.11b/g/n
WPS 2.0 security
Digital media renderer
(compliant with DLNA 1.5)
WMA (WMA9, CBR,CBR, up to 320kbps)
PCM (16 bits-44.1kHz, 24 bits-44/48/96 kHz, .wav, .aiff,
.aif, .aifc files, HTTP streams)
AAC-LC (up to 320kbps), ALAC (.m4a)
FLAC (16 bits-44.1kHz, 24 bits- 44/48/96 kHz)
2 x 50 W RMS/4-8 ohms
or
4 x 25 W RMS/4-8 ohms
Wifi : < 0,1%
Bluetooth : < 0,1%
Analogue : < 0,1%
Optical < 0.1% THD+N
91 x 218 x 190 mm / 3.58 x 8.58 x 7.48 in
1.9 kg - 4.2 lbx
43
Page 44
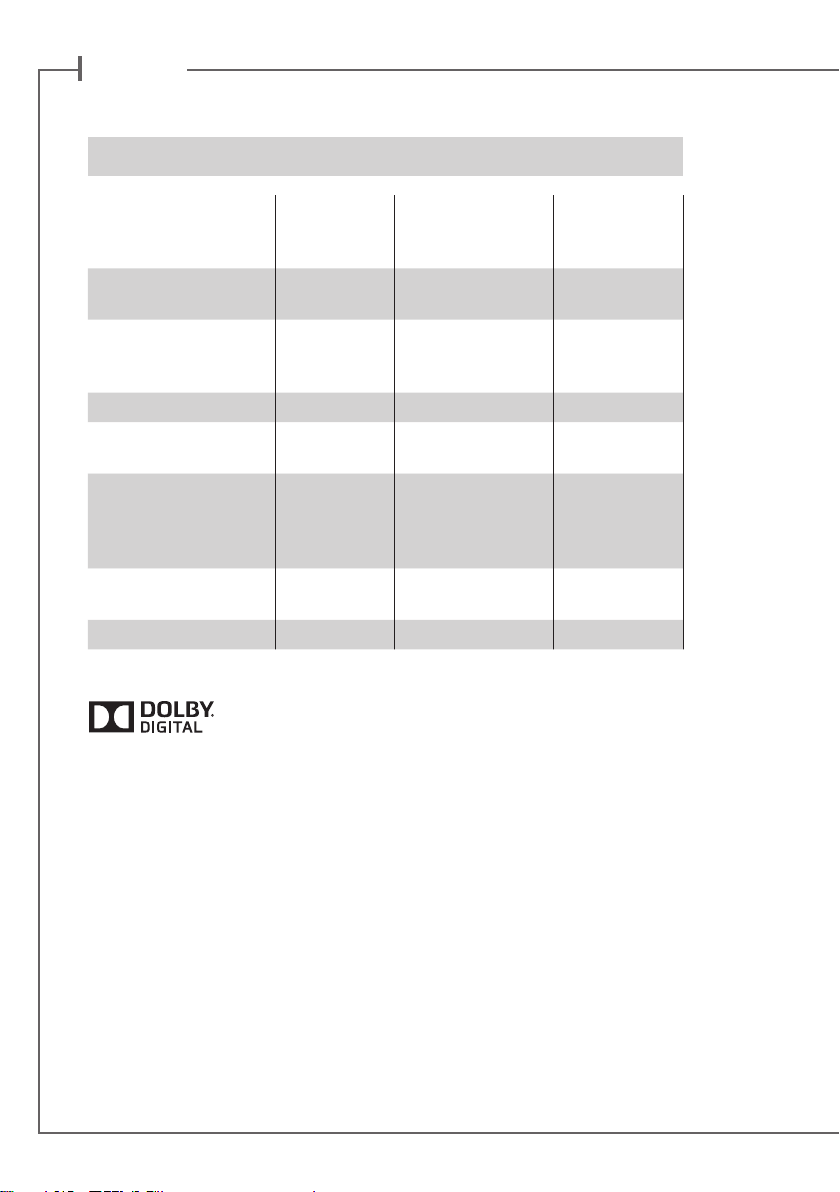
e n g l i s h
FEATURES
Loss less audio
playback
Access to any audio
from WLAN network
(desktop...)
Multi-room
Tracks playback from
smartphone/tablet
Playback smart-
phone/tablet a audio
applications
(youtube…)
Playback from USB
device
Web radio /DEEZER
Manufactured under licence form Dolby Laboratories.
Dolby and the double D symbol are trademarks of Dolby Laboratories.
Bluetooth
connection
WIFI/ETHERNET
via internet router
4 4
4
4
4 4 4
4
4 4
4
WIFI direct to
smartphone/
tablet
44
Page 45
FCC STATEMENT
This equipment has been tested and found to comply with the limits for a
Class B digital device, pursuant to Part 15 of the FCC Rules. These limits
are designed to provide reasonable protection against harmful interference
in a residential installation. This equipment generates uses and can radiate
radio frequency energy and, if not installed and used in accordance with
the instructions, may cause harmful interference to radio communications.
However, there is no guarantee that interference will not occur in a particular
installation. If this equipment does cause harmful interference to radio or
television reception, which can be determined by turning the equipment off
and on, the user is encouraged to try to correct the interference by one or
more of the following measures:
-- Reorient or relocate the receiving antenna.
-- Increase the separation between the equipment and receiver.
-- Connect the equipment into an outlet on a circuit different from that to
which the receiver is connected.
-- Consult the dealer or an experienced radio/TV technician for help.
This device complies with part 15 of the FCC Rules. Operation is subject
to the following two conditions :(1) This device may not cause harmful
interference, and (2) this device must accept any interference received,
including interference that may cause undesired operation.
Changes or modifications not expressly approved by the party responsible for
compliance could void the user's authority to operate the equipment.
This equipment complies with FCC radiation exposure limits set forth for an
uncontrolled environment. This equipment should be installed and operated
with minimum distance 20cm between the radiator & your body.
45
Page 46
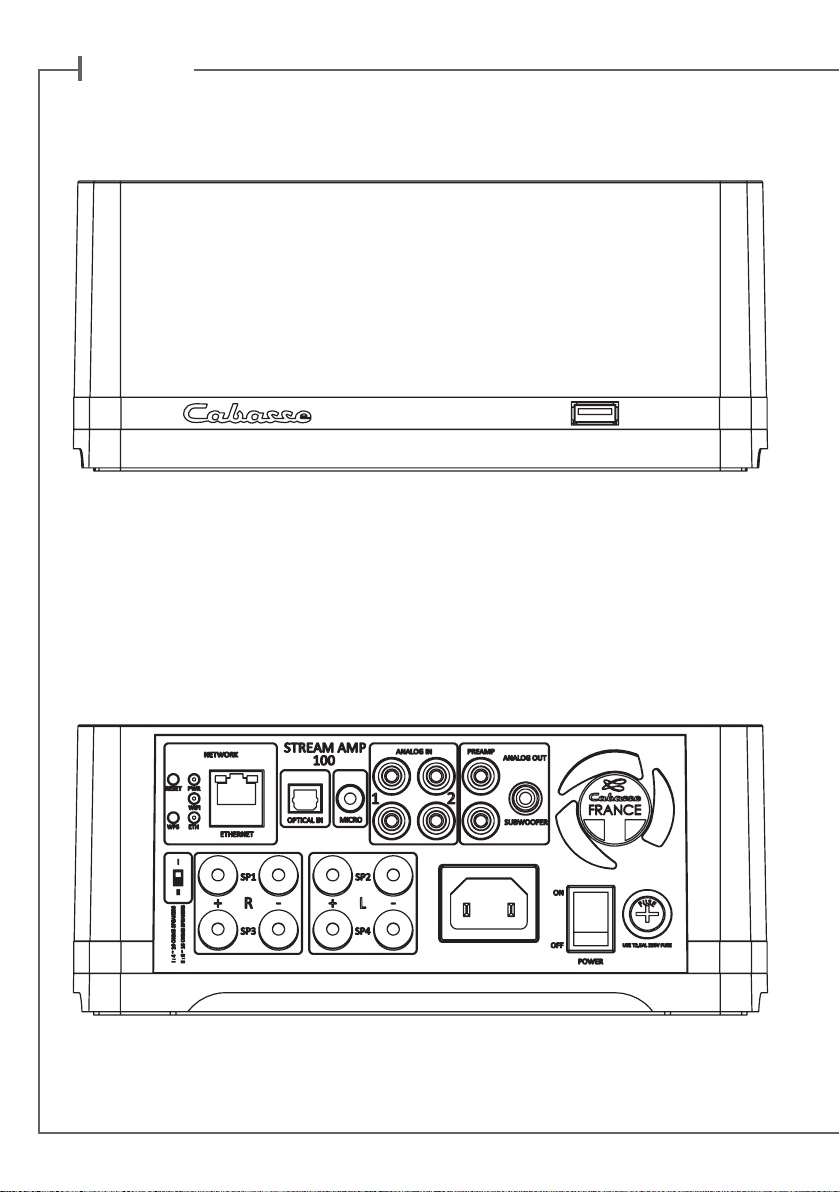
d e u t s c h
4646
Page 47
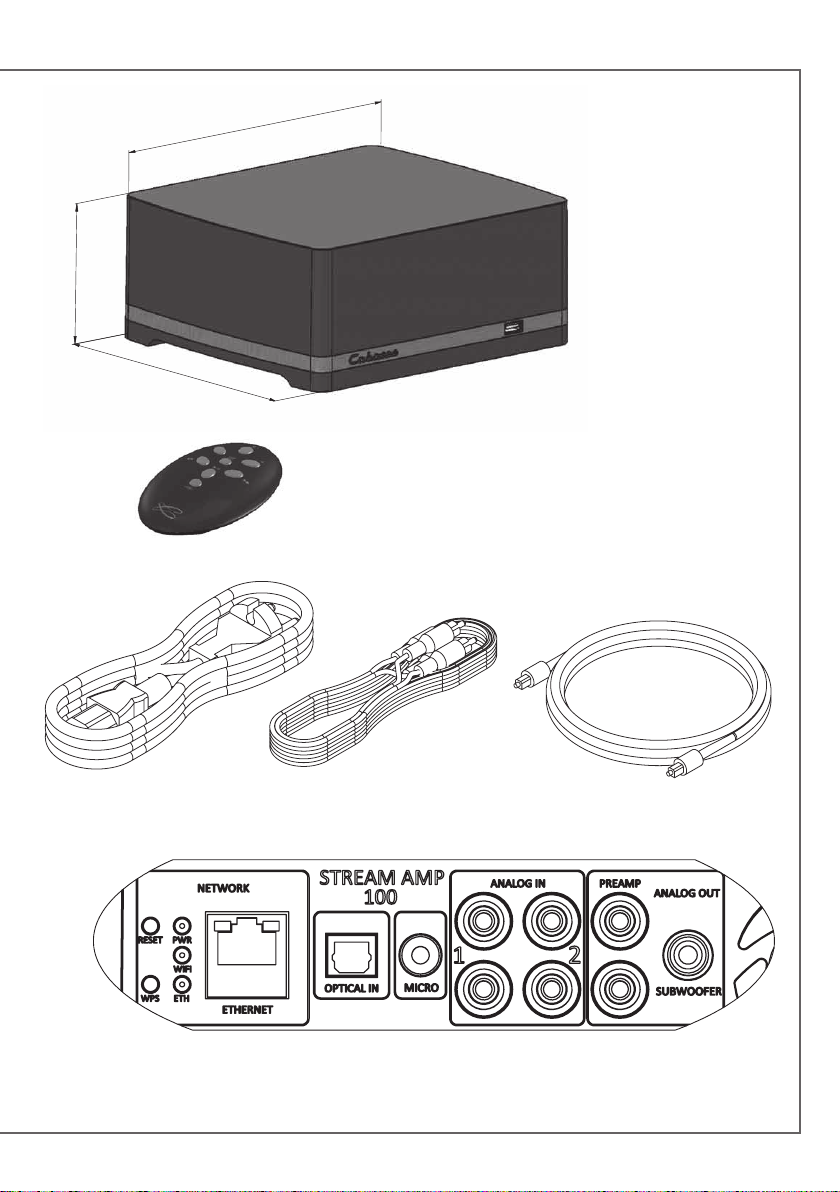
218
218
91
190
47
Page 48
d e u t s c h
1
11
8
9
1
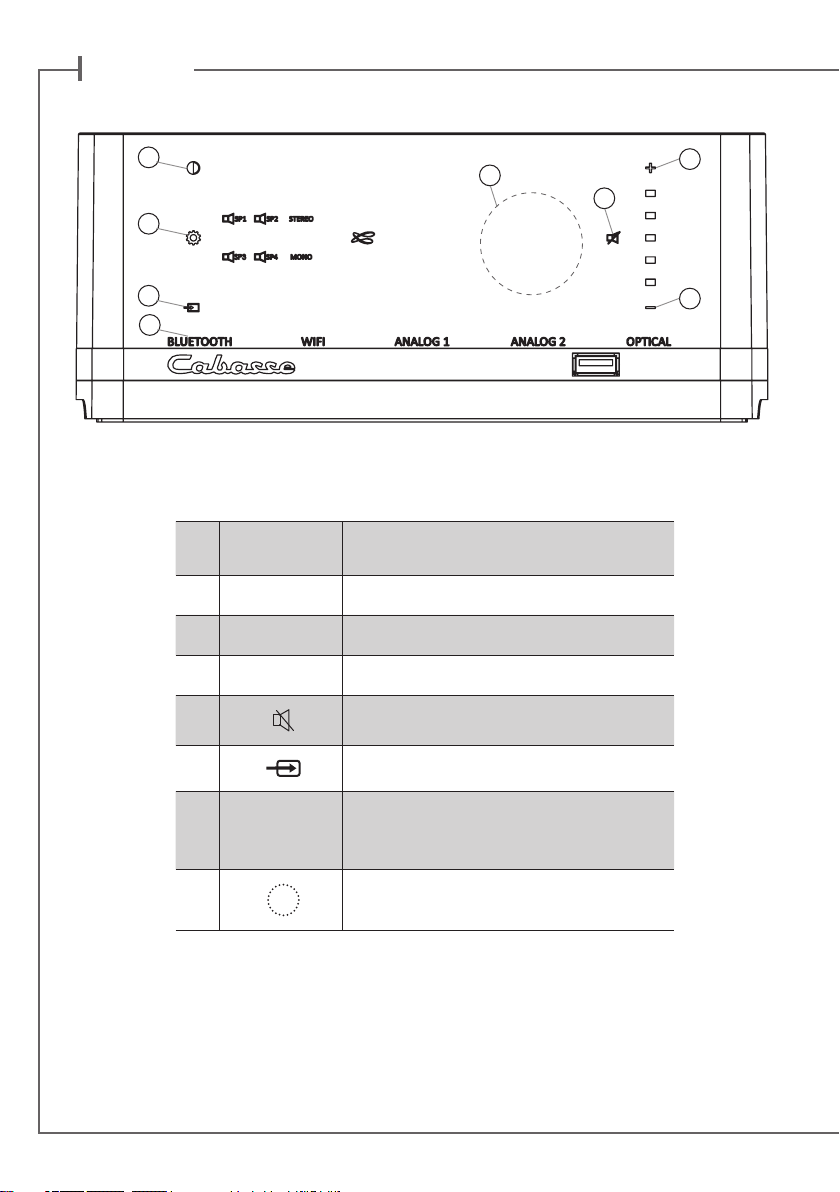
LED DISPLAY EIN (LED weiss) /ECO (LED rot)
2 VOL - Lautstärke verringern
3 VOL + Lautstärke erhöhen
4
Stummschaltung Ein/Aus
10
3
4
2
ERKLÄRUNG DER
BEDIENELEMENTE
8
9 QUELLE
10
Quellenwahl
WIFI (WLAN/LAN) - BLUETOOTH
RCA ANALOG 1 - RCA ANALOG 2 - DIGITAL
OPTISCH
Position des NFC-Patch
4848
Page 49
1
2
3
5
4
1
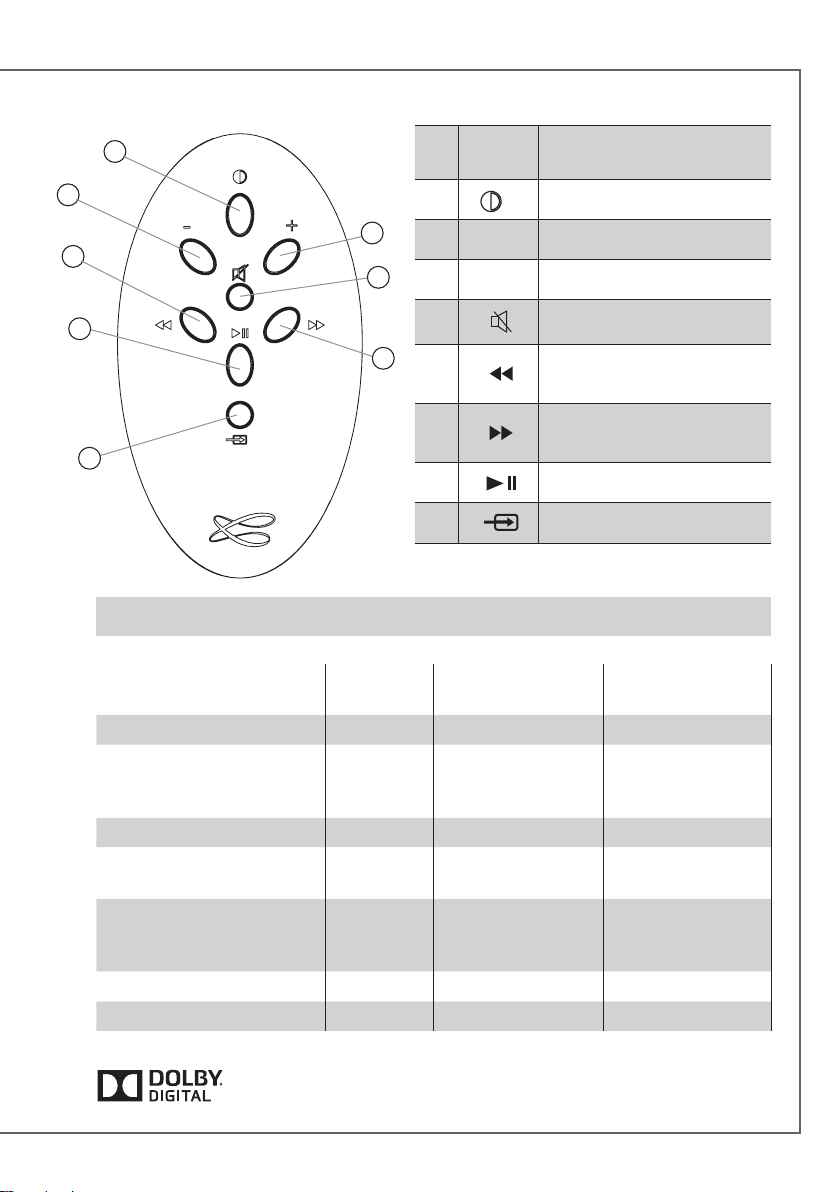
2 VOL - Lautstärke VERRINGERN
3 VOL + Lautstärke ERHÖHEN
ERKLÄRUNG DER
BEDIENELEMENTE
EIN / ECO
7
8
FUNKTIONEN
Loss less audio Abspielen
Zugriff alle Audio Medium
an den WLAN Netzwerk
(Computer..)
Multi-room
Musik Content aus Smart-
phone/Tablet abspielen
Audio Apps (youtube…)
aus Smartphone / Tablet
abspielen
Abspielen aus USB Gerät
Web radio /DEEZER
Stummschaltung Ein/Aus
Vorheriger Titel des
gerade gespielten Albums
Nächster Titel des
gerade gespielten Albums
Quellenwahl
6
Bluetooth
Verbindung
4
5
6
7 Pause/Play
8
WIFI/ETHERNET
via Internet Router
4 4
4
4
4 4 4
4
4 4
4
WIFI direkt to
Smartphone/Tablet
Verfertigt unter Lizenz von Dolby Laboratories. Dolby und die
doppelten D Symbol sind Warenzeichen des Dolby Laboratories.
49
Page 50
1
d e u t s c h
SCHNELLEINSTIEG
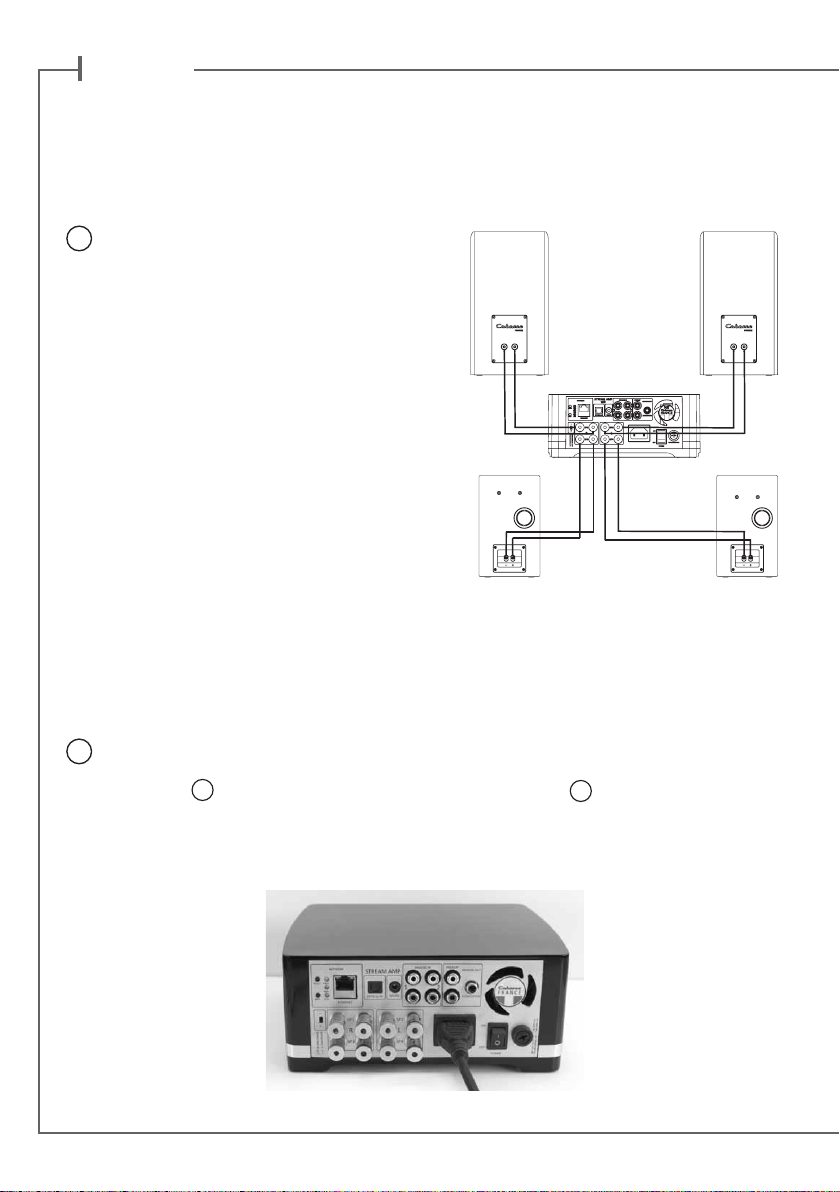
Platzieren Sie das STREAM AMP in der Nähe
einer Steckdose. Achten Sie darauf, dass
oberhalb, unterhalb und hinten, für die
optimale Wirkung der Bluetooth-und WLANAntennen und eine ausreichende Belüftung
genug Freiraum gibt.
Verbinden Sie 2 oder 4 Lautsprechern am
Stream Amp. Für Stereo mit 2 Lautsprechern,
verbinden Sie die SP1 Ausgang am
Lautsprecher rechts und die SP2 am
Lautsprecher links.
Überprüfen Sie bitte, dass alle
Lautsprecherkabel phasengleich angeschlossen
sind (+/rot auf +/rot und schwarz/- auf
schwarz/-), und dass alle Linken Ausgängen
mit Linken Eingänge angeschlossen sind.
Impedanz Schalter :
Auf „I“ (Fabrikeinstellungen), gibt Stream Amp
eine RMS Leistung von 2 x 50 W oder 4 x 25
W mit minimaler Impedanz von Lautsprechern unter 6,4 Ohm. Mit Lautsprecher minimaler
Impedanz über 6,4 Ohm, wird die RMS Leistung 50% kleiner sein.
Verbinden Sie das Netzteil mit dem STREAM AMP und mit einer Steckdose. Bringen Sie den
2
Schalter POWER ON/OFF in die „ON“-Position. Das STREAM AMP ist zur Wiedergabe bereit,
sobald LED
der Fernbedienung um auf „EIN“ zu bringen.
Bemerkung: Der DLNA-Modus des STREAM AMP ist erst verfügbar, wenn die Farbe der PWR-LED
von rot nach grün wechselt, etwa 40 Sekunden nach Einschalten des STREAM AMP.
1
rot leuchtet (ECO Modus). Betätigen Sie die Taste
50
1
auf STREAM AMP oder
Page 51
3
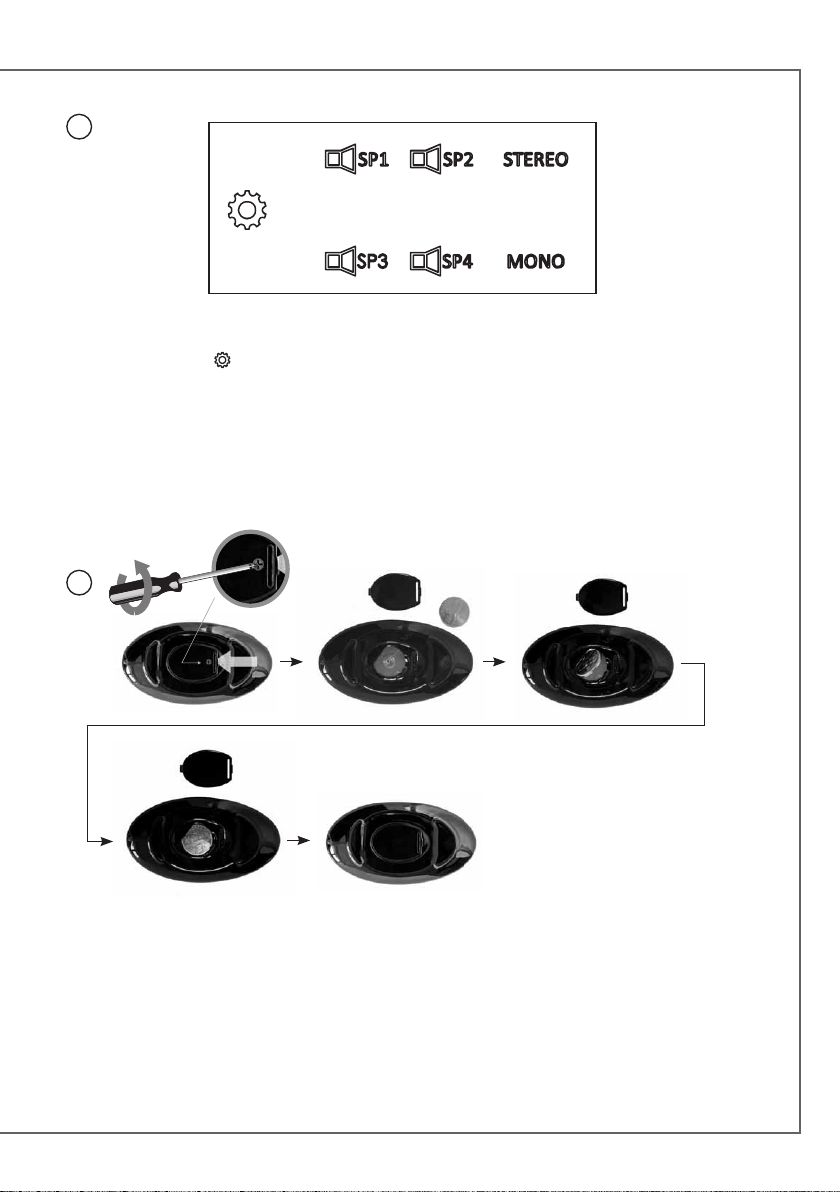
Auswahl des Lautsprecher Ausgänge Konfiguration.
Betätigen Sie die Taste
- 1 STEREO Paar von Lautsprechern (Fabrikeinstellungen). Die SP1, SP2, STEREO LED kontinuierlich
leuchten.
- 2 STEREO Paar von Lautsprechern. Die SP1, SP2, SP3, SP4 und STEREO LED kontinuierlich leuchten.
- 2 Lautsprechern mit MONO Signal. Die SP1, SP2, MONO LED kontinuierlich leuchten.
- 4 Lautsprechern mit MONO Signal. Die SP1, SP2, SP3, SP4 und MONO LED kontinuierlich leuchten.
um die Konfiguration zu ändern:
4
Vor der ersten Benutzung der Fernbedienung, Schrauben Sie die Schraube ab (Schraubenzieher
PH00), entfernen Sie den Verschluss und Entladeschutz, Bringen Sie den Deckel wieder an und
lockern Sie die Schraube wieder.
Ersetzen der Batterie (Typ CR-2025) bei der Fernbedienung des STREAM AMP: Schrauben Sie die
Schraube ab, entfernen Sie den Verschluss. Entfernen Sie die alte Batterie und platzieren Sie die neue
Batterie mit der "+"-Markierung nach außen, so dass sie sichtbar bleibt. Bringen Sie den Deckel wieder
an und lockern Sie die Schraube wieder.
51
Page 52
d e u t s c h
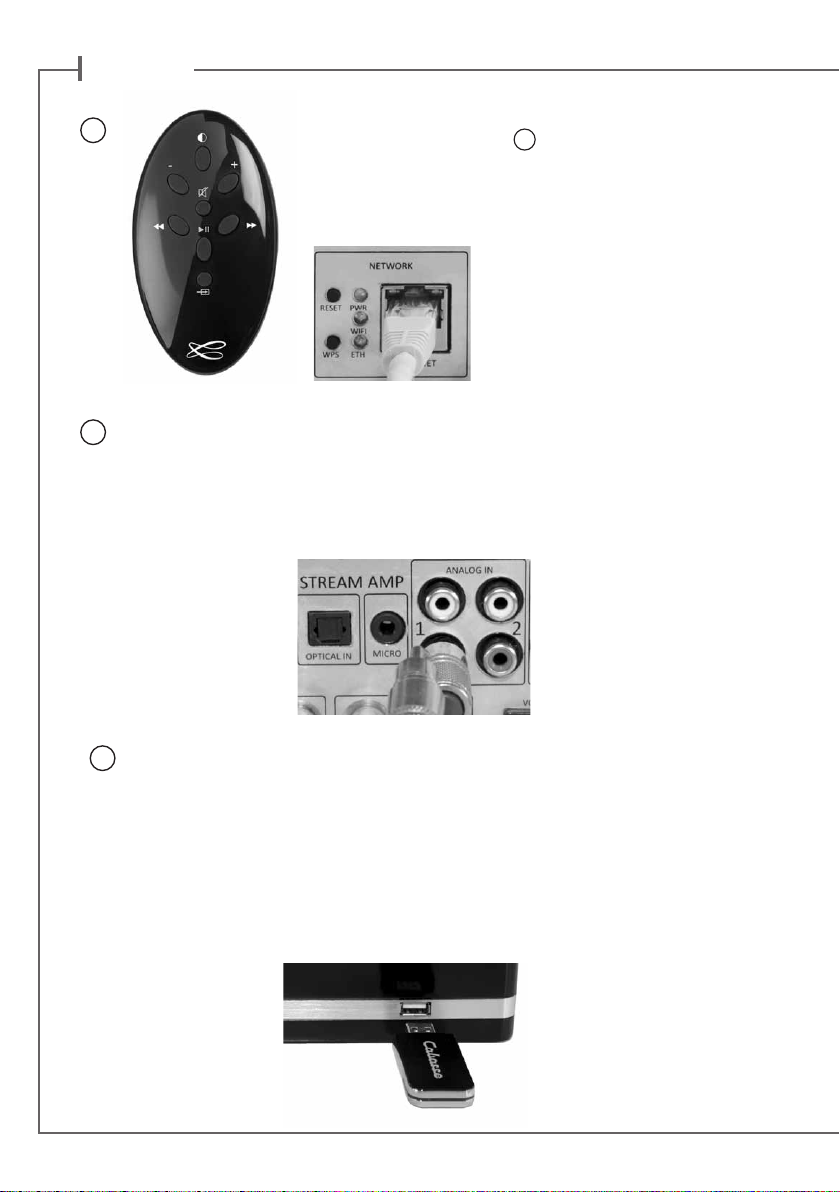
5
6
Sobald die Bluetooth- und WLAN-Verbindungen aktiviert sind,
betätigen Sie bitte die Taste
dem Stream Amp, um auf die gewünschte Quelle umzuchalten.
Die Wi-Fi LED leuchtet für WLAN als Quelle Aktiv. Die ETH LED
leuchtet für LAN als aktiv Quelle.
8
auf der Fernbedienung oder auf
ANALOGER EINGANG AUX
Dieser Anschluss dient zur Verbindung mit einem Gerät mit analogem Ausgang.
Hat Ihr Gerät eine Minilink-Ausgäng, benötigen Sie einen Cinch-MiniklinkenAdapter (nicht im Lieferumfang des STREAM AMP). Schließen Sie den roten
Cinchstecker an die Buchse für den rechten Kanal an, die weiße (oder schwarze)
an die für den linken Kanal.
USB-EINGANG
7
Verbinden Sie einen USB-Stick oder eine USB-Festplatte mit diesem Anschluss und stellen
Sie alle darauf gespeicherten Audio-Dateien in Ihrem Heim-Netzwerk bereit. Alle diese
Dateien werden
– soweit ihr Format kompatibel mit dem im STREAM AMP integrierten DLNA-Server ist
– in den StreamCONTROL Apps angezeigt und können von jedem Gerät der CabasseStream-Reihe, das mit dem gleichen Netzwerk verbunden ist, wiedergegeben werden.
Der USB-Anschluss ist mit einem Stromversorgungs-Ausgang mit 1 Ampere
Stromlieferfähigkeit ausgestattet, so dass auch portable Festplatten ohne externes Netzteil
angeschlossen werden können.
52
Page 53
BLUETOOTH -VERBINDUNG
STREAM AMP befindet sich nach Einschalten im Suchmodus für eine Bluetooth-Verbindung. Zur
Herstellung einer Verbindung wählen Sie bitte "Cabasse STREAM AMP" in der Bluetooth-Geräteliste
des Quellgerätes, das mit dem STREAM AMP verbunden werden soll. Ist bereits eine Verbindung mit
einem anderen Quellgerät aktiv, müssen Sie diese vor Erstellung einer neuen Verbindung zunächst
beenden.
BLUETOOTH-VERBINDUNG MIT EINEM ANDROID-GERÄT: Siehe deutsche Erklärung auf Seite 60
VERBINDUNG UND NUTZUNG DES STREAM AMP MIT EINEM APPLE-COMPUTER: siehe deutsche
Erklärung auf Seite 61.
SOFORTIGE BLUETOOTH NFC-VERBINDUNG MIT EINEM NFC-SMARTPHONE
1)Installation der NFC-App von Cabasse
a) Aktivieren Sie NFC im Setup Ihres Smartphones.
b) Prüfen/aktivieren Sie die WLAN- oder 3G-Verbindung Ihres Smartphones mit dem Internet.
c) Berühren Sie mit Ihrem Smartphone den NFC-Patch
STREAM AMP.
d) Akzeptieren Sie die Installation der NFC-App von Google Play.
e) Ihr Smartphone ist nun bereit für eine NFC-Bluetooth-Verbindung.
2) Benutzung der Bluetooth-NFC-App von Cabasse
a) Berühren Sie mit Ihrem Smartphone die NFC Antenne
AMP, um eine sofortige Bluetooth-Verbindung aufzubauen; wenn nötig schaltet sich das
STREAM AMP ein, der Bluetooth-Eingang wird automatisch ausgewählt und der erste Track der
Wiedergabeliste des Smartphones wird vom STREAM AMP wiedergegeben.
b) Berühren Sie nochmals mit Ihrem Smartphone die NFC Antenne 10, um die Bluetooth-Verbindung
unterbrechen.
Anmerkung: Wurde die NFC-App einmal auf dem Smartphone installiert, läuft sie ständig
im Hintergrund. Sie wird in der Liste der Apps aufgeführt, besitzt aber kein Icon auf der
Bedienoberfläche.
10
auf der Oberseite Gitters am
10
in der Mitte des Gitters am STREAM
WIFI-DIREKT-MODUS
„Wi-Fi direct“ ermöglicht das drahtlose Abspielen aller Musiktitel auf einem Tablet oder Smartphone
sowie derjenigen auf dem Speichermedium (USB-Festplatte oder-Stick), die am USB-Eingang
des STREAM AMP angeschlossen sind, ohne dass dazu ein WLAN-Netzwerk benötigt wird. Die
Wiedergabe von Internet-Quellen wie vTuner oder Deezer sowie das Firmware-Update des STREAM
AMP sind nicht möglich.
Aktivieren Sie das STREAM AMP, installieren und starten Sie die Cabasse-App auf Ihrem Tablet/
Smartphone und wählen Sie „Use this device in standalone-mode“ statt „Configure this audio
device“. Folgen Sie den Anweisungen und starten Sie die Wiedergabe.
53
Page 54
d e u t s c h
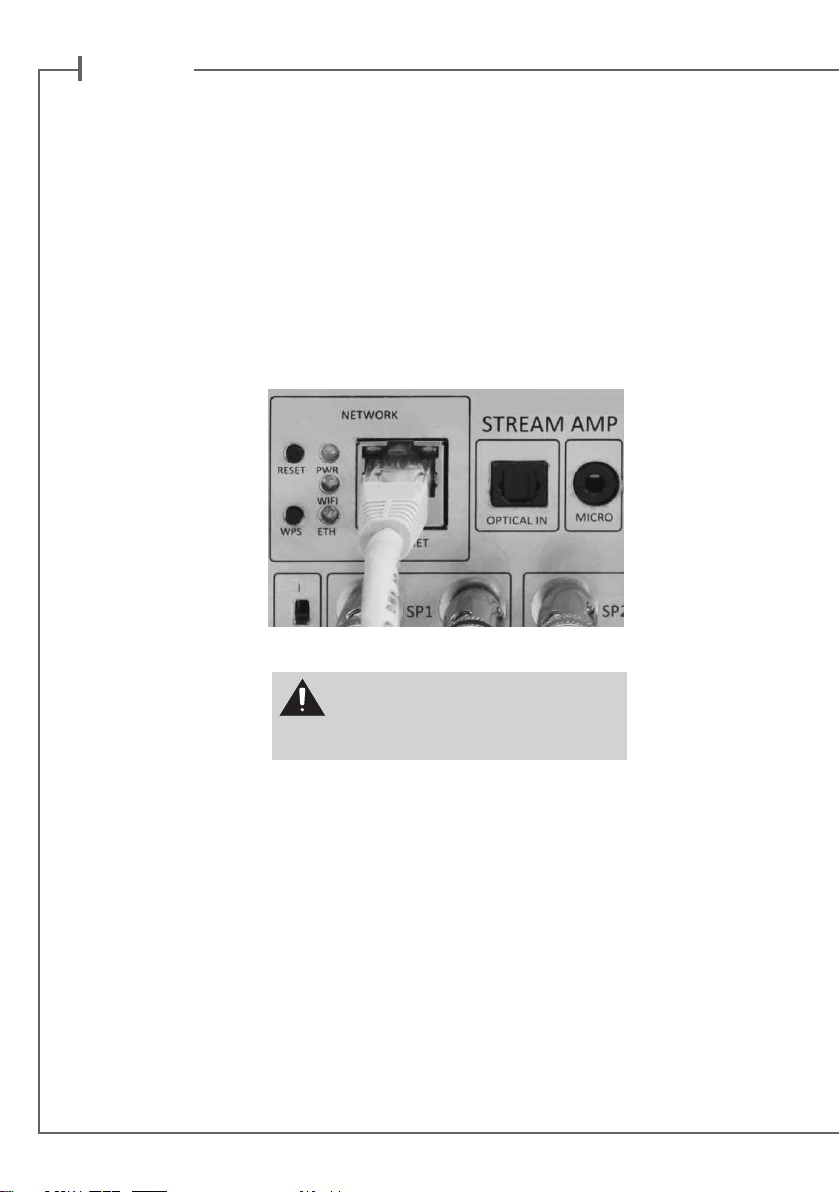
VERBINDUNG MIT EINEM DRAHTGEBUNDEN ETHERNET-NETZWERK
Die LAN-Draht-Verbindung sorgt für eine konstante und optimale Übertragungsrate. Verwenden Sie
es, wenn unter Wi-Fi-Modus die Musikwiedergabe stoppt oder unberechenbar ist (z.B. wegen einer
gesättigten Wi-Fi Netzwerk oder einer zu lang Abstand zwischen dem Router und Stream Gerät).
Benutzen Sie ein handelsübliches Netzwerkkabel mit RJ45-Steckern zum Anschluss des STREAM
AMP an den Netzwerk-Router. Die Verbindung ist aufgebaut, wenn die blaue LED "ETH" aufhört zu
blinken und kontinuierlich leuchtet.
ACHTUNG: Stellen Sie den Router in seinem Konfigurationsmenü auf DHCP.
Betätigen Sie „Reset“, bevor Sie einen neuen
Verbindungsprozess einleiten (wired, auto, easy
oder manual) oder vor dem Anschluss an einen
neuen Router.
WIFI-DIREKT-MODUS
„Wi-Fi direct“ ermöglicht das drahtlose Abspielen aller Musiktitel auf einem Tablet oder Smartphone
sowie derjenigen auf dem Speichermedium (USB-Festplatte oder-Stick), die am USB-Eingang
des STREAM AMP angeschlossen sind, ohne dass dazu ein WLAN-Netzwerk benötigt wird. Die
Wiedergabe von Internet-Quellen wie vTuner oder Deezer sowie das Firmware-Update des STREAM
AMP sind nicht möglich.
Aktivieren Sie das STREAM AMP, installieren und starten Sie die Cabasse-App auf Ihrem Tablet/
Smartphone und wählen Sie „Use this device in standalone-mode“ statt „Configure this audio
device“. Folgen Sie den Anweisungen und starten Sie die Wiedergabe.
54
Page 55
DRAHTLOSE DLNA-VERBINDUNG PER WLAN
ES GIBT ZWEI MÖGLICHKEITEN, DAS STREAM AMP
MIT EINEM WLAN ZU VERBINDEN:
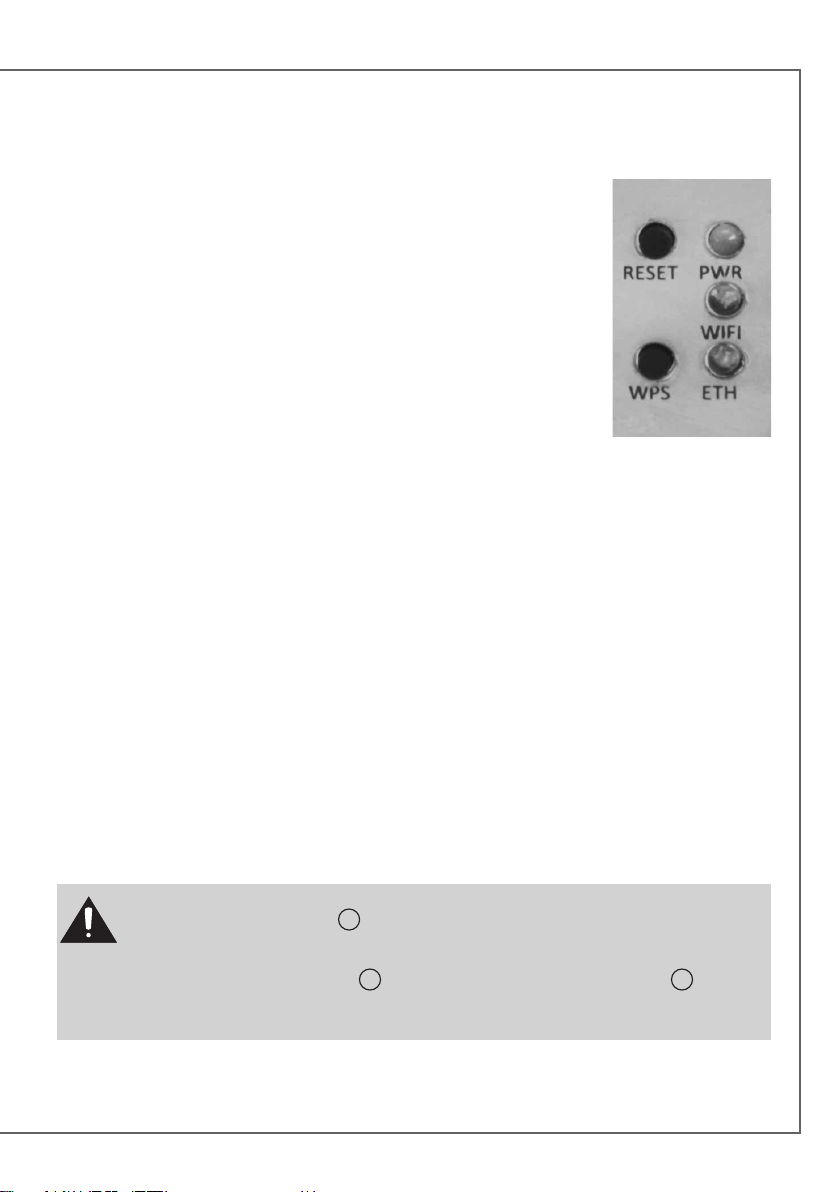
1) WPS-VERBINDUNG: Betätigen Sie die WPS-Taste an Ihrem WLAN-
Router für mindestens zwei Sekunden und betätigen Sie anschließend
innerhalb von etwa zwei Minuten (überprüfen Sie den genauen Zeitraum
in der Anleitung Ihres Routers). Die Verbindungsaufbau ist dann
abgeschlossen, wenn die blaue LED "WIFI CONFIGURATION" dauerhaft
leuchtet. Führen Sie nun die auf Seite 63 beschriebene Installation der
Cabasse-App durch.
2) EINFACHE WLAN-VERBINDUNG mit einem Smartphone oder Tablet – jeweils mit dem
Heimnetz verbunden – mit Hilfe der Stream-App von Cabasse
a) Installieren Sie die Cabasse-Stream-App auf Ihrem Android- oder Apple Smartphone/Tablet vom
"Play Store" oder "App Store".
b) Schalten Sie das STREAM AMP ein oder – falls schon eingeschaltet – betätigen Sie die "Reset"Taste. Aktivieren Sie WLAN im Setup-Menü Ihres Smartphones oder Tablets.
c) Wählen Sie aus den im Menü verfügbaren Netzwerken "STREAM AMP" und stellen Sie die Verbindung her.
d) Starten Sie die Stream-App. Wählen Sie "configure this audio device" und folgen Sie den weiteren
Anweisungen.
Anmerkung: von Phase b) an können Sie die Cabasse-App starten und den Online-Anweisungen
folgen, die beim ersten Herstellen einer Verbindung automatisch angezeigt werden.
e) Die blaue WLAN-LED auf der Rückseite des STREAM AMP blinkt für etwa 30 Sekunden.
f) die blaue WLAN-LED hört auf zu blinken und leuchtet kontinuierlich: Betätigen Sie "Close the Win-
dow". Das STREAM AMP ist jetzt bereit, alle Ihre im Netzwerk abrufbaren Musikdateien abzuspielen
und per vTuner Internetradio-Stationen wiederzugeben.
ACHTUNG! Ein automatisches Update der Firmware könnte beginnen, sobald das STREAM AMP mit
dem Internet verbunden wird. Die
Update vollständig abgeschlossen ist.
Versuchen Sie nicht, das STREAM AMP während des Updates zu benutzen, sondern warten Sie, bis das STREAM
AMP einen Neustart durchgeführt hat und die
STREAM AMP einzuschalten. Nun können Sie das STREAM AMP benutzen.
Trennen Sie das STREAM AMP während eines Updates nicht vom Stromnetz und schalten Sie es nicht aus.
9
LED wechselt zu weiß und blinkt für 5 bis 15 Minuten, bis das
9
LED kontinuierlich rot leuchtet. Betätigen Sie
1
, um das
55
Page 56
d e u t s c h
Wir bedanken uns für den Kauf eines Lautsprechers von Cabasse.
Lesen Sie bitte die Betriebsanleitung durch, um sich mit dem Gerät
vertraut zu machen. Bewahren Sie die Anleitung auf, um auch
zukünftig nachschlagen zu können.
SICHERHEITSHINWEISE
Erklärung der grafischen Symbole -
Das Blitzsymbol mit Pfeil innerhalb eines
gleichseitigen Dreiecks soll den Anwender
auf das Vorhandensein von gefährlichen
elektrischen Spannungen im Inneren des
Gehäuses dieses Produktes aufmerksam machen.
Derartige Spannungen sind hoch
genug, um für Menschen gefährliche
Stromschläge zu bewirken.
Das Ausrufezeichen innerhalb eines
gleichseitigen Dreiecks soll den Anwender auf
das Vorhandensein von wichtigen Betriebsoder Wartungshinweisen in der dem Produkt
beiliegenden Betriebsanleitung hinweisen.
Betriebshinweise - Lesen Sie vor der
Inbetriebnahme alle Sicherheits- und
Verwendungshinweise aufmerksam.
Behalten Sie die Betriebshinweise im
Hinterkopf – auf sie wird in dieser Anleitung
ständig Bezug genommen.
Achten Sie besonders auf Warnungen
– Alle Warnungs-Symbole auf dem Produkt
und Warn-Hinweise in dieser Anleitung müssen
befolgt werden.
Achtung: Die Batterie muss nicht
schlucken oder lutschen sein:
chemische Brandwunde Gefahr
Beachtung der Betriebshinweise –
befolgen Sie alle Installations- und BedienungsAnweisungen sorgfältig.
Reinigung - Trennen Sie das Gerät vor jeder
Reinigung vom Stromnetz! Wir empfehlen
die Reinigung mit einem feuchten Tuch.
Verwenden Sie niemals ätzende Produkte,
Verdünner, Spiritus, Waschbenzin oder
chemische Lösungsmittel, da diese die
Oberfläche angreifen oder die Beschriftung
ablösen können.
Zubehör - Verwenden Sie nur Zubehör, das
von Cabasse ausdrücklich empfohlen wird.
Wasser und andere Flüssigkeiten
–
Das Produkt darf nicht an feuchten oder
nassen Orten, wie zum Beispiel einem feuchten
Keller, neben einer Badewanne, einem Abfluss
oder einem Swimming Pool oder ähnlichen
Bedingungen betrieben werden.
Rollwagen und Standfüße – Das Gerät
sollten nur mit vom Hersteller empfohlenen
Rollwagen oder Standfüßen verwendet werden.
> Warnung für transportable Rollwagen
Standflächen: Das Gerät nicht auf unstabile
Standflächen, beispielsweise Standfüße,
Stative, Tische, Regale oder ähnliches. stellen,
von denen es herabfallen und Verletzungen
verursachen könnte.
Belüftung - Gewährleisten Sie eine
ausreichende Belüftung. Decken Sie niemals
vorhandene Lüftungsschlitze sowie Öffnungen
von Ventilatoren ab. Achten Sie darauf, dass
bei auf dem Boden stehendem Gerät durch
eventuell vorhandene hochflorige Teppiche die
Luftzirkulation nicht blockiert wird. Stellen Sie
das Gerät ebenfalls nicht in z.B. geschlossenem
Mobiliar auf, dadurch wird verhindert, dass
genügend Kühlluft zirkulieren kann.
56
Page 57
Netzanschluss - Das Gerät darf nur
mit dem Stromnetz verbunden werden,
wenn die Netzspannung der Steckdose, an
der das Gerät betrieben werden soll, der
Betriebsspannung entspricht, welche in der
dem Gerät beiliegenden Betriebsanleitung und
auf den am Gerät angebrachten Hinweisen
vorgeschrieben ist. Wenn Sie sich nicht sicher
sind, welche Versorgungsspannung bei Ihnen
verfügbar ist, wenden Sie sich an Ihren Händler
oder den örtlichen Stromversorger.
Netzkabel - Greifen Sie das Netzkabel
immer am Stecker - ziehen Sie niemals am
Kabel selbst! Stellen Sie nicht das Gerät selbst
oder Möbel auf das Netzkabel. Stellen Sie auch
sicher, dass das Kabel nicht eingeklemmt wird.
Sorgen Sie dafür, dass nicht auf das Netzkabel
getreten werden kann und dass es nicht
abgeklemmt wird.
Gewitter - Wir empfehlen, bei Gewitter
Netz- und Antennenstecker aus den jeweiligen
Anschlussdosen herauszuziehen. Diese
Maßnahmen sollten auch bei längerer
Nichtbenutzung, beispielsweise einem Urlaub,
erfolgen.
Flüssigkeiten und Fremdkörper -
Achten Sie darauf, dass weder Flüssigkeiten
noch kleine Gegenstände durch vorhandene
Öffnungen in das Gerät gelangen. Das könnte
zu Stromschlägen oder Bränden führen. Sorgen
Sie dafür, dass keine Flüssigkeit auf das Gerät
tropft bzw. gespritzt wird.
Wartung - Bei Öffnen des Gehäuses
besteht Stromschlaggefahr! Im Geräteinneren
befinden sich keine vom Nutzer zu wartenden
Teile. Wenden Sie sich im Servicefall bitte an
Ihren Händler.
Schäden, die eine Reparatur erfordern
- Trennen Sie das Gerät sofort vom Netz.
Überprüfung und Reparatur darf nur von
geschultem Personal durchgeführt werden.
Das ist insbesondere dann der Fall, wenn das
Netzkabel bzw. dessen Stecker beschädigt ist.
Fremdkörper oder Flüssigkeiten ins
Geräteinnere gelangt sind.
das Gerät hingefallen ist und/oder das
Gehäuse sichtbare Schäden aufweist.
das Gerät nass geworden ist (z.B. durch Regen
oder Wasser).
das Gerät trotz Beachten von in dieser
Anleitung dokumentierten Bedienschritten
nicht mehr erwartungsgemäß funktioniert.
Das Verhalten des Geräts sich merklich
geändert hat.
Ersatzteile - Verwenden Sie nur Original-
Ersatzteile oder Teile, die den Spezifikationen
des Herstellers entsprechen.
Prüfung – Fordern Sie bei jedem Wartungs-
oder Reparaturvorgang den jeweiligen
Servicetechniker dazu auf, sich durch
entsprechende Abschlussprüfungen vom in
jeder Hinsicht sicheren Betrieb des Gerätes zu
überzeugen
Hohe Umgebungstemperaturen – Das
Gerät sollte von Wärmequellen wie Heizkörpern,
Verstärkern und ähnlichen Einrichtungen,
die die Betriebstemperatur ansteigen lassen
können, ferngehalten werden.
57
Page 58
d e u t s c h
AUSPACKEN
Öffnen Sie den Karton und entnehmen Sie ihm
die einzelnen Komponenten Stück für Stück.
Bewahren Sie die Originalverpackung für
späteren Gebrauch auf.
Ist das Gerät augenscheinlich beschädigt,
benutzen Sie sie nicht. Packen Sie in
diesem Fall sämtliche Komponenten in
der Originalverpackung wieder ein und
informieren Sie unverzüglich Ihren CabasseHändler.
EINRICHTUNG
DIE KOMPONENTEN IHRES
SYSTEMS
1 STREAM AMP, 1 externes Netzteil, 1
Fernbedienung, 1 Betriebsanleitung und
Garantiekarte.
AUFSTELLUNG
Stellen, legen oder hängen Sie das STREAM
AMP an den gewünschten Platz und sorgen
Sie für eine Steckdose zur Stromversorgung in
Reichweite.
Lassen Sie genügend Freiraum über dem
STREAM AMP und um die Einheit herum,
damit:
- für Bluetooth und WLAN eine gute
Übertragung gewährleistet ist,
- genügend Platz für Ihr Smartphone zur
Herstellung einer NFC-Verbindung bleibt,
- eine gute Klangqualität gewährleistet ist.
ANSCHLUSS
DER STROMVERSORGUNG
Verbinden Sie das Netzteil mit dem STREAM
AMP und mit einer Steckdose. Bringen Sie
den Schalter „POWER ON/OFF“ in die
„ON“-Position. Das STREAM AMP ist bereit
zur Musikwiedergabe, wenn die LED
beginnt zu leuchten.
ANMERKUNG: Der WLAN-Modus des
STREAM AMP ist verfügbar, wenn die PWRLED etwa 40 Sekunden nach Einschalten des
STREAM AMP von rot auf grün wechselt.
9
EINSCHALTEN / ECO-BETRIEB
a) Schalten in den ECO (Stromspar)Modus: Betätigen Sie die Taste
Fernbedienung oder am Bedienfeld des
STREAM AMP. Die WLAN- und BluetoothFunktionen bleiben aktiviert. Die AudioSektion des STREAM AMP wird ausgeschaltet.
b) Zurückkehren zum Normal(ON) –Modus :
- Betätigen Sie die Taste
oder Geräte-Bedienfeld oder
- stellen Sie eine Bluetooth-Verbindung her
oder
- betätigen Sie „Play“ in der Fernbedienungs-
App von Cabasse
1
1
auf der
auf Fernbedienung
58
Page 59
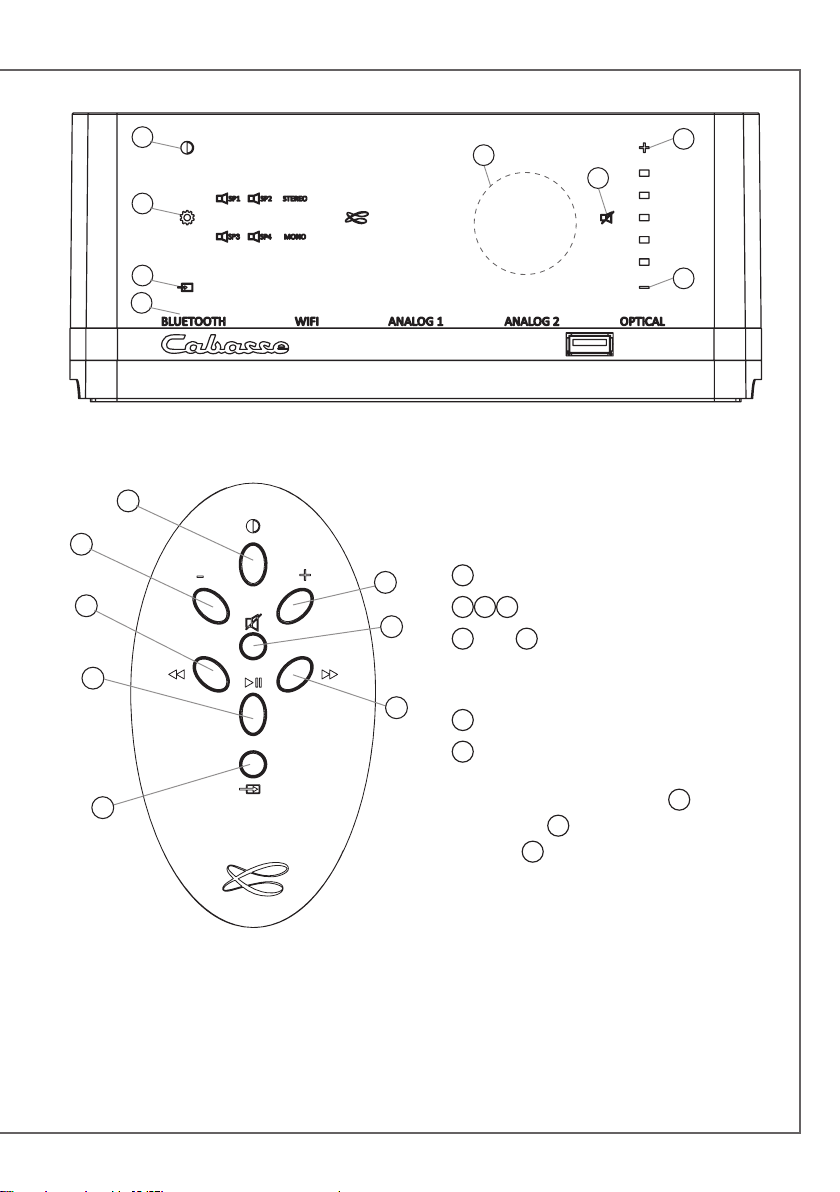
11
1
10
4
3
8
9
1
BENUTZUNG DES STREAM AMP
2
MIT DER FERNBEDIENUNG
2
1
3
5
4
7
6
8
EIN / ECO
2 3 4
VOL -, VOL +, Stummschaltung
5
und 6 WLAN: abwärts und aufwärts
scannen
Bluetooth: vorheriger Titel, nächster Titel
7
Pause/Play (WLAN und Bluetooth)
8
Quellenwahl: Betätigen Sie diese Taste,
um eine der angeschlossenen Quellen zu
aktivieren: Bluetooth (LED
WLAN (LED
log (LED
9
leuchtet orange) oder ana-
9
leuchtet grün).
9
ist blau),
59
Page 60
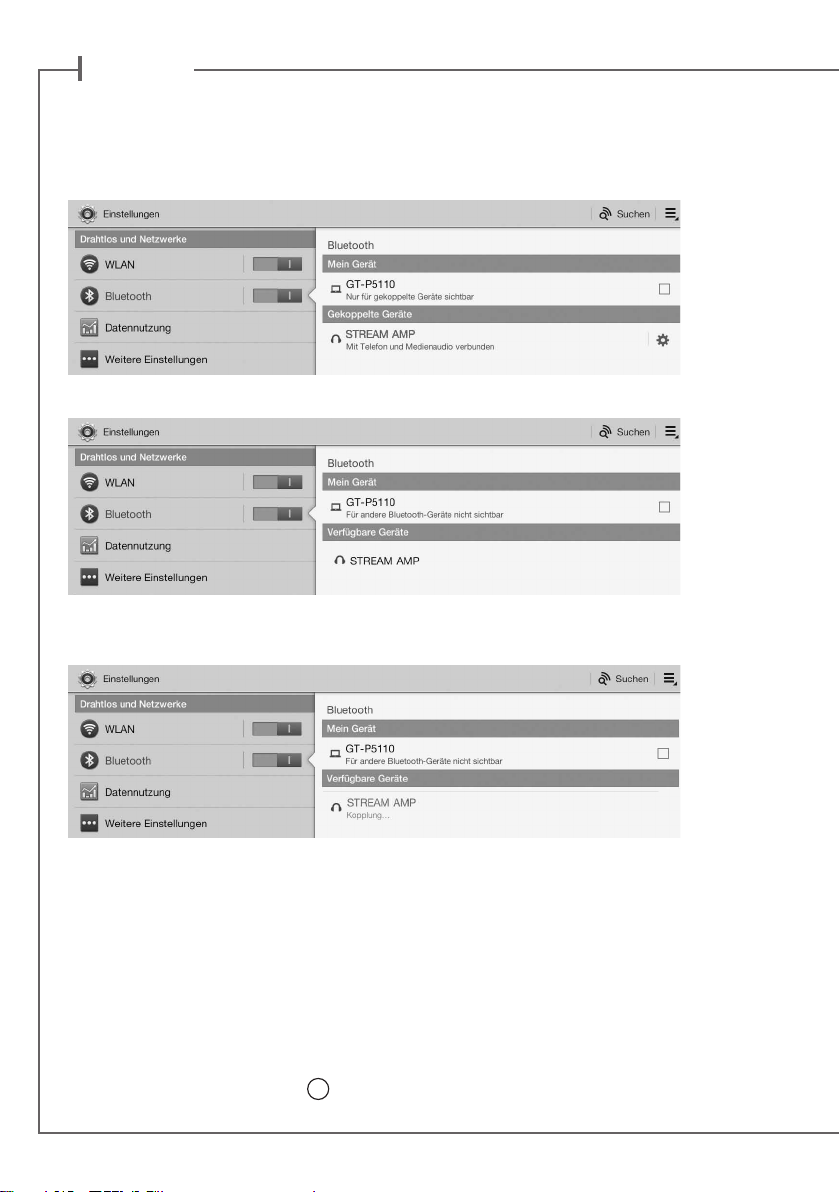
d e u t s c h
BLUETOOTH-VERBINDUNG
MIT EINEM ANDROID-SMARTPHONE/TABLET
- Wenn noch nicht erfolgt, aktivieren Sie im Einstellungs-Menü Ihres Smartphones/Tablets Bluetooth.
- Betätigen Sie „Geräte suchen“ und wählen Sie „Cabasse STREAM AMP“ aus den verfügbaren Geräten
Das STREAM AMP ist nun mit dem Smartphone/Tablet gekoppelt, wenn keine andere BluetoothVerbindung aktiv war.
Wird die Nachricht „Connection...“ jetzt nicht angezeigt, beenden Sie zunächst die Verbindung
eines anderen Geräts mit dem STREAM AMP, indem Sie entweder im Einstellungs-Menüs dieses
Geräts die Verbindung beenden oder indem Sie das STREAM AMP aus- und wieder einschalten.
Betätigen Sie nun beim zu verbindenden Gerät nochmals „Cabasse STREAM AMP“.
Um auf dem Smartphone/Tablet gespeicherte Musiktitel über das STREAM AMP abzuspielen,
öffnen Sie die Audioplayer-App auf Ihrem Smartphone/Tablet. Wählen Sie dort einen Titel und
betätigen Sie „play“. Ist nun trotzdem keine Musik zu hören, überprüfen Sie zunächst, ob nicht
vielleicht die Lautstärke des Smartphone/Tablets komplett heruntergeregelt oder die „Mute“-Funktion aktiv ist. Stellen Sie die Lautstärke in der App ein und erhöhen nun auch die Lautstärke am
STREAM AMP mit der Fernbedienung. Wählen Sie nun „Bluetooth“ als die aktive Quelle, indem Sie
auf der Fernbedienung die Taste
8
so lange gedrückt halten, bis die blaue LED anfängt zu blinken.
60
Page 61
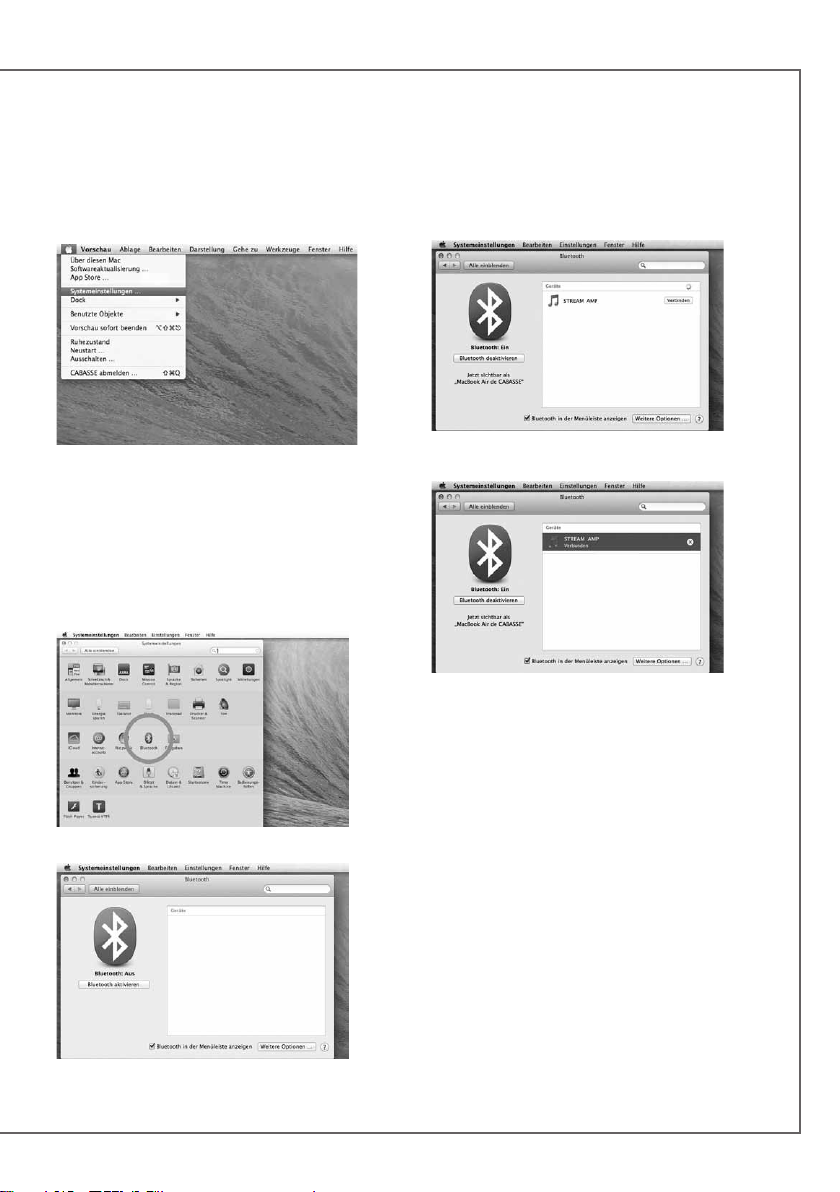
SOFORTIGE NFC-VERBINDUNG MIT EINEM NFC-SMARTPHONE
Erklärung auf Seite 53.
BLUETOOTH-VERBINDUNG MIT EINEM APPLE-COMPUTER
1) AKTIVIEREN DES BLUETOOTH-MODUS
Wählen Sie „STREAM AMP Verbinden“
Schalten Sie das STREAM AMP ein. Beenden
Sie eine etwaige Bluetooth-Verbindung mit einem anderen Gerät.
Aktivieren Sie Bluetooth auf Ihrem Apple-Computer: Wählen Sie im „Apple“-Menü „Systemeinstellungen“.
Das STREAM AMP ist nun mit Ihrem Mac-
Computer gekoppelt.
Wählen Sie dort „Bluetooth“.
Wählen Sie „Bluetooth aktieren" oder „Einschalten“
61
Page 62
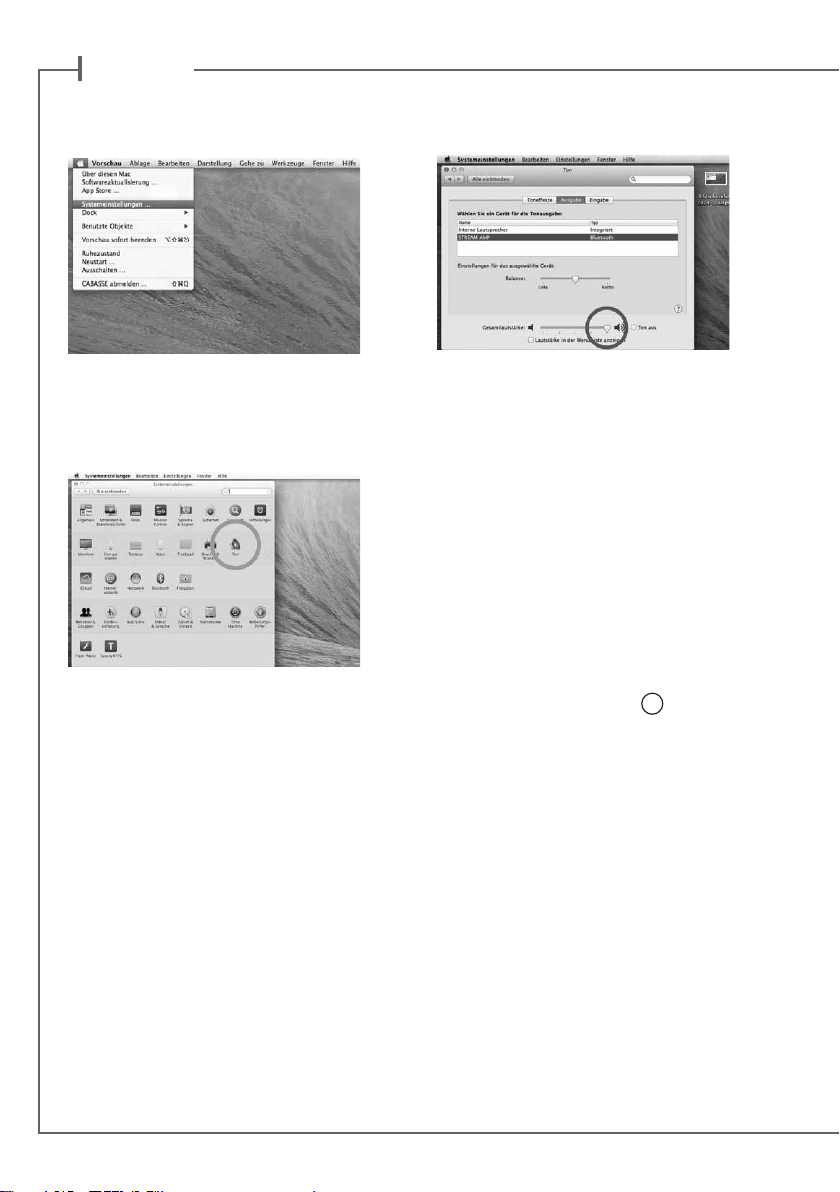
d e u t s c h
2) AUSWAHL DES AUDIO-AUSGABEGERÄTS
Zur Wiedergabe der auf Ihrem Mac gespeicherten Musik mit dem STREAM AMP wählen Sie bitte im „Systemeinstellungen“-Menü
„STREAM AMP “ als Wiedergabegerät aus.
Wählen Sie im „Systemeninstellungen“-Menü
„Ton“.
Wählen Sie unter „Ausgang“ „STREAM AMP
Stereo“. Die Zeile „STREAM AMP “ dient
nur zur Verwendung der Freisprech-Funktion mit einem Smartphone. Stellen Sie
die Lautstärkeeinstellung ganz nach rechts.
Schließen Sie das „Sound“-Menü.
Befindet sich das STREAM AMP im Bereitschaftsmodus, dauert es etwa sechs Sekunden,
bis die Wiedergabe startet. Der BluetoothEingang wird dann automatisch gewählt. Die
Lautstärke lässt sich über die Fernbedienung
des STREAM AMP einstellen.
Ist das STREAM AMP eingeschaltet und gibt
eine andere Quelle wieder (WLAN, analog)
wählen Sie mit der Taste
nung den Bluetooth-Eingang und stellen Sie
dann die gewünschte Lautstärke ein.
8
der Fernbedie-
62
Page 63

Version allemande de
USE OF STREAM AMP wITH StreamCONTROL APP
1 - Switch ON the POWER button on the back of the STREAM AMP. STREAM AMP IS ready to
1
play when the LED
STREAM AMP or on the remote control to get STREAM AMP on.
2 - Connect the smartphone or the tablet to the WLAN network to be used with STREAM AMP.
3 - Download and install the free application names StreamCONTROL on Playstore for
Android or on the App Store for iOS.
4 - Launch the application and follow the instructions from the setup wizard. Choose between
direct Wi-Fi (see page 32) or network mode (see pages 33) upon request.
The app is easy to use
When necessary (after an application update for instance), pressing the “?” key gives specific
help and hints at each level of navigation.
You can now enjoy Stream, play all the audio files listed in your smartphones or tablets, PC
and Mac computers, NAS hard disks, as well as the HD or USB sticks directly connected to any
Stream Amp, Stream Source or Stream 1 connected to the network, discover thousands of web
radios and stream with Deezer.
illuminates red (stand-by mode), press key 1 on the front board of
All the Stream players of the same network can be controlled by one or several smartphones
and tablets. Groups of Stream players connected the same way ( LAN or WLAN) can be created
to play synchronised music with individual level control.
63
Page 64
d e u t s c h
BATTERIEWECHSEL BEI DER
FERNBEDIENUNG
Heben Sie die Klammer auf der Rückseite
des Gebers an und entfernen Sie den
Deckel. Entfernen Sie die verbrauchte
Batterie, legen Sie eine frische CR-2025Batterien entsprechend der Kennzeichnung
im Batteriefach ein und schließen dann den
Deckel wieder.
Verbrauchte Batterien gehören nicht in den
Hausmüll. Bitte entsorgen Sie Ihre alten
Batterien bei einer Batteriesammelstelle, die
Sie in vielen Supermärkten und häufig auch in
der Nähe von Glas- und Altpapier-Containern
angebracht finden.
VORSICHT: Wird die Batterie
falsch in die Fernbedienung eingelegt,
besteht die Gefahr einer Explosion.
Ersetzten Sie die Batterie ausschließlich mit einer
gleichen oder äquivalenten Typs. Die Batterie darf
NICHT starker Wärme wie zum Beispiel direkter
Sonneneinstrahlung, Feuer oder ähnlichem
ausgesetzt werden.
WEEE-ZEICHEN
Entsorgung von elektrischen und
elektronischen Produkten. (Gültig
für die Europäischen Union)
Dieses Logo, angebracht an
den Hauptkomponenten des
Lautsprechersystems (Rückseite des
Steuergerätes und der Lautsprecher
sowie an der Innenseite des
Batteriefachdeckels der Fernbedienung), der
Verpackung und/oder den Begleitdokumenten,
weist darauf hin, dass gebrauchte elektrische
und elektronische Produkte nicht über den
Haushaltsmüll entsorgt werden dürfen. Zur
richtigen Handhabung, Rückgewinnung
und Wiederverwertung von Altprodukten
bringen Sie diese bitte zu den gemäß der
nationalen Gesetzgebung dafür zuständigen
Sammelstellen. Mit der korrekten Entsorgung
dieser Produkte helfen Sie dabei, wertvolle
Ressourcen zu schonen und vermeiden mögliche
negative Auswirkungen auf Gesundheit
und Umwelt, die durch eine unsachgemäße
Behandlung des Abfalls entstehen könnten.
Weitere Informationen zur Sammlung und
Wiederverwertung von Altprodukten erhalten
Sie von Ihrer örtlichen Gemeindeverwaltung,
Ihrem Müllentsorger oder dem Verkäufer, bei
dem Sie die Ware erworben haben.
AUTO UPDATE
Ein Firmware-Updates für das STREAM AMP
wird automatisch in zwei Schritten ausgeführt:
Schritt 1: Die neueste Version wird aus dem
Internet heruntergeladen. Die „Power“-LED
blinkt schnell. Die Wiedergabe über das
STREAM AMP kann fortgesetzt werden.
Schritt 2 : Installation der neuen Firmware mit
einem Neustart des Netzwerkmoduls.
1
Die
LED wechselt für etwa 25 Sekunden auf
Rot und wird wieder grün, wenn die Installation
abgeschlossen ist. Die Tonwiedergabe wird
temporär stummgeschaltet und wird dann mit
normalem Einschaltpegel (30%) wieder aktiv.
ACHTUNG: Das STREAM AMP
darf während eines FirmwareUpdates nicht ausgeschaltet werden!
64
Page 65
CLEANING STREAM AMP
REINIGUNG DES STREAM AMP
Ihr STREAM AMP-System kann mit einem
weichen, feuchten Tuch gesäubert werden. Bitte
benutzen Sie keine Ätz- oder Reinigungsmittel,
die in Geräte-Öffnungen fließen könnten.
Bitte benutzen Sie auch keine Lösungsmittel,
Chemikalien oder Reinigungsmittel, die Alkohol,
Salmiakgeist oder Scheuermittel enthalten.
Den Stoffbezug Ihrer Satelliten können Sie, falls
notwendig, mit einem Staubsauger reinigen.
Vorsicht! Die Lautsprecher-Membranen sitzen
ganz nahe hinter dem Stoffbezug, ein zu starker
Sog vom Staubsauger kann die Membranen
beschädigen.
FAQ
Suchen Sie weiterführende Informationen?
Lesen Sie unsere detaillierten Antworten zu
häufig gestellten Fragen auf der Seite des
STREAM AMP von www.cabasse.com.
KUNDENDIENST
Cabasse verfügt über ein Netz zugelassener
Händler, dessen Kundendienst Ihnen voll
und ganz zur Verfügung steht. Wenn Sie die
Adressen eines Händlers erfahren wollen, rufen
Sie uns an oder besuchen Sie unsere Webseiten
unter www.cabasse.com.
65
Page 66
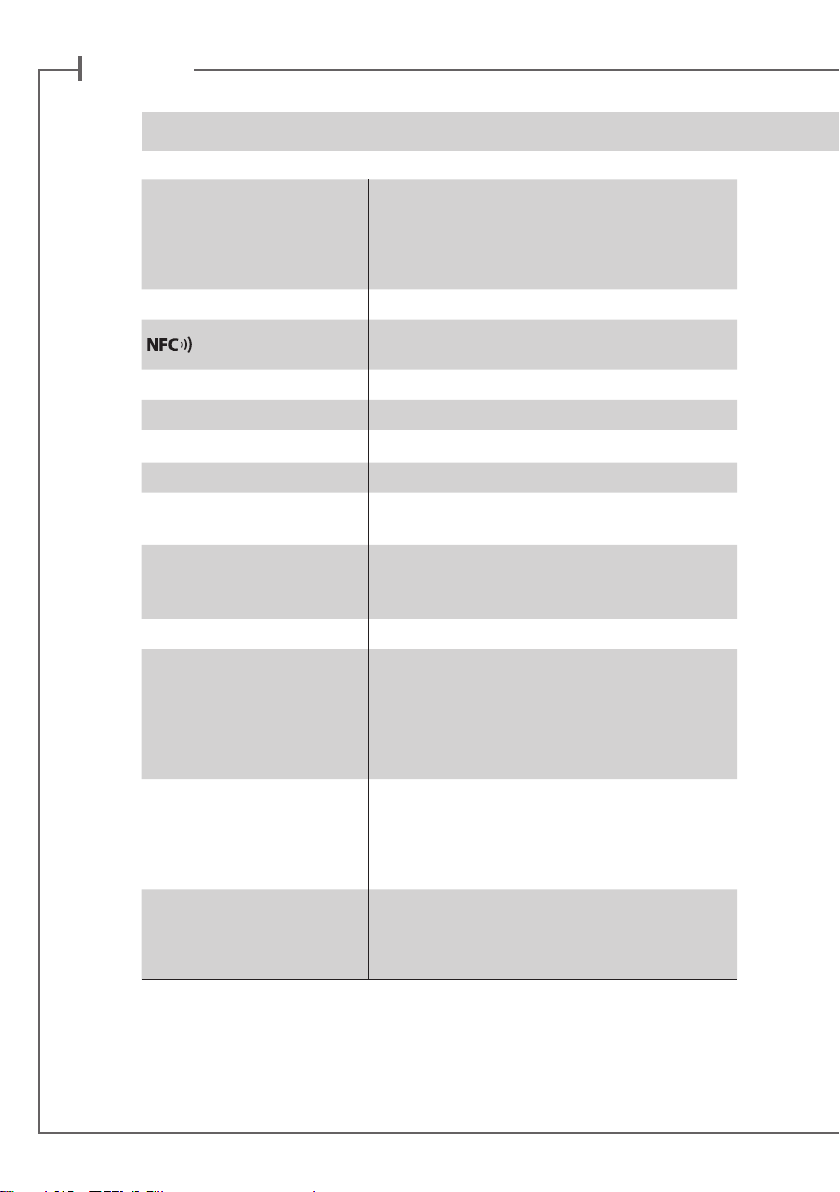
d e u t s c h
STREAM AMP 100
Digitaleingänge
Analogeingang
Stromversorgung
Leistungsaufnahme
Eco Stromverbrauch
Stromverbrauch Off-Modus
spezifizierte Umgebungstem-
peratur für Betrieb
spezifizierte
Umgebungstemperatur für
Lagerung
Useable humidity range
Netzwerk
Audio-Formate
(WLAN/RJ45)
Lautsprecher-Chassis
- 1 DLNA-Eingang, entweder über kabelgebundenes
Ethernet oder WLAN
- 1 Bluetooth-APTX-Eingang
- 1 S/PDIF-Eingang optisch
- 1 USB-Eingang
2 RCA strereo
NFC-Patch im Zentrum des Frontgrills
Sofortige Bluetooth-Verbindung
110-240V ~ 60/50Hz, 2A
150 W
11 W @ 110-240VAC~50/60Hz
0 W @ 110-240VAC~50/60Hz
+5 °C bis +35 °C
-5 °C bis +40 °C
40 % to 70 %
Ethernet 10/100 Mb
MAC & PHY
WLAN 802.11b/g/n
Sicherheit WPS 2.0
Digitaler Media-Renderer
(kompatibel zu DLNA 1.5)
WMA (WMA9, CBR,CBR, up to 320kbps)
PCM (16 bits-44.1kHz, 24 bits-44/48/96 kHz, .wav,
.aiff, .aif, .aif-Dateien, HTTP-Streams)
AAC-LC (bis zu 320kbps), ALAC (.m4a)
FLAC (16 bits-44.1kHz, 24 bits- 44/48/96 kHz)
1 x Zweiweg-Koaxialchassis mit:
1 x 2,9cm-„Softdome“-Hochtöner
1 x 8cm Mitteltöner
1 x 17cm-Tieftöner mit Doppelschwingspule
66
Page 67
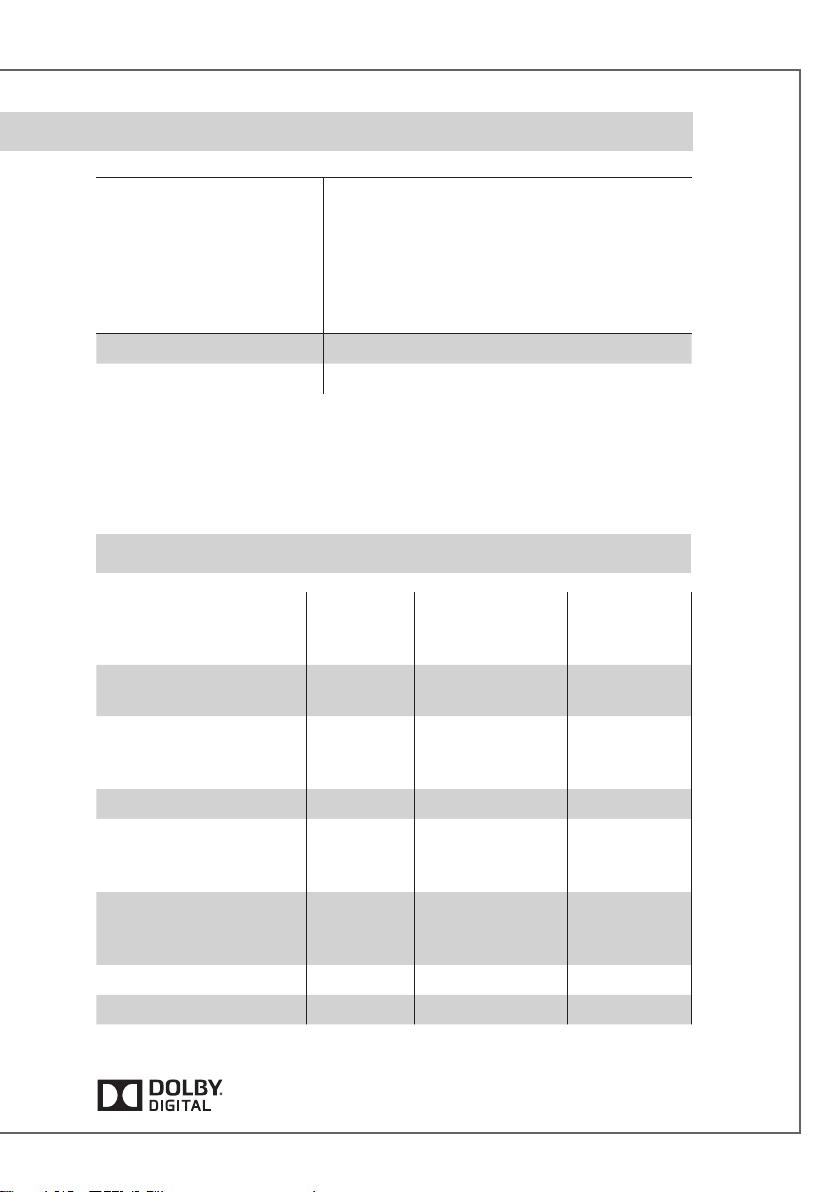
Verstärkerleistungen
2 x 50 W RMS / 4-8 Ohm
4 x 25 W RMS / 4-8 Ohm
Verzerrungen und Rauschen
(THD+N von 20 bis 20.000Hz Bandbreite
und Verstärkerleistung oberhalb 100mW)
Abmessungen (H x B x T)
Gewicht
FUNKTIONEN
Loss less audio
Abspielen
Zugriff alle Audio
Medium an den WLAN
Netzwerk (Computer..)
Multi-room
Musik Content aus
Smartphone/Tablet
abspielen
Audio Apps (youtube…)
aus Smartphone / Tablet
abspielen
Abspielen aus USB Gerät
Web radio /DEEZER
WLAN : < 0,1%
Bluetooth : < 0,1%
Analog : < 0,1%
Optisch < 0.1% THD+N
91 x 218 x 190 mm
1,9 kg
Bluetooth
Verbindung
WIFI/ETHERNET
via Internet
Router
4 4
4
4
4 4 4
4
4 4
4
WIFI direkt to
Smartphone/
Tablet
Verfertigt unter Lizenz von Dolby Laboratories. Dolby und die
doppelten D Symbol sind Warenzeichen des Dolby Laboratories.
67
Page 68
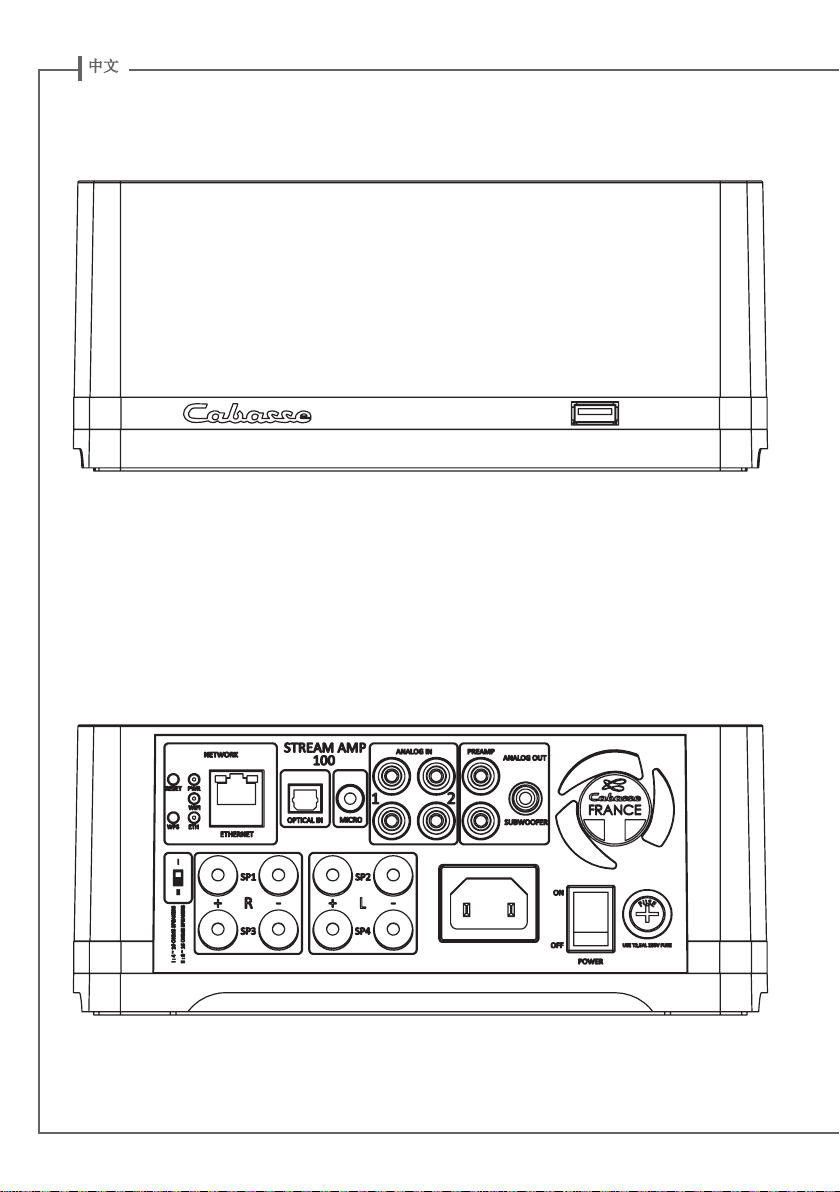
中文
6868
Page 69
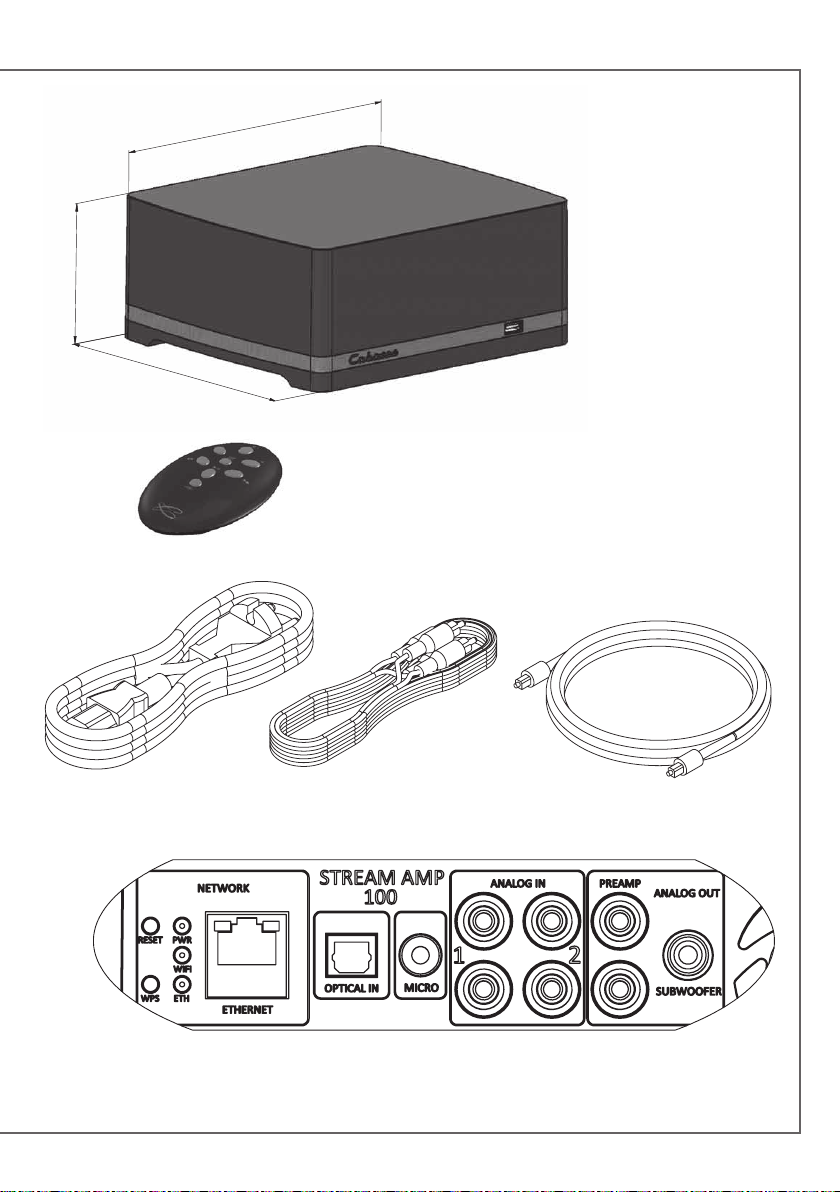
218
218
91
190
69
Page 70
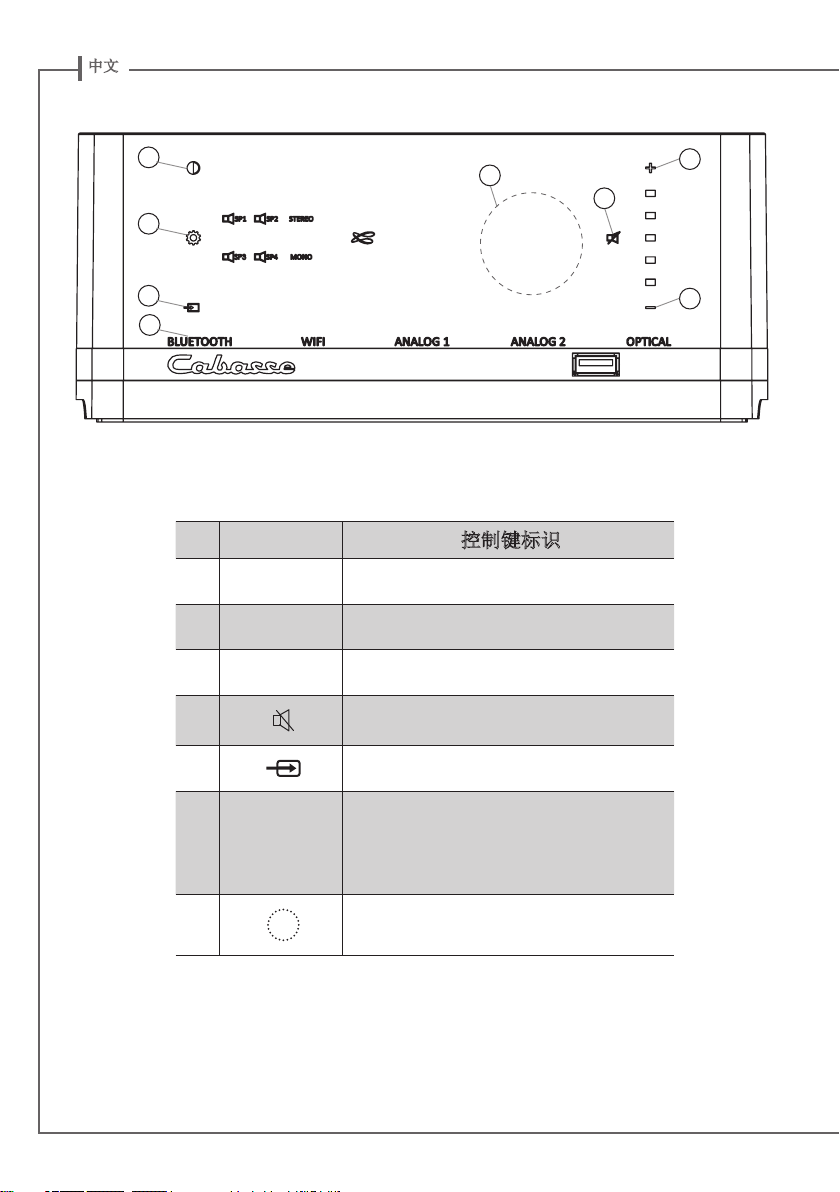
中文
1
11
8
9
1
LED 显示灯 开/ECO节能
2 音量 -
3 音量 +
4
10
3
4
2
控制键标识
音量下降
音量上升
静音 开/关
8
9 SOURCES
10
信号源选择
红色:ECO节能模式
蓝色:蓝牙
橙色:无线Wifi
绿色:模拟
NFC近距离无线通讯技术信号发射罩位置
7070
Page 71
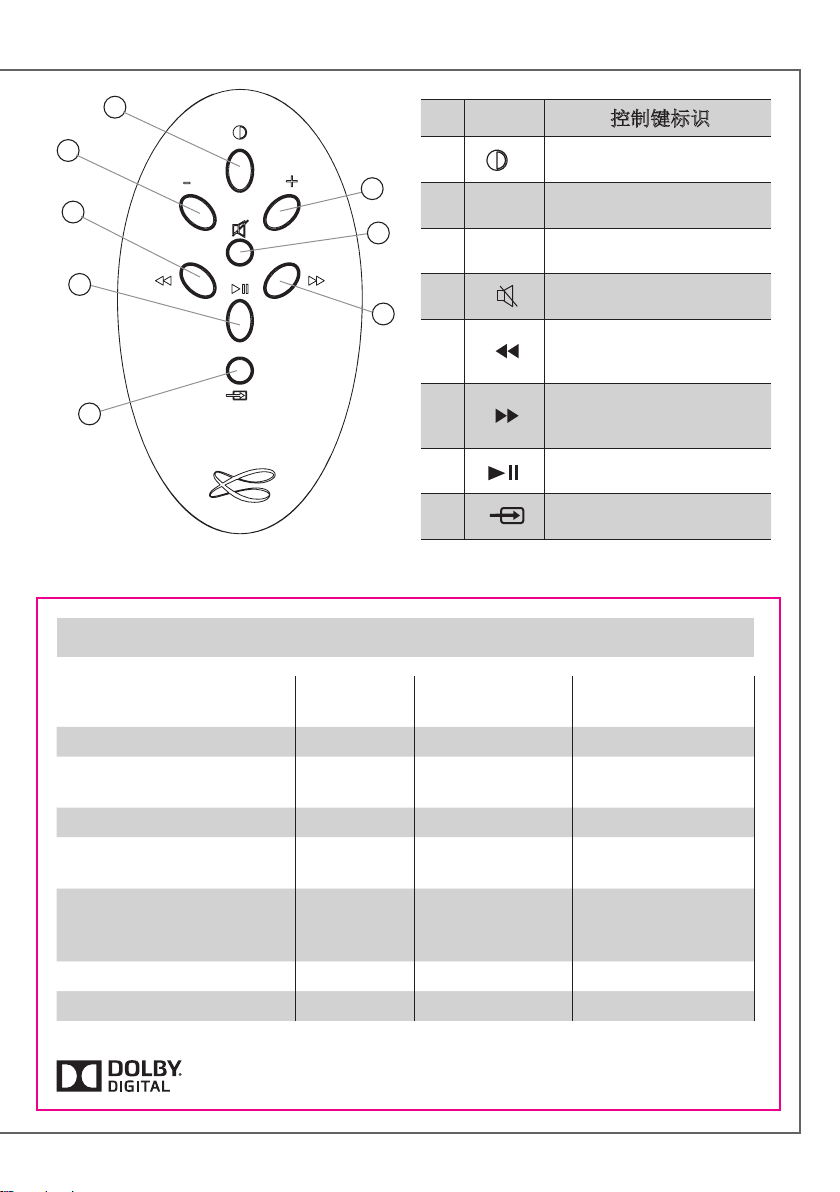
1
2
1
控制键标识
开/ECO节能
3
5
2 音量 -
音量下降
4
3 音量 +
7
4
音量上升
静音 开/关
6
5
所播放专辑的上一
首曲目
8
FEATURES
Loss less audio playback
Access to any audio from
WLAN network (desktop...)
Multi-room
Tracks playback from
smartphone/tablet
Playback smartphone/
tablet a audio applications
(youtube…)
Playback from USB device
Web radio /DEEZER
所播放专辑的下一
首曲目
播放/暂停
信号源选择
Bluetooth
connection
6
7
8
WIFI/ETHERNET
via internet router
4 4
4
4
4 4 4
4
4 4
4
WIFI direct to
smartphone/tablet
Manufactured under licence form Dolby Laboratories.
Dolby and the double D symbol are trademarks of Dolby Laboratories.
71
Page 72
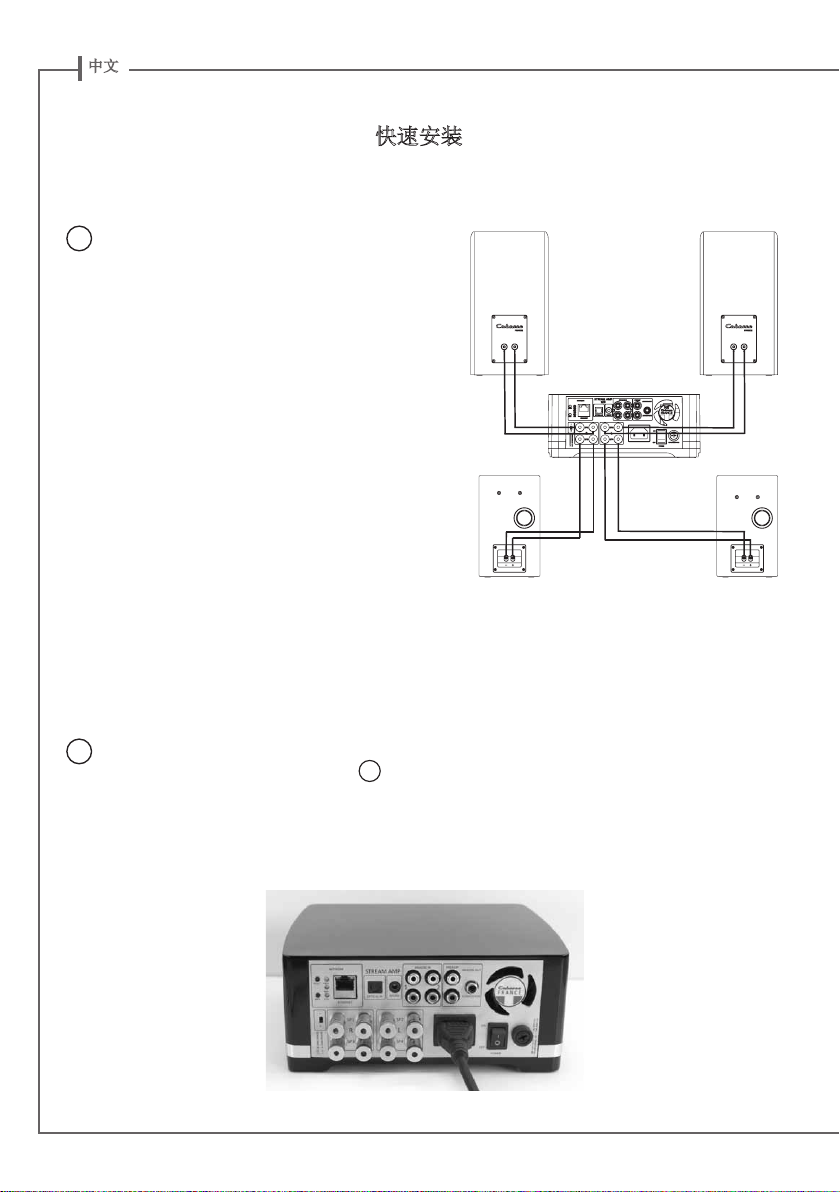
中文
快速安装
将STREAM AMP主机靠近主电源插座摆放,
1
可采用平放、立放或挂墙方式。为让蓝牙
和无线Wifi天线有效工作,STREAM AMP主
机上方需要预留下足够的空间非常重要,
该预留空间更可通过NFC近距离无线通讯技
术信号发射罩操作,简便连接智能手机和
蓝牙设备。
将STREAM AMP连接上电源,并把主电源 开 / 关按钮保持于 “开启”状态。按下
2
STREAM AMP 机身上或遥控器上
1
键以启动STREAM AMP。
72
Page 73
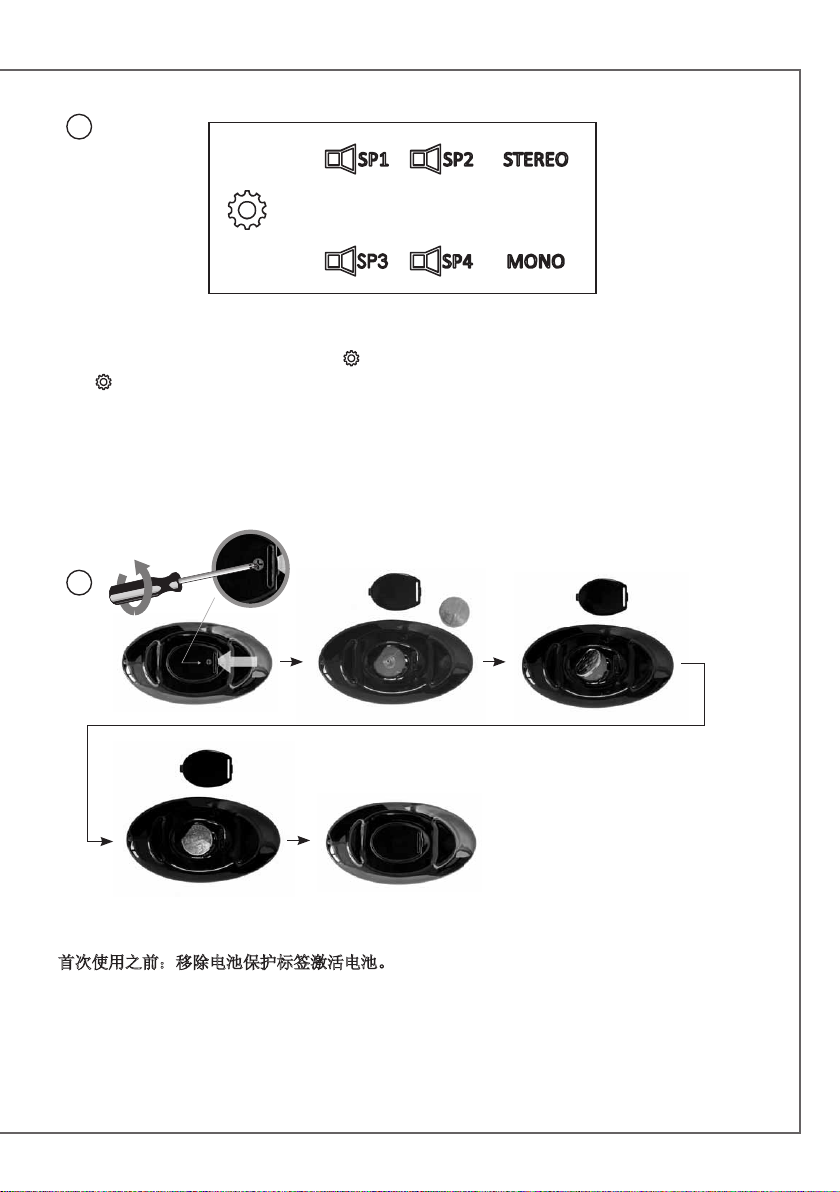
3
VERSION CHINOISE DE
Settings of the loudspeakers outputs
to select between the 4 possible set-ups:
Press
- 1 STEREO pair of loudspeakers (default mode). The SP1, SP2, STEREO LEDs are on.
- 2 STEREO pairs of loudspeakers. The SP1, SP2, SP3, SP4 and STEREO LEDs are on.
- 2 loudspeakers playing MONO. The SP1,SP2 and MONO LEDs are on.
- 4 loudspeakers playing MONO. The SP1,SP2, SP3,SP4 and MONO LEDs are on.
.
4
首次使用之前:移除电池保护标签激活电池。
更换Stream遥控器中的CR-2025电池:loosen the screw 用手指压下簧片打开后盖,
取下旧电池,换上新电池,电池正极朝向后盖那一面,最后盖上后盖 retighten the screw。
73
Page 74
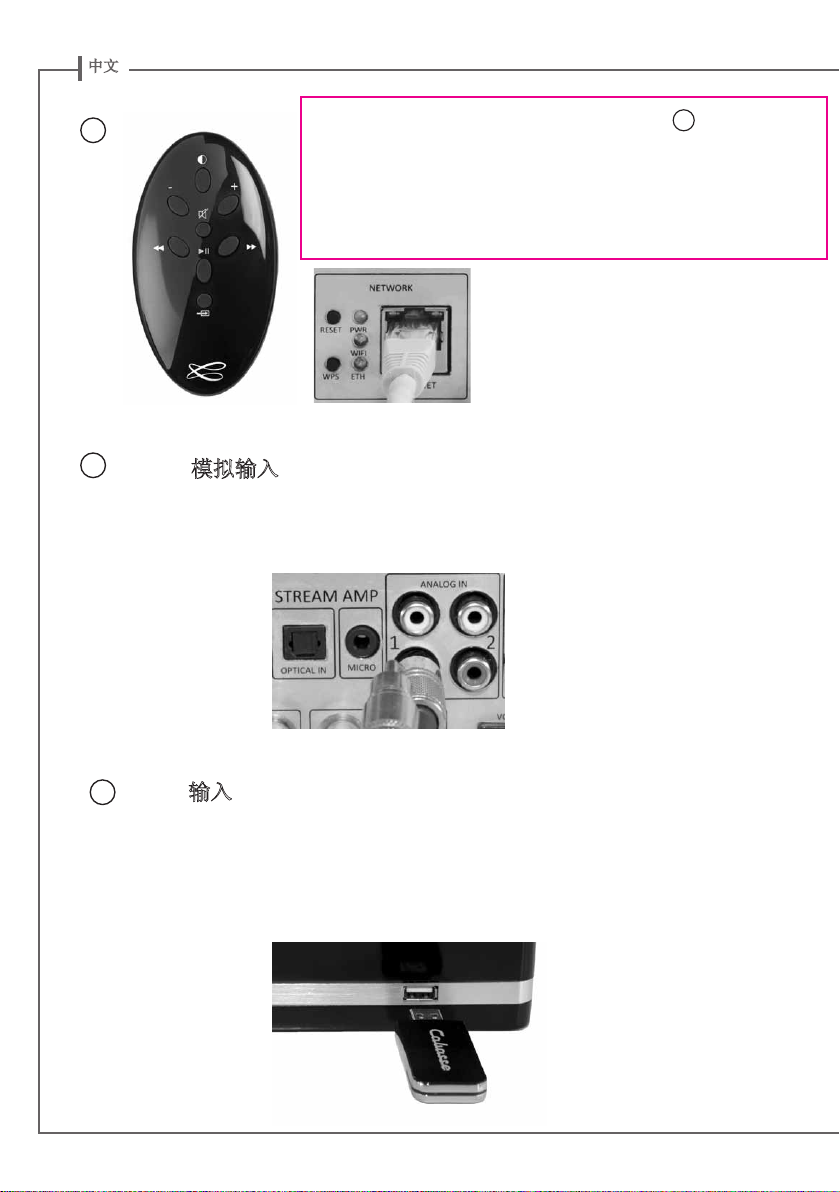
中文
5
6
一旦蓝牙和无线Wifi连接被激活,按下遥控器的 8 键不放,直
到选中所需的信号源:
- 蓝色LED显示灯亮起表明蓝牙信号源被选中。
- 橙色LED显示灯亮起表明无线Wifi信号源被选中。(Wi-Fi / 以
太网)
- 绿色LED显示灯亮起表明模拟声频信号源被选中。(AUX 输入)
AUX模拟输入
选择适合模拟输出的音频信号源,以及RCA类型的迷你插头。如果信号源适合
RCA输出,用一根带迷你插头的RCA信号线插入音频播放器相应的输出插孔(
红色或有R标志,白色或有L标志)中。另一头插入STREAM AMP主机的迷你输
入插孔(AUX IN)。
USB输入
7
将USB储存器或移动硬盘插入此输入端子中,可以从家用无线网络中获取所有储存的
音频文件。所有与STREAM AMP主机内置DLNA
(数字生活网络联盟)伺服器兼容的音频文件均可以出现在卡巴斯开发的无线串流应
用程式 (对应安卓和苹果系统) 的列表中,并且可以通过连接到同一家用无线网络的
任何一款Cabasse Stream播放器进行播放。
USB输入端子可提供800毫安的电源输出,可以直接驱动移动硬盘而无需外接电源。
74
Page 75
蓝牙连接:
STREAM AMP主机默认设定为自动进行蓝牙连接。在蓝牙设备的设备列表中选择“Cabasse
STREAM AMP主机”就可以将蓝牙设备作为音频数据信号源使用。如果已经有蓝牙设备信号源连
接到STREAM AMP主机,就需要先断开这个设备,然后再连接新设备。
与安卓平板电脑进行蓝牙连接:请看第41页的中文说明。
与苹果电脑连接并使用STREAM AMP主机:请看第42页的中文说明。
与带有NFC近距离无线通讯技术功能的智能手机进行快速NFC连接
1) 安装Cabasse NFC应用程式:
A.在NFC智能手机菜单中激活NFC功能。
B.检查并激活智能手机的无线Wifi或3G功能,与互联网连接。
C.将智能手机放在STREAM AMP主机顶部的NFC信号发射罩之上。
D.通过Google Play程序安装Cabasse NFC应用程式。
E.智能手机已经可以实现快速蓝牙NFC连接。
2)
使用Cabasse蓝牙NFC应用程式:
10
A. 将智能手机放在STREAM AMP主机顶部网罩正中的NFC信号发射罩
对;如果STREAM AMP主机处于开机状态,此时蓝牙输入会被自动选中,智能手机播放列表
中的第一首曲目也会通过STREAM AMP主机自动进行播放。
B. 将智能手机再次与STREAM AMP主机顶部的NFC标志接触一次,两款设备会断开连接。之后可
以将另一部智能手机与STREAM AMP主机进行配对。
注意:Cabasse NFC应用程式安装到智能手机中之后,会在后台运行。此应用程式可以在应用
程式列表中显示,但是不会在智能手机桌面上创建图标。
之上,实现快速蓝牙配
Wi-Fi 直接連接模式
Wi-Fi 直接連接模式可以Wi-Fi傳輸的質量播放所有在平板電腦或智能手機上的軟件音樂檔,以
及那些以USB輸入端連接到STREAM AMP的硬盤或U盤連上的軟件音樂檔,而不需要通過家用
Wi-Fi網絡連接。
但是Wi-Fi 直接連接模式對一些網絡資源如的vTuner﹑Deezer 或STREAM AMP固件升級便不支
援了。
啟動STREAM AMP,於您的平板電腦 / 智能手機安裝並打開卡巴斯App,選擇“在獨立模式下
使用這個設備”而並非“配置這個音頻設備”, 按照App上的功能項去開始播放音樂。
75
Page 76
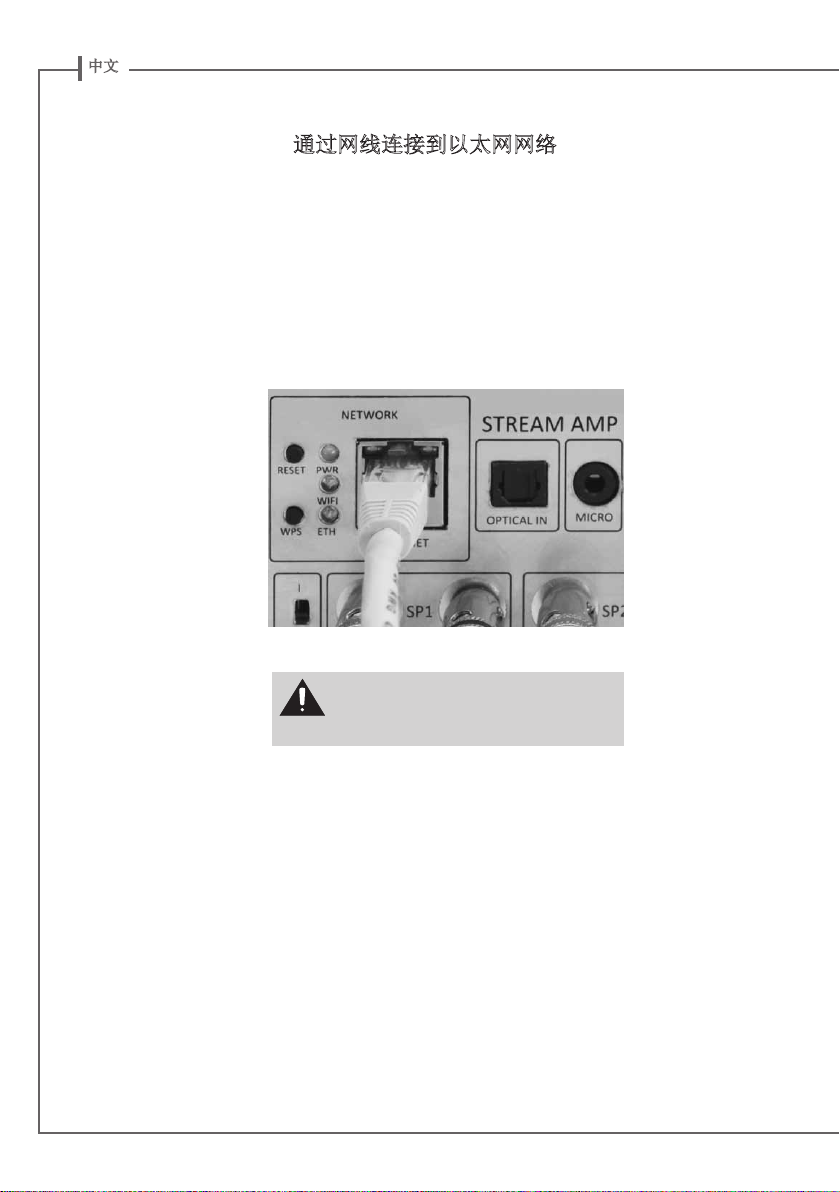
中文
通过网线连接到以太网网络
在饱和的Wi-Fi 讯号或路由器和 Stream系列设备距离过长情况下,将影响音乐播放不稳定或停
止。使用局域网线直接连接可确保恒定的和最佳的传输速率。
通过RJ45网线将STREAM AMP主机与本地路由器连接。使用这种连接方式时,蓝色LED显示灯
的“ETH”字样会停止闪烁并保持长亮。
注意:在DHCP“动态主机设置协议”模式之下设置路由器
在开始新的连接(有线、自动、快捷、
手动)之前以及连接另外一台路由器之
前需要先按下“重启”键。
76
Page 77
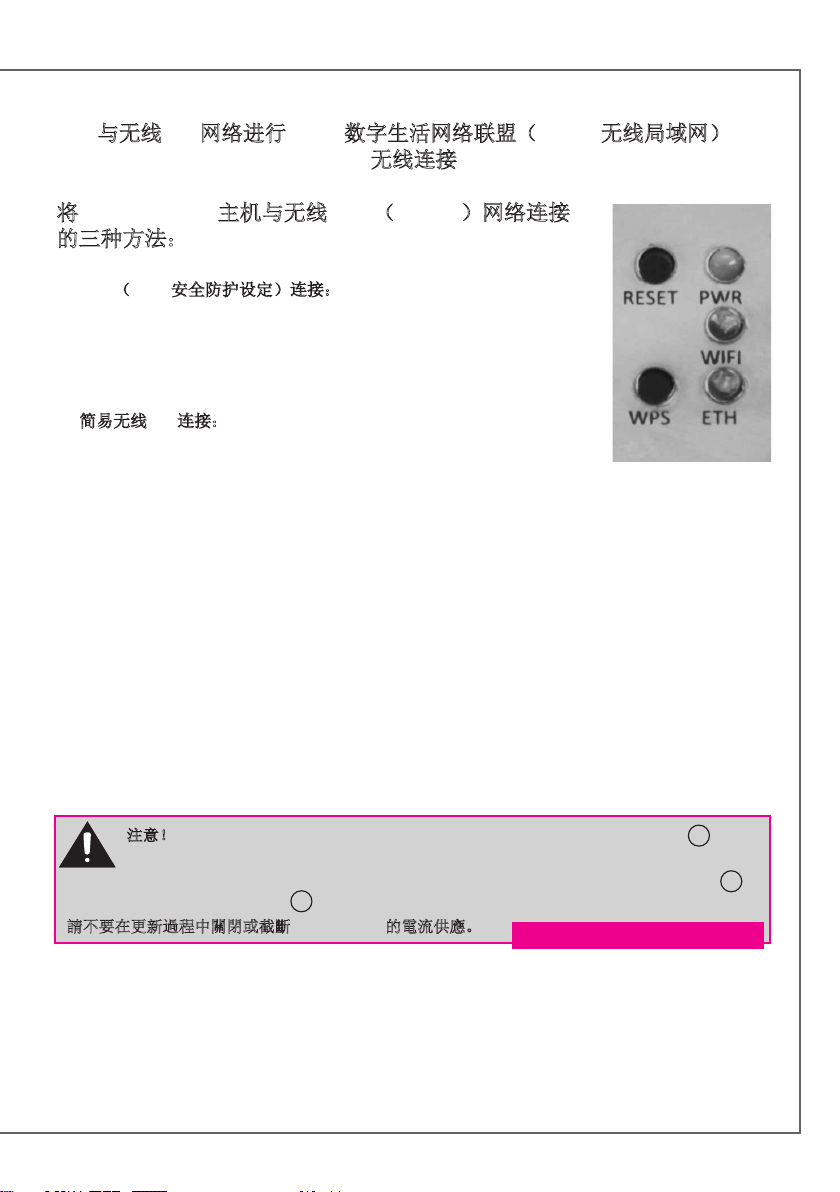
与无线Wifi网络进行DLNA数字生活网络联盟(WLAN无线局域网)
无线连接
将STREAM AMP主机与无线WIFI(WLAN)网络连接
的三种方法:
1. WPS(Wi-Fi安全防护设定)连接:按下无线路由器上的WPS按键不
放保持最少两秒钟,并在两分钟内(请阅读路由器说明书确定准确的
时间)按下STREAM AMP主机的WPS键。连接完成之后,蓝色LED显示
灯(无线Wifi设定)会亮起。此时请看第43页了解如何安装Cabasse应
用程式。
2.
简易无线Wifi连接:使用Cabasse Stream音频控制应用程式以及智能
手机、平板电脑的无线Wifi功能连接到本地网络。
A. 通过“Play Store”或“App Store”程序将Cabasse Stream音频控制
应用程式安装到安卓或苹果平板电脑或智能手机之中。
B. 打开STREAM AMP主机,如果以前曾经连接到另外一台路由器,就按下重启键。在智能手机
或平板电脑的应用模式“设置”中激活无线Wifi。
C. 在已激活的设备中选择STREAM AMP主机,实现连接。
D. 启动Cabasse Stream应用程式。连接到STREAM AMP主机之后,在可选的Stream设备中选择
STREAM AMP主机,并且依照安装提示进行操作。
注意:从B开始,你可以打开Cabasse应用程式并且按照在线向导的提示进行操作。首次连接的时
候,在线向导会自动运行。
E. STREAM AMP主机背板上的无线Wifi蓝色LED显示灯会闪烁约30秒钟。
F. 无线Wifi蓝色LED显示灯停止闪烁,保持长亮:点击“关闭此視窗”。STREAM AMP主机现在
可以播放网络上的所有音频文件,也可以播放网络收音机收到的所有网络电台节目。
注意!當STREAM AMP被連接到家用Wi-Fi網絡後,固件的升級更新將自動啟動。
示燈將顯示為白色閃爍5到15分鐘,直到更新全部完成。
在更新過程中,請暫停使用STREAM AMP,請等待STREAM AMP自動重新啟動後,當
LED顯示燈顯示為紅色常亮。按
請不要在更新過程中關閉或截斷STREAM AMP的電流供應。
1
鍵啟動STREAM AMP即可。
77
9
LED顯
9
A vérifier (reprise Stream 1)
Page 78
中文
非常感谢您选择Cabasse扬声器。
在设置您的扬声器之前,请仔细阅读以下说明。
安全指导:
绘画标识的解
释:
等边三角
形中一个
带箭头的闪电符号,表示警告您在产品箱体
内部存在未绝缘的“危险电压”,有可能具
有足够大的电压级而对人体构成电击危险。
等边三角形中一个惊叹号符号,表示
提醒您在随机的文档中有着重要的操
作或保养(售后服务)提示。
提示:首次启动任何设备之前,请仔细阅
读所有的安全和操作提示。
牢记这些提示:在整个使用说明中,它
们会不断地出现。
特别注意警告信息:所有产品表面的警
告标识和用户使用说明中的警告信息都必须
严格遵守。
遵守所有提示:仔细遵守所有的安装和
操作提示。
清洁:在清洁设备之前,务必拔下电源
线。不要使用任何液态或喷雾的清洁剂。推
荐使用浸湿的软布进行清洁。
附件:为避免发生意外,只能够使用
Cabasse公司明确推荐的附件。
>> 便携式推车警告
在家俱和底座上进行安装:不要把本
设备放置在不稳定的表面,如:底座、三脚
架、桌子、书架等。否则有可能造成跌落,
对附近的孩子和成人产生严重伤害。
通气孔:本设备不能够放置在影响其内部
风扇工作的位置使用。不要把设备放置在床
上、沙发上、地毯上或其它类似的可能影响
正常空气流动的表面上。不要将此设备放置
在密闭空间中,例如书柜或其它类似的家俱
中,否则有可能影响足够的空气自由流动。
电源:此设备只能够与本操作说明中或是
产品表面印刷标识中所提到的供电设备连
接。如果您不确定可用的电源类型,请联系
您的销售商或本地的供电公司。
电源线:电源线必须要放置在不会被踩
踏、挤压的地方,也不能弯曲放置在其它设
备下方。另外要特别注意设备的电源线和插
头相互匹配。
雷击:为了更好地避免设备遭受雷击或是
设备长时间不使用时,从主机上拔下电源适
配器。这样可以将因为雷击和电流浪涌造成
的潜在损害降至最低。
过载:避免电源插头、扩展线材或电流继
电器造成过载,否则有可能造成火灾和触
电。
水和潮气:产品不能够在潮湿或浸水的地
方使用,例如潮湿的地下室;靠近浴缸、水
池、游泳池的位置或其它类似的环境。
推车和底座:产品只能够用厂家推荐的
推车和底座运输和放置。
机外的异物和液体:本设备不能暴露在
滴水或溅水的环境中。装满液体的物体,例
如花瓶,不能够放在设备上方。避免让外部
异物或液体进入到设备中,否则会造成火灾
或触电。禁止向设备泼洒任何液体。
78
Page 79
保养:除了本使用说明书提到的保养操作
之外,用户绝不能尝试自行保养本设备。任
何超出日常用户保养的工作必须由经过认证
的售后服务操作员完成。
常见问题的解决:您必须从电源上拔下
您的设备,并在以下情况发生时由经过认证
的技术人员进行检查:
电源或插头损坏。
外部异物或液体进入设备之内。
设备暴露在滴水或溅水的环境中。
在正常的操作条件下,设备不能够正常工
作。只能够按照使用说明书中描述的操作
方法控制设备,任何其它的操作都有可能
损坏设备,并且需要经过认证的技术人员
进行现场检查。
此设备发生坠落或是机箱损坏。
此设备的音色表现发生明显变化。
在某种天气情况列雷雨,您可能需要重新启
动此器材已保持它的功能。
备件:如果需要用备件来修复本设备,请
确认技术人员完全遵守厂家的推荐操作方
法,或是用于替换的部件参数与原部件完全
相同。不兼容的部件有可能造成多重损坏,
包括火灾和触电。
检查:设备经过任何保养措施之后,让技
术人员作适当的测试,确保设备安全工作。
设置
系统所有部件 1
- 一台STREAM AMP主机、一台外置电源
供应器带插头适配器、一个遥控器、一本
说明书和一张质保卡。
安装 5
将 STREAM AMP主机靠近主电源插座,采
用平放、立放或挂墙的安装方式。
STREAM AMP主机上方和四周留下足够的
空间:
- 实现更好的无线Wifi和蓝牙信号传输
- 方便把智能手机在FNC近距离无线通讯
- 实现更好的音频还原效果。
:
技术信号发射罩附近“刷机”实现快速
蓝牙连接。
:
电源连接:
将电源线连接到STREAM AMP主机,再
插到主电源上,将电源开关置于“开”
位置。LED显示灯
AMP主机进入工作状态。
注意:STREAM AMP主机开机后大约40秒
钟,PWR(电源)LED显示灯从红色变为绿
色之后,无线Wifi模式才可用。
9
亮起时,STREAM
暴露在高温之下:此设备被设计在正常
的温度下使用,需要远离热源,例如:辐射
器、加热器、放大器或其它任何类似的有可
能使得工作温度大幅上升的物体。
拆开包装:
打开纸箱的盖板,取出所有器材。如果扬声
器或超低音扬声器出现损坏,请勿使用。请
将所有器材重新放进原包装箱中并立即联系
您的Cabasse授权经销商。我们建议您保留
包装箱以供未来使用。
开机/ECO节能模式
A. 切换到ECO节能模式:按下Stream遥控器
或STREAM AMP主机的
蓝牙功能仍然保持可用,但STREAM AMP主
机的音频部分电源断开。
B. 恢复ON开机模式:
- 按下Stream遥控器或STREAM AMP主机
1
的
键,或者
- 进行蓝牙设备连接(NFC连接或其它),
或者
- 点击Cabasse Stream音频控制应用程式
的“播放”键。
79
1
键。无线Wifi和
Page 80
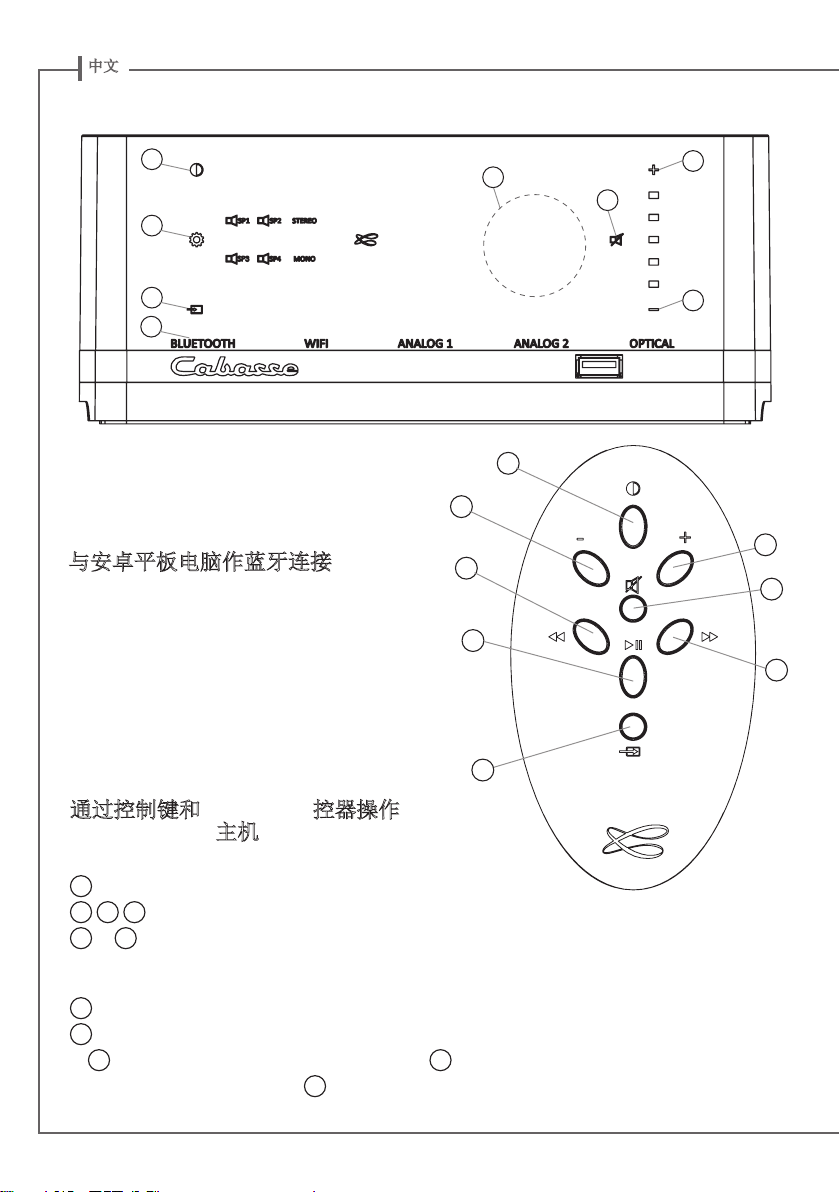
中文
1
11
8
9
与安卓平板电脑作蓝牙连接:
- 如果是初次连接,在平板电脑的“设置”
菜单中按下开-关键激活蓝牙功能。
10
3
4
2
1
2
3
5
4
7
6
8
通过控制键和STREAM遥控器操作
STREAM AMP主机:
1
键ECO节能模式/开机模式选择。
2 3 4
5 和6
模式下:当播放某音乐专辑或播放列表时,播放前一首或
下一首曲目。
7
8
(
灯发橙色光)或模拟信号源(
键控制音量增减和静音。
键在WiFi 无线模式下:向前和向后扫描;在蓝牙
音乐键:播放或暂停这(无线Wifi和蓝牙模式下)
键进行信号源选择:按下此键可选择蓝牙信号源
9
LED显示灯发蓝光)、无线Wifi信号源(9LED显示
9
LED显示灯发绿色光)
80
Page 81
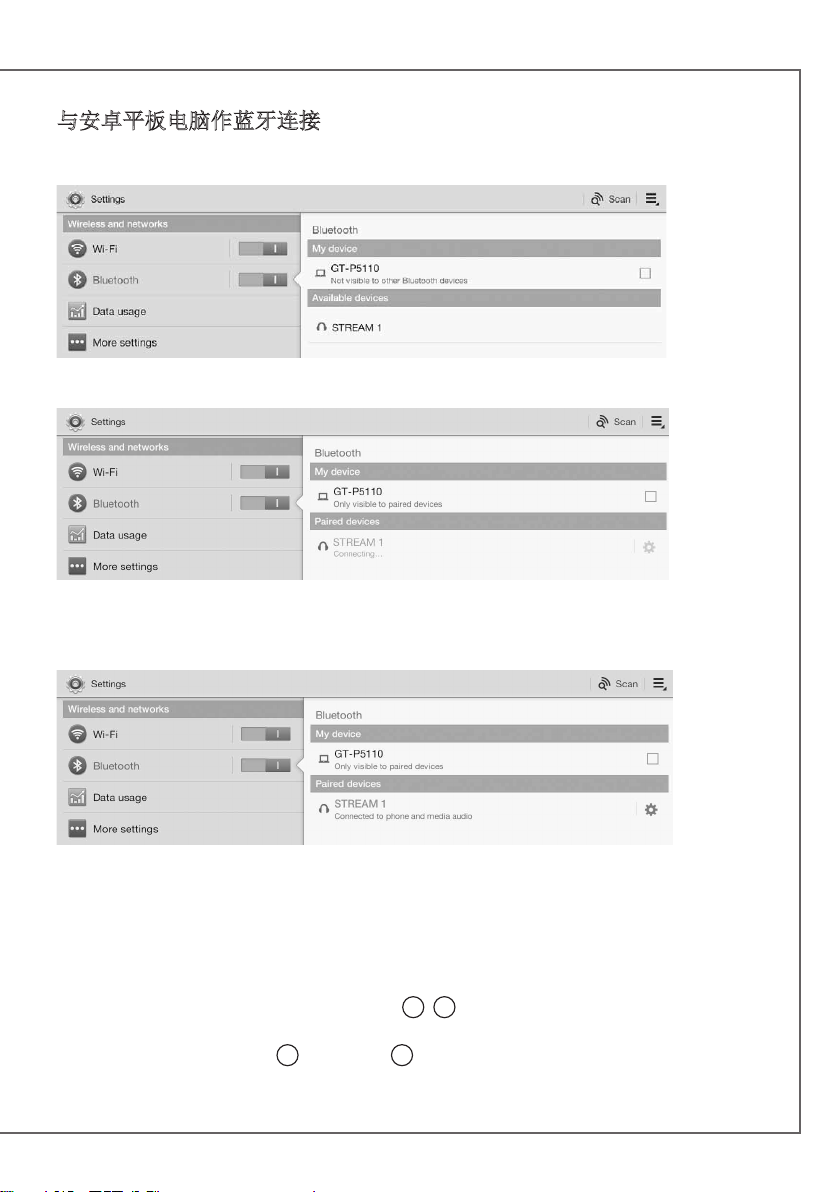
与安卓平板电脑作蓝牙连接:
- 如果是初次连接,在平板电脑的“设置”菜单中按下开-关键激活蓝牙功能。
- 按下“扫描设备”键并且在可选设备中选择“Cabasse STREAM AMP”。
- 现在STREAM AMP主机正在与平板电脑配对,并且其它连接到STREAM AMP主机的蓝牙
设备没有处于激活状态。
现在连接已启动。如果“连接...”信息没有出现,通过设备的设置菜单或关闭再开启
STREAM AMP主机来停止与另一台设备的蓝牙连接。然后再次点击“Cabasse STREAM
AMP”。
如果要在STREAM AMP主机上播放储存在平板电脑(或智能手机)中的音频文件,可以打
开音频播放器应用程式,选择某个文件并且点击“播放”。
如果STREAM AMP主机不发声,首先检查平板电脑(或智能手机)的主音量是否位于零位
并且“静音”功能处于关闭状态。然后在播放器应用程式中将音量调节到最大值,再使用
Stream遥控器提高STREAM AMP主机的音量
最后按下Stream遥控器上的
AMP主机被激活的信号源。
8
键直到蓝色9LED显示灯闪烁,选择“蓝牙”作为STREAM
2 3
81
键。
Page 82
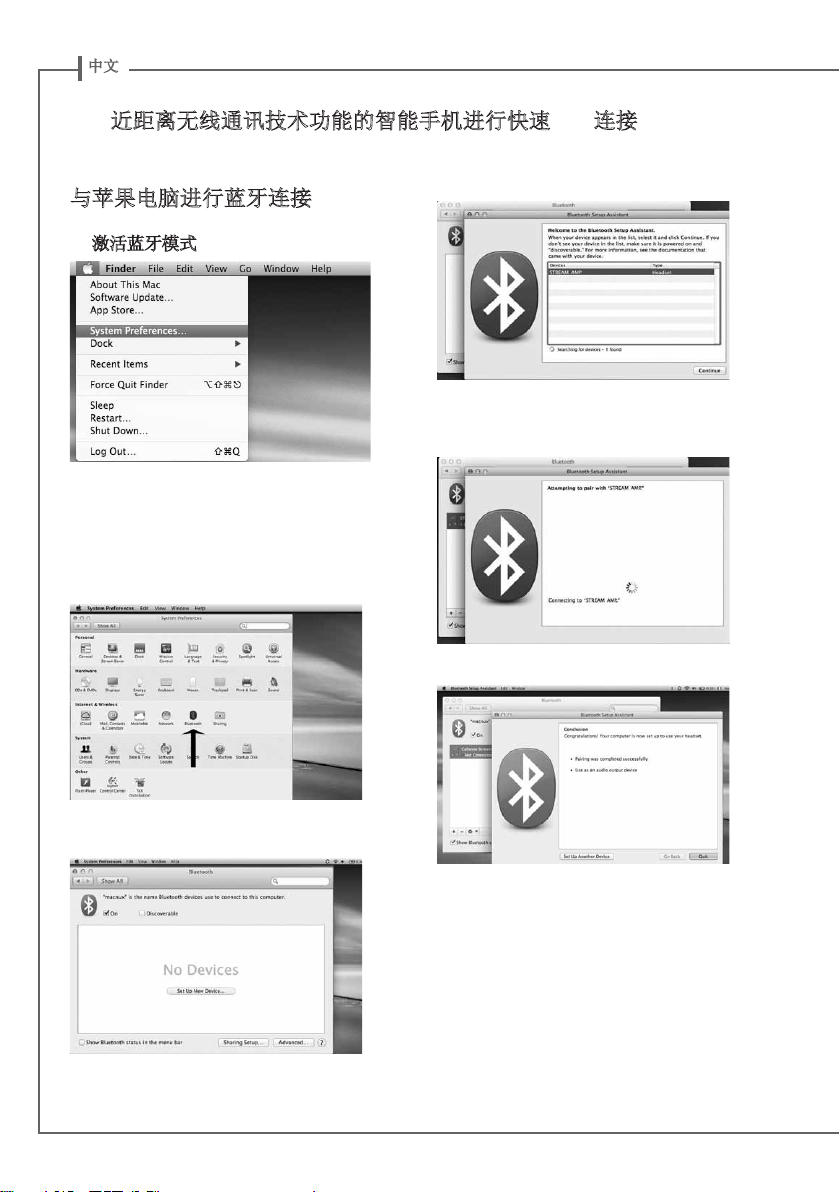
中文
NFC近距离无线通讯技术功能的智能手机进行快速NFC连接
參見第8頁。
与苹果电脑进行蓝牙连接:
1. 激活蓝牙模式
在设备列表中选择“STREAM AMP”并点
击“继续”。
將STREAM AMP連接到電源將其啟動。如
果STREAM AMP已經開啟,先停止STREAM
AMP和任何其他設備之間的藍牙連接。
啟動電腦的藍牙功能:打開 «蘋果» 的選項
菜單,然後選擇 «系統偏好設置»。
在“系统偏好设置”視窗中选择“蓝牙”。
选择“开”并点击“设置新的设备”。
连接……
连接完成。STREAM AMP主机现在与苹果电
脑配对成功。
82
Page 83
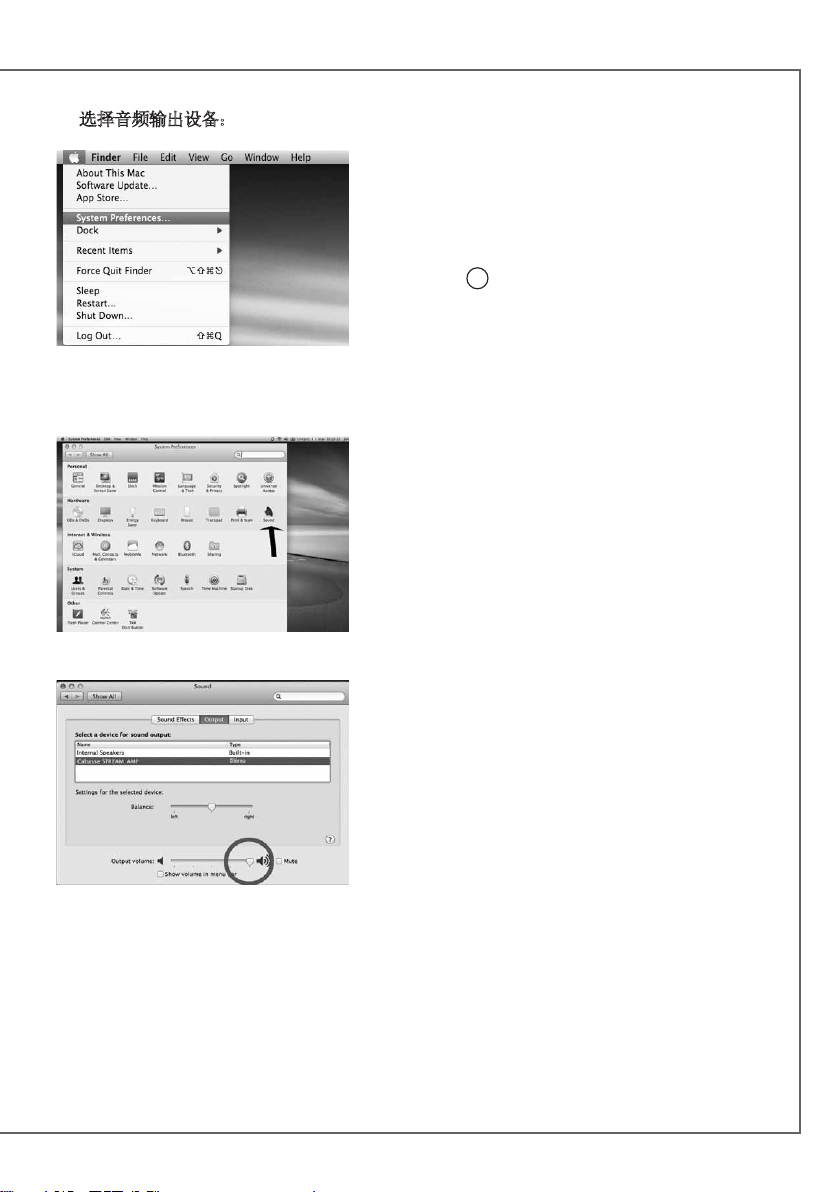
2.
选择音频输出设备:
要使用STREAM AMP主机欣赏苹果电脑内储
存的音乐,需要在“系统偏好设置”菜单中
将STREAM AMP主机设置为音频输出设备。
在“硬件”部分选择“声音”。
如果STREAM AMP主机处于待机模式时,
需要花上6秒钟进入播放状态,蓝牙输入也
会被自动选中。可以使用Stream遥控器调节
音量。
如果STREAM AMP主机被激活并连接到另一
台已激活的信号源设备时(通过无线Wifi、
模拟或光纤数字方式连接),使用Stream遥
8
控器
注意:STREAM AMP不具备光纤数字输入,
只 Stream 3具备一个纤数字输入。
键选中蓝牙输入,然后调节音量。
在“输出”标签中选择“STREAM AMP 立
体声”。“STREAM AMP主机”那一行表明
只有在与智能手机配合使用时才能进行免提
通话设置。
将音量控制调到最右边位置。
关闭“声音”視窗。
83
Page 84

中文
Version chinoise de
USE OF STREAM AMP WITH StreamCONTROL APP
1 - Switch ON the POWER button on the back of the STREAM AMP. STREAM AMP IS ready to
play when the LED
STREAM AMP or on the remote control to get STREAM AMP on.
2 - Connect the smartphone or the tablet to the WLAN network to be used with STREAM AMP.
3 - Download and install the free application names StreamCONTROL on Playstore for
Android or on the App Store for iOS.
4 - Launch the application and follow the instructions from the setup wizard. Choose between
direct Wi-Fi (see page 32) or network mode (see pages 33) upon request.
The app is easy to use
When necessary (after an application update for instance), pressing the “?” key gives specific
help and hints at each level of navigation.
You can now enjoy Stream, play all the audio files listed in your smartphones or tablets, PC
and Mac computers, NAS hard disks, as well as the HD or USB sticks directly connected to any
Stream Amp, Stream Source or Stream 1 connected to the network, discover thousands of web
radios and stream with Deezer.
1
illuminates red (stand-by mode), press key 1 on the front board of
All the Stream players of the same network can be controlled by one or several smartphones
and tablets. Groups of Stream players connected the same way ( LAN or WLAN) can be created
to play synchronised music with individual level control.
84
Page 85
WEEE标志
电子电气设备废物处理(适
用于欧盟)
产品上这一由打叉的带轮子
垃圾箱组成的标志,表明此
产品不能够作为家庭废物处
理。此产品应该在使用寿命终止时
被送到适当的电子电气设备废物处
理收集点。确保此产品被正确地处
理,您可以有助于避免对环境和人
体健康产生潜在的负面影响,否则
对此产品不适当的废弃处理会造成
上述的负面影响。原料回收利用也
有助于保护自然资源。如果需要了
解回收此产品的更多详细信息,请
联系您本地的市政办公室、您家庭
的废物处理服务机构或是您购买此
产品的商店。
更换电池:
用手拿起遥控器,按键那一面朝向地面。扳
开电池盖锁扣,打开电池仓。取出旧电池,
用一只新的CR-2025电池替换。按照以下提
示丢弃旧电池。
注意:如果错误更换电池,会有
爆炸的危险。用相同或可替换的
电池型号进行更换。电池不能够
暴露在高温状态下,如太阳光、
火或类似的环境中。
跟随以上信息步骤,您的STREAM AMP系统
相信现在是适当的设置,我们衷心希望你能
一直享受卡巴斯音响扬声器系统。
清洁STREAM AMP:
STREAM AMP扬声器可以用浸湿的软布进
行清洁。不要在系统附近使用任何喷雾器,
或是让液体溅入到系统的任何一个开口中。
另外,不要使用溶剂、化学物或任何含有酒
精、氨水、研磨剂的清洁剂进行清洁。
有必要的话,网罩可以很仔细地进行真空吸
尘。请注意那些位于网罩织物后方的音響單
元,在不注意的情况下它们非常容易被损
坏。
常见问题:
需要了解更多的信息?请操作www.cabasse.
com网站中的STREAM AMP页面,阅读我们
对常见问题的详细回答。
用户支持服务:
Cabasse销售网络随时为您服务,确保您的
产品享有售后服务。如想获得Cabasse销售
商的列表,请联系我们或浏览我们的网站
www.cabasse.com。
自动升级
STREAM AMP主机固件的升级是自动完成。
升级用时从五分钟到半小时不等。
LED显示灯
完全完成。在升级期间,不能使用STREAM
AMP主机。
9
会变为红色并闪烁,直到升级
注意:升级过程中不能关闭系统。
85
Page 86
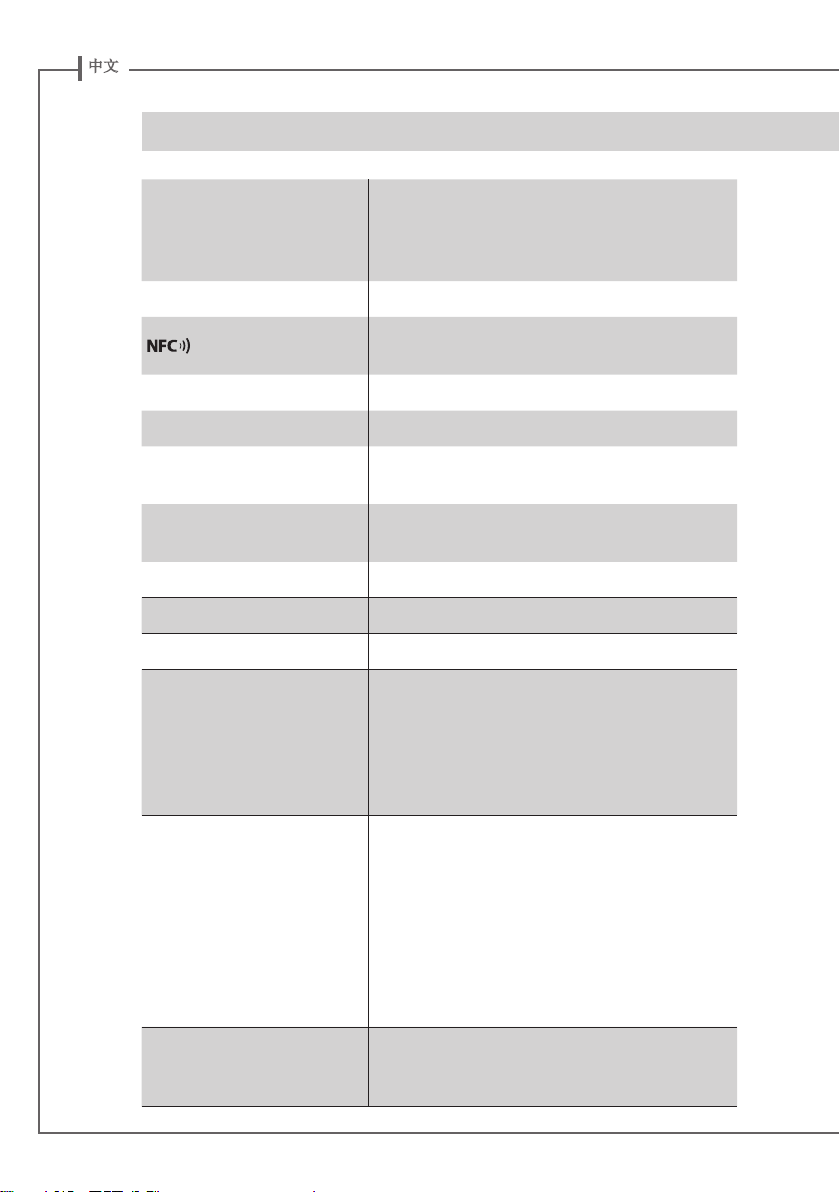
中文
STREAM AMP 100
DLNA
一组
数字输入端子
(数字生活网络联盟)输入:
RJ45
有线方式或无线
一组蓝牙
一组
APTX
USB
输入
Wifi
输入
方式输入
模拟输入端子
电压
消耗功率
待机消耗功率
关机后消耗功率
工作温度范围
贮藏温度范围
工作湿度范围
网络
音频模式
(无线W
ifi/RJ45
)
3.5
毫米迷你插头输入
一组
前方网罩正中心的
110-240伏 ~ 60/50
(兼容
24bits - 44 / 48 / 96 kHz;
.wav、.aiff、.aif、.aifc文件;HTTP数码串流)
FLAC(16bits-44.1kHz;24bits -
NFC
近距离无线通讯技术信号发
射罩,可实现快速蓝牙连接
赫兹,
2A
150
瓦
11瓦 @ 220-240VAC ---
11
瓦@
110-120VAC
0瓦 @ 220-240VAC ---
0
瓦@
110-120VAC
5
摄氏度到35摄氏度
负5摄氏度到40摄氏度
40%到75%
10/100
兆以太网
MAC和PHY
无线网络
DLNA
WMA(WMA9、CBR、CBR,
PCM(16bits-44.1kHz;
AAC-LC(最高码率320kbps,
44 / 48 / 96 kHz)
802.11b/g/n
WPS 2.0
数字媒体输出
最高码率320kbps
ALAC(.m4a)
安全
数字生活网络联盟
1.5
)
驱动器
一只二分频同轴单元:带有一只直径
米“软球顶”高音单元、一只直径
单元、一只直径
86
17
厘米双音圈低音单元
2.9
8
厘米中音
厘
Page 87
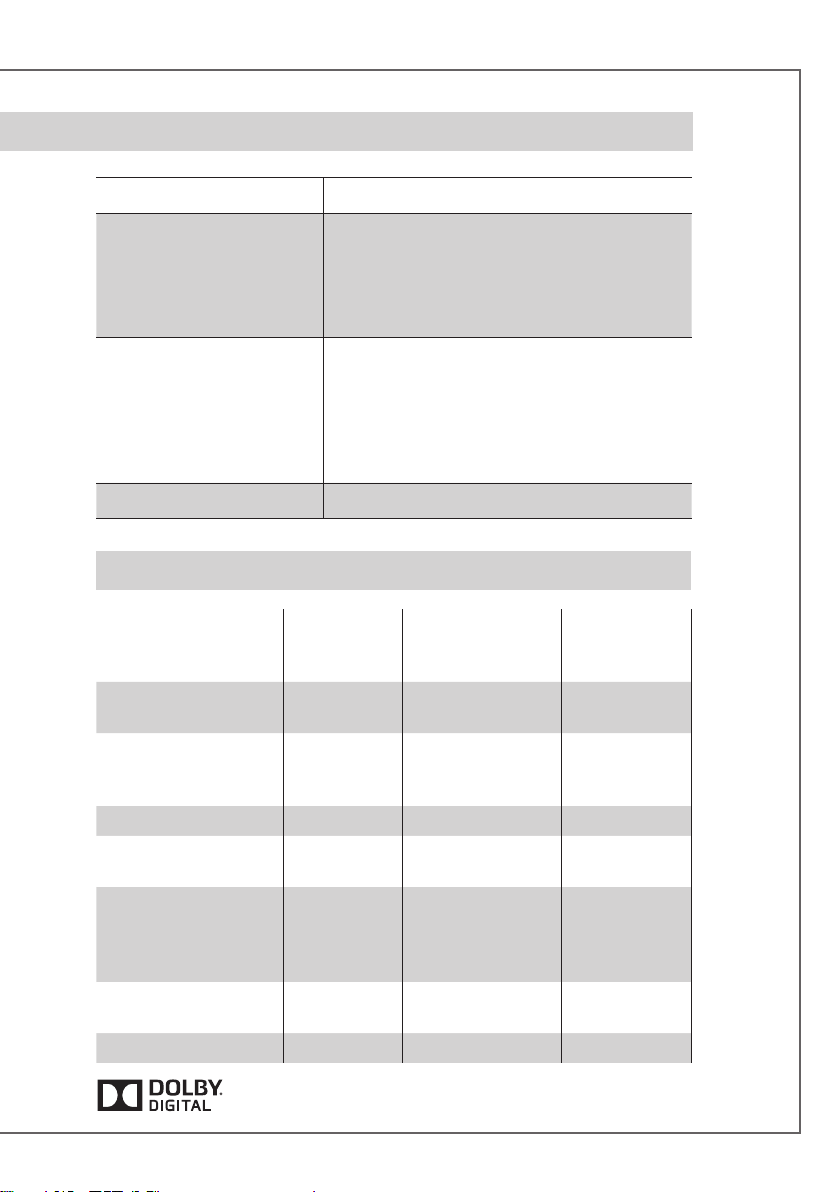
放大部分
高音:10瓦;中音:10瓦;低音:20瓦×
2
失真率及噪音:
(总谐波失真+噪音,
kHz
带宽下,
100mW
20
到20
及更高
功率输出 )
外形尺寸(高×宽×深)
重量
FEATURES
Loss less audio
playback
Access to any audio
from WLAN network
(desktop...)
Multi-room
Tracks playback from
smartphone/tablet
Playback smart-
phone/tablet a audio
applications
(youtube…)
Playback from USB
device
Web radio /DEEZER
无线Wifi状态:小于
蓝牙状态:小于
模拟输入状态:小于
in Chinese:
91 x 218 x 190 mm
3.58 x 8.58 x 7.48 in
1.9
公斤(
4.2
磅)
Bluetooth
connection
WIFI/ETHERNET
via internet router
4 4
4
4
4 4 4
4
4 4
4
0.1%
0.1%
0.1%
WIFI direct to
smartphone/
tablet
Manufactured under licence form Dolby Laboratories.
Dolby and the double D symbol are trademarks of Dolby Laboratories.
87
Page 88

Cabasse SA - 210, rue René Descartes - BP 10 - 29280 Plouzané
Tel +33 (0)2 98 05 88 88 - Fax +33 (0)2 98 05 88 99
www.cabasse.com
CABASSE - NOT0351 - 1408
 Loading...